1
User Experience Guidelines
Livescribe™ Platform SDK
Version 1.2.0
User Experience Guidelines
Copyright and Trademarks
LIVESCRIBE, PULSE, and PAPER REPLAY are trademarks or registered trademarks of
Livescribe, Inc. Anoto is a trademark of Anoto Group AB. Microsoft and Microsoft
Word are either registered trademarks or trademarks of Microsoft Corporation in the
United States or other countries. MyScript is a registered trademark of Vision
Objects, Inc. All other brand and product names are trademarks of their respective
owners.
Copyright © 2007-2009 Livescribe, Inc. All rights reserved.
UserExpGuidelines-1.2.0-SDK-1.2.0-REV-D
11/14/2009 11:35 AM
2
User Experience Guidelines
Contents
About this Document ..................................................................................... 5
About the Platform SDK Documentation Set ..................................................... 5
End-User Documentation ............................................................................... 6
User Experience Guidelines ................................................................................ 7
Using the Menu ............................................................................................ 7
Double Tap Center ..................................................................................... 7
Right Tap ................................................................................................. 8
Left Tap ................................................................................................... 9
Up Tap and Down Tap ................................................................................ 9
Standardized Menu Structure ....................................................................... 10
Horizontal Scroll Speed ................................................................................ 12
Display Area ............................................................................................... 12
Prompt and Believe ..................................................................................... 13
Providing Instructions .................................................................................. 13
The OLED Should Never Be Blank .............................................................. 14
Audio Punctuation Marks .......................................................................... 14
Termination Events ..................................................................................... 15
Timeout ................................................................................................. 15
3
User Experience Guidelines
Double Tap on Open Paper ....................................................................... 16
Special Characters ................................................................................... 16
Application Deactivation............................................................................... 16
One-Second Deactivation ......................................................................... 17
Data on Display .......................................................................................... 17
Background Recording ................................................................................. 17
Snapback ................................................................................................... 18
Livescribe Standard Controls ........................................................................... 20
Don't Repurpose Standard Controls ............................................................... 21
4
User Experience Guidelines
Preface
About this Document
This guide presents user interface guidelines for creating penlets to ensure a
consistent user experience across all smartpen applications.
About the Platform SDK Documentation Set
The Livescribe Platform SDK documentation set includes the following documents.
Introductory Documentation:
Read Me First: introduces the components of the Livescribe Platform, lists
system requirements, and provides download instructions.
Livescribe Developer License Agreement: The Livescribe license agreement for
third-party developers, in TXT and PDF formats. All developers must accept
this agreement before downloading the Platform SDK.
Introduction to the Livescribe Platform: describes the Livescribe Platform, the
Pulse smartpen and Livescribe dot paper, and Pulse smartpen applications.
README.txt: provides a quick overview of how to set up your development
environment. It is aimed at experienced developers and presents information
with minimal context. For full instructions, see Getting Started with the
Livescribe Platform SDK instead.
Getting Started with Livescribe Platform SDK: describes the contents of the
SDK, how to set up your IDE (Integrated Development Environment), and
how to create some simple Hello World penlets. It also provides a reference
for the wizards, views, and dialogs of the Penlet perspective within the IDE.
Eclipse Help: basic coverage of the Livescribe IDE plug-in with Eclipse.
Release Notes: covers late-breaking information, fixed bugs, and known
issues.
Glossary: terms and definitions (located in Getting Started with the Livescribe
Platform SDK).
User Experience Guidelines
Penlet Development Documentation:
Developing Penlets: the primary programming guide for open paper (OP) and
fixed print (FP) penlet development.
Livescribe Platform API javadoc: API reference for packages, classes, and
methods.
(This Document) User Experience Guidelines.
Development Guidelines: presents guidelines for creating penlets and paper
products that conform to Livescribe standards and legal requirements.
Paper Product Development Documentation:
Developing Paper Products: introduces the Livescribe Paper Designer and
processes for designing paper products for the Pulse smartpen.
End-User Documentation
To learn about the Pulse Smartpen and Livescribe Desktop from a user‟s perspective,
please consult their user guides. They are available at http://www.livescribe.com.
Click on the Support button and locate the Documents list in the right-hand column.
Links to the following documents in PDF format are available:
Getting Started: introduces the Pulse Smartpen. A dot-enabled version of
this document is included in the Pulse Smartpen box.
Pulse Smartpen User Manual: explains Pulse Smartpen features and use.
Livescribe Desktop User Manuals for Mac OS X and Windows: explain
Livescribe Desktop features and use.
6
User Experience Guidelines
User Experience Guidelines
This section presents guidelines for designing a consistent user experience.
Livescribe follows these guidelines for applications we develop in-house, such as
Paper Replay, Paper Piano, and others.
Using the Menu
The Pulse smartpen uses a flat 2D model for its menu system. The model is
essentially a tree-like structure of menu items with submenu items. The best way to
understand this model is to use the Nav Plus paper control to activate the Main Menu
on your Pulse smartpen. Then, experiment using the record and playback features of
Paper Replay. Refer to the Paper Replay section of the Pulse Smartpen User Manual
for detailed instructions on navigating using the Nav Plus.
There are several basic Nav Plus actions reserved to control menus and applications:
Double Tap Center
Right Tap
Left Tap
Up Tap
Down Tap
Double Tap Center
Double tapping on the center of the Nav Plus returns the display to the Main Menu.
Double tapping also stops most applications that are currently running. The main
exception is Paper Replay, which goes into background recording mode if recording
was in progress prior to double tapping the center of the Nav Plus.
7
User Experience Guidelines
Right Tap
Right tapping on the Nav Plus performs one of the following actions, depending on
the application and its menu structure:
Slides the display text to the left to reveal a submenu. For example, right
tapping on the Paper Replay application menu will slide the menu to the
Record Session submenu.
Slides the display text to the left to show the first item in a selectable list. For
example, right tapping on the Play Sessions function of Paper Replay will slide
the menu to show the first in a series of recorded sessions.
Starts an application or one of its functions. For example, right tapping when
Record Session is on the display will start recording and display an audio
timeline. Similarly, right tapping when Time is on the display will run that
application and display the time.
Right tapping can select an item that is on the display. For example, in Play
Session mode, right tapping on a displayed session will select it and start
playing it.
Confirm a command. Applications should consider right tapping as a Yes
response from the user. For example, right tapping when “Delete this
session?” is on the display will delete the session and slide the text to the left
to display a confirmation message such as “Session Deleted”.
8
User Experience Guidelines
Left Tap
Left tapping on the Nav Plus slides the display text to the right to return to
the parent menu. For example, left-tapping when the Record Session
submenu is on the display will slide the menu to show Paper Replay on the
main menu.
If the application or one of its functions is running, left tapping out to the
Main Menu exits the application or function.
Cancel a command. Applications should consider left tapping as a No response
from the user. For example, left tapping when “Delete this session?” is on the
display will not delete the session and slides the text to the right to show the
parent function or application.
Up Tap and Down Tap
Up tapping and down tapping on the Nav Plus scrolls through a list of menu items
that are at the same level, such as Record Session, Play Session, and Delete Session
for Paper Replay. You can also use up and down tapping to scroll a list of items, such
as a list of Paper Replay sessions that are available to play or delete. Menus and lists
do not wrap. On reaching the top or bottom of a menu, the display shows a bracket
in place of the scroll arrow. Continued attempts to move in that direction play a
“can‟t do that” audio instruction.
9
User Experience Guidelines
Standardized Menu Structure
The primary way users interact with a smartpen application is through its menu
system. Whether simple or complex, the menu system should adhere to certain
standards defined by Livescribe. A standardized approach to menu design will ensure
a consistent user experience and make applications easier to learn and use.
When designing your application's menus, please observe the following rules:
Related items (such as top-level menu items, related commands, selectable
options, and so on) should be organized in a vertical menu structure.
Actions on a specific menu item should be organized in a horizontal menu
structure.
Quizzes and tests should be grouped under their own top-level menu item
within the application.
Tapping left should return the user to the previous item in the horizontal
menu. Ultimately, the user can exit the application by tapping left enough
times.
Tapping right should move the user to the next item in the horizontal menu.
Depending on the application, this may run a command, display information,
or display sub-menu item.
Tapping down should move the user to the next item in the vertical menu.
Tapping up should return the user to the previous item in the vertical menu.
All applications should have a Help or Instructions menu item that explains
how to use the application or directs users to other resources, such as a URL
to an online video or documentation.
Recommended: Applications should have voice instructions that accompany
the written text instructions.
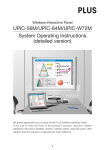
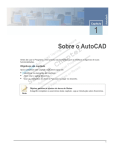
The following diagram illustrates a standard menu structure for a smartpen
application. Arrows in the diagram correspond to Nav Plus navigation by the user.
For example, the
symbol indicates a right tap on a Nav Plus, and the symbol
indicates a down tap on a Nav Plus.
10
User Experience Guidelines
Application Menu
Menu item 1
Run menu item
Submenu item 2.1
and/or show result
[optional additional
Run menu item and/or
Run menu item and/or
[optional additional
menu items/info]
Menu item 2
show result
[optional additional menu
[optional additional menu
[optional additional Help
[optional additional Help
items/info]
Menu item N
Submenu item 2.2
Run menu item
and/or show result
show result
items/info]
menu items or
information]
Instructions
Help topic 1
Help text regarding
Help text regarding
topic.
text]
Help topic 2
11
topic.
text]
User Experience Guidelines
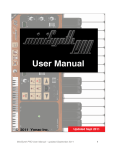
Let's take as an example, the menu structure of the Video Poker game. It is simple
and follows Livescribe standards:
Video Poker
Start New Game
Starts a new game.
Displays scrolling instructions
Displays poker hand 1 and values.
Instructions
Hand Values
Displays poker hand 2 and values.
Displays poker hand N and values.
Horizontal Scroll Speed
If text is too long to be displayed all at once on the OLED, it scrolls to display the
unseen characters. The speed at which text scrolls horizontally is a system setting.
The user selects it to suit their needs or taste. Your application cannot modify the
scroll speed. When designing applications, keep in mind that the user may have
selected a speed slower or faster than the one you are using on your own smartpen.
Display Area
The size of the Pulse smartpen display is 96 pixels wide by 18 pixels high. Your
application can write to the full display. However, the system may use some of the
12
User Experience Guidelines
space to show system status. The space reserved for status is the System Tray. Its
dimensions are 6 pixels wide x 18 pixels high, always on the right of the display.
An example of the System Tray is when in you are recording in Paper Replay and go
back to the Main Menu to run another command, such as Time. Paper Replay
continues to record in background mode. However, instead of showing the usual
audio timeline, the System Tray displays a flashing dot. The System Tray also
displays system warnings, such as low battery and low memory icons.
Prompt and Believe
For some applications, Livescribe uses a protocol called Prompt and Believe. This
protocol is for an application that prompts a user for a specific input but does not
analyze or confirm the actual input. Instead, the application assumes (or believes)
that the user entered the proper value.
For example, an application might prompt a user to create a circle and put a letter
“r” in it to create a “Reminder” button. Instead of using character recognition to
determine that users actually enter an “r”, the application trusts that they always do.
The application simply notes the area the user wrote in and assigns the entire
bounding area of their strokes to the “Reminder” function. The user can write a
circled “r” as directed, or could write the word “Reminder” or draw a picture of a
finger with a string tied around it. From then on, the application treats whatever the
user drew as the button and invokes the proper code when the user subsequently
taps on it.
Prompt and Believe allows for flexibility and creativity for the user. However, we‟ve
found that it helps when the instructions suggest something for the user to draw.
When the directions are completely open (e.g., “Draw a control”), sometimes users
worry about getting it wrong. It‟s similar to the old “press any key” instruction on
desktop computers, which had to be replaced because nervous users sat staring at
their keyboards, looking for a key labeled “Any.” We recommend language such as
“Draw your „Reminder‟ button, and then double tap.” This tells users what the button
will be used for, and also gives some suggestion as to how to label it.
Providing Instructions
Livescribe applications communicate instructions to users as text and audio. You
should always provide text instructions on the OLED display. Audio instruction may
13
User Experience Guidelines
also be added, if you desire. Text instructions are mandatory because users may
choose to mute their Pulse smartpen or disable audio instructions. All instructions
need to be complete. Text and audio instructions do not need to be identical, but
they each need to provide all the information a user needs to know to use the
application or complete a specific command.
The OLED Should Never Be Blank
A smartpen application must never display a blank screen. The OLED should always
display some pertinent information to the user about the currently running
application.
For example, imagine that your application gives full audio instructions to the user
for the current action, but you don't want to repeat the instructions onscreen. In that
case, the OLED should display some brief but useful information. For instance, if your
application is State Capitals and you provide an audio hint after 5 seconds of
inactivity from the user, the OLED should at least display Hint or Tip.
Audio Punctuation Marks
The system also uses audio punctuation marks (APMs) to convey success or failure of
a command. APMs also indicate transitions from one state to another or from one
menu to another. APMs are usually short beeps or chimes. You can use APMs in your
application as well.
Acknowledge OK
User selected the OK action. Often used in confirmation ("are you sure?")
messages to user. The right arrow of Nav Plus is normally considered the OK
button in a confirmation.
Cancel
User selected the Cancel action. Often used in confirmation ("are you sure?")
messages to user. The left arrow of Nav Plus is normally considered the
Cancel button in a confirmation.
Action not available
User attempted an action she might reasonably expect to work. Used when
required resources (such as data files associated with an application) are not
available.
User Selection
User selects an item from a menu.
End of menu
User tried to advance beyond the top- or bottom-most item of a menu.
14
User Experience Guidelines
Scroll down in Nav Plus
User tapped the down arrow of a Nav Plus.
Scroll up in Nav Plus
User tapped the up arrow of a Nav Plus.
Termination Events
Termination Events (TEs) are notifications from users that they are finished
responding. Whenever a user is prompted for input by a smartpen application, a TE
is how the user signifies that they are through writing or drawing their input and are
ready to proceed. The most common forms of TEs are:
Timeout
Double-tap on Open Paper
Special characters
In general, we recommend that applications allow for both timeout and double-tap
TEs whenever possible. However, certain TE types can be excluded when they are
likely to cause confusion to the user.
Timeout
Timeout assumes the user is finished responding when there is no smartpen activity
on paper for a certain timeout period. The recommended default timeout is one
second. However, some applications might want a longer timeout setting.
Example: In the Piano application, the user is prompted with “Write the letter „I‟.
This is your instrument icon.” Once the user begins writing on OP, a pause of one
second constitutes a TE, and the application then moves on to the next request.
Whatever the user has drawn before the timeout will be used as the instrument icon
going forward.
There are times when a timeout TE are not appropriate. Think about your user‟s
state of mind and the typical activities they may be engaged in while using your
application or function. For example, in QuickCalc, when the user is entering a math
problem, the timeout TE is not used. This is because it‟s easy to imagine that a user
15
User Experience Guidelines
might need to pause to find the numbers they want to use in their mathematical
expression. If a user is adding up receipts, they might even be setting down the pen
between each number. So in this case, other TEs are accepted for finalizing the entry
of the expression, but a timeout is not used.
Double Tap on Open Paper
Another way for users to indicate they have finished responding is for them to
double-tap on Open Paper. You can design your application to instruct users to
double-tap somewhere on Open Paper when they have finished writing.
This is the most common of the TEs, and it should be included wherever possible.
Users will get used to using double-tap to finish their entry and move quickly on to
the next step.
Special Characters
You can also have the application look for special characters that indicate the user
has finished entering data. For example, the Calc Quick Command application
assumes the user has finished entering numbers when the user writes “=” (the
equals sign). Use special character TEs only where users could easily be confused
were the option not available.
Special characters are specific to an application or situation, and are included where
they align with how a user might reasonably expect an application to work.
Application Deactivation
Once started, Livescribe applications continue to run. Instead of terminating,
applications change from an active state to an inactive state. For example, when a
user changes from one application to another, the first application is deactivated and
the second one is activated if it is already running, or started if not. Application
switching is the most common cause for an application to deactivate. However, there
are other cases as well. When designing your application, you should consider these
cases and program the proper response:
16
User Experience Guidelines
Application switching
The current application deactivates because the
system switched to another application.
Notes Mode
The current application deactivates because the
user switched to Notes Mode. Notes Mode is when
users write on Open Paper and are not running
Paper Replay or another application that uses Open
Paper.
Self deactivation
The current application deactivates because the
application changed its own state.
System shutdown
The current application deactivates because the
system is shutting down.
System event
The current application deactivates because of a
system event.
One-Second Deactivation
Due to the nature of Livescribe smartpen computing, applications must respond to
user input immediately. When a user switches to another application, the current
application must deactivate in one second or less. Unlike a PC application, which
normally asks tidying-up questions such as whether files or settings should be saved,
a smartpen application must not ask for any input from the user before exiting.
Data on Display
Some applications write data to the display. For example, a calculator application
displays the results of a calculation. For this kind of application, it is important to
keep the results on the display for a long enough time so the user can write down
the results. The issue is that when users start writing down the results, the Pulse
smartpen switches to the default Notes Mode. Notes Mode will change the display to
the default screen and erase the displayed calculator results. To prevent this from
happening prematurely, the calculator application uses the Data on Display feature
to delay showing the default display after calculating a result.
Background Recording
Paper Replay can record in background mode. This allows users to start recording a
Paper Replay session and then start or switch to another application. When they do
this, recording continues. The Pulse smartpen display shows a flashing dot on the
System Tray to indicate recording is going on in the background. Any application that
17
User Experience Guidelines
is active cannot record or play audio when Paper Replay is in background recording
mode. If your application requires audio recording or playback, you should test if the
Pulse smartpen is already in background recording mode and if so, instruct your
users to turn it off before running your application. For an example of this, try the
Piano application while recording. Livescribe instructs you to turn off recording before
running the Piano because the piano application is an audio-centric application.
Snapback
When in background recording mode, Paper Replay can become the foreground
application in several ways. When this happens, the Pulse smartpen system will
deactivate the application that was in the foreground. The most obvious way is in
response to action from a user. Here are some actions that can restore Paper Replay
to the foreground:
Tapping on any Fixed Print Paper Replay control. Even though some controls
have no effect during recording, tapping on them brings Paper Replay to the
foreground.
Tapping on a Fixed Print area that is associated with Paper Replay but not
assigned to a particular button will bring Paper Replay back to the foreground.
Doing any other action that would normally start Paper Replay, such as
tapping on a session, or launching Paper Replay from the Nav Plus.
Writing on Open Paper while the current foreground application is not
expecting Open Paper input. Examples are Fixed Print Calculator at any time,
since it never takes Open Paper input, or Piano after the user has created
keyboard and buttons because it is not expecting any Open Paper input at
that point.
Paper Replay in background recording mode automatically returns to the foreground
if the current application does not receive input from the user for five seconds. This
feature is Snapback. For example, if the Calculator application is the current
foreground application and the user pauses for five seconds without providing input,
Paper Replay snaps back to be the foreground application. Snapback will deactivate
the application that was in the foreground.
While Paper Replay is recording in the background, it does not receive any new
strokes made by the user, as those belong to the current foreground application.
Snapback is implemented to protect the user from accidentally remaining in
18
User Experience Guidelines
background recording when they believe that Paper Replay is active in the
foreground and is capturing and linking their strokes to their audio.
Dynamic Active Regions
Dynamic Active regions are user-created areas on open paper pages that are saved
by the application and which have ongoing functions. For example, an application
may ask a user to create a button by drawing or writing a word. The user draws the
button, and the application saves the bounding rectangle as a dynamic active region.
When the user later taps in that region, the specific function associated with that
region is triggered.
Another example of dynamic active regions is when a user writes something as input
for an application. This could be a word to be translated, a mathematical expression
for calculation, or a number written as a variable or setting (such as how many dice
to roll).
Wherever it makes sense and could be desirable to the user, the application should
ensure these regions remain active, even after the application is deactivated or
destroyed. Keeping these regions active ensures that tapping on them later triggers
the appropriate function in the application. For example, an application that does
translation or calculation, should repeat the same function performed when the
information was first written. This allows users to quickly get back to look-ups or
calculations they already performed. The application should save the regions should
across application launches, so that any time a user returns to them, they retain
their function and value.
Shaping Dynamic Active Regions
In most cases, dynamic active regions created on Open Paper should correspond to
the area written on by the user. It is usually acceptable to create the active region as
a rectangular bounding area around what is written/drawn by the user. In some
cases (such as when the user draws a large diagonal line) the shaping should employ
polygons or some other way to create regions more closely corresponding to exactly
19
User Experience Guidelines
what is drawn. The goal is for ease of use, so that users can clearly see which areas
of their page are mapped to applications or functions. In most cases, the application
should not create dynamically active regions on Open Paper where the user has not
written or drawn.
Activating Functions
When a user taps on a dynamic active region, the application that owns that region
will launch. This is the default behavior of using dynamic active regions on Open
Paper.
In general, if a user has drawn a dynamic region, the user‟s expectation is that when
tapping that region at a later time will launch the application and perform the
function associated with that region. For example, if a user taps on the “Deal” button
of Video Poker, the application will launch and then deal a new hand.
In some cases, the dynamic region is associated with a function that is not actionable
at the time. For example, when Video Poker is not active, and a user taps on a predrawn “hold” button, the application launches. However, there is no active hand, and
therefore, nothing to hold. In this case, the hold function is not actionable. Video
Poker handles this situation as follows. Your penlets should follow a similar approach:
Displays a helpful message, such as “First tap the DEAL button to deal a
hand”
Plays the Action not available audio punctuation mark
Positions the application in the main application menu.
Livescribe Standard Controls
The Livescribe Standard Controls, such as the Paper Replay controls or the Settings
controls can be used in a Fixed-Print application. For information on how to include
them in your application, see "Livescribe Standard Controls" in Developing Paper
Products. The Platform SDK includes the graphics for these controls, so you can
make them part of your Fixed-Print paper product.
20
User Experience Guidelines
Don't Repurpose Standard Controls
Smartpen applications should not, however, use these graphics and assign them
different functionality. For instance, a Nav Plus graphic should always behave the
way users expect them to behave. In short, smartpen applications should not
repurpose the existing Livescribe Standard Controls.
21