1
EzPhoto3 User Manual
2013 HanCom
Copyright 2000-2013 Hancom, Hangeul & Computer Co.
The copyright to all of the content in this book is held by HanCom. Any unauthorized copying or distribution will be subject
to criminal punishment.
Head of manual editing and preparation : Go Seong Seo.
EZ Photo development : Go Seong Seo, Kim Gwan Jung, Kim Mun Gi, Kim Ki Hong, Park Jun Kyu, Choi Geun Gil.
Address : Hancom Tower 10th floor, 49 Rd 644 Daewang Pangyo-ro Bundang-gu, Gyeonggi-do
TEL : 031)627-7000, FAX : 031)627-7700
www.hancom.com
V3.1.0.3
<Table of Contents>
1. EzPhoto Installation ······················································································ 11
1.1.
1.2.
1.3.
1.4.
1.5.
EzPhoto Program Environment ·················································································································· 13
EzPhoto Package Components ················································································································· 13
EzPhoto Installation ································································································································· 13
Uninstalling EzPhoto ······························································································································ 16
Customer Support Service ························································································································ 17
2. EzPhoto Screen ··························································································· 19
2.1. Window Title ········································································································································ 21
2.2. Menu Bar ············································································································································· 21
2.3. Window Button ····································································································································· 21
2.4. Tool Box ············································································································································ 22
2.5. Work Window ········································································································································ 23
2.5.1. Work Window Composition ················································································································ 23
2.5.2. Image File Name ··························································································································· 23
2.5.3. Work Windows Button ····················································································································· 23
2.5.4. Work Area ······································································································································ 23
2.5.5. Image Size ··································································································································· 23
2.5.6. Ruler ··········································································································································· 24
2.5.7. Actual Size ··································································································································· 24
2.5.8. Fit to Window ······························································································································· 24
2.5.9. View Scale Scroll Bar ····················································································································· 24
2.5.10. View Scale ·································································································································· 24
2.6. Option Window <F8> ······························································································································ 24
2.7. Information Window ································································································································· 24
2.8. Color Pallette/Histogram Window ··············································································································· 25
2.8.1. Color Pallette ·································································································································· 25
2.8.2. Histogram Window ··························································································································· 25
2.9. Layer/Path/Channel/History Window <F7> ···································································································· 25
2.9.1. Layer Window ································································································································· 25
2.9.2. Path Window ·································································································································· 25
2.9.3. Channel Window ······························································································································ 26
2.9.4. History Window ································································································································ 26
2.10. Open Images ······································································································································· 26
2.11. Quick Button ······································································································································ 26
3. Tool Box ···································································································· 27
3.1. Selection Tool ······································································································································ 29
3.1.1. Selection Type ······························································································································· 29
3.1.2. Selection Mode ······························································································································ 29
3.1.3. Selection Command ························································································································ 30
3.1.4. Selection Size ································································································································ 30
3.1.5. Feather ········································································································································ 30
3.1.6. Similar ·········································································································································· 30
3.1.7. Neighbor ······································································································································· 30
3.1.8. Work to Selection ···························································································································· 31
3.2. Edit Tool <V> ······································································································································ 32
3.3. Crop Tool <C> ···································································································································· 33
3.4. Pan Tool <H> ····································································································································· 33
3.5. Brush Tool <F5, B> ····························································································································· 34
3.5.1. More ············································································································································ 34
3.5.2. Basic Setting ··································································································································· 34
3.5.3. Brushes ·········································································································································· 34
3.5.4. Shape Dynamics ······························································································································ 34
3.5.5. Scatter Dynamics ····························································································································· 35
3.5.6. Color Dynamics ······························································································································· 35
3.5.7. Other Dynamics ······························································································································· 35
3.6. Eraser Tool <E> ·································································································································· 36
3.7. Clone Tool <S> ··································································································································· 36
3.8. Pattern Brush Tool ······························································································································· 36
3.9. Effect Brush Tool <R> ·························································································································· 37
3.10. Shape Tool <U> ································································································································· 38
3.11. Paint Bucket Tool ······························································································································· 39
3.12. Pattern Fill Tool <Shift+G> ··················································································································· 39
3.13. Gradation Tool <G> ···························································································································· 40
3.14. Text Tool <T> ···································································································································· 42
3.15. Pen Tool ··········································································································································· 42
3.16. Eye Dropper <I> ································································································································· 43
3.17. Color Picker ······································································································································· 43
3.18. Undo Tool <Ctrl+Alt+Z> ························································································································ 43
3.19. Redo Tool <Ctrl+Shift+Z> ····················································································································· 43
3.20. Arrange Window <F> ··························································································································· 43
4. Menu Functions ··························································································· 45
4.1. Menu Bar ············································································································································· 47
4.2. File Menu ··········································································································································· 47
4.2.1. New <Ctrl+N> ································································································································· 47
4.2.2. Browse <Ctrl+Shift+O> ······················································································································ 48
4.2.3. Open <Ctrl+O> ································································································································ 48
4.2.4. Save <Ctrl+S> ································································································································· 49
4.2.5. Save As ········································································································································ 49
4.2.6. Close <Ctrl+W> ······························································································································· 49
4.2.7. Retrieve ········································································································································· 49
4.2.8. File Information ································································································································ 50
4.2.9. Batch Job ······································································································································ 50
4.2.10. Print <Ctrl+P> ································································································································ 52
4.2.11. Exit <Ctrl+Q> ································································································································· 52
4.3. Edit Menu ············································································································································· 53
4.3.1. Last Job <Ctrl+Z> ···························································································································· 53
4.3.2. Undo <Ctrl+Alt+Z> ···························································································································· 53
4.3.3. Redo <Ctrl+Shift+Z> ························································································································· 53
4.3.4. Rotate and Flip ······························································································································· 53
4.3.5. Image Size <Ctrl+Alt+I> ···················································································································· 54
4.3.6. Canvas Size <Ctrl+Alt+C> ················································································································· 55
4.3.7. Cut <Ctrl+X> ··································································································································· 55
4.3.8. Copy <Ctrl+C> ································································································································ 55
4.3.9. Paste <Ctrl+V> ································································································································ 55
4.3.10. Delete <Del> ································································································································· 55
4.3.11. Crop <C> ····································································································································· 55
4.3.12. Fill ··············································································································································· 55
4.3.13. Feather ········································································································································· 56
4.3.14. Eraser <E> ··································································································································· 56
4.3.15. Effect Brush <R> ··························································································································· 56
4.3.16. Filter ············································································································································ 57
4.3.16.1. Gaussian Blur ························································································································· 57
4.3.16.2. Motion Blur ····························································································································· 58
4.3.16.3. Unsharp Mask ························································································································· 58
4.3.16.4. Spread ··································································································································· 58
4.3.16.5. Edge ····································································································································· 59
4.3.16.6. Neon ····································································································································· 59
4.3.16.7. Dilate ····································································································································· 59
4.3.16.8. Apply Lens ····························································································································· 60
4.3.16.9. Tiled Glass ····························································································································· 60
4.3.16.10. Flare FX ······························································································································· 60
4.3.16.11. Lighting ································································································································· 61
4.3.16.12. Emboss ································································································································ 61
4.3.16.13. Mosaic ·································································································································· 62
4.3.16.14. Ripple ·································································································································· 63
4.3.16.15. Backlight ······························································································································· 63
4.3.16.16. Video ··································································································································· 64
4.3.16.17. Wind ···································································································································· 64
4.3.16.18. Canvas ································································································································· 64
4.3.16.19. Cubism ································································································································· 65
4.3.16.20. Oilify ···································································································································· 65
4.3.16.21. Soft Glow ····························································································································· 65
4.3.16.22. Bending Effect ······················································································································· 66
4.3.16.23. Cylinder Effect ······················································································································· 66
4.3.16.24. Pinch/Punch Effect ·················································································································· 67
4.3.16.25. Plane Effect ·························································································································· 67
4.3.16.26. REV Effect ···························································································································· 68
4.3.16.27. Roman Mosaic ······················································································································· 68
4.3.16.28. Ripple 2 ······························································································································· 69
4.3.16.29. Magnification Blur ··················································································································· 69
4.3.16.30. Wave Reflection ····················································································································· 69
4.3.16.31. Pixelization ···························································································································· 70
4.3.16.32. Bending Plane Effect ·············································································································· 70
4.3.16.33. Sketch ·································································································································· 71
4.3.16.34. Expansion Sketch ··················································································································· 71
4.3.16.35. Dot Drawing Effect ················································································································· 71
4.3.16.36. Color Ball Effect ····················································································································· 72
4.3.16.37. Rotation(Radiation) Blur ············································································································ 72
4.3.16.38. Brick Texture Effect ················································································································ 73
4.3.16.39. Cloud Texture Effect ··············································································································· 73
4.3.17. Clone ··········································································································································· 74
4.4. Color Menu ··········································································································································· 75
4.4.1. Auto Adjust ····································································································································· 75
4.4.1.1. Auto Level <Ctrl+Shift+L> ············································································································ 75
4.4.1.2. Auto Contrast <Ctrl+Alt+Shift+L> ··································································································· 75
4.4.1.3. Equalize ··································································································································· 75
4.4.1.4. Desaturate <Ctrl+Shift+U> ············································································································ 75
4.4.1.5. Invert <Ctrl+I> ··························································································································· 75
4.4.2. Bright/Contrast ································································································································· 75
4.4.3. Color Balance <Ctrl+B> ····················································································································· 76
4.4.4. Hue/Saturation/Brightness <Ctrl+U> ······································································································ 76
4.4.5. Color Level <Ctrl+L> ························································································································ 77
4.4.6. Curve <Ctrl+M> ······························································································································· 77
4.4.7. Posterize ········································································································································ 77
4.4.8. Color Mode ···································································································································· 78
4.4.9. Assign Profile ·································································································································· 78
4.4.10. Convert to Profile ··························································································································· 78
4.4.11. Assign Camera Profile ····················································································································· 79
4.4.12. Easy Adjust ··································································································································· 79
4.5. Make Menu ··········································································································································· 80
4.5.1. Brush <F5, B> ································································································································ 80
4.5.1.1. More ····································································································································· 80
4.5.1.2. Basic Setting ···························································································································· 80
4.5.1.3. Brushes ··································································································································· 80
4.5.1.4. Shape Dynamics ······················································································································· 81
4.5.1.5. Scatter Dynamics ······················································································································· 81
4.5.1.6. Color Dynamics ························································································································· 81
4.5.1.7. Other Dynamics ························································································································· 81
4.5.2. Pattern Brush ································································································································ 82
4.5.3. Shape <U> ····································································································································· 82
4.5.4. Paint Bucket ·································································································································· 83
4.5.5. Pattern Fill <Shift+G> ······················································································································· 83
4.5.6. Gradation <G> ································································································································ 84
4.5.7. Text <T> ········································································································································ 86
4.5.8. Pen ············································································································································· 86
4.6. Setting Menu ········································································································································· 87
4.6.1. Color Setting ··································································································································· 87
4.6.2. User-Defined Pattern <Ctrl+Shift+P> ····································································································· 88
4.6.3. Arrange Window <F> ························································································································ 88
4.7. Fun Menu ············································································································································· 89
4.7.1. Clipart ············································································································································ 89
4.7.2. Macro ············································································································································ 89
4.8. Windows Menu ······································································································································ 89
4.9. Help Menu ············································································································································ 90
4.9.1. EzPhoto Help ·································································································································· 90
4.9.2. EzPhoto Information ·························································································································· 90
4.9.3. FAQ ·············································································································································· 90
5. Layer ········································································································· 93
5.1.
5.2.
5.3.
5.4.
Layer Window ········································································································································ 95
Layer Sequence ····································································································································· 95
Active Layer ·········································································································································· 96
View Layer ·········································································································································· 96
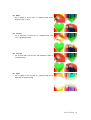
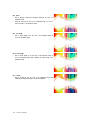
5.5. Mode ················································································································································· 96
5.5.1. Normal ··········································································································································· 96
5.5.2. Dissolve ········································································································································· 96
5.5.3. Darken ··········································································································································· 96
5.5.4. Multiply ·········································································································································· 97
5.5.5. Color Burn ······································································································································ 97
5.5.6. Linear Burn ···································································································································· 97
5.5.7. Lighten ··········································································································································· 97
5.5.8. Screen ··········································································································································· 98
5.5.9. Color Dodge ··································································································································· 98
5.5.10. Linear Dodge ································································································································· 98
5.5.11. Overlay ········································································································································· 98
5.5.12. Soft Light ······································································································································ 99
5.5.13. Hard Light ···································································································································· 99
5.5.14. Vivid Light ···································································································································· 99
5.5.15. Linear Light ··································································································································· 99
5.5.16. Pin Light ····································································································································· 100
5.5.17. Hard Mix ····································································································································· 100
5.5.18. Difference ···································································································································· 100
5.5.19. Exclusion ····································································································································· 100
5.5.20. Hue ············································································································································ 101
5.5.21. Saturation ···································································································································· 101
5.5.22. Color ·········································································································································· 101
5.5.23. Luminosity ··································································································································· 101
5.6. Opacity ············································································································································· 102
5.7. Flatten Layer ······································································································································ 102
5.8. Merge Layers ····································································································································· 102
5.9. Group Layer ······································································································································ 102
5.10. New Layer ······································································································································· 102
5.11. Copy Layer ······································································································································ 102
5.12. Layer Style ······································································································································ 103
5.12.1. Drop Shadow ······························································································································· 103
5.12.2. Inner Shadow ······························································································································· 103
5.12.3. Outer Glow ·································································································································· 103
5.12.4. Inner Glow ·································································································································· 104
5.12.5. Satin ·········································································································································· 104
5.12.6. Color Overlay ······························································································································· 104
5.12.7. Gradation Overlay ························································································································· 104
5.12.8. Pattern Overlay ···························································································································· 105
5.12.9. Line ··········································································································································· 105
5.13. Layer Mask ······································································································································ 105
5.14. New Fill and Adjustment Layer ············································································································ 106
5.15. Vector Layer ······································································································································ 106
5.16. Shape Layer ····································································································································· 106
5.17. Clipping Mask Layer ···························································································································· 107
5.18. Delete Layer ····································································································································· 107
6. Path ········································································································· 109
6.1. About ················································································································································· 111
6.2. New Path ············································································································································ 111
6.3. Edit Path ············································································································································ 112
6.4. Convert Path ······································································································································· 112
7. Channel ···································································································· 113
7.1.
7.2.
7.3.
7.4.
7.5.
Channel Window ··································································································································· 115
New Channel ····································································································································· 115
Channel to Selection ··························································································································· 115
Selection to Channel ··························································································································· 116
Delete Channel ··································································································································· 116
8. Appendix ··································································································· 117
8.1. Hotkeys ··············································································································································· 119
8.2. List of Camera Models Supported ··········································································································· 121
Chapter 1. EzPhoto Installation
12 Hancom EzPhoto
1. EzPhoto Installation
1.1. EzPhoto Program Environment
Ÿ
Ÿ
Ÿ
Ÿ
Ÿ
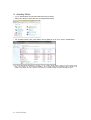
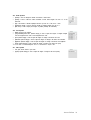
Recommended computer specs
Environment
Specs
OS
Microsoft Windows XP/Vista/7/8, 32-Bit recommended
PC CPU
Pentium4 or higher
PC RAM
2GB
HDD
More than 1GB free space
Monitor resolution 1280×1024 True Color
Graphic card
Geforce FX 5600/Radeon X300
Flash Player
Adobe Flash Player 8 or higher
ODD*
CD or DVD-ROM
Before installing EzPhoto, the OS for your computer must be properly installed.
The above specs are recommendations, and can vary depending on the user environment.
The EzPhoto menus were made using Adobe Flash. To use EzPhoto, you will need to install Adobe Flash Player 8 or
higher on your PC.
Flash Player can be automatically installed by accessing a web page that requires Flash, such as naver
(www.naver.com).
v ODD is used only if you use the program CD to install EzPhoto. If you install a downloaded program, you will not need an ODD.
1.2. EzPhoto Package Components
Ÿ
Ÿ
1 EzPhoto Installation CD.
CD components – EzPhoto installer
Adobe Flash Player installer
EzPhoto function descriptions
EzPhoto sample images
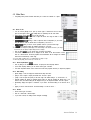
1.3. EzPhoto Installation
Ÿ
Ÿ
Ÿ
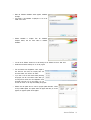
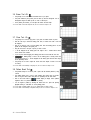
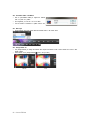
Insert the EzPhoto installation CD into the CD-ROM Drive.
If you downloaded the installation program, execute it.
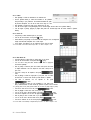
Read the information on the ‘User Rights Agreement’ screen,
select ‘Agree’ and then click the ‘Next’ button.
Hancom EzPhoto 13
Ÿ
In the ‘Installation Wizard Start’ screen, click the ‘Next’ button
to proceed with the installation of EzPhoto.
Ÿ
From the ‘Installation Folder Selection’ screen, select the folder in which you want EzPhoto to be installed, and click the
‘Next’ button.
By default, EzPhoto will be installed in the ‘C:\Program
Files\EzPhoto' folder.
If you use a 64-Bit OS, then it will be installed in the
‘C:\Program Files (x86)\EzPhoto' folder.
Ÿ
Ÿ
Ÿ
From the ‘Installation Confirmation’ screen, click the ‘Next’ button to proceed with installation of EzPhoto.
14 Hancom EzPhoto
Ÿ
Ÿ
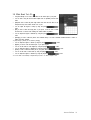
When the ‘EzPhoto3 Installation’ window appears, installation
will begin.
The progress of the installation is displayed as a bar in the
middle of the screen.
Ÿ
EzPhoto installation is complete. From the ‘Installation
Complete’ window, click the ‘Close’ button to terminate
installation.
Ÿ
Ÿ
You will find an ‘EzPhoto’ shortcut icon on the Desktop, and an 'EzPhoto' link in the ‘Start’ menu.
Double-click the EzPhoto desktop icon to run the program.
Ÿ
From the ‘EzPhoto User Registration’ screen, register a
user. Enter the ‘user name’, the ‘company name’ and
the ‘serial number,’ and click the ‘OK’ button.
If you want to use the trial version without purchasing
the program, click the ‘Trial Version’ button. While you
are using the trial version, the User Registration screen
will appear each time you run the program. You can
use this trial version for 30 days after installing the program.
Ÿ
Ÿ
EzPhoto uses the update server to check for program update information. If there
are any available updates, the ‘Update’ window will appear. Next time you run the
program, the program updates will be applied.
Hancom EzPhoto 15
1.4. Uninstalling EzPhoto
Ÿ
Ÿ
You can uninstall EzPhoto using the [Start Menu-Control Panel] in Windows.
Select [Control Panel] from [Start Menu] and click [Program-Delete Program].
Ÿ
From the [Delete Program] screen, select EzPhoto3 and click [Delete] at the top of the screen to uninstall EzPhoto.
v You can only delete EzPhoto3 while EzPhoto3 is not running. If you try to delete it while the program is running, you will see a warning message
saying, “close the program if you want to proceed with installation.” This is a warning message given by [MS-Windows Control Panel] when you try
to delete a running program. Click “OK” at the bottom of the message box to terminate the program and proceed with deleting the program.
16 Hancom EzPhoto
1.5. Customer Support Service
HanCom’s technical support center provides customer support via telephone, fax and the web.
Phone consulting service
Technical support is provided by our engineers via telephone to give our customers an accurate and speedy response to
their problems.
Korea : 1566-5192
Overseas : 82-2-2632-1989
Business hours : Mon~Friday, 9AM ~ 6PM
(Not available on Saturdays, Sundays or holidays.)
Call our technical support center and enter your product number following the voice message.
When a consultant is online, you can receive technical service from HanCom.
Fax service: 02-6280-5400
If your inquiry about problems or functions is not urgent then you can use our fax service, which is available 24-hours
daily.
Write down your inquiry and fax it to 02-6280-5400 (technical support fax). When you send a fax, provide details such
as the customer name/organization name/product name/build number/fax number/system specs and inquiries.
Web service
HanCom’s homepage provides the latest technical information and consulting data, including the FAQ and information on
how to use the product.
① Access the Hancom homepage(www.hancom.com) and login.
② From the [Customer Support] page, click on [Q&A].
③ Allow our technical engineers to resolve the issue quickly and accurately by providing details such as system specs,
and problems (attach files), and send your query by pressing the Send button.
④ Our answers to your requests will be sent to the email address you provided when you registered as a user.
Hancom EzPhoto 17
18 Hancom EzPhoto
Chapter 2. EzPhoto Screens
Hancom EzPhoto 19
20 Hancom EzPhoto
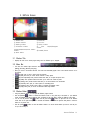
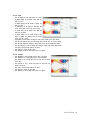
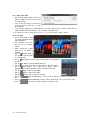
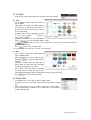
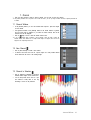
2. EzPhoto Screen
① Window title
③ Window buttons
⑤ Working window
⑦ Information window
⑨Layer/path/channel/work details
window
⑪ Quick button
② Menu bar
④ Tool box
⑥ Option window
⑧
Color
sample/histogram
window
⑩ Loaded photos
2.1. Window Title
Ÿ
Displays the name of the current program being used. The EzPhoto logo is displayed.
2.2. Menu Bar
Ÿ
Ÿ
Ÿ
Ÿ
Ÿ
Ÿ
Ÿ
Ÿ
Ÿ
Ÿ
The menu bar includes eight sub-menus with various functions, which are [File], [Edit], [Color Adjustment], [Make],
[Setting], [Decorate], [Windows] and [Help].
Move your cursor to the desired sub-menu. The menus will automatically appear. Click on the desired sub-menu to run
the function.
The [File] menu is used to access photo file functions.
The [Edit] menu lets you access various functions to modify photos.
The [Color Adjustment] menu provides functions that allow you to adjust the photo colors.
The [Make] menu provides functions that allow you to create new content in photos.
The [Setting] menu provides functions that allow you to set the EzPhoto user environment.
The [Decorate] menu gives you various options for decorating photos.
The [Windows] menu provides various options for adjusting the EzPhoto screen.
The [Help] menu gives you access to information about using EzPhoto.
2.3. Window Button
Ÿ
Ÿ
Ÿ
Ÿ
Using the [Windows] button, you can adjust the EzPhoto program window.
Click the [Minimize(
)] button to minimize the EzPhoto screen. In the [Task Bar] at the bottom of your Windows
screen, the EzPhoto logo will be displayed. Click on EzPhoto in the [Task Bar] to launch the EzPhoto screen again.
You can use the [Previous Size(
)] button and the [Full Screen(
)] button to adjust the size of the EzPhoto
screen. Click on the [Full Screen] button to maximize the EzPhoto screen. Click the [Previous Size] button to return the
window to its previous size.
Click the [Close(
)] button to close the EzPhoto windows. You will be asked whether you want to save the photos you were working on.
Hancom EzPhoto 21
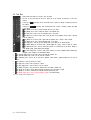
2.4. Tool Box
Ÿ
Ÿ
Ÿ
Ÿ
Ÿ
Ÿ
Ÿ
Ÿ
Ÿ
Ÿ
Ÿ
Ÿ
Select various tools that you can use to work on photos.
The size of your [Tool Box] can be set to either one or two columns. By default, it is set to two
columns.
Ÿ In the top of
[Tool Box], click on the double arrow of [View 2 Columns] to display [Tool Box] in
two columns.
Ÿ In the top of
[Tool Box], click on the double arrow of [View 1 Column] to display [Tool Box]
in one column.
Ÿ
The [Select] tool is used to select a desired area from your photo.
Ÿ
The [Modify] tool is used to modify the shape of the selected area.
Ÿ
The [Crop] tool is used to crop out undesired parts of your photo.
Ÿ
The [Move] tool is used to drag a photo. If the full photo is not displayed on the screen, it will only
move the visible part.
Ÿ
The [Brush] tool is used to paint a photo with the selected color or shape or draw a shape.
Ÿ
The [Eraser] tool is used to erase undesired parts of your photo.
Ÿ
The [Copy] tool is used to copy the selected area of your photo to the desired location.
Ÿ
The [Pattern Brush] tool is used to paint a desired pattern on a photo, or draw a shape on a photo.
Ÿ
The [Effect Brush] tool is used to create various effects on a desired part of your photo. Effects include: [Bright], [Dark], [Clear], [Blurry] and [Smudge].
Ÿ
The [Draw Shape] tool is used to draw various shapes on a photo. Available shapes include lines,
rectangles, circles, polygons, and user-defined shapes.
The [Fill with Single Color] tool is used to fill an area with the selected color.
The [Fill with Pattern] tool is used to fill an area with a pattern.
The [Gradation] tool is used to fill an area with a gradation, which means a gradual change from one color to
another.
The [Text] tool is used to add text to a photo.
The [Pen] tool is used to draw a [Path] on a photo.
The [Eye dropper] tool is used to select a color for a photo.
The [Select Color] tool is used to show the selected colors and select a desired color.
The [Undo] tool is used to cancel actions performed in EzPhoto, from most recent to oldest.
The [Redo] tool is used to re-execute jobs canceled using the [Cancel Job] tool.
The [Reset Screen] tool is used to reset the EzPhoto screen to the default setting.
v For more on [Path], refer to ‘Chapter 6. Path’.
22 Hancom EzPhoto
2.5. Working Window
2.5.1. Working Window Layout
①
③
⑤
⑦
⑨
Image file name(color mode)
Working area
Ruler button
Fit to window button
View scale
②
④
⑥
⑧
Working window button
Image size(resolution)
Actual size button
View scale scroll bar
2.5.2. Image File Name
Ÿ Displays the filename and color mode for a photo you are working on. The filename is in the form of
‘filename.extension’.
Ÿ The color mode shows the basic colors that constitute a photo. All photos are taken in RGB mode. EzPhoto can use
four different color modes: RGB, CMYK, Gray & Indexed.
2.5.3. Work Windows Button
Ÿ The basic windows button used to adjust the size of the working window. It can maximize, minimize(prev size) and
close the working window.
2.5.4. Work Area
Ÿ Shows photos selected. Users can modify photos here.
2.5.5. Image Size
Ÿ Shows the size of the selected photo in pixels.
Ÿ The photo resolution is displayed in ( ). The unit used is DPI (Dots Per Inch).
Hancom EzPhoto 23
2.5.6. Ruler Button
Ÿ Shows the ruler in the top left of the working window. By grabbing and dragging a ruler, you can create a guide line.
2.5.7. Actual Size Button
Ÿ Click the button to display an image at actual size, which means that a single pixel in the photo is represented by a
single pixel on the monitor. By displaying a photo at actual size, the photo is displayed with the greatest color
accuracy.
2.5.8. Fit to Window Button
Ÿ Adjusts the photo size so that the full photo is displayed in the whole working window.
2.5.9. View Scale Scroll Bar
Ÿ Drag the button to adjust the ratio of the photo displayed in the working window.
Ÿ The screen size is scaled based on the pixels of the monitor and the image.
Ÿ Move the slider to the right to magnify the image, and move the slider to the left to shrink it.
Ÿ The range of magnification/shrinking is 1~1,600%.
2.5.10. View Scale
Ÿ Displays the shrinking and magnification ratio of photo displayed in the working area.
Ÿ Enter the desired ratio here to magnify or shrink a photo.
2.6. Option Window <F8>
Ÿ
Ÿ
Ÿ
In this screen, you can set various options for the use of tools and the menus.
Depending on the tool/menu, a different popup window will appear.
Click the hotkey <F8> to open or close the option window.
2.7. Information Window
Ÿ
Ÿ
Ÿ
Ÿ
Displays the ‘Color Value 1/Color Value 2/Mouse Location/Shape Size’ information.
‘Color Value’ shows the color of the pixel where the mouse cursor is located, depending on the color method selected by a user. By default, it is set to RGB & CMYK.
‘Mouse Location’ shows the current mouse location. The unit is pixels and the reference point (0, 0) is the top left of the photo.
‘Shape Size’ is the size of the current shape being drawn. The unit is pixels.
24 Hancom EzPhoto
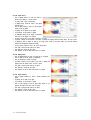
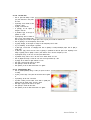
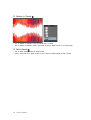
2.8. Color Pallette/Histogram Window
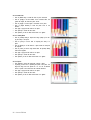
2.8.1. Color Pallette
Ÿ Select the color to be used for your task.
Ÿ You can select your desired color from a total of 36 samples including DIC,
Pantone and Truematch.
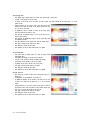
2.8.2. Histogram Window
Ÿ Displays the color distribution of your photo.
Ÿ Click the [Renew] button to renew the histogram for the current photo.
Ÿ Select your desired channel in [Channel] to display the histogram for each channel
that composes the photo.
2.9. Layer/Path/Channel/History Window <F7>
Ÿ
Displays the photo layer/path/channel/work details information and runs each function.
2.9.1. Layer Window
Ÿ Layer is a unit used to measure the number of levels in an image.
Ÿ You can create a layer and work on it to make modifications without damaging the
original image.
v For more details on [Layer] refer to ‘Chapter 5. Layer’.
2.9.2. Path Window
Ÿ Lines and shapes draw by the [Pen] tool are called paths.
Ÿ A path only has a shape, and you need to change the path in the [Path] window to meet
your desired purpose of use.
v For more details on [Path], refer to ‘Chapter 6. Path’.
Hancom EzPhoto 25
2.9.3. Channel Window
Ÿ Various color modes can be used depending on the usage.
Ÿ Channels are each color that composes your photo.
Ÿ Channels are classified into the master channel that integrates all the channels and the
channel for each color.
v If a single channel image is displayed on the screen, to express the light and shade of each channel color, the
channel image will be displayed as black and white. If multiple channel images are displayed on the screen, each
channel image is expressed in the channel color.
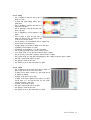
2.9.4. History Window
Ÿ Shows the twenty most recent actions performed in EzPhoto.
2.10. Open Images
Ÿ
Ÿ
Ÿ
Shows all the photos retrieved in EzPhoto.
Click on the desired photo to show it in the work
window.
Right-click to [Save], [Save As] or [Close].
2.11. Quick Button
Ÿ
Ÿ
Ÿ
Ÿ
This is a shortcut to some frequently used
EzPhoto3 functions.
[Batch Job(
)] is used to immediately run [Menu-File-Batch Job].
[Easy Adjustment( )] is used to immediately run [Menu-Color Adjustment-Easy Adjustment].
[Auto Adjustment( ) is used to immediately run [Menu-Color Adjustment-Auto Adjustment].
26 Hancom EzPhoto
Chapter 3. Tool Box
Hancom EzPhoto 27
28 Hancom EzPhoto
3. Tool Box
Ÿ
The [Tool Box] includes multiple tools. Click on a tool and use it to modify your photo. Some tools can
be used immediately after they are selected, while others must be set in [Option Window] before being
used.
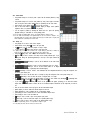
3.1. Selection Tool
Ÿ
The [Selection] tool is used to select a desired area to paint or apply effects to. The selected area in the photo is marked by the dotted line. If you perform actions on a layer
or channel, the content in the layer or channel you are working on will be selected. The
content in other layers or channels will not be selected.
3.1.1. Selection Type
Ÿ Sets the shape of the selected area.
Ÿ
[Rectangle] is used to select a rectangular area. Hotkey <M>
Ÿ
[Circle] is used to select a circular area.
v Using the <Shift> & <Alt> keys, you can adjust the shape and mode of the selected area.
v Click and drag while holding down the <Shift> key to add a new area to the existing area selected. Drag while
pressing the <Shift> key to make a circular or rectangular selection area.
v While holding the <Alt> key, drag the pointer to delete the new area from the existing selection area. Drag the
pointer and press the <Alt> key to make a symmetrical selection area based on the starting point of dragging.
v While holding the <Shift> and <Alt> keys, drag the pointer to create a symmetrical rectangular or circular selected area based on the starting point of
dragging.
Ÿ
Ÿ
[Snare] is used to freely shape a selected area. Drag the pointer to create a selected area with a desired shape.
Hotkey <L>
[Polygon] is used to select polygon shaped areas. Click and drag to draw a line from the starting point. Each time
you click, a new line will be started. If you want to finish, double-click.
[Magic Stick] is used to select a color in a photo. The area that can be selected with one click varies depending
on [Limits] and [Proximity Selection]. Hotkey<W>
3.1.2. Selection Mode
Ÿ Set the mode to create selected areas.
Ÿ
[Create New Area] is used to select one area only. Click and drag to select a photo area with the shape selected
in [Selection Type].
Ÿ Drag the pointer within the selected area to move the selected area(dotted line) only.
Ÿ If you drag the pointer outside the selected area, the first selected area will be canceled and the new area will be
Hancom EzPhoto 29
Ÿ
selected.
[Add to Area] is a continuous selection mode. You can select multiple areas in a row. Regardless of the pointer's
location, all the areas that are dragged will be selected.
v While an area is selected, press and hold the <Shift> key and select an area. A new area will be added to the existing area, as with [Add to Area].
When [Selection Type] is [Rectangular] or [Circle], use the <Shift> key to add an area. Only areas with a rectangular or circular shape will be added.
Ÿ
[Remove from Area] is a selection cancelation mode. You can cancel a newly created area from the area selected.
v When an area is selected, press and hold the <Alt> key and select an area. As with [Remove from Area], a new area is removed from the area
currently selected. When [Selection Type] is [Rectangle] or [Circle], an area with a rectangular or circular shape with its center on the starting point of
dragging will be removed from the area currently selected.
Ÿ
[Intersect with Area] is a duplicate selection mode. Only the overlap between the existing area and the newly selected area will be selected. The remaining areas will be deselected.
3.1.3. Selection Command
Ÿ Revert the selected areas.
Ÿ
[Cancel Selection] is used to deselect all the areas selected within a photo.
Ÿ
[Revert Selection] is used to select the opposite of the selected area. The selected area will be deselected
and the deselected area will be selected.
3.1.4. Selection Size
Ÿ Set the size of the selected area.
Ÿ [Normal] is used to freely select areas. You can click and drag to select areas.
Ÿ [Ratio Setting] is used to select an area by using the ratio. The size of the selected area can
freely set by using your mouse.
Ÿ [Fixed Size] is used to select an area of a size set by you. Click to select an area of a size set
you.
Ÿ
[Width] is used to set the horizontal ratio and the width of the selected area. The setting
1,000.
Ÿ
[Height] is used to set the vertical ratio and the height of the selected area. The setting
1,000.
be
by
range is from 1 to
range is from 1 to
3.1.5. Feather
Ÿ This expands the borderline of the selected area and softens the image borderlines.
Ÿ It also softens the edge of the selected area.
Ÿ [Feather] is only applied to the areas selected after setting the value.
3.1.6. Similar
Ÿ Set the range of color selected at once in [Magic Stick]. The larger the value, the wider the range of the color
selection.
3.1.7. Neighbor
Ÿ Set the range of areas selected with [Magic Stick].
Ÿ If you use [Proximity Selection], only the areas connected with the pixels having the colors set within the range of
[Similar] on the location where you have clicked will be selected.
Ÿ If you don’t use [Proximity Selection], all the pixels having colors within the range of [Similar] in the photo will be
selected.
30 Hancom EzPhoto
3.1.8. Work to Selection
Ÿ In the photo, select desired areas and right-click to perform various actions.
Ÿ
Ÿ
Ÿ
Ÿ
Ÿ
Ÿ
Use [Cut] to remove the selected area and store it in Clipboard.
Use [Copy] to copy the selected area to Clipboard.
Use [Paste] to paste the image saved in Clipboard into the selected area.
Use [Delete] to remove the selected area from the photo. The deleted
area is displayed with the background color in the background image, and
displayed as transparent in other layers.
Use [Crop] to discard all areas outside of the selected area of the photo.
Regardless of the shape of the selected area, it will be cropped to a rectangular shape.
Use [Paint] to fill the selected area of the photo with the desired color or pattern.
v Select a color or pattern to fill up the area selected in [Content]. Select from
foreground color/background color/single color/pattern.
v Select the pattern to fill out with in [Pattern].
v In [Mode], set the mode to synthesize a photo and content to be painted. For more
details on [Mode]. refer to ‘5.5. Synthesis Mode’ in ‘Chapter 5. Layer’.
v [Opacity] is used to set the level of opacity for content painted.
Ÿ
[Feather] is used to soften the borderline of the selected area.
v By setting [Feather Radius], you can expand the borderline of [Selected Area] to meet
the setting value. The expanded borderline becomes gradually transparent.
v [Feather] can be used to change the shape of the selected area as well. You can make
the edge of the [Rectangle] area rounded with the size set in [Feather Radius]. You can
make the edges of the [Snare], [Polygon] or [Magic Stick] area rounded with the size set in [Feather Radius].
Ÿ
[Help] shows a description of the [Selection] tool.
Hancom EzPhoto 31
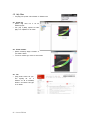
3.2. Edit Tool <V>
Ÿ
Ÿ
You can move, magnify, shrink or rotate layer images.
Select the [Edit] tool and click on a photo to display the target to edit as a small rectangle or dotted line.
Ÿ
[Auto Selection] will automatically select a layer and an image if a user clicks on an image to use the [Edit
Tool] on.
v [Edit Tool] cannot be used in the background layer of the background window.
v [Edit Tool] will change all the images of the selected layer.
Ÿ
Ÿ
Ÿ
Ÿ
Ÿ
Ÿ
Click and drag the selected image to move it.
Use [Location] to move the selected image location by the step of one pixel. In [Width(
)] and
[Height(
)], enter the coordinates to move to. The range of input is from –100,000 to 100,000.
Drag the rectangle at the edge of the selected image to magnify or shrink the image size.
[Size] is used to set the selected image size in the unit of pixels. In [Width(
)] and [Height
(
)], enter the desired size to magnify or shrink the image size. The range of input is from –50,000 to
50,000.
Drag the dotted line to rotate the selected image.
[Angle] is used to set the rotational angle for the image.
v
v
v
v
v
In the [Edit] tool option window, enter the setting value. The selected image’s location, size and angle will be changed accordingly.
While holding the <Shift> key, drag the rectangle at the edge to shrink or magnify the photo size while maintaining the horizontal and vertical ratio.
While holding the <Ctrl> key, drag the rectangle at the edge to move the focus of dragging only and change the image shape.
While holding the <Ctrl> key, drag the rectangle in the middle to make the image tilt.
Click with your mouse outside the selected image to launch the message box. Select whether to apply the edit(Y), discard the edit(N) or continue
editing(Cancel).
v Click the <Enter> key to apply the edit.
v Click the <ESC> key to cancel the edit.
32 Hancom EzPhoto
3.3. Crop Tool <C>
Ÿ
The [Crop] tool is used to crop outside of the selected area.
Ÿ
Drag your mouse in a photo to select the area to crop. The selected area will be displayed as dotted lines and a
small rectangle as with the [Edit] tool.
The area to crop will be displayed with a small rectangle and dotted lines.
Double click within the area to crop to crop the photo.
Drag your mouse within the displayed area to move the area you want to crop outside.
Drag your mouse in a small rectangle to adjust the size of the area to crop outside.
Drag along the dotted line to rotate the cropping area.
[Size] is used to set the size of the cropping area in the unit of pixels. In [Width(
)] and
[Height(
)], enter the size of the cropping area.
[Ratio] is used to adjust the ratio of the photo displayed on the screen while performing [Crop].
Ÿ
Ÿ
Ÿ
Ÿ
Ÿ
Ÿ
Ÿ
3.4. Pan Tool <H>
Ÿ
Ÿ
The [Pan] tool is used to move a photo by dragging the pointer.
If the photo size is magnified and the full photo is not visible, then select the [Pan] tool and drag the pointer on the
photo to move the photo. The photo location will not be moved, but the part of the photo that is visible on the screen
is changed.
v While performing these tasks, press the <Space> bar to move the screen. Click the <Space> bar to change the pointer to
. Then, you will be
able to move the screen in the same way as when you select the [Pan] tool.
v When you use the <Space> bar, press the <Ctrl> key at the same time to magnify the desired part on the screen. While pressing the <Space> bar
and the <Alt> key at the same time, click on the part to shrink the screen size.
Hancom EzPhoto 33
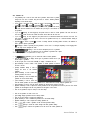
3.5. Brush Tool <F5, B>
Ÿ
Ÿ
Ÿ
Ÿ
Ÿ
You can use the [Brush] tool to open up various types of brushes that can be used to
paint or draw figures. Click or drag multiple times to repeatedly use the same effect.
[Size] is used to adjust the brush size. Drag the slider or input
the brush size. The unit is pixels.
[Opacity] is used to adjust the level of transparency for your
brush. Drag the slider or enter the desired level of transparency. The unit is %.
[Mode] is used to set the synthesis mode for your brush and image.
[Brush Shape] displays detailed information on your brush.
v The name and size displayed in [Brush Shape] are the default settings for the selected brush. Even if you
change the brush size, the size displayed in [Brush Shape] will not be changed.
Ÿ
Ÿ
Click on [More (
)] to use various types of brushes and settings.
The brushes used in EzPhoto will be displayed at the bottom of the brush window in
order. Click on your desired brush. The brush properties and characteristics will be changed.
The selected brush will be surrounded by a blue edge.
v For more details on [Mode], refer to ‘5.5. Synthesis Mode’ in ‘Chapter 5. Layer’.
v While using the [Brush] tool, press the <Alt> key to view the color.
3.5.1. Brush Properties (More)
Ÿ Click on [More] in the ‘Brush Option Window’ to display the ‘Brush Properties Window.’
Ÿ In the Brush Properties Window, you can select various types of brushes.
Ÿ The ‘Brush Properties Window’ shows various brush sizes and properties and lets you adjust the properties.
3.5.2. Basic Setting
Ÿ [Brush Shape] is used to display the selected brush shape and name.
Ÿ [Size] is used to adjust or display the default size. The unit is pixels.
Ÿ [Level] is used to adjust the opacity of the brush edge. The default setting is ‘0,’ and the unit is %.
Ÿ [Interval] indicates the interval of repeated brush strokes when you paint by dragging the [Brush] tool. If
you select a brush, the default setting will be displayed and you can adjust the interval. The unit is
pixels.
Ÿ [Roundness] displays the degree of roundness of your brush. The default setting is 100 and the unit is
%.
Ÿ [Angle] is used to rotate a brush. The default setting is 0 and the unit is °.
3.5.3. Brushes
Ÿ Shows various types of brushes.
Ÿ Click on a brush with a desired shape.
Ÿ If you select a brush, the settings will be changed accordingly.
3.5.4. Shape Dynamics
Ÿ You can use this menu to change the brush shape irregularly.
Ÿ [Size Dynamic Range] is used to set the degree of irregular changes of your brush.
Ÿ [Angle Dynamic Range] is used to set the degree of irregular rotation of your brush shape.
Ÿ [Roundness Dynamic Range] is the degree of irregular distortions of the brush shape.
Ÿ [Horizontal Flipping] is used to reverse the left and the right of a brush irregularly.
Ÿ [Vertical Flipping] is used to reverse the top and the bottom of a brush irregularly.
34 Hancom EzPhoto
3.5.5. Scatter Dynamics
Ÿ [Scatter] is used to change the number and location of brush marks.
Ÿ [Scatter] is used to make the vertical coordinate of brush marks irregular. The unit is % of the
brush size.
Ÿ [EA] is the number of brushes displayed each time you click on it. The unit is ~ times.
Ÿ [EA/Dynamic Range] is used to make the number of brushing irregular. The unit is %.
Ÿ [Both Axes] is used to display the changes in [Scatter] vertically and horizontally.
3.5.6. Color Dynamics
Ÿ Makes the brush color irregular.
Ÿ [Foreground/Background Color Dynamic Range] is used to adjust the degree of irregular changes
from the foreground brush color to the background brush color.
Ÿ [Hue Dynamic Range] is used to adjust the degree of change in the brush color tone.
Ÿ [Saturation Dynamic Range] is used to adjust the degree of change in the brush color saturation.
Ÿ [Brightness Dynamic Range] is used to adjust the degree of change in the brush color brightness.
Ÿ [Purity Dynamic Range] is used to adjust the degree of change in the brush color purity.
v For more details on ‘Hue/Saturation/Brightness’ refer to ‘4.4.4. Hue/Saturation’ in ‘Chapter 4. Menu’.
3.5.7. Other Dynamics
Ÿ This gives various effects to your brush.
Ÿ [Opacity Dynamic Range] is used to adjust the degree of change in the brush opacity.
Hancom EzPhoto 35
3.6. Eraser Tool <E>
Ÿ
Ÿ
Ÿ
The [Eraser] tool is used to erase undesired areas in your photo.
The pixels deleted by the [Eraser] tool are filled up with the background color in
“Background Image” and filled up with no color in other layers.
In the [Eraser] tool window, you can adjust the eraser size and shape.
v For more details on the eraser shape and size, refer to ‘3.5. Brush’ in ‘Chapter 3. Tool.’
3.7. Clone Tool <S>
Ÿ
Ÿ
Ÿ
Ÿ
Ÿ
Ÿ
Ÿ
Ÿ
The [Clone] tool is used to copy parts of your photo to another location or photo.
Click the <Alt> key to select the starting point. Then, a circular cursor with a cross will
be displayed.
Click on an image to copy to set the starting point. Once the starting point is set, the
pointer will be changed to the [Clone] tool.
Drag the clone tool to the part or photo you want to clone.
‘+’ will be displayed at the starting point. The image in the ‘+’ location will be cloned
to the current cursor location.
If you stop and restart dragging, the starting point will be moved with the clone tool.
[Fix Starting Point] is used to fix the starting point of cloning. Each time
you drag the clone tool, ‘+’ will be displayed at the starting point and the same image
will be repeatedly cloned.
The [Clone] tool is used to adjust the various sizes and shapes of brush to be used
for cloning.
v For more details on the size/shape of the [Clone] tool, refer to ‘3.5. Brush’ in ‘Chapter 3. Tool’.
3.8. Pattern Brush Tool
Ÿ
Ÿ
Ÿ
Ÿ
The [Pattern Brush] tool is used to paint a photo with the selected pattern by using
a brush.
The [Pattern Brush] tool is used to draw patterns with various types of brushes.
Click or drag the same location many times to repeatedly use the same effect.
Click on the arrow button in
[Pattern Shape] to display various patterns
registered. Click on a pattern to be used for painting.
You can register a pattern by selecting the desired area in a photo and pressing
[Register Pattern] or <Ctrl+Shift+ P> in the [Setting] menu.
v For more details on [Register Pattern], refer to ‘4.6.2. Register Pattern’ in ‘Chapter 4. Menu’.
v For more details on the size/shape of the [Pattern Brush] tool, refer to ‘3.5. Brush’ in ‘Chapter 3. Tool’.
36 Hancom EzPhoto
3.9. Effect Brush Tool <R>
Ÿ
Ÿ
Ÿ
Ÿ
Ÿ
Ÿ
Ÿ
The [Effect Brush] tool is used to add effects to the desired part of your photo.
You can click or drag the same location multiple times to repeatedly use the same
effect.
[Sharpenis used to make the photo edge clearer and revive the 3-D effect. It can
sharpen the blurry areas where camera focus is poor.
You can adjust the degree of clarity by using the [Level(
)]
menu.
[Blur] is used to soften the rough parts of your photo. It can be used to soften
the facial skin or remove moire resulting from textile material or patterns.
You can adjust the degree of blurriness by using the [Level(
)]
menu.
[Smudging] is used to make the photo’s color borderline blurry. It is used to eliminate unnatural borders or stains resulting from photo synthesis.
v [Shape Change] or [Diffusion] are not available in [Smudging].
Ÿ
Ÿ
Ÿ
Ÿ
Ÿ
Ÿ
Ÿ
You can adjust the degree of effects by using the [Level(
[Brighter] is used to make the desired part of your photo brighter.
You can set the areas to make brighter by using the [Range(
You can adjust the degree of brightness by using the [Exposure(
[Darker] is used to make the desired part of your photo darker.
You can set the area to make darker by using the [Range(
You can adjust the degree of darkness by using the [Exposure(
)] menu.
)] menu.
)] menu.
)] menu.
)] menu.
v For more details on the size/shape of the [Effect Brush] tool, refer to ‘3.5. Brush’ in ‘Chapter 3. Tool’.
Hancom EzPhoto 37
3.10. Shape Tool <U>
Ÿ
Ÿ
Ÿ
The [Shape] tool is used to draw various shapes.
In
[Mode], you can select the purpose of using a shape.
A shape drawn in [Shape Layer] will be a new mask layer.
v In [Shape Layer], you cannot use the functions such as [Paint Bucket] or [Pixel Paint]. As well, any
function for which the pointer shows ( ) cannot be used in [Shape Layer].
Ÿ
Ÿ
Ÿ
Ÿ
Ÿ
Ÿ
Ÿ
Ÿ
Ÿ
Ÿ
Ÿ
Ÿ
Ÿ
Ÿ
Ÿ
Ÿ
Ÿ
Ÿ
Using the [Path] menu, draw a shape that will become a new path.
[Pixel Paint] is used to create a new shape in the currently selected layer. If you
select [Pixel Paint], the [Thickness]~[Anti-alias] at the top of the option window will
be activated.
[Thickness] is used to set the thickness of the outer border
of a shape.
[Opacity] is used to set the transparency level for a shape.
[Radius] is used to set the minimal radius for an ellipse and
the radius of the edge of [Rectangle with Rounded Edges].
[Borderline] is used to create an outer borderline with the designated thickness by using the foreground color
set in the [Color Picker] tool.
[Fill] is used to fill the inner area of a shape by using the background color in the [Color Picker] tool.
[Anti-alias] is used to soften the curves or diagonal lines of a shape.
In
[Shape], you can select the desired shape you want to draw. Select from [Rectangle( )], [Rectangle with
Rounded Edges( )], [Circle( )], [Line( )] and [User Defined( )].
If you select
[User Defined], the screen on the right side will appear, prompting you to select the desired
shape. Click the arrow button to launch the list of user-defined shapes.
Double-click the desired shape that you want to use.
Click the arrow button in the top right to edit the user-defined shapes.
[Delete Shape] deletes the selected shape from the list.
[Shape Resetting] initializes the list of user-defined shapes.
[Load Shape] retrieves the list of other user-defined shapes saved.
[Save Shape] saves the edited list.
[Area] is used to create a layer in the [Shape Layer] mode.
[New Area] is used to create each shape as a separate [Mask Layer].
[Add to Area] is used to add a shape to the selected [Mask Layer].
v For more on [Mask Layer], refer to ‘5.13. Layer Mask’ in ‘Chapter 5. Layer’.
v In the [Shape] tool menu, press the <Alt> key to view the colors.
38 Hancom EzPhoto
3.11. Paint Bucket Tool
Ÿ
Ÿ
Ÿ
The [Paint Bucket] tool is used to fill the pixels having a similar color as the location clicked with the foreground color in the [Color Picker] tool.
[Opacity] is used to set the transparency level of the fill
color.
[Mode] is used to select the mode to synthesize the fill color
and a photo.
v For more on [Mode], refer to ‘5.5. Synthesis Mode’ in ‘Chapter 5. Layer’.
v In the [Paint Bucket] tool menu, you can press the <Alt> key to view the color.
Ÿ
Ÿ
[Range] is used to set the range of color used for filling. The larger the value, the wider the range of
colors filled at once.
[Proximity Selection] is used to fill an area having colors within the range from the location clicked. If you do
not select [Proximity Selection], all the pixels within the range will be filled with the foreground color.
3.12. Pattern Fill Tool<Shift+G>
Ÿ
Ÿ
Ÿ
Ÿ
The [Pattern Fill] tool is used to fill the pixels having a similar color as the location clicked with a pattern.
In
[Pattern], select a desired pattern. Click the arrow button to display various patterns. Click the pattern you wish to use for filling.
[Opacity] is used to set the transparency level of a pattern.
In
[Mode], select the mode to synthesize a pattern and a photo.
v For more on [Mode], refer to ‘5.5. Synthesis Mode’ in ‘Chapter 5. Layer’.
Ÿ
Ÿ
[Range] is used to set the range of colors for filling. The larger the
value, the wider the range of colors used for filling. The maximum is 255.
[Proximity Selection] is used to fill an area having colors within the range from the location clicked. If you do
not select [Proximity Selection], all the pixels within the range will be filled with the pattern.
Hancom EzPhoto 39
3.13. Gradation Tool <G>
Ÿ
Ÿ
Ÿ
Ÿ
Ÿ
Ÿ
Ÿ
Ÿ
Ÿ
The [Gradation] tool is used to fill a photo with gradations, which means a gradual
change from one color to another. Drag to create a different gradation depending on
the selected shape.
In the middle of the option window, select the shape of gradation. Select from
[Linear( )], [Circular( )], [Cone( )], [Symmetry( )] and [Rectangle( )].
[Linear] is used to fill the area where you drag with gradations and fill the outer area with the start/end color. The direction in which you drag is the direction of
gradation.
If you use [Circular], the area where you drag will be a radius or circular gradation. The start color will be used to
fill the center and the area outside the radius will be filled with the end color.
If you use [Cone], the area where you drag will be an intersection between the start and end colors. The start location will be the vertex of the cone. The gradation will fill up in a clockwise direction starting from the location where
dragging begins.
[Symmetry( )] is similar to [Linear( )] in terms of drawing methods and filling patterns. The key difference is that a
gradation repeats symmetrically.
[Rectangle] is similar to [Circular] but gradation is in the form of a rectangle. Depending on the dragging direction,
the angle of the rectangle will rotate.
[Opacity] is used to set the transparency level for a gradation.
In
[Mode], you can select the mode to synthesize a gradation and a photo.
v For more on [Mode], refer to ‘5.5. Synthesis Mode’ in ‘Chapter 5. Layer’.
Ÿ
Ÿ
Ÿ
In
[Gradation], you can select and create your desired gradation.
Click the arrow button(▼) to display various types of gradations. Double-click on the
desired shape of gradation.
In the top right, click on the arrow button(▶) to display a ‘Gradation Job List’.
[New Gradation] is used to create a new gradation. The created gradation will be added to the end of the list.
[Change Gradation Name] is used to
change the name of the selected
gradation.
[Delete Gradation] is used to delete the
selected gradation from the list.
[Reset Gradation] is used to initialize the
gradation list to the default setting.
[Load Gradation] is used to select and
load the desired gradation list. The loaded gradation list is added behind the currently displayed gradation list.
[Save Gradation] is used to save the current gradation list with the name chosen by the user.
[Replace Gradation] is used to replace the current gradation list with the gradation list desired by the user. The current
gradation list will disappear and the new gradation list will appear on the screen.
Click on the gradation's shape to modify its color and shape.
Ÿ
Ÿ
Ÿ
Ÿ
Ÿ
Ÿ
Ÿ
Ÿ
Ÿ
Click on the gradation to create a new one.
[Pre Setting] displays gradations that are already created.
Click on the arrow button to change the gradation list.
[Reset Gradation] is used to initialize the gradation list to the default setting.
[Replace Gradation] is used to replace the existing gradation list.
Click
[OK] to select a gradation to edit and finish gradation editing works.
Click
[Cancel] to cancel the current task and finish gradation editing works.
Click
[Load] to add the new gradation list to the end of the current gradation list.
Click
[Save] to save the current gradation list as a file.
Ÿ
Ÿ
Ÿ
Ÿ
Ÿ
Ÿ
Ÿ
Ÿ
40 Hancom EzPhoto
Ÿ
Ÿ
Ÿ
Ÿ
Ÿ
Ÿ
Ÿ
Ÿ
Ÿ
Click on the desired gradation to
launch the detailed setting selected in
the editing screen.
In
[Name], designate the name of the gradation to be created.
In
[Edit], you can
modify the existing gradation or create
a new gradation.
Click on [Stop Point( , )] to set the
color of the location, the opacity and
the location.
Click on [Top Stop Point( )] to activate
t h e [ O p a c i t y
(
) ]
menu. In the [Opacity] menu, set the
transparency level for the stop point. In
the [Location] menu, set the location of the stop point.
Click on [Bottom Stop Point( )] to activate the [Color(
)] menu. In the [Color] menu,
you can set the color of the stop point. In the [Location] menu, set the location of the stop point.
Click the [Stop Point] menu to display a black rhombus. You can drag this rhombus to move the center location of the
gradation. In the [Location] menu, enter the value and move to the location corresponding to it.
Click in the middle of a gradation to create a new [Stop Point].
Click the [Delete] button to delete the selected [Stop Point].
Hancom EzPhoto 41
3.14. Text Tool <T>
Ÿ
Ÿ
Ÿ
Ÿ
Ÿ
Ÿ
Ÿ
Ÿ
Ÿ
Ÿ
Ÿ
Ÿ
Ÿ
Ÿ
The [Text] tool is used to add text to your photo. Click on the location where you
want to enter text, and start typing to add text to it.
In
[Font], select the font type to enter text. Click on the arrow button
to display the list of fonts installed in Windows.
In
[Size], enter the font size for text to be added. The font size is expressed in points. 1 point is 1/72 inch. The font size frequently used in documents
is 10~11 Points.
In
[Color], set the font color.
In
[Font Style], select your desired font style. [Bold Face( )] is used to make
the font thicker. [Italic( )] can tilt the letters.
In
‘Line Alignment’, select the criteria for aligning the text. [Left Alignment( )]
is used to align text on the left. [Central Alignment( )] aligns the center of text
and [Right Alignment( )] aligns the right side of text.
[Font Interval(
)] is used to set the interval between each
letter. The unit is points.
[Line Spacing(
)] is used to set the spacing between each line. The unit is points.
‘Deform’ is used to change the shape of text strings.
In [Input], enter characters.
In [Deform], you can deform the shape of space occupied by text strings. The selected text string will be displayed
as a rectangle that has a small rectangle at the edge. Drag your mouse on this small rectangle to change the shape
of the space and the shape of the text as well. While working on fonts, press the <Ctrl> key to switch to [Deform].
Use [Add Deform Point] to add a deform point to a desired location. While working on fonts, press the <Ctrl+Shift>
key to switch to the [Add Deform Point] status.
Use [Delete Deform Point] to delete unnecessary deform points. While working on fonts, press the <Ctrl+Alt> key to
switch to the [Delete Deform Point] status.
Use [Cancel Deform] to cancel the deform action.
v In [Text Layer], you cannot use functions such as [Paint Bucket]. Any function for which the pointer is marked ( ) cannot be used in [Text Layer].
3.15. Pen Tool
Ÿ
Ÿ
Ÿ
Ÿ
Ÿ
Ÿ
Ÿ
Ÿ
Ÿ
Ÿ
Ÿ
Ÿ
Ÿ
Ÿ
Ÿ
The [Pen] tool is used to create a shape used in photo editing works.
In
[Select Type], set the range of targets selected as the [Pen] tool.
The [Path Selection] tool is used to select the entire path. Move the selected path
by dragging.
The [Direct Selection] tool is used to select an adjustment point composing the
path. You can adjust the location of each adjustment point and the curvature rate.
In
[Edit], you can select work to perform by using the [Pen] tool.
In the [Pen] tool menu, you can create a new path.
In the [Add Reference Point] tool menu, you can add a new reference point to the existing path.
In the [Delete Reference Point] tool menu, you can delete a reference point from the existing path.
In the [Deform Reference Point] tool menu, you can adjust the curvature rate of the path.
In [Mode], you can select the type of path creation.
If you draw a path in [Shape Layer] mode, it will be created as a [Mask Layer]. Select the [Shape Layer] mode to
activate the below area.
Select [Path] to process a shape drawn by the [Pen] tool as a path.
[Area] is used to set the content of a newly created path.
[New Area] is used to delete the existing paths and leave the newly created paths only.
[Add to Area] is used to create a new path while maintaining the path created and selected.
v For more on [Mask Layer], refer to ‘5.13. Layer Mask’ in ‘Chapter 5. Layer’.
42 Hancom EzPhoto
3.16. Eye Dropper <I>
Ÿ
Ÿ
The [Eye Dropper] tool is used to display or select the color of a pixel in a photo.
You can place the eye dropper on the pixel that has your desired color, and click to select the pixel's color.
v While using the [Brush], [Paint Bucket] or [Shape] tools, press the <Alt> key to preview the color.
3.17. Color Picker
Ÿ
Ÿ
Ÿ
Ÿ
Ÿ
Ÿ
Ÿ
Ÿ
Ÿ
The [Color Picker] tool is used to select the color to be used.
Two boxes are overlapped. The top left box shows the foreground color while
the bottom right box shows the background color.
If a single color is used in work, the foreground color is used.
The background color is used to fill a photo when you use the [Shape] tool
or fill an area deleted by the [Eraser] tool in the background layer.
If you want to change the foreground color (or background color), click on the color.
Click on the desired color in (1) of the [Color Picker] menu to change the foreground or background color. The selected color is displayed in the top of (3). The previously selected color is displayed in the bottom of (3).
Drag the wedge-shaped red box in (2) to change the color displayed in the area of (1).
Enter the desired color on your own according to your preference. In EzPhoto, you can select the following color
modes: HSB, RGB, CMYK.
Click on the arrow in the top right of the [Color Picker] tool to swap the background color and the foreground color.
Hotkey<X>
v Lab will be supported in the future.
3.18. Undo Tool <Ctrl+Alt+Z>
Ÿ
The [Undo] tool is used to cancel EzPhoto actions on the selected photo, one by one.
3.19. Redo Tool <Ctrl+Shift+Z>
Ÿ
The [Redo] tool is used to re-execute actions canceled by using the [Undo] tool, one by one.
3.20. Arrange Window <F>
Ÿ
Arranges the windows that compose the EzPhoto screen. All windows will be moved to their default locations.
Before arrangement
After arrangement
Hancom EzPhoto 43
44 Hancom EzPhoto
Chapter 4.
Menu Functions
Hancom EzPhoto 45
46 Hancom EzPhoto
4. Menu Functions
Ÿ
Ÿ
Ÿ
EzPhoto provides various functions that can be applied to photos.
Depending on the characteristics, each function is classified into several menus.
If you select a function that requires additional adjustments, a pop-up window will appear, and in this window, you
need to set the proper values.
4.1. Menu Bar
Ÿ
Ÿ
By grouping various functions, EzPhoto displays a total of eight menus.
Move your mouse cursor to the desired functional menu, and the content will be displayed automatically.
4.2. File Menu
Ÿ
Ÿ
From the [File] menu, you can perform actions related to the photo file itself.
This menu does not contain any functions to modify the photo image, only functions
related to the file.
4.2.1. New <Ctrl+N>
Ÿ By selecting [New], you can create new photo files.
Ÿ In [Settings], a number of frequently used sizes are provided. Click on the
arrow button and select the desired size.
Ÿ If you want to create a photo file with a specific size, enter your preferred
values in [Width], [Height] and [Resolution].
Ÿ In [Width] and [Height], you can enter values in various units, such as pixel/inch/cm/mm/point.
Ÿ [Resolution] is used to set the photo resolution. You need to set the appropriate resolution for the purpose of use. The
recommended resolution for internet homepages and PC screens is 75DPI, 150DPI for printing, and 300DPI for printing.
The higher the resolution, the better quality and the larger capacity.
Ÿ In [Background], you can set the background color for a photo to be newly created. Select a desired color from
white/foreground/background/transparent.
Ÿ In [Mode], you can select the color mode for a photo file to be newly created. Select from gray shadow/RGB/CMYK.
Hancom EzPhoto 47
4.2.2. Browse <Ctrl+Shift+O>
Ÿ You can use the [Browse] menu to use photo files in EzPhoto.
Ÿ In the area of (1), select a folder with photo files.
Ÿ The files in this folder will be displayed in the area of (2). The photos
that can be retrieved in EzPhoto will be displayed in the preview pane.
Here, you can check the content of photo files.
Ÿ In the area of (2), select photo files by clicking them. Click on a desired
photo to select a file. While holding the <Ctrl> key, click to select the files
that you want to retrieve. While holding the <Shift> key, you can select a photo. Then, all the files that you clicked
will be selected.
Ÿ (3) is where the selected files are stored temporarily. If you drag photos from (2) to (3), they will be stored in (3). If
you change the folder or deselect in (2), the photos saved in (3) will not disappear. If you want to delete a photo in
(3), then select a photo and press the <Del> key. If you want to delete multiple photos at the same time in (3), use
the <Ctrl> key to allow multiple selection, as in (2). The screen in (3) does not allow you to make multiple selections
using the <Shift> key.
Ÿ Use [Open] to open the selected photo files in EzPhoto. If there are photos selected in the area of (3), they will be
opened in EzPhoto; if not, photos selected in the area of (2) will be opened in EzPhoto.
Ÿ [Cancel] is used to cancel the browsing.
Ÿ The
[Magnify/Shrink] bar is used to adjust the preview size of photos displayed in the [Browse] screen. Move
the slider to the right to magnify and to the left to shrink the preview size.
4.2.3. Open <Ctrl+O>
Ÿ Use [Open] to retrieve photo files for use in EzPhoto.
Ÿ In (1), select the location where photo files are saved. Select from recent
work/background/library/my computer/network.
Ÿ (2) displays the current folder. Click the arrow button to show the entire folder
structure. Click a desired folder to move to it.
Ÿ In [File Format] of (3), select the file format to retrieve. By default, it is set to
Image Files. You can retrieve all the photo files that you can use in EzPhoto.
Ÿ In the area of (4), select the photo files to be used in EzPhoto. Click on a desired photo, or click while pressing the
<Crtl> or <Shift> keys to select multiple photo files.
Ÿ The [Open] menu provides various functional buttons in Windows.
Ÿ Click the [Move to the Last Opened Folder] button to move to the folder that you opened most recently.
Ÿ Click the [One Level Higher] button to move to a folder at a higher level.
Ÿ Click the [Create New Folder] button to create a new folder in the current folder.
Ÿ Click
[View Menu] to set the information of files shown in the screen of (4).
Ÿ In the [File Name] menu, enter the name of the file you want to retrieve.
Ÿ In the [File Format] menu, you can set the desired format of the file you want to retrieve.
Ÿ Click the [Open] button to retrieve the selected photos into EzPhoto.
Ÿ Click the [Cancel] button to cancel the Open function.
v EPS supported: EPS Preview supports TIFF(1bit/pixel), TIFF(8bit/pixel). It supports encoding types such as ASCII, Binary, and JPEG. PhotoShop DCS
1.0, PhotoShop DCS 2.0 are not supported.
v Fonts (true type) included in EPS are not supported. Images are supported, though.
48 Hancom EzPhoto
4.2.4. Save <Ctrl+S>
Ÿ Click [Save] to save the current photo you are working on as a file.
Ÿ A photo file retrieved using [Browse] or [Open] is saved as a file with the same name and format while no message
window appears.
Ÿ If you save a file created using [New], a pop-up message will prompt you to set the filename and format. Set the desired filename and format and click the [Save] button to save the photo file.
Ÿ If you retrieve a file with a format other than ‘~.EZI’(or ‘EZIX’) and create a [Layer], then a window will appear that
prompts you to set the filename and format. The information about [Layer] is saved only as ‘~.EZI’(or ‘EZIX’).
4.2.5. Save As
Ÿ Save the work done in EzPhoto with the desired filename and
format.
Ÿ Most of the [Save As] options are the same as those for [Open].
Ÿ In [Save Location], select the folder to save your photo file, and in
[Filename] and [File Format], set the filename and format.
Ÿ Click the [Save] button to save an image worked on in EzPhoto with
the filename and format to the designated folder.
Ÿ Click [Cancel] to cancel [Save As].
4.2.6. Close <Ctrl+W>
Ÿ Click [Close] to close the current file you are working on.
Ÿ If you have modified something since the last time the file was saved, a window will pop up, prompting you to save
the photo file.
Ÿ If there has been nothing modified since the last time the photo was saved, the photo will be closed.
4.2.7. Load
Ÿ Using a scanner or web cam that converts images into computer data, load an image into EzPhoto.
Ÿ EzPhoto uses the TWAIN driver to connect to video equipment
connected to a user’s PC.
Ÿ Click on [Load] to display the list of devices that can be
connected. Select a device and then the program for each device will run.
Ÿ Images loaded into the device are displayed as new photos in EzPhoto.
v TWAIN is the standard interface protocol that delivers image data by directly connecting a video input device such as a scanner or digital camera to
the graphics processing program.
v TWAIN driver for Windows OS needs to be installed in the TWAIN (16 bit) or TWAIN_32 (32 bit) folder under the Windows directory and the DLL
(Dynamic Linked Library) file with the *DS extension must exist.
v After copying a photo on a smartphone or a tablet PC to the HD, you have to work on it in EzPhoto. If you click on [Load] to retrieve a photo
from a smartphone or a tablet PC, an error will occur.
v If you click on [Load], the popup window will ask you to select a TWAIN driver. For this reason, the title of the window displayed does not reflect
the function of EzPhoto3.
Hancom EzPhoto 49
4.2.8. File Information
Ÿ Shows various information recorded in a photo file.
4.2.9. Batch Job
Ÿ Use the [Batch Job] function to adjust the photo
size and file format simultaneously. After processing works on all the photo files in a single folder, save photo files to the designated folder.
Ÿ
Ÿ
Ÿ
Ÿ
Ÿ
Ÿ
Ÿ
Ÿ
Ÿ
Ÿ
Ÿ
Ÿ
Ÿ
[Environment Setting] is used to save and retrieve the settings of [Batch Job] as a file. Click
the arrow button(▼) of [Environment Setting
Name(
)] to display the file
where the settings are saved. Click a desired file
to change the settings.
Click
[Save Setting] to save the current
settings to a file with the name selected by a
user.
Click
[Delete Setting] to delete the file
currently displayed in [Environment Setting].
In
[Folder and File Management], you can set the folder/filename/file format used in [Batch Job].
In
[Source File Folder], you can set the folder containing photo files to perform [Batch Jobs] on. Click
the [Designate Folder] button and select a desired folder. A folder name can have up to 255 characters.
In
[Target File Folder], set the folder to save photo files resulting from the [Batch Job]. Click on the
[Designate Folder] button and select the desired folder. A folder name can have up to 255 characters.
In
[Source File Format], set the format of the files in the folder to run the [Batch Job]. Select either
JPG or TIFF.
In
[Target File Format], set the file format to save photo files resulting from the [Batch Job]. Select either JPG, Tiff or EPS.
In
[Target Filename Rule], set the naming rule for a photo file created as the result of
[Batch Job]. Add a color mode next to the original filename or add a number to it.
[Start Number] is used to set the starting number when you select the source name_number in [Target
File Naming Rule].
[Size Conversion] is used to convert the photo to a certain size. Depending on the photo's orientation, it is
classified either as a landscape or a portrait photo. For photo size, set either width(
) or
height. To maintain consistent proportions with the original photo, if you set either width or height, the other will be automatically set.
Click on
[Connect] to adjust the size of landscape/portrait photo to the same size. If you adjust the width of a
landscape photo, its height will also be changed. If you adjust the height of a portrait photo, its width will also be
changed. You can set either width or height, and the other will be set automatically.
Click on
[Resolution] to set the photo resolution.
v For an appropriate resolution depending on the purpose of use, refer to ‘4.2.1. New’ in ‘Chapter 4. Menu Tools’.
50 Hancom EzPhoto
Ÿ
Ÿ
Ÿ
Ÿ
Ÿ
Click on
[Color Profile Conversion] to convert the photo color by using the ICC Profile and the Color
Engine.
Click on
[Source Color Profile] to set the ICC Profile used as the photo color area. You can
use the camera’s ICC Profile or the standard RGB ICC Profile.
Click on
[EzPhoto Color Application] to supplement the quality of photos processed as batch jobs. Photos
shot by a DSLR camera registered in EzPhoto will use the ICC profile for each camera mode. If a photo is not shot
by a camera registered in EzPhoto, you can adjust its brightness, color and clarity.
Click on
[Target Color Profile] to set the ICC Profile used as the color area of target
subject to color conversion. If you need to print a photo, set the ICC Profile for your printer.
Click on
[Conversion Method] to set the method for converting colors in the color engine.
v For more details on the ICC Profile, the color engine and the conversion method, refer to '4.6.1. Color Setting' in 'Chapter 4. Menu'.
Ÿ
Ÿ
Ÿ
Ÿ
Ÿ
Ÿ
Ÿ
Ÿ
Ÿ
Ÿ
Ÿ
Ÿ
Ÿ
Click [Curve Application] to supplement a fine difference between photo colors resulting
from the [Batch Job].
Click the [Arrow Button(▼)] to display the saved curves. Select a
desired curve for use.
If you want to check or modify the details of the selected curve or
create a new curve, click the [Detail] button. If you want to delete
the current curve, click the [Delete] button.
In the [Batch Job Curve] window, you can see the selected curve
setting and change the curve values.
As fine color error corrections are made, you can enter the desired
value in the density field to change the curve.
In [Channel], select the color channel to correct.
If you want to use the corrected curve value in [Batch Job], click the [OK] button.
Click [Cancel] to cancel the curve works and return to [Batch Job].
Click [Save as New] to save the changed curve value with the desired name.
Click [Unsharpen Mask Application] to supplement the quality by using the
[Unsharpen Mask] tool for all the photos processed by [Batch Job].
Click the [Arrow Button(▼)] to display the Unsharpen Mask values saved. Select
the desired value for use.
Click the [Detail] button to display or change the settings of the selected
Unsharpen Mask. The changed Unsharpen Mask value can be saved as the new
unsharpen mask setting value by using [Save as New].
v For more details on [Unsharpen Mask], refer to '4.3.12.3. Unsharpen Mask Filter' in 'Chapter 4. Menu'.
Ÿ
Ÿ
Ÿ
When all the settings are complete, click [Start Job(
)] to start the [Batch
Job].
Click
[Close] to close the [Batch Job] window.
Click
[View Log] to display the detailed information of [Batch Job], such as working time and errors for each
photo.
Hancom EzPhoto 51
4.2.10. Print <Ctrl+P>
Ÿ You can print a photo selected in EzPhoto on a printer connected to the PC.
Ÿ
Ÿ
Click [Selected Printer] to display the printer to print a photo. If you run EzPhoto, the default Windows printer will be
selected. If you change the printer, it will be used until you terminate the program.
Click
[Printer Setting] to display or change the selected printer settings.
Ÿ In [Paper Orientation], select the printing paper orientation.
Ÿ In [Unit], set the unit used for margin and photo size. Select from mm/cm/inch/point.
Ÿ Click on [Left Margin] to set the left margin of a photo.
Ÿ Click on [Top Margin] to set the top margin of a photo.
v Using the margin option, set the location of photo printing. Some printers cannot print the full page. Ask your printer maker what
the default margin is for your printer.
Ÿ
Ÿ
In [Width], set the photo width.
In [Height], set the photo height.
v A printer maintains the width/height ratio of the original photo, but magnifies or shrinks the photo size. Enter [Width] or [Height] and then other values
will be automatically determined to maintain the same width/height ratio.
Ÿ
Ÿ
Ÿ
Ÿ
Ÿ
Ÿ
Ÿ
Click on [Adjust Size] to magnify or shrink a photo in %.
Click [Fit to Paper Size] to magnify or shrink the photo to a size that can be printed on paper by the selected printer.
Click on
[Color Processing Method] to set the method for processing the color of the photo to be printed.
Click [No Color Processing] to use the printer without processing the photo color at all.
Click [Color Processing in EzPhoto] to print colors accurately by using the ICC Profile set in the work area of [Color
Setting] and [Printer Profile].
Click [Color Processing in Printer] to print a photo using the color setting of a printer.
Click on
[Printer Profile] to set the ICC Profile used as the color area of a
printer.
v Use the profile provided by a printer maker or paper maker.
Ÿ
Click on
[Conversion Method] to select the method for converting the photo colors.
v For more details on [Color Processing Method], ICC profile and [Conversion Method], refer to '4.6.1. Color Setting' in 'Chapter 4. Menu'.
Ÿ
Ÿ
Click [Print] to print a photo using the current settings.
Click [Cancel] to cancel the current printing job.
4.2.11. Exit <Ctrl+Q>
Ÿ Click [Exit] to terminate EzPhoto.
Ÿ Finish saving the currently open photos and terminate the EzPhoto program. If photos are already saved, then the program will be terminated without saving them again.
52 Hancom EzPhoto
4.3. Edit Menu
Ÿ
Ÿ
In the [Edit] menu, you can modify or edit photos.
You can adjust the photo size or add and delete some photos.
4.3.1. Last Job <Ctrl+Z>
Ÿ Select [Last Job] to cancel and rerun the action most recently processed on the selected photo.
4.3.2. Undo <Ctrl+Alt+Z>
Ÿ Select [Undo] to cancel the actions on the selected photo file one by one.
Ÿ This is the same as the [Undo( )] tool in the [Tool Box].
4.3.3. Redo <Ctrl+Shift+Z>
Ÿ Select [Redo] to rerun the actions canceled by [Cancel Job].
Ÿ This is the same as the [Redo( )] tool in the [Tool Box].
4.3.4. Rotate and Flip
Ÿ Click on [Rotate and Flip] to rotate and flip the photo.
Ÿ In [Rotation Angle], select the angle of rotation and click on the rotation direction(
,
) to rotate the photo.
Ÿ
Click on
[Flip Horizontally] to reverse the left/right side of a photo.
Ÿ
Click on
[Flip Vertically] to reverse the top/bottom side of a photo.
v [Flip Horizontally] & [Flip Vertically] are not affected by the [Rotation Angle] setting.
Hancom EzPhoto 53
4.3.5. Image Size <Ctrl+Alt+I>
Ÿ Click on [Image Size] to freely adjust the photo size.
Ÿ There are two types of photo sizes - [Pixel Size] &
[Document Size].
Ÿ [Pixel Size] is the number of pixels composing a
photo. The photo file capacity and quality are dependent on the [Pixel Size].
Ÿ [Document Size] is the size information displayed in a
photo file. If you retrieve a photo file from Hangeul
program, for example, it will be displayed in the size
set in [Document Size].
Ÿ Click on [Image Size] to display the size of the selected photo. Magnify or shrink a photo by entering
the photo size that you want to change to.
Ÿ If you want to adjust the photo size on a pixel basis, enter a value in the [Pixel Size] menu.
Ÿ In
[Maintain Ratio], you can shrink or magnify a photo while maintaining the ratio of the original
photo. Change either width or length, and the other value will be automatically calculated.
Ÿ Click on [Doc Size] to adjust the photo size in various units such as mm/cm/inch/%/point.
Ÿ Click on [Resolution] to adjust the photo quality. For internet homepages or displaying images, you are recommended to
use 75DPI, 150DPI for printing and 300DPI for publishing. If you use a resolution higher than the recommended vale,
the quality will be improved, but the file size is also increased.
Ÿ Click on
[Image Resample] to change the photo’s [Pixel Size]. If you select [Image Resample] and
change the photo size in [Document Size], then the width/height in [Pixel Size] will be changed. If you deselect [Image
Resample], then even if you change the photo size in [Document Size], the [Pixel Size] will not be changed.
Ÿ Set the desired photo size and click the [OK] button to change the photo size.
Ÿ Click [Cancel] to cancel the [Image Size] action.
v Even if you use [Image Resample], the image quality will be degraded if you magnify the photo size by two times or more. If you want to have high
quality photos, you need to use a high resolution when you take the picture. Photo shrinking does not cause signigicant image quality loss.
54 Hancom EzPhoto
4.3.6. Canvas Size <Ctrl+Alt+C>
Ÿ Click on [Canvas Size] to reduce or expand the photo
area, not the photo size.
Ÿ If you expand the [Canvas Size], empty space will be
added around the photo.
Ÿ If you reduce the [Canvas Size], parts of the photo will
be cropped out.
Ÿ [Current Size] is used to display the size of the currently
selected photo.
Ÿ In [New Size], enter the desired new canvas size.
Ÿ You can set the canvas size in various units, such as
pixel/mm/cm/%/point.
Ÿ [Reference] is used to set the direction of expanding or
reducing the canvas size.
4.3.7. Cut <Ctrl+X>
Ÿ Click [Cut] to delete a selected area of photo and save it to the Clipboard.
Ÿ A deleted area will be filled with the background color in the background image, and filled with transparent color in
other layers.
4.3.8. Copy <Ctrl+C>
Ÿ Click [Copy] to copy a selected area to the Clipboard.
4.3.9. Paste <Ctrl+V>
Ÿ Click [Paste] to create a new layer for the selected photo and paste a saved image to the Clipboard.
v For more details on [Paste] image synthesis and effects, refer to ‘Chapter 5. Layer’.
4.3.10. Delete <Del>
Ÿ Click [Delete] to delete the selected area of a photo.
Ÿ A deleted area will be filled with the background color in the background image, and filled with transparent color in
other layers.
4.3.11. Crop
Ÿ Click [Crop] to crop out the selected area of photo.
Ÿ Only the selected area will remain, while other areas will disappear. Regardless of the [Selected Area], the photo will
be cropped to a rectangular shape.
4.3.12. Fill
Ÿ Click [Fill] to fill the selected area of a photo with the
desired color or patterns.
Ÿ
Ÿ
Ÿ
Ÿ
In [Content], select the pattern or color to fill the selected
area with. Select from foreground color/background color/single color/pattern.
In [Pattern], select the pattern to fill the area with.
In [Mode], set the mode to synthesize a photo and painted content.
In [Opacity], set the transparency level for the painted
content.
Hancom EzPhoto 55
4.3.13. Feather
Ÿ Click [Feather] to soften the borderline of the selected area.
Ÿ Set the [Feather Radius] to extend the borderline of the [Selected
Area] according to your preference. The extended borderline will gradually become transparent. You can set the value in the range of 1~200.
Ÿ Click [Feather] to change the shape of the selected area as well.
Ÿ This will turn the edges of the [Rectangular] area to rounded edges with the radius set in [Feather Radius].
Ÿ Turn the edges of [Snare], [Polygon] or [Magic Stick] areas into rounded edges with the radius selected in [Feather
Radius].
4.3.14. Eraser <E>
Ÿ Use [Eraser] to delete undesired parts in your photo.
Ÿ This has the same function as the [Eraser( )] [Tool].
Ÿ Pixels deleted by the [Eraser] tool are filled with the background color in background
images and filled with transparent color in other layers.
Ÿ In the [Eraser Tool Window], you can adjust the eraser’s size and shape.
v For more details on the eraser’s size and shape, refer to ‘3.5. Brush’ in ‘Chapter 3. Tool’.
4.3.15. Effect Brush <R>
Ÿ Use [Effect Brush] to apply effects to desired parts of your photo.
Ÿ This has the same function as the [Effect Brush( )] [Tool].
Ÿ You can click or drag the same location multiple times to apply the
same effect repeatedly.
Ÿ Click on [Clear] to make the photo focus clearer and improve the sense
of multiple dimensions. This can sharpen an area that is blurry due to
poor focus.
Ÿ The level of clarity can be adjusted in the [Level(
)]
menu.
Ÿ Click on [Blurry] to soften the rough parts of your photo. This can soften
the facial skin or remove moire caused by textile textures or patterns.
Ÿ The level of blurriness can be adjusted in the [Level
(
)] menu.
Ÿ Click on [Smudge] to make the color borderlines in your photo more
blurry. Unnatural borders or stains caused by synthesis of photos can be removed.
v In [Smudge], there are many brush properties available, but you cannot use [Shape Change] or [Scatter].
Ÿ
Ÿ
Ÿ
Ÿ
Ÿ
Ÿ
Ÿ
The level of effect can be set in the [Level(
Click on [Bright] to make some areas of the photo brighter.
You can set an area to become brighter in the [Range(
The level of brightness can be set in the [Exposure(
Click on [Dark] to make a certain area of your photo darker.
You can set an area to become darker in the [Range(
The level of darkness can be set in the [Exposure(
)] menu.
)] menu.
)] menu.
)] menu.
)] menu.
v For more details on the size/shape of the [Effect Brush] tool, refer to ‘3.5. Brush’ in ‘Chapter 3. Tool’.
56 Hancom EzPhoto
4.3.16. Filter
Ÿ Click on [Filter] to apply various effects to a photo.
Ÿ Using an optical filter, you can create various effects to make your photo more interesting.
Ÿ Double-click on a filter to use and set the desired value. Click on OK and click on OK again to apply the filter effect
to the selected photo.
Ÿ
Ÿ
Ÿ
Ÿ
Ÿ
Ÿ
In
In
In
In
In
In
[All Filters], you can select your preferred filter from the list of all filters in EzPhoto3.
[Basic Filters], you can see the general filters that are used frequently.
[Style Filters], you can see the filters that provide stylish photo effects.
[Artistic Filters], you can see the filters that offer artistic effects.
[Photo Filters], you can see the filters that provide optical effects.
[Favorite( )], the filters used by a user are saved in the order of use.
4.3.16.1. Gaussian Blur
Ÿ Click on [Gaussian Blur] to make a photo blurry.
Ÿ Click on [Range] to set the degree of blur. The larger the value,
the more blurry a photo is.
Ÿ Click [OK] to apply the filter effect to a photo.
Ÿ Click [Cancel] to cancel the filter action.
Ÿ Click [Preview] to see the filter's effect before it is applied.
Hancom EzPhoto 57
4.3.16.2. Motion Blur
Ÿ Click on [Motion Blur] to create the effect of photo movement.
Ÿ Click on [Length] to set the duration of the movement effect. The
greater the length, the faster the photo 'moves.'
Ÿ Click on [Angle] to set the angle of movement for the photo.
Ÿ Click on [Single Direction] to make the photo move in one
direction.
Ÿ Click [OK] to apply the filter effect to the photo.
Ÿ Click [Cancel] to cancel the filter action.
Ÿ Click [Preview] to see the filter's effect before it is applied.
4.3.16.3. Unsharp Mask
Ÿ Click on [Unsharp Mask] to improve the image quality by fine tuning the clarity of the photo.
Ÿ Click on [Level] to set the level of improving the clarity of a
photo.
Ÿ Click on [Radius] to set the width of a photo where the clarity will
be improved.
Ÿ Click on [Limits] to set the range within which the [Unsharp Mask]
effect will be applied.
Ÿ Click [OK] to apply the filter effect to the photo.
Ÿ Click [Cancel] to cancel the filter action.
Ÿ Click [Preview] to see the filter's effect before it is applied.
4.3.16.4. Spread
Ÿ Click [Spread] to spread the pixels that compose a photo.
Ÿ In [Range], set the level of spreading the pixels in the photo. The
larger the range, the more spread out it is. You can set different
levels of spread in the vertical and the horizontal directions.
Ÿ Click [OK] to apply the filter effect to the photo.
Ÿ Click [Cancel] to cancel the filter action.
Ÿ Click [Preview] to see the filter's effect before it is applied.
58 Hancom EzPhoto
4.3.16.5. Edge
Ÿ Click [Edge] to leave only the edge of objects in a photo.
Ÿ Click [Brightness] to set the edge’s brightness.
Ÿ Click [Limit] to set the level of detecting the edge of an object.
The larger the value, the more the detailed edges will disappear
and only the thick edges will remain.
Ÿ In [Shape], select the shape of the photo created by the filter
effect.
Ÿ Click [OK] to apply the filter effect to the photo.
Ÿ Click [Cancel] to cancel the filter action.
Ÿ Click [Preview] to see the filter's effect before it is applied.
4.3.16.6. Neon
Ÿ Click on [Neon] to make objects look like they are made of neon
lights.
Ÿ In [Size], set the length of the neon light.
Ÿ In [Brightness], set the brightness of the neon light.
Ÿ In [Limits], set the edge of objects where the [Neon] effects will
be created.
Ÿ Click [OK] to apply the filter effect to the photo.
Ÿ Click [Cancel] to cancel the filter action.
Ÿ Click [Preview] to see the filter's effect before it is applied.
4.3.16.7. Dilate
Ÿ Click [Dilate] to make the pixels spread in blurry shapes and have
the appearance of a watercolor painting.
Ÿ In [Range], set the degree of pixel spreading.
Ÿ Click [OK] to apply the filter effect to the photo.
Ÿ Click [Cancel] to cancel the filter action.
Ÿ Click [Preview] to see the filter's effect before it is applied.
Hancom EzPhoto 59
4.3.16.8. Apply Lens
Ÿ Click [Apply Lens] to display objects as if they were seen through a convex lens.
Ÿ In [Size], set the degree of the lens effect.
Ÿ In [Focus], set the center of the lens effect. The unit is pixels. The center selected will be marked with a (+) in the
preview screen.
Ÿ Using the pointer, you can set the center of the lens effect in the
preview screen. Place the pointer on the desired location and click
on it to set the new center.
Ÿ In [Neighbors], select a method for filling up the empty space
when the maximum lens effect is used.
Ÿ Click [Fill with the Selected Color] to fill it up with the color selected in [Color Picker].
Ÿ Click [Fill with the Neighboring Image] to fill the empty space with
the neighboring images.
Ÿ Click [No Change] to fill the empty space with the original image.
Ÿ Click [OK] to apply the filter effect to the photo.
Ÿ Click [Cancel] to cancel the filter action.
Ÿ Click [Preview] to see the filter's effect before it is applied.
4.3.16.9. Tiled Glass
Ÿ Click [Tiled Glass] to display objects as if they are being viewed
through tiled glass.
Ÿ The [Width] and [Height] of the tiles can be adjusted.
Ÿ The unit of size should be selected in [Width] and [Height].
Ÿ In [Number], set the number of tiles to be created.
Ÿ In [Width], set the size of the tile. The unit is pixels.
Ÿ Click [OK] to apply the filter effect to the photo.
Ÿ Click [Cancel] to cancel the filter action.
Ÿ Click [Preview] to see the filter's effect before it is applied.
4.3.16.10. Flare FX
Ÿ Click [Flare FX] to make an object look as though the light is reflected on it.
Ÿ In [Brightness], set the brightness of the Flare FX.
Ÿ In [Width] and [Height]. set the location of the Flare FX. The unit
is pixels. The center will be marked by a (+) in the preview
screen.
Ÿ Using the pointer, you can set the center of the Flare FX effect in
the preview screen. Place the pointer on the desired location and
click on it to set the new location of the Flare FX.
Ÿ Click [OK] to apply the filter effect to the photo.
Ÿ Click [Cancel] to cancel the filter action.
Ÿ Click [Preview] to see the filter's effect before it is applied.
60 Hancom EzPhoto
4.3.16.11. Lighting
Ÿ Click on [Lighting] to create the effect of light reflected on a photo.
Ÿ In [Partial Light Source Setting], select a type of
lighting effect.
Ÿ Click on [Spotlight] to make the light reflect on a
single point of the photo.
Ÿ Click on [Directivity] to make the light shine everywhere in the photo.
Ÿ Click on [Brightness] to set the brightness of the
lighting.
Ÿ Click on [Edge] to adjust the edge effect of
lighting. The larger the value, the weaker the light
is and the more the light spreads.
Ÿ Click on [Opacity] to set the transparency level for a lighting color.
Ÿ In [Color Picker], set the lighting color.
Ÿ In [Image Lighting], set the effects of lighting for the entire photo.
Ÿ In [Neighbor], set the brightness of a photo.
Ÿ In [Brightness], set the brightness of your photo and lighting.
Ÿ Click on [Add Light Source] to add a source of light to a photo.
Ÿ In the preview screen, you can adjust the location and shape of lighting.
Ÿ Drag the red circle on the center of lighting to adjust the location of lighting.
Ÿ Drag a [Green Circle] on a large [Red Circle] displaying the area of lighting to adjust the shape of lighting.
Ÿ Click [OK] to apply the filter effect to the photo.
Ÿ Click [Cancel] to cancel the filter action.
Ÿ Click [Preview] to see the filter's effect before it is applied.
4.3.16.12. Emboss
Ÿ Click on [Emboss] to add 3-D effects to the edges of objects in a
photo. Images will look like they have been carved.
Ÿ In [Range], set the degree of fineness of a photo image that will
be displayed by [Emboss].
Ÿ In [Depth], set the level of the 3-D effect.
Ÿ In [Angle], set the angle of lighting used to express 1 3-D effect.
The left center is ‘0’. The larger the value, the more counterclockwise the location of light moves.
Ÿ In [Shape], set the shape of emboss.
Ÿ Click [OK] to apply the filter effect to the photo.
Ÿ Click [Cancel] to cancel the filter action.
Ÿ Click [Preview] to see the filter's effect before it is applied.
Hancom EzPhoto 61
4.3.16.13. Mosaic
Ÿ Click on [Mosaic Tile] to make your photo look like
it is made of many tiles.
Ÿ In [Cartesian Plotting Setting], set the tile size. The
unit is pixels.
Ÿ In [Width], set the tile width. In [Polar] plotting, set
the size of tile divided into radiation rays.
Ÿ In [Height], set the vertical length of a tile. In
[Polar Plotting], set the interval for circles that divide tiles.
Ÿ In [Edge Property], set the tile interval.
Ÿ In [Opacity], set the filter brightness.
Ÿ In [Edge Thickness], set the space between tiles.
The unit is pixels.
Ÿ In [Mosaic Plotting], select the basic shape of tile.
Ÿ [Cartesian] consists of the X-axis and the Y-axis. [Polar] consists of a concentric circle and rays.
Ÿ In [Borderline Color], select the color for the space between tiles. The selected color will be synthesized with a photo
to create the tile borderlines.
Ÿ In [Tile Color], select the tile color. The selected color and a photo will be synthesized to create a tile.
Ÿ In [Polar Plotting Setting], set the center of polar plotting tile. The unit is pixels. In [Width] and [Height], enter the desired location of center. The center selected will be marked by a (+) in the preview screen.
Ÿ Using the pointer, you can set the center of the polar plotting effect in the preview screen. Place the pointer in the desired location and click on it to set the new center.
Ÿ [Shadow Setting] is used to set the direction of shadows in a tile.
Top, bottom, left and right are North, South, West and East,
respectively.
Ÿ In [Limit], set the clarity of tile effects.
Ÿ Click [Shape] to set the shape of the shadow.
Ÿ Click [Apply Gray Tone] to express the shadow and the light with
black and white.
Ÿ Click [Apply Color] to express the shadow and the light by using
the tile borderlines and the colors.
Ÿ Click [OK] to apply the filter effect to the photo.
Ÿ Click [Cancel] to cancel the filter action.
Ÿ Click [Preview] to see the filter's effect before it is applied.
62 Hancom EzPhoto
4.3.16.14. Ripple
Ÿ Click on [Ripple] to create ripple effects in a photo.
Ÿ In [Ripple Height], set the height of the ripple created in a photo.
Ÿ In [Ripple Interval], set the number of ripples created in a photo.
Ÿ In [Attenuation], set the degree of attenuation that
occurs as the ripple moves away from its center.
Ÿ In [Center Size], set the height of the ripple that
starts from the center.
Ÿ In [Ripple Center], set the center location of the
ripple. In [Width] and [Height], enter the desired
values. The unit is pixels.
Ÿ In [Neighbor], set the method for filling the empty space created by the ripple effects.
Ÿ Click [Fill with Selected Color] to fill the empty space with the color set in [Color Picker].
Ÿ Click [Fill with Neighboring Images] to fill the empty space with the neighboring images.
Ÿ Click [No Change] to fill up the empty space with the original image without ripple effects.
Ÿ Click [OK] to apply the filter effect to the photo.
Ÿ Click [Cancel] to cancel the filter action.
Ÿ Click [Preview] to see the filter's effect before it is applied.
4.3.16.15. Backlight
Ÿ Click [Backlight] to shine the light from the back of the photo.
Ÿ Click [Width] to use a long lighting lamp to shine horizontally.
Ÿ Click [Single] to use a single light source to shine from the center
of the photo.
Ÿ Click [Circular] to use a circular light source to shine from the
center of the photo.
Ÿ Click [OK] to apply the filter effect to the photo.
Ÿ Click [Cancel] to cancel the filter action.
Ÿ Click [Preview] to see the filter's effect before it is applied.
Hancom EzPhoto 63
4.3.16.16. Monitor Effect
Ÿ Click on [Monitor Effect] to make a photo look like
it is being displayed on a TV screen.
Ÿ In [Shape], set the shape of this monitor effect.
Ÿ In [Color Conversion], set the colors created by the
monitor effects and their order.
Ÿ In [Size], set the size of the line used to produce
the monitor effect.
Ÿ In [Opacity], set the transparency level of the original image.
Ÿ In [Shape], select the pattern of the monitor effect.
Ÿ In [Color Distribution], set the strength of basic colors for the monitor effect, such as red, green and
blue.
Ÿ In [Color Mix], select the method for mixing colors of a photo with the monitor effect.
Ÿ Click [OK] to apply the filter effect to the photo.
Ÿ Click [Cancel] to cancel the filter action.
Ÿ Click [Preview] to see the filter's effect before it is applied.
4.3.16.17. Wind Effect
Ÿ [Wind Effect] makes a photo look like it has been blown by the
wind.
Ÿ In [Range], set the extent of the wind effect.
Ÿ In [Opacity], set the degree of the wind effect. The larger the value, the stronger the effect.
Ÿ In [Angle], set the degree of irregularity in the wind effect.
Ÿ Click [OK] to apply the filter effect to the photo.
Ÿ Click [Cancel] to cancel the filter action.
Ÿ Click [Preview] to see the filter's effect before it is applied.
4.3.16.18. Canvas Effect
Ÿ Click [Canvas Effect] to make it look like it has been drawn on a
canvas.
Ÿ In [Depth], set the level of the canvas effect.
Ÿ In [Push], set the degree of mismatches caused by the repeating
patterns.
Ÿ Click [OK] to apply the filter effect to the photo.
Ÿ Click [Cancel] to cancel the filter action.
Ÿ Click [Preview] to see the filter's effect before it is applied.
64 Hancom EzPhoto
4.3.16.19. Cubism
Ÿ Click on [Cubism] to see an image through a
transparent object with irregular surfaces.
Ÿ Click [Interval] to set the interval for transparent
objects.
Ÿ Click [Size] to set the sizes of transparent objects.
Ÿ Click [Brightness] to set the brightness of your
photo.
Ÿ Click [Shape Setting] to set the shape of the transparent objects.
Ÿ Click [Color Setting] to set the color used to fill the
space between transparent objects.
Ÿ Click [Use Background Color] to fill the space between transparent objects with the original image.
Ÿ Click [Use Selected Color] to fill the space between transparent objects with the color selected in [Color Picker].
Ÿ Click [Direction Setting] to align transparent objects. Select [Direction Setting] to make transparent objects appear with
certain shapes and intervals.
Ÿ Click [OK] to apply the filter effect to the photo.
Ÿ Click [Cancel] to cancel the filter action.
Ÿ Click [Preview] to see the filter's effect before it is applied.
4.3.16.20. Oilify
Ÿ Click on [Oilify] to apply an oil painting effect to a photo.
Ÿ In [Range], set the level of the "Oilify" effect.
Ÿ Click [OK] to apply the filter effect to the photo.
Ÿ Click [Cancel] to cancel the filter action.
Ÿ Click [Preview] to see the filter's effect before it is applied.
4.3.16.21. Soft Glow
Ÿ Click on [Soft Glow] to make your photo look like the light is shinning on the surface.
Ÿ Click [Level] to set the intensity of light.
Ÿ Click [Clarity] to set the transparency level for the original photo.
Ÿ Click [Diffusion] to set the degree of light scatter on a photo.
Ÿ Click [Density] to set the density for the light source used.
Ÿ Click [Color] to set the color of the light emitted from the light
source.
Ÿ Click [OK] to apply the filter effect to the photo.
Ÿ Click [Cancel] to cancel the filter action.
Ÿ Click [Preview] to see the filter's effect before it is applied.
Hancom EzPhoto 65
4.3.16.22. Bending Effects
Ÿ Click on [Bending Effects] to distort and elongate your photo.
Ÿ Click [Range of Application] to set the range of deformation of
your photo.
Ÿ Click [Standard] to distort and elongate the photo vertically or
horizontally.
Ÿ Click [Horizontal] to distort and elongate the photo horizontally.
Ÿ Click [Vertical] to distort and elongate the photo vertically.
Ÿ Click [X-coordinate] to set the horizontal location of the center of
the effect.
Ÿ Click [Y-coordinate] to set the vertical location of the center of the
effect.
Ÿ Click [Neighbor] to select the method for filling the empty space created by the effects. Select from [Fill with Selected
Color/Fill with Neighboring Images/No Change].
Ÿ Click [Rotate] to rotate an image filling the space at the center.
Ÿ Click [Color Picker] to select a color to fill up the empty space.
Ÿ Click [OK] to apply the filter effect to the photo.
Ÿ Click [Cancel] to cancel the filter action.
Ÿ Click [Preview] to see the filter's effect before it is applied.
4.3.16.23. Cylinder Effect
Ÿ [Cylinder Effect] is used to make a photo look like it has been
bent like a cylinder.
Ÿ In [Range of Application], set the level of the cylinder effects.
Ÿ In [Type], set the direction of bending.
Ÿ Click [OK] to apply the filter effect to the photo.
Ÿ Click [Cancel] to cancel the filter action.
Ÿ Click [Preview] to see the filter's effect before it is applied.
66 Hancom EzPhoto
4.3.16.24. Pinch/Punch Effect
Ÿ Use the [Pinch/Punch] effect to make a photo look
like it has been reflected in a concave or convex
mirror.
Ÿ In [Range of Application], set the degree of
deformation.
Ÿ In [Pinch/Punch], set the degree of bending. If the
value is (-), it will be convex and if the value is
(+) it will be concave.
Ÿ In [Emphasis], set the degree of deformation on the
tilted plane.
Ÿ In [Center of Effect], set the location of the center.
In [Width] and [Height], enter the desired values.
The unit is pixels.
Ÿ In [Neighbor], select a method for filling up the neighboring empty spaces. Select from [Fill with Selected Color/Fill with
Neighboring Images/No Change].
Ÿ Click [Rotate] to rotate an image filling up the central empty space.
Ÿ Click on [Color Picker] to select a color to fill up the empty space.
Ÿ Click [OK] to apply the filter effect to the photo.
Ÿ Click [Cancel] to cancel the filter action.
Ÿ Click [Preview] to see the filter's effect before it is applied.
4.3.16.25. Plane Effect
Ÿ Click on [Plane Effect] to create a
sense of perspective using repeated
photos.
Ÿ Click on [Plane Distance] to set the
size of the area with the plane
effect. The unit is pixels.
Ÿ Click on [Plane Distance] to set the
photo size.
Ÿ Click on [# of Repeats] to set the
number of repeated photos.
Ÿ Click on [Compression Rate] to set
the shape distorted vertically.
Ÿ Click on [Angle] to set the angle of the deformed photo.
Ÿ Set the center location by using [Center of Effect]. In [Width] and [Height], enter the desired locations. The unit is
pixels.
Ÿ In [Height], enter the degree of perspectives in a photo.
Ÿ Click [View Plane] to select the plane to display a photo. Only the plane with the checkmark will be displayed on the
screen.
Ÿ Click [Brightness] to set the changes in the brightness of a photo.
Ÿ Click [Start] to set the starting point’s brightness.
Ÿ Click [Last] to set the end point’s brightness.
Ÿ Click [Length] to set the degree to which the original color of the photo is maintained.
Ÿ In [Color Picker], select the color used to synthesize the photo with the [Bright] effect.
Ÿ In [Background Color], select the color to fill the background. Select whether to use [Background Color] and select the
color to use as the background color in [Color Picker].
Ÿ Click [OK] to apply the filter effect to the photo.
Ÿ Click [Cancel] to cancel the filter action.
Hancom EzPhoto 67
Ÿ
Click [Preview] to see the filter's effect before it is applied.
68 Hancom EzPhoto
4.3.16.26. REV Effect
Ÿ Click on [REV Effect] to make your photo with shaking lines.
Ÿ Set [Max Height] to set the max width of the waveform.
Ÿ Click on [Line Interval] to set the interval for the lines forming the
waveform.
Ÿ Click [OK] to apply the filter effect to the photo.
Ÿ Click [Cancel] to cancel the filter action.
Ÿ Click [Preview] to see the filter's effect before it is applied.
4.3.16.27. Roman Mosaic
Ÿ Click on [Roman Mosaic] to make a mosaic-style
photo.
Ÿ In [Tile], set the mosaic size. In [Width] and
[Height], enter the desired tile size.
Ÿ In [Borderline], set the tile interval.
Ÿ In [Color Selection, select the color to fill the space
between the tiles.
Ÿ In [Shape], select a mosaic shape. Select
[Rectangle] to make rectangular mosaic tile patterns
and select [Circle] to make trapezoid shaped mosaic tiles in circular shapes.
Ÿ In [Shadow], set the shadow effect for a mosaic
tile.
Ÿ In [Angle], set the direction of shadow.
Ÿ In [Limit], set the degree of shadow.
Ÿ In [Shape], set the color of shadow.
Ÿ Click [OK] to apply the filter effect to the photo.
Ÿ Click [Cancel] to cancel the filter action.
Ÿ Click [Preview] to see the filter's effect before it is applied.
Hancom EzPhoto 69
4.3.16.28. Ripple Effect 2
Ÿ Click on [Ripple Effect 2] to make your photo reflected by the ripples in a circular manner.
Ÿ In [Type], select a type of ripple effect.
Ÿ In [Ripple Effect], create the effect of fine ripples
spreading away.
Ÿ Click on [Near Center] to make your photo appear
shaken by the big ripples.
Ÿ In [Width], set the interval for the ripples.
Ÿ In [Frequency], set the number of ripples.
Ÿ In [Attenuation Rate], set the degree of attenuation
that occurs as the ripples move outward.
Ÿ In [Step], set the steps for the ripple to weaken as it moves.
Ÿ In [Center of Effect], set the location of the center. In [Width] and [Height], enter the desired values. The unit is pixels.
Ÿ In [Neighbor], select a method for filling up the empty space created by the effect. Select from [Fill with Selected
Color/Fill with Neighboring Images/No Change].
Ÿ In [Color Picker], select the color to fill out the empty space.
Ÿ Click [OK] to apply the filter effect to the photo.
Ÿ Click [Cancel] to cancel the filter action.
Ÿ Click [Preview] to see the filter's effect before it is applied.
4.3.16.29. Magnify Blurry
Ÿ Click on [Magnify Blurry] to make your photo blur as it expands.
Ÿ Click on [Size] to set the degree of magnification.
Ÿ Click on [Emphasis] to degree of blurring.
Ÿ In [Center of Effect], set the location of the center. In [Width] and
[Height], enter the desired values. The unit is pixels.
Ÿ Click [OK] to apply the filter effect to the photo.
Ÿ Click [Cancel] to cancel the filter action.
Ÿ Click [Preview] to see the filter's effect before it is applied.
4.3.16.30. Ripple Reflection
Ÿ Click on [Ripple Reflection] to make a shadow reflected by the
ripples.
Ÿ In [Width], set the width of the ripple.
Ÿ In [Frequency], set the number of ripples.
Ÿ Click on [Low Opacity] to have the ripple effect weaken as you
approach the edge of the photo from the center.
Ÿ Click [OK] to apply the filter effect to the photo.
Ÿ Click [Cancel] to cancel the filter action.
Ÿ Click [Preview] to see the filter's effect before it is applied.
70 Hancom EzPhoto
4.3.16.31. Pixelization
Ÿ Click on [Pixelization] to increase the size of the
pixels composing the photo. This has an effect similar to mosaic.
Ÿ In [Range of Application], set the pixel size. In
[Width] and [Height], set the pixel width/height.
Ÿ In [Frequency], set the number of pixels to divide
the entire photo.
Ÿ In [Period], set the pixel size.
Ÿ Click on [Opacity] to set the transparency level for
the filter effect.
Ÿ In [Center of Effect], set the location of the center.
In [Width] and [Height], enter the desired values.
The unit is pixels.
Ÿ In [Pixel Mode], select the type of pixel configuration.
Ÿ In [Type], set the pixel color. Click on [Max] to use the brightest color in the pixel range, click on [Min] to use the
darkest color and click on [Ave] to use the average color to fill up the pixels.
Ÿ Click [OK] to apply the filter effect to the photo.
Ÿ Click [Cancel] to cancel the filter action.
Ÿ Click [Preview] to see the filter's effect before it is applied.
4.3.16.32. Bending Plane Effect
Ÿ Click on [Bending Plane Effect] to
bend a repeated photo in the direction and angle desired by the user.
Ÿ Click on [Plane Distance] to set the
degree of tilt in a photo.
Ÿ Click on [# of Repeats] to set the
number of repeated photos.
Ÿ Click on [Angle] to set the tilt of a
photo.
Ÿ In [Center of Effect], set the location
of the center. In [Width] and
[Height], enter the desired values.
The unit is pixels.
Ÿ In [Screen Distance], set the photo size.
Ÿ In [Compression Rate], set the vertically distorted shape.
Ÿ In [Curvature Rate], set the degree of curvature.
Ÿ In [Height], set the degree of perspective for the photo.
Ÿ In [View Plane], select a plane to display the photo.
Ÿ In [Brightness], set the changes in the brightness of the photo.
Ÿ In [Start], set the starting point’s brightness.
Ÿ In [Last], set the end point’s brightness.
Ÿ In [Length], set the degree to which the original color of the photo is maintained.
Ÿ In [Color Picker], select the color to synthesize a photo with the [Bright] effect.
Ÿ In [Background Color], select a color to fill up the background. Select whether to use [Background Color] and select
the color to use as the background color in [Color Picker].
Ÿ Click [OK] to apply the filter effect to the photo.
Ÿ Click [Cancel] to cancel the filter action.
Ÿ Click [Preview] to see the filter's effect before it is applied.
Hancom EzPhoto 71
4.3.16.33. Sketch
Ÿ Click on [Sketch] to make your photo look like it was drawn with
a color pencil.
Ÿ In [Rate], set the area to be converted with the sketching effect.
Ÿ In [Size], set the thickness of a pen used for sketching.
Ÿ Click [OK] to apply the filter effect to the photo.
Ÿ Click [Cancel] to cancel the filter action.
Ÿ Click [Preview] to see the filter's effect before it is applied.
4.3.16.34. Expansion Sketch
Ÿ Click on [Expansion Sketch] to make a sketch with
various types of color pencils.
Ÿ In [Size], set the area size to be recognized as the
edge of sketching.
Ÿ In [Level], set the size of the edge line.
Ÿ In [Limit], set the area to be recognized as the
edge.
Ÿ In [Paper Roughness], set the degree of roughness
of the paper used for sketching.
Ÿ In [Brightness], set the brightness and the degree
of scattering in the sketch effect.
Ÿ Click on [Stroke] to set the degree of smudging in
a sketch.
Ÿ In [Angle], set the angle of the line drawn in a sketch.
Ÿ In [Type], set the type of sketch made. Click on [Art] to make a sketch with a clear image shape. Click on [Direction]
to make a sketch that combines similar colors as one.
Ÿ Click [OK] to apply the filter effect to the photo.
Ÿ Click [Cancel] to cancel the filter action.
Ÿ Click [Preview] to see the filter's effect before it is applied.
4.3.16.35. Dot Drawing Effect
Ÿ Click on [Dot Drawing Effect] to express a photo with dots.
Ÿ In [Size], set the sizes of dots composing the photo.
Ÿ In [Property], select a method for filling up the space between
dots. Select [No Change] to fill it up with the original photo. Click
on [Color] to fill it up with the selected color.
Ÿ In [Type], select the type of overlapping dots. Click on [Point] to
make overlapping areas with dots. Click on [Sticker] to make overlapping areas with circular papers.
Ÿ Click [OK] to apply the filter effect to the photo.
Ÿ Click [Cancel] to cancel the filter action.
Ÿ Click [Preview] to see the filter's effect before it is applied.
72 Hancom EzPhoto
4.3.16.36. Color Ball Effect
Ÿ Click on [Color Ball Effect] to make
your photo with balls in many different colors.
Ÿ In [Number], set the number of balls
composing a photo.
Ÿ In [Size], set the ball size.
Ÿ In [Change], set the degree of
changes in ball size.
Ÿ In [Gradation Type], set the type of
gradation for a ball.
Ÿ In [Background], select a method for
filling up the space between balls.
Click on [Figure] to fill it with the original photo. Click on [Color] to fill it with the selected color.
Ÿ Click on [Opacity] to set the transparency level for balls.
Ÿ In [Opacity Change], set the degree of changes in the transparency level for balls.
Ÿ In [# of Gradations], set the changes in gradation.
Ÿ In [Ball Type], set the effect of overlapping balls. Click on [Sticker] to overlap ball-shaped papers. Click on [Ball] to
overlap balls.
Ÿ In [Ball Color Type], set the ball color. Click on [Opacity] to synthesize the ball and photo colors depending on the
setting in [Opacity]. Click on [Mask] to make a photo with the color in the area occupied by a ball.
Ÿ In [Background Color], set the color to fill the space between balls.
Ÿ In [Gradation Color], select a color to be used for the shadow effects on a ball.
Ÿ Click on [Bright Area Color] to select the color used for the light reflected by a ball.
Ÿ In [Angle], set the location of lights reflected on a ball.
Ÿ Click [OK] to apply the filter effect to the photo.
Ÿ Click [Cancel] to cancel the filter action.
Ÿ Click [Preview] to see the filter's effect before it is applied.
4.3.16.37. Rotation(Radiation) Blurry
Ÿ Click on [Rotation(Radiation) Blurry] to make your photo look like it
is rotating.
Ÿ In [Size], set the range of the photo that the effect will be applied
to.
Ÿ In [Emphasis], set the level of the effect.
Ÿ In [Center of Effect], set the location of the center. In [Width] and
[Height], enter the desired values. The unit is pixels.
Ÿ Click [OK] to apply the filter effect to the photo.
Ÿ Click [Cancel] to cancel the filter action.
Ÿ Click [Preview] to see the filter's effect before it is applied.
Hancom EzPhoto 73
4.3.16.38. Brick Texture Effect
Ÿ Click on [Brick Texture Effect] to
make a photo look like it was painted on a brick wall.
Ÿ In [Offset X], set the degree of the
first brick pushed in the horizontal
direction.
Ÿ In [Offset Y], set the degree of the
first brick pushed in the vertical
direction.
Ÿ In [Brick Width], set the brick width.
Ÿ In [Brick Height], set the brick
height.
Ÿ In [Shadow], set the shadow shape for bricks.
Ÿ In [Edge Width], set the magnitude of the 3-D effects created outside the bricks.
Ÿ In [Brick Interval], set the space between bricks.
Ÿ In [Brick Interval Roughness], set the brightness level for the light used to express the roughness for the space between bricks.
Ÿ Click on [Soften the Brick Spaces] to set the degree of softening of the space between bricks.
Ÿ In [Angle], set the angle of light shining on a brick.
Ÿ In [Starting Row Offset], set the offset for brick shapes in the odd and even numbered rows.
Ÿ In [Brick Surface Roughness], set the intensity of light expressing the 3-D effects on the brick surface.
Ÿ Click on [Soften Brick Surface] to set the degree of softening of the texture of the brick surface.
Ÿ Click on [Brick Space Color] to fill the space between bricks with the color set by you.
Ÿ Click [OK] to apply the filter effect to the photo.
Ÿ Click [Cancel] to cancel the filter action.
Ÿ Click [Preview] to see the filter's effect before it is applied.
4.3.16.39. Cloud Texture Effect
Ÿ Click on [Cloud Texture Effect] to add clouds to your photo.
Ÿ In [Frequency], set the frequency for the effects showing throughout
the photo.
Ÿ In [Density], set the difference between a bright area and a dark
area.
Ÿ In [Opacity], set the transparency level for the cloud effect.
Ÿ In [Color], set the color for the cloud effect. Click on [Background
Color] to set the background color for the cloud. In [Foreground
Color], set the cloud color.
Ÿ In [Mix], set the method of synthesizing the cloud and photos.
Ÿ Click on [Spread] to set the type of cloud effect.
Ÿ Click [OK] to apply the filter effect to the photo.
Ÿ Click [Cancel] to cancel the filter action.
Ÿ Click [Preview] to see the filter's effect before it is applied.
74 Hancom EzPhoto
4.3.17. Clone
Ÿ Click [Clone] to copy parts of a photo to another location or photo.
Ÿ This is the same function as [Tool – Clone].
Ÿ Execute [Clone] and set the starting point for cloning in a photo. Set the starting
point by holding <Alt> while clicking. If you press the <Alt> key, the pointer will be
turned into a cross. When the starting point is set, it will revert to its original
shape.
Ÿ While pressing the <Alt> key, move the tool to the cloning location. Your photo will
be cloned.
Ÿ Select [Fix Starting Point] to clone an image in the starting location each time you
drag your mouse. When [Fix Starting Point] is released, each time you drag your
mouse, an image that is separated as far as the distance between the starting point
and the first cloning location will be cloned.
v For more details on brushes used for [Cloning] works, refer to ‘3.5. Brush Tool’ in ‘Chapter 4. Tool’.
Hancom EzPhoto 75
4.4. Color Adjustment Menu
Ÿ
Ÿ
The [Color Adjustment] menu provides functions to adjust the photo colors.
You can adjust the brightness and the color of a photo.
4.4.1. Auto Adjust
Ÿ The photo’s brightness and color are automatically adjusted.
4.4.1.1. Auto Level <Ctrl+Shift+L>
Ÿ The levels of the channels composing the photo are automatically adjusted.
Ÿ The photo’s color and brightness are automatically adjusted.
4.4.1.2. Auto Contrast <Ctrl+Alt+Shift+L>
Ÿ Among the color levels, only the master level is automatically
adjusted.
Ÿ Only the brightness is automatically adjusted.
4.4.1.3. Equalize
Ÿ The range of brightness of pixels composing the photo is expanded to the full range of brightness.
Ÿ A photo’s brightness and clarity are automatically adjusted.
4.4.1.4. Desaturation <Ctrl+Shift+U>
Ÿ Turns a color photo into a B/W photo.
4.4.1.5. Invert <Ctrl+I>
Ÿ It inverts the photo color, essentially turning a color photo into a negative film.
4.4.2. Brightness/Contrast
Ÿ Click on [Brightness/Contrast] to adjust a photo’s brightness and
contrast.
Ÿ Drag the sliders to adjust the photo’s brightness and contrast.
Ÿ The larger the value of [Brightness], the brighter the photo
becomes. The smaller the value, the darker the photo becomes.
Ÿ The larger the value of [Contrast], the more contrast a photo
has. The smaller the value, the less contrast it has.
Ÿ Adjust the contrast and brightness according to your preference.
Ÿ Click on [OK] to apply the change to the photo.
Ÿ Click on [Cancel] to cancel the change.
76 Hancom EzPhoto
4.4.3. Color Balance <Ctrl+B>
Ÿ Click on [Color Balance] to adjust the photo color by changing the color for each channel that composes a photo.
Ÿ In [Color Balance], the color channels such as RGB
(red/green/blue) can be adjusted.
Ÿ By dragging the slider for each channel, you can adjust the
photo's color. The larger the value, the stronger the color
channel becomes. The lesser the value, the weaker it gets.
Ÿ You can enter the desired value on your own to fine tune
the strength of the color for each channel.
Ÿ In a photo, you can set the area that you wish to adjust the
[Color Balance] for. Select one from dark/medium/bright areas.
Ÿ Select [Maintain Brightness] to maintain the brightness of a photo even if the [Color Balance] is adjusted.
Ÿ Click [OK] to apply the setting to the photo.
Ÿ Click [Cancel] to cancel the change.
v In a CMYK image, you can adjust the color balance for the RGB channel. A CMYK image has color channels such as CMY(Cyan-Magenta-Yellow) as
supplementary colors for RGB, and you can use the RGB to adjust the color balance for the CMY. The mapping is as follows: Red - Cyan, Green Magenta, Blue - Yellow. The last color of CMYK is Black or K. It has no relevance to the color balance.
4.4.4. Hue/Saturation/Brightness <Ctrl+U>
Ÿ Click on [Hue/Saturation] to adjust a photo’s color, clarity
and brightness.
Ÿ [Hue] is a value corresponding to a segment in the circularly displayed spectrum of visible light. The red color
with the longest wavelength is the reference(0). The colors are in the order of the rainbow – Red, Orange,
Yellow, Green, Blue, Violet and Purple.
Ÿ [Saturation] is used to adjust the clarity of a photo. 100
means that it has the most clear color and –100 is the
zero clarity level, or gray color.
Ÿ [Brightness] is used to adjust the brightness of a photo. 100 represents the white color and –100 the black color.
Ÿ [Colorization] is used to turn a color photo into a single-colored photo. You can adjust the photo color by using [Hue].
Ÿ Click [OK] to apply the setting to the photo.
Ÿ Click [Cancel] to cancel the change.
Hancom EzPhoto 77
4.4.5. Color Level <Ctrl+L>
Ÿ Click on [Color Level] to display the color distribution
(histogram) for each channel that composes the photo colors
and adjust the level to compensate for the photo’s color
and brightness.
Ÿ Click on [Input Level] to adjust the level range and the
gamma value to be used for the selected channel. To select the range (extreme values – 0. 255) enter the gamma
value (median – 1.0) in the box or drag the wedge shaped
mark appearing below the histogram.
Ÿ All the levels below the minimum [Input Level] will be set
to the minimum [Output Level]. Likewise, all levels above
the max [Input Level] are set to the max [Output Level].
Ÿ You can adjust the gamma value to adjust the brightness. If the gamma value is greater than 1.0, then the photo will
become brighter, and if it is less than 1.0, it will become darker.
Ÿ Click on [Output Level] to set the levels for the brightest and the darkest areas in a photo. This is used to reduce the
amount of ink consumed for the dark areas of a photo printed, published and so on.
Ÿ In [Option], set the [Auto Level] functions. The larger the value, the stronger the effect, and the more the image quality
is damaged.
Ÿ Click [OK] to apply the setting to the photo.
Ÿ Click [Cancel] to cancel the change.
v You can adjust the level for each channel to adjust the color of a photo properly.
4.4.6. Curve <Ctrl+M>
Ÿ Click on [Curve] to fine tune a photo’s brightness and
colors.
Ÿ Click on [Curve] to compensate for the photo colors by
adjusting the level for each color channel.
Ÿ From a point where you desire to adjust on, you can
drag your mouse to adjust the level value. For fine
tuning, enter the current color level in [Input[ and enter
the desired color level value in [Output].
Ÿ Click [OK] to apply the setting to the photo.
Ÿ Click [Cancel] to cancel the change.
4.4.7. Posterize
Ÿ Click on [Posterize] to make your photo look like a poster by reducing
the number of colors included.
78 Hancom EzPhoto
4.4.8. Color Mode
Ÿ Click on [Color Mode] to change the mode that sets the color
of a photo.
Ÿ RGB mode is used for computer monitors, digital cameras or
TVs. Red, Green, and Blue are combined to make colors by
using 256 levels.
Ÿ CMYK mode is used for all types of printing devices, including printers. Cyan, Magenta, Yellow and Black are combined
to make the colors by adjusting the density from 0 to 100%.
Ÿ There are 256 gray levels from white to black.
Ÿ Index is used to express a photo color by using the colors in
the 256-color palette set in the color mode.
v If you change the mode, the ICC profile/color engine/conversion method of [Setting – Color Setting] will be used to convert the color.
4.4.9. Assign Profile
Ÿ Click on [Assign Profile] to set the ICC
profile used in a photo.
Ÿ For a color area of a photo, do not
use the ICC Profile included in the file
or in the working area of [Setting –
Color Setting]. Use another ICC Profile
for it. If you save a photo file, the designated ICC Profile will be saved as well.
Ÿ If you use a digital camera for recording a photo, and set the ICC Profile for the camera, the actual color it records
will be displayed.
v If you set the ICC Profile, then the color displayed on the monitor will be changed. However, the actual color information of the photo is not
changed. For more details on the ICC Profile, refer to ‘4.6.1. Color Setting’ in ‘Chapter 4. Menu’.
4.4.10. Convert to Profile
Ÿ Click on [Convert to Profile] to convert the photo
color by using the ICC Profile.
Ÿ Color conversion using the ICC Profile can minimize the color differences between devices.
Ÿ If you use [Source Profile], then the ICC Profile
included in a photo file, the ICC Profile set as
the color area for each mode set in [Color
Setting] or the ICC Profile designated in
[Designate Profile] will be used.
Ÿ Click on [Target Profile] to set the ICC Profile of a device. If you want to print a photo, set the ICC Profile for your
printer. If you want to print and publish a book, then set the ICC Profile for publishing.
v If you set the ICC Profile, then the color displayed on the monitor will be changed. However, the actual photo color information is not changed. For
more details on the ICC Profile, refer to ‘4.6.1. Color Setting’ in ‘Chapter 4. Menu’.
Hancom EzPhoto 79
4.4.11. Assign Camera Profile
Ÿ Click on [Assign Camera Profile] to set the color
profile for a digital camera used to record a photo as the color area.
Ÿ If you use the color profile of a camera recording the color area, the actual color of a photo
will be displayed.
Ÿ If you select [Auto Application of Cameral Models], the color areas of photos shot by a camera for which there is a
profile in EzPhoto will be automatically set to the color profile of the digital camera.
v The available models of cameras in [Camera Setting] can be found in ‘7.2. List of Cameras Supported’ in ‘Chapter 7. Appendix’.
4.4.12. Easy Adjust
Ÿ Click on [Easy Adjust] to adjust
your photos professionally through
simple manipulations.
Ÿ Each adjustment can be processed by using 3 to 6 EzPhoto
functions.
Ÿ Select a desired type of adjustment and set the degree of
adjustment.
Ÿ Click on
[Horizontal Mode] to
show the before and after photos
on the left/right sides.
Ÿ Click on [Vertical Mode] to show the before and after photos on the top/bottom of
the screen.
Ÿ Click on [Full Screen] to show the adjusted photos only.
Ÿ Click on [Fit to Current Screen Size] to fit the full photo to the current window.
Ÿ Click on
[Actual Pixels] to use a single pixel to display a pixel in a
photo.(Magnification). Displaying the photo in this way provides the truest color.
Ÿ Click on
[Bright] to make the photo brighter.
Ÿ Click on
[Dark] to make the photo darker.
Ÿ Click on
[Clear] to make a fuzzy photo more clear.
Ÿ Click on
[Flash Correction(Yellow)] to correct a photo in which the skin color is too "yellow" due to
flash.
Ÿ Click on
[Flash Correction(Red)] to correct a photo in which the skin color is too "red" due to flash.
Ÿ Click on
[Rich Color] to make the color/edge of a photo more clear.
80 Hancom EzPhoto
4.5. Make Menu
Ÿ
The [Make] menu provides functions that allow you to make new contents for a photo.
4.5.1. Brush <F5, B>
Ÿ You can use the [Brush] tool to open up various types of brushes that can be used to
paint or draw figures. Click or drag multiple times to repeatedly use the same effect.
Ÿ Same function as the [Brush( )] tool in the [Tool Box].
Ÿ
[Size] is used to adjust the brush size. Drag the slider or input
the brush size. The unit is pixels.
Ÿ
[Opacity] is used to adjust the level of transparency of your brush.
Drag the slider or enter the desired level of transparency. The unit is %.
Ÿ
[Mode] is used to set the synthesis mode for your brush and image.
Ÿ
[Brush Shape] displays the detailed information of your brush.
v The name and size displayed in [Brush Shape] are the default settings for the selected brush. Even if you change
the brush size, the size displayed in [Brush Shape] will not be changed.
Ÿ
Ÿ
Click on [More(
)] to use various types of brushes and settings.
The brushes used in EzPhoto will be displayed at the bottom of the brush window in order.
Click on a desired brush. The brush properties and characteristics will be changed. The selected
brush will be surrounded by a blue edge.
v For more details on [Mode], refer to ‘5.5. Synthesis Mode’ in ‘Chapter 5. Layer.’
v While using the [Brush], press the <Alt> key to view the color.
4.5.1.1. Brush Properties(More)
Ÿ Click on [More] in the ‘Brush Option Window’ to display the ‘Brush Property Window.’
Ÿ In the Brush Property Window, you can select various types of brushes.
Ÿ The ‘Brush Properties Window’ shows various brush sizes and properties and lets you adjust the properties.
4.5.1.2. Basic Setting
Ÿ [Brush Shape] is used to display the selected brush shape and name.
Ÿ [Size] is used to adjust or display the default size. The unit is pixels.
Ÿ [Level] is used to adjust the opacity of the brush edge. The default setting is ‘0’, and the unit is %.
Ÿ [Interval] indicates the interval of repeated brushes when you paint by dragging the [Brush] tool. If you
select a brush, the default setting will be displayed and you can adjust the interval. The unit is pixels.
Ÿ [Roundness] displays the degree of roundness of your brush. The default setting is 100 and the unit is
%.
Ÿ [Angle] is used to rotate the brush. The default setting is 0 and the unit is °.
4.5.1.3. Brushes
Ÿ Shows various types of brushes.
Ÿ Click on a brush with a desired shape.
Ÿ If you select a brush, the settings will be changed accordingly.
Hancom EzPhoto 81
4.5.1.4. Shape Dynamics
Ÿ You can use this menu to change the brush shape in an irregular manner.
Ÿ [Size Dynamic Range] is used to set the degree of irregular changes of your brush.
Ÿ [Angle Dynamic Range] is used to set the degree of irregular rotation of your brush shape.
Ÿ [Roundness Dynamic Range] is the degree of irregular distortions of the brush shape.
Ÿ [Horizontal Flipping] is used to reverse the left and the right of a brush in an irregular manner.
Ÿ [Vertical Flipping] is used to reverse the top and the bottom of a brush in an irregular manner.
4.5.1.5. Scatter Dynamics
Ÿ [Scatter] is used to change the number and location of brush marks.
Ÿ [Scatter] is used to make the vertical coordinate of brush marks irregular. The unit is % of the brush size.
Ÿ [EA] is the number of brushes displayed each time you click on it. The unit is ~ times.
Ÿ [EA/Dynamic Range] is used to make the number of brush strokes irregular. The unit is %.
Ÿ [Both Axes] is used to display the changes in [Scatter] vertically and horizontally.
4.5.1.6. Color Dynamics
Ÿ Makes the brush color irregular.
Ÿ [Foreground/Background Color Dynamic Range] is used to adjust the degree of irregular changes
from the foreground brush color to the background brush color.
Ÿ [Hue Dynamic Range] is used to adjust the degree of change in the brush color tone.
Ÿ [Saturation Dynamic Range] is used to adjust the degree of change in the brush color saturation.
Ÿ [Brightness Dynamic Range] is used to adjust the degree of change in the brush color brightness.
Ÿ [Purity Dynamic Range] is used to adjust the degree of change in the brush color purity.
v For more details on ‘Hue/Saturation/Brightness’ refer to ‘4.4.4. Hue/Saturation’ in ‘Chapter 4. Menu.’
4.5.1.7. Other Dynamics
Ÿ This adds various effects to your brush.
Ÿ [Opacity Dynamic Range] is used to adjust the degree of change in the brush opacity.
82 Hancom EzPhoto
4.5.2. Pattern Brush
Ÿ The [Pattern Brush] tool is used to paint a photo with the selected pattern by using
a brush.
Ÿ The [Pattern Brush] tool is used to draw patterns by using various types of brushes.
Click or drag the same location multiple times to repeatedly use the same effect.
Ÿ Same function as the [Pattern Brush( )] tool in the [Tool Box].
Ÿ Click on the arrow button in
[Pattern Shape] to display various patterns
registered. Click on a pattern to be used for painting.
Ÿ You can register a pattern by selecting the desired area in a photo and pressing
[Register Pattern] or <Ctrl+Shift+ P> in the [Setting] menu.
v [For more details on [Register Pattern], refer to ‘4.6.2. Register Pattern’ in ‘Chapter 4. Menu.’
v For more details on the size/shape of the [Pattern Brush] tool, refer to ‘3.5. Brush’ in ‘Chapter 3. Tool.’
The [Pattern Brush] tool is used to paint a pattern with various types of brushes. Click or drag the same
location multiple times to repeatedly use the same effect.
4.5.3. Shape <U>
Ÿ The [Shape] tool is used to draw various shapes.
Ÿ Same function as the [Shape( )] tool in the [Tool Box].
Ÿ In
[Mode], you can select the purpose of using a shape.
Ÿ A shape drawn in [Shape Layer] will be a new mask layer.
v In [Shape Layer], you cannot use the functions such as [Paint Bucket] or [Pixel Paint]. In addition, any
function for which the mouse cursor shows ( ) cannot be used in [Shape Layer].
Ÿ
Ÿ
Ÿ
Ÿ
Ÿ
Ÿ
Ÿ
Ÿ
Ÿ
Ÿ
Ÿ
Ÿ
Ÿ
Ÿ
Ÿ
Ÿ
Ÿ
Ÿ
Using the [Path] menu, draw a shape that will become a new path.
[Pixel Paint] is used to create a new shape in the currently selected layer. If you
select [Pixel Paint], the [Thickness]~[Anti-alias] in the top of the option window will
be activated.
[Thickness] is used to set the thickness of the outer border
of a shape.
[Opacity] is used to set the transparency level of a shape.
[Radius] is used to set the minimal radius for an ellipse
and the radius of the edge of [Rectangle with Rounded Edges].
[Borderline] is used to create a outer borderline with the designated thickness by using the foreground color
set in the [Color Picker] tool.
[Fill] is used to fill the inner area of a shape by using the background color in the [Color Picker] tool.
[Anti-alias] is used to soften the curves or diagonal lines of a shape.
In
[Shape], you can select the desired shape you want to draw. Select from [Rectangle( )], [Rectangle with
Rounded Edges( )], [Circle( )], [Line( )] and [User Defined( )].
If you select
[User Defined], the screen on the right side will appear, prompting you to select the desired
shape. Click on the arrow button to launch the list of user-defined shapes. Double-click on the shape that you want to
use.
Click on the arrow button at the top right to edit the user-defined shapes.
[Delete Shape] is used to delete the selected shape from the list.
[Shape Resetting] is used to initialize the list of user-defined shapes.
[Load Shape] is used to retrieve the list of other user-defined shapes saved.
[Save Shape] is used to save the edited list.
[Area] is used to create a layer in the [Shape Layer] mode.
[New Area] is used to create each shape as a separate [Mask Layer].
[Add to Area] is used to add a shape to the selected [Mask Layer].
v For more on [Mask Layer], refer to ‘5.13. Layer Mask’ in ‘Chapter 5. Layer’.
v In the [Shape] tool menu, press the <Alt> key to view the colors.
Hancom EzPhoto 83
4.5.4. Paint Bucket
Ÿ The [Paint Bucket] tool is used to fill the pixels having a similar color as the location clicked with the color set as foreground color in the [Color Picker] tool.
Ÿ Same function as the [Paint Bucket( )] tool in the [Tool Box].
Ÿ
[Opacity] is used to set the transparency level of the fill
color.
Ÿ
[Mode] is used to select the mode to synthesize the fill color
and a photo.
v For more on [Mode], refer to ‘5.5. Synthesis Mode’ in ‘Chapter 5. Layer’.
v While using the [Paint Bucket] tool, you can press the <Alt> key to view the color.
Ÿ
Ÿ
[Range] is used to set the range of colors used for filling. The larger the value, the wider range of colors is filled at once.
[Proximity Selection] is used to fill an area having colors within the range from the location clicked. If you do
not select [Proximity Selection], all the pixels within the range will be filled with the foreground color.
4.5.5. Pattern Fill <Shift+G>
Ÿ The [Pattern Fill] tool is used to fill the pixels having a similar color as the location clicked with a pattern.
Ÿ Same function as the [Pattern Fill( )] tool in the [Tool Box].
Ÿ In
[Pattern], select a desired pattern. Click the arrow button to display various patterns. Click on the desired
pattern that you wish to use for filling.
Ÿ
[Opacity] is used to set the transparency level of a pattern.
Ÿ In
[Mode], select the mode to synthesize a pattern and a photo.
v For more on [Mode], refer to ‘5.5. Synthesis Mode’ in ‘Chapter 5. Layer’.
Ÿ
Ÿ
[Range] is used to set the range of color for filling in one step. The larger the value, the wider the
range of colors used for filling. The maximum is 255.
[Proximity Selection] is used to fill an area having colors within a certain range from the location clicked. If you
do not select [Proximity Selection], all the pixels within the range will be filled with the pattern.
84 Hancom EzPhoto
4.5.6. Gradation <G>
Ÿ The [Gradation] tool is used to fill an area with a gradation, which means a gradual
change from one color to another. Drag the mouse to create a different gradation
depending on the selected shape.
Ÿ In the middle of the option window, select the shape of the gradation. Select either
[Linear( )], [Circular( )], [Cone( )], [Symmetry( )] or [Rectangle( )].
Ÿ
[Linear] is used to fill an area dragged by the mouse with gradations and fill the
outer area with the start/end color. The direction that you drag in is the direction of
the gradation.
Ÿ If you use [Circular], an area dragged by the pointer will be a radius or circular gradation. The start color will be
used to fill the center and the area outside the radius will be filled with the end color.
Ÿ If you use [Cone], an area dragged by the pointer will be an intersection between the start and end colors. The
start location of dragging will be the vertex of the cone. The gradation will fill up in a clockwise direction starting at
the location of dragging.
Ÿ [Symmetry( )] is similar to [Linear( )] in terms of drawing methods and filling patterns. However, the difference is
that a gradation repeats symmetrically.
Ÿ
[Rectangle] is similar to [Circular] but the gradation is in the form of a rectangle. Depending on the dragging direction, the angle of the rectangle will rotate.
Ÿ
[Opacity] is used to set the transparency level for a gradation.
Ÿ In
[Mode], you can select the mode to synthesize a gradation and a photo.
v For more on [Mode], refer to ‘5.5. Synthesis Mode’ in ‘Chapter 5. Layer’.
Ÿ
Ÿ
Ÿ
In
[Gradation], you can select and create a desired gradation.
Click the arrow button(▼) to display various types of gradations. Double click on your
desired shape of gradation.
At the top right, click on the arrow button(▶) to display a ‘Gradation Job List’.
[New Gradation] is used to create a new gradation. A created gradation is added to
the end of the list.
[Change Gradation Name] is used to
change the name of the selected
gradation.
[Delete Gradation] is used to delete the
selected gradation from the list.
[Reset Gradation] is used to initialize the
gradation list to the default setting.
[Load Gradation] is used to select and
load the desired gradation list. The loaded gradation list is added behind the currently displayed gradation list.
[Save Gradation] is used to save the current gradation list with the name chosen by the user.
[Replace Gradation] is used to replace the current gradation list with the gradation list chosen by the user. The current
gradation list will disappear and the new gradation list will appear on the screen.
Click on the gradation's shape to modify its color and shape.
Ÿ
Ÿ
Ÿ
Ÿ
Ÿ
Ÿ
Ÿ
Ÿ
Click on the gradation to create a new one.
[Pre Setting] displays gradations that are already created.
Click on the arrow button to change the gradation list.
[Reset Gradation] is used to initialize the gradation list to the default setting.
[Replace Gradation] is used to replace the existing gradation list.
Click
[OK] to select a gradation to edit and finish gradation editing.
Click
[Cancel] to cancel the current changes and finish gradation editing.
Click
[Load] to add the new gradation list to the end of the current gradation list.
Ÿ
Ÿ
Ÿ
Ÿ
Ÿ
Ÿ
Ÿ
Ÿ
Hancom EzPhoto 85
Ÿ
Ÿ
Ÿ
Ÿ
Ÿ
Ÿ
Ÿ
Ÿ
Ÿ
Ÿ
Click
[Save] to save the current gradation list as a file.
Click on the desired gradation to
launch the detailed setting selected in
the editing screen.
In
[Name], designate the name of gradation to be created.
In
[Edit], you can
modify the existing gradation or create
a new gradation.
Click [Stop Point( , )] to set the color of the location, the opacity and the
location.
Click [Top Stop Point( )] to activate
t h e [ O p a c i t y
(
) ]
menu. In the [Opacity] menu, set the transparency level for the stop point. In the [Location] menu, set the location of
the stop point.
Click [Bottom Stop Point( )] to activate the [Color(
)] menu. In the [Color] menu, you
can set the color of the stop point. In the [Location] menu, set the location of the stop point.
Click the [Stop Point] menu to display a black rhombus. Drag this rhombus to move the center location of the
gradation. In the [Location] menu, enter the value and move to the location corresponding to it.
Click in the middle of the gradation to create a new [Stop Point].
Click the [Delete] button to delete the selected [Stop Point].
86 Hancom EzPhoto
4.5.7. Text <T>
Ÿ The [Text] tool is used to add text to your photo. Using the tool, click on the location where you want to enter text and start typing to add text to it.
Ÿ Same function as the [Text( )] tool in the [Tool Box].
Ÿ In
[Font], select the font type to enter text. Click on the arrow button
to display the list of fonts installed in Windows.
Ÿ In
[Size], enter the font size for text to be added. The font size is expressed in points. 1 point is 1/72 Inch. A font size that is commonly used in printed documents is 10~11 Points.
Ÿ In
[Color], set the font color.
Ÿ In
[Font Style], select the font style you want. [Bold Face( )] is used to make
the font thicker. [Italic( )] can tilt your font.
Ÿ In
‘Line Alignment’, select the criteria for aligning the text. [Left Alignment( )]
is used to align text on the left. [Central Alignment( )] aligns the center of text
and [Right Alignment( )] aligns the right side of the text.
Ÿ [Font Interval(
)] is used to set the interval between each letter. The unit is points.
Ÿ [Line Spacing(
)] is used to set the spacing between each line. The unit is points.
Ÿ
‘Deform’ is used to change the shape of text strings.
Ÿ In [Input], enter characters.
Ÿ In [Deform], you can deform the shape of space occupied by text strings. The selected text string will be displayed
as a rectangle that has a small rectangle at the edge. Click and drag this small rectangle to change the shape of the
space and the shape of the text as well. While working on fonts, press the <Ctrl> key to switch to the [Deform] tool.
Ÿ Use [Add Deform Point] to add a deform point to a desired location. While working on fonts, press <Ctrl+Shift> to
[Add Deform Point].
Ÿ Use [Delete Deform Point] to delete unnecessary deform points. While working on fonts, press <Ctrl+Alt> to switch to
[Delete Deform Point].
Ÿ Use [Cancel Deform] to cancel deformation of the characters.
v In [Text Layer], you cannot use functions such as [Paint Bucket]. In addition to these functions, any function that the pointer shows as ( ) when
clicked cannot be used in [Text Layer].
4.5.8. Pen
Ÿ The [Pen] tool is used to create a shape used in photo editing works.
Ÿ This is the same function as the [Pen( )] tool in the [Tool Box].
Ÿ In
[Select Type], set the range of targets selected as the [Pen] tool.
Ÿ The [Path Selection] tool is used to select the entire path. Move the path selected
by dragging.
Ÿ The [Direct Selection] tool is used to select an adjust point composing the path.
You can adjust the location of each adjustment point and the curvature rate.
Ÿ In
[Edit], you can select work to perform using the [Pen] tool.
Ÿ In the [Pen] tool menu, you can create a new path.
Ÿ In the [Add Reference Point] tool menu, you can add a new reference point to the existing path.
Ÿ In the [Delete Reference Point] tool menu, you can delete a reference point from the existing path.
Ÿ In the [Deform Reference Point] tool menu, you can adjust the curvature rate of the path.
Ÿ In [Mode], you can select the type of path creation.
Ÿ If you draw a path in [Shape Layer] mode, it will be created as a [Mask Layer]. Select [Shape Layer] mode to activate the below area.
Ÿ Select [Path] to process a shape drawn by the [Pen] tool as a path.
Ÿ
[New Area] is used to delete the existing paths and leave the newly created paths only.
Ÿ
[Add to Area] is used to create a new path while maintaining the path that has been created and selected.
v For more on [Mask Layer], refer to ‘5.13. Layer Mask’ in ‘Chapter 5. Layer’.
Hancom EzPhoto 87
4.6. Setting Menu
Ÿ
The [Setting] menu provides functions that help you to set your preferred user environment in EzPhoto3.
4.6.1. Color Setting
Ÿ Click on [Color Setting] to set the environment for
setting the colors of EzPhoto3.
Ÿ Click on [Working Color Space] to set the ICC
Profile used as the color area for each color mode.
Depending on which ICC Profile is used, the color of
the EzPhoto working window will vary.
Ÿ In [Color Management Policy], determine how to proceed if the ICC Profile included in a file differs from
the ICC Profile set in [Working Color Space].
Ÿ Click on [Don’t Manage Colors] to display a photo in
the standard color without using the ICC Profile.
Ÿ Click on [Preserve Doc Color Profile] to use the ICC
Profile included in a photo file as the color area for
a photo.
Ÿ Click on [Convert to Working Color Profile] to use
the ICC Profile set in [Working Color Space] as the
color area for a photo.
Ÿ Click on [Profile Mismatch] to check if the profile included in a photo file is the same as the profile set
in [Color Setting] and display the resulting messages. If there is no additional check, it will be processed according to
the [Color Management Policy].
v If you use [Profile Mismatch], and the profile saved in a file is different from the profile in the working area, a window will pop up asking you to
select a profile to use. If you click [OK], the user’s selected profile will be used as a working area. If you click [Cancel], the working area profile will
be set according to the [Color Setting-Color Management Policy].
Ÿ
Ÿ
Ÿ
Ÿ
Ÿ
Ÿ
Ÿ
Ÿ
Click on [No Profile] to display a message for a photo file having no profile.
Click on [Conversion Option] to convert the colors using the ICC Profile.
Click on [Color Engine] to display and convert the colors using the ICC Profile.
Click on [Conversion Method] to determine what characteristics of a photo will be used for color conversions by using
the ICC Profiles having different color areas.
Click on [Perceptual] to convert the color while maintaining the 3-D effects of a photo. This is frequently used for photo developing jobs.
Click on [Saturation] to convert the color while maintaining the saturation of colors. This is frequently used for illustration
jobs.
Click on [Relative Colorimetric] to convert the colors while minimizing the color errors. This is frequently used for printing and publishing books.
Click on [Absolute Colorimetric] to convert the colors while compensating for the color differences in white points for
each device in [Relative Colorimetric]. This is frequently used for professional printing and publishing.
v ICC (International Color Consortium) is the international color standard association formed by eight companies, including Adobe, AGFA,
Kodak, Sun Micro Systems, Apple, Microsoft, and Silicon Graphics.
v The ICC Profile is the color profile for each device. The standard charts used to measure the color of each device such as IT8 are
measured by a spectrometer, and the ICC Profile is created. The ICC Profile has lab/chart/color information which corresponds to the
measurements by a spectrometer. The colors are expressed and converted by the ICC Profile into Lab, and then by using the ICC
Profile for each equipment, colors can be expressed and converted accurately.
88 Hancom EzPhoto
v Windows uses the unique ICM of MS. Apple’s iOS uses Color Sync. Photoshop uses its own color engine called ACE. The
performance of the color engines is ranked, from best to poorest, in the order of ACE > Color Sync > ICM.
Hancom EzPhoto 89
4.6.2. User-Defined Pattern <Ctrl+Shift+P>
Ÿ Click on [User-Defined Pattern] to register the selected
area of a photo as a pattern.
Ÿ Once registered, you can use it in Tool or Menu.
Ÿ The max number of characters in a pattern name is 255.
4.6.3. Menu Style
Ÿ Set the EzPhoto menu style. Select either the standard menu or the narrow menu.
4.6.4. Arrange Window <F>
Ÿ Use [Arrange Window] to arrange the windows that compose the EzPhoto screen. All the windows are moved to their
default locations.
Ÿ Same function as the [Arrange Window( )] tool in the [Tool Box].
Before
90 Hancom EzPhoto
After
4.7. Fun Menu
Ÿ
The [Fun] menu provides various functions that can make a photo more interesting.
4.7.1. Clipart
Ÿ Click on [Clipart] to decorate a photo with various figures and images.
Ÿ Various figures are classified into different categories.
In the left list of the clipart window, select clipart image names and select the actual image you want to
use in the right window.
Ÿ In [Search], enter the name of the list that you want
to use and click on [Search(
)] to
move to the list immediately.
Ÿ Double-click on an image to use or click [Add Selected
Figure(
)] to add the selected image to a photo.
Ÿ
[Search on My PC] is used to load an image saved on your PC. The following file formats can be
used: BMP, JPG, PNG, GIF.
Ÿ Click
[Close] to close the clipart window.
v Images in a format other than PNG will display as rectangles on the white background.
4.7.2. Macro
Ÿ Click on [Macro] to easily access complex tasks that
require complicated settings.
Ÿ Select the desired type of task and select an effect.
Click [Apply(
)] to apply the selected effect to
the photo.
Ÿ Use [Brush] to decorate a photo using various types of
brushes. Select your desired brush type, click [Apply]
and perform the brushing works on a photo.
Ÿ Click on [Text] to add various effects to text. Select
your desired effect and select [Text Layer] in the
[Layer] window. Click [Apply] to apply the selected effect to the text strings in [Text Layer].
Ÿ Click
[Close] to close the macro windows.
4.8. Window Menu
Ÿ
Ÿ
Ÿ
Ÿ
In the [Window] menu, you can open or close the EzPhoto windows.
A checkmark on the left of the window name indicates that the window is currently
open.
Select an open window to close it. If you select a closed window, it will be opened.
Even if the [Option] window is activated, it will not appear until you run the function or
tool that requires the option.
Hancom EzPhoto 91
4.9. Help Menu
Ÿ
The [Help] menu provides useful information for EzPhoto3 users.
4.9.1. EzPhoto Help
Ÿ [EzPhoto Help] shows how to use the
EzPhoto3 program.
Ÿ From [Tool] or [Menu], right-click and select
[Help] for an explanation of the function.
4.9.2. EzPhoto Information
Ÿ [EzPhoto Information] displays information on
your EzPhoto software.
Ÿ It shows the software type, version and serial number.
4.9.3. FAQ
Ÿ [FAQ] provides answers and questions regarding the use of
EzPhoto3. You will be immediately
directed to the EzPhoto FAQ page
on the internet.
92 Hancom EzPhoto
Hancom EzPhoto 93
94 Hancom EzPhoto
Chapter 5.
Layers
Hancom EzPhoto 95
96 Hancom EzPhoto
5. Layers
Ÿ
In [Layer], you can make modifications or supplementations without damaging the original photo. It is like working on a
transparent film on top of the photo.
Ÿ
If you add text or figures directly to a photo, you will need to delete parts of the photo, which can damage the original photo. In this case, you will be unable to recover the original photo later. To resolve this issue, you can use the
tool called [Layer].
Using a layer is like working on a transparent film on top of the photo. Text or drawing shapes will be applied to the
layer, and do not change the original photo data.
If you want to revert to the original photo, all you have to do is to delete or hide the layer.
Using a layer, you can easily apply a range of different effects. Simply apply each effect to a different layer and select
the desired layers at the end. If you do not want some effects, all you have to do is to delete the layers for them.
There is no limit on the number of layers.
Ÿ
Ÿ
Ÿ
Ÿ
5.1. Layer Window
Ÿ
Ÿ
Ÿ
You can work with layers in the [Layer] window.
When you load a photo file, the background image will be created in the Layer
window. The background is not a layer. This means that you cannot apply layer effects and other functions to it. If you delete or add text or figures to the background layer, the original photo will be damaged. If you save it, you can never get
the original photo back.
You cannot perform layer work in the ‘background image’.
5.2. Layer Sequence
Ÿ
Ÿ
Layers are placed in the order that they are displayed on the Layer window. An upper layer’s content is placed on top of a lower layer’s content.
Drag layers in the layer window to change the order.
Hancom EzPhoto 97
5.3. Selecting Active Layers
Ÿ
Ÿ
If you want to add, delete or modify the content of a layer, then click on a layer.
The selected layer will be displayed in blue-green.
5.4. View Layers
Ÿ
Ÿ
Ÿ
Display the shapes, text or effects created in a layer.
Only the shapes/text/effects of the layers showing [View Layer( )] in the layer window will be displayed in the working
window.
Click on [View Layers] to make the mark disappear. This will hide the layer's content in the working window. If a layer
is not marked as [View Layer], it is classified as a layer that is not being used. This means that if you merge it with
other layers, its shapes and effects will be gone.
5.5. Synthesis Mode
Ÿ
Ÿ
In [Synthesis Mode], you can set the method for synthesizing a layer’s text and shapes into a photo.
The [Layer] information is saved as an EZI or EZIX file.
5.5.1. Normal
Ÿ Click on [Normal] to display a synthesized image on top of the background image.
5.5.2. Dissolve
Ÿ Click on [Dissolve] to scatter a synthesized image over the layer.
Ÿ The lower the [Opacity], the more scattered it is.
5.5.3. Darken
Ÿ Click on [Darken] to show the background image with a darker color
than the synthesized image.
98 Hancom EzPhoto
5.5.4. Multiply
Ÿ Click on [Multiply] to mix the colors of a synthesized image and the
background image in a layer.
5.5.5. Color Burn
Ÿ Click on [Color Burn] to burn the colors of a synthesized image in the
colors of the background image.
5.5.6. Linear Burn
Ÿ Click on [Linear Burn] to burn the colors while maintaining the exterior of
a synthesized image.
5.5.7. Lighten
Ÿ Click on [Lighten] to show only pixels in a synthesized image that are
brighter than the background image.
Hancom EzPhoto 99
5.5.8. Screen
Ÿ Click on [Screen] to display the background image with the colors of a
synthesized image.
Ÿ Using dots that have the colors of the ‘synthesized image,’ you can express the shades of the background image.
5.5.9. Color Dodge
Ÿ Click on [Color Dodge] to see the colors of the background image on
top of the synthesized image.
5.5.10. Linear Dodge
Ÿ Click on [Linear Dodge] to see the colors of the background image on
top of the synthesized image while maintaining the exterior shape of the
synthesized image.
5.5.11. Overlay
Ÿ Click on [Overlay] to add the colors of the synthesized image while
maintaining the background image’s contrast and brightness.
100 Hancom EzPhoto
5.5.12. Soft Light
Ÿ Click on [Soft Light] to shine a soft light with the color and shape of
the synthesized image onto the background image.
5.5.13. Hard Light
Ÿ Click on [Hard Light] to shine a hard light with the color and edges of
the synthesized image onto the background image.
5.5.14. Vivid Light
Ÿ Click on [Vivid Light] to shine a vivid light with the color and shape of
the synthesized image onto the background image.
5.5.15. Linear Light
Ÿ Click on [Linear Light] to shine a light with the color and shape of the
synthesized image onto the background image while maintaining the exterior shape of the synthesized image.
Hancom EzPhoto 101
5.5.16. Pin Light
Ÿ Click on [Pin Light] to shine lights from small light sources in a synthesized image onto the background image.
5.5.17. Hard Mix
Ÿ Click on [Hard Mix] to roughly mix a synthesized image with the background image.
5.5.18. Difference
Ÿ Click on [Difference] to display the color difference between the synthesized image and the background image.
5.5.19. Exclusion
Ÿ Click on [Exclusion] to exclude the colors of the synthesized image from
the background image.
102 Hancom EzPhoto
5.5.20. Hue
Ÿ Click on [Hue] to add the hue value of the synthesized image to the
hue value of the background image.
5.5.21. Saturation
Ÿ Click on [Saturation] to add the saturation value of the synthesized image to the saturation value of the background image.
5.5.22. Color
Ÿ Click on [Color] to add the color value of the synthesized image to the
color value of the background image.
5.5.23. Luminosity
Ÿ Click on [Luminosity] to add the luminosity value of the synthesized image to the luminosity value of the background image.
Hancom EzPhoto 103
5.6. Layer Opacity
Ÿ
Ÿ
Ÿ
Set the transparency level of a [Layer] image.
The higher the level of the [Opacity], the clearer the text and shapes in a layer become.
You can adjust the [Opacity] by dragging the slider that appears when you press the [Arrow Button(▼)] or entering a
number. The input range is from. 0 to 100.
5.7. Flatten Layers
Ÿ
Ÿ
Ÿ
Click on [Flatten Layers] to finish working with layers and save your image as a general image file.
You can perform various work on a layer but you cannot save the layer information in a general image file. Image
files are saved without layers.
In the [File] menu, select [Save As] to save a file in a format that does not save the layer information. This will achieve the same effect as [Flatten Layers].
5.8. Merge Layers
Ÿ
Ÿ
Click on [Merge Layers] to integrate the contents of layers shown in the working window into a single layer.
Layers not displayed in the working window will not be integrated.
5.9. Group Layers
Ÿ
Ÿ
Ÿ
Click on [Group Layers] to group multiple layers into one group for the efficient management and application of effects.
Double-click on the name in [Group Layers] to change the group name.
Select a layer and drag it to the desired [Group Layer]. It will now belong to the group. If you want to remove it from
the group, select it and drag it out of the [Group Layer].
5.10. New Layer
Ÿ
Ÿ
Click on [New Layer] to create a new layer on top of the selected layer.
Double-click on the layer name that you want to change.
5.11. Copy Layer
Ÿ
Click on [Copy Layer] to create another layer with the same properties on top of the selected layer.
104 Hancom EzPhoto
5.12. Layer Style
Ÿ
Click on [Layer Style] to add effects to text or shapes in a layer.
5.12.1. Drop Shadow
Ÿ Click on [Drop Shadow] to create the shadow of text/shape in the lower
layer.
Ÿ Click on [Synthesis Mode] to set the mode where the shadow and the lower layer are synthesized.
Ÿ Click on [Color Box] to set the color of the shadow.
Ÿ Click on [Opacity] to set the transparency level for a shadow.
Ÿ In [Angle], set the angle of the shadow. Zero is located on the right side
of the layer image and it rotates in the CCW direction.
Ÿ In [Distance], set the distance between the layer image and the shadow.
Ÿ In [Borderline Extension], set how much the edge of the shadow is spread.
Ÿ In [Size], set how much the edge of the shadow is spread.
v For more details on [Synthesis Mode], refer to ‘5.5. Synthesis Mode’ in ‘Chapter 5. Layer’.
5.12.2. Inner Shadow
Ÿ Click on [Inner Shadow] to create a shadow within a layer image.
Ÿ Click on [Color Box] to set the color of the shadow.
Ÿ In [Opacity], set the transparency level for the shadow.
Ÿ In [Angle], set the angle of the shadow. Zero is located on the right side
of the layer image, and it rotates in the CCW direction.
Ÿ In [Distance], set the distance between the layer image and the shadow.
Ÿ In [Borderline Extension], set how much the edge of the shadow is spread.
Ÿ In [Size], set how much the edge of shadow is spread.
v For more details on [Synthesis Mode], refer to ‘5.5. Synthesis Mode’ in ‘Chapter 5. Layer'.
5.12.3. Outer Glow
Ÿ Click on [Outer Glow] to make a bright edge surrounding a layer image.
Ÿ Click on [Color Box] to create a bright edge color.
Ÿ In [Opacity], set the transparency level for a bright edge.
Ÿ In [Borderline Extension], set how much the bright edge is spread.
Ÿ In [Size], set how much the bright edge is spread.
v For more details on [Synthesis Mode], refer to ‘5.5. Synthesis Mode’ in ‘Chapter 5. Layer’.
Hancom EzPhoto 105
5.12.4. Inner Glow
Ÿ Click on [Inner Glow] to make a bright edge inside a layer image.
Ÿ Click on [Color Box] to create a bright edge color.
Ÿ In [Opacity], set the transparency level for a bright edge.
Ÿ In [Borderline Extension], set how much the bright edge is spread.
Ÿ In [Size], set how much the bright edge is spread.
v For more details on [Synthesis Mode], refer to ‘5.5. Synthesis Mode’ in ‘Chapter 5. Layer’.
5.12.5. Satin
Ÿ Click on [Satin] to apply a glossy texture to a layer image.
Ÿ In [Synthesis Mode], set the mode in which the satin effect is applied to a layer image.
Ÿ Click on [Color Box] to set the color of the satin effect.
Ÿ In [Opacity], set the transparency level of the satin effect.
Ÿ In [Angle], set the direction of the satin effect.
Ÿ In [Distance], set the interval for repeating shade and light.
Ÿ In [Size], set the level of shade/light for the satin effect.
Ÿ Click on [Invert] to reverse the shade and the light.
v [For more details on [Synthesis Mode], refer to ‘5.5. Synthesis Mode’ in ‘Chapter 5. Layer’.
5.12.6. Color Overlay
Ÿ Click on [Color Overlay] to additionally paint the selected color on the surface of a layer image.
Ÿ In [Synthesis Mode], set the method for applying the color overlay effect to
a layer image.
Ÿ Click on [Color Box] to set the color for the color overlay effect.
Ÿ In [Opacity], set the transparency level for the color overlay effect.
v For more details on [Synthesis Mode], refer to ‘5.5. Synthesis Mode’ in ‘Chapter 5. Layer’.
5.12.7. Gradation Overlay
Ÿ Click on [Gradation Overlay] to wrap a layer image with a gradation.
Ÿ In [Synthesis Mode], set the mode to synthesize a gradation and a layer
image.
Ÿ In [Opacity], set the transparency level for a gradation.
Ÿ In [Type], set the gradation shape. Linear means a linear gradation. Radial
means a circular gradation. Angle is a cone gradation and Reflected is a
repeated circular gradation. Diamond is a rectangular gradation.
Ÿ In [Angle], set the direction and the start angle of a gradation.
Ÿ Click on [Color Box] to set the start and end color for a gradation.
Ÿ In [Color Opacity], set the opacity level for the start and end of a gradation. If you set the opacity level differently,
then it will be changed as the gradation is changed.
v For more details on [Synthesis Mode], refer to ‘5.5. Synthesis Mode’ in ‘Chapter 5. Layer’.
106 Hancom EzPhoto
5.12.8. Pattern Overlay
Ÿ Click on [Pattern Overlay] to wrap a layer image with a pattern.
Ÿ In [Synthesis Mode], set the mode to synthesize a pattern and a layer
image.
Ÿ In [Opacity], set the transparency level for a pattern.
Ÿ In [Pattern], select a pattern to wrap it with.
5.12.9. Line
Ÿ In [Line], create an edge line to a layer image.
Ÿ In [Size], set the line thickness.
Ÿ In [Location], set the location where an edge line will be created. If you
select Outside, an edge line will be created outside a layer image and if
you select Inside, it will be created inside a layer image. Selecting Both
means that half of it will be located outside a layer while the other half
will be located inside a layer.
Ÿ In [Synthesis Mode], set the mode to synthesize an edge line and an image.
Ÿ Click on [Color Box] to set the color for an edge line.
Ÿ In [Opacity], set the transparency level for an edge line.
5.13. Layer Mask
Ÿ
Ÿ
Click on [Layer Mask] to fine-tune the opacity level of a layer image.
A white area in [Layer Mask] has the opacity level of 100. Black has the opacity level of 0. If you use [Layer Mask],
you will be able to crop out and synthesize images into various forms.
Background image
Synthesized image
Layer mask
Final image
Hancom EzPhoto 107
5.14. New Fill and Adjustment Layer
Ÿ
Ÿ
Ÿ
Ÿ
Ÿ
Ÿ
Click on [New Fill/Adjustment Layer] to execute the functions of the [Color Adjustment] and [Make] menu in a layer.
You can use [New Fill/Adjustment Layer] to adjust or paint a photo without damaging it.
If you adjust a photo using the [Color Adjustment] menu, the adjusted values will be lost, but if you use [New
Fill/Adjustment Layer], they will be recorded.
If you repeat the same adjustments using [Color Adjustment], the photo quality will be degraded, but if you use [New
Fill/Adjustment Layer], then regardless of the number of adjustments, the image quality is maintained.
[New Fill/Adjustment Layer] is a layer. So, you can freely apply or cancel the effect and select the target of application
by changing the layer's location.
[New Fill/Adjustment Layer] supports the following functions: Paint Bucket, gradations, fill pattern as well as brightness/contrast, color levels, curve, hue, color balance, invert, and posterization in the [Color Adjustment] menu.
5.15. Vector Mask Layer
Ÿ
Ÿ
Click on [Vector Mask Layer] to create a vector type mask.
Unlike a bitmap type photo that consists of dots in various colors, a vector type image consists of a reference point, a
direction point and a direction line. If you magnify or shrink a vector type image, there is no change in image quality.
Unlike a bitmap type image, where you need to modify each and every point on your own, you can use the reference
point and the direction point to easily modify the image shape as you wish.
v For more details on how to modify a vector image, refer to ‘Chapter 6. Path’.
5.16. Shape Layer
Ÿ
Ÿ
Ÿ
Ÿ
[Shape Layer] is a layer that contains vector type images.
In the [Shape] and [Pen] tools, select [Shape Layer( )] mode to create a [Shape Layer].
An image in [Shape Layer] can only be modified using the [Pen] tool.
An image in [Shape Layer] is created as a [Path].
v For more details on how to modify an image in [Shape Layer], refer to ‘Chapter 6. Path’.
5.17. Clipping Mask Layer
Ÿ
Click on [Clipping Mask Layer] to create a layer that contains images with the mask effect.
108 Hancom EzPhoto
Ÿ
Ÿ
Click on [Clipping Mask] to create an image to use. After creating a layer, paste an image to crop out by using
[Mask]. In the Layer Window, select a layer for an image to crop out and right-click to execute the function.
Click on [Clipping Mask Layer] to crop out an image on a layer right above it. If the [Clipping Mask Layer] effect is
applied to a layer, select [Create Clipping Mask] for it. An image on the layer is cropped into the shape of an image
on the layer below.
Original image
Clipping image
Clipping mask image
5.18. Delete Layer
Ÿ
Ÿ
Click on [Delete Layer] to delete the selected layer. Any image effect applied to the layer will be also deleted.
Select a layer to delete and click on the [Delete Layer] button, or drag a layer to the [Delete Layer] button. The warning window will appear. Click on [Yes(Y)] to delete the layer. If you click on [No(N)], [Delete Layer] will be canceled.
Hancom EzPhoto 109
110 Hancom EzPhoto
Chapter 6.
Path
Hancom EzPhoto 111
112 Hancom EzPhoto
6. Path
Ÿ
Ÿ
Click on [Path] to create a vector type shape in EzPhoto3.
You can create or modify a [Path] using the [Pen] tool in the [Tool Box].
v You cannot drag a path in the [Path] window.
6.1. Path Organization (About)
Ÿ
Ÿ
Ÿ
[Path] consists of the reference point, the direction line, and the direction point.
The ‘Reference Point’ sets where a line starts and ends. By moving the Reference
Point, you can change the shape.
Use the ‘Direction Point’ and the ‘Direction Line’ to set the curvature rate of a line.
By moving the Direction Point, you can change the extent to which a line is bent.
6.2. New Path
Ÿ
Ÿ
Ÿ
Ÿ
Ÿ
Ÿ
Ÿ
Ÿ
You can create a [Path] by using the [Pen( )] tool in the [Tool Box].
Select the [Pen] tool to set the [Pen( )] tool in the option window.
Move to the ’Working Window’; the pointer should be shown as [New Path( )]. Click
to create the reference point. When you move the tool, a line will be drawn from
the reference point. If you click again, the tool will be changed to [Add Reference
Point( )] and a new reference point will be created. Move the tool and a line will
be drawn from the newly created reference point.
If you move the tool back to the first reference point, it will be changed to [Path
End( )]. Click and a line will be connected to the first reference point and the
[Path] work will be terminated. The tool will be changed to [New Path].
If you want to create a line type path, first draw a line with the shape you want,
and press the <Esc> key. Click the <Esc> key to stop [Path] works.
The tool will be changed to [New Path].
[Path] is managed in a group in the path window. If a [Path] is created without special works, it will be recorded in ‘Path 1’. Click on
[New Path( )] to record ‘Path 2’ in the path window. All the paths
created will now be recorded in ‘Path 2’.
Double-click on the name of the [Path] that you want to change.
If you want to record the newly created path together with the exising paths, then select a path group in the path window and create
[Path].
Configuration of Path
v [Path] is only saved in EZI or EZIX file format.
Hancom EzPhoto 113
6.3. Edit Path
Ÿ
Ÿ
Ÿ
Ÿ
Ÿ
Ÿ
Ÿ
Ÿ
Ÿ
Using the [Pen] tool in the [Tool Box], you can modify a [Path].
Click on [Path Selection Tool] to select the entire path. Move the selected path by dragging.
If you drag the inner area of a shape, you can move a polygon-shaped [Path]. You can move a line type [Path] by
dragging near the line.
Click on [Direct Selection Tool] to select the adjustment point that composes a path. You can adjust the location of
each adjustment point and the curvature rate of a curve.
Click on [Direct Selection Tool] to modify the length/direction of the direction line by moving the direction point.
Depending on the length/direction of the direction line, the direction/curvature of a curve will be changed.
Click on the [Add Reference Point] tool to add a new reference point to the existing path.
Click on the [Delete Reference Point] tool to delete the reference point for the existing path.
Click on the [Deform Reference Point] tool to adjust the curvature rate of a path. Soft curves will be bent curves
and bent curves will be soft curves.
Click on [Delete Path( )] to delete the [Path] selected in the path window. Select [Path] and click on [Delete Path] to
delete the path.
6.4. Convert Path
Ÿ
Ÿ
Ÿ
Ÿ
You can
Click on
Click on
Click on
convert a [Path] in the path window according to your own purposes.
[Paint Path with Foreground Color( )] to paint the selected [Path] with the ‘foreground color’.
[Use Brush along Path( )] to draw a line along the selected [Path] with the brush.
[Make Path as Selected Area( )] to select the [Path] as an area.
v The [Path] information can be only saved in an EZI or EZIX file format. If you save your image in a different file format, all [Path] information will be
deleted.
6.5. Path Window Menu
Ÿ
Ÿ
Ÿ
In the [Path] window, select a path that you want and right-click to open the
pop-up menu.
Click on [New Path] to create a new path as in ( ).
Click on [Copy Path] to copy the selected path.
v If you try to copy a [Vector Mask Layer] as a path, it will be copied as a general path.
Ÿ
Ÿ
Ÿ
Ÿ
Ÿ
Ÿ
Ÿ
Ÿ
Click
Click
path.
Click
Click
Click
Click
Click
size.
Click
on [Delete Path] to delete the selected path.
on [Select Area] to select an area having the same shape as the selected
on
on
on
on
on
[Paint Path] to paint inside the selected path.
[Path Line] to make an edge line for the selected path.
[View Minimum Size] to minimize the preview of the path window.
[View Small Size] to make the preview of the path window a small size.
[View Medium Size] to make the preview of the path window a medium
on [View Maximum Size] to maximize the preview of the path window.
114 Hancom EzPhoto
Chapter 7.
Channel
Hancom EzPhoto 115
116 Hancom EzPhoto
7. Channel
Ÿ
Each color that composes a photo is called a channel. You can work on each color channel.
v The [Channel] information can be only saved in EZI or EZIX file format. If you save your image in another file format, all [Channel] information will
be deleted.
7.1. Channel Window
Ÿ
Ÿ
Ÿ
In the [Channel] window, you can view channels that compose a photo and images
in each channel.
The uppermost channel in the [Channel] window is the master channel. In general,
the color mode name is displayed. If you select the master channel, then all the
channel colors will be displayed.
Click on [View] to show or hide the desired channel colors.
v If only a single channel image is displayed, it will be displayed in black and white to express the
difference between each channel color. If multiple channel images are displayed, then each will be
displayed in the corresponding channel color.
7.2. New Channel
Ÿ
Ÿ
Click on [New Channel] to create a new channel.
A channel is the basic color mode for a photo. Images in a newly created channel
will be mixed with the colors of the existing images.
7.3. Channel to Selection
Ÿ
Ÿ
Click on [Channel to Selection] to convert the
selected channel images to the selected area.
You can easily select all the colors of a specific channel to modify them. In this way,
fine-tuning of colors can be performed.
Hancom EzPhoto 117
7.4. Selection to Channel
Ÿ
Ÿ
Click on [Selection to Channel] to convert the selected area to a channel.
Click on [Selection to Channel] to create a new channel and turn the selected area into a new channel image.
7.5. Delete Channel
Ÿ
Ÿ
Click on [Delete Channel] to delete the selected channel.
Select a channel and click on [Delete Channel] or drag a channel into [Delete Channel] to delete a channel.
118 Hancom EzPhoto
Chapter 8.
Appendix
Hancom EzPhoto 119
120 Hancom EzPhoto
8. Appendix
8.1. Hotkeys
Menu
Open
Create New
Browse
Save
Close
Print
Exit
Close all
Hotkeys
EzPhoto
Ctrl+O,
Double-click
background of EzPhoto.
Ctrl+N
Ctrl+Shift+O
Ctrl+S
Ctrl+W
Ctrl+P
Ctrl+Q
Shift+close button
the
Photoshop
Ctrl+O,
Double-click
background of Desktopo
Ctrl+N
Ctrl+Shift+O
Ctrl+S
Ctrl+W
Ctrl+P
Ctrl+Q
Shift+close button
Recent job
Undo
Redo
Adjust photo size
Adjust canvas size
Color setting
Ctrl+Z
Ctrl+Alt+Z
Ctrl+Shift+Z
Ctrl+Alt+I
Ctrl+Alt+C
Ctrl+Shift+K
Ctrl+Z
Ctrl+Alt+Z
Ctrl+Shift+Z
Ctrl+Alt+I
Ctrl+Alt+C
Ctrl+Shift+K
Select all
Copy
Paste
Cut
Deselect
Ctrl+A
Ctrl+C
Ctrl+V
Ctrl+X
Ctrl+D
Ctrl+Shift+I,
Shift+F7
Shift+Drag
Alt+Drag
M
L
W
Ctrl+A
Ctrl+C
Ctrl+V
Ctrl+X
Ctrl+D
Ctrl+Shift+I,
Shift+F7
Shift+Drag
Alt+Drag
M
L
W
V
C
S
E
G
Shift+G
F5/B
Ctrl+R
R
T
U
I
H
V
C
S
E
G
Shift+G
F5
Ctrl+R
R
T
U
I
H
X
X
Select inverse
Add to area
Remove from area
Selection type - rectangle
Selection type - snare
Selection type – magic stick
Edit tool
Crop tool
Copy tool
Eraser tool
Gradation tool
Fill pattern tool
Brush tool
Ruler
Effect brush tool
Text tool
Shape tool
Eye Dropper tool
Move tool
Color selection (foreground
color/background color
inversion)
the
Hancom EzPhoto 121
Arrange screen
F
Decrease the brush size
Increase the brush size
Decrease brush hardness
Increase brush hardness
Previous brush
Next brush
Register patterns
[
]
{
}
,
.
Ctrl+Shift+P
[
]
{
}
,
.
Ctrl+Shift+P
Create new layers
Copy layers
Merge visible layers
Ctrl+shift+N
Ctrl+J
Ctrl+E
Ctrl+shift+N
Ctrl+J
Ctrl+E
Ctrl+L
Ctrl+M
Ctrl+B
Ctrl+U
Ctrl+Shift+L
Ctrl+Alt+Shift+L
Ctrl+Shift+U
Ctrl+I
Ctrl+Alt+D
Ctrl++
Ctrl+Ctrl+0
Ctrl+L
Ctrl+M
Ctrl+B
Ctrl+U
Ctrl+Shift+L
Ctrl+Alt+Shift+L
Ctrl+Shift+U
Ctrl+I
Ctrl+Alt+D
Ctrl++
Ctrl+Ctrl+0
F7
F8
F7
Tab
Tab
Space
Space+Ctrl
Space+Alt
Space
Space+Ctrl
Space+Alt
Color level
Curve
Color balance
Hue/saturation
Auto level
Auto contrast
Desaturate
Invert
Feather
Magnify
Shrink
Fit to screen
Layer window
Option window
Open or close all the option
windows
Move
Partial magnification
Partial shrinking
122 Hancom EzPhoto
8.2. List of Cameras Supported
Manufacturer
Canon
(51 models)
Fuji
(5 models)
Nikon
(36 models)
Olympus
(24 models)
Pentax
(20 models)
Sony
(30 models)
Samsung
(9 models)
Camera Model
EOS-1DS, EOS-1DS Mark II, EOS-1DS Mark II N, EOS-1DS Mark III,
EOS-1D, EOS-1D Mark II, EOS-Mark III, EOS-Mark IV, EOS-1D X, EOS-5D,
EOS-5D Mark II, EOS-5D Mark III, EOS-6D, EOS-7D, EOS-10D, EOS-20D,
EOS-30D, EOS-40D, EOS-50D, EOS-60D,
EOS-300D, EOS-350D,
EOS-400D, EOS-450D, EOS-500D, EOS-550D, EOS-600D, EOS-650D,
EOS-1000D, EOS-1100D, Digital Rebel, Digital Rebel XT, Digital Rebel XTi,
Digital Rebel XSi, Digital Rebel T1i, Digital Rebel T2i, Digital Rebel T3i, Digital
Rebel T4i, Digital Rebel T2, Digital Rebel T3, Kiss Digital, Kiss Digital N, Kiss
Digital X, Kiss X2, Kiss X3, Kiss X4, Kiss X5, Kiss X6i, Kiss X40, Kiss X50,
EOS-M.
FinePix S2 Pro, FinePix S3 Pro, FinePix S5 Pro, X10, FinePix X100.
D1H, D1X, D2H, D2Hs, D2X, D2Xs, D3, D3S, D3X, D4, D40, D40x, D50,
D60, D70, D70s, D80, D90, D100, D200, D300, D300s, D600, D700, D800,
D3000, D3100, D3200, D5000, D5100, D5200, D7000, Nikon 1 J1, Nikon 1
J2, Nikon 1 V1, Nikon 1 V2.
E-1, E-3, E-5, E-10, E-20, E-30, E-300, E-330, E-400, E-410, E-420,
E-500, E-510, E-520, E-620, E-P1, E-P3, E-PL1, E-PL2, E-PL3, E-PL5
E-PM1, E-PM2, OM-D E-M5.
K5, K7, K10D, K20D, K30D, K100D, K100D Super, K110D, K200D, *ist D,
*ist DL, *ist DL2, *ist DS, *ist DS2, K-m, K-r, K-x, K-01, Q, Q10.
A33, A35, A37, A55, A57, A65, A77, A99, A100, A200, A230, A290, A300,
A330, A350, A380, A390, A450, A500, A550, A560, A580, A700, A850,
A900, NEX-3, NEX-5, NEX-5N, NEX-7, NEX-C3.
NX5, NX10, NX11, NX20, NX100, NX200, NX210, NX300, NX1000.
Total : 7 manufacturers, 175 models
Hancom EzPhoto 123