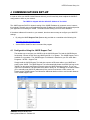
1
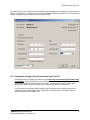
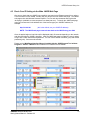
INTEG Process Group, Inc 4 COMMUNICATIONS SET-UP In order to utilize your JNIOR via the Ethernet network, you will most likely have to adjust the JNIOR IP configuration to work on your network. The JNIOR is shipped with the default IP Address of 10.0.0.201 The JNIOR supports DHCP for dynamic setting of the JNIOR IP address by a network server, however, this method is normally not recommended because the IP address of the JNIOR may change and prevent your application from finding the JNIOR. The default JNIOR setting is to have DHCP disabled. If the above address will not work on your network, then there are two ways to configure your JNIOR IP settings: By using the JNIOR Support Tool (Beacon tab) provided on our website at the following link: http://www.integpg.com/support/jnior/ Via the RS232 Serial Port and a command line program 4.1 Configuration Using the JNIOR Support Tool The easiest way to configure your JNIOR is via the JNIOR Support Tool and the JNIOR Beacon functionality. Beacon is built into every JNIOR with OS 3.1 or greater. The JNIOR Support Tool is available on our website. The JNIOR Support Tool Manual is installed on your PC under Start – Programs – INTEG – Support Tool. Simply install the JNIOR Support Tool and then connect an Ethernet cable to your JNIOR and power-up the JNIOR. The JNIOR Support Tool will automatically detect the JNIOR (as long as the JNIOR is on the same local Ethernet network) when the JNIOR completes its boot. Or you can right click in the Beacon Tab and select Query New or Query All. The Manage IP List feature allows you to manually enter JNIOR IP addresses so they can be found across a VPN, routers, etc. Please see the JNIOR Support Tool Manual for additional details on how to use the other features of the JNIOR Support Tool. JNIOR A Network I/O Resource Getting Started Manual – Release 3.3 5