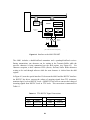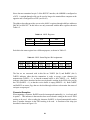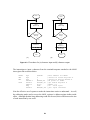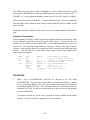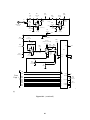
1
Table of Contents
Introduction ................................................................................................................ ii
Lab #1 - Introduction to EDIT .................................................................................... 1
Lab #2 - Introduction to PC-VT .................................................................................. 9
Lab #3 - Introduction to the 68KMB ........................................................................... 20
Lab #4 - Introduction to A68K and XLINK................................................................. 32
Lab #5 - Programming Problems ................................................................................. 38
Lab #6 - Character I/O ................................................................................................ 48
Lab #7 - Interface to Switches and LEDs..................................................................... 57
Lab #8 - Interface to a 7-Segment LED ....................................................................... 64
Lab #9 - Interface to a 4-Digit Display......................................................................... 69
Lab #10 - Interface to an 8-Digit Display..................................................................... 72
Lab #11 - Interface to a Hexadecimal Keypad.............................................................. 76
Lab #12 - Interface to a Digital-to-Analog Converter................................................... 80
Lab #13 - Interface to an Analog-to-Digital Converter................................................. 90
Lab #14 - Modular Programming................................................................................. 95
Lab #15 - Firmware Development................................................................................ 100
Appendix A - Checkout/Calibration for I/O Board #6 .................................................. 109
i
Introduction
The following labs are intended for educational use in college or university courses using
The 68000 Microprocessor textbook and the 68KMB single-board computer. The
complete set of materials for these labs consists of
•
•
•
•
•
•
•
•
•
•
•
•
•
•
•
The 68000 Microprocessor textbook
68KMB 68000-based single-board computer (from URDA, Inc.)
I/O Board #1 (from URDA, Inc.)
I/O Board #2 (from URDA, Inc.)
I/O Board #3 (from URDA, Inc.)
I/O Board #4 (from URDA, Inc.)
I/O Board #5 (from URDA, Inc.)
I/O Board #6 (from URDA, Inc.)
PC host computer with COM port
screwdriver
oscilloscope
voltmeter
null modem cable
± 12 volt or ±15 volt power supply
amplified speaker system
Note that the 68KMB is shipped complete with serial cable, AC adapter, two 20conductor ribbon cables, and a user's manual. The 68000 Microprocessor textbook is
shipped with a 3.5 inch 1.44M byte "student disk" containing the following:
•
•
•
•
•
68000 cross assembler, A68K
Linker/locator, XLINK
Batch files to simplify execution of A68K and XLINK
Terminal emulator, PC-VT
Example programs from The 68000 Microprocessor textbook
An "instructor disk" is also available. This disk contains solutions to all problems given in
the following labs. Contact URDA, Inc. or Prentice-Hall for more information.
Comments or suggestions are also welcome by the author:
ii
Scott MacKenzie
Dept. of Computing and Information Science
University of Guelph
Guelph, Ontario
Canada N1G 2W1
Voice: 1-519-824-4120 Ext. 8268
Fax:
1-519-837-0323
Email: [email protected]
This manual assumes a basic knowledge of PC computers and MS-DOS. The reader
should be comfortable with
•
•
•
•
The most common MS-DOS commands
Entering key combinations such as CTRL+F4 or ALT+E
Drives, files, directories, paths
Changing the default directory or drive
The 68KMB interfaces with the PC host computer through a COM port. The host
computer must have at least one available COM port.
At numerous points throughout these labs, reference is made to "your textbook". These
labs are intended to accompany The 68000 Microprocessor textbook in forming a
complete course to learn about the 68000 microprocessor. References to "your lab
instructor" are made when the student must obtain expert assistance with a problem or
demonstrate the solution to a problem.
The labs are organized using checkpoints. A checkpoint is indicated by the following
symbol:
x.y
4
The code x.y indicates the sequence of checkpoints with x indicating the lab number, and y
indicating the checkpoint within a lab. When the student reaches a checkpoint, the results
of the preceding steps should be demonstrated to the lab instructor. Lab instructors may
maintain a record of checkpoints to assign marks or to gauge students' progress as each
lab is completed.
iii
Software Installation
To install all the software from the 68KMB diskette onto the PC host computer, proceed
as follows:
1.
Place the student disk in drive A or drive B of the PC host system.
2.
Change the default drive to A or B, as appropriate.
3.
Type INSTALL.
This will install all the software for the 68KMB on drive C in a directory called 68KMB.
It is suggested that you make all program files read-only by issuing the following MSDOS commands: (User input is underlined.)
C:\68KMB>ATTRIB +R *.*
C:\68KMB>ATTRIB -R PARMS.DAT
ATTRIB must be in a directory specified in the current path. The file PARAMS.DAT
contains configuration information for the terminal emulation program, PC-VT. It should
remain read-write for the moment, in case the configuration of PC-VT must change.
If you are re-installing the software, bear in mind that read-only files cannot be overwritten. Make all files read-write before attempting to re-install the software.
In a Hurry?
For a quick test of your 68KMB system, proceed as follows after installing the software.
1.
With the serial cable provided, connect the 68KMB to the COM port on the PC host
computer (preferably COM1). The cable should connect to J3 on the 68KMB.
2.
Plug the AC adapter into a 110 Volt AC wall outlet. Attach the jack at other end of
the cable to J4 on the 68KMB.
iv
3.
Run the terminal emulation program: (Note user input is underlined.)
C:\68KMB>PC-VT
4.
Press and release the RESET switch on the 68KMB. The 68KMB's monitor
program, MON68K, will output the following prompt:
MON68K
V4.4>
Note: If this prompt does not appear, verify that the 68KMB is connected to
COM1 on the PC host computer. To re-configure PC-VT to communicate
through COM2, follow steps 8-15 in Lab #2. If you still have problems, perform a
thorough check of the RS232C serial interface by following lab #2 from the
beginning.
5.
Issue MON68K's load command:
V4.4>LO
6.
Issue a File Transmit command to PC-VT:
CTRL+F4
7.
PC-VT's File Transmit dialog box will appear. Enter
DEMO.HEX
8.
The demonstration program is transferred from the PC host computer to the
68KMB's memory. Enter Y when asked if CTRL+Z should be transmitted.
9.
Execute the demo program:
V4.4>GO 8000
A welcome message is displayed on the CRT display of the PC host computer.
v
10.
Terminate PC-VT:
CTRL+F8
Quick Test of A68K and XLINK
As a quick demo of the 68KMB programming environment, we will use EDIT, the editor
supplied with MS-DOS 5.0 (or later), to modify the demo program. The modified
program will be assembled, linked, and downloaded to the 68KMB for execution. (Use an
editor of your own choice, if you prefer.)
1.
From the MS-DOS prompt, enter:
C:\68KMB>COPY DEMO.SRC DEMO2.SRC
C:\68KMB>EDIT DEMO2.SRC
Make sure the EDIT.COM program is in a directory listed by the PATH
command. If it is not, edit the AUTOEXEC.BAT file to include the path. Reboot the system after editing AUTOEXEC.BAT.
2.
The demo program is read into the editor's buffer and appears on the screen. Use
the arrow keys and position the cursor just after the "O" in HELLO. Enter your
name:
John Doe
3.
Save the modified demo program. Enter
ALT+F followed by S
4.
Exit the editor and return to MS-DOS. Enter
ALT+F followed by X
5.
Assemble the modified demo program using A68K's batch program:
C:\68KMB>A DEMO2
vi
A68K assembles the modified demo program and stores the output in the files
DEMO2.OBJ and DEMO2.LST.
6.
Convert the assembled program to Motorola S-records. This task is performed by
XLINK. A batch program is provided to reduce the typing. Enter
C:\68KMB>L DEMO2
XLINK converts the 68000 machine language program in the file DEMO2.OBJ to
Motorola S-records. The output is stored in the file DEMO2.HEX.
7.
Run the terminal emulation program:
C:\68KMB>PC-VT
8.
Press the RESET switch on the 68KMB and enter the load command:
MON68K
V4.4>LO
9.
Transmit the modified demo program from the PC to the 68KMB:
CTRL+F4 followed by DEMO2.HEX
Enter Y when asked if CTRL+Z should be transmitted.
10.
Execute the modified demo program:
V4.4>GO 8000
A welcome message with your name embedded in it is displayed on the CRT of the
PC host computer.
Congratulations, you are now ready to have fun with the 68KMB.
vii
Lab #1
Introduction to EDIT
PURPOSE
This lab demonstrates the use of MS-DOS's full-screen editor called EDIT.
completion of this lab, students will be able to do the following:
•
•
Upon
Create and edit text files using EDIT.
Perform a variety of editing operations on a text file, such as deleting, copying, or
moving selected regions of text.
MATERIALS
Hardware:
• PC host computer running MS-DOS 5.0 or later
MS-DOS Software:
• EDIT
• QBASIC
MS-DOS editor
used by EDIT
Note: The program QBASIC.EXE is used by EDIT.COM. QBASIC.EXE must be in the
same directory as EDIT.COM or in a directory in the search path.
INTRODUCTION
Beginning with version 5.0, MS-DOS includes a simple full-screen editor called EDIT.
EDIT allows the user to create and edit unformatted text files such the MS-DOS batch
files AUTOEXEC.BAT or CONFIG.SYS. These files contain unformatted ASCII text.
1
The 68000 assembly language source programs written in subsequent labs are also stored
in unformated text files. These files are considered unformatted, because they only
contain ASCII graphic characters (letters, numbers, and punctuation) and control
characters such as CR (carriage return), LF (line feed), or HT (horizontal tab). Files
created with a word processor are more complex. They contain a variety of binary
formatting codes defining the page layout, fonts, etc. Although most word processors
include a file-save option to save files as unformatted ASCII text, to use a word processor
for creating assembly language program files is overkill. EDIT is a perfectly adequate
editor for creating the source program files for the labs that follow.
Students who are familiar with MS-DOS and have their own favorite editor to use in
subsequent labs, may skip ahead to step 16. Be prepared to demonstrate to your lab
instructor that you are comfortable in editing a text file.
PROCEDURE
PART I – Familiarity with the Host Computer Environment
1.
Power-up the host computer and wait for the following MS-DOS prompt to
appear:
C:\>
The exact form of this prompt is controlled by the command PROMPT, which
usually appears in the system's AUTOEXEC.BAT file. If this prompt does not
appear, edit the AUTOEXEC.BAT file and insert a line containing
PROMPT $P$G. Re-boot the system after saving the AUTOEXEC.BAT file.
Ask your lab instructor for assistance, if necessary.
2.
Find out which version of MS-DOS is running on the host computer by entering
the following command: (Note: User input is underlined.)
C:\>VER
If the version number is lower than 5.0, ask your lab instructor for assistance.
3.
Check the current search path by entering the following command:
C:\>PATH
2
A series of directory names separated by semicolons will appear. If MS-DOS was
installed on the host computer following the usual procedure, then one of the
directories listed will be C:\DOS. This is where the files EDIT.COM and
QBASIC.EXE are stored.
Verify the presence of these files by entering the following command:
C:\>DIR \DOS/P
Both EDIT.COM and QBASIC.EXE should appear in the long list of files that
appears on the console.
EDIT.COM and QBASIC.EXE must be present in the directory \DOS or in a
directory listed in the search path. If you cannot find these files, ask your lab
instructor for assistance.
4.
For this lab we will create a new directory for our example file. Create a directory
called LAB1 by entering the command
C:\>MKDIR \LAB1
Make the new directory the default directory by entering the command
C:\>CD \LAB1
The prompt should change to
C:\LAB1>
PART II – Using EDIT.COM
5.
EDIT A FILE
Now we will use EDIT to create and edit an example file. Enter the command
C:\LAB1>EDIT EXAMPLE.TXT
This command starts EDIT and brings the user into a full-screen editor. The text
entered will be saved in a file called EXAMPLE.TXT.
3
6.
TEXT ENTRY
Begin by typing the following three lines exactly as shown. Each line is terminated
by pressing the ENTER key.
This is a test of DOS EDIT.
This is the second line of the example file.
This is the last line of the example file.
7.
CURSOR MOVEMENT
With these three lines entered, we can illustrate the most common editing features
of EDIT. The primary cursor movement keystrokes are listed below.
Keystrokes
Movement
Arrow Keys
One character or one line
CTRL+LEFT ARROW
One word to the left
CTRL+RIGHT ARROW
One word to the right
HOME
Beginning of the line
END
End of the line
CTRL+ENTER
Beginning of the next line
CTRL+Q+E
Top of the window
CTRL+Q+X
Bottom of the window
Experiment with the keystrokes listed above and verify the movement effect stated.
Although our example text is very short, the following cursor movement
keystrokes may be needed later when working with larger files.
Keystrokes
8.
Movement
CTRL+UP ARROW
Scrolls up one line
CTRL+DOWN ARROW
Scrolls down one line
PgUp
Scrolls up one screen
PgDn
Scrolls down one screen
CTRL+HOME
Moves the cursor to the start of a file
CTRL+END
Moves the cursor to the end of a file
CTRL+PgUp
Scrolls right one screen
CTRL+PgDn
Scrolls left one screen
SELECTING TEXT
Most editing tasks begin by selecting text. Any amount of text may be selected,
from a single character to the entire file. Experiment with the following steps on
the example text.
4
To Select a Block of Text:
9.
•
Position the cursor at the first character you want to select.
•
•
Hold the SHIFT key and move the cursor to the last character you want to
select. The text selected is highlighted as the cursor moves.
Release the keys. The text is selected.
•
To de-select the text, press any cursor movement key.
MOVING TEXT
Use the steps below to move the first line of text entered in step 6 to the end of the
file. The example text should look like this:
This the second line of the example file.
This is the last line of the example file.
This is a test of DOS EDIT.
To Move a Block of Text:
10.
•
Select the block of text you wish to move.
•
Press ALT+E to activate the EDIT menu.
•
Press T to cut the selected text to a temporary buffer.
•
Move the cursor to the location where you want the text to appear.
•
Press ALT+E to activate the EDIT menu.
•
Press P to paste the text from the buffer to the cursor location.
COPYING TEXT
Use the steps below to make a copy of the last line in the file and insert it at the
beginning of the file. The example file should look like this:
This
This
This
This
is
is
is
is
a test of DOS EDIT.
the second line of the example file.
the last line of the example file.
a test of DOS EDIT.
To Copy a Block Text:
•
Select the block of text you want to copy.
•
Press ALT+E to activate the EDIT menu.
•
Press C to copy the selected text to a temporary buffer.
•
Move the cursor to the location where you want to copy the text.
•
Press ALT+E to activate the EDIT menu.
•
Press P to paste the text from the buffer to the cursor location.
Practice the move-text sequence again by moving the third line in the new text to
the end of the file. The example file should look like this:
5
This
This
This
This
11.
is
is
is
is
a test of DOS EDIT.
the second line of the example file.
a test of DOS EDIT.
the last line of the example file.
REPLACING TEXT
Use the steps below to change all instances of "DOS" to "MS-DOS". The example
file should look like this:
This
This
This
This
is
is
is
is
a test of MS-DOS EDIT.
the second line of the example file.
a test of MS-DOS EDIT.
the last line of the example file.
To Replace Existing Text With New Text:
12.
•
Position the cursor where you want to begin replacing text.
•
Press ALT+S to activate the SEARCH menu.
•
Press C to activate the CHANGE dialog box.
•
Enter the text you wish to change in the "Find What" box
•
Press TAB to advance the cursor to the "Change To" box.
•
Enter the new text you want the original text to be replaced with.
•
Press ENTER to begin changing. Follow the instructions as you proceed.
•
Press C to accept changes, press S to skip changes, press ESC to
terminate.
SAVING A FILE
Use the steps below to save the example text to a disk file. Leave the name of the
file as EXAMPLE.TXT.
To Save an Edited File:
13.
•
Press ALT+F to activate the FILE menu.
•
Press S to save the file with its current name, OR
Press A to save the file with a new name (Type the new name and press
ENTER.)
EXIT
Use the steps below to exit EDIT and return to MS-DOS.
To Exit From EDIT:
•
Press ALT+F to activate the FILE menu.
•
Press X to exit EDIT and return to MS-DOS.
6
14.
Verify that the file EXAMPLE.TXT has been created and is present in the current
working directory. Enter the command
C:\LAB1>DIR
The file EXAMPLE.TXT should appear in the directory listing.
15.
Verify that the contents of the file are as expected. Enter the command
C:\LAB1>TYPE EXAMPLE.TXT
The contents of the file, as shown in step 11 above, should appear on the console.
16.
Demonstrate to your lab instructor that you can perform the following operations:
•
•
•
•
•
•
•
•
•
Open a file for editing using EDIT.
Enter text.
Move the cursor on character, word, line, or page boundaries.
Select a block of text.
Move text from one position to another.
Copy text from one position to another.
Replace sequences of text with new text.
Save the edited text to a disk file.
Use MS-DOS to verify the presence and contents of a text file.
1.1
17.
Delete the example file:
C:\LAB1>DEL *.TXT
18.
Delete the directiory LAB1:
C:\LAB1>CD \
C:\>RMDIR LAB1
7
4
CONCLUSION
This is a very brief introduction to MS-DOS's full-screen editor, EDIT. A variety of other
features and commands are accessible from EDIT's menus. Students are advised to
experiment with these until comfortable with EDIT.
8
Lab #2
Introduction to PC-VT
PURPOSE
This lab demonstrates the use of a terminal emulation program called PC-VT. Upon
completing this lab, students will be able to do the following:
•
•
•
•
•
•
•
Define terminal emulation.
Describe the difference between a DTE and a DCE.
Run PC-VT on a PC computer system running MS-DOS.
Configure the baud rate, data format, COM port, and other modes of operation with
PC-VT.
Issue a file transmit command with PC-VT.
Suspend PC-VT's operation temporarily while MS-DOS commands are executed.
Verify that PC-VT is operating properly using a wrap-back test.
MATERIALS
Hardware:
• PC host computer running MS-DOS
• RS232C interface cable (provided with the 68KMB)
• Null modem cable (optional)
MS-DOS Software:
• PC-VT
• HELP.DAT
terminal emulation program
help file for PC-VT
9
INTRODUCTION
Terminal emulation is the act of making a computer system behave like a terminal. A
terminal emulator is a program that implements terminal emulation.
The terminal emulator provided with The 68000 Microprocessor textbook and the
68KMB 68000-based computer is called PC-VT. When this program is run on an IBM
PC (or compatible) system running MS-DOS, the system behaves like a terminal. In
particular, PC-VT makes the system behave like a VT-100 terminal. "VT-100" is a model
of video display terminal originally made by Digital Equipment Corporation (DEC). VT100s, and related models of DEC terminals, are widely-used as terminals on
minicomputers and mainframe-computers, such as the VAX by DEC. If a PC is running a
VT-100 terminal emulation program such as PC-VT, then the PC can act as a terminal and
communicate with a VAX or other computer as though it were a VT-100 terminal.
PC-VT will be used throughout this and subsequent labs to conveniently turn the PC host
computer into a VT-100 terminal for connection to a target computer. The purpose of
this lab is to introduce the operation of PC-VT and some concepts in connecting terminals
to computers through serial RS232C interfaces. In subsequent labs, we will use a PC host
computer running PC-VT to act as a terminal for connection to the 68KMB 68000-based
computer.
For this lab, we need a PC host computer, an RS232C serial interface cable, and, of
course, PC-VT. Figure 2-1 illustrates the PC host computer and the RS232C serial
interface cable.
PC
D B2 5 P
Co nn e ct o r
RS2 3 2 C
ser ia l in t erf a ce cab le
1
2
3
7
13
Co nn e ct ion t o
COM Port o n
b a ck o f PC
14
25
End vie w
Figure 2-1. PC host computer with RS232C serial interface cable
10
For a brief introduction to asynchronous serial communications using RS232C, see
Chapter 9 of your textbook.
PC-VT communicates through a serial port on the PC host computer. Although PCs may
have four or more serial ports, usually only one or two are present. These are referred to
as COM1 and COM2. The RS232C serial interface cable connects to one of the COMport connectors on the back of the PC host computer.
The connector at the end of the RS232C cable is a 25-pin DB25P. (The suffix P stands
for pin.) The mate for this connector is a DB25S socket connector. The pin sequence is
shown in Figure 2-1 as viewed from the end of the DB25P connector. Of the 25 pins,
only three are needed for the interface between the PC host computer and the target
computer. The purpose of each is given in Table 2-1.
Table 2-1. Signals for Serial Connection From a PC to a Target Computer
Pin
Signal
Number
Mnemonic
Name
Purpose
2
TxD
Transmit Data
3
RxD
Receive Data
7
GND
Signal Ground
Data from PC host computer to the target
computer
Data into PC host computer from the target
computer
Common ground between systems at each
end of cable
A serial device that operates with the signal directions in Table 2-1 is called a DTE, for
Data Terminal Equipment. If the signals travel straight-through the cable from one
device to the other, then pin 2, which is an output from the PC host computer in Figure 21, must be an input for the device at the other end of the cable. Similarly, pin 3 which is
an input for the DTE is an output from the device at the other end of the cable. A device
which communicates with a DTE using a straight-through cable is called a DCE, for Data
Communications Equipment. Historically, DTEs are devices at the terminus of a
connection, such as computers and terminals; whereas, DCEs are modems. This
distinction is often blurred on many of today's devices with so-called RS232C interfaces.
This is the case with the 68KMB, which is configured as a DCE. On the 68KMB, pin 2 is
an input and pin 3 is an output (see Figure 2-2). This simplifies the connection with the
host computer (DTE), since a straight-through cable can be used.
11
D TE
(h o st c o m p u t e r)
DCE
( 6 8 K MB)
2
2
3
3
7
7
Tx D
Rx D
GN D
GND
Figure 2-2. DTE to DCE connections
It follows that, if a DTE connects to a DTE, then the TxD and RxD signals must cross
over. A cable that performs this function is called a null modem. A null modem gives the
impression that each DTE is connected to a modem. This is illustrated in Figure 2-3.
DTE
DTE
2
2
3
3
7
7
T xD
T xD
RxD
Rx D
GN D
GN D
Figure 2-3. Null modem connection between two DTEs
PROCEDURE
1.
Connect the RS232C serial interface cable provided with the 68KMB to the
COM1 or COM2 connector on the back of the PC host computer.
2.
Turn on the PC host computer and wait for the following MS-DOS prompt to
appear:
C:\>
3.
Switch to the directory called 68KMB by entering the following command:
C:\>CD \68KMB
12
If this directory is not present, the software from the 68KMB diskette must be
installed. Follow the installation procedure at the beginning of this lab manual.
4.
Verify that the files PC-VT.EXE and HELP.DAT are in the directory 68KMB.
Enter the following command:
C:\68KMB>DIR/P
If these files do not appear, follow the installation procedure at the beginning of
this lab manual.
5.
Begin PC-VT by entering the following command:
C:\68KMB>PC-VT
When PC-VT begins executing, it briefly displays a copyright screen, then it enters
terminal emulation mode. Several important command-key sequences are
displayed on the screen, including the key sequence to obtain help.
6.
Access PC-VT's help screen by pressing
ALT+H
PC-VT includes twelve screens of help. Browse through these by pressing
PgDn or PgUp
As you can see, PC-VT supports many advanced features. Most of these pertain
to the special keyboard definitions on a VT-100 terminal or the other terminaltypes supported by PC-VT. We will only use a small subset of PC-VT's features in
this and subsequent labs.
7.
Leave help and return to terminal emulation mode by pressing the ESCAPE key.
8.
It may be necessary to re-configure PC-VT to operate with a different COM port,
at a different baud rate, or with a different data format. PC-VT includes two setup
screens to customize its operation for a particular application. Access PC-VT's
SETUP-A screen by pressing
13
CTRL+F1
Proceed to SETUP-B by entering
5
The screen shows all the configuration modes that we are concerned with.
9.
Change the baud rate by continually entering
7
The changes are highlighted near the bottom of the display. Cycle through the
baud rates until 9600 is selected.
10.
Change the data format by continually entering
P
The changes are observed beside the baud rate display. The first character of the
display indicates the number of data bits – 7 or 8. The second character selects
and indicates the type of parity – odd, even, or no parity. The third character
indicates the number of stop bits – always one. Cycle through the options until
7O1 is selected.
11.
Change the COM port by continually entering
C
Observe the changes near the bottom of the screen. Cycle through the options
until COM1 or COM2 is selected, conforming to the connection for the RS232C
serial interface cable on the back of the system. If you are not sure which port to
use, select COM1 for the moment.
12.
Change the File Transfer Mode by continually entering
X
Observe the changes near the middle of the screen. Cycle through the options until
"ASCII (CTRL+Z)" is displayed.
14
13.
Return to SETUP-A by entering
5
14.
Save the changes just made by entering
S
PC-VT will store these changes in a file called PARAMS.DAT. Once PC-VT is
configured, it is not necessary to access the setup screen again unless a change is
necessary.
15.
Return to terminal emulation mode by entering
ESC
16.
Now that PC-VT is configured, let's verify that it is working. Since, for this lab,
we do not have a computer at the other end of the RS232C cable, we use some
ingenuity to test PC-VT.
As characters are entered on the keyboard, PC-VT transmits the ASCII codes out
the designated COM port. Each character is transmitted in serial, framed by a start
bit, a parity bit, and a stop bit. (See Chapter 9 of your textbook for details.)
Normally, a computer is at the other end of the cable and the characters received
are echoed back to the terminal on pin 3. We can simulate this by shorting pin 2
and pin 3 together at the end of the RS232C cable. This is called a wrap-back test.
Use a metal pen tip or other small metal object (e.g., paper clip, screwdriver) to
short pins 2 and 3 on the DB25P connector at the end of the RS232C cable (see
Figure 2-4). Be careful not to short the pins to the metal shroud of the connector
as well. Now enter some characters on the keyboard. They should be echoed
back and appear on the screen. Remove the short and enter some characters on
the keyboard again. No characters are echoed and nothing displays on the screen.
This is a simple but very effective test of PC-VT's operation.
15
PC
RS2 3 2 C
ser ia l in t erf a ce cab le
1
13
D B2 5 P
Co n ne ct o r
14
25
U se a m e t al pe n t ip
o r o t he r m et al o b je ct
t o sh or t p ins 2 & 3
Figure 2-4. Wrapping output on TxD back into RxD
If the test above failed, the most likely problem is that the wrong COM port is
selected. Change the COM port setting using the instructions given previously.
Repeat the test.
Illustrate to your lab instructor that PC-VT is working properly.
2.1
17.
4
One important feature of PC-VT that is used throughout the labs that follow is
File Transmit. When the PC host computer is connected to the 68KMB target
computer, PC-VT is run on the PC host computer to transform it into the terminal
for the target computer. Most of the time, the PC is used to enter commands to
the target computer. As well, it is necessary to transmit a program to the target
computer. PC-VT's File Transmit command is used for this purpose.
From terminal emulation mode, enter
CTRL+F4
This will bring-up a dialog box requesting the name of a file to transmit out the
COM port to the device at the end of the RS232C cable. We'll demonstrate file
transmit mode over the next several steps. For the moment, return to terminal
emulation mode by pressing the ESCAPE key.
16
18.
The next several steps require two lab groups in close proximity to work together.
Obtain a null modem cable from your lab instructor and use it to join together the
RS232C cables connected to each system (see Figure 2-5). The null modem cable
is wired as shown in Figure 2-3, with a DB25S connector at each end. Proceed to
step 24 if you do not have a null modem cable.
RS2 3 2 C
se rial in t e rf ac e ca b le
PC
RS2 3 2 C
se rial in t e r f ac e ca b le
PC
N u ll m od e m
ca b le
Figure 2-5. Connecting two PCs through a null modem cable
Enter characters on the keyboard of one system. They should appear on the screen
of the other system. If this test does not work, either a cable is improperly wired,
or the configuration of PC-VT is not the same on each system. Use the steps
given earlier to access PC-VT's setup screens and resolve the problem.
19.
Temporarily suspend PC-VT and return to MS-DOS by entering
ALT+F
The following MS-DOS prompt should appear
C:\68KMB>
20.
Find the names of hexadecimal files in the current directory by entering
C:\68KMB>DIR *.HEX
Make a mental note of the name of one of the files. Files with .HEX as the
filename suffix contain Motorola S-records representing the binary bytes of a
17
68000 program. The format of Motorola S-records is discussed in Chapter 1 of
your textbook.
21.
Return to terminal emulation mode by entering
C:\68KMB>EXIT
22.
Issue a File Transmit command to PC-VT on one system by entering
CTRL+F4
23.
When the file dialog box appears, enter
xxxx.HEX
where xxxx is the name of a hexadecimal file from step 20.
The content of the file is transmitted out the COM port and appears on the screen
of the other system. Enter Y when asked if CTRL+Z should be transmitted.
Repeat this operation from the other system.
Note: If a large file is transmitted, it is possible that the receiving system will
experience a buffer overflow. This will only occur on systems which are too slow
to receive continuous input at 9600 baud (e.g., a 12 MHz PC/AT). PC-VT
responds by displaying hash characters (#) when its buffer overflows. (Note that
the 68KMB is capable of receiving continuous input at 9600 baud. Buffer
overflows, should they occur, will not compromise the operation of the 68KMB
when using PC-VT in subsequent labs.)
Illustrate to your lab instructor that the two systems are communicating with each
other and that files can be transmitted from one system to the CRT display on the
other system.
2.2
18
4
24.
Terminate PC-VT by pressing
CTRL+F8
CONCLUSION
This lab has introduced PC-VT, the terminal emulation program that will be used
throughout the rest of the labs. Table 2-2 summarizes the PC-VT commands
demonstrated in this lab.
Table 2-2. PC-VT Commands
PC-VT Command
Effect
ALT+F
Suspend PC-VT and go to MS-DOS
ALT+H
Access on-line help
CTRL+F1
Go to SETUP-A screen
CTRL+F4
File Transmit
CTRL+F8
Terminate PC-VT
ADDENDUM
A variety of other modes are selected by toggling bits displayed along the bottom line of
the SETUP-B display. These bits are accessed by moving the cursor with the left-arrow
and right-arrow keys. As the cursor passes over each mode bit, a brief message
summarizes the effect of the bit. A mode bit may be toggled by pressing 6, as noted on
the SETUP-B display.
It should not be necessary to change any of the these bits; but knowing what each does
may be helpful for debugging terminal-related problems later.
Note: Changes introduced through PC-VT's SETUP-A or SETUP-B screens take effect
immediately and stay in effect until PC-VT is terminated. If changes are not saved using
the S option in the SETUP-A screen, then the next time PC-VT is run, the previous
settings are restored.
19
Lab #3
Introduction to the 68KMB
PURPOSE
This lab introduces the 68000 Mini-Board – the 68KMB. The 68KMB is a 68000-based
single-board computer containing a simple monitor program called MON68K. The
monitor program is stored in EPROM and supports about 17 commands.
Upon completion of this lab, students will be able to do the following:
•
•
•
•
•
Operate the 68KMB using its monitor program, MON68K.
Use MON68K commands to examine and change data values in the 68KMB's
memory.
Use MON68K commands to examine and change data values in the 68000's registers.
Use MON68K commands to enter and execute programs.
Use MON68K commands to debug programs using breakpoints, single-stepping,
register display, etc.
PREPARATION
Prior to the scheduled lab session, read the following section from your textbook:
• Appendix E (Command Descriptions)
MATERIALS
Hardware:
• 68KMB 68000-based computer
• PC host computer
• RS232C serial interface cable
20
MS-DOS Software:
• PC-VT
terminal emulation program
INTRODUCTION
This lab introduces the operation of the 68KMB and its monitor program, MON68K.
Complete details are given in your textbook. Chapter 8 describes the 68KMB hardware
and Appendix E describes the monitor program, MON68K. In particular, complete details
of each of MON68K's commands are given in Appendix E. It will be necessary to read
portions of Appendix E while working through this lab.
The 68KMB is intended to work with a PC host computer running MS-DOS. Program
development requires several steps: The program is edited, assembled, and converted to
hexadecimal files containing Motorola S-records. Editing and assembling programs take
place on the PC host computer independent of the 68KMB. When a program is ready for
testing, the 68KMB is connected to the PC host computer's RS232C serial
communications port. Both systems are powered-up and the terminal emulation program
(PC-VT) is run on the PC host computer. This turns the PC host computer into a terminal
and enables access to the 68KMB through the monitor program MON68K. Programs are
transferred to the 68KMB and executed and debugged using MON68K's commands.
The configuration of equipment is illustrated in Figure 3-1.
A C ad a pt e r
PC
110
VAC
RS2 3 2 C
ser ia l in t er f a ce cab le
J4
J3
Co nn e ct ion t o
COM p or t o n
b a ck o f PC
6 8 K MB
6 8 0 0 0 CPU
Figure 3-1. Configuration of lab equipment
21
When powered-up (or upon pressing the Reset button), MON68K begins executing and
outputs the prompt
MON68K
Vx.x>
were x.x is the version number of MON68K. MON68K implements a variety of low-level
commands to control the 68KMB. These will be explored in this lab.
PROCEDURE
1.
Connect the 68KMB to the PC host computer using the RS232C serial interface
cable provided. The cable connects from J3 on the 68KMB to the COM port
connector on the back of the PC host computer (see Figure 3-1).
Power-up both systems. The following MS-DOS prompt should appear:
C:\>
2.
Change to the directory called 68KMB by issuing the command
C:\>CD \68KMB
If this directory is not present, the software from the 68KMB diskette must be
installed. Follow the installation procedure at the beginning of this lab manual.
3.
Begin execution of PC-VT by entering
C:\68KMB>PC-VT
4.
Press and release the RESET button on the 68KMB to obtain the following
prompt:
MON68K
V4.4>
If this prompt does not appear, verify that the RS232C serial cable is connected to
the correct COM port. Verify PC-VT's baud rate, data format, COM port, etc.,
using the steps outlined in Lab #2. The 68KMB RS232C serial interface operates
22
at 9600 baud, with 7 data bits, and odd parity. Ask your lab instructor for
assistance if you still do not get the prompt above.
5.
HELP COMMAND
To obtain a brief listing of all MON68K's commands, enter the help command as
follows:
V4.4>HE
The output should appear as follows:
***** MON68K COMMAND SUMMARY *****
==================================
DI
disassemble instructions
GO
go to user program
GT
go to temporary breakpoint
HE
help (display this message)
LG
load S-records and go
LO
load S-records
MC
memory copy
MD
memory dump
MF
memory fill
MM
memory modify
MT
memory test
RD
register dump
SZ
size of data for MD command
TD
trace delay
TR
trace instructions
.R X
set register R to value X
?
display this message
==================================
A detailed description of each command is given in Appendix E of your textbook.
6.
MEMORY COMMANDS
The most fundamental commands supported by monitor programs are those that
examine and change memory locations. MON68K supports the following memory
commands:
MD
MC
MF
MM
MT
SZ
Memory Display
Memory Copy
Memory Fill
Memory Modify
Memory Test
Size of data for MD command
Read about each of these commands in Appendix E of your textbook. Enter the
examples given.
23
7.
REGISTER COMMANDS
MON68K maintains a copy of the 68000's registers for user programs.
following two commands display and change register contents
RD
.R X
The
Register Dump
Register Modify
Read about these commands in Appendix E of your textbook. Enter the examples
given.
Demonstrate to your lab instructor that you are familiar with MON68K's register
commands and memory commands.
3.1
8.
4
PROGRAM EXECUTION
Over the next several steps we will enter a simple program into the 68KMB's
memory and execute it. The program will be entered directly in hexadecimal. This
is a very primitive way to get a program into memory; but it is a worthwhile
exercise to gain familiarity with MON68K. (In the next lab, we'll use MON68K's
load command to transfer programs written and assembled on the PC host
computer.)
Use the MM command to place the following bytes in memory beginning at
address $008000:
24
Address
008000
008001
008002
008003
008004
008005
008006
008007
008008
008009
00800A
00800B
00800C
00800D
00800E
00800F
008010
008011
Content
32
00
52
41
D2
40
D2
7C
00
09
82
FC
00
02
92
40
4E
4E
These bytes correspond to a very simple 68000 program that performs a few
arithmetic operations.
9.
MON68K's disassemble command (DI) will display the assembly language form of
the program. Issue the following command:
V4.4>DI 8000 7
This command disassembles seven instructions beginning at address $008000. The
output should appear as follows:
-----------------------------
008000
008002
008004
008006
00800A
00800E
008010
3200
5241
D240
D27C0009
82FC0002
9240
4E4E
MOVE.W
ADDQ.W
ADD.W
ADD.W
DIVU.W
SUB.W
TRAP
D0,D1
#1,D1
D0,D1
#9,D1
#2,D1
D0,D1
#14
Each line of output from the DI command corresponds to one 68000 instruction.
In the example above, the first instruction is in memory location $008000. The
binary representation of the instruction is shown in hexadecimal as two bytes – $32
followed by $00. The assembly language version of the instruction is shown on
the right as MOVE.W D0,D1. This instruction copies the 16 bits in the low-order
word of data register D0 to data register D1. Since the instruction is two bytes,
the address of the next instruction is $008000 + 2 = $008002.
25
The program is repeated below with a brief comment beside each instruction.
Examine the comments to gain an understanding of the operations. The comments
assume an initial value (n) is in data register D0 when the program begins.
MOVE.W
ADDQ.W
ADD.W
ADD.W
DIVU.W
SUB.W
TRAP
10.
D0,D1
#1,D1
D0,D1
#9,D1
#2,D1
D0,D1
#14
;make a copy of n in D1
;add 1 to n, store result in D1
;add n to result
;add 9 to result
;divide result by 2
;subtract n from result
;return to MON68K
Use the .R command to initialize data register D0 with a data value of $00000015:
V4.4>.D0 15
11.
Verify the new value in D0 using the register display command:
V4.4>RD
12.
Prepare to execute the program by initializing the 68000's program counter with
$008000:
V4.4>.PC 8000
The command above is a variation of MON68K's .R X command (See Appendix E
of your textbook for details.)
13.
Verify the new value in the program counter by using the register display
command:
V4.4>RD
14.
Execute the program using MON68K's GO command:
V4.4>GO
26
15.
The program executes and terminates by returning to MON68K.
What is the final result in D1?
16.
Now, we'll execute the program again in single-step mode. This is a very powerful
debugging feature of MON68K. Enter
V4.4>.D0 15
V4.4>.PC 8000
V4.4>TR 1
MON68K's trace (TR) command is similar to the GO command except the
instructions are executed one at a time, and the CPU's registers are displayed after
each instruction. As well, the instruction that will execute next is displayed. With
a parameter of 1 (as above), TR executes one instruction and then waits for user
input.
Continue to single-step through the program by pressing the ENTER key
repeatedly. What is the value in D1 after each instruction executes?
Value in D1 After
Instruction Executes
Instruction
MOVE.W
D0,D1
ADDQ.W
#1,D1
ADD.W
D0,D1
ADD.W
#9,D1
DIVU.W
#2,D1
SUB.W
D0,D1
TRAP
#14
Demonstrate the program to your lab instructor.
3.2
27
4
28
17.
Now, we'll re-run the program in single-step mode, this time using a negative value
in D0. Pick a negative value between -5 and -100 and convert it to 32-bit
hexadecimal form.
What number did you choose?
Decimal:
18.
Hexadecimal:
Put this value in D0 and re-run the program in single-step mode. Remember to
initialize the PC to $008000 before issuing the TR command.
Complete the table below identifying the content of D1 and the condition code
register (CCR) after each instruction. The CCR bits are individually identified
below.
CCR
Instruction
MOVE.W
D0,D1
ADDQ.W
#1,D1
ADD.W
D0,D1
ADD.W
#9,D1
DIVU.W
#2,D1
SUB.W
D0,D1
BRA
*
Value in D1
X
N
Z
V
C
Show the completed table to your lab instructor.
3.3
19.
4
To further explore the tracing and debugging features of MON68K, a short
program containing a loop is now demonstrated. Place the following hexadecimal
bytes in memory beginning at address $9000:
29
Address
009000
009001
009002
009003
009004
009005
009006
009007
009008
009009
00900A
00900B
20.
Content
7E
04
7C
F4
E3
1E
53
47
66
FA
4E
4E
Disassemble the program:
V4.4>DI 9000 6
The output should appear as follows:
-------------------------
009000
009002
009004
009006
009008
00900A
7E04
7CF4
E31E
5347
66FA
4E4E
MOVEQ.L
MOVEQ.L
ROL.B
SUBQ.W
BNE.S
TRAP
#4,D7
#-12,D6
#1,D6
#1,D7
$009004
#14
Examine the program above and try to determine what it does. Ask your lab
instructor for assistance, if necessary.
What is the 32-bit hexadecimal value in D7 after the
first instruction executes?
What is the 32-bit hexadecimal value in D6 after the
second instruction executes?
21.
Execute the program in single-step mode and complete the table below. Enter as
many rows as necessary to illustrate the complete execution of the program.
The first row is filled-in to help you get started. It indicates the 68000 state
immediately after the first instruction executes. (The content of D6 is indicated as
"?", since it is not initialized until the second instruction.)
30
Instruction
CCR
PC
Just Finished
X
N
Z
V
C
D6
D7
9002
MOVEQ.L #4,D7
0
0
0
0
0
?
00000004
31
In the table above, circle the state of the Z-bit in the CCR immediately after each
execution of the instruction SUBQ #1,D7.
Why is the state of the Z-bit important
immediately after the SUBQ #1,D7
instruction?
What does the program do? (Provide
as concise an answer as possible.)
There is a much simpler way to achieve
the same result as the above program.
What is it? Show the revised program
on the right. (Hint: Read about the
ROL instruction in Appendix B of your
textbook.)
3.4
4
CONCLUSION
This lab has demonstrated the operation of the 68KMB and its monitor program,
MON68K. The monitor commands introduced in this lab will be used extensively in the
labs that follow.
32
Lab #4
Introduction to A68K and XLINK
PURPOSE
This lab introduces the 68000 cross assembler, A68K, and the linker/locator/conversion
utility, XLINK. These are the primary software development tools for the labs that
follow. A program will be created on the PC using a text editor. The program will be
assembled, converted to hex-ASCII format, downloaded to the 68KMB, and executed.
Upon completion of this lab, students will be able to do the following:
•
•
•
•
•
•
•
Create a 68000 source program using a text editor.
Use A68K to assemble a 68000 source program.
Determine the opcodes for 68000 instructions by examining a listing file.
Use XLINK to convert an object program to a hex file containing Motorola Srecords.
Determine addresses and object bytes of a 68000 program by examining either a
listing file or a hex file.
Download a hex file to a 68000 target system.
Execute a program on a 68000 target system.
PREPARATION
Prior to the scheduled lab session, read the following section from your textbook:
• Section 4.2 (Assembler Operation)
33
MATERIALS
Hardware:
• 68KMB 68000-based computer
• PC host computer
• RS232C serial interface cable
MS-DOS Software:
• A68K
• XLINK
• PC-VT
• EDIT
68000 cross assembler
68000 linker, locator, conversion utility
VT100 terminal emulator
MS-DOS text editor (or equivalent)
68000 Programs:
• MYNAME
• FUN
provided (to be entered)
to be written
PROCEDURE
1.
Using EDIT or a text editor of your own choice, enter the 68000 assembly program
in Figure 4-1 and save it in a disk file called MYNAME.SRC. Change the program
so that the line containing the label MESSAGE contains your name.
* MYNAME.SRC
CR
EQU
LF
EQU
MYNAME
LOOP
MESSAGE
ORG
MOVE.W
MOVEA.L
TRAP
SUBQ.W
BNE
TRAP
DC.B
DC.B
DC.B
END
$0D
$0A
;ASCII carriage return
;ASCII line feed
$8000
#10,D6
;repeat 10x
#MESSAGE,A1
;A1 points to message
#2
;send message
#1,D6
;decrement count
LOOP
;if not 0, do it again
#14
;if 0, return to MON68K
'Scott MacKenzie'
CR,LF
;carriage return, line feed
0
;end with null byte
MYNAME
Figure 4-1. MYNAME.SRC
2.
Assemble the program by entering the command
C:\68KMB>A68K MYNAME.SRC MYNAME.LST MYNAME.OBJ X S
34
The command above (A68K) contains five arguments. In order, these are
•
•
•
•
•
source file to assemble
name of output file for the program listing
name of output file for the binary object code
option to create a cross reference listing
option to place a symbol table in the object file
MYNAME.SRC
MYNAME.LST
MYNAME.OBJ
X
S
The program listing file is a text file which may be printed or displayed on the system
screen. The object file contains binary codes and cannot be printed.
3.
Have a look at the program listing by entering the command
C:\68KMB>TYPE MYNAME.LST
This command displays the contents of the specified file on the CRT display. Press
the PAUSE key if the output scrolls too fast. Press the SPACE bar to resume
output.
Examine the listing file and try to identify opcodes for the instructions in the
program. Figure 4-2 shows the contents of MYNAME.LST. Your listing file will
be very similar, differing only in the ASCII bytes for your name.
1
2
3
4
5
6
7
8
9
10
11
12
13
14
15
* MYNAME.SRC
CR
EQU
LF
EQU
0000000D
0000000A
00008000
00008000
00008004
00008008
0000800A
0000800C
0000800E
00008010
00008012
00008016
0000801A
0000801E
00008021
00008023
00008024
3C3C000A
227C0000
8012
4E42
5346
66F4
4E4E
53636F74
74204D61
634B656E
7A6965
0D0A
00
$0D
$0A
;ASCII carriage return
;ASCII line feed
;repeat 10x
;A1 points to message
MYNAME
LOOP
ORG
MOVE.W
MOVEA.L
$8000
#10,D6
#MESSAGE,A1
MESSAGE
TRAP
SUBQ.W
BNE
TRAP
DC.B
#2
;send message
#1,D6
;decrement count
LOOP
;if not 0, do it again
#14
;if 0, return to MON68K
'Scott MacKenzie'
DC.B
DC.B
END
CR,LF
0
MYNAME
Figure 4-2. MYNAME.LST
35
;begin a new line
;end with null byte
What are the machine language bytes for the
instruction MOVEA.L #MESSAGE,A1?
What are the first five ASCII bytes for your name, as
found in your version of this program?
4.1
4.
4
It was stated above that the object file contains binary codes, and therefore cannot
be printed. Convince yourself of this by entering the command
C:\68KMB>TYPE MYNAME.OBJ
The output to the CRT is garbled. In the worst case, some of the binary codes may
lock-up your system. Enter CTRL+ALT+DEL to re-boot your system, if necessary.
5.
Convert the object file to hex-ASCII format by entering the command
C:\68KMB>XLINK 68K MYNAME.OBJ /O=MYNAME.HEX
The command above (XLINK) contains three arguments:
•
•
•
the CPU type
the object file to convert
the name of the file to receive the output
68K
MYNAME.OBJ
/O=MYNAME.HEX
As well as linking program modules together (described in a later lab), the XLINK
program converts object files to hex-ASCII format. The latter contain Motorola Srecords, which conform to a standard format to represent binary programs in ASCII.
Each binary byte is stored by splitting it into two 4-bit hexadecimal nibbles. Each
nibble is coded as the corresponding ASCII character (0-9, A-F). Motorola Srecords are explained in detail in Chapter 1 of your textbook.
Figure 4-3 illustrates the S-records for the program in Figure 4-2.
36
S00900006D796E616D656F
S11380003C3C000A227C000080124E42534666F437
S11380104E4E53636F7474204D61634B656E7A6981
S1078020650D0A00DC
S90380007C
Figure 4-3. MYNAME.HEX
Circle the first program byte in Figure 4-3.
Circle the last program byte in Figure 4-3.
Circle the ASCII bytes in the message string in Figure 4-3.
4.2
6.
Transfer the program to the target system. (Review Lab #2, if necessary.)
7.
Demonstrate the program to your lab instructor.
4.3
8.
4
4
Make a copy of MYNAME.SRC and save it in a file called FUN.SRC. Put your
name and the date in comment lines at the top. Modify the source program to
display the following message five times with a blank line between each line of
output:
Assembly language programming is fun!
Make the program executable at address $00A00016. Demonstrate the modified
program to your lab instructor.
4.4
37
4
CONCLUSION
Having completed this lab, students are familiar with the 68000 programming environment
used with the 68KMB 68000-based computer.
ADDENDUM
Batch files are included in the 68KMB directory to simplify the use of A68K and XLINK.
These include
A.BATAssemble a source program
L.BAT Convert an object program to Motorola S-records
AL.BAT
Equivalent to A.BAT followed by L.BAT
For example, to assemble MYNAME.SRC using A.BAT, the following command is
entered:
C:\68KMB>A MYNAME
38
Lab #5
Programming Problems
PURPOSE
This lab is an introduction to 68000 assembly language programming. Students will write,
assemble, download, execute, debug, and demonstrate assembly language problems that
solve specific yet simple programming problems. Concepts from the previous labs are
used extensively.
Upon completing this lab, students will be able to do the following:
•
Write, test, and debug 68000 assembly language programs to solve defined problems
in data computation, manipulation, or conversion.
PREPARATION
Prior to the scheduled lab session, read the following chapter from your textbook:
• Chapter 5 (Programming Examples)
MATERIALS
Hardware:
• 68KMB 68000-based computer
• PC host computer
• RS232C serial interface cable
39
MS-DOS Software:
• A68K
• XLINK
• PC-VT
• EDIT
68000 cross assembler
68000 linker, locator, conversion utility
VT100 terminal emulator
MS-DOS text editor (or equivalent)
68000 Programs:
• EXAMPLE
• SHIFT32
• LENSTR
• SAME
• HEXCHAR
• LOOKUP
provided (to be entered)
to be written
to be written
to be written
to be written
to be written
INTRODUCTION
The following programming example demonstrates how problems are stated in this lab.
Problem:
Write a 68000 program called EXAMPLE to compute the sum of three 16bit words of data. The data are stored in memory starting at address $9000,
identified by the label NUMBERS. Store the result immediately after the data, in
SUM at memory location $9006.
Sample Conditions:
Before:
Address
009000
009002
009004
009006
Contents
1234
5678
0ABC
0000
Address
009000
009002
009004
009006
Contents
1234
5678
0ABC
7368
Note: $1234 + $5678 + $0ABC
= $7368
After:
40
The sample conditions show the source data and the memory location where the result is
stored. The result of the addition is shown in the "after" contents of memory location
$9006. This allows the programmer to work through the problem by hand to verify the
objective.
Below is one possible solution to this problem.
Solution:
1
******************************************************
2
*
*
3
******************************************************
4 00008000
CODE
EQU
$8000
5 00009000
DATA
EQU
$9000
6
7 00008000
ORG
CODE
8 00008000 207C0000 EXAMPLE MOVEA.L #NUMBERS,A0 ;use A0 as
00008004 9000
9 00008006 323C0003
MOVE.W
#COUNT,D1
;use D1 as
10 0000800A 4240
CLR.W
D0
;init D0 =
11 0000800C D058
LOOP
ADD.W
(A0)+,D0
12 0000800E 5341
SUBQ
#1,D1
13 00008010 66FA
BNE
LOOP
14 00008012 3080
MOVE.W
D0,(A0)
15 00008014 4E4E
TRAP
#14
16
17 00009000
ORG
DATA
18 00009000 1234
NUMBERS DC.W
$1234
19 00009002 5678
DC.W
$5678
20 00009004 0ABC
DC.W
$0ABC
21 00000003
COUNT
EQU
(*-NUMBERS)/2
22 00009006 0000
SUM
DC.W
0
23 00009008
END
EXAMPLE
41
EXAMPLE.SRC
pointer
counter
0
PROCEDURE
Part I: Debugging
1. Work through the solution to the example problem by hand and complete the table
below. If you are not sure of the precise operation of any instruction, consult
Appendix B of your textbook. (As consistent with MON68K's trace facility, the first
column shows the PC value after each instruction executes.)
Instruction
PC
Just Finished
CCR
X
N
Z
V
C
MOVEA.L
8006
#NUMBERS,A0
42
A0
D0
D1
2. Enter the example problem in a file called EXAMPLE.SRC. Assemble the program
and convert the object output file to S-records. Begin execution of PC-VT and
transfer the program to the 68KMB.
Use MON68K's single-step facility (described in lab #3) to verify your work above.
If you completed the table without any errors, congratulations: You are ready to
undertake problems in assembly language programming. Ask your lab instructor for
assistance if you have trouble determining the correct conditions after any instruction.
5.1
43
4
Part II: Programming Problems
Solve each of the following 68000 assembly language programming problems. Make
appropriate use of comments, labels, and assembler directives in your source code. Enter
your name, the date, and the problem name in comment lines at the top of each source file.
Prior to demonstrating your programs to your lab instructor, obtain printouts of the listing
files. Be prepared to demonstrate your program with sample data specified by your lab
instructor.
Problem 1:
Write a program called SHIFT32 to shift a 32-bit binary number until the
most-significant bit of the number is 1. The address of the number is
defined by the longword variable NUM at location $9000. Store the
normalized (shifted) number in the variable NORM at location $9004.
Store the number of left shifts required in the byte variable SHIFTS at
location $9008. If the number is zero, clear NORM and SHIFTS.
Sample Conditions:
Before:
Address
009000
009002
009004
009006
009008
009100
009102
Contents
0000
9100
FFFF
FFFF
FFFF
1234
5678
Address
009004
009006
009008
Contents
91A2
B3C0
0003
After:
Note: Test your program with values of 0, $FFFFFFFF, etc.
5.2
44
4
Problem 2:
Write a program called LENSTR to determine the length of a string of
characters. The starting address of the string is contained in the 32-bit
variable START at location $9000. The end of the string is marked by an
ASCII null character. Place the length of the string (excluding the null
character) in the variable LENGTH at location $9004.
Sample Conditions:
Before:
Address
009000
009002
009004
009040
009042
009044
009046
009048
Contents
0000
9040
5555
4142
4344
4546
4748
00FF
Address
009004
Contents
0008
After:
Note: Place the ASCII string in your program by enclosing the characters
within single quotes after a DC.B directive.
5.3
45
4
Problem 3:
Write a program called SAME to compare two strings of ASCII characters
to see if they are the same. The starting addresses are contained in the
longword variables START1 at location $9000 and START2 at location
$9004. The first byte of each string contains the string length (in bytes)
and is followed by the string. If the two strings match, clear the variable
MATCH at location $9008; otherwise set its value to -1.
Sample Conditions:
Before:
Address
009000
009002
009004
009006
009008
009040
009042
009044
009050
009052
009054
Contents
0000
9040
0000
9050
5555
0441
4243
44FF
0441
4244
5FDD
009008
FFFF
After:
= -1 (Strings are different!)
Note: Test your program with several different string conditions. Place
strings in your program in the appropriate way.
5.4
46
4
Problem 4:
Write a program called HEXCHAR to convert the contents of the variable
HEX at location $9000 to an ASCII character representing the
hexadecimal value of the variable. HEX contains a single hexadecimal digit
(the four most significant bits are zero). Store the ASCII character in the
variable CHAR at location $9001.
Sample Conditions:
Before:
Address
009000
Contents
0F00
009000
0F46
After:
Note: Verify that your program works for any hexadecimal value.
5.5
47
4
Problem 5:
Write a program called LOOKUP to convert the contents of the BCD
variable DIGIT at location $9000 to a seven-segment code and store it in
the variable CODE at location $9001. If DIGIT does not contain a single
BCD digit, clear CODE. Assume a standard segment arrangement (e.g.,
74LS47) with segment a as bit 0 and segment g as bit 6 (bit 7 = 0, always).
This is shown below. Assume a segment is ON for a 1 and OFF for a 0.
Hint: begin by constructing a table of BCD-to-CODE mappings.
a
f
b
g
c
e
d
Sample Conditions:
Before:
Address
009000
Contents
0400
009000
0466
After:
Note: Verify that your program works for any value from 0 to F.
5.6
4
CONCLUSION
Having completed this lab, students are capable of writing small 68000 programs in
assembly language.
48
Lab #6
Character I/O
PURPOSE
This lab introduces the low-level details of character input/output on the 68KMB. Upon
completion of this lab, students will be able to do the following:
•
•
Write subroutines to perform character input/output on an asynchronous serial
interface.
Use character I/O subroutines in programs that receive input from a keyboard and
send output to a CRT display.
PREPARATION
Prior to the scheduled lab session, read the following sections from Chapter 9 (Interface
Examples) of your textbook:
• Section 9.1 (Introduction)
• Section 9.2 (The 68681 DUART)
• Section 9.3 (RS232C Interface)
MATERIALS
Hardware:
• 68KMB 68000-based computer
• PC host computer
• RS232C serial interface cable
49
MS-DOS Software:
• A68K.EXE
• XLINK.EXE
• PC-VT.EXE
• EDIT.COM
68000 cross assembler
68000 linker, locator, conversion utility
VT100 terminal emulator
MS-DOS text editor (or equivalent)\
68000 Programs:
• MYNAME2
• ALPHA
to be written
to be written
INTRODUCTION
The 68KMB's monitor program, MON68K, includes a variety of built-in routines for
input/output, data conversion, etc. These are accessed through trap instructions.
As an example, the program called MYNAME in lab #4 sent a string of ASCII characters
to a terminal by placing the address of the string in register A1 and then executing a TRAP
#2 instruction:
MOVEA.L
TRAP
#MESSAGE,A1
#2
There is nothing unique about TRAP #2 in the architecture of the 68000. TRAP #2
provides access to special routines in MON68K; but this trap could be used for a different
purpose (or not at all) in other implementations using the 68000 microprocessor. This
point is mentioned because it is important to distinguish details of the 68000 architecture
from details of an implementation – the 68KMB.
As students of computer organization and the 68000 microprocessor, we want to get as
close to the hardware as possible using machine language or assembly language programs.
Traps hide details of input/output. This is convenient for systems' programmers; however,
to uncover the details of input/output subsystems, we want to get inside the low-level
details of character input/output as implemented on typical computer systems such as the
68KMB.
Asynchronous Input/Output
The interface between the MON68K and a terminal (or host computer) uses a serial
RS232C communications channel. Each character is transmitted in the following
sequence:
50
•
•
•
•
a start bit (low)
7 or 8 data bits (LSB first)
a parity bit (optional)
a stop bit (high)
This type of communications is called asynchronous, since the receiver must resynchronize itself with each new character. Usually 7 data bits are used since this is the
size of ASCII codes. Figure 6-1 shows the ASCII code for the letter a framed by a start
bit, an odd parity bit, and a stop bit. (Odd parity means the total number of bits equal to
one is an odd number. Only the data bits and the parity bit are counted.) The reciprocal
of the transmission time for each bit is called the baud rate. For the 68KMB, the baud
rate is 9600, so the period of transmission for each bit is 104 µs.
Id le
St at e
St ar t
Bit
7 Da t a B it s
L SB F ir st
( ' a' = $ 6 1 )
Od d Pa r it y
B it
St o p
B it
Id le
St at e
1
0
1
t im e
Ba ud Rat e
Figure 6-1. Asynchronous character transmission
Of course, characters are stored in parallel in registers or memory locations, so
transmission on an RS232C interface requires special devices at each end to perform
parallel-to-serial conversion or vice versa. On the 68KMB, this device is a 68681
DUART (Dual Universal Asynchronous Receiver/Transmitter). Although the 68681
includes two separate serial interface channels, we will only use Channel A in this lab. Our
discussion of the 68681's features is very limited in this lab. Complete details are found in
The 68000 Microprocessor. The hardware interface to the 68000 is presented in Chapter
8, programming examples are found in Chapter 9, and the 68681 data sheet is found in
Appendix H.
A simplified version of the CPU interface is shown in Figure 6-2.
51
6 8 00 0
Sy st em Bu se s
A d dre ss
De co d ing
Control Regi sters
6 86 8 1
S ta tu s Reg ist er
1 Ch ara cte r
T x B uf fer
3 Ch ara cte r
Rx Buff er
Sh if t Reg ist er
Sh if t Reg ist e r
B a ud Ra t e
Cl oc k
RS 2 3 2 C
Dri ve r
7
RS2 3 2 C
Re cei ve r
3
2
RS2 3 2 In t er f a ce
( t o t e rm in al/ h o st c om pu t er )
Figure 6-2. Interface to the 68681 DUART
The 68681 includes a double-buffered transmitter and a quadruple-buffered receiver.
During transmission, one character can be waiting in the Transmit Buffer while the
previous character is being transmitted out the shift register (see Figure 6-2). For
character reception, a three character FIFO (first-in, first-out) buffer holds characters
waiting to be read through software while the next character is clocked into the shift
register.
In Figure 6-2, note the special interface ICs between the 68681 and the RS232C interface.
An RS232C line driver converts the voltage of outgoing signals from TTL (transistortransistor logic) levels to RS232C levels. An RS232C line receiver converts the voltage of
incoming signals from RS232C levels to TTL levels. This conversion is summarized in
Table 6-1.
Table 6-1. TTL-RS232C Signal Conversions
TTL
RS232C
Logic
Voltage
high (1)
2.4 to 5 volts
low (0)
0 to 0.8 volts
Logic
Voltage
=
MARK
-3 to -25 volts
=
SPACE
+3 to +25 volts
52
Since data are transmitted on pin 3 of the RS232C interface, the 68KMB is configured as
a DCE. A straight-through cable can be used as long as the terminal/host computer at the
opposite end is configured as a DTE (see lab #2).
The address decoding provides access to the 68681's registers through odd-byte addresses
$00C001 to $00C01F. In this lab we are only concerned with the three registers shown in
Table 6-2.
Table 6-2. 68681 Registers
Address
Read
Write
$00C005
Status Register A (SRA)
-
$00C007
Receive Buffer A (RBA)
Transmit Buffer A (TBA)
Each bit in the status register has a different purpose, as shown in Table 6-3.
Table 6-3 68681 Status Register Bit Assignments
7
Received
Break
0 = no
1 = yes
6
Framing
Error
0 = no
1 = yes
5
Parity
Error
0 = no
1 = yes
4
Overrun
Error
0 = no
1 = yes
3
2
1
0
TxEMT
0 = no
1 = yes
TxRDY
0 = no
1 = yes
FFUL
0 = no
1 = yes
RxRDY
0 = no
1 = yes
The bits we are concerned with in this lab are TxRDY (bit 2) and RxRDY (bit 0).
TxRDY indicates either that the transmitter is ready to accept a new character for
transmission (TxRDY = 1), or that the transmit buffer is full (TxRDY = 0). RxRDY
indicates either that a character has been received and is waiting in the FIFO to be read by
the CPU (RxRDY = 1), or that the receive buffer is empty (RxRDY = 0). Both TxRDY
and RxRDY are status flags that are checked through software to determine the status of
an input or output port.
Character Reception
When inputting a character, RxRDY must be interrogated continually (i.e., in a loop) until
it equals 1. This indicates a character has been received and is sitting in the receive FIFO
waiting to be read. After reading the character, RxRDY is cleared automatically unless
there is another character in the FIFO waiting to be read. A flowchart of the steps just
described is shown in Figure 6-3a.
53
NO
En t e r
En t e r
Re ad
RxRD Y F lag
Re ad
T xRD Y Flag
Ch ar a ct e r
W ait ing
?
NO
Buf f er
Em p t y
?
YE S
Y ES
Re ad
Ch ar a ct er
W rit e
Ch ar a ct er
Cle ar Fla g
Cle ar Fla g
Ex it
Ex it
(a)
(b)
Figure 6-3. Flowcharts for (a) character input and (b) character output
The instructions to input a character from the terminal/computer attached to the 68681
into register D0 are shown below:
DUART
SRA
RBA
LOOP
EQU
EQU
EQU
MOVEA.L
MOVE.B
ANDI.B
BEQ
MOVE.B
$00C001
2
6
#DUART,A0
SRA(A0),D7
#1,D7
LOOP
RBA(A0),D0
;base address for 68681
;offset for Status Register A
;offset for Receive Buffer A
;A0 points to 68681
;get Status Register A
;RxRDY = 1?
;no: check again
;yes: input character
Note the effective use of equates to make the instructions easier to understand. As well,
the addressing mode used to access the 68681 registers is address-register-indirect-withoffset. Although absolute long addressing could also be used, this would increase the size
of each instruction by one word.
54
The ANDI instruction uses a mask of 000000012 to clear all bits except bit 0, which
corresponds to the RxRDY bit. After the ANDI instruction, the entire low-byte of D7 = 0
if RxRDY = 0; so the appropriate branch to repeat the test is branch-if-equal-zero (BEQ).
Once a character has arrived, RxRDY = 1 and the branch test fails. The move instruction
following BEQ reads a character from memory location $00C007 (Receive Buffer A) and
places it in D0.
Usually the instruction sequence shown above is part of an input character subroutine or
trap.
Character Transmission
When outputting a character, TxRDY must be interrogated continually to determine when
the last character written has been moved into the shift register. At such time, the next
character can be loaded into the transmit buffer. A flowchart illustrating this is shown in
Figure 6-3b. The following output character sequence is similar to the input character
sequence. In this instance however, we assume an ASCII code has been loaded into D0 in
advance. Note also that bit 2 of the 68681 status register must be interrogated in the
output character sequence.
DUART
SRA
TBA
LOOP
EQU
EQU
EQU
MOVEA.L
MOVE.B
ANDI.B
BEQ
MOVE.B
$00C001
2
6
#DUART,A0
SRA(A0),D7
#4,D7
LOOP
D0,TBA(A0)
;base address for 68681
;offset for Status Register A
;offset for Transmit Buffer A
;A0 points to DUART
;get Status Register A
;TxRDY = 1?
;no: check again
;yes: send character
PROCEDURE
1.
Make a copy of MYNAME.SRC (from lab #4), and save it in a file called
MYNAME2.SRC. Put your name and the data in comment lines at the top. Modify
the new program as follows. Place the code to output a character to the terminal in
a subroutine called OUTCHR. This subroutine should be called from inside the
subroutine OUTSTR. Do not use trap instructions except at the end of the program
to return to MON68K.
Use equates near the top of the source program to define symbols for the 68681
registers. Use these symbols as appropriate in your subroutine.
55
Obtain a printout of the listing file and show it to your lab instructor. Demonstrate
your program.
6.1
2.
4
Write a program called ALPHA that outputs a continuous stream of alphabetic
characters to the terminal as follows:
abcdefghijklmnopqrstuvwxyz
abcdefghijklmnopqrstuvwxyz
abcdefghijklmnopqrstuvwxyz
(etc.)
Monitor the keyboard for input as follows:
• If "U" or "u" is entered, the output switches to uppercase.
• If "L" or "l" is entered, the output switches to lowercase.
• If "Q" or "q" is entered, the program terminates to MON68K.
• Ignore any other input characters.
Do not use trap instructions except at the end of the program to return to MON68K.
Put your name and the date in comment lines at the top. Demonstrate the program
to your lab instructor.
6.2
CONCLUSION
This lab has introduced character I/O on the 68KMB using a 68681 DUART.
QUESTIONS
1.
If odd parity is enabled, what is the state of the parity bit for the
following character codes:
F
56
4
e
z
%
2.
At 4800 baud, what is the duration of each bit transmitted?
3.
How many characters per second can be continuously transmitted at
1200 baud using 7 data bits, no parity, 1 start bit, and 1 stop bit?
4.
An asynchronous serial interface is configured to operate at 4800
baud with 1 start bit, 7 data bits, 1 stop bit, and no parity. What is
the maximum number of characters that can be transmitted across
this interface in one minute?
57
Lab #7
Interface to Switches and LEDs
PURPOSE
This lab introduces parallel input/output with the 68KMB. Upon completion of this lab,
students will be able to do the following:
•
•
•
Write programs that input data from the parallel input port on the 68681 DUART.
Write programs that output data to the parallel output port on the 68681 DUART.
Write programs that synchronize input/output operations using software delays or a
programmable timer.
PREPARATION
Prior to the scheduled lab session, read the following sections from your textbook:
• Section 9.4 (Switches and LEDs)
• Section 9.5 (68681 Timer)
MATERIALS
Hardware:
• 68KMB 68000-based computer
• I/O Board #1 for the 68KMB
• PC host computer
• RS232C serial interface cable
• 20-conductor ribbon cable
58
MS-DOS Software:
• A68K
• XLINK
• PC-VT
• EDIT
68000 cross assembler
68000 linker, locator, conversion utility
VT100 terminal emulator
MS-DOS text editor (or equivalent)
68000 Programs:
• WIRE681
• ROTATE
• TWOHZ
• KEYTEST
• FIVEHZ
provided in 68KMB directory
provided in 68KMB directory
provided in 68KMB directory
to be written
to be written
INTRODUCTION
This is the first in a series of labs to explore interfacing with the 68KMB. These labs use
I/O boards that connect either to J1 or J2 on the 68KMB. This lab uses I/O Board #1
which interfaces to the 68KMB through J1. This is illustrated in Figure 7-1.
A C ad a pt e r
1 10
VAC
Fro m PC Ho st
co m p u t e r
J4
J3
I/ O Bo a rd
#1
6 8 K MB
J1
6 8 0 0 0 CPU
2 0 - c on d u ct o r
rib b o n c ab le
Figure 7-1. Connecting an I/O board to J1 on the 68KMB
J1 provides access to the 68681's parallel input port and parallel output port, as shown in
Figure 8-15 in The 68000 Microprocessor.
59
I/O Board #1 contains a very simple interface to LEDs and switches (see Figure 7-2). The
output port signals on the 68681 are labeled OP0 to OP7. Each signal interfaces to an
LED through a buffer and a resistor. Writing a zero to a port pin turns the corresponding
LED on. Writing a one to a port pin turns the corresponding LED off. Upon reset, all
port pins are one, therefore all LEDs are off.
J1
2 0 -p in
H ea de r
OP7
OP6
OP5
OP4
OP3
OP2
OP1
OP0
To J1
on t he
6 8 KMB
RP1
8 ×
2 20 Ω
7 4 LS2 4 4
8
17
3
7
15
5
9
13
7
3
11
9
17
8
12
4
6
14
11
4
16
5
2
18
+5 V
L ED 7
L ED 6
L ED 5
L ED 4
IC1
L ED 3
L ED 2
L ED 1
L ED 0
20
1, 1 9
+5V
10
+5 V
IP5
IP4
14
SW5
15
SW4
16
IP3
IP2
IP1
IP0
SW3
12
SW2
13
SW1
6
SW0
1
nc
2
nc
N1
6 ×
1 0 kΩ
19
nc
20
nc
Figure 7-2. I/O Board #1
The 68681's parallel input port is only six bits wide. The input port signals are labeled
IP0-IP5, as seen in Figure 7-2. Each input bit is connected to a single-pole single-throw
switch. One terminal of each switch connects to ground, and the other terminal connects
to an input port pin through a 10K pull-up resistor (see Figure 7-2).
Recall from lab #6 that the base address of the 68681 is $00C001 and that internal
registers reside at consecutive odd addresses from this address up to $00C01F. To access
the 68681's parallel ports, three registers are used. These are summarized in Table 7-1.
60
Table 7-1. 68681 Registers Used With This Lab
Read
Write
Address
Name
Function
Name
$00C01B
IPR
Input Port
-
Function
-
$00C01D
-
-
OPR_SE
Set Output Register Bits
T
(clear pins)
$00C01F
-
-
OPR_CL
Clear Output Register Bits
R
(set pins)
Reading input port pins is a simple matter of reading memory address $00C01B. Bits 0-5
reflect the state of the input port pins IP0-IP5, and bits 6-7 are read as ones. For example,
the instruction
MOVE.B
$00C01B,D0
reads the state of IP0-IP5 into bits 0-5 of data register D0.
Writing to the output port is more difficult. To clear output pins, a mask byte must be
written to address $00C01D with a one in each position where an output port pin is to be
cleared. To set output pins, a mask byte must be written to address $00C01F with a one
in each position where an output port pin is to be set. As noted in Table 7-1, there is an
inverse relationship between the output register bits and the output pins.
The operation of the 68681's output port may seem odd, but there is a good reason for it
to work as it does. Consider that the outputs might be divided among two or more
interfaces. If the software driver for one interface needs to set or clear a few bits in the
output port while leaving the others as is, there is no easy way to do so (since the output
port is write-only). The 68681 implementation is a simple solution to this, allowing output
pins to be set or cleared independent of other pins.
Writing an 8-bit value to the output pins requires three steps. First, the value is written to
OPR_CLR. Second, the value is complemented. Third, the complemented value is
written to OPR_SET. For example, to copy the contents of the low-byte in D0 to the
output port, the following instruction sequence could be used:
MOVE.B
NOT.B
MOVE.B
D0,$00C01F
D0
D0,$00C01D
;write to OPR_CLR
;complement data
;write to OPR_SET
61
PROCEDURE
1.
With the 68KMB powered-off, connect I/O Board #1 to J1.
2.
Power-on the 68KMB and the PC host computer. Execute PC-VT and obtain the
MON68K prompt from the 68KMB.
3.
Use MON68K's memory modify command to read the state of the switches
connected to the 68681's parallel input port:
V4.4>MM C01B
The value displayed reflects the state of the input switches. Toggle some of the
input switches and re-read the input port. The easiest way to do this is to press the
down-arrow key followed by the up-arrow key until the desired memory address is
displayed in the current line.
Note: Do not write data to address $C01B. This will re-configure the output port
and foul-up subsequent access to the 68681. To restore the 68681 to its default
configuration, press the 68KMB's reset switch.
4.
Use MON68K's commands to write to OPR_CLR and OPR_SET to turn LEDs on
and off.
Demonstrate to your lab instructor that you are comfortable using MON68K
commands to read the input switches and write to the LEDs.
7.1
5.
4
An example program called WIRE681 is presented in Example 9-3 in your textbook.
WIRE681 simulates a wire connection between the six input switches and the six
least-significant LEDs. Review the software listing and the description of the
program to gain an understanding of its operation.
62
WIRE681, and other examples from your textbook, are located in the 68KMB
directory of drive C on the PC host computer. Run the program and demonstrate it
to your lab instructor. Be prepared to answer questions on the operation of this
program.
7.2
6.
Another example program called ROTATE is presented in Example 9-4 in your
textbook. Review the software listing and the description of the program to gain an
understanding of its operation. Run the program and demonstrate it to your lab
instructor.
7.3
7.
4
4
OK, now it's your turn: Write a program called KEYTEST that inputs characters
from the console and displays the ASCII code in binary on the LEDs. Put the
program in a loop and terminate to MON68K when q is detected.
Put your name and the date in comment lines at the top of the source program.
Demonstrate KEYTEST to your lab instructor.
7.4
8.
4
An example program called TWOHZ is presented in Example 9-5 in your textbook.
The program makes LED #3 flash at a rate of 2 Hz. Unlike, Example 9-4, which
uses a software delay to synchronize output, TWOHZ uses the 68681's built-in
timer. Review the software listing and the description of the program to gain an
understanding of its operation.
63
Run TWOHZ and demonstrate it to your lab instructor.
7.5
9.
4
Write a modified version of TWOHZ that causes all 8 LEDs to flash at a rate of 5
Hz. Call the new program FIVEHZ.
Continue to use the 68681 timer in FIVEHZ. A new approach is required, however.
In Example 9-5, we directed the timer output to OP3 by writing $04 to the output
port configuration register. This will not work here, because we want all 8 LEDs to
flash. The solution is to interrogate the timer status directly to determine when the
counter reaches its terminal count. Each time the terminal count is reached, the
output data should be complemented. (Note: It takes two toggles of the output data
to achieve one period of flashing.) The terminal count is tested through the
counter/timer ready bit of the interrupt status register (ISR). See Chapter 9, Table
9-2 and Appendix H, Table 6. Each time the counter/timer ready bit changes from 0
to 1, a terminal count has been reached and data can be written to the LEDs. A stop
command is required to clear the counter/timer ready bit. This is performed through
the 68681's STOP register, which is address-triggered (see Chapter 9, Table 9-2).
Any read of this register (e.g., a TST instruction) will work fine. Note that when
the 68681 is in "timer mode", as is the case here, the stop command does not
actually stop the timer; it just clears the counter/timer ready bit in the interrupt status
register.
Put your name and the date in comment lines at the top of the source program.
Demonstrate the program to your lab instructor.
7.6
4
CONCLUSION
This lab has introduced simple parallel I/O on the 68KMB using the 68681's parallel input
port, parallel output port, and timer.
64
Lab #8
Interface to a 7-Segment LED
PURPOSE
This lab introduces interfacing to 7-segment LEDs. Upon completion of this lab, students
will be able to do the following:
•
Write programs that perform counting and code conversion using a 7-segment
display.
PREPARATION
Prior to the scheduled lab session, read the following section from your textbook:
• Section 9.7 (7-Segment LED Interface)
MATERIALS
Hardware:
• 68KMB 68000-based computer
• I/O Board #2 for the 68KMB
• PC host computer
• RS232C serial interface cable
• 20-conductor ribbon cable
65
MS-DOS Software:
• A68K
• XLINK
• PC-VT
• EDIT
68000 cross assembler
68000 linker, locator, conversion utility
VT100 terminal emulator
MS-DOS text editor (or equivalent)
68000 Programs:
• LED7
• LED5HZ
• LED7A
• RSEGMENT
provided in 68KMB directory
provided in 68KMB directory
to be written
to be written
INTRODUCTION
This is the second in a series of labs to explore interfacing with the 68KMB. I/O Board #2
is a simple interface between the 68681 on the 68KMB and a 7-segment display and four
switches. The schematic is illustrated in Figure 8-1.
66
J1
2 0 - p in
H ea de r
O P7
O P6
O P5
O P4
O P3
O P2
O P1
O P0
To J1
on t he
6 8 KMB
+5 V
RP1
8 ×
7 4 L S2 4 4
2 20
1 4, 3
Ω
8
17
3
7
15
5
1
9
13
7
13
3
11
9
10
IC1
dp
12
8
6
14
7
11
4
16
2
5
2
18
11
17
8
4
20
1, 1 9
+5V
IP4
14
nc
15
nc
a
b
b
f
c
g
d
c
e
e
d
f
dp
g
M A N7 2 A
7 - s e g m en t
c o m m on
a no d e L ED
10
IP5
a
N1
4 ×
+5 V
1 0 kΩ
16
IP3
IP2
IP1
IP0
SW 3
12
SW 2
13
SW 1
6
SW 0
1
nc
2
nc
19
nc
20
nc
Figure 8-1. I/O Board #2
I/O Board #2 is very similar to I/O Board #1. Instead of six input switches, I/O Board #2
only has four. These are used to input a 4-bit BCD or hexadecimal code. The output
LEDs are combined in a 7-segment display driven by OP0-OP6. A decimal-point LED is
driven by OP7. Electrically, the interface to the LEDs is identical to that in I/O Board #1.
PROCEDURE
1.
With the 68KMB powered-off, connect I/O Board #2 to J1.
2.
Power-on the 68KMB and the PC host computer. Execute PC-VT and obtain the
MON68K prompt from the 68KMB.
67
3.
Use MON68K's memory modify command to access the 68681's output port
registers. Experiment with turning on the segments of the LED display one at a
time. For example, turn on segment a, then segment b, etc. Review lab #7, if
necessary.
Demonstrate to your lab instructor that you are comfortable using MON68K
commands to turn the LEDs on and off.
8.1
4.
4
An example program called LED7 is presented in Example 9-7 in your textbook.
LED7 reads a 4-bit hexadecimal code from the input switches on I/O Board #2 and
outputs the corresponding 7-segment pattern to the display. Review the software
listing and the description of the program to gain an understanding of its operation.
Run the program and demonstrate it to your lab instructor. Be prepared to answer
questions on the operation of this program.
8.2
5.
4
Make a copy of LED7.SRC and call it LED7A.SRC. Put your name and the date in
comment lines at the top of the source file. Modify the new program such that only
BCD codes are displayed. If a code in the range $1010 to $1111 is read from the
switches, the display should appear blank.
Demonstrate the program to your lab instructor.
8.3
6.
4
An example program called LED5HZ is presented in Example 9-8 in your textbook.
LED5HZ counts from 0 to F repeatedly at 5 Hz. The count is displayed on the 7-
68
segment display on I/O Board #2. Review the software listing and the description of
the program to gain an understanding of its operation.
Run the program and demonstrate it to your lab instructor. Be prepared to answer
questions on the operation of this program.
8.4
7.
4
Write a program to operate with the 7-segment display in I/O Board #2. The
program should light segments one at a time, following a pattern around the outside
of the display (a, b, c, ... f, a, b, and so on). The frequency of rotation should be 5
Hz. That is, segment a is on for 200 ms, segment b is on for 200 ms, and so on.
Bonus: Place the output instructions in an interrupt service routine and time the
rotation using the 68681 timer. Example 9-6 in your textbook illustrates how to
create timed interrupts using the 68681 timer. Review this if necessary.
Call the new program RSEGMENT. Put your name and the date in comment lines
at the top. Demonstrate the program to your lab instructor.
8.5
4
CONCLUSION
This lab has introduced code conversions, counting, and timed I/O on the 68KMB using
the 68681's parallel input port, parallel output port, and timer.
69
Lab #9
Interface to a 4-Digit Display
PURPOSE
This lab introduces interfacing to a 4-digit display. Upon completion of this lab, students
will be able to do the following:
•
•
•
Write programs that perform counting and code conversion using a 4-digit display.
Write programs that perform parallel-to-serial data conversion using a parallel output
port and an MC14499 serial display driver.
Write programs to output a 4-digit count in decimal at a fixed rate.
PREPARATION
Prior to the scheduled lab session, read the following section from your textbook:
• Section 9.8 (4-Digit 7-Segment Display)
MATERIALS
Hardware:
• 68KMB 68000-based computer
• I/O Board #3 for the 68KMB
• PC host computer
• RS232C serial interface cable
• 20-conductor ribbon cable
70
MS-DOS Software:
• A68K
• XLINK
• PC-VT
• EDIT
68000 cross assembler
68000 linker, locator, conversion utility
VT100 terminal emulator
MS-DOS text editor (or equivalent)
68000 Programs:
• COUNT4
• COUNT4D
provided in 68KMB directory
to be written
INTRODUCTION
This is the third in a series of labs to explore interfacing with the 68KMB. I/O Board #3 is
a simple interface between the 68681 on the 68KMB and a 4-digit output display. The
output consists of four 7-segment LED displays driven by an MC14499. As shown in
Figure 9-1, only three 68681 output signals are required to interface to the MC14499.
+5 V
J1
2 0 - p in
he ad e r
18
V cc
5
4
OP2
11
13
5
12
OP1
OP0
RP 1
8 ×
47 Ω
DA T A
CL OCK
a
ENA BL E
20
b
c
MC1 4 4 9 9
+5 V
10
d
IC1
e
6
C1
0 .0 1 5
µF
f
O SC
g
9
GN D
D4
7
h (d p)
D3
8
D2
10
4
14
3
13
2
8
1
7
17
6
16
1
15
2
14
4
L ED 1
MA N 7 4 A
L ED 2
MA N 7 4 A
L ED 3
MA N 7 4 A
L ED1
M A N7 4 A
a
a
a
a
aa
bb
cc
f
ee
f
b
g
dd
c
e
b
f
c
e
d
dp
b
g
c
e
d
dp
g
f
g
c
e
d
ff
b
g
d
dp
dp
dp
4 ,1 2
D1
11
4 , 12
4 ,1 2
4 ,1 2
T1
T2
T3
T4
2N39 04
2 N39 04
2 N3 90 4
2N3 9 0 4
Figure 9-1. I/O Board #3
The interface is described in detail in The 68000 Microprocessor (Section 9.8). Review
this before proceeding.
71
PROCEDURE
1.
With the 68KMB powered-off, connect I/O Board #3 to J1.
2.
Power-on the 68KMB and the PC host computer. Execute PC-VT and obtain the
MON68K prompt from the 68KMB.
3.
An example program called COUNT4 is presented in Example 9-9 in The 68000
Microprocessor. COUNT4 outputs a 4-digit count to the MC14499. The count
increments at 10 Hz, beginning at 0000 and overflowing at 9999. Review the
software listing and the description of the program to gain an understanding of its
operation.
The program is in the directory 68KMB on the PC host computer. Run the program
and demonstrate it to your lab instructor. Be prepared to answer questions on the
operation of this program.
9.1
4.
4
Make a copy of COUNT4.SRC and save it in a file called COUNT4D.SRC. Put
your name and the date in comment lines at the top. Modify the program to count
down instead of up.
Demonstrate the program to your lab instructor.
9.2
4
CONCLUSION
This lab has introduced code conversions, counting, and timed I/O on the 68KMB using
the 68681's parallel input port, parallel output port, and timer.
72
Lab #10
Interface to an 8-Digit Display
PURPOSE
This lab introduces interfacing to an 8-digit display. Upon completion of this lab, students
will be able to do the following:
•
•
•
•
•
Write interrupt-driven programs for the 68000 microprocessor.
Write programs that perform counting and code conversion using an 8-digit display.
Write a program to output an 8-digit count at a fixed rate.
Write a program to implement a time-of-day alarm clock.
Write programs to synchronize I/O operations using the 68681 programmable timer.
PREPARATION
Prior to the scheduled lab session, read the following sections from your textbook:
• Section 7.7 (Interrupt-Initiated I/O)
• Section 9.6 (68681 Timer With Interrupts)
• Section 9.9 (8-Digit 7-Segment Display)
MATERIALS
Hardware:
• 68KMB 68000-based computer
• I/O Board #4 for the 68KMB
• PC host computer
• RS232C serial interface cable
• 20-conductor ribbon cable
73
MS-DOS Software:
• A68K
• XLINK
• PC-VT
• EDIT
68000 cross assembler
68000 linker, locator, conversion utility
VT100 terminal emulator
MS-DOS text editor (or equivalent)
68000 Programs:
• TIME
• ALARMCLK
provided in 68KMB directory
to be written
INTRODUCTION
This is the fourth in a series of labs to explore interfacing with the 68KMB. I/O Board #4
is an interface between the 68681 on the 68KMB and a 8-digit output display. The output
consists of eight 7-segment LED displays driven by two MC14499s. Only three 68681
output signals are required, even though the display contains eight digits. This is possible
because the MC14499s can be cascaded, as illustrated in Figure 10-1.
J1
2 0 -p in
He ad e r
D IGIT
SEG
M C1 4 4 9 9
To J1
on the
68KMB
OP2
OP1
OP0
D IGIT
SEG
MC1 4 4 9 9
4
h
D AT A
CL OCK
ENA BL E
11
5
DA TA
CL OCK
ENA BL E
h
nc
nc
nc
20
+5 V
10
( see I/ O BOA RD # 3 f o r p in ou t s, e t c .)
Figure 10-1. I/O Board #4
The interface is described in detail in The 68000 Microprocessor (Section 9.9). Review
this before proceeding.
74
This is our first lab that uses interrupts. Interrupts represent a significant leap forward –
one which poses special challenges for students. The sections listed as Preparation should
be studied carefully before proceeding. Ask your lab instructor for assistance if any of the
concepts on interrupts are unclear.
PROCEDURE
1.
With the 68KMB powered-off, connect I/O Board #4 to J1.
2.
Power-on the 68KMB and the PC host computer. Execute PC-VT and obtain the
MON68K prompt from the 68KMB.
3.
An example program called TIME is presented in Example 9-10 in your textbook.
TIME outputs the time to the eight-digit display on I/O Board #4. The time is
updated in one-second intervals. This is a relatively complex program since output
to the display is synchronized by interrupts. In fact, MON68K operates concurrently
with the interrupt routine that updates the output display. Review the software
listing and the description of the program to gain an understanding of its operation.
The program is in the directory 68KMB on the PC host computer. Run the
program. After the program begins executing, the time 1:00:00 is displayed and
control is passed back to MON68K. A new time is set using MON68K's memory
modify command.
Answer the following questions:
What memory locations must be modified to set the
time?
Hours:
Minutes:
Seconds:
Which of the 68000's interrupt levels is used in this
example?
How are interrupts generated in this example?
What are the first three instructions to execute in
response to an interrupt for this example?
75
What will happen if a level-1 interrupt occurs while
the program is executing? Why?
Demonstrate the program to your lab instructor. Be prepared to answer questions
on the operation of this program.
10.1
4.
4
Make a copy of TIME.SRC and save it in a file called ALARMCLK.SRC. Put your
name and the date in comment lines at the top. Modify the program to include an
alarm feature. Use memory locations to hold the alarm time, as with the time-ofday. When the alarm time is reached, output five beeps to the console at half-second
intervals. The time should be continually updated and displayed during the alarm.
Note: A beep is generated by sending the ASCII bell code ($07) to the console.
Run the program and demonstrate it to your lab instructor.
10.2
4
CONCLUSION
This lab has introduced code conversions, counting, and timed I/O on the 68KMB using
the 68681's parallel input port, parallel output port, and timer. I/O operations were
synchronized using interrupts.
76
Lab #11
Interface to a Hexadecimal Keypad
PURPOSE
This lab introduces interfacing a keypad to a 68000 microprocessor through a 6821
peripheral interface adapter (PIA). Upon completion of this lab, students will be able to
do the following:
•
•
•
Write program to perform input/output operations using a 6821 PIA.
Write programs that scan rows and columns of a keypad to determine if a key is
pressed.
Write programs to perform software debouncing.
PREPARATION
Prior to the scheduled lab session, read the following sections from your textbook:
• Section 9.11 (6821 Peripheral Interface Adapter)
• Section 9.12 (Hexadecimal Keypad Interface)
MATERIALS
Hardware:
• 68KMB 68000-based computer
• I/O Board #5 for the 68KMB
• I/O Board #2 for the 68KMB
• PC host computer
• RS232C serial interface cable
• 20-conductor ribbon cable
77
MS-DOS Software:
• A68K
• XLINK
• PC-VT
• EDIT
68000 cross assembler
68000 linker, locator, conversion utility
VT100 terminal emulator
MS-DOS text editor (or equivalent)
68000 Programs:
• KEYPAD
• KEYPAD2
provided in 68KMB directory
to be written
INTRODUCTION
This is the fifth in a series of labs to explore interfacing with the 68KMB. I/O Board #5 is
quite different from the boards used in the preceding labs. Instead of interfacing to the
68681 on the 68KMB, I/O Board #5 contains its own peripheral interface IC – a 6821
peripheral interface adapter (PIA). The connection to the 68KMB is through J2. J2
includes the required address decoding and control signals to interface to any 8-bit
peripheral interface device from the 6800-family. The signals on J2 of the 68KMB are
illustrated in Figure 8-16 in The 68000 Microprocessor.
The connection between I/O Board #5 and connector J2 of the 68KMB is illustrated in
Figure 11-1.
11 0
V AC
I/ O B o ar d
#5
A C ad ap t er
2 0 -co n d uc t o r
rib b o n c ab le
F ro m PC H o st
c o m pu t er
J4
J2
J3
J1 is u se d f o r
I/ O Bo ar d s # 1 - # 4
6 8 K MB
J1
6 8 0 0 0 CPU
Figure 11-1. Connecting I/O Board #5 to J2 on the 68KMB
78
The hexadecimal keypad has 16 pressure-sensitive switches arranged in four rows and four
columns. These connect to Port A on the 6821 PIA. The complete interface is shown in
Figure 11-2.
J1
2 0 -p in
He ad e r
1
26
2
27
3
28
4
29
D7
D6
D3
D2
D1
D0
SD
A1 6
CA 2
CA 1
D6
D5
D4
6 8 21
PIA
D7
D5
30
6
31
3
PA 1
PA 2
D2
32
8
33
He xa d e cim a l
ke y p ad
2
D3
7
40
PA 0
D4
5
39
PA 3
4
5
D1
J
9
23
11
24
H
IC 1
D0
6
N
7
M
8
L
9
K
G
F
0
1
2
3
4
5
6
7
8
9
A
B
C
D
E
F
PA 4
CS2
CS1
1
To J2
on the
68KMB
2
+5 V
22
PA 5
CS0
IC 2
PA 6
7 4 HC 0 0
3
VPA
RESET
R/ W
E
IN T 3
A3
A2
A1
18
6
4
IC2
5
13
34
19
21
17
25
12
38
PA 7
RESET
T S1
R/ W
14
E
IRQA
37
nc
IRQB
15
35
16
36
20
10
RS1
RS0
+5V
+5 V
20
1
PB0
PB1
PB2
PB3
PB4
PB5
PB6
PB7
10
11
12
13
14
15
16
17
1
2
3
4
5
6
7
8
18
CB1
19
CB2
V cc
GN D
W IRE WRA P
A REA
9
10
+ 5V
GND
11
12
Figure 11-2. I/O Board #5
The 6821 PIA and the keypad interface are discussed in Section 9.11 and Section 9.12 of
your textbook. Review this material before proceeding.
PROCEDURE
1.
With the 68KMB powered-off, connect I/O Board #5 to J2.
79
2.
Power-on the 68KMB and the PC host computer. Execute PC-VT and obtain the
MON68K prompt from the 68KMB.
3.
An example program called KEYPAD is presented in Example 9-12 in your
textbook. KEYPAD scans the rows and columns of the keypad to determine if a key
is pressed. The program includes software debouncing to ensure the mechanical
contacts in the keypad have stabilized. When a clean key closure is detected, the
ASCII code for the key is sent to the console. Review the software listing and the
description of the program to gain an understanding of its operation.
The program is in the directory 68KMB on the PC host computer. Run the program
and demonstrate it to your lab instructor. Be prepared to answer questions on the
operation of this program.
11.1
4
4.
Power-off the 68KMB. For the next part of this lab, we will use two I/O Boards –
I/O Board #5 and I/O Board #2. Connect I/O Board #2 to J1 on the 68KMB.
Power-on the 68KMB. Execute PC-VT and obtain the MON68K prompt from the
68KMB.
5.
Make a copy of KEYPAD.SRC and save it in a file called KEYPAD2.SRC. Put
your name and the date in comment lines at the top. Modify the program such that
the output is sent to the 7-segment display on I/O Board #2 (rather than to the
console).
Run the new program and demonstrate it to your lab instructor.
11.2
4
CONCLUSION
This lab has introduced interfacing to a hexadecimal keypad, including scanning the rows
and columns of the keypad and debouncing mechanical switches through software.
80
81
Lab #12
Interface to a Digital-to-Analog Converter
PURPOSE
In this lab a digital-to-analog converter (DAC) is interfaced to a 68000 microprocessor
through a 6821 peripheral interface adapter. Upon completion of this lab, students will be
able to do the following:
•
•
•
•
•
Use monitor commands to read and write registers inside a 6821 PIA.
Use monitor commands to control a DAC connected to a 6821 PIA.
Calibrate the output voltage range of a DAC.
Write programs to create waveforms at the output of a DAC.
Write programs to create musical tones using a loudspeaker driven by a DAC.
PREPARATION
Prior to the scheduled lab session, read the following sections from your textbook:
• Section 9.13 (Analog Output)
• Section 9.14 (Digital Sine Wave Generator)
• Section 9.15 (Music Output From a Digital-to-Analog Converter)
82
MATERIALS
Hardware:
• 68KMB 68000-based computer
• I/O Board #6
• power supply (±12 volt or ±15 volt)
• oscilloscope
• screwdriver
• PC host computer
• RS232C serial interface cable
• 20-conductor ribbon cable
• amplified external speaker (optional)
MS-DOS Software:
• PC-VT
• A68K
• XLINK
VT100 terminal emulator
68000 cross assembler
68000 linker, locator, conversion utility
68000 Programs:
• SAWTOOTH
• TRIANGLE
• SINEWAVE
• AMAJOR
provided in 68KMB directory
to be written
provided in 68KMB directory
provided in 68KMB directory
INTRODUCTION
This is the sixth in a series of labs to explore interfacing with the 68KMB. I/O Board #6
contains a single 6821 PIA and two separate interfaces. Port A of the PIA interfaces to an
8-bit digital-to-analog converter (DAC), and Port B of the PIA interfaces to an 8-bit
analog-to-digital converter (ADC). The DAC is an MC1408L8 device, and the ADC is an
ADC0804 device. This lab is concerned with the DAC interface.
The complete schematic of I/O Board #6 is spread over three pages. These appear in
Figure 12-1, at the end of this lab. Note that I/O Board #6 requires an external ±12 volt
or ±15 volt power supply.
The DAC interface is discussed in Section 9.13 of your textbook. Review this before
proceeding.
83
PROCEDURE
1.
With the 68KMB powered off, connect I/O Board #6 to J2.
2.
With the external power supply switched off, connect the power supply cable to I/O
Board #6.
Have your lab instructor verify the connections, before turning the power on.
12.1
4
3.
Power-on all equipment and execute PC-VT on the PC host computer. The monitor
prompt should appear on the console.
4.
Calibrate the MC1408L8 as follows:
(a)
Reset the 68KMB.
(b)
Configure Port A of the 6821 as an output port by writing $FF to Data
Direction Register A (DDRA) at address $010001. (Hint: Use MON68K's
memory modify command.)
(c)
Enable access to Port A of the 6821 by writing $04 to Control Register A
(CRA) at address $010003.
(d)
Write $FF to Port A at address $010001. (This places the byte $FF at the
input to the MC1408L8 DAC, generating the full-scale output voltage at
Test Point 1, TP1 (see Figure 12-1a).
(e)
Adjust trimpot R1 while observing the voltage at TP1. Calibrate for a fullscale output of 10 volts.
84
5.
Write the following values to the DAC and measure the analog result with an
oscilloscope. Tabulate the results:
$00
$7F
$80
$B0
$FF
Demonstrate to your lab instructor that you can configure the 6821 PIA using
MON68K's memory modify command and manually write data to the MC1408L8
DAC.
12.2
6.
4
A program called SAWTOOTH is presented in Example 9-13 in your textbook. The
program creates a sawtooth waveform at TP1 by continually sending a count to the
DAC. Review the software listing and the description of the program to gain an
understanding of its operation.
The program is in the directory 68KMB on the PC host computer. Run the program
and demonstrate it to your lab instructor.
What is the frequency of the sawtooth waveform that you
observe on the oscilloscope?
What is the duration of each output step?
7.
Use MON68K's DI command to disassemble the program. Compare the result with
the listing in your textbook.
At what address within the program is the variable COUNT
located?
85
8.
Using MON68K's memory modify command, change the variable COUNT to
$000A. Re-run the program.
What is the frequency of the sawtooth waveform?
With COUNT = $000A, what is the duration of each output
step?
9.
Leave COUNT = $000A, but change the variable STEP to $0040.
What is the frequency of the output waveform?
What is the duration of each output step?
12.3
10.
Make a copy of SAWTOOTH.SRC and call it TRIANGLE.SRC. Put your name
and the date in comment lines at the top. Modify the new program to create a
triangle waveform instead of a sawtooth waveform. Demonstrate the new program
to your lab instructor.
12.4
11.
4
4
A program called SINEWAVE is presented in Example 9-14 in your textbook. The
program creates a sine wave at TP1 by continually outputting data read from a lookup table. Review the software listing and the description of the program to gain an
understanding of its operation.
The program is in the directory 68KMB on the PC host computer. Run the
program. Connect channel A of the oscilloscope to TP1 and channel B to TP2. The
circuit between TP1 and TP2 is a 4 kHz low-pass filter (see Figure 12-1a).
Demonstrate the program to your lab instructor.
86
What is the frequency of the sine wave that you observe on
the oscilloscope?
12.
Using MON68K's memory modify command, change the variable STEP to $0020.
Re-run the program.
What is the frequency of the sine wave?
13.
Change the variable STEP to $0080 and re-run the program.
What is the frequency of the sine wave?
12.5
4
14.
The DAC circuit includes additional output stages to create audio tones for music or
speech output. Section 9.15 in your textbook describes the circuit and presents a
technique to create musical tones. Review this section before proceeding.
15.
A program called AMAJOR is presented in Example 9-15 in your textbook. The
program uses the console keyboard to create musical tones on the loudspeaker on
I/O Board #6. The volume is controlled by potentiometer R2. If an amplified
external speaker is available, connect it to J1 (on I/O Board #6).
Review the software listing and the description of the program to gain an
understanding of its operation.
The program is in the directory 68KMB on the PC host computer. Connect channel
A of the oscilloscope to TP1 and channel B to TP2. Run the program and
demonstrate your musical skill to your lab instructor.
12.6
87
4
CONCLUSION
This lab has introduced interfacing to a digital-to-analog converter using a 6821 PIA and
an MC1408L8 8-bit DAC.
88
J3
D7
D6
D5
2
27
3
28
4
29
D2
D1
D0
D7
PIA
CA 2
CA 1
D6
D4
PA 7
D3
PA 6
D2
PA 5
D1
PA 4
D0
PA 3
30
5
31
6
7
32
8
33
PA 2
SD
A16
39
40
D5
D4
D3
6 821
26
1
23
9
PA 1
CS2
24
11
PA 0
CS1
9
8
7
6
See
Page 2
5
4
3
2
22
1
To J2
on the
68KMB
2
CS0
+5V
IC1
IC2
7 4 HC0 0
PB 7
3
4
V PA
RESET
R/ W
E
INT 3
A3
A2
A1
18
6
IC2
PB 6
5
13
34
19
21
17
25
12
32
PB 5
RE SET
R/ W
E
IRQ A
14
32
nc
IRQ B
15
32
16
32
20
PB 3
PB 2
PB 1
PB 0
16
15
14
13
12
11
See
Page 3
10
RS 1
RS 0
+ 5V
+5 V
20
10
J4
PB 4
17
1
V cc
CB2
CB1
19
18
G ND
D3
1N40 0 1
+1 2V
Auxiliary
Power
Supply
GN D
-1 2 V
D4
1N4 00 1
(a)
Figure 12-1. I/O Board #6 (a) CPU Interface (b) DAC output (c) ADC input
89
MC1 4 0 8 L8
5
PA 7
6
7
8
15
D4
PA 4
9
R1 9 b
150 Ω
14
D5
PA5
From
Page 1
V re f +
D6
PA6
+ 5V
R1
1 kΩ
D7
R1 9 a
100 Ω
R2 2
1 kΩ
V re f -
D3
PA3
10
PA 2
11
PA 1
12
PA 0
1
D2
IC2
R2 1
4 . 7 kΩ
nc
D1
+ 1 2 V -1 2 V
D0
7
4
13
+5 V
IO
V CC
4
2
6
IC5
3
16
C3
15 pF
COM P
8
TP1
LM 3 0 1
( V O)
1
2
GN D
V EE
C4
33 pF
3
-1 2 V
C6
0 . 0 4 4 µF
T P2
R2 0
2 .4 k Ω
J1
( V O F)
+12V -12V
+ 1 2 V -1 2 V
7
R5
1 . 2 kΩ
R6
1 .2 k Ω
7
4
2
6
IC6
8
C7
0 .0 2 2
4
2
6
3
A ux illia r y
J ac k
1
µF
IC7
3
L M3 0 1
( lo w -pa s s
f ilt e r )
8
R2
5 kΩ
C5
33 pF
1
+
LM 3 0 1
( vo lt ag e
f o llo w e r )
C8
3 3 pF
(b)
Figure 12-1. (continued)
90
C1
2 5 µF
Sp ea ke r
T P3
(V A )
R9
100 k Ω
1%
R7
1 kΩ
1%
T P4
( V B)
R1 2
1 0 kΩ
R1 3
1 kΩ
+
+12V - 12V
J2
7
R8
1 kΩ
1%
Micro p h on e
20 0 Ω
4
2
6
1
R1 5
2 2 kΩ
D1
1N91 4
C1 0
33 p F
D2
1 N9 1 4
C1 3
0 . 0 4 4 µF
LF 3 9 8
( sam p le an d h o ld)
+1 2V
+1 2V -1 2V
T P5
( V C)
7
1
µF
R1 8
R1 9
1 8 k Ω 5 .6 k Ω
Vcc
20
+5 V
8
3
IC1 0
8
C1 5
0. 0 2 2
A D C0 8 0 4
4
6
3
-1 2 V
T P6
( V D)
1
4
2
L M3 0 1
( am p )
8
C9
33 pF
R2 4
2 . 4 kΩ
R1 6
1 . 2 kΩ
IC9
3
+5 V
R1 7
1 .2 k Ω
4
2
+5 V
L M3 0 1
( pr e- a m p )
8
1
R1 1
1 0 0 kΩ
1%
R2 3
47 Ω
7
R1 4
2 2 kΩ
6
IC 8
3
+12 V - 12 V
C1 2
1 0 µF
R1 0
47 Ω
IC1 1
L M3 0 1
( low - pa s s f ilt e r )
6
7
C1 1
3 3 pF
5
C1 4
0.001
µF
IC3
X1
X2
X3
6
7
V in ( + )
V in ( - )
CS
RD
1
2
+5V
R3
1 0 kΩ
t r im p o t
J5
EXT
3
CB2
WR
5
CB1
From
Page 1
INTR
11
PB7
PB6
PB5
PB4
PB3
PB2
PB1
PB0
12
13
14
15
16
17
18
(c)
Figure 12-1. (continued)
91
V re f
CL K R
D7
D6
D5
D4
D3
D2
D1
D0
C LK IN
D GND
A GND
9
nc
19
4
R4
1 0 kΩ
t r im p o t
10
C2
1 50 pF
8
Lab #13
Interface to an Analog-to-Digital Converter
PURPOSE
In this lab an analog-to-digital converter (ADC) is interfaced to a 68000 microprocessor
through a 6821 peripheral interface adapter. Upon completion of this lab, students will be
able to do the following:
•
•
•
Write programs to interface to an ADC through a 6821 PIA.
Write programs to input speech samples through an ADC and store them in a buffer.
Write a program to output the content of a buffer to an ADC.
PREPARATION
Prior to the scheduled lab session, read the following sections from your textbook:
• Section 9.16 (Analog Input)
• Section 9.17 (Digitized Speech Input and Playback)
92
MATERIALS
Hardware:
• 68KMB 68000-based computer
• I/O Board #6
• I/O Board #3
• microphone (200 Ω)
• power supply (±12 volt or ±15 volt)
• screwdriver
• PC host computer
• RS232C serial interface cable
• two 20-conductor ribbon cable
MS-DOS Software:
• PC-VT
VT100 terminal emulator
68000 Programs:
• ADCTEST
• ADCTEST2
• SPEECH
• SPEECH2
provided in the 68KMB directory
to be written
provided in the 68KMB directory
to be written
INTRODUCTION
This lab is a continuation of lab #12. Our main focus is on the analog input channel on I/O
Board #6. An ADC0804 8-bit analog-to-digital converter connects to Port B of the 6821
PIA, as shown in Figure 12-1 in lab #12. The interface also includes three op amps and a
sample-and-hold circuit to allow input from a microphone.
The ADC interface is discussed in Sections 9.16 and 9.17 of your textbook. Review these
before proceeding.
PROCEDURE
1.
With the 68KMB powered off, connect I/O Board #6 to J2.
2.
With the external power supply switched off, connect the power supply cable to I/O
Board #6.
93
Have your lab instructor verify the connections, before turning the power on.
13.1
3.
4
Notice in Figure 12-1c (lab #12) that jumpers X1, X2, and X3 select between three
possible inputs to the ADC. If X1 is installed, the ADC's input is from the
microphone and the conditioning circuitry. If X2 is installed, the ADC's input is
from the 10K trimpot labeled R3 in Figure 12-1c. If X3 is installed, input is from an
external transducer connected to J5 on I/O Board #6..
Install a jumper in X2. (Remove the jumper from X1, if it is present.)
4.
An example program called ADCTEST is presented in Example 9-16 in your
textbook. The program continually reads the ADC0804 and reports the result of the
conversion on the console. Review the software listing and the description of the
program to gain an understanding of its operation.
The program is in the directory 68KMB on the PC host computer. Run the program
and connect an oscilloscope or voltmeter to test point #6 (TP6). Demonstrate the
program to your lab instructor.
Adjust the trimpot R3 to the following voltages, as measured at TP6. For each
voltage, what is the converted result read from the ADC0804?
0 volts
1 volt
2 volts
3 volts
4 volts
5 volts
94
13.2
5.
4
Power-off the 68KMB by removing the AC adapter jack and by switching off the
external power supply connected to I/O Board #6.
For the next part of this lab, we will add I/O Board #3 – the 4-digit LED display.
Connect I/O Board #3 to J1 on the 68KMB. Power-on the 68KMB and switch on
the external power supply connected to I/O Board #6. Execute PC-VT and obtain
the MON68K prompt.
6.
Make a copy of ADCTEST.SRC and call it ADCTEST2.SRC. Put your name and
the date in comment lines at the top. Modify the new program such that the output
is sent to the 4-digit display on I/O Board #3. The display should vary from 0 to 255
as the input varies from 0 volts to 5 volts. Use subroutines from COUNT4.SRC in
lab #9, as appropriate.
Hint: Begin by writing a subroutine that converts a hexadecimal byte to three BCD
digits. This can be done by first dividing the byte by 100 to obtain the hundreds
digit, and then dividing the remainder by 10 to obtain the tens digit. The final
remainder is the ones digit.
Demonstrate the new program to your lab instructor.
13.3
4
7.
Move the jumper from position X2 to position X1 on I/O Board #6. With jumper
X1 installed, the trimpot is disconnected from the ADC0804. Input is now obtained
through the microphone and its associated conditioning circuitry.
8.
A program called SPEECH is presented in Example 9-17 in your textbook. The
program has two parts. When started at address $008000, speech samples are
gathered from the ADC0804 and placed in a buffer. When started at address
$00800C, the samples in the buffer are sent to the DAC output channel on I/O
95
Board #6. Review the software listing and the description of the program to gain an
understanding of its operation.
The program is in the directory 68KMB on the PC host computer. Connect the
microphone provided to connector J2 on I/O Board #6. Run the program and
demonstrate it to your lab instructor.
13.4
4
Notes:
1.
Adjust trimpot R2 to vary the volume of the output.
2.
Install an amplified external speaker in the auxiliary connector (J1) to
improve the quality of audio output.
3.
If the speech output is very noisy, follow the calibrate/checkout procedure
for I/O Board #6 given in Appendix A of this lab manual.
9.
Make a copy of SPEECH.SRC and save it in a file called SPEECH2.SRC. Place
your name and the date in comment lines at the top. Modify the new program as
follows. Place the playback routine in a loop such that the content of the RAM
buffer is continually sent to the DAC. During playback, monitor the console for
keyboard input and respond in the following way when a key is pressed:
u
d
SPACE
q
the frequency of playback increases (UP)
the frequency of playback decreases (DOWN)
the frequency of playback is restored to normal
quit to MON68K
Ignore any other keystrokes. (Hint: The frequency of playback can be controlled by
altering the timer count.)
Demonstrate the modified program to your lab instructor.
13.5
96
4
CONCLUSIONS
This lab has demonstrated an interface between an analog-to-digital converter and the
68000 microprocessor through a 6821 PIA.
97
Lab #14
Modular Programming
PURPOSE
This lab introduces a variety of concepts relevant to developing large assembly language
programs.
Upon completion of this lab, students will be able to do the following:
•
•
•
Define and give examples of the following terms: modular programming, relocatable
module, absolute module, code segment, data segment, external symbol, public
symbol, linker, and locator.
Write a 68000 assembly language program consisting of multiple relocatable modules
containing code and data segments.
Assemble, link, and locate a 68000 program, creating a single absolute output
module.
PREPARATION
Prior to the scheduled lab session, read the following section from Chapter 4 of your
textbook:
• Section 4.7 (Modular Programming)
MATERIALS
Hardware:
• 68KMB 68000-based computer
• PC host computer
• RS232C serial interface cable
98
MS-DOS Software:
• A68K
• XLINK
• EDIT
• PC-VT
68000 cross assembler
68000 linker/locator
MS-DOS editor (or equivalent)
VT100 terminal emulator
68000 Programs:
• ECHO
• MYLIB
• ECHO2
• MYLIB2
provided in the 68KMB directory
provided in the 68KMB directory
to be written
to be written
INTRODUCTION
A simple program is used in this lab to illustrate modular programming. The program is
split across two files which must be assembled separately and then linked together to form
a single absolute object module.
The program does the following:
1.
Output the prompt "Enter a command: ".
2.
Input a line from the keyboard. (Store the line in an input buffer. Echo each
character as it is typed.)
3.
When RETURN is entered, echo the entire input line (again).
4.
Repeat.
When a line beginning with "q" or "Q" is entered, the program terminates to MON68K.
The main part of the program is in a file called ECHO.SRC and the subroutines are in a
file called MYLIB.SRC.
Section 4.7 in your textbook contains a detailed discussion on modular programming
using the above program as an example. Review this section before proceeding.
99
PROCEDURE
1.
The files ECHO.SRC and MYLIB.SRC are in the directory 68KMB on the PC host
computer. Assemble each of these.
Examine the listing files and answer the following questions:
What is the name of the code segment?
What is the name of the data segment?
What is the first address of the prompt string? (Note:
this address is relative to the start of ECHO.OBJ.)
What does the symbol CR stand for?
What is the opcode for the RTS instruction?
14.1
2.
4
The file ECHO.XLK is a batch file for XLINK to combine ECHO.OBJ and
MYLIB.OBJ into a single executable object program. ECHO.XLK is also located in
the directory 68KMB on the PC host computer. Use the TYPE command to
examine ECHO.XLK.
Do you understand the purpose of each line in ECHO.XLK? If not, review Section
4.7 in your textbook or ask your lab instructor for assistance.
3.
Issue the appropriate command to link and locate ECHO.OBJ and MYLIB.OBJ.
Review Section 4.7 of your text if you are not sure how to do this.
What output files were created?
Examine the link map and answer the following questions:
What is the absolute address of the beginning of the
prompt string?
100
What is the first and last address of your program?
What is the first and last address of the RAM buffer
used in the program?
What is the address of the OUTSTR subroutine?
4.
Execute PC-VT and transfer ECHO.HEX to the 68KMB. Verify that the program
is in the 68KMB's memory.
What MON68K command did you enter?
5.
Run the program and demonstrate it to your lab instructor.
14.2
6.
4
Now, we'll modify ECHO. First, make copies of ECHO.SRC, MYLIB.SRC,
ECHO.XLK and save them in ECHO2.SRC, MYLIB2.SRC, and ECHO2.XLK
respectively. Put your name and the date in comments lines at the top of each
source file. Change the prompt to "Sharon's program, Enter a command: ". (Use
your name, please.)
Modify the program to interpret the first character on each line as follows:
Q
Quit to MON68K (this is already supported)
U
Echo the entire line in uppercase characters. Convert lowercase characters
to uppercase characters. Leave graphic characters as is.
L
Echo the entire line in lowercase characters. Convert uppercase characters
to lowercase characters. Leave punctuation characters as is.
F
Echo the input line forwards
B
Echo the input line backwards
101
?
Display a description of the commands supported
For any other command character, do not echo the line. Re-issue the prompt and
repeat. Recognize commands in both uppercase and lowercase.
Continue to use a modular approach in the modified program. Put the code to
determine the command in ECHO2. Put the code to execute commands in
subroutines in MYLIB2. Remember to change the filenames in ECHO2.XLK as
appropriate.
Demonstrate the new program to your lab instructor.
14.3
4
CONCLUSION
Having completed this lab, students are familiar with modular programming in 68000
assembly language.
102
Lab #15
Firmware Development
PURPOSE
This lab introduces firmware development – the process of putting a program into
EPROM for execution on a target system.
Upon completion of this lab, students will be able to do the following:
•
•
•
•
Write 68000 programs which are position-independent.
Burn a 68000 program into EPROM.
Install EPROMs on a target system.
Execute a user program installed in EPROM on a target system.
MATERIALS
Hardware:
• 68KMB 68000-based computer
• PC host computer
• EPROM programmer
• RS232C serial interface cable
MS-DOS Software:
• A68K
• XLINK
• EPP-01
• HEXOBJ
• EDIT
• PC-VT
68000 cross assembler
68000 linker/locator
EPROM programming software (or equivalent)
hex-to-binary conversion utility (or equivalent)
MS-DOS editor (or equivalent)
VT100 terminal emulator
103
68000 Programs:
• FIRMWARE
• ECHO3
• MYLIB3
in 68KMB directory
to be written
to be written
INTRODUCTION
Software burned into EPROM is called firmware. The process of writing software which
will eventually execute in EPROM is called firmware development.
The 68KMB includes two EPROM sockets for user programs. One socket is for the
upper-byte data (even addresses), and the other socket is for the lower-byte data (odd
addresses). By default, the 68KMB configures these sockets for 2764 (or 2764A)
EPROMs beginning at address $004000. A 2764 contains 8K by 8 bits, so the two user
sockets can hold a program up to 16K bytes in length.
An additional feature of the 68KMB allows the program in the user EPROMs to execute
immediately after a system reset. This will occur if jumper X16 is installed. MON68K
senses whether or not X16 is installed upon reset. If X16 is not installed, MON68K
proceeds as usual. If X16 is installed, execution is transferred to address $004000. The
importance of this feature is that a terminal or host computer is not needed to initiate the
user program. If X16 is installed, execution following a reset operation immediately
passes to the user EPROMs.
This lab assumes an EPROM programmer is available and that the lab instructor will
demonstrate its operation to students. At the University of Guelph, we use an inexpensive
EPROM programmer from Modular Circuit Technology (MCT).1 Figure 15-1, near the
end of this lab, illustrates the menu that appears when the accompanying programming
software (EPP-01) is executed. A sub-menu appears for each command, making the
operation of the EPROM programmer very simple. With the MCT programmer, a hex file
(S-records) must be converted to a binary file before programming. A utility called
HEXOBJ performs this conversion.
One point about programming EPROMs deserves special mention. Since the 68000's data
bus is 16-bits wide, a program must be split in half and burned into two EPROMs – an
upper-byte EPROM and a lower-byte EPROM. This is easy to do with the MCT (and
most other) programmers. After selecting the P option to program an EPROM, a submenu appears with options to program only the even (upper) bytes or the odd (lower)
1Available
from JDR Microdevices, 2233 Samaritan Dr., San Jose, CA 95124.
104
bytes from the EPROM programmer's buffer. It is advisable to write U or L on top of
each EPROM to prevent installing them in the wrong user socket.
In the following procedure, two programs will be burned into EPROM and installed in the
68KMB. The first, called FIRMWARE, is debugged and ready to go. This will help us
with the initial hurdle of burning a program into EPROM and installing it on the 68KMB.
For the second program, we'll use the ECHO2 program from lab #14 (with a few
modifications).
Let's discuss the first program: FIRMWARE is simple program that sends the following
message to the console ten times:
Test firmware program
The program is in the 68KMB directory on the PC host computer. For convenience, the
listing is given in Figure 15-2, at the end of this lab.
FIRMWARE is a position-independent program, which means it can execute at any
address. Even though it is ORGed to begin at address 0 (line 15, Figure 15-2), and it will
be programmed starting at address 0 in EPROM, once the EPROMs are installed in the
user sockets on the 68KMB, they are selected at address $004000. FIRMWARE will
execute at address $004000 on the 68KMB!
From a programming perspective, position-independent implies that the code segment
does not include any instructions using absolute addresses. For example, an instruction
such as
JMP
LOOP
cannot be used because the destination of the jump is specified using absolute addressing.
However, the instruction
BRA
LOOP
is perfectly OK, because the branch destination is specified using PC-relative addressing.
A specific example appears in line 16 of FIRMWARE where A1 is initialized as follows:
LEA
TEXT(PC),A1
The source addressing mode is PC-relative with offset, which is position-independent
because the text string is the same distance from the LEA instruction regardless of the
program's location. Note, however, that the following similar instruction is not positionindependent and cannot be used in our example program:
105
MOVEA.L
#TEXT,A1
Initializing a pointer to the 68681 DUART is another story, however. Since the DUART
resides starting at address $00C001 regardless of the address of any program that accesses
it, initializing an address register to point to the DUART can use a specific address. This
occurs in lines 28 and 51 (see Figure 15-2).
One final note about FIRMWARE. Since this program uses the DUART to output a
message to the console, and since we want the program to execute immediately after a
system reset, we must include the appropriate code to initialize the DUART. We have not
had to do this previously because our programs were executed from MON68K: The
DUART was already initialized! So, FIRMWARE includes an INIT subroutine (lines 5156) and "BSR INIT" at the beginning (line 16).
For the second program, we'll use ECHO2 from lab #14. Begin by copying ECHO2.SRC,
MYLIB2.SRC, and ECHO2.XLK to new files: ECHO3.SRC, MYLIB3.SRC and
ECHO3.XLK. The program will have to be modified, replacing absolute memory
references (within the code segment) with relative addressing.
Since ECHO2 is your program, we'll leave it to you to sift through the code and introduce
the appropriate modifications. Change the prompt too:
Sharon's FIRMWARE echo program, Enter a command:
Since we want this program to be stand-alone, it must include an INIT subroutine, as in
the FIRMWARE example program. Delete the code supporting the q command as well.
Remember to modify ECHO3.XLK, changing the filenames as appropriate. Leave the
data segment at address $00A000, since this is the location of the 68KMB's RAM. It's a
good idea to debug the modified program in RAM with the code segment at address
$008000, as in lab #14. When a position-independent version of ECHO3 is working at
address $008000, modify ECHO3.XLK and change address of the EPROM segment to 0.
Re-link, burn the new program into EPROM, install it in the user sockets, and try it out.
Good luck!
PROCEDURE
1.
The example program called FIRMWARE is found in the 68KMB directory on the
PC host computer. The listing appears in Figure 15-2, at the end of this lab.
Obtain two blank 2764 or 2764A EPROMs from your lab instructor.
106
CAUTION: A 2764 is not the same as a 2764A. Use
the EPROM programming software to select the correct
type of EPROM. Programming a 2764A as a 2764 will
destroy the device.
Burn this program into an upper-byte EPROM and a lower-byte EPROM. Install
the EPROMs in the user sockets on the 68KMB. Test the program two ways: first,
by entering the MON68K command "GO 4000"; then by installing jumper X16 and
pressing the RESET switch. Demonstrate the program to your lab instructor.
15.1
4
Note: Jumpers X5 through X11 on the 68KMB configure the size and type of device
installed in the user sockets. The following jumpers are required for 2764 or 2764A
EPROMs:
X5
jumper
X6
no jumper
X7
jumper
X8
no jumper
X9
no jumper
X10 jumper
X11 no jumper
2.
Make the changes described earlier to the ECHO program. While debugging the
new program, leave its execution address at $008000, as in lab #14. Demonstrate to
your lab instructor that ECHO3 is executing correctly in RAM.
15.2
107
4
3.
Modify ECHO3.XLK, placing the EPROM code segment at address 0. Re-link the
program and burn it into EPROM. Install jumper X16 and demonstrate the program
to your lab instructor.
15.3
4.
4
OPTIONAL: Under supervision of your lab instructor, remove the MON68K
EPROMs from the 68KMB. Install the ECHO3 EPROMs in place of MON68K and
test out the new-but-definitely-not-improved 68KMB.
Replace the MON68K EPROMs and verify that the 68KMB is operating properly.
CONCLUSION
Having completed this lab, students are familiar with firmware development on the
68KMB.
108
MCT
E(E)PROM PROGRAMMER
V1.0
MODEL : MCT-MEP
(C) SEP 1988
intelligent
By Modular Circuit Technology
MAIN MENU :
===================================
1. DIR
2. LOAD OBJ FILE TO MEMORY BUFFER
3. SAVE MEMORY BUFFER TO DISK
4. DEBUG MEMORY BUFFER
5. GANG SIZE
6. PROGRAMMING ALGORITHM
7. SET MEMORY BUFFER SIZE
M. MANUFACTURER
T. TYPE
B. BLANK CHECK
P. PROGRAM
A. AUTO
R. READ
V. VERIFY
C. COMPARE
D. DISPLAY & EDIT
Q. QUIT
* MFG.: Intel
* ZIP.: 1
* TYP.: 2764A/27C64 *PROG.:
# Vpp.: 12.5V
SELECT WHICH NUMBER ?
Figure 15-1. EPROM programmer menu
109
# VCC.: 6.0V
1
******************************************************
2
*
FIRMWARE.SRC
*
3
******************************************************
4 0000C001
DUART
EQU
$C001
;68681 base address
5 00000000
MR1A
EQU
0*2
;mode reg. 1A
6 00000000
MR2A
EQU
0*2
;mode reg. 2A
7 00000002
CSRA
EQU
1*2
;clock select reg. A
8 00000002
SRA
EQU
1*2
;status register A
9 00000004
CRA
EQU
2*2
;command reg. A
10 00000006
TBA
EQU
3*2
;Tx buffer A
11 0000000D
CR
EQU
$0D
;ASCII carriage return
12 0000000A
LF
EQU
$0A
;ASCII line feed
13 000000BB
B9600
EQU
$BB
;9600 baud
14
15 00000000
ORG
0
16 00000000 613C
FIRMWARE BSR.S
INIT
;init 68681 DUART
17 00000002 3E3C0009
MOVE.W
#9,D7
;use D7 as counter
18 00000006 43FA0056 LOOP
LEA
TEXT(PC),A1
;A1 ---> message
19 0000000A 6124
BSR.S
OUTSTR
;send it
20 0000000C 51CFFFF8
DBRA
D7,LOOP
;repeat until done
21 00000010 60FE
BRA
*
;infinite loop
22
23
******************************************************
24
* OUTCHR - OUTput CHaRacter in D0 to serial port
*
25
******************************************************
26 00000012 2F08
OUTCHR
MOVE.L
A0,-(A7)
;save A0
27 00000014 3F07
MOVE.W
D7,-(A7)
;save D7
28 00000016 207C0000
MOVEA.L #DUART,A0
;A0 points to 68681
0000001A C001
29 0000001C 1E280002 OUTCHR2 MOVE.B
SRA(A0),D7
;get port A status
30 00000020 02070004
ANDI.B
#4,D7
;buffer empty?
31 00000024 67F6
BEQ.S
OUTCHR2
;no: check again
32 00000026 11400006
MOVE.B
D0,TBA(A0)
;yes: send char.
33 0000002A 3E1F
MOVE.W
(A7)+,D7
;restore D7
34 0000002C 205F
MOVE.L
(A7)+,A0
;restore A0
35 0000002E 4E75
RTS
36
37
******************************************************
38
* OUTSTR - OUTput null-terminated STRing
*
39
******************************************************
40 00000030 2F00
OUTSTR
MOVE.L
D0,-(A7)
;save D0 on stack
41 00000032 1019
OUTSTR2 MOVE.B
(A1)+,D0
;get character
42 00000034 6704
BEQ.S
EXIT
;if null byte, done
43 00000036 61DA
BSR.S
OUTCHR
;send it
44 00000038 60F8
BRA.S
OUTSTR2
;repeat
45 0000003A 201F
EXIT
MOVE.L
(A7)+,D0
;restore D0
46 0000003C 4E75
RTS
47
Figure 15-2. FIRMWARE.LST (page 1 of 2)
110
48
******************************************************
49
* INIT
INITialize 68681 DUART channel A
*
50
******************************************************
51
0000003E 207C0000
INIT
MOVEA.L
#DUART,A0
;A0 points to
DUART
00000042 C001
52
00000044 117C0006
MOVE.B
#$06,MR1A(A0)
;7 data, odd
parity
00000048 0000
53 0000004A 117C000F
MOVE.B
#$0F,MR2A(A0)
;2 stop bits (Tx)
0000004E 0000
54 00000050 117C00BB
MOVE.B
#B9600,CSRA(A0) ;set baud rate
00000054 0002
55 00000056 117C0005
MOVE.B
#$05,CRA(A0)
;Tx/Rx enabled
0000005A 0004
56 0000005C 4E75
RTS
57
58 0000005E 0D0A5465 TEXT
DC.B
CR,LF,'Test firmware program',0
00000062 73742066
00000066 69726D77
0000006A 61726520
0000006E 70726F67
00000072 72616D00
59 00000076
END
FIRMWARE
Figure 15-2. FIRMWARE.LST (page 2 of 2)
111
Appendix A
Checkout and Calibration Procedure for I/O Board #6
Part I - Setup
1.
Perform the usual setup procedure for the 68KMB.
2.
Using a 20-conductor ribbon cable, connect I/O Board #6 to J2 on the 68KMB.
3.
Connect the ±12 volt or ±15 volt external power supply to the the banana jacks on
I/O Board #6.
4.
Power-up the 68KMB, then power-up the external power supply.
5.
Run PC-VT and obtain the MON68K prompt on the console.
Part II- DAC
1.
A test program called SAWTOOTH is found in the C:\68KMB directory on the PC
host computer. Load and run SAWTOOTH and measure the waveform at TP1
using an oscilloscope. Adjust R1 to obtain a 0-10 volt waveform.
2.
Adjust R2 to verify that an audible tone is heard through the on-board speaker.
Part III - ADC
3.
Press and release the RESET switch on 68KMB. Measure the clock waveform at
pin 4 of the ADC0804 (IC3). Adjust R4 to obtain f = 640 kHz (p = 1.56 µs).
Notes:
(i)
The clock waveform will be triangular and will range from about 0.5 volts to
2 volts.
(ii)
The clock many be up to 1.46 MHz (p = 0.68 µs), but not lower than 640
kHz.
(ii)
If the clock cannot be adjusted within 640 kHz to 1.46 MHz, remove
capacitor C2 on I/O Board #6 and replace as follows:
(a) If f < 640 kHz (p > 1.56 ms), replace C2 with a 100 pF capacitor.
(b) If f > 1.46 MHz (p < 0.68 ms), replace C2 with a 220 pF capacitor.
113
4.
I/O Board #6 is delivered with a jumper in X1. Move this jumper to X2. Load and
run the test program ADCTEST. Observe the output on the console while adjusting
R3. The output should vary from 00 to FF.
5.
Move the jumper to the X1 position. Install the microphone provided with I/O
board #6 in J2, and load the SPEECH program. (The switch on side of microphone
should be "on".)
6.
Run the record routine by entering "GO 8000" from the MON68K prompt. After
pressing the RETURN key, speak into the microphone for about 1.5 seconds, until
the MON68K prompt re-appears.
7.
Run the playback routine by entering "GO 800C" from the MON68K prompt.
Adjust R2 to control the volume of output. (The quality of audio output is
improved by installing an amplified external speaker system to auxiliary jack J1.)
114