1
Toolset On-line User Guide:
D-FlowMaster
HP/ElectraLink DTS
Copyright © 2003, 2004-2009 Hewlett-Packard Development Company, L.P.
HP/ElectraLink DTS - Toolset On-line User Guide – D-FlowMaster
Table of Contents
1 DOCUMENT AUTHORISATION.................................................................................. 3 2 D-FLOWMASTER........................................................................................................ 5 2.1 Editor ...................................................................................................................................... 5 2.1.1 To create a new file .............................................................................................................. 7 2.1.2 Opening an existing file ....................................................................................................... 9 2.1.3 Saving a file ....................................................................................................................... 11 2.1.4 Appending Groups ............................................................................................................. 13 2.1.5 Updating existing Groups or the Header ........................................................................... 14 2.1.6 Changing File Format ........................................................................................................ 14 2.1.7 Inserting Groups................................................................................................................. 14 2.1.8 Deleting Groups ................................................................................................................. 15 2.1.9 Importing Groups from an external file ............................................................................. 15 2.1.10 Printing a file.................................................................................................................. 16 2.1.11 Starting a new file .......................................................................................................... 17 2.1.12 Data Entry ...................................................................................................................... 19 2.2 File Audit .............................................................................................................................. 22 2.3 Searching for a Message ...................................................................................................... 23 2.4 Search Criteria ..................................................................................................................... 23 2.5 Message Search Results Table ............................................................................................ 25 2.6 Preferences............................................................................................................................ 25 3 3.1 APPENDIX- A: D-FLOWMASTER PRE-REQUISITES ............................................. 30 SUN Java Plug-in ................................................................................................................. 30 3.2 Security Policy ...................................................................................................................... 30 3.2.1 Find the JRE version used by your browser. ..................................................................... 30 3.2.2 Find the location of the JRE used by your browser. .......................................................... 30 3.2.3 Create a policy file using the Policy Tool.......................................................................... 31 3.3 Internet Explorer 7 and above ............................................................................................ 36 11/07/2011
Copyright © 2003, 2004-2010 Hewlett-Packard Development Company, L.P.
User_Guide - D-FlowMaster.docx
Page 2 of 36
HP/ElectraLink DTS - Toolset On-line User Guide – D-FlowMaster
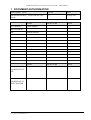
1 DOCUMENT AUTHORISATION
DOCUMENT TITLE
ISSUE
DATE
HP/ElectraLink DTS – Toolset On-line User
Guide
1.1
4th July 2011
NAME
AUTHOR(S)
SIGNATURE
DATE
SIGNATURE
DATE
Gareth Hughes
REVIEWER(S)
HP
Alan McDonald
ElectraLink
Mark Pearce
NAME
ON BEHALF OF
HP
ON BEHALF OF
ELECTRALINK
11/07/2011
Copyright © 2003, 2004-2010 Hewlett-Packard Development Company, L.P.
User_Guide - D-FlowMaster.docx
Page 3 of 36
HP/ElectraLink DTS - Toolset On-line User Guide – D-FlowMaster
Document Control
CURRENT VERSION: 1.1
Project Name:
Status:
HP/ElectraLink DTS
Production
Doc. Version No:
1.1
Date:
4th July 2011
(Doc. Version No. and Date are used for configuration control of deliverables.)
AMENDMENT HISTORY:
Document
Version #
Version Date
Author
Section, Page(s)and Text Revised
1.0
15th June 2011
Gareth Hughes CCN1251 – Split User Guide into
separate documents. Created from
version 3.9 of the original user Guide.
1.1
4th July 2011
Gareth Hughes Changes following ElectraLink review
11/07/2011
Copyright © 2003, 2004-2010 Hewlett-Packard Development Company, L.P.
User_Guide - D-FlowMaster.docx
Page 4 of 36
HP/ElectraLink DTS - Toolset On-line User Guide – D-FlowMaster
2 D-FLOWMASTER
D-FlowMaster™ allows users to create or modify User Files. It supports all file formats: variable
User File Format, fixed User File Format and Pool Transfer File format. Please contact the
ElectraLink Help Desk if you wish to use this facility.
With this tool, users can open and save User Files on their local file system. However, being a
browser based application, D-FlowMaster™ is subject to strict security constraints that are designed
to protect users from malicious code inadvertently loaded while browsing the internet. These
security constraints prevent browser based applications from accessing local file systems unless
specific permission is granted by the user of that workstation.
Details of how to create a Java™ security policy file to allow D-FlowMaster™ to read and write
files on your local file system are provided in Appendix A.
D-FlowMaster™ also requires the user to have installed the SUN Java Plug-in on their workstation.
SUN JRE version 1.5 is the recommended and supported version.
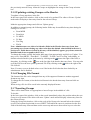
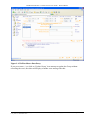
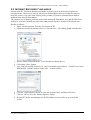
2.1 EDITOR
The editor is the principal component of D-FlowMaster™. To invoke the editor select “DFlowMaster” from the navigation menu on the left hand side of the browser window and then select
“Editor” from the sub-options. If the “D-FlowMaster” menu option is not present, contact the
ElectraLink Help Desk.
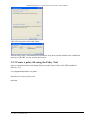
1. Select D-FlowMaster
2. Select Editor
Figure 2-1 D-FlowMaster Menu
11/07/2011
Copyright © 2003, 2004-2010 Hewlett-Packard Development Company, L.P.
User_Guide - D-FlowMaster.docx
Page 5 of 36
HP/ElectraLink DTS - Toolset On-line User Guide – D-FlowMaster
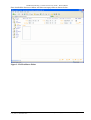
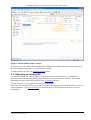
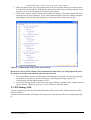
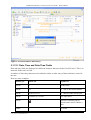
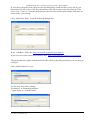
Once invoked the browser window will show an empty editor as shown below:
Figure 2-2 D-FlowMaster Editor
11/07/2011
Copyright © 2003, 2004-2010 Hewlett-Packard Development Company, L.P.
User_Guide - D-FlowMaster.docx
Page 6 of 36
HP/ElectraLink DTS - Toolset On-line User Guide – D-FlowMaster
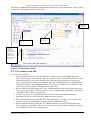
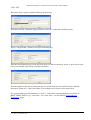
The editor is subdivided into number of different functional areas as described below. These will be
referred to in subsequent sections of this Guide.
Header Dataentry form
Group Selection
Box
Group Dataentry form
User File
content. This
shows the
contents of the
user file’s
Header, Groups
and Trailer as
they exist in the
physical file.
Figure 2-3 D-FlowMaster Editor
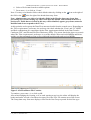
2.1.1 To create a new file
To create a new user file:
1. Review and if necessary modify the Data Flow Id and version in the Header data-entry
form. You may type values directly, press F1 while the cursor is in a field and select a value
from the pop-up list, or revert to default values defined in your preferences (see below).
Note: a pop-up list of valid version numbers will only be displayed once a valid Data Flow
Id has been entered. After changing the flow id, the version number will, by default, be set
to the most recent (highest) version number for that flow.
2. Review and if necessary modify the ‘From’ MPID and Role Code in the Header data-entry
form. Again, pressing F1 while the cursor is on one of these fields will display a pop-up list
of MPIDs or Role Codes as appropriate.
3. Accept, or overtype the system generated File Id. (For more information on system
generated File Ids, see the section on setting preferences below).
4. Review and if necessary modify the Test Flag. Pressing F1 while the cursor is in the field
labelled ‘Test Flag’ will display a pop-up list of the standard test flags.
5. Review and if necessary modify the ‘To’ MPID and Role Code in the Header data-entry
form. As before, pressing F1 while the cursor is on one of these fields will display a pop-up
list of MPIDs or Role Codes as appropriate.
11/07/2011
Copyright © 2003, 2004-2010 Hewlett-Packard Development Company, L.P.
User_Guide - D-FlowMaster.docx
Page 7 of 36
HP/ElectraLink DTS - Toolset On-line User Guide – D-FlowMaster
6. Select a file format from the available options.
7. Press enter (↵) or click on ‘Create’.
Note: You may revert header fields to their default values by clicking on the
icon to the right of
the field or the
at the far right of the header data entry form.
Note: Administrators are able to lock header fields in the Header data-entry form, thus
preventing users from selecting any other value than the default value defined in the user’s
preferences. Fields that are locked in this way will be disabled, appear greyed out, cannot be
modified and do not respond to the F1 key.
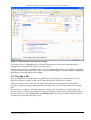
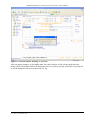
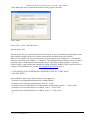
At this point the tool requests the Data Flow structure details from the central server. Depending on
the ‘Flow requirements’ preference, the tool may also check whether the ‘From’ and ‘To’ MPID
and Role combinations are compliant with the Flow requirements defined in the Data Transfer
Catalogue (DTC) and ElectraLink Flow Dictionary (EFD). The screen shot below shows a scenario
where the ‘Flow requirements’ preference is set to the default ‘Warn on invalid MPIDs and Roles’
and the user has attempted to create a flow with both invalid sender and receiver MPIDs.
Figure 2-4 D-FlowMaster File Creation
To continue, press enter (↵) or click on OK.
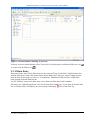
After acknowledging the warning, or if no such warning was given, the editor will display the
header and trailer records of an otherwise empty file in the User File content area of the screen.
The Group data-entry form area displays a form for the first Group expected for this flow type.
11/07/2011
Copyright © 2003, 2004-2010 Hewlett-Packard Development Company, L.P.
User_Guide - D-FlowMaster.docx
Page 8 of 36
HP/ElectraLink DTS - Toolset On-line User Guide – D-FlowMaster
Figure 2-5 D-FlowMaster File Creation
If necessary you can amend the header details by filling in the Header data-entry form at the top of
the screen and pressing enter (↵) or clicking on ‘Update’.
To add Groups to the file, see Inserting Groups below.
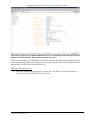
2.1.2 Opening an existing file
To open an existing file, click on ‘Open’ at the foot of the browser window. You will then be
presented with a file browser showing the contents of your specified base directory. (For further
information on specifying a base directory see Preferences below).
Use the file browser to navigate to the file you want to edit.
Note: The files and directories you are able to browse will depend on the Security Policy in force on
your workstation. See Security Policy for details on how to define the Security Policy for your
workstation.
11/07/2011
Copyright © 2003, 2004-2010 Hewlett-Packard Development Company, L.P.
User_Guide - D-FlowMaster.docx
Page 9 of 36
HP/ElectraLink DTS - Toolset On-line User Guide – D-FlowMaster
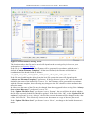
Figure 2-6 D-FlowMaster Open Existing File
Select the file you want to edit and then press ‘Open’.
If the file is larger than 50kb a message, warning you that loading and validating the file may take a
long time will be displayed. On being presented with this warning you will have the option of
proceeding to load the file or cancelling the operation. If the file is less than 50Kb, or you choose to
open the file regardless of its size, the file will be loaded into the editor and validated. Validation
errors are presented in the middle of the screen. e.g.
11/07/2011
Copyright © 2003, 2004-2010 Hewlett-Packard Development Company, L.P.
User_Guide - D-FlowMaster.docx
Page 10 of 36
HP/ElectraLink DTS - Toolset On-line User Guide – D-FlowMaster
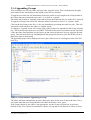
Figure 2-7 D-FlowMaster Existing File Loaded
The Group in error is highlighted in the User File content area of the screen and displayed for
editing in the Group data-entry form area of the screen.
If there is more than one validation error you can scroll through the other errors using the right and
left arrow buttons next to the ’Error’ label. As you scroll through the errors the editor will highlight
the Group in error and display it for editing.
2.1.3 Saving a file
After creating a new file in the editor (or modifying an existing one) you should save it to your
local file system by clicking on the ‘Save’ button at the foot of the browser window.
When you choose to save your file, the editor will validate your document. If the document is
invalid a message will appear asking whether you really want to save the document in an invalid
state.
If you choose to continue, or if the document is valid, the file will either be saved directly to the
base directory or a file browser window will appear allowing you to select the name and location of
the file to be saved. The “Always Save to base Directory?” preference controls whether the file is
saved directly to the base directory or not.
11/07/2011
Copyright © 2003, 2004-2010 Hewlett-Packard Development Company, L.P.
User_Guide - D-FlowMaster.docx
Page 11 of 36
HP/ElectraLink DTS - Toolset On-line User Guide – D-FlowMaster
Figure 2-8 D-FlowMaster Saving A File
The locations where the file can be saved will depend on the security policy in force on your
workstation (see Security Policy).
If the file is a newly created file, the filename will be generated in accordance with the user’s
defined “Custom Filename Template”. If that is not defined, the filename will default to
combination of the header fields as follows:
<to_mpid_<to_role>_<from_mpid>_<from_role>_<flow_id>_<file_id>.usr
If the file was loaded into the editor from the local file system the name will depend on the
“Always use Filename Template?” preference. If the preference is set to ‘No’, the filename will
default to the name of the loaded file. If set to ‘Yes’ the filename will be generated in accordance
with the filename template, thus reflecting any changes to the file’s header or other attributes that
affect the name.
In either case the name of the file may be changed from that suggested before saving if the “Always
Save to base Directory?” preference is set to ‘No’.
If the ‘Update File Id on Save?’ preference is set to ‘Prompt’, the user will then be asked whether
the Id of the currently loaded file should be updated. If the user clicks ‘OK’, or the ‘Update File Id
on Save?’ preference is set to ‘Always’, the Id of the current document will be changed to the value
of the ‘Next File Id’. This effectively creates a new document as a copy of the one just saved.
If the ‘Update File Id on Save?’ preference is set to ‘Never’, no change to the loaded document is
made.
11/07/2011
Copyright © 2003, 2004-2010 Hewlett-Packard Development Company, L.P.
User_Guide - D-FlowMaster.docx
Page 12 of 36
HP/ElectraLink DTS - Toolset On-line User Guide – D-FlowMaster
2.1.4 Appending Groups
After creating a new file, the editor will enter into ‘Append’ mode. This is indicated by the rightmost button on the function bar in the middle of the browser window.
To append a record to the file immediately before the trailer record, complete the Group details in
the Group data-entry form and press enter (↵) or click on ‘Append’.
The editor will remain in ‘Append’ mode until a Group other than the last one in the file is selected.
To append a Group to the end of file when the editor is currently in ‘Insert’ or ‘Update’ mode:
Click on the last Group in the file (i.e. the one immediately preceding the trailer record). This will
select that record and place the editor in ‘Update’ mode.
To change to ‘Append’ mode, click on the code of the Group to be appended in the Group selection
box. The keyboard equivalent is to use SHIFT-TAB while the cursor is positioned on the first field
of the data entry form and then use the cursor-up and cursor-down arrow keys to select the desired
group. Once the desired Group is highlighted in the group selection box, press ENTER to create a
data entry form for that Group.
The appended group will be displayed in lower part of the screen as it will appear in the User File
itself. E.g
Figure 2-9 D-FlowMaster Appending a Group
The editor will then automatically present a data-entry form for the next Group in the flow. If it is
not certain what the next Group should be the editor will make a best ‘guess’.
If the Group chosen by the editor is not appropriate, use the Group selection box to select the
desired Group. You will not be permitted to choose a Group that is not allowed to follow on from
11/07/2011
Copyright © 2003, 2004-2010 Hewlett-Packard Development Company, L.P.
User_Guide - D-FlowMaster.docx
Page 13 of 36
HP/ElectraLink DTS - Toolset On-line User Guide – D-FlowMaster
the previously entered Group. Allowed Groups are highlighted in orange in the Group selection
box.
2.1.5 Updating existing Groups or the Header
To update a Group anywhere in the file:
In the lower part of the window, click on the record to be updated. The editor will enter ‘Update’
mode and will display a data-entry form for the selected Group.
Make the appropriate changes and click on ‘Update group’.
In addition to normal groups, the following header fields may be modified at any time during the
editing of a user file:
• From MPID
• From Role
• To MPID
• To Role
• Test Flag
• File Id
Note: Administrators are able to lock header fields in the Header data-entry form, thus
preventing users from selecting any other value than the default value defined in the user’s
preferences. Fields that are locked in this way will be disabled, appear greyed out, cannot be
modified and do not respond to the F1 key.
To change the header, modify the header data entry form appropriately and click on ‘Update’. You
may revert ‘From MPID’, ‘From Role’, ‘To MPID’, ‘To Role’ and ‘Test Flag’ individually, to
default values defined in your preferences by clicking on the
icon to the right of the field, or
altogether by clicking on the
icon at the far right of the header data entry form. You may also
reset the File Id to the next system generated File Id by clicking on the
icon to the right of the
File Id field.
Note: You may revert to default values even if the header field value has been locked by an
administrator and is disabled.
2.1.6 Changing File Format
The format of the file can be changed from any of the supported formats to another supported
format at any time.
To change the file format, select the desired format in the header data entry form and click on
‘Update’
When saving a file it will be saved in the currently displayed format.
2.1.7 Inserting Groups
There will be times when it is appropriate to insert Groups in the middle of a file.
To do this:
In the lower part of the window, click on the record immediately above the position where the new
Group is to be inserted. The editor will enter ‘Update’ mode and will display a data-entry form for
the selected Group.
Using the Group selection box, click on the code of the Group to be inserted below the selected
record. The keyboard equivalent is to use SHIFT-TAB while the cursor is positioned on the first
field of the data entry form and then use the cursor-up and cursor-down arrow keys to select the
11/07/2011
Copyright © 2003, 2004-2010 Hewlett-Packard Development Company, L.P.
User_Guide - D-FlowMaster.docx
Page 14 of 36
HP/ElectraLink DTS - Toolset On-line User Guide – D-FlowMaster
desired group. Once the desired Group is highlighted in the group selection box, press ENTER to
create a data entry form for that Group.
Fill in the data-entry form as appropriate and then press enter (↵) or click on ‘Insert Group’.
2.1.8 Deleting Groups
To delete a Group and all its sub-groups, click on the
symbol on the left hand side of the Group.
The editor will prompt you to confirm that the selected Groups should be deleted. E.g.
Figure 2-10 D-FlowMaster Deleting Groups
Click on OK to delete the Groups.
2.1.9 Importing Groups from an external file
D-FlowMaster allows groups to be imported from external files. The files may be in Fixed,
Variable or Pool transfer format. For added flexibility, groups within the file may be delimited by
either Windows or UNIX style line terminators (i.e. CR/LF or LF) and data items may be delimited
by commas as an alternative to the pipe (“|”) delimiter used in variable and pool transfer format
files. Files must otherwise be formatted according to User File encoding rules. Only records with
group codes valid for the current flow can be imported. Headers, trailers, blank lines and lines
beginning with characters which cannot be recognised as a valid group code for the flow will not be
loaded. As a consequence of this it is not necessary for the file from which groups are to be
imported to have header or trailer records.
To import groups from an external file:
11/07/2011
Copyright © 2003, 2004-2010 Hewlett-Packard Development Company, L.P.
User_Guide - D-FlowMaster.docx
Page 15 of 36
HP/ElectraLink DTS - Toolset On-line User Guide – D-FlowMaster
1. Select the group in the User File content area of the screen below which you want to insert
records from an external file. If the header and trailer are the only records present this is not
necessary as records will simply be inserted between them.
2. Click on the ‘Import’ button, and use the resulting file dialog to open the external file from
which groups are to be imported. After a file has been chosen a preview window will open
displaying records from the file which have valid group codes for the current flow:
Figure 2-11 Importing Groups From External File
Records are shown in the format of the document into which they are being imported, not in
the format of the file from which they have been extracted.
3. Use the checkboxes on the left hand side of the display to select the records to be imported.
By default, all records are selected for import. Selecting/deselecting a group will
select/deselect all descendant groups as well.
4. Once the desired groups have been selected, import them by clicking on the ‘Import selected
groups’ button. Otherwise press the ‘Cancel’ button to abort the import.
2.1.10 Printing a file
To print a hard copy of the file from within the editor click on the ‘Print’ button at the foot of the
browser window.
A printer selection window will appear allowing you to select the print device to send the print job
to.
11/07/2011
Copyright © 2003, 2004-2010 Hewlett-Packard Development Company, L.P.
User_Guide - D-FlowMaster.docx
Page 16 of 36
HP/ElectraLink DTS - Toolset On-line User Guide – D-FlowMaster
Figure 2-12 D-FlowMaster Print File
Select the desired printer and click on ‘Print’.
2.1.11 Starting a new file
To start a new file after working in the editor on another file, click the ‘New’ button at the foot of
the browser window.
If you have not saved the changes made to the file currently displayed in the editor you will be
prompted to do so. E.g.
11/07/2011
Copyright © 2003, 2004-2010 Hewlett-Packard Development Company, L.P.
User_Guide - D-FlowMaster.docx
Page 17 of 36
HP/ElectraLink DTS - Toolset On-line User Guide – D-FlowMaster
Figure 2-13 D-FlowMaster Starting A New File
After saving the changes, or discarding them, the editor window will be cleared apart from the
header fields. The header fields will remain the same as for the previously edited file except the file
id will be updated to the next preferred file id. E.g
11/07/2011
Copyright © 2003, 2004-2010 Hewlett-Packard Development Company, L.P.
User_Guide - D-FlowMaster.docx
Page 18 of 36
HP/ElectraLink DTS - Toolset On-line User Guide – D-FlowMaster
Figure 2-14 D-FlowMaster Starting A New File
You may revert to default header values, if desired, by clicking on the individual field reset icon
or on the reset all fields icon,
.
2.1.12 Data Entry
Data-entry forms show all the Data Items for the selected Group. Each field is labelled on the left
with the Data Item’s name and on the right with the Data Item’s data type, logical length, and an
asterisk if the field requires a value (i.e. is mandatory). Mandatory fields also have a light blue
back-ground. Optional fields do not.
Use the TAB key to move the data-entry cursor from one data-entry field to another.
All entries are validated against the rules for the Data Item’s data type. If you enter an invalid value
into a field the editor will display an error message and display
next to the field. E.g.
11/07/2011
Copyright © 2003, 2004-2010 Hewlett-Packard Development Company, L.P.
User_Guide - D-FlowMaster.docx
Page 19 of 36
HP/ElectraLink DTS - Toolset On-line User Guide – D-FlowMaster
Figure 2-15 D-FlowMaster Data Entry
If you press enter (↵) or click on ‘Update Group’ in an attempt to update the Group without
correcting the error, the editor will display a further error message like this:
11/07/2011
Copyright © 2003, 2004-2010 Hewlett-Packard Development Company, L.P.
User_Guide - D-FlowMaster.docx
Page 20 of 36
HP/ElectraLink DTS - Toolset On-line User Guide – D-FlowMaster
Figure 2-16 D-FlowMaster Data Entry
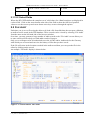
2.1.12.1 Date, Time and Date-Time Fields
Date and time fields are displayed in a different format to that used in the User File itself. This is to
make the fields easier to read.
A number of data-entry shortcuts exist within the editor to make entry of dates and times easier for
the user.
Here are some examples:
Field Type
Short-cut
Equates to
DATE
T
Todays date
DATE
12
12th day of the current month
DATE
12.03 or 12 03
12th March of the current year
DATE
12.04.05 or 12 04 05
12th April 2005
DATE
TIME
Invokes a calendar pop-up
which can be used to choose a
date.
7
07:00:00
11/07/2011
Copyright © 2003, 2004-2010 Hewlett-Packard Development Company, L.P.
User_Guide - D-FlowMaster.docx
Page 21 of 36
HP/ElectraLink DTS - Toolset On-line User Guide – D-FlowMaster
TIME
730 or 7 30 or 7.30 or 7:30
07:30:00
2.1.12.2 Select Fields
Where the DTC/EFD defines the complete set of valid values for a Data Item these are displayed in
a select field. Click on the arrow button at the side of the field to show the full list of possible
values or use the cursor-up and cursor-down arrow keys to move through the options.
2.2 FILE AUDIT
Each time you a) save a file using the editor or b) load a file from disk that does not pass validation,
an audit record is stored in the DTS database. These records can be viewed by selecting ‘File Audit’
from the menu on the left hand side of the browser window.
Over time, you may generate a large number of audit records so the ‘File Audit’ screen allows you
to enter search criteria to help you find audit records of interest.
Only you or colleagues who are authorized to use the ACMT and/or Audit tools for the Gateway
with which you are associated can view the history of files that you have saved.
If the file still exists in the location recorded in the audit record then you can open the file in the
editor by clicking on the record.
An example ‘FileAudit’ display is shown below.
Figure 2-17 D-FlowMaster File Audit
11/07/2011
Copyright © 2003, 2004-2010 Hewlett-Packard Development Company, L.P.
User_Guide - D-FlowMaster.docx
Page 22 of 36
HP/ElectraLink DTS - Toolset On-line User Guide – D-FlowMaster
2.3 SEARCHING FOR A MESSAGE
1.
To search for a Message, from the drop lists, select the relevant criteria and in the text field
enter the relevant information.
For all text fields except ‘Filename’ and ‘User File ID’, multiple entries can be entered by
separating each entry with a space. For example, ABCD JKLM WXYZ. The ‘Filename’ and
‘User File Id’ text fields can accept a % as a wild card. For example, entering %D0004% in
the filename field will return all files with ‘D0004’ somewhere in their name.
2.
Click Search .
Results of the search are displayed in the File Search Results table in the lower half of the
window.
3.
To reset the search criteria click Reset .
This clears all previous search criteria except:
• the date field, which displays the current date
• the time from field, which displays 00:00
• the time to field, which displays 23:59.
2.4 SEARCH CRITERIA
The following criteria can be used to search for a Message:
Login Id
The Login Id of the person who performed some operation on the files to be
searched. By default this will be the currently logged in user.
However, the login ids of other users with ACMT or AUDIT access rights to
the same Gateway(s) as the logged in user has ACMT or AUDIT access
rights, can also be selected from the drop down list.
Local MPID
The Market Participant Identifier (MPID) of the sender of the file.
To enter a Local MPID, type the identifier in the text field. Multiple entries
must be separated by a space.
Other MPID
The Market Participant Identifier (MPID) of the intended recipient.
To enter an Other MPID, type the identifier in the text field. Multiple entries
must be separated by a space.
Local Role
The sender’s Role. The Role is the function a company provides within the
electricity industry.
To enter a Local Role, type the Role in the text field. Multiple entries must be
separated by a space.
Other Role
The Role of the recipient. The Role is the function a company provides within
the electricity industry.
To enter an Other Role, type the Role in the text field. Multiple entries must
be separated by a space.
Flow
The number or name assigned to a specific Data Flow or File Type.
To enter a Flow, type the Flow Number (including the D prefix e.g. D0010)
in the text field. Multiple entries must be separated by a space.
11/07/2011
Copyright © 2003, 2004-2010 Hewlett-Packard Development Company, L.P.
User_Guide - D-FlowMaster.docx
Page 23 of 36
HP/ElectraLink DTS - Toolset On-line User Guide – D-FlowMaster
Version
Data Flow Version number of the File.
To enter a Version, type the Data Flow Version number in the text field.
Multiple entries must be separated by a space.
Test Flag
The Message Test Flag/File Usage Code.
This can either be a standard Test Flag selected from the drop-down list or a
non-standard, free-format Test Flag entered in the adjacent field. The system
ensures that only a single Test Flag can be supplied for a search.
Selecting ‘Any’ will search for Messages containing any Test Flag.
User File ID The File Identifier assigned by the sender of the File
To enter a File ID, type the File ID in the text field. Multiple entries must be
separated by a space.
If a partial File ID is specified, any Message whose File ID starts with the
characters entered will be displayed.
Filename
The Filename used by the local Gateway.
To enter a Filename, type the Filename in the text field.
If a partial filename is specified, any Message whose filename starts with the
characters entered will be displayed.
(Note filename is the full path to the file on your local file system.).
Date/Time
– From
A User can search for Files saved or read between a defined date range.
If no date and time are defined, the date defaults to the current date and the
time defaults to 00:00hrs.
Date/Time
– To
A User can search for Files saved or read between a defined date range.
If no date and time are defined, the date defaults to the current date and the
time defaults to 23:59hrs.
Action
The action performed on the file.
A User can search for Files that have been:
• Read = Invalid files read from disk
• Written = Files written to disk
• Both = Read or written
11/07/2011
Copyright © 2003, 2004-2010 Hewlett-Packard Development Company, L.P.
User_Guide - D-FlowMaster.docx
Page 24 of 36
HP/ElectraLink DTS - Toolset On-line User Guide – D-FlowMaster
2.5 MESSAGE SEARCH RESULTS TABLE
The fields in the Message Search Results Table are detailed below:
Login Id
This shows the login id of the user who performed an operation on the file
Date/Time
This displays the date and time that the user read or saved the file.
S/R
Displays ‘S’ where the Message has been sent by the local Gateway.
Displays ‘R’ where the Message has been received by the local Gateway.
User File
ID
The file identifier assigned to the file by the sender.
Data Flow
Flow Number e.g. D0010. The number or name assigned to a specific Data
Flow/File Type.
Vn
Data Flow Version number. The version number changes when a Data Flow
is modified. RGMA File Types always have a version number of 001.
TF
The Test Flag of the File.
From MPID
Displays the Market Participant Identifier (MPID) of the sender
From Role
Displays the Role of the sender.
To MPID
Displays the Market Participant Identifier (MPID) of the receipient.
To Role
Displays the Role of the recipient
R/W
Indicates whether the file was read (R) or written (W) by the user.
Filename
The full path name of the file relative to the user’s workstation.
Page 1 of 1
Displays the current page a User is viewing and the total number of pages.
1 message
The total number of Files returned by the search
A maximum of 100 Files are displayed per page in the Table of Results and can be viewed using
the scroll bar.
1.
To display the next page of Files, click Next .
2.
To display the previous page of Files, click Previous .
3.
To display the last page of Files, click Last .
4.
To return to the first page of Files, click First .
5.
To update the results, click Refresh .
2.6 PREFERENCES
Before using D-FlowMaster™, each user authorised to use the tool must, at a minimum, have the
following three preferences defined:
1. Base directory. This is the directory where the open and save file browsers will start
browsing. The user’s local security policy must allow read and write access to this directory
as a minimum.
2. Next file id. This is a CHAR(10) value that D-FlowMaster™ will use to automatically
populate the File Id field of any new user files created in the editor. If the user saves a file
with this id, D-FlowMaster™ will increment the next file id preference value by one. The
sequence followed depends on the file id template that you have defined. (See below).
11/07/2011
Copyright © 2003, 2004-2010 Hewlett-Packard Development Company, L.P.
User_Guide - D-FlowMaster.docx
Page 25 of 36
HP/ElectraLink DTS - Toolset On-line User Guide – D-FlowMaster
3. File Id template. A template may comprise of boiler plate text and the following special
characters:
A – Uppercase characters A-Z
a – Lowercase characters a-z
9 – Digits 0-9
X – Uppercase characters A-Z and digits 0-9
x – Lowercase characters a-z and digits 0-9
Boilerplate text must be enclosed in double quotes. For example, the template
“ABC”9999999
would result in file ids being generated that follow this sequence:
ABC0000001, ABC0000002, ABC0000003 and so on.
The file id preference allows the user to define the next file id to be used (the starting point
of the sequence), but it must conform to the template.
Note: After creating or modifying the base directory preference, the user whose preference has
changed must, if currently logged in, log out and back in again to make the change effective.
The following preferences allow default values for User File header fields and the file format to be
set for the user and are optional:
• Default Sender MPID
• Default Sender Role
• Default Receiver MPID
• Default Receiver Role
• Default Flow
• Default Flow Version
• Default Test Flag
• Default Format
The Custom Filename Template preference is also optional. If it is not defined a default template
will be used. To specify a custom template, enter one or more of the following placeholder tokens
separated by the underscore character, “_”:
Token
Description
TOMPID
Receiver MPID
TOROLE
Receiver Role
FRMMPID
Sender MPID
FRMROLE
Sender Role
FILEID
User File Id
FLOW
Flow Id
FLOWVER
Flow version
TSTFLG
Test Flag
11/07/2011
Copyright © 2003, 2004-2010 Hewlett-Packard Development Company, L.P.
User_Guide - D-FlowMaster.docx
Page 26 of 36
HP/ElectraLink DTS - Toolset On-line User Guide – D-FlowMaster
FMT
Flow format (P,V or F)
USER
User’s WebTools username
Tokens may be placed in any order. When the filename is generated the token will be replaced by
the corresponding file attribute, and the suffix “.usr” will be applied. The default template is:
TOMPID_TOROLE_FRMMPID_FRMROLE_FLOW_FILEID
The “Alway use filename template?” preference defaults to No. When set to ‘No’ all files loaded
into D-FlowMaster, modified, and saved back to disk will retain their original filename regardless
of any changes to the file header, format or person making the change. However, when set to ‘Yes’
the filename is regenerated each time the ‘Save’ button is pressed, so if there has been a change to
the one of the file attributes that are referenced by the file name template, the generated name will
be different from that originally loaded. Depending on the value of the next preference, “Always
Save to Base Directory?” the user may be able to override the generated name before the file is
actually saved to disk.
The “Always Save to Base Directory?” preference also defaults to ‘No’. When set to ‘No’ a
dialog window is opened whenever the ‘Save’ button is pressed in the D-FlowMaster editor,
allowing users to save to any directory they have access to. It also allows the user to override the
generated filename. However, when set to ‘Yes’, files are saved directly to the user’s base
directory.
The “Update File Id on Save?” preference defaults to ‘Never’. Other options are ‘Prompt’ and
‘Always’. When set to ‘Never’ the file id of the document currently loaded in the DFM editor is
never changed when the file is saved. When set to ‘Always’ the file id of the document currently
loaded in the DFM editor is always changed to the ‘Next File Id’. When set to ‘Prompt’ the user is
asked whether to update the file id of the currently loaded document or not.
The “Flow Requirements” preference defaults to ‘Warn on invalid MPIDs and Roles’. Other
options are ‘Allow invalid MPIDs and Roles’ and ‘Disallow invalid MPIDs and Roles’. This
preference determines how D-FlowMaster behaves when you try to create a new flow where the
sender or receiver MPID/Role combination is not valid according to the flow requirements defined
in the DTC and EFD catalogues. The ‘Allow invalid MPIDs and Roles’ option will permit any
flow to be created with any sender and receiver MPID/Role. The ‘Disallow invalid MPIDs and
Roles’ option will display an error message if either sender or receiver, or both, MPID/Role
combinations are invalid and will prevent the flow from being created. Finally, the ‘Warn on
invalid MPIDs and Roles’ option will display a warning message if either sender or receiver, or
both, MPID/Role combinations are invalid and will give the user the option to create the flow or
abort.
The “Restrict sender MPID/Role” preference defaults to ‘No. The other available option is ‘Yes’.
When set to ‘No’, the user can set the sender MPID and Role Code in the header of any flow he
creates to any MPID or Role code known to the DTS. When set to ‘Yes’ the user can only set the
sender MPID and Role code to those in his scope of access. Furthermore DFM will prevent the flow
from being created if the combination of MPID and Role Code is not in the user’s scope of access.
Preferences can either be set by the user themselves, their user group administrator or the system
administrators. Administrators can, however, lock a user’s preference value preventing that user
from changing the preference value themselves. Similarly, administrators can lock some preference
values so that the DFM user cannot select any other value when creating or modifying User Files in
the DFM editor.
The screen through which administrators set preferences is shown below:
11/07/2011
Copyright © 2003, 2004-2010 Hewlett-Packard Development Company, L.P.
User_Guide - D-FlowMaster.docx
Page 27 of 36
HP/ElectraLink DTS - Toolset On-line User Guide – D-FlowMaster
Figure 2-18 D-FlowMaster Preferences (Administrator View)
To define or change preferences for a user, select that user from the drop down list, fill in the form
fields appropriately and click save. If your changes are valid they will be saved and a dialog
message will appear confirming that the changes have been saved.
Checking the ‘Lock Preference?’ option will prevent that user from being able to modify that
preference themselves.
Checking the ‘Lock in editor?’ option will prevent that user from choosing any other value when
creating or modifying User files in the D-FlowMaster™ editor.
11/07/2011
Copyright © 2003, 2004-2010 Hewlett-Packard Development Company, L.P.
User_Guide - D-FlowMaster.docx
Page 28 of 36
HP/ElectraLink DTS - Toolset On-line User Guide – D-FlowMaster
Figure 2-19 D-FlowMaster Preferences (Normal user view)
In the screen shot above, the Base Directory field is disabled, showing that an administrator has
locked that privilege down, preventing the user from altering the value set by the administrator.
Any number of fields can be locked in this way.
Notes on setting preferences:
• The value for Base Directory must be entered as a file URL. If your base directory is
D:\a\b\c then the file URL will be file:/d:/a/b/c.
11/07/2011
Copyright © 2003, 2004-2010 Hewlett-Packard Development Company, L.P.
User_Guide - D-FlowMaster.docx
Page 29 of 36
HP/ElectraLink DTS - Toolset On-line User Guide – D-FlowMaster
3 APPENDIX- A: D-FLOWMASTER PRE-REQUISITES
3.1 SUN JAVA PLUG-IN
D-FlowMaster makes use of a Java applet to read and write user files to the local file system. This
applet requires the SUN Java Run-time Environment (JRE) plug-in to be installed on your
workstation.
HP support the use of JRE version 1.5 which can be downloaded from
http://java.sun.com/j2se/1.5.0/download.jsp. Installation instructions can be found there too.
3.2 SECURITY POLICY
To allow the applet used by D-FlowMaster to read and write files from your local file system you
must grant the applet permission to do so via a security policy file.
Specifically the applet requires the following permissions:
RuntimePermission “ModifyThread”
PropertyPermission to read the user.dir system property.
FilePermission – to read and write to directories where you store User Files
The following subsections guide you through the process of setting-up your Security Policy file to
grant these permissions, assuming that JRE 1.5 has been installed on your workstation.
3.2.1 Find the JRE version used by your browser.
In IE, select “Tools -> Internet Options” from the Web browser’s menu bar. Select the “Advanced”
tab, and scroll down until the “Java (Sun)” category appears. Take a note of the JRE version used
by the browser to execute applets (E.g. Use Java 2 v1.5.0_06 for <applet>…)
3.2.2 Find the location of the JRE used by your browser.
To do this, start Web Tools. The browser will attempt to load the FileHelper applet used by DFlowMaster. The applet will not run successfully but the “Java (TM) 2 Platform” icon will appear
in the system tray in the bottom right hand corner of the screen. Right click on this icon and select
“Open Control Panel” from the pop-up menu. Click the “Java” tab, then click the “View…” button
under Java Applet Runtime Settings.
11/07/2011
Copyright © 2003, 2004-2010 Hewlett-Packard Development Company, L.P.
User_Guide - D-FlowMaster.docx
Page 30 of 36
HP/ElectraLink DTS - Toolset On-line User Guide – D-FlowMaster
This will bring up the following dialog:
Find the entry in the “Java Runtime Environment” drop down list that identifies the installation
directory of the JRE version used by the browser.
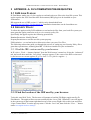
3.2.3 Create a policy file using the Policy Tool
Open a command window and change directory to the binary folder of the JRE installation
directory. E.g.
cd c:\program files\java\jre1.5.0_06\bin
Start the Java security policy tool.
policytool
11/07/2011
Copyright © 2003, 2004-2010 Hewlett-Packard Development Company, L.P.
User_Guide - D-FlowMaster.docx
Page 31 of 36
HP/ElectraLink DTS - Toolset On-line User Guide – D-FlowMaster
11/07/2011
Copyright © 2003, 2004-2010 Hewlett-Packard Development Company, L.P.
User_Guide - D-FlowMaster.docx
Page 32 of 36
HP/ElectraLink DTS - Toolset On-line User Guide – D-FlowMaster
If, as is likely, the policy tool reports an error declaring that it could not find a policy file in your
home directory, take a note of the file path and then click OK to remove the error message. Then
select “File -> Save As” from the menu and save the file to the location and with the same name as
shown in the error message.
Click “Add Policy Entry” to get the following dialogue box:
In the “CodeBase” field enter: http://electralink-webtools/secure/applets/
If you are a user of the remote user Gateway enter http://electralink-rug-webtools/secure/applets
This means that only applets loaded from this URL will be granted the permissions you are going to
configure.
Click “Add Permission” to get:
Use the drop down lists to change:
“Permission” to “RuntimePermission”
“Target Name” to “modifyThread”
11/07/2011
Copyright © 2003, 2004-2010 Hewlett-Packard Development Company, L.P.
User_Guide - D-FlowMaster.docx
Page 33 of 36
HP/ElectraLink DTS - Toolset On-line User Guide – D-FlowMaster
Click “OK”
Repeat the above steps to add the following permissions:
Note that “user.dir” should be typed exactly as “user.dir” (without the double quotes).
Where “Target Name” points to your user home directory.
Note the last permission gives read and write access to the root directory on the c: drive and is used
here as an example only. Please read the note below..
Note the hyphen in the above permission gives read and write access to all directories and subdirectories rooted in C:\ and is used here as an example only. Please see the note below.
It is expected that you will substitute c:\\ and c:\\- with values corresponding to your choice of
BASE_DIRECTORY (e.g c:\\user files\\ & c:\\user files\\-) as described in D-FlowMasterPreferences above.
11/07/2011
Copyright © 2003, 2004-2010 Hewlett-Packard Development Company, L.P.
User_Guide - D-FlowMaster.docx
Page 34 of 36
HP/ElectraLink DTS - Toolset On-line User Guide – D-FlowMaster
After adding the above permissions the Policy Entry appears like this:
Click “Done”.
Select “File -> Save” from the menu.
Exit the policy tool.
Note that once the java security policy has been created, it can be amended using notepad or some
other suitable editing tool; however please note that this should be done with caution.
Below is an example of a java security policy file as displayed by an editing tool. – note that all
directory names must use a double “\\” delimiter. The example has been produced for a user who’s
home directory is d:\Documents and Settings\czpny2. Data flows will be written to a directory
called d:\dflow_temp and this must match the setting for BASE_DIRECTORY in the Preferences
section of D-FlowMaster (see section D-FlowMaster-Preferences above).
/* AUTOMATICALLY GENERATED ON Thu Mar 16 09:58:11 GMT 2006*/
/* DO NOT EDIT */
grant codeBase "http://electralink-webtools/secure/applets/" {
permission java.lang.RuntimePermission "modifyThread";
permission java.util.PropertyPermission "user.dir", "read";
permission java.io.FilePermission "d:\\Documents and Settings\\czpny2\\-", "write, read";
permission java.io.FilePermission "d:\\dflow_temp\\", "write, read";
permission java.io.FilePermission "d:\\dflow_temp\\-", "write, read";
};
11/07/2011
Copyright © 2003, 2004-2010 Hewlett-Packard Development Company, L.P.
User_Guide - D-FlowMaster.docx
Page 35 of 36
HP/ElectraLink DTS - Toolset On-line User Guide – D-FlowMaster
3.3 INTERNET EXPLORER 7 AND ABOVE
Starting with IE7, Microsoft introduced a further level of security in their browser known as
protected mode. This level of security will prevent D-FlowMaster from accessing files on your
local file system, even if the Java security policy permits it. Therefore protected mode must be
disabled when using D-FlowMaster.
The simplest way to disable protected mode while running D-FlowMaster is to add the WebTools
website to your list of trusted sites and ensure that protected mode is switch off for trusted sites.
Do this as follows:
1. Select ‘Internet Options’ from the Tools menu in IE7.
2. Select the security tab and then click on ‘Trusted Sites’. The dialog should look like this:
3. Ensure ‘Enable Protected Mode’ is not checked (as shown above).
4. Click on the ‘Sites’ button.
5. Type ‘http://electralink-webtools’ or ‘http://electralink-rug-webtools’ if a RUG user, in the
field labelled ‘Add this website to the zone:’, as shown below:
6. Click the ‘Add’ button to the site to your list of trusted sites, and then click close.
7. Click on ‘OK’ to close the ‘Internet Options’ dialog.
8. Re-start IE7 before attempting to use D-FlowMaster to access files on your local file
system.
11/07/2011
Copyright © 2003, 2004-2010 Hewlett-Packard Development Company, L.P.
User_Guide - D-FlowMaster.docx
Page 36 of 36