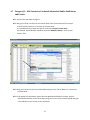
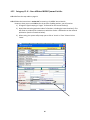
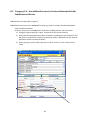
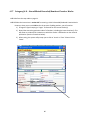
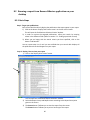
1
User Manual for the entry of 1. 2. 3. 4. HERDC-Eligible Research Publications ERA Non-traditional Research Outputs (creative works) University-only Research Publications Non-affiliated publications into ResearchMaster Publications Module Version 16 – 22nd July 2015 Using this Manual This manual has been written to support Research Data Collection Coordinators to enter data into the ResearchMaster system. If you have any queries while using this manual please contact Research Services on 03 9953 3157 or by email [email protected] Table of Contents 1. Definitions ....................................................................................................................................... 4 2. Changing User Preferences, Control Desk Preferences, and your Password ...................................... 5 3. 2.1 Changing User Preferences....................................................................................................... 5 2.2 Changing Control Desk Preferences .......................................................................................... 6 2.3 Changing your password ........................................................................................................... 8 Searching for an existing record ....................................................................................................... 9 3.1 Setting the ‘Control Desk’ window as the active window ............................................................. 9 3.2 Finding a particular record ........................................................................................................ 10 4. Creating a new record.................................................................................................................... 11 4.1 Selecting the new record’s category .......................................................................................... 11 4.2 Category A1 – HERDC Book ....................................................................................................... 12 4.3 Category B1 – HERDC Book Chapter .......................................................................................... 19 4.4 Category C1 – HERDC Journal Article ......................................................................................... 24 4.5 Category E1 – HERDC Conference Publication............................................................................ 28 4.6 Category J1 – ACU Original Creative Work ................................................................................. 32 4.7 Category J2 – ACU Curated or Produced Substantial Public Exhibitions and Events .................... 37 4.8 Category J3 – ACU Live Performance of Creative Works............................................................. 41 4.9 Category J4 – ACU Recorded/Rendered Creative Work .............................................................. 45 4.10 Category A2 – ACU Book Authored Other & Category A3 – ACU Book Edited .......................... 49 4.11 Category B2 – ACU Book Chapter - Other ................................................................................ 56 4.12 Category C2 – ACU Journal Article – other refereed, scholarly ................................................. 59 4.13 Category C3 – ACU Journal Article – non-refereed, scholarly, professional ............................... 62 4.14 Category E2 – ACU Conference Publication – Full paper, non-refereed .................................... 65 4.15 Category K1 – ACU Refereed Journal & Category K2 – ACU Non-refereed Journal .................... 68 4.16 Category R1 – ACU Other Externally Funded Research Projects ............................................... 70 4.17 Category R2 – ACU Funded Staff Research Projects ................................................................. 72 2 4.18 Category R3 – ACU Unfunded Staff Research Projects.............................................................. 74 4.19 Category P2 – ACU Postgraduate Supervision of Non-ACU HDR Students................................. 76 4.20 Category A1-N – Non-affiliated HERDC Book............................................................................ 78 4.21 Category B1-N – Non-affiliated HERDC Book Chapter .............................................................. 79 4.22 Category C1-N – Non-affiliated HERDC Journal Article ............................................................. 80 4.23 Category E1-N – Non-affiliated HERDC Conference Paper ........................................................ 81 4.24 Category J1-N – Non-affiliated Original Creative Work ............................................................. 82 4.25 Category J2-N – Non-affiliated Curated or Produced Substantial Public Exhibitions and Events 83 4.26 Category J3-N – Non-affiliated Live Performance of Creative Works ........................................ 84 4.27 Category J4-N – Non-affiliated Recorded/Rendered Creative Works ........................................ 85 4.28 Category G – Government Report............................................................................................ 86 5 Modifying an existing record.......................................................................................................... 92 5.1 Modifying the top part of the Publications Entry window .......................................................... 92 5.2 Modifying the bottom part of the Publications Entry window .................................................... 92 6 Viewing an existing record ............................................................................................................. 93 7 Deleting an existing record ............................................................................................................ 93 8 Reports .......................................................................................................................................... 94 8.1 Running a report from Orion (preferred option) ..................................................................... 94 8.2 Running a report from ResearchMaster application on your desktop ..................................... 95 3 1. Definitions 1.1 “ACU member”: refers to any author who is or was an academic staff member or student of ACU when his/her work was published. 1.2 “AOU”: refers to Academic Organisational Unit, for example, the School of Theology or the Centre for Early Christian Studies. 1.3 “AOU Code”: refers to the 4-digit code which is used to identify a particular AOU. 1.4 “External author”: refers to any author who is not an ACU member, and belongs to another university, institution or organisation. 1.5 “HERDC checklist”: refers to the checklist which is used to track all verification materials for HERDC-eligible publications. Please refer to your Research Collection Manual. 1.6 “HERDC coversheet”: refers to the coversheet which is attached at the front of all verification materials for HERDC-eligible publications. Please refer to your Research Collection Manual. 1.7 “ISBN”: stands for International Standard Book Number. The ISBN number should be entered in the format XXXXXXXXXXXXX in ResearchMaster. (For example, 9781843106029 is the ISBN number for the book with the title ‘The Spiritual Dimension of Childhood’) 1.8 “ISSN”: stands for International Standard Serial Number. The ISSN number should be entered in the format XXXX-XXXX in ResearchMaster. (For example, 1363-9080 is the ISSN number for the printed version of the Journal of Education and Work.) 1.9 “Non-affiliated publication”: refers to research publications where the author affiliation is not to ACU, that is, research publications that Academic Staff authored during employment at previous universities or institutions. 1.10 “School Code” in the ‘Publication Details 1’ tab: refers to the code of the Academic Organisational Unit (AOU) managing the publication, which is usually the AOU belonging to the Research Data Collection Coordinator (RDCC) responsible for collecting the publication. Otherwise, if there is no RDCC assigned to the AOU, the school code is the AOU of the first ACU staff member listed as an author on the publication. 1.11 “Record”: refers to the set of data stored for each publication. 4 2. Changing User Preferences, Control Desk Preferences, and your Password 2.1 Changing User Preferences Go to ‘Settings’ Click on ‘User Preferences’ A ResearchMaster Alert will pop up. Click on the ‘OK’ button. Click on the button ‘Modify selected record’ on the left hand side of the screen. Click on the drop down list of the Starting Module field, and select ‘Publications’. Tick the box next to “Allow sortable Control Desk columns”. 5 2.2 Click on the ‘Publications’ tab as shown below. Set the ‘Default Publications Year’ field as the current collection year. Click on the ‘Save’ button on the left hand side of the screen. Close the ‘User Preferences’ window. Changing Control Desk Preferences Go to ‘Settings’ Click on ‘Control Desk Preferences’ Click on the ‘Publications’ tab Click on the button ‘Modify selected record’ on the left hand side of the screen. Click on the button ‘Load all fields’. This will display all the fields which can appear on the ‘Control Desk’ window in the first pane. To make the first ACU author available in a column of the ‘Control Desk’ window: In the 1st pane, click on the field ‘Custom Info Field 3'. Click on the button ‘>’ (the one between the 1st and 2nd pane) ‘Custom Info Field 3' is now displayed in the 2nd pane. In the 2nd pane, click on the field ‘Custom Info Field 3'. Bring your cursor into the field ‘Edit Heading’ at the bottom of the 2nd pane. Erase ‘Custom Info Field 3’ and write ‘First ACU author’. Click on the ‘Save’ button on the left hand side of the screen. Close the ‘Control Desk Preference’ window. 6 To select a particular field and allow it to be shown on the ‘Control Desk’ window: In the 1st pane, click on the field you wish to select. Click on the button ‘>’ (the one between the 1st and 2nd pane) The field is now displayed in the 2nd pane. To remove a field from the ‘Control Desk’ window: Click on the field you wish to remove in the 2nd pane. Click on the button ‘<’ (the one between the 1st and 2nd pane) Please Note: if the field you wish to remove also appears in the 3rd pane, you need to remove it from the 3rd pane before you can remove it from the 2nd pane. Fields are listed on the ‘Control Desk’ window according to their position in the 2nd pane. To change the order in which fields are listed on the ‘Control Desk’ window: In the 2nd pane, click on the field you wish to select. Using the sign, move the field up or down according to your preference. Please Note: The order of the columns can also be changed by clicking and dragging column headings on the ‘Control Desk’ window. To customise the way in which records are sorted on the ‘Control Desk’ window: The records will be sorted according to the order in which fields appear in the 3rd pane. Using the sign, move the fields up or down according to your preference. You can also edit the sorting in ascending or descending order by clicking on the radio buttons below the 3rd pane. Please Note: Items can also be sorted on the ‘Control Desk’ window by double-clicking the column headings. Double-clicking the extreme left column header (small grey box) on the ‘Control Desk’ window, resizes the column widths. 7 2.3 Changing your password Go to ‘Settings’ Select ‘Change Password’ In the field Current Password, enter your existing password In the fields New Password and Repeat New Password, enter your new password Press Enter on your keyboard to save your new password 8 3. Searching for an existing record 3.1 Setting the ‘Control Desk’ window as the active window If you see that all the buttons on the left vertical menu bar are disabled, left-click on the blue horizontal area on the top of the ‘Control Desk’ window. 9 3.2 Finding a particular record Click on the ‘Display find criteria screen’ button on the left hand side of the screen. This will open the ‘Publications Selection Criteria’ window. In this window, you can see the fields you can use to refine your search. Use the Reference Number field to find a publication record if you already know its Reference Number. Use the Category Code field to find all the publication records in particular category: A1, B1, C1, E1, J1, J2, J3, J4. Use the Year of Collection field to find all the publication records collected for a particular year. Use the Publication Title field to find a publication record using its title. Use the Publisher Name field to find a publication record using its publisher. Use the Edition field to find a publication record using its edition number. Use the School field to find a publication record using its AOU code. You can also see all the publications recorded for a particular AOU using this field. If you would like to search by author, you will need to click on the 2nd tab of ‘Publications Selection Criteria’ window, which is the ‘Related From Publications’ tab. In the first drop down list (under the title ‘Table’), select ‘Authors’. In the second drop down list (under the title ‘Field’), select the field with which you want to refine your search. For example, you could use the ‘Surname’ field. Once you have set your search criteria, click on the button ‘Find Records’. 10 4. Creating a new record 4.1 Selecting the new record’s category Set the ‘Control Desk’ window as the active window – see the instructions in 3.1. Click on the button “Create new record” on the left hand side of the screen. This will open the ‘Publication Data Entry’ window. You are now on the ‘Publication Details 1’ tab. For the Collection Year field, select the year which is indicated in the Collection Year field on the coversheet. For the Category field, Select A1 for A1 HERDC Book Select B1 for B1 HERDC Book Chapter Select C1 for C1 HERDC Journal Article Select E1 for E1 HERDC Conference Publication Select J1 for J1 ACU Original Creative Work Select J2 for J2 ACU Curated or Produced Substantial Public Exhibitions and Events Select J3 for J3 ACU Live Performance of Creative Works Select J4 for J4 ACU Recorded/Rendered Creative Work Select A2 for A2 Book - Authored other Select A3 for A3 Book - Edited Select B2 for B2 Book Chapter – Other Select C2 for C2 Journal Article – other refereed, scholarly Select E2 for E2 Conference Publication – full paper, non-refereed Select K1 for K1 Editing of refereed journal Select K2 for K2 Editing of non-refereed journal Select R1 for Other Externally Funded Research Projects Select R2 for ACU Funded Staff Research Projects Select R3 for Unfunded Staff Research Projects Select P2 for Postgraduate Supervision of non-ACU HDR students Select A1-N for A1 Non-affiliated HERDC Book Select B1-N for B1 Non-affiliated HERDC Book Chapter Select C1-N for C1 Non-affiliated HERDC Journal Article Select E1-N for E1 Non-affiliated HERDC Conference Publication Select J1-N for J1 Non-affiliated ACU Original Creative Work Select J2-N for J2 Non-affiliated ACU Curated or Produced Substantial Public Exhibitions and Events Select J3-N for J3 Non-affiliated ACU Live Performance of Creative Works Select J4-N for J4 Non-affiliated ACU Recorded/Rendered Creative Work 11 4.2 Category A1 – HERDC Book 4.2.1 Bring your cursor into the First ACU Author field. Enter the surname and first name/s of the first ACU author as it is written on your HERDC coversheet. It is mandatory that you enter the data in the format: Surname, Given name For example, Patrick McArdle should be entered as McArdle, Patrick in the First ACU Author field. 4.2.2 Bring your cursor into the Book Title field and type in the Book Title as it is written on your HERDC coversheet. 4.2.3 Bring your cursor into the Publisher field. The publisher has been highlighted and specified on the proof document. Click on the button “List data” on the left hand side of the screen to list the data available. This will open the ‘Find Publishers...’ window. Click on the button ‘Search for Publishers...’. This will list all the publishers already stored in ResearchMaster. Alternatively, in order to facilitate and narrow your search, use the search criteria available to you: Select ‘Category Name’ in the 1st drop down list. Select ‘Starts With’ in the 2nd drop down list. Enter the first few letters of the publisher you are looking for. Click on the button ‘Search for Publishers...’. 12 Click on the publisher you are looking for to select it. Click on the button ‘Return Selected Code’. This will bring you back to the ‘Publication Data Entry’ window with the selected publisher. Please Note: if the publisher you are looking for is not in the list, please send an email to [email protected] 4.2.4 Bring your cursor into the Country of Publication field. Type in the Country of Publication as highlighted and specified on the proof document. 4.2.5 Bring your cursor into the Volume No field. Type in the Volume No as highlighted and specified on the proof document. 4.2.6 Bring your cursor into the Start Page Numbers field. Enter 1. 4.2.7 Bring your cursor into the End Page Numbers field. Enter the Total No of pages as it is written on your HERDC coversheet. 4.2.8 Press tab on your keyboard, and this will automatically update the Total Pages field. 4.2.9 Bring your cursor into the ISBN field. Enter the ISBN as highlighted and specified on the proof document. The ISBN should be entered in the format XXXXXXXXXXXXX in ResearchMaster. (For example, 9781843106029 is the ISBN for the book with the title ‘The Spiritual Dimension of Childhood’) 4.2.10 Bring your cursor into the Year Published field. Enter the year published as highlighted and specified on the proof document. 4.2.11 Bring your cursor into the School Code field. In this field, we will record the AOU of the publication as it is written on your HERDC coversheet. Click on the button “List data” on the left hand side of the screen to list the data available. This will open the ‘Find Schools...’ window. Click on the button ‘Search for Schools...’. This will list all the AOUs already stored in ResearchMaster. In order to facilitate and narrow your search, use the search criteria available to you: Select ‘School Title’ in the 1st drop down list. Select ‘includes’ in the 2nd drop down list. Enter some letters of the AOU written on the HERDC coversheet. 13 Click on the button ‘Search for Schools...’. Click on the AOU you are looking for to select it. Click on the button ‘Return Selected Code’. This will bring you back to the ‘Publication Data Entry’ window with the selected AOU Code. Please Note: if you would like to edit the School Code after you have saved it, you will need to perform the following steps: Select the publication record from the Control Desk window. Click on the ‘View Selected Record’ button on the left hand side of the screen. This will open the ‘Publication Data Entry’ window with the selected record. Click on ‘Linked AOU’ in the bottom section of the ‘Publication Data Entry’ window. On the right pane, click on the School Code entry you wish to edit. Click on the ‘Edit’ button. Using the drop-down lists available, change the school code and school name. Click on the ‘Save’ button on the left hand side of the screen. 4.2.12 In the Series title field, type in the Series title as highlighted and specified on the proof document. 4.2.13 In the Published Names field, type in the name/s of the author/s as written in the book. If there is more than one author, separate each author’s name by a comma. 4.2.14 Click on ‘Publication Details 2’ tab. 4.2.15 In the Series Editors field, type in the series editors as highlighted and specified on the proof document. You should enter the editors in the format: A Smith, where A is the first letter of the firstname and Smith is the lastname. If there is more than one editor, you should separate each editor by a comma. For example: A Smith, B Jones. 4.2.16 By using the Tab key on your keyboard, move to the Project Code field. This field refers to the funded project details recorded at the bottom of your HERDC coversheet (just above the ‘Declaration of Authorship’). Click on the button “List data” on the left hand side of the screen to list the data available. This will open the ‘Find Projects...’ window. Click on the button ‘Search for Projects...’. This will list the funded projects already stored in ResearchMaster. Click on the project you are looking for to select it. 14 Click on the button ‘Return Selected Code’. This will bring you back to the ‘Publication Data Entry’ window with the selected project. 4.2.17 Tick the box ‘Evidence Received’ provided that you have received all the items for Verification, as stipulated on your HERDC Checklist. 4.2.18 By using the Tab key on your keyboard, move to the Date field and enter today’s date in dd/mm/yyyy format. (This date refers to the date that you are actually performing the data entry.) 4.2.19 Click on the ‘Save’ button on the left hand side of the screen. This will bring you to the bottom part of the ‘Publication Data Entry’ field. This is the related data entry section. 4.2.20 Adding Authors In the related data entry section, select ‘Authors’ on the left pane. Click on the button ‘Add’ to input the author(s) as listed on your coversheet. This will open the ‘Add Contributor Form’ window. Please Note: You must enter all the authors listed on your coversheet, including the author you specified earlier in the field First ACU Author. Click on the ‘Search’ button. This will list all the persons already stored in ResearchMaster. Please Note: To facilitate and narrow your search, you are encouraged to use the Surname field in the search criteria. Click on the author you are looking for to select it. Click on the button ‘Copy details to fields’ For authors who are ACU members, you must use the ‘Search’ function (as explained above) to select the author. If the ACU member you are looking for is not in the list, please send an email to [email protected] For external authors, you must still start by searching for the authors already in ResearchMaster. If the person is not in the list, click on the ‘Create New Person’ button. This will automatically generate the value in the Contributor Code field, and move the cursor to the Surname field. By using the Tab key on your keyboard to move across the fields, enter the Surname, Given Name, Title, and Gender. For the Type Grouping field, select External to mark the fact that this is an external author. Please Also Note: Internal authors who are now external authors and vice versa. 15 You can change their status through the Type Grouping field to match with what is stated on the publication. You should afterwards, send an email to [email protected], to advise Research Services of the change you made to the author’s type grouping. If you have selected an external author, move to ‘Page 2’ tab and then, bring your cursor into the Ext.Organisation Code field. Click on the button “List data” on the left hand side of the screen to list the data available. This will open the ‘Find Organisations...’ window. Click on the button ‘Search for Organisations...’. This will list the organisations already stored in ResearchMaster. Click on the organisation you are looking for to select it. Click on the button ‘Return Selected Code’. This will bring you back to the ‘Add Contributor Form’ window with the selected organisation. Please Note: if the organisation you are looking for is not in the list, please download and complete the External Organisation Request form available at http://www.acu.edu.au/research/support_for_researchers/research_master under Help and Resources. Click on the ‘Save’ button on the left hand side of the screen. This will bring you back to the ‘Publications Data Entry’ screen with the newly added author. Repeat the steps in 4.2.19 if you want to add another author. You can use the ‘Quick Add’ button to quickly add an author to the list if you already know the author’s ResearchMaster code. Just bring your cursor into the white box on the left of the ‘Quick Add’ button. Then, enter the code and press on the ‘Quick Add’ button. You can use the ‘Edit’ button to edit the details of an author you have already entered. You can use the ‘Delete’ button to delete an author you have previously entered. 4.2.21 Linking the AOUs In the related data entry section, select ‘Linked AOU’ on the left pane. If you haven’t recorded the school code in the top section of the publication record in ‘Publication Details 1’ tab, then you need to do the following: Click on the ‘Add’ button. This will open the ‘School Entry’ window. For the first ACU staff member listed, click on the button ‘copy’. This will add an entry at the bottom of the ‘School Entry’ window. 16 Adjust the percentage number (at the bottom of the ‘School Entry’ window) to 100%. Click on the ‘Save’ button on the left hand side of the screen. This will bring you back to the ‘Publications Data Entry’ screen with the linked AOU listed in the related data entry section. 4.2.22 Adding Classifications In the related data entry section, select ‘Classifications’ on the left pane. Click on the ‘Add’ button. This will open the ‘Classification Details Entry’ window. For the Classification Type field, for TOA, select ‘ABS Type of Activity Code’ for FOR, select ‘ANZSRC Field of Research Codes’ for SEO, select ‘ANZSRC Socio Economic Objective Codes’ In the Classification Code field, type in the ‘CODE No’ as it is written on your coversheet. Please Note: RM will accept only 6 digit FOR/SEO codes. In Percentage field, type in the % number as written on your coversheet. For each Type entered, tick the box ‘Primary Code of this type’ only when entering the one with the highest percentage. Please Note: If one Type holds only 2 codes, and both codes have 50% as percentage, you can make any one of these 2 codes become the primary code by ticking on the box ‘Primary Code of this type’. 4.2.23 Once the Author(s) and Classifications have been added, close the ‘Publications Data Entry’ window. Click on the ‘Display find criteria screen’ button on the left hand side of the screen. This will open the ‘Publications Selection Criteria’ window. Click the button ‘Find Records’. 4.2.24 Make the ‘Control Desk’ window become the active window. (See section 3.1 on page 9) Click on the publication record you just entered in order to select it. Click on the ‘Modify Selected Record’ button. This will open the ‘Publication Data Entry’ window. Select the ‘Publication Details 2’ tab. Tick the box ‘Record Complete’. Update the Reference No generated by ResearchMaster on your HERDC coversheet and checklist. 17 4.2.25 Click on the ‘Verification Details’ tab. In School Level Verification: Tick the box ‘Verified’ Tick the box ‘Evidence Sighted’ Enter the Verification Date as the date that the author has signed off the HERDC checklist. Click on the ‘Save’ button on the left hand side of the screen. Close the ‘Publication Data Entry’ window. 18 4.3 Category B1 – HERDC Book Chapter 4.3.1 Perform the step at 4.1 on page 11. 4.3.2 Bring your cursor into the First ACU Author field. Enter the surname and first name/s of the first ACU author as it is written on your HERDC coversheet. It is mandatory that you enter the data in the format: Surname, Given name For example, Patrick McArdle should be entered as McArdle, Patrick in the First ACU Author field. 4.3.3 Bring your cursor into the Chapter Title field and type in the Chapter Title as it is written on the HERDC coversheet. 4.3.4 Bring your cursor into the field ‘Full Book Title’. Click on the button “List data” on the left hand side of the screen to list the data available. This will open the ‘Find Book Titles...’ window. Click on the button ‘Search for Book Titles...’. This will list the Book titles already stored in ResearchMaster. Alternatively, in order to facilitate and narrow your search, use the search criteria available to you: 19 Select ‘Book Title’ in the 1st drop down list. Select ‘includes’ in the 2nd drop down list. Enter some letters of the book title you are looking for. Click on the button ‘Search for Book Titles...’ If the Book Title you are looking for is in the list: Click on the book title you are looking for to select it. Click on the button ‘Return Selected Code’. This will bring you back to the ‘Publication Data Entry’ window with the Full Book Title’s code. Press Tab on your keyboard and the Full Book Title will appear. Go to 4.3.5 If the Book Title you are looking for is not in the list: Click on the button ‘Clear’. Click on the button ‘Search for Book Titles’. Scroll down the end of the list. Write down the last code number listed that is in the format 00000XXXXX, and click ‘Cancel’. This will bring you back to the ‘Publication Data Entry’ window. Enter a new code for the book by continuing the numbering. For instance, if the last code number listed is 0000015283, you should enter 0000015284 as the new code to continue the order in which books are listed in ResearchMaster. Press Tab or Enter on your keyboard. On the ResearchMaster alert window, click on the button ‘new book’. This will bring you back to the ‘Publication Data Entry’ window. Enter the Full Book Title as it is written on your HERDC coversheet. Go to 4.3.5 4.3.5 Bring your cursor into the Commercial Publish field. Click on the button “List data” on the left hand side of the screen to list the data available. This will open the ‘Find Publishers...’ window. Click on the button ‘Search for Publishers...’. This will list all the publishers already stored in ResearchMaster. Alternatively, in order to facilitate and narrow your search, use the search criteria available to you: Select ‘Category Name’ in the 1st drop down list. Select ‘Starts With’ in the 2nd drop down list. Enter the first few letters of the publisher you are looking for. Click on the button ‘Search for Publishers...’. Click on the publisher you are looking for to select it. Click on the button ‘Return Selected Code’. 20 This will bring you back to the ‘Publication Data Entry’ window with the selected publisher. Please Note: if the publisher you are looking for is not in the list, please send an email to [email protected] 4.3.6 Bring your cursor into the Country of Publication field. Type in the Country of Publication as highlighted and specified on the proof document. 4.3.7 Bring your cursor into the Volume No field. Type in the Volume No as highlighted and specified on the proof document. 4.3.8 Bring your cursor into the Revision No field. Type in the Revision No as highlighted and specified on the proof document. 4.3.9 Bring your cursor into the Start Page Number field. Enter the Start Page No as it is written on your HERDC coversheet. 4.3.10 Bring your cursor into the End Page Number field. Enter the End Page No as it is written on your HERDC coversheet. 4.3.11 Press tab on your keyboard, and this will automatically update the Total Pages field. 4.3.12 Bring your cursor into the ISBN field. Enter the ISBN as highlighted and specified on the proof document. The ISBN should be entered in the format XXXXXXXXXXXXX in ResearchMaster. (For example, 9781843106029 is the ISBN for the book with the title ‘The Spiritual Dimension of Childhood’) 4.3.13 Bring your cursor into the Total field. Enter the total No of Chapters in the book as it is written on your HERDC coversheet. 4.3.14 Bring your cursor into the Year Published field. Enter the year published as highlighted and specified on the proof document. 4.3.15 Bring your cursor into the School Code field. In this field, we will record the AOU of the publication as it is written on your HERDC coversheet. Click on the button “List data” on the left hand side of the screen to list the data available. This will open the ‘Find Schools...’ window. 21 Click on the button ‘Search for Schools...’. This will list all the AOUs already stored in ResearchMaster. In order to facilitate and narrow your search, use the search criteria available to you: Select ‘School Title’ in the 1st drop down list. Select ‘includes’ in the 2nd drop down list. Enter some letters of the AOU written on the HERDC coversheet. Click on the button ‘Search for Schools...’. Click on the AOU you are looking for to select it. Click on the button ‘Return Selected Code’. This will bring you back to the ‘Publication Data Entry’ window with the selected AOU Code. Please Note: if you would like to edit the School Code after you have saved it, you will need to perform the following steps: Select the publication record from the Control Desk window. Click on the ‘View Selected Record’ button on the left hand side of the screen. This will open the ‘Publication Data Entry’ window with the selected record. Click on ‘Linked AOU’ in the bottom section of the ‘Publication Data Entry’ window. On the right pane, click on the School Code entry you wish to edit. Click on the ‘Edit’ button. Using the drop-down lists available, change the school code and school name. Click on the ‘Save’ button on the left hand side of the screen. 4.3.16 In the Series title field, type in the Series title as highlighted and specified on the proof document. 4.3.17 In the Published Names field, type in the name/s of the author/s of the book chapter as written on the publication. If there is more than one author, separate each author’s name by a comma. 4.3.18 Click on ‘Publication Details 2’ tab. 4.3.19 In the Book Editors field, type in the book editors as highlighted and specified on the proof document. You should enter the editors in the format: A Smith, where A is the first letter of the firstname and Smith is the lastname. If there is more than one editor, you should separate each editor by a comma. For example: A Smith, B Jones. 4.3.20 Follow the instructions from 4.2.16 to 4.2.25. 22 However, when you are at 4.2.20 and in the process of adding authors, you will need to consult your B1 coversheet, and check whether the ACU author has selected ‘Yes’ in Section A, no 2. (Is this your Main Chapter in the book?) If the ‘Yes’ has been selected, you will need to tick Main Chapter in the ‘Add Contributor Form’ window, for the internal author(s). 23 4.4 Category C1 – HERDC Journal Article 4.4.1 Perform the step at 4.1 on page 11. 4.4.2 Bring your cursor into the First ACU Author field. Enter the surname and first name/s of the first ACU author as it is written on your HERDC coversheet. It is mandatory that you enter the data in the format: Surname, Given name For example, Patrick McArdle should be entered as McArdle, Patrick in the First ACU Author field. 4.4.3 Bring your cursor into the Article Title field and type in the Article Title as it is written on the HERDC coversheet. 4.4.4 Bring your cursor into the Journal Name field. Click on the button “List data” on the left hand side of the screen to list the data available. This will open the ‘Find Journals...’ window. Click on the button ‘Search for Journals...’. This will list the journals already stored in ResearchMaster. 24 Please Note: To facilitate and narrow your search, you are encouraged to use the Category Name field in the search criteria. Then, use the criteria ‘starts with’ and enter the first word or letters in the journal name you are looking for. Click on the journal you are looking for to select it. Click on the button ‘Return Selected Code’. This will bring you back to the ‘Publication Data Entry’ window with the selected journal. Please Note: if the journal you are looking for is not in the list, please send an email to [email protected] 4.4.5 Bring your cursor into the Publisher field. Type in the Publisher as highlighted and specified on the proof document. 4.4.6 Bring your cursor into the Country of Publication field. Type in the Country of Publication as highlighted and specified on the proof document. 4.4.7 Bring your cursor into the Volume No field. Type in the Volume No as highlighted and specified on the proof document. 4.4.8 Bring your cursor into the Issue No field. Type in the Issue No as highlighted and specified on the proof document. 4.4.9 Bring your cursor into the Month field. Type in the month of publication of the journal, if available. 4.4.10 Bring your cursor into the Start Page No of Article field. Enter the Start Page No as it is written on your HERDC coversheet. 4.4.11 Bring your cursor into the End Page No of Article field. Enter the End Page No as it is written on your HERDC coversheet. 4.4.12 Press tab on your keyboard, and this will automatically update the Total Pages field. 4.4.13 Bring your cursor into the ISSN field. Enter the ISSN as highlighted and specified on the proof document. The ISSN should be entered in the format XXXX-XXXX in ResearchMaster. (For example, 1363-9080 is the ISSN for the printed version of the Journal of Education and Work.) Please note that ISSN in this field should match with the ISSN returned when you searched for the journal in the Journal Name field (4.4.4). If those 2 ISSNs don’t match, please email [email protected]. 25 4.4.14 Bring your cursor into the Year Published field. Enter the year published as highlighted and specified on the proof document. 4.4.15 Bring your cursor into the School Code field. In this field, we will record the AOU of the publication as it is written on your HERDC coversheet. Click on the button “List data” on the left hand side of the screen to list the data available. This will open the ‘Find Schools...’ window. Click on the button ‘Search for Schools...’. This will list all the AOUs already stored in ResearchMaster. In order to facilitate and narrow your search, use the search criteria available to you: Select ‘School Title’ in the 1st drop down list. Select ‘includes’ in the 2nd drop down list. Enter some letters of the AOU written on the HERDC coversheet. Click on the button ‘Search for Schools...’. Click on the AOU you are looking for to select it. Click on the button ‘Return Selected Code’. This will bring you back to the ‘Publication Data Entry’ window with the selected AOU Code. Please Note: if you would like to edit the School Code after you have saved it, you will need to perform the following steps: Select the publication record from the Control Desk window. Click on ‘Linked AOU’ in the bottom section of the ‘Publication Data Entry’ window. On the right pane, click on the School Code entry you wish to edit. Click on the ‘Edit’ button. Using the drop-down lists available, change the school code and school name. Click on the ‘Save’ button on the left hand side of the screen. 4.4.16 In the Published Names field, type in the name/s of the author/s of the article as written on the publication. If there is more than one author, separate each author’s name by a comma. 4.4.17 Click on the ‘Publication Details 2’ tab 4.4.18 Bring your cursor into the Proof of refereeing field. Click on the button “List data” on the left hand side of the screen to list the data available. This will open the ‘Find Proof of Refereeing...’ window. Click on the button ‘Search for Proof of Refereeings...’. 26 Click on the Proof of Refereeing you are looking for to select it. Click on the button ‘Return Selected Code’.This will bring you back to the ‘Publication Data Entry’ window with the selected Proof of Refereeing. 4.4.19 Bring your cursor into the Journal Editors field. Enter the journal editors as it is written on your HERDC coversheet. 4.4.20 Follow the instructions from 4.2.16 to 4.2.25. 27 4.5 Category E1 – HERDC Conference Publication 4.5.1 Perform the step at 4.1 on page 11. 4.5.2 Bring your cursor into the First ACU Author field. Enter the surname and first name/s of the first ACU author as it is written on your HERDC coversheet. It is mandatory that you enter the data in the format: Surname, Given name For example, Patrick McArdle should be entered as McArdle, Patrick in the First ACU Author field. 4.5.3 Bring your cursor into the Title of Paper field and type in the Title of Paper as it is written on your HERDC coversheet. 4.5.4 In the Title of Conf Public field, type in the Title of the Conference Publication as highlighted and specified on the proof document. 4.5.5 Bring your cursor into the Publisher field. Click on the button “List data” to list the data available. This will open the ‘Find Publishers...’ window. Click on the button ‘Search for Publishers...’. This will list all the publishers already stored in ResearchMaster. 28 Alternatively, in order to facilitate and narrow your search, use the search criteria available to you: Select ‘Category Name’ in the 1st drop down list. Select ‘Starts With’ in the 2nd drop down list. Enter the first few letters of the publisher you are looking for. Click on the button ‘Search for Publishers...’. Click on the publisher you are looking for to select it. Click on the button ‘Return Selected Code’. This will bring you back to the ‘Publication Data Entry’ window with the selected publisher. Please Note: if the publisher you are looking for is not in the list, please send an email to [email protected] 4.5.6 Bring your cursor into the Country of Publication field. Type in the Country of Publication as it is written on your HERDC coversheet. 4.5.7 In the Location of Conference field, type in the Location of Conference as it is written on your HERDC coversheet. 4.5.8 Bring your cursor into the Volume No field. Type in the Volume No as highlighted and specified on the proof document. 4.5.9 Bring your cursor into the Issue No field. Type in the Issue No as highlighted and specified on the proof document. 4.5.10 Bring your cursor into the Start Page No of Article field. Enter the Start Page No as it is written on your HERDC coversheet. 4.5.11 Bring your cursor into the End Page No of Article field. Enter the End Page No as it is written on your HERDC coversheet. 4.5.12 Press tab on your keyboard, and this will automatically update the Total Pages field. 4.5.13 Bring your cursor into the ISBN/ISSN field. Enter the ISBN or ISSN number as highlighted and specified on the proof document. The ISBN number should be entered in the format XXXXXXXXXXXXX in ResearchMaster. (For example, 9781843106029 is the ISBN number for the book with the title ‘The Spiritual Dimension of Childhood’) The ISSN number should be entered in the format XXXX-XXXX in ResearchMaster. (For example, 1363-9080 is the ISSN number for the printed version of the Journal of Education and Work.) 29 4.5.14 Bring your cursor into the Year Published field. Enter the year published as highlighted and specified on the proof document. 4.5.15 Bring your cursor into the School Code field. In this field, we will record the AOU of the publication as it is written on your HERDC coversheet. Click on the button “List data” on the left hand side of the screen to list the data available. This will open the ‘Find Schools...’ window. Click on the button ‘Search for Schools...’. This will list all the AOUs already stored in ResearchMaster. In order to facilitate and narrow your search, use the search criteria available to you: Select ‘School Title’ in the 1st drop down list. Select ‘includes’ in the 2nd drop down list. Enter some letters of the AOU written on the HERDC coversheet. Click on the button ‘Search for Schools...’. Click on the AOU you are looking for to select it. Click on the button ‘Return Selected Code’. This will bring you back to the ‘Publication Data Entry’ window with the selected AOU Code. Please Note: if you would like to edit the School Code after you have saved it, you will need to perform the following steps: Select the publication record from the Control Desk window. Click on ‘Linked AOU’ in the bottom section of the ‘Publication Data Entry’ window. On the right pane, click on the School Code entry you wish to edit. Click on the ‘Edit’ button. Using the drop-down lists available, change the school code and school name. Click on the ‘Save’ button on the left hand side of the screen. 4.5.16 In the Conf Start Date field, type in the Start Date of the Conference as it is written on your HERDC coversheet in dd/mm/yyyy format. 4.5.17 Bring your cursor into the Name of Conference field. Click on the button “List data” to list the data available. This will open the ‘Find Conferences...’ window. Click on the button ‘Search for Conferences...’. This will list all the conferences already stored in ResearchMaster. Alternatively, in order to facilitate and narrow your search, use the search criteria available to you: Select ‘Category Name’ in the 1st drop down list. Select ‘Starts With’ in the 2nd drop down list. 30 Enter the first few letters of the conference you are looking for. Click on the button ‘Search for Conferences...’. Click on the conference you are looking for to select it. Click on the button ‘Return Selected Code’. This will bring you back to the ‘Publication Data Entry’ window with the selected conference. Please Note: if the conference you are looking for is not in the list, please send an email to [email protected] 4.5.18 In the Published Names field, type in the name/s of the author/s of the conference paper as written on the publication. If there is more than one author, separate each author’s name by a comma. 4.5.19 In the Editors field, type in the Editors of the Conference Publication as highlighted and specified on the proof document. You should enter the editors in the format: A Smith, where A is the first letter of the firstname and Smith is the lastname. If there is more than one editor, you should separate each editor by a comma. For example: A Smith, B Jones. 4.5.20 Follow the instructions from 4.2.16 to 4.2.25. 31 4.6 Category J1 – ACU Original Creative Work 4.6.1 Perform the step at 4.1 on page 11. 4.6.2 Bring your cursor into the First ACU Creator field. Enter the surname and first name/s of the first ACU Creator as it is written on the coversheet. It is mandatory that you enter the data in the format: Surname, Given name For example, Patrick McArdle should be entered as McArdle, Patrick in the First ACU Creator field. 4.6.3 Bring your cursor into the Title of Work field and type in the Title of Work as it is written on the coversheet. 4.6.4 Bring your cursor into the Publisher field and type in the Publisher or Organisation or Place of Performance as it is written on the coversheet. 4.6.5 Bring your cursor into the Place of Publication field and type in the Place of Publication as it is written on the coversheet. 32 4.6.6 If the author has selected the Type of Work as Textual Work or Other, and has indicated the Total No of Pages on the coversheet, type in the Start Page Number, and End Page Number. Total Pages will be updated automatically. It is fine to type in 1 as the start page number if you cannot locate the correct start page number. 4.6.7 If the author has selected the Type of Work as Textual Work or Other, and has indicated the ISBN/ISSN on the coversheet, type in the ISBN/ISSN as it is written on the coversheet. Enter the ISBN or ISSN number as highlighted and specified on the proof document. The ISBN number should be entered in the format XXXXXXXXXXXXX in ResearchMaster. (For example, 9781843106029 is the ISBN number for the book with the title ‘The Spiritual Dimension of Childhood’) The ISSN number should be entered in the format XXXX-XXXX in ResearchMaster. (For example, 1363-9080 is the ISSN number for the printed version of the Journal of Education and Work.) 4.6.8 Bring your cursor into the Year Published field. Enter the year published as it is written on the coversheet. 4.6.9 Bring your cursor into the School Code field. In this field, we will record the AOU of the publication as it is written on the coversheet. Click on the button “List data” on the left hand side of the screen to list the data available. This will open the ‘Find Schools...’ window. Click on the button ‘Search for Schools...’. This will list all the AOUs already stored in ResearchMaster. In order to facilitate and narrow your search, use the search criteria available to you: Select ‘School Title’ in the 1st drop down list. Select ‘includes’ in the 2nd drop down list. Enter some letters of the AOU written on the coversheet. Click on the button ‘Search for Schools...’. Click on the AOU you are looking for to select it. Click on the button ‘Return Selected Code’. This will bring you back to the ‘Publication Data Entry’ window with the selected AOU Code. Please Note: if you would like to edit the School Code after you have saved it, you will need to perform the following steps: Select the publication record from the Control Desk window. Click on ‘Linked AOU’ in the bottom section of the ‘Publication Data Entry’ window. On the right pane, click on the School Code entry you wish to edit. Click on the ‘Edit’ button. 33 Using the drop-down lists available, change the school code and school name. Click on the ‘Save’ button on the left hand side of the screen. 4.6.10 Bring your cursor into the Date of Activity field. If the author has selected the Type of Work as Music Composition or Writing for Performance, and has indicated the date when the performance was held on the coversheet, enter the date in the format dd/mm/yyyy. 4.6.11 Bring your cursor into the Type of Work field. Click on the button “List Data” on the left hand side of the screen to list the data available. This will open the ‘Find Output Types...’ window. Click on the button ‘Search for Output Types...’. This will list all the types of work already stored in ResearchMaster. In order to facilitate and narrow your search, use the search criteria available to you: Select ‘Category Code’ in the 1st drop down list. Select ‘includes’ in the 2nd drop down list. Enter J1 Click on the button ‘Search for Output Types...’. Click on the Type of Work you would like to select. Click on the button ‘Return Selected Code’. This will bring you back to the ‘Publication Data Entry’ window with the selected Type of Work. 34 4.6.12 Click on ‘Publication Details 2’ tab 4.6.13 If the author has selected the Type of Work as Visual Art Work or Design/Architectural Work or Music Composition or Writing for Performance or Other, and has indicated the Extent on the coversheet, bring your cursor into the Extent field and type in the extent as it is written on the coversheet. Enter the value and what the value represents. For example: 10 days or 1 month or 60 minutes. (DO NOT enter just 10 or 1 or 60.) 4.6.14 If the author has selected the Type of Work as Visual Art Work or Design/Architectural Work or Other, and has indicated the Medium on the coversheet, bring your cursor into the Medium field and type in the medium as it is written on the coversheet. 4.6.15 If the author has selected the Type of Work as Textual Work or Other, and has indicated the Editor(s) on the coversheet, bring your cursor into the Editors/Performer field and type in the editors. You should enter the editors in the format: A Smith, where A is the first letter of the firstname and Smith is the lastname. If there is more than one editor, you should separate each editor by a comma. For example: A Smith, B Jones. If the author has selected the Type of Work as Music Composition or Writing for Performance, and has indicated the Performer/Professional Company on the coversheet, 35 bring your cursor into the Editors/Performer field and type in the Performer or Professional Company. 4.6.16 By using the Tab key on your keyboard, move to the Project Code field. This field refers to the funded project details recorded at the bottom of the coversheet (just above the ‘Declaration of Authorship’). Click on the button “List data” on the left hand side of the screen to list the data available. This will open the ‘Find Projects...’ window. Click on the button ‘Search for Projects...’. This will list the funded projects already stored in ResearchMaster. Click on the project you are looking for to select it. Click on the button ‘Return Selected Code’. This will bring you back to the ‘Publication Data Entry’ window with the selected project. 4.6.17 Follow the instructions from 4.2.18 to 4.2.23. 4.6.18 Make the ‘Control Desk’ window become the active window. (See section 3.1 on page 9) Click on the publication record you just entered in order to select it. Click on the ‘Modify Selected Record’ button. This will open the ‘Publication Data Entry’ window. Select the ‘Publication Details 2’ tab. Tick the box ‘Record Complete’, ‘Evidence Claimed’, and ‘Evidence Received’. Type in the Date in dd/mm/yyyy format. Update the Reference No generated by ResearchMaster on the coversheet. 4.6.19 Click on the ‘Verification Details’ tab. Tick the box ‘Verified’ Tick the box ‘Evidence Sighted’ Enter the Verification Date. Click on the ‘Save’ button on the left hand side of the screen. Close the ‘Publication Data Entry’ window. 36 4.7 Category J2 – ACU Curated or Produced Substantial Public Exhibitions and Events 4.7.1 Perform the step at 4.1 on page 11. 4.7.2 Bring your cursor into the First ACU Creator field. Enter the surname and first name/s of the first ACU Creator as it is written on the coversheet. It is mandatory that you enter the data in the format: Surname, Given name For example, Patrick McArdle should be entered as McArdle, Patrick in the First ACU Creator field. 4.7.3 Bring your cursor into the Title of Work field and type in the Title of Work as it is written on the coversheet. 4.7.4 If the author has selected the Type of Work as Web-based Exhibition or Other, and has indicated the Publisher on the coversheet, bring your cursor into the Publisher field and type in the publisher as it is written on the coversheet. 37 4.7.5 If the author has selected the Type of Work as Web-based Exhibition or Other, and has indicated the Place of Publication on the coversheet, bring your cursor into the Place of Publication field and type in the Place of Publication as it is written on the coversheet. 4.7.6 If the author has selected the Type of Work as Exhibition/Event or Festival or Other, and has indicated the Place of Exhibition/Festival on the coversheet, bring your cursor into the Place of Exhib/Festi field and type in the Place of Exhibition/Festival as it is written on the coversheet. 4.7.7 Bring your cursor into the Year Published field. Enter the year published as it is written on the coversheet. 4.7.8 Bring your cursor into the School Code field. In this field, we will record the AOU of the publication as it is written on the coversheet. Click on the button “List data” on the left hand side of the screen to list the data available. This will open the ‘Find Schools...’ window. Click on the button ‘Search for Schools...’. This will list all the AOUs already stored in ResearchMaster. In order to facilitate and narrow your search, use the search criteria available to you: Select ‘School Title’ in the 1st drop down list. Select ‘includes’ in the 2nd drop down list. Enter some letters of the AOU written on the coversheet. Click on the button ‘Search for Schools...’. Click on the AOU you are looking for to select it. Click on the button ‘Return Selected Code’. This will bring you back to the ‘Publication Data Entry’ window with the selected AOU Code. Please Note: if you would like to edit the School Code after you have saved it, you will need to perform the following steps: Select the publication record from the Control Desk window. Click on ‘Linked AOU’ in the bottom section of the ‘Publication Data Entry’ window. On the right pane, click on the School Code entry you wish to edit. Click on the ‘Edit’ button. Using the drop-down lists available, change the school code and school name. Click on the ‘Save’ button on the left hand side of the screen. 4.7.9 Bring your cursor into the Type of Work field. Click on the button “List Data” on the left hand side of the screen to list the data available. This will open the ‘Find Output Types...’ window. 38 Click on the button ‘Search for Output Types...’. This will list all the types of work already stored in ResearchMaster. In order to facilitate and narrow your search, use the search criteria available to you: Select ‘Category Code’ in the 1st drop down list. Select ‘includes’ in the 2nd drop down list. Enter J2 Click on the button ‘Search for Output Types...’. Click on the Type of Work you would like to select. Click on the button ‘Return Selected Code’. This will bring you back to the ‘Publication Data Entry’ window with the selected Type of Work. 4.7.10 If the author has selected the Type of Work as Exhibition/Event or Festival or Other, and has indicated the Date of Exhibition/Festival on the coversheet, bring your cursor into the Date of Exhib/Festi field and type in the Date of Exhibition/Festival in the format dd/mm/yyyy. 4.7.11 Click on ‘Publication Details 2’ tab 39 4.7.12 Bring your cursor into the Extent field and type in the extent as it is written on the coversheet. Enter the value and what the value represents. For example: 10 days or 1 month or 60 minutes. (DO NOT enter just 10 or 1 or 60.) 4.7.13 By using the Tab key on your keyboard, move to the Project Code field. This field refers to the funded project details recorded at the bottom of the coversheet (just above the ‘Declaration of Authorship’). Click on the button “List data” on the left hand side of the screen to list the data available. This will open the ‘Find Projects...’ window. Click on the button ‘Search for Projects...’. This will list the funded projects already stored in ResearchMaster. Click on the project you are looking for to select it. Click on the button ‘Return Selected Code’. This will bring you back to the ‘Publication Data Entry’ window with the selected project. 4.7.14 Follow the instructions from 4.2.18 to 4.2.23 4.7.15 Make the ‘Control Desk’ window become the active window. (See section 3.1 on page 9) Click on the publication record you just entered in order to select it. Click on the ‘Modify Selected Record’ button. This will open the ‘Publication Data Entry’ window. Select the ‘Publication Details 2’ tab. Tick the box ‘Record Complete’, ‘Evidence Claimed’, and ‘Evidence Received’. Type in the Date in dd/mm/yyyy format. Update the Reference No generated by ResearchMaster on the coversheet. 4.7.16 Click on the ‘Verification Details’ tab. Tick the box ‘Verified’ Tick the box ‘Evidence Sighted’ Enter the Verification Date. Click on the ‘Save’ button on the left hand side of the screen. Close the ‘Publication Data Entry’ window. 40 4.8 Category J3 – ACU Live Performance of Creative Works 4.8.1 Perform the step at 4.1 on page 11. 4.8.2 Bring your cursor into the First ACU Creator field. Enter the surname and first name/s of the first ACU Creator as it is written on the coversheet. It is mandatory that you enter the data in the format: Surname, Given name For example, Patrick McArdle should be entered as McArdle, Patrick in the First ACU Creator field. 4.8.3 Bring your cursor into the Title of Work field and type in the Title of Work as it is written on the coversheet. 4.8.4 Bring your cursor into the Director/Choreographer field and type in the Director/Choreographer as it is written on the coversheet. 4.8.5 Bring your cursor into the Place of Publication field and type in the Place of Publication as it is written on the coversheet. 41 4.8.6 Bring your cursor into the Year Published field. Enter the year published as it is written on the coversheet. 4.8.7 Bring your cursor into the School Code field. In this field, we will record the AOU of the publication as it is written on the coversheet. Click on the button “List data” on the left hand side of the screen to list the data available. This will open the ‘Find Schools...’ window. Click on the button ‘Search for Schools...’. This will list all the AOUs already stored in ResearchMaster. In order to facilitate and narrow your search, use the search criteria available to you: Select ‘School Title’ in the 1st drop down list. Select ‘includes’ in the 2nd drop down list. Enter some letters of the AOU written on the coversheet. Click on the button ‘Search for Schools...’. Click on the AOU you are looking for to select it. Click on the button ‘Return Selected Code’. This will bring you back to the ‘Publication Data Entry’ window with the selected AOU Code. Please Note: if you would like to edit the School Code after you have saved it, you will need to perform the following steps: Select the publication record from the Control Desk window. Click on ‘Linked AOU’ in the bottom section of the ‘Publication Data Entry’ window. On the right pane, click on the School Code entry you wish to edit. Click on the ‘Edit’ button. Using the drop-down lists available, change the school code and school name. Click on the ‘Save’ button on the left hand side of the screen. 4.8.8 Bring your cursor into the Date of Activity field. Enter the Date of Activity specified on the coversheet in the format dd/mm/yyyy. 4.8.9 Bring your cursor into the Type of Work field. Click on the button “List Data” on the left hand side of the screen to list the data available. This will open the ‘Find Output Types...’ window. Click on the button ‘Search for Output Types...’. This will list all the types of work already stored in ResearchMaster. In order to facilitate and narrow your search, use the search criteria available to you: Select ‘Category Code’ in the 1st drop down list. Select ‘includes’ in the 2nd drop down list. Enter J3 42 Click on the button ‘Search for Output Types...’. Click on the Type of Work you would like to select. Click on the button ‘Return Selected Code’. This will bring you back to the ‘Publication Data Entry’ window with the selected Type of Work. 4.8.10 Click on ‘Publication Details 2’ tab 4.8.11 Bring your cursor into the Extent field and type in the extent as it is written on the coversheet. Enter the value and what the value represents. For example: 10 days or 1 month or 60 minutes. (DO NOT enter just 10 or 1 or 60.) 4.8.12 By using the Tab key on your keyboard, move to the Project Code field. This field refers to the funded project details recorded at the bottom of the coversheet (just above the ‘Declaration of Authorship’). Click on the button “List data” on the left hand side of the screen to list the data available. This will open the ‘Find Projects...’ window. Click on the button ‘Search for Projects...’. This will list the funded projects already stored in ResearchMaster. Click on the project you are looking for to select it. 43 Click on the button ‘Return Selected Code’. This will bring you back to the ‘Publication Data Entry’ window with the selected project. 4.8.13 Follow the instructions from 4.2.18 to 4.2.23 4.8.14 Make the ‘Control Desk’ window become the active window. (See section 3.1 on page 9) Click on the publication record you just entered in order to select it. Click on the ‘Modify Selected Record’ button. This will open the ‘Publication Data Entry’ window. Select the ‘Publication Details 2’ tab. Tick the box ‘Record Complete’, ‘Evidence Claimed’, and ‘Evidence Received’. Type in the Date in dd/mm/yyyy format. Update the Reference No generated by ResearchMaster on the coversheet. 4.8.15 Click on the ‘Verification Details’ tab. Tick the box ‘Verified’ Tick the box ‘Evidence Sighted’ Enter the Verification Date. Click on the ‘Save’ button on the left hand side of the screen. Close the ‘Publication Data Entry’ window. 44 4.9 Category J4 – ACU Recorded/Rendered Creative Work 4.9.1 Perform the step at 4.1 on page 11. 4.9.2 Bring your cursor into the First ACU Creator field. Enter the surname and first name/s of the first ACU Creator as it is written on the coversheet. It is mandatory that you enter the data in the format: Surname, Given name For example, Patrick McArdle should be entered as McArdle, Patrick in the First ACU Creator field. 4.9.3 Bring your cursor into the Title of Work field and type in the Title of Work as it is written on the coversheet. 4.9.4 Bring your cursor into the Distributer Name field and type in the Name of Distributer as it is written on the coversheet. 4.9.5 Bring your cursor into the Place of Publication field and type in the Place of Publication as it is written on the coversheet. 45 4.9.6 Bring your cursor into the Year Published field. Enter the year published as it is written on the coversheet. 4.9.7 Bring your cursor into the School Code field. In this field, we will record the AOU of the publication as it is written on the coversheet. Click on the button “List data” on the left hand side of the screen to list the data available. This will open the ‘Find Schools...’ window. Click on the button ‘Search for Schools...’. This will list all the AOUs already stored in ResearchMaster. In order to facilitate and narrow your search, use the search criteria available to you: Select ‘School Title’ in the 1st drop down list. Select ‘includes’ in the 2nd drop down list. Enter some letters of the AOU written on the coversheet. Click on the button ‘Search for Schools...’. Click on the AOU you are looking for to select it. Click on the button ‘Return Selected Code’. This will bring you back to the ‘Publication Data Entry’ window with the selected AOU Code. Please Note: if you would like to edit the School Code after you have saved it, you will need to perform the following steps: Select the publication record from the Control Desk window. Click on ‘Linked AOU’ in the bottom section of the ‘Publication Data Entry’ window. On the right pane, click on the School Code entry you wish to edit. Click on the ‘Edit’ button. Using the drop-down lists available, change the school code and school name. Click on the ‘Save’ button on the left hand side of the screen. 4.9.8 Bring your cursor into the Type of Work field. Click on the button “List Data” on the left hand side of the screen to list the data available. This will open the ‘Find Output Types...’ window. Click on the button ‘Search for Output Types...’. This will list all the types of work already stored in ResearchMaster. In order to facilitate and narrow your search, use the search criteria available to you: Select ‘Category Code’ in the 1st drop down list. Select ‘includes’ in the 2nd drop down list. Enter J4 Click on the button ‘Search for Output Types...’. Click on the Type of Work you would like to select. Click on the button ‘Return Selected Code’. 46 This will bring you back to the ‘Publication Data Entry’ window with the selected Type of Work. 4.9.9 Click on ‘Publication Details 2’ tab 4.9.10 Bring your cursor into the Extent field and type in the extent as it is written on the coversheet. Enter the value and what the value represents. For example: 10 days or 1 month or 60 minutes. (DO NOT enter just 10 or 1 or 60.) 4.9.11 Bring your cursor into the Distribution Medium field and type in the Distribution Medium as it is written on the coversheet. 4.9.12 By using the Tab key on your keyboard, move to the Project Code field. This field refers to the funded project details recorded at the bottom of the coversheet (just above the ‘Declaration of Authorship’). Click on the button “List data” on the left hand side of the screen to list the data available. This will open the ‘Find Projects...’ window. Click on the button ‘Search for Projects...’. This will list the funded projects already stored in ResearchMaster. 47 Click on the project you are looking for to select it. Click on the button ‘Return Selected Code’. This will bring you back to the ‘Publication Data Entry’ window with the selected project. 4.9.13 Follow the instructions from 4.2.18 to 4.2.23 4.9.14 Make the ‘Control Desk’ window become the active window. (See section 3.1 on page 9) Click on the publication record you just entered in order to select it. Click on the ‘Modify Selected Record’ button. This will open the ‘Publication Data Entry’ window. Select the ‘Publication Details 2’ tab. Tick the box ‘Record Complete’, ‘Evidence Claimed’, and ‘Evidence Received’. Type in the Date in dd/mm/yyyy format. Update the Reference No generated by ResearchMaster on the coversheet. 4.9.15 Click on the ‘Verification Details’ tab. Tick the box ‘Verified’ Tick the box ‘Evidence Sighted’ Enter the Verification Date. Click on the ‘Save’ button on the left hand side of the screen. Close the ‘Publication Data Entry’ window. 48 4.10 Category A2 – ACU Book Authored Other & Category A3 – ACU Book Edited 4.10.1 Perform the step at 4.1 on page 11. 4.10.2 Bring your cursor into the First ACU Author field. Enter the surname and first name/s of the first ACU author as it is written on your coversheet. It is mandatory that you enter the data in the format: Surname, Given name For example, Patrick McArdle should be entered as McArdle, Patrick in the First ACU Author field. 4.10.3 Bring your cursor into the Book Title field and type in the Book Title as it is written on your coversheet. 4.10.4 Bring your cursor into the Publisher field. Click on the button “List data” on the left hand side of the screen to list the data available. This will open the ‘Find Publishers...’ window. Click on the button ‘Search for Publishers...’. This will list all the publishers already stored in ResearchMaster. Alternatively, in order to facilitate and narrow your search, use the search criteria available to you: Select ‘Category Name’ in the 1st drop down list. 49 Select ‘Starts With’ in the 2nd drop down list. Enter the first few letters of the publisher you are looking for. Click on the button ‘Search for Publishers...’. Click on the publisher you are looking for to select it. Click on the button ‘Return Selected Code’. This will bring you back to the ‘Publication Data Entry’ window with the selected publisher. Please Note: if the publisher you are looking for is not in the list, please send an email to [email protected] 4.10.5 Bring your cursor into the Country of Publication field. Type in the Country of Publication as it is written on your coversheet. 4.10.6 Bring your cursor into the Volume No field. Type in the Volume No as it is written on your coversheet. 4.10.7 Bring your cursor into the Revision No field. Type in the Revision No as it is written on your coversheet. 4.10.8 Bring your cursor into the Edition No field. Type in the Edition No as it is written on your coversheet. 4.10.9 Bring your cursor into the ISBN field. Enter the ISBN as it is written on your coversheet. The ISBN should be entered in the format XXXXXXXXXXXXX in ResearchMaster. (For example, 9781843106029 is the ISBN for the book with the title ‘The Spiritual Dimension of Childhood’) 4.10.10 Bring your cursor into the Year Published field. Enter the year published as it is written on your coversheet. 4.10.11 Bring your cursor into the School Code field. In this field, we will record the AOU of the publication as it is written on your coversheet. Click on the button “List data” on the left hand side of the screen to list the data available. This will open the ‘Find Schools...’ window. Click on the button ‘Search for Schools...’. This will list all the AOUs already stored in ResearchMaster. In order to facilitate and narrow your search, use the search criteria available to you: 50 Select ‘School Title’ in the 1st drop down list. Select ‘includes’ in the 2nd drop down list. Enter some letters of the AOU written on the coversheet. Click on the button ‘Search for Schools...’. Click on the AOU you are looking for to select it. Click on the button ‘Return Selected Code’. This will bring you back to the ‘Publication Data Entry’ window with the selected AOU Code. Please Note: if you would like to edit the School Code after you have saved it, you will need to perform the following steps: Select the publication record from the Control Desk window. Click on the ‘View Selected Record’ button on the left hand side of the screen. This will open the ‘Publication Data Entry’ window with the selected record. Click on ‘Linked AOU’ in the bottom section of the ‘Publication Data Entry’ window. On the right pane, click on the School Code entry you wish to edit. Click on the ‘Edit’ button. Using the drop-down lists available, change the school code and school name. Click on the ‘Save’ button on the left hand side of the screen. 4.10.12 In the Series title field, type in the Series title as as it is written on your coversheet. 4.10.13 Click on ‘Publication Details 2’ tab. 4.10.14 In the Editors field, type in the series editors as it is written on your coversheet. You should enter the editors in the format: A Smith, where A is the first letter of the firstname and Smith is the lastname. If there is more than one editor, you should separate each editor by a comma. For example: A Smith, B Jones. 4.10.15 By using the Tab key on your keyboard, move to the Project Code field. This field refers to the funded project details recorded at the bottom of your coversheet (just above the ‘Declaration of Authorship’). Click on the button “List data” on the left hand side of the screen to list the data available. This will open the ‘Find Projects...’ window. Click on the button ‘Search for Projects...’. This will list the funded projects already stored in ResearchMaster. Click on the project you are looking for to select it. Click on the button ‘Return Selected Code’. 51 This will bring you back to the ‘Publication Data Entry’ window with the selected project. 4.10.16 By using the Tab key on your keyboard, move to the Date field and enter today’s date in dd/mm/yyyy format. (This date refers to the date that you are actually performing the data entry.) 4.10.17 Click on the ‘Save’ button on the left hand side of the screen. This will bring you to the bottom part of the ‘Publication Data Entry’ field. This is the related data entry section. 4.10.18 Adding Authors In the related data entry section, select ‘Authors’ on the left pane. Click on the button ‘Add’ to input the author(s) as listed on your coversheet. This will open the ‘Add Contributor Form’ window. Please Note: You must enter all the authors listed on your coversheet, including the author you specified earlier in the field First ACU Author. Click on the ‘Search’ button. This will list all the persons already stored in ResearchMaster. Please Note: To facilitate and narrow your search, you are encouraged to use the Surname field in the search criteria. Click on the author you are looking for to select it. Click on the button ‘Copy details to fields’ For authors who are ACU members, you must use the ‘Search’ function (as explained above) to select the author. If the ACU member you are looking for is not in the list, please send an email to [email protected] For external authors, you must still start by searching for the authors already in ResearchMaster. If the person is not in the list, click on the ‘Create New Person’ button. This will automatically generate the value in the Contributor Code field, and move the cursor to the Surname field. By using the Tab key on your keyboard to move across the fields, enter the Surname, Given Name, Title, and Gender. For the Type Grouping field, select External to mark the fact that this is an external author. Please Also Note: Internal authors who are now external authors and vice versa. You can change their status through the Type Grouping field to match with what is stated on the publication. 52 You should afterwards, send an email to [email protected], to advise Research Services of the change you made to the author’s type grouping. If you have selected an external author, move to ‘Page 2’ tab and then, bring your cursor into the Ext.Organisation Code field. Click on the button “List data” on the left hand side of the screen to list the data available. This will open the ‘Find Organisations...’ window. Click on the button ‘Search for Organisations...’. This will list the organisations already stored in ResearchMaster. Click on the organisation you are looking for to select it. Click on the button ‘Return Selected Code’. This will bring you back to the ‘Add Contributor Form’ window with the selected organisation. Please Note: if the organisation you are looking for is not in the list, please download and complete the External Organisation Request form available at http://www.acu.edu.au/research/support_for_researchers/research_master under Help and Resources. Click on the ‘Save’ button on the left hand side of the screen. This will bring you back to the ‘Publications Data Entry’ screen with the newly added author. Repeat the steps in 4.10.18 if you want to add another author. You can use the ‘Quick Add’ button to quickly add an author to the list if you already know the author’s ResearchMaster code. Just bring your cursor into the white box on the left of the ‘Quick Add’ button. Then, enter the code and press on the ‘Quick Add’ button. You can use the ‘Edit’ button to edit the details of an author you have already entered. You can use the ‘Delete’ button to delete an author you have previously entered. 4.10.19 Linking the AOUs In the related data entry section, select ‘Linked AOU’ on the left pane. This will show you the schools/centres/institutes already connected to this publication record. If you have previously added more than one author and they are from different schools/centres/institutes, then you need to do the following: Click on the ‘Add’ button. This will open the ‘School Entry’ window. For each author listed, click on the button ‘copy’. 53 This will list all the schools related to each author at the bottom of the ‘School Entry’ window. Adjust the percentage numbers (at the bottom of the ‘School Entry’ window) so that they all total up to 100%. Click on the ‘Save’ button on the left hand side of the screen. This will bring you back to the ‘Publications Data Entry’ screen with all the linked AOUs listed in the related data entry section. 4.10.20 Adding Classifications In the related data entry section, select ‘Classifications’ on the left pane. Click on the ‘Add’ button. This will open the ‘Classification Details Entry’ window. For the Classification Type field, for TOA, select ‘ABS Type of Activity Code’ for FOR, select ‘ANZSRC Field of Research Codes’ for SEO, select ‘ANZSRC Socio Economic Objective Codes’ In the Classification Code field, type in the ‘CODE No’ as it is written on your coversheet. Please Note: RM will accept only 6 digit FOR/SEO codes. In Percentage field, type in the % number as written on your coversheet. For each Type entered, tick the box ‘Primary Code of this type’ only when entering the one with the highest percentage. Please Note: If one Type holds only 2 codes, and both codes have 50% as percentage, you can make any one of these 2 codes become the primary code by ticking on the box ‘Primary Code of this type’. 4.10.21 Once the Author(s) and Classifications have been added, close the ‘Publications Data Entry’ window. Click on the ‘Display find criteria screen’ button on the left hand side of the screen. This will open the ‘Publications Selection Criteria’ window. Click the button ‘Find Records’. 4.10.22 Make the ‘Control Desk’ window become the active window. (See section 3.1) Click on the publication record you just entered in order to select it. Click on the ‘Modify Selected Record’ button. This will open the ‘Publication Data Entry’ window. Select the ‘Publication Details 2’ tab. Tick the box ‘Record Complete’. 54 4.10.23 Click on the ‘Verification Details’ tab. Tick the box ‘Verified’ Tick the box ‘Evidence Sighted’ Enter the Verification Date as the date signed by the Head of School. Click on the ‘Save’ button on the left hand side of the screen. Close the ‘Publication Data Entry’ window. 55 4.11 Category B2 – ACU Book Chapter - Other 4.11.1 Perform the step at 4.1 on page 11. 4.11.2 Bring your cursor into the First ACU Author field. Enter the surname and first name/s of the first ACU author as it is written on your coversheet. It is mandatory that you enter the data in the format: Surname, Given name For example, Patrick McArdle should be entered as McArdle, Patrick in the First ACU Author field. 4.11.3 Bring your cursor into the Chapter Title field and type in the Chapter Title as it is written on the coversheet. 4.11.4 Bring your cursor into the Full Book Title field and type in the Book Title as it is written on the coversheet. 4.11.5 Bring your cursor into the Publisher field. Click on the button “List data” on the left hand side of the screen to list the data available. This will open the ‘Find Publishers...’ window. Click on the button ‘Search for Publishers...’. 56 This will list all the publishers already stored in ResearchMaster. Alternatively, in order to facilitate and narrow your search, use the search criteria available to you: Select ‘Category Name’ in the 1st drop down list. Select ‘Starts With’ in the 2nd drop down list. Enter the first few letters of the publisher you are looking for. Click on the button ‘Search for Publishers...’. Click on the publisher you are looking for to select it. Click on the button ‘Return Selected Code’. This will bring you back to the ‘Publication Data Entry’ window with the selected publisher. Please Note: if the publisher you are looking for is not in the list, please send an email to [email protected] 4.11.6 Bring your cursor into the Country of Publication field. Type in the Country of Publication as it is written on your coversheet. 4.11.7 Bring your cursor into the Volume No field. Type in the Volume No as it is written on your coversheet. 4.11.8 Bring your cursor into the Revision No field. Type in the Revision No as it is written on your coversheet. 4.11.9 Bring your cursor into the Edition No field. Type in the Edition No as it is written on your coversheet. 4.11.10 Bring your cursor into the ISBN field. Enter the ISBN as it is written on your coversheet. The ISBN should be entered in the format XXXXXXXXXXXXX in ResearchMaster. (For example, 9781843106029 is the ISBN for the book with the title ‘The Spiritual Dimension of Childhood’) 4.11.11 Bring your cursor into the Year Published field. Enter the year published as it is written on your coversheet. 4.11.12 Bring your cursor into the School Code field. In this field, we will record the AOU of the publication as it is written on your coversheet. Click on the button “List data” on the left hand side of the screen to list the data available. This will open the ‘Find Schools...’ window. Click on the button ‘Search for Schools...’. 57 This will list all the AOUs already stored in ResearchMaster. In order to facilitate and narrow your search, use the search criteria available to you: Select ‘School Title’ in the 1st drop down list. Select ‘includes’ in the 2nd drop down list. Enter some letters of the AOU written on the coversheet. Click on the button ‘Search for Schools...’. Click on the AOU you are looking for to select it. Click on the button ‘Return Selected Code’. This will bring you back to the ‘Publication Data Entry’ window with the selected AOU Code. Please Note: if you would like to edit the School Code after you have saved it, you will need to perform the following steps: Select the publication record from the Control Desk window. Click on the ‘View Selected Record’ button on the left hand side of the screen. This will open the ‘Publication Data Entry’ window with the selected record. Click on ‘Linked AOU’ in the bottom section of the ‘Publication Data Entry’ window. On the right pane, click on the School Code entry you wish to edit. Click on the ‘Edit’ button. Using the drop-down lists available, change the school code and school name. Click on the ‘Save’ button on the left hand side of the screen. 4.11.13 In the Series title field, type in the Series title as it is written on your coversheet. 4.11.14 Click on ‘Publication Details 2’ tab. 4.11.15 In the Book Editors field, type in the book editors as it is written on your coversheet. You should enter the editors in the format: A Smith, where A is the first letter of the firstname and Smith is the lastname. If there is more than one editor, you should separate each editor by a comma. For example: A Smith, B Jones. 4.11.16 Follow the instructions from 4.10.15 to 4.10.23. 58 4.12 Category C2 – ACU Journal Article – other refereed, scholarly 4.12.1 Perform the step at 4.1 on page 11. 4.12.2 Bring your cursor into the First ACU Author field. Enter the surname and first name/s of the first ACU author as it is written on your coversheet. It is mandatory that you enter the data in the format: Surname, Given name For example, Patrick McArdle should be entered as McArdle, Patrick in the First ACU Author field. 4.12.3 Bring your cursor into the Article Title field and type in the Article Title as it is written on the coversheet. 4.12.4 Bring your cursor into the Journal Name field. Click on the button “List data” on the left hand side of the screen to list the data available. This will open the ‘Find Journals...’ window. Click on the button ‘Search for Journals...’. This will list the journals already stored in ResearchMaster. 59 Please Note: To facilitate and narrow your search, you are encouraged to use the Category Name field in the search criteria. Then, use the criteria ‘starts with’ and enter the first word or letters in the journal name you are looking for. Click on the journal you are looking for to select it. Click on the button ‘Return Selected Code’. This will bring you back to the ‘Publication Data Entry’ window with the selected journal. Please Note: if the journal you are looking for is not in the list, please send an email to [email protected] 4.12.5 Bring your cursor into the Volume No field. Type in the Volume No as it is written on the coversheet. 4.12.6 Bring your cursor into the Issue No field. Type in the Issue No as it is written on the coversheet. 4.12.7 Bring your cursor into the Month field. Type in the month of publication of the journal as it is written on the coversheet. 4.12.8 Bring your cursor into the Start Page No of Article field. Enter the Start Page No as it is written on your coversheet. 4.12.9 Bring your cursor into the End Page No of Article field. Enter the End Page No as it is written on your coversheet. 4.12.10 Press tab on your keyboard, and this will automatically update the Total Pages field. 4.12.11 Bring your cursor into the ISSN field. Enter the ISSN number as it is written on your coversheet. The ISSN should be entered in the format XXXX-XXXX in ResearchMaster. (For example, 1363-9080 is the ISSN for the printed version of the Journal of Education and Work.) Please note that ISSN in this field should match with the ISSN returned when you searched for the journal in the Journal Name field (4.12.4). If those 2 ISSNs don’t match, please email [email protected]. 4.12.12 Bring your cursor into the Year Published field. Enter the year published as it is written on the coversheet. 4.12.13 Bring your cursor into the School Code field. In this field, we will record the AOU of the publication as it is written on your coversheet. 60 Click on the button “List data” on the left hand side of the screen to list the data available. This will open the ‘Find Schools...’ window. Click on the button ‘Search for Schools...’. This will list all the AOUs already stored in ResearchMaster. In order to facilitate and narrow your search, use the search criteria available to you: Select ‘School Title’ in the 1st drop down list. Select ‘includes’ in the 2nd drop down list. Enter some letters of the AOU written on the coversheet. Click on the button ‘Search for Schools...’. Click on the AOU you are looking for to select it. Click on the button ‘Return Selected Code’. This will bring you back to the ‘Publication Data Entry’ window with the selected AOU Code. Please Note: if you would like to edit the School Code after you have saved it, you will need to perform the following steps: Select the publication record from the Control Desk window. Click on ‘Linked AOU’ in the bottom section of the ‘Publication Data Entry’ window. On the right pane, click on the School Code entry you wish to edit. Click on the ‘Edit’ button. Using the drop-down lists available, change the school code and school name. Click on the ‘Save’ button on the left hand side of the screen. 4.12.14 Click on the ‘Publication Details 2’ tab 4.12.15 Follow the instructions from 4.10.15 to 4.10.23. 61 4.13 Category C3 – ACU Journal Article – non-refereed, scholarly, professional 4.13.1 Perform the step at 4.1 on page 11. 4.13.2 Bring your cursor into the First ACU Author field. Enter the surname and first name/s of the first ACU author as it is written on your coversheet. It is mandatory that you enter the data in the format: Surname, Given name For example, Patrick McArdle should be entered as McArdle, Patrick in the First ACU Author field. 4.13.3 Bring your cursor into the Article Title field and type in the Article Title as it is written on the coversheet. 4.13.4 Bring your cursor into the Journal Name field. Click on the button “List data” on the left hand side of the screen to list the data available. This will open the ‘Find Journals...’ window. Click on the button ‘Search for Journals...’. This will list the journals already stored in ResearchMaster. 62 Please Note: To facilitate and narrow your search, you are encouraged to use the Category Name field in the search criteria. Then, use the criteria ‘starts with’ and enter the first word or letters in the journal name you are looking for. Click on the journal you are looking for to select it. Click on the button ‘Return Selected Code’. This will bring you back to the ‘Publication Data Entry’ window with the selected journal. Please Note: if the journal you are looking for is not in the list, please send an email to [email protected] 4.13.5 Bring your cursor into the Volume No field. Type in the Volume No as it is written on the coversheet. 4.13.6 Bring your cursor into the Issue No field. Type in the Issue No as it is written on the coversheet. 4.13.7 Bring your cursor into the Month field. Type in the month of publication of the journal as it is written on the coversheet. 4.13.8 Bring your cursor into the Start Page No of Article field. Enter the Start Page No as it is written on your coversheet. 4.13.9 Bring your cursor into the End Page No of Article field. Enter the End Page No as it is written on your coversheet. 4.13.10 Press tab on your keyboard, and this will automatically update the Total Pages field. 4.13.11 Bring your cursor into the ISSN field. Enter the ISSN number as it is written on your coversheet. The ISSN should be entered in the format XXXX-XXXX in ResearchMaster. (For example, 1363-9080 is the ISSN for the printed version of the Journal of Education and Work.) Please note that ISSN in this field should match with the ISSN returned when you searched for the journal in the Journal Name field (4.12.4). If those 2 ISSNs don’t match, please email [email protected]. 4.13.12 Bring your cursor into the Year Published field. Enter the year published as it is written on the coversheet. 4.13.13 Bring your cursor into the School Code field. In this field, we will record the AOU of the publication as it is written on your coversheet. 63 Click on the button “List data” on the left hand side of the screen to list the data available. This will open the ‘Find Schools...’ window. Click on the button ‘Search for Schools...’. This will list all the AOUs already stored in ResearchMaster. In order to facilitate and narrow your search, use the search criteria available to you: Select ‘School Title’ in the 1st drop down list. Select ‘includes’ in the 2nd drop down list. Enter some letters of the AOU written on the coversheet. Click on the button ‘Search for Schools...’. Click on the AOU you are looking for to select it. Click on the button ‘Return Selected Code’. This will bring you back to the ‘Publication Data Entry’ window with the selected AOU Code. Please Note: if you would like to edit the School Code after you have saved it, you will need to perform the following steps: Select the publication record from the Control Desk window. Click on ‘Linked AOU’ in the bottom section of the ‘Publication Data Entry’ window. On the right pane, click on the School Code entry you wish to edit. Click on the ‘Edit’ button. Using the drop-down lists available, change the school code and school name. Click on the ‘Save’ button on the left hand side of the screen. 4.13.14 Click on the ‘Publication Details 2’ tab 4.13.15 Follow the instructions from 4.10.15 to 4.10.23. 64 4.14 Category E2 – ACU Conference Publication – Full paper, non-refereed 4.14.1 Perform the step at 4.1 on page 11. 4.14.2 Bring your cursor into the First ACU Author field. Enter the surname and first name/s of the first ACU author as it is written on your coversheet. It is mandatory that you enter the data in the format: Surname, Given name For example, Patrick McArdle should be entered as McArdle, Patrick in the First ACU Author field. 4.14.3 Bring your cursor into the Title of Paper field and type in the Title of Paper as it is written on your coversheet. 4.14.4 In the Title of Conf Public field, type in the Title of the Conference Publication as it is written on your coversheet. 4.14.5 Bring your cursor into the Publisher field. Click on the button “List data” to list the data available. This will open the ‘Find Publishers...’ window. Click on the button ‘Search for Publishers...’. This will list all the publishers already stored in ResearchMaster. 65 Alternatively, in order to facilitate and narrow your search, use the search criteria available to you: Select ‘Category Name’ in the 1st drop down list. Select ‘Starts With’ in the 2nd drop down list. Enter the first few letters of the publisher you are looking for. Click on the button ‘Search for Publishers...’. Click on the publisher you are looking for to select it. Click on the button ‘Return Selected Code’. This will bring you back to the ‘Publication Data Entry’ window with the selected publisher. Please Note: if the publisher you are looking for is not in the list, please send an email to [email protected] 4.14.6 Bring your cursor into the Country of Publication field. Type in the Country of Publication as it is written on your coversheet. 4.14.7 In the Location of Conference field, type in the Location of Conference as it is written on your coversheet. 4.14.8 Bring your cursor into the Volume No field. Type in the Volume No as it is written on your coversheet. 4.14.9 Bring your cursor into the Issue No field. Type in the Issue No as it is written on your coversheet. 4.14.10 Bring your cursor into the Start Page No of Paper field. Enter the Start Page No as it is written on your coversheet. 4.14.11 Bring your cursor into the End Page No of Paper field. Enter the End Page No as it is written on your coversheet. 4.14.12 Press tab on your keyboard, and this will automatically update the Total Pages field. 4.14.13 Bring your cursor into the ISBN/ISSN field. Enter the ISBN or ISSN number as it is written on your coversheet. The ISBN should be entered in the format XXXXXXXXXXXXX in ResearchMaster. (For example, 9781843106029 is the ISBN for the book with the title ‘The Spiritual Dimension of Childhood’) The ISSN should be entered in the format XXXX-XXXX in ResearchMaster. (For example, 1363-9080 is the ISSN for the printed version of the Journal of Education and Work.) 4.14.14 Bring your cursor into the Year Published field. Enter the year published as it is written on your coversheet. 66 4.14.15 Bring your cursor into the School Code field. In this field, we will record the AOU of the publication as it is written on your coversheet. Click on the button “List data” on the left hand side of the screen to list the data available. This will open the ‘Find Schools...’ window. Click on the button ‘Search for Schools...’. This will list all the AOUs already stored in ResearchMaster. In order to facilitate and narrow your search, use the search criteria available to you: Select ‘School Title’ in the 1st drop down list. Select ‘includes’ in the 2nd drop down list. Enter some letters of the AOU written on the coversheet. Click on the button ‘Search for Schools...’. Click on the AOU you are looking for to select it. Click on the button ‘Return Selected Code’. This will bring you back to the ‘Publication Data Entry’ window with the selected AOU Code. Please Note: if you would like to edit the School Code after you have saved it, you will need to perform the following steps: Select the publication record from the Control Desk window. Click on ‘Linked AOU’ in the bottom section of the ‘Publication Data Entry’ window. On the right pane, click on the School Code entry you wish to edit. Click on the ‘Edit’ button. Using the drop-down lists available, change the school code and school name. Click on the ‘Save’ button on the left hand side of the screen. 4.14.16 In the Conf Start Date field, type in the Start Date of the Conference as it is written on your coversheet in dd/mm/yyyy format. 4.13.17 In the Name of Conference field, type in the Name of the Conference as it is written on your coversheet. 4.14.18 In the Editors field, type in the Editors of the Conference Publication as it is written on your coversheet. You should enter the editors in the format: A Smith, where A is the first letter of the firstname and Smith is the lastname. If there is more than one editor, you should separate each editor by a comma. For example: A Smith, B Jones. 4.14.19 Follow the instructions from 4.10.15 to 4.10.23. 67 4.15 Category K1 – ACU Refereed Journal & Category K2 – ACU Non-refereed Journal 4.15.1 Perform the step at 4.1 on page 11. 4.15.2 Bring your cursor into the First ACU Editor field. Enter the surname and first name/s of the first ACU editor as it is written on your coversheet. It is mandatory that you enter the data in the format: Surname, Given name For example, Patrick McArdle should be entered as McArdle, Patrick in the First ACU Editor field. 4.15.3 Bring your cursor into the Journal Name field. Enter the Journal Name as it is written on your coversheet. 4.15.4 Bring your cursor into the Publisher field. Enter the Name of the Publisher as it is written on your coversheet. 4.15.5 Bring your cursor into the Country of Publication field. Enter the Country of Publication as it is written on your coversheet. 4.15.6 Bring your cursor into the Volume field. 68 Enter the Volume No as it is written on your coversheet. 4.15.7 Bring your cursor into the Issue field. Enter the Issue No as it is written on your coversheet. 4.15.8 Bring your cursor into the ISSN field. Enter the ISSN as it is written on your coversheet. The ISSN should be entered in the format XXXX-XXXX in ResearchMaster. (For example, 1363-9080 is the ISSN for the printed version of the Journal of Education and Work.) 4.15.9 Bring your cursor into the School Code field. In this field, we will record the AOU of the publication as it is written on your coversheet. Click on the button “List data” on the left hand side of the screen to list the data available. This will open the ‘Find Schools...’ window. Click on the button ‘Search for Schools...’ This will list all the AOUs already stored in ResearchMaster. In order to facilitate and narrow your search, use the search criteria available to you: Select ‘School Title’ in the 1st drop down list. Select ‘includes’ in the 2nd drop down list. Enter some letters of the AOU written on the coversheet. Click on the button ‘Search for Schools...’ Click on the AOU you are looking for to select it. Click on the button ‘Return Selected Code’. This will bring you back to the ‘Publication Data Entry’ window with the selected AOU Code. Please Note: if you would like to edit the School Code after you have saved it, you will need to perform the following steps: Select the publication record from the Control Desk window. Click on ‘Linked AOU’ in the bottom section of the ‘Publication Data Entry’ window. On the right pane, click on the School Code entry you wish to edit. Click on the ‘Edit’ button. Using the drop-down lists available, change the school code and school name. Click on the ‘Save’ button on the left hand side of the screen. 4.15.10 Click on ‘Publication Details 2’ tab. 4.15.11 Follow the instructions from 4.10.16 to 4.10.23. Note that in section 4.10.18, you will be adding the editors as listed on your coversheet. 69 4.16 Category R1 – ACU Other Externally Funded Research Projects 4.16.1 Perform the step at 4.1 on page 11. 4.16.2 Bring your cursor into the Title of Project field. Enter the Title of the Project as it is written on your coversheet. 4.16.3 Bring your cursor into the Funding Body field. Enter the name of the Funding Body as it is written on your coversheet. 4.16.4 Bring your cursor into the Admin Institution field. Enter the name of the institution administering the funding as it is written on your coversheet. 4.16.5 Bring your cursor into the Total $ for ACU field. Enter the Total $ amount received by ACU as it is written on your coversheet. 4.16.6 Bring your cursor into the ACU Account Code field. Enter the ACU Account Code as it is written on your coversheet. 4.16.7 Bring your cursor into the Year of the Project field. Enter the Year of the Project as it is written on your coversheet. 4.16.8 Bring your cursor into the School Code field. In this field, we will record the AOU of the publication as it is written on your coversheet. Click on the button “List data” on the left hand side of the screen to list the data available. This will open the ‘Find Schools...’ window. Click on the button ‘Search for Schools...’ This will list all the AOUs already stored in ResearchMaster. In order to facilitate and narrow your search, use the search criteria available to you: Select ‘School Title’ in the 1st drop down list. Select ‘includes’ in the 2nd drop down list. Enter some letters of the AOU written on the coversheet. Click on the button ‘Search for Schools...’ Click on the AOU you are looking for to select it. Click on the button ‘Return Selected Code’. This will bring you back to the ‘Publication Data Entry’ window with the selected AOU Code. Please Note: if you would like to edit the School Code after you have saved it, you will need to perform the following steps: Select the publication record from the Control Desk window. 70 Click on ‘Linked AOU’ in the bottom section of the ‘Publication Data Entry’ window. On the right pane, click on the School Code entry you wish to edit. Click on the ‘Edit’ button. Using the drop-down lists available, change the school code and school name. Click on the ‘Save’ button on the left hand side of the screen. 4.16.9 Click on ‘Publication Details 2’ tab. 4.16.10 Bring your cursor into the Project Status field. Click on the button “List data” on the left hand side of the screen to list the data available. This will open the ‘Find Project Status...’ window. Click on the button ‘Search for Project Status...’. Click on the Project Status you are looking for to select it. Click on the button ‘Return Selected Code’. This will bring you back to the ‘Publication Data Entry’ window with the selected Project Status. 4.16.11 Follow the instructions from 4.10.15 to 4.10.23. 71 4.17 Category R2 – ACU Funded Staff Research Projects 4.17.1 Perform the step at 4.1 on page 11. 4.17.2 Bring your cursor into the Title of Project field. Enter the Title of the Project as it is written on your coversheet. 4.17.3 Bring your cursor into the Type of ACU Funding field. Click on the button “List data” on the left hand side of the screen to list the data available. This will open the ‘Find Type of ACU Fundings...’ window. Click on the button ‘Search for Type of ACU Fundings...’. Click on the Type of ACU Funding you are looking for to select it. Click on the button ‘Return Selected Code’. This will bring you back to the ‘Publication Data Entry’ window with the selected Type of ACU Funding. 4.17.4 Bring your cursor into the Scheme/Program Name field. Enter the Scheme/Program Name administering the funding as it is written on your coversheet. 4.17.5 Bring your cursor into the ACU Account Code field. Enter the ACU Account Code as it is written on your coversheet. 4.17.6 Bring your cursor into the Year of the Project field. Enter the Year of the Project as it is written on your coversheet. 4.17.7 Bring your cursor into the School Code field. In this field, we will record the AOU of the publication as it is written on your coversheet. Click on the button “List data” on the left hand side of the screen to list the data available. This will open the ‘Find Schools...’ window. Click on the button ‘Search for Schools...’ This will list all the AOUs already stored in ResearchMaster. In order to facilitate and narrow your search, use the search criteria available to you: Select ‘School Title’ in the 1st drop down list. Select ‘includes’ in the 2nd drop down list. Enter some letters of the AOU written on the coversheet. Click on the button ‘Search for Schools...’ Click on the AOU you are looking for to select it. Click on the button ‘Return Selected Code’. 72 This will bring you back to the ‘Publication Data Entry’ window with the selected AOU Code. Please Note: if you would like to edit the School Code after you have saved it, you will need to perform the following steps: Select the publication record from the Control Desk window. Click on ‘Linked AOU’ in the bottom section of the ‘Publication Data Entry’ window. On the right pane, click on the School Code entry you wish to edit. Click on the ‘Edit’ button. Using the drop-down lists available, change the school code and school name. Click on the ‘Save’ button on the left hand side of the screen. 4.17.8 Click on ‘Publication Details 2’ tab. 4.17.9 Bring your cursor into the Project Status field. Click on the button “List data” on the left hand side of the screen to list the data available. This will open the ‘Find Project Status...’ window. Click on the button ‘Search for Project Status...’. Click on the Project Status you are looking for to select it. Click on the button ‘Return Selected Code’. This will bring you back to the ‘Publication Data Entry’ window with the selected Project Status. 4.17.10 Follow the instructions from 4.10.15 to 4.10.23. 73 4.18 Category R3 – ACU Unfunded Staff Research Projects 4.18.1 Perform the step at 4.1 on page 11. 4.18.2 Bring your cursor into the Title of Project field. Enter the Title of the Project as it is written on your coversheet. 4.18.3 Bring your cursor into the Year of the Project field. Enter the Year of the Project as it is written on your coversheet. 4.18.4 Bring your cursor into the School Code field. In this field, we will record the AOU of the publication as it is written on your coversheet. Click on the button “List data” on the left hand side of the screen to list the data available. This will open the ‘Find Schools...’ window. Click on the button ‘Search for Schools...’ This will list all the AOUs already stored in ResearchMaster. In order to facilitate and narrow your search, use the search criteria available to you: Select ‘School Title’ in the 1st drop down list. Select ‘includes’ in the 2nd drop down list. Enter some letters of the AOU written on the coversheet. Click on the button ‘Search for Schools...’ Click on the AOU you are looking for to select it. Click on the button ‘Return Selected Code’. This will bring you back to the ‘Publication Data Entry’ window with the selected AOU Code. Please Note: if you would like to edit the School Code after you have saved it, you will need to perform the following steps: Select the publication record from the Control Desk window. Click on ‘Linked AOU’ in the bottom section of the ‘Publication Data Entry’ window. On the right pane, click on the School Code entry you wish to edit. Click on the ‘Edit’ button. Using the drop-down lists available, change the school code and school name. Click on the ‘Save’ button on the left hand side of the screen. 4.18.5 Click on ‘Publication Details 2’ tab. 74 4.18.6 Bring your cursor into the Project Status field. Click on the button “List data” on the left hand side of the screen to list the data available. This will open the ‘Find Project Status...’ window. Click on the button ‘Search for Project Status...’. Click on the Project Status you are looking for to select it. Click on the button ‘Return Selected Code’. This will bring you back to the ‘Publication Data Entry’ window with the selected Project Status. 4.18.7 Follow the instructions from 4.10.15 to 4.10.23. 75 4.19 Category P2 – ACU Postgraduate Supervision of Non-ACU HDR Students 4.19.1 Perform the step at 4.1 on page 11. 4.19.2 Bring your cursor into the Thesis Title field. Enter the Dissertation or Thesis Topic Title as it is written on your coversheet. 4.19.3 Bring your cursor into the Supervision Period field. Enter the Expected or actual period of supervision as it is written on your coversheet. You should enter this data in the format From: dd/mm/yyyy To: dd/mm/yyyy 4.19.4 Bring your cursor into the Year of Supervision field. Enter the Year of Supervision as it is written on your coversheet. 4.19.5 Click on ‘Publication Details 2’ tab. 4.19.6 Bring your cursor into the Project Status field. Click on the button “List data” on the left hand side of the screen to list the data available. This will open the ‘Find Project Status...’ window. Click on the button ‘Search for Project Status...’. Click on the Project Status you are looking for to select it. 76 Click on the button ‘Return Selected Code’. This will bring you back to the ‘Publication Data Entry’ window with the selected Project Status. 4.19.7 Follow the instructions from 4.10.16 to 4.10.23. 77 4.20 Category A1-N – Non-affiliated HERDC Book 4.20.1 Perform the step at 4.1 on page 11. 4.20.2 Follow the instructions in section 4.2 for entering an A1 HERDC Book. However, when you are at 4.2.20 and in the process of adding authors, you will need to: 1) Change the Type Grouping in ‘Page 1’ to External for the internal author(s). 2) Record the external organisation code of all authors, including the internal author(s). This will allow us to identify the institution to which the author is affiliated to on the research publication. (See the screenshot below). 3) When saving, the system will prompt you to click on ‘Leave’ or ‘Clear’. Please click on ‘Leave’. 78 4.21 Category B1-N – Non-affiliated HERDC Book Chapter 4.21.1 Perform the step at 4.1 on page 11. 4.21.2 Follow the instructions in section 4.3 for entering a B1 HERDC Book Chapter. Please take note of the following: At 4.3.4, just type in the full book title When you are at 4.2.20 and in the process of adding authors, you will need to: 1) Change the Type Grouping in ‘Page 1’ to External for the internal author(s). 2) Record the external organisation code of all authors, including the internal author(s). This will allow us to identify the institution to which the author is affiliated to on the research publication. (See the screenshot below). 3) When saving, the system will prompt you to click on ‘Leave’ or ‘Clear’. Please click on ‘Leave’. 79 4.22 Category C1-N – Non-affiliated HERDC Journal Article 4.22.1 Perform the step at 4.1 on page 11. 4.22.2 Follow the instructions in section 4.4 for entering a C1 HERDC Journal Article. However, when you are at 4.2.20 and in the process of adding authors, you will need to: 1) Change the Type Grouping in ‘Page 1’ to External for the internal author(s). 2) Record the external organisation code of all authors, including the internal author(s). This will allow us to identify the institution to which the author is affiliated to on the research publication. (See the screenshot below). 3) When saving, the system will prompt you to click on ‘Leave’ or ‘Clear’. Please click on ‘Leave’. 80 4.23 Category E1-N – Non-affiliated HERDC Conference Paper 4.23.1 Perform the step at 4.1 on page 11. 4.23.2 Follow the instructions in section 4.5 for entering an E1 HERDC Conference Paper. However, when you are at 4.2.20 and in the process of adding authors, you will need to: 1) Change the Type Grouping in ‘Page 1’ to External for the internal author(s). 2) Record the external organisation code of all authors, including the internal author(s). This will allow us to identify the institution to which the author is affiliated to on the research publication. (See the screenshot below). 3) When saving, the system will prompt you to click on ‘Leave’ or ‘Clear’. Please click on ‘Leave’. 81 4.24 Category J1-N – Non-affiliated Original Creative Work 4.24.1 Perform the step at 4.1 on page 11. 4.24.2 Follow the instructions in section 4.6 for entering a J1 ACU Original Creative Work. However, when you are at 4.2.20 and in the process of adding authors, you will need to: 1) Change the Type Grouping in ‘Page 1’ to External for the internal author(s). 2) Record the external organisation code of all authors, including the internal author(s). This will allow us to identify the institution to which the author is affiliated to on the research publication. (See the screenshot below). 3) When saving, the system will prompt you to click on ‘Leave’ or ‘Clear’. Please click on ‘Leave’. 82 4.25 Category J2-N – Non-affiliated Curated or Produced Substantial Public Exhibitions and Events 4.25.1 Perform the step at 4.1 on page 11. 4.25.2 Follow the instructions in section 4.7 for entering a J2 ACU Curated or Produced Substantial Public Exhibition and Event. However, when you are at 4.2.20 and in the process of adding authors, you will need to: 1) Change the Type Grouping in ‘Page 1’ to External for the internal author(s). 2) Record the external organisation code of all authors, including the internal author(s). This will allow us to identify the institution to which the author is affiliated to on the research publication. (See the screenshot below). 3) When saving, the system will prompt you to click on ‘Leave’ or ‘Clear’. Please click on ‘Leave’. 83 4.26 Category J3-N – Non-affiliated Live Performance of Creative Works 4.26.1 Perform the step at 4.1 on page 11. 4.26.2 Follow the instructions in section 4.8 for entering a J3 ACU Live Performance of Creative Works. However, when you are at 4.2.20 and in the process of adding authors, you will need to: 1) Change the Type Grouping in ‘Page 1’ to External for the internal author(s). 2) Record the external organisation code of all authors, including the internal author(s). This will allow us to identify the institution to which the author is affiliated to on the research publication. (See the screenshot below). 3) When saving, the system will prompt you to click on ‘Leave’ or ‘Clear’. Please click on ‘Leave’. 84 4.27 Category J4-N – Non-affiliated Recorded/Rendered Creative Works 4.27.1 Perform the step at 4.1 on page 11. 4.27.2 Follow the instructions in section 4.9 for entering a J4 ACU Recorded/Rendered Creative Works. However, when you are at 4.2.20 and in the process of adding authors, you will need to: 1) Change the Type Grouping in ‘Page 1’ to External for the internal author(s). 2) Record the external organisation code of all authors, including the internal author(s). This will allow us to identify the institution to which the author is affiliated to on the research publication. (See the screenshot below). 3) When saving, the system will prompt you to click on ‘Leave’ or ‘Clear’. Please click on ‘Leave’. 85 4.28 Category G – Government Report 4.28.1 Perform the step at 4.1 on page 11. 4.28.2 Bring your cursor into the First ACU Author field. Enter the surname and first name/s of the first ACU author as it is written on your coversheet. It is mandatory that you enter the data in the format: Surname, Given name For example, Patrick McArdle should be entered as McArdle, Patrick in the First ACU Author field. 4.28.3 Bring your cursor into the Title of Report field and type in the title of the report as it is written on your coversheet. 4.28.4 Bring your cursor into the Publisher field. Type in the Publisher as it is written on your coversheet. 4.28.5 Bring your cursor into the Country of Publication field. Type in the Country of Publication as it is written on your coversheet. 4.28.6 Bring your cursor into the Volume No field. Type in the Volume No as it is written on your coversheet. 4.28.7 Bring your cursor into the Revision No field. Type in the Revision No as it is written on your coversheet. 86 4.28.8 Bring your cursor into the Start Page field. Type in the Start Page Number as it is written on your coversheet. 4.28.9 Bring your cursor into the End Page field. Type in the End Page Number as it is written on your coversheet. 4.28.10 Bring your cursor into the ISBN field. Enter the ISBN as it is written on your coversheet. The ISBN should be entered in the format XXXXXXXXXXXXX in ResearchMaster. (For example, 9781843106029 is the ISBN for the book with the title ‘The Spiritual Dimension of Childhood’) 4.28.11 Bring your cursor into the Year Published field. Enter the year published as it is written on your coversheet. 4.28.12 Bring your cursor into the School Code field. In this field, we will record the AOU of the publication as it is written on your coversheet. Click on the button “List data” on the left hand side of the screen to list the data available. This will open the ‘Find Schools...’ window. Click on the button ‘Search for Schools...’. This will list all the AOUs already stored in ResearchMaster. In order to facilitate and narrow your search, use the search criteria available to you: Select ‘School Title’ in the 1st drop down list. Select ‘includes’ in the 2nd drop down list. Enter some letters of the AOU written on the coversheet. Click on the button ‘Search for Schools...’. Click on the AOU you are looking for to select it. Click on the button ‘Return Selected Code’. This will bring you back to the ‘Publication Data Entry’ window with the selected AOU Code. Please Note: if you would like to edit the School Code after you have saved it, you will need to perform the following steps: Select the publication record from the Control Desk window. Click on the ‘View Selected Record’ button on the left hand side of the screen. This will open the ‘Publication Data Entry’ window with the selected record. Click on ‘Linked AOU’ in the bottom section of the ‘Publication Data Entry’ window. 87 On the right pane, click on the School Code entry you wish to edit. Click on the ‘Edit’ button. Using the drop-down lists available, change the school code and school name. Click on the ‘Save’ button on the left hand side of the screen. 4.28.13 Click on ‘Publication Details 2’ tab. 4.28.14 Bring your cursor into the DOI field. Enter the DOI (Digital Object Identifier) as it is written on your coversheet. 4.28.15 Bring your cursor into the Web Link to Report field. Enter the web link to the report as it is written on your coversheet. 4.28.16 By using the Tab key on your keyboard, move to the Project Code field. This field refers to the funded project details recorded at the bottom of your coversheet (just above the ‘Declaration of Authorship’). Click on the button “List data” on the left hand side of the screen to list the data available. This will open the ‘Find Projects...’ window. Click on the button ‘Search for Projects...’. This will list the funded projects already stored in ResearchMaster. Click on the project you are looking for to select it. Click on the button ‘Return Selected Code’. This will bring you back to the ‘Publication Data Entry’ window with the selected project. 4.28.17 By using the Tab key on your keyboard, move to the Date field and enter today’s date in dd/mm/yyyy format. (This date refers to the date that you are actually performing the data entry.) 4.28.18 Click on the ‘Save’ button on the left hand side of the screen. This will bring you to the bottom part of the ‘Publication Data Entry’ field. This is the related data entry section. 4.28.19 Adding Authors In the related data entry section, select ‘Authors’ on the left pane. Click on the button ‘Add’ to input the author(s) as listed on your coversheet. This will open the ‘Add Contributor Form’ window. Please Note: You must enter all the authors listed on your coversheet, including the author you specified earlier in the field First ACU Author. 88 Click on the ‘Search’ button. This will list all the persons already stored in ResearchMaster. Please Note: To facilitate and narrow your search, you are encouraged to use the Surname field in the search criteria. Click on the author you are looking for to select it. Click on the button ‘Copy details to fields’ For authors who are ACU members, you must use the ‘Search’ function (as explained above) to select the author. If the ACU member you are looking for is not in the list, please send an email to [email protected] For external authors, you must still start by searching for the authors already in ResearchMaster. If the person is not in the list, click on the ‘Create New Person’ button. This will automatically generate the value in the Contributor Code field, and move the cursor to the Surname field. By using the Tab key on your keyboard to move across the fields, enter the Surname, Given Name, Title, and Gender. For the Type Grouping field, select External to mark the fact that this is an external author. Please Also Note: Internal authors who are now external authors and vice versa. You can change their status through the Type Grouping field to match with what is stated on the publication. You should afterwards, send an email to [email protected], to advise Research Services of the change you made to the author’s type grouping. If you have selected an external author, move to ‘Page 2’ tab and then, bring your cursor into the Ext.Organisation Code field. Click on the button “List data” on the left hand side of the screen to list the data available. This will open the ‘Find Organisations...’ window. Click on the button ‘Search for Organisations...’. This will list the organisations already stored in ResearchMaster. Click on the organisation you are looking for to select it. Click on the button ‘Return Selected Code’. This will bring you back to the ‘Add Contributor Form’ window with the selected organisation. Please Note: if the organisation you are looking for is not in the list, please download and complete the External Organisation Request form available at http://www.acu.edu.au/research/support_for_researchers/research_master under Help and Resources. Click on the ‘Save’ button on the left hand side of the screen. 89 This will bring you back to the ‘Publications Data Entry’ screen with the newly added author. Repeat the steps in 4.28.19 if you want to add another author. You can use the ‘Quick Add’ button to quickly add an author to the list if you already know the author’s ResearchMaster code. Just bring your cursor into the white box on the left of the ‘Quick Add’ button. Then, enter the code and press on the ‘Quick Add’ button. You can use the ‘Edit’ button to edit the details of an author you have already entered. You can use the ‘Delete’ button to delete an author you have previously entered. 4.28.20 Linking the AOUs In the related data entry section, select ‘Linked AOU’ on the left pane. This will show you the schools/centres/institutes already connected to this publication record. If you have previously added more than one author and they are from different schools/centres/institutes, then you need to do the following: Click on the ‘Add’ button. This will open the ‘School Entry’ window. For each author listed, click on the button ‘copy’. This will list all the schools related to each author at the bottom of the ‘School Entry’ window. Adjust the percentage numbers (at the bottom of the ‘School Entry’ window) so that they all total up to 100%. Click on the ‘Save’ button on the left hand side of the screen. This will bring you back to the ‘Publications Data Entry’ screen with all the linked AOUs listed in the related data entry section. 4.28.21 Adding Classifications In the related data entry section, select ‘Classifications’ on the left pane. Click on the ‘Add’ button. This will open the ‘Classification Details Entry’ window. For the Classification Type field, for TOA, select ‘ABS Type of Activity Code’ for FOR, select ‘ANZSRC Field of Research Codes’ for SEO, select ‘ANZSRC Socio Economic Objective Codes’ In the Classification Code field, type in the ‘CODE No’ as it is written on your coversheet. Please Note: RM will accept only 6 digit FOR/SEO codes. 90 In Percentage field, type in the % number as written on your coversheet. For each Type entered, tick the box ‘Primary Code of this type’ only when entering the one with the highest percentage. Please Note: If one Type holds only 2 codes, and both codes have 50% as percentage, you can make any one of these 2 codes become the primary code by ticking on the box ‘Primary Code of this type’. 4.28.22 Once the Classifications have been added, do the following: Click on the ‘Modify Selected Record’ button. This will open the ‘Publication Data Entry’ window. Select the ‘Publication Details 2’ tab. Tick the box ‘Record Complete’. 4.28.23 Click on the ‘Verification Details’ tab. Tick the box ‘Verified’ Tick the box ‘Evidence Sighted’ Enter the Verification Date as the date signed by the Head of School. Click on the ‘Save’ button on the left hand side of the screen. Close the ‘Publication Data Entry’ window. 91 5 Modifying an existing record 5.1 Modifying the top part of the Publications Entry window Set the ‘Control Desk’ window as the active window – see the instructions in 3.1. On the ‘Control Desk’ window, click on the record you wish to modify. Click on the ‘Modify Selected Record’ button on the left hand side of the screen. This will open the ‘Publication Data Entry’ window with the selected record. You can now make changes to the data in the top part of the Publications Entry window. Click on the ‘Save’ button on the left hand side of the screen. Close the ‘Publication Data Entry’ window. 5.2 Modifying the bottom part of the Publications Entry window Set the ‘Control Desk’ window as the active window – see the instructions in 3.1. On the ‘Control Desk’ window, click on the record you wish to modify. Click on the ‘View Selected Record’ button on the left hand side of the screen. This will open the ‘Publication Data Entry’ window with the selected record. You can now make changes to the data in the bottom part of the Publications Entry window. Click on the ‘Save’ button on the left hand side of the screen. Close the ‘Publication Data Entry’ window. Please note: In order to see the changes reflected in the record you modified, you need to click on the ‘Display find criteria screen’ button on the left hand side of the screen. This will open the ‘Publications Selection Criteria’ window. Click on the button ‘Find Records’, and then set the ‘Control Desk’ window as the active window. – see the instructions in 3.1. 92 6 Viewing an existing record Set the ‘Control Desk’ window as the active window – see the instructions in 3.1. On the ‘Control Desk’ window, click on the record you wish to view. Click on the ‘View Selected Record’ button on the left hand side of the screen. This will open the ‘Publication Data Entry’ window with the selected record. Please Note: as explained in 5.2 above, clicking on the button ‘view selected record’ also allows you to get immediate access to the bottom part of the Publications Entry window and hence, edit any data you have already entered in this section. 7 Deleting an existing record If you wish to delete a record from the Control Desk, you need to send an email to [email protected], quoting 1) the RM Reference No 2) the reason for deleting the record 93 8 Reports Publication reports can be generated from Orion or from the ResearchMaster application on your desktop. Orion is however, the preferred option to generate reports because it provides a more user-friendly interface. This section is divided into 2 parts: Section 8.1: Running a report from Orion (preferred option) Section 8.2: Running a report from ResearchMaster application on your desktop i. 8.2.1: basic steps ii. 8.2.2: some examples 8.1 Running a report from Orion (preferred option) Step 1: Access Orion 1) Please access Orion at https://orion.acu.edu.au 2) Enter your ACU staff username and password 3) Click on the ‘Log in’ button 4) In the ‘Publications’ menu, click on ‘View Publications List’ Step 2: Select the Report Type Select ‘Managing Unit Publication List’ to retrieve a faculty wide report (depending on your level of access, you may not be eligible to retrieve a faculty wide report. Please email [email protected] if you require more information.) Select ‘AOU Publication List’ to retrieve a school/centre wide report. Select ‘Individual Publication List’ to retrieve a report for a specific person. Step 3: Select the Report Name Select ‘Publication List’ to retrieve a report in citation format. Step 4: Enter the Selection Criteria The ‘Year Created’ refers to the ‘Year Published’ Step 5: Select an option in ‘Managing Unit and AOU based on’ Select ‘Publication Record’ to have your report based on the school code (AOU code) recorded in the top part of the publication record in ResearchMaster. Select ‘Contributor Record’ to have your report based on the AOU code attached to the author in the ‘Authors’ related items in the bottom part of the publication record in ResearchMaster. Step 6: Generate your report Select your report format in the ‘Output Type’ options and click on ‘Generate Report’ 94 8.2 Running a report from ResearchMaster application on your desktop 8.2.1 Basic Steps Step 1: Target your publications Your control desk should only display the publications that must appear in your report. 1) Click on the button ‘Display find criteria screen’ on the left vertical menu. This will open the ‘Publications Selection Criteria’ window. 2) In order to retrieve the targeted publications, refine your search by entering values in the different fields. (Refer to section 3.2 – Finding a particular record) 3) When you are happy with the search criteria you have specified, click on the button ‘Find Records’. You can repeat steps 1 to 3 until you are satisfied that your control desk displays all the publications that should appear on your report. Step 2: Display, Print or Save your report 1) Click on the ‘Display Print Screen’ button. This will open the ‘Publications Report Selection’ window. 2) Select the Report Group and Report Name according to the Report Description given on the screen. 3) The Screen button allows you to view the report from the screen. The Printer button allows you to print a hard copy of the report. 95 The File button allows you to save the report in a specific file format. (This will be covered in step 3 below) Step 3: Choose the format for your report Before you can click on the File button, you need to select the ‘File Output Type’. Whatever you choose in the drop down list, will determine the format of your report. You can present your report in the following formats: Ms Excel select Microsoft Excel 5.0 (.xls) in the drop-down list. This will then prompt you to save the file. After you have saved the file and opened it, you will see that the column names are not comprehensible. The next step is to customise the column names in the Excel file to meet your reporting requirements. We will explain the meaning of the column headings in the table and Examples in section 8.2 below. Ms Word (APA, Chicago or Harvard styles of referencing) you will need to run the report in Ms Excel as specified above. Then, a Mail Merge needs to be processed in Ms Word. Before processing the Mail Merge you will need to customise the column names in the Excel spreadsheet (refer to the table on 96 section 8.2) to meet the specific requirements for the style of referencing. The examples in section 8.2 will provide detailed steps on how to achieve this. 8.2.2 Examples Example 1: Report of all publications from one or more AOUs and published in one or more specific years. Step 1: Target your publications 1) Click on the button ‘Display find criteria screen’ on the left vertical menu. This will open the ‘Publications Selection Criteria’ window. 2) Place your cursor in the School field If you want to retrieve publications from 1 specific AOU, use the operator ‘Equal To’ If you want to retrieve publications from more than 1 specific AOU, use the operator ‘In List’ 3) While your cursor is in the School field, click on the button ‘List Data’ on the left vertical menu and retrieve the AOU(s) that you need. 4) Place your cursor in the Year of Collection field If you want to retrieve publications published during 1 specific year, use the operator ‘Equal To’. For example, if you want to retrieve publications published during 2005, you would put the Year of Collection field as ‘Equal To’ 2006. If you want to retrieve publications published in more than 1 specific year, use the operator ‘Between’. For example, if you want to retrieve publications published from 2003 to 2009, you would put the Year of Collection field as ‘Between’ 2004 & 2010. 5) Click on the button ‘Find Records’ and close the ‘Publications Selection Criteria’ window. This will display all the targeted publications on the control desk. Step 2: Display, Print or Save your report 1) Click on the ‘Display Print Screen’ button. This will open the ‘Publications Report Selection’ window. 2) Select the Report Group as ‘General’ 3) Select the Report Name as ‘Publications by AOU – Detailed’ 4) If you just want to view the report from your screen, click on the Screen button 5) If you just want to print the report that is displayed on your screen, click on the Printer button 97 6) If you want to run your report in Ms Excel or Ms Word, please go to step 3 below. Step 3: Choose the format for your report If you want your report to be presented in Ms Excel: 1) Select the ‘File Output Type’ as Microsoft Excel 5.0 (.xls) in the drop-down list. 2) Click on the File button. This will prompt you to save your file. 3) After you have saved your file, go to the location on your computer where it has been saved, and then open your file. 4) You will see that the column names are not comprehensible. Change or Delete the column names as indicated below. (Please note: The columns mentioned below have been sorted in alphabetical order for making it easier for you to search through the table for a column name. Some of the columns listed below might not be visible in your report. If there is a column name in your report that does not figure in the list below and you are not sure what this column represents, please send an email to [email protected] and attach your excel sheet for reference. Deleting the columns below is optional. If you want to use the Mail Merge feature to present your report in Ms Word, you can save time by just changing the column names that are necessary for the Mail Merge.) Change/Delete Delete Delete Delete Change Change Delete Delete From caou cfor cpubcat cref eaou eclass efor 98 To RM Reference No AOU Code Note Change/Delete Delete Change Delete Delete Delete Delete Delete Delete Delete Delete Change Delete Delete Change Change Change Change Delete Delete Delete Delete Delete Delete Delete Delete Change Change Delete Delete From epubaou epubcat lcomplete levidclaim levidrcvd mdesc mkeywords mmissing nchapters ndeetwtng npages npercent nrawwtng ntotchap saou sauthors scatname sclassname sclasstype scust1 scust2 scust3 scust4 scust5 scust6 sedition seditor selecloc selocatc 99 To Note HERDC Category No of Pages No of Chapters AOU Description 1st Author HERDC Category Name Edition No Editors For publication records where there is more than 1 author, put each other author in a new column and name the columns as ‘2nd Author’, ‘3rd Author’, etc... Change/Delete Change Delete Change Delete Delete Delete Change From sendpag sfor sisbnissn slanguage slocation smedium snumber Change Change Change Change sparentdoc splaceact splacepub spublisher Change Change Change Change Change Change spubtitle sstartpag svolume syear syrcreate tdateact To End Page No Note ISBN/ISSN Issue No Book Title(B1) or Journal Name(C1) or Conference Publication Name(E1) Location of Conference Location Publisher Book Title(A1), Chapter Title(B1), Journal Article Title(C1), Conference Paper Title(E1) Start Page No Volume No Year of Collection Year Published Conference Start Date If you want your report to be presented in Ms Word (APA, Chicago or Harvard styles of referencing): 1) You should first run your report in Ms Excel as explained above. 2) Using the Mail Merge facility in Ms Word, you can present your publication records in APA, Chicago or Harvard styles of referencing. The table below provides the template you can use for each HERDC category. 100 APA A1 «1st Author», «2nd Author», & «3rd Author» («Year Published»). «Book Title (A1), Chapter Title (B1), Journal Article Title (C1), Conference Paper Title (E1) ». «Location»:«Publisher».«Next Record» B1 «1st Author», «2nd Author», & «3rd Author» («Year Published»). «Book Title (A1), Chapter Title (B1), Journal Article Title (C1), Conference Paper Title (E1) ». In «Editors» (Eds.), « Book Title (B1) or Journal Name (C1) or Conference Publication Name (E1) » (pp. «Start Page No»-«End Page No»). «Location»:«Publisher».«Next Record» C1 «1st Author», «2nd Author», & «3rd Author» («Year Published»). «Book Title (A1), Chapter Title (B1), Journal Article Title (C1), Conference Paper Title (E1) ». « Book Title (B1) or Journal Name (C1) or Conference Publication Name (E1) », «Volume No»(«Issue No»), «Start Page No»-«End Page No».«Next Record» E1 «1st Author», «2nd Author», & «3rd Author» («Year Published»). «Book Title (A1), Chapter Title (B1), Journal Article Title (C1), Conference Paper Title (E1) ». « Book Title (B1) or Journal Name (C1) or Conference Publication Name (E1) ». «Location»:«Publisher».«Next Record» Chicago A1 «1st Author», «2nd Author», and «3rd Author». «Book Title (A1), Chapter Title (B1), Journal Article Title (C1), Conference Paper Title (E1) ». «Location»:«Publisher», «Year Published». «Next Record» B1 «1st Author», «2nd Author», and «3rd Author». “«Book Title (A1), Chapter Title (B1), Journal Article Title (C1), Conference Paper Title (E1) ».” In « Book Title (B1) or Journal Name (C1) or Conference Publication Name (E1) », edited by «Editors», «Start Page No»-«End Page No». «Location»:«Publisher», «Year Published». «Next Record» C1 «1st Author», «2nd Author», and «3rd Author». “«Book Title (A1), Chapter Title (B1), Journal Article Title (C1), Conference Paper Title (E1) ».” « Book Title (B1) or Journal Name (C1) or Conference Publication Name (E1) » «Volume No», no. «Issue No» («Year Published»): «Start Page No»-«End Page No». «Next Record» E1 «1st Author», «2nd Author», and «3rd Author», «Year Published». «Book Title (A1), Chapter Title (B1), Journal Article Title (C1), Conference Paper Title (E1) »: « Book Title (B1) or Journal Name (C1) or Conference Publication Name (E1) ». «Location»:«Publisher». «Next Record» Harvard A1 «1st Author», «2nd Author», & «3rd Author» «Year Published», «Book Title (A1), Chapter Title (B1), Journal Article Title (C1), Conference Paper Title (E1) », «Publisher», «Location». «Next Record» B1 «1st Author», «2nd Author», & «3rd Author» «Year Published», ‘«Book 101 C1 E1 Title (A1), Chapter Title (B1), Journal Article Title (C1), Conference Paper Title (E1) »’, in «Editors» (Eds.), « Book Title (B1) or Journal Name (C1) or Conference Publication Name (E1) », «Publisher», «Location», pp. «Start Page No»-«End Page No». «Next Record» «1st Author», «2nd Author», & «3rd Author» «Year Published», ‘«Book Title (A1), Chapter Title (B1), Journal Article Title (C1), Conference Paper Title (E1) »’, « Book Title (B1) or Journal Name (C1) or Conference Publication Name (E1) », vol. «Volume No», no. «Issue No», pp. «Start Page No»-«End Page No». «Next Record» «1st Author», «2nd Author», & «3rd Author» «Year Published», ‘«Book Title (A1), Chapter Title (B1), Journal Article Title (C1), Conference Paper Title (E1) »’ in « Book Title (B1) or Journal Name (C1) or Conference Publication Name (E1) », «Publisher», «Location», pp. «Start Page No»«End Page No». «Next Record» Example 2: Report of all publications from one or more specific authors and published in one or more specific years. Step 1: Target your publications 1) Click on the button ‘Display find criteria screen’ on the left vertical menu. This will open the ‘Publications Selection Criteria’ window. 2) Click on the 2nd tab ‘Related From Publications’ 3) In the first drop down list (under the title ‘Table’), select ‘Authors’. 4) In the second drop down list (under the title ‘Field’), select the ‘Surname’ field. 5) If you need to report the publications of only one author, use the operator ‘Equal To’. If you need to report the publications of several authors, use the operator ‘In List’. 6) In the ‘Value(s)’ field, enter the surname of the Author. If you have more than one author, enter the surnames separated by a comma. For example, ‘Smith, Jones, Andrews’ 7) Place your cursor in the Year of Collection field If you want to retrieve publications published during 1 specific year, use the operator ‘Equal To’. For example, if you want to retrieve publications published during 2005, you would put the Year of Collection field as ‘Equal To’ 2006. 102 If you want to retrieve publications published in more than 1 specific year, use the operator ‘Between’. For example, if you want to retrieve publications published from 2003 to 2009, you would put the Year of Collection field as ‘Between’ 2004 & 2010. 8) Click on the button ‘Find Records’ and close the ‘Publications Selection Criteria’ window. This will display all the targeted publications on the control desk. Step 2: Display, Print or Save your report 1) Click on the ‘Display Print Screen’ button. This will open the ‘Publications Report Selection’ window. 2) Select the Report Group as ‘General’ 3) Select the Report Name as ‘Publications by Author – Detailed’ 4) If you just want to view the report from your screen, click on the Screen button 5) If you just want to print the report that is displayed on your screen, click on the Printer button 6) If you want to run your report in Ms Excel or Ms Word, please go to step 3 below. Step 3: Choose the format for your report Please follow the same instructions as Step 3 in Example 1. Example 3: Report of all publications from one or more specific HERDC categories and published in one or more specific years. Step 1: Target your publications 1) Click on the button ‘Display find criteria screen’ on the left vertical menu. This will open the ‘Publications Selection Criteria’ window. 2) Place your cursor in the Category Code field 3) If you need to report the publications of only one category, use the operator ‘Equal To’. If you need to report the publications of several categories, use the operator ‘In List’. 4) In the ‘Value(s)’ field, enter the category. If you have more than one category, enter the values separated by a comma. For example, ‘A1, B1, C1’. 5) Place your cursor in the Year of Collection field If you want to retrieve publications published during 1 specific year, use the operator ‘Equal To’. For example, if you want to retrieve publications published during 2005, you would put the Year of Collection field as ‘Equal To’ 2006. If you want to retrieve publications published in more than 1 specific year, use the operator ‘Between’. 103 For example, if you want to retrieve publications published from 2003 to 2009, you would put the Year of Collection field as ‘Between’ 2004 & 2010. 6) Click on the button ‘Find Records’ and close the ‘Publications Selection Criteria’ window. This will display all the targeted publications on the control desk. Step 2: Display, Print or Save your report 1) Click on the ‘Display Print Screen’ button. This will open the ‘Publications Report Selection’ window. 2) Select the Report Group as ‘General’ 3) Select the Report Name as ‘Publications by Category – Detailed’ 4) If you just want to view the report from your screen, click on the Screen button 5) If you just want to print the report that is displayed on your screen, click on the Printer button 6) If you want to run your report in Ms Excel or Ms Word, please go to step 3 below. Step 3: Choose the format for your report Please follow the same instructions as Step 3 in Example 1. 104