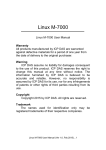
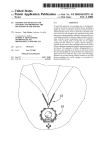
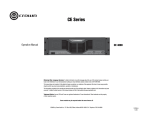
1
IT SERVICES – THE UNIVERSITY OF CHICAGO ACCTS Cost Transfer Module User Manual https://accts.uchicago.edu/ support: [email protected] 2010.09.01 Account Create/Cost Transfer System - ACCTS Page 1 of 32 IT SERVICES – THE UNIVERSITY OF CHICAGO 2010.09.01 Account Create/Cost Transfer System - ACCTS Page 2 of 32 IT SERVICES – THE UNIVERSITY OF CHICAGO The Cost Transfer (CT) module of ACCTS replaces the paper Expenditure Transfer (Comptroller Form 61), Journal Voucher (Comptroller Form 60), and Interdepartmental Order (Comptroller Form 62) forms for certain types of cost transfers. Transfers are allowed among all Ledgers, including 3. Certain subaccount ranges are excluded from both JV and ET transfers: 1791 1801 1910 - 1999 8300 - 8368 (UHRM temp pool) (RATA) (Payroll) (Financial Aid) The exclusions for IDO transfers are: 1000 – 1900 8300 – 8389 (Payroll) (Financial Aid) Transfers may neither debit nor credit these subaccounts. Ledger 3 transfers are excluded from these subaccount validations. Ledger 8 JV and ET transfers have the further restriction that if one line on a JV or ET form involves an L8 account, then all other lines must also have an L8 account (either debit or credit). JVs making lump sum transfers should only use the 9600–9699 and 9700–9799 subaccounts. Non-mandatory transfers should not be made through ACCTS. Also excluded from this process are late cost transfers (over 90 days) and cost transfers that require supporting documentation. For these categories of transfers, the paper forms must be used. It is assumed that users of the system are Faculty Service Representatives (FSRs) or Department personnel with delegated responsibilities from Financial Services for account management. In addition, Departments may want to designate Responsible Parties (RPs) with the authority to enter transactions through ACCTS. When a transfer is submitted, it is reviewed by Financial Services staff. If approved, it is incorporated into an FAS batch in the normal update cycle. There is no check to ensure programmatically that the authorized signer of the debited account has approved a transfer. This approval should be obtained verbally or via e-mail by the initiating Department, and does not get recorded in ACCTS. RPs are notified of a rejection by Financial Services by the status of the transaction in the CT Summary Table. It is the responsibility of the RP to notice such a status change and take appropriate action. 2010.09.01 Account Create/Cost Transfer System - ACCTS Page 3 of 32 IT SERVICES – THE UNIVERSITY OF CHICAGO The Cost Transfer Home Screen When you log on to the CT module of ACCTS, the application displays the CT home screen, with the CT Summary Table and a number of buttons (Figure 1). The table summarizes the logged-in user’s activity with cost transfers; the buttons provide the functionality to initiate new and manage existing cost transfers. Figure 1. CT Home Screen The CT Summary Table presents a summary view of cost transfer transactions in nine columns. Control #: The Control Number assigned to the transaction form, equivalent to the Control Number present on the corresponding paper forms. To distinguish cost transfers submitted through ACCTS from those processed with paper forms, "JE", "EE", and "DD" are used as the alphabetic prefix in place of "JV", "ET", and "DP", respectively. Saved transactions are assigned temporary Control Numbers beginning with "JTMP", "ETMP", and "DTMP." Temporary Control Numbers don’t have any meaning outside of ACCTS. When a saved entry is edited and submitted, it is assigned a standard Control Number that has no relationship with the value of the temporary Control Number. Debit Acct: The FAS account debited by the first line item of the cost transfer. Encum #: The encumbrance number referenced by the first line item of the cost transfer. Credit Acct: The FAS account credited by the first line item of the cost transfer. Description: The 'Description' field of the first line item of the cost transfer. Status: An indication of the processing status of the transaction. Multiple values are possible. The following are common to EE, JE, and DD transactions. 2010.09.01 Account Create/Cost Transfer System - ACCTS Page 4 of 32 IT SERVICES – THE UNIVERSITY OF CHICAGO SAVED SUBMITTED REJECTED APPROVED BATCHED PROCESSED The transaction has been saved with a temporary control number for completion at a later date. A 'SAVED' cost transfer may be edited at a later time and submitted when complete, or deleted. The transaction has been submitted for approval and processing. 'SUBMITTED1,' 'SUBMITTED2,' etc. indicate re-submissions subsequent to rejections by Financial Services. The transaction has been reviewed and rejected by Financial Services. 'REJECTED1,' 'REJECTED2,' etc. indicate rejections subsequent to re-submissions. A 'REJECTED' cost transfer may be edited at a later time and re-submitted when corrected, or deleted. The transaction has been reviewed and approved by Financial Services. The transaction has been incorporated into a batch for transfer to FAS. The transaction has been transferred to FAS. This does not imply that FAS has processed the transaction successfully. DD transactions may also have additional status values, related to workflow features that allow different Departments to complete the debit and credit portions of the transaction. These additional values are: SUBMIT_DEPT SUBMIT_OFF SUBMIT_ODEPT SUBMIT_CO SUBMIT_ADMIN The eIDO has been submitted to the preparer’s Departmental approver for review, if the preparer’s Department has a 2-stage workflow. The eIDO has been submitted to the offset preparer to complete the offset account information. The eIDO has been submitted to the offset preparer’s Departmental approver for review, if the offset preparer’s Department has a 2-stage workflow. The eIDO has been submitted to Financial Services for final review. The eIDO has been submitted by a user with "Initiate Only" privileges to a Departmental administrator for completion. Status Date: The date on which the status changed to that indicated in the 'Status' field. Batch ID: The identifier of the FAS batch in which the transaction will be processed. Batch Date: The FAS 'Batch Date' of the batch in which the transaction will be processed. The data in the CT Summary Table may be sorted according to the values in a column by clicking on the title bar of the column. All the columns are resizable, and a scroll bar appears for access to the 'off-screen' columns. Button and menu actions are only enabled 2010.09.01 Account Create/Cost Transfer System - ACCTS Page 5 of 32 IT SERVICES – THE UNIVERSITY OF CHICAGO if the selected item permits the type of action, and all actions accessible from the menus are also accessible with the buttons. Eight buttons are displayed at the bottom of the CT home screen: [New JE], [New EE], [New DD], [Edit], [Hide], [Print], [Delete], and [Lookup]. There is also a 'Show All Transactions' check box, which functions in conjunction with the [Hide] button. These buttons have the following functions. [New JE]: Used to initiate a new Journal Voucher cost transfer. [New EE]: Used to initiate a new Expenditure Transfer cost transfer. [New DD]: Used to initiate a new Interdepartmental Order cost transfer. [Edit]: Used to edit a cost transfer that has been partially completed and saved. This button is active when a transaction with a status of 'SAVED' or 'REJECTED' is selected. [Hide]: Used to mark transactions as "hidden," which causes them to be removed from the default display. Transactions with a status of 'BATCHED' or 'PROCESSED' may be hidden. To display all transactions, including ones that have been hidden, check the 'Show All Transactions' box at the upper left corner of the 'Cost Transfer' tab. When this is checked, a new column, labeled "H," appears, with a value of "Y" for hidden transactions. Multiple contiguous transactions may be selected for hiding by using [SHIFT]-select, non-contiguous transactions may be selected using [CTRL]-select. [Print]: Used to print the selected cost transfer. [Delete]: Used to delete the selected cost transfer transactions. Only transactions with a status of 'SAVED' or 'REJECTED' may be deleted. Multiple contiguous transactions may be selected for deletion by using [SHIFT]-select, non-contiguous transactions may be selected using [CTRL]-select. [Lookup]: Used to search for and display cost transfers processed through ACCTS. 2010.09.01 Account Create/Cost Transfer System - ACCTS Page 6 of 32 IT SERVICES – THE UNIVERSITY OF CHICAGO "JE" Cost Transfers To initiate a "JE" cost transfer, click [New JE]. ACCTS displays the form shown in Figure 2. Fig. 2. JE Entry Form Data may be entered either by direct entry on the form, or by importing from an Excel spreadsheet. The data entry process is described first, spreadsheet import is covered below. On-Screen Data Entry Use the data entry fields in the 'Enter Line Item' section to build up the form. As with other entry forms in ACCTS, required fields are white, optional fields are purple. For each individual transfer, enter the debit account, the credit account, the encumbrance number (optional), the partial/full liquidation flag (optional), the transaction number (optional), a description of up to 20 characters, and the amount. As you enter the debit and credit account numbers, ACCTS checks that the account numbers are valid, and if they are, displays the account name in the area under the account number. If an invalid account number is entered, ACCTS displays the message seen if Figure 3. 2010.09.01 Account Create/Cost Transfer System - ACCTS Page 7 of 32 IT SERVICES – THE UNIVERSITY OF CHICAGO Fig. 3. Invalid Account Error Message ACCTS also checks that the transfer conforms to the account restrictions outlined in the first section. You will not be able to add a line item that violates these guidelines. Click [Add] to display the data in the 'Line Item Detail' area. Repeat this process for as many line items as you wish to submit under a single Control Number. To edit a line, select it, and edit the values that fill the ‘Enter Line Item’ fields. Click [Update] to effect the change. To delete a line, select it, and click [Delete]. Each cost transfer must also have an explanation (one explanation for the entire form, not for each line item). Several standard explanations are provided in a drop-down list. Select one of these, or select 'Other' and enter your own in the text box that appears. The available explanations are: 1. 2. 3. 4. 5. Other. Provide written explanation below. Record receivable and fund addition for new award. Record receivable and fund addition (deduction) for amended award. Correct original receivable and fund addition entries for new or amended award. Record receivable and fund deduction to reflect the accounts unobligated award balance. 6. Transfer receivable and fund addition for an award from its prior year account to its current year account. 7. Transfer to the correct FAS account, payments that were credited to Restricted Funds unclassified account. 8. Transfer to the correct FAS account, payments that were credited to an incorrect account. 9. Reverse interest income calculation that can be attributed to an institutional allowance. 10. Reverse interest income calculation on fixed price contracts. 11. Reverse interest income calculation by the amount allowed by OMB Circular A-110 as an annual administrative allowance. 12. Indirect Cost adjustment. 13. Write off small award balance. 2010.09.01 Account Create/Cost Transfer System - ACCTS Page 8 of 32 IT SERVICES – THE UNIVERSITY OF CHICAGO Below the 'Explanation' area are two checkboxes, 'Automatic Accrual Reversal' and 'Previous Month Business'. Select 'Automatic Accrual Reversal' if the transaction should be automatically reversed by FAS the following month. Transactions marked in this way will be incorporated into an FAS batch with a batch prefix of 'XVA', not the usual batch prefix for the unit preparing the transaction. The AD010 report for these batches is sent to Financial Services, not the Department contact. The 'Previous Month Business' checkbox appears during the days at the beginning of each month prior to the previous month business cutoff date, set by Financial Services. As you can see in Figure 2, the form displays the actual name of the month. If you check this box, the transactions will be processed as belonging to the previous (named) month. Finally, you may add an attachment. Click the [Attachments] button at the bottom of the JE form to open the window shown in Figure 3a. Fig. 3a. Adding an Attachment 2010.09.01 Account Create/Cost Transfer System - ACCTS Page 9 of 32 IT SERVICES – THE UNIVERSITY OF CHICAGO Click [Select File] to open a file browser. Find the file you want to attach, and click [Open]. You are returned to the 'Attachment' window (Fig. 3a) with the name of the file filed in. Enter a comment in the 'Comments:' box, and click [Add]. The filename, comment, date the file was attached, and file size are displayed in the lower area of the window. Repeat the process to add multiple files. Files must be added one at a time. To delete an attachment, select the name of the file from the list in the lower area of the screen and click [Delete]. The [Attachments] button also appears on the JE screens throughout the review process, and is used to view attachments. To view an attachment, select the name of the file from the list in the lower area of the screen and click [View]. The application needed to view the file must be installed on your computer. When you are done with the 'Attachment' screen, click the [Close] button. Excel Import To import JE transactions from a spreadsheet, you must first download the appropriate template. This is done from the "Cost Transfer" menu at the top of the CT Home Screen. Navigate to Cost Transfer Journal Voucher Download JE Template. You will be given the option of renaming the file and saving it to any location on your computer. Files may be in either .xls or .xlsx format. The template has the same required and optional fields that are present on the JE screen. Columns shaded purple are optional data fields. Do not change the column names or the worksheet name ('JVLineItems'). When the data has been entered, save the spreadsheet, go into ACCTS, open a new JE form, and click the [Import] button. Select the file with your data in the file browser and click [Open]. The data from the spreadsheet is entered into the form just as if you had keyed it on the screen. Faulty entries are not imported. After this, the JE behaves as normal. Explanations must be added, and the 'Previous Month's Business' and 'Automatic Accrual Reversal' flags set if appropriate. Multiple file imports may be done to a single form, and manual entries may be added to those created by a spreadsheet import. Finishing the Process A completed form is shown in Figure 4. 2010.09.01 Account Create/Cost Transfer System - ACCTS Page 10 of 32 IT SERVICES – THE UNIVERSITY OF CHICAGO Fig. 4. Completed JE form When the form has been completed, either by direct data entry or by Excel import, three actions are available - [Submit], [Save], and [Cancel]. [Submit]: The cost transfer is submitted for Financial Services review and, if approved, for FAS batch processing. It is assigned a control number with the format 'JE#####.' A message box displays this number (Figure 5). Click [Ok] to dismiss the message, [Print] to print the transfer. Fig. 5. JE Control Number Message [Save]: The cost transfer is saved for completion at a later time. A temporary control number is assigned with the format 'JTMP#####.' A message box displays this number (Figure 6). Click [Ok] to dismiss the message, [Print] to print the transfer. 2010.09.01 Account Create/Cost Transfer System - ACCTS Page 11 of 32 IT SERVICES – THE UNIVERSITY OF CHICAGO Fig. 6. JE Temporary Control Number Message A saved cost transfer is retrieved for editing by highlighting it in the CT Summary Table and clicking the [Edit] button. When you either [Save] or [Submit] a cost transfer, an entry appears in the CT Summary Table (Figure 1). [Cancel]: The JE entry window is closed and ACCTS returns to the CT home screen. All of the data entered since the last [Save] is lost. 2010.09.01 Account Create/Cost Transfer System - ACCTS Page 12 of 32 IT SERVICES – THE UNIVERSITY OF CHICAGO "EE" Cost Transfers To initiate an "EE" cost transfer, click [New EE]. ACCTS displays the form shown in Figure 7. Fig. 7. EE Entry Form Data may be entered either by direct entry on the form, or by importing from an Excel spreadsheet. The data entry process is described first, spreadsheet import is covered below. On-Screen Data Entry Use the data entry fields in the 'Enter Line Item' section to build up the form. As with other entry forms in ACCTS, required fields are white, optional fields are purple. For each individual transfer, enter the debit account, the credit account, the PO/encumbrance number (optional), the associated date (optional), the Control Number (optional), a description of up to 20 characters, the amount, the Batch Reference Number, and the Batch Date. The format for the Batch Date is MM/DD/YYYY. Batch Dates read off of current FAS reports consist of only a month and a day. You must add the four-digit year. As you enter the debit and credit account numbers, ACCTS checks that the account numbers are valid, and if they are, displays the account name in the area under the 2010.09.01 Account Create/Cost Transfer System - ACCTS Page 13 of 32 IT SERVICES – THE UNIVERSITY OF CHICAGO account number. If an invalid account number is entered, ACCTS displays a message similar to that seen if Figure 3. ACCTS also checks that the transfer conforms to the account restrictions outlined in the first section. You will not be able to add a line item that violates these guidelines. Click [Add] to display the data in the 'Line Item Detail' area. Repeat this process for as many line items as you wish to submit under a single Control Number. To edit a line, select it, and edit the values that fill the 'Enter Line Item' fields. Click [Update] to effect the change. To delete a line, select it, and click [Delete]. Each cost transfer must also have an explanation (one explanation for the entire form, not for each line item). Several standard explanations are provided in a drop-down list. Select one of these, or select 'Other' and enter your own in the text box that appears. The available explanations are: 1. Other. Provide written explanation below or on a separate attachment. 2. Move expenses to a non-sponsored account. 3. Move expenses between accounts/sub-accounts used for the same budget year of an award. 4. Transfer moves expenses between accounts that are for the same award but for different budget years. Transfer places expenses in the correct budget year account. 5. Award account was created late because awarding agency was late in issuing the award instrument. 6. Preaward expenses, i.e., expenses incurred within an allowed period of time prior to the beginning of an award period. 7. Charge account was not created until sometime after the account distribution had to be entered into the payroll or procurement systems. 8. Additional funding being provided by the University. 9. Recharge center failed to enter account distribution change requested. 10. Transfer vacation and personal holiday accruals. Employee transferred from one department to another. 11. Individual was transferred from one project to another for a short time (less than three months). Rather than changing account distribution changes by revising payroll appointment forms, they are being made by salary transfers. 12. Individual was transferred from one project to another, but payroll forms could not be processed before payroll deadlines. 13. Payroll forms were not processed timely because the program's activity and financial plans were being reviewed. 14. Keypunch personnel committed a data entry error. 15. Administrator/data entry personnel committed a data entry error. 16. Administrator incorrectly assumed how cost was to be allocated. 17. Administrator misunderstood PIs instructions as to how to allocate the cost. 2010.09.01 Account Create/Cost Transfer System - ACCTS Page 14 of 32 IT SERVICES – THE UNIVERSITY OF CHICAGO 18. Administrator was unable to change an account distribution on a payroll form, P.O, or recharge center requisition order in a timely manner because of a heavy workload or simple oversight. 19. Administrator, in lieu of having timely instructions from PI as to how to allocate cost, temporarily assigned cost to an existing account that acted as a clearing account until administrator received instructions from PI as to how to allocate the cost. 20. PI recently instructed administrator how to allocate expense, first charged to a clearing or departmental account because it was unknown what activity it would benefit when account distribution had to be entered into payroll or procurement systems. 21. PI has multiple awards, funding sources. He or she simply gave the administrator the wrong award or account number to charge. 22. Account distribution error was caused by the untimely receipt of information by the University. (Describe below in the "other" category the information that was received untimely.) 23. Related project cost transfer. (Attach Related Project Certification Form.) 24. Original charges had to be placed against an alternate account because an authorized signer for the award account was unavailable. 25. Original transaction was posted to a "clearing" account because the activity that benefited from the expense was not know at the time the expense was incurred. Below the 'Explanation' area is the 'Previous Month Business' checkbox. This checkbox appears during the days at the beginning of each month prior to the "previous month business cutoff date", set by Financial Services. As you can see in Figure 2, the form displays the actual name of the month. If you check this box, the transactions will be processed as belonging to the previous (named) month. Finally, you may add an attachment. Click the [Attachments] button at the bottom of the EE form to open the window shown in Figure 3a (see above). Click [Select File] to open a file browser. Find the file you want to attach, and click [Open]. You are returned to the 'Attachment' window (Fig. 3a) with the name of the file filed in. Enter a comment in the 'Comments:' box, and click [Add]. The filename, comment, date the file was attached, and file size are displayed in the lower area of the window. Repeat the process to add multiple files. Files must be added one at a time. To delete an attachment, select the name of the file from the list in the lower area of the screen and click [Delete]. The [Attachments] button also appears on the EE screens throughout the review process, and is used to view attachments. To view an attachment, select the name of the file from the list in the lower area of the screen and click [View]. The application needed to view the file must be installed on your computer. When you are done with the 'Attachment' screen, click the [Close] button. 2010.09.01 Account Create/Cost Transfer System - ACCTS Page 15 of 32 IT SERVICES – THE UNIVERSITY OF CHICAGO Excel Import To import EE transactions from a spreadsheet, you must first download the appropriate template. This is done from the 'Cost Transfer' menu at the top of the Cost Transfer Home Screen. To get the EE template, navigate to Cost Transfer Expenditure Transfer Download EE Template. You will be given the option of renaming the file and saving it to any location on your computer. Files may be in either .xls or .xlsx format. The template has the same required and optional fields that are present on the ACCTS screens. Columns shaded purple are optional data fields. Do not change the column names or the worksheet name ('ETLineItems'). When the data has been entered, save the spreadsheet, go to ACCTS, open a new EE form, and click the [Import] button. Select the file with your data in the file browser and click [Open]. The data from the spreadsheet is entered into the form just as if you had keyed it on the screen. Faulty entries are not imported. After this, the EE behaves as normal. Explanations must be added, and the 'Previous Month's Business' flag set if appropriate. Multiple file imports may be done to a single form, and manual entries may be added to those created by a spreadsheet import. Finishing the Process A completed form is shown in Figure 8. Fig. 8. Completed EE Form 2010.09.01 Account Create/Cost Transfer System - ACCTS Page 16 of 32 IT SERVICES – THE UNIVERSITY OF CHICAGO When the form has been completed, either by direct data entry or by Excel import, three actions are available - [Submit], [Save], and [Cancel]. [Submit]: The cost transfer is submitted for FAS batch processing (or, if a Restricted Account is debited by any line item, for Financial Services review and approval). It is assigned a control number with the format 'EE#####.' A message box displays this number (Figure 9). Click [Ok] to dismiss the message, [Print] to print the transfer. 2010.09.01 Account Create/Cost Transfer System - ACCTS Page 17 of 32 IT SERVICES – THE UNIVERSITY OF CHICAGO Fig. 9. EE Control Number Message [Save]: The cost transfer is saved for completion at a later time. A temporary control number is assigned with the format 'ETMP#####.' A message box displays this number (Figure 10). Click [Ok] to dismiss the message, [Print] to print the transfer. Fig. 10. EE Temporary Control Number Message A saved cost transfer is retrieved for editing by highlighting it in the CT Summary Table and clicking the [Edit] button. When you either [Save] or [Submit] a cost transfer, an entry appears in the CT Summary Table (Figure 1). [Cancel]: The EE entry window is closed and ACCTS returns to the CT home screen. All of the data entered since the last [Save] is lost. 2010.09.01 Account Create/Cost Transfer System - ACCTS Page 18 of 32 IT SERVICES – THE UNIVERSITY OF CHICAGO "DD" Cost Transfers To create an eIDO transfer, click the [New DD] button at the bottom of the summary screen. ACCTS displays the form shown in Figure 11. Fig. 11. DD Entry Form The data entry screen has three section, one for entering the line items, one for entering account distributions, and one for entering an explanation and selecting or viewing reviewers/approvers. Entering Line Items Fill in the information in the entry fields for Description, Quantity, Unit Price, click the [Add] button. The other buttons have the following functions: [Update]: Updates information for the highlighted line. 2010.09.01 Account Create/Cost Transfer System - ACCTS Page 19 of 32 IT SERVICES – THE UNIVERSITY OF CHICAGO [Delete]: Deletes the highlighted line. [Clear Fields]: Clears the data entry fields. [Clear Entries]: Removes all line items. Entering Account Distributions Each user may fill in: a. both debit and credit accounts b. debit account only c. credit account only If both sides of the transaction are filled in, the form will go either to the Departmental approvers for review if you are in a Department that is set up for a 2-stage workflow, or otherwise to Financial Services for review. If only one side of the transaction is filled in (either debit or credit accounts), then you must select an offset Department and an offset reviewer in the section at the bottom of the screen before submitting the form. To enter a distribution for the entire set of line items as a whole, leave the line item number in the “Item #” drop-down list at the default “0”. Fill in the appropriate account information, a description, and either a percentage in the “%” field or an amount in the “Amount” field, and click the [Add] button. To enter a distribution for a specific line item, select the item number in the “Item #” drop-down list, then fill in the corresponding information in the entry fields and click [Add]. If you have entered distributions for one or several line items, but want to distribute the remaining items as a whole, select the “0” in the “Item #” list, fill in the account information and description, and leave the “%” and “Amount” fields blank. When you click [Add], ACCTS will calculate the amount remaining and fill in the correct value. When you enter an account and tab out of the field, ACCTS checks whether you have entered a valid account number, and displays the account name under the corresponding account field. The other buttons have the following functions: [Update]: Updates information for the highlighted line [Delete]: Deletes the highlighted line [Clear Fields]: Clears the data entry fields [Clear Entries]: Removes all account information 2010.09.01 Account Create/Cost Transfer System - ACCTS Page 20 of 32 IT SERVICES – THE UNIVERSITY OF CHICAGO The “Item Balance” field shows the remaining balance on a particular line item, if you’re entering account information by line item. The “Total Balance” field shows the remaining balance for the entire form. The total balance must be zero before the form can be submitted. In cases where splits have resulted in totals that are off by some amount due to rounding errors on division, you will need to adjust the lines manually to balance the transaction. When you have finished entering the line items and account information, enter an explanation in the “Explanation” field near the bottom of the form. Below the 'Explanation' area is the 'Previous Month Business' checkbox. This checkbox appears during the days at the beginning of each month prior to the "previous month business cutoff date", set by Financial Services. As you can see in Figure 2, the form displays the actual name of the month. If you check this box, the transactions will be processed as belonging to the previous (named) month. If you are with a Department that has a 2-stage workflow, select the Departmental approver who will review this transfer. If you have only entered one side of the transaction (either debit or credit account information), select the offset Department and person to whom you are sending the form for completion in the “Offset Dept./Reviewer” drop-down boxes. Once you select a Department, the “Reviewer” list will show the people in that Department who have access to ACCTS and to whom the transactions may be sent. You may also send the transaction to another Department, or to another ACCTS user in your own Department, even if you have filled in both credit and debit account information. In that case, however, this will be for notification only, as they will be unable to edit either side of the accounting information. They may add a comment, and they do have to submit the eIDO to move it along to the next stage. Finally, if enough accounting information has been entered to determine who the Comptroller’s Office reviewer will be, that information will be displayed in the “CO Reviewer” field. The CO reviewer is selected based on the CO Responsibility Code of the most restricted account used on the form, using the same rules that are applied to “JE” and “EE” transfers. A completed form is shown in Figure 12. Fig. 12. Completed DD Form Three actions are available - [Submit], [Save], and [Cancel]. [Submit]: The cost transfer is submitted for entry of offset information, for Departmental approval, or for Financial Services approval. It is assigned a control number with the 2010.09.01 Account Create/Cost Transfer System - ACCTS Page 21 of 32 IT SERVICES – THE UNIVERSITY OF CHICAGO format 'DD#####.' A message box displays this number (Figure 13). Click [Ok] to dismiss the message, [Print] to print the transfer. 2010.09.01 Account Create/Cost Transfer System - ACCTS Page 22 of 32 IT SERVICES – THE UNIVERSITY OF CHICAGO Fig. 13. DD Control Number Message [Save]: The cost transfer is saved for completion at a later time. A temporary control number is assigned with the format 'DTMP#####.' A message box displays this number (Figure 14). Click [Ok] to dismiss the message, [Print] to print the transfer. Fig. 14. DD Temporary Control Number Message A saved cost transfer is retrieved for editing by highlighting it in the CT Summary Table and clicking the [Edit] button. When you either [Save] or [Submit] a cost transfer, an entry appears in the CT Summary Table (Figure 1). [Cancel]: The DD entry window is closed and ACCTS returns to the CT home page. All of the data entered since the last [Save] is lost. Entering Offset Account Information If an eIDO has been sent to you to complete the offset account information, you will receive an e-mail notification, and the transaction will be listed on your ACCTS Summary Table with a status of SUBMIT_OFF (for “submitted to offset preparer”). This is shown in Figure 15. 2010.09.01 Account Create/Cost Transfer System - ACCTS Page 23 of 32 IT SERVICES – THE UNIVERSITY OF CHICAGO Fig. 15. DD Transaction Pending Offset Account Entry Select the transaction, and click [Edit]. You will see the details of the eIDO, and will be able to add the offset account information. You will not be able to add line items or edit the account information already entered on the form. This form, Figure 16, has some functions available on it that are not on the preparer's DD entry form. 2010.09.01 Account Create/Cost Transfer System - ACCTS Page 24 of 32 IT SERVICES – THE UNIVERSITY OF CHICAGO Fig. 16. DD Offset Account Entry Form To enter the offset information, select each component of the distribution and enter the corresponding offset account, then click [Update]. You can also split any of the distribution lines if you need the amount credited or debited to more than one account. Select the distribution line and click [Split]. A new distribution line is created with the preparer’s information duplicated. Select each of the split lines in turn, add the offset account information, adjust the percentage or amount, and click [Update]. You will not be able to split a line where both debit and credit information has already been entered by the preparer. If you try to do this, you will see the error message in Figure 17. 2010.09.01 Account Create/Cost Transfer System - ACCTS Page 25 of 32 IT SERVICES – THE UNIVERSITY OF CHICAGO Fig. 17. DD Disallowed Split Error Message You may also add a comment. If your Department is one that has a two-step approval/workflow process, you must also select the Departmental approver to whom the eIDO should be routed for approval prior to routing to the Comptroller’s Office. When you are finished entering the required information, click the [Approve and Submit] button at the bottom of the screen. The other buttons have the following functions: [Clear All]: Inactive; at this point in the workflow, it is not possible to clear the entire eIDO because some information has been entered by others. [Reject Transaction]: Returns the eIDO to the preparer. Any information you have entered is deleted, except for comments, which remain to be reviewed by the preparer. [Cancel]: Removes any information you have entered, but the eIDO remains with you to be completed later. "Initiator Only" User Accounts The CT module of ACCTS supports a type of user account called an "Initiator Only" account, which allows users to initiate eIDO transfers without filling in all of the financial information. This was developed for Departments that may wish to distribute the responsibility of entering the basic data on an eIDO ("DD") to a wider range of their staff, and then pass on responsibility for completion, checking, and follow-up to an administrator. When a user with an "Initiator Only" account logs in to ACCTS and selects the [New DD] button, the form shown in Figure 18 is displayed. 2010.09.01 Account Create/Cost Transfer System - ACCTS Page 26 of 32 IT SERVICES – THE UNIVERSITY OF CHICAGO Fig. 18. DD "Initiator Only" Entry Form The new feature is the [Set Admin Owner] button, which is used to select the Department administrator who will review the transaction before submitting it into normal workflow. As an "Initiator Only" user, you may enter as little as just the line item information, and leave everything else for an administrator to complete. You may also complete all of the information, but an administrator will still review the transfer before it is processed. After filling in as much of the information as is appropriate, click the [Set Admin Owner] button. The window shown in Figure 19 displays a list of Administrators in your Department (CT users who have "standard" ACCTS accounts) to whom the transaction may be assigned. 2010.09.01 Account Create/Cost Transfer System - ACCTS Page 27 of 32 IT SERVICES – THE UNIVERSITY OF CHICAGO Fig. 19. 'Set Admin Owner' Screen If you enter incomplete information, you must use the [Save Transaction] button to save the form with a temporary control number. The transaction will also appear on the Admin Owner's CT Summary Table, available to him/her for review and submission. If you have completed all of the required information, you may click the [Submit Transaction] button, which will assign a 'DD' control number to the form, but it will still require review and submission by the Admin Owner before it is processed further. You, and the Admin Owner, will see the transaction listed in the CT Summary Table with a status of 'SUBMIT_ADMIN'. After the administrator to whom the transaction has been passed for completion has submitted the DD, you will still be able to view it on your CT Summary Table to follow its progress, but you can no longer edit it unless it gets rejected by a reviewer somewhere in the workflow. If a DD transfer is rejected at any point, email notification is sent to the Admin Owner of the transaction, not the initiator. This process assumes that the Admin Owner has taken responsibility for the processing of the transaction after it is passed to him/her by the initiator. 2010.09.01 Account Create/Cost Transfer System - ACCTS Page 28 of 32 IT SERVICES – THE UNIVERSITY OF CHICAGO Reviewing/Approving Transfers If you are a Departmental reviewer, you will receive an e-mail notification for any cost transfer ("JE", "EE", or "DD") that has been sent to you for review. Financial Services reviewers do not get e-mail notifications. To review a transfer, select the 'Review' menu item at the top of the CT home page, and select 'Review Transfers…'. ACCTS will display the 'Review Transfers' screen shown in Figure 19. Fig. 19. 'Review Transfers' Screen Find the transfer by selecting the radio button corresponding to the type of transfer you’re looking. You may also retrieve transfers that have been directed to another approver in your workgroup by using the 'transfers for' drop-down list. When you have made your selection, click [Select] to retrieve the list of available transfers. 2010.09.01 Account Create/Cost Transfer System - ACCTS Page 29 of 32 IT SERVICES – THE UNIVERSITY OF CHICAGO Select the transfer from the list in the 'Summaries' box, and the transfer details are shown in the 'Line Items', 'Accounts', and 'Header Information' areas of the screen. Use the [Attachments] button to view any attachments, or to add an attachment. [Print] will create a PDF copy of the transfer for printing. Review the submission, add a comment, and either approve or reject it using the buttons at the bottom of the screen. For 'DD' transfers, if you are a Departmental reviewer in a Department with a two-step workflow, and your Department is entering the offset account information, you have a third option, [Return To Offset Preparer]. This allows you to return the eIDO to the offset preparer (in your Department) if there is a problem with the offset account information. If you were to reject the eIDO, it would go back to the original preparer, who would only be able to edit the account information that he/she had entered. After a rejection at any stage, if the cost transfer is corrected and resubmitted, the status will again indicate the workflow stage of the transaction, but a number will be appended to each status to reflect the number of “cycles” the cost transfer has gone through. For example, if an eIDO has been rejected twice by Financial Services and has been resubmitted again to Financial Services, the status will be SUBMIT_CO3. One final note on rejected transfers. The comments entered by the reviewer who does the rejection are only visible to the preparer and previous reviewers by using the [Print] button to generate a PDF version of the transfer. 2010.09.01 Account Create/Cost Transfer System - ACCTS Page 30 of 32 IT SERVICES – THE UNIVERSITY OF CHICAGO Cost Transfer Lookup ACCTS can be used to search for and display cost transfers performed through ACCTS. Click [Lookup] on the CT home screen (or select "Lookup" from the 'Cost Transfer' menu) to bring up the 'Lookup Transfers' screen (Figure 19). Fig. 19. ‘Lookup Transfers’ screen Enter your search criteria in the fields in the 'Search Parameters' section at the top of the form. You may search on any or all of: Control Number, Debit Account (single or range), Credit Account (single or range), Prepare Date (submission date; single or range), Batch Date (single or range), and Batch ID. Select [Search] to execute the search. Single-line summaries of the search results will display in the 'Summaries' table. To view the details of a cost transfer, select the corresponding summary. The detail for the transfer will display in the 'Line Items' and 'Header Information' sections of the form. Click [Attachments] to view any attachments that accompany the transfer. To perform another search, click [Clear] to clear the search criteria fields, then repeat the search as described above. Click [Done] to return to the CT home screen. 2010.09.01 Account Create/Cost Transfer System - ACCTS Page 31 of 32 IT SERVICES – THE UNIVERSITY OF CHICAGO Click [Print] to print the selected transfer. Printing Cost Transfers "JE" and "EE" cost transfers processed through ACCTS may also be viewed and printed with another web application that is independent of the ACCTS interface. This is the ACCTS Cost Transfer Lookup Facility. It can be accessed from the "Look up a Cost Transfer processed through ACCTS" link on the main ACCTS page, https://accts.uchicago.edu/. The CT Lookup login page prompts you for your Authorized Signer Number in addition to your CNetID and password. Enter the requested information and click [Login]. The next screen prompts for the Control Number of the transfer. Enter it in the field provided, and click [Search]. If you have entered a valid Control Number, the details of the cost transfer will be displayed. The data may be printed; for best results, you should specify a landscape orientation in your printer setup. This application was designed primarily as a tool for account administrators and authorized signers who do not have access to ACCTS, so that they may look up cost transfers that affect their accounts. Anyone with an Authorized Signer Number and CNetID/UCHAD ID may log in and retrieve any "JE" or "EE" cost transfer processed through ACCTS. 2010.09.01 Account Create/Cost Transfer System - ACCTS Page 32 of 32