1
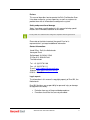
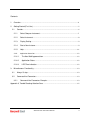
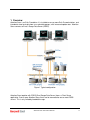
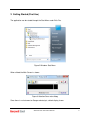
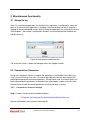
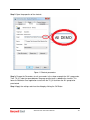
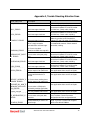
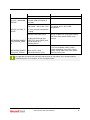
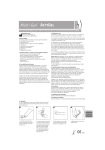
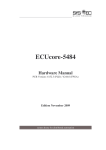
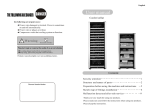
Instruction Manual
Entis Pro Attention Scan
February 2013
PART NO: 4416386
REV.0
Attention Scan Instruction Manual
1
Preface
This manual describes how to operate the Entis Pro Attention Scan.
It has been written for system supervisors as well as engineers to
provide them with all information to configure the system.
Safety and prevention of damage
‘Notes’ have been used throughout in this manual to bring special
matters to the immediate attention of the reader.
A note points out a statement deserving more emphasis than the general text.
Please do not hesitate to contact Honeywell Enraf or its
representative if you require additional information.
Contact Information:
Head Office - Delft, the Netherlands
Honeywell Enraf
Delftechpark 39, 2628 XJ Delft
PO Box 812, 2600 AV Delft
The Netherlands
Tel.: +31 (0)15 2701 100
Fax: +31 (0)15 2701 111
E-mail: [email protected]
Website: http://www.honeywell.com/ps
© 2013 – Enraf B.V.
Legal aspects
The information in this manual is copyright property of Enraf BV, the
Netherlands.
Enraf BV disclaims any responsibility for personal injury or damage
to equipment caused by:
•
•
Deviation from any of the prescribed procedures.
Execution of activities that are not prescribed.
Attention Scan Instruction Manual
2
Contents
1.
Overview .............................................................................................................................................. 4
2.
Getting Started (First Use) ................................................................................................................ 5
2.1.
3.
Controls........................................................................................................................................ 6
2.1.1.
Select Group or Instrument ............................................................................................... 7
2.1.2.
Select Instrument................................................................................................................ 8
2.1.3.
Display Scaling ................................................................................................................... 9
2.1.4.
Start a New Instance.......................................................................................................... 9
2.1.5.
Help .................................................................................................................................... 11
2.1.6.
Application Status Bar ......................................................................................................... 12
2.1.6.1.
The Non W&M approved icon .................................................................................... 12
2.1.6.2.
Application Status......................................................................................................... 12
2.1.6.3.
LED/Time indication ..................................................................................................... 12
Miscellaneous Functionality ............................................................................................................ 13
3.1.
Always On top ........................................................................................................................... 13
3.2.
Command line Parameters ..................................................................................................... 13
3.2.1.
Command Line Parameters Example ........................................................................... 13
Appendix A, Trouble Shooting Attention Scan .................................................................................... 15
Attention Scan Instruction Manual
3
1. Overview
Attention Scan is an Entis Pro add-on. It is installed on one or more Entis Pro workstations, and
intended to view level data from user selectable gauges, with increased update rates. Attention
Scan connects to Enraf’s Gauge Data Server (EGDS).
Figure 1 Typical configuration
Attention Scan together with EGDS (Enraf Gauge Data Server) forms a Client Server
application. One or more Attention Scan clients can be connected to one or more EGDS
servers. This is only limited by bandwidth usage.
Attention Scan Instruction Manual
4
2. Getting Started (First Use)
The application can be started through the Start Menu under Entis Pro.
Figure 2 Windows Start Menu
When clicked the Main Screen is shown:
Figure 3 Attention Scan main dialog
Since there is no Instrument or Gauge selected yet, a blank display shown.
Attention Scan Instruction Manual
5
2.1.
Controls
These are the controls to use the Attention Scan application.
Figure 4 Attention Scan main dialog controls
In the following paragraphs each control is described separately.
Attention Scan Instruction Manual
6
2.1.1. Select Group or Instrument
Instruments are gathered in groups to create a structure.
The ‘Select Group or Instrument’ button
select a group or an instrument in a group.
will start a new dialog to enable the user to either
Figure 5 ‘Group or Instrument Selector’ dialog
The picture shows several Instruments which are a member of the ‘ALL’ group. By selecting the
group ‘ALL’, the ‘Select Instrument’ combo box is filled with all instruments from ‘ALL’ group. In
this case these are DEMOGAUGE_mm , DEMOGAUGE_mm10, TK_01…TK03.
Figure 6 Select Instrument Combo box
Attention Scan Instruction Manual
7
If an Instrument is selected directly from the ‘Instrument Selector’, for example
‘DEMOGAUGE_mm’, the ‘Select Instrument’ combo box is still filled with all instruments from
the group of the selected instrument, in this case ‘ALL’, but additionally the instrument is
selected directly.
Figure 7 Select Instrument Combo box prefilled
2.1.2.
Select Instrument
The ‘Select Instrument’ combo box
is used to select an
instrument from the previous selected group with ‘Select Group or Instrument’ button, by clicking
the down arrow symbol.
The ‘Select Instrument Selector’ will be empty initially, because it will be filled with the
instrument list from the selected group from the select group / instrument function. (Refer to
paragraph 2.1.1)
If the group is not selected yet, the instrument cannot be selected since the combo box will be
empty.
Always first select a group and or instrument with the ‘Select Group or Instrument’ button.
Groups and Instruments are user configurable, through the configuration tool, described in the Entis Pro
Attention Scan Installation Guide part no.: 4416387
Attention Scan Instruction Manual
8
2.1.3. Display Scaling
To create readability from great distance, the Attention Scan application supports scaling the
size of the data field in two ways. Either by selection of the Font directly
Enlarge and Diminish Font buttons the appearance can be changed.
or by using the
Figure 8 Scaling example
2.1.4. Start a New Instance
Since the Attention Scan application will show one instrument at the time, it can be started
multiple times. This is done by clicking the ‘Start New Instance’
button.
Please note that more instances mean a higher load on the field bus. It could lead to low responsiveness or
timeout errors. Using many instances defeats the purpose of the application, since this will degrade the
overall performance
Attention Scan Instruction Manual
9
Attention Scan Instruction Manual
10
2.1.5. Help
The Help Button will show the user manual (this file), a non contextual help in PDF
format.
Figure 9 Coversheet
Please note that hovering over the Help button will show the application ‘About’ text.
It is important for the Help function to operate correctly, that a suitable PDF reader is installed.
Attention Scan Instruction Manual
11
2.1.6.
Application Status Bar
The Status bar consists of three elements:
•
•
•
The Non W&M indication, to indicate the application is not suitable for custodial
processes.
The application status, indicating current action or error situations.
The Watch dog LED / Time indication, indicating the ‘health of the application’.
2.1.6.1.
The Non W&M approved icon
The main purpose of the application is high speed level scan. The application is
not certified for custodial transfer. Therefore the Non W&M indication indicates
that the shown data is not suitable for custodial transfer.
2.1.6.2.
Application Status
The Application Status indicates the current status of the program. Possible messages are
application activities and or error conditions codes, with a expanded description in the tooltip.
2.1.6.3.LED/Time indication
Both the LED (yellow) and the time indication Watchdog are used to indicate the health of the
application. The time system indication, displays the local system time. If the time appears to be
stopped, normal operation of the application is disrupted, and eventual displayed data cannot be
relied upon. If the LED indicator seem frozen in either state (lit or extinguished), the application
has difficulties retrieving valid data from the instrument.
Attention Scan Instruction Manual
12
3. Miscellaneous Functionality
3.1. Always On top
Since it is a monitoring application, the Attention Scan application is configured for always on
top use. By minimizing the application, it disappears from the desktop and active scanning is
stopped to minimize bandwidth usage. Upon restoring the application, the scanning will resume.
If the Windows 7 Aero theme is configured in windows, the minimized preview thumbnail will
look like figure 10.
Figure 10 Aero theme thumbnail preview
The actual tank select is shown; the tooltip describes the stopped situation.
3.2. Command line Parameters
During the installation a shortcut is made to the application in the Windows Start Menu only,
since it is part of the Entis Pro suite. It is however possible to create your own shortcut with
preconfigured group and instrument parameters. <Group Name> and <Instrument Name> will
have to be provided as parameters to Attention Scan separated by a space and in this order.
Attention Scan will load the correct group and instrument and begin scanning.
3.2.1.
Command Line Parameters Example
Step 1: Create a shortcut to the executable located in:
”C:\Program Files\Honeywell Enraf\AttentionScan\AttentionScan.exe”
Refer to the Windows Help system on how to do this.
Attention Scan Instruction Manual
13
Step 2: Open the properties of the shortcut:
Figure 11 Shortcut parameters
Step 3: Change the Parameters to suit your needs. In the shown example the ‘ALL’ group and a
Tank ‘TK_01’ (note the space between the group and the tank) is added to the shortcut. This
forces the Attention Scan application to start with the TK_01 tank from the ALL group to be
preselected.
Step 4: Apply the settings and close the dialog by clicking the OK Button
Attention Scan Instruction Manual
14
Appendix A, Trouble Shooting Attention Scan
Error code name
Description
Remedy
NO_ERROR
Occurs when there is no error
This normally not shown!
BCC_ERROR
Serial message checksum
CRC_ERROR
Serial message checksum
TIMEOUT_ERROR
Communication time out
1) On protocol level this occurs
when a reply cannot be
converted to a valid message.
PARSING_ERROR
2) Occurs also when
client/server XML message fails
SERIALPORT_PARIT
Y_ERROR
Occurs when serial port parity
fails
CHECKSUM_ERROR
Serial message checksum
LRC_ERROR
DEVICE_ALREADY_
OPEN_ERROR
Serial message checksum
Occurs when sending open
device request 2 or more times
1) Occurs when sending a
request while the device is
closed.
DEVICE_ALREADY_C
LOSED_ERROR
DEVICE_ALREADY_
OPENED_BY_NON_E
NGAUGE_APPLICATI
ON_ERROR
DEVICE_CANNOT_C
LOSE_ERROR
COULD_NOT_CREAT
E_SERIALDEVICE_E
RROR
2) Occurs when sending close
device request 2 or more times
CONFIG_ERROR
Noise or instability: Check Serial
Connections between PC and CIU and/or
CIU field lines; Check cable shielding
Noise or instability: Check Serial
Connections between PC and CIU and/or
CIU field lines; Check cable shielding
Instrument does not respond: Check
addressing, and or serial Connections
between PC and CIU and/or CIU field lines
Possible problem with network interface, or
unscheduled disconnect: Check network
connection, routing
Noise or instability: Check Serial
Connections between PC and CIU and/or
CIU field lines; Check cable shielding
Noise or instability: Check Serial
Connections between PC and CIU and/or
CIU field lines; Check cable shielding
Noise or instability: Check Serial
Connections between PC and CIU and/or
CIU field lines; Check cabre shielding
Possible double use of serial port: Check for
other application that uses the serial port.
Possible double use of serial port: Check for
other application that uses the serial port.
Possible double use of serial port: Check for
other application that uses the serial port.
Occurs when a COM port is
claimed by another application.
Occurs when a COM port is still
in use by another EGDS client
Occurs when serial port does
not exists
Occurs when timeout,
turnaround delay or retries are
out of range
Possible double use of serial port: Check for
other application that uses the serial port.
The application tries to open a remote port
that is not there: Check Instrument
configuration with the configuration tool
Latency timeout value configured, out of
range: Try to use a smaller non negative
value, or the default 5000ms
Attention Scan Instruction Manual
15
DEVICE_UNKNOWN_
ERROR
DEVICE_ILLEGAL_E
RROR
NETWORKCONNECT
ION_DENIED_ERRO
R
NETWORKCONNECT
ION_LOST_ERROR
Occurs when the error is
unknown (Global exception in
the code)
1) If an illegal device is selected
(Not COM1…255 or UDP, TCP)
2) If the serial port configuration
is failing
1) When a client cannot
connect to the EGDS server.
2) When the Ethernet layer
(UDP/TCP) of the EGDS server
cannot connect to a
Gateway/Device
When client is losing
connection with the server
Serial Port number out of range: Valid range
1-31 through GUI, 1-255 in XML
configuration
No network connection: Check network
cabling, IP addresses and Firewall settings
both at the client and the EGDS server
machine
No network connection or performance
issue: Check network cabling, reduce
number of Attention Scan clients, Check
Firewall settings both at the client and the
EGDS server machine
The application, beside the error code name, will also show an error number. This is mainly intended to
communicate to the service engineer, in case of a support contact.
Attention Scan Instruction Manual
16