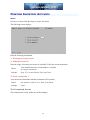
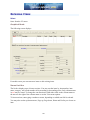
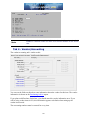
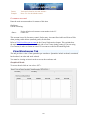
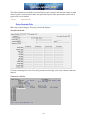
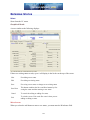
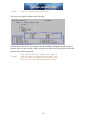
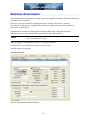
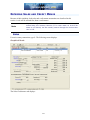
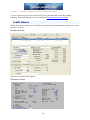
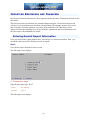
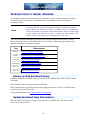
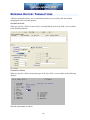
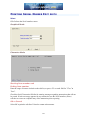
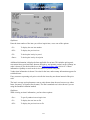
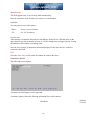
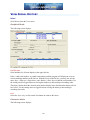
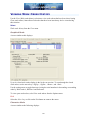
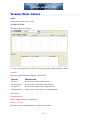
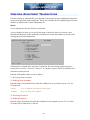
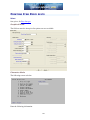
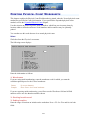
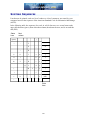
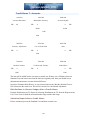
1
Inventory Control
Passport Business Solutions™
Accounting and Business Software
Version 12.0
April 2011
i
181 Waukegan Road, Suite 200
Northfield, Illinois 60093
(847) 729-7900 or (800) 969-7900
FAX: (847) 729-7909
www.pass-port.com
Passport Business Solutions™
Accounting and Business Software
Copyright Passport Software, Inc. © 2011. All Rights Reserved.
PROPRIETARY RIGHTS NOTICE: No part of this material may be reproduced or transmitted in any form
or by any means, electronic, mechanical, or otherwise, including photocopying and recording or in connection with any information storage or retrieval system, without the permission in writing from Passport
Software, Inc.
Passport Software, Inc. (“Passport” or “PSI”) have taken reasonable preventive measures to ensure the accuracy of the information contained in this manual. However, Passport makes no warranties or representations
with respect to the information contained herein; and Passport shall not be held liable for damages resulting
from any errors or omissions herein or from the use of the information contained in this manual.
AcuCorp is a trademark of AcuCorp, Inc. All rights reserved. All other tradenames, and logos are trademarks
of their respective companies.
ii
ATTENTION: ONLY LICENSEES CURRENTLY ENROLLED IN THE PASSPORT UPDATE PROGRAM (PUP) ARE
PERMITTED TO INSTALL AND USE, SUBJECT TO THE TERMS AND CONDITIONS OF THE LICENSE AGREEMENT
BELOW, THE ENCLOSED SOFTWARE.
LICENSE AGREEMENT
1. License Grant
Passport Software, Inc. (Passport) hereby grants to Licensee and Licensee accepts a non-exclusive license for the enclosed Software
with the rights, terms, and conditions as detailed in this License Agreement:
a. You may install and use the Software on a single computer system or single computer file server for your own internal business purposes provided you (the Licensee) do not exceed the number of concurrent users licensed by Passport to access the Software. If
Licensee wishes to increase the number of licensed concurrent users, Licensee must contact Licensee's Passport Partner (your Passport Software supplier) or Passport directly.
b. You may make backup copies of the Software as required for your own internal business purposes provided that you reproduce all
copyright notices and other proprietary notices on each copy made. Backup copies may be used at any time to re-install the enclosed
Software in the event of loss, destruction, or other malfunction of the Software.
c. You may only transfer the Software and this license to a successor to the whole of Licensee's business, provided the successor
agrees to accept the terms and conditions of this agreement. If you transfer the Software, you must report to Passport the name of the
new user of the Software, and you may not retain any copies of the Software yourself once you have transferred it. No other transfers
of the Software are permitted without the prior written consent of Passport Software, Inc.
Licensee shall not export or re-export, directly or indirectly (including via remote access) the Software, Documentation or other information or materials provided by Passport hereunder, to any country for which the United States or any other relevant jurisdiction
requires any export license or other governmental approval at the time of export without first obtaining such license or approval from
Passport. It shall be Licensee's responsibility to comply with the latest United States export regulations, and Licensee shall defend and
indemnify Passport from and against any damages, fines, penalties, assessments, liabilities, costs and expenses (including reasonable
attorneys' fees and court costs) arising out of any claim that Software, Documentation, or other information or materials provided by
Passport hereunder were exported or otherwise accessed, shipped or transported in violation of applicable laws and regulations.
Licensee shall comply with all laws, legislation, rules, regulations, and governmental requirements with respect to the Software, and
the performance by Licensee of its obligations hereunder, of any jurisdiction in or from which Licensee directly or indirectly causes the
Software to be used or accessed. In the event that this Agreement is required to be registered with any governmental authority,
Licensee shall cause such registration to be made and shall bear any expense or tax payable in respect thereof.
This non-exclusive license is effective for the useful life of the Software. However, this license will immediately terminate if you fail to
comply with any term or condition of this Agreement. Upon termination you must destroy all copies of the Software.
A new version of the Software replaces the version of the Software previously licensed. Use of a new Software version terminates the
license to use that part of the Software replaced by the new Software version and Licensee shall destroy or return to Passport all copies
of any prior Software version previously licensed.
EXCEPT AS STATED ABOVE, YOU MAY NOT COPY, TRANSFER, OR DISTRIBUTE THE SOFTWARE TO OTHERS, AND ANY UNAUTHORIZED COPYING, TRANSFER, OR DISTRIBUTION SHALL AUTOMATICALLY TERMINATE YOUR LICENSE.
2. Passport Update Program
Passport makes available its subscription update service (Passport Update Program - PUP) to licensees of the Software. Only licensees
having current and up-to-date enrollment in PUP are permitted to install and use any updates. Contact your Passport Partner (your
Passport Software supplier) or Passport directly to enroll in this program.
Updates to the Software made available to Licensee shall be treated for all purposes as Software under this License and all intellectual
property rights therein shall be retained by Passport.
3. Passport's Proprietary Rights
The Software is copyrighted by Passport Software, Inc. and some portions of the Software are copyrighted by AcuCorp, Inc., a Micro
Focus International PLC company. All rights reserved.
Passport and its third party licensors retain all proprietary and intellectual property rights in the Software and Documentation and in any
trademarks affixed to the Software or the Documentation. Licensee shall not take any action inconsistent with such title and ownership. Licensee shall not alter or remove any printed or on-screen copyright, trade secret, proprietary or other legal notices contained
on or in copies of any Software or Documentation. LICENSEE ACKNOWLEDGES AND AGREES THAT THE SOFTWARE MAY CONTAIN CODE
OR REQUIRE DEVICES THAT DETECT OR PREVENT UNAUTHORIZED USE OF THE SOFTWARE. Licensee shall notify Passport immediately in
the event of unauthorized possession or use of Software or Documentation.
Licensee is not permitted (a) todecompile, disassemble, reverse compile, reverse assemble, reverse translate or otherwise reverse engineer the Software, (b) to use any similar means to discover the source code of the Software or to discover the trade secrets in the Software, or (c) to otherwise circumvent any technological measure that controls access to the Software.
iii
Updates to the Software made available to Licensee through the Passport Update Programs shall be treated for all purposes as Software under this License and all intellectual property rights therein shall be retained by Passport.
4. Limited Warranty and Disclaimers
Passport warrants that the CD-ROM and/or other media on which the Software and User Documentation is recorded are readable by a
compatible hardware system. For a period of 90 days (the Warranty Period) after the initial date of this license, if Licensee discovers any
defects in the readability of the original CD-ROM and/or other media, Licensee may return it to Licensee's Passport Partner (your Passport Software supplier) or Passport for a free replacement, which is Licensee's sole and exclusive remedy in the event of such defect[s].
EXCEPT AS SPECIFICALLY PROVIDED HEREIN, THE SOFTWARE IS NOT ERROR-FREE AND IS BEING PROVIDED "AS IS" WITHOUT WARRANTY
OF ANY KIND.
PASSPORT SOFTWARE, INC., ITS PROGRAM LANGUAGE SUPPLIERS AND OTHER VENDORS, HEREBY DISCLAIM ALL WARRANTIES, WHETHER
EXPRESS OR IMPLIED, ORAL OR WRITTEN, WITH RESPECT TO THE SOFTWARE INCLUDING, WITHOUT LIMITATION, ALL IMPLIED WARRANTIES OF
TITLE, NON-INFRINGEMENT, MERCHANTABILITY, FITNESS FOR ANY PARTICULAR PURPOSE, COURSE OF DEALING OR TRADE USAGE.
NOWARRANTY IS MADE REGARDING THE RESULTS OF ANY SOFTWARE OR SERVICES OR THAT ALL ERRORS IN THE SOFTWARE WILL BE CORRECTED, REGARDLESS OF THE FORM OR NATURE OF ANY CLAIM. SOME STATES DO NOT ALLOW THE EXCLUSION OR LIMITATION OF
IMPLIED WARRANTIES, AND DO NOT ALLOW A LIMITATION ON HOW LONG ANY IMPLIED WARRANTY LASTS, SO THE ABOVE LIMITATIONS
MAY NOT APPLY. NO PASSPORT EMPLOYEE, SUPPLIER, OR AGENT IS AUTHORIZED TO MAKE ANY MODIFICATIONS OR ADDITIONS TO THIS
WARRANTY.
THE ENTIRE RISK AS TO THE QUALITY AND PERFORMANCE OF THE SOFTWARE IS WITH YOU. SHOULD THE SOFTWARE PROVE DEFECTIVE,
YOU ASSUME THE ENTIRE COST OF ANY NECESSARY SERVICING, REPAIR OR CORRECTION, AND ANY INCIDENTAL OR CONSEQUENTIAL
DAMAGES.
IN NO EVENT WILL PASSPORT, ITS PROGRAMMING LANGUAGE SUPPLIERS AND OTHER VENDORS, DISTRIBUTORS, OR DEALERS (PASSPORT
PARTNERS) BE LIABLE FOR ANY DAMAGES, INCLUDING LOSS OF DATA, LOSS OF PROFITS, OR DIRECT, OR INDIRECT, INCIDENTAL, SPECIAL, OR CONSEQUENTIAL DAMAGES RESULTING FROM ANY DEFECT IN THE SOFTWARE, EVEN IF THEY HAVE BEEN ADVISED OF THE POSSIBILITY OF SUCH DAMAGE. SOME STATES DO NOT ALLOW THE EXCLUSION OR LIMITATION OF IMPLIED WARRANTIES OR LIABILITY FOR
INCIDENTAL OR CONSEQUENTIAL DAMAGES, SO THE ABOVE LIMITATIONS MAY NOT APPLY TO YOU.
THE FOREGOING RESTRICTIONS, DISCLAIMERS AND LIMITATIONS SHALL APPLY AND REMAIN IN FORCE EVEN IN THE EVENT OF A BREACH
BY PASSPORT HEREUNDER OF A CONDITION OR FUNDAMENTAL TERM HEREUNDER, OR IN THE EVENT OF A BREACH WHICH CONSTITUTES
A FUNDAMENTAL BREACH.
5. General Terms and Conditions
Nothing contained in this Agreement shall be deemed to constitute either party as the agent or representative of the other party, or
both parties as joint venturers or partners for any purpose. Licensee's supplier of the Software (referred to herein as a "Passport Partner")
is an independent contractor in relation to Passport and is not an employee, agent or partner of Passport.
This License Agreement is governed by the laws of the State of Illinois and jurisdiction for any claim or controversy raised by Licensee
against Passport Software, Inc. shall only be in the Circuit Court of Cook County, State of Illinois.
If either party commences any action or proceeding against the other party to enforce or interpret this License, the prevailing party in
such action or proceeding shall be entitled to recover from the other party the actual costs, expenses and attorneys' fees (including all
related costs and expenses), incurred by such prevailing party in connection with such action or proceeding and in connection with
obtaining and enforcing any judgment or order thereby obtained.
This License and the rights and obligations hereunder, may not be assigned, in whole or in part by Licensee, except to a successor to
the whole of Licensee's business, without the prior written consent of Passport. In the case of any permitted assignment or transfer of or
under this License, this License and all of its terms and conditions shall be binding upon, and inure to the benefit of, the successors,
executors, heirs, representatives, administrators and assigns of the parties hereto.
This is the complete and exclusive statement of the License between you and Passport, and this License supersedes any prior agreements or understanding, oral or written, with respect to the subject matter of this License.
If you have any questions regarding this License, you may contact Passport at 847-729-7900 or email to [email protected].
iv
Understanding
Inventory Control
This chapter contains the following topics:
Key Words and Concepts
Product Description
1
KEY WORDS
AND
CONCEPTS
To understand how to use Inventory Control, you should understand some key concepts and
words that are used in this module that relate to Inventory Control.
Inventory
Inventory consists of goods purchased and held for resale to customers. It can also include
items that will be used internally in the business, on jobs, or in the manufacturing process.
Inventory is quite simply the collective total of all merchandise on-hand for sale to customers
in the ordinary course of business.
Inventory Control
The control of inventory includes being able to regulate or know what goes into inventory and
what goes out of inventory. This includes knowing the value of what is in inventory at any
time. Inventory control is often abbreviated as I/C or IC.
Item
An item is a clearly identifiable product, material, or commodity that can be stocked, sold, or
used. Inventory Control maintains a file of inventory items. Each item is identified by a unique
number and a description. Other information maintained for an item includes cost, price,
product category, quantity on hand and reorder level.
Perpetual Inventory
Perpetual inventory is an inventory system that shows each change in the amount on-hand as it
occurs. It is called perpetual because you perpetually (or continually) know the amount of each
inventory item on hand.
Accounting
Accounting is the collection, categorization and presentation of financial records.
General Ledger
General Ledger is the area of accounting where the records from other areas of accounting are
brought together for classification and summarization, thereby creating a picture of the overall
condition of the company’s finances.
As used here, general means pertaining to many areas. Ledger means a book where
accounting records are kept. (This term evolved from pre-computer times when accounting
records were kept exclusively by hand in large books called ledgers.) General Ledger is often
abbreviated G/L or GL.
General Ledger Account
A general ledger account is a specific category under which all financial activity of a certain
kind is classified. For example, you might have a general ledger account called telephone
expenses, under which you categorize your telephone bills.
2
General ledger account is often abbreviated G/L account. Accountants are experts at defining
the various G/L accounts (financial activity categories) needed by a business. Part of this
definition process involves assigning an account number to each G/L account.
Independent businesses usually use a 3 or 4 digit account number. For example, you may
have a G/L account called 100 Cash in the bank, and one called 200 Sales of Product A, and
one called 210 Sales of Product B. Typically, an independent business will have a hundred or
more G/L accounts. In accounting modules, each time any financial activity occurs in any
area of accounting, the dollar amount of the activity is recorded under the appropriate G/L
account numbers.
Cost Center
A cost center is a distinct area within your company for which sales and/or expenses (and
sometimes costs) can be calculated separately from the total sales and expenses of the whole
company.
In the Passport Business Solutions software, the main G/L account number is from 4 to 8
digits long. If you choose to use cost centers (they are optional in PBS software), you get a
sub-account (up to 8 digits) added onto the G/L account number.
For example, your office supplies G/L account is numbered 4200, and you want to track
office supply expenses independently for each of your three major departments (Dept. A,
Dept. B, and Dept. C). Rather than use a different main account number for each department
(such as 4201, 4202 and 4203), you could append -001, -002 and -003 to the 4200 main
account number as follows:
4200-001 Office supplies, Dept. A
4200-002 Office supplies, Dept. B
4200-003 Office supplies, Dept. C
Then, whenever you’re allocating office supply expenses to G/L accounts, you would use the
above 7-digit numbers.
Cost centers also apply to sales. A typical use for tracking sales by cost center is for a
company that has several sales offices. By making each sales office a cost center, you can
separately track the sales performance of each office.
Data Organization
The information you enter into your computer is stored on your disk. In order for computer
programs to be able to locate specific pieces of data (within large masses of data) and to be
able to process it logically, data must be organized in some predictable way.
PBS software organizes your data for you automatically as it stores it on your disk.
There are four terms you should understand about the way the data is organized:
Character
A character is any letter, number, or other symbol you can type on your computer keyboard.
3
Field
A field (sometimes called a data field) is one or more characters representing a single piece of
data. For example, a name, a date, or a dollar amount are all fields.
Record
A record is a group of one or more related fields. For example, the fields representing a
customer’s name, address, and account balance might be grouped together into a record called
the customer record. A record in a data file is often referred to as an entry.
Data File
A data file is a group of one or more related records. A data file is often referred to simply as a
file.
The Item file in Inventory Control is an example of a data file. Such a file is made up of many
records, each of which contains the description, prices, etc., for one item.
Each file is kept separate from the other files on the disk.
There are other types of files in addition to data files. For example, programs are stored on the
disk as program files. However, file in this User documentation means data file, unless
specifically stated otherwise.
Purging Files
As used here, purge means to remove unnecessary items. For example, the Inventory Control
Serial file can be purged of sold serial number records. The serial number records for the item
range and cut-off dates that you specify are deleted (purged) from the file.
Any other items’ serial number records, and those that fall outside of the cut-off dates
specified for the purge, remain in the Inventory Control Serial file.
Transactions
As used in accounting, transaction means a business event involving money and/or goods
and/or services. For example, a transaction occurs each time you gas up your car -- you are
paying money in exchange for gasoline (goods). Or another example: you give a television set
(goods) to your neighbor in exchange for the use of his lake cottage (services).
Computer software deals primarily with business events that have already taken place.
Therefore, in PBS, software transaction means the record of a completed business event
involving money and/or goods and/or services.
The records of sales made and payments received are examples of transactions from the area
of accounting called accounts receivable. The records of your purchases and the payments
you make for such purchases are transactions from the accounting area called accounts
payable.
The records of quantities of goods received and sold are transactions from the accounting
area called inventory control.
4
Post
To post means to take transactions from a temporary file and move them to a permanent file
(where other transactions probably already exist). For example, in Accounts Receivable, sales
are initially entered into a temporary transaction file. After sales have been entered and edited,
they are posted to the more permanent A/R Open Item file.
Often, during transaction posting, information in other data files is also updated. For example,
when sales are posted, the account balance and historical sales figures in the Customer file are
also updated.
Function
As used here, function means one or more programs that accomplish a specific task. Each
selection on a menu for a Passport module is a function. When you select a function from a
menu, one or more programs automatically execute, thereby allowing you to accomplish the
task you selected.
Integrated
When a set of accounting modules is integrated, any information generated in one area that is
needed in another area is automatically supplied to that other area. You don’t have to enter it
twice.
PBS software is fully integrated. When Inventory Control is used with other modules, data
recorded in other modules can be transferred automatically to I/C and vice versa.
Inventory Control is integrated with these other modules:
•
Accounts Receivable sales of goods can update I/C quantities.
•
General Ledger distributions are generated as items are put into or taken out of inventory.
These can be automatically transferred to G/L if you use General Ledger.
•
Order Entry automatically updates item quantities in I/C for all orders processed.
•
Point of Sale provides counter sales, orders and layaways of I/C items and updates quantities
sold during receipt or invoice posting.
•
Sales Analysis is automatically updated so that it can produce reports including sales by item,
by product category, and by sales volume.
•
Job Cost accepts items that you wish to transfer from inventory to jobs or vice versa.
•
Purchase Order quantity on order will display in I/C.
Alphanumeric
When the documentation refers to an alphanumeric entry, this means that the entry can be
letters of the alphabet, numerals (numbers), special symbols (*, &, $, etc.) or any combination
of all three kinds. In contrast, if an entry is specified as numeric, only numbers can be used.
Cost, Price and Margin
An item’s price is what a customer would pay to buy that item from you. An item’s cost is how
much you spent to acquire that item for your inventory. The difference between the two is the
5
margin, or gross cost, that you make on a sale of that item.
Every item in I/C has two recorded costs: a replacement cost and an average cost.
Replacement cost: This is the most current cost of an item. It is what you would pay now to
replace an item in inventory.
Average cost: The average of all costs paid for an item. This is recalculated each time items
are added to your inventory, and in certain situations, when items are removed from your
inventory.
Serialized Items
A serialized item is a specific unit of merchandise with a unique serial number. Only one serial
number is allowed for each serialized item received. Receivings of serialized items are made as
for any item, with the addition of entering serial numbers when appropriate.
Serialized inventory allows you to capture and track detailed information on individual serial
numbers
Lot-controlled Items
A lot-controlled item is an item whose quantities are tracked within unique lot numbers. Lot
numbers are specified during the normal receiving process. On-hand quantities can be viewed
by lot, and sales of full or partial lots are recorded and tracked by lot number.
Kits and Work Orders
A kit is an inventory item that is assembled from a set of other inventory items. The inventory
items from which a kit is assembled are the kit’s components, and they may either be raw
materials or previously assembled kits.
A work order is a request to assemble a kit. Work orders can be immediate, in which case the
kit is immediately available for sale. Alternatively, a work order may be printed, issued, and
the component items removed from inventory, but the kit is not available for sale until the
work order is marked as complete.
Work orders adds functions for quick, one-step assembly. In addition, kit disassembly and
component modifications are allowed. Serial numbers, lot numbers, and detailed component
tracking are fully supported.
Multi-company
Multi-company refers to the capability to do accounting functions for multiple companies with
the same set of software. Accounting functions can be done for more than one company on
Passport modules by selecting the Multi-company option.
Help
At any time while running a PBS module, you can press certain keys for Help.
Graphical Mode
Help is accessible from the graphical screens using the <Ctrl>+<F1> keys. The full chapter is
available.
6
Character Mode
You can press the <F8> for Help. A brief explanation of the particular function you are using
then appears on your screen.
Look-ups
There are two kinds of lookups: Data Lookup and Date Lookups.
Data Lookup
Look-ups refer to a list of available entries for a particular field. Many fields allow you to press
a designated key <F8> to show all available data on file. For instance, when entering an
invoice you may press this key at the Account number field to bring up a list of all G/L
accounts on file. Selecting an entry from this list is often easier and faster than remembering
the account number or stepping through all possible entries until the right one is reached.
Date Lookup
The date lookup provides a point and click window for finding and entering date fields.
In Graphical mode the date lookup is available via the <F4> key. In Character mode access the
date lookup via the <F7> key.
Note
In character mode, depending on where you press <F8>, this function will
return a Look-up window or context sensitive Help. If a Look-up window is
returned, pressing <F8> a second time will display Help for the field if
available.
Spool
Spool is a computer word meaning Save Printer Output Off-Line. Spooling is a technique that
allows a report to be printed on a printer at a later time. Instead of reports going directly to a
printer, they are saved as a disk file (which is usually a lot faster). When a printer is available,
all or some saved reports can be printed in one long run (for example, overnight).
Password Protection
Passwords are required to access PBS. A password is a unique code you assign to each
individual using your Passport software. Each user must enter a valid password prior to being
allowed to use a protected function.
File Recovery Procedure
This function provides the capacity to recover corrupted data files. You can also use it to
convert important data files to a format that can be easily interfaced to common data base and
word processing modules.
Printers
You can easily configure your PBS software to work with any of the most popular printers.
Additionally, instructions are given to allow you to configure the software to use virtually any
other printer.
7
Weighted Average
Regarding inventory, weighted average measures the total cost of items in inventory that are
available for sale divided by the total number of units available for sale. Typically this average
is computed at the end of an accounting period.
Suppose you purchase five widgets at $10 apiece and five widgets at $20 apiece. You sell five
units of product. The weighted average method is calculated as follows:
Total Cost of Goods for Sale at Cost (divided)
Total Number of Units Available for Sale =
Weighted Average Cost per Widget
Example:
Five widgets at $10 each = $50
Five widgets at $20 each = $100
Total number of widgets = 10
Weighted Average = $150 / 10 = $15
$15 is the weighted average cost of the 10 widgets
Upgrading from Earlier Versions
We have included the necessary functions and instructions to allow you to upgrade from earlier
Classic versions.
See the PBS Administrative documentation for more information on upgrading.
8
PRODUCT DESCRIPTION
•
Inventory Control is designed for use by retailers, wholesalers, and manufacturers. It includes
those features most asked for by thousands of users whose experiences with previous inventory control modules have helped refine Inventory Control to its current mature level.
•
Supports multiple companies and multiple cost centers
•
Provides for multiple warehouses
•
Supports multiple costing methods - average, standard, LIFO, and FIFO, as well as serial (real
costs) for serialized items using average cost
•
Permits use of multiple balance sheet inventory accounts
•
Allows you to maintain item data and print item lists
•
Allows you to maintain inventory status and print status reports
•
Allows you to maintain and print price codes and commission codes
•
Supports alternate selling units
•
Provides special pricing by category, sub-category, and location, supports sale and contract
pricing, and generates group price changes
•
Allows you to enter, change, delete and post inventory transactions and to print an edit list
and a transaction journal for receivings, sales, credit memos, transfers and adjustments
•
Tracks inventory by unique serial number or lot number
•
Has inquiry into all currently available and previously sold serial numbers and shows oldest
unsold serial number
•
Prints the serial loan report, the flooring report, and the serialized item report by item, by vendor, and by customer
•
Has inquiry into lot numbered inventory, including a history of transactions processed for a
lot number
Prints the lot numbers report by item, by vendor, and by customer, and allows purging of lot
number information
•
Allows high-speed entry of physical inventory counts, and automatic generation of inventory
adjustments
•
Supports input from hand-held terminals for receivings and physical counts
•
Prints the Price List, Inventory Valuation Report, Purchasing Advice Report, Inventory Usage
Report, Physical Count Worksheet, ABC Analysis Report, and Inventory Turnover Report
•
Supports kits. A kit is an item that is assembled from other inventory items, using a work
order.
•
Provides kit and work order reports, including Where Used Report, Kit Price/Cost Report, and
Incomplete Work Orders
9
•
Allows reports to be stored on disk to save computer time, then printed later at your convenience
•
Allows use of multiple printers
•
Includes password protection
•
May be used either independently or integrated with General Ledger, Order Entry, Accounts
Receivable, Point of Sale, Sales Analysis, Purchase Order, and/or Job Cost
•
May be used with ODBC (Open DataBase Connectivity) for producing spreadsheets in MS
Excel, Database connections with MS Access and integration with other ODBC compliant
applications. Passport provides ODBC through a product called XDBC. Please contact your
PBS provider for instructions on acquiring XDBC. If you already have XDBC, refer to the
documentation provided with the product for setup instructions.
•
Has Help (highlights of functions) built into the software
If on-hand quantities of component-items are not to be reduced, you may enter receiving transactions, using Inventory, to establish on-hand quantities for kit-items.
If on-hand quantities of component-items are to be reduced, use Work orders to enter and
issue immediate work orders for assembly of the kit-items. Refer to the Work Orders chapter.
10
Getting Started
This chapter contains the following topics:
Getting Started with Inventory Control
Setting Up Inventory Control
Passport Support
11
GETTING STARTED
WITH
INVENTORY CONTROL
It is assumed at this point that you have installed the programs for this module on your
computer according to the PBS Administration documentation. If you have not done so, refer
to that documentation and install the Passport Business Solutions software on your computer.
It is also assumed that you have familiarized yourself with the main features of this module by
reading the Understanding Inventory Control chapter. If you have not done so, read that
chapter and then return to this chapter.
This chapter describes the Inventory Control data files and briefly explains the order in which
to set them up for regular use.
Inventory Control Data Files
In order to use Inventory Control, you first enter into the computer some information
describing your inventory system and how you want the software to handle inventory
transactions.
Data Files
There are several different data files that you must enter before you can begin using the
module on a regular basis.
Listed below is a brief description of these files:
Company file
This file is used to record information about your company, such as the name and address, as
well as some system information such as the printer(s) you are using.
Valid G/L Account file
This file contains a list of all your general ledger accounts used in I/C. Any time you use a G/L
account number I/C will check this file to see if the number is valid.
Inventory Accounts file
This file contains the balance sheet inventory accounts that you define. You may use an
unlimited number of accounts.
I/C Control file
This file contains control information that defines the way you handle your inventory and, as a
result, changes or controls some of the features of this and related modules. For example, the
I/C Control file tells I/C which inventory valuation method you want to use and if your
company uses multiple stocking warehouses.
Warehouse file
You will use this file only if you are using the multi-warehouse feature of the I/C module. This
file contains the names and addresses of your different warehouses.
12
I/C Codes file
This file contains price codes, commission codes, and taxable codes.
Price codes allow you to define simple or sophisticated pricing structures for specific
inventory items in the Item file (described below). For example, you can define different
discount or mark-up percentages for different types of customers, based on the quantity of the
item sold.
Commission codes allows you to define commission schedules that are used for specific items
in the Item file.
Prices file
This file contains warehouse-specific prices, date-specific sale prices, and customer-specific
contract prices for your items. It also contains pricing information on alternate selling units.
Accounts Receivable and Order Entry use these prices, so you only need to enter information
in this file if you intend to use either of these modules.
Item file
This file identifies and describes the items you keep in your inventory. You give each item an
identifying number, a description, prices, and so on.
Certain entries in the Item file, such as an item’s price code or commission code, are only
useful if you are also using Accounts Receivable or Order Entry. Read the discussion in the
Items chapter carefully.
Inventory Status file
This file contains information on the status of the items in your inventory, such as quantity on
hand, quantity committed, maximum on hand quantity, reorder level, and quantity sold periodto-date.
Serial file
The Serial file contains information on individual serial numbers. The data on each unsold
serial number includes the corresponding item number, receiving date, cost, price and status.
This file also contains information on serial numbers that have been sold, including the
original unsold information, and additional information such as invoice number, invoice date,
customer number, and warranty dates.
Lot number information is also retained in the Serial file. Lot balance and, optionally, lot
detail records are kept for each lot-controlled item.
Kit file
This file is used only if you use kits. A kit is an item that is assembled from other inventory
items. This file contains the definitions of the kits you use.
Label file
This file is used only if you want to print item labels, and contains the format that you define
for labels.
13
Category/sub category file
These files allow you to further define your inventory items. You can associate specific G/L
accounts with your items when you set up the category and sub category files. You may also
use categories and sub categories as criteria for reports.
Unit file
The unit file enables you to define standard units of measure for your inventory items.
Item sequence file
This file allows automatic sequential numbering of new items.
Status code file
The status code file is a user-defined designator to associate with your inventory items. For
example, you could separate your items into Active and Inactive status, if you wish. Many
Inventory reports allow you to specify a status code as selection criteria.
Coverage file
This file identifies the scope of a warranty.
Warranty Programs file
This file identifies the scope of a warranty.
14
SETTING UP INVENTORY CONTROL
The steps below briefly describe how to set up your Inventory Control system.
Step
DESCRIPTION
1
Study the System User documentation for information
on the general features of PBS.
2
Run the Inventory Control software according to the
instructions in the Using Inventory Control chapter.
3
Modify the information in the Company file that was
set up during installation of the I/C module so that it
relates to your company, using Company information.
Refer to the Company Information chapter in the PBS
Administration documentation.
4
Enter your valid G/L accounts, using Valid G/L
accounts. Refer to the Valid G/L Accounts chapter in
the System User documentation. If you are also using
General Ledger, enter your Chart of Accounts first
and then use the Setup valid G/L accounts selection
in G/L to copy the Chart of Accounts to the Valid
G/L Account file.
5
Enter your balance sheet inventory accounts, using
Master information (Inventory accounts). Refer to the
Inventory Accounts chapter.
6
Enter your control information into the Control file,
using Master information (Control information). Refer
to the Control Information chapter.
7
If you specified in Control information that you use
multiple warehouses, enter your warehouse codes,
using Master information (Warehouses). Refer to the
Warehouses chapter.
If you will use price codes when setting up pricing
structures for your items, enter your price codes,
using Master information (Price codes). Refer to the
Price Codes chapter.
8
The codes you enter here are used when entering
inventory items using Items. You need only enter
price codes if you plan to use Accounts Receivable,
Order Entry or Point of Sale interfaced to I/C. Price
codes are used by these modules in order to deter-
15
Step
DESCRIPTION
mine the selling price for items.
9
If you will use commission codes to set up commission schedules for your items, enter your commission codes, using Master information
(Commission codes). Commission codes only need to
be entered if you use commissions and you are using
Accounts Receivable or Order Entry. See Commission Codes.
10
If you will use taxable codes when setting up your
items, enter your taxable codes, using Master information (Taxable codes). Refer to the Tax Codes chapter in the A/R User documentation.
11
Enter your items, using Items. Refer to the Items
chapter.
Enter the status information for each item in each
warehouse, using Status. Refer to the Status chapter.
12
Alternatively, status information can be entered,
using Status load. Refer to the Status Load chapter.
13
If you will be using multi-warehouse pricing, enter
your warehouse-specific prices, using Item prices.
Refer to the Prices chapter.
Multi-warehouse prices are used only in Accounts
Receivable and Order Entry.
If you will be using sale and/or contract prices, enter
these prices, using Sale prices and Contract prices.
Refer to the Prices chapter.
14
These sale and/or contract prices are used only in
Accounts Receivable and Order Entry. Point of Sale
has a separate contract prices file.
15
If you will be using kits, enter the definitions of your
kits, using Kits. Refer to the Kits chapter.
16
If you wish, enter your item label formats, using Item
labels. Refer to the Item Labels chapter.
You may enter your item label formats at any time
prior to printing item labels.
16
DESCRIPTION
Step
Establish initial on-hand quantities and serial numbers
(if using) for each item at each applicable warehouse.
This may be done in one of two ways:
17
•
Enter and post receiving transactions for
each item at each applicable warehouse,
using Inventory. Refer to the Average Cost
Method of the Costing Inventory Methods
appendix, or the LIFO/FIFO Cost
Valuation appendix.
•
Automatically create adjustment
transactions for each item at each
applicable warehouse, using Physical
count to create physical count transactions.
Refer to the Expanded Physical Count
chapter. You must have specified the
Expanded physical count method in the I/C
Control file to use this selection.
Edit the adjustment transactions as necessary to enter
serial numbers, and to review the costs used in the
transactions. The adjustments are edited and posted,
using Inventory.
18
If you are using kits in Inventory Control, establish
on-hand quantities for all existing kit-items.
If on-hand quantities of component items are not
reduced, you may enter receiving transactions, using
Inventory, to establish on-hand quantities for kit
items.
If on-hand quantities of component items are to be
reduced, use Work Orders to enter and issue immediate work orders for assembly of the kit items. See
the Work Orders chapter.
19
If you are using serialized items, and wish to establish information on previously sold serial numbers,
enter and post history serial transactions, using Serial
numbers.
20
Read the Guide to Daily Operations chapter, which
explains how to use Inventory Control to perform various daily, weekly, and periodic tasks.
17
PASSPORT SUPPORT
If you have problems with this software module, contact your authorized Passport partner.
For the name and location of a Passport partner near you, contact Passport Software, Inc. at 1800-969-7900.
If you wish to inquire about support, directly from Passport, please call our End User Support
Department at 1-800-969-7900 ext 124.
You can contact your own dealer for training; however, if your dealer does not offer training,
contact Passport at 1-800-969-7900 for assistance.
18
Using Inventory
Control
This chapter contains the following topics:
Organization of this Documentation
How to Use This Documentation
Starting Inventory Control
Exiting Passport Business Solutions
19
ORGANIZATION
OF THIS
DOCUMENTATION
This documentation provides the information you need to use the Passport Business Solutions
Inventory Control.
Organization
This chapter describes how to use and locate information in the Inventory Control User
documentation. It also tells you how to start and exit Inventory Control.
Chapter 4, Guide to Daily Operations, explains how you use Inventory Control to perform
various daily, weekly, and periodic tasks.
Chapters 5 through 16 give instructions on how to enter the basic information (mentioned in
the chapter titled Getting Started) that will tailor your module according to your needs and
prepare you for daily operation.
Chapters 17 through 35 describe how to use Inventory Control on a daily basis, and how to
print the Inventory Control reports. You will probably use these chapters most frequently.
Chapters 36 through 39 describe selections that are used periodically, including such selections
as closing an accounting period.
The appendixes provide technical material and reference information on valuation methods.
You can obtain additional information from the System User documentation. This
documentation contains chapters that describe features common to all Passport Business
Solutions accounting modules.
Topics covered in the System User documentation include the following:
•
General rules
•
Using Help and Lookups
•
Switching companies
•
Defining menu selections
•
Printing
•
Using the mouse
•
Using the menu
20
HOW
TO
USE THIS DOCUMENTATION
When beginning, you will want to keep this documentation handy so you can refer to it as often as
you need. Later, you may only need to refer to it occasionally.
Each chapter of this documentation provides instructions on how to use a particular selection
of your software.
The instructions include many examples of what to enter where. In fact, you can proceed
through the documentation entering all the examples as you encounter them. Whenever you
encounter a diagram of how your screen should look at any given point, this diagram contains
sample information. If you wish to use this documentation as a tutorial, enter all information
exactly as shown in these diagrams, in the order they appear. Occasionally, additional tutorial
instructions are included after the word “Example”. Be sure to follow these instructions as well.
Following along in this manner will give you a good understanding of the capabilities of your
software. If you enter the examples, you will want to initialize the data files before you begin
entering your actual business information. When you initialize a file, you clear out all
information previously entered in that file. The initialization procedure is described in the PBS
Administration documentation. After initialization, you would restart with this chapter and
enter your actual business information.
21
STARTING INVENTORY CONTROL
To start your Passport Business Solutions software, select one of the following options. If you
are unsure how to proceed, please contact your supplier.
For Windows
Start->Programs->Passport Business Solutions->PBS
For UNIX
Ensure you are logged in as a user authorized to use Passport software. Refer to the PBS
Administration documentation for more information.
Type the following:
cd /usr/pbs
or replace “/usr/pbs” with the name of your Passport top-level directory.
Then type the following:
pbs
Then when the master menu appears, select the module you wish to use from the master menu.
Multiple Companies
If you have set up your software to process information for more than one company (see
Define Multiple Companies in the PBS Administration documentation), you will be prompted
to enter the Company-ID.
Entering Your Initials
You are prompted to enter your initials.
Entering Passwords
You will be prompted to enter your password. For security, the characters you type will not
display on the screen. A user may reset (change) his or her password during login to PBS.
For the initial setup of users and passwords refer to the PBS Users chapter in the PBS
Administration documentation.
Using the Menus
A menu is a list of things from which something can be selected.
Selecting items from a menu on a computer is the way you tell your computer what you want
to do.
The Windows version of Passport Business Solutions can have three different menu types.
They are the Tree-view, Windows and Menu-bar types.
22
The SCO Open Server and Linux versions only use the Menu-bar.
Here is an example of the Tree-view menu.
The “+” corresponds to expandable menu sections. One click will open the menu selection for
the application or the sub-menu of a particular menu entry. Clicking on the “-” closes the menu
item. Viewing application menus will cause a vertical slider bar to display: and sometimes
depending on size and proportions of the screen and associate font, the slider bar as well.
These sliders are mouse enabled.
In addition to the mouse-based menu operation, you can use the keyboard to navigate the treeview menu. The home, end, page-up, page-down and arrow keys provide a quick and easy
method of maneuvering around the menu.
To select the menu program use the Enter key or click on the menu line with the mouse.
The remainder of this section describes the functions of the Menu-bar menu. To navigate
vertically within a module you have two choices. You may use the up and down arrow keys on
your keyboard or you may type the first letter of a displayed menu item. If more than one
menu item starts with the same letter, pressing the letter again will position your cursor over the
next menu item starting with that letter.
The remainder of this section describes the functions of the Menu-bar. To navigate horizontally
between individual modules use your keyboard’s left and right arrow keys. Up to ten modules
and your Passport Business Solutions System Manager may be displayed on the menu bar. If
you are using more than ten modules, a More function is added to the menu bar. To access
your additional modules, highlight More and press your <Enter> key.
To select one of the functions shown above, use the arrow keys, or press the first letter of the
function name, and then press <Enter>.
Exiting Passport Business Solutions
To exit a Passport Business Solutions module, press <Esc> from the main menu or click on the
Exit button in Windows.
23
Always exit PBS before turning off your computer or you are going to be away from your
computer for a significant amount of time.
Failure to exit PBS correctly could result in a loss of data.
24
Guide to Daily
Operations
This chapter contains the following topics:
Inventory Control Checklists
Daily Operations Checklist
Periodic/Monthly
25
INVENTORY CONTROL CHECKLISTS
The following checklists are provided as examples of how you might use Inventory Control to perform various daily and periodic tasks.
While we attempt to present the tasks in a logical order, you should adjust the checklist as
necessary to meet your own needs. You may wish to consult with your accountant for advice
on organizing your own checklists to ensure the efficiency and security of your business
operations.
Daily Operations Checklist
Use the following guidelines for performing daily and periodic Inventory Control tasks:
EACH DAY
Enter, print, and issue work orders to
assemble kits.
EACH DAY AS NEEDED
Enter
new items
using
Items .
If the item is a kit, enter a kit definition
using Kits. You may read more in the Items
and Kits chapters.
Enter receivings, sales, credit memos, and
transfers using Inventory. If you are using
Job Cost, also enter job usage transactions. This posting will also post all component usage and kit assembly
transactions generated by issuing and closing work orders. Refer to the Inventory
Transactions chapter.
If you are using Order Entry or Point of
Sale
Sales and credit memo transactions are
entered using O/E Orders or Point of Sale
Transactions. The posting of invoices in
O/E and POS will automatically generate
and post sales and credit memo transactions for inventory.
If you are using Purchasing with Inventory Control
Enter your receivings using P/O Receivings. When these receivings are posted in
P/O, receiving transactions are generated
and placed in the Inventory Transaction
file for all inventory items received.
These receivings do not have to be
entered again using Inventory. They will
26
EACH DAY
EACH DAY AS NEEDED
be posted automatically, along with any
other transactions that you enter directly
using Inventory.
Enter, print, and issue work orders to
assemble kits.
Log work orders as completed using Completed work orders.
Close these work orders using Close work
orders.
Back up data files to removable media.
Inquire into item information, using View
items.
Inquire into serial number information,
using View serial numbers.
Inquire into lot number information, using
View lot numbers.
Enter new price codes using Price codes ,
and new commission codes using Commission codes.
Use Item prices to enter new item prices for
a specific warehouse, and to change item
prices.
Enter new sale prices using Sale prices and
new contract prices using Contract prices.
Use Group price changes to change prices
for groups of items.
Print price lists using Price list.
Determine which items have dropped below
reorder level or which are out of stock using
Purchasing advice.
Determine the current stock status of inventory items using Stock status.
Print a list of incomplete work orders using
Incomplete work orders.
27
EACH DAY
EACH DAY AS NEEDED
Inquire into completed work orders using
View work order history.
Print information about completed work
orders using the Work Order History
Report.
Print item labels for inventory items using
Item labels.
Purge out-of- date sale prices using Purge
sale prices and out-of-date contract prices
using Purge contract prices.
Enter new sale prices using Sale prices and
new contract prices using Contract prices.
Print price lists using Price list.
Periodic/Monthly
Use the following guidelines for performing daily and periodic Inventory Control tasks:
EACH PERIOD
EACH PERIOD AS NEEDED
Physical Count
If you are using expanded physical count,
create physical count transactions and
print a Physical Count Worksheet using
Physical count.
Count your inventory, and then enter or
import counted quantities into the physical
count transactions using Physical count.
Edit physical count transactions and
create adjustment transactions from them
using Physical count. Post the adjustment
transactions using Inventory.
If you are not using expanded physical
count, you should print a physical count
worksheet using Physical count (Worksheet), count your inventory, and then
enter and post adjustment transactions
using Inventory.
28
EACH PERIOD
EACH PERIOD AS NEEDED
Correct serial number information using
Serial numbers.
Print the Flooring Report, which shows, by
“Source”, the serial numbers that are unsold
or sold.
Print Serial Number reports (by Item, Vendor, and/or Customer; or loaned serials).
Print Lot Number Report, which shows the
status of each lot number, selecting to purge
the file.
Print the Valuation Report to determine
the value of your inventory at the end of
the period.
Print the Usage Report, which shows sales
figures and margins for the period and year
to date.
Print the ABC Analysis Report to rank your
items in terms of year-to-date sales, costs, or
margins.
Print a status report using Status by item #
or Status by description . (This report contains the final period-to-date figures for each
item at each warehouse at which it is
stocked.)
If using Sales Analysis , print sales analysis
reports (such as Item, Item category, Item
sales volume.)
Close the sales period, using Close a
period. If this period is also your year end,
answer <Y> to the related question in
Close a period. See the chapter titled
Close a Period for a description of this
selection.
29
EACH PERIOD
EACH PERIOD AS NEEDED
Print the I/C Distributions to G/L Report
(from “Earliest” to the last date of the
accounting period) to get a list of the distributions to G/L. If you are not using G/L,
back up your data files and purge the distributions when you print the report. If you
are using G/L, do not purge the distributions at this time.
If you are using G/L, back up your data
files and then run Get distributions in G/L
to pull the distributions from I/C into G/L.
Follow the procedures described in the
G/L User documentation. You may purge
the distributions when running this selection in G/L. If you encounter any system
difficulty (e.g., power failure) while running Get distributions, then restore your
backup and repeat this procedure.
Purge items that are no longer active using
Purge inactive items.
Purge sold serial numbers that are out of
warranty using Purge serial numbers
Back up data files to removable media.
30
Inventory Accounts
This chapter contains the following topics:
Entering Inventory Accounts
Printing Inventory Accounts
31
ENTERING INVENTORY ACCOUNTS
An inventory account is a current asset account in General Ledger summarizing the value of items
in inventory.
PBS Inventory Control provides for multiple inventory accounts. You may enter as many as
your company needs.
You may set up multiple inventory accounts in this selection. You will then assign each
inventory item to one of those accounts. All postings (inventory sales, usage, and receivings)
debit or credit the inventory account associated with that item.
Select
Inventory accounts from the Master Information menu.
This selection lets you enter, modify, or delete inventory accounts.
When you use this selection to add a new inventory account, you are given the option of
adding it to the list of valid G/L accounts as well.
Enter the following information:
*1. Inventory acct #
Options
Enter the inventory account number, or use one of the following options:
<F1>
For the next Inventory Account on file
<SF1>
For the previous inventory account
Format
Your standard format for account numbers, as defined in
Company Information.
Example
Enter account 1200-000
32
If the account you enter does not already exist in the Valid G/L Account file, you may add it
here.
Description
When adding a new account, a message displays informing you that the new account is not a
valid G/L account and asks whether you would like to add it.
You must enter Y to add the account. Although I/C maintains its own account numbers, they
must also appear in the Valid G/L accounts. If you enter N, the number is cleared from the first
field and the cursor is positioned to enter another number without having recorded the new
account. After entering Y, you will be prompted to enter an account description of up to 30
characters.
Format
Up to 30 characters
Example
In this example the description appears automatically.
If this account already exists in the Valid G/L Account file, its description displays. If not, enter
the description, and the account is automatically added to the Valid G/L Account file.
2. Inventory type
This designates the type of inventory represented by this inventory account.
Enter one of the following codes:
CODE
TYPE
DESCRIPTION
M
Merchandise
Items purchased for resale
R
Raw Materials
for raw materials. This account type is for
items that are components of kits.
F
Finished Goods
Items (defined as kits in the Kits selection)
constructed from raw materials, and possibly from other kits.
Miscellaneous
costs applied
Used for inventory accounts which are
assigned to miscellaneous items in inventory. For example, if a miscellaneous item
is set up to represent labor costs associated
with constructing a kit, then this account
will be credited when the components for
the kit are taken from inventory. In addition, if miscellaneous items are sold using
O/E or A/R, then this account is credited at
the time of the sale. Refer to the Billing
chapter in the O/E User documentation or
the Post Invoices. chapter in the A/R User
documentation for additional information
regarding the handling of miscellaneous
items.
C
33
CODE
W
TYPE
DESCRIPTION
Work in progress
Used directly for inventory items, but is
used on a work order to designate the G/L
account to which component items should
be posted while the work order is in progress.
Format
A single-letter code from the above table.
Example
Type: M
Note
The Distributions to G/L report contains a separate section for each of the
above inventory types. Refer to the Distributions to G/L Report chapter.
While the Inventory acct # field (inventory asset account) for a Miscellaneous item must be
entered, its use is not that of a true balance sheet asset account since no inventory is kept for
this item. Rather it is used basically for generating the contra-account to cost-of-sales and
therefore is really being used as a suspense account against the expense side distribution that
happened when the item was received. In this sense the accounting transactions for
Miscellaneous items are similar to what happens when an item is drop-shipped, except that a
drop ship clearing account is used instead of the inventory account.
The accounting T bars associated with these transactions are:
Accounts Payable
Expense account
used in AP = * Item
Inventory account =
Clearing acct
Cost of sales
account from selling this item
Debit
Credit
Debit
Credit
Debit
Credit
Miscellaneous item receiving
-
1000
1000
-
-
-
Miscellaneous item selling
-
-
-
1000
1000
-
3. Comments
Enter any comments about the cash account.
This field uses Passport’s text editing function. Enter the text in much the same way as most
word processing programs, using the <Enter> key, the character keys, and the <Delete> key.
When you are finished entering text, press <Esc> and follow the screen instructions.
When you have finished entering commands, press <Esc> and the following file options
display:
34
File
Save what was entered/changed, clear the screen, and
get ready for another comment. Like pressing <Enter>
at “Field number to change?” in other selections.)
Save &
Continue
Save what was entered/changed, but leave the information on the screen for further work.
Abandon
changes
Do not save what has been entered/changed and get
ready for a new comment. Like pressing <Enter> at
“Field number to change?” in other selections.)
Delete
Delete this entire comment from the file and clear the
screen to get ready for another comment. Like Delete
in other selections. The software will ask you to confirm the deletion with an “OK to delete ?” message.
Format
Ten lines of 65 characters each
Example
Type: Primary inventory account for
sales
The completed screen
This completes the screen to enter inventory accounts. Make any needed changes or press
<F3> to delete this inventory account.
Note
An inventory account cannot be deleted if it is currently in use in the I/C
Control file as a default inventory account, or if it has been entered as the
inventory account for an item. If you are not allowed to delete an inventory account, a message will display giving the reason.
35
PRINTING INVENTORY ACCOUNTS
Select
Inventory accounts from the Reports, master info menu.
The following screen displays:
Enter the following information:
1. Starting account # and
2. Ending account #
Enter the range of inventory account to be included. Follow the screen instructions.
Format
Example
Your standard format for account numbers, as defined
in Company information.
Press <F2> at each field for "First" and "Last".
3. Print comments ?
Your answer here determines whether comments will be printed.
Format
Example
One character, either Y or N. There is no default.
Type Y
The Completed Screen
This completes the screen. Make any needed changes.
36
Control Information
This chapter contains the following topics:
Selecting Control Information
Entering Control Information
37
SELECTING CONTROL INFORMATION
Control information is where you enter control file data. A control file contains key information
about the inventory control requirements of your business and key information about your
business operation. Is is called Control information because it controls certain program
functions and default values.
Select
Control information from the Master information menu.
Graphical Mode
The following tab displays:
If you are entering Control information for the first time, the cursor will be at the first field. As
you are accessing a single record file, only certain buttons are active:
New
Not active
38
Edit
For editing a Control information record
Save
For saving a new record or changes to an existing record
Save/New
Not active
Cancel
To cancel the editing or adding a record
Exit
To exit the screen. Exit works like cancel when you are
adding or editing an item.
Character Mode
The following screen displays:
39
ENTERING CONTROL INFORMATION
Enter the Control information as follows:
Inventory valuation method
Inventory Control will track the value of your inventory in one of four ways:
1. by standard cost with average cost assumption
2. by average cost with or without serial cost
3. by the last in-first out (LIFO) method
4. by the first in-first out (FIFO) method.
Select one of the following:
Character Graphical Description
S
Standard
cost
to select standard cost
A
Average
cost
to select average cost
L
LIFO
to select LIFO
F
FIFO
to select FIFO
Refer to the Cost Inventory Methods appendix for a detailed discussion of each valuation
method.
This documentation presents examples using the Average cost method, without serial costs (see
below). Special notes are included, as appropriate, for other valuation methods.
Regardless of the valuation method you select, use the transaction processing instructions in
the Inventory under Average Cost chapter.
The LIFO/FIFO Cost Valuation Appendix describes the differences in transaction processing
under LIFO. If you wish to select FIFO, also read the discussion on FIFO in that Appendix.
If you select standard cost, also refer to the Standard Cost Valuation Appendix.
If you need to change valuation methods, be sure to review the Changing Valuation Methods
Appendix for the proper procedures prior to making this change.
Use serial costing
An entry in this field is allowed only if the Average cost method is specified in field number 1.
40
Check this box if you wish the real cost of a serialized item to be used (instead of the average
cost) when processing the item. Otherwise, press <Enter> for the default of unchecked.
If you specified a valuation method other than A in field number 1, this field is skipped.
Multiple warehousing
Check this box if you have more than one location where inventory is kept, and inventory
control is desired at each location.
Leave it unchecked if just one location for storage is used or if multiple site control is not
needed.
For multiple warehousing, inventory levels (the status of items) are tracked for each item in
each warehouse.
LIFO/FIFO by Warehouse
When multi-warehousing is in effect under LIFO or FIFO costing, a history of the cost of each
item is kept with regard to warehouse. Check this box to track LIFO or FIFO by warehouse,
otherwise leave it unchecked.
Note
If you wish to change your warehousing method once you’ve completed setting up control information, refer to the Changing Valuation Methods appendix.
Multiple warehouse pricing
If you checked the box to Multiple warehousing, check this box if you wish to have the ability
to price your items differently for each warehouse. Otherwise, leave it unchecked for no.
This field cannot be entered if you left the Multiple warehousingunchecked.
Inventory register format
Select Detail for a detail format or Summary for a summary format.
The detail format of the Inventory Register shows all detail for each transaction to be posted.
For average or standard costing, both the summary and the detail format will provide full audit
information on the register.
For LIFO or FIFO, the summary format does not give details of layers added, layers removed,
or negative layers created. It does show the total cost correction resulting from a transaction
that removes one or more negative layers.
If selected, the summary format should be reviewed by your company’s accountant to be sure
that it meets the audit requirements of your company. If there is any question as to which
format to use, select the detail format.
Condensed sales registers
Check this box to print a condensed format of the Inventory Register when inventory
transaction posting is originated by Order Entry invoice posting.
41
Your answer here does not affect the register format selected in the Inventory register format
field when inventory transaction posting is originated by the Inventory (Post) selection.
The condensed format shows one line of information for each item by transaction type,
warehouse, and transaction date.
If you leave it unchecked, the register format selected in the Inventory register format field is
printed when inventory transactions are posted, regardless of the selection used to initiate
posting.
Using Purchasing order
Check this box if you intend to use the PBS P/O application. This causes I/C to display and
print the quantity on order for each item. Purchase Order is licensed separately and can be
added to your system if you are not licensed for it.
Using Accounts payable
Check this box if you intend to use the Accounts Payable module. Accounts Payable is
licensed separately and can be added to your system if you are not licensed for it.
Number of prior periods to track quantity info
You may track quantities for up to 24 prior periods. Enter the number of periods in your
accounting year, from 1 to 24.
Quantities sold, used, sold + used and returned is the status information tracked by item by
warehouse by period. This information can be viewed in from the Status menu selection and
may optionally print on the Status reports.
When Close a Period is run then the quantity information is moved down to a prior period.
If you are not sure, then an entry of 24 is recommended. This can be reduced to a smaller
number at any time.
Use monthly periods
Check this box if your accounting periods are monthly. Otherwise, leave it unchecked.
If they are monthly, then the period labels will display and print as month plus year. If they are
not monthly then they will be Prior prd # 9 with 9 being the month number.
Use cost of sales
Check this box if you wish to report on cost of sales in Sales Analysis. If you leave it
unchecked, data pertaining to cost of sales will not be reported in Sales Analysis.
Regardless of your answer here, cost of sales figures are available for viewing and reporting in
Inventory Control. If you have the A/R module, your answer to this question should be the
same as it is in the A/R Control information selection.
Use back order control
Check this box if you wish to use back order control. You must also check this box if you wish
to track committed inventory quantities. Leave it unchecked if you are not using back order
42
control or tracking committed quantities for your items.
If LIFO/FIFO is being used, or if you intend to use serialized items, back order control must be
set to checked.
Your answer here is used in the formatting of various reports and in setting up items in the
Items menu selection.
Graphical Mode
After entering the last field the next tab displays:
Character Mode
After you have pressed <Enter> at Field number to change ?, a second screen appears:
Enter the following fields:
Assign cost centers (or sub-accounts) to items
Entry in this field and the next is allowed only if the Company file specifies that cost centers
(or sub-accounts) are to be used (i.e., the size of the sub-account number is not zero).
43
Otherwise, they are grayed-out and cannot be entered.
You have a choice of assigning cost centers (or sub-accounts) either to the inventory items
themselves or have each inventory item use the default Cost Center as defined in the next field.
Check this box if you want to assign cost centers (or sub-accounts) to items. In this case, the
default cost center (or sub-account) in the next field is displayed as a default when entering
items.
If you check this box, an item’s cost center will be used as a default for sales and credit memo
transactions for the item in the Inventory selection.
Leave this box unchecked if you do not want a cost center (or sub-accounts) to be assigned to
each inventory item.
Default cost center (or sub-account)
If you checked the box for the previous field, the cost center (or sub-accounts) entered here is
used as the default when entering inventory items (using Items).
If you left the previous field unchecked, this cost center (or sub-account) is used as a default
when entering inventory transactions. When entering accounts in Items, the cost center (or subaccount) must exist for the main account you are entering.
Enter the default cost center (or sub-account) or press <Enter> to use a Cost Center (or subaccount) of all zeros.
Entering Account Numbers
For the next three fields, you enter only the main account number to use as the default for new
items (in Items). You will specify the cost center (or sub-account) when you enter transactions in
Inventory.
Default sales account
The account you enter here is used as a default for the Sales acct # field when entering an
inventory item using Items.
The Sales acct # for an item is used by Accounts Receivable, Order Entry and Point of Sale
when posting sales of this item.
If Cost Centers (or sub-accounts) are used, the Sales acct # is combined with a cost center in
order to obtain the G/L account to be used for the posting.
In Accounts Receivable, Order Entry and Point of Sale the cost center (or sub-account) , is
determined by an option specified in the A/R, O/E and P/S Control file.
Default expense account
The account you enter here is used as a default for the Expense acct # (cost of goods sold)
field when entering an inventory item using Items.
The Expense acct # for an item is used when posting sales transactions using Inventory. A
sales transaction removes an item from inventory and reflects its cost in cost of goods sold.
44
If cost centers (or sub-accounts) are used, the Expense acct # is combined with the cost center
(or sub-account) entered for the sales transaction in order to obtain the G/L account to be
debited for the sale transaction. The item’s inventory account is credited.
Default credit memo account
The account you enter here is used as a default for the Credit memo acct # field when entering
an inventory item using Items.
The Credit memo acct # for an item is used when posting credit memo transactions using
Inventory. These credit memo transactions are used to handle goods returned by a customer.
If cost centers are used, the Credit memo acct # is combined with the cost center for the credit
memo transaction in order to obtain the G/L account to be credited for the credit memo
transaction. The item’s inventory account is debited.
Default B/S inventory account
Each item is assigned a balance sheet inventory account that is used for all posting for that
item.
Enter the inventory account (as entered using Inventory accounts) that you wish to use as a
default for the Inventory acct # field when entering an inventory item using Items. You should
enter the most frequently used inventory account here in order to speed up data entry for items.
B/S liability account
If you are not using Accounts Payable:
Enter the number of the account that is to serve as the balance sheet liability account.
When receivings for an item are posted, the item’s balance sheet inventory account is debited
and the account you enter here is credited.
This account may be your accounts payable account. However, you should consult with your
accountant as to the exact account that should be used for your business.
If you are using Accounts Payable:
Receiving transactions debit the item’s inventory account and credit the B/S liability account
that is entered here.
Later, your vendor will send you an invoice for the receiving and you will enter it into A/P. If
you set the expense distribution of the A/P invoice voucher to be the same account that was
originally credited at the time of the receivings in I/C (i.e., the B/S liability account), the net
effect will be to debit inventory and credit accounts payable.
At the time of I/C receiving posting:
•
Debit item’s B/S inventory account
Credit B/S liability account
At the time of A/P voucher posting:
•
Debit B/S liability account (as the expense distribution)
45
Credit Accounts Payable
The net effect is:
•
Debit Item’s B/S inventory account
Credit Accounts Payable
At the end of an accounting period, the net amount in the B/S liability account represents
inventory that has been received but that has not yet been posted as a payable in A/P. (If all
bills are received by the end of a period, this account balance will be zero.) The B/S liability
account will also reflect any errors or discrepancies between entries made in I/C and entries
made in A/P.
The B/S liability account may be a clearing account. It can also be a liability account called
Uninvoiced receivings. You should consult with your accountant to determine the exact
account to be used.
If LIFO, FIFO, or Average was selected as the valuation method, field number 20 appears as
follows:
Cost correction account
(Average, LIFO, or FIFO only)
Enter the number of the account that is to serve as the average or LIFO/FIFO cost correction
account. If using standard cost see the Purchase variance account field.
Cost corrections occur under average cost, LIFO or FIFO if an item’s quantity on hand is
negative and a later receiving of the item arrives.
When the quantity on hand goes negative, the replacement cost is used in posting, because the
LIFO or FIFO cost is no longer known.
When the later receiving arrives, the actual cost of the item’s negative quantity on hand
becomes known, and any difference between this cost and the cost that was posted while the
item was negative is posted to the cost correction account.
At the end of your accounting period, any remaining balance in this account should be charged
to the cost of goods sold account.
Note
In certain situations, cost correction can also occur when a kit is assembled
from components. Refer to the Inventory Transactions chapter.
If Standard Cost was selected for the valuation method, field number 20 appears as follows:
Purchase variance account
(Standard cost only)
Enter the account number of the account that is to serve as the purchase variance account.
Cost variances occur when an item is purchased at an actual cost that is different from the
standard cost specified for the item in the Item file. The amount of any variance is posted to the
purchase variance account.
46
This variance is actually a purchase price variance, and it allows you to assign variance
responsibility to the purchasing or sales department within your company.
At the end of an accounting period this purchase price variance must be allocated between cost
of goods sold and ending inventory, for financial statement presentation purposes.
See the appendix titled Standard Cost Valuation for more details concerning the assignment of
responsibility within departments and the transactions involving the purchase variance account.
Cr memo/Adj variance account
(Standard cost only)
Enter the number of the account that is to serve as a variance account for credit memos and
adjustments. If you are using LIFO, FIFO, or Average, this field cannot be entered.
Current period ending date
This is the ending date of your current accounting period. It is used during transaction posting
to determine whether the transaction applies to the current period.
Graphical Mode
After entering the last field the following tab displays:
Character Mode
After pressing <Enter> at Field number to change ?, a third screen appears.
47
Enter the information as follows:
Item searched by
1st/2nd/3rd/4th keyword method
A keyword is a word or piece of information about an item that can be used to search for an
item.
Enter up to four keyword methods to be used when searching for items, in the order in which
they will be used. The 1st keyword method is the default method used to search for items.
Refer to the table below for keyword method choices.
M ETHOD
DESCRIPTION
1
Full description
2
Description line 1
3
Description line 2
4
Description line 3
5
Description line 4
6
Sub-category
7
Category/sub-category
8
Vendor item #
9
Vendor #/vendor item #
Press <Enter> to specify None for any method.
48
When Items is used to enter or change item information that is used as a keyword method, the
item keywords are updated in the Keyword file.
If you select Full Description as a keyword method, each separate word of two or more
characters (separated by a space or comma) in any line of an item’s description is considered a
keyword, and is stored in the Keyword file.
If you change a keyword method after setting up your items, you must run Rebuild item
keywords on the I/C File utilities menu to rebuild the Keyword file.
The keyword search method is used in Order Entry order lines and I/C View > Items to help
you search for an item. In graphical mode, it can also be accessed anywhere where the item
lookup is available by clicking on the Keyword button.
Physical count method
Select Normal or Expanded from the drop down list box.
In Inventory Control, you can perform the physical inventory counting process in one of two
ways: the normal way or the expanded way.
The normal way allows you to print physical count worksheets for the items to be counted.
When the physical count is complete, you must manually calculate and enter adjustments
(using the Inventory selection) to align the item quantities on hand with the physical count
quantities.
If you select normal, follow the instructions in the Physical Count Worksheets chapter.
The expanded method takes a picture of inventory levels for the items to be counted. Physical
count worksheets may be printed for these items. When the physical count is complete, you
enter the counted quantities, which are then compared to the picture inventory levels.
Adjustments can be automatically calculated and created for items with different picture and
counted quantities.
If you select expanded, follow the instructions in the Expanded Physical Count chapter.
Inventory reorder basis
Select Net quantity, or Quantity on hand from the drop down list box.
Inventory Control allows you to report on items that need to be reordered or that are out of
stock in one of two ways: based on net quantity or based on quantity on hand.
If you select Net quantity, an item is determined to be below reorder level or out of stock,
based on the following formula:
Net quantity = quantity on hand-quantity committed-quantity on back order+quantity on work
orders+quantity on order
If you select Quantity on hand, only the Quantity on hand field (in the Item file or Status file)
is used to determine if an item needs to be reordered.
Reports that show items needing reorder are the Purchasing Advice Report, Stock Status
Report, and Valuation Reports.
49
Use sale prices by
A sale price is a price in effect for an item, or a group of items, for a specific period of time.
Enter up to three types of sale prices to be used when selling items through Accounts
Receivable or Order Entry.
Check the box Item if you intend to set up sale prices by item, check Category for sale prices
by item category, and/or Sub-category for sale prices by item sub-category. Leave any or all
unchecked if you do not use them.
An item sale price is a price that applies to a specific item. A category sale price is a price that
applies to all items with the same category. A sub-category sale price is a price that applies to
all items with the same sub-category. (The category and sub-category of an item are defined in
the Items selection.)
Use the Sale prices selection to set up sale prices by item, by category, or by sub-category.
When an item is sold in Accounts Receivable or Order Entry, sale prices are used only for the
sale price types specified here. In addition, sale prices are printed on the Item Price List and
Actual Customer Price List only for the sale price types specified here.
You may read more about this in the Entering Sale Prices section of the Prices chapter.
Use contract prices by
A contract price is a price in effect for an item, or a group of items, for a specific customer.
Enter up to three types of contract prices to be used when selling items through Accounts
Receivable or Order Entry.
Check the box Item if you intend to set up sale prices by item, check Category for sale prices
by item category, and/or Sub-category for sale prices by item sub-category. Leave any or all
unchecked if you do not use them.
An item contract price is a price to a specific customer that applies to a specific item. A
category contract price is a price to a specific customer that applies to all items with the same
category. A sub-category contract price is a price to a specific customer that applies to all items
with the same sub-category. (The category and sub-category of an item are defined in the
Items selection.)
Use the Contract prices selection to set up contract prices by item, by category, or by subcategory.
When an item is sold to a customer in Accounts Receivable or Order Entry, contract prices are
used only for the contract price types specified here. In addition, contract prices are printed on
the Actual Customer Price List only for the contract price types specified here.
Because the number of types entered here has an effect on system performance in Accounts
Receivable and Order Entry, you should only specify the contract price types you actually plan
to use.
You may read more about this in the Entering Contract Prices section of the Prices chapter.
50
Print item labels
This field determines if you will be printing labels when receivings are posted.
The following applies if you have the Purchase Order module installed and you have checked
the box for the Using Purchasing order field. In Purchase Order, when posting a receiving, the
question Print item labels ? displays. Check this box to print item labels in Purchase Order. If
you leave it unchecked, then the P/O posting entry program will skip the field.
Default label format
The format used for printing of item labels is determined by the answer provided here.
On initial entry you will be asked to select a printer. Once selected it will display in
parentheses. If you do not select a default printer, you will be prompted to select one when
labels are printed. Select <F6> to change a default printer for this field.
User defined fields
These fields are user defined. You may define up to 2 quantity, 2 description and 2 date fields.
After you enter the last field, then the following tab displays:
Use kits Kits are inventory items that are assembled from other inventory items. Check this box if you
assemble kits from items that you stock.
Leave it unchecked if kit assembly is never used. Read more about the use of kits in the Kits
chapter.
Starting work order #
This field cannot be entered if you are not using kits.
Kits can be assembled by entering, printing, and issuing work orders. Enter the number to be
assigned to the next work order entered. Each time a new work order is entered, this number is
automatically incremented by 1.
51
Default Work in process account
This field cannot be entered if you are not using kits.
Enter the usual work in process account to which distributions for components items should be
posted while a work order is being assembled. This account is used as a default when entering
work orders.
The entered account must exist in the Inventory Account file.
Next kit serial number
This field is numbered automatically for serialized kit items. It will assign sequential serial
numbers for kit items.
Default work order posting printer
You may assign a default printer in this field. If you do not select a default printer, you will be
prompted to select one when labels are printed.
If you need to change the printer select <F6> to assign a new one.
Default work order label format
This field determines if you will be printing kit labels automatically when Work Orders are
complete.
Inventory history order
This selection determines sort order when viewing inventory history. You can specify
ascending or descending order.
Update standard cost with replacement cost
This option is only available if Standard Costing is used. It allows you to specify that the
standard cost of an item will be overwritten with the replacement cost generated at the time of a
receiving.
Optional coverage type
This field allows you to specify a coverage type in addition to the four pre-defined coverage
types available in Coverages. You may read more about Coverage Types in the Master
information chapter.
52
Warehouses
This chapter contains the following topics:
Entering Warehouses
Printing Warehouse Lists
53
ENTERING WAREHOUSES
If you are not using multi-warehousing, skip this chapter entirely, as the Warehouses selection
will not be available.
If you selected multi-warehousing, use this selection to designate valid warehouses. When
using I/C, you can make entries only for warehouses that are defined here.
This chapter describes how to set up multiple warehouses.
Select
Warehouses from the Master Information menu.
Graphical Mode
The following screen displays:
Warehouse List Box
The list box displays up to 6 existing warehouses at a time. You may sort the warehouses by
warehouse code in ascending or descending order. Only column names in red may be sorted.
To select a field or change the sort order, click on the column name or the arrow to the right of
the column name or use the View options.
54
To locate a warehouse, start typing the warehouse code. You may also use the up/down
arrows, Page up, Page down, Home and End keys to locate a checking account. The <F1> and
<SF1> keys function the same as the up/down arrow keys.
Warehouses that display in the list box are available for changes or deletion.
The fields for the warehouse selected in the list box display in the lower part of the screen.
Warehouse Buttons
The buttons provide the following:
Button
Keyboard
Description
New
Alt+n
To enter a new warehouse
Edit
Alt+e
To edit an existing warehouse
Save
Alt+s
To save a new warehouse or changes to an existing
warehouse
Save/New
Alt+w
To save a new warehouse and start entering a new one
Delete
Alt+d
To delete an existing warehouse. It does the same as
the <F3> key
Cancel
Alt+c
To stop entering a new warehouse or stop editing an
existing warehouse without saving the changes
Exit
Alt+x
To exit the screen to the menu
Character Mode
The following screen displays:
You may use one of the character mode options:
55
<F1>
To scan through the warehouses on file
<SF1>
To scan through previous warehouses on file
<F3>
To delete an existing warehouse
Warehouse code
Options
Enter a warehouse code, or in character mode use the option:
<Enter>
To designate this warehouse as the “Central” warehouse
<F1>
To scan through the warehouses on file
If you designate a “Central” warehouse, you are able to default to it by
pressing <Enter> during many I/C selections. Otherwise, you have to enter a
warehouse code in those selections.
Note
Warehouse name
Enter a name that describes the warehouse.
Address lines 1 - 5
Enter the address lines for the warehouse. The first line of the address is usually your company
name.
Format
Enter information for a second warehouse as shown on the
screen below, so that you will have a second warehouse to
transfer items into in a later example.
56
PRINTING WAREHOUSE LISTS
Select
Warehouses from the Reports, master info menu.
The Printer Selection screen will be displayed. Select the printer that you want use for this list,
elect to print the Warehouse List to disk or display on your screen.
All warehouses will be printed on the Warehouse List.
57
Price Codes
This chapter contains the following topics:
Introduction to Price codes
Entering Price Codes
Printing Price Code Lists
58
INTRODUCTION
TO
PRICE
CODES
Price codes are optional
•
If you are not using Order Entry, Accounts Receivable or Point of Sale, all sales are handled
by the Sales transaction of the Inventory selection, which does not use price codes.
•
If you do not discount or vary your prices you do not need price codes.
In either case, you may skip this chapter.
This selection enables you to define price codes. This feature lets you design a more
sophisticated price structure than can be achieved by simple discounting. Once defined, price
codes can be applied to items or ranges of items whenever you choose. For items to which you
apply a price code, the price code determines the price when the criteria of the price code are
met by an order(s).
•
A price code is a formula describing how to arrive at a price.
•
The basis of the computation may be the customer type or the quantity ordered, or both.
•
The result may amount to either:
A discount from one of the item's prices, average cost, or replacement cost.
A mark-up from either one of the item’s prices, the average cost, or the replacement cost.
•
A selection from among the current prices defined for an item.
•
Although discounts are usually applied to prices and mark-ups to costs, the reverse is permitted.
Each of these possibilities is specified by selecting a price code type. For instance, one code
discounts the price solely on the basis of the quantity ordered, while another selects one from
among up to five existing prices , average cost, or replacement cost on the basis of a customer
type. There are eight types of price codes.
Each price code must include the selection of one of the eight price code types. Once a price
code has been defined, it may then be associated with as many items as desired.
It is important to distinguish between price code and price code type. A price code is a set of criteria you select to determine an alternate price(s) for some business reason. A price code type is one
of the criteria used in a price code, for instance, discounts based on quantities ordered.
You may define a number of different price codes of the same type. For Example
•
Price code #23 gives a discount of 5% off Price-1 in quantities of 100 units or more.
•
Price code #56 gives a discount of 25% off Price-1 in quantities of 500 or more.
Both price codes use price code type 1 and Price-1 but might be used to discount the price of different products.
59
Related selections
Customer types and discounts are associated with customers by the A/R Customers selection.
Prices and price codes are associated with items in three different ways:
1. By the I/C Items selection. This is the usual method. Each item has at least one price and may
have as many as five. Each item also has an optional price code. If it doesn't have a price code,
Price-1 is used as the price for the item.
2. By the I/C Contract prices or P/S Contract prices selections. These methods are optional. It
lets you replace the normal prices and/or price code by different values, applying only to a particular customer with whom you have a special contract arrangement.
3. By the P/S Special sale prices selection. It lets you replace the normal price by different
values or a price code. The sale price can be for any time period.
Any individual price code that you define may be used for any of these purposes.
I/C Sale prices makes no use of price codes.
Orders and Invoices
When an order is entered in O/E. an invoice in A/R or a transaction in Point of Sale, the price of
each item on the order is either Price-1 for that item or, if present, calculated by the item's price
code. The calculated price is displayed and you will have the option of either accepting it or entering a different price (sale or contract price, if there is one, or simply a one-time price specified by
you).
When an order is entered in O/E, an invoice is entered in A/R or a transaction is entered in Point of
Sale, the price of an item on the order or invoice will be calculated automatically, based upon the
calculation method specified in the item's price code. The calculated price will display, and you will
have the option of accepting it or entering a different price.
In O/E, additional pricing options are available by using multi-warehouse pricing, sale prices, and
contract prices. These options are described in the chapter titled Prices.
In Point of Sale, additional pricing options by sale prices and contract prices are available. See the
Point of Sale documentation for setting up these price options.
In O/E, and A/R, the customer's trade discount may be applied in addition to the discount specified
by a price code.
This happens in all selections which allow entry of goods line items: Recurring bills, Quotations,
Recurring Orders, Standard bills, and Billing.
When a price for a particular line item on an order has been calculated using a price code, it is still
subject to any applicable customer discount.
Quantity Levels
Price code types using quantity levels determine which level in the price code matches a quantity
ordered on a particular line item.
60
A level is a range of quantities you define. There may be up to five of them, and they must be in
ascending order.
•
Each level is defined by a lower bound and continues to but does not equal the lower bound
of the next level. For example, if the lower bounds of level-3 is 100 and level-4 is 500, then
the range of level-3 is 100 through 499 inclusive.
•
The last level defined continues indefinitely.
•
The first level may (but need not) begin at zero. If it does not, orders for quantities less than
the lowest level do not receive any discount but are sold at Price-1.
•
The first level may (but need not) begin at zero. If it does not, orders for quantities less than
the lowest level receive the basis price (or cost) specified in the price code, but without any
discount.
If two line items for the same item number occur twice on an invoice (or quotation, order, etc.),
then the price for each will be evaluated independently according to the quantity of each.
If it becomes necessary to back order part of a line item, each partial order receives the price appropriate to the total quantity ordered, regardless of how many shipments are required.
This provision insures that your customer is not deprived of the discount he is entitled to, merely
because of operational conditions in your warehouse.
This chapter refers to Price-1, Price-2, Price-3, Price-4 and Price-5. These are the five prices
assigned to an inventory item. Prices are normally in descending order, with Price-1 being the highest.
You will also see references made to Average cost, Standard cost, and Replacement cost. These are
the costs that are retained for an inventory item.
Refer to the Items chapter for a further explanation of these prices and costs.
Note
You should not delete a price code unless you are sure that it is not currently used for any inventory items.
Price Code Error Conditions
It is possible to create situations in which no valid price can be calculated from the applicable price
code. For example, you could:
•
Delete the price code while there are still items on file using that price code.
•
Define a price code varying by customer type, but fail to include all existing customer types.
•
Define new customer types but fail to adjust existing price codes accordingly.
•
Define a price code based on one of the prices from Price-2 through 5, but apply it to an item
which does not have that price defined (Recall that Price-1 is the only required price on an
item).
In all such cases, the system uses Price-1. It behaves as it would have behaved in the absence of a
price code.
61
Refer to the Items chapter for a further explanation of these prices and costs.
62
ENTERING PRICE CODES
Select
Price codes from the Master Information menu.
The following screen displays:
From this screen you can work with both new and existing price codes. If information has
already been entered for the price code you specify, it appears and is available for changes or
deletion.
Enter the information as follows:
*1. Price code
You may use either numeric or alphanumeric codes. Unlike most other alphanumeric fields in
this system, leading zeroes are suppressed. That is, an entry of 8 is read as 08 and so displayed
thereafter.
Options
Enter the number assigned to this price code, or use the following options:
<F1>
To scan through the price code on file.
<SF1>
For the previous price code
Format
Either two letters or digits
Example
Type 1
2. Price desc
Enter a description of this particular price code. This description will appear on the entry screen
for selling items.
63
Format
Up to 25 letters
Example
Type Discount by Quantity
*3. Price type
Price code type is explained in the Introduction to this chapter, and a list of the available types
displays below.
The format of the remaining fields of the screen varies for each price code type, so each is
described separately beginning at the page shown in the table.
The price type defines which of the eight available price structures will be used by this price
code. To select one, enter its number.
The price code type of an existing price code may not be changed.
A prompt displays at the bottom of the screen to remind you of the eight types of price
structures available. The eight types of price structures are:
TYPE
INFO
LINK
DESCRIPTION
1
Discount Price by Quantity Ordered: Price is
discounted according to the quantity ordered.
Price
Code
Type 1
2
Discount Price by Customer Type: Price is discounted according to the customer type (specified in the Accounts Receivable Customers
selection).
Price
Code
Type 2
3
Discount Price by Quantity Ordered Within
Customer Type: Price is discounted according
to the customer type; and for each customer
type, according to the quantity ordered.
Price
Code
Type 3
64
TYPE
INFO
LINK
DESCRIPTION
4
Mark up Price by Quantity Ordered: Price is
marked up according to the quantity ordered.
Price
Code
Type 4
5
Mark up Price by Customer Type: Price is
marked up according to the customer type.
Price
Code
Type 5
6
Mark up Price by Quantity Ordered Within CusPrice
tomer Type: Price is marked up according to
Code
the customer type; and for each customer type,
Type 6
according to the quantity ordered.
7
Pick price by Quantity Ordered. The price is
selected from among an item's five prices
according to the quantity ordered.
Price
Code
Type 7
8
Pick Price by Customer Type. The Price is
selected from the prices according to the customer type.
Price
Code
Type 8
Enter a price code type from the above table.
Format
One digit
Example
Type 1
The fields to be entered from this point forward depend on the price type you specify in field
number 3. Each of the types is shown in the following sections.
4. Price basis
Price basis is the price or cost from which the discount or markup is calculated. Typically you
would use price as the basis for a discount and cost as the basis for a markup.
Options
Enter one of the following options:
1 through 5
Item Price-1 through Price-5
A
Average cost
R
Replacement cost
Format
One character from the list above
Example
Type 1 for all discount calculations on Price -1.
65
If you selected Price code type 7 or 8, this field will not display because those price code types
do not generate a price based on a calculation.
Remainder of Price code Screen
The appearance of the remainder of the screen depends on which price code type is entered.
The screens for each price code type are explained on the following pages, with an example
for each.
Standard cost appears only if you are using the standard cost valuation method.
Enter the quantities and discounts for field numbers 5-14 as shown below. Minimum quantities
must be in increasing order (level-2 larger than level-1, level-3 larger than level-2, etc.).
The Completed Screen
After completing each screen, you are positioned at Field number to change ?.
Options
Make any needed changes, or use one of the options:
<F1>
For the next price code
<SF1>
For the previous price code
<F3>
To delete this price code
Note
If you delete a price code while on or more selling items (or contract price
entries) continue to reference that price code, Price-1 will be used instead.
Price Code Type 1
For each Price code, this Price code type discounts any one of an item's prices or costs by a percentage you specify. You may specify up to five quantity levels each with its own discount.
The screen displays as follows:
66
5. Level 1 minimum qty
Enter the minimum quantity that will qualify for the discount percentage (entered in the next
field) for level-1.
Orders for quantities less than the minimum receive no discount. In the following example,
orders of ten or more receive the discount, orders of nine or fewer pay the full price. The level1 maximum quantity will be determined by what is defined for level-2 or will be unlimited if
only level-1 is defined.
Format
99,999,999.99999
Example
Type 10
6. Level-1 discount pct
Enter the discount percentage that applies to orders with quantities falling within the level-1
range.
Format
999.99
Example
Type 2 to specify 2% as the discount for orders of ten or
more.
7. Level-2 minimum qty
Enter the minimum quantity that will qualify for the discount for the level-2 range or terminate
defining additional levels by successively pressing <Enter> until Field number to change ?
appears on the lower left corner of the screen.
Format
99,999,999.99999
Example
Type 20
8. Level-2 discount pct
Enter the discount percentage.
Format
999.99
Example
Type 4 to specify 4% as the discount for orders of 20 or
more.
9. through 14.
The remaining fields on the screen are grouped in pairs to allow definition of the remaining
quantity ranges:
•
9 and 10
•
11 and 12
•
13 and 14
Example
Continue entering minimum quantities and the corresponding discount percentages.
67
Price Code Type 2
This method allows you to discount any one of the item's prices or costs by a percentage which
varies according to customer type(s). Up to six discounts may be specified, each of which may
apply to up to five customer types.
There are no minimum quantities required for this Price code type. Any customer of a type which
you specify in a Price code receives the discount on any order where the Price code applies.
Example
Create a new entry for Price code 2 with the name Discount by customer type. Enter 1 as the price basis for
Price-1. Enter Price code type 2.
The following screen displays:
Enter the information for fields 5 through 16 as follows:
5. Customer types
Enter up to five customer types to which this discount will apply. The cursor moves to the next
field (Discount pct) after entry of the fifth customer type or the first blank entry.
Customer types should correspond to existing type codes in the A/R Customers selection. The
system does not check to validate them as you enter them.
Format
Up to five types, of up to five characters each
Example
Type RET (retail) as the customer type. Press <Enter>
twice to indicate that this is the only customer type to
which this discount applies.
6. Discount pct
Enter the discount percentage that applies to all the customer types specified in field #5 above;
or press <Enter> to default to 0% discount.
Format
999.99
68
Example
Press <Enter> to default to 0.00 as the discount that
applies to retail type customers.
7. through 14.
The remaining fields on the screen (field numbers 7 through 14) are grouped in pairs:
7 and 8, 9 and 10, 11 and 12, 13 and 14.
The first field of each pair allows you to enter up to five customer types as in field #5. If you
enter no customer types, the previous discount entry is considered to be the last one and you
are positioned at Field number to change ?.
The second field allows you to enter the percent of discount to be applied to each customer
type that is named in the preceding Customer types field.
Example
In field #7, type WSL . Next press <Enter>. Type 10 in
field #8. Next type SPC and press <Enter> twice. This
specifies wholesale and special customer types with discounts of 10% and zero, respectively. Press <Enter> at
field #11 and field #13 to skip the remaining fields.
Price Code Type 3
This method is a combination of types 1 and 2. That is, it allows the discount to vary by both quantity and customer type.
To accomplish this, a separate screen is used for each customer type. Since there can be multiple
entries for the same Price code, it follows that:
•
In change mode, the information does not appear on the screen until both the Price code
number and the customer type have been entered.
•
The <F3> option deletes only the current screen. If there are other customer types defined for
this Price code they remain on file.
Example
Create a new entry for Price code 3 with the name Discount by qty & cust type .
Enter Price code type 3.
The following screen displays:
69
4. Customer Type
Enter one customer type to which this discount will apply. The cursor moves to the next field
(Discount pct).
Customer types should correspond to existing type codes in the A/R Customers selection. The
system does not check to validate them as you enter them.
Format
One type of up to five characters each
Example
Type WSL (wholesale) as the customer type. Press
<Enter> twice to indicate that this is the only customer
type to which this discount applies.
5. Price basis
Price basis is the price or cost from which the discount or markup is calculated. Typically you
would use price as the basis for a discount and cost as the basis for a markup.
Options
Enter one of the following options:
1 through 8
Item Price-1 through Price-8
Format
One digit from 1 through 8
Example
Type 1 for all discount calculations on Price-1.
6. Level -1 minimum qty
Enter the minimum quantity ordered that will qualify for the level-1 discount percentage.
Quantities must be in ascending order.
Format
99,999,999.99999
Example
Type 10 to specify 10 as the minimum quantity to qualify
for the level-1 discount.
70
7. Level-1 discount pct
Enter the discount percentage that applies to quantities of at least the amount specified in field
number 6.
Format
999.99
Example
Type 3 to specify a discount of 3.00% for a quantity
ordered of at least 10.
8. through 15.
The remaining fields on the screen are grouped in pairs to allow definition of the remaining
quantity ranges:
•
8 and 9
•
10 and 11
•
12 and 13
•
14 and 15
Example
For fields #8 through #15, continue entering minimum
quantities and the corresponding discount percentages.
Price Code Type 4
This method is the reverse of type 1. It allows markups rather than discounts.
Markups would typically be applied using a cost as a basis (in field #4), whereas discounts typically apply to a price. This however is not a requirement.
Example
Create a new entry for Price code 4 with the name Mark
up by qty.
Enter 4 as the price-code type and R as the price basis for
Replacement cost.
The following screen displays:
71
Enter the information for fields #5 through #14 as follows:
5. Level-1 minimum qty
The level-1 minimum quantity is the minimum quantity ordered that will qualify for the level-1
mark up percentage you will enter in field #6. Quantities must be in ascending order.
Format
99,999,999.99999
Example
Type 10 to specify ten as the minimum quantity ordered
to qualify for the mark up percentage to be entered in
field #6.
6. Level-1 mark up pct
Enter the mark up percentage that applies to orders with item quantity at least as large as that
specified in field #5.
Format
999.99
Example
Type 70 to specify 70.00% as the mark up for orders of
ten or more.
7. Level-2 minimum qty
Enter the minimum quantity ordered that will qualify for the level-2 mark up percentage
specified in field #8.
Format
99,999,999.99999
Example
Type 20
8. Level-2 mark up pct
Enter the mark up percentage.
Format
999.99
Example
Type 60
9. through 14.
The remaining fields on the screen are grouped in pairs to allow definition of the remaining
quantity ranges:
•
9 and 10
•
11 and 12
•
13 and 14
Example
For fields #9 through #14, continue entering minimum
quantities and the corresponding discount percentages.
Price Code Type 5
This method is the reverse of type 2. It allows markups rather than discounts.
72
Example
Create a new entry for Price code 5 with the name Mark
up by customer type
Enter 5 as the price-code type and R as the price basis for
Replacement cost. The following screen displays:
Enter the information for fields #5 through #14 as follows:
5. Customer types
Enter customer types.
Press <Enter> after each customer type to advance the cursor to the next type. The cursor
advances to the next field (field #6) as soon as you have entered five customer types or have
entered a blank customer type.
All the customer types entered here will receive the mark up percentage entered in the next
field when the customer orders those items that specify this Price code.
Format
Five types of up to five characters each
Example
Type RET (for retail). Next press <Enter> again.
6. Mark up pct
Enter the mark up percent applying to all the customer types specified in the preceding field.
Format
999.99
Example
Type 90 for the mark up that applies to retail customers.
7. through 14.
The remaining fields on the screen (#7 through #14) are grouped as follows:
•
7 and 8
•
9 and 10
•
11 and 12
73
•
13 and 14
The first field of each pair allows you to enter up to 5 customer types, as in field #5. The
second allows you to enter the percentage of mark up to be applied to each customer type that
is named in the preceding Customer types field.
Example
In field #7, enter the customer types WSL (wholesale) and
SPC (special).
Press <Enter> twice to go to field #8.
Enter 50 in field #8.
Press <Enter> repeatedly to skip fields #9 through 14.
Price Code Type 6
This method is the reverse of type 3. It allows markups rather than discounts. It can also be considered as a combination of types 4 and 5.
Like type 3, this allows multiple entries for a single Price code, one for each customer type.
Example
Create a new entry for Price code 6 with the name Mark
up by cust & qty.
Enter 6 as the price-code type.
The following screen displays:
Enter the information for fields #5 through #17 as follows:
*4. Customer type
Enter the customer type. Many different mark up structures are allowed for the same Price
code, provided that each structure is for a different customer type. You cannot use a blank
customer type.
Format
5 characters
Example
Type WSL
74
5. Price basis
Enter the code corresponding to the price or cost to be used as a base for this Price code. Your
choices are:
1
Price-1
2
Price-2
3
Price-3
4
Price- 4
5
Price- 5
A
Average cost
R
Replacement cost
Format
One character
Example
Type R.
6. Level-1 minimum qty
Enter the minimum quantity that must be ordered to qualify for the level-1 mark up percentage
you will enter in field number 7.
Format
99,999,999.999
Example
Type 10
7. Level-1 mark up pct
Enter the mark up percentage that applies to orders with an item quantity of at least the quantity
specified in field number 6.
Format
999.99
Example
Type 70 to specify a mark up of 70.00% for a quantity
ordered of at least 10.
8. through 15.
The remaining fields on the screen (#8 through #15) are grouped as follows:
•
8 and 9
•
10 and 11
•
12 and 13
•
14 and 15
75
The first field of each pair allows you to enter up to 5 customer types, as in field #5. The
second allows you to enter the percentage of mark up to be applied to each customer type that
is named in the preceding Customer types field.
Example
Press <Enter> repeatedly to skip fields #8 through #15.
Price Code Type 7
Price code types 7 and 8 use a different method than the types considered previously. Types 1
through 6 used one price (or one cost) as the basis for applying some discount (or markup),
and ignored the other prices. Types 7 and 8 instead select among all of an item's prices on the
basis of the quantity ordered or the customer type (respectively). There is no attempt to either
discount or mark up the selected price; the goal is to choose the right one.
This technique requires that the item's prices be already assigned with this
use in mind.
Note
Example
Create a new entry for Price code 7 with the name Pick
price by qty.
Enter Price code type 7. The following screen displays:
Enter the information for fields #4 through #8 as follows:
4. Level-1 minimum qty for price-1
Enter the minimum quantity that must be ordered to qualify for price-1.
Format
99,999,999.999
Example
Type 5
5. Level-2 minimum qty for price-2
Enter the minimum quantity that must be ordered to qualify for price-2.
Format
99,999,999.999
Example
Type 100
76
6. Level-3 minimum qty for price-3
Enter the minimum quantity that must be ordered to qualify for price-3.
Format
99,999,999.999
Example
Type 500
Price Code Type 8
Price code type 8 selects among all five of an item's prices on the basis of the customer type. There
is no attempt to either discount or mark up the selected price; the goal is to choose the right one.
For consistency with the other Price code types, items using type 8 must still have their five prices
arranged in descending sequence even though the selection method does not logically require this.
Example
Create a new entry for Price code 8 with the name Pick
price by cust.
Enter Price code type 8. The following screen displays:
In this example, retail type customers are charged price-1, wholesale type are charge price-2,
and special type are charged price-3.
Enter the information for fields #4 through #8 as follows:
4. Use price-1 for customer types:
Enter those customer types to be charged Price-1.
Format
Up to five characters of five characters each
Example
Type RET. Then press <Enter> again.
5. Use price-2 for customer types:
Enter up to five customer types that will be charged price-2.
Format
Up to five types of five characters each
77
Example
Type WSL and press <Enter>.
Type SPC and press <Enter>.
Press <Enter> again.
6. Use price-3 for customer types: through
8. Use price-5 for customer types:
Enter up to 5 customer types for each of Price-3 through Price-6.
Format
For each price level, up to 5 types of 5 characters each
Example
Press <Enter> at each field to indicate no further data
entry.
In this example, retail customers are charged price-1, while special and wholesale customers
are charged price-2. No customer types are charged price-3.
78
PRINTING PRICE CODE LISTS
Select
Price codes from the Reports, Master info menu.
The Printer Selection screen will be displayed. Select the printer that you want use for this list,
elect to print the Price Codes List to disk or display on your screen.
All price codes will be printed on the Price Codes List.
79
Commission Codes
This chapter contains the following topics:
Introduction to Commission Codes
Entering Commission Codes
Printing Commission Code Lists
80
INTRODUCTION
TO
COMMISSION CODES
This chapter describes how to enter and print commission codes.
Commission codes do not apply if:
•
You are not interfaced to the Order Entry (O/E) and Accounts Receivable (A/R) modules.
•
You have specified (in O/E Control information) that you do not use inventory item numbers
for order entry.
•
You have specified (in A/R Control information) that you do not use sales representatives.
•
You have specified (in A/R Control information) that you employ sales representatives but do
not pay them on a commission basis.
•
You do pay commissions, but you wish to decide the percent (or amount) of the commission
without reference to the item number, either:
-On the basis of the customer
-On the basis of the sale representative
-On a case-by-case basis.
If your situation falls into any of these categories, you can skip this chapter.
The Commission codes selection enables you to define different rules for computing
commissions and assign a code to each rule. You can then associate this code (in Items) with
individual items, so that the sale representative's commission is calculated automatically. This
calculation is performed upon both:
•
Invoice (entered in A/R)
•
Order (entered in O/E).
Commission codes control the calculation of commissions not just on regular prices, but on
override, sale, and contract prices as well.
You are not required to accept the calculated commission; you can always override it on
individual documents.
Commissions
•
A commission is a payment which you make to your sales representatives based on the sales
they generate.
•
Commissions only occur if you use sales representatives and if you choose that method of paying them.
•
A commission is a percentage of either the price or the margin (your choice).
•
Commissions become payable to the sales representative either when the invoice is posted or
when payment has cleared (your choice).
•
Commissions may apply to either goods and/or services.
81
•
Commissions are calculated separately for each line item on a document (invoice or order),
and the commission for the entire document is the sum of the individual line items.
•
When entering a document, for each line item, the operator must determine whether or not it is
commissionable.
If the line item is commissionable, the commission amount calculated for the line item is
included in the total commission for this document.
If it is not commissionable, this line item does not contribute towards the total commission for
this document.
The operator cannot alter the commission amount for an individual line item; he may only
decide whether or not it is commissionable.
In deciding between commissionable and uncommissionable, the operator is given a default
based on the characteristics of the customer, the item, or the sales representative. In most cases
he need merely ratify this default.
After all line items have been entered, the operator can override the computed total
commission, either by:
•
Specifying a flat amount for the commission or
•
Providing a commissionable amount and a percentage for the document as a whole. The system extends these figures to obtain a commission total for that document (without attempting
to allocate this total among the line items).
Commission percents and calculation methods (price or margin) are associated either with each
customer or with each sales representative (your choice).
These values are used to compute commissions for all service line items. If you do not use I/C
inventory item numbers, they are also used to compute commissions for goods line items.
You define a system-wide default, which is automatically assigned to new entries when you do
customer or sales representative maintenance unless you override this default in individual
entries.
A line item is considered commissionable at the specified percentage whenever its customer or
sales representative (whichever you have determined) possesses a non zero commission
percent. Conversely, if you have not specified a percentage the line item is uncommissionable.
If you do use I/C inventory item numbers, then the default commissionability of a goods line
item is determined by the presence or the absence of a commission code for that item.
A commission code identifies a rule or formula, defined by you, for varying the commission
percent according to the price. This enables you to define different commissions for different
items, and also to grant a higher or lower commission percent for the same item depending on
its price. Prices for an item may vary from one document to another because of price codes,
customer discount, sale pricing, or contract pricing; or simply because the user has supplied a
one-time override price.
82
When you use I/C inventory item numbers, the commission percentage assigned to the
customer or sales representative is ignored in computing the commission for that line item.
83
ENTERING COMMISSION CODES
Select
Commission codes from the Master Information menu.
The following screen displays:
From this screen you can work with both new and existing commission codes. Enter the
information as follows:
*1. Commission code
Options
Enter the commission code or use one of the options:
<F1>
For the next commission code on file
<SF1>
For the previous commission code
Format
Up to two digits
Example
Type 3
2. Commission description
Enter the commission code description. The description will appear on the screen in the
Orders, Billing, and Invoices selections.
Format
Up to 25 letters
Example
Type Standard Commission
Price-1 through Price-5
Enter in fields #3 through #7 the commission percentages to be paid for the corresponding
price.
84
The price of each item is assigned in the Items selection. Prices are in descending order, with
Price-1 being the highest. Your price structure may not use all five of these prices; if so, omit
the unused prices.
The price actually charged may not coincide with any of an item's five prices, for several
reasons:
•
A customer line item discount may apply.
•
The price may be a sale, contract, or override price.
•
A price code may be in effect, which may cause the price to be discounted or marked up, or
to be based on a cost rather than on any of the five prices. Refer to the Price Codes chapter
for further information.
In any of these cases, the system takes the price actually charged, computes the equivalent unit
price, then compares the result with the five prices for the item and finds the one which
matches best. It then picks a commission percentage corresponding to that price.
Note that any customer discount for the invoice (as opposed to line item discounts) is
calculated only after all line items are entered, and therefore does not affect the selection of
which commission percentage to use. However, both types of discounts are applied to the
extended commission amount (otherwise the sales representative would be remunerated for
revenue that has not actually occurred.)
3. Comm pct - price-1
Enter the commission percentage to be paid on items sold at or above price-1.
Format
99.99
Example
Type 8
4. Comm pct - price-2
Enter the commission percentage to be paid on items sold at or above price 2, but below price
1.
Format
99.99
Example
Type 7
5. Comm pct - price-3
Enter the commission percentage to be paid on items sold at or above price 3, but below price
2.
Format
99.99
Example
Type 6
85
6. Comm pct - price-4
Enter the commission percentage to be paid on items sold at or above price 4, but below price
3.
Format
99.99
Example
Type 5
7. Comm pct - price-5
Enter the commission percentage to be paid on items sold at or above price 5, but below price
4.
Format
99.99
Example
Type 4
8. Comm pct - price override
Enter the commission percentage to be paid on items sold at a price that is lower than the last
price you have entered in fields #3 through #7 above.
Even if the maximum number of prices you have specified on any item in inventory is less
than five, you should still specify a commission percent in this field, since it is always possible
to enter an override price lower than the lowest price you have entered for the item.
Format
99.99
Example
Type 2
9. Calculation method
Enter P to calculate the commission amount based on the price, or enter G to calculate the
commission amount based on gross profit (price minus cost). You may default to P by pressing
<Enter>.
Format
One letter, either P or G. The default is P.
Example
Press <Enter> to accept the default.
At the Field number to change ? prompt you may modify a field or press <Enter> to accept
the code as defined.
Changing Existing Commission Codes
If at the first field you enter the number for an existing code, the screen display will be
completed with the fields defined for the existing code. Make any needed changes, or use one
of the options:
Options
Make any needed changes, or use on of the options:
86
<F1>
For the next commission code on file
<SF1>
For the previous commission code
<F3>
To delete this commission code
Commission codes can only be deleted in change mode. Before deleting any commission code,
make sure that no item is still using that code, since the system does not test for this condition.
If you enter an invoice (or order, or other document) for a line item containing a nonexistent
commission code, no error message will be issued and the line item will be considered uncommissionable.
If you have been entering the suggested examples, the screen now displays similar to below:
In the example, if an item is sold at a unit price greater than price-2, but less than price-1, the
commission is calculated as 7% of the price paid, and so on for the other price levels.
87
PRINTING COMMISSION CODE LISTS
You may print a list of Commission Codes.
To print a list of Commission Codes, select Commission codes from the Reports, Master information menu.
Select
Commission codes from the Reports, Master info menu.
88
Master Information
This chapter contains the following topics:
Introduction to Master Information
Categories and Sub-categories
Units
Item Sequence
Status Codes
Coverage Types
Warranty Programs
89
INTRODUCTION
TO
MASTER INFORMATION
Master information includes functions that allow you to further define your Inventory Control
system. Some of these selections are explained in their own chapters; we cover the remaining
Master information functions in this chapter.
Master information functions that are explained in their own chapters include Control
Information, Price Codes, Inventory Accounts, Commission Codes, and Warehouses. These
selections are not covered again in this chapter.
Master information functions that are explained in this chapter include Categories, Subcategories, Units, Item sequence, Status codes, Coverage types, and Warranty programs.
90
CATEGORIES
AND
SUB-CATEGORIES
Inventory Control allows you to associate each item with a category and/or sub-category.
You can enter Categories and Sub-categories as criteria for your reports.
If you have a category called Tools, you can specify to only have items that have a category of
Tools to print on the report.
Categories enable you to enter in the Inventory, Sales, Expense and Credit Memo General
Ledger account numbers. When you enter in a category into the item file, once you get to the
last screen of entry, these accounts will automatically be defaulted to. You can change them if
needed at that time.
Entering Categories
To enter categories, follow these steps:
Select
Categories from the Master information menu.
The following screen displays:
From this screen you can work with both new and existing category codes. Enter the
information as follows:
*1. Category
Options
Enter the category code, or use one of the options:
<F1>
For the next category on file
<SF1>
For the previous category on file
91
Format
Up to five characters
Example
Type Tools
2. Description
Enter the category description.
Format
Up to 25 characters
Example
Type Power Tools
3. Inventory acct #
Enter the inventory account number or press <F2> for the default inventory account defined in
Control information.
Format
Your standard account number format as defined in Company information.
Example
Press <F2>.
4. Sales acct #
Enter the sales account number associated with this category.
Format
Your standard account number format as defined in Company information.
Example
Enter account 4010-100
5. Expense acct #
Enter the expense account number associated with this category.
Format
Your standard account number format as defined in Company information.
Example
Enter account 5020-200
6. Cr-memo acct #
Enter the credit memo account number associated with this category.
Format
Your standard account number format as defined in Company information.
Example
Enter account 5080-100
92
Entering
Sub-categories
Sub-categories are associated with a category. You can define multiple sub-categories against one
category.
Select
Sub-categories from the Master information menu.
The following screen displays:
From this screen you can work with both new and existing sub-category codes. Enter the
information as follows:
*1. Category
Options
Enter the category code, or use one of the options:
<F1>
For the next sub-category on file
<SF1>
For the previous sub-category on file
<F2>
For the next category on file
<SF2>
For the previous category on file
Format
Up to five characters
Example
Type Tools
93
2. Sub category
Options
Enter the sub-category code, or use one of the option
<F1>
For the next sub-category on file
<SF1>
For the previous sub-category on file
Format
Up to five characters
Example
Type Elec
3. Description
Enter the sub-category description.
Format
Up to 25 characters
Example
Type Electric Power Tools
Both categories and sub categories must be entered here before they can be used in the item
file.
Printing Category Lists
You may print a list of Categories, and may include or exclude Sub-categories on the report.
Select
Categories from the Master info menu.
The following screen displays:
From this screen you can define the range of categories that you wish to print, and you can
include or exclude sub-categories.
94
1. Print sub-categories?
Enter Y if you wish to have sub-categories print on the report; otherwise enter N.
2. and 3. Starting and Ending category
Enter the range of categories you want to include on the report.
4. and 5. Starting and Ending sub-category
Enter the range of sub-categories you want to include on the report.
You may modify your selection criteria from Field number to change ?, or press <Enter> to
print the report.
95
UNITS
Units refer to units of measure.
All units of measure that will be used for an item, must be defined under Units first. If the unit
is not defined, you can not use it.
Units for stocking, pricing, weight, depth, height and width must be defined before you can
use them in the item file.
Entering Units
To enter units, follow these steps
Select
Units from the Master information menu.
The following screen displays:
From this screen you can work with both new and existing Units. Enter the information as
follows:
*1. Unit
Options
Enter the unit code, or use one of the options:
<F1>
For the next unit on file
<SF1>
For the previous unit on file
Format
Up to four characters
Example
Type Case
96
2. Description
Enter the unit description.
Format
Up to 10 characters
Example
Type Case/24
Printing Unit Lists
You may print a list of Units.
Select
Units from the Reports, Master info menu.
The following screen displays:
From this screen you can define the range of units that you wish to print.
97
ITEM SEQUENCE
Item sequence numbers allow auto item numeric number sequencing for new items.
This is helpful if you have certain groups or types of items that follow a specific numbering
scheme.
You access item sequence numbers when you are in Items Enter by pressing the <F5> key.
Every time you use an item sequence number, the number will automatically be incremented
by one.
Entering Item Sequence Numbers
To enter item sequence numbers, follow these steps:
Select
Item sequence from the Master information menu.
The following screen displays:
From this screen you can work with both new and existing Item Sequence Numbers. Enter the
information as follows:
*1. Item seq.
Options
Enter the item sequence number, or use one of the options:
<F1>
For the next item sequence number on file
<SF1>
For the previous item sequence number on file
Format
Up to 15 characters
Example
Type 195000
98
2. Description
Enter the item sequence number description.
Format
Up to 25 characters
Example
Type IBM Computer
Printing Item Sequence Number Lists
You may print a list of your Item Sequence Numbers.
Select
Item sequence from the Reports, Master info menu.
The following screen displays:
From this screen you can define the range of item sequence numbers that you wish to print.
99
STATUS CODES
When you enter in your inventory items, you will be asked to enter in Status.
All status codes are user defined and can be anything you like. Examples of Status codes are
Active and Inactive.
Status is a mandatory field when entering items.
Status can be used as selection criteria when printing most of the inventory reports.
These must be defined in the Status codes file before you can enter them in the item file.
Status codes are single characters, with an associated description.
This Status code is not the same as status records, which maintains your items warehouse
information.
Entering Status Codes
To enter status codes, follow these steps:
Select
Status codes from the Master information menu.
The following screen displays:
From this screen you can work with both new and existing status codes. Enter the information
as follows:
*1. Status
Options
Enter the status code, or use one of the options:
100
<F1>
For the next status on file
<SF1>
For the previous status on file
Format
One character
Example
Type A
2. Description
Enter the Status description.
Format
Up to 25 characters
Example
Type Active item
Printing Status Code Lists
You may print a list of your Status codes.
Select
Status codes from the Reports, Master info menu.
The following screen displays:
From this screen you can define the range of status codes that you wish to print.
101
COVERAGE TYPES
Coverage is something you get when you purchase a warranty, or get a warranty with the purchase
of a product. You get a certain type of coverage, for a certain length of time.
In Coverage Types, we define the different coverages that will be available under our warranty
programs. In an example, extended coverage would cover everything.
There are four pre-defined coverage categories and one user defined coverage category (this is
defined in Control Information).
•
Parts
•
Labor
•
Travel
•
Exchange
•
Refund (user defined coverage category from Control information)
Once all of your coverage types are defined, they can then be used under the Warranty
Programs.
Define the coverage code and provide a description.
Then you can flag which coverage code is applicable to this coverage type.
Note
You should always define a coverage type that covers nothing. We will discuss why when we cover warranty programs.
Entering Coverage Types
To enter a coverage type, follow these steps:
Select
Coverage types from the Master information menu.
The following screen displays:
102
From this screen you can work with both new and existing coverage types. Enter the
information as follows:
*1. Code
Options
Enter the coverage code, or use one of the options:
<F1>
For the next coverage on file
<SF1>
For the previous coverage on file
Format
six characters
Example
Type Extend
2. Description
Enter the Coverage description.
Format
Two lines of 25 characters each
Example
Type Extended coverage
Printing Coverage Lists
You may print a list of your Coverages.
Select
Coverage types from the Reports, Master info menu.
The following screen displays:
From this screen you can define the range of Coverages that you wish to print.
103
WARRANTY PROGRAMS
Warranty programs are applicable for serialized and warranty items only.
A warranty is a promise to the customer in the event something goes wrong with their product.
Warranties can and will vary, depending on the product purchased and which warranty you
associate with the product.
Define the warranty and provide a description. You can select up to 5 coverage types per
warranty.
Entering Warranty Programs
To enter warranty programs, follow these steps:
Select
Warranty programs from the Master information menu.
The following screen displays:
From this screen you can work with both new and existing Warranty programs. Enter the
information as follows:
1. Warranty program code
Options
Enter the Warranty program code, or use one of the options:
<F1>
For the next Warranty program on file
<SF1>
For the previous Warranty program on file
Format
six characters
Example
Type Extend
104
2. Description
Enter the Warranty program description.
Format
Two lines of 25 characters each
Example
Type Extended warranty
3. through 7.
Field #3 through #7 ask what the start date, or continued date of the coverage is. When does it
start, how long is this coverage for, what is the coverage (this coverage must be on file under
coverage) and if it is warranted by the manufacturer or not.
You should always have a coverage type of none. If you do not have 5 coverages for a
warranty, and the last coverage you enter does not go into the future (forever), then you will
need a coverage type of none. You should also always have a warranty program of none,
because serialized and warranted items require a warranty be associated with each. Also, there
may not be an actual warranty for the item.
Example
You could have extended coverage for 30 days, then up to
90 days have parts coverage only and after that, no coverage at all. So in this case, we would use the Extend coverage for the first 30 days, the Parts coverage for the next
60 days and the None coverage for the future.
The warranty flag denotes whether or not this warranty is covered by the manufacturer or
yourself.
From
The first entry will always be Warranty start date. The values for the remaining lines are
automatically created. It is the combination of the Until and Unit of the previous line plus one
day.
Until
Enter the number of Days, Weeks, Months, or Years the coverage type will be in effect. In
order to end a warranty program a coverage type that has no coverage categories associated
with it must be entered for an Indefinite future.
Format
3 digits
Example
Type 90
(Unit of time)
Enter the unit of either Days, Weeks, Months, or Years the coverage type will be in effect.
Format
1 character, either D, W, M or Y
Example
Type D
Use coverage type
Enter the coverage type code to include in the warranty program.
105
Format
6 character
Example
Type Extend
Warr?
Type Y if this coverage is provided by the manufacturer of the item. Otherwise, type N.
Format
1 character, either Y or N
Example
Type N
Field number to change ?
Make any changes or select Enter to save the record.
Printing Warranty Programs
You may print a list of your Warranty programs.
Select
Warranty programs from the Reports, Master info menu.
The following screen displays:
From this screen you can define the range of Warranty programs that you wish to print.
106
Items
This chapter contains the following topics:
Introduction to Items
Entering Items
Entering New Items
Entering Item Notes
Entering Alternate Items
Printing Item Lists
Changing Inventory Accounts
Data Import
107
INTRODUCTION
TO
ITEMS
The Items selection is used to maintain and print information on items in inventory, print item
labels, and obtain a log (audit trail) of changes.
If you have more than one warehouse, descriptive information about each item is entered only once
whereas stocking information is entered separately for each warehouse at which you choose to
stock that item.
This chapter assumes the more general case of multi-warehousing, but the absence of a warehouse
code is the only difference that single warehouse users will notice.
Information on each item in your inventory is kept in the Item file. This chapter describes the fields
in this file, tells how to enter them, and shows how to print item lists.
108
ENTERING ITEMS
Select
Items from the I/C menu.
Graphical Mode
The following screen displays:
From this screen you can enter new items or edit existing items.
Items List Box
The list box displays up to 6 items at a time. You may sort the items by item number, item
name, category, and vendor number all in ascending or descending order. Only column names
in red may be sorted. To change the sort direction or field either click on the column name or
the arrow to the right of the column name or use the View menu options.
To locate an item, start typing a number or name, depending on which sort field is selected.
You may also use the up/down arrows, Page up, Page down, Home and End keys to locate an
item.
109
Items that display in the list box are available for changes or deletion. The fields for the
selected item display in the lower part of the screen.
When an item is found, you may select the <Enter> key or Edit button to start editing.
Items Buttons
The buttons at the top of the screen do the following:
Button
Keyboard
Description
New
Alt+n
For adding a new item
Edit
Alt+e
For editing an existing item
Save
Alt+s
For saving a new item or changes to an existing item
Save/New
Alt+w
This button combines the Save and New buttons by first
saving the item and then starting a new item
Cancel
Alt+c
To cancel the editing or adding of an item
Exit
Alt+x
To exit the screen. Exit works like cancel when you are
adding or editing an item
Character Mode
The following screen displays:
Tab 1 - General
Enter the following information:
Item number
This field is used to maintain item numbers.
Options
Enter a new or existing item number, or use one of the following: options:
110
<F1>
For the next item on file
<SF1>
For the previous item
<F2>
For a list of temporary items entered in O/E Orders.
See Temporary Item Conversion
<F5>
For item sequence
<Enter>
To look by description
On an existing item, an ampersand (&) displays immediately to the left of the word Item in this
field if there is a note on file for this item. The note may be viewed from the Field number to
change ? prompt by pressing <F6>.
Format
Up to 15 characters
Example
Type 101
For an existing item, you may also enter (or scan) the item bar code.
Format
Up to 20 characters
Miscellaneous Items
An item number that starts with an asterisk (*) signifies a miscellaneous item. A miscellaneous item
is one for which no quantities are tracked, and whose description and price are not considered permanent.
Miscellaneous items allow you to set up catch-all inventory items to represent a variety of
different items for which you do not wish to create separate item records. For example, a
miscellaneous item could be used to track such things as service charges.
Miscellaneous items are non-inventory items and cannot be processed through the Inventory
selection. Miscellaneous items may be sold through Accounts Receivable and Order Entry
(O/E). When entering a miscellaneous item in these modules, you can enter its description and
price. Quantities on hand are not monitored by the system for miscellaneous items.
You may wish to create miscellaneous item records in the Item file for broad categories of
items that have the same taxable status, sales account, etc., as well as miscellaneous items to be
used in kit definitions to represent overhead costs.
When Miscellaneous items are used costs are used to generate the appropriate GL transactions.
Thus posting a sale of these items is financial ONLY – no updates to inventory (quantity) are done.
Miscellaneous Items must have an inventory account that has an Inventory type code of C. See
Entering Inventory Accounts in the Inventory Accounts chapter for details on how the
distribution transactions for Miscellaneous items differ from that of regular inventory.
111
Entering existing items
Options
After you have selected an existing item, you have these options:
<F1>
For next
<SF1>
For previous
<F3>
To delete
<F5>
To enter alternate items
<F6>
To enter or change item notes
<F7>
To enter or change status information
<SF7>
To view the multi-warehouse window
The alternate items and items notes options are discussed in detail later in this chapter.
Temporary Item Conversion
After an O/E order with a temporary item is entered and before the order is printed, while in I/C
Items you should convert any temporary item into an active item.
Conversion is not mandatory, but if don't convert you will not be able to track in I/C the items
sold.
Do this by adding a new item and when on the item number field select the <F2> function key.
A list of the temporary items entered in O/E displays. Once you have found the correct item,
select OK to continue or Cancel to exit.
After selecting OK you will be on a blank Item number field. Enter a new item number. You
may change the description as well. Enter the remaining item fields as needed. Set up a status
to match the warehouse used in O/E.
Saving the new item will update the item number and description on the order.
Deleting Items
An item can be deleted when status information (explained later in this chapter) exists for it, if
the status records contain no quantities on-hand, committed, on-order, on backorder, or on
work orders.
If you select to delete an item, you are asked to confirm the deletion if status records exist.
Description
Enter the item description.
Format
Four lines of 25 characters each
Example
Type: Drill, 3/8” Power
112
Bar code
Bar codes are an alternate method to identify an item throughout Inventory control, Order
Entry, and Purchase Order. A bar code can be entered instead of the item number to lookup a
particular item.
Options
Enter the bar code for the item, or use one of the options:
<F2>
To enter up to 8 different bar codes for the items
<Enter>
To leave this field blank
Format
Up to 20 characters or use the options
Example
Press <Enter>
A bar code may be entered from the keyboard, or it may be scanned by using a bar code
reader. If one or more bar codes are entered, each must be different from any other bar code or
item number already on file.
Category
Sub-category
Enter codes of your choice that identify the category and sub-category of this inventory item.
Entering a category and sub-category are optional, but each must exist in the category or subcategory file. You may review the entry of Categories and Sub-categories in the Master
information chapter.
An item can be searched for by its category/sub-category or sub-category in the View (Items) if
you selected in Control information to use the category/sub-category or sub-category keyword
methods.
Format
Up to 5 character
Example
Type: Tools
The category/sub-category classifications are used as sorting and selection parameters for
various item-related reports in Inventory, Sales Analysis and Point of Sale. For example, a
report could be printed for only Drills used in Plumbing by assigning a category of DRILL and
a sub-category of PLUMB.
We suggest reviewing your inventory items prior to data entry to determine groupings that may
be used to standardize the categories and sub-categories. You may wish to specify the item’s
department as its category.
Sub-category
Format
Five characters
Example
Type: Elec
113
Track method
Enter a code to specify the method of tracking this item.
CODE
Normal
Serial
DESCRIPTION
For normal tracking.
For always serialized tracking.
Lot detail
For lot detail tracking
Warranty
For warranty tracking
Format
Drop down list box. Select from the table above. The
default is Normal.
Example
Press <Enter> to accept the default.
The tracking method of an item is used in Inventory control, Order Entry, Point of Sale and
Purchase Order.
If Normal is selected, normal tracking is performed for the item, and no serial numbers or lot
numbers are requested for this item during any function. You may press <Enter> to default to
Normal.
Normal is the only valid entry for miscellaneous items (those whose item number begins with
an asterisk), or if you specified in Control information that back order control is not used.
If Serial is selected, a serial number must be entered for this item when entering inventory
transactions, and when orders are processed in O/E and P/S and receivings in P/O.
If Lot detail is selected, a lot number must be entered for this item during entry of inventory
transactions and purchase orders. Select Lot detail to track lot balances and the detail of every
transaction processed for this item’s lots.
If Warranty is selected, normal tracking is performed. These types of items are actual
warranties that have been purchased from the manufacturer of the item. This can also be an
internal warranty item.
Changing an Item’s Track Method
The tracking method for an item may be changed only if the item has no quantity on hand, quantity
committed, quantity on order, quantity on back order, or quantity on work orders. In addition, for a
serialized item, the tracking method cannot be changed if serial numbers exist or if components are
tracked. For a lot-controlled item, the tracking method cannot be changed if lot numbers exist.
Item type
Merchandise items you receive and sell. Kits are items that you build from others items. Subassembly type items are for future use.
114
Options
Select from one of the following:
Merchandise
Sub-assembly
Kit
Format
Select one of the above from a drop down list
Example
Select Merchandise
Status
This is a mandatory field. Status must be on file prior to entry here. This field is used as
selection criteria for the I/C Reports.
You may review the entry of Status Codes in the Master Information chapter.
Quantities
On hand
An entry in this field is not allowed. The field is updated during the posting of inventory
transactions.
If necessary, this field can be corrected using the Recalculate inventory quantities selection on
the File recovery utilities menu.
Committed
An entry in this field is not allowed. The quantity committed is updated automatically when
inventory transactions are entered and posted in I/C, when orders are entered in O/E, when
invoices are entered in A/R, and when receivings are posted in P/O.
If you enter a backorder code of X in the B/O code field (number 43 on the character mode
screen), quantity committed for this item is not tracked.
If necessary, this field can be corrected using the Recalculate inventory quantities selection on
the I/C File Recovery Utilities menu.
On order
If you have specified in Control information that you are using Purchase Order, the quantity
that your company has on order from your vendor displays in this field.
No entry is allowed, as this field is automatically updated when you run the Purchase Order
module.
In character mode, if you are not using Purchase Order, (Not applicable) displays.
115
If necessary, this field can be corrected using the Recalculate inventory quantities selection on
the I/C File Recovery Utilities menu.
On B/O
This field displays the quantity of this item that your customers have ordered that is on
backorder. The quantity on back order field is shown if you specify in the B/O code field to
keep track of backorders for this item.
This field is automatically updated when an O/E order or P/S transaction is posted, assuming
the above conditions are met.
If necessary, this field can be corrected using the Recalculate inventory quantities selection on
the I./C File Recovery Utilities menu.
On W/O
In character mode, if you do not use kits, (Not applicable) displays for this field.
This field shows the quantity of this item currently being assembled on work orders. This
quantity is increased when work orders are issued using Issue work orders and decreased when
work orders are completed using Close work orders.
If necessary, this field can be corrected using the Recalculate inventory quantities selection on
the File recovery utilities menu.
Tab 2 - Costs and Pricing
The second tab appears like the following:
116
Price Calculation
Stocking unit, pricing unit, and conversion factor (described below) are used in O/E, P/S and A/R
for price calculation. However, no conversion between stocking and pricing units is done in I/C.
When you are using I/C without Accounts Receivable the stocking unit and pricing unit you enter
should be the same, with a conversion factor of 1.
Format
One character
Example
Type A
Stock unit
Enter the unit of measure in which you stock this item. An item may be stocked and sold in
units of EACH, BOX, CASE, etc. Each item is stocked in only one stocking unit. The stocking
unit is normally the same as the selling unit.
Enter the stocking unit or press <F2> to use a stocking unit of Each.
Format
Up to 4 characters, or press <F2>.
Example
Press <F2>
You may review the entry of Units in the Master Information chapter.
Average cost An entry is allowed in this field for non-miscellaneous items only when initially adding the
item, or if Average cost and Qty on hand are currently zero. This field is automatically updated
when posting inventory transactions.
If you need to change the average cost, enter and post a series of adjustment transactions, so
that the appropriate distributions to G/L are made. Refer to the Inventory Transactions chapter
for details.
The average cost is the cost per stocking unit.
Format
999999.99999
Standard cost
When you select LIFO, FIFO, or average as the inventory valuation method in Control
information, this field cannot be entered.
If standard is the inventory valuation method, enter the standard cost. The standard cost is the
cost you have set as standard for one stocking unit of the item being entered. The cost set by
you in the Item file is not updated by the system. Later, if the actual cost of the item varies
from the standard cost, the variance (difference) will be reported separately.
Note
Format
Standard costing is illustrated in the Standard Cost Valuation appendix. If
you wish to use standard costing throughout the exercises, make up a standard cost for each item on file.
999999.99999
117
Replacement cost
Enter the replacement cost of the item. Replacement cost is the cost of a stocking unit of an
item at the last purchase. It is updated automatically when a receiving is entered.
Replacement cost is used as a default cost for miscellaneous items.
Format
999999.99999
Example
Press <Enter>.
Price unit
Enter the pricing unit or press <F2> to use the stocking unit as the pricing unit.
Format
Up to four characters
Example
Press <F2>
On certain items, the unit of measure on which pricing is based may be different from the
stocking unit. The pricing unit entered in this field allows you to record this different unit of
measure.
For example, paper is often stocked and sold by the ream, but priced per 1000 sheets. Its
stocking unit would be REAM and its pricing unit would be MSHT.
If you enter a pricing unit that is different from the stocking unit, you will enter the conversion
factor in the next field.
Conv factor
Enter the number of stocking units in each pricing unit.
The entry for the conversion factor depends upon the relationship between the stocking unit
and pricing unit.
1. Stocking unit is smaller than the pricing unit. For example, if an item is stocked by the dozen and
priced by the gross, the conversion factor would be 12. There are 12 dozen (stocking unit) in one
gross (pricing unit).
2. Stocking unit is larger than the pricing unit. For example, if an item is stocked by the box (8
each in a box) and priced by EACH, the conversion factor would be 0.125. There is 1/8 of a
stocking unit in a pricing unit.
Note
Format
Note that the conversion factor is used only for the purpose of price calculation, and only within Accounts Receivable and Order Entry.
999,999.99999
Price code
Enter the price code that will be used to determine the price and discount (or markup) structure
for this inventory item, or press <Enter> to skip this field.
118
The price code entered here is used by Accounts Receivable and Order Entry in conjunction
with the prices (or costs) for the item.
For codes with a price type of 3 (discount price basis by quantity ordered within customer
type) or 6 (mark up price basis by quantity ordered within customer type), a generalized
description will display rather than one you entered, as there can be several customer types
associated with each type-3 and type-6 price code.
Format
Up to two characters
Example
Press <Enter>.
Price-1
Enter price-1, the first of up to three prices that customers can be charged for a pricing unit of
this inventory item. Normally, this would be the list price of this item.
Price-1 is normally the highest price charged for the item. It is the highest price that can be
entered within the group of five prices.
Format
9,999,999.99999
Example
Type: 65.00
Price-2
Enter price-2 for this inventory item. It must be less than Price-1.
Format
9,999,999.99999
Example
Type: 62.00
Price-3
Enter price-3 for this inventory item. It must be less than Price-2.
Format
9,999,999.99999
Example
Type: 61.50
Price-4
Enter price-4 for this inventory item. It must be less than Price-3.
Format
9,999,999.99999
Example
Press <Enter>
Price-5
Enter price-5 for this inventory item. It must be less than Price-4.
Format
9,999,999.99999
Example
Press <Enter>
Price-5 is normally the lowest price charged for the item.
119
Alternate unit 1 pricing
Alternate unit 2 pricing
Entry is not allowed in the alternate unit pricing fields for items with a tracking method of
serialized.
If this item can be sold or received in units other than the stocking unit, enter up to two
alternate units for this item. You can press <Enter> at Alt unit 1 to skip these fields if the item
can be sold only by the stocking unit, as shown in the following screen:
For example, an item that is normally stocked and sold as EACH might also be sold as a
CASE.
If you enter an alternate unit for field number 18 or 19, a window displays for you to enter
additional information about the unit.
Format
Up to four characters, or press <Enter> for None at both
fields.
Price unit
The unit of measure is displayed. Changes to the unit can be made when Any change ?
appears. Enter spaces for this field to delete an alternate unit.
Format
Up to four 4 characters
Conv factor
Enter the number of stocking units in each alternate unit.
Note
Format
If the number of stocking units per alternate unit includes decimals, rounding errors will accumulate in this item’s Qty-on-hand. To avoid any rounding error, enter only whole numbers in this field.
999,999.99999
120
Price code
Enter the price code that will be used to determine the price and discount (or markup) structure
when selling this unit of the item, or press <Enter> to skip this field.
Format
Up to two characters
Price-1, Price-2, Price-3, Price-4, or Price-5
Enter up to five prices that customers can be charged for this item when sold in this unit. Price1 must be the highest price and Price-5 the lowest.
The prices entered here are per alternate unit. If a pricing unit has been entered that is different
than the stocking unit, the prices entered here are per pricing unit.
For example, the item “Eggs” may have a stocking unit of EACH and a pricing unit of DOZ,
with a conversion factor of 12. If your alternate unit is TRAY, with 24 EACH per TRAY, and
you enter $0.80 in this field, this is the price per DOZ when sold in this alternate unit. When a
TRAY of “Eggs” is sold in A/R or O/E, its price would be $1.60.
After the information is entered for each alternate unit, field numbers 18 and 19 change to
show Price-1 for the unit.
Format
9,999,999.99999 for each price
For this example, skip the alternate pricing fields.
Preferred unit
If you entered at least one alternate unit, enter your preferred selling unit for this item. Enter
one of the alternate units, or press <Enter> to default to the stocking unit.
The preferred unit is used as the default selling unit for this item during the Order Entry (Enter)
selection. A different selling unit may be selected during order entry.
If this item has no alternate units, this field cannot be entered.
Format
Up to four characters
Tab 3 - Item Details
Graphical Mode
The third tab looks similar to the following:
121
Character Mode
After you press <Enter> at Field number to change ?, a second screen displays:
Physical size
Weight
This field allows entry of the weight of the item. Weight information can be printed on invoices
from Order Entry.
Format
99999.99 (for the weight) and four characters (unit)
Example
Type
3.5
Type Lbs
and
press
Height
This field allows entry of the height of the item
122
<Enter>.
Format
999999.999 (height) and four characters (unit)
Example
Press <Enter>.
Width
This field allows entry of the width of the item.
Format
99999.999 (width) and four characters (unit)
Example
Press <Enter>.
Depth
This field allows entry of the weight of the item.
Format
99999.999 (depth) and four characters (unit)
Example
Press <Enter>.
Item dates
Date created
This date is automatically updated by the system.
Last sold on
This date is automatically updated by the system.
Last used on
This date is automatically updated by the system.
Last received
This date is automatically updated by the system.
Drawing
Drawing number
This field allows you to associate a drawing number with the item. This is an optional field that
could be used to identify a diagram, mechanical drawing, specification, etc. for the inventory
item.
Format
15 characters
Example
Press <Enter>.
Revision number
This field allows you to enter a revision number for the drawing.
Format
15 characters
Example
(Not applicable) displays
123
Revision date
This field allows you to enter a revision date for the drawing.
Format
MMDDYY
Example
(Not applicable) displays
Miscellaneous fields
Warranty
This field is only applicable for serialized and warranty items. This is the warranty program that
is associated with the item. Warranty programs must already be defined under warranty
programs before you can enter the information. This is a mandatory field for these types of
items, therefore if you do not have a warranty for these items, make sure to use the None
warranty program you defined under warranty programs.
If you change from Non-Serialized Inventory to Serialized Inventory , make
sure to enter the warranty information after you change the track method.
Note
Grace Period
This field may only be entered for items with a item tracking method of Warranty. See Track
method.
This is the amount of time from your purchase of a product, until you sell the product that you
have as a grace period for the associated warranty from the manufacturer.
ABC code
This code is used by the Reports (ABC analysis) selection in I/C. For an explanation of what
the ABC code is, see the chapter in this documentation titled ABC Analysis.
You can enter one character (A, B, or C), but you don't have to enter it because it can be
automatically set when you run ABC analysis. You can skip this field by pressing <Enter>.
Format
One letter (A, B, or C), or press <Enter> to skip this field.
Example
Press <Enter>.
B/O code
Enter a code to indicate whether this item can be back ordered for customers, and whether
committed quantities are tracked for this item.
Select OK to B/O if the item may be backordered, and quantity committed is tracked.
Select not OK to B/O to designate that the item may not be backordered. If an attempt is made
to backorder this item, a warning displays, but it can be override.
Select no B/O control if the item cannot be backordered, and quantity committed is not
tracked. If no B/O control is selected here, no committed quantities will be tracked for the item
in O/E, P/S and I/C.
124
Enter OK to B/O to indicate that it is acceptable to back order the item (in O/E and P/S), or not
OK to B/O to indicate that it is not acceptable to back order the item. Regardless of your entry,
you will still be able to back order or not backorder the item in O/E and P/S. Your entry here
should be such that normal conditions are accommodated.
If no B/O control is selected, no attempt is made to determine whether there is sufficient stock
of the item to meet an order. Thus, the entire quantity ordered is assumed to be the quantity to
ship.
no B/O control is a valid entry for an item with the field Track method settings of normal and
warranty. It is also the only allowable entry for miscellaneous items (those items where the
item number begins with *). no B/O controlis the only valid entry for an item if you specified
in I/C Control information that there is to be no backorder control.
Options
Select one of the following options:
OK to B/O
For backordered, and quantity committed to be
tracked.
no B/O control
If the item may can be backordered, and quantity
committed is tracked, but the system will warn you if
it is not typical to backorder this item.
not OK to B/O
If the item may not be backordered, and quantity
committed is not tracked.
Format
Drop down list, one selection from the table above
Example
Select OK to B/O, then press <Enter>
Job cost category
If you are using Job cost, you can define the default cost category.
User defined fields
If you have defined user defined fields in I/C Control Information, they will display next. If
you have not, then you will move on to the next tab.
125
Note
If you have added user- defined fields in Control information, the field
numbers in character mode will differ form the field numbers on the screen
shot.
Tab 4 - Vendor/Accounting
The vendor/accounting tab is similar to this:
You can use the fields on this tab to enter information about the vendor for this item. The vendor
information is shown on the Purchasing Advice report.
If you plan to add Purchase Order later, you should enter this vendor information now. If you
will be using vendor items in P/O, this information appears as defaults when setting up the
vendor item records.
The accounting numbers must be entered for every item.
126
Vendor information
Vendor number
Enter the vendor number of the current primary vendor.
If you are using Accounts Payable, the number is verified against the Vendor file. If Accounts
Payable is not used, then any number can be entered.
Options
You may use one of the options:
<F2>
To skip entry of a vendor and proceed
<Enter>
To look up the vendor by name in the Vendor file if
Accounts Payable is installed
If you are using A/P and press <F2> to skip entry of a vendor; the Vendor prod #, Min order
qty, and Lead time fields are also skipped.
Format
Up to six characters or use the option.
Example
Type: 100
Vendor prod #
Enter the vendor’s specific product number. This is the number that the vendor uses to identify
this product.
An item can be searched for by vendor number/vendor product number or vendor product
number in the View (Items) and P/O Purchase order (Enter) selections, if you selected in
Control information to use these keyword methods.
Format
Up to 15 digits
Example
Type: 38001
Min order qty
Enter the minimum order quantity the vendor will accept for this item.
Format
999999.999
Example
Type: 12
(Unit of measure)
This field cannot be entered if you left the min order qty field blank.
If you entered a Min order qty, then enter the unit in which the vendor sells this item (CASE,
LITR, DOZ, EACH, etc.).
127
Lead time
Enter the usual time (in days) that the vendor requires to fill your order for this item. If you are
not sure how long the lead time is, press <Enter>.
The lead time will appear on the Purchasing Advice Report.
Format
Up to three digits
Example
Press <Enter>.
Service vendor
Enter the vendor number of the service vendor for this item.
Format
six characters
Example
Press <Enter>.
Taxable
For tax rate
Leave the boxes unchecked or select the <Space bar> to check the boxes.
The taxable status of the item determines whether the price for this item is included in the
taxable amount of the order or invoice in O/E, P/S or A/R.
A checked box means the item is taxable when the customer is taxable. An unchecked box
means the item is not taxable, regardless of the customer’s tax status.
If you are using A/R, with multiple tax levels per tax code, you will need to determine if this
item is taxable at one or more tax levels.
Format
Check box with checked being yes and unchecked is no.
The default is unchecked.
Example
Press <Enter> to accept the default.
Commission code
Enter the commission code that will be used to calculate the sales rep’s commission on a sale
of this item, or press <Enter> to skip this field. This code takes precedence over all other
commission information in the A/R Control information.
Inventory account
Note
If you entered a category for this item, fields #52 through #55 default to
the accounts entered for the category.
Enter the inventory account for this item.
Options
Use one of the following:
128
<F1>
1200-000 Merchandise inventory
<F2>
To scan through the valid inventory accounts file
Receivings for this item will debit this account, and sales of this item will credit it. If you are
using average cost valuation, see the summary in the chapter titled Inventory Under Average
Cost regarding postings to inventory accounts. If you are using LIFO or FIFO cost valuation,
see the distributions summary in the LIFO/FIFO Cost Valuation appendix. If you are using
standard cost valuation, see the distributions summary in the Standard Cost Valuation
appendix.
Miscellaneous items (item number beginning with *) must be assigned inventory accounts of type C (Miscellaneous costs applied). Refer to the Inventory Accounts chapter.
Note
Format
This varies and is based on Account structure.
Example
Press <F2> for the default account.
If you wish to change the inventory account for an item, refer to Changing Inventory Accounts
section later in this chapter.
Sales account
Enter the main account number for this item’s sales account, or press <F2> for the default account.
This main account is used by Order entry, Accounts Receivable and Point of Sale when
posting sales distributions for this item.
When not using sub accounts or cost enters as determined by the 13. Assign cost centers (or
sub-accounts) to items ? field in I/C Control information, when you enter a sales account, but
the sales sub account is different that what is entered in 14. Default cost center (or subaccount) field, then you will not be able to enter the account.
See the description of Default sales account in the chapter titled Control Information that
explains how the main account entered here is combined with a Cost Center during posting (if
you are using Cost Centers) in order to obtain an actual G/L account to credit for the sale of the
item.
Format
This varies and is based on Account structure.
Example
Press <F2> for the default account.
Expense account
Enter the main account number for this item’s expense, or cost of goods sold account.
This main account is used by Inventory control, Order entry, Accounts Receivable and Point of
Sale when posting the cost of sales for this item.
See Default expense account in the Control Information chapter. This explains how the main
account entered here is combined with a Cost Center during posting (if you are using Cost
Centers) in order to obtain an actual G/L account to debit for the cost of goods sold.
129
Format
Varies and is based on Account structure.
Example
Press <F2> for the default account.
Cr-memo account
Enter the main account number for returns of this item.
Options
Use the following:
<Enter>
For the default credit memo account number in the I/C
Control file.
This account is used by Inventory control, Order entry, Accounts Receivable and Point of Sale
when posting credit memos (returned goods) for this item.
Refer to Default credit memo account in the Control Information chapter. This explains how
the main account entered here is combined with a Cost Center during posting (if you are using
Cost Centers) in order to obtain an actual G/L account to credit for the returned goods.
View Warehouses Tab
This tab provides a view of item quantities per warehouse. Quantities include on-hand, committed,
back ordered, on order and work ordered.
You must be viewing an item in order to access the warehouse tab.
Graphical Mode
To access the tab click on it or select <SF7>.
130
Character Mode
To access the multi-warehouse window select <SF7>.
Here is an example of a multi-warehouse window that has three warehouses:
Options
The options while in this window include:
<SF7>
To exit the window and return to the item
<Esc>
To escape the window and enter a new item
131
ENTERING NEW ITEMS
There are three optional functions that you may enter following the entering of the primary
fields for an item. There are warehouse statuses, item notes and alternate items. All three of
these can be entered immediately or later.
Keep in mind that you cannot track stocked item quantities until a warehouse status record has
been entered.
Graphical Mode
When entering a new item the following window displays:
Choice one of the radio buttons using the left or right arrow keys or click on a choice with your
mouse. You may access more information about each of the three choices through these links:
Entering Status Records
Entering Item Notes
Entering Alternate Items
OK or Cancel
Select OK to accept your radio button choice or select Cancel to return to the item entry screen. If
you select Cancel you may select any of these choices from the Options menu at a later time. You
cannot recieve any inventory until you have entered a status record for that item.
Character Mode
If you are entering a new item, in the middle of the last screen the following window displays:
132
All three choices are documented in detail below:
Entering Status Records
Status information must be entered for each item that you define. If you are using multiwarehousing, status information must be set up for each warehouse in which the item is
stocked.
You may use this selection to enter status information, or you may use the Status or Status load
described in the Status and Status Load chapters.
Graphical Mode
After you have select Status from the selection window, <F7> from Items (Enter) or select Item
status entry from the Options menu a window similar to this displays:
133
Select the New button to add a status record. Select Edit to change and existing record.
Character Mode
If you choose Status records from the selection window it looks similar to this:
Enter the information as follows:
Warehouse
If you are not using multiple warehouses as defined in I/C Control information, then this field
cannot be entered and will default to Central.
Enter the code for the warehouse for which you want to enter the item’s status information.
You must have previously defined the warehouse code using Warehouses.
Options
Enter a warehouse code or use one of the options:
<F1>
For the next status record
<SF1>
For the previous status record
Format
Up to two digits or use the option.
Example
Press <F1>.
Location code
Enter a bin or floor location code where items are stored.
When picking tickets are printed in Order Entry or when a Physical Count Worksheet is
printed, items are listed in order by their location code to help physically locate them.
The location code is alphanumeric, so it may be letters, numerals, or a mixture of both.
Alphanumeric characters are handled differently by the program than purely numeric numbers.
For example, the alphanumeric characters “12^^” (where ^^ represents 2 spaces) is not the
134
same as the number 12. Also, the value “9^^^” (with 3 spaces) is greater than the value “12^^”
(with 2 spaces).
If you intend to use only numbers for location codes, and you wish them to appear in
ascending order on the picking tickets, you must enter leading zeros in the Location code field.
Enter the number 9 as “0009” and 12 as “0012”. In this way, items will always appear in the
desired order on the picking tickets.
Enter the location code.
Format
Up to four alphanumeric characters
Example
Type A1
Quantities for This Warehouse:
All quantities entered or displayed on this screen are for this warehouse only.
Maximum qty
Enter the maximum quantity that you have decided should be on hand for this item.
A quantity called Average quantity on hand is calculated by the software
and used in the Inventory Turnover Report. The software restricts this average quantity to be no more than the maximum quantity and no less than
the reorder level (next field). See the Inventory Turnover chapter.
Note
If you use the Inventory Turnover Report, you should enter a value in this field and in Reorder
level field to ensure that useful information is shown on the report.
Format
99999999.99999
Example
Type: 10000
Reorder level
Enter the quantity at which the item should be reordered, to be used for the Stock Status and
Purchasing Advice reports.
Format
99999999.99999
Example
Type: 25
Last sold on
Enter the most recent date on which this item was sold. It is automatically updated when an
inventory sale transaction is posted.
Format
MMDDYY
Example
Press <Enter>
Last used on
If you are not using either kits or Job Cost, this field cannot be entered.
135
Enter the date of the last usage of this item in a work order or on a job (as opposed to a sale).
This field is updated when a job usage transaction (from Job Cost) or component usage
transaction is posted using Inventory.
Format
MMDDYY
Example
Press <Enter>
Quantities
Average on hand
This is a display only field. This quantity is calculated when you run Close a period, and
represents a running weighted average of the quantity on hand each period. See Weighted
Average. Refer to the information in field Maximum qty above regarding Average quantity on
hand.
Qty on hand
Qty committed
Qty on back-order
Qty on order
Qty on work-order
No entry is allowed in these fields. Their meaning is the same as on the first Items screen,
except that the quantities shown are for this warehouse.
Period to date, Next period and Year to date Fields
When a transaction (sale, credit memo, job usage, or assembly) is posted, the following PTD
and YTD fields are updated if the transaction date is on or earlier than the period ending date.
(The period ending date was entered in Control information.) If the transaction date is beyond
the period ending date, then it is update in the Next period field.
For an existing status record, you would ordinarily not want to change the PTD and YTD fields
because they are automatically updated by other selections. If you try to change these fields, a
message informs you that a change is not allowed.
However, if Allow protected changes is checked (yes) in Company information, you may
override this restriction. Refer to the Overriding Protected Changes in the System User
documentation for information on how to do this.
For a new item, you can press <F2> at field # 7 to set all remaining fields to zero. Otherwise,
you can enter information in each field as described below:
Sold PTD
Sold next prd
Sold YTD
Enter the quantity of the item sold to date in the current period and year.
136
The quantity in each field is increased when a sale is posted, and decreased when a credit
memo is posted. Quantity sold PTD and Quantity sold YTD represent the actual quantity sold,
less all returns.
Format
999999999.99999-
Used PTD
Used nxt prd
Qty used YTD
If you do not use either kits or Job Cost, the above fields cannot be entered.
Enter the quantity used to date in the current period and year for either a work order or on a job
(as opposed to a sale).
The quantity in each field is updated when a job usage transaction (from Job Cost) or a
component usage transaction is posted.
Returned PTD
Returned nxt prd
Returned YTD
Enter the quantity of the item returned to date in the current period and year.
The quantity in each field is increased when a credit memo for returned goods is posted.
Format
999999999.99999-
Sales
Period to date
Next period
Year to date
Enter the dollar amount sold period-to-date and year-to-date.
The dollar amount in each field is increased when a sale is posted, and decreased when a credit
memo is posted. Sales PTD and Sales YTD represent actual sales, less all returns.
Format
999,999,999.99-
Costs
Period to date
Next period
Year to date
Enter the dollar amount of costs period-to-date and year-to-date. The next period field cannot
be entered. Amounts for this field will be automatically filled through posting.
137
The dollar amount in each field is increased when a sale is posted, and decreased when a credit
memo is posted. Costs period to date, next period and year to date represent the actual cost of
goods sold, less all returns.
Format
999,999,999.99-
Prior Periods Tab
Make any needed changes. The prior periods tab displays:
Graphical Mode
If you are not using kits or Job Cost, the Quantity-used and Qty-sold+used columns cannot be
entered.
Character Mode
138
The screen appears as shown above if you are using kits and/or Job Cost. If you are not using
kits or Job Cost, the Qty-used and Qty-sold+used columns do not display.
Prior periods qty sold, used, sold + used, returned
Enter a quantity in each field, except Qty-sold+used (which is calculated automatically) or
press <F2> to set the quantities in all prior periods to zero.
Format
999999999.99999-
There may be up to 24 periods. If there are more than 12 periods, then you must enter the
second Prior Periods tab which has the same type fields as the first Prior Periods tab, just
earlier periods.
The first status screen reappears to enter another item in this warehouse.
When there are no more items associated with this warehouse, press <Esc> at the Warehouse
field.
Each time you run the Close a period selection, the oldest period is removed and the period just
closed becomes the newest period displayed on this screen.
139
ENTERING ITEM NOTES
If you select to enter item notes, you can enter unlimited notes for this item.
Graphical Mode
Notes are entered on a screen like this:
The item number and description 1 for which you are adding a note, displays as the tab name.
Select New to add a note or select Save/New to add another note if you just finished entering
one. Select Edit to edit an existing note.
The cursor is positioned for you to enter the first line of the text. When typing text words the
end of the line will word wrap.
Format
ten lines of 77 characters each
When adding a new note the date and time defaults to now. You may change the date and time
before saving or when editing the note later.
Select Save to save the note or Cancel to not save.
Existing notes sort in the list box in descending date order.
When finished select Exit to return to the item screen.
Character Mode
A notes area of the screen displays similar to below:
140
Each note is given a date/time stamp so that you can scan through the notes in time sequence
later. Item notes may be viewed in I/C Items.
To scan through existing notes for an item, use the keys as shown at the bottom of the screen:
<PgUp>, <PgDn>, <Home>, <End>, and <F1>.
A menu at the bottom of the Notes area shows three selections: Date and Time, File options,
and Text Entry.
Date and time
Use this selection to change the date and/or time of a note.
File options
When you select File options, you have these choices:
File
Save what was just entered or changed, and clear the
screen for entry of the next note. (Like pressing
<Enter> at Field number to change ? in other selections.)
Save &
Continue
Save what has been entered or changed, but
leave the information on the screen for further
work.
Abandon
changes
Do not save what has been entered or changed
and clear the screen for entry of a new note.
Similar to pressing <Esc> at Field number to
change ? in other selections.)
Delete
Delete this entire note from the file and clear
the screen for entry of the next note. (Like
Delete in other selections.) The software will
ask you to confirm the deletion with an OK to
delete ? message.
Text entry
Use this selection to enter the note text. When you select Text entry, the cursor is positioned for
you to enter the first line of the text.
Format
ten lines of 77 characters each
141
This selection uses text editing functions. You enter text in much the same way as most word
processing programs, using the <Enter>, character keys, <Delete>, etc. When you are finished
entering text, press <Esc> and follow the screen instructions.
If you wish to use the more powerful text editing commands that are included in the character
notes editor, see the Text Editing appendix in the System User documentation.
When you are through using notes, press <Esc>.
142
ENTERING ALTERNATE ITEMS
Up to eight substitute items that may be sold to a customer in place of the item ordered. These
alternate items may be selected in O/E, or A/R as replacement items for the primary stock item.
Some of the reasons an alternate item may be useful during entry of a transaction are:
•
the item ordered is out of stock and there are similar items available
•
the item being ordered is not quite what the customer wants or needs and there is another item
that will fit the need
•
another item is more profitable but will work just as well or better for the customer
•
other products are available that work with the item being purchased
Select
<F5> or click on Alternate items on the Options menu.
Graphical Mode
The following window appears:
If an alternate item has never been entered the cursor is at the Item # 1 field. If there is an
existing alternate item the cursor is positioned at the Edit button.
Enter
143
Character Mode
The following window displays:
Item #
Format
15 characters
Options
Enter item numbers for up to eight alternate items, or use one of the options:
<F1>
To scan through the items on file in item number order
when on the Item # field and in description order if on
the Description 1 field.
<Enter>
To look up by description
(Description)
The item number must exist in the Item file or Item not in item file message will display.
Select the Save button when you have completed entering alternate items.
144
PRINTING ITEM LISTS
There are 4 items list reports.
Items by Item Number or Description
Select
Items by item # or descr from the Reports menu.
Or from Items (Enter) select by item # or desc from the Print > Items menu selection.
Graphical Mode
The following screen displays:
Character Mode
The following screen displays:
145
The screen for both item lists are almost identical.
Enter the information as follows:
Print by item
Enter the selection to be shown on the report, by Number or by Description.
Options
Use one of the options:
Number
Print in item number order
Description
Print in item description order
Starting item #
Ending item #
For the Items by Item Number List, specify the range of item numbers to include.
You may press <F2> for "First" at Starting item # and "Last" at Ending item #.
Format
Up to 15 characters or use the option
Example
Press <F2> at both fields
Starting item description
Ending item description
Options
Enter the item description that is alphabetically lowest (first) in the range of items to be shown
on the list, or press <F2> for "First" at Starting item description and "Last" at Ending item
description.
Format
Up to 25 characters or use the option
Example
Press <F2> at both fields
146
To be included, the description must be the full description of the item, because trailing spaces
are alphabetically lower than any other characters.
For example, if you intend your list to end with the item HUBCAPS, 57 MODEL, and you
enter HUBCAPS, 57 MOD, the item will not be on the list because HUBCAPS, 57 MOD^^^^^
is alphabetically lower than HUBCAPS, 57 MODEL. (The ^^^^^ represents spaces).
To include miscellaneous tools as the last item on the report, for instance, it is not sufficient to
merely type misc, miscellaneous, or even miscellaneous tool. You must type the item's entire
description, or something like misczzzzzz. Refer to the Technical Notes appendix for an
explanation of the sorting sequence of alphanumeric characters.
Group by inventory acct #
Check the box to print the items in order by inventory account number.
Leave the box unchecked to print them in item number order. If you leave the box unchecked,
the next field cannot be entered.
Format
Check box, where checked is yes and unchecked is no. The
default is unchecked
Example
Press <Enter> to accept the default
Inventory account #
Options
Enter the inventory account for which to print the list, or use one of the options:
<F1>
For 1200-000 Merchandise Accounts
<F2>
For other inventory accounts
<F5>
For All inventory accounts.
Format
Up to eight digits or use the option
Example
Press <F5> to select all inventory accounts
Status code
Enter a valid Status Code or press <F5> for all status codes.
Format
One character or use the option
Example
Press <F5> for all status codes
Vendor
Options
Enter a vendor number or press <F5> for all vendor numbers.
147
Format
Up to six digits or use the option
Example
Press <F5> for all vendor numbers
Product category
This is the Category you assigned while entering items earlier.
Options
Enter a product category to include only items of this category, or press <F5> for all
categories.
Format
Up to five digits or use the option
Example
Press <F5> for all categories
Product sub-category
This is the Sub-category you assigned while entering items earlier.
Options
Enter a product sub-category to include only items of this sub-category, or press <F5> for all
sub-categories.
Format
Up to six digits or use the option
Example
Press <F5> for all sub-categories
Print notes
Answer Y to print notes (if any) for each item on the list.
Format
Check box, where checked is yes and unchecked is no. The
default is unchecked
Example
Press <Enter> to accept the default
Print costs
Check this box to print costs for each item on the list.
Format
Check box, where checked is yes and unchecked is no. The
default is unchecked
Example
Press <Enter> to accept the default
Print items which have no quantity on hand
Check this box to print items which have no quantity on hand.
Format
Check box, where checked is yes and unchecked is no. The
default is checked
Example
Select the <Space bar> to uncheck the box then press
<Enter>
148
One item per page
Check this box to print one item per page.
Format
Check box, where checked is yes and unchecked is no. The
default is unchecked
Example
Press <Enter> to accept the default
OK or Cancel
Select OK to select a printer and then print the report. Select Cancel to exit the screen without
printing.
Printing Item Labels
Use this selection to print a set of labels for some or all of your items.
Refer to the Item Labels chapter, for a description of creating item label formats and printing
item labels.
Purging Inactive Items
Use this selection to remove a group of inactive items and associated status information from
the Item and Status files.
An inactive item is one with no quantity on hand, quantity committed, quantity on order,
quantity on back order, or quantity on work orders, and whose PTD and YTD sales figures are
zero. In addition, the item cannot be a kit-item or a component item of a kit.
Refer to the Purging Inactive Items chapter, for an explanation of this selection.
Printing Item Change Logs
If use of the optional change log was specified in Company information, you can print the Item
Change Log.
Select
Item change log from the Reports menu.
You are then asked whether the Change Log should be purged.
If you answer Y, there will be no option to display the log, and the log is cleared after it is
printed. If you answer N, the log may be displayed, and the information is retained.
Press <Enter> and select a printer or press <Esc> to go back to the menu without printing or
purging.
149
CHANGING INVENTORY ACCOUNTS
Normally, when an inventory account is assigned to an item, it is not changed. If the inventory
account for an item is changed, I/C will not be in agreement with General Ledger. That is, the inventory value on the Valuation Report for the inventory account will not add up to that inventory
account's balance in G/L.
To keep I/C and G/L in balance, the following must be done if an item's inventory account is to
be changed:
1. Run a Valuation Report and get the balance for the item's old (current) inventory account. See
Valuation Reports.
2. Make a G/L journal entry that credits the item's old inventory account and debits the item's
new inventory account. (This assumes the item's old account has a debit balance on the Valuation Report. If it has a credit balance, then the old inventory account would be debited and
the new one would be credited.)
3. Change the item's inventory account (in the Item file) to the new inventory account.
150
DATA IMPORT
Select
Data import items from the Utility menu.
This selection may be used to import items directly into the item file.
Data Import is licensed separately and may not be available on your system. For information
on setting up and using data import see the Data Import documentation.
151
Status
This chapter contains the following topics:
Introduction to Status
Entering Status
Printing Status Lists
152
INTRODUCTION
TO
STATUS
This chapter describes the Inventory Status file, how to set it up, and how to print lists of the status
information for items.
This selection allows direct access to and entry of status information for items that are already
on file. The Status screen is essentially the same as in the Items selection.
This selection is provided separately to allow you to easily enter status information when item
information already exists. For example, when you start stocking an existing item at a new
warehouse, you only need enter status information for the new warehouse.
Status information can be deleted in the Status selection (this chapter) if the status record
contains no current quantities (on-hand, committed, on-order, backorder, on work order).
In addition, status information can be deleted in the Items selection when an item record is
deleted, if all status records for the item contain no current quantities.
An item record cannot be deleted in Items if one of its status records contains current
quantities.
153
ENTERING STATUS
Select
Status from the I/C menu.
Graphical Mode
A screen similar to the following displays:
If there are existing status records, up to 6 will display in the list box at the top of the screen.
New
For adding a new status
Edit
For editing an existing status
Save
For saving a new status or changes to an existing status
Save/New
This button combines the Save and New buttons by first
saving the status and then starting a new status
Cancel
To cancel the editing or adding of a status
Exit
To exit the screen. Exit works like cancel when you are
adding or editing a status
Warehouse
When you select the add button to enter a new status, you must enter the Warehouse field.
154
Enter the warehouse code. If you are not using multiple warehouses, then you cannot enter this
field.
When editing an existing status, this field cannot be changed.
Format
Two characters
Example
Select the <Enter> key for the Central warehouse
Character Mode
For multiple warehousing, you are asked to specify the warehouse for which you want to enter
the item's status information.
Options
Enter the warehouse code, or use the option:
<Enter>
For Central (if you defined a Central warehouse in
Warehouses).
The following screen displays:
If you are using single-warehousing, you will not see the Warehouse field.
Note
From this screen, you can work with both new and existing status information for an item. If
status information for the warehouse you specified above and for the item number you enter
here already exists, that information appears and is available for changes or deletion.
Item number
Options
Enter the item number, or use the options:
<F1>
For the next status on file
<F1>
For the previous status on file.
155
Format
Four characters
Example
Type 101
When the item is specified, the item description, category and sub-category, vendor number,
stocking unit, and quantities are displayed.
Deleting Status Records
Use the Delete button, Alt+d or <F3> to delete a status record.
A status record cannot be deleted if it has a non-zero quantity on hand, committed, on order,
on back order, or on work order. In addition, you are asked OK to delete ? if you select to
delete a status record with a non-zero PTD, YTD, or prior period amount.
There are also other checks made. If you cannot delete a status record, a message will display
the reason for the error.
Avg qty on hand
This is a display only field. This quantity is calculated when you run Close a period, and
represents a running weighted average of the quantity on hand each period. See Weighted
Average. Refer to the information in Maximum qty field regarding Avg qty on hand.
Qty on hand
Qty committed
Qty on back-order
Qty on order
Qty on work-order
No entry is allowed in these fields. Their meaning is the same as on the first Items screen,
except that the quantities shown are for this warehouse.
Location code
Enter a bin or floor location code where items are stored.
When picking tickets are printed in Order Entry or when a Physical Count Worksheet is
printed, items are listed in order by their location code to help physically locate them.
The location code is alphanumeric, so it may be letters, numerals, or a mixture of both.
Alphanumeric characters are handled differently by the program than purely numeric numbers.
For example, the alphanumeric characters “12^^” (where ^^ represents 2 spaces) is not the
same as the number 12. Also, the value “9^^^” (with 3 spaces) is greater than the value “12^^”
(with 2 spaces).
If you intend to use only numbers for location codes, and you wish them to appear in
ascending order on the picking tickets, you must enter leading zeros in the Location code field.
Enter the number 9 as “0009” and 12 as “0012”. In this way, items will always appear in the
desired order on the picking tickets.
Enter the location code.
156
Format
Up to four alphanumeric characters
Example
Type A1
Quantities for This Warehouse:
All quantities entered or displayed on this screen are for this warehouse only.
Maximum qty
Enter the maximum quantity that you have decided should be on hand for this item.
A quantity called Average quantity on hand is calculated by the software
and used in the Purchasing advice report. The software restricts this average quantity to be no more than the maximum quantity and no less than
the reorder level (next field).
Note
If you use the Purchasing advice report, you should enter a value in this field and in Reorder
level to ensure that useful information is shown on the report. See Purchasing Advice chapter.
Format
99999999.99999
Example
Type: 10000
Reorder level
Enter the quantity at which the item should be reordered, to be used for the Stock Status and
Purchasing Advice Reports.
Format
99999999.99999
Example
Type 25
Last sold on
Enter the most recent date on which this item was sold. It is automatically updated when an
inventory sale transaction is posted.
Format
MMDDYY
Example
Press <Enter>
Last used on
If you are not using either kits or Job Cost, this field displays (Not applicable).
Enter the date of the last usage of this item in a work order or on a job (as opposed to a sale).
This field is updated when a job usage transaction (from Job Cost) or component usage
transaction is posted using Inventory.
Format
MMDDYY
Example
Press <Enter>
157
Period to date, Year to date and Next period Fields
When a transaction (sale, credit memo, job usage, or assembly) is posted, the following Period
to date and Year to date fields are updated if the transaction date is on or earlier than the period
ending date. (The period ending date was entered in Control information.) If the transaction
date is beyond the period ending date, then it is update in the Next period field.
For an existing status record, you would ordinarily not want to change these fields because
they are automatically updated by other selections. If you try to change these fields, a message
informs you that a change is not allowed.
However, if Allow protected changes ? is set to Y in Company information, you may override
this restriction. Refer to the Overriding Protected Changes in the System User documentation
for information on how to do this.
Character Mode
For a new item, you can press <F2> at field # 7 to set all remaining fields to zero. Otherwise,
you can enter information in each field as described below:
Quantities
Sold PTD
Sold YTD
Enter the quantity of the item sold to date in the current period and year.
The quantity in each field is increased when a sale is posted, and decreased when a credit
memo is posted. Sold PTD and Sold YTD represent the actual quantity sold, less all returns.
Format
999999999.99999-
Used PTD
Used YTD
If you do not use either kits or Job Cost, field #’s 9 and 10 display (Not applicable).
Enter the quantity used to date in the current period and year for either a work order or on a job
(as opposed to a sale).
The quantity in each field is updated when a job usage transaction (from Job Cost) or a
component usage transaction is posted.
Returned PTD
Returned YTD
Enter the quantity of the item returned to date in the current period and year.
The quantity in each field is increased when a credit memo for returned goods is posted.
Format
999999999.99999-
158
Sales
Period to date
Year to date
Enter the dollar amount sold period-to-date and year-to-date.
The dollar amount in each field is increased when a sale is posted, and decreased when a credit
memo is posted. Sales Period to date and Year to date represent actual sales, less all returns.
Format
999,999,999.99-
Costs
Period to date
Year to date
Enter the dollar amount of costs period-to-date and year-to-date.
The dollar amount in each field is increased when a sale is posted, and decreased when a credit
memo is posted. Costs Period to date and Year to date represent the actual cost of goods sold,
less all returns.
Format
999,999,999.99-
Make any needed changes.
The screen appears as shown above if you are using kits and/or Job Cost. If you are not using
kits or Job Cost, the Qty-used and Qty-sold+used columns do not display.
159
Prior periods
Quantity sold
Quantity used
Qty sold + used
Qty returned
Enter a quantity in each field, except Qty-sold+used (which is calculated automatically) or
press <F2> to set the quantities in all prior periods to zero.
Format
999999999.99999-
The first status screen reappears to enter another item in this warehouse.
When there are no more items associated with this warehouse, press <Esc> at the Warehouse
field.
Each time you run the Close a period selection, the oldest period is removed and the period just
closed becomes the newest period displayed on this screen.
160
PRINTING STATUS LISTS
You can print a status list by item number or by item description.
Select
Status by item # or Status by item description from the Reports menu.
Graphical Mode
The Status by item # screen looks like this:
Character Mode
A screen then displays similar to this:
161
If you are not using multiple warehouses, then the Warehouse field and Print in order by
warehouse or Item ? field will not display. The field numbers will change and so that there are
9 fields instead or 11.
With the exception of the second and third fields, the screen for both status lists are almost
identical.
Warehouse
Format
two characters
Options
For multi-warehousing, enter the warehouse code or use one of the options:
<Enter>
For the Central warehouse
<F5>
For "All" warehouses
If you are not using multi-warehousing, you will not see this field or the
Print in order by warehouse or item ? field, and all field numbers will be
one less than the numbers shown.
Note
Print by item
Select to print by either item number or description.
Format
Drop down list box with the choices of Number or
Description.
Starting item #
Enter the starting item # to be shown on the report or press <F2> for the first item # on file.
Ending item #
For the Status by Item Number List, enter the ending item # to include.
Options
You may use one of the options:
<F2>
For the highest item # on file
<Enter>
To select only the item # entered in the starting item #
field.
For the Status by Item Description List, enter as follows:
Starting item description
Enter the starting item description that is alpha-numerically lowest in the range of items to be
shown on the report or press <F2> for the first description on file.
162
Ending item description
Enter the ending item description that is alpha-numerically highest in the range of items to be
shown.
Options
You may use one of the options:
<F2>
For the "Last" description on file
<Enter>
To show only the starting item description (if you did
not select "First" for starting description above)
Print in order by
If you selected a specific warehouse for the first field or you are not using multiple
warehouses, this field is skipped.
If you selected "All" warehouses, enter Warehouse to print the status records grouped by
warehouse, or enter Item to print the status records grouped by item.
Format
One character
The following field is requested only for the Status by Item Number List:
Group by inventory acct #
If you selected to print by warehouse, this field is skipped.
Check this box to print the items in order by inventory account number.
Leave the box unchecked to print the items in item number order. If you do not check this box,
entry of the next field is not allowed.
Inventory account #
Enter the inventory account for the items to be printed.
Options
You may use one of the options:
<F1>
For the next inventory account
<SF1>
For the previous inventory accounts
< F2>
For the default inventory account in the I/C Control file
<F5>
For "All" inventory accounts. Items will print in item
number order within inventory account.
Vendor #
Enter a vendor number for the items to be printed or press <F5> for "All" vendors.
163
Format
Six characters
Product category
This is the Category you assigned to each item in Items.
Enter a product category to include only items of this category or press <F5> for "All" product
categories.
Format
Five characters
Product sub-category
This is the Sub-category you assigned to each item in Items. Enter a product sub-category to
include only items of this sub-category or press <F5> for "All" product categories.
Format
Five characters
Print prior periods
Check this box to print all quantities sold, returned, or used in prior periods. (The report prints
faster and requires less paper if your answer leave the box unchecked.)
Print items which have no quantity on hand
Check this box to include items which have no quantity on hand.
OK or Cancel
Select OK to print the report or Cancel to return to the menu without printing.
164
Status Load
This chapter contains the following topics:
Introduction to Status Load
Selecting Status Load
Entering Status Load Requests
Printing Load Requests
Loading Status Records
165
INTRODUCTION
TO
STATUS LOAD
This chapter describes the Status load selection.
Because an inventory can contain several thousand items, this selection is provided as an
alternative method of loading a large number of status records very quickly.
Status load is of primary benefit to a company with multiple warehouses. If a company were to
add an additional warehouse, Status load would rapidly do a partial set-up for that warehouse.
This selection can also be used by companies that do not use multiple warehouses, although
the benefit is more limited.
For single-warehouse companies, a check is made of each item record to ensure that a status
record is present for it. If the status record does not exist, a record will be created. All quantities
and amounts in the status record will be set to zero.
For multi-warehouse companies, a check is made of each item within a range of items or item
descriptions that you specify. When an item in this range is found, a check is made to see if a
status record exists for the warehouse you specified. If the status record is not found, a record
will be created with all quantities and amounts set to zero.
For either single or multi-warehouse companies, an additional option exists that allows you to
add location codes for each new status record.
When you select this option, you must remain at your computer terminal while this selection is
running. When a new status record is being created, you are asked for the location code, which
should be included in the status record.
If you choose not to assign location codes at the time when new status records are being
created, you can let the Status load selection run unattended. After the load has been
completed, use the Status selection to make any changes.
The normal sequence of events using Status Load functions is this:
1. Enter Status Load Requests
2. Print Edit List
3. Run Status Load
166
SELECTING STATUS LOAD
Select
Status load requests from the Utility menu.
The following screen displays:
167
ENTERING STATUS LOAD REQUESTS
From the Selecting Status Load screen you can work with both new and existing status load
requests.
Status load requests are identified by a load sequence number assigned when you originally
enter the request. If a status load request with the warehouse or load sequence number you
enter exists, the information on it appears and is available for changes or deletion.
Enter the following information:
For an existing Status load request
*1. Warehouse
Options
Enter the warehouse and load sequence number or use one of the options.
<Enter>
For the Central warehouse
<F1>
For the next load request
<SF!>
For the previous load request
Format
Enter up to two characters
Example
Press <Enter> for Central warehouse.
For a new Status load request
Enter a warehouse code, or use the option.
The warehouse code must have been defined previously using Warehouses.
Load sequence #
Enter the sequence in which this load request will be used to load items (in relation to other
load requests you may have entered for this warehouse).
On subsequent load requests, you may either enter another number or press <Enter> to use the
default number shown (1 greater than the preceding load sequence number).
You can specify the range of the items to be loaded as being either from a starting to an ending
item number, or from a starting to an ending item description.
Format
Up to two digits
Example
Type: 1
168
Specifying a range of item numbers
Enter the starting and ending item numbers, then press F1 in the Starting description and
Ending description fields to leave the description range wide open.
Specifying a range of item descriptions
Press <F1> in the Starting item # and Ending item # fields to set them to First and Last. This
leaves the item number range wide open. You can then narrow down the range by specifying a
starting and ending item description.
2. Starting item # and
3. Ending item #
Specify the range of item numbers for which you wish to load status records.
Format
Up to 15 digits or use the option
Example
Press <F2> for the First and Last item numbers
4. Starting description and
5. Ending description
Specify the range of item descriptions for which you wish to load status records.
Format
Up to 25 digits or use the option
Example
Press <F2> for the First and Last item numbers
6. Inventory account #
Options
Enter the inventory account for which you wish to load status records, or use one of the
options:
<F1>
<SF1>
<F2>
<F5>
For the next inventory account
For the previous inventory account
For the default Control information inventory account
For All inventory accounts
Format
Defined in Company information
Example
Press <F5> for All
7. Vendor#
Enter the vendor number to load item status records for only one vendor, or press <F5> to
include All vendors.
Format
six characters
Examples
Press <F5>.
169
8. Product category
Enter the product category to load item status records for only one product category, or press
<F5> to include All product categories.
Format
five characters
Examples
Press <F5>.
9. Product sub-category
Enter the product sub-category to load item status records for only one product sub-category,
or press <F5> to include All product sub-categories.
10. Assign location while loading?
Answer Y or N. If you answer N, Status load will run unattended and the location codes will be
left blank. If you answer Y, you are asked for a location code before each new status record is
added.
Format
One letter (either Y or N). The default is N.
Example
Press <Enter> to accept the default
170
PRINTING LOAD REQUESTS
Use this selection to print a current list of status load requests.
Select
Status load list from the Utility menu.
The Status File Load List prints to the printer you select. No entry parameters are requested.
All load requests on file are printed on the report.
171
LOADING STATUS RECORDS
Select
Status load from the Utility menu.
A message displays, asking whether it is OK to load the status information specified above into
the Status file.
Answer Y, or press <Enter> to default to N. If you answer Y, the Status file is loaded.
While loading, a screen displays, showing the load activity.
Options
Use these options:
<F1>
To stop loading at any time
<F2>
To resume loading
<Esc>
To exit from loading
172
Prices
This chapter contains the following topics:
Introduction to Pricing
Multiple Sale Prices
Changing Item Prices
Entering Sale Prices
Entering Contract Prices
Changing Prices for Groups of Items
Price Points
Purging Sale Prices
Purging Contract Prices
173
INTRODUCTION
TO
PRICING
This chapter also explains how to use the Purge sale prices and Purge contract prices selections
on the Utility menu. Refer to the Price Lists chapter.
Use this selection to do the following:
•
Change existing prices for an item or group of items
•
Enter prices for an item in a specific warehouse (if you selected to use multi-warehouse pricing in Control information)
•
Enter sale or contract prices for an item or group of items
•
Print a list of sale or contract prices for a group of items
•
Print a price list for a group of items
•
Print a price list for a particular customer
Refer to the Price Lists chapter for a description of Price Lists.
Inventory Control provides for the following types of prices:
•
Item default prices
•
Warehouse-specific prices
•
Sale prices
•
Contract prices
Item Default Prices
Item default prices are the prices that exist for an item in the Item file (Price-1/2/3/4/5 for the
stocking unit and for each alternate unit). If you do not enter a price code or set up any other
prices for an item, Price-1 for the corresponding selling unit will be used as the default selling
price. Price-1 is always used as the default price if the item is sold using the Inventory
selection.
If an item has a price code for the selected selling unit, the item's selling price is calculated by
applying the price code to the item default prices. Price codes are used only in Order Entry and
A/R.
Item default prices can be changed using either the Item prices or Items selection.
Warehouse-specific Prices
Warehouse-specific prices are the prices charged for an item at a particular warehouse. These
prices are used in place of item default prices when the item is sold from that warehouse in A/R
or Order Entry. If the item has a price code, it is applied to the warehouse-specific prices when
calculating the selling price.
174
Warehouse-specific prices can be entered using Item prices, only if you selected multiwarehouse pricing in Control information.
Sale Prices
Sale prices are the prices charged for specific inventory items or groups of items, for a specific
period of time. If a sale price is in effect when an invoice is entered in A/R or an order is
entered in Order Entry, the price used is the lower of the sale price and the price calculated
based on item default or warehouse-specific prices.
Sale prices are entered using Sale prices. Six distinct types of sale prices can be defined for the
stocking unit and for each alternate unit of an item, as shown below. However, A/R and Order
Entry use only the types that are indicated for Use sale prices by in Control information.
175
MULTIPLE SALE PRICES
If multiple sale prices exist for an item, the type that appears highest on the following list is
used by A/R and Order Entry.
1. Sale price for an item at a specific warehouse
2. Sale price for an item at all warehouses
3. Sale price for a category/sub-category at a specific warehouse
4. Sale price for a category at a specific warehouse
5. Sale price for a category/sub-category at all warehouses
6. Sale price for a category at all warehouses
Warehouse-specific sale prices may be set up only if you selected multi-warehouse pricing in
Control information.
Contract Prices
Contract prices are the prices charged for specific items, or groups of items, to specific
customers. They may be set up for a specific period of time, or to remain in effect until
removed from the file.
If a contract price exists for an item/customer when an invoice is entered in A/R or an order is
entered in Order Entry, the contract price is used instead of any automatically calculated price.
A contract price can instead be defined to only be active when it is the lowest price.
Contract prices are entered using Contract prices. Three distinct types of contract prices can be
defined for the stocking unit and for each alternate unit of an item, as shown below. However,
A/R and Order Entry use only the types that are indicated for Use contract prices by in Control
information.
If multiple contract prices exist for an item, the type that appears highest on the following list is
used by A/R and Order Entry:
1. Contract price for a customer for a specific item
2. Contract price for a customer for a category/sub-category
3. Contract price for a customer for a category
Warehouse-specific contract prices cannot be defined.
Deleting Prices
Any of the prices that you define through this selection may be deleted by pressing <F3> when the
individual price information is displayed. Sale prices and contract prices may also be deleted by
using either Purge sale prices or Purge contract prices.
In addition, if you delete an item using either Items or Purge inactive items, any associated
prices for the deleted items are also removed. If the status record for an item is deleted (using
176
Status, Items, or Purge inactive items), warehouse-specific prices for the item in the related
warehouse are deleted as well.
Select
Item prices from the Prices menu.
177
CHANGING ITEM PRICES
If you are using multi-warehouse pricing (as specified in Control information), you are asked if
you wish to enter prices by warehouse. Follow the screen instructions to update item default prices
or prices for a specific warehouse.
Select
Item prices from the Prices menu.
The following screen displays:
If you selected to enter prices by warehouse, the warehouse you specified
is shown at the top of this screen.
Note
Enter the information as follows:
1. Item number
Options
Enter the item number or bar code or use one of the options:
<F1>
For the next item number
<SF1>
For the previous item number
Blank
To look up the item by description
The existing non-zero prices for the item display, along with the item's stocking unit, pricing
unit, average cost (standard cost for standard valuation), and replacement cost.
Use Field number to change ? to change any of the displayed prices.
If the item has a pricing unit that is different from its stocking unit, enter the revised prices per
pricing unit. The price per stocking unit is then calculated and displayed.
If all prices for an item are currently zero, the message displays No prices exist for this item.
178
To enter new prices for an item (for example, if Price-3, 4 and 5 are zero or alternate unit
prices do not already exist), use the Items menu selection to enter the prices.
Warehouse-specific Prices
If you are entering prices for a specific warehouse, at Item number, enter the item number.
After the item is specified, enter each price to be used at that warehouse or press <Enter> for
the current price in the Item file (Item default).
If you press <Enter>, Item default displays as the price. The price in the Item file will be used
when the item is sold from this warehouse.
179
ENTERING SALE PRICES
Use the Sale prices selection to enter sale prices and dates for inventory items or groups of items.
When entering A/R invoices or O/E orders, if a sale price is in effect for an item, the lower of
the sale price and the automatically calculated price will be used as the default for the item.
Sale prices that have expired may be cleared from the file using this selection, or the Purge
sales prices selection on the Utility menu. Refer to Purging Sale Prices.
Select
Sale prices from the Prices menu.
If you are using multi-warehouse pricing (as specified in Control information), you are asked if
you wish to enter sale prices by warehouse. Follow the screen instructions to update item
default sale prices or sale prices for a specific warehouse.
On the next screen that appears, you are asked to enter the following information:
*1. Sale type
Enter I to enter a sale price for a specific item, or enter C to enter a sale price for a category or
sub-category of items.
Options
You may also use one of the options:
<F1>
To scan through the sale prices on file
<Enter>
After entering the first sale price, to default to the last
sale type entered
Format
One letter, either I or C
Example
Type I
If you enter I, and did not select to use this type of sale price in Control information, a message
displays to inform you that sale prices by item are not active.
If you enter C, and did not select to use either sale prices by category or sub-category, a
message displays to inform you of this.
Sale prices may be entered by item, by category, or by sub-category, regardless of the types
selected in Control information. However, these sale prices will not be used in A/R or Order
Entry until they are also selected in Control information.
Sale Prices by Item
If you specify a Sale type of Item, the following screen displays:
180
Enter the information as follows:
*2. Item number
Options
Enter the item number or bar code, or use one of the options:
<F1>
<SF1>
Blank
For the next item on file
For the previous item on file
To look up the item by description
The item's stocking unit, pricing unit, average cost (standard cost for standard valuation), and
replacement cost are displayed, along with its current regular price. If alternate units are
defined for the item, the current alternate unit prices are also displayed.
3. Start date
Enter the date that the sale price becomes effective. After entering the first sale price, you may
also press <Enter> to use the last sale price start date entered.
Format
MMDDYY
4. End date
Format
MMDDYY
Enter the last date that the sale price will be in effect. After entering the first sale price, you
may also press <Enter> to use the last sale price end date entered.
Stock unit
Price Unit
The above fields will be filled automatically with the information selected in Control
information.
181
5. Each sale price
Enter the price that will be used as sale price.
Format
Up to ten digits
Sale Prices by Category
If you specify a Sale type of Category, the following screen displays:
Enter the following information:
*2. Category
Enter the category of the items to be included in the sale price as defined in Control
information.
Format
Up to five characters
Example
Type MISC
*3. Sub-category
Enter the sub-category of the items to be included in the sale price, or press <F5> for All subcategories of the category.
Format
Up to five characters or use the option
Example
Press <F5>.
An entry of All is considered a category sale price because it includes the entire category. An
entry of a specific sub-category is considered a sub-category sale price.
If you enter a sub-category of All, and did not select to use sale prices by category (in Control
information), a message displays to inform you that category sale prices are not active.
If you enter a specific sub-category, and did not select to use sale prices by sub-category (in
Control information), a message displays to inform you that sub-category sale prices are not
active.
182
4. Start date
Enter the date that the sale price becomes effective. After entering the first sale price, you may
also press <Enter> to use the last sale price start date entered.
Format
MMDDYY
Example
Enter the current date.
5. End date
Enter the last date that the sale price will be in effect. After entering the first sale price, you
may also press <Enter> to use the last sale price end date entered.
Format
MMDDYY
Example
Enter the current date.
6. Price basis
Specify the price to be used as a base for discounting.
Options
Enter one of the following:
1
To calculate the sale price by discounting Price-1
2
For Price-2
3
For Price-3
4
For Price-4
5
For Price-5
After entering the first sale price, you may also press <Enter> to use the last price basis
entered.
Format
One digit from above or use the option
Example
Press 1.
7. Disc pct
Enter the percent by which to discount the price specified for Price basis when the item is sold
by its stocking unit, or press <Enter> to indicate that the stocking unit price is not on sale.
Format
Up to five digits or use the option
Example
Press <Enter>.
8. Alt-1 disc pct
Enter the percentage by which to discount the price specified for Price basis when the item is
sold by its first alternate unit. You may also press <Enter> to indicate that the first alternate unit
183
price is not on sale.
Format
Up to five digits or use the option
Example
Press <Enter>.
9. Alt-2 disc pct
Enter the percentage by which to discount the price specified for Price basis when the item is
sold by its second alternate unit. You may also press <Enter> to indicate that the second
alternate unit price is not on sale.
Format
Up to five digits or use the option
Example
Press 4.50
184
ENTERING CONTRACT PRICES
Use this selection to enter contract prices for items, or groups of items, for specific customers.
When entering an A/R invoice or O/E order, if a contract price is in effect for an item/customer,
the contract price is used instead of the automatically calculated price. A contract price can
instead be defined to only be active when it is the lowest price.
Contract prices that are no longer in effect may be cleared from the file using this selection, or
the Purge contract prices selection on the Utility menu. Refer to Purging Sale Prices.
Select
Contract prices from the Prices menu.
*1. Contract type
Enter I to enter a contract price for a specific item, or enter C to enter a contract price for a
category or sub-category of items.
If you enter I, and did not select to use this type of contract price in Control information, a
message displays to inform you that contract prices by item are not active.
Contract prices may be entered by item, by category, or by sub-category, regardless of the
types selected in Control information. However, these contract prices will not be used in A/R or
Order Entry until they are also selected in Control information.
Contract Price by Item
Type I to display the following screen:
The following screen displays:
Enter the information as follows:
*2. Customer number
Enter the number of the customer to receive the contract price.
185
Options
You may also use one of the options:
<F1>
To lookup by Contract ID
Blank
To look up the customer by name
Format
Up to 12 digits or use the options
Example
Type:10
After entering the first contract price, you can also press <Enter> for the last customer number
entered.
*3. Item number
Options
Enter the item number or bar code, or use Blank to look up the item by description.
Format
Up to 20 digits or use the options
Example
Type:1
4. Start date
Enter the date that the contract price becomes effective.
Options
You may also use one of the options:
<F2>
For None if there is no specific start date
<Enter>
After entering the first contract price, to use the last
contract start date entered
Format
MMDDYY
Example
Press <F2>.
5. End date
Options
Enter the last date that the contract price will be in effect, or use one of the options:
<F2>
For None if there is no specific end date
<Enter>
After entering the first contract price, to use the last
contract end date entered
Format
MMDDYY
186
Example
Press <F2>.
6. Contract ID
Options
Enter the identification information for this contract, or press <Enter> for subsequent contract
prices and to use the last contract ID entered.
Format
Up to 15 digits or use the options
Example
Press <Enter>.
7. Use contract or lowest price?
Enter C (Contract price) or L (Lowest price) to indicate whether to always use the contract price
or to use the lowest price, if a lower price exists for this item.
Format
One letter, L or C
Example
Type C, then press <Enter>.
8. Each price
Enter the price that will be used as the Contract price.
Format
Up to 10 digits
Example
Enter 25.50
Contract Prices by Category
If you specify a Contract type of Category, the following screen displays:
Enter the following information:
*2. Customer number
Enter the number of the customer to receive the contract price.
187
Options
You may also use one of the options:
<F1>
To lookup by Contract ID
Blank
To look up the customer by name
Format
Up to 12 digits or use the options
Example
Press <Enter> for customer name.
After entering the first contract price, you may also press <Enter> to use the last customer
number entered.
*3. Category
Enter the category of the items to be included in the contract price.
Format
Up to five characters
Example
Type Misc
*4. Sub-category
Enter the sub-category of the items to be included in the contract price, or press <F5> for all
sub-categories of the category.
An entry of All is considered a category contract price because it includes the entire category.
An entry of a specific sub-category is considered a sub-category contract price.
If you enter a category of All, and did not select to use contract prices by category (in Control
information), a message displays to inform you that category contract prices are not active.
If you enter a specific sub-category, and did not select to use contract prices by sub-category
(in Control information), a message displays to inform you that sub-category contract prices
are not active.
Format
MMDDYY
Example
Press <F2>.
5. Start date
Options
Enter the date that the contract price becomes effective, or use one of the options:
<F2>
For None if there is no specific end date.
<Enter>
After entering the first contract price, to use the last
contract end date entered.
188
6. End date
Enter the last date that the contract price will be in effect.
Options
You may also use one of the options:
<F2>
For None if there is no specific end date
<Enter>
After entering the first contract price, for the last contract end date entered
Format
MMDDYY
Example
Press <F2>.
7. Contract ID
Enter the identification information for this contract, or press <Enter> for subsequent contract
prices and to use the last contract ID entered.
Format
Up to 15 characters or use the option
Example
Type:12345
8. Use contract or lowest price?
Enter C (Contract price) or L (Lowest price) to indicate whether to always use the contract price
or to use the lowest price, if a lower price exists for this item.
Format
One letter, C or L
Example
Type C, then press <Enter>.
9. Price basis
Specify the price to be used as a base for discounting. Enter one of the following:
1
For Price-1
2
For Price-2
3
For Price-3
4
For Price-4
5
For Price-5
After entering the first contract price, you may also press <Enter> to use the last price basis
entered.
Format
One digit from above (1,2, or 3)
Example
Press 1
189
10. Disc price
Enter the percentage by which to discount the price specified for Price basis when an item is
sold by its stocking unit, or press <Enter> to indicate that the stocking unit price is not on
contract.
Format
Up to five digits or use the options
Example
Press <Enter>.
11. Alt-1 disc pct
Enter the percentage by which to discount the price specified for Price basis when an item is
sold by its first alternate unit. You may also press <Enter> to indicate that the first alternate unit
price is not on contract.
Format
Up to five digits or use the options
Example
Press <Enter>.
12. Alt-2 disc pct
Enter the percentage by which to discount the price specified for Price basis when an item is
sold by its second alternate unit. You may also press <Enter> to indicate that the second
alternate unit price is not on contract.
Format
Up to five digits or use the options
Example
Type:22.50
190
CHANGING PRICES
FOR
GROUPS
OF
ITEMS
Use this selection to change existing prices for a group of items.
Select
Group price changes from the Prices menu.
If you are using multi-warehouse pricing (as specified in Control information), you are asked if
you wish to change group prices by warehouse. Follow the screen instructions to change item
default prices or prices for a specific warehouse.
If you selected to change group prices by warehouse, the warehouse you
specified or All is shown at the top of this screen.
Note
Enter the information as follows:
1. Starting item # and
2. Ending item #
Enter the range of item numbers for which prices are to be changed or press <F2> for First and
Last. Follow the screen instructions.
Format
Up to 15 characters or use the option
Example
Press <F2> at both fields.
3. Category/sub-cat
Enter the category of the items for which prices are to be changed, or press <F5> for All
categories.
Format
Up to five characters or use the options
Example
Press <F5> for All categories.
191
4. Sub-category
Enter the sub-category of the items for which prices are to be changed or press <F5> for All
subcategories.
Format
Up to five characters or use the options
Example
Press <F5> for All categories.
5. Vendor #
Enter the vendor number to change item prices for a single vendor, or press <F5> for All
vendors.
6. Change prices by
Prices can be changed by adding or subtracting a dollar amount to a base figure, or by
computing a percentage of a base figure and adding or subtracting the result to the base figure.
Enter D (Dollar amount) to change prices by a dollar amount, or P (Percent) to change prices
by a percentage.
The base figure can be any of an item's current prices or its replacement cost. For prices other
than Price-1, the base figure can also be any of the item's new prices. You can specify a
different base for each price to be changed.
Format
One letter, D or P
Example
Type: D
7. Rounding method
Specify the method to be used for rounding the newly calculated prices. Enter one of the
following:
C
To round the prices to the nearest cent
P
To round the prices to the nearest price point
I
To increase the prices to the next price point
N
To not round the prices.
If you enter C, the third decimal position of each new price is rounded up or down to the
nearest cent. A value of 5 or greater is rounded up, and 4 or less is rounded down.
If you enter P or I to round or increase prices to the nearest or next price point, a window
appears for you to enter the price points to be used, as shown below:
192
193
PRICE POINTS
A price point is a particular price at which merchandise is sold. For example, the price points in
your store might be $0.79, $1.79, $2.79.
By selecting a rounding method of P or I, you can ensure that each calculated price coincides
with one of your price points.
In our example ($0.79, $1.79, $2.79), a two-digit price mask of 79 defines the price points. In
other words, no matter what price was calculated, the last two digits of that price are masked
with 79.
Some businesses require multiple price masks, or even different price masks for different price
levels of goods. Price points allows you to define up to three distinct price levels and up to
sixteen price masks within each level.
For example, your low-price goods are under $3.00 and you price them at $0.79, $1.79, and
$2.79. Your moderate goods are more than $3.00 but under $9.00, and you price them at
$5.95 or $8.95. The rest of your goods are over $9.00, and you price them in increments of
$10.00, at $9.95, $19.95, $29.95 and so forth.
You would define your price points as follows:
LEVEL-1
Cut-off price
# of digits
Price masks
LEVEL-2
LEVEL-3
3.00
9.00
Unlimited
2
3
3
***.79
**5.95
**9.95
**8.95
Price changes are calculated in the normal manner. Then, if you specified I as the rounding
method, the price is rounded to the next higher price point. If you specified P, the price is
rounded to the closest lower or higher price point.
Your entry for the Level-2 Cut-off price must be higher than the Cut-off price for Level-1, and
Level-3 must be higher than Level-2. Press <Enter> for Unlimited when entering the cut-off
price for the last level to be defined.
Your entry for # of digits to be entered for the price masks must be between 1 and 5, and
cannot be greater than the number of digits entered for the value of Cut-off price.
For Price masks, up to 16 masks may be entered for each level and the masks within each level
must be ascending. Press <Enter> when completed entering the masks in a level. If you
specified 3 or more for # of digits, you must enter a decimal point in the appropriate position of
each mask.
194
After defining price points, you may save them as default entries for use the next time you run
Group price changes.
8. Print or change
Options
Enter one of the following:
P
To only print a report showing all items for which
prices would be changed, along with the old and new
prices that would be changed. The prices are not actually changed.
C
To print the report and change the prices.
<Enter>
To indicate No change
If you selected to change by dollar amount, for each price shown, enter the amount to be
added to or subtracted from the base figure to calculate the new price. To subtract the amount,
include a minus sign.
For example, an entry of 2.50 establishes a new item price of the specified base, plus $2.50.
An entry of 2.50- establishes a price of the specified base, less $2.50.
If you selected to change by percentage, enter the percentage of the base by which to change
the price. To use a price less than the base figure, include a minus sign.
For example, an entry of 10 establishes an item price of the specified base, plus 10%. An entry
of 10- establishes a price of the specified base, less 10%.
For both dollar amount and percentage changes, you may also press <Enter> to indicate No
change at any price.
Basis
For each price being changed, enter the base to use.
Enter O to use one of the item's old prices, or enter R to use the item's replacement cost. For
prices other than Price-1, you may also enter N to use one of the item's new prices as the base.
An old price is a price on file for the item prior to the change you are making now. The
replacement cost is the cost of the item at the last purchase. A new price is a price for the item
that will be created by a change you have already made on this screen.
If you enter a basis of either O or N, a window displays for you to select which old or new
price you wish to use.
195
Note
For new prices, only those prices already specified on this screen are shown
in the window.
Select the old or new price to be used by using the arrow keys (or typing the first letter) to
position the cursor and press <Enter>.
If you specified to print the report without changing prices, you can display the report to the
screen or send it to a printer. The display option is not available if you are also changing
prices.
If Price-1 was changed for any item, the change in retail value of the reported items is shown at
the end of the report. The retail value is computed based on the current on-hand quantity of the
item and Price-1.
If you specified to change prices, the screen displays each item for which prices are being
changed.
If any errors occur when attempting to change prices for an item, no prices are changed.
196
PURGING SALE PRICES
Use this selection to purge sale prices that have expired.
Select
Purge sale prices from the Utility menu.
The following screen displays:
You are asked to enter an ending cut-off date. Enter the last date for which sale prices are to be
purged, or press <F5> to purge all sale prices regardless of ending date.
Sale prices with an End date on or before the cut-off date will be purged.
197
PURGING CONTRACT PRICES
Use this selection to purge contract prices that are no longer in effect.
Select
Purge Contract prices from the Utility menu.
The following screen displays:
1. Purge type
Enter the type that you want to purge from the following:
C
To purge by customers
I
To purge by item
D
For contract ID
Example
Type: C
2. Starting customer # and
3. Ending customer #
Enter the range of customers for whom contract prices are to be purged. Press <F2> to select
First to Last customer numbers. Follow the screen instructions.
Format
Up to 12 digits or use the option
Example
Press <F2> at each field to select All customers.
4. Ending cut-off date
Enter the last date for which contract prices are to be purged, or press <F5> to purge all
contract prices regardless of ending date.
198
Contract prices with an End date on or before the cut-off date for the specified customer range
will be purged.
Format
MMDDYY or use the option
Example
Press <F5> to select All.
199
Kits
This chapter contains the following topics:
Introduction to Kits
Work Orders
Entering Kit-items
Printing Kits
Copying Kits
Resequencing Kit-items
200
INTRODUCTION
TO
KITS
If you do not use kits (as specified in Control information), you may skip this chapter.
This chapter explains how to define kit-items
A kit is an inventory item that is constructed from other inventory items. To differentiate
between the kit and the items (raw materials) from which a kit is constructed, we refer to the kit
as the kit item and the items that are used to construct the kit as component items.
A kit item could be constructed as follows:
The Kits selection is used to specify each of the component items for a kit. Additionally, the
quantity of each component item is specified. This quantity is the quantity required to assemble
a single kit item.
Before using Kits, both the kit item and the component items must be defined as items using
the Items selection. A miscellaneous item may be used as a component item of a kit. Such
items would be used to take into account the cost of assembling the kit item, as well as certain
overhead costs.
Kits may also be used as components of other kits. You can do this by using the level number
which is assigned to each kit when is created. See below:
In the above example, kit item #20 is defined as consisting of item #180, item #52, and kit item
#124.
In order to allow kit-items to be components of other kits, each kit item is assigned a level
number. Whenever a kit item is used as a component of another kit, the level number of the
component kit item must be lower than the level number of the kit being constructed.
For example, kit item #20 is defined at level 2 and kit item #124 is defined at level 1.
The Kit selection enables you to do the following:
201
•
Enter and maintain kits.
•
Print an edit list of kits, or print the kits themselves.
•
Copy one kit to another.
•
Resequence the kit components.
202
WORK ORDERS
A work order (W/O) is a request to assemble a specified quantity of a kit from its component
items.
A work order can be immediate, in which case the kit is immediately available for sale.
Alternatively, a work order may be printed, issued, and the component items removed from
inventory, but the kit is not available for sale until the work order is completed.
The following outline describes how to use work orders to assemble kits. Details for each of
the selections used can be found in the appropriate chapters of this manual.
1. Enter a work order to assemble a specified quantity of the kit, using Work orders (Enter). You will
be requested for a work in process account, which is used to hold the cost of the kit while it is
being assembled.
2. Commit the required quantity for each component item needed to assemble the kits, using
Work orders (Commit inventory).
Note
If the work order contains a kit item as a component, then the kit item
must have been previously assembled using a separate work order. The component kit item will not be assembled as a result of this work order.
3. Print the work order using Work orders (Print work orders), unless you specified that no
printed work order is required in step 1 above.
Work orders are never printed for immediate work orders because the assembled kit will be
available immediately for sale.
4. Issue the work order using Work orders (Issue work orders). Issuing the work order will
result in Component usage transactions being generated and placed in the Inventory Transaction file for each component on the work order. These transactions may be viewed using
Inventory or printed along with other inventory transactions on the Inventory Edit List. Component usage transactions remove items from inventory for the purpose of constructing kits.
If the work order is an immediate work order, then a kit assembly transaction is generated in
addition to the component usage transactions. The kit assembly transaction may be viewed
using Inventory or printed along with other inventory transactions on the Inventory Edit List.
A kit assembly transaction places the quantity assembled of the kit into inventory.
The component usage transactions (and kit assembly transaction, if applicable) will be posted
along with other inventory transactions when you post all inventory transactions using
Inventory. Each component's inventory account will be credited for the cost of the quantity to
be used on the work order. The work in process account that was specified in step one is
debited for the same amount. Thus, the work in process account contains the cost of the kit
while it is being assembled.
5. The Incomplete Work Orders report can be used to determine work orders that are overdue
for completion, or that are coming due in the next few days, week, etc.
6. When the work order is completed, record this fact using Completed work orders (Enter)
selection.
203
This step is not applicable to immediate work orders, because they are completed at the time
they are originally issued.
7. Close the work order using Completed work orders (Close work orders). Closing a work
order will result in a kit assembly transaction being generated and placed in the Inventory
Transaction file. The kit assembly transaction may be viewed using Inventory or printed
along with other inventory transactions on the Inventory Edit List. A kit assembly transaction
places the quantity assembled of the kit into inventory.
The kit assembly transaction will be posted along with other inventory transactions when you
post all inventory transactions using Inventory. The work in process account will be credited
for the cost of the kits assembled and the kit item's inventory account will be debited for the
same amount. Therefore, the cost of the kit is transferred from work in process to the correct
inventory account.
This step is not applicable to immediate work orders, because they are completed at the time
they are originally issued.
8. As needed, a completed work order may be viewed using View (Work order history) or
printed using the Work Order History Report. This report shows the costs used for each component and the cost of the assembled kit.
Refer to the Inventory Transactions chapter for a description of how to disassemble a kit after it
has been assembled.
204
ENTERING KIT-ITEMS
With the Enter selection, you can enter new kits, change existing kits, or delete kits no longer in
stock. For work orders that are entered already but have not been issued, you may view, (but not
change) the components.
Select
Enter from the Kits menu.
Enter the following information:
*1. Kit-item #
The kit item must already have been defined as an item in the Items selection. It may not be a
miscellaneous item, nor may it be described as kit component only.
Options
Enter the item number of the kit-item or use one of the options:
<F1>
For the next kit on file
<SF1>
For the previous kit
<F2>
For the next item on file
<SF2>
For the previous item
Blank
To look up the kit item by its description
Format
Up to 15 digits
Example
Enter 1000
205
If you choose to look up the item by description, the cursor moves to the description field.
Both the spelling and the capitalization must match the description on file. Enter the text of the
description, or just the leading characters.
Options
You may also use one of the following options:
<F2>
For the next item
<SF2>
For the previous item
*2. Level #
Enter the level to be assigned to this kit item.
If you only assemble kit-items from raw materials (i.e., component items that are not
themselves defined as kits), then always enter 1 here.
Format
One character
Example
Type:1
3. Comments
Enter any comments about this kit-item. These comments print on the work order, as well as
appearing on the kit edit list. They are not seen by the customer, however.
Format
Four lines of 25 characters each
Example
Type: Reorder point: 20
Press <Enter> at Field number to change ? prompt and a second screen displays to enable you
to enter information about component-items for the kit. The following screen displays:
Enter the following information:
Component-item-#
The component item must already have been defined as an item in Items.
206
The item must already exist in the Item File.
Note
Miscellaneous items (those beginning with an asterisk) may be included as
components in kit- items. You may use them to assign labor charges and
overhead costs to a kit-item.
Options
If component items have already been assigned to this kit, enter the item number of the
component item or use one of the following options:
<F2>
To insert a new component item
<F3>
To delete a component item
<F5>
To move the component item
<F6>
For a full description
If you choose to look up the item by its description, the cursor moves to the description field.
Both the spelling and the capitalization must match the description on file. Enter the text of the
description, or just the leading characters.
Options
If you are assigning new components to this kit, you may also use one of the following options:
<F1>
For the next item on file
<SF1>
For the previous item
Format
Up to 15 characters or use the option
Example
Press <F1>.
Quantity
Enter the number of component-items required to assemble one kit item. Press <Enter> to
default to a quantity of 1.
Format
99999999.99999
Example
Press <Enter> for the default
Unit
The unit for each item is automatically displayed, and no entry is allowed.
Fill Reqs
For miscellaneous items, this field is set to Override and entry is not allowed.
The Fill requirements field enables you to define what you want to happen to a work order for
this kit when there is not enough of this component available. Your choices are:
207
F
O
S
Full
Don't issue a work order for this kit until the
full quantity of this component is available.
Note that this does not control whether or not
inventory will be committed to the work order
(this is a separate issue decided at the time the
work order is entered).
Override
Issue work order even though quantity is insufficient. Use this option if confident that new
inventory will soon be received, since physical
assembly of the issued work order is not possible until then. This option should also be used
for miscellaneous components (for which there
is never any quantity available).
Shortage
OK
Assemble the kit even if the full quantity of this
component is not available. The shortage is
reported in Commit inventory but does not stop
the work order from being issued. Use this
option for components to be used "while
supplies last".
Format
One letter from the table above
Example
Type: S
Whs
If you are not using multiple warehouses, this field is not applicable.
Options
Enter a warehouse code, or use the option:
<Enter>
To designate this warehouse as the “Central” warehouse
<F1>
To scan through the warehouses on file
Use the arrow keys to move up or down to the next line. Press <PgUp> or <PgDn> to move
between screens of component-items.
Options
When the cursor is positioned at a component item, you may also use these options:
Arrow keys
For the previous or next line
<PgUp> or
<PgDn>
For the previous or next screen
208
<Home> or
<End>
For the first or last screen
<F2>
To insert a component-item between two existing components
<F3>
To delete the current component
<F5>
To change the order of components, select the component you want and press <F5>. Use the arrow keys to
highlight the place where you want the selected component inserted and press <Enter>. Press <Esc> to cancel the move operation.
<F6>
To view the full description of this component-item.
(Press F6 again to resume entering component-items.)
209
PRINTING KITS
The Print selection enables you to print a list of which kits are on file. You can also print a list
of components for each kit.
Select
Kits from the Reports, Kits menu.
The following screen displays:
Enter the information as follows:
1. Starting kit-item # and
2. Ending kit-item #
Enter the range of kit-items to include on this report or press <F2> for First and Last. Follow
the screen instructions.
Format
Up to 15 digits or use the option
Example
Press <F2> for each field
3. Group by level # ?
Answer Y to use the kits' level numbers to group the kits when printing the list.
If you answer N, field number #4 displays (Not applicable).
Format
One letter, Y or N
Example
Type: N
4. Level #
Enter a kit-item level number to print the report for only one level, or press <F5> to include All
kit levels (the report prints in order first by level number, then by kit-item number).
210
Format
One digit
Example
Displays (Not applicable) in this example
5. Print full component item description ?
Answer Y to print the full description of each component-item.
Format
One character, Y or N
Example
Type: N
211
COPYING KITS
Use Copy when you want to define a kit that is similar to an existing one. You may copy
information from an existing kit-item to make a new kit-item, which you may then modify
using Kits (Enter).
The new kit-item must already exist in the Item file.
Select
Copy from the Kits menu.
The following screen displays:
Enter the following information:
1. Copy from kit-item #
Enter the number of the kit-item from which to copy.
Options
You may also use one of the following options:
<F1>
For the next kit item on file
<SF1>
For the previous kit item
Format
Up to 15 digits
2. Copy to kit-item #
Enter the number of the new kit item.
Options
You may also use one of the following options:
212
<F1>
For the next kit item on file
<SF1>
For the previous kit item
3. Level #
Enter the level to be assigned to this kit-item, just as in Kits (Enter).
Format
One digit
4. Comments
Enter any comments about this new kit item.
Format
Four lines of 25 characters each
The component items are then copied to the new kit item. You may modify the new kit item
information using Kits (Enter).
213
RESEQUENCING KIT-ITEMS
In the event of a system failure, component entries in a kit might become out of sequence. In
this case, an error message may appear when you try to modify a kit definition. The error
message will refer to this Resequence functions.
To recover from this situation, do the following:
STEP
DESCRIPTION
1
Run Resequence on the kit-item.
2
Print a Kit List showing the kit-item and its component-items.
3
Compare it to an earlier list to see whether any component-items are no longer in sequence or are missing.
4
Make any needed adjustments to component-items
through Kits (Enter).
Select
Select Resequence from the Kits menu.
A screen appears for you to enter the number of the kit-item to resequence:
Kit-item #
Enter the number of the kit-item to resequence.
Options
You may also use on of the following options:
214
<F1>
For the next kit item on file
<SF1>
For the previous kit item
The component-items in the kit-item are then resequenced.
Use <Esc> to return to the first screen.
215
Item Labels
This chapter contains the following topics:
Introduction to Item Labels
Printing Location Grids
Creating Label Layouts
Viewing Labels
Printing Layout Lists
Testing Label Layouts
Copying Label Layouts
216
INTRODUCTION
TO
ITEM LABELS
Item labels may be printed in Inventory Control or under the Ctl and the menu selection
Labels. Read this chapter for printing the labels in Inventory Control or read the PBS
Administration manual for setting up and printing labels under Ctl.
This selection allows you to create inventory labels of your own design. You can specify
which inventory information (fields) to show on the label and the exact arrangement (layout) of
that information on the label.
Although you will probably use Item labels most of the time to create labels that attach to and
identify your inventory items, it can also be used to create an index of your inventory on 3" x
5" index cards, inventory fact sheets, and customized lists of inventory information.
Usually, you would follow these steps in creating an item label:
STEP
DESCRIPTION
1
Use Location grid to print a grid on top of your labels
form (or sheet), and sketch the layout of your label on
it.
2
After you have an idea of what your label will look
like, use the Layout selection to first describe its general appearance, and then to select each field and
specify where it will print on the label.
3
Use Layout list to print a list of your layout specifications. This step will indicate any problems in
your layout.
4
Use Test to try your new label layout.
5
After you are satisfied with the label layout, use the
Print selection to print your item labels for the items
and warehouses that you designate. Refer to theItems
chapter.
6
Use the Copy function to create another layout if it is
similar to the label already designed. (Use Layout to
tailor the new (copied) layout rather than creating the
label from scratch.)
This chapter describes how to create a label in the same sequence as outlined above.
Selecting Item Labels
Select
Item labels from the I/C menu.
217
PRINTING LOCATION GRIDS
Although Location grid is not the first selection on the menu, it is normally the first function to
use when you begin designing a new item label.
A location grid consists of column and row markers printed on top of one of your labels (or
one of your label sheets), to be used as an aid in laying out the overall design of the label.
Use the location grid as a worksheet to help you to establish the exact location (the row and
column) of each field and piece of text that you intend to print on the label. Mark the positions
of your fields and text on the grid and, later, use it as a guide when entering the label layout.
Select
Location grid from the Item labels menu.
The following screen displays:
Enter the information as follows:
1. # of rows to print (top to bottom)
Enter the number of rows you want to print on the grid, or press <F2> for five rows on each
label.
Format
99
Example
Press <F2> for five rows.
2. # of print columns (left to right)
Enter the number of columns you want printed on the grid, or press <F2> for 35 print columns
on each label.
Format
99
Example
Press <F2> for 35 columns.
218
Make any needed changes and press <Enter> to print the label grid. Insert your label or label
sheet in the printer. Follow the screen instructions to print the location grid.
219
CREATING LABEL LAYOUTS
The Layout selection allows you to enter all of the specifications needed to define the size of your
labels, the number of labels across the label sheet, and which I/C Item fields will print on the label.
To assist you in answering some of the questions in the following screens, use the location grid
on which you have designed your label.
Two screens are used:
1. A single screen to describe the general appearance of the label.
2. A separate screen to describe each field on the label.
Select
Layout from the Item labels menu.
The following screen displays:
General Appearance of Labels
On this screen you identify this label layout with a number and description, and define its general
appearance.
From this screen you can work with both new and existing label layouts. If a label layout exists
for the label number you specify, that label layout appears and is available for changes or
deletion.
Enter the following information:
1. Label #
Enter a number to identify this label layout.
Options
You may also use one of the options:
220
<F1>
For the next layout on file
<SF1>
For the previous layout
Format
Three characters
Example
Type: A
2. Description
Enter a description for this label layout.
Format
30 characters
Example
Type: Sample inventory item
3. # of labels across page (max 4)
Format
A single digit from 1 to 4
Example
Type: 3
Enter the number of labels to print across the page (label sheet), up to 4 labels.
4. # lines per label (max 66)
Enter the number of lines (rows) to print on a label, up to 66 lines.
Format
99
Example
Type: 10
5. # lines between labels
Enter the number of lines to skip between labels. (For most labels this is 1 line.)
Format
99
Example
Type: 1
6. # columns per label (max 132)
Enter the number of columns (at 10 cpi) to print for a label, up to 132 columns.
Format
999
Example
Type: 33
7. Starting column for 1st label
Enter the starting column number for the first label. This column number determines the
distance from the left the printing will start on your label sheet.
Format
99
Example
Type: 1
221
Fields eight, nine, and ten display only if you entered 2, 3, or 4 (respectively) at field # 3.
8. Starting column for 2nd label
This field only appears if you specified (in field #3 above) that more than one label is to be
printed across the sheet.
Enter the starting column for the second label. This column number must be at least the starting
column for the first label, plus the number of columns per label (field #6 above) plus 1.
Format
999
Example
Type: 34
9. Starting column for 3rd label
This field only appears if you specified (in field #3 above) that more than 2 labels are to be
printed across the sheet.
Enter the starting column for the third label. This column number defaults to the starting
column for the second label, plus the number of columns per label (field # 6 above).
Format
999
Example
Press <Enter> for 67
10. Starting column for 4th label
This field only appears if you specified (in field #3 above) that four labels are to be printed
across the sheet.
Enter the starting column for the fourth label. This column number defaults to the starting
column for the third label, plus the number of columns per label (field #6 above).
Format
999
Example
Not applicable in this example.
Press <Enter> to terminate the description of the label as a whole, and start the description of
the individual fields.
222
Located at the bottom of this screen is a window showing the first 10 fields available for you
layout. To view the remainder, press <PgDn>.
It makes no difference in what order you enter information into the fields. A field must be
visible in the window before it can be entered. Each field is entered on a separate screen. When
all a label’s fields have been defined, press <Esc> to return to the menu.
The exact format of this screen will vary depending upon the nature of the field currently being
described. Examples of all formats are shown below:
1. Field #
Format
99
Enter the number of the field name that you want to select for the label.
Options
You may also use one of the following options:
<Blank >
To enter text instead of a field number. Refer to Inserting Label Text.
<F1>
To display the label
<PgUp> or
<PgDn>
To scan through additional item fields
Format
99
Example
Type: 1 for Field # to select item number.
Some fields are optional and may not be present for your company; those not present are
omitted from the window seen on the screen, and the remainder are renumbered.
The screen now displays as follows:
223
This screen enables you to specify where to print the selected field (item number) and how you
want it to look when it is printed.
The appearance of this screen below Row and Column depends on what type of field you have
selected. A field will be one of three types, depending on the type of information that it
contains:
Alphanumeric fields
may contain any combination of letters, digits, and special symbols.
Date fields
only contain dates.
Numeric fields
only contain digits, along with any decimal points, minus signs or parentheses (for negative
numbers), and commas.
Numeric fields only contain digits, along with any decimal points, minus signs or parentheses
(for negative numbers), and commas.
Date fields only contain dates.
Alphanumeric Fields
Enter the information for an alphanumeric field as follows:
2. Row
Specify the row in which to print this field.
Format
99
Example
Type: 2
3. Column
Specify the starting column in which to print this field.
Format
999
Example
Type: 10
4. Length to print (maximum = nn)
Enter the number of characters you want to print in this field, up to the maximum number
shown, or press <Enter> for the maximum length of the field allowed by the software.
Format
99
Example
Type: 15
5. Justify
Justify means to adjust characters within the space allowed. Enter one of the following:
224
L
To left-justify the characters. The characters will be
aligned with the left-hand margin of the space for this
field.
R
To right-justify the characters. The characters will be
aligned with the right-hand margin of the space for this
field.
N
For no justification. The characters will be printed
exactly as entered.
Format
One character from the list above
Example
Press <Enter> for left justification
The screen now displays as follows:
When you press <Enter> at Field number to change ?, you are returned to Field # for selection
of another field.
Next, we will use the Item average cost. Select this by entering 16, and the screen now
displays as follows:
225
Numeric Fields
The choices for a numeric field depend on the characteristics of that particular field (for
example, its maximum length, if negative numbers are allowed, if it has any decimal places,
etc.).
Item average cost is a numeric field.
Fields #5 through #7 appear only as needed. For example, Item average cost allows fractional
and negative values. Vendor lead time, however, does not, so fields #6 and #7 do not appear.
Example
Enter a row of 3 and a column of 10. After specifying the
row and column, specify the remainder of the information
as follows:
4. Number of integers
Enter the number of integers (digits to the left of the decimal point) you want to print in this
field, up to the maximum shown, or press <Enter> for the maximum shown.
Format
99
Example
Press <Enter> for the maximum
5. Use commas?
If commas are not appropriate for a particular field, you are not given the option of using
commas.
Answer Y to use commas when printing this field on a label.
Format
One character, either Y or N
Example
Type: Y
6. Decimals
If the field has no decimal places, this choice does not appear.
Enter the number of decimal places you want to print, up to the maximum shown, or press
<Enter> for the maximum shown.
Format
9
Example
Type 2 to show cost only cents (instead of the default five
digits)
7. Show negative with
If this field cannot contain a negative value, this choice displays (Not applicable.)
Options
Enter one of the following:
226
M
To show negative numbers with a minus sign
P
To show them in parentheses
on left or right?
If you select to show negative numbers with a minus sign
Options
Enter one of the following:
R
To place the minus sign on the right. (-1234)
L
To place the minus sign on the left. (1234-)
Print where?
If you select to show negative numbers with parentheses.
Options
Enter one of the following:
F
To place the parentheses in fixed positions
(Parentheses enclose the entire size of the field regardless
of the numbers.)
N
To them next to the number.
(Parentheses enclose the numbers, stripping out leading
spaces.)
8. Print when zero?
Answer Y to print a zero when the number is zero. Answer N to leave the field blank when the
number is zero.
Format
One character, either Y or N
Example
Type: Y
The screen now displays as follows:
227
Now press <Enter> at Field number to change ?, so that you are back at Field #, ready to
select another field. Select Last sale on (item). First you will first have to press <PgDn> until
this field is visible.
The following screen displays:
Date Fields
If you select a date field, such as Last sale on (item), the screen will have the above
appearance.
Enter the row and column in the same way as for an alphanumeric field.
Then specify the format to use when printing the date:
4. Date format to use
Enter one of these choices for how the date is to be printed:
1
MM/DD/YY
2
MM/DD
228
3
DD-MMM-YY
4
DD-MMM
5
Month fully spelled
MM represents the month number. (January = 1, December = 12). MMM represents the month
abbreviation (January = JAN).
When you enter your choice, the Will look like: field on the right side of the screen shows how
the date will look. The length of the field displays so you will know how much room this field
will occupy on the label.
Format
One digit from the above list
Example
Type: 1
The screen now displays as follows:
229
VIEWING LABELS
While entering the label layout, you can press <F1> to view a picture of the label. This will
give you an idea of the appearance of your label.
The width of the label is your entry for # columns per label, and the number of lines is your
entry for # lines per label.
•
X’s appear to represent the alphanumeric fields that you selected, in the length and location
you specified.
•
9's appear for numeric fields.
•
Dates are represented differently, depending on the format you have chosen for the date.
•
?'s appear where any of the fields overlap, in which case you need to change the position of a
field.
Press <F1> to view your label. A screen similar to this displays:
Options
Use one of the following options:
<Up> or
<Down>
To scroll your label up and down one row at a time.
This is useful to bring a row to the bottom of the screen
to be near the column numbers, where you can more
easily judge a field's column position.
<PgUp> or
<PgDn>
To shift your view of the label up and down by a
screen-full at a time. This is useful when your label
size is large than can be displayed on the screen.
<F2>
To shift your view to the right edge of the label. This
option only appears when your label is wider than the
screen. Press <F2> again to shift back to the left.
230
<Esc>
To exit the View label screen and return to the layout
screen.
Press <Esc> and then press <Enter> to display the following screen:
Inserting Label Text
You can enter text and position it where you want it to print on each label. For instance, you would
probably want to print the text Item #: next to the Item number field on each label. You can also
use this option to print dashed lines (---------------) or symbols on your labels.
To insert text, press <Enter> at Field #.
This enables you to enter text and position it where you want it to print for each label. For
instance, you might want to print the caption Item #, next to the item number field on each
label.
Enter text information as follows:
1. Field #
Text appears in this field, to indicate that you are working with text rather than fields.
231
2. Row
Enter the row in which you want the text to print.
Format
99
Example
Type: 2
3. Column
Enter the column in which you want the text to begin printing.
Format
99
Example
Type: 5
A ruler appears, with numbers starting at the column you specified above, and extending up to
40 columns. The ruler stops at the right-hand edge of your label, and thus may be shorter than
40 columns.
Format
40 characters
Example
Type:Item #
4. Text
Enter the exact text you want to appear in that location.
5. Suppress ?
Answer Y if you want the text to be suppressed (not printed) when some field (to be specified
next) is zero or blank. Answer N if you want to suppress the text.
Format
One character, either Y or N. The default is N.
Example
Press <Enter> for N.
For example, suppose you had specified that the text Vendor-# would be printed next to the
Vendor number field value on your label. To prevent the Vendor-# text from printing for items
that have no vendor, you would answer Y here.
Field #
If you answered Y to Suppress?, enter the number of the field that, when zero or blank, will
cause the text not to print.
If you have not already selected this field to print on the label, you get a warning message.
However, your choice is still accepted. Make a note to select the field later. The field you select
here must also be selected to print on the label.
Changing or Deleting Text
To delete a text entry, or change the location or wording of text you have entered, display the
text screen by pressing <Enter> at Field #.
A screen similar to this displays:
232
A window shows information on the text entries already entered.
To delete a text entry, enter its row and column number, then press <F3>.
To change the wording of the text, enter its row and column number, select field #4, and enter
the new wording. You can also change the Suppress? information by selecting field #5 and
entering a new answer or new field number.
To change the row or column in which the text starts, enter its current row and column
numbers. Then select field number 2 or 3 and enter the new row or column number.
Example
Press <Enter> at Field number to change ? to leave the
text unchanged.
Modifying Fields
Sometimes you may need to change the appearance or print location of a field that you have
already selected to appear on your label. This section describes how to change a field's
appearance or location, delete it, or print it in additional locations on the label.
The first step is to select the field you want to modify by entering its number at Field #.
Format
99
Example
Type: 1 to reselect the item number field.
The screen now displays as follows:
233
The Field usage window shows how many times you have used this particular field in your
label and where you have used it. You can use each field up to four times. In this example,
Item number has only been used one time -- in row 2, column 10.
Now select the usage of the field you wish to modify by entering its row in Row, and its
column number in Column.
Format
99 in each field
Example
Enter 2 for Row, then enter 10 for Column.
For instance, if you choose Row 2, Column 13 in this example and change the column to
column 16, the screen displays similar to this:
Use Field number to change ? to change any of the information about this field,
Options
You may also use the options:
<F1>
To view the label
<F2>
To delete this particular usage. Any other usages will
not be affected.
Example
Enter 3 at Field number to change ? to enter a new column. Enter 11 for column so that the Item number field
will now print in column 11 of the label. Press <F1> if
you want to view the change in location for Item number.
After making changes, press <Enter> at Field number to change ? and you will be back at
Field # ready to select another field.
Printing Fields
You can print any field in up to 4 different locations on the label.
To use a field again, enter its number at Field #.
234
Example
Type: 1 to reselect the Item number field.
The screen now displays similar to the following:
Enter the new location (row and column), and the remaining information to specify how to
print the field in its new location. When you print your labels, this field will print in all of the
locations that you have specified.
Example
Enter 5 for Row and 16 for Column . Press <Enter> to
accept the defaults for Length to print and Justify . Then
press <F1> to view both usages of Item number on your
label. Press <Esc> so that this second usage is not saved.
235
PRINTING LAYOUT LISTS
This selection prints a report that lists the label layouts you have entered for one or more labels.
For each label layout listed, it shows you the label's general appearance information and the
information specifying the appearance and location of each field on the label.
After you have entered all of the layout information for your label, we recommend that you
print this report so that you can view all of the layout specifications together at once. Based on
the information in the report, you can make adjustments and corrections to your label layout
before using Test to print a test label.
Select
Layout list from the Item labels menu.
The following screen displays:
1. Starting label # and
2. Ending label #
Enter the range of label numbers for which to print the list. Follow the screen instructions.
Format
Three characters
Example
Press <F2> at each field for First and Last.
3. Start each format on separate page ?
Answer Y to print each format on a new page. Otherwise, answer N.
236
TESTING LABEL LAYOUTS
Use this selection to test your label layout. It will print a test label, substituting X’s for each field
that you have selected to print on the label.
For example, if you have selected the Item number field to appear in row 1 at column 12, and
to print its full length of 15 characters, the test label will have XXXXXXXXXXXXXXX
printed on row 1, starting at column 12.
This feature is useful for verifying a new label layout prior to actual use and for checking
printer alignment.
Select
Test from the Item labels menu.
The following screen displays:
Enter the following information:
Label to test
Enter the number of the layout you want to test.
Options
You may also use the options:
<F1>
For the next layout on file
<SF1>
For the previous layout
Format
Three characters
Example
Type: A to access the layout example previously created.
237
You will be prompted with Any change?. Make any needed change. If you enter N, the test
label will print.
238
COPYING LABEL LAYOUTS
This selection copies a label layout to a new one.
You can use this selection to quickly produce a new label layout by copying an existing layout
that is similar to the new one. After copying the label, tailor the new layout as described in the
Modifying Fields section.
Select
Copy from the Item labels menu.
The following screen displays:
Enter the following information:
1. Copy from layout #
Enter the number of the layout you wish to copy.
Options
You may also use the following options:
<F1>
For the next layout on file
<SF1>
For the previous layout
Format
Three characters
Example
Type: A to access the layout example previously created.
2. Copy to layout #
Enter the number to assign to the new layout. You may not copy over an existing layout.
Format
Three characters
Example
Type: B to create a new layout.
239
Make any needed changes. When you press <Enter>, the layout is copied. A message informs
you that processing is occurring.
240
Inventory
Transactions
This chapter contains the following topics:
Introduction to Inventory Transactions
Entering Inventory Transactions
Entering Adjustments
Entering Sales and Credit Memos
Entering Transfers
Kit Assembly EntriesKit Assembly Entries
Entering Component Usage Transactions
Entering Job Usage Transactions
Data Import
Importing Receivings and Transfers
Printing Inventory Edit Lists
Posting Inventory Transactions
Distributions to General Ledger
Cost Correction Notes
Hardware Failure During Posting
241
INTRODUCTION
TO
INVENTORY TRANSACTIONS
Use this selection to enter inventory transactions, or to import receiving or transfer transactions
from an external disk file. Once the transactions are entered (or imported) and verified to be
correct, you can post them to the permanent I/C files.
There are eight different types of transactions that can be processed in Inventory:
•
Receivings
•
Sales
•
Credit memos
•
Adjustments
•
Transfers (under multi-warehousing)
•
Kit assembly (if kits are used)
•
Component usage (if kits are used)
•
Job usage (if Job Cost is used)
Processing of inventory transactions varies depending upon whether you have selected
Average cost, LIFO or FIFO, or Standard cost in your I/C Control file.
Average cost is discussed in this chapter. Additional information on processing inventory
transactions under LIFO, FIFO, and standard cost can be found in the appendix titled
LIFO/FIFO Cost Valuation. The standard cost method itself is documented in the appendix
titled Standard Cost Valuation.
There are other transaction sources besides Inventory. Kit assembly and component usage are
generated from work orders and are not entered here. Adjustments can be generated by
expanded physical count. Sales and credit memos can be generated from Order Entry and
Accounts Receivable. Receivings can also be generated from Purchase Order.
Note that references to warehouses apply only when multi-warehousing is being used.
When inventory transactions are entered for serialized or lot-controlled items, related serial
transactions are automatically created. The serial transactions are automatically posted when
the associated inventory transactions are posted. (These serial transactions are not accessible
through the Serial numbers selection.)
Correcting entries: You can press <F5> at the Field number to change ? question to mark any
inventory transaction that will be passed to G/L as a correcting entry. Refer to the Control
Information chapter in the G/L User documentation for more information.
242
ENTERING INVENTORY TRANSACTIONS
Select
Inventory from the I/C menu.
A screen displaying the following five Passport Business Solutions inventory selections will be
displayed:
•
Enter enables transactions to be entered and (until they are posted) modified or deleted.
•
Fixed format import does the receiving and transfer of transactions that can be automatically
imported into the Inventory Transaction file from a file that is not normally part of the Inventory control system. The Fixed format import is included with the I/C system.
•
Data import allows you to import any file that is a fixed length or csv format. It is a separate
product and requires that you licence Data Import Manager.
•
Edit list produces a list of the transactions prior to posting. Edit lists are optional and can be
printed as often as desired until the entries are posted.
•
Post does the actual posting of the transactions and prints a permanent register.
You can work with both new and existing transactions.
Select
Enter from the Inventory menu.
243
Graphical Mode
Transaction List Box
The list box displays up to 6 inventory transactions at a time. You may sort the transactions by
item number in ascending or descending order. Only column names in red may be sorted. To
change the sort direction or field either click on the column name or the arrow to the right of
the column name or use the View menu options.
To locate an inventory transaction, start typing the item number. You may also use the
up/down arrows, Page up, Page down, Home and End keys to locate an item. The <F1> and
<SF1> keys function the same as the up/down arrow keys.
Inventory transactions that display in the list box are available for changes or deletion. The
fields for the selected item display in the lower part of the screen.
When an inventory transaction is found, you may select the <Enter> key or Edit button to start
editing.
Inventory Transaction Buttons
The buttons at the top of the screen and keyboard equivalents do the following:
Button
Keyboard
Description
New
Alt+n
For adding a new inventory transaction
Edit
Alt+e
For editing an existing inventory transaction
244
Save
Alt+s
For saving a new item or changes to an existing inventory transaction
Save/New
Alt+w
This button combines the Save and New buttons by first
saving the item and then starting a new inventory transaction
Cancel
Alt+c
To cancel the editing or adding of an inventory transaction
Exit
Alt+x
To exit the screen. Exit works like cancel when you are
adding or editing an inventory transaction
Character Mode
The following screen displays:
Enter the following information:
Item number
Entering the Item for a New Transaction
Enter the item number or select <Enter> to lookup the item by description.
Options
You may also use the options:
<F2>
For the next item in item number order
<SF2>
For the previous item number
<F8>
or click on
binoculars
button
To look up the item by number or on the description
field by description
If you are using multi-warehousing, the cursor moves to the Warehouse field.
245
For an Existing Transaction in Character Mode Only
Enter the item number, warehouse code (if you are using multi-warehousing), and transaction
type for the transaction you wish to change.
Options
You can also use the options:
<F1>
To find the next transaction
<SF1>
For the previous transaction
If there is no matching transaction on file, continue entry as if this were a new transaction.
Warehouse
This field appears only if you are using multi-warehousing.
Specify which warehouse is involved in the transaction. Enter the warehouse, or press <Enter>
for the Central warehouse.
If this is a transfer, enter the warehouse code of the sending warehouse (the one the item is
being sent from), or press <Enter> for the Central warehouse.
Type
Enter one of the following transaction types:
Receiving
Receivings must be entered here unless you are
licensed for Purchase order. See the Purchase
order documentation for more information.
Sale
Sales can be entered here, but are normally handled through A/R Invoicing, O/E orders or P/S transactions
Credit memo
Credit memos can be entered here, but are normally handled through A/R Invoicing, O/E orders
or P/S transactions
Transfer
Available only if using multi-warehousing
Adjustment
Adjustment
Kit assembly
Available only if using kits
Component
usage
Available only if using kits
Job usage
Available only if using Job Cost with I/C
After the first transaction is entered, for subsequent transactions, this field defaults to the type
entered for the prior transaction.
246
The fields to be entered from this point forward depend on the transaction type you specify in
this field. Each of the types is shown in the following sections.
If you are using Purchase Order, receivings should be entered alternatively using the
Receivings selection in P/O. When the receivings are posted in P/O, inventory receivings
transactions are generated automatically.
Receivings
Graphical Mode
After you select Receiving, the following screen displays:
The ReceivingAdjustment/Kit tab displays.
Character Mode
After you select R for Receivings, the following screen displays:
247
A receiving enables you to enter additions to your inventory.
Adjustments are explained in this section as well, because of their similarity to receivings, but
receivings will be considered first.
This section will be the only one to describe each field on the screen. Subsequent sections
avoid much repetition by describing only what is different about the transaction type. Anything
stated here about any field on the receivings screen applies to the same field on the other
transaction types. Exceptions are noted as they occur.
Note
If you are using Purchase Order, receivings may be entered using this Inventory selection, but are normally entered using the Receivings selection in
P/O. When these receivings are posted in P/O, inventory receivings transactions are generated automatically and posted.
Quantity avail
This is the sum of the quantities at all warehouses. Average cost
This is the computed average actual cost for all items currently in inventory, as reported at the
time of receipt. If serialized unit costing is in effect (for which refer to the Serial Inventory
chapter), the average cost does not reflect the individual unit costs.
Replacement cost
The Replacement cost displayed is that found in the Item file. Refer to the Items chapter for a
definition. This field does not display when Standard cost is the inventory valuation method.
Whs avail
This displays the quantity available at the warehouse. There may be more stocking item.
Price-1, Price-2, Price-3, Price-4, Price-5
These show the prices charged.
Enter the information as follows:
248
Transaction date
The current date is displayed for the first transaction. For subsequent transactions, the last date
entered is displayed.
Enter the date for this transaction or press <Enter> to use the date shown.
It is important to make any necessary change to Transaction date as the transaction is being
added. The transaction date cannot be changed in an existing transaction.
Format
MMDDYY, or use the option
Example
Press <Enter> to accept the system date
Document #
For the first transaction, you must type in the document number you wish to use. For
subsequent transactions, it displays the last document number entered.
Enter a document number and press <Enter> to accept the default.
Options
You may also use the options:
<Enter>
To use the previously entered document number.
<F1>
For the next entry matching the item, type, and transaction date entered.
Quantity received
This is the quantity received, where Unit represents the unit defined for this item. (Each, Gal,
Tons etc.) Zero and negative quantities are not accepted, nor can the unit be changed. For
serialized items, the unit should be Each and the quantity should not be fractional (that is, there
should be no digits to the right of the decimal).
Enter the number of stocking units received, or press <F2> for an item with alternate units
defined, to enter the quantity in an alternate unit.
If you press <F2>, a window displays for you to enter the quantity and actual cost per alternate
unit. Press <F2> again to switch to a different alternate unit or stocking unit for the item.
If you enter the quantity and actual cost as an alternate unit, the equivalent number of stocking
units and the cost per stocking unit is also displayed in the window. Upon leaving the window,
the stocking unit equivalents are displayed.
The name of this field varies depending on the entry type, and will appear on different screens
as quantity adjusted, quantity credited, etc. It is entered as a positive value in all cases, except
that Adjustments and Job Usage permit either positive or negative entries.
Enter the number of units received.
249
You cannot enter zero in this field. A negative quantity or a decimal quantity may be entered
for items that are not serialized or lot-controlled.
The new total quantity available and the new quantity available at this warehouse are updated
automatically.
After entering a receiving the New qty avail field is updated. However this is temporary.
Format
99999999.99999
Example
Type: 40, and then press <Enter>
Actual cost per (stocking unit)
Enter the actual cost of this item per your stocking unit or press <F2> to default to the
replacement cost.
If the item's quantity on hand and average cost are zero in the Item file, the average cost you
enter here is automatically updated in the Item file when you complete entry of the receiving.
If you entered Quantity received in an alternate unit, the Actual cost is also entered per
alternate unit.
Format
99999999.99999
Example
Press <F2>
Correcting entry
Check this box if this is a correcting entry. Leave it unchecked if it is not.
Format
Check box where checked is yes and unchecked is no
Example
Select <Enter> to leave it unchecked
New location
This field initially displays the location. Changes to these fields can be made when Field
number to change ? displays.
When this transaction is posted, any new prices and location you have entered here update the
applicable fields in the item record.
Format
Enter up to four characters
Example
Press <Enter> for Central warehouse
Comment
Enter any comment you wish about this receiving.
Form
Enter up to 25 characters
Example
Type: Partial Receiving
250
New Price-1 through New Price-5
These five fields initially displays the new prices. Changes to these fields can be made when
the Field number to change ? prompt appears.
Format
99999999.99999
If you entered Quantity received in an alternate unit, specially formatted text about the
alternate unit automatically displays here.
Make any needed changes or press <F5> to flag this entry as a correcting entry or to remove
that flag if present.
Serialized and Lot Items
For an existing transaction for a serialized item, you are then asked if you wish to change the
related serial number information.
If you answer Y, or if you are entering a new transaction for a serialized item, a window
appears for entry of information for each serial number.
Serialized Items
The window appears similar to this:
Graphical Mode
The cursor will be at the Serial # field.
Character Mode
A window displays similar to this:
251
A serial number must be specified for each unit received prior to posting the transaction.
The number of serial numbers remaining to be entered displays at the top of the window.
Enter the information as follows:
Serial #
For new serial entries
Enter the serial number of the first item, or press <Esc> to terminate serial number entry prior
to entering a serial number for each unit received.
Format
Enter up to 15 digits
Options
If the quantity received is greater than 1, after entering the first serial number, you may use one
of these options:
<F1>
To display the next serial number already entered for
this transaction
<F2>
To automatically increment the previous serial number
(the next consecutive serial number)
To automatically increment the previous serial number
by one for each remaining unit received.
<F5>
<Esc>
When assigning consecutive serial numbers (alpha or
numeric), the system will assign the numbers only until
the significant specified digits are used. For example,
start with #10 as the first serial number and receive 100
assigning consecutive numbers. The system stops at 99
because only two digits are specified.
To terminate serial number entry prior to entering a
serial number for each unit received
If you press <Esc> to terminate serial number entry prematurely, a message informs you that
all serial numbers are not entered. You are then given three choices:
252
Continue
Resume serial number entry for this transaction.
Exit
Terminate serial number entry for this transaction, even though all serial numbers are not
entered. To complete serial number entry prior to posting a transaction, refer to the For an
existing serial entry instructions below.
Abort
The entire inventory transaction is canceled and removed from the file. The Inventory screen
appears to enter a new transaction.
When the receivings are posted, the serial numbers entered here are recorded in the Serial file
with an unsold status.
For existing serial entries
To change a serial number, enter the serial number for which information is to be changed, or
press <F1> to display the next serial number for this transaction.
To add a serial number, enter the serial number in the normal manner. The screen shows the
number of Serials to add if the Quantity received is greater than the serial numbers already
entered.)
To delete a serial number, enter the serial number to be deleted or press <F3> to delete the
serial number for this transaction.
When the serial number to be deleted is displayed, press F3 to delete it. You are asked to
confirm the deletion.
New/Used
Press <Enter> to default to N if the item is new, or type U to indicate this item is used.
After the first serial number has been entered, you may also press <F2> to assign the same
values as the prior serial number to this and the remaining fields.
P.O. #
Enter the purchase order number under which this item was bought, press <Enter> for the first
serial number, to default to the Document # entry. For subsequent serial numbers, to default to
the P.O. number entered for the prior serial number.
Format
Up to 15 digits or use the option
Example
Press <Enter>.
This field is used when printing the Flooring Report. If your inventory is financed, you may
use this field to identify the finance company for this serial number.
253
Source
Enter the source from which this serial number was obtained, or press <Enter> for the first
serial number to default to the vendor number for the item.
For subsequent serial numbers, to default to the Source entry for the prior serial number.
This field is used when printing the Flooring Report. If your inventory is financed, you may
use this field to identify the finance company for this serial number.
Reference
Enter any remark you wish for this specific serial number.
Options
You may also use the options:
<Enter>
To leave this field blank
<F1>
For the first serial number, to default to the first 20 characters of the Comment field. For subsequent serial
numbers, to default to the Reference entry for the prior
serial number.
Format
Up to 20 digits or use the option
Example
Press <Enter>
Make changes as usual. The serial fields then clear for entry of the next serial number. Press
<Esc> at Serial # when completed entering the serial numbers for the receiving.
Example
Enter these four serial numbers to complete the receiving:
DS4558, DS4559, DS4560, DS4599. Press <F2> at
New/Used for each to default the remaining fields to the
same entries as the prior serial number
Lot-controlled Items
For an existing transaction for a lot-controlled item, you are then asked if you wish to change
the related lot number information.
If you answer Yes, or if you are entering a new transaction for a lot-controlled item, a window
appears for entry of information for each lot number.
For lot-controlled items, the quantity received must be fully allocated to one or more lot
numbers prior to posting the transaction. The quantity allocated cannot exceed the quantity
received.
The quantity remaining to be allocated displays at the top of tab.
Enter the information as follows:
254
Lot number
For new lot number entries
Enter the first lot number, or press <Esc> to terminate lot number entry prior to fully allocating
the quantity received.
Options
If the quantity received is allocated to more than one lot number, after entering the first lot number,
you may use one of these options:
<F1>
To display the next lot number already entered for this
transaction
<F2>
To automatically increment the previous lot number
(next consecutive lot number)
<Esc>
To terminate lot number entry prior to fully allocating
the quantity received
Character Mode
If you press <Esc> to terminate lot entry prematurely, a message informs you that lot allocation
is incomplete. You are then given three choices:
Continue
Resume lot number entry for this transaction.
Exit
Terminate lot number entry for this transaction, even though the quantity received has not been
fully allocated. To complete lot number allocation prior to posting a transaction, refer to the
For an existing lot number entry instructions below.
Abort
The entire inventory transaction is canceled and removed from the file. The Inventory screen
appears to enter a new transaction.
For existing lot number entries
To change a lot number, enter the lot number for which information is to be changed, or press
<F1> to display the next lot number for this transaction.
To add a lot number, enter the lot number in the normal manner. The screen shows the Qty to
allocate if the Quantity received is greater than the lot number allocations already entered.
To delete a lot number, enter the lot number to be deleted or press <F1> to display the next lot
number for this transaction.
When the lot number to be deleted is displayed, press <F3> to delete it. You are asked to
confirm the deletion.
255
Quantity
Enter the quantity received of this lot number, or press <F1> to use the remaining quantity to
allocate.
Format
99999999.99999
Example
Enter the quantity or use the option
The Qty to allocate is updated automatically.
P.O. #
Enter the purchase order number under which this item was bought.
Options
You may also use the options:
<Enter>
For the first lot number, to default to the Document #
entry. For subsequent lot numbers, to default to the P.O.
number entered for the prior lot number
<F2>
To default this field and the remaining fields to the
values entered for the prior lot number
Source
Enter the source from which this lot number was obtained, or press <Enter> to default to the
vendor number for the item. For subsequent lot numbers, to default to the source entered for
the prior lot number.
Format
Up to six characters or use the option
Example
Press <Enter>
Reference
Enter any remark you wish for this specific lot number.
Options
You may also use the options:
<Enter>
To leave this field blank
<F1>
For the first lot number, to default to the first 20 characters of Comment. For subsequent lot numbers, to
default to the Reference entry for the prior lot number
Make changes as usual. Click on the Save button or select <Alt+s>.
Press <Esc> at Lot number when completed entering the lot numbers for the receiving.
256
Example
Type 834W for the next lot number, press <F1> at Quantity to use the remaining 20 gallons, press <Enter> at P.O.
# and Source to accept previous values, and type 20
Gal rec'd as the reference text for this lot number
When completed entering the receivings, exit the Enter screen, print an edit list, and post the
transactions. Return to Inventory (Enter) and this point in the documentation when posting
completes.
257
ENTERING ADJUSTMENTS
An adjustment allows the quantity-on-hand values to be adjusted so that they reflect the actual physical count in your inventory.
In this way you can account for beginning inventory, breakage, theft, losses, incorrect
receiving, over shipment, etc. Adjustments can increase or decrease the quantity on-hand of
any item in your inventory.
Adjustments are entered only through this selection; unlike many of the other Inventory
transactions they are never automatically generated by some other function.
Note
Fields already described above for Receivings are not repeated here except
where some difference exists.
Begin by typing A for adjustment in field #1. Continue as follows:
For LIFO/FIFO, you will be asked, Adjust a specific layer?.
The following screen appears:
Graphical Mode
The ReceivingAdjustment/Kit tab displays.
258
Character Mode
Entry Date
For LIFO/FIFO this field is called Layer date for adjustments to a specific layer.
Document #
Enter the document number, just as for a receiving.
Format
Up to ten digits
Quantity adjusted
Enter a positive or negative quantity.
If the item is serialized, (1) Whole numbers are required (fractional quantities are not allowed, and (2) the quantity can be adjusted downwards only
to the extent that the number of serialized units does not exceed quantity
on hand.
Note
Format
99999999.99999-
Reduce qty used
This field only appears if:
•
Control information specifies that kits are used, and
•
You have entered a positive value in the preceding field.
This feature is provided to enable disassembly of kits after posting. If you are doing this, check
this box . In all other cases unchecked is no.
Format
Check box, checked is yes and unchecked is no
Actual cost for (unit)
Format
99999999.99999
Example
Type 11.22
259
New price 1 to 5
These fields display current prices.
In character mode, they can be changed from Field number to change ?.
Adj account #
Enter the adjustment account number. This must be a valid G/L account number.
New location
Enter the new location for the item.
Comment
This field allows entry of up to 25 characters for comments.
Average Cost Notes
Average cost is an attribute of the stocking item but cannot be changed through Items. Average
cost is also not affected by Sales.
If it becomes necessary to change an average cost, do so through entries in Inventory. You
may use upward or downward adjustments, or use receiving and credit memo entries.
The following equation determines the new average cost:
Changing Average Cost
A simple way to change Average Cost is to use two entries in two separate posting runs:
•
The first entry would adjust the quantity to zero.
•
The second entry would adjust the quantity to the correct amount, and the average cost would
become the cost entered for the second entry.
260
ENTERING SALES
AND
CREDIT MEMOS
Because of their similarity, both sales and credit memo transactions are described in this
section. A sale will be entered first, then a credit memo.
Note
If you are using Accounts Receivable, sales and credit memos may be
entered using this Inventory selection (if for some reason an invoice document is not desired), but are normally entered through the Invoices selection in A/R.
Sales For an inventory transaction, type S. The following screen displays:
Graphical Mode
The Sales/Credit memo tab displays.
261
Character Mode
Enter the information as follows:
Transaction date
Enter the date of the transaction, just as for a receiving.
It is important to make any necessary change to the Transaction date field as the transaction is
being added. The transaction date cannot be changed in an existing transaction.
Format
MMDDYY
Document #
Enter the document number, just as for a receiving.
Format
Up to ten digits
# of (unit of measure) sold or
Quantity sold
Enter the quantity of this sale. When you enter this quantity, the new quantity available is
automatically calculated and displayed. Negative and zero quantity transactions are not allowed for sales.
Format
99999999.99999
Price per (stocking unit)
Enter the unit price, or press <F2> to use Price-1 for this item.
Note
Because I/C does not do conversions between stocking and pricing units, all
sale quantities and prices must be entered in stocking units.
Format
9999999.999
Example
Type the price or use the option
262
Actual cost for (overstocking unit)
No entry is allowed in this field for sales. The average cost for the item is automatically
displayed.
If you are using serial costs (as specified in the I/C Control file) and this transaction is for a
serialized item, the sale is costed at the specific serial item cost from the Serial file (if
available), rather than the average cost from the Item file.
Comment
Enter any comment you wish about this sale.
Format
Type up to 25 characters
Serialized Items
For an existing sale transaction for a serialized item, you are then asked if you wish to change
the related serial number information.
If you answer Y, or if you are entering a new transaction for a serialized item, a window
appears for entry of information for each sold serial number.
Entry is similar to entries to Receivings except for a sale you may also enter the Invoice #,
Customer # and Warranty fields.
Automatically Created Transactions Upon posting invoices in A/R, O/E and P/S, sales and credit memo inventory transactions are
generated automatically and immediately posted to Inventory. They are therefore not available
for modification or viewing by this selection.
Returned merchandise entered via the RMA selection of the O/E module are ultimately
transferred as credit memos to the A/R module, and are processed by Inventory no differently
from any other A/R or P/S credit memos.
Fields already described in the preceding Receivings and Adjustments section are not repeated
here except where some difference exists.
263
For Average Cost
To illustrate adding sales and credit memos under average cost, enter the information as
follows through the Enter screen: Begin by selecting Sale for the Type field.
Example
Type: S for Sale
Price and Quantity Information
The software equates the selling item to its associated stocking item, and displays:
•
The stocking unit
•
The total quantity available at all warehouses
•
Prices 1 through 6, with their selling unit
•
The average cost (as computed from previous receivings)
•
The replacement cost (as defined in Items)
•
For LIFO/FIFO, the cost and quantity available from the top layer of history, as of the last
posting. If no layers exists a statement displays to that effect.
•
For Standard cost, standard cost displays.
Whs avail
The quantity available at that location displays as Whs avail.
The section Entering Adjustments shows a Sale resulting from your entries. The screen for a
Credit Memo is identical except that:
•
Field #3 is named Transaction date rather than Entry date.
•
Field #5 is named Quantity credited rather than Quantity sold.
Continue entering information as follows:
Example
Press <Enter> to use the current date.
Type: 155216 for Document #
Continue entering information as follows:
Quantity sold or Quantity credited
One or the other of these captions displays depending upon whether this is a sale or a credit
memo.
Enter the quantity of this sale. When you enter this quantity, the new qty avail and New whs
avail are automatically calculated and displayed.
If this item is serialized, the quantity must be a whole number.
Format
99999999.99999
Example
Type: 10
264
For FIFO/LIFO
The number of units available in the top LIFO/FIFO layer displays above as part of the old
information. If your sale quantity exceeds this amount, you will be using at least one new
LIFO/FIFO layer to satisfy the sale quantity.
Price for (unit)
Unit represents the selling unit on file for this item.
Automatic calculation of sale price, contract price, or discounted price, such as occurs in the
Invoices selection, is not available in the Inventory selection. This is because Inventory
transactions are not specific to any particular customer.
Enter the unit price or press <F2> for Price-1.
Format
99999999.99999
Example
Press <F2>
Ext price
The extended price appears automatically.
Actual cost per (unit)
For credit memos, actual cost must always be entered. For sales, this field is informational and
contains the average cost, which cannot be changed.
LIFO/FIFO and Standard Costs
Standard cost sales are costed at the standard cost on file.
For LIFO/FIFO the exact actual cost per unit of the sale is determined by automatically
running through enough LIFO/FIFO layers to satisfy the quantity of the sale. The total cost,
represented by the layers to be relieved, is divided by the sale quantity to obtain the actual cost
per unit. Unposted entries existing elsewhere for the same item do not affect the layers, so the
cost of this item when it comes to be posted may vary from what you see now. To see the cost
used for posting, print an edit list just before posting.
Comment
Enter any comment as follows, or press <Enter>.
Example
Type: New Account for the comment
Cost Center (or Sub-account)
Your account structure as defined in Company InforFormat
mation
Example
Press <Enter> to accept the default
At this point the screen is complete. Make any needed changes, or use the standard options as
described for Receivings.
265
Example
Post this entry using Post as described later in this chapter
To see the impact of your entries on the LIFO layers, post them and review the resulting
Inventory Transaction Register. Post is described in Posting Inventory Transactions.
Credit Memos
Follow the same procedure as for a Sale above and enter the information shown on the next screen.
Specify C for Type.
Graphical Mode
The Sales/Credit Memo tab displays.
Character Mode
266
Example
Following the same procedure as for a receiving above,
enter the information shown on the next screen.
Specify C for Type
Example
Post this entry using Post as described in Posting Inventory Transactions
267
ENTERING TRANSFERS
If you are using single-warehousing, skip to the Adjustments section.
This section describes how transfers between warehouses are handled. This is available if you
are using multi-warehousing.
Specify T for Type and the following screen displays:
Graphical Mode
Character Mode
268
Item #
Format
15 characters
Enter the item number or description, or scan the bar code, as for a receiving.
Warehouse-1
Format
Two characters
Enter the warehouse code of the sending warehouse (the one the item is being sent from), or
press <Enter> for the Central warehouse.
Type
Enter the transaction type for a transfer.
Format
One character
When a transfer is specified for Type, Warehouse changes to Warehouse-1, and you are asked
to enter:
To warehouse-2
Format
Up to two digits
Warehouse-2 designates the receiving warehouse. Enter the warehouse code or press <Enter>
for the Central warehouse.
At this point, existing information displays as follows:
Quantity avail
This is the sum of available quantities for all warehouses.
Whs avail Wh-1
This is the available quantity of the item at the sending warehouse.
Whs avail Wh-2
This is the available quantity at the receiving warehouse.
Enter the remaining information as follows:
Transaction date
Format
MMDDYY
Enter the date of the transaction, just as for a receiving.
As with other transaction types, make any necessary change to Transaction date at this point.
The transaction date cannot be changed in an existing transaction.
Document #
Format
Up to ten characters
269
Enter the document number, just as for a receiving.
Quantity transferred
Enter the quantity transferred (in stocking units). Negative or zero quantities are not accepted.
Fractional quantities are not accepted for serialized items.
Format
99999999.99999
When this field is entered, the new available quantities at the sending (Wh-1) and receiving
(Wh-2) warehouses display.
New avail wh-1 and New avail wh-2
These are the new available quantities of the item at the sending and receiving locations,
respectively. This information appears when the quantity is entered.
Comment
Format
25 characters
Enter any comments you wish about this transfer.
270
KIT ASSEMBLY ENTRIES
If you do not use kits, proceed to the Job Usage Entries section called Entering Job Usage
Transactions
The transaction types K (kit assembly) and U (component usage) are used only if you specified
in Control information that you are using kits and you use work orders to assemble kits.
Kit assembly transactions are created automatically when work orders are closed and when
immediate work orders are issued. Kit assembly transactions cannot be entered (or deleted)
through Inventory. Also, you do not enter any kit assembly transactions.
When a kit assembly transaction is posted, the quantity assembled (as shown on the entry
screen) is used to increase the quantity on hand of the kit-item. Therefore, a kit assembly
transaction is the manufacturing counterpart of a receiving transaction used to enter a quantity
received of goods purchased for resale.
This screen is intended for viewing or changing kit assembly transactions. You can not enter or
delete them from this screen. You can change them only to the extent of changing the
comment.
The screen that appears in Inventory is similar to the screen for receivings, except that:
•
Qty assembled is shown for kit assembly instead of Qty received
•
a WIP account # (Work in Process) is displayed
Fields already described in the Receivings and Adjustments sections are not repeated here
except where a difference exists.
Begin by selecting Kit assembly for the Type field.
Example
Type: K for type
Document #
Issue work orders creates document numbers for each kit assembly entry by prefixing W/O to
the 6-digit work order number. Enter the following:
Format
Up to ten characters
Example
Type:W/O-000001
There are 2 fields that can be edited for a kit assembly:
New location
Enter the new location for the kit.
Comment
Format
25 characters
Enter any comments you wish about this kit assembly.
271
ENTERING COMPONENT USAGE TRANSACTIONS
You may select a Component usage transaction type only if you chose in Control information to
use kits. Refer to the chapters on Kits and Work Orders, for details on these subjects
Component usage transactions are created automatically when work orders are issued. Component
usage transactions cannot be entered (or deleted) through Inventory.
When a component usage transaction is posted, the # used (as shown on the entry screen) is
subtracted from the quantity on hand of the component item and the Qty used PTD and Qty
used YTD of the component item are increased. Thus, a component usage transaction is similar
to a downward adjustment, except it represents a usage of the inventory to construct a kit as
opposed to a downward adjustment for some other reason.
You can use Inventory to view kit assembly transactions. Changes can be made to the
Comment field.
The screen that appears in Inventory is similar to the screen for downward adjustments, except
that:
•
# used is shown for kit assembly instead of # adjusted
•
WIP account # is shown instead of Adj. acct
Fields already described in the Receivings and Adjustments sections are not repeated here
except where a difference exists.
Example
Type:U for Type
Document #
Issue work orders creates document numbers for kit assembly entries by prefixing W/O to the
6-digit work order number. Enter the document number:
Format
Up to ten characters
Example
Type:W/O-000001
Quantity used
The new quantity available and new warehouse available are automatically calculated and
displayed.
Comment
Format
25 characters
This is the only field that can be changed. Enter any comments you wish about this kit
assembly.
272
ENTERING JOB USAGE TRANSACTIONS
This section applies only if Job Cost is interfaced to I/C. If it isn't, skip to the section, Printing
Inventory Edit Lists.
Job Usage entries cause items to be allocated to a specific job or to be returned to inventory
from that job. These processes resemble Adjustments in as much as the same screen can both
increase or decrease quantity on hand.
Job usage transactions are created automatically in the Job Cost module but may also be
entered by this Inventory transaction.
The transaction type J (job usage) is available only if you are using Job Cost with I/C.
Fields already described in previous sections above are not repeated here except where some
difference exists.
Enter a positive value for usage of items on jobs, and a negative value to return items from jobs
to inventory. Zero is not accepted.
Format
99999999.99999
6. Actual cost per (unit)
You may not change the actual cost of items sent to a job, but you may do so for items being
returned to inventory.
Format
99999999.99999
7. Job #
Enter the job number in which the item is being used, or from which the item is being returned
to inventory. The job description and status appear.
If this job has sub-jobs and/or change orders, you are also asked to enter these numbers.
Format
Up to seven characters
8. Cost item
Enter the cost item to which this transaction applies.
Format
999999999.99999
9. Job account #
Enter the G/L account number for this job, or press <F2> to use the G/L account number
assigned to the cost item entered above.
273
DATA IMPORT
Data import provides flexible field mapping, numeric conversion, date conversion and other
options for converting field peculiarities. It has many more conversion options than the Fixed
format import.
Data import will allow the importing of receivings, transfers, adjustments and layer
adjustments.
A data import control record must be entered before this selection will operate properly. The
control record contains field by field instructions for the importing of the file. See the Data
import (DI_PBS.PDF) documentation for details on the set up of importing inventory
transactions.
There must be no existing transactions on file to run this function.
Select
Data import from the Inventory menu.
Follow the instructions on the screen.
Use Inventory (Edit list ) to print a report of the transactions after they are imported.
Use Inventory (Enter) to view or change transaction information after the import.
274
IMPORTING RECEIVINGS
AND
TRANSFERS
Receiving and Transfer transactions can be imported into the Inventory Transaction file from an outside source.
The field conversion specifications are somewhat limited using the Fixed format import menu
selection. If you want much more flexibility when defining field mapping, numeric conversion,
date conversion and other options to converting field peculiarities use Data import. Data
import will allow the importing of receivings, transfers, adjustments and layer adjustments. See
the Data import documentation for details.
Entering General Import Information
First, you must tell the system whether this is a receivings or a transfer transaction. Then, you
must define the layout of the file that you wish to import.
Select
Fixed format import from the Inventory menu.
The following screen displays:
1. Transaction type
Enter the transaction type, R or T.
Format
One character
Example
Type: R
The following screen displays:
275
2. Transaction date
Enter the date.
Format
MMDDYY
Example
Press <Enter> to default to the current date
3. Document number
Enter the document number for the import transaction.
Format
Up to 10 characters
Example
Type:Import
4. Default comment
Enter a comment.
Format
Up to 25 characters
Example
Press <Enter>
5. Warehouse
Enter a warehouse if applicable. Press <Enter> to default to Central warehouse.
Format
Two characters
Example
Press <Enter>
If you entered a Type T transaction type in Field 1, the following screen displays:
276
5. From warehouse, and
6. To warehouse
These fields allow you to enter the appropriate warehouse codes for the transfer.
Make any changes or press <Enter> at Field number to change ? to continue.
For a Receivings Import, the following screen displays:
Entering New Import Formats
Enter an import format in a similar manner for receivings and transfers, as follows:
1. Import filename
Enter the name of the file to be imported. If the import file is not in the top-level PBS folder
(directory), include the drive letter or path name where it is located.
Format
Up to 14 characters
Example
Type: C:\IMPORT1.TXT
277
2. Field format
Format
One character
Enter the letter that corresponds to the format of each field in a record of the import file.
Options
Enter the one of the following options:
D
If the data fields in a record are in variable starting columns, and are separated by a specific, delimiting character at the end of each field
F
if each data field in each record always begins in a specific, fixed column.
If you specify a delimited field format, two additional fields display for you to further define
the delimiting character.
Delimiting char
Format
Two characters
Specify the ASCII character used at the end of each field to separate the fields in a record. The
character should be entered in its two-character hexadecimal form.
The corresponding ASCII character is then displayed in quotation marks next to the
hexadecimal entry.
Text in quotes?
Answer Y if the text fields in a record are enclosed in quotation marks. Otherwise, answer N.
Use the remaining fields on this screen to describe the item number, quantity, serial number,
and lot number information in the import records. The fields that display depend on the field
format that you entered in field #3.
Format
One letter, either Y or N
Example
Type: N and then press <enter>
3. Item numbers
Describe the method of determining item numbers, as follows:
Primary lookup by
Enter the letter corresponding to the first method to be used to locate each item number.
Enter I if the actual item number appears in the import record, or enter B if the item's bar code
exists in the import record.
Format
One letter, either I or B
Example
Type: I and then press <enter>
278
Secondary lookup by
Enter the letter corresponding to the alternate method of locating the item number in each
import record, or press <Enter> for no secondary lookup method.
During the import, the item number (or bar code) is initially looked up using the method
specified for Primary lookup by. If a matching entry is not located using that method, the
Secondary lookup by method is used.
Format
One letter, either I or B
Example
Type: I and then press <enter>
Field number
For delimited field formats, enter the relative field number of the item number (or bar code) in
an import record.
For example, if you enter 4 for this field, the item number (or bar code) for each item would be
found in the fourth field, and is preceded by three occurrences of the delimiting character
specified above in field #3.
Format
Enter up to two digits
Example
Type: 10 and then press <Enter>
Start Position and Length
Length
For fixed position field formats, specify the starting column number and length of the item
number (or bar code) field in an import record.
For example, if you enter a Start position of 15, and a Length of 10, the item number (or bar
code) for each item would be found beginning at column 15 and extending for 10 characters.
4. Quantities
Describe the handling and location of the quantity in each import record, as follows:
Use 1 if blank?
Answer Y to import a default transaction quantity of 1 for any record whose quantity is spaces.
Otherwise, answer N.
If you answer Y, any numeric quantity, including 0, is imported as the value in the record. If
the quantity is spaces (blank), a quantity of 1 is imported. Non-numeric values that are not
spaces are reported as errors.
If you answer N, numeric values are imported as usual. All non-numeric values, including
spaces, are reported as errors.
Format
One letter, either Y or N. There is no default
Example
Type: Y and then press <Enter>
279
Implied decimal places
Enter the number of decimal places contained within the quantity to be imported, either 1, 2, or
3, or press <Enter> to default to 0 if the quantities are always expressed as whole numbers.
If the quantity to be imported contains a decimal point to separate whole digits from the
decimal positions, the decimal point is used to determine the number of decimal places, and
your entry in this field is ignored.
Field number
For delimited field formats, enter the relative field number of the quantity in an import record.
Start Position and Length
For fixed position field formats, specify the starting column number and length of the quantity
field in an import record.
5. Serial numbers
Describe the location of the serial number in each import record for serialized items, as follows:
Field number
For delimited field formats, enter the relative field number of the serial number in an import
record, or press <Enter> to default to None if you are not using serial numbers.
Format
Up to two digits or use the option
Example
Press <Enter> for None
Start Position and Length
For fixed position field formats, specify the starting column number and length of the serial
number field in an import record, or press <Enter> to default to a Start position of 0 if you are
not using serial numbers.
Format
Up to two digits or use the option
Example
Press <Enter> for Start Position
6. Lot numbers
Describe the location of the lot number in each import record for lot-controlled items, as
follows:
Field number
For delimited field formats, enter the relative field number of the lot number in an import
record, or press <Enter> to default to None if you are not using lot numbers.
Start Position and Length
For fixed position field formats, specify the starting column number and length of the lot
number field in an import record, or press <Enter> to default to a Start position of 0 if you are
not using lot numbers.
280
Format
Up to two digits or use the option
Example
Press <Enter> for Start Position
Make changes as usual.
If you defined a new import format, or changed the saved import format, you are asked if you
wish to save (replace) the format.
Answer Y to save this import format for use in subsequent import sessions. Only one import
format may be retained. The import format is saved in the I/C Control file.
Answer N to use this import format for the current import session only. Any existing saved
import format remains unchanged.
After you answer this question, a screen appears for you to select where to print the Inventory
Import Log. The import process then begins.
Using the details supplied in the import format, the information from the import file is used to
create inventory receiving or transfer transactions for the corresponding items and warehouse.
As the data file is being imported, a count of the records being imported and the item number
being processed is displayed.
Any error conditions encountered during the import session are recorded on the Inventory
Import Log, and a message notifying that errors have been recorded in this file is displayed on
the screen at the end of the import session. The import error log resides in the Passport toplevel folder (directory), and is named IMPORTxx.LOG, where xx is the Company-ID.
Use Inventory (Enter) to view or change any of the information on the transactions after they
are imported.
281
PRINTING INVENTORY EDIT LISTS
This selection will print an Inventory Edit List for your review before you post all of your inventory
entries.
Select
Edit list from the Inventory menu.
Graphical Mode
Character Mode
Starting item number
Ending item number
Enter the item numbers of the starting and ending transactions to print. Follow the screen
instructions.
Report format
Select either the Detail, Summary, or Condensed version for the Inventory Transaction Edit
List.
A summary list does not include serial number/lot number information for any transaction.
282
A condensed list consolidates like transactions for an item into a single entry. In addition, the
condensed list does not show G/L account numbers for any transaction or job numbers and
cost items for job usage transactions.
OK or Cancel
Select OK to print the edit list of Cancel to return to the menu.
Check the Inventory Transaction Edit List for warning messages regarding transactions that
will not be posted. If such a message appears for any transaction, use Inventory (Enter) to
correct or complete entry of the transaction prior to posting.
283
POSTING INVENTORY TRANSACTIONS
Select
Post from the Inventory menu.
You are then asked to specify where to print the Inventory Transaction Register.
The Inventory Transaction Register is printed followed by a period of processing which
updates the Item, Status, and the I/C Distribution to G/L files with the new transaction
information.
If you entered transactions for serialized and lot-controlled items, the serial number and lot
number information prints on the Inventory Transaction Register, and is updated to the Serial
file.
If you attempt to post transactions that are incomplete or incorrect, a message describing the
error appears on your Inventory Transaction Register. These erroneous transactions are not
posted and remain in the transaction file. Posting of accurate and complete transactions
continues normally.
284
DISTRIBUTIONS
TO
GENERAL LEDGER
Inventory transactions are posted in the order shown below. The G/L distributions generated by
transaction posting are also described here.
Receivings
•
Debit item's Inventory Account (defined in the item header screen of Items)
•
Credit Balance Sheet Liability Account (defined in Control information)
If a receiving occurs when there is a negative quantity on hand:
•
Debit (or credit) Cost Correction Account (defined in Control information) if the cost for the
receiving is greater than average cost, or credit if it is greater. If identical, do neither.
Kit Assembly Entries
•
Debit kit item's Inventory Account (defined in the item header screen of Items)
•
Credit Work in Process Account. This account is stored in the kit assembly transaction by
Issue work orders or Close work orders. It is always the Work in Process Account that was
entered on the original work order entered in Work Orders.
•
In addition, if a kit assembly occurs when there is a negative quantity on hand:
Debit the Cost Correction Account (defined in Control information) if the cost for the kit
assembly is greater than average cost, or credit it if the reverse is true. Accumulated round-off
errors of odd pennies are also directed to the Cost Correction Account.
Credit Memos
•
Debit item's Inventory Account (defined in Control information)
•
Credit the Memo Account. The Credit Memo Account is obtained by combining the Credit
memo account # field of this item with the Cost Center (or sub-account) entered for the specific transaction.
Upward Job Usages
•
Debit item's Inventory Account (Item file)
•
Credit Job Account (entered for the transaction)
If a job usage occurs when there is a negative quantity on hand:
•
Debit item's Inventory Account (Item file)
•
Debit (or credit) Cost Correction Account (I/C Control file)
•
Credit Job Account (I/C Control file)
* See the note below titled Special Note on Cost Correction.
285
Upward Adjustments
•
Debit the item's Inventory Account
•
Credit the Adjustment Account. The Adjustment Account is obtained from the specific transaction.
Transfers
•
No distributions are created for transfers.
Downward Adjustments
•
Debit the Adjustment Account. The Adjustment Account is obtained from the specific transaction.
•
Credit the item's Inventory Account
Sales
•
Debit the Expense Account. The Expense Account is obtained by combining the Expense
account # field from the item with the Cost Center (or sub-account) entered for the specific
transaction.
•
Credit the Inventory Account.
Component Usage
•
Debit the Work in Process Account. Issue work orders take the Work in Process Account
entered on the original work order (via Work Orders) and moves it to the component usage
transaction.
•
Credit the component item's Inventory Account (defined in Control information).
Downward Job Usages
•
Debit Job Account (entered for the transaction)
•
Credit item's Inventory Account (Item file)
Transactions are posted in the same order and with the same amounts as appear on the
Inventory Transaction Register.
Cost Correction Notes
When there is a negative quantity on hand and a receiving, kit assembly, credit memo, upward
job usage, or upward adjustment is posted, if the cost is greater than average cost, then the cost
correction account is debited for the difference between the two costs. If the cost is less than
average cost, then the cost correction account is credited.
Cost correction can also occur in a kit assembly when the sum of the exact costs for each
component are different from the sum of the rounded costs for each component (i.e., when
each component's cost is rounded to two decimal places). In this case, inventory value has
either been lost or gained as a result of manufacturing the item.
286
For example, if a kit-item is assembled out of two inventory items whose costs are 3.487 and
4.235 each, the inventory accounts for the components are credited for 3.49 and 4.24,
summing up to 7.73. However, the actual cost of the kit-item is 3.487 + 4.235 = 7.722, which
results in a debit of 7.72 to the kit-item's inventory account. The penny that is lost in the
manufacturing process is debited to the cost correction account.
For LIFO/FIFO
If a receiving occurs when there is a negative LIFO/FIFO layer, debit the Cost Correction
Account if the cost for the receiving is greater than replacement cost; or credit it if the reverse
is true. If identical, do neither.
For Standard Cost
Debit the Purchase Variance Account if the actual cost is greater than standard cost of the kit
item, or credit it if the reverse is true. Do nothing if both are equal.
Order of Posting
Entries are posted in the same order and with the same amounts as they appear on the
Inventory Transaction Register.
Possible Cost Flow Calculation Problem
Inventory control normally posts all of an item's receivings on a given date before posting that
item's sales.
287
HARDWARE FAILURE DURING POSTING
In the rare event of a computer failure during posting (as the result of a power outage or other
hardware problem), it is wise to restore your files from your backup copies and rerun the
posting procedure. Refer to the Backing Up Your Data Files appendix in the PBS
Administration documentation.
If you have not backed up prior to posting, the posting procedures include features that prevent
previously posted transactions from being posted again.
When the computer becomes functional again, print the Inventory Transaction Edit List to
determine which transactions have been posted. The edit list will identify the transactions that
have already been posted with the message:
***Entry will not be posted due to duplication***
The first transaction on the edit list not accompanied by this message is probably partially
posted.
If you rerun posting without having the files restored from your backup copies, you should
watch for this partially posted transaction. If any error is found in posting this transaction, you
will have to correct it using manual entries.
288
Serial Numbers
This chapter contains the following topics:
Introduction to Serial Numbers
Entering Serial Number Transactions
Entering History Transactions
Entering Update Transactions
Entering Loan Out and Loan Return
Printing Serial Number Edit Lists
Posting Serial Number Transactions
Distributions to General Ledger
289
INTRODUCTION
TO
SERIAL NUMBERS
Use the Serial numbers selection primarily for upgrading. If your existing inventory is going to
be converted from normal items to serialized items, you should use Move In function to
convert your items.
The majority of your serial number processing should be done through the
Inventory selection to ensure that General Ledger distributions are made.
Note
Serial numbers are used during setup of Inventory control to establish historical information on previously sold serialized items. After the initial setup
of this module, this selection is used to change the serial number information without affecting the on hand quantities of your items.
There are six different transaction types that can be entered through Serial numbers. There a
links in the table below to a brief description of each of the six transaction types, followed by
detailed instructions for entering each type:
TYPE
DESCRIPTION
History
History of Sold Serialized Items
Update
Update Serialized Item Information
Loan Oout
Loan Return
Loan Out Serialized Items
Loan Return Serialized Items
Move Out
Move Out Serialized Items
Move In
Move In Serialized Items
History of Sold Serialized Items
A History transaction is entered to place previously sold serialized items in the Serial file with a
sold status. The on hand quantity of the item remains unchanged.
History transactions are typically entered when setting up Inventory Control, to build a history
of previously sold serialized items.
For detailed information see Entering History Transactions.
Update Serialized Item Information
Enter an Update transaction to change existing data on a serialized item. The item's current
status can be sold or unsold.
290
The information that may be changed depends on the serialized item's status. For example, the
warranty date fields can be changed on a sold serialized item.
The on hand quantity of an item remains unchanged by an Update transaction.
For detailed information see Entering Update Transactions.
Loan Out Serialized Items
Enter a Loan Out transaction to track a serialized item that is on loan to a customer.
The status of the serialized item must be unsold and available (not committed or already on
loan). After posting the Loan Out transaction, the status of the serialized item becomes on loan
(and remains unsold). The on hand quantity of the item remains unchanged.
Serialized items on loan are reported on in the Serial Numbers on Loan report and are
considered unsold in other reports.
For detailed information see Entering Loan Out and Loan Return.
Loan Return Serialized Items
A Loan Return transaction is entered when a loaned out serialized item is returned from loan.
The item's status becomes unsold and available (not committed or on loan).
For detailed information see Entering Loan Out and Loan Return.
Move Out Serialized Items
Enter a Move Out transaction to change the status of a serialized item from unsold to sold. A
Move Out transaction does not change the on hand quantity of the item.
If an incorrect serial number was entered (and posted) for a sales transaction, you can enter a
Move Out transaction to record the correct serial number as sold. Similarly, you would then
enter a Move In transaction (see below) to record the incorrect serial number as unsold.
For detailed information see Entering Move In and Move Out.
Move In Serialized Items
A Move In transaction is entered to change the status of a serialized item from sold to unsold.
A Move In transaction does not change the on hand quantity of an item.
Use this function when you change a Normal tracked item to a Serialized tracked item. Only
enter serial #s for existing Qty on hand. You must then add a warranty program to the item
once these serial numbers are posted.
For detailed information see Entering Move In and Move Out.
291
ENTERING SERIAL NUMBER TRANSACTIONS
Select
Enter from the Serial numbers menu.
Graphical Mode
The following screen displays:
From this screen, you can work with both new and existing serial number transactions.
New
For adding a new serial number transaction
Edit
For editing an existing serial number transaction
Save
For saving a new serial number transaction or saving
changes to an existing serial number transaction
Save/New
This button combines the Save and New buttons by first
saving the item and then starting a new serial number
transaction
Delete
To delete and existing serial number transaction
Cancel
To cancel the editing or adding of an serial number
transaction
Exit
To exit the screen. Exit works like cancel when you are
adding or editing a serial number transaction
292
Character Mode
In character mode the following screen displays:
Enter the following information:
Item number
(Description
Format
15 characters
For an existing transaction
In graphical mode up to 6 transactions will display in the list box. To edit an existing
transaction find and select it by using the arrow keys, <PgUp>/<PgDn> and <Home>/<End>
keys. Select the Edit button. You may sort the transactions in ascending or descending order
by item number.
In character mode, enter the item number, warehouse code (if you are using multiwarehousing), serial number, and transaction type for the transaction you wish to change, or
press <F1> to find the next transaction.
<F1>
In character mode only, for next Entry
<SF1>
In character mode only, for previous Entry
If there is no matching transaction on file, continue entry as if this were a new transaction.
For a new transaction
In graphical mode, select the New button to add a new transaction. In character mode start
entering the item number.
Options
Enter the item number or you may also use one of the following options:
<F2>
For next Item
293
<SF2>
For previous Item
<Enter>
Look up item by description
After entering an item number, if you are using multi-warehousing, the cursor moves to the
Warehouse field. Otherwise, the cursor moves to Serial number.
Warehouse
Format
2 characters
This field appears only if you are using multi-warehousing.
Enter the warehouse that is involved in the transaction, or press <Enter> for the Central
warehouse.
Serial number
Enter the serial number of the item.
Format
Up to 15 digits
Type
Enter the transaction type as follows:
Character
Graphical
For more information:
H
History
See Entering History Transactions
U
Update
See Entering Update Transactions
LO
Loan out
See Entering Loan Out and Loan Return
LR
Loan return
See Entering Loan Out and Loan Return
MO
Move out
See Entering Move In and Move Out
MI
Move in
See Entering Move In and Move Out
Options
For subsequent transactions, you can also use one of these options:
<F2>
In character to default to the values entered for the last
transaction for this and the remaining fields
<Enter>
To default to the last transaction type entered
294
ENTERING HISTORY TRANSACTIONS
A History transaction allows you to enter historical data on a previously sold item without
changing the item's on-hand quantity.
Graphical Mode
When you specify a History transaction by selecting History in the Type field, a screen similar
to the following displays:
Character Mode
When you specify a History transaction type in the Type field, a screen similar to the following
displays:
Enter the information as follows:
295
Transaction date
The current date is displayed for the first transaction. For subsequent transactions, it displays
the last date entered.
Enter the date for this transaction or press <Enter> to use the System date.
Format
MMDDYY
New/Used
Select New or Used to indicate the status of the item.
You may also use one of the options:
New
To define the item as New
Used
To define the Item as Used
<F2>
To default to New item
Format
One of the options from the drop down list. There is no
default in character. In graphical the default is New.
P.O. number
Enter the purchase order number under which this item was bought.
Format
Up to 15 digits
Source
Enter the source from which this serial number was obtained, or press <Enter> to default to the
vendor number for the item.
This field is used when printing the Flooring Report. If your inventory is financed, you can use
this field to identify the finance company for this serial number.
Format
Up to six character
Item cost
Enter the cost of this item, or press <F1> to default to the Average cost in the Item file
(replacement cost for LIFO/FIFO valuation- Standard cost for Standard valuation).
Format
Up to ten characters
Item price
Enter the price of this item, or press <F1> to default to Price 1 for the item.
Format
Up to 11 characters
296
Invoice date
Enter the invoice date for this sold serial number, or press <Enter> to default to the System
date.
Format
MMDDYY
Invoice #
Enter the invoice number, or press <Enter> to leave this field blank.
Format
Up to six digits
Customer #
Enter the number of the customer to whom this item was sold, or press <Enter> to leave this
field blank.
Format
Up to 12 characters
Warranty
Enter the warranty program.
Format
Six characters
Reference
Enter any reference text or comments for this transaction, or press <Enter> to leave this field
blank.
Format
Up to 20 characters
Correcting entry
Check this box if this is a correcting entry.
Format
Check box, checked is yes and unchecked is no
297
ENTERING UPDATE TRANSACTIONS
Use the Update transaction to change existing serial number information.
An Update transaction is not allowed if an unsold serialized item is committed or on loan.
Note
If you are using the average cost valuation method and are also using serial
costs (as specified in Control information), the Item cost field cannot be
modified. Use Inventory adjustments to change the cost of a specific serial
number.
The changes you enter here do not affect the existing serial number information in the Serial
file until the Update is posted.
298
ENTERING LOAN OUT
AND
LOAN RETURN
Use the Loan Out transaction to record the serial number of loaned items, and use the Loan
Return transaction to record the return of the loaned serialized items.
For Loan Out transactions, the Reference field is used to deter-mine the sequence of printing
on the Serial Numbers on Loan report. Loan Out and Loan Return transactions are entered in the same manner, with the following
exceptions: •
Loan Out transactions require the item's current status to be unsold and available (not committed).
•
Loan Return transactions require a current status of unsold and on loan for the item.
•
A Return date can be entered on a Loan Return transaction.
As with other serial number transactions, Loan Out and Loan Return transactions do not
change the on hand quantity of the item.
299
ENTERING MOVE IN
AND
MOVE OUT
Use a Move In transaction to establish a serial number as unsold (without increasing the item's
on hand quantity) if a receiving was previously entered for a serialized item through the
Inventory selection.
Similarly, a Move Out transaction changes the status of a serialized item from unsold to sold
without changing the on hand quantity of the item.
You can also use the Move In and Move Out transactions to correct the status of serial
numbers that were entered incorrectly on a sales transaction or credit memo/return transaction
that has already been posted.
If you are using the average cost valuation method, and have specified that serial costs are to
be used (in Control information), the average cost for the item in the Item file is recalculated
during posting, using the serial cost of the serialized item.
300
PRINTING SERIAL NUMBER EDIT LISTS
Select
Edit list from the Serial numbers menu.
Graphical Mode
Character Mode
Starting item number and
Ending item number
Enter the range of items to include on the edit list, or press <F2> at each field for "First" to
"Last".
Check the Serial Transaction Edit list for warning messages regarding transactions that will not
be posted. If such a message appears for any transaction, use the Serial numbers (Enter)
selection to correct or complete entry of the transaction prior to posting.
OK or Cancel
Select OK to print the edit list of Cancel to return to them menu.
301
POSTING SERIAL NUMBER TRANSACTIONS
Select
Post from the Serial numbers menu.
You are asked to select a printer or Print to disk for the Serial Transaction Register. After the
printer is selected there will be a period of processing and then you are returned to the menu.
Posting Results
If you are using the average cost valuation method, and are also using serial costs (as specified in
Control information), the Item file is updated to reflect any change to an item's average cost that
may be caused by Move In and Move Out transactions.
The Serial file is updated for the new transactions as follows:
TRANSACTION
TYPE
STATUS
CHANGE
FROM
TO
History
N/A
Sold
Update
N/A
N/A
Loan Out
Unsold
Loaned
Loan Return
Loaned
Unsold
Move Out
Unsold
Sold
Move In
Sold
Unsold
302
DISTRIBUTIONS
TO
GENERAL LEDGER
If you are using the average cost valuation method, and have specified in the I/C Control file
that you are also using serial costs, Move In and Move Out serial transactions will create
distributions only if there is a change in the item's average cost.
In this case, the distribution amount will be the change in the item's average cost times the
quantity on hand of the item.
Note
If you are using General Ledger, you can press <F5> at Field number to
change ? to mark a Move In or Move Out transaction to create distributions
as a correcting entry.
If the change causes an increase in average cost, distributions are posted to the I/C Distribution
file as described below:
•
Debit item's Inventory Account (Item file)
•
Credit Cost Correction Account (I/C Control file)
If the change causes a decrease in average cost, distributions are posted to the I/C Distribution
file as follows:
•
Debit Cost Correction Account (I/C Control file)
•
Credit item's Inventory Account (Item file)
G/L distributions are not created by any other serial transaction type. If you are not using serial
costs, distributions are not created by this selection.
303
View
This chapter contains the following topics:
Introduction to View
Viewing Inventory History
Viewing Items
Viewing Lot Numbers
View Serial History
Viewing Serial Numbers
Viewing Work Order History
Viewing Work Orders
304
INTRODUCTION
TO
VIEW
Use this selection to inquire into the following types of information:
•
Inventory History
•
Items
•
Lot Numbers
•
Serial History
•
Serial Numbers
•
Work Order History
•
Work Orders
For an item, the display includes all information in the Item file for the item.
For serial numbers, all the serial numbers for a serialized item are displayed, both unsold and
sold.
For lot numbers, all the lot numbers for a lot-controlled item can be displayed.
For work orders, information on work order that has been issued (using Issue work orders) or
closed (using Close work orders) is available.
305
VIEWING INVENTORY HISTORY
Use this selection to view Inventory history detail.
Select
Inventory history from the View menu.
Graphical Mode
The following screen displays:
Once an item is selected, you may select View A/R invoice history from the Options menu. If there
is a matching invoice history record to the number in the reference field in the list box, then the
invoice or credit memo will display. If there is no matching record, then the record closest to the
one selected will display. See the A/R documentation for information on the view invoice history.
This option is not available if A/R is not installed.
Item number Options
Enter the item number or use on of the options:
<F1>
For the next item number
<SF1>
For the previous item number
<Enter>
To lookup by item description
306
(Description)
This field is only available in Graphical Mode.
If you selected <Enter> on the item number field, then you may look up by item description.
<F1>
For the next item description
<SF1>
For the previous item description
<Enter>
To lookup by item number
Warehouse Options
Enter the warehouse code, or use one of the options:
<F1>
For the next warehouse
<F5>
For "All" warehouses
List Box
After selecting the warehouse then all the transactions will display in the list box for the
selected item. Use the sorting arrow to toggle between viewing the history dates in descending
or ascending order.
Exit
Select the <Esc> key or click on the Exit button to return to the menu.
Character Mode
The following screen displays:
Enter the information as follows:
307
Item number
Options
Enter the item number or use on of the options:
<F1>
For the next item number
<SF1>
For the previous item number
Warehouse
Options
Enter the warehouse code, or use one of the options:
<F1>
For the next warehouse
<F5>
For "All" warehouses
Start date and End date
These fields are only available in character mode.
Enter the date range or press <F2> for Earliest and Latest.
308
VIEWING ITEMS
Use the View (Items) selection to inquire into item and status information for an item. The
information shown is the same as that in the Item and Status files for the item, but changes
cannot be made through this selection.
Select
Items from the View menu.
Graphical Mode
A list box displays where you may select an item:
From the above list box you may sort the items by item number, item description, category,
vendor and item status.While viewing an item's information, you have these options:
<Esc>
To specify another item to inquire into
<F1> or
down arrow
If the focus is on the list box only, use to display the
next item on file
<SF1> or up If the focus is on the list box only, use to display the prearrow
vious item on file
309
<F2>
To lookup an item by keyword. See the Item searched
by section in the Control information chapter
<F3>
To display warranty program for a serialized item only
<F5>
To view alternate items for the current item
<F6>
To view notes for the current item. If the item has notes
then there will be a red ampersand to the left of the
Item number on the general tab
<F7>
To view the status tab for the current item
There are three tabs on this screen.
Tab 1 - General Tab
Tab 1 looks something like this:
Tab 2 - Additional item info
Tab 2 has the vendor, accounts and price information and looks like this:
310
Tab 3 - Multi-warehouses
Tab 3 shows the status of each warehouse and is similar to this:
Information from up to 6 warehouses display in the lower list box.
Exit
Select the <Esc> key or click on the Exit button to return to the menu.
Character Mode
The following screen displays:
311
Options
Enter the item number of the item you wish to inquire into, or use one of the options:
<F1>
To display the next item number
<SF1>
To display the previous item
<F2>
To look up the item by keyword
<Enter>
To look up the item by description
Additional information is displayed when applicable for an item. This includes pricing unit,
conversion factor, preferred unit, alternate unit prices, and quantity on back order. Quantity on
order is shown if you checked the box to the Using Purchasing order field in I/C Control
information. Quantity on work order is also shown if you are using kits.
Vendor item information is shown if it exists for the item, and warranty information appears for
serialized items.
If any current or upcoming sale prices exist for the item, they are shown instead of the price
code.
The item's average and replacement costs are only shown when the user has access to either
Items, Inventory, or Reports (Stock status). The item's standard cost is also shown if you are
using the Standard valuation method.
Options
While viewing an item's information, you have these options:
<Esc>
To specify another item to inquire into
<F1>
To display the next item on file
<SF1>
To display the previous item on file
312
<F2>
To display other price
<F3>
To display warranty program
<F5>
To view alternate items for the current item
<F6>
To view notes for the current item
<F7>
To view status information for the current item
If you press <F5>, a window appears showing the item number and description of each
alternate item that has been defined for the current item.
If you press <F6>, existing notes for the item are displayed. To scan through existing notes for
an item, use the keys as shown at the bottom of the screen (<PgUp>, <PgDn>, <Home>,
<End>, and <F1>). Item notes cannot be added or changed through this selection.
If you press <F7>, a screen displays for you to view status information.
When you press <F7> to view status information for an item, if you are using multiwarehousing, you are asked to specify the warehouse to inquire into.
Options
Enter the warehouse code or use one of the options:
<F1>
For the next warehouse on file
<SF1>
For the previous warehouse on file
<Enter>
For the Central warehouse
If you select warehouse 1, the status information screen displays similar to this:
Quantities and dates (Last sold on and Last used on) on this screen are those for the particular
warehouse.
313
If warehouse-specific item or sale prices are defined, they display on this screen. Otherwise,
the prices shown are those in the Item file.
Options
While viewing status information, you can use one of the options:
<Esc>
To specify another item to inquire into
<F1>
To view status information for the next warehouse on
file
<F2>
To specify a different warehouse for inquiry
<F5>
To view item availability in all warehouses
<F7>
To re-display the item inquiry screen for the current
item
314
VIEWING LOT NUMBERS
Use the View (Lot numbers) selection to inquire into the lot numbers for an item.
Select
Lot numbers from the View menu.
Graphical Mode
The following screen displays:
Item number Enter the item number of the lot-controlled item.
Options
You may also use one of the options:
<F1>
To display the next lot–controlled item number
<SF1>
To display the previous lot-controlled item numbers
<Enter>
To look up the lot-controlled item by description
Format
Up to 15 digits
315
Warehouse
This field appears only if you are using multi-warehousing.
Enter the warehouse code for which you want to view lot numbers.
Options
You may also use one of the options:
<Enter>
For the Central warehouse
<F5>
For "All" warehouses
List Boxes
After entering a lot number in then the lot data displays in the list box. With the focus on the
upper list box, type the lot number to locate it. Use the sorting arrow to toggle between viewing
the numbers in descending or ascending order.
Once the lot is located, lot transaction information displays in the lower list box on the Lot
transaction detail tab.
Exit
Select the <Esc> key or click on the Exit button to return to the menu.
Character Mode
The following screen displays:
A summary or detail inquiry can be requested.
A summary inquiry shows the following information for each lot number:
·
Warehouse
316
·
Quantity
received
·
Date of
last activity
·
·
Quantity
sold
Quantity
on- hand
·
Quantity
credited
·
Quantity
available
·
Quantity
adjusted or
·
Reference
text
·
Transferred
A detail inquiry for an item with a lot detail tracking method also shows the following
information for each transaction processed for the lot number:
·
Type (transaction)
·
Trx date
·
Trx quantity
·
Price
·
Cost
Enter the information as follows:
Item number
Enter the item number of the lot-controlled item.
Options
You may also use one of the options:
<F1>
To display the next lot–controlled item number
<SF1>
To display the previous lot-controlled item numbers
<Enter>
To look up the lot-controlled item by description
Format
Up to 15 digits
Inquiry type
This field can only be entered in Character Mode.
317
·
Purchase
Order
number
·
Customer
number
·
Source
·
Invoice
number
·
Reference
Enter D to view the detail of a lot number for the item, or press <Enter> to default to S for a
summary of the item's lot numbers.
Format
One letter, D or S. The default is S.
Warehouse
This field appears only if you are using multi-warehousing.
Enter the warehouse code for which you want to view lot numbers.
Options
You may also use one of the options:
<Enter>
For the Central warehouse
<F5>
For "All" warehouses
For a summary lot number inquiry, you are asked to enter:
Start lot #
This field can only be entered in Character Mode.
Enter the starting lot number to be displayed, or press <F2> to start from the First lot number
on file for the item.
Format
Up to 15 characters
Lot-#
This field can only be entered in Character Mode.
If you selected Detail inquiry, enter the lot number to be displayed.
For a summary inquiry, up to 15 lot numbers display on the screen at one time.
Options
If there are more than 15 lot numbers to view, use one of these options:
<F1>
<PgUp>
<Enter>
Format
To view more lot numbers
To return to a previous screen display of lot numbers
To view the first activity date, quantity received, quantity sold, quantity credited, and the quantity adjusted for
each lot number.
Up to 15 digits
When you have finished reviewing the lot numbers, press <Esc>. You can then enter the item
number of the next lot-controlled item that you want to inquire into.
318
You can also press <Esc> when the <PgUp> or <PgDn> message is displayed to end inquiry
into a lot-controlled item before you reach the end of that item.
For a detail inquiry, up to 12 transactions for the lot display on the screen at one time.
Options
If there are more than 12 transactions, use one of these options:
<PgDn>
<PgUp>
To view additional transactions for the lot
To return to a previous screen display of lot transactions
When you have finished reviewing the transaction detail, press <Esc>. You can then enter the
item number of the next lot-controlled item that you want to inquire into.
You can also press <Esc> when the <PgUp> or <PgDn> message is displayed to end inquiry
of a lot-controlled item before you reach the end of that item.
319
VIEW SERIAL HISTORY
Select
Serial history from the View menu.
Graphical Mode
The following screen displays.
List Boxes
Serial numbers for all items display in the upper list box.
Enter a valid serial number, or partial serial number and the program will display the exact or
closest matching numbers in the list box. With the focus on the list box, you may also use the
arrow keys, <Page up>/<Page down> and <Home>/<End> keys to find the serial number. Use
the sorting arrow to toggle between viewing the numbers in descending or ascending order.
The history details about the selected serial number display in the Serial number history tab list
box below. Use the sorting arrow to toggle between viewing the history in descending or
ascending date order.
Exit
Select the <Esc> key or click on the Exit button to return to the menu.
Character Mode
The following screen displays:
320
Enter the information as follows:
Enter a valid serial number, or partial serial number in the lookup screen. All matching serial
numbers display. Select the item you wish to view and press <Enter>.
Options
You may select from one of the following options:
<Esc>
To reselect
<F2>
To view history
<F5>
To print history
321
VIEWING SERIAL NUMBERS
Use the View (Serial numbers) selection to inquire into the unsold and/or sold serial numbers
for an item.
Select
Serial numbers from the View menu.
Graphical Mode
The following screen displays:
After an item number is entered, both sold and unsold serial numbers display. You may select
to view the data by serial number for either box in ascending or descending order.
Item number
(Description)
Options
Enter the item number of the serialized item, or use one of the options:
<F1>
To display the next serialized item number
<SF1>
To display the previous serialized item number
<Enter>
To look up the serialized item by description
322
Format
Up to 15 characters
Example
Press <F1> and then press <Enter>.
List Boxes
Once a number for a serialized item is entered, if you have a large amount of history it may
take a few moments to view all the data. The sold serial numbers display in the upper list box
and the unsold serial numbers in the lower list box.
To locate a serial number in either list box you may type the serial number or use the arrow
keys, <PgDn>, PgUp>, <Home> and <End> keys.
Some of the fields that display are different depending if the item is sold or unsold. The
following is a list of fields that display for each list box:
Field
Sold List Box
Unsold List Box
Invoice date
Yes
Customer number
Yes
Invoice number
Yes
Price
Yes
5 warranty dates that
include Parts, Labor,
Travel, Exchange or
User definable other.
Yes
Cost
Yes
Yes
New or Used code
Yes
Yes
Warehouse
Yes
Yes
Reference
Yes
Yes
Order number
Yes
Receipt date
Yes
Purchase order #
Yes
Source (Vendor)
Yes
Status (committed or
loaned)
Yes
Order #
Yes
Line #
Yes
323
For both list boxes, use the sorting arrow to toggle between viewing the serial numbers in
descending or ascending order.
Exit
Select the <Esc> key or click on the Exit button to return to the menu.
Character Mode
The following screen displays:
Enter the information as follows:
Item number
(Description)
Options
Enter the item number of the serialized item, or use one of the options:
<F1>
To display the next serialized item number
<SF1>
To display the previous serialized item number
<Enter>
To look up the serialized item by description
Format
Up to 15 characters
Example
Press <F1> and then press <Enter>.
Inquiry type
This field may only be entered in character mode.
Enter the type of inquiry, either U to view unsold serial numbers for the item or S to view sold
serial numbers.
Format
One letter, either U or S. There is no default.
324
Start serial #
This field may only be entered in character mode.
Enter the serial number of the first item to be displayed, or press <F2> to default to the First
serial number on file for the item.
Up to 13 serial numbers display on the screen at one time.
Options
If there are more than 13 serial numbers to view, You may also use one of these options:
<PgDn>
<PgUp>
<Enter>
To view more serial numbers
To return to a previous screen display of serial numbers
To view the Reference text for each serial number displayed on the screen.
When the last serial number is displayed, serial number totals are shown and information on
the oldest received serial number displays at the bottom of the screen.
For sold serial numbers, the invoice date, customer number, invoice number, price, warranty
dates, cost, new or used code, warehouse, and reference text are shown for each serial number.
When you have finished reviewing the serial numbers, press <Esc>. You can then enter the
number of the next serialized item that you want to inquire into.
You can also press <Esc> when the <PgUp> or <PgDn> message is displayed to end inquiry
into a serialized item before you reach the end of that item.
325
VIEWING WORK ORDER HISTORY
Use the View (Work order history) selection to view work orders that have been closed (using
Close work orders). Immediate work orders that have been issued may also be viewed using
this selection.
Select
Work order history from the View menu.
Graphical Mode
A screen similar to this displays:
Up to six closed work orders display in the list box at one time. To scan through the closed
work orders, use the arrow keys <PgUp>, <PgDn>, <Home>, and <End>.
Use the sorting arrow to toggle between viewing the serial numbers in descending or ascending
order by Work order #, Kit item # and Reference.
To view open work orders, select View work orders from the Options menu.
Exit
Select the <Esc> key or click on the Exit button to return to the menu.
Character Mode
A screen similar to the following displays:
326
Up to five closed work orders display on the screen at one time. To scan through the closed
work orders, use the keys as shown at the bottom of the screen (<PgUp>, <PgDn>, <Home>,
and <End>).
Options
You may also use the options:
<F5>
To jump directly to the W/O you wish to view, either
by W/O number or reference
<F6>
To view comments entered for this W/O
<Esc>
When you are finished viewing W/O history
Press <Esc> when you are finished viewing W/O history.
327
VIEWING WORK ORDERS
Select
Work orders from the View menu.
Graphical Mode
The following screen displays:
To view work order history, select View work order history from the Options menu.
Search
There are options when searching for a work order.
OPTION
Kit item #
Kit item/Serial #
Component #
Component/Serial
DESCRIPTION
Search for the number of the kit item
Search for the serial number of the kit item
Search for the number of the component item
Search for the serial number of a component item
Kit item #
Component #
Enter a valid kit item # or component #.
Serial / Lot #
Enter the serial or lot number for the component or kit item.
328
List Boxes
When you enter a valid kit item # (or component #), in the list box a list of Work orders display
that contain that number.
For the work selected in the upper list box the work order components display in the lower list
box.
Exit
Select the <Esc> key or click on the Exit button to return to the menu.
Character Mode
The following screen displays:
In character mode, on the Kit item # field, enter the kit item # or press <F2> to search by
component-#. Select <Enter> to serial by serial number.
329
Work Orders
This chapter contains the following topics:
Introduction to Work Orders
Entering Work Orders
Work Order Edit Lists
Committing Inventory
Printing Work Orders
Issuing Work Orders
Printing Issued Work Orders
Quick Work Orders
330
INTRODUCTION
TO
WORK ORDERS
This chapter describes how to do the following:
•
Enter and print an Edit list of work orders
•
Print work orders
•
Commit the inventory needed to process the work orders
•
Issue work orders
•
Print additional copies of work orders that have been issued
If you chose not use Kits in Control information, you may skip this chapter.
A work order is a request to assemble a specified quantity of a kit from its component items.
Work order is abbreviated as W/O on various screens and reports in Inventory Control. The
Kits chapter describes kits and the relationship between a kit and its components.
Work Order Types
A work order can be immediate, in which case the kit is immediately placed in inventory.
Alternatively, a work order may be printed, issued, and the component items removed from
inventory, but the kit is not placed in inventory until the work order is completed.
When a work order is defined as immediate completion, Inventory transactions are created to
remove the components from, and to add the kit to, inventory. The kit is immediately available
for sale. No document is printed, and the process of closing the work order does not arise. For
an immediate work order, you still have to commit the inventory and issue the work order.
When a work order is not immediate (typically because some time and labor is required to
physically assemble the kit), several further steps are necessary before the kit is available for
sale. These steps, described in detail in succeeding chapters, are summarized below.
•
The work order must be committed (so that the inventory needed to complete it is not diverted
to other uses). Several iterations of this step may be needed when shortages exist and partial
commitment is authorized. Committed work orders may be deleted (in which case their components are uncommitted), but they may no longer be changed.
•
Work orders may be printed, but only after commitment. This is for the use of personnel
doing the physical assembly. You may decide as you enter each work order whether or not
you want to print it.
•
Work orders must be issued. This allows physical assembly of the kit to begin. Issuance
requires that all needed components have been committed and that the work order has been
printed (if so specified); it also removes the components from inventory, prevents printing the
work order as a work order, and allows printing it as an issued work order. Issued work
orders may no longer be accessed through the Enter selection, and therefore may no longer be
deleted.
331
•
The work order must be completed (flagged as ready for closing). This happens upon physical
assembly of the kit. It prevents printing an issued work order and allows printing a completed
work order. Completion may be reversed at any time until the work order is closed; if this
happens the completed work order reverts to being an issued work order.
•
Completed work orders must be closed. Closing the work orders adds the new kits to inventory. Closed work orders may no longer be printed as completed work orders.
•
At various stages in this progression, you may reprint work orders (even though printing was
not originally specified), view work orders, or print lists of work orders not yet issued, of
issued work orders, of issued orders overdue for completion, or of completed work orders.
Work orders are entered and completed individually. The other functions (committing,
printing, issuance, and closing) operate upon the work orders as a group (optionally restricted
by range or other properties) much as posting does in other selections.
332
ENTERING WORK ORDERS
Select
Enter from the Work orders menu.
The following screen displays:
Enter the following information:
1. Work order #
If you want a new work order, use the <F2> key to generates a new work order number by
adding one to the previous number used. The initial value is set in Control information.
Enter an existing work order number.
Options
You may also use one of the options:
<F1>
For the next work order on file
<SF1>
For the previous work order on file
<F2>
For a new work order number
Entering a number that is already on file, or using the <F1> or <SF1> keys, loads the screen
with the data for that existing work order and positions the cursor at the Field number to
change ? prompt. You may then change or delete the work order.
Format
Up to six digits
Example
Press <F2> for a new Work order.
333
2. Kit item #
Kit items must be defined via the Items selection, and must already have been defined as a kit,
via the Kits selection. Enter a kit item number.
Options
You may also use one of the options:
<F1>
For the next kit item number
<SF1>
For the previous kit item number
Format
Up to 15 digits
Example
Press <F1>.
3. Work order date
Enter the date to be assigned to this work order press <Enter> for the default date. For the first
W/O entered, the default is the System date; thereafter, the date of each work order entered
becomes the default for the next
Format
MMDDYY
Example
Press <Enter> for system date
4. Kit quantity required
Kit quantity required is almost always an integer, but fractional quantities are permitted if the
kit is not serialized. This is occasionally useful when dealing with kits assembled from
components that can be measured but not counted. For example, 105-octane gasoline might be
defined as a kit assembled from an 80-octane component and a 120-octane component in a
certain proportion. You might then have as a result 250.35 gallons of the 105-octane gasoline
and would enter that as the kit quantity.
Enter the number of kits to be assembled for this work order.
Format
99999999.99999
Example
Type:8
5. Work order reference
Enter a reference for this work order. This field is optional and is provided so that you may
enter a customer number, purchase order number, or whatever reference you choose.
Later, you will be able to locate an incomplete work order using this reference. This is useful if
you need to determine if a work order for a specific customer has been completed or not.
Using View work order history, you will also be able to locate a completed work order using
this reference.
Format
Enter up to 15 characters
Example
Type:PO-135-923
334
6. Immediate completion ?
An immediate completion work order renders the kit-item available for sale now. Typically
you would use this feature for kits needing little labor or time for assembly.
If you answer N the work order is processed as a normal work order. You must commit, issue,
complete, and close it before you can sell the kit or before inventory is adjusted.
If you answer Y, then:
•
The work order is never printed.
•
It is automatically completed and closed as soon as it is entered.
•
There is no targeted completion date.
•
No work in process account is required (since the components are placed into and removed
from work in process immediately).
•
The next three fields on the screen are skipped.
•
Component usage transactions and kit assembly transactions for Inventory are generated
through the Issue work orders process.
Unlike regular work orders, immediate work orders can not be committed if there is a shortage
of needed components. Attempting to do this generates the message Inventory short.
•
You may continue to enter the work order as a regular work order.
•
If you have already physically assembled the work order on an emergency basis by using
inventory already committed to other uses, you cannot enter the immediate work order until
you have either:
Received further inventory, or Identified and deleted the work order(s) whose components
you have pre-empted.
Format
One letter, either Y or N. There is no default.
Example
Type:N and then press <Enter>
7. Targeted completion date
This field does not apply to immediate completion work orders.
Enter the target date on which this work order is to be completed. This date will appear on
screens and reports used to track incomplete work orders.
Format
MMDDYY
Example
Type:92505
8. Print work order?
This field does not apply to immediate completion work orders.
If the nature of your business is such that you do not require a printed document, answer N.
The work order will still have to be issued even though not printed. If you change your mind
335
later you may obtain a copy via the Print issued work orders selection, if the work order has
already been issued; or via the Print work orders selection, if it hasn't. Once the work order is
completed it may no longer be printed.
Format
One letter either Y or N there is no default
Example
Type: Y
9. Work in Process account
This field does not apply to immediate completion W/O’s.
When the component usage transactions for the work order are posted, the work in process
account entered here is debited for the cost of each component item. These items are retained
in the work in process inventory until the corresponding kit assembly transaction is posted after
closing the work order (using Close work orders).
Enter an existing work in process account or press <F2> for work in process account.
Example
Press <F2>.
10. Commit component quantities when partially available?
Prior to printing this work order, you must commit the inventory quantities for the component
items using Commit inventory. When Commit inventory is run, the quantity available for one
or more of the component items that you designated as Full amount items in the kit definition
(using Kits) may be less than the amount required to assemble the quantity of kits needed.
If you answer Y, then component-item quantities will be committed for all items, even if there
is a shortage for the Full amount component items. In this case, the Work Order Status Report
will show the amounts committed and the amounts still needed in order to print and issue the
work order. Use this report (described in the Committing Work Orders chapter) to determine
what receivings are needed to obtain sufficient quantities available to issue the work order.
Once these receivings have been entered using Inventory, you may run Commit inventory
again to commit the remainder needed to assemble the kit. Then, the work order may be
printed and issued.
If you answer N, a shortage of any Full amount item will prevent commitment of all
components on the work order. The Work Order Status Report will show the shortages for each
component item.
Work orders compete with one another for scarce parts. If you want to ensure that kits are
assembled first-come first-served, always respond Y. Understand that this could result in some
work orders being delayed even though parts are on hand, because the parts they need are
committed to other work orders waiting for other parts.
If you want to maximize turnover and ensure that each part is used as soon as there is a kit
ready to use it, always respond N. The danger here is that work orders containing numerous
parts could be kept waiting indefinitely because there is never enough at any one time of every
part needed. This policy, therefore, requires more careful monitoring than the other.
336
Format
One letter either Y or N there is no default
Example
Type:Y
The next two fields appear only if you use multi-warehousing.
11. Stocking warehouse
This is the warehouse where the assembled kit is to be stocked. The kit item must already be
defined (in Items) as stocked at that warehouse.
Enter a warehouse code.
Options
You may also use one of the options:
<F1>
For the next warehouse for this item kit
<SF1>
For the previous warehouse for this item kit
Format
Up to two characters or use the option
Example
Press <F1>.
The description of the warehouse appears next to its code as soon as one has been selected.
12. Override Kit component Warehouses ?
Answer Y if you wish to override.
Make any desired changes.
Options
You may also use one of the options and press <Enter>.
<F1>
For the next work order on file
<SF1>
For the previous work order on file
<F2>
To enter a new work order number
<F3>
To delete this work order
<F6>
To enter or view Work Order comments
Deleting Work Orders
When a work order is deleted after inventory has been committed to that kit, any serialized
components are released. They become available for sale or for incorporation into another kit.
To enter or view existing comments about this work order, press <F6>.
337
Entering Comments
Press <F6> to enter up to 10 lines of 64 characters each.
Options
When you press <Esc> from the comments window, you have these file options:
File
Save what was just entered/changed, and clear the
screen for entry of another comment. (Like pressing
<Enter> at Field number to change ? in other selections.)
Save &
Continue
Save what has been entered or changed, but leave the
information on the screen for further work.
338
WORK ORDER EDIT LISTS
This selection enables you to edit and display all or a range of work orders.
Select
Edit list from the Work orders menu or Work order edit list from the Reports, kits menu.
The following screen displays:
Enter the following information:
1. Starting work order # and
2. Ending work order #
Enter the range of work orders to appear on the edit list or press <F2> for First and Last at
each field.
Format
Up to six digits for each field, or use the option
Example
Press <F2> at each field
3. Cut-off targeted completion date
Enter the last targeted completion date for which work orders are to be included on the edit list
or use the options below. Work orders with a targeted completion date later than this date will
not be included.
Press <F2> for Latest (no cutoff date)
Format
MMDDYY or use the option
Example
Press <F2> for Latest
4. Work order status
The status of a work order changes as it proceeds through the various steps of processing.
These are listed in the table below.
Enter one of the statuses listed.
339
Options
You may also use the options:
N
For Not committed
S
For Inventory short
P
For OK to print
I
For OK to issue
<F5>
To include All work orders regardless of status
Note that Issued is not listed as a status. A separate selection is available to print issued work
orders. Refer to the Print Issued Work Orders chapter.
Format
One letter from the options above
Example
Press <F5> then press <Enter>.
WORK ORDER
STATUS
DESCRIPTION
N
Not committed
Assigned by Work orders when the work order
is first entered.
S
Inventory short
Assigned by Commit inventory when there is a
shortage of a Full amount item and commitment of partially available inventory is disallowed.
P
OK to print
Assigned by Commit inventory when there is
sufficient quantity available for all Full amount
items and the work order is to be printed before
being issued.
I
OK to issue
Assigned by Print work orders after printing a
work order. Also assigned by Commit inventory
when there is sufficient quantity available for
all Full amount items and the work order does
not need to be printed before being issued.
340
COMMITTING INVENTORY
Prior to printing a work order, you must commit the inventory quantities for the component
items using Commit inventory.
When Commit inventory is run, there may be insufficient quantities available for one or more
component items that you designated Full amount in the Kits selection.
If you answered Y to Commit inventory when partially available? on the work order, then
component-item quantities will be committed for all items. In this case, the Work Order Status
Report will show the amounts committed and the amounts still needed in order to print and
issue the work order. Use this report to determine what receivings must be done in order to
have sufficient quantities available to issue the work order.
For shortages on Full amount component items, once receivings have been entered using
Inventory, you may run Commit inventory again to commit the remainder needed to assemble
the kit. Then, the work order may be printed and issued.
If you answered N to Commit inventory when partially available?, then no component items
are committed if there is a shortage of any Full amount items. The Work Order Status Report
will show the shortages for each component item.
The Work Order Status Report is printed as part of running Commit inventory. It shows the
status (as described earlier) of each work order processed. For work orders with insufficient
quantities available for Full amount components, or with insufficient quantities for Shortage
OK components, actual shortages are shown on the report. Shortages of Shortage OK
components do not prevent a work order from being printed and issued. They are listed on the
Work Order Status Report for your information.
Select
Commit inventory from the Work orders menu.
The following screen displays:
Enter the information as follows:
341
1. Starting work order # and
2. Ending work order #
Enter the range of work order numbers for which to commit inventory or press <F2> for First
and Last at each field
Format
Up to six digits for each field, or use the option
Example
Press <F2> at each field.
3. Cut-off targeted completion date
Enter the last targeted completion date for which to commit inventory for work orders. Those
with a targeted completion date that is later than this date will not be processed by Commit
inventory. Press <F2> for Latest (no cutoff date).
Format
MMDDYY or use the option
Example
Press <F2> for Latest.
342
PRINTING WORK ORDERS
This selection enables you to print all or a range of work orders from file. If you specify that a
work order must be printed prior to being issued, then print it using this selection.
Immediate completion work orders cannot be printed
If you specify that a work order must be printed prior to being issued, then print it using this
selection.
Select
Print work orders from the Work orders menu.
The following screen displays:
Enter the information as follows:
1. Starting work order #
2. Ending work order #
Enter the range of work orders to print or press <F2> for First and Last at each field.
Format
Up to six digits for each field, or use the option
Example
Press <F2> at each field for First and Last.
3. Cut-off targeted completion date
Enter the last targeted completion date for which to print work orders. Work orders with a
targeted completion date later than this date will not be printed. You may also press <F2> for
Latest (no cutoff date).
Format
MMDDYY or use the option.
Example
Press <F2> for the Latest.
343
4. Reprint work orders already printed?
Answer Y to reprint work orders that have already been printed.
If you are using multi-warehousing, an additional field appears:
Format
One letter either Y or N, the default is N.
Example
Press <Enter> to accept the default.
5. Print in order by
Select S by stocking warehouse, or W by work order number.
If you select S to print in order by stocking warehouse, field #6 appears as follows:
S
Stocking warehouse
W
Work order number
Format
One letter from the table above there is no default.
Example
Type: S and then press <Enter>.
6. Stocking warehouse
Enter a warehouse. Work orders are printed if their kit items are to be stocked at this
warehouse.
Options
You may also use one of the options:
<Enter>
For the Central warehouse
<F1>
To print work orders for All stocking warehouses (work
orders will be printed in order by the warehouse in
which the kit items are stocked)
Format
Two characters or use the option
Example
Press <Enter> for Central.
344
ISSUING WORK ORDERS
A work order may be issued if it has the status OK to issue. This status is assigned when the
following has occurred:
•
All Full amount component items have been committed for the work order, using Commit
inventory.
•
The work order has been printed. (This step is not required if you answered N to Print work
order ? when the work order was entered.)
When a work order is issued, component usage transactions are generated in the Inventory
Transaction file for each component-item of the work order. Additionally, the Qty on W/O for
each kit-item is increased.
For an immediate completion work order, a kit assembly transaction is generated in addition to
the component usage transactions. However, the Qty on W/O is not increased for the kit-item
because the work order is considered to be completed immediately. However, the generation of
the kit assembly transaction increases the quantity of the kit-item available for sale by
decreasing quantity committed for the kit-item.
Select
Issue work orders from the Work orders menu.
The following screen displays:
Enter the following information:
1. Starting work order # and
2. Ending work order #
Enter the range of work orders to issue or press <F2> for First and Last at each field.
Format
Up to six digits for each field, or use the option
Example
Press <F2> at each field.
345
3. Issuing date
Enter the issue date to be assigned to these work orders. This date is used as the date for the
component usage and kit assembly transactions that are placed in the Inventory Transaction
file. You may also press <Enter> to use the System date.
Format
MMDDYY or use the option
Example
Press <Enter> for the System date.
4. W/O cut-off date
Enter a cut-off date for the work orders to be issued. Work orders with a Work order date that
is later than this date will not be issued. You may also press <Enter> to use the date entered for
Issuing date.
Format
MMDDYY or use the option
Example
Press <Enter> for the Issuing date.
5. Print W/O register?
Answer Y to print a Work Order Register.
If you chose to print a Work Order Register, then select to print the register in either F (full) or
B (brief) format.
Format
One letter either Y or N, there is no default
Example
Type Y then press <Enter>.
If you are using multi-warehousing, an additional field appears:
If you chose to print a Work Order Register, a new section of this field will appears, then select
to print the register in either F (Full) or B (Brief) format.
Options
You can use one of the following options :
F
For Full format of W/O Register
B
For Brief format of W/O Register
Format
One letter either F or B. There is no default.
Example
Type: F and then press <Enter>.
6. Issue in order by
Enter S to issue work orders by stocking warehouse, or W by Work order number.
Options
You may also use one of the options:
346
S
For Stocking warehouse
W
For Work order number
If you enter S for Issue in order by, field #7 appears as follows:
7. Stocking warehouse
Enter the stocking warehouse for which to issue work orders.
Options
You may use one of the options:
<Enter>
For the Central warehouse
<F5>
For All warehouses
Format
Enter up to two characters or use the option
Example
Press <F5> for All warehouses.
Make any desired changes, or use one of the options, and then press <Enter>.
347
PRINTING ISSUED WORK ORDERS
Use the Print issued work orders selection to print additional copies of non-immediate work
orders that have been issued.
You may also use this selection to print don't print work orders (i.e., work order was originally
specified to not print).
Work orders may not be printed using this selection after they are closed using Close work
orders, or if they were specified as immediate completion when the work orders were entered.
Select
Print Issued work orders from the Work orders menu.
The following screen displays:
Enter the information as follows:
1. Starting work order # and
2. Ending work order #
Enter the range of work orders to print or press <F2> for First and Last at each field
Format
Up to six digits for each field, or use the option.
Example
Press <F2> at each field.
3. Cut-off targeted completion date
Enter the last targeted completion date for which to print work orders. Work orders with a
targeted completion date later than this date will not be printed. You may also use press <F2>
for Latest (no cut-off date)
Format
MMDDYY , or use the option.
Example
Press <F2> for (no cut-off date) Latest.
348
4. Include "Don't print" work orders ?
Do not print work orders are those for which you answered N to field # 8 (Print work order ?)
in Work orders (Enter).
If you answer Y, all work orders will be printed. If you answer N, Do not print work orders
will not be printed.
Immediate completion work orders are never printed.
Format
One letter, either Y or N, there is no default.
Example
Type:Y and then press <Enter>.
5. Print in order by
Enter S by stocking warehouse, or W by work order number.
Options
Use one of the following options :
S
For Stocking warehouse
W
For Work order number
Format
One letter, either S or W. There is no default.
Example
Type S and then press <Enter>.
If you enter S for Print in order by, field # 6 appears as follows:
6. Stocking warehouse
Enter a warehouse. Work orders will be printed if their kit-items are to be stocked at this
warehouse.
Enter the stocking warehouse for which to issue work orders.
Options
You may also use on of the options:
<Enter>
For Central warehouse
For All warehouses
Format
Enter up to two characters or use the option.
Example
Press <F5> for All warehouses.
Make any desired changes, or use one of the options, and then press <Enter>.
349
QUICK WORK ORDERS
Use the Quick work orders selection to process a single step work order.
Select
Quick work orders from the Work orders menu.
The following screen displays:
Enter the information as follows:
1. W/O- #
Enter the number of the quick work orders to process.
Options
You may also use on of the following options:
<F1>
For the next work order
<SF1>
For the previous work order
<F2>
To create a new work order
Format
Up to six digits
Example
Press <F2>.
2. Date
Enter the date for this quick work order or press <Enter> for the System date.
Format
MMDDYY ,or use the option.
Example
Press <Enter> for the System date.
350
3. Kit Item #
Enter in the kit item number you are building.
Options
You may also use one of the options:
<F1>
For next Kit item number
<SF1>
For previous Kit item number
Format
Enter up to 15 characters, or use the option.
Example
Press <F1> and then press <Enter>.
4. Quantity
Enter the quantity of kits you will be building.
Format
Up to nine digits
Example
Type:234
5. User
Enter in the user id of the person building the kit or press <Enter> for the default User ID.
Format
Enter up to four characters, or use the option.
Example
Press <Enter> for the default User ID.
6. Kit warehouse
Enter a warehouse or press <Enter> for the Central warehouse
Format
Up to two characters, or use the option.
Example
Press <Enter> for Central warehouse.
Make any changes or press <Enter> at Field number to change ?. The following screen
displays:
351
This screen allows you to modify the components items, quantity and warehouse if they differ
from the original entry under Kits.
You may use the following options:
<PgUp> or
<PgDn>
Page Up or Page Down
<F2>
To insert
<F3>
To delete
<F5>
To move
When inserting or entering a new component, you must enter the following fields:
Item-#
Enter the component item number.
The item must already have been defined as an item in the Items selection.
Format
Up to 15 characters or use the option
Example
Press <F1>
Miscellaneous items (those beginning with an asterisk) may be included as
components in kit- items. You may use them to assign labor charges and
overhead costs to a kit-item.
Note
Need
Enter the number of component-items required to assemble one kit item. Press <Enter> to
default to a quantity of 1.
Format
99999999.99999
Example
Type: 1 and press <Enter>
Whs
This field may not be entered if you are only not using multiple warehouses.
Enter a warehouse code, or use the option:
<Enter>
To designate this warehouse as the “Central” warehouse
<F1>
To scan through the warehouses on file
Serial-#/Lot-#
If you have serialized or Lot controlled items, you must enter serial and lot numbers for this
item.
352
Press <Esc> when you have made your changes and entries.
Options
The options that become available are:
1
Save and post
To save and post the work order
2
Save
To save the changes to the work order.
You may return later and continue editing the work order or post it then.
3
Abort
To not save the quick work order
353
Completed Work
Orders
This chapter contains the following topics:
Introduction to Completed Work Orders
Marking Work Orders Complete
Printing Completed Work Order Edit Lists
Closing Completed Work Orders
354
INTRODUCTION
TO
COMPLETED WORK ORDERS
If you chose not to Use kits in Control information, skip this chapter.
This chapter does not apply to Immediate work orders.
The Completed work orders selection enables you to process issued work orders. You will be
requested to enter serialized numbers for serialized kits.
Four selections are available:
1. You can list incomplete (overdue) work orders.
2. You can report the completion of a work order.
3. You can print an edit list of completed work orders.
4. You can close completed work orders. Closing is similar to posting, and generates kit
assembly transactions for processing by Inventory.
Select
Incomplete work orders from the Reports, kits menu.
The following screen displays:
Enter the following information:
1. Starting targeted completion date and
2. Ending targeted completion date
Enter the range of targeted completion dates to be included or press <F2> for the Earliest and
Latest for each field
Format
MMDDYY for each field or use the option
Example
Press <F2> for the Earliest and Latest.
355
3. Starting work order # and
4. Ending work order #
Enter the range of work orders to include on the print list or press <F2> for First and Last for
each field
Format
Up to six digits on each field
Example
Press <F2> for First and Last.
If you are using multi-warehousing, an additional field displays:
5. Print in order by
This field enables you to control the order in which the list is printed, or (in conjunction with
the following field) to restrict printing to a single warehouse.
Options
Enter one of the following:
S
For stocking warehouse
W
For work order number
Format
One letter, either S or W there is no default
Example
Type: W and then press <Enter>.
*6. Stocking warehouse
If you selected stocking warehouse for the previous field enter the stocking warehouse or
select All warehouses, the list is printed for every warehouse. The previous field merely
controls the sequence without restricting the selection.
If you specify a particular warehouse, the list is restricted to those work orders whose stocking
or component warehouse (respectively) match that specified. Since only one warehouse is
involved, the sequence is by work order.
Enter a warehouse.
Options
You may also use one of the options:
<F5>
For All warehouses
<Enter>
For the Central warehouse
Format
Up to two characters or use the option
Example
Press <Enter> for <Central warehouse>.
356
The field does not appear because you chose W for the previous field. Make any needed
changes at Field number to change ?, and print the report.
357
MARKING WORK ORDERS COMPLETE
The Completed work orders selection enables you to flag work orders as complete and specify the
completion date. Completed work orders are eligible for closing.
Select
Enter from the Completed work orders menu.
The following screen displays:
To mark a work order as complete, enter the completion date or press <F1> for the System
date.
The cursor then moves to the Comp-dat column for the next incomplete work order. If this is
the last work order on file, you are informed of this.
To scan through the work orders that are incomplete, or have been marked as complete but
have not yet been posted, use the keys as shown at the bottom of the screen (arrow keys,
<PgUp>, <PgDn>, <Home>, and <End>).
Options
You may also use one of these options:
<F3>
To change a work order from complete (date shown) to
incomplete (completion date is removed)
<F5>
To jump directly to the work order you wish to view,
either by work order number or reference
<F6>
To view comments entered for this work order
When you are through entering completion dates, press <Esc>.
358
Printing Completed Work Order Edit Lists
After you mark work orders as complete, you may want to print an edit list to review your selections before you actually close the work orders.
Select
Edit list from the Completed work orders menu or Completed W/O edit list from the Reports,
kits menu.
The following screen displays:
Enter the following information:
1. Starting work order # and
2. Ending work order #
Enter the range of work orders to close or press <F2> for First and Last in both fields
Format
Up to six digits for each field or use the option
Example
Press <F2> at each field.
3. Cut-off completion date
Enter the cut-off completion date to use in closing work orders or press <F2> for Latest (no
cut-off date) use the option. Only work orders with a completion date on or earlier than this
date will be closed.
Format
MMDDYY or use the option
Example
Press <F2>.
Make any needed changes at Field number to change ?, or press <Enter> to print the Edit list.
Only the kits appear on the list, not the components.
After the report is printed, kit assembly transactions are generated and placed in the Inventory
Transaction file. Use Inventory to view, print an edit list, and post those transactions.
359
CLOSING COMPLETED WORK ORDERS
The Close work orders selection enables you to close work orders which have been marked or
logged as complete. A report listing the closed work orders may be printed if desired.
Closed work orders remain on file until purged, and can still be viewed or listed.
Select
Close work orders from the Completed work orders menu.
The following screen displays:
Enter the following information:
1. Starting work order # and
2. Ending work order #
Enter the range of work orders to include on the edit list. Follow the screen instructions.
Format
Up to six digits at each field, or use the option
Example
Press <F2> for the First and Last at both fields.
3. Cut-off completion date
Enter a cut-off for targeted completion date or press <F2> for Latest (no cut-off date). Work
orders with a targeted completion date which is later than the date entered here will not be
included on the edit list.
Format
MMDDYY
Example
Press <F2> for the Latest (no cut-off.
4. Print W/O register ?
Format
One character, either Y or N.
Example
Type: Y.
360
5. Close in order by
This field enables you to control the order in which the list is closed, or (in conjunction with
the following field) to restrict printing to a single warehouse.
Options
Use one of the following options:
S
For stocking warehouse
W
For work order number
Format
One letter either, S or W. There is no default
Example
Type: W and then press <Enter>.
Make any needed changes at Field number to change ? or press <Enter> to close the work
orders and print the Work Orders Closed Report.
361
Expanded Physical
Count
This chapter contains the following topics:
Introduction to Physical Count
Creating Physical Count Transactions
Entering Counted Quantities
Adding New Transactions
Removing Physical Count Transactions
Importing Counted Quantities
Printing Physical Count Worksheets
Creating Adjustment Transactions
Physical Count Continued Operations
362
INTRODUCTION
TO
PHYSICAL COUNT
Use the Physical count selection to perform an expanded physical inventory count. This selection
allows high speed entry of physical counts through manual data entry or through the use of handheld terminals.
You must specify the Expanded physical count method in Control information in order to
perform a physical inventory count in this manner. If you specified the Normal physical count
method, refer to the Physical Count Worksheets chapter.
Performing Expanded Inventory Counts
To perform an Expanded Physical Inventory Count, follow these steps:
STEP
DESCRIPTION
1
Create physical count transactions for the items to be
counted. These transactions are created automatically
and represent a suspended picture of the on-hand
inventory levels.
Select Create from the Physical count menu to create
the physical count transactions.
2
Print a physical count worksheet for the items, to be
used for the actual count. The worksheet may be
printed in either item number or location order, for
any range of items with physical count transactions.
Select Worksheet from the Physical count menu to
print the worksheet.
3
Enter the actual counted quantities of the items in the
corresponding physical count transactions. As many
as five separate counts may be entered for a single
inventory item. Counts can be entered manually, or
automatically if the counts were taken with a device
such as a hand-held terminal.
Select Enter from the Physical count menu to manually enter actual counts, or select Import to automatically import the actual counts.
4
Review the accuracy of the entered counts by printing
a physical count worksheet for the items, specifying
to print actual counts and variances.
In addition to printing the actual counted quantity for
each item, the suspended on-hand quantity is printed,
and the variance in quantity and cost between the two
figures is shown.
Select Worksheet from the Physical count menu to
print the worksheet, specifying to print actual counts
363
STEP
DESCRIPTION
and variances.
Make changes or additions to the counted quantities
as necessary, using the Enter selection.
5
Select Create adjustments from the Physical count
menu.
Automatically create adjustment inventory transactions for items whose actual counts differ from
their suspended on-hand quantities. Upward and downward adjustment transactions are created only for the
items that you specify.
The inventory adjustment transactions may be processed further, using the Inventory selection.
Use Inventory (Enter) to edit them as necessary. When all the required changes are made, use
Inventory (Post) to post the adjustment transactions.
Uncounted Items Continuing Operations
Passport recommends that once the physical count transactions have been created, you avoid
computer operations that affect on-hand inventory levels for those items. These computer
operations can be resumed after posting the physical count adjustments.
If you must continue these computer operations, refer to Physical Count Continued
Operations.
Until the actual counting process is completed, it is a good practice not to remove or bring in
physical goods to the area where goods are being counted.
If goods arrive after the count transactions are created, place them in an area where they will
not be counted. If goods must be removed after the transactions are created, record the
quantities being removed and include the quantities in your counted quantity figures.
This allows for a fixed relationship between the suspended on-hand quantity and the counted
on-hand quantity, and ensures that the inventory adjustment quantity and cost (variance) are
correct.
364
CREATING PHYSICAL COUNT TRANSACTIONS
Select
Create from the Physical count menu.
The following screen displays:
Enter the information as follows:
1. Starting item number and
2. Ending item number
Enter the range of item numbers for which physical count transactions are to be created or
press <F2> for the First item number.
Format
Up to 15 digits
Example
Press <F2> to select the first item number.
For field #2, select <F2> for the Last item number.
Format
Up to 15 digits
Example
Press <F2> to select the First item number.
3. Starting location and
4. Ending location
Enter the range of locations of the items for which physical count transactions are to be created
or press <F2> for the First and Last item number.
Format
Four digits or select the option
Example
Press <F2> to select the First item number.
In field #4, you can select <F2> for the Last item.
365
Format
Four digits or select the option
Example
Press <F2> to select the Last item number.
5. Inventory account #
Enter the inventory account for which to create the transactions, or use one of the options:
<F1>
For the next inventory account
<SF1>
For the previous inventory account
<F2>
For the default inventory account
<F5>
For All inventory accounts
Example
Press <F5>.
6. Vendor number
Enter the vendor number to create transactions for only one vendor, or press <F5>to create
transactions for All vendors.
Format
Six digits or use the option
Example
Press <F5> to create transactions for All vendors
7. Product category
Enter the product category to create transactions for only one product category, or press
<F5>to create transactions for All categories.
Format
Up to five digits or use the option
Example
Press <F5> for All product categories
8. Product sub-category
Enter the product sub-category to create transactions for only one product sub-category, or
<F5> to create transactions for All sub-categories.
Format
Up to five digits or use the option
Example
Press <F5>.
9. Warehouse
This field appears only if you are using multi-warehousing.
Enter the warehouse code for which you want transactions created, or use one of the options:
<Enter>
For the Central warehouse
<F5>
For All warehouses
366
Format
Up to two digits for warehouse code or use the option
Example
Press <Enter> for the Central warehouse.
10. Creation date
Enter the date that is to display and print as the on file as of date for the physical count
transactions, or press <Enter> to use the System date.
The creation date is for reference only, and represents the date on which the picture is taken of
your on-hand inventory.
Format
MMDDYY
Example
Press <Enter> for the System date.
Physical count transactions are automatically created for the specified items in the
warehouse(s) designated.
For lot-controlled items, a separate physical count transaction is created for each lot number (if
no lot numbers exist for the item, no physical count transaction is created).
If other physical count transactions are already present, and a duplicate transaction is
encountered while creating new physical count transactions, Duplicate record encountered
displays.
Options
You are then provided the following three options:
Skip duplicates
New physical count transactions are created only for those items that do not already have a
transaction on file.
Replace duplicates
New transactions are created for all specified items. Any existing transactions are replaced by
the new transactions.
Abort
The creation process is canceled. Any new transactions that were created prior to encountering
the duplicate remain in the file, and no additional transactions are created.
367
ENTERING COUNTED QUANTITIES
Use the Enter selection to manually enter or change the actual counted quantities for an item's
physical count transaction.
New physical count transactions can also be created in the Enter selection to add transactions
for items that are found during the actual physical count. (Note that the item number and a
status record for the corresponding warehouse must already exist in the I/C Item and Status
files.)
Select
Enter from the Physical count menu.
For multi-warehousing, you are asked to specify the warehouse for which you want to enter or
change counted quantities. Enter the warehouse code, or press <Enter> for the Central
warehouse.
The following screen displays:
Enter the information as follows:
1. Item number
Enter the item number or bar code of the physical count transaction for which you want to
enter or change counts.
Options
You may also use one of the options:
<Enter>
To look by description
<F1>
For the next entry by location
<F2>
For the next item
<Up>
To toggle the search by category, item #, or location
368
When the physical count transaction displays, the item's suspended Qty-on-hand figure is
displayed next to the On file as of date, and the cursor is positioned at Count qty-1 for entry of
the actual counted quantity.
Format
Up to 20 digits for an item #
Format
Up to 24 characters for a category
Example
Press <F1> and then press <Enter>.
369
ADDING NEW TRANSACTIONS
If you enter an item number or bar code for which there is no transaction, the current date displays
as the On file as of date, and the current quantity on-hand for the item is shown.
A message displays to inform you that the transaction is not on file and you are asked if you
wish to add it. Answer Y to add the new physical count transaction. The cursor is then
positioned at Count qty-1 for entry of the actual counted quantity.
Continue entering the information as follows:
2. Count qty-1
Enter the actual counted amount. Negative values are allowed, and you may default to zero by
pressing <Enter>.
<Enter>
To reset to zero
<F1>
For next entry by location
<F3>
To delete an entry
<F5>
To correct an entry
Format
99999999.99999-
Example
Type: 240
3. Count qty-2
Format
99999999.999994. Count qty-3
Format
99999999.999995. Count qty-4
Format
99999999.999996. Count qty-5
Format
99999999.99999-
Use Field number to change ? to enter additional counted amounts for this item in field #’s
three through six.
The sum of all counts entered for a transaction is displayed in the Total counted field.
7. Comment
Use Field number to change ? to enter a comment for the physical count transaction.
370
Format
Up to 25 characters
Example
Type:count and press <Enter>.
371
REMOVING PHYSICAL COUNT TRANSACTIONS
Use the Remove selection to delete a range of physical count transactions.
Select
Remove from the Physical count menu.
The following screen displays:
To specify the range of items for transactions that you want to remove, enter the information
on this screen in the same manner as described for the Create selection.
1. Starting item number
2. Ending item number
Enter the range of item numbers for which physical count transactions are to be removed or
press <F2> for the First item number.
Format
Up to 15 digits or use the option
Example
Press <F2> then <Enter> to select First
Options
For field #2 press <F2> for Last item number.
Format
Up to 15 digits or use the option
Example
Press <F2> then <Enter> to select Last.
3. Starting location and
4. Ending location
Enter the range of locations of the items for which physical count transactions are to be
removed or press <F2> to select First.
372
Format
Four digits or select the option
Example
Press <F2> and then <Enter> to use First.
For field, field #4 press for the Last location.
Format
Four digits or select the option
Example
Press <F2> then <Enter> for Last.
5. Inventory account #
Enter the inventory account for which to remove the transactions.
Options
You may also use one of the options:
<F1>
For the next inventory account
<SF1>
For the previous inventory account
<F2>
For the default inventory account
<F5>
For All inventory accounts
Format
Enter up to seven digits or use the options
Example
Press <F5> to select All then press <Enter>
6. Vendor number
Enter the vendor number to remove transactions for only one vendor or press <F5> to remove
transactions for All vendors.
Format
Enter six digits or the option
Example
Press <F5> and then press <Enter> for All vendors.
7. Product category
Enter the product category to remove transactions for only one product category press <F5> to
remove transactions for All categories.
Format
Enter up to five digits or use the option
Example
Press <F5> then press <Enter> for All.
8. Product sub-category
Enter the product sub-category to remove transactions for only one product sub-category press
<F5> to remove transactions for All sub-categories.
Format
Up to five digits or use the option for All
Example
Press <F5> then press <Enter>.
373
9. Warehouse
Enter the warehouse code for which you want transactions created or press <F5> for the
Central warehouse .
Format
Up to two digits of warehouses code or use the option
Example
Press <Enter> for the Central warehouse.
Field number to change ?
Make any needed changes, then press <Enter>.
374
IMPORTING COUNTED QUANTITIES
Use the Import selection to automatically import the actual counts for physical count
transactions.
Note
Before using this selection, be sure to make a backup copy of your ICPHXF
file in the Inventory Data File directory. If you have to rerun the Import
selection for any reason, you will need to restore this file to its original
state prior to the rerun.
If you use a hand-held terminal to perform the physical counting process, the Import selection
can retrieve the actual counts collected by the device from a disk file and update the
corresponding transactions.
Saved Import Formats
If an import format was saved previously when using this selection, that format is displayed
automatically.
Use Field number to change ? to make any necessary changes for the file to be imported in
this session. You may also press <F1> to clear the screen to enter a new import format.
Select
Import from the Physical count menu.
*1. Warehouse
For multi-warehousing, you are asked to specify the warehouse for which the counts are to be
imported. Enter the warehouse code.
Options
You may also use the options:
<Enter>
For the Central warehouse
<F5>
For All warehouses
Format
Up to two digits of warehouses code or use the option
Example
Press <Enter> for the <Central> warehouse.
The following screen displays:
375
Enter the information for a new import format as follows:
1. Import filename
Enter the name of the file to be imported. If the import file is not in the PBS top-level folder
(directory), include the drive letter or path name where it is located.
Format
Up to 14 characters
Example
A:\IMPORT.EXP
2. Duplicate counts
Enter the letter that corresponds to the desired processing method if a count has already been
recorded in the transaction.
Enter S to skip the import count if any count, including 00. You may default to S by pressing
<Enter>.
Enter A to add the import count to the next available count field of the transaction or, if all
count fields contain entries, add to the existing entry for Count qty-5.
Enter R to replace all existing counts in a transaction with the import count.
Options
Use the following options:
S
To skip the duplicate counts
A
To add the duplicate counts
R
To replaces the duplicate counts
Format
One letter from the table above. The default is S.
Example
Press <Enter> to accept the default.
376
3. Field format
Format
One character
Enter the letter that corresponds to the format of each field in a record of the import file.
Options
Enter the one of the following options:
D
If the data fields in a record are in variable starting columns, and are separated by a specific, delimiting character at the end of each field
F
if each data field in each record always begins in a specific, fixed column.
If you specify a delimited field format, two additional fields display for you to further define
the delimiting character.
Delimiting char
Format
Two characters
This field will only need to entered if you selected D for the field format.
Specify the ASCII character used at the end of each field to separate the fields in a record. The
character should be entered in its two-character hexadecimal form.
The corresponding ASCII character is then displayed in quotation marks next to the
hexadecimal entry.
If the delimiting character is a comma “,”, enter B2
Text in quotes?
This field will only need to entered if you selected D for the field format.
Answer Y if the text fields in a record are enclosed in quotation marks. Otherwise, answer N.
Use the remaining fields on this screen to describe the item number, quantity, serial number,
and lot number information in the import records. The fields that display depend on the field
format that you entered in field #3.
Format
One letter, either Y or N.
Example
Type: N and then press <enter>.
4. Item numbers
Describe the method of determining item numbers, as follows:
Primary lookup by
Enter the letter corresponding to the first method to be used to locate each item number.
377
Enter I if the actual item number appears in the import record, or enter B if the item's bar code
exists in the import record.
Format
One letter, either I or B.
Example
Type:I and then press <enter>.
Secondary lookup by
Enter the letter corresponding to the alternate method of locating the item number in each
import record, or press <Enter> for no secondary lookup method.
During the import, the item number (or bar code) is initially looked up using the method
specified for Primary lookup by. If a matching entry is not located using that method, the
Secondary lookup by method is used.
Format
One letter, either I or B.
Example
Type: I and then press <enter>.
Field number
For delimited field formats, enter the relative field number of the item number (or bar code) in
an import record.
For example, if you enter 4 for this field, the item number (or bar code) for each item would be
found in the fourth field, and is preceded by three occurrences of the delimiting character
specified above in field #3.
Format
Enter up to two digits
Example
Type: 10 and then press <Enter>.
Start Position and Length
Length
For fixed position field formats, specify the starting column number and length of the item
number (or bar code) field in an import record.
For example, if you enter a Start position of 15, and a Length of 10, the item number (or bar
code) for each item would be found beginning at column 15 and extending for 10 characters.
5. Quantities
Describe the handling and location of the quantity in each import record, as follows:
Use 1 if blank?
Answer Y to import a default transaction quantity of 1 for any record whose quantity is spaces.
Otherwise, answer N.
If you answer Y, any numeric quantity, including 0, is imported as the value in the record. If
the quantity is spaces (blank), a quantity of 1 is imported. Non-numeric values that are not
spaces are reported as errors.
378
If you answer N, numeric values are imported as usual. All non-numeric values, including
spaces, are reported as errors.
Format
One letter, either Y or N. There is no default.
Example
Type: Y and then press <Enter>.
Implied decimal places
Enter the number of decimal places contained within the quantity to be imported, either 1, 2, or
3, or press <Enter> to default to 0 if the quantities are always expressed as whole numbers.
If the quantity to be imported contains a decimal point to separate whole digits from the
decimal positions, the decimal point is used to determine the number of decimal places, and
your entry in this field is ignored.
Field number
For delimited field formats, enter the relative field number of the quantity in an import record.
Start Position and Length
For fixed position field formats, specify the starting column number and length of the quantity
field in an import record.
6. Lot numbers
Describe the location of the lot number in each import record for lot-controlled items, as
follows:
Field number
For delimited field formats, enter the relative field number of the lot number in an import
record, or press <Enter> to default to None if you are not using lot numbers.
Start Position and Length
For fixed position field formats, specify the starting column number and length of the lot
number field in an import record, or press <Enter> to default to a Start position of 0 if you are
not using lot numbers.
Format
Up to two digits or use the option.
Example
Press <Enter> for Start Position.
Field number to change ?
Make any required changes and press <Enter>.
If you defined a new import format, or changed the saved import format, you are asked if you
wish to save (replace) the format.
Answer Y to save this import format for use in subsequent import sessions. Only one import
format may be retained. (The import format is saved in the I/C Control file.)
379
Answer N to use this import format for the current import session only. Any existing saved
import format remains unchanged.
After you answer this question, a screen appears for you to select where to print the Physical
Count Import Log. The import process then begins.
Using the details supplied in the import format, the data from the import file is transferred into
the physical count transactions for the corresponding items and warehouse.
As the data file is being imported, a count of the records being imported and the transactions
being updated is displayed.
The count quantity for each item is placed into the first Count qty field of the corresponding
physical count transaction. If a count has already been recorded in the transaction, the
imported counts are processed as specified in the Duplicate counts field.
Any error conditions encountered during the import session are recorded on the Physical count
Import Log, and a message notifying that errors have been recorded in this file is displayed on
the screen at the end of the import session.
380
PRINTING PHYSICAL COUNT WORKSHEETS
Use the Worksheet selection to print a Physical count Worksheet.
Expanded Physical Count
If you specified the Expanded Physical count method in Control information, the worksheet
lists the inventory items with physical count transactions by location or item number within a
selected warehouse. Serial numbers and lot numbers may be optionally printed. You can use
this worksheet to do an actual physical count.
This selection is also used after actual counts have been entered to show variances in quantity
and cost between the suspended on-hand quantities and the actual physical counts. This report
also highlights transactions for which no actual counts are entered.
Normal Physical Count
If you specified the Normal physical count method in Control Information, the worksheet lists
your inventory items by location within any warehouse. You can use this worksheet to do an
actual physical count.
For a Normal physical count, refer to the Physical Count Worksheets chapter for instructions
on entering Worksheet information.
Select
Worksheet from the Physical count menu.
When using the expanded physical count method, a screen similar to below displays:
Enter the information as follows:
1. Warehouse
For multi-warehousing, you are asked to specify the warehouse for which the counts are to be
printed. Enter the warehouse code.
You may also use the options:
381
<Enter>
For the Central warehouse
If you are not using multi-warehousing, you will not see the Warehouse field and all field
numbers will be one less than the numbers shown.
2. Starting location
3. Ending location
Enter the range of locations for which the worksheet is to be printed or press <F2> to select
First and Last in each field.
Format
Four digits or select the option
Example
<F2> to use First.
4. Starting item number
5. Ending item number
Enter the range of item numbers for which the worksheet is to be printed or press <F2> for
First and Last in each field.
Format
Up to 15 digits or use the option
Example
Press <F2> t to select Last.
6. Inventory account #
Enter the inventory account for which the worksheet is to be printed.
Options
You may also use the options:
<F1
For the next inventory account on file
<SF1>
For the previous inventory account on file
<F2>
For the default inventory account (in the I/C Control
file) 1200-000 Merchandise Inventory
<F5>
For All inventory accounts
Format
Enter up to seven digits or use the options
Example
Press <F5> to select All.
7. Vendor number
Enter the vendor number to print the worksheet for only one vendor, or press <F5> to print the
worksheet for All vendors.
Format
Enter six digits or the option
Example
Press <F5> for All vendors.
382
8. Product category
Enter the product category to print the worksheet for only one product category press <F5> to
print worksheet for All categories.
Format
Enter up to five digits or use the option
Example
Press <F5> for All.
9. Product sub-category
Enter the product sub-category to print the worksheet for only one product sub-category press
<F5> to print worksheet for All sub-categories.
Format
Up to five digits or use the option for All
Example
Press <F5>.
10. Print in order by
Options
Enter in the order you desire to print the worksheet by using one of the following options:
L
To print the worksheet by location
I
To print the worksheet by item
C
To print the worksheet by category
Format
From the table above, one letter either L, I, or C. The
default is L
Example
Press <Enter> to select the default
By selecting to print worksheet by category C a new field will appears and ask if you want the
print out to be One category per page?
Format
One letter, either Y or N. The default is N.
Example
Press <Enter> to accept the default.
11. Count data to print?
Enter the character that corresponds to the amount of quantity information to be printed.
Enter N for None to omit printing of all quantities. Underlines are printed on the worksheet, for
recording the figures while taking the actual physical count.
Enter A for Actual to show the total actual counted quantity for each item as entered in the
physical count transaction. The suspended on-hand quantity is also printed for each item.
Enter V for Actual/variance to show the total actual counted quantity, suspended on-hand
quantity, and unit cost for each item. The difference between the suspended and actual quantity
383
is shown as a quantity and cost variance. The variance prints as a negative amount if the
counted quantity is less than the suspended quantity.
If either A or V is specified, **Not counted** prints on the report for an item if no counted
quantities are entered.
In addition, for A or V type reports, serial numbers cannot be printed for serialized items and
the field #15 Print quantities on-hand ? will not be displayed.
Options
Use on of the following:
N
For None
A
For Actual counts
V
For Actual counts and variances
Format
One letter from the table above. The default is N.
Example
Press <Enter> to select the default.
12. Suppress blank lines?
Answer Y to eliminate blank lines between items on the worksheet. Answer N if you wish one
line to be skipped prior to printing an item on the worksheet.
Format
One letter, either Y or N. The default is Y.
Example
Press <Enter> for the default
13. Recalc Qty on hand?
Answer Y if you want to print on the worksheet the recalculate quantities on-hand. Answer N if
you prefer not to print out the recalculation of the quantities on-hand.
Format
One letter, either Y or N. The default is N.
Example
Press <Enter> for the default.
* If you specified None for Count data to print ?, both field #’s 14 and 15 will display. If you
answer selected Actual counts or Actual counts and variances then only field 14 will display.
*14. Serial / lot data to print
Enter S to show the serial numbers with an unsold status on the worksheet for serialized items
with physical count transactions. Each unsold serial number and its Reference text is printed for
serialized items. In addition, committed or loaned is printed for applicable serial numbers.
Enter L to show the individual lot numbers and Reference text on the worksheet for lotcontrolled items.
Enter B to show both unsold serial numbers and individual lot numbers for the items.
384
Enter N for None if you do not wish either serial numbers or lot numbers printed on the
worksheet.
Options
Use one of the following:
S
Serial number
L
Lot number
B
Both
N
None
Format
One letter from above. N is the default.
Example
Press <Enter> to accept the default.
*15. Print quantities on hand?
If you answer N, no quantities on-hand will be printed.
If you answer Y and you have selected to print actual counts, the suspended on-hand quantity,
counted quantity, and variance information are shown.
By selecting Z, only the quantities whit non zero value will be printed on the worksheet.
Options
Use on of the following:
N
Not to print quantities on-hand
Y
Print quantities on-hand
Z
Print just the Non- zero quantities on-hand
Format
One letter from above. There is no default.
Example
Type:Y then press <Enter>.
Field number to change ?
Make any needed changes, and then press <Enter>.
The suspension date entered when the transactions were created is printed at the top of the
worksheet. If you selected to print actual counts and the transactions were created with
different suspension dates, the suspension date of the first item printed is shown at the top of
the worksheet. Dates that are different are printed below the item number to which they relate.
385
CREATING ADJUSTMENT TRANSACTIONS
Use this selection to automatically create upward or downward inventory adjustment transactions
from selected physical count transactions. This is only available for the Expanded physical count
method, as defined in the Control information file.
Select
Create adjustments from the Physical count menu.
A screen displays to allow you to specify the range of items for which you wish to create
adjustment transactions. Enter information on this screen in the same manner as described for
creating physical count transactions.
If transactions are found in the Inventory Transaction file, the message displays Inventory
transactions are on file - Proceed?. Answer Y to continue, or press <Enter> to default to N to
cancel the creation process.
Enter the information on this screen as follows:
1. Starting item number
2. Ending item number
Enter the range of item numbers for which the worksheet is to be printed or press <F2> for
First and Last.
Format
Up to 15 digits for both fields or use the option
Example
Press <F2> select First and Last.
3. Starting location
4. Ending location
Enter the range of locations for which the worksheet is to be printed or press <F2> to select
First and Last for both fields #3 and #4.
386
Format
Four digits or select the option
Example
Press <F2> to use First and Last.
5. Inventory account #
Enter the inventory account for which the worksheet is to be printed.
Options
Use on of the following options:
<F1>
For the next inventory account on file
<SF1>
For the previous inventory account on file
<F2>
For the default inventory account (in the I/C Control
file) 1200-000 Merchandise Inventory
<F5>
For All inventory accounts
Format
Enter up to seven digits or use the options
Example
Press <F5> to select All.
6. Vendor number
Enter the vendor number to print the worksheet for only one vendor, or press <F5> to print the
worksheet for All vendors.
Format
Up to six digits or use the option
Example
Press <F5> for All vendors.
7. Product category
Enter the product category to print the worksheet for only one product category, or press <F5>
to print worksheet for All categories.
Format
Enter up to five digits or use the option
Example
Press <F5> for All.
8. Product sub-category
Enter the product sub-category to print the worksheet for only one product sub-category, or
press <F5> to print worksheet for All sub-categories.
Format
Up to five digits or use the option for All
Example
Press <F5>.
9. Warehouse
For multi-warehousing, you are asked to specify the warehouse for which the counts are to be
imported. Enter the warehouse code.
387
Options
You may also use the following options:
<Enter>
For the Central warehouse
<F5>
For All warehouses
If you are not using multi-warehousing, you will not see the <Warehouse> field and all field
numbers will be one less than the numbers shown.
If transactions are found in the Inventory Transaction file, the message displays Inventory
transactions are on file - Proceed ?. Answer Y to continue, or press <Enter> to default to N to
cancel the creation process.
If inventory transactions are not on file, or if you select to proceed, a second screen appears
similar to this:
1. Transaction date
Enter the date to be used as the transaction date for the adjustment transactions or press
<Enter> for the System date.
2. Document number
Enter the document number to be used for the adjustment transactions, or press <Enter> to
default to PHYS-COUNT.
Format
Up to ten characters
Example
Press <Enter> for the default.
3. Adjustment account
Enter the number of the G/L account to be used for adjustments.
The account number entered must be a valid General Ledger account number.
388
4. Adjust non-counted items to zero?
Answer Y to create adjustments for items whose physical count transactions do not have actual
counts entered. Otherwise, answer N.
If you answer Y, adjustments are created in the amount necessary to adjust the item's
suspended on-hand quantity to zero.
If you answer N, adjustment transactions are not created for items if actual counts are not
entered.
Format
One letter, either Y or N. The default is N.
Example
Press <Enter> for the default.
5. Default comment
Format
25 characters
Enter the comment to be used as a default comment for the adjustment transactions, or press
<Enter> to leave this field blank.
The default comment is used only if the physical count transaction does not already have a
comment entered.
Format
Up to 30 characters
Example
Press <Enter> to leave this field with no comment.
6. Mark adjustments as correction ?
Enter the adjustments transactions, if you want them to be saved as a correction or an
adjustment.
Format
One letter, either Y or N. The default is N.
Example
Press <Enter> to accept the default.
Make changes as usual.
You are asked OK to create adjustments?. Answer Y to create adjustment transactions for
those items whose actual counts differ from the suspended on-hand quantity.
An upward adjustment is created for an item if the actual count is greater than the suspended
on-hand quantity. A downward adjustment is created if the actual count is less than the
suspended on-hand quantity.
If specified, adjustment transactions are also created for items that have no actual count
quantities entered. The adjustment is created in the amount necessary to set the quantity onhand for the item to zero.
No adjustment is created for an item whose actual count is the same as its suspended quantity
on-hand.
389
Physical count transactions are then deleted for all items within the range specified, including
those with actual counts for which adjustments were not created, as well as those without actual
counts entered.
The adjustment transactions are not automatically posted. They may be edited as required and
posted, using the Inventory selection.
If adjustments were created for serialized items, use Inventory (Enter) to enter the actual serial
numbers that are to be adjusted up or down for the item
Example
After you have created the adjustment transactions for the
items specified (by answering Y to OK to create adjustments?), you may exit this selection and use Inventory to
view the adjustments and to post them. When posting completes, return to this point in the manual.
390
PHYSICAL COUNT CONTINUED OPERATIONS
Read this section if you wish to continue computer processing or movement of physical goods that
affects on-hand inventory levels for items that are being counted.
The procedures outlined below allow you to produce an accurate period-end valuation, even
though your quantities or costs may have changed while you were counting.
The Physical count (Create adjustments) selection creates inventory adjustment transactions
with the actual cost at that time. If other transactions that affect cost have taken place between
the time of valuation (counting) and the time of posting the adjustments, the value of the
adjustments will not be correct.
If you plan to continue normal operations during the counting period, but wish to be able to
print a final Valuation Report, follow these steps (in addition to the steps presented at the
beginning of this chapter):
STEP
DESCRIPTION
After creating the physical count transactions (step 1
in performing an expanded physical count), save a
copy of these files:
1
•
Item file (ITMFIL)
•
Status file (STAFIL)
•
Serial file (ICSERF)
•
Layer file (LAYFIL)
Save a copy of the Layer file only if you are using
LIFO or FIFO valuation.
2
After entering, verifying, and correcting the actual
count data for the physical count transactions, save a
copy of all Inventory Control data files (typically
located in the ICxx subdirectory, where xx is the company-ID. Then load the four files that were saved in
step 1 back on to your system. Run Physical Count
(Create adjustments) and post the adjustments using
Inventory (Post).
At this point, you must stop all computer processing
until you complete steps 3 and 4 below.
3
After posting the adjustment transactions, run the Valuation report. This reports your inventory value as of
the end of the period.
If you think you may need to reprint this exact report
391
STEP
DESCRIPTION
at some other time, save the Item, Status, Serial and
Layer files again.
Load all of the Inventory control data files that were
save in step 2.
You now have current, adjusted inventory available
for reporting.
4
Note that the value of the adjustments posted in step
C would be different than those posted in step D
because of cost changes. If this difference is considered an end of period adjustment for the prior
period, then add this difference to the Valuation
report run in step C to arrive at a final end of period
value.
392
PHYSICAL GOODS MOVEMENT
Until the actual counting process is completed, it is a good practice not to remove or bring in physical goods to the area where goods are being counted.
If goods arrive after the count transactions are created, place them in an area where they will
not be counted. If goods must be removed after the transactions are created, record the
quantities being removed and include the quantities in your counted quantity figures.
393
Price Lists
This chapter contains the following topics:
Introduction to Price Lists
Printing Item Price Lists
Printing Warehouse Price Lists
Printing Sale Price Lists
Printing Contract Price Lists
Printing Actual Customer Price Lists
394
INTRODUCTION
TO
PRICE LISTS
Inventory control provides for several types of prices, including item default prices, warehouse-specific prices, sale prices, and contract prices. Refer to the Prices chapter for a detailed discussion of
each type of price.
Use the Price list selection to print price lists. Five different types of price lists are available:
Item price list
This price list shows price-1, price-2, price-3, price-4, and price-5 for a range of items and,
optionally, sale prices and warehouse-specific prices.
Warehouse price list
This price list shows only item prices that are defined for a specific warehouse.
Sale price list
This price list shows sale prices (or discounts) for items and/or categories of items that are in
effect for a specified period. You may optionally include warehouse-specific sale prices.
Contract price list
This price list shows contract prices (or contract discounts) that are defined for customers and
specific items or categories of items that are in effect for a specified period.
Actual customer price list
This price list shows, for a specific customer or customer type, the actual prices charged. Sale
prices and warehouse-specific prices may optionally be shown.
The warehouse price list and warehouse-specific prices are available only if you specified that
you are using multi-warehouse pricing (in I/C Control information).
Selecting Price Lists
Select
Price list from the Prices menu.
Graphical Mode
Character Mode
The following screen displays:
395
Enter the information as follows:
Price list type
Enter the type of price list to be printed, as follows:
Item prices
Warehouse prices
Sale prices
Contract prices
Actual customer prices
The fields that can be entered on the screen depend on the price list type selected here. Each of
the types will be shown in turn.
Warehouse
This field can only be entered if you are using multi-warehouse pricing and you did not select
Contract pricing in the Price list type field.
Enter the warehouse code to print item prices for a specific warehouse.
Options
You may use one of the following options:
<Enter>
For the Central warehouse
<F2>
For the Item file (item default) prices
If you enter a specific warehouse, prices that are defined for that warehouse (using Item prices)
are printed for applicable items. If a warehouse-specific price does not exist for an item, the
Item file price is shown.
396
If you enter a specific warehouse, and are also printing sale prices, sale prices defined for that
warehouse are shown as well.
If you specify Item default prices, Item file prices are printed for each item. If you are also
printing sale prices, only sale prices that do not pertain to a specific warehouse are shown.
If you selected to print sale prices on the list, they print only if they are active (in the I/C
Control information).
397
PRINTING ITEM PRICE LISTS
Select
Item prices for Price list type.
Graphical Mode
The fields to enter the item price list options are now available:
Character Mode
The following screen as below:
Enter the following information:
398
Starting item number and
Ending item number
Enter the range of item numbers to include on the list or press <F2> at each field for "First"
and "Last" item numbers.
Vendor
Enter the vendor number to print items for only one vendor, press <F5> for "All" vendors.
Product category
Enter the category to print items for only one category, or press <F5> to include items for All
categories.
Product sub-category
Enter the sub-categories to print items for only one sub-category, or press <F5> to include
items for "All" sub-categories.
Print in order by
Specify the order in which to print the list.
Item number
To print in order by item number
Description
By description
Category
By category
If you enter by category, field the Page break by category field can be entered.
Page break on category
This field can only be entered if you selected Category on the previous field.
Check this box if you want to start each category on a new page.
Suppress blank lines
Check this box to eliminate blank lines between items on the list. Leave it unchecked if you
wish to skip one line prior to printing each item.
Show sale prices
Select Yes to show sale prices and effective dates, in addition to other prices for the items. Sale
prices for items and categories within the ranges specified will be shown.
Options
You may use one of the following options:
Yes
To include the sales prices on the report
No
To exclude sales prices on the report
399
Sale prices
only
To print only those items within the specified range that
have sales prices
If you enter Yes or Show sales prices, the Effective date field can be entered.
Effective date
The effective date for the sales prices to be printed are assigned by the system at the time you
create the report. Items with sale prices that are in effect on that date are printed.
OK or Cancel
Select OK to print the report or Cancel to return to the menu.
400
PRINTING WAREHOUSE PRICE LISTS
This type of price list may be printed only if you specified in Control information that you are
using multi-warehouse pricing.
The list shows only those items for which warehouse-specific prices are defined (using Item
prices) and only those prices specifically defined for the designated warehouse. (To see all
item prices for a single warehouse, print an Item price list for the desired warehouse.)
Select Warehouse prices for Price list type.
Graphical Mode
The fields to enter the warehouse prices list options are now available:
Character Mode
The following screen displays:
401
Enter the information as follows:
Warehouse
Enter the code of the warehouse for which you wish to print prices.
Options
You may also use one of the options:
<Enter>
For the Central warehouse
<F5>
For "All" warehouses
Starting item number and
Ending item number
Enter the range of item numbers for which warehouse prices are to be included on the list or
press <F2> at each field for "First" and "Last". Follow the screen instructions.
Vendor
Enter the vendor number to print items for only one vendor, or press <F5> to include items for
"All" vendors.
Product category
Enter the category to print items for only one category, or press <F5> to include items for "All"
categories.
Product sub-category
Enter the sub-category to print items for only one sub-category, or press <F5> to include items
for "All" sub-categories.
Suppress blank lines
Check this box to eliminate blank lines between items on the list. Leave it unchecked if you
wish one line to be skipped prior to printing each item.
402
Format
Check box where checked is yes and unchecked is not.
The default is unchecked.
Example
Check this box
403
PRINTING SALE PRICE LISTS
You may print a list that shows only sale prices for items, only sale prices for categories of items, or
a list that shows both types of sale prices.
If you are using multi-warehouse pricing, you may also specify to print only sale prices for a
specific warehouse, only sale prices that are not warehouse-specific, or all sale prices.
For each item sale price, the item number, description, sale price(s), and starting and ending
sale dates are shown.
For each category sale price, the category, sub-category, discount percentage(s), and starting
and ending sale dates are shown.
Select Sale pricesfor Price list type.
Graphical Mode
The fields to enter the sale price list options are now available:
Character Mode
The following screen displays:
404
Enter the following information:
Warehouse
This field can only be entered if you are using multi-warehouse pricing.
For Central warehouse, leave this field blank. For multiple warehouses, use one of the options:
Options
Enter the warehouse code to print sale prices for a specific warehouse, or use one of the
options:
<F2>
For Item default sales price
<F5>
For "All" sale prices
<Enter>
For the Central warehouse
If you enter a specific warehouse, only sale prices that are defined for that warehouse are
printed.
If you press <F2> for Item default sale prices, only sale prices that do not pertain to a specific
warehouse are printed.
If you press <F5> for "All" sale prices, both specific warehouse and item default sale prices are
printed.
Starting item number and
Ending item number
Enter the range of item numbers for which sale prices are to be included on the list or press
<F2> in each field for "First" and "Last". Follow the screen instructions.
Product category
Enter the category to print sale prices for only one category, or press <F5> to include sale
prices for "All" categories.
405
Product sub-category
Enter the sub-category to print sale prices for only one sub-category, or press <F5> to include
sale prices for "All" sub-categories.
Suppress blank lines
Check this box to eliminate blank lines between items and/or categories on the list. Unchecked
this box if you wish one line to be skipped prior to printing each item or category.
Format
Check box where checked is yes and unchecked is no. The
default is unchecked.
Example
Check this box by selecting the space bar.
Starting effective date and
Ending effective date
Enter the range of dates during which a sale price must be in effect to be printed on the list or
press <F2> in each field for "Earliest" and "Latest" effective dates.
Format
MMDDYY
Item sale prices
Check this box to include item sale prices, in addition to other prices for the items. Sale prices
for items and categories within the ranges specified are shown.
Uncheck the box if you do not wish sale prices to print on the list. The Starting and Ending
item number fields become grayed-out and cannot be entered.
Format
Check box where checked is yes and unchecked is no. The
default is checked.
Example
Press <Enter> to accept the default.
Category sale prices
Check this box to include category sale prices on the sale price list. Otherwise, answer uncheck
it.
If you uncheck it, the Product category and Product sub-category fields are grayed-out and
entry is not allowed.
Format
Check box where checked is yes and unchecked is no. The
default is checked.
Example
Press <Enter> to accept the default.
If any of the sale prices shown on the list are not active (in the I/C Control information), a
warning message to that effect is printed at the bottom of the list.
406
PRINTING CONTRACT PRICE LISTS
You may print a Contract Price List that shows, for each customer specified, only contract
prices for items, only contract prices for categories of items, or both types of contract prices.
For each item contract price, the item number, description, starting and ending contract dates,
contract ID, use contract or lowest price value, and contract price(s) are shown.
For each category contract price, the category, sub-category, starting and ending contract
dates, contract ID, use contract or lowest price value, price basis for the discount, and discount
percentage(s) are shown.
Select Contract prices for Price list type.
Graphical Mode
The fields to enter the contract price list options are now available:
Character Mode
The following screen displays:
407
Enter the following information:
Starting item number and Ending item number
Enter the range of item numbers for which contract prices are to be included on the list or press
<F2> at each field for "First" and "Last". Follow the screen instructions.
Format
Up to 15 digits
Example
Press <F2> and then press <Enter>.
Product category
Enter the category to print contract prices for only one category, or press <F5> to include All
contract prices for "All" categories.
Format
Up to five characters
Example
Press <F5> for All categories.
Product sub-category
Enter the sub-category to print contract prices for only one sub-category, or press <F5> to
include contract prices for "All" sub-categories.
Format
Up to five characters
Example
Press <F5> for all sub-categories.
Suppress blank lines
Check this box to eliminate blank lines between items and/or categories on the list. Uncheck
the box if you wish one line to be skipped prior to printing each item or category.
Format
Check box where checked is yes and unchecked is no. The
default is checked.
Example
Press <Enter> to accept the default.
408
Starting effective date and
Ending effective date
Enter the range of dates during which a contract price must be in effect to be printed on the list
or press <F2> at each field for Earliest and Latest effective dates. Follow the screen
instructions.
Format
MMDDYY
Example
Press <F2> for "Earliest" and "Latest".
Starting customer number and
Ending customer number
Enter the range of customer numbers for which contract prices are to be printed or press <F2>
for First and Last customer numbers. Follow the screen instructions.
Example
Press <F2> for "First" and "Last".
Page break on customer
Check this box to start a new page for each customer. Otherwise, answer uncheck it.
Format
Check box where checked is yes and unchecked is no. The
default is unchecked.
Example
Press <Enter> to accept the default.
Item contract prices
Check this box to include item contract prices on the contract price list. Otherwise, uncheck it.
If you uncheck it, the Starting item number and Ending item number fields are grayed-out and
entry is not allowed.
Format
Check box where checked is yes and unchecked is no. The
default is checked.
Example
Press <F5>.
Category contract prices
Check this box to include category contract prices on the contract price list. Otherwise,
uncheck this box.
If you unchecked this box, the Product category and Product sub-category fields are grayedout and entry is not allowed.
Format
Check box where checked is yes and unchecked is no. The
default is checked.
Example
Press <Enter> to accept the default.
409
If any of the contract prices shown on the list are not active in the I/C Control information, a
warning message to that effect is printed at the bottom of the list.
410
PRINTING ACTUAL CUSTOMER PRICE LISTS
A Customer Price List can be printed for a single customer or customer type. The list shows the
actual prices that customer (or type of customer) would be charged on a specific date.
The item prices shown are calculated using the applicable price codes. Any contract prices and,
optionally, sale prices in effect on the specified date are also shown. If you are using multiwarehouse pricing, you may also print the Customer Price List for a specific warehouse.
Select Actual customer prices for Price list type.
Graphical Mode
The fields to enter the actual customer price list options are now available:
Character Mode
The following screen displays:
411
If you are using multi-warehouse pricing, Warehouse displays as the last field.
Enter the following information:
Warehouse
This field appears only if you are using multi-warehouse pricing.
Options
Enter the warehouse code to print prices for a specific warehouse, or use one of the options:
<Enter>
For the Central warehouse
<F2>
For item default prices
If you enter a specific warehouse, prices defined for that warehouse are printed for applicable
items. If a warehouse-specific price does not exist for an item, the Item file price is shown. If
you are also printing sale prices, sale prices defined for that warehouse are shown as well.
Starting item number and
Ending item number
Enter the range of item numbers to be included on the list or press <F2> at each field for
"First" and "Last". Follow the screen instructions.
Format
Up to 15 digits
Example
Press <F2>
Vendor
Enter the vendor number to print item prices for only one vendor, or press <F5> to include
item prices for "All" vendors.
Format
Up to six digits
Example
Press <F5>.
412
Product category
Enter the category to print prices for only one category of items, press <F5> to include prices
for "All" categories.
Format
Up to five characters
Example
Press <F5>.
Product sub-category
Enter the sub-category to print prices for only one sub-category of items press <F5> for "All"
sub-categories.
Format
Up to five characters
Example
Press <F5>.
Print in order by
Specify the order in which to print the list.
Options
Use one of the following options:
Item number To print in order by item number
Description
To print in order by description
Category
To print in order by category
Example
Select Item number
If you enter Category for the previous field, only then may you enter this field:
Page break on category
Check this box to start a new page for each category. Otherwise, uncheck it.
Format
Check box where checked is yes and unchecked is no. The
default is unchecked.
Suppress blank lines
Check this box to eliminate blank lines between items on the list. Uncheck the box if you wish
one line to be skipped prior to printing each item.
Format
Check box where checked is yes and unchecked is no. The
default is unchecked.
Example
Check the box and then press <Enter>.
413
Show sale prices
Select Yes to show sale prices (for items or categories) and ending sale dates, in addition to
other prices shown for the items.
Only sale prices that are in effect on the date specified for Effective date , and that are active
(in I/C Control information) are printed.
Select No if you do not wish sale prices to print on the list.
Format
Either Yes or No.
Example
Select Yes
Effective date Enter the effective date for the prices to be printed. Contract prices (for items or categories) that
are in effect on that date are printed on the list.
Only those contract prices that are active (in I/C Control information) are printed.
Format
MMDDYY
Example
Press <Enter> to accept the System date.
Customer # or type
The entry of this field will determine if you can enter the Customer number or Customer type field next.
Customer type Enter the customer type. You may select <F2> for by customer.
Format
Up to five characters.
Example
Press <F2>, and then press <Enter>.
Customer number
Enter the number of the customer for which the list is to be printed, or press <F2> to print the
list for a customer type.
Options
If you are using Accounts Receivables, you may also use one of this option:
<Enter>
To look up by customer name
Example
Press <F1>
Customer name
If you selected <Enter> on the Customer number field, then you can enter or lookup the
customer by name.
414
Options
You may also use one of this option:
<Enter>
To look up by customer number
Example
Press <F1>
If you specify Item default prices, Item file prices are printed for each item. If you are also
printing sale prices, only sale prices that do not pertain to a specific warehouse are shown.
415
Purchasing Advice
This chapter contains the following topics:
Introduction to Purchasing Advice
Selecting Purchasing Advice
416
INTRODUCTION
TO
PURCHASING ADVICE
Use this selection to print the Purchasing Advice report.
This report lists the inventory items that have dropped below the reorder level or have gone out
of stock since the last time this report was printed. It also shows items that are still below
reorder level or out of stock after receivings have been posted.
If you entered an inventory reorder basis of Net quantity in Control information, the net
quantity of an item is used to determine if the item is below reorder level or out of stock. Net
quantity is calculated as follows:
•
Quantity on-hand
•
Quantity committed
•
Quantity on back order (if using O/E or P/S)
•
Quantity on work orders (if using kits)
•
Quantity on order (if using P/O)
If you instead entered an inventory reorder basis of Quantity on-hand, only the quantity onhand of an item is used for calculation.
If you are using Purchase Order, you should use the Purchasing advice report in that module
rather than this one.
417
SELECTING PURCHASING ADVICE
Select
Purchasing advice from the Reports menu.
The following screen displays:
Enter the information as follows:
1. Warehouse
Options
If you are using multi-warehousing, enter the warehouse code for the items to be included on
the report, or use one of the options:
<Enter>
For the Central warehouse
<F1>
For All warehouses
If you are not using multi-warehousing, you will not see the Warehouse field
and all field numbers will be one less than the numbers shown.
Note
2. Starting item # and
3. Ending item #
The values entered here need not be valid items, since their purpose is to define a range; but at
least one item within the range must previously have been defined in the Items selection.
Enter the range of item numbers to include on the report. Follow the screen instructions.
Format
Up to 15 digits
Example
Press <F2> at each field for First and Last.
418
4. Group by inv acct ?
If you answer N the inventory account will not affect the sequence of the report. If you answer
Y, then depending on your answer to the next field you will either:
•
Group the items by inventory account on the report. If you are printing All multiple warehouses on this report, the major grouping will be by inventory account, and the warehouses
and items (or items and warehouses) will be shown within each inventory account.
•
Restrict the report to those items with a single specified inventory account.
Format
One letter, either Y or N, there is no default
Example
Type:N and then press <Enter>.
Answer Y to print the items in order by inventory account number.
Answer N to print the items in item number order. If you answer N, the next field displays (Not
Applicable).
5. Inventory account #
Options
Enter the inventory account for the items to be printed, or use one of the options:
<F1>
For the next inventory account
<SF1>
For the previous inventory account
<F2>
For the default inventory account
<F5>
For All inventory accounts. Items will print grouped by
inventory account
Format
Enter as defined in Company information.
Example
This field is not applicable because N was selected in the
previous field.
6. Vendor #
The report can be restricted to items from a particular vendor.
Options
Enter a vendor number, or use one of the options:
<F5>
To include All items whether or not they have a vendor
number
<Enter>
To include only those items which do not have a vendor
number
419
Format
Up to six digits
Example
Press <F5> for all vendors.
7. Product category
The report can be restricted to items in a particular category.
Options
Enter a product category, or use one of the options:
<F5>
To include All items whether or not they have a category
<Enter>
To include only those items which do not have a category
Format
Up to five characters
Example
Press <F5> for all categories.
8. Product sub-category
If you entered blank in the previous field, this field also displays as blank and may not be
changed.
The report can be restricted to items in a particular sub-category.
Options
Enter a product sub-category, or use one of the options:
<F5>
To include All items whether or not they have a sub-category
<Enter>
To include only those items which do not have a subcategory
Format
Up to five characters
Example
Press <F5> for all sub-categories.
9. Print vendor info ?
Answer Y to print vendor information (vendor product #, minimum order quantity, and lead
time) on the report.
Format
One letter, either Y or N. The default is N.
Example
Press <Enter> to accept the default.
10. Print items which have no Qty on hand ?
Answer Y to print items which have no Qty on-hand on the report.
420
Format
One letter, either Y or N. The default is N.
Example
Press <Enter> to accept the default.
If you have chosen to print the report (as opposed to merely viewing it on the screen), then
once the report has printed a data entry screen displays. You are asked:
Skip these items on later purchasing advices until they hit reorder or outof-stock again ?
If you answer N
The next time that you print the report, items which were on the previous report and have not
since been restocked will be repeated on the new report. This allows you to discard an old
report as soon as you print a new one.
If you answer Y
Items that have not been restocked will not be repeated on the next report. The assumption is
that you continue to reference the old reports until all problems have been corrected.
This feature saves printing time and paper bulk, but requires continual reference to multiple
reports.
•
If an item has been restocked and has again fallen below the reorder level (or if the receiving
was inadequate to bring it up to the reorder level in the first place), it will appear on the next
report.
•
If you use multi-warehousing, your response to this question affects only those future reports
printed for the same warehouse selection (counting All as a distinct warehouse selection).
Thus successive reports for the same warehouse are consistent. This has one rather odd consequence: If you print a report for Warehouse 1 and a report for All warehouses at the same
time, a given item in Warehouse 1 may appear on one report but not the other. It depends on
the previous history of both reports.
•
If you subsequently decide that you do want to see all out-of-stock items after all (perhaps
because you have mislaid earlier generations of your report), you can obtain this information
from the Valuation Report. Refer to the chapter of that name in this manual.
If you are using multi-warehousing, your answer applies only to the specific warehouse you
selected (or All if that was your selection), and does not affect reporting for other warehouses.
Example
If item 1 appears on a report for All warehouses, and is
specified not to print on later reports, it will not appear on
subsequent reports for All warehouses. However, item 1
would appear on a report for any specific warehouse such
as AA, until it was specified not to print for that specific
warehouse.
Whether you answer Y or N, you are returned to the previous menu.
Format
One letter, either Y or N. There is no default.
Example
Type:Y, then press <Enter>
421
When items have been specified not to print on later reports, you may still want to see all items
out of stock or at reorder level even those specified not to show up. To obtain this information,
you can print the Stock Status Report.
422
Physical Count
Worksheets
This chapter contains the following topic:
Printing Physical Count Worksheets
423
PRINTING PHYSICAL COUNT WORKSHEETS
This chapter explains the Physical Count Worksheet that is printed when the Normal physical count
method was specified in Control information. If you specified the Expanded physical count
method, refer to the Expanded Physical Count chapter.
Use this selection to print a Physical Count Worksheet, which lists your inventory items by
location within a selected warehouse. Serial numbers and lot numbers may be optionally
printed.
You can then use this work-sheet to do an actual physical count.
Select
Worksheet from the Physical count menu.
The following screen displays:
Enter the information as follows:
1. Warehouse
If you are using multi-warehousing, enter the warehouse code for which you want the
worksheet printed press for the Central warehouse.
Format
Up to two characters
Example
Press <Enter> for Central warehouse.
If you are not using multi-warehousing, you will not see the Warehouse field and all field
numbers will be one less than the numbers shown.
2. Starting location and
3. Ending location
Enter the range of locations to include on the worksheet. Press <F2> for First and Last in both
fields.
424
Format
Up to four characters
Example
<F2> then press <Enter> in both fields.
4. Starting item # and
5. Ending item #
Enter the range of item numbers to include on the worksheet. Press <F2> for First and Last in
both fields.
Format
Up to 15 digits
Example
<F2> then press <Enter> in both fields.
6. Inventory account #
Enter the inventory account for which to print the worksheet.
Options
You may also use one of the options:
<F1>
For the next inventory account
<SF1>
For the previous inventory account
<F2>
For the default inventory account
<F5>
For All inventory accounts
Example
Press <F5> for All accounts on file.
7. Vendor #
Enter the vendor number to print the worksheet for only one vendor, or press <F5> for All
vendors numbers.
Format
Up to six digits or use the option
Example
Press <F5> for All vendors numbers.
8. Product category
Enter the category to print the worksheet for only one product category, or press <F5> for All
categories.
Format
Up to five characters or use the option
Example
Press <F5> for All categories.
9. Product sub-category
Enter the sub-category to print the worksheet for only one product sub-category, or press <F5>
for All sub-categories.
425
Format
Up to five characters or use the option
Example
Press <F5> for All sub-categories.
10. Serial/lot data to print
Options
Select to print by one of the following:
S
Serial numbers
L
Lot numbers
B
Both
N
None
Example
Type:N
11. Print quantities on hand ?
Options
Enter if you want to count data to print on the report, the option are:
Answer Y or N.
Example
Type:Y
12. Suppress blank lines?
Answer Y to eliminate blank lines between items on the worksheet.
Answer N to skip one line prior to printing an items on the worksheet.
Format
One letter either Y or N. The default is Y.
Example
Press <Enter> to accept the default.
426
Inventory History
Report
This chapter contains the following topic:
Selecting Inventory History Report
427
SELECTING INVENTORY HISTORY REPORT
The Inventory History Report enables you to print the transaction types by date range.
Transaction quantity and transaction value totals by item are optionally provided.
Select
Inventory history from the Reports menu.
The following screen displays:
Enter the information as follows:
1. Warehouse
Options
If you are using multi-warehousing, enter the warehouse code for which you want the report
printed, or use one of the options:
<Enter>
For the Central warehouse
<F1>
For All warehouses
Format
Two characters
Example
Press <F5> for All warehouses.
Note
If you are not using multi- warehousing, you will not see the Warehouse
field and all field numbers will be one less than the numbers shown.
2. Start date and
3. End date
Enter the range of transaction dates to include on the report.
428
Format
MMDDYY for both fields
Example
Press <F2> for Earliest and Latest dates.
4. Starting item-# and
5. Ending item-#
Enter the range of item numbers to include on the report.
Format
Up to 15 digits
Example
Press <F2> for First and Last item numbers.
6.Category
Enter the category to print the report for only one product category.
<F5>
To include All items.
<Enter>
To include only those items which do not have a category.
Format
Up to five characters
Example
Press <F5>.
7. Sub-category
If you entered blank in the previous field, this field also displays as blank and may not be
changed.
Options
Enter the product sub-category for the items to be printed, or use one of the options:
<F5>
To include All items regardless of whether they have a
sub-category or what the sub-category is
<Enter>
To include only those items which do not have a subcategory.
Format
Up to five characters
Example
Press <F5> for All sub-category.
8. Transaction type
Enter a specific transaction type to print on the report.
Options
You may also use one of the following:
<F5>
<F2>
For all types
To show a list of the valid transaction types
429
The transaction types include the following:
A
C
R
T
S
J
K
U
Adjustment
Credit memo
Receiving
Transfer
Sale
Job usage
Kit assembly
Component usage
Format
One letter from the table above or one of the options
Example
Select F5 for all types
9. Show ?
Select Q to print the transaction quantities, C to print the transaction costs or B to print both.
Totals by item quantities or costs will also be printed if selected.
Options
You can use the following options:
Q
Quantity
C
Cost
B
Both
Format
One letter from the table above
Example
Enter B to print both Quantity and Cost
10. Show post date ?
If you selected B for both for the previous field Show, then this field displays as (Not
applicable).
If you want to print the posting date, select Y. If not select N.
Format
One letter, either Y or N. The default is Y.
Example
Displays as (Not applicable) in this example.
Field number to change ?
Enter a number to change a field or select the <Enter> key to continue.
430
431
Stock Status Report
This chapter contains the following topic:
Selecting Stock Status Reports
432
SELECTING STOCK STATUS REPORTS
The Stock Status Report selection enables you to print reports showing the current stock status
of your inventory items, including the current value of the items.
Select
Stock status from the Reports menu.
The following screen displays:
Enter the information as follows:
1.Warehouse
Options
If you are using multi-warehousing, enter the warehouse code for which you want the report
printed, or use one of the options:
<Enter>
For the Central warehouse
<F1>
For "All" warehouses
Format
Two characters
Example
Press <F5> for "All" warehouses.
Note
If you are not using multi- warehousing, you will not see the Warehouse
field and all field numbers will be one less than the numbers shown.
2. Starting item # and
3. Ending item #
Enter the range of item numbers to include on the report. Follow the screen instructions.
433
Format
Up to 15 digits
Example
Press <F2> for "First" and "Last" item numbers.
4. Group by inv acct?
Answer Y to either restrict the report to a single inventory account, or to group items by
inventory account. (Your entry in the next field will determine by which grouping.)
Answer N to print the items in item number order. If you answer N, the next field displays (Not
applicable).
Format
One letter, either Y or N there is no default
Example
Type N then press <Enter>.
5. Inventory account #
If you answered N in the previous field, this field is not applicable.
Options
Enter the inventory account for which to print the report, or use one of the options:
<F1>
For the next inventory account
<SF1>
For the previous inventory account
<F2>
For the default inventory account as defined in Control
information.
<F5>
For "All" inventory accounts. Items will print grouped
by inventory account.
6. Vendor #
Enter the vendor number for the items to be printed or press <F5> to include All items
regardless of whether they have a vendor number or what the number is.
Format
Up to six digits
Example
Press <F5> for "All" vendors.
7. Product category
Enter the category to print the report for only one product category.
<F5>
To include "All" items.
<Enter>
To include only those items which do not have a category.
Format
Up to five characters
Example
Press <F5> for "All" categories.
434
8. Product sub-category
If you entered blank in the previous field, this field also displays as blank and may not be
changed.
Options
Enter the product sub-category for the items to be printed, or use one of the options:
<F5>
To include "All" items regardless of whether they have
a sub-category or what the sub-category is
<Enter>
To include only those items which do not have a subcategory.
Format
Up to five characters
Example
Press <F5> for "All" sub-category.
9. Report format
Enter F to print a full format report, or enter B for a brief format.
Full Format
The Full format shows, for each item, quantity on-hand, quantity committed, reorder level,
maximum quantity, back order code. and the value of the on-hand inventory (cost x quantity
on-hand). If you are using Purchase Order, it also shows quantity on order. It shows Net qty if
you selected that as the inventory reorder basis in Control information.
Brief Format
The Brief format prints only one line per item and shows quantity on-hand, reorder level, and
the value of the on-hand inventory. It also shows Net qty.
If applicable, an item's stock status is indicated on the report as O for out of stock, or R for at
or below reorder level. An item's status is based on the inventory reorder basis (either Net
quantity or Quantity on-hand that was specified in Control information.
The Net qty is calculated as the quantity on-hand - quantity committed - quantity on back order
(if you are using A/R with back order control) + quantity on work orders (if you are using kits)
+ quantity on order (if you are using A/R)
Options
Use one of the following:
F
B
For full format report
For brief format report
Format
One letter from the table above
Example
Type F then press <Enter>.
435
10. Include items with on hand qtys which are…
Items can be selected for printing based on their on-hand quantity.
Enter N to include only items with non-zero quantity on-hand, B for only items that are below
the reorder level, or O for only items that are out of stock.
Options
You can use the following options:
N
For non-zero quantity on-hand
B
For items that are below the reorder level
O
Only for items that are out of stock
<F5>
For "All"
Format
One letter from the table above
Example
Press <F5> and then press <Enter> for "All" items.
11. Print costs ?
Enter Y if you want to have printed the prices of items on report that will be printed out, or
send to disk.
Format
One letter, either Y or N. The default is Y.
Example
Press <Enter> to accept the default.
436
Valuation Reports
This chapter contains the following topic:
Introduction to Valuation Reports
Selecting the Valuation Report
Selecting the Valuation by Date Report
437
INTRODUCTION
TO
VALUATION REPORTS
Use the Valuation and Valuation by date reports to print details for the current value for a
range of inventory items for one or all warehouses.
The Valuation report shows current inventory values only. If using LIFO or FIFO, it provides
values from the layer file. If not, then the values are from the item or status file.
The purpose of the inventory Valuation by date report is to appraise the value of inventory
items for one or all warehouses as of a certain date (cut-off date). Appraisal is done by looking
at the inventory transaction history file. For each selected item, the quantity-on-hand, cost and
price is printed.
The Valuation report provides more details than the Valuation by date report. The Valuation
report looks at current quantities only so it cannot provide a cut-off date. It varies based on the
valuation method used.
Both reports have an option to print by item record inventory account number.
Note
If the status or layer file become out of sync with the inventory history file,
then the inventory values may not be equal when comparing both reports.
Under normal usage this should not happen.
438
SELECTING
THE
VALUATION REPORT
If you are using the LIFO or FIFO inventory valuation method, you have the option of
showing LIFO/FIFO layers. Depending on the valuation method chosen, some fields may be
different.
The actual cost appearing on the report is calculated differently depending on the valuation
method:
•
For the Average Cost and Standard Cost valuation methods, this is the running average cost.
•
For the LIFO and FIFO valuation methods, the average cost is calculated based in data in the
layer file at the time the report is generated.
Select
Valuation report from the Reports menu.
The following screen displays:
Field variations
Your screen may vary from the above display for the following reasons, and the fields are
renumbered to accommodate variations:
The above screen is for multi-warehousing. If you are using single-warehousing, you will not
see the Warehouse field.
The Use standard or actual cost ? field only displays if you use the Standard cost valuation
method.
The last two fields depend on which selection you have chosen.
Enter the information as follows:
439
1. Warehouse
Options
If you are using multi-warehousing, enter the warehouse code for which you want the report
printed, or use one of the options:
<Enter>
For the Central warehouse
<F5>
For All warehouses
Format
Up to two characters
Example
Press <F5> for All warehouses.
If you are not using multi- warehousing, you will not see the Warehouse
field and all field numbers will be one less than the numbers shown.
Note
2. Starting item # and
3. Ending item #
Enter the range of item numbers to include on the report. Follow the screen instructions.
Example
Press <F2> for the First and Last item number.
4. Group by inv acct?
Answer Y to restrict the report to a single inventory account, or to group items by inventory
account. Your entry in the next field determines the grouping.
Answer N to print the items in item number order. If you answer N, the next field displays (Not
applicable).
Format
One letter, either Y or N. The default is N.
Example
Press <Enter> for the default.
5. Inventory account #
If you chose not to group by Inventory account, this field displays as (Not applicable). Enter
the inventory account for which to print the report.
Options
You may also use the options:
<F1>
For next inventory account on file
<SF1>
For the previous inventory account
<F2>
For the default inventory account as defined in Control
information
<F5>
For All inventory accounts. Items will print grouped by
inventory account.
440
Example
Press <F5> for All Inventory accounts on file.
6. Vendor #
Enter the vendor number to print the report for only one vendor.
Options
You may also use the following options:
<F5>
To include All items regardless of whether they have a
vendor number
<Enter>
To include only those items which do not have a vendor
number.
Format
Up to six digits
Example
Press <F5> for All vendors.
7. Product category
Options
Enter the category to print the report for only one product category.
You may also use the following options:
<F5>
To include All items regardless of whether they have a
category
<Enter>
To include only those items which do not have a category.
Format
Up to five digits
Example
Press <F5> for All categories.
8. Product sub-category
If you entered Blank in the previous field, this field also displays as Blank and may not be
changed.
Enter the product sub-category for the items to be printed.
Options
You may also use one of the following options:
<F5>
To include All items regardless of whether they have a
sub-category
<Enter>
To include only those items which do not have a subcategory
441
Format
Up to five characters
Example
Press <F5> for All sub-categories.
9. Suppress blank lines?
Answer Y to eliminate blank lines between items on the report. Answer N if you wish one line
to be skipped prior to printing each item.
Format
One letter, either Y or N. The default is Y.
Example
Type Y and then press <Enter>.
10. Include items with zero qty on hand?
Answer Y to include items with zero quantity on-hand. Answer N to exclude items with zero
quantity on-hand from the report.
Format
One letter, either Y or N. The default is N.
Example
Press <Enter> to accept the default.
Note
If you answer N, an item with zero quantity on-hand in the Item record
will still appear on the report if one or more of the Status records for the
item are non-zero. Additionally, under LIFO and FIFO, if the quantity onhand is zero but there are layers for the item, the item will show up on
the report. In this case, the integrity of your data is in question and you
should consider running Recalculate inventory quantities. This is described in
the PBS Administration Manual.
If you are using the LIFO or FIFO costing methods, a second screen displays where an
additional field appears as follows:
Print LIFO (FIFO) layers ?
Answer Y if you want to have the layers of the item printed.
Format
One letter, either Y or N. The default is N.
Example
Type:Y and then press <Enter>.
If you are using the standard cost method, an additional field appears as follows:
11. Use standard or actual cost ?
Answer S for standard cost and A for actual cost.
Format
One letter, either S or A .
Example
In our example we are not using standard costing, so this
field will not display.
Field number to Change ?
Make changes to any field as needed. When finished select enter to print the report.
442
SELECTING
THE
VALUATION
BY
DATE REPORT
Use this selection to print a report detailing the current value of inventory items for one or all warehouses as of a certain date. You may select all or part of the inventory.
Select
Valuation by Date report from the Reports menu.
The following screen displays:
Field variations
Your screen may vary from the above display for the following reasons, and the fields are
renumbered to accommodate variations:
The above screen is for multi-warehousing. If you are using single-warehousing, you will not
see the Warehouse field.
The Use standard or actual cost ? field only displays if you are using the Standard cost
valuation method.
The last two fields depend on which selection you have previously chosen.
Enter the information as follows:
1. Warehouse
Options
If you are using multi-warehousing, enter the warehouse code for which you want the report
printed, or use one of the options:
<ENTER>
For the Central warehouse
<F5>
For All warehouses
443
Format
Up to two characters
Example
Press <F5> for All warehouses.
If you are not using multi- warehousing, you will not see the Warehouse
field and all field numbers will be one less than the numbers shown.
Note
2. Starting item # and
3. Ending item #
Enter the range of item numbers to include on the report. Follow the screen instructions.
Format
15 characters
Example
Press <F2> for the First and Last item number.
4. Cut-off date
Enter the cut-off date for the report.
Any inventory transaction history records on or before this date, that fall with in the other
report criteria, will be included on the report.
Format
6 digits
Example
MMDDYY
5. Group by inv acct?
Answer Y to restrict the report to a single inventory account, or to group items by inventory
account. Your entry in the next field determines the grouping.
Answer N to print the items in item number order. If you answer N, the next field displays (Not
applicable).
Format
One letter, either Y or N. The default is N.
Example
Press <Enter> for the default.
6. Inventory account #
If you chose not to group by Inventory account, this field displays as (Not applicable). Enter
the inventory account for which to print the report.
Options
You may also use the options:
<F1>
For next inventory account on file
<SF1>
For the previous inventory account
<F2>
For the default inventory account as defined in Control
information
<F5>
For All inventory accounts. Items will print grouped by
inventory account.
444
Example
Press <F5> for All Inventory accounts on file.
7. Vendor #
Enter the vendor number to print the report for only one vendor.
Options
You may also use the following options:
<F5>
To include “All” items regardless of whether or not
there is an associated vendor number
<Enter>
To include only those items which do not have a vendor
number.
Format
Up to six digits
Example
Press <F5> for All vendors.
8. Product category
Options
Enter the category to print the report for only one product category.
You may also use the following options:
<F5>
To include All items regardless of whether they have a
category
<Enter>
To include only those items which do not have a category.
Format
Up to five digits
Example
Press <F5> for All categories.
9. Product sub-category
If you entered Blank in the previous field, this field also displays as Blank and may not be
changed.
Enter the product sub-category for the items to be printed.
Options
You may also use one of the following options:
<F5>
To include All items regardless of whether they have a
sub-category
<Enter>
To include only those items which do not have a subcategory
445
Format
Up to five characters
Example
Press <F5> for All sub-categories.
10. Suppress blank lines?
Answer Y to eliminate blank lines between items on the report. Answer N if you wish one line
to be skipped prior to printing each item.
Format
One letter, either Y or N. The default is Y.
Example
Type Y and then press <Enter>.
11. Print items with no qty on hand?
Answer Y to include items with zero quantity on-hand. Answer N to exclude items with zero
quantity on-hand from the report.
Format
One letter, either Y or N. The default is N.
Example
Press <Enter> to accept the default.
If you are using the standard cost method, an additional field appears as follows:
12. Use standard or actual cost ?
This question only displays if you are using standard costing methods.
Answer S for standard cost and A for actual cost.
Format
One letter, either S or A .
Example
In our example we are not using standard costing, so this
field will not display.
Field Number to Change ?
Make any changes needed. Select Enter when you are ready to print the report.
446
Usage Reports
This chapter contains the following topic:
Selecting Usage Reports
447
SELECTING USAGE REPORTS
The Usage report selection enables you to print a report on items used. This shows the quantity
and dollar amount of sales by item, both year-to-date, and period-to-date. The actual cost and
the margin (price minus cost) are also shown.
The Usage Report can be restricted to a range of items. It can also be limited to a selected
warehouse, product category, sub-category, vendor, and/or inventory account. It can further be
expanded to include data from prior periods.
Select
Usage report from the Reports menu.
The following screen displays:
The above screen is for multi-warehousing. If you are using single-warehousing, you will see
the Warehouse field and the remaining fields will be renumbered accordingly.
Enter the information as follows:
1. Warehouse
If you are using single-warehousing, this field does not appear.
Ware house must be a valid warehouse as described in the Warehouses chapter. The name of
the warehouse displays upon selection.
Options
Enter a warehouse code, or use one of the options:
<Enter>
For the Central warehouse
<F5>
For "All" warehouses
448
2. Starting item # and
3. Ending item #
Enter the range of item numbers to include on the report. Follow the screen instructions.
Example
Press <F2> at each field for "First" and "Last" item
numbers.
4. Print in order by
Enter W to print items grouped by warehouse. Enter I to print in item order, showing all
warehouses for one item before printing the next item.
If you are using single-warehousing, or selected a single warehouse above, this field displays
(Not applicable).
Example
Type:I
5. Group by inv acct?
Group the items by inventory account on the report. If you are also printing multiple
warehouses on this report, the major grouping will be by inventory account, and the
warehouses and items (or items and warehouses) will be shown within each inventory account.
Restrict the report to those items with a single specified inventory account.
Answer Y to print the items in order by inventory account number.
Answer N to print the items in item number order. If you answer N, the next field displays (Not
applicable).
Format
One letter, either Y or N. The default is N.
Example
Press <Enter> for the default.
6. Inventory account #
This field is not applicable if you answered N at the previous field.
Options
Enter the inventory account for which to print the report, or use one of the options:
<F1>
For the next account
<SF1>
For the previous account
<F2>
For the default account as defined in Control information.
<F5>
For "All" inventory accounts
7. Vendor #
The report can be restricted to items from a particular vendor.
449
Options
Enter a vendor number, or use on of the options:
<F5>
To include "All" vendors
<Enter>
To include only those items which do not have a vendor
number
Format
Up to six digits
Example
Press <F5> for "All" vendors.
8. Product category
Options
The report can be restricted to items from a particular category.
Enter the category to print items for only one product category, or use one of the options:
<F5>
To include "All" items regardless of whether they have
a category
<Enter>
To include only those items which do not have a category
Format
Up to five digits
Example
Press <F5> for "All" categories.
9. Product sub-category
If you entered Blank in the previous field, this field also displays as Blank and may not be
changed. The report can be restricted to items in a particular sub-category.
Options
Enter the sub-category or use on of the options:
<F5>
To include "All" items regardless of whether they have
a sub-category
<Enter>
To include only those items which do not have a subcategory
Format
Up to five digits
Example
Press <F5> for "All" sub-categories.
450
10. Print prior periods ?
Answer Y to show the usage in prior periods, as well as usage during the current period.
Otherwise, answer N.
Format
One letter, either Y or N. The default is N.
Example
Press <Enter> for the default.
11. Suppress blank lines ?
Answer Y to eliminate blank lines between items on the report. Answer N if you wish to skip
one line prior to printing each item.
Format
One letter, either Y or N. The default is Y.
Example
Press <Enter> for the default.
12. Print items which have no YTD activity ?
Answer Y to include items with Qty YTD and Sales YTD of zero. Answer N to exclude
inactive items. The default in N.
Example
Press <Enter>.
13. Print items which have no Qty on hand ?
Answer Y to print items which have no Qty on-hand. Answer N to exclude inactive items.
Example
Press <Enter>.
451
ABC Analysis
This chapter contains the following topic:
Selecting ABC Analysis Reports
452
SELECTING ABC ANALYSIS REPORTS
The ABC Analysis selection enables you to print year-to-date item analysis.
This analysis report shows the dollar value of sales volume, year-to-date cost of the items sold,
and year-to-date gross margin (sales minus costs) for each item.
This report separates items into three value classes by percentage:
•
The top percentage (code A) of inventory value,
•
The middle percentage (code B) of inventory value,
•
The bottom percentage (code C) of inventory value.
The separation may be based on sales, cost, or margin.
The boundaries between these categories are flexible. You define them each time you print the
report.
The ABC codes are based on percentages. In a typical business, a large percentage of total
sales is based on a small percentage of items that are carried in inventory.
For example, it would not be unusual for 20% of your inventory items to account for 80% of
your sales volume. These are your A items.
Continuing with this example, you might find that another 20% of your inventory items
accounted for 15% of your sales volume. These are your B items.
Finally, you might find that the remaining 60% of your inventory items account for 5% of your
sales volume. These are your C items.
A items are much more important to your business than B or C items. So you would want to
keep tighter control over A items than over C items.
A items are typically high-priced items that sell in moderate volume, or moderately priced
items that sell in high volume.
C items are typically high or medium priced items that hardly sell, or low priced items that sell
in moderate to low quantity.
B items are in between. They provide the transition between A items and C items.
The ABC code is an attribute of the item, and may be individually maintained by the Items
selection. However, the code on file is not used in creating this report. Rather, this selection
regenerates the ABC code of each item whenever you print the report, without reference to the
existing codes. You then have the option of propagating the new codes to the items, and thus
over-laying the existing.
Select
ABC analysis from the Reports menu.
The following screen displays:
453
Enter the information as follows:
1. Starting item # and
2. Ending item #
Enter the range of item numbers to include on the report. Follow the screen instructions.
Example
Press <F2> for First and Last at each field.
3. By sales, cost or margin ?
Enter S, C, or M to analyze based on sales, cost, or margin.
If you enter S, code A will be those items with the highest year-to-date sales volume in dollars,
code B will be those items in the middle range, and code C will be those in the lowest range.
If you enter C, the three codes (A, B and C) will be based on the total year-to-date cost of the
items sold, in dollars.
If you enter M, the three codes (A, B and C) will be based on the year-to-date gross margin in
dollars for each item (gross margin = sales minus cost).
Format
One letter from the table above
Example
Type: S and then press <Enter>.
4. Inventory account #
Options
Enter the inventory account for which to print the report, or use one of the options:
<F1>
For the next inventory account on file
<SF1>
For the previous inventory account on file
<F2>
For the Merchandise Inventory account on file
454
<F5>
For All inventory accounts. Items will be grouped by
inventory account.
Format
Your standard format for account numbers, as defined in
Company information.
Example
Press <F5> for All inventory accounts.
5. Product category
The report can be restricted to items in a particular category.
Options
Enter the category to print the report for only one product category or use one of the following
options:
<F5>
To include All items regardless of whether they have a
category.
<Enter>
To include only those items which do not have a category
Format
Up to five characters
Example
Press <F5> for all categories
6. Product sub-category
If you entered Blank in the previous field, this field also displays as Blank and may not be
changed.
The report can be restricted to items in a particular sub-category.
Options
Enter a product sub-category, or use one of the options:
<F5>
To include All items regardless of whether they have a
sub-category.
<Enter>
To include only those items which do not have a subcategory
Format
Up to five characters
Example
Press <F5> for all sub-categories
7. Print 2nd line of desc?
Answer Y to print the second line of description. If you answer N, the second line of
description is not printed.
Format
One letter, either Y or N. The default is N.
Example
Press <Enter> to accept the default.
455
8. Suppress blank lines ?
Answer Y to eliminate blank lines between items on the report. Answer N if you wish to skip
one line prior to printing each item.
Format
One letter, either Y or N. The default is Y.
Example
Press <Enter> to accept the default.
9. Include items which have no YTD activity?
Answer Y to include items with Qty YTD and Sales YTD of zero. Answer N to exclude
inactive items.
Format
One letter, either Y or N. The default is N.
Example
Press <Enter> to accept the default.
10. Print items which have no QTY on hand ?
Answer Y to include items which have no Qty on-hand. Answer N to exclude inactive items.
Format
One letter, either Y or N. The default is Y.
Example
Press <Enter> to accept the default.
Make any changes at Field number to change ?, and then press <Enter> to continue.
Definition of the boundaries between the codes occur upon a separate screen.
The following screen displays:
Enter the information as follows:
Code A - top %
Enter the percentage of sales, cost, or margin that will define the top (A) percentage.
Format
99.99
Example
Type: 80
456
Code C - bottom %
Enter the percentage of sales, cost, or margin that will define the bottom (C) percentage.
Format
99.99
Example
Type: 5
In the example above, Code A will include those items whose combined sales volumes (by
dollar) made up the top 80% of sales. Code C will include those items whose sales volumes
made up the bottom 5% of sales. Code B will include all other items.
Resetting the ABC codes
After the report is printed, you are asked if you wish to reset the ABC codes for these items to
their new values.
If you answer Y, the ABC code for each item printed is set to its A, B, or C value. Although
these codes are not used to create this report (which generates them each time), they do have
informational value as they appear on various screens and reports. It is advantageous to keep
them reasonably up to date.
457
Inventory Turnover
This chapter contains the following topics:
Selecting The Inventory Turnover Report
458
SELECTING THE INVENTORY TURNOVER REPORT
The Inventory Turnover report is an analysis that shows how may times that an inventory item turns
over in one year.
Basically, it compares the sales of an item to your average quantity on hand of that item. For
example, if you sold 150 of an item in one year, and your average quantity on hand was 60,
your inventory turnover is 2.5.
Select
Inventory turnover from the Reports menu.
The following screen displays:
Enter the information as follows:
1. Warehouse
Options
If you are using multi-warehousing, enter the warehouse code for the items to be included on
the report, or use one of the options:
<Enter>
For the Central warehouse
<F5>
For All warehouses
Note
If you are not using multi-warehousing, you will not see the Warehouse field
and all field numbers will be one less than the numbers shown.
459
2. Starting item # and
3. Ending item #
The values entered here need not be valid items, since their purpose is to define a range; but at
least one item within the range must previously have been defined in the Items selection.
Enter the range of item numbers to include on the report. Follow the screen instructions.
Format
Up to 15 digits
Example
Press <F2> at each field for First and Last.
4. Group by inv acct ?
If you answer N the inventory account will not affect the sequence of the report. If you answer
Y, then depending on your answer to the next field you will either:
•
Group the items by inventory account on the report. If you are printing All multiple warehouses on this report, the major grouping will be by inventory account, and the warehouses
and items (or items and warehouses) will be shown within each inventory account.
•
Restrict the report to those items with a single specified inventory account.
Format
One letter, either Y or N, there is no default
Example
Type:N and then press <Enter>.
Answer Y to print the items in order by inventory account number.
Answer N to print the items in item number order. If you answer N, the next field displays (Not
Applicable).
5. Inventory account #
Options
Enter the inventory account for the items to be printed, or use one of the options:
<F1>
For the next inventory account
<SF1>
For the previous inventory account
<F2>
For the default inventory account
<F5>
For All inventory accounts. Items will print grouped by
inventory account
Format
Enter as defined in Company information.
Example
This field is not applicable because N was selected in the
previous field.
6. Vendor #
The report can be restricted to items from a particular vendor.
460
Options
Enter a vendor number, or use one of the options:
<F5>
To include All items whether or not they have a vendor
number
<Enter>
To include only those items which do not have a vendor
number
Format
Up to six digits
Example
Press <F5> for all vendors.
7. Product category
The report can be restricted to items in a particular category.
Options
Enter a product category, or use one of the options:
<F5>
To include All items whether or not they have a category
<Enter>
To include only those items which do not have a category
Format
Up to five characters
Example
Press <F5> for all categories.
8. Product sub-category
If you entered blank in the previous field, this field also displays as blank and may not be
changed.
The report can be restricted to items in a particular sub-category.
Options
Enter a product sub-category, or use one of the options:
<F5>
To include All items whether or not they have a sub-category
<Enter>
To include only those items which do not have a subcategory
Format
Up to five characters
Example
Press <F5> for all sub-categories.
461
9. Prds completed YTD
Enter the number of periods completed this year, then the number of periods in the year.
Format
2 characters at each field
Example
Type 3, then type 12.
10. Days completed PTD
Enter the number of days elapsed for the current period, then the number of days in the current
period.
Format
3 characters at each field
Example
Type 90, then type 90.
11. Over or understocked items ?
This field determines which items print based on quantities on hand and current movement
rates.
Enter O for overstocked, U for understocked or A for all items.
If you enter O or U, you will be asked to enter the number of months to be used to evaluate
your stock position.
12. Items to print
Select A to print all items, F to print fast moving items as defined in the next field, or S to print
slow moving items as defined in the next field.
Format
1 character
Example
Type A
Field number to change ?
Enter a field number to change or select the <Enter> key to print the report.
462
Serial Number
Reports
This chapter contains the following topics:
Introduction to Serial Number Reports
Printing Serial Numbers by Customer Report
Printing Serial Numbers by Item Report
Printing Serial Numbers by Vendor Report
Printing Serial Numbers on Loan Report
463
INTRODUCTION
TO
SERIAL NUMBER REPORTS
This chapter explains four of the reports that are available if you are using serial numbers.
The four reports are:
•
Serial Numbers by Customer
•
Serial Numbers by Item
•
Serial Numbers by Vendor
•
Serial Numbers on Loan
One other serial number report, the Flooring Report, is described in the Flooring Report
chapter.
The Serial Numbers by Customer Report
shows sold serialized inventory, organized by customer. This report can be used to highlight a
range of warranty expiration dates. The age of each sold serial number is also shown, based on
the invoice date.
The Serial Numbers by Item Report
shows current unsold or sold serialized inventory, organized by item number.
The Serial Numbers by Vendor Report
shows current unsold or sold serialized inventory, organized by vendor. This report shows the
age of each serial number, based on the serial number receiving date, for the specified range of
vendors. The last activity for each serial number is also shown.
The Serial Numbers on Loan Report
shows serialized items that have been loaned out. The report shows unsold serial numbers that
are on loan. Because this report is printed in order by the Reference field, you can track loans
by salesperson, customer name, or any method convenient for you.
464
PRINTING SERIAL NUMBERS
BY
CUSTOMER REPORT
Select
Select Serial numbers by customer from the Reports, serial menu.
Graphical Mode
The following screen appears:
Character Mode
The following screen appears:
465
Note
The above screen is for multi-warehousing. If you are not using multi-warehousing, you will not see the Warehouse field.
Enter the information as follows:
Starting item number and
Ending item number
Enter the range of item numbers of the serialized items to print on the report. Press <F2> for
First and Last item numbers. Follow the screen instructions.
Format
Up to 15 digits
Example
Press <F2> for both fields
Starting customer number and
Ending customer number
Enter the range of customer numbers to be included in the report. Press <F2> for the Earliest
and Latest customer numbers. Follow the screen instructions.
Format
Up to 12 digits
Example
Press <F2> for both fields
Starting invoice date and
Ending invoice date
Enter the range of invoice dates for which serial numbers are to be printed. Follow the screen
instructions.
Format
MMDDYY
Example
Press <F2> for both fields
Page break on customer
Check this box if you want to start a new page in the report for each customer who has
serialized items. You may press <Enter> to default to unchecked.
Format
Check box where checked is yes and unchecked is no. The
default is unchecked
Example
Press <Enter> to accept the default
Detail or summary
The detail report shows the selected items for each customer you specify. The summary report
shows totals only for each customer.
In character mode enter D for a detail report, or enter S for a summary report.
Format
Drop down list box with the options of Detail and Summary. The default is Detail
Example
Press <Enter> to accept the default
466
Starting warranty date 1 and
Ending warranty date 1
Enter the range of dates of the first warranty expiration for which serial numbers are to print.
Press <F2> for Earliest and Latest warranty dates. Follow the screen instructions.
Format
MMDDYY
Example
Press <F2> for both fields
Starting warranty date 2 and
Ending warranty date 2
Enter the range of dates of the second warranty expiration for which serial numbers are to
print. Press <F2> for Earliest and Latest warranty dates. Follow the screen instructions.
Format
MMDDYY
Example
Press <F2> for both fields
Print costs
Enter Y if you want to print the cost on the report, or use Y and the cost will not be printed on
the report.
Format
Check box where checked is yes and unchecked is no. The
default is checked
Example
Press <Enter> to accept the default
Warehouse
Options
If you are using multi-warehousing, enter the warehouse code for which you want the report
printed, or use one of the options:
<Enter>
For Central warehouse
<F5>
For All warehouses
Format
Up to two characters, or use the option
Example
Press <Enter> for the Central warehouse
OK or Cancel
Select OK to print the report or Cancel to return to the menu.
467
PRINTING SERIAL NUMBERS
BY
ITEM REPORT
Select
Serial numbers by item from the Reports, serial menu.
Graphical Mode
The following screen appears:
Character Mode
Note
The above screen is for multi-warehousing. If you are not using multi-warehousing, you will not see the Warehouse field.
Enter the information as follows:
Report type
Enter the report type for items to be printed on the report, Unsold items if you select that the
unsold items to be printed or Sold items for the sold items. Follow the screen instructions.
468
Options
You may use the following options:
Unsold items To select the Unsold items report
Sold items
To select the Sold items report
Format
Drop down list box with one of the choices above. The
default is Sold items
Example
Select Unsold items and then press <Enter>
Starting item number and
Ending item number
Enter the range of item numbers of the serialized items to print on the report. Press <F2> for
First and Last item number. Follow the screen instructions.
Format
Up to 15 digits, or use the option
Example
Press <F2> for both fields
Detail or summary
Select Detail for a detail report, or Summary for a summary report.
The detail report shows the selected items for each customer you specify. The summary report
shows totals only for each customer.A detail report includes information on each unsold or
sold serial number for the range of item numbers specified. A summary report shows totals
only for each item for the range of item numbers specified.
Format
Drop down list box. The default is Detail
Example
Press <Enter> to accept the default
Warehouse
If you are using multi-warehousing, enter the warehouse code for which you want the report
printed.
Options
You may also use one of the options:
<Enter>
For Central warehouse
<F5>
For All warehouses
Format
Up to two characters, or use the option
Example
Press <Enter> for the Central warehouse
469
OK or Cancel
Select OK to print the report or Cancel to return to the menu.
470
PRINTING SERIAL NUMBERS
BY
VENDOR REPORT
Select
Serial numbers by vendor from the Reports, serial menu.
Graphical Mode
The following screen appears:
Character Mode
The following screen appears:
Note
The above screen is for multi-warehousing. If you are not using multi-warehousing, you will not see the Warehouse field.
Enter the information as follows:
471
Report type
Enter the report type for items to be printed on the report, Unsold items if you select that the
unsold items to be printed or Sold items for the sold items. Follow the screen instructions.
Format
Drop down list box. The default is Sold items
Example
Select Unsold items and then press <Enter>
Starting item number and
Ending item number
Enter the range of item numbers of the serialized items to print on the report or press <F2> for
First and Last item numbers. Follow the screen instructions.
Format
Up to 15 digits, or use the option
Example
Press <F2> for both fields
Starting vendor number and
Ending vendor number
Enter the range of vendor numbers to be included in the report or press <F2> for First and
Last vendor number. Follow the screen instructions.
Format
Up to six digits, or use the option
Example
Press <F2> for both fields
Starting receipt date and
Ending receipt date
or
Starting invoice date and
Ending invoice date
The label for this field is dependent on the selection for the Report type field. If it is an unsold
item, then it is the receipt date range. If it is sold then the invoice date range.
Enter the range of dates for which serial numbers are to print or press <F2> for the Earliest and
Latest dates. Follow the screen instructions.
Format
MMDDYY
Example
Press <F2> for both fields
Page break on vendor
Check this box if you want to start a new page in the report for each vendor who has serialized
items. You may press <Enter> to default to unchecked.
Format
Check box where checked is yes and unchecked is no. The
default is unchecked
Example
Press <Enter> to accept the default
472
Detail or summary
The detail report shows the selected items for each vendor you specify. The summary report
shows totals only for each vendor.
In character mode enter D for a detail report, or enter S for a summary report.
Format
Drop down list box with the options of Detail and Summary. The default is Detail
Example
Press <Enter> to accept the default
Warehouse
If you are using multi-warehousing, enter the warehouse code for which you want the report
printed.
Options
You may also use one of the options:
<Enter>
For Central warehouse
<F5>
For "All" warehouses
Format
Up to two characters, or use the option
Example
Press <Enter> for Central warehouse
OK or Cancel
Select OK to print the report or Cancel to return to the menu.
473
PRINTING SERIAL NUMBERS
ON
LOAN REPORT
Select
Serial numbers on loan from the Reports, serial menu.
Graphical Mode
The following screen displays:
Character Mode
The following screen displays:
Enter the information as follows:
Starting item number and
Ending item number
Enter the range of item numbers of the serialized items to print on the report or press <F2> for
First and Last item numbers. Follow the screen instructions.
474
Format
Up to 15 digits, or use the option
Example
Press <F2> for both fields
Page break on reference
Check this box if you want to start a new page in the report for each reference. You may press
<Enter> to default to unchecked.
Format
Check box where checked is yes and unchecked is no. The
default is unchecked
Example
Press <Enter> to accept the default.
Detail or summary
The detail report shows the selected items for each reference you specify. The summary report
shows totals only for each reference.
In character mode enter D for a detail report, or enter S for a summary report.
Format
Drop down list box with the options of Detail and Summary. The default is Detail
Example
Press <Enter> to accept the default.
Print costs
Answer Y if you wish to print the item costs from the Serial file for the serialized items on the
report. Otherwise, answer N.
Format
Check box where checked is yes and unchecked is no. The
default is checked
Example
Press <Enter> to accept the default.
Starting return date and
Ending return date
Enter the range of loan return dates of loaned serial numbers to be included on the report for
the range of items specified or press <F2> for Earliest and Latest item numbers. Follow the
screen instructions.
Format
MMDDYY
Example
At both fields press <F2> and then press <Enter>
A sorting process takes place prior to printing (or screen display) of the report.
OK or Cancel
Select OK to print the report or Cancel to return to the menu.
475
Flooring Report
This chapter contains the following topic:
Selecting the Flooring Report
476
SELECTING
THE
FLOORING REPORT
The Flooring Report is intended to show what consignment merchandise is sold and how much to
pay the vendor.
The report can be printed for unsold and/or sold serial numbers. For unsold serial numbers, the
report can be used to verify (check) that all of the financed goods are present. For sold serial
numbers, the report can be used to verify which items were sold during a specified time period,
so that payment can be made by the retailer to the finance company.
An underline is also provided on the report for each serial number to record notes.
Select
Flooring report from the Reports, serial menu.
The following screen displays:
Note
The above screen is for multi-warehousing. If you are not using multi-warehousing, you will not see the Warehouse field.
Enter the information as follows:
1. Starting item number
2. Ending item number
Enter the range of item numbers of the serialized items to print on the report or press <F2> to
select First for field #1 and also to select Last for field #2. Follow the screen instructions.
Example
Press <F2> for the First and Last source serial
number.
477
3. Starting source and
4. Ending source
Enter the range of sources of the serial numbers to print on the report or press <F2> to select
First for field #1 and also to select Last for field #2. Follow the screen instructions.
Format
Up to six characters, or use the option
Example
Press <F2> for the First and Last source serial number.
5. Print unsold serials?
Answer Y to include unsold serial numbers on the report. Otherwise, answer N.
If you answer N, the following two fields display (Not applicable) and entry is not allowed.
Format
One letter, either Y or S. The default is Y.
Example
Press <Enter> to accept the default.
If you answered Y to Print unsold serials?, enter the following two fields:
6. Starting receipt date and
7. Ending receipt date
Enter the range of receiving dates of the serial numbers to be printed or press to select the
Earliest for field #6 and also Latest for field #7. Follow the screen instructions.
Format
MMDDYY
Example
Press <F2> for the Earliest and Latest receipt dates.
8. Print sold serials ?
Answer Y to include sold serial numbers on the report. Otherwise, answer N.
If you answer N, the following two fields display (Not applicable) and entry is not allowed.
Format
One letter, either Y or N. The default is Y.
Example
Press <Enter> to accept the default.
9. Starting invoice date and
10. Ending invoice date
Enter the range of invoice dates of the serial numbers to be printed or press to select the
Earliest for field # 9 and also Latest for field # 10 Follow the screen instructions.
Format
MMDDYY
Example
Press <F2> for the Earliest and Latest invoice dates.
11. Page break on source ?
Answer Y if you want to start a new page in the report for each source. Otherwise, answer N.
478
If you answer Y to Page break on source?, and are printing both unsold and sold serial
numbers, an additional field appears:
on Sold/Unsold?
Answer Y if you want to print unsold and sold serial numbers on separate pages for each
source. Answer N if unsold and sold serial numbers may be printed on the same page for each
source.
Format
One letter, either Y or S. The default is N.
Example
Type Y, and then press <Enter>.
12. Detail or summary
The detail report shows individual serial numbers for each item you specify. The summary
report shows totals only for each specified item.
Enter D for a detail report, or enter S for a summary report.
Format
One letter D or S.
Example
Type S, and then press <Enter>.
13. Warehouse
If you are using multi-warehousing, enter the warehouse code for which you want the report
printed.
Options
You may use one of the options:
<Enter>
For the Central warehouse
<F5>
For All warehouses
A sorting process takes place prior to printing (or screen display) of the report.
479
Lot Numbers Report
This chapter contains the following topic:
Selecting Lot Numbers
480
SELECTING LOT NUMBERS
Use this selection to print a report showing lot number information for a specified range of items,
lot numbers, and either vendors or customers. The report may be printed in summary or detail.
You also have the option to purge zero-balance lots using this selection.
Select
Lot numbers from the Reports menu.
Graphical Mode
The following screen displays:
Character Mode
The following screen displays:
481
The above screen is for multi-warehousing. In Character mode if you are
not using multi-warehousing, you will not see the Warehouse field and all
the above field numbers will be one less than the numbers shown.
Note
Enter the information as follows:
Print or purge
Enter 1 to print the report only, or enter 2 to purge the file and print a report of the lot number
information that is purged.
Format
One digit, either 1 or 2
Example
Type: 1, and then press <Enter>
Warehouse
If you are using multi-warehousing, enter the warehouse code for which you want lotcontrolled items to be printed and/or purged.
Options
You may also use on of the options:
<Enter>
For the Central warehouse
<F5>
For "All" warehouses
Starting item number and
Ending item number
Enter the range of item numbers of the lot-controlled items to be printed and/or purged. Follow
the screen instructions.
If you enter the same item number for both fields, the following field displays (Not applicable)
and an entry is not allowed.
Format
Enter <F2> for the "First" and "Last" item numbers
482
If you entered the same item number for Starting item number and Ending item number, field
the Starting lot number and Ending lot number fields may be entered as follows:
Starting lot number and
Ending lot number
Enter the range of lot-controlled numbers to be included in the report/purge. Follow the screen
instructions.
Format
Enter <F2> for the "First" and "Last" item numbers
Vendor
If you entered more than one item number above, enter the vendor number to include only lotcontrolled items for a single vendor, or press <F5> to include items for "All" vendors.
Format
Up to six digits
Example
Press <F5> for "All" vendors.
If you entered more than one item number for Starting item number and Ending item number,
field numbers 6 and 7 appear as follows:
Product category
Enter the product category to include only lot-controlled items for a single category.
Options
You may also use the options:
<Enter>
To include only those items which do not have a category
<F5>
To include "All" items regardless of whether they have
a category
Format
Up to five characters
Example
Press <F5> for "All" vendors
Product sub-category
If you entered Blank in the previous field, this field also displays as Blank and may not be
changed.
Enter the product sub-category to include only lot-controlled items.
Options
You may also use the options:
<Enter>
To include only those items which do not have a subcategory
483
<F5>
To include "All" items regardless of whether they have
a sub-category
Format
Up to five characters
Example
Press <F5> for "All" sub-categories
If you selected to Print report in the Print or purge field, two additional fields can be entered:
On-hand balances to print
Enter the character which corresponds to the current on-hand quantity of the lot numbers to be
printed.
Options
You may use on one of the options:
Non-zero
To print only lot numbers within the ranges specified
Which have non-zero on-hand quantities.
Zero
To print only lot numbers within the ranges specified
which have zero on-hand quantities.
All
A to print all lot numbers within the ranges specified,
regardless of their on-hand quantities.
Detail or summary
Select Detail to print a detail report, or Summary for a summary report.
A summary report shows totals only for each lot number for the range of item numbers
specified. A detail report also includes information on each transaction processed for lot
numbers.
Format
Drop down list. The default is Summary
Example
Press <Enter> for the default
If you selected Detail, you may print sales detail for one customer or a range of customers.
Enter the information in the next 2 fields as follows:
Starting customer # and
Ending customer #
Enter the range of customer numbers to be included in the report. Follow the screen
instructions.
Format
Up to 12 digits
Example
Press <F2> and then press <Enter> for the "First" and
"Last"
Make any needed changes.
484
OK or Cancel
Select OK to continue to either purge and print or print only. Select Cancel to return to the I/C
menu.
If you specified Print reportfor Detail or summary field, the Lot Numbers Report is printed.
If you specified Print report/purge file for Detail or summary field, the Lot Purge Audit List is
printed instead of the Lot Numbers Report, showing detailed information on every lot number
that is being removed from the file.
All records for lot numbers within the specified ranges are then purged from the Serial file. Lot
number records for the specified warehouse(s) are purged only if the lot's quantity on-hand
and quantity committed are zero.
485
Kit Price/Cost Report
This chapter contains the following topic:
Selecting Kit Price Reports
486
SELECTING KIT PRICE REPORTS
The Kit Price/Cost Report enables you to compare the selling prices of a kit with the total cost of its
components.
The amount by which the price exceeds the cost (margin) is also shown. Because an item may
have up to six prices, as many as six prices and six margins may appear for each kit.
This selection ignores the effect of the following:
•
Price Codes
•
Customer discounts
•
Sale prices
•
Contract prices
•
Serial unit costing
Costs
Cost is obtained by accumulating the extended cost of all components. The detail is shown on the
report. For each component, the quantity-in-kit, unit cost, stocking unit, and extend cost (quantity x
cost) is given.
Components are items, and cost is an attribute of the item and does not vary by warehouse. For
unit cost, you specify whether to use Average, Standard, or Replacement cost.
Select
Kit price/cost from the Reports, kits menu.
The following screen displays:
Enter the following information:
1. Starting kit-item # and
2. Ending kit-item #
Enter the range of kit-item numbers to be used for this report. Follow the screen instructions.
487
Enter
Up to 15 digits or use the option
Example
Press <F2> for First and Last at each field.
3. Group by level # ?
Kit-items are assigned level numbers. Refer to the Kits chapter.
To print the report with your kit-items grouped by their level numbers, answer Y. Otherwise,
answer N and the kit-items are printed in order by item number.
Format
One letter, either Y or N.
Example
Type:N, and then press <Enter>.
4. Level #
If you answered N to the previous question, this field displays as (Not applicable) and may not
be changed.
If you answered Y to the previous question, you may choose to what depth you wish to view
the detail. For example, specifying a level of 3 means that components with a higher-numbered
level do not appear individually on the report. They are summarized into a single level-3
component.
Enter the specific level number for the kit-items to be printed, or press <F5> to include All
level numbers. Kit-items are grouped by level number.
Format
One digit
Example
Not applicable in this example since N was entered in the
previous field.
5. Vendor #
The report can be restricted to kits purchased from a specified vendor.
Options
Enter the vendor number for the kit-items to be printed, or use the option:
<F5>
To include All kits regardless of whether they have a
vendor number
Blank
To include only those kits which do not have a vendor
number.
6. Product category
Enter the product category for the kit-items to be printed, or use the option:
Options
You may also use the options:
488
<F5>
To include All kits regardless of whether they have a
category
Blank
To include only those kits which do not have a category
Format
Five characters
Example
Press <F5>.
7. Product sub-category
Enter the product sub-category of the kit-items to be printed.
Options
You may also use the options:
<F5>
To include All kits regardless of whether they have a
sub-category
Blank
To include only those kits which do not have a sub-category
Format
Five characters
Example
Press <F5>.
8. Cost to use
The cost for each kit component is calculated based on your entry for this field.
If Average, LIFO, or FIFO costing method is used, select A to use Average cost or R to use
Replacement cost.
If Standard cost is used, select A to use average cost or S to use Standard cost.
Format
One character
Example
Type:A, and then press <Enter>.
489
Where-Used Report
This chapter contains the following topic:
Selecting Where-used Report
490
SELECTING WHERE-USED REPORT
The Where-used report selection enables you to view all the kits containing a specific component
item (or items). It may also be used to identify items not used in any kit.
Select
Where-used from the Reports, kits menu.
The following screen displays:
Enter the following information:
1. Starting item # and
2. Ending item #
Enter the range of item numbers for this report or press <F2> at each field for First and Last.
3. Vendor #
Enter the vendor number for the items to be printed, or press <F5> for All vendors.
Format
Up to six characters
Example
Press <F5> for All vendor numbers.
4. Product category
Enter the product category for the items to be printed, or press <F5> for All product categories.
Format
Up to five characters
Example
Press <F5> for All product categories.
5. Product sub-category
Enter the product sub-category for the items to be printed, or press <F5> for All product subcategories.
491
Format
Up to five characters
Example
Press <F5> for All product subcategories.
6. Starting kit-item # and
7. Ending kit-item #
Enter the range of kit-item numbers for this report. Follow the screen instructions.
Field numbers one through five define a set of inventory items to be printed on the report. You
can further restrict the report according to the range of kit items in which these components are
included.
Press <F2> at each field for First and Last kit item numbers.
8. Items to print
This selection determines the type of information printed on this report. Enter one of the
following:
CODE
DISPLAYS
AS
DESCRIPTION
The range of items specified above are
checked against the kit definitions for the
range of kit-items specified. Each item that
is used as a component of one or more kits is
printed on the report, along with the kit-items
for which it is a component.
1
Items used in
kits
2
The range of items specified above are
checked against the kit definitions for the
Items not used
range of kit-items specified. Each item that
in kits
is not used as a component of any kit is
printed on the report.
3
All items
The range of items specified above are
checked against the kit definitions for the
range of kit-items specified. If the item is not
used as a component of any kit, then Not
used in any kit is printed for the item. Otherwise, the kit-items for which the item is a
component are printed.
492
Work Order History
This chapter contains the following topics:
Viewing Work Order History
Printing Work Order History Reports
493
VIEWING WORK ORDER HISTORY
The Work Order History selection enables you to print work orders after they have been closed.
If you choose no to Use kits in Control information, you may skip this chapter.
After a work order has been closed (using Close work orders), it may be viewed or printed using
this selection. Immediate work orders that have been issued may also be viewed or printed using
this selection.
If the component usage transactions and/or kit assembly transaction for the work order have
not yet been posted (using Inventory), then some or all of the cost information may be omitted
from the Work Order History Report. This information will appear on the report after you post
those inventory transactions.
This selection applies to immediate work orders as well as to regular work orders. This is also
available even if you have responded not to Keep history in Control information.
Work order history may also be purged using the Work Order History Report.
Select
Work order history from the View menu.
The following screen displays:
Enter the following information:
Up to five closed work orders display on the screen at one time. To scan through the closed
work orders, use the keys as shown at the bottom of the screen (<PgUp>, <PgDn>, <Home>,
and <End>).
Options
Other options are:
<F5>
To jump directly to the W/O you wish to view, either
494
by W/O number or reference
<F6>
To view comments entered for this W/O
<Esc>
Press this key when you are finished viewing W/O history.
495
PRINTING WORK ORDER HISTORY REPORTS
Select
Work order history from the Reports, kits menu.
The following screen displays:
Enter the following information:
1. Kit-item #
Enter a specific kit-item number to print just the work orders that were used to assemble that
kit-item, or press <F5> for All kit items.
2. Starting work order # and
3. Ending work order #
Enter the range of work order numbers to be printed on the report. Follow the screen
instructions.
Format
Up to sex digits for each field.
Example
Press <F2> to enter First and Last at each field.
4. Starting completion date and
5. Ending completion date
Work orders that were completed within the range of completion dates entered here are printed
on the report. Follow the screen instructions.
Format
MMDDYY for each field
Example
Press <F2> to enter First and Last at each field.
Field numbers 6 and 7 appear as follows if you are using multi-warehousing:
496
6. Stocking warehouse
Work orders are printed on the report if their kit-items were assembled for this warehouse.
Options
Enter a warehouse or use one of the options:
<F5>
For All warehouses
<Enter>
For the Central warehouse (if defined)
Format
Up to two characters
Example
Press <F5>.
7. Print detail or summary
Enter either D to print a detail report, or S for a summary report.
The detail version of the report prints the quantity used for each component, along with the
total cost for each component.
Format
One letter, either D or S.
Example
Type:D, and then press <Enter>.
8. Purge or print
Options
Use one of the following options:
1
To print the report without purging work orders from the
Work Order History file.
2
To print the report and purge from the file the work orders
selected by the above criteria.
3
To purge from the file the work orders selected by the above
criteria, without printing the report.
497
Distributions to G/L
Report
This chapter contains the following topics:
Introduction to G/L Distributions
Selecting Distributions to G/L
G/L Usage Notes
498
INTRODUCTION
TO
G/L DISTRIBUTIONS
This report shows you all the G/L activity (called G/L distributions) that has resulted from posting
I/C transactions. In addition, you can purge (delete records from) the I/C Distribution file.
G/L activity resulting from transactions entered in other modules, such as Accounts Payable or
Payroll, is not shown on this report. Those entries can be printed using the Distributions to G/L
Report in the appropriate module.
The report contains eight sections:
1. Cost of Goods Sold
2. Liabilities
3. Inventory Value (Merchandise)
4. Inventory Value (Finished Goods)
5. Inventory Value (Raw Materials)
6. Inventory Value (Variance)
7. Inventory Value (Work in Process)
8. Miscellaneous Costs Applied
A total is printed for each account, and for each section.
If there is no G/L activity for a particular section, then that section will not be printed.
Within each section, distributions are summarized for each day in which transactions are
entered. The date of the accounting transaction is used, not the date of posting.
Sections of the Distribution to G/L Report for which inventory accounts have not been defined
are not printed:
For example, you only use merchandise inventory in your business. The sections for finished
goods, raw materials, and work in progress will not be shown.
The Variance report section appears only if you use the Standard Cost valuation method, and
only when postings have occurred to the two variance accounts specified in Control
information.
499
SELECTING DISTRIBUTIONS
TO
G/L
Select
Distributions to G/L from the Reports menu.
The following screen displays:
Enter the information as follows:
1. Starting account # and
2. Ending account #
Enter the range of account numbers for this report.
Example
Press <F2> at each field.
3. Starting date and
4. Ending date
Enter the range of transaction dates for this report. Follow the screen instructions.
Format
MMDDYY
Example
Press <F2> for the Earliest and Latest dates for both
fields.
5. Purge file ?
Answer Y to purge the file after printing the report, or answer N if you do not wish the file to
be purged.
Entry here is allowed only if you entered First to Last for the range of account numbers (in
field #’s 1 and 2 above). Otherwise, Purge file ? displays (Not applicable). The reason for this
is that purging only some accounts would put the I/C Distributions to G/L file out of balance.
This is true, whether General Ledger is interfaced or not.
500
In a multi-user environment, do not purge distributions while another user is posting sales
transactions or cash receipts, or is posting invoices from Order Entry.
If G/L is not installed and you answer Y to Purge file?, all distributions within the date range
will be purged after the report is printed.
Format
One character, either Y or N.
Example
Type N.
If G/L is installed and you answer Y to Purge file?, field # 6 appears:
6. Dists to purge
This field appears only if G/L is interfaced and you have answered Y to the previous field.
Enter 1 to purge all distributions within the date range entered above, regardless of whether
they have already been interfaced to G/L.
Enter 2 to purge only those distributions that are within the date range and that have already
been interfaced to G/L.
If you selected to purge, there is a period of processing while the file is being purged.
501
G/L USAGE NOTES
Two situations arise: If you are using or not using General Ledger. These are described below.
General Ledger not used
The I/C Distributions to G/L Report lists the debits and credits that must be entered into your
manual ledger.
You should print out this report at the end of each accounting period after all I/C transactions
for the period have been entered and posted.
Backup your data files and then print this report for all accounts. Specify a date range from
Earliest to the date that is the end of your accounting period. Specify that the file should be
purged. By purging the distributions that are printed on the report, the only distributions
remaining in the file (if any) will be those that apply to the future accounting periods.
You may wish to print the report to disk and then obtain a printed copy using Print reports
from disk.
If a system failure occurs while printing the report and purging the file, restore the backup and
repeat the procedure.
General Ledger Used
The I/C Distributions to G/L file contains debits and credits (created by I/C transactions) that
must be transferred to General Ledger.
The distributions are actually transferred using the Get distributions selection from the G/L
menu, and then specifying that you want to get distributions from the I/C module. Refer to the
Get Distributions chapter in the G/L User Manual.
Printing Considerations
Prior to running Get distributions, you should print the I/C Distributions to G/L Report for all
accounts. Specify a date range from Earliest to the date that is the end of your accounting
period.
Do not specify to purge the file.
If you purge distributions before transferring them to G/L, you must enter the distributions
manually in G/L (using General journal).
The purpose of printing this report prior to transferring the distributions to G/L is to obtain an
accurate list of the debits and credits that are to be transferred to G/L.
You may wish to print the report to disk and then obtain a printed copy using the Print reports
from disk selection.
After printing the report, you should then back up your data files and run Get distributions.
When running this selection, you should specify that the distributions are to be purged as they
502
are copied to the General Journal Transaction file. If a power failure (and computer crash)
should occur while running Get distributions, restore your backup and repeat the procedure.
After Get distributions has been run, you may then print a General Journal Entry Edit List and
compare this report with the I/C Distributions to G/L Report to verify that all debits and credits
have been transferred. (The debits and credits will only be comparable if you have purged the
distributions each period. If you have not purged the I/C Distributions to G/L file in a previous
period, then the reports will not be comparable.)
Alternative procedure
An alternative procedure is listed below:
STEP
DESCRIPTION
1
Back up your data files.
2
Run Get distributions, specifying that distributions are
not to be purged.
3
Run Distributions to G/L Report, specifying to purge
the file and only interfaced distributions are to be
purged.
4
Print the General Journal Entry Edit List. The debits
and credits printed on the edit list should be comparable to the debits and credits on the I/C Distributions to G/L Report, provided that you have
followed this procedure each period. If you have not
purged the I/C Distributions to G/L file in a previous
period, then the reports will not be comparable.
If you specify that distributions are not to be purged by Get distributions, and you run Get
distributions again, you will still never transfer the same distribution from I/C to G/L more than
once, because Get distributions prevents this.
Therefore, if after step 2 in the alternate procedure, you discover additional I/C distributions for
the accounting period that have not yet been entered into Inventory Control, simply enter and
post these transactions in I/C, and repeat the alternate procedure starting with step 1.
Account not on file
When printing this report, it is possible to get an **Account not on file** message with an
accompanying account number and distribution amount. This occurs when an amount has
been distributed to a valid General Ledger account that is not in the Valid G/L Accounts file.
If you get this message, you should trace the missing account name and re-enter it in the Valid
G/L Accounts file, using the Valid G/L accounts selection. If you are using General Ledger,
ensure the account number also exists in the Chart of Accounts file in that module.
503
If distributions have been made to an invalid account, one that you do not intend to set up,
print and purge the Distribution to G/L Report as usual. If you are using General Ledger, allow
the invalid account to interface and then correct the invalid account and distribution using the
General journal selection in General Ledger.
In any event, determine the source of the invalid account number, make the entry to the proper
account number, and take steps to ensure that the invalid number cannot be used again.
If you encounter any problems in tracing the erroneous entry (amount, where it came from,
where it should go, etc.), you may wish to use the printout from the previous accounting period
as a guide. This will show you the accounts you usually post to, the amounts, etc.
Comparing the current report to the previous report line by line should isolate the error.
If the above procedure fails, calculate and reconstruct the postings manually and then compare
these figures to the figures on the printout.
504
Close a Period
This chapter contains the following topics:
Introduction to Close a Period
Selecting Close a Period
505
INTRODUCTION
TO
CLOSE
A
PERIOD
Use this selection to clear the period-to-date fields in the Status file. Specifically, the quantities or
amounts in the following fields will be set to zero:
•
Quantity sold PTD
•
Quantity used PTD
•
Quantity returned PTD
•
Sales PTD
•
Costs PTD
Additionally, if prior period information is being retained in the Status file, then the oldest
period is deleted and the period being closed becomes the most recent prior period.
You may also clear the year-to-date fields as explained below.
You must close at the end of the designated period, as defined by you. There is no grace
period.
Prerequisites for Closing Periods
Prior to running this selection, you should ensure that you have posted all inventory
transactions for the current period. Then you should print all needed inventory reports and any
sales analysis reports (if you are using Sales Analysis) in order to obtain a permanent record of
the final period-to-date figures (and corresponding year-to-date figures) for your inventory
items.
The term period as used here, may either be your accounting period, or you may choose a
longer or shorter time. For example, you could run this selection and close I/C each week. In
this case, the period-to-date figures on the inventory and sales analysis reports would be
weekly figures. Alternatively, you could close I/C once a quarter, in which case the period-todate figures would be quarterly figures. If you are using S/A comparatives, then in I/C you
must use the last day of the month as your closing date as S/A can only pull in data for one
month at a time.
You may define your period in I/C as your accounting period or some other time period.
Closing a period in I/C has no effect on General Ledger. The interface between I/C and G/L is
through the G/L Get distributions selection, described in the G/L User documentation. Also
refer to the chapter Distributions to G/L Report chapter.
The current period in I/C is determined by the Current period end date in Control
information. If you post inventory transactions that are dated after this date, they will not
appear in the period-to-date totals.
When you run this selection, the following occurs:
1. The period being closed becomes the most recent prior period. If necessary, the oldest prior period
information is removed.
506
2. The current period ending date in the I/C Control file is set to the ending date of the new
period.
3. Average quantity on hand is calculated for each item at each warehouse at which it is
stocked. Refer to Control Information chapter for more information on the calculation.
Ensure that all necessary accounting operations, including printing all reports are completed,
before proceeding.
If you are using the Passport Sales Analysis application, the sales analysis reports must be run
before running Close a period. This is because information needed for these reports will be
completely cleared by this function.
If this is the end of the year, this current period and date will become the default Prior fiscal
year-end date for the new period in Control information.
If you are using this User documentation as an instructional tool, skip this function and follow
the examples in the Sales Analysis documentation, if Sales Analysis is being used. Then return
to the I/C User documentation to run Close a period.
507
SELECTING CLOSE
A
PERIOD
Select
Close a period from the I/C menu.
The following screen displays:
Enter the ending date of the new period.
If the period is the last period in your accounting year, answer Y to the question: Is (date) also
the year ending date ?. Otherwise, answer N.
If you are using Sales Analysis, the sales analysis reports should be run before running Close a
period. This is because information needed for these reports is cleared by running this
selection.
After you answer Y to Are your sure ?, the period-to-date fields, average quantity on hand,
and prior period fields are updated as described at the beginning of this chapter.
508
Purging Serial
Numbers
This chapter contains the following topic:
Purging Serial Numbers
509
PURGING SERIAL NUMBERS
Use this selection to purge (remove) sold serial numbers from the Serial file, and to print a
report showing the serial numbers that will be purged from the file.
You should run a purge as necessary to conserve disk space. Disk space is not regained unless
records are physically removed by running the File Recovery Utilities selection to Export and
then Restore from export the Serial file. Refer to PBS Administration documentation for using
the File Recovery Utilities.
Select
Purge serial numbers from the Utility menu.
The following screen displays:
Enter the information as follows:
1. Starting item number and
2. Ending item number
Enter the range of item numbers of the serialized items to be included in the purge or press
<F2> at each field for First and Last. Follow the screen instructions.
Format
Up to 15 digits or use the option
Example
Press <F2> for the First and Last.
Only sold serial numbers in the specified range of item numbers are purged.
3. Invoice cut-off date
Enter the last invoice date for which sold serial numbers are to be purged, or press <Enter> to
use the System date.
Format
MMDDYY
Example
Press <Enter> to accept the System date.
510
All sold serial numbers with invoice dates after the cut-off date entered here are left on file.
4. Warranty cut-off date
Enter the last warranty date for which sold serial numbers are to be purged, or press <Enter> to
use the System date.
Sold serial numbers are left on file if the warranty is after the cut-off date entered here.
Format
MMDDYY
Example
Press <Enter> to accept the System date.
5. Purge file?
Answer Y if you want to have the sold serial numbers purged from the Serial file. The Serial
File Purge Audit List prints automatically if you answer Y.
Answer N if you wish to print a report and examine the serial numbers before they are purged.
The Serial File Purge Review List is printed and no purging takes place.
If you answered Y to Purge file?, the program then purges from the Serial file all sold serial
numbers with invoice dates and warranty dates that are dated before the respective cut-off
dates for the specified range of item numbers.
Format
One letter, either Y or N. The default is N.
Example
Press <Enter> for the default.
The Serial File Purge Review List is printed, showing detailed information on every serial
number that would be removed from the file.
511
Purging Inactive
Items
This chapter contains the following topic:
Selecting Purge Inactive Items
512
SELECTING PURGE INACTIVE ITEMS
Use this selection to purge (remove) a group of inactive items from the Item and Status files, or to
print a report showing the items that would be purged from the files.
An inactive item is one with no quantity on hand, quantity committed, quantity on order,
quantity on back order, or quantity on work orders in any warehouse. In addition, the quantity
and sales period-to-date and year-to-date for the item must be zero. Furthermore, the item
cannot be a kit-item or component-item.
When an inactive item is purged using this selection, its associated alternate item number
information, notes, prices, and keywords are also purged from their respective files.
You may also use the Items selection to delete inactive items, one at a time.
You may purge as needed to eliminate inactive items and regain disk space. (Disk space is not
regained unless the records are physically removed by running the File recovery utilities
selection to Export and then restore from export the Item and Status files. Refer to the PBS
Administration documentation for more information.)
Select
Purge inactive items from the Utility menu.
The following screen displays:
Enter the information as follows:
1. Starting item # and
2. Ending item #
Enter the range of item numbers to be included in the purge or press <F2> in each field for
First and Last. Follow the screen instructions.
Format
Up to 15 digits or use the option
Example
Press <F2> for First and Last.
513
3. Inventory acct #
Enter the inventory account for which to purge items.
Options
You may use one of the options:
<F1>
For next inventory account on file
<SF1>
For the previous inventory account on file
<F2>
For the default inventory account
<F5>
For All inventory accounts
4. Vendor #
Enter the vendor number to purge items for only one vendor, or press <F5> to include items
for All vendors.
Format
Up to six digits or use the option
Example
Press <F5> for All vendors.
5. Product category
Enter the category to purge items for only one product category, or press <F5> to include
items for All product categories.
Format
Up to five digits or use the option
Example
Press <F5> for All categories.
6. Product sub-category
Enter the sub-category to purge items for only one product sub-category, or press <F5> to
include items for All sub-categories.
7. Last sale cut-off date
Enter the last sale date of the inactive items to purge, or press <F2> for the Earliest cut-off
date.
Only items with a Last sold on date on or before the date entered here are included.
If you enter Earliest for the sale cut-off date, an additional field appears:
Purge items never sold?
Answer Y to include items that have never sold (Last sold on date of None). Answer N to
exclude items with a Last sold on date of None.
Format
One letter, either Y or N. The default is N.
Example
Press <Enter> to accept the default.
514
8. Print or purge ?
Options
Use one of the following options:
1
To print a report showing the inactive items that would be
purged
2
To purge the file without printing a report
3
To print a report, and to purge the inactive items
If you selected to purge the file, a screen then appears showing the files from which
information will be deleted.
Prior to proceeding, you should ensure that you have a backup of these files. When you are
ready to continue, answer Y to the question Are you sure you wish to do this?.
If you select to print the report only, the Inactive Items Purge List is printed, showing
information on every item that would be removed from the file. If you select to print and purge
the file, the Inactive Items Purge Log is printed, prior to the items being purged.
If you select to purge items, the program purges from the Item, Status, and Serial files all
inactive items with Last sold on dates on or before the cut-off date specified. Alternate item
information, special prices (warehouse-specific, sale prices, or contract prices), keywords, bar
codes or notes that are defined for the purged items are also removed.
515
Purge Inventory
History
This chapter contains the following topic:
Selecting Purge Inventory History
516
SELECTING PURGE INVENTORY HISTORY
Use this selection to purge inventory history.
Maintaining inventory history has no significant detrimental effect on the system. However,
you may choose to purge your inventory.
The purge creates balance forward records for all items and warehouses. For this reason you
may want to select a purge cut-off date on the last day of the fiscal year.
You may purge to eliminate no longer needed history. If you purge to conserve disk space,
you should know that disk space is not regained unless the records are physically removed by
running the File recovery utilities selection to Export and then restore from export the
Inventory history file. Refer to the PBS Administration documentation for more information.
Select
Purge inventory history from the Utility menu.
The following screen displays:
Enter the information as follows:
1. Cut-off date
Enter the last date of the inventory history to purge, or press <F2> for the Latest cut-off date.
Only history records with a date on or before the date entered here are included.
Format
MMDDYY
Example
Type 060199
2. Starting item-# and
3. Ending item-#
Enter the range of item numbers to be included in the purge or press <F2> in each field for
First and Last. Follow the screen instructions.
517
Format
Up to 15 digits or use the option
Example
Press <F2> for First and Last.
4. Category
Enter the category to purge items for only one product category, or press <F5> to include
items for All product categories.
Format
Up to five digits or use the option
Example
Press <F5> for All categories.
5. Sub-category
Enter the sub-category to purge items for only one product sub-category, or press <F5> to
include items for All sub-categories.
Format
Up to five digits or use the option
Example
Press <F5> for All sub categories.
Field number to change ?
Make any changes or select <Enter> to continue.
Are you sure you wish to do this ?
Prior to proceeding, you should ensure that you have a backup the entire IC module by
copying the ICxx directory with the xx representing the company number. When you are ready
to continue, answer Y to the question Are you sure you wish to do this?. If you are not sure,
then select N.
If you select to purge inventory history, the program purges from the Inventory history file all
inactive items with dates on or before the cut-off date specified.
518
Technical Notes
This appendix contains the following topics:
Sorting Sequences
General Sorting Sequence
519
SORTING SEQUENCES
Lists that can be printed, such as a list of vendors or a list of customers, are sorted by your
computer based on the sequence of the American Standard Code for Information Interchange
(ASCII).
In the following table, the sequence (the order in which characters are sorted) starts at the
upper left character (space), then down that column, then down the next, and so on until the
end (DEL)
Starts
here
Next
column
(space)
!
]
.
F
G
_
/
H
’
$
0
I
a
m
y
%
1
b
n
z
&
2
{
’
(
;
?
K
c
o
@
L
d
p
e
q
}
DEL
M
)
w
Y
f
*
6
s
+
7
t
Ends
here
520
GENERAL SORTING SEQUENCE
The general sequence is as follows:
1. Special characters
2. Numerals
3. Uppercase letters
4. Lowercase letters
As an example, refer to the table in the Sorting Sequences section and determine the reason
entry #900 would print out on a list before the entry 100.
(It is because the character “#” appears before the character “1”.)
Similarly, the entry _ZEBRA (with the first character being a blank space) prints out before
ANTELOPE. This is because “_” (space) precedes “A” in the ASCII sorting sequence.
Sorting normally presents no problems. But you should be aware of the ASCII sequence,
especially if you intend to combine alphabetic and numeric characters (for example, if you
identify four different vendors as A, B, 100, 200).
Also consider the sorting sequence when you select the range of items you want to print. For
example, you have placed the character, “#”, before the name of each executive in your
company. Because “#” appears before alphabetic characters, a list of your executives would
appear before other employees whenever you requested an alphabetic listing of all employees.
If you wished a list of only the executives, you would select as a “range”: #AAA to #ZZZ.
However, if you wanted to print out of all employees, you could not select “AAA” to “ZZZ”,
as your executives would not be listed (refer back to the ASCII sort sequence).
Some programs have an option to select either a numeric or alphabetic listing of items. Note
that the ASCII sequence is still followed in both cases. For example, if you request an
alphabetic listing of vendors, the sequence might be:
1. 21st Century Corp.
2. Acme Office Supply
3. Red Line Freight
4. Wells Fargo Bank
Because numbers precede letters in the ASCII sorting sequence, “2” has preceded “A” on the
printout.
If you request a numeric listing of vendors, your list might read:
#999
000100
000200
521
000300
ABC
DEF
In the above example, the character “#” appears first, numbers appear next, and alphabetic
characters are last.
522
Cost Inventory
Methods
This appendix contains the following topics:
Introduction to Costing Inventory Methods
Average Cost Method
Standard Cost Method
Comparison of Methods
523
INTRODUCTION
TO
COSTING INVENTORY METHODS
The cost of purchased goods for inventory varies during the year. When identical items are bought
and sold, it is difficult to determine which items have been sold and which are still in inventory.
Therefore, to cost inventory, it is necessary to make assumptions about the order in which items
were sold.
Because the assumed order of sale may not be the actual order of sale, it is really an
assumption about the flow of costs rather than the flow of goods.
Several assumed cost flows are acceptable in accounting practice. Inventory Control allows
you to choose from four generally accepted methods:
1. Average Cost
2. Standard Cost
3. First-in, First(FIFO)
4. Last-in, First(LIFO)
If desired, the serial (real) cost method can be used for serialized items in conjunction with the
average cost method.
To illustrate these four methods, the following data for the month of July will be used:
Inventory Data, July 31
July
1
7
7
15
26
On hand
Purchased
Purchased
Purchased
Purchased
Totals
Sales
On hand July 31
100 units at $1.00
100 units at $1.20
100 units at $1.21
100 units at $1.30
100 units at $1.40
500 units
280 units
220
$100
$120
$121
$130
$140
$611
The important data for the four examples which follow is the sale of 280 units. The inventory is
relieved of (reduced by) these 280 units. The examples show how inventory is relieved of
these 280 units and a chart compares these four methods in terms of the value of closing
inventory and the amount of profit.
524
AVERAGE COST METHOD
Under the Average Cost method, the cost of inventory is the total cost of inventory on-hand at the
beginning of the period, plus the cost of all goods purchased during the period, valued at the average cost of these goods.
Average Cost
Total cost of goods on-hand divided by total quantity of goods expressed as some unit.
Inventory Control also allows the actual costs of individual serialized items to be tracked when
the average cost method is used.
Serial Cost
The real cost of an individual serialized item.
Average Cost is updated each time items are received into inventory. If serial costs are being
used, the average cost is also recalculated when a serialized item is sole, when a Move In or
Move Out serial transaction is posted, and when an inventory adjustment is made (adjustment
transaction), using the serial number’s serial cost.
Inventory, July 31
July
Totals
1
7
7
15
26
Inventory
Purchased
Purchased
Purchased
Purchased
100 units at $1.00
100 units at $1.20
100 units at $1.21
100 units at $1.30
100 units at $1.40
500 units
Average unit cost: $611 / 500 =
Ending inventory: 220 units at $1.22 =
Cost of goods available for sale
Minus July 31 inventory
Cost of goods sold
$100
$120
$121
#130
$140
$611
$1.22
$268
$611
$268
$343
If you are using Serialized Unit Costing, the true unit cost is used for accounting purposes
instead of the Average Cost. Refer to the Serial Inventory chapter.
525
STANDARD COST METHOD
Standard Cost is an inventory valuation system which highlights price variance at the time of purchase. It is designed to assist wholesalers and distributors in assigning profit responsibility between
the Purchasing and the sales departments.
In the Standard Cost method, the cost of each item is set and is not changed by the sale or receipt of
items. It is only changed by a definite decision and action by you to change it. The actual cost (purchase price) of inventory is automatically at Average Cost.
Standard Cost
Cost is set by you and only changed by reentering a new Standard Cost.
The easiest way to think of Standard Costing is that you set the cost of an item in the Item File.
This becomes the target you set for the purchasing department. You also set the target (with
mark up) for the sales department (to determine their portion of the responsibility for profit on
an item). Variances (±) from that cost are thereafter tracked, and these variances may be
printed on reports.
Inventory, July 31 - Standard Cost Method
Standard cost is set by management at $1.218
July
1
7
7
15
26
Inventory
Purchased
Purchased
Purchased
Purchased
Totals
100 units at $1.00
100 units at $1.20
100 units at $1.21
100 units at $1.30
100 units at $1.40
500 units
$100
$120
$121
$130
$140
$611 (Actual)
500 units x 1.218$609 (standard cost) + $2 (variance) + $2 (purchase variance)
Average unit cost: $611 ÷ 500 = 1.22
Cost of goods sold (280 units x $1.218) = $341
This shows that the Purchasing department bought the goods at $2.00 above the set Standard
Cost.
LIFO Method
LIFO
The LIFO (Last in, First out) method is based on the assumption that the most recently
purchased units are sold first.
526
LIFO assumes that the cost of the last items purchased should be assigned to the first items
sold, and that the cost of the ending inventory consists of the cost of the merchandise
purchased earlier.
FIFO Method
FIFO
The FIFO (First in, First out) method is based on the assumption that the oldest (first into
inventory) items in stock are sold first.
FIFO assumes that the cost of the first items acquired should be assigned to the first items sold.
The cost of goods on hand at the end of a period are assumed to be from the most recent
purchases.
To understand the LIFO and FIFO methods, assume that you have a computer file on all items
received. For each shipment received, the quantity and the unit cost of that item is input into
the computer. The computer would contain a cost history of all items in inventory. LIFO/FIFO
cost histories develop in what are called layers.
LIFO assumes that the last (most recent) item put into inventory is the first to be sold, or
relieved from the computer’s Layer File.
It is as if all receipts are dumped into a barrel, and the top ones are sold first. Each new
shipment is dumped on top and then sold off before the older items, which are at the bottom of
the barrel.
The FIFO method assumes that the earliest items (oldest items in stock) are sold first. You are
receiving items into the bottom of the barrel, then selling the items from the top of the barrel.
The computer’s Cost History File is relieved of the earliest (first) items on file, rather than the
latest as in the LIFO method.
LIFO Layers
Inventory, July 31 - LIFO Method
July
Totals
Note
26
15
7
7
1
Purchased
Purchased
Purchased
Purchased
Inventory
100 units at $1.40
100 units at $1.30
100 units at $1.20
100 units at $1.21
100 units at $1.00
500 units
$140
$130
$120
$121
$100
$611
If there are two receivings for an item on a given date, and if the two
costs vary, then the lower of the two costs is assumed to be the later
layer.
527
For LIFO the last layer to be received (July 26) is referred to as the top layer, and the total cost
history consists of five layers. (To simplify, we are assuming that the July 1 Inventory is a
single purchase).
When sales occur, the layers are relieved from the top down (LIFO), and the cost of the sale is
determined from the layers relieved, as follows.
For example, if 280 units are sold:
100 units at $1.40 =
100 units at $1.30 =
80 units at $1.20 =
$140
$130
$96
Cost of goods sold
After the sale, the remaining LIFO layers would look like this:
July 7
20 at $1.20 $24
7
100 at $1.21
1
100 at $1.00
Ending inventory, July 31
$121
$100
$245
The remaining layers represent the ending inventory for July 31. Another method of
calculating is:
Cost of goods available for sale
Less July 31 inventory
Cost of goods sold
$611
$245
$366
For FIFO, the layers develop in the reverse order of LIFO.
Inventory, July 31 - FIFO Method
July
Totals
Note
1
7
7
15
26
Inventory
Purchased
Purchased
Purchased
Purchased
100 units at $1.00
100 units at $1.21
100 units at $1.20
100 units at $1.30
100 units at $1.40
500 units
$100
$121
$120
$130
$140
$611
* If there are two receivings for an item on a given date, and if the two
costs vary, then the lower of the two costs is assumed to be the later
layer.
The earliest purchases make up the top layers. When sales occur, the layers are relieved from
the top down (FIFO). The cost of the sale is determined from the layers relieved, as follows:
528
100 units at $1.00 =
100 units at $1.20 =
$100
$120
$97
Cost of goods sold =
$317
The resulting FIFO layers would look like this:
July
$24
15
26
100 at $1.30
100 at $1.40
Ending Inventory, July 31
$130
$140
$294
The remaining layers represents the closing inventory for July 31.
Another method of calculation is shown below:
Cost of goods available for sale
Less July 31 inventory
Cost of goods sold
529
COMPARISON
OF
METHODS
The following four methods of pricing inventory have now been illustrated: Average,
Standard, LIFO, and FIFO. All four methods are based on assumptions regarding the flow of
costs.
The following is a comparison that shows the effects of the four methods on net income, using
the same data as before and assuming sales during July of $500.
Sales
Cost of goods sold
Beginning inventory
Purchases
Cost of goods available
for sale
Less ending inventory
Cost of goods sold
Gross profit on sales
AVERAGE STANDARD
COST
COST
$500
$500
LIFO
FIFO
$500
$500
$100
$511
$122 (std.)
$487
$100
$511
$100
$511
$611
$609
$611
$611
$268
$343
157
$268 (std.)
$341
$159
$245
$366
$134
$294
$317
$183
Assuming that costs are inflating, LIFO (which charges the most recent and therefore highest
cost of goods sold) results in the lowest net income (and the lowest ending inventory value).
For this example, FIFO (which charges the earliest and therefore lowest cost of goods sold)
produces the highest net income (and the highest ending inventory value).
Under average cost, the net income and value of ending inventory are between those computed
under LIFO and FIFO, reflecting the leveling effect of Average Costing.
During a period of deflation, the reverse effect would occur under LIFO and FIFO (with LIFO
showing a higher net income than FIFO).
The outline on page {paranumonly[ChapterTitle,AppendixTitle]}–531 is also presented as an
opinion on average, standard, LIFO, and FIFO.
530
VALUE METHOD CONSIDERATIONS
You need to consider various options when selecting a valuation method for Average, Standard,
LIFO, or FIFO methods.
Average Cost
What is it
Perpetual average cost flow assumption.
Benefits
1. Second easiest (to FIFO) to audit/review.
2. Saves data file space when there’s large number items. If there are a large number of inventory items, the average cost method is a feasible option (getting more disk space is another
option).
3. The Cost figure for ending inventory is influenced by all prices paid during the year and thus
tends to level effects of cost increases/decreases during year.
Comments
1. No Detail is kept on each transaction.
2. During times of rising prices, this method can cause higher taxes. Refer to Comments under
LIFO.
3. Values inventory based on a generally accepted accounting method.
Standard Cost
What is it
Modified standard cost system that highlights purchase price variance at time of purchase. This
method automatically uses the perpetual average cost flow assumption described above.
Benefits
1. Can provide distributors & wholesalers with information to identify profit responsibility between
purchasing/sales departments.
2. Purchase variance clearly identified.
Comments
1. Most time and effort to audit and review.
2. No detail on each transaction is maintained.
LIFO
What is it
Perpetual, specific goods, LIFO cost flow assumption.
531
Benefits
1. Cost of sales kept closest to replacement costs.
2. Always keeps inventory at LIFO cost.
3. Prevents reporting excessive profits during times of rising prices. Under FIFO or average cost
methods, profit is overstated because inventory must be replaced at new, higher prices. Note,
that FIFO can be manually adjusted at year end to dollar value LIFO, giving operational
advantages of FIFO with tax advantages of LIFO. Consult your accountant.
Comments
1. Detail is maintained on each transaction.
2. Because of the perpetual updating of costs, you cannot build up significant LIFO layers as
you could with FIFO and made a periodic dollar value LIFO adjustment.
3. More is involved in audit and review because many small layers can be built.
4. Uses more computer disk storage space.
5. Values inventory based on a generally accepted accounting method.
FIFO
What is it
Perpetual, specific goods, FIFO cost flow assumption.
Benefits
1. Easiest to audit or review of the four methods.
2. Errors are easily identified and corrected.
3. Keeps your inventory value close to replacement value.
4. Easiest to use of all four methods.
Comments
1. The detail is sufficient for easy manual entry at year end to express the financial statement values
at dollar value LIFO (on a periodic basis). This gives the benefit of reporting lower profit when
prices rising. For a full explanation of this, consult your accountant.
2. Values inventory based on a generally accepted accounting method.
3. Uses more storage space on the computer disk.
532
LIFO/FIFO Cost
Valuation
This appendix includes the following topics:
Introduction to LIFO/FIFO Cost Valuation
Receivings
Credit Memos
Distributions to General Ledger
533
INTRODUCTION
TO
LIFO/FIFO COST VALUATION
This appendix provides additional information on inventory transaction processing under LIFO,
FIFO, or Standard Cost inventory valuation. It should be used in conjunction with the chapter titled
Inventory Under Average Cost.
Prior to reading this appendix, read the chapter titled Inventory Under Average Cost. If you are
using the LIFO, FIFO or Standard Cost valuation method, do not enter the examples in the
chapter. Instead, return to this appendix to enter the examples shown here and to learn about
the differences in inventory processing when using the LIFO, FIFO, or Standard Cost
valuation methods.
Information specific to entry of fields when using LIFO, FIFO, or Standard Cost valuation
methods is presented for each transaction type in Special Notes on Fields.
534
RECEIVINGS
Enter the information shown below for a receiving. The first serial number being received is also
shown.
LIFO/FIFO Field Notes
Top layer LIFO cost
With a FIFO inventory, this position displays FIFO cost. The cost displayed is from the top
layer in the LIFO/FIFO history. Unposted transactions do not affect the LIFO/FIFO layers until
they are actually posted.
The screen above displays (no LIFO layers) because no transactions have been posted yet.
When Standard Cost inventory valuation is used, this position displays the Standard Cost for
this item (from the Item file).
Top layer LIFO qty
With a FIFO inventory, this position displays FIFO quantity. The quantity displayed is the
number of units available at the displayed LIFO cost (or FIFO cost). This shows the number of
units currently available at that cost as of the last posting.
If LIFO or FIFO layers do not exist, this line shows Replacement cost, instead of the
LIFO/FIFO units available.
When Standard Cost inventory valuation is used, this position displays the Average Cost for
this item (found in the Item file).
5. Quantity received
A negative quantity is not allowed under LIFO/FIFO valuation.
Format
99,999,999.99999
535
6. Actual cost
If you are using the Standard Cost method, enter the actual cost and not the Standard Cost.
Any variance (difference) between these costs will be reported to you on the Inventory
Transaction Register, and the variance will be posted to the purchasing variance account
(specified in Control information).
Format
99999999.99999
Make changes to the serial number information as usual. The serial fields then clear for entry
of the next serial number. Press <Esc> at Serial # when completed entering the serial numbers
for the receiving.
Example
Enter serial numbers DS4558 and DS4559 to complete
this receiving. Press <F2> at New/Used for each to
default the other fields to the same entries as the prior
serial number.
To build up some inventory layers, enter the receivings on the next two screens:
LIFO/FIFO cost histories develop in layers. The receivings you have just entered will create
the following LIFO layers.
536
Inventory, March 16
March 16
March 10
March 7
Receivings
Receivings
Receivings
1 Lathe at $194.70
1 Lathe at $194.10
3 Lathes at $194.40
Because this is the LIFO costing method, the last (most recent) purchase of lathes has become
the top layer and will be the first inventory relieved when a sale is made.
Example
Exit the Enter screen, print an Inventory Transaction
Edit List, and post the receivings. Return to the Inventory (Enter) selection and this point in the user manual
when posting completes.
Sales
Enter the following sale to further illustrate how LIFO layering works, using the Inventory
(Enter) screen.
LIFO cost
With a FIFO inventory, this position would display FIFO cost. In either case, the cost
displayed is from the top layer in the LIFO/FIFO history, and is the cost as of the last posting.
Note that unposted transactions do not affect the LIFO/FIFO layers until they are actually
posted.
When Standard Cost inventory valuation is used, this position displays the Standard Cost for
this item (from the Item file).
LIFO units
With a FIFO inventory, this position would display FIFO units. In either case, the number of
units displayed is the number of units available at the cost displayed as LIFO cost (or FIFO
cost). This shows the number of units still available at that cost from the last posting. (If no
LIFO layers have been established, this line shows Replacement cost.)
537
When Standard Cost inventory valuation is used, this position displays the Average Cost for
this item (from the Item file).
5. Quantity sold
Under LIFO and FIFO, the number of units available in the top LIFO/FIFO layer displays
above as part of the old information. If your sale quantity exceeds this amount, you will be
using at least one additional LIFO/FIFO layer to satisfy the sale quantity.
Format
99999999.99999
7. Actual cost for (stocking unit)
No entry is allowed in this field for sales. Sales are posted at LIFO/FIFO or Standard Cost,
depending on the valuation method used.
For LIFO or FIFO, the exact actual cost (per stocking unit) of the sale is determined by
relieving LIFO/FIFO layers to satisfy the sale quantity. The total cost, represented by the layers
to be relieved, is divided by the sale quantity to obtain the actual cost per unit.
LIFO/FIFO layers are unaffected by unposted transactions. As a result, if you have unposted
transactions for the item, the actual cost used when the transactions are posted may be different
than the one shown on the screen.
To view the actual cost that will be used during posting, print an edit list.
When a sale is posted, it relieves LIFO/FIFO layers beginning with the top layer and progressing
downward. This procedure continues until enough layers have been relieved to satisfy the sale quantity you have entered.
As the layers are relieved, the exact cost of the sale is computed from the costs stored in the
layers. In this way, the exact LIFO/FIFO cost is determined.
When the sale is first entered, the actual cost automatically displays on the screen. This cost is
obtained from the LIFO/FIFO layers as they exist as of the last posting of transactions.
However, by the time this sale is posted, the LIFO/FIFO layers may have changed due to other
transactions that are posted before it.
This occurs because receivings, credit memos, and adjustments are posted first and new layers
may have been added. Because of this, the actual cost of the sale may be different than what is
displayed on the screen when you were entering the sale.
If you would like to know the exact cost of your sale and how other unposted transactions may
affect the cost layers, print an Inventory Transaction Edit List. To see the impact of your
transactions on the LIFO layers, post the transactions.
Examine the Inventory Transaction Registers that were printed when you posted the example
receivings and sales.
Page 0001 of the first register shows the three receiving layers. The most recent (03/16/05) will
be the top layer under LIFO (or the bottom layer under FIFO). If you add down the column
under total quantity, you will see that 5 lathes were received.
538
Page 0001 of the second register shows the sale of 1 lathe. The layer is relieved from the top
down. The register shows:
Sale
Layers removed:03/16/051 each at $194.70 cost
The remaining LIFO layers in inventory would be:
Inventory, March 25
March 10
March 7
Receivings
Receivings
1 Lathe at $194.10
3 Lathes at $194.40
The first register shows three receiving layers and a total quantity of 5. The second register
shows a sale of 1. Therefore, the remaining inventory is (5 -1= 4 units).
539
CREDIT MEMOS
To introduce you to credit memo transactions, assume that the customer to whom you sold the lathe
returned it for credit.
Following the same procedure as for sales, enter the information shown below. For Type,
specify C (credit memo).
This credit memo creates a new LIFO layer.
Adjustments
An adjustment can also be used to adjust the quantity of a specific LIFO/FIFO layer (specific
adjustment). It can also adjust a quantity without regard to a specific LIFO/FIFO layer.
You can see the current LIFO/FIFO layers for any item in inventory by printing a Valuation
Report (described in theValuation Reports chapter).
Downward Adjustments
There are two types of downward adjustments:
1. Specific layer adjustments
2. Non-specific layer adjustments.
A specific layer downward adjustment will reduce one layer by the negative quantity you
enter. This is useful when you discover that an earlier transaction was entered with a wrong
quantity.
A non-specific layer downward adjustment also reduces your inventory by the negative
quantity you enter. However, it does so without regard to any specific layer.
This non-specific type of adjustment begins with your top LIFO/FIFO layer, and relieves
(eliminates) as many layers as are necessary to satisfy the quantity you entered. As this is done,
the cost of the transaction is calculated, using the costs recorded in the layer(s) relieved. For
540
this reason, an entry is not allowed in the Actual cost field when entering a non-specific
downward adjustment.
This is useful when you need to adjust inventory as the result of a physical count. In this case,
you probably will not know the exact layer(s) affected by your shrinkage, but you are still able
to reduce inventory by LIFO/FIFO cost.
Upward Adjustments
There are two types of upward adjustments:
1. Specific layer adjustments
2. Non-specific layer adjustments.
A specific upward adjustment increases one layer by the quantity you enter. As with a
downward specific adjustment, this gives you the ability to correct an earlier transaction that
was entered with an incorrect quantity.
A non-specific upward adjustment also increases your inventory by the quantity you enter.
However, it does so by inserting a new layer for the date, quantity and cost of the transaction.
If a layer already exists for the entered date and cost, the new transaction quantity is added to
it.
To introduce you to adjustments, enter the information shown below.
•
When asked if you wish to adjust a specific layer, type Y to assign the adjustment to a specific
LIFO inventory layer. (Answering N makes the adjustment without regard to specific layers.)
•
Specify “DS4558” as the serial number to be adjusted for this serialized item.
Note that for a specific layer adjustment, field number 3 changes from Transaction date to
Entry date when adjusting a specific layer to Layer date, and field # 6 changes from Actual
cost to Layer cost.
Enter the date and actual cost (purchase price) for the specific layer you want to adjust.
541
The document number used must match the document number used in the transaction that
created the layer you are adjusting. In this case, it is R2.
You can get the document number by printing the Valuation Report for this item, selecting to
show (LIFO or FIFO) layers.
If the layer date and layer cost do not match an existing LIFO layer, the message LIFO layer
not found, press <Enter> or F8 displays.
Only one specific adjustment transaction per a specific layer is allowed for each posting.
If an adjustment brings a layer to zero quantity during posting, that layer is removed.
Therefore, you may delete a layer using a specific layer adjustment resulting in a layer quantity
of zero.
A specific adjustment cannot cause the resulting quantity of the specific layer to pass through
zero. That is, a negative inventory quantity cannot be made positive, and a positive inventory
quantity cannot be made negative.
Edit List Errors
Specified Layer not Found/Invalid Transaction Quantity
While printing an edit list or register, you might get an error message that a specified layer has
not been found, or that an invalid quantity was entered. This condition can be brought about
by the fact that transactions are posted in date order.
While entering specific layer adjustments, the program automatically checks to ensure that the
layer you specified is present and that the quantity entered is acceptable. However, during
posting, it is possible that your specified layer may have already been eliminated, or its
quantity altered, before your specific layer adjustment is posted.
Your specified layer could be eliminated or have its quantity reduced if you enter a sale or
downward adjustment with an earlier date than your specific adjustment. Then posting relieves
the layer (the one you had specified for your adjustment) or reduces its quantity in order to
satisfy the quantity of the sale. This will happen before the posting process gets to your
adjustment.
If adjusting the layer you specified is not possible, one of these two messages will appear on
the edit list or register:
Specified layer not found-Entry will not be posted.
Invalid entry qty-Entry will not be posted.
In either case, select Enter and change the specific adjustment so that it applies to a valid layer.
Refer to your Valuation Report and Edit List for valid layers.
Attempts to post this transaction will not affect the Running quantity on hand and will not
create General Ledger distributions. In effect, this transaction will be automatically deleted
during posting. A valid specific layer must be found in order to allow posting to occur for that
transaction. Posting for other transactions will continue normally.
542
DISTRIBUTIONS
TO
GENERAL LEDGER
Inventory transactions are posted in the order shown below. The G/L distributions generated by
posting the transactions are also described here.
Receivings
•
Debit item’s Inventory Account (Item file)
•
Credit Balance Sheet Liability Account (I/C Control file)
If a receiving occurs when there is a negative LIFO/FIFO layer:
•
Debit item’s Inventory Account (Item file)
•
Debit (or credit) Cost Correction Account (I/C Control file)
•
Credit Balance Sheet Liability Account (I/C Control file)
For Standard Costing
•
Debit item’s Inventory Account (Item file)
•
Debit (or credit) Purchase Variance Account (I/C Control file)
•
Credit Balance Sheet Liability Account (I/C Control file)
•
See the Special Note on Cost Correction at Cost Correction Notes.
Kit Assembly
•
Debit item’s Inventory Account (Item file)
•
Credit Work in Process Account (entered for the work order)
If a kit assembly occurs when there is a negative LIFO/FIFO layer:
•
Debit item’s Inventory Account (Item file)
•
Debit (or credit) Cost Correction Account (I/C Control file)
•
Credit Work in Process Account
For Standard Costing
•
Debit item’s Inventory Account (Item file)
•
Debit (or credit) Purchase Variance Account (I/C Control file)
•
Credit Work in Process Account (entered for the work order)
•
See the note below titled Special Note on Cost Correction.
Credit Memos
•
Debit item’s Inventory Account (Item file)
•
Credit Memo Account (Item file) as the main account number, with the specified profit center
(if multiple profit centers are used)
543
Upward Job Usages
•
Debit item’s Inventory Account (Item file)
•
Credit Job Account (entered for the transaction)
If a job usage occurs when there is a negative quantity on hand:
•
Debit item’s Inventory Account (Item file)
•
Debit (or credit) Cost Correction Account (I/C Control file)
•
Credit Job Account (I/C Control file)
Upward Adjustments
•
Debit item’s Inventory Account (Item file)
•
Credit Adjustment Account (entered for the transaction)
Transfers
No distributions are created for transfers.
Downward Adjustments
•
Debit Adjustment Account (entered for the transaction)
•
Credit item’s Inventory Account (Item file)
Sales
•
Debit item’s Expense Account (Item file) as the main account number, with the specified
profit center (if multiple profit centers are used)
•
Credit item’s Inventory Account (Item file)
Component Usages
•
Debit Work in Process Account (this account number is entered when the work order is
entered)
•
Credit component-item’s Inventory Account (Item file)
Downward Job Usages
•
Debit Adjustment Account (entered for the transaction)
•
Credit item’s Inventory Account (Item file)
Transactions are posted in the same order and with the same amounts as appear on the
Inventory Transaction Register.
544
COST CORRECTION NOTES
When there is a negative quantity on hand and a receiving, kit assembly, credit memo, upward job
usage, or upward adjustment is posted, if the cost is greater than replacement cost (LIFO/FIFO),
then the cost correction account is debited for the difference between the two costs. If the cost is
less than replacement cost, then the cost correction account is credited.
For Standard Cost, the Purchase Variance account is debited or credited for differences
between the transaction cost and Standard Cost.
545
Standard Cost
Valuation
This appendix contains the following topics:
Introduction to Standard Cost Valuation
Receivings
Posting Sales
Credit Memos
Downward Adjustments
Upward Adjustments
Allocation Methods
546
INTRODUCTION
TO
STANDARD COST VALUATION
This appendix describes how to use the Standard Cost valuation option, one of the cost options
available in Inventory Control.
Standard Cost is designed to assist wholesalers and distributors in assigning profit
responsibility between the purchasing and sales departments.
It is desirable that an in-house Certified Management Accountant or Certified Public
Accountant be assigned the responsibility of monitoring and interpreting the information
produced by this Standard Cost system.
If your company does not have a qualified person to monitor a Standard Cost system, we
suggest that you select one of the other valuation options available (average, LIFO or FIFO).
These methods do not require the same level of monitoring or interpretation and they can
normally be handled by a general manager on a day-to-day basis and then adjusted by a
Certified Public Accountant at year end.
This Standard Cost module was designed to be a modified, not a traditional, Standard Cost
system for a manufacturing company. It isolates a material price variance at time of purchase,
but does not address material usage, labor cost, or overhead.
This chapter begins with a discussion of setting up the Inventory Control module for the
standard valuation method, followed by descriptions of transaction processing involving
receivings, sales, credit memos and adjustments.
Setting up Inventory Control
The following should help you and your accountant decide if the Standard Cost method is appropriate for your company, and it should also serve as a reference for processing Standard Cost transactions.
When the Standard Cost valuation method is selected in your I/C Control file, your inventory
can be valued at both standard and actual (average) cost.
This means that all your accounting transactions (booked to the G/L) are made using a
Standard Cost per unit; however, perpetual average cost is also calculated and recorded (but
not booked). This allows you to identify both the Standard Cost of your inventory (per your
G/L distribution), as well as the actual cost of your inventory (per the Valuation Report with the
A method selected).
You may set the I/C Control file so that receivings will update an item’s Standard Cost with it’s
replacement cost. The examples in this section are based on the I/C Control file set to not
update Standard Cost with Replacement Cost.
The following should assist you in understanding the processing logic used for Standard
Costing. Several transactions are illustrated and the set-up of selected master files is shown.
Set up or verify the information in these files:
547
1. Valid General Ledger Account file
These accounts below will be used throughout the illustrations for the Standard Cost method:
ACCOUNT
#
DESCRIPTION
1100-000
Accounts Receivable
1200-000
Merchandise Inventory
2000-000
Accounts Payable
4010-100
Sales - Tools
5070-000
Cost of Goods Sold
5080-000
Credit Memo
7000-000
Inventory Adjustments
7010-000
Purchase Variances
7020-000
Credit Memo/Adj Variance
2. I/C Control file
Use Control information to set up the I/C Control file as shown on the following four screens:
548
Note
The Standard Cost example explained here requires that the Control file
field #43 above is set to N. If you do choose the Update standard cost
with replacement cost, this discussion does not apply to your setup.
3. The Item file
If field # 22 in Items for item number 3 (Wrench) does not currently show a quantity on hand
of zero, you will need to either enter an adjustment transaction to leave a zero quantity balance
or initialize the Item file and re-enter the data for item number 3 using Items.
For our examples to make sense, the inventory account for this item should be 1200-000 and
the credit memo account should be 5080. Prior to entering the item data for item number 3, set
up the pricing code and commission code shown, if you have not already defined them.
Item #3 should be set up as follows:
549
On the status information screen, enter 2 for the location code, 20 for the maximum quantity,
and 10 for the reorder level. Enter zero amounts for all sold and used fields on the status
information screens.
550
Receivings
Now that your three master files have been verified as correct, some accounting transactions
can be illustrated.
A new date will be used for each transaction illustrated in this chapter. You will then be able to
sort printouts by the transaction dates.
Select Enter from Inventory from the I/C menu. Enter the following receiving:
Note that this purchase was made at an actual cost of $12.00 per unit and the standard unit cost
was $10.00.
You may print an Edit List to verify the transaction was properly entered.
After you have verified that the receiving was properly entered, select Post from the Inventory
menu to post the receiving to the inventory files.
When you post the transaction, a register is printed.
551
RECEIVINGS
Posting causes certain cost fields in the Item file and accounting activity in the I/C Distribution
to G/L file to be updated.
The Item file and Distribution file changes are illustrated below, along with T-Account representations of the posting activity. BB in the T-Accounts below is an abbreviation for
Beginning Balance.
The Item file is not a G/L account; however, it is updated during posting and provides you with
perpetual average cost information for a valuation report.
Old Qty.
Old Avg. Cost
New Qty.
New Avg. Cost
0
0
100
$12.00
Actual entries in the I/C Distribution to G/L file:
Debit Merchandise Inventory
$1000
Debit Purchase Variances
$200
Credit Accounts Payable
$1200
Receivings T-Account
1100-000
1200-000
2000-000
Accounts Receivable
Merchandise Inventory
Accounts Payable
BB
00
BB
0
0
$1000
$1200
7000-000
5070-000
4010-000
Inventory Adjustments
Cost of Goods Sold
Sales
BB
0
BB
0
0
7010-000
7020-000
5080-000
Purchase Variance
Cr Memo/Adj Variance
Credit Memo
552
BB
BB
BB
0
BB
0
0
BB
$200
General Ledger Distributions After Receivings
Example
Print the Distributions to G/L Report by selecting Distributions to G/L from the Reports menu.
Use First to Last for both the account number range and the date range.
Notice that merchandise inventory is distributed at Standard Cost, accounts payable is at actual
cost, and the purchase variance is the difference between actual cost and Standard Cost.
Valuation Reports After Receivings
Now print a valuation report using the Standard Cost option.
Example
Select Valuation report from the Reports menu.
Enter the following information:
Now print the Valuation Report again, answering Y to Include items with zero qty on hand ?
and using Actual cost.
Notice that the inventory value at Standard Cost is $1000 (the value in the Merchandise
Inventory account). The value at actual cost is $1200 (Merchandise Inventory Control
Purchase Variances).
Item File after Receivings
Now examine the Item file again and see what has happened.
Example
Select Items from the I/C menu
553
Type 3 to see the information for item number 3, as shown below:
Notice that the average cost field has been updated to reflect the receiving. Replacement cost
has also been adjusted to the last receiving.
Sales
To illustrate a sale, exit to the I/C menu, and select Inventory. Then select Enter. Enter the
following transaction:
Note that this sale was made at the Standard Cost of $10.00, not the actual cost of $12.00.
Field number 7 defaults to Standard Cost.
Run the edit list to verify the transaction was properly entered.
554
POSTING SALES
Select Post from the Inventory menu to post the sale to the Inventory files.
When you post the transaction, a register will be printed.
T-Account Postings of a Sale
Posting causes certain fields in the Item file and in the I/C Distribution to G/L file to be
updated. The Item file and Distribution file changes are illustrated below, along with T-account
representations of the posting activity.
Old Qty.
Old Avg.Cost
New Qty
New Avg. Cost
100
$12.00
90
$12.00
Actual entries in the I/C Distribution to G/L file:
Debit Cost of Goods Sold
Credit Merchandise
$100
Sales T-Account
1100-000
1200-000
2000-000
Accounts Receivable
Merchandise Inventory
Accounts Payable
BB
00
BB
0
0
$1000
$1200
BB
$100
7000-000
5070-000
4010-000
Inventory Adjustments
Cost of Goods Sold
Sales
BB
0
BB
0
0
$100
7010-000
7020-000
555
5080-000
BB
Purchase Variance
BB
0
Cr Memo/Adj Variance
BB
Credit Memo
0
0
BB
$200
Note that a sale does not change the actual average cost.
Also note that neither sales nor accounts receivable entries are generated by Inventory Control.
Such entries would be generated by Order Entry or Accounts Receivable. If you are not using
these modules, you must enter a sale transaction in Accounts Receivable. If you are not using
A/R, then you must make a journal entry in General Ledger.
Distributions to the General Ledger after a Sale
Print the Distributions to G/L Report by selecting Distributions to G/L from the Reports menu.
Use First to Last for both the account number range and the date range.
Valuation Reports after a Sale
Print two valuation reports, one using Standard Cost and the other actual cost.
Select Valuation report from the Reports menu, and print Valuation reports for item number 3,
one using Standard Cost and one using average cost.
Item File after a Sale
Examine the Item file again and see what has happened.
Select Items from the I/C menu and enter 3 to see the information for item number 3. After
viewing this screen, look at the Status screen.
Notice that the quantity on hand, Last sold on date, and PTD/YTD fields have been updated to
reflect the sale.
556
CREDIT MEMOS
To introduce you to credit memos under Standard Costing, select Inventory, then select Enter.
Enter the information shown on the following screen.
Be certain to enter the credit memo using the same price and cost (standard) at which the item
was originally sold. This allows the system to correctly update the Item file at average cost, and
the Distribution file using Standard Cost.
If you issue credit for damaged goods or goods that will not be returned to inventory, then you
should use the Accounts Receivable module or make a General Journal entry in the General
Ledger module to debit the Sales account and credit the Accounts Receivable account.
This will inflate your PTD/YTD figures, but your inventory quantities and your distributions
will be correct.
Example: Select Post from the Inventory menu to post the credit memo to the inventory files. A
register will be printed.
T-Account Postings of a Credit Memo
Posting causes certain fields in the Item file and in the I/C Distribution to G/L file to be
updated. The Item file and Distribution file changes are illustrated below, along with T-account
representations of the posting activity.
Old Qty.
Old Avg.Cost
New Qty
New Avg. Cost
90
$12.00
100
$11.80
Actual entries in the I/C Distribution to G/L file:
Debit Merchandise Inventory
$100
Credit Memo (actual)
557
Credit Memo T- Accounts
1100-000
1200-000
2000-000
Accounts Receivable
Merchandise Inventory
Accounts Payable
BB
00
BB
0
0
$1000
$1200
BB
$100
$100
7000-000
5070-000
4010-000
Inventory Adjustments
Cost of Goods Sold
Sales
BB
0
BB
0
0
BB
$100
BB
7010-000
7020-000
5080-000
Purchase Variance
Cr Memo/Adj Variance
Credit Memo
0
BB
0
0
$200
BB
$100
The item will be added back to inventory at actual cost. If there was a difference between
Standard Cost and actual cost when the unit was originally sold, then you should use an
adjustment transaction to account for this difference.
In order to illustrate this difference, it was assumed (incorrectly) that the Standard Cost of
$10.00/unit was the actual cost. This will be corrected in a downward adjustment.
Distributions to General Ledger after a Credit Memo
Print the Distributions to G/L Report by selecting Distributions to G/L from the Reports menu.
Use First to Last for both the account number range and the date range.
Valuation Report after a Credit Memo
Print a valuation report at the Standard Cost and then at actual cost.
558
Select Valuation report from the Reports menu, and print Valuation reports for item number 3,
one using Standard Cost and one using average cost.
The Item File after a Credit Memo
Now examine the Item file again.
After viewing this screen, look at the Status screen.
Note that the average cost, quantity on hand, and PTD/YTD figures have been updated, but not
the replacement cost.
559
DOWNWARD ADJUSTMENTS
This transaction illustrates the handling of a downward adjustment.
The purpose of this adjustment is to reverse the credit memo. Be certain to enter the $10.00
actual cost that was used in the earlier credit memo. This was used as the cost at the time of
sale, and is the Standard Cost as found in the Item file at the time of sale.
An adjustment transaction allows you to adjust your quantity on hand so that it reflects the
actual physical count in your inventory.
Posting after a Downward Adjustment
Example:Select Post from the Inventory menu to post the adjustment. A register will be
printed.
T-Account Postings of Downward Adjustments
Posting causes certain fields in the Item file and in the I/C Distribution to G/L file to be
updated. The Item file and Distribution file changes are illustrated below, along with T-account
representations of the posting activity.
Old Qty
Old Avg.Cost
New Qty
New Avg. Cost
100
$11.80
90
$12.00
Actual entries in the I/C Distribution to G/L file:
Debit Inventory Adjustments $100
Credit Merchandise Inventory $100
560
Downward Adjustment T-Account
1100-000
1200-000
2000-000
Accounts Receivable
Merchandise Inventory
Accounts Payable
BB
00
BB
0
0
$1000
$1200
BB
$100
$100
$100
7000-000
5070-000
4010-000
Inventory Adjustments
Cost of Goods Sold
Sales
BB
0
BB
$100
BB
0
0
$100
7010-000
7020-000
5080-000
Purchase Variance
Cr Memo/Adj Variance
Credit Memo
0
BB
BB
0
0
$200
BB
$100
Distributions to General Ledger after a Downward Adjustment
Print the Distributions to G/L Report by selecting Distributions to G/L from the Reports menu.
Use First to Last for both the account number range and the date range.
Valuation Reports after a Downward Adjustment
Now print valuation reports using Standard Cost and then actual cost.
Select Valuation report from the Reports menu, and print Valuation reports for item number 3,
one using Standard Cost and one using average cost.
Item File after a Downward Adjustment
Now examine the Item file again.
561
Note that the average cost has been updated due to this downward adjustment, reversing the
effect of the credit memo transaction on the Item file.
After viewing this screen, examine the Status screen.
On the status information screen, only the quantity on hand has changed.
562
UPWARD ADJUSTMENTS
The next transaction will illustrate the handling of an upward, or positive adjustment.
Adjustment transactions allow you to adjust your inventory to reflect the actual physical count
in your warehouse(s). Note that, in this example, average cost is used to make the adjustment.
Posting an Upward Adjustment
Select Post from the Inventory menu to post the above adjustment. A register will be printed.
Upward Adjustments T-Account Postings
Posting causes certain fields in the Item file and in the I/C Distribution to G/L file to be
updated. The Item file and Distribution file changes are illustrated below, along with T-account
representations of the posting activity.
Old Qty.
Old Avg.Cost
New Qty
New Avg. Cost
90
$12.00
95
$12.00
Actual entries in the I/C Distribution to G/L file:
Debit Merchandise Inventory $50
Credit Inventory Adjustments $50
T-Account Postings
1100-000
1200-000
2000-000
Accounts Receivable
Merchandise Inventory
Accounts Payable
BB
00
BB
0
0
563
BB
$100
$1000
$1200
$100
$100
$100
$50
7000-000
5070-000
4010-000
Inventory Adjustments
Cost of Goods Sold
Sales
BB
0
BB
$100
0
0
BB
$100
$60
BB
7010-000
7020-000
5080-000
Purchase Variance
Cr Memo/Adj Variance
Credit Memo
0
$200
BB
0
0
$10
$100
BB
Distributions to General Ledger after an Upward Adjustment
Print the Distributions to G/L Report by selecting Distributions to G/L from the Reports menu.
Use First to Last for both the account number range and the date range.
Valuation Reports after Upward Adjustments
Now print valuation reports using Standard Cost and then actual cost.
Example: Select Valuation report from the Reports menu, and print Valuation reports for item
number 3, one using Standard Cost and one using average cost.
Item File after Upward Adjustments
Examine the Item file again.
After viewing this screen, look at the Status screen.
Note only the quantity on hand has changed.
564
Disposition of Variances
At year end, your Merchandise Inventory and Cost of Goods Sold accounts will be at standard.
You may also have entries in your Credit Memo/Adjustment Variance and Purchase Variances
accounts. Generally accepted accounting principles require that you present reconciled figures
for inventory and cost of goods.
Allocation of Variances at Year End or Prior to Changing any Standard
Unit Cost
In order to reconcile these figures to actual cost, you must allocate the total variances
accumulated throughout the year in the Purchase Variances and Credit Memo/Adjustment
Variance accounts. The net variance should be posted (debited and credited) to the
Merchandise Inventory and Cost of Goods Sold accounts by means of a General Journal entry
(in the G/L module). No transaction entry is required in Inventory Control.
Procedures for Allocation of the Variances and Determining the
Adjustment Amounts
The net variance for the year can be determined by adding the balances in the Purchase
Variances and the Credit Memo/Adjustment Variance accounts. This net variance can then be
allocated in either of the two following methods, or another method more appropriate to your
needs.
565
ALLOCATION METHODS
You should consult an accountant to determine the appropriate method of allocation.
Method #1
1. Determine the total goods available for the period by adding ending inventory and the cost of goods
sold figures.
Ending inventory (std) + Cost of goods sold (std) = Total goods available (std)
2. Divide ending inventory by the total goods available for the period.
Ending inventory (std) / Total goods available (std) = Ratio
3. Multiply this ratio by the net variance. The resulting figure represents the portion of the net
variance that should be allocated to the ending inventory balance.
Ratio x Net variance = Ending inventory portion
(Amount needed to adjust inventory to actual cost)
4. The remaining amount represents the portion to be allocated to the cost of goods sold balance.
Net variance - Ending inventory portion = Cost of goods sold portion
(Amount needed to adjust COGS to actual cost)
5. The following entry would be made to allocate the variance, assuming the net variance was a
debit balance:
Debit Merchandise Inventory
Debit Cost of Goods Sold
Credit Purchase Variances
Credit Memo/Adjustment Variance
A second method is illustrated below:
Method #2
1. Print Valuation Reports at actual and at Standard Cost.
2. The difference between the two inventory figures (total at actual cost minus total at Standard
Cost) is the net variance that is needed to adjust inventory at standard to inventory at actual
(Ending inventory portion).
3. The Cost of goods sold portion is calculated by subtracting the Ending inventory portion from
the net variance amount.
4. The following entry would be made to allocate the variance, assuming the net variance was a
debit balance:
Debit Merchandise Inventory
Debit Cost of Goods Sold
566
Credit Purchase Variances
Credit Memo/Adjustment Variance
Note
Standard costs are not usually changed during the year. However, if your
circumstances dictate that a change is needed, and your accountant
agrees, changes are allowed in this system.
Prior to changing even one standard unit cost, though, it is necessary to allocate the net
variances that have been accumulated to date. All outstanding transactions should be posted,
and then the procedures outlined above for year-end allocation should be followed and the
appropriate journal entries made.
After the journal entries have been made, your General Ledger module will have inventory at
actual cost, and your Inventory Control module will have inventory at Standard Cost.
To state your General Ledger inventory at Standard Cost, you would make the following
entries:
Debit Purchase Variances
Debit Credit Memo/Adjustment Variance
Credit Merchandise Inventory
This will allow you to continue using Standard Cost on a daily basis. Notice that you do not
have to make any reversing journal entries for Cost of Goods Sold, because it is an expense
account.
567
Changing Valuation
Methods
This appendix contains the following topics:
Changing Valuation Methods
Restoring Lost or Corrupted Control Files
568
CHANGING VALUATION METHODS
During the normal course of business, you may decide to change your inventory valuation or warehousing method. In order to make such a change, the steps outlined below must be followed to
ensure data integrity.
When considering a change to your valuation or warehousing method, be sure to obtain your
accountant's advice before proceeding.
CHANGING VALUATION M ETHODS
STEP
DESCRIPTION
1
Back up all I/C data files. Also back up data files for
Accounts Receivable, Order Entry, Point of Sale and
Purchase Order, if you are using any of these modules.
This provides you a means of recovering your data
files, if needed, as they existed prior to making the
changes below.
2
All I/C processing currently underway must be completed before any change of inventory valuation or
warehousing methods is begun.
If you are using Purchase Order, post all purchase
requests before continuing. Refer to the Purchase
Order User Manual.
If you are using Order Entry, Accounts Receivable or
Point of Sale and are switching from multi-warehousing to single warehousing, close out all orders
with line items to be shipped from warehouses other
than the Central warehouse.
If it is not possible to print invoices and post all line
items for all orders from these warehouses, you will
have to delete these orders before continuing (they
can be reentered later after completing the instructions in this section).
You should also remove (by posting or deleting) any
order or invoice that refers to other than the Central
warehouse. Refer to the Order Entry, Point of Sale or
Accounts Receivable User Manuals for instructions
on how to print and post invoices and delete line
items or orders.
569
CHANGING VALUATION M ETHODS
STEP
DESCRIPTION
If you are using kits, complete and close all work
orders prior to changing your valuation method or
warehousing method.
Complete all inventory transaction processing.
If you have just posted from O/E, P/S or A/R, all
inventory transaction processing is already completed. If you have just posted from Purchasing, inventory transaction processing may not be completed. If
it is unclear whether transaction processing is incomplete, try to print an Inventory Transaction Edit List.
This is done by selecting Edit list from the Inventory
menu.
If you track serial numbers, you should also try to
print a transaction edit list for serial transactions by
selecting Edit list from the Serial numbers menu.
3
If any unposted transactions are present, run Post on
the Inventory menu and/or on the Serial numbers
menu. This completes any transaction processing that
may have been in progress.
4
This applies if you are switching from LIFO to FIFO
or if you are switching from FIFO to LIFO.
If you are using the General Ledger module, any outstanding I/C distributions must be interfaced to G/L
before continuing.
If it is unclear whether any distributions exist, try to
print an I/C Distribution to G/L Report by selecting
Distributions to G/L from the Reports menu. If any
distributions show on the report, run Get distributions
from the General Ledger menu. Refer to the General
Ledger User Manual.
Whether or not you are running General Ledger, print
and purge the Distributions to G/L report.
5
If you are currently using LIFO and are switching to
FIFO, or if you are currently using FIFO and are
switching to LIFO, print a Valuation Report. Print the
report for your entire range of items.
570
CHANGING VALUATION M ETHODS
STEP
DESCRIPTION
The layers shown on the report will be in the reverse
order of the order in which they need to appear after
you switch to LIFO from FIFO, and vice versa.
Later, you will have to re-enter receiving transactions
for all items/layers in order to get them into the
proper order for your new valuation method.
6
If you are switching from multi-warehousing to single-warehousing, you must delete all status records
from the Status file for warehouses other than the
Central warehouse. If balances remain at those warehouses, transfer them to the Central warehouse
before deleting the status records. Do not forget to
enter any serial numbers for serialized items, or lot
numbers for lot-controlled items, as you enter the
transfer transactions.
To delete the Status records, run Status from the I/C
menu. In order to recover disk space, after the deletion, you may run File recovery utilities.
From the File recovery utilities menu, select Export a
file and export the Status file. After the export is completed, select Restore a file from export and restore
the Status file using the C (Create new file) option.
7
Change the inventory valuation or warehousing
method specified in the I/C Control file. However,
the Control information selection prevents you from
changing these options. Also, if a change to LIFO or
FIFO costing is being done, the Layer file (which contains LIFO/FIFO layers) must be created.
In either case, the I/C Control file must be initialized
prior to doing so. Refer to the Initializing Data Files
appendix. Write down the current values in the I/C
Control file.
If you are switching to LIFO or FIFO, or switching
from LIFO/FIFO to Average or Standard costing, also
initialize the Layer file.
If you are switching from multi-warehousing to single-ware-housing, you should also initialize the Ware-
571
CHANGING VALUATION M ETHODS
STEP
DESCRIPTION
house file, because the data in this file will no longer
be needed.
8
After initializing the I/C Control file, re-enter its data
with the new options.
9
If you have switched from single to multi-warehousing, run Warehouses from the Master information
menu to define your warehouse(s). You may also run
the Status load selection from the I/C Utility menu.
This gives you an easy way to set up status records
for the appropriate items in your warehouse(s).
10
Run Recalculate inventory quantities from the File
recovery utilities menu. This selection sets the quantity fields in the Item file and Status file to the totals
for the Layer file, the Order Line Item file (if you are
using O/E, P/S or A/R).
11
If you have switched from Average or Standard costing to LIFO or FIFO, you should enter receiving transactions for all items to create layer history. Enter a
separate receiving transaction for each layer to be
created.
12
If you have switched from LIFO to FIFO (or vice
versa), you should enter receiving transactions for all
items/layers in order to reorder the layer history. Refer
to the Valuation Report printed in step 5.
If maintaining the specific detailed layers is not necessary, according to your accountant's advice, you can
take the layer totals as shown on the Valuation Report
and enter one receiving transaction for each item. After
posting these transactions, run the Distributions to G/L
selection and purge all G/L distributions. This prevents
double posting to G/L, because distributions for these
layers have already been interfaced to G/L in step 4
above.
572
RESTORING LOST
OR
CORRUPTED CONTROL FILES
In the event that the I/C Control file is accidentally deleted or is lost, it must be restored from a
backup or recreated before continuing with any other Inventory Control functions.
The preferred method is usually to restore the file from a backup. If that is not possible, then
you will need to recreate the I/C Control file.
To recreate the I/C Control file, follow these steps:
STEP
DESCRIPTION
1
Initialize the I/C Control file, skipping all other files.
Refer to the Initializing Data Files chapter in the PBS
Administration manual.
2
Select Control information from the Master information menu. Enter the desired options.
3
When recreating a lost I/C Control file, it is essential
to enter the inventory valuation and warehouse methods exactly as they were prior to losing the Control
file. To do otherwise would be the same as changing
valuation or warehouse methods, and the guidelines in
this appendix must be followed to ensure data integrity.
573
Index
1
1, price code type
66
2
2, price code type
68
3
3, price code type
69
4
4, price code type
5
72
6
6, price code type
7
76
8
8, price code type
inventory
31
accounts file, inventory
12
accounts lists, printing inventory
36
accounts payable, using
42
actual customer price lists, printing
411
adding new transactions
370
adjustment transactions, creating
386
downward
286
T–account postings of downward
560
upward
adjustments, entering
74
7, price code type
32
adjustments
71
5, price code type
entering inventory
77
A
286, 541
258
advice
introduction to purchasing
417
purchasing
416
selecting purchasing
418
after receivings
distributions to General Ledger
553
ABC analysis
452
item file
553
ABC analysis reports, selecting
453
valuation reports
553
account file
valid G/L
12
account, General Ledger
2
accounting, defined
2
accounts
changing inventory
after sales, T–account postings
555
allocation methods
566
alphanumeric
defined
fields for labels
150
1
5
224
alternate items
categories
entering
143
and sub–categories
91
analysis reports, selecting ABC
453
entering
91
analysis, abc
452
appearance, general
220
contract price by
187
ASCII sort sequence
520
sale price by
182
assembly entries, kit
271
category lists, printing
automatically-created transactions
263
center, cost
avail
category
change logs, printing item
quantity
248, 269
94
3
149
changing
wh-1, whs
269
an item’s track method
wh-2, whs
269
existing commission codes
whs
248
inventory accounts
150
item prices
178
average cost
114
86
and method
525
or deleting text
232
benefits of
531
prices for groups of items
191
defined
248
valuation methods
method
525
character
notes
260
checklist
average, weighted
8
B/S inventory account, default
45
B/S liability account
45
back order control, control information
42
195
for Inventory Control
26
117
2
26
close a period
chapter topics
505
selecting
508
closing completed work orders
C
calculation, price
3
checklists
B
basis, described
of daily operations
568-569
360
closing periods
codes file
introduction to
506
prerequisites for
506
code error conditions, price
61
code lists
comments, entering
79
printing status
101
88
code type
13
338
commission code
lists, printing
printing price
code lists, printing commission
I/C, described
88
commission codes
changing existing
86
chapter topics
80
entering
84
introduction to
81
1, price
66
2, price
68
commissions, introduction to
3, price
69
committing inventory
4, price
71
company file, described
5, price
72
comparison of cost methods
530
6, price
74
complete, marking work orders
358
7, price
76
completed work orders
8, price
77
codes
81
341
12
chapter topics
354
closing
360
changing existing commission
86
introduction to
355
commission
80
printing
359
entering commission
84
component usage
entering price
63
component usage transactions, entering 272
entering status
100
concepts, key words and
introduction to commission
81
conditions, price code error
introduction to price
59
considerations, value method
price
58
continued operations
status
100
3
physical count
286
2
61
531
391
continuing operations
uncounted items
cost method
364
contract price
lists, printing of
407
contract prices
average
525
standard
526
cost valuation
introduction to LIFO/FIFO
534
by category
187
introduction to standard
547
by item
185
LIFO/FIFO
533
entering
185
standard
546
purging of
198
cost, average
control information, selecting
conversion, temporary item
38
112
copying
and receivings
248
consideratons for
531
defined
525
537
kits
212
cost, LIFO
label layouts
239
costing inventory methods
correction notes
cost
introduction to
286, 545
costing, control information flag serial
524
40
corrupted control files, restoring lost or 573
costs and pricing, item entry
116
cost
costs, described
487
costs, LIFO/FIFO and standard
265
price and margin
5
replacement
248
serial
525
standard
526, 531
cost center
3
cost correction
notes
cost correction account
286, 545
46
count
expanded physical, and worksheets
381
expanded physical, chapter topics
362
introduction to physical
363
normal physical
381
count continued operations, physical
count transactions
creating physical
4
391
365
removing physical
372
count worksheets
D
daily operations
physical
423
checklist of
26
printing physical
381
guide to
25
counted quantities
data files
entering
368
defined
importing
375
Inventory Control
4
12
counts, performing expanded inventory 363
data import
274
coverage lists, printing
data import items
151
data organization
3
103
coverage types
defined
102
date fields, described
228
entering
102
date report, selecting the valuation by
443
creating
date, current period ending
47
adjustment transactions
386
label layouts
220
B/S inventory account
45
physical count transactions
365
credit memo account
45
credit memo account, default
45
expense account
44
540
default sales account
44
entering sales and
261
deleting
introduction to
557
items
112
T–account postings
557
prices
176
status records
156
text, changing or
232
work orders
337
credit memos
Credit menu/adj variance account with
Standard cost
47
current period ending date
47
customer price lists, printing actual
411
customer report, printing serial numbers 465
by
default
description
product
details, item entry item
5
9
121
distributions
control information
40
introduction to G/L
499
counted quantities
368
to G/L report
498
coverage types
102
to G/L, selecting
500
history transactions
295
285, 303, 543
inventory accounts
32
to General Ledger
to General Ledger after receivings
downward adjustments, posting
553
inventory transactions
243
286
item notes
140
downward adjustments, T–account post-560
ings of
downward job usages
286
during posting, hardware failure
288
E
earlier versions, upgrading from
8
edit list
errors
542
edit lists
printing inventory
282
printing serial number
301
work order
339
entering
adjustments
258
alternate items
143
categories
91
comments
338
commission codes
84
component usage transactions
272
contract prices
185
6
item sequence numbers
98
items
109
job usage transactions
273
kits
205
loan out and loan return
299
move in and move out
300
new import formats
277
new items
132
price codes
63
sale prices
180
sales and credit memos
261
serial number transactions
292
status
154
status codes
100
status load requests
168
status records
133
sub–categories
93
transfers
units
update transactions
268
96
298
vendor information
126
warehouses
54
method
527
file
warranty programs
104
company
12
work orders
333
I/C codes
13
I/C control
12
inventory accounts
12
inventory status
13
item
13
kit
13
expanded inventory counts, performing 363
label
13
expanded physical count
prices
13
entries
kit assembly
271
error conditions, price code
errors, edit list
61
542
existing commission codes, changing
86
chapter topics
362
serial
13
described
381
valid G/L account
12
warehouse
12
expense account, default
44
file recovery procedure
F
failure during posting, hardware
288
field notes, LIFO/FIFO
535
field, defined
4
fields
7
files
Inventory Control data
purging
restoring lost or corrupted control
12
4
573
alphanumeric
224
flooring reports
modifying
233
chapter topics
476
numeric
224
selecting
477
numeric, described
226
printing of label
234
FIFO
comparison of
532
described
527
7
formats
entering new import
277
saved import
375
function, defined
5
G
G/L account file, valid
12
selecting purge inventory
517
transactions, entering
295
G/L distributions, introduction to
499
view serial
320
G/L report, distributions to
498
viewing inventory
306
G/L usage notes
502
viewing work order
G/L, selecting distributions to
500
work order
general appearance of labels
220
general import information, entering
275
General Ledger
after receivings, distributions to
described
distributions to
553
326, 494
493
I
I/C
codes file, defined
13
control file
12
2
import formats
285, 303, 543
entering new
277
saved
375
general sorting sequence
521
getting started
import information, entering general
275
chapter topics
11
import, data
with Inventory Control
12
importing counted quantities
375
goods movement, physical
393
importing receivings and transfers
275
grids, printing location
218
inactive items, purging
groups of items, changing prices for
191
inactive items, selecting purge
guide to daily operations
25
help
149, 512
513
information
control
37
288
entering control
40
6
entering vendor
126
H
hardware failure during posting
151, 274
history
master
89
38
inventory, report
427
selecting control
of sold serialized items
290
update serialized item
reports, printing work order
496
8
information, introduction to Master
290
90
inserting label text
integrated, described
231
5
introduction to
closing periods
commission codes
Introduction to
price lists
395
inventory
506
committing
341
81
described
2
completed work orders
355
perpetual
2
costing inventory methods
524
G/L distributions
499
changing
inventory transactions
242
chapter topics
31
item labels
217
entering
32
items
108
file, defined
12
kits
201
lists, printing
36
LIFO/FIFO cost valuation
534
Master information
physical count
price codes
90
363
59
inventory accounts
150
Inventory Control
checklists for
26
data files used in
12
defined
2
pricing
174
getting started with
12
purchasing advice
417
set up steps
15
serial number reports
464
setting up
serial numbers
290
starting
standard cost valuation
547
understanding
status
153
using
status load
166
Inventory Control, starting
22
valuation reports
438
Inventory Control, using
19
view
305
inventory counts, performing expanded 363
work orders
331
inventory edit lists, printing
9
547
22
1
19
282
inventory history report
item entry costs and pricing
chapter topics
427
selecting
428
after receivings
inventory history, selecting purge
517
described
inventory history, viewing
306
inventory methods, introduction to cost- 524
ing
116
item file
item information, update serialized
553
13
290
item labels
chapter topics
216
introduction to
217
49
printing
149
13
selecting
217
inventory register format, control information
41
inventory reorder basis
inventory status file
item notes
inventory transactions
entering
140
chapter topics
241
entering
243
item price lists, printing
398
introduction to
242
item prices, changing
178
posting
284
item report, printing serial numbers by
468
459
item sequence
inventory turnover, selecting
invoices, orders and
60
introduction to
98
issued work orders, printing
348
number lists, printing
99
issuing work orders
345
numbers, entering
98
item’s track method, changing an
item
contract price by
185
114
items
changing prices for groups of
191
180
chapter topics
107
item change logs, printing
149
continuing operations, uncounted
364
item conversion, temporary
112
data import
151
item details, item entry
121
deleting
112
entering
109
defined
sale price by
2
10
entering alternate
143
file
13
entering new
132
items, resequencing
214
history of sold serialized
290
price reports, selecting
487
introduction to
108
price/cost report
486
loan out serialized
291
loan return of serialized
291
and work orders
lot
251
chapter topics
200
kits
6
lot-controlled
6
copying
212
miscellaneous
111
entering
205
move in serialized
291
introduction to
201
move out serialized
291
printing
210
numbers, printing
145
L
purging inactive
149, 512
label file
resequencing kit
214
defined
selecting purge inactive
513
serialized
viewing
label layouts
6, 251
copying
239
309
creating
220
testing
237
J
job usage transactions, entering
13
273
job usages
label text, inserting
231
labels
downward
286
general appearance of
220
upward
285
introduction to item
217
item
216
K
key words and concepts
2
printing item
149
keyword wearch method
48
selecting item
217
viewing
230
kit
assembly entries
271, 285
11
labels, print item
51
layers, LIFO
527
layout
list errors, edit
542
lists
lists, printing of
236
layouts
printing actual customer price
411
printing category
94
88
copying label
239
printing commission code
creating label
220
printing contract price
407
testing label
237
printing coverage
103
128
printing inventory accounts
lead time, purchasing advice
ledger account, general
2
ledger after receivings, distributions to
general
ledger, distributions to general
553
printing inventory edit
282
printing item price
398
printing item sequence number
285, 303,
543
36
printing layout
99
236
ledger, general
2
printing price code
79
levels, quantity
60
printing sale price
404
printing serial number edit
301
LIFO
considerations in using
531
printing status
161
cost
537
printing status code
101
defined
526
printing unit
97
layers in
527
printing warehouse
57
method for
526
printing warehouse price
401
units of
537
selecting price
395
work order edit
339
LIFO/FIFO
load
and standard costs
265
cost valuation
533
introduction to status
166
cost valuation, introduction to
534
selecting status
167
field notes
535
status
165
12
load requests
Master information
entering status
168
chapter topics
89
printing
171
introduction to
90
loading status records
172
loan out
memos
entering sales and credit
261
T–account postings credit
557
and loan return, entering
299
serialized items
291
memos, credit
474
method, entering the valuation
loan report, printing serial numbers on
loan return
266, 285, 540, 557
40
methods
entering loan out and
299
allocation
566
of serialized items
291
average cost
525
location grids, printing
218
changing an item’s track
114
logs, printing item change
149
changing valuation
Look-ups
7
568-569
comparison of
530
lost or corrupted control files, restoring 573
considerations, value
531
lot-controlled items
6
FIFO
527
lot items, changing
251
introduction to costing inventory
524
LIFO
526
Standard cost
526
lot numbers
report
480
selecting
481
miscellaneous items, described
111
viewing
315
modifying fields
233
521
move in
lowercase letters, sorting of
M
manual
how to use this
21
organization of this
20
marking work orders complete
358
13
and move out, entering
300
serialized items
291
move out
entering move in and
300
serialized items
291
movement, physical goods
393
multi–company
6
multi warehousing, control information
flag
41
multi warhouse pricing, control information flag
41
multiple sale prices
176
N
by item report, printing serial
468
by vendor report, printing serial
471
entering item sequence
98
introduction to serial
290
on loan report, printing serial
474
printing items
145
purging serial, chpater topics
509
new import formats, entering
277
purging serial, selecting
510
new items, entering
132
report, lot
480
new transactions, adding
370
selecting lot
481
normal physical count
381
serial
289
viewing lot
315
viewing serial
322
notes
cost correction
286, 545
entering item
140
numerals, sorting of
521
G/L usage
502
numeric fields, described
224
LIFO/FIFO field
535
technical
519
ODBC
301
operations
number edit lists, printing serial
O
10
number lists, printing item sequence
99
checklist, daily
26
number reports, introduction to serial
464
guide to daily
25
number reports, serial
463
physical count continued
391
uncounted items continuing
364
number transactions
entering serial
292
order control. conrol information back
posting serial
302
order edit list
work
numbers
by customer report, printing serial
465
339
order history
reports, printing work
14
42
496
viewing work
work
326, 494
493
orders
and invoices
P
password protection
payable, using accounts
60
7
42
performing expanded inventory counts 363
closing completed work
360
period ending date, current
complete, marking work
358
period, selecting close a
completed work
354
periodic/monthly
deleting work
337
periods
entering work
333
closing
505
introduction to completed work
355
introduction to closing
506
introduction to work
331
prerequisites for closing
506
issuing work
345
kits and work
6
perpetual inventory
47
508
28
2
physical count
printing completed work
359
continued operations
printing issued work
348
expanded
printing work
343
introduction to
363
quick work
350
normal
381
viewing work
328
transactions, creating
365
transactions, removing
372
20
worksheet
423
3
worksheets
423
work
organization of this manual
organization, data
203, 330
out
391
362, 381
worksheets, printing
381, 424
49
and loan return, entering loan
299
physical count method
entering move in and move
300
physical goods movement
393
serialized items, loan
291
points, price
194
serialized items, move
291
post
15
5
posting
item, contract
185
item, sale
180
component usage
286
credit memos
285
price calculation
downward adjustments
286
price code
downward job usages
286
error conditions
61
inventory transactions
284
lists, printing
79
type 1
66
285
type 2
68
receivings
285
type 3
69
results
302
type 4
71
286, 555
type 5
72
serial number transactions
302
type 6
74
transfers
286
type 7
76
upward adjustments
286
type 8
77
upward job usages
285
kit
assembly entries
sales
posting, hardware failure during
288
postings
after sales, T–account
555
credit memos, T–account
557
117
price codes
chapter topics
58
entering
63
introduction to
59
price lists
of downward adjustments, T–account 560
printing actual customer
411
T-account
printing contract
407
printing item
398
printing sale
404
printing warehouse
401
552
postings of stamdard cost receivings, T– 552
account
prerequisites for closing periods
506
price by
category, contract
187
category, sale
182
16
price lists, introduction to
395
price lists, selecting
395
price points
194
price reports, selecting kit
487
inventory edit lists
282
price/cost report, kit
486
issued work orders
348
item change logs
149
prices
changing item
178
item labels
149
chapter topics
173
item price lists
398
deleting
176
item sequence number lists
entering contract
185
items numbers
145
entering sale
180
kit
210
layout lists
236
file
13
99
for groups of items, changing
191
load requests
171
multiple sale
176
location grids
218
purging contract
198
physical count worksheets
purging sale
197
price code lists
79
warehouse-specific
179
sale price lists
404
pricing, introduction to
174
serial number edit lists
301
pricing, item entry costs and
116
serial numbers by customer report
465
serial numbers by item report
468
serial numbers by vendor report
471
serial numbers on loan report
474
status code lists
101
161
print item labels
printers, information about
51
7
printing
actual customer price lists
411
381, 424
category lists
94
status lists
commission code lists
88
unit lists
97
completed work orders
359
warehouse lists
57
contract price lists
407
warehouse price lists
401
coverage lists
103
warranty programs
106
fields
234
work order history reports
496
work orders
343
inventory accounts lists
36
17
procedure, file recovery
7
quantity levels
product description
9
quick work orders, entering
programs
60
350
R
entering warranty
104
printing warranty
106
distributions to General Ledger after
553
warranty
104
entering
247
item file after
553
protection, password
7
receivings
535
purchase order, print item labels
51
posting
285
purchase order, using
42
T–account postings of standard cost
552
purchase variance account
46
valuation reports after
553
purchasing advice
receivings and transfers import
275
chapter topics
416
introduction to
417
defined
selecting
418
deleting status
156
purge inactive items, selecting
513
entering status
133
purge inventory history, selecting
517
loading status
172
purging
records
recovery procedure, file
contract prices
198
files
4
inactive items
149, 512
sale prices
197
serial numbers
509-510
Q
quantities
4
7
removing physical count transactions
372
replacement cost
248
reports
after receivings, valuation
553
distributions to G/L
498
flooring
476
introduction to serial number
464
entering counted
368
inventory history
427
importing counted
375
kit price/cost
486
248
lot numbers
480
quantity avail
18
printing serial numbers by customer
465
printing serial numbers by item
468
printing serial numbers by vendor
471
printing serial numbers on loan
474
printing work order history
496
by category
182
selecting ABC analysis
453
by item
180
selecting flooring
477
entering
180
selecting inventory history
428
multiple
176
selecting kit price
487
purging
197
selecting stock status
433
sales
selecting usage
448
sales account, default
selecting where–used
491
sales and credit memos, entering
261
serial number
463
sales, inventory
261
stock status
432
sales, posting
555
usage
447
sales, T–account postings after
555
valuation
437
saved import formats
375
where–used
490
selecting
requests
S
sale price
lists, printing
404
sale prices
286
44
ABC analysis reports
453
508
entering status load
168
close a period
printing load
171
control information
38
214
distributions to G/L
500
restoring lost or corrupted control files 573
flooring reports
477
results, posting
302
inventory history report
428
return of serialized items, loan
291
inventory turnover
459
return, entering loan out and loan
299
item labels
217
kit price reports
487
lot numbers
481
resequencing kit items
19
purchasing advice
418
by item report, printing
468
purge inactive items
513
by vendor report, printing
471
purge inventory history
517
chapter topics
289
status load
167
introduction to
290
stock status reports
433
on loan report, printing
474
the valuation by date report
443
purging
509-510
usage reports
448
viewing
322
where–used reports
491
serialized item information, update
395
serialized items
selecting price lists
sequence
general sorting
changing
521
defined
290
251
6
item
98
history of sold
290
number lists, printing item
99
loan out
291
numbers, entering item
98
loan return of
291
sequences, sorting
520
move in
291
serial cost
525
move out
291
serial costing, control information flag
40
serial file
13
serial history, view
320
serial number
setting up Inventory Control
information about
steps for
sold serialized items, history of
edit lists, printing
301
reports
463
reports, introduction to
464
sorting sequences
transactions, entering
292
ASCII chart for
transactions, posting
302
serial numbers
by customer report, printing
20
15
290
sorting sequence
general described
special characters, sorting of
spool
465
547
521
520
521
7
standard cost
entering
133
172
comparison of
531
loading
described
526
status report
LIFO/FIFO and
265
selecting stock
433
method
526
stock
432
valuation
546
stock status report
valuation, introduction to
547
chapter topics
432
starting work order number
51
selecting
433
status
sub–categories
chapter topics
152
categories and
91
codes
100
entering
93
entering
154
introduction to
153
status codes
T
T–account
posting of upward adjustment
563
entering
100
postings after sales
555
introduction to
100
postings credit memos
557
list, printing
101
postings of downward adjustments
560
postings of standard cost receivings
552
status file
inventory
status lists, printing
13
tab 2, item entry
116
161
tab 3, item entry
121
tab, warehouse
130
status load
chapter topics
165
technical notes
519
introduction to
166
temporary item conversion
112
requests, entering
168
testing label layouts
237
selecting
167
text, changing or deleting
232
text, inserting label
231
track method, changing an item’s
114
status records
deleting
156
21
transactions
6, price code
74
adding new
370
7, price code
76
automatically-created
263
8, price code
77
creating adjustment
386
types, coverage
102
creating physical count
365
types, entering coverage
102
entering component usage
272
U
entering history
295
uncounted items continuing operations 364
entering inventory
243
unit lists, printing
97
entering job usage
273
units
96
entering serial number
292
units, entering
96
entering update
298
units, LIFO
introduction to inventory
242
update
inventory
241
serialized item information
290
posting inventory
284
transactions, entering
298
posting serial number
302
upgrading from earlier versions
removing physical count
372
uppercase letters, sorting of
transfers, entering
268
upward adjustment, T–account
transfers, importing receivings and
275
transfers, posting
286
turnover
selecting inventory
459
type
posting of
537
8
521
563
upward adjustments
and G/L distributions
286
described
541
upward job usages
285
502
1, price code
66
usage notes, G/L
2, price code
68
usage reports
3, price code
69
chapter topics
447
4, price code
71
selecting
448
5, price code
72
22
usage transactions
entering component
272
entering job
273
usage, component
286
usages
downward job
286
upward job
285
use kits
51
using Inventory Control
19
V
valid G/L account file
12
valuation
introduction to LIFO/FIFO cost
534
introduction to standard cost
547
LIFO/FIFO cost
533
standard cost
546
vendor information, entering
126
vendor report, printing serial numbers
by
471
versions, upgrading from earlier
view
304
view serial history
320
view warehouse tab
130
view, introduction to
305
viewing
inventory history
306
items
309
labels
230
lot numbers
315
serial numbers
322
work order history
valuation method, entering the
328
W
443
40
warehouse-specific prices
568-569
valuation reports
after receivings
553
chapter topics
437
introduction to
438
valuation reports, introduction to
438
value method considerations
531
23
179
warehouse file
described
valuation methods
changing
326, 494
work orders
valuation by date report
selecting the
8
warehouse lists, printing
12
57
warehouse price lists, printing
401
warehouse tab
130
warehouses
chapter topics
53
entering
54
warehousing, control information flag,
41
multi
warhouse pricing, control information
flag, multi
41
warranty programs
entering
104
introduction to
104
printing
106
weighted average
8
wh-1, whs avail
269
wh-2, whs avail
269
where–used report
490
where–used reports, selecting
491
whs avail
248
whs avail wh-1
269
whs avail wh-2
269
words and concepts, key
work in process account, default
work order edit lists, editing
337
described
203
entering
333
introduction to
331
introduction to completed
355
issuing
345
kits and
6
printing
343
printing completed
359
printing issued
348
quick
350
viewing
328
worksheets
physical count
52
339
chapter topics
493
reports, printing
496
326, 494
work orders
chapter topics
330
closing completed
360
complete, marking
358
completed
354
24
423
printing physical count
2
work order history
viewing
deleting
381, 424
X
XDBC
10