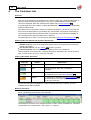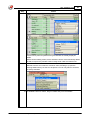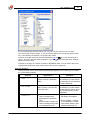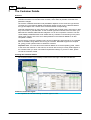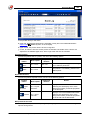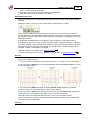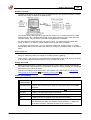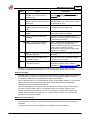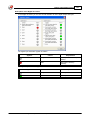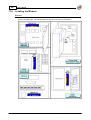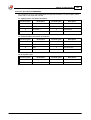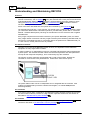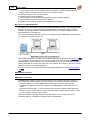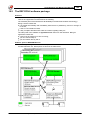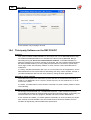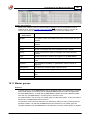
1
REFCON 6
Reefer Container Monitoring System
User's Guide
Transportation Solutions
User's Guide
© 2015 Emerson Climate Technologies - Transportation Solutions ApS
All rights reserved. No parts of this work may be reproduced in any form or by any means - graphic, electronic, or
mechanical, including photocopying, recording, taping, or information storage and retrieval systems - without the
written permission of the publisher.
Products that are referred to in this document may be either trademarks and/or registered trademarks of the
respective owners. The publisher and the author make no claim to these trademarks.
While every precaution has been taken in the preparation of this document, the publisher and the author assume no
responsibility for errors or omissions, or for damages resulting from the use of information contained in this
document or from the use of programs and source code that may accompany it. In no event shall the publisher and
the author be liable for any loss of profit or any other commercial damage caused or alleged to have been caused
directly or indirectly by this document.
Manual version:
6.8.1
Document Revision Record
Rev.
Date
Responsible
Description
6.0.0
2010-06-22
Hans Peter Lund
Original revision
6.2.0
2011-05-13
Hans Peter Lund
Major update
6.5.0
2012-08-22
Hans Peter Lund
Major update
6.6.0
2013-04-12
Hans Peter Lund
GMS interface, many minor issues
6.7.0
2013-10-15
Hans Peter Lund
Modem trouble shooting updated, minor changes
6.8.1
2015-04-07
Hans Peter Lund
Four pole monitoring added
PDF created: 07-04-2015 in Aarhus, Denmark by
Emerson Climate Technologies
Transportation Solutions
Axel Kiers Vej 5A
8270 Hoejbjerg
Denmark
Phone: +45 7023 4444
Fax: +45 7023 6044
E-mail: [email protected]
www.emersonclimate.com/Transportation_Solutions
www.ProActTransport.com
Contents
3
Table of Contents
Part I Introduction to REFCON 6
8
1 Contact
...................................................................................................................................
information
8
2 Purposes
...................................................................................................................................
and User Roles
9
3 REFCON
...................................................................................................................................
6 configurations
11
4 Using
...................................................................................................................................
the Online Help
13
Searching.........................................................................................................................................................
the Online Help
16
Part II The REFCON Monitor
20
1 The
...................................................................................................................................
REFCON Monitor base picture
21
2 The
...................................................................................................................................
Performance Bar
25
3 The
...................................................................................................................................
Mini-status window
28
4 Shortcut
...................................................................................................................................
menus
30
5 Container
...................................................................................................................................
Quick Search
32
6 The
...................................................................................................................................
REFCON Clock System
32
Clock Configuration
......................................................................................................................................................... 35
Clock Setting
......................................................................................................................................................... 36
7 Backup
...................................................................................................................................
function
39
8 Configuration
...................................................................................................................................
export(/import)
41
9 Selecting
...................................................................................................................................
drive and folder on Main PC
44
10 The
...................................................................................................................................
taskbar notify icon
48
Part III User Authentication
50
1 User
...................................................................................................................................
Authentication in daily use
50
2 User
...................................................................................................................................
Administration
53
3 User
...................................................................................................................................
Authentication Setup
56
Part IV The Container List
58
1 Using
...................................................................................................................................
the Container List
59
2 Container
...................................................................................................................................
List columns
61
3 Setting
...................................................................................................................................
up the Container List
63
4 Setting
...................................................................................................................................
up a Filter
66
5 How
...................................................................................................................................
to use the Filter Builder
69
Part V The Container Plan
78
1 Using
...................................................................................................................................
the Container Plan
80
2 Container
...................................................................................................................................
Plan Legends
80
3 Container
...................................................................................................................................
Plan Generator (terminal version)
80
© 2015 Emerson Climate Technologies - Transportation Solutions ApS
4
User's Guide
4 Container
...................................................................................................................................
Plan Generator (ship version)
82
5 Editing
...................................................................................................................................
the Container Plan (ships only)
84
88
Part VI The Alarm System
1 Alarm
...................................................................................................................................
Summary
89
2 Alarm
...................................................................................................................................
propagation
92
3 Special
...................................................................................................................................
reefers
94
4 Container
...................................................................................................................................
handling mode (ships only)
94
5 Temperature
...................................................................................................................................
setpoint supervision
95
6 Possible
...................................................................................................................................
loss of power alarm
95
7 Alarms
...................................................................................................................................
for missing or wrong ID
97
8 User
...................................................................................................................................
generated alarms
98
9 Alarm
...................................................................................................................................
Options setup
100
Part VII The Container Details
104
1 Container
...................................................................................................................................
Details common
105
2 The
...................................................................................................................................
Container Item
108
3 Remote
...................................................................................................................................
operations
109
4 Change
...................................................................................................................................
Container ID operation
113
5 Measurement
...................................................................................................................................
resolution
114
6 Sub-page
...................................................................................................................................
Summary
114
7 Sub-page
...................................................................................................................................
Alarms
116
8 Sub-page
...................................................................................................................................
Operations (optional)
116
9 Sub-page
...................................................................................................................................
Data
117
10 Sub-page
...................................................................................................................................
Events
118
11 Sub-page
...................................................................................................................................
Communication
119
122
Part VIII Print and Export
1 The
...................................................................................................................................
Preview
122
2 Automatic
...................................................................................................................................
Print/Export
124
Part IX Historic data logging
130
1 Periodic
...................................................................................................................................
logging
131
2 Using
...................................................................................................................................
the Container History menu
132
3 Container
...................................................................................................................................
Trend
134
4 Historic
...................................................................................................................................
Log
136
5 Event
...................................................................................................................................
logging
138
6 Event
...................................................................................................................................
Log
138
Part X Data Transfer for Global Monitoring
144
1 GMS
...................................................................................................................................
Setup
145
© 2015 Emerson Climate Technologies - Transportation Solutions ApS
Contents
5
2 Transferring
...................................................................................................................................
data automatically using your own tool
147
3 Transferring
...................................................................................................................................
data manually
148
4 Trouble
...................................................................................................................................
shooting the GMS connection
150
Part XI Planning data import
152
1 The
...................................................................................................................................
Planning data element in the Side panel
154
2 Planning
...................................................................................................................................
data file transfer settings
156
3 File
...................................................................................................................................
reading rules
158
4 Manual
...................................................................................................................................
Planning data file transfer
160
5 Planning
...................................................................................................................................
data file transfer information
161
6 CSV
...................................................................................................................................
format editor
165
Part XII The Planning System Communication Interface
170
1 Planning
...................................................................................................................................
System Interface Setup
172
2 Trouble-shooting
...................................................................................................................................
the interface
174
3 Planning
...................................................................................................................................
System Interface Live Monitor
177
Part XIII REFCON Data Collector
180
1 Operating
...................................................................................................................................
RDC from REFCON
182
RDC Preparation
.........................................................................................................................................................
Selection
187
How the Default
.........................................................................................................................................................
Walk Route is organised
189
Creating .........................................................................................................................................................
a custom w alk route
192
Part XIV Four pole monitoring
196
1 Four
...................................................................................................................................
pole related maintenance
198
Part XV The Email Notification function
204
1 Email
...................................................................................................................................
Notification Setup
205
Part XVI Digital input/output signals
210
1 The
...................................................................................................................................
Digital IO viewer
210
Part XVII Modem Troubleshooting
214
1 Checking
...................................................................................................................................
the Containers
216
2 Checking
...................................................................................................................................
modem-related alarms
219
Sym ptom.........................................................................................................................................................
: No Location - Wrong or No ID in Controller ("Ghost")
219
Finding a..................................................................................................................................................
Ghost Container
221
Change of
..................................................................................................................................................
Container ID
222
Sym ptom.........................................................................................................................................................
: No Data from Container
223
Sym ptom.........................................................................................................................................................
: Stopped Com m unicating
224
3 Checking
...................................................................................................................................
the Modem Remedy List
225
Sym ptom.........................................................................................................................................................
: Never Com m unicated
227
4 Checking
...................................................................................................................................
the Power Cabling
228
5 Typical
...................................................................................................................................
Errors
229
© 2015 Emerson Climate Technologies - Transportation Solutions ApS
6
User's Guide
6 Locating
...................................................................................................................................
the Modem
230
7 RMM
...................................................................................................................................
Modem Facts
231
Part XVIII Understanding and Maintaining REFCON
236
1 The
...................................................................................................................................
REFCON system hardware
237
2 The
...................................................................................................................................
REFCON 6 software package
239
3 The
...................................................................................................................................
REFCON Data Service and plug-ins
240
4 Third-party
...................................................................................................................................
Software on the REFCON PC
244
5 The
...................................................................................................................................
External interfaces
245
6 Understanding
...................................................................................................................................
installation and update
245
7 Updating
...................................................................................................................................
a plug-in
248
8 REFCON
...................................................................................................................................
Setup
251
9 System
...................................................................................................................................
Devices List
254
10 PCT
...................................................................................................................................
Communication Statistics List
256
11 Master
...................................................................................................................................
groups
257
Part XIX The REFCON Manager
260
1 Supervision
................................................................................................................................... 263
2 Administration
................................................................................................................................... 264
3 Remote
...................................................................................................................................
Monitor Configuration
266
4 Updates
................................................................................................................................... 267
Index
275
© 2015 Emerson Climate Technologies - Transportation Solutions ApS
REFCON 6
Reefer Container Monitoring System
Introduction to REFCON 6
Transportation Solutions
8
1
User's Guide
Introduction to REFCON 6
Welcome to REFCON 6
The REFCON system enables an operator to automatically monitor and control thousands of
reefer containers through a single computer system and provides following functions:
Monitors alarm and temperature conditions, and notifies the user of any alarms generated by
the container controller.
Registers the history of each container, recording all important parameters and storing the
data in accurate, detailed log files.
Interfaces with the vessel's load calculator or the terminal's administrative system for
automatically transferring reefer container data and locations.
Optionally send commands, such as “defrost” and “change of set point”, to the containers
directly from REFCON.
This makes REFCON the ideal solution for any terminal and any container vessel - large or
small.
REFCON 6 is the new generation of the well-known REFCON PC application. Where the
previous generation was in some senses inflexible, REFCON 6 introduces built-in configuration
options in many ways, which should make the application able to meet the requirements of a
wide range of users. You can read more about this in REFCON 6 configurations 11 .
Welcome to the User's Guide
Welcome to the REFCON 6 User's Guide.
The Guide is available in three versions:
An online help, which can be opened by selecting "Help" from REFCON's Help menu, or by
selecting the F1 keyboard button. The latter will in many cases open the online help directly
on the page most relevant in the context. Note that the online help - to some degree - is
adapted to the actual purchase time configuration.
A print-friendly PDF-file comprising the entire online help, also available online from
REFCON's menu. Note that the PDF version is not adapted to the actual configuration and
thus may describe functions that are not enabled in your specific REFCON system.
A printed manual, which can be purchased from your REFCON supplier.
1.1
Contact information
About us
The REFCON application was developed and delivered by:
Emerson Climate Technologies
Transportation Solutions
Axel Kiers Vej 5A,
8270 Hoejbjerg
Denmark.
Phone: +45 70 23 44 44
Fax: +45 70 23 60 44
E-mail: [email protected]
www.emersonclimate.com/Transportation_Solutions
www.ProActTransport.com
© 2015 Emerson Climate Technologies - Transportation Solutions ApS
Introduction to REFCON 6
1.2
9
Purposes and User Roles
Overview
Let us discuss the purposes of REFCON and your possible roles when using it.
Of course we, as manufacturers, can not know the specific purposes that a specific customer
has in mind when deciding to install a REFCON system. Neither can we know your specific role
when using it. But REFCON was designed to comply with the set of known common purposes
and the set of common roles described below. The different functions in REFCON often aim at a
certain purpose or a certain role, so understanding the purposes and roles would explain why
the functions are included - and when you understand your role in this context you would easier
find the right function to use.
Purpose 1 of REFCON: the local cargo supervision system
The original main purpose of REFCON is to make you, the local user, able to treat the cargo in
the containers as required while the containers are your responsibility. Complying with this
purpose means making sure that:
all reefer containers are connected to power
all reefer containers are continuously supervised
all reefer containers have correct setpoints
any alarm from the containers is dealt with
any problem is dealt with as soon as possible.
Purpose 2 of REFCON: the local claim treatment system
Should a claim occur relating to a container that, while loaded with the specific cargo in
question, for some time was connected to your REFCON, the archived log files are supposed to
help you proving or rejecting the claim.
Purpose 3 of REFCON: data provider
The last significant purpose of REFCON is to be a data link between all the connected reefer
containers and external systems. Examples of external systems are the Global Monitoring
Server and the Planning System.
Summary of user roles
Whether one user takes more roles, or there are more users with separate roles, it is relevant to
think about the following principle roles for users of REFCON:
© 2015 Emerson Climate Technologies - Transportation Solutions ApS
10
User's Guide
As can be seen there are two main roles, corresponding to the purposes 1 and 2 of REFCON.
The roles in the second row are service roles necessary to fulfill the purposes and the main
roles.
Cargo supervisor role
A user taking the Cargo supervisor role is responsible for the points listed under Purpose 1 9
above. This user would take advantage of a wide range of functionality in REFCON, including the
REFCON Monitor 20 and the Alarm System 88 .
Claim handler role
A user taking the Claim handler role has the responsibilities mentioned under Purpose 2 9
above. This user would specifically take advantage of the Historic data logging 130 functionality.
Container repairer role
A user taking the Container repairer role is supposed to take action when a container has
mechanical or electrical defect.
Typically the action is initiated by an alarm (see the Alarm System 88 ). The alarm text
should give an idea of what is wrong. In most cases you will have to check the container
manufacturer's manual for instructions.
If REFCON has no connection to a container, the Container repairer should, in co-operation
with the REFCON maintainer, get the communication to work as described in the Modem
Troubleshooting Guide 214 . You can maximize the value of REFCON by taking this job very
seriously.
REFCON maintainer role
A user taking the REFCON maintainer role is responsible for keeping the REFCON system
running and working optimally.
This user would need a deep knowledge and understanding of the REFCON system hardware
being described in Understanding and Maintaining REFCON 236 , where you can also find
descriptions of the available tools in the REFCON Monitor.
The REFCON maintainer works closely together with the IT maintainer:
© 2015 Emerson Climate Technologies - Transportation Solutions ApS
Introduction to REFCON 6
11
The IT maintainer role
In the very most cases, REFCON is connected to a LAN network used for interfacing internally
and/or externally.
A user taking the IT maintainer role is responsible for keeping the LAN and the required external
systems running and working optimally. For example, in many cases an external mail system
is required to transfer data from REFCON to external receivers.
This user would need a thorough understanding of the interfaces relevant to the specific
REFCON system. The possible interfaces are sketched in Understanding and Maintaining
REFCON 236 , while detailed descriptions are found in GMS log interface 144 , Planning data
import 152 , Planning system communication interface 170 and Email notification 204 .
The Data responsible role
A user taking the role as Data responsible must ensure that log data are backed up and
secured for possible future claim handling purposes. We recommend using the Backup function
39 for this.
1.3
REFCON 6 configurations
Overview
REFCON 6 is a highly flexible application providing a wide range of functionality. Most users do
not need all this functionality. Therefore, REFCON 6 can be configured. Two major levels of
configuration exist:
Purchase time configuration
Your REFCON system was delivered with a license file that decides the purchase time
configuration.
The file is named License.xml. You can open it and read it, but you are in no way able to
change it, as it is digitally signed. Contact us (see Contact information 8 ) if you need a
change.
To see exactly what is in your license, see Viewing the Purchase time configuration
13
below.
The following list shows some of the decisions made in the license file - note that the list should
not be considered complete:
Option / information
Type
Description
Terminal or Ship
Flag
Some details in REFCON work different depending
on whether your system is in a terminal or on a ship.
In the most cases it is smaller differences.
Installation Name
String
The installation name is and must be unique, that is,
no other REFCON system in the world is allowed to
have the same name. The name is shown in the
caption line of the REFCON Monitor. Further it is
used to identify the system when transmitting or
exporting data to external receivers.
IMO number
String
Ships only: The ship's unique IMO number.
Container Plan enabled or
not
Option
This option decides whether the graphical container
overviews are included in your system or not.
RDC or not
Option
This option decides whether you can use the
handheld REFCON Data Collector with your
REFCON system or not. The RDC is powerful to
© 2015 Emerson Climate Technologies - Transportation Solutions ApS
12
User's Guide
Option / information
Type
Description
collect data from containers that can for some reason
not communicate over the power lines.
Remote container
operations enabled or not
Option
This option decides whether you can send
commands to container controllers from REFCON,
such as changing temperature setpoint or starting
defrost.
Email notification enabled
or not
Option
This option decides if you can have emails
transmitted in case of alarms.
Digital input/output alarm
extension enabled or not
Option
If a supported digital input/output card is found in the
Main PC AND this option is enabled, alarms are
extended through the digital outputs.
Automatic 2-way Planning Option
System Interface enabled
or not
This option decides whether REFCON can
communicate bi-directionally online via LAN with the
Planning System.
Maximum number of
REFCON Monitors
Number
This value decides the maximum number of
concurrently running REFCON Monitors.
Maximum number of
simultaneously
communicating reefer
containers
Number
This value decides the maximum number of
concurrently communicating reefer containers that
REFCON supports. Should more containers be
connected, you will be significantly warned, but the
containers still are alarm supervised.
License expiration date
Date
If this date is defined in your license file, your
REFCON system will not be able to start when the
date has passed. You should in good time purchase
another license.
Update expiration date
Date
Your REFCON software can be upgraded free of
charge until this date has passed.
Expected number of RMM
Masters
Number
Your REFCON system is purchased with a certain
number of RMM Masters. REFCON automatically
detects the actually connected RMM Masters, and
should an extra be connected, this is detected and
worked with, too. This number in the license is used
to make sure that possible defective RMM Masters,
being no longer detected by REFCON, are handled
and repaired, rather than ignored.
Expected number of
RS2LAN units
Number
Your REFCON system is purchased with a certain
number of RS2LAN units, maybe zero. REFCON
automatically detects the actually connected
RS2LAN units, and should an extra be connected,
this is detected and worked with, too. This number in
the license is used to make sure that possible
defective RS2LAN units, being no longer detected by
REFCON, are handled and repaired, rather than
ignored.
It is possible to run REFCON 6 without a license file. In such case it runs in Demo mode, where
it does not communicate with any real containers and can therefore not be used as a monitoring
system.
© 2015 Emerson Climate Technologies - Transportation Solutions ApS
Introduction to REFCON 6
13
Runtime configuration
From the REFCON Monitor it is possible to make quite a number of decisions regarding the
way REFCON works. This is primarily done through the REFCON Setup 251 dialog box
described elsewhere in this manual.
Viewing the Purchase time configuration
Select "View License Settings" from the "Help" menu to view the contents of your license file:
Note that the Installation Name (and corresponding textual information) is not included in the
viewer, as this is shown in the caption of the REFCON Monitor.
1.4
Using the Online Help
Overview
In the Help menu, select the "Help" option to have the online help displayed. The Help window
appears:
© 2015 Emerson Climate Technologies - Transportation Solutions ApS
14
User's Guide
The Help window consists of three main parts:
The command buttons 15 at the top.
The Navigation Pane 14 to the left.
The Information Pane 15 to the right.
The Navigation Pane
You have four possible entrances to the help information:
Click the Contents tab 14 to scroll through a table of contents for Help.
Click the Index tab 14 to have all keywords listed in alphabetical order.
Click the Search tab 16 to be allowed to enter any free text search string.
Click the Favorites tab 15 to be allowed to use and build your own list of important topics.
Using the Help Contents Tab
In the Help window, selecting the Contents tab displays the table of contents for the Help
system.
As you see, the Help is organised in modules. In the example above, there are 6 modules, of
which "The REFCON Monitor" is open. Within each module, you will find a number of subtopics, in some cases organised in more levels.
Clicking a + sign makes sub-topics shown. Clicking a – sign makes sub-topics hidden.
To display any topic, just click it. This also is true for the module titles.
Using the Help Index Tab
In the Help window, selecting the Index tab lists all keywords in alphabetical order.
© 2015 Emerson Climate Technologies - Transportation Solutions ApS
Introduction to REFCON 6
15
In the textbox, type in the first characters in the keyword you're looking for. The list scrolls
automatically as you type, if the string is found.
Double-click the desired topic, or single-click and select the Display button.
Using the Help Favorites Tab
In the Help window, selecting the Favorites tab will allow you to use and build a list of
important topics. Note that you share the list with the other users of the PC.
To add a topic, you must first open it from one of the other tabs.
The Information Pane
In the larger right side of the Help window, the selected topic is shown. You will find the
following ingredients:
The Title of the topic. You will recognize it from the Navigation Pane.
The Link box, with the list of subject labels to the left, and a list of related topics to the right.
The body of the topic, with text and graphics.
The Topic navigation buttons at the bottom, see The Buttons 15 .
The Buttons
At the top of the Help window, and at the bottom of the Information Pane, the following buttons
are available:
Buttons
Explanation
The Hide button removes the Navigation Pane, making the Help
window smaller while the topic information is still visible. Click Show
to bring it back.
The Back and Forward buttons operate on your actual chain of visited
topic pages. Each time you open a new topic page, it is inserted in
the chain after the actually displayed page. The Back button jumps to
the page earlier in the chain. Having used the Back button, you can
use Forward to return to a page later in the chain.
Jumps to the very first topic in the very first Help module
("Introduction to REFCON 6").
© 2015 Emerson Climate Technologies - Transportation Solutions ApS
16
User's Guide
Buttons
Explanation
Prints the current topic or a number of topics on the printer you
select. To have a collection of topics printed, proceed as follows:
1. Click the Contents tab in the Navigation pane.
2. Select the heading of a topic with sub-topics.
3. Click the Print button and select "Print the selected heading and
all subtopics".
Jumps to the previous / next topic in the current Help module
according to the Contents table. If you are already on the first / last
topic, the respective button is not shown. Please do not confuse with
the Back and Forward buttons upperleft in the Help window.
Jumps to the first topic in the current Help module according to the
Contents table. Please do not confuse with the Home button at the
top of the Help window.
1.4.1
Searching the Online Help
Overview
You can find the information you are looking for in a number of ways:
Within REFCON, press the F1 key or select the Help button where available. This typically
jumps to the help page most relevant to the context in REFCON.
Use the Contents or the Index tab, see Using the Online Help 13 .
Use the Search function described below.
Using the Help Search Tab
In the Help window, selecting the Search tab will allow you to enter any free text search string.
Proceed as follows:
© 2015 Emerson Climate Technologies - Transportation Solutions ApS
Introduction to REFCON 6
Step
17
Action
1
Enter a search criterion (see details below).
2
Maybe change the settings of the three checkboxes at the bottom.
3
Select "List Topics" to do the search – it might take a while.
4
If no hits are found, a dialog box informs about this, and you may try again.
5
If hits are found, a prioritised list appears in the listbox.
6
Double-click a topic to have it shown in the Information pane.
7
Note that your search criterion word(s) are highlighted.
Search Criteria Syntax
If you, as in the above example, type in more than one word, topics will be listed that contain all
the words, but they don't have to be in succession. Using the AND operator will have the same
function. For example, the criterion iso container and the criterion iso and container will both
find all topics where both the word iso and the word container are found.
Use quotation-marks (") to search for all the words in sequence. For example, the criterion "iso
container" will only find topics where the two words are found in succession.
Use the OR operator to search for any of the words, that is, topics are listed that contain either
the one or the other search word (or more). For example, the criterion iso or container will find
all topics where either the word iso or the word container are found.
Also you can use wildcard characters:
Use the asterisk (*) to replace any sequence of characters. For example, wh* will find why,
who and when.
Use the question-mark (?) to replace one character. For example, wh? will find why and who,
but not when.
Note that you can't combine the wildcard characters and the quotation-marks.
The List of Topics
In the list of found topics, the first column shows the topic headings. The second column shows
the titles of the Help modules to which the information topics relate.
© 2015 Emerson Climate Technologies - Transportation Solutions ApS
REFCON 6
Reefer Container Monitoring System
The REFCON Monitor
Transportation Solutions
20
2
User's Guide
The REFCON Monitor
Overview
As a REFCON user, you mainly work with the containers through the REFCON Monitor. You
work through various pictures and dialog boxes that are described in specific parts of the
manual.
Certain common principles lie behind all the pictures and the way you operate the system. First
of all you will recognize principles origin from Microsoft Windows, that is, things basically work
like in most Windows applications.
But on top of this we have defined our own user interface basics, regarding how the screen
pictures are organised, and how you operate.
Starting the REFCON Monitor
As standard you start the REFCON Monitor by selecting it in Windows' Start menu:
or by selecting the desktop icon, if installed:
If neither of the above are found, you will have to run through the following first-start procedure. If
certain 3rd-party software (Microsoft, Adobe) needs to be installed, you must have administrator
rights on the PC.
Step
Action
Comment
0 If this is not the REFCON Main PC,
make sure your PC is connected by
LAN (ethernet) to the Main PC.
Read more about Main PC and
Secondary PC in The REFCON system
hardware 237 .
1 Obtain the REFCON Monitor link from
the REFCON Manager on the Main
PC.
See Remote Monitor Configuration
2 Run the REFCON Monitor link in
Internet Explorer.
You will see a "web" page as shown after
this table.
3 Click "Install".
An anonymous file named "setup.exe" is
to be downloaded.
4 Select "Run" to run "setup.exe".
You may get a warning for "Unknown
Publisher". Click "Run" to proceed.
5 Be patient while your PC is checked
for software.
You may be asked whether to install
REFCON Monitor from "Unknown
publisher". Click "Install" to proceed.
6 After a little time you are asked for a
PC description. Please enter a
significant, unique description of the
specific PC.
See dialog box example after this table.
The description you enter is in particular
important if you have several REFCON
Monitors running. See also the System
Devices list 254 .
266
.
© 2015 Emerson Climate Technologies - Transportation Solutions ApS
The REFCON Monitor
The REFCON Monitor installation "web" page looks like this:
The PC Description entry dialog box looks like this:
2.1
The REFCON Monitor base picture
Overview
When the REFCON Monitor is opened, the base picture is shown:
© 2015 Emerson Climate Technologies - Transportation Solutions ApS
21
22
User's Guide
The various parts of the base picture are described in the following.
The Caption bar
The Caption bar identifies the application and includes the three standard buttons:
Button
Explanation
Minimises (= hides) the REFCON Monitor. To re-open it, click the
REFCON Monitor item in Windows' taskbar (normally bottommost on the
screen).
The first button maximises the REFCON Monitor, making it occupy the
entire screen. When so, you can use the second button to restore the
REFCON Monitor to only occupy a part of the screen, thus making it
possible to work in more applications at the same time.
Closes the REFCON Monitor. You are asked for confirmation.
Note that unless it is maximised you can:
resize the REFCON Monitor window by dragging any of it's edges or corners;
move the REFCON Monitor by dragging the Caption bar.
The Menu bar
The actual menu will depend on the context. Feel comfortable to investigate the menu by
clicking around!
The Top panel
At the top of the REFCON Monitor, below the Menu, the Top panel is utilising the Container
Quick Search 32 function, the current user 50 (if User Authentication 50 is enabled), the
handling mode 94 (ships only), the current time, and the product logo. In rare, special cases,
more information may occur.
Click the current time field to
decide whether to display the LMT time or the UTC time (when the REFCON Monitor starts, it
always shows LMT);
set the clock 36 .
See The REFCON Clock System
32
for further information.
© 2015 Emerson Climate Technologies - Transportation Solutions ApS
The REFCON Monitor
23
The Side panel
The Side panel, being the wide dark blue ribbon to the left, includes overall information and
commands for your daily use. From top to bottom the included items are:
The Performance Bar 25 .
The System alarms indicator, which is visible only if there is any system alarm.
The optional Container Plan 78 entry.
The Container Lists, being described in Container List 58 .
The Events 138 entry.
The Planning System data import element, being related to Planning data import 152 and to
the optional Planning System Communication Interface 170 .
The optional RDC element.
The PCT indicator. Normally it shows the ID of the container that right now communicates on
the PCT (Power Cable Transmission) system. As this changes frequently, the indicator will
normally change rapidly though irregularly, and therefore, if it does not change for some time,
it might indicate that something is wrong. However, while a container remote operation 109 is
taking place, the indicator shows the status of this in stead.
Statistics in the Side panel
Most list items do normally have a counter shown in parentheses:
In general the counter is the number of alarms or containers in that specific list.
The "All Containers" counter illustrated above shows the total number of containers currently
registered in REFCON's database:
All that was included in the latest data transfer from the Planning System, of which some
might not yet have started communicating.
All that are currently communicating.
All that have stopped communicating but have not yet been deleted from the database.
By adding your own container lists
63
you can create statistics as you need.
The Picture area
The larger centre-right area of the REFCON Monitor is where the pictures appear that you select
in the Side panel or the menu.
It is possible to have one or two pictures open at a time. If two are open, selecting the small
Close button (X) upper right in a picture will close this, making the other picture resize to the
whole picture area. In contrary, if only one picture is open, the Close button does not work, as
you can not close the last picture. If you want to do so, open another in stead from the Side
panel or the menu.
As the starting point, only one picture is open. When simply clicking another picture item in
the Side panel or the menu, this replaces the existing picture.
When you want two pictures to be open, proceed as follows:
Step
Action
Result
1 Move the mouse over the
You will see that a symbol appears next to the
relevant picture item in the Side item:
panel.
2 Click the symbol.
The split selection popup appears:
© 2015 Emerson Climate Technologies - Transportation Solutions ApS
24
User's Guide
Step
Action
Result
3 Select one of the split screen
symbols.
The new picture opens in the position indicated by
the lighter blue.
4 Maybe move the splitter to
change the sizes of the
pictures. You recognize the
splitter by the three spots,
appearing horizontally or
vertically:
One picture gets smaller, the other larger.
The Container Details
The larger lower-right area of the REFCON Monitor is occupied by the Container Details
104
.
Increasing the Picture area
It is possible to make the Picture area larger by sliding aside the Side panel and/or sliding down
the Container Details. Use the Minimise buttons upper right in the respective element for this
purpose. To restore the Side panel and the Container Details, respectively, re-select the button.
"List changed" indication
It is possible for any user, without logging on, to make temporary changes to any of the lists in
REFCON.
Whereas such changes can be very useful to the current user, they can cause
misunderstandings to others. Therefore, a temporarily changed list is distinctly indicated in the
REFCON Monitor:
As seen, the title of the list gets orange with an asterisk appended, both in the Side panel and
© 2015 Emerson Climate Technologies - Transportation Solutions ApS
The REFCON Monitor
25
in the caption of the list.
You will notice that the "Reset sorting/filtering" button has shown up upper right:
If you click this button, you are asked if you are sure. If so, the list returns to it's standard / last
saved version, and your changes are discarded.
2.2
The Performance Bar
Purpose
The purpose of the Performance Bar is to help you perform your job even smarter. It guides you
in your daily work, as it emphasises where your effort is most needed, and gives easy access
to the lists of containers that mostly need your attention.
Also it could help the work planner to estimate the work load and similar.
Overview
The Performance Bar consists of a vertical bar with up to six coloured areas, together with list
entries and textual indications:
You may additionally experience the Performance Bar in any of the following special cases:
© 2015 Emerson Climate Technologies - Transportation Solutions ApS
26
User's Guide
No containers at all
Monitoring is perfect !!
Critical system alarm(s)
Normal starting point. Seen if
you have no reefer containers
at all for the present.
Ideal situation: All containers
are monitored satisfactory,
and none of them are in
alarm. There might be a
lighter green area as you may
use the optional RDC to
obtain this situation.
A vital system device or
external interface has
reported error. REFCON does
therefore not have fully
updated data, and can
therefore not show a reliable
Performance Bar. You must
remidy the problem as soon
as possible.
How the Performance Bar works
REFCON counts the containers periodically with a certain time interval, which means that the
updating of the Performance Bar can be slightly delayed.
When counting, REFCON checks the monitoring status for each individual container.
If the container does not communicate by power line, REFCON checks if data for the
specific container are found on the Global Monitoring Server (GMS).
If not so (= unknown on GMS), or GMS reports that it never communicated, the container is
counted in the group named "Modem missing".
If the container is known on the GMS and it has been communicating by power line on any
ship or terminal, the container is counted in the group named "Modem available". We
recommend that user attempts to repair the modems on these containers.
The check on the GMS actually is a check in a file found on the harddisk of the REFCON Main
PC. This file was extracted from the GMS (by Emerson Climate Technologies) and included in
your REFCON installation. The extraction takes place each time a new REFCON version is
released (minor or major), but the updating at your site depends on your online and updating
situation (see REFCON Update 267 ). Should the file get a few months old, it's information is still
very useful, however, at some point of time it's data should be considered obsolete, and your
REFCON should be updated.
The Performance Bar colours
The Performance Bar shows up to 6 colours as indicated in the above "real world" example.
Interpret the colours as follows:
Colour
Category
PCT OK
Green
Explanation
The containers in this group are
monitored perfectly well by power
line communication with data up-todate, no alarms.
Recommended actions
No action needed.
© 2015 Emerson Climate Technologies - Transportation Solutions ApS
The REFCON Monitor
Colour
Category
The containers in this group are
monitored perfectly well by the
optional RDC or by the REFCON
Data Service with data up-to-date,
no alarms.
You have to repeat the
manual RDC inspection
periodically. You might
reduce the need for
manual inspection by
repairing or mounting
modems.
In alarm
The containers in this group are in
alarm. They may or may not be
monitored well.
The alarms must be
handled by user.
Modem
missing
The containers in this group are not
monitored. They have been reported
by the Planning System, and either
have they not yet started
communicating, or they never will
because modems are missing (as
far as we know).
Manual inspection is
required unless you
choose to install modems.
You may use the optional
RDC.
Modem
available
The containers in this group are not
monitored and are in one of the
following situations:
They have been reported by the
Planning System, and either have
they not yet started
communicating, or they never will
despite modems should be
available but have errors.
Their modems have no connection
to the controllers and
communicate by factory ID.
Manual inspection is
required unless you
choose to repair/replace
the modems or their
connections. You may use
the optional RDC.
Obsolete
This group covers containers that
Fix the modems and/or
have been green, but for which data the Planning data.
are now obsolete. This can be due
to a number of possible reasons,
including:
Containers having been plugged
off, intendedly or not.
Containers having defective
modems or the like.
Planning data being incomplete or
not up-to-date.
You are late in doing a manual
RDC inspection.
Red /
flashing
Light blue
Recommended actions
RDC OK
Lighter
green
White
Explanation
27
Orange
Minimum height of coloured area
A coloured area has a minimum height of about 4% of the total bar height, because otherwise it
could become almost invisible. In particular for the Alarms area it is vital that it is clearly visible.
So, if for example just 1% of the containers are in alarm, it still occupies 4% of the total height.
Dynamic list entry position
As the starting point, the container list entry text is centred vertically in relation to the
corresponding coloured area:
© 2015 Emerson Climate Technologies - Transportation Solutions ApS
28
User's Guide
The minimum text height is, however, greater than the minimum area height. This means that in
case of small amounts, the two are displaced:
If you are in doubt what text belongs to what coloured area, move the mouse cursor over the
text. This makes a border show up at the related area:
Opening a related list
Each coloured area except the green ones have dedicated list pictures attached:
For the alarm area, the Container Alarm Summary 89 .
For other areas, specific Container Lists 58 .
To open a list,
click the text or the split screen symbol
click the coloured area.
2.3
23
, or
The Mini-status window
Overview
When designing the Mini-status window, we thought of the situation that you are not working at
the REFCON PC, but you are from time to another present in the room where it is situated. By
having the Mini-status window open, you can take just a short look from the distance and see if
everything is all right or not.
Also we think that the Mini-status window could be useful when you work at the REFCON PC,
using another application than REFCON. You might then place the Mini-status window in a
corner of the screen and watch it out of the tail of your eye.
Opening and Closing the Mini-status window
You open the Mini-status window by selecting it from the File menu:
You can also use the key combination Ctrl + Shift + M.
You will see that this hides the REFCON Monitor and displays the Mini-status window in stead.
© 2015 Emerson Climate Technologies - Transportation Solutions ApS
The REFCON Monitor
29
Click anywhere in the Mini-status window except the title bar to change back to the REFCON
Monitor.
What the Mini-status window shows
The Mini-status window is divided into four parts:
The upper left part is the title bar, reading REFCON. You can move the Mini-status window by
dragging this area.
The centre left part indicates the total number of items in alarm in REFCON right now, that is,
the sum of containers in alarm and system devices in alarm. If any of the alarms are
unacknowledged, the field is flashing. If there is no alarms at all in REFCON, the field is green:
The lower left part currently shows the ID of the latest inspected container. When running well,
with some number of reefer containers connected, the shown ID will change irregularly. See
also the PCT indicator in the Side panel 23 .
The right part is a smaller version of the Performance Bar
25 .
In case of a system alarm, the Performance Bar gets smaller, making room for the bell
indicator:
If the system alarm is even a critical alarm, the Performance Bar is replaced by a distinct
warning:
© 2015 Emerson Climate Technologies - Transportation Solutions ApS
30
User's Guide
which should make you take action as soon as possible.
2.4
Shortcut menus
Overview
In all relevant places, such as list pictures and the Container Plan, Shortcut menus (also known
as right-click menus) are available.
In general, the Shortcut menu offers a selection of commands relevant to the context.
To ensure that the Shortcut menus are easy, fast and safe to use, they are designed
systematically and uniformly, meaning that the menu is always immediately recognized by the
user.
Any Shortcut menu is build up of one or more sections. For example, if a container was rightclicked, the container command section is included.
The order of the sections is always the same. For example, the container command section
always comes first if included because it is expected to be most frequently used.
Within each section, commands have been selected according to the following guidelines:
commands that are (expectedly) used frequently are included
commands that are considered important in the context are included
rarely used commands of secondary importance are excluded.
The order of the commands within a section is always the same.
Commands that are irrelevant at the moment are disabled, that is, they are greyed but still
visible, thus keeping the uniformity of the menu.
© 2015 Emerson Climate Technologies - Transportation Solutions ApS
The REFCON Monitor
31
The exception is commands that relate to an option - such commands are included only if the
option is activated in the specific REFCON system.
Illustrative example
If you right-click a container, the Shortcut menu will include a section with container relevant
commands (see below). This section is exactly the same, no matter where you select the
container.
The Container Command section
This Shortcut menu section includes a number of commands relevant to the appointed container or
containers. The always included commands are:
Shortcut menu text
Function
Comments
Refresh now
Update all live data for this
See Container Commands
container via PCT as soon as
possible.
Delete container(s)
Manual container deletion:
Removes the appointed
container(s) from REFCON's
database if allowed (the
container is not
communicating and has no
unacknowledged alarms).
The user is asked for accept.
You should normally not use
this command. In stead, you
should enable automatic
deletion, see Automatic
Cleaning Up parameters 251 .
Mark special reefer
Selects the "special" alarm
priority for the appointed
container(s).
See Special reefers
94 .
Unmark special reefer
Selects the "normal" alarm
priority for the appointed
container(s).
See Special reefers
94 .
Show historic data (tabular
view)
Opens the window that
displays the container's
periodical historic data as a
table.
See Historic Log
Show historic data (graph)
Opens the window that
displays the container's
periodical historic data
graphically.
See Container Trend
Acknowledge container's
alarms
Displays the list of alarms on See Acknowledging a
this container, allowing the
container's alarms 89 .
user to have them
acknowledged.
Make RDC List
Option: Saves the list of
selected containers for use
with the optional RDC.
136
115
.
.
134
.
See RDC.
Other sections
Depending on where you display the Shortcut menu, it might include one or more sections other
than the Container Command section 31 . These sections are described in relation to the
pictures where they occur. An example is the Container List section 59 .
© 2015 Emerson Climate Technologies - Transportation Solutions ApS
32
2.5
User's Guide
Container Quick Search
Overview
The Container Quick Search function allows you to have a specific container selected/displayed
quickly.
How to search
To search for a container, proceed as follows:
Step
Action
Result
Description
1
Click the "<Search
container>" element in the
Top panel.
The list displays all
containers in REFCON's
database.
2
Type a search string.
The list changes as you
type, still showing all
container IDs including
the typed string.
As shown in the
example, this might very
well be a string in the
middle of the ID.
3
2.6
Select the desired container
by
Double-clicking it in the
"Containers" list, or
Using the Down and Up
keys and then the Enter
key.
The list closes.
The Container Details, all
relevant open list
pictures and the optional
Container Plan, if open,
shows/highlights the
selected container.
The REFCON Clock System
Overview
The REFCON Clock System provides two dates and times:
UTC (Universal Time), previously known as GMT.
LMT (Local Mean Time).
In fact, the LMT is identical to the UTC with the addition of an offset, called the LMT Offset. The
LMT Offset is an integer number of minutes, up to +/- 12 hours (note: it can be up to +14 hours
in certain time zones).
© 2015 Emerson Climate Technologies - Transportation Solutions ApS
The REFCON Monitor
33
If your system includes more than one REFCON PC, you will discover that the current date and
time shown in the Top panel on each REFCON Monitor are synchronised.
UTC is very important
The UTC is, along with the LMT, used when time stamping alarms, events and data logs, and
when deciding when to make logs and other time controlled actions. Also the UTC is used when
time stamping data sent to the Global Monitoring Server. It is vital to the reliability of these data
that the UTC is correct and that it runs continuously without adjustments. And as you know, the
reliability of data is vital in case of claims and similar.
Therefore, do never change the UTC unless it is strongly required! If you are changing time
zone or daylight saving time, always adjust the LMT only!
UTC time synchronisation is very important
Even though the clock electronics in newer PCs is quite precise, it can't guarantee that the UTC
used by REFCON is correct and remains so. Therefore, time synchronisation is vital.
To avoid that this gets a manual duty to the users, we recommend that any REFCON system
runs some kind of automatic synchronisation. When such a solution is found, your duty as a
user is to react on alarms or other signs should it stop working.
Note that REFCON also supports automatic synchronisation of the LMT.
There are many possible automatic solutions, and the most adequate solution should have been
chosen for your REFCON system.
However, basically there are two ways that external equipment can control the clock in
REFCON:
Via LAN, through the Windows clock on the Main PC.
Through the REFCON Data Service.
Clock Configuration and Clock Setting
Please be aware of the two different activities, Clock Configuration
35
and Clock Setting
36
.
Typically at commisioning time, the Clock Configuration is decided once for all (though it can
later be changed). The Clock Configuration determines which of the connections in the below
illustration are in fact active/valid. The Clock Configuration must match the chosen automatic
time synchronisation solution, if any.
Clock Setting is, depending on the Clock Configuration, frequently done on ships sailing eastwest, however, you would generally do it if the REFCON time is incorrect.
REFCON Clock System Overview
The following drawing should illustrate the essentials of the REFCON Clock System:
© 2015 Emerson Climate Technologies - Transportation Solutions ApS
34
User's Guide
Symbols used in the illustration
The above drawing includes the following symbols:
Symbol
Meaning
Dependency
Elements involved in or affected by
the REFCON Clock System.
The external Windows/PC clock.
Used on Main PC only, and only if
decided by Clock Configuration.
User's Clock Setting.
If and where depends on Clock
Configuration.
Clock setting by external system
via REFCON Data Service.
Only possible for a certain Clock
Configuration.
Time synchronisation.
Setting Windows's clock on Main
PC
Only if allowed by Clock
Configuration.
© 2015 Emerson Climate Technologies - Transportation Solutions ApS
The REFCON Monitor
Symbol
Meaning
Dependency
Time synchronisation.
Only if allowed by Clock
Configuration.
35
Time stamping.
Use of the Windows date and time
On any of the optional secondary PCs, the Windows operating system clock is not used nor
affected. Thus, using Windows' time setting dialog on such a PC has no effect in REFCON.
The light green parts in above drawing illustrate the Windows operating system clock on the
Main PC, being fully or partly used for deciding the REFCON clock. There are two main rules
decided by the Clock Configuration:
With main rule 1, the REFCON clock exactly reflects the Windows clock. Thus, using
Windows' time setting dialog on the Main PC will make the REFCON clock change
correspondingly. However, we recommend that you use the Clock Setting 36 dialog in the
REFCON Monitor in stead, if allowed by Clock Configuration.
With main rule 2, the Windows clock is ignored. The PC hardware clock does, however,
decide the rate of the REFCON clock.
2.6.1
Clock Configuration
Overview
The Clock Configuration is controlled through the "Clock" tab of the REFCON Setup
251
dialog:
Note that within the Clock tab, tooltips are available with guiding instructions.
Remember to apply your changes.
Matching the chosen time synchronisation solution
It is essential that the clock configuration matches the chosen time synchronisation solution:
If REFCON is synchronised via LAN (NTP or similar), select Main rule 1 with the option
"Clock can only be set externally".
If REFCON is synchronised via the REFCON Data Service, select Main rule 2 and make sure
the relevant is checked: "Allow external control of UTC" and/or "Allow external control of
LMT".
© 2015 Emerson Climate Technologies - Transportation Solutions ApS
36
User's Guide
Clock Configuration options
The following table shows the guidelines on which options to select:
Main rule
Option
Guidelines
1: REFCON clock
equals Main PC
Windows clock.
Clock can only be
set externally.
You need to select this combination if the
REFCON Main PC is time synchronised via LAN
(NTP or similar). In any other case, do not select
this combination.
1: REFCON clock
equals Main PC
Windows clock.
Clock can be set
from REFCON or
Windows.
You should select this combination if the
REFCON Main PC is not externally time
synchronised, and it is important that REFCON
time equals time in other applications on the
REFCON Main PC.
We do in this case recommend that you use
REFCON's Clock Setting dialog to set the date
and time rather than the Windows dialog. It is our
experience that the latter can be a little difficult to
use expediently.
2: REFCON clock
is independent.
Either option;
"Allow external
control of UTC"
and/or "Allow
external control of
LMT" checked.
If you want REFCON's clock to be decided by an
external system, you need to select main rule 2
and make sure the relevant is checked: "Allow
external control of UTC" and/or "Allow external
control of LMT". Note that you can still set the
clock manually, however, when a new synchro
message arrives from the external system, your
selection is overwritten.
2: REFCON clock
is independent.
LMT set using time You should select this combination if you want to
zones.
make sure the REFCON clock is not set
unintentionally (important for data logging), and
you do not want to use Advance and Retard
buttons.
This option lets you select LMT from a list of time
zones. The time zone list is identical to the one
found in Windows on the REFCON Main PC.
2: REFCON clock
is independent.
LMT set by
advance/retard
buttons.
Select this option to have Advance and Retard
buttons displayed with selected value. You can in
this case also adjust the LMT Offset directly or
set the time zone like above.
Note that daylight saving time is in this case
automatically applied only if selecting time zone.
Warn if UTC is
Logging functions appear most reliable when UTC
changed more than runs continuously. A small adjustment can be
limit.
necessary if the PC clock is not accurate, but a
larger change could be unintentional.
2.6.2
Clock Setting
Overview
The Clock Setting dialog box can be opened from the popup menu appearing when clicking the
current time in the Top panel. The contents of the dialog box depend on the Clock Configuration
35 . The primary variants are:
© 2015 Emerson Climate Technologies - Transportation Solutions ApS
The REFCON Monitor
37
The dialog box clearly reflects the following principles:
It is in the most cases permitted, and it can be a daily routine (on east <-> west going ships),
to change the LMT, which is therefore immediately possible and easy.
You should never, or only very rarely, change the UTC.
The rarely used options can be displayed using the "More" button, if permitted.
You are warned if the change you try to do does in some way conflict with the configuration or
is not recommended.
The elements that can be found in the dialog box are described in the following.
Current REFCON time
At the top of the Clock Setting dialog box, the current LMT and UTC dates and times are shown
for information:
It is not possible to make changes in this area.
Not changeable message
When, in the Clock Configuration, the main rule 1 has been selected in combination with "Clock
can only be set externally", the Clock Setting dialog box is limited to the above mentioned
current time and the following message:
In this case, the date and time is most likely externally time synchronised. If not so, you will
have to make possible changes through the Windows' Adjust date/time dialog on the REFCON
Main PC.
LMT synchronisation warning
When, according to the Clock Configuration, LMT is synchronised through the REFCON Data
Service (Main rule 2, "Allow external control of LMT" checked), you are warned when opening
the Clock Settings dialog box as follows:
As indicated, the Clock Settings dialog box can not check if the external source does actually
control the LMT - it should do, but please make sure your self.
Setting the time zone
When the Clock Configuration does NOT read "Clock can only be set externally", you are able
to decide the local time by selecting the time zone:
To change the time zone,
© 2015 Emerson Climate Technologies - Transportation Solutions ApS
38
User's Guide
1. Select the appropriate in the drop-down list.
2. Select OK or Apply.
If the Clock Configuration main rule 1 has been selected, the header of the field reads "On Main
PC" (as in above example), meaning that your change will affect the Windows clock on the
REFCON Main PC.
If the Clock Configuration main rule 2 has been selected, the header of the field reads "REFCON
time affected only", meaning that the Windows's clock is NOT affected.
Using Advance and Retard
When, in the Clock Configuration, the main rule 2 has been selected in combination with "LMT
set by advance/retard buttons", the Clock Setting dialog box opens with two large buttons and a
More button:
The number of minutes displayed on the buttons is selected in the Clock Configuration.
Clicking either of the large buttons will
Advance or Retard the LMT the shown number of minutes.
Close the dialog box.
Advancing and Retarding affect the REFCON time only, not the Windows clock.
Clicking the More button will change to an extended version of the Clock Setting dialog box. The
Advance and the Retard button will at the same time slightly change behaviour as described
below.
Advance/Retard buttons and LMT Offset in extended dialog
When the More button is selected as described above, the Advance/Retard field changes to the
following:
Here, clicking either of the large buttons will temporarily change the LMT offset shown just
below the buttons. You may alternatively type an LMT Offset or use the small arrow buttons to
change it in steps of 5 minutes.
In any case you must select OK or Apply to activate your changes. Doing so affects the
REFCON time only, not the Windows clock.
Setting the UTC
When the Clock Configuration does NOT read "Clock can only be set externally", you are able
to decide the universal time by selecting the date and/or the time:
To change the UTC,
1. Select the date, maybe using the calendar available when clicking the down-arrow button.
2. Select the time by changing the hour, the minute and/or the second separately: Click the
© 2015 Emerson Climate Technologies - Transportation Solutions ApS
The REFCON Monitor
39
figure (eg. the minute), and type the desired value or click the small up and down arrows.
3. Select OK or Apply.
If the Clock Configuration main rule 1 has been selected, the header of the field reads "On Main
PC" (as in above example), meaning that your change will affect the Windows clock on the
REFCON Main PC.
If the Clock Configuration main rule 2 has been selected, the header of the field reads "REFCON
time affected only", meaning that the Windows's clock is NOT affected.
2.7
Backup function
Overview
We strongly recommend that you make backups regularly of system and log data.
All settings that you can decide in the REFCON Monitor as well as all container and event log
files are as standard stored on the harddisk of the REFCON Main PC. Unless you have
purchased some harddisk mirror solution, the harddisk should not be regarded as a reliable
long-time storage. Therefore, if you consider your settings and/or the container log files valuable,
you must back up to an external media.
Note that the backup function is quite similar to the Configuration Export
41
function.
Backup chunks
The whole set of files that can be backed up are divided into the following chunks:
Chunk
Short
When to backup
Included information
Basic System Data
S
When changes have
been made, or
regularly.
Installation settings.
Settings selected in REFCON Setup.
Customized Container List versions
and the like.
User profiles.
Event log files.
Container history
files
L
Regularly, very
often.
Debug log files
D
When requested / in Logs that hopefully could help Emerson
case of troubles.
Climate Technologies to solve
problems / correct errors, or to improve
the product.
The Backup dialog box
The Backup dialog box looks like this:
© 2015 Emerson Climate Technologies - Transportation Solutions ApS
The trend log files for every single
container.
Note that the size of this chunk can be
giga-bytes, especially if you have a large
amount of containers.
40
User's Guide
The dialog box has been designed with an active and an disabled half to illustrate the similarity
with the Configuration Export 41 function.
Backup procedure
To make a backup, proceed as follows:
Step
Action
Result
1 Select "Backup..." from the
"File" menu.
The Backup dialog opens.
2 Select which items (= chunks)
to include.
One or more checkboxes checked.
Note: You can combine more
chunk s in one back up, however,
consider if this is a good idea,
as the time scope of the chunk s
are different
3 Select "Start".
A folder selection dialog opens.
4 Locate and select the folder
where you want your backup to
The folder selection dialog closes, and the backup
operation starts. You will observe the progress:
© 2015 Emerson Climate Technologies - Transportation Solutions ApS
The REFCON Monitor
Step
Action
41
Result
be created.
Note:Insert possible USB k ey or
similar before selecting.
5 Await completion.
In case of troubles you are informed like this:
Note: First the back up zip-file is
created on the REFCON Main
PC harddisk . After this it is
copied to the final destination,
which may tak e quite some
time.
6 If Completed/Success, remove
the possible USB key or similar.
Inspecting a backup
The backup is a single compressed file in zip format. It is automatically named as follows:
"Installation name_yyyy-mm-dd-HHMMSSz_SLD.zip"
where
"Installation name" is the official "name" of your REFCON system, as shown in the REFCON
Monitor caption and in the About box.
yyyy-mm-dd is the year-month-day when the file was created.
HHMMSS is the hour minute second when the file was created.
z indicates that the date and time is UTC.
SLD (or only one or two of these letters) indicate what chunks have been included, see the
"Short" column above 39 .
If you unpack and inspect the zip-file, you will see that it contains two folders:
BackupFiles includes the data files, in the most cases in xml format.
BackUpInfo includes information used when REFCON is to restore the backup.
It is important that you do not modify the zip-file, as this might make restore fail.
Restoring a backup
A backup can be restored using the REFCON Manager
2.8
265
.
Configuration export(/import)
Overview
The main purpose of the Configuration export(/import) function is to allow copying of settings
from one REFCON system to another. The similar Backup Function 39 is not suitable for this
as it contains data that should never be copied.
All relevant settings that you can decide in the REFCON Monitor can be copied.
Configuration export chunks
The whole set of files that can be exported are divided into the following chunks:
Chunk
Settings from REFCON
Setup
Short
R
Included information
All data selected in the REFCON Setup dialog box
all tabs.
© 2015 Emerson Climate Technologies - Transportation Solutions ApS
251
,
42
User's Guide
Chunk
Short
Included information
Alarm Priorities and
Categories
A
The file AlarmPrioritiesAndCategories.xml - which can
be edited externally, with greatest caution.
Note that alarm priorities are not used in this REFCON
version.
Container Plan
P
The one or two files defining the Container Plan
Custom Container Lists
C
All the possible unlocked Container Lists having been
added 63 to your REFCON.
User Roles
Ur
All the User Roles
User Roles and User
Accounts
Ua
All the User Roles and Accounts 50 defined in your
REFCON. If you work with personal user accounting you
should not copy this chunk.
50
78 .
defined in your REFCON.
The Configuration export dialog box
The Configuration export dialog box looks like this:
The dialog box has been designed with an active and an disabled half to illustrate the similarity
with the Backup 39 function.
Configuration export procedure
To make an export, proceed as follows:
Step
Action
Result
1 Select "Configuration export..."
from the "File" menu.
The Configuration export dialog opens.
© 2015 Emerson Climate Technologies - Transportation Solutions ApS
The REFCON Monitor
Step
Action
2 Select which items (= chunks)
to include.
43
Result
One or more checkboxes checked.
Note: You can combine more
chunk s in one export.
3 Select "Start".
A folder selection dialog opens.
4 Locate and select the folder
where you want your export to
be created.
The folder selection dialog closes, and the export
operation starts. Normally this goes quite fast so
you will hardly observe the progress.
Note:Insert USB k ey or similar
before selecting, if relevant.
5 Await completion.
In case of troubles you are informed like this:
Note: First the export zip-file is
created on the REFCON Main
PC harddisk . After this it is
copied to the final destination,
which may tak e quite some
time.
6 If Completed/Success, remove
the USB key or similar, if
relevant.
Inspecting a configuration export file
The export is a single compressed file in zip format. It is automatically named as follows:
"Installation name_yyyy-mm-dd-HHMMSSz_RAPCUrUa.zip"
where
"Installation name" is the official "name" of your REFCON system, as shown in the REFCON
Monitor caption and in the About box.
yyyy-mm-dd is the year-month-day when the file was created.
HHMMSS is the hour minute second when the file was created.
z indicates that the date and time is UTC.
RAPCUrUa (or only some of these letters) indicate what chunks have been included, see the
"Short" column above 41 .
If you unpack and inspect the zip-file, you will see that it contains two folders:
BackupFiles includes the data files, in the most cases in xml format.
BackUpInfo includes information used when REFCON is to import the configuration.
It is important that you do not modify the zip-file, as this might make import fail.
© 2015 Emerson Climate Technologies - Transportation Solutions ApS
44
User's Guide
Importing a configuration file
An exported configuration can be imported using the REFCON Manager.
2.9
Selecting drive and folder on Main PC
Overview
Various functions in REFCON need to read from or write to a drive that is accessible from the
REFCON Main PC. Keep in mind, however, that the set of drives and drive letters available to
REFCON may very well differ from the ones available to the user in the Windows operating
system.
Sometimes this is because the user works at a different location than the REFCON Main PC,
but even though he works at the REFCON Main PC itself, the REFCON system maintains its
own selection of available network and drive mappings which are not (necessarily) identical to
those of the user’s.
Example 1:
A user works at a remote machine with REFCON Monitor, and the REFCON Main PC is
situated elsewhere.
Clearly, the files and the folders of the user’s C: drive is not the same as those of
REFCON’s (as the user works at a different machine than REFCON).
Both the user’s machine and the REFCON Main PC may (or may not) have a selection of
mapped network drives. But there is no guarantee at all that they both map to the same
network places (unless having deliberately been set up that way).
Example 2:
A user works at the REFCON Main PC and has a network drive E: available (in Windows). But
– because the REFCON system maintains its own set of network drive mappings - REFCON
may not be able to see that drive (or, REFCON’s E: drive may point out a completely different
network place).
When configuring REFCON in the REFCON Setup dialog, you often have to point out to
REFCON where to look for or store different types of files (e.g. log files). You do so by browsing
the file system in REFCON Monitor, but you must be aware that when doing so, you will most
often be look ing at the REFCON Main PC’s file system and drive mappings rather than your
own!
Anywhere in REFCON where this is the case, a light blue background colour is used instead of
the normal white to indicate that you have left your own set of drive letters and network
mappings and now use those of REFCON’s.
How to edit a drive and path
In relevant places you will find an Edit button, for example like this:
The textbox, with the light blue background, shows the previously selected path. To change it,
select the Edit button.
The Choose Main PC folder dialog box
Having selected Edit, the following dialog box opens (note that it might take some time):
© 2015 Emerson Climate Technologies - Transportation Solutions ApS
The REFCON Monitor
45
As indicated, the contents of the dialog box differs depending on the context.
In the upper part you see the drives and folders that are available to the Data Engine
program on the REFCON Main PC.
239
If you need to select a network drive/folder that is not available, select Manage network drives
45 . You may also create a new folder 46 .
Use the small + buttons to expand relevant parts of the folder structure.
Click the desired folder or, if relevant, the desired file to select it. You will see that the folder
path and, if relevant, the file name appear in the respective textboxes.
If you are selecting a folder on the Main PC harddisk that is going to be accessed from an
external computer, you need to share it 46 .
Having completed your changes, click OK to apply these and close the dialog box.
Manage network drives
To obtain access to a network drive/folder that is not already on the list, select the "Manage
network drives" button. This opens the following dialog box:
© 2015 Emerson Climate Technologies - Transportation Solutions ApS
46
User's Guide
Proceed as follows:
1. Select a vacant drive letter, for example F:.
2. Type the full path to the external computer's folder. As shown, start with two backslashes,
then write the exact name of the external computer, and finally type the path on that
computer. Example: "\\NameOfExternalComputer\REFCONfiles\PlanningData". Do not
include any file name.
3. If the external computer is secured, check the "Use log on credentials" check box. If a
domain is to be specified, either select this from the drop down list or prepend or append it to
the username as mentioned in the dialog box. Type a valid user name and password. Note
that if you type an invalid domain, user name or password, you must expect quite a long
response time from the system before you are informed.
4. Select "Add connection". You do now automatically return to the Choose a folder dialog 44 ,
having the new drive selected.
In the "Manage network drives" dialog box you may alternatively:
Simply inspect an existing connection - select a used drive letter, eg. F:, and see the
corresponding path.
Remove a connection - select a used drive letter, eg. F:, and click the "Remove connection"
button.
Create new folder
To create a new folder,
1. Select the drive/folder where you want the new folder to occur, in the upper part of the
Choose a folder dialog 44 .
2. Select the "New folder" button.
3. Type the name of the new folder and select OK.
If success you do automatically return to the Choose a folder dialog
selected. If not success, you are informed about this.
44
, having the new folder
Sharing a local folder
If relevant in the context and you have selected a folder on the REFCON Main PC harddisk, you
can define a share name, being required by an external computer to make use of the folder. You
can additionally decide which Windows user on the REFCON Main PC to be permitted to
access the share. It is possible to define a Windows user 46 specifically for this purpose.
To share the folder, write a name in the "Share name" textbox. We recommend that you make
it short and letters only.
If a share name is already defined you can
change it by simply editing the name
remove the share by deleting the existing name from the textbox.
Having defined a share name you should select a Windows user permitted to attach it from the
"Permitted main PC user" drop down list.
Unfortunately, the setting of the folder sharing as described above does not always work fully
automatically. You may have to follow the procedure Manual action needed to make sharing
work 47 .
Defining a Windows user for sharing permission
If relevant in the context, you can define a single REFCON Main PC Windows user with limited
rights. This user will be available at Windows logon like other Windows users.
If such a user has not already been defined through REFCON, select the "Add user" button. If a
user is already defined, the button text is "Edit user". Clicking the button makes the following
dialog box appear:
© 2015 Emerson Climate Technologies - Transportation Solutions ApS
The REFCON Monitor
47
To create a user, type a valid Windows "User name". It is recommended that you add a
password, which you have to type twice.
To change a user name, simply edit it.
To change the password, type the full new password twice.
To delete the existing user, delete the text in the "User name" field.
Automatic re-establishment
Each time the Data Engine 239 is started, it checks if the folder, it's possible sharing information
and the possible Windows user are exactly as you have chosen. If not so, a background
function attempts to re-establish it. This is in particular useful if the Configuration Export/Import
41 function has been used to copy your settings from another REFCON system, as in this
case the required folder, the possible Windows user and the possible share settings are
automatically created.
Manual action needed to make sharing work
In order to have your selected folder(s), for example "C:\GmsLogIf", shared on the network, you
must in addition to the above manually enable network sharing in Windows. Please proceed as
follows:
Windows XP
1. In MyComputer, right click the folder (eg. "C:\GMSLogIf") and select Properties.
2. Open the pane Sharing.
3. Click the text “If you understand the security risks, but want to share files without running the
wizard, click here”.
4. Check the two boxes: “Share this folder on the network” and “ Allow network users to change
my files”.
5. Select OK
6. In the Enable File Sharing window, select the option “Just enable file sharing”.
7. Select OK.
8. Follow the same procedure for all folders to be shared.
Windows 7
1. In MyComputer, right click the folder (eg. "C:\GMSLogIf") and select Properties.
2. Open the pane Sharing.
3. Click the text “Network and Sharing Center”
4. Select the option “Turn on sharing so anyone with network access can read and write files in
the Public folders".
5. Turn off password protected sharing.
6. Follow the same procedure for all folders to be shared.
© 2015 Emerson Climate Technologies - Transportation Solutions ApS
48
2.10
User's Guide
The taskbar notify icon
Overview
While the REFCON Monitor is running, you find it's notify icon in the taskbar, as standard, in
the lower right corner of the screen:
The idea of the notify icon is that you can use the PC for other purposes, the REFCON Monitor
being not visible, and still be notified in case of alarms.
The icon is:
Green when there is no alarms.
Steady Red when there are one or more alarms, and all have been acknowledged.
Flashing Red/Yellow when there are one or more unacknowledged alarms.
In case of alarm, the so-called "balloon" shows up, as indicated in the above figure, showing the
alarm count. You may click the X button to remove the "balloon".
The notify icon menu
Right-click the notify icon to have the menu displayed:
In the menu, select:
"Open Monitor" to have the REFCON Monitor displayed.
"View Alarms" to have the REFCON Monitor displayed with Alarm Summary open.
"Exit" to close the REFCON Monitor and remove the notify icon.
"Help" to display this page in the Online help.
© 2015 Emerson Climate Technologies - Transportation Solutions ApS
REFCON 6
Reefer Container Monitoring System
User Authentication
Transportation Solutions
50
3
User's Guide
User Authentication
Overview
User Authentication is the name of REFCON's security system.
Experience has shown that different customers and users have different views on security.
Some customers find it needless, while others want a high security level. As shown in the
following, REFCON's User Authentication system can be set up to fit any of these viewpoints.
As the starting point, the following description covers the standard level of security.
Purpose of User Authentication
The purpose of User Authentication is to
prevent unauthorized people from changing data;
make it possible to log which operator made the change; and
prevent data from being changed by mistake.
It is therefore possible to
assign personal User ID and Password
assign specific rights to each User ID.
Each time important operations are done, the User ID that was used is logged.
Security levels
The User Authentication system can be configured to work at any of the following security
levels:
Level
3.1
Title
Description
4
High
security
Similar to level 3, however, administration and
configuration is restricted as decided by the
customer.
3
Standard
security
Any privileged action requires user ID and
password, and it is logged who does what. The
administrator password is available in the
online help.
2
Who-didwhat only
Logging on is very easy, as no passwords are
used (except for security configuration). It is
logged who does what.
1
No security
Any user (having access to the REFCON
Monitor) can do everything (except security
configuration), and it is not logged who does
what.
User Authentication in daily use
Overview
You are prompted for user ID and password when you need it, so generally you will not have to
think very much about User Authentication.
Remember to log off if you want to make sure that no other user can do things in your name.
Who is logged on?
You can at any time see who is actually logged on to this REFCON Monitor in the upper left
© 2015 Emerson Climate Technologies - Transportation Solutions ApS
User Authentication
51
corner of the REFCON Monitor:
To the left, no user is logged on, while to the right, the user John is logged on.
Note
At security level 1, the above indications are not visible.
Logging on by choice
If you wish, you can log on - maybe in stead of previous user - by clicking the User element in
the Side panel:
Select your ID on the list (if you are not on the list, please contact your local user
administrator). This opens the User Log On dialog box 51 .
Note
At security level 2, the User Log On dialog does not appear, as you are
immediately logged on.
Note
At security level 1, you are not able to log on.
Logging on at demand
You do not have to log on by choice as described above. Any time you try to do something that
requires log on, you are automatically prompted to do so, as the User Log On dialog box 51
opens.
Entering User ID and Password
In the situations mentioned above, the User Log On dialog box opens:
The person symbol being grey indicates that no user is logged on in advance.
Depending on the situation, the User ID field is empty or pre-filled with selected/relevant user
ID. If it is empty, or if you want another user ID, select one using the down-arrow button. Note
that the drop-down list includes relevant user IDs only, that is, user IDs with required
permissions.
Below the person symbol it is indicated what permission is needed, if relevant.
© 2015 Emerson Climate Technologies - Transportation Solutions ApS
52
User's Guide
Note that you do not need to use the mouse at all to log on - try the keyboard only, it is
faster!
If you are already logged on, but you are not permitted to perform the intended action, the
prompt will appear something like this:
The person symbol flashes, and you will have to select a user ID on the list.
Note
At security level 2, the Password entry is not visible - you just need to
select the user ID and hit Enter/OK.
Logging off
The actual user is logged off in three ways:
by choice - see below.
by timeout (see below) 52 .
by another user ID being logged on.
You can choose to log off by clicking the User element in the Side panel and selecting "Log
off":
Note
At security level 1, you are not able to log off.
Automatic log off by timeout
If enabled in the configuration, the actual user is automatically logged off when he has done no
privileged action for the decided time. If timeout is not enabled, users stay logged on until
manually logged off.
For example, the timeout time could be set to 5 minutes. If you change setpoints on containers,
once every 4 minutes, you keep logged on. But if you take a break and does nothing for 5
minutes, you are logged off and will have to log on again.
© 2015 Emerson Climate Technologies - Transportation Solutions ApS
User Authentication
3.2
53
User Administration
Overview
Unless you operate on security level 1, assigning user IDs and passwords to the REFCON
users is necessary. You do that in the User Administrator dialog boxes, using a user ID with
special permissions.
You would normally create one User Account for each user. The User Account includes the
unique user ID, the password, the assigned User Role and optionally a user name and a
description.
The permissions of the user is decided by the assigned User Role. The User Role is in fact a
list of actions that users with this Role are allowed to do.
Note
At security level 1, user administration is not available (and not relevant).
Example, User Accounts and Roles
Two persons, John and Miranda, are working on the same REFCON system as reefer
electricians. The user administrator has created one User Role, named "ReeferTechnician", and
two User Accounts with user IDs "John" and "Miranda". Both User Accounts are assigned to
Role "ReeferTechnician", so John and Miranda have exactly the same permissions.
The User Administrator dialog box
You open the User Administrator from the "Tools" menu:
Clicking the option opens the following dialog box:
The User Account editor
Selecting either of the buttons "Show user", "Add" or "Edit" in the User Administrator opens the
following dialog box:
© 2015 Emerson Climate Technologies - Transportation Solutions ApS
54
User's Guide
In the above example, the dialog box is showing the user, in which case you can change
nothing.
When creating a new user, all fields are empty when opening the dialog box. You must then
Type a User ID. The string must be unique. Use alphanumeric characters only.
Type a Password. Use alphanumeric characters only. The string length must be at least 3
characters.
Select a User Role from the list.
Optionally, type the User's name or similar - note that it is shown in parenthesis in the User
Administrator.
Optionally, type a Description.
Note
At security level 2, the Password is optional. If there is any chance that
you later enable passwords, you should select one at once - otherwise
leave the field blank.
The User Role Administrator dialog box
Selecting "User Role setup" in the User Administrator opens the following dialog box:
The User Role editor
Selecting either of the buttons "Show", "Add" or "Edit" in the User Role Administrator opens the
following dialog box:
© 2015 Emerson Climate Technologies - Transportation Solutions ApS
User Authentication
55
In the above example, the dialog box is showing the role, in which case you can change nothing
- but you can open or collapse parts of the tree.
When creating a new role, the two text fields are empty and all in the tree is de-selected when
opening the dialog box. You must then
Type a role name. The string must be unique. Use alphanumeric characters only.
Optionally, type a Description.
Select what groups / actions / permission to be included.
User Administrator access
When selecting "Add", "Edit" or "Remove" in either the User Administrator dialog box or the
User Role Administrator dialog box, you are prompted for user ID and password.
As standard, the user account "UserAdm" has the permissions to change user accounts and
roles. "UserAdm" is a special account that is not changeable or removable.
As standard, the password of "UserAdm" is "LSKEY".
It is possible to create users with same permissions as "UserAdm".
Note
At security level 2, you can not enter a Password.
Note
At security level 4, the password mentioned above will not work.
External documentation will describe how to get access in this
case.
© 2015 Emerson Climate Technologies - Transportation Solutions ApS
56
3.3
User's Guide
User Authentication Setup
Overview
User Authentication is controlled through the "Security" tab of the REFCON Setup
251
The connections between the User Authentication configuration and the security levels
as follows:
dialog:
50
are
When Security is configured as shown in above figure (all checkboxes
selected), you operate at security level 3.
If you de-select "Use passwords", you change to security level 2.
If you de-select "Enable User Authentication", you change to security
level 1.
If you consider it important that one user can not do things in the name of another user, make
sure "Log users off by timeout" is selected and the "Actual log off time" is as small as possible.
User Authentication Setup access
When trying to change anything under the Security tab illustrated above, you are prompted for
user ID and password.
As standard, the user account "SecurityAdm" has the permissions to change the User
Authentication configuration. "SecurityAdm" is a special account that is not changeable or
removable.
As standard, the password of "SecurityAdm" is "LSKEY".
It is possible to create users with same permissions as "SecurityAdm".
Note
At security level 2, you can not enter a Password.
Note
At security level 4, the password mentioned above will not work.
External documentation will describe how to get access in this
case.
© 2015 Emerson Climate Technologies - Transportation Solutions ApS
REFCON 6
Reefer Container Monitoring System
The Container List
Transportation Solutions
58
4
User's Guide
The Container List
Overview
The Container List is a list showing selected data for a number of reefer containers.
Each line in the Container List represents one container, having the container's data shown in
columns. Because of the limited length of a line, only a smaller selection of the possible
columns is displayed. Note that measurements appear with a limited accuracy 114 .
A list can either show all containers in REFCON's database, or it can have a filter applied that
makes a subset shown.
The idea is that you work with a number of Container List versions, using at any time the one
that is the most appropriate for your working duty. Each version has a unique combination of
columns and a unique filter and thereby shows a specific part of the information available for
each container and a specified subset of the containers.
We encourage you to make your own lists as described in Setting up the Container List
63
.
Standard lists, Pre-defined lists and User-defined lists
In REFCON you operate with three categories of Container Lists:
Standard lists that occur in the Side panel and the menu in fixed positions and with fixed
names and settings.
Pre-defined lists that you can "install" 63 and use if you wish.
User defined lists that are created and designed by you or your colleagues.
Having "installed" a pre-defined list, it works exactly like a user-defined list. This is the whole
idea: To make it easy for you to create your own lists.
Colour codes within data fields
The individual fields of the Container List are coloured as described in the following table:
Example
Colour
Explanation
Grey
Field with no value or a value that can not get obsolete.
Blue
The row (container, alarm etc.) is selected /
highlighted.
Green
The value is valid and not "obsolete", that is, it has
been updated recently (see Data Obsoletion 253 ).
Orange
The data point is "obsolete" (see Data Obsoletion 253 ).
The shown value is the latest available, but you should
not rely very much on it.
You will see that values get bold for a couple of seconds from time to another. This just
indicates that the field is updated.
Bands and Columns
Because the amount of available columns is very high, the columns have been grouped into
bands. The following figure shows a few examples:
The Container List version in the example includes 4 bands, named "Standard Info", "Manifest",
"Temperature" and "Cargo Probes", with a total of 11 columns.
© 2015 Emerson Climate Technologies - Transportation Solutions ApS
The Container List
4.1
59
Using the Container List
Opening the Container List
You would use the Container List to have an overview of an amount of containers. Being
organised in a limited number of columns, the Container List shows a selected subset of the
data for each container. So, before opening the Container List, you would probably think of:
What subset of containers you need to deal with.
What subset of data you are interested in.
You open the Container List by selecting it in the Side panel or, for certain specific list(s), in
the menu 22 .
In the Side panel, Container Lists are available at the Performance Bar
under the Container Lists heading:
25
, when relevant, and
Select a version to open the Container List.
Locked or Unlocked Container List
As can be seen in the above figure, two icons can occur next to the Container Lists headings:
Icon
Meaning
The Container List version is locked: You can make certain
temporary changes, but you can not save these, and you can not
delete the version. You can not, even temporarily, change the filter.
The Container List version is unlocked: You can make permanent
changes, and you can delete the version.
If neither of these symbols are shown, the list is locked.
Operating the Container List
A specific set of commands is available allowing you to manipulate the Container List as such.
You find these commands as part of the Shortcut menu 31 , but also you can use the options
button:
Here, selecting "Best Fit.." will adjust the width of every single column so that it is just wide
enough to show the actual content.
The other commands are explained in Setting up the Container List
© 2015 Emerson Climate Technologies - Transportation Solutions ApS
63
.
60
User's Guide
Operating the selected container(s)
By right-clicking one container, or by selecting a number of containers and right-clicking one of
them, you will have the Shortcut menu displayed. Please refer to The Container Command
section of the Shortcut menu 31 for details.
Finding containers in the Container List
If you need to locate one specific container in the Container List (as well as in any other
picture), you might find the search function useful, please refer to Container Quick Search
32 .
If you are rather looking for a group of containers, you can use the filter functions described
below.
Making changes to a Container List
Note that whenever you make any change to a Container List as described in the following, this
is indicated by orange colours and symbols, see "List changed" indication 24 .
The orange indication means that the Container List is temporarily changed.
You can not save changes to a locked 59 list. If you have made temporary changes to a locked
list, they will disappear without warning when you open another picture. Note that you can,
however, save the list with the temporary changes in a new name, using the "Save list as..."
command.
Selecting the order of the containers
You can click any column header to change the sorting order of the containers. Having done so,
you will see a small arrow symbol appear in the header:
If you click the same header once more, the arrow symbol flips to the opposite direction.
The arrow symbol indicates that now the containers are sorted alphabetically according to the
appointed column. Only one column can be appointed at a time.
The meaning of the arrow symbol is:
When it points upward (like in above figure), the sorting order is ascending (A before B etc.).
When it points downward, the sorting order is descending (B before A etc.).
Selecting the filter of the containers
You select which containers to include in the list by setting up the filter. Please refer to Setting
up a Filter 66 for instructions. Note that you can not change the filter of a locked list.
Changing column widths
You can make a column wider or narrower by dragging the lower part of the right column header
edge:
In the example, the ContainerID column width is affected.
© 2015 Emerson Climate Technologies - Transportation Solutions ApS
The Container List
4.2
61
Container List columns
Overview
In the various versions of the Container List, you find subsets of the columns listed below.
Alarm indication column
All versions include the narrow leftmost column with alarm indication:
Indication
Description
No alarms on this container
There are one or more unacknowledged alarms on this container.
There are one or more alarms on this container, they have all been
acknowledged.
Column specifications
REFCON provides about 130 columns organised in about 15 bands
in customised Container Lists as desired.
58
. These can all be used
Note that
Not all columns that origin from controllers are relevant to all controller types. If the controller
does not provide that measure, the field will be empty.
Similarly, not all columns that origin from the Planning System are relevant to all Planning
System interface protocols. If it is not included, the field will be empty.
When shown in list headers, column names can be abbreviated and therefore be difficult to
understand. Try moving the mouse cursor over the name in the list header, you will then
normally get a tooltip that explains the abbreviation.
You will in general see the following abbreviations:
Abbreviation
Explanation
Abs
Absolute
Batt
Battery
Cap
Capacity
Comm
Communication
Comp
Compressor
Cond
Condenser
Ctrl
Controller
Defr
Defrost(ing)
Disch
Discharge
Evap
Evaporator
Exp
Expected (= informed by Planning System or
user)
Hum
Humidity
Interv
Interval
Msg
Message
© 2015 Emerson Climate Technologies - Transportation Solutions ApS
62
User's Guide
Abbreviation
Explanation
Op
Operating
PD
Planning data
Press
Pressure
PTI
Pre-trip inspection
Rel
Relative
SP
Setpoint
Suct
Suction
SW
Software
Temp
Temperature
USDA
Used as synonym for cargo probe
Volt
Voltage
The following table describes a few columns that could need a special explanation:
Column header
Explanation
Defrosting
Defrosting: A "D" is shown when the controller
reports that it is being defrosting
Extern.datacord
means that the controller has external
Datacorder, while
means that it has not.
HasData
means that data has been received from
controller via Power Cable Transmission or
RDC recently, while
means that either data
were never received or they are obsolete. In
other words, HasData is
if either
OnlineDataOK is
or RDCdataOK is .
Location
Shows the container's location as reported by
the Planning System or typed in by the user.
If (*) is appended to the location, it indicates
that the container will be deleted as soon as all
it's alarms have been acknowledged and it has
stopped communicating on the PCT. See also
Planning data import 152 .
Obsolete
means that data has been received from
controller via Power Cable Transmission or
RDC, but they are obsolete, while
means
that data are up-to-date or have never been
received.
Online
Communication Status. On PCT,
means
that REFCON has connection to the container,
or it had connection recently, while
means
that it has not.
OnlineDataOK
means that data has been received via
Power Cable Transmission recently, while
means that either data were never received via
PCT or they are obsolete.
© 2015 Emerson Climate Technologies - Transportation Solutions ApS
The Container List
Column header
63
Explanation
PDdeleteFailed
means that the container was no longer in
latest Planning data import, but it could not be
deleted because it was still online or did have
unacknowledged alarm(s).
This column is now obsolete because the
same information is indicated by (*) added to
the location, as described elsewhere.
RDCdataOK
means that data has been received via the
optional RDC recently, while
means that
either data were never received via RDC or they
are obsolete.
Special
An "S" is shown when the container is marked
as Special Reefer.
In addition to the above, you may also see/use the special columns regarding PCT
Communication Statistics 257 .
4.3
Setting up the Container List
Overview
When REFCON 6 is installed the first time, it includes a limited number of standard and predefined Container List versions. All of these are locked 59 , meaning that you cannot change
them.
The idea is, however, that you design your own user-defined Container List versions. If you from
time to another need the same subset of containers or columns, follow the instructions below to
create a version that fits your needs.
"Installing" a pre-defined Container List
Out of the box, REFCON 6 provides a number of pre-defined Container Lists that are found in
the drop-down menu in the Side panel:
When you select one of the lists, it shows up in the Side panel as an unlocked list. Should you
one day not need it anymore, simply delete it - you can always "install" it again.
How to create a Container List version
To create a new Container List version, proceed as follows:
Step
Action
Comments
0 Open the existing Container List version that fits
best to your requirements.
This is in particular valuable if you
are going to re-use or modify a
complex list filter.
1 Click the + icon in the Side panel:
You should carefully write a
name for your version 64 that
© 2015 Emerson Climate Technologies - Transportation Solutions ApS
64
User's Guide
Step
Action
Comments
Alternative: In stead of the + icon you can use
the "Save list as..." command.
Alternative: "Install" a pre-defined list, see above
63 .
clearly describes what is it's
purpose, to you and other users.
2 Change the settings of the Container List as
described below.
3 Save the layout in any of the following ways:
From the Shortcut menu 30 or the options
menu 59 , select "Save list changes".
Or close the Container List and select Yes
when asked whether to save.
If the version you are setting up
is locked, the "Save list
changes" option is greyed, and
you are not asked when the
Container List is closed.
Selecting the name for your version
When you create a new Container List version, it is important that you carefully select a name
that clearly describes it's purpose. Remember that the name appears in the Side panel, along
with others. To you and other users, the name will be the only means to decide which version to
open.
The name that you select can only consist of letters, digits and spaces. Special characters are
not allowed.
Selecting the order of the columns
You can drag the band headers or the column headers with the mouse to change the order that
the bands and columns appear.
Dragging means:
1. Point to the header and press and keep the left mouse button.
2. While the left mouse button is pressed, move the mouse cursor to another header, and
release the button.
While dragging, you will observe a black rectangular frame within the appointed header. The
frame is just visible for a short while. It appears in either of the ends of the header:
If at the left end, the moved band or column will be placed left to the appointed column.
If at the right end, the moved band or column will be placed right to the appointed column.
You will notice that you can't move a column outside it's band.
Selecting the columns
You add or remove bands or columns from the Container List version as follows:
Step
Action
1 Right-click anywhere inside the Container List window, and select "Add/Remove
Columns..." from the menu.
Result: A small box named "Add Remove Columns" appears in the lower right
corner of the Container List window. The box has two tab's, named "Columns"
and "Bands". Under each tab, there will normally be a number of column and
band headers, respectively.
2a To add a band, locate it in the "Add Remove Columns" box under the "Bands"
tab and drag it up upon the existing band header where you want it to be placed.
See also Selecting the order of the columns 64 .
© 2015 Emerson Climate Technologies - Transportation Solutions ApS
The Container List
Step
65
Action
A band can be placed anywhere among and besides the already displayed
bands.
Note that when adding a band, all the attached columns are automatically added
as well, except for the possible columns being found under the Columns tab.
2b To add a column that has been un-attached it's band, locate it in the "Add
Remove Columns" box under the "Columns" band, and drag it up upon the
existing header where you want it to be placed. You can only add it to it's band,
as clearly indicated.
2c To remove a band or column, drag it's header away from the headers.
© 2015 Emerson Climate Technologies - Transportation Solutions ApS
66
User's Guide
Step
Action
When you have dragged it some way down, a cross appears upon the floating
header - then release the mouse button, and the header has been removed. It
automatically occurs in the "Add Remove Columns" box.
Sorting the containers
You can change the sorting order of the containers as described in Selecting the order of the
containers 60 .
You set up the filter as described in Setting up a Filter
4.4
66 .
Setting up a Filter
Overview
You define a filter to specify a certain subset of all containers to be shown in the Container
List. Filters can be applied to more columns at a time. Columns having filter applied are marked
like this:
Filters can be rather simple or quite complex as you choose. There are several ways to define
the filter, as described in the following.
Initially selecting a Filter
When you are working with a Container List having no filter applied, the first step in defining a
filter always is as follows. Note that you can also do this when a filter is active.
Move the mouse cursor onto the header of the column of interest (if there are more, just pick
one for a beginning):
As soon as the mouse cursor moves over the header, it changes colour, and the small filter
button gets visible. Click the button to open the list of filter options:
© 2015 Emerson Climate Technologies - Transportation Solutions ApS
The Container List
67
At the top of this list, you will see a number of options marked with parentheses. They can be:
Filter option
Explanation
(All)
Removes the filter regarding this column. After this, all containers are
shown unless filtered by other column(s).
(Custom)
Selecting an advanced filter as described below.
(Blanks)
Do only show the container if the field in this column is empty.
(Non blanks)
Do only show the container if the field in this column is not empty.
Below the parentheses options, all values that actually appear in the column are listed - in the
above example, 0.0 and 5.0. When selecting one of these, only containers reading this specific
value in this column will be shown. For example, select 0.0 to show containers with setpoint
zero.
The Filter Status Bar
Having selected a filter as described above, the Filter Status Bar appears near the bottom of the
Container List:
From left to right, the Filter status bar includes:
Bar element
Description
"Cancel filter"
button
Completely removes the filter. After this, all containers are shown.
"Filter on /
temporary off"
checkbox
Removing the checkmark makes the filter temporarily cancelled, which
makes all containers shown. Checking anew re-invokes the filter.
"Current filter
specification" field
Shows how the actual filter is defined.
"Quick change
filter" button
If available the button leads to a list of related alternative filter
specifications.
"Customize filter"
button
Opens the Filter Builder
69
described below.
Customising the filter, method 1
One way to further develop the filter is to repeat the initial selection for another column, see
Initially selecting a Filter 66 above.
© 2015 Emerson Climate Technologies - Transportation Solutions ApS
68
User's Guide
This way you achieve AND-logic, that is, for a container to be shown, it must meet the filter
conditions for all columns where filters are applied. You will recognize the word "and" in the
specification in the Filter status bar (and not the word "or").
Customising the filter, method 2
When you select "(Custom)" from the filter list,
the following dialog box opens:
You will see that the selected column is indicated, in the example: "Setpoint".
It is possible to select one or two criteria. Each criterion is specified by a type and a parameter
string.
Regarding the parameter string, note that:
It is not case sensitive - you can use upper and lower case letters to wish.
For some criterion types, the % character means "any character combination" - see
examples below.
The available criterion types depend on the column type. All the possible criterion types are:
Criterion type
Explanation
Examples
equals
The column reading must exactly
match the parameter string
does not equal
Display all column readings that do "does not equal" "SoMu0123456"
not match the parameter string
will display all containers except
the one with ID "SOMU0123456"
is greater than
is greater than or
equal to
is less than
If numeric column: Display all
column readings being greater
than the parameter value.
If textual column: Display all
column readings being higher in
the alphabet than the parameter
string
Same as "is greater than" but also
including the exact match
If numeric column: Display all
column readings being less than
the parameter value.
"equals" "SoMu0123456" will
display ID "SOMU0123456" only
"is greater than" "17" will display
the value 18 and higher (or
17.0001 and higher)
"is greater than" "somu%" will
display all IDs starting with
"SOMU", "SONU", "TAAU" etc.,
but not "AAAU", "SOLU" etc.
"is greater than or equal to" "17"
will display the value 17.0000 and
higher
"is less than" "17" will display
the value 16 and smaller (or
16.9999 and smaller)
© 2015 Emerson Climate Technologies - Transportation Solutions ApS
The Container List
Criterion type
69
Explanation
Examples
If textual column: Display all
column readings being lower in
the alphabet than the parameter
string
"is less than" "somu0123456"
will display all IDs starting with
"AAAU", "SOLU" etc. as well as
"SOMU0123455", but not
"SOMU0123456" and higher
numbers or IDs starting with
"SONU", "TAAU" etc.
is less than or
equal to
Same as "is less than" but also
including the exact match
blanks
Do only show the container if the
field in this column is empty.
non blanks
Do only show the container if the
field in this column is not empty.
like
Similar to "equal", but the %
character can be used to hit more
than one container
not like
The opposite of "like": Displays all
containers that "like" would hide.
"is less than or equal to" "17" will
display the value 17.0000 and
smaller
"like" "SoMu0123456" will
display ID "SOMU0123456" only
"like" "SOmu%" will display all
IDs starting with "SOMU".
"like" "SOmu%20" will display all
IDs starting with "SOMU" and
ending with "20".
"like" "%77%" will display all IDs
including the sequence of
characters "77".
"not like" "%77%" will display all
IDs that do not include the
sequence of characters "77".
If you select two criteria, also choose the combination type:
Select "And" if both criteria must be met.
Select "Or" if one of the criteria or both must be met.
Examples:
To have all containers with setpoint near zero selected, you could define criterion 1 as "is
greater than" "-0.5", criterion 2 as "is less than" "0.5" and combination type "And".
To have all containers in bay 02 and 06 displayed, you would choose the Location column
and set criterion 1 to "like" "b02%", criterion 2 to "like" "b06%" and combination type "Or".
Customising the filter, method 3
When you select the "Edit Filter" button rightmost in the Filter status bar
selection dialog box appears, see How to use the Filter Builder 69 .
4.5
67 ,
the advanced filter
67 ,
the Filter Builder
How to use the Filter Builder
Overview
When you select the "Edit Filter" button rightmost in the Filter status bar
appears:
© 2015 Emerson Climate Technologies - Transportation Solutions ApS
70
User's Guide
Note that any element within the filter logic pane is click-able and changeable.
We believe that you will have to experiment a little to learn how to create advanced filters, but
here are a few tips:
Combination types
Clicking "And" (or any of the following alternatives) displays a menu where you can select any
of the following options:
Operator option
Explanation
Examples
All related operands are
"and'ed", that is, all conditions
must be met.
([Alms] > 0) And ([Special] =
Checked) => only containers
that are marked Special and
have alarms are selected.
The related operands are
"or'ed", that is, one or more
conditions must be met.
([Alms] > 0) Or ([Special] =
Checked) => all containers
that are marked Special or
have alarms (or both) are
selected.
All related operands are
"and'ed" and the result is
inverted, that is, if all conditions
are met the container is
excluded.
Not (([Alms] > 0) And
([Special] = Checked)) => all
containers that are not marked
Special or do not have any
alarms are selected.
All related operands are "or'ed"
and the result is inverted, that
is, if any condition is met the
container is excluded.
Not (([Alms] > 0) Or ([Special]
= Checked)) => all containers
that are not marked Special
and do not have any alarms
are selected.
Adds a condition row - same as There are two condition rows in
clicking the addition symbol:
above Filter Builder example.
Adds a new group of conditions. Both advanced examples
below have two groups.
Removes a group of conditions.
Column name selection
Clicking a column name (eg. [Alms]) opens a dialog box with all available columns (= container
data fields), including those not displayed in the actual Container List:
© 2015 Emerson Climate Technologies - Transportation Solutions ApS
The Container List
71
As you see there are two lists side by side. You can use any of the lists as you wish.
You can use the mouse to select, or you can use the arrow keys, the tab key and the Enter
key. In the following we assume you are using the mouse.
In the list to the left, all the columns are organised by bands 58 . So, if you are looking for a
column, and you know what band it belongs to, click the next to the band name, and then
select the column name.
In the list to the right, all columns are listed in alphabetical order. You can search this list by
typing the first characters of the column name in the text box uppermost.
Criterion selection
Clicking "Equals" (or any of the following alternatives) displays a menu where you can select
any of the following options:
Criterion
Explanation
Examples
The column reading must
exactly match the parameter
string.
[Running Mode] = 'Defrost' =>
all containers in mode "defrost"
are selected, but not containers
in mode "defrosting".
Display all column readings
that do exactly not match the
parameter string.
[Running Mode] <> 'Defrost' =>
all containers in mode "defrost"
are not selected, but all others
are, including those in mode
"defrosting".
If numeric column: Display all
column readings being
greater than the parameter
value.
If textual column: Display all
column readings being higher
in the alphabet than the
© 2015 Emerson Climate Technologies - Transportation Solutions ApS
[Alms] > 0 => all containers
with alarms are selected.
[Running Mode] > 'Defrost'
=> all containers in modes
coming after "defrost" when
sorted alphabetically are
72
User's Guide
Criterion
Explanation
Examples
parameter string.
selected - for example,
"defrosting" is selected, but
"defrost" is not.
If numeric column: Display all
column readings being
greater than or equal to the
parameter value.
If textual column: Display all
column readings being higher
or equal in the alphabet than
the parameter string.
[Alms] >= 1 => all containers
with alarms are selected.
If numeric column: Display all
column readings being less
than the parameter value.
If textual column: Display all
column readings being lower
in the alphabet than the
parameter string.
[Alms] < 1 => all containers
without alarms are selected.
If numeric column: Display all
column readings being less
than or equal to the
parameter value.
If textual column: Display all
column readings being lower
or equal in the alphabet than
the parameter string.
[Alms] <= 1 => all containers
with none or one alarm are
selected.
[Running Mode] <= 'Defrost'
=> all containers in mode
"defrost", and all modes
coming before "defrost" when
sorted alphabetically, are
selected - for example,
"defrost" is included, but
"defrosting" is not.
If numeric column: Display all
column readings being
between the two parameter
values.
If textual column: Display all
column readings being
between the two parameter
strings in the alphabet.
[Alms] Between ('1', '4') =>
all containers with 2 or 3
alarms are selected.
[Running Mode] Between
('Defrost', 'Remote') => all
containers in modes coming
after "defrost" and before
"remote" when sorted
alphabetically are selected for example, "defrosting" is
selected, but "defrost" and
"remote" are not.
If numeric column: Display all
column readings being less
than or equal to the smallest
parameter value or greater
Not ([Alms] Between ('1', '4'))
=> all containers with 0, 1 or
more than 3 alarms are
selected.
[Running Mode] >= 'Defrost'
=> all containers in mode
"defrost", and all modes
coming after "defrost" when
sorted alphabetically, are
selected - for example, both
"defrost" and "defrosting" are
included.
[Running Mode] < 'Defrost'
=> all containers in modes
coming before "defrost" when
sorted alphabetically are
selected - for example,
"cooling" is selected, but
"defrost" is not.
© 2015 Emerson Climate Technologies - Transportation Solutions ApS
The Container List
Criterion
Explanation
than or equal to the highest
parameter value.
If textual column: Display all
column readings being not
between the two parameter
strings in the alphabet.
73
Examples
Not ([Running Mode]
Between ('Defrost', 'Remote'))
=> all containers in modes
coming before "defrost" and
after "remote" when sorted
alphabetically, as well as
both "defrost" and "remote",
are selected - for example,
"defrosting" is not selected,
but "cooling" and "unit off"
are.
Display all column readings
that includes the parameter
string.
[Location] Like '%23%' => all
containers where the exact
substring "23" is found in the
location are included, for
example, 005R123A and
011R231B, but not 008R203A.
Display all column readings
that do not include the
parameter string.
[Location] Not Like '%23%' =>
all containers where the exact
substring "23" is not found in
the location are included, for
example, 005R120A and
011R203B, but not 008R123A.
Display all column readings
that begin with the parameter
string.
[Location] Like '00%' => all
containers where the exact
substring "00" is the beginning
of the location are included, for
example, 005R123A and
008R203A, but not 011R231B
nor 123R001A.
Display all column readings
that end with the parameter
string.
[Location] Like '%3A' => all
containers where the exact
substring "3A" is the end of the
location are included, for
example, 005R123A and
008R203A, but not 011R231B
nor 123A001R.
Similar to "equal", but the %
character can be used to hit
more than one container.
[Location] Like '005%A' => all
containers where the location
starts with the exact substring
"005" and ends with "a" are
included, for example,
005R123A and 005R203A, but
not 005R123B nor 008R203A.
Similar to "not equal", but the
% character can be used to
refine the specification.
[Location] Not Like '005%A' =>
all containers where the
location does not start with the
exact substring "005" and ends
with "a" are included, for
example, 008R203A and
005R123B, but not 005R123A.
© 2015 Emerson Climate Technologies - Transportation Solutions ApS
74
User's Guide
Criterion
Explanation
Examples
Do only show the container if
the field in this column is
empty.
Not really a useful criterion!
Do only show the container if
the field in this column is not
empty.
Not really a useful criterion!
Display all column readings
that exactly match one of the
parameters.
[Running Mode] In ('Defrost',
'Defrosting') => all containers in
"defrost" or "defrosting" mode
are selected.
Display all column readings
that do not exactly match any
of the parameters.
Not ([Running Mode] In
('Defrost', 'Defrosting')) => all
containers not in "defrost" nor
"defrosting" mode are selected
Parameter selection
Clicking the parameter field ("1" or "Defrosting" in above figure) lets you edit this.
Note that if the column is binary (on/off, yes/no etc.), repeating the click will walk through the
options.
Other hints
Clicking an addition symbol
Clicking a deletion symbol
adds a condition to the current node.
removes the condition.
Examples
The following figure shows an example of how you can define a subset of locations (area 005R
stack 23 or area 011R level B):
The following figure shows how you can combine certain locations and other parameters (it
must be a special reefer located in area 005R with running mode either "defrost" or "fan
reduced"):
© 2015 Emerson Climate Technologies - Transportation Solutions ApS
The Container List
© 2015 Emerson Climate Technologies - Transportation Solutions ApS
75
REFCON 6
Reefer Container Monitoring System
The Container Plan
Transportation Solutions
78
5
User's Guide
The Container Plan
Overview
The Container Plan is a system of graphical pictures showing the states of the reefer
containers. It can be all containers, or a specified subset.
The Container Plan is build up of squares, called Container Items. Each Container Item
represents one 40' container or one or two 20' containers. The Container Items are organised in
the picture in a way that should associate to the physical locations of the containers. The
picture layout is thus customised for the individual application.
The Container Item indicates the status of the container at that specific location by colours,
see Container Plan Legends 80 .
REFCON includes a generator/import tool that can be used to create or edit the Container Plan
pictures, see Container Plan Generator (terminal version) 80 and Container Plan Generator
(ship version) 82 .
The Container Plan provides two zoom levels, as described below.
The Overview zoom level
The Overview zoom level aims at supervising all containers at the ship/terminal in one picture.
As indicated in above example, it is possible for the Container Plan designer to divide into two
or more overviews - in this case three, named Area 1, 2 and 3. You can display one overview
only at a time.
The overview automatically adapts to the available screen area. Hence, if you make the
REFCON Monitor and/or the Container Plan window area smaller, the Container Items get
smaller, and vice versa. The Container Plan designer would normally optimise the layout for the
maximum window size.
Note: On ships you need to move the mouse over the bay to see the bay number.
© 2015 Emerson Climate Technologies - Transportation Solutions ApS
The Container Plan
79
The Detail zoom level
The Detail zoom level shows a decided segment of the overview. On a container ship, it would
normally be a bay.
As shown in the above example, a system of co-ordinates appears in the Detail view. You will
see that the axes dynamically indicates the position of the mouse cursor. Of course, also the
Container Items are much larger.
The segment is identified next to the overview name at the top of the picture, eg. "Area 3 ->
K126".
Apart from this, the information shown is the same as in the overview. The detail view
automatically adapts to the available screen area, exactly like the overview.
The Container Plan Tooltip
When moving the mouse cursor over the Container Items, you will see that a Tooltip is
displayed, showing primary data regarding the appointed container.
You will recognize the second line in the Tooltip as the container ID.
In case of one or more alarms on a container, these are listed in the Tooltip.
Note that measurements appear with a limited accuracy
© 2015 Emerson Climate Technologies - Transportation Solutions ApS
114
.
80
5.1
User's Guide
Using the Container Plan
Opening the Container Plan
To open the Container Plan, click the item in the Side panel:
Operating the selected container
By right-clicking a container you will have the Shortcut menu displayed. Please refer to The
Container Command section of the Shortcut menu 31 for details.
Zooming the Container Plan
You can change between the Overview zoom level
78
and the Detail zoom level
79
in two ways:
Use the scroll wheel on the mouse. If at Overview level, select a Detail section first (click it to
have the yellow frame shown).
Double-click - at Overview level, in the Detail section of interest; at Detail level, just
somewhere within the Container Plan picture.
5.2
Container Plan Legends
Overview
The Container Item, being the square representing one container, indicates the status of the
container by colour and simple symbols, see Legends 80 .
Legends
The Container Item provides a set of general legends 108 . The following table specifies the
possible additional colour indications and symbols in the Container Item.
Sym In words
bol
5.3
Short description
Explanation
Dark grey No reefer container at
location
The location is vacant, or it is occupied by a
container that is unknown to REFCON.
Divided in Two 20' containers at
two
location
The foremost container is shown at the upper half
of the square.
Note that if there is only one 20' reefer container at
the location, the other "half" being vacant or
occupied by a dry reefer, the full square is used, in
which case you can not graphically distinguish
between a 20' and a 40' container.
Light grey A disabled location
(ships only)
A location that can not be occupied by any (reefer)
container. See Enabled and disabled locations 83 .
Container Plan Generator (terminal version)
Overview
This version of the Container Plan generator allows you to import a Container Plan designed in
the separate tool "RefConfig".
Having successfully imported a new Container Plan and saved it, it replaces any possible
existing Container Plan.
© 2015 Emerson Climate Technologies - Transportation Solutions ApS
The Container Plan
81
Procedure
To import a Container Plan, walk through the steps described below:
A. Make sure you have an XML-file exported from RefConfig.
B. Invoke the Container Plan Generator 81 .
C. View the result 81 .
D. Save the Container Plan 82 .
Invoking the Container Plan Generator
To open the Container Plan Generator, select "Create Container Plan" from the "Settings"
menu.
The following dialog box opens:
Type or paste the full path and filename into the textbox, or use the Browse function to locate it.
Follow the result in the Result / Status area, see below.
Viewing the result
As soon as you have entered a valid RefConfig file path and name, the Generator immediately
starts importing the Container Plan. This normally lasts just a few seconds.
Having completed, you can watch the result in the "Result / Status" area of the dialog box.
In case of success, the dialog box appears something like this:
In this example you observe:
The "Result / Status" reads success, stating the number of overviews detected (66 in the
example).
The "Save and Restart" button has become enabled.
© 2015 Emerson Climate Technologies - Transportation Solutions ApS
82
User's Guide
Saving the Container Plan
To complete your work, now select the "Save and Restart" button.
"Save" means that the Container Plan you just generated will now replace a possible existing
one.
"Restart" means that the REFCON Monitor will restart to make the new Container Plan
available.
5.4
Container Plan Generator (ship version)
Overview
This version of the Container Plan generator is designed for ships where the containers are
organised strictly according to the ISO 9711-1:1990 standard, however, it also handles certain
exceptions from this. Please examine the result if you have such exceptions.
The generator works with Baplie files, that is, files in the Baplie 1.5 or Baplie 2.0 format
(specified by the SMDG group, see www.smdg.org).
All you have to do is to select a Baplie file including the actual locations on the ship. Preferably,
the Baplie file should include all locations where you can have reefer containers, or if you wish,
all locations at all. Your Planning System would probably be able to produce such a file. An
incomplete Baplie file might also give a reasonable result.
Having successfully generated a new Container Plan and saved it, it replaces any possible
existing Container Plan.
Procedure
To generate a new Container Plan, walk through the steps described below:
A. Invoke the Container Plan Generator 82 .
B. View the result 83 .
C. Save the Container Plan 83 .
D. Optionally, edit the result 84 .
Invoking the Container Plan Generator
To open the Container Plan Generator, select "Create Container Plan" from the "Settings"
menu.
The following dialog box opens:
1. Type or paste the full path and filename into the textbox, or use the Browse function to locate
it. Follow the result in the Result / Status area, see below.
© 2015 Emerson Climate Technologies - Transportation Solutions ApS
The Container Plan
83
2. You may, before or after step 1, select/deselect the option "Include positions for dry reefers".
Many users would find the Container Plan more clear when dry reefers are left out.
Viewing the result
As soon as you have entered a valid Baplie file path and name in the above step 1, the
Generator immediately starts calculating the Container Plan. This normally lasts just a few
seconds.
Having completed, you can watch the result in the "Result / Status" area of the dialog box.
In case of success, the dialog box appears something like this:
In this example you observe:
The "Result / Status" reads success, stating the number of bays detected (16 in the
example).
The "Save and Restart" button has become enabled.
Saving the Container Plan
To complete your work, now select the "Save and Restart" button.
"Save" means that the Container Plan you just generated will now replace a possible existing
one.
"Restart" means that the REFCON Monitor will restart to make the new Container Plan
available.
Enabled and disabled locations
The Generator determines the overall maximum and minimum tier and row numbers and then
constructs the basic bay to fit these. Then it constructs the specific individual bays in
accordance with the specific locations defined in the Baplie file. The result (in the very most
cases) is that a number of locations are disabled as indicated in the following example:
© 2015 Emerson Climate Technologies - Transportation Solutions ApS
84
User's Guide
You can use the Container Plan editor
84
to enable or disable locations.
A container on a disabled location
If it happens that, after saving the Container Plan, a container appears at a disabled location,
that location will be temporarily enabled.
When later the container is removed and deleted from REFCON, that location returns to the
disabled state.
A container outside the basic bay
If it happens that a container appears at a location outside the basic bay area, it will not appear
in the Container Plan. Still you can find it in the Container List, and alarms will be shown in the
Alarm Summary.
5.5
Editing the Container Plan (ships only)
Overview
On ships it is possible to manually modify the Container Plan layout by enabling or disabling
locations within the existing bays, within the decided maximum size of these.
Exceptions
This editor has the following limitations:
You can not add or remove bays.
You can not add locations outside the defined maximum bay size.
In both the above cases, if you need to do so, you will have to use the Container Plan Generator
82 with an appropriate Baplie file.
How to edit the Container Plan
Invoke the Container Plan editor this way:
1. Open the Container Plan.
© 2015 Emerson Climate Technologies - Transportation Solutions ApS
The Container Plan
85
2. Select "Edit Container Plan" from the "Container Plan" menu.
You will now see (within a few seconds) that the frame of the Container Plan changes to orange,
and the disabled locations in each bay change to pink:
While these colours are observed, you are in edit mode. Below you find descriptions on editing
details.
Having completed your editing:
3. Re-select "Edit Container Plan" from the "Container Plan" menu. The changes are saved (if
you accept to do so), and you are back in normal mode.
The tooltip in edit mode
Normally, when moving the mouse over disabled locations within the bays, no tooltips occur.
But when in edit mode, you will have a tooltip, making it easy to determine exactly where the
mouse is positioned at the moment:
Enabling and disabling locations
You enable locations (the pink ones) by:
Clicking individual disabled locations:
By pressing the left mouse button on a disabled location and dragging to other disabled
locations. Note that if the mouse passes enabled locations, these are not affected (because
you started at a disabled location):
© 2015 Emerson Climate Technologies - Transportation Solutions ApS
86
User's Guide
You disable locations (the non-pink ones) by:
Clicking individual enabled locations:
By pressing the left mouse button on an enabled location and dragging to other enabled
locations. Note that if the mouse passes disabled locations, these are not affected (because
you started at an enabled location):
© 2015 Emerson Climate Technologies - Transportation Solutions ApS
REFCON 6
Reefer Container Monitoring System
The Alarm System
Transportation Solutions
88
6
User's Guide
The Alarm System
Overview
A vital part of REFCON is the Alarm System. Please look at the following sketch:
There are in fact three main parts:
Alarm generation = the decision that an alarm must be given. Alarms are generated in two
places, the container controller 88 and REFCON 89 .
Alarm handling 89 = maintaining a list of actual alarms and event logging.
Alarm propagation 92 = attracting your attention, or just showing on the screen that an alarm
is present.
A number of tools are available at REFCON for your alarm handling. The primary tool is the
Alarm Summary 89 in which you can always inspect all the actual alarms.
Alarms generated by the controller
Reefer container controllers are independent alarm systems. Alarms can be inspected on the
container – which you will have to do if the container is not connected to REFCON by PCT
(Power Cable Transmission).
Each controller has a certain number of alarm points, each corresponding to an alarm reason.
The specific list of possible alarms depends on the controller type.
In case of PCT, the states of all the alarm points are periodically transmitted to REFCON.
In REFCON, changes are detected, causing the Alarm Summary and Event Log to be updated
and the alarm to be propagated, if relevant.
Reservation regarding alarm text strings
Please observe the following:
Emerson Climate Technologies makes reservations regarding the alarm text strings
attached to the controller generated alarms. Emerson Climate Technologies cannot
guarantee that these text strings are correct and clear.
Please consult the controller manufacturer's manual to be absolutely sure what is
the correct alarm text.
The alarm text strings shown in REFCON were informed by the controller manufacturers.
Emerson Climate Technologies has made great efforts to ensure that each text string is true.
Possible divergences could for example be due to controller changes that have not yet been
updated in REFCON.
You should keep your REFCON system updated in order to ensure full compatibility with
controller manufacturers' latest software, see Understanding installation and update 245 .
© 2015 Emerson Climate Technologies - Transportation Solutions ApS
The Alarm System
89
Alarms generated by REFCON
REFCON provides the following types of alarms:
All REFCON hardware is supervised. In case of malfunction an alarm is released.
All communication interfaces are supervised. If, for example, information that should be
retrieved is not so, or information that should be transmitted can not be so, alarms are
released.
User generated alarms 98 .
Various function alarms are described in relation to the respective functional descriptions.
REFCON will generate alarm on behalf of the container controller in the following cases where
the controller would not itself have the necessary data to do the alarm decision:
Expected temperature setpoint differs from actual setpoint 95 .
Modem does not communicate with the controller.
Container ID is missing or wrong 97 .
Communication has stopped (possible loss of power) 95 .
Alarm handling
Your main activities regarding alarms would be:
Inspecting an Alarm Summary 89 , to find the reason for a new alarm and more. As regards
container alarms, you may in stead inspect the optional Container Plan.
Acknowledging alarms (see Acknowledging a container's alarms 89 below and
Acknowledging alarms 91 ).
Taking action to solve the problem causing the alarm.
De-acknowledging 91 an alarm, if relevant.
Acknowledging a container's alarms
In addition to the Alarm Summary, you can acknowledge a container's alarms from the
Container Details 116 .
Further you can acknowledge a container's alarms directly from pictures where the container
occur, typically the Container List 58 and the optional Container Plan.
To do so, right-click the container. In the Shortcut menu
alarms". This makes a container alarm overview appear:
30
, select "Acknowledge container
Make sure to inspect this list of new alarms carefully. Then select Yes to acknowledge them
all.
6.1
Alarm Summary
Overview
The Alarm Summary is a list showing all the pending alarms.
REFCON provides two Alarm Summary versions, one for container alarms and one for system
alarms. The two versions work the same way, so only the container version is illustrated in the
following.
© 2015 Emerson Climate Technologies - Transportation Solutions ApS
90
User's Guide
As indicated, the Alarm Summary might be divided into sections. The individual section is
shown only if there is one or more alarms in the related category:
1. Special reefers: Here you find all containers that are marked "Special" and have alarms (see
Special reefers 94 ).
2. Containers: Here you find all non-special containers with alarms.
3. System alarms: Here you find all alarms that are not related to containers (see Alarms
generated by REFCON 89 ).
Basically, each line in the Alarm Summary represents one alarm, however, if there are more
than one alarm on the same container or the same system device, it is still just one line.
Please observe the Alarms column, counting the number of alarms on each container/device. In
case of more alarms, the "Text" field relates to the newest alarm, while the indicator leftmost
flashes if any of the alarms is not acknowledged. You can open a sub-list of the alarms by
clicking the + sign leftmost.
The Alarm Summary includes a fixed number of columns. The contents of the columns are
described in Acknowledge state indication 91 and Column specifications 92 .
When opened, the Alarm Summary always includes all alarms in the relevant category, and it is
always sorted chronologically, the newest alarm in each section being shown first. The sorting
order can be changed as shown in Sorting the alarms 92 .
Indication of temporary list changes
It is possible to temporarily change the Sorting of the alarms 92 , the selection of displayed
columns 64 , and more. As this can lead to serious mistakes for other users, the change is
clearly indicated by orange colours of the list caption and more:
You revert to the standard settings by closing and re-opening the Alarm Summary or by clicking
the "Reset sorting/filtering" button.
Opening the Alarm Summary
You can not open an Alarm Summary if there are no alarms in the relevant category. For
example, if there is no pending system alarms, the System Alarm Summary can not be opened
- but if it is already open, it stays so.
To open the Container Alarm Summary, click the "Alarms (nn)" text or the red/flashing field in
the Performance Bar 25 :
Note that the Alarms field is available even when the Side panel is minimized:
To open the System Alarm Summary, click the "System Alarms (nn)" text or the red/flashing
bell icon below the Performance Bar 25 :
© 2015 Emerson Climate Technologies - Transportation Solutions ApS
The Alarm System
91
Note that the System Alarms bell icon is available even when the Side panel is minimized:
Acknowledge state indication
The narrow leftmost column indicates the acknowledge state of each alarm:
Indication
Flashing
Steady
Description
There are one or more unacknowledged alarms on this
container.
There are one or more alarms on this container, they have all
been acknowledged.
Acknowledging alarms
Alarms can be acknowledged from the Alarm Summary as follows:
1. Select the alarm or the alarms to be acknowledged (see Selecting alarms for acknowledge
91 below).
2. Either right-click the alarm (/ any of the selected alarms) and choose "Acknowledge selected
alarms", or click the "Acknowledge selected alarm(s)" button upper right:
You can also acknowledge all alarms as follows:
Either right-click any alarm and choose "Acknowledge all alarms",
Or click the "Acknowledge all alarm(s)" button upper right:
Selecting alarms for acknowledge
Selecting specific alarms for acknowledge can be done as follows:
To select a single alarm,
1. Click the row and thereby make it highlighted.
To select a continuous series of alarms in the list,
1. Click the first alarm in the series.
2. Keep the Shift button pressed and click the last alarm in the series. You should now see the
two clicked alarms and all in between being selected (highlighted).
To select chosen alarms in the list,
1. Click one of the alarms to be acknowledged.
2. Keep the Ctrl button pressed and click each of the other alarms to be acknowledged.
To select all alarms in the list,
1. Click any alarm to have the Alarm Summary "in focus".
2. Select the keyboard combination Ctrl+A.
De-acknowledging an alarm
An alarm that once has been acknowledged can be de-acknowledged from the Alarm Summary
as follows:
1. Click the specific alarm of interest so that the row gets highlighted. Note that if you select a
container or device with more alarms, you are warned (in step 2) that de-acknowledgement is
not possible for a set of alarms.
2. Right-click the alarm and choose "De-acknowledge alarm".
© 2015 Emerson Climate Technologies - Transportation Solutions ApS
92
User's Guide
De-acknowledgement means that alarm flashing and other Alarm propagation
but the original time of the alarm is not changed.
92
is restarted,
Sorting the alarms
When opened, the Alarm Summary always includes all alarms, and it is always sorted
chronologically, the newest alarm in each section being shown first. It is possible to change the
sorting, however, the change will be temporary as it can not be saved.
Changing the sorting is done exactly like in the Container List, please refer to Selecting the
sorting order of the containers 60 and Selecting a sorting filter 60 .
Column specifications
The Alarm Summary includes the columns described below. Note that the Source table-column
shows where the information comes from.
Column header
/ abbreviation
6.2
Explanation
Source
Location
If a container: It's location, if known.
If not a container: The location of the system
device, if known.
Planning System or
REFCON
Origin
If a container: The ID (4 letters + 7 digits).
If not a container: The name of the system
device.
Planning System /
controller, or
REFCON
Text
Description of the alarm cause.
Controller
manufacturer /
REFCON
Alarms
Number of alarms on this container / device.
Controller / REFCON
User
The user ID of the user who acknowledged the
alarm.
REFCON
Time UTC and
Time LMT
The time when the alarm occurred.
REFCON
User's note
The text written in the Note field of the container.
The column is always empty for system alarms.
Planning System or
user
Generated By
What unit did release the alarm. If it was a
Controller / REFCON
controller, the controller type is indicated. In case
of a user generated alarm, the user ID is indicated.
Action category
(optional)
The alarm's category in the optional Email
notification system.
REFCON
Alarm propagation
Overview
The purpose of the Alarm propagation is to attract your attention in case of alarm.
In the basic REFCON version, you need to watch the REFCON PC screen at intervals to
discover new alarms. However, a number of Alarm Extension options are available that can alert
you actively.
© 2015 Emerson Climate Technologies - Transportation Solutions ApS
The Alarm System
93
Alarm indication in the REFCON Monitor
When the REFCON Monitor is open and active, alarms are primarily indicated in the Side panel:
The indicators and the related texts show:
The total number of container alarms (16 in the example) and system alarms (1 in the
example). All possible alarm categories and priorities are included.
If there are any unacknowledged alarm(s), the respective indicator is flashing.
If there is no alarms in the category, the indicator is not shown.
Also, alarms are indicated in the Windows task bar, see The taskbar notify icon
48 :
Alarm indication with REFCON's Mini-status window
If you want the alarm indication to be visible at a distance, you may use the Mini-status window
28 .
Alarm indication when the REFCON Monitor is not active
If the REFCON Monitor is open but not active when an alarm occurs, you will see that the
caption bar is flashing:
In the same situation, the taskbar field is flashing, keeping the taskbar visible even if autohidden:
Alarm Extensions
In general, the optional Alarm Extension functions more actively attract your attention in case of
alarms. The current version of REFCON 6 includes the Alarm Extension functions listed below.
Note that if the link does not work, it it because the particular option has not been enabled for
your REFCON system.
Digital output signals 210 for external alarm system or alarm panel.
The Email Notification function 204 .
Possible plug-ins or external systems utilizing REFCON's data-service interface 240 .
© 2015 Emerson Climate Technologies - Transportation Solutions ApS
94
6.3
User's Guide
Special reefers
Overview
This version of REFCON includes the "Special Reefers" option, making it possible to change
the alarming priority of individual containers. Normally, all container alarms belong to the
Standard category. Selecting "Special Reefer" will move the container to the Special category.
This category change makes difference in the Alarm Summary
different sections.
89 ,
as alarms are displayed in
"Special" is indicated by an "S" in the Container Details 108 and in the optional Container Plan.
It can also be included in versions of the Container List 64 .
Also, with Alarm extensions 93 , the idea is that alarms - depending on the configuration - can
be distinguished externally, for example, on a main alarm system.
Selecting "Special reefer"
The alarm category of a container can be changed using the "Special" button in the Container
Details 115 .
Alternatively you can proceed as follows:
Step
6.4
Action
1
Open the Container List
2
Right-click the container.
3
From the Shortcut menu,
select "Mark special reefer" to change to the "Special" category; or
select "Unmark special reefer" to change to the "Standard" category.
4
In both cases, select OK to close the resulting dialog box.
58
or the optional Container Plan and find the container.
Container handling mode (ships only)
Overview
This topic applies to container ships only.
When loading and discharging containers in a port (Harbour mode), containers are powered on
and off rather randomly seen from a monitoring viewpoint. At the same time, the information
received from the Planning System arrives asynchronously, which might result in containers
that are temporarily "unplanned". At the contrary, at sea (Sea mode) things are stable and
predictable.
When a container is without power, REFCON looses its ability to supervise the container. After
a while, REFCON will generate a disconnect event and, if in Sea mode, an alarm. In other
words, if the handling mode is not set to Harbour mode before containers starts to disconnect,
there will be many "false" loss-of-power-alarms 95 .
Similarly, if a container is connected before being informed by the Planning System, you will
have a wrong ID alarm 97 if not in Harbour mode.
Mode indication
In the Top Panel upper left in the REFCON window, a field shows the selected handling mode
by displaying either of the following:
© 2015 Emerson Climate Technologies - Transportation Solutions ApS
The Alarm System
Mode
Symbol
95
Description
Harbour
Bollard
Relevant alarms are suspended.
Sea
Propeller
Relevant alarms are enabled.
Changing the mode
To change the handling mode, click the mode indicator in the Top Panel.
In the drop-down menu that appears, select the new mode. If requested, enter user name and
password.
6.5
Temperature setpoint supervision
Overview
Provided that expected temperature setpoints are available from the Planning System, and that
the supervision function is enabled 100 , it works as follows:
For all containers in the database, REFCON continuously supervises the actual temperature
setpoints, received from the container controllers, and compares them to the expected
setpoints, received from the Planning System. If, for any specific container, the difference
between the two is greater than "Delta" 100 , the "Actual and Expected setpoints differ" alarms is
released.
Note that this is a very important alarm because it indicates that the cargo might be kept at a
wrong temperature level.
How to act upon this alarm?
When the "Actual and Expected setpoints differ" alarm occurs, it is important that you carry out
the following steps:
1. Find out if the expected setpoint is wrong, or the actual setpoint is wrong, or both.
2. If the expected setpoint is wrong, change this at the Planning System, and await the
Planning data update - which you might have to trig manually.
3. If the actual setpoint is wrong, change this in the container controller. You can normally do
this from the Container Details 114 , otherwise you need to visit the container.
Setpoint alarm parameters
You can change the Temperature Setpoint supervision parameters from the REFCON Setup
dialog box.
6.6
100
Possible loss of power alarm
Overview
“Loss-of-power surveillance” is a REFCON feature that aims at detecting when a reefer container
has broken down or has otherwise lost power in an unexpected way. If such a container is
detected, REFCON releases an alarm showing: “WARNING! Possible loss of power”,
accompanied by the ID of the container in question. The user should then physically check the
container as soon as possible.
As standard the following applies:
On ships, this automatic surveillance is enabled when in Sea mode 94 and disabled when in
Harbour mode 94 .
In terminals, this automatic surveillance is enabled per default.
The user can change the alarm delay. A larger delay will reduce the risk of "false" alarms
© 2015 Emerson Climate Technologies - Transportation Solutions ApS
96
User's Guide
(see below).
Because the feature may in certain cases produce "false" alarms (see below), the user can
disable it.
How the loss-of-power detection works
When operating normally, a container equipped with a modem starts to communicate with
REFCON shortly after it has been connected to power. It continues to regularly send readings
to REFCON until it eventually is being disconnected in order to be moved away.
If for some reason the container looses power, the communication stops and does not start
again by itself (unless the container is re-powered or repaired).
Whenever communication stops for more than the user decided alarm delay (being 3 hours as
default), the loss-of-power alarm is released.
This alarm delay allows the container to recover from a temporary communication gap (due to
noise, weak signals, and the like) without releasing the loss-of-power alarm. Also it allows a
deliberate short disconnection.
Limitations
Because a loss-of-power alarm is really a “lengthy-loss-of-connection”-alarm, the following
limitations apply:
If a container was never connected to power or for some other reason never started
communication, no alarm will ever occur for that container (since you can’t loose a
connection to a container that never had one!).
If a container for some other reason looses the communication to REFCON for more than the
alarm delay, the loss-of-power alarm will still be released. That is why the alarm text says
“Possible loss of power”. Reasons for communication stop while still on power may include:
Weak signal, noisy connection, defect modem and others. REFCON can in no way
distinguish between those reasons.
How to avoid alarms on deliberate disconnects
In general, the right way to avoid the alarm from a container that has been deliberately
disconnected (in order to be moved away) is to have the container deleted from REFCON’s
database within the alarm delay time. This deletion is normally handled automatically by
REFCON based on data received from the Planning System. It is therefore essential that the
Planning System is kept up-to-date as regards what containers are supposed to be on power at
any time.
Handling deliberate disconnects in terminals
On most container terminals, REFCON has a two-way online connection with the Planning
System. In this case everything works automatically because the Planning System very quickly
informs REFCON that a certain container has been disconnected, after which it is immediately
deleted from REFCON's database.
If no two-way online connection with the Planning System is available, REFCON is updated via
Planning data file transfers. At each file transfer, the Planning System produces a file that is
then imported by REFCON. On every import, REFCON checks if all previously known
containers are still present in the new file, and missing containers are automatically deleted. To
avoid that deliberately disconnected containers will release unwanted loss-of-power alarms, it is
essential that the file transfer is done frequently. For example, if the alarm delay is 3 hours,
transfer should be done at least every 2 hours.
Handling deliberate disconnects on ships
On ships the procedure is a bit different: While at sea the set of connected containers remains
the same throughout the sailing. Once in harbour, containers are connected and disconnected
all the time, and finally, when leaving the harbour, REFCON is updated with the new/changed
container load (by Planning data file transfer as described above).
© 2015 Emerson Climate Technologies - Transportation Solutions ApS
The Alarm System
97
This means that there may very well pass more than alarm delay time from a container is
disconnected until it disappears from the REFCON database. To avoid unwanted loss-of-power
alarms while in harbour, the automatic loss-of-power surveillance should be temporarily
suspended by selecting Harbour mode 95 .
How to configure loss-of-power surveillance
Both enabling/disabling the surveillance and changing the alarm delay is done from the
REFCON Setup dialog box 100 .
When disabling the surveillance (= removing the check mark), all already created loss-of-power
alarms disappear (once they have been acknowledged) and no new loss-of-power alarms will be
created.
When enabling the surveillance, all timing starts anew, meaning that at least the alarm delay
will pass before any loss-of-power alarms will be created – even if communication has stopped
hours ago.
Decreasing the alarm delay means quicker discovery of containers without power, but with the
potential expense of more unwanted alarms.
Increasing the alarm delay generates less unwanted alarms, but also slows down the detection
of containers loosing power.
The optimal delay for your system depends on the quality of communication on your particular
site. If communication quality is always good, you may choose a short delay (eg. 90 minutes),
otherwise a longer delay should be chosen. You may have to experiment a bit to find the
optimal value for your particular system.
6.7
Alarms for missing or wrong ID
Overview
It happens that a container has a mismatch between the ID painted on the box and the ID used
by the power cable modem:
A wrong ID typically could occur because the controller has been exchanged, taken from
another container, and was not re-programmed.
A missing ID would occur if a new controller did never have any ID programmed. In this case it
uses a factory ID starting with RMMU, LOSU, LANG, RAND or MCID.
How the Missing ID alarm works
When a container is connected to the power cable transmission system, it runs through two
steps:
1. It logs in. This is in fact just communication between REFCON and the modem on the
© 2015 Emerson Climate Technologies - Transportation Solutions ApS
98
User's Guide
container.
2. The controller is type detected, implying that communication is now established the whole
way through.
There can be several minutes between the two steps.
In case of errors on the connection between the modem and the controller, the step 2 never
occurs.
When a container logs in (step 1) using one of the factory IDs mentioned above (eg. RMMU),
REFCON puts it on an observation list. If and only if step 2 does later occur, the Missing ID
alarm is given immediately and unconditionally.
How the Wrong ID alarm works
As REFCON can not actually read what is painted on the container box, the detection of a
wrong ID is based on Planning data.
Assuming that REFCON has always a complete and updated list of the containers to expect
received from the Planning System, the detection is simple: If a container starts communicating
using an ID that is not on the Planning data list, the ID must be wrong.
In real life, the Planning data list might not be that perfect. In particular, when using file transfer,
there might be some time lag. Therefore, the alarm text shown in the REFCON Monitor is
"Container ID is wrong or Planning data missing".
On ships, the Wrong ID alarm is disabled while in Harbour mode
94
.
In terminals, user can decide a delay or even disable the Wrong ID alarm, see below
98
.
How to act upon these alarms?
Please refer to the Modem Troubleshooting
214
guide..
Settings regarding missing or wrong ID alarms
There are no settings available for the Missing ID alarm.
On ships, there are no settings available for the Wrong ID alarm, either, as the disabling is
handled by the Container handling mode 94 .
In terminals, user can
Select an alarm delay. For example, if you normally update Planning data every 4 hours, you
could select a delay of 4 hours to avoid unintended alarms.
Disable the alarm. This is necessary if you intendedly operate with unplanned containers.
See also Alarm Options setup
6.8
100
.
User generated alarms
Overview
You can create an alarm related to a specific container in two ways:
By selecting the "User Alarm" button in the Container Details, see below.
Using the optional RDC, please refer to the separate section of the user's manual.
The alarm text you write appears - exactly as you write it - in the Alarm Summary and the Event
Log:
© 2015 Emerson Climate Technologies - Transportation Solutions ApS
The Alarm System
99
Creating a user alarm
To create a user alarm, make sure the desired container is selected in the Container Details.
Then click the "User Alarm" button under the Container Details' "Summary" tab:
This opens the following dialog:
Type your alarm text and select "Generate alarm", and the alarm immediately appears.
Removing a user alarm
To remove a user alarm, make sure the container with the alarm is selected in the Container
Details. Then click the "User Alarm" button under the Container Details' "Summary" tab (see
above). This opens the above dialog displaying the following:
Select "Remove alarm" - and the dialog closes.
If the alarm does not immediately disappear, it is because it has not been acknowledged. If you
re-open the User alarm dialog, you will see this:
At the moment you acknowledge the alarm, it disappears.
© 2015 Emerson Climate Technologies - Transportation Solutions ApS
100
6.9
User's Guide
Alarm Options setup
Overview
The Alarm Options tab of the REFCON Setup dialog specifies data relevant to various alarms.
For ships it looks like this:
In terminals there is one more option:
The data fields are described below.
Setpoint alarm parameters
In the first row of the Alarm Options tab you can enable or disable the setpoint supervision
function. When the checkbox is checked, the function is enabled.
95
When enabled - as in the example in the above figure - you can further choose:
The Delta value.
Please be aware that both REFCON and the container controllers may miscalculate Fahrenheit
to/from Centigrade conversions by the last digit. To avoid that this causes alarms, the Delta
value should not be set to less than 0.2 degrees.
Remote operations parameters
This option is not shown if remote operations are not enabled in your license
11 .
© 2015 Emerson Climate Technologies - Transportation Solutions ApS
The Alarm System
101
In the second row of the Alarm Options tab you can enable or disable the alarm occurring when
a remote operation 109 fails.
A remote operation can fail in a number of ways. One of these is by timeout, the timeout time
being decided in the field "Max. time to complete". Note that this setting is used no matter if the
alarm is enabled or not.
GMS alarm parameters
In the third row of the Alarm Options tab you can enable or disable the alarm occurring should
the transfer of files to the Global Monitoring Server 144 (GMS) stop.
GMS files are produced once an hour. Preferably they are transferred immediately, however, in
particular on ships it might be chosen to transfer only once or twice a day. Therefore you can
decide a time limit - the number of hours you would allow the transfer to be delayed.
Loss-of-power surveillance parameters
Please refer to How to configure loss-of-power surveillance
97 .
Wrong ID / missing planning data surveillance parameters
This option is only available in terminals. Please refer to Settings regarding missing or wrong ID
alarms 98 .
© 2015 Emerson Climate Technologies - Transportation Solutions ApS
REFCON 6
Reefer Container Monitoring System
The Container Details
Transportation Solutions
104
7
User's Guide
The Container Details
Overview
The Container Details allows you to work with one single specific reefer container. It includes all
available information from and about the container, and it offers all possible commands and
parameter changes.
The amount of available information and possibilities depends on the connection type and the
controller type. The Container Details automatically adapts to both, that is, REFCON detects
the type and adjusts the contents of the Container Details correspondingly.
Controller manufacturers do, from time to time, release new controller types, and sooner or later
they will connect to your REFCON. As the controller type was unknown at the time when your
REFCON was installed, REFCON will categorize it as an ISO compatible container. The ISO
10368:1992(E) standard decides a set of data that any controller communicating on the power
cables must support. This is the set of data presented in the Container Details for an ISO
compatible container.
On the contrary, when the controller type is known to REFCON, there normally is an extended
data set available, being different from one type to another. REFCON supports the complete
set, giving you the optimal means to handle the container.
Important note: You must think of the Container Details as a remote operating panel, similar
to the one at the container. In this manual, we are not able to tell you exactly what happens in
the controller when you enter commands and parameter settings. If you are in doubt, please
consult the controller manual.
Locating the Container Details
The Container Details is permanently located at the lower right of the REFCON Monitor:
Container Connection Types
It is expedient to have the following connection types in mind:
© 2015 Emerson Climate Technologies - Transportation Solutions ApS
The Container Details
105
From left to right, the potential amount of information increases.
RDC (option)
States and measured inputs, manually collected.
PCT, ISO
PCT running the basic ISO 10368:1992(E) protocol, transferring a
certain minimum of information.
PCT, manufacturer
specific
PCT running an extended ISO 10368:1992(E) protocol, transferring
all available information, depending on the controller type.
For all connection types, there can be additional information available from the Planning
System.
Note that in the Container Details, a container monitored by RDC is called an "RDC-monitored
container".
7.1
Container Details common
Minimising and restoring the Container Details
When opening the REFCON Monitor, the Container Details is found at the lower right in normal
size, see Locating the Container Details 104 .
Click the down arrow button upper right to have the Container Details minimised:
This makes the Container Details appear as a single line bottommost:
You will recognize the elements from the normal size Container Details, described in the
following.
Click the up arrow button rightmost to return to the normal size.
Note that the up arrow button might cover parts of the information. To avoid this, resize the
REFCON Monitor.
© 2015 Emerson Climate Technologies - Transportation Solutions ApS
106
User's Guide
The Identification area
Leftmost in the Container Details window, the container being dealt with is identified:
Uppermost, the container ID is shown.
To the right of the container ID, a small Container Item 108 square is shown, exactly as known
from the optional Container Plan, thus indicating the main status of the container by colour
and simple symbols.
Below this, the container's location according to the Planning System is shown. If the
location origins from the Planning System, it can not be edited by the user, otherwise it is
editable 107 .
Next, the container controller's Operating mode is indicated, if known. Please refer to the
controller manuals for explanations.
In the lower part, the connection type 104 and the controller type are indicated as described in
the following table:
Condition
Result
If the controller type is known
(via PCT or RMM+/RDC+)
Then the controller type is indicated. If a picture of the type
is available, this is shown, otherwise a stylistic container is
shown, see the following table.
If the controller type is read via
PCT, but it is new to REFCON
Then you will read the type "ISO compatible container". A
stylistic white container is shown, see the following table.
If the container communicates
via PCT, but with no connection
between modem and controller
Then you will read the type "Modem without controller".
The stylistic light blue container is shown, see the following
table.
If the container data is updated
manually using the optional
RDC
Then you will read the type "RDC-monitored container".
The stylistic white or light blue container is shown, see the
following table.
If the container is reported by
the Planning System, but
REFCON has no live data at all
Then you will read the type "Modem-missing container" or
"Modem-available container" with corresponding stylistic
white or light blue container shown, see the following table.
Three stylistic pictures can be found:
Picture
Meaning
© 2015 Emerson Climate Technologies - Transportation Solutions ApS
The Container Details
107
The controller type is detected, and data was received, but
your version of REFCON was not prepared for this type, or
it does not include a specific picture.
This picture is shown in the following situations:
The container has not (yet) started communicating, but it
is known to have (had) a modem due to the Global
Monitoring Server.
The container has logged in on the Power Cable
Transmission, but it has not (yet) been type detected.
Normally this is a temporary state, but if the there is an
error on the container like modem not connected to
controller, it will be "permanent".
The controller type is detected, but your version of
REFCON was not prepared for this type, or it does not
include a specific picture. Data was not (yet) received.
The container has not (yet) started communicating, and it
is not known to have a modem due to the Global
Monitoring Server.
Using the tabs
The Container Details consists of a number of sub-pages. You open a sub-page by clicking it's
tab:
The individual sub-pages are described in separate topic pages, see the Table of Contents.
Editable fields in the Container Details
In various places in various sub-pages, some data fields can (or maybe can) be edited by the
user.
In contrary to a non-editable field, an editable field appears in bold characters on a slightly dark
background. Also, when you move the mouse cursor over an editable field, a rectangle appears
around the field.
Both editable and non-editable fields display a tool tip when the mouse cursor moves over. In
particular, a non-editable field's tool tip will show why it is not editable, if not obvious.
To edit a field, click it. If it is not editable, nothing happens, except that the tool tip shows the
reason.
Having clicked an editable field, you will be prompted for user ID and password if relevant, that
is, if the User Authentication option is enabled and you are not already logged on with
appropriate rights.
When the user ID/password is accepted, the field changes to a text box:
© 2015 Emerson Climate Technologies - Transportation Solutions ApS
108
User's Guide
If it is a numeric field, the unit of measure is indicated, where relevant.
Now, simply change the reading and then:
Press the Enter key or click the OK button to accept and activate your change. If relevant,
your new value is validated. If it is not OK, you are informed, and the value is not activated.
You will then have to edit anew and try again. Did you forget to observe the validation rules
stated in the tool tip?
Press the Esc key or click the Cancel button to revert to the existing value.
You may select the F1 key to obtain help. Also you may click the question mark button to have
validation rules displayed.
Note: Having accepted your change, if the field represents data origin in a container controller,
you will have to accept an extra time, see Remote operations 109 . You may in this case observe
that the field's value changes back to the "old" value, and then changes to the "new" value some
time later, as it can take some time for the "new" value to be sent to the controller and then be
read back to REFCON.
7.2
The Container Item
Overview
The Container Item, being the square indicating the container's status in the Container Details.
and being the square representing one container in the optional Container Plan, indicates the
status of the container by colour, see Legends 108 .
Legends
The following table specifies the possible colour indications and symbols in the Container Item.
Sym In words
bol
White
Short
description
Explanation
Never
communicated /
probably no
modem
The container was included in Planning data but did not
(yet) start communicating. It's modem appears to be
missing due to data from the Global Monitoring Server
(GMS).
Light blue Not started
The container was included in Planning data but did not
communication / (yet) start communicating. It's modem should be
modem available available due to data from the Global Monitoring Server
(GMS) or due to actual communication with a modem
that has no connection to it's controller.
Green
Everything is OK The container communicates by PCT and has recently
been updated, and there is no alarms.
Lighter
green
Monitored OK by The container has recently been updated by means of
RDC
the optional RDC or via the REFCON Data Service, and
there is no alarms.
Flashing
New alarm(s)
There is one or more alarms on this container, and one
or more of these has not been acknowledged.
Red
Acknowledged
alarm(s)
There is one or more alarms on this container, and they
have all been acknowledged.
© 2015 Emerson Climate Technologies - Transportation Solutions ApS
The Container Details
Sym In words
bol
Short
description
109
Explanation
Orange
Data obsolete
Primary data on this container are obsolete, that is,
they have not been updated via power cable
communication nor optional RDC within decided time
limit
An S,
any
colour
Special reefer
A user did mark this container "special".
A filled
blue-grey
circle
Operation in
progress
A user-demanded remote operation
completion.
109
is awaiting
Note that when the Container Item occurs in other contexts, there can be more legends than
the above.
7.3
Remote operations
Overview
Remote operations - or short operations - is the common name for all commands and parameter
selections that you can send to container controllers. Remote operations are possible only on
containers that communicate on the power lines. A few operations are common to all controller
types, while others are available for certain types only.
Remote operations are only possible if enabled in your license
11
.
How a Remote operation is generally carried out
You initiate a Remote operation from the sub-page Operations 116 or, for selected operations,
the sub-page Summary 114 , see these for details. In general, having selected the parameter and
clicked OK, or having clicked the command button, leads to a standardised number of dialog
boxes:
Step
Action
1 If the User Authentication option is enabled, and you have presently insufficient
rights to do the operation, you are asked for user name and password.
2 You are requested a confirmation, for example:
Select OK to proceed.
3 A progress dialog appears, showing how the operation proceeds.
© 2015 Emerson Climate Technologies - Transportation Solutions ApS
110
User's Guide
Step
Action
Refer to How a Remote operation generally works
messages that can appear in this dialog box.
111
for explanations to the
You may select the Hide button, which makes the dialog box disappear. It
automatically shows up again should the operation fail.
4a If/when the operation has completed successfully, the progress dialog shows this
for a few seconds - if you did not close it in the mean time:
You may select the "Keep open" button to avoid that the dialog box is
automatically closed, allowing you to inspect the messages.
4b If the operation fails, the progress dialog stays open / re-opens, showing the error
description. At the same time, an alarm occurs unless you have disabled this
feature.
© 2015 Emerson Climate Technologies - Transportation Solutions ApS
The Container Details
Step
111
Action
Refer to How a Remote operation generally works
possible error messages.
111
for explanations to the
Indication of Remote operation in Side panel
While a Remote operation is being carried out, this is indicated lowermost in the Side panel:
Indication of Remote operation in Container Item
While a Remote operation is being carried out, this is indicated in the Container Item
108
:
How a Remote operation generally works
In the following table, the messages that can appear in the progress dialog (see above) are
described:
Message
Explanation
Suspending regular monitoring...
The system is suspending its automatic
container communication for a while. It does
so because REFCON communicates with the
specific container through a certain RMM
Master. Most REFCON systems have more
masters, of which only one can be active at a
time, and it takes a while to change to the
required.
Preparing telegram sequence…
The system is figuring out which telegrams to
send to the container.
Communication failed
The system had to give up the operation
because of communication problems with the
© 2015 Emerson Climate Technologies - Transportation Solutions ApS
112
User's Guide
Message
Explanation
container. You may try again a little later.
Container is reported offline
The system cannot currently communicate
with the container.
Answer received from container
The system received an answer telegram from
the container in reply to a previously sent
request telegram.
Success
The whole container operation was carried out
successfully.
Exceeded max. retries
The system gave up completing the
requested container operation (because of
communication problems).
Operation did not complete within time limit
The system gave up completing the
requested container operation because it did
not complete within the time selected in the
REFCON Setup dialog.
Aborted
The container operation was aborted by the
operator.
Transmitting "xxxx xxxx" message
The actually selected command or parameter
is sent to the container, the "xxxx xxxx"
being replaced by the "name" of the
operation, e.g. "Start Defrost".
The controller accepted the operation.
The container has understood the request and
now starts carrying out the requested
operation.
Container answer had wrong size
The container has replied to a request with a
telegram that has a different length than
expected by the system. Note: This does not
mean that the requested operation has failed.
Reply was invalid - retransmitting...
The system had difficulties communicating
with the container.
Transmitting telegram no. 3
The system is sending telegram no. 3 in the
sequence (“Refresh” operation).
Received reply
The system received a reply to the most
recent sent telegram (“Refresh” operation).
No reply
The system did not receive an expected reply
from the container within time.
OK
The telegram sequence planned has been
carried out successfully.
Note that certain special messages might occur for the Change Container ID operation
113
.
The Remote operation failure alarm
As standard, if/when an operation fails, an alarm is released. The benefit is that you don't have
to wait for the operation to complete - consider it successful unless you get the alarm.
However, if you do not want this alarm, you can disable it in the REFCON Setup
is, of course, also where you re-enable it.
100
dialog. This
© 2015 Emerson Climate Technologies - Transportation Solutions ApS
The Container Details
7.4
113
Change Container ID operation
Overview
To some degree, remote change of Container ID works like the other remote operations 109 ,
however, it requires special attention and works somewhat differently as described in the
following.
Greatest caution needed
Most controller types accept the Change Container ID command.
You should, however, be strongly aware that it requires the utmost care to use this remote
command. This is because the container ID is the key in Power Cable Transmission. Should
you, by accident, change the ID of a container to an ID other than the one printed on the
container box, you will have what we call a ghost container 221 and thereby a monitoring
problem.
Communication key change
Notice that when the ID is changed in the controller, it works as if the container was
disconnected and another was connected. This is, to REFCON, a complicated change that
takes some time and with some risk of failure.
Please be aware that we talk about one container that had the old ID before and now is going to
have the new ID.
In general, various combinations of modem types and controller types act in one of two ways
when remotely changing the container ID:
a. It responds to the command by the old ID, and then after a few seconds changes to the new
ID.
b. It changes to the new ID immediately without having responded by the old ID.
Because of the possible second behaviour, REFCON acts on the "no response" situation by
assuming that the command actually went well. Just like the "response=OK" situation,
REFCON proceeds by checking if the "new ID" has shown up.
How to change the ID
To change an ID, proceed as follows:
1. Select the container going to have a new ID. Make absolutely sure that it is the right one
shown in the Container Details.
2. Click the command button and then enter the new ID. Be absolutely sure that you type the
correct 4 letters and 7 digits. Then select OK.
What happens when changing the ID
After this, things proceed as a standard remote operation 109 , however, with some extensions:
1. When REFCON receives the OK message from the container, still using old ID, or when it
gets the "no response" time-out, it expects the container to start communicating by the new
ID within less than a minute.
2. REFCON waits for a while and then tries to contact the container using new ID. If this fails, it
tries again a few times.
3. When (and if) the OK message is received from the container, using the new ID, a new record
is created in REFCON's database with the new ID as key. All data, except log files, are
moved from the record with the old ID to the new record. Then the record with the old ID is
deleted.
4. The Refresh now 117 command is initiated to make sure that the new record is up-to-date.
Unwanted situations
In case of any fault or time-out during this process (steps 1 - 3) you end up in an unwanted
situation that can probably be described by one of the following statements:
© 2015 Emerson Climate Technologies - Transportation Solutions ApS
114
User's Guide
Though responding OK, the controller did not change the ID. You recognize this situation by
a) the record with the new ID does not appear, and b) the record with the old ID persists and
keeps updating (you could try the Refresh now 117 command to check). You may try again,
but probably you will have to walk to the container and change the ID directly in the controller.
The controller changed the ID, but it did not start communicating using the new ID before
time-out. REFCON concludes that the ID did not change, and things appear like the above
bullet except that the old ID record is no longer updated. Most likely a record with the new ID
shows up within an hour, as the container is (re-)discovered by the standard PCT
functionality. Then you will have two records representing the same container, one with old ID
and one with new ID. You may delete the one with old ID.
7.5
Measurement resolution
Overview
Any measurement that originates from a container controller and is shown on the REFCON
Monitor has a limited accuracy. The sensors and the controller operate with certain resolutions,
and after this the power cable transmission system will in some cases further reduce the
accuracy in order to improve communication performance.
Temperature resolution example
For specific controller types and modem types, cargo temperatures are logged with following
resolutions depending on temperature intervals:
Range
7.6
Resolution
Below -1.71 C
1.0 C resolution
From -1.71 C to 3.39 C
0.05 C resolution
Above 3.39 C
0.25 C resolution
Sub-page Summary
Overview
The Summary is the common / front page of the Container Details.
The Summary includes the information and options that, according to feedback from users, are
generally the most important and/or the most frequently used.
The Setpoint area
Next to the Identification area 106 uppermost, the setpoints available for the specific controller
type are listed. The first one is always the Temperature setpoint. The following "rules" apply to
© 2015 Emerson Climate Technologies - Transportation Solutions ApS
The Container Details
115
each of the setpoints:
If the actual setpoint is read from the controller, this is shown.
Otherwise, if the expected setpoint is received from the Planning System, this is shown. An
(E) is appended to the text.
If both actual and expected setpoint are known, these are indicated in the tool tip.
If both actual and expected setpoint are known, and they differ by more than the delta value
95 , the value is shown in red colour.
If the actual setpoint is known (and therefore shown), and the controller allows remote
changing it, the field is editable 107 . Editing it results in a remote operation 109 .
If the expected setpoint is shown, the field is not editable.
If neither setpoint is known, the value field is blank, and the text is greyed.
The Planning data area
Below the Setpoints area, the available Planning data are shown, except the container ID, the
location and the expected setpoints.
If it is a terminal, the Inbound and Outbound data are shown. If it is a ship, the Load Port and
Discharge Port are shown in stead.
The following "rule" applies to each of the Planning data fields: If the value is received from the
Planning System or otherwise is automatically generated, it is not editable 107 .
The Commands area
In the centre part of the Summary sub-page, you see a column of buttons.
The very first button is "Refresh now". This command works only for a container communicating
via PCT. It suspends the PCT data polling for a short while, sending an update request
immediately to this container's controller. As a result all live data on this specific container
should be updated within a short time.
After this you find one or more Operations buttons ("Defrost" in above example), that is,
commands applying directly to the container controller. Only the most frequently used
commands are included here - other commands may be available on the Sub-page Operations
116 . Note that the Operations buttons are not available if remote operations 109 are not enabled
in your license 11 .
If the operation is not supported by the container controller, the button is greyed.
Below the Operations buttons, the following command buttons are found:
Command
Action
User Alarm
You can use this command to have an alarm released on this container with
an alarm text you decide, please refer to User generated alarms 98 . Also, if
you have generated an alarm via the optional RDC, you can use this
command to remove it, if desired.
Special
If the container is not marked "Special reefer", this button appears "normal" otherwise it appears "pressed down". See Special reefers 94 .
Delete
See Container Shortcut menu
Trend
This button opens the Container Trend
actual container.
31
.
134
window displaying data for the
The Historic Log
Rightmost in the Summary sub-page, the Historic Log is found. It combines the most recent
readings in the first row and periodically logged data in the succeeding rows.
At the moment a new periodic logging is present (once per hour if not disabled by the user), the
Historic Log list automatically updates: The new recordings are shown in the second row, and
the first row (named "Current") gets empty. After this, when new measures are received over the
© 2015 Emerson Climate Technologies - Transportation Solutions ApS
116
User's Guide
PCT (or by other means), these appears in the first row with green background colour. Until the
next periodic log occurs, the green fields keep updating - you will see this indicated by short
time bold characters. In other words, current values are only shown if they are newer than the
latest periodic logging.
Note that measurements appear with a limited accuracy
114
.
The Date and Time columns show the times of the recordings as LMT or UTC as indicated and
decided upper right. Simply click the option buttons to change.
You can print/export
7.7
122
the historic log by selecting the print button upper right:
Sub-page Alarms
Overview
The Alarms sub-page shows the list of present alarms on this container.
If no alarms, the list is empty. The alarm's acknowledge status is indicated exactly like in the
main Alarm Summary 91 . The alarms can be acknowledged 91 individually or in groups using
the small acknowledge buttons upper right.
Note that within the tab header
the number of alarms on this container is indicated, for example,
(0) means there are no alarms.
(2,1) means there are 2 alarms, and 1 of these has not been acknowledged.
(2) means there are 2 alarms that have all been acknowledged.
You can print/export
122
the container alarms summary by selecting the print button upper right:
Columns in the Container Alarm Summary
The columns in this list is the relevant subset of the columns in the main Alarm Summary.
Please refer to Column specifications 92 for explanations.
7.8
Sub-page Operations (optional)
Overview
When Remote container operations are enabled in the license file
sub-page in the Container Details:
11 ,
you find the Operations
© 2015 Emerson Climate Technologies - Transportation Solutions ApS
The Container Details
117
Within the Operations sub-page you find all the possible container commands, of which you
recognize some from the Summary page 115 .
If a certain command is not supported by the specific container, or it is for another reason not
available, it is disabled (greyed) - like "Change Container ID" in above example. Move the mouse
cursor over the disabled command to have a tool tip show you the specific reason.
Changing a setpoint
As standard all controller types accept the temperature setpoint change command. A few
controllers accept other setpoint commands as well. No matter the setpoint type, you proceed
as follows:
1. Change the setpoint value shown in bold (14.0 in above example). While doing so, an OK
button is available just below the input field - select this to activate your change.
2. After this, things proceed as a standard remote operation 109 .
Note that if you select a value different from the expected setpoint, a setpoints differ
will occur, if enabled.
95
alarm
Start defrost
When you select "Start defrost", things proceed as a standard remote operation
109
.
Note that even if the remote operation results in "Success", you can not conclude that
defrosting has actually been started - this is a decision made by the controller.
Refresh now
This command is described under The Commands area
115
.
Change Container ID
The command is described in Change Container ID operation
113
.
Delete container record
The Delete command is described under Container Shortcut menu
7.9
31
.
Sub-page Data
Overview
The Data sub-page shows all current data related to the actual container, except alarms and
communication data.
© 2015 Emerson Climate Technologies - Transportation Solutions ApS
118
User's Guide
Note that measurements appear with a limited accuracy
114
.
As shown, the data has been divided into three tables:
Planning data: Data origin from the Planning System or entered by the user.
Controller data: Data origin from the container.
Other data: Hardware-related data from the controller, and miscellaneous data if any.
You can print/export
right:
122
each of these tables individually by selecting the print button upper
Data field descriptions
Some of the data field descriptions are abbreviated rather much. To get the full description,
move the mouse cursor over the text.
Data field colours
The fields in the Value column are coloured exactly like in the Container List
7.10
58 .
Sub-page Events
Overview
The Events sub-page shows the list of events relevant to this container origin from the present
cargo voyage as described in Event logging 138 .
The list is similar to the general event list, see Event log
You can print/export
122
138
.
the container event log by selecting the print button upper right:
© 2015 Emerson Climate Technologies - Transportation Solutions ApS
The Container Details
119
Comments to Container Event Log
Referring to the example above, note that
A few general events are logged to all container event log files because they are considered
directly relevant to each container. An example is the "temperature setpoint delta" changed in
the first event in the figure. You will see that the "Scope" is not "Container" for these events.
All events with "Scope" = "Container" and "Item Description" showing the specific container
ID are logged for this container only (plus the general event list).
When the location of the container is known, this is added to the "Item description". You will
see that when the container database record is created, causing the "Creation" event, the
location is never shown.
7.11
Sub-page Communication
Overview
The Communication sub-page shows all data related to the power cable communication related
to the actual container.
You can print/export
122
the communication data by selecting the print button upper right:
Data field descriptions
Some of the data field descriptions are abbreviated rather much. To get the full description,
move the mouse cursor over the text. See example here 118 .
Data field colours
The fields in the Value column are coloured exactly like in the Container List
© 2015 Emerson Climate Technologies - Transportation Solutions ApS
58 .
REFCON 6
Reefer Container Monitoring System
Print and Export
Transportation Solutions
122
8
User's Guide
Print and Export
Overview
In REFCON, "printing" and "data export" is combined in two common "print" functions.
"Printing" means sending the selected picture to a printer, which can either be a part of the
REFCON system or a network printer.
"Exporting" means creating a file and saving it on disk or attaching it to an email. The file can
be PDF or other formats.
You have two options:
Print/Export on demand, being described below.
Automatic, timed print/export, see Automatic Print/Export
124
.
Print/export on demand procedure
To have a picture printed or exported, you always proceed as follows:
1. Make sure the picture of interest is open.
2. Select
the keyboard combination "Ctrl"+"P", or
"Print" from the "File" menu, or
the Print button, which is only available if the picture can be printed:
3. If you did select "Ctrl"+"P" or "Print" from the "File" menu, and there is more than one
printable picture open, you must choose which to print:
Simply click the one to print.
4. Wait for the preview window to open.
5. In the preview window, select your option as described in The Preview
8.1
122
.
The Preview
Overview
When opened, the Preview shows the active picture as it would look if printed in colours on A4
paper portrait:
© 2015 Emerson Climate Technologies - Transportation Solutions ApS
Print and Export
123
In the preview itself you will notice:
Upper left, the REFCON application is indicated, exactly like in the REFCON Monitor's
Caption bar 20 ("DEMO System" in the example).
Upper centre, the picture name is shown in large font.
If a list, all columns from the screen picture are included. The widths of the columns are
adjusted to the available paper size, which might mean that text is truncated.
Print the Preview
To have the preview sent to a printer, use one of the following options:
Toolbar
button
Menu option
Print...
File -> Print...
Quick
File -> Print
Keyboard
shortcut
"Ctrl"+"P"
Result
The standard print dialog opens, allowing
you to select a printer etc.
The preview is immediately printed on the
default printer.
Print
Export the Preview
To have the preview exported to a file, use one of the following options:
Toolbar
button
Export
Document
Menu option
Keyboard
shortcut
File -> Export
Document...
Send via File -> Send
via E-mail...
E-mail
Result
Displays a list of the available file formats.
Selecting one will display one or more
dialog boxes where you decide properties
for the file export.
Displays a list of the available file formats.
Selecting one will display one or more
dialog boxes where you decide properties
for the E-mail and the attachment.
Manipulate the Preview
To manipulate the preview before printing or exporting it, you can use one of the following
options among others:
© 2015 Emerson Climate Technologies - Transportation Solutions ApS
124
User's Guide
Toolbar
button
Page
Setup
8.2
Menu option
Keyboard
shortcut
Result
Opens the standard print setup dialog
box, where you can change the orientation
of the paper, among others. In the case
that text is truncated, changing to
"landscape" might be a solution.
File -> Page
Setup...
Automatic Print/Export
Overview
This function allows the user to have any Container List or the Alarm Summary automatically
printed and/or exported at selected intervals and time points. The user can set up any number
of such printing jobs.
The jobs decided by a user on a specific PC with a specific Windows logon is separate from
any other jobs, and they work only while that PC is running AND that Windows user is logged
on AND the REFCON Monitor is running. This is because on different PCs and to different
Windows users it can differ what printers and network drives are available.
The Automatic Print/Export Administrator window
To set up automatic print/export jobs, select "Auto print/export..." from the File menu:
This opens the Administrator window. While no jobs have been created, it looks like this:
Here you would select the Add button to create your job(s).
When one or more jobs are defined, they appear like this:
© 2015 Emerson Climate Technologies - Transportation Solutions ApS
Print and Export
125
The most columns you will recognize from the Create/Edit dialog box described below, however,
the "Next" column shows when the job is scheduled to run the next time - being identical to the
Start time when it is the first time.
From the Administrator window you can, in addition to create new jobs, select an existing job
and click the
"Show job..." button to view the job settings.
"Edit..." button to change a job.
"Remove..." button to delete a job.
The Automatic Print/Export Create/Edit dialog box
Selecting "Add..." from the Automatic Print/Export Administrator window opens the following
editor:
You will see that the content is dynamic as items get visible/invisible or enabled/disabled
according to your selections. Here is an example of a completed job definition:
© 2015 Emerson Climate Technologies - Transportation Solutions ApS
126
User's Guide
All the possible fields and selections are described below.
When you have entered or changed data, you can at any time select the Cancel button to
discard your changes.
Probably you would rather select the "Test now" or the "OK" button. In both cases the selected
data are validated. If not valid you are warned and informed about what is wrong.
Assuming valid data,
"Test now..." runs the job as if it was decided to run now, that is, the selected list is
immediately printed or exported. Note that the operation can take some time. When finished
you are informed about the result, however, of course you would normally check the produced
paper or file.
"OK" saves the job for further handling by the background scheduler 127 .
Automatic Print/Export job data fields
In the Automatic Print/Export Administrator and the Automatic Print/Export editor, the following
data fields are or can be available:
Field name
Explanation / options
Job title
Aims at making the purpose of the job obvious to you and your
colleagues. You decide the text, but it is required to be at least 4
characters.
Container List
Select any item in the drop-down list, that is, all locked and
customer decided lists in the Side Panel, the Alarm Summary
and the PCT Communication Statistics list.
Job target type
Select Printer or a file format. The available file formats are:
Pdf - being viewable in Adobe Reader, and being ready to print.
Csv - comma separated values - being readable by certain
programs including Microsoft Excel.
Txt - text format - being useful in special cases.
© 2015 Emerson Climate Technologies - Transportation Solutions ApS
Print and Export
Field name
127
Explanation / options
Xls - Microsoft Excel 2003 format.
Xlsx - Microsoft Excel 2007 format.
Selected printer (only if
target is Printer)
Select any item in the drop-down list.
File folder (only if target is
not Printer)
Use Browse to locate the desired folder, which can be on the
local harddisk or on a network drive. You also can select a
removable drive, however, are you sure it keeps available?
File naming method/file
name (only if target is not
Printer)
Select one of the options:
"Selected fixed": The exported file always has the same name.
It is overwritten at each job-run.
"Selected + '-yymmddN'": The file is given a name composed
of two parts; first the text you select in the "file name" field (for
example "Morning report"; second the year (2 digits), month
and day followed by a serial number (resulting example, third
job that day: "Morning report-1105133.pdf").
"'yymmddN'": The file is given a name composed of the year (2
digits), month and day followed by a serial number (for
example, third job that day: "1105133.pdf").
Paper orientation (only if
target is Printer or Pdf)
Select Portrait or Landscape. With many columns in the list,
landscape normally gives the best result.
Timing type and time
selections
Select one of the options:
"Once" - the job runs at the selected Start date and time and
is then deleted.
"Recurring limited" - the job starts at the selected Start date
and time. It repeats at the selected time interval. At the
selected End date and time the job is deleted.
"Recurring unlimited" - the job starts at the selected Start date
and time. It repeats at the selected time interval. It keeps
repeating until you remove it.
LMT or UTC
Select if the date and time(s), you select, must be according to
LMT or UTC.
The background scheduler
The job(s) being listed in the Automatic Print/Export Administrator window 124 are checked a
few times a minute by a background scheduler running in the specific REFCON Monitor.
When a job is due, it is executed. The execution causes the REFCON Monitor to "freeze" for
some time, depending on the length of the list and the type of target. When the job has
completed, the REFCON Monitor is again at your disposal.
If two jobs are due at the same time, they will run one at a time, that is, the second job is
delayed for the time it takes the first to complete.
If the REFCON Monitor is not running at a job's due time, the job will execute as soon as the
REFCON Monitor has been started (within half a minute or so); however, if the job is more than
one hour overdue, the user will be asked if the job is to execute.
If the job can for any reason not be completed successfully, an alarm is released. The alarm
text explains the reason.
© 2015 Emerson Climate Technologies - Transportation Solutions ApS
REFCON 6
Reefer Container Monitoring System
Historic data logging
Transportation Solutions
130
9
User's Guide
Historic data logging
Overview
REFCON includes two primary logging functions, making it possible for daily users and service
technicians to view historic trends and sequences of events.
The periodic data logging 131 function records all available controller measurements and primary
status indicators. We sometimes refer to this as temperature logging, as temperatures are
important in this context, however, also other measurements are recorded.
The Event Log 138 function records all important events triggered by users, container controllers,
the REFCON system itself or any external source.
Logging parameters
Under the Logging tab of the REFCON Setup
periodic logging and event logging:
251
dialog box, you can decide the parameters for
Unchecking "Enable hourly logging of container data" will stop REFCON's periodic logging. Data
are then no longer recorded, but you can still use the Container Trend 134 or the Historic Log 136
to view the logs from before the stop.
When enabled, the automatic logging function runs according to the Configuration parameters
that you decide.
Log file philosophy
To promote important factors like data safety, easy backup and high performance, REFCON's
periodic log files and container event log files are organised according to the following
philosophy:
Logs for different containers are stored in separate files. The file name includes the container
ID.
REFCON attempts to make it one periodic log file and one event log file for each container
journey, that is, when the container has been loaded with new cargo, new files are started,
and the old are archived. Unfortunately, REFCON can not specifically detect that the cargo is
new. In stead, you select a time limit: If the container is disconnected from REFCON for more
than the selected number of days, it is considered a new journey.
When archiving a log file, it's name is extended to also include the date range of the included
logs. For example, if the container was continuously connected to REFCON from August
29th to September 4th, you will recognize this time span in the file name - along with the
container ID.
© 2015 Emerson Climate Technologies - Transportation Solutions ApS
Historic data logging
131
To avoid that the harddisk runs full, archived log files are automatically deleted after your
selected number of months.
Deciding the log file location
The log files are stored in the folder shown in the light blue textbox. Archived log files are stored
directly in that folder, while the ongoing log files are stored in an automatically created subfolder named "Active log files".
To change the folder, select the Edit button and proceed as described in Selecting drive and
folder on Main PC 44 . Note that you can only select a folder on a harddisk situated in the
REFCON Main PC (fixed drive), not on an external disk or a network drive.
Please be aware that when changing the folder, all the existing log files are moved from the old
folder to the new one, unless you deselect this. If you selected another drive, this file removal
might take quite some time. Apart from this, it takes place in the background, and REFCON
keeps working, so you probably should not worry.
Deciding the "new cargo" limit
Regarding the second bullet in above philosophy, you select the limit in the field labelled
"Whenever a container shows up after at least". The maximum is 14 days.
Deciding the archiving duration
Regarding the fourth bullet in above philosophy, you select the archiving duration in the field
labelled "Keep container history for". The maximum is 120 months. If the harddisk is small you
should minimise the duration.
9.1
Periodic logging
Overview
Being independent units, most reefer containers do their own data logging. What exactly is
logged depends on the controller type, but typically, events are logged as they occur, and
temperatures and other measurements are logged periodically.
What makes the containers own logging a little inconvenient is that it takes some manual work
and some time to retrieve it. It might therefore be helpful for you to use one of the
supplementary logging options.
One option is to take advantage of the Global Monitoring Server (GMS). Your REFCON system
should be sending data to the GMS regularly as described in Data Transfer for Global
Monitoring 144 . When doing so, you can use the internet to view the logs from your containers.
The other option is that you can have REFCON do it's own data logging, based on the data that
are periodically read via the PCT or the other possible data sources.
How to use periodic logging
You use REFCON's periodic logging as follows:
In the REFCON Setup dialog 130 , you decide about the automatic logging - if you want it to be
active, the file location, and some time parameters.
In the Container Trend 134 window, you watch the trend curves resulting from the logging.
In the Historic Log of the Container Details 115 as well as in the Historic Log 136 window, you
watch the logged data as a table.
How periodic logging works
As standard, REFCON logs the data once an hour, starting every full hour (UTC time).
If, at the time of logging, a certain data point has not changed since it was last logged (as
standard one hour earlier), it is still recorded in the log file, however, the time stamp shows
when it was actually updated, so viewing the log reveals that it is old data.
© 2015 Emerson Climate Technologies - Transportation Solutions ApS
132
User's Guide
The periodic logging supports import of historic data. If recorded data are imported (for example
from the RDC+), REFCON imports all data newer than the latest existing log, while older data
are rejected.
Example: The supply temperature was last logged at 7.00. Historic data are imported containing
the supply temperature values at 6.15, 7.00, 8.00 and 8.35. REFCON ignores the values from
6.15 and 7.00 and inserts the values from 8.00 and 8.35 in the relevant container log file. Note
that this way there can be more or less than one log an hour.
9.2
Using the Container History menu
Overview
The Container History menu entry allows you to select a specific container and have it's periodic
log data displayed graphically (see Container Trend 134 ) or as a list (see Container Details 115 or
Historic Log 136 ). If you want to inspect archived log files, this is the only way.
How to select
To select a container and have it's logged data displayed, proceed as follows:
© 2015 Emerson Climate Technologies - Transportation Solutions ApS
Historic data logging
Result
133
Step
Action
Description
1
Open the "Show historic
container data" dialog by
selecting "Container History"
from the Tools menu:
The
"Containers" list
displays all
containers for
which active or
archived log
files exist on
the selected
folder 130 .
2
Type a search string (in the
"Container name" field).
The
"Containers" list
changes as you
type, still
showing all
container IDs
including the
typed string.
As shown in the
example, this
might very well
be a string in
the middle of
the ID.
3
Select the desired container
by
Double-clicking it in the
"Containers" list, or
Using the Down and Up
keys.
4
Select the "Show graph..."
button or the "Show table..."
button.
The container is
highlighted.
The dialog closes, and the Container
Trend 134 or the Historic Log 136
opens.
© 2015 Emerson Climate Technologies - Transportation Solutions ApS
134
9.3
User's Guide
Container Trend
Overview
The Container Trend is a window showing historical data related to one specific container in a
co-ordinate system. As standard, values from a certain number of selected data points are
shown, depending on the type of the container controller. When opening the window,
approximately the last 24 hours are selected, and the range of the Y-axis matches the values
found within that time period. You can manipulate the appearance of the trend as described
below.
Opening the Container Trend
There are three ways to open a Container Trend:
1. Click the "Trend" button in the Container Details
2. Use the Container history menu option
132
114
.
.
3. If you are not sure about the container ID, and the container is still in REFCON's database,
you can in stead open the Container List 58 or the optional Container Plan 78 and find the
container of interest. Right-click the container and select Show historic data (graph) from the
Shortcut menu 30 to have the graphical window opened.
Understanding the Container trend
When just opened, the Container trend appears like this, showing data from the latest 24 hours
or the selected range:
In the caption of the window, and in large font above the co-ordinate system, the affected
container's ID is shown.
Upper left, all available data points have been enabled - all checkboxes are checked.
Lower left, it has been chosen to show data points - the dots on the curves - but not to show
© 2015 Emerson Climate Technologies - Transportation Solutions ApS
Historic data logging
135
labels - no value readings at each dot.
Upper right, the colours used for each data point are indicated.
Below the X-axis, the UTC log times are indicated.
Understanding the dots
When Show data points is checked lower left, dots are shown on each curve, as in the above
example.
Moving the mouse cursor on top of a dot will make it's data shown in a tooltip:
In this example, logging was typically done at 3:00 AM UTC. The indicated time is about 3
minutes before that. This is because the indicated time shows when the data was received from
the container controller. If data was received more than once between two loggings, always the
newest data is used.
If no data was received between two loggings, no dot will appear. In the Container trend
example above, this is true for the "Online" data point and the "Setpoint" data point - neither of
them have changed or been updated since at least 27 hours ago. Note that neither the humidity
(top green curve) has changed in the example, but humidity data have been received from the
container controller, and therefore dots appear.
Note that measurements appear with a limited accuracy
114
.
It may occur that dots are "missing" in between. A typical reason is data obsolescence
253
.
Zooming
You may wish to have a closer look by zooming in or a better survey by zooming out. Both can
be done in the following ways:
1. You can use the scroll wheel on your mouse to zoom in (= scroll up) or out (= scroll down).
2. You can keep the Shift button (on the keyboard) down and then drag the mouse over a part
of the curve area to zoom in:
3. You can keep the Shift button down and then click the mouse inside the co-ordinate
system to zoom in by a pre-defined step - both axes are affected.
4. You can keep the Alt button on the keyboard down and then click the mouse inside the coordinate system to zoom out by a pre-defined step - both axes are affected.
Note that in both zoom directions there are limits, so you can't just keep zooming.
You will see that when using the scroll wheel or when zooming in steps (3 and 4 above), both
axes are zoomed simultaneously.
Scrolling
Unless you have zoomed out to the limit, scroll bars occur within the co-ordinate system,
© 2015 Emerson Climate Technologies - Transportation Solutions ApS
136
User's Guide
horizontal and/or vertical. In such case you can:
scroll horizontally to change to another duration of time
scroll vertically to change the span of the Y-axis.
You can scroll in the following ways:
1. Move the mouse cursor inside the co-ordinate system and then drag in any direction:
2. Drag one of the the scroll boxes, or click the scroll bar arrows or the base like a standard
Windows scroll bar:
Selecting data points
All data points are selected when opening the Container trend window. You can remove a curve
by deselecting the data point's checkbox upper left. When doing so, the curve disappears from
the co-ordinate system and from the legend list upper right.
Viewing old log files
Even if the container has been discharged and removed from REFCON's database, and even if
the periodic logging would have been stopped, there might still be "old" log files available. You
can view these exactly like described above; however, if the container is no longer in REFCON's
database, you need it's container ID, as you will have to use the access method 1 (see Opening
Container Trend 134 above).
9.4
Historic Log
Overview
The Historic Log is a list showing the periodically logged historic data, that is, the same data as
shown in the Container Trend 134 . The Historic Log is a part of the Summary tab of the
Container Details 114 picture, but also it is available as an independent window:
© 2015 Emerson Climate Technologies - Transportation Solutions ApS
Historic data logging
137
Each line in the Historic Log represents one sample of each of the available measures.
Note that measurements appear with a limited accuracy
114
.
The Historic Log includes one column for each available measure, depending on the type of the
container controller.
The Historic Log includes all logs available for the specific container. It is always sorted
chronologically, the newest sample being shown first.
Opening the Historic Log
There are two ways to open a Historic Log:
1. Use the Container history menu option
132
.
2. If you are not sure about the container ID, and the container is still in REFCON's database,
you can in stead open the Container List 58 or the Container Plan 78 and find the container of
interest. Right-click the container and select Show historic data (tabular view) from the Shortcut
menu 30 to have the list window opened.
Changing the time base
Use the button upper right in the window to change between LMT and UTC.
Scrolling the list
To scroll the list, you can use:
The vertical scrollbar.
The "Page Up" and the "Page Down" keys.
The key-combinations "Ctrl"+"Home" (= move to top) and "Ctrl"+"End" (= move to bottom).
© 2015 Emerson Climate Technologies - Transportation Solutions ApS
138
9.5
User's Guide
Event logging
Overview
The Event Log function records all important events detected by REFCON. An event is
considered "important" if it influences the cargo in the containers or the "permanent" behaviour
of the REFCON system, or similar. The events can have all kinds of origins, such as users,
controllers and REFCON itself.
There are in fact two event logs:
The general event log contains all the newest events, including system events and container
events. One single general event log file exists.
The container event log contains all the events relevant to a specific container during a
specific journey. There is one file for each container, plus possible archived files.
How to use event logging
You use REFCON's event logging as follows:
In the REFCON Setup dialog 130 , you decide about the event logging file location and
archiving parameters.
In the Event Log 138 window, you watch the events found in the general event log. You can
use standard list facilities to search and sort the events.
In the Container Details, Events tab 118 , you watch the events found in the specific container
event log.
Event log storage housekeeping
In this version of REFCON 6, the general event log storage is limited to 10000 events. When the
storage is full, a new event automatically makes the oldest event removed from the storage.
The individual container log file is literally unlimited. It is archived, and a new started, according
to the log file philosophy 130 .
9.6
Event Log
Overview
The Event Log is a list showing the most recent events as defined in Event logging overview
138
.
Each line in the Event Log represents one event.
The Event Log includes a fixed number of columns. The contents of the columns are described
in Column specifications 139 .
When opened, the Event Log shows the newest events, a pre-decided number. It is always
sorted chronologically, the newest event being shown first. The sorting order can be changed as
shown in Sorting the events 139 .
Opening the Event Log
To open the Event Log, click the Events item in the Side panel:
© 2015 Emerson Climate Technologies - Transportation Solutions ApS
Historic data logging
139
Number of records
In the bar at the bottom of the Event Log, the field "Records in list" shows the number of events
XXX that are actually included in the displayed list.
As indicated above, XXX might be smaller than the number YYY of records stored in the event
logging storage. This is because the transfer of logs takes some time, and to make the Event
Log open quickly, only the newest 1000 events are transferred immediately.
As new events occur while the Event Log picture is open, you will see that the number XXX
grows, as there is no reason to remove events once they have been transferred.
If you need to view older events, you can change the setting "No. of logs to show". A change
will take effect within a few seconds. Note that if you change to a smaller number, it will have no
effect.
Freezing the list
In the bar at the bottom of the Event Log, you may click the "Freeze (stop updating)" button.
Doing so makes the button text change to "Unfreeze (resume updating)".
While "frozen", new events will not be added to the displayed list. This could allow you to study
a set of events without being disturbed by the list scrolling and the like.
Sorting the events
When opened, the Event Log always shows all events, and it is always sorted chronologically,
the newest event being shown first. It is possible to change the sorting, however, the change will
be temporary as it can not be saved.
Changing the sorting is done exactly like in the Container List, please refer to Selecting the
sorting order of the containers 60 and Selecting a sorting filter 60 .
Column specifications
The Event Log includes the columns described below.
Column header
/ abbreviation
Explanation
Event description Together with the following four fields, the Event description shows what
happened.
Event type
The category of what happened, see Event types
New value
If relevant, the value/setting that is now active.
Old value
If relevant, the value/setting that was active before the event occurred.
Unit
If relevant, the unit of measure of the New and the Old value.
Item description
Together with the Scope, the Item description shows WHOM or WHAT
was affected by the event. If a container: The ID (4 letters + 7 digits) and
the location (if known), otherwise the name of the system item.
© 2015 Emerson Climate Technologies - Transportation Solutions ApS
140
.
140
User's Guide
Column header
/ abbreviation
Explanation
Scope
The category of whom or what was affected by the event, see Event
scopes 140 .
Trigging
The category of who or what caused the event, see Trigging types
Trigger
If "Trigging" = User: The user ID of the user doing the action. Otherwise:
The hardware or software unit that trigged the event.
UTC time
The UTC time when the event occurred.
LMT time
The LMT time when the event occurred.
141
.
Event types
The "Event type" column can show the following types.
Event type
Explanation
Operation
User did send a command or parameter change to a container controller.
Monitor Setup
User did change the behaviour of the REFCON Monitor or one of its
pictures or functions.
REFCON Setup
User did change the behaviour of the REFCON system.
Installation
A change occurred during installation.
Export
Data was exported to an external system.
Import
Data was imported from an external system.
State change
The state of a specific function was changed.
Work action
User did perform a standard action as a part of the normal job.
Parameter
change
A parameter for a specific function was changed.
Creation
A database object was created, eg. a container object.
Deletion
An object was removed from the database, eg. a container object.
New alarm
An alarm occurred.
Alarm to Normal
The cause of an alarm returned to the normal state. If the alarm had been
acknowledged, it disappeared at the same time.
Acknowledge
User did acknowledge an alarm. If it had gone normal, the alarm
disappeared at the same time.
Other
An event not covered by the above.
Event scopes
The "Scope" column can show the following types.
Scope type
Explanation
Container
The event affected a specific container, defined by the Item description.
System
The event affected the REFCON system.
Monitor
The event affected the REFCON Monitor.
RDC
The event affected the optional RDC unit.
© 2015 Emerson Climate Technologies - Transportation Solutions ApS
Historic data logging
Scope type
Explanation
Planning system
The event affected the planning system, in the optional case that
REFCON sends data to this.
Other
A scope not covered by the above.
Trigging types
The "Trigging" column can show the following types.
Trigging type
Explanation
User
The event was caused by a user.
Container
The event was caused by a specific container controller or similar.
Planning system
The event was caused by the planning system.
External
The event was caused by another external system.
System
The event was caused by the REFCON system.
RDC
The event was caused by the optional RDC.
© 2015 Emerson Climate Technologies - Transportation Solutions ApS
141
REFCON 6
Reefer Container Monitoring System
Data Transfer for Global
Monitoring
Transportation Solutions
144
10
User's Guide
Data Transfer for Global Monitoring
Background
The Global Monitoring concept makes it possible for container owners and other interests to
establish automated and centralised remote monitoring of the reefer containers, covering the
whole journey.
The central part of the concept is the Global Monitoring Server (GMS). The GMS is an internet
based database that regularly receives data from most REFCON systems worldwide about the
connected reefer containers. Also it receives data directly from containers equipped with the
RMM+ modem, and from other data sources.
The highest efforts are done to keep the data on the GMS private, that is, they can only be
accessed by people with legal rights to read them.
Using standard internet PCs, interested parties with legal rights can log in to http://
gms.myreefer.com and inspect data. The value of this highly depends on the regularity and the
coverage. You may visit www.myReefer.com for further information.
When is your interaction required?
If you are a daily user of REFCON, you should pay attention to GMS in the following cases:
Case
Your action
Reference
Manual data transfer has
been selected.
Perform manual transfer at
least once a day.
Please refer to Transferring data
manually 148 and Checking if
your transfer works manually
145 below.
A system alarm regarding
GMS appears.
Identify and solve the
problem.
Trouble shooting the GMS
connection 150
If you are a commisioning responsible, a service technician or similar, you are probably the one
being responsible for making the data transfer work automatically or for preparing the manual
transfer. In such case, please proceed below.
The Data Transfer Link
For the Global Monitoring concept to work, it is vital that the data transfer link between your
REFCON system and the GMS is established and runs well.
Please observe the following possible conditions:
The REFCON Main PC is connected
to the Internet
The REFCON Main PC is not connected to the
Internet
The Transfer Link can work fully
automatic using REFCON's built-in
tools.
Customer's automatic solution
transfer 148 is required.
In GMS Setup
but the first.
In GMS Setup 145 , select the first option (Store in
local folder only).
145
, select any option
147
or manual data
In short, the REFCON Main PC creates a “GMS file” once an hour, containing the complete set
of data that needs to be transferred to the GMS at that point of time. The file is placed in the
© 2015 Emerson Climate Technologies - Transportation Solutions ApS
Data Transfer for Global Monitoring
145
drive and folder decided during the GMS Setup 145 . The file is packed and is under no
circumstances allowed to be changed by hand.
Data transfer as standard takes place by attaching these files to emails. This can work
automatically or manually. If, in your case, there is no automatic connection between REFCON
and your email system, your manual action is needed, please, as described in Transferring data
manually 148 .
If possible, of course an automatic data transfer is a great advantage to everybody.
If the REFCON Main PC has access to the Internet, the built-in functionality of REFCON can be
used, by selecting any option but the first in GMS Setup 145 .
If you do not want to use the built-in functionality, or the REFCON Main PC has not access to
the Internet, but has an online LAN connection to your email system, you can implement your
own automatic solution. You may find the topic Transferring data automatically using your own
tool 147 useful.
Checking if your transfer works manually
You should normally have been instructed if your manual interaction is required. Further, if data
are not received by GMS for a longer time, we would normally contact you to find the reason.
If you are not sure and want to check if your manual participation is required, check the folder
selected in the GMS Setup 145 (see Procedure for data transfer 149 ). If there are no files in the
folder that are more than 24 hours old, it indicates that automatic file transfer is running, in
which case you need to do nothing.
10.1
GMS Setup
Overview
The GMS data transfer is controlled through the GMS tab of the REFCON Setup
251
dialog box:
The GMS files folder
The dialog box shows the drive and folder ("C:\GMSLogIF" in the example) where the files for
the GMS are produced, and the possible share name of the folder ("GMSLogIF" in the
example).
If the folder is not on the REFCON Main PC harddisk or it is not shared, the "Shared as" field is
not visible:
© 2015 Emerson Climate Technologies - Transportation Solutions ApS
146
User's Guide
To change the GMS folder, click the Edit button and proceed as described in Selecting drive
and folder on Main PC 44 .
Method for exporting data
In the major lower part of the dialog box, you select the exporting method. In the example
shown above, there are only two options; however, at your REFCON system there might be a
third option as well, as described here:
Method option
Explanation
Store in local
folder only
Select this option if the REFCON Main PC has no access to the Internet,
or you do not want it to use the access. Customer's automatic solution 147
or manual data transfer 148 is required in this case.
Deliver by email
We recommend that you select this option if the REFCON Main PC has
access to the Internet, and the third option is not available. Note that when
clicking this option, the "Email Server" tab 146 shows up in the REFCON
Setup 251 dialog box, if not already visible. You would normally select the
Recipient "[email protected]" unless your company uses it's own
server. Also remember to make sure the Email Server settings are correct,
see below.
Deliver by web
service
We recommend that you select this option if available. Make sure the
Delivery URL is exactly as informed by Emerson Transportation Solutions
or by your company.
Email Server settings
The "Email Server" tab is available in the REFCON Setup
sent emails for GMS or other purpose:
251
dialog box when REFCON is to
You need once for all to specify your mail account:
The Mail server is the address of your Internet company's SMTP server.
The Port no. on the mail server.
The Security information fields must be filled in if required by that SMTP server. In some
cases these fields must be left blank.
The Sender address is two strings before and after the @ in the email address that will
occur in the "From" field when the user receives the email. Note that many mail servers pay
restrictions to the "From" domain (string after @), in order to avoid spam mails. The string
before the @ is automatically created based on the installation name 11 .
Having completed and applied the settings you may select "Send Test Email" to check that
© 2015 Emerson Climate Technologies - Transportation Solutions ApS
Data Transfer for Global Monitoring
147
your data work.
GMS alarm settings
In the "Alarm Options" tab 100 in the REFCON Setup 251 dialog box, you can enable the "alarm
when GMS file sending stops" to help you remember to do the manual data transfer or to keep
an eye that your automatic solution is working.
10.2
Transferring data automatically using your own tool
Overview
Data transfer to GMS takes place by attaching files to emails. You may find the information
below useful to trouble-shoot or establish an automatic connection. Maybe you would show it to
the IT responsible.
Principle sketch
The involved elements and responsibilities can be sketched as follows:
REFCON Main PC facts
You would need to know the following data about REFCON. The data shown in the table are the
settings used as standard, however, they might differ in your specific case, so you need to
check the REFCON Main PC.
Field
Standard value
Comments
Computer name:
pc01refcon
Can be changed by customer.
IP address:
192.168.0.22.
Can be changed if required by
customer. REFCON supports static IP
addresses only.
Shared file folder:
C:\GMSLOGIF shared as
GMSLOGIF.
See GMS Setup
information.
User (login):
Refcon, no password.
Can be changed by customer.
145
for specific
Email regularity
Please make sure emails with attached REFCON files are sent to [email protected]
regularly as follows:
Preferred frequency: 4 – 6 emails per 24 hours.
Minimum frequency: 1 email per 24 hours.
Note: More files may be attached to one E-mail.
© 2015 Emerson Climate Technologies - Transportation Solutions ApS
148
User's Guide
Customer’s responsibility
It is your job to set up your email system to run the described schedule automatically. Some
email programs do include functionality for this.
Regularly, at the frequency you decide, the email system should:
1. Move all files from the shared folder “GMSlogif”.
2. Make sure the files that have been moved are deleted from “GMSlogif”.
3. Attach the files to one or more emails; however, make sure each file is only attached and
sent once.
4. Send the emails to [email protected].
REFCON’s file naming
The REFCON Main PC generates a packed “GMS file” every hour. The “GMS files” are created
in the folder “C:\GMSLogIf” on the REFCON Main PC harddisk. The files are named
“REFCON.001”, “REFCON.002” up to “REFCON.999”. Each time the folder is emptied,
numbering restarts from “REFCON.001”.
When your email system works as described, there will normally never be more than 24 files in
the folder.
If the files are for some reason not removed, the limit of 999 files will be reached in almost 6
weeks. REFCON then overwrites the oldest file, typically “REFCON.001” as the first.So, if the
oldest file has not been transmitted, the data are lost.
Should for some reason a number of files (but not all) be removed, REFCON will attempt to use
free numbers, meaning that numbering might no longer match the chronological order.
Probably you will not have to think about these special cases – simply send all the files found in
the “GMSlogif” folder, and remove each file when sent.
Other information
The files in “C:\GMSlogif” have been packed by REFCON. DO NEVER make any further
packing or other changes to the files.
Always send the REFCON files at least once a day, for the data in the Global Monitoring
Server to be reasonably up-to-date and thereby useful.
Please note: Setting up the email system is not a part of Emerson Transportation Solutions’
delivery.
10.3
Transferring data manually
Overview
Data transfer to GMS takes place by attaching files to E-mails. If there is no automatic
connection between REFCON and your E-mail system, your manual action is needed, please.
Principle sketch
The involved elements and responsibilities can be sketched as follows:
© 2015 Emerson Climate Technologies - Transportation Solutions ApS
Data Transfer for Global Monitoring
149
Procedure for data transfer
Regularly, at least once a day, you should run through the following procedure:
Step
Action
1 Plug a removable storage into the REFCON Main PC.
Note 1: You would typically use a USB memory key.
Note 2: If you have more than one REFCON PC, make sure it is the Main PC, not
a Secondary PC. Read more about Main PC and Secondary PC in The REFCON
system hardware 237 .
2 Move all files from C:\GMSlogif to the removable storage.
Note 3: Make sure the files are deleted from C:\GMSlogif as soon as they have
safely been moved to the removable storage.
3 If you use a USB key, make sure to use the Remove command available from the
taskbar – DO NOT just pull it out!
4 Carry the removable storage to the E-mail system and plug it in.
5 Create a new E-mail addressed to [email protected]
6 Attach the files from REFCON to the E-mail and send it.
Note 4: You may alternatively create more E-mails and maybe attach only one file
for each.
7 Delete the files from the removable storage to make sure you do not send any file
twice.
E-mail regularity
Please make sure E-mails with attached REFCON files are sent to [email protected]
regularly as follows:
Preferred frequency: 4 – 6 E-mails per 24 hours.
Minimum frequency: 1 E-mail per 24 hours.
Note: More files may be attached to one E-mail.
REFCON’s file naming
The REFCON Main PC generates a packed “GMS file” every hour. The “GMS files” are created
in the folder “C:\GMSLogIf” on the REFCON Main PC harddisk.
The files are named “REFCON.001”, “REFCON.002” up to “REFCON.999”. Each time the folder
is emptied, numbering restarts from “REFCON.001”.
Other information
The files in “C:\GMSlogif” have been packed by REFCON. DO NEVER make any further
© 2015 Emerson Climate Technologies - Transportation Solutions ApS
150
User's Guide
packing or other changes to the files.
Always send the REFCON files at least once a day, for the data in the Global Monitoring
Server to be reasonably up-to-date and thereby useful.
Please note: Setting up the E-mail system is not a part of Emerson Transportation Solutions’
delivery.
10.4
Trouble shooting the GMS connection
Overview
Should an alarm occur that includes the abbreviation GMS in the alarm text, please take action
as described below.
System alarm on REFCON GMS Plugin: Device went offline
Indication in System Devices List
254
:
Indication in System Alarm Summary
89 :
Remidy:
Restart the REFCON Main PC.
System alarm: “Could not upload data to GMS by web service"
Remidy:
Check that the REFCON Main PC has in fact access to the Internet.
Verify the Delivery URL.
Restart the REFCON Main PC.
System alarm: “Could not send GMS data by email"
Remidy:
Check that the REFCON Main PC has in fact access to the Internet.
Verify the Email Server settings and the Recipient.
Restart the REFCON Main PC.
System alarm: "Cannot create or delete files in the log files folder"
Remidy:
Check if the harddisk is full.
Verify that the chosen "local folder holding GMS data files" exists and that a system account
has full read and write access.
System alarm: "GMS file sending has stopped"
Remidy:
If manual data transfer is required: Do it!
If customer's automatic solution should be running, check this.
If the alarm comes to soon, select a higher number of hours in the GMS alarm settings
147
.
© 2015 Emerson Climate Technologies - Transportation Solutions ApS
REFCON 6
Reefer Container Monitoring System
Planning data import
Transportation Solutions
152
11
User's Guide
Planning data import
What is Planning data?
The majority of container companies are using computers to manage the positioning of the
containers. We generally refer to such a computer as the Planning System.
In most cases, the Planning System stores
the complete list of reefer containers found in the ship/terminal right now
and, for each container,
the container ID
if it is a reefer container
the expected temperature setpoint
and other information.
We call this information Planning data, opposed to the data available online from the containers.
Why are Planning data important?
It is a great advantage to have the Planning data transferred from the Planning System to
REFCON. In particular, the following data are valuable:
The presence of a container, as it enables the user to identify containers that are not
monitored and thereby potentially are without power.
The container location, as it allows REFCON to show the containers graphically, see the
optional Container Plan 78 .
The expected setpoint, as it allows REFCON to check the setpoint actually running in the
container controller, see Actual and Expected setpoints differ 95 .
Other information can be valuable as well for specific purposes.
Possible interface types
REFCON includes the following interface options:
Manual Planning data file reading 160 , via removable disk or LAN.
Automatic Planning data file reading 156 , via LAN.
The optional 2-way automatic online interface 170 , via LAN.
We strongly recommend that you always select an automatic interface option.
Only the two file transfer types are described in this topic and it's sub-topics.
Understanding the Data Flow
The following figure illustrates how data enter the Container Data Record:
© 2015 Emerson Climate Technologies - Transportation Solutions ApS
Planning data import
153
There is one Container Data Record for each container known to REFCON – no matter if it is
reported by both Planning data and Power Cable Transmission, or by only one of them;
communicating or not.
Container Data Records are dynamically created and deleted. For example, if a container
appears in Planning data and has not been known to REFCON before, a new record is created,
and the Planning data is inserted.
Selected data in any Container Data Record can be inspected in the Container Details
the Container List 58 .
104
and
"Planned" and "Unplanned" containers
We denote a container as planned if it's data record includes valid Planning data, that is, if
information about the container has been received from the Planning System.
We denote a container as unplanned if it is not planned, that is, if REFCON did not receive
information about the container from the Planning System. Such a container will always have
online data, as the data record was created because the container was discovered by the
Power Cable Transmission system.
Working schedule flexibility
REFCON is highly flexible and allows you to transfer the Planning data file at any time you wish
and as often as you wish:
If the container ID is not known to REFCON in advance, a new Container Data Record is
created.
If the container ID is known to REFCON in advance, it is checked if Planning data have
changed. If so, they are updated in the existing Container Data Record.
If a container ID is no longer in the Planning data File, the record is conditionally deleted as
described below 154 .
In particular, on a ship, you are supposed to transfer Planning data at least once in each port.
You can do it
when arriving to the port, before starting discharging and loading;
after leaving the port;
or any time in between.
In the first mentioned case it is likely that a number of containers will keep communicating for
hours, maybe even for days, after having disappeared from the Planning data file. These
containers are denoted "delete-candidates", as described below. As REFCON assumes it
© 2015 Emerson Climate Technologies - Transportation Solutions ApS
154
User's Guide
important to keep supervision as long as possible, the delete-candidates are not deleted until
they actually stop communicating. And should such a container log in anew (within 3 days), it
retains it's data, as it could be a temporary plug out.
In the second mentioned case it is likely that you will get a number of unplanned containers
while the file has not yet been transferred. These are fully supervised, but the user will not know
their locations. Therefore we recommend the first mentioned schedule or a combination.
When are containers deleted?
It is essential that container data records are removed from REFCON's database when they are
no longer in use. As standard this is done automatically, and you should normally never use the
available manual delete commands.
Planned containers are deleted on basis of the received Planning data as follows:
If the optional 2-way automatic online interface 170 is running, REFCON receives a specific
delete command from the Planning System on every single container. When such a
command is received, the container is immediately and unconditionally deleted from the
database, and it is canceled in the Power Cable Transmission system. Should this be a fault,
and the container is in fact still connected to power, it will start communicating again after a
couple of hours, and will then appear as an unplanned container.
If Planning data is received via file transfer (manual or automatic), a container is noted as a
"delete-candidate" if it is no longer found in the file, see below.
Unplanned containers are deleted on timeout, see Container Deletion parameters
251
.
About "Delete-candidates"
A delete-candidate is a container that is no longer found in the Planning data file.
A delete-candidate is indicated in the REFCON Monitor by having the (*) symbol appended to
it's location. For example, if the location is "140184", it now reads "140184(*)" on the screen. It
does no longer appear in the Container Plan, but keeps available in Container Lists and the
Container Details.
A delete-candidate is automatically deleted as soon as it meets the "delete-conditions". The
"delete-conditions" are that the container must be off line (that is, it is no longer communicating
or has never been) and it must not have any unacknowledged alarms. In other words, if a
container is online or has one or more unacknowledged alarms at the moment the Planning
data file is read, it's deletion is postponed, and it stays in the database.
11.1
The Planning data element in the Side panel
Overview
Lower left in the REFCON Monitor you find the Planning data element:
In general, the element
indicates the overall Planning System interface setting
indicates the Planning data import status
gives access to a number of options.
Note that if the optional Planning System Communication Interface is enabled, or similar, the
element can occur slightly different than described below. Please refer to the respective parts of
the manual.
© 2015 Emerson Climate Technologies - Transportation Solutions ApS
Planning data import
155
The Arrow indicator
The Arrow occurs as follows:
Arrow occurrence
Description
Ponting to the right only
Planning data import works by file import, auto or manual.
Pointing left and right
A two-way Planning System Communication Interface is
enabled.
Green, steady arrow
Auto is selected.
Flashing red/white
/
Unacknowledged alarm on Planning System interface.
White, steady arrow
Flashing green/white
Manual is selected.
/
Manual is selected, and a new Planning data file is found.
The text
The text occurs as follows:
Text occurrence
Description
Reading "Auto"
The Planning System interface runs in automatic mode.
Note that you still might have to take manual action in the
Planning System.
Reading "Manual"
The Planning System interface runs in manual mode. You
need to take action each time Planning data needs to be
updated.
Time duration in parentheses
Time since a Planning data file was last imported,
automatically or manually.
Message in parentheses
If you read "data error", the last read file was rejected. Other
messages may occur.
Green text
The Planning System interface runs in automatic mode and
works fine.
White text
The Planning System interface runs in manual mode, no
problems detected.
Flashing red/yellow
Unacknowledged alarm on Planning System interface.
Steady red
Acknowledged alarm on Planning System interface,
problem has not been solved.
Possible selections
You can at any time, no matter the mode, click the icon or the text to open the "Read planning
data file" dialog box, see Manual Planning data File transfer 160 .
Click the down-arrow button
minimum menu is as follows:
to display the options menu. The contents of this can vary. The
Here,
selecting "Read file..." works like clicking the icon or the text of the element, opening the
© 2015 Emerson Climate Technologies - Transportation Solutions ApS
156
User's Guide
"Read planning data file" 160 dialog box;
selecting "Info" opens the Planning System Interface Information
11.2
161
dialog box.
Planning data file transfer settings
Overview
The settings regarding Planning data file transfer comprises
Selection of automatic file transfer, and settings for this.
Decisions regarding error handling in the Planning data files.
Alarm settings regarding file errors and rejection.
Automatic Planning data file transfer
When Automatic Planning data File Transfer is enabled, REFCON will periodically look for a file
with a specific name in a selected file location. Please be aware that at the Planning System,
the file still has to be generated, manually or automatically.
At a certain (small) time interval, REFCON reads the file and checks for changes.
We recommend that you always use the Automatic Planning data File transfer, if possible
(requires network connection).
Planning data file transfer routing
When in auto, the Data Engine
of the following ways:
239
reads the Planning data file from the Planning System in one
Setting up Planning data file transfer
Planning data file transfer is controlled through the "Planning data Import" tab of the REFCON
Setup 251 dialog:
© 2015 Emerson Climate Technologies - Transportation Solutions ApS
Planning data import
157
To have the automatic file transfer run, make sure the "Enable automatic import..." check-box is
checked. Note: Even if you are going to disable automatic file transfer, you need to check the
check-box (temporarily) to get access to the parameters used also for manual transfer.
You further need to decide as follows:
In the "Import folder\file on main PC" field, the selected path for automatic import is shown. To
change it, select the Edit button and proceed as described in Selecting drive and folder on
Main PC 44 . If file transfer routing option 1 (see above 156 ) is used, you should see the
"Shared as" field next to the Edit button.
If a file format is used that is not immediately supported by REFCON, use the "Set/edit CSV
reader format" button to define the appropriate reader, see CSV format editor 165 .
Select the File reading rules
158
.
Select the File import error alarming option
157
.
Check the "Enable alarms..." check-box to get an alarm if the automatic Planning data file
transfer stops. Carefully select the time limit.
Remember to Apply your changes.
While experimenting with your settings you may wish to select the "Info..." button to inspect the
result for the latest file transfer, see Planning data file transfer information 161 .
Automatic (re-)creation of folder and share
Using the Edit button mentioned above, you can not only point to an existing folder, but you can
create a new folder, select sharing and even define a Windows user to access the share.
Each time the Data Engine 239 is started, it checks if the folder and it's possible sharing
information is exactly as you have chosen. If not so, a background function attempts to reestablish it. This is in particular useful if the Configuration Export/Import 41 function has been
used to copy your settings from another REFCON system, as in this case the required folder,
the possible Windows user and the possible share settings are automatically created.
File import error alarming options
You have the following alarming possibilities in case of errors in a Planning data import file, no
matter if you are importing manually or automatically:
Option
Description
Give alarm if file is rejected
If REFCON dismisses the file as a whole, thus using no
data at all from the file, the alarm is released.
In contrary, if just some data are used, maybe despite of
errors, no alarm occurs.
Give alarm if any container
record is rejected
If there is one or more errors in the file with the result that
data from one or more containers are totally ignored, the
© 2015 Emerson Climate Technologies - Transportation Solutions ApS
158
User's Guide
Option
Description
alarm is released. This also occurs if the whole file is
rejected.
Do not give alarm
No matter if the file is fully or partly rejected, no alarm is
released. Still the event is logged in such case.
Establishing Online Connection
Below you find a little information necessary to establish the Local Area Network connection
between the Planning System and REFCON.
REFCON is running under Microsoft Windows, and is supporting all communication protocols
that Windows is supporting. As network driver, Microsoft's TCP/IP is used. This means that it is
not important which operating system the Planning System is using, as long as it can
exchange data using TCP/IP and supports file sharing with the Windows version of the
REFCON Main PC.
The communication hardware is standard Ethernet.
11.3
File reading rules
Overview
The ideal situation is that all Planning data files are error free, that is, the Planning System
produces files that are always fully readable by REFCON. Though this ideal situation is also the
real situation in many cases, experience has shown that there are often "errors" in the files. An
"error" could, for instance, be caused by a simple typing error in the Planning System (or in the
manifest imported to the Planning System).
Further, REFCON supports a number of file formats, including the customised CSV format 165 .
On the Planning System side it must be decided, once for all or repeated, which format to use.
REFCON automatically detects the format, which in case of errors can be difficult or even
impossible.
In the following it is explained how REFCON handles file errors. The handling is based on a set
of rules. Some of these rules are selected by the user.
User selected rules
In the REFCON Setup
156
you find the rule settings:
How these rules apply is explained below.
Requirements to the single container record
Any Planning data file is a list of containers. For each container there is a set of data - this is
what we call a container record.
A specific container record can be in one (and only one) of the following "states":
State
OK
Description
The container ID is OK, and all required data fields are found and fulfill
the conditions.
© 2015 Emerson Climate Technologies - Transportation Solutions ApS
Planning data import
State
159
Description
Partly OK
The container ID is OK, and at least one other required data field is OK,
but other required fields are not.
Bad
A record is considered "Bad" in any of the following cases:
The record is wrong format.
The container ID is missing or incorrect.
None of the required data fields are OK.
The temperature setpoint is not-readable and the "Bad record" rule
option has been chosen.
Useless
Like state "OK", but the temperature setpoint is not-readable and the
"Record to ignore" rule option has been chosen.
The following data fields are or can be required:
Data field
Conditions
Container ID
The container ID is accepted if (and only if) it consists of exactly 4
letters followed by exactly 7 digits.
For example, if the check digit (= digit 7) has been omitted in the
Planning System, the record is considered Bad.
Location
Decided by the user selected rule "Location requirements":
If "Accept if not empty" is selected, it is required that a location string
is found, and this string is not allowed to be spaces only. If this
condition is not met, the container record can not be considered OK.
If "Accept any location" is selected, location is not a required field. It
is, however, used if a non-empty string is read, and the record is
used.
Temperature
setpoint
If a readable decimal value is found, it is range checked:
If the value is within the range -99°C to 99°C, the field is OK, and the
record is then considered OK if the above conditions are met.
If the value is outside this range, it is considered not readable and is
then handled as follows:
If the setpoint is not found or not readable, the handling is decided by
the user selected rule "Consider a not-readable temperature setpoint a":
"Dry reefer": The field is OK. If the record is used, the container is
created in REFCON's database without any expected setpoint.
"Bad record": The entire record is considered bad.
"Record to ignore": The entire record is considered not existing.
"Container with unknown expected setpoint": The field is OK. If the
record is used, the container is created in REFCON's database with
an expected setpoint having the value "unknown".
Requirements to the import file
REFCON has a number of format readers, one for each of the supported file formats. Each time
a Planning data import file is read, the format readers are tried one by one. The outcome of a
trial is
Fully applicable - at least one container record was identified, and all container records were
OK (as defined above).
Partly applicable - at least one container record was identified that was at least Partly OK,
but also there was at least one error.
Not applicable - neither of the above.
In practice, all format readers but one will be Not applicable.
If all format readers are Not applicable, the file is rejected.
© 2015 Emerson Climate Technologies - Transportation Solutions ApS
160
User's Guide
Normally one format reader is Fully or Partly applicable. If it is Fully applicable, data are
immediately read into REFCON's database.
If the format reader is Partly applicable, the handling depends on the user selected "Strictness":
Strictness
11.4
If file is Partly applicable:
Reject file if any
error
The file is rejected.
Reject any record
with error
If there are one or more records that are OK (as defined above), these
records are used, and the file is accepted, otherwise the file is rejected.
All records that are not fully OK are ignored.
Read all
meaningful
If there are one or more records that are OK or Partly OK (as defined
above), the useful parts of these records are used, and the file is
accepted, otherwise the file is rejected. All records that are not OK or
Partly OK are ignored.
Manual Planning data file transfer
Overview
The Planning data file must be transferred to the REFCON. If automatic transfer 156 is not
enabled, you need to do it manually. You can use a USB key or, if available at your specific
REFCON system, the LAN network connection:
File transfer procedure
To have the Planning data transferred to REFCON, you must proceed as follows:
Step
Action
Comments
0
Decide the format of the transferred
file (normally this is done once for
all).
The file must be in the decided format, which in
the most cases is called Baplie 1.5 or Baplie
2.0 (specified by the SMDG group, see
www.smdg.org).
Also it can be a comma-separated file (csv) in
a customized format, which must be configured
before you can proceed, see CSV format editor
165 .
1
At the Planning System, execute
the command that stores the
Planning data as a file.
The file must be stored at an appropriate
location, which can be a USB key or a network
folder, accessible from both REFCON and the
Planning System.
© 2015 Emerson Climate Technologies - Transportation Solutions ApS
Planning data import
Step
Action
161
Comments
If you have enabled the “Automatic
Shortly after step 1, the file is automatically
Planning data File Transfer” function, imported, see Automatic Planning data File
don’t do more.
Transfer 156 .
2
If using a USB key, move it to the
REFCON Monitor PC.
That is, the REFCON Monitor PC where you
are working.
3
Open the Planning data import
dialog.
See The Planning data element in the Side
panel 155 .
4
Select the file stored in step 1 and
read it.
See Using the Planning data import Dialog 161 .
The last used location and filename appears
automatically.
5
If you have any reason to doubt that
the data transfer was successful,
inspect the Status.
Does the number of updated containers match
your expectation? See Viewing the Import
Status 161 .
Using the Planning data import dialog
The Planning data import dialog is used to retrieve a Planning data file manually:
If you previous have read a Planning data file, and a file with same name (but maybe newer) still
exists in the same folder, it is indicated in the "Last read file" field. You can in this case simply
select the "Read now" button to re-read it immediately.
If no such file exists, or you want to read another file, select the "Browse and Read" button and
use the standard Windows file-open dialog box to locate the file on the harddisk (of the PC you
are working at), a USB key or on the network.
Having selected the file, the file import immediately starts. You will see the import progress
being indicated in the The Planning data element in the Side panel 154 .
11.5
Planning data file transfer information
Overview
You can at any time select the Info command from the options menu
156 to watch the result of the latest Planning data file import:
© 2015 Emerson Climate Technologies - Transportation Solutions ApS
155
or the REFCON Setup
162
User's Guide
The "Status" area shows the result of the latest import. The fields are explained below, see
Understanding the Import Status 162 . If the file import went wrong, this is clearly indicated, see
File rejection 162 .
Understanding the Import Status
The Status information shown in the Planning System Interface Information dialog box relates to
the latest automatic or manual file import and can be interpreted as follows:
Field name
Description
Last imported at
The UTC date and time (year-month-day hour:second) when an import
file was last successfully read.
If the last file was rejected, this is indicated in stead, and a button
appears allowing you to inspect the import log, see below.
Imported
The number of containers that were identified as new reefers and
therefore caused container records to be created, including dry
reefers if so decided.
Updated
The number of reefer containers that did already exist in REFCON's
database. If data were changed, the corresponding records were
updated.
Delete-candidates
The number of containers that were no longer in the file and therefore
were deleted if the conditions 154 were met.
Rejected due to error
The number of unreadable container records in the file.
Not imported
If the "Record to ignore" rule option is selected, this count shows the
number of not used records (typically dry reefers) identified in the file;
otherwise this count is 0.
Dry reefers included
Yes or No according to your rule selection.
File rejection
If and when a Planning data import file is rejected (according to the File reading rules
158
), the
© 2015 Emerson Climate Technologies - Transportation Solutions ApS
Planning data import
163
following things happen:
An alarm is released, if so selected by the user.
The event is logged.
In the Planning System Interface Information 161 dialog box, the situation is indicated as
follows:
Here you can select "Show log" to inspect the import log as explained in the following.
Why rejected?
As explained under File reading rules
rejected:
159
, generally there are two possible reasons why a file is
either because all format readers are Not applicable - which is displayed as follows in the log
viewer:
or because the relevant format reader is Partly applicable but rejected due to the user
selected rules.
Example of file with a few errors
In this example, a sample file in Baplie format was read, in which two errors were found. Due to
highest Strictness, the file was rejected. The log showed the situation like this:
© 2015 Emerson Climate Technologies - Transportation Solutions ApS
164
User's Guide
At the top of the log viewer, the File name of the tested file is shown for your information.
The "Used reader" shows the name of the identified Partly applicable format reader
159
.
Below this three counters are shown:
The "Total no. of records" shows the number of records in the file, of which at least one has
errors. Often this count would match the current total number of reefer containers according
to the Planning System - is it so?
The "No. of error-free records" shows the number of container records that were considered
fully OK according to the rules 158 .
The difference between the above two counts is the number of records with errors. The "No. of
records with useful data" shows how many of these were considered Partly OK according to
the rules 158 . Of course, error-free records are certainly useful, too, but these are not included
in the third counter.
Below the counters you see two scroll-able text fields.
The second text field, named "Top of imported file", simply is a copy of the first many lines of
the file in question, for your recognition.
The first text field, named "Error report", attempts to visualise the errors. The list has been
limited to max. 5 errors - if there are more you would hardly inspect all the details, anyway.
For all format readers but the Baplie reader, the Error report is relatively clear and easy to
survey, because each record is one line in the file.
But in our example, the Baplie format was used, in which each record is several lines with a
very special syntax. Let's try reading it anyway:
© 2015 Emerson Climate Technologies - Transportation Solutions ApS
Planning data import
165
Here is one more example:
11.6
CSV format editor
Overview
Depending on the type of the Planning System, it might be expedient that the Planning data file
is in a proprietary comma-separated format. In such case, REFCON needs to know the exact
specifications of the format, for which purpose you need to use the CSV format editor.
A CSV-formatted Planning data file is supposed to include one line for each container. The line
includes a number of data source columns, separated by tab characters, commas, semi-colons
or another selected character (despite of the name "comma-separated"). So what you mainly
configure in the CSV format editor is: what is the separator character, also called the delimiter,
and what is the meaning of each individual data source column.
Opening the CSV format editor
To open the editor, click the "Set/edit CSV reader format…" button in the REFCON Setup
dialog, see Setting up Automatic Planning data File Transfer 156 .
Automatic format detection
Each time REFCON reads a Planning data file, it automatically attempts to recognize the
format. In principle, it tries the available known formats one by one and checks if the parsing of
the file makes sense.
In particular, when checking a CSV format, the following rules apply:
A container line is only valid if all data source columns are parsed correctly, that is, the
number of separator characters is as specified, and the values in between are reasonable (but
not necessarily valid).
If more that 50% of the container lines are somehow in-valid, the file-type identification fails,
and then none of the values in the file are imported (unless another format succeeds).
Note that every single valid data source column in a container line is imported, i.e. a single invalid value does not result in skipping all the other container line-values.
Example of fully configured CSV format editor
The following diagram shows a fully configured format:
© 2015 Emerson Climate Technologies - Transportation Solutions ApS
166
User's Guide
How to configure a CSV format
Assuming that no format has been configured in advance, we recommend that you proceed as
follows:
Step
Action
Result
1
Click "Select file..." and open a
(sample) Planning data file of the
decided format.
Path and file name occurs in Test file field
2
Click "Guess?"
3
If either Delimiter, Header/Footer lines Reflects your changes.
or Encoding is not as expected, make
appropriate changes.
4
Click either of the "Preview" buttons.
5
Make changes to the Source column
of Grid 2, using the drop-down lists.
Also maybe make changes to the
Search and/or Replace columns.
Grid 2 rows mapped to relevant grid 1
columns.
6
Click either of the "Preview" buttons.
Grid 3 should now reflect data from the file
positioned at appropriate data points (you
Name field indicates what was done.
Delimiter and succeeding field shows the
determined format.
Grid 1 (the uppermost table) shows the
parsed content of the test file.
If any header or footer lines exist, errors
are probably indicated. Ignore these if the
lines are in fact headers/footers.
Grid 3 shows a preliminary mapping
result, which is most likely unuseful.
© 2015 Emerson Climate Technologies - Transportation Solutions ApS
Planning data import
Step
Action
167
Result
may find the column header tooltip useful
to see the full name of the data point).
7
Repeat steps 3 - 5 as required if any
errors are indicated in grid 3, or the
result in grid 3 is not as expected.
Understanding the parts of the CSV format editor
Referring to the above figure, the following tables explain the individual fields of the editor:
Option
Option description
Name
The Name has no direct impact on the logic, but it is an appropriate place
to capture a reference back to a defined export-list and possible formatversion information.
Test file
The file is used during the format definition, and to test and verify that files
can be parsed.
Delimiter
The separator character used between data source columns.
Header and
footer lines
The number of lines to exclude/ignore during every import.
Encoding
Must be selected, to handle old DOS-text-encoding-formats like codepage
850 and special characters like Turkish ‘i’ or Danish ‘ø’ etc.
Button
Save
Save
Button description
Saves the changes. An un-saved change is indicated in the form's title bar
by a trailing *.
Delete
Deletes the format, and no custom CSV-format parsing will be attempted
by REFCON.
Select file…
Opens a file-selection dialog for the Test file.
Guess?
Tries to determine the format of the selected Test file, i.e. the delimiter,
and also if possible the header lines, footer lines, and the encoding.
Please note that it is only a guess, so you must verify the choices your
self. In most cases the guess must be corrected!
Preview
Updates all the grids according to the selected options, i.e. with the
parsed content of the Test file.
Grid (= table)
Button description
1. Data source
column numbers
Shows all the delimited lines of the Test file, i.e. unfiltered content that is
only tokenized according to the selected delimiter.
2. Mapping of
data source
column to target
data point
Shows the possible target data points for the import, i.e. container id,
expected set points, and text fields. The columns of this grid are
described below.
3. Preview import Shows the resulting import, with the chosen data source columns to be
mapped, with the input values searched and replaced and potential error-
© 2015 Emerson Climate Technologies - Transportation Solutions ApS
168
User's Guide
Grid (= table)
Button description
indications, like trying to parse a free text column as a type of double.
Every failed container line-parsing is indicated at the start of the row and, if
possible, at the failing cell like this:
Columns in Mapping grid
The columns in the grid "Mapping of data source column to target data point" can be described
as follows:
Column
Description
Source column
The values in this column map to the column numbers in the "Data source
column numbers" grid. Choose from the drop-down list to change.
Search and
Replace
Is a very simple transformation option, which helps to change the input
value before it is stored in REFCON. For example it can trim away a
trailing "°C" before the decimal value is parsed into REFCON as a set
point.
DataPoint
columns
All the columns starting with "DataPoint..." are just information to help you
choose, e.g. the right Search and Replace values, and that you do not
import Fahrenheit degrees into a data point expecting Celsius degrees.
© 2015 Emerson Climate Technologies - Transportation Solutions ApS
REFCON 6
Reefer Container Monitoring System
The Planning System
Communication Interface
Transportation Solutions
170
12
User's Guide
The Planning System Communication Interface
Overview
Your REFCON system might include the Planning System Communication Interface option.
The option is relevant in container terminals and similar places where reefer containers
frequently come and go (in contrary to container ships).
To make the Planning System Communication Interface work, the Planning System and the
REFCON Main PC must be connected by an ethernet LAN:
When properly connected and software configured, the interface runs automatically. You will be
warned by an alarm should the connection fail, please refer to Trouble-shooting the interface 174 .
Purposes of the Planning System Interface
The basic idea of the Planning System Communication Interface is to automatically keep data
updated on both sides:
The Planning System continuously gets live data from the containers.
REFCON continuously gets the data necessary to check the containers and to display them
graphically (Container Plan).
Please refer to the Planning System for instructions on how to send the below messages. Be
aware if it runs automatically, or you have to do things manually.
On the REFCON side, data transfer runs automatically, however, you can trig a complete retransfer of data as described below.
Communication status
In the Side panel you can at any time see the status of the Planning System Communication
Interface:
In the left example, the interface runs well - to the right it does not so.
Note that if the Planning System Interface is not enabled, Planning data Import
shown in stead.
152
status is
You will notice that the arrow in the icon points both ways only when the Planning System
Interface is enabled.
The options menu
Click the
button to have the options menu displayed:
© 2015 Emerson Climate Technologies - Transportation Solutions ApS
The Planning System Communication Interface
171
Here,
The "Read file..." can be used to import a Planning data file manually 160 . This might be
useful should the automatic interface fail.
The "Re-read all online" 171 and the "Send all online" 171 commands are described below.
The "Info" command displays the Planning System Interface Live Monitor 177 .
The Re-read all command
Though data are transferred automatically from the Planning System to REFCON whenever
changes occur, you can trig a full re-transfer by selecting the "Re-read all online" command in
the options menu 170 .
Having entered the command, and accepted the warning, a request is sent from REFCON to the
Planning System, which should then start re-sending data for all planned containers, one by
one. This may take a few minutes to complete.
The Send all command
Use the "Send all online" command in the options menu 170 to trig that Reefer Monitor
messages (see below 172 ) are sent to the Planning System for every single reefer container in
REFCON's database.
Note that normally this is not necessary if Timer based data transmission
selected.
173
has been
Overview of transferred data
The Planning System Communication Interface transfers data from the Planning System to
REFCON and vice versa. The primary data messages are:
Data transferred to REFCON
From the Planning System, the following information can be sent:
Name
Description of main contents
Reefer Data
message
General container information, including ID, location and expected
setpoint.
Reefer Delete
message
Command to remove a certain container from the REFCON database.
Change Container Command to change the ID of a reported container. Note that this will
ID message
never make any change in the container controller – the message is
only used to change the ID in the REFCON database, and it only works
© 2015 Emerson Climate Technologies - Transportation Solutions ApS
172
User's Guide
Name
Description of main contents
if no communication is or has been running with a container with the
"old" ID.
Request message
Request for Reefer Monitor message (see below).
Data transferred from REFCON
From REFCON, the following information can be sent:
Name
Description of main contents
Reefer Monitor
message
Online data for specific containers, including alarm status, temperature
readings and actual setpoints.
REFCON sends this message in the following situations:
In case of a new alarm on the specific container. Only one message
is sent (though of course, if more containers have alarms
simultaneously, it will be more messages).
Periodically if so decided by the REFCON user (timer based
transmission 173 ). One message for every single container in
REFCON's database is sent, up to 8 times a day.
As response to the request message (mentioned above) - one
response message for each request message.
Request message
Request for Reefer Data message (see above).
Planning System Interface failure alarm
Should the connection to the Planning System fail, an alarm is released.
12.1
Planning System Interface Setup
Overview
The Planning System Communication Interface is controlled through the "Planning System
Interface" tab of the REFCON Setup 251 dialog:
To have the Planning System Communication Interface work, first of all make sure the "Enable"
checkbox is checked. Also decide the configuration as described in the following.
© 2015 Emerson Climate Technologies - Transportation Solutions ApS
The Planning System Communication Interface
173
Preparing the Planning System
The Planning System must be prepared for this interface. The separate Planning System
Interface Programmers Guide describes how to do this preparation. The Guide is available on
www.myREFCON.com, but it requires a password that can be requested through the emailaddress shown under Contact Information 8 .
Communication setup
These three settings are vital to make the communication work:
Setting
Explanation
Protocol
version
What protocol version to select is normally agreed between the parties when
the REFCON system was planned. V1_6 is the newest protocol. If a wrong
protocol is selected here, the Planning System and REFCON is likely to
misunderstand the data from each other.
My IP address
Here you would normally select "All available", however, if there is more than
one LAN card (internally or externally) in the REFCON Main PC, it might be
preferred to select a specific card.
My Port
number
The Port number is agreed between the parties. If the selected Port number
does not match the number used by the Planning System, the
communication will not work.
Timer based data transmission
The Reefer Monitor message is automatically sent in case of a new alarm, but not in any other
case, such as measured data changing. If you want such data periodically updated in the
Planning System, check "Use timer based transmission of reefer data" and select the
parameters:
Setting
Explanation
Fixed time of
transmission
Here you select when to have the data transmitted. For example, if a new
crew is meeting at 7 o'clock, you might select the fixed time 6.45 to provide
fresh data (note that the total transmission may take some time).
Frequency of
transmissions
Here you select how often the data are transmitted. For example, selecting
"Every 6 hours" and the fixed time 6.45 would start the transmission at 0.45,
6.45, 12.45 and 18.45.
Delay between
messages
Normally leave this value as it is, however, if you experience troubles (like
data for some containers are not updated in the Planning System), try to
increase the value. Be careful not to select a very high value. For example, if
you select 500 milliseconds, and you have 2000 reefer containers, the total
transmission time will be at least 1000 seconds - such a long time would
hardly be expedient.
Transmission log files
REFCON logs all messages transmitted on the interface, in both directions. You may select the
parameters:
Setting
Explanation
Main PC folder
for log files
The log files are stored on the REFCON Main PC's harddisk. You can select
the specific folder by clicking Browse, see Selecting drive and folder on
Main PC 44 .
Keep log files
The purpose of the log files is trouble shooting. While everything runs well,
© 2015 Emerson Climate Technologies - Transportation Solutions ApS
174
User's Guide
Setting
for...
Explanation
they are needless and just occupies space on the harddisk. But when one
day troubles should occur, you will need the log files covering a time range
starting before things went wrong. The log files are as default kept for 5
days, leaving you 4 days to discover and act on the troubles. If you think 4
days is not enough, you may increase the value.
Advanced options
Selecting "Advanced options" opens the following self-explaining dialog box:
12.2
Trouble-shooting the interface
Overview
The Planning System Communication Interface is a vital connection. Should it stop working, it
is important that you take action. Here is a few hints.
© 2015 Emerson Climate Technologies - Transportation Solutions ApS
The Planning System Communication Interface
175
Starting Up
When starting up the first time, or starting up after a break e.g. for service, the communication
to and from the Planning System must be checked. The check must be done to be sure that
the interface is working all right.
The following can be done for checking the communication line:
1. Check that the communication is enabled, in the Setup dialog box 172 .
2. Inspect the Planning System Interface Live Monitor 177 . Does it show OK upper right?
3. Try sending a message from the Planning System. You should be able to identify the
message received by REFCON in the Live Monitor.
Checking that messages can be sent to the Planning System:
You may use the "User Alarm 98 " function to create an alarm on a container. If enabled, this
will cause a message to be sent to the Planning System. The Planning System Interface Live
Monitor 177 will show that the message has been sent, however, you also need to check that
the message is received at the Planning System.
In both above cases, if the messages do not work, please check the Planning System, the LAN
connection and the setup 172 .
If Communication Stops
If the connection to the Planning System has been working well, and it is then disabled or fails,
and this situation remains for a long time, you will have to take care of the deletion of the old
containers in REFCON. Otherwise the REFCON database will be filled up with old containers.
The deleting must be done manually from the Container List. Note that containers having been
reported by the Planning System are "planned" and will therefore not be deleted by the
automatic clean-up function 251 .
Please note; in the situation that the connection is disabled by user's choice, no alarm will
appear.
Not All Old Containers Are Deleted
It will happen that containers communicating with REFCON over the power cables do have
container IDs different from the ones expected by the Planning System. The result of such
mismatches is that the Reefer Delete message doesn't work on the specific containers. Such
containers are "unplanned" and will therefore be deleted by the automatic clean-up function 251 .
If the ID mismatch is due to a fault on the container, this should be corrected. Please refer to
the description of "ghost containers".
© 2015 Emerson Climate Technologies - Transportation Solutions ApS
176
User's Guide
Change Container ID does not work
The "Change Container ID" message is sent from the Planning System to REFCON, one message
for each container. Note that this will never make any change in the container controller – the
message is only used to change the ID in the REFCON database, and it only works for containers
that did never communicate on the power lines.
When received, the message is treated as follows:
© 2015 Emerson Climate Technologies - Transportation Solutions ApS
The Planning System Communication Interface
177
Request for Reefer Monitor message does not work
The Request for Reefer Monitor Data message is sent from the Planning System to REFCON,
one message for each container. REFCON is expected to respond with the Reefer Monitor
message.
The message is treated as follows:
12.3
Planning System Interface Live Monitor
Overview
The Planning System Interface Live Monitor is found under the "Planning System Monitor" tab
of the Planning System Interface Information dialog available from the options menu 170 :
The Live Monitor displays one line for each message being transmitted on the interface. The
Live Monitor is not able to display messages that were transmitted before the Live Monitor was
opened - for such purpose you will have to inspect the log files.
© 2015 Emerson Climate Technologies - Transportation Solutions ApS
178
User's Guide
Status indication
Upper right, the Live Monitor indicates the status of the communication:
Indication
text
Explanation
WAIT...
Is shown right after opening the Live Monitor. Please wait until this indication
changes before using the Monitor.
TIME OUT
The interface communication does not run - something is wrong.
OK
The interface communication is running.
Show or Hide alive-messages
If you uncheck the checkbox upper left, the Live Monitor will also show the non-data messages,
like this:
Normally it is unnecessary to have these messages displayed, as the status OK upper right
exactly means that the alive-messages run as intended.
The list of messages
The major part of the Live Monitor displays one line for each message. The columns are:
Column
header
Rx/Tx
Explanation
"R" is short for Received (by REFCON): A message sent from the
Planning System to REFCON.
"T" is short for Transmitted (by REFCON): A message sent from
REFCON to the Planning System.
Date
The date indication stamped in the message, if any.
Time
The time indication stamped in the message, if any.
Message type
The type of the message, as described in Overview of transferred data
Container ID
The container ID stamped in the message, if any.
Location
The container location stamped in the message, if any.
171
.
You may use the Clear button to remove everything in the list.
© 2015 Emerson Climate Technologies - Transportation Solutions ApS
REFCON 6
Reefer Container Monitoring System
REFCON Data Collector
Transportation Solutions
180
13
User's Guide
REFCON Data Collector
Overview
The RDC (REFCON Data Collector) allows systematic data collection from reefer containers
that are not communicating on the power cables. Also it allows you to check the setpoints of
the containers.
To take advantage of the RDC, you need to do regular inspections, where you carry the RDC
unit 180 and walk to the selected containers. Before an inspection, you should prepare 187 the
RDC unit by deciding exactly which containers to visit (the selection), and in which order to visit
them (the walk route).
The RDC software has been and will be released in various versions. It is installed and updated
independently of the REFCON installation, using the Handheld Software Commander. Please
find the RDC operating manual on the PC where Handheld Software Commander is installed,
being the REFCON Monitor PC where you interact with the RDC.
The hand-held computer: The RDC unit
Inspections are done by means of a hand-held computer equipped with RDC software. We
generally refer to this as the RDC unit.
The RDC unit needs to be connected to REFCON for data transfer. Normally this takes place
through a docking station connected to a USB port of the REFCON PC. If you have more than
one REFCON PC, any of them can be used.
Important note: You must import RDC data and prepare the RDC unit from the REFCON PC to
which it is connected. In the above example, you can operate the RDC from PC 2, but not from
PC 1 or PC 3 (unless you move the docking station).
Also important: On the same PC (PC 2 in above example), the Handheld Software
Commander must be installed and running. The Handheld Software Commander helps you
installing the RDC software and keeping it up-to-date.
Recommended inspection schedule
Your normal data collection and setpoint-checking schedule would look like this:
Step
Action
Comments
1 Receive container Planning data To be able to prepare the RDC with the
from the Planning System.
correct list of containers and their locations.
2 Await that all relevant containers
have had time to start
communication.
With RDC you will normally only deal with
containers that do not communicate on the
power lines - but this is your decision.
3 Place the RDC unit in the
docking station, being connected
to REFCON.
Note that if you have more than one
REFCON PC, the RDC unit is connected to
a specific one of them.
© 2015 Emerson Climate Technologies - Transportation Solutions ApS
REFCON Data Collector
Step
Action
181
Comments
4 Select which containers to
include in the preparation list (=
the selection).
You do this from the RDC Preparation
Selection 187 dialog box on that particular
PC.
5 Select the order in which you
intend to visit the containers (= the
walk route).
This requires one or more walk routes to be
specified once for all. Normally this is done
at commisioning time.
6 Prepare the RDC, that is, send the
sorted preparation list to the RDC
unit.
You may observe file transfer progress on
both REFCON and the RDC unit.
7 Do your manual inspection
round.
That is, carry the RDC unit to the containers,
in the order stated in the display.
8a For each container, check the
setpoints.
Compare controller's setpoints with the
expected, and change the first mentioned on
the controller if necessary.
8b Also for each container, get it's
runtime values (wait or type).
Data is retrieved automatically if your RDC
and the container are equipped with
matching wireless technology; otherwise you
need to type in setpoints, primary
temperatures, alarm state and maybe other
measures on the RDC.
9 Make sure you have covered all the
selected containers.
If your preparation list is complete: Are they
all green?
10 Return and place the RDC unit in
the docking station.
After this, wait a few seconds for the RDC
unit and the PC to connect.
11 Select the "Import data file"
command on the PC.
Note that only containers with updated data
are affected, and only if they meet the
conditions for RDC-monitored containers 181 .
Usually you would repeat the inspection periodically.If no new Planning data, you start
succeeding inspections at above step 4 or, if same selection and walk route, at step 6.
Why Use the RDC?
Normally, most containers communicate with REFCON over the power cables (PCT), however,
it will happen that a number of containers don't. This can be because of defects, or simply
because the containers are not equipped with power cable modems.
Thus, containers that do not communicate will have to be supervised manually, to some extent.
With the RDC this manual inspection gets easier, and it allows data to be integrated in
REFCON and on the Global Monitoring Server.
The main advantage is that the RDC shows you the list of containers that you need to visit in
the order you have chosen. This can considerable reduce your manual inspection time.
Another advantage is that data from the non-communicating containers get into REFCON,
making these containers work similar to any communicating container. Of course this will
depend on your inspection interval.
RDC-monitored containers
When you import data from the RDC unit to the PC, REFCON checks the conditions
mentioned below. We refer to containers that fulfill these conditions as the RDC-monitored
containers.
The following conditions must be fulfilled for a container to be RDC-monitored:
© 2015 Emerson Climate Technologies - Transportation Solutions ApS
182
User's Guide
The container has never been communicating via the PCT, or data from the container are
obsolete, or the container is communicating, but data could not be retrieved (most likely
because of an error on the container).
If you during your manual inspection have recorded setpoints and/or measures for a container
that, at the time of import, does not meet the above conditions, these data will be ignored and
thus not imported to REFCON. Note that if you, for the same container, also have changed the
Note or the textual Alarm field, these data will be imported, as these do not conflict with PCT
data.
13.1
Operating RDC from REFCON
Overview
If REFCON is configured to include the RDC, any REFCON Monitor will include the RDC
element in the Side panel as well as the pictures and functionality described in the following.
The RDC Side panel element
The key to the user's handling of the RDC from the PC is the RDC Side panel element:
By very simple means, the RDC Side panel element always:
Informs you about the actual situation (as regards the RDC).
Provides the most relevant command available in the situation.
Provides access to alternatives and detailed status information.
Below, you find further information about RDC Side panel element details 183 , The RDC Side
panel element extension 184 , The Options Menu 184 and The RDC status viewer 184 .
The main schedule
When everything works as expected, a manual inspection runs through the following steps:
Pre-condition
Step
Procedure
1. Prepare
the RDC.
Click the element to have containers
selected and sorted according to the
last saved options (= quick
preparation).
Choose "Prepare inspection (select)"
from the Options menu to open the
RDC Preparation Selection dialog 187 to
adjust the options.
In both cases, the resulting list is sent
to the RDC.
2. Do your
manual
inspection.
1. Disconnect the RDC unit.
2. Carry out your manual inspection
round.
3. Connect
the RDC
unit.
Plug it into the docking when you have
completed your inspection round. Wait
for a while.
© 2015 Emerson Climate Technologies - Transportation Solutions ApS
REFCON Data Collector
Pre-condition
Step
183
Procedure
4. Import
changed
data.
Click the element to have the data
recorded during your inspection
imported into REFCONs database.
Choose "Ignore data file" from the
Options menu to skip the import. In
this case, the file with changes is still
found in the RDC unit, meaning that
you may disconnect the unit without a
new preparation and add more
changes.
5. Watch
the import
result.
The square should be green, and the
two counters should match the number
of containers that you did visit.
Exceptions
It might occur that things do not quite appear as described above. The most common
exceptions occur when importing the container data file. Such exceptions will make the RDC
Side panel element look something like this:
Notice the yellow square and the third counter. The following exceptions are the most common:
One or more containers have been disconnected since the RDC unit was prepared, and since
you recorded their data. Usually you would know, of course, but it could be an unintended
disconnect, maybe?
One or more containers have started communicating on the PCT since the RDC unit was
prepared. In this case, if you have made changes to the Note or the Alarm field of any such
container, these data are imported all right, but setpoint and temperature data are not. Even if
you have changed nothing but the Note and/or the textual Alarm, it will count as a "container
that was not or only partly updated".
If it is even worse than this, for example the data file being not readable, the square will be red.
RDC Side panel element details
The RDC status icon can appear as follows:
Icon appearance
Explanation
No RDC unit is connected to this PC.
(light gray
arrow)
/
(flashing)
(green arrow)
An RDC unit is connected, awaiting preparation for next
inspection.
An RDC unit is connected, data are ready for import.
An RDC unit is connected, it has been prepared for next inspection
and is awaiting your disconnection.
The command text appears as follows:
© 2015 Emerson Climate Technologies - Transportation Solutions ApS
184
User's Guide
Text / appearance
Explanation
Please connect RDC
No RDC unit is connected to this PC. No primary command is
available as you can do nothing.
Connecting
An RDC unit has just been connected, it's status and possible
data files are being retrieved - please wait for a while.
Import data file
An RDC unit is connected, data are ready for import. Click the field
to start the import, or select alternative from Options menu.
Importing file
An RDC unit is connected, data are being imported - please wait
for a while.
Prepare inspection
An RDC unit is connected, awaiting preparation for next
inspection. Click the field to prepare with standard configuration, or
select alternative from Options menu.
Re-prepare inspection
An RDC unit is connected, it has been prepared for next inspection
and is awaiting your disconnection. Still you have the option to
overwrite the already prepared data file.
Being prepared
An RDC unit is connected, the preparation data file is being
created - please wait for a while.
Being transferred
An RDC unit is connected, the preparation data file is being sent to
the RDC unit - please wait for a while.
The RDC Side panel element extension
Each time a primary RDC operation has completed, the RDC Side panel element extension
appears to the right of the RDC Side panel element itself:
The extension disappears automatically in case of certain events, for example, when the RDC
unit is disconnected or user selects the Options menu. If none of these events occur, the
extension fades away after a short time. You can remove it by clicking the small X button.
For further information, use the RDC status viewer
184
.
The Options Menu
In general, the Options Menu provides the alternatives to the primary command in the actual
situation:
The first option in the menu is identical to the primary command. After this follows one or more
alternatives, if any.
As the last option you find the RDC status viewer 184 described below. If this is the only option
in the menu, the viewer opens immediately when selecting the Options menu button.
The RDC status viewer
To open the RDC status viewer, select it in the Options menu:
© 2015 Emerson Climate Technologies - Transportation Solutions ApS
REFCON Data Collector
185
If the "Show latest status" option is the only one in the menu, the viewer opens immediately
when selecting the Options menu button.
Note that the viewer always displays a snapshot! Should status change while the viewer is
open, this will not be reflected - you must close and reopen the viewer to have it updated.
The RDC status viewer contains two tabs, "Status latest Import" and "Status latest
Preparation". If the latest primary operation was a preparation, the latter tab automatically
opens.
With the "Status latest Import" tab open, the viewer looks like this:
With the "Status latest Preparation" tab open, the viewer looks like this:
Note: The "Used filter" is a description of the selections done in the RDC Preparation Selection
187 dialog. In the above example, the filter selected is the Container List "Cold treatment".
Clicking "Show list of containers" opens the following dialog:
© 2015 Emerson Climate Technologies - Transportation Solutions ApS
186
User's Guide
Here, the selected containers appear in the selected walk route order.
Removing an RDC alarm from REFCON
An "RDC alarm" is an alarm generated by the user by selecting it from the standard alarms list
or by typing in an alarm text at the RDC unit during an inspection.
Normally you would check the same container during later inspections. When observing that
now the alarm condition is no longer present, you would delete the alarm at the RDC unit and
thereby have it removed from REFCON.
There are, however, situations where it is more convenient to remove the RDC alarm from
REFCON. You can do this by selecting the "User Alarm" button in the Container Details 114 .
You will see that the normal User Alarm dialog box has been extended with an "Alarms created
from RDC" section:
In the section, the two "types" of alarms can occur:
There can be any number of "Alarm(s) selected from list". To remove one, click it in the list
and the select the "Remove" button. If an alarm is grayed in the list, it has already been
removed, but awaits acknowledgement.
There can be one "Typed alarm text"; in the above example, the words "This is a free text
alarm" were typed in at the RDC unit. Select the "Remove" button to have it removed without
using the RDC unit. You will have to acknowledge the alarm before it actually disappears.
© 2015 Emerson Climate Technologies - Transportation Solutions ApS
REFCON Data Collector
187
13.1.1 RDC Preparation Selection
Overview
Preparation Selection means making the RDC unit ready for your next inspection round. You
select which containers to include in the RDC list and the sorting order (walk route).
Note that it is possible to include non-RDC-monitored containers, that is, containers that are or
starts communicating. Such containers receive data via the power lines, and therefore the data
you may collect using the RDC unit will be ignored - of course, only where conflicts are
detected.
The RDC Preparation Selection dialog
You make your choices in the following dialog:
In the upper part you select which containers to include in the preparation list. In the lower part
you select the sorting order (walk route).
Having made your choices, select one of the Prepare buttons to have the preparation list
generated and, if not empty, sent to the RDC unit:
The left Prepare button also saves your choices so that you can very easily repeat it the next
time you are going to prepare.
The right Prepare button makes your choices used only this time.
Selecting Cancel will dismiss your possible choices, and the RDC unit is not prepared.
© 2015 Emerson Climate Technologies - Transportation Solutions ApS
188
User's Guide
Using filter, list or both
To the left in the upper part of the dialog, the first three radio buttons decide whether to Use
filter, Use list or both. To use list you have to generate a list from the Container List (see below).
If you select "Use filter and list", the result will limit to containers that both are on the list and
meet the filter conditions.
Selecting the filter
In the frame to the right of the "Use specified filter only" radio button, you can set up a filter
deciding which containers to include in the preparation list:
Choice
Result
Containers that never
communicated
The result depends on the "Include containers missing data"
checkbox:
If not checked, the RDC list will include all containers reported by
the Planning System that have not (yet) started communicating. If
the container has communicated, even if it was just for a while, it is
not included.
If checked, the RDC list will include the same containers as if not
checked plus all containers for which setpoint and temperature
data are not known or are obsolete. Note that this selection
corresponds to what we call RDC-monitored containers 181 .
Containers with
alarms
The RDC list will include all containers with alarms, no matter if the
alarm origins from the container controller, from REFCON or from the
user, and no matter if the container is communicating or not.
Special reefers
The RDC list will include all containers marked as Special reefers, no
matter all other conditions of the container.
All containers
The RDC list will include all containers unconditionally.
You can refine the filter by selecting either of the checkboxes:
Choice
Result
Exclude containers
with unknown
locations due to
Planning data
When this checkbox is checked, containers that were included in the
Planning data but without a location are excluded from the resulting
RDC list. In other words, containers that pass the other filter
definitions are only included in the list if either they have Planning
data-specified locations or they have no Planning data at all.
Exclude "ghost
containers" (with no
Planning data) and
dry reefers
When this checkbox is checked, containers without Planning data
and containers with no expected temperature setpoints are excluded
from the resulting RDC list.
Selecting an RDC list
You can pick out a specific collection of containers for the RDC as follows:
1. Open (or switch to) the Container List (any version).
2. Highlight the containers of interest.
3. From the Shortcut menu, select "Make RDC list...".
What happens next depends:
If the RDC unit is connected, and the RDC Preparation Selection dialog is not open, this will
automatically open, and "Use specific list only" will be checked.
If the RDC unit is connected, and the RDC Preparation Selection dialog is already open, this
will be updated, and "Use specific list only" will be checked, ready to use the list.
© 2015 Emerson Climate Technologies - Transportation Solutions ApS
REFCON Data Collector
189
If the RDC unit is not connected, you will get a message that you need to connect it before
you can use the list.
Using a selected Container List
As described in Setting up the Container List 63 , it is possible to define Container List versions
with built-in filters. Such a filter can be anything from simple to very advanced, thus selecting
exactly the subset of containers that you want. Before proceeding, you might have to create a
Container List version if the appropriate one does not exist. REMEMBER to SAVE it before
using it.
If you select the fourth radio button upper left, named "Use selected Container List", and choose
the desired Container List version from the list, the RDC list will be identical to the actual list of
containers in that version, at the moment you select "Prepare...". Next time you prepare, the
filter is applied again, meaning that the list of containers might have changed.
Defining the Sorting order (walk route)
In the lower part of the RDC Preparation Selection dialog you decide the sorting order of the
selected containers. You have three options:
Choice
Result
Alphabetical by
container ID
All the containers are sorted by ID, meaning that the locations are not
taken into account. This is your only option if you have defined no
walk route.
As defined by default
walk route
A walk route is basically a list of locations. All containers with
locations defined in the walk route list are sorted according to this,
while containers without defined locations or with locations not
defined in the walk route are sorted alphabetically by ID and
appended to the sorted list.
The default walk route would be automatically created when
generating the Container Plan, if this option is enabled, please refer
to How the Default Walk Route is organised 189 .
As defined by walk
As alternative to the default walk route, you can define your own as
route loaded from file described below, see Defining a custom walk route 192 .
(see procedure below)
13.1.2 How the Default Walk Route is organised
Overview
The default RDC walk route is created on basis of the optional Container Plan. If no such is
included, the following description is not relevant.
How the default walk route for a terminal is organised
As there is no common standard for the organisation of the locations in terminals, the default
walk route for terminals is one area, named "Div", where all locations appear in kind of random
order. The only real value of this default walk route is to be the basis for your custom walk route,
please refer to Creating a custom walk route 192 .
How the default walk route for a ship is organised
The calculation of the default walk route for a ship is based on the assumption that the ship's
containers are organised according to the ISO 9711-1:1990 standard, however, it also handles
certain minor exceptions from this.
© 2015 Emerson Climate Technologies - Transportation Solutions ApS
190
User's Guide
The order of the locations in the default walk route is decided by the following rules/
assumptions:
All 40' containers are placed with the machinery end pointing astern.
For example, a 40' container in bay 06 and a 20' container in bay 07 will have the controller
displays accessible side by side, while a 20' container in bay 05 will have the controller
display at the other end (ahead) of the 40' bay.
The walk route starts ahead, on deck.
You inspect all containers on deck first, and then all containers below deck.
Far most ahead you might have 20' containers in bay 01. You inspect these first, starting just
above deck in starboard side. Having finished the first tier, you continue at the tier just above,
starting again in starboard side. Etc.
Having completed bay 01 above deck, you continue with bay 02/03, starting just above deck
in port side. When you reach the starboard side, you turn around and inspect possible 20'
containers i bay 05, starting in starboard side. Back in port side, you continue to the tier just
above. Etc.
© 2015 Emerson Climate Technologies - Transportation Solutions ApS
REFCON Data Collector
191
Having completed bay 02/03/05, you repeat this in bay 06/07/09, 10/11/13, etc.
Having completed the last bay astern on deck, you continue with the last bay astern below
deck. If for example the last bay below deck is bay 54, you first inspect bay 54/55, starting in
port side just below deck. Having completed the uppermost tier, you step down to the tier just
below, starting in port side. Etc.
Having completed bay 54/55 (in the example), you continue with bay 53, starting just below
deck at starboard side. When you reach the port side, you turn around and inspect bay
50/11, starting in port side. Back in starboard side, you continue to the tier just below. Etc.
© 2015 Emerson Climate Technologies - Transportation Solutions ApS
192
User's Guide
Having completed bay 53/50/51 (in the example), you repeat this in bay 49/46/47, 45/42/43
etc.
13.1.3 Creating a custom walk route
Overview
On basis of the default walk route, you can create any number of customised walk routes using
a text editor like Notepad. Any such custom walk route is kept in an external text file. It is your
responsibility to name the file, to decide its location and to back it up. Having created such a
file (or more), you use it in the RDC Preparation Selection 187 dialog box.
Start: Exporting the default walk route
To create a custom walk route, you need a complete list of all possible locations. The safe and
easy way to obtain this list is to export the default walk route. This also gives a few other
advantages as described below. Proceed as follows:
1. Open the RDC Preparation Selection dialog (only possible with an RDC connected).
2. Make sure the "As defined by default walk route" radio button is selected. If this is not
possible, unfortunately no default walk route exists.
3. Select the "Save as file" button.
4. Choose folder and file name.
Customisation
To do your customisation, proceed as follows:
1. Open Notepad - or a similar plain text editor.
2. Open the file saved above or a previously created walk route file.
3. Follow the instructions at the top of the exported file and/or the hints below.
4. Save the file in a position that can be read from the REFCON Monitor PC, for example on a
USB key.
A walk route file opened in Notepad typically looks like this:
© 2015 Emerson Climate Technologies - Transportation Solutions ApS
REFCON Data Collector
193
The first about 25 lines are comments (defined by the //).
The first line describes the file. You could choose to edit this line, or add one below, when
you make changes to the file, for registration.
The next about 23 lines is a guiding instruction on how to edit the file. Please read the
instructions carefully.
There are in fact four "types" of lines in the file:
Line starting with
is a
Description
//
comment line
Being ignored by the importing software - you may
add or delete comment lines to wish.
##
designation line
There should always be exactly 4 designation lines
- never change anything but the words within the
quotation marks.
::
area definition line
Defines that here starts another area, and the short
and long title of this.
location string
location line
There must be exactly one location line for every
single location covered by your REFCON system,
that is, as defined in the Container Plan.
Normally you would leave all lines down to the first :: as is, maybe except for some registration
at the top.
You would probably mainly do the following operations:
Move a location, using cut and paste.
Define a new area by a) copying an existing :: line; b) pasting where the added area is to
start; c) editing the words within the quotation marks (remember that the first must be very
short).
Final: Importing your text file
To utilise your custom walk route, proceed as follows:
1. In the RDC Preparation Selection dialog, select the Browse button.
2. Locate the walk route text file you created above.
© 2015 Emerson Climate Technologies - Transportation Solutions ApS
194
User's Guide
3. Click Open. The file is validated, and in case of troubles you are informed.
4. Select the Show button next to the Browse button to make sure the file was imported all
right.
5. Select the "Prepare (and save as "Quick")" button to have the imported walk route saved in
REFCON.
Note: REFCON can only store one walk route at a time. Importing another custom walk route or
starting to use the default walk route makes REFCON forget the one you first imported.
Therefore make sure you keep the external text file, if you ever would use it again.
© 2015 Emerson Climate Technologies - Transportation Solutions ApS
REFCON 6
Reefer Container Monitoring System
Four pole monitoring
Transportation Solutions
196
14
User's Guide
Four pole monitoring
Overview
Four pole monitoring is an optional extension to REFCON 6, allowing supervision of a reefer
container through three binary signals, "Compressor Running", "Defrosting" and "In range". The
binary signals are read through dedicated hardware modules, called FMM units (Fourpole
Monitoring Modules) being connected to REFCON by power line communication.
A four pole monitored container may also be power line monitored if it has a power line modem
attached. Also it can be additionally monitored by the optional RDC.
Using four pole monitoring
All you have to do in your daily work is to plug in (and later out) the four pole cables to the
containers that are not otherwise automatically monitored. Note that it is important that you
use the correct cable for the specific container, matching the location.
Having plugged in, the container will start being four pole monitored after some time. Note,
however, that if all three signals are Off, REFCON is not able to detect the container. If/when
later a signal gets On, the detection will occur.
"Planned" and "unplanned" four pole containers
When a four pole cable is plugged in, REFCON checks if it has information about a container on
that location from the planning system in advance. If so, it is called a "planned" four pole
container, and it will occur in the REFCON Monitor with the container ID stated in the planning
data.
If the location is not found in planning data, it is called an "unplanned" container. In such case
REFCON does not know the real container ID. It is therefore given a "pseudo" container ID
starting with the letters "FPMC" (for Four Pole Monitored Container) followed by the location. In
the case that the location is shorter than 7 characters, one or more additional figures 9 are
added. For example, an "unplanned" container at location 020182 will get the ID
"FPMC0201829".
If later planning data arrives defining that specific location, the "pseudo" container ID is replaced
by the real ID within a short time.
Settings and alarms related to four pole monitoring
You can control the four pole related alarms from the Four pole tab in the REFCON Setup
window:
As you see, all time settings are a little more than an hour as default. This is because in the
© 2015 Emerson Climate Technologies - Transportation Solutions ApS
Four pole monitoring
197
worst case the updating of the four pole signals can take an hour. You may try smaller values if
you think your system runs faster.
When the "In range" signal goes Off, REFCON releases an alarm unless it is cut off. In the
settings window, we refer to the "Out-of-range alarm". It is always cut off for the selected time
after four pole cable plug-in, and for the selected time after defrosting has completed
according to the "Defrosting" signal.
Because REFCON can't distinguish between "all three signals gone Off" and cable unplug, a
"disconnected timer" is used. It is started when change to all signals Off. While the timer is
running, the container is still considered connected and four pole monitored. At timeout, it is
considered disconnected and no longer monitored. Depending on other parameters this may
mean that it is deleted from REFCON.
You decide whether the "out-of-range alarm" is to be cut off while the disconnected timer is
running by setting the first checkbox in the window.
You decide if you want an alarm on "defrosting too long" by setting the second checkbox. If
selected, you decide the time limit.
The third checkbox decides whether you will have a system alarm in the case that an FMM
stops communicating.
Container List columns relevant to four pole monitoring
A few columns are available in Container Lists being relevant with the four pole monitoring option
enabled. These columns are:
Column header
/ abbreviation
Explanation
Cmpr.Runn
means that the compressor is currently running, while
that it is not so.
means
Defrosting
means that the container is currently defrosting, while empty field
means that it is not so.
In range
means that the temperature is currently in range, while
that it is not so.
Plug No
The plug number on the FMM (1..10) reading the binary signals.
4P Station ID
The user decided description of the FMM.
means
Indication in Container Plan etc
When a container is four pole monitored, the three signals are graphically indicated in the
Container Details and the optional Container Plan like this:
From left to right, the signals are indicated as follows:
Cmpr.Runn
means that the compressor is currently running, while
that it is not so.
means
Defrosting
means that the container is currently defrosting, while
that it is not so.
means
In range
means that the temperature is currently in range, while
that it is not so.
© 2015 Emerson Climate Technologies - Transportation Solutions ApS
means
198
User's Guide
The pre-defined Four pole list
You may activate 63 the pre-defined "Four pole list". Afterwards you can modify the column
selection etc. to meet your specific needs.
Four pole and the RDC
You may wish to use the optional hand-held RDC to manually retrieve data additional to the four
pole signals. For detailed information about using the RDC, please refer to the separate chapter.
The standard RDC selection looks like this:
This will make all "planned" containers that are not Monitored by PCT sent to the RDC,
including "planned" four pole containers, but excluding "unplanned" four pole containers.
If you want "unplanned" four pole containers to be included, simply remove the checkmark
labeled "Exclude "ghost containers" (no planning data) and dry reefers".
14.1
Four pole related maintenance
The four pole configuration
Your REFCON system includes a specific number of four pole monitoring stations. In each
station you find one FMM.
On each FMM, a specific number (1..10) of plugs are in use. Each plug is attached to one
specific container location, meaning that when the cable in that plug is connected to some
container, it is presupposed that this container is situated at that exact location.
All this is defined in the four pole configuration, being stored in a file named Location.dat on the
REFCON Main PC. Please do never make any changes directly to this file!
The four pole configuration specifies all the stations. First of all, each station has a unique
number, from 1 to N, N being the number of stations. Additionally, each station refers to an
FMM ID and a list of plug specifications.
FMMs in the System Devices list
Each FMM occurs as a single line in the System Devices
Column header
/ abbreviation
254
list. It appears as follows:
Explanation
Device
Example "FMM001", the digits indicating the number of the station in
the four pole configuration.
User's Description
The free text description of the station, changeable.
Online
Indicates if the FMM is currently online.
Software
Indicates the software version running in the FMM, if known.
© 2015 Emerson Climate Technologies - Transportation Solutions ApS
Four pole monitoring
Column header
/ abbreviation
199
Explanation
Hardware
If the FMM has not started communicating, you will see the static text
"FMM (Fourpole Monitoring Module)". Having started communicating,
the ID of the FMM is added, for example "FMM LOSU9879879...".
Activity
The date and time when last receiving data from the FMM.
Connected
Number of plugs on the FMM being in the connected state.
Inspecting the four pole configuration
If you right-click an FMM in the System Devices 254 list and select "Configuration" from the
Shortcut menu, you can view how the plugs are configured:
Note that the unit that you did select in the System Devices list is highlighted (light gray
background colour) and is having it's list of plugs displayed to the right.
While having the Editor window open, you can click any other station to have it's plugs
displayed in stead.
Note the warning lower right: "There are unconfigured devices in list!". This appears if/when you
have installed a new FMM in stead of an existing/a configured. It would tell you that there is a
need for changing the configuration as described in the following.
Also note that the Editor has two tabs. The "Stations View" tab shown above is always open
when opening the Editor. You may select the "Plugs View" tab to see a list of all plugs as
described below.
Sorting the lists
When opening the Editor,
The Stations View list is always sorted like this: The configured stations come first, sorted by
Station Number. After this, the not configured stations are listed, if any.
© 2015 Emerson Climate Technologies - Transportation Solutions ApS
200
User's Guide
The Plugs View list is sorted primarily by Station Number, secondarily by Plug Number.
You may change the sorting of either of the lists by clicking any field in the list's header, except
the # header. Click once to sort alphabetically (ascending) by that column. Click once more to
sort reverse alphabetically (descending).
Changing the four pole configuration
In a commisioning situation and when replacing equipment there will be a need for editing the
four pole configuration. You can do three types of changes: Edit the User's Description, Replace
a station, and exchange two plugs' locations.
Editing the User's Description
To change the text shown in the "User's Description" column, select a single station in the
"Stations View" list, right-click it and select the first option:
Make your changes in the small window and click OK.
Replacing a station
The wording "replace a station" refers to the situation that you have been replacing an FMM with
a spare. The function is also relevant in the commisioning situation when you install an FMM
the first time.
To do a replacement, you must always proceed as follows:
Step
Action
Comment
1 Pick a spare FMM, and do carefully write down it's ID found on
the label at the end of unit:
Note that the labeled
ID forms the FMM
Device ID: Remove
the first digit and the
hyphen, and put the
letters "LOSU" up
front. For example,
ID: 0624-0500
makes it
"LOSU6240500".
2 Take the spare to the station needing replacement. Remove
the existing FMM. Do carefully write down it's ID, too - maybe
make an "Old" note next to the ID.
If you do more
replacements, make
sure you know what
"new" ID matches
what "old".
3 Install and power up the spare.
4 Return to the REFCON PC. In the System Devices list, await
that a new FMM reading "Not configured" in the "User's
Description" column gets online, with Device ID formed by the
ID you noted in step 1.
5 Open the Fourpole Configuration Editor
199
It may take up to a
couple of hours from
power up until
online.
.
6 Locate and click your new "not configured" unit at the bottom
of the "Stations View" list. If there are more "not configured",
carefully select the one with the relevant Device ID.
© 2015 Emerson Climate Technologies - Transportation Solutions ApS
Four pole monitoring
Step
Action
201
Comment
7 Hold down the Ctrl button on the keyboard, and click the
replaced FMM in the list, reading the Device ID formed by the
ID you noted in step 2.
You should now
have the two units
highlighted. Note
that the replaced
unit might still be
online because it
can take a few hours
for REFCON to
detect offline.
8 Right-click either of the two highlighted rows, and select the
second option in the Shortcut menu:
9 You get a warning. To proceed, answer Yes.
You should now see
that the "Not
configured" unit
disappears from the
list (and from the
System Devices
list), and that the
replaced unit has
got the new Device
ID.
Exchanging plugs
It may happen that a location configured for a plug does not match the location stated on the
four pole cable. You would then normally have at least two plugs with such mismatch. There
can be many reasons, but the point is that easiest way to solve it may be to change the four
pole configuration. You do this by exchanging the locations of two plugs. You may have to
repeat this if the problem is more complex.
Proceed as follows:
Step
Action
1 Open the Fourpole Configuration Editor
"Plugs View" tab.
Comment
199
, and click the
You now see quite a
long list of all configured
plugs in the system.
2 Locate and click the first of the plugs with wrong location. You should now have
You would probably locate it by this wrong location!
one plug highlighted.
3 Locate the other plug. You may need to scroll the list to
find it.
4 Hold down the Ctrl button on the keyboard, and then click You should now have
the other plug.
both plugs highlighted.
© 2015 Emerson Climate Technologies - Transportation Solutions ApS
202
User's Guide
Step
Action
5 Right-click either of the two highlighted rows, and select
the option in the Shortcut menu:
Comment
You will see that the
highlights disappear
from the list, and that
the locations of the two
plugs that you did select
have swapped.
In case you made a
mistake, simply select
the two again and repeat
the operation, to swap
back.
Understanding the FMM
Please be aware that REFCON communicates with the FMM through the PCT (Power Cable
Transmission). This means that logging in and out as well as data polling work very much as if
the FMM were a container with PCT modem.
© 2015 Emerson Climate Technologies - Transportation Solutions ApS
REFCON 6
Reefer Container Monitoring System
The Email Notification
function
Transportation Solutions
204
15
User's Guide
The Email Notification function
Overview
The optional Email Notification function allows REFCON to alert about container alarms and
possible other decided events by sending emails. The different types of alarms can be
categorised so that, for instance, only selected alarms do cause emails to be sent. Also it is
possible to have alarms of different categories sent to different email addresses.
"Action categories" and "Notification groups"
The Email Notification function is based on a general "action" function. The connection between
these functions can be illustrated as follows:
Any alarm type (for example Carrier's "Compressor Motor Failure") is related to exactly one
Action category. The Action category is specified as a non-negative integer and can be edited
by the user. In the present REFCON 6 version, this can only be done by editing the
"AlarmPrioritiesAndCategories.xml" file located in the "Data Engine\Data" folder on the
REFCON Main PC. It is extremely important to be very careful when editing the file!
Also in the present version, only 4 Action categories are available, numbered 0, 1, 2 and 3.
REFCON generally includes a number of actions. Examples of actions would be sending an
email, or alerting the user on screen. In the present REFCON 6 version, only 4 email actions
are available, corresponding to each of the 4 Action categories.
Each action that involves sending emails is attached to exactly one Notification group. Each
Notification group defines the list of email recipients (one or more) and the email template 204 .
About email templates
Any email being sent is based on a decided template. The template generally defines
the "subject"; and
the "body" of the email.
In the present REFCON 6 version, you do not find a template editor. Please select one of the
provided templates, or ask Emerson Climate Technologies to implement one for you.
Customer's contribution
To have it work, the customer needs a mail account at some Internet company. Depending on
this, it is possible to arrange that the emails are received on the user's cell phone. Note that all
this is not a part of Emerson Climate Technologies's delivery!
Possible delay of received emails
Notification emails are sent by REFCON immediately when the alarms or other events occur.
Depending on the Internet company and the general load on the Internet, there can be some
© 2015 Emerson Climate Technologies - Transportation Solutions ApS
The Email Notification function
205
delay before the email is actually received.
Installation
Having installed REFCON, and having achieved a mail account, you need to make a few
settings 205 . After this, alarms and other events will automatically be forwarded as decided. You
can of course change the settings at any time. Note: In case of a re-installation of REFCON,
remember to import your backup of the settings, and to verify that they actually are as desired.
15.1
Email Notification Setup
Overview
The Email Notification function is controlled through the Alarm Options tab of the REFCON
Setup 251 dialog:
To have email notifications transmitted, make sure the "Enable" checkbox is checked. Also
decide the configuration, see Common Configuration 205 and Notification Group Configuration
below.
205
Remember to apply your changes.
Common Configuration
Note that when enabling Email Notification (at the momemt you click the checkbox), the "Email
Server" tab shows up in the REFCON Setup 251 dialog box, if not already visible. In addition to
the settings described below, you need to set up your email server, please refer to "Email
Server" settings 146 for information.
Notification Group Configuration
To decide the email recipients and more, click the "Configure notification groups" button. This
makes the following dialog box appears:
© 2015 Emerson Climate Technologies - Transportation Solutions ApS
206
User's Guide
In the left side, the available Notification groups are listed. In the present REFCON 6 version,
there is a fixed number of 4 Notification groups available. Out of the box these are named as
shown above.
At each notification group in the list a status indication is found:
--no recipient-- means that no emails will be sent in this group because no email address has
been selected.
--disabled-- means that no emails will be sent in this group because the "Group enabled"
check mark has been removed.
Neither of the above means that the group is active.
To make any change to a notification group, select it in the list. This makes the details of the
group appear in the right side of the dialog box. Here you can:
See the Group ID, being the link to the specified action category 204 of each alarm.
Change the Group name. When you select this field, you get a change warning, because the
out-of-the-box text actually matches the specified out-of-the-box action categories, so change
with care! Apart from this, you can enter any string to wish.
Decide if the group is to be enabled. If you remove the check mark, no emails will be sent in
this group.
Choose the template by selecting one in the list.
Decide the email recipients by setting or removing check marks to the already defined
recipients. If a recipient is missing in the list, use the "Add recipient 206 " 206 button.
Your possible changes are not applied when selecting OK. Having returned to the REFCON
Setup, select OK or Apply here to make your changes take effect. You may alternatively select
Cancel to dismiss your changes.
Adding or editing an email recipient
When you decide to Add or Edit a recipient, the following dialog box opens:
It is optional but recommended that you enter a Name for the recipient. It could be a persons
name or a job title, maybe. If you do not want to define a name, clear the field.
You must enter a valid email address as two strings separated by @.
© 2015 Emerson Climate Technologies - Transportation Solutions ApS
The Email Notification function
207
Click OK to finish your change.
Editing the Recipient List
Selecting the "Edit receiver email addresses" button in the REFCON Setup makes the following
dialog box appear:
You will recognize the Recipient List as a simplified list of Contacts, as known from most email
programs.
In the dialog you can:
Add a new recipient by clicking the "Add new" button. This opens the Edit Mail Recipient
dialog box described above.
206
Remove the selected recipient by clicking the "Delete" button. Note that if the recipient is in
use in one or more Notification groups, you are warned about this.
Change the name or the email address of an existing recipient by clicking the "Edit" button.
This opens the Edit Mail Recipient 206 dialog box described above.
Your possible changes are not applied when selecting OK. Having returned to the REFCON
Setup, select OK or Apply here to make your changes take effect. You may alternatively select
Cancel to dismiss your changes.
© 2015 Emerson Climate Technologies - Transportation Solutions ApS
REFCON 6
Reefer Container Monitoring System
Digital input/output signals
Transportation Solutions
210
16
User's Guide
Digital input/output signals
Overview
Your REFCON Main PC is optionally equipped with hardware allowing writing/reading digital
outputs/inputs. As standard a relay card type LPCI-7250 is used, but for specific details, please
refer to "Instruction Manual - Hardware Descriptions.pdf" being as standard found on the
"Customer disk" supplied with REFCON.
Digital outputs
The following table shows how the digital outputs are used as standard:
Channel
Type
Name / usage
DO 0
NO and NC
System Alarm
DO 1
NO and NC
Reefer Container Alarm,
Normal
DO 2
NO and NC
Reefer Container Alarm,
Special
DO 3
NO and NC
Common Alarm (/ Buzzer On)
DO 4
NO
System Alarm
DO 5
NO
Reefer Container Alarm,
Normal
DO 6
NO
Reefer Container Alarm,
Special
Digital inputs
The following table shows how the digital inputs are used as standard:
Channel
DI 0
16.1
Type
24VDC input
Name / usage
Reset (/ Buzzer Silence)
The Digital IO viewer
Overview
The Digital IO viewer shows the status of each individual digital output and input on the optional
relay card. Note, however, that it is in fact the internal software status that is shown; should a
relay or external cabling fail, the physical signal might differ.
Opening the Digital IO viewer
The Digital IO viewer is available from the Settings menu under the Views entry (if enabled in
the license 11 ):
© 2015 Emerson Climate Technologies - Transportation Solutions ApS
Digital input/output signals
211
Description of the Digital IO viewer
In the Digital IO viewer you see one circular indicator for each digital output and input:
The digital input indicators appear as follows:
Symbol
Colour
Explanation
Grey
The input is not active (=
0VDC).
Red
The input is active (=
24VDC).
The digital output indicators appear as follows:
Symbol
Colour
Explanation
Grey
The output is not active.
Green
The output is active.
© 2015 Emerson Climate Technologies - Transportation Solutions ApS
REFCON 6
Reefer Container Monitoring System
Modem Troubleshooting
Transportation Solutions
214
17
User's Guide
Modem Troubleshooting
Overview
To have the full benefits of your REFCON system, it is very important that the highest possible
number of reefer containers are communicating on the PCT (Power Cable Transmission).
To achieve this, the electronics – modem, controller etc – on every single container must be
maintained. This Guide intends to show you how to check the containers, and how to act in
case of troubles.
Please note that this guide assumes that the conditions are stable for several hours for the
reefer container being investigated. Stable conditions means that it is constantly plugged in to
power, and it's Planning data are up-to-date.
Communication path
The communication only works if the entire communication path is OK:
The REFCON system must work
It is essential to modem troubleshooting that the REFCON system as such works well. If you
get an error here, it might appear as a high number of containers have communication
problems, maybe located in same physical area. Please consult Understanding and Maintaining
REFCON 236 to learn how to check and fix system errors.
Updating Planning data
Modem troubleshooting highly depends on updated and reliable Planning data.
First of all this is a requirement to your Planning System. It must always have the complete list
of reefer containers and their locations.
If manual action is required in the Planning System to produce the data for REFCON, make
sure you do this whenever significant changes have occurred.
The following figure sketches how to import Planning data into REFCON if this does not run
automatically:
© 2015 Emerson Climate Technologies - Transportation Solutions ApS
Modem Troubleshooting
© 2015 Emerson Climate Technologies - Transportation Solutions ApS
215
216
17.1
User's Guide
Checking the Containers
Overview
How do you find out that something is wrong, as regards the communication equipment on the
containers? Depending on the problem, it will be visible in one of the following ways:
Certain types of errors give alarms.
The other types can be located in various lists as described below.
General checking tools
In addition to handling the modem-related alarms
your containers and attempt to fix the problems.
219
, we recommend that you regularly check
The job to fix a problem can be more or less easy. As reflected by the Performance Bar 25 , we
think of two categories of containers:
"White" containers - that appear to have never had a modem installed - are assumed not
practicable to remedy; but of course, you are very welcome to install modems. The "white"
containers are not described any further in this guide.
"Light blue" containers - that have modems according to history - should be repaired.
Note that having connected power to a container, you should always wait at least an hour before
deciding that it needs trouble-shooting. It will often happen that a "white" or "light blue"
container gets "green" automatically after some time.
"Light blue" containers appear in the "Modem available" list as the starting point. This list can
be opened from the Performance Bar 25 .
Unfortunately, the "Modem available" list does not in all cases give a complete overview of the
containers to be handled.
In this guide we assume that you do in stead use the provided "Modem remedy" list.
Primary check procedure
Pre-supposing that Planning data and the PCT system are all right, you should check your
containers regularly and in case of alarm as follows:
© 2015 Emerson Climate Technologies - Transportation Solutions ApS
Modem Troubleshooting
217
Note: If "Possible loss of power" alarms are enabled, the check of the Performance Bar (step 2
above) should not be necessary, as you would then handle the alarms as they occur.
Understanding the flow charts
In the flow charts shown in this guide, like the one above, the following elements are used:
Element
Description
Action that
either is referred to from another flow chart
or is described in detail in another flow chart / topic.
Flow chart termination, either start or stop. Shows event or action
that is not further described in this guide.
Elementary action that needs to further explanation.
Decision, typically evaluating to either Yes or No.
Activating the "Modem remedy" list
The "Modem remedy" list is a pre-defined list that needs to be activated once for all. Please
proceed as follows:
© 2015 Emerson Climate Technologies - Transportation Solutions ApS
218
User's Guide
Having activated list, you may edit the filter 69 or add or remove columns 64 . If you do so, and
later want to return to the original list, you need to delete the list and then activate it anew.
Note that this guide presupposes that the Modem remedy list is not modified.
© 2015 Emerson Climate Technologies - Transportation Solutions ApS
Modem Troubleshooting
17.2
219
Checking modem-related alarms
Overview
A few types of communication equipment related problems give alarms, appearing in the
Container Alarm Summary 89 . Examples are shown in this figure:
When such an alarm occurs, we highly recommend that you take action as soon as possible
because
your cargo might be at risk;
the remedy will surely improve your monitoring performance; and
it should be practicable.
See also Possible loss of power alarm
95
and Alarms for missing or wrong ID
97 .
Modem not connected to controller
Should this alarm occur, please follow the remedy procedure described in Symptom: No Data
from Container 223 .
Container ID is wrong or Planning Data missing
Should this alarm occur, please follow the remedy procedure described in Symptom: No
Location - Wrong or No ID in Controller ("Ghost") 219 .
Note: If the wrong ID alarm
Modem remedy list 225 .
97
is not enabled, we recommend that you regularly check the
Container ID is missing
Should this alarm occur, please follow the remedy procedure described in Symptom: No
Location - Wrong or No ID in Controller ("Ghost") 219 .
WARNING - Possible loss of power
Should this alarm occur, please follow the remedy procedure described in Symptom: Stopped
Communicating 224 .
Note: If the Possible loss of power alarm 95 is not enabled, we recommend that you regularly
check the Performance Bar 25 . If there are any obsolete containers, indicated by orange colour,
you should carefully check the Obsolete list:
If you are using the optional RDC, and obsoletion is due to a delayed RDC inspection round,
please make sure this is completed as soon as practicable.
Otherwise, for each container, please follow the remedy procedure described in Symptom:
Stopped Communicating 224 .
17.2.1 Symptom: No Location - Wrong or No ID in Controller ("Ghost")
Overview
A so-called “ghost container” is most likely a container with wrong container ID, or no ID at all. It
is communicating but has no valid location. Correspondingly, a container reported by the
Planning System has got a location, but it never started communicating. The two are one and
the same - but how do you match them?
© 2015 Emerson Climate Technologies - Transportation Solutions ApS
220
User's Guide
Ghost explanation
Please refer to Finding a Ghost Container
221
below to solve the problem.
© 2015 Emerson Climate Technologies - Transportation Solutions ApS
Modem Troubleshooting
221
17.2.1.1 Finding a Ghost Container
Overview
If you have (at least) one ghost container, how do you physically locate it?
In the ideal situation, all your reefer containers are equipped with power cable modems, and
the number of communicating containers is as expected. Then you would look in the "Modem
missing" list, the "Modem available" list or the "Modem remedy" list for non-communicating
containers with valid location. Or you would open the optional Container Plan and look for white
and light blue container positions. In both cases we will refer to white or light blue positions
in the following. The number of such positions would match the number of ghosts. This number
is usually very small, so the further investigation would be practicable.
In many cases you will, however, face a non-ideal situation. Just a few reefer containers without
modems will make your job much more difficult because these will appear as white or light blue
positions, exactly like the ghosts. So rather than deciding which white or light blue position is
which ghost, you must find out which of the white or light blue positions are actually ghosts!
Looking for container ID similarity
Some wrong IDs are caused by misprint when the ID was originally entered into the controller –
maybe just a single character out of 11 is wrong (note: the check digit also must be correct).
Look for white or light blue position IDs that are similar to the Ghost ID. If there is only one, you
probably found it.
Comparing Actual Setpoint and Expected Setpoints
In some cases, controller data like actual setpoint, temperatures and controller type are
available. You would discover this in the Modem remedy list. In this case, maybe try going
through the white or light blue positions, looking for expected setpoint values that are close to
the actual setpoint. Do not expect an exact match. In some cases this would reduce the
number of "suspects" dramatically.
Using the RMM Master number
Note: This method is only possible for certain REFCON systems.
The communication on the power lines is similar to radio communication. On some REFCON
systems, signals from any point on the power lines are reaching literally any other point – and
then the RMM Master number is useless. On certain other REFCON systems, there are
barriers so that a certain RMM Master modem only covers a limited area. In the latter case, you
may take advantage of this to find your ghost.
To know if your REFCON system provides this advantage, proceed as follows:
1. Inspect the System Layout drawing. Do you have only one or two RMM Masters in the
system? If so, the RMM Master number is useless – please jump to Manual inspection
below.
222
2. Look in the Container Plan. Walk through the Bays/Stacks one by one.
3. In each Bay/Stack, look up the Container Details for at least 10 communicating containers
(green positions) – click the "Communication" tab and write down the "CurMasterNet" and
the "CurMasterNode" numbers.
4. Are the master numbers different in one Bay/Stack? If so, the RMM Master number is
useless – please jump to Manual inspection 222 below.
5. Having walked through all Bays/Stacks, do you see a clear correlation between Bay/Stack
numbers and RMM Master numbers (one master may cover more than one Bay/Stack)? If
so, the RMM Master number can be useful – please keep your notes for future use.
If the above test is successful in your REFCON system, you might open the Container Details
for the Ghost, and click the "Communication" tab. Notice the "CurMasterNet" and the
"CurMasterNode" numbers. From your notes written above, you should now be able to decide in
© 2015 Emerson Climate Technologies - Transportation Solutions ApS
222
User's Guide
which Bay(s)/Stack(s) to look for the Ghost.
Manual inspection
Eventually you have a number of white positions that can be your ghost. Now you have to
manually inspect the containers. It is a great advantage to be two with walkie-talkies, one at the
REFCON PC and one at the container.
For each suspected container, try using the exclusion method:
If you know the controller type of the ghost (controller data available), does it match the actual
container?
If you know the actual setpoint of the ghost (controller data available), does it match the Actual
Setpoint read on the controller of the actual container. Remember: If the one is in Celsius, and
the other in Fahrenheit, there might be a small conversion error.
Check the Communication sub-page of the Container Details of the ghost. Does the last part of
the "Modem" string match the serial number of the modem at the actual container?
If the first 4 letters of the container ID read "LOSU", you are probably dealing with a Thermo
King MP-3000 or MP-4000. The 7 digits of the container ID will then normally reflect the last 7
digits of the serial number of the controller.
If the first 4 letters of the container ID read "RMMU", you are probably dealing with an RMM Mk
IV modem. You will then normally find this default container ID printed at the rear of the modem.
Final check for 100 % certainty
How many containers do you have that matches those criteria? Typically there will be only one.
To be absolutely sure you suspect the right one, do a final test: Try sending a setpoint change
of 0.1 degree from REFCON, and then go to the container and check that it has responded. Or
try making the change at the container, and check that it updates in REFCON (it might take a
few minutes). If so, you got it! Remember to change back the setpoint!
Please refer to Change of Container ID
222
below to clear the ghost.
17.2.1.2 Change of Container ID
Change procedure
When you are absolutely sure which container to rename to what ID, proceed as follows:
© 2015 Emerson Climate Technologies - Transportation Solutions ApS
Modem Troubleshooting
223
17.2.2 Symptom: No Data from Container
Overview
The figure below shows the most common reasons when no data are read from a container,
even though it is communicating. Note that the container ID might be correct (and thereby the
location probably is known) because certain modems remember the ID even if the connection to
the controller fails.
© 2015 Emerson Climate Technologies - Transportation Solutions ApS
224
User's Guide
Check procedure
17.2.3 Symptom: Stopped Communicating
Overview
The following figure shows the most common reasons when a container used to communicate
but does not do so anymore, and tips for diagnoses and repairs.
© 2015 Emerson Climate Technologies - Transportation Solutions ApS
Modem Troubleshooting
225
Check and repair procedure
17.3
Checking the Modem Remedy List
Overview
The pre-defined Modem remedy list attempts to list all containers with fixable communication
equipment problems. It includes problems that will or can give alarms 219 as well as all
containers that are basically "light blue", belonging to the "Modem available" group in the
Performance Bar 25 .
© 2015 Emerson Climate Technologies - Transportation Solutions ApS
226
User's Guide
Out-of-the-box it does not include "white" containers, belonging to the "Modem missing" group because these do probably require a modem installation rather than a modem repair.
As regards "orange" containers, belonging to the "Obsolete" group, PCT-obsoleted containers
are not included, because the reason for these is most likely not related to the equipment on
the containers.
Hence there are overlaps between on the one side checking the Container Alarm Summary, the
Modem available list and the Obsolete list, and on the other side the Modem remedy list. The
idea about the Modem remedy list is to provide a common working list. To utilise the Modem
remedy list, you will once for all have to activate 217 it.
In general, when a container appears on the Modem remedy list and it stays there for some
time (1 - 3 hours), you should check it and fix the problem, if possible:
Check procedure
© 2015 Emerson Climate Technologies - Transportation Solutions ApS
Modem Troubleshooting
227
17.3.1 Symptom: Never Communicated
Overview
The following figure shows the most common reasons when a container does not communicate,
and tips for diagnoses and repairs.
Check and repair procedure
Another possible reason is described in Symptom: No Location - Wrong or No ID in Controller
("Ghost") 219 .
© 2015 Emerson Climate Technologies - Transportation Solutions ApS
228
17.4
User's Guide
Checking the Power Cabling
Overview
The power cable communication only works if the internal cabling at the container is correct:
© 2015 Emerson Climate Technologies - Transportation Solutions ApS
Modem Troubleshooting
17.5
229
Typical Errors
Overview
This section describes some typical errors that have been observed on containers.
Inexpedient cabling example
Forced plug example
Actual setpoint above 51 C
In rare cases you may get the alarm "Actual and expected setpoints differ" caused by the
actual setpoint reported by the container controller reading 51.1 or 51.2°C, being obviously
wrong.
This is a known potential problem when the container is equipped with a Daikin Decos controller
type IIIc or IIId in combination with an older RMM modem. In this case the problem shows up if
the connection between the controller and the RMM modem fails (plug fallen out, cable cut, or
electronic problem).
The recommended way to solve the problem is to replace the modem with an RMM MK IVb,
HW-revision H, or newer.
© 2015 Emerson Climate Technologies - Transportation Solutions ApS
230
17.6
User's Guide
Locating the Modem
Overview
The modem can be an integrated unit (MPC2000 / MP-3000) or an independent unit attached to
various controller types. The following figure shows the most common examples:
© 2015 Emerson Climate Technologies - Transportation Solutions ApS
Modem Troubleshooting
17.7
231
RMM Modem Facts
Overview
Below you find facts about the three most common modem types.
LED interpretation
The LEDs can be interpreted as follows:
LED
POWER
Color
Green
Status
Description
On
24V AC or DC power on. Power cable is correct wired.
Off
No power.
© 2015 Emerson Climate Technologies - Transportation Solutions ApS
232
User's Guide
LED
ACTIVITY
TRANSMIT
ERROR
RESET
CTRL
USER or
PCT
Color
Green
Yellow
Red
Red
Green
Green
Status
Description
Flashing
High Data Rate activity is detected at the power line.
On
High Data Rate activity is detected at the power line.
Off
No power cable communication is detected.
Flashing
Communication in progress with a Master on the PCT
network.
Off
No communication in progress.
On
Internal malfunction has occurred.
Off
Normal operation.
Off
Normal operation.
On
The RMM is reset. Turns off after a while.
Off
Searching for a connected controller.
Flashing
Controller connected – controller does not have a valid ID.
On
Controller connected – valid container ID found.
On
The container is logged on to a master, with normal
parameters.
Flashing
Ready to log on.
Off
Between 15 and 60 minutes has passed since last device
poll. As 60 minutes is reached, the unit resets and gets
ready to log on.
LED appearance examples
You often can obtain useful information simply by watching the Light Emitting Diodes (LEDs) of
the RMM modem.
The following figures show the most common examples. Note, however, that in case of
malfunctions, the LED behaviour can not always be foreseen.
© 2015 Emerson Climate Technologies - Transportation Solutions ApS
Modem Troubleshooting
233
Connector Specifications RMM Mk4b
The connectors on the modem RMM Mk4b are specified as follows. For other modem makes,
please refer to the respective manuals.
J1: 3-phase power and earth connection
Terminal (pin)
Description
Terminal (pin)
Description
1
Earth/Ground
5
AC Phase 2
2
No connection
6
No connection
3
AC Phase 1
7
AC Phase 3
4
No connection
J3: Communication connection to controller
Terminal (pin)
Description
Terminal (pin)
Description
1
GND
5
RxD
2
De-select
6
TxD
3
RTS
7
No connection
4
CTS
J5: 24 V power inlet
Terminal (pin)
Description
1
AC/DC input
2
No connection
© 2015 Emerson Climate Technologies - Transportation Solutions ApS
Terminal (pin)
3
Description
AC input/DC ground
REFCON 6
Reefer Container Monitoring System
Understanding and
Maintaining REFCON
Transportation Solutions
236
18
User's Guide
Understanding and Maintaining REFCON
Overview
This topic and the sub-topics describe the REFCON system, it's possible components and
external connections, and it's settings 251 . They also describe the screen pictures and functions
in REFCON Monitor dealing with these subjects. The descriptions are mainly meant for users
taking the REFCON maintainer role 10 or the IT maintainer role 11 and should be useful in
situations where you have to install or troubleshoot REFCON.
Some of the items described here are optional and controlled by your license file
11 .
The descriptions found here - in this manual - are general, with a medium level of details. When
you need more details and/or information specific to your REFCON, please refer to "Instruction
Manual - Hardware Descriptions.pdf" being as standard found on the "Customer disk" supplied
with REFCON.
Every single component that has been included in your specific REFCON system, as well as
every single network connection and every single external system interfacing with REFCON, are
and must be considered important. It is therefore vital for the performance of REFCON that you,
in case of errors, remedy these as soon as possible.
The Reefer Container
Though it is not a part of the REFCON system as such, it is important to know about the
equipment on every single reefer container.
A reefer container is an independent unit that is completely self-sustained, being supplied with
3-phase power. The onboard controller makes sure that the temperature and other parameters
are kept at their respective setpoint(s), and it continuously logs the conditions.
The majority of reefer containers are equipped with a power cable modem, allowing the
container to communicate most parameters via Power Cable Transmission (PCT).
The power cable modem can be an independent unit or integrated with the controller. If the
modem is manufactured by Emerson Climate Technologies, it is named RMM (Remote
Monitoring Module).
The hardware
In it's most common basic configuration, the REFCON system hardware consists of a PC and
two PCT master modems; but there is a high number of possible extensions and variants as
described in The REFCON system hardware 237 .
The software
The REFCON 6 PC software is one package with a number of configuration options
software is described in The REFCON 6 software package 239 .
11
. The
© 2015 Emerson Climate Technologies - Transportation Solutions ApS
Understanding and Maintaining REFCON
237
The external "partners"
In the very most cases, REFCON has one or more interfaces to external systems. An important
example is the Planning System from which REFCON receives important information about the
containers. The Planning System can therefore be seen as a "partner" that significantly
increases your advantages of using REFCON.
18.1
The REFCON system hardware
Overview
The description below aims at giving you a useful understanding of the REFCON system
hardware; what are the possible components, how are they connected, what are their roles, and
how can they be trouble-shooted.
REFCON can be hardware configured in a very high number of ways. If you need to know in
details exactly how your specific REFCON system is configured, you would consult the System
Overview drawings in the "Instruction Manual - Hardware Descriptions.pdf" being as standard
found on the "Customer Disk" supplied with REFCON.
The most simple power line solution
As sketched in the following figure, the most common basic configuration includes three
components:
Any REFCON system includes one and only one Main PC. You would then probably know it as
the REFCON PC.
The RMM Masters communicate with the Main PC on an RS 485 network. However, standard
PCs do not support RS 485. If the PC is equipped with an RS 232 port, the problem often is
solved by inserting a converter as indicated in above sketch and applying the so-called
Danbuss-driver to the RS 232 port.
The standard solution of today is, however, to use the RS2LAN:
Simple solution with RS2LAN
In the following sketch, the obsolete RS 232 solution was replaced by a single RS2LAN unit:
This solution is far more extendable than the RS 232 solution:
The LAN can (for example by using fibre optic cable) be extended to literally any length.
© 2015 Emerson Climate Technologies - Transportation Solutions ApS
238
User's Guide
You can apply a high number of RS2LAN units and thereby separate the RMM Masters though still there normally must be at least two on each RS2LAN.
To make this solution work, it is required that
the Main PC has a fixed IP address
that IP address must be typed into the RS2LAN using it's display/keyboard
each RS2LAN must have a unique fixed IP address.
A separate user's manual is supplied with the RS2LAN as standard.
More than one REFCON Monitor
As standard you operate REFCON through the REFCON Monitor, being a standard application
that can run on any PC with a supported, updated version of Microsoft Windows (including
Windows XP Pro and Windows 7 with latest service packs). It is always possible to run the
REFCON Monitor on the Main PC.
You can run the REFCON Monitor from any PC meeting the base requirements, provided that it
is connected to the Main PC via LAN:
The number of permitted concurrent running REFCON Monitors is decided by the license file 11
. If, for example, the maximum is 3, and you have already three users working with the
REFCON Monitor on three different PCs, should a fourth user try to start a REFCON Monitor, a
warning will appear on screen saying that this is not possible. The solution is to have one of the
other users close down a REFCON Monitor.
You find a list of the running and previously running REFCON Monitors in the System Devices
List 254 .
REFCON Data Collector
The optional RDC must also be seen as a part of the REFCON system, when included.
RMM Master extensions
The RMM Master modem can be connected directly to the 3-phase power lines; however, in
many cases you will find electronic devices in between. The purposes of these devices are
Cheaper equipment - you save RMM Masters even when the power system is highly
sectioned (as regards high frequency signals). The RMM Bridge is an example of such a
device.
Optimized communication - in some cases the power system properties make direct high
frequency communication difficult. The ISC (inductive signal coupler) in many cases is used
as a very effective solution to this problem.
Please find detailed information about the possible devices in your specific case in the
"Instruction Manual - Hardware Descriptions.pdf" mentioned above.
© 2015 Emerson Climate Technologies - Transportation Solutions ApS
Understanding and Maintaining REFCON
18.2
239
The REFCON 6 software package
Overview
The REFCON 6 software package installed on the REFCON Main PC consists of a number of
services and applications as described in the following.
The essential parts of the software are all services (in the Microsoft Windows terminology).
Being a service means that
it is started automatically and immediately when the PC is powered up, even if no one logs on
to the PC;
it has no user interface in itself;
it fully complies with Microsoft's rules for services regarding safety etc.
The other parts of the software are applications with their own user interfaces. Being an
application means that
a user must be logged on to have it running;
you can start and stop it;
you can interact directly with it.
Software parts on REFCON Main PC
The following drawing illustrates the different parts of REFCON 6 that are or can be running on
the REFCON Main PC. Descriptions are found in the table below.
© 2015 Emerson Climate Technologies - Transportation Solutions ApS
240
User's Guide
The software parts are:
Part name
Type
Function
Description
Data Engine
Service
System server,
database
The heart of the REFCON PC software
system, where all container data are stored
and all background activities are running.
Provides data for the REFCON Monitors,
and receives data via the PLS.
REFCON
Data Service
Integrated
in Data
Engine
OData interface
Part of Data Engine, providing a general
purpose data interface, see The REFCON
Data Service and plug-ins 240 .
PLS
Service
Power Line
Scheduler
Makes sure the Data Engine can effectively
communicate with the containers.
Web server
Service
Monitor auto
installation
On a Secondary PC, all you need to install
the REFCON Monitor is entering the link to
the Web server into a browser. The Web
server then provides all that is needed to
install the REFCON Monitor (in Microsoft
terminology: ClickOnce).
Supervisor
Service
Keeping eye on
above services
Does nothing but watch and take care of
that all required services are continuously
running.
REFCON
Manager
Application Controlling above
services
REFCON
Monitor
Application REFCON's primary See REFCON Monitor
user interface
topics in the manual.
Described in The REFCON Manager
20
260
.
and many other
Special notes about the Main PC
Please be aware of the following points regarding the REFCON Main PC:
We recommend that the Main PC is exclusively used for running REFCON, because this is a
demanding and time critical application that could be disturbed by running other programs on
the PC. In contrary you are free to use possible Secondary PCs for other purposes.
The Main PC must be running 24 hours every day (unless you for a period has no reefer
containers at all). It must therefore never be powered off, shut down, hibernated or turned
stand-by.
Even if you set the power options on the Main PC to turn stand-by after some time of
inactivity, you will see that it does not. This is because the Data Engine service works to
Windows just as if a user were active.
18.3
The REFCON Data Service and plug-ins
Overview
As illustrated in Software parts on REFCON Main PC
the Data Engine.
239
, the REFCON Data Service is a part of
The REFCON Data Service allows any external software to read data from and/or write data to
REFCON. Writing data does require specific permissions.
This means that any software developer can create an application that uses data from or
changes data in REFCON. This can be done without Emerson Climate Technologies' knowledge
© 2015 Emerson Climate Technologies - Transportation Solutions ApS
Understanding and Maintaining REFCON
241
or accept. Of course Emerson Climate Technologies takes no responsibility for and does not
service any such applications.
Emerson Climate Technologies does, however, deliver a variety of plug-ins that are or can be
parts of your REFCON system. A plug-in works together with REFCON 6 through the REFCON
Data Service.
How to make software use the REFCON Data Service
To develop third-party interfacing software, please request the "REFCON Data Service Programmer's guide" from Emerson Climate Technologies - Transportation Solutions ApS
8
.
Third party software can run on any computer connected to the REFCON Main PC by LAN.
Note that the same is true for plug-ins delivered by Emerson Climate Technologies, however,
these are as standard installed on the REFCON Main PC.
Plug-ins
Normally a plug-in is a service running on the REFCON Main PC. You can check that it is
running by inspecting "Processes" in Windows' Task Manager.
There can be zero, one or more plug-ins installed and running.
Most plug-ins work as middleware. A middleware plug-in provides an interface between two
systems, of which REFCON is the one:
How a plug-in is installed
As standard, if a plug-in is going to be used in your REFCON system, it's installation program is
found on the Customer Disk being part of the delivery. On the Customer Disk, it is found in the
AutoInstall folder. Provided that you use the Customer Disk during the installation of REFCON
245 , this makes the plug-in automatically installed, and your interference will normally not be
necessary.
It is possible to install a plug-in on another PC, provided that this is connected by LAN to the
REFCON Main PC. This requires extra manual action. Should this be desired, it should be
specifically agreed between you (/the customer) and Emerson Climate Technologies Transportation Solutions ApS.
How a plug-in is updated
It may happen that a new version of a plug-in is released.
When so, Emerson Climate Technologies places it on the updating server on the Internet. If
your REFCON Main PC is connected to the Internet, it will automatically discover that an
update is available, and inform you about it. As described in Updating a plug-in 248 , you will have
to accept the update before it actually takes place.
If your REFCON Main PC is not connected to the Internet, or if the plug-in is running on another
PC, you must obtain the new installation program from Emerson Climate Technologies Transportation Solutions ApS. You then run this program on the relevant PC, which makes the
version updated.
How to supervise a plug-in
As any plug-in must be considered vital, it will as standard be indicated in the REFCON Monitor
© 2015 Emerson Climate Technologies - Transportation Solutions ApS
242
User's Guide
as a line in the System Devices List
254
. An example would be:
Here, the plug-in is the last device, with User's description "External System". "Online" is
green, indicating that the plug-in is running. There is no alarm indication, which as standard
means that the plug-in works as intended.
Should the plug-in fail to run, or should the Connection A in the above figure break, it causes an
alarm:
As seen, "Online" is grey, indicating no connection to the plug-in. If the plug-in runs on the
REFCON Main PC, you might try to restart this. If the plug-in runs on another PC, check the
LAN connection, or try restarting the other PC.
If, in contrary, the plug-in works fine, but it has no connection to the external system
(Connection B in the above example), or it otherwise fails to do it's duty, it creates an alarm in
REFCON:
Note that it looks the same except that the "Online" indicator is green.
To see the alarm description, you need to check the System Alarm Summary. If both the above
alarms are active at the same time (which is unlikely in practice), it looks like this:
Notice the "Generated By" column. The "Connection A" alarm is generated by REFCON, while
the "Connection B" alarm (or any other function alarm) is generated by the plug-in. In the latter
case, please refer to the plug-in manual, see below.
Plug-in details and update info
You can get more information about the plug-in by right-clicking it in the System Devices List
254 and selecting "Properties" from the drop-down menu:
© 2015 Emerson Climate Technologies - Transportation Solutions ApS
Understanding and Maintaining REFCON
243
Among others, you can here
See what version of the plug-in is running.
Read a description of the plug-in.
In case of trouble, see where to find the possible log files that could help you solve the
problem.
See if a plug-in update is available (which it is not in above example).
See that if you uninstall REFCON, also the plug-in will be uninstalled.
See that the plug-in provides some documentation - and click "See now" to open it
immediately.
Plug-in list in REFCON Manager
In the REFCON Manager you can see a list of all plug-ins and similar installed on the REFCON
Main PC:
© 2015 Emerson Climate Technologies - Transportation Solutions ApS
244
User's Guide
In this example, only one plug-in is found.
18.4
Third-party Software on the REFCON PC
Overview
Your system includes a REFCON Main PC and maybe one or more REFCON Monitor PC(s).
As standard the REFCON Main PC is reserved for the task of running REFCON. Being a
demanding task, you should not install additional software on the REFCON Main PC
without acceptance from Emerson Climate Technologies, with the exceptions described below.
Be aware that REFCON may be using COM ports and other PC resources in special ways,
which might conflict with third-party software. In worst case this could cause REFCON to
malfunction.
In contrary, the REFCON Monitor often runs on a PC that also runs other applications. As the
REFCON Monitor is less critical and less demanding, this rarely causes troubles; however, if
your REFCON Monitor does not work well, please try closing the other applications.
REFCON on public networks
Some REFCON systems are stand-alone systems that are not connected to the Internet or
similar. If your REFCON is such a system, please stop here, as virus software etc. is not an
issue in this context.
If, however, your REFCON PCs are somehow connected to a public network, please be aware
of the following:
Protection against computer viruses and similar
We strongly recommend that you – the REFCON customer – make sure the PC (or PCs)
running REFCON software is protected against all kinds of damaging threats. If necessary you
should install and run anti-virus programs, firewalls and similar on each REFCON PC.
If such software is installed, you should update it periodically as recommended by the vendor.
Note, however, that full harddisk scans and similar functions should be disabled, as such
activities will significantly influence REFCON’s performance.
© 2015 Emerson Climate Technologies - Transportation Solutions ApS
Understanding and Maintaining REFCON
245
Windows updates
When Microsoft does release Windows upgrades due to security reasons, we recommend that
you perform the update. Do always reset the PC after an update.
Should this cause troubles to REFCON – and Windows upgrades sometimes do cause troubles
on PCs – please uninstall the upgrade and inform Emerson Climate Technologies about the
experience.
18.5
The External interfaces
Overview
This topic describes the possible external interfaces that can be applied to a REFCON system.
Any of the specific interfaces has a certain purpose and should always be considered vital. It is
therefore important that all interfaces are kept running well.
Planning System interface
Essential REFCON functions depend on data received from your Planning System (loading
calculator, terminal operating system or what you name it). Also, for some REFCON systems,
data are transmitted the other way, from REFCON to the Planning System.
There are a number of ways that this interface can work:
Manual file transfer from Planning System to REFCON - see Transferring the Planning data
File 160 .
Automatic file transfer from Planning System to REFCON - see Automatic Planning data File
Transfer 156 . This requires a LAN connection.
Automatic two-way online communication - see Planning System Interface 170 .
Global Monitoring Server interface
To most REFCON owners it is essential that data are continuously transmitted from REFCON
to the Global Monitoring Server. Learn more about this in GMS Log Interface 144 .
Alarm extension interfaces
In addition to displaying alarms on screen, REFCON includes a number of alarm extension
options:
Email Notification 204 .
Digital Outputs 210 for main alarm system, REFCON Alarm Panel or similar.
The REFCON Data Service
The REFCON Data Service allows other interfaces than the ones described above, please see
The REFCON Data Service and plug-ins 240 . It is likely that in future REFCON 6 versions, plugins will even replace some of the above.
18.6
Understanding installation and update
Overview
This topic attempts to give you an understanding of the installation and update processes.
You will typically run an installation if REFCON is going to run on a new PC, or if you change
to REFCON 6 from an older version, typically REFCON 5. In such case, be sure to uninstall the
old version before installing REFCON 6.
You would run an update to upgrade to a newer release of REFCON 6.
Whether you run an installation or an update, the goal is a fully running REFCON with program
and settings in place on the Main PC harddisk:
© 2015 Emerson Climate Technologies - Transportation Solutions ApS
246
User's Guide
The Installation Set
As standard, an installation set is delivered with any REFCON 6 system. It can be a part of a
larger package, and different types of media can be used (DVDs, USB flash disks etc), but in
this context you should notice the two software media:
The Customer Disk
As standard, a Customer Disk is delivered with any REFCON 6 system. The Customer Disk is
uniquely prepared for the specific REFCON 6 system and must never be copied or used in any
other system.
The Customer Disk always includes the unique License file
system.
11
prepared for this specific
It further can include one or more of the following items:
The Container Plan design file.
The RDC default walk route.
A configuration zip file.
Plug-in installation programs and similar in AutoInstall folder.
If the Customer Disk is used during the installation (see below), all the above items are
automatically imported / processed if present.
The Customer Disk further as standard includes documentation. Such documentation might be
automatically copied to the desktop of the REFCON Main PC. Apart from this, extra content is
not automatically imported or otherwise handled by the installation.
The Update Set
REFCON is continuously developed and maintained. With time intervals new versions are
released. At each such release, both the Program installation medium and an update set is
produced. The update set is intended for download via the Internet, but it can also be delivered
on a medium. To optimize the download speed, the update set contains the changes only
related to specific releases:
© 2015 Emerson Climate Technologies - Transportation Solutions ApS
Understanding and Maintaining REFCON
247
As sketched, updating from the newest release but one (6.3 in the example) normally means
the smallest download size.
Installing REFCON 6 on new PC
To learn exactly how to run an installation, please consult the Installation Guide. But in short,
this is what happens when you install REFCON 6 on a PC where REFCON 6 has not been
installed before:
1. You run the installation using the Setup.exe found on the Program installation medium.
2. At some point during the installation you are asked for the Customer Disk 246 . We strongly
recommend that you use the Customer Disk, even though you have the option of importing
the license file 11 manually later.
3. Having completed the installation and with REFCON running, you must make sure that all
settings are in place. If provided on the Customer Disk, you might not have to change
anything at all. If a medium with an exported configuration is available, you might import 265
this, which will overwrite the possible configuration on the Customer Disk.
4. Having completed step 3 we strongly recommend that you make a backup
40 .
Updating an existing REFCON 6 installation
Having once installed REFCON 6 as described above, it is likely that you at some point of time
decide to upgrade to a newer release.
You may know the update concept from common PC products. For example, Microsoft's
Windows Update can be used to update your Windows - and after an update everything seems
to work as before, that is, all your data are intact, and your programs work as you are used to.
The REFCON update is designed to work exactly the same way - details are changed, in the
background or visible, but your data are safe, and essentially everything works as before. All
this is taken care of automatically and can be illustrated like this:
© 2015 Emerson Climate Technologies - Transportation Solutions ApS
248
User's Guide
Detecting that an update is available
You can be informed that a new REFCON 6 release is available in the following ways:
Automatic online detection, which requires Internet connection and a service agreement.
Read more in REFCON Manager Updates Tab 267 .
You receive a new Installation set or an Update set from Emerson Climate Technologies.
You discover it by checking www.myREFCON.com.
Starting the update
No matter if the new release is automatically detected or not, it is your decision whether and
when to run the update.
In case of online detection or manual use of an Update set, you are simply asked: Do you want
to perform the update? When you accept, the further process is automatic as described above.
If you use a new Installation set, you start the installation just as if you were Installing REFCON
6 on new PC 247 . What is not illustrated above is, however, that the installation program actually
checks if REFCON 6 is already installed on the PC. If so, you will (after some time) see the
following dialog box:
Here you in fact decide whether to run an automatic update (by keeping all check marks) or a
new installation (by clearing all check marks).
18.7
Updating a plug-in
Overview
This section describes how software updates of plug-ins 240 delivered with REFCON are
detected, decided and carried out. This also may apply to third party software utilising the
REFCON Data Service 240 if so decided by the software developer; however, here we shall only
refer to the term "plug-in". In any case it only works as described below if the plug-in is installed
on the REFCON Main PC.
If the REFCON Main PC is connected to the Internet, any plug-in 240 will periodically check for
updates, several times a day. It will automatically detect if a new version of the plug-in has been
released.
When an update is detected, it is not automatically installed. In stead, user is informed through
the REFCON Monitor and has to make the decision and give a command to have the update
installation done.
Detecting that an update is available
When a plug-in detects an update, you are informed through a dialog box appearing in the
© 2015 Emerson Climate Technologies - Transportation Solutions ApS
Understanding and Maintaining REFCON
249
REFCON Monitor:
As seen it works like an alarm clock: You can snooze the alarm, or you can stop it. But you
will have to use the REFCON Manager to do something about the update...
In the REFCON Manager, the update availability is informed like this:
Deciding the update
Click the Plug-in tab - now labelled "New Plug-In Updates!" - to deal with the update:
Click the "Release Notes" button of the plug-in of interest to continue:
© 2015 Emerson Climate Technologies - Transportation Solutions ApS
250
User's Guide
Here you can read the release notes that should make it possible for you to decide if you want
the update. You can then:
Start the update installation by clicking "Update now!".
Decide never to install this update by checking "Disregard this update" and clicking "Close".
Simply click "Close" to postpone the installation.
Having selected "Update now!", the dialog box closes. In the REFCON Manager you can
observe the installation progress and result. First, the installation file(s) is downloaded:
This might take some time. After this, the installation takes place. It should end up with this
picture:
© 2015 Emerson Climate Technologies - Transportation Solutions ApS
Understanding and Maintaining REFCON
251
Plug-in requiring REFCON update
When selecting "Update now!" (see above), you might see the following message:
In this case you are not allowed to update the plug-in until you have updated REFCON 6
Normally a REFCON 6 update is already available in this case.
18.8
247
.
REFCON Setup
Overview
The REFCON Setup dialog box is used for setting up system parameters.
As you see (eg. in the figure below) the dialog box consists of several tabs, each including a
number of parameters and options. Some of the tabs are described below, others are described
in relevant parts of the manual.
Certain tabs are only available if the corresponding options are enabled in the License file
11 .
The number of tabs might be so high that not all are visible. In this case, use the two small
arrow buttons upper right to scroll horizontally.
Automatic Cleaning Up parameters
Under the Automatic Cleaning Up tab of the REFCON Setup dialog box, you can enable or
disable automatic deletion of unplanned containers 252 :
© 2015 Emerson Climate Technologies - Transportation Solutions ApS
252
User's Guide
When enabled - as in the example in the figure - you can further choose:
The delay field: The time (hours:minutes) to wait before doing the deletion; in the example in
the figure, 2 hours.
The second checkbox: Whether the presence of any unacknowledged alarm(s) shall
postpone the deletion.
Please find information about cleaning up
252
below.
Unplanned container - what is that?
Most REFCON systems are informed about the majority of reefer containers from the Planning
System. These containers are referred to as planned containers. Thus, an unplanned container
is a container that starts communicating on the power lines even though it has not been
reported by the Planning System.
Four explanations of containers being unplanned can be mentioned:
The container is plugged in and starts communicating before REFCON has received
information from the Planning System. When later this information arrives, it changes "status"
from unplanned to planned.
There is no Planning System attached, or data are not being updated.
The site has (smaller) areas not covered by the Planning System where containers can be
located.
It is a ghost container that communicates using a wrong ID.
Cleaning up - why?
The REFCON database includes an amount of information for each container. Even when a
(communicating) container is disconnected, this information stays in the database – for two
reasons: It could be just a temporary disconnection, or you might need the data for your record.
But when you do certainly no longer keep the container, and you have certainly saved data as
needed, the container must be "deleted", that is, the corresponding data are removed from the
database. While not "deleted", the container will still appear in the Container Plan and in the
Container List – so if you don't make sure containers are "deleted", you will very soon have a
confusing mix of relevant and irrelevant containers.
As standard, planned containers are deleted automatically on information from the Planning
System. The cleaning up parameters described above thus only relate to unplanned containers
252 .
Note that there are two delays involved:
© 2015 Emerson Climate Technologies - Transportation Solutions ApS
Understanding and Maintaining REFCON
253
At leftmost time mark, the container is actually unplugged. Then, after the time "Disconnect
delay"", it is noted "disconnected" by REFCON. Next, after the "Deletion delay", if still
disconnected, the container's data are removed. Note that possible log files are not removed by
this function.
Data Obsoletion
Under the Data Obsoletion tab of the REFCON Setup dialog box, you can enable or disable the
Data Obsoletion function:
When enabled - as in the example in the figure - you can further choose two delays, the Power
Line delay and the RDC Unit delay. These can be explained as follows:
The Data Obsoletion function makes sure that values received from containers, being shown in
screen pictures and used in logs, are up to date:
If no data was received from the container via the power cables for the Power Line delay (1
hour and 30 minutes in the above example), the data point is marked "obsolete".
However, if data is received via the optional RDC, the RDC Unit delay (24 hours in the above
example) is used in stead. Example: You type in data on the RDC unit for a certain container
at 2 PM and transfer data to REFCON. In this case, if you do not repeat this operation within
24 hours, the data point will be marked "obsolete" at 2 PM the next day (provided that you
selected 24 hours above).
When a data point is marked "obsolete", the data field on the screen will indicate "obsolete", for
example by changing colour. The periodic logging function will omit the data point in this case.
Please refer to other parts of the manual for detailed descriptions.
© 2015 Emerson Climate Technologies - Transportation Solutions ApS
254
18.9
User's Guide
System Devices List
Overview
The System Devices List shows all units that are communicating with the REFCON Main PC,
including the REFCON Monitor(s). This allows you to check if everything is all right. In case of
troubles, the List should help you deciding what is wrong. Here the included statistics might be
helpful.
Opening the System Devices List
The System Devices List is available from the Settings menu under the Views entry:
The System Devices List window
In the System Devices List you find one line for each unit:
As shown in the lower right corner this is the "Standard view". If you in stead select the
"Statistics view", the included columns change:
Selecting "Both" includes all columns from the two views.
Column specifications
The following table specifies the columns included in the System Devices List:
Column header
/ abbreviation
Device
Explanation
Textual, automatically created identification of the
device.
User's description Textual identification of the device. For a REFCON
Origin
REFCON
User, but partly
© 2015 Emerson Climate Technologies - Transportation Solutions ApS
Understanding and Maintaining REFCON
Column header
/ abbreviation
Explanation
255
Origin
Monitor device it is the PC description followed by
the Windows user shown in the parentheses.
automatically
created for some
devices.
Online
means that the device is online, while
that it is offline.
REFCON
Software
Name of software plus version where relevant.
Device
Hardware
The type of hardware in question.
REFCON / Device
Activity
Only used for RMM Masters. The "fish" moving
REFCON / Device
indicates that the master is actively communicating
at the moment. Note that in each Group, only one
master can be active at a time.
Group
The master group
Connected
257
means
.
For RS2LAN device: Number of connected RMM
Masters.
For RMM Master device: Number of "connected"
containers.
REFCON
REFCON
Total
Total number of messages sent to that RMM
REFCON
Master (since Data Engine start or statistics reset).
Retrans
Number of messages re-transmitted to that RMM
REFCON
Master (since Data Engine start or statistics reset).
Lates
Number of messages received from that RMM
Master after timeout (since Data Engine start or
statistics reset).
REFCON
No answ
Number of times (since Data Engine start or
statistics reset) that a response message never
arrived from that RMM Master.
REFCON
The following columns are irrelevant when the RMM Master is connected to an RS2LAN, while
they are used when it is connected through the COM port:
Column header
/ abbreviation
Explanation
Origin
Rejects
Number of messages rejected by that RMM Master REFCON
(since Data Engine start or statistics reset).
Errors
Number of messages with errors received from that
RMM Master (since Data Engine start or statistics
reset).
REFCON
Deads
Number of dead nodes.
REFCON
Remove offline devices
REFCON automatically detects the devices. Once a device has been detected, it does not
automatically disappear, even if it goes offline. For the case that you have been experimenting
with extra devices or have given a device a wrong network ID, the "Remove offline devices"
button is available.
Selecting the button makes REFCON check each device group - the RMM Masters, the
RS2LANs etc.
© 2015 Emerson Climate Technologies - Transportation Solutions ApS
256
User's Guide
If all devices in a device group are online there is nothing to remove in that group.
If the number of devices of a specific type is less than or equal to the optional count stated in
the license file 11 , there is nothing to remove in that group.
When neither of the two conditions above are met, all offline devices of the type exceeding the
optional count stated in the license file 11 are listed on the remove candidate list.
If the check reveals no remove-candidates at all, you are informed like this:
Otherwise, if there are one or more candidate, these are listed:
Select Yes to confirm the removal.
Reset statistics
You can at any time select "Reset statistics" to have all the statistics counters reset to 0.
18.10 PCT Communication Statistics List
Overview
The PCT Communication Statistics List is a locked Container List 58 having been configured
out-of-the-box to show communication statistics for each individual container.
Opening the PCT Communication Statistics List
The PCT Communication Statistics List is available from the Settings menu under the Views
entry:
The PCT Communication Statistics List window
In the PCT Communication Statistics List you find one line for each container:
© 2015 Emerson Climate Technologies - Transportation Solutions ApS
Understanding and Maintaining REFCON
257
Column specifications
Some of the columns in the PCT Communication Statistics List are recognised from other
Container Lists, see the general column description 61 . The following columns can also be
used in other Container Lists, but most likely they are only used in the statistics list:
Column header
/ abbreviation
Explanation
MastNet
The network number of the RMM master that communicates with this
container.
MastNode
The node number of the RMM master that communicates with this
container.
MsgCount
Total number of messages sent to this container.
Invalids
Number of messages with errors received from this container.
NoResp
Number of times that a response message never arrived from this
container.
Logins
Number of times this container has logged in to the RMM Master.
%Online
Since first login, the fraction of the time that this container has been
online.
MsgErrors
Sum of Invalids and NoResp. In parentheses: Same in fraction of
MsgCount.
FirstLoginUTC
Time when this container logged in (the first time).
LastLoginUTC
Time when this container logged in (the last time).
LastPollTryUTC
Time when this container was last attempted polled (= requested for
data).
LastPollAnswerUTC
Time when valid data were last received from this container.
18.11 Master groups
Overview
A master group is a set of RMM Masters that are treated as if they are connected to a common
power cable network in the sense that the individual RMM Master can "hear" the signals from
the other RMM Masters. To avoid that the RMM Masters disturb each other, REFCON makes
sure that only one RMM Master in a master group is active at a time.
As standard there is one and only one master group in a REFCON system. In this case there is
always only one RMM Master active at a time.
The maximum communication performance is obtained by defining as many master groups as
possible; however, it is vital that all RMM Masters and containers in one master group are
complete separated from all RMM Masters and containers in all other master groups as regards
© 2015 Emerson Climate Technologies - Transportation Solutions ApS
258
User's Guide
Power Cable Transmission, that is, a unit in one master group must in no way be able to "hear"
signals sent by any unit in any other master group. Please contact us for advice about your
specific power cable configuration.
Viewing the master group
Each RMM Master always belongs to one and only one master group. You can see the number
of the group in the Group column in the System Devices List 254 .
Editing the master groups
It is possible to change the used master groups by
1. Editing the file intended for this purpose.
2. Stopping and Starting REFCON from the REFCON Manager.
Warning: Because of the separation requirement mentioned above, do never change the
master group file unless you are highly qualified in Power Cable Transmission.
© 2015 Emerson Climate Technologies - Transportation Solutions ApS
REFCON 6
Reefer Container Monitoring System
The REFCON Manager
Transportation Solutions
260
19
User's Guide
The REFCON Manager
Overview
The REFCON Manager is an extra software program running on the REFCON Main PC only. It
provides a number of tools for controlling and maintaining the entire REFCON software package
installed and running on the REFCON Main PC and the optional REFCON Monitor PCs.
When do you use the REFCON Manager?
First of all: When REFCON runs perfectly well, you do normally not worry about the REFCON
Manager at all. It does not even have to run.
You must or can use the REFCON Manager in the following cases:
Case
Typical situation(s)
What to do
New License file
You purchased extended
functionality.
Import the License file
New Container Plan
Maybe you had Emerson Climate
Technologies create a new design.
Import the Container Plan
266 .
265
.
Import Configuration
You need your REFCON to work
exactly like a specific other
REFCON system from which you
received an exported
configuration.
Emerson Climate Technologies
did organise your configuration in
advance.
Import configuration
Install software updates
A new version of REFCON 6 was
detected automatically (requires
Internet connection).
You received an update package.
See how to check for
updates and how to install
in Updates 267 .
Restore backup data
Back up data
You performed a re-installation of
REFCON 6.
You changed your settings.
You regard log files valuable and
therefore make back up regularly.
265
.
Use the Restore function
.
265
Use Backup command
from REFCON Monitor 39
or from REFCON Manager
264 .
Prepare REFCON
Monitor installation
You want the REFCON Monitor to
run on a Secondary PC.
Save the link on a USB key
or similar as described in
Remote Monitor
Configuration 266 .
Trouble-shooting the
REFCON system
System hardware is failing.
Watch the REFCON
Manager taskbar icon (see
below) or the Supervision
263 tab.
Starting the REFCON Manager
To start the REFCON Manager, you need administrator rights in Windows.
If the taskbar icon described below is not available when you need it, you must start the
REFCON Manager using the shortcut being normally found on the desktop:
© 2015 Emerson Climate Technologies - Transportation Solutions ApS
The REFCON Manager
261
The REFCON Manager taskbar icon
The REFCON Manager is identified by the following taskbar icon:
The icon can display the following colours:
Icon colour
in words
Explanation
Green
Everything is fine - all parts of REFCON on the REFCON
Main PC work well.
White
REFCON was stopped by a user and does not run.
Orange
Red
Temporary state: REFCON is being started or being stopped.
Normally the colour changes within a short time.
Something is wrong - one or more parts of REFCON on the
REFCON Main PC is malfunctioning.
Note: The icon might be red temporarily for a few seconds,
this should be considered OK.
Opening and closing the REFCON Manager
You open the REFCON Manager's user interface by
Right-clicking the taskbar icon and selecting Show from the menu:
Double-clicking the taskbar icon.
You can hide the REFCON Manager by clicking either the Minimize or the Close button upper
right:
In both cases, the program keeps running, and the taskbar icon keeps visible.
If you for some reason want the REFCON Manager to close completely, you need to select
"Exit Refcon Manager" from the taskbar icon menu (see above).
Understanding the REFCON Manager
When just opened, the REFCON Manager appears like this:
© 2015 Emerson Climate Technologies - Transportation Solutions ApS
262
User's Guide
The window is organised with five tabs: Supervision
Configuration 266 , Updates 267 and Plug-Ins 243 .
263
, Administration
264
, Remote Monitor
© 2015 Emerson Climate Technologies - Transportation Solutions ApS
The REFCON Manager
19.1
263
Supervision
Overview
The REFCON Manager's Supervision tab shows the states of REFCON's services.
Also it allows you to stop REFCON and to start it in normal mode or commisioning mode.
The states of REFCON's services
Each service can be in any of the following states:
State
Colour
Explanation
Green
The service is running as expected.
Grey
The service is not running, and it is not expected to be
running according to License options.
Orange
The service is starting right now, should last for a few
seconds only.
Orange
The service is stopping right now, should last for a few
seconds only.
Dark red
The service is not running though it should be. If not
stopped by user, this indicates a fault.
Red
Only PLS can be in this state. It indicates
commisioning mode. Before logging off from the PC
you must make sure you return to normal mode.
Why Stop REFCON
REFCON is supposed to run "permanently", supervising your containers 24 hours - so normally
you would not stop it.
© 2015 Emerson Climate Technologies - Transportation Solutions ApS
264
User's Guide
You do, however, need to select Stop to be able to perform the functions under the
Administration tab: Backup/restore and import of new License, Container Plan or configuration.
Note: You do not need to Stop REFCON to make the backup from the REFCON Monitor.
Remember that you have no container supervision while REFCON is stopped.
Commisioning mode
Having stopped REFCON, you have the option to check the "Commisioning Mode" checkbox.
You will in such case get a warning saying that Commisioning mode should only be selected by
service technicians from Emerson Climate Technologies or our co-operating partners.
Please be aware that in Commisioning mode, PLS is running as an application rather than a
service. This is potentially a sensible situation because if you (or another user) logs off from
Windows without having cancelled the Commisioning mode, PLS will simply stop, and
REFCON will therefore not be able to communicate with the containers.
The advantage about Commisioning mode is that PLS, being an application, has a separate
user interface useful for trouble-shooting and similar purposes.
To cancel Commisioning mode, proceed as follows:
1. Click the Stop button.
2. Uncheck the Commisioning mode checkbox.
3. Click the Start button. You should now see the green words RUNNING OK at the PLS.
19.2
Administration
Overview
The REFCON Manager's Administration tab provides file input and output functions:
Note that REFCON must be stopped for these functions to be enabled. This is done from The
Supervision tab 263 .
Backup function
The Backup function available from the REFCON Manager works exactly like the one available
from the REFCON Monitor, see The Backup Function 39 .
© 2015 Emerson Climate Technologies - Transportation Solutions ApS
The REFCON Manager
265
Restore function
The Restore function is your tool to have data saved with the Backup function reloaded into
REFCON. You would normally need this after a REFCON re-installation only.
Proceed as follows:
1. Stop REFCON.
2. Click "Restore". The following dialog appears:
3. Locate the backup zip file and click Open.
4. Wait for the data to load.
5. Start REFCON.
Export configuration
The Export configuration function available from the REFCON Manager works exactly like the
one available from the REFCON Monitor, see Configuration Export 41 .
Import configuration
The Import configuration function is your tool to have data saved with the Configuration Export
function imported into REFCON. You would typically import a configuration received from
another REFCON system or from Emerson Climate Technologies.
The procedure is quite similar to the Restore function
265
above.
Import License file
Any REFCON system needs a unique license file 11 , defining exactly what standard features
are enabled for the specific application. If you decide to purchase a new license, or if you for
other reason receive a new license file, you must import it using the REFCON Manager as
follows:
1. Stop REFCON.
2. Select "Import License File".
3. In the dialog, locate the license XML file and select Open. If you choose an XML file of wrong
type you are warned.
© 2015 Emerson Climate Technologies - Transportation Solutions ApS
266
User's Guide
4. Wait for import to complete.
5. Start REFCON.
Import Container Plan
You can make a new or changed Container Plan available at the REFCON Monitor in the
following ways:
By selecting "Create Container Plan" from the REFCON Monitor menu. On ships, you will
need a baplie file 82 , while in terminals, a special XML file 80 provided by Emerson Climate
Technologies is required. In both cases, the result is a Container Plan, stored as a file in the
format used by REFCON 6.
By importing a Container Plan file in the format used by REFCON 6.
In the latter case, proceed as follows:
1. Stop REFCON.
2. Select "Import Container Plan".
3. In the dialog, locate the Container Plan XML file and select Open. If you choose an XML file of
wrong type you are warned.
4. Start REFCON.
19.3
Remote Monitor Configuration
Overview
To have the REFCON Monitor running on a secondary PC, first of all this must be allowed in the
License file. In the following we assume that it is allowed.
For the REFCON Monitor to work on a secondary PC, this must be connected to the REFCON
Main PC by a network of ethernet type (LAN). Most commonly, the REFCON Main PC is
equipped with one network connector only, and then things are very straightforward.
Should the REFCON Main PC be equipped with more than one network connector, you need to
decide which one to use for REFCON Monitor connection in the Remote Monitor Configuration
tab of the REFCON Manager.
Common case: REFCON Main PC has 1 network connector
During installation, REFCON always picks "the first the best" network connector on the
REFCON Main PC and assumes that this is the one to be used for REFCON Monitor
connection - and of course, if there is only one, this assumption is always correct. It also
assumes that Port number 80 is used, which is the standard web service Port being generally
accepted by firewalls.
If both assumptions are OK, everything is set up automatically. All you need to do to have one
or more REFCON Monitors installed on secondary PCs is to either write down or save the
Monitor Install Link/URL:
© 2015 Emerson Climate Technologies - Transportation Solutions ApS
The REFCON Manager
267
Then take your note or your USB key to the secondary PC, and either
start Internet Explorer or another suitable browser and type in the URL noted above, or
invoke the link directly from the USB key - which will start the browser and automatically
insert the correct address.
If the automatic assumptions are not OK
If you need to select another network adapter or another Port number, proceed as follows:
1. Uncheck "Enable remote Monitors" (to get editing enabled).
2. Make the required changes in the lower part of dialog box (see below).
3. Check "Enable remote Monitors" (to get your changes applied).
During installation, REFCON automatically detects if the REFCON Main PC has more than one
network connector (= adapter). Therefore you will normally be able to simply pick the right
adapter from the drop-down list (labelled "Name"). Watch that selecting another makes the
other data change, and you should then be able to recognize the correct adapter. Note that also
the Monitor Install Link/URL changes, so you may have to make changes on the secondary
PCs.
If necessary select another Port number. You might have to make changes to firewalls if doing
so.
19.4
Updates
Overview
REFCON's Updating service aims at making sure that you always have the newest software
version.
If REFCON is "permanently" or at least frequently connected directly to the internet, the
Updating service works very much like similar services known from Windows, Adobe, Java etc.
It automatically checks for updates a few times every day, and if an update is detected, you are
informed. REFCON's Updating service never starts an upgrade without your permission - you
decide if and when.
If REFCON is not connected to the internet, your manual interaction is required. You will need a
CD or the like with the update files, and then you can have the upgrade carried out as if
REFCON were internet connected.
© 2015 Emerson Climate Technologies - Transportation Solutions ApS
268
User's Guide
You may consult Understanding Installation and Update
245
for further information.
Automatic update detection prerequisites
Please be aware that the optional online Updating service only works when all the following
conditions are met:
A user is logged on to the REFCON Main PC, and the REFCON Manager is running (but it's
user interface may be hidden).
That user, and thereby the REFCON Manager, has access to the internet.
Updating is enabled in the license file 11 and is not expired.
You have enabled automatic update checking as shown below.
Starting point: Checking for update
The Update tab of the REFCON Manager normally appears very much like this:
As long as "Enable automatic update checking" is checked, the REFCON Manager will attempt
to check for updates on the internet a few times a day. Any time you see the Status "REFCON
is up-to-date", you know that the check was carried out all right and that it found no newer
software. If there was no connection to the internet or to the updating server, you can read an
error message - the REFCON Manager will simply try again a few hours later. If an update was
detected, things happen as described below.
Clicking "Check for update now" has exactly the same effect: REFCON Manager immediately
attempts to check for updates on the internet.
If you have update files on CD, USB key or similar, you need to click "Update from media".
What happens in this case is that you are asked to locate the update files. Having done so, the
REFCON Manager checks the update files exactly as if they were found on the internet. The
result can similarly be: No new software, or update detected.
An update was detected
No matter how the check was carried out as described above, if a new software version is
detected, you are informed in the following ways:
The message *** Update available! *** appears in the caption of each REFCON Monitor:
© 2015 Emerson Climate Technologies - Transportation Solutions ApS
The REFCON Manager
269
The following dialog box appears on each REFCON Monitor:
Note: You can read the version ID of the new software and the related release notes, telling what is
new - but you can't decide to upgrade in the REFCON Monitor. Before closing the dialog box, you
may decide if you want to be reminded later (next day) or not.
In REFCON Manager, the name of the Updates tab and the text on the buttons change:
© 2015 Emerson Climate Technologies - Transportation Solutions ApS
270
User's Guide
At the same time, you can read the release notes.
Deciding if you want to upgrade
When an update is detected as described above, you must make the decision. You have the
following options:
Wait for a better moment (maybe because you strongly need REFCON now): Simply do
nothing until the best time comes.
Decide that the update is not to be installed: Click "Disregard this update". Note that this is
really only relevant for media updates and non-automatic internet updates. If checking runs
automatically, it will re-discover the update a few hours later.
Decide to install: Click the "Install update" button and see the installation proceed as
described below.
Update installation progress
When you have decided to "Install update", things happen as follows:
1. The software files are downloaded. If a local media is used, this normally goes fast, while
download from internet may take some time. The progress is indicated:
2. Your existing software version and data files are backed up (secured), should the update
somehow fail:
© 2015 Emerson Climate Technologies - Transportation Solutions ApS
The REFCON Manager
271
3. The new software is installed:
Note that here you have the option to Cancel the Update. Doing so will roll back to the software
version and data files that you used to run.
4. REFCON is prepared to run after the update:
© 2015 Emerson Climate Technologies - Transportation Solutions ApS
272
User's Guide
5. You now must decide on the following subjects:
Normally you would keep all checkboxes checked.
Unchecking the first will clear all data except log files - maybe you prefer restoring the data from a
backup? Note that if you do not preserve data and do not restore a backup, you probably will have
to do quite an amount of configuration work to get up and running as expected!
If you have received a new License file you may uncheck the second checkbox, as you will have
to import the new License 265 anyway.
6. Finally you should see the success message:
7. When you select OK, you will see that REFCON is automatically started. This includes
refreshing the Remote Monitor Configuration, which takes a little while:
© 2015 Emerson Climate Technologies - Transportation Solutions ApS
The REFCON Manager
© 2015 Emerson Climate Technologies - Transportation Solutions ApS
273
Index
Index
-CChange Container ID operation
113
Change of Container ID
222
Changing a setpoint
117
Checking modem-related alarms
219
Checking the Containers
216
Checking the Modem Remedy List
225
Checking the Power Cabling
228
Cleaning up containers
252
Clock
Advance and Retard
38
Configuration
35
Setting
36
System
32
Time zones
37
-551 C actual setpoint error
229
-AAbout us
8
Acknowledging alarms
91, 116
Actions by users
53
Activation of pre-defined list
217
Actual and Expected setpoints differ
Actual setpoint above 51 C
229
Address of manufacturer
Email
8
Postal
8
95
Colour codes in container lists
58
Column specifications
Alarm Summary
92
Container List
61
Event Log
139
PCT Communication Statistics List
System Devices List
254
Administration functions
264
Advancing the clock
38
Alarm
Missing ID
97
Wrong ID
97
Alarm indication
93
Alarm indication column
61
Alarm Options setup
100
Alarm removal
186
Alarm Summary
89
Opening
90
Alarms page in Container Details
116
Alarms, modem-related
219
Automatic (re-)creation of folder and share
157
Automatic Planning data File Transfer
156
Setup
156
Automatic Print/Export
124
Automatic update detection prerequisites
Backup function
39
Bands and Columns
58
Base picture
21
257
Communication page in Container Details
Communication path
214
Configuration
Export
41, 265
Import
265
Purchase time
11
Runtime
13
Alarm System
Alarm generation
88
Alarm handling
88
Alarm propagation
92
Introduction
88
-B-
275
268
Connection Types
104
Connector specifications RMM Mk4b
Contact information
8
Container commands
109
Container Connection Types
104
Container Deletion
Conditions
251
Disabling
251
Enabling
251
Time delay
251
Container Details
Editable fields
107
Identification of container
Introduction
104
Minimising
105
Restoring
105
Sub-page Alarms
116
© 2015 Emerson Climate Technologies - Transportation Solutions ApS
105
233
119
276
User's Guide
Container Details
Sub-page Communication
119
Sub-page Data
117
Sub-page Events
118
Sub-page Operations
116
Sub-page Summary
114
Using
105
Container Event Log
118
Container handling mode
94
Container History
132
Container ID is missing
219
Container ID is missing alarm
97
Container ID is wrong alarm
97
Container ID is wrong or Planning Data missing
Container Item
108
Container List
Colour codes
58
Column order
64
Column selection
64
Columns
61
Customising
63
Customising sorting filter
68
Finding containers
60
Introduction
58
Opening
59
Searching
60
Setting up
63
Sorting filter
60, 66
Sorting order
60
Usage
59
Container Plan
Container Item indications
Context menu
80
Detail picture
79
Editing
84
Generator
80, 82
Introduction
78
Legends
80
Opening
80
Overview picture
78
Tooltip
79
Usage
80
Zoom levels
78
Container Quick Search
Container trend
134
Context menus
30
Copy settings
41, 265
32
80
CSV format editor
How to
166
Customer Disk
165
246
-DData Obsoletion
253
Data page in Container Details
117
Data transfer
144
Data Transfer Link
144
De-acknowledging an alarm
91
Default walk route
189
Delete containers overview
154
Delete-candidates
154
219
Digital IO
Introduction
210
Viewer
210
Disconnection alarm
95
-EEmail address
8
Email Notification
Introduction
204
Setup
205
Email Server settings
146
Event Log
118
Event scopes
140
Event types
140
Trigging types
141
Event Log list
138
Opening
138
Event logging
138
Events page in Container Details
Exporting automatically
124
Exporting data
122
External interfaces
245
118
-FFax number
8
Filter Builder
69
Finding a Ghost Container
221
Flow chart
217
Folder sharing
44
Four pole monitoring
196
Alarms
196
Columns in lists
197
Configuration
198
© 2015 Emerson Climate Technologies - Transportation Solutions ApS
Index
-J-
Four pole monitoring
196
Graphical indication
197
Maintenance
198
RDC
198
Settings
196
Jobs for print/export
LED appearance examples
232
Legends in Container Plan
80
Legends, Container Item
108
License file
11
LMT 32
Locating the Modem
230
Log on and off to REFCON
50
Logging data periodically
131
Logging events
138
Loss-of-power surveillance
95
Ghost container
219, 221
Global monitoring
144
GMS
144
Setup
145
Trouble shooting
150
144
-HHandling mode
94
Harbour mode
94
Harbour mode indication
Hardware
components
237
overview
237
Historic data logging
Container History menu
Event Log
138
Event logging
138
Introduction
130
Periodic logging
131
Scrolling
135
Setup
130
Tabular View
136
Trend window
134
Zooming
135
Historic Log
Opening
-M94
Main PC
237
Recommendations
Standby prevention
132
115
137
How to
Use the Filter Builder
124
-L-
-G-
GMS data
277
69
-IID is missing alarm
97
ID is wrong alarm
97
Import Containers dialog
161
Installation and update
245
Installation name
11
Installation set
246
Installing REFCON 6
247
Introduction to REFCON 6
8
240
240
Main PC software
239
Maintaining REFCON
236
Maintaining the four pole monitoring equipment
Manager
260
Manual versions
8
Master groups
257
Measurement resolution
114
Minimising Container Details
105
Minimising the REFCON Monitor
28
Mini-status window
28
Modem not connected to controller
219
Modem Remedy List
225
Activation
217
Modem Symptom
Never Communicated
227
No Data from Container
223
No ID in controller
219
No Location
219
Stopped Communicating
224
Wrong ID in controller
219
Modem Troubleshooting
214
Modem-related alarms
219
-NNetwork drives
44
Notify icon
48
© 2015 Emerson Climate Technologies - Transportation Solutions ApS
198
278
User's Guide
Introduction
170
Live window
177
Setup
172
Trouble-shooting
174
-OObsoletion
253
Odata interface
240
Online help
Buttons
15
Contents Tab
14
Index Tab
14
Navigation Pane
14
Printable version
8
Search Criteria Syntax
Search Tab
16
Searching
16
Using
13
Plug-ins
Update
Possible loss of power
219
Postal address
8
Power Cabling check
228
Pre-defined Container List
63
Print Preview
122
Printing
122
Printing automatically
124
Protection against computer viruses
Psion
180
Public networks
244
Purchase time configuration
11
Purposes and User Roles
9
Purposes of REFCON 6
9
17
Operating RDC from REFCON
Operations
109
Change Container ID
113
Setpoint change
117
Start defrost
117
182
Operations page in Container Details
248
116
-PPasswords
50
PC description
20, 254
PCT Communication Statistics List
256
Performance Bar
25
Periodic logging
131
Periodic logging parameters
130
Phone number
8
Planned container
153, 252
Planning data element
154
Planning data import
Automatic File Transfer
156
CSV format editor
165
Establishing Online Connection
158
File error alarming options
157
File error log
161
File reading rules
158
File transfer procedure
160
Introduction
152
Manual file transfer
160
Settings
156
Transferring the File
160
Understanding the Data Flow
152
When are containers deleted?
154
Planning System
245
Planning System Communication Interface
244
-RRDC
180
Custom walk route
192
Default walk route
189
Hand-held computer
180
Operating from REFCON
182
Preparation Selection
187
Psion
180
Recommended schedule
180
Walk route
189, 192
Why Use?
181
RDC list
How to create
188
RDC-monitored containers
181
Reefer container
236
REFCON 6 configurations
11
REFCON 6 introduction
8
REFCON 6 software package
239
REFCON Clock System
32
REFCON Data Collector
180
REFCON Data Service
240
REFCON external interfaces
245
REFCON Manager
260
Administration
264
Remote Monitor configuration
266
Supervision
263
Updates
267
© 2015 Emerson Climate Technologies - Transportation Solutions ApS
Index
REFCON Manager taskbar icon
REFCON Monitor
Base picture
21
Introduction
20
Starting
20
REFCON on public networks
244
REFCON Setup
251
REFCON system description
236
REFCON system hardware
237
Relay card
210
Remote Monitor configuration
266
Remote operations
109
Change Container ID
113
Setpoint change
117
Start defrost
117
Removing an RDC alarm from REFCON
186
Reservations
88
Restoring Container Details
105
Retarding the clock
38
Right-click menus
30
RMM
236
RMM Master
237
RMM Mk4b connector specifications
233
RMM Modem Facts
231
Roles of REFCON users
Cargo supervisor role
10
Claim handler role
10
Container repairer role
10
REFCON maintainer role
10
The Data responsible role
11
The IT maintainer role
11
RS2LAN
237
Runtime configuration
13
-SSea mode
94
Sea mode indication
94
Search function
32
Searching the Online Help
Secondary PC
238
Security
Administration
53
Introduction
50
Setup
56
Selecting
Harbour mode
95
16
Sea mode
261
279
95
Selecting drive and folder on Main PC
Setpoint change
117
Setting up REFCON
251
Settings
Planning data import
156
Sharing a local folder
44
Shortcut menus
30
Software package
239
Special reefer selection
94
Square symbol
108
Standby on Main PC
240
Start defrost
117
Starting REFCON Monitor
20
Summary page in Container Details
Supervising functions
263
Symptom
Never Communicated
227
No Data from Container
223
No ID in controller
219
No Location
219
Stopped Communicating
224
Wrong ID in controller
219
System description
System Devices List
44
114
236
254
-TTaskbar icon REFCON Manager
Taskbar notify icon
48
Telephone number
8
Temperature measurement
Resolution
114
261
Temperature setpoint supervision
95
Third-party Software on the REFCON PC
244
Time synchronisation, configuration
35
Time zones
37
Trend window
134
Trouble shooting
PCT Communication Statistics List
256
System Devices List
254
Trouble shooting GMS
Typical modem errors
150
229
-UUnderstanding installation and update
Understanding REFCON
236
© 2015 Emerson Climate Technologies - Transportation Solutions ApS
245
280
User's Guide
Understanding the flow chart
217
Unplanned container
153, 252
Update
Automatic detection prerequisites
Checking for update
268
Updating process
270
User's decision
270
Windows updates
245
Windows user
46
268
-XXML file
264
Update and installation
245
Update functions
267
Update set
246
Updating a plug-in
248
User accounts
53
User Authentication
Administration
53
Automatic log off 50
Daily use
50
Introduction
50
Logging on and off 50
Purposes
50
Security levels
50
Setup
56
User accounts
53
User roles
53
User generated alarms
98
User roles
53
Using
Container Details
105
Using the Container History menu
132
Using the Filter Builder
69
Using the Online Help
13
UTC
32
UTC synchronisation very important
33
UTC very important
33
-VViruses
244
-WWalk route
189
WARNING - Possible loss of power
219
Web site
8
Welcome
8
What is Planning data
152
Why are Planning data important
152
Why use the RDC?
181
Windows date and time
35
© 2015 Emerson Climate Technologies - Transportation Solutions ApS