1
Intelicode User's Manual
Version 8
Table Of Contents
Welcome to INTELICODE® ........................................................................................... 1
Basic features of INTELICODE®..................................................................................... 3
What's New In Version 8 .............................................................................................. 5
Getting Started ........................................................................................................... 7
System requirements ................................................................................................ 7
Hardware.............................................................................................................. 7
Software............................................................................................................... 7
Installing INTELICODE® ............................................................................................ 7
Activating INTELICODE® ........................................................................................... 7
Basic steps to use INTELICODE® ................................................................................ 9
Creating a new Office/Department ............................................................................ 10
Changing Offices/Departments ................................................................................. 13
Getting Help .......................................................................................................... 14
A Walk Through ........................................................................................................ 17
Step One ............................................................................................................... 17
Step Two............................................................................................................... 18
Step Three ............................................................................................................ 19
Step Four .............................................................................................................. 21
Step Five............................................................................................................... 23
Step Six ................................................................................................................ 25
Step Seven ............................................................................................................ 26
Navigation................................................................................................................ 27
1 Patient Screen ..................................................................................................... 27
1 History Screen..................................................................................................... 28
1 Exam Screen ....................................................................................................... 29
1 Decision - Diagnosis/Management Options............................................................... 30
1 Decision - Amount/Complexity of Data .................................................................... 31
1 Risk Screen - Presenting Problem(s) ....................................................................... 31
1 Risk Screen - Diagnostic Procedure(s) Ordered......................................................... 31
1 Risk Screen - Management Option(s) Selected ......................................................... 31
1 Teaching Physician Screen..................................................................................... 32
1 End Screen ......................................................................................................... 32
1 Note Macros ........................................................................................................ 34
1 Visit Summaries................................................................................................... 36
1 Visit Summaries Archive ....................................................................................... 37
1 Retrieving Saved Reports ...................................................................................... 37
Reports and Printing .................................................................................................. 39
Generating Audit Summary Reports........................................................................... 39
Encounter Detail Report........................................................................................... 41
Issues and Recommendations™ Report ...................................................................... 43
iii
Intelicode User's Manual Version 8
Report Printing Options ........................................................................................... 46
Fee Schedule Report ............................................................................................... 48
Modifier Listing....................................................................................................... 49
Note Macro Listing .................................................................................................. 49
Patient Listing ........................................................................................................ 50
Provider Listing ...................................................................................................... 51
Requester Listing.................................................................................................... 52
Resident Listing ...................................................................................................... 53
User Listing ........................................................................................................... 54
Retrieving Saved Reports......................................................................................... 55
Maintenance ............................................................................................................. 57
Utilities Menu ......................................................................................................... 57
Patient Maintenance................................................................................................ 57
Provider Maintenance .............................................................................................. 58
Resident Maintenance (P.A.T.H. only) ........................................................................ 59
Specialty Maintenance ............................................................................................. 60
User Maintenance ................................................................................................... 61
Modifier Codes Maintenance ..................................................................................... 62
Requesting Provider Maintenance .............................................................................. 63
Managing Your Data .................................................................................................. 65
Archiving Data ....................................................................................................... 65
Copying and Sending From Office to Office (Pro and P.A.T.H. only) ................................ 65
Editing or Changing an Office Name .......................................................................... 65
Creating Multiple Offices/Departments/Sites ............................................................... 66
Advanced Tips .......................................................................................................... 69
Shortcuts .............................................................................................................. 69
Contacting................................................................................................................ 71
Corporate Headquarters .......................................................................................... 71
End-user License Agreement for INTELICODE®........................................................... 71
Sales .................................................................................................................... 73
Technical Support ................................................................................................... 73
Troubleshooting ........................................................................................................ 75
Common Problems.................................................................................................. 75
Index ...................................................................................................................... 77
iv
Welcome to INTELICODE®
"When Compliance Counts and Reputation Matters!"
Thank You for choosing INTELICODE®. We appreciate the fact that you have placed your
trust in us. Rest assured, you are in good company. Since the early days of our first
product in 1998, Intelicode has evolved into the number one software for auditing,
validating, and teaching Evaluation and Management services (E&M).
If you are new to Intelicode, you are in for a surprise. If you have been using Intelicode you
already know how valuable this tool has become. You will no doubt find its many new
features a compliment to its ease of use and its powerful reporting.
Intelicode is ideal for auditing or reviewing services for HCFA/CMS compliance. Many are
using this as a "monitoring tool". Simply stated, they are using Intelicode to monitor and
validate charges prior to submission. Others find this program to be ideally suited for
training purposes.
Countless professionals rely on Intelicode for consistency, reliability, and credibility for their
encounter reviews, education, appeals, and expert witness testimony.
We are pleased that you have chosen Intelicode. We invite you to call us any time with
questions, comments, or suggestions on how we can continue to deliver a superior product.
TSI - Makers of INTELICODE® products
1
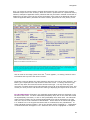
Basic features of INTELICODE®
Easy to use - Intelicode has a familiar look and feel to the paper audit forms you are
used to.
Excellent reporting - A variety of reports that improve your productivity that save you
time.
Produces a "running tally" - Intelicode starts calculating from the very beginning.
Adheres to both HCFA '95 and '97 Guidelines - CMS has instructed payors to use
whichever set of guidelines is most favorable to the provider. Intelicode makes this
easy. You
can use both '95 and '97 exams and Intelicode will save the highest level if you prefer.
Visit archive - Intelicode "archives" or stores visits that have been "edited".
Flexible reporting - Intelicode gives you the flexibility to create reports that fit your
needs,
giving you the information you want, while being able to save them into the format of
your
choice, or even email them!
Enhanced features of INTELICODE® Pro and P.A.T.H.
Stand-alone or network - Intelicode runs locally, yet allows you to network data. If
you need
to be mobile, simply copy the data to your local drive and go!
Supports multiple "offices" (i.e. databases) - If you have multiple sites,
departments, or
clients, Intelicode allows you to maintain as many as you wish.
Copy and Send Data - Copy and Send Patients, Providers, Diagnosis Codes, Note
Macros,
etc from office to office.
3
What's New In Version 8
Although the overall look and feel of Intelicode hasn't changed, there is much
about the program that has been improved. Many of the changes are those that
you have been asking for, but others effect the inner workings and really won't be
outwardly noticeable. Their "net affect" will leave you pleasantly pleased with the
new Intelicode! Some of the changes are:
Intelicurve This is an Intelicode add-on that allows you to quickly generate a
bell curve graph for provider billing information. It runs either as a stand along
application or as an integrated bell curve solution in Intelicode.
Numerous Bug Fixes As always, there are those pesky "features" also known
as "bugs". We have fixed some that you may have known about and some others
were not so obvious.
Trailblazer Support Including in Version 8 of Intelicode is support for the
Trailblazer medical decision making component.
Diagnosis and Procedure Accuracy Report This report shows the percentage
of accurate diagnosis and procedure codes.
Deleted Visits There is an updated visits summaries screen. You now have the
ability to delete multiple visits at one time. Just for a safe measure, we have
added a "recycle bin" to the visits menu, which is called "Deleted Visits." This grid
contains all the visits that have been deleted in Intelicode. From here you can
restore those visits or delete them permanently.
5
Getting Started
System requirements
Hardware
The minimum hardware requirements are:
CPU:
Pentium II or later
Memory :
64MB or greater
Available disk space:
50MB
Software
The minimum software requirements are:
Operating System:
Windows 2000 SP1
Other software:
Microsoft Office 2000 or
later
Other software:
Adobe Acrobat reader 5 or
later
Installing INTELICODE®
Follow these simple instructions:
1.
Close all programs.
2.
Insert the CD labeled INTELICODE® into your CD-ROM drive. If Autorun is enabled
on your system, the installation starts automatically and you can skip steps 3 and 4.
3.
From the Start menu, select Run.
4.
Type D:\setup (substitute the appropriate letter of your CD-ROM drive for D).
5.
Follow the instructions on the screen.
Our latest files are found at www.intelicode.com/solo or www.intelicode.com/pro, or
www.intelicode.com/path. Choose the Solo Install.exe, or Pro Install.exe, or Path Install.exe
and Save it to your computer. These contain our installation package.
By default, INTELICODE is installed in C:\Program Files\Intelicode\Applications. Your
data will be stored (by default) in C:\Program Files\Intelicode\Applications\Data\Offices. Of
course, you can choose to have your data stored in a directory of your choosing, or across a
network.
Feel free to contact us for help in setting up your data or for network installation.
Activating INTELICODE®
7
Intelicode User's Manual Version 8
Once installation is complete, you will see an INTELICODE® icon on your desktop.
To start INTELICODE™
• Double-click the INTELICODE®icon.
OR
• From the Start menu, select All Programs, then click on INTELICODE®.
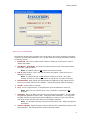
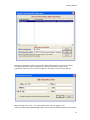
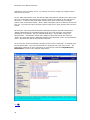
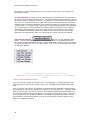
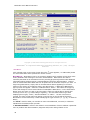
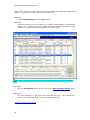
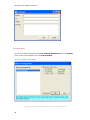
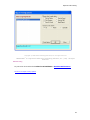
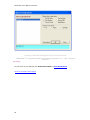
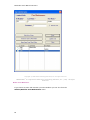
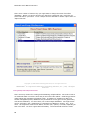
When you start INTELICODE™ you will notice the following activation screen. To activate
your copy of Intelicode, select Phone Activation. Select the "Launch Program" button to
activate your 30 day trial period of INTELICODE™. You will get a message box that tells you
how many days are left in the evaluation of the software.
Phone Activation
To activate INTELICODE™ over the phone you will need the System ID from the box below.
Please call us at 1-800-786-4231 with the System ID. You will then receive an Serial
Number that needs to be entered into the Serial Number box. After the Serial Number
has been entered, you will receive a message that the program has activated successfully or
failed.
8
Getting Started
Basic steps to use INTELICODE®
The following simple steps will outline the overall flow as well as the necessary information
to perform an audit using Intelicode. First, we will define the minimal information required
to start the process:
1.
Patient ID This is the medical record number or whatever number that is used to
identify the patient
2.
Last Name - First Name This is the last name and first name of the patient whose
encounter is being audited.
Note: The patient name is not required to perform an audit.
3.
D.O.B. (Date of Birth) This is the date of birth of the patient. Enter the D.O.B. in
MM/DD/YYYY format.
Note: The patient D.O.B. is not required to perform an audit. Only when
auditing services for service types which are age driven is a D.O.B. necessary.
4.
Patient Status Each patient will automatically be flagged as a new patient the first
time you first enter them into the software. Change the patient status accordingly.
5.
Gender Choose 'Male' or 'Female'
6.
User This is a required field. A User/Reviewer must be selected for each visit.
Note: When you set yourself up as a user, remember, a password is not
required.
7.
Visit Date This is the date of service for the encounter being audited. The Visit date
automatically defaults to today's date. Change the date accordingly. You may enter
the date manually by entering the date in MM/DD/YYYY format, or you may click the
drop down button and select the date from the display calendars.
Note: The Visit date will stay the same as the previous visit. Always change this
accordingly.
8.
Service Category Select the type of service that you feel is appropriate, based on the
documentation. This may differ from what the provider 'billed'.
9
Intelicode User's Manual Version 8
9.
Service Subcategory Make sure you include the appropriate subcategory (i.e. A
Consultation could be an Office Consult or Inpatient Consult) as this will be a
determining factor of the overall code.
Note: If the Service Type consultation is selected, the consult Verification
questions must be answered to continue with the audit.
Once the required information is entered, the Navigation buttons (Patient, History, Exam,
Decision, End) will become active.
Our previous version required fees to determine whether a visit was Over or Under coded.
The software based this on the difference in fees between the "Audited" and the "Billed" code.
Now Intelicode looks at the Service Category (Type of visit) to determine the "Variance"
between the "Reviewer" (Audited) and the "Provider" (Billed) code.
Note: The Visit Date, User, and Provider will remain the same from encounter to
encounter until you change them or exit the program.
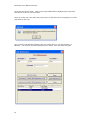
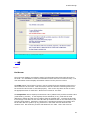
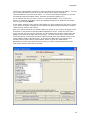
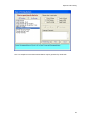
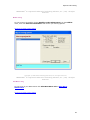
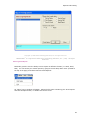
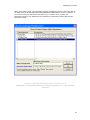
Creating a new Office/Department
The first screen you will see upon entering the Intelicode program will be the
“Choose/Create/Change Office/Department” screen. The first time you use your software,
there will be two items in the list box, “Sample Office” and "Master Office." The sample
office is simply to provide users with an example of how to set up their own offices.
Intelicode Pro and P.A.T.H. users will need to create a new office(s) to store your audit data
in. Simply click on the “Create new Office” button and two fields will appear. The first field
is the office name. Choose a name for the office that will indicate to you what audit
information you plan to store in this office (i.e., Internal Medicine, ENT Office, Long Beach
Office, etc.) The second field will be the “Data Name and Location” field. The Intelicode
program will default to storing your audit data on the hard drive
(C:\ProgramFiles\Intelicode\Applications\Data\Offices) of your computer. If you wish to
have your data stored elsewhere (e.g. a network drive) contact your Information Services
(IS) department for assistance in determining where data storage should be located.
10
Getting Started
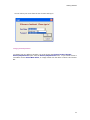
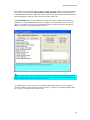
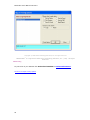
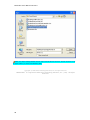
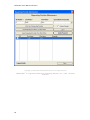
Once this is completed, a pop-up screen will appear that will allow you to enter specific
information about this office or department, such as the address, telephone, etc.
(information entered on this screen will appear in the upper corners of your reports).
When finished, click “Save.” The newly added office will now appear in the
“Choose/Create/Change Office/Department” screen under the Office/Department name field
11
Intelicode User's Manual Version 8
on the left side of the screen. Click on the newly added office to highlight (blue) the name
and then click “OK” to enter the office.
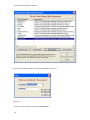
Once you create your new office and you go into it for the first time it will prompt you to add
yourself as a new user.
Give yourself an ID Number something like your initials and a 3 or 4 digit number (i.e.
SE1000). You can give yourself a password if you choose, then click Save and Close.
12
Getting Started
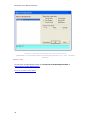
You will select your name from the list of Users and log in!
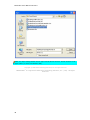
Changing Offices/Departments
To change from one Office to another you would choose the Choose/Create/Change Offices/Departments option from the Offices/Departments menu. If you wish to create a
new Office choose Create New Office, or simply double click the office or select it and choose
OK.
13
Intelicode User's Manual Version 8
Any time you change an Office you will be prompted to log into it.
Getting Help
There are various ways to get Help on INTELICODE:
14
Getting Started
•
Troubleshooting Click Here to see the most common problems
•
Join our INTELICODE® Auditing & Coding Forum
This email forum is a wonderful resource for all of your coding and auditing questions.
You can post questions and answers to the list, which is comprised of experts in the field
from all specialties across the country.
•
Call technical support at: 1-800-786-4231
15
A Walk Through
Step One
This topic will show you a walk-through of INTELICODE® as we go through an audit, screen
by screen. Once you have opened your Intelicode program and logged in as a user, you will
see a blank patient screen. Please note that the field names followed by an asterisk (*) are
required fields.
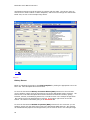
Patient Screen
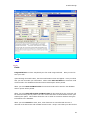
To begin an audit, in the Patient ID* field you must enter a number by which you can
identify the patient (i.e. medical record number, account number, etc.). The Patient ID we
have entered for our audit is 167 as seen in the example image below.
The Last Name and First Name fields should then be completed with the patient's name.
Completion of the Last and First Name fields is not required to complete an audit. Any
names entered in the name fields will appear on reports exactly as they are entered here.
The patient Last Name and First Name we entered for our audit is Bebee, Beth as seen in
the example image below.
The D.O.B. (Date of Birth) field is only required for those services that are age driven, such
as preventive health services. If date of birth is entered, enter in MM/DD/YYYY format. The
patient D.O.B. we entered for our audit is 07/27/1952 as seen in the example image below.
Choose the Patient Status* to indicate if the patient is new or established. The Patient
Status we entered for our audit is established, as seen in the example image below.
Choose the patient's Gender*. The patient Gender we entered for our audit is female, as
seen in the example image below.
Select the Attending Provider (physician performing the visit) for the encounter being
audited. If the attending provider is not listed, select Add New Provider to add the provider
to the database. The Attending Provider we entered for our audit is Welmore MD, Marcus
#1 as seen in the example image below.
Enter the Visit Date (the date of service) by entering the date in MM/DD/YYYY format, or by
clicking on the drop down arrow and selecting the appropriate date from the calendar
displays. The Visit Date we entered for our audit is 7/10/2007 as seen in the example
image below.
Enter Requesting Provider (physician requesting the service) as necessary in relation to
the services being provided. If the requesting provider is not listed, select Add New
Requester to add the provider to the database. We did not enter a Requesting Provider for
our audit since the service type was Office or Other Outpatient.
Select the appropriate Service Type* (i.e. office visit, consult, etc.) for the encounter being
audited. Next select the appropriate service Sub Type (i.e. initial visit, office consultations,
initial hospital care, etc.). Note: if Service Type "Consultations" is selected, the Consult
17
Intelicode User's Manual Version 8
Verification questions must be answered to continue with the audit. The Service Type we
entered for our audit is Office or Other Outpatient, and the service subtype we entered was
Initial Visit, as seen in the example image below.
Next
Step Two
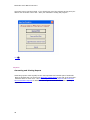
History Screen
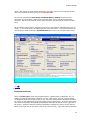
Begin by indicating the presence of a Chief Complaint by clicking the appropriate Yes or No
box in the Chief Complaint Documented field.
To enter the documented History of Present Illness (HPI) elements for the encounter
you are auditing, simply click the check boxes next to the appropriate history elements. We
entered Yes in the Chief Complaint Documented field and checked off Location, Quality,
Duration, Context, and Modifying Factors for our audit as seen in the example image below.
Also notice the level of HPI displayed in red font in the upper right corner of the HPI
section. We entered 5 elements giving us an Extended HPI.
To enter the documented Review of Systems (ROS) elements for the encounter you are
auditing, simply click the check boxes next to the appropriate ROS elements. We checked
off Constitutional Symptoms and Integumentary for our audit as seen in the example image
18
A Walk Through
below. Also notice the level of ROS displayed in the upper right corner of the ROS section.
We entered 2 ROS elements giving us an Extended ROS.
To enter the documented Past Family and Social History (PFSH) elements for the
encounter you are auditing, simply click the check boxes next to the appropriate PFSH
elements. We have not checked off any PFSH elements, therefore we do not have a PFSH
level.
As we add the various history elements to this screen, Intelicode is calculating the level of
History. The level of History is displayed at the top of the screen. The history elements we
entered for our audit produced a Expanded History as seen in the example image below.
Next
Step Three
Examination Screen
Select the Exam Type (1997 General Multi System, Cardiovascular, 1995 Exam, etc.) to
display the desired examination elements. For the 1997 exams, once the exam elements
are displayed down the left side of the screen, select the documented examination elements
by clicking on the appropriate body areas/organ system check boxes. Once the check boxes
have been selected the corresponding examination elements will appear on the right side of
the screen. Select the desired individual examination elements by clicking on the element
listed on the right side of the screen (click on the actual words). Once the element has been
19
Intelicode User's Manual Version 8
selected the font will change to red. To unselect an element, simply click it again and the
font will return to blue.
For the 1995 examinations, once the desired 1995 examination is selected in the Exam Type
field, the examination body areas/organ systems elements will appear on the right side of
the screen. To select a body area/organ system simply click on that body area/organ
system (click on the actual words). Once a body area/organ system is selected, the font will
turn red. To unselect a body area/organ system simply click it again and the font will return
to blue.
We chose the 1997 General Multi-System Examination and then selected Constitutional.
Within Constitutional we selected Measurement of any three vital signs, and General
appearance of the patient. We also selected Respiratory - Auscultation of lungs and
Cardiovascular - Auscultation of heart with notation of abnormal sounds and murmurs.
Finally, we chose Skin with the individual element being Inspection of skin an subcutaneous
tissue. We selected a total of 6examination elements.
As we select the various examination elements on this screen, Intelicode™ is calculating the
level of Examination. The level of Examination is displayed at the top of the screen. The
Examination elements we have entered for our audit haven produced a Expanded (97)
Examination as seen in the example image below.
Next
20
A Walk Through
Step Four
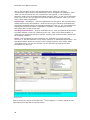
Decision Screen
The decision screen is divided into three tabs, Diagnosis/Management Options,
Amount/Complexity of Data, and Risk. Each tab displays the information respective to the
tab name. Intelicode will calculate the level of each tab as the information is entered.
The Diagnosis/Management Options tab displays the Number of Diagnosis or
Management Options section of the Documentation Guidelines (both 1995 and 1997). Each
statement is preceded by a blank box with a drop down arrow. Choose the appropriate
statement(s) for the encounter being audited. Click the drop down arrow next to the
desired statement(s) and select the number of applicable diagnoses. We entered 1 Self limited or minor problem as seen in the example image below.
The Amount/Complexity of Data tab displays the Amount and Complexity of Data Options
section of the Documentation Guidelines (both 1995 and 1997). Each statement is preceded
by a check box. To choose the appropriate statement(s) for the encounter being audited,
simply click on the check box to select it. To unselect a statement(s) simply click on the
check box again and the check will disappear. We did not enter any information on this tab
for our audit.
The Risk tab is further divided into three tabs representing the three columns of the Risk
table, Presenting Problem, Diagnostic Procedure(s) Ordered, and Management
Option(s) Selected. Each tab lists the elements as they appear on the Risk Table from the
Documentation Guidelines (both 1995 and 1997). To select elements from each tab, simply
click on the risk statement itself (click on the actual words). The font for selected elements
will turn red. To unselect any element, click it a second time and it will return to blue.
Intelicode will calculate the highest level of risk from all three of the Risk tabs.
We chose the following elements for our audit: Presenting Problem - Acute uncomplicated
illness or injury
Diagnostic Procedure(s) Ordered - We chose nothing on this screen
Management Option(s) Selected - Over the counter drugs & Elastic bandages
Intelicode™ will calculate the level of Medical Decision Making (MDM) by compiling the
information from all of the Decision screens. The level of overall MDM will be displayed at
the top of the screen as shown in the example image below. The Decision elements we have
entered for our audit produce a Straightforward MDM.
21
Intelicode User's Manual Version 8
22
A Walk Through
Next
Step Five
End Screen
The end screen displays a cumulative total of all information entered through this point in
the audit. It is advisable to check the information entered thus far to ensure accuracy. The
Visit Information section displays information entered on the previous screens.
The Time section (far left side of screen) may be utilized for those situations where time is
documented for an encounter. Both the Face-to-face time and the Counseling times must
be entered for this function to calculate properly. Click on the drop down arrows to select
the appropriate time for each field. We did not use time for our audit.
The Comparison section displays the Reviewer E & M (audited code) and the Provider E & M
(code billed by provider). It also displays the Fee Schedule (if any) used and the total
difference in dollars and the level of variance from the audited code. To select the Provider
E & M simply scroll down the list of E & M Codes provided and click on the code billed by the
provider being audited. Intelicode™ will then do a comparison between the Reviewer and
the Provider E & M to produce (if any) difference in the dollar amounts billed and the
variance level. We chose the provider code 99204 for our audit. There was not a fee
23
Intelicode User's Manual Version 8
difference and the variance shows that the encounter was billed in the wrong category as
seen in the example image below.
The Diagnosis Codes section lets the reviewer select the diagnosis used by the provider
and also select diagnosis codes the reviewer feels were supported by the documentation to
provide a complete picture of the encounter being audited. The diagnosis codes come preloaded by Intelicode, or users may choose to use their own diagnoses which would be user
loaded. In the latest version of Intelicode, we allow the user to enter four diagnosis codes
for both the provider and the reviewer. Theses codes can be accessed by click either the
Provider or Reviewer DX tab.
The Note Macros field gives the reviewer the ability to document specific information about
an audit, encounter, documentation issue, etc. Note Macros can be developed to insert in
the Notes field or the reviewer may type freeform text as desired. This aspect of Intelicode
provides reviewer with the ability to enhance their audit reporting without a lot of additional
work. For our audit, we inserted a Note Macro we developed called Legibility. We
developed an Issue macro and a Recommendation macro. Both macros explain what the
documentation issue is and the recommended steps to improve that issue.
The Medical Necessity questions allow the user to override the Reviewer E & M by setting
the Medical Decision Making level as the key component in determining the level of service.
The example below shows both questions that need to be answered. If you do this the
program will place a -DC behind your CPT identifying that the code has been down coded to
the Medical Decision Making level of service.
The Diagnosis or Procedure Codes are accessed with the tabs on the right side of the
screen. The agree check boxes will set the Reviewer E&M code equal to the Provider E&M
code. Any modifiers that need to be added can be done with the boxes on the right side of
each Procedure Code.
24
A Walk Through
Next
Step Six
Finish
Congratulations! You have completed your first audit using Intelicode.
save your work.
Now you need to
Upon selecting the Finish button, the Save Confirmation screen will appear. Here you select
how you wish to handle your information. When select Save and Print the encounter audit
will be saved in the database and an Encounter Detail Report will be printed.
When you select Save and Don't Print the encounter audit will be saved in the database
and no reports will be printed.
When you select Clear All Screens and Don't Save all data entered for this encounter will
be lost and nothing will be printed. The user will be returned to a blank Patient Screen upon
selecting this option. This feature allows the user to audit an encounter without saving the
information to the database.
When you select Cancel the Save, Print, Clear functions are cancelled and the user is
returned to the End screen with all data entered in tact. Keep in mind that your data for this
25
Intelicode User's Manual Version 8
encounter has not yet been saved. If you should exit out of the program at this point your
data for this encounter will be lost. Save your data before exiting the program.
Next
Step Seven
Generating and Printing Reports
Generating reports could arguably be the most important and valuable part of Intelicode.
Step Six showed how you can print an Encounter Detail Report at the end of the encounter.
Intelicode does so much more. See Generating Audit Summary Reports and Issues and
Recommendations Reports for details on how to get the most of Intelicode's reporting
capabilities.
26
Navigation
1 Patient Screen
Click specific areas on the image below (areas where the
more information and to preview the various screens.
* cursor appears, i.e. History) for
Patient ID – This field is required to generate an audit. The Patient ID can be the patient’s
medical record number, or any other unique number by which the auditor could identify the
encounter being audited.
Last/First Name – Patient names are optional fields and are not required to generate an
audit.
D.O.B. (Date of Birth) – This field is only required to generate an audit if the services are
those that are dependent upon the age of the patient (e.g. preventive services). The Date
of Birth must be entered in mm/dd/yyyy format. Press the tab key to progress through the
date fields.
Patient Status – This is the status of the patient during the encounter being audited.
Intelicode will load all patients as new patients the first time they are entered into the
software, and will subsequently default existing patients (those already loaded into the
software) as established patients for any additional encounters audited. This should be
changed as appropriate for the encounter being audited.
Patient Gender – The gender of the patient should be indicated here.
Attending Provider - This is the provider who rendered service for the encounter being
audited. Providers can be added all at one time, or individually as they are encountered
during audits. To add Attending Providers, click on the drop down arrow in the Attending
Provider field. Next click on the “Add New Provider” option. The Provider Maintenance
screen will appear for completion. You may also access the Provider Maintenance screen by
clicking on the Utilities drop down menu and select Provider Maintenance. The Provider
Maintenance screen will appear for completion.
Visit Date – Enter the date of service for the encounter being audited. This can be done by
clicking on the Month, Day, or Year with your mouse cursor and changing the value. You
can also click the drop-down arrow to the right of the date which will display a calendar
control. You can scroll back and forward by year. You can also display an entire list of
months by clicking on the current month (see below).
Requesting Provider - This is the provider who sent the patient to the attending provider,
or the requester of service for the encounter being audited. Requesting Providers can be
added all at one time, or individually as they are encountered during audits. To add
Attending Providers, click on the drop down arrow in the Requesting Provider field. Next
click on the “Add New Requester” option. The Requesting Provider Maintenance screen will
appear for completion. You may also access the Requesting Provider Maintenance screen by
clicking on the Utilities drop down menu and select Requester Maintenance. The Requesting
Provider Maintenance screen will appear for completion.
User/Reviewer - A User/Reviewer is required for any visit. The User/Reviewer is the
individual performing the audit. Each individual performing audits should be assigned an
individual User ID to maintain the most accurate audit data. To set up a User/Reviewer,
27
Intelicode User's Manual Version 8
click on the drop down arrow in the User/Reviewer field. Select the “Add New
User/Reviewer” option and the User Maintenance screen will appear for completion. Note:
When you set yourself up as a user, a password is not required. To save without a
password, simply leave the Password field blank and click “Save.” A pop-up box will appear
to ask you if you are sure you want the user saved without a password. Click “yes” if you
want to save without a password.
Service Type – Subcategory – Select the appropriate service type for the encounter being
audited, based on the documentation. Once the service type is selected, the Subcategory
field will be populated with the corresponding subcategory types (i.e. For a Consultation the
subcategories could be an Office or Inpatient for example). The Subcategory will be a
determining factor of the overall code.
Teaching Physician Visit? – Only for Intelicode P.A.T.H. users, this field will be accessible
to indicate whether a service is a teaching visit or not. If the service being audited is a
“teaching visit” click this check box to add the “Teaching” tab to the encounter and activate
the Teaching Guidelines.
Notes – This field allows the user to add their own comments (free text) about the
encounter, or the documentation, etc for future reference, or educational opportunities. The
Note Macros button allows the reviewer to store specific notes for use in future audits.
Using Note Macros can save the reviewer the time and effort of retyping the same
information over and over.
1 History Screen
Click an area on the image (areas where the * cursor appears, i.e. History) below for more
information and to preview the various screens.
28
Navigation
Here, you select the various History elements documented for the encounter being audited.
Intelicode keeps track of the counting! When the mouse is positioned over a particular History
element, examples of applicable history elements that may be found in medical records will be
displayed in the blue-green help box across the bottom of the page as an additional reference.
When all applicable history elements have been entered, proceed to the next (Exam) screen.
1 Exam Screen
Click an area on the image (areas where the * cursor appears, i.e. History) below for more
information and to preview the various screens.
The Exam screen will display the exam elements relevant to the type of exam selected. The
Exam Type is displayed at the top left side of the Exam screen. To change the Exam type,
click the drop down arrow and choose the desired exam type. You may audit any given
encounter in multiple Exam Types and Intelicode will save all of the utilized exam types, and
will tell you when you have not chosen the exam type displaying the highest level of service.
For the 1997 Exams (all Exams), the applicable Systems/Body Areas are displayed on the
left side of the screen. To select a desired System/Body Area, click on the check box beside
the System/Body Area name, or click on the System/Body Area name itself. The individual
exam elements (bullets) for the selected System/Body Area will be displayed on the right
side of the screen under “Elements of Examination”. Exam elements or bullets that appear
in a “shaded” box in the original 1997 Exams will be underlined for easy identification. To
select individual elements (bullets), click on the element itself to “highlight” it. “Highlighted”
or selected elements will appear in red. Intelicode will count the “highlighted” or selected
29
Intelicode User's Manual Version 8
elements for you and will display them at the top of the screen next to the “Elements of
Examination” header.
For the 1995 Exam, the Body Areas and Organ Systems are displayed on the right side of
the screen under “Elements of Examination”. To select individual elements (bullets), click on
the element itself to “highlight” or select it. “Highlighted” or selected elements will appear in
red. There are exam elements in the 1995 exam that are specifically designed to allow the
auditor/reviewer to reflect examination as accurately as possible. These elements indicate a
“Limited exam” or a “Detailed exam” relating to how the presenting problem was performed.
The “Limited exam” element will allow the auditor/reviewer to keep the level of exam at
“Expanded” (when appropriate) when 2 to 7 Body Areas or Organ Systems are selected.
The “Detailed exam” element will allow the auditor/reviewer to make the level of exam
“Detailed” (when appropriate) when 2 to 7 Body Areas or Organ Systems are selected.
Joints/Bones/Muscles –
Only for use with applicable 1997
Exams. To access the individual elements or bullets pertaining to Joints/Bones/Muscles,
click on the “Joints/Bones/Muscles” button. Select the desired individual elements or bullets
by clicking the check box next to the desired area. Click on the “x” in the upper right corner
to close when finished.
Copyright © 1998-2006 Technology Solutions, Inc. All rights reserved.
INTELICODE® is a registered trademark of Technology Solutions, Inc. (TSI). All Rights
Reserved.
1 Decision - Diagnosis/Management Options
Click an area on the image (areas where the * cursor appears, i.e. History) below for more
information and to preview the various screens or to see additional information about that
item.
Here, you select "the number" of diagnoses or problems that are applicable to the encounter
being audited by selecting the appropriate number from the drop down box. Intelicode keeps
track of the counting! The level or counts for the Diagnosis/Management Options portion of
the encounter elements selected will appear in the upper left corner of the screen. When the
mouse is positioned over a specific statement, the actual corresponding quotation from the
Documentation Guidelines will appear in the blue-green help box across the bottom of the
page as an additional reference.
30
Navigation
1 Decision - Amount/Complexity of Data
Click an area on the image (areas where the * cursor appears, i.e. History) below for more
information and to preview the various screens.
Recording the Amount/Complexity of Data documented in a record being audited is easy.
Simply select those items that have been documented by clicking on the check box next to
the statement, or clicking on the statements (words) themselves. Select as many elements or
statements as are relevant/supported by the encounter documentation. To unselect an item,
simply click the check box or statement again. The level or counts for the Amount/Complexity
portion of the encounter elements selected will appear in the upper left corner of the screen.
When the mouse is positioned over a specific statement, the actual corresponding quotation
from the Documentation Guidelines will appear in the blue-green help box across the bottom
of the page as an additional reference.
1 Risk Screen - Presenting Problem(s)
Click an area on the image (areas where the * cursor appears, i.e. History) below for more
information and to preview the various screens.
The Presenting Problem tab of the three Risk screens is used to indicate the level of risk
associated with the presenting problem documented for the encounter being audited. To
select the desired level of Presenting Problem Risk, click on the risk elements or statements.
Selected risk elements will be “highlighted” in Red. The highest corresponding level of
Presenting Problem Risk (e.g. minimal, low, moderate, high) will appear to the left of the
selected elements. To unselect any element, simply click that element again (it will turn
blue again).
1 Risk Screen - Diagnostic Procedure(s) Ordered
Click an area on the image (areas where the * cursor appears, i.e. History) below for more
information and to preview the various screens.
The Diagnostic Procedures tab of the three Risk screens is used to indicate the level of risk
associated with the review or ordering of diagnostic procedures or services documented, if
applicable, for the encounter being audited. To select the desired level of Diagnostic
Procedures Risk, click on the risk elements or statements. Selected risk elements will be
“highlighted” in Red. The highest corresponding level of Diagnostic Procedures Risk (e.g.
minimal, low, moderate, high) will appear to the left of the selected statements. To unselect
any element, simply click that element again (it will turn blue again).
1 Risk Screen - Management Option(s) Selected
31
Intelicode User's Manual Version 8
Click an area on the image (areas where the * cursor appears, i.e. History) below for more
information and to preview the various screens.
The Management Option(s) Selected tab of the three Risk screens is used to indicate the
level of risk associated with the management options documented for the encounter being
audited. To select the desired level of Management Options Risk, click on the risk elements
or statements. Selected risk elements will be “highlighted” in Red. The highest
corresponding level of Management Options Risk (e.g. minimal, low, moderate, high) will
appear to the left of the selected statements. To unselect any element, simply click that
element again (it will turn blue again).
1 Teaching Physician Screen
Click selected areas on the image (areas where the * cursor appears, i.e. Navigation
Buttons) below for more information and to preview the various screens.
The Teaching Physician Screen is available only to Intelicode P.A.T.H. customers. This
screen is activated by identifying an encounter as a Teaching Visit by clicking a check box on
the Patient screen. Once the check box has been clicked an additional button/tab will
appear across the top of the Intelicode screen (between the Decision and End buttons/tabs)
labeled “Teaching.” The Teaching screen displays a field for the Resident’s name followed by
a series of questions to determine if the encounter being audited meets the Teaching
Physician Guidelines as issued by CMS.
The Resident’s name field operates like the Attending Provider & Referring Provider fields.
Simply click the drop down arrow in the field and choose the Add New Resident option. The
Attending Resident Maintenance pop-up screen will appear. Complete the resident’s
identification number (chosen by the user), last and first names, then click the Save and
Close buttons.
The questions should all be answered by choosing the appropriate Yes or No answer to each
question. Once the Teaching Guidelines have been met, a GC modifier will be displayed with
the audited/reviewed code in the upper right hand corner of the screen. An asterisk (*) will
be displayed when the Teaching Guidelines have not been met.
Note: Teaching visits not meeting the Teaching Guidelines (Identified by (*)) will be displayed
in the Non-Compliant TP (*) field on the Visit Summaries screen.
Copyright © 1998-2006 Technology Solutions, Inc. All rights reserved.
INTELICODE® is a registered trademark of Technology Solutions, Inc. (TSI). All Rights
Reserved.
1 End Screen
Click selected areas on the image (areas where the * cursor appears, i.e. E & M Codes)
below for more information and to preview the various screens.
32
Navigation
Code – The audited code (the code produced by the information entered by the reviewer)
will appear in the upper right corner of the End screen in Yellow font.
Visit Information - The information reflecting in this section of the End screen is a
culmination of the encounter information the reviewer has entered up to this point. If
information reflected on this portion of the End screen is incorrect, return to the screen
where the original information was entered to make the appropriate changes.
Time – If Time is a factor in the encounter being audited, enter the Face-to-Face time in the
appropriate field by clicking on the drop down arrow and selecting the documented Face-toFace time. Additionally, enter the documented Counseling time in the appropriate field by
clicking on the drop down arrow and selecting the documented Counseling time. If the
Counseling time is 50% or more of the total Face-to-Face time, Intelicode will automatically
adjust to reflect the appropriate code in the selected service category in relation to the times
entered. If you wish to remove Face-to-Face and Counseling times, simply click on the drop
down arrows and select the blank space at the top of the times listed in each field.
Comparison – Intelicode calculates the "Reviewer E&M" based on what has been selected in
each of the screens (History, Exam, Decision). When you get to the end of the review and
are on the End Screen, select the Provider E&M from the list of E&M codes in the middle of
the screen. To the left of the list of E&M codes you will notice a "Comparison" area. This
shows the "Reviewer E&M" and the "Provider E&M" and will calculate a "Variance" based on
the code difference. A "Fee Difference" will also be calculated based on your fee schedule
selected.
NOTE: When the Reviewer E&M and Provider E&M are from different Service Categories (i.e. Office/Outpatient vs
Consultation) the "Variance will not calculate automatically. You can manually select the Variance from the drop-down
list.
Provider E & M – The code used by the provider for billing the encounter being audited.
Reviewer E & M - The audited/reviewed code (the code produced by the information
entered by the reviewer) will appear in the upper righ corner of the each screen in Yellow
font and in the Reviewer E&M field in the "Comparison" area.
Modifier – This is the Modifier field (located next to the Provider and Reviewer E&M fields)
for the Provider and Reviewer E&M. Select the appropriate modifier, if applicable, by
clicking on the drop down arrow and clicking on the desired modifier.
Fee Schedule – The fee schedule field will display the fee schedule utilized to produce the
comparison “Overbilled” or "Underbilled" amount. This field also allows the reviewer to
change fee schedule for the encounter being audited, if more than one fee schedule is
loaded. If no fee schedule amounts are loaded, the “Overbilled” or "Underbilled" field will
remain blank in applicable situations.
Diagnosis Codes – Select the diagnosis code(s) used by the provider when billing the
audited encounter, when applicable, if desired. Select the Reviewer diagnosis code(s), when
desired. The diagnosis codes are pre-loaded by Intelicode. The display of the pre-loaded
diagnosis codes can be changed to display the code first, or the description first.
33
Intelicode User's Manual Version 8
Copyright © 1998-2006 Technology Solutions, Inc. All rights reserved.
INTELICODE® is a registered trademark of Technology Solutions, Inc. (TSI). All Rights
Reserved.
1 Note Macros
Click selected areas on the image (areas where the * cursor appears, i.e. E&M Codes) below
for more information and to preview the various screens.
Note Macros – Note Macros can be an extremely helpful tool for auditors to help them more
clearly elaborate their findings in encounter documentation. Note Macros can also be
extremely beneficial as an educational tool for providing physicians/providers with additional
information about problems and or recommendations concerning documentation. Think of
them as saved information tidbits that can be pasted into an encounter anytime you wish. To
begin using Note Macros, simply click on the Note Macros button appearing in the lower
portion of the screen on the Patient, History and End Screens. A Note Macro Maintenance
pop-up screen will appear. Select the “Add New Macro” button. The bottom of the pop-up
screen will change to have a section labeled “Create/Edit A Note Macro.” In the field “Macro
Name” enter the name you wish to give this macro (what you will be able to identify this
macro by from a list, e.g. hand writing or legibility). The next field is Macro Type field
displaying three types, “Issue”, “Recommendation” or “Other.” As each new macro is
created, the name of that macro will appear in the list box on the left side of the Macro
Maintenance screen followed by a letter identifying the type of macro (i.e. (I), (R), or blank for
Other)
An “Issue” would be what you consider an issue to be addressed, corrected, or otherwise
identified to the auditor and/or provider.
A “Recommendation” would be the auditor’s recommendation of how to address a particular
issue or problem with documentation, diagnosis and/or CPT coding related to the
34
Navigation
encounter(s) being audited (individual or entire grouping of encounters or providers). An easy
way to utilize this feature would be to give an "Issue" macro and its respective
“Recommendation” macro the same names. (i.e. Issue macro named “Legibility (I)” and the
corresponding Recommendation macro would also be named “Legibility (R)”)
If your desired new macro is not an "Issue" or a "Recommendation" (e.g. a note to the
auditor, or additional information macros like Additional Diagnoses or Additional CPT Codes,
etc.) the type would be Other.
In the “Macro Contents” field, enter the information you wish to appear for this macro, exactly
as you wish it to appear, including all of the appropriate grammar and punctuation necessary.
When finished, click the “OK” button.
Once your macros have been successfully added, the names of your macros will appear in the
macros list on the left side of the Note Macro Maintenance screen. Select the name of the
macro you wish to insert into the encounter you are auditing (the contents of that macro will
appear in the block on the right side of the screen). Click the “Insert Text” button and the
macro will then be inserted into the Notes (white text field) field at the bottom of the screen
on the Patient, History and End screens. If you know the Note Macro you wish to use is
already created, simply click the “Note Macros” button to get to the “Note Macros
Maintenance” screen, then select the macro name you wish to insert and click the “Insert
Text” button and the macro will be inserted.
35
Intelicode User's Manual Version 8
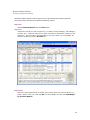
1 Visit Summaries
Visit Summaries – The visit summaries screen displays the audited encounters for each
office/department. You may sort by using only one filter or multiple filters at the same time.
The information displayed on this screen can be sorted in multiple ways to make your
reports as specific as you desire. The following will describe the various filtering items on
the Visit Summaries screen.
Visit Date / Audit Date – This sort will determine if the encounters displayed will be sorted
by visit date or audit date. The Visit Date is the date of service of the audited encounter.
The Audit Date is the actual date the audit was performed (Intelicode automatically stores
the date each audit is performed). The date fields located directly below the Visit Date /
Audit Date toggle button correspond with which ever type of date is selected. For example,
if Visit Date is selected, the date boxes display 2/27/2005 – 2/27/2007, the encounters
displayed will be only those encounters with visit dates (service dates) ranging from
2/27/2005 through 2/27/2007. The same applies to Audit Date, when this is selected the
date ranges displayed in the date fields will control the encounters displayed by their actual
date of audit.
Status – This is patient status – New or Established
Service Category / Sub Category – this field will allow you to sort by the service type
(from the Patient Screen). Once the service type (Office or other outpatient, Hospital
inpatient services, etc) is selected, the Sub Category field will be populated with the
corresponding service sub-types (from Patient Screen, i.e. initial, follow-up).
Provider – this field will allow you to sort the encounters displayed by the provider
selected. The providers available for this field are those you have previously added to your
Provider fields on the Patient screen.
CPT Code – will allow you to sort the encounters displayed by CPT Code.
The CPT Code that will be referenced for this sort will be the Provider CPT for the audited
encounters.
User – will allow you to sort displayed encounters by the user or auditor who performed the
audits.
Specialty – this field will allow you to sort the encounters displayed by the specialty of the
providers who performed the encounters/visits.
Requester – this field will allow you to sort encounters displayed by the Requesting
Provider. The Requesters available for this field are those you have previously added to
your Requester field on the Patient screen.
Var – This field will allow you to sort the encounters displayed by the Variance between the
provider code and auditor code. This information is taken from the Var field on the End
screen.
Macro – this field will allow you to sort the encounters displayed by the Note Macros
utilized. The Macros available for this field are those previously added to the Note Macros
Maintenance screen.
The informational fields located at the bottom of the screen will provide totals specific to the
sorts performed. There are two sets of numbers for each heading, “No.” for number and “$”
for dollars.
Total Visits – Reflects the total number of visits associated with the displayed information,
and the total dollar amount of the visits associated with the information displayed.
Under Coded/Billed – Reflects the total number of visits and percentage that were Under
Coded/Billed, and the total dollar amount of those Under Coded/Billed services.
Over Coded/Billed - Reflects the total number of visits and percentage that were Over
Coded/Billed, and the total dollar amount of those Over Coded/Billed services.
36
Navigation
Non-Compliant Teaching (P.A.T.H. only)– Reflects only those services (the number and
percentage) that are non-Compliant teaching service, or those services that did not meet
the teaching physician guidelines.
NOTE: when you select a visit (see above) the notes associated with that encounter are displayed
below.
NOTE: To Delete a visit, "Right Click" on the selected visit and choose "Delete".
Copyright © 1998-2006 Technology Solutions, Inc. All rights reserved.
INTELICODE® is a registered trademark of Technology Solutions, Inc. (TSI). All Rights
Reserved.
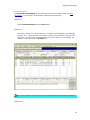
1 Visit Summaries Archive
When you edit a visit, Intelicode keeps the original in its unaltered format. The "edited visit"
is saved in Visit Summaries. You can not go back and edit an original once you have
changed it, but you can print it or delete it. "Right Click" on a visit to print or delete it.
Copyright © 1998-2006 Technology Solutions, Inc. All rights reserved.
INTELICODE® is a registered trademark of Technology Solutions, Inc. (TSI). All Rights
Reserved.
1 Retrieving Saved Reports
Intelicode gives the user the ability to save reports in different formats (i.e. Word®, Excel®,
PDF). You can access your saved reports by going to the File drop down menu (located at
the top of the page) and select Retrieve Saved Reports.
An “Open” pop-up window will appear. Select the file name containing your saved reports
and click the Open button, or double click the file name.
37
Intelicode User's Manual Version 8
NOTE: The "Open" dialog's default "Files of Type" looks for Word™ Doc files. Choose "All Files" to see
all types of files (i.e. Excel™ and Acrobat™ PDF).
Copyright © 1998-2006 Technology Solutions, Inc. All rights reserved.
INTELICODE® is a registered trademark of Technology Solutions, Inc. (TSI). All Rights
Reserved.
38
Reports and Printing
Generating Audit Summary Reports
Intelicode makes creating custom reports easy to generate Audit Summary Reports,
Encounter Detail, and Issues and Recommendations reports:
Step One:
choose Visit Summaries from the Visits menu.
Step Two:
Choose the criteria you wish to report by (i.e. Status, Service Category, Sub Category,
Provider, etc.). Select as many as you deem necessary to achieve the results you are
looking for. This will "filter" the information to suit your needs. In our example, we
chose Dr. Welmore from the Provider list.
Step Three:
Select the report from the list of reports, then choose where you want to send it (i.e.
Printer, Word™, PDF, etc.) and click OK. In this example we chose the Audit Report
by Provider With Dx.
39
Intelicode User's Manual Version 8
Copyright © 1998-2006 Technology Solutions, Inc. All rights reserved.
INTELICODE® is a registered trademark of Technology Solutions, Inc. (TSI). All Rights
Reserved.
40
Reports and Printing
Encounter Detail Report
The Encounter Detail Report can be printed at the end of the audit or later from Visit
Summaries. To print from Visit Summaries follow these simple steps:
Step One:
choose Visit Summaries from the Visits menu.
Step Two:
Choose the criteria you wish to report by (i.e. Status, Service Category, Sub Category,
Provider, etc.). Select as many as you deem necessary to achieve the results you are
looking for. This will "filter" the information to suit your needs. In our example, we
chose Dr. Carrington from the Provider list.
NOTE: when you select a visit (see above) the notes associated with that encounter are displayed
below.
Step Three
41
Intelicode User's Manual Version 8
select a visit and click the Print Selected button and choose your Print Options. Click
OK.
42
Reports and Printing
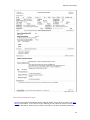
Issues and Recommendations™ Report
The Issues and Recommendations Report depends greatly on how well you utilize your Note
Macros in Intelicode. In the course of your auditing you will utilize the various macros that
you have developed. Each time you insert a macro that is an Issue (problem) Intelicode
43
Intelicode User's Manual Version 8
keeps a tally. When you insert a macro that is a Recommendation Intelicode keeps track of
that too. To generate the report follow these simple steps:
Step One:
choose Visit Summaries from the Visits menu.
Step Two:
Choose the criteria you wish to report by (i.e. Status, Service Category, Sub Category,
Provider, etc.). Select as many as you deem necessary to achieve the results you are
looking for. This will "filter" the information to suit your needs.
NOTE: when you select a visit (see above) the notes associated with that encounter are displayed
below.
Step Three:
Click the Print Reports button and you will see the Report Printing Options dialog.
Step Four:
Fill in any comments (i.e. the Type of Audit, Provider name, etc.). Then click OK and
choose your "Print Destination" (i.e. Printer, Word™, PDF, etc).
See more on Report Printing Options
44
Reports and Printing
This is a sample Issues and Recommendations report generated by Intelicode.
45
Intelicode User's Manual Version 8
Copyright © 1998-2006 Technology Solutions, Inc. All rights reserved.
INTELICODE® is a registered trademark of Technology Solutions, Inc. (TSI). All Rights
Reserved.
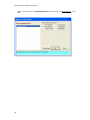
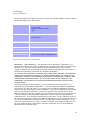
Report Printing Options
When printing various reports, whether it be a list of Providers or an Audit Summary Report
you will be presented with this dialogue. Report Printing Options gives you choices about
what report to print, how you choose to have the data listed (i.e. sorted by ID or Specialty,
etc.) and how you want to "print" the report. Most of these choices are self explanatory, but
a couple of items should be clarified.
46
Reports and Printing
In the latest version of Intelicode, we have changed the report options. We have separated
the reports into two sections, All Providers and By Provider. Each tab contains its own
individual Audit Summaries. Both tabs contain some of the same reports, including Issues &
Recommendations, Audit by Patient, Provider Net Fee Totals, etc.
The Print Graph option is only available on select report types. When the check box is
enabled if it is selected Intelicode will place a graph of the current data at the end of the
report. The graphs can help you and providers identify trouble areas quickly and give a
different format for returning data after an audit.
NOTE: when saving a report in Word™ or Excel™ please be advised that the original formatting of
the report will be altered. This is something that is out of our control and cannot be helped. You will
need to re-format the report to correct any discrepancies.
To "Email Report" you will need to have Microsoft Outlook® installed on your computer.
This will create an email message and will include your report as an Adobe Acrobat® PDF
file. There is no need to save it as one first.
47
Intelicode User's Manual Version 8
Fee Schedule Report
To print a Fee Schedule Report choose Fee Schedule Maintenance from the Utilities
menu, select a Fee Schedule, then click Print Schedule .
See more on Report Printing Options
Copyright © 1998-2006 Technology Solutions, Inc. All rights reserved.
48
Reports and Printing
INTELICODE® is a registered trademark of Technology Solutions, Inc. (TSI). All Rights
Reserved.
Modifier Listing
To print a listing of Modifiers choose Modifier Codes Maintenance from the Utilities
menu, then click Print List Of Modifiers and choose your Printing Options.
See more on Report Printing Options
Copyright © 1998-2006 Technology Solutions, Inc. All rights reserved.
INTELICODE® is a registered trademark of Technology Solutions, Inc. (TSI). All Rights
Reserved.
Note Macro Listing
To print a list of your Note Macros click Print Note Macro List in Note Macro
Maintenance.
See more on Report Printing Options
49
Intelicode User's Manual Version 8
Copyright © 1998-2006 Technology Solutions, Inc. All rights reserved.
INTELICODE® is a registered trademark of Technology Solutions, Inc. (TSI). All Rights
Reserved.
Patient Listing
To print a list of your Patients click Print List of Patients in Patient Maintenance.
See more on Report Printing Options
50
Reports and Printing
Copyright © 1998-2006 Technology Solutions, Inc. All rights reserved.
INTELICODE® is a registered trademark of Technology Solutions, Inc. (TSI). All Rights
Reserved.
Provider Listing
To print a list of Providers click Print List of Providers in Provider Maintenance.
See more on Report Printing Options
51
Intelicode User's Manual Version 8
Copyright © 1998-2006 Technology Solutions, Inc. All rights reserved.
INTELICODE® is a registered trademark of Technology Solutions, Inc. (TSI). All Rights
Reserved.
Requester Listing
To print a list of Requesting Providers click Print List of Requesting Providers in
Requesting Provider Maintenance.
See more on Report Printing Options
52
Reports and Printing
Copyright © 1998-2006 Technology Solutions, Inc. All rights reserved.
INTELICODE® is a registered trademark of Technology Solutions, Inc. (TSI). All Rights
Reserved.
Resident Listing
To print a list of Providers click Print List of Residents in Resident Maintenance.
See more on Report Printing Options
53
Intelicode User's Manual Version 8
Copyright © 1998-2006 Technology Solutions, Inc. All rights reserved.
INTELICODE® is a registered trademark of Technology Solutions, Inc. (TSI). All Rights
Reserved.
User Listing
To print a list of your Patients click Print List of Users in User Maintenance.
See more on Report Printing Options
54
Reports and Printing
Copyright © 1998-2006 Technology Solutions, Inc. All rights reserved.
INTELICODE® is a registered trademark of Technology Solutions, Inc. (TSI). All Rights
Reserved.
Retrieving Saved Reports
Intelicode gives the user the ability to save reports in different formats (i.e. Word, Excel,
PDF). You can access your saved reports by going to the File drop down menu (located at
the top of the page) and select Retrieve Saved Reports.
An “Open” pop-up window will appear. Select the file name containing your saved reports
and click the Open button, or double click the file name.
55
Intelicode User's Manual Version 8
NOTE: The "Open" dialog's default "Files of Type" looks for Word™ Doc files. Choose "All Files" to see
all types of files (i.e. Excel™ and Acrobat™ PDF).
Copyright © 1998-2006 Technology Solutions, Inc. All rights reserved.
INTELICODE® is a registered trademark of Technology Solutions, Inc. (TSI). All Rights
Reserved.
56
Maintenance
Utilities Menu
The Utilities menu is where you go to choose the various maintenance forms. In this latest
version of Intelicode "Enter Codes by Description" and "Require Consult Verification"
have been moved to the Preferences Menu.
Copyright © 1998-2006 Technology Solutions, Inc. All rights reserved.
INTELICODE® is a registered trademark of Technology Solutions, Inc. (TSI). All Rights
Reserved.
Patient Maintenance
You can enter patient information on the Patient Screen or you can enter it here. You can
get to Patient Maintenance by clicking on the Patient ID button, or choosing Patient
Maintenance from the Utilities Menu.
57
Intelicode User's Manual Version 8
Copyright © 1998-2006 Technology Solutions, Inc. All rights reserved.
INTELICODE® is a registered trademark of Technology Solutions, Inc. (TSI). All Rights
Reserved.
Provider Maintenance
To add a new Provider, choose "--Add New Provider--" from the Attending Provider dropdown list on the Patient screen or choosing Provider Maintenance from the Utilities menu.
The only required fields are: ID Number, Last Name, and First Name. If you wish to run
reports based on Specialty then you should assign a Specialty to the Provider. The Default
Exam Type will allow you to have the same Exam template loaded each time you audit that
provider. Default Fee Schedule works the same way.
58
Maintenance
NOTE: If you don't choose a Default Exam type your exam will default to the General Multi-System
(97). However, you can choose any exam during an audit.
Copyright © 1998-2006 Technology Solutions, Inc. All rights reserved.
INTELICODE® is a registered trademark of Technology Solutions, Inc. (TSI). All Rights
Reserved.
Resident Maintenance (P.A.T.H. only)
To add a new Resident, choose "--Add New Resident--" from the Attending Resident dropdown list on the Teaching screen or choosing Resident Maintenance from the Utilities
menu. The required fields are: ID Number, Last Name, and First Name.
59
Intelicode User's Manual Version 8
Specialty Maintenance
If you choose to enter and maintain your own Specialties choose Specialties Maintenance
from the Utilities menu.
60
Maintenance
Copyright © 1998-2006 Technology Solutions, Inc. All rights reserved.
INTELICODE® is a registered trademark of Technology Solutions, Inc. (TSI). All Rights
Reserved.
User Maintenance
Intelicode requires you to be logged in as a user. When setting yourself up as a user you
need to assign a User ID which can be any number of your choosing. We also suggest
having a password.
61
Intelicode User's Manual Version 8
Copyright © 1998-2006 Technology Solutions, Inc. All rights reserved.
INTELICODE® is a registered trademark of Technology Solutions, Inc. (TSI). All Rights
Reserved.
Modifier Codes Maintenance
If you choose to enter and maintain your own Modifiers you can do it from the
Utilities/Modifier Code Maintenance menu.
62
Maintenance
Copyright © 1998-2006 Technology Solutions, Inc. All rights reserved.
INTELICODE® is a registered trademark of Technology Solutions, Inc. (TSI). All Rights
Reserved.
Requesting Provider Maintenance
To add a new Requesting Provider, choose "--Add New Requester--" from the Requesting
Provider drop-down list on the Patient screen or choosing Requesting Provider
Maintenance from the Utilities menu. The only required fields are: ID Number, Last
Name, and First Name.
63
Intelicode User's Manual Version 8
Copyright © 1998-2006 Technology Solutions, Inc. All rights reserved.
INTELICODE® is a registered trademark of Technology Solutions, Inc. (TSI). All Rights
Reserved.
64
Managing Your Data
Archiving Data
Performance slows as your database grows. Because of this fact, we have designed
Intelicode so that it will support multiple databases. We highly recommend that you
formulate a plan for how you want your data organized. To make this point, think of a file
cabinet: Most of us store our documents in individual file folders, rather than lumping them
all into a single drawer. Intelicode enables you to manage your databases in the same
manner. For example, if you have multiple sites you would want to create an
"Office/Department" for each one. If you have multiple departments (i.e., Department of
Medicine, Pediatrics, Family Practice, Surgery, etc.) you would want to create and
"Office/Department" for each of those. Each Offices/Department will hold Providers, Users,
Patients, Note Macros, Visits, etc. However, you can copy everything except Visits from one
Office/Department to another, or several at the same time.
This is also useful if you wish to archive your data at the end of each year. For example:
Say you have a clinic named "Cardiology North". To archive your data you would create a
new Office named "Cardiology North 06" for the new year. Next, you would copy your
Users, Providers, Patients, Fee Schedules, etc. See more on copying data
Copyright © 1998-2006 Technology Solutions, Inc. All rights reserved.
INTELICODE® is a registered trademark of Technology Solutions, Inc. (TSI). All Rights
Reserved.
Copying and Sending From Office to Office (Pro and P.A.T.H. only)
Intelicode gives you the ability to "Send" or "Copy" various things from office to office (i.e.,
Note Macro , Diagnosis Codes, Patients, Providers, etc.).
You can send certain "selected" items (i.e.,
at least one, but not all) items to another office, or multiple offices at once. If you choose
this button with no items selected, it will send the entire list. NOTE: If you have any items
selected, you will be asked if you want to send just the selected items or all the items.
When "Copying" from another Office, all
records from that table (i.e. all Diagnosis codes for example) will be copied from the other
Office/Department.
Copyright © 1998-2006 Technology Solutions, Inc. All rights reserved.
INTELICODE® is a registered trademark of Technology Solutions, Inc. (TSI). All Rights
Reserved.
Editing or Changing an Office Name
65
Intelicode User's Manual Version 8
There are a number of reasons why you might want to change the name of an office
(database). Maybe you wish to archive your data from a particular year, much like you
would with files in your office. In our example we have decided to rename "Spine Clinic" to
"Spine Clinic 06".
Copyright © 1998-2006 Technology Solutions, Inc. All rights reserved.
INTELICODE® is a registered trademark of Technology Solutions, Inc. (TSI). All Rights
Reserved.
Creating Multiple Offices/Departments/Sites
There are many reasons for creating and maintaining multiple Offices. We need to look at
our Intelicode data in much the same way as we would a file cabinet. Good filing practices
make finding and managing information easier. In addition to "breaking up data" into
smaller manageable pieces, databases lose performance as they grow in size (particularly
with Access databases). For this reason, we create multiple databases. We might create
one for each Clinic, Site, Department (i.e Department of Medicine, Surgery, etc.), or by
client. We might also create a new "Office" for each year, quarter, or month, depending on
how much data. You have a great deal of flexibility. The second field will be the “Data
66
Managing Your Data
Name and Location” field. The Intelicode program will default to storing your audit data on
the hard drive (C:\ProgramFiles\Intelicode\Applications\Data\Offices) of your computer. If
you wish to have your data stored elsewhere (e.g. a network drive) contact your
Information Services (IS) department for assistance in determining where data storage
should be located.
Copyright © 1998-2006 Technology Solutions, Inc. All rights reserved.
INTELICODE® is a registered trademark of Technology Solutions, Inc. (TSI). All Rights
Reserved.
67
Advanced Tips
Shortcuts
This topic is for any tips, tricks, or shortcuts you may want to familiarize yourself with.
Hopefully you will find useful ways to accomplish tasks that can help increase productivity
with our product. Please feel free to contact us at 800-786-4231 and we will be happy to
do a walk-through to show you helpful tips.
Quickly calculate a level of service.
If you simply want to calculate a level of service, you only need a Patient ID,
Status, Gender, and Service Type. When you get to the End, simply click
Finish, then Clear All Screens and Don't Save.
Keeping your offices updated with, Note Macros, etc..
Each time you enter a new Note Macro, Provider, or other item that you wish to
have included in your other offices, simply select the new item or items (in this
case, Diagnosis Code) and click the Send to Other Office, button, choose your
other office or offices and hit OK.
A quick way of getting into your program
Intelicode highlights the last Office/Department that you were in. It also
highlights the last user. When you start the program and assuming you wish to
go into the previous office, you can simply click "Enter" on your keyboard. If your
user has no password, again click "Enter" and it will open up your office.
Save multiple Encounters into one report.
You can combine multiple encounters into one report by selecting multiple
encounters (by selecting and holding your CTRL key while selecting each
encounter). Then you choose Print Selected and save to PDF. Give the report a
name that will correspond the Encounters (i.e Office Name - Provider - Date
range). This will combine all encounters into one report!.
Choose the columns you wish to display in Visit Summaries.
You can "right-click" in the Visit Summaries grid and choose See video
Advanced Report Filtering
If you want to filter certain items in a report, there are a few solutions. First, you
can use the note macros to filter out certain criteria. For example, if you had
added a legibility issue to several encounters. Then in the visit summaries screen
you can select legibility in the note macros drop down box to see all the
encounters that had a legibility problem. Second, you can sort by custom
specialties if you want. For example, lets say you wanted to see all the First
Year Residents. To do this we need to add a new specialty in the Specialty
Maintenance screen and call it First Year Resident. Then we go into the
Provider Maintenance screen and select our provider and select First Year
Resident in the Specialty drop down box. Click Save. Open the Visit Summaries
screen and in the Specialty drop down box select First Year Resident. This will
show all of the Providers that have the First Year Resident Specialty therefor
showing all of the First Year Residents. Please call us if you have a unique
filtering criteria and need some assistance.
69
Contacting
Corporate Headquarters
We are committed to providing not only the number one auditing software, but the customer
service and support to go along with it.
Address:
Technology Solutions, Inc.
P.O. Box 758
Waterloo, Indiana 46793
USA
Telephone:
260.837.8200
800.786.4231
Fax:
260.837.9090
World Wide Web:
www.intelicode.com
Office Hours:
Monday to Friday
9 am to 5 pm Eastern Standard Time
End-user License Agreement for INTELICODE®
IMPORTANT -- READ CAREFULLY: This End-User License Agreement ("Agreement") is a
legal contract between you (either an individual or a single business entity) and Technology
Solutions, Inc., d/b/a TSI, for the software product identified above, which includes
computer software and, as applicable, associated media, printed materials, and "online" or
electronic documentation (hereinafter the "Software Application").
BY CLICKING THE ACCEPTED ICON BELOW, OR BY INSTALLING, COPYING, OR OTHERWISE
USING THE SOFTWARE APPLICATION, YOU AGREE TO BE BOUND BY THE TERMS OF THIS
AGREEMENT, INCLUDING THE WARRANTY DISCLAIMERS, LIMITATIONS OF LIABILITY AND
TERMINATION PROVISIONS BELOW. IF YOU DO NOT AGREE TO THE TERMS OF THIS
AGREEMENT, DO NOT INSTALL OR USE THE SOFTWARE APPLICATION, AND EXIT NOW.
LICENSE TERMS
Following acceptance of this Agreement, you may install and execute and use one (1)
registered copy of the Software Application. If you are installing this Software Application
for the thirty (30) day trial period, your license to use this Software Application expressly
expires thirty (30) days from the date of installation. If you have purchased a fully licensed
version of the Software Application, or agree to purchase a fully licensed version of the
Software Application after the expiration of the trial period, TSI hereby expressly grants you
a one-year license to use the Software Application, subject to the terms and conditions
contained herein. If you already purchased a one-year license, you are entitled to receive a
full refund of any payment made for the Software Application by so requesting and returning
any media and materials to TSI within fifteen (15) days after the date of payment. In the
event you request a refund, you agree to destroy all copies of the Software Application and
all of its component parts, and TSI may suspend or deactivate your use of the Software
Application with or without notice.
71
Intelicode User's Manual Version 8
TSI does not render any medical or legal advice in support of the use of the Software
Application and any use thereof is understood to be done under the sole control,
determination, and responsibility of the medical staff and/or physician using the Software
Application. It is the user's full responsibility to have a working knowledge of the
Documentation Guidelines and CPT. Furthermore, the user assumes full responsibility for
the accuracy of the input of data and any subsequent output of data from the Software
Application based on the inputted data.
It is understood that the user will keep current with respect to any changes in the CMS/AMA
guidelines and is responsible for any and all data inputted and generated using the Software
Application. TSI will use its best efforts to furnish updates to the product within a
reasonable period of time to address such changes in the HCFA/AMA guidelines.
Use on a PC. You may install the single registered copy on one hard disk or other storage
device for one computer, and you may access and use the Software Application at that
location so long as only one copy of the Software Application is in operation. If you are a
private business rather than an individual, you may authorize the personnel associated with
your business to use the Software Application, but only one person at a time, on one
computer at a time. The primary user of the computer on which the Software Application is
installed may make a second copy for his or her exclusive use on a backup or portable
computer, so long as each registered copy of the Software Application is used on only one
computer at a time.
Use on a Network. You may store, install and access the registered version of the Software
Application through an internal network, provided that you must obtain and pay for a license
for each workstation that will access the Software Application through the network. For
example, if 5 different workstations will access the Software Application on the network,
each workstation must have its own paid-up license, regardless of whether the workstations
use the Software Application at different times or concurrently.
OTHER LIMITATIONS
You may not rent, lease or lend the Software Application. You may not reverse engineer,
decompile, or disassemble the Software Application, except and only to the extent that such
activity is expressly permitted by applicable law notwithstanding this limitation.
TSI may provide you with support services related to the Software Application ("Support
Services"). Use of Support Services is governed by TSI policies and programs described in
the user manual, in "online" documentation, and/or in other provided materials. Any
supplemental software code provided to you as part of the Support Services shall be
considered part of the Software Application and subject to the terms and conditions of this
Agreement. With respect to technical information you provide to TSI as part of the
registration of your license to the Software Application or in connection with the Support
Services, TSI may use such information for its business purposes, including for product
support and development.
You may permanently transfer all of your rights under this Agreement, provided that you
retain no copies, you transfer all of the Software Application (including all component parts,
the media and printed materials, any upgrades and your registration), and the recipient
expressly agrees to the terms of this Agreement.
Without prejudice to any other rights, TSI may terminate this Agreement if you fail to
comply with the terms and conditions of this Agreement. In such event, you must destroy
all copies of the Software Application and all of its component parts, and TSI may suspend
or deactivate your use of the Software Application with or without notice.
GOVERNING LAW
This Agreement shall be governed by the laws of the State of Indiana
PROPRIETARY RIGHTS
Copyright. All title and copyrights in and to the Software Application (including, without
limitation, any images, photographs, animations, video, audio, music, text, and "applets"
incorporated into the Software Application), any accompanying media and printed materials,
and any copies of the Software Product are owned by TSI. The Software Application is
72
Contacting
protected by copyright laws and international treaty provisions. Therefore, you must treat
the Software Application like any other copyrighted material, subject to the provisions of this
Agreement.
Submissions. Should you decide to transmit to TSI by any means or by any media any
materials or other information (including, without limitation, ideas, concepts or techniques
for new or improved services and products associated with the Software Application),
whether as information, feedback, data, questions, comments, suggestions or the like, you
agree such submissions are unrestricted and shall be deemed non-confidential and you
automatically grant TSI and its assigns a non-exclusive, royalty-free, worldwide, perpetual,
irrevocable license, with the right to sublicense, to use, copy, transmit, distribute, create
derivative works of, display and perform the same.
DISCLAIMER OF WARRANTY
THIS SOFTWARE AND THE ACCOMPANYING FILES ARE PROVIDED "AS IS." TSI DOES NOT
AND CANNOT WARRANT THE PERFORMANCE OR RESULTS YOU MAY OBTAIN BY USING THE
SOFTWARE OR SUCH FILES. TSI MAKES NO WARRANTIES, EXPRESS OR IMPLIED, AS TO
MERCHANTABILITY OR FITNESS FOR ANY PARTICULAR PURPOSE.
Good data processing procedure dictates that any program be thoroughly tested with noncritical data before relying on it. The user must assume the entire risk of using the Software
Application. ANY LIABILITY OF TSI FOR A DEFECTIVE COPY OF THE SOFTWARE
APPLICATION WILL BE LIMITED EXCLUSIVELY TO REPLACEMENT OF YOUR COPY OF THE
SOFTWARE APPLICATION WITH ANOTHER COPY OR REFUND OF THE INITIAL LICENSE FEE
TSI RECEIVED FROM YOU FOR THE DEFECTIVE COPY OF THE PRODUCT. IN NO EVENT WILL
TSI BE LIABLE TO YOU FOR ANY CONSEQUENTIAL, INCIDENTAL OR SPECIAL DAMAGES,
INCLUDING ANY LOST PROFITS OR LOST SAVINGS, EVEN IF TSI OR ANY OF ITS
REPRESENTATIVES HAS BEEN ADVISED OF THE POSSIBILITY OF SUCH DAMAGES, OR FOR
ANY CLAIM BY ANY THIRD PARTY.
Sales
Contact us for information about the latest products and services.
Phone:
1.800.786.4231
Fax:
1.260.837.9090
World Wide Web:
www.intelicode.com
Email:
[email protected]
Office hours:
9am to 5pm Eastern Daylight Time
Technical Support
Your annual license includes unlimited technical support. You may contact us via phone,
fax, email, or web. Please have the following information to help better serve your needs:
•
Locate your product serial number. This is found under the Help/About Intelicode
menu.
73
Intelicode User's Manual Version 8
•
Determine your operating system version. All of the pertinent information about
your computer can be found by choosing Help/About Intelicode then choosing
System Information.
•
Find the version of INTELICODE in the by choosing Help/About Intelicode.
Having these pieces of information available will help our support person better diagnose
any problem you may be experiencing.
Phone:
1-800-786-4231
Fax:
1.260.837.9090
Email:
[email protected]
Office hours:
9am to 5pm Eastern Daylight Time
74
Troubleshooting
Common Problems
•
•
Problem: "I don't get a code, and I have History, Exam, and MDM" What's wrong?
•
Possible Cause: Make sure that you choose the appropriate Sub Category
(i.e. Initial Visit) along with the Service Category (i.e. Office or other
Outpatient)
•
Possible Cause: If you are auditing a "time based code" (i.e Preventative
Medicine codes) make sure that you choose the "face to face" time on the
"End Screen"
•
Possible Cause: Make sure that you have enough documentation to
support the level that you think it should be. A common one that we see is
Initial Hospital Care 99221 which requires a detailed or comprehensive
history; a detailed or comprehensive examination; and medical
decision making that is straightforward or of low complexity. Make
sure to check that there is adequate levels of History, Exam, and MDM.
Intelicode will not calculate a "Reviewer E&M" unless the requirements are
met.
•
Possible Cause: If you are auditing an "age based code" make sure that
you have the Date of Birth field completed.
Problem: Intelicode is not calculating a "Variance".
•
•
Possible Cause: In most cases, Intelicode will calculate a Variance when
the "Reviewer E&M" and the "Provider E&M" are part of the same "Service
Category (i.e. Office or other Outpatient). In most situations where the
Service Categories don't match Intelicode will calculate a "wrong category"
(wc). Occasionally, Intelicode will not calculate either. It would take far too
much space to try to explain the technical reasoning behind it here. Simply
know that in the occasional times that a variance or "wc" is not calculated
you can select a variance of your choosing.
Problem: My totals don't seem to be correct. In other words, the Total
Overbilled/Underbilled numbers don't seem to match the Variances and dollar
differences.
•
Possible Cause: There are a couple of things that will effect your totals:
Sometimes we will see instances where a fee has been entered incorrectly
for one of the codes being compared. For example: The Reviewer code is a
99203 and the Provider code is a 99205. This will show a variance of +2
which will be added to the Overcoded totals. However, if the fee was
entered incorrectly for either one of these the dollar difference could show a
negative amount thus adding that to the Underbilled totals. This would have
a cancelling out effect.
•
Example: Sometimes fees are not entered for a particular set of
codes. In the example above, lets assume that the Provider code
was a Preventative code fees were never entered into the fee
schedule for Preventative codes. The 99203 would have a fee
assigned to it, let's say $80 and the provider billed a 99396 which
had no fee assigned to it. This would show a negative difference
which would be added to the Underbilled totals. If the reviewer
assigned a positive variance (because this typically has a fee of $95)
75
Intelicode User's Manual Version 8
to indicate that the provider had overbilled then that would create
conflicting totals.
•
Problem: I cannot find the Critical Care Codes (99291x99292x1, etc..) in the fee
schedule list
•
76
Possible Cause: The Critical Care Codes are further down in the fee
schedule list. Just keep scrolling down and you will find them.
Index
A
A Tour of Intelicode ............................ 31
Adobe Acrobat ..................................... 7
L
Last Name........................................... 9
M
Advanced tips and tricks...................... 81
Male ................................................... 9
Archiving Data ................................... 77
Modifier Codes Maintenance ................. 74
B
Basic features ...................................... 3
Basic steps .......................................... 9
C
Changing
Offices/Departments ........................ 13
Modifier Listing................................... 59
Multiple Offices/Departments/Sites ....... 78
N
Note Macro Listing .............................. 60
Note Macros .................................. 3, 39
O
Changing .......................................... 13
Office ..........................................10, 13
Choose
Office/Department .............................. 77
Choose/Create/Change..................... 13
Offices/Departments menu .................. 13
CMS ................................................... 3
Opening projects ................................ 13
Copying and Sending From Office to Office
..................................................... 77
Patient Listing .................................... 61
Corporate Headquarters ...................... 83
Patient Maintenance............................ 69
Create New Office............................... 13
Printing............................................. 57
Custom Audit Summary Reports ........... 45
Printing from Visit Summaries .............. 57
D
Decision - Amount/Complexity of Data .. 36
Decision - Diagnosis/Managment Options35
E
P
Provider Listing .................................. 62
Provider Maintenance .......................... 70
R
Registering .......................................... 7
Editing or Changing an Office Name ...... 77
Report options ................................... 57
encounter ......................................... 49
Reports Menu .................................... 57
End Screen........................................ 37
Requester Listing................................ 63
End-user License Agreement ................ 83
Requester Maintenance ....................... 75
Exam Screen ..................................... 34
Resident............................................ 71
F
Resident Listing.................................. 64
FAQ.................................................. 15
Retrieve Saved Reports ....................... 66
Fee Schedule Report ........................... 58
Reviewer ............................................. 9
File Menu .......................................... 43
Risk - Diagnostic Procedures ................ 36
G
Getting Help ...................................... 15
Guidelines ........................................... 3
H
History.......................................... 9, 33
I
Installing............................................. 7
Issues and Recommendations Report .... 53
Risk - Management Options ................. 37
Risk - Presenting Problems .................. 36
Running Tally....................................... 3
S
Sales ................................................ 85
Send Data ........................................... 3
Send Patients....................................... 3
Service Category .................................. 9
77
Intelicode User's Manual Version 8
Service Type........................................ 9
Specialty Maintenance......................... 72
Utilities Menu ..................................... 69
V
Start menu.......................................... 7
Variance.............................................. 9
System Requirements ........................... 7
Verification .......................................... 9
T
Visit Date ............................................ 9
Teaching Screen................................. 37
Visit Summaries ................................. 41
Technical Support............................... 85
Visit Summaries Archive ...................... 42
Troubleshooting ................................. 87
U
W
walk through ..................................... 17
Unregistered........................................ 7
Website ............................................ 15
User ................................................... 9
Welcome ............................................. 1
User Listing ....................................... 65
What's New ......................................... 5
User Maintenance ............................... 73
78