1
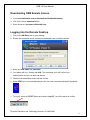
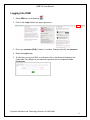
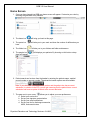
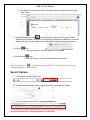
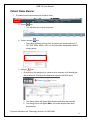
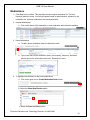
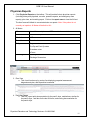
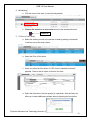
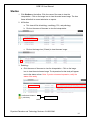
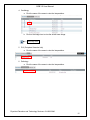
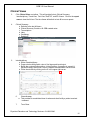
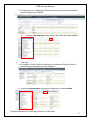
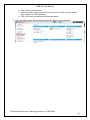
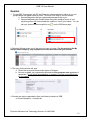
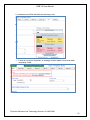
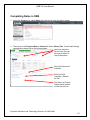
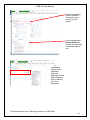
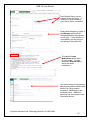
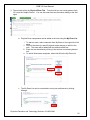
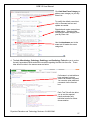
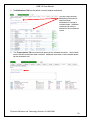
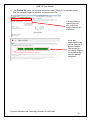
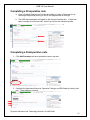
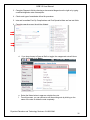
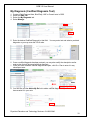
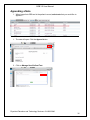
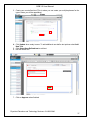
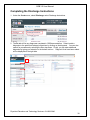
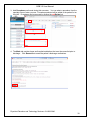
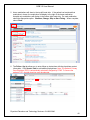
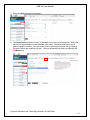
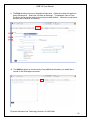
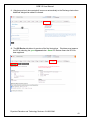
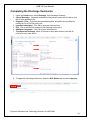
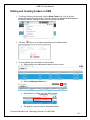
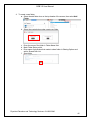
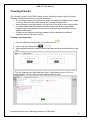
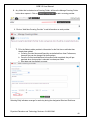
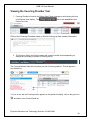
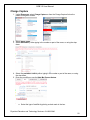
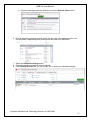
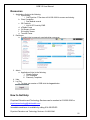
ORB 3.0 User Manual ORB 3.0 User Manual Physician Education and Technology Services- 614-566-3646 1 ORB 3.0 User Manual Table of Contents Downloading ORB For Remote Access .......................................................................... 3 Logging into the Remote Desktop ................................................................................... 3 Logging Into ORB ............................................................................................................ 4 Home Screen .................................................................................................................. 5 Search Options ............................................................................................................... 7 Patient Name Banner ...................................................................................................... 8 Patient Profile .................................................................................................................. 9 Current Orders ................................................................................................................ 9 Medications ................................................................................................................... 10 Physician Reports ......................................................................................................... 11 Labs .............................................................................................................................. 12 Studies .......................................................................................................................... 14 Clinical Views ................................................................................................................ 16 Medical Records ........................................................................................................... 19 Queries.......................................................................................................................... 21 Completing Notes in ORB ............................................................................................. 23 Completing a Preoperative note .................................................................................... 31 Completing a Postoperative note .................................................................................. 31 My Diagnosis (Codified Diagnosis Tool)........................................................................ 33 Appending a Note ......................................................................................................... 36 Completing the Discharge Instructions .......................................................................... 38 Completing the Discharge Summaries .......................................................................... 44 Editing and Creating Folders in ORB ............................................................................ 45 Covering Provider.......................................................................................................... 47 Viewing the Covering Provider Tool .............................................................................. 49 Charge Capture ............................................................................................................. 50 Resources ..................................................................................................................... 52 How to Get Help ............................................................................................................ 52 Physician Education and Technology Services- 614-566-3646 2 ORB 3.0 User Manual Downloading ORB Remote Access 1. Go to news.ohiohealth.com to download the OhioHealth desktop. 2. Click on the Green download button. 3. Enter the server: ohconnect.ohiohealth.com Logging into the Remote Desktop 1. Click on the VM Ware icon on your desktop. 2. Ensure the connection server is ohconnect.ohiohealth.com and select connect 3. Enter your user name and password. 4. Your phone will ring. Answer and hit #. The automated voice will confirm your authentication and you can then end the call. 5. The blue remote desktop screen will start to load. 6. Select ORB icon on remote desktop and enter your user name and password if prompted. 7. To log off, select the START button and choose Log Off. You will be asked to confirm. Physician Education and Technology Services- 614-566-3646 3 ORB 3.0 User Manual Logging Into ORB 1. Select ORB icon on the desktop. 2. Click on the Login button in the upper right corner. 3. Enter your username (OPID) (3 letters, 3 numbers, Example: abc123) and password. 4. Select the Login button. 5. The first time you log into ORB, you will need to fill out the Electronic Signature with Credentials. Any changes to your electronic signature can be completed in User Preferences. Physician Education and Technology Services- 614-566-3646 4 ORB 3.0 User Manual Home Screen 1. Once you have logged into ORB your home screen will appear. Customize your view by selecting the gear next to My Patients. 2. The home icon will bring you back to this page. 3. The quote icon have. will take you to your work and show the number of deficiencies you 4. The folder icon will take you to your folders and folder maintenance. 5. The people icon down will appear. will displays your patients. By hovering on this button a drop 6. Patient search can be done from the header by entering the patients name, medical record number or account number. The advanced search options are still available. Note: If you search on an older account number and the patient also has a current admission (in a bed or in the ED), you will get a warning that the patient has a current admission and have an option to switch to the current admission. 7. The gear next to your name allows you to adjust your user preferences. a. Select your service line b. Set up your signature customization c. Set up your email notifications d. Set up your fax for discharge summaries, H&Ps, and consult notes. Physician Education and Technology Services- 614-566-3646 5 ORB 3.0 User Manual 8. My patients a. This is your default patient list. i. To set up a default patient list: 1. Select My Folders 2. Select the folder you wish to be your default census 3. Select the marker next to My Folders 4. Select the green Select Default button b. From the patient list the New button represents a new patient that does not have ORB documentation completed by you. c. Select the gear to set preferences such as empty beds, Charge Capture icon, surgery times, report preferences (double space, sign out memos, etc.) and customizing the columns for the Sign-Out View 9. My Work a. This section contains items that require action such as: i. Medical record deficiencies ii. Signatures needed on ORB notes and unsigned orders iii. CDI queries or review iv. Draft notes v. Pharmacy queries b. Click on the line to process item 10. Fax Status Physician Education and Technology Services- 614-566-3646 6 ORB 3.0 User Manual a. By clicking on fax status, a screen will appear with a list of all faxes sent in the past 5 days 11. Patient Management folder icon will attach the patient to your census, folders, watch list and/or detach the patient. Once a patient is attached or detached, a popup will appear letting you know the patient was either added or detached from your census. 12. Printer icon i. View reports sign out memos, patient list, facesheets 13. Paper/Pencil icon i. Batch print/view of the Pre-Anesthesia Evaluation eForm Note: The Help button is available throughout ORB 3. Click on the Help button to get information about the current section. Search Options 1. Click inside the Patient Search box. 2. Using the Advance search option, type in the patient name and click Search 3. From the search results, click on the patient’s name link. Physician Education and Technology Services- 614-566-3646 7 ORB 3.0 User Manual Patient Name Banner 1. The patient name banner has quick reference icons. a. History icon i. This will show you a list of encounters b. Patient indicator icon i. The patient indicator will turn red if the patient has tested positive for C. Diff, CRE, ESBL, MRSA, VRE or if they have been designated a difficult airway patient. c. Allergies icon i. By clicking on the allergies icon, shows a quick summary of all the allergies with a detail link. Clicking on the details link show the full PDR report. ii. The Allergy button will appear A! if allergies have been documented. iii. The allergy button will appear NKA if no known allergies have been documented. Physician Education and Technology Services- 614-566-3646 8 ORB 3.0 User Manual iv. The allergy button will appear A? if no allergies are documented. d. Sign-out Memo icon i. Provides basic patient information and will be visible once a patient is admitted and until 72 hours post-discharge. ii. Data entered in the same fields as progress notes will automatically appear in the Sign-Out Tools. Data in both places is presented based on patient selected and user's service line. The shared fields include: To do This was previously known as the "Sign-out Memo". It is shared with progress notes. Reason for admission This data is shared with progress notes. Perpetual assessment This data is shared with progress notes. Disposition e. Mom Baby This data is shared with progress notes. icon i. This allows the toggle between mother and infant Patient Profile 1. Click Patient Profile on the toolbar. This link takes you to a list of all OhioHealth encounters. 2. Clicking on an encounter will display the facesheet for the encounter. Current Orders 1. Click Orders on the toolbar. This link takes you to McKesson Physician Portal to view current orders. Physician Education and Technology Services- 614-566-3646 9 ORB 3.0 User Manual Medications 1. Click Meds on the toolbar. This populates current hospital medication list. The time frame will default to today. You can pull reports based on administration, schedule or the medication list. All home medications are documented here. 2. Hospital Medications a. Click on the name of the medication to view medication administration schedule. 3. Home Medications a. To add a home medication select the black plus mark b. Type in the name of the medication, dose, form quantity, frequency, last taken, and the source the information came from. Remember to save. 4. To highlight beta blockers on the home medications: a. Click on the gear next to Create Medication Order button. b. Select the Show Beta Blocker option. c. Select the Save and Close button. Physician Education and Technology Services- 614-566-3646 10 ORB 3.0 User Manual Physician Reports 1. Click Physician Reports on the toolbar. This will provide links to physician reports (including history and physicals, consults, operative reports, and emergency room reports), plan view, and rounding report. Click on the report name to view the full text. The time frame will default to current admission on reports. Note: if the patient is not currently an inpatient, All Notes will default to ALL. 2. All Notes All List of all transcriptions and ORB created documentation. ED List of all ED reports from OhioHealth facilities. Admission H&P Consult Consult notes Daily Progress notes Pre-Op and Post-Op notes Procedure notes eForms Discharge Discharge Instructions Discharge Summaries 3. Plan View a. This view is broken up by service line displaying perpetual assessment, diagnosis and plan, and disposition/comments. 4. Rounding Report a. This PDF report pulls documentation for the past 2 days, medications, studies for the past 2 days, and labs for the last 24 hours, and nursing documentation for the past 4 days. Physician Education and Technology Services- 614-566-3646 11 ORB 3.0 User Manual Labs 1. Click Labs on the toolbar. Use the Search functionality to find a specific test. The time frame will default to current admission on labs. Note: The drop down list has all tests that have been completed on the patient. 2. All Labs a. Click on the name of the test to view the reported result. b. Click on the trend icon to view serial values for the selected lab result. Trend Icon c. Quick View- Click the quick link to open pop up a window with a hover feature. 3. Results View a. This filtered view gives the ability to view and trend analytes. Physician Education and Technology Services- 614-566-3646 12 ORB 3.0 User Manual 4. Microbiology a. Click the name of the exam to view the interpretation b. Click on the trend icon to view serial values for the selected lab result. Trend Icon 5. To Print or Fax a study. a. Select the studies you wish to be printed or faxed by placing a checkmark in the box next to the study’s name. b. Select the Print or Fax button c. When you select the Print button. A PDF of all the selected studies will populate. There is also an option to fax from this view. d. Select the fax button to fax the report(s) to a physician. Send and stay will allow you to enter additional providers without reopening the fax window. Physician Education and Technology Services- 614-566-3646 13 ORB 3.0 User Manual Studies 1. Click Studies on the toolbar. Click the name of the exam to view the interpretation. Click on the image icon to view the actual exam image. The time frame will default to current admission on reports. 2. All Studies a. This view will list all radiology, cardiology, PVL, and pathology. b. Click on the name of the exam to view the interpretation. c. Click on the image icon (if listed) to view the exam image. 3. Radiology a. Click the name of the exam to view the interpretation. Click on the image icon to view the actual exam image. The impression for that study will appear next to the status column. Note: if you do not see an impression, verify the status of the study. =verified and dictated = preliminary View Image Icons Physician Education and Technology Services- 614-566-3646 14 ORB 3.0 User Manual 4. Cardiology a. Click the name of the exam to view the interpretation. b. Click on the image icon to view the actual exam image. View Image Icons 5. PVL (Peripheral Vascular Lab) a. Click the name of the exam to view the interpretation. 6. Pathology a. Click the name of the exam to view the interpretation. Physician Education and Technology Services- 614-566-3646 15 ORB 3.0 User Manual Clinical Views 3. Click Clinical Views on toolbar. This will provide links to Clinical Summary, Interdisciplinary, Trend View, Text View, EmSTAT, and ED Viewer. Click on the report name to view the full text. The time frame will default to last 48 hours on reports. 4. Clinical Summary a. Defaults to the last 48 hours b. Clinical Summary Contains: All ORB created notes c. Transcriptions d. Labs e. Cardiology f. Radiology 5. Interdisciplinary a. Select Interdisciplinary b. Popup window with graphic view of vital signs and input/output. c. Below the nursing documentation, clinical nutrition, occupational, speech & physical therapy, social work, wound, Hospice documentation can be found. d. Close the window by clicking on the X in the upper right corner. 6. 7. Chemotherapy a. This provides a consolidated view for when and what facility a patient received treatment. Trend View Physician Education and Technology Services- 614-566-3646 16 ORB 3.0 User Manual a. This link takes you to McKesson Physician Portal to view clinical documentation from Care Organizer and MUSE. b. 8. Select the documentation type from the drop down and select refresh. Text View a. By clicking on Trend View this link takes you to McKesson Physician Portal to view clinical documentation from care Organizer b. Select the documentation type from the drop down and select refresh. Physician Education and Technology Services- 614-566-3646 17 ORB 3.0 User Manual c. Select the Edit button to modify the default flow sheet at all campuses under Display Options. d. Once updated click Save at the bottom of the page. The newly selected default flow sheets will be displayed for subsequent logins. 9. EmSTAT a. EmSTAT is a link into the emergency room documentation system from Westerville, Riverside and Grant. b. If you need access please call 614-566-HELP (4357) 10. ED Viewer a. Provides a link to Horizon Emergency Care documentation from Dublin and Doctors Hospital. Physician Education and Technology Services- 614-566-3646 18 ORB 3.0 User Manual Medical Records 1. Click Medical Record on the toolbar. This link takes you to McKesson Medical Records Portal to view the entire patient’s current and past legal medical record. Select the back to ORB link to return to ORB. 2. Once selected, from the left side of the screen, you can select to view a patient’s medical record grouped by either encounter or document type. 3. To bookmark a document: a. Click on the document in the document tree to be bookmarked. b. Click the ‘Bookmark’ button on the toolbar. 4. To print click on the ‘Print’ button on the tool bar. 5. To personalize how you view groups of documents a. Select File then Preferences. b. Select Personal Record View. c. Select the documents you want in your personal record view then click Add. d. To include all of the accessible documents, click on Add All. 6. To Change your PIN a. Select the edit button located in the top left corner of the application screen. Note: For first time use only, OLD PASSWORD is the last four digits of your SSN. 7. To Complete Deficiencies a. Select Deficiency Type in the top left corner. b. Select Group worklist or Individual worklist to see those encounters that you need to dictate. You will need to dictate this report using the normal process via MedQuist. c. Click on the check box(es) to select the deficiency. d. Select Process to view and complete a single deficiency or, click on Process All to view and complete all of your Signature deficiencies. e. The PIN Required window will open. You will only need to enter your PIN once per chart completion session. 8. To add or edit text a. Click in the document where you want to start typing. Be sure to edit BEFORE you sign the deficiency. b. Click the Sign Button to complete the deficiency. 9. Missing Text a. Enter the missing text in the yellow text box. b. Maximum of 240 characters. c. Your initials, date and time are added to the bottom of the page. d. Once all text is entered in each box, click the Complete ’button to complete the Missing Text deficiency. 10. To Decline Deficiency a. Click the check box next to the document you wish to decline. Physician Education and Technology Services- 614-566-3646 19 ORB 3.0 User Manual b. Then click the Decline button. c. Select a standard reason from the drop down menu, or enter your own reason with a maximum of 225 characters. d. Click OK to save your deficiency decline and reason. 11. From any ORB screen, click on the Resources tab. Select Chart Completion. Physician Education and Technology Services- 614-566-3646 20 ORB 3.0 User Manual Queries 1. On the ORB 3 home page, the CDI and Pharmacy queries assigned to either you or your groups/folders will appear under My Work. Click one of the links to view the queries. a. Queries Assigned to Me are queries assigned specifically to you. b. Queries Assigned to My Group/Folders are queries assigned to one of your physician groups OR is associated with a patient in one of your folders. You can edit your shared folders through this icon on the ORB home page. 2. Select the Review button next to the query you want to review. For the queries in the My Group/Folders category, only respond to the ones associated with your patients. 3. The query review window will open. a. Review the query and choose either Agree or Disagree. b. Be sure to update your response documentation in the progress note regardless of agreement. Do not select agree/disagree on a patient if you are not providing care for this patient. 4. Queries can also be responded to from the following locations in ORB: a. Clinical Navigation Queries tab Physician Education and Technology Services- 614-566-3646 21 ORB 3.0 User Manual b. Assessment and Plan tab while documenting a note c. If there is a query on the patient, a message will also appear on each tab when composing a note. Physician Education and Technology Services- 614-566-3646 22 ORB 3.0 User Manual Completing Notes in ORB 1. Under the Create menu, select Notes, then the type of note you wish to create. 2. The first tab in the Progress Note or Consult will be the History Tab. We will walk through completing the history tab in the following steps. Select the Date and Service Line (this can be set as a default in User Preferences) Enter the Procedure if indicated. Enter the Chief Complaint / Reason for Visit The History of Present Illness can be entered via the free text box. Physician Education and Technology Services- 614-566-3646 23 ORB 3.0 User Manual Check the applicable systems reviewed. Comments can be entered for each system. Check the applicable Results Reviewed. This can be completed on individual tabs as well. Past Medical History can be selected by entering a Diagnosis into the Select Diagnosis field or selecting from Prior Diagnoses. Physician Education and Technology Services- 614-566-3646 24 ORB 3.0 User Manual Past Surgical History can be entered via the text boxes. A reference for prior procedure notes will be shown if available. Enter patient allergies by typing in the Allergies selection field. Allergies selections will populate as you type. If your selection is not available, you can add your own allergy to the patient list. The patient’s Home Medications will be listed for your review. You can also select Express Edit to add or edit home medications. The Social History is completed by selecting the patient’s tobacco and alcohol use, living situation, occupation, marital status, and functional status. Additional comments can be entered via the Comments text box. Physician Education and Technology Services- 614-566-3646 25 ORB 3.0 User Manual 3. The next tab will be the Physical Exam Tab. From this tab you can review patient vitals, I/O’s, and the Graphic Record. You can also enter free text comments relating to the vital signs. b. Physical Exam components can be added to the note using the My Exam List. i. To start an exam, make a selection from My Exam on the right side of the page. ii. Click on the name of a specific physical exam category to add it to the note. The exam will be added with the default normal text. iii. Exam text can be edited by clicking in the text box and entering desired text. iv. To add all listed exam categories, select Add All on the My Exam List. c. The My Exam List can be customized to meet your preferences by clicking Manage. Physician Education and Technology Services- 614-566-3646 26 ORB 3.0 User Manual Click Add New Exam Category to add an exam category to your My Exam List. To modify the default normal text, click in the exam text box and update as needed. Standard and custom exams have a Hide option. Selecting Hide removes that exam category from your My Exam List Use the dropdowns next to the exam text to reorder the exam categories. 4. The Lab, Microbiology, Pathology, Radiology, and Cardiology Tabs allow you to review the tab’s associated results and enter comments regarding the tests into the note. These tabs will all function in the same manner as below. If all exams in a test tab have been reviewed, you can select Lab Results Reviewed. You can also enter additional comments via the free text box. Each Test Tab will also allow you to see the reported results and select only individual results for review documentation. Physician Education and Technology Services- 614-566-3646 27 ORB 3.0 User Manual 5. The Medications Tab lists the patient’s current hospital medications. You can select Pertinent Medications Reviewed or select individual medications to include in reviewed notes. Additional comments can also be entered for the medications review. 6. The Transcriptions Tab lists results and reports for the selected encounter. Add a check mark to indicate results have been reviewed. Additional comments on the indicated reports can be entered as well. Physician Education and Technology Services- 614-566-3646 28 ORB 3.0 User Manual 7. The Assessment and Plan Tab allows for entry of the patient’s diagnosis and treatment plan. The Perpetual Assessment is a free text entry box. Diagnosis is a required field. All diagnoses entered must be codified. To search by ICD-9 code, select Abridged. You may edit a diagnosis description once the diagnosis code is selected. Diagnosis and Plans entered previously will display in the Diagnosis List for selection. Enter Disposition or comments via free text. Face to Face counseling and Critical Care time can also be entered via the A&P Tab Physician Education and Technology Services- 614-566-3646 29 ORB 3.0 User Manual 8. The Preview Tab allows you to review and print the note. Once you are satisfied with the note, you can select Approve to finalize and approve the note. You can choose to Approve the note now, or Save as Draft to complete at a later time. Along with Approving the note, you can Approve & Submit Charges. This will take you into Charge Capture for the patient after the note approval completed Physician Education and Technology Services- 614-566-3646 30 ORB 3.0 User Manual Completing a Preoperative note a. Enter a Codified Diagnosis on Pre-Operative Note by typing in Diagnosis box or selecting a diagnosis by clicking on Dx on the Diagnosis List on the right. b. The H&P status attestation will default to No with pre-formatted text. If there has been a change since the last H&P, select Yes and free text indicated update. Completing a Postoperative note 1. Click Add Procedure and enter procedure name in text box. 2. Complete the Specimens Removed, Operative Findings, and EBL fields by entering free text. These fields are required. Physician Education and Technology Services- 614-566-3646 31 ORB 3.0 User Manual 3. Complete Diagnosis field by choosing a documented diagnosis on the right or by typing a codified diagnosis code or description. 4. Check mark type of anesthesia utilized for procedure. 5. Intra and Immediate Post Op Complications and Post Operative Note are free text fields. 6. Complete operative report should be dictated. d. If you have chosen to Save as Draft or toggle, the unapproved note will show under the Create, then Notes. e. Select the Notes button to approve or delete the note. f. From this screen, you can choose to edit the existing note by clicking on the name of the note or delete the note completely. Physician Education and Technology Services- 614-566-3646 32 ORB 3.0 User Manual My Diagnosis (Codified Diagnosis Tool) 1. 2. 3. 4. Create a Daily Progress Note, Brief Daily, H&P or Consult note in ORB. Select the A&P Tab. Select the My Diagnosis tab. Select Manage. 5. Enter the desired Codified Diagnosis in that field. You may enter text and select a provided diagnosis or you may enter the ICD-9 code. 6. Once a codified diagnosis has been entered, you may also modify the description and/or enter a plan that will be saved with that diagnosis. 7. Once you have created a codified diagnosis and plan, click Dx + Plan to enter it in any subsequent note. 8. You can also use the Add to My Dx link to add a codified diagnosis to your list after you have created it in your note. Physician Education and Technology Services- 614-566-3646 33 ORB 3.0 User Manual SAVING NON- DIAGNOSIS BASED PLANS IN THE “MY DIAGNOSES” LIST: This feature is only to be used for non-diagnosis based plans, for example: AAOS Statement for VTE Prophylaxis Critical Care Assessment Discharge Exam – Well Follow Up Exam – Formula Fed Prophylaxis Nutrition 1. In Progress Notes, go to the “My Diagnoses” tab and click the Manage button 2. Search for the term “ZZZ” 3. Click on the Abridged (or Standard) List entry for “ZZZ” 4. Customize the description for your needs then click the Save button: 5. Click on the “Dx + Plan” link to bring it into the note: 6. Enter the plan or click “Use Previous” and update the previous plan: Physician Education and Technology Services- 614-566-3646 34 ORB 3.0 User Manual 7. The “ZZZ” code will NOT display on the report: Physician Education and Technology Services- 614-566-3646 35 ORB 3.0 User Manual Appending a Note 1. When logged into ORB and in the patient’s record, select note that you would like to Append. 1. The note will open. Click the Append button. 2. Click on Manage User-Defined Text. Physician Education and Technology Services- 614-566-3646 36 ORB 3.0 User Manual 3. Create your user defined text (This is where you can create your multiple phrases for the type of notes you will be appending). 4. Click Update when ready to save. To add additional user define text options select Add New Text. 5. Click Select User-Defined text to add text. 6. Edit text within box. 7. Click on Approve when finished. Physician Education and Technology Services- 614-566-3646 37 ORB 3.0 User Manual Completing the Discharge Instructions 1. Under the Create menu, select Discharge, select Discharge Instructions. 2. The Dx tab will list any diagnoses completed in ORB documentation. Select to add a diagnosis to the patient’s discharge instructions by clicking on the diagnosis. You can also search for procedures by selecting the filter drop down. Finally, you can enter additional diagnosis by typing your selection in the bottom text box. Diagnosis’ that have been added will be displayed on the right side. Physician Education and Technology Services- 614-566-3646 38 ORB 3.0 User Manual 3. Add Procedures performed during this encounter. You can select a procedure from the specialty filters or enter you own. Procedures selected will be added to the patient list on the right. Procedures can be removed by clicking the red Delete link. 4. The Meds tab contains home and hospital medications that must be reconciled prior to discharge. Click Reconcile to create the patient’s discharge medications. Physician Education and Technology Services- 614-566-3646 39 ORB 3.0 User Manual 5. Home medications will show in the top left hand side. If the patient had continued that medication in house, the medication will display to the right of the home medication. Hospital only medications will display in the bottom right hand side. For each medication, select the appropriate option: Continue, Change, Stop or Start Taking. When complete, select Close. 6. The Follow –Up tab allows you to enter follow up instructions with the physicians contact information. Click Search / Add to add additional physicians. Note: The patient’s Primary Care Physician (PCP) is automatically selected if assigned by STAR. To remove the patient’s PCP, another physician must be selected. Physician Education and Technology Services- 614-566-3646 40 ORB 3.0 User Manual 7. Select the Diet indicated for the patient. 8. The Instructions tab allows for entry of standard and custom care instructions. Select the service line then procedure to add standard instructions. Additional instructions can be entered using the text box. You can create custom instructions for future use by selecting Save as Custom after entering your text. Remove unwanted instructions by selecting the red Delete link. Physician Education and Technology Services- 614-566-3646 41 ORB 3.0 User Manual 9. The Disp tab allows for entry of disposition information. Select the location the patient is being discharged to. Select the Condition at discharge. The Medicare Face to Face Encounter box should be checked for any home health patients. Referral to a post-acute provider can be entered as indicated. 10. The Addl tab allows for free text entry of any additional information you would like to include on the Discharge Instructions. Physician Education and Technology Services- 614-566-3646 42 ORB 3.0 User Manual 11. Allergies previously documented will cross over automatically to the Discharge Instructions. Additional allergies can added if indicated. 12. The DCi Review tab allows for preview of the final instructions. Physicians must approve the DCi by selecting the green Approve button. Green DCi Review means the DCi has been approved. Physician Education and Technology Services- 614-566-3646 43 ORB 3.0 User Manual Completing the Discharge Summaries 1. Under the Create menu, select Discharge, then Discharge Summary. 2. Clinical Summary: Perpetual Assessment from previous notes can be used or click Edit to enter additional text. 3. Diagnosis / Plan: Previously documented diagnosis’ and plans can be utilized by clicking the Dx or Dx+Plan on the left. 4. Important Information: Click Edit to enter any indicated text. 5. Diet: Click to add the Diet entered in the Discharge Instructions. 6. Additional Comments: Click Edit to enter indicated text. 7. Time Spent on Discharge: select 30 minutes or less radio button or slect the 30 minutes or more radio button. 8. To approve the Discharge Summary, select the DCS Review tab and select Approve. Physician Education and Technology Services- 614-566-3646 44 ORB 3.0 User Manual Editing and Creating Folders in ORB 1. To edit any folders you can hover over the Show Folder icon. A list of all your folders will appear in the dropdown. There is a pencil icon beside editable folders in the folder hover list, clicking on the pencil lets you edit the folder. 2. The gear next to your folder name allows you to edit the folder 3. To move patient from one folder to another folder a. Select the box next the patients name you wish to move b. Select the Manage Patient icon c. Select Move to a folder, then the folder’s name d. The patients are now listed in the selected folder Physician Education and Technology Services- 614-566-3646 45 ORB 3.0 User Manual 4. To create a new folder a. Select the add folder icon on the top header of the screen, then select Add Folder b. Select the create button under create new folder c. Enter the name of the folder in Folder Name field d. Mark Folder Status public. e. Enter name of physicians that needs to share folder in Sharing Options and add to Shared User List f. Save folder Physician Education and Technology Services- 614-566-3646 46 ORB 3.0 User Manual Covering Provider The Covering Provider Tool in ORB 3 allows all users the ability to easily view the Covering Providers for patients that have not yet been discharged. The covering provider(s) for a patient are shown in the patient list display column called “Covering” and also in the patient header when viewing a single patient. When viewing the covering provider, you may click on the name of one of the providers to view the details about all providers currently covering the patient. These details include the provider’s specialty, when they are covering, contact information and any additional information. A folder may have several covering providers such as individuals with different specialties and/or different work shifts. Creating a Covering Folder 1. From the ORB Home Page, hover on your folders icon . 2. Click on the Add Folders button . 3. Select appropriate option to either create a new folder or edit an existing folder from the list: 4. Fill in the fields such as Folder Name and Type. Check the box next to “This is a Covering Folder”. Add any users to Folder Sharing and click Save. Physician Education and Technology Services- 614-566-3646 47 ORB 3.0 User Manual 5. Any folder that is checked as a Covering Folder, will have the Manage Covering Folder button when opened. Click on to add a covering provider. 6. Click on “Add New Covering Provider” to add information on each provider. 7. Fill in the fields to add a provider’s information for the first time or edit what has already been added. a. Covering Provider Name and Specialty are defaulted from User Preferences, however they can be changed via the dropdown. b. Once the Contact and Additional Information fields are added, they will prepopulate when that provider is selected in subsequent fields c. Start date and time default to current Selecting Daily indicates coverage for each day during the designated Start and End times. Physician Education and Technology Services- 614-566-3646 48 ORB 3.0 User Manual Viewing the Covering Provider Tool 1. Covering Provider is listed in the Patient View if their coverage is active during the time of the Patient View display. The Patient List View. link is also available in the Click on the Covering Providers name on this list to bring up their contact information. 2. The Covering field in the Patient Header will contain Provider entries depending on whether any coverage is present or currently active. The Covered Patients folder will only show your list of covering patients. This will appear in your folders list: 3. If you do not see the Covering column appear on the patient list display, click on the gear icon and add it to the Current Fields list. Physician Education and Technology Services- 614-566-3646 49 ORB 3.0 User Manual Charge Capture 1. Under Resources, select Charge Capture or from the Charge Capture link on the patient’s navigation toolbar. 2. Select group name. 3. Select E/M code by either typing in the number or part of the name, or using the drop down. 4. Select the procedure code by either typing in the number or part of the name, or using the drop down. 5. Enter any modifiers or use the Help Me Choose feature. a. Select the type of modifier by placing a check mark in the box. Physician Education and Technology Services- 614-566-3646 50 ORB 3.0 User Manual b. Once the code type has been selected, click on the Select & Close button. 6. Enter a diagnosis by placing a check mark in the box next to the diagnosis name. You can also make a diagnosis primary and organize the order from this section. 7. Select the Submit New Charge button. 8. Charges submitted successfully icon will appear. 9. On the Charge Process tab, you can review, edit or delete your submitted charges. Physician Education and Technology Services- 614-566-3646 51 ORB 3.0 User Manual Resources 1. Applications (links) to the following: a. Eprescribing i. Call Physician IT Services at 614-566-3646 for access and training b. Chart Completion i. See Medical records c. GE Centricity i. Link to GE Centricity EMR d. eFillable Forms e. OH Surgery Viewer f. DH surgery Viewer g. Transfer Center 2. Resources a. Provides links to commonly used physician resources. 3. Admin a. Applications (links) to the following: i. Charge Capture ii. CDI Templates iii. Pharmacy Templates 4. Help 5. Log Out a. To close your session of ORB click the Logout button. How to Get Help Physician Education and Technology Services can be reached at 614-566-3646 or [email protected]. Immediate assistance is available by calling 614-566-EDOC. Physician Education and Technology Services- 614-566-3646 52