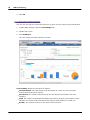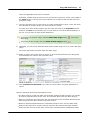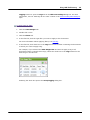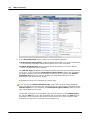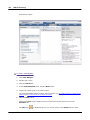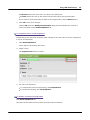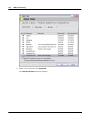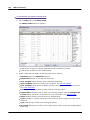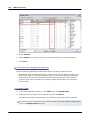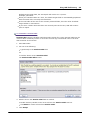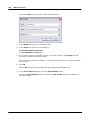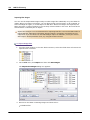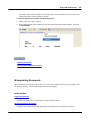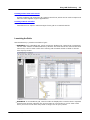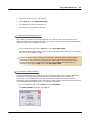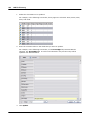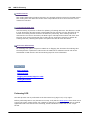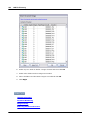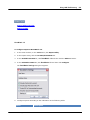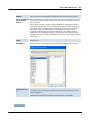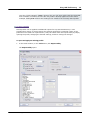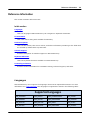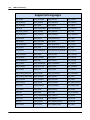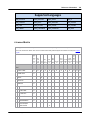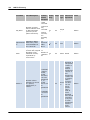
1
Using LAW PreDiscovery
User Guide
LAW PreDiscovery™, Version 6.2.46
• Getting Started
• Licensing
• Early Data Analyzer
• Working with Cases and Projects
• Acquiring Documents
• Image Display
• Manipulating Documents
• Working with Native Documents
• Grid Displays
• Searching
• Coding
• OCR
• Batch Processing
• Managing Distributed Processes
• Deduplication
• Exporting
Using LAW PreDiscovery User Guide
© 2015 LexisNexis. All rights reserved.
No part of this work may be reproduced or transmitted in any form or by any means, electronic or mechanical,
including photocopying, recording, or by any information storage or retrieval system, without permission.
While the information contained herein is believed to be accurate, this work is provided "as is," without warranty of
any kind. The information contained in this work does not constitute, and is not intended as, legal advice.
LexisNexis and the Knowledge Burst logo are registered trademarks of Reed Elsevier Inc., used under license. LAW
PreDiscovery, is a registered trademark, Concordance is a registered trademark, and CaseMap is a trademark of
LexisNexis, a division of Reed Elsevier Inc. Other products or services may be trademarks or registered trademarks
of their respective companies.
LAW PreDiscovery™
Concordance®
CaseMap®
LexisNexis® Total Litigator
LexisNexis® Early Data Analyzer
LAW PreDiscovery™
Version: 6.2.46
LAW Prediscovery Release Date: September 5, 2012
Contents
3
Table of Contents
Chapter 1 About LAW PreDiscovery
9
Chapter 2 What's New in LAW PreDiscovery
12
Chapter 3 Using LAW PreDiscovery
19
...................................................................................................................................
19
1 Getting
Started
.......................................................................................................................................................... 20
Main User Interface
.......................................................................................................................................................... 21
Basic Navigation
22
Working with..........................................................................................................................................................
Folders and Items
..........................................................................................................................................................
25
Viewing Images
..........................................................................................................................................................
26
Viewing Text
..........................................................................................................................................................
27
Opening Native Files
..........................................................................................................................................................
28
Viewing Metadata
..........................................................................................................................................................
29
Finding Items in a Grid
..........................................................................................................................................................
30
Configuring a Scanner
..........................................................................................................................................................
30
Adding Documents to LAW
31
2 LAW ...................................................................................................................................
Licensing
.......................................................................................................................................................... 32
License Types
.......................................................................................................................................................... 36
Undocked Keys
.......................................................................................................................................................... 47
Profile Manager
..........................................................................................................................................................
59
About the Evaluation
Version
60
3 Early...................................................................................................................................
Data Analyzer
..........................................................................................................................................................
61
About Early Data
Analyzer
.......................................................................................................................................................... 64
Startup and Configuration
..........................................................................................................................................................
68
Cases in Early
Data Analyzer
.......................................................................................................................................................... 91
Importing
.......................................................................................................................................................... 99
Filtering
.......................................................................................................................................................... 124
Tagging
.......................................................................................................................................................... 132
Performing OCR
Searching .......................................................................................................................................................... 138
About Searching
......................................................................................................................................................... 139
Running Searches
......................................................................................................................................................... 142
About Search
.........................................................................................................................................................
Operators
162
Managing.........................................................................................................................................................
Indexes
168
..........................................................................................................................................................
171
Using the Global
Dashboard
.......................................................................................................................................................... 179
Reviewing Exceptions
Exporting .......................................................................................................................................................... 186
.......................................................................................................................................................... 195
Creating Reports
...................................................................................................................................
208
4 Working
With Cases and Projects
..........................................................................................................................................................
209
Creating a New
Case
..........................................................................................................................................................
213
Working with
Existing Cases
.......................................................................................................................................................... 220
Case Templates
..........................................................................................................................................................
226
Working With
Projects
230
Establishing..........................................................................................................................................................
Folder Structures
...................................................................................................................................
236
5 Working
with Fields
© 2015 LexisNexis. All rights reserved.
3
4
LAW PreDiscovery
About Fields.......................................................................................................................................................... 237
239
Manipulating..........................................................................................................................................................
Fields
..........................................................................................................................................................
246
Working with List Fields
..........................................................................................................................................................
249
Index Profiles
...................................................................................................................................
252
6 Acquiring
Documents
..........................................................................................................................................................
253
Importing Electronic
Discovery
Starting an
.........................................................................................................................................................
Import Session
254
Specifying
.........................................................................................................................................................
Sources
262
Adding and Removing
.........................................................................................................................................
Sources
262
Review ing the Source
.........................................................................................................................................
Queue
265
Creating a File Type
.........................................................................................................................................
Summary
267
Configuring
.........................................................................................................................................................
Import Settings
272
Archives
......................................................................................................................................... 273
Compound Documents
......................................................................................................................................... 275
Deduplication ......................................................................................................................................... 278
E-Mail
......................................................................................................................................... 280
Exclusions
......................................................................................................................................... 283
File Types
......................................................................................................................................... 285
General
......................................................................................................................................... 288
Metadata
......................................................................................................................................... 291
NIST (NSRL) Filter
......................................................................................................................................... 292
Output
......................................................................................................................................... 295
Post-Import Actions
......................................................................................................................................... 296
Text Extraction ......................................................................................................................................... 298
Session Defaults
......................................................................................................................................... 301
Review ing
.........................................................................................................................................................
Sessions
302
Quality Control After
.........................................................................................................................................
Import
303
Session Brow ser
.........................................................................................................................................
and Session View er
304
Summary Reports
......................................................................................................................................... 310
Importing .........................................................................................................................................................
E-Mail Files
314
Importing .........................................................................................................................................................
Instant Messages (IM)
318
Inserting Attachments
.........................................................................................................................................................
After Import
319
Extracting.........................................................................................................................................................
Missing Text After Import
321
Cancelling.........................................................................................................................................................
and Resuming Sessions
323
Distributed
.........................................................................................................................................................
ED Loader
325
.......................................................................................................................................................... 332
Scanning Documents
Selecting .........................................................................................................................................................
a Scanner
333
Preparing.........................................................................................................................................................
to Scan
335
Using Barcodes
......................................................................................................................................................... 336
Adjusting.........................................................................................................................................................
Scanner Settings
342
Configuring
.........................................................................................................................................................
Scan Options
344
Configuring
.........................................................................................................................................................
Imaging Options
348
Using the.........................................................................................................................................................
Scan Toolbar
351
Scanning......................................................................................................................................................... 362
..........................................................................................................................................................
366
Importing from
Other Sources
Importing .........................................................................................................................................................
Cases and Load Files
366
Importing .........................................................................................................................................................
Raw Images
376
Importing .........................................................................................................................................................
Replacement Images
382
...................................................................................................................................
384
7 Image
Display
..........................................................................................................................................................
384
Working with
Images
393
Viewing File ..........................................................................................................................................................
Properties
...................................................................................................................................
395
8 Manipulating
Documents
.......................................................................................................................................................... 396
Page-level Cleanup
© 2015 LexisNexis, a division of Reed Elsevier Inc. All rights reserved.
Contents
5
..........................................................................................................................................................
399
Moving Documents
and Pages
..........................................................................................................................................................
402
Deleting Documents, Pages and Folders
.......................................................................................................................................................... 404
Splitting Documents
.......................................................................................................................................................... 407
Merging Documents
..........................................................................................................................................................
408
Inserting Documents
and Pages
..........................................................................................................................................................
411
Replacing Documents and Pages
..........................................................................................................................................................
414
Working with Attachments
..........................................................................................................................................................
416
Annotating Documents and Pages
...................................................................................................................................
420
9 Working
with Native Documents
..........................................................................................................................................................
420
Extracting Page
Counts
..........................................................................................................................................................
423
Launching Native
Files
..........................................................................................................................................................
426
Inserting Electronic
Documents
..........................................................................................................................................................
428
Converting Documents
to TIFF
..........................................................................................................................................................
431
Converting Documents
to PDF
434
10 Grid...................................................................................................................................
Displays
..........................................................................................................................................................
435
Launching the
Grids
438
Customizing..........................................................................................................................................................
the Grid View
..........................................................................................................................................................
448
Filtering Search
Results on a Grid
..........................................................................................................................................................
450
Grouping Search
Results on a Grid
..........................................................................................................................................................
452
Managing Grid
Views
.......................................................................................................................................................... 457
Grid Functions
..........................................................................................................................................................
464
Creating Control
Lists From a Grid
..........................................................................................................................................................
467
Creating Outlook
.PST Files
................................................................................................................................... 468
11 Searching
.......................................................................................................................................................... 469
Creating Queries
472
Examples of..........................................................................................................................................................
Field-Based Queries
.......................................................................................................................................................... 474
Full Text Searching
..........................................................................................................................................................
483
Working With
Saved Searches and Search History
................................................................................................................................... 491
12 Coding
..........................................................................................................................................................
492
Document-Level
Coding
.......................................................................................................................................................... 495
Numbering Documents/Pages
503
Incremental..........................................................................................................................................................
Numbering Syntax for Pages
.......................................................................................................................................................... 504
Batch Updating
..........................................................................................................................................................
508
Using Text Files
for Coding
509
Creating Tag..........................................................................................................................................................
Fields
.......................................................................................................................................................... 511
Tagging Records
..........................................................................................................................................................
515
Importing Tag
Lists
..........................................................................................................................................................
517
Coding at Scan
Time
13 OCR................................................................................................................................... 518
.......................................................................................................................................................... 519
OCR Overview
..........................................................................................................................................................
521
Flagging Documents/Pages
for OCR
OCR Options.......................................................................................................................................................... 523
.......................................................................................................................................................... 528
Performing OCR
..........................................................................................................................................................
532
Creating Searchable
PDFs
...................................................................................................................................
535
14 Batch
Processing
..........................................................................................................................................................
536
Batch Processing
Overview
..........................................................................................................................................................
538
Selecting Documents
for Processing
..........................................................................................................................................................
547
Updating Page
Data
.......................................................................................................................................................... 549
Document Numbering
.......................................................................................................................................................... 550
Image Cleanup
..........................................................................................................................................................
552
Endorsing Headers
and Footers
.......................................................................................................................................................... 559
Applying Watermarks
© 2015 LexisNexis. All rights reserved.
5
6
LAW PreDiscovery
..........................................................................................................................................................
562
Batch Processing
OCR
..........................................................................................................................................................
564
Batch Printing
..........................................................................................................................................................
569
Scanning for Suspect Footers
..........................................................................................................................................................
571
E-Printing, TIFF, and PDF Conversion
Output Settings
.........................................................................................................................................................
for E-Print/TIFF/PDF Conversion
572
Supported.........................................................................................................................................................
File Types
579
Passw ords
......................................................................................................................................................... 582
Acrobat ......................................................................................................................................................... 584
Excel
......................................................................................................................................................... 585
HTML
......................................................................................................................................................... 588
Image Printer
......................................................................................................................................................... 590
Pow erPoint
......................................................................................................................................................... 592
Project ......................................................................................................................................................... 594
Word
......................................................................................................................................................... 596
..........................................................................................................................................................
598
Separator Pages
..........................................................................................................................................................
602
Distributed Batch Processing
...................................................................................................................................
607
15 Managing
Distributed Processes
.......................................................................................................................................................... 608
LMC Overview
609
Starting the ..........................................................................................................................................................
LMC
.......................................................................................................................................................... 615
Using the LMC
..........................................................................................................................................................
628
Managing LMC
Operation
................................................................................................................................... 631
16 Deduplication
.......................................................................................................................................................... 632
About Deduplication
..........................................................................................................................................................
637
Deduplication
Utility
..........................................................................................................................................................
643
Deduplication
Information
.......................................................................................................................................................... 646
Inter-Case Deduplication
.......................................................................................................................................................... 654
Duplicate Viewer
................................................................................................................................... 657
17 Exporting
658
Export Utility..........................................................................................................................................................
Overview
..........................................................................................................................................................
663
Formats/Documents
Tab
..........................................................................................................................................................
669
Format-Specific
Settings
CaseLogistix
......................................................................................................................................................... 670
CaseMap......................................................................................................................................................... 671
Concordance
......................................................................................................................................................... 673
Concordance
.........................................................................................................................................................
Direct (DCB)
675
Delimited Text
......................................................................................................................................................... 677
DocuMatrix
.........................................................................................................................................................
1.5
679
EDRM XML
.........................................................................................................................................................
1.0
680
EDRM XML
.........................................................................................................................................................
2.0
682
iCONECT ......................................................................................................................................................... 683
Inmagic Export
.........................................................................................................................................................
Settings
685
Introspect.........................................................................................................................................................
eCM
686
IPRO IntelliVIEW
......................................................................................................................................................... 688
JFS Litigator's
.........................................................................................................................................................
Notebook
690
PDF Conversion
......................................................................................................................................................... 692
Ringtail Casebook
......................................................................................................................................................... 693
Storm View
.........................................................................................................................................................
er
696
Summation
......................................................................................................................................................... 697
TrialDirector
.........................................................................................................................................................
and Sanction
700
Fields Tab .......................................................................................................................................................... 701
Options Tab.......................................................................................................................................................... 704
711
Creating CD..........................................................................................................................................................
Volumes
..........................................................................................................................................................
713
Selectively Exporting
Native Files
© 2015 LexisNexis, a division of Reed Elsevier Inc. All rights reserved.
Contents
7
716
Checking for..........................................................................................................................................................
Blanks or Duplicates
..........................................................................................................................................................
717
Export Profiles
..........................................................................................................................................................
720
Exporting E-Mail
Threads
Chapter 4 Reference Information
1
2
3
4
5
6
723
................................................................................................................................... 723
Languages
...................................................................................................................................
725
License
Matrix
...................................................................................................................................
731
Field
Descriptions
...................................................................................................................................
755
Unicode
Support
...................................................................................................................................
756
Keyboard
Shortcuts
...................................................................................................................................
759
Contacting
LexisNexis
Chapter 5 Glossary
Index
762
771
© 2015 LexisNexis. All rights reserved.
7
Using LAW PreDiscovery
User Guide
About LAW PreDiscovery
Chapter
1
About LAW PreDiscovery
9
About LAW PreDiscovery
LexisNexis ® LAW PreDiscovery™ helps legal professionals and their service providers meet the
increasing demands in the discovery of printed and electronic documents. By integrating
production-level scanning with robust e-discovery and data processing features, LAW
PreDiscovery is optimized to enable scalable execution of even the largest discovery projects,
from running multiple computers to batch scan boxes of paper documents to importing millions
of e-mails and attachments from mail stores, to full text indexing, querying, and exporting to
many other popular litigation support applications.
In practice, LAW PreDiscovery supports these key discovery processes:
Prefilter large document sets
The Early Data Analyzer module is a standalone prefiltering module available with the LAW
PreDiscovery 6.0 suite. Use it to implement high volume electronic discovery productions.
Early Data Analyzer indexes, filters, and produces export sets. Culled documents are passed
directly to LAW for full expansion and production.
Creating and managing cases
LAW PreDiscovery centers all activities, including data collection, processing, and export on
the case. Each case corresponds to a database file, which tracks all source files and
production files, including graphics and text.
In the process of creating a new case, you select a database engine, create and name the
database file, establish a folder structure for documents, and define any additional database
fields you will need later for coding. Optionally, to simplify future case creation, you can
create case templates that specify pre-defined options.
Acquiring documents
In this step you may do any of the following activities that bring documents into the case:
Import electronic discovery using ED Loader to extract text and to record document
metadata in the case database.
Scan paper documents to electronic format.
Import items and metadata from existing cases and load files.
Import existing TIFFs or other kinds of image files.
Assign custodians at the batch or source level.
Code documents with data fields.
Performing quality control
The exact nature and timing of quality control activities vary greatly, depending on the type
and quality of source documents. Quality control typically involves multiple activities spread
throughout the discovery project:
Error correction, for example: reviewing and fixing processing errors, keeping detailed
logs of warning and other error conditions, and alerting you to suspected file
extensions.
© 2015 LexisNexis. All rights reserved.
10
LAW PreDiscovery
Tag documents that contain specific text or metadata attributes for the purpose of
narrowing consideration to pertinent documents or pages.
Deduplicate files that were imported during electronic discovery.
Fix problems with TIFF files using built-in image cleanup tools.
Batch processing
Batch processing functionality helps to automate various processor-intensive jobs, including:
document numbering, image cleanup, endorsing, conversion to TIFF or PDF, printing, and
optical character recognition (OCR). LAW PreDiscovery lets you take batch processing to a
new level by combining the processing power of multiple computers to join distributed batch
processing of large jobs.
Exporting
LAW PreDiscovery provides a wide range of options for exporting to litigation support
applications in a variety of standard formats, including: native files, images, coded data, and
OCR text.
For information on LAW PreDiscovery and other litigation support products by LexisNexis,
please visit the LexisNexis PreDiscovery website.
© 2015 LexisNexis, a division of Reed Elsevier Inc. All rights reserved.
Using LAW PreDiscovery
User Guide
What's New in LAW PreDiscovery
Chapter
2
12
LAW PreDiscovery
What's New in LAW PreDiscovery
LAW PreDiscovery™ 6.2.46 and Early Data Analyzer 1.2.11 introduce the following features and
product enhancements:
LAW PreDiscovery
Annotations
The HasAnnotations field is now included with all new cases and will be added to existing
cases the first time they are opened. The HasAnnotations field indicates whether
annotations have been applied to a document within the application. It will not be set for
images imported into the application (either via load file or the ED Loader module).
For more information about the HasAnnotations field, see: Field Descriptions.
Batch Processing
Now all Adobe Acrobat PDF files, normal, image-only, and image+text formats, can be
endorsed in LAW PreDiscovery.
The endorse process will convert any searchable PDF file to an image-only PDF file. To
make a PDF file searchable again, after endorsing the file, perform OCR on the file.
For more information about endorsing files, see: Endorsing Headers and Footers and
Applying Watermarks.
Dictionary
The dictionary for a full text index can now be exported to a CSV file from the Fulltext
Dictionary dialog.
For more information, see: Full Text Searching.
ED Loader
The Enable Compound Document Extraction check box was removed from the Compound
Documents options on the Settings tab of the Electronic Discovery Loader dialog.
Three new compound document extraction options are included:
Disable compound document extraction. Disables all compound document extraction
during the import.
Enable compound document extraction on all supported file types. All embedded
files (attachments) to e-docs (does not include e-mails) will be extracted.
Restrict compound document extraction to PDF portfolios. Embedded files will only
be extracted from PDF portfolios.
Special handling is now given to PDF portfolios if either of the latter two settings are
used. If compound document extraction is enabled in either case, PDF portfolios will be
discarded if at least one file can be extracted. Because a PDF portfolio functions as a
© 2015 LexisNexis, a division of Reed Elsevier Inc. All rights reserved.
What's New in LAW PreDiscovery
13
document wrapper (more like an archive than a file), the portfolio itself is not required
after the files have been extracted. This also allows documents within the portfolio to
retain the proper parent/attachments relationships once extracted.
For more information, see: Compound Documents.
Added support for 7Zip .7z archives.
For more information about importing electronic document archives, see: Archives.
Exports
Placeholder text files can now be included in exports for documents that do not contain any
text content. If the ‘Include Full Text’ check box is selected on the Formats/Documents tab in
the Export Utility and the export includes documents that do not contain text content, the
specified placeholder text file will be copied for these documents.
The placeholder text file can be specified from the Text Options dialog.
For more information, see: Formats/Documents Tab.
Current Issues RSS Feed
You can subscribe to an RSS feed that announces updates to current issues for LAW
PreDiscovery and Early Data Analyzer.
The URL for the RSS Feed is:
http://help.lexisnexis.com/litigation/ac/law_docs/law6.2/Release_Notes/HTML/
LAW_EDA_Current_Issues.xml
For more information on how to setup an RSS subscription via Outlook 2010, see:
Release Notes.
Imports
Individual files from a mail store or archive file can now be imported from Early Data
Analyzer into LAW PreDiscovery. Files imported from a mail store or archive file are
imported into ED Loader as top-level documents, and will reference the parent mail store
or archive file and individual file name in the file name generated by the import. For
example, Zip.zip?subfolder\file-in-zip.txt.
When an individual file from a mail store or archive file is imported into LAW from Early
Data Analyzer, the _DocCat field is populated with "Archive Item" for the file, and all tags
and OCR content associated with the file is also imported.
For more information, see: Exporting in Early Data Analyzer.
Embedded mail stores, such as a Microsoft Outlook PST file within a WinZip ZIP file, can
now be imported from Early Data Analyzer into LAW PreDiscovery.
For more information, see: Importing E-Mail Files.
Licensing
© 2015 LexisNexis. All rights reserved.
14
LAW PreDiscovery
The Electronic Discovery:TIFF license is renamed to Electronic Discovery:TIFF/PDF, and now
includes permissions for converting native files to PDF files individually and in batches using
the TIFF/PDF Conversion.
For more information, see: License Types and Converting Documents to PDF.
Moving Pages
Pages within serialized or multipage documents can now be moved using the new Move
Page(s) dialog box. The Move Page(s) dialog box can be opened from the new Move Page(s)
menu selection on the Edit menu, or by right-clicking a page thumbnail on the Image tab and
clicking Move Page(s). The Move Page(s) dialog box allows you to select the pages you want
to move, select a new insertion point within the document, and then choose whether to
move the pages before or after the insertion point.
For more information, see: Moving Documents and Pages.
OCR
The Romanian and Romanian (Moldavia) languages are now supported for the ABBYY OCR
engine. If additional languages are required, an updated ABBYY installer containing all
available languages is available for download at http://www.imagecap.com/installs/
ABBYYEngine91.exe.
For more information about ABBYY FineReader and languages, see: OCR Options.
Scanning
A Scan Toolbar is now available to improve the efficiency of scan operations. The Scan
Toolbar provides quick access to all scan-related functions and settings. The Scan Toolbar
also allows you to create scan profiles that can be used to quickly change between
predefined settings for different document types, for example: color photos, duplex
documents, and single-sided black & white documents.
For more information, see: Using the Scan Toolbar.
TIFF/PDF Conversions and E-printing
Native files can now be directly converted to PDF files by printing to the easyPDF SDK 7
print driver. PDF files created in this manner will be searchable if the native file is textbased, for example: Microsoft Word, Excel, etc.
When a searchable PDF file is endorsed, the endorsed PDF will be converted to an
image-only PDF file. If endorsements are required on PDF files, the recommended
workflow is to convert to TIFF, endorse, and then OCR to PDF.
For more information see: Converting Documents to PDF and Output Settings for E-Print,
TIFF and PDF Conversion.`
Text-based PDF files can now be converted or printed using the “Image Printer” as the
source application.
© 2015 LexisNexis, a division of Reed Elsevier Inc. All rights reserved.
What's New in LAW PreDiscovery
15
For more information, see: Image Printer and Supported File Types.
Adobe Acrobat PDF files can now be converted to TIFF files using Adobe Acrobat Reader
version X.
For more information, see: Converting Documents to TIFF and Output Settings for EPrint, TIFF and PDF Conversion.
Early Data Analyzer
Exports
The Exclude column is now added to the Documents tagged with table. The Exclude
column allows documents to be excluded from an export by tag assignment, such as for
privileged documents or excluding individual documents from a mail store or archive file.
The Target LAW Case list can now be unlocked to allow an export set to be sent to
multiple LAW PreDiscovery cases.
Early Data Analyzer now runs any searches related to the export that are out-of-date
before generating the export set for a case.
Implemented 64-bit export agents for 64-bit operating systems to support better
performance and prevent memory errors while exporting large amounts of data.
For more information about exporting, see: Exporting.
Filters
The renamed File Hash Filter now contains the NIST Items filter and the newly added Custom
File Hash Items filter.
With the Custom File Hash Items filter, you can create or import a custom list of SHA-1 hash
values to extend filtering to files that are not already included in the NIST database. You can
export the list for use in other cases.
For more information, see: Filtering.
Imports
Early Data Analyzer now supports 7Zip .7z archive files.
For more information about importing, see: Importing.
Indexing
The Index Management dialog box has been added to the Search tab for managing case
indexes and for compacting and rebuilding selected indexes. To access the Index
Management dialog box, on the Search tab, click the Index Management button.
For more information, see: Managing Indexes.
© 2015 LexisNexis. All rights reserved.
16
LAW PreDiscovery
OCR
Early Data Analyzer now supports performing OCR on image-only Adobe Acrobat PDF
files.
Added the ability to retry OCR on documents. You can limit retries to specific document
categories.
For more information, see: Performing OCR.
Navigation
Improved navigation performance between tabs in Early Data Analyzer by modifying the
refresh rate for displaying selected tabs.
Password Management
The Passwords tab in the New Case Settings and Edit Case Settings dialog boxes now
supports passwords for password-protected Microsoft Word DOC and DOCX and Microsoft
Excel XLS and XLSX files. Now when the password for a password-protected DOC, DOCX,
XLS, or XLSX file in a case is added to the Passwords tab, the document content will be
visible in the content viewer in Early Data Analyzer.
For more information, see: Cases in Early Data Analyzer.
Reports
The User Audit Log is added to the Reports tab. The User Audit Log is a tab-delimited textbased log file containing a list of qualified actions performed by users in the case.
For more information, see Creating Reports.
Searching
Running searches are now performed in the service, which allows saved searches to run
without locking the application.
Implemented 64-bit search agents for 64-bit operating systems to support better
performance and prevent memory errors while running numerous complex searches
simultaneously.
Index Management button and dialog box now added to the Search tab. For more
information, see: Managing Indexes.
Two new fields, MessageClass and Source, are added to the Guided Search tab. For
more information, see: Running Searches.
For more information, see: About Searching.
Status Toolbar
Index Status has been added to the status toolbar next to Work Status at the bottom of the
Early Data Analyzer window. The Index Status indicates whether the case files are being
indexed (Indexing), compacted (Compacting), reindexed (ReIndexing), or there are no index
© 2015 LexisNexis, a division of Reed Elsevier Inc. All rights reserved.
What's New in LAW PreDiscovery
processes running and the index is ready for processing (Ready).
For more information about the status toolbar, see Cases in Early Data Analyzer.
For more information on this release and on previous releases of LAW PreDiscovery, see:
Release Notes.
© 2015 LexisNexis. All rights reserved.
17
Using LAW PreDiscovery
User Guide
Using LAW PreDiscovery
Chapter
3
Using LAW PreDiscovery
19
Using LAW PreDiscovery
Getting Started
Some of the most common startup tasks you need to know about when you first open LAW
PreDiscovery are described here.
In this section
Main User Interface
Shows how to access the main features in the main window of LAW PreDiscovery.
Basic Navigation
Shows how to access the main navigational features for moving between images, pages,
and documents.
Working with Folders and Items
Provides instructions for adding, moving, and deleting: folders, documents and pages.
Viewing Images
Provides instructions for opening and viewing TIFF files.
Viewing Text
Provides instructions for opening the text associated with a document.
Opening Native Files
Provides instructions for opening the original source files from which images and text are
extracted.
Viewing Metadata
Provides instructions for viewing metadata associated with images, text, and source files.
Finding Items in a Grid
Provides instructions for opening grids and for finding items that conform to criteria that you
specify.
Configuring a Scanner
Provides instructions for setting up a scanner for use by LAW PreDiscovery.
Adding Documents to LAW
Provides a basic overview of the ways you can add documents to a case.
© 2015 LexisNexis. All rights reserved.
20
LAW PreDiscovery
Main User Interface
The main user interface of LAW PreDiscovery™ provides a top-level view of the case and
provides access to the tools you use to perform discovery tasks. The main user interface is
generally referred to as the main window.
The name of the case that is currently open is visible in the title bar of the window. If a case
is not open, no name appears in the title bar.
For more information on creating a case see Creating a New Case.
For more information on opening an existing case, see: Working with Existing Cases.
Menus
The menus in the main window provide access to features and tools:
File. Use this menu to create new files, open existing cases, print or send items, import
items, and perform case administration.
Scan. Provides utilities for selecting and configuring a scanner.
Edit. Contains many quality control features. For example, you can use this menu to:
insert items, replace items, work with attachments, and to merge, move, split, or autonumber items. You can also view page details and properties, and delete documents,
pages, and folders.
Folder. Provides functionality for working with folders.
Index. Provides access to tools for creating and managing fields, and for working with
page IDs.
View. Provides controls for manipulating the view of the currently selected image.
Page. Provides page navigation, OCR flagging, and image enhancements.
Tools. Provides access to tools for batch processing, export, deduplication, annotations,
barcodes, viewers for TIFFs and logs, OCR tools, full text indexing, searching, links to
© 2015 LexisNexis, a division of Reed Elsevier Inc. All rights reserved.
Using LAW PreDiscovery
21
LexisNexis Total Litigator features, and options for LAW PreDiscovery.
Help. Provides help topics, user manual, bug reporting, update checker, and versioning
with licensing information.
Toolbar items
Toolbar items are listed as follows:
Related Topics
Basic Navigation
Viewing Images
Viewing Text
Opening Native Files
Viewing Metadata
Finding Items in a Grid
Configuring a Scanner
Basic Navigation
The main window provides several ways to navigate folders, documents, and pages:
Page navigation. These buttons navigate between pages of the currently selected
document. If an image is available these buttons are disabled.
Grid view (standalone). You can navigate between documents by selecting items in the
© 2015 LexisNexis. All rights reserved.
22
LAW PreDiscovery
grid.
Folders and folder items. You can navigate and work with folders, documents, pages, and
attachments.
Image thumbnails. If the document has an accompanying image file, you can double-click
thumbnails to navigate between images of pages.
Go to page. Double-click to open a page navigator.
Related Topics
Working with Images
Viewing Text
Opening Native Files
Viewing Metadata
Finding Items in a Grid
Configuring a Scanner
Working with Folders and Items
Folders and the items they contain can be worked with by using the tools in the lower right of
the main interface.
© 2015 LexisNexis, a division of Reed Elsevier Inc. All rights reserved.
Using LAW PreDiscovery
23
Folder and item fields
The record list can contain any of the following columns:
ItemNo: Displays records contained within the folder, resetting to 0001 at the start of
each new folder. An indented item indicates an attachment to the previous record.
ImgExt: Identifies the type of image based on the image extension. This column will only
be populated if an image document state exists.
Pages: Identifies the Page Count of the document. This will only exist when an Image
document state exists.
Page Range: Displays the start and end page numbers within a document range. This
will only exist when documents are in image format and a Page ID has been assigned.
DocID: Identifies the DocID assigned when electronic files are loaded via the Electronic
Discovery Loader.
DocExt: Identifies the document extension of the native file.
Folder and item symbols
The appearance of items in the item list can be interpreted as follows:
If the selected item is an image or has an image associated with it, a preview and
thumbnails are visible in the image viewing area.
Items in the list indented with two dashes (--) are considered attachments to the nonindented document directly above.
Each record contains color-coded cubes symbolizing the document state of the record.
© 2015 LexisNexis. All rights reserved.
24
LAW PreDiscovery
A yellow cube (lower left) means that an image exists for the record. The record must
have been converted to TIFF or PDF, scanned or imported via raw images or a load file
for this document state to appear.
A blue cube (top) means that text exists for the record. The text may be a result of
extracted text, printed text, or OCR.
A green cube (lower right) means that a native file exists for the record.
To configure columns for folder items
You can choose which columns you wish to have displayed in the record list.
1. Right-click a column header.
A list of the column headers appears. A check mark signifies the field is displayed.
2. Click a column header to select or de-select it.
© 2015 LexisNexis, a division of Reed Elsevier Inc. All rights reserved.
Using LAW PreDiscovery
25
Related Topics
Moving Documents and Pages
Deleting Documents, Pages and Folders
Splitting Documents
Merging Documents
Inserting Documents and Pages
Replacing Documents and Pages
Working with Attachments
Viewing Images
You use the image viewer to see displays of any image associated with the currently selected
document and thumbnails. For more information on working with pages in the image viewing
area see Working with Images.
Related Topics
© 2015 LexisNexis. All rights reserved.
26
LAW PreDiscovery
Scanning in LAW PreDiscovery
Converting Documents to TIFF
Converting Documents to PDF
Importing Raw Images
Working with Images
Viewing File Properties
Page-level Cleanup
Viewing Text
The text area displays the text file associated with the document. There are three types of text
files: text extracted during the import, text extracted during the conversion to TIFF, and text
obtained through OCR.
A green flag
A page icon
indicates that text has not yet been extracted.
indicates that text exists for the file.
© 2015 LexisNexis, a division of Reed Elsevier Inc. All rights reserved.
Using LAW PreDiscovery
27
Related Topics
OCR Overview
Full Text Searching
Opening Native Files
If a native file exists for a document, the Open File button is enabled. You can use this button
to open the file directly or to access options for opening the file with applications that you
specify. For more information on working with native files, see Launching Native Files.
Related Topics
Launching Native Files
Inserting Electronic Documents
© 2015 LexisNexis. All rights reserved.
28
LAW PreDiscovery
Viewing Metadata
The Index tab shows metadata corresponding to a selected document. You can expand the list
of fields so that they cover the folder list. Also you can add or remove fields from being visible
on the Index tab.
To expand or collapse the list of metadata, click the expander button (
).
To select fields to display, choose a selection from the list, or click the ellipses button and
then use the Modify Fields tool to change the visibility of fields. For more information about
customizing field views, see Index Profiles.
You can also use the grid view to see metadata for multiple items at one time. For more
information on grids see Launching the Grids.
Related Topics
Manipulating Fields
Working with List Items
Index Profiles
© 2015 LexisNexis, a division of Reed Elsevier Inc. All rights reserved.
Using LAW PreDiscovery
29
Finding Items in a Grid
The Grid View tab shows a tabular view of documents and pages. It allows navigation between
listed items. However, it is not populated by default.
To view a list of items you must run a query using Query Builder and specify results to be
sent to a Grid (Embedded).
Note that the grid has its own toolbar that is separate from the toolbar of the main
window.
For more information about grids, see Launching the Grids.
Related Topics
Launching the Grids
Filtering Search Results on a Grid
Customizing Grid Views
© 2015 LexisNexis. All rights reserved.
30
LAW PreDiscovery
Configuring a Scanner
You can access configuration options of a scanner. Before you can configure a scanner, you
must add one by selecting a particular model. If you have not yet selected a scanner, the scan
status area reads <No Scanner Detected>. For more information on selecting a scanner see
Selecting a Scanner.
To change particular settings, double-click items in the scan status area.
Related Topics
Selecting a Scanner
Scanner Settings
Scanning in LAW PreDiscovery
Adding Documents to LAW
This topic provides a basic overview of the ways you can add documents to a case. The ways
are listed as follows:
Prefiltering with Early Data Analyzer. You can use Early Data Analyzer to cull large
document sets and then send the results directly to the ED Loader utility in LAW
© 2015 LexisNexis, a division of Reed Elsevier Inc. All rights reserved.
Using LAW PreDiscovery
31
PreDiscovery. For more information, see: Prefiltering.
Import using ED Loader. ED Loader is the utility you run to import electronic documents. ED
Loader supports indexing during import and provides other advanced import features. For
more information, see: Importing Electronic Discovery.
Using a scanner. You can add document images to a LAW case by using a scanner. You can
control scanner operation for many scanner models directly from within LAW. For more
information, see: Scanning Documents.
Importing cases from LAW and other litigation support applications. LAW allows you to
import documents into the current case from other LAW cases and from load files created by
other litigation support applications. For more information, see: Importing Cases and Load
Files.
Importing image stores. You can import existing images directly into a LAW case. For more
information, see: Importing Raw Images.
Importing replacement images. You can import images to replace current images. For more
information, see: Importing Replacement Images.
Related Topics
Prefiltering
Acquiring Documents
LAW Licensing
To be able to access various advanced features of LAW PreDiscovery, you must have a license
that corresponds to the particular functionality. This section describes how to implement
licensing with both the production-ready version of LAW PreDiscovery and with the evaluation
version.
In this section
License Types
Lists each type of available license and the features implemented by each.
Undocked Keys
Describes how to share licenses among office computers and how to checkout licenses to
computers for remote operation.
Profile Manager
© 2015 LexisNexis. All rights reserved.
32
LAW PreDiscovery
Describes how to checkout licenses from a central computer, as well as how to save the
configuration of a particular set of licenses so you can more easily setup other computers to
use LAW PreDiscovery.
About the Evaluation Version
Describes how to setup the evaluation edition of LAW PreDiscovery. Lists the tasks you can
perform by using the evaluation edition.
License Types
LAW PreDiscovery™ consists of multiple modules that provide different functionality. Module
may be licensed individually or by bundle. The module you need depends on the requirements
of your project. For a one page summary of each function of LAW PreDiscovery and which
license supports each, see license matrix.
Common features
All modules support the following set of basic features:
Open cases.
Use the View menu.
Access the help system.
Print image records of a document, one at a time.
Navigate between individual pages of documents.
Rotate pages.
View page properties.
Use grid views.
Run external programs using the Run Command feature.
Customize LAW PreDiscovery by using the Options dialog.
Admin (Import/Export)
This license allows you to:
Create cases.
Create and modify index fields.
Import and export, except for importing by ED Loader.
Perform administrative functions.
Summarize cases.
Reorganize cases.
Scan for errors.
Compact the database.
© 2015 LexisNexis, a division of Reed Elsevier Inc. All rights reserved.
Using LAW PreDiscovery
33
Validate ranges.
View reports.
Apply and save case templates.
Create and delete folders.
Numbering.
CD Publishing with Full Text
This license allows you to:
Create searchable optical character recognition (OCR) indexes for Storm exports.
ED Analyzer: User
This license allows you to:
Run an instance of Early Data Analyzer on a computer.
ED Analyzer: Worker (Service Agent)
This license allows you to:
Run one Early Data Analyzer agent on one computer.
Edit/Review (QC)
The Edit/Review (QC) license is used to perform quality control and coding.
This license allows you to perform specific functions under the Edit menu :
Insert existing pages
Delete pages and documents
Replace image from file
Auto Number at a page/document level
Split
Merge
Move pages
Perform page level cleanup
Rotate
Image cleanup
Perform searches, filtering, grouping, coding, and tagging
Perform specific batch processing functions: Document numbering, image cleanup, scan
© 2015 LexisNexis. All rights reserved.
34
LAW PreDiscovery
for suspect footers, and update page data
Perform all folder functionalities
Perform deduplication after importing electronic discovery
Access the Log Viewer
Annotations (Required)
Set preferences
Electronic Discovery: e-Print
This license allows you to:
Batch print native files directly to paper.
Print slipsheets with document information.
Electronic Discovery: Loader
This license allows you to:
Import native files.
Import metadata.
Extract text from native files.
Deduplicate native files.
Electronic Discovery: TIFF/PDF
This license allows you to:
Convert native files to TIFF images or PDF files in LAW PreDiscovery.
Replace image or PDF file in LAW PreDiscovery with existing image or PDF file.
Convert single documents to TIFF images or PDF files (print file through native application
and save resulting TIFF or PDF to LAW PreDiscovery record).
Endorse
This allows you to:
Assign headers/footers/watermarks
Number documents.
Endorse documents.
Full Text Indexing
This license allows you to:
© 2015 LexisNexis, a division of Reed Elsevier Inc. All rights reserved.
Using LAW PreDiscovery
35
Index extracted text.
Perform full text searching in LAW PreDiscovery cases that are held in SQL Server (.mdb)
databases.
OCR (ABBYY FineReader)
This license allows you to:
Perform optical character recognition (OCR) on entire documents or pages.
Reset OCR flags.
Create searchable PDF or PDF/A files using the ABBYY FineReader OCR engine.
Perform OCR on East Asian languages (Chinese, Japanese, and Korean).
If you are using ABBYY FineReader, additional languages from ABBYY FineReader's
supported language list (http://finereader.abbyy.com/recognition_languages/) can be
added to LAW PreDiscovery upon request.
Languages added to LAW PreDiscovery will be available for selection in the Language
list on the OCR tab in the Options dialog box, and LAW PreDiscovery will be able to
recognize the language characters during the OCR process, and accurately search for
the language characters in the extracted OCR text.
OCR (ExperVision OpenRTK)
This license allows you to:
Perform OCR on documents or pages.
Reset OCR flags.
OCR (ExperVision PDF Add-On)
This license allows you to:
Create searchable PDF files using the ExperVision OpenRTK OCR engine.
Print
This license allows you to:
Apply headers, footers, and watermarks to printed pages.
Batch print image records.
Print slip sheets between documents with or without field information.
Scan
© 2015 LexisNexis. All rights reserved.
36
LAW PreDiscovery
There are two Scan licenses, Scan (Gold - Token based) and Scan (Platinum - Unlimited).
Both licenses provide the same permissions. The only difference between the two licenses is
the Scan (Gold - Token based) license is token based, so each time you scan, a scan token is
removed from your license key. With the Scan (Platinum - Unlimited) license, you can scan an
unlimited number of times.
This license allows you to:
Scan documents (all Scan features).
Edit documents (all Edit menu features, including Insert and Replace).
Create and delete folders.
Number documents.
Clean up images.
Reset OCR flags.
TSI Scan
This license allows you to:
Allows scanning to a LAW PreDiscovery case using LAWtsi (touch screen interface). For
more information, see the LAWtsi product sheet.
Related Topics
Profile Manager
Undocked Keys
License Matrix
Undocked Keys
The software licenses needed to run LAW PreDiscovery are provided on encrypted USB keys,
called license keys. LexisNexis can also provide encrypted USB keys that do not contain
licenses. These are called undocked license keys. Their purpose is to temporarily hold licenses
checked out from the license key, so that licenses can be used on a second computer. A typical
use of undocked keys is to furnish a laptop with the licenses necessary to conduct onsite
discovery operations.
To undock licenses you use LAW Profile Manager, specifying which licenses to checkout, and the
length of time to check them out. When the licenses are ready to be returned, you again use
© 2015 LexisNexis, a division of Reed Elsevier Inc. All rights reserved.
Using LAW PreDiscovery
37
LAW Profile Manager to reclaim the undocked keys to the license key.
To obtain undocked keys
There are two sources of undocked keys:
Undocked keys can be purchased from LexisNexis. For more information you can email
LexisNexis or call 1.866.831.0497.
LAW 4.0 license keys and Z-Print keys can be reused as undocked keys after
upgrading to LAW 5.0 or above.
License keys cannot be used as undocked keys.
To create an undocked key on a local server
1. Plug an undocked USB key into the LAW license server.
2. Start LAW Profile Manager. You can find a shortcut in the programs group for LAW
PreDiscovery.
LAW Profile Manager opens.
3. On the File menu, click Switch to Administrative Mode, and then type the administrator
© 2015 LexisNexis. All rights reserved.
38
LAW PreDiscovery
password.
4. Click OK.
5. On the Tools menu, click Options, and then deselect Enable LAW 5.0 license server
enumeration, if it is already selected.
6. Click OK.
7. On the File menu, click Undocked Key Admin, and then click Create Undocked Key.
8. Do one of the following, depending on how many license keys are plugged into the local
computer, not counting the undocked key:
If more than one license key is plugged into the local computer, you will see the Select
License Key dialog box, which lists the license keys plugged into the computer. Select
a license key and then click OK. The Select Licenses dialog box opens.
Or
If just one license key is plugged in, the Select Licenses dialog box opens
immediately.
9. Select licenses to check out, select an expiration date, and then click OK.
The Undock Successful confirmation box opens.
© 2015 LexisNexis, a division of Reed Elsevier Inc. All rights reserved.
Using LAW PreDiscovery
39
10. Click OK.
The undocked key may be detached from the current workstation and used on a
different LAW workstation.
To create an undocked key on a local server (alternative method)
1. Plug an undocked USB key into the LAW license server.
2. Start LAW Profile Manager. You can find a shortcut in the programs group for LAW
PreDiscovery.
LAW Profile Manager opens.
3. On the File menu, click Switch to Administrative mode, and then type the administrator
password.
© 2015 LexisNexis. All rights reserved.
40
LAW PreDiscovery
4. Click OK.
5. On the Tools menu, click Options, and then deselect Enable LAW 5.0 license server
enumeration, if it is already selected.
6. Click OK.
7. Click Advanced, type the administrator password, and then click OK.
LAW Profile Manager (Administrative Mode) opens.
8. Select a key.
Licenses held on the selected key are listed. Licenses showing 1 or higher in the Free
column are available for checkout.
© 2015 LexisNexis, a division of Reed Elsevier Inc. All rights reserved.
Using LAW PreDiscovery
9. On the Server Key menu, click Create Undocked Key.
The Select Licenses dialog box appears.
© 2015 LexisNexis. All rights reserved.
41
42
LAW PreDiscovery
10. Select licenses to check out, select an expiration date, and then click OK.
The Undock Successful confirmation box opens.
11. Click OK.
The newly created undocked key appears below the key. The undocked key may be
detached from the current workstation and used on a different LAW workstation.
12. Optionally, click the undocked key.
License key details are visible, including key serial number, key type, check-out date,
expiration date, and the names of checked out licenses.
To reclaim undocked keys
1. Plug the undocked USB key into the LAW license server.
2. Start LAW Profile Manager. You can find a shortcut in the programs group for LAW
PreDiscovery.
LAW Profile Manager opens.
© 2015 LexisNexis, a division of Reed Elsevier Inc. All rights reserved.
Using LAW PreDiscovery
43
3. On the File menu click Switch to Administrative Mode, and then enter the administrator
password.
4. Click OK.
5. On the Tools menu, click Options, and then deselect Enable LAW 5.0 license server
enumeration, if it is already selected.
6. Click OK.
7. On the File menu, click Undocked Key Admin, and then click Reclaim Undocked Key(s).
8. In the Reclaim Successful confirmation, click OK.
LAW reclaims all licenses on the undocked key and returns them to the server key.
To view properties of a local server, keys, and undocked keys
1. Start LAW Profile Manager. You can find a shortcut in the programs group for LAW
PreDiscovery.
LAW Profile Manager opens.
© 2015 LexisNexis. All rights reserved.
44
LAW PreDiscovery
2. On the File menu click Switch to Administrative Mode, and then enter the administrator
password.
3. Click OK.
4. On the Tools menu, click Options, and then deselect Enable LAW 5.0 license server
enumeration, if it is already selected.
5. Click OK.
6. Click Advanced, type the administrator password, and then click OK.
LAW Profile Manager opens in administrative mode. The license servers are shown with
license keys and any undocked keys.
© 2015 LexisNexis, a division of Reed Elsevier Inc. All rights reserved.
Using LAW PreDiscovery
45
7. Select license servers, keys, and undocked keys to view the details of each, as described
in the following table:
Click this:
License server
To view these details:
Server name
IP address
Key count
Keys
License types contained on the key
Total of each type of license
Number of each type in use
Number of each type available
© 2015 LexisNexis. All rights reserved.
46
LAW PreDiscovery
Undocked keys
Key serial number
Type (public or private)
Check-out date
Expiration date
Names of any checked out licenses, for example Electronic
Discovery: Loader
Related Topics
License Types
Profile Manager
License Matrix
About the Evaluation Version
© 2015 LexisNexis, a division of Reed Elsevier Inc. All rights reserved.
Using LAW PreDiscovery
47
Profile Manager
Profile Manager is the utility you use to manage licenses. All licenses are maintained on one or
more Sentinel USB hardware keys plugged into the USB ports of computers.
You use Profile manager to perform the following tasks:
On the computer that has a USB key plugged into it, you use Profile Manager for many
purposes, including: downloading licenses from LexisNexis, selecting licenses to use on a
computer, creating profiles, identifying licenses in use, and identifying licenses that are
currently available.
On a computer that is not a license server but is running LAW PreDiscovery, you use LAW
Profile Manager to:
Establish a connection to the license server.
View available licenses on the server.
Check out available licenses for use on that computer.
To start Profile Manager
Click Start, point to All Programs, point to LAW PreDiscovery, and then click Profile
Manager.
To create or change a password
To create a password for the first time on a computer
1. Click Start, point to All Programs, point to LAW PreDiscovery, and then click Profile
Manager.
2. Click the Advanced button
A prompt to enter an administrative password appears. The password is stored at a
workstation level, meaning each computer on which LAW is launched, whether running
locally or in a client/server configuration, will prompt for a password when executed
initially.
3. In the Enter Admin Password dialog box type a case-sensitive password that is at least
6 characters long and then type it again to confirm.
4. Click OK.
To change the password on a computer
1. Click Start, point to All Programs, point to LAW PreDiscovery, and then click Profile
Manager.
2. Click the Advanced button.
3. In the LAW Profile Manager (Administrative Mode) dialog box appears.
© 2015 LexisNexis. All rights reserved.
48
LAW PreDiscovery
4. On the Tools menu click Change Administrative Password.
5. In the Enter Admin Password dialog box type a case-sensitive password that is at least
6 characters long and then type it again to confirm.
6. Click OK.
A prompt for a password after clicking Advanced means that you are not running Profile
Manager in administrative mode. For more information, see the section To switch to
Administrative Mode in this topic.
To connect to a license server
1. When you start LAW for the first time on a computer, the Change License Server dialog
box appears.
2. Type the computer name to which the LAW license key is physically attached.
If the license key is plugged into the computer you are currently working at, you can
simply type LOCALHOST.
If the license key is plugged into a different computer, type the name of that
computer. To find the name of a computer, log on to the computer, click Start, rightclick My Computer, and then click Properties. Select the Computer Name tab. The
computer name appears in the Full computer name field.
3. Click OK.
If a valid host name has been entered, LAW Profile Manager starts.
If a license key is not found on the specified server, a message will appear stating that
the key was not found and will ask to try another server. If this happens click Yes, and
then follow the prompts to change the license server.
To select licenses by using a license profile
Each time you start LAW, instead of selecting licenses singly, you can load a license profile.
1. Start LAW Profile Manager.
© 2015 LexisNexis, a division of Reed Elsevier Inc. All rights reserved.
Using LAW PreDiscovery
49
2. Check out licenses by means of a license profile by selecting one of the following:
<Any Available Licenses> Checks out one of each available license. These licenses
will not be available to other workstations using the same license key.
<Custom> You can check out specific licenses based on their tasks. For example, if you
need to scan documents, you can select just the Scan license. Click OK to open the list
of licenses.
User defined. Any user-defined license profile is listed below the two system profiles.
To create a user-defined license profile, see the next section of this topic.
3. Select the licenses needed for the session and then click OK.
Only the selected licenses are checked out and available on that workstation. If one or
more license modules cannot be checked out, a message box appears stating which
licenses could not be acquired. This message will not appear if the CD Publishing license
could not be acquired.
To create custom profiles
1. Start LAW Profile Manager.
2. Click Add.
If the Add button is grayed out, switch to administrative mode to enable it. On the File
menu, click Switch to Administrative Mode and then enter and confirm the password,
© 2015 LexisNexis. All rights reserved.
50
LAW PreDiscovery
click OK twice and then click Add.
3. In the Add New Profile dialog box type the name of the new profile and a description.
4. Select the licenses to include in the profile.
5. To set this profile as the default profile for the current user, select Default Profile.
6. Click OK.
The new license profile is displayed in the LAW Profile Manager dialog box. If selected as
the default profile, it is automatically highlighted.
7. To automatically check out licenses and bypass the LAW Profile Manager, select the
profile as the default profile. Then deselect Prompt for profile when starting LAW in the
LAW Profile Manager dialog box.
To re-enable the setting that automatically opens Profile Manager, set Prompt=1 in the
profman.ini file in <application path>\ProfMan. The section in the INI file containing
this setting is in the following format: [<user name>].
To hide the system profiles
Hiding a profile can be useful to safeguard against inadvertently selecting the wrong profile.
For example, Profile Manager populates the Profiles area with two system profiles <Any
Available Licenses>, and <Custom>. To prevent users from checking out more licenses
than needed, these profiles may be hidden.
1. Start Profile Manager.
2. Click File, and then click Switch to Administrative Mode. Enter the administrative
password, click OK, and then OK again.
3. Right-click the system profile to hide and then click Hide System Profile.
To restore the system profiles
Right-click anywhere in the Profile area and then click Restore Hidden Profiles.
About Administrative Mode
You must switch Profile Manager to administrative mode before you can perform several
administrative functions, such as reclaim undocked keys, work with licenses, and work with
profiles.
One way to switch to administrative mode is to start the Profile Manager, and then, on the
File menu, click Switch to Administrative Mode and then type the administrator password.
Alternatively, there are many features that require you to provide the administrator
password before continuing. Switching to administrative mode enables you to:
Add, edit, and delete profiles.
© 2015 LexisNexis, a division of Reed Elsevier Inc. All rights reserved.
Using LAW PreDiscovery
Create and reclaim undocked keys.
Refresh licenses to add any newly purchased licenses to the server key.
Enter the advanced view of the Profile Manager.
Hide/restore system profiles.
To switch to Administrative Mode
1. Click Start, point to All Programs, point to LAW PreDiscovery, and then click Profile
Manager.
The LAW Profile Manager dialog box appears.
2. Click File and then click Switch to Administrative Mode.
3. The Enter Password dialog box appears.
© 2015 LexisNexis. All rights reserved.
51
52
LAW PreDiscovery
4. Type the administrative password and then click OK.
To configure administrative details
1. Click File and then click Switch to Administrative Mode.
© 2015 LexisNexis, a division of Reed Elsevier Inc. All rights reserved.
Using LAW PreDiscovery
2. The Enter Password dialog box appears.
© 2015 LexisNexis. All rights reserved.
53
54
LAW PreDiscovery
3. Type the administrative password and then click OK.
4. In the Success dialog box click OK.
5. Click Advanced.
Profile Manager searches for license servers.
The LAW Profile Manager (Administrative Mode) dialog box appears.
© 2015 LexisNexis, a division of Reed Elsevier Inc. All rights reserved.
Using LAW PreDiscovery
55
6. Use the following menu commands to configure the administrative mode of Profile
Manager:
Use the
File menu
When you want to
Refresh the view of profiles.
Refresh the view of available license servers.
Profile menu
Add, edit, and delete profiles.
Set a profile as the default.
Server Key menu
Change the license server.
Manage undocked keys.
Refresh the view of license counts when new licenses have
been purchased and added to the existing server key.
Tools menu
Change the Administrative password.
Disable or enable automatic refresh of the view of network
server keys. This option is controlled by the Enable server key
enumeration setting, which is enabled by default. When
enabled this option forces the Profile Manager to find all server
keys on the network and list them in the License Servers
section.
Profiles tree
Add a new profile.
View details about all profiles stored on the current computer as
well as the two default license selection methods. When a
profile is selected, the right pane will display the name,
description, and licenses stored in that particular profile.
License Servers
tree
© 2015 LexisNexis. All rights reserved.
View details about the current license server, including its IP
address, host name, and concurrent user counts (see next
section). If the server key enumeration option is enabled, all other
server keys on the network will be displayed here as well. If any
undocked keys currently exist, they will be displayed below the
56
LAW PreDiscovery
server key's serial number.
License: Lists each type of LAW license. Licenses that do not exist
on the key will be grayed out.
Total: Displays the total number of each particular license on the
current server key.
In Use: Displays the number of licenses in use for each type of
license.
Free: Displays the number of available licenses for each type of
license.
About concurrent user licenses
The total number of user licenses controls the total number of users that may work
concurrently in LAW PreDiscovery. Concurrent licensing means that users can run LAW
PreDiscovery using any combination of licenses, at the same time. For example, if a key
contains 10 concurrent user licenses, and 3 workstations are currently logged into LAW,
then 7 concurrent user licenses will be available at that time.
In the License Servers tree, the serial number of the license server key is listed with two
numbers in parentheses beside it. These two numbers reflect concurrent user license
counts.
The first number indicates the number of concurrent licenses in use.
The second number indicates the total number of concurrent licenses contained on the
server key.
For example, the '5' in (5/25) means that LAW PreDiscovery is running on 5 computers. The
'25' means that there is a total of 25 concurrent licenses on the key. In this example, you
could conclude that 20 concurrent user licenses are still available.
The amount of concurrent user licenses that you may work with depends on a number of
factors. If more are needed contact LexisNexis.
To add new licenses to an existing Server Key
The instructions in this procedure apply only after you have purchased additional licenses
from LexisNexis sales and a sales representative has updated the license counts.
1. Log in to a computer designated as a license server.
2. Start the Profile Manager.
3. Click File and then click Switch to Administrative Mode.
© 2015 LexisNexis, a division of Reed Elsevier Inc. All rights reserved.
Using LAW PreDiscovery
57
4. The Enter Password dialog box appears.
5. Type the administrative password and then click OK.
6. In the Success dialog box click OK.
7. On the File menu click Refresh License(s) from Internet.
The key will be updated with the new license counts.
To acquire or release licenses
To avoid closing LAW and launching the Profile Manager in order to change the selection of
license modules, licenses can be checked out and released from within the LAW application.
1. In LAW PreDiscovery on the Help menu, click About LAW and then click Licenses.
The License Information dialog box appears.
© 2015 LexisNexis. All rights reserved.
58
LAW PreDiscovery
The Active Key area displays the license server name, the serial number of the key(s),
and expiration date(s) (if applicable).
The Licenses area displays selected licenses. A selected license means it is checked
out.
2. Perform one of the following:
To acquire a license, select it. A message box will appear indicating whether license
acquisition was successful.
To release a license, de-select it. No message box will appear.
At least one license must remain checked out while LAW is running.
If the OCR license is released, OCR Add-on (PDF) will be automatically released
because it also depends on the OCR license. This feature will be disabled when an
undocked key or temporary license is used or while running LAW in demonstration
mode.
© 2015 LexisNexis, a division of Reed Elsevier Inc. All rights reserved.
Using LAW PreDiscovery
59
Related Topics
License Types
Undocked Keys
License Matrix
About the Evaluation Version
An evaluation version of LAW PreDiscovery™ is available for download from http://
law.lexisnexis.com/law-prediscovery/ordering.
Note the following facts that apply to the evaluation version:
The evaluation version may be run 30 times.
You can load as many documents to a case as you like, however if you add more than 100
documents you will not be able to open the case later on.
Existing case files with more than 100 documents cannot be opened by the evaluation
version.
A subset of the most commonly used ISIS scanner drivers is included with the evaluation
version. If your scanner is not listed you contact LexisNexis support at
[email protected] to request a driver for your scanner model.
Adding more than 100 documents to a case and scanning with document break sheets or
scanning to single pages can result in unexpected behavior. Any remaining pages
scanned in a batch after the limit has been reached will be added to the current document.
Related Topics
Contacting LexisNexis
© 2015 LexisNexis. All rights reserved.
60
LAW PreDiscovery
Early Data Analyzer
The Early Data Analyzer module is a new component available with the LAW PreDiscovery 6.0
suite. This module offers a new workflow for dealing with electronic discovery to dramatically
reduce the cost and time associated with handling large electronic discovery productions. Early
Data Analyzer is a standalone module that allows you to search and cull data where it resides
on disk without requiring the costly process (in terms of time and disk space) of full expansion.
Once the initial data set has been indexed and culled based on several available filtering
mechanisms, a reduced data set can be passed directly to LAW for full expansion and
production capabilities.
In this section
Overview
Provides an introduction to the workflow for using of Early Data Analyzer.
Startup and Configuration
Describes the first-time startup of Early Data Analyzer, how to configure a connection to
SQL Server, and how to setup a case folder. Provides instructions for re-configuring
environment variables after the initial setup.
Cases in Early Data Analyzer
Provides procedures for creating cases, opening them, and for viewing their properties.
Describes how to suspend cases from processing and how to lift cases from suspension.
Provides instructions for working with the case list.
Importing
Discusses procedures for importing files into Early Data Analyzer. Explains how to create
custodians, add items for processing, and how to monitor the process of importing files into
custodians.
Filtering
Provides procedures for applying filters to case files in Early Data Analyzer.
Searching
Describes the search functionality in Early Data Analyzer, and provides procedures for
creating and running search queries in Early Data Analyzer.
Tagging
Provides procedures for applying tags to case files in Early Data Analyzer.
Performing OCR
Describes the purpose for performing OCR on case files in Early Data Analyzer and provides
procedures for performing OCR.
Using the Global Dashboard
Describes how to manage processing status of individual cases. Explains how you can
© 2015 LexisNexis, a division of Reed Elsevier Inc. All rights reserved.
Using LAW PreDiscovery
61
monitor the overall status of: individual case processing, Early Data Analyzer services, and
individual computers or clients that are engaged in processing. Describes possible causes of
case blacklisting and how to restart a blacklisted case.
Reviewing Exceptions
Describes mechanisms for conducting reviews and the processes and procedures for
carrying out reviews.
Exporting
Describes how to configure an export set and how to send it directly into a LAW case.
Creating Reports
Lists the reports that Early Data Analyzer provides and shows how to generate them.
About Early Data Analyzer
This topic discusses the features in Early Data Analyzer that enable you to perform the
essential steps of a prefiltering workflow; also discussed are administrative features that you
use in an ongoing or as-needed basis.
Workflow overview
A basic workflow for using Early Data Analyzer is described as follows:
1. Configure environment settings. This is a one-time task in which you configure settings
in Early Data Analyzer that apply across cases. For example, you setup a connection to
SQL Server, select a license server, and identify a storage location for Early Data
Analyzer cases. For more information on initial setup and configuration of Early Data
Analyzer, see: Startup and Configuration.
2. Create a case. Creating a case in Early Data Analyzer involves specifying a case name
and other basic properties, verifying the data connection, selecting analysis options, and
setting options for indexing. For more information on creating cases, see Cases in Early
Data Analyzer.
3. Import files. Early Data Analyzer provides drag and drop functionality for adding items
into the import queue. Custodians can be created automatically as items are added.
During the import phase, you also create custodians, and commit files to the case. The
files are then inventoried and indexed and made ready for filtering. For more information
on importing, see: Importing.
4. Configure filters. Early Data Analyzer provides several methods to pre-filter source data.
These methods are described in the following table:
© 2015 LexisNexis. All rights reserved.
62
LAW PreDiscovery
Filter type
Removes from the export set:
File Hash
File types that do not contain user-related data.
Duplicate Document Documents that are identical to the first identified instance of a
document.
Date Range
E-mails and files whose sent date falls outside a date range that
you specify.
File Type
File types that do not match those you explicitly allow. For
example, if your filter lists PDF files, all other kinds of files are
excluded.
E-Mail Sender
Domain
E-mail sent from domains other than those you specify.
Language
Files that do not contain the languages that you specify.
For more information on filtering, see: Filtering.
5. Tag files. Tags can be applied to files in Early Data Analyzer to help track, sort, and
organize the documents in a case. For example, tags can be applied to documents that
need to be converted to TIFF, produced to paper, responsive documents, etc. The
tagging feature makes it easier for any project, scanned or electronic discovery, to be
produced. For more information on tagging, see: Tagging.
6. Export to LAW. Exporting from Early Data Analyzer involves generating an export set
and then sending the export set to a LAW case. The export function also allows you to
override filtering to include entire e-mail threads containing a filtered document or to only
export filtered items with a specified tag. For more information on exporting from Early
Data Analyzer, see: Exporting.
Administrative features
Early Data Analyzer provides the following administrative features:
Global Dashboard - managing processing across cases. Early Data Analyzer is
designed to make full use of the processing power of multiple networked computers to
efficiently process multiple cases. The Global Dashboard is the monitoring instrument in
Early Data Analyzer for tracking the status of the local system and its running services,
along with the status of working cases, and services across all computers sharing in the
workload. For more information on using the Global Dashboard, see: Using the Global
Dashboard.
Reports. Early Data Analyzer provides the following report types:
Report
Description
Document Timeline
Summarizes the timeline of the documents in the current
case.
Exception Report
Displays a report of any errors or other exceptions that my
have been logged during the processing of the case.
Export Exclusion Log
A tab-delimited text-based log file containing a list of all
© 2015 LexisNexis, a division of Reed Elsevier Inc. All rights reserved.
Using LAW PreDiscovery
63
documents not included in the export set provided to LAW
PreDiscovery.
Export Inclusion Log
A tab-delimited text-based log file containing a list of all
documents included in the export set provided to LAW
PreDiscovery.
Export Report
Provides a summary of the documents exported to LAW
PreDiscovery across all export sessions from Early Data
Analyzer for the current case grouped by custodian.
File Type Summary
Summarizes the documents in the current case by file type.
This report includes the total number of documents by file
type and the total file size of each file type.
Filter Summary
Summarizes the results of filtering operations.
Language Identification
Summary
Summarizes the language identification results of the
documents in the current case.
Search Report
Provides a summary of the search hit results for the search
terms defined in the current case grouped by search term
and custodian.
Top 25 File Types
Summarizes the documents in the current case by the top
25 file types. This report includes the total number of
documents by file type and the total file size of each file
type.
User Audit Log
A tab-delimited text-based log file containing a list of
qualified actions performed by users in the case.
For more information on using the reporting feature of Early Data Analyzer, see Creating
Reports.
Exception monitoring. Early Data Analyzer provides robust exception monitoring so you
can more easily detect typical problems with data sources, for example, encrypted files
and corrupted mail stores. For more information on exception monitoring in Early Data
Analyzer, see: Reviewing Exceptions.
Related Topics
Startup and Configuration
Cases in Early Data Analyzer
Importing
Filtering
Tagging
Performing OCR
© 2015 LexisNexis. All rights reserved.
64
LAW PreDiscovery
Searching
Using the Global Dashboard
Reviewing Exceptions
Exporting
Creating Reports
Startup and Configuration
When you run Early Data Analyzer for the first time, you must perform a few configuration
tasks:
1. Specify a connection to SQL Server. As a part of this step, you must select an authentication
method for Early Data Analyzer to use for logging into SQL Server. You can use either a
Windows domain login or a SQL Server security login.
Note that specifying an authentication method for connecting to SQL Server is different
from specifying the authentication method for running Early Data Analyzer as a Windows
service. This distinction is important should you need to troubleshoot Early Data Analyzer,
especially if running in a distributed environment. You select an authentication method for
the Early Data Analyzer service when you run the full installation of LAW PreDiscovery. You
can change the authentication method for SQL Server by opening the environment
settings in Early Data Analyzer. You can change the authentication method of the Early
Data Analyzer service by using the Windows Services management console. For more
information on installing Early Data Analyzer and LAW PreDiscovery, see: Installing LAW
Prediscovery.
2. Select a home directory for storing case files. The home directory should be accessible via
UNC path to all computers that will participate in processing.
3. Select a license server.
After configuring these elements, you can create cases and begin prefiltering operations
immediately. If you want to run prefiltering operations using multiple computers, you can
add more Early Data Analyzer clients by repeating the configuration steps on different
computers.
Configuring environment settings at startup
1. Click Start and the point to All Programs.
2. Point to LexisNexis, point to Early Data Analyzer, and then click Early Data Analyzer.
The Environment Configuration dialog box appears.
© 2015 LexisNexis, a division of Reed Elsevier Inc. All rights reserved.
Using LAW PreDiscovery
65
3. Configure options as needed:
Option
Description
Server
Type the name of the SQL Server computer followed by a slash
(\) character, followed by the SQL Server instance name. For
example, if the computer name of the server is SomeServer and
the name of the SQL Server is SQLEXPRESS, you would type:
SomeServer\SQLEXPRESS.
Database
Use the default database name provided: EDA_Management.
Home Directory
The home directory is where all shared configuration data is
stored. It is the default directory for new Early Data Analyzer
cases. It is used by multiple installations of the application so
that each one can access shared resources and configurations.
If you plan to use one or more additional computers to process
Early Data Analyzer cases then change the default path to a
UNC path, for example: \\SomeServer\SomeFolder\MyCases\.
The folder must also be accessible by all computers that
participate in processing.
If a mapped drive is used, the mapped drive path is converted
automatically to a UNC path.
Use Windows
Authentication
Select this option to connect to the database server using the
current Windows login.
Licensing Server
Provide the name of a computer that has license keys. The
warning icon is visible if the value you provide resolves to the
© 2015 LexisNexis. All rights reserved.
66
LAW PreDiscovery
local computer.
Law Case List
Provide a path to the case list database file. By default, this value
is set to: C:\Program Files\LAW50\caselist.mdb.
Import settings from Click this link to retrieve settings from the database for the latest
the management
location of the home directory. This is useful for reconfiguring
database
clients if the home directory was moved.
4. Click OK.
Creating a case is the next step. For more information on creating and configuring a new
Early Data Analyzer case, see Cases in Early Data Analyzer.
You can re-configure the settings for Early Data Analyzer after you have run it for the
first time. To do so, close Early Data Analyzer, delete or rename common.ini located in
C:\Documents and Settings\All Users\Application Data\LexisNexis\EdAnalyzer\Settings,
and then restart Early Data Analyzer. When you open Early Data Analyzer again, the
Configure Environment dialog box opens.
Editing environment settings
1. Click the tool icon (
) located in the upper right corner of Early Data Analyzer.
2. Click Environment Settings.
The Options dialog box opens.
© 2015 LexisNexis, a division of Reed Elsevier Inc. All rights reserved.
Using LAW PreDiscovery
67
3. Configure options as needed.
For descriptions of the environment settings, see the table in the preceding section of
this topic. For information on how to configure settings for individual cases, see: Cases in
Early Data Analyzer.
Editing any of the following environment configuration options requires a restart of Early
Data Analyzer:
SQL Server computer or instance name, database name, authentication method, or
license server.
4. Click OK.
Related Topics
© 2015 LexisNexis. All rights reserved.
68
LAW PreDiscovery
About Early Data Analyzer
Cases in Early Data Analyzer
Importing
Filtering
Tagging
Performing OCR
Searching
Using the Global Dashboard
Reviewing Exceptions
Exporting
Creating Reports
Cases in Early Data Analyzer
A case in Early Data Analyzer functions as unit of storage for document metadata and
processing information. Note the following facts about cases in Early Data Analyzer:
How you work with cases. In Early Data Analyzer you can create, open, and view the
status of an Early Data Analyzer case. You can also manage the queue by which cases are
executed. By default, cases are executed for processing on a first-come first-served basis.
However, cases in the processing queue can be suspended from processing or lifted from
suspension. For more information on working with the case queue, see: Using the Global
Dashboard.
How cases in Early Data Analyzer relate to cases in LAW. Although similar in purpose to
cases in LAW PreDiscovery, Early Data Analyzer cases are stored and managed separately
from LAW PreDiscovery cases.
To create an Early Data Analyzer case
1. Open Early Data Analyzer.
Early Data Analyzer opens to the Case Manager tab.
2. Click the Create New Case button.
The New Case Settings dialog box opens with the General tab open.
3. Define the general case settings.
© 2015 LexisNexis, a division of Reed Elsevier Inc. All rights reserved.
Using LAW PreDiscovery
69
1. On the General tab, configure general case properties as described in the following
table:
Option
Description
Name
Type a name for the case. The case name must be unique. After the
case is created, you cannot edit this selection. The case name will
be appended to the default case directory path as previewed in the
Case Directory field.
Description
Optionally, type a description of the case.
Client
Optionally, type the name of a client or select one from the list.
Case Directory Type the path to a folder. To share processing of cases among
multiple computers, you must use a network path to a folder that is
accessible to all computers that will participate in the processing of
cases. If you will not use other computers to process cases, you can
use a path to a folder on the local computer. After the case is
created, you cannot edit this selection.
Case is active
Select this option to hide cases that are no longer in production.
This setting does not affect the case’s ability to be processed
however.
2. Click the Database tab.
© 2015 LexisNexis. All rights reserved.
70
LAW PreDiscovery
4. Define the database settings.
1. On the Database tab, use the values selected when Early Data Analyzer was first
run, or configure new options as described in the following table:
Option
Description
Server
Specify the computer name of the database server
followed by the name of the instance of SQL Server, for
example:
MyServ erCom puter\SQLEXPRESS
The server name and instance name are not casesensitive.
A server name of LOCALHOST may be used if SQL Server is
running on the same computer that you are using to create
the case.
After the case is created, you cannot edit this selection.
Database
This field is automatically populated from the case name
followed by -EDA. If you edit the default database name,
note that the name must be unique across all Early Data
Analyzer cases held on the database server.
© 2015 LexisNexis, a division of Reed Elsevier Inc. All rights reserved.
Using LAW PreDiscovery
71
After the case is created, you cannot edit this selection.
Authentication mode
Provides security credentials to the database server. The
supplied credentials or user account must have the SQL
Server dbcreate permission enabled for it.
Windows authentication. (Recommended) It is
recommended that you select Use Windows
Authentication to use your current Windows login as a
credential for connecting to SQL Server.
SQL Server authentication. Fill in the User and
Password fields. These fields are only enabled if Use
Windows Authentication is de-selected. Type the user
name and password associated with a user account
managed by SQL Server. By default, the user name is
supplied as: law_user; and the password is: law32user.
The user name is not case sensitive.
2. Click the Test Connection button to try the connection to SQL Server.
A message box says whether the connection succeeded or not. If the connection
attempt failed then review what you typed in the server field. The syntax is:
ServerComputerName\SqlInstanceName. If after reviewing the syntax and values used
in the server field, the connection still fails, contact your database administrator.
3. Click the Analysis tab.
5. Define the analysis settings.
© 2015 LexisNexis. All rights reserved.
72
LAW PreDiscovery
1. On the Analysis tab, configure options as described in the following table:
Option
Description
Deduplication Mode
In most cases, either the MD5 or SHA1 mode provide sufficient
deduplication integrity. However, if there is a question about
which to use, consult applicable policies for your organization.
The two modes with Custodian in the name indicate that
deduplication will compare sources only within each custodian
and not across custodians.
MD5. Uses 128-bit string; used to deduplicate files
across all custodians.
SHA1. Uses a 160-bit string; used to deduplicate files
across sources.
MD5Custodian. Uses a 128-bit string; used to
deduplicate files within a source.
SHA1Custodian. Uses a 160-bit string; used to
deduplicate files within a source.
For more information on sources in Early Data Analyzer, see:
Importing Custodians.
Analysis Level
Full. Performs content extraction. Allows full-text
searching.
NoContent. Skips content extraction. Does not allow fullcontent searching. Selecting this option can help to
© 2015 LexisNexis, a division of Reed Elsevier Inc. All rights reserved.
Using LAW PreDiscovery
73
improve performance.
Maximum Agents
Type or scroll to the maximum number of agents that can
process data for the case at any given time. Use this setting
to manage hardware resources when processing multiple
cases at the same time. The Maximum Agents field defaults to
0. When the Maximum Agents field is set to 0, all available
agents will process data for this case.
Content Extraction
Select Save all content to disk if you are using SQL Express
(recommended.) This setting prevents the storage of content
directly in the database. Using this setting can help to avoid
reaching the maximum database size limitation imposed by
SQL Express.
NIST Identification
Select Identify NIST (NSRL) items to enable removal of files
that are unlikely to be responsive, such as system files.
If you do not already have the most recent version of the NIST
database, then download the latest NIST filter definitions
using the link provided in the NIST Identification area. This link
downloads EdLoaderNistFilter.zip, which you must extract.
Click the path button (...) to identify the path to the NIST filter
database file. (EdLoaderNsrlFilter-%version%.mdb)
Language Analysis
Select this option to identify language content during
analysis.
The option to restrict language identification to common
languages can help to improve accuracy of language
identification.
The option to limit scanning to a specified number of KB can
help to improve performance. Leave the value set to 0 to scan
files entirely.
2. Click the Indexer tab.
6. Define the index settings.
© 2015 LexisNexis. All rights reserved.
74
LAW PreDiscovery
1. On the Indexer tab, configure options as described in the following table:
Option
Description
General
options
The following indexer options may be selected as needed:
Accent-sensitive. The indexer will take accents into account in
indexing words with this option enabled. For most users this is
not recommended because this option increases the chance of
missing the retrieval of a document if an accent was omitted in
one letter.
Automatically recognize dates, e-mail addresses, and credit
card numbers. Enable this option to have the indexer scan for
anything that looks like a date, e-mail address, or credit card
number.
Case-sensitive. The indexer will take capitalization into account in
indexing words when this option is enabled. In a case-sensitive
index, "CREDIT", "Credit", and "credit" would be three different
words. This option can be useful, for example, when you are
searching for a term, such as a capitalized name that can be
confused with a common non-capitalized word.
Insert word breaks between Chinese, Japanese, and Korean
characters. Check this box if you plan to search Chinese,
Japanese, or Korean documents that do not contain word breaks.
Some Chinese, Japanese, and Korean text does not include word
breaks. Instead, the text appears as lines of characters with no
© 2015 LexisNexis, a division of Reed Elsevier Inc. All rights reserved.
Using LAW PreDiscovery
75
spaces between the words. Because there are no spaces
separating the words on each line, the indexer sees each line of
text as a single long word. To make this type of text searchable,
enable automatic insertion of word breaks around Chinese,
Japanese, and Korean characters so each character will be
treated as single word.
Use local folder for temporary files during indexing. During
indexing, the dtSearch Engine may need to create temporary files
to store word lists that are too large to fit into memory. By
default, these files will be placed in the index folder. Use this
setting to instruct the indexer to use the local user’s temporary
folder for these files. The indexer will automatically delete the
word list files when the index update completes. This is the
recommended setting for cases on network drives, NAS, or SAN
devices.
Hyphens
Treat hyphens as searchable. For example, first-class is indexed as
first-class.
Ignore hyphens. For example, first-class is indexed as firstclass.
Treat hyphens as spaces. For example, first-class is indexed as first
and class.
All three. For example, first-class is indexed as first-class, firstclass,
first, and class.
The hyphens, case and accent-sensitive settings are only applied to new indexes. To
apply a change to one of these settings to an index, all documents in the case must
be reindexed by rebuilding the index. For more information about rebuilding indexes,
seeManaging Indexes.
2. Click the OCR tab.
7. Define the OCR settings.
© 2015 LexisNexis. All rights reserved.
76
LAW PreDiscovery
1. On the OCR tab, configure the optical character recognition (OCR) options as
described in the following table:
Option
OCR Engine
Description
LAW PreDiscovery™ supports two OCR engines. Select the OCR
engine you want to use:
ABBYY FineReader
Installed seperately from LAW PreDiscovery and can be
obtained by LexisNexis when purchasing the ABBYY OCR
license.
Slower than ExperVision OpenRTK but supports Chinese,
Japanese, and Korean (CJK) languages.
Can create PDF/A files.
Able to run multiple instances on a single PC, one
instance per CPU core.
ExperVision OpenRTK
Is included with the LAW installer.
Is the faster of the two engines by 2-3 times.
Limited to one instance per machine.
© 2015 LexisNexis, a division of Reed Elsevier Inc. All rights reserved.
Using LAW PreDiscovery
77
Both engines support the creation of searchable PDF files and
are able to produce < image >.ocr files, which are used in the
Storm and IPRO applications for highlighting search hits on
images.
Page Layout
Select the page layout of the pages.
Auto Detect. Automatically determines the layout of the
page. This is the default option.
Single Column. Specifies that one column of text exists
on a page.
Quality
Specify the type of printing technology used to create the
original documents and the print quality of the scanned
pages.
Normal. Use this for pages printed with inkjet printers,
laser printers, or offset lithography. This is the default.
Normal (Degraded). The same as Normal, except that the
print quality is known to contain some distortion or
blemishes due to poorly printed originals, photocopying,
heavy use, or aging. (ExperVision OpenRTK only)
Typewriter (ABBYY FineReader only)
Dot Matrix. Use this for pages printed using dot matrix
printers, which include many early printer models as well as
many types of printed receipts, such as from cash registers
and ATM machines.
Dot Matrix (Degraded). The same as Dot Matrix, except
that except that the print quality is known to contain some
distortion or blemishes due to poorly printed originals,
photocopying, heavy use, or aging. (ExperVision OpenRTK
only)
OCR A. OCR-A font is used in original documents. (ABBYY
FineReader only)
OCR B. OCR-B font is used in original documents. (ABBYY
FineReader only)
MICR. Magnetic Ink Character Recognition (MICR) font is
used in original documents. (ABBYY FineReader only)
Note also the following when selecting a quality option:
When a setting other than Normal is selected, OCR
engine performance may be reduced.
ABBYY FineReader engine supports a quality setting called
Magnetic Ink Character Recognition (MICR). This is the
technology used for the routing numbers on personal
checks and for other documents designed to be machine
readable.
Language
© 2015 LexisNexis. All rights reserved.
The Language setting is used to specify the language
dictionary the engine should use during the OCR process. If
the correct language is not selected prior to the OCR process,
the characters may not be recognized properly.
78
LAW PreDiscovery
If ABBYY FineReader is the selected engine, English will
automatically be used as a second language if a non-English
language is selected. For example, if Greek is selected and
both Greek and English exist in the source image, ABBYY
FineReader differentiates the languages and performs
recognition for both. However, if a document contains Greek,
and English is selected as the language, Greek characters will
not be interpreted or rendered correctly in the text. This only
pertains to documents containing Unicode characters, such as
Chinese, Japanese, Korean, Greek, or Russian. Languages
that share a common many common characters in their
alphabet, for example, English, Spanish, French, German,
Dutch, and Portuguese will be interpreted correctly when
existing in the same document if any of these languages are
selected.
Auto Rotate
The Auto Rotate setting determines whether the OCR engine
automatically rotate images for the OCR output. The three
options are:
Always ON
Always OFF
Binary Images Only - Auto-rotates monochrome (black and
white) images. This option can help to prevent color and
grayscale images that have little or no text from being
improperly rotated. This setting is only available with the
ExperVision OCR engine.
Auto-Deskew
By default, the Auto-Deskew check box is selected. When the
check box is selected, the Auto-Deskew feature is enabled and
forces the OCR engine to deskew an image before OCRing the
document. This can often lead to more accurate OCR
(depending on the type of document). However, if the
document contains graphics or angled vertical lines, the
deskew feature may align to these graphics and cause
unexpected results. When the Auto-Deskew feature is
disabled, the OCR engine will OCR the document with its
current orientation.
The Auto-Deskew feature is only available if the ExperVision
OCR engine is selected.
2. Click the Passwords tab.
8. Add passwords for password-protected files.
© 2015 LexisNexis, a division of Reed Elsevier Inc. All rights reserved.
Using LAW PreDiscovery
79
The Passwords tab allows you to enter any known passwords for passwordprotected Adobe Acrobat PDF, Microsoft Word DOC and DOCX, and Microsoft Excel
XLS and XLSX files. This enables Early Data Analyzer to analyze and extract the
content in password-protected files. When the password for a password-protected
file in the case is added to the Passwords tab, the document content will be visible
in the content viewer in Early Data Analyzer. Passwords can be manually added or
imported from a line-delimited .txt file. Up to 500 passwords can be added to the
Passwords tab.
To manually add a password:
1. In the text field next to the Add button,
, type the password name.
2. Click the Add button.
The password is added to the password list on the Passwords tab.
3. Once you are finished adding the passwords, click the Tags tab.
To import passwords into a case:
1. Click the Import button,
Delimited) dialog box.
© 2015 LexisNexis. All rights reserved.
, to open the Select file containing passwords (Line
80
LAW PreDiscovery
2. Browse to and select the password .txt file you want to import, and then click the
Open button.
The following message is displayed indicating the number of passwords successfully
imported:
3. Click OK to close the message.
The passwords are imported and added to the passwords list on the Passwords
tab.
4. Once you are finished adding the passwords, click the Tags tab.
To delete a password:
© 2015 LexisNexis, a division of Reed Elsevier Inc. All rights reserved.
Using LAW PreDiscovery
81
On the Passwords tab, click the password you want to delete, and then press the
DELETE key on your keyboard.
9. Add tags for the case.
With the tagging feature in Early Data Analyzer, tags can be applied to documents to
help track, sort, and organize the documents in a case. For example, tags can be applied
to documents that need to be converted to TIFF, produced to paper, responsive
documents, etc. Users may even wish to tag documents that should be produced at a
larger paper size or produced in color. This feature makes it easier for any project,
scanned or electronic discovery, to be produced.
In Early Data Analyzer, tags are created and maintained for a case on the Tags tab in
the New Case Settings and Edit Case Settings dialog box. On the Tags tab, tags can be
created by manually adding tags or importing tags from a line-delimited .txt file.
Tags created on the Tags tab in Early Data Analyzer can be exported to a line-delimited
.txt file. The exported tags can then be imported into other Early Data Analyzer cases.
Tags can also be exported from Early Data Analyzer to LAW PreDiscovery. Tags are
automatically exported to and created in LAW PreDiscovery when a file containing tags is
exported from Early Data Analyzer to LAW PreDiscovery. For more information about
exporting files, see Exporting.
Tags are applied to individual files or file groups, such as files in a filter, search query, or
exception category, on the the Filters, OCR, Search, Export, and Exceptions tabs.
Tags created on the Tags tab are available for selection in the Document Tagging section
© 2015 LexisNexis. All rights reserved.
82
LAW PreDiscovery
at the bottom of the document preview pane on the Filters, OCR, Search, Export and
Exceptions tabs and in the Group Tagging dialog box on the Filters, Search, and
Exceptions tabs.
For more information about applying tags, see Tagging.
To manually add a tag:
1. In the text field next to the Add button,
, type the tag name.
Tag names can be up to 50 characters long.
2. Click the Add button.
The tag is added to the tag list on the Tags tab.
To import tags into a case:
1. Click the Import button,
Delimited) dialog box.
, to open the Select file containing tags (Line
2. Browse to and select the tags .txt file you want to import, and then click the Open
© 2015 LexisNexis, a division of Reed Elsevier Inc. All rights reserved.
Using LAW PreDiscovery
button.
The following message is displayed indicating the number of tags successfully
imported:
3. Click OK to close the message.
The tags are imported and added to the tags list on the Tags tab.
To edit a tag name:
1. On the Tags tab, double-click the tag you want to edit.
2. Edit the tag name.
3. Press the ENTER key on your keyboard to save your changes.
© 2015 LexisNexis. All rights reserved.
83
84
LAW PreDiscovery
When you rename a tag that has been applied to documents, the tag name is
automatically updated in the Document Tagging section at the bottom of the
document preview pane on the Filters, OCR, Search, Export and Exceptions tabs
and in the Group Tagging dialog box on the Filters, Search, and Exceptions tabs.
To delete a tag:
On the Tags tab, click the tag you want to delete, and then press the DELETE key on
your keyboard.
When you delete a tag that has been applied to documents, the tag is automatically
removed from the documents when the tag is deleted.
To export tags from the Tags tab:
1. Click the Export button,
, to open the Save export file dialog box.
3. Browse to where you want to save the tag .txt file, and in the File name field type
the tag file name.
4. Make sure Text File (*.txt) is selected in the Save as type list, and then click Save.
The following message is displayed indicating the number of tags successfully
exported:
© 2015 LexisNexis, a division of Reed Elsevier Inc. All rights reserved.
Using LAW PreDiscovery
4. Click OK to close the message.
The tags are imported and added to the tags list on the Tags tab.
10. Click OK to save the case settings.
A connection to SQL Server is established.
The case database is created in SQL server.
The case directory is created.
The eda-case.ini file is created.
The new case opens.
After you create the case, the next step is to add sources. For more information on adding
sources, see: Importing Custodians.
To filter or sort the case list
1. In Early Data Analyzer, click the Case Manager tab.
2. Do any of the following:
To filter the case list, switch tabs from Recent Cases to Active Cases to All Cases.
© 2015 LexisNexis. All rights reserved.
85
86
LAW PreDiscovery
To sort the case list, click one of the column headers: Name, Client, Location, or Last
Opened.
To filter by client name, click the Filter by Client list and then select a client.
Clicking <Not Specified> from the Filter by Client list displays the cases that do not
have a client name specified.
To open an ED Analyzer case
1. In Early Data Analyzer, click the Case Manager tab.
2. Double-click the case you want to open.
The case tab opens with its Sources tab open.
If the case that you want to open is not immediately visible in the case list, click Active
Cases or All Cases. If the case is still not visible, click the Browse/Attach button, open
the cases folder, open the folder named after the case you want to open, select the
eda-case.ini file for the case, and then click Open.
To view or edit properties of an existing case
1. In Early Data Analyzer, click the Case Manager tab.
2. Select a case and then click Edit Selected Case.
The Edit Case Settings dialog opens.
© 2015 LexisNexis, a division of Reed Elsevier Inc. All rights reserved.
Using LAW PreDiscovery
87
After a case has been created not all settings are editable.
3. Browse the tabs to change settings:
General tab. The following fields are editable: Description, Client, and Case is active.
Database tab. If the Use Windows Authentication check box was selected when the
case was created, no database connection settings are editable after case creation. If
the User Windows Authentication check box was not selected and SQL Server
authentication is being used for the case, the Login and Password fields are editable.
Analysis tab. You can modify the maximum number of agents, enable or disable the
option to save all content to disk; also, and can download the latest NIST hash
database.
Indexer tab. You can edit any of the indexer settings.
OCR tab. You can edit any of the OCR settings.
Passwords tab. You can delete and add additional Adobe Acrobat PDF, Microsoft Word
DOC and DOCX, and/or Microsoft Excel XLS and XLSX encryption passwords.
Tags tab. You can add, delete, and export the case tags.
After you create a case you can edit any of the originally chosen case properties, except
the case name, case directory, database server, database name, or authentication
method. However, after a source has been committed to a case, most of the analysis
settings will no longer be editable.
In addition to editing properties for individual cases, you can also edit properties for
Early Data Analyzer environment. For more information, see: Startup and Configuration.
© 2015 LexisNexis. All rights reserved.
88
LAW PreDiscovery
4. Click OK.
To view case processing metrics
You can view the metrics of items processed for a given case by using the Case Dashboard.
1. In Early Data Analyzer, click the Case Manager tab.
2. Double-click a case.
3. Click Dashboard.
The case metrics and other details are visible.
Case Summary details are described as follows:
Total documents. The total number of all documents in a case. The count includes
archives and the files they contain.
Inventoried. The number of documents in the case that were included in the case
inventory.
Yield. The number of expanded documents found during analysis. This number usually
indicates the number of files extracted from archives, attachments to e-mails, etc.
Growth. The percent increase in size of files after extraction.
© 2015 LexisNexis, a division of Reed Elsevier Inc. All rights reserved.
Using LAW PreDiscovery
89
Analysis Status details are described as follows:
Analyzed. The number of files analyzed.
Analysis failures. The number of failed analysis operations on individual files.
Exceptions. The number of processing errors that occurred.
% complete. The current status of processing in terms of completed documents.
Source Contents. Provides a bar graph of the number of each type of document in all
committed sources.
Filters. Provides a bar graph showing the number items that will be filtered by each filter
type. This area also provides a pie chart that compares the percent of items that will be
included after filtering versus the percent of items remaining after filters are applied.
To view the connection, work, and index statuses
You can check the connection status of the currently opened case, and you can check
whether Early Data Analyzer is processing case records or indexes.
1. Open Early Data Analyzer.
At the bottom of the Early Data Analyzer window a status bar shows that Early Data
Analyzer is disconnected and that no case is open.
2. In the case list, double-click a case to open it.
The connection status, work status, and index status for the case are updated.
Note the following:
The case name follows in brackets. The case name is followed by the SQL Server
computer name\SQL instance\database name. This is followed by the name of the
currently logged on user.
If you add a source to the case and then commit the source to processing, the Work
Status state will change from Idle to any of the following: Work Pending, Working:
Inventory, Analysis, or Analysis: Indexing. When processing finishes, the status
returns to Idle.
The Index Status on the status toolbar indicates whether the case files are being
indexed (Indexing), compacted (Compacting), reindexed (ReIndexing), or there are
no index processes running and the index is ready for processing (Ready).
To remove or to restore a case
When you are finished working on a case, you can remove it from the case list. Removing a
case from the case list does not delete the case database or other case files. You can
© 2015 LexisNexis. All rights reserved.
90
LAW PreDiscovery
reattach the case that you removed, as needed, and it will appear again in the list.
To remove a case from the case
list
To restore a case to the list
1. Click Case Manager.
1. Click Case Manager.
2. Select the case you want to
remove.
2. Click All Cases.
3. Click Remove From List.
4. In the Detach Case dialog box,
click Yes.
The case is removed from the list.
3. Click Browse / Attach.
4. The cases folder opens by default.
5. Open the folder named after the case you want
to open.
6. Select the eda-case.ini file for the case, and then
click Open.
Related Topics
About Early Data Analyzer
Startup and Configuration
Importing
Filtering
Tagging
Performing OCR
Searching
Using the Global Dashboard
Reviewing Exceptions
Exporting
Creating Reports
© 2015 LexisNexis, a division of Reed Elsevier Inc. All rights reserved.
Using LAW PreDiscovery
91
Importing
After you create a case in Early Data Analyzer, the next step is to import files into your case.
The importing process itself consists of two steps:
1. Adding custodians and document sources.
2. Committing custodians to processing.
About custodians
In Early Data Analyzer, a set of files identified for import is organized by custodian. A
custodian can point to one or more individual files, folders, disk volumes, or network shares.
For example, within a case you can create one custodian that points to a particular mail
store, create another custodian that points to a particular folder, and create a third that
points to a series of individual files and folders from various places in a file system.
You can work with custodians the following ways:
Create custodians, add sources, and start processing. You can create an individual
custodian and then add sources to it. Or you can simultaneously create many custodians
at one time by using drag and drop. After you setup a custodian, you can commit it for
processing, and then continue to setup other custodians as needed.
Rename custodians. By default, the custodian name is taken from the name of the item
as it appears in the file system.
Delete custodians. You can remove a custodian from a case.
View custodian statistics. During or after a custodian is being processed, you can view
such information as the the number and types files it contains, its size and other
statistics.
Manage the view of custodian list. You can configure the custodian list for a case to
collapse or expand the details of all custodians at one time. You can also filter the
custodian list by entering the leading characters of the custodian name.
Delete sources from a custodian. After custodians are committed, you can remove any
source registered to a custodian.
To create a single custodian and add sources
1. Click Case Manager.
2. Create a new case or double-click an existing case.
3. Click Import.
The Import tab opens.
© 2015 LexisNexis. All rights reserved.
92
LAW PreDiscovery
4. Do one of the following:
Drop sources onto the upper drop area.
Or
Click Add Custodian and then drag and drop files onto the drop area of the custodian.
Or click the down arrow on the Add button, navigate to sources and then select
sources.
Before importing Lotus Notes mail stores, make sure the Lotus Notes application is
closed on the processing workstation. If Lotus Notes is open on the workstation while
attempting to import Lotus Notes mail stores, the e-mail messages in the Lotus Notes
mail stores are not extracted during the import.
5. Rename the custodian as needed.
© 2015 LexisNexis, a division of Reed Elsevier Inc. All rights reserved.
Using LAW PreDiscovery
93
6. Add more custodians or items as needed and then click Commit Sources.
After you click Commit Sources, the label and custodian of the source cannot be edited.
To create multiple custodians from multiple items
1. Click Case Manager.
2. Create a new case or double-click an existing case.
3. Click Import.
The Import tab opens.
4. Drop sources onto the lower drop area.
Before importing Lotus Notes mail stores, make sure the Lotus Notes application is
© 2015 LexisNexis. All rights reserved.
94
LAW PreDiscovery
closed on the processing workstation. If Lotus Notes is open on the workstation while
attempting to import Lotus Notes mail stores, the e-mail messages in the Lotus Notes
mail stores are not extracted during the import.
Multiple custodians are created. Each custodian corresponds to a single top-level item.
5. Rename custodians as needed.
6. Add more custodians or items as needed and then click Commit Sources.
To rename a custodian
1. Click Case Manager.
2. Double-click a case to open it.
3. Click Sources.
4. Select a custodian name and then type a new name for it.
5. Click the save button.
Clicking the save button opens the Confirm Custodian Rename message.
© 2015 LexisNexis, a division of Reed Elsevier Inc. All rights reserved.
Using LAW PreDiscovery
95
6. Click Yes to save your changes and close the message.
7. Reindex the case index.
To reindex the case index, you will need to rebuild the case index. For more information
about rebuilding indexes, see Managing Indexes.
The index stores the the full custodian name, not the custodian ID. So when a custodian
is renamed, the index needs to be rebuilt to update the custodian name in the index.
To delete custodians
After you add a custodian, whether it has been committed for processing or not, you can
delete it from the case. When you delete a custodian from a case, the original source files
are not deleted.
1. Click Case Manager.
2. Double-click a case to open it.
3. Click Import.
4. Click a custodian to select it, or shift-click to select multiple custodians.
5. Click Delete Custodian(s).
6. In the Delete Sources? dialog box, click Yes.
Any selected custodian is removed from the case.
When you remove a source that was already committed, the case dashboard is
updated.
To view custodian statistics
1. Click Case Manager.
2. Double-click a case to open it.
3. Click Sources.
© 2015 LexisNexis. All rights reserved.
96
LAW PreDiscovery
4. Click the down arrow next to a source.
5. Click the down arrow next to Statistics.
Statistics for the custodian are visible. Note that if the source has not yet been
committed, its statistics all list as zeros.
Custodian statistics may be interpreted as follows:
Size (input). The amount of disk space occupied by the source prior to processing.
Created. The date and time the custodian was created.
Created By. The user name of the person who ran the import in EDA.
Mail Stores. The number of e-mail stores detected in the source.
E-Mails. The number of individual e-mail items found in all e-mail stores.
E-Mail Att. The number of attachments found.
Archives. The number of archive files found.
Archive Att. The number of files found in all archive files.
Duplicates. The number of duplicates found in the source.
NIST Hits. The number of items identified as NIST items.
Exceptions. The number of exceptions that occurred during processing.
Errors. The number of errors that occurred during processing.
Failures. The number of failures that occurred during processing.
Manage the view of custodian list
1. Click Case Manager.
2. Double-click a case to open it.
3. Click Import.
3. Manage the custodian list as follows:
When you want to
Perform these steps
Collapse details of all
custodians
Click the collapse all button.
Expand details of all
custodians
Click the expand all button.
Filter the custodian list by
custodian name
In the text box at the top of the custodian list, enter part or all
of a custodian name. The custodian list updates as you type.
© 2015 LexisNexis, a division of Reed Elsevier Inc. All rights reserved.
Using LAW PreDiscovery
Custodians with the character string anywhere in their name
are shown in the list. In the graphic, only custodians with "fi"
anywhere in the name are listed.
If no custodians have the character string then the list is
empty.
Show all custodians by
removing the filter placed
on the custodian list.
Delete all text from the custodian name filter.
To delete sources from a custodian
You can delete sources from custodians whether the source has been committed for
processing or not. When you delete a custodian, the original source files are not deleted.
1. Click Case Manager.
2. Double-click a case to open it.
3. Click Import.
4. Select a custodian and then click its expander button.
The sources are listed in the area below the custodian name.
© 2015 LexisNexis. All rights reserved.
97
98
LAW PreDiscovery
5. Select the sources you want to delete.
6. Click Delete Sources.
7. In the Delete Items dialog box, click Yes.
Related Topics
About Early Data Analyzer
Startup and Configuration
Cases in Early Data Analyzer
Filtering
Tagging
Performing OCR
Searching
Using the Global Dashboard
Reviewing Exceptions
Exporting
Creating Reports
© 2015 LexisNexis, a division of Reed Elsevier Inc. All rights reserved.
Using LAW PreDiscovery
99
Filtering
Filtering refers to the ability of Early Data Analyzer to selectively remove files from the result
set. The remaining subset of documents are those from original source content that have the
highest likelihood of being relevant to the case. The filtered subset can then be exported to
LAW PreDiscovery.
Documents are only filtered if they unambiguously meet the criteria you specify. For example, if
you apply a date range filter and Early Data Analyzer finds a file that does not contain any date
metadata, the file will not be filtered.
Early Data Analyzer provides these types of filters:
File Hash. Filters by NIST (National Institute of Standards and Technology) items and/or
from a custom list of file hash items. Removes file types unlikely to contain relevant content,
such as system files or documentation installed with software.
Duplicate Document. Removes duplicate files.
Date Range. Evaluates the sent date for e-mail messages, and start- and end-dates for
calendar items. E-mails are filtered if the sent date falls outside the range of dates you
specify. Calendar items are filtered if both start- and end-dates fall outside the dates you
© 2015 LexisNexis. All rights reserved.
100
LAW PreDiscovery
specific. Items with missing or ambiguous date metadata are not filtered.
File Type. Removes all but specified file types. A file type list is generated based on analysis
of the source files. Select those file types that you want to bypass filtering. File types are
identified by Early Data Analyzer using the same software library used by other LAW
PreDiscovery tools.
E-mail Sender Domain. Evaluates the domain that e-mail was sent from. Domains other
than those you specify are filtered.
Language. Removes all but files containing the specified languages. A language list is
generated based on analysis of the source files. Select those languages that you want to
bypass filtering. For more information about supported languages, see: Languages.
To configure file hash filtering
With the File Hash filter you can specify files to be filtered from a case based on the hash
value of each file. Any file is filtered that matches either of the following conditions:
The file is identified in the NIST Items filter.
The file matches a custom file hash value, as specified by using the Custom File Hash
Items filter.
Before case files can be filtered by the NIST Items filter, a NIST database must be attached
to the case. A NIST database is attached to a case on the Analysis tab in the New Case
Settings or Edit Case Settings dialog box. For more information about attaching a NIST filter,
see: Cases in Early Data Analyzer.
Before case files can be filtered by the Custom File Hash Items filter, the custom file hash
value list must be created for or imported into the case. Once a custom file hash value list
has been created for a case, it can be exported to a .lst file and imported into other cases.
For more information about working with custom file hash value lists including creating,
importing and exporting them, see: To manage the custom file hash list for a case.
To configure file hash filtering:
1. Click the Case Manager tab.
2. Double-click a case.
3. Click the Filters tab.
© 2015 LexisNexis, a division of Reed Elsevier Inc. All rights reserved.
Using LAW PreDiscovery
101
4. If it is not already visible, in the drop-down list, select File Hash Filter.
By default, the NIST Items and Custom File Hash Items check boxes are selected.
5. Do either of the following:
To disable the NIST Items filter and allow NIST items to be included in the results,
leave the NIST Items checkbox selected.
To disable the Custom File Hash Items filter and allow the file types in the custom file
hash value list to be included in the results, leave the Custom File Hash Items check
box selected.
Or
To enable the NIST Items filter and prevent NIST items from being included the
results, clear the NIST Items checkbox.
To enable the Custom File Hash Items filter and prevent the file types in the custom
file hash value list from being included the results, clear the Custom File Hash Items
checkbox.
If a NIST database is not selected when a case is created, then even if the NIST Items
filter is enabled, the NIST Items filter will not function.
If a custom file hash value list has not been created or imported into the case, then
even if the Custom File Hash Items filter is enabled, the Custom File Hash Items filter
will not function.
To manage the custom file hash list for a case:
© 2015 LexisNexis. All rights reserved.
102
LAW PreDiscovery
You can create a custom file hash value list by doing either of the following:
Import SHA-1 hash values from a folder directory.
Import an existing list file.
After a custom file hash value list is created for a case, the list can be exported from the
case to a new list file. These list files carry the .lst file extension. The exported list file can be
imported into other cases. If a list is modified after files are imported into a case and
analyzed, the hash values in the list can be refreshed by using the Re-identify hash matches
feature.
To create a new hash value list:
When you create a new custom file hash value list for a case, you can import SHA-1 hash
values from one or more folder directories and their subdirectories that contain the file
types you want to include in the list. If you import more than one folder directory into the
list and there are duplicate hash values, the import will automatically ignore any duplicate
values.
1. Click the Case Manager tab.
2. Double-click a case.
3. Click the Filters tab.
4. If it is not already visible, in the drop-down list, select File Hash Filter.
5. Click the Edit link next to the Custom File Hash Items filter.
Clicking the Edit link opens the Manage Custom Hash Filter dialog box. By default,
Import custom hashes is selected in the Select Action list and the From folder option
is selected.
© 2015 LexisNexis, a division of Reed Elsevier Inc. All rights reserved.
Using LAW PreDiscovery
103
6. Make sure Import custom hashes is selected in the Select Action list, and the From
folder option is selected.
7. Click the ellipses button,
.
Clicking the ellipses button opens the Browse for Folder dialog box.
8. Browse to and select the folder containing the SHA-1 Hash values you want to add to
the custom file hash value list.
9. Click OK.
Clicking OK closes the Browse for Folder dialog box and adds the folder directory to
the Manage Custom Hash Filter dialog box.
10. Click the Start button.
Clicking the Start button opens the following message:
© 2015 LexisNexis. All rights reserved.
104
LAW PreDiscovery
11. Click Yes.
Clicking Yes starts the import. The SHA-1 hash values for all the file types in the folder
and its subdirectories are imported into the case's custom file hash value list. When
the import is completed, the total number of hash values and other import statistics
are displayed in the Manage Custom Hash Filter dialog box.
To import an existing hash value list:
An existing custom file hash value list can be imported into a case to become the case's
custom file hash value list, or to add additional hash values to the case's existing custom file
hash value list. If the imported custom file hash value list contains duplicate SHA-1 hash
values, the duplicate values will be ignored. When you import custom file hash value lists
into a case, the hash values are appended to the case's existing list, the imported list does
not overwrite the case's existing list.
© 2015 LexisNexis, a division of Reed Elsevier Inc. All rights reserved.
Using LAW PreDiscovery
105
1. Click the Case Manager tab.
2. Double-click a case.
3. Click the Filters tab.
4. If it is not already visible, in the drop-down list, select File Hash Filter.
5. Click the Edit link next to the Custom File Hash Items filter.
Clicking the Edit link opens the Manage Custom Hash Filter dialog box. By default,
Import custom hashes is selected in the Select Action list and the From folder option is
selected.
6. Make sure Import custom hashes is selected in the Select Action list, and click the From
existing hash file option.
7. Click the ellipses button,
.
Clicking the ellipses button opens the Select Hash List File dialog box.
© 2015 LexisNexis. All rights reserved.
106
LAW PreDiscovery
8. Browse to and select the custom file hash value list .lst file you want to import into the
case.
9. Click Open.
Clicking Open closes the Select Hash List File dialog box and adds the file directory to
the Manage Custom Hash Filter dialog box.
10. Click the Start button.
Clicking the Start button opens the following message:
11. Click Yes.
Clicking Yes starts the import. The SHA-1 hash values in the .lst file are imported into the
© 2015 LexisNexis, a division of Reed Elsevier Inc. All rights reserved.
Using LAW PreDiscovery
107
case's custom file hash value list. When the import is completed, the total number of
hash values and other import statistics are displayed in the Manage Custom Hash Filter
dialog box.
To export a case's hash value list:
A case's custom file hash value list can be exported for editing and/or to be used in other
cases. When you export a case's custom file hash value list, the list is saved to a .lst file. The
.lst file can be manually edited using a text file editor.
1. Click the Case Manager tab.
2. Double-click a case.
3. Click the Filters tab.
4. If it is not already visible, in the drop-down list, select File Hash Filter.
5. Click the Edit link next to the Custom File Hash Items filter.
Clicking the Edit link opens the Manage Custom Hash Filter dialog box.
© 2015 LexisNexis. All rights reserved.
108
LAW PreDiscovery
6. In the Select Action list, click Export custom hashes.
7. Click the ellipses button,
, next to the Destination File field.
Clicking the ellipses button opens the Export Custom Hash List dialog box.
© 2015 LexisNexis, a division of Reed Elsevier Inc. All rights reserved.
Using LAW PreDiscovery
109
8. Browse to where you want to save the custom file hash value list, and then click Save.
Clicking Save closes the Export Custom Hash List dialog box and adds the folder
directory to the Manage Custom Hash Filter dialog box.
9. Click the Start button.
Clicking the Start button starts the export. The case's custom file hash value list is
exported to a .lst file in the selected destination directory. When the export is
completed, the Hash values successfully exported message is displayed in the Manage
Custom Hash Filter dialog box.
© 2015 LexisNexis. All rights reserved.
110
LAW PreDiscovery
To re-identify hash matches:
If the custom hash value list for a case has been modified after the case files have been
imported and analyzed or all the custom hash values have been deleted from the case,
you will need to refresh the Custom File Hash Items filter results for the case using the Reidentify hash matches feature in the Manage Custom Hash Filter dialog box.
1. Click the Case Manager tab.
2. Double-click a case.
3. Click the Filters tab.
4. If it is not already visible, in the drop-down list, select File Hash Filter.
5. Click the Edit link next to the Custom File Hash Items filter.
Clicking the Edit link opens the Manage Custom Hash Filter dialog box.
© 2015 LexisNexis, a division of Reed Elsevier Inc. All rights reserved.
Using LAW PreDiscovery
111
6. In the Select Action list, click Re-identify hash matches.
7. Click the Start button.
Clicking the Start button opens the following message:
8. Click Yes.
Clicking Yes refreshes the Custom File Hash Items filter results for the case. When
the refresh is completed, the Re-identification of custom file hash matches completed
successfully message and the number of files in the case matching a value in the
case's custom file hash value list is displayed in the Manage Custom Hash Filter
dialog box.
© 2015 LexisNexis. All rights reserved.
112
LAW PreDiscovery
To delete all custom hash values
If you want to delete the custom hash values from a case, you can delete all hash values
in the case's custom file hash value list using the Clear all custom hash values feature in
the Manage Custom Hash Filter dialog box. Using this feature will delete all hash values
from the list.
If you only want to delete specific hash values from the list, you will need to export the
case's custom file hash value list, edit the exported .lst file in a text editor, use the Clear
all custom hash values feature to remove all custom hash values from the case, then
import the exported and edited custom file hash value list back into the case.
1. Click the Case Manager tab.
2. Double-click a case.
3. Click the Filters tab.
4. If it is not already visible, in the drop-down list, select File Hash Filter.
5. Click the Edit link next to the Custom File Hash Items filter.
Clicking the Edit link opens the Manage Custom Hash Filter dialog box.
© 2015 LexisNexis, a division of Reed Elsevier Inc. All rights reserved.
Using LAW PreDiscovery
113
6. In the Select Action list, click Clear all custom hash values.
If there are no custom hash values added to the case, the Start button is disabled.
7. Click the Start button.
Clicking the Start button opens the following message:
8. Click Yes.
Clicking Yes deletes all the custom hash values from the case's custom file hash value
list.
After the custom hash values are deleted the All custom file hash values cleared
successfully message is displayed in the Manage Custom Hash Filter dialog box.
© 2015 LexisNexis. All rights reserved.
114
LAW PreDiscovery
9. Run the Re-identify hash matches feature in the Manage Custom Hash Filter dialog
box to refresh the Custom File Hash Items filter results for the case.
For more information, see To re-identify hash matches.
To configure deduplication filtering
1. Click the Case Manager tab.
2. Double-click a case.
3. Click the Filters tab.
4. In the drop down list, select Duplicate Document Filter.
© 2015 LexisNexis, a division of Reed Elsevier Inc. All rights reserved.
Using LAW PreDiscovery
115
By default, the Include Duplicates check box is selected.
5. Do either of the following:
To allow duplicates to be included in the results, leave the Include Duplicates check
box selected.
Or
To prevent duplicates from being included the results, clear the Include Duplicates
check box.
To configure date range filtering
1. Click the Case Manager tab.
2. Double-click a case.
3. Click the Filters tab.
4. In the drop down list, select Date Range Filter.
© 2015 LexisNexis. All rights reserved.
116
LAW PreDiscovery
5. Click the plus button (
source.
) to add a date range for filtering the individual items in the
6. If you want to filter using multiple date ranges, repeat this step to add additional date
ranges.
When you click the plus button (
), the date range's start date defaults to the date
displayed in the Earliest field, and the end date defaults to the date displayed in the
Latest field.
7. To modify the Start Date or End Date, click the date.
Clicking the date allows you to manually edit the date or click the calendar button to
© 2015 LexisNexis, a division of Reed Elsevier Inc. All rights reserved.
Using LAW PreDiscovery
117
select the applicable start date or end date.
By default, all date range check boxes are selected for inclusion in results. The number in
the Count column next to a date range indicates the number of files that fall within the
given date range.
8. Clear the check box for any date range you want excluded from export. Leave the check
box selected for all date ranges you want included in results.
To select all or clear all date ranges, click the check box next to the Start Date header,
and then click Yes when asked Are you sure you want to un-check all filter definitions? or
Are you sure you want to check all filter definitions?.
To remove a single date range, click the Delete date range button,
date range.
, next to the
To remove all date ranges, click the Delete all date ranges button,
.
9. Optionally, you can review individual items within a date range; to do so, select the date
range.
The center panel lists the items within the date range.
10. Select an item in the center panel to review it. Text extracted from the item along with
item metadata are visible in the rightmost panel.
11. Click Launch Source Document if you want to view the file in its native application or
viewer.
Note the following about how date filtering works:
The filter removes e-mail with date sent that falls outside the date range(s) you specify.
It removes calendar items whose start- and end-date fall outside the date range(s).
Dates for e-mail files are drawn from the sent date field. If the sent date falls within the
date range, then the filter will allow the item to pass.
Dates for calendar appointments are evaluated based on start- and end-date fields.
Dates for files other than e-mail are drawn from the date created and date modified
fields. The filter will only retain items whose date created and date modified fall within
© 2015 LexisNexis. All rights reserved.
118
LAW PreDiscovery
the date range(s). For example, if date created or date modified is unavailable, then the
filter will allow the item to pass. If both dates are known, and either of the dates falls
outside the date range(s) specified, the filter will allow the item to pass.
To configure file type filtering
1. Click the Case Manager tab.
2. Double-click a case.
3. Click the Filters tab.
4. In the drop down list, select File Type Filter.
The list of file types is populated. By default, all file type check boxes are selected for
inclusion in results. The number in the Count column next to a file type indicates the
number of files matching the given file type.
5. Clear the check box for any file type you want excluded from export. Leave the check box
selected for all file types you want included in results.
To select all or clear all file types, click the check box next to the Name header, and then
click Yes when asked Are you sure you want to un-check all filter definitions? or Are you
sure you want to check all filter definitions?.
6. Optionally, you can select a file to review it more closely.
The files of the type selected are listed in the center panel.
© 2015 LexisNexis, a division of Reed Elsevier Inc. All rights reserved.
Using LAW PreDiscovery
119
7. Optionally, click a file to preview the text associated with it. The text appears in the
rightmost panel. If available, click Document text truncated due to length... to view the
extracted text in a text editor.
8. Click Launch Source Document if you want to view the file in its native application or
viewer.
To configure e-mail sender domain filtering
1. Click the Case Manager tab.
2. Double-click a case.
3. Click the Filters tab.
4. In the drop down list, select E-Mail Sender Domain Filter.
© 2015 LexisNexis. All rights reserved.
120
LAW PreDiscovery
The list of e-mail sender domains is populated. The number in the Count column next to
a sender domain indicates the number of files from the given domain. By default, all
sender domain check boxes are selected for inclusion in results.
5. Clear the check box for any domain you want excluded from export. Leave the check box
selected for all domains you want included in results.
To select all or clear all domains, click the check box next to the Name header, and then
click Yes when asked Are you sure you want to un-check all filter definitions? or Are you
sure you want to check all filter definitions?.
6. Optionally, you can review individual items sent from domains; to do so, select the
sender domain.
The center panel lists the items sent from the selected domain.
7. Select an item in the center panel to review it. Text extracted from the item along with
item metadata are visible in the rightmost panel.
© 2015 LexisNexis, a division of Reed Elsevier Inc. All rights reserved.
Using LAW PreDiscovery
121
8. Click Launch Source Document if you want to view the file in its native application or
viewer.
To configure language filtering
Some documents may contain multiple languages. When a document contains multiple
languages, the document is included in the count for each language it contains.
Also, if a document contains multiple languages and one of the languages in the
document is excluded from export, but another language in the document is included in
the export, the export may include the document containing the excluded language,
depending on the other filter and export settings.
For example, if French is excluded from export, the export may still include documents
containing the French language if the documents also contain a language which is
selected to be included in the export.
1. Click the Case Manager tab.
2. Double-click a case.
3. Click the Filters tab.
4. In the drop down list, select Language Filter.
© 2015 LexisNexis. All rights reserved.
122
LAW PreDiscovery
The list of languages is populated. The number in the Count column next to the language
indicates the number of files that contain the given language. By default, all language
check boxes are selected for inclusion in results.
5. Clear the check box for any language you want excluded from export. Leave the check
box selected for all languages you want included in results.
To select all or clear all languages, click the check box next to the Start Date header,
and then click Yes when asked Are you sure you want to un-check all filter definitions? or
Are you sure you want to check all filter definitions?.
6. Optionally, you can select individual files containing the selected language to review it
more closely.
7. The files containing the selected language are listed in the center panel.
© 2015 LexisNexis, a division of Reed Elsevier Inc. All rights reserved.
Using LAW PreDiscovery
123
8. Optionally, click a file to preview the text associated with it. The text appears in the
rightmost panel. If available, click Document text truncated due to length... to view the
extracted text in a text editor.
9. Click Launch Source Document if you want to view the file in its native application or
viewer.
Related Topics
About Early Data Analyzer
Startup and Configuration
Cases in Early Data Analyzer
Importing
Tagging
Performing OCR
Searching
Using the Global Dashboard
Reviewing Exceptions
Exporting
Creating Reports
© 2015 LexisNexis. All rights reserved.
124
LAW PreDiscovery
Tagging
With the tagging feature in Early Data Analyzer, tags can be applied to documents to help
track, sort, and organize the documents in a case. For example, tags can be applied to
documents that need to be converted to TIFF, produced to paper, responsive documents, etc.
Users may even wish to tag documents that should be produced at a larger paper size or
produced in color. This feature makes it easier for any project, scanned or electronic discovery,
to be produced.
In Early Data Analyzer, tags can be applied to individual files or files in a group, such as files in
a filter, search query, or exception category.
Tags are applied to individual files in the Document Tagging section at the bottom of the
document preview pane on the Filters, OCR, Search, Export and Exceptions tabs in Early Data
Analyzer. Tags are applied to files in a group in the Group Tagging pane on the Filters, Search,
and Exceptions tabs.
Tags are added to a case, maintained, and exported on the Tags tab in the New Case Settings
and Edit Case Settings dialog box. For more information, see the "Add tags for the case"
section in the Cases in Early Data Analyzer topic.
To apply tags to individual documents
1. Click the Case Manager tab.
2. Double-click a case.
3. Click the Filters, OCR, Search, Export, or Exceptions tab.
4. Display a list of documents by selecting a filter, OCR file type, search query, export
setting, or exception category on the tab.
5. In the document list, click the document to which you want to apply tags.
6. Click the down arrow,
, in the Document Tagging section.
7. Select the check box next to the tags you want to apply to the document.
When a tag check box is selected, the tag has been applied to the individual document.
When a tag check box is not selected, the tag has has not been applied to the individual
document.
If you need to delete or add additional tags, click the Edit Tags link in the Document
© 2015 LexisNexis, a division of Reed Elsevier Inc. All rights reserved.
Using LAW PreDiscovery
125
Tagging section to open the Tags tab in the Edit Case Settings dialog box. For more
information, see the "Add tags for the case" section in the Cases in Early Data Analyzer
topic.
To apply tags by filter
1. Click the Case Manager tab.
2. Double-click a case.
3. Click the Filters tab.
4. In the filter list, click the type filter you want to apply to the documents.
For more information about applying filters, see Filtering.
5. In the filter list, click check box in the Tags column for the filter containing the documents
to which you want to apply a tag.
For example, if you selected the Date Range Filter and want to apply a tag to all
documents within a specific date range, select the check box in the Tags column for the
date range in the filter list.
Selecting the check box opens the Group Tagging dialog box.
© 2015 LexisNexis. All rights reserved.
126
LAW PreDiscovery
6. Select the check box next to the tag you want to apply to all documents in the filter.
If you need to delete or add additional tags, click the Edit Tags link in the Group Tagging
dialog box to open the Tags tab in the Edit Case Settings dialog box. For more
information, see the "Add tags for the case" section in the Cases in Early Data Analyzer
topic.
7. Close the Group Tagging dialog box.
When a tag has been applied by filter, the blue tag icon,
, is displayed next to the
filter in the Tag column, and the corresponding tag check box in the Document Tagging
section is selected for each document in the group of documents.
If additional documents are imported into the case and some of the new documents are
returned in the tagged filter results, the tag is automatically applied to those documents.
To apply tags by search query
1. Click the Case Manager tab.
2. Double-click a case.
© 2015 LexisNexis, a division of Reed Elsevier Inc. All rights reserved.
Using LAW PreDiscovery
3. Click the Search tab.
4. On the Searches tab, select the check box next to the search query containing the
records to which you want to apply tags.
For more information about search queries, see About Searching.
5. Click the Tag button.
Clicking the Tag button opens the Group Tagging dialog box.
© 2015 LexisNexis. All rights reserved.
127
128
LAW PreDiscovery
6. Select the check box next to the tag you want to apply to all records in the search query.
If you need to delete or add additional tags, click the Edit Tags link in the Group Tagging
dialog box to open the Tags tab in the Edit Case Settings dialog box. For more
information, see the "Add tags for the case" section in the Cases in Early Data Analyzer
topic.
7. Close the Group Tagging dialog box.
When a tag has been applied by search query, the blue tag icon,
, is displayed next to
the search query in the Tag column, and the corresponding tag check box in the
Document Tagging section is selected for each record in the group of records.
If additional records are imported into the case and some of the new records are
returned in the tagged search query results, the tag is automatically applied to those
documents.
To apply tags by exception category
1. Click the Case Manager tab.
2. Double-click a case.
3. Click the Exceptions tab.
4. Select the check box next to the exception category containing the documents to which
you want to apply tags.
For more information about exceptions, see Reviewing Exceptions.
5. Selecting the check box opens the Group Tagging dialog box.
© 2015 LexisNexis, a division of Reed Elsevier Inc. All rights reserved.
Using LAW PreDiscovery
129
6. Select the check box next to the tag you want to apply to all documents in the exception
category.
If you need to delete or add additional tags, click the Edit Tags link in the Group Tagging
dialog box to open the Tags tab in the Edit Case Settings dialog box. For more
information, see the "Add tags for the case" section in the Cases in Early Data Analyzer
topic.
7. Close the Group Tagging dialog box.
When a tag has been applied by exception category, the blue tag icon,
, is displayed
next to the exception category in the Tag column, and the corresponding tag check box
in the Document Tagging section is selected for each document in the group of
documents.
If additional documents are imported into the case and some of the new documents are
returned in the tagged exception category results, the tag is automatically applied to
those documents.
To remove tags from individual documents:
© 2015 LexisNexis. All rights reserved.
130
LAW PreDiscovery
1. Click the Case Manager tab.
2. Double-click a case.
3. Click the Filters, OCR, Search, Export, or Exceptions tab.
4. Display a list of documents by selecting a filter, OCR file type, search query, export
setting, or exception category on the tab.
5. In the document list, click the document to which you want to remove tags.
6. Click the down arrow,
, in the Document Tagging section.
7. Clear the check box next to the tags you want to remove from the document.
When a tag check box is selected, the tag has been applied to the individual document.
When a tag check box is not selected, the tag is not been applied to the individual
document.
If the same tag was applied to a document individually in the Document Tagging
section and as part of a group of documents in the Group Tagging dialog box, when the
tag is removed from the document in the Document Tagging section, both the group
and individual tag are removed from the document.
To remove group tags from documents:
1. Click the Case Manager tab.
2. Double-click a case.
3. Do one of the following:
If you are removing a group tag from a filter, click the Filters tab and then click the
group tag icon,
the filter.
, next to the filter containing the group tag you want to remove from
If you are removing a group tag from a search query, click the Search tab, click the
search query, and then click the Tag button,
.
If you are removing a group tag from an exception category, click the Exceptions tab
and then click the group tag icon,
, next to the exception category containing the
group tag you want to remove from the exception category.
© 2015 LexisNexis, a division of Reed Elsevier Inc. All rights reserved.
Using LAW PreDiscovery
131
4. In the Group Tagging dialog box, clear the check box next to the tag you want to
remove from the documents.
5. Close the Group Tagging dialog box.
When you remove a group tag, the tag and the group tag icon,
, are removed from
the Filters, Search, or Exceptions tab, and the corresponding tag check box in the
Document Tagging section is cleared for each document in the group of documents.
If the same tag was applied to a document individually in the Document Tagging
section and as part of a group of documents in the Group Tagging dialog box, when the
group tag is removed from the group of documents in the Group Tagging dialog box,
the individual tag will continue to be applied to the document in the Document Tagging
section.
For example, if Tag 1 was originally applied to a document in the Document Tagging
section, and then Tag 1 was applied to the same document as part of a group of
documents in the Group Tagging dialog box, when the group tag is removed from the
documents in the Group Tagging dialog box, the Tag 1 check box will continue to be
selected for the document in the Document Tagging section. The document now only
has Tag 1 applied to the document as an individual tag instead of both an individual
and group tag.
Once a document-level tag has been applied or removed from a document, the
document-level tag will no longer be affected by the group tag version of the same
name. This tag can only be applied or removed from the tag individually in the
Document Tagging section.
Sample Scenario 1:
1. The Privilege tag is applied to a group of documents from the Group Tagging dialog
box.
2. You determine one of the documents (Document A) in the group is not really
privileged, so you remove the Privilege tag from the Document A in the Document
Tagging section.
3. Later, the Privilege tag is applied to another group of documents containing
Document A.
Results: The Privilege tag is not applied to Document A.
Sample Scenario 2:
1. The Privilege tag is applied to an individual document (Document B) from the
Document Tagging section.
2. The Privilege tag is then applied to a group of documents containing Document B
from the Group Tagging dialog box.
© 2015 LexisNexis. All rights reserved.
132
LAW PreDiscovery
3. Later, you determine the group of documents is really not privileged, so you
removed the Privilege group tag from the Group Tagging dialog box.
Results: The Privilege tag is not removed from Document A.
Related Topics
About Early Data Analyzer
Startup and Configuration
Cases in Early Data Analyzer
Importing
Filtering
Performing OCR
Searching
Using the Global Dashboard
Reviewing Exceptions
Exporting
Creating Reports
Performing OCR
In Early Data Analyzer, OCR (optical character recognition) can be performed on image-based
documents, such as TIFF, JPEG, GIF, BMP, PNG, and Adobe Acrobat PDF files, at the document
level so that the documents' content can be read, filtered, and searched before exporting the
documents to LAW PreDiscovery.
OCR can be performed on groups of documents by file type on the OCR tab or on individual
documents using the OCR Document button on the Filters, OCR, Search, Export, or Exceptions
tab in Early Data Analyzer.
Before performing OCR on any documents in Early Data Analyzer, verify that the OCR settings
© 2015 LexisNexis, a division of Reed Elsevier Inc. All rights reserved.
Using LAW PreDiscovery
133
have been set to ensure the proper output format. When a case is created, the OCR settings
for the case are defined on the OCR tab in the New Case Settings dialog box. These settings
can be modified on the OCR tab in the Edit Case Settings dialog box. For more information
about the OCR case settings, see the "To create an Early Data Analyzer case" section or "To
view or edit properties of an existing case" section in the Cases in Early Data Analyzer topic.
The purpose for performing OCR on documents is to help identify the documents you want
to export to LAW PreDiscovery. When you export image-based documents on which OCR
was performed in Early Data Analyzer, if an image-based document included image-based
attachments, only the OCR from the parent document is exported to LAW PreDiscovery.
The OCR for the child documents is not exported. In this scenario, OCR needs to be
performed again on the child documents in this document family in LAW PreDiscovery once
the documents are exported into LAW PreDiscovery.
For more information about performing OCR in LAW PreDiscovery, see OCR Overview.
Supported file types
OCR can be performed on the following file types in Early Data Analyzer:
Supported File Types for OCR
File Extension
File Description
BMP
Microsoft Windows Bitmap
DCX
Paintbrush Multi-Page Fax Bitmap
GIF
Graphics Interchange Format
JPEG or JPG
JPEG File Interchange File
PCX
PC Paintbrush Bitmap
PDF
Adobe Portable Document Format
PNG
Portable Network Graphics Bitmap
TIF or TIFF
Intel Tag Image File Format
To perform OCR by file type
1. Click Case Manager.
2. Double-click a case.
3. Click the OCR tab.
© 2015 LexisNexis. All rights reserved.
134
LAW PreDiscovery
4. In the Document Scope section, select one of the following options:
All documents (ignore filters). All image-based documents in the case are displayed
on the OCR tab, regardless of the filters applied to the case documents.
Filtered documents only. Only the image-based documents in the case's filtered
results are displayed on the OCR tab.
The OCR File Types list displays the image-based file types for the documents currently
in the case. If you selected the All documents (ignore filters) option, the list displays
the image-based file types for all document in the case. If you selected the Filtered
documents only option, the list only displays the image-based file types for the
documents in the case's filtered results.
By default the check box is selected for each file type.
If you selected the Filtered documents only option and one of the image-based file
types was filtered out using the File Type Filter, the file type will not be displayed in the
OCR File Types list. If you selected the All documents (ignore filters) options, the file
type will be displayed in the list.
To view the documents for a specific file type, click the file type in the OCR File Types
list. Use the View list to view the documents with and without OCR. The View list only
determines which documents are listed in the document list, it does not affect which
documents are included or excluded from the OCR queue.
© 2015 LexisNexis, a division of Reed Elsevier Inc. All rights reserved.
Using LAW PreDiscovery
135
5. In the OCR File Types list, define which file types to include when performing OCR.
To perform OCR on a file type, make sure the check box next to the file type is
selected.
To exclude a file type, clear the check box next to the file type.
All Selected File Types does not affect which file types are included or excluded when
performing OCR. Clicking All Selected File Types displays all documents that qualify for
the OCR process for the selected file types in the document list pane.
For example, if the Adobe Portable Document Format and JPEG File Interchange File
check boxes are selected, clicking All Selected File Types will display both the PDF and
JPEG in the document list pane.
The OCR Statistics section displayed the following information:
Documents to OCR. Total number of documents that qualify for the OCR process
without OCR.
If the All documents (ignore filters) option is selected, the total number of
documents that qualify for the OCR process in the case without OCR is displayed. If
the Filtered documents only option is selected, the total number of filtered
documents that qualify for the OCR process without OCR is displayed.
Documents pending OCR. Number of documents in the OCR queue when the OCR
process is running.
Documents with OCR. Number of image-based documents in the case that have
OCR.
Cannot OCR. Number of image-based documents in the case that OCR cannot be
performed on, such as when no OCR content is recognized for a document.
Errors. Number of image-based documents in the case that had errors while
performing OCR.
6. Do one of the following in the OCR Statistics section:
To perform OCR on the documents without OCR, click the Start link next to Documents
to OCR.
© 2015 LexisNexis. All rights reserved.
136
LAW PreDiscovery
If you need to clear the OCR queue while the OCR process is running, click the Clear
link next to Documents pending OCR.
To perform the OCR process on the documents that already have OCR, click the Retry
link next to Documents with OCR. If a document already has OCR, the OCR process
will overwrite the existing OCR.
To perform the OCR process on the documents that OCR could not originally be
performed on, click the Retry link next to Cannot OCR.
To perform the OCR process on the documents that previously had errors during the
OCR process, click the Retry link next to Errors.
The OCR process automatically starts when the Start or Retry link is clicked. When the
OCR process is completed, the documents are automatically indexed for full-text
searching.
To perform OCR on individual documents
OCR can be performed on individual documents from the Filters, OCR, Search, Export, and
Exceptions tabs by clicking the OCR Document button in the document viewer panel for the
selected document. The OCR Document button is only displayed for image-based documents
in the case. It is displayed for image-based documents regardless of whether the documents
are with or without OCR.
1. Click the Case Manager tab.
2. Double-click a case.
3. Click the Filters, OCR, Search, Export, or Exceptions tab.
© 2015 LexisNexis, a division of Reed Elsevier Inc. All rights reserved.
Using LAW PreDiscovery
137
4. Display a list of documents by selecting a filter, OCR file type, search query, export
setting, or exception category on the tab.
5. In the document list, click the document to OCR.
6. In the document viewer panel, click the OCR Document button.
The OCR process automatically starts when the OCR Document button is clicked. When
the OCR process is completed, the document is automatically indexed for full-text
searching.
© 2015 LexisNexis. All rights reserved.
138
LAW PreDiscovery
Related Topics
About Early Data Analyzer
Startup and Configuration
Cases in Early Data Analyzer
Importing
Filtering
Tagging
Searching
Using the Global Dashboard
Reviewing Exceptions
Exporting
Creating Reports
Searching
In Early Data Analyzer, filtered case records that have been imported into Early Data Analyzer
can be searched to locate specific records for reviewing and tagging.
In this section
About Searching
Provides an introduction to searching in Early Data Analyzer.
Running Searches
Provides procedures for creating, running, importing, and maintaining search queries in
Early Data Analyzer.
About Search Operators
Provides information about search operators and using them in search queries.
Managing Indexes
Provides an overview of the function of indexing within Early Data Analyzer. Describes the
management field and column definitions. Provides procedures for rebuilding and
compacting case indexes.
© 2015 LexisNexis, a division of Reed Elsevier Inc. All rights reserved.
Using LAW PreDiscovery
139
About Searching
In Early Data Analyzer, you can use the Search tab to search the filtered case records that
have been imported into Early Data Analyzer. Search is only performed on the filtered records
for a case. For example, if a case contains 3,000 records, but after filtering the records there
are only 500 records, a search query is only run against the 500 remaining case records.
Early Data Analyzer allows you to quickly search case data because it automatically creates a
comprehensive index during the import process. You can search and locate all instances or
"hits" of your search terms in in the filtered case records.
About indexing
Early Data Analyzer creates an index when you import files into a case. During the indexing
process, Early Data Analyzer reads each imported file and compiles an index based off each
word it reads. The index is used when you run searches so you can locate important words,
dates, and text phrases easily in your case records.
When you import new files into a case, the new files are automatically indexed and included
when running new or saved searches.
The index settings for a case are defined on the Indexer tab in the New Case Settings and
Edit Case Settings dialog boxes. If you modify a case's index settings or change a case
custodian name, you will need to manually reindex the case by rebuilding the index.
For more information about rebuilding and managing case indexes, see Managing Indexes.
About noise words
LAW PreDiscovery and Early Data Analyzer come with a pre-defined list of noise words that it
skips while indexing case information. Noise words are words that are automatically
excluded from a case index. The noise word list includes the most common words in the
English language (and, but, is, if, the). Noise words are words you would generally not
search for. Eliminating these words from the index ensures that searches run faster and
more efficiently.
Effectively, a noise word is processed as an "any word" wildcard (*). For example the search
"Harold the cat" is processed as: Harold * cat.
A single word search request for a noise word will return no records. For example, a search
request for the term "because" yields no results.
The noise words for both LAW PreDiscovery and Early Data Analyzer are stored in the
noise.dat file.
© 2015 LexisNexis. All rights reserved.
140
LAW PreDiscovery
LAW manages noise words at the application level in a file named noise.dat. This file is
located in the \dtconfig folder which can be found in the installation path of LAW
PreDiscovery.
To edit the noise word list
1. Navigate to the \dtconfig folder located in the LAW PreDiscovery installation directory.
The default directory is: C:\Program Files\LAW50\
2. Open the noise.dat file using Notepad or another text editor.
3. Add or remove noise words from the list.
4. Save the file.
5. On the Tools menu click Full Text Index and then click Re-Index All Documents.
Removal of noise words from noise.dat can result in reduced performance of indexing
and search operations. This is because any word removed from the noise list is
indexed along with other keywords.
Search terms can be more than one word. They can also be numbers, text phrases, or a
combined use of terms and search operators. A search term is typed into the search query field
with results displaying in the document list pane.
Early Data Analyzer uses the dtSearch® search engine for searching in Early Data Analyzer. For
more information about dtSearch, see http://www.dtsearch.com/index.html.
All records or individual records returned from a search query can be tagged in Early Data
Analyzer. For more information about tagging search queries, see Tagging.
There are two lev els of searching in Early Data Analyzer:
Basic Searching — performing keyword (one word) searches and locating all instances of
the term in the filtered case records.
Advanced Full-Text Searching — performing searches with two or more search terms or
phrases that gain stronger, more precise search results.
For more information, see Running Searches and About Search Operators.
© 2015 LexisNexis, a division of Reed Elsevier Inc. All rights reserved.
Using LAW PreDiscovery
Related Topics
Running Searches
About Search Operators
About Early Data Analyzer
Startup and Configuration
Cases in Early Data Analyzer
Importing
Filtering
Tagging
Performing OCR
Using the Global Dashboard
Reviewing Exceptions
Exporting
© 2015 LexisNexis. All rights reserved.
141
142
LAW PreDiscovery
Creating Reports
Running Searches
In Early Data Analyzer, you can run new and saved searches against a case's filtered records
from the Search Request pane on the Search tab. New searches are run by entering a search
query and clicking the Search button. Saved searches are run from the Searches tab in the
Search Request pane by clicking a saved search or searches and then clicking the Run Searches
button. You can run multiple saved searches simultaneously in Early Data Analyzer.
The Status column on the Searches tab indicates the current status for each saved search. The
following key shows the different statuses available for saved searches:
Search Status Icon Key
Search Status Icon Key
Icon
Name
Description
New
Search query is new and has not run yet.
© 2015 LexisNexis, a division of Reed Elsevier Inc. All rights reserved.
Using LAW PreDiscovery
Pending
Search query is currently running.
Complete
Search query is completed and is search results are current.
Out of Date
Search query results are out of date.
143
The Out of Date icon will be displayed if documents that have been
added or removed from the case or filter settings that have been
modified affect the saved search query.
You can create and run basic and full-text searches in Early Data Analyzer. When you are
creating full-text searches you can manually add search terms or you can add search terms
directly from the dictionary, fields, and field values. You can also help fine tune your searches by
defining the full-text search options in the Search Options dialog box.
Search queries can also be imported into Early Data Analyzer from a line-delimited text file.
When search queries are imported into Early Data Analyzer, they are automatically added to
the saved search queries list on the Searches tab in the Search Request pane.
On the Search tab, tags can be applied to all or individual records in a search query. For more
information about tagging documents by search query, see To apply tags by search query in
the Tagging topic.
To create and run a basic word search
1. Click Case Manager.
2. Double-click a case.
3. Click the Search tab.
4. In the Search Request pane, click the New button.
5. Click in the search query field and type the keyword you want to search for.
© 2015 LexisNexis. All rights reserved.
144
LAW PreDiscovery
6. Click the Search button.
The search results are displayed in the document list pane and the search results are
clustered by field and field value on the Guided Search tab. For more information about
guided search, see To view search results from the Guided Search tab.
When the Created and Modified fields are displayed on the Search tab, the time in the
Created and Modified fields is displayed in GMT (Greenwich Mean Time), not the local
time.
The number of records returned in the search results is displayed at the bottom of the
the document list pane.
© 2015 LexisNexis, a division of Reed Elsevier Inc. All rights reserved.
Using LAW PreDiscovery
145
7. Optionally, click a file in the document list pane to preview the text associated with it and
the search hits. The text appears in the rightmost panel. If available, click Document text
truncated due to length... to view the extracted text in a text editor.
8. Review the file in any of the following ways:
Click Launch Source Document to open the record in a native application or viewer.
Scroll through the record to find search hits highlighted.
Click the First, Prev, Next, or Last button to move between highlighted occurrences of
the content in the file.
© 2015 LexisNexis. All rights reserved.
146
LAW PreDiscovery
To save the search query, see To save a search query.
To create and run a full-text search
Full-text searching includes additional advanced search features that allow you to write
longer full-text queries. When writing advanced full-text search queries, you will want to
learn how to use search operators that help provide precise search results. For more
information, see About Search Operators.
Before running full-text searches, define the full-text search options in the Search Options
dialog box. For more information, see To configure full-text search options.
1. Click Case Manager.
2. Double-click a case.
3. Click the Search tab.
4. Review the full-text search options in the Search Options dialog box, and make any
necessary changes.
To open the Search Options dialog box, on the Search Requests pane, click the Options
button.
For more information, see To configure full-text search options.
5. In the Search Request pane, click the New button.
6. Click in the search query field and type the search query, including operators, and/or add
words directly from the dictionary or field list.
To add dictionary words to a search query
1. In the Search Request pane, click the Dictionary button.
Clicking the Dictionary button opens the Dictionary dialog box. The current
search query is displayed in the Search Request field and can be manually edited,
if needed.
© 2015 LexisNexis, a division of Reed Elsevier Inc. All rights reserved.
Using LAW PreDiscovery
147
2. In the Dictionary Lookup field, type part or all of the word you want locate in the
dictionary.
When you begin typing the word, the corresponding dictionary words are listed in
the Dictionary dialog box. The Word column displays the dictionary words, the
Doc Count column displays the number of filtered documents in the case that
contain the dictionary word, and the Hit Count column displays the number of
occurrences of the dictionary word in the filtered case documents.
The dictionary contains words from the records imported into the case that were
identified during indexing.
3. Click the dictionary word you want to add to the search query.
If this is the first term being added to the search query, the value selected in the
Operators list is ignored.
4. If this is the second or more term to be added to the search query, click AND or
OR from the Operators list.
The Operators list defaults to AND. For more information about the AND and OR
search operators, see About Search Operators.
5. Click the Append button to add the word to the search query in the Search
© 2015 LexisNexis. All rights reserved.
148
LAW PreDiscovery
Request field.
6. Click OK to update the search query in the Search Request box on the Search
tab and close the Dictionary dialog box.
Dictionary terms added to a search query can be edited in the Search Request
field in the Dictionary dialog box and the Search Query box on the Search tab.
To add fields and field values to a search query
1. In the Search Request pane, click the Fields button.
Clicking the Fields button opens the Fields dialog box. The current search query is
displayed in the Search Request field and can be manually edited, if needed.
The Available Fields box contains all of the metadata fields available for selection.
The Available Values box displays the available field values for the field selected
in the Available Fields box. When you are adding a field to a search query, you
can add both the field and field values or just the field itself to the search query.
© 2015 LexisNexis, a division of Reed Elsevier Inc. All rights reserved.
Using LAW PreDiscovery
149
In Early Data Analyzer version 1.1 or later, when you click the Fields button for a
case created in Early Data Analyzer version 1.0.x, the case fields are not displayed
in the Fields dialog box. Clicking the Refresh button,
fields.
, does not display the
To display the case fields in the Fields dialog box, on the Search tab, click the
Index Management button to open the Index Management dialog box. Select the
check box for the index you want to rebuild, and then click the Rebuild Selected
Index button. Clicking the Rebuild Selected Index button adds the fields to the
index, making the fields available for searching and selection in the Fields dialog
box. For more information see, Cases in Early Data Analyzer.
2. In the Available Fields box, click the field you want to add to the search query.
If field values are available for the field, they are displayed in the Available
Values box.
3. If you want to include a field value in the search query, in the Available Values
box, click the field value(s) you want to add to the query.
To select multiple fields, use CTRL+SHIFT or CTRL+click.
If you do not want to include a field value in the search query, do not click any
value in the Available Values box. When the field is added to the query, the
query will display (<field name> Contains("")).
If you are adding a field value that contains special characters that dtSearch treats
as spaces, Early Data Analyzer will strip these special characters out of the field
value when the value is added to the search query and replace them with spaces.
If a field value contains special characters that will be stripped from the value, a
caution icon,
, is displayed next to the Append button. Place your pointer over
the caution icon to view the message.
For example: The original From field value is ethics integrity
© 2015 LexisNexis. All rights reserved.
150
LAW PreDiscovery
<[email protected]>. When the field value is added to the query, the
< and > symbols and the period are removed from the value.
If this is the first term being added to the search query, the value selected in the
Operators list is ignored.
4. If this is the second or more term to be added to the search query, click AND or
OR from the Operators list.
The Operators list defaults to AND. For more information about the AND and OR
search operators, see About Search Operators.
5. Click the Append button to add the field and/or field value(s) to the search query
in the Search Request field.
6. Click OK to update the search query in the Search Request box on the Search
tab and close the Fields dialog box.
Field terms added to a search query can be edited can be edited in the Search
Request field in the Fields dialog box and the Search Query box on the Search
tab.
If the Any Words or All Words option is selected in the Search Options dialog box, the
sequence of words in the query must be wrapped in quotes to prevent the search from
inserting Boolean operators (like AND or OR) between the words in the sequence.
7. Click the Search button.
The search results are displayed in the document list pane and the search results are
clustered by field and field value on the Guided Search tab. For more information about
guided search, see To view search results from the Guided Search tab.
© 2015 LexisNexis, a division of Reed Elsevier Inc. All rights reserved.
Using LAW PreDiscovery
151
When the Created and Modified fields are displayed on the Search tab, the time in the
Created and Modified fields is displayed in GMT (Greenwich Mean Time), not the local
time.
The number of records returned in the search results is displayed at the bottom of the
the document list pane.
8. Optionally, click a file in the document list pane to preview the text associated with it and
© 2015 LexisNexis. All rights reserved.
152
LAW PreDiscovery
the search hits. The text appears in the rightmost panel. If available, click Document text
truncated due to length... to view the extracted text in a text editor.
9. Review the file in any of the following ways:
Click Launch Source Document to open the record in a native application or viewer.
Scroll through the record to find search hits highlighted.
Click the First, Prev, Next, or Last button to move between highlighted occurrences of
the content in the file.
To save the search query, see To save a search query.
To configure full-text search options
© 2015 LexisNexis, a division of Reed Elsevier Inc. All rights reserved.
Using LAW PreDiscovery
153
The settings defined in the Search Options dialog box apply to all full-text searches.
1. Click Case Manager.
2. Double-click a case.
3. Click the Search tab.
4. Click the Options button.
Clicking the Options button opens the Search Options dialog box.
5. Select the check box next to the search options you want to enable for the case.
Use Stemming. Finds grammatical variations of the term. For example, "fish" also
returns "fishing."
Use Phonic Searching. Finds terms that sound like the search term. For example,
"Smith" also returns "Smyth."
Use Fuzzy Searching. Finds words with similar spelling as the search term. For
example, the search term case might return records that contains cash, cale, cake, etc.
You set the fuzzy value to a number between 1-10, with 1 being the least fuzzy and
10 the most.
Search Syntax. Selects terms according to logical operators and character patterns
that you specify that occur within the search string.
Boolean - Supports standard AND/OR connectors between search terms.
All Words - Alternative to using Boolean that implies all ANDs and ORs respectively
between words. All of the words in the search query must be present in the record
for a record to be retrieved in your search results.
Any Words - Alternative to using Boolean that implies all ANDs and ORs respectively
between words. Any of the words in the search query can be located in a record.
Synonym Searching. Enables synonym searching.
© 2015 LexisNexis. All rights reserved.
154
LAW PreDiscovery
WordNet Synonyms - Use synonyms from the WordNet thesarus.
WordNet Related Words - Use related words from the WordNet thesaurus.
6. Close the Search Options dialog box.
The search option settings are automatically saved and applied to all full-text searches.
To view search results from the Guided Search tab
When a search query runs in Early Data Analyzer, all of the records in the search results are
displayed in the document list pane, and the search results are clustered by field and field
values on the Guided Search tab in the Search Request pane. There are six fields that can
be displayed on the Guided Search tab: the Custodian, FileType, From, FromDomain,
MessageClass, and Source fields. Out of these six fields, only the fields that the records in
the search results have in common will be displayed on the Guided Search tab. The clustered
search results are only available on the Guided Search tab after running a search query.
The Guided Search tab displays the field, field values, and number of search hits for each
field value in the search results.
© 2015 LexisNexis, a division of Reed Elsevier Inc. All rights reserved.
Using LAW PreDiscovery
155
1. Run a new or saved search query.
2. Click the Guided Search tab.
3. Click the down arrow,
, next to the field name.
4. Clicking the down arrow displays the field's values and the search hit count for each
value.
5. To view the records in the search results containing a specific field's value, click the field
value.
6. Clicking the field value displays the records containing the selected field value in the
© 2015 LexisNexis. All rights reserved.
156
LAW PreDiscovery
document list pane.
To save a search query
1. Click Case Manager.
2. Double-click a case.
3. Click the Search tab.
4. In the Search Request pane, click the New button.
5. Create the search query you want to save.
For more information about creating search queries, see To create and run a basic word
search and To create and run a full-text search.
6. Click the Save button.
Clicking the Save button adds the query to the saved search queries list on the
Searches tab.
The New icon,
, is displayed for the new search query in the Status column. If the
© 2015 LexisNexis, a division of Reed Elsevier Inc. All rights reserved.
Using LAW PreDiscovery
157
search was run before saving the search query, when you click the Save button, the
Complete status icon,
, is displayed for the new search query in the Status column.
To run multiple search queries
You can have Early Data Analyzer run multiple saved search queries at one time. When you
run multiple search queries at one time, each search query is run individually against the
filtered case files. They are not combined into one query. Once the queries have finished
running, you can click the saved query to view the search results in the document list pane.
When saved searches queries are running, users can continue working in Early Data
Analyzer, but sources cannot be deleted from a case and OCR cannot be performed on
documents while the searches are processing.
1. Click Case Manager.
2. Double-click a case.
3. Click the Search tab.
4. On the Searches tab in the Search Request pane, select the check box next to the
saved search queries you want to run.
If you want to select all saved queries, on the Searches tab, select the check box in the
header row. You can also clear all the check boxes by clearing the check box in the
header row.
5. Click the Run Searches button.
© 2015 LexisNexis. All rights reserved.
158
LAW PreDiscovery
The Run Searches button is only enabled when one of more of the saved search query
check boxes are selected.
When you click the Run Searches button, all of the selected search queries run. When
the process is complete, the Complete icon,
, is displayed in the Status column for the
selected search queries, the Count column is updated with the number of hits found for
the selected queries, the number of searches completed is displayed at the bottom of
the Searches tab, and the search results are displayed in the document list pane.
To import search queries
On the Search tab, search queries can be created and saved manually or imported from a
line-delimited .txt file. Up to 5000 search queries in a line-delimited .txt file can be imported
at one time.
1. Click Case Manager.
2. Double-click a case.
3. Click the Search tab.
4. On the Searches tab in the Search Request pane, click the Import button.
Clicking the Import button opens the Select file containing searches (Line Delimited)
dialog box.
© 2015 LexisNexis, a division of Reed Elsevier Inc. All rights reserved.
Using LAW PreDiscovery
159
5. Browse to and select the search query .txt file you want to import, and then click the
Open button.
The following message is displayed indicating the number of search queries successfully
imported:
6. Click OK to close the message.
The search queries are imported and added to the saved search queries list on the
Searches tab in the Search Request pane, and the New icon,
Status column for the imported search queries.
To edit saved search queries:
© 2015 LexisNexis. All rights reserved.
, is displayed in the
160
LAW PreDiscovery
1. Click Case Manager.
2. Double-click a case.
3. Click the Search tab.
4. On the Searches tab in the Search Request pane, click the search query you want to
edit.
5. The search query is displayed in the search query field.
6. Edit the search query and click the Save button.
Clicking the Save button saves your changes and the query is updated in the saved
search queries list on the Searches tab.
To delete saved search queries:
1. Click Case Manager.
2. Double-click a case.
3. Click the Search tab.
4. On the Searches tab in the Search Request pane, select the check box next to the
search queries you want to delete.
© 2015 LexisNexis, a division of Reed Elsevier Inc. All rights reserved.
Using LAW PreDiscovery
161
5. Click the Delete button.
The following message is displayed indicating the number of search queries successfully
deleted:
6. Click OK to close the message.
Clicking the OK deletes the selected search queries from the case.
© 2015 LexisNexis. All rights reserved.
162
LAW PreDiscovery
Related Topics
About Searching
Running Searches
About Early Data Analyzer
Startup and Configuration
Cases in Early Data Analyzer
Importing
Filtering
Tagging
Performing OCR
Using the Global Dashboard
Reviewing Exceptions
Exporting
Creating Reports
About Search Operators
Search operators allow you to formulate or write your own advanced queries to garner
stronger search results from your case records. Once you learn to use search operators, you
can advance to typing complex searches that will help you locate information that might
otherwise takes hours of review to uncover.
Searching in Early Data Analyzer in not case sensitive, so you do not have to enter all caps
when typing in operators. You should type spaces between search terms and the operator
(LayK AND LangW), except when searching with characters or using symbols and punctuation.
For more information, refer to the Search Operators table below.
Once you learn how to write your own basic queries, you can advance to creating full-text
search queries.
Document level (Boolean)
© 2015 LexisNexis, a division of Reed Elsevier Inc. All rights reserved.
Using LAW PreDiscovery
163
Boolean operators are based on the binary logic used in computers today, producing strict
true or false results. In Early Data Analyzer, Boolean operators search at the document
level. Boolean operators used in Early Data Analyzer include AND, OR, and AND NOT.
Field level (Context)
Context operators search at the field level. The search term you are trying to locate may still
exist elsewhere in your case data (in another field or spreadsheet), you are just narrowing
your search to one field.
Early Data Analyzer uses the search operator, CONTAINS, to locate text within a specified
field. An alternative to typing CONTAINS is typing double colons ::. When you use this option,
you must have a space before and after the double colons.
Field names must have quotes around them. For example, when you search the Author field,
your query should by typed as: "Author".
Word level (Proximity)
Proximity operators search at the word level and are useful when looking for content that
appears in records either in direct succession or adjacent order, or in close succession to
each other within a specified range. This number refers to the maximum number of
intervening indexed words.
Character level (Wildcards)
Wildcard operators are symbols you can use as a substitute for characters or series of
characters in a search term, creating a broader search with stronger results.
Using wildcard characters helps you locate:
Variations on a root word
Possible misspellings of a name or word
Words or names that might include punctuation (apostrophes)
Search Operators
Search Operators
Operator
DOCUMENT LEVEL
© 2015 LexisNexis. All rights reserved.
Query
Results
164
LAW PreDiscovery
Search Operators
Operator
Query
Results
AND contains both words
lay AND lang
Finds all records with
both the words: lay
and lang
OR contains either word
lay OR lang
Finds all records with
either lay or lang, or
both
AND NOT contains first word, but not
second
lay AND NOT lang
Finds all records with
lay, but not lang
WORD LEVEL
BEFORE
kenneth BEFORE lay
kenneth BEFORE5 lay
Finds kenneth directly
preceding lay
Finds kenneth before
five words of lay
NEAR
lay NEAR5 lang
Finds lay within five
words of lang
w/5
lay w/5 lang
Finds lay within five
words of lang
not w/12
lay not w/12 lang
Finds lay where it is
not within 12 words of
lang
w/5 xfirstword
lay w/5 xfirstword
Finds lay when it
occurs in the first five
words of a document
w/5 xlastword
lay w/5 xlastword
Finds lay when it
occurs in the last five
words of a document
LIKE
LIKE deposition
Finds synonyms from
the thesaurus for the
search term specified;
might locate testimony
% performs a fuzzy search
Phil%
Finds Phil, Philip, and
Philllip
* Fuzzy searching finds
words even if they are
misspelled. The
position of the %
character determines
© 2015 LexisNexis, a division of Reed Elsevier Inc. All rights reserved.
Using LAW PreDiscovery
165
Search Operators
Operator
Query
Results
how many letters at
the start of the word
must match exactly.
For example: ba%nana
must begin with ba
and have at most one
difference between it
and banana. The
query: b%%anana
finds words that begin
with b and have at
most two differences
between it and
banana.
For more information,
see Fuzzy Searching.
# performs a phonic search
#Smith
Finds words that
sounds alike, such as
Smith and Smythe
For more information,
see Phonic Searching.
~ stemming at the end of a word
finds grammatical variations of a word
manage~
apply~
Finds manager and
management
Finds applies, applied,
applying
For more information,
see Stemming.
& finds synonyms
&fast
Finds quickly
For more information,
see Synonym
Searching.
FIELD LEVEL
CONTAINS
"Filename" CONTAINS
meeting
Finds meeting in the
File Name field
* Text before the
CONTAINS operator
must be a field name
and the field name
must be in quotes.
** The CONTAINS
operator cannot be
© 2015 LexisNexis. All rights reserved.
166
LAW PreDiscovery
Search Operators
Operator
Query
Results
used with the NEAR or
BEFORE operators.
::
"Filename" :: meeting
Short form alternative
for the CONTAINS
operator. Returns the
same results: Finds
meeting in the File
Name field.
Requires a space
before and after the
double colons. The
field name must be in
quotes.
CHARACTER LEVEL
? represents any character in its place
in the character sequence
wom?n
??99
10:??
Finds the following:
woman, women
Finds all dates in the
year 1999
Finds all timeframes of
10:00 o'clock (a.m. or
p.m.), i.e. 10:00, 10:42
= matches any single digit
=55
=12
Finds all records that
contain the number 55
Finds dates with the
number 12, such as
12/01/2001 and
08/12/2005
* matches multiple characters
Phil*
Finds Phil, Philip
## regular expression
"##app.*ie"
Finds apple pie
Finds search terms
that includes a
combination of
characters. A regular
expression included in
a search query must
be in double quotes
and must begin with
##.
For more information,
see Regular
© 2015 LexisNexis, a division of Reed Elsevier Inc. All rights reserved.
Using LAW PreDiscovery
167
Search Operators
Operator
Query
Results
Expressions.
NUMERIC
<
less than
< 50
Florida < 32803
Finds numbers less
than 50
Finds Florida followed
by a number less than
32803
>
greater than
> 50
Finds numbers greater
than 50
<=
less than or equal to
<=50
Finds numbers less
than or equal to 50
>=
to
greater than or equal
>=50
Finds numbers greater
than or equal to 50
=
equal to
=50
Finds the number 50
<x and >x
not equal to
<50 and >50
Finds all numbers
except 50
~~
numeric range
10 ~~ 20
Finds any numbers
between the two
numbers, such as
between 10 and 20
For more information,
see Numeric Range
Searching.
TO
10 TO 20
Finds numbers in text
within the specified
range
* The TO operator
requires numeric text
before and after the
operator.
Related Topics
© 2015 LexisNexis. All rights reserved.
168
LAW PreDiscovery
About Searching
Running Searches
About Early Data Analyzer
Startup and Configuration
Cases in Early Data Analyzer
Importing
Filtering
Tagging
Performing OCR
Using the Global Dashboard
Reviewing Exceptions
Exporting
Creating Reports
Managing Indexes
Early Data Analyzer creates an index when you import files into a case. During the indexing
process, Early Data Analyzer reads each imported file and compiles an index based off each
word it reads. The index is used when you run searches so you can locate important words,
dates, and text phrases easily in your case records.
When you import new files into a case, the new files are automatically indexed and included
when running new or saved searches.
The index settings for a case are defined on the Indexer tab in the New Case Settings and Edit
Case Settings dialog boxes. If you modify a case's index settings or change a case custodian
name, you will need to manually reindex the case by rebuilding the index.
For more information about the Indexer tab, see Cases in Early Data Analyzer.
To maximize search indexing and performance, Early Data Analyzer will distribute documents to
a maximum of 32 indexes. Indexes are initially limited to 250,000 documents, but maximum
number of documents per index will double if all 32 indexes have more than 250,000
documents.
The Index Management dialog box in Early Data Analyzer allows you to view the details of a
case's indexes and compact and rebuild all or individual case indexes. The Index Management
dialog box is accessed by clicking the Index Management button on the Search tab.
© 2015 LexisNexis, a division of Reed Elsevier Inc. All rights reserved.
Using LAW PreDiscovery
169
The Summary of Indexes section of the Index Management dialog box displays the index
information for all the case's indexes. The Index Details section lists the individual indexes in
the case index and the individual case information.
Index Management Field and Column Definitions
Name
Description
Index Count
Number of indexes in the case's index
Index ID
Index identification number
State
Current index state:
Ready – Indicates there are currently no index processes (indexing
new documents, rebuilding the index, or compacting the index)
running and the index is ready for processing
© 2015 LexisNexis. All rights reserved.
170
LAW PreDiscovery
Compacting – Index is in the process of being compacted
ReIndexing – Index is in the process of being rebuilt
Indexing - New case documents are being indexed
Work Pending
Pending work state:
None – No work (indexing, rebuilding, or compacting) is currently
pending
Indexing – New case documents are being indexed
Compacting – Index is in the process of being compacted
Reindexing – Index is in the process of being rebuilt
Documents
Pending
Number of documents in queue to be indexed
Documents in
Indexes
Total number of documents whose full text has been indexed in all the
case's indexes
Documents in
Index
Total number of documents whose full text has been indexed in the
individual index
Index Size (MB)
Total case index file size (Summary of Indexes) or individual index file
size (Index Details) in megabytes
Fragmentation
Fragmentation measures the extent to which an index is fragmented
by being built in multiple indexing jobs. The number displayed in the
Fragmentation field is the number of fragments in the binary tree.
Compressing an index eliminates fragmentation. Fragmentation of an
index increases the size of the index and slows searching, but the
effect is generally not noticeable unless the fragmentation is severe.
Last Updated
Date and time the case index was last updated.
To rebuild a case index:
1. Click the Case Manager tab.
2. Double-click a case.
3. Click the Search tab.
4. Click the Index Management button.
Clicking the Index Management button opens the Index Management dialog box.
5. In the Index Details section, select the check box next to the indexes you want to
rebuild.
If you want to select all the case's indexes, select the check box in the header row to
the left of the Index ID header. To clear all the check boxes, clear the check box in the
© 2015 LexisNexis, a division of Reed Elsevier Inc. All rights reserved.
Using LAW PreDiscovery
171
header row.
6. Click the Rebuild Selected Indexes button.
7. Click Yes when asked, Are you sure you want to rebuild [number of selected indexes]
indexes?.
Clicking Yes manually starts the indexing process to rebuild the selected case indexes.
8. Click the Close button to close the Index Management dialog box.
To compact a case index:
Compacting the index to reduces the indexing space on the disk and removes fragmentation
from the index. The index can only be compacted when the indexer state is idle.
1. Click the Case Manager tab.
2. Double-click a case.
3. Click the Search tab.
4. Click the Index Management button.
Clicking the Index Management button opens the Index Management dialog box.
5. In the Index Details section, select the check box next to the indexes you want to
compact.
If you want to select all the case's indexes, select the check box in the header row to
the left of the Index ID header. To clear all the check boxes, clear the check box in the
header row.
6. Click the Compact Selected Indexes button.
7. Click Yes when asked, Are you sure you want to compact [number of selected indexes]
indexes?.
Clicking Yes manually starts the compacting process for the selected case indexes.
8. Click the Close button to close the Index Management dialog box.
Using the Global Dashboard
You use the Global Dashboard to administer overall processing of cases in the following ways:
© 2015 LexisNexis. All rights reserved.
172
LAW PreDiscovery
Review the list of all cases currently being processed.
Monitor the processing status of individual cases.
Re-prioritize the order the cases are processed.
Suspend cases from processing, and lift cases from suspension.
Monitor status at the system-level.
Work with cases that have been blacklisted.
Control whether the information and statistics displayed on the dashboard refresh
automatically or on-demand.
To monitor processing status of a case
1. Click Global Dashboard.
2. Select a case.
The processing details of the case are visible in the right panel.
© 2015 LexisNexis, a division of Reed Elsevier Inc. All rights reserved.
Using LAW PreDiscovery
173
If no case is listed this means that none are processing.
In the left panel the processing status and the number of agents participating
processing the case are listed along with the following details:
Status bar. The relative progress of processing.
Remaining. The number of documents awaiting processing.
Failures. The number of documents that were unable to be processed.
Growth %. The percentage increase in disk space occupied by files as a result of
opening archives and attachments.
Agents. The Client is a computer that is processing the source. The client is the name
of the computer. The Activity is the phase of processing, e.g. analyzing, inventorying,
etc.
To re-prioritize processing of cases
The Global Dashboard tab displays the cases that are processing or waiting to be
processed. The order the cases are listed is the order the cases will be processed from top
to bottom. The case processing priority order can be modified on the Modify Case Priorities
dialog box.
1. Click Global Dashboard.
2. On the Working Cases tab, click the Modify the order in which cases are processed
link.
© 2015 LexisNexis. All rights reserved.
174
LAW PreDiscovery
Clicking the Modify the order in which cases are processed link opens the Modify Case
Priorities dialog box. Only the cases with a status of Working or Pending are displayed
in the Modify Case Priorities dialog box. By default, the cases are prioritized by date
and time created, from oldest to newest with the oldest being processed first.
3. To change the processing priority of a case, click the case in the case list, and click one of
the following buttons:
Highest. Moves the case to the top of the priority list to be processed first.
Increase. Moves the case up one level in the priority list.
© 2015 LexisNexis, a division of Reed Elsevier Inc. All rights reserved.
Using LAW PreDiscovery
175
Decrease. Moves the case down one level in the priority list.
Lowest. Moves the case to the bottom of the priority list to be processed last.
If you need to reset the priority list back to the original order, click the Reset button.
4. Click OK to save your changes.
Clicking OK closes the Modify Case Priorities dialog box and updates the order the
cases are listed on the Global Dashboard tab.
To suspend a case or to lift suspension
Suspending a case prevents all agents from working on the case. After a case is suspended
it can be unsuspended.
1. Click Global Dashboard.
Cases that are processing are listed.
2. Select a case.
The Suspend Case button is visible.
3. Do one of the following:
To suspend the case from processing, click Suspend Case.
To resume processing, click Lift Suspension.
To monitor overall processing status
Click Global Dashboard tab.
The panel at the bottom of the window provides status indicators.
© 2015 LexisNexis. All rights reserved.
176
LAW PreDiscovery
System
The number of cases working and cases pending.
Total number of available Early Data Analyzer services and the number of services
running.
Number of agents running.
Local Service
Service Uid
Connection status
Running status
About blacklisting
Definition
Blacklisting is a mechanism in which a service instance stops processing a case after
repeated attempts to work on the case fail. The service will try 5 times before a blacklisting
is applied to a case. When a case is blacklisted, the service removes the case from
consideration for further work. For example, the service will not start agents for inventory or
perform analysis.
Blacklistings are scoped to the service and case level. This means that a single service will
blacklist a single case. For example, if a single service has 5 cases to process, and the
service blacklists 2 of the cases, the service will continue to work on the other 3. Only the 2
blacklisted cases are ignored. In another example, suppose that 3 services are running on 3
workstations, with each service connected to the same management store. If each service is
processing a different case and one service blacklists its case, the other 2 services will
continue to operate as normal.
Purposes
Blacklisting cases can help to:
Enable the Early Data Analyzer service to process other cases that are available for
processing.
Alert you to losses of connectivity, permission issues, and other potential problems that
might impair work on cases.
Causes of blacklisting
© 2015 LexisNexis, a division of Reed Elsevier Inc. All rights reserved.
Using LAW PreDiscovery
177
The most common cause of blacklisting is the inability of the Early Data Analyzer service to
access the the case directory. This situation may be the result of setting the login for the
Early Data Analyzer service to using the Local account. Other less common issues can
include: loss of connectivity or permissions issues with the connection to SQL Server,
unhandled exceptions from the agent, or initialization failures from the agent.
To determine the type of login that the service uses or to reconfigure Early Data
Analyzer to use a Windows account, you can use the Windows Services management
console. If the Early Data Analyzer service is found to be running under a local account,
you can try stopping the Early Data Analyzer service, reconfiguring it to use a Windows
account to login, and then restarting the service.
To resume blacklisted cases
Before you resume a blacklisted case, you should address the root cause of the
blacklisting. Try to determine if the cause is due to having used a Local service login
instead of a Windows login for the service, loss of connectivity with SQL Server, or some
other cause. For more information on possible causes of blacklisting, see the section,
About blacklisting in this topic.
1. Click Global Dashboard.
Cases are listed. Any case blacklisted by any client is flagged as Blacklisted.
2. Select a blacklisted case.
© 2015 LexisNexis. All rights reserved.
178
LAW PreDiscovery
3. Do any of the following:
Click X on the status bar notification to reset a blacklisted case. This action causes the
service to restart processing the case.
Click Remove All to reset all blacklisted cases. This action causes the service to
restart processing of all cases.
Click Save. Saves all log entries.
To control refresh rate of dashboard information
Click Global Dashboard.
In the panel at the bottom of the window the refresh options are available:
Refresh (F5)
Enable or disable auto-refresh
Set time for auto refresh
Related Topics
About Early Data Analyzer
Startup and Configuration
Cases in Early Data Analyzer
Importing
Filtering
Tagging
Performing OCR
Searching
© 2015 LexisNexis, a division of Reed Elsevier Inc. All rights reserved.
Using LAW PreDiscovery
179
Reviewing Exceptions
Exporting
Creating Reports
Reviewing Exceptions
If exceptions occur during source processing, the details are recorded and are made available
for review. On the Exceptions tab, exceptions are organized by exception categories. The
exception categories are displayed in the Categories pane. Exceptions exist for any category
that has the number (1) or higher alongside it. If (0) appears next to the All category, there
are no exceptions in any category. The following exception categories are available:
© 2015 LexisNexis. All rights reserved.
180
LAW PreDiscovery
After reviewing exceptions, you can save the exception details for exception files, and you can
re-analyze any of the exception files. When you re-analyze a file, the file is removed from the
exceptions list and added back into the analysis queue. Once the file is added to the analysis
queue, it is automatically re-analyzed and reindexed. If the file has attachments or is part of a
document family, the family relationships are retained.
To view and save details for a single exception
1. Click Case Manager.
2. Double-click a case to open it.
© 2015 LexisNexis, a division of Reed Elsevier Inc. All rights reserved.
Using LAW PreDiscovery
181
3. Click Exceptions.
In the leftmost panel, a listing of exception categories is visible. Exceptions exist for any
category that has the number (1) or higher alongside it. If (0) appears next to the All
category, there are no exceptions in any category.
4. Click an exception category.
In the center panel, a list of individual exceptions is visible with details displayed for
each. In the rightmost panel, details related to the currently selected file are visible.
© 2015 LexisNexis. All rights reserved.
182
LAW PreDiscovery
5. Click one of the exception rows in the center panel to show details in the rightmost
panel.
If you want to view and open the source document with its native viewer, click Launch
Source Document.
© 2015 LexisNexis, a division of Reed Elsevier Inc. All rights reserved.
Using LAW PreDiscovery
183
6. Click the save file button to save a text file that contains the error log entry for that item.
By default, the file is saved as a text file to the ..\cases\<CaseName> folder. It provides
the following details:
Activity. For example, analysis.
Category. The category of the error, for example, EncryptedFile.
Type. The type of error, for example, Encrypted File.
Created. The data and time when the error occurred.
Inventory Id. The inventory identification number, for example, 10295.
Source. The source name, for example, LAW_Training.
Source Id. The unique identifier within the case for the source. for example, 3.
Session Id. The Early Data Analysis session number, for example, 6.
File Ref. A path to the file, listing a relative folder structure, for example,
EDD_Materials.zip?EDD_Materials\Lab02\eDocs\LEAR.PDF.
Message. A general descriptor of the error, for example, File is encrypted.
To save details for all exceptions
1. Click Case Manager.
2. Double-click a case.
3. Click Exceptions.
© 2015 LexisNexis. All rights reserved.
184
LAW PreDiscovery
4. Click All.
5. Click Save As... and then save the file. By default, the file is saved to the ..\cases
\<CaseName> folder as All Exceptions.csv.
To re-analyze an exception
1. Click Case Manager.
2. Double-click a case to open it.
3. Click Exceptions.
In the leftmost panel, a listing of exception categories is visible. Exceptions exist for any
category that has the number (1) or higher alongside it. If (0) appears next to the All
category, there are no exceptions in any category.
4. Click an exception category.
In the center panel, a list of individual exceptions is visible with details displayed for
each. In the rightmost panel, details related to the currently selected file are visible.
© 2015 LexisNexis, a division of Reed Elsevier Inc. All rights reserved.
Using LAW PreDiscovery
185
5. Click one of the exception rows in the center panel to show details in the rightmost
panel.
If you want to view and open the source document with its native viewer, click Launch
Source Document.
6. Click the Re-Analyze button.
When you click the Re-Analyze button, the file is removed from the exceptions list and
added back into the analysis queue. Once the file is added to the analysis queue, it is
automatically re-analyzed and reindexed. If the file has attachments or is part of a
document family, the family relationships are retained.
If you want to export files in the exception list without re-analyzing the files, you can
© 2015 LexisNexis. All rights reserved.
186
LAW PreDiscovery
apply tags to individual files or all files in an exception category on the Exception tab,
and then export the files based on the tag you applied to the files.
For more information about tagging files, see Tagging. For more information about
exporting based on tags, see Exporting.
Related Topics
About Early Data Analyzer
Startup and Configuration
Cases in Early Data Analyzer
Importing
Filtering
Tagging
Performing OCR
Searching
Using the Global Dashboard
Exporting
Creating Reports
Exporting
Export is the final output of Early Data Analyzer. The export process passes files that remain
after filtering or tagging to ED Loader. The export process involves two steps. First, you
generate an export set. The export set is simply a list of all the items that will be exported.
Second, you send the export set directly to a new or existing LAW case.
Early Data Analyzer provides the option to create a new case at the time of export. Or you can
export to an existing LAW case. To export to an existing case, the case must be.
SQL Server-based
Active
Enabled for electronic discovery
© 2015 LexisNexis, a division of Reed Elsevier Inc. All rights reserved.
Using LAW PreDiscovery
187
For more information on configuring options for LAW cases, see: Working with Existing Cases.
Before you generate an export set it is recommended you check the following:
Have all custodians been committed? If a custodian has been setup with source files
but not committed, none of its items will be available for export. For more information on
setting up custodians and importing sources, see: Importing.
Are filters and tags appropriately configured? The contents of the export set directly
reflect whatever filtering and/or tagging is in place at the time the export set is
generated. For more information on configuring filtering in Early Data Analyzer, see:
Filtering. For more information on tagging files, see: Tagging.
To generate an export set
1. Click Case Manager.
2. Create a new case or double-click an existing case.
3. Click the Export tab.
If an export set has already been created for the case, you can clear the export
statistics, the item list, and item details that were generated previously for this case by
clicking the Clear All link next to Total Items in the Export Statistics section, and then
clicking Yes when asked, Are you sure you want to remove ALL items from the export set?.
When you click the Clear All link the options associated with the export set are
retained.
© 2015 LexisNexis. All rights reserved.
188
LAW PreDiscovery
Use caution when clearing the export set. The Clear All link can increase the risk of
introducing duplicates into LAW case. If you need to change filtering in EDA and then
export to the same LAW case a second time, try opening the target LAW case and then
remove previously added items. Alternatively, create a new LAW case, instead of reexporting to an existing case.
The Include e-mails in thread (Outlook only) check box determines whether all items
of an e-mail thread, including any item contained in the thread that is filtered, are
included in the export. This will allow you to review the exported items in the context of
its entire thread.
4. If you want the export set to include all e-mail messages in a thread, select the Include
e-mails in thread (Outlook only) check box.
If you do not want to include all e-mail messages in a thread, clear the Include e-mails
in thread (Outlook only) check box.
5. In the Documents to Export section, click one of the following options:
All filtered documents. Select this option to export all files that remain after applying
filters to the files in the case, regardless of the tags applied to the files.
When the All filtered documents option is selected, the Documents tagged with
section is disabled.
Documents tagged with. Select this option to export files by tags.
1. In the Export column, select the check box next to the tags you want include in
the export.
When tag check boxes are selected, the export will only include the files that
have been filtered and contain the selected tags.
For example, if the selected tags have been applied to 5 files in the case, but
after filtering, only 3 of these files are left, when the check boxes for the tags are
selected on the Export tab, only the 3 files containing the tags will be exported.
© 2015 LexisNexis, a division of Reed Elsevier Inc. All rights reserved.
Using LAW PreDiscovery
189
In the export tags section on the Export tab, the Total column displays the total
number of files in the case to which a tag has been applied, and the Filtered
column displays the number of files that remain after applying filters to the files in
the case to which a tag has been applied. If you change any of the filter settings
for the case before generating the export set, be sure to click the Refresh
button,
, in the export tags section to update the values in the Total and
Filtered columns.
To view the list of filtered files for a specific tag, in the export tags section, click
the row for the tag. Clicking the row displays all files to which the tag has been
applied that remain after applying filters to the files in the case.
When a tag is applied to a file in Early Data Analyzer, and the file is exported to
LAW PreDiscovery, the tags are automatically exported to and created in LAW
PreDiscovery. Both group and individual tags are created as document-level tags
in LAW PreDiscovery.
If a parent level archive item is tagged to be Exported but none of its attachment
items are tagged for Export then it is assumed that the archive contents are to
be exported as well. The same is true for sub-archives contained within the
original archive.
2. In the Exclude column, select the check box next the tags you want to exclude
from the export.
When used in conjunction with an Export tag(s), the Exclude column can be
used to exclude any documents associated with a tag, such as documents
tagged with a tag for privileged documents, such as Private, Confidential or
Trade Secret. The Exclude column can also be used to exclude individual
documents from a mail store or archive file that is included in the export set.
The Exclude column settings take precedence over the Export column settings for
tags. For example, if you are exporting by tag, and a document contains one tag
that is flagged for export and one tag that is flagged to be excluded from the
export, the document will be excluded from the export.
E-mail items and archive items are treated differently when used with Exclude
tags. If any item contained in an e-mail thread is tagged as being Excluded, the
entire thread will be excluded from the export up to the first level message of the
thread. If an archive item such as a zip file contains multiple files tagged to be
Exported but one of the items are Excluded, then the remaining items in the
archive will still be exported.
When excluding documents from a mail store of archive file, only the first level of
documents within an mail store or archive file can be excluded. For example, if the
parent archive file contains another archive file, you cannot exclude the content of
the sub-archive file. All the files contained within the sub-archive will be exported.
6. Click the Queue Export Set button.
Clicking the Queue Export Set button generates the export set.
7. To review the documents in the export set, in the Export Statistics section, click the
© 2015 LexisNexis. All rights reserved.
190
LAW PreDiscovery
Show Documents link.
When you click the Show Documents link, the middle panel is populated with a list of
files for export. The rightmost column is populated with details concerning the currently
selected item in the file list.
You can generate export sets multiple times from an Early Data Analyzer case for export
to the same LAW case. This process is additive. Each time you create a new export set
and then export to LAW, only new items are added to the case.
If you need to remove the new items added to the export set or any items not yet
exported from the export set, in the Export Statistics section next to New Items, click
the Remove link, and then click Yes when asked, Are you sure you want to remove all
new/not-exported items from the export set?.
To review an export set
After an export set is generated, you can review export statistics and the details of
individual items in the export set. Reviewing the export set is recommended prior to sending
the export set to LAW. The following description assumes that a case is open and an export
set has already been generated.
1. Review the Export Statistics area.
© 2015 LexisNexis, a division of Reed Elsevier Inc. All rights reserved.
Using LAW PreDiscovery
191
Export statistics are explained as follows:
Statistic
Description
Last Export
The date and time of the most recently generated export
set.
Total Items
The number of items included in the most recently
generated export set.
New Items
The number of new items included in the most recently
generated export set.
Expanded Count
(EDA)
The count of items expanded from archives by Early Data
Analyzer.
Exported Items
The total number of exported items.
Expanded Count
(LAW)
The count of items expanded from archives during import
by ED Loader. The Expanded Count does not include the
file count for embedded mail stores or archives within a
mail store or archive file.
Error Count
The number of processing errors triggered by the previous
export set.
Export Progress
The percentage of the export from Early Data Analyzer to
ED Loader that is currently completed.
Show Documents
All documents in the export set are displayed in the middle
panel.
2. In the Export Statistics section, click the Show Documents link.
When you click the Show Documents link, the middle panel is populated with a list of
files for export. The rightmost column is populated with details concerning the currently
selected item in the file list.
3. Scan the file list as needed to find files of interest.
© 2015 LexisNexis. All rights reserved.
192
LAW PreDiscovery
Document icons are explained as follows:
Icon
Description
Electronic document
Electronic document with attachment
E-mail
E-mail with attachment
You can expand e-mails with attachments to see attachment details.
You can expand archives to see individual files contained in them.
3. Select individual items in the file list. Metadata for the item is visible in the right panel.
Each item in the file list provides the following:
A link to open the source document
File name
File type
File size
Each file provides the following information:
Custodian name
Filename
© 2015 LexisNexis, a division of Reed Elsevier Inc. All rights reserved.
Using LAW PreDiscovery
193
File type
Location
Size
Preview of document text
To send an export set to LAW PreDiscovery
The following instructions assumes that a case is already open in Early Data Analyzer and an
export set has already been generated.
1. In the Target Law Case list, click a case:
Click <Default LAW Case> to send the export set to a new case that LAW will create
for you. The LAW case that is created takes the same name as the EDA case.
Or
Click an existing case from the list.
2. Click the Send to LAW PreDiscovery button.
The LAW case opens with the import queue of ED Loader populated by items from the
Early Data Analyzer export set.
Note that certain options in ED Loader are not available when the import queue is
populated by an Early Data Analyzer export:
The buttons for adding and removing sources in ED Loader are disabled.
The post-import settings in ED Loader are disabled.
3. Complete the process by configuring and running the ED Loader import session. For
more information on configuring ED Loader sessions, see: Starting an Import Session
and Configuring Import Settings.
You can switch back to Early Data Analyzer while ED Loader processes the import. The
progress of the ED Loader session is visible in Early Data Analyzer by Export Progress in
the Export Statistics section.
© 2015 LexisNexis. All rights reserved.
194
LAW PreDiscovery
After the export to LAW PreDiscovery is completed, the lock icon,
, is displayed above
the Target LAW Case list in Early Data Analyzer. The lock icon indicates the Target LAW
Case list is locked. The list is locked to help prevent users from unintentionally sending
the export set to another LAW PreDiscovery case. In Early Data Analyzer, you can send
an export set to multiple cases in LAW PreDiscovery by unlocking the the Target LAW
Case list and selecting another LAW PreDiscovery case.
Exporting an export set to multiple LAW PreDiscovery cases may cause unexpected
results.
To send an export set to another LAW PreDiscovery case:
1. Click the lock icon,
.
Clicking the lock icon opens the following message:
2. Click Yes.
© 2015 LexisNexis, a division of Reed Elsevier Inc. All rights reserved.
Using LAW PreDiscovery
195
Clicking Yes unlocks the Target LAW Case list and the lock icon is no longer displayed.
3. In the Target LAW Case list, click the other case you want to send the export set to.
4. Click the Send to LAW PreDiscovery button.
After the export to LAW PreDiscovery is completed, the lock icon,
, is displayed above
the Target LAW Case list and the Target LAW Case list is locked again.
Related Topics
About Early Data Analyzer
Startup and Configuration
Cases in Early Data Analyzer
Importing
Filtering
Tagging
Performing OCR
Searching
Reviewing Exceptions
Creating Reports
Starting an Import Session (ED Loader)
Configuring Import Settings (ED Loader)
Creating Reports
You can choose from several built-in reports to generate. After you generate a report, you can
copy the text or print it. Available types of reports are listed in the following table:
Early Data Analyzer Reports
© 2015 LexisNexis. All rights reserved.
196
LAW PreDiscovery
The reports available in the Early Data Analyzer are listed in the following table:
Report Type
Description
Example
Document
Timeline
Provides a two-part summary report of the frequency
of items occurring between two dates that you select.
In the first part, a line chart shows a frequency of
documents in the case for each custodian.
In the second part, a table provides occurrence for
each custodian of e-mails versus electronic documents
on a year/month basis, along with their percentages of
all documents in custodian and in the document date
range.
Exception
Report
Displays a report of any errors or other exceptions
that my have been logged during the processing of the
case.
Export
Exclusion Log
A tab-delimited text-based log file containing a list of
all documents not included in the export set provided
to LAW PreDiscovery.
Export
Inclusion Log
A tab-delimited text-based log file containing a list of
all documents included in the export set provided to
LAW PreDiscovery.
Export Report
Provides a summary of the documents exported to
LAW PreDiscovery across all export sessions from Early
Data Analyzer for the current case grouped by
custodian.
File Type
Summary
Provides a summary report of documents in the case
by file type: includes the total number of documents by
file type and the total file size of each file type.
© 2015 LexisNexis, a division of Reed Elsevier Inc. All rights reserved.
Using LAW PreDiscovery
Filter Summary
Provides a summary of the effects of the current filter
settings on the case by displaying the total number of
included and excluded items per filter, as well as a
summary of the net result of the filters on the case as
a whole.
Language
Identification
Summary
Provides a summary of languages found in the current
case documents.
Search Report
Provides a summary of the search hit results for the
search terms defined in the current case grouped by
search term and custodian.
© 2015 LexisNexis. All rights reserved.
197
198
LAW PreDiscovery
Top 25 File
Types
Lists the top 25 frequently occurring file types in the
case; includes the total number of documents by file
type and the total file size of each file type.
User Audit Log
A tab-delimited text-based log file containing a list of
qualified actions performed by users in the case.
User actions are listed by date and time, with the most
recent actions at the top of the log and the oldest
actions at the bottom. For more information, see To
generate the User Audit Log.
To generate reports
1. Click Case Manager.
2. Double-click a case to open it.
3. Click Reports.
4. In the Available Reports list, click a report type.
5. Configure the report as needed. Not all reports require configuration. Configuration
options for reports are described in the following table:
Report Type
Configuration options
Document
Timeline
Provide a start date and an end date. If no dates are specified, the
default start and end dates of 1/1/1900 and 12/31/9999 are used.
Exception
Report
No configuration needed.
Export Report
No configuration needed.
File Type
Summary
No configuration needed.
Filter Summary
No configuration needed.
Language
Identification
Summary
No configuration needed.
Search Report
No configuration needed.
Top 25 File
Types
No configuration needed.
© 2015 LexisNexis, a division of Reed Elsevier Inc. All rights reserved.
Using LAW PreDiscovery
199
6. To add custom logo to the report, click Global Report Settings, select Display Logo on
Reports, and then browse to an image file.
7. Click the Render Report button.
The report renders in the right pane.
8. After the report renders, you can use the toolbar above the report to do the following:
Print the report.
Save it to a PDF file or XLS file.
Navigate the pages of the report.
Adjust the view of the report onscreen.
Search for specific text within the report.
To generate export logs
1. Click Case Manager.
2. Double-click a case to open it.
3. Click Reports.
4. In the Available Reports list, click Export Exclusion Log or Export Inclusion Log.
5. Click the Generate Log button.
If you selected the Export Exclusion Log, the Save Export Exclusion Log dialog box
opens. If you selected the Export Inclusion Log, the Save Export Inclusion Log dialog
box opens.
© 2015 LexisNexis. All rights reserved.
200
LAW PreDiscovery
6. Browse to where you want to save the log file, and in the File name field, type the log
file name.
The Save as type field defaults to Text (*.txt).
7. Click Save.
Clicking Save generates the log. Once the log is generated, the following message is
displayed:
8. To view the log file, click Yes.
Clicking Yes opens the directory where you saved the log file. Double-click the log file to
open the Export Exclusion Log or Export Inclusion Log.
© 2015 LexisNexis, a division of Reed Elsevier Inc. All rights reserved.
Using LAW PreDiscovery
To close the message without viewing the log file, click No.
The Export Inclusion Log is populated after running an export. If you generate the
Export Inclusion Log before exporting data, the Export Inclusion Log will not be
populated.
To generate the User Audit Log
1. Click Case Manager.
2. Double-click a case to open it.
3. Click Reports.
4. In the Available Reports list, click User Audit Log.
5. Click the Generate Log button.
Clicking the Generate Log button opens the Save User Audit Log dialog box.
© 2015 LexisNexis. All rights reserved.
201
202
LAW PreDiscovery
6. Browse to where you want to save the log file, and in the File name field, type the log
file name.
The Save as type field defaults to Text (*.txt).
7. Click Save.
Clicking Save generates the log. Once the log is generated, the following message is
displayed:
8. To view the log file, click Yes.
Clicking Yes opens the directory where you saved the log file. Double-click the log file to
open the User Audit Log.
Columns displayed on the User Audit Log
© 2015 LexisNexis, a division of Reed Elsevier Inc. All rights reserved.
Using LAW PreDiscovery
203
The User Audit log displays the following information:
Column
Description
Audit ID
Sequential numbering for audits
TimeStamp
GMT timestamp when the action was performed
UserName
Username of the user who performed the action
Action
Action performed by the user
Type
Identifier for what the action took place on
AffectedID
ID of the item (search, document, filter, exception) that the action
was performed on
AffectedDescript Brief description of the item that was acted on.
ion
Value
Value of the affected item after the change was made
Value Data
This column is only populated when tags are applied to an item. The
name of the tag(s) are displayed in this column.
Actions tracked on the User Audit Log
The following user actions are tracked and displayed in the Action column on the User
Audit Log:
Action Name
FilterDefinitionChanged
Description
When documents present in any filter category are
excluded from the production set.
FilterDefinitionValueChan When there is any change in the filter condition under Date
ged
Range Filters.
FilterDefinitionAdded
© 2015 LexisNexis. All rights reserved.
When a new filter condition is added under Date Range
Filter
204
LAW PreDiscovery
FilterDefinitionTagAdded
When documents present in any filter category are group
tagged.
FilterDefinitionTagRemove When group tagged documents present in any filter
d
category are untagged.
FilterDefinitionDeleted
When any filter definitions are removed from the filter
group.
TagAdded
When tag fields are added to the case
TagChanged
When tag fields are edited in the case
TagDeleted
When tag fields are deleted from the case
DocumentTagAdded
When tagging is applied to any of the documents in the
case
DocumentTagRemoved
When tagging is removed to any of the documents in the
case
SearchAdded
When search terms are added to the saved search list
SearchTermChanged
When existing search terms are edited in the saved search
list
SearchExecuted
When any saved or unsaved search term is executed
SearchTagAdded
When saved search terms are group tagged
SearchTagRemoved
When group tagged saved search terms are untagged
SearchDeleted
When saved search terms are deleted from the saved
searches list
ExceptionTagAdded
When all documents from any exception category are group
tagged
ExceptionTagRemoved
When group tagged documents from any exception
category are untagged
© 2015 LexisNexis, a division of Reed Elsevier Inc. All rights reserved.
Using LAW PreDiscovery
To close the message without viewing the log file, click No.
To search for text within a report
1. Click Case Manager.
2. Double-click a case to open it.
3. Click Reports.
2. In the Available Reports list, click a report type.
5. Click the Render Report button.
The report renders in the right pane.
6. Type search terms into the text box in the toolbar at the top of the report.
As you type, matching text in the document is highlighted.
7. Press ENTER to navigate from instance to instance of any matching text found in the
report.
© 2015 LexisNexis. All rights reserved.
205
206
LAW PreDiscovery
To print a report
1. Click Case Manager.
2. Double-click a case to open it.
3. Click Reports.
4. In the Available Reports list, click a report type.
5. Click the Render Report button.
The report renders in the right pane.
6. Click the printer icon.
To save a report
1. Click Case Manager.
2. Double-click a case to open it.
3. Click Reports.
4. In the Available Reports list, click a report type.
5. Click the Render Report button.
The report renders in the right pane.
6. Click the save icon.
Clicking the save icon opens the Save Report As dialog box. Reports can be saved as
Adobe Acrobat .pdf files or Microsoft Excel .xls files.
© 2015 LexisNexis, a division of Reed Elsevier Inc. All rights reserved.
Using LAW PreDiscovery
7. Browse to where you want to save the report, and in the File name field, type the
report file name.
The Save as type field defaults to Excel (*.xls).
8. In the Save as type field, click Excel (*.xls) or PDF (*.pdf), and then click Save.
Related Topics
About Early Data Analyzer
Startup and Configuration
Cases in Early Data Analyzer
Importing
Filtering
Tagging
© 2015 LexisNexis. All rights reserved.
207
208
LAW PreDiscovery
Performing OCR
Searching
Using the Global Dashboard
Reviewing Exceptions
Exporting
Working With Cases and Projects
In LAW PreDiscovery the case is the basic unit of organization for source documents, images,
extracted data, and metadata. This section describes procedures used when working with
cases.
In this section
Creating a New Case
Provides guidance and procedures for creating cases.
Working with Existing Cases
Provides guidance and procedures for opening existing cases, viewing case properties, and
deleting cases.
Case Templates
Describes how to use an existing case as a template for creating new cases.
Working With Projects
Describes how to organize cases by identifying them with a project.
Establishing Folder Structures
Describes how to organize the contents of a case by creating, moving, renaming, and
deleting folders. Shows how to access folder properties.
© 2015 LexisNexis, a division of Reed Elsevier Inc. All rights reserved.
Using LAW PreDiscovery
209
Creating a New Case
The first process in LAW PreDiscovery™ is to create a new case. The following facts apply to
cases:
A case is the basic unit of organization in LAW PreDiscovery. It consists of a database file
that tracks source documents, metadata, images, and other files.
Before you can begin working in LAW, you must create a case or open an existing case.
A case list is a list managed by SQL Server or Access that records the name and file path of
all the cases that LAW Discovery has opened or created. The case list can be viewed in the
New Case dialog.
By default, a local case list is created in the same folder as the LAW PreDiscovery
executable file. For example, if you kept the default install path for LAW PreDiscovery, and
your database application is version of SQL Server, the path to your case list would be: C:
\Program Files\Law50\caselist.mdb.
A case list may be shared by multiple users. If the case list file is not found the first time you
try to open it, you are prompted to browse to an existing case list file.
Whenever multiple users share a case list, if one station adds or removes a case, the
changes are immediately visible to all other stations.
If you are using Windows Vista or Windows 7, some functions in LAW PreDiscovery will not
work properly if data redirection through Windows User Account Control (UAC) is enabled.
To avoid this issue:
Create cases to a folder not protected by UAC or to a network location.
Do not save case files in the \Program Files directory.
To create a new case
1. On the File menu click New Case.
Or
On the main form toolbar click New Case.
The Select Database Engine dialog box appears.
© 2015 LexisNexis. All rights reserved.
210
LAW PreDiscovery
2. Select the desired database type, and if necessary, type a server name and select an
authentication mode for the new case.
3. Click OK.
4. The New Case - Properties dialog box appears.
© 2015 LexisNexis, a division of Reed Elsevier Inc. All rights reserved.
Using LAW PreDiscovery
211
5. Configure the case using options as described in the following table.
Option
Description
Case Name
The name should be unique and must adhere to file name
requirements of the host operating system. For example, the case
name may contains spaces but cannot contain any of the following
special characters: \ / : * > < |
Case Description
Type a description of the case in this optional field. Case
descriptions are visible when you open a case.
Enable electronic
Selected by default. When enabled the case is registered for
discovery for this case electronic discovery. Any files added later are available to
electronic discovery tools.
Case Template
If enabled, you can select a template to apply to this case. A case
template specifies a pre-determined of selections of case options.
For more information see Case Templates.
Client or Project
Name
If enabled, you can select a client or project name to associate
with the case.
Case Paths
Specifies the paths in an editable field where case files are stored.
The database path and the case path may be entirely different. A
case path may point to a folder on the local computer, to a UNC
© 2015 LexisNexis. All rights reserved.
212
LAW PreDiscovery
path, or to a network share mapped to a drive letter.
If you will be sharing a case list among multiple stations then
the case paths must point to a network drive that can be
identically mapped for all stations. For example, if you create a
case on a mapped network drive Z:\SomeCase then any other
computer intended to use that case must also be able to map a
drive to Z:\SomeCase.
Append case name to
case paths
Creates new folders under the default directory for the database
and images using the same name as the case. This option is
enabled by default. When disabled, all cases and images are
stored in the default directory.
Options
Opens a dialog box where you can edit the default paths for
database and image files.
Case is Active
Yes is the default. If No is selected the Date Deactivated field
updates with the current date and time.
6. Click OK.
What to name cases
As the case list grows, it can help to implement a naming scheme for cases. Applying a
consistent and intuitive naming scheme can make is easier to find cases and ensure that the
right case is selected as the target for importing documents and for other processing.
Below are some examples of possible naming schemes:
Client_JobNumber_InvoiceID
Client_Matter
Client_Matter_JobNumber
Date_CaseName
CaseName_StartDate
Client_JobNumber_Today'sDate
Client_Invoice_JobNum
Related Topics
Working with Existing Cases
Creating Index Fields
Case Templates
© 2015 LexisNexis, a division of Reed Elsevier Inc. All rights reserved.
Using LAW PreDiscovery
213
Importing E-Mail Files
Selecting a Scanner
Importing Cases and Load Files
Working with Existing Cases
There are several ways that you can work with cases:
Open cases. There are several ways to open a case.
View case properties. See section below for detailed list.
Delete a case. When you delete a case, you have the choice of backing up the case before
deleting it, or deleting the case without creating a backup.
Disable SQL case database deletion. You can remove the options from within LAW that
allow users to permanently delete SQL case databases.
To open an existing case
1. On the File menu click Open Case.
2. The Open Case dialog box appears.
© 2015 LexisNexis. All rights reserved.
214
LAW PreDiscovery
3. Navigate to a case by using either the Recent Cases, Active Cases, or All Cases tabs.
Recent Cases: Lists the last ten cases that were opened.
Active Cases: Lists only active cases
All Cases: Lists all cases and includes searching capabilities. You can search for a case
by either the case name or by the creation date. To utilize the Search feature, first
select the desired search method: CaseName or DateCreated. As letters or numbers
are entered into the adjacent box, the cases that correspond to those beginning
characters appear in the list.
4. Select a case and then click Open.
To open a case by browsing
1. On the File menu click Open Case.
2. In the Open Case dialog box, click Browse.
3. Browse to the case folder and then select select the project database or ini file
(project.mdb, project.add, or project.ini).
If you do not want to edit the case, select Open as read-only.
4. Click Open.
One of the following results occur:
© 2015 LexisNexis, a division of Reed Elsevier Inc. All rights reserved.
Using LAW PreDiscovery
215
The case opens and is added to the case list.
If the case is already in the case list, a message will appear stating that the case is
already in the list.
If the case name conflicts with a case name already in the case list, you are prompted
to enter a new case name.
To open a case using a DOS command
You can open a case by using a command by using the Run window or the command
prompt.
For example, to open a LAW PreDiscovery case called LAW Demo Case:
1. Click Start and then click Run.
2. Type the command, including quotes (""), into the text box, substituting your case name
for LAW Demo Case:
"C:\Program Files\Law50\Law50.exe" LAW Demo Case
3. Click OK.
To view case properties
1. On the File menu click Open Case.
The Open Case dialog box appears.
© 2015 LexisNexis. All rights reserved.
216
LAW PreDiscovery
2. Select a case and then click Properties.
The Case Properties dialog box appears.
© 2015 LexisNexis, a division of Reed Elsevier Inc. All rights reserved.
Using LAW PreDiscovery
It shows the following properties:
Case name.
Case database type.
Case description.
Whether electronic discovery is enabled or not.
Case template from which the case was derived.
Client or project name.
Database path and image path.
Case status as active or deactivated, and date of deactivation.
Last opened date.
Case options.
To delete a case
1. In the main form, on the File menu click Open Case.
The Open Case dialog box opens.
© 2015 LexisNexis. All rights reserved.
217
218
LAW PreDiscovery
2. Select a case.
3. Select deletion options as needed:
Delete SQL databases from server on case deletion. Removes the database and log
files from SQL Server.
Perform backup before deleting database from server. Leaving this option enabled
is recommended.
4. Click Delete from List.
The Delete Case dialog box appears.
5. Click Yes.
© 2015 LexisNexis, a division of Reed Elsevier Inc. All rights reserved.
Using LAW PreDiscovery
219
Whenever you delete a case from SQL Server, you are strongly recommended to create
a backup copy of your case database. You can disable the option to delete SQL case
databases from within LAW. For more information on disabling the LAW option to delete
SQL case databases, see the next section in this topic.
6. Follow prompts either to save the database, or permanently remove the database from
the case list and from SQL Server.
To remove options for deleting SQL databases
You can remove the options that allow users to delete SQL databases. Removing these
options can help to mitigate the risk of data loss caused by users mistakenly deleting the
SQL database from within LAW.
You can disable or re-enable options to delete SQL cases by editing the law50.ini file. After
the options to delete SQL cases are disabled, you can still remove a case from the case list
but this action does not delete the SQL database.
If you want to re-enable options to delete SQL databases, you can edit the INI file again
and remove the lines described in the steps that follow.
1. Close LAW PreDiscovery.
2. Use Windows Explorer to open the installation directory for LAW PreDiscovery. The
default path is C:\Program Files\LAW50\.
3. Open Notepad or some other text editor and then open law50.ini for editing.
4. Insert a new line.
5. Type the following on the new line:
[Administration]
DisableSQLDatabaseDeletes=1
6. Save the file and then close the text editor.
7. Start LAW PreDiscovery.
8. On the File menu, click Open Case.
The Open Case dialog box opens.
© 2015 LexisNexis. All rights reserved.
220
LAW PreDiscovery
The options to delete SQL Server are no longer available.
Related Topics
Creating a New Case
Case Templates
Importing Electronic Discovery
Case Summary Report
Case Templates
You can save the folder structure and field for reuse when creating a new case in a case
template. Case templates are saved in XML files in the ..\LAW50\Templates folder. The file
© 2015 LexisNexis, a division of Reed Elsevier Inc. All rights reserved.
Using LAW PreDiscovery
221
name is the same name as the template.
To save a case template
On a computer that has a LAW Admin license, you can save a case template from the File or
Index menu.
To save a case template from the File menu:
1. On the File menu click Administration, and then click Save Case Template.
The Save Case Template dialog box appears.
2. Apply a folder setting.
Select Save Folder Structure with Template to save the current folder structure and
field information of the case.
Select Top level folders (ONLY) to configure the template so that it consists of field
information and only the folders located one level below the root.
To save a case template from the Index menu:
1. On the Index menu click Modify Fields, and then click Save Template.
The Save Case Template dialog box appears.
2. Apply a folder setting.
Select Save Folder Structure with Template to save the current folder structure and
field information of the case.
Select Top level folders (ONLY) to configure the template so that it consists of field
information and only the folders located one level below the root.
For more information on working with fields, see Creating Index Fields.
© 2015 LexisNexis. All rights reserved.
222
LAW PreDiscovery
To apply a case template
To apply the case template at the time of case creation:
1. On the File menu click New Case.
2. Select a database and then click OK.
The New Case - Properties form appears.
3. Clear Enable Electronic Discovery for this case.
When you create a new case with Electronic Discovery enabled you cannot apply a case
template at the same time, but you can apply a template to such a case after you
create it. For more information see To apply a template to an existing case in this
topic.
4. Select a template from the Case Template list.
5. Fill out the rest of the form, and then click OK.
A previously created template is applied to the new case. The template will have index
fields and may also specify a folder structure for the new case.
© 2015 LexisNexis, a division of Reed Elsevier Inc. All rights reserved.
Using LAW PreDiscovery
To apply a template to an existing case
1. Open a case.
2. On the File menu click Administration, and then click Apply Case Template.
The Select Case Template dialog appears.
3. Select a template and then click Open.
A listing of the fields that will be added to the case appears. Any field names that are
duplicates of existing fields are ignored.
© 2015 LexisNexis. All rights reserved.
223
224
LAW PreDiscovery
4. Click Yes to proceed.
The index fields and folder structure (if any) stored in the template will be applied to the
case in addition to any already existing fields and folders.
To use an alternate method of applying a case template, on the Index menu click
Modify Fields, and then click Apply Template. Follow the instructions above to apply
the template.
To modify fields in the #Default.xml template file
The #Default.xml file is the default case template installed with LAW PreDiscovery. The
#Default.xml file determines the default case properties, including fields, automatically
defined for a case when a case is created, unless another case template is applied when the
case is being created.
The #Default.xml file is stored in the Templates folder within the LAW PreDiscovery
installation folder (...\Progam Files\Law50\Templates). In Law PreDiscovery, if you want each
new case to be created with specific fields, you can modify the #Default.xml template file so
that when a new case is created in LAW, the case is automatically populated with the fields
you defined in the #Default.xml file
1. Browse to C:\Program Files\Law50\Templates folder.
If you are using a 64-bit OS, the path will be C:\Program Files (x86)\Law50
\Templates. If your LAW PreDiscovery shortcut is pointing to a shared drive, please use
the #Default.xml file in that location.
2. Before modifying the #Default.xml file, it is best practice to make a backup copy of the
#Default.xml.
3. Right-click the #Default.xml file and open it in a text editor program.
4. Copy the text from <Field1> to </Field1> and paste it under the </Field1> line.
<Field1>
<FieldName>_FTIndex</FieldName> Correspond with the field name
© 2015 LexisNexis, a division of Reed Elsevier Inc. All rights reserved.
Using LAW PreDiscovery
225
<FieldType>7</FieldType> Corresponds with the type of field please see table
below.
<MaxLength>0</MaxLength> Corresponds with the max length of the field. 0
= no limit
<PageLevel>False</PageLevel> Corresponds if the field is page level or not
<SpanHeight>1</SpanHeight> ‘This applies to memo fields only
<Indexed>True</Indexed> Corresponds if the field is indexed or not
<Unique>False</Unique> Corresponds if the field is Unique or not
<Locked>True</Locked> Corresponds with if the field is editable or not
<System>True</System> Corresponds if the field is a system field or not.
<Visible>False</Visible> Corresponds with if the field is visible in the index
and/or grid view automatically
</Field1>
5. Change <Field1> and </Field1> to the corresponding field name.
An example would be, for the second added field, change it to <Field2> and </Field2>
6. Change the value between <FieldName> and </FieldName> to match the field name
you want in your cases.
7. Change the value between <FieldType> and </FieldType> to the numeric value of the
field you would like in the case. Please see field type value chart below:
Field Type:
0 = Text
1 = Auto-Increment
2 = List
3 = Memo
4 = Date
5 = Numberic
6 = Tag
7 = Tiny Int
8. Change any of the other values that you want for setting up the field.
© 2015 LexisNexis. All rights reserved.
226
LAW PreDiscovery
9. Save the file with the same name, #Default.xml.
10. Create a new case.
The case will automatically be populated with the new and/or modified fields from the
#Default.xml file. For more information about creating a new case, see Creating a New
Case.
Related Topics
Creating a New Case
Creating Index Fields
Working With Projects
In LAW PreDiscovery, assigning cases to projects can make it easier to find and manage cases.
When you first create a case, you can assign it to a project or you can assign cases to projects
after you create your cases. After cases are assigned to projects, you can use a tree control
that lists projects and member cases to easily navigate to the case you are interested in.
Organizing cases by project can be useful, for example, when you need to work with multiple
cases from the same client.
The steps to create a new project vary, depending upon whether you create a project at the
same time as you create a new case, or create a project for an existing case.
To create a project when creating a new case
1. On the File menu click New Case.
Or
On the main form toolbar click New Case.
The Select Database Engine dialog box appears.
2. Select the desired database type, and if necessary, type a server name and select an
authentication mode for the new case.
3. Click OK.
© 2015 LexisNexis, a division of Reed Elsevier Inc. All rights reserved.
Using LAW PreDiscovery
The New Case - Properties dialog box appears.
4. Click Edit List.
The Project Administration dialog box appears.
5. In the Project Administration dialog box click New Project.
The New Project dialog box appears.
6. Type a project name and a project description.
© 2015 LexisNexis. All rights reserved.
227
228
LAW PreDiscovery
7. Next to Project is Active, keep the default, Yes, if the project will be initially active,
otherwise select No.
8. Click OK.
The new project is added to the list in the Project Administration dialog.
9. Click OK.
To create a project for an existing case
1. On the File menu click Open Case.
2. In the Open Case dialog box, select a case and then click Properties.
3. Click Edit List.
4. In the Project Administration dialog box click New Project.
The New Project dialog box appears.
5. Type a project name and a project description.
6. Next to Project is Active, keep the default, Yes, if the project will be initially active,
otherwise select No.
7. Click OK
The new project is added to the list in the Project Administration dialog.
8. Click OK.
© 2015 LexisNexis, a division of Reed Elsevier Inc. All rights reserved.
Using LAW PreDiscovery
To edit project properties
1. On the File menu click Open Case.
2. In the Open Case dialog box, select a case and then click Properties.
3. In the Case Properties dialog box, click Edit List.
The Project Administration dialog box appears.
4. In the Project Administration dialog box, select a project.
5. Select a project from the list and then click Edit Project.
6. Edit the project name, description, or active status.
7. Click OK.
To delete a project
1. On the File menu click Open Case.
2. In the Open Case dialog box, select a case and then click Properties.
3. In the Case Properties dialog box click Edit List.
The Project Administration dialog box appears.
© 2015 LexisNexis. All rights reserved.
229
230
LAW PreDiscovery
4. In the Project Administration dialog box select a project.
5. Select a project from the list and then click Delete Project.
6. Click OK to confirm and then click OK again.
The project name will revert to <none> for any LAW PreDiscovery™ case previously
associated with the deleted project.
Related Topics
Creating a New Case
Case Templates
Establishing Folder Structures
Creating a folder structure in LAW PreDiscovery™ will allow better organization of documents
and the ability to mimic the structure of the original documents. This helps scanner operators
find their place in the case more easily and aids in finding and correcting scan errors. The folder
structure is also useful for EDD projects, allowing organization by media type or custodian, for
© 2015 LexisNexis, a division of Reed Elsevier Inc. All rights reserved.
Using LAW PreDiscovery
231
example.
LAW PreDiscovery provides a set of pre-defined folder suffixes to quickly create a folder
structure, or you can customize the folder names as needed. When naming folders, one
important item to note is that the folder structure generally determines the order of processing,
i.e. folders are processed in alphabetical order.
The files referenced in the document list are not necessarily physically stored in the folders
shown in the folder tree. Displaying the records in this manner will allow the desired
representation of folders and records to be maintained. For example, folders created via
TIFF/PDF conversion in LAW are stored in <case root>\$Image Archive; however, the
records will appear in the document list when clicking on the original folder structure
created by the ED Loader during import. See the topic related to the type of function being
performed in order to see how the associated files are stored.
To create a folder
1. Create a new case or open an existing case.
2. Select a folder that will hold the new folder.
3. On the Folder menu click New.
© 2015 LexisNexis. All rights reserved.
232
LAW PreDiscovery
The New Folder dialog appears.
4. Configure the folder naming scheme.
Follow these steps
To apply this naming scheme
The folder name consist of a number
1. In the Number field type a number.
followed by a predefined type code, for
example, 002Box or 123Rubr.
2. In the Type list select a source type.
The Folder Name field previews the name
of the folder that will be created.
The folder name consists of custom
text.
1. Delete any text in the Folder Name field
and then type the name of the folder.
5. Click OK.
The new folder is created as a subfolder of the currently selected folder. To create a new
folder on the same level as the current folder, select the parent of that folder prior to
adding the new folder.
To automatically create a folder series
LAW also provides a quick and easy method for creating a series of folders. The Auto-Create
feature automatically creates the next logical folder on the same level as the current folder.
For example, if currently in "C:\Case1\0001Box\0001Fldr" and Auto-Create is selected, LAW
creates "C:\Case1\0001Box\0002Fldr" and makes that the current folder.
© 2015 LexisNexis, a division of Reed Elsevier Inc. All rights reserved.
Using LAW PreDiscovery
233
On the Folder menu click Auto-Create.
Or
Right-click a folder that will contain the folder series and then click Auto-Create.
Note the following considerations when auto-creating folders:
If the next logical folder already exists, LAW will jump to that folder and make it the
current folder.
The next folder is created on the same level as the current one.
Folders cannot be auto-created while the root image folder is selected, as this would
create a folder outside of the root case folder.
On the Folder menu if you select Auto-Create N Folders you can to create up to 999
folders automatically with names based on the current folder.
To expand or collapse folders
1. On the main interface in the tree view select a folder.
Any subfolders appear in the folder tree.
Any files contained in the folder appear in the document list below the folder tree.
2. As necessary you can expand or collapse folders and subfolders as described in the
following table:
To perform this action
Do this
Expand a folder to view one level of subfolders.
Click the plus sign next to the folder.
Expand all folders below the selected folder.
On the Folder menu click Expand.
Collapse a folder.
Click the minus sign next to the folder.
Collapse all folders below the selected folder.
On the Folder menu click Collapse.
The files referenced in the document list are not necessarily physically stored in the
folders shown in the folder tree. Displaying the records in this manner will allow the
desired representation of folders and records to be maintained. For example, folders
created via TIFF/PDF conversion in LAW are stored in <case root>\$Image Archive;
however, the records will appear in the document list when clicking on the original
folder structure created by the ED Loader during import. See the topic related to the
type of function being performed in order to see how the associated files are stored.
To delete a folder
© 2015 LexisNexis. All rights reserved.
234
LAW PreDiscovery
1. Select a folder to delete.
2. On the Folder menu click Delete.
To prevent accidental deletion of an entire folder tree, all subfolders of that folder must
first be deleted. Similarly, the root case folder cannot be deleted from within LAW.
To rename or move a folder
1. Select a folder to rename.
2. On the Folder menu click Rename.
Note the following considerations when renaming folders:
The folder name must not contain any characters that the operating system cannot
support (i.e. ? / \).
The root case folder cannot be renamed.
When a folder is renamed, the path for all documents in and below that folder must be
updated to reflect the name change. This process can take some time if the folder is
near the top of the case, depending on the number of documents affected by the
name change.
If the number of documents affected by folder renaming is near or greater than 10,000
the folder renaming process could fail due to file locking. The upper limit is typically >
10,000. If such an error occurs, you can edit a setting in the registry to allow the
renaming of the folder to proceed. Contact LexisNexis for specific details if this occurs.
To move folders
1. In the folder tree click the folder to be moved.
2. Do one of the following:
On the Folder menu click Move.
Or
Right-click the folder and then click Move.
The Move Folder dialog box displays the same folder structure as the tree in the main
interface.
3. Select the folder into which the folder should be moved or create a new folder.
4. Click Accept.
The folder will be moved to the designated location. This process may take longer to
complete for folders containing a large number of documents.
Note the following considerations when moving folders:
© 2015 LexisNexis, a division of Reed Elsevier Inc. All rights reserved.
Using LAW PreDiscovery
235
You can move any folder below the root folder that is displayed in the folder tree.
All subfolders and records contained in the folder will be moved to the new location as
well.
Folder properties and document area summaries
Summaries for folder properties, images, and document area are available. These are
described in the following table:
Description
Type of
summary
Folder properties LAW provides a means to get a quick summary of a folder that includes
the actual location, size, and number of files and subfolders within it. The
size and number of files displayed will include all files in and below the
current folder. To view the folder properties for a specific folder, click the
desired folder and select Properties from the Folder menu.
Area of images
and documents
LAW provides a summary view of the images contained within a folder
and subfolders. The image summary displays a report of the number of
documents and pages contained within a selected folder. LAW also
calculates the Total Area of the documents contained within the folder.
The total area information can be very useful for billing purposes.
As noted in the message box (ED-enabled cases only), electronic files
and their printed images are skipped during this image summary
process. The number of skipped records will be listed in the summary
output, in addition the number of scanned images.
To calculate the square footage of the documents, LAW must open and
read each image individually, which takes an additional amount of time.
For a faster document or page count:
Use the Query Builder or Grid View to create a query on the selected
folder, and then on the Tools menu click Summary to view the
document and page totals.
Or
Use the Case Summary feature. On the File menu click
Administration and then click Case Summary.
When you use Case Summary you select a date range prior to
summarizing the data. The summary provides the number of pages
flagged for optical character recognition (OCR) and the number of
pages that the OCR process completed.
Related Topics
© 2015 LexisNexis. All rights reserved.
236
LAW PreDiscovery
Case Templates
Moving Documents and Pages
Session Configuration
Working with Fields
Fields are storage containers that hold the various forms of metadata associated with case
documents and pages. For example, each document in a case has a DocID field. The actual
contents of the DocID field will vary from document to document. Field contents serve as the
basis for searching, sorting, and many purposes that are project-specific.
For each case, LAW PreDiscovery automatically creates a basic set of fields, such as DocID,
OcrStatus, and many others. For a complete list of the predefined fields that are created with
every case, see: Field Descriptions.
In addition to the fields that are created by default, you can create fields to suit your own
purposes. Whether provided by default or created by you, every field in LAW PreDiscovery
belongs to one or another data type. For more information on data types in LAW PreDiscovery,
see: Manipulating Fields.
In this section
About Fields
Discusses field types and how fields are created.
Manipulating Fields
Provides procedures for creating, updating, and deleting fields. Describes each of the
possible data types that define the kind of information a field can store. Includes
procedures for changing the data type of a field. Describes how to customize whether
particular fields appear in the main window and how to change the sequence in which they
appear.
Working with List Items
Describes procedures for creating, editing and removing list items. Describes how to
populate list fields while coding and how to import and export list field items.
Index Profiles
Defines index profiles as a saved list of fields that are visible for a case, thus allowing you
to reuse views of index fields across cases. Gives procedures for creating index profiles,
and for changing the order in which the fields appear in a profile.
© 2015 LexisNexis, a division of Reed Elsevier Inc. All rights reserved.
Using LAW PreDiscovery
237
About Fields
The purpose of a field is to store data. This topic describes: the types of data you can store in
fields, whether a type can be applied to at the document or page level, and how fields are
created.
Field types
Each field type stores a different type of data. Field types, the kind of data each can hold,
whether it can be applied to a page or a document, and implementation notes are described
in the following table:
Field type Type of What it can be Notes
data it
applied to
can hold
Text
text
Pages or
documents
Can hold up to 255 characters.
AutoIncre
ment
text
Documents
only
Automatically increments from one document to the
next if no other value is specified.
Date
dates
Documents
only
A date formatted as:
Documents
only
You create a list of text items.
List
text
mm/dd/yyyy
Only these items will then appear in a drop-down
list for the field on the Index tab.
To modify listed values select the field and then
click the Edit List.
For detailed information on setting up List fields,
see: Working with List Items.
Memo
Numeric
Tag
(Boolean)
text
numbers
Y or N
(yes or
© 2015 LexisNexis. All rights reserved.
Documents
only
Can exceed 255 characters.
Pages or
documents
Can hold any numeric value between:
Pages or
documents
In a grid, a check mark indicates Y.
Note, you can use the Span Height option to adjust
the number of rows displayed on the embedded
grid. Memo fields cannot be indexed.
-2147483647 and 2147483648.
In Query Builder, use Y or N to designate a Yes or
238
LAW PreDiscovery
no)
No value.
See the Tagging Records section for more
information.
System fields, extended properties, and user-defined fields
Some fields are created automatically by LAW PreDiscovery as a part of creating a case and
performing other operations. For example, LAW automatically creates DocID and
PageNumber for you when you create a case. These are called system fields and are listed in
the in the Field Descriptions topic.
Extended property fields are a special kind of system field that can be created during import
of electronic discovery. When you use ED Loader to import items into your case, you can set
options to extract custom metadata from certain types of documents. This custom metadata
is stored in fields called extended properties. The names of these fields all begin with EP. If a
case has extended properties, its HasExtProps system field is set to Y. For more information
on enabling extraction of custom metadata upon import, see: Metadata. For more
information on viewing extended properties in grids, see: Customizing the Grid View.
By comparison to system fields created by LAW PreDiscovery, user-defined fields, sometimes
called custom fields, are fields that you create yourself to assist in performing any number of
tasks. For example, you might want to create fields to store billing information, or to track
where a document is in your production workflow. For more information on creating custom
fields, see: Manipulating Fields. Note that custom fields are imported along with other case
data when you import another case into the current case. For more information on importing
cases, see: Importing Cases and Load Files.
Determining field scope
Fields scope, or whether a field may be applied to documents or to individual pages, is
determined by its membership in one of three possible tables in the LAW case database:
Page table. This table includes fields whose scope is set to the page level. For example,
PageID can only be applied to individual pages within documents.
Document table. This table includes fields whose scope is set to the document level. For
example, DocID can only be applied to documents and not to individual pages.
Extended table. This table includes fields whose origin is with the metadata of the
source document. Extended properties are created during import to ED Loader if
metadata extraction is enabled. Every extended property corresponds to custom
metadata found in native documents and therefore apply to entire documents, and not
to individual pages.
To determine whether any field belongs to the Page, Document, or Extended table
1. On the Index menu, click Modify Fields.
2. Scroll to the field name in question, and then check the value in the Table column for the
field in question. Note also that extended properties are prefaced with EP in their
names.
© 2015 LexisNexis, a division of Reed Elsevier Inc. All rights reserved.
Using LAW PreDiscovery
239
Related Topics
Manipulating Fields
Grid Functions
Working with List Fields
Index Profiles
Field Descriptions
Manipulating Fields
The following facts apply to index fields in LAW PreDiscovery:
LAW PreDiscovery provides many built-in fields. However, you define as many new fields as
you need to support specialized queries.
When a new case is created, and Enable Electronic Discovery for this case is selected, all
fields necessary for processing electronic discovery are created automatically.
Field information for each record is displayed on the Index display on the main form to the
right of the main image window.
Use the Modify Fields dialog box to add, delete, and update existing fields.
© 2015 LexisNexis. All rights reserved.
240
LAW PreDiscovery
To add, delete, and update existing fields
1. On the Index menu click Modify Fields.
The Modify Fields dialog box appears.
Fields shown in gray are system fields and cannot be deleted or edited.
Fields shown in black are user-defined fields.
2. Select a field and then apply the following options as needed:
Add Field: Opens the Add Field dialog box.
Delete Field: Deletes a user-defined index field.
Save Changes: Saves changes after editing field properties.
Apply Template: Applies an existing case template. See Case Templates.
Save Template: Saves a case template based on the current LAW PreDiscovery case.
See Case Templates.
Edit List: Starts the List Editor to allow editing of list field values.
Field Profiles: Click the arrow to view a list of active profiles, open the Manage Field
Profiles dialog, and save a new profile. For more information, see Index Profiles.
Name: Displays names of system and user-defined fields.
Table: Indicates if a field is contained in the document-level or page-level table of the
database.
Type: Lists the type of field (see Field Types below).
Row Span: Indicates how many rows of data will be visible in the Index display (Memo
fields only).
© 2015 LexisNexis, a division of Reed Elsevier Inc. All rights reserved.
Using LAW PreDiscovery
241
Indexed: Indicates if a field is indexed.
Locked: Indicates if a field is locked. All system fields will be locked, meaning they
cannot be edited.
Unique: Indicates if a field is set to unique, meaning values in this field must be unique
for each record.
Visible: Indicates if the field is visible on the Index display.
Field Order: Displays the order of fields in the Index display.
Active Profile: Displays the name of the profile currently applied in the Index
display.**
Save: Saves any changes made to the active field profile.**
Save As: Deletes a user-defined Index profile. to be used for storing field order and
visibility.**
Delete: Deletes the profile currently selected in the Active Profile field. The Default
profile cannot be deleted.**
**For more information on index profiles, see Index Profiles.
To create a new field
1. From the main window, on the Index menu, click Modify Fields.
The Modify Fields dialog box opens.
2. Click Add Field.
The Add Field dialog box appears.
© 2015 LexisNexis. All rights reserved.
242
LAW PreDiscovery
3. Type a unique name for the field.
LAW PreDiscovery reserves many field names. You will not be able to name a field with
one of the reserved names or with any custom field that already exists. For more
information see Field Descriptions.
4. In the Table list, select the level.
Document-level applies the same value to all pages in a document.
Page-level applies a unique value to each page in a document.
5. Select options for the database properties for the field:
Option
Description
Type
The type should reflect the kind of data that will be stored.
Type choices are:
Autoincrement
List
Memo
Numeric
Tag (Boolean)
Text
For a full description of these field types, see About Fields.
Indexed
Select this option only if the information in the field will be unique across
records, and you are certain the information will be used frequently as a
basis for queries.
For example, do not apply an index to a Tag (Boolean) field type as this
can reduce database performance.
© 2015 LexisNexis, a division of Reed Elsevier Inc. All rights reserved.
Using LAW PreDiscovery
243
Unique
Applies a uniqueness standard to data stored in the field. Use if the field
will be used as a key value.
Insert at top of
list
Adds the new field to the top of the current list of fields.
6. Click OK.
To apply an index to a field
In database terms, an index refers to a numerical list that the database engine applies to
field data. The database engine uses this list instead of the actual data as the basis for
sorting and searching. The end result of applying an index to a field is a potential boost in
query performance. It is important to note that the database engine does not automatically
create an index for any field. Instead, you must assign them yourself and exercise good
judgment when doing so because if an index is applied to the wrong kind of field,
performance can be impacted negatively.
It is recommended that you follow these guidelines when deciding which fields to apply an
index to:
Apply indexes only to fields that hold unique values.
Apply indexes only to fields that you expect will be the subject of queries or that you
expect will be used as a basis for sorting. There is a performance cost that the database
engine incurs with applying an index. So you should apply indexes sparingly and only to
those fields you expect you will use the most.
To apply an index to a field
1. In the main application window, on the Index menu, click Modify Fields.
2. Select a field that you want to index.
© 2015 LexisNexis. All rights reserved.
244
LAW PreDiscovery
3. Select Indexed.
4. Select Unique if you want the values in the field to function as a unique identifier.
5. Click Close.
Considerations for changing field properties
Note the following important considerations before you change a field property:
Certain field type conversions may cause a loss of data. For example, changing a text
field to date field can cause all invalid date values to be cleared. Similarly, changing a
memo field to text will cause truncate fields that have greater than 255 characters.
A unique index cannot be added to an existing field if that field does not contain all
unique values.
To delete a field
1. In the main application window, on the Index menu, click Modify Fields.
2. Select the field you want from the field list and then click Delete.
The field and all data associated with it are deleted permanently from the database.
System fields cannot be deleted. You can tell if a field is a system field if it is displayed in
gray in the Modify Fields dialog box.
© 2015 LexisNexis, a division of Reed Elsevier Inc. All rights reserved.
Using LAW PreDiscovery
245
To manipulate field sequence and visibility
The Field Order section of the Modify Fields dialog box is used to specify the order in which
fields will be displayed in the Index display on the main form.
To perform this
action
Do this
Add a field to the pane.
Select Visible for the desired field; the field will be added to the
bottom of the list.
Move a field to a
different location.
Drag the field from the Field Order pane to the desired location,
and then release the mouse button.
Move multiple fields
simultaneously.
1. Use the CTRL or SHIFT key to select multiple fields.
2. While holding one of these keys, click and drag the fields to the
new location and then release the mouse button.
The fields will be re-ordered on the Index display after closing
the Modify Fields dialog box.
Hide or show fields.
Right-click anywhere within the Field Order pane and then select
an option:
Hide Selected Fields: Hides any fields selected in the Field Order
pane. Use the Ctrl or Shift keys to select multiple fields.
Hide All Fields: Hides all fields that are currently displayed in the
Field Order pane.
Show All Fields (User-defined): Leaving currently displayed
fields intact, this option displays all user-defined fields in the
current LAW PreDiscovery case.
Show All Fields: Displays all system and user-defined fields
existing in the current case.
Related Topics
Batch Updating
Grid Functions
Field Descriptions
Index Profiles
© 2015 LexisNexis. All rights reserved.
246
LAW PreDiscovery
Working with List Fields
You can work with list items by adding, removing, or editing the items available in a list field.
You can import or export list items for reuse across cases. You can also add list items while
coding.
To work with list items
1. From the main window in LAW PreDiscovery, on the Index menu, click Modify Fields.
The Modify Fields dialog box opens.
2. Select a list field and then click Edit List. The Edit List button is only enabled for fields
defined as List types.
The List Editor opens. The name of the field being edited is listed just below the title
bar.
© 2015 LexisNexis, a division of Reed Elsevier Inc. All rights reserved.
Using LAW PreDiscovery
247
3. Use the List Editor to work with list items from list items as described in the following
table:
To complete this
task:
Add items to a list.
Perform these steps in the List Editor
Type a unique value into the Current Item text box and then
click Add.
The new item appears in the list.
Delete a list item.
Select a list item from the List Items pane and then click
Delete.
The selected item is removed from the current list.
Rename a list item.
Select a list item from the List Items pane, type the new name
in the Current Item text box, and then click Update.
This name of the current item is updated.
To import or export list values
You can import or export existing list values for reuse. List items are imported and exported
using list file. A list file is a text file with the .lst extension. After you setup list items on one
© 2015 LexisNexis. All rights reserved.
248
LAW PreDiscovery
workstation, use the List Editor to export list files, and then on other workstations, you can
use the List Editor to import the list files. Sharing list files allows multiple users to use a
common set of fields between cases.
1. From the main window in LAW PreDiscovery, on the Index menu, click Modify Fields.
The Modify Fields dialog box opens.
2. Select a list field and then click Edit List.
To import existing entries from a list file use the Import function.
To export existing entries to a list file, use the Export function.
To add list items while coding
You can add items to a list automatically when coding documents from the main form.
1. On the Tools menu, click Options, and then click the Preferences tab.
2. Select Add all new list field values to list on update and then click OK.
If a value is typed directly into a list field on the Index display, the value will be added to
the list after you click Update.
Related Topics
© 2015 LexisNexis, a division of Reed Elsevier Inc. All rights reserved.
Using LAW PreDiscovery
249
About Fields
Manipulating Fields
Batch Updating
Grid Functions
Field Descriptions
Index Profiles
Index profiles store a list of fields that are visible for a case and the order in which the fields
appear. Index profiles allow you to reuse views of index fields across cases.
Note the following facts about index profiles:
You can setup an index profile once and then can reuse it multiple times.
Field profiles can be used to easily switch between sets of fields in the Index panel.
Profiles are stored in a text file with the .ifp file extension.
The Default profile is a user-level profile included by default in each LAW PreDiscovery™
case. If you change the Default profile in a case, the changes will not persist to the Default
in other existing or new cases.
In electronic discovery-enabled cases, a number of popular EDD-related fields are displayed
in the Index view automatically when the Default profile is selected.
In non-EDD cases, no fields are displayed by default.
To edit an index profile
1. In the main window, on the Index menu, click Modify Fields.
© 2015 LexisNexis. All rights reserved.
250
LAW PreDiscovery
2. Configure fields as visible and sequence them as needed in the Field Order area.
3. Click Save As.
Or
Click the arrow beside the Field Profiles button and then click Save As.
3. Select a storage level. Three storage levels are available when creating field profiles:
User - Available to the current user in the current case.
Shared - Available to any user in the LAW PreDiscovery case in which the profile was
created. If a profile is shared, LAW PreDiscovery will automatically display "(Shared)"
after the profile name.
Global - Available to any user in any LAW PreDiscovery case. If a profile is global, LAW
PreDiscovery will automatically display "(Global)" after the profile name.
5. Type a name for the profile. The name must be a valid file name, as the .ifp profile
storage file will be named according to the value entered in this dialog.
6. Click Accept to save the changes.
The user and shared profiles are stored in the case folder structure ($UserData), while
global profiles are stored in <application path>\Shared. To change the default
storage location for global profiles, on the Tools menu, click Options, and then click
Preferences.
7. To configure a new storage path click Browse and then select a folder.
Any previously created global queries and profiles will need to be manually moved from
the LAW50\Shared folder into this specified location to be detected as a global query or
profile by LAW PreDiscovery. Changing this path will affect saved global queries, global
index field profiles, and global grid profiles.
Versions 5.3.08 and below used a different storage scheme for index profiles. All
profiles were stored in a single INI file. When 5.3.14 or later is installed and a case is
opened, the profiles will be copied from this indexprof.ini file and updated to match the
© 2015 LexisNexis, a division of Reed Elsevier Inc. All rights reserved.
Using LAW PreDiscovery
new storage schema. The previous Default profile will be named Default_Shared to
avoid conflict with the new Default profile in the current case.
To create a new profile
1. In the main window, on the Index menu, click Modify Fields.
2. Click the arrow next to the Field Profiles button.
Profiles also can be applied or deleted from this dialog box.
To apply an index profile
On the Index menu, click Modify Fields.
Or
On the main form Index panel select a profile from the Profile drop-down list.
To modify or delete an existing profile
1. In the main window, on the Index menu click Modify Fields.
2. Do one of the following:
In the Active Profile drop-down, select a profile to modify or delete.
To modify a profile, edit fields and then click Save.
To delete a profile, click Delete and then click Yes.
Or
© 2015 LexisNexis. All rights reserved.
251
252
LAW PreDiscovery
3. Click the arrow next to the Field Profiles button.
4. Click Manage Profiles.
5. Select a profile to delete from the Field Profiles list.
6. On the Edit menu click Delete.
Related Topics
Case Templates
Working With Projects
Manipulating Fields
Batch Updating
Grid Functions
Field Descriptions
Acquiring Documents
You use LAW PreDiscovery to acquire documents in any of several ways: through electronic
discovery, via scanner, or by directly importing cases, load files, or raw images.
In this section
Importing Electronic Discovery
Provides details on how to use ED Loader to import electronic documents.
Scanning Documents
Provides details on how to use LAW PreDiscovery to scan documents. Provides steps for
configuring and controlling the operation of a scanner.
Importing from Other Sources
Provides details on how to import: existing LAW PreDiscovery cases, load files, raw images,
and replacement images.
© 2015 LexisNexis, a division of Reed Elsevier Inc. All rights reserved.
Using LAW PreDiscovery
253
Importing Electronic Discovery
You use the Electronic Discovery Loader (ED Loader) utility to import electronic documents.
In this section
Starting an Import Session
Provides procedures for: starting ED Loader, setting the default folder in which to place
imported items, creating a session label, and specifying the value, or DocId seed, to use as
the basis for document numbering.
Specifying Sources
Provides guidance and procedures for adding sources to import and for removing sources
from import.
Configuring Import Settings
Provides guidance concerning general options for configuring import as well as options that
are specific to the type of source you are importing.
Reviewing Sessions
Describes steps you can take to perform quality control after import. Provides guidance on
accessing post-import reports.
Importing E-Mail Files
Provides guidance and procedures specific to the import of e-mail stores.
Importing Instant Messages (IM)
Provides guidance and procedures specific to the import of IM files from Yahoo, AOL, and
MSN.
Inserting Attachments After Import
Describes procedures for finding attachments that were not imported. Provides procedures
for inserting attachments that were not imported initially.
Extracting Missing Text After Import
Describes procedures for identifying any imported documents whose text could not be
imported initially, as well as procedures for recovering the text.
Cancelling and Resuming Sessions
Provides procedures for temporarily stopping, cancelling, and resuming import sessions.
Distributed ED Loader
© 2015 LexisNexis. All rights reserved.
254
LAW PreDiscovery
Describes distributed processing as it applies to ED Loader import sessions. Provides
instructions and considerations for running distributed ED Loader sessions.
Starting an Import Session
Starting an import session involves the following tasks:
Open ED Loader.
Set a default target folder
Select a default custodian
Create a session label
Specify a DocID seed
The following sections for this topic describe how to complete these tasks.
© 2015 LexisNexis, a division of Reed Elsevier Inc. All rights reserved.
Using LAW PreDiscovery
255
Opening ED Loader
On the File menu, click Import, and then click Electronic Discovery.
ED Loader opens.
ED Loader can also be opened directly by exporting from Early Data Analyzer. See
Exporting in Early Data Analyzer for more information.
Preparing to start an import session
Before you start an ED Loader session, you can configure variables that control ED Loader
operation and especially how specified type of sources are handled.
1. On the File menu, click Import, and then click Electronic Discovery.
ED Loader opens.
2. Click Sources.
3. Set any of the following session variables as needed.
Default target folder
Default custodian
Session label
DocID seed
These options may be set either before or after selecting the sources to be loaded.
Default Target Folder and Default Custodian apply to all sources unless further
configuration is performed at the source level. For more information see Source Queue.
Starting ED Loader
1. On the File menu, click Import, and then click Electronic Discovery.
The LAW Electronic Discovery Loader utility opens.
© 2015 LexisNexis. All rights reserved.
256
LAW PreDiscovery
2. Add sources as needed. For more information on adding sources see Specifying Sources.
3. Configure the import session as needed. For more information on configuring an import
session see Configuring Import Settings.
4. Click Start.
5. In the Confirm Settings dialog box, review the import settings.
© 2015 LexisNexis, a division of Reed Elsevier Inc. All rights reserved.
Using LAW PreDiscovery
© 2015 LexisNexis. All rights reserved.
257
258
LAW PreDiscovery
6. Click OK.
Setting the default target folder
The location of electronic discovery documents to be imported is based on the default target
folder setting.
Note the following facts when you set the default target folder:
The value in the Default Target Folder is relative to the path of the case folder. For
example, if the case is located in C:\Case1 and you type Example Case_0001 into the
© 2015 LexisNexis, a division of Reed Elsevier Inc. All rights reserved.
Using LAW PreDiscovery
259
Default Target Folder field, the actual path will resolve as: C:\Case1
\Example_Case0001.
When you start ED Loader in a case, the default target folder is automatically populated
with the name of the currently selected folder.
If the root folder of the case is the currently selected folder, then the value of Default
Target Folder is <Case Root>.
If you enter a folder name that does not currently exist in the case, LAW will create it
prior to import.
To customize a session label
Session Label uniquely identifies each ED Loader session for a case. Session labels can be
useful to filter records by session or to review session logs. The default value is the start
date and time of the session.
1. Start ED Loader.
2. Do one of the following:
Type directly in the Session Label field.
Or
Click the button next to Session Label.
The Session Label Editor starts.
3. Edit the text in the Session Label field as needed.
Double-click any variable in the list to add it to the Session Label text box.
Click Reset to remove all text from Session Label.
3. Click Accept.
© 2015 LexisNexis. All rights reserved.
260
LAW PreDiscovery
To designate a custodian
A custodian is the person designated as responsible for the safekeeping and availability of a
document or source. After import, the custodian you select is assigned to the Custodian field
for the document.
1. Start ED Loader.
By default the Sources tab is open.
2. If the custodian name you want does not appear in the Default Custodian field, do one
of the following:
Delete <None> and then type the name there.
Or
Select the name you want from the list in the Default Custodian field.
Or
Click the button next to Default Custodian list, and then add, update, or import
custodian names using the Custodian Manager.
© 2015 LexisNexis, a division of Reed Elsevier Inc. All rights reserved.
Using LAW PreDiscovery
261
More information about importing custodian lists
A list of custodians may be imported or exported to a list file.
A file list is a text file with the .lst extension.
A list files contains just the custodian names without quotes separated by hard returns.
To set a seed value for DocID
Note the following about choosing a seed value to use for the document identification
(DocID) field:
The DocID is a unique identifier assigned to each document.
ED Loader uses the DocID seed as the starting value for each document you import.
ED Loader increments the specified seed value for each record.
The seed value can be a mix of numbers and letters.
The DocID field may contain up to 50 characters.
The default DocID seed for material imported using the distributed ED loader follows this
format: SessionNumber.Document.Item, for example: 10000.000001.000023.
To ensure the DocID is unique to each record when loading from multiple workstations,
devise a file numbering scheme that uniquely identifies the workstation used to process
documents, for example: ScannerPC1_000001, ScannerPC2_000001, etc.
Related Topics
Importing Data
Importing E-Mail Files
Importing Raw Images
Importing Cases and Load Files
Importing Replacement Images
Specifying Sources
Configuring Import Settings
© 2015 LexisNexis. All rights reserved.
262
LAW PreDiscovery
Specifying Sources
Specifying sources involves not only the choice of source documents to add to the import
operation, but the final quality checks, such as reviewing the queue of items to import and
generating a file type report prior to import.
In this section
Adding and Removing Sources
Provides procedures for adding sources to the e-discovery import process and procedures
for removing sources.
Reviewing the Source Queue
Provides guidance and procedures for reviewing sources bound for import prior to import.
File Type Summary
Describes how to generate a report prior to processing that lists by type all selected source
files. This summary processes and logs e-docs, archive contents, and e-mail attachments.
A source is a folder or files selected for import by means of the Electronic Discovery (ED) Loader.
You can add sources by using the Sources tab or by dragging and dropping.
To add sources to ED Loader
1. In ED Loader click the Sources tab.
2. Select one or more sources to import. For more information see the Source Types section
of this topic.
3. Click the Settings tab.
4. Configure selection options for folders and archives as needed:
Automatically set E-Doc folder sources to Recurse when I add them via drag and
drop. Ensures that the subfolders of the selected folders are processed.
Scan folder selections for supported mail stores when added to the queue. Enables
scanning of all folder selections for Outlook and Lotus Notes mail stores. If found, the
files are processed as mail stores rather than e-docs.
Scan supported archives. Enables scanning of archives (i.e., zip or rar) for mail
stores.
Add selected folder to queue when mail store scan is active. Adds folders containing
mail stores to the queue in addition to any mail stores found. For example, if a folder is
selected that contains 5 Excel files and 1 Outlook PST file, enabling this option will
result in two sources being added to the queue: one file set consisting of 5 Excel files
and 1 Outlook PST file.
© 2015 LexisNexis, a division of Reed Elsevier Inc. All rights reserved.
Using LAW PreDiscovery
263
5. Do one of the following to add items to the queue:
Use Windows Explorer to drag and drop items from the file system.
Click one of the source type buttons and navigate to a source. For more information on
source types, see the following section in this topic.
Overview of source types
Options are available for selecting any of the five different types of sources.
These options are described in the following table:
Option
Use it to
Mail Store
Add mail store sources.
LAW currently supports Outlook (*.pst and *.ost) mail stores as well as Lotus
Notes (*.nsf) mail stores.
When the Select Mail Store dialog appears, browse to the mail store(s) and
then click <Open>.
The store(s) will be added to the Source Queue.
Outlook
Fldr.
Select Outlook folders for import.
1. In the Select Outlook Folder(s) dialog box, select the folders you want to
process.
2. Select Recurse Subfolders if you want the subfolders of selected folders
also to be processed.
The items in parentheses beside each folder represent the number of items
in the folder (first number) and the number of unread messages (second
number).
3. Click Accept.
The selected folders are added to the queue.
© 2015 LexisNexis. All rights reserved.
264
LAW PreDiscovery
The mail store(s) containing the folders to be processed must be opened in
Outlook prior to starting this option.
Folder(s)
Select one or more folders to import.
1. In the Select Folder(s) dialog box select the folders you want to process.
2. Select Recurse Subfolders if you want the subfolders of selected folders
also to be processed.
3. Select Scan selection(s) for mailstores to search any selected folders for
supported mail stores. If any stores are found, they will be listed separately
in the queue and processed as mail stores.
Disable this option if you want the mail stores contained in the selected
folders to be either processed as e-docs or excluded completely, depending
on the state of the Exclude mailstores from e-doc processing option
located on the Settings tab. See Exclusions for more information.
File(s)
Select one or more files. Use this option to open any type of electronic
document, other than Outlook PST files, including MBOX files.
In the Select File(s) dialog box select one or more files from a folder to
process.
You can use the CTRL and SHIFT keys to select multiple files and CTRL+A
may be used to select all files in a folder.
File List
Select a file list to import.
1. In the Select File List dialog box browse to the file containing the file paths.
2. Click Open to add the source to the queue.
A file list is a text file with paths to files for import. The file extension does
not matter. The file must contain full paths to the files, separated by hard
returns, without quotes. If the file contains relative paths, the file list must
be placed in a location that will allow the ED Loader to complete the path.
For example, if the file list contains a listing of EDOCS\0001.xls, then the file
list should be placed one level above the EDOCS folder.
To remove sources
Sources can be removed from the queue by using a Remove option.
Remove Item - Removes one source at a time from the queue. To use, click a source in
the queue to be removed and then click Remove Item.
© 2015 LexisNexis, a division of Reed Elsevier Inc. All rights reserved.
Using LAW PreDiscovery
265
Clear All - Removes all sources from the queue.
To view source details
On the Sources tab click View Details.
Or
On the View menu click Source Details.
If the source consists of a file set or file list, all file names will be displayed.
Long paths
If the path to a source exceeds 260 characters, which is the Windows limit:
ED Loader copies the files to a temporary location to allow successful processing of the
files.
A warning will be logged in the Session Viewer logs.
Related Topics
Importing Data
Importing E-Mail Files
Importing Raw Images
Importing Cases and Load Files
Importing Replacement Images
Source Queue
The Source Queue lists the sources ready for processing that have been added during the
current session. You should review the Source Queue as a last check before you initiate an
import operation. Source Queue is located on the Sources tab in the Electronic Discovery
Loader.
The Source Queue may also be used to configure source-level information, such as the
custodian assigned to a source.
© 2015 LexisNexis. All rights reserved.
266
LAW PreDiscovery
To configure source-level options
After sources have been added to the queue, configure the following source-level options as
needed:
Source Name - When the option to Use source name as top level folder is enabled in
the Output settings (see Output section), the name is used for the top-level folder, and
documents are imported below it.
The source name may be edited by simply typing the desired name directly into the
text box. When a source name is changed, the new name will appear in green.
Source names may appear in green by default if the option to "Ensure source names
are unique when they are added to the queue" is enabled and duplicate source names
are detected. The duplicate source name will be appended with a '-001'.
Custodian - The custodian may be edited at a source level by either choosing a different
value from the drop-down list in the Custodian field or by typing the a new value in the
field.
When a custodian is changed at a source level, the custodian name becomes green.
If the custodian should be the same for all sources, assign a custodian in the Default
custodian field. This field is located above the Source Queue.
Target Folder - The selected sources will be imported into the designated LAW folder.
If all sources should be imported below the same target folder, select the folder in the
'Default target folder' text box located above the Source Queue in the session
configuration settings.
To change the target folder for a particular source, click within the Target Folder text
box for the source and either type a new folder or folder path or click the box within
the field to launch the Select Target Folder dialog. This dialog may be used to choose
an existing folder for the target location or to create a new folder.
To reset source-level settings
Open the Source Queue and then click one of the following:
Reset All - Resets the Custodian, Source Name, and Target Folder fields back to the
defaults.
© 2015 LexisNexis, a division of Reed Elsevier Inc. All rights reserved.
Using LAW PreDiscovery
267
Reset Names - Resets the Source Name field to the default.
Reset Cstdns. - Resets the Custodian field to the default.
Reset Folders - Resets the Target Folder field to the default.
These options are also available from the Edit menu.
To view paths to sources
On the View menu click Show source paths.
Or
Click the Show source paths button next to the Target Folder column.
Note the following:
For File Sets, the total file count is displayed after the path in the Source Path column.
For File Lists, the path (including filename) of the file list will be displayed.
For folders, if Recurse Subfolders is selected to include subfolders, a plus sign + is
displayed at the end of the source path.
Related Topics
Importing Data
Importing E-Mail Files
Importing Raw Images
Importing Cases and Load Files
Importing Replacement Images
The File Type Summary in the ED Loader can generate a summary of the selected source files
prior to importing. The summary will process and log e-docs, archive contents, and e-mail
attachments. It does not expand loose e-mails or compound documents.
The summary will include items such as total file counts, counts based on file type, total size,
and size of files per file type. This feature may also be used to generate a report of this
information.
© 2015 LexisNexis. All rights reserved.
268
LAW PreDiscovery
To create a summary
1. Add items to the ED Loader Source Queue. See Adding and Removing Sources for more
information.
2. On the Tools menu click Summarize Queue.
The File Type Summary Progress dialog appears.
Currently, if a Microsoft Outlook OST file in present in the source queue, the Summarize
Queue function does not run and a Store Mgmt Error is generated indicating the .ost file
is not a personal folders file.
Until this issue is fixed, if any OST files are present in the source queue, the OST files
need to be removed from the source queue before creating a summary.
The File Type Summary dialog box displays the results.
© 2015 LexisNexis, a division of Reed Elsevier Inc. All rights reserved.
Using LAW PreDiscovery
269
You can view report details using the tabs in the File Type Summary:
All - Displays a listing of files found in the queue, organized by file extension. E-docs,
archives, archive contents, loose e-mail messages, and e-mail attachments from mail
stores will be included in the summary. Loose e-mail and compound documents are not
expanded in the summary, so the attachments/embedded files from these types of files
will not be included. E-mail messages from mail stores are also not included in the
summary, but the number of e-mails can be viewed using the reporting feature
(explained below).
E-Docs - Displays a listing of e-docs only. This tab will include loose e-docs, archives (i.e.
zip files), and archive contents. Compound documents are not expanded so files
embedded within the parent documents will not be included in the summary or reports.
E-mail Att. - Displays a listing of e-mail attachments found in mail stores. Loose e-mail
items are not expanded so their attachments will not appear in the summary or reports.
Identified - This tab will only be populated once the optional identification process has
been executed, allowing users to view the true file types of the items contained in the
queue. Note: This process is only available for items listed in the E-Docs tab.
To view file groups
1. Do one of the following:
On the View menu click Files.
Or
Click the Files button.
© 2015 LexisNexis. All rights reserved.
270
LAW PreDiscovery
The view shows each file in the group, the total size of the group, each individual file
size, and any warnings that may have occurred during the summary or file identification
process.
2. Navigate among file groups or open files as needed.
Click Prev Set and Next Set to navigate among groups.
For electronic documents, to open the file, click Open.
To identify file types
You can use the file identification process to validate the files included in the summary. The
file engine will determine the true file type based on the header of each file.
On the Tools menu click Identify Files.
Or
Click the Identify Files button.
The Identified tab will display the results of this process and is linked to the file type
manager database, which allows users to set the Include/Exclude flags directly from this
view. File identification automatically takes place when sources are loaded into LAW via
ED Loader, so running this process prior to loading provides a preview of the file types
as they will be displayed in LAW.
Working with summaries
To save a summary
On the File menu click Save As.
Or
Click the Save As button.
Saved summary databases will be saved as .EDSD files in the location selected by the user.
To reload a summary
1. Start ED Loader.
2. On the File menu click Open Summary.
3. Browse to the saved .EDSD file.
The File Type Summary dialog box appears displaying the results of the saved summary.
To add the sources to the ED Loader Source Queue
On the Tools menu click Enqueue from the File Type Summary dialog.
The sources will be loaded into the Source Queue and are ready for import into LAW.
© 2015 LexisNexis, a division of Reed Elsevier Inc. All rights reserved.
Using LAW PreDiscovery
To create a summary report
1. Create a summary.
2. In the File Type Summary dialog box click Tools and then click Reports.
3. The View Report dialog appears.
4. To add a logo to the report select Apply logo to report and then browse to the logo
image file.
5. Click View Report.
After you create the report you can print or save it.
Related Topics
Importing Electronic Discovery
Source Queue
© 2015 LexisNexis. All rights reserved.
271
272
LAW PreDiscovery
Configuring Import Settings
ED Loader provides general configuration options as well as options that are specific to the
type of source you are importing.
In this section
Archives
Describes options for importing zip files and other archive formats.
Compound Documents
Describes options for handling office documents and PDF files that are embedded in source
documents.
Deduplication
Describes options for handling identical files discovered during the import process.
E-Mail
Describes options for importing e-mail.
Exclusions
Describes options for handling e-mail attachments and date ranges; also covers options for
handling empty files.
File Types
Describes options for selecting the types of files to import, as well as how to work with
import lists.
General
Describes options for selecting sources, and for specifying the database you will use to
manage file type data. Provides instructions for enabling an electronic discovery loading
session to be distributed among multiple client computers.
Metadata
Describes how to enable extraction of various types of metadata from Office files, PDF files,
and TIFF and JPEG image files.
NIST (NSRL) Filter
Describes options for filtering from the import stream any operating system files,
executables, and other kinds of files that are not typically used in litigation.
Output
© 2015 LexisNexis, a division of Reed Elsevier Inc. All rights reserved.
Using LAW PreDiscovery
273
Describes how to manage the presentation of sources in the tree view of LAW
PreDiscovery. Provides guidance on specifying export folder and path options, and on
managing how e-mail is exported.
Post-Import Actions
Describes actions that can be automatically initiated after import, including TIFF/PDF
conversion, indexing, and displaying metadata of imported items in a grid.
Text Extraction
Describes how to enable and control text extraction as a part of the import process.
Session Defaults
Describes how to lock your current import settings and reuse your current settings the next
time you start an import session.
LAW supports the extraction from these kinds of archive files:
ZIP
7Z
RAR
JAR
GZIP
Z
TAR
To configure archive import
1. On the File menu click Import and then click Electronic Discovery.
2. Click the Settings tab and then click Archives.
The Archives options are available.
© 2015 LexisNexis. All rights reserved.
274
LAW PreDiscovery
3. Configure archive import as needed using the following options:
Enable Archive Extraction - When selected, LAW will extract contents of the supported
archive file types (see above list).
Treat archive as attachment containers - When selected, if importing an archive file, ED
Loader creates a record for the archive. If the archive contains loose message files or
mail stores then the ThreadId field is not populated for the mail items. If left unselected,
the ThreadID field for loose message files or mail stores found in archives is populated.
Include embedded archive - This option creates records for any nested or attached
archives found.
Include archive source files - This option allows users to choose whether or not to copy
the native archive file into the typical native file structure in the case. Users may choose
not to copy the file to save space and the file is often not needed once the contents are
extracted.
Use nested filename for items extracted from archive - The archive filename will
precede the filename of each extracted item in the Filename field, as follows:
archive.zip?filename.doc
Related Topics
Session Configuration
Session Defaults
Post-Import Actions
© 2015 LexisNexis, a division of Reed Elsevier Inc. All rights reserved.
Using LAW PreDiscovery
275
Quality Control After Import
Compound documents are composed of a container document and embedded documents. For
example, a Word document may contain an embedded spreadsheet.
To enable extraction of compound documents
1. On the File menu, click Import, and then click Electronic Discovery.
Clicking Electronic Discovery opens the Sources tab in the LAW Electronic Discovery
Loader dialog box.
2. Click the Settings tab and then click Compound Documents.
The Compound Documents options are available.
3. Click one of the following options:
© 2015 LexisNexis. All rights reserved.
276
LAW PreDiscovery
Disable compound document extraction
Disables the compound document extraction feature during the import.
Enable compound document extraction on all supported file types
Any file containing an embedded file is imported as a parent document, and any
embedded file within the parent file is imported as an attachment to the parent file.
Restrict compound document extraction to PDF portfolios
Only PDF portfolios are imported as compound documents. When this option is
selected each file in a PDF portfolio is imported as a top-level file instead of the PDF
portfolio being imported as the parent file with all of the files within the PDF portfolio
being imported only as attachments to the parent PDF portfolio.
If an embedded file cannot be opened, a warning will be generated and logged in the
Session Viewer and ErrorMsg field.
Supported embedded file types
The following file types are supported for extraction from compound documents:
Word/RTF
Excel
PowerPoint
PDF
SnapShot
Visio
Outlook.FileAttach (Word-authored e-mail with inline attachments, generally stored in
RTF)
Project
Package*
*A Package is a general type of embed; it can be a text file or a zip file, for example. Any of
the above types may also be embedded as a package type depending on the software
installed when a user embeds the file. For example, if a user were to embed an Excel
spreadsheet into a Word document, and Excel is not installed, the spreadsheet will be
embedded as Package.
Supported containers file types and embedded files
The following table lists common embedded file types that LAW PreDiscovery supports for
extraction:
Detection
Extraction
Y
Y
Rich text format (rtf) *Converted to Word
Y
format for extraction. Original file is preserved.
Y
Description
Non-MS Office Formats
Adobe Acrobat (pdf)
Office 2007
© 2015 LexisNexis, a division of Reed Elsevier Inc. All rights reserved.
Using LAW PreDiscovery
Excel Spreadsheet (OpenXml)
Y
Y
MS Office Data File (OpenXml)
Y
Y
PowerPoint Presentation (OpenXml)
Y
Y
Word (OpenXml)
Y
Y
Word
Y
Y
Word (xml)
Y
N
Excel
Y
Y
Excel (xml) *Compound documents not
supported in this format
*N
*N
OneNote
N
N
PowerPoint
Y
Y
Project
Y
Y
Project (xml) *Compound documents not
supported in this format
*N
*N
Publisher
**Y
Y
Visio
N
N
Visio (xml) *Currently not recognized by file
engine
*Y
N
Word
Y
Y
Excel
Y
Y
PowerPoint
**Y
N
Publisher
Y
Y
Project
Y
Y
Visio
N
N
Word
Y
Y
Excel
Y
Y
PowerPoint
Y
Y
Project
Y
Y
277
Office 2003
Office 2002/XP, Office 2000
Office 97, Office 95
**Detection of embeds in these types is limited to the types of files supported for extraction
(see above list).
© 2015 LexisNexis. All rights reserved.
278
LAW PreDiscovery
Related Topics
Session Configuration
Session Defaults
Post-Import Actions
Quality Control After Import
Deduplication is the process of identifying duplicate files during the discovery process and
removing them from further processing and analysis. Deduplication is a necessary step in
managing the volume of data that must be analyzed.
A duplicate file is an exact copy of another file. Deduplication is necessary in many situations
involving electronic documents because multiple identical documents are a typical feature of
large record sets. For example, in electronic discovery sets containing e-mail archives for an
organization, it is not uncommon for multiple e-mail accounts to contain the exact same widely
distributed e-mail or file attachment.
LAW PreDiscovery™ identifies duplicate files by comparing hashes of files. A hash is a numerical
representation of a file whose value is based on the file contents or other attributes. In
essence, the file is subjected to an encryption process that yields a unique value. An exact copy
of a file will yield the same hash value. In the case of electronic documents, the file is hashed.
For e-mail, metadata fields are hashed. You can set the encryption key in the deduplication
settings.
The scope of the project will determine whether or not deduplication will be performed and
which methods will be used.
In addition to deduplicating prior to the import process, LAW PreDiscovery also allows you
to deduplicate at these other times in a pre-discovery workflow:
After the import against other records in the case by using the Deduplication Utility.
After the import against other records in the case and other LAW cases by using InterCase Deduplication.
To configure deduplication
1. On the File menu click Import and then click Electronic Discovery.
2. Click the Settings tab and then click Deduplication.
© 2015 LexisNexis, a division of Reed Elsevier Inc. All rights reserved.
Using LAW PreDiscovery
279
The Deduplication options are available.
3. Choose from among the following options:
Enable Duplicate Detection: Enables duplicate checking for the current session.
Working digest: The working digest is the method of hashing that will be conducted to
determine duplicates. A hash value can be thought of as the DNA of a file. The hash
values are obtained through metadata fields (e-mail) or by hashing the entire file (edocs). LAW uses two types of hashing methods:
MD5: 128-bit output
SHA-1: 160-bit output
Test for duplicate against (Scope): This option identifies the scope for deduplication.
During the import process, deduplication can be performed at one of two levels:
Case Level (Globally): Deduplicates documents against the entire incoming collection
and against existing records in the LAW case.
Custodian Level: Deduplicates documents against records with identical custodian
values.
If record is considered a duplicate then (Action): This setting determines the action to
take once a duplicate is located. Three options are available:
Include: Creates a record for the duplicate in the database and copies the native file
into the case folder.
Partially exclude: Creates a record in the database but does not copy the native file.
Exclude: Does not create a record, no text is extracted, and the native file is not
copied to the case folder.
© 2015 LexisNexis. All rights reserved.
280
LAW PreDiscovery
Include attachment hashes in e-mail metadata hash: When enabled, the ED Loader will
include the hashes of attached files in the parent e-mail's metadata hash. When
disabled, the Attach field is incorporated in with the metadata hash which only contains
the file names of attached files.
Note the following warnings prior to running a deduplication session:
While enabling the Include attachment hashes in e-mail metadata hash setting is
recommended, it is not advisable to change this setting during the course of a case
as it will alter the e-mail hashing schema, as noted in the interface. The desired
state of this setting should be determined prior to the first import into new cases
and should not be changed. This setting was not available in versions prior to
5.5.07.
If the current case has already been deduplicated via the Inter-Case Deduplication
utility, a warning will appear (see below) when starting the ED Loader import if
deduplication is enabled.
Use of the ED Loader deduplication on imported records after the case has already
been deduplicated against other cases using the Inter-Case Deduplication utility is
not recommended. Doing so will present a mixture of internal and external
duplicates and could cause problems when purging, filtering, or reviewing duplicate
records.
Proceeding with the ED Loader deduplication after the case has been deduplicated
with the Inter-Case Deduplication utility will result in the external deduplication
database being placed in Rebuild/Flush mode. At this point, the current case should
be removed from the external database. Also, before running the internal
deduplication, it is recommended that the Deduplication Status Reset command is
executed to clear the values assigned by the Inter-Case Deduplication utility to
prevent the mixture of internal and external duplicates.
Related Topics
Session Configuration
Session Defaults
Post-Import Actions
Quality Control After Import
The E-Mail settings identify how e-mails are sorted when loaded into LAW, the format in which
they are saved, and the format of the date field values.
© 2015 LexisNexis, a division of Reed Elsevier Inc. All rights reserved.
Using LAW PreDiscovery
281
To access and configure e-mail import
1. On the File menu, select Import and then click Electronic Discovery.
2. Click the Settings tab and then click E-Mail.
The E-Mail options are available.
3. Choose from among the following options:
Sort Key - When loading e-mails from mail stores, it is important to identify how the files
are imported into LAW and later produced. Four fields can be used to sort the e-mails
during extraction: From, Received, Sent On, and Subject. For example, if Received is
chosen, e-mails are imported by the date the e-mail was received. Note, these settings
do not apply to MBOX messages.
Sort Direction - The direction of the sort may be Ascending (oldest to newest) or
Descending (newest to oldest).
Save Outlook messages as - Select the output format of Outlook messages as they are
imported with the ED Loader. The four options are:
HTML - Messages are saved to HTML files with the exception of messages containing
embedded OLE items that cannot be rendered in HTML, such as an Excel worksheet.
These embedded images and non-mail items such as calendars, contacts, and tasks,
are saved as native Outlook files (*.msg). Embedded images in HTML messages are
saved in the same folder as the converted message. These images are not LAW
records. Instead they are linked to the HTML file for proper rendering. They are listed
in a dependency file (*.dep) with the same root name as the native file. During Export,
© 2015 LexisNexis. All rights reserved.
282
LAW PreDiscovery
linked images are exported along with the native file so the HTML file can be properly
rendered with associated images.
HTML/MHTML (based on format) - The format of the output file is determined based
on the format of the e-mail message. Messages formatted as RTF, non-mail items, or
HTML messages, including HTML with linked images, are saved as MHTML. All other
messages are saved as HTML.
HTML/RTF (based on format) - The format of the output file is determined based on
the format of the e-mail message. Messages formatted as RTF and non-mail items are
saved as RTF. Text or HTML messages are saved as HTML. RTF messages are saved
directly from Outlook, so the GMT date option is not applied to the display of the
converted file.
The use of ED Loader on a 64-bit machine with Outlook 2010 is not yet supported.
Messages saved as RTF will not contain the BCC information in the RTF output. This is a
function of Outlook and how it renders messages to RTF. The BCC field, if present, will
however still be captured in the database and in the extracted text.
Subtle formatting differences may exist between HTML and RTF messages. However,
this is the preferred setting if native rendering (MSG) is not required due to the
potential of lost images or embedded objects when saving an RTF-formatted message
as HTML.
MSG - Messages are saved as native Outlook files (*.msg) with the exception of emails that contain extremely large recipient lists (typically over 5,000). These
messages can cause Outlook and the ED Loader to hang. Messages that cannot be
saved as MSG files are saved as HTML files.
MHTML - All items are saved as MHTML files (*.mht). MHTML files are web archives that
allow the embedding of images directly in an HTML file. This eliminates the need for any
linked images or dependent files. Similar to the HTML/RTF setting, e-mails are
converted to HTML or RTF based on their original format, and then converted to MHTML
files.
RTF messages and items use Microsoft Word to convert RTF to MHTML. If Word is not
installed, any RTF output remains as RTF during the import. Due to the secondary
conversion from RTF to MHTML using Word, processing speed is significantly slower
when using this setting. Print speeds are also significantly slower with MHTML files. Use
this setting only if it is absolutely necessary.
Preserve X.400 addresses - When enabled, ED Loader maintains the X.400 e-mail
address if the address is available in the To, CC, or BCC fields. The e-mail address is not
converted to the SMTP address. This option is enabled by default. Disabling this setting,
if a valid SMTP address is not present, the resulting auto-generated SMTP addresses
may not be accurate.
Outlook Folder Types - Allows the loading of non-mail folder types such as calendar
items and contacts when processing Outlook folders or mail stores.
Lotus Notes options:
Log warning messages for e-mails containing RTF body content - This option logs a
warning message when rich text format (RTF) is found in the e-mail body. If the e-mail
body contains RTF, you can lose formatting or data when you convert the RTF to HTML.
Extract embedded images in RTF content as attachments - Use this option to extract
© 2015 LexisNexis, a division of Reed Elsevier Inc. All rights reserved.
Using LAW PreDiscovery
283
images embedded in the body, or RTF of e-mail items. Images appear as attachments to
the e-mail item. The state of this option is recorded in the case INI file. You can check
details of this option in the Summary tab of the Summary Viewer.
In ED Loader you can set a time zone that applies to imported mail items. For more
information see ED Loader General Settings.
Related Topics
Importing E-Mail Files
Session Configuration
Session Defaults
Post-Import Actions
Quality Control After Import
Exclusions settings are conditional settings that can be used to prevent certain types of
records from being loaded to LAW.
To access and configure import exclusions
1. On the File menu, select Import and then click Electronic Discovery.
2. Click the Settings tab and then click Exclusions.
The Exclusions options are available.
© 2015 LexisNexis. All rights reserved.
284
LAW PreDiscovery
3. Choose from among the following options:
Exclude mail stores from e-doc processing (Mail store as e-doc) - Prevents mail stores
from being processed as e-docs. For example, if a mail store is contained in a folder that
is selected for processing, the mail store would be recorded as a single e-doc record
when this option is disabled. The mail store will still be processed as a mail store if it is
added to the Source Queue.
Exclude empty files (0 bytes) from processing (0 byte file) - Prevents any native file
that is empty (0 byte file size) from being copied or written to the database.
E-Mail Date Range Exclusions - Prevents e-mail sent between a specified date range
from being imported.
Select a condition, for example on or after.
Select a date to which the condition applies.
If necessary, select AND or OR and then specify another condition and date.
Related Topics
© 2015 LexisNexis, a division of Reed Elsevier Inc. All rights reserved.
Using LAW PreDiscovery
285
Session Configuration
Session Defaults
Post-Import Actions
Quality Control After Import
File type settings allow users to identify specific files for processing. LAW PreDiscovery™
supports import of all file types. Even if a file type is not supported for printing or conversion,
metadata and text may still be extracted. After importing a file, if application is installed on the
computer that is capable of opening and printing it, then the file can be processed to TIFF, PDF,
or paper.
Files that could not be converted to TIFF or PDF can still be exported and delivered in native file
format. Provided the reviewer has the native file application, the file can be opened and
reviewed. For this reason, loading all file types into LAW is recommended. However, it is
understandable that users may not wish to import certain file types, such as common system
files.
To access and configure file type options
1. On the File menu click Import and then click Electronic Discovery.
2. Click the Settings tab and then click File Types.
The File Types options are available.
© 2015 LexisNexis. All rights reserved.
286
LAW PreDiscovery
3. Select a file type management database.
4. Configure options for file types as needed:
Enable File Filtering - If this option is disabled, all files will be imported. If enabled, the
files imported will depend on the selected scope.
Active List (Scope) - Specifies a list that identifies files to import. You can identify a
list as an Include list or as an Exclude list.
If filetype is not marked 'Include' then (Action): Options include:
Include - This option will copy the native file and log a record in the database.
Partially Exclude - This option will not copy the native file but will log a record in
the database.
Exclude - This option will not copy the native file or log a record in the database.
Note the following facts about using these kinds of lists:
If the Include list is selected, file types marked as Include in the File Type Manager's
Include list will be imported. Files that are not checked in the Include list will be
excluded.
If the Exclude list is selected, file types marked as Exclude in the list are excluded from
import. File types that are not marked as Exclude in the list will be imported.
Lists are evaluated independently of each other. If the Include list is selected as the
active list, or scope, the Exclude list is not considered during the import and vice
versa.
Auto-assign suspect extensions - assigns inferred extensions to files identified with
© 2015 LexisNexis, a division of Reed Elsevier Inc. All rights reserved.
Using LAW PreDiscovery
287
suspect extensions.
5. Click Edit.
The File Type Manager opens.
6. Configure file inclusion and exclusion lists, and other options:
Inc. Files marked as Include will be imported if the active list is set to the Include list.
Exc. If Exclude is set as the active list, then anything not marked as Exclude will be
imported.
Multiple file type databases can be created. This feature can be useful when
establishing procedures on specific files to exclude from processing. The File menu in
the File Type Manager is used to create new file type databases, open existing
databases, and save changes to the current database.
Assign default source applications for each file type.
Select whether or not to extract text from each file type.
Auto Assign Suspect Extensions - Performs maintenance actions if a file extension
does not match the actual file type. When enabled, if the extension of the incoming
file does not match any extensions in the Extensions field in the File Type Manager
for the assigned file ID, LAW PreDiscovery assigns a new extension from the Active
Ext. field to the DocExt field, and records the original extension in the OrigExt field.
If Auto Assign Suspect Extensions is not enabled and a suspect file is found, the
SuspectExt field is marked as Y, but the OrigExt field is not populated and the DocExt
field keeps the original file extension.
Related Topics
© 2015 LexisNexis. All rights reserved.
288
LAW PreDiscovery
Session Configuration
Session Defaults
Post-Import Actions
Quality Control After Import
The General category of ED Loader options identifies source selection and the file type
management database. You also use the General category to enable distributed processing of
an import job.
To access and configure general options
1. On the File menu, select Import and then click Electronic Discovery.
2. Click the Settings tab and then click General.
The General options are available.
© 2015 LexisNexis, a division of Reed Elsevier Inc. All rights reserved.
Using LAW PreDiscovery
289
3. Choose from among the following options:
Ensure source names are unique when they are added to the queue - When enabled,
ensures there are no duplicate source names in the Source Queue. This feature is
particularly useful when dealing with multiple mail stores with a source name of
"Personal Folders." In this example, the first occurrence of the mail store will be named
Personal Folders, while any subsequent mail stores will be added as Personal Folders001, Personal Folders-002, and so on.
Automatically set E-Doc folder sources to 'Recurse' when I add them via drag and
drop - If using the drag and drop method to select sources for processing, enabling this
option adds the selected folder and all subfolders to the source queue. If this option is
not enabled, only the selected folder is added to the queue.
Scan folder selections for supported mail stores when added to the queue - Ensures
the ED Loader searches for supported mail stores in folders that are selected for
processing and adds them to the queue as mail stores. This option is also located in the
Select Folders dialog when selecting sources. Two sub-options are available:
Scan supported archives - When enabled, this option ED Loader searches supported
archive files for supported mail stores. If a mail store is found, the Extract Stores dialog
box opens. You can then select a location where ED Loader can extract the mail
store(s) prior to processing. After mail stores are extracted they are added to the
queue.
Add selected folder to queue when mailstore scan is active - Forces the selected
folders to be added to the queue as e-doc folders following the scan for mail stores.
For example, if a folder is selected that contains 5 XLS files and 1 PST mail store, and
this option is enabled, two sources will be added to the queue (one file set (5 XLS files
© 2015 LexisNexis. All rights reserved.
290
LAW PreDiscovery
and one PST mail store.) In this example, if the option is disabled, only the mail store
would be added to the queue and the folder of XLS files would not be processed.
Active database - If file type filtering will be used, this option will identify which database
is referenced during the import. New databases may be created and existing databases
may be applied in the File Type Manager. See the File Types section for additional
information.
Time Zone Selection - Shifts all date and time fields except Created to selected time
zone. The default is the Time Zone registered in Windows for the local computer. Note
that this setting also automatically changes the time zone for the imported items when
you e-print or convert documents to TIFF or PDF files. The date and time information in
the print output of items match the imported metadata.
When you are doing single-document TIFF or PDF conversion, the time zones that
are associated with image or PDF files do not automatically adjust to match the time
zones of the native files. In such circumstances, if you need dates to match between
the native files and image or PDF files, you can manually change the time zone on
your system prior to printing to match the time zone of the native files. For more
information about converting documents to TIFF or PDF, see Converting Documents
to TIFF and Converting Documents to PDF.
Enable Distributed Processing - Allows other LAW PreDiscovery computers to share in
the processing of a case.
Click Edit, select an invitation type, schedule a time to run the job, select clients to
participate in the job and then click Accept.
For more implementation details regarding Distributed ED Loader sessions see
Distributed Electronic Discovery.
After you start a distributed loading session, you can monitor its progress and perform
other management tasks using the LAW Management Console (LMC). For more
information on managing distributed import jobs, see: Using the LMC.
Related Topics
Session Configuration
Session Defaults
Post-Import Actions
Quality Control After Import
© 2015 LexisNexis, a division of Reed Elsevier Inc. All rights reserved.
Using LAW PreDiscovery
291
You can configure ED Loader to selectively import custom metadata from various types of
documents.
To access and configure metadata options
1. On the File menu, select Import and then click Electronic Discovery.
2. Click the Settings tab and then click Metadata.
The Metadata options are available.
3. Choose from among the following options:
Capture custom metadata for Adobe PDF files. Extracts metadata field names and
values that were assigned to the original PDF. Such fields might include the names of email attachments, or of PDF's embedded in other files such as in a Word document.
Capture custom metadata for MS Office files. Extracts metadata field names and
values that were assigned to MS Office file, except for Publisher and Access files. Field
names and data are brought into the LAW case as extended properties. See note below.
Capture EXIF metadata for image files (TIFF/JPEG). Extracts metadata field names
and values from EXIF files. If found, custom metadata fields are added to the case
database with field names preceded by EP.
Detect comments for MS Word and Excel files. If comments from Word and Excel files,
assigns a Y to the HasComments field.
© 2015 LexisNexis. All rights reserved.
292
LAW PreDiscovery
Detect tracked changes for MS Word and Excel files. If tracked changes are found,
assigns a Y to the HasTrackChanges system field.
Detect hidden rows and/or columns for MS Excel files. If hidden columns, rows, or
sheets are found, assigns a Y to HasHiddenRow and HasHiddenColumn and/or
HasHiddenSheet, respectively.
Extended property metadata is placed in extended property fields that are created when
the documents are imported. The names of all extended property fields start with EP.
The remainder of the field name depends on the name of the field as it exists in the
source document. For example, if a Word document is imported that contains a custom
metadata field called Typist, LAW will create a metadata field upon import called
EPTypist. Deleting a document will delete all corresponding extended properties for that
document. For more information on extended properties, see: Extended Properties in
Grid Views.
Related Topics
Session Configuration
Session Defaults
Quality Control After Import
Launching the Grids
Full Text Indexing
The chief purpose of NIST filtering is to focus investigation on user-generated data by removing
from consideration files that are of types that are unlikely to be responsive. Examples of such
file types include system files and executable files. The National Institute of Standards and
Technology (NIST) is an agency of the U.S. Department of Commerce that maintains and
publishes a database of known computer file profiles. This database is referred to as a
reference data set (RDS) and is compiled by NIST's National Software Reference Library (NSRL).
The NIST filter uses the RDS database to compare files against a known set of software
applications. The NIST filter is typically employed in forensics cases to scan for and remove
system files and application logic files from consideration as case documents.
Note the following facts when considering whether to use the NIST filter:
To make use of this option you must first download the database of known file types from
NIST.
E-mails are not tested against this filter although their attachments are tested.
© 2015 LexisNexis, a division of Reed Elsevier Inc. All rights reserved.
Using LAW PreDiscovery
293
If an archive's hash is present in the NSRL database, then it is automatically filtered out and
its contents are not evaluated or logged to LAW PreDiscovery™. This also applies to
embedded/attached archives. If the archive's hash is not present, then its contents are
evaluated on a file-by-file basis.
Enabling this option will exclude any files present in the configured hash database using the
documents' SHA-1 hash values.
A copy of the NIST database can be found at: http://law.lexisnexis.com/downloads/nist/
edloadernistfilter.zip. For more information about the RDS database, visit the NSRL website.
The rest of this topic discusses NIST filters when used in the context of document import with
ED Loader.
To configure NIST filter options
NIST filter options are accessible via the LAW Electronic Discovery (ED) Loader.
1. On the File menu, select Import and then click Electronic Discovery.
2. Click the Settings tab and click NIST(NSRL) Filter.
3. Choose from among the following options:
Enable NIST(NSRL) Filter - Checking this box will enable the NIST(NSRL) filter for the ED
Loader session. After enabling the filter, the hash database path must be configured
(see next setting).
Hash Database - The hash database is a collection of SHA-1 hashes for known, traceable
software applications. These hashes are stored in a partitioned Access database
© 2015 LexisNexis. All rights reserved.
294
LAW PreDiscovery
(*.MDB), which must be downloaded from a LexisNexis-hosted web site (see option
below). Click the ellipsis button to browse to and select the MDB file and then click the
Open button.
Click here to learn more about the NIST(NSRL) hash database - Click this link to
launch an informational dialog regarding the NIST (NSRL) feature.
Click here to download the latest version of the NIST(NSRL) hash database
(launches browser) - Click this link to download the NIST(NSRL) hash database, which is
required in order to use this feature. The database provided here is the only database
that can be used with the NIST filter. The file is an archive named EdloaderNistFilter.zip
and contains three files which make up the partitioned hash database (see "Hash
Database" section above "Options"). Extract the contents to a folder that can be
accessed by LAW and then browse to that location via the Select NIST/NSRL Hash
Database dialog (see Hash Database above). This database can be downloaded from:
http://law.lexisnexis.com/downloads/nist/edloadernistfilter.zip.
Check for updated NIST(NSRL) hash database - The NSRL RDS is updated quarterly
and therefore, the hash database compiled and hosted by LexisNexis will also be
updated as the new data becomes available. Click this link to check for an updated
database. If a newer version is found, LAW will prompt to download the updated
database.
NIST database details
The NSRL hash database is a collection of SHA-1 hashes for known, traceable software
applications.
The database is deployed as three files:
Master database (EdLoaderNistFilter-<NsrlVersion>.mdb) - Contains version
information and verification counts, in addition to a hash partition table pointing to one of
the two partition databases.
Partition database (1 of 2) (EdLoaderNistFilter-<NsrlVersion>-ISO(A-B).part) Contains hashes from the *NSRL RDS_<NsrlVersion>_A and B ISO's.
Partition database (2 of 2) (EdLoaderNistFilter-<NsrlVersion>-ISO(C-D).part) Contains hashes from the *NSRL RDS_<NsrlVersion>_C and D ISO's.
All three of these files must reside in the same directory in order for the hash lookup to
work. If this condition is not met, or the versions of these files are mismatched, ED Loader
will raise an initialization error and block processing until this configuration is corrected or
until the NIST(NSRL) Filter option is disabled.
The NSRL RDS is publicly available as four ISO files containing hashes within specified
ranges. The two partition databases only contain unique instances of each hash present in
the ISO.
Related Topics
Session Configuration
Session Defaults
Post-Import Actions
Quality Control After Import
© 2015 LexisNexis, a division of Reed Elsevier Inc. All rights reserved.
Using LAW PreDiscovery
295
The output settings determine how selected sources are identified and organized in the tree
view of LAW PreDiscovery.
To access and configure output options
1. On the File menu, select Import and then click Electronic Discovery.
2. Click the Settings tab and then click Output.
The Output options are available.
3. Configure output options as needed:
Folder Output Scheme
Relative (Output path is relative to selection) (Applicable to EDoc selection only) This option applies to e-doc selections only. The path created in the tree view starts
with the selected folder, or with the folder containing the selected files. Use this
setting if you want to shorten paths. It can also help to limit issues that result from
path naming limitations of operating systems. This option does not apply to mail
stores. Paths within mail stores are always mirrored on import.
Mirrored - Re-creates the entire folder structure of the selected electronic files in the
tree view of the main window of LAW PreDiscovery.
Options
Categorize output sources (E-Mails/E-Docs) - When enabled, all mail store sources
© 2015 LexisNexis. All rights reserved.
296
LAW PreDiscovery
will be imported into an "E-Mail" folder and all e-doc sources (including loose e-mail)
will be imported into an "E-Doc" folder.
Use source name as top level folder - The Source Name, as displayed in the Source
Queue on the Sources tab, will be used as the top level folder name for each source
when imported into LAW.
Ensure root output folder is unique in LAW - Ensures the target folder for each
source is unique in LAW. This only applies when <Case Root> is NOT set as the target
folder for a source or sources. For example, if this option is checked and the other two
output options (listed above) are not checked and a user loads to folders that are
both named "EDOC" into a folder in LAW named 001CD, LAW will import one of the
EDOC folders into a 001CD-001 folder and the other EDOC folder into a 001CD-002
folder. This will prevent records in both EDOC folders from being loaded into one folder.
Structure - Previews of the folder structure in LAW (following the import), depending on
the selected Output options.
Related Topics
Session Configuration
Session Defaults
Post-Import Actions
Quality Control After Import
Post-import actions configure LAW PreDiscovery™ to continue to perform the next tasks in a
workflow unattended, without the need of user intervention.
If no options are selected and your case is SQL Server-based, you are prompted to index
documents.
To access and configure post import actions
1. On the File menu, select Import and then click Electronic Discovery.
2. Click the Settings tab and then click Post Import Actions.
The Post Import Actions options are available.
© 2015 LexisNexis, a division of Reed Elsevier Inc. All rights reserved.
Using LAW PreDiscovery
297
3. Configure post-import actions as needed:
Convert imported documents to TIFF - When enabled, the Display imported
documents in grid option will be automatically selected and grayed out. LAW will
automatically attempt to convert the imported documents to TIFF images after it has
closed the results dialog and after a specified number of seconds.
If you plan to enable the option to convert imported documents to TIFF, configure TIFF
conversion settings before you run an ED Loader session.
Display imported documents in grid - Following the import, LAW will close the results
dialog after the specified number or seconds. Then, the grid view will launch and
display only the records imported during that session.
Perform full-text indexing - When enabled, LAW will automatically begin indexing any
documents flagged to be indexed immediately after closing the results dialog that
appears following the import.
Results dialog will close after <N> seconds, unattended - Allows users to specify the
number of seconds to pass before the results dialog is closed and the selected post
import action takes place. The default is 600 seconds. This option is active only if one
of the above options is selected.
Related Topics
Session Configuration
© 2015 LexisNexis. All rights reserved.
298
LAW PreDiscovery
Session Defaults
Quality Control After Import
Launching the Grids
Full Text Indexing
1. On the File menu, select Import and then click Electronic Discovery.
2. Click the Settings tab and then click Text Extraction.
The Text Extraction options are available.
3. Configure text extraction options as needed:
Option
Description
© 2015 LexisNexis, a division of Reed Elsevier Inc. All rights reserved.
Using LAW PreDiscovery
Enable Text Extraction
Enables text extraction options from applicable
files during an ED Loader import session.
You must select this option to access any other
options for text extraction.
Include metadata in extracted text
Includes any available document properties in
the extracted text file, for example: Author, Title,
etc.
Enable binary scanning in text
extraction
Forces all file types to be scanned for text.
This option works by overriding the Ext. Text
flag in the File Type Manager (see File Types).
If you enable this option, it is recommended that
you also enable the Validate extracted text
option.
Validate extracted text
Scans each text file for readable text.
Use this option to filter text files containing only
form feed and other control characters. Text files
that do not contain readable text are marked as
invalid and discarded.
Identify hidden text content
Detects specific kinds of hidden text in Word,
Excel, and PowerPoint documents.
Hidden text can be found in these forms:
Text that is hidden inside shape controls, for
example, text boxes, etc.
Text formatted as Hidden.
Hidden spreadsheets, spreadsheet columns,
and spreadsheet cells.
Hidden slides.
If hidden text is detected the following actions
occur:
The hidden text is added to the start of the
extracted text for the document under the
Text tab.
The hidden text appears at the top of the
document in a section marked with <<<
START HIDDEN CONTENT >>><< END
HIDDEN CONTENT >>>. Page numbers
within the hidden content area can help you
determine the context for the hidden text.
The HiddenText field for the document is
assigned a Y.
Note
Enabling this option may decrease import
speeds.
© 2015 LexisNexis. All rights reserved.
299
300
LAW PreDiscovery
Identify language content
Identifies the first 5 languages used in each
document.
When you create a new case or when you open
a case that was created using a previous
version of LAW PreDiscovery, a field named
Language is created that stores language
identifiers.
Note the following:
Single word sentences are not evaluated.
A language with only one occurrence in the
document is ignored.
After the first language is identified, to be
added Language field, the second through
fifth languages require a hit percentage of
at least 15% of document text.
Enabling this option may decrease import
speeds. To improve speeds, try using the
option to limit analysis to the first kilobytes
of each file.
Limit content analysis to first _ KB
of file
Limiting analysis can help to enhance
performance.
Restrict language identification to
common languages
Limiting identification to common languages can
help to enhance accuracy.
Note the following:
This setting is enabled by default and
persists between sessions.
When this setting is enabled, only the
following languages are detected:
Arabic
Bengali
Chinese: Simplified Chinese, and Traditional
Chinese
Czech
Danish
Dutch
English
Finnish
French
German
Greek
Hebrew
Hindi
Hungarian
Italian
© 2015 LexisNexis, a division of Reed Elsevier Inc. All rights reserved.
Using LAW PreDiscovery
301
Japanese
Korean
Latin
Norwegian Bokmål
Norwegian Nynorsk
Polish
Portuguese
Russian
Spanish
Swedish
If a supported language is not
encountered, a value of Unknown is
returned. This value might also be returned
if only a small amount of content is
available.
When multiple languages are detected,
they are delimited with semi-colon.
Related Topics
Importing Electronic Discovery
Session Configuration
Session Defaults
Post-Import Actions
Quality Control After Import
You can setup import session defaults, such as locking and unlocking settings, saving the
current settings as default, or set the settings and the DocID seed in current use as the default
for future sessions.
© 2015 LexisNexis. All rights reserved.
302
LAW PreDiscovery
Use the Settings tab in ED Loader to select among options for saving ED Loader settings:
Lock Settings or Unlock Settings - Toggles between locking and unlocking import settings.
When locked, settings cannot be changed.
Apply Settings - Saves the currently selected settings and applies them if you restart ED
Loader. Use this option if you want to temporarily close ED Loader before running the
import session. Settings are saved to a case-level ED Loader configuration file. For more
information on stopping and restarting ED Loader sessions, see Cancelling and Resuming
Sessions.
Set as Default - Saves the current Settings tab selections and the DocID seed as default
for all cases started with the same LAW PreDiscovery executable.
Related Topics
Session Configuration
Cancelling and Resuming Sessions
Reviewing Sessions
Reviewing the session after import is an important measure you should take to ensure the all
aspects of the import operation completed satisfactorily.
In this section
Quality Control After Import
Identifies specific steps you can take to assess the success or failure of the import operation.
Session Browser and Session Viewer
Provides guidance and procedures for accessing the Session Browser to view import session
summaries, and for using the Session Viewer, for viewing detailed import session reports. The
Session Viewer allows you to review any warnings or errors that were generated during the
session.
© 2015 LexisNexis, a division of Reed Elsevier Inc. All rights reserved.
Using LAW PreDiscovery
303
Summary Reports
Describes procedures for generating reports that list the type of files imported, and whether
each type is supported or not.
During the import of electronic discovery, ED Loader flags any record whose file import triggered
errors or warnings. It is considered a best practice to review all errors and warnings after each
import session and then to respond accordingly.
After import, the quality control process should involve the following basic steps:
1. Review the Session Log by opening the Session Viewer. For more information on the
Session Viewer, see: Session Browser and Session Viewer.
Look for records listed in the Incomplete or Commit tabs.
If records are listed in either of these tabs, they were not imported.
Records appearing in the Incomplete tab might be able to be resolved by resuming the
ED Loader session. If this does not work, try reprocessing the files.
Records appearing in the Commit tabs will need to be re-processed.
The Insert feature may be used if maintaining order is necessary.
2. Review the ErrorMsg field in the LAW PreDiscovery™ case database to identify errors and
determine what action will take place to resolve the error.
3. Review the TextXStatus field to identify records that did not have text extracted.
Extraction of text may be prevented either by an error or by a configuration setting that
excludes a file type. These files may need to be converted to TIFF or PDF to obtain printed
text or OCR text.
Related Topics
Post-Import Actions
Extracting Missing Text After Import
Reviewing Errors
ED Loader Session Report
Files By Type Report
© 2015 LexisNexis. All rights reserved.
304
LAW PreDiscovery
After an Electronic Discovery Loader (ED Loader) session, you can open the Session Browser to
review an overview of the import session. From the Session Browser, you can open the Session
Viewer that opens the log containing a detailed report of the session. The log provides details
such as warnings and any errors that occurred during the import process.
To view an import session summary (Session Browser)
Start the Session Viewer in either one of the following ways:
After an import operation, in the results dialog box, click the View Logs.
Or
1. On the File menu, click Import and then click Electronic Discovery.
The ED Loader dialog box opens.
2. On the File menu, click Open Session.
The Session Browser dialog lists existing sessions for the current case.
3. Select a session.
© 2015 LexisNexis, a division of Reed Elsevier Inc. All rights reserved.
Using LAW PreDiscovery
305
The Session Browser is updated with details from the session you selected.
The following items are available for review:
Label. The session label.
Distributed. Whether the import was distributed or not. For more information on
distributed imports, see: Distributed ED Loader.
Created. Date and time the session was created.
Elapsed Time. The time taken to process items by that specific machine in that
session. If the session was a standalone session then this value should be equal to
the total session time. If the session is distributed in nature then this value will
represent the total duration for which that specific machine was actively importing
documents in the distributed session and this value can be lesser than the actual
session duration.
Directory. The directory where the import log is located.
Creator. The user name associated with the user who created the session.
Workstation. The workstation name where the case was created.
Status. The status of the session; whether it completed or not.
Processed. The number of documents processed.
Records Written. The number of case records written.
Size. The size of all files combined that were processed.
Errors. The number of errors that occurred during the session.
Excluded. The number of files that were excluded from processing.
© 2015 LexisNexis. All rights reserved.
306
LAW PreDiscovery
Partially Excluded. The number of files that were partially excluded from the session.
To learn more about the details concerning these items, open the Session Viewer for this
session. See the next section of this topic for more information.
To view import session details (Session Viewer)
Start the Session Viewer in either one of the following ways:
After an import operation, in the results dialog box, click the View Logs.
Or
1. On the File menu, click Import and then click Electronic Discovery.
The ED Loader dialog box opens.
2. On the File menu, click Open Session.
The Session Browser dialog lists existing sessions for the current case.
3. Select a session.
4. Click View Session.
© 2015 LexisNexis, a division of Reed Elsevier Inc. All rights reserved.
Using LAW PreDiscovery
307
5. The Show all sessions option will allow users to view logs for sessions initialized on all
workstations (for the current case).
6. Select the tabs in the Session Viewer to access information about the currently selected
session.
The number of records listed in each tab is shown beside the tab name in parentheses.
The tabs of the Session Viewer are described in the following table:
Use this tab
When you want to review
Overview
Session totals, such as the number of items processed, errors, and
filtered items.
Settings
ED Loader options.
Edit settings from the EDLoader.case.config.ini (located in root LAW
case folder), and the state of those settings during the selected
session. The VisibleInUi field will indicate if the setting is visible in
the ED Loader interface, or if it only exists in the
EDLoader.case.config.ini. The SettingKey displays the name of the
© 2015 LexisNexis. All rights reserved.
308
LAW PreDiscovery
setting in the configuration file, while the UnderlyingValue field
displays the value of the setting in the configuration file.
Sources
Sources that were included in the session and any error messages
about them.
Incomplete
Records that did not import completely.
All
All of the records that were imported during the current session.
Warnings
Warning messages generated during import.
Processing Errors Records that generated an processing error.
Processing errors result typically when a file cannot be opened, as
for example, might be the case when a file is password protected.
Typically, a document that generates a processing error is still
imported despite the error, and if so, the error message will be
logged to the ErrorMsg field for affected records.
Commit Errors
Documents that failed to import because of a disk write error.
Commit errors can result for example, when a disk is full or nearly
full, or if there was an error in the connection to the file source
during the import. Typically, the import failed for any document
listed in this tab.
Duplicates
Records that were flagged as duplicates during the import process.
These records may or may not have been imported, depending on
the selected action in the Deduplication settings.
NIST Exclusions
Records that were filtered based on the NIST/NSRL database. These
records are not written to the LAW case database.
FileType
Exclusions
Records that were filtered based on the Include or Exclude list. The
documents may or may not have been imported, depending on the
selected action in the File Types settings.
Conditional
Exclusions
Records that were excluded based on the Exclusions settings. These
documents are not written to the LAW database.
Suspect
Records that were determined to be suspect files based on the file
extension. LAW validates all files to ensure the original file extension
reflects the actual file type. An example of a suspect file would be a
Word .doc file that was renamed and given a .pdf extension. If the
Auto Assign Suspect Extensions option is enabled in this situation,
the .dox extension would be assigned to the DocExt field, and the
.pdf extension would be assigned to the OrigExt field. See File Types
for more information.
To export session data
The data contained within the tabs in the Session Viewer may be exported to a separate file
or to an Excel spreadsheet.
To save the currently selected tab
© 2015 LexisNexis, a division of Reed Elsevier Inc. All rights reserved.
Using LAW PreDiscovery
309
1. Start the Session Viewer. See the section at the start of this topic for instructions.
2. On the File menu, click Save As.
3. Select a file type:
CSV - for comma-separated value
TXT - for text file
4. Select a path to save the file and a file name.
5. Click Save.
6. Click Yes at the prompt to view the output file or click No to view the file later.
To save all tabs in the Session Viewer to file
1. Start the Session Viewer. See the section at the start of this topic for instructions.
2. On the File menu, click Export To Excel.
3. Select a location and file name for the output file and then click Save.
Each tab will appear in its own worksheet in the output Excel file.
Other session review options
Other session review options are listed as follows:
Session List
This area of the Session Viewer provides a list of sessions that were initialized on the
current machine in the currently selected LAW case. The sessions will be named
according to the user-defined Session Labels (specified in the ED Loader prior to
import).
Fields
The Fields section lists the fields available for display for the currently selected tab.
Item Properties
The Item Properties panel displays metadata and other information specific to the
selected record. The properties for attachment records will contain information about the
parent record as well.
Related Topics
Post-Import Actions
© 2015 LexisNexis. All rights reserved.
310
LAW PreDiscovery
Extracting Missing Text After Import
Reviewing Errors
ED Loader Session Report
Files By Type Report
After documents are loaded via ED Loader, you can use the ED Reports feature to generate
reports of the types of files imported, and whether or not each file type is supported.
To create summary reports
1. Open a grid by doing one of the following:
On the Tools menu, click Display All Records.
Or
Click the globe icon on the main toolbar.
Or
Run a query.
Or
Select a folder and then click Grid View or Grid View (Recurse).
2. With a standalone grid open, on the Tools menu, click ED Reports.
The Report Preview dialog box appears.
© 2015 LexisNexis, a division of Reed Elsevier Inc. All rights reserved.
Using LAW PreDiscovery
311
3. Select an option as needed:
To number the file path entries for either the Supported Files By Type report or the
Unsupported Files by Type Report, on the Format menu, select File Numbering.
To apply a watermark to the report, select Apply watermark to reports and then
browse to an image file.
4. Select a report from the list or choose a report from the Selected Report list.
A preview of the report appears in the Report Preview dialog box.
© 2015 LexisNexis. All rights reserved.
312
LAW PreDiscovery
5. In the Report Preview dialog box you may select from among the following options:
Do this
When you want to
Save the report as a PDF or HTM file.
1. On the File menu, click Save or Save As.
2. Name the file, select either PDF or HTM, and
then click Save.
Print the report.
On the File menu, click Print
Or
Click the printer icon.
© 2015 LexisNexis, a division of Reed Elsevier Inc. All rights reserved.
Using LAW PreDiscovery
Apply file numbering to the report.
313
On the Format menu, select File Numbering.
Select a different report to preview.
In the Selected Report list, select a
different report.
Browse pages of the report.
Select the page browsing controls.
Change the view of the preview page.
Click the magnifying glass icon and then
select a viewing option.
Report types
The reports that you may choose from are described as follows:
Supported Files by Type: Lists all supported files loaded via ED Loader, grouped by file
type. The term 'supported' refers to records that have an application assigned in the
SourceApp field. The report contains paths to each file, a total count of supported files,
and a count of supported files for each file type. If the EDPages field contains data, these
values will also be included in the report.
The EDPages field contains data when the Extract ED Pages Counts or the E-Print
process is run on the documents.
Unsupported Files by Type: Lists all unsupported files loaded via ED Loader, grouped by
file type. The term 'unsupported' refers to records that do NOT have an application
assigned in the SourceApp field (<No Source Specified>). The report contains paths to
each file, a total count of unsupported files, and a count of unsupported files for each file
type. If the EDPages field contains data these values will also be included in the report.
Supported Files by Type (Condensed): This report is similar to the Supported Files by
Type report, but does not include paths/filenames to each individual file. The report
contains a total count of supported files and a count of supported files for each file type.
If the EDPages field contains data, these values will also be included in the report.
Unsupported Files by Type (Condensed): This report is similar to the Unsupported Files
by Type report, but does not include paths/filenames to each individual file. The report
contains a total count of unsupported files and a count of unsupported files for each file
type. If the EDPages field contains data, these values will also be included in the report.
Related Topics
Post-Import Actions
Extracting Missing Text After Import
Reviewing Errors
ED Loader Session Report
Files By Type Report
© 2015 LexisNexis. All rights reserved.
314
LAW PreDiscovery
Importing E-Mail Files
In addition to other types of electronic documents, you can use the ED Loader utility to import
files containing e-mail and related items. Examples of items related to e-mail include calendar
items, meetings notes, and others. The types of items provided by each program vary.
ED Loader recognizes the following file formats:
Lotus Notes databases
Mbox format mail files
Outlook data files
Outlook Express Saved Mail Messages
Early Data Analyzer can generate MSG files or HTM to extracted from password-protected
PST files and from OST files, and send these to ED Loader. For more information on Early
Data Analyzer, see: Early Data Analyzer.
The use of ED Loader on a 64-bit machine with Outlook 2010 is not yet supported.
To import e-mail and related items
1. On the File menu, click Import and then click Electronic Discovery.
The LAW Electronic Discovery Loader utility (ED Loader) appears.
© 2015 LexisNexis, a division of Reed Elsevier Inc. All rights reserved.
Using LAW PreDiscovery
2. Identify source files to import as follows:
Format
Source
Extension Import option
application
Lotus
Lotus Notes
Notes
database
s
.nsf
Mbox
format
mail file
Eudora,
Netscape,
etc.
.mbox
Outlook
data file
Outlook
.pst
Outlook
folder
Outlook
Select
folders
directly from
an Outlookstyle tree
control.
Outlook
Express
Saved
Mail
Outlook
Express
.dbx
or
.msf
.ost
© 2015 LexisNexis. All rights reserved.
.eml
or
315
316
LAW PreDiscovery
Message
3. Specify a session label and a DocID Seed as needed.
4. Optionally, click Next to specify other import options for Outlook items.
5. Click Start.
When the import completes, you are provided with a message stating the number of
items imported, and then you are given the option to view the log file generated for the
import action.
Mbox import details
Note the following when using ED Loader to import MBox mail stores:
When you import Mbox email stores, ED Loader extracts individual messages from within
the mail store and processes each message as a separate e-mail item.
ED Loader creates log entries for e-mail metadata, and extracts all attachments.
ED Loader saves each message in the mail store as an individual file. These files are
saved to the working directory of ED Loader.
There are many e-mail clients that use the Mbox format, for example: Alpine, Claws Mail,
Cone, Eudora, Gnus, Kmail, Mozilla Mail & Newsgroups, Mozilla Thunderbird, Mulberry,
Mutt, Netscape Messenger, Netscape Messenger 9, Novell Evolution, Opera Mail, Pine,
Pocomail, SeaMonkey, and The Bat!.
Mbox files can have the following file IDs:
862 – Berkeley UNIX Mailbox Format
3563 – Netscape E-Mail message
863 – Eudora MBOX files
3050 – MBX Mail Folder
Embedded mail store import details
Embedded mail store files can be imported from Early Data Analyzer using ED Loader.
When an embedded mail store is queued for import into ED Loader, the target folder for
the file is the _EmbeddedStores folder. The value in the parenthesis, (), refers to the
EdaId or mail store.
For example: _EmbeddedStores\PSTinZip.pst (12345)
The embedded mail store file name has a 25 character limit. If the mail store name
exceeds 25 characters, the embedded mail store file name is truncated and (...) is
displayed after the first 20 characters of the mail store file name.
For example: If the mail store file name is
ThisIsAVeryVeryVeryVeryVeryVeryVeryLongFilename.pst, the target folder and
truncated file name will be _EmbeddedStores\ThisIsAVeryVeryVeryV(...) (123456)
© 2015 LexisNexis, a division of Reed Elsevier Inc. All rights reserved.
Using LAW PreDiscovery
317
All supported mail store types (PST, OST, NSF, MBX, and DBX) are put into their EDLoader
source when they are embedded.
The default source label for mail stores includes the mail store file extensions for
embedded PST, OST, NSF, MBX, and DBX files.
The default source label for mail stores also includes the mail store file extensions for
non-embedded PST, OST, and NSF files.
Files imported into LAW PreDiscovery from the embedded mail store file will have the
same file name as if the mail store file was imported directly into ED Loader.
The full path to the embedded mail store file and its contents is store in the SourceFile
field in LAW PreDiscovery for the lifetime of the LAW PreDiscovery case.
Lotus Notes item types
In addition to e-mail you can use ED Loader to import other types of Lotus Notes items. Item
types include:
All Day Event
Anniversary
Appointment
Meeting
Memo
Notice
Reminder
Task (Single Task)
The output file is in HTML format. The output begins with a text header that identifies the
extracted text as belonging to a meeting item.
To import Lotus Notes items see the section entitled To import e-mail and related items in
this topic.
Passing an e-mail thread to a review application
You can pass email threads from LAW PreDiscovery to review application by configuring your
review application to handle the ThreadID field.
ED-enabled cases created using LAW PreDiscovery 6.0 and later, contain the ThreadID field.
This field tracks e-mail threads from Outlook stores and from loose MSG files.
Note the following about the ThreadID field:
It is populated with the leftmost 22 characters of ConversationIndex field.
Attachments to e-mails receiving a value for the ThreadID are populated with the
ThreadID of the corresponding parent e-mail.
© 2015 LexisNexis. All rights reserved.
318
LAW PreDiscovery
Opening an existing ED-enabled case will add the ThreadID field to the case.
ThreadID is not visible by default on the main form or on grids.
The ThreadID field is not indexed.
When you use ED Loader to import an e-mail that has one or more attachments, the
ThreadID of attachments are assigned to the same ThreadID as the parent e-mail.
Keeping the ThreadID the same between parents and their attachments can help to find
and filter messages that might be related by business logic but not necessarily by
indexed keywords found in message subject or content.
To enable this threading feature, in ED Loader, on the Text Extraction settings, select
Enable Archive Extraction. For more information on enabling text extraction, see: Text
Extraction.
Related Topics
Session Configuration
Text Extraction
Quality Control After Import
Launching Native Files
Importing Instant Messages (IM)
You can use the ED Loader utility to extract text produced by instant messaging (IM) clients. ED
Loader processes the following IM formats:
Yahoo IM
MSN Messenger
AOL IM
Extracted text is saved to an HTML file. The HTML file contains the following information about
messages:
Date and time sent
From
To
Message
Additional details specific to the Yahoo and AOL IM formats are provided in the following table:
© 2015 LexisNexis, a division of Reed Elsevier Inc. All rights reserved.
Using LAW PreDiscovery
IM Format
Yahoo IM
319
Notes
The archive file name should be in the format: date_personid.dat. For example,
20101103-MikeP.dat. The sender name is taken from the file name.
If the selected archive file is not located within the directory installed by Yahoo,
then the name that appears in the To field is displayed as "Remote User."
Messages that were generated by Yahoo messenger are not displayed.
In the case of conference messaging, the To list will contain the names of the
participants who exchanged messages with the group.
File transfer details are not available in the archive file.
AOL (AIM7)
The archive file for AIM does not provide user sign in or sign out details, or file
transfer details.
In the case of conference messaging, the To list will contain the names of the
participants who exchanged messages with the group.
Related Topics
Session Configuration
Quality Control After Import
Launching Native Files
Inserting Attachments After Import
If Electronic Discovery Loader (ED Loader) was unable to extract embedded or attached files
from a compound document, it still might be possible to get the attachment from the parent file
and then insert it as an attachment into the case. Note the following considerations before you
start the process of inserting attachments after import:
It might not be worth the trouble to import document attachments. For example, if the
embedded file is a logo, or some other image that is not relevant to the case, it may not be
worth the trouble of taking corrective action on the record. If the embedded file contains
possibly relevant data, you should consider fixing the extraction error.
The most common fix for failed extraction is to manually save the attachment, and then
insert it into the appropriate location. It is important to note that manually saving the
embedded file will alter the metadata of the file.
© 2015 LexisNexis. All rights reserved.
320
LAW PreDiscovery
To insert documents as attachments
1. Review the import log ErrMsg field to locate any errors with importing embedded
compound documents.
2. Use the source application of the compound document to open the document and save
any embedded or attached files that were not imported.
Saving the embedded file will alter its metadata.
3. In the main form, select the compound document parent file.
4. On the Edit menu, click Insert.
5. Click E-Document Attachment(s) and then click either Before current.
The ED Loader opens in insert mode.
6. Add the embedded file to the Source Queue; click one of the buttons in the Add area,
select the attachment files, and then click Start.
Selected files are inserted as attachments to the selected document.
For more information on adding or removing sources from ED Loader, see Adding/Removing
Sources.
© 2015 LexisNexis, a division of Reed Elsevier Inc. All rights reserved.
Using LAW PreDiscovery
321
Related Topics
Post-Import Actions
Extracting Missing Text After Import
Reviewing Errors
ED Loader Session Report
Files By Type Report
Adding/Removing Sources
Extracting Missing Text After Import
When you import electronic documents, even if you select the option to extract text during the
import, you may still experience errors importing text for supported documents. Missing text
after import is most common for these kinds of files:
PDF files where the format is image-only and does not contain embedded text.
JPEGs or other image files that might contain text, but only as part of the image.
Encrypted or locked files.
After you import, the first step is to identify files where the text extraction process failed.
Depending on the type of error encountered, you can take action to extract the missing text.
To find missing text by grouping
If a file type is supported for text extraction, but text extraction failed LAW PreDiscovery™
generates an error message. The error message appears in the ErrorMsg field and the
TextXStatus field is marked with the value E. You can isolate text extraction errors using the
grouping or searching functions of a grid display.
To find errors by grouping in a grid
1. Open either grid view.
If the TextXStatus field is not a displayed column, right-click on a column header to
open the Field List dialog, select TextXStatus and then close the Field List dialog.
The TextXStatus now appears.
© 2015 LexisNexis. All rights reserved.
322
LAW PreDiscovery
2. In the grid, group by the TextXStatus field to see if any E values are present.
3. Expand the E group, then right-click on an E value in the TextXStatus field. The Filter
options will appear.
4. Click Choose Filter by Selection. Only those records containing an E value in the
TextXStatus field will be returned.
To find missing text by searching
With larger cases, locating files with missing text by performing a search may be quicker
than using the grouping method.
1. In the main user interface on the Tools menu, click Search Records.
The Database Query Builder appears.
2. Add a condition by choosing the following:
Field Name = TextXStatus
Operator = Equal
Value = E
3. Click <Add Condition>.
The condition will appear in the clause window.
4. Click <Execute>.
The search is performed returning only the records containing a TextXStatus value of an
E.
To extract missing text
You may still be able to obtain text files for records where text extraction failed during
import. The general process for addressing text extraction errors follows these basic steps:
1. Find files where the TextXStatus is either N or E. TextXStatus of N indicates the file could
not have text extracted based on its file type. TextXStatus of E indicates the file type is
supported but text extraction resulted in an error.
2. Fix these files as necessary based on the reason text could not be extracted:
For files that are locked or encrypted, get the passwords, open files in native
applications, and then perform import again with text extraction.
For files not locked or encrypted, use a batch process to convert them to TIFF, and
extract text during TIFF/PDF conversion. Prior to conversion, in the TIFF/PDF
conversion settings, enable the Save text with images option. The TextPStatus will
indicate if text was printed to file at the time of TIFF conversion.
For any other graphics or PDF files where text is visible but otherwise inaccessible,
perform optical character recognition (OCR).
© 2015 LexisNexis, a division of Reed Elsevier Inc. All rights reserved.
Using LAW PreDiscovery
323
Related Topics
Launching the Grids
Grouping Search Results on a Grid
Query Builder
Batch Processing Overview
OCR Overview
E-Printing, TIFF, and PDF Conversion
Cancelling and Resuming Sessions
The Electronic Discovery (ED) Loader may be easily canceled during an import and then
restarted at a later time.
To cancel a session
When an ED Loader import session is running, click Cancel and then follow the prompts
to fully cancel the session.
If you cancel an ED Loader session when the Progress dialog box is open, you will see
the Confirm Cancellation dialog box.
© 2015 LexisNexis. All rights reserved.
324
LAW PreDiscovery
Click one of the following:
Safe Cancel. (Recommended) To complete the current item and then stop.
Normal Cancel. To stop the session immediately. This option may result in
incomplete items.
Continue. To continue processing the current session.
To resume a session
You can restart any session that was previously started on the current workstation and
then canceled.
1. On the File menu, click Import, and then click Electronic Discovery.
2. The LAW PreDiscovery™ Electronic Discovery Loader starts.
3. On the File menu, click Sessions.
4. The Session Browser dialog box opens. Incomplete sessions will show as Canceled
recoverable in the Status message.
5. Select an uncompleted session and then click Resume.
6. The incomplete session restarts.
© 2015 LexisNexis, a division of Reed Elsevier Inc. All rights reserved.
Using LAW PreDiscovery
325
Note the following facts when restarting import sessions:
Only sessions initialized from the current workstation may be resumed.
Sessions that end unexpectedly due to some sort of crash may generate a restart
prompt when the ED Loader is re-launched from the same machine in the same LAW
case.
If the connection to a SQL Server is lost during the ED Loader import process, the
ED Loader will display a notification on the Progress dialog just above the total
progress bar. During this time, the Loader will attempt to reconnect to the database
and continue processing. The import process can be stopped at this time by clicking
the Cancel button.
Related Topics
Session Configuration
Session Defaults
Distributed ED Loader
An ED Loader session may be configured to allow multiple computers to participate in the
import session. You start the distributed session in ED Loader on one computer with LAW
PreDiscovery running on it. When you configure the import session, you specify sources for
import. All sources must be accessible by all other computers that will participate in the
distributed session. Sources can be held on a network share for this purpose. After you specify
sources to process, you continue to configure your import session by enabling the option to
allow distributed processing. At that time, you also select other computers to participate in the
import session.
When the distributed ED Loader session is running, you can use the LAW Management Console
(LMC) to monitor the progress of the session, view the status of individual computers, and
perform other session management tasks. For more information on using the LMC see LMC
Overview.
Starting a distributed ED Loader session
1. Place sources for import on a network share that is visible to all computers participating
in the import session. Be sure all computers have full access privileges to the share.
2. On the File menu, click Import, and then click Electronic Discovery.
© 2015 LexisNexis. All rights reserved.
326
LAW PreDiscovery
The LAW Electronic Discovery Loader utility opens.
3. Add sources as needed. For more information on adding sources see Specifying Sources.
4. Click the General tab and then, in the Categories section, click General.
© 2015 LexisNexis, a division of Reed Elsevier Inc. All rights reserved.
Using LAW PreDiscovery
5. Select Enable Distributed Processing.
6. Click Edit.
The Create/Modify Job Invitation dialog box appears.
© 2015 LexisNexis. All rights reserved.
327
328
LAW PreDiscovery
7. Select an invitation type.
Closed. (Default) None of the LMC instances will be able to auto-join LAW to the
shared batch. LAW workstations can still be joined to the job manually.
Open. All LMC instances automatically join LAW to the shared batch.
Restricted. Only selected LMC instances will automatically join the process.
If you choose Restricted, select computers that can participate in the batch process from
among available computers in the Clients area of the dialog box.
8. Configure a scheduling restriction as needed. This option prevents the job from starting
until after the date and time that you specify.
9. Click Accept.
After the shared batch is initialized on a machine, the job appears below the Jobs node
in the LMC, and other LAW workstations can join the job.
10. Configure other import session settings as needed. For more information on configuring
an import session see Configuring Import Settings.
© 2015 LexisNexis, a division of Reed Elsevier Inc. All rights reserved.
Using LAW PreDiscovery
11. Click Start.
12. In the Confirm Settings dialog box, review the import settings.
© 2015 LexisNexis. All rights reserved.
329
330
LAW PreDiscovery
13. Click OK.
Implementation details
When you implement distributed electronic discovery the following details apply:
Post-import actions. Post-import actions are disabled for distributed ED Loader
sessions.
© 2015 LexisNexis, a division of Reed Elsevier Inc. All rights reserved.
Using LAW PreDiscovery
331
Session label and DocID prefix. The session label and DocId seed reflect the distributed
ED Loader session. The session label defaults to Session [&SESSION_ID] on
[@CASENAME]. The DocID value is blank by default. If you leave it blank and then run
run the distributed ED Loader session the numerical values are automatically assigned
using the following scheme: SessionNumber.DocumentNumber.ItemNumber.
Mapped drives versus UNC paths. All computers enrolled in a distributed ED Loader
session must connect to the source file folder using the same mapped drive letter or the
same UNC path. While there can be a performance gain when you use a mapped drive,
using a UNC path is simpler to setup and less prone to error.
E-mail store processing. When processing e-mail stores, such as PST files and NSF files,
only one client can process any single e-mail store.
Folder size and processing time per client. Only one client can process the items in a
single folder at a time. Relative differences in folder sizes are reflected in time required
for an individual client to process folders. A client that is processing a folder with a large
volume of data will spend more time than a client that is processing a relatively smaller
volume of data.
Determining the computer that ran the import
You can review individual documents to determine which workstation executed the import.
1. From the main form in LAW PreDiscovery, on the Index menu, click Modify Fields.
© 2015 LexisNexis. All rights reserved.
332
LAW PreDiscovery
2. Scroll to ImportStation.
3. Select Visible.
4. Click Save As, name the profile, and then click Accept.
5. Click Close.
6. In the main form in LAW PreDiscovery, select a document from the folder list.
7. Scroll to the ImportStation field.
The name of the computer that performed the import is listed.
Related Topics
Starting an Import Session
Cancelling and Resuming Sessions
General Import Settings
LMC Overview
Scanning Documents
Before you can use a scanner with LAW PreDiscovery, you must install the scanner on your
computer according to instructions provided by the scanner manufacturer. Preparation to run a
scanning job also should include the process of identifying the scanning requirements of the
job.
Assuming a scanner is installed and your requirements are clearly drawn, the next step is to
open LAW PreDiscovery to select your particular scanner model. Selecting a scanner involves
registering your scanner model within LAW PreDiscovery. After you select your scanner, you
configure scanning options according to the requirements of the scanning job. If you are using
barcode break sheets, you also can set options for scanning them as well. Then you are ready
to scan.
In this section
Selecting a Scanner
Provides the steps required to configure LAW PreDiscovery so that it can control your
scanner.
© 2015 LexisNexis, a division of Reed Elsevier Inc. All rights reserved.
Using LAW PreDiscovery
333
Preparing to Scan
Lists suggested activities that precede a scanning operation.
Using Barcodes
Describes how to get ready to use barcode break sheets in the scanning process and
provides some best practices for controlling quality when using barcode break sheets.
Adjusting Scanner Settings
Describes how to directly configure a scanner from within LAW PreDiscovery.
Configuring Scan Options
Describes how to take advantage of several scan options to further control the scanner and
image processing, and user interface elements that can help to improve scanning efficiency.
Configuring Imaging Options
Describes how to control the format that will be used to save images when scanning.
Using the Scan Toolbar
Describes the Scan Toolbar and how to create and maintain scan profiles for scanning.
Scanning
Provides steps for implementing typical scan operations, including starting, pausing, and
resuming scanning. Also describes actions needed to insert documents after scan time,
appending pages, and replacing documents, pages, and images.
Selecting a Scanner
Before you can scan you must select and configure a scanner. After you add a scanner,
whenever LAW PreDiscovery™ starts, it opens a connection to the scanner.
To select a scanner
1. Make sure your scanner is installed. You cannot select a scanner unless it is installed.
Refer to the instructions provided by the scanner manufacturer.
2. On the Scan menu, click Select Scanner.
The Scanner Selection dialog box appears. It lists all of the currently available scanner
drivers.
© 2015 LexisNexis. All rights reserved.
334
LAW PreDiscovery
3. Select your scanner model from the Scanner list.
If you want to narrow the list so it shows only connected scanners, select Show only
connected scanners.
If your scanner model is not listed but you have an installation CD, follow the scanner
manufacturer's installation instructions to install the scanner driver.
If you have downloaded a driver without installation instructions, click Add and then
browse to the driver for your scanner.
Available scanner models are listed.
4. With your scanner model selected click Setup. If a dialog box appears that lists options
for your scanner, then select the options that you want, and then click OK.
5. Click OK.
Driver support notes
The following guidance applies when selecting and configuring drivers for scanners:
If the connected scanner is not in the list, contact LexisNexis to determine if a driver is
available for the scanner.
LAW PreDiscovery supports most scanners that use an ISIS driver. If you intend to use a
scanner that is bundled with an ISIS driver, do not automatically run the installation for
the scanner driver. First, check the LAW PreDiscovery CD for that scanner model or
contact us to determine if we have a driver for that scanner. Bundled driver installations
typically contain additional system files that may overwrite critical image libraries and
cause problems when running LAW PreDiscovery.
If an error occurs when selecting a scanner, there are two possible explanations: either
the wrong driver was selected or the scanner was not recognized by Windows. The
scanner will not be recognized if it was not turned on prior to the operating system
loading. Ensure that the scanner is on and then restart the computer. If Windows
recognizes the scanner and you still cannot select it, contact LexisNexis for assistance.
© 2015 LexisNexis, a division of Reed Elsevier Inc. All rights reserved.
Using LAW PreDiscovery
Related Topics
Scanning in LAW PreDiscovery
Scanner Settings
Scan Options
Preparing to Scan
As you make preparations to scan, consider the following items:
Item
Install your scanner according to manufacturer's instructions.
Make certain that Windows can detect the scanner and that all drivers
and necessary software have been installed. Consult product
documentation for the scanner or visit the manufacturer's website for
instructions and to locate up-to-date drivers.
Evaluate the project / work order
Gather project specifications and any other instructions.
Evaluate materials to be scanned.
Are the documents single-sided or double-sided? What is the paper
size? Color? How will tabs, post-it notes, folder covers, etc., be
handled?
Consider page and document breaks
Will you use physical or logical (unitization) breaks?
Physical breaking identifies new documents and pages based on a
physical boundary, such as rubber band, staple, paper clip, or binder
clip.
Logical (unitization) examines the document itself to determine the
start and end of each document.
Will you use document break sheets (slip sheets) or “prep” as you go?
Slip sheets may be inserted at the start of each folder, document, and
attachment. Once scanned, LAW will recognize the slip sheet and
create the appropriate document boundary. By choosing the prep-asyou-go method, the document boundary is removed. The document is
scanned using hotkeys or functions on the keyboard. The document is
reassembled accordingly.
Consider attachments
Will attachments (parent/children groups) be created? If yes, how will
they be created? Are they determined by the smallest physical break?
© 2015 LexisNexis. All rights reserved.
335
336
LAW PreDiscovery
Determine coding scheme
What will the numbering scheme be?
Will fields be coded at scan time or after scan time? Typically, the fields
coded at scan time will be those where the value is the same for
multiple records such as a Box or Folder.
Configure scanning options in LAW PreDiscovery
Select a scanner.
Configure scanning options.
Related Topics
Selecting a Scanner
Scanner Settings
Scan Options
Scanning in LAW PreDiscovery
Using Barcodes
Documents may be prepared for scanning using barcode break sheets. Break sheets are also
sometimes called slip sheets, are sheets of paper inserted into the set of documents to be
scanned. They are scanned along with source documents. Each sheet contains a barcode that
identifies the page that follows is a new document, folder, or attachment. With additional
configuration, the barcode values may be stored in an index field or used to number the
documents and pages.
The LAW PreDiscovery installation folder contains four pre-defined barcode break sheets:
Document Break #1 (Break_Doc1.tif), Document Break #2 (Break_Doc2.tif), Folder Break
(Break_Folder.tif), and Attachment Break (Attach1.tif).
Barcode break sheets may also be used to indicate document breaks when importing raw
images, or to code multiple index fields. See the Importing Raw Images section for additional
information.
To access barcode break sheets
1. Click Start and then point to All Programs.
2. Point to LAW PreDiscovery and then point to Break Sheets.
© 2015 LexisNexis, a division of Reed Elsevier Inc. All rights reserved.
Using LAW PreDiscovery
3. Click one of the four predefined break sheets:
Document Break #1 (Break_Doc1.tif)
Document Break #2 (Break_Doc2.tif)
Folder Break (Break_Folder.tif)
Attachment Break (Attach1.tif)
To configure barcode settings
1. On the Tools menu, click Options, and then click the Imaging tab.
2. Configure the following imaging options as needed:
Option
Description
Folder Level
Determines the barcode value used to represent a folder break.
© 2015 LexisNexis. All rights reserved.
337
338
LAW PreDiscovery
If a barcode that matches this value is encountered while scanning, a
new document is started in a new folder. LAW will increment the current
folder name by one for the newly created folder's name. If the next
logical folder does not exist, it is automatically created.
Document
Level
Determines the barcode value used to represent a document break.
Attachment
Level
Determines the barcode value used to represent an attachment break. If
a barcode that matches this value is encountered while scanning, a new
attachment is created and attached to the previous document.
Ignore
Barcode
Value
Use this option to ignore and drop barcodes matching the specified
value during scan time. Multiple values to ignore may be specified by
separating each value with a semi-colon (;).
Storing
Barcode
Break Sheet
Values in a
Field
Stores the values on barcode break sheets in a field.
If a barcode that matches this value is encountered while scanning, a
new document is started. To include multiple document break sheets,
enter all possible values separated by semi-colons (;).
This option can be used to automatically number documents at scan
time. To use this feature, break sheets must be created for every unique
value or every document, if using auto-numbering.
When using this feature, the barcode value must be entered in the
following notation:
/p/f <prefix> <field>
The <prefix> is a common prefix that must be present on every barcode.
The <field> is the name of the field used to store the value. (Note: If
spaces exist in the prefix or field name, they MUST be enclosed in single
quotes.) The value to be stored is the value of the barcode with the
prefix stripped. For example, if the user has entered "/p/f IDDocumentID" (without quotes) for the value of a document break, LAW
would recognize all barcodes starting with "ID-" as a document break,
and the remaining text would be stored in the DocumentID field. A
barcode value of "ID-ABC001" would then be detected as a break sheet,
and "ABC001" would be stored in the DocID field of that document. To
use this feature for auto-numbering, simply specify BegDoc# as the field
name. This notation may be used with Document, Attachment, or Folder
level break sheets.
Dilate Scan
Region
Dilates or widens the area tested for barcodes. This setting can help
recognize poor barcodes with lines missing that may prevent
recognition; however, its use may actually prevent recognition of
otherwise recognizable barcodes. As such, it should be used with
caution and only as a last resort when all other options have failed.
Scan Entire
Page
Causes the entire page to be scanned for barcodes at scan time. This
may slow scanner throughput due to the increased time required for
barcode detection and should only be used if barcodes are located in
various positions on the page.
If this setting is disabled, only a portion of the page will be scanned for
barcodes.
Use Thorough Increases the resolution of scanning for barcodes to improve
Scan
recognition> Using this setting can help to recognize poor quality
barcodes. This requires more time to scan but the extra time required
can be offset because of the relatively small scan region.
© 2015 LexisNexis, a division of Reed Elsevier Inc. All rights reserved.
Using LAW PreDiscovery
339
To extract barcodes
LAW PreDiscovery™ can scan all pages of the current document for any barcode values.
On the Tools menu, click Barcodes, and then click Scan All Pages.
All pages of the current image will be scanned, and any recognized barcodes will be
saved to a delimited text file in the following structure:
Value
Page
BarcodeNo
If no region is active, the entire page will be scanned. If a region has been created, only
this area of every page will be scanned.
To view or modify the barcode scanning region
To view the barcode scanning region
1. Select an image.
2. On the Tools menu, click Barcodes and then click Display Scan Region.
The region used for barcode detection is highlighted on the current image.
To modify the barcode scanning region
When you set the scanning region, you can modify the existing scan region or create a new
one.
1. Select an image.
2. Modify the scan region as follows:
Option
Steps
To modify the current scan
region.
On the Tools menu, click Barcodes and then click
Set Scan Region.
To create a new barcode
scanning region.
Hold the CTRL key down and draw a rectangle by
dragging the mouse from one corner of the
rectangle to the opposite with the left mouse button
depressed.
To quality control barcode breaks
© 2015 LexisNexis. All rights reserved.
340
LAW PreDiscovery
When preparing to use barcode breaks, checking the following items will help to make the
scanning process go more smoothly:
Check paper, scanner settings, and barcode values
Item
Description
Paper
LexisNexis recommends using a light colored paper, e.g., light yellow or
light blue paper. Dark paper decreases the contrast between the bars in
the barcode and the paper's background causing detection of the barcode
to become more difficult. A Laser Jet printer should be used to create a
sharper barcode font. Photocopies of barcodes may result in "fuzzy"
barcodes, which can be difficult to read. Also, if the barcode sheets are too
badly wrinkled, they may become unreadable as well.
Scanner
contrast and
brightness
Adjusting the contrast and/or brightness of the scanner may be required to
produce a usable scan. If LAW appears to be detecting barcodes
sporadically, this adjustment will likely resolve the problem.
1. On the Scan menu, click Scanner Settings.
2. Increase or decrease the contrast or brightness of the scanner.
3. Test the new settings.
4. Repeat as necessary to find the optimal setting for the scanner.
Scanner
resolution
(DPI)
The lower the DPI, the lower the quality of the scanned image. A scan
resolution of less than 200 DPI can cause barcodes to be unreadable.
Expected
Verify that the value on the barcode matches the value registered in LAW
barcode values PreDiscovery.
On the Tools menu, click Options and then click the Imaging tab.
The value on the barcode must match the value in the Doc field to be
considered an actual document break sheet.
If these values do not match, the barcode sheet will be imported as a
normal page in a document.
Verify scan options
1. On the Scan menu, click Scan Options.
2. Verify the following options:
Detect Barcode Breaks should be checked.
Single Page should not be checked. If it is checked, each new page becomes its own
document.
Auto-Deskew may need to be checked.
Noise Removal should not be checked. This feature may ruin the image of the barcode
when enabled.
© 2015 LexisNexis, a division of Reed Elsevier Inc. All rights reserved.
Using LAW PreDiscovery
341
Verify scan region
1. Select an image.
2. On the Tools menu, click Barcodes, and then click Display Scan Region.
3. Compare the selected scan region to the actual position of barcodes on pages.
4. Modify the region as needed.
Check for conflicts in the scan region override settings
1. On the Tools menu, click Options, and then click the Imaging tab.
2. Check the following settings.
Consider using Dilate scan region if barcodes are not being recognized due to poor
print quality.
Consider using Scan entire page if barcode location is inconsistent between pages.
Consider using Use thorough scan if barcodes are not being recognized due to poor
print quality.
Using all three of these settings will override the Scan Region configured in the previous
step and cause the entire page to be scanned. Use only the settings that you need.
Verify that actual barcode readings match expected values
Run this test if a barcode image is already present. This test may also reveal an unexpected
value of the barcode which could cause problems.
On the Tools menu, click Barcodes, and then click Detect Barcode.
The current document is scanned.
The value of the barcode is displayed if it can be read and a value can be found.
Consider whether to split documents
If the scanner is able to scan all the barcodes but does not detect them then consider
splitting the documents based on the barcode images.
Right-click the image, select Split Document and then click Barcode break sheets.
For additional assistance
For additional assistance with barcodes, please contact Technical Support.
© 2015 LexisNexis. All rights reserved.
342
LAW PreDiscovery
Related Topics
Scan Options
Working with Images
Inserting Documents and Pages
Splitting Documents
Imaging Options - Barcodes
Adjusting Scanner Settings
Scanner settings are those properties that control the operation of the scanner directly. Before
you can configure scanner settings you must add a scanner. For more information on adding a
scanner, see Selecting a Scanner.
To configure scanner settings
1. On the Scan menu, click Scanner Settings.
2. The Scanner Settings dialog box appears. The availability of specific settings will vary,
depending on the scanner model.
3. Configure scanning settings as needed. Some important settings are described as
follows:
© 2015 LexisNexis, a division of Reed Elsevier Inc. All rights reserved.
Using LAW PreDiscovery
343
Scan Area - The scan area can be further adjusted by selecting the Area button. A
Scan Area dialog will be displayed that allows users to fine-tune the scan area for
the current page size. The scan area dialog allows users to set an X and Y offset for
the page as well as a custom height and width. This custom area applies only to the
current page size. The custom area for each page size is retained between sessions,
so users will only have to customize a scan area once for each page size. Setting a
custom scan area may be necessary with some scanner models that frequently
exhibit a black border around scanned images. Because the black border is not even
on all sides, it cannot be adequately removed with black-border removal and must be
removed by adjusting the scan area.
Scan brightness - Scan brightness can be adjusted in the Brightness section of the
Scanner Settings dialog box. Alternatively, the following shortcut keys may be used:
Press ALT+UP ARROW to increase brightness by 32 points.
Press ALT+DOWN ARROW to decrease brightness by 32 points.
Pressing either of these hot keys will cause the scanner settings to pop up for visual
inspection and fine-tuning of the new brightness. When the dialog appears, focus
will be placed on the brightness setting so that it can be quickly adjusted by holding
the CTRL key while pressing LEFT ARROW or RIGHT ARROW.
Scanner-specific settings - To display any special settings for your particular
scanner, select the More button from the Scanner Settings dialog. Available settings
vary depending on the scanner.
Related Topics
Scanning in LAW PreDiscovery
Scan Options
© 2015 LexisNexis. All rights reserved.
344
LAW PreDiscovery
Imaging Options
Configuring Scan Options
In addition to the standard scanner settings, LAW PreDiscovery™ provides several scan options
to help improve scanning efficiency.
The scan options can be toggled by selecting the desired option from the Scan > Scan Options
menu. The scan options menu can also be displayed by right-clicking on any of the scanner
settings displayed in the scanner status bar, located in the lower right-hand corner of main
form.
The scanner status bar
The scan settings displayed on the status bar are some of the most frequently used settings
and can be toggled by double-clicking the desired setting.
© 2015 LexisNexis, a division of Reed Elsevier Inc. All rights reserved.
Using LAW PreDiscovery
345
Scan menu options
The options available in the Scan menu are described as follows:
Page Size
The Page Size setting provides a quick alternative to selecting the page size from the
Scanner Settings dialog. This option allows users to toggle between the four most
popular page sizes: Letter (<F7>), Legal (<F8>), Double Letter (<F9>), and A4.
Scan Mode
The Scan Mode controls how the scanner will scan documents.
Simplex is used to scan single-sided documents and Duplex is for double-sided
documents.
Flatbed is used to scan a page from the glass bed; although, if pages are in the
document feeder, it defaults to Simplex and scans a single page from the feeder. If the
scanner does not support duplex scanning, use the Turnover Mode option (see below) to
scan double-sided documents.
To select Simplex press F10.
To select Duplex press F11.
© 2015 LexisNexis. All rights reserved.
346
LAW PreDiscovery
To select Flatbed press F12.
Auto-Deskew
The Auto-Deskew scan option will straighten documents as they are scanned. The
deskew filter can also be applied to multiple documents during Batch Processing and to
individual documents (see Page-level Cleanup).
Black-Border Removal
The Black-Border Removal scan option will remove black edges from all newly scanned
images. This filter will only pick up even black edges. If the black edge is uneven or
slanted down the page, it will not be dropped. These borders are a result of the scanner
model being used and the scan area will have to be adjusted in order to remove them.
The scan area can be adjusted from the Scanner Settings dialog. Black borders left on
pages can prevent LAW from recognizing blank pages, so this filter should be selected if
using the Drop Blank Pages scan option. The black-border removal filter can also be
applied to multiple documents during Batch Processing.
Detect Barcode Breaks
The Detect Barcode Breaks setting allows users to scan multiple documents in a single
batch. Barcode pages can be used to determine both document- and folder-level breaks
while scanning. The settings for the break sheets can be specified from the Imaging tab
of the Options form. Images with the default barcode settings can be found in the
installation directory for LAW. These images can be opened with any image viewer and
printed if users need to prepare a scan job with break sheets. Light-colored paper is
recommended when printing barcode sheets (e.g., white, light blue, light yellow, or light
green). LAW relies on the contrast between the bars in the barcode and the background
color of the paper for detecting the barcode value. Scanner brightness or contrast (Scan
> Scanner Settings) may require adjustment if LAW is having a difficult time recognizing
the barcodes. See Using Barcodes for more information about barcodes.
Drop Blank Pages
The Drop Blank Pages setting determines whether or not to disregard pages that have a
very low percentage of text or graphics (possibly blank pages attached to a document).
If this option is set, pages with very low pixel ratios will not be saved. If this option is
not set, all pages scanned will be saved. This feature can be extremely useful as it
allows users to combine both single- and double-sided documents in a single batch.
Blank backsides of all single-sided documents will be dropped. The backsides of the
double-sided documents containing text or images will be retained.
Hole Removal
The Hole Removal setting removes afterimages of standard size holes (1/4" - 5/16") left
from scanning pages that were hole punched, and can be used to perform quality control
on images batch processed for hole removal. Hole removal can be done for RAW Image
and scanned documents, and documents imported in ED Loader and converted to TIFF
before hole removal. The letters o and e and zeros, are ignored by the hole removal
process.
You can also adjust the size of the image border size that will be scanned for hole
removal.
There are two ways to configure the size of borders for hole removal on images:
In the Scan Toolbar select the Hole Removal check box and then click Configure.
Or
Open the Configure Scan Filters dialog box (Scan > Scan Options > Configure Filters.)
Add Hole Removal to the Selected Filters list, select Hole Removal and then click
© 2015 LexisNexis, a division of Reed Elsevier Inc. All rights reserved.
Using LAW PreDiscovery
347
Configure.
Invert Pages
The Invert Pages setting allows users to invert (rotate 180 degrees) odd or even pages
of a document. This feature is used for double-sided documents that are printed with
opposite orientations on the front and back.
Noise Removal (Despeck)
The Noise Removal setting allows users to apply a filter to reduce the amount of random
dots and specks that appear on the scanned image. OCR results may improve if Noise
Removal is performed on a document before converting it to text.
OCR All New Pages
The OCR All New Pages setting determines whether or not all new pages being scanned
will be flagged for OCR. LAW allows users to flag certain pages for OCR to help increase
OCR speed and efficiency. Pages with graphs and tables or handwriting are not good
OCR candidates and may negatively impact OCR performance. See the Flagging
Documents/Pages for OCR section for information on flagging pages after they have
been scanned.
Scan Rotation
The Scan Rotation setting can be used to rotate pages as they are scanned. Images can
be rotated 90, 180, or 270 degrees. Scanning documents in landscape mode may
increase the scanner throughput and help prevent paper jams. If using this feature to
scan landscape, the scanner must support double-letter page size in order to capture
the full height of the document.
Single Pages
The Single Pages setting instructs LAW to save all pages in a batch as one-page
documents. This can be used to scan a large group of single-page documents in one
batch, saving a great deal of time.
Turnover Mode
The Turnover Mode setting can be used to scan double-sided documents without a
duplex scanner. If this option is enabled, LAW will prompt to flip the document and
continue scanning after the front side of a double-sided document has been scanned.
LAW then rebuilds the document in the proper order.
If this option is enabled, the "Detect Barcode Breaks" setting will be ignored because
the document must be flipped after the front side has been scanned.
Scan Page Limit
The Scan Page Limit feature can be used to specify a page limit for the number of pages
scanned per document. This feature can be very useful for scanning checks or note
cards, for example.
Configure Filters
This option allows advanced users to modify the default settings for the following filters:
Black Border Removal
Drop Blank Pages
Auto Deskew
Noise Removal
© 2015 LexisNexis. All rights reserved.
348
LAW PreDiscovery
Hole Removal
Detect Barcode Breaks
These settings should only be modified if the default settings are not working or
causing problems.
Related Topics
Scanning in LAW PreDiscovery
Scanner Settings
Imaging Options
Configuring Imaging Options
Imaging options will control the format used to save images when scanning and the settings
used for barcode break sheets. (See the Using Barcodes section for additional details.)
© 2015 LexisNexis, a division of Reed Elsevier Inc. All rights reserved.
Using LAW PreDiscovery
349
To configure imaging options
1. On the Tools menu, select Options, and then click Imaging.
2. Configure imaging options as needed:
Scanner Output - Color Format
This setting is for display purposes only; it may not be modified from this form. This
setting identifies the color format selected by the scanner and determines which file
types are available. To change the color format displayed, users must change the color
mode via Scanner Settings.
File Type
The File Type setting determines what type of format, or packaging, is used to save
newly scanned images. Common file types include Adobe (*.pdf), Bitmaps (*.bmp),
Calera (*.pda), Fax (*.dcx), JBIG (*.jbg), JPEG (*.jpg), PaintBrush (*.pcx), Portable
Network Graphics (*.png), and TIFF (*.tif). The file types available are determined by the
color format selected. For example, if Binary (Black & White) is the current color mode,
JPEG is not available as a file type because it can only be used for True Color and 256Level Grey images.
TIFF images (specifically CCITT Group 4) are accepted as the industry standard and are
the recommended format for black & white images. Users can scan to PDF (a frequent
© 2015 LexisNexis. All rights reserved.
350
LAW PreDiscovery
request). However, certain features (e.g., endorsing images and OCR to a non-text
format) will not be available to PDF images. If PDF images are required in the destination
application, this conversion can be handled during the export process after the images
have been endorsed and OCR'd by selecting the PDF Conversion export format or by
choosing PDF as the Output Format (see Options tab).
Compression
The Compression setting determines the type of compression used for the specified file
type and is specifically determined by the file type and color format. CCITT Group 4 is the
common compression for a TIFF image, although this compression is not available for
non-bitonal images. If scanning color or grayscale images, we recommend Sequential
JPEG as the compression type (TIFF as the File Type). It offers excellent compression for
both color and grayscale images and can be used with multi-page images.
Storage Schema
The Storage Schema setting determines how scanned documents are stored.
The Serialized option stores images as single-page images. For example, using this
option, scanning a 5 page document stores each page as a separate file. The files are
stored in the $Image Archive folder located in the root case folder.
The Multipage option stores images as multiple pages in one file. For example, using this
option, scanning a 5-page document stores one file with 5 pages. Files are stored within
the case folder structure displayed in the folder view.
You can move pages in the thumbnails display.
Barcode Breaks
Barcodes are used in scanning to establish barcode break settings. These settings allow
users to specify custom values for barcode sheets that determine both document and
folder breaks and control other aspects of the recognition process.
To use these settings, the Detect Barcode Breaks scan option must be enabled.
See Using Barcodes for more information.
Related Topics
Selecting a Scanner
Scan Options
Using Barcodes
© 2015 LexisNexis, a division of Reed Elsevier Inc. All rights reserved.
Using LAW PreDiscovery
351
Using the Scan Toolbar
The Scan Toolbar provides quick access to all scan-related functions and settings. The Scan
Toolbar also allows you to create scan profiles that can be used to quickly change between
predefined settings for different document types, such as those for color photos, duplex
documents, or single-sided black and white documents. All available scan settings can be saved
with a scan profile.
Until the first scan profile is created, all scan settings will be saved to the "<Default>" scan
profile. This profile will always exist and cannot be deleted. After one or more profiles are
created, the designated scan profile will be stored at the case level, allowing you to retain
case- or customer-specific scan settings. Changing cases will automatically restore the scan
profile that was last used in the case.
Scan profiles are specific to a particular scanner model due to differences in the settings
available for each scanner, for example, color modes, page size, and resolution. So although
scan profiles can be shared between users if desired, they can only be shared by users on
workstations with the same scanner model. A user or workstation with one scanner model will
not be able to see shared profiles for a user or workstation with a different scanner model.
Scan Toolbar features
© 2015 LexisNexis. All rights reserved.
352
LAW PreDiscovery
Feature
Task Bar
Description
New Document - Opens the Scan New dialog box
for scanning new documents.
New Attachment - Manually adds the new
document as an attachment to the last document
in the current folder.
Append - Adds the pages to the end of the
currently selected document.
Insert - inserts pages or entire document
Replace - replaces pages or entire document
For more information about scanning new
documents, attachments or appending pages, see
Scanning.
For more information about inserting pages and
documents, see Inserting Documents and Pages.
Scan Profile
Scan Profile list - The existing scan profiles for
the case. The selected scan profile determines the
current scan settings.
New button - Opens the New Profile dialog box.
Edit button - Opens the Edit Profile dialog box.
Show Settings button
Expands the Scan Toolbar dialog box to display the
scan settings tabs.
Hide Settings button
Hides the scan settings tabs in the Scan Toolbar
dialog box.
Scanner Settings tab
Color Mode - The Color Mode setting determines
the color format to use when scanning
documents. For example, Black and White or 24bit color.
Resolution - The Resolution setting determines
the dots per inch.
Page Size - The Page Size setting provides a
quick alternative to selecting the page size from
the Scanner Settings dialog. This option allows
users to toggle between the four most popular
page sizes: Letter (<F7>), Legal (<F8>), Double
Letter (<F9>), and A4.
Scan Mode - The Scan Mode controls how the
scanner will scan documents.
Simplex is used to scan single-sided documents
and Duplex is for double-sided documents.
Flatbed is used to scan a page from the glass
bed; although, if pages are in the document
feeder, it defaults to Simplex and scans a single
page from the feeder. If the scanner does not
support duplex scanning, use the Turnover Mode
option on the Other tab to scan double-sided
documents.
Advanced - Opens the Scanner Settings dialog
© 2015 LexisNexis, a division of Reed Elsevier Inc. All rights reserved.
Using LAW PreDiscovery
353
box.
For more information about these settings, see
Adjusting Scanner Settings and Configuring Scan
Options.
Scanner Output tab
File Type - The File Type setting determines what
type of format, or packaging, is used to save
newly scanned images. Common file types include
Adobe (*.pdf), Bitmaps (*.bmp), Calera (*.pda),
Fax (*.dcx), JBIG (*.jbg), JPEG (*.jpg), PaintBrush
(*.pcx), Portable Network Graphics (*.png), and
TIFF (*.tif). The file types available are determined
by the color format selected. For example, if
Binary (Black & White) is the current color mode,
JPEG is not available as a file type because it can
only be used for True Color and 256-Level Grey
images.
TIFF images (specifically CCITT Group 4) are
accepted as the industry standard and are the
recommended format for black & white images.
Users can scan to PDF (a frequent request).
However, certain features (e.g., endorsing images
and OCR to a non-text format) will not be
available to PDF images. If PDF images are
required in the destination application, this
conversion can be handled during the export
process after the images have been endorsed
and OCR'd by selecting the PDF Conversion
export format or by choosing PDF as the Output
Format (see Options tab).
Compression - The Compression setting
determines the type of compression used for the
specified file type and is specifically determined by
the file type and color format. CCITT Group 4 is
the common compression for a TIFF image,
although this compression is not available for
non-bitonal images. If scanning color or grayscale
images, we recommend Sequential JPEG as the
compression type (TIFF as the File Type). It offers
excellent compression for both color and
grayscale images and can be used with multipage images.
Storage Schema - The Storage Schema setting
determines how scanned documents are stored.
The Serialized option stores images as singlepage images. For example, scanning a 5 page
document stores each page as a separate file.
The files are stored in the $Image Archive folder
located in the root case folder. The Multipage
option stores images as multiple pages in one file.
For example, scanning the same 5-page
document stores one file with 5 pages. The files
are stored within the case folder structure
displayed in the folder view.
Note that records scanned using the Serialized
© 2015 LexisNexis. All rights reserved.
354
LAW PreDiscovery
Storage Schema can be moved in the thumbnails
display.
Rotation - The Rotation setting can be used to
rotate pages as they are scanned. Images can be
rotated 90, 180, or 270 degrees. Scanning
documents in landscape mode may increase the
scanner throughput and help prevent paper jams.
If using this feature to scan landscape, the
scanner must support double-letter page size in
order to capture the full height of the document.
For more information about these settings, see
Configuring Imaging Options.
Contrast/Brightness tab
Brightness - The Brightness setting determines
the brightness value applied to the scanned
documents.
Contrast - The Contrast setting determines the
optical density value applied to the scanned
documents.
For more information about these settings, see
Adjusting Scanner Settings.
Filters tab
Auto Deskew - The Auto-Deskew scan option will
straighten documents as they are scanned. The
deskew filter can also be applied to multiple
documents during Batch Processing and to
individual documents (see Page-level Cleanup).
Black Border Removal - The Black-Border
Removal scan option will remove black edges from
all newly scanned images. This filter will only pick
up even black edges. If the black edge is uneven
or slanted down the page, it will not be dropped.
These borders are a result of the scanner model
being used and the scan area will have to be
adjusted in order to remove them. The scan area
can be adjusted from the Scanner Settings dialog.
Black borders left on pages can prevent LAW from
recognizing blank pages, so this filter should be
selected if using the Drop Blank Pages scan
option. The black-border removal filter can also be
applied to multiple documents during Batch
Processing.
Detect Barcode Breaks - The Detect Barcode
Breaks setting allows users to scan multiple
documents in a single batch. Barcode pages can
be used to determine both document- and folderlevel breaks while scanning. The settings for the
break sheets can be specified from the Imaging
tab of the Options form. Images with the default
© 2015 LexisNexis, a division of Reed Elsevier Inc. All rights reserved.
Using LAW PreDiscovery
355
barcode settings can be found in the installation
directory for LAW. These images can be opened
with any image viewer and printed if users need
to prepare a scan job with break sheets. Lightcolored paper is recommended when printing
barcode sheets (e.g., white, light blue, light
yellow, or light green). LAW relies on the contrast
between the bars in the barcode and the
background color of the paper for detecting the
barcode value. Scanner brightness or contrast
(Scan > Scanner Settings) may require
adjustment if LAW is having a difficult time
recognizing the barcodes. See Using Barcodes for
more information about barcodes.
Drop Blank Pages - The Drop Blank Pages setting
determines whether or not to disregard pages
that have a very low percentage of text or
graphics (possibly blank pages attached to a
document). If this option is set, pages with very
low pixel ratios will not be saved. If this option is
not set, all pages scanned will be saved. This
feature can be extremely useful as it allows users
to combine both single- and double-sided
documents in a single batch. Blank backsides of all
single-sided documents will be dropped. The
backsides of the double-sided documents
containing text or images will be retained.
Hole Removal - The Hole Removal setting
removes afterimages of standard size holes (1/4"
- 5/16") left from scanning pages that were hole
punched, and can be used to perform quality
control on images batch processed for hole
removal. Hole removal can be done for RAW
Image and scanned documents, and documents
imported in ED Loader and converted to TIFF
before hole removal. The letters o and e and
zeros, are ignored by the hole removal process.
There are two ways to configure the size of
borders for hole removal on images:
In the Scan Toolbar select the Hole Removal
check box and then click Configure.
Or
Open the Configure Scan Filters dialog box
(Scan > Scan Options > Configure Filters.) Add
Hole Removal to the Selected Filters list, select
Hole Removal and then click Configure.
Noise Removal - The Noise Removal setting
allows users to apply a filter to reduce the
amount of random dots and specks that appear
on the scanned image. OCR results may improve if
Noise Removal is performed on a document before
converting it to text.
Configure - This option allows advanced users to
modify the default settings for the filters. To
© 2015 LexisNexis. All rights reserved.
356
LAW PreDiscovery
modify the settings for a filter, on the Filters tab,
click the filter name, and then click the Configure
button.
For more information about these settings see,
Configuring Scan Options.
Other tab
Invert Pages - The Invert Pages setting allows
users to invert (rotate 180 degrees) odd or even
pages of a document. This feature is used for
double-sided documents that are printed with
opposite orientations on the front and back.
Scan Page Limit - The Scan Page Limit feature
can be used to specify a page limit for the number
of pages scanned per document. This feature can
be very useful for scanning checks or note cards,
for example.
OCR All New Pages - The OCR All New Pages
setting determines whether or not all new pages
being scanned will be flagged for OCR. LAW
allows users to flag certain pages for OCR to help
increase OCR speed and efficiency. Pages with
graphs and tables or handwriting are not good
OCR candidates and may negatively impact OCR
performance. See the Flagging Documents/Pages
for OCR section for information on flagging pages
after they have been scanned.
Single Pages - The Single Pages setting instructs
LAW to save all pages in a batch as one-page
documents. This can be used to scan a large
group of single-page documents in one batch,
saving a great deal of time.
Turnover Mode - The Turnover Mode setting can
be used to scan double-sided documents without
a duplex scanner. If this option is enabled, LAW
will prompt to flip the document and continue
scanning after the front side of a double-sided
document has been scanned. LAW then rebuilds
the document in the proper order.
If this option is enabled, the "Detect Barcode
Breaks" setting will be ignored because the
document must be flipped after the front side has
been scanned.
For more information about these settings see,
Configuring Scan Options.
To open the Scan Toolbar
© 2015 LexisNexis, a division of Reed Elsevier Inc. All rights reserved.
Using LAW PreDiscovery
357
There are two ways to open the Scan Toolbar dialog box:
On the Scan menu, click Scan Toolbar.
OR
Double-click the scan profile name in the scanner status bar located at the bottom of the
main LAW PreDiscovery application window.
Note that if a scan profile has not been created the profile option is marked as <Default>.
This is shown in the following graphic:
If a custom scan profile is loaded, it is shown in place of <Default>. In the following graphic a
profile named Scan Profile 1 is loaded.
To create a scan profile
1. On the Scan menu, click Scan Toolbar.
Clicking Scan Toolbar opens the Scan Toolbar dialog box.
2. Click the New button.
© 2015 LexisNexis. All rights reserved.
358
LAW PreDiscovery
Clicking the New button opens the New Profile dialog box.
3. In the Name field, type the scan profile name.
4. In the Scope list, click one of the following:
Shared (Available to all users)
Local (Available to only you)
5. If you want to assign a keyboard shortcut to the scan profile, in the Hot Key list, click
one of the available keyboard shortcuts.
When a keyboard shortcut is added to a scan profile, the shortcut is no longer available
for selection.
6. Click OK.
Clicking OK creates the scan profile and closes the New Profile dialog box.
7. In the Scan Toolbar dialog box, click the Show Settings button.
Clicking the Show Settings button expands the Scan Toolbar dialog box to display all
the scan settings.
© 2015 LexisNexis, a division of Reed Elsevier Inc. All rights reserved.
Using LAW PreDiscovery
359
8. Define the scan profile settings.
The scan profile settings are automatically saved when the Scan Toolbar is closed or
another scan profile is selected in the Scan Profile list.
To edit a scan profile
The Default and custom profiles can be edited, but the Default profile name, scope, and
shortcut key settings cannot be modified.
1. On the Scan menu, click Scan Toolbar.
Clicking Scan Toolbar opens the Scan Toolbar dialog box.
2. In the Scan Profile list, click the profile you want to edit.
3. If you want to edit a profile's name, scope, or shortcut key, in the In the Scan Profile list,
click the Edit button.
Clicking the Edit button opens the Edit Profile dialog box.
© 2015 LexisNexis. All rights reserved.
360
LAW PreDiscovery
4. Make the applicable edits, and then click OK.
5. In the Scan Toolbar dialog box, modify the applicable scan settings.
The scan profile settings are automatically saved when the Scan Toolbar is closed or
another scan profile is selected in the Scan Profile list.
To delete a scan profile
Note the following when deleting scan profiles:
A local profile can only be deleted by the user who created it.
A shared profile can be deleted by any user. Deleting a shared profile deletes it for all
users.
1. On the Scan menu, click Scan Toolbar.
Clicking Scan Toolbar opens the Scan Toolbar dialog box.
2. In the Scan Profile list, click the profile you want to delete.
3. Click the Edit button.
Clicking the Edit button opens the Edit Profile dialog box.
© 2015 LexisNexis, a division of Reed Elsevier Inc. All rights reserved.
Using LAW PreDiscovery
4. Click the Delete button, and then click OK.
The Delete Profile dialog box opens.
5. Click Yes.
The profile is deleted.
Related Topics
Using Barcodes
Adjusting Scanner Settings
Configuring Scan Options
Configuring Imaging Options
Scanning
© 2015 LexisNexis. All rights reserved.
361
362
LAW PreDiscovery
Scanning
After you have selected and configured your scanner you are ready to begin scanning. All newly
scanned documents are saved in the currently selected folder. Be sure to change the folder
selection as needed.
To add documents
1. From the main window, open a folder.
2. On the Scan menu, click New Document.
Or
Press F3.
The Scan New dialog box opens. If this is the first page in the case then the Starting
Page ID is blank, otherwise the next available Page ID is provided.
3. Add or edit the starting page ID and then click Begin.
All newly scanned documents are added to the end of the folder.
To resume scanning after scanner is empty
To continue a scan batch using a delay-enabled scanner
If scanning from the document feeder, LAW PreDiscovery™ scans until the feeder is empty.
Some scanner models have a delay option that allows users to insert more pages after the
feeder is empty and then to continue scanning in the same batch. This is helpful if scanning
large documents that exceed the capacity of the feeder or multiple documents separated by
barcode document break sheets.
Consult your scanner documentation for information on using its delay feature.
© 2015 LexisNexis, a division of Reed Elsevier Inc. All rights reserved.
Using LAW PreDiscovery
363
To continue a scan batch using a scanner without a delay feature
1. On the Tools menu, click Options.
2. Click the Preferences tab.
3. Select Prompt to continue scanning when feeder is empty.
You will be prompted to insert more pages when the feeder is empty.
To add attachments
You can add attachments during or after scanning.
To add an attachment manually
On the Scan menu, select New Attachment.
Or
Press CTRL+F3.
The new document is added as an attachment to the last document in the current
folder.
Attachments cannot be added at scan time to intermediate documents in a folder. If
documents have been scanned out of order, you must:
1. Scan the attachment as a normal document, where it will be place at the end of the
folder.
2. Move it behind the appropriate parent document and then manually attach it.
For more information on attaching existing documents, see the Working with
Attachments section.
To scan documents as attachments using break sheets
You use an attachm ent barcode break sheet during scanning to designate a document as
an attachment. An attachment barcode break sheet is a special type of barcode break sheet
that signifies that the document that follows is an attachment.
Note the following facts when using barcode break sheets:
If using barcode break sheets to scan multiple documents, each attachments must be
preceded by an attachment break sheet.
The break sheet for attachments is named attach1.tif and can be found in the
installation directory for LAW PreDiscovery.
A shortcut to this file (Attachment Break #1) can be found in the Break Sheets subfolder
in the LAW PreDiscovery program group.
© 2015 LexisNexis. All rights reserved.
364
LAW PreDiscovery
Documents preceded by an attachment break sheet will always be attached to the
previous parent document. Therefore, to scan a document with three attachments, a
standard document break sheet must precede the parent, and an attachment break
sheet must precede each of the three attachments.
After you scan an attachment, you can check that the attachment was itemized as an
attachment by looking at the item number of the document. Attached documents appear
indented in the document list to indicate that they are attached to the previous
document. For example, in the following figure, item number -- 0002 is an attachment of
item number 0001.
To insert documents after scan time
You can insert document that were missed at scan time. This feature is very important
because, unless documents are specified by a query, the scan order determines the order of
all processing functions, such as batch processing and exporting. The insert document
function can be used to insert multiple documents if the "Detect Barcode Breaks" setting is
enabled and the pages are separated by barcode break sheets.
1. On the Edit menu, click Insert.
2. Click one of the following:
Scanned Document
New Page(s)
Existing Page(s) and then follow the prompts to select one or more existing images
to insert.
The inserted document will be placed above the currently selected document in the
current folder.
If multiple documents are selected, they will be imported in alphabetical order by
filename. Also, the Insert Pages function works the same as the Append Pages in that it
disables checks for barcode break sheets because it is designed to insert pages into
the current document.
To append pages
You can add one or more pages to the end of the currently selected document.
1. Select a document to which you want to add pages.
2. On the Scan menu click Append.
Or
Press F5.
© 2015 LexisNexis, a division of Reed Elsevier Inc. All rights reserved.
Using LAW PreDiscovery
365
The new page(s) are added to the end of the selected document.
The Append Pages function is only intended to add pages to a single document and is
not intended for batch scanning. Append Pages will not check for barcode break sheets,
even if Detect Barcode Breaks is activated.
If using break sheets, use the Prompt to continue scanning... setting if you want to
continue adding pages to the current batch until it is complete. Otherwise, users must
manually ensure that document integrity is maintained every time that a batch is broken
down so that it fits into the auto-feeder.
To replace pages and documents
You can replace pages within a document or replace an entire document.
To replace pages
1. Select a document.
2. On the Edit menu, click Replace, and then click Page(s).
Or
Press F6.
The new pages will replace the current page forward for as many new pages are
scanned.
To replace an entire document
1. Select a document.
2. On the Edit menu, click Replace, and then click Document.
Or
Press CTRL+F6.
If replacing pages, both replace pages and document work the same as the append and
insert page functions, disabling the detection of barcode breaks.
To replace documents with file images
1. Select a document.
2. On the Edit menu, click Replace, and then click Image from File(s).
The entire document is replaced by the image file. Only one existing image may be
selected when using this feature.
© 2015 LexisNexis. All rights reserved.
366
LAW PreDiscovery
Related Topics
Selecting a Scanner
Scan Options
Imaging Options
Importing from Other Sources
LAW PreDiscovery supports options for importing into a case: existing case files, load files in a
variety of formats, raw images, and replacement images.
In this section
Importing Cases and Load Files
Provides procedures for importing LAW PreDiscovery case files and load files. Describes
procedures for saving storage space and processing time by enabling the import operation
to create links to sources rather than to create new copies of sources.
Importing Raw Images
Provides procedures for importing batches of images.
Importing Replacement Images
Provides procedures for importing images to replace images already held within the case.
Importing Cases and Load Files
You can import materials from existing LAW PreDiscovery™ cases and from load files generated
by applications.
When the import completes the following conditions apply:
© 2015 LexisNexis, a division of Reed Elsevier Inc. All rights reserved.
Using LAW PreDiscovery
367
All fields in the source case will be automatically created if they do not already exist.
The path structure for the existing case will be re-created in the current case relative to the
current folder.
The image and native records, text, and index information from the source case will be
copied into the current case. There is no danger of losing the data associated with the
source case.
If single-page images exist with no document breaks defined, then either a load file must
be created in one of the supported formats or document boundaries must be created after
they have been imported into the case.
Imported images are stored in the same format as the original images: single-page will
remain single-page and multi-page will remain multi-page.
With the exception of Z-Print imports, all images imported via load file will be stored in the
<case root>\$Image Archive folder.
To import a LAW PreDiscovery case
You can import an existing case created in LAW PreDiscovery versions 4 or 5 into a new or
existing case.
1. With a case open, on the File menu, click Import, and then click LAW Case.
2. Browse to the case file and then click Open.
The LAW Case Import dialog appears.
If errors occur during import, the Import Status dialog appears with an error message. If
this occurs, click Yes to open the Log Viewer and review the error log.
3. After import you can do one of the following:
© 2015 LexisNexis. All rights reserved.
368
LAW PreDiscovery
If everything was imported successfully and the source case is no longer needed, you
can continue working in the target case. The source case may be marked inactive or if
necessary, deleted with the option to backup the case before deletion. For more
information on deleting cases, see Working with Existing Cases.
If errors or warnings are generated during import you are recommended to open the
Log Viewer. Under the Import tab, you can review issues with the import session. For
more information on reviewing errors after import, see Reviewing Errors.
Note the following considerations when importing LAW PreDiscovery case files:
The DupStatus, _DupID, and _DupMethod fields are cleared for EDD records being
imported into a new LAW case.
User-defined page-level fields existing in the source case are not imported into the
target case.
Session databases are not copied from the source case folder to the target case
folder. If you try to view logs in the Session Viewer in the target case that were
generated by the source case, a database not found message results. You may still
browse to the location of the databases from within the target case using the Session
Viewer. Also, the logs associated with the source case are still viewable if you open
the source case.
To import a Z-Print load file
The Z-Print import allows users to import images using a log file created by Z-Print during its
printing or pre-saving process. This log file is named <job name>.csv and is located in the
root destination path of the processed Z-Print job.
1. On the File menu, click Import, and then click Load File.
2. Browse to the Z-Print log file and then click Open.
In the Z-Print Import dialog box, the incoming fields can be mapped to existing fields in
the case or selected to be skipped. You can also import a pre-saved job that has not yet
been processed to images. This allows users to pre-screen the documents and make
detailed selections on the documents they want to process.
© 2015 LexisNexis, a division of Reed Elsevier Inc. All rights reserved.
Using LAW PreDiscovery
369
3. Click the Options button to view and configure the available import settings:
Check for Matching Records - If this option is not selected, LAW will import the images
and metadata into the LAW case regardless of what the DocID value is for the existing
documents (normal method). If this option is selected, LAW will compare the value in the
DocID field of the CSV file and look for matching values in LAW's DocID index field. If an
exact match is found, there are 3 additional options on how the matching data can be
updated.
Ignore incoming record - The data in the csv being imported will not be imported if a
© 2015 LexisNexis. All rights reserved.
370
LAW PreDiscovery
document with a matching DocID value exists. This feature is useful if a csv file was only
partially imported and skipping the existing records would speed up the import process.
Replace existing record - If the DocID of the incoming data matches an existing
document's DocID value, the data from the csv will replace all the existing metadata for
the specified document and the image itself. So if the existing record contains 10 fields of
data, and you choose to re-import only 1 field, the 10 fields will be cleared and only the 1
field will be populated.
Update existing record - If the DocID of the incoming data matches an existing
document's DocID value, the data from the csv will update the existing metadata for the
specified document and the image itself. So if the existing record contains 10 fields of
data, and you choose to re-import only 1 field, only the 1 field will be updated with the
new information and the other fields will remain unchanged.
This update feature is primarily designed to attach images to existing data. So when
updating, it ignores records without images (those with pagecount=0).
Drop Blank Pages - Any blank pages that are detected during the import process are
dropped. This action helps to reduce image sizes and total page counts for documents.
By changing the Blank Sensitivity, users can specify the sensitivity of the drop blank
pages filter. Pristine White (recommended) is used for perfectly (all white) documents
and is best suited for digitally converted documents. Scanned images may require a
slightly less sensitive filter. Dirty White allows the document to contain a small amount
of (non-white) data, such as speckles, creases, or folds.
If Drop Blank Pages is enabled, at least 1 page will always be retained even if all the
pages are blank.
If pages are dropped, the metadata in the csv file will not be updated to reflect the
new page size in LAW, this may result in page count differences between LAW and the
Pages field in the csv.
Ignore Unflagged Documents - If this option is set, all records in the csv with a Status
value of N (do not print) or D (duplicate) will be skipped during the import process. This
can be useful when using the Update Z-Print Flags feature.
Link to images in place - This feature can be used to link to the source files in their
existing location rather than copying the files into the LAW case folder structure.
4. Click OK.
To import a Doculex Imagebase
The Doculex import allows users to import images from a Doculex imagebase. A Doculex
imagebase does not contain any index information so only page numbering will apply to the
imported documents.
1. On the File menu, click Import, and then click Load File.
2. Browse to the load file (Doculex3.dbf or Doculex5.dbf)) and then click Open.
The path structure for the images will be re-created relative to the current folder in LAW.
If importing multiple imagebases, creation of a separate folder for each volume is
recommended as the folder structure will frequently be a sequential numeric format (e.g.,
\001, \002, etc.). If a separate folder for each volume is not created, images from
different volumes in the same folder may occur. While this will not affect LAW, it can be
confusing and interfere with processing order.
© 2015 LexisNexis, a division of Reed Elsevier Inc. All rights reserved.
Using LAW PreDiscovery
371
The Doculex import does not require the documents breaks to be defined in the
database. Existing breaks can be overwritten with new ones defined by a range file. A
range file is simply a delimited text file with two fields, BegDoc# and EndDoc#, which
specify the ranges to use when rebuilding the documents. If no range file is specified,
the document breaks defined in the Doculex imagebase are used.
To import an Opticon load file
1. On the File menu, click Import, and then click Load File.
2. Browse to the load file (*.opt or *.log)) and then click Open.
Text files that match the image filenames found in the source directory are imported as
OCR text.
To import a Summation load file
The Summation import allows users to import images with document breaks defined by a
Summation load file.
1. On the File menu, click Import, and then click Load File.
2. Browse to the load file (*.dii)) and then click Open.
3. If prompted to include fields, to configure import of user-defined fields, click Yes and then
specify fields to include and destination names to use, and then click OK.
© 2015 LexisNexis. All rights reserved.
372
LAW PreDiscovery
When configuting options in the Import Fields dialog box, note the following:
The Source Name column will list the fields contained within the load file.
Fields listed in blue are those that do not already exist in the case.
The Destination Name column displays the name of the field that will be created or the
existing field name in the case.
Both new and existing field names may be changed by double-clicking in the cell and
typing a new name.
To exclude a field, clear the check box in the Include column in the proper row.
The Type field displays the field type for each field. The type can be changed for new
fields only.
Any text and image files referenced in the load file will be copied to their respective
folders in the case. If you are importing an XML load file, any native files referenced in
the load file will also be copied to their respective folders in the case. Native files are
only imported if the load file is an XML load file.
Only the text associated with native files and image files is copied into the case if the
Link to source files in place when importing load files option. This option is set on the
Tools menu, in Options, under Preferences.
© 2015 LexisNexis, a division of Reed Elsevier Inc. All rights reserved.
Using LAW PreDiscovery
373
The file is imported.
Note the following facts about importing Summation load files:
The folder structure will be re-created relative to the current folder. Depending on the
path notation in the load file, users may have to select the image path for the images.
If the load file uses CD volume notation (@V), LAW PreDiscovery scans for the CD drive
letter that contains the images. If the images have been copied to a local drive from a
CD, or if image directory notation (@I) has been used, you must specify the directory for
images to be stored.
OCR is imported if it exists with the images. During import, page-level OCR, consisting of
one text file for each single-page image, is merged into one text file for the entire
document. Any existing word list files (*.ocr) with images are also imported.
A Summation load file may contain index information for each document. This index
information may or may not be imported, depending on the options set in the Import
Fields dialog box.
Summation load files do not contain page IDs or Bates numbers for every page. They do
contain a beginning document number and an ending document number. During import,
numbers are added to every page, based on the first page of the document, but this
numbering scheme may not match the originals if gaps or changes exist in the numbering
scheme within the document.
To import an IPRO load file
1. On the File menu, click Import, and then click Load File.
2. Browse to the load file (*.lfp) and then click Open.
The file is imported as OCR text.
To import an EDRM XML file
You can use EDRM XML 1.0 or EDRM XML 2.0 to import any combination of native, text,
images, and metadata into an electronic discovery enabled LAW case.
1. On the File menu, click Import, and then click Load File.
2. Browse to the load file (*.xml) and then click Open.
When you are importing an EDRM XML file, you do not need to select the EDRM XML
version. LAW PreDiscovery automatically imports the EDRM XML file using the EDRM XML
version associated with the EDRM XML file being imported.
The Import Fields dialog box appears.
© 2015 LexisNexis. All rights reserved.
374
LAW PreDiscovery
3. Configure options as needed:
To change a field name, double click it and then type the new name.
To exclude a field, clear its check box in the Include column.
To clear all fields, click Clear All.
To select all fields, click Select All.
To change the type of a new field, click the type and then select a new one. The type
can be changed for new fields only.
When configuring options, note the following:
Source Name column lists fields found in the load file.
Fields listed in blue are those that do not already exist in the case.
Destination Name column lists either the name of the field that will be created or the
name of the existing field.
Any native, text, and image files referenced in the load file will be copied to their
respective folders in the case.
© 2015 LexisNexis, a division of Reed Elsevier Inc. All rights reserved.
Using LAW PreDiscovery
375
Only the text associated with native files and image files is copied into the case if the
Link to source files in place when importing load files option. This option is set on the
Tools menu, in Options, under Preferences.
4. Click OK.
If an Add New Fields dialog box opens, click OK to add fields, or No to cancel the
import.
If a message box appears that provides you with the option to view the error log, click
Yes to view the error log or No to return to the main window.
To link instead of copy files during import
Rather than copying files into the LAW folder structure during import, you can choose to link
to files in their current location. This option applies to Doculex, EDRM, IPRO, Opticon, and
Summation load file imports.
1. On Tools menu, click Options, and then click Preferences.
2. Select Link to source files in place when importing load files.
Native files or images associated with the load files will not be copied to the case.
Instead a link is created to their existing location.
Note the following details when considering options related to linking to originals versus
importing:
To simply import raw images without a load file or defined format, use the Import Raw
Images function detailed in the Importing Raw Images section.
LAW will not link to document text when using the Link to source files in place when
importing load files setting. The associated text files will be copied to the applicable
location within the case folder structure.
Modifying the images in LAW PreDiscovery, for example, rotating or annotating the
images, will result in the source file being modified. If the source image should not be
altered, do not use the Link to source files in place when importing load files option.
Related Topics
Query Builder
Launching the Grids
Creating Control Lists From a Grid
© 2015 LexisNexis. All rights reserved.
376
LAW PreDiscovery
Importing Raw Images
You can use the Import Raw Images utility to select image files individually or by the folder for
import. When you import raw images, you can filter the file type for import, as for example, to
select all image file types, or restrict import to TIFF files. When raw images are imported, the
folder structure is created relative to the currently selected folder in the case. Ensure that the
desired folder is selected prior to import.
Import Raw Images is not recommended for importing PDF files. Use instead ED Loader to
import PDF files. PDF import using Raw Images Import is sometimes successful but not
supported. If you do choose to use RAW Images Import on PDF files, check your results
after import. Should problems occur, try using ED Loader instead.
To import image files
1. From the main window, in the case folder structure, select the folder that will receive the
imported files or folders.
2. On the File menu, click Import and then click Raw Images.
The Import Raw Images dialog box appears.
3. Browse to the folder containing images and then select:
Individual files.
© 2015 LexisNexis, a division of Reed Elsevier Inc. All rights reserved.
Using LAW PreDiscovery
377
Or
Any folder and then, if necessary select Include subfolders. This option selects folders
and any subfolders for import.
4. Select a file filter as necessary. For example, to import only JPEG files and no other file
types, select JPEG (*.JPG).
5. Click Options and then select import options as necessary. When finished selecting
options click OK. For more information on import options, see the Import Options section
in this topic.
6. Click Begin.
The Import Status message box reports the number of items imported.
7. Click OK.
To import images with a supported database or load file, use the image import functions
described in the Importing Cases and Load Files section.
To configure import opions
1. From the LAW PreDiscovery™ main window, on the File menu, click Import and then
click Raw Images.
2. Click Options.
© 2015 LexisNexis. All rights reserved.
378
LAW PreDiscovery
3. Configure import options as needed and then click OK. These are described as follows:
Option
Description
Convert images Force all images to be converted to black and white during the import
to binary (B&W) process.
Determine
document
breaks
Specify whether to use blank pages or barcode break sheets to split
multi-page image files into separate documents during import.
To specify blank pages or barcode breaks
1. Click the More... button.
2. Select one of the following sensitivity options for the blank page
filter:
Pristine White. Recommended for all white documents and for
digitally converted documents.
Dirty White. Recommended for scanned documents, especially
those that contain a small amount of speckles, creases, or folds.
Or
If barcode break sheets are selected, click More and then
configure values breaks used in the source documents. Each
time a barcode with the specified Barcode Value is detected, a
new document will be created.
To assign the incoming barcode value to a field value in LAW,
select Capture barcode values and then select the first field to
© 2015 LexisNexis, a division of Reed Elsevier Inc. All rights reserved.
Using LAW PreDiscovery
379
receive values.
If necessary you can configure LAW further to recognize barcode
symbologies, barcode orientation, or the region on pages where
existing barcodes are positioned, click More again and then
configure the properties on the Barcode Detection and Region
Properties tabs, as needed.
Capture barcode Capture additional barcode values on the break sheet and place the
© 2015 LexisNexis. All rights reserved.
380
LAW PreDiscovery
values
values into index fields for the newly created document.
For example, a barcode break sheet image contains three barcode
values: DOCBREAK, MEMO, and ABC0001. If two index fields are
created, the "MEMO" and "ABC0001" values can be stored with the
newly created document. In this example, the DocType field has been
selected to store the first "non-document break" barcode value
("MEMO"). Then, the next barcode value detected on this sheet will be
placed in the next index field immediately following the DocType field
as listed under the Index tab on the main LAW window.
This feature does not currently support barcode breaks that indicate
folders or attachments.
Include OCR
Import text files (*.txt, *.doc, *.wpd, *.htm) associated with images.
Link to images in Create links to selected images instead of creating copies of the files
place
into the case. This feature can help to conserve storage space.
Remove
originals
Remove original images after import. This feature is useful if the
import process is canceled or interrupted. You can resume at a later
time without re-importing any of the same images.
This setting has no effect if the images are on a read-only source
(e.g., CD-ROM).
Use filename as
BegDoc#
Numbers incoming images according to their filenames.
This feature can be useful when images have already been named
according by document number.
However, if the documents are multi-page images and have been
named sequentially (e.g., AB0001.tif, AB0002.tif, etc.), numbering
them in this manner will cause duplicate page IDs.
Use Numeric Suffixes names the first page of each document
according to the filename and names the remaining pages with a
numeric suffix.
The default setting (*.###) forces a suffix padded with three digits,
separated by a period (e.g., AB0001, AB0001.002, AB0001.003, etc.).
The separator character can be modified or omitted and the number
of pad digits can be adjusted with the format string.
Mirror original
structure
Rebuilds the original folder structure relative to the topmost selected
folder(s). The selected images will then be imported into the currently
selected folder in the folder list window.
Auto-increment
folder
Stores incoming images in the current folder until a specified number
of files specified in the File Limit setting has been reached. After the
file limit is reached, LAW PreDiscovery creates a new folder at the
same level as the current folder and stores new images there.
LAW PreDiscovery does not auto-increment the root image folder. If
this setting is selected, at least one folder must exist under the
root folder.
Store original
filename
Store the filenames of the imported images in an index field.
Store original
Store the path of the imported images in an index field. If the same
© 2015 LexisNexis, a division of Reed Elsevier Inc. All rights reserved.
Using LAW PreDiscovery
location
field is used for the filename and location, the full path of the images
(path and filename) will be stored in the specified field.
Import filter options
The Import Raw Images utility provides the following file filter options:
ADOBE (*.pdf) Note: importing PDF files using the Raw Images Import function is not
supported. Instead use ED Loader to import PDF files.
All Files (*.*)
All Image Files
CALS Files (*.cal)
Compuserve (*.gif)
FAX (*.dcx)
JBIG Files (*.jbg)
JPEG (*.jpg)
JPEG 2000 (*.jp2)
MO:DCA Files (*.mda)
Paintbrush (*.pcx)
Plexus TIFF (*.tif)
Portable Network Graphics (*.png)
TIFF (*.tif)
Windows Bitmap (*.bmp)
Related Topics
Importing Cases and Load Files
Importing Replacement Images
Query Builder
Launching the Grids
© 2015 LexisNexis. All rights reserved.
381
382
LAW PreDiscovery
Importing Replacement Images
You can use a load file to replace images already in a case with images that may have been
redacted or altered in some other way by an external application.
Import considerations
Note the following considerations before you replace existing images using a load file:
Load file considerations
The load file must contain a document number for each replacement image that
corresponds with the BegDoc# field or the DocID field of the original document. Note that
OCR text associated with the load file is not imported. If a file listed in the load file
cannot be found, the import operation skips the file and continues loading the next listed
file.
To avoid the extra overhead of merging or splitting images while performing the import
into the case, it is recommended to produce the load file in the same storage format as
the images contained in the case.
Folder structures
The import process maintains the folder structure of the destination image. So if a
serialized load file is imported into a case containing multi page images only, those
images will remain as multi page images after the batch image replacement has
completed.
Backup of originals
You have the option to keep renamed copies of the originals or to delete the originals. If
you keep the original files, they are renamed using the following scheme:
<originalfilename>_v01<.image extension>
For example, SomeExampleImage.opt is renamed as SomeExampleImage_V01.opt.
Switching the file type
LAW PreDiscovery™ supports the replacement of images with a different image file type.
So importing a single page JPG image will overwrite the single page TIFF image in the
case.
To import replacement images
1. From the main window, on the File menu, click Import and then click Image
Replacement Load File.
2. In the Select Image Replacement Load File dialog box, select a supported load file.
The Replace Existing Images dialog box appears.
© 2015 LexisNexis, a division of Reed Elsevier Inc. All rights reserved.
Using LAW PreDiscovery
383
3. Configure options as needed. For more information, see the Image replacement options
section in this topic.
4. Click OK.
When import completes a summary report appears.
Image replacement options
You can select from among the following options when importing replacement images:
Source File
These types of load files are supported:
IPro .lfp
Opticon .log or .opt
Import Mode
The following import modes are provided:
Retain copy of original image. Default option. Copies of the original documents are
kept.
Replace existing images (permanent). Original images are permanently deleted.
Import Options
Reset OCR flags for replaced images. Sets the OCR flag of each page to Y and then
refreshes the OCR status of the document. This option helps you to run OCR again on
the replaced documents if necessary.
Tag replaced images. This option allows you to set a selected Tag (Boolean) field to
checked for each document that receives a replaced image. This option can help you
to more easily create a query that returns all of the affected documents. You can also
use this option to define a new tag before you apply it to the images. Select <Create
© 2015 LexisNexis. All rights reserved.
384
LAW PreDiscovery
New Field…> to add a Tag (Boolean) field to the case without having to open the
Modify Fields dialog box.
Related Topics
Importing Cases and Load Files
Importing Raw Images
Query Builder
Launching the Grids
Image Display
You can use LAW PreDiscovery to view the images associated with a page, open images in an
external viewer, or view image properties.
In this section
Working with Images
Provides procedures for viewing image files either from within LAW PreDiscovery or by using
an external viewer.
Viewing File Properties
Provides procedures for viewing image properties of both the current page and the entire
image.
Working with Images
You can view common formats of image files, such as TIFF files, by using either the Image
display that is built into LAW PreDiscovery™ or by using an external viewer.
© 2015 LexisNexis, a division of Reed Elsevier Inc. All rights reserved.
Using LAW PreDiscovery
385
To view an image
From the main window, select an item and then click the Image tab.
If the item has an associated image file, the image will appear in the Image tab.
Otherwise a graphic that says No Image Available will appear.
To view certain types of image files in the Image panel, for example with DWG drawing
files, you can use the Batch Processing utility to convert the image file to TIFF and then
© 2015 LexisNexis. All rights reserved.
386
LAW PreDiscovery
review the TIFF in the Image panel. For more information about converting items to TIFF
using the Batch Process utility see: E-Printing, TIFF, and PDF Conversion.
If the item is a document that consists of multiple images, you can navigate between
images by selecting thumbnails that appear in the leftmost column.
To switch page and thumbnail modes
On the View menu, select: Page and Thumbnails, Thumbnails, or One Page.
These modes are described as follows:
Page and Thumbnails - This is the default viewing mode. It shows both a preview of the
full page and a thumbnail view.
© 2015 LexisNexis, a division of Reed Elsevier Inc. All rights reserved.
Using LAW PreDiscovery
Thumbnails - Shows just the thumbnails of page images.
One Page - Shows just the currently selected page.
© 2015 LexisNexis. All rights reserved.
387
388
LAW PreDiscovery
To navigate and select pages
LAW provides several ways to navigate between and to select pages of multi-page
documents:
Action
Open the page
navigation
controls.
Steps
In the main window click the page count area of the status bar. This is
located at the very lower left corner of the main window.
The Goto Page dialog opens.
© 2015 LexisNexis, a division of Reed Elsevier Inc. All rights reserved.
Using LAW PreDiscovery
389
Move between Do one of the following:
pages.
In the Goto Page dialog, select First page, Last page, type a page
number, or use the slider to select a page, and then click OK.
On the Page menu, select First Page, Last Page, Previous, or Next.
On the main toolbar, click one of the navigation buttons.
Select a single
page.
Left click in the thumbnails area and then select a navigation control.
Press and hold the CTRL key and click a thumbnail.
Or
Click to the right of the thumbnail and then press the SPACEBAR.
Or
Click the full-page preview and then press the SPACEBAR.
The backgrounds of selected pages appear black.
De-select one
page.
Press and hold the CTRL key and click a thumbnail.
Select multiple
pages.
Press and hold the SHIFT key and click a thumbnail.
Select a range
of pages.
1. Press and hold the CTRL key and click a thumbnail at one end of the
range.
2. Press and hold the SHIFT key and click the thumbnail at the other end
of the range.
Click in the thumbnails region and then press CTRL+A.
Select all pages.
Press ESC.
De-select all
pages.
To manipulate page display
When you use the Image Viewer, you have the following options for manipulating the way
the page displays. These ways are described as follows:
Action
Steps
© 2015 LexisNexis. All rights reserved.
390
LAW PreDiscovery
Zoom in.
In the main window, on the View menu, click Zoom In.
Zoom out.
In the main window, on the View menu, click Zoom Out.
Zoom to
selection.
Press and hold down the left mouse button and drag to select the area
to zoom; release the mouse.
LAW zooms to the area defined by the rectangle. Double-click to return
to the Best Fit state.
Best entire
page in Viewer.
In the main window, on the View menu, click Best Fit.
Fit page to
viewer width.
In the main window, on the View menu, click Fit to Width.
Lock or unlock
the zoom across
pages.
Press CTRL+Z; or in the main window, on the View menu, click Zoom
Lock.
A lock icon displays on the Image button.
To zoom in, press CTRL+PAGE UP; to zoom out. press CTRL+PAGE
DOWN.
Unlock the
zoom.
In the main window, on the View menu, click de-select Zoom Lock.
Move the view
across a
zoomed image.
Click and drag the scrollbars.
Or
Press and hold the CTRL key and press UP ARROW, DOWN ARROW.
LEFT ARROW, or RIGHT ARROW keys.
Pan Window
1. In the main window, select an image.
2. On the View menu, click Pan Window.
A small pan window with a black box that represents the zoomed
portion of the current image opens.
© 2015 LexisNexis, a division of Reed Elsevier Inc. All rights reserved.
Using LAW PreDiscovery
391
3. Click and drag the black box within the pan window.
The full page view updates with a close-up of the panned area.
Scale to gray for This feature can improve the readability of some text. It is for viewing only
all pages (only and does not alter the image in any way.
for viewing;
1. In the main window, select an image.
cannot be
saved.)
2. On the View menu, click Scale to Gray.
Invert page
1. In the main window, select an image.
color on all
pages (only for 2. On the View menu, click Invert.
viewing; cannot
be saved.)
This feature is useful when viewing documents that have shaded or
colored backgrounds, making them difficult to interpret. The Invert
feature reverses the colors and can help to clarify the image. This
feature does not alter the image in any way; it is for viewing purposes
only.
Rotate pages.
1. In the main window, on the Page menu, click Rotate Left, Rotate
Right, or Rotate 180.
© 2015 LexisNexis. All rights reserved.
392
LAW PreDiscovery
If no pages are selected, only the current page is rotated. If one or
more pages are selected, all selected pages are rotated the specified
direction.
The rotation applied to an image is not saved automatically. An
unsaved rotation is evident if the main image window shows the
current page as rotated but the thumbnail view shows the original
orientation.
2. Save the rotation for the image, if necessary. In the main window on
the File menu, click Save.
The current orientation for all pages is saved; the thumbnails and
image update with the new rotation.
Rotating an image that has been endorsed by LAW may result in
undesired results if the endorsement is later modified or removed. See
Header/Footer Options for further information on endorsing.
To open an image in an external viewer
1. From the main window, select an item.
2. Click the Tools menu.
If the item has an image file then Launch Viewer will be enabled.
3. Click Launch Viewer.
This feature opens the image in whichever image viewer is registered in the operating
system as the default for the specified image type.
If the image is modified in the external viewing application, you will need to switch
documents in LAW PreDiscovery before you save changes; otherwise, a locking violation
will occur.
Related Topics
Viewing File Properties
Scan Options
Header/Footer Options
Page-level Cleanup
Converting Documents to TIFF
© 2015 LexisNexis, a division of Reed Elsevier Inc. All rights reserved.
Using LAW PreDiscovery
393
Viewing File Properties
You can view the properties for both the current page and the entire image when working with
records with associated image files.
To view the properties for the current page
1. Select a page.
2. On the Page menu, click Properties.
The Page Properties dialog box appears. It provides the height and width of the image
in both inches and pixels, the resolution, the color format, and the compression type for
the current page.
To view image file properties
1. Select an image for which you want to view properties.
2. In the main window, on the Edit menu, click Properties.
A file properties dialog provides file attributes, file size, and the actual file name for the
image.
© 2015 LexisNexis. All rights reserved.
394
LAW PreDiscovery
Note the following about image file properties:
For scanned or imported images (non-ED), LAW PreDiscovery™ does not display the
actual file names for the images in the document list.
File names consist of the ID field in the database, zero-padded to 8 characters, followed
by the file extension.
For images created via the TIFF/PDF Conversion batch process, the actual file name will
be displayed in the page-level PageFilename field.
To view native file properties
The steps to view native file properties depend on whether the native file has an image file
associated with it.
To view file properties for native files with no image files
1. Select a file in the main window.
2. On the Edit menu, click Properties.
© 2015 LexisNexis, a division of Reed Elsevier Inc. All rights reserved.
Using LAW PreDiscovery
395
The native file properties appear. If an image does exist in addition to a native file, the
image properties will be shown by default.
To view file properties for native files with image files
1. Select a file in the main window.
2. Right-click the native file hyperlink, which is located above the image display, and then
click Properties.
Related Topics
Page-level Cleanup
Filtering Search Results on a Grid
M anipulating Documents
After documents are brought into a case, you have many options for cleaning up images, and
for adding, deleting, and reorganizing documents and pages.
In this section
Page-level Cleanup
Provide instructions for enhancing the quality of page images.
Moving Documents and Pages
Provides instructions on moving documents and pages from one folder to another.
© 2015 LexisNexis. All rights reserved.
396
LAW PreDiscovery
Deleting Documents, Pages and Folders
Provides instructions and best practices for deleting documents, pages, and folders.
Splitting Documents
Provides instructions for splitting a single document into multiple documents.
Merging Documents
Provides instructions for merging multiple documents into a single document.
Inserting Documents and Pages
Provides instructions for inserting into folders: scanned documents, scanned pages, and
existing images.
Replacing Documents and Pages
Provides instructions for replacing an existing page or document.
Working with Attachments
Provides instructions for working with documents that have attachments.
Annotating Documents and Pages
Provides instructions for adding annotations to documents and pages.
Page-level Cleanup
Image enhancements are page cleanup operations applied to individual pages. Examples
include deskew and rotate pages. Enhancements may be performed at the document-level or
page-level. Page-level options are found in the Page menu, or by right-clicking a page in the
thumbnail display.
To deskew an page
1. On the View menu click Thumbnails, or you can click Page and Thumbnails.
2. Select an image.
3. Click Deskew or press F4.
If multiple pages are selected, then all selected pages will be deskewed.
If no pages are selected, only the current page will be deskewed. This is ideal when
inspecting documents on the page level and only a few unacceptably skewed pages
exist.
© 2015 LexisNexis, a division of Reed Elsevier Inc. All rights reserved.
Using LAW PreDiscovery
397
See the Batch Processing section to learn about deskewing larger sets of documents.
To enhance images
1. In the main window, in the image viewing area, select an image.
2. On the Page menu, click Enhance Image.
The Select Image Filters dialog box appears.
3. Use the information in the following table to select from among available filters, and then
click OK.
Use this
filter
To do this
Black-Border
Removal
Remove black edges from pages.
This filter will cleanup only black edges that are even. If the black edge is
uneven or slanted down the page, it will not be filtered. If receiving uneven
borders, it is due to the scanner model being used and the scan area will
have to be adjusted in order to remove them. The scan area can be
adjusted from the Scanner Settings dialog.
Black borders left on pages can prevent LAW from recognizing blank pages,
so this filter should be selected if using the 'Drop Blank Pages' scan option.
The black-border removal filter can also be applied to multiple documents
during Batch Processing.
Deskew
Straighten images that show a slant from their correct orientation.
Skewing occurs if the original document was unevenly pulled when it was
fed into the scanner. Deskewing an image makes the image contents more
legible and can drastically improve OCR results. As such, it is a crucial step
in the quality control process.
Hole Removal
Removes afterimages of standard size holes (1/4" - 5/16") left from
scanning pages that were hole punched. Hole removal can be done for
pages of RAW Image and scanned documents, and pages of documents
imported in ED Loader and converted to TIFF before hole removal.
The letters o and e and zeros, are ignored by the hole removal process. If
© 2015 LexisNexis. All rights reserved.
398
LAW PreDiscovery
needed, the image borders can be configured for removing holes on images
from the Configure Scan Filters dialog box (Scan > Scan Options > Configure
Filters).
Line Removal
Remove black lines from pages.
Lines must be black, straight, and even.
Noise Removal Reduce the amount of random dots and specks that appear on the scanned
image.
OCR results may improve if Noise Removal is performed on a document
before converting it to text.
To rotate images
LAW allows users to rotate pages in the event that one or more pages are improperly
oriented.
To perform this action
Automatically rotate pages while
scanning.
Do this
Pages may be rotated automatically while scanning
using the 'Output Rotation' setting.
For more information on rotating pages at scan time,
see Scan Options.
Rotate one or more pages
during the quality control
process.
1. From the current page, or after selecting multiple
pages, click Page.
If no pages are selected, only the current page will
be rotated.
Pages may also be rotated
during the quality control
process if they were not
corrected at scan time or
were acquired from
another source.
If one or more pages are selected, all selected
pages will be rotated.
2. Click one of the following
Rotate Left (CTRL+L)
Rotate Right (CTRL+R)
Rotate 180
3. On the File menu, click Save.
Page and thumbnail orientation changes to new
setting.
Care should be taken when rotating an image that has been endorsed in LAW
PreDiscovery™. This operation may create problems if the endorsement is later
modified or removed. See Header/Footer Options for more information on endorsing.
© 2015 LexisNexis, a division of Reed Elsevier Inc. All rights reserved.
Using LAW PreDiscovery
399
Related Topics
Working with Images
Scan Options
Converting Documents to TIFF
Converting Documents to PDF
Moving Documents and Pages
Splitting Documents
Replacing Documents and Pages
Header/Footer Options
Moving Documents and Pages
You can move pages, documents, and folders. These options are especially useful if documents
have been scanned into the wrong folder or if you want to re-organize documents.
To move documents
1. Select one or more documents.
2. Do one of the following:
On the Edit menu click Move Document(s).
Or
Right-click the document list, point to Edit and then click Move Document(s).
3.
The Move Document(s) dialog box appears.
© 2015 LexisNexis. All rights reserved.
400
LAW PreDiscovery
4. Browse to a document to select it as the current document.
5. Do one of the following:
Select Before Current to insert the document before the currently selected document.
Or
Select After Current to insert documents after the currently selected document.
6. Click Insert.
Documents can be moved within the same folder; however, the insertion point cannot
be one of the selected documents.
To move folders
On the Folder menu, click Move Folder.
See the Establishing Folder Structures for more information.
To move pages
Consider the following information before you move pages:
Pages can be moved within a single document by selecting a document and viewing the
thumbnails display on the main interface.
Moving pages in the thumbnails display is not currently supported for any image records
stored as single-page, such as images scanned while using the Serialized Storage
Schema option or images converted to serialized TIFF images via single document or
batch TIFF/PDF conversion.
Moving pages does not move page information. For example, if you move a page, its
page ID, header, footer, and size, will not be moved.
If you move a page, pages may need to be renumbered after the move.
Because header/footer size info will not be moved. Pages should only be moved within a
document in which all or no pages have been endorsed with the same settings;
otherwise, unexpected results may occur if re-endorsed.
To move pages using Thumbnails:
1. Page thumbnails must be visible to move pages. If thumbnails are not currently visible,
on the View menu, click either Thumbnails or click Page and Thumbnails.
© 2015 LexisNexis, a division of Reed Elsevier Inc. All rights reserved.
Using LAW PreDiscovery
401
2. From the thumbnail display, select the pages to move.
3. Click and hold on any of the highlighted pages.
4. After the icon changes and drag to the selected insertion point and then release the
mouse.
To move pages using the Move Page(s) dialog box:
1. Page thumbnails must be visible to move pages. If thumbnails are not currently visible,
on the View menu, click either Thumbnails or click Page and Thumbnails.
2. From the thumbnail display, select the pages to move.
3. Click and hold on any of the highlighted pages.
4. On the Edit menu, click Move Page(s).
Clicking Move Page(s) opens the Move Page(s) dialog box. You can also open the
Move Page(s) dialog box by right-clicking the selected page(s) and then clicking Move
Page(s).
5. Click where you want to insert the highlighted page(s).
6. Do one of the following:
Select Before current to insert the page(s) before the selected page.
Or
Select After current to insert the page(s) after the selected page.
7. Click the Insert button.
Related Topics
Working with Images
© 2015 LexisNexis. All rights reserved.
402
LAW PreDiscovery
Viewing File Properties
Page-level Cleanup
Deleting Documents, Pages and Folders
You can delete pages, documents, and folder structures from a case directly from the main
form. From a grid display you can delete one or more documents, an entire range of pages in a
document, or specific pages from a document.
To delete documents
1. Select one or more documents from the document list.
2. Do one of the following:
Press the DELETE key.
Or
On the Edit menu, click Delete and then click Document(s).
The Delete Document(s) dialog box appears.
3. Click Yes.
To delete pages
1. Select one or more pages from the thumbnails display.
2. On the Edit menu, click Delete and then click Page(s).
The Delete Page(s) dialog box appears.
© 2015 LexisNexis, a division of Reed Elsevier Inc. All rights reserved.
Using LAW PreDiscovery
403
3. Select Current Page or enter a range of pages, and then click OK.
Please note the following when deleting pages:
Deleting pages in PDFs is not supported in LAW.
If an image has associated OCR text, the deleted pages will be removed from the
OCR as well (text-based OCR only) and the remaining OCR pages will be renumbered
if page identifiers are found (i.e., <<< Page 1 >>>).
To delete folder structures
You can delete a folder and all its contents, including subfolders and their contents.
1. From the main window, do one of the following:
Right-click a folder and then click Delete.
Or
Select a folder and then click the delete button:
.
The Delete Folders and All Subfolders dialog box appears.
2. Click Yes to delete the folder and all its contents or click No to cancel.
To delete records from a grid display
On either a standalone or embedded grid display, select records to delete and then
press the DELETE key.
© 2015 LexisNexis. All rights reserved.
404
LAW PreDiscovery
Use caution when using this feature as anywhere from one record to all records in the
case may be selected at once and deleted from the grids.
Related Topics
Moving Documents and Pages
Splitting Documents
Replacing Documents and Pages
Launching the Grids
Splitting Documents
You can split a document into multiple documents. Splitting may be configured to split every
page of a document into its own document. Splitting may also be based on page selection,
barcode pages, or by the presence of blank pages.
To split a document
1. Select a document.
2. On the Edit menu click Split Document. You may receive a warning that you could lose
metadata and file links if the document you are splitting is electronic.
© 2015 LexisNexis, a division of Reed Elsevier Inc. All rights reserved.
Using LAW PreDiscovery
405
3. Apply options to split documents according to the following table:
Option
Description
Barcode
Processes documents in compliance with any barcode break sheets that are
Break Sheets detected, and then removes the barcode break sheets from the page output.
Splits the document if a document break is detected.
Creates a new folder if a folder break is detected.
Separates attachments if attachment sheets are detected. Deletes
from the image after being processed.
Click the Configure button for more supported barcode settings and types.
You can specify break sheet settings from the Imaging tab of the Options
form. If no pages with barcode breaks are found, the operation will be
canceled.
This setting may be useful if the Detect Barcode Breaks scan option was
disabled while scanning.
See the Using Barcodes topic for additional barcode information.
Blank Pages Removes blank pages from the document. Detection of blank pages may be
configured as follows:
Click the Configure button for blank page filter options. These options are
listed as follows:
Pristine White. Removes pages only if they completely blank and contain
no discernable visual noise. This option is best used for electronic
documents that were converted directly to TIFF or PDF. Scanned images
may require a slightly less sensitive filter.
© 2015 LexisNexis. All rights reserved.
406
LAW PreDiscovery
Dirty White. Removes pages that are blank even if a small amount of
visual noise is detected. Visual noise includes such things as speckles,
creases, and folds. This setting is recommended for scans of good or
excellent quality scanned documents.
Very Dirty White. Removes pages that are blank even if a large amount
of visual noise is detected. This setting is recommended for scans of poor
quality documents.
One Line Acceptable. Removes pages that contain a single line of text,
for example, "This page intentionally left blank".
Every Page
Splits every page of the document into its own single-page document.
Selected
Pages
Designates the currently selected pages as the starting page of new
documents.
This setting is only available if one or more pages are selected. Because the
first page (of the current document, prior to splitting) is automatically
included as the start of the first sub-document, selection of this page is not
necessary.
Drop
selected
pages
Drops all selected pages. This will also be the case if barcode break sheets
or blank pages as the separator pages are manually selected.
Metadata
Options
Use these options for records imported with ED Loader and then converted
to TIFF or PDF using LAW PreDiscovery.
(for ED
Records)
Discard all metadata. Removes all ED import metadata associated with the
original record, with the exception of the DocID field. This includes important
values used to indicate duplicate record status, metadata pulled from the
native file, and ED Loader session information.
All records created after the split (including the first record) will lose the
value used to indicate the file is an ED record. You will no longer be able to
perform ED-related operations with these records such as converting to
TIFF or PDF and exporting native files.
Copy to all records. Records created by the split inherit the metadata of the
original record.
The original native file will be associated with all new records. The native file
is not copied; all new records will point to the same file. For new records
beyond the first record, this native file link is created by placing the path to
the native file into the "NativeFile" field in the LAW case. Because of this
behavior, if the newly split records are included in a TIFF/PDF conversion
process, the same native file will be converted for each of the records
involved in the split.
Copy to first record only - Only the first record created by the split inherits
the metadata of the original record. Other records created as a result of the
split do not inherit ED Loader metadata, with the exception of DocID. Other
user-defined field data is retained for all records.
Autonumber
For any record created as a result of the split operation, this option will
automatically number the DocID values with a suffix.
To use this feature, enable the "Auto number remaining DocID's" setting in
the Split Document dialog and enter the value in the "Starting Suffix" field.
The default is ".002". The value in the "Starting Suffix" field value will be
© 2015 LexisNexis, a division of Reed Elsevier Inc. All rights reserved.
Using LAW PreDiscovery
407
appended to every record created as a result of the split with the exception
of the first, or original, record. The suffix will increment by one for each
record.
For non-ED records, the index information from the original document is applied to all
new documents. This may cause duplicate values if unique fields are defined, so any
duplicate values will automatically be cleared. See below for information on metadata
handling for ED records.
Related Topics
Moving Documents and Pages
Replacing Documents and Pages
Launching the Grids
Document-Level Coding
Merging Documents
You can can merge two or more documents together. Merging documents can make sense, for
example, if each page of a single document is scanned as a series of separate documents. Also,
if records that were converted to TIFF are imported, they may arrive as one document per
page, in which case you would want to merged page ranges into whole documents.
Preparing to merge documents
Consider the following facts before merging documents:
Folder location of target documents. The documents to be merged must be located in
the same folder. If documents in different folders need to be merged, the Move
Documents function may be used to move them into the same folder.
Use caution when merging ED records. Important metadata and file links may be lost
depending how the documents are merged.
Merge sequence. The documents will be merged in the same order they appear in the
document list. To merge them in a different order, move the documents prior to the
© 2015 LexisNexis. All rights reserved.
408
LAW PreDiscovery
merge operation. All PageID information for the pages will be retained when merging
documents; however, the index information for the first document will be used as index
information for the new document. Be sure to verify this information after the merge.
Performance considerations. Because LAW stores multi-page documents in multi-page
image format, the image file has to be physically rebuilt, with all pages from the 2nd to
the Nth documents being appended to the first document selected. This can take some
time depending on the number of pages being merged. LAW can typically merge 100
pages in less than 5 seconds, but as the number of pages increases, the average time
per page increases.
To cancel this process press the ESC key.
To merge documents
1. Select two or more documents.
2. On the Edit menu click Merge Documents.
Merge Documents is not enabled if a single document is selected.
If at any time you need to cancel a merge operation, press the ESC key.
Related Topics
Moving Documents and Pages
Replacing Documents and Pages
Launching the Grids
Inserting Documents and Pages
You can insert scanned documents, scanned pages, and existing images in the desired
locations within the current folder.
Inserting a document versus inserting a page
The main insertion modes are listed along with descriptions for the best use of each:
Inserting a document. Use this mode when you want to add a document after the first
© 2015 LexisNexis, a division of Reed Elsevier Inc. All rights reserved.
Using LAW PreDiscovery
409
round of scanning is done.
Insert multiple documents if the Detect Barcode Breaks setting is enabled and the
pages are separated by barcode break sheets. This feature is important because, unless
documents are specified by a query, all processing functions, such as batch processing
and exports, are executed in scan order.
Inserting a page. Inserting a page is often used when a page, such as the back of a
page, was skipped during the initial scan process.
To insert documents within the current folder
1. Select a document.
2. On the Edit menu click Insert and then click Scanned Document(s).
The inserted document is inserted above the currently selected document.
To insert new pages
1. On the View menu click Thumbnails or Page and Thumbnails.
2. Select the thumbnails display on the main form.
© 2015 LexisNexis. All rights reserved.
410
LAW PreDiscovery
LAW PreDiscovery™ will always insert a page or document prior to the one highlighted.
In the screen image above, a new page would be inserted between pages 21 and 22
2. Click a page that the inserted page will precede and then press the SPACEBAR.
3. On the Edit menu, click Insert, and then click New Page(s).
To insert existing pages
© 2015 LexisNexis, a division of Reed Elsevier Inc. All rights reserved.
Using LAW PreDiscovery
411
1. On the Edit menu, click Insert and then click Existing Page(s),
2. Browse to the image file to be inserted and then click Open.
The image is inserted as a page in the document above the currently selected page.
Related Topics
Moving Documents and Pages
Splitting Documents
Replacing Documents and Pages
Inserting Electronic Documents
Replacing Documents and Pages
The Replace feature inserts a page or document in place of an existing page or document. You
use this feature when you need to rescan one or more pages due to quality issues with the
initial scan.
The detection of barcode breaks is temporarily disabled when replacing pages, replacing
documents, or inserting pages.
To replace a document using a scanner
1. Select the document to be replaced in the document list.
2. Insert the replacement document into the scanner.
3. On the Edit menu click Replace and then click Document.
4. Click OK.
The new or existing document replaces the selected document.
To replace a document with an existing document
© 2015 LexisNexis. All rights reserved.
412
LAW PreDiscovery
1. Select the document to be replaced in the document list.
2. On the Edit menu, click Replace and then click Image from File(s).
3. Browse to the desired image file and click Open.
The new or existing document replaces the selected document.
To replace a page
Insert the replacement page into the scanner.
1. On the View menu click Thumbnails or click Page and Thumbnails.
2. Select the thumbnails display on the main form.
© 2015 LexisNexis, a division of Reed Elsevier Inc. All rights reserved.
Using LAW PreDiscovery
3. Select one or more pages to be replaced and then press the SPACEBAR key.
4. On the Edit menu, click Replace and then click Page(s).
5. Click OK
The selected page is replaced with the newly scanned page.
© 2015 LexisNexis. All rights reserved.
413
414
LAW PreDiscovery
Related Topics
Moving Documents and Pages
Splitting Documents
Inserting Electronic Documents
Working with Attachments
You have several options for working with document attachments, including:
Adding attachments to a particular document.
Removing attachments from documents.
Performing quality control on attachments to verify that all attachments identified actually
exist, and that all attachments have a corresponding parent document.
To add attachments
1. In the document list, select documents to be attached.
2. Do one of the following:
Press SHIFT+INSERT.
Or
© 2015 LexisNexis, a division of Reed Elsevier Inc. All rights reserved.
Using LAW PreDiscovery
415
On the Edit menu click Attachments and then click Attach to Previous.
All selected documents will be attached to the previous document. The documents to be
attached must be consecutive and on the same level if attaching multiple documents.
This means that all selected documents must be currently unattached and cannot have
attachments of their own. Because the documents are always attached to the previous
document, if the parent and documents to be attached are not consecutive, the
documents must be rearranged so the documents to be attached are positioned
immediately after the designated parent.
To remove attachments
To remove one attachment
1. Select an attachment.
2. On the Edit menu, click Attachments, and then click Detach Document.
Although multiple documents may be selected, only the current document will be
detached. When removing individual attachments from a document with multiple
attachments, if an intermediate attachment is removed, it will be shifted down in the
document list to the position immediately after the last attachment for the current
parent. This is necessary to ensure parent/children integrity.
To remove multiple attachments
1. Select any one of multiple attachments to a document.
2. Do one of the following:
Press SHIFT+BACKSPACE.
Or
On the Edit menu, click Attachments, and then click Detach All.
To validate attachments
This function performs checks on the database to ensure that any document marked as a
parent has at least one attachment, and any document marked as an attachment has a
parent document. LAW automatically corrects any errors found and writes to a log file for
later verification. The validate function should be performed on large databases containing
many parent/attachment groupings.
How attachments are identified in the database:
The following fields identify attachment information in the LAW 5.0 database:
AttachPID: Identifies the parent ID of the attachment. The ID referenced is the unique
ID assigned by LAW to each record scanned or imported into the LAW database.
AttachLVL: References the level of attachment. A zero (0) indicates either a parent
© 2015 LexisNexis. All rights reserved.
416
LAW PreDiscovery
record or no attachment and a one (1) indicates a child.
BegAttach: References the beginning number of the attachment. This is the first number
assigned to the parent document of the attachment group.
EndAttach: References the ending number of the attachment group. This is the last
number assigned to the document page within the attachment group.
AttRange: Provides the range from the start of the parent to the last page of the final
attachment.
Attachmt: Populates the parent level only. This is the list of attachments found within
the parent document.
To validate attachments
On the Edit menu, click Attachments, and then click Validate.
Related Topics
Moving Documents and Pages
Splitting Documents
Replacing Documents and Pages
Scanning in LAW
Inserting Electronic Documents
Annotating Documents and Pages
You can add annotations to TIFF images. After you create an annotation object, you can
then customize its properties. You can later edit your annotations or permanently merge
them to the file.
Overview of annotation tools
The following tools are available for annotating TIFF images:
© 2015 LexisNexis, a division of Reed Elsevier Inc. All rights reserved.
Using LAW PreDiscovery
417
Select - Move or resize annotation
objects.
Redact - Add a solid rectangle to hide
page content.
Highlight - Add a transparent rectangle.
Text -- Add a text box.
Popup - Add a captioned popup text box.
Freehand line - Draw a freehand line.
Arrow - Draw an arrow or a line.
Rectangle - Draw a rectangle or rounded
rectangle.
Ellipse - Add an ellipse to the image.
Rubber stamp - Paste an external
picture file onto the current TIFF.
Line tool - Draw a polygon.
To create and save annotations
Annotations can only be added, deleted, or modified if the annotation toolbar is displayed.
Displaying the annotation toolbar changes the mouse behavior from image to annotation
mode.
To create annotations
1. Select a page.
2. Click the Image tab.
On the Tools menu, click Annotations, and then click Toggle Toolbar.
Or
Press CTRL+T.
The toolbar activates.
3. Click one of the tools.
4. Apply the tool to the image.
To save annotations
Click outside the annotations area and then follow prompts to save the changes.
Or
On the Tools menu, click Annotations, and then click Save by Default.
Annotations are saved automatically when you click outside the annotation area.
To hide or print annotations
© 2015 LexisNexis. All rights reserved.
418
LAW PreDiscovery
After an annotation has been created on a document, you can display or hide the
annotations on all documents and you can configure whether annotations will be printed.
This option not only affects how the annotations are displayed but how they are printed as
well. When the annotations are hidden, the documents can be printed in their original form.
If the annotations are visible, any documents containing annotations will also be printed
with the annotations visible.
To hide annotations
On the Tools menu, click Annotations, and then click Hide Annotations.
Or
Press SHIFT+F12.
To unhide annotations
On the Tools menu, click Annotations, and then click Hide Annotations.
To suppress printing of annotation, you can also use the Do not print annotations
option available in the Print options in the Batch Process utility. If you select this
option, annotations will not print regardless of whether they are set to visible or not.
To merge annotations
Use this function to permanently mark the current document with any annotations that have
been applied to it. Annotations that are not merged will be lost if you perform image
cleanup.
Consider the following facts before you merge annotations:
After the annotations have been merged with the document they cannot be
removed.
Merging annotations converts the image to grayscale.
By default, you can preserve the color information of the annotation, the images will
need to be exported using the Merge Annotations + Retain Color settings in the
Options tab of the Export Utility.
Popup annotations are merged as an image icon.
On the Tools menu, click Annotations, and then click Merge Annotations.
Or
Press CTRL+F12.
Annotations on the currently selected page will be merged.
Merging a color annotation onto a B&W document will result in the annotation being
converted to a B&W annotation to match the color properties of the document.
To modify annotation object defaults
You can configure the default properties for common annotation object properties.
1. On the Tools menu, click Annotations, and then click Default Properties.
2. Select a property and then set options as needed:
© 2015 LexisNexis, a division of Reed Elsevier Inc. All rights reserved.
Using LAW PreDiscovery
419
Line Color
Line Width - options are 1, 2, 3, 5, 10, 15 or 20.
Redact Color
Rubber Stamp - selects the source image file.
Text Color
Text Font
New annotations will conform to the new defaults.
To customize an existing annotation
After you add an annotation you can change its color, add a border and vary other
characteristics of its appearance.
Right-click an annotation and then click Item Properties.
A dialog box opens with settings particular to that object type available for you to
configure.
To enable sticky mode
Sticky Mode keeps the currently selected tool available after applying the tool to the image.
This setting is useful when you need to apply the same type of annotation repetitively. If
Sticky Mode is not selected, the mouse cursor will return to the selection tool after each
annotation is applied.
On the Tools menu, click Annotations, and then click Sticky Mode.
Related Topics
Working with Images
Print Options
Launching the Grids
© 2015 LexisNexis. All rights reserved.
420
LAW PreDiscovery
Working with Native Documents
Native documents are the source documents upon which electronic discovery is based. They
may be PDF files, Word documents, Excel files, or any number of other file types. The main tasks
involved in working with native files are: extracting page counts, opening the files in the
application registered to open them, inserting new native documents into the case, and
converting native documents to TIFF or PDF.
In this section
Extracting Page Counts
Describes variables involved in estimating the number and size of individual sheets of paper
that would be required to print one or more documents. Provides instructions for
generating estimated page counts.
Launching Native Files
Provides instructions for starting external applications from within LAW PreDiscovery to
open native source files.
Inserting Electronic Documents
Provides instructions for inserting an electronic discovery record into an existing folder of
records.
Converting Documents to TIFF
Provides guidance and procedures for manually converting documents to TIFF.
Converting Documents to PDF
Provides guidance and procedures for manually converting documents to PDF.
Extracting Page Counts
You can extract estimated page counts without having to print to paper or convert native files
to TIFF or PDF. To generate estimated page counts for most common native file formats that
have been imported into a case, use the Electronic Discovery Loader (ED Loader). Note the
following when extracting page counts:
Page counts are estimated because some source applications are unable to provide an
exact page count without actually sending the document to a printer. The page counts
returned using this process should only be considered an estimated page count.
To obtain a more accurate page count, convert the native files to TIFF or PDF, or print the
files.
ED Loader extracts page estimated counts by opening files in the native application listed in
the SourceApp field and retrieving the page count value.
© 2015 LexisNexis, a division of Reed Elsevier Inc. All rights reserved.
Using LAW PreDiscovery
421
Not all applications support page count extraction. For example, you cannot extract page
counts from Microsoft Outlook items. If a page count cannot be extracted, a warning
message will be returned to the error log.
To extract page counts
1. Do one of the following:
Run a query using Query Builder.
Or
On the Tools menu, click Display All Records.
2. On the Tools menu, click Extract ED Page Counts.
A status window appears.
After the process finishes, the Page Count Extraction Complete message box provides:
Number of files processed.
Count of pages discovered.
Elapsed time.
Speed in pages per hour.
Number of errors. If errors occurred during processing, you are prompted to view the
error log,
3. In the grid display, the EDPages column contains estimated page counts.
Applications that support page count extraction
The following table lists source applications and whether they support page count
extraction:
Source
application
Supports More information
page count
extraction?
Adobe Acrobat
Yes
AutoVue Suite
Yes
Binary/Hex
Printer
Yes
Corel
WordPerfect
Yes
eDrawings
Viewer
Yes
Image Printer
Yes
© 2015 LexisNexis. All rights reserved.
Reads the page count from the image.
422
LAW PreDiscovery
Internet Explorer Yes
Uses the alternate HTML engine to calculate page counts.
Therefore, the output may not exactly match the output
printed with Internet Explorer.
Microsoft Excel
Page counts for items with a source application of Microsoft
Excel are estimated.
Yes
Estimates are based on the TIFF, PDF, and e-Print Excel
print options for the case.
To view print options for Excel
1. On the Tools menu, click Batch Process.
2. Click Options, click TIFF/PDF Options, and then click
Excel.
Microsoft Outlook No
Microsoft
PowerPoint
Yes
Microsoft Visio
Yes
Microsoft Word
Yes
Quick View Plus
No
Shell Printer
No
Snapshot Viewer Yes
Text/RTF Printer
Yes
VoloView Express Yes
Always returns a page count of 1.
<No Source
Specified>
Always returns 1 page to account for a slip sheet.
No
Related Topics
Converting Documents to TIFF
Converting Documents to PDF
Launching the Grids
Query Builder
Batch Updating
Batch Processing Overview
© 2015 LexisNexis, a division of Reed Elsevier Inc. All rights reserved.
Using LAW PreDiscovery
423
Launching Native Files
The Open File drop-down list includes options for reviewing common file types quickly and
efficiently using LAW PreDiscovery and either AutoVue or Quick View Plus.
Note the following facts when opening native files:
A viewer application or the native application must be installed to open native files.
When selecting non-EDD records, the native file review mode options are ignored since
native files do not exist for these record types.
If using Quick View Plus version 9 or later, please see Avantstar's license agreement prior
to using this application with LAW PreDiscovery™.
To open native documents
After native documents are loaded via ED Loader, they can be opened from within LAW
PreDiscovery in any application installed on the computer.
Open files using any of these methods:
Click the native file hyperlink located above the Image display.
Or
Right-click the native file hyperlink and then click Open.
When a user clicks the hyperlink to launch a native file, the file will launch in the
application that is specified for that document in the SourceApp index field. This field is
populated automatically during an ED Loader session and is based on the specifications
in the file type database. If the value is set to "<No Source Specified>", LAW will
attempt to launch the file in the application assigned to this file type in the operating
system. If no application is assigned in the OS, LAW will attempt to launch the file in a
text editor.
The native file may also be launched by right-clicking the hyperlink and selecting Open.
The application to open the file will be determined using the methods explained in the
previous paragraph.
Or
Click Open File. This button is located above the native file hyperlink.
© 2015 LexisNexis. All rights reserved.
424
LAW PreDiscovery
The Open File button is similar to the hyperlink in that it will launch the native file using
the application specified in the SourceApp field, in the operating system, or a text editor
(see above section for details). However, this option provides more control as it allows
the user to choose the application with which to open the native file. To choose an
application, click the downward pointing arrow located beside the Open File button.
Next, choose one of the popular applications in the list to view the file in that application
or select "Choose Program..." to select any other application installed on the computer.
Another option available in the Open File drop-down list is Change Source Application.
This option can be used to change the value listed in the SourceApp field for the current
document. The change will affect the TIFF/PDF Conversion and E-Print processes since
the SourceApp values determine the application used when printing or converting the
file.
To open files with viewer applications
In the Open File list, select:
Quick View Plus Review Mode to open the file in Quick View Plus.
Or
AutoVue Review Mode to open the file in AutoVue.
To synchronize native view
Selecting the Synchronize Native View option in addition to a review mode automatically
opens the native file in the selected review mode when a new record is selected. Each
record opens in the same window, closing the previously opened record. The active record's
DocID is displayed in the title bar.
To enable native e-mail review
After import, e-mail messages may be opened by their native applications, regardless of how
ED Loader converted the file during the import process. You can open top-level, parent
messages in mail stores as well as top-level loose messages (MSG and EML) on disk.
1. Click the arrow to the right of the Open File button. The arrow is located above the
image display.
2. Click Review Parent E-Mails Natively.
E-mail files open in the application associated with the file type in the operating system.
For example, PST files open in Outlook; NSF files open in Lotus Notes. Mbox mail store
files open in Eudora, or whichever Mbox-compatible application you have installed that is
associated with that file type. For more information on applications that might be
associated with Mbox files, see Importing E-Mail Files.
The mail stores and loose messages must be in their original locations from which they
were processed by the ED Loader. If they have been moved, LAW will not be able to
locate them when attempting to launch the native e-mail. If this occurs, an error
message will appear stating the file could not be found and then LAW will launch the
version of the file located in the <case root>\$EDD\$NativeFiles folder.
© 2015 LexisNexis, a division of Reed Elsevier Inc. All rights reserved.
Using LAW PreDiscovery
425
To open e-mail one time in its native application
E-mails can also be opened natively without enabling the Review Parent E-Mails Natively
option.
Right-click the hyperlink above the image display and then click Open Source E-Mail
Natively.
Reviewing native e-mail
Lotus Notes and Outlook email messages may be opened in their respective native
applications after import into LAW, regardless of how ED Loader converted the file during the
import process. This feature supports top-level, or parent, messages in mail stores as well
as top-level loose messages (MSG and EML) on disk.
To review native e-mails
In ED Loader, right-click the hyperlink above the image display and choosing Open
Source E-Mail Natively.
Emails open in their native application.
To enable the option to review native e-mail items
1. Click the arrow to the right of the Open File button.
2. Click Review Parent E-Mails Natively.
LAW will open e-mails in either Microsoft Outlook or Lotus Notes when launching the files
via the hyperlink above the image display or the Open File button.
The mail stores and loose messages MUST be in their original locations from which they
were processed by the ED Loader. If they have been moved, LAW will not be able to
locate them when attempting to launch the native e-mail. If this occurs, an error
message will appear stating the file could not be found and then LAW will launch the
version of the file located in the <case root>\$EDD\$NativeFiles folder.
Working with native files using Windows Explorer
Native files are stored in a special folder structure within the case folder when imported
using the Electronic Discovery Loader. These files are not stored in the folders that appear in
the folder list on the main form but are instead stored within the <case root>\$EDD
\$NativeFiles folder.
To work with native files using Windows Explorer
© 2015 LexisNexis. All rights reserved.
426
LAW PreDiscovery
To work with native files using Windows Explorer do one of the following:
On the main form, right-click the hyperlink that is located above the Image display and
then select Open Containing Folder.
Windows Explorer opens the folder that contains the native file. The native file is
selected.
Or
In LAW PreDiscovery view the ID field.
In records that reference native files, the ID field value will contain the folder name for
the native file.
The folder path is relative to the $NativeFiles folder.
For example, assuming that the file is a Word document, if a record's ID value is 1234,
then the path to the native file would be:
<case root>\$EDD\$NativeFiles\00\00\12\34.NTV.doc
Note that ID values are padded with zeroes to form an 8-digit number when used for
this purpose; for example, an ID value of 1 for a native record would result in a native
path of:
00\00\00\01.NTV.doc
Understanding how this function works will allow you to browse to the native files
when not using the Open Containing Folder option.
Related Topics
Query Builder
Working with Images
Inserting Electronic Documents
Inserting an electronic discovery record in an existing folder of records may be useful when you
want to add skipped files or when working with unsupported embedded files.
To insert electronic documents
1. On the Edit menu, click Insert and then click one of the following:
E-Document(s), and then click Before Current to insert record(s) before currently
© 2015 LexisNexis, a division of Reed Elsevier Inc. All rights reserved.
Using LAW PreDiscovery
427
selected record.
E-Document(s), and then click After Current to insert record(s) after currently
selected record.
E-Document Attachment(s), and then click Before Current to insert record(s) as
attachment to the record before the currently selected record.
E-Document Attachment(s), and then click After Current to insert record(s) as
attachment to the currently selected record.
ED Loader opens in Insert Mode.
2. Click Details.
The Insert Mode Details dialog box appears, indicating where the document will be
inserted.
3. Review the information and then click OK.
4. Select files to insert.
5. Set any desired options in the Settings tab.
6. Click Start and then click OK.
The import process starts. The selected file(s) will be imported into the specified location
in the case.
© 2015 LexisNexis. All rights reserved.
428
LAW PreDiscovery
The Default Target Folder setting cannot be configured inserting e-documents. The
value will be set to the folder that was selected when choosing to insert an edocument.
Related Topics
Importing Electronic Discovery
Query Builder
Working with Images
Inserting Documents and Pages
Inserting Attachments After Import
Converting Documents to TIFF
Single document TIFF conversion, also referred to as manual TIFFing, makes it easy to review a
native file, make adjustments if needed, and process (or re-process) to TIFF. Once printed,
users can review the image and choose to either save or discard it. Saving the image will
commit the image to LAW PreDiscovery by either replacing an existing image or by inserting the
image, depending on whether or not an image previously existed for that record.
This feature provides a simple method of opening and printing otherwise unsupported file
types, provided the native application is installed on the machine. This feature is also useful
when reviewing and re-processing "problem" supported file types.
Multiple options should be reviewed prior to using this method of converting to TIFF images:
Decide whether to store the resulting image as serialized (single-page) or multi-page.
Decide whether or not to generate printed text, that is, text created during a TIFF
conversion when using the LexisNexis Image Driver.
Determine the desired color reduction setting.
Decide whether or not to drop blank pages.
When you are doing single-document TIFF conversion, the time zones that are associated
with image files do not automatically adjust to match the time zones of the native files. In
such circumstances, if you need dates to match between the native files and image files,
you can manually change the time zone on your system prior to printing to match the
time zone of the native files.
© 2015 LexisNexis, a division of Reed Elsevier Inc. All rights reserved.
Using LAW PreDiscovery
429
To configure options for batch TIFF conversion
1. On the Tools menu, click Batch Process.
2. In the Batch Processing dialog box, click Options, and then click TIFF/PDF Options.
3. Select the TIFF/PDF Output category.
4. In the Active Driver list, click one of the following print drivers:
LexisNexis Image Driver 5.0
LexisNexis Image Driver 5.0 (300 DPI)
5. Set the other TIFF output options as needed and then click OK.
For more information about the TIFF/PDF output options, see Output Settings for E-Print,
TIFF and PDF Conversion.
6. Close the Batch Processing dialog.
The selected options will now apply to the single document TIFF conversion process in
addition to the batch TIFF conversion process.
To convert a single document to TIFF
1. Select a document to be printed from its native application.
2. Above the image display on the main form, click the hyperlink or click Open File.
3. In the native application, print the file.
4. In the print dialog box, select the Informatik Image Driver or the LexisNexis® Image
Driver.
5. Click Properties to adjust settings, as needed.
6. Print the file.
After the file has been converted to a TIFF image, the Image Acquired dialog box
appears.
© 2015 LexisNexis. All rights reserved.
430
LAW PreDiscovery
7. If the image is acceptable, click the Save the Image button,
.
Clicking the Save the Image button adds the TIFF image to the selected record.
If you want to discard the TIFF image, click the Discard the Image button,
.
© 2015 LexisNexis, a division of Reed Elsevier Inc. All rights reserved.
Using LAW PreDiscovery
431
Related Topics
Query Builder
Working with Images
Converting Documents to PDF
Converting individual documents to a PDF file makes it easy to review a native file, make
adjustments if needed, and process (or re-process) to PDF. Once printed, users can review the
PDF file and choose to either save or discard it. Saving the PDF file will commit the file to LAW
PreDiscovery by either replacing an existing PDF file or by inserting the PDF file, depending on
whether or not PDF file previously existed for that record.
This feature provides a simple method of opening and printing otherwise unsupported file
types, provided the native application is installed on the machine. This feature is also useful
when reviewing and re-processing "problem" supported file types.
All PDF files created during the single-document PDF conversion are created as searchable,
web-optimized PDF files that you can perform OCR on, print, and endorse. When a converted
PDF file is endorsed, the searchable PDF file is converted to an image-only PDF file. The
easyPDF SDK 7 print driver is now included with the LAW PreDiscovery installation for PDF
conversions. Like TIFF files created during the TIFF/PDF Conversion process, PDF files
generated during the conversion are also saved to the <case root>\$Image Archive folder.
When you are doing single-document PDF conversion, the time zones that are associated
with image files do not automatically adjust to match the time zones of the native files. In
such circumstances, if you need dates to match between the native files and image files,
you can manually change the time zone on your system prior to printing to match the
time zone of the native files.
To configure options for batch PDF conversion
1. On the Tools menu, click Batch Process.
2. In the Batch Processing dialog box, click Options, and then click TIFF/PDF Options.
3. Select the TIFF/PDF Output category.
4. In the Active Driver list, click easy PDF SDK 7.
5. Set the other PDF output options as needed and then click OK.
For more information about the TIFF/PDF output options, see Output Settings for E-Print,
TIFF and PDF Conversion.
6. Close the Batch Processing dialog.
© 2015 LexisNexis. All rights reserved.
432
LAW PreDiscovery
The selected options will now apply to the single-document PDF conversion process in
addition to the batch TIFF/PDF conversion process.
To convert a single document to PDF
1. Select a document to be printed from its native application.
2. Above the image display on the main form, click the hyperlink or click Open File.
3. In the native application, print the file.
4. In the print dialog box, select the easyPDF SDK 7 print driver.
5. Click Properties to adjust settings, as needed.
6. Print the file.
After the file has been converted to a PDF file, the Image Acquired dialog box appears.
© 2015 LexisNexis, a division of Reed Elsevier Inc. All rights reserved.
Using LAW PreDiscovery
7. If the PDF file is acceptable, click the Save the Image button,
.
Clicking the Save the Image button adds the PDF file to the selected record.
If you want to discard the PDF file, click the Discard the Image button,
© 2015 LexisNexis. All rights reserved.
.
433
434
LAW PreDiscovery
Related Topics
Query Builder
Working with Images
Grid Displays
The grid displays in LAW PreDiscovery are simply spreadsheet views that you can configure to
show metadata associated with documents and pages. Grids help to fulfill major discovery
functions, including: querying and analysis, quality control, tagging, batch processing, and
reporting.
Each row of a grid holds the data for a record. Each record corresponds with an individual
document or page. Each row is divided into multiple columns, also called fields or index fields,
which hold metadata about the record, such as its document ID, page number or file type.
In this section
Launching the Grids
Explains the difference between the two types of grids: embedded and standalone.
Describes procedures for starting the standalone grid and for using it to view document and
page metadata.
Customizing the Grid View
Explains how to change the columns that appear in the grid, how to change the row height
and column width, and how to change the color scheme of grids.
Filtering Search Results on a Grid
Provides guidance and procedures for performing quick filters of information on a grid.
Grouping Search Results on a Grid
Provides a procedure for grouping search results on a grid.
Managing Grid Views
Describes how to create and modify grid profiles. You use grid profiles to store configuration
options that determine how a grid appears, such as the visibility and sequence of column
headings, the color of columns and rows, and other settings.
Grid Functions
Discusses methods and provides procedures for using grids for quality control, filtering,
tagging, and working with query results.
© 2015 LexisNexis, a division of Reed Elsevier Inc. All rights reserved.
Using LAW PreDiscovery
435
Creating Control Lists From a Grid
Provide guidance and procedures for creating control lists, which can be used to import text
files into other litigation support applications.
Creating Outlook .PST Files
Describes how to export e-mail messages from a grid to an Outlook PST file.
Launching the Grids
LAW PreDiscovery™ provides two kinds of grid:
Embedded. In an embedded grid, search results are displayed in a panel that is integrated
into the main window of LAW PreDiscovery. Because this view shares the main window with
other tools, it can be most useful when working with a limited number of fields or shorter
sets of query results.
Standalone. In a standalone grid, search results are displayed in a window that is separate
from the main window. Because this view occupies its own window, it can be most useful
when you want to work with many fields or longer sets of query results.
© 2015 LexisNexis. All rights reserved.
436
LAW PreDiscovery
To open a grid
1. From the main window, on the Tools menu, click Search Records.
The Database Query Builder dialog box opens.
2. Configure a query to select specific records, or to return all records, leave the query with
its default settings.
3. In the Send Results To list select one of the following:
Grid View (Embedded). Returns query results to the embedded view.
Grid View (Standalone). Returns query results to the standalone view.
4. Click Execute.
Query results are returned to an embedded grid or a standalone grid.
© 2015 LexisNexis, a division of Reed Elsevier Inc. All rights reserved.
Using LAW PreDiscovery
437
Other methods for starting grids
To start a grid use one of the following methods:
On the main toolbar click the globe button:
.
Or
On the Tools menu, click Display All Records.
All records in the case are listed.
Or
On the Folder menu, click Grid View.
The records in the currently selected folder are listed.
Or
On the Folder menu, click Grid View (Recurse).
The records in currently selected folder and its subfolders are listed.
Or
1. On the main form click the Grid View button.
2. Click Yes in the prompt to run a search to populate the grid.
The Database Query Builder appears.
To show results in the embedded grid, select Send results to grid on main form.
To show results in a standalone grid clear Send results to grid on main form.
3. Add any additional search criteria and then click Execute.
Full text searches cannot be returned to the embedded grid. When Full text search is
selected, Send results to grid on main form is disabled.
To set a default grid
You can set as default your own preferred grid view.
1. On the Tools menu, click Options.
2. Click the Preferences tab.
3. Select Send query results to grid on main form by default.
Results for new queries will be sent to the embedded grid view.
© 2015 LexisNexis. All rights reserved.
438
LAW PreDiscovery
Related Topics
Query Builder
Filtering Search Results on a Grid
Grouping Search Results on a Grid
Customizing Grid Views
Grid Functions
Customizing the Grid View
You can change how the grid shows or hides columns, adjust column width and row height, and
change the colors used. You can also make fields visible or hide fields. You can also view any
extended properties or Office properties associated with a document.
To show or hide fields
To show or hide fields in the embedded grid
1. From the main form, on the Index tab, click the ... button next to the Profile list.
© 2015 LexisNexis, a division of Reed Elsevier Inc. All rights reserved.
Using LAW PreDiscovery
439
2. In the Modify Fields dialog box, select or deselect Visible on fields to make them visible
or hidden.
3. Click either Save to keep the fields you selected visible in the current profile, or click
Save As and then create a new grid profile.
4. Close the Modify Fields dialog box.
Any field with Visible selected in the previous steps can be seen in the embedded grid.
To show or hide fields in the standalone grid.
1. From within a grid view, right-click any column heading.
The Field List dialog box appears.
2. Do the following:
Select any field you want to show.
Deselect any field you want to hide.
© 2015 LexisNexis. All rights reserved.
440
LAW PreDiscovery
To view extended properties
Custom metadata found in imported documents is placed into special fields called extended
properties. You can use grid controls to view the extended properties of documents.
To view extended properties, you must customize the view of the grid control. Then, you can
identify any extended property by looking for those preceded by EP. For example, if you
import a Word document that contains a value of Jones in its Typist field, LAW will create a
new field for the case called EPTypist and populate the field for that document with the
value Jones.
To view extended properties from the embedded grid
1. From the main form, on the Index tab, click the ... button next to the Profile list.
2. In the Modify Fields dialog box, scroll down to find fields that begin with EP.
Fields that begin with EP contain extended property data. These fields can also be
identified by looking at the Table column. Any field belonging to the Extended table is an
extended field.
3. Select Visible on extended property fields as needed.
© 2015 LexisNexis, a division of Reed Elsevier Inc. All rights reserved.
Using LAW PreDiscovery
4. Click either Save to keep the fields you selected visible in the current profile, or click
Save As and then create a new grid profile.
5. Close the Modify Fields dialog box.
The extended fields you selected are now visible in the embedded grid.
To view extended properties from a standalone grid
1. From the main form, on the Tools menu, click Display all Records.
Or click the Globe icon.
A standalone grid opens.
2. Right-click one of the column headings.
The Field List appears.
3. Select HasExtProps.
© 2015 LexisNexis. All rights reserved.
441
442
LAW PreDiscovery
The HasExtProps column appears in the grid. You might have to scroll left or right to find
the column.
4. Drag the HasExtProps column to the grouping area.
© 2015 LexisNexis, a division of Reed Elsevier Inc. All rights reserved.
Using LAW PreDiscovery
443
5. Expand the HasExtProps record set.
6. Select any record with HasExtProps set to Y.
7. On the View menu, click Extended Properties.
A panel opens to the left of the main grid window. Any extended properties that exist for
the selected document are visible.
To move a column
1. From within a grid view, right-click any column heading.
2. Do one of the following:
Manually select a column heading and drag it to a new location.
© 2015 LexisNexis. All rights reserved.
444
LAW PreDiscovery
Or
Right-click a column cell and then select either:
Send Column Left-most. Moves the column to the first position on the left in the grid.
Send Column Right-most. Moves the column to the first position on the right in the
grid.
If you close the grid you are prompted to save the change to the current grid profile. For
more information on grid profiles see: Managing Grid Views.
To change column width
1. From within a grid view, click and drag either edge of a grid column heading. Release the
mouse button when the column heading reaches the width you want.
Or
From either an embedded grid or a standalone grid, right-click within a column cell and
then select Shrink Column to Window. The width of the column adjusts to the space
available in the window.
To change row height
Click and drag the top or bottom edge of any row. Release the mouse button when the
row reaches the height you want.
To move columns, rows, and cells
Columns and rows can be manipulated in a number of ways to make certain aspects of
quality control easier and more efficient.
To move a column. Click and hold the column header and then drop it to the desired
location.
To move a column to the right-most position in the grid. Right-click any cell in that
column and then click Send Column Right-most.
To move a column to the left-most position in the grid. Right-click any cell in that
column and then click Send Column Left-most.
© 2015 LexisNexis, a division of Reed Elsevier Inc. All rights reserved.
Using LAW PreDiscovery
445
To change grid colors
1. From a standalone grid, in the View menu, select Grid Colors.
The Grid Colors dialog box opens.
2. Click the button next to any of the following:
Row color even
Row color odd
Grid line color
Grid text color
3. In the Color dialog box, select a color and then click OK.
4. Click OK again to save your selection.
Note the following:
While you are editing the grid colors, if you click the Reset button the currently
selected grid colors return to the colors selected when you opened the Grid Colors
dialog box.
If you close the Grid Colors dialog box, grid colors change to those you selected. The
colors persist when you close the grid and then re-open it. They also persist in the
embedded grid view.
If you then re-enter the grid, open the Grid Colors dialog box, and then click Reset,
the colors will not change to their original defaults. The colors do change to their
values that were in place when you opened the dialog box.
To sort grid records
In a standalone grid you can sort records based on one or more visible index fields.
To sort by a single field
In the column by which want to sort, click a cell and then either:
On the Tools menu, click Sort Records, and then click Ascending or Descending.
Or
© 2015 LexisNexis. All rights reserved.
446
LAW PreDiscovery
Click either the Ascending (
toolbar.
) or Descending (
) button located on the grid
To sort by multiple fields
You use the Advanced Sort feature to sort by up to four index fields at one time. A different
sort direction may be specified for each of the four fields: ascending or descending.
1. On the Tools menu, click Sort Records, and then click Advanced Sort.
Or
Click the Advanced Sort button on the toolbar (
).
The Advanced Sort dialog box appears.
2. Choose fields from one or more of the drop-down lists.
Note the following:
Memo fields cannot be sorted and therefore will not appear in the lists.
Records are sorted in the order in which they appear in this dialog box. For example, in
the above image, records would first be sorted by DateSent in Ascending order, then
by From (Descending), then by EDFolder (Ascending), then by Importance
(Descending).
3. Click OK to apply the sort to the current set of records.
To view attachment fields
© 2015 LexisNexis, a division of Reed Elsevier Inc. All rights reserved.
Using LAW PreDiscovery
447
1. From the main form, on the Tools menu, click Display all Records.
Or click the Globe icon.
A standalone grid opens.
2. On the View menu, click Attachment Fields.
3. Scroll to the far right of the grid.
The following fields are now available: BegAttach, EndAttach, AttRange, amd Attachmt.
4. Right-click on a column header to display the Field List and then select AttachPID and
AttachLvl fields.
5. Interpret values shown in these fields as follows:
BegAttach
References the beginning number of the attachment. This is the first number assigned to
the parent document of the attachment group.
EndAttach
References the ending number of the attachment group. This is the last number
assigned to the document page within the attachment group.
AttRange
Provides the range from the start of the parent to the last page of the final attachment.
Attachmt
Populates the parent level only. This is the list of attachments found within the parent
document.
For more information about these fields, please see the Field Descriptions topic.
Related Topics
Query Builder
Launching the Grids
Grouping Search Results on a Grid
Managing Grid Views
Grid Functions
© 2015 LexisNexis. All rights reserved.
448
LAW PreDiscovery
Filtering Search Results on a Grid
You can filter the records shown in a grid based on the values stored in fields. Filtering can be
performed on the entire database or on search results.
The grid displays do not currently support Unicode. However, Unicode data can be
displayed by resting your pointer over a cell containing Unicode. The Unicode data appears
in a pop-up text box beside the cell. For more information about support for Unicode in
LAW PreDiscovery, see: Unicode Support.
To filter records
1. Open a grid display.
2. Right-click a cell to be used as a criterion for filtering.
To return all records that match the value in the selected cell, click Filter by Selection.
To return all records that do not match the value in the selected cell, click Filter
Excluding Selection.
For example, in the previous screen capture, to view only records with xls extension, you
would right-click one of the cells that contains xls and then click Filter by Selection. This
action would result in a filtered view of the records showing only files with xls extension.
© 2015 LexisNexis, a division of Reed Elsevier Inc. All rights reserved.
Using LAW PreDiscovery
3. Add more filters on the results as needed.
To process the filtered documents, launch the Batch Process or Export Utility from the
grid; only the current record set will be selected for processing.
To remove a filter
You can remove filters to view the original set of records.
1. Right-click any cell in the grid.
The filtering options appear.
© 2015 LexisNexis. All rights reserved.
449
450
LAW PreDiscovery
2. Click Remove All Filters.
Related Topics
Query Builder
Launching the Grids
Grouping Search Results on a Grid
Customizing Grid Views
Grid Functions
Grouping Search Results on a Grid
You can group search results based on field values. This feature is useful when you want to
view records organized by field values for the purpose of analysis or review.
© 2015 LexisNexis, a division of Reed Elsevier Inc. All rights reserved.
Using LAW PreDiscovery
451
The number of records that contain a particular value is listed beside the value for each group.
The following table describes how to work with grouping records:
When you want to do
this
Perform these steps
View grouped records.
1. Start a grid view.
Add a group.
2. Drag the column header of the field you want to group by into
the grouping area. The grouping area is located just above the
column headers.
Documents are grouped by each unique value found in that field.
Add a second level of
grouping.
With one or more groups already added to the grouping area,
select a field and then click and drag it into the grouping area.
Expand an individual
group.
Click the plus sign (+).
Collapse an individual
group.
Click the minus sign (-).
Expand or collapse all
groups.
Right-click any group and then select either Expand All Groups
or Collapse All Groups.
Remove groups.
To remove a single grouping, click and drag the column header
from the grouping area to the area containing the column
headers.
When a top-level group is expanded, a second grouping will
appear below it. Up to four levels of grouping may be applied at
one time.
To remove all groups at once, right-click on any grouping in the
grid and then select Clear All Groups.
Related Topics
© 2015 LexisNexis. All rights reserved.
452
LAW PreDiscovery
Query Builder
Launching the Grids
Filtering Search Results on a Grid
Customizing Grid Views
Grid Functions
Managing Grid Views
After you close a grid, if you changed certain grid properties, you are prompted to save the
properties to a grid profile. A grid profile captures: visibility and placement of fields, column
width, and row height.
When you save a grid profile you give it a name and set its access level. The access level can
be set to one of three levels:
User - Available to the current user in the current case. Stored in the case folder structure
($UserData). A profile of this type may be deleted only by the user who created it.
Shared - Available to any user in the LAW case in which the profile was created. If a profile is
shared, LAW will automatically display "(Shared)" after the profile name. This profile is also
stored in the case folder structure ($UserData). A profile of this type may be deleted by any
user.
Global - Available to any user in any LAW case. If a profile is global, LAW will automatically
display "(Global)" after the profile name. Global profiles are stored in <application path>
\Shared folder. A profile of this type may be deleted by any user.
The grid displays do not support Unicode. However, Unicode data can be displayed by
resting your pointer over a cell containing Unicode. The Unicode data appears in a pop-up
text box beside the cell.
To create a grid profile
1. From within either type of grid, change the visibility of fields, their placement, the width
of any column, or the row height. For more information on making these changes see:
Customizing the Grid View.
2. If using either type of grid, on the grid view menu bar, click Grid Views and then click
Manage Views. If you are using a standalone grid you may alternatively click the View
menu, click Grid Views and then click Manage Views.
The Manage Grid Views dialog box appears.
© 2015 LexisNexis, a division of Reed Elsevier Inc. All rights reserved.
Using LAW PreDiscovery
3. Click New.
4. Type a name for the profile.
5. Click the list next to the name field and then select a scope.
6. Click Save.
To modify an existing grid profile
You can modify any grid profile, including the <Default> profile.
1. From either type of grid, on the grid menu, select Grid Views and then select a grid
profile.
© 2015 LexisNexis. All rights reserved.
453
454
LAW PreDiscovery
2. Change the column placement, visibility of fields, or row height of the grid as needed.
3. Again, on the grid menu, select Grid Views and then click Manage Grid Views.
4. Click Save.
To switch profiles
You can switch between profiles. When you switch profiles, the settings for the newly
selected profile are loaded.
In the active grid, on the View menu, click Grid Views and then select a grid view.
To delete a grid profile
If the scope of a grid profile is set to Shared or Global, then the profile may be deleted by
anyone. A profile created at the level of User may be deleted only by the user who created
it. The <Default> profile may not be deleted.
1. In a grid display, on the Views menu, click Grid Views and then click Manage Views.
© 2015 LexisNexis, a division of Reed Elsevier Inc. All rights reserved.
Using LAW PreDiscovery
455
The Manage Grid Views dialog box appears.
2. Select a profile to delete.
3. Do one of the following:
Press the DELETE key.
Or
On the Edit menu, click Delete.
To change the default path for global queries and profiles
To share a global profile among multiple computers,you place the file that holds the profile
on a network share that is accessible to all computers. Then you can open LAW PreDiscovery
on each computer and configure the default path to point to the file located on the network
share.
The new path becomes the default for each of the following:
Global queries
Global index field profiles
Global grid profiles
1. From the main window in LAW PreDiscovery, on the Tools menu, click Options, and then
© 2015 LexisNexis. All rights reserved.
456
LAW PreDiscovery
click the Preferences tab.
The Preferences tab appears.
2. Click Browse.
3. Type a network path or select a folder.
4. Click OK and then click OK again.
5. Switch to Windows Explorer.
6. Copy the folders in C:\Program Files\LAW50\Shared\.
7. Paste the folders to your newly chosen folder.
© 2015 LexisNexis, a division of Reed Elsevier Inc. All rights reserved.
Using LAW PreDiscovery
457
Related Topics
Query Builder
Launching the Grids
Customizing the Grid View
Filtering Search Results on a Grid
Grouping Search Results on a Grid
Grid Functions
Grid Functions
This topic describes procedures for working with grid data and viewing grid reports.
The grid displays do not currently support Unicode. However, Unicode data can be
displayed by resting your pointer over a cell containing Unicode. The Unicode data appears
in a pop-up text box beside the cell.
To copy contents between columns
The contents of a grid column, can be copied into another column.
1. Make sure a field to accept the incoming data has been created.
2. Start a standalone grid.
3. Click the column header of the source field.
4. On the Edit menu, click Copy.
5. Click the column header of the destination field. Note that LAW PreDiscovery will not
copy data into locked or system fields.
6. On the Edit menu, click Paste.
7. Click Yes to proceed with the copy.
Copying data into a field of a different type (e.g. memo to text) in this manner could
result in a loss of data.
© 2015 LexisNexis. All rights reserved.
458
LAW PreDiscovery
To save grid data to file
You can save the visible field data that is displayed in a grid. Saving grid data to a file is
useful when you want to work with grid data in a word processor or spreadsheet. Only fields
visible in the grid will be included in the output file.
Text formats
LAW PreDiscovery™ can save grid data to a text file encoded using any of the following text
formats:
Comma separated value (CSV): ANSI. Can be imported into Microsoft Excel.
Tab delimited: ANSI. Can be imported into Microsoft Excel.
Tab delimited: Unicode UCS-2. This format can be opened directly with versions of
Microsoft Excel.
Tab delimited: Unicode UTF-8. Can be imported into Microsoft Excel.
If you want to open the file directly using a version of Microsoft Excel, using the Tab
delimited: Unicode UCS-2 format is recommended. To open a file saved to a different
format using Excel, try opening a new spreadsheet in Excel first, and then import your
file using the data import function within Excel.
To save grid data to file
1. From a grid, on the File menu, click Save, or click the Save button in the toolbar.
2. The Save Options dialog box appears.
3. Configure options for saving the file. These options are described as follows:
© 2015 LexisNexis, a division of Reed Elsevier Inc. All rights reserved.
Using LAW PreDiscovery
When you want to do
this
459
Perform these steps
Save the file to a different 1. Click Browse.
location or change the
name of the file.
The Save Results As dialog box appears.
2. Select a new location to save the file, type a different
The default path and
filename, or change the text format for the file.
file name for saving grid
data to file is:
<current case path> 3. Click Save.
\results.csv.
The Save Results As dialog box closes. The Save Options
dialog box is still open. Note that your selections are
saved.
Change the text format of Click the Text format drop-down, and then select the text
the output file.
format for the output file.
Choose between saving
all the records in the grid
or just the records that
are highlighted.
Select either:
Save all records. Saves all the records showing in the
grid.
Or
Save selected records. Saves just the records that are
highlighted in the grid. If no records are highlighted, then
only the currently selected record is saved.
Specify text delimiters
other than the defaults.
Select Override Default Delimiters and then, as needed, select
new characters to use to specify fields, to surround text, and to
indicate new lines.
Reset text delimiters to
their default values.
Select Override Default Delimiters and then click Restore
Defaults.
4. Click Save.
5. After the file is saved, the Save Results dialog box appears.
6. Click Yes to open the file using the default application registered in Windows for the
chosen file extension, or click No to return to the grid.
To print the contents of a grid
The visible field data associated with records displayed in a grid may be printed. Only fields
© 2015 LexisNexis. All rights reserved.
460
LAW PreDiscovery
visible in the grid will be included in the output.
1. Select records to print or select none to print all records.
2. On the grid toolbar, click the Print button (
)and then click either:
Print Selected Records Only.
Or
Print All.
2. Select a printer and set other print options.
3. Click OK.
To batch update grid data
You can use the Batch Update tool to change the value stored in one or more fields for all
the records in a grid at once. For example, if you sent all the source documents for a case to
a specific custodian, you could use the Batch Update tool to update the Custodian field for all
the case records at once.
1. From a standalone grid, on the Edit menu, click Batch Update.
The Batch Update dialog box appears.
2. In the Field list select the field that you want to update.
© 2015 LexisNexis, a division of Reed Elsevier Inc. All rights reserved.
Using LAW PreDiscovery
461
3. In the Value area type the value that should go in the field.
4. Exercise the following options as needed:
To add a new field to the list, click Add Field.
To remove a field from the field list, click anywhere in the row and then click Remove
Field.
To append an incrementing number to each value, select Auto-increment selected
text/memo fields.
5. Click OK.
A message box reports the number of records updated.
To reset flags for indexing or OCR
In the standalone grid display, you can reset flags to ON or OFF that apply to full text
indexing or OCR. The flag setting options described here apply flags to all records in the grid
display, not just to highlighted records.
1. Open a standalone grid.
2. Click the Tools menu.
To reset tags for full text indexing on all records in the grid, click Reset Fulltext Flags
and then click ON or OFF.
To reset tags for OCR on all records in the grid, click Reset OCR Flags and then click
ON or OFF.
For information on working with OCR flags, see Flagging Documents/Pages for OCR. For
information on working with full text indexing flags, see Full Text Indexing.
To check spelling of grid data
You can use the spell check feature to find and fix misspelled words in user-defined fields.
The spell checker cannot be used to check spelling in system fields or fields that are locked.
1. Ensure the user-defined, unlocked field to be searched is visible in the standalone or
embedded grid.
2. Select a cell in the column that you want to spell check.
If in an embedded grid, on the grid toolbar, click the spell check button:
If in a standalone grid, click the spell check button, or on the Tools menu click Spell
Check.
3. The Spell Check dialog box appears.
© 2015 LexisNexis. All rights reserved.
462
LAW PreDiscovery
The first word in the column not found in the dictionary is displayed in the Change To
field.
4. Exercise an option to spell check the word that appears in the Change To field. These
options are described as follows:
To use this option
Perform these steps
Ignore this instance of the
word.
Click Ignore.
Ignore all instances of the
word.
Click Ignore All.
Edit the word directly but do
not add it to the dictionary.
Edit the word in the Change To field and then click
Change.
Edit the word directly and add it
to the dictionary.
Edit the word in the Change To field and then click Add.
Replace this instance of the
word with a suggested word.
Double-click the suggested word.
Replace all instances of the
word with a suggested word.
Select the suggested word and then click Change All.
To use a grid to permanently delete records
From a standalone grid you can permanently delete records along with their associated files
and field data.
Deleting records from the grid is a permanent operation and cannot be undone.
© 2015 LexisNexis, a division of Reed Elsevier Inc. All rights reserved.
Using LAW PreDiscovery
463
1. Select one or more rows to be deleted.
2. On the Edit menu click Delete Record(s).
3. Click Yes on the warning message box.
The records are permanently deleted.
To view document and page totals
The number of documents currently displayed in the grid is shown at the bottom of the
dialog in between the navigational arrows. If a page-level query was executed, this number
will be the total number of pages instead.
From a standalone grid, on the View menu, click Doc/Page Totals.
The document and page counts appear in the lower right corner of the grid. For example,
Documents: 660 / Pages: 21,166.
Because additional time is needed to calculate the total documents and total pages
information, viewing totals for documents and pages will introduce a slight delay,
relative to the size of the case, when opening either grid or when returning records
from the query builder. To prevent this delay, simply disable this setting via the
standalone grid. On the View menu, click Doc/Page Totals.
To generate an index summary
An index summary can be generated from the standalone grid. When invoked, this feature
will display a message box containing three pieces of information: total number of
documents currently displayed in the grid, total number of pages associated with the
documents currently displayed in the grid, and the total number of fields associated with the
currently displayed documents that are coded with information.
From a standalone grid, on the Tools menu, click Summary.
The Index Summary message box appears.
© 2015 LexisNexis. All rights reserved.
464
LAW PreDiscovery
Related Topics
Query Builder
Launching the Grids
Filtering Search Results on a Grid
Grouping Search Results on a Grid
Customizing Grid Views
Creating Control Lists From a Grid
From a grid display, you can create control lists, which can be used to import text files into CT
Summation and other applications.
The control list that a grid display generates is a text file with a .lst extension.
For each record in the control list, the file contains a beginning document number (BegDoc#)
and the path to the associated text file.
During the control list export process you can optionally export the text from each document
listed. You may specify to include: text from optical character recognition (OCR), printed text, or
extracted text. By default, the limit of exported text files is 1,000. You can increase this number
by editing an initialization file. For more information see Configuring control lists for large
record sets in this topic.
A control list may also be created by the Export Utility of LAW PreDiscovery™.
To create a control list
1. From the main window, on the Tools menu, click Search Records.
The Database Query Builder dialog box opens.
© 2015 LexisNexis, a division of Reed Elsevier Inc. All rights reserved.
Using LAW PreDiscovery
465
2. Configure a query to select specific records, or to return all records, leave the query with
its default settings.
3. In the Send Results To list select Grid View (Standalone).
4. Click Execute.
Query results are returned to a standalone grid.
5. On the Tools menu, click Build Control List.
The Build Control List message box appears.
© 2015 LexisNexis. All rights reserved.
466
LAW PreDiscovery
6. Do one of the following:
Click No to link the control list text path to the current location of the text.
Click Yes to identify a new path for copied text files, and then specify that path.
After the control list file is created, a confirmation message appears.
7. Click Yes to view the control list, or click No to return to the grid.
Configuring control lists for large record sets
By default, LAW will place no more than 1,000 text files in the selected output folder. If more
than 1,000 files are found prior to the text export, a notification will appear.
The files per folder limit can be modified by adding the following setting in the <application
path>\law50.ini file:
[Summation]
ControlListFileLimit=1000
If the [Summation] section already exists, then just place the ControlListFileLimit key
below the existing section. Change the value as needed. After invoking the Build Control List
menu item and choosing Yes to export the text files to a new location, if LAW determines the
number of text files will exceed this value, an error message is displayed.
The number in parentheses will match the value in the INI setting or the default of 1,000.
Specify the name of the first folder to hold the exported text files. After the specified number
of text files are placed in this folder, LAW creates a sequential folder to hold the next set.
If a case is enabled for electronic discovery ("ED-enabled) and the records in the standalone
grid have associated images, LAW may prompt to choose between the DocID or BegDoc#
fields for the image tag (or document identifier).
If the BegDoc# is not populated for the images in an ED-enabled case, the DocID field will be
used automatically. Lastly, LAW will offer to launch the control list file once it has been
created. The file extension is .lst and can be viewed in any text editor.
© 2015 LexisNexis, a division of Reed Elsevier Inc. All rights reserved.
Using LAW PreDiscovery
467
Related Topics
Query Builder
Launching the Grids
Importing Cases and Load Files
Creating Outlook .PST Files
From a standalone grid, you can create Outlook PST files for visible records of the following file
type:
Messages imported from Outlook mail stores
Loose Outlook messages (*.msg)
Loose RFC-822 messages (*.eml)
Note that only top-level messages and loose e-mail items are added. Message attachments
become part of the parent items, regardless of whether or not these attachment records are
shown in the grid.
To create Outlook PST files
1. From the main window, on the Tools menu, click Display All Records, or run a query
using Query Builder with results sent to a standalone grid.
2. From a standalone grid with source records visible, on the Tools menu click Create
Outlook PST.
The Create Outlook PST dialog box appears.
If no supported message records exist in the record set, a message box reports this
condition and then returns to the grid.
3. Click Browse to specify a path and file name for the new PST. If an existing PST is
selected, LAW will present an option to either append to or overwrite that file.
4. Specify the root output folder, noting the following:
The Root Output Folders area below the output path contains two columns. The first
column will display "Loose Messages" for any supported loose e-mail message records
found in the grid and will display the file name (minus the extension) of the original PST
© 2015 LexisNexis. All rights reserved.
468
LAW PreDiscovery
mail store from which the store-based records originated. These values will be used as
the root folders in the output PST file. To change any of these default folders, type the
values into the text box or boxes.
The second column will display <Loose E-Mails on Disk> for the supported loose email message records found in the grid and will display the path to the original PST
mail store for any store-based records. The Create Outlook PST feature creates new
PSTs (or appends existing) by accessing these original stores and/or loose messages.
The mail stores and loose messages must be in their original locations from which they
were processed by the ED Loader. If they have been moved, LAW will not be able to
locate them and the new PST files cannot be generated. LAW will present a list of mail
stores that have been moved when invoking the menu item in the grid.
5. Click OK.
A status bar displays the percentage completed.
When complete, a report appears that lists the total number of top-level messages
added, the number of errors, elapsed time, and average speed. If errors occurred during
the process, the error log may be launched from the status screen as well. Error logs are
stored in the root of the case folder in a file named pst errors.txt.
Related Topics
Query Builder
Launching the Grids
Searching
Query Builder is the tool you use in LAW PreDiscovery to search full-text and metadata
associated with documents and pages.
In this section
Creating Queries
Provides instructions on using Query Builder to conduct basic searches of metadata.
Examples of Field-Based Queries
Provides examples of basic field-based searches of metadata.
© 2015 LexisNexis, a division of Reed Elsevier Inc. All rights reserved.
Using LAW PreDiscovery
469
Full Text Searching
Provides instructions for enabling and executing full-text searches.
Working With Saved Searches and Search History
Describes how to save queries, run saved queries, and access the search history.
Creating Queries
You use the Database Query Builder utility, also known as Query Builder to search case
records. A search can be based on field values, the full text of documents, or on some
combination of both. This topic covers how to perform queries based on field values.
For details on performing full text searching, or searches that combine field values with full text
searching, see Full Text Searching.
To run a basic query
1. From the main window in LAW PreDiscovery, click
2. Start the Query Builder. Do one of the following:
From the main window, on the Tools menu click Search Records.
Or
On the ribbon, click the Search Records button (
3. The Database Query Builder dialog box appears.
© 2015 LexisNexis. All rights reserved.
).
470
LAW PreDiscovery
4. In the Database Query Builder dialog box select a Field Name, select an Operator, and
if necessary type comparison text into the Value (text) field.
Option
Description
Field name
Lists all the fields in the current case. Select the field to be searched from
this list.
In Access-based cases, the Query Builder does not list extended
properties. You can create queries that use the HasExtProps field, send
these results to a grid, and then sort and filter by extended properties,
which are visible in grid displays in Access-based cases.
Operator
The Operator determines what type of search to apply for the specified
value. Available operators are:
Equals - matches specified value (NOT case sensitive).
Does Not Equal - does not equal specified value (NOT case sensitive).
Greater Than - greater than specified value.
© 2015 LexisNexis, a division of Reed Elsevier Inc. All rights reserved.
Using LAW PreDiscovery
471
Less Than - less than specified value.
Greater or Equal - greater than or equal to specified value.
Lesser or Equal - less than or equal to specified value.
Is Empty - field has no value.
Is Not Empty - field has any value.
Value
The string or value to search for in the specified field.
Wildcard characters (* for any string of characters, and ? for any single
character) can be used with either the Equals and Does Not Equal
operator.
The Is Empty and Is Not Empty operators do not require a value. The
Value field will be removed if either of these operators is selected.
5. Click Add Condition.
6. Add more conditions as necessary to modify the query.
To modify the query like this Try this
Narrow the query.
Add an OR condition.
Broaden the query.
Add an AND condition.
Group or ungroup conditions.
Use the (+ and +) buttons to group a condition.
Use the (- and -) buttons to ungroup a condition.
Click the X button to remove all groupings.
Create or modify a search
based on keywords. For SQL
Server-based cases only.
1. Remove any field based conditions.
2. Click Dictionary.
3. Select words to add to the query.
Remove a condition.
Select the condition and then click Remove.
Remove all conditions.
Click Remove All.
7. In the Send Results To list, select the utility that will receive the query results:
Batch Process
Batch Update
Export Utility
Grid View (Embedded)
Grid View (Standalone)
Report Viewer
8. Select output options as needed:
Return all Page ID's with query results - Select this option to return a page-level
query for the returned documents. The grid view will display a record for every page of
each document. Additional page-level fields also become available after selecting this
option.
© 2015 LexisNexis. All rights reserved.
472
LAW PreDiscovery
Return parent/attachment groups - Displays documents matching the specified
search criteria and will also display any parents or attachments of those documents.
This does not imply that both the parent/attachments also match the search criteria,
however. Enabling this option may require additional time for the query to return
results.
Use NOLOCK setting to improve performance (SQL only/read-only) - This option
can help to improve performance of queries of SQL Server-based cases. With this
option, the result set is read-only, and updates will not be available in the grid. The
NOLOCK setting should only be used in cases where updates in the grid are not
necessary, for example, when executing a query that will be used to run a batch
process or export.
9. Click Execute.
After you run a search it is automatically saved in the Search History tab.
You can also save the search so that it appears in the Saved Filters tab.
For more information see Working With Saved Searches and Search History.
Related Topics
Full Text Searching
Working With Saved Searches and Search History
Document-Level Coding
Batch Updating
Creating Tag Fields
Examples of Field-Based Queries
This topic provides instructions for running examples of field-based queries.
To create field-based queries
1. From the main window in LAW PreDiscovery, on the Tools menu, click Search Records.
2. The Database Query Builder opens.
© 2015 LexisNexis, a division of Reed Elsevier Inc. All rights reserved.
Using LAW PreDiscovery
473
3. Configure your search as follows:
To find documents that match these
criteria:
Configure search Field - Operator - Value
like this:
Microsoft Office documents with more than
one revision. A document increases its
revision number each time it is saved after
being edited.
Revision | Is Greater Than | 1
Microsoft Word or Excel file with tracked
changes.
HasTrackChanges | Equals | Y
E-mails with "Accounting" in the subject
line.
EMail-Sub | Contains | Accounting
E-mails sent after June 15 2010.
DateSent | Greater than | 6/15/2010
Any document created before June 15 2010 DateCreated | Less than | 6/15/2010
Documents whose text was successfully
extracted during TIFF/PDF conversion
process.
TextPStatus | Equals | C
Documents that had no text extracted
during TIFF/PDF conversion process.
TextPStatus | Equals | N
Documents whose text extraction during
TIFF/PDF conversion process resulted in an
error.
TextPStatus | Equals | E
4. Click Add Condition.
5. In the Send Results To field, select one of the tools as needed.
6. Click Execute.
Related Topics
Creating Queries
Full Text Searching
Working With Saved Searches and Search History
Field Descriptions
© 2015 LexisNexis. All rights reserved.
474
LAW PreDiscovery
Full Text Searching
You can use the Query Builder to perform full text searching of case records, and to perform
complex searching by creating a search based on full text and field values.
Note the following facts about full text searching:
Full text search is supported only for SQL Server-based cases.
Case records must be indexed prior to searching. For more information on indexing see Full
Text Indexing.
You can also use the Query Builder to export the case dictionary.
To run a full text search
1. Start the Query Builder. Do one of the following:
From the main window, on the Tools menu click Search Records.
Or
On the ribbon, click the Search Records button (
).
2. The Database Query Builder dialog box appears.
© 2015 LexisNexis, a division of Reed Elsevier Inc. All rights reserved.
Using LAW PreDiscovery
475
3. From the main window, on the Tools menu click Search Records.
4. Select Full text search.
5. Add terms to the text box by performing any of the following actions:
Type terms separated by spaces directly into the text box.
Click Dictionary, type a term into the Lookup field, click Add (F3), and then click Done.
Click Load Terms, select a text file, select an operator to use, and then click Accept.
6. Configure full text search options as needed. See the section To configure full text
searching in this topic.
7. In the Send Results To list, select a utility to receive search results:
Batch Process
Batch Update
Export Utility
© 2015 LexisNexis. All rights reserved.
476
LAW PreDiscovery
Grid View (Embedded)
Grid View (Standalone)
Report Viewer
8. Click Execute.
After you run a search it is automatically saved in the Search History tab.
To configure full text search options
1. From the main window, on the Tools menu click Search Records.
2. In the Database Query Builder dialog box select Full text search and then click
Options.
The Full Text Search Options dialog box appears.
3. Configure full text search options as needed:
Stemming - includes records in the result set that contains words with variant endings
compared to the search term. For example, the search term depend will return records
that contain depend, depends, depending, etc.
Phonic - includes records in the result set that contains words that sound similarly to the
search term. For example, the search term pear will return records that contain pair, per,
pure, etc.
© 2015 LexisNexis, a division of Reed Elsevier Inc. All rights reserved.
Using LAW PreDiscovery
477
Fuzzy - includes records in the result set that contains words with similar spelling as the
search term. For example, the search term case, might return records that contain cash,
cale, cake, etc. You set the fuzzy value to a number between 1-10, with 1 being the
least fuzzy and 10 the most.
Retrieval thresholds
Max files to retrieve - Sets an upward limit on the number of files to return. In any
new case the default maximum number of files to retrieve is unlimited, which appears
in the field as 0.
Abort Search After - Sets an upward limit on the number of files to search. The default
value for this field is unlimited, which appears in the field as 0.
Search syntax
Boolean - Supports standard AND/OR connectors between search terms.
All Words/Any Words - Alternative to using Boolean that implies all AND’s and OR’s
respectively between words.
Include hits by word in search results - When enabled, LAW will include a temporary
ft_HitsByWord field in the search results in the standalone grid.
For each document, this field contains the search words that matched each document
and the frequency of those words. Search words and their frequency are commaseparated and multiple search words are separated by a hard return character.
4. Click Accept.
Tagging text hits
You can create a Tag (Boolean) field value and then apply it to query results, by using the
Tag Text Hits feature.
This feature can be a quicker alternative to running a search and then having to wait for the
search results to populate a grid display, and tagging documents from that interface (if
needed), especially when dealing with large amounts of data. The flagged field can later be
queried to pull results or used in conjunction with other queries.
To tag text hits
1. From the main window on the Index menu click Modify Fields.
2. Create a tag field or a numeric field. The following list provides considerations for
choosing the field type and name:
Name the field after the search term in some way, for example "contains_Smith".
Create a document-level tag (Boolean) field if you want simply to record whether or not
the record contains the search term. Records that contain the term are marked Yes, else
No.
Create a numeric index field if you want a count of the number of text hits found in each
record.
3. After the field is created, on the Tools menu click Search Records.
4. Select Full text search and then provide search terms.
© 2015 LexisNexis. All rights reserved.
478
LAW PreDiscovery
5. Click the Tag Text Hits button.
The Select Target Field dialog box appears with all user-defined tag and numeric fields
listed.
6. Select the field to be used as the target field and then click OK.
After the query has run a message box provides a summary. It lists the number of
affected documents, the total number of hits, and the elapsed time.
This feature does not incorporate any database conditions that may be selected when
performing the text search. Only full text searching is supported.
To search by multiple terms
You can search for multiple words that occur in a specified sequence by entering the
sequence of words to be searched into the full text search text box.
If the search syntax is set to Any Words or All Words, then the sequence of words must be
wrapped in quotes to prevent the search from inserting AND's or OR's between the words in
the sequence.
Example searches
Request description
Matching text
Does not match
Security Code (If using Any
"I entered the security code". "To disable security enter the
Words/All Words syntax, then (Words occur in sequence.)
code". (Words occur, but not
use: "Security Code".)
in sequence.)
Enter * Code (If using Any
"enter unique code" , "enter
Words/All Words syntax then key code"
use: "Enter * Code".)
"Enter Code"
Note the following about multiple term searching:
Wildcards can be incorporated into term searches to match all or part of the words in the
sequence similar to a single term search with the added restriction that the wildcard
occur in sequence.
Each word in the term is always counted as a hit in the ft_HitCount column and
highlighting view. The search request "Security Code" will return a minimum of two hits
(one for each of the two words that comprise the term). Full Text reports count the
occurrence of the entire term as one hit, as do counts in the ft_HitsByWord column which
is controlled by the "Include hits by word in search results" Full Text Search Option
Working with noise words
This topic section describes noise words, their impact on search, and how to edit the list of
noise words.
© 2015 LexisNexis, a division of Reed Elsevier Inc. All rights reserved.
Using LAW PreDiscovery
479
What are noise words?
Noise words are words that are ignored by the indexer because they occur so commonly
that they are of little use in searching content.
How noise words impact search
The effect of noise words in a search request typically manifests itself when searching for
terms or word sequences. The search engine effectively treats a noise word in a search
request as a word-level wildcard, matching any word that occurs at that position.
Effectively, a noise word is processed as an "any word" wildcard (*), so in the above
example the search request is processed as: Harold * Cat.
A single word search request for a noise word will return no records. For example, a search
request for the term "because" would yield no results.
Examples
The following table describes examples of how the noise word "The" effects search.
Request description
Matching text
The Car
"Red Car","Blue Car","Fast
Car"
(If using Any Words/All Words
syntax then use: "The Car")
Harold The Cat (If using Any "Harold my cat"
Words/All Words syntax then
use: "Harold The Cat")
Does not match
"Harold My Friend" (Term
search, only matches one of
the required words in the
sequence).
To edit the noise word list
LAW manages noise words at the application level in a file named noise.dat. This file is
located in the \dtconfig folder which can be found in the installation path of LAW
PreDiscovery.
1. Use Notepad or some other text editor to open the noise.dat file.
2. Add or remove noise words from the list.
3. Save the file.
4. On the Tools menu click Full Text Index and then click Re-Index All Documents.
Removal of noise words from noise.dat can result in reduced performance of indexing
and search operations. This is because any word removed from the noise list is indexed
along with other keywords.
© 2015 LexisNexis. All rights reserved.
480
LAW PreDiscovery
To view full text reports
The Full Text Reports feature can be used to create reports based on a single search or
multiple search requests and to run multiple text search requests at once to obtain
document and hit counts without returning records to the grid.
To view full text reports
1. On the Tools menu click Search Records.
2. Select Full text search, and then click the Full Text Reports button.
3. The Full Text Search Reports dialog box appears.
To save hits to a memo field
After you run a full text search in a standalone grid, you can save the search results in a
user-defined, document-level memo field.
To save results to a memo field
1. Run a full text search.
2. When the results display in the grid on the Tools menu click Persist Text Hits.
3. In the Persist Text Hits dialog box click the Target field for preserving text hits dropdown list and then either:
Select an existing memo field.
Or
Select <Create New Field...> and then follow prompts to create a new memo field.
4. Click Accept.
If hits already existed in the field, the new, unique values will be appended, with each
hit separated by a semi-colon.
If a term, or multi-word, search is executed, each word of that term is treated as a
separate search term.
To export the dictionary
The case dictionary can be exported from the Fulltext Dictionary dialog box. The dictionary
© 2015 LexisNexis, a division of Reed Elsevier Inc. All rights reserved.
Using LAW PreDiscovery
481
export creates a UCS-2 tab-delimited CSV file. The CSV file contains a listing of every word in
the case's full-text index, and includes the document and hit count for each word. The
dictionary export supports words containing Unicode characters.
Attempting to use a text editor or Excel to open a dictionary that was exported as a
Comma Separated Value (CSV) file could cause the text editor or Excel to stop
responding. This is because exporting the dictionary as a CSV can create very large
files.
1. From the main window, on the Tools menu click Search Records.
Clicking Search Records opens the Database Query Builder dialog box .
2. On the Advanced tab, click the Dictionary button.
Clicking the Dictionary button opens the Fulltext Dictionary dialog box.
© 2015 LexisNexis. All rights reserved.
482
LAW PreDiscovery
3. Click the Export button.
Clicking the Export button opens the Select Output for Dictionary Export dialog box.
© 2015 LexisNexis, a division of Reed Elsevier Inc. All rights reserved.
Using LAW PreDiscovery
483
4. Browse to where you want to save the dictionary .csv file
5. In the File name field, type the file name, and then click Save.
Clicking Save generates the dictionary .csv file and opens the Open Output File Now
message.
6. Click Yes to view the dictionary .csv file or click No to return to the Fulltext Dictionary
dialog box.
Related Topics
Creating Queries
Working With Saved Searches and Search History
Document-Level Coding
Tagging Records
Working With Saved Searches and Search History
The Query Builder utility provides several options for reusing previously created searches. You
can:
Save searches.
Run previously saved searches.
Run searches from the search history.
Edit searches that are saved stored in history.
Edit the default path used for saving queries.
© 2015 LexisNexis. All rights reserved.
484
LAW PreDiscovery
To save a search
You can save a search so it appears under the Saved Filters tab.
1. Start the Query Builder. Do one of the following:
From the main window, on the Tools menu click Search Records.
Or
On the ribbon, click the Search Records button (
).
2. The Database Query Builder dialog box appears.
3. Create a query.
For more information on creating queries using fields, see Query Builder. For more
information on creating queries using full text, or fields combined with full text, see Full
Text Searching.
4. With the query open, on the File menu, click Save.
© 2015 LexisNexis, a division of Reed Elsevier Inc. All rights reserved.
Using LAW PreDiscovery
5. In the Save As dialog box, select a storage level for the search. This selection
determines who will be able to find the search to run it later.
User (Available to only you)
Shared (Available to all users in this case)
Global (Available to all users across cases)
6. Type a name and a description for the search and then click OK.
The search will appear in the Saved Filters tab.
To run a saved search
1. Start the Query Builder. Do one of the following:
From the main window, on the Tools menu click Search Records.
Or
On the ribbon, click the Search Records button (
2. The Database Query Builder dialog box appears.
© 2015 LexisNexis. All rights reserved.
).
485
486
LAW PreDiscovery
3. Click the Saved Filters tab.
Previously saved searches are listed.
© 2015 LexisNexis, a division of Reed Elsevier Inc. All rights reserved.
Using LAW PreDiscovery
487
4. If necessary, select a storage level/scope. This setting can apply a filter to show
searches by level of availability:
All Available Views. The default. Shows all searches available to you at any level.
User (Available to only you). Shows only searches that are visible to your profile.
Shared (Available to all users in this case). Shows searches that any user of this
case can use.
Global (Available to all users across cases). Shows searches that can be run by any
user across all cases.
5. Do one of the following:
Right-click a search request, and then click Open.
Or
Double-click one of the listed searches.
Query Builder switches to the Advanced tab. The saved query is open.
6. In the Send Results To list, select a utility to receive the search results:
Batch Process
Batch Update
Export Utility
Grid View (Embedded)
Grid View (Standalone)
Report Viewer
7. Do either of the following:
Save the query. On the File menu, click Save. Select a storage level, type a name and
a description, and then click Accept.
Or
Run the query. Click Execute.
© 2015 LexisNexis. All rights reserved.
488
LAW PreDiscovery
After you run a search it is automatically saved in the Search History tab.
To run a search from Search History
1. Start the Query Builder. Do one of the following:
From the main window, on the Tools menu click Search Records.
Or
On the ribbon, click the Search Records button (
).
2. The Database Query Builder dialog box appears.
3. Click the Search History tab.
Previously run searches are listed.
4. Do one of the following:
© 2015 LexisNexis, a division of Reed Elsevier Inc. All rights reserved.
Using LAW PreDiscovery
489
Right-click a previous search request, and then click Open.
Or
Double-click one of the listed searches.
Query Builder switches to the Advanced tab. The historical query is open.
5. Modify the query as needed.
6. In the Send Results To list, select a utility to receive the search results:
Batch Process
Batch Update
Export Utility
Grid View (Embedded)
Grid View (Standalone)
Report Viewer
7. Do either of the following:
Save the query. On the File menu, click Save. Select a storage level, type a name and
a description, and then click Accept.
Or
Run the query. Click Execute.
After you run a search it is automatically saved in the Search History tab.
To edit a saved or historical search
You can edit searches listed under the Saved Filters tab or the Search History tab.
1. Start the Query Builder. Do one of the following:
From the main window, on the Tools menu click Search Records.
Or
On the ribbon, click the Search Records button (
2. The Database Query Builder dialog box appears.
© 2015 LexisNexis. All rights reserved.
).
490
LAW PreDiscovery
3. Click the Saved Filters tab or the Search History tab.
4. Double-click one of the listed searches.
The Advanced tab opens, populated with the criteria of the search you selected.
5. Modify the search criteria as needed.
6. In the Send Results To list, select a utility to receive the search results:
Batch Process
Batch Update
Export Utility
Grid View (Embedded)
Grid View (Standalone)
Report Viewer
7. On the File menu, click Save.
8. Specify the storage level, type a name for the query, and type a query description.
© 2015 LexisNexis, a division of Reed Elsevier Inc. All rights reserved.
Using LAW PreDiscovery
491
9. Click Accept.
The newly saved query will be listed under the Saved Filters tab.
To edit default save path for queries and profiles
You can edit the default path to use for saving queries and profiles. Changing the default
path as described here will affect saved global queries, global index field profiles, and global
grid profiles.
1. On the Tools menu click Options and then select the Preferences tab.
2. Click the Browse button beside the Path for global field profiles, grid views, and
filters.
3. Select a new storage location.
By default, user and shared queries are stored in the case folder structure under the
$UserData folder. Global queries are saved by default to the <application path>
\Shared folder.
4. To maintain the visibility of any global query, indexes and profiles, you must move any of
these previously created items from the default (<application path>\Shared) folder
to the newly specified folder.
Related Topics
Full Text Searching
Working With Saved Searches and Search History
Coding
Coding is the process of marking a document with data. Coding can be used in queries to sort
or filter documents according to criteria you specify.
In this section
© 2015 LexisNexis. All rights reserved.
492
LAW PreDiscovery
Document-Level Coding
Shows how to code existing records singly. Describes ways to help improve coding
efficiency.
Numbering Documents/Pages
Explains how to apply numbering to documents and pages.
Incremental Numbering Syntax for Pages
Explains how to use an expression to implement incremental numbering.
Batch Updating
Describes how to use the Batch Updating utility to apply codes to multiple records.
Using Text Files for Coding
Explains how to code existing records by importing a .csv or .txt file that contains a set of
code values.
Creating Tag Fields
Describes tag (Boolean) fields and how to create them.
Tagging Records
Describes how to apply tag data to documents and pages.
Importing Tag Lists
Explains how to reuse tags between cases.
Coding at Scan Time
Explains how to apply a code to a document when you scan it.
Document-Level Coding
Document-level coding is a way to track information about records to aid in retrieval. This data
is stored in the index fields, which are typically created when setting up the case. Information
that applies to the entire document is considered document-level and can be displayed on the
Index display on the main form.
© 2015 LexisNexis, a division of Reed Elsevier Inc. All rights reserved.
Using LAW PreDiscovery
493
User defined page-level fields can also be displayed in the Index display, but are not editable.
Page-level fields created by users can only be edited using the Import Tag List and AutoNumbering features.
To edit an index field for a document
1. Select the document in the document list.
2. In the Index area scroll to the field you want to use for coding.
3. Select <Yes> or <No>.
4. Click Update.
The values are validated based on the field types. If the values pass validation they are
saved. If any values violate the rules for the field the update operation generates an
© 2015 LexisNexis. All rights reserved.
494
LAW PreDiscovery
error message and cancels. For example, the update would cancel if you attempted to
load: duplicate values into a field requiring unique values, or a list of names into a
numerical field.
To improve coding efficiency
LAW PreDiscovery™ provides the following two options to save time for users who are
coding large batches of documents. When combined these options can help reduce the
number of keystrokes and mouse actions needed to code.
Steps to configure
Option and description
Auto-Advance
1. On the Tools menu click Options.
After updating a document the next
document is loaded automatically.
2. Click the Preferences tab.
When enabled you do not need to press
the TAB or the DOWN ARROW key, or
switch to the mouse each time you need
to move to the next document.
Default Field
1. On the Index menu click Default Field.
Sets the initial focus on a specific field
whenever a document is selected. The
default field is useful when coding large
batches of documents.
This eliminates the need to tab around or
use the mouse to set the focus back to the
index fields.
Add list items automatically
3. Select Auto-advance after updating a
document and then click OK.
2. Select the field name.
The default field is denoted by a check mark.
To disable the default field setting, simply
select the same field again.
1. On the Tools menu click Options.
When enabled, after a list field is updated 2. Click the Preferences tab.
with a value, the value is added to the list.
3. Select Add all new list field values to list on
update, and then click OK.
Update multiple documents
1. Select all documents to be updated in the
document list by using the CTRL key, the
LAW can update multiple documents with
SHIFT key, or by pressing CTRL+A.
the same values. To update fields for
multiple documents, See Batch Updating 1. Type common values in chosen fields.
for additional information.
2. Click Update.
If the <Update> button is clicked while
multiple documents are selected, the Batch
Update dialog box appears allowing you to
select only those fields to be updated.
Select multiple list items when updating 1. On the Tools menu click Options.
a single document
2. Click the Preferences tab.
Helps to reduce the amount of time
© 2015 LexisNexis, a division of Reed Elsevier Inc. All rights reserved.
Using LAW PreDiscovery
required to select list items.
495
3. Select Allow selection of multiple list items,
and then click OK.
Related Topics
Manipulating Fields
Batch Updating
Grid Functions
Field Descriptions
Numbering Documents/Pages
You can apply numbers to documents or pages. Differences between document-level and pagelevel coding are described as follows:
Document level. A document-level field applies a numeric or alphanumeric field value to
documents that you specify. Typically, document-level numbering is used to uniquely
identify documents. It is also used to apply categories to documents.
Page level. A page-level field applies a value to the pages that might exist within
documents. The most commonly used page-level field is Page ID. You typically use pagelevel numbering to uniquely identify pages across all documents in a case.
Note the following facts that apply specifically to numbering pages:
When the Page ID field is numbered, LAW PreDiscovery™ will automatically update the
BegDoc# and EndDoc# fields to match those values. Other user-defined page-level fields
may be numbered as well.
In an Access case, with the exception of blanks, each Page ID must be unique.
SQL and ADS cases allow duplicate page IDs.
If duplicates are encountered during any of the numbering processes, either you will receive
an error, or LAW will modify the Page IDs by adding a " -DUP1", " -DUP2", etc. to the end of
them.
To configure numbering of documents and pages
© 2015 LexisNexis. All rights reserved.
496
LAW PreDiscovery
1. From the main window, on the Tools menu, click Options.
Or
From the Batch Processing tool, click Options, click OCR.
2. Click the Numbering tab.
3. Configure numbering options. These options are described as follows:
Option
Description
Use document/
page level
separator for
Page IDs
Specifies a character to use to separate PageIDs.
Use alphanumeric Bates
numbering
Adds a Bates number ending in either a number or an alphabetical
character.
The default is a period.
Bates numbers created with an ending alpha character are incremented
as abc001a, abc001b, abc001c, etc.
This functionality can be disabled by clearing the Use alpha-numeric
bates numbering check box.
To configure this option, on the Tools menu, click Options and then
click the Numbering tab.
By disabling this setting, LAW will number the same sequence as
follows: abc001a, abc002a, abc003a, etc. This is useful for Bates
numbering if the Bates numbers all contain the same alpha suffix.
Use document
Assigns a special suffix to a user-specified document level numbering
level attachment scheme for parent and attachment records.
numbering (ie.
ABC001[00-01]) When enabled, if the collection to be numbered contains parent and/or
attachment record types, the value specified by the user will be
appended with a suffix in this format:
[<attach number>-<total # of attachments>]
You can access this feature by first creating a document level index field
to populate with the desired numbering scheme.
Records that are not parents or attachments will not receive this suffix.
This feature only applies to editable document level index fields (as
opposed to page level numbering) and applies to the document
numbering batch process and the Auto Number feature, which is
available under the Edit menu.
Use rolling
numeric sections
(ie.
Changes the pattern of values to use for numbering.
The setting applies to auto-numbering, the batch document numbering
ABC.001.001.00 process, and both document-level and page-level fields.
01)
Section delimiter specifies the character that separates sections in a
numbering scheme. The default is a "." (period). For example, the
following contains four sections if the period is the chosen delimiter:
ABC.0001.001.0001
© 2015 LexisNexis, a division of Reed Elsevier Inc. All rights reserved.
Using LAW PreDiscovery
497
Rolling will not occur in sections containing non-numeric characters.
Section delimiter
Allows you to specify a character to use to separate sections.
The default is a period.
Allow page level
numbering to
span across
sections
Allow parent/
attachment
families to span
across sections
Numbers pages sequentially from page to page or from document to
document.
Values ending in a numeric suffix are incremented numerically (e.g.,
ABC001, ABC002 ... ABC027). Pages ending in an alphabetical suffix
are incremented alphabetically (e.g., ABC001a, ABC001b ...
ABC001z). This is the standard method of numbering records.
However, if numbering the documents using a split document/page level
scheme (e.g., ABC001-001, ABC001-002, ABC001-003 , with the next
document starting with ABC002-001), you must select Use document/
page level separator for Page IDs and then specify the character to
use for the breaks. The default is underscore (_).
To configure this option, in the main window, on the Tools menu, click
Options and then click Numbering.
If this option is enabled, and the break character is detected when
switching between documents, the portion of the string before the break
character will be incremented by one. The portion after the break
character will be reset to one and will use the same number of
characters for padding as the previous document.
To number documents or pages
You use the Auto-Number function to efficiently number or renumber document-level or
page-level fields of the current document or all of the documents from the specified page or
document to the end of the current folder.
You can use the Batch Processing tool to number documents and pages. For more
information see Document Numbering.
1. On the Edit menu, click Auto-Number.
2. The Number Document dialog box appears.
© 2015 LexisNexis. All rights reserved.
498
LAW PreDiscovery
3. Configure numbering options as needed:
Page Level or Document Level. The Page Level option will only apply to records with
associated images. When using page=level, any records without images are ignored.
Target Field. Select from the list of fields that are available for numbering (i.e., userdefined fields). If Page Level is chosen, then only page-level fields will appear in the list.
If Document Level is chosen, then only document-level fields will appear in the list.
Starting #. Type the starting number to be placed in the selected field.
The default starting number is the value of the Target Field for the currently selected
page or document.
Field names. For both document and page level numbering, users may also include a
specific field name in the Starting # field using the following notation: &[<field
name>]. For example, &[BegDoc#] will number the selected target field with the current
BegDoc# values. Multiple fields can also be used in the Starting # field. For example,
" &[Page] of &[Pages]" (without the quotes) will result in the text " 1 of 20" in the
selected target field.
The following fields can be used when numbering with field codes:
&[Page] – Current page of the document.
&[Pages] – Total pages in document.
&[Page ID] – Page ID value.
&[0] - &[000000000000] (12 zeroes) – Displays an incrementing value starting at 1
and resets at the beginning of each document. The zeroes are used to format the string
with zero padding.
&[<fieldname>] – Valid for all other LAW fields.
Production Notes
The document/page level numbering feature is not supported when used in
conjunction with the " ++" option on a LAW field.
If a numbering string ends with " ]" it is assumed the string ends with a field. This
string will not be automatically incremented by LAW to avoid the confusion of the
extra digits in the string. For example, &[Page]_001 becomes: 1_001, 2_002,
3_003,... but 001_&[Page] becomes: 001_1, 001_2, 001_3,...
The field notations explained above can also be used in the document numbering
batch process Starting # field.
© 2015 LexisNexis, a division of Reed Elsevier Inc. All rights reserved.
Using LAW PreDiscovery
499
The field replacement feature is not supported if Document Level Attachment
Numbering is enabled. To configure this option, on the Tools menu, click Options
and then click the Numbering tab.
If the currently selected record has an associated image, the Pages boxes will be
populated with the currently selected page and the ending page. If numbering
image records, set the starting and ending pages. If the ending page exceeds the
page count of the current image, LAW will only number to the end of the current
document.
If the Auto-number to end of folder option is selected and the user plans to
number a page-level field, the ending page is disabled and LAW will number all the
way to the end of the current folder. This feature helps to fix numbering mistakes in
a single document that cause subsequent documents in the folder to be incorrectly
numbered. If numbering a document-level field, LAW will automatically auto-number
to the end of the folder. If only the current document requires updating with a
document-level number, edit the field value in the Index display after ensuring the
field is visible.
Numbering during the scan process
You can automatically number pages as they are scanned. At scan time any gaps in the
numbering of originals are removed.
1. On the Index menu, click Increment Mode.
2. Select a mode:
Automatic. Forces all pages to be numbered based on the previous document. If no
previous document exists or the previous document is not numbered, LAW will prompt
for a starting number
Manual. Prompts you for the starting number whenever a new scan is started or a
break sheet is detected. This option is helpful if there are frequent gaps in the
numbering because it give you a chance to verify the starting page of each new batch.
The default Page ID will be the next logical Page ID, which is the same as would be
used with automatic numbering. If the page matches, then click OK to begin scanning.
Manual (Auto). Does the same thing as the manual mode, except that you are not
prompted to enter a starting bates number during a batch when break sheets are
used.
None. Disables document auto-numbering.
Document-level attachment numbering example
In this example, a parent document contains two attachments.
A starting number of ABC0001 is entered into the Number Document dialog box.
Use document level attachment numbering option in the Numbering tab is selected.
The user has created a document level text field named ProdNo, which is selected in the
Number Document dialog box.
© 2015 LexisNexis. All rights reserved.
500
LAW PreDiscovery
The selected document level field, after numbering is complete, will contain the following:
ABC000001[00-02] - parent
ABC000001[01-02] - attachment 1
ABC000001[02-02] - attachment 2
If an attachment is included in a collection to be numbered without its parent, the parent will
also receive a value in the selected field, since the attachment's value relies on the parent's
value. Any other attachments of the same record not included in the selected range will not
be numbered. If the parent already contained a value, the attachment value will be based
on the parent's numbering scheme even when attempting to auto-number. Therefore, the
parent's field must be cleared or the entire family range must be selected in order to
renumber with a different scheme.
If an attachment range is modified after numbering a family using this feature, the family will
need to be renumbered. This will not be done automatically.
Prior to using this feature and exporting from LAW, ensure the target application supports
the brackets and dashes included in the scheme if utilizing the field containing these values
as the image tag or file naming scheme.
Modifying the default suffix
An initialization setting in the Law50.ini file is available to modify the default suffix of
[<attach number>-<total # of attachments>] .
The Law50.ini file is located in the C:\<Windows> directory.
If the [Preferences] section already exists, place AttNumSuffix=[00-00] below it.
[Preferences]
AttNumSuffix=[00-00]
The value shown, [00-00], is the default format. This suffix is used if the initialization
setting does not exist or is invalid. The value that is used must contain:
Opening and closing characters, such as brackets or parentheses. Ensure the two
characters are different.
© 2015 LexisNexis, a division of Reed Elsevier Inc. All rights reserved.
Using LAW PreDiscovery
501
A separator character, such as a hyphen.
At least one zero character before and after the separator character. The minimum value
is: [0-0]. The number of zeroes before or after the separator pads the value with
zeroes. For example, [000-000] displays as [002-009].
This feature is not supported when auto-numbering with field codes included, such as
&[Page ID].
To number individual pages manually
The auto-numbering functions work well for numbering batches of sequentially numbered
pages. However, if frequent gaps in the numbering scheme or intermittent alpha suffixes on
pages exist, users may have to manually edit Page IDs.
1. Select the page to renumber and then:
On the Index menu, click Edit Page ID.
Or
Press CTRL+E.
The Edit Page ID dialog box appears.
2. Type a new Page ID for the selected record.
You can use the arrow controls to navigate between pages. Use these controls if you
want to manually select individual pages for renumbering, or if you want to designate
a starting point for auto-numbering.
If necessary, select Auto-number to end of document. This option extends the
numbering as specified in the Page ID box from the currently selected page to the end
of the document.
3. Click Update.
The Edit Page ID feature will allow you to change the page number on a page or
the entire document. If you need to renumber the document or an entire folder,
use the Document Numbering feature.
To find a page by PageID
© 2015 LexisNexis. All rights reserved.
502
LAW PreDiscovery
1. Press CTRL+F.
Or
On the Index menu, click Find Page ID.
2. Type the page ID that you want to find and then click OK.
The page with the matching Page ID opens.
To locate groups matching a specific pattern or ranges of Page IDs, use the Query
Builder.
Rolling numbering more information
This example illustrates the use of the the rolling numbering feature.
The Use rolling numeric sections setting is enabled and the value ABC.0001.001.0001
used to number a document-level index field.
ABC.0001.001.9998
ABC.0001.001.9999
ABC.0001.002.0001
ABC.0001.002.0002
If the Use rolling numeric sections setting is disabled, the values will be incremented as
follows (using the above example values):
ABC.0001.001.9998
ABC.0001.001.9999
ABC.0001.001.10000
ABC.0001.001.10001
Note the following facts about this example:
By default, when the numbering sequence increments high enough to roll into the next
section, the section that rolled will increment back to the value of "1" instead of "0". So
001.999 becomes 002.001 (not 002.000).
The other settings on the Numbering tab can be used with the rolling numeric sections
option. When the document/page level separator is enabled, the number will first be split
into prefix and suffix sections and then incremented accordingly. If either the prefix or
the suffix contains a matching rollover character, rollovers will occur at the page and
document levels.
The alpha-numeric Bates numbering setting may be used with rolling sections as well.
For example, ABC.999.999.9999 would increment to ABD.000.000.0001 with both
settings enabled. If the alpha-numeric option is disabled while rolling numeric is enabled,
the value would become ABC1.000.000.0001. However, if a non-numeric character
exists in a section, that section will not rollover. For example, 001.99z would increment
to 001.99aa.
If Use document level attachment numbering is enabled, the [00-00] suffix will be
applied to the end of the user-defined starting value. The rollover calculations occur prior
to appending this suffix.
© 2015 LexisNexis, a division of Reed Elsevier Inc. All rights reserved.
Using LAW PreDiscovery
503
The sub-option, Allow page level numbering to span across sections, will determine
whether or not pages of a document will span across more than one document level.
This numbering option allows users of Ringtail to number documents in conformance with
the numbering scheme utilized frequently in Australia for document productions.
Related Topics
Launching the Grids
Batch Updating
Tagging Records
Incremental Numbering Syntax for Pages
Incremental Numbering Syntax for Pages
You can auto-number documents on a page level, using a seed value contained in an index
field. For example, if you have a file name field such as ABC0001 you can number PageID's
based on the field and with each page incrementing automatically.
When you number a page level field with a document level index field, use &[<Field Name>]
to apply the value of the document level field to the page level destination field for each page.
To increment the document field for each page use the syntax:
&[<Field Name>]++
Adding ++ at the end of the field increments the document level index field for each page in
the document.
This ++ syntax is also used in the endorsing function in batch processing when applying
headers and footers.
Related Topics
Launching the Grids
Batch Updating
© 2015 LexisNexis. All rights reserved.
504
LAW PreDiscovery
Tagging Records
Numbering Documents/Pages
Batch Updating
A batch update applies the same update to multiple documents at one time.
Note the following facts about batch updates:
Batch updates can be run either from a grid view or from the main window.
A batch update run from a grid view applies the update to the records listed in the grid.
A batch update run from the main window applies the update to pages and documents
selected under the Index tab of the main window.
For more information about selecting records using grids see Launching the Grids.
For more information about updating documents individually, see Document-Level Coding.
Batch updates in grid views
1. From a standalone grid or embedded grid click the batch update button:
.
2. The Batch Update dialog box appears.
© 2015 LexisNexis, a division of Reed Elsevier Inc. All rights reserved.
Using LAW PreDiscovery
3. Select fields and values to update.
To add a field initially, click in the empty field cell, click again on the list control that
appears in the cell, and then select a field from the list.
To add or remove fields, select the field and then click Add Field or Remove Field.
4. Select Auto-increment selected text/memo fields, if necessary. When enabled any
value entered for text or memo type fields increment by one for each updated record.
This feature could be used to assign a new, unique identifier to all or a subset of
documents in a case.
5. Click OK.
A message box appears that reports the number of records updated.
6. Click OK.
Batch updates in the Index tab
© 2015 LexisNexis. All rights reserved.
505
506
LAW PreDiscovery
1. Select the documents to be updated.
For example, in the following screenshot, these pages are selected: 0002, 0004, 0006,
0007, and 0009.
2. Enter the common values in the fields that you want to update.
For example, in the following screenshot, in the SourceApp field, Microsoft Word is
selected. The SourceApp field in each record selected in the previous step will be
updated with Microsoft Word.
3. Click Update.
© 2015 LexisNexis, a division of Reed Elsevier Inc. All rights reserved.
Using LAW PreDiscovery
The Batch Update dialog box appears.
4. Select any fields to be updated.
In the following screenshot, SourceApp is selected for update.
5. Click OK.
6. Click OK in the Batch Update message box, which confirms that updates were
successful.
Related Topics
Document-Level Coding
Launching the Grids
Tagging Records
© 2015 LexisNexis. All rights reserved.
507
508
LAW PreDiscovery
Using Text Files for Coding
LAW PreDiscovery™ can import delimited text files to link records in LAW with existing index
information stored in delimited text format. This feature is useful when coding was performed in
another application, for example.
To import delimited text files
1. On the File menu click Import, and then click Delimited Text.
2. The Import Delimited Text dialog appears.
3. Select a delimited text file (*.csv , *.txt) to import.
A sample of the data contained in the file is displayed. This preview can be used to check
the order of the fields being imported and whether or not the first record contains the
field names.
4. If necessary, adjust the Character Encoding value to ensure the file is parsed correctly.
5. To ignore the first row if the first record of the file contains field names, select First row
contains field names.
6. Select the fields being imported from the list of Available Fields according to the
following requirements:
The fields must appear in the same order as they appear in the text file.
The records must either be already numbered (i.e., PageID for image records) or have
at least one coded field to act as the image tag. Otherwise, the coded data cannot be
linked to the images.
Select Image Tag must be marked as one of the fields to import. The Image Tag field
must be selected because it is used to match the imported data with existing records.
It acts as a "link" between the records in the imported field information and the
existing records in the LAW case. If no match is found for the incoming record, it will be
ignored. If a duplicate match is found, both records matching the Image Tag value
found in the LAW case will be updated with the same information.
7. Select <!-SKIP FIELD-> for fields not to be imported.
8. Select a Data Delimiter to allow other types of delimited files to be imported.
9. Click Begin.
To return the options on this page to their original values, click Restore Defaults. This
action resets the delimiters back to the default comma/quote delimiters.
Related Topics
© 2015 LexisNexis, a division of Reed Elsevier Inc. All rights reserved.
Using LAW PreDiscovery
509
Importing Cases and Load Files
Document-Level Coding
Batch Updating
Numbering Documents/Pages
Creating Tag Fields
Tag fields allow you to mark document or pages with a Boolean value (yes or no). Tags can be
used for any number of purposes, for example, to mark documents that must be converted to
TIFF or PDF or that have already been converted. Tagging may be performed on individual
records, on all records in a case, or on filtered results. Users may also import a list of unique
IDs to toggle tag values.
The tagging feature has multiple uses. Users may choose to tag documents that need to be
converted to TIFF or PDF, produced to paper, responsive documents, etc. Users may even wish
to tag documents that should be produced at a larger paper size or produced in color. This
feature makes it easier for any project, scanned or electronic discovery, to be produced.
Before documents can be tagged, one or more tag type index fields will need to be created.
To create tag fields
1. On the Index menu, click Modify Fields.
Or
From the main menu, click the Manage Your Profiles button:
2. The Modify Fields dialog box appears.
© 2015 LexisNexis. All rights reserved.
.
510
LAW PreDiscovery
3. Click Add Field.
The Add Field dialog box appears.
4. Type a name for the tag field and then make a selection from the Table list as DocumentLevel or Page-Level. For example, if you are creating a field to identify pages having
suspect footers, select Page-Level. If you are creating a field to identify documents that
are ready for export, select Document-level.
5. Select Tag (Boolean) for the type.
6. Select Insert at top of list to insert the field at the top of the list in the Index display,
making the field easier to locate.
Leave Indexed and Unique unselected.
© 2015 LexisNexis, a division of Reed Elsevier Inc. All rights reserved.
Using LAW PreDiscovery
511
7. Click OK to create the tag field.
The process of tagging documents is discussed in the Tagging Records topic. For more
information on creating index fields, see the Creating Index Fields topic.
Related Topics
Launching the Grids
Batch Updating
Tagging Records
Tagging Records
You use tag fields to mark records with a Yes or No value. In the grid displays, a Yes value
appears as a checked checkbox. A No value appears as an unchecked checkbox. Tag fields are
potentially useful for many purposes, such as tracking status of records. To learn how to create
a tag field, see Creating Tag Fields.
You can tag records by using any of the following methods:
Select records to update using the mouse.
Edit records using hotkeys.
Batch update.
Tag list import. See the Importing Tag Lists topic for information on the third method of
tagging multiple documents.
To tag records individually using a mouse
1. Open a grid display.
2. Make sure the tag field you want to work with is visible. Right-click the field names title
bar.
The Field List dialog box appears.
3. Select your tag field.
© 2015 LexisNexis. All rights reserved.
512
LAW PreDiscovery
4. In the grid, select or deselect the checkbox in the tag field for the record.
To tag multiple records at once
1. Open a grid display.
2. Make sure the tag field you want to work with is visible.
3. Right-click the field names title bar.
The Field List dialog box appears.
4. Select your tag field.
5. Filter records as needed.
6. Select rows to tag or leave rows unselected to tag all.
7. Right-click a cell in the tag field and then click one of the options:
Tag Selected Rows as Yes. Marks selected rows as Yes.
Tag Selected Rows as No. Marks selected rows as No.
Toggle Tag for Selected Rows. On selected rows, changes tags marked No to Yes
and tags marked Yes to No.
Tag All Rows as Yes. Tags all rows in current view, whether selected or not to Yes.
Tag All Rows as No. Tags all rows in current view, whether selected or not to No.
Toggle Tag for All Rows. Regardless of selection, changes any tag in current view
marked No to Yes and any tag marked Yes to No.
A message box provides the number of records updated.
8. Click OK.
To tag using hotkeys
You can assign a hotkey to tag fields. Tagging fields using a hotkey can be more efficient
than using the mouse to select records. To tag using hotkeys you must perform three
steps:
1. Assign hotkeys to tags. In this step you create a link between a keyboard key, such as
F1, and a tag field.
2. Enable review mode. In this step you prevent conflicts between your hotkeys and those
provided by default in LAW PreDiscovery. Enabling review mode temporarily suspends all
default hotkeys in LAW PreDiscovery and allows the hotkeys you assigned to function
according to your configuration choices.
3. Tag records using hotkeys. In this step you use the assigned hotkey to edit the value in
the tag field.
© 2015 LexisNexis, a division of Reed Elsevier Inc. All rights reserved.
Using LAW PreDiscovery
513
These steps are described in the sections that immediately follow:
To assign hotkeys to tags
1. In a standalone or embedded grid click the Tagging Hotkeys button:
.
The Tagging Hotkeys dialog box appears. All existing tag fields are listed in the Tag Field
column.
2. Select a hotkey for any tag field listed and then click OK.
To enable review mode
1. In a standalone or embedded grid click the Review Mode button:
.
A message at the bottom of the grid indicates that review mode is enabled:
When enabling review mode in the embedded grid, a Review Mode Enabled message
box will appear after clicking the review mode button. The button will appear
"depressed" to indicate that review mode is enabled (in both grids).
When you are finished tagging with hotkeys, to disable review mode in either grid, click
the Review Mode button again.
© 2015 LexisNexis. All rights reserved.
514
LAW PreDiscovery
To use hotkeys to tag records
1. In a standalone or embedded grid click with review mode enabled, use the up and down
arrow keys to navigate through the records in the grid display.
2. After a relevant record is found, press the assigned hotkey to toggle the tag value in the
tag field.
The cell displays a green check mark when a record is flagged with the Yes value.
Press the hotkey a second time to toggle the current value.
When you are finished tagging with hotkeys, to disable review mode in either grid,
click the Review Mode button again.
To tag using batch updates
Batch updating is the process of applying the same value to an index field for multiple
records. This feature can be used for tagging in addition to updating any other type of userdefined or any other unlocked index field. In most cases, the batch tagging options
mentioned above will be more efficient than using this feature when working with tag fields.
1. Perform a search or filter to ensure only the desired records are displayed in the grid.
2. On the Edit menu, click Batch Update.
The Batch Update dialog box appears.
3. Click within the cell in the Field column and then choose a tag field from the drop-down
list.
When a tag field is selected, a check box will appear in the associated Value cell.
4. Update the current record set as follows:
To update records to Yes, select the checkbox in the Value field.
To update records to No, deselect the checkbox in the Value field.
5. Click OK.
All records currently displayed in the grid are updated.
Related Topics
Launching the Grids
Batch Updating
Creating Tag Fields
© 2015 LexisNexis, a division of Reed Elsevier Inc. All rights reserved.
Using LAW PreDiscovery
515
Importing Tag Lists
Importing Tag Lists
The tag import file is a text (.txt) or comma separated value (.csv) file containing a list of unique
identifiers used to locate the records in the case. The unique identifiers typically used in tag
lists are the DocID or BegDoc# field. Tag lists make it easier to:
Flag multiple records. This feature is especially useful when native or imaged files have
already been distributed and further action such as converting to TIFF or PDF or printing a
production set with specific documents is required.
Find records in a database created by a database application other than the type
associated with the case. If a different type of database was used to flag records and a list
of documents to be produced was created, this list may be easily imported into the existing
LAW case and later queried to locate the records for further processing.
To import a tag list
1. On the File menu, click Import and then click Tag List.
2. The Import Tag List dialog box appears.
© 2015 LexisNexis. All rights reserved.
516
LAW PreDiscovery
3. Click Browse to locate the tag import file.
If the import file's first record contains the field name, check the First row contains field
names box. The range delimiter is used when importing ranges of records to be updated
rather than a list of individual ID numbers (i.e. ID0001-ID0048).
4. Configure Target Field, Action, and Flag Value as needed. Note the following when
configuring these options:
The Document ID Field lists fields that may be used to link the incoming import file
with existing records. For example, if the user is provided a text file containing a list of
DocIDs that match the DocIDs in the case, then the user would select DocID as the
Document ID Field.
For greater performance in cases with a large number of records, it is recommended to
apply an index to the selected Document ID field. You can manually apply a tag to a
field by using the Modify Fields dialog box. However, LAW PreDiscovery™ will check for
the existence of an index on the selected Document ID field. If the field is not indexed
after initializing the import, LAW will allow the addition of an index for the selected
Document ID field at that time. When adding an index using this method, the grid
displays will need to be closed prior to adding the index. If the grid is active, LAW will
display a prompt requesting the grid be closed in order to continue.
© 2015 LexisNexis, a division of Reed Elsevier Inc. All rights reserved.
Using LAW PreDiscovery
517
A memo field cannot be used as the Document ID field.
The Target Field is the field to be updated with the "tag" value. If a tag field is
selected, the Flag Values will appear as "True" and "False". The Action drop-down will
have two options: Update (which will update the records with the specified Flag Value)
and Reverse (which ignores the Flag Value and simply toggles the current value of the
tag field for each affected document). If other field types are selected, such as a text
field, the Action options will change to Update (explained above) and Append, which
allows users to append the specified Flag Value to any existing field data. Date fields
will only have an Update option.
5. Click Add.
The entry is added to Selected Fields.
6. Select additional target fields as needed.
7. Click OK.
The import process starts.
After the import is complete, a report appears that lists the number of records that have
been updated and any errors that may have occurred during the import. These records
may then be returned by a search using the filter functions or query tools.
Related Topics
Launching the Grids
Batch Updating
Creating Tag Fields
Coding at Scan Time
Data may be coded at the same time the document is scanned. For efficiency purposes, coding
at scan time is performed when the same value will exist for multiple records such as a Box or
Folder label.
To code at scan time
1. Select the folder in which documents will be scanned.
© 2015 LexisNexis. All rights reserved.
518
LAW PreDiscovery
2. Place the document in the scanner feeder.
3. Enter the values you need to populate.
4. Press F3.
The new document is scanned and the field is populated accordingly.
Related Topics
Scan Options
Imaging Options - Barcodes
Coding
OCR
Optical character recognition (OCR) refers to the process of converting the printed text that can
be found on a physical page or image file to machine-readable text. The text extracted from
documents can then be indexed and queried.
The OCR batch process performs OCR on documents that are flagged as ready for OCR. The
first step in performing OCR is to set the OCR flag status to ready for OCR.
In this section
OCR Overview
Discusses considerations for performing OCR. Provides procedures for determining if
documents contain text, and for determining if OCR has already been performed on
documents.
Flagging Documents/Pages for OCR
Provides instructions for applying OCR status tags to documents and pages.
OCR Options
Explains various options you can configure that determine how OCR proceeds, including:
selection of OCR engine, page layout, OCR quality, language, output formats, page
© 2015 LexisNexis, a division of Reed Elsevier Inc. All rights reserved.
Using LAW PreDiscovery
519
markers, auto-deskew, PDF thumbnails, refreshing page layout and pictures, overwriting
existing text files, and resetting text index status.
Performing OCR
Provides instructions for performing the OCR process at the document level or page level.
Explains how to configure OCR so that just a region of the page is scanned.
Creating Searchable PDFs
Provides instructions for creating searchable PDF files in the same process as performing
OCR.
OCR Overview
Take into account the following considerations before performing OCR on documents:
OCR does not offer perfect recognition of text. Accuracy can be reduced by many conditions,
including:
Text appears skewed or uneven on the page.
Pages are dusty, folded, or torn.
Letters are faded, blurry or otherwise distorted.
Non-standard typefaces are used in documents.
OCR is a CPU-intensive activity and can require significant time and computing resources to
carry out large jobs. OCR processing speed is typically between 1 to 2 pages per second.
However the actual processing rate depends on many factors, including:
Processing power and memory of computer performing OCR.
The number of computers involved in OCR processing. You can configure OCR processing
to be distributed among multiple computers. For more information see Distributed Batch
Processing.
The amount of text and other information on pages.
The quality of the original documents. Before you perform OCR on a batch of documents,
consider applying filters to deskew, remove dust and lines, and clean up images in other
ways.
Determining if a document contains text
The Text display in the main interface will indicate the presence of text for the current
document, which may be OCR text, text extracted during an ED Loader import, text imported
with load file records or raw images, or text pulled during a TIFF/PDF conversion.
To choose the type of text to display
© 2015 LexisNexis. All rights reserved.
520
LAW PreDiscovery
In the Text display, right-click and then select a source type from the context menu.
When an image is selected, the Text button has a small "page" icon on it if there is text
for that image, with the actual text displayed below the button.
WordPerfect and HTML formats cannot be displayed in this viewer. The Text display is
for viewing purposes only. If a user needs to edit the OCR, simply double-click the text
to launch the text in the editor registered for that file format. If there are multiple OCR
formats for the same image, users can right-click on the OCR text and specifically select
the format to open from a pop-up menu.
Determining OCR status
LAW PreDiscovery™ displays a green flag, yellow flag, or red flag, or no icon at all to the
selected record, depending on the OCR status for that image. You can flag all, none, or
selected pages only for the OCR process. (See the Flagging Documents/Pages for OCR topic
for more details.) The OCR indicator gives users a quick visual representation of the OCR
status for the current document. One of the following icons will be displayed on the Text
button when a document is selected:
- Page icon, the OCR has been completed for the document (or text has been
extracted during an ED Loader import)
- Green flag, the document has one or more pages flagged for OCR
- Yellow flag, OCR process was cancelled while processing a document
- Red flag, error occurred during OCR
If no icon is displayed, no pages for the current document have been flagged for OCR.
Related Topics
Batch Updating
Flagging Documents/Pages for OCR
OCR Options
OCRing Documents
© 2015 LexisNexis, a division of Reed Elsevier Inc. All rights reserved.
Using LAW PreDiscovery
521
Flagging Documents/Pages for OCR
OCR functionality in LAW PreDiscovery is controlled by values that are assigned to two special
OCR system fields. This topic describes these fields, the values each can assume, and how to
view or re-assign values to these fields in order to review and control OCR operations.
OCR fields
LAW maintains two fields in the database to track the status of pages with regard to OCR:
OcrStatus and OcrFlag. These fields and their possible values are described in the following
table:
Field and description Possible values
OcrStatus
Y = One or more pages are flagged as ready for OCR
A document-level field
that indicates the OCR
status of a document.
N = No pages are flagged
C = OCR is complete on the document
I = OCR was cancelled
E = Error occurred during the OCR process
P = Processing (special flag used by LAW during the OCR process
OcrFlag
Y = Page is flagged as ready for OCR
A page-level field that
tracks the OCR status
of each page of a
document.
N = Page is not flagged (will be skipped)
C = Page is complete
E = Error occurred OCRing page
In many cases, LAW assigns values to OCR fields automatically. For example, if you use ED
Loader to import electronic discovery with text extraction enabled, records with extracted
text should have OcrStatus of N and records with no text extraction should have OcrStatus
of Y. Because you may still want to access the text of a document whose text extraction
operation failed, LAW automatically assigns a Y to the OcrStatus field.
LAW PreDiscovery™ uses the processing flag (P) to mark a document in the process of being
OCR'd. This allows multiple workstations to OCR the same set of documents simultaneously
without having to worry about overlapping OCR. Using multiple stations to share the OCR
process provides an extra layer of redundancy. If one machine locks up or crashes during
the OCR process, one or more other stations can continue to OCR that set of documents.
To flag items manually
1. Select the pages to be flagged.
2. Do one of the following:
On the Page menu, click Flag for OCR.
© 2015 LexisNexis. All rights reserved.
522
LAW PreDiscovery
Or
Right-click on a page thumbnail and then click Flag for OCR.
To flag multiple items
Resetting the OCR flags for multiple documents can be done in either of the following ways,
depending on whether the documents are currently viewed in a folder or from a query.
If all of the documents are in the same
folder
1. Select the documents in the document list.
2. On the Edit menu, select Reset OCR Flags
and then click ON or OFF.
If the documents span multiple folders
and can be logically grouped in a query
In the grid display, on the Tools menu,
click Reset OCR Flags and then click ON
or OFF.
If you use the single-document OCR process, all pages are included regardless of the
OcrFlag field value.
To set OCR flags at scan time
© 2015 LexisNexis, a division of Reed Elsevier Inc. All rights reserved.
Using LAW PreDiscovery
523
On the Scan menu, select Scan Options, and then click OCR All New Pages.
Or
In the status bar at the bottom of the main form, toggle the setting. Double-click
OCR(Y) or OCR(N).
To display flagged pages
On the Page menu, select Show OCR Flags.
In the thumbnail display, all pages flagged for OCR are highlighted. If the thumbnail
display is not active when this function is selected, it automatically becomes active so
that the thumbnails are shown. This function only highlights pages that are flagged for
OCR. It will not highlight pages that have already been completed.
Related Topics
Batch Updating
OCR Overview
OCR Options
OCRing Documents
Reorganizing Documents
OCR Options
You can specify various optical character recognition (OCR) options by doing one of the
following:
From the main window, on the Tools menu, click Options and then click the OCR tab.
Or
From the Batch Processing utility, on the Options menu, click OCR Settings.
OCR engine
© 2015 LexisNexis. All rights reserved.
524
LAW PreDiscovery
LAW PreDiscovery™ supports two OCR engines:
ExperVision OpenRTK
Is included with the LAW installer.
Is the faster of the two engines by 2-3 times.
ABBYY FineReader
Installed separately from LAW PreDiscovery and can be obtained by LexisNexis when
purchasing the ABBYY OCR license.
Slower than ExperVision OpenRTK but supports Chinese, Japanese, and Korean (CJK)
languages.
Can create PDF/A files.
Both engines support the creation of searchable PDF files and are able to produce < image
>.ocr files, which are used in the Storm and IPRO applications for highlighting search hits on
images.
Xerox TextBridge engine was included with previous versions of LAW PreDiscovery but
is no longer supported by LexisNexis.
Page layout
These options improve OCR accuracy by specifying the layout of the pages.
Auto Detect - Automatically determines the layout of the page. This is the default option.
Single Column - Specifies that one column of text exists on a page.
For the unsupported Xerox TextBridge engine, two special page layouts are available
that can be used to OCR pages that are broken into even quadrants: "Quadrants, left
to right" and "Quadrants, top to bottom." Both settings will OCR the page as if it were 4
separate pages condensed onto a single page. The left to right setting will OCR the 4
quadrants in the following order: upper left, lower left, upper right, lower right. The top
to bottom setting will process in the following order: upper left, upper right, lower left,
lower right.
Quality
Specifies the type of printing technology used to create the original documents and the print
quality of the scanned pages.
Normal - Use this for pages printed with inkjet printers, laser printers, or offset
lithography. This is the default.
Normal (Degraded) - The same as Normal, except that the print quality is known to
contain some distortion or blemishes due to poorly printed originals, photocopying,
heavy use, or aging.
Dot Matrix - Use this for pages printed using dot matrix printers, which include many
early printer models as well as many types of printed receipts, such as from cash
registers and ATM machines.
© 2015 LexisNexis, a division of Reed Elsevier Inc. All rights reserved.
Using LAW PreDiscovery
525
Dot Matrix (Degraded) - The same as Dot Matrix, except that except that the print
quality is known to contain some distortion or blemishes due to poorly printed originals,
photocopying, heavy use, or aging.
Note also the following when selecting a quality option:
When a setting other than Normal is selected, OCR engine performance may be
reduced.
ABBYY FineReader engine supports a quality setting called Magnetic Ink Character
Recognition (MICR). This is the technology used for the routing numbers on personal
checks and for other documents designed to be machine readable.
The Auto Detect setting with Xerox TextBridge OCR accommodates varying quality levels
among originals.
Language
The Language setting is used to specify the language dictionary the engine should use
during the OCR process. If the correct language is not selected prior to the OCR process, the
characters may not be recognized properly.
If ABBYY FineReader is the selected engine, English will automatically be used as a second
language if a non-English language is selected. For example, if Greek is selected and both
Greek and English exist in the source image, ABBYY FineReader differentiates the languages
and performs recognition for both. However, if a document contains Greek, and English is
selected as the language, Greek characters will not be interpreted or rendered correctly in
the text. This only pertains to documents containing Unicode characters, such as Chinese,
Japanese, Korean, Greek, or Russian. Languages that share many common characters in
their alphabet, for example, English, Spanish, French, German, Dutch, and Portuguese will be
interpreted correctly when existing in the same document if any of these languages are
selected.
If additional languages are required, an updated ABBYY installer containing all available
languages is available for download at http://www.imagecap.com/installs/
ABBYYEngine91.exe.
Languages added to LAW PreDiscovery will be available for selection in the Language
list on the OCR tab in the Options dialog box, and LAW PreDiscovery will be able to
recognize the language characters during the OCR process, and accurately search for
the language characters in the extracted OCR text.
For the unsupported Xerox TextBridge engine, the System Default setting uses whichever
language is specified by Windows as the default.
Output format
This feature is used to select the output format produced by the selected OCR engine. The
available output formats and licensing requirements are in the following table:
Output format
© 2015 LexisNexis. All rights reserved.
License required
526
LAW PreDiscovery
Smart Text Document
OCR (ExperVision OpenRTK)
Standard Text
Document
OCR (ExperVision OpenRTK)
-OROCR (ABBYY FineReader)
HTML
OCR (ExperVision OpenRTK)
-OROCR (ABBYY FineReader)
Word for Windows
OCR (ExperVision OpenRTK)
-OROCR (ABBYY FineReader)
Word for Windows
(2007)
OCR (ABBYY FineReader)
WordPerfect
OCR (ExperVision OpenRTK)
Adobe PDF (Normal)
OCR (ExperVision OpenRTK) + OCR (ExperVision PDF add-on)
-OROCR (ABBYY FineReader
Adobe PDF (w/ Hidden OCR (ExperVision OpenRTK) + OCR (ExperVision PDF add-on)
Text)
-OROCR (ABBYY FineReader)
Adobe PDF/A (Normal) OCR (ABBYY FineReader)
Adobe PDF/A (w/
Hidden Text)
OCR (ABBYY FineReader)
If planning to export OCR results for searching functionality, using one of the text
settings is recommended as most export formats do not support non-text OCR.
The Smart Text and Standard Text are essentially the same, both producing standard ANSI
text output. See Creating Searchable PDFs for more information when using the Adobe
output options to create searchable PDF files.
Page markers
This option allows LAW to "stamp" the resulting OCR with a Bates number or page value
using information retrieved directly from the LAW database. This feature is useful for
providing 100% accurate Bates values in the OCR text to aid searching in certain
applications.
Page Markers can be customized via the law50.ini file located in the C:\Windows directory.
By placing the PageStampText= section under the [OCR] key, the text stamped by the Page
Marker feature can be customized. Currently supported fields are:
© 2015 LexisNexis, a division of Reed Elsevier Inc. All rights reserved.
Using LAW PreDiscovery
527
&[Page] - Current page
&[Pages] - Page count
&[Page ID] - Bates number
&[BegDoc#] - Beginning document number
<CR> - Carriage return (new line)
Example
The following page marker: PageStampText=###&[Page]|||Page &[Page ID]^^^
Results in a stamp of: ###1|||Page ABC0001^^^
This value increments for each OCR page stamped.
Auto-Rotate
This option specifies if the OCR engine should automatically rotate images for the OCR
output. The three options are:
Always ON
Always OFF
Binary Images Only - Auto-rotates monochrome (black and white) images. This option
can help to prevent color and grayscale images that have little or no text from being
improperly rotated. This setting is available with the ExperVision engine.
Auto Deskew
Enable this option to force the OCR engine to deskew the image before OCRing the
document. This can often lead to more accurate OCR (depending on the type of document).
However, if the document contains graphics or angled vertical lines, the deskew feature may
align to these graphics and cause unexpected results. Disabling this option will OCR the
document with its current orientation. This feature is only available if the ExperVision OCR
engine is selected.
Create PDF Thumbnails
The OCR engines automatically create thumbnails during the Searchable PDF creation
process. Use this setting to set the "visible" property of the thumbnails when opening the
PDF file in Adobe Acrobat. If this setting is checked, the thumbnails will be viewable
automatically in Adobe Acrobat; otherwise, the thumbnails will be hidden under the Pages
tab in Adobe Acrobat.
Retain Page Layout
This setting determines whether the layout of the page (columns, etc.) will be preserved in
the OCR results (non-text output formats only).
© 2015 LexisNexis. All rights reserved.
528
LAW PreDiscovery
Retain Pictures
This setting determines whether pictures in the original will be preserved in the OCR results.
This setting does not affect the results if the output format is set to text. Pictures are not
retained in text files.
Overwrite Existing Files
Use this setting to prevent or allow the replacing of existing OCR text. This feature is useful
if some documents already contain usable OCR text files and the only the files that do not
contain an existing text file should be included for processing. If an existing text file is
detected for the current document, the OCR engine will skip the document and move onto
the next, thus saving processing time. It may also be necessary at times to replace all
existing text files; checking this option will replace the OCR for each document.
Reset Text Index Status
De-selecting this option will prevent LAW from re-flagging the document for indexing after
the OCR process is performed. This means the OCR text for affected records will not be
searchable in LAW. See the Full Text Indexing topic for more information.
Related Topics
Batch Updating
OCR Overview
Flagging Documents/Pages for OCR
OCRing Documents
Performing OCR
The OCR process can be performed at the document level, page level, or by region.
Before performing OCR on any documents in LAW, verify that the OCR Options have been set to
ensure the proper output format. For example, if planning to export documents into a retrieval
application that uses OCR text for searching, select standard or smart text as the output
format.
© 2015 LexisNexis, a division of Reed Elsevier Inc. All rights reserved.
Using LAW PreDiscovery
529
OCR should be performed after document boundaries are fixed. For any non-text format, LAW
PreDiscovery™ may not be able to merge or split the OCR files if document boundaries change
after the OCR has been created. If the OCR files cannot be modified, the OCR process will need
to be run again on the document(s) in the modified range.
Single document OCR
To OCR a single document or pages of a single document
1. Open the document to OCR.
2. Press CTRL+O.
3. If the File Already Exists dialog box opens, click Yes to rescan the file and overwrite
previously extracted text, or press No to cancel the OCR operation.
To OCR only certain pages of a document
1. Select the pages to OCR in the thumbnails display.
2. Select a page.
3. On the Tools menu, click OCR, and then click Document.
4. If pages of the document have already been flagged for OCR, select Page and then click
Show OCR Flags.
5. The flagged pages are selected.
See Flagging Documents/Pages for OCR for more details.
6. On the Tools menu, click OCR and then click Selected Pages.
Multiple document OCR
To OCR multiple documents, run the OCR process from the Batch Processing utility. During
batch processing, only documents and pages flagged for OCR will be included in the OCR
results. For more information flagging documents for OCR, see Flagging Documents/Pages
for OCR.
1. From the main window, on the Tools menu, click Batch Processing.
2. In the Processes area, select OCR.
3. On the Options menu, click OCR Settings.
4. Configure OCR options as needed. For more information on OCR settings see OCR
Options.
5. Click OK and then click Begin.
© 2015 LexisNexis. All rights reserved.
530
LAW PreDiscovery
To OCR a page region
Another available option is to OCR a specified region of an image. This feature is useful for
coding information directly from a document to a field without having to retype it.
1. With a page open in the Image tab, press and hold the CTRL key.
2. Drag the mouse over the image to create a resizable rectangle.
3. Release the mouse.
4. Resize and move the rectangle selection tool as needed. To remove the highlight, press
ESC or open a different document.
© 2015 LexisNexis, a division of Reed Elsevier Inc. All rights reserved.
Using LAW PreDiscovery
5. Right click the rectangle selection and then click OCR Region.
© 2015 LexisNexis. All rights reserved.
531
532
LAW PreDiscovery
6. In the OCR Results dialog box, select options for working with the text:
Copy results to the clipboard - Copies the text to the system clipboard. Use this option
if you want to paste the text into a different program.
Send results to an index field - Copies the text to an index field of your choosing.
Parse results into Name/Value pairs - Extracts name/value pairs from the selected
area.
7.Click OK.
Related Topics
Batch Updating
OCR Overview
Flagging Documents/Pages for OCR
OCR Options
Creating Searchable PDFs
You can create searchable PDF files in the same process as performing OCR. This feature
requires one of the following license configurations:
© 2015 LexisNexis, a division of Reed Elsevier Inc. All rights reserved.
Using LAW PreDiscovery
533
OCR (ExperVision OpenRTK) + OCR ExperVision PDF add-on
ABBYY FineReader license for LAW PreDiscovery
After the searchable PDF files are created, those records will have:
An associated image file.
A text file containing the OCR text of the document.
An .OCR file that contains coordinates for on-image hit highlighting in Storm and IPRO.
A PDF+ file. The PDF+ file is the searchable PDF.
To configure OCR for searchable PDF
Prior to creating the searchable PDF files, verify that the required settings are selected.
1. In the main window, on the Tools menu, click Options and then click the OCR tab.
2. In the OCR Engine list select either ExperVision OpenRTK or ABBYY FineReader.
3. Set the Output Format to Adobe PDF (w/Hidden Text) or Adobe PDF/A (w/ Hidden
Text). PDF/A is only available if the ABBYY FineReader engine is selected.
4. If necessary, select Create PDF thumbnails. Use this setting to set the visibility property
of the thumbnails when opening the PDF file in Adobe Acrobat. If this setting is checked,
the thumbnails will be viewable automatically in Adobe Acrobat; otherwise, the
thumbnails will be hidden under the Pages tab in Adobe Acrobat.
5. Click OK.
To export searchable PDF files
1. On the Tools menu, click Export Utility and then click the Formats/Documents tab.
2. In the Formats list, select PDF Conversion.
3. Select Multi-Page.
© 2015 LexisNexis. All rights reserved.
534
LAW PreDiscovery
The single-page option creates single-page PDF files that are not searchable.
The "Include Full Text" option does not need to be selected.
Provided the previous instructions were followed and the Output Format on the Options
tab of the Export Utility is set to "PDF" (and not "PDF (Image Only)"), LAW will export
searchable PDF files.
4. Set the remaining export options according to the specifications for the project. See
Export Utility Overview for additional information about the Export Utility.
For more information on PDF export options, see PDF Conversion.
Related Topics
© 2015 LexisNexis, a division of Reed Elsevier Inc. All rights reserved.
Using LAW PreDiscovery
535
Batch Updating
OCR Overview
Flagging Documents/Pages for OCR
OCRing Documents
OCR Options
Batch Processing
The Batch Processing utility enables you to perform repetitive operations, such as applying
endorsements or performing optical character recognition (OCR) to a selection of documents or
to all documents in a case.
In this section
Batch Processing Overview
Explains what batch processing can do. Provides instruction on starting the batch
processing utility, and on selecting documents for processing. Describes a method for
helping to enhance performance. Provides instruction on configuring options related to:
document numbering, image cleanup, endorsing, applying watermarks, performing OCR,
printing standard images, scanning, converting to TIFF or PDF, and updating page data.
Selecting Documents for Processing
Provides instructions on selecting documents for batch processing by means of querying,
grid functionality, selecting folders, and selecting ranges of folder items.
Updating Page Data
Provides instructions for updating page data.
Document Numbering
Provides instructions particular to using the Batch Processing tool for document numbering.
Image Cleanup
Provides instructions for deskewing, removing black borders, removing holes, and removing
visual noise from images.
Endorsing Headers and Footers
Explains how to use the Batch Processing utility to endorse page images.
Applying Watermarks
© 2015 LexisNexis. All rights reserved.
536
LAW PreDiscovery
Provides instruction on how to add a watermark to page images.
Batch Processing OCR
Provides instructions particular to using the Batch Processing tool for performing OCR on
pages.
Batch Printing
Provides procedures for configuring advanced options for image printing.
Scanning for Suspect Footers
Provides instructions for finding and removing duplicate endorsements in footers.
E-Printing, TIFF, and PDF Conversion
Provides guidance on performing e-print on source documents, and for performing TIFF/PDF
conversion as a batch process.
Separator Pages
Describes procedures for customizing separator pages and placeholders for the e-print,
print, and TIFF/PDF conversion batch processes.
Distributed Batch Processing
Explains how to start, join, and cancel a batch process that is distributed across multiple
workstations.
Batch Processing Overview
The Batch Processing utility enables you to perform operations, such as document numbering or
optical character recognition, to a selection of documents or to all documents in a case.
What batch processing can do
Batch processes can be applied to the following actions:
Document and page numbering.
Image cleanup.
Endorse documents.
Optical character recognition (OCR).
Print images and native files.
Find documents with double endorsements (scan for suspect footers.)
Convert documents to TIFF or PDF.
© 2015 LexisNexis, a division of Reed Elsevier Inc. All rights reserved.
Using LAW PreDiscovery
537
Update page color and size data.
In addition, the Batch Processing utility is capable of enrolling multiple computers to
complete certain shared processing tasks, such as endorsing. For more information see:
Distributed Batch Processing.
Performance and document page counts
In cases with a large number of documents and/or pages, a delay may be experienced when
launching the Batch Process or Export Utility dialogs while LAW calculates the total number
of pages to display.
To disable page counting
1. On the Tools menu, select Options, and then click the Preferences tab.
2. Clear Calculate total pages in batch/export dialogs.
© 2015 LexisNexis. All rights reserved.
538
LAW PreDiscovery
3. Click OK.
Start the Batch Processing utility. The number of pages will no longer appear beside the
number of documents.
Related Topics
Selecting Documents for Processing
Updating Page Data
Document Numbering
Image Cleanup
Endorsing Headers and Footers
Applying Watermarks
Batch Processing OCR
Batch Printing
Scanning for Suspect Footers
E-Printing, TIFF, and PDF Conversion
Distributed Batch Processing
Selecting Documents for Processing
There are several methods for selecting items for batch processing:
From within the Batch Processing tool you can: select all documents in the case, select
entire folders, or select ranges of items within folders.
From the Query Builder or from a grid you can send query results or grid items directly to
the Batch Processing tool.
These methods are described in the following sections:
To process all documents
© 2015 LexisNexis, a division of Reed Elsevier Inc. All rights reserved.
Using LAW PreDiscovery
1. From the main form on the Tools menu, click Batch Process.
The Batch Processing tool opens.
2. Select and configure options for batch processes as needed.
3. Select All Documents.
3. Click Begin.
To process grid items
1. Open a grid. For information on opening a grid see Launching the Grids.
2. On the Tools menu, click Batch Process.
3. The Batch Processing tool opens. When opened from a grid, meaning the items that
currently appear in the grid.
© 2015 LexisNexis. All rights reserved.
539
540
LAW PreDiscovery
4. Select and configure options for batch processes as needed.
5. Click Begin.
To process query results
1. From the main form on the Tools menu, click Search Records.
The Database Query Builder opens.
© 2015 LexisNexis, a division of Reed Elsevier Inc. All rights reserved.
Using LAW PreDiscovery
541
2. Configure a query. For more information on configuring queries see Creating Queries.
3. In the Send Results To drop down list, select Batch Process.
4. Configure any other query options as needed and then click Execute.
5. The Batch Processing tool opens. When opened from a query, the selection of the Batch
Process tool defaults to Current Recordset, meaning the items returned from the query
are those that are processed.
© 2015 LexisNexis. All rights reserved.
542
LAW PreDiscovery
6. Select and configure options for batch processes as needed.
7. Click Begin.
To process folders
1. From the main form or from a standalone grid, on the Tools menu, select Batch Process.
The Batch Processing tool opens.
© 2015 LexisNexis, a division of Reed Elsevier Inc. All rights reserved.
Using LAW PreDiscovery
2. Select and configure batch processes as needed.
3. Click Select...
The Select Folders dialog box opens.
© 2015 LexisNexis. All rights reserved.
543
544
LAW PreDiscovery
4. Expand the folder structures and place check marks next to any folder that contains
documents you want to process.
5. Click OK.
6. Click Begin.
To process ranges of documents
1. From the main form or from a standalone grid, on the Tools menu, select Batch Process.
The Batch Processing tool opens.
2. Select and configure batch processes as needed.
3. Click Select...
The Select Folders dialog box opens.
© 2015 LexisNexis, a division of Reed Elsevier Inc. All rights reserved.
Using LAW PreDiscovery
545
4. Expand the folder structures and place check marks next to any folder that contains
documents you want to process.
5. To process a range of documents in a folder, place a check mark next to the folder and
then click Set Range.
The Select Document Range dialog box opens.
© 2015 LexisNexis. All rights reserved.
546
LAW PreDiscovery
6. Select any two items to define a range of items and then click OK.
7. Select other folders and set ranges as needed.
8. When all folders and document ranges are selected click OK.
9. Click Begin.
Related Topics
Updating Page Data
Document Numbering
Image Cleanup
Endorsing Headers and Footers
© 2015 LexisNexis, a division of Reed Elsevier Inc. All rights reserved.
Using LAW PreDiscovery
Applying Watermarks
Batch Processing OCR
Batch Printing
Scanning for Suspect Footers
E-Printing, TIFF, and PDF Conversion
Distributed Batch Processing
Updating Page Data
This process populates the PageColor, PageSize, PageWidth, and PageHeight fields for any
images in the selected record set that are missing this information. Values held in the
PageSource field are locked when images are acquired and are not affected by this process.
To update page data
1. From the main form on the Tools menu, click Batch Process.
2. The Batch Processing tool opens.
© 2015 LexisNexis. All rights reserved.
547
548
LAW PreDiscovery
3. Select the documents to update. For more information on selecting documents, see
Selecting Documents for Processing.
4. Select Update Page Data.
5. Optionally, select Enable Distributed Batch Processing and configure the session as
needed. For more information on using distributed batch processing see Distributed
Batch Processing.
6. Click Begin.
Related Topics
Selecting Documents for Processing
Distributed Batch Processing
© 2015 LexisNexis, a division of Reed Elsevier Inc. All rights reserved.
Using LAW PreDiscovery
549
Document Numbering
Document numbering is used to assign numbers to documents or pages. Typically, this means
assigning an alphanumeric value, such as the Page ID to each page of a document so that the
page can be reliably paired with an image file. Document-level fields may also be numbered
using this process.
To run a document numbering batch process
1. From the main form on the Tools menu, click Batch Process.
2. The Batch Processing tool opens.
3. Select the documents to number. For more information on selecting documents for batch
processing, see Selecting Documents for Processing.
4. In the Processes area, select Document Numbering.
© 2015 LexisNexis. All rights reserved.
550
LAW PreDiscovery
5. Select either Page or Document. Select the number to apply from the Target Field list.
6. Type a starting number.
The value will increment by one for each document or page.
7. Click Begin.
Image Cleanup
The Batch Processing tool provides image cleanup options that can improve the legibility of
black and white scanned images of paper documents. Eliminating data borders, holes, and
noise from images can also help to reduce file size.
Note that if you are annotating a document and then run an image cleanup before merging the
annotations, the annotations are lost.
To run an image cleanup batch process
1. From the main form on the Tools menu, click Batch Process.
2. The Batch Processing tool opens.
© 2015 LexisNexis, a division of Reed Elsevier Inc. All rights reserved.
Using LAW PreDiscovery
551
3. Select the documents to cleanup. For more information on selecting documents, see
Selecting Documents for Processing.
4. Click Image Cleanup.
5. Select from the following options:
Deskew - Straightens the alignment of the image.
Black-Border Removal - Removes black borders from images. In order for black
borders to be removed, the borders must be of uniform width (angled black edges will
not be removed).
Hole Removal - Removes afterimages of standard size holes (1/4" - 5/16") left from
scanning pages that were hole punched. Perform quality control on images batch
processed for hole removal. Hole removal can be done for RAW Image and scanned
documents, and documents imported in ED Loader and converted to TIFF before hole
removal. The letters o and e and zeros, are ignored by the hole removal process. If
needed, the image borders can be configured for removing holes on images from the
Configure Scan Filters dialog box (Scan > Scan Options > Configure Filters).
Noise Removal -- Remove speckles from the image that result from dust on an image
during copy or scanning.
5. Optionally, select Enable Distributed Batch Processing and configure the session as
needed. For more information on using distributed batch processing see Distributed
Batch Processing.
6. Click Begin.
© 2015 LexisNexis. All rights reserved.
552
LAW PreDiscovery
Related Topics
Selecting Documents for Processing
Distributed Batch Processing
Endorsing Headers and Footers
You can use the Batch Process tool to add custom headers and footers to images. The same
header and footer may also be applied to printed images during batch processing, although it
will not be stamped on the image unless the endorse process is selected.
When applying header and footers, a border is added to the image to eliminate the chance of
overwriting image data. Placing headers and footers on a border also makes it easier to edit or
remove any header or footer previously applied by LAW PreDiscovery.
To add and configure a header and footer
1. From the main form on the Tools menu, click Batch Process.
The Batch Processing tool opens.
© 2015 LexisNexis, a division of Reed Elsevier Inc. All rights reserved.
Using LAW PreDiscovery
2. Select the documents to process. For more information on selecting documents see
Selecting Documents for Processing.
3. Select Endorse Image and then either select or clear First page only, as needed.
When using the First Page Only option, if the first page contains annotations, the
annotations will be lost.
4. On the Options menu, click Header/Footer.
© 2015 LexisNexis. All rights reserved.
553
554
LAW PreDiscovery
The Header/Footer dialog box appears.
5. Add text as needed to occupy the left, center and right sections of the header and
footer.
Each text box can contain a maximum of 8 lines.
6. Configure header and footer options as needed:
When you
want to
Change the
font.
Do this
1. Select text to format and then click
.
2. Configure the font as needed and then click OK.
Apply the
selected font
format
uniformly to all
header/footer
sections.
Select Synchronize fonts for all sections.
Format fonts in 1. Clear Synchronize fonts for all sections.
each section
independently.
2. Select text as needed and then click the font button:
.
3. Configure the font as needed and then click OK.
© 2015 LexisNexis, a division of Reed Elsevier Inc. All rights reserved.
Using LAW PreDiscovery
Add a page
number to a
section.
1. Click in a section.
2. Click the page number button:
.
&[Page] is inserted into the section.
Add a page
count to a
section.
1. Click in a section.
2. Click the page count button:
.
&[Pages] is inserted into the section.
Add a field
value to a
section.
1. Click in a section.
2. Click the field value button:
.
The Select Field dialog box appears.
3. Select a field and then click OK.
A token that represents the field value is inserted into the section.
Add the PageID 1. Click in a section.
to a section.
2. Click the PageID button:
.
&[Page ID] is inserted into the section.
Set the size of
the header or
footer.
© 2015 LexisNexis. All rights reserved.
Select a value in the Header (in.) or Footer (in.) list.
Note the following:
555
556
LAW PreDiscovery
The default size of 1/2" is adequate for 2 lines of text at the default
font size.
The value you select for header or footer size only takes effect if the
header or footer contains text.
If the header/footer text is too large for the specified border size, it
will be cropped.
Configured
default settings
for headers
and footers.
Select or clear Save settings as default.
Endorse
documents
with sequential
values based
on a starting
value in a
specified index
field.
Type ++ after the field notation in the header/footer code.
For example, a footer value of "&[DocID]++" would cause the
documents to be endorsed sequentially, starting each document with
the value in the DocID field.
7. Click OK.
8. Optionally, select Enable Distributed Batch Processing and configure the session as
needed. For more information on using distributed batch processing see Distributed
Batch Processing.
9. Click Begin.
To change or remove headers and footers
1. From the main form on the Tools menu, click Batch Process.
The Batch Processing tool opens.
© 2015 LexisNexis, a division of Reed Elsevier Inc. All rights reserved.
Using LAW PreDiscovery
557
2. Select the documents that you want to apply headers/footers to, for example, select: All
Documents or Current Record Set, or click Select to specify documents individually. For
more information on selecting documents see Selecting Documents for Processing.
3. Select Endorse Image and then either select or clear First page only, as needed.
When using the First Page Only option, if the first page contains annotations, the
annotations will be lost.
4. On the Options menu, click Header/Footer.
© 2015 LexisNexis. All rights reserved.
558
LAW PreDiscovery
The Header/Footer dialog box appears.
5. Do one of the following:
To create a new header/footer, edit the header and footer as needed.
To remove the existing header/footer, without adding a new one, remove any text in
the header and footer fields, or set the border size to None.
6. Click OK.
7. Click Begin.
LAW PreDiscovery™ removes the previously applied headers/footers and adds any new
one that you specified.
Best practices for headers/footers
Note the following best practices when working with headers and footers:
Before you apply a header or footer to an large set of documents, first apply the
specified header/footer on a small subset of documents. Be sure that text fits and that
other results match your expectations and then if necessary adjust accordingly and
retest.
If trying to position text using spaces, it is easiest to use a monospace font, such as
Courier New or Lucida Console in which all characters are the same width.
Use caution when working with rotated images containing an existing endorsement.
If the endorsement does not appear on the top or bottom of the image due to a manual
rotation (as viewed in LAW), removing or modifying the existing endorsement on this
image will cause LAW to remove the endorsement (which LAW thinks exists on the
© 2015 LexisNexis, a division of Reed Elsevier Inc. All rights reserved.
Using LAW PreDiscovery
559
bottom of the image) and may remove actual document data located at the bottom of
the image. One way to prevent this from occurring is to first re-rotate the image so the
endorsement that LAW applied to the image appears as it was applied.
Related Topics
Selecting Documents for Processing
Applying Watermarks
Distributed Batch Processing
Applying Watermarks
You can use the Batch Process tool to apply a watermark at the same time as you endorse or
print. Applying a watermark permanently stamps an image onto the document.
To apply a watermark
1. From the main form on the Tools menu, click Batch Process.
2. The Batch Processing tool opens.
© 2015 LexisNexis. All rights reserved.
560
LAW PreDiscovery
3. Select the documents to watermark. For more information on selecting documents, see
Selecting Documents for Processing.
4. Click Options and then click Watermark.
The Watermark Settings dialog box opens.
© 2015 LexisNexis, a division of Reed Elsevier Inc. All rights reserved.
Using LAW PreDiscovery
561
5. Select or browse to an image file. Most commonly used image file formats are supported,
for example: bitmap, GIF, JPEG, PNG, and TIFF.
6. Specify whether to apply the watermark to just the endorse process, the print process
or both.
Apply watermark to endorse process - adds the watermark to whatever other
endorsement you select.
Apply watermark to print process - add the watermark to printed output. If selected
then also select an alignment for the watermark: Top Left, Top Right, Bottom Left, or
Bottom Right.
7. Click OK and then click Begin.
Endorsed watermarks cannot be removed. Given that there is usually some trial and
error involved in applying graphics to files and given that watermark requirements can
change over the course of a project, it is considered a best practice to back up the case
and images and test the watermark on a small batch of records before you endorse the
full set of records with a watermark.
Considerations for applying watermarks
Before you apply a watermark, note the following considerations:
Unlike endorsements, watermarks cannot be removed once applied. It is recommended
that you backup your case and image files before applying a watermark.
If a watermark is applied during an endorsement where text is also being applied, the
watermark will be aligned to the additional header or footer applied to the document. If
the text needs to later be modified, re-applying the endorsement will cause LAW to
remove the old header/footer and re-apply the new header/footer text. Some of the
watermark's image data may exist in this region and would be lost in this situation. Avoid
© 2015 LexisNexis. All rights reserved.
562
LAW PreDiscovery
this situation by either creating watermarks that contain wide margins so image data
does not exist outside the header/footer regions or apply the watermark as a final step.
Different image formats will be applied differently on the various image types. For best
results, if the source documents are TIFF images, use/create a watermark which is also a
TIFF image using the same resolution as the original document. If the watermark
appears expanded or shrunk more than expected, it could be due to a large difference in
the image resolutions. Color formats should also be considered. Applying a color
watermark on a black and white document will result in a black and white watermark.
Various colors resolve different when applied as a watermark. White and other light
colors, such as yellow resolve as transparent. Black resolves as black. Medium to dark
colors, such as red, green, and blue, resolve as shades of gray.
GIF images with transparent regions are not compatible with this feature.
If the dimensions of the watermark are greater than the size of the document, the
watermark will be shrunk and fit to page.
For very large jobs, it can help to take the file size of the watermark image into
consideration. The time required to apply a watermark increases with the file size of the
watermark. It is recommended to use small size watermark file. For example a
watermark endorsement job might achieve a rate of 21,000 pages per hour using a 4 KB
watermark file. Running the same job using a 400 KB file might achieve a rate of only
16,000 pages per hour.
If you need to redact a batch of documents all in the same spot on the page, you can
use the watermark feature. First, create a new document in Word. In the Word
document, position a text box with a black background on the redaction spot and then
print the document to TIF file. Switch to LAW PreDiscovery. In the batch process
settings for watermark select the TIF file. Try the batch first on a couple of test
documents to be sure of the positioning. When you are certain the position is correct for
all the documents, run the batch.
Related Topics
Selecting Documents for Processing
Distributed Batch Processing
Batch Processing OCR
You can use the Batch Processing tool to perform OCR on documents.
Before starting an OCR batch process
© 2015 LexisNexis, a division of Reed Elsevier Inc. All rights reserved.
Using LAW PreDiscovery
563
Note the following when preparing to OCR using a batch process:
Each page that you intend to OCR must have its OCR flag set to On or Yes.. For more
information see Flagging Documents/Pages for OCR.
Documents may be skipped, even if flagged, if they already have OCR for the specified
output format and the "Overwrite Existing Files" OCR setting is not selected.
When selecting the output format, keep in mind that most third-party applications cannot
use non-text formats for search and retrieval capabilities.
To start an OCR batch process
1. From the main form on the Tools menu, click Batch Process.
2. The Batch Processing tool opens.
3. Select the documents you want to OCR. For more information on selecting documents,
see Selecting Documents for Processing.
4. Select OCR.
5. Click Options and then click OCR.
6. Configure OCR options as needed. For more information on configuring OCR options, see
OCR Options.
© 2015 LexisNexis. All rights reserved.
564
LAW PreDiscovery
7. Optionally, select Enable Distributed Batch Processing and configure the session as
needed. For more information on using distributed batch processing see Distributed
Batch Processing.
8. After configuring OCR options, return to the Batch Processing tool and then click Begin.
Related Topics
Selecting Documents for Processing
Distributed Batch Processing
Batch Printing
You can use the Batch Processing tool to send selected image records to a specified printer.
To batch print images
1. From the main form on the Tools menu, click Batch Process.
The Batch Processing tool opens.
© 2015 LexisNexis, a division of Reed Elsevier Inc. All rights reserved.
Using LAW PreDiscovery
2. Select the documents to print. For more information on selecting documents, see
Selecting Documents for Processing.
3. Click Options and then click Print Options.
© 2015 LexisNexis. All rights reserved.
565
566
LAW PreDiscovery
4. Configure options as needed. These options are described in the following sections of
this topic.
5. Click OK and then click Begin.
Auto-Rotate Pages
This setting causes pages to be rotated 90 degrees. This setting can be useful when
printing TIFF images of landscape-formatted pages.
Auto-Size Paper
This option automatically selects the paper size that most closely matches the image
dimensions.
For example, a legal sized document may have been scanned as 8 ½" x 14" and endorsed in
LAW PreDiscovery™ with a ½" footer resulting in an image size of 8 ½" x 14 ½". LAW detects
the page size and sends it to the paper size that most closely matches the original size of
the image; in this example, the document would be printed on legal sized paper. This
feature will also work with documents containing mixed paper sizes.
© 2015 LexisNexis, a division of Reed Elsevier Inc. All rights reserved.
Using LAW PreDiscovery
567
To use this feature, you must also enable Send jobs in batches of N pages, otherwise a
message box will appear stating the feature requires it and will enable the option
automatically.
Enabling these two options also enables the printing of color separator pages. For more
information, see the separator pages section in this topic.
Do Not Print Annotations
Use this setting to exclude non-merged annotations from printed output. If this setting is
disabled, any non-merged annotations will appear on the printed output.
Include Separator Pages
This setting causes separator pages to be included in front of each document. The Paper
Source setting determines the paper tray used for the separator pages, enabling separator
pages to be pulled from an alternate tray than the actual images. This allows the separator
pages to be printed on color pages if the printer contains multiple trays. The available trays
are determined by the specified printer driver and frequently apply to a wide range of
models. As such, some trays listed may have no effect on the specific printer model used.
Experiment to determine the actual trays used before batching a large set of documents
when using this feature.
Clicking the Options button will launch the Separator Page Options dialog and allow
customizing of separator pages for the print job. See the Separator Pages topic for more
information on this feature.
The Print separator pages only option can be used to print only the separator pages for
the selected documents. The actual documents will not be printed. If needed, select the
Options button (above) to configure the separator pages prior to printing.
The Print folder break separator pages will instruct LAW to print a separator page each
time a new folder is encountered while printing the selected documents. Folder breaks
can also be configured by clicking the above Options button.
Limit Jobs in Print Queue
This setting causes LAW to monitor the print queue for active jobs and limit the number of
jobs in the print queue to the specified number. This can be beneficial for slower printers by
minimizing the amount of information queued at any one time. If this feature is activated,
LAW will stop sending documents to the printer once the limit has been reached and wait
until the document currently being printed is complete before sending another.
Rip to PDF Before Printing
Use this setting to convert images to PDF format before sending them to the printer.
If you print using a PostScript printer driver, this option can decrease time required to print.
The performance gain is the result of inherent compatibility between the PDF format and
PostScript drivers.
© 2015 LexisNexis. All rights reserved.
568
LAW PreDiscovery
Send Jobs in Batches
This setting controls the size of jobs sent to the printer. It can improve printing results in
two ways:
It can significantly improve printer performance when printing a large number of
documents with only a few pages each on high-speed printers.
For example, using the default spool limit of 100 to print 100 3-page documents would
cause LAW to send 3 100-page documents to the printer as opposed to 100 3-page
documents. This eliminates the majority of the extra time required by the printer for
cycling down and then up again between documents.
It corrects the problem with documents being printed out of order by various digital
printers.
The spoolers used by many high-speed printers, in an attempt to reduce printing time,
will actually reorder documents in the print queue causing documents to be printed out
of order even though they were sent to the printer in the original order. Batching the
documents into large print jobs prevents the print spooler from reorganizing documents
in most cases.
With this feature enabled, separator pages cannot be printed to a separate tray unless
Auto-Size paper is also selected.
Staple Documents
This setting has been added specifically for the Canon iR110 printer to staple documents
during the print process in LAW. This is the only printer supported for stapling, although
other models may in fact work as well.
Tracking Print Jobs in the Spooler
Each document sent to the print spooler will be named in the following format, making
quality control of print jobs via the print spooler easier to perform:
LAW Batch 000000 - <Description>
The count to the left of the hyphen will increment by one for each job.
The <Description> will be replaced with the DocID, BegDoc#, or ID for documents.
LAW will use whichever item is found first in the order shown. If Send jobs in batches of
N pages is enabled, the <Description> portion will not be present as the job would
contain multiple documents. For separator pages, the <Description> will be followed
by a hyphen and then Break for document separator pages or Folder Break for folder
separator pages.
Examples
Example (folder break): LAW Batch 000276 - Folder Break
Example (document break): LAW Batch 000277 - Break
© 2015 LexisNexis, a division of Reed Elsevier Inc. All rights reserved.
Using LAW PreDiscovery
569
Example (document): LAW Batch 000278 - ABC00382
Related Topics
Selecting Documents for Processing
Distributed Batch Processing
Scanning for Suspect Footers
You can use the Scan for Suspect Footers batch process to help find documents having more
than one endorsement. This process scans all pages for footers appearing to be 1 inch or
larger and flags an index field that you select if any pages in a document contain suspect
footers.
To scan for suspect footers
1. Create a page-level Tag (Boolean) field. This field will be used to identify pages with
suspect footers. For more information on creating Tag (Boolean) fields see Creating Tag
Fields.
2. From the main form on the Tools menu, click Batch Process.
3. The Batch Processing tool opens.
© 2015 LexisNexis. All rights reserved.
570
LAW PreDiscovery
4. Select the documents to scan. For more information on selecting documents, see
Selecting Documents for Processing.
5. Optionally, select Enable Distributed Batch Processing and configure the session as
needed. For more information on using distributed batch processing see Distributed
Batch Processing.
6. Select Scan for Suspect Footers.
If you have never run this batch process before, an Invalid Suspect Field message
appears.
7. Click OK.
The Select Field For Suspects dialog box appears.
© 2015 LexisNexis, a division of Reed Elsevier Inc. All rights reserved.
Using LAW PreDiscovery
571
8. Select the page-level field that you created to identify suspect footers and then click OK.
The batch process starts.
Related Topics
Selecting Documents for Processing
Distributed Batch Processing
E-Printing, TIFF, and PDF Conversion
You can use the e-print batch process to print native files to paper.
You can use the TIFF/PDF conversion batch process to convert native files to TIFF images or PDF
files, or to reprocess files that are already in TIFF or PDF format. In the process of converting
native files to TIFF images or PDF files the application displayed in the SourceApp field for each
record is used to convert the native document to a TIFF image or PDF file. For example, if
Microsoft Word is the value in SourceApp, then Microsoft Word will be used to convert the
document. The selected SourceApp must be installed on the computer in order to be used for
© 2015 LexisNexis. All rights reserved.
572
LAW PreDiscovery
TIFF/PDF Conversion. See the Output Settings for E-Print, TIFF and PDF Conversion section for
information about native application options and TIFF and PDF printer settings. For a list of
source applications and supported file types, see Supported File Types. This process uses the
LexisNexis® Image Driver, LexisNexis® Image Driver (300 DPI), or Informatik Image Printer to
convert the selected files to TIFF images. Version 7 of the Peernet Image Printer is also
supported for TIFF/PDF conversions, but must be purchased directly from Peernet. The easyPDF
SDK 7 print driver is used to convert the selected files to PDF files. All PDF files generated by the
TIFF/PDF Conversion are searchable, web-optimized PDF files.
In this section
Output Settings for E-Print, TIFF and PDF Conversion
Describes options for e-printing, TIFF, and PDF conversion and how to access them.
Explains how to view and edit file IDs and extension mappings. Explains how to track job
status in the print spooler.
Supported File Types
Lists details regarding conversion of supported office applications, as well as those for builtin applications and special file types.
Passwords
Provides instructions for entering the passwords that are needed to open passwordprotected files.
The remaining topics describe the conversion options that are specific to various file formats:
Acrobat
Excel
HTML
Image Printer
PowerPoint
Project
Word
Output Settings for E-Print/TIFF/PDF Conversion
You can use the E-Print batch process to print to paper native files that have been imported
into a case. You can use the TIFF/PDF Conversion to convert native files to TIFF images or PDF
files. The batch process for TIFF/PDF conversion supports distributed batch processing. For
more information, see Distributed Batch Processing.
© 2015 LexisNexis, a division of Reed Elsevier Inc. All rights reserved.
Using LAW PreDiscovery
573
If you used ED Loader to import the items that you intend to e-print or convert to TIFF or
PDF, note that the time zone specified during import will persist when you e-print or
convert the items to TIFF or PDF. For more information on managing time zone setting
during ED Loader import, see General.
For more information on source applications and file types supported for E-Print, TIFF, and PDF
production, see Supported File Types.
To access E-Print, TIFF, and PDF output settings
1. From the main window, on the Tools menu, click Batch Process.
2. In the Batch Processing dialog box, on the Options menu click E-Print Options or click
TIFF/PDF Options.
E-Print options
The E-Print Options contains the active printer and separator page settings.
© 2015 LexisNexis. All rights reserved.
574
LAW PreDiscovery
Active Printer - Indicates the printer that will be used to print the native files to paper.
Click Setup to configure any printer-specific settings, such as tray assignments.
Print Separator Pages - When selected, this feature enables the printing of separator
pages between documents and/or folders.
Template - Contains a list of available templates for the separator pages. Select
<Custom> to enable the Options button. Clicking Options will launch the Separator
Pages Options dialog and will allow customizing of separator pages. See the Separator
Pages topic for more information.
Included - Select a printer tray from the drop-down to print separator pages in front of
any "included" file types (supported for printing).
Excluded - Select a printer tray from the drop-down to print separator pages in front of
any "excluded" file types (files without a valid source application for printing).
© 2015 LexisNexis, a division of Reed Elsevier Inc. All rights reserved.
Using LAW PreDiscovery
575
Folders - Select a printer tray from the drop-down to print separator pages at the
beginning of each new folder when printing.
Print separator pages only - This option can be used to print only the separator pages
for the selected documents. The actual documents will not be printed. Select a
predefined template from above or click the Options button to configure custom
separator pages.
TIFF/PDF output options
The TIFF/PDF Output category in the TIFF/PDF Options provides options specific to the TIFF
and PDF formats.
© 2015 LexisNexis. All rights reserved.
576
LAW PreDiscovery
Active Driver: Stores the active TIFF or PDF printer driver. LAW PreDiscovery currently
supports the easyPDF SDK 7 print driver for PDF files and the Informatik Image Driver,
LexisNexis® Image Driver, and LexisNexis® Image Driver (300 DPI) for TIFF files. The
easyPDF SDK 7 driver and both LexisNexis drivers are included with LAW PreDiscovery.
Also supported is Peernet TIFF Image Printer version 7.0, which must be purchased from
Peernet. Click Setup to configure printer-specific settings.
The Informatik Image Driver is no longer included in LAW full installs for versions 5.2
and higher, but can still be used for batch and single document TIFF conversions. The
Informatik Image Driver version 4.0 is not officially supported on Windows Vista.
Limited technical support will be provided for this driver; the LexisNexis Image Driver
is the supported printer for TIFF conversions.
The LexisNexis Image Driver, based on the Zan Image Printer, is included in LAW full
installs and can be used for batch TIFF conversion and single document TIFF
conversions.
Unlike other supported drivers, the LexisNexis Image Driver supports text extraction
during conversions. Also included with the LAW full installer is the LexisNexis Image
Driver (300 DPI) printer. The images created by this printer will always be forced to
300 DPI.
Color Reduction: If you are converting native files to TIFF images, the 'Reduce to Optimal
Palette' setting will cause the image to be saved as a color image or a black and white
image based on the image color properties. If the image contains any color, then the
TIFF image will be saved in a color TIFF format; if no color is found, the image will be
saved as black and white. The 'Reduce to grayscale' setting will reduce color images or
text to a grayscale format. If you are converting native files to PDF files, only the 'None'
and 'Reduce to grayscale' selections are available in the Color Reduction list.
Color Compression: The Color Compression setting allows users to specify the
compression type of the produced images or PDF files. The most widely supported and
more commonly used format is the JPEG or JPEG 2K (PDF only) compression format. This
format will also produce the smallest file sizes compared to the other three formats. The
Packbits (TIFF only), LZW (TIFF only), ZIP (PDF only) and no compression settings may
also be used, but the file sizes will be larger than the JPEG formats and may not be
viewable in the destination application.
Output Format: LAW PreDiscovery can produce output TIFF images in either single-page
(serialized) or multi-page format. For PDF conversion, LAW PreDiscovery only produces
PDF files in the multi-page format. When the multi-page format is selected, each
document will have its own TIFF image or PDF file associated with it containing all the
pages of the document in the single TIFF or PDF file. LAW PreDiscovery stores the output
TIFF images and PDF files in the <case root>\$Image Archive folder. All PDF files
generated by the TIFF/PDF Conversion are searchable, web-optimized PDF files.
Multipage unless size is over: (only available for TIFF conversion) Used for printing large
files where documents may contain thousands of pages per document (text files for
example). Use this feature to force those documents over a certain file size (in kilobytes)
to be converted serialized instead of multi-paged.
Drop blank pages: (only available for TIFF conversion) When selected, LAW PreDiscovery
will detect any blank pages created during the TIFF conversion and remove them from
the output TIFF image.
Overwrite Existing Files: With this option selected, during the TIFF or PDF conversion,
LAW PreDiscovery will overwrite any existing images or PDF files that were created as a
result of the TIFF/PDF Conversion batch process.
Print placeholders for unsupported/excluded docs: With this setting enabled, LAW
PreDiscovery will print a placeholder image for any documents that were included for
© 2015 LexisNexis, a division of Reed Elsevier Inc. All rights reserved.
Using LAW PreDiscovery
577
printing but did not have a source application assigned. See "Template" below for more
information.
Print placeholders for documents that error during conversion: When enabled, LAW
PreDiscovery will produce a placeholder image for any documents that received errors
and could not be converted to TIFF images or PDF files.
Template: The Template option offers a drop-down list of placeholder templates to be
used in conjunction with the "Print placeholders for unsupported/excluded docs" and
"Print placeholders for documents that error during conversion" settings. To
customize these placeholder images, select <Custom> from the drop-down list and then
click the Options button. See the Separator Pages topic for information on customizing
placeholders.
Save text with images: (only available for TIFF conversion with the LexisNexis® Image
Driver) When enabled, the LexisNexis Image Driver will extract text from documents
during the TIFF conversion process. This text can be viewed from the main LAW window.
Select the document and then select the Text tab. Right-click the text and select Open
Text (Printed).
Adobe PDF files are not supported for text extraction during TIFF Conversion.
Reset text index status: (only available for TIFF conversion with the LexisNexis® Image
Driver) De-selecting this sub-option of "Save text with images" will prevent LAW from reflagging the document for indexing after the TIFF conversion and printed text is created.
This means the printed text for affected records will not be searchable in LAW. See the
Full Text Indexing topic for more information.
Treat native TIFF/PDF as image for record (bypass conversion): When enabled, LAW
PreDiscovery will copy the native TIFF image or PDF file from the $EDD\$NativeFiles folder
and place it in the $Image Archive folder. This feature saves time during TIFF or PDF
conversion because it skips the printing process by making a copy of the native TIFF
image or PDF file instead of creating a new image using the LexisNexis Image Driver or
new PDF file using the easyPDF SDK 7 driver.
By default, this feature applies to the following TIFF image file type IDs: 321, 298, and
146. These file type ID numbers correspond to the ID numbers stored in the file type
database used by the ED Loader.
Force TIFF/PDF conversion settings on native TIFF/PDF images: When enabled, for
TIFF conversion, LAW PreDiscovery will apply the active color reduction, color
compression, output format (multi-page or serialized), and drop blank pages settings to
a copy of the native image. The modified image is then saved and moved into the
$Image Archive folder. This setting is useful for matching the image format of previously
printed TIFFs which maintains the format consistency of the images throughout the case
while using the treat native as image feature.
For PDF conversion, LAW PreDiscovery will apply the active color reduction and color
compression settings to a copy of the native PDF file. The modified PDF file is then saved
and moved into the $Image Archive folder. This setting is useful for matching the PDF file
format of previously printed PDF files which maintains the format consistency of the files
throughout the case while using the treat native as image feature.
To view or edit file IDs and their file extensions
To view file IDs and their file extensions
1. In the main window click the File menu and then click Import and then click Electronic
© 2015 LexisNexis. All rights reserved.
578
LAW PreDiscovery
Discovery.
2. In ED Loader on the Tools menu, click File Type Manager.
The File ID column contains the ID number for each file type.
To edit file IDs mappings to file extensions
To edit the default list of file types for this feature, place the following setting in the
LAW50.ini file located in the application path (i.e. C:\Program Files\Law50):
[TreatNativeAsImage]
ImageFileTypes=321;298;146
The default types are shown above, separated by semi-colons. File IDs can be removed
from the list and/or other image file IDs can be added. This feature is limited to image
files that are supported by the imaging toolkit used by LAW. An error will be logged if an
image is not a supported file type.
Use caution when adding file types to the list if you plan to endorse the native image
files. If the image dimensions are very small, such as 2x2, the endorsement may
appear too large on the image or may not be viewable. To prevent this issue, try
converting the image to a larger TIFF image (i.e. 8.5x11) instead of using the treat
native as image setting.
Tracking job status in the print spooler
You can track the status of a job by finding the separator page name in the print spooler.
Finding the name is easier if you understand the rules by which pages are named.
The name of each separator page or placeholder sent to the print spooler is formatted as
follows:
LAW Batch 000000 - <document identifier> - <description>
The count to the left of the hyphen increments by one for each job.
<document identifier> is replaced with the DocID, BegDoc#, or, with ID for document
separator pages and placeholders that are generated for documents that error during
TIFF conversion. LAW will use whichever item is found first in the order shown. Folder
breaks will not have the document identifier as they are not associated with a single
document.
<description> is replaced by Separator for document separator pages and Placeholder
for documents that error during conversion to TIFF.
The name of the print job for native files will display in the spooler as the filename stored
in LAW, such as 01.ntv.doc.
Examples
To create a folder break - E-Print: LAW Batch 000276 - Folder Break
© 2015 LexisNexis, a division of Reed Elsevier Inc. All rights reserved.
Using LAW PreDiscovery
579
To create a document break - E-Print: LAW Batch 000277 - ID000384 - Separator
To create an error placeholder - TIFF Conversion: LAW Batch 000278 - ID000385 -
Placeholder
Related Topics
Batch Updating
Batch Processing Overview
Supported File Types
Separator Pages
Supported File Types
LAW PreDiscovery™ supports printing images and documents created in Microsoft Office and
other applications. In addition to the default file types, you can specify custom file types for
printing, provided that they can be opened and printed by one of the supported source
applications.
The source applications are the programs used to open and print documents, and must be
installed on the same computer as LAW PreDiscovery to print documents of that type.
Supported source applications
The following table lists the supported source applications and their common corresponding
file types.
File Type
Source Application
*.pdf
Adobe Acrobat/Reader
Supports over 450 file types.
AutoVue Suite
Please view the product website for a
list of supported formats:
www.cimmetry.com/_products/
formats.html.
*.wpd
© 2015 LexisNexis. All rights reserved.
Corel WordPerfect
580
LAW PreDiscovery
*.eprt, *.easm, *.edrw, *.eprtx,
*.easmx, *.edrwx (eDrawings Files);
*.sldprt, *.sldasm, *.slddrw (SolidWorks
Files); *.dxf, *.dwg (DXF/DWG Files);
*.3dxml (3DXML Files); *.stl (STL Files);
*.prt, *.prt.*, *.xpr, *.asm, *.asm.*,
*.xas (Pro/E Files); *.prtdot, *.asmdot,
*.drwdot (SolidWorks Template Files)
Install one or another version of EDrawings,
depending upon your version of LAW
PreDiscovery.
For LAW PreDiscovery version 5.9 – current, install
just EDrawings 2011 (32 bit version only). For
example, if only EDrawings 2009 is installed along
with LAW 5.9, you will be prompted to install
EDrawings 2011. It is recommended that you
uninstall any versions of EDrawings prior to 2011.
For LAW PreDiscovery 5.3.14 – 5.8.17 install just
EDrawings 2009.
For LAW PreDiscovery versions previous to 5.3.14
install just EDrawings 2008.
*.htm, *.html
Internet Explorer
*.nsf
Lotus Notes
*.xls, *.xlw, *.wk?
Microsoft Excel
*.doc, *.dot, *.htm, *.rtf, *.txt, *.wpd,
Unicode text files
Microsoft Word
*.pst, *.ost, *.msg, *.eml, *.idx
Microsoft Outlook
*.pps, *.ppt
Microsoft PowerPoint
*.mpp
Microsoft Project
*.vs*, *.v?x
Microsoft Visio
*.snp
Snapshot Viewer
*.dwf, *.dwg, *.dxf
VoloView Express
Built-in sources
LAW PreDiscovery directly supports printing of several file types. These are listed as follows:
Binary/Hex Printer - *.bin, *.hex
Text/RTF Printer - *.txt, *.rtf, *.ini, *.bat, *.vbs, *.java, *.cpp, and various other text
based types.
Unicode text files are not supported with the Text/RTF Printer. However, RTF with
Unicode is supported. This is a limitation of the underlying component. To print Unicode
text files, use Microsoft Word or the Shell Printer as the source application.
Image Printer - *.awd, *.bmp, *.dcx, *.gif, *.jpg, *.pdf, *.pex, *.tif, *.xif
Shell Printer - The Shell Printer source application can be used to print file types through
any application that supports command line printing. In other words, if you can right-click
on a file in Windows and select Print, to print the file through the associated application,
then the application supports command line printing.
When the Shell Printer is set as the SourceApp for a document in LAW, then the
application associated with that file type in Windows will be used to convert the file to
© 2015 LexisNexis, a division of Reed Elsevier Inc. All rights reserved.
Using LAW PreDiscovery
581
TIFF or PDF or print the file to paper in LAW.
For example, a user imports a text file into LAW and sets the SourceApp to Shell Printer.
On the user’s computer, text files are associated with Notepad. When the user converts
the file to TIFF or PDF in LAW, Notepad will be used to print the file to TIFF or PDF. The
output image will be added to the record in LAW, as it would when using any other
SourceApp.
If using the Shell Printer, you must ensure that the application registered on the system
for text files supports shell prints. For example, Notepad supports shell prints.
Compressed (ZIP archive) Files - LAW also supports printing zipped archives (*.zip)
and self-extracting zip archives (*.exe). Zipped files will automatically be included in both
file and e-mail print jobs. The contents of the archive will be processed according to the
specified file types for printing. If a zip file happens to contain a zip file, Z-Print will
recursively open the archives and process the supported file types. The filename
extraction format for Zip files is in the format <Archive>^<Filename>.
Special file types
LAW does not support printing Lotus 1-2-3 documents directly. In order to print these
documents, you must have Microsoft Excel installed.
Printing WordPerfect files to MS Word may require an additional add-on found on the MS
Office installation CD. If this add-on is not installed prior to printing WordPerfect files, Word
will be unable to recognize the file format and an error will be logged.
In order to use the "Snapshot Viewer", you must install support for the Microsoft Access
Snapshot Viewer. If Microsoft Office with Access is installed, it can be added from the Office
installation media. If Microsoft Access is not installed, a free viewer can be downloaded from
Microsoft.
Both Internet Explorer and Word are capable of printing HTML (*.htm / *.html) files. By
default LAW prints these two file types to Internet Explorer due to issues with Word. If you
experience any problems printing certain HTML files using Internet Explorer then try using
Word to print.
Note: HTML files will always return a page count of 1 if the source application is set to
Internet Explorer. If the source application is set to Microsoft Word, the page count will
return 1 if the file is exactly 1 page long, or it will return 2 pages if the document is longer
than a page. Accurate page counts for HTML files will be determined and logged after the file
has been printed to either an image or paper.
Printing files with VoloView Express (*.dwg) automatically centers the drawing and fills the
page.
VoloView Express may not work correctly for the first document printed if the 'Drawing
Settings' tab of the Page Setup is not the active tab. The last viewed tab remains the
default. To ensure it works correctly, open a document, select the Drawing Settings tab,
and click OK. This tab should remain the default tab allowing LAW to send the
appropriate messages to the dialog.
© 2015 LexisNexis. All rights reserved.
582
LAW PreDiscovery
Related Topics
Batch Updating
Batch Processing Overview
Passwords
The Passwords area allows you to enter any known passwords for password-protected files
contained within the collection. Up to three passwords may be specified at one time for Adobe
Acrobat PDFs. An unlimited number of passwords may be entered for Microsoft Office
applications.
© 2015 LexisNexis, a division of Reed Elsevier Inc. All rights reserved.
Using LAW PreDiscovery
To add a password, click Add and then follow the prompts to add a password.
Related Topics
Batch Processing Overview
Supported File Types
© 2015 LexisNexis. All rights reserved.
583
584
LAW PreDiscovery
Acrobat
If you experience problems printing Adobe Acrobat files, try changing the PostScript Options in
the Acrobat category.
To prevent possible problems with certain PostScript printers, LAW PreDiscovery™ prints PDF
documents using as default the PostScript level of 3.
If necessary, this setting may be modified by enabling Allow Binary Data, and choosing the
desired Print Method.
© 2015 LexisNexis, a division of Reed Elsevier Inc. All rights reserved.
Using LAW PreDiscovery
585
Related Topics
Batch Processing Overview
Supported File Types
Excel
Options for printing Microsoft Excel documents can be found in the Excel category in the e-Print
and TIFF/PDF Options. These options help to standardize the format of the Excel files being
processed.
© 2015 LexisNexis. All rights reserved.
586
LAW PreDiscovery
Take extra care to perform quality control for readability and formatting when converting
from Excel files. Page boundaries on spreadsheets can be difficult may require manual
adjustment.
Descriptions of conversion options
Conversion options for Microsoft Excel are described in the following table:
Option
Override
Default
Description
Enables you to override the print settings saved in the native e with settings
that you select.
© 2015 LexisNexis, a division of Reed Elsevier Inc. All rights reserved.
Using LAW PreDiscovery
Settings
587
For example, select this option if the native file is saved with the option to
hide gridlines and you want to print the spreadsheet with gridlines. With
Override Default Settings" enabled, the options to override the gridlines and
other options become available.
When this option is enabled, Excel recalculates the printable area of a
document. An Excel file can contain a very small amount of information
(e.g., a space or formatting data) in row 10,000 column AAA, for example.
If such data exists, Excel could print all pages up to the pages where print
data is stored. This situation could result in hundreds of blank pages being
printed. For this reason, it is important to check the quality of Excel files
after printing.
Orientation
Scaling
Use this option to select the orientation of the pages to be printed (portrait
or landscape).
Auto-Size Columns - Adjusts the column sizes so the information
contained within the cells is not "cropped" or hidden by an adjacent cell.
Fit to Page - Forces the entire spreadsheet to fit onto one page when
printed. Caution: This option may cause unreadable or extremely small font
sizes if the sheets are very large. This feature is not recommended if
printing Excel files with unknown content or large amounts of data per
sheet.
Print
Gridlines - Displays the gridlines or cell outlines in the spreadsheet if
selected.
Footers - Prevents sheets from including footers on processed documents
when disabled. This can be helpful if a footer contains date information
that the user does not want included in the output.
Headers - Prevents sheets from including headers on processed
documents when disabled. This can be helpful if a header contains date
information that the user does not want included in the output.
Hidden columns/rows - Prints any columns and rows that have been
hidden when selected.
Hidden sheets - Prints any hidden sheets contained in the Excel file when
selected.
Print black & white - Forces Excel documents to be printed as black and
white only, removing all background colors and forcing all text to black. If
this setting is enabled, all background fills and patterns are cleared, which
can prevent unnecessary parts of a worksheet from being printed.
Remove repeating columns - Prevents any columns set to repeat from
repeating in the TIFF or PDF output when selected.
Remove repeating rows - Prevents any rows set to repeat from
repeating in the TIFF or PDF output when selected.
Row and column headings - Includes the headings in the printed
spreadsheet when selected.
Comments - Prints any comments saved in the Excel files. Comments may
be printed As Displayed -- as saved in the Excel file or at the 'End of the
Sheet'.
Limit output to <N> pages - Limits the number of printed pages to the
number specified in the text box. The minimum value for this setting is 0,
which will act the same as disabling the setting (does not limit pages
printed). The maximum value is 99999. When LAW limits the number of
© 2015 LexisNexis. All rights reserved.
588
LAW PreDiscovery
pages for a file, the following warning will be logged to the ErrorMsg field:
[tiff]: Output limited by Excel page count threshold (ErrCode=-1,
Line=3780). This warning will also be logged in the event the actual page
count happens to match the limit specified in the options - LAW cannot
filter out these occurrences.
Page Order
Down, then Over - Causes the spreadsheet to be printed down the
sheet, then over and back down, if selected.
Over, then Down - Causes the spreadsheet to be printed across first,
then down the columns and back over, if selected.
Field
The following Field Replacement options allow users to specify the actions
Replacement LAW should take when encountering these types of dynamic fields in a
s
document.
Date/Time Fields - Allows the selection of one of five items: Do not
modify (print as is), Do not print, Replace with date created, Replace with
modified date, and Show field codes.
Filename Fields - Allows the selection of one of four items: Do not modify
(print as is), Do not print, Replace path from filename, and Show field
codes.
Both of these settings are useful for preventing Excel documents from
printing current date or file path information which may only apply to the
production machine and not to the project being printed.
Related Topics
Batch Processing Overview
Supported File Types
HTML
This category contains options for printing HTML documents paper or converting HTML to TIFF or
PDF.
© 2015 LexisNexis, a division of Reed Elsevier Inc. All rights reserved.
Using LAW PreDiscovery
589
Remove indentation from presaved e-mails (HTML) when printing
Removes the indentation from e-mails converted to HTML for printing. If enabled, all
indentation will be stripped when printing to prevent e-mail threads from being pushed so
far to the right that the output ends up with very few characters per line. This setting
affects only printed output and does not directly affect the native files.
Use alternate HTML rendering engine for Internet Explorer
This HTML engine will increase print speeds dramatically for HTML documents printed using
Internet Explorer. However, it is not as mature and tested as Internet Explorer for handling
extremely complex HTML and all the possibilities of malformed HTML that may occur.
Although substantial effort has been taken to verify the output of a wide array of HTML
documents printed using this engine, there is no way to test every possibility and
LexisNexis cannot absolutely guarantee the quality of any third-party product.
© 2015 LexisNexis. All rights reserved.
590
LAW PreDiscovery
Before using this alternate engine for large scale productions, LexisNexis recommends that
you test small samples and perform periodic QA on any output produced with this engine.
Related Topics
Batch Processing Overview
Supported File Types
Image Printer
This category contains options for printing documents to paper or converting them to TIFF or
PDF using the Image Printer source application.
© 2015 LexisNexis, a division of Reed Elsevier Inc. All rights reserved.
Using LAW PreDiscovery
591
Auto-Rotate Images
Automatically rotates images that are printed through the image printer.
This option is useful for images containing a mixture of landscape and portrait orientations.
If printed directly to paper, some of the images would appear correctly in portrait, and
others would appear as a landscape image printed on portrait paper.
Related Topics
© 2015 LexisNexis. All rights reserved.
592
LAW PreDiscovery
Batch Processing Overview
Supported File Types
PowerPoint
This category contains options for printing Microsoft PowerPoint documents to paper or
converting them to TIFF or PDF.
© 2015 LexisNexis, a division of Reed Elsevier Inc. All rights reserved.
Using LAW PreDiscovery
593
Descriptions of configuration options
Configuration options for Microsoft PowerPoint are described in the following table:
Option
Description
Do not print date/time stamps
Removes any auto-date and auto-time fields
from a slide and prevents them from printing.
Do not print headers/footers
Prevents printing of the header and footer
sections of slides.
Print hidden slides
Prints any hidden slides that exist in the
presentation.
Scale to fit paper
Scales the printing of the PowerPoint slide to the
current page size.
Prints just the slides and not the notes.
Print What
Or
Prints both the slides and notes.
Color mode
Adjusts the color settings of the printed slide to
either Pure black and white, Grayscale, or
Color.
This setting only affects how PowerPoint will
send the file to the printer, not the actual
printed output.
Setting the mode to Color will not necessarily
print in color. To help ensure color output,
check that the printer supports color printing
and is set to print color.
If printing to TIFF, set color reduction to None
or Reduce to optimal palette.
Related Topics
Batch Processing Overview
Supported File Types
© 2015 LexisNexis. All rights reserved.
594
LAW PreDiscovery
Project
This category contains options for printing Microsoft Project documents to paper or converting
them to TIFF or PDF.
Descriptions of configuration options
Configuration options for Microsoft Project are described in the following table:
Option
Description
Orientation
Use this option to select the orientation of the pages to be printed (portrait
© 2015 LexisNexis, a division of Reed Elsevier Inc. All rights reserved.
Using LAW PreDiscovery
595
or landscape).
Scaling
Auto-Size Columns - Adjusts the sheet column sizes so the information
contained within the columns is not "cropped" or hidden by an adjacent
column.
Fit to Timescale - Forces the entire project for the selected timescale to fit
onto one page when printed. Caution: This option may cause unreadable
or extremely small font sizes if the timescale is long. This feature is not
recommended if printing Project files with unknown content or large
amounts of data.
Print
View - Determines which project view is printed. When you are printing a
Project document, you can print the Detail Gantt, Gantt Chart, or Task
Sheet.
If Task Sheet is selected in the View list, only the Notes check box is
available for selection in the Print section, and the Fit Timescale check box
is disabled in the Scaling section.
When a check box is selected in the Print section, the corresponding feature
will be included in the output. When a check box is not selected in the Print
section, the feature is not included in the output.
All Columns - Determines whether all sheet columns in the project are
printed.
Legend - Determines whether the project legend is printed.
Print first <n> columns on each page - Determines whether the first
columns in the project, such as the project line numbers and % Complete,
are printed on each page. The text box determines how many of the first
columns in the project are printed on each page. For example, if you type
3, the first 3 columns will be printed on each page. The minimum value for
this setting is 0, which will act the same as disabling the setting (does not
limit columns printed). The maximum value is 99.
Blank Pages - Determines whether blank pages are printed.
Notes - Determines whether the project notes are printed.
Sort
Sort [field name] - Determines the field used to sort the project data that
is printed. The project data can be sorted by: ID, Priority, Start Date, or
Finish Date.
Sort [direction] - Determines the order the project data is sorted when
printed. The project data can be sorted in Ascending or Descending order.
Related Topics
Batch Processing Overview
© 2015 LexisNexis. All rights reserved.
596
LAW PreDiscovery
Supported File Types
Word
This category contains options for printing Microsoft Word documents to paper or converting
them to TIFF or PDF.
In addition to the options you set in LAW PreDiscovery for printing Word documents, their final
appearance will also depend on the print settings as they are configured in the Microsoft Word
application on the processing station.
© 2015 LexisNexis, a division of Reed Elsevier Inc. All rights reserved.
Using LAW PreDiscovery
597
Settings
Do not print headers - Disables printing of headers contained within the Word
document. This can be useful if the original document contains information in the header
which is not desired in the printed output.
Do not print footers - Disables printing of footers contained within the Word document.
This can be useful if the original document contains information in the footer which is not
desired in the printed output.
Force manual repagination before printing - This option causes Word to repaginate
itself before printing which can prevent the last line from running onto the next page in
certain conditions.
Log warnings for Word 95/6.0 documents - This option is used to log a warning
message for the purpose of reviewing these documents for possible formatting issues
that can occur with some older Word documents. This makes it easier to isolate, QC, and
optionally reprint all Word 95 documents if needed.
Reveal hidden text - This option will reveal text in the output TIFF, PDF, or hard copy
that is not otherwise visible due to the text matching the background color (i.e., white
text on a white background) or text matching the highlight color in the source document.
The setting to reveal hidden text can increase the time required to complete printing of
Word documents.
When the Reveal hidden text check box is selected, there are two options for running
the Reveal hidden text feature:
Fast Mode. By default, the Fast Mode is selected. Fast Mode is optimized for speed,
and will force all text to black and background color to white to reveal hidden text.
When Fast Mode is selected, a document is not tagged when hidden text is detected
in the document.
Normal Mode. Compares text color to background color for each word in a document
to detect hidden text. This mode is slower than Fast Mode, but when Normal Mode is
selected, a tag is applied to a document when hidden text is detected in the
document.
Show comments - This option enables the printing of comments included in the Word
document if present.
Printing of comments on the actual page where they occur is only available in Word XP
and higher. In prior versions, the notes will be printed after the last page of the
document.
Show revisions - Some Word documents may also contain tracked changes which can be
printed through LAW by selecting this option. LAW will only print the changes that have
been made to the document if Track Changes has been enabled for the document.
Field Replacements
The Field Replacement options allow users to specify the actions LAW should take when
encountering these types of dynamic fields in a document.
Date/Time Fields - This option allows selection of one of five actions: Do not modify (print
© 2015 LexisNexis. All rights reserved.
598
LAW PreDiscovery
as is), Do not print, Replace with date created, Replace with modified date, and Show field
codes.
Filename Fields - This option allows selection of one of four actions: Do not modify (print
as is), Do not print, Replace path from filename, and Show field codes.
Both of these settings are useful for preventing Word documents from printing current date
or file path information which may only apply to the production machine and not to the
project being printed.
Related Topics
Batch Processing Overview
Supported File Types
Separator Pages
Separator pages can help to organize paper copies of documents and folders. You can use the
batch processes for printing, e-printing, and TIFF/PDF conversion to create custom separator
pages and to insert them into folders before specific documents.
Pre-configured separator page and placeholder templates are available for the E-Print and
TIFF/PDF Conversion processes. LAW also allows you to use customized separator pages and
placeholders for the E-Print, Print, and TIFF/PDF Conversion batch processes.
For information on the templates or other print functions, see the following topics: Print Options
or Output Settings for E-Print, TIFF and PDF Conversion.
Separator pages and placeholders can be configured via the Separator Page Options form. This
form is accessible from three locations as it applies to three different processes.
To configure separator pages for e-print
1. In the main window, on the Tools menu click Batch Process.
2. In the Batch Processing dialog, on the Options menu click E-Print Options and then
select E-Print.
3. In the Template list select <Custom>.
4. Click Options.
© 2015 LexisNexis, a division of Reed Elsevier Inc. All rights reserved.
Using LAW PreDiscovery
599
5. Configure options for separator pages.
After configuring separator pages for the E-Print process, configure the tray settings
below the Print Separator Pages option. See the Output Settings for E-Print, TIFF and
PDF Conversion topic for more information.
To configure placeholders
This procedure applies to configuring placeholders for excluded/unsupported documents, or
documents that received errors, for the TIFF/PDF Conversion process.
1. In the Batch Processing dialog, on the Options menu, click TIFF/PDF Options and then
select TIFF/PDF Output.
2. Select from among the following options:
Print placeholders for excluded/unsupported documents
Print placeholders for documents that error during conversion
3. In the Placeholder template list select <Custom> and then click Options.
To configure separator pages for print process
1. In the Batch Processing dialog, on the Options menu click Print Options.
2. Select Include separator pages and then click Options.
3. The Separator Page Options dialog appears.
Configure separator pages using the option described in the sections of this topic.
To modify the header or footer
The options that are available in the Header and Footer sections are used to display custom
information in the left, center, and/or right sections of the top (header) or bottom (footer) of
the separator page or placeholder.
To display text in a particular section, enter the desired text into the text box below the
section in the Header and/or Footer areas.
This text will then appear on the separator page or placeholder during the print or
conversion process. To select a font, font style, and font size, click the button labeled
with the letter "A" below the header sections if modifying a header.
To modify a footer, click the button below the footer sections.
The selected font and text settings for the header and footer sections are specific to the
currently selected placeholder type.
If multiple placeholder types are available in the drop down box (possible with E-Print
and TIFF/PDF Conversion), each type of placeholder is allowed to display different text
values using different font settings.
© 2015 LexisNexis. All rights reserved.
600
LAW PreDiscovery
Configuring separator page fields
The Fields section of the Separator Page Options dialog is used to choose which fields
should appear on the separator page or placeholder and also to configure options related to
these fields.
Most system fields and all user-defined fields will appear in this list. The fields enclosed in
chevrons < > are those derived from the Default Template for each placeholder type. Some
of these fields display calculated or formatted values on the separator pages to match the
output displayed on the Default Template.
Do this
To perform this task
Force an alternate field name to be displayed Configure options in the Display As column.
on the separator page or placeholder.
Create a new display name for a field.
Double-click the Display As cell beside the
desired field and then type the new name.
If the Display As cell is blank, then the name
in the Field Name column will be used.
Sort fields by columns.
Click a column header.
Configure the font, font style, and font size
for the field names and field values.
Click the button labeled with the letter A.
Prevent the names of the selected fields fromSelect Do not print field names for blank
appearing on the separator page for any
values.
documents that do not contain data in those
fields.
This setting applies to E-Print, TIFF/PDF
Conversion, and the standard Print batch
processes.
Include or hide the Comments system field
For E-Print and TIFF/PDF Conversion jobs, the
on placeholder pages that are generated for Show comments field option can be used.
unsupported file types or files that error
during printing or conversion.
Customize the UNSUPPORTED OR EXCLUDED Enable Show Comments field and then enter
the desired text in the Unsupported file type
FILE TYPE message.
message text box.
The Fields section is disabled when the Folder placeholder type is selected. This is
because field information does not exist at the folder level. See the Options section in
this topic for more information on placeholder types.
Options
The Options section of the Separator Page Options dialog contains a number of features to
allow further customization of the separator pages or placeholders.
Placeholder Type - Separator page and placeholder settings can be configured for the
types listed in the drop-down. File separator pages will print in front of e-documents
© 2015 LexisNexis, a division of Reed Elsevier Inc. All rights reserved.
Using LAW PreDiscovery
601
imported via ED Loader or XML load file. Folder separator pages will be printed each time
a new folder is encountered and will apply to the E-Print and Print processes. The field
selection will not apply to folder pages as the fields are only document- or page-level.
The folder path, in addition to the specified header and footer text, will be printed on
each folder separator page. E-Mail separator pages will be printed in front of e-mail
records and other store-based items including calendar items, contacts, tasks, journal
entries, and notes. Attachment separator pages will be printed in front of any
attachment records loaded into the case using ED Loader and is based on the
Attachment value found in the _DocCat field. The File, E-Mail, and Attachment types will
also be used as placeholders for excluded/unsupported records or as an error
placeholder during the TIFF/PDF Conversion process.
The currently selected placeholder type will also appear in parentheses beside the Fields
heading just above the Selected Fields list. The placeholder type will be grayed out and
set to "Raw Images" when viewing this setting via the Print Options, since the other
types will not apply to this process.
Synchronize field settings for all types - When enabled, the fields selected for the
active placeholder type (type selected in Placeholder Type drop-down) will be applied
to the File, E-Mail, and Attachment separator pages and placeholders. (Fields do not
apply to Folder separator pages.) Also applied with this setting are the following: field
fonts, Do not print field names for blank values setting, Show Comments field setting,
and the Unsupported file type message text box value.
Margins - The separator and placeholder margins can be modified by entering the
desired values in one or more of the available text boxes: Top, Bottom, Left, and Right.
The values should be entered as twips as indicated in the interface (1440 twips = 1
inch). The margin settings are unique to each placeholder type.
Vertical field spacing (in twips) - Use this setting to configure the amount of white
space between fields on the separator pages and placeholders. The values should be
entered as twips as indicated in the interface (1440 twips = 1 inch). This setting is
unique to each placeholder type.
Print Delays (in ms) - The print delay settings can be configured to cause a delay
before (Pre-print delay) and after (Post-print delay) pages print in an attempt to prevent
a separator page from printing before a file and vice versa (i.e. separator, separator, file,
separator). Certain printers rearrange jobs in the spooler causing the printing of smaller
files first while larger files are still spooling. LAW cannot always prevent every occurrence
of this behavior but specifying a print delay can reduce the chances of this occurring.
Enter values in milliseconds (1000ms=1 second) and test various values to determine
what works best in your environment. The print delay values are unique to each
placeholder type. The values will be forced to zero and grayed out when configuring
placeholders for TIFF Conversion.
Saving default settings
The Save settings as default option located at the bottom of the Separator Page Options
dialog is used to save the current settings as the default selections for new LAW cases.
When this option is selected, the current settings will be saved to a separator.ini file located
in the application folder (same folder as law50.exe). The settings in this file will be applied to
all new cases going forward.
If settings are modified in a case and not saved as default, LAW PreDiscovery creates a
separator.ini in the case folder and those settings and LAW use the settings in the caselevel INI file for that specific case. LAW always looks for the case-level separator.ini file
before looking in the application path.
© 2015 LexisNexis. All rights reserved.
602
LAW PreDiscovery
This setting and the Save settings as default setting in the TIFF/PDF Options and Eprint Options dialogs are independent of each other. For example, if Save settings as
default is enabled in the TIFF/PDF Options dialog, the current separator page settings
will not be saved or affected in any way.
Related Topics
Batch Processing Overview
TIFF Conversion
Print Options
E-Print/TIFF Output Settings
Distributed Batch Processing
Distributed processing is available for those batch types that do not require sequential
execution. You can run distributed batch processes on these kinds of jobs:
Image Cleanup
Endorse
OCR
TIFF/PDF Conversion
Update Page Data
Scan for Suspect Footers
For information on running these and other kinds of batch processes in a non-distributed
manner, see: Batch Processing.
To start a distributed batch process
1. On the Tools menu click Batch Process.
The Batch Processing dialog box opens.
© 2015 LexisNexis, a division of Reed Elsevier Inc. All rights reserved.
Using LAW PreDiscovery
603
You can also run a query that will send results directly to a batch process. For more
information see Creating Queries.
2. In the Batch Processing dialog box select documents to be processed.
3. Choose one or more batch type that is supported for distributed processing.
4. In the Sharing section of the Batch Processing dialog, select Enable Distributed Batch
Processing.
5. Type a name for the batch over the default of (Unassigned). The batch name is visible
to other workstations when they are prompted to join a distributed job. The batch name
is also visible in the LAW Management Console (LMC).
6. Click Edit to modify the invitation type.
The Create/Modify Invitation Type dialog box opens.
© 2015 LexisNexis. All rights reserved.
604
LAW PreDiscovery
The invitation type determines how the job is handled by other stations when utilizing
the LMC.
7. Select an invitation type, add scheduling parameters, select from available clients, and
then click Accept.
8. Click Begin to start processing.
To join a distributed batch
1. After a distributed batch is started on a computer, open the case on a second computer.
2. On the Tools menu click Batch Process.
The Running Batches dialog appears. All active batches created in this case are listed.
The batch may also be started by clicking View in the Batch Processing dialog in the
Sharing section. This will launch the Running Batches dialog as well and allow users to
choose a batch to join.
© 2015 LexisNexis, a division of Reed Elsevier Inc. All rights reserved.
Using LAW PreDiscovery
605
If the Running Batches dialog does not immediately appear, click the Refresh button in
the Sharing section of the Batch Processing dialog box. If a batch becomes available,
click the View button to view the running batch.
3. Select a batch and then click Join.
LAW opens the next unprocessed document in the batch for processing using the same
settings that were used on the computer that started the batch process.
When the batch completes it is removed from the Running Batches list.
If you cancel a batch process running on one computer, the batch will not be canceled
on other stations.
To join a distributed batch using LAW
You can join a computer to a distributed batch process from within LAW PreDiscovery.
1. Start LAW PreDiscovery.
2. Opening the case that the distributed process is running on.
3. On the Tools menu, click Batch Process.
The Running Batches dialog box appears.
© 2015 LexisNexis. All rights reserved.
606
LAW PreDiscovery
4. Select a batch and then click Join.
To delete a shared batch
1. Start LAW PreDiscovery.
2. Opening the case that the distributed process is running on.
3. On the Tools menu, click Batch Process.
The Running Batches dialog box appears.
4. Select the batch in the Running Batches dialog box.
5. On the Edit menu click Delete.
The shared batch will be deleted from the list.
Determining the computer that ran a batch process
You can review individual documents to determine which workstation executed the batch
process.
© 2015 LexisNexis, a division of Reed Elsevier Inc. All rights reserved.
Using LAW PreDiscovery
607
1. From the main form in LAW PreDiscovery, on the Index menu, click Modify Fields.
2. Scroll to BatchStation.
3. Select Visible.
4. Click Save As, name the profile, and then click Accept.
5. Click Close.
6. In the main form in LAW PreDiscovery, select a document from the folder list.
7. Scroll to the BatchStation field.
The name of the computer that performed the batch process is listed.
Related Topics
Selecting Documents for Processing
Distributed Batch Processing
M anaging Distributed Processes
The LAW Management Console (LMC) is the utility you use to manage processing jobs that are
distributed among multiple computers. You can enable distributed processing for ED Loader
sessions and for some kinds of batch processing jobs.
In this section
LMC Overview
Explains the function of the LAW Management Console (LMC).
Starting the LMC
Covers procedures for starting the LMC and provides steps for determining the status of
the connection to a SQL Server instance.
Using the LMC
Provides procedures for using the LMC to start, monitor, and restart jobs. Also explains how
© 2015 LexisNexis. All rights reserved.
608
LAW PreDiscovery
to monitor client activity and license usage.
Managing LMC Operation
Provides instructions on how to configure: system timeout, polling interval, and on
restarting unresponsive clients. Provides guidance on choosing an instance of LAW
PreDiscovery™ and explains how to handle remote refresh requests.
LMC Overview
The LAW Management Console (LMC) is a utility that you use to manage distributed processes
for electronic discovery and for certain kinds of batch jobs. A distributed process pools the
processing power of multiple computers to get large processing jobs done faster.
To start a distributed process you use ED Loader for distributed electronic discovery; you use
the Batch Processing utility for batch processing. After starting a distributed process of either
type, you use the LMC to manage participating computers and to monitor progress.
In this section of help topics, the term client represents a computer that is running LMC.
LMC capabilities
After a distributed process is started, you use the LMC to monitor and manage computers,
processing jobs, and licenses. Specifically, you can use the LMC to perform the following
tasks:
Running and managing jobs
Start or end distributed processes.
Join computers to distributed processes.
Force unresponsive computers to leave jobs.
Monitoring
Monitor overall progress of a job.
Detect whether a computer joined to a job is working normally or appears
unresponsive.
Monitor jobs in queue or currently running.
View license keys in use by client computers involved in processing.
The LAW Management Console (LMC) does not show licenses are in use when OCR is
being performed within Early Data Analyzer. Licenses in use may be viewed in the LAW
Profile Manager as an alternative.
View connection state to SQL Server.
Logging
Maintain logs for errors, messages, and debugging information.
© 2015 LexisNexis, a division of Reed Elsevier Inc. All rights reserved.
Using LAW PreDiscovery
609
Requirements
When planning to use the LMC, consider the following requirements:
Each client that will participate must be running LAW PreDiscovery and the LMC. LAW
PreDiscovery versions 5.3.14 and above include the LMC.
The LMC runs with cases based on versions of SQL Server.
Each client that will participate in a batch process must be able to connect to the same
SQL Server instance that was used to create the case.
Related Topics
Batch Processing Overview
Starting the LMC
Using the LMC
Managing LMC Operation
Starting the LMC
The steps required to start LAW Management Console (LMC) depend on whether LMC has been
started before on a client, and if so, whether the LMC was configured to connect to a SQL
Server instance. Independent of these factors, the steps to start the LMC also depend on
whether LMC is currently running in the background and if you have already established a
connection between LMC and SQL Server.
To start LMC for the first time
1. Use Windows Explorer to browse to the path that contains the LMC executable file. By
default, file path is:
C:\Program Files\Law50\Console\
2. Double click LAWConsole.exe.
3. The LAW Management Console welcome screen appears.
© 2015 LexisNexis. All rights reserved.
610
LAW PreDiscovery
4. Select I have a SQL Server and would like to configure the LMC client to remotely
manage shared batch processing jobs.
The Server Connection Information dialog box appears.
5. Provide login details and then click Accept.
© 2015 LexisNexis, a division of Reed Elsevier Inc. All rights reserved.
Using LAW PreDiscovery
611
The LMC opens and a green LMC icon appears in the Windows notification area.
If you do not want to configure a connection to SQL Server or if you want to cancel this
session entirely, in the LAW Management Console welcome screen you can choose from
among the remaining options:
I do not want to configure the client right now, but would like it to remain
running in the notification area for future configuration.
LMC starts in the background.
A red LMC icon in the notification area appears, indicating SQL Server connection
is not configured.
If you click the LMC icon, the welcome screen reappears.
After you restart Windows, the LMC icon reappears in the notification area.
Select the third option if you want to cancel configuration process and close the LMC.
I do not have a SQL Server or do not plan to use the client. Close the client and
remove it from system startup.
The LMC welcome screen closes without configuring a connection to SQL Server.
If you want to run the LMC, you can restart the LMC by following steps at the
beginning of this procedure. The LMC welcome screen will reappear.
To open the LMC
1. Mouse over the LMC icon located in the Windows notification area.
2. Click the LMC icon or right click the icon and then click Restore.
The LMC starts.
If necessary log into an instance of SQL Server.
If the LMC icon is not visible in the Windows notification area, see the previous section
in this topic To start the LMC for the first time.
To work with LMC in the notification area
You can use the LMC icon in the Windows notification area to restore the LMC, stop it, or
perform a quick check of its connection status to SQL Server.
1. Mouse over the LMC icon located in the Windows notification area.
© 2015 LexisNexis. All rights reserved.
612
LAW PreDiscovery
2. Perform the following tasks as needed:
Task
Steps
Restore the LMC.
Click the LMC icon.
Or
Right-click the LMC icon and then select Restore.
Stop the LMC.
Right-click the LMC icon and then click Quit.
Or
Press ALT+F4 while the LMC is in focus.
Check the connection
status of the LMC to
SQL Server.
Mouse over the LMC icon to view the tool tip.
To configure LMC to start with Windows
1. Start LAW PreDiscovery.
2. From the main window, on the Tools menu, click Options and then click Preferences.
3. Select Start the Management Console on Windows Startup.
© 2015 LexisNexis, a division of Reed Elsevier Inc. All rights reserved.
Using LAW PreDiscovery
613
4. Click OK. Click Yes if you are prompted to start the LMC.
LMC starts. Every time you restart Windows, the LMC will also start automatically but run
minimized. You can then restore the LMC by selecting its icon in the Windows notification
area.
© 2015 LexisNexis. All rights reserved.
614
LAW PreDiscovery
To connect to or disconnect from a SQL Server
1. Start the LMC.
If you are not connected to SQL Server, the right panel of the LMC will display a prompt
to connect to a SQL Server instance.
2. Click Server and then click Connect.
© 2015 LexisNexis, a division of Reed Elsevier Inc. All rights reserved.
Using LAW PreDiscovery
615
3. Type the SQL Server name and if necessary provide authentication details.
After you connect to SQL Server, the LMC starts. The left panel shows a tree view of
clients, jobs, and licenses. The right panel shows details of each type of object when you
click an item in the left panel.
To disconnect from the current SQL Server
Start the LMC, click Server and then click Disconnect.
Related Topics
Batch Processing Overview
LMC Overview
Using the LMC
Managing LMC Operation
Using the LMC
You use the LMC to monitor client computers, jobs, and licenses in use. You can also use the
LMC to help manage clients and jobs.
Client management tasks:
Force computers to leave a batch process or distributed electronic discovery loading
session.
End a batch process or distributed electronic discovery loading session.
Jobs management tasks:
Cancel a job for all clients.
Change the type of invitation for a job to control which computers will participate in a
job.
© 2015 LexisNexis. All rights reserved.
616
LAW PreDiscovery
Preparing to join computers to a distributed process
The LMC can join computers to a shared job. LAW will launch, open the SQL case, and begin
processing the job without user interaction. Jobs will be joined in the order in which they
were created, but are sorted visibly by name under the Jobs node.
The following conditions apply when joining a client computer to a shared job:
LAW PreDiscovery must not be running on the client.
The LMC must be running on the client.
The LMC must be connected to the same SQL Server as all other computers participating
in the process.
The LMC only runs when the client computer is left in an idle state. The idle state is how
long the system has processed no keyboard or mouse movement for a specified number
of seconds. You can set the number of seconds value in the LMC on the Tools menu.
Click Options, and then General. In the System Idle Timeout field change the value to a
number greater than 0, which represents the number of seconds. When the workstation
is idle in the LMC, the second panel in the status bar changes to System Idle: YES. The
LMC will attempt to join a job provided all other criteria have been met.
The client must not be in the Excluded Clients list for a job.
The job status must be Active.
To view client, job, and license details
1. Start the LMC and if necessary connect to a SQL Server instance. For more information,
see Starting the LMC.
© 2015 LexisNexis, a division of Reed Elsevier Inc. All rights reserved.
Using LAW PreDiscovery
617
2. Expand a node under Clients, Jobs, or Licenses and then click an item.
The node expands and the right pane provides details for the client, job or license that
you select.
To work with clients
1. Start the LMC and if necessary connect to a SQL Server instance. For more information,
see Starting the LMC.
2. By default the Clients node is selected with a table listing of clients populating the right
panel.
© 2015 LexisNexis. All rights reserved.
618
LAW PreDiscovery
Clients is followed by a number in parentheses. This number represents the total
number of clients (workstations running the LMC) connected to the same SQL Server
and visible to the current instance of the LMC.
The computer name at the top of the list, which is preceded by an asterisk (*), is the
computer on which you are running this instance of the LMC.
You can identify a client as unresponsive if the client name appears in bold red text
and a tool tip for the client is <Client Name> does not appear to be responding.
In the Clients table located in the right hand part of the window, each computer
currently connected to the SQL Server is listed in a row. Fields in the list are:
Computer. The name of the computer.
Running. True if LAW PreDiscovery™ is running or not, otherwise False.
User. The Windows user name currently logged into the computer.
LAW Version. The version of LAW PreDiscovery running on the computer.
© 2015 LexisNexis, a division of Reed Elsevier Inc. All rights reserved.
Using LAW PreDiscovery
619
Case. The name of the case open. This field is blank if no case is open.
Status. ONLINE if not running a job but available. WORKING if running a batch process.
If a client status is listed as WORKING but the client is listed in the Clients list to the
left in bold red font, this means the client has stopped responding and might need to
be removed from the job and restarted. STARTING if starting a job. CANCELLING if
leaving a job unfinished.
Job Name. The name of the distributed batch process that the computer is running.
This field is blank if the computer is not running a job.
Last Updated (Server Time). The last time the client status was checked by LMC. By
default each client status is updated every 10 seconds.
3. Select a client from the list and then, if necessary, click one of the following buttons:
Screenshot - Creates and opens a picture of the current Desktop of the client. This
tool is useful for monitoring the state of the workstations when processing jobs or
preparing to process jobs.
Leave Job - Removes the client from the job that it is currently working on. When a
workstation is forced to leave a job in this manner, the client is added to the Excluded
Clients list for the job it was working on.
End Process - Stops the job that the client is currently working on.
4. Expand the Clients node and then click a client name.
The node expands and the right pane provides details about the selected client.
Status - Displays the status of the current workstation. Possible values are: ONLINE,
STARTING, WORKING, or CANCELLING.
User - Displays the user currently logged in on the workstation.
Workstation - Displays the machine name of the selected workstation.
IP Address - Displays the IP address of the workstation.
© 2015 LexisNexis. All rights reserved.
620
LAW PreDiscovery
Console Version - Displays the version of the LAW Management Console. Typically,
this version should match the LAW version shown in the Clients section.
To work with jobs
1. Start the LMC and if necessary connect to a SQL Server instance. For more information,
see Starting the LMC.
2. Select Jobs.
The node expands and the jobs overview panel is visible to the right.
Jobs is followed by a number in parentheses. This is the total number of jobs on
workstations running the LMC, connected to the same SQL Server, and visible to the
current instance of the LMC.
Monitor the details of the selected job, as needed.
The Job Details area provides information fields, a Cancel Job button, and the invitation
editor:
Job Name - The job name as entered in the Name field when creating the batch.
Case Name - The name of the case currently open on the workstation.
Processes - The processes selected when the batch was created, such as TIFF/PDF,
OCR, or Endorse.
Req. Lic - Lists the license modules required in order to work on the batch.
Job Status - Displays the status of the job.
© 2015 LexisNexis, a division of Reed Elsevier Inc. All rights reserved.
Using LAW PreDiscovery
621
Created - Displays the date and time the batch was created and the user who created
the share batch.
Invitation - Displays the invitation type for the current job.
The Job Progress area contains four fields and the View Errors button:
Complete - Displays the total number of documents completed thus far in the batch.
Remaining - Displays the estimated amount of time remaining in the batch.
Total - Displays the total number of documents included in the batch.
Errors - Displays the number of errors that have occurred thus far in the batch.
View Errors - Opens the batch process log. It displays errors that occurred during a
batch.
Clients tab - Displays each client working on the job, the process currently taking place
on the machine (i.e., OCR), and the document currently being processed.
Client Activity tab - Shows client activity specific to the selected job. Entries will appear
when a client attempts to join a job, successfully joins a job, fails to join a job, is
excluded from a job, etc.
Excluded Clients tab - Lists clients excluded from a job. The computer name and reason
for the exclusion are listed.
3. Change the invitation type, cancel the job, or remove the job from the Jobs area as
needed.
To change the invitation type, click the ellipsis button and then configure the new
invitation type.
To cancel the job, click Cancel Job. This action cancels the batch for all clients but does
not delete the job from LAW.
To remove the job from the Jobs area of the LMC, right-click the job and then click
Remove Job.
To work with licenses
1. Start the LMC and if necessary connect to a SQL Server instance. For more information,
see Starting the LMC.
© 2015 LexisNexis. All rights reserved.
622
LAW PreDiscovery
2. Select Licenses.
The node expands and the the licenses overview panel is visible to the right.
Licenses is followed by a number in parentheses. This is the total number of keys on
workstations running the LMC, connected to the same SQL Server, and visible to the
current instance of the LMC.
© 2015 LexisNexis, a division of Reed Elsevier Inc. All rights reserved.
Using LAW PreDiscovery
623
The licenses overview panel provides the following information:
License column - Lists all license modules found on the keys listed below the Licenses
node.
Total column- The total of each license module found on the collection of keys listed
below the Licenses node.
In Use column- The total of license modules in use on workstations running the LMC
and connected to the same SQL Server (for all keys listed below the License node).
Available column - The total of available licenses for each module for all keys listed
below the Licenses node.
Clients using '<license module>' - Lists the clients that are using the module selected
in the license module list. The machine names and user names are shown.
The LAW Management Console (LMC) does not show licenses are in use when OCR is
being performed within Early Data Analyzer. Licenses in use may be viewed in the LAW
Profile Manager as an alternative.
3. Expand the Licenses node and then click a license to view information particular to that
license.
© 2015 LexisNexis. All rights reserved.
624
LAW PreDiscovery
The license detail window provides the following information:
A table listing by license type, showing: total on the key, number of licenses in use,
and number of licenses available.
The name and IP address of the computer to which the license key is attached.
4. Select a license type listed in the table.
In the far left panel, the computer name and the user name are listed for any computer
using the license.
To cancel a distributed batch process
You can cancel a job for all clients.
1. In the LMC, expand the Jobs node and then select a job.
2. Click Cancel Job.
To remove a client from a distributed batch process
You can remove a client from a distributed batch process.
1. In the LMC, expand the Clients node and then select a client.
© 2015 LexisNexis, a division of Reed Elsevier Inc. All rights reserved.
Using LAW PreDiscovery
625
2. Click Leave Job.
To manage unresponsive clients
1. Within the LMC connected to SQL Server, identify a client as unresponsive if the client
name appears in bold red text.
2. Hover your mouse over the client to see the following tool tip: <Client Name> does not
appear to be responding. This condition can be caused by the client being either hung or
by it simply having paused the job.
3. Select the unresponsive client.
Details for the client are shown in the panel to the right.
© 2015 LexisNexis. All rights reserved.
626
LAW PreDiscovery
4. Click Screenshot.
An image viewer should appear showing a screen capture of the client Desktop.
5. Take corrective action based on what you see in the screen shot:
If a viewer appears showing the client Desktop, look in the screen shot for the Batch
Process Status dialog box. If this is visible, check the status in the title bar of the
dialog box. If it is (Paused), you can go to the client computer and then click Resume.
The client will continue processing the batch and its status in the LMC will return to
normal.
If the viewer does not appear, or opens showing only black: click Leave Job to remove
the client from the job. This action adds the client to the Excluded Clients list for that
job. Or click End Process, to stop the job entirely. Use the Batch Process utility to
restart a stopped job. For more information, see Batch Processing Overview.
To view LMC logs
The LMC provides a listing of errors, messages, and debug information pertaining to LMC
operation. The LMC also provides direct access to batch process error log.
To view logs of LMC errors, messages, and debug information
1. Start the LMC. For more information, see Starting the LMC.
2. Click the Log tab.
© 2015 LexisNexis, a division of Reed Elsevier Inc. All rights reserved.
Using LAW PreDiscovery
627
The last 500 entries that were logged during the application session are visible. The log
is composed of data from multiple application sessions and has a maximum size of 5MB.
This log is written to: %APPDATA\LAWConsole\LAWConsole.log.
3. Select or uncheck Errors, Messages, and Debug as necessary to filter the view.
4. To save a copy of the log, click Save and then choose a folder and a file name.
The saved copy of the log will contain all errors, messages, and debug information
regardless of the filter applied to the view.
To view the batch process error log
1. Start the LMC. For more information, see Starting the LMC.
2. Expand the Jobs node.
3. Select a job.
4. Click View Errors.
The batch processing error log opens.
Related Topics
© 2015 LexisNexis. All rights reserved.
628
LAW PreDiscovery
Batch Processing Overview
LMC Overview
Starting the LMC
Managing LMC Operation
Managing LMC Operation
You can configure LMC settings that control system timeout, polling interval, whether
unresponsive clients are restarted, the executable instance of LAW PreDiscovery™ to use, and
how remote refresh requests are handled.
To manage LMC operational settings
1. In the LMC, on the Tools menu click Options.
The Application Options dialog box appears.
2. Configure the LMC as needed using the settings provided in the Options dialog box.
Categor Option and Description
y
General
© 2015 LexisNexis, a division of Reed Elsevier Inc. All rights reserved.
Using LAW PreDiscovery
629
System Idle Timeout
Allows a client not in use for this number of seconds to join a shared batch.
The default value is 30 seconds.
A client is determined as in use if mouse or keyboard activity occurs during the
timeout interval. For example, if this is set to 60, the LMC cannot join the client
until the client is idle for one minute.
To prevent the client from ever automatically joining a shared batch set the
value to 0.
If the system idle timeout value is reached, the LMC reads as System Idle:
YES.
If the value is never reached, the LMC reads as System Idle: NO.
To determine whether the idle timer status, look at the second panel in the
task bar.
Polling Interval
Determines the frequency by which the LMC updates its status and retrieves
data about clients.
The default value is 10 seconds. The maximum value is 65.
It is important to note that the LMC is a single threaded application and
therefore user-interaction with the interface incurs a small delay while it is
updating the interface. Under normal conditions this is extremely negligible and
almost cannot be noticed. This delay can be mitigated somewhat by reducing the
polling interval. The lower the value, the less latency experienced in the
interface, but the trade-off is network and database traffic. The default value is
10 seconds.
Auto Restart Client
The number of minutes to wait before restarting the client with a status of Not
Responding.
The default value is 3 minutes.
To prevent the client from restarting automatically set the value to 0.
All unattended restart actions are executed by the local LMC instance
relative to LAW instance that is not responding.
Unattended restarts are logged into the applications main log and are
visible in the log interface. An entry in the Job Log indicates whether an LMC
instance executed an unattended restart of its Local LAW instance.
Unattended restart activity is visible in the LMC Jobs panel in the client
activity area.
If the LAW client is restarted automatically then the following message is
registered in the application log:
System[<LMC Local Computer Name>] is forcing automatic restart of Client
© 2015 LexisNexis. All rights reserved.
630
LAW PreDiscovery
LAW
LAW50.exe
Determines which instance of LAW is started.
Typically, if you run a shared Law50.exe from a network drive mapped to a server
instance of LAW, then it is recommended that you use that mapped instance of
Law50.exe for processing.
Network
Enable Remote Refresh Requests
Enables client-to-client operations, such as screenshots and requests to leave
jobs.
This setting defaults to enabled.
© 2015 LexisNexis, a division of Reed Elsevier Inc. All rights reserved.
Using LAW PreDiscovery
631
The LMC communicates actions between clients by using a central message
store. When a client requests an action from another client, the message is
placed into the store, and the recipient client gets the message the next time it
refreshes.
Since clients refresh at an unsynchronized interval, there could be a delay in
retrieving the message by the recipient client. This option sends a UDP packet to
the recipient client requesting that it refresh immediately, thereby reducing the
time it takes to retrieve and process the message.
UDP Port #
Specifies the port for the current client to use as UDP listener.
The default value is 8401.
This port enables the client to determine whether other clients are connected.
It is not necessary that this value be the same for all clients. However, for ease
of configuration using the default port for all clients is recommended.
When the LMC starts, or if changes are made to this setting, an entry is placed
into the application log.
3. When finished configuring click Accept.
Related Topics
Batch Processing Overview
LMC Overview
Starting the LMC
Using the LMC
Deduplication
Deduplication is the process of identifying duplicate information sources and then removing
them from further analysis. LAW PreDiscovery provides several tools to perform deduplication:
ED Loader Deduplication, Deduplication Utility, and Inter-Case Deduplication.
In this section
© 2015 LexisNexis. All rights reserved.
632
LAW PreDiscovery
About Deduplication
Describes the phases in the electronic discovery process where deduplication is of the
greatest use.
Deduplication Utility
Provides instructions on how to identify duplicate items after they have been imported into
a case.
Deduplication Information
Explains how key generation works in the deduplication process. Describes how
deduplication works with e-mail messages compared to electronic documents. Provides a
list of deduplication-related fields and possible values. Explains deduplication options and
the effect each has on resulting output.
Inter-Case Deduplication
Explains how to deduplicate an existing LAW PreDiscovery case to prepare it for import into
the current case.
Duplicate Viewer
Provides instructions for reviewing records that were flagged as duplicates in an EDenabled case.
About Deduplication
In LAW PreDiscovery™ deduplication can be accomplished at different stages of the discovery
process using different tools. Deduplication requires an active connection to the case database.
If the data connection is lost, deduplication can pause until the connection is restored.
Deduplication stages
These stages and tools are described as follows:
1. When importing documents into a case you can deduplicate using ED Loader. For more
information about deduplication during import with ED Loader, see Deduplication.
© 2015 LexisNexis, a division of Reed Elsevier Inc. All rights reserved.
Using LAW PreDiscovery
633
2. After importing documents into a case, you can use LAW PreDiscovery Deduplication
utility. This utility can help if you have already deduplicated a case, but later need to add
more files and deduplicate them as well. For more information see Deduplication Utility.
© 2015 LexisNexis. All rights reserved.
634
LAW PreDiscovery
3. Prior to importing an existing LAW case into the current case, you can use the Inter-Case
Deduplication utility. For more information see Inter-Case Deduplication.
© 2015 LexisNexis, a division of Reed Elsevier Inc. All rights reserved.
Using LAW PreDiscovery
635
LAW PreDiscovery also provides a viewer as well as reporting options for you to quality
assure and otherwise manage the deduplication process. For more information see Duplicate
Viewer and Deduplication Reports.
Re-establishing the database connection
Deduplication processes require an active connection to the case database. During
© 2015 LexisNexis. All rights reserved.
636
LAW PreDiscovery
deduplication, if the connection is lost, LAW PreDiscovery will attempt to re-establish the lost
connection. You can allow the re-connection process to continue indefinitely until the
connection is restored, or you can cancel the deduplication process altogether.
Related Topics
Deduplication Utility
Deduplication Information
Inter-Case Deduplication
Duplicate Viewer
Deduplication Reports
© 2015 LexisNexis, a division of Reed Elsevier Inc. All rights reserved.
Using LAW PreDiscovery
637
Deduplication Utility
You use the Deduplication Utility to help identify and flag duplicate items after they have been
imported into a case. Using it can help you to significantly reduce the time it takes to analyze
and process documents.
This utility may be used if deduplication was not performed by ED Loader during the import
process, or if deduplication was not done by using the Inter-Case Deduplication utility. See
the Deduplication Information topic for more information.
Note the following important considerations before you deduplicate records:
If you use the internal Deduplication Utility after the case has been deduplicated
against other cases using the Inter-Case Deduplication, a combination of internal and
external duplicates could result. Combining internal and external duplicates can cause
problems when purging, filtering, or reviewing duplicate records.
Proceeding with the internal deduplication after clicking the Yes I understand and
wish to continue button will result in the external deduplication database being
placed in Rebuild/Flush mode. At this point, the current case should be removed from
the external database.
Before you run the internal deduplication, it is recommended that you reset
deduplication flags. See To reset deduplication log status section below. Run this
procedure to prevent the mixture of internal and external duplicates.
For more information, see Inter-Case Deduplication.
To load records for deduplication
1. In the main window, on the Tools menu click Deduplication Utility.
The Info tab of the Deduplication Utility dialog box opens.
© 2015 LexisNexis. All rights reserved.
638
LAW PreDiscovery
2. If the case has not been already deduplicated using the Inter-Case Deduplication utility,
then click the Load button.
Before you run the Deduplication Utility a second time for a case, reset flags for logs
and records. You can determine if the Deduplication Utility has already been run by
viewing the Info tab. If the statistics on this tab are set to any other value than 0 then
reset flags for logs and records before you run the Deduplication Utility.
Deduplication statistics for the LAW case are displayed, including the number of
duplicates at the global- or custodian-level and the number of root duplicate records.
© 2015 LexisNexis, a division of Reed Elsevier Inc. All rights reserved.
Using LAW PreDiscovery
639
If deduplication has not yet been performed on the records, the values for each
displayed item will be zero.
If records had been deduplicated externally, two additional rows show the number of
records deduplicated externally and the name and location of the external
deduplication database.
To reset deduplication status
1. In the main window, on the Tools menu click Deduplication Utility.
2. Click the Tools tab.
© 2015 LexisNexis. All rights reserved.
640
LAW PreDiscovery
3. In the Deduplication Status Reset area click Run.
The deduplication log and deduplication-related fields for all the case records are reset.
The case returns to a state as if deduplication has never been performed.
To verify deduplication log against case entries
1. On the Tools menu click Deduplication Utility.
2. Click the Tools tab.
© 2015 LexisNexis, a division of Reed Elsevier Inc. All rights reserved.
Using LAW PreDiscovery
641
3. In the Verify Duplication Log area click Run.
The LAW PreDiscovery™ deduplication fields that were updated as a result of inter-case
deduplication are reset.
See Inter-Case Deduplication for more information. However, iitems from external
deduplication databases are not reset. As mentioned above, it is recommended to run
this command on a case before running the deduplication process via the Deduplication
Utility if a case has already been deduplicated using the Inter-Case Deduplication utility.
The Verify Deduplication Log tool will verify that all entries in the log exist in the LAW
case. This tool is included for troubleshooting purposes and does not check external
deduplication databases.
To configure settings
The Settings tab contains processing and processing range options.
© 2015 LexisNexis. All rights reserved.
642
LAW PreDiscovery
Working digest - This setting is used to select the hash key to be used for determining
duplicates. The hash values are obtained through metadata fields (e-mail) or by hashing
the entire file (e-docs). LAW PreDiscovery™ provides two hash keys to choose from: MD5
(128-bit output) and SHA-1 (160-bit output).
Test for duplicate against (Scope) - This setting pertains to the scope in which
duplicates are tested. Deduplication can be performed at one of two levels: Case Level
(globally deduplicates against all records in the database) or Custodian Level
(deduplicates against records with the same custodian value).
Only test untested records - When enabled, this option will force LAW to only process
records that have not been tested previously in the deduplication process. This feature
may be useful when a case has been deduplicated previously and then new records are
added (and deduplication was not enabled during the import). If the "Only test records
with selected custodians" option is also enabled, only untested records with the
specified custodian values will be tested.
Only test records with selected custodians - When enabled, this option allows the
specification of one or more custodians and forces LAW to process only records with
those custodians during deduplication.
Click the Select button to launch the Custom Value Selection [Custodian] dialog.
Check the boxes beside the custodians to include them in the deduplication process.
The Reset button can be used to reset any options that were modified in the current
session. Click Start to initialize the deduplication process.
© 2015 LexisNexis, a division of Reed Elsevier Inc. All rights reserved.
Using LAW PreDiscovery
643
Related Topics
About Deduplication
Deduplication Information
Inter-Case Deduplication
Duplicate Viewer
Deduplication Information
This topic explains the deduplication process implemented in LAW PreDiscovery™ and the
related Inter-Case Deduplication utility. Items discussed include:
Key generation and how it relates to the deduplicate of e-mail compared to electronic
documents.
A list of deduplication-related fields and possible values.
Brief explanations of deduplication options and their resulting output.
What is key generation?
Deduplication technologies do not directly compare file contents. Instead, the encryption
signatures, also known as the hash values, of files are compared. If the hash values for two
different items are identical, the content of the two files is assumed to also be identical. Key
generation then, refers to the process of creating an encryption signature for a file so that
files can be easily compared. File hashing and metadata hashing are the two primary
methods used by the ED Loader for generating keys.
Currently, the ED Loader generates two output hashes in parallel: MD5 and SHA-1. In the ED
Loader options you can choose which of these is used in the deduplication process.
E-docs. The key value is generated using the entire file as the input.
E-mail The key value is generated using an input value of certain metadata after
processing of the metadata fields has been executed. The purpose of using the postprocessed metadata is to match the metadata that is stored in LAW; therefore, if the key
is regenerated in the future, the value would match the original. E-mail includes both email messages contained in mail stores and loose e-mail messages. The term "loose email" refers to a file that is identified as a mail item and successfully converted to a mail
item by Outlook. These include .msg files, .eml files, and other RFC822-format e-mails.
The fields shown in the following table are used to generate the deduplication key for email and loose e-mail items:
E-mail fields used by deduplication keys
BCC
© 2015 LexisNexis. All rights reserved.
644
LAW PreDiscovery
Body
CC
From
IntMsgID
Email_Subject
To
Attach -- These are first-level attachments in the e-mail. The strings are delimited by
semi-colons (;).
- OR AttachmentContentHash -- If Include attachment hashes in e-mail metadata hash is
enabled in the ED Loader Deduplication setting, the hashes of the attached files are
included in the parent e-mail's metadata hash, as opposed to the above Attach field.
Fields
LAW PreDiscovery stores information regarding deduplication test results and other
deduplication-related data in the following five fields:
DupStatus: Indicates the duplicate state of the document. This is the primary field used
for differentiating duplicate items from non-duplicate items. DupStatus is a single
character field and will contain one of the following values:
U - Indicates the record was not tested (not deduplicated).
N - Indicates the record was tested and was not determined to be a duplicate at the
selected scope (Global/Custodian-level).
G - Indicates the record is a global-level duplicate.
C - Indicates the record is a custodian-level duplicate.
P - Indicates the "parent" duplicate. This value is set when a duplicate has been
identified. The record that was assigned the "G" or "C" status will have the same
_DupID value as this parent record (see _DupID field, explained below).
_DupID: This field is designed to provide a mechanism for grouping duplicate records
with their "parent" duplicates. A document determined to be a duplicate via ED Loader
deduplication or the LAW Deduplication Utility will contain the same LAW ID field value as
any other records that were determined duplicates of that particular document. The
parent duplicate will store its own ID in this field. Drag and drop this field into the
grouping area in one of the grid displays to view the parent and "child" duplicates
together.
Records deduplicated via inter-case deduplication are slightly different. Parents and their
duplicate records will still have matching _DupID field values; however, the value will not
be pulled from the ID field in LAW. This value will instead come from an ID assigned to
records in the external deduplication database. The ID for each parent and duplicate will
be the ID of the parent, as assigned in the tblDupLog table's DupID field.
_DupMethod: Indicates which hash type was used in testing the duplicate state of the
record. Possible values are:
1 - MD5 hash
2 - SHA-1 hash
© 2015 LexisNexis, a division of Reed Elsevier Inc. All rights reserved.
Using LAW PreDiscovery
645
129 - MD5 hash and record was included in an inter-case deduplication process
130 - SHA-1 hash and record was included in an inter-case deduplication process
MD5Hash: Stores the MD5 hash value of the record. If a file is considered to be a
duplicate, this value will be equal to the deduplication key.
Sha1Hash: Stores the SHA-1 hash value of the record. If a file is considered to be a
duplicate, this value will be equal to the dedup key.
Scope
Scope refers to the range of deduplication keys that will be tested to determine the record’s
duplicate state. The scope may be specified by the user in the ED Loader’s Deduplication
settings, the LAW Deduplication Utility, and Inter-Case Deduplication utility.
Two kinds of scope are available:
Global: The Global scope will result in the deduplication keys of incoming records being
tested against ALL other keys, regardless of how the scope of other records were
logged.
Custodian: The Custodian scope will result in the incoming records’ deduplication keys
being tested against all other keys that have the same CustodianID value.
Actions
The Action options are used to limit or exclude the data stored for a record that is
considered to be a duplicate. Options include:
(Include) Log record: Duplicate records are added to the LAW case normally, including
the native file, and all associated duplicate fields are set.
(Partially Exclude) Log record but do not copy file: Duplicate records are added to the
LAW case normally and all associated duplicate fields are set, but the native file is not
copied to the case folder.
(Exclude) Do not log record or copy file: Duplicate records are completely excluded
from the case. The record is not added to LAW and the native file is not copied.
Attachments
Attachments inherit the DupStatus of their parent item. This includes all types of
attachments, such as e-mail attachments, attachments to an archive file (i.e. zip), and loose
e-mail message attachments.
Filtering by file type
When the following action is selected, and File Type Filtering is enabled, duplicate checking
is executed normally.
(Partially Exclude) File Type Filter Action and Deduplicating
Records without native files can still be flagged as duplicate parents or children.
© 2015 LexisNexis. All rights reserved.
646
LAW PreDiscovery
Related Topics
About Deduplication
Deduplication Utility
Inter-Case Deduplication
Duplicate Viewer
Inter-Case Deduplication
The Inter-Case Deduplication utility installs with LAW PreDiscovery™ but is run externally from
LAW PreDiscovery. You use it to deduplicate cases against other cases. This type of
deduplication is intended for cases that are already populated with documents imported via the
ED Loader. If documents are added to the cases after the inter-case deduplication process,
they can be deduplicated against the other records as well.
Note the following facts when considering using the Inter-Case Deduplication Utility:
After a case is deduplicated using the Inter-Case Deduplication utility, the case should not
be deduplicated using the internal Deduplication Utility, and incoming documents should not
be deduplicated using ED loader.
Doing so can lead to issues with purging, reviewing, and filtering duplicate records caused
by a mixture of internal and external duplicates existing in the case. See the Deduplication
and/or Deduplication Utility topics for more information about these risks and associated
warnings.
In addition to creating a database for each case, LAW PreDiscovery also creates a database
external to the case database. The external deduplication database can be created as a
Microsoft SQL Server or Access database (*.MDB file).
The purpose of this database is to maintain deduplication information. When you use the
Inter-Case Deduplication Utility, the database registers each case added. Cases are ready
for inter-case deduplication after they have been populated with records via the ED Loader
import. Records added to these cases during subsequent imports can also be deduplicated.
It is best practice to use SQL Server databases for deduplication due to the 2 GB limitation
of Access databases. When working with large cases, the 2 GB limit can quickly be reached
and exceeded.
Member cases are LAW cases that are added to the external deduplication database with
© 2015 LexisNexis, a division of Reed Elsevier Inc. All rights reserved.
Using LAW PreDiscovery
647
the intention of deduplicating them against each other.
All member cases must be ED-enabled.
Both SQL and Access cases are supported.
To start Inter-Case Deduplication utility
1. Click Start, point to All Programs, and then click LAW PreDiscovery.
2. Click Inter-Case Deduplication Utility.
The Inter-Case Deduplication dialog box will appear.
To create the external deduplication database
When you are creating an external deduplication database, you can create the database as
© 2015 LexisNexis. All rights reserved.
648
LAW PreDiscovery
a Microsoft SQL Server (.icd file) or Access (.mdb) database.
It is best practice to use SQL Server databases for deduplication due to the 2 GB
limitation of Access databases. When working with large cases, the 2 GB limit can
quickly be reached and exceeded.
To create an external SQL deduplication database (recommended):
1. On the File menu click New.
Clicking New opens the Select Database Type dialog box. By default, the SQL Server
option is selected.
2. Make sure the SQL Server option is selected, and then click OK.
Clicking Accept opens the Server Connection Information dialog box.
3. In the Server Name list, click or type the name of the server where SQL Server is
installed.
By default, the Use Windows Authentication check box is selected, and the User Name
© 2015 LexisNexis, a division of Reed Elsevier Inc. All rights reserved.
Using LAW PreDiscovery
649
and Password fields are disabled.
4. If you do not want to use Windows authentication, clear the Use Windows
Authentication check box, and in the User Name and Password fields, type the
applicable SQL Server user name and password.
5. In the Database field, type the name of the new external deduplication database, and
then click OK.
Clicking OK opens the Save Deduplication Project Configuration dialog box.
6. In the Save Deduplication Project Configuration dialog box, browse to a location
accessible to all member cases.
The File name field defaults to the database name you entered in the Database field in
the Server Connection Information dialog box. The Save as type field defaults to
Deduplication Projects (*.icd).
7. Click Save.
Clicking Save closes the Save Deduplication Project Configuration dialog box, and in
the Inter-Case Deduplication Utility dialog box, the path to the database is now
displayed with Mode set to New. When the Mode is set to New all documents in the
member cases are deduplicated against each other.
8. Set the deduplication options:
Digest - The digest refers to the type of hash that will be used to determine duplicates.
The hash values are obtained through metadata fields (e-mail) or by hashing the entire
file (e-docs) during the ED Loader import process. Two options are available:
MD5 (128-bit output digest) - This hash value is stored in the MD5Hash field in LAW
for each document.
SHA-1 (160-bit output digest) - This hash value is stored in the Sha1Hash field in
LAW for each document.
Scope - This option refers to the scope in which duplicates are tested. Two options are
available:
Global - Records will be deduplicated against all records in all member cases.
Custodian Level - Records will only be deduplicated against others records with the
same custodian assigned. Records with no custodian value set will be evaluated
globally.
9. Move to the Member Cases area to add LAW cases. These cases will be deduplicated
against each other in the inter-case deduplication process. See the "Member Cases"
section for details.
To create an external Access deduplication database:
1. On the File menu click New.
Clicking New opens the Select Database Type dialog box. By default, the SQL Server
option is selected.
© 2015 LexisNexis. All rights reserved.
650
LAW PreDiscovery
2. In the Select Database Type dialog box, click the Access Database (*.mdb) option, and
then click OK.
Clicking OK opens the Create Deduplication Database dialog box.
3. In the Create Deduplication Database dialog box, browse to a location accessible to all
member cases.
The File name field defaults to DuplicateLog, and the Save as type field defaults to
Deduplication Database (*.mdb).
4. If you want to change the database file name, in the File name field, type the new
name.
5. Click Save.
Clicking Save closes the Create Deduplication Database dialog box, and in the InterCase Deduplication Utility dialog box, the path to the database is now displayed with
Mode set to New. When the Mode is set to New all documents in the member cases are
deduplicated against each other.
6. Set the deduplication options:
Digest - The digest refers to the type of hash that will be used to determine duplicates.
The hash values are obtained through metadata fields (e-mail) or by hashing the entire
file (e-docs) during the ED Loader import process. Two options are available:
MD5 (128-bit output digest) - This hash value is stored in the MD5Hash field in LAW
for each document.
SHA-1 (160-bit output digest) - This hash value is stored in the Sha1Hash field in
LAW for each document.
Scope - This option refers to the scope in which duplicates are tested. Two options are
available:
Global - Records will be deduplicated against all records in all member cases.
Custodian Level - Records will only be deduplicated against others records with the
same custodian assigned. Records with no custodian value set will be evaluated
globally.
7. Move to the Member Cases area to add LAW cases. These cases will be deduplicated
against each other in the inter-case deduplication process. See the "Member Cases"
section for details.
© 2015 LexisNexis, a division of Reed Elsevier Inc. All rights reserved.
Using LAW PreDiscovery
651
To open an existing database
You can open an existing database from a previous deduplication session.
1. Click the ellipsis button that is located to the left of the New button.
Or on the File menu click Open.
2. Browse to and select the external Access deduplication database (*.mdb) or project
configuration file for SQL (*.icd), and then click Open.
If the database has already been used in the inter-case deduplication process, the Mode
will change to Resume/Append.
To add cases
1. Click the Add button.
Or on the Case menu click Add.
2. Browse to and select the project.ini file for the case, located in the root of the LAW case
folder.
3. Click Open.
Cases can also be added to the list by dragging and dropping one or more root case
folders (folder containing the project.ini) or the project.ini file itself into the Member
Cases grid. Once added, the case names and paths will be listed in the grid and the
number in parentheses beside Member Cases will increment by one for each added case.
Since the cases are validated at the time they are added to the grid, an error will occur
at this time if the case does not meet the requirements for inter-case deduplication, such
as the case not being ED-enabled.
Once the member cases have been added, the Up and Dn keys (or Case > Move Up |
Move Down) may be used to specify the order in which records are deduplicated. The
first case shown in the grid will be processed first, the second case is next, and so on.
These buttons can only be used in New or Rebuild/Flush mode.
The Remove button (or Case > Remove) can be used to remove the selected LAW case
from the Member Cases grid. The Clear button (or Case > Clear) will remove all cases
from the grid. These buttons can only be used in New or Rebuild/Flush mode.
To determine deduplication status
Once the external database has been specified, the options have been set, and the member
cases have been added, click Begin to start the inter-case deduplication process. Note the
following facts about the Inter-Case Deduplication Progress screen:
The Progress area provides both visual (progress bar) and textual indicators of how
much work is remaining and what has been done thus far.
The Errors value is a count of all errors that occurred during processing. The total error
© 2015 LexisNexis. All rights reserved.
652
LAW PreDiscovery
count will be displayed in a summary screen once processing has been completed.
The Summary screen will appear once the deduplication process has been completed,
canceled, or aborted due to some sort of error condition. For a successful process, the
summary will show the Digest and Scope options that were selected and the total
number of member cases included in the process. The summary will also list total counts
for documents loaded, duplicate records, and errors at a case level. The "Documents
Loaded In This Session" value is the total number documents, not including any
attachment records, that were loaded in the current deduplication session. The
"Duplicates" value will show the total number of duplicates in each listed case and also
does not include any attachment records in the count.
If errors occurred during processing, a View Errors button will be included at the bottom
of the Summary screen. Click this button to view the error details. The log file that
appears is stored in <drive>\Documents and Settings\<user>\Application Data\Law50
\LawInterCaseDedup\LawInterCaseDedup.ErrorLog.txt. The Elapsed field displays the
amount of time that has passed during the process.
If an error occurs during processing that aborts the deduplication process completely,
the Summary screen will appear with a message stating the process was aborted.
Similar behavior will occur if the process is cancelled by the user. The Summary screen
will appear with a message stating the process was cancelled.
To save the contents of the summary to a text file:
1. On the File menu, click Save As from the Summary screen.
2. Browse to the desired location, type a file name, and then click Save.
Errors that halt processing or cancelling the deduplication process will both result in the
database entering Rebuild/Flush mode.
Deduplication fields
LAW contains a number of system fields to store deduplication-related information about
each document in a case. The Inter-Case Deduplication utility writes to two of those fields
(_DupID and _DupMethod) differently than the ED Loader deduplication and Deduplication
Utility in LAW. Please see the Deduplication Information topic for a list of these fields, their
descriptions, and possible values. Field information for all LAW fields can also be found in
the Field Descriptions topic.
Deduplication mode values
The Mode indicator shown below the External Deduplication Database path will display one
of four possible mode values:
No Database Selected - This mode will be set when no external deduplication database
is selected. See the "External Deduplication Database" section above for information on
creating and opening existing databases.
New - This mode will be set when the selected external deduplication database has not
yet been involved in the inter-case deduplication process. The New mode will occur when
a new database is created or when an existing database is selected but has not yet
been through the deduplication process.
Resume/Append - This mode will be set when the selected external deduplication
© 2015 LexisNexis, a division of Reed Elsevier Inc. All rights reserved.
Using LAW PreDiscovery
653
database has already been through the deduplication process. When the external
database is in this mode, only documents added to member cases since the database's
previous deduplication session will be added and deduplicated against each other and
the existing documents in the database. When the process is run again on this existing
database, the Summary screen will show the total number of documents added in the
session (documents loaded in member cases after previous deduplication session) and
the total number of duplicates in the cases.
Rebuild/Flush - This mode indicates that the external database was previously in
Resume/Append mode, but a change was made to one of the member cases that
requires that the external database be rebuilt. Functionally, this mode is the same as the
New mode, as the cases will need to be re-deduplicated once this mode has been
assigned. A "Click here for 'Rebuild/Flush' details" link will become available beside the
mode value. Clicking this link will launch a message box that lists the reasons why the
deduplication database was placed in Rebuild/Flush mode. The following actions are
possible reasons for this mode or occur:
Cancelling the inter-case deduplication process
Deleting a document from a member case
Renaming, removing, or adding a custodian in a member case when the Custodian
Level scope was used
Deduplicating a member case using ED Loader's Deduplication or the internal
Deduplication Utility
The Refresh button can be used to inspect member cases for changes that may the mode. If
changes are detected, the mode will be updated to the correct state.
To review duplicates
The Duplicate Viewer is a tool that can be used to review records in a case or multiple cases
that have been flagged as duplicates by one of LAW's deduplication methods (ED Loader
Deduplication, Deduplication Utility, or Inter-Case Deduplication).
Please see the Duplicate Viewer topic for details.
Related Topics
About Deduplication
Deduplication Utility
Deduplication Information
Duplicate Viewer
© 2015 LexisNexis. All rights reserved.
654
LAW PreDiscovery
Duplicate Viewer
The Duplicate Viewer is a tool that can be used when reviewing records in an ED-enabled case
that were flagged as duplicates by one of the deduplication methods: ED Loader Deduplication,
Deduplication Utility, or Inter-Case Deduplication. This viewer presents a tree view of
documents identified as duplicates. You can then select documents to see whether or not the
record is a duplicate, and then navigate to any duplicates that exist in the current case or other
LAW case.
The Duplicate Viewer displays on top of the main LAW PreDiscovery form. When you navigate
documents in the main document list or in one of the grid displays the viewer updates, ensuring
the duplicate information matches the current record.
Attachment records are not listed in the Duplicate Viewer.
To start the Duplicate Viewer
1. In the main window, in the folder tree, select a file.
2. On the Tools menu, click Duplicate Viewer.
The Duplicate Viewer appears. The file that you selected is listed either as a duplicate or
not. The following graphic shows a file determined not to be a duplicate:
The next graphic shows two files determined to be duplicates.
© 2015 LexisNexis, a division of Reed Elsevier Inc. All rights reserved.
Using LAW PreDiscovery
655
If the file is determined to be a duplicate, it appears in the context of a tree control
connected to its duplicates.
The top-level duplicate file is assigned a duplicate ID, which is visible after the record
ID,
3. Navigate to any file in the tree control by clicking on it.
To interpret duplicate status of a file
The possible status that Duplicate Viewer provides are described in the following table:
Status
Description
There is currently no document
selected.
When Duplicate Viewer was started, no document
was selected.
Close the viewer, select a file from the folder tree,
and then restart the viewer.
Document does not appear to be ED
(native) document.
The document selected is a TIFF or other nonnative file type.
Close the viewer, select a different file, and then
restart the viewer.
To retrieve duplicate status of a case
1. In the main window, on the Tools menu, click Duplicate Viewer.
© 2015 LexisNexis. All rights reserved.
656
LAW PreDiscovery
2. Select the Click here to retrieve the deduplication status of the case link.
3. The deduplication status for the case appears in the lower left area of the window.
The possible status that Duplicate Viewer provides are described in the following table:
Status
Description
Case is 100% deduplicated. The number of deduplicated records in the case matches the
number of records in the case.
<ERROR> Could not
determine the case level
deduplication status.
The number of deduplicated records in the case is less than
the number of documents in the case. This result could be
caused, for example, if new files were added to a case after
the case was deduplicated.
© 2015 LexisNexis, a division of Reed Elsevier Inc. All rights reserved.
Using LAW PreDiscovery
657
Related Topics
About Deduplication
Deduplication Utility
Deduplication Information
Inter-Case Deduplication
Duplicate Viewer
Exporting
The Export Utility allows you to export data for use by LexisNexis Concordance and other
litigation support applications.
In this section
Export Utility Overview
Provides instructions for starting the Export Utility. Also provides a list of supported export
formats and load file extensions, as well as considerations for using the export utility to
export images. Provides a Quick Reference that lists supported export formats, file
extensions and other details.
Formats/Documents Tab
Covers how to setup export formats for various document types.
Format-Specific Settings
Describes options that are associated with formatting the export for use by Concordance
and many other applications.
Fields Tab
Describes how to select the index fields to be included in the load files, and how to select
the Image Tag, or document identifier that links the index field data to the associated
image or native document.
Options Tab
Shows how to set naming to be used for exported files and folders, the export path, and
various other options.
Creating CD Volumes
© 2015 LexisNexis. All rights reserved.
658
LAW PreDiscovery
Provides guidance and procedures for breaking up a large export into smaller units so that
each can be written to CD.
Selectively Exporting Native Files
Provides procedures for including or excluding native files for export.
Checking for Blanks or Duplicates
Explains how to control blank values and to check for duplicate values for a selected image
tag and file naming field.
Export Profiles
Provide guidance and procedures on how to reuse the settings used in a particular export.
Exporting E-Mail Threads
Explains the ThreadID field.
Export Utility Overview
The first step in using the Export Utility is to start it. Next comes deciding upon the data type or
format you need to export. You can export to multiple formats in a single export session. To this
end, LAW PreDiscovery allows you to export critical data used by litigation support applications
and provides a wide ranging list of possible export formats. Some of the export formats allow
for advanced configuration, which are covered in the Format-Specific Settings section.
Considerations when planning an export session include: deciding how to handle native
applications, selecting image file formats, and configuring formats and fields for load files.
For a complete list of export formats, including details regarding file extensions assigned to
exported items and many other details, see the quick reference in this topic.
To start the Export Utility
From the main form or a standalone grid, on the Tools menu click Export Utility.
Or
Click the Export Utility button (
) located both on the main form, and in the toolbars of
standalone and embedded grids.
Export data types and formats
The following kinds of data may be exported:
© 2015 LexisNexis, a division of Reed Elsevier Inc. All rights reserved.
Using LAW PreDiscovery
659
Scanned data
Electronic discovery
Image files
Full text
Native files
Field data, for example, DocID and file metadata
Extended property metadata for certain types of files, including PDF, Office documents,
and EXIF (TIFF and JPEG) files. Extended properties can be recognized by their "EP"
prefix, for example, "EPTypist."
The following kinds of items can be exported:
Native files
Load files formatted for compatibility with litigation support programs
Image files of various formats
XML
The types of load files that are supported are listed as follows. Those with a link support
additional configuration options:
BlueTrace
CaseLogistix
CaseMap
Concordance
Concordance Direct (DCB)
Delimited Text
Doculex Viewer 4.x
Doculex Viewer 5/6
DocuMatrix 1.5
EDRM XML 1.0
EDRM XML 2.0
iCONECT
inData's TrialDirector
Inmagic's DB/TextWorks
Introspect eCM
IPRO IntelliVIEW
JFS Litigator's Notebook
LaserFiche
OmniDox (Custom)
PDF Conversion
Ringtail CaseBook
© 2015 LexisNexis. All rights reserved.
660
LAW PreDiscovery
Sanction
Storm Viewer
Summation Blaze
TotalVzn
Selecting external applications
Note the following considerations about external applications when using the Export Utility:
Because the requirements for working with each export format are unique, LAW provides
application-specific settings to better handle each format.
Many of the applications for working with supported formats are only viewers and do not
support index or OCR information. Consult the documentation for the intended target
applications before doing any coding or OCR to avoid wasting time performing
unnecessary steps in LAW. LAW supports many litigation support packages.
Image format considerations
The image format required is a result of the target application and its image viewer.
Some applications use one multi-page image file to represent a multi-page document. Other
applications use a series of single-page image files (logically grouped) to represent a multipage document.
If images created via TIFF/PDF Conversion in LAW were stored in multi-page format and a
single-page export format was chosen, the images would need to be split upon exporting,
which can significantly slow the process. Therefore, converting to single-page TIFF files is
recommended whenever possible.
Load file extensions
Note the following facts about load file extensions:
The load file extensions indicate the extensions of the load files that are created for each
of the supported formats.
With the exception of Doculex (which use a FoxPro database) and the Concordance DCB
export, all of the load files created are text files that conform to the specifications defined
by the target application.
In the case of Concordance and JFS, the export produces two export files, one with index
data and one with image information.
The load files can be found in the export path after the export is complete.
The load files are named (with the appropriate extensions) according to the last folder in
the export path (e.g., "Vol001.dat", "Vol001.dii", etc., for an export path of "D:\Exports
\Case1\Vol001"), as LAW assumes this is the volume label for the export.
Supported Formats Quick Reference
© 2015 LexisNexis, a division of Reed Elsevier Inc. All rights reserved.
Using LAW PreDiscovery
661
The following table lists supported export formats, image file formats (single or multi-page
images), load file extensions, formats that support importing of index information, native file
support, and support for (single- or multi-page) OCR.
Format
BlueTrace
Output
Files
Single /
Meta
Multi
Data
Page
Support
[VolName] Single /
.dat
Multi
Page
[VolName]
.opt
16-Bit
Naming
Required
(8.3 chars)
Full Text
Support
Single Native
Pg
File
Text
Suppo
Support
rt
Predefin No
ed
Yes
No
Yes
ImportTex
t.cpt
CaseLogistix
[VolName] Single /
.xml
Multi
Page
Yes
No
Yes
No
Yes
CaseMap
[VolName] Single /
.csv
Multi
Page
Yes
Yes
Yes
Yes
No
Concordance
[VolName] Single /
.dat
Multi
Page
[VolName]
.opt
Yes
No -- unless
Yes
using Opticon
versions
earlier than
2.0
No
Yes
Yes
No
Yes
No
Yes
ImportTex
t.cpt
Concordance
Direct (DCB)
[VolName] Single /
.dcb
Multi
Page
[VolName]
.ini
[VolName]
.key
[VolName]
.ndx
[VolName]
.opt
[VolName]
.tex
ImportTex
t.cpt
Delimited Text
[VolName] Single /
.csv
Multi
Page
Yes
No
Yes
No
Yes
Doculex Viewer
Doculex3. Single
No
Yes
No
No
No
© 2015 LexisNexis. All rights reserved.
662
LAW PreDiscovery
Format
Output
Files
Single /
Meta
Multi
Data
Page
Support
16-Bit
Naming
Required
(8.3 chars)
Full Text
Support
Single Native
Pg
File
Text
Suppo
Support
rt
4.x
dbf
Doculex Viewer
5/6
Doculex5. Single
dbf
No
No
No
No
No
DocuMatrix 1.5
[VolName] Single /
.xml
Multi
Page
Yes
No
Yes
No
No
dtSearch
N/A
Yes
No
Yes
No
No
EDRM XML 1.0
[VolName] Single /
_v1.xml
Multi
Page
Yes
No
Yes
No
Yes
EDRM XML 2.0
[VolName] Single /
_v2.xml
Multi
Page
Yes
No
Yes
No
Yes
iCONECT
[VolName] Single /
.xml
Multi
Page
Yes
No
Yes
No
Yes
inData's
TrialDirector
[VolName] Single /
.oll
Multi
Page
Yes
No
No
No
No
Inmagic's DB/
TextWorks
[VolName] Single /
.add
Multi
Page
Yes
No
Yes
(embedd
ed)
No
No
Introspect eCM
[VolName] Multi
.idx
Yes
No
Yes
No
No
Yes
No
Yes
(embedd
ed)
No
No
Yes
Yes
Yes
No
No
Multi
IPRO IntelliVIEW [VolName] Single /
.lfp
JFS Litigator's
Notebook
Multi
Page
[VolName] Single
.jfs
[VolName]
.log
jfs.col
LaserFiche
[VolName] Single
.lst
Yes
No
No
No
No
OmniDox
(Custom)
[VolName] Single
.ID
Yes
No
Yes
No
No
PDF Conversion
Straight
PDFs
No
No
No
No
Yes
(embed
No
Yes
(embedd
No
Single /
Multi
Page
PDF Hidden Text Searchabl Multi
e PDFs
No
© 2015 LexisNexis, a division of Reed Elsevier Inc. All rights reserved.
Using LAW PreDiscovery
Format
Output
Files
Single /
Meta
Multi
Data
Page
Support
16-Bit
Naming
Required
(8.3 chars)
ded)
Full Text
Support
663
Single Native
Pg
File
Text
Suppo
Support
rt
ed)
Ringtail
CaseBook
Ringtail.m Single /
db
Multi
(Access
Page
DB)
Yes
No
Yes
(embedd
ed)
Sanction
[VolName] Single
.oll
Yes
No
Yes \ No Yes
(external)
No
Storm Viewer
ImageBas Single /
e.add +
Multi
Supporter Page
Tables
Yes
No
Yes
No
(external)
+
Indexing
No
Summation
Blaze
[VolName] Single /
.dii
Multi
Page
[VolName]
.txt
(Metadata
if
exported
field count
is 6 or
more)
Yes
No
Yes
Yes
(external)
Yes
TotalVzn
[VolName] Single /
.opt
Multi
Page
No
No
No
No
Related Topics
Export Profiles
Formats/Documents Tab
Formats/Documents Tab
You use the Formats/Documents tab to specify the following:
© 2015 LexisNexis. All rights reserved.
No
No
Yes
664
LAW PreDiscovery
Export type
Files to be included for exporting
Type of files (e.g., native files)
Target application name
Target application configuration settings
Image format
To start the Export Utility
1. From the main window, on the Tools menu click Export Utility.
Or click the
button from the main or from the embedded grid toolbar.
The Export Utility dialog appears.
To configure file and text export options
© 2015 LexisNexis, a division of Reed Elsevier Inc. All rights reserved.
Using LAW PreDiscovery
665
Because LAW is both a scanning and an electronic discovery application, the Export Utility
allows users to choose which type of data should be included in the export.
The options available in this area of the Export Utility are described in the following table:
Option
Description
Selected Types
The Selected Types drop-down contains three options:
All Records - This option may be used when a LAW case contains
both scanned (or imported) images and native files, and the user
wishes to include both types in the export. This option may also be
used if the case is all e-discovery or all scanned data.
Scanned Data - Use this option when exporting only scanned
images or images imported using a feature other than the ED
Loader (such as Import Raw Images).
Electronic Discovery - This option will be used to export files that
were imported as e-discovery only. This may include native files
and/or the TIFF images or PDF files for each ED record (if files were
converted to TIFF or PDF).
Note: Keep in mind, not all target applications support native file
review. Currently, native file exports apply only to Blue Trace,
CaseLogistix, Concordance, Concordance Direct (DCB), Delimited Text,
EDRM XML 1.0, EDRM XML 2.0, iCONECT, Introspect eCM, Ringtail, and
Summation.
Include Images
Includes scanned images, images imported via Import Raw Images or
Import Load File, and images created during the TIFF/PDF Conversion
batch process or single document tiffing.
Include Full Text
Includes text files for any documents that contain text. This text may
have been extracted during the pre-save or created during the OCR
process. The type of text included in the export will depend on the
option selected in the Text Options dialog (see below).
Include Native
Files
Includes the native files imported during the e-discovery import
process. Again, not all export formats support native file review. If
Include Native is the only option selected, only Blue Trace,
CaseLogistix, iCONECT, Concordance, Concordance Direct (DCB),
Ringtail, and Summation will be displayed in the Formats section.
This option is disabled if the Scanned Data export type is selected.
Include records
without files
© 2015 LexisNexis. All rights reserved.
When enabled, includes a record in the export load file or database for
all LAW records that do not have a native file associated with them.
666
LAW PreDiscovery
For example, if a duplicate file was detected during an ED Loader
import, and the action was set to log a record but exclude the native
file, then the record in LAW would not have a native file. If this export
setting is disabled, this record would not be included in the export
output and a warning would be logged.
Options... button
Opens the Text
Set three conditions to determine precedence of text types for export:
Options dialog box.
Option 1: OCR Text, Extracted Text, or Printed Text
Option 2: <None>, OCR Text, Extracted Text, or Printed Text
Option 3: <None>, OCR Text, Extracted Text, or Printed Text
Text priority example configuration:
Option 1: OCR selected -- LAW will export the OCR text for any
documents that have associated OCR.
If no OCR text is found, LAW evaluates the Option 2 selection and
exports either Extracted Text or no text.
LAW will then move to Option 3 and export Printed Text if it has
been created from the native documents during the TIFF
conversion process.
Allow UNICODE in text - When enabled, LAW will include any
UNICODE characters in the exported text if present. This feature
should be used with caution as many export formats do not support
UNICODE.
Decode UTF-8 to ANSI - When enabled, LAW will convert the
default UTF-8 extracted text files to ANSI upon exporting.
Export as single page text - Single-page text files for each
document will be exported if this option is enabled. Only two
formats, Summation and Sanction, support single-page text.
Include placeholder file when text is missing - Export includes the
placeholder text .txt file for documents without text content during
the export. If the Include Full Text check box is selected on the
Formats/Documents tab in the Export Utility dialog box, when the
text files are being copied during the export, the placeholder .txt file
will be copied for each document without text content.
When this option is selected, click the Browse button to add the
placeholder .txt file you want to use. The placeholder .txt file can be
any .txt file containing the text you want to include in the
placeholder file.
Insert page markers in text (OCR / Printed text only) - Exports
specified field replacements and stamps the page markers on the
exported text. By default this option is disabled, which means no
page markers would be added to the exported text. When enabled,
you can type your own page marker or use the following default
page marker:
<<< &[PageID] / &[Pages] >>>
Omit text for tagged documents - Removes OCR, printed, or
extracted text from the export for certain records. Use this option to
help avoid creating overly large text files. A tag field must be
created and records tagged prior to launching the Export Utility. The
tag field will appear in the drop-down list below this option.
© 2015 LexisNexis, a division of Reed Elsevier Inc. All rights reserved.
Using LAW PreDiscovery
667
To help filter large text files from export, you can use the Capture
Text File Sizes run command along with the Omit text for tagged
documents option. The command stores the file size of the
extracted text associated with a document in an index field. The
option prevents text of tagged files from being exported.
Note that the Capture Text File Sizes command has not been fully
tested and cannot be supported in the event of a problem.
To configure document export options
Use the Documents section to choose specify documents to include in the export.
All Documents - Includes all documents in the case, depending on the selected Export
Type. For example, if this option is selected, and Electronic Discovery is chosen in the File
Types section, LAW will only export records imported as e-discovery; non-ED data will not
be included in the export.
Search Results - Includes all records currently displayed in the grid. This option will only
be enabled if the Export Utility is launched while a grid display is active or if it is launched
directly from a grid.
Select Documents - Specify folders and/or ranges of documents within folders for
processing.
1.Click Select.
2.The Select Folders dialog box appears.
3.Select folders to export.
4.To select a range of documents, click the folder containing the desired records and click
the Set Range button.
5.Check the boxes next to the starting and ending documents. The Calculate total
documents option may be selected to include document counts (and possibly page
counts - see next section) in addition to the number of folders selected. Enabling this
option could cause a delay when returning to the main Export Utility screen in large
cases.
In cases with a large number of documents and/or pages, a delay may be experienced
when launching the Batch Process or Export Utility dialogs while LAW calculates the
total number of pages to display.
To avoid the potential delay, disable page counting.
© 2015 LexisNexis. All rights reserved.
668
LAW PreDiscovery
1. On the Tools menu, click Options, and then click the Preferences tab.
2. Clear the Calculate total pages in batch/export dialogs setting before you
launching the Export Utility.
The number of pages will no longer appear beside the number of documents.
To select export formats
Use the Formats section to specify the target application(s) as well as the load file/image
format. Although you may select multiple applications, not all export formats support the
same options. Also, certain applications will have special configuration settings available in
the Export Utility.
To select a format
1. Select an application title from the Available Formats list.
2. Select either Single-Page or Multi-Page.
Note: The image format must be selected before moving the application format to the
Selected Formats list.
3. Click Select.
4. To determine if a format has additional configuration options, select the application title
in the Selected Formats list. If the Configure button becomes enabled, this indicates
additional settings exist and can be viewed by clicking Configure.
Note the following when configuring output formats:
When exporting PDFs to any single-page format other than PDF Conversion, if
<Default> is selected as the output format, the PDFs will be converted to imageonly. If PDF is the output format, the PDFs will be searchable.
If the "Use Pegasus Image Library" is checked, the PDFs will fail to export, unless
the documents are only one page.
If exporting multi-page color or grayscale TIFF images to a single page format with
the Output Format set to Default, and the "Use Pegasus Image Library" setting is
disabled, LAW will automatically export these files as JPEG images. This is done for
better compatibility with older image viewers that may not support TIFF w/JPEG
compression and to minimize the file sizes of the color images. B&W TIFF images
will not be affected by this process.
Related Topics
Export Utility Overview
© 2015 LexisNexis, a division of Reed Elsevier Inc. All rights reserved.
Using LAW PreDiscovery
669
Format-Specific Settings
Format-Specific Settings
For some of the supported export formats, LAW PreDiscovery provides advanced configuration
options.
In this section
The topics in this section describe those options that are specific to particular export
formats.
CaseMap
CaseLogistix
Concordance
Concordance Direct (DCB)
Concordance Direct (DCB)
Delimited Text
DocuMatrix 1.5
EDRM XML 1.0
EDRM XML 2.0
iCONECT
Inmagic Export Settings
Introspect eCM
IPRO IntelliVIEW
JFS Litigator's Notebook
PDF Conversion
Ringtail Casebook
Storm Viewer
Summation
TrialDirector and Sanction
© 2015 LexisNexis. All rights reserved.
670
LAW PreDiscovery
CaseLogistix
To configure export to CaseLogistix
1. In the main window, on the Tools menu, click Export Utility.
2. In the Export Utility, click the Formats/Documents tab.
3. In the Available Formats list, click CaseLogistix and then click the Select > button.
4. In the Selected Formats list, click CaseLogistix and then click Configure.
The CaseLogistix Settings dialog box appears.
5.
Specify the options that control how image paths are written to the load files during the
export process:
Use this
option
When you want to
Hard Path
Display in the load file a full path to each output file. For example, C:\Exports
\TestCase\Vol001\image.tif.
Relative Path
Use a relative path to the images from the export path instead of the entire
path (minus the drive letter).
UNC Path
Indicate that export path is a mapped network drive; the image paths are
written using an UNC notation, for example, \\MyServerName\MyFolder\.
© 2015 LexisNexis, a division of Reed Elsevier Inc. All rights reserved.
Using LAW PreDiscovery
671
Include
document/
OCR text as a
field in load
file
Include the text for each document (if available) as a field in the CaseLogistix
XML file.
Field Name
Specify the name of the field to which the text will be exported.
In LAW PreDiscovery™ 5.2 and higher, any Unicode data included in exported fields is
automatically included in CaseLogistix load files.
Related Topics
Export Utility Overview
Export Profiles
CaseMap
To configure export to CaseMap
1. In the main window, on the Tools menu, click Export Utility.
2. In the Export Utility, click the Formats/Documents tab.
3. In the Available Formats list, click CaseMap and then click the Select > button.
4. In the Selected Formats list, click CaseMap and then click Configure.
The CaseMap Settings dialog box appears.
© 2015 LexisNexis. All rights reserved.
672
LAW PreDiscovery
5. Select options according to the following guidelines:
Choose the desired delimiters to surround each field and/or field value in the load file.
To specify a delimiter not in the Field drop-down list, choose <other> and type the
delimiter into the Other text box.
To specify how image paths are written to the load files during the export process, edit the
path notation.
With Hard Path selected, the load file will display a full path to each output file, such as
C:\Exports\TestCase\Vol001\image.tif.
The Relative Path setting uses a relative path to the images from the export path
instead of the entire path (minus the drive letter).
If the UNC Path option is selected, and the export path is a mapped network drive, the
image paths are written using an UNC notation for example, \\my-server-name\myfolder-name.
To force LAW PreDiscovery™ to place the names of any included index fields in the first row
of the load file, enable Include field names as first record setting.
Related Topics
Export Utility Overview
Export Profiles
© 2015 LexisNexis, a division of Reed Elsevier Inc. All rights reserved.
Using LAW PreDiscovery
673
Concordance
To configure export to Concordance
1. In the main window, on the Tools menu, click Export Utility.
2. In the Export Utility, click the Formats/Documents tab.
3. In the Available Formats list, click Concordance and then click the Select > button.
4. In the Selected Formats list, click Concordance and then click Configure.
The Concordance Settings dialog box appears.
5. Configure options according to the information in the following table:
Option
Description
Data Delimiters
These options allow users to specify which data delimiters to use in the
Concordance .dat file. The data delimiters used when exporting will also
need to be used when importing the .dat file into Concordance. The
default values Concordance uses by default can be applied by clicking the
Restore Defaults button.
Path Notation
The path notation allows users to specify how image paths are written to
the load files during the export process. With Hard Path selected, the
© 2015 LexisNexis. All rights reserved.
674
LAW PreDiscovery
load file will display a full path to each output file, such as C:\Exports
\TestCase\Vol001\image.tif. The Relative Path setting uses a relative
path to the images from the export path instead of the entire path
(minus the drive letter). If the UNC Path option is selected and the export
path is a mapped network drive, the image paths are written using an
UNC notation (\\computername\sharename\...).
Allow Unicode
data (UCS-2
format)
Allows Unicode field data to be included in the load file if any exists in the
records selected for export. Prior to exporting, please ensure the version
of Concordance being used will support the Unicode data.
Create Opticon
load file only
With this option selected, LAW will only create an Opticon load file (.OPT)
and not the .DAT file.
Enable support for When enabled, configures the load file created during export to be
Concordance
opened with Concordance Native Viewer 1.0.
Native Viewer
Sets the default priority to export: image files, if they exist; and then
native files. This priority is only needed if exporting a combination of
image files and native files. This setting is enabled by default.
If both native and image files exist for a record the image file should
take precedence in the Opticon file.
If both native and image files exist for a record and if include tagged
documents is also selected then the native file takes precedence in the
Opticon file.
Include field
names as first
record
Inserts the field names for each field as the first record in the .dat file.
This is useful when viewing the data manually or importing into other
applications.
Include document/ The text for the selected documents will be included in the .dat file if this
OCR text as a field option is enabled. This setting also overwrites the Include Full Text
in load file
setting on the Formats/Documents tab of the Export Utility. The Field
Name is the name of the field in the .dat file which will contain the text. If
the selected field contains more than ~8MB of text, LAW will automatically
create sequential fields to adhere to Concordance's field size limitations.
Link to images and Leaves any images and native files included in the export in their location
native files in their (LAW case directory). This feature greatly improves the speed of the
current location
export because no files are being copied and LAW must only generate
the load files. Paths in the load file will reflect the current location of the
files.
The "Allow Unicode data" setting only applies to Concordance database versions 10 and
above.
Related Topics
Export Utility Overview
Export Profiles
© 2015 LexisNexis, a division of Reed Elsevier Inc. All rights reserved.
Using LAW PreDiscovery
675
Concordance Direct (DCB)
To configure export to Concordance Direct (DCB)
1. In the main window, on the Tools menu, click Export Utility.
2. In the Export Utility, click the Formats/Documents tab.
3. In the Available Formats list, click Concordance Direct (DCB) and then click the Select >
button.
4. In the Selected Formats list, click Concordance Direct (DCB) and then click Configure.
The Concordance Direct Settings dialog box appears.
© 2015 LexisNexis. All rights reserved.
676
LAW PreDiscovery
5. Configure options according to the information in the following table:
Option
Description
Use specific
database (*.dcb)
override path
Allows users to append to the desired database.
Security
The Security feature applies login information when appending to
existing Concordance DCB databases. Click the button to enter a user
name and password for the database.
The Security button is disabled in versions of Concordance that do not
support this feature,
Database path
This option is used in conjunction with the "Use specific database
(*.dcb) override path" option. Click Browse to locate a Concordance
database; exported records will be appended to the selected *.dcb file.
Path Notation
The path notation is used to specify how image paths are written to the
Opticon load file during the export process. With Hard Path selected,
the load file will display a full path to each output file, such as C:
\Exports\TestCase\Vol001\image.tif. The Relative Path setting uses a
relative path to the images from the export path, instead of the entire
path (minus the drive letter). If the UNC Path option is selected, and the
export path is a mapped network drive, the image paths are written
using an UNC notation, for example:
\ \ c o mp u t e r n a me \ s h a r e n a me \
Note: Hard paths will always be used if the option Automatically load
Opticon imagebase files is enabled.
If Record Match is
Found
The selected option will determine the action LAW will take if a matching
record is found in the Concordance database when utilizing the append
feature. The three options are:
Skip Record
Record will be omitted if it already exists.
Update Existing
Record
Any new information will be applied to the existing record, if one is
located.
Append All Records
All records will be appended to existing database.
Field Indexing
Click this button to open the Concordance Field Settings dialog box,
listing the fields in the current LAW case. The fields can be selected as
"Key" or "Indexed" fields before exporting the database to
Concordance. When the Concordance database is opened, the selected
key and indexed fields are listed in File > Modify.
Note: These field settings only apply to Concordance 8 databases (or
higher). To modify fields for earlier database versions, edit the EDiscovery.dcb database template located in the Template folder in the
LAW installation directory.
Concatenate DCB's
across separate
partitions
Select this option to concatenate the databases into one database and
then export it into partitions. For example, a partition size of 650 MB
creates partitions of the concatenated database that can be copied to
CDs. All of the database partitions are treated as one database. The
partition size is set in the Options tab of the Export Utility.
© 2015 LexisNexis, a division of Reed Elsevier Inc. All rights reserved.
Using LAW PreDiscovery
Automatically load
Opticon imagebase
files
677
When enabled, LAW will automatically load any exported images into
Opticon, eliminating the need for the user to do so once the
Concordance database is created.
Enable support for
When enabled, configures the load file created during export to be
Concordance Native opened with Concordance Native Viewer 1.0.
Viewer
This setting is selected by default.
If both native and image files exist for a record the image file should
take precedence in the Opticon file.
If both native and image files exist for a record and if include tagged
documents is also selected then the native file takes precedence in
the Opticon file.
Include document/
OCR text as a field
in database file
When enabled, this feature includes exported text to a field in the
database. Type the field name in the text box provided.
Link to images and
native files in their
current location
Leaves any images and/or native files included in the export in their
current location (LAW case directory). This feature greatly improves the
speed of the export because no files are being copied and LAW must
only generate the load files. Paths in the load file will reflect the current
location of the files.
Truncate text values If this setting is enabled, records with text values that exceed their field
that exceed their
size in the target DCB will still be added to the database. The offending
field size
text values will be truncated and a warning will be logged. When
disabled, these records will not be added to the DCB and errors will be
logged. The warning and error messages will include the field name,
field size, and the offending data size.
Related Topics
Export Utility Overview
Export Profiles
Delimited Text
To configure export to delimited text
1. In the main window, on the Tools menu, click Export Utility.
2. In the Export Utility, click the Formats/Documents tab.
© 2015 LexisNexis. All rights reserved.
678
LAW PreDiscovery
3. In the Available Formats list, click Delimited Text and then click the Select > button.
4. In the Selected Formats list, click Delimited Text and then click Configure.
The Delimited Text Settings dialog box appears.
5. Configure options according to the information in the following table:
Option
Description
Data Delimiters Choose the desired delimiters to surround each field and/or field value in the
delimited text file. The Delimited Text export generates a *.csv file named for
the last folder in the export path (i.e., Vol001.csv).
Path Notation
The path notation allows users to specify how image paths are written to the
load files during the export process. With Hard Path selected, the load file
will display a full path to each output file, such as C:\Exports\TestCase
\Vol001\image.tif. The Relative Path setting uses a relative path to the
images from the export path instead of the entire path (minus the drive
letter). If the UNC Path option is selected and the export path is a mapped
network drive, the image paths are written using an UNC notation ( \
\computername\sharename\ ...).
Allow Unicode
data (UCS-2
format)
Select this option to view any Unicode data existing in the selected export
fields in the delimited text (CSV) file created during export.
The Allow Unicode data setting only applies to Concordance database versions 10 and
above.
Excel will not parse a Unicode file correctly by default unless a tab [009] is used for the field
delimiter.
© 2015 LexisNexis, a division of Reed Elsevier Inc. All rights reserved.
Using LAW PreDiscovery
Related Topics
Export Utility Overview
Export Profiles
DocuMatrix 1.5
To configure export to DocuMatrix 1.5
1. In the main window, on the Tools menu, click Export Utility.
2. In the Export Utility, click the Formats/Documents tab.
3. In the Available Formats list, click DocuMatrix 1.5 and then click the Select > button.
4. In the Selected Formats list, click DocuMatrix 1.5 and then click Configure.
The DocuMatrix Settings dialog box appears.
5. Configure options according to the information in the following table:
Option
© 2015 LexisNexis. All rights reserved.
Description
679
680
LAW PreDiscovery
Case Name and
Database Name
These are both optional settings and are not required to create the
export from LAW. These values may be entered if requested.
Include attachments by
parent
Forces LAW PreDiscovery™ to include attachments with any
selected parent.
Include page offset data This setting uses the OCR information created from the ExperVision
with OCR
or ABBYY OCR engine to create information in the load file for
producing hit highlighting in DocuMatrix. Without this setting
enabled, OCR text will be included in the load file, but the location
of each word will not be included. ("Include Full Text" must also be
checked on the Formats/Documents tab of the Export Utility.)
Create XML for fixing
existing documents
Use this setting to create an XML file specifically used for updating
existing records in an existing DocuMatrix case.
Renumber documents
sequentially
When enabled, LAW will renumber the documents in the .xml load
file, starting with the specified value in the Starting # field.
DocuMatrix requires attachment (child) documents to have a parent in the load file. If an
attachment is included to be exported but the parent is not (using the manual document
range selection), this may cause problems when loading the file into DocuMatrix.
Related Topics
Export Utility Overview
Export Profiles
EDRM XML 1.0
To configure export to EDRM XML 1.0
1. In the main window, on the Tools menu, click Export Utility.
2. In the Export Utility, click the Formats/Documents tab.
3. In the Available Formats list, click EDRM XML 1.0 and then click the Select > button.
4. In the Selected Formats list, click EDRM XML 1.0 and then click Configure.
The EDRM 1.0 Settings dialog box appears.
© 2015 LexisNexis, a division of Reed Elsevier Inc. All rights reserved.
Using LAW PreDiscovery
681
5. Configure options according to the information in the following table:
Option
Description
Batch
Name
Associates a specific name with the exported set of files and metadata.
Path
Notation
Specifies how image paths are written to the load files during the export process.
With Hard Path selected, the load file will display a full path to each output file,
such as C:\Exports\TestCase\Vol001\image.tif. The Relative Path setting uses a
relative path to the images from the export path instead of the entire path
(minus the drive letter). If the UNC Path option is selected and the export path is
a mapped network drive, the image paths are written using a UNC notation ( \
\computername\sharename\ ...).
The value entered in the text box will be stored in the XML load file in the Batch
Name tag.
When enabled, the Include document/OCR text as content in load file setting
includes the text for each document (if available) within the EDRM XML file.
Specifically, the text will appear between the starting and ending InlineContent
tags.
Include
Adds extracted full text of document and any OCR text to the load file.
document/
OCR text
as content
in load file
Link to
Creates links in the load file to the current location of image files and all other
images and types of files.
native files
in their
current
location
© 2015 LexisNexis. All rights reserved.
682
LAW PreDiscovery
Related Topics
Export Utility Overview
Export Profiles
EDRM XML 2.0
To configure export to EDRM XML 2.0
1. In the main window, on the Tools menu, click Export Utility.
2. In the Export Utility, click the Formats/Documents tab.
3. In the Available Formats list, click EDRM XML 2.0 and then click the Select > button.
4. In the Selected Formats list, click EDRM XML 2.0 and then click Configure.
The EDRM 2.0 Settings dialog box appears.
5. Configure options according to the information in the following table:
© 2015 LexisNexis, a division of Reed Elsevier Inc. All rights reserved.
Using LAW PreDiscovery
683
Option
Description
Path
Notation
Specifies how image paths are written to the load files during the export process.
With Hard Path selected, the load file will display a full path to each output file,
such as C:\Exports\TestCase\Vol001\image.tif. The Relative Path setting uses a
relative path to the images from the export path instead of the entire path
(minus the drive letter). If the UNC Path option is selected and the export path is
a mapped network drive, the image paths are written using a UNC notation ( \
\computername\sharename\ ...).
When enabled, the Include document/OCR text as content in load file setting
includes the text for each document (if available) within the EDRM XML file.
Specifically, the text will appear between the starting and ending InlineContent
tags.
Include
Adds extracted full text of document and any OCR text to the load file.
document/
OCR text
as content
in load file
Link to
Creates links in the load file to the current location of image files and all other
images and types of files.
native files
in their
current
location
If you are planning to export to EDRM 2.0 and then re-import the XML back into a new LAW
PreDiscovery case, be sure to include the <FolderPath> field in the load file. The
<FolderPath> field is required in order to recreate the folder structure in LAW upon import.
Related Topics
Export Utility Overview
Export Profiles
iCONECT
To configure export to iCONECT Settings
1. In the main window, on the Tools menu, click Export Utility.
© 2015 LexisNexis. All rights reserved.
684
LAW PreDiscovery
2. In the Export Utility, click the Formats/Documents tab.
3. In the the Available Formats list, click iCONECT and then click the Select > button.
4. In the Selected Formats list, click iCONECT and then click Configure.
The iCONECT Settings dialog box appears.
5. Configure options according to the information in the following table:
Option
Description
Path Notation
The path notation allows users to specify how image paths are written to
the load files during the export process.
With Hard Path selected, the load file will display a full path to each
output file, such as C:\Exports\TestCase\Vol001\image.tif.
The Relative Path setting uses a relative path to the images from the
export path instead of the entire path (minus the drive letter).
If the UNC Path option is selected and the export path is a mapped
network drive, the image paths are written using a UNC notation (\
\computername\sharename\ ...).
Date Format
Choose the date format for any exported date fields. Choose the desired
format from the drop-down list.
Include document/ Includes the text for each document (if available) as a field in the
OCR text as a field CaseLogistix XML file.
in load file
The Field Name text box is used to specify the name of the field to which
the text will be exported.
Related Topics
© 2015 LexisNexis, a division of Reed Elsevier Inc. All rights reserved.
Using LAW PreDiscovery
685
Export Utility Overview
Export Profiles
Inmagic Export Settings
To configure export to Inmagic DB/TextWorks Settings
1. In the main window, on the Tools menu, click Export Utility.
2. In the Export Utility, click the Formats/Documents tab.
3. In the the Available Formats list, click Inmagic DB/TextWorks and then click the Select >
button.
4. In the Selected Formats list, click Inmagic DB/TextWorks and then click Configure.
The Inmagic DB/TextWorks Settings dialog box appears.
5. Configure Path Notation options as needed:
With Hard Path selected, the load file will display a full path to each output file, such as C:
\Exports\TestCase\Vol001\image.tif.
The Relative Path setting uses a relative path to the images from the export path instead of
the entire path (minus the drive letter).
If the UNC Path option is selected and the export path is a mapped network drive, the
image paths are written using a UNC notation (\\computername\sharename\ ...).
© 2015 LexisNexis. All rights reserved.
686
LAW PreDiscovery
Introspect eCM
To configure export to Introspect eCM
1. In the main window, on the Tools menu, click Export Utility.
2. In the Export Utility, click the Formats/Documents tab.
3. In the the Available Formats list, click Introspect eCM and then click the Select > button.
4. In the Selected Formats list, click Introspect eCM and then click Configure.
The Introspect Settings dialog box appears.
5. Configure options according to the information in the following table:
Option
Description
General
Enter values for:
Batch Name. If left blank, the volume name of the exported load file
will be used by default.
Index ID. Appears as repeating value in the load file.
Folder ID. Appears as repeating value in the load file.
Each of these three values is usually provided if this format has been
requested.
© 2015 LexisNexis, a division of Reed Elsevier Inc. All rights reserved.
Using LAW PreDiscovery
Include all Bates
numbers
687
Creates a text file called "<image>_uid.txt" for each multi-page document
and contains a list of PageIDs contained in the multi-page document.
Link to images and When enabled, the export process will generate the load file(s) and link
files in current
them to the images and/or native files in their current location; the files
location
are not copied.
Note: When using this setting, images MUST be in multi-page format in
the LAW PreDiscovery™ case in order for Introspect to view all pages of
the images. Also, the IDX load file will always be written to the image
path of the case so relative paths to the documents can be used
(required by Introspect) and named according to the batch name as
configured in the Introspect settings. A shortcut to the load file will be
created in the export path referencing the load file in the image directory
of the case.
Use IDX Version 5 Forces LAW to configure the load file to match the specifications for
format
Introspect 5.
<Field IDs..>
Click this button to display the field configuration dialog shown below:
Introspect Field
Information dialog
box
Use this to define specific Field ID values for any of the fields.
The fields shown in this list are all of the index fields which exist in the
current LAW case.
These fields will exist in the Header section of the .idx load file.
Related Topics
© 2015 LexisNexis. All rights reserved.
688
LAW PreDiscovery
Export Utility Overview
Export Profiles
IPRO IntelliVIEW
To configure export to IPRO IntelliVIEW
1. In the main window, on the Tools menu, click Export Utility.
2. In the Export Utility, click the Formats/Documents tab.
3. In the the Available Formats list, click IPRO IntelliVIEW and then click the Select >
button.
4. In the Selected Formats list, click IPRO IntelliVIEW and then click Configure.
The IPRO Settings dialog box appears.
5. Configure options according to the information in the following table:
Option
Description
Include index fields in
load file
Specifies fields to include in the LPF file.
Click the Edit button to display the IPRO Field Information dialog.
© 2015 LexisNexis, a division of Reed Elsevier Inc. All rights reserved.
Using LAW PreDiscovery
689
You can select of up to 10 Information (IO) fields and as many Tag/
Issue (IS) fields as you need.
When specifying the IO tags, an index value (1-10) must be
assigned to the selected field and will match the corresponding
field in IPRO.
No two selected IO fields may have the same index value.
Selection of index fields in this window is independent of the fields
selected under the Fields tab in the Export Utility.
After the desired selections have been made, click OK to save the
changes and return to the IPRO Settings dialog.
Include OCR Word
Information
OCR produced using the ExperVision or ABBYY OCR engine may be
included in the IPRO load file using the full text (FT) tag, which allows
full text searching in IPRO.
To separate the OCR text from the image information, select Write
to separate LFP file. This option will generate two IPRO files
displayed as [Volume].lfp and [Volume](ocr).lfp.
Number pages (w/
IPRO annotations)
This feature allows LAW PreDiscovery™ to create special tags in the
exported LFP file that apply the current PageID of the document as
an "IPRO Annotation." This allows IPRO users to view/hide the
PageID annotation just as if the annotation were created in IPRO
itself.
Alignment determines the horizontal location of the annotation:
© 2015 LexisNexis. All rights reserved.
690
LAW PreDiscovery
Left
Centered
Right
Vertical Position places the annotation relative to the height of the
document. Select 0% to create an annotation at the top of the page.
Select 100% to create the annotation at the bottom of the page.
This annotation is applied directly on top of the existing image;
therefore, it could potentially cover existing image data. The IPRO
annotation does not modify the image itself.
Use new folder flags
(DocBreak = F)
Use this setting to include an (F) flag in the IPRO .lfp file as the
document break at the beginning of each new folder. The default
value for this feature uses the document (D) flag.
Use volume path
notation
Select this option to use a volume path notation. Otherwise, a full
path (with drive letter) will be used and no volume will be specified.
Related Topics
Export Utility Overview
Export Profiles
JFS Litigator's Notebook
Use the JFS Settings dialog box to map LAW fields to default JFS fields.
To configure export to Litigator's Notebook Settings
1. In the main window, on the Tools menu, click Export Utility.
2. In the Export Utility, click the Formats/Documents tab.
3. In the the Available Formats list, click JFS Litigator's Notebook and then click the Select >
button.
4. In the Selected Formats list, click JFS Litigator's Notebook and then click Configure.
The JFS Litigator's Notebook Settings dialog box appears.
© 2015 LexisNexis, a division of Reed Elsevier Inc. All rights reserved.
Using LAW PreDiscovery
691
5. Map LAW PreDiscovery™ fields to JFS fields according to the information in the following
table:
To perform this action
Map a LAW field to a
particular JFS field.
To this
1. Select the LAW field in the Available Fields list.
2. Select a field in the JFS Fields list.
3. Click <Link Fields>.
The fields are added to the Mapped Fields list.
Undo a mapped field.
Select an item in the Mapped Fields list and then click Delete.
List only the exported field
names (per line) with the
corresponding field value.
Select Use alternate format (only mapped fields, one per line).
Related Topics
Export Utility Overview
Export Profiles
© 2015 LexisNexis. All rights reserved.
692
LAW PreDiscovery
PDF Conversion
To configure export to PDF Conversion Settings
1. In the main window, on the Tools menu, click Export Utility.
2. In the Export Utility, click the Formats/Documents tab.
3. In the the Available Formats list, click PDF Conversion and then click the Select > button.
4. In the Selected Formats list, click PDF Conversion and then click Configure.
The PDF Settings dialog box appears.
5. Configure options according to the information in the following table:
Option
Description
Create
bookmarks
for grouped
documents
Use this setting in conjunction with the Combine Parents/Attachments
option, found in the Export Utility under the Options tab, to create bookmarks
in exported PDF files.
If a document is not a parent or contains no attachments, no bookmarks will
be created in the PDF file for that document.
The Parent and Attachments drop-down lists will contain the index fields that
exist in the current case.
Bookmark
Caption
The fields will be used as the bookmark titles in the exported PDF.
Populate PDF
metadata
This setting may be used to populate the metadata of a PDF file with index
field values stored in the LAW case. This feature must be used in conjunction
with the Combine Parents/Attachments option located in the Options tab of
© 2015 LexisNexis, a division of Reed Elsevier Inc. All rights reserved.
Using LAW PreDiscovery
693
the Export Utility.
When exporting PDFs to single-page format, the Use Pegasus Image Library option must
be unchecked, otherwise an "unsupported PDF" error will be logged.
Single page export is set in the Export Utility on the Formats/Documents tab. The Use
Pegasus Image Library option is set on the Options tab.
Related Topics
Export Utility Overview
Export Profiles
Ringtail Casebook
To configure export to Ringtail Casebook
In the main window, on the Tools menu, click Export Utility.
1. In the Export Utility, click the Formats/Documents tab.
2. In the the Available Formats list, click Ringtail CaseBook and then click the Select >
button.
3. In the Selected Formats list, click Ringtail CaseBook and then click Configure.
The Ringtail Settings dialog box appears.
© 2015 LexisNexis. All rights reserved.
694
LAW PreDiscovery
4. Configure options according to the information in the following table:
Option
Description
Allow long folder names (over 20 chars)
This option allows LAW PreDiscovery™ to
ignore Ringtail's recommended folder name
length limit of 20 characters.
This setting is not recommended as
Ringtail does not officially support long
folder names. This option is available due
to special LAW user requests.
Include document/OCR text as a field in
load file
Ringtail does not directly support this
method and it should be used with
caution.
Insert special page markers in OCR text
Inserts document text into a memo field
inside the Ringtail load file. This was the
default method for handling Ringtail OCR with
LAW versions 4.02.41 and earlier.
Inserts a special page marker onto the OCR
text of each page in the following format:
###{Page}|||Page {PageID}^^^
This tag is used by Ringtail for linking the OCR
text to the actual images.
Replace existing page markers
Removes any existing page markers currently
on the OCR and replace them with the new
value.
This feature is useful if the OCR in LAW
already contains these markers but document
© 2015 LexisNexis, a division of Reed Elsevier Inc. All rights reserved.
Using LAW PreDiscovery
695
boundaries have since changed. Instead of
re-OCRing the documents, this feature
replaces the old tag with the new.
Include reference to native file in Pages
table
When enabled, and native files are included
for export, LAW will write a record for each
native file to the Pages table in the Ringtail
load file (export.mdb).
Records referenced in the pages table will be
available for viewing in the Image frame in
Ringtail.
If images and native files are included for
export, and the native records are not
referenced in the Pages table, Ringtail will
locate the native files and allow viewing of
them in the Content frame, provided the
native files are named the same as the
associated image and are located in the same
folder.
Important Format Notes
The requirements for the Ringtail format should be followed closely to avoid possible
problems importing this load file into Ringtail.
Format
Note
Folder names limited to To enable folder names longer than 20 characters, enable the
20 character
Allow long folder names option.
By default LAW PreDiscovery™ truncates folder names longer than
20 characters.
Folder names may not
contain spaces
Spaces in folder names will automatically be converted to
underscores ("_") during the export process.
File names for exported Ringtail requires filenames for the exported text files to follow
text
specific rules. The file name must:
Be the same as the image tag.
Have the .txt file extension.
Support for single-page Ringtail supports either single-page or multi-page TIFFs; however,
and multi-page TIFFs
the most commonly used image format is single-page TIFF.
Document fields:
BegDoc#
EndDoc#
PgCount
© 2015 LexisNexis. All rights reserved.
These fields (if included in the Fields tab and selected for export)
will be automatically placed in the Export_Extras table of the
Ringtail load file.
696
LAW PreDiscovery
Related Topics
Export Utility Overview
Export Profiles
Storm Viewer
About export to StormViewer
Storm Viewer is a freely distributable viewer available to the public. The viewer runs as a frontend to the Storm imagebase. The Storm imagebase can be built and distributed freely by users
of LAW PreDiscovery™ and Storm-X. Storm Versions 1.2 and above now offer the DB-Builder
License which allows users to import industry standard loads files and raw image files to build
their own Storm ImageBases.
Storm utilizes the powerful Advantage Local Server for accessing image data and metadata.
The local server has a 5-user concurrent connection limit, so any 5 users may have a single
database open at one time.
For users who wish to scale Storm for use as a document retrieval tool, and have more clients,
the Advantage Database Server is a lightweight and powerful relational database management
system (RDBMS) that can add stability, speed, and connections to existing imagebases.
Storm Viewer exports will also work for the Storm software, a free CD-runtime viewer.
Related Topics
Export Utility Overview
Export Profiles
© 2015 LexisNexis, a division of Reed Elsevier Inc. All rights reserved.
Using LAW PreDiscovery
697
Summation
To configure export to Summation
1. In the main window, on the Tools menu, click Export Utility.
2. In the Export Utility, click the Formats/Documents tab.
3. In the the Available Formats list, click Summation Blaze and then click the Select >
button.
4. In the Selected Formats list, click Summation Blaze and then click Configure.
The Summation Settings dialog box appears.
5. Configure options according to the information in the following table:
Option
Description
Allow advanced (iBlaze) dii
features
Enables features not compatible with versions 5.21 and
below of Summation.
Write all fields to dii file
Allows the writing of seven or more index fields to be written
to the DII file. The default export method is to write the index
fields to a text file if the number of index fields is greater than
© 2015 LexisNexis. All rights reserved.
698
LAW PreDiscovery
seven.
Include document/OCR text
directly in dii file
This feature appears to
have bugs in Summation.
Form feed characters to
delimit text pages are not
supported and errors
about unsupported
operations may occur,
although all the data does
appear to get imported.
Allows the text for the exported documents to be included in
the dii load file. If this setting is enabled, it will overwrite the
'Include Full Text' option on the Fields tab of the Export Utility
for the Summation format.
Include PST tokens directly in Forces LAW PreDiscovery™ to include an extra 'tag' in the edii
dii file
file. The @PSTFile token allows Summation users to identify
the source PST file where the e-mails originated. This can be
helpful if there are many individual PST files being processed
for a job. If this option is not checked, the @PSTFile token will
be omitted from the load file (*.dii). This option is only
available in cases that are enabled for electronic discovery.
Include @EDOC token for email messages
If a PST or NSF mail store file is included in the export,
enabling this option adds the @EDOC filename token to the
load file (*.dii).
Always write index fields to
separate file
Forces LAW to place all index field information into a delimited
text file regardless of the number of index fields selected for
export.
Include field names as first
record of delimited text file
Places the index field names in the first line of the delimited
text file. This is useful for determining the field order of the
data in the load file or for importing into other applications.
Data Delimiters
The data delimiters for the delimited text file may be defined
in this section. The default values for this feature can be
reset by clicking the Restore Defaults button.
Dii Path Notation
eDii Tokens
This setting is used to specify the type of volume notation
to use in the dii file. The CD Volume (@V Vol:) option will
return a tag in the dii similar to: "@D @VVol001:\Vol001
\001\" where "Vol001" is the volume name. Hard Path
creates a tag similar to: "@D C:\Exports\Vol001\001\".
The Image Directory (@I) option will return a tag in the
dii similar to: "@D @I\Vol001\001\" where "Vol001" is the
volume name. The two options (@V and @I) are the most
commonly used with @I being the recommended (most
versatile) method. Most users of Summation have a
preferred way of importing the dii files so it is important to
check on the preferred method.
This feature allows users to choose which tokens are
placed in the Summation load file. All available tokens are
selected by default.
© 2015 LexisNexis, a division of Reed Elsevier Inc. All rights reserved.
Using LAW PreDiscovery
699
An INI setting is available to modify the @MEDIA value used for e-mail attachments that
are e-mail files (i.e. MSG attached to an MSG).
By default, LAW will populate the @MEDIA token for these attachments as Attachment per
the Summation documentation.
However, the value can be changed to eMail for e-mails attached to e-mails by adding the
following setting in the Law50.ini file in the application path (same folder as Law50.exe):
[Summation]
EmailAttachEmailMedia=eMail
If the [Summation] section already exists, add the key below it. Otherwise, add the entire
setting as shown. To switch back to the default of Attachment, either remove or comment
out the setting above or replace the eMail value with Attachment.
The @O token will be included in the Summation load file in either of the following
conditions:
1) The text is exported to a different location or has a filename different than the image.
or
2) When there is no TIFF image associated with a record.
Related Topics
Export Utility Overview
Export Profiles
© 2015 LexisNexis. All rights reserved.
700
LAW PreDiscovery
TrialDirector and Sanction
The TrialDirector and Sanction formats use the same configuration settings.
To configure export to TrialDirector or Sanction
1. In the main window, on the Tools menu, click Export Utility.
2. In the Export Utility, click the Formats/Documents tab.
3. In the the Available Formats list, click InData's TrialDirector or Sanction and then click
the Select > button.
4. In the Selected Formats list, click InData's TrialDirector or Sanction and then click
Configure.
The TrialDirector Settings dialog box appears.
5. Configure options according to the information in the following table:
Option
Document ID
Description
Uniquely identifies each document within the collection.
Users may choose BegDoc# or any other index field in the LAW
PreDiscovery™ case, such as DocID or Exhibit Number (for example).
Object ID
References each page within the document. This field may either be Page ID
(used when BegDoc# is selected as the Document ID field) or Auto-Generate,
which assigns a .001 extension (and so on) after the Document ID to each page
within the document (i.e., EX001.001, EX001.002, EX001.003). The AutoGenerate feature is most commonly used when a field other than BegDoc# is
selected as the Document ID.
Description
(Optional)
Optional setting allowing users to populate the Description field in TrialDirector
or Sanction with values from a user-defined field in the LAW database.
© 2015 LexisNexis, a division of Reed Elsevier Inc. All rights reserved.
Using LAW PreDiscovery
701
Related Topics
Export Utility Overview
Export Profiles
Fields Tab
You use the Fields tab in the Export Utility to select the index fields to be included in the load
files, and to select the Image Tag, or document identifier that links the index field data to the
associated image or native document.
To access this feature, from the main window, on the Tools menu, click Export Utility, and
then click the Fields tab.
© 2015 LexisNexis. All rights reserved.
702
LAW PreDiscovery
Selected format
The Selected Format list will contain up to five items, depending on the formats selected in
the Formats/Documents tab:
Default (always present in list)
Summation
Concordance
Concordance Direct (DCB)
Ringtail
In certain situations, users may need to include certain fields in a Summation load file and a
different set of fields in a Concordance load file, for example, but would like to perform both
exports at one time. LAW PreDiscovery™ allows customization of the field selection and field
names for each of the four aforementioned formats while still maintaining a "default" field
selection for any other selected formats. This option eliminates creation of multiple exports
solely to change index field information for one or more of the formats.
© 2015 LexisNexis, a division of Reed Elsevier Inc. All rights reserved.
Using LAW PreDiscovery
703
For example, suppose you need to export to Summation, Concordance, and Storm Viewer,
and the specifications call for different index fields to be included in each type of load file.
1. You would first choose the Storm Viewer fields with <Default> as the Selected Format in
the Fields tab.
2. Next, you would select Summation from the Selected Formats list, check the "Use format
specific fields over default selections" option, and then choose the desired fields for the
Summation load file.
3. The final step would be to choose Concordance from the Selected Formats drop-down,
check the "Use format specific..." option, and then choose the desired fields for the
Concordance load file.
In another example, supposed you are asked to export to Summation and Storm Viewer. A
requirement is for the export to include the same fields for both formats.
In this scenario, you could choose <Default> in the Selected Format drop-down and
then select the desired fields. These fields would then be included in both the Storm
Viewer database and the Summation load file.
The Use format specific fields over default selections option enables the Available and
Selected Fields lists when a format other than <Default> is chosen, allowing users to choose
fields to be included in that format's load file.
Selecting fields
Available Fields
The Available Fields area displays a list of both user-defined and system fields that are
available for export. The following table provides guidance on how to accomplish common
tasks:
To accomplish
this result
Include a field in
the export
Do this
Highlight an index field in the Available Fields list.
Click Select.
Or
Double-click the field name.
The field moves to the Selected Fields list.
When performing native file productions it is important to export a
unique reference number for the image tag from LAW for use in the
reviewing database. Typically, the DocID will be used as for this
purpose. This number will serve as the link between the two
databases and will be used to tag the records in LAW that will be
produced to TIFF, PDF, or paper.
© 2015 LexisNexis. All rights reserved.
704
LAW PreDiscovery
Remove a field
Double-click a field in the Selected Fields list.
Or
Select a field first and press the Remove button. Fields may also be
selected or deselected by clicking the Select All or Remove All buttons.
Change the order of The Promote and Demote buttons may be used to change the order of
fields
the fields in the Selected Fields list and ultimately, in the load file.
The Promote button will move the selected field further up in the
list.
The Demote button will move the selected field down the list.
Selected Fields
The Selected Fields list is divided into two columns:
Field Name - Displays the name of the selected index field.
Export As - Allows users to rename the field upon export. This does not rename the field in
the LAW case itself, just in the load file. This is useful for applications that require fields to
be named a certain way, such as Summation.
Field names displayed in red once moved to the Selected Fields list indicates the field
name is not compatible with one or more of the selected export formats (i.e., field name
is too long or contains unsupported characters). The field will need to be renamed in
the 'Export As' column prior to export. The field name will no longer appear in red once
the name has been properly changed.
Image Tag field
The Image Tag is a document identifier field. Use it to link images or native documents to the
matching index field data. The BegDoc# and DocID fields are commonly used for this
purpose, but other user-defined fields may be used provided they contain a unique value
and do not contain blank values for any record.
Options Tab
In the Export Utility, the Options tab is where you configure many general settings that control
how your export works. For example, the Options tab is where you set the output path,
images, native, text, and load files, as well as the folder and file naming schemes, export
logging, and various other output settings, such as file format.
To access this feature, from the main window, on the Tools menu, click Export Utility, and
© 2015 LexisNexis, a division of Reed Elsevier Inc. All rights reserved.
Using LAW PreDiscovery
705
then click the Options tab.
Output Path
This area of the Options tab contains settings related to the location in which the files will be
exported.
Export Path - This value will be the location to which the exported files will be saved.
These files may include one or a combination of images, native files, full text, and load files,
depending on the selected options.
Partition Size - This setting is used to determine how much data is written to each volume.
© 2015 LexisNexis. All rights reserved.
706
LAW PreDiscovery
The last folder listed in the output path is considered to be the volume name. For example,
if the export path listed is C:\Exports\EDD_001\Vol001, then the first volume will be
Vol001. When the partition size has been reached, a Vol002 folder will be created, etc. The
default of 650 MB should be used if planning on burning the exported data to CDs but may
be increased or decreased as needed (0=unlimited, all records will be written to one
volume).
Prompt to continue export when volume is full - When this option is enabled, a prompt
will appear on the screen each time a volume becomes full and a new volume must be
created. The user must click Yes each time in order for LAW PreDiscovery™ to create the
new volume and continue with the export.
File Naming Scheme
The file naming grid is used to specify the type of file name to be used for images, native
files, and full text.
The grid columns are described in the following table:
Column
Description
File Type
Lists each file type included in the export as well as a Default option, which
will apply to all types unless the Override option is used. Only file types that
are selected on the Formats/Documents tab will be displayed; the Default
option will always be displayed and represents all three file types. Having
each type listed separately allows users to apply different options to each
(native, images, full text) if desired.
Override
Overrides the default settings for the desired file type. For example, if
BegDoc# is needed as the filename for images and the original filename is
needed for native files, select the Override option in the Native row and
choose <Original Filename> in the File Naming column, leaving BegDoc#
as the default.
File Naming
Specifies a file naming scheme for the exported files. Lists user-defined and
system fields in the drop-down for use as the file naming convention,
including DocID and BegDoc#.
Exts
Includes the file extension in the exported file name. This will be useful for
single-page imports when a document-level file naming scheme is used
(otherwise resulting in .001, .002, etc. extensions).
Starting Num Available when the Auto Number file naming scheme is selected. Enter a
starting number for the exported files; the value will increment by one for
each exported record.
© 2015 LexisNexis, a division of Reed Elsevier Inc. All rights reserved.
Using LAW PreDiscovery
707
Reset Num
Available when the Auto Number file naming scheme is selected. Forces
auto-numbering to restart to the specified starting number for each new
folder.
Create
control list
file for
extracted full
text
Provides a control list (*.lst file) that consists of a unique document
identifier for each record with full text as well as a path to the text file.
This option is commonly used to import text into a Summation case with
existing records but may be used for other purposes if needed. The .lst
file will be created in the currently specified Export Path, also found in
the Options tab.
Folder Naming Scheme
The folder naming grid is used to specify the folder structure to be used for the
exported images, native files, and full text.
Each column in the grid and its purpose is described in the following table:
Column
Description
File Type
Lists each type of file (images, native, text) included in the export as well as a
'<Default>' option, which will apply to all types unless the Override option is
used.
Override
Used to override the Default settings for the desired file type. For example, if
<Default> is set to Mirror Original, but the job specifications call for Incremental
folders for native files only (and mirrored for images and text), the user could
select 'Override' beside the Native file type and then choose Incremental in the
Folder Naming column.
Root
Folder
If a root folder value is specified here, the file type(s) (images, native, and/or full
text) will be placed in the mirrored or incremental folders, following this folder
structure: <Export Path>\<Root Folder>. For example, if a ”r;Text” root folder is
specified for the Full Text file type, and the specified export path is C:\Exports
\EDD_001\vol001, then the full text will be placed in C:\Exports\EDD_001\vol001
\Text. The Folder Naming scheme (see next option) will be applied following the
Root Folder.
© 2015 LexisNexis. All rights reserved.
708
LAW PreDiscovery
Folder
Naming
Three options exist for folder naming: Custom, Mirror Original, and Incremental.
One option may be applied to all by selecting the desired option as the
<Default>. Or, use the Override setting and choose different options for each.
Custom - Uses 1-3 of the specified index fields to create a folder structure when
exporting (see Files/Folder option below).
Mirror Original - Mirrors the current structure as shown in the folder tree in
LAW’s main interface.
Incremental - Places the specified number of files in a "001" folder, creates a
"002" folder, etc. (see Files/Folder option below).
Files/Folder - This option only applies to the Incremental and Custom folder naming
schemes. If Incremental was chosen, enter the desired number of files to be placed in each
folder or use the default of 250. If Custom was chosen, use this field to launch the Custom
Folder Structure dialog and choose the field or fields containing the folder structure.
If a folder or file name length exceeds 250 characters for any records, the export path
for those records will be changed to <Export Path>\$Invalid_Paths.
Output Settings
The Output Settings section contains options related to output image files, annotations, and
other miscellaneous settings. These settings are described as follows:
Output Format
The Output Format setting allows users to convert images to an alternate format during
the export process. The Output Format settings are:
<Default>
When <Default> is selected, LAW PreDiscovery will automatically determine whether
the image is exported as a:
24-bit color JPEG
8-bit grayscale JPEG
1-bit black and white TIFF
Image-only PDF if exporting PDF files to a single-page format other than the PDF
Conversion format on the Formats/Documents tab.
JPEG
The JPEG format only support single-page image files and should NOT be used with
exports that produce multi-page images.
PCX
The PCX format only support single-page image files and should NOT be used with
exports that produce multi-page images.
PDF
The PDF format can be used to convert images to PDF and may be used with singleor multi-page image formats. This setting has the same effect as choosing the 'PDF
© 2015 LexisNexis, a division of Reed Elsevier Inc. All rights reserved.
Using LAW PreDiscovery
709
Conversion' export format. The PDF Conversion format provides a means to export
images as PDF with no load files, whereas the PDF output format setting produces
PDF images with all specified load files.
PDF (Image Only)
The PDF (Image Only) format exports images as image-only PDF files.
PNG
The PNG format only support single-page image files and should NOT be used with
exports that produce multi-page images.
TIFF
TIFF (Binary)
The TIFF (Binary) format exports images as black and white 1-bit TIFF files.
Note the following when configuring output formats:
When exporting PDFs to any single-page format other than PDF Conversion, if
<Default> is selected as the output format, the PDF files will be converted to
image-only PDF files. If PDF is the output format, the PDF files will be searchable.
If the "Use Pegasus Image Library" is checked, the PDF files will fail to export,
unless the documents are only one page.
If exporting multi-page color or grayscale TIFF images to a single page format with
the Output Format set to <Default>, and the "Use Pegasus Image Library" setting
is disabled, LAW PreDiscovery will automatically export these files as JPEG images.
This is done for better compatibility with older image viewers that may not
support TIFF w/JPEG compression and to minimize the file sizes of the color
images. Black and white TIFF images will not be affected by this process.
Output Scale
The Output Scale setting allows users to reduce the size (AND quality) of the images
during the export process. This setting is typically used to create a set of images to be
viewed over the Internet or an intranet where bandwidth is limited. This feature may be
used to create a second set of images to be viewed as thumbnails for browsing and
allow the entire original image to be loaded upon request from a separate location.
Output Scale is not available for use if the "Use Pegasus Image Library" setting is
enabled.
Image Drive
The Image Drive setting allows users to specify an alternate drive letter for hard image
paths written to load files. If using hard paths for images (not recommended, but
necessary with some formats), this setting will replace the drive letter (with the
designated letter) written to the load files, so they can be imported without modification
from another system. The <Default> setting uses the drive letter of the export path. This
setting should only be used if importing the data from another system and the drive
letter from which it will be read is known.
Merge Annotations
Merging annotations will "burn" all annotations onto the exported images. See
Annotations for more information on merging.
Retain Color
© 2015 LexisNexis. All rights reserved.
710
LAW PreDiscovery
This setting allows color annotations to be preserved when merging annotations. It is
ONLY applied when an output format of TIFF or PDF is selected for a multi-page export.
The Retain Color setting for annotations currently only exists in the Export Utility.
This requires changing the color format of the page and may significantly increase the
size of the images. Also, if using the PDF setting users should first ensure that the
target application supports PDF images.
Combine parents/attachments
This feature merges attached documents to their respective parents during the export
process, creating a single document.
Use Pegasus Image Library
When enabled, LAW uses the Pegasus Image Library to manipulate images during
export. When this option is not selected, LAW uses the Pixel Image Library. However,
common "assertion failure" errors may occur when using the Pixel Image Library.
JPEG subsampling - Enabled only when the Pegasus Image Library is selected, JPEG
subsampling is used to adjust the color quality of a JPEG-compressed color image
exported out of LAW. Subsampling is used to calculate the color values of pixels that
have been removed from the image to reduce the size of the file. By averaging the
known colors of nearby pixels, the missing pixels can be determined. There are four
possible selections for this setting ranked by displayed image quality starting with the
highest: 1:1:1, 2:1:1 (horizontal), 2:1:1 (vertical), and 4:1:1.
The default subsampling value of 4:1:1 is sufficient in most situations because it results
in a good quality image with the smallest file size out of the four possible settings. If the
highest quality display image is desired, the 1:1:1 subsampling option should be used
instead. It will produce a very high quality JPEG-compressed image because all of the
color information for each pixel is stored in the image file; however, the existence of this
data results in a larger file size. The 2:1:1 (vertical) and 2:1:1 (horizontal) settings will
produce a medium image quality between 4:1:1 and 1:1:1. These two options differ by
the direction in which they average nearby pixels in the image.Depending on the content
of the image, the difference in image quality between the four possible subsampling
formats may not be noticeable. Some users of Summation iBlaze have reported a
noticeable improvement in displayed image quality when using the 1:1:1 subsampling
format.
Summation iBlaze defines these subsampling options differently than LAW.
LAW's Value
Summation's Value
1:1:1..................4:4:4
2:1:1 (horz).........4:2:2
4:1:1..................4:1:1
2:1:1 (vert)..........4:4:4
Export Status
© 2015 LexisNexis, a division of Reed Elsevier Inc. All rights reserved.
Using LAW PreDiscovery
711
This feature allows users to track whether or not a file has been exported.
A user-defined field must be selected to store the export status from the drop-down.
Exported files will receive a value of Y; records that did not export will receive a value of N. If
an index field was created for this purpose, enable this setting and choose the field from the
list. If the "Reset export status" option is enabled, LAW will update the export status for all
documents in the case (regardless of the documents selected for export).
Related Topics
Export Utility Overview
Export Profiles
Export Utility Overview
Creating CD Volumes
LAW PreDiscovery™ can export a case to compact disk (CD). Note the following about creating
CD volumes using the Export Utility:
The Options tab in the Export Utility contains an Output Path section. Inside this section are
options to set the export path and partition size of the volumes created.
If creating standard CD’s, you should use 650MB, the default value. Most CD’s can hold
700MB, but LAW needs additional buffer space. Since LAW must prevent documents from
© 2015 LexisNexis. All rights reserved.
712
LAW PreDiscovery
spanning across CD’s, this extra space is used for fitting the last document on the CD. The
resulting volume size could result anywhere from ~630MB to ~670MB depending on the
documents in the case.
The last folder of the export path is used as the volume label for the export, so it needs to
be named accordingly. For example, an export path of "D:\Exports\Cases\John Doe\Vol001"
will use "Vol001" as the volume label. All load files created (with the exception of Doculex)
are named after the volume label (e.g., Vol001.dii, Vol001.dat, Vol001.oll, etc.) and all load
files that reference a volume label will use this as the CD volume name. This is critical when
performing exports that read image information from a CD with a reference to the CD via
the volume name. If the volume of the CD is not specified as the last folder name, those
applications will not be able to find the images located on the CD.
Once the export has been created, depending on the size of the case, multiple volume
folders may have been created. For example, this sample case created three volumes:
To export a case to CD
1. In the Output Path area of the Export Utility, select an output path, and a partition size.
2. Indicate whether to continue export across 2 or more CD volumes.
3. Begin burning the volume folders onto the CD.
It is important this step is followed exactly or the load files may not load properly into
the destination application. Open the desired CD burning software and create the CD
so that the entire Vol001 folder is on the root of the CD and name the CD "Vol001".
Repeat this step for each volume.
© 2015 LexisNexis, a division of Reed Elsevier Inc. All rights reserved.
Using LAW PreDiscovery
713
Related Topics
Export Utility Overview
Export Profiles
Selectively Exporting Native Files
The Export Utility allows you to set an option to globally include or exclude native files for
export. This option is located on the Formats/Documents tab.
However, if you only want to export some but not all native files along with other case items,
the Export Utility provides a different option that allows you to include or exclude native
documents from export based on a tag value.
To use this feature, you identify or create a Tag (Boolean) field that you will use to tag
documents for native file export. Then apply the tag to documents. A value of Yes (checked)
includes the native file for export. Now enable the filter option in the Export Utility and then run
the export.
To selectively export native files
1. Check that a Tag (Boolean) field is available for use by this export filter. If a suitable Tag
(Boolean) field is not available, you must create one.
To check for an available tag field, in the main window on the Index menu, click Modify
Fields. Examine the list of fields for a field of type Tag (Boolean) that was already
created for the purpose of filtering export.
To create a tag, in the main window on Index menu, click Modify Fields. In the Modify
Fields dialog box, click Add Field. In the Add Field dialog box, type a name for the
field, specify its type as Tag (Boolean), and then click OK.
© 2015 LexisNexis. All rights reserved.
714
LAW PreDiscovery
2. Open the Batch Processing utility or a grid view, apply a Yes or No value to the tag
value of documents. For more information on tagging documents see Manipulating Fields.
Yes (checked) includes the native file for export.
No (unchecked) excludes the native file from export.
3. From the main window, on the Tools menu, click Export Utility, and then click the
Advanced tab.
© 2015 LexisNexis, a division of Reed Elsevier Inc. All rights reserved.
Using LAW PreDiscovery
715
4. Click Include native for tagged documents only and then select a tag field to use as a
filter.
5. Configure other export options as needed and then click Finish.
Related Topics
Export Utility Overview
Export Profiles
Creating CD Volumes
Options Tab
© 2015 LexisNexis. All rights reserved.
716
LAW PreDiscovery
Checking for Blanks or Duplicates
The Advanced tab of the Export Utility contains settings to control blank values and to check for
duplicate values for the selected image tag and file naming fields. These settings are enabled
by default.
Disabling checks for blanks and duplicates could result in files being overwritten in the
export path. Or you may experience problems with loading into the target application. If
these checks are not needed, a speed increase in export initialization is a potential
benefit of disabling the settings in larger cases.
To check for blank values
1. In the main window, on the Tools menu, click Export Utility, and then click the Advanced
tab.
2. Set these options to determine whether LAW PreDiscovery™ performs a check for blank
values prior to exporting:
On file naming scheme - When enabled, checks the selected field(s) used as the file
naming scheme on the Options tab for blank values and notifies you if any are found.
On image tag(s) - When enabled, checks the selected image tag field on the Fields tab
for blank values and notifies you if any are found.
To check for duplicate values
1. In the main window, on the Tools menu, click Export Utility, and then click the Advanced
tab.
2. Set these options to determine whether LAW performs a check for duplicate values prior
to exporting.
On file naming scheme - When enabled, LAW will check the selected field(s) used as the
file naming scheme on the Options tab for duplicate values and notify the user if any are
found.
On image tag(s) - When enabled, LAW will check the selected image tag field on the
Fields tab for duplicate values and notify the user if any are found.
Related Topics
© 2015 LexisNexis, a division of Reed Elsevier Inc. All rights reserved.
Using LAW PreDiscovery
717
Export Utility Overview
Export Profiles
Creating CD Volumes
Options Tab
Export Profiles
Export profiles are used to save settings used in a particular export. Export profiles can save
time and help reduce errors when specifying index fields to use and other settings.
Note the following basic facts about export profiles:
You work with export profiles by using the Export Utility.
When you save an export profile the file gets the PFL extension.
You select the folder location where the file is saved.
No profile is loaded by default when the Export Utility is launched in a new case.
The profile can be created and saved to a file at any time when working in the Export
Utility; otherwise, you are prompted to save the settings after after you start the import or
even when you open the Export Utility and change a setting.
To create an export profile
1. On the Tools menu click Export Utility.
Or click the
button from the main or embedded grid toolbar.
The Export Utility dialog box appears.
© 2015 LexisNexis. All rights reserved.
718
LAW PreDiscovery
2. Click File from the menu bar and then click Save As.
3. The Save As dialog box appears.
4. Choose a location and enter a name for the profile.
Create an 'ExportProfiles' folder in a directory (i.e. LAW50 folder)
Or
Keep profiles with the associated LAW case.
5. Click Save.
The profile name will appear in the title bar of the Export Utility dialog as shown.
The profile can also be created after clicking Finish from the Options tab of the Export
Utility. A prompt will appear prior to the export process initializing, asking if you want to
© 2015 LexisNexis, a division of Reed Elsevier Inc. All rights reserved.
Using LAW PreDiscovery
719
save the current settings. If Yes is chosen, the user can enter a file name for the profile
and a location in which to save the file. If a profile is already applied as in the above
example, clicking Yes will force the settings to be saved to the currently active profile.
To open a profile
Saved profiles can be applied to additional exports for any LAW PreDiscovery™ case
provided they match, or closely match, the settings needed for a particular export. If the
profile does not meet the requirements, it may be edited within the Export Utility by simply
opening the profile, changing the desired settings, and then saving the changes.
To open and apply an existing profile
1. In the main window, on the Tools menu, click Export Utility.
The Export Utility opens.
© 2015 LexisNexis. All rights reserved.
720
LAW PreDiscovery
2. On the File menu click Open.
The Open dialog box appears.
3. Browse to a PLF file and then click Open.
All settings saved to this profile will be applied to the current export session.
When a profile is used and an export is executed, that same profile will be automatically
selected when the Export Utility is launched in that LAW case. Profiles may also be
opened and applied using the "recent profiles" menu. The last four profiles opened in a
case will be listed in the File menu within the Export Utility. Simply click the desired
profile to apply it.
Related Topics
Export Utility Overview
Exporting E-Mail Threads
You can pass email threads from LAW PreDiscovery to review application by configuring your
review application to handle the ThreadID field.
Electronic discovery-enabled cases created using LAW PreDiscovery 6.0 and later, contain the
ThreadID field. This field tracks e-mail threads from Outlook stores and from loose MSG files.
The new field is called ThreadID.
Note the following about the ThreadID field:
It is populated with the leftmost 22 characters of ConversationIndex field.
Attachments to e-mails receiving a value for the ThreadID are populated with the ThreadID
of the corresponding parent e-mail.
Opening an existing ED-enabled case will add the ThreadID field to the case.
ThreadID is not visible by default on the main form or on grids. The ThreadID field is not
indexed.
© 2015 LexisNexis, a division of Reed Elsevier Inc. All rights reserved.
Using LAW PreDiscovery
Related Topics
Export Utility Overview
© 2015 LexisNexis. All rights reserved.
721
Using LAW PreDiscovery
User Guide
Reference Information
Chapter
4
Reference Information
723
Reference Information
This section contains reference items.
In this section
Languages
Lists the languages LAW PreDiscovery can recognize in imported documents.
License Matrix
Lists each license along with available functionality.
Field Descriptions
Lists the field names, their return values, and other information pertaining to the fields that
are created by default with any LAW case.
Unicode Support
Provides description of Unicode support in LAW PreDiscovery.
Keyboard Shortcuts
Lists the keyboard shortcuts available in LAW PreDiscovery.
Contacting LexisNexis
Provides contact information for LexisNexis training, technical support, and sales.
Languages
LAW PreDiscovery can recognize the languages that exist in imported documents. For more
information see: Text Extraction. The languages recognized are listed in the following table:
Supported Languages
LANG_AFRIKAANS
LANG_FRENCH
LANG_LUXEMBOURGISH
LANG_SOMALI
LANG_ALBANIAN
LANG_FRISIAN
LANG_MACEDONIAN
LANG_SORBIAN
LANG_ALSATIAN
LANG_FULFULDE
LANG_MALAY
LANG_SOTHO
LANG_AMHARIC
LANG_GALICIAN
LANG_MALAYALAM
LANG_SPANISH
© 2015 LexisNexis. All rights reserved.
724
LAW PreDiscovery
Supported Languages
LANG_ARABIC
LANG_GEORGIAN
LANG_MALTESE
LANG_SWAHILI
LANG_ARMENIAN
LANG_GERMAN
LANG_MANIPURI
LANG_SWEDISH
LANG_ASSAMESE
LANG_GREEK
LANG_MAORI
LANG_SYRIAC
LANG_AZERI
LANG_GREENLANDIC
LANG_MAPUDUNGUN
LANG_TAGALOG
LANG_AZERI_CYRILLIC
LANG_GUARANI
LANG_MARATHI
LANG_TAJIK
LANG_AZERI_LATIN
LANG_GUJARATI
LANG_MOHAWK
LANG_TAMAZIGHT
LANG_BASHKIR
LANG_HAUSA
LANG_MONGOLIAN
LANG_TAMIL
LANG_BASQUE
LANG_HAWAIIAN
LANG_NEPALI
LANG_TATAR
LANG_BELARUSIAN
LANG_HEBREW
LANG_NORWEGIAN
LANG_TELUGU
LANG_BENGALI
LANG_HINDI
LANG_NORWEGIAN_BOKMAL
LANG_THAI
LANG_BRETON
LANG_HUNGARIAN
LANG_NORWEGIAN_NYNORSK
LANG_TIBETAN
LANG_BULGARIAN
LANG_IBIBIO
LANG_OCCITAN
LANG_TIGRIGNA
LANG_BURMESE
LANG_ICELANDIC
LANG_ORIYA
LANG_TSONGA
LANG_CAMBODIAN
LANG_IGBO
LANG_OROMO
LANG_TSWANA
LANG_CATALAN
LANG_INDONESIAN
LANG_PAPIAMENTU
LANG_TURKISH
LANG_CHEROKEE
LANG_INUKTITUT
LANG_PASHTO
LANG_TURKMEN
LANG_CHINESE
LANG_IRISH
LANG_POLISH
LANG_UIGHUR
LANG_CHINESE_SIMPLIFIED
LANG_ITALIAN
LANG_PORTUGUESE
LANG_UKRAINIAN
LANG_CHINESE_TRADITIONAL
LANG_JAPANESE
LANG_PUNJABI
LANG_URDU
LANG_CORSICAN
LANG_KANNADA
LANG_QUECHUA
LANG_UZBEK
LANG_CROATIAN
LANG_KANURI
LANG_ROMANSH
LANG_UZBEK_CYRILLIC
LANG_CZECH
LANG_KASHMIRI
LANG_ROMANIAN
LANG_UZBEK_LATIN
LANG_DANISH
LANG_KAZAK
LANG_RUSSIAN
LANG_VENDA
LANG_DARI
LANG_KICHE
LANG_SAMI
LANG_VIETNAMESE
LANG_DIVEHI
LANG_KINYARWANDA LANG_SANSKRIT
LANG_WELSH
LANG_DUTCH
LANG_KONKANI
LANG_SERBIAN
LANG_WOLOF
LANG_EDO
LANG_KOREAN
LANG_SERBIAN_CYRILLIC
LANG_XHOSA
LANG_ENGLISH
LANG_KYRGYZ
LANG_SERBIAN_LATIN
LANG_YAKUT
© 2015 LexisNexis, a division of Reed Elsevier Inc. All rights reserved.
Reference Information
725
Supported Languages
LANG_ESTONIAN
LANG_LAOTHIAN
LANG_SINDHI
LANG_YI
LANG_FAEROESE
LANG_LATIN
LANG_SINHALESE
LANG_YIDDISH
LANG_FARSI
LANG_LATVIAN
LANG_SLOVAK
LANG_YORUBA
LANG_FINNISH
LANG_LITHUANIAN
LANG_SLOVENIAN
LANG_ZULU
License M atrix
Each type of LAW PreDiscovery license is shown with its corresponding LAW PreDiscovery interface items.
For more information about each of the licenses and the Early Data Analyzer and TSI Scan licenses, see License
Types.
Admi
n
Impo
rt
Expo
rt
CD
Pub
Full
Text
OPEN CASE
X
X
NEW CASE
X
ED:
Edit
E(QC) Print
ED:
Load
er
ED:
Full
TIFF
Text
/ Endor Indexi
PDF
se
ng
OC
R
OCR
Exp
OCR Exper
er
ABB OpenR PDF
YY
TK
Pri
nt
Sca
n
X
X
FILE
X
X
X
X
X
X
X
X
X
SAVE
X
X
SAVE AS
X
X
IMPORT
X
DELIMITED TEXT
X
LAW CASE
X
LOAD FILE
X
TAG LIST
X
RAW IMAGES
X
ELECTRONIC
DISCOVERY
© 2015 LexisNexis. All rights reserved.
X
726
LAW PreDiscovery
PRINT
X
X
X
X
X
X
X
X
X
X
X
X
X
PRINT SETUP
X
X
X
X
X
X
X
X
X
X
X
X
X
SEND
X
X
X
X
X
X
X
X
X
X
X
X
X
IMAGE
X
X
X
X
X
X
X
X
X
X
X
X
X
IMAGE + OCR
X
X
X
X
X
X
X
X
X
X
X
X
X
OCR ONLY
X
X
X
X
X
X
X
X
X
X
X
X
X
ADMINISTRATION
APPLY CASE
TEMPLATE
X
CASE SUMMARY
X
COMPACT
DATABASE
X
REORGANIZE
DOCUMENTS
X
SAVE CASE
TEMPLATE
X
SCAN FOR
ERRORS
X
VALIDATE
RANGES
X
SCAN
SELECT SCANNER
X
SCANNER SETTINGS
X
SCAN OPTIONS
X
NEW DOCUMENT
X
NEW ATTACHMENT
X
APPEND
X
EDIT
INSERT
X
X
NEW PAGE(S)
X
X
EXISTING PAGE(S)
X
X
© 2015 LexisNexis, a division of Reed Elsevier Inc. All rights reserved.
Reference Information
727
E-DOCUMENT(S)
*requires both
Edit and ED
Loader
X
SCANNED
DOCUMENT
X
X
DELETE
X
X
REPLACE
X
X
AUTO NUMBER
X
X
ATTACHMENTS
X
X
MERGE
DOCUMENTS
X
X
MOVE DOCUMENTS
X
X
X
RESET OCR FLAGS
X
RESET FULLTEXT
FLAGS
X
X
X
SPLIT DOCUMENTS
X
X
VIEW PAGE INFO
*requires both Edit
and Admin
X*
X*
PROPERTIES
X
X
NEW
X
X
OPEN
X
AUTO-CREATE
X
X
X
AUTO-CREATE N
FOLDERS
X
X
X
COLLAPSE
X
X
X
X
X
X
X
X
X
X
X
X
X
EXPAND
X
X
X
X
X
X
X
X
X
X
X
X
X
DELETE
X
X
X
EXTRACT AS SUBSET
X
X
X
GRID VIEW
X
X
X
X
X
FOLDER
© 2015 LexisNexis. All rights reserved.
X
X
X
X
X
X
X
X
X
X
X
X
X
X
X
X
X
X
X
X
X
X
X
X
X
728
LAW PreDiscovery
GRID VIEW
(RECURSE)
X
SUMMARIZE IMAGES
X
X
X
RENAME
X
X
X
MOVE
X
X
X
PROPERTIES
X
X
X
X
X
X
X
X
X
X
X
X
X
X
X
X
X
X
X
X
X
X
X
X
X
INDEX
DEFAULT FIELD
X
X
X
INCREMENT MODE
X
X
X
MODIFY FIELDS
X
EDIT PAGE ID
X
X
X
FIND PAGE ID
X
X
X
VIEW
ZOOM IN
X
X
X
X
X
X
X
X
X
X
X
X
X
ZOOM OUT
X
X
X
X
X
X
X
X
X
X
X
X
X
ZOOM LOCK
X
X
X
X
X
X
X
X
X
X
X
X
X
BEST FIT
X
X
X
X
X
X
X
X
X
X
X
X
X
FIT TO WIDTH
X
X
X
X
X
X
X
X
X
X
X
X
X
X
X
X
X
X
X
X
X
X
X
X
X
X
THUMBNAILS
X
X
X
X
X
X
X
X
X
X
X
X
X
PAGE AND
THUMBNAILS
X
X
X
X
X
X
X
X
X
X
X
X
X
INVERT
X
X
X
X
X
X
X
X
X
X
X
X
X
PAN WINDOW
X
X
X
X
X
X
X
X
X
X
X
X
X
SCALE TO GRAY
X
X
X
X
X
X
X
X
X
X
X
X
X
FIRST PAGE
X
X
X
X
X
X
X
X
X
X
X
X
X
PREVIOUS PAGE
X
X
X
X
X
X
X
X
X
X
X
X
X
NEXT PAGE
X
X
X
X
X
X
X
X
X
X
X
X
X
ONE PAGE
PAGE
© 2015 LexisNexis, a division of Reed Elsevier Inc. All rights reserved.
Reference Information
729
LAST PAGE
X
X
X
X
X
X
X
X
X
X
X
X
X
GOTO PAGE
X
X
X
X
X
X
X
X
X
X
X
X
X
FLAG FOR OCR
X
X
X
SHOW OCR FLAGS
X
X
X
DESKEW
X
X
ENHANCE IMAGE
X
X
ROTATE PAGES
X
X
X
X
X
X
X
X
X
X
X
X
X
PROPERTIES
X
X
X
X
X
X
X
X
X
X
X
X
X
X
X
X
X
X
X
X
X
X
X
X
X
X
TOOLS
BATCH PROCESS
BATES
NUMBERING
X
X
IMAGE CLEANUP
X
X
X
ENDORSE IMAGE
X
PRINT (IMAGES)
X
E-PRINT
(NATIVES)
X
X
SCAN FOR
SUSPECT
FOOTERS
LOG VIEWER
X
X
X
X
X
X
X
X
X
X
X
X
X
X
X
X
X
X
X
X
OCR
TIFF/PDF
CONVERSION
X
X
UPDATE PAGE
DATA
X
X
X
X
X
X
X
X
X
X
X
X
X
DISTRIBUTED
BATCH
PROCESSING
X
X
X
X
X
X
X
X
X
X
X
X
X
EXPORT UTILITY
X
DEDUPLICATION
UTILITY
X
© 2015 LexisNexis. All rights reserved.
X
730
LAW PreDiscovery
ANNOTATIONS
X
BARCODES
X
LAUNCH VIEWER
X
OCR
FULLTEXT INDEX
X
X
X
X
RUN COMMAND
X
X
X
X
X
X
X
X
X
X
X
X
X
DISPLAY ALL
RECORDS
X
X
X
X
X
X
X
X
X
X
X
X
X
SEARCH RECORDS
X
X
X
X
X
X
X
X
X
X
X
X
X
OPTIONS
X
X
X
X
X
X
X
X
X
X
X
X
X
HELP TOPICS
X
X
X
X
X
X
X
X
X
X
X
X
X
USER GUIDE
X
X
X
X
X
X
X
X
X
X
X
X
X
BUG REPORT
X
X
X
X
X
X
X
X
X
X
X
X
X
CHECK FOR UPDATE
X
X
X
X
X
X
X
X
X
X
X
X
X
ABOUT LAW
X
X
X
X
X
X
X
X
X
X
X
X
X
HELP
OPEN FILE
AUTOVUE SUITE
HEX EDITOR
INTERNET
EXPLORER
MICROSOFT WORD
NOTEPAD
QUICK VIEW PLUS
CHOOSE PROGRAM
CHANGE SOURCE
APPLICATION
AUTOVUE SUITE
REVIEW MODE
QUICK VIEW PLUS
REVIEW MODE
REVIEW PARENT EMAILS NATIVELY
© 2015 LexisNexis, a division of Reed Elsevier Inc. All rights reserved.
Reference Information
Related Topics
License Types
Profile Manager
Undocked Keys
Field Descriptions
For a downloadable copy of Field Descriptions see LAW PreDiscovery Field Descriptions.
Field Name
Field Description
_DocCat
Numeric value
indicating type of
document.
Attributes may be
easily searched
using the Query
Builder in LAW.
_DupID
Child duplicates
have ID value of
parent dup. Parents
have their own ID
value (from LAW ID
or external
deduplication
database
tblDupLog.DupID),
allowing grouping of
the field to locate
dup families.
Records that are
not duplicates or
not tested will have
a value of 0 in this
field.
Possible
E-Disc. Scope Field
Values/
Only
Type
Examples
ex: 521
Z-Print Field Table
Equivalent
Doc
Nume
ric
tblDoc
Doc
Nume
ric
tblDoc
Doc
TinyIn
t
tblDoc
0=Not dup
or not
tested
>0=Dup or
parent
dup
1=MD5Has
h
_DupMethod
Indicates which key,
or hash, was used 2=Sha1Ha
when testing the
sh
dup state of the
129=MD5H
record.
ash Deduplicat
© 2015 LexisNexis. All rights reserved.
731
732
LAW PreDiscovery
Field Name
Field Description
Possible
E-Disc. Scope Field
Values/
Only
Type
Examples
Z-Print Field Table
Equivalent
ed using
Inter-Case
Deduplicati
on utility
130=Sha1
Hash Deduplicat
ed using
Inter-Case
Deduplicati
on utility
0=No text
is
available
for
indexing
_FTIndex
Displays status of
full text indexing
using numeric
values.
1=Docume
nt's text is
ready for
indexing
2=Record
was
flagged for
reindexing
, but has
not yet
been
reindexed
Doc
TinyIn
t
tblDoc
Doc
TinyIn
t
tblDoc
Doc
TinyIn
t
tblDoc
3=Docume
nt's text
has been
indexed.
0=Not
executed.
_PS_ARCX
_PS_ATTX
1=Success
Numeric success/
fully
failure indicator tied executed.
to archive
extraction process. 2=Error
occurred,
see
ErrorMsg
field.
Numeric success/
failure indicator tied
to attachment
extraction process
(set for parent and
child).
0=Not
executed.
1=Success
fully
executed.
© 2015 LexisNexis, a division of Reed Elsevier Inc. All rights reserved.
Reference Information
Field Name
Field Description
Possible
E-Disc. Scope Field
Values/
Only
Type
Examples
Z-Print Field Table
Equivalent
2=Error
occurred,
see
ErrorMsg
field.
0=Not
executed.
1=Success
Numeric success/
fully
failure indicator tied executed.
_PS_DIGESTX
to process of
hashing native file. 2=Error
occurred,
see
ErrorMsg
field.
Doc
TinyIn
t
tblDoc
Doc
TinyIn
t
tblDoc
Doc
TinyIn
t
tblDoc
Doc
TinyIn
t
tblDoc
0=Not
executed.
_PS_EMBEDX
Numeric success/
failure indicator tied
to extraction of
embedded images
in e-mail.
1=Success
fully
executed.
2=Error
occurred,
see
ErrorMsg
field.
0=Not
executed.
_PS_MDX
1=Success
Numeric success/
fully
failure indicator tied executed.
to metadata
extraction process. 2=Error
occurred,
see
ErrorMsg
field.
0=Not
executed.
_PS_NATIVEX
1=Success
Numeric success/
fully
failure indicator tied executed.
to native file
extraction process. 2=Error
occurred,
see
ErrorMsg
field.
© 2015 LexisNexis. All rights reserved.
733
734
LAW PreDiscovery
Field Name
Field Description
Possible
E-Disc. Scope Field
Values/
Only
Type
Examples
Z-Print Field Table
Equivalent
0=Not
executed.
_PS_OLEX
ApplicationNa
me
Attach
Numeric success/
failure indicator tied
to OLE extraction
process (set for
parent and child).
1=Success
fully
executed.
Doc
TinyIn
t
tblDoc
2=Error
occurred,
see
ErrorMsg
field.
Application Name
field value pulled
from metadata of
the native file.
ex:
Microsoft
Office
Word
Doc
Text
tblDoc
Populates parent
records with original
filenames of all
attached records,
separated by
ex:
Attach1.do
c;Attach2.
xls
Doc
Memo Attach
tblDoc
Doc
Similar to
AttachNo, in
that parent
records or
records
without
attachment
s will be 0
and
attachment
records will
be greater
than 0.
However,
Nume 5.0 does
tblDoc
ric
not use
values
greater
than 1,
while ZPrint's
AttachNo
value would
increment
up by one
for each
attachment
with the
same
parent.
semi-colons.
AttachLvl
Numeric values
indicate if a record
is a parent,
attachment, or
neither.
0=Indicate
s parent
record,
record
that does
not have
attachmen
ts, or
record
that is not
an
attachmen
t.
1=Indicate
s record is
an
attachmen
t.
© 2015 LexisNexis, a division of Reed Elsevier Inc. All rights reserved.
Reference Information
Field Name
Field Description
Possible
E-Disc. Scope Field
Values/
Only
Type
Examples
Attachmt
Populates parent
records with
ex:
BegDoc# of each
ABC0002;
attached record,
ABC0003
separated by semicolons.
735
Z-Print Field Table
Equivalent
Doc
Text
tblAttach
Doc
Similar to
AttachID, in
that
parents and
Nume
their
tblDoc
ric
attachment
s will have
the same ID
number.
0=Indicate
s record is
not a
parent
and not an
attachmen
t.
>0=Any
value
greater
than zero
will
indicate
that a
record is
either a
parent or
an
attachmen
t. The
value is
equal to
the ID
value of
the parent
record, so
parents
and their
attachmen
ts will
have the
same
value.
AttachPID
Populates parent
records and
attachments with
the ID number of
the parent record.
AttRange
Stores BegDoc# of
parent record and
EndDoc# of last
attachment record, ex:
ABC0001 separated by a
hyphen. Populated ABC0008
for all records in the
family (parent and
attachment(s)).
Doc
Text
Author
Author field value
pulled from
metadata of the
native file.
Doc
Text
© 2015 LexisNexis. All rights reserved.
tblAttach
Author
tblDoc
736
LAW PreDiscovery
Field Name
Field Description
BatchStation
Name of the
computer that ran a ex:
batch process on a Laptop01
document.
Doc
Text
tblDoc
BatesRng
(Exports only - does
not exist in LAW
case database)
Lists the PageID of
ex:
the first page of a
ABC0001 document and the
ABC0005
PageID of the last
page of a
document,
separated by a
hyphen.
Doc
N/A
N/A
BCC
Recipient(s) of
"Blind Carbon
Copies" of the email message.
Doc
Memo BCC
tblDoc
BegAttach
Displays BegDoc#
of parent record.
When exported, the ex:
ABC0001
values will match
the field used as
the Image Tag.
Doc
Text
BegDoc#
Displays page ID of ex:
first page in a
ABC0001
document.
Doc
Text
tblDoc
Categories
Category field value
ex:
pulled from
Software
metadata of the
native file.
Doc
Memo Categories
tblDoc
CC
Recipient(s) of
"Carbon Copies) of
the e-mail message.
Doc
Memo CC
tblDoc
Comments
Comments field
value pulled from
the metadata of the
native file.
Doc
Memo Comments
tblDoc
Conversation
Normalized subject
of e-mails.
Doc
Memo Conversatio tblDoc
n
Doc
Memo
ConversationI E-mail thread
ndex
identification.
Possible
E-Disc. Scope Field
Values/
Only
Type
Examples
ex:
01C72AC4
CB0FC395
3C5FA8E1
49389B52
2EFF595EF
9FB
Z-Print Field Table
Equivalent
Similar to
BegAttach,
but uses
BegDoc#
instead of
DocID.
tblAttach
Conversatio
tblDoc
nIndex
© 2015 LexisNexis, a division of Reed Elsevier Inc. All rights reserved.
Reference Information
Possible
E-Disc. Scope Field
Values/
Only
Type
Examples
737
Field Name
Field Description
Z-Print Field Table
Equivalent
Created
Stores date and
time the record was
created in LAW.
Doc
Date
tblDoc
Custodian
Lookup field,
displays textual
value of custodian
assigned by user in
EDLoader.
Doc
Looku
Custodian
p
tblCustodi
ans.Name
Stores the last
accessed date from
the properties of
the file. Note: Many
functions will cause
this value to be
updated by
Windows (e.g.,
viewing file
properties,
dragging and
dropping) and
therefore this date
will often reflect the
current date. To
avoid this situation,
run the
DisableLastAccessU
DateAccessed pdate.reg file
located in the
\LAW50 folder
(same folder as
law50.exe) prior to
handling the data
(requires reboot
after running). This
will prevent
updates to this
value (applies to
LAW TimeAccessed
field also) by
Windows. To reenable the registry
setting, run the
EnableLastAccessU
pdate.reg file
located in the same
folder.
Doc
Date
tblDoc
DateAppEnd
Appointment end
date for calendar
items.
Doc
Date
tblDoc
DateAppStart
Appointment start
date for calendar
items.
Doc
Date
tblDoc
© 2015 LexisNexis. All rights reserved.
738
LAW PreDiscovery
Field Name
Field Description
Possible
E-Disc. Scope Field
Values/
Only
Type
Examples
Z-Print Field Table
Equivalent
DateCreated
Creation date of the
native file.
Doc
Date
DateCreate tblDoc
d
DateLastMod
Date the native file
was last modified.
Doc
Date
DateLastMo
tblDoc
d
DateLastPrnt
Date the native file
was last printed
(Office documents).
Doc
Date
DateLastPr
nt
tblDoc
DateRcvd
Received date of an
e-mail message.
Doc
Date
DateRcvd
tblDoc
DateSent
Sent date of an email message.
Doc
Date
DateSent
tblDoc
Doc
Text
DelivReceipt tblDoc
DocExt
File extension of
native file. May
show original
extension or
suggested
ex: DOC
extension,
depending on state
of "auto-assign
ext." option in
EDLoader.
Doc
Text
DocExt
tblDoc
DocID
Document ID value
assigned during ED
import. Starting
ex:
number specified by ID00001
user in DocID Seed
field in Sources tab
in EDLoader.
Doc
Text
DocID
tblDoc
DocOrder
Numeric value
indicating order of
documents in each
folder.
ex: 3
Doc
Text
DupStatus
Displays dedup
status with single
character value
U=Unteste
d
Doc
Text
Y=Yes
(delivery
receipt
requested
)
DelivReceipt
Delivery receipt
N=No
request notification.
<null>=Att
achments
and edocs will
have null
value.
tblDoc
Z-Print
populates
the Status
tblDoc
© 2015 LexisNexis, a division of Reed Elsevier Inc. All rights reserved.
Reference Information
Field Name
Field Description
Possible
E-Disc. Scope Field
Values/
Only
Type
Examples
Z-Print Field Table
Equivalent
field with a
"D" value if
record is a
dup. 5.0
uses
DupStatus
to indicate
dup status
in a more
advanced
manner. "G"
or "C" will
indicate the
record is a
dup in LAW.
N=Not a
duplicate
(see dedup
documentation for
more info).
739
G=Globallevel
duplicate
C=Custodi
an-level
duplicate
P=Parent
duplicate
EdaID
0=Indicate
s nonEarly Data
Analyzer
record or
record
Populated for
from Early
parent items
Data
exported from Early Analyzer
Data Analyzer.
that was
Pulled from
not a
InventoryItems.ID
parent.
in the EDA case
database.
>0=Parent
record
from Early
Data
Analyzer
case.
Doc
Nume
ric
tblDoc
EDFolder
Full path to source
files (if e-docs or
loose e-mail) or
folder path
contained with a
mail store (if NSF or
PST).
Doc
Looku
Folder
p
tblFolders
.Name
Doc
Nume
Pages
ric
tblDoc
DocB
Looku
p
tblSession
s.Title
ex(1):
Personal
Folders
\Inbox
ex(2): C:
\EDOCS
EDPages
Stores the number
of printed pages
ex: 75
following the e-Print
batch process.
EDSession
Stores session
name, as assigned
by user in
EDLoader's Session
Label field.
© 2015 LexisNexis. All rights reserved.
ex:
Session
Created
On
1/4/2007
12:48:23
740
LAW PreDiscovery
Field Name
Field Description
Possible
E-Disc. Scope Field
Values/
Only
Type
Examples
Z-Print Field Table
Equivalent
PM
EDSource
Fully qualified
original path to the
source folder, files,
and/or mail stores.
Subject of the eEMail_Subject
mail message.
ex(1): C:
\Mail
\Outlook.p
st
Doc
Folder (edocs/loose
e-mail);
Looku
MailStore
p
(storebased email)
Doc
Memo
Email_Subje
tblDoc
ct
Similar to
EndAttach,
but uses
EndDoc#
instead of
DocID.
ex(2): C:
\Edocs
\Spreadsh
eets
ex: FW:
LAW
PreDiscove
ry
tblEDSour
ces.Sourc
ePath
EndAttach
EndDoc# of last
attached document
in family. When
exported, the
values will match
the field used as
the Image Tag.
ex:
ABC0003
Doc
Text
EndDoc#
Page ID of last
page in a
document.
ex:
ABC0003
Doc
Text
tblDoc
EntryID
Unique identifier of
e-mails in mail
stores.
ex:
1322C3C0
3649D441
86257114
00748A13
Doc
Memo EntryID
tblDoc
EP*
ex: if a
Word
Any field preceded
document
by EP indicates a
contains a
field that contains
value of
extended property Jones in
or EP metadata. EP its Typist
metadata can come field, upon
from user defined
import of
fields added to
the file,
original PDFs, Office LAW
files, and EXIF
create a
metadata for TIFF
new field
and JPEG image
for the
files. Any custom
case
metadata found is
called
placed into a special EPTypist
field designated as and
a an extended
populate
property.
the field
for that
document
Doc
Text
Extended
tblAttach
© 2015 LexisNexis, a division of Reed Elsevier Inc. All rights reserved.
Reference Information
Field Name
Field Description
Possible
E-Disc. Scope Field
Values/
Only
Type
Examples
741
Z-Print Field Table
Equivalent
with the
value
Jones.
ErrorMsg
FileAccuracy
Displays error or
warning messages,
if any occurred
during ED import or
TIFF/PDF
conversion.
Accuracy rating
generated by file
engine during file
validation.
Doc
Memo ErrorMsg
tblDoc
Doc
TinyIn
t
tblDoc
Doc
Text
Doc
Memo Filename
tblDoc
0=Unidenti
fied
1=Low
2=Medium
3=High
Description of
FileDescription native file type, as
listed in file type
database.
Filename
Original filename of
native file. Contains
subject of e-mail
message for e-mail
records.
ex: MS
Word for
Windows
Document
ex(1):
Estimates.
xls
FileDescripti
tblDoc
on
ex(2): FW:
Monday
Meeting
Filesize
Size of native file, in ex: 27739
bytes.
Doc
BigInt Filesize
tblDoc
FileType
ID number
associated with file ex: 229
type, as listed in file
type database.
Doc
Nume
FileType
ric
tblDoc
FolderRng
(Exports only - does
not exist in LAW
case database)
Lists the PageID of
the first page of the ex.
first document in a ABC0001 ABC0011
folder and the last
PageID of the last
document in a
folder, separated by
a hyphen.
Doc
N/A
N/A
Footer
Displays size of
footer value if
image was
endorsed in LAW.
Page
Nume
ric
tblPage
© 2015 LexisNexis. All rights reserved.
0=Unendo
rsed
25=Contai
ns 1/4 in.
742
LAW PreDiscovery
Field Name
Field Description
Possible
E-Disc. Scope Field
Values/
Only
Type
Examples
Z-Print Field Table
Equivalent
footer.
50=Contai
ns 1/2 in.
footer.
and so on.
From
Author of the e-mail
message.
HasAnnotatio
ns
Annotations are
applied to
document.
Doc
Text
Doc
Text
tblDoc
Doc
Text
Extended
Doc
Text
Extended
Microsoft Excel
document contains Y=Yes
one or more hidden N=No
rows or columns.
Doc
Text
Extended
Microsoft Excel
HasHiddenShe document contains Y=Yes
et
one or more hidden N=No
worksheets.
Doc
Text
Extended
Microsoft Word or
HasTrackChan Excel document
ges
contains tracked
changes.
Doc
Text
Extended
Page
Nume
ric
tblPage
HasExtProps
HasHiddenRo
wCol
tblDoc
Y=Yes
N=No
Microsoft Word or
Y=Yes
HasComments Excel document
contains comments. N=No
Microsoft Word or
Excel document
contains extended
properties.
From
Y=Yes
N=No
Y=Yes
N=No
0=Unendo
rsed
Header
Displays size of
header value if
image was
endorsed in LAW.
25=Contai
ns 1/4 in.
header.
50=Contai
ns 1/2 in.
header.
and so on.
Headers
Contents of the
header in an e-mail
message.
Doc
Memo Headers
tblDoc
HiddenText
True if document
contains hidden
text, otherwise
Doc
Boole
an
tblDoc
© 2015 LexisNexis, a division of Reed Elsevier Inc. All rights reserved.
Reference Information
Field Name
Field Description
Possible
E-Disc. Scope Field
Values/
Only
Type
Examples
Z-Print Field Table
Equivalent
False.
ID
Unique ID value
assigned to all
records in LAW,
starting with 1.
Doc
Nume
ric
tblDoc
ImageExt
File extension of
image records in
LAW (applies to
docs imported as
ex: TIF
raw images or via
load file, scanned
images, and files
converted to TIFF or
PDF in LAW).
Doc
Text
tblDoc
Importance
Importance field
extracted from an
e-mail message.
ex: High
Doc
Text
Importance tblDoc
ex:
Laptop01
Doc
Text
tblDoc
Name of the
ImportStation computer that
imported a
document.
ex: 1
InReplyToID
IntMsgID of the email replied to.
Doc
Memo InReplyToID tblDoc
IntMsgID
Internet Message
ID assigned to an
e-mail message by
the outgoing mail
server.
Doc
Memo IntMsgID
tblDoc
Keywords
Keywords extracted
from the metadata ex: LAW
of the native file.
Doc
Memo Keywords
tblDoc
tblDoc
tblDoc
Language
Lists the first 5
languages found in
the document.
ex:
English;
Japanese;
Spanish
Doc
varch
ar
(SQL)
or
text
(Acce
ss)
LastAuthor
Last Saved By field
value pulled from
metadata of the
native file.
ex: Joe L.
Author
Doc
Text
MailStore
(Exports only - does
not exist in LAW
case database)
Fully qualified
original path to mail
store (including
ex: D:
\MailStore
s
\Sample.p
st
Doc
N/A
© 2015 LexisNexis. All rights reserved.
MailStore
N/A
743
744
LAW PreDiscovery
Field Name
Field Description
Possible
E-Disc. Scope Field
Values/
Only
Type
Examples
Z-Print Field Table
Equivalent
filename).
MD5Hash
Unique identifier,
similar to a
"fingerprint",
extracted from all
files imported via
EDLoader. Uses
128-bit encryption.
May be used for
deduping purposes.
MsgClass
Outlook bound
property indicating
type of entry in
store.
ex:
D5646688
21C34200
FF3E32C9
BFDCCC80
Text
MD5Hash
Doc
Text
MessageCla
ss (ZP
database
tblDoc
only, not
displayed in
CSV)
NativeFile
Not currently
utilized in LAW
N/A
PreDiscovery for ED
cases.
Doc
Memo
NumAttach
(Exports only - does
not exist in LAW
case database)
Total number of
records attached to ex: 2
the document.
Value will always be
0 (zero) for actual
attachment records.
Doc
N/A
Page
Text
tblPage
Doc
Text
tblDoc
ex:
IPM.Note
Doc
tblDoc
tblDoc
NumAttach
N/A
Y=Page
flagged for
OCR
OcrFlag
N=Page
not
flagged
Page-level OCR
status of each page
C=Page is
in a document.
complete
E=Error
occurred
OCRing
page
OcrStatus
Doc-level OCR
status of a
document.
Y=One or
more
pages
flagged for
OCR
N=No
pages
© 2015 LexisNexis, a division of Reed Elsevier Inc. All rights reserved.
Reference Information
Field Name
Field Description
Possible
E-Disc. Scope Field
Values/
Only
Type
Examples
745
Z-Print Field Table
Equivalent
flagged
C=OCR
complete
on
document
I=OCR
was
cancelled
E=Error
occurred
OCRing
document
P=Processi
ng (special
flag used
by LAW
during
OCR)
Organization
Company field
extracted from
metadata of native
file.
ex:
LexisNexis
Doc
Memo
OrigExt
Original file
extension of native
file, if "auto-assign
ext." option was
enabled and file
was suspect.
ex: PDF
Doc
Text
tblDoc
Page
Page number of
each page in a
document.
Page
Nume
ric
tblPage
Page ID
ID number assigned
by user to pages of ex:
documents (images ABC0001
only).
Page
Text
tblPage
PageColor
Stores the color
information at a
page level for
scanned and
imported images, as
well as images
created during a
TIFF conversion.
See the following
Help topic for more
information:
Administration>Tracking Page
Page
Looku
p
tblPage.C
olorID
© 2015 LexisNexis. All rights reserved.
Organizatio
tblDoc
n
Black &
White (1)
Color (2)
Grayscale
(3)
746
LAW PreDiscovery
Field Name
Field Description
Possible
E-Disc. Scope Field
Values/
Only
Type
Examples
Z-Print Field Table
Equivalent
Source, Size, and
Color.
Similar to
OutputFile,
in that this
field shows
the location
of the
tblPage
output TIFF
image or
PDF file
after TIFF/
PDF
conversion.
Path to TIFF image
or PDF file that was
a result of a TIFF/
PDF conversion in
ex: 00\00
PageFilename LAW. Path is
\00\01.tif
relative to
$ImageArchive
folder, located in
case folder.
Page
Text
PageHeight
Stores the height of
an image at a page
level for scanned
and imported
images, as well as
images created
during a TIFF
conversion. See the ex: 11.50
following Help topic
for more
information:
Administration>Tracking Page
Source, Size, and
Color.
Page
Nume
ric
tblPage
PageSize
Stores the page
size of an image at
a page level for
scanned and
imported images, as
well as images
created during a
TIFF conversion.
See the following
Help topic for more
information:
Administration>Tracking Page
Source, Size, and
Color.
Page
Looku
p
tblPage.P
ageSizeID
Page
Looku
p
tblPage.S
ourceID
PageSource
Stores the source of
an image at a page
level for scanned
and imported
images, as well as
images created
during a TIFF/PDF
conversion. See the
Letter (1)
Legal (2)
Double
Letter (3)
Oversized
(4)
Feeder (1)
Flatbed (2)
Imported
(3)
TIFF/PDF
Conversio
© 2015 LexisNexis, a division of Reed Elsevier Inc. All rights reserved.
Reference Information
Field Name
Field Description
following Help topic
for more
information:
Administration>Tracking Page
Source, Size, and
Color.
Possible
E-Disc. Scope Field
Values/
Only
Type
Examples
747
Z-Print Field Table
Equivalent
n (4)
Manual
TIFF/PDF
Conversio
n (5)
PageWidth
Stores the width of
an image at a page
level for scanned
and imported
images, as well as
images created
during a TIFF/PDF
conversion. See the ex: 8.5
following Help topic
for more
information:
Administration>Tracking Page
Source, Size, and
Color.
Page
Nume
ric
tblPage
ParentID
(Exports only - does
not exist in LAW
case database)
Populated only for
attachments, this
field will display the
Image Tag field
value of the
ex:
attachment record's
ID00001
parent. For
example, if the
Image Tag is set to
"DocID", the parent
record's DocID
value will be listed
as the ParentID for
the attachments.
Doc
N/A
N/A
Path
Folder path for LAW
records, relative to
root case folder, as
shown in the tree
view in LAW's main
interface. Physical
files may not exist
001Source
in this path in
\001Box
Windows,
depending on how
the files were
imported or
scanned into LAW.
For more
Doc
Text
tblDoc
© 2015 LexisNexis. All rights reserved.
748
LAW PreDiscovery
Field Name
Field Description
Possible
E-Disc. Scope Field
Values/
Only
Type
Examples
Z-Print Field Table
Equivalent
information on
storage locations,
please see the Help
topics under
Acquiring
Documents.
PgCount
Number of pages in
a document (image ex: 250
records).
Doc
Nume
Pages
ric
PrevErrMsg
If a record is
successfully
converted to TIFF or
PDF, the ErrorMsg
field is cleared and
any existing value
in that field is
prepended to the
PrevErrMsg field for
reference.
Doc
Memo
Doc
Text
ReadReceip
tblDoc
t
Doc
N/A
RecordType N/A
ReadReceipt
RecordType
Read receipt
request notification
for e-mail
messages.
tblDoc
Y=Yes
(read
receipt
requested
)
N=No
<null>=Att
achments
and edocs will
have null
value.
IMAGE;LO
OSE EMAIL;EMAIL;EDOC;IMAG
E
ATTACHME
(Exports only - does
NT;LOOSE
not exist in LAW
E-MAIL
case database)
ATTACHME
Lists the record
NT;E-MAIL
type for each entry
ATTACHME
in the load file.
NT;E-DOC
ATTACHME
NT;LOOSE
E-MAIL
ATTACHME
NT (EMAIL);E-
© 2015 LexisNexis, a division of Reed Elsevier Inc. All rights reserved.
Reference Information
Field Name
Field Description
Possible
E-Disc. Scope Field
Values/
Only
Type
Examples
Z-Print Field Table
Equivalent
MAIL
ATTACHME
NT (EMAIL);
E-DOC
ATTACHME
NT (EMAIL)
Revision
Revision number
extracted from
metadata of native
file.
ex: 18
Doc
Text
Sensitivity
Sensitivity field
extracted from email messages.
ex: Private
Doc
Text
Sha1Hash
Unique identifier,
similar to a
"fingerprint",
extracted from all
files imported via
EDLoader. Uses
160-bit encryption.
May be used for
deduping purposes.
ex:
B68F4F57
223CA7DA
3584BAD7
ECF111B8
044F8631
Doc
Text
Doc
List
tblDoc
Sensitivity
tblDoc
tblDoc
<No
Source
Specified>
Adobe
Acrobat
SourceApp
Source application
assigned to the
native file, as
specified in the file
type database. This
application will be
used to print the file
during the e-Print
and TIFF/PDF
Conversion batch
processes.
AutoVue
Suite
Binary/Hex
Printer
Corel
WordPerfe
ct
eDrawings
Viewer
Image
Printer
Internet
Explorer
Microsoft
Excel
Microsoft
© 2015 LexisNexis. All rights reserved.
SourceApp
tblDoc
749
750
LAW PreDiscovery
Field Name
Field Description
Possible
E-Disc. Scope Field
Values/
Only
Type
Examples
Z-Print Field Table
Equivalent
Outlook
Microsoft
PowerPoin
t
Microsoft
Project
Microsoft
Visio
Microsoft
Word
Quick View
Plus
Shell
Printer
Snapshot
Viewer
Text/RTF
Printer
VoloView
Express
SourceFile
Fully qualified
original path
(including filename) ex: D:\001
to original loose e- \test.msg
mail message. Field
is blank for all other
types.
Doc
Memo
Subject
Subject field value
extracted from
metadata of native
file.
Doc
Text
SuspectExt
Flagged with "Y"
value for files
deemed suspect
during the
validation process,
meaning the
original file
extension did not
represent the true
file type.
Doc
Text
tblDoc
Doc
Text
tblDoc
SuspectOLE
Document
suspected to
contain embedded
files.
ex: LAW
tblDoc
Subject
tblDoc
Y=Conside
red
suspect
N=Not a
suspect
file
Y=Contain
s
embedded
files.
© 2015 LexisNexis, a division of Reed Elsevier Inc. All rights reserved.
Reference Information
Field Name
Field Description
Possible
E-Disc. Scope Field
Values/
Only
Type
Examples
Z-Print Field Table
Equivalent
N=Does
not
contain
embedded
files.
Template
Template field value
ex:
pulled from
Normal.dot
metadata of the
native file.
TextPStatus
Status of text
extraction that
occurs as files are
converted to TIFF
images or PDF files
(TIFF/PDF
Conversion batch
process). "Save text
with images" must
be enabled in order
for the TIFF/PDF
engine to attempt
text extraction.
C=Text
was
extracted
during
TIFF/PDF
conversion
.
Doc
Text
tblDoc
Doc
Text
tblDoc
Doc
Text
tblDoc
Doc
Text
tblDoc
N=No text
was
extracted
during
TIFF/PDF
conversion
.
C=Text
extracted
successfull
y from
native file.
TextXStatus
ThreadID
Status of native
text extraction that
occurs when a file is
imported via
EDLoader.
N=No text
was
extracted.
Tracks e-mail
threads imported
via ED Loader from
Outlook stores and
from loose MSG
files. Attachments
to e-mails receiving
a value for the
ThreadID are
populated with the
ThreadID of the
corresponding
parent e-mail.
Populated
with the
leftmost
22
characters
of
Conversati
onIndex
field.
© 2015 LexisNexis. All rights reserved.
E=Error
occurred
extracting
text, see
ErrorMsg
field.
751
752
LAW PreDiscovery
Field Name
Field Description
Possible
E-Disc. Scope Field
Values/
Only
Type
Examples
Z-Print Field Table
Equivalent
Y=Flagged
for
converting
to TIFF or
PDF (any
files with a
valid
source
app
assigned
will be
flagged
after ED
import)
C=File was
converted
to TIFF or
PDF file
Status of TIFF/PDF
conversion.
TiffStatus
Note: Values in this
field will not control
which files are
converted to TIFF or
PDF files, and which
are not. Any files
selected for TIFF or
PDF conversion in
the Batch Process
form will be
converted to TIFF or
PDF or given a
placeholder (if
enabled) regardless
of this field.
E=Error
occurred
and was
logged
during
TIFF or
PDF
conversion
(see
ErrorMsg
field)
W=Warnin
g was
logged
during
TIFF or
PDF
conversion
Doc
Text
Similar to
Status.
Values are
slightly
different
than ZPrint. See
Possible
Values.
tblDoc
N=File not
flagged for
converting
to TIFF or
PDF (no
valid
source
app
assigned
during ED
import,
<No
Source
Specified>
value is
assigned)
© 2015 LexisNexis, a division of Reed Elsevier Inc. All rights reserved.
Reference Information
Field Name
Field Description
Possible
E-Disc. Scope Field
Values/
Only
Type
Examples
Z-Print Field Table
Equivalent
P=Placehol
der
printed for
the
document
Stores the last
accessed time from
the properties of
the file. Note: Many
functions will cause
this value to be
updated by
Windows (e.g.,
viewing file
properties,
dragging and
dropping) and
therefore this time
will often be
inaccurate.
To avoid this
situation,prior to
handling the data,
run the
DisableLastAccessU
TimeAccessed pdate.reg file
located in the
\LAW50 folder
(same folder as
law50.exe)
(requires reboot
after running). This
will prevent
updates to this
value (applies to
LAW DateAccessed
field also) by
Windows while the
file is being handled
throughout the
project. To reenable the registry
setting, run the
EnableLastAccessU
pdate.reg file
located in the same
folder.
Doc
Text
tblDoc
TimeAppEnd
Appointment end
time for calendar
items.
Doc
Text
tblDoc
TimeAppStart
Appointment start
time for calendar
Doc
Text
tblDoc
© 2015 LexisNexis. All rights reserved.
753
754
LAW PreDiscovery
Field Name
Field Description
Possible
E-Disc. Scope Field
Values/
Only
Type
Examples
Z-Print Field Table
Equivalent
items.
TimeCreated
Creation time of the
native file.
Doc
Text
TimeCreate tblDoc
d
TimeLastMod
Time native file was
last modified.
Doc
Text
TimeLastMo
tblDoc
d
TimeLastPrnt
Time native file was
last printed (Office
documents).
Doc
Text
TimeLastPrn
tblDoc
t
TimeRcvd
Time the e-mail
message was
received.
Doc
Text
TimeRcvd
tblDoc
TimeSent
Time the e-mail
message was sent.
Doc
Text
TimeSent
tblDoc
Doc
Text
Time zone where
TimeZoneProc item was first
processed.
tblDoc
Title
Title field value
extracted from the
metadata of the
native file.
Doc
Text
To
Main recipient(s) of
the e-mail message.
Doc
Memo To
tblDoc
Unread
E-mail has not been Y=Yes
read.
N=No
Doc
Text
tblDoc
UserId
Not currently
utilized in LAW.
Doc
Nume
ric
tblDoc
Volume
Stores volume ID,
as listed in
tblVolume in LAW
case database.
Doc
Nume
ric
tblVolume
N/A
Title
Unread
tblDoc
Related Topics
User Guides
© 2015 LexisNexis, a division of Reed Elsevier Inc. All rights reserved.
Reference Information
755
Unicode Support
The general requirements and supported functionality for Unicode are listed as follows:
LAW PreDiscovery™ versions 5.2 and higher support the Unicode standard.
Proper language packs must be installed for the associated Unicode characters to render
correctly.
To print Unicode text files, use either Microsoft Word or the Shell Printer as the source
application. The Text/RTF Printer can print RTF with Unicode, however it cannot print Unicode
text files.
If using the Shell Printer, you must ensure that the application registered on the system for
text files supports shell prints For example, Notepad supports shell prints.
The ExperVision and TextBridge OCR engines do not currently support Unicode.
Supported languages for OCR can be found in the Language drop-down list located in the
OCR tab in Tools -> Options.
Printed and extracted text will contain Unicode data if it exists in the original file and can be
displayed, provided the proper language pack(s) are installed on the system.
To view Unicode in a grid
In a grid view, rest the mouse pointer over a cell that contains Unicode characters.
The text appears in a pop-up text box.
Unicode in names for files, cases, and fields
Files with Unicode file names or residing in a Unicode path may be imported using the ED
Loader. These Unicode paths can be retained and displayed in the main folder view and
any other applicable folder view in the application. Unicode existing in the metadata will
be retained and can be displayed in the Index display.
Unicode is not supported in case names. While the rest of the case path can contain
Unicode, it is recommended the case paths do not contain Unicode characters to avoid
potential issues with 3rd party applications.
Index field names cannot contain Unicode characters.
Exporting Unicode data
Unicode data can be sent to the export file when exporting field data from a grid.
In the Save Results As dialog box, in the Save as type list, select Unicode Text (Tab
delimited)(*.csv).
Exporting Unicode
© 2015 LexisNexis. All rights reserved.
756
LAW PreDiscovery
Export Formats
Unicode data is supported in the Export Utility in the following export formats:
CaseLogistix - Unicode is automatically included if present in the exported data.
Delimited Text - Unicode data will be included only if the Allow Unicode data (UCS-2
format) option is enabled in this format's configuration settings.
EDRM XML 1.0 - Unicode is automatically included if present in the exported data.
EDRM XML 2.0 - Unicode is automatically included if present in the exported data.
Concordance Direct DCB - Unicode data will be included only if LexisNexis Concordance
10 or above is installed on the computer and Create Concordance 10.0 database
(supports Unicode is enabled in the configuration settings for that format.
Concordance - Unicode data will be included only if Allow Unicode data (UCS-2 format)
is enabled in this format's configuration settings.
Export Utility Restrictions
When using the Export Utility, if you export to a format that does not support Unicode:
Do not use the Mirror Original folder naming scheme if Unicode folders exist in the
case.
Ensure the export path does not contain Unicode. Unicode paths and filenames may
prevent the target applications from opening associated images, text, or native files.
Keyboard Shortcuts
If the keyboard shortcuts are not functioning, and a grid display is currently active, please
ensure that Review Mode is disabled in the grid. See Tagging Records for more information.
For a downloadable copy of the keyboard shortcuts see LAW PreDiscovery Keyboard Reference.
Function keys
Key
Function
F1
Help
F2
Edit Search Entry
F3
Scan New Batch
F4
Deskew Document
© 2015 LexisNexis, a division of Reed Elsevier Inc. All rights reserved.
Reference Information
Key
Function
F5
Append Document
F6
Replace Pages
F7
Page Size - Letter (8.5 x 11")
F8
Page Size - Legal (8.5 x 14")
F9
Page Size - Double Letter (11 x 17")
F10
Scan Mode - Simplex
F11
Scan Mode - Duplex **
F12
Scan Mode - Flatbed **
** Availability of these modes depends on whether the scanner support for these
capabilities.
Control keys
Key Combination
Action
ALT+UP ARROW
Increase scan brightness (32pts)
ALT+DOWN ARROW
Decrease scan brightness (32pts)
CTRL+A
Select All Pages (if thumbnails display has focus)
CTRL+A
Select All Documents (if document list has focus)
CTRL+A
Show All Fields (if Search Results window has focus)
CTRL+X
Hide All Fields (if Search Results window has focus)
CTRL+E
Edit Page ID
CTRL+F
Find Page ID
CTRL+G
Go To Page
CTRL+L
Rotate Left (current or selected pages)
CTRL+M
Merge Documents
CTRL+O
OCR Document
CTRL+P
Print
CTRL+R
Rotate Right (current or selected pages)
CTRL+S
Save Image (saves image with current page orientation)
CTRL+U
Split Document
CTRL+Z
Zoom Lock
CTRL+1
Black and White Scanning
© 2015 LexisNexis. All rights reserved.
757
758
LAW PreDiscovery
Key Combination
Action
CTRL+2
8-bit Grayscale Scanning
CTRL+3
24-bit Color Scanning
CTRL+F3
Scan New Attachment
CTRL+F4
Enhance Image menu
CTRL+F6
Replace Document
CTRL+F12
Merge Annotations
CTRL+INSERT
Insert New Pages (from scanner)
CTRL+PAGE DOWN
Zoom In
CTRL+PAGE UP
Zoom Out
CTRL+LEFT ARROW
Pan Left (moves image, if zoomed)
CTRL+RIGHT ARROW Pan Right ARROW (moves image, if zoomed)
CTRL+UP ARROW
Pan Up (moves image, if zoomed)
CTRL+DOWN
ARROW
Pan Down (moves image, if zoomed)
ESC
Clear current region (if main image has focus)
ESC
Clear selected pages (if thumbnails display has focus)
SHIFT+INSERT
Attach to Previous
SHIFT+BACKSPACE
Detach All
SHIFT+DELETE
Delete Pages
Document list keys
The focus must be on the document list to use these shortcuts.
Key
Action
LEFT
Previous page
RIGHT
Next page
UP
Previous document
DOWN
Next document
HOME
First page
END
Last page
DELETE
Delete document
SPACEBAR
Toggle page selection for current page
© 2015 LexisNexis, a division of Reed Elsevier Inc. All rights reserved.
Reference Information
759
Related Topics
User Guides
Contacting LexisNexis
LexisNexis ® offers the broadest choice of discovery solutions, giving law firms, corporations
and government agencies the efficiency, control, and confidence they need to litigate
successfully in the face of overwhelming data volumes and rapidly changing technology.
Technical Support
Our number one priority is our clients. Our representatives pride themselves on resolving
client issues quickly and effectively. To receive technical assistance, or to provide feedback or
suggestions, please e-mail or call us. The Technical Support team is available from 9:00 A.M.
to 8:00 P.M. Eastern Time, Monday - Friday.
E-mail: [email protected]
Phone: 1 (800) 833-3346 (Option 5 for LAW PreDiscovery. Option 7 for Early Data
Analyzer.)
Websites
Litigation Solutions:
http://www.lexisnexis.com/litigation
LexisNexis® Early Data Analyzer:
http://www.lexisnexis.com/litigation/products/ediscovery/early-data-analyzer
LAW PreDiscovery® :
http://www.lexisnexis.com/litigation/products/ediscovery/law-prediscovery
© 2015 LexisNexis. All rights reserved.
760
LAW PreDiscovery
Sales
Our sales team is committed to helping you to find the right products to suit your
requirements. Contact us to learn more about the many flexible licensing options for LAW
PreDiscovery™, and to see how our related software and service offerings for litigation
support — such as Concordance ®, CaseMap ®, and IDEX Full-Service Expert Witness Search
— can help to integrate and accelerate your efforts to arrive at winning solutions.
E-mail: [email protected]
Phone: 1 (800) 722-3288
Client Training Program
To help you meet the increasing complexity of electronic discovery, our Client Training
Program offers classroom experiences that focus on applying the powerful features of LAW
PreDiscovery to solve real-world problems. To learn more about our training offerings, please
e-mail or call us.
E-mail: [email protected]
Phone: 1 (800) 227-9597 extension 1252111
© 2015 LexisNexis, a division of Reed Elsevier Inc. All rights reserved.
Using LAW PreDiscovery
User Guide
Glossary
Chapter
5
762
LAW PreDiscovery
Glossary
Glossary
A–B–C -D–E–F–G–H–I–J–K–L–M–N–O–P –Q–R–S–T–U–V–W –X–Y–
Z
A–B–C
Acrobat
An application by Adobe Corporation for creating, reading, and editing PDF files.
archive file
A file type whose purpose is to store compressed copies of other files. The ZIP file is a
common type of archive file. Other types of archive files are:
RAR
JAR
GZIP
Z
TAR
ED Loader can import archive files and the files they contain either as multiple separate files
or as a single-file archive. The files within the archive are called attachments.
attachments
Attachments are files that are linked to or embedded within other files. For example, word
processor files are commonly found attached to e-mail messages.
An attachment relationship is displayed by indenting attachments below its parent
document or archive.
Batch Process
The tool you use to perform page and document numbering, image cleanup, endorsing
images, OCR, printing, e-printing, scanning for suspected footers, TIFF/PDF conversion, and
updating page data. Batch processing can be done using just a single computer, or by
distributing the job among 2 or more networked computers by using the LAW Management
Console.
Batch Update
The tool you use from a grid display to update all currently visible records in a grid. For
example, you could use the Batch Update tool to reassign all selected records to a different
custodian. Before you can use the Batch Update tool, the field that you want to update
must be unlocked for editing. See also Modify Fields.
Tools -> Batch Update
Bates numbering
A system for uniquely identifying individual documents or pages using a sequential
© 2015 LexisNexis, a division of Reed Elsevier Inc. All rights reserved.
Glossary
763
alphanumeric code.
case
1. In LAW PreDiscovery, the basic unit of organization for a set of source documents and
source metadata; and the metadata and operational settings associated with that set of
documents. 2. In the Early Data Analyzer component of LAW PreDiscovery, the basic unit of
organization for identifying sets of source documents, applying filters, exporting, and other
functions related to prefiltering.
Cases in Early Data Analyzer and LAW PreDiscovery are managed and stored in separate
databases.
case name
Case name is the only property required when you create a database. LAW provides you
with a default name of New Case, but we advise you use a more descriptive name. LAW
uses the case name as the root directory of the case.
compound document
A document created in one application that contains information created in another
application. For example, a Word document can contain a worksheet developed in Excel.
When you import compound documents you can specify whether a compound document will
be extracted or not.
custodian
The party responsible for safe keeping of documents. In ED Loader, prior to importing, you
can identify the custodian responsible for source documents. You can also access the
Custodian Manager from ED Loader to manage the list of custodians available for a case.
After import, the Custodian field is locked by default.
You can update the custodian after import. To do so, unlock the field for editing (Index ->
Modify Fields), and then you can reassign the custodian manually by using the folder view
or Index tab. Or you can use the Batch Update utility accessible from a grid view.
D–E–F
data source
In LAW, a data source is the collection of MS Word docs, Excel worksheets, Adobe .pdf files,
winzip .zip files, or others, to be imported into a case.
database
A type of data structure in which information is organized in one or more tables. LAW
PreDiscovery cases are managed each in its own database file. See also table.
database engine
The software application used to organize, manage and query information stored in a
database.
Deduplication Utility
The tool used for determining if there are multiple copies of the same document in a case.
default value
© 2015 LexisNexis. All rights reserved.
764
LAW PreDiscovery
A value that LAW uses to populate a field. For example, the default value for the name of a
new case is ‘New Case.’ The default value for Case is Active is ‘Yes.”
delimited text
A method of representing a table of information in a text file. In delimited text, the table
columns are separated by a designated character, such as a comma or tab character.
Example:
Order number,CustomerName
1,Smith
2,Jones
3,Brown
Typically a comma is used to separate values. A comma-separated value (CSV) file contains
comma delimited text. One of the six kinds of source files you can import into a LAW case.
DocExt
DocExt is the name for one of the fields in the case database. It’s an abbreviation for
‘document extension.’ See Document and Document Extension.
DocID
A unique value that LAW assigns to each document in a case.
DocID seed
A unique eight-digit number that you can specify as the starting point for document
numbering before importing source docs into the case.
document
Used interchangeably with ‘file.’ a document is composed of one or more pages, has a
three-character extension, and a unique ID created during import.
document extension
The suffix added to a filename that identifies the format of its contents. For example, the
document extension of text files is TXT. During electronic discovery, LAW PreDiscovery
analyzes file contents and records the file extensions in the DocExt field. If a file’s contents
do not match the extension, the SuspectExt field is checked. For documents with suspected
extensions the OrigExt field is populated with the extension associated with the type of file,
as inferred by LAW PreDiscovery.
document numbering
One of the batch processes applied to the results of an import session. You can opt for
numbering each page of every document, placing the number that LAW generates in the
PageID field, and specifying the serial number to start counting from.
document review software
A type of litigation support software that consumes the export product of LAW
PreDiscovery.
© 2015 LexisNexis, a division of Reed Elsevier Inc. All rights reserved.
Glossary
765
e-doc
Short of electronic document, in distinction to paper document. Any computer file identified
as a source document in a case.
Early Data Analyzer
An optional software component of LAW PreDiscovery that performs high-speed prefiltering
of large document sources.
electronic discovery
The process of finding information in electronic documents that is important to litigation. In
LAW PreDiscovery you use ED Loader to import electronic files These files then constitute
the source documents for further discovery processing.
e-mail store
A type of file that contains individual email messages.
endorsing
Imprinting an image or PDF file, such as a logo on TIFFs. One of the batch processes applied
to the results of an import session. You can opt for endorsing every image or PDF file or
only the first page of every image or PDF file.
e-print
One of the batch processes that you can run on electronic documents. Prints the native
document using application software external from LAW PreDiscovery.
ErrorMsg
One of the built-in fields that LAW adds to the project database, error messages tell you
that LAW was either unable to extract data from a document, or write that data to the
database.
exclusions
Rules that prevent certain items from being processed.
export
The process of packaging documents and metadata in formats suitable for use by software
applications outside of LAW PreDiscovery.
Export Utility
Used for specifying what data will be exported to document review software. In the Export
utility you specify: the documents to be exported, the data fields and values of interest, the
export format, file name and path, and the naming scheme for exported files and folders.
field
One of the properties associated with a document or page. Examples include: document
identification number (DocId), page identification number (PageID), document file extension
(DocExt), etc. You use fields as a basis for filtering and analyzing documents. By default,
LAW PreDiscovery creates and populates many fields for documents and pages that it
processes. You can lock or unlock fields, or create new fields for your own purposes by
using the Modify Fields dialog box.
© 2015 LexisNexis. All rights reserved.
766
LAW PreDiscovery
field list
A tool in the grid display you use to control which fields are visible in the grid. Checked
items are visible, unchecked are not. All the properties associated with a document. For
example the three fields in the screen shot tell you the date when a file was created, the
date for the last time it was modified, and the date when it was last printed. All of these
fields are populated by the operating system.
file description
Information about a document stored in the FileDescription field.
Folder
A container for documents and pages.
From:
Found in email, saved in the To field of the database so that you can search for all of the
emails that were sent by an individual.
G–H–I
grid
A type of display in LAW PreDiscovery that enables you to view lists of document and page
records each in a single row in a table. You can configure grids to show whichever
metadata fields you are interested in. You can also define custom sorting and reuse saved
views.
The embedded grid is built into the main window of LAW PreDiscovery and is designed to
provide a snapshot view, showing just a few records and fields at a time. There is also a
standalone grid that runs in its own window and can be more useful for reviewing larger
record sets and more fields.
hash value
A value assigned to a particular document that uniquely identifies it. Hash values for files
are generated by the Deduplication utility to identify files suspected of being duplicates.
There is a slight margin of error when creating file hashes and this factor decreases with
the strength of the working digest used to create the hash. For most projects, configuring
the Deduplication utility to use 128-bit strength is sufficient to positively identify duplicates.
You can use a stronger digest for extremely high reliability but at a cost of processing
efficiency.
header/footer
Batch process for adding headers and footers to the image of a page before exporting.
image
One of the three options for viewing a document in LAW. For example, the image tab
contains a picture of the document. The image is like a Xerox copy of a document. You can
read it, but you can’t be change it.
image cleanup
A batch process for deskewing images, removing black borders found in the original images,
or and random black marks that are not part of the image.
© 2015 LexisNexis, a division of Reed Elsevier Inc. All rights reserved.
Glossary
767
index field
A term that describes a field whose purpose is to hold sequential numbering of documents
or pages.
J–K–L
LAW case
One of the six kinds of source files you can import into a LAW case. LAW Case allow users
to import an existing LAW case (created in version 4.x or 5.x) into a new or existing LAW
case.
load file
One of the six kinds of source files you can import into a LAW case. Load files are produced
by litigation support applications for the purpose of packaging source files and other
information for import and export to other programs.
Log Viewer
A utility that provides access to LAW PreDiscovery logs.
M–N–O
mail store
A type of file that acts as a container for individual e-mail messages. Outlook mail stores
have the PST extension.
metadata
The information about a file, document or page other than its content. Examples of
metadata include: author, date created, file size, file type, page dimensions, and many
others. Much metadata is collected in the process of electronic discovery during the import
process. Metadata is useful as a basis for creating queries.
Modify Fields
The tool you use to add, delete, lock, or unlock the fields associated with a case. See also
Batch Update.
naming scheme
A set of rules you define that govern naming of various objects in LAW, such as projects,
cases, and folders. Creating a naming scheme helps to maintain organization over sources
and cases.
noise (visual)
Blemishes, dust, creases and other imperfections in images that can reduce the accuracy
and speed of OCR. If scanned images are known to contain fair amounts of noise, you can
run a batch process to remove noise, before you run a batch process to OCR the images.
noise (words)
Words that are ignored by processes of text indexing and full text search. Examples of
noise words include: are, the, and, but, in, etc.
© 2015 LexisNexis. All rights reserved.
768
LAW PreDiscovery
Open File
An option for viewing files. Opens the native document using the source application of the
document.
optical character recognition (OCR)
The capability of extracting text from images. LAW PreDiscovery can perform OCR on
scanned pages of documents or pictures.
P–Q–R–S
path
A description of the location in the file system of a volume, file, or folder. For example, C:
\Program Files\test.txt represents the path to a test file located in the Program Files folder
on the C: drive.
prefiltering
An optional action that can be performed on document sets prior to their import into a LAW
PreDiscovery case. This function is accomplished by the use of the Early Data Analyzer
component of LAW PreDiscovery.
Print Options
A batch process for preparing documents for output to a printer.
properties
The fields of a document.
For example one of the properties of a computer file is its name. Other properties would
include the name of its author, the date it was created, the application that was used to
create it.
quality control (QC)
The process of ensuring that the results of one phase of discovery are complete, accurate,
and usable by subsequent phases. After import, for example, QC may consist of reviewing
and resolving errors and warnings. Prior to OCR, QC may consist of applying image cleanup
batch processes to TIFFs.
Query Builder
A tool for finding documents and pages that match conditions you select based on field data
and/or full text conditions. Query Builder can send results to be sent to a grid for further
analysis or to a batch process, update utility, or direct to export.
range file
A range file is a delimited text file with two fields, BegDoc# and EndDoc#. You can use a
range file when you want to reorganize documents, validate document ranges. or to import
images from a Doculex imagebase.
raw images
One of the six kinds of source files you can import into a LAW case, raw images are readonly image files without an accompanying database or a load file.
© 2015 LexisNexis, a division of Reed Elsevier Inc. All rights reserved.
Glossary
769
record
A single row in a database. In a LAW PreDiscovery case, a record is represented in a grid as
the values held in a row of fields. A record holds all the properties and values associated
with a particular document or page.
recursive
Directing processing to take place on all items in a folder and then all its subfolders.
Recursive processing helps to ensure all items in a deep folder structure are processed.
root directory
The top level folder in a directory structure.
session
A job run in ED Loader.
Session Browser
The utility in ED Loader for reviewing the details of previously run jobs.
session label
A unique name that LAW creates every time it’s importing files into the case.
For example, the default value for a session label is Session Created on [&Created]. When
LAW starts a session, it reads the date and time from the computer and adds that
information to the phrase above
Session Viewer
A feature of the ED Loader that provides access to logs of previous import sessions.
source
A file or folder identified for processing by the Early Data Analyzer component of LAW
PreDiscovery.
source name
The folder or file name associated with an item bound for import in ED Loader.
Source Queue
In ED Loader, a control that shows a list of items bound for processing. When you use ED
Loader, you must specify items to import based on source type, for example, Outlook folder,
files, file lists, etc. You can identify multiple items to import before you press the Start
button. When you select an item for processing it is added to the Source Queue list.
SourceApp
A field that names the application that originally produced a document.
sources
The files that ED Loader imports into a case.
© 2015 LexisNexis. All rights reserved.
770
LAW PreDiscovery
T–U–V
tag list
A text (.txt) or comma separated value (.csv) file containing a list of unique identifiers used
to locate the records in the case. The unique identifiers typically used in tag lists are the
DocID or BegDoc# field. You use tag lists to help speed up the process of defining special
fields for a case. A tag list allows you to save and reuse special fields between cases. See
Importing Tag Lists.
Text tab
One of the three options for viewing a document in LAW, the Text tab displays any text
extracted from a document.
TIFF
One of several popular image file formats and the most commonly used image format used
in the legal profession for rendering documents.
TIFF/PDF conversion
The process of rendering scanned documents and other electronically stored information
(ESI) into the TIFF image or PDF file format. The Batch Processing utility can then be used
to apply Bates numbering, OCR, and other actions to the files.
Title
A metadata field found in office documents. The document title and other metadata is
extracted by ED Loader during the import phase of electronic discovery. After import, you
can use Query Builder to query documents by words found in the Title field.
To:
A metadata field for e-mail records that is extracted during the import phase of electronic
discovery. After import, you can use Query Builder easily find all the e-mails in a document
collection that were sent to a particular individual by creating a query on the To: field.
unique value
A value in a field that is unique to that field for all records in a database. For example, in an
employee database, no two records should have the same Social Security number.
value
The information stored in a particular database field for a specific record. For example, the
Author field for a document might contain the value “Smith”.
W–X–Y-Z
© 2015 LexisNexis, a division of Reed Elsevier Inc. All rights reserved.
Index
Index
-##Default.xml
modifying fields
220
-..lst files
246
-AABBY FineReader
OCR options
523
searchable PDF files
532
administrator
47
annotating
416
archives
import settings
273
attachments
319
adding after scanning
362
deduplication options
643
document-level numbering
495
inserting after import
319
losing metadata
319
working with
414
AutoIncrement
239
AutoVue
423
-Bbarcode break sheets
coding while scanning
336
document breaks in images
336
during scanning
344
inserting documents
408
scanning
336
scanning options
348
splitting documents
404
batch processing
configuring separator pages
598
distributed
608
endorsements
552
© 2015 LexisNexis
E-Printing/TIFF/PDF conversion
572
header and footer options
552
numbering
495
OCR
519
overview
536
printing images
564
processes
536
selecting documents for
536
starting
536
watermarks
559
Batch Update
overview
504
tagging records
511
Bates numbering
exporting to Introspect eCM
686
numbering
495
OCR options
523
Bates numbers
inspecting on images
384
black-border removal
344
Boolean fields
509
-CCanon iR110
564
case list
213
CaseLogistix
export settings
670
Unicode export format
755
CaseMap
export settings
671
cases
case list database file
209
case templates
220
creating
209
deduplicating
637
deduplication status
654
deleting
213
existing
213
importing
366
Inter-Case Deduplication
646
mofigyin
220
organizing by project
226
preventing accidental deletion
213
reusing fields
239
Unicode in case names
755
CD burning
and Summation path notation
697
771
772
LAW PreDiscovery
CD burning
export options
711
overview
711
setting partition size for export
704
coding
adding to lists
246
batch updates
504
documents
492
efficiency
492
using barcode break sheets
336
compound documents
import settings
275
post-import quality control
319
Concordance
export format
658
export settings
673, 677
exporting Unicode delimited text
677
Concordance DCB
export format
658
export settings
675
Concordance Native File Viewer (OPT)
Concordance DCB export setting
675
Concordance export setting
673
control lists
464
creating
cases
209
custodians
254
fields
239
folders
230
index profiles
249
projects
226
Tag (Boolean) fields
509
Custodian Manager
254
custodians
adding new
254
creating from list files
254
deduplication assignments
637
deduplication scope
278, 643
designating for import session
254
custom profiles
47
-Ddeduplication
646
about
632
custodian-level vs. case-level
custodians
637
Duplicate Viewer
654
278
e-mail vs. electronic documents
643
fields
643
file type filtering
643
import settings
278
Inter-Case Deduplication Utiliity
632
keys MD5 and SHA-1
643
log options
643
methods
654
re-establishing a connection
632
reports
637
resetting log and record flags
637
scope
643
settings
637
statistics
637
status of case
654
deleting
cases
213
documents
402
fields
239
folder restructuring
402
folders
230
images
402
index profiles
249
pages
402
deleting a case
217
deleting subfolders
403
deskewing scans
344
despeckle scans
344
dictionary
exporting
474
distributed batch processing
608
candidate processes
602
joining
602
starting
602
distributed ED Loader
325
DocID seed
numbering
495
setting on import
254
Doculex
export format
658
importing
366
DocuMatrix
export settings
679
document breaks
336
Document Timeline
195
documents
annotating
416
attachment numbering
495
© 2015 LexisNexis
Index
documents
attachments
414
batch processing
536
batch updates
504
Bates numbers
495
coding
492
converting to TIFF post-import
296
deleting
402
endorsing headers/footers
552
filtering in grids
448
grouping in grids
450, 457
inserting
408
inserting e-documents
426
merging
407
moving
399
numbering
495
OCR
528
OCR flagging
521
OCR status
519
replacing
411
searching
469
splitting
404
tagging
511
Duplicate Viewer
654
-EEarly Data Analyzer
cases
68
configuring filters
99
environment configuration
64
exceptions
179
exporting to ED Analyzer
186
importing sources
91
managing cases
171
performing OCR
132
reports
195
searching
139
startup
64
tagging
124
ED Loader
archives
273
assigning custodians
254
cancelling and resuming sessions
compound documents
275
deduplication
278
distributed
325
distributed processing
288
© 2015 LexisNexis
323
e-mail
280
exclusions
283
File Type Summary
267
file types
285
general settings
288
identifying languages in content
298
metadata extraction
298
metadata settings
291
NIST filter
292
Office properties
291
output settings
295
post-import actions
296
quality control Session Log
303
session configuration
254
session defaults
301
Session Viewer
304
specifying sources
262
Summary Reports
310
text extraction
298
time zone settings
288
editing
list fields
246
EDrawings
579
EDRM XML
export settings
680, 682
importing
366
Unicode export format
755
e-mail
import settings
280
opening
423
Preserve X.400 addresses
280
embedded grid
description
435
embedded grids
batch updates
504
creating control lists
464
filtering search results
448
grid profiles
452
grouping search results
450
sorting search results
457
empty scanner
362
endorsements
adding
552
batch processing
552
header and footer options
552
page counts
552
page numbers
552
PageID
552
773
774
LAW PreDiscovery
endorsements
removing
552
watermark during
559
E-Print
supported file types
579
E-Print/TIFF conversion
Excel settings
585
HTML settings
588
Image Printer settings
590
Microsoft Project settings
594
passwords
582
PDF settings
584
PowerPoint settings
592
Word settings
596
E-Print/TIFF/PDF conversion
output settings
572
ErrorMsg field
303
estimating page counts
420
Excel
E-Print/TIFF conversion
585
importing
262
page counts
420
Exception Report
195
exclusions
import
283
ExperVision OpenRTK
OCR options
523
searchable PDF addin
532
Export Exclusion Log
195
Export Inclusion Log
195
export path
704
export profiles
717
Export Report
195
Export Utility
overview
658
exporting
755
CaseLogistix
670
CaseMap
671
checking for blanks
716
checking for duplicates
716
Concordance
673, 677
Concordance DCB
675
delimited text
677
delimited Unicode text
755
dictionary
474
DocuMatrix
679
Early Data Analyzer
186
EDRM XML 1.0
680
EDRM XML 2.0
682
e-mail threads
720
export path
704
export profiles
717
Export Utility
658
field lists
717
fields
701
file and text format options
663
file naming scheme
704
filtering native files
713
full-text options
663
ICONECT 683
image file options
663
image format considerations
658
InMagic DB/TextWorks
685
Introspect eCM
686
IPRO IntelliView
688
JFS Litigator's Notebook
690
list fields
246
load files
658
naming output files
704
OCR options
523
omit text for tagged documents
663
page markers in text
663
PDF
692
Ringtail
693
Sanction
700
StormViewer
696
Summation
697
to CD or other media
711
TrialDirector
700
Unicode
755
extended properties
determining if a field is an extended property
237
extracting with ED Loader
291
in Access-based cases
469
external deduplication database
646
-Ffields
about
237
coding documents
492
create new
241
deduplication
643
descriptions
731
endorsement based on values
552
© 2015 LexisNexis
Index
fields
ErrorMsg
303
example searches
472
Export Profiles
717
export-specific
704
extended property import settings
flagging to omit text export
663
grid profiles
452
how created
237
index profiles
249
List Field Editor
246
list fields
246
OCR
521
OCR results
528
on separator pages
598
searching
469
support in load files
658
table membership
237
Tag (Boolean)
509
TextXStatus
303
types and properties
239
types of fields
237
Unicode in field names
755
viewing in grids
435
viewing order
249
visibility
249
file export formats
658
file properties
393
file type import filter
285
File Type Summary report
195
Filter Summary report
195
filtering grid views
448
folders
auto-creating
230
barcode break sheets
336
creating
230
deleting
230, 402
image archive folder
230
modifying
230
moving
399
target for importing
254
view options
230
footers
add
552
on separater pages
598
remove
552
full text search
basic queries
469
© 2015 LexisNexis
291
basic search in Early Data Analyzer
142
in Early Data Analyzer
142
Query Builder options
474
full-text indexing
compacting index in Early Data Analyzer
168
post-import
296
rebuilding index in Early Data Analyzer
168
-Ggrid profiles
452
grids
attachment fields
438
creating control lists
464
customizing rows, columns and cells
457
customizing views
438
display imported documents
296
embedded
435
filtering search results
448
grid profiles
452
grouping search results
450
numbering
495
sorting search results
457
standalone
435
viewing or hiding fields and extended properties
438
viewing Unicode
755
-Hheaders
add
552
on separator pages
598
remove
552
hole removal
344
hotkeys
for tagging
511
listing of 756
HTML
e-mail
280
E-Print/TIFF conversion
588
OCR options
523
printing
579
Web page counts
420
775
776
LAW PreDiscovery
-IiCONECT
export settings
683
image archive folder
230
image path
213
images
annotating
416
barcode breaks sheets
336
batch printing options
564
cleanup
396
deleting
402
importing
376
in e-mail
280
inserting
408
inserting after scanning
362
merging
407
moving
399
preventing black-borders on scan
342
replacing
411
replacing images
382
splitting
404
text extraction quality control
321
viewing
384
viewing properties
393
imaging options
348
importing
adding sources
262
archives
273
cancelling and resuming
323
cases
366
character encoding and
508
compound documents
275
custodian lists
254
deduplication
278
delimited text files
508
distributed among clients
288
Doculex Imagebase
366
documents with multiple languages
298
EDRM XML
366
elapsed time of session
304
e-mail
280
e-mail formats
314
e-mail threads
314
excluding files by type
292
exclusions for
283
extracted text
298
File Type Summary
267
file types
285
general settings
288
hidden text
291, 298
linking to source files
366
list fields
246
load files
366
locked files
321
metadata
298
metadata from Office and image files
missing text
321
NIST filter
292
Opticon
366
output settings
295
post-import
296
quality control
321
raw images
376
replacement images
382
session configuration
254
Session Viewer
304
single-page images
366
source queue
265
source types
262
Summary Reports
310
Summation
366
tag lists
515
time zone settings
288
tracked changes
291
Unicode
755
XML
366
Z-Print load files
366
incremental numbering syntax
503
InMagic DB/TextWorks
export settings
685
inserting
documents
408
images
408
pages
408
inserting attachments
319
Inter-Case Deduplication
646
Introspect eCM
export settings
686
IPRO IntelliView
export settings
688
291
-JJFS
658
© 2015 LexisNexis
Index
JFS export format
658
JFS Litigator's Notebook
export settings
690
JPG files and text import
321
-Kkeyboard shortcuts
756
-LLanguage Identification Summary
195
language recognition
298
LAW Management Console
608
LAW PreDiscovery
adding documents
30
basic navigation
21
configuring a scanner
30
folder view
22
grid basics
29
image view
25
main user interface
20
opening native files
27
text view
26
viewing metadata
28
LAW PreDiscovery overview
9
LexisNexis contact information
759
license server
47
licensing
capabilities listed by UI element
725
capabilities of each type
32
dongle
36
evaluation version
59
LexisNexis sales
759
scanner drivers
59
undocked keys
36
Z-Print undocked keys
36
list fields
246
list files
246
LMC
Auto Restart Client
628
cancel a distributed process
615
connecting to SQL Server
609
icon in notification area
609
LAW instance location
628
LMC logs
615
manage unresponsive clients
615
© 2015 LexisNexis
monitor operations
615
opening
609
overview
608
remove a client
615
requirements
608
starting
609
supported tasks
608
System Idle Timeout
628
UDP Port
628
load files
CD volume notation
366
Concordance
658
Concordance DCB
658
Doculex
658
export formats
658
field support
658
file extensions
658
image directory notation
366
importing
366
JFS
658
native file support
658
OCR support
658
Summation page numbering
366
LOCALHOST 47
logs
LAW Management Console (LMC)
Lotus Notes
importing
314
Lotus Notes Meeting
317
615
-MMagnetic Ink Character Recognition (MICR)
MBOX
importing
262
MBOX e-mail
import on 64 bit machines
314
importing
314
merging
documents
407
images
407
pages
407
merging annotations
416
metadata
export option
658
extracting
285
in ED Loader Session Viewer
304
lost after inserting attachments
319
523
777
778
LAW PreDiscovery
metadata
lost when merging
407
options when splitting documents
404
PDF export settings
692
Unicode
755
viewing in grids
435
Microsoft Project
E-Print/TIFF conversion
594
mirrored folder output scheme
295
missing text
321
Modify Fields
239
moving documents, pages, and folders
399
-Nnative files
bulk converting to TIFF/PDF
572
converting a document to PDF
431
converting a document to TIFF
428
opening
423
NIST (NSRL) filter
292
No Image Available
385
noise removal
344
noise words
474
in Early Data Analyzer
139
NSRL
292
numbering
503
Australian
495
batch process
495
incremental
503
manual
495
PageIDs
495
pages and documents
495
renumbering after deletions
402
Ringtail
495
rolling numeric sections
495
seed values
495
syntax
503
-OOCR
batch processing
519
Bates numbering
523
CJK language support
523
deleting text
402
factors affecting accuracy
519
flagging documents and pages
Greek language support
523
hidden text
523
in Early Data Analyzer
132
load file support
658
OCR field values
521
OCR flag field
521
OCR status field
521
options
523
overview
519
page markers
523
page regions
528
PDF/A options
523
performance
523
print quality
523
receipts
523
searchable PDF
532
selected pages
528
send results to a field
528
settings in law50.ini
523
single documents
528
smart text
523
status
519
text priority
663
Unicode
755
Word options
523
opening native files
423
optical character recognition (OCR)
Outlook
creating files from a grid
467
import settings
280
importing
314
page counts
420
Outlook Express
importing
314
Outlook messages (*.msg)
467
521
519
-Ppage counts
estimating
420
programs that support
420
page counts, applications that support
PageID
endorsing
552
numbering
495
retaining when merging
407
pages
421
© 2015 LexisNexis
Index
pages
annotating
416
auto-numbering
503
batch processing
536
batch updates
504
cleanup
396
deleting
402
deleting PDF pages
402
endorsing headers/footers
552
filtering in grids
448
grouping in grids
450
incremental numbering syntax
503
inserting
408
merging
407
moving
399
numbering
495
OCR
528
OCR flagging
521
OCR status
519
replacing
411
searching
469
sorting in grids
457
splitting
404
tagging
511
password for Profile Manager
47
passwords
passwords-protected files in EDA
68
passwords-protected files in LAW
582
PDF
batch processing
572
conversion
572
deleting pages not supported
402
E-Print/TIFF conversion
584
export settings
692
missing text post-import
321
OCR options
523
passwords E-Print/TIFF conversion
582
scan output
348
searchable
532
single document conversion
431
performance
language identification during import
298
text extraction during import
298
post-import
deduplication
637
extracting missing text
321
full-text indexing
296
inserting attachments
319
© 2015 LexisNexis
quality control
303
TIFF conversion
296
PowerPoint
E-Print/TIFF conversion
592
prefiltering
configuration
64
Early Data Analyzer cases
68
exporting culled documents
186
filtering
99
Global Dashboard
171
identifying sources
91
overview
61
reports
195
reviewing exceptions
179
startup
64
printing
Excel
585
file types
579
HTML
588
image batches
564
Image Printer
590
Microsoft Project
594
PDF
584
PowerPoint
592
Unicode
755
watermarks
559
Word
596
Profile Manager
administrative mode
47
profiles
47
Project
E-Print/TIFF conversion
594
Project Administration
226
PST files
creating from a grid
467
-Qquality control
attachment validation
414
deduplication methods
654
Duplicate Viewer
654
ED Loader Session Log
303
E-Print/TIFF/PDF conversion
572
exporting blanks and duplicates
716
image text extraction
321
images
396
importing compound documents
319
779
780
LAW PreDiscovery
quality control
importing locked files
321
importing PDF
321
missing text post-import
321
pages
396
post-import actions
303
scan options
344
Query Builder
advanced queries
474
basic queries
469
full-text options
474
saved searches
483
querying
example field-based queries
472
fields
469
full-text
474
saving queries
483
Quick View Plus
423
-Rraw image import
376
RDS
292
receipts
523
records
batch processing
536
batch updates
504
filtering in grids
448
grouping in grids
450
searching
469
sorting in grids
457
tagging
511
redacting
416
relative folder output scheme
295
release notes
12
replacing documents and pages
411
report logos
267
reports
ED Loader Session
304
ED Loader Summary
310
File Type Summary
267
full text reports
474
Verify Duplication Log
637
reports-Early Data Analyzer
Document Timeline
195
Exception Report
195
Export Exclusion Log
195
Export Inclusion Log
195
Export Report
195
File Type Summary report
195
Filter Summary report
195
Language Identification Summary
Search Report
195
Top 25 File Types report
195
resetting
Profile Manager
47
RFC-822 messages (*.eml)
467
Ringtail
export settings
693
numbering
495
195
-SSanction
export settings
700
saved searches
483
scanners
342
model-specific options
342
selection and drivers
333
settings
342
scanning
adjusting scan brightness
342
appending pages
362
barcode preparation
336
creating scan profiles
351
deleting scan profiles
351
extracting barcodes
336
general settings
362
image replacements
411
imaging options
348
numbering during scanning
495
options
344
page cleanup
396
preparing to scan
335
preventing black borders
342
replacing documents and pages
411
replacing pages
362
Scan Toolbar
351
search full-text
474
search history
469, 474
Search Report
195
search results
filtering in grids
448
grouping in grids
450
sorting in grids
457
searchable PDF
532
© 2015 LexisNexis
Index
searching
139
about in Early Data Analyzer
139
creating queries
469
editing saved queries
483
full text searching
474
noise words
474
noise words in Early Data Analyzer
139
operators
469
operators in Early Data Analyzer
162
running saved queries
483
running searches in Early Data Analyzer
142
saving queries
483
saving search hits
474
separator pages
598
shortcuts
keyboard
756
sorting grid views
457
sorting records
457
source queue, source options
266
splitting documents
404
SQL Server
case database
209
LAW Management Console (LMC)
609
standalone grids
batch updates
504
creating control lists
464
creating Outlook files
467
customizing rows, columns and cells
457
filtering search results
448
grid profiles
452
grouping search results
450
opening
435
sorting search results
457
storage level
grid profiles
452
index profiles
249
saved searches
483
StormViewer
export settings
696
Summation
export settings
697
exporting @EDOC tokens in e-mail
697
-Ttag lists
515
tagging
creating fields
© 2015 LexisNexis
509
Early Data Analyzer
124
records
511
search hits
474
tag lists
515
text extraction
during import
298
finding hidden text
298
language recognition
298
text priority
export options
663
TextWorks
export settings
685
TIFF
archive folder
230
batch processing
572
conversion
572
converting documents post-import
page count accuracy
420
scan output
348
scanning to TIFF
342
single document conversion
428
viewing
384
Top 25 File Types report
195
TrialDirector
export settings
700
-Uundocked keys
36
Unicode
export options
663
exporting delimited text
677
in EDRM XML exports
680, 682
language pack requirement
755
summary of support
755
USB keys
36
UTF-8 to ANSI export option
663
-Vviewing
file properties
393
images
384
VoloView Express
579
296
781
782
LAW PreDiscovery
-Wwatermarks
applying
559
applying to reports
310
batch process
559
not removable
559
what's new
12
Word
E-Print/TIFF conversion
596
OCR options
523
printing Unicode text
755
-XX.400 addresses
280
Xerox TextBridge OCR
523
XML
case template file format
220
CaseLogistix export format
658
DocuMatrix export format
679
exporting EDRM XML 1.0
680
exporting EDRM XML 2.0
682
importing EDRM XML
366
modifying the #Default.xml file
220
Unicode export format
755
Unicode in exports
680, 682
-ZZ-Print
and attachments
414
and ZIP files
579
importing
366
undocked keys
36
© 2015 LexisNexis