1
Escan Technologies Corporation®
™
Exeba® Smart-COMM
UserGuide
Smart Card Reader/Writer Software
Escan Technologies Corp®
12140 Severn Way
Riverside, CA 92503
Phone (951) 270-0043 • Fax (951) 304-1267
ESCAN TECHNOLOGIES CORPORATION
Exeba® Smart-COMM™ User Guide
This documentation has been written by Escan Technologies Corp. No part of this publication
may be reproduced or distributed in any form or by any means without the prior written
permission of Escan Technologies Corp.
We welcome your suggestions and comments regarding improvements to Exeba® SMARTCOMM or this manual. Changes will be incorporated in the new editions of this manual and in
new versions of Exeba® SMART-COMM. Escan Technologies Corp. reserves the right to make
improvements or changes to this product at any time without notice.
While every reasonable precaution has been taken in the preparation of this manual and
software, Escan Technologies Corp. assumes no responsibility or liability of any kind for errors or
omissions, or for the consequences of such errors. Exeba® SMART-COMM is provided “as is”
without warranty of any kind. The entire risk as to the quality and performance of Exeba®
SMART-COMM is on the user.
This documentation was last updated for Version 8.0 of Exeba® SMART-COMM.
Document Revision: 8.0.0
Serial Number
2
License Agreement
This license agreement is your proof of license. Please treat it as valuable property.
This is an agreement between you (either individual or entity), the end user, and Escan
Technologies Corp. If you do not agree to the terms of this agreement, promptly return the disk
package and accompanying items (including written materials and binders or other containers) to
the place you obtained them for a full refund.
GRANT OF LICENSE. This License Agreement permits you to use one copy of the specified
version of the Exeba®-COMM™ software product identified above ("SOFTWARE") on any single
computer, provided the SOFTWARE is in use only on one computer at any time. If you have
multiple Licenses for the SOFTWARE, then at any time you may have as many copies of the
SOFTWARE in use as you have Licenses. The SOFTWARE is "in use" on computer when it is
loaded into the temporary memory (i.e. RAM) or installed into the permanent memory (e.g. hard
disk, CD-ROM, or other storage device) of that computer, except that a copy installed on a
network server for the sole purpose of distribution to other computers is not "in use". If the
anticipated number of users of the SOFTWARE will exceed the number of applicable Licenses,
then you must have a reasonable mechanism or process in place to assure that the number of
persons using the SOFTWARE concurrently does not exceed the number of Licenses. If the
SOFTWARE is permanently installed on the hard disk or other storage device of a computer
(other than a network server) and one person uses that computer more than 80% of the time it is
in use, then that person may also use the SOFTWARE on the portable or home computer.
COPYRIGHT. The SOFTWARE is owned by Escan Technologies Corp. or its suppliers and is
protected by United States copyright laws and International treaty provisions. Therefore, you
must treat the SOFTWARE like any other copyrighted material (e.g. book or musical recording)
except that you may either (a) make one copy of the SOFTWARE solely for backup or archival
purposes, or (b) transfer the SOFTWARE to a single hard disk provided you keep the original
solely for backup or archival purposes. You may not copy the written materials accompanying
the SOFTWARE.
OTHER RESTRICTIONS. This Exeba® SMART-COMM™ License Agreement is your proof of
license to exercise the rights granted herein and must be retained by you. You may not rent or
lease the SOFTWARE, but you may transfer your rights under this Exeba®-COMM™ License
Agreement on a permanent basis provided you transfer this License Agreement, the
SOFTWARE, and all accompanying written materials and retain no copies and the recipient
agrees to the terms of this Agreement. You may not reverse engineering, decompile, or
disassemble the SOFTWARE. Any transfer of the SOFTWARE must include the most recent
update and all prior versions.
DUAL MEDIA SOFTWARE. If the SOFTWARE package contains both 3.5-inch disks and CDROM, then you must use only the media appropriate for your single designated computer or
network server. You must not use the other media on another computer or computer networks,
or loan, rent, lease, or transfer them to another user except as part of a transfer or other use as
expressly permitted by this Exeba® SMART-COMM™ License Agreement.
LIMITED WARRANTY. Escan Technologies Corp. warrants that (a) the SOFTWARE will perform
substantially in accordance with the accompanying written materials for a period of thirty (30)
days from the date of receipt; and (b) any hardware accompanying the SOFTWARE will be free
from defects in materials and workmanship under normal use and service for a period of one (1)
year from the date of receipt. Any implied warranties on the SOFTWARE and hardware are
3
limited to thirty (30) days and one (1) year, respectively. Some states do not allow limitations on
duration of an implied warranty, so the above limitation may not apply to you.
CUSTOMER REMEDIES. Escan Technologies Corp.'s entire liability and your exclusive remedy
shall be, at Escan Technologies Corp.'s option, either (a) return of the price paid or (b) repair or
replacement of the SOFTWARE or hardware that does not meet Escan Technologies Corp.'s
Limited Warranty and that is returned to Escan Technologies Corp. with a copy of your receipt.
This limited warranty is void if failure of the SOFTWARE or hardware had resulted from accident,
abuse, or misapplication. Any replacement SOFTWARE will be warranted for the remainder of
the original warranty period or thirty (30) days, whichever is longer. Neither these remedies nor
any product support services offered by Escan Technologies Corp. are available for this U.S.A.
version product outside of the United States of America.
NO OTHER WARRANTIES. Escan Technologies Corp. Disclaims all other warranties, either
express or implied, including but not limited to implied warranties of merchantability and fitness
for a particular purpose, with respect to the SOFTWARE, the accompanying written materials,
and any accompanying hardware. This limited warranty gives you specific legal rights. You may
have others, which may vary from state to state.
NO LIABILITY FOR CONSEQUENTIAL DAMAGES. In no event shall Escan Technologies Corp.
or its suppliers be liable for any damages whatsoever (including, without limitation, damages for
loss of business profits, business interruption, loss of business information, or other pecuniary
loss) arising out of the use of or inability to use this Escan Technologies Corp. product, even if
Escan Technologies Corp. has been advised of the possibility of such damages. Because some
states do not allow the exclusion or limitation of liability for consequential damages, the above
limitation may not apply to you.
U.S. GOVERNMENT RESTRICTED RIGHTS
This SOFTWARE and documentation are provided with RESTRICTED RIGHTS.
Use,
duplication, or disclosure by the Government is subject to restrictions as set forth in subparagraph
(c)(1)(ii) of the Rights in Technical Data and Computer Software clause at DFARS 252.227-7013
or subparagraphs (c)(1) and (2) of the Commercial Computer Software--Restricted Rights at 48
CFR 52-227-19, as applicable.
This Agreement is governed by the laws of the State of California.
COPYRIGHT
Information in this document is subject to change without notice and does not represent a
commitment on the part of Escan Technologies Corp. The software described in this document is
subject to the license agreement that is included with Exeba®-COMM™, in whole or in part, in
print, or in any other storage and retrieval system is prohibited. No part of this publication may be
reproduced, transmitted, transcribed, stored in a retrieval system, or translated into any language
in any form by any means for any purpose other the purchaser's personal use without express
written permission of Escan Technologies Corp
Copyright 2009 Escan Technologies Corp. All rights reserved.
Printed in the United States of America.
This manual was produced using Microsoft Word for Windows.
TRADEMARKS
Exeba® and the Exeba® logo are registered trademarks of Escan Technologies Corporation.
Escan Technologies Corp® and the Escan Technologies Corp® logo are registered trademarks
of Escan Technologies Corporation.
4
Microsoft and Windows are registered trademarks of Microsoft Corporation.
Visual Basic is registered trademark of Microsoft Corporation.
True DBGrid is registered trademark of Apex Software Corporation.
Crystal Reports is registered trademark of Seagate Crystal Reports.
5
Table of Contents
License Agreement.......................................................................................................................... 3
Introduction ...................................................................................................................................... 7
Exeba SMART-COMM Features ..................................................................................................... 8
Installing Exeba® Smart-COMM™.................................................................................................. 9
Hardware Switch Window.............................................................................................................. 10
UNLOCK (Register) the Software.................................................................................................. 11
Getting Started............................................................................................................................... 13
Main Window ................................................................................................................................. 14
Quick Start ..................................................................................................................................... 16
Setup Menu ................................................................................................................................... 17
General Settings ............................................................................................................................ 18
Exit Program .................................................................................................................................. 19
Device Menu.................................................................................................................................. 20
Re-Connect.................................................................................................................................... 21
Device Settings.............................................................................................................................. 22
Card read/write .............................................................................................................................. 23
Card Type Menu ............................................................................................................................ 24
Predefined Applications................................................................................................................. 25
General Application ....................................................................................................................... 26
Member Application....................................................................................................................... 27
Health Application.......................................................................................................................... 28
Loyalty Application......................................................................................................................... 29
Custom Applications...................................................................................................................... 30
Custom Application Fields ............................................................................................................. 31
Custom Field Descriptions............................................................................................................. 32
Applications Window ..................................................................................................................... 35
Search for a Record ...................................................................................................................... 37
Database Menu ............................................................................................................................. 38
Open Current Database ................................................................................................................ 39
Open Existing Database................................................................................................................ 40
Open Default Database ................................................................................................................. 42
Set Database Password ................................................................................................................ 43
Clear a Password .......................................................................................................................... 45
File Menu ....................................................................................................................................... 47
Create a Report ............................................................................................................................. 48
Import Records .............................................................................................................................. 50
Export Records .............................................................................................................................. 52
Tools Menu .................................................................................................................................... 54
Compact & Repair Database......................................................................................................... 55
Switch Application.......................................................................................................................... 56
Switch Hardware............................................................................................................................ 57
Product Support............................................................................................................................. 58
6
Chapter 1
Introduction
Welcome to Exeba® SMART-COMM, a powerful Smart Card Reader/Writer software designed to
work with the hardware offered by Escan Technologies and Incode Corp. It supports different
types of smart memory cards. It runs under Windows operating systems: Me, NT, 2000, XP and
Vista. It is affordable and user-friendly. It includes a comprehensive user manual and on-line
help.
In this chapter you will learn,
About Exeba® SMART-COMM main features
How to install the software
How to unlock the software
About the hardware switch window
7
Exeba SMART-COMM Features
In general, Exeba® SMART- COMM™ has the following features:
Developed for Windows Me / 2000 / NT / XP / Vista
Provides a single menu to install software, install drivers, view documentation and link to our
web site.
Provides detailed on-line help and documentation.
Easily switch between the different hardware types and application types without exiting the
software.
Obtain reader and card features.
Saves data in a database/text file.
Provides database security by setting a password.
Select between 13 different card applications (predefined and custom).
Its read/Write window provides user the flexibility to read and write any data to the smart
card.
Allows user to set a default application for quick access.
Allows user to select between a few software startup options.
Auto connects to smart card readers on startup.
Select between 4 different types of predefined applications and these are:
General Card application which contains standard fields such as ID, name, address…
Member Card application which can be used for gym memberships…
Health card application which can be used in healthcare for quickly identifying patients…
Loyalty card application for tracking loyal customers’ purchases…
Select between 9 different custom applications. For this category of applications you can:
Select from the predefined layout
Enter a name and description
Customize the fields’ name
Whether you select a predefined application or a custom application, you will be able to access
the following features:
Save, update, and delete records in the database
Write data from the database into the card
Read data from the card directly into the application
Move to a previous, next, or any record number
Search for a record by entering a criterion
View card type
Set a PIN# on the card
Import data from a text file to the application database.
Export data to a text file from the application database.
Specify the order and the fields to be included in the export/import file.
Query report data and print
Compact and repair the application database
8
Installing Exeba® Smart-COMM™
The installation program installs Exeba® Smart-COMM™ from a CD. Before you begin, ensure
that your computer meets the requirements listed below.
System Requirements
Exeba® Smart-COMM™ has the following system requirements:
An IBM PC or compatible computer
Microsoft Windows Me, 2000, XP, NT or Vista
A Pentium processor
Approximately 30 MB of available disk space
Installation
Make sure all applications are closed.
Insert the Exeba® Smart-COMM™ CD-ROM into your CD-ROM drive. The installation
program will start automatically.
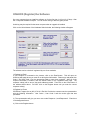
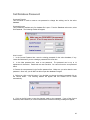
From the first screen that appears select between the English or the Spanish language by
clicking on the designated button. Then a screen with the following buttons will appear:
¾ Install Exeba SMART-COMM - Allows you to install the software on your computer.
Once you click on this button the setup program will automatically start. Follow online
instructions.
¾ Install Drivers - Installing the drivers before connecting the hardware is a must for the
hardware to work properly. Click on this button to go to the driver selection screen.
¾ View Exeba SMART-COMM Manual - Allows you to view/print this manual in PDF format
¾ Browse CD Contents - Allows you to view the files on the installation CD
¾ Register Now - Connects you to our registration web page. You should be connected to
internet to be able to use this feature.
¾ Download Acrobat Reader - Connects you to Adobe Acrobat web page to download a
free copy of Adobe to view the manual in PDF format.
¾ Contact Us - Displays our contact information.
9
Hardware Switch Window
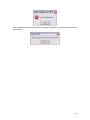
When you start Exeba® Smart-COMM™, the window below will appear. This window is used to
select the hardware you are communicating with, to UNLOCK and register the software, and to
link to the Exeba® web site.
Click on the Unlock button to unlock the software if not already unlocked.
Click on the button of the hardware connected to your computer to start working with the
software during the grace period or after you unlock the software.
Click on the Visit our Website button to automatically link to our website.
Click on the Exit button to close the software application.
10
UNLOCK (Register) the Software
On every computer that you install the software on for the first time, it will run for 15 days. After
the 15 days the software will expire. You can unlock during or after the grace period.
Unlocking may be required for the same computer when an upgrade is installed.
Click on the Unlock button of the Hardware Switch window, the following window will appear.
The software can be unlocked / registered by one of two methods:
1) Register by Email
If your computer is connected to the Internet, click on the Email button. This will open our
Unlocking web page where you must fill out all required information. Please copy and paste User
Code 1 and User Code 2 into the appropriate fields or enter them manually. After all of the
required information is entered, click the Submit button of the registration web page. The
response code(s) will be sent to the email address provided. Then click on the Close button of
the window shown above. DO NOT click on the Register button until you enter the correct
response code(s).
2) Register by Phone
Call Escan’s support line at (951) 270-1911 Ext 224. Provide the customer service representative
with the following information: User Code 1, User Code 2 and the version type that was
purchased.
3) The representative will give you one or two codes: Response 1, and Response 2. Enter them
in the designated boxes.
4) Click on the Register button.
11
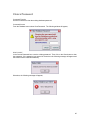
If the software registration was successful, the message “Software Unlocked Successfully!” will
appear. The software registration will fail if any of the user codes or response codes were invalid.
Verify the User Codes & Response Code(s) with the customer service representative again. Then
repeat steps 2 thru 4.
When you call, we recommended you be in front of the computer, and have the software running
with the UNLOCK screen open. However, if you cannot be in front of the computer, please have
User Code 1 and User Code 2 available.
The Unlock button of this window will be disabled once the software is unlocked successfully.
12
Chapter 2
Getting Started
You are now ready to start using Exeba® SMART-COMM. This chapter provides detailed
information about the main window features. It also provides a quick tutorial.
13
Main Window
After selecting the hardware you want to communicate with, the following window will appear:
From this window, select the desired software function(s).
Main Menu
It is located at top of the main window. From the main menus, you can access all the program’s
functions. And these menus are:
Setup – under this menu you will find commands to setup the application settings and to exit.
Device – from this menu you can access all the device menu commands such as getting
more information about the device, and connecting to it.
Card Type – the commands under this menu are all related to the type of application that you
want to create, whether it is predefined or custom.
Database – once an application is created, access commands from this menu to manipulate
the data in your application such as open the application window, and add a password.
File – once you have added data to your application, you can access the commands under
this menu to create a report, export and import data.
Tools – commands under the Tools menu allow you to compact your database, change the
application or switch to a different reader.
Help – the help menu allows you to access on-line help and to get information about the
software such as the version number.
Button Bar
It is located under the main menu. The button bar contains buttons that can be used to easily
access some of the frequently used commands in Exeba® Smart-COMM™. These buttons are:
Re-Connect – quick access to the Re-Connect command under the Device menu.
Open DB – opens an existing database, same as the menu command Open Existing
Database under the database menu.
Read/Write – this is the only access to the Read/Write function of the software. This function
allows you to read and write a card without creating an application.
Card Info – Same as the menu command Card Info under the Card Type menu.
Import – Access the Import Data command under the File menu.
Switch Hardware – Same as the menu command Switch Hardware under the Tools menu.
Card Template – Same as the Create Card Template command under the Card Type menu.
14
Exit – quickly access the exit command under the Setup menu.
Status Bar
It is located at the bottom of the main window and displays communication status messages
being used in Exeba® Smart-COMM™.
It is displayed as follows:
Status – displays any communication status with the reader
Reader – displays the name of the connected reader
15
Quick Start
If you just need to test the reader or card, then you can
¾ access the Re-connect button if the software has not established communication with the
hardware.
¾ access the Read/Write button to test the card or reader.
Before you get started with the software, select the application. There 13 different applications in
the software. Four applications are predefined (Loyalty, health, general card and members) Nine
applications are customized where you can change the name of the field and the name of the
application. Take some time to learn about the different applications as they are explained in
details in Chapter 3.
Once you decide on the application, create it and save the database file. You can setup a
password. Once created, you can manipulate your database as explained in chapter 4.
After an application is created, you can create records that can be read and written from and to
the card. Once you have data in the database, you can search for records using the advanced
search of the application, create a report of the existing records, export and import the data.
16
Chapter 3
Setup Menu
The Setup menu allows you to change the application’s main settings and to exit.
You will be introduced to the following topics,
General Settings
Exit application
17
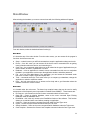
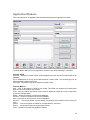
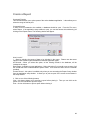
General Settings
Command Access
From the Setup main menu, select General Settings.
Command Function
This command allows you to change settings that are applied to all of the application features.
Currently there are two settings to change in the software as shown in the figure below,
Default Application
This is the location and name of the database file that the software will save as default. This will
allow you to quickly access the application that is linked to the database by clicking on Open
Default Database command under the Database menu or by automatically opening the
application on startup depending on the Software Startup Options as described below.
Software Startup Options
Once you select the hardware type from the Hardware Switch window, the software will load a
function on startup depending on your selection as follows:
None – nothing will start automatically.
Load default application window automatically – loads the default application if any was set as
default.
Load card read/write window automatically – load the Card Read/Write window.
18
Exit Program
Before you exit Exeba Smart-COMM make sure you saved your data. To exit the software use
one of the following methods:
From the Setup menu select Exit command.
Click on the Exit button of the main button bar.
From the hardware switch window click on the Exit button.
Upon exit, the software will disconnect from the reader if connected and will warn you about any
unsaved changes.
19
Chapter 4
Device Menu
This chapter describes the Device menu commands as well as the Read/Write command in
details. And these commands are:
Re-Connect
Device Settings
Read/Write Card
20
Re-Connect
Command Function
This command allows you to connect to the reader if it was connected or disconnected after the
software was launched.
Command Access
From the Device menu, select Re-Connect command. Or click on the Re-connect button from the
main button bar.
If successful, a message will appear in the status bar.
21
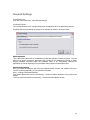
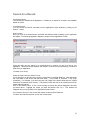
Device Settings
Command Function
The Device Settings window allows you to get additional information about the card and the
reader settings.
Command Access
From the Device menu, select Device Settings. The following window will appear,
Click on the List connected Reader to obtain the name of the reader.
Click on the Get Card Attributes button in order to obtain information about the insert card such
as type, memory, no of pins…
22
Card Read/Write
Command Function
All of the card applications in the software, defined and custom, allow you to read and write a
card based on the fields in the application. However, this window allows you to write the data
without linking it to any field. And to read the data from the card as it is stored. You may want to
use this command to test the card or read/write data quickly. It also has several other card
functions that are not available in any of the card applications.
Command Access
The only way to access this command is by clicking on the Read/Write button of the main button
bar. The following window will appear.
23
Chapter 5
Card Type Menu
The applications in the software are divided into two categories Predefined applications and
Custom applications. This chapter explains the following in detail:
What is a predefined application
How to create a predefined application
Explain each of the following predefined application card
o General Card
o Member Card
o Health Card
o Loyalty Card
What is a custom application
How to create a custom application
Sample custom application
Features common to all applications
How to search for a record
24
Predefined Applications
In the predefined application, all the fields are predefined by the software. The user is not able to
make any customization.
There are 4 types of predefined applications in this version of the software.
General Card
Member Card
Loyalty Card
Health Card
All of these applications can be access through the Card Type menu. When you first open a
predefined application, a temporary database is created. Upon closing the application, you will
be asked to save your data to the database.
Make sure you check the documentation for each application and/or create a temporary database
before you decide on the final application for your card.
25
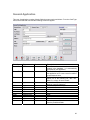
General Application
This type of application consists of basic fields that most cards would have. From the Card Type
menu, select General Card and the following screen will appear.
Field Name
Record Date
Type
Date
Size
Record Time
Time
Title
Alphanumeric
5
ID
Alphanumeric
12
SSN
First Name
Last Name
Address
City
State
Zip
Phone
Notes
Alphanumeric
Alphanumeric
Alphanumeric
Alphanumeric
Alphanumeric
Alphanumeric
Alphanumeric
Alphanumeric
Alphanumeric
11
50
50
60
20
5
10
20
65,536
Description
This is the date on which the record was
created in the database. It is automatically
generated by the application.
This field is also generated automatically by
the application once a new record is created.
It represents the time.
The title field is predefined in this application.
Select one of the following: Mr., Mrs., Ms.,
Miss, Dr., or Atty. Or leave it blank
Card holder ID, can be any combination of
alpha or numeric characters.
Card holder SSN including dashes.
Card holder first name.
Card holder last name.
Street address
City
State
Zip code
Phone#
Enter any extra information that is different
from the predefined fields.
26
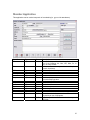
Member Application
This application can be used to keep track of membership (i.e. gym or club attendance).
Field Name
Title
Type
Alphanumeric
Size
5
ID
Alphanumeric
12
SSN
First Name
Last Name
Issue Date
Department
Alphanumeric
Alphanumeric
Alphanumeric
Alphanumeric
Alphanumeric
11
50
50
10
30
Address
City
State
Zip
Phone
Fax
Email
Stations Visited
Alphanumeric
Alphanumeric
Alphanumeric
Alphanumeric
Alphanumeric
Alphanumeric
Alphanumeric
Alphanumeric
60
20
5
10
20
20
50
65,536
Notes
Alphanumeric
65,536
Description
The title field is predefined in this application. Select
one of the following: Mr., Mrs., Ms., Miss, Dr., or
Atty. Or leave it blank.
Member’s ID, can be any combination of alpha or
numeric characters.
Member’s Social Security number.
Member’s first name.
Member’s last name.
Card issue date.
Membership department or division. Can be used
as membership type also.
Member’s street address.
Member’s city
Member’s state.
Member’s zip.
Member’s phone#.
Member’s fax#.
Member’s email.
The stations visited by the member. That could be
any activity or use of equipment.
Type in any additional information that is not part of
the fields.
27
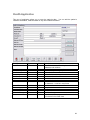
Health Application
This type of application allows you to store the patient’s data. You can add the patient’s
insurance information, medicines taken or any other related information.
Field Name
Card ID
Type
Alphanumeric
Size
5
Group#
Group Name
Subscriber ID
Subscriber Name
Member ID
Member Name
SSN
Date of Birth
Alphanumeric
Alphanumeric
Alphanumeric
Alphanumeric
Alphanumeric
Alphanumeric
Alphanumeric
Alphanumeric
30
50
30
50
30
50
15
10
Issued Date
Plan
Medicine Fill Date
Medicine
Medicine Dosage
Notes
Alphanumeric
Alphanumeric
Alphanumeric
Alphanumeric
Alphanumeric
Alphanumeric
10
30
20
50
50
65,536
Description
The card holder’s ID.
Any combination of
characters and numbers.
Card holder insurance group#.
Card holder insurance group name.
Subscriber’s ID
Subscriber’s name
Card holder’s member ID
Card holder’s name.
Card holder’s social security number.
Card holder’s date of birth. Enter a valid date of
10 characters. It can be in any format.
Card issue date.
The plan that the member is on.
Medicine name
Medicine dosage.
This field is left for any extra information that is
not included in the fields’ data.
28
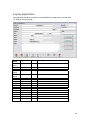
Loyalty Application
This application should be selected for loyalty applications to keep track of a stored value.
(i.e. parking, laundry, gaming…)
Field
Name
Issued
Date
Store ID
Points
First
Name
Last
Name
Age
Address
City
State
Zip
Phone
Fax
Email
Value 1
Value2
Draft
Notes
Type
Size
Description
Alphanumeric
15
Date the card was issued.
Alphanumeric
Alphanumeric
Alphanumeric
50
10
50
An ID to identify a store or location.
Total points.
Card holder’s first name.
Alphanumeric
50
Card holder’s last name.
Alphanumeric
Alphanumeric
Alphanumeric
Alphanumeric
Alphanumeric
Alphanumeric
Alphanumeric
Alphanumeric
Alphanumeric
Alphanumeric
Alphanumeric
Alphanumeric
5
60
15
2
10
20
20
20
15
10
30
65,536
Card holder’s age.
Card holder’s street address.
Card holder’s city.
Card holder’s state.
Card holder’s zip code.
Card holder’s phone#.
Card holder’s fax.
Card holder’s email.
Stored value 1.
Stored value 2.
(??)
Extra information.
29
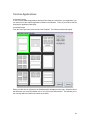
Custom Applications
Command Function
If none of the predefined applications defines all the fields you would like in your application, you
can select one of the custom applications defined in the software. To do so you need to start by
selecting the application field layout.
Command Access
From the Card Type menu select Create Card Template. The following window will appear.
When you click once on any layout, the field description will appear on the right. Select the layout
that best suits your need and double click on it or click on the Select button. This will take you to
the next step which is to define the names of the fields.
30
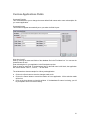
Custom Applications Fields
Command Function
This command allows you to change the name default field names and to enter a description for
you custom application.
Command Access
This window will appear automatically once you select the fields’ layout.
How does it work?
Start by entering the name and folder of the database file in the File Name box. You can use the
browse button as well.
Enter a description for your application in the Description text box.
Enter a name for each field. If the designated box for the field name is left blank, the application
will use the default “Field 1”, “Field 2”, … for the name.
The window above shows example for a library card application.
Click on the Save button to save the changes made so far.
Click on the Cancel button to cancel the creation of a new application. All the selection made
will be lost.
Click on the close button to close this window. If the database file name is missing, you will
be prompted to enter one before closing.
31
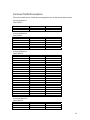
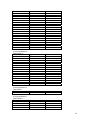
Custom Fields Description
This topic provides the list of fields that each application has, as well as their type and size.
Custom Application 1
Total Fields: 2
Field Name
Field1
Field2
Type
Alphanumeric
Alphanumeric
Size
65,536
65,536
Custom Application 2
Total Fields: 6
Field Name
Field1
Field2
Field3
Field4
Field5
Field6
Type
Alphanumeric
Alphanumeric
Alphanumeric
Alphanumeric
Alphanumeric
Alphanumeric
Size
20
20
20
10
10
65,536
Custom Application 3
Total Fields: 22
Field Name
Field1
Field2
Field3
Field4
Field5
Field6
Field7
Field8
Field9
Field10
Field11
Field12
Field13
Field14
Field15
Field16
Field17
Field18
Field19
Field20
Field21
Field22
Type
Alphanumeric
Alphanumeric
Alphanumeric
Alphanumeric
Alphanumeric
Alphanumeric
Alphanumeric
Alphanumeric
Alphanumeric
Alphanumeric
Alphanumeric
Alphanumeric
Alphanumeric
Alphanumeric
Alphanumeric
Alphanumeric
Alphanumeric
Alphanumeric
Alphanumeric
Alphanumeric
Alphanumeric
Alphanumeric
Size
20
20
20
10
10
20
20
20
10
10
20
10
10
10
10
20
10
10
10
10
20
65,536
Custom Application 4
Total Fields: 24
Field Name
Field1
Field2
Field3
Type
Alphanumeric
Alphanumeric
Alphanumeric
Size
20
20
20
32
Field4
Field5
Field6
Field7
Field8
Field9
Field10
Field11
Field12
Field13
Field14
Field15
Field16
Field17
Field18
Field19
Field20
Field21
Field22
Field23
Field24
Alphanumeric
Alphanumeric
Alphanumeric
Alphanumeric
Alphanumeric
Alphanumeric
Alphanumeric
Alphanumeric
Alphanumeric
Alphanumeric
Alphanumeric
Alphanumeric
Alphanumeric
Alphanumeric
Alphanumeric
Alphanumeric
Alphanumeric
Alphanumeric
Alphanumeric
Alphanumeric
Alphanumeric
20
20
20
20
20
20
20
20
20
20
20
20
20
20
20
20
20
20
20
20
20
Custom Application 5
Total Fields: 16
Field Name
Field1
Field2
Field3
Field4
Field5
Field6
Field7
Field8
Field9
Field10
Field11
Field12
Field13
Field14
Field15
Field16
Type
Alphanumeric
Alphanumeric
Alphanumeric
Alphanumeric
Alphanumeric
Alphanumeric
Alphanumeric
Alphanumeric
Alphanumeric
Alphanumeric
Alphanumeric
Alphanumeric
Alphanumeric
Alphanumeric
Alphanumeric
Alphanumeric
Size
20
10
20
20
20
10
10
20
20
10
10
10
20
20
65,536
65,536
Custom Application 5
Total Fields: 1
Field Name
Field1
Type
Alphanumeric
Size
65,536
Custom Application 7
Total Fields: 21
Field Name
Field1
Field2
Field3
Field4
Type
Alphanumeric
Alphanumeric
Alphanumeric
Alphanumeric
Size
20
20
20
20
33
Field5
Field6
Field7
Field8
Field9
Field10
Field11
Field12
Field13
Field14
Field15
Field16
Field17
Field18
Field19
Field20
Field21
Alphanumeric
Alphanumeric
Alphanumeric
Alphanumeric
Alphanumeric
Alphanumeric
Alphanumeric
Alphanumeric
Alphanumeric
Alphanumeric
Alphanumeric
Alphanumeric
Alphanumeric
Alphanumeric
Alphanumeric
Alphanumeric
Alphanumeric
20
10
10
20
10
10
20
10
10
20
20
20
20
20
20
65,536
65,536
Custom Application 8
Total Fields: 15
Field Name
Field1
Field2
Field3
Field4
Field5
Field6
Field7
Field8
Field9
Field10
Field11
Field12
Field13
Field14
Field15
Type
Alphanumeric
Alphanumeric
Alphanumeric
Alphanumeric
Alphanumeric
Alphanumeric
Alphanumeric
Alphanumeric
Alphanumeric
Alphanumeric
Alphanumeric
Alphanumeric
Alphanumeric
Alphanumeric
Alphanumeric
Size
20
10
20
20
20
10
10
20
20
10
10
10
20
20
65,536
Custom Application
Total Fields: 4
Field Name
Field1
Field2
Field3
Field4
Type
Alphanumeric
Alphanumeric
Alphanumeric
Alphanumeric
Size
65,536
65,536
65,536
65,536
34
Application Windows
This is an example of an application that was created using custom application #2 layout.
The fields will be different for every application. However, they all the following in command.
Common Fields
Record # - displays the record number of the displayed record as well as the total records in the
database.
Pin # - displays the pin (if any) of the card data once a card is read. You can also type in a pin
before the data is written to the card.
Card Type – displays the type of the card once a card is read.
Common Buttons
New – click on this button to create a new record. This button will change into Cancel button
when a new record creation is in process.
Save – once you read a card, create a new record or update an existing one, click on this button
to save the changes made.
Delete – deletes an existing record from the database.
Previous – moves to a previous record in the database.
Next – move to the next record in a row in the database.
Move To… - click on this button to move directly to a particular record based on the number you
enter.
Search… - click on this button to search for a record based on a criterion.
Report… - this button will open the report query window.
Close – this button will close the application window.
35
Read Card – click on this button once you are ready to read a card. This button is similar to
creating a new record but in this case the data will be coming from the card. Please insert the
card before click on this button. Also make sure the software has established communication
with the reader. If the data on the card matches the application it will appear in the designated
fields.
Write Card – click on this button to write that data that appears on the screen of the application
window to the card insert in the reader. As in the Read Card function, make sure the software is
communicating with the hardware and a card is already inserted in the reader. Please note that if
any data exists on the card it will be overwritten.
Clear Fields – this button will simply clear any data entered or read from the application window.
It will not affect the data on the card or the database.
36
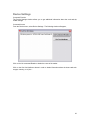
Search for a Record
Command Function
This command is available to all applications. It allows you to search for a record in the database
based on criteria.
Command Access
You can access the Search command from the application’s setup window by clicking on the
Search… button.
How it works?
Once you click on the Search button a window with different fields according to your application
will appear. The following application displays a sample custom application 2 fields.
Using this utility you can search for a record based on a criterion you set for a field in your
application. When this window appears, the Search For list box will be populated by a number of
fields from you application.
To search for a record,
Select the criteria from the Search For list.
If your criterion is of date type, then enter the correct date in the Enter Data box. Otherwise enter
the exact data or part of the data and wild cards ( * any number of character, ? any single
characters). For example, if you know only the first 3 digits of the author fields enter the 3 digits
followed by an asterisk (Such as Art*). The search function will look for all records that have an
author that start with Art
Click on the Search button. If one or more records are found, they will be displayed in the table
as shown above. Highlight the record you want and double click on it. This window will
disappear and you will go back to the Application Setup window.
If you need to start over, click on the Clear button to clear the Enter Data box.
To cancel the search at anytime, click on the Cancel button.
37
Chapter 6
Database Menu
The Database menu is used to open an existing database and to change the database password.
The commands in this menu will appear enabled or disabled according to status of the database.
In this chapter the following topic are explained in details:
Open an Existing Database
Open Current Database
Open Default Database
Set Password
Clear Password
38
Open Current Database
Command Function
This submenu command allows you to open or reopen the current application window. For
example, if you closed the current General Card application window, you can reopen it again later
by using this command.
Command Access
From the Database menu, select Open Current Database.
This command is available if the current application database is active.
39
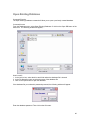
Open Existing Database
Command Function
The Open Existing Database command will allow you to open a previously created database.
Command Access
From the Database menu, select Open Existing Database. Or click on the Open DB button of the
button bar. The following window will appear,
How it works?
1. In the Look In box, select the drive and folder where the database file is located.
2. In the File Name box enter or select the name of the database file.
3. Click on the Open button to open the database.
If the database file you selected is password protected, the following window will appear.
Enter the database password. Then click on the Ok button.
40
The name of the active database file will appear at the top of the main menu and the window
linked to application database will appear. For example, if the database was created using
Loyalty card then the loyalty card application window will appear.
41
Open Default Database
Command Function
This command allows you to open the default application automatically. First, a default database
should be created in the software. A database can be created either by entering the name and
folder in the General Settings or by selecting to save a newly created application as your default
when prompted to do so by the software.
Command Access
From the Database menu, select Open Default Database.
This command is available only if no database is currently open.
42
Set Database Password
Command Function
This command is used to create a new password or change the existing one for the active
database.
Command Access
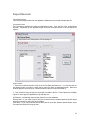
This command is available only if a database file is open. From the Database main menu, select
Set Password. The following window will appear,
How it works?
1. In the Current Password box, enter the existing password for the active database, if any.
Leave this field blank if you are creating a password for the first time.
2. In the New password box, enter a new password. The password can be up to 14
alphanumeric characters. Passwords are case sensitive. You cannot leave the new password
blank.
3. Reenter the new password in the Confirm password box. Make sure you write down the new
password. Once lost, you will NOT be able to open the database file again.
4. Before you click on the Ok button, if you decided not change the existing password click on
the Cancel button. The following window will appear and this window will be closed
automatically.
4. Click on the Ok button to save the changes made to the password. If any of the Current
Password, New Password, or Confirm Password are invalid the following message will appear,
43
If the changes were successful, the following message will appear and the window will be closed
automatically.
44
Clear a Password
Command Function
Use this command to clear the existing database password.
Command Access
From the Database menu select Clear Password. The following window will appear,
How it works?
In the Current Password box, enter the existing password. Then click on the Clear button to clear
the password. If the password you entered is correct then the following message will appear and
the window will be closed automatically.
Otherwise, the following message will appear,
45
Enter the password and try again. If you do not wish to clear the password then click on the
Cancel button. The following message will appear, and the window will be closed automatically.
46
Chapter 7
File Menu
From the File menu you can access commands to import or export data and to print reports. As
shown in the figure below.
This chapter explains in details the following submenus,
Import Card Data records
Export Card Data records
Print Card Data Reports
47
Create a Report
Command Function
This command allows you to print reports of the active database application. It also allows you to
select the range of data to print.
Command Access
In order for this command to be available, a database should be open. From the File menu,
select Report. If the application setup window is open, you can also access this window by just
clicking on the Report button. The following window will appear.
How it works?
1. Start by selecting the range of data to be included in the report. Please note that some
options in this window might be disabled for different application types.
All Records – When you select this option, all the existing records in the database, will be
included in the report.
Date Range– Available to some applications. Select this option if you would to see a report of all
the records that were created between specific dates. Then select the dates from the calendar
provided.
Current Record – this option is available only when you are accessing the Report Query window
from the application setup window. It allows you to print a report of the current record shown in
the setup window.
2. Click on one of the following buttons,
View – this button allows you to preview a report before printing it. Then you can click on the
printer icon of this window to print the report.
Print – click on this button to print a report without viewing it.
48
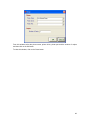
From this window select the printer name, printer driver, printer port and the number of copies
and then click on the OK button.
To close this window, click on the Close button.
49
Import Records
Command Function
This command is used to import data from a comma delimited text file to the active application
database.
Command Access
This command is available only if an application is open. From the File menu, select Import, then
select Import Records. Or click on the Import button of the button bar. Depending on the
application, a window similar to the one below will appear.
How it works?
1. Create the file to be imported while keeping the following rules in mind:
Unless the file contains only one field, all fields should be separated with commas even if field is
blank.
The records (or lines) must end with a carriage return.
The order of the fields in the file should be the same as the order of the fields in import list of the
window above.
2. In the File Name and Path box, enter the location and name of the file to import. You can also
use the browse button (…). When you click on this button the Save As standard window appears.
Select the drive, folder and name of the file to be imported.
3. Select the fields list by highlighting the field, then clicking on one of the following buttons to
add it to the import list.
Æ - adds a single field to the end of the list
Å - deletes a single field from the list
50
>> - adds all the fields to the import list
<< - deletes the import list
4. Click on the Import button to import the file. If successful a message will be displayed and the
data can be viewed in the application window, Reports, etc...
51
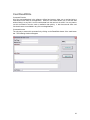
Export Records
Command Function
This command exports data from the application database into a comma delimited text file.
Command Access
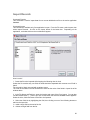
The command is available only when an application is open. From the File menu, select Export
Records. Depending on the application type and fields a window similar to the one below will
appear.
How it works?
1. Enter the location and name of the file in the File Path and Name box. You can also click on
the Browse button to locate or create the file using the Save as standard window. When this
window appears, select the drive, folder and name of the file to export the data to.
2. Then select the range of data you would like to include in the file. These options are available
options to some types of applications only and they are:
All Records – will basically export all the data in the current database.
Record Date – if you need to export only the records that were created between specific dates
select this option then select the range of dates.
Issue Date – if you only need the records that have an issue date between specific dates, select
this option and select the range of date.
52
3. If you would like the name of the fields to be the first line in the text file, then click on the
Include Header in Export File option.
4. The next step would be to select the field(s) to export and in the order required.
Export From List - This box lists all the available fields that can be exported.
Export To List - This box shows the fields that you select to export.
Field Selection
To select the fields use the following buttons.
-> - This button will add a single field to the end of the Export To List. Highlight the field in the
Export From List then click on this button.
>> - This button will move all the fields in the Export From List to the Export To List. The contents
of the Export To List will be replaced by the Export From List.
<- - To remove a field from the export list, highlight the field in the Export To List, and click on
this button.
<< - To remove all the fields from the export list, click on the Export button
Export - By clicking this button, the fields in the list box Export To List will be written to the
specified text file.
Close - Use this button to close the window and return to the main menu.
53
Chapter 6
Tools Menu
Under this menu you will find commands to compact or repair, the application database, to
change the selected application, and to change the hardware selection.
Compact & Repair Database
Switch Application
Switch Hardware
54
Compact & Repair Database
As the data in the application is updated, the size of the database file grows over time. The
Compact Database utility compacts and repairs the database, thus making it smaller in size. It
also allows all of the software functions to run more efficiently.
To compact the database, select the Tools menu, then select Compact and Repair Database.
Before you use this function, make sure all the windows in the software are closed and only a
single user is running the software.
If the database is corrupted, the Compact Database utility will attempt to repair it. Since this utility
cannot fix all the possible forms of database corruption, it is recommended to always back-up the
database files to avoid unrecoverable data loss.
55
Switch Application
Command Function
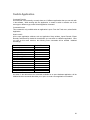
As mentioned in this manually, currently there are 13 different applications that you can work with
in the software. While working with one application, to create or switch to another one of the
same type or different type, select Switch Application command.
Command Access
This command is only available when an application is open. From the Tools menu, select Switch
Application.
How it works?
All the open application windows, such as Application Setup window, Import Records, Export
Records, and Search By should be closed before you can switch to a different application. Once
you click on this menu selection, the following menu commands will be enabled / disabled
accordingly:
Menu Command
General Card
Member Card
Health Card
Loyalty Card
Create Card Template
Open Existing Database
Open Default Database
Open Current Database
Set Password
Clear Password
Report
Export Records
Import Records
Compact & Repair Database
Enabled/Disabled
Enabled
Enabled
Enabled
Enabled
Enabled
Enabled
Enabled
Disabled
Disabled
Disabled
Disabled
Disabled
Disabled
Disabled
As shown in the table above the commands available for an open database application, will be
disabled and the commands that allow you to open or create a new application are enabled.
56
Switch Hardware
Command Function
This command is used to switch from one hardware type to another without closing the software
application.
Command Access
The Switch Hardware submenu is found under the Tools menu. You can also click on the Switch
Hardware button of the main button bar.
How it works?
When the Switch Hardware command is selected, the Hardware Switch window will appear.
Select the new hardware type by clicking on the designated button.
57
Appendix A
Product Support
A variety of resources are available to help you use Exeba® SMART-COMM™. These resources
are covered in this appendix and can be divided into the following sections:
On-line help
User Manual
Web support
Customer Support
58
On-Line Help
Exeba® SMART-COMM™ has a comprehensive on-line help system that allows you to locate
information quickly and easily. On-line help can be accessed from the Start menu. You can also
access it while working with Exeba® SMART-COMM™, by selecting Help from the main menu.
User Manual
This manual contains detailed information on how to use Exeba® SMART-COMM™. For
commands and questions related to the hardware, consult the manufacturer’s User Guide that is
included with this software purchase.
Customer Support
Escan Technologies Corp. welcomes your questions, suggestions and comments regarding
improvements to Exeba® SMART-COMM™ and this manual. Your comments can be mailed to
Escan Technologies Corp., or sent electronically via e-mail or via our World Wide Web (www)
site. If you have a bug report that requires immediate attention, please contact us as soon as
possible.
If you would like to purchase any of the hardware described in this manual, you may contact us
for the current price and availability.
In order to be eligible for technical support, you must register your version of Exeba® SMARTCOMM™ with Escan Technologies Corp. In addition to technical support, you will receive
updates regarding what is new in the upcoming versions of the software.
When reporting a problem, please include the following information:
Company
Mailing Address
Phone Number
Name/Contact Person
E-mail Address (if available)
Exeba® SMART-COMM™ Serial Number
Date of Purchase
Operating system (Windows Me, NT, 2000, XP or Vista)
Where to send your registration/correspondence:
Email Address:
[email protected]
Telephone / Fax:
Tel: (951) 270-1911 (9:00 am - 4:00 pm PST)
Fax: (951) 304-1267 (24 hours - 7 days a week)
On-line Support
As an alternative to mailing your registration, you may visit our www site. In addition to on-line
registration, comments or suggestions are posted, read about upcoming versions of Exeba®
SMART-COMM™, related software, and download up-to-date files. Our websites are at the
following addresses:
http://www.e-scan.com
http://www.exeba.com
59