1
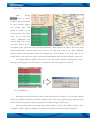
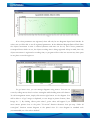
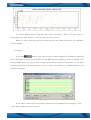
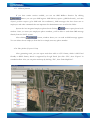
TAVL
ADVANCED USER MANUAL
v1.1.2
CONTENTS
1. INTRODUCTION ......................................................................................................................... 4
2. SYSTEM OVERVIEW ................................................................................................................. 5
2.1 THE BASICS.................................................................................................................................. 5
2.2 MAIN FUNCTIONS ........................................................................................................................ 5
3. DATA ACCUMULATION AND TRANSFER........................................................................... 7
3.1 DATA ACCUMULATION .................................................................................................................. 7
3.2 EVENTS ........................................................................................................................................ 7
3.3 DATA TRANSFER BY GPRS............................................................................................................. 7
3.4 DATA TRANSFER BY SMS ............................................................................................................... 8
4. TAVL USER APPLICATION ..................................................................................................... 9
4.1 PC REQUIREMENTS...................................................................................................................... 9
4.2 INSTALLING USER APPLICATION .................................................................................................... 9
4.2.1 Installing .NET Framework 2.0.......................................................................................... 9
4.2.2 Installing TAVL Application............................................................................................. 10
4.3 LOGIN ....................................................................................................................................... 10
4.4 USER INTERFACE ........................................................................................................................ 10
4.5 OBJECT ADMINISTRATION ........................................................................................................... 11
4.5.1 Objects .............................................................................................................................. 11
4.5.2 Track ................................................................................................................................. 12
4.5.3 Graphic Reports ............................................................................................................... 12
4.5.4 Request.............................................................................................................................. 14
4.5.5 Additional functions.......................................................................................................... 15
4.5.6 Other facilities (Export & Print) ...................................................................................... 15
4.5.7 Statistic Reports ................................................................................................................ 16
4.5.8 Geofence – FM3101 function ........................................................................................... 16
4.5.9 Geofence – TAVL function ................................................................................................ 17
4.5.10 Filtering .......................................................................................................................... 19
4.6 OPTIONS .................................................................................................................................... 20
4.7 WEB AND WAP APPLICATIONS ..................................................................................................... 21
5. CONFIGURATION .................................................................................................................... 22
5.1 EVENT CONFIGURATION ............................................................................................................. 22
5.2 MODULE CONFIGURATION ......................................................................................................... 23
5.2.1 Profiles.............................................................................................................................. 23
5.2.2 Operating Basics .............................................................................................................. 24
5.2.3 Parameter List .................................................................................................................. 25
5.3 DATA LOGGING .......................................................................................................................... 28
6. FREQUENTLY ASKED QUESTIONS (FAQ) ........................................................................ 29
7. TECHNICAL SUPPORT ........................................................................................................... 31
8. CHANGES LOG SHEET ........................................................................................................... 32
2
TAVL USER MANUAL V1.1.2
2007
This document describes TAVL telemetric moving object control system; it’s structure,
features, client application functions and using methods.
Copyright © 2007 UAB „Teltonika“.
All rights reserved. Reproduction, transfer, distribution or storage of part or all of the contents
in this document in any form without the prior written permission of Teltonika is prohibited.
3
1. Introduction
JSC Teltonika is proud to present a new telemetric solution, which integrates moving object
control tools, effective remote object data transfer, powerful logistic tool and low maintenance
expenses. Growing needs for such system and existence of cheap connection boosted system creation.
This AVL (Automatic Vehicle Location) software enables reduction of vehicles outage, delivery
time, service costs and increase of transportation efficiency. These solutions allow effectively manage
staff work, analyze results and structure conclusions.
System also enables object’s on-line tracking and detection of dishonesty, thefts etc. System can
automatically execute special tasks, such as monitoring object’s temperature, informing about events
etc.
All mentioned features and possibilities prove, that system is a perfect tool for effective
management of your transport company.
The system is good solution for companies whose success depends on transport service quality
and efficiency.
4
2. System Overview
2.1 The Basics
The module, which is installed in the object, receives GPS satellites information and calculates
its position in global coordinates system. Coordinates data is gathered in modules internal memory as
well as other object information (temperature, battery voltage, etc.) and in fixed time intervals are sent
(SMS or GPRS) to the server. The server processes that data and presents it to the user, who is
connected to the server with his PC using TAVL application.
The system embraces technical solution (installed object with connected sensors), connectivity
solution (data exchange between object and server in GPS network) and IT solution (data
accumulation, processing and accessing with TAVL user application).
2.2 Main Functions
System shows objects location on the integrated map (MS MapPoint Europe 2002 or any
other vector map).
Object coordinates and speed registration in fixed intervals (time may vary from 1 minute
to 24 hours).
Object‘ track calculation and display on the map.
Object‘s parameters registration and display on the TAVL application (temperature, fuel
in tanks, engine work time, door opening and closing, etc.)
Graphical system reports information about object.
System informs user about set parameters change (door opened, temperature dropped or
5
raised beyond specified) in real time.
GeoFence function lets you define a geographic zone, which borders crossing generate a
message that is sent to the user by SMS or e-mail.
Gathered data is sent to server by GPRS in fixed intervals (which may vary from 1
minute to 24 hours) or SMS (usually 1 to 3 times per day), considering which operators network
module is in and thus saving data sending expenses. Despite the chosen method, user can always send a
request about object‘s whereabouts and receive it by SMS.
With the help of the system user can communicate with drivers or other employees by
sending them the SMS.
6
3. Data Accumulation and Transfer
3.1 Data accumulation
There are two possibilities to acquire data: every configured time or every configured distance.
Every sampling interval Imlet is checking if the distance from last position to current position is equal
to or higher than the acquired distance. If it is so, Imlet saves the position and other data to memory. If
it is not so, Imlet is checking if the time between last saved position and current time is equal to or
higher than the sapling interval. If it is so, Imlet saves the position and other data to memory. If it is
not, waits for new data and repeats the cycle. More data saved means more precise information
displayed, but it also means that more information is sent to the server, which takes more time and
increases transfer cost.
3.2 Events
Data received from sensors is identified as passive and active. Active data can be analyzed in
real-time in module. When one of the parameters value is out of the defined range, module immediately
sends message to server. Message includes information about event, its parameters and coordinates.
Server sends message information (by SMS or e-mail) to everyone listed in the configuration list. In
cases, when object is out of GSM coverage, module waits till object reaches GSM coverage zone and
then immediately sends the message. Have in mind that when GSM connectivity is not possible and
events accumulate, module can remember only last ten. Previous events are overwritten.
Passive data is accumulated along with coordinates and both are sent periodically. When GSM
connectivity is not possible, data is written to the internal module memory. When memory limit is
reached, oldest data is overwritten. With standard settings module can keep two to three weeks old
records.
3.3 Data transfer by GPRS
GPRS is the most cost and speed-effective way to transfer accumulated data to server. When
data is transferred to server, it is deleted from modules memory to make space for new data. When
working in different operator networks, module chooses the most optimum transfer type depending on
the operators transfer costs. When module can’t transfer data by GPRS for a long time (object is
abroad or out of GSM coverage) data is accumulated till GPRS service is available. T-Box/GPS module
uses UDP protocol, which reduces sent traffic and respectively lowers data transfer cost.
7
3.4 Data transfer by SMS
As an alternative to GPRS, T-Box/GPS module can send data by SMS. Every day, at defined
time (time and number of transfers is configurable parameters) module sends SMS message with 24
coordinates, including time and speed. Other sensors data is not transferred. It is accumulated in the
memory until GPRS connection can be established and confirmation about received data is received
from server. In spite of chosen transfer type, user can always request the objects location and receive it
by SMS.
8
4. TAVL user application
4.1 PC Requirements
For the TAVL application to work properly, a computer with Internet connection is required
with installed Microsoft Windows 2000 SP3 or Windows XP SP2 operating system, .NET Framework
2.0 environment and cartographic program packet. (Akis, MS MapPoint Europe 2002, etc.).
4.2 Installing User Application
A computer should have Microsoft Windows 2000 SP3 or Windows XP SP2 operating system
and full cartographic program packet - Microsoft MapPoint 2004 or Microsoft MapPoint 2002 Europe,
MapX, which can import lots of vector maps that other packets don't have. TAVL application can
export data in KML format, which is supported by Google Earth.
.NET Framework 2.0 is needed for TAVL. If you have .NET Framework 2.0 beta or .NET
Framework 2.0 beta 2 installed, just remove it like any other program in "Add/Remove Programs"
(Start → Settings → Control Panel → Add Remove programs).
For reports you need to install the Crystal Reports, which can be downloaded from Teltonika
website
(url:
http://213.226.139.30/Downloads/tavl/Tavl%5FClient/Crystal
Reports
Runtime/CRRedist2005_x86.zip).
Depending on your computer configuration, you may need to install Windows Installer v3.0,
which
can
be
downloaded
from
Microsoft
website
after
validation
(url:
http://www.microsoft.com/downloads/details.aspx?familyid=5FBC5470-B259-4733-A914A956122E08E8&displaylang=en).
4.2.1 Installing .NET Framework 2.0
Download
.NET
Framework
2.0
from
Microsoft
website
and
install
it
(url:
http://www.microsoft.com/downloads/thankyou.aspx?familyId=0856EACB-4362-4B0D-8EDDAAB15C5E04F5&displayLang=en). If the download doesn't start automatically, click on the "Start
Download" button.
9
4.2.2 Installing TAVL Application
Download the latest T-VL version from http://www.teltonika.lt/downloads/tavl/. The file
name is tavlnetxx.zip, where xx is version number. Higher number means newer version of
application. Extract the files into any directory and launch tavl.exe.
4.3 Login
To start working, launch client’s application. Enter
your login name and password. To change server or
language, click
button and enter Server name or its IP
and choose the desired language.
4.4 User interface
TAVL user interface consists of three basic parts: TAVL toolbar, object list window, which can
include track, event and other windows if selected and map window in which objects are displayed.
10
4.5 Object Administration
4.5.1 Objects
After clicking button
in TAVL toolbar, all
objects are indicated in the map. If the object doesn’t move,
it’s shown as a red point. If object is moving at that
moment, it is indicated as green arrow showing movement
direction in the map.
Double-click on the object shows object name, time
and date when data was sent and speed that object was
moving at that moment. Another way to find object in the
map is to click on its name in the objects list. The map will be zoomed to show the location.
In status bar you can set time period in which information will be refreshed, or simply click
“Refresh” button.
11
4.5.2 Track
After
clicking
button in TAVL
toolbar, tracking time fields
in status window appear.
Fill
textbox
with
time
period in which you are
interested, select the object
from the list and click
“Find”. Application will
transfer data from server
and show them in the list
box bellow (time, speed and other measured parameters). There will also be object’s trail in the map,
which corresponds to list box entries (if you click on the time entry in the list, the point, indicating
object’s position and movement direction at defined time, will be shown in the map). Also, if you
double-click on the track in the map, a record will be highlighted in the box list with data at that point.
To estimate distance between two points of the track mark the points holding button “Ctrl”.
Message box will appear. You’ll be able to see information for chosen period of time in it.
4.5.3 Graphic Reports
Sometimes text data listed in the table is quite inconvenient for analysis. You can make tracking
reports that indicate parameters and their change in time. To do that, graphic reports functions have
been created. They represent registered parameters and their changes in time scale.
After generating path in the map using “Find” button, you can click “Report” button. New
“Graphics” window appears. Diagrams of parameter’s changes are shown in the picture below.
12
If no other parameters are registered, there will only be two diagrams: Speed and Altitude. In
other cases you’ll be able to see all registered parameters. In the additional diagram Driver Work Time
the objects movement in time is tracked (distance and time can be set) and if these parameters
correspond those which are set, the objects working time is being registered. Keep in mind, that only
objects movement is registered as working time, so program will not take into account any time spent
in one place even with engine on.
To get better view, you can manage diagrams using mouse. You can use
zoom by rolling mouse wheel or select rectangular while holding mouse left button.
To call management menu, simply click mouse right button on the diagram. You
will be able to “Copy” image to clipboard, or save image in picture format (“Save
Image As…”). By clicking “Show point values”, point values will appear if you
move mouse pointer close to the point. "Un-zoom" function decreases view per step. “Undo all
zoom/pan” function returns diagram to the primal view. To view diagram in standard scale
(recommended) use “Set scale to default”.
13
To connect diagram points using lines click “Line” and check √ “Show”. To show points in
other symbol type click “Symbol”. After choosing one, select it’s size.
When you select point from the list in track data box, red vertical line selects your parameter
value in diagram.
4.5.4 Request
If you click
button, „Get object location“ window appears. In the Request Type field
choose what kind of request would you like to send: SMS with 24 coordinates, one last coordinate or all
data by GPRS. When you want to send a request about object’s current location, select (√) an object
from the list and click “Request location” button. If object can connect to its GSM provider, it will
send the coordinates.
If you want to send request to the objects, which haven’t responded since last request – click
”Select object without responses” button.
14
4.5.5 Additional functions
If you have certain services enabled, you can use SMS Mailbox function. By clicking
button you can open SMS register. SMS delivery reports („SMS delivered“), real time
object’s position request („Get SMS with 24 coordinates“), SMS messages that have been sent to
employees and other commands that are important for administration are saved in this folder.
System also has integrated employee phone book. Clicking
button opens phone book
window. Once you enter your employees phone numbers, you’ll be able to send them SMS message
directly from the TAVL system.
After clicking
button, window where you can send an SMS message appears.
You can either choose employee from the list or simply enter any phone number.
4.5.6 Other facilities (Export & Print)
After generating track, you can export track data table to CSV format, which is MS Excel
friendly or KML format, which is supported by Google Earth. Just click “File”, then “Export” in
standard toolbar. Also you can print track map by clicking “File”, then “Print MapPoint”.
15
4.5.7 Statistic Reports
In the TAVL toolbar choose "Reports" and click on report type you
want to view. In the new window choose the object and time period. "Driven
Distance" and "Driven Distance Daily" produces total or daily driven road.
"Geofencing" produces statistics when object entered or left specified areas.
"Moto Hours Daily" produces engine working time and used fuel actual and
average statistics, "Fuel Tank" - refueling and used fuel statistics, also
calculates average usage for hundred kilometers. "Trip Stops" and "Trips
Stops Daily" produces a statistic about object’s idle time. "Worktime" and
"Worktime Detailed" produces objects engine working time - total for each day or detailed with starting
and ending time.
4.5.8 Geofence – FM3101 function
This function allows the user to receive a message when the object crosses defined areas
borders. It can be used to receive information when object reached its destination or left it. The
possibility lets you manage your transport even while you are away from your computer - user receives
the SMS message when his load reaches the destination.
Function is executed in FM3101 module, where coordinates are checked and, if they are in
defined area, the message is sent. Up to 8 different messages can be sent to recipients and one
quadrangle may be specified.
Right-click in the object list on the desired object and choose "Geofence". In the new window
mark the "Geofence On" field.
16
Geofence borders are defined as top left and bottom right corners of the area in the global
coordinate system. Or you can simply select area from the map defining those two points by clicking
"Select Area from Map" button.
4.5.9 Geofence – TAVL function
Defining area with configuration is devices internal function which can also be preceded by
TAVL application, only this way data will be preceded in the server. When coordinates are sent to the
server, they are proceeded using application’s algorithms. If coordinate is in specified area, messages are
sent. Note, that when FM3101 device unloads big amount of data, it send latest coordinates first, so
first message that will be sent will be informing about last event.
In the toolbar click "Tools" - "Geofencing".
"Zones" menu allows you to create new, edit or view existing zones, which can be in shape of
quadrangle, circle or polygon. To create new area, click
. Enter name, attach to the zone group
(optional) and specify coordinates by entering them in the fields or clicking
and choosing the area
in the map window. For quadrangle two corner point are required, for circle - center and radius. If you
choose the polygon, double click while selecting last point and application will automatically connect
first and last points specified.
17
When you click "Zone Groups" you will be able to attach zones to groups. This makes object
management even more easy, because you can specify groups as destination addresses, not allowed
places, checkpoints and set different messages to be sent for each group.
When you are setting Geofencing rules, you can choose which objects to monitor and specify
included zones or zone groups. Click "Warnings" and choose recipients and message sending policies.
These two are specified in Warnings menu (click "Tools" - "Warnings" - "Warning Recipients"). Also
set parameter in "Transition" field for message sending when objects enters or leaves (or both) area,
specify oldest possible warning message in "Reject State" field and set if messages require user
confirmation in "Confirmation" field.
18
If you want to view messages in TAVL
application, click "View" – "Warning Console". In the
new window
Geofence warning along with other
generated waning can be viewed. Settings, how
information should be displayed are made in "Settings"
window – click
to open it. You can define which
messages should be displayed, time interval to check for
new messages and how should they be displayed.
4.5.10 Filtering
Loading lots of objects takes more time and sometimes it can be very confusing. Filtering lets
you choose which object you want to view and hides the rest. When refreshing objects, data is sent only
19
about those that are marked, so it takes less time. In the TAVL toolbar click on "View" and "Filter". In
the new window click on desired object and click "Ok". To select all objects click "Select All" and to
deselect all objects click "Deselect All".
4.6 Options
"Options" allows you to customize TAVL applications settings. In the "View" menu choose
"Options". To change settings either choose a value from the list or enter your own.
"Stop Speed" - speed value at which the object is
treated as not moving. This is used when coordinates error
occurs and object is replaced, it should not be indicated as
changing its stopping point.
"Trace Events" - sets if passive data is displayed in
new window when its state changes or with all data in the
objects window. Interval sets the period in seconds when the
data is to be refreshed.
"Geofence" setting let you specify line colors and
width.
"Graphic Parameters" these settings define graphic
reports parameters - fonts and their sizes, symbol types and
sizes, etc. "Work Time Graphic Min Time" and "Work Time
Graphic Min Speed" define minimum time and speed values
at which object’s engine is being treated as working.
"Use IButton" lets you use IButton function.
"Map" menu defines visual parameters in the TAVL
map window. "Exclude Engine Off Points" sets object to not
moving when engine is turned off. With this parameter "Min
Distance In Track When Engine Is Off" is set in kilometers
to indicate how far object can move so it will be treated as
moving. "Min Distance In Track" sets minimum distance
from one point to another in the map. "Min Satellites In Track" specifies how many satellites should
module be using when defining its position. Note that minimum three satellites can be used, but more
means better accuracy.
"Messages Refresh Rate" rate at which data is refreshed in mailbox.
"Objects" shows last known good coordination when no GPS satellites are in view.
20
"Remember Windows Layout" saves windows layout in TAVL on exit.
It is also possible to set different symbols to
represent the object while ignition is on or fuel counters
are being used.
4.7 Web and Wap Applications
If you have certain features enabled, you can view objects in your Internet browser or with
mobile phone, which supports Wap applications. Login using your username and password and choose
one of the following - a list with numeric coordinates values and locality or one object in the integrated
map. This is a simplified version of the TAVL application that lets you see newest and most important
information anywhere you go.
21
5. Configuration
5.1 Event Configuration
Analysis and management of large data amounts, caused by large objects number is
complicated. Even more, usually critical situations need rapid response, in cases when parameters get
out of defined range. On that purpose Events function has been created. User can define desirable
parameters range (for example refrigerators temperature) and receive SMS or e-mail messages when
parameter exceeds defined range.
Select object from the object list, right-click on it and select “Configuration”.
Select page “Event Configuration”. There is a list of object’s available parameters in the field
“Available events”. Select parameter and click “Add Event” button. Selected item will appear in the
right field including the minimal and maximal values. Enter critical values in Min and Max fields. Click
„Details »“ button, to select message type (SMS or e-mail) and enter phone number (international
format) or e-mail address in “Event address” field.
As an example, we will choose ignition. Since ignition connects to the digital input, it has values
1 or 0. We will define minimum and maximum values 1 and when the ignition is on, we will receive a
notice about that. In case of temperature the analog input is used, which can measure values in certain
range (maximum input is 10V). We will set minimum value to -10° and maximum to 0° and set event to
critical, so when these values are exceeded we will immediately receive a warning. "Critical" defines the
way that message will be sent. If the box is checked, module will try to send data by GPRS and if this
will not be possible, by SMS. If event is not critical, data will be recorded to the modules memory and
sent with all other data at fixed time.
After defining range and receiver’s contacts click “Save” button. Complete “Save” action by
22
selecting “Yes” in a dialog box. After such confirmation “New” entry with all new events in
configuration list will appear. In 10 seconds system will start synchronizing configuration changes with
the module. If synchronization succeeds, “New” configuration status becomes “Active”. If
synchronizing fails configuration status is indicated as “Failed”. Synchronization may take up to 15
minutes; the message is sent to the module and configuration starts using GPRS protocol. If this is not
possible configuration is proceeded with SMS messages. To check current configuration status click
”Update from server” button.
“Event” message format:
<Entered event message>. <Object’s name>. <Parameter’s name>. <Current parameter’s
value><parameter’s units describing parameter>. L=<Least parameter’s value><parameter’s units>;
H=<Highest parameter’s value> <parameter’s units>.
5.2 Module Configuration
5.2.1 Profiles
Profile is the list of parameters that define data acquirement and sending, module connection to
server and etc. Profile is chosen depending on GSM network operator - when module connects to the
network, it checks what is the network operator and if it is working under that operator profile. If more
than one operator is detected, the one with higher priority is chosen. If detected operator is not in the
list, module is working under default profile.
In the example, Home Network profile is set to send data every 10 minutes and acquire data
every 200 meters or every 10 minutes. This profile is usually set for home networks, where GPRS
prices are cheapest.
23
Second profile is used for foreign operators and data is sent less often - from 5AM to 4PM
every half an hour.
Third profile allows data to be sent only on working days at 8AM, 9AM, 10AM, 11AM, 12PM,
1PM, 2PM, 3PM and 4PM.
5.2.2 Operating Basics
When module starts working, it is searching for GSM network operator. When any is found, it
checks if that operator is on the list. If it is not, then default profile is set. After time interval exceeds
Id=49 parameter module checks if distance is more than Id=44 (time interval between last and
24
available coordinate and distance between two coordinates). If both values satisfy the required values,
then search for new operators is proceeded again and if listed operator is found, module switches to
corresponding profile. If profile uses GPRS data transfer, context is kept until network is broken.
5.2.3 Parameter List
Acquire Interval (ID=0)
Interval in milliseconds to acquire the data. Recommended value - 600000, minimal
recommended value - 20000, Going with (depending on) parameters ID=44, ID=49.
Send GPRS Interval (ID=1)
Interval in milliseconds to send acquired data if there is GPRS connection. Minimal
recommended value - 60000.
Server (ID=4)
Server address string. Depending on server address prefix (socket or datagram), TCP or UDP
protocol will be used, i.e. datagram://10.10.10.145:2564 (for UDP/IP), socket://192.168.10.52:7896
(for TCP/IP).
Server SMS Phone Number (ID=5)
GSM number to which 24 coordinates SMS are send (international format), i.e. +37065200000
Geofence on/off (ID=11)
Geofence event of/off parameter, values true or false. Going with (depending on) parameters
ID=12, ID=13, ID=14, ID=15.
Geofence x1 (ID=12)
Geofence rectangle bottom left corner X coordinate (WGS multiplied by 107) i.e. 250830746.
Going with (depending on) parameters ID=11, ID=13, ID=14, ID=15.
Geofence y1 (ID=13)
Geofence rectangle bottom left corner Y coordinate (WGS multiplied by 107) i.e. 546828690.
Going with (depending on) parameters ID=11, ID=12, ID=14, ID=15.
25
Geofence x2 (ID=14)
Geofence rectangle upper right corner X coordinate (WGS multiplied by 107) i.e. 251830746.
Going with (depending on) parameters ID=12, ID=13, ID=11, ID=15.
Geofence y2 (ID=15)
Geofence rectangle upper right corner Y coordinate (WGS multiplied by 107) i.e. 547828690.
Going with (depending on) parameters ID=12, ID=13, ID=14, ID=11.
Geofence boarder (ID=16)
Geofence boarder thickness in WGS degree units. Value 1000 is approximately 10 meters.
Recommended value - 10000. Going with (depending on) parameters ID=11, ID=12, ID=13, ID=14,
ID=15.
SMS Times (ID=25)
List of times in minutes when SMS with 24 positions is sent. Several times are separated with
semicolons. For example 05:40;14:00 means that 5:40 and 14:00 GMT time the module will send 24
coordinates in one SMS. If there is no need to send 24 coordinates SMS, then leave this parameter
blank.
Failed Resend Count (ID=27)
Number of times to retry sending SMS messages (for example if there is no GSM coverage).
Recommended value - 10. Going with (depending on) parameter ID=28.
Failed Resend Interval (ID=28)
Interval in milliseconds between retries. Recommended value - 60000. Going with (depending
on) parameter ID=27.
Averaging Properties (ID=34)
Array (separated by comma) of virtual properties to average.
Averaging History Lengths (ID=35)
Array of sampling numbers, which are used for averaging. Read properties are averaged each
time the new value is added. Recommended value - 10.
Averaging Intervals (ID=36)
Time in milliseconds for each property sampling. Recommended value - 1000.
26
Subscribed Properties (ID=38)
Array of values indicating properties to be read and sent to server.
Trigger Properties (ID=39)
Array of values indicating properties to be observed.
Trigger Low Values (ID=40)
Array of values for low limit of observed property.
Trigger High Values (ID=41)
Array of values for high limit of observed property
Trigger Properties (ID=62)
Priorities array (limited by comma) for triggers. If priority is above normal, generated event will
be sent to server immediately. Priorities can vary from 0 (lowest) to 20 (highest). Currently used priority
values are: 10 for usual AVL data packets (normal), and 20 for events (above normal).
Acquire Distance (ID=44)
Distance in meters to acquire data. If distance is traveled, module acquires data without waiting
for acquire interval (ID=0). Minimal recommended value 200. Depending on (going with) parameters
ID=0, ID=49.
GPRS Send Week Minutes (ID=45)
Times when device should connect to GPRS and hold connection. Minimal interval allowed is
10 minutes. Settings are made with TAVL application using "Wizard" function (see chapter 5.2.1).
Operator Scan Interval (Id=46)
Interval in milliseconds to look for better operator. When GPRS connection is broken it is
searching for operators every defined time period. Recommended value - 300000.
Operator Code List (ID=48)
List of GSM providers networks codes (limited by comma) in descending priorities, which
allow GPRS connection.
Sampling interval (ID=49)
Time interval in milliseconds to check if the coordinate changed enough to acquire the data by
27
parameter Acquire distance (ID=44). Recommended value - 10000. Going with (depending on)
parameter ID=44.
5.3 Data logging
Usually it is not important to monitor events in real time, but still event logging is needed. In
such cases module is configured to read certain sensor data and send it with usual coordinates packet.
In the object list select the desired object and right-click on it and choose "Configuration".
Choose "Data" and click on the parameter. Click "Add Data" to add or "Remove Data" to remove data
from the list.
Click “Save” button to activate new configuration and then “Yes” in a dialog box. After such
confirmation “New” entry with new configuration list will appear. In 10 seconds system will start
synchronizing configuration changes with the module. If synchronization succeeds “New”
configuration status becomes “Active”.
28
6. Frequently asked questions (FAQ)
1. Why doesn't objects trail match roads that are shown in the map? What is the
accuracy of GPS?
Object trail doesn’t coincide
100
with roads shown in the maps because
80
GPS
accuracy
limited
accuracy.
depends
(geographic
on
latitude,
GPS
location
longitude),
satellites’ location and ionosphere’s
conditions.
In
perfect
conditions
(sunny weather, no clouds, in open
Probability, %
of
Horizontal
Vertical
(altitude)
60
Error
Hor.
CEP (50%) 2.9 m
95%
6.9 m
99% 10.1 m
40
20
Alt.
4.1 m
13.7 m
19.6 m
0
0
2
4
area, without skyscrapers, woods)
6
8
10
12
14
16
18
20
Distance, meters
accuracy can be about 3 – 5 meters.
Usually accuracy is estimated using statistical method CEP (Circle of Equal Probability). This
method allows us to consider, that in probability of 50%, object’s coordinates’ error does not exceed
designated values.
Otherwise, roads in the map not always are defined very precisely (especially considering
Eastern Europe). Another possibility is that new roads don’t exist in the map.
2. Why do data transfers from server to application take so long?
Duration of data transfers from server to user application depends on amount of data and
speed of Internet connectivity. While object registers many parameters very often grows data quantity.
Then transfer time for long requested period of time could be very long. So if you want to increase data
transfer time you should decrease requested data time period.
One more way to decrease data transfer time is to decrease frequency of object’s parameters
data (time T1 should be not 1 minute but 2 – 3 minutes).
3. Why it is impossible to request current object position?
In most cases you are unable to receive information about current object’s location, because
it is out of GSM coverage (is in the sea, in deep woods, etc.)
29
4. It's one or two hours since module sent its data. Why is it not refreshed?
Module is sending data to the server at fixed time. If the connection is not possible (there is no
GPRS context), the next sending will be at fixed time. Still You can send the request, and get the latest
data. Also profile may define data acquirement less often (i.e. every 10 minutes when object is not
moving) and setting allow only full packet sending.
5. Why only yesterdays data is shown?
Either module didn't sent data because it's not time to do it or it couldn't send it because of
network problems. Solution is to configure module so it sends data at desired time.
6. How can I know objects location if it is not sending data by GPRS?
You can send a request and get the SMS with 24 coordinates (see chapter 4.4.4).
7. Why is object changing its coordinates even when engine is off?
It is because of GPS accuracy. If object is standing between tall buildings or in from of the wall,
module doesn't see enough satellites to set its exact coordinates. Then each coordinate is calculated
with a slight error. Error depends on number of visible satellites. If object is standing between tall
buildings or in front of a wall it may not be enough for module to set its position correctly.
30
7. Technical support
If you encounter any problems when using our products, please contact our technical support
by writing an e-mail to [email protected] . We will be pleased to help you.
If you are interested in other products from Teltonika, please visit our website
www.teltonika.lt, where you will find our newest products.
If you are interested in product pricing or want to order our products with different antennas,
connectors or built-in programs, please contact our sales department by writing an e-mail to
[email protected] .
31
8. Changes Log Sheet
Nr.
Date
1
070207
New
version
number
1.0.1
2
070219
1.1.1
3
070413
1.1.2
Comments
Parameter description and grammar fixes.
Geofence description updated
Geofence and Options description updated, "Trips Stops"
description added
32