1
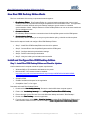
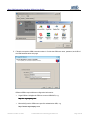
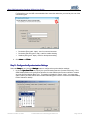
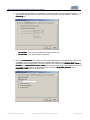
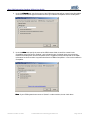
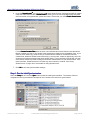
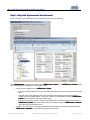
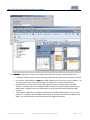
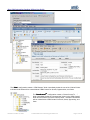
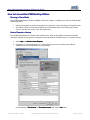
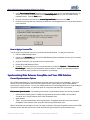
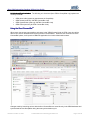
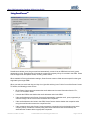
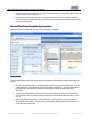
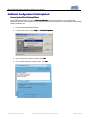
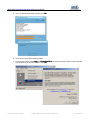
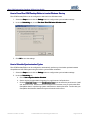
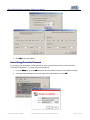
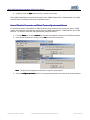
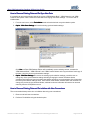
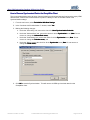
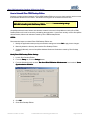
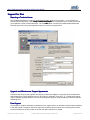
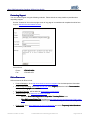
Riva CRM Integration
Desktop Edition User Guide
This Guide
Omni’s Riva CRM Integration for GroupWise - Desktop Edition provides transparent, bi-directional
synchronisation of appointments, tasks, notes and address book information between GroupWise and
SugarCRM, Microsoft Dynamics CRM, Microsoft SharePoint, SageCRM, GoldMine, Salesforce, Bluefin,
info@hand CRM and others. Opportunities, quotes and cases are synchronised to GroupWise. Users can use
the Omni ConnectBar to edit, review or delete items directly from the GroupWise client.
Use Riva to deliver a single, unified view of CRM data in GroupWise. Users enter data once in GroupWise or
their CRM interface and no longer need to manually cut and paste information from one application to
another.
Revised: October 31, 2008
© 2002-2008 Omni Technology Solutions Inc.
Page 1 of 28
Riva CRM Integration Desktop Edition User Guide
www.omni-ts.com
Table of Contents
How Riva CRM Desktop Edition Works ................................................................................ 3
Install and Configure Riva CRM Desktop Edition ................................................................. 3
Step
Step
Step
Step
Step
1
2
3
4
5
–
–
–
–
–
Install Riva CRM Desktop Edition and Check for Updates ..................................... 3
Configure the Connections ............................................................................... 4
Configure the Synchronization Settings ............................................................. 6
Run an Initial Synchronization .......................................................................... 9
Verify the Initial Synchronization was Successful .............................................. 10
How to License Riva CRM Desktop Edition ......................................................................... 13
Running in DEMO Mode .............................................................................................. 13
How to Request a License ........................................................................................... 13
How to Apply a License File .......................................................................................... 14
Synchronize Data Between GroupWise and Your CRM Solution ......................................... 14
Current Synchronization Options ................................................................................. 14
Using the Omni GroupWise Client HTML ConnectBar View ................................................ 15
Using Omni SmartConvert Drag-‘n-Drop ....................................................................... 16
Microsoft SharePoint to GroupWise Synchronization ....................................................... 17
Additional Configuration Tasks Explained ......................................................................... 18
How
How
How
How
How
How
How
How
How
to
to
to
to
to
to
to
to
to
Update Riva Desktop Edition ............................................................................ 18
Force Riva CRM Desktop Edition to Load at Windows Start-up ............................... 20
Schedule Synchronization Cycles ...................................................................... 20
Change Connection Passwords ......................................................................... 21
Rebuild a Connection and Retain Previous Synchronized Data .............................. 22
Remove Existing Data and Re-Initialize New Data ............................................... 23
Remove Existing Data and Re-Initialize New Data with New Settings ..................... 23
Permanently Remove Synchronized Data in the GroupWise Client ......................... 24
Uninstall Riva CRM Desktop Edition ................................................................... 25
Support for Riva CRM Desktop Edition ................................................................................ 27
Reporting a Technical Issue ........................................................................................
Upgrade and Support Maintenance Agreements .............................................................
Free Support .............................................................................................................
Contacting Support ....................................................................................................
Online Support ..........................................................................................................
Revised: October 31, 2008
© 2002-2008 Omni Technology Solutions Inc.
27
27
27
28
28
Page 2 of 28
Riva CRM Integration Desktop Edition User Guide
www.omni-ts.com
How Riva CRM Desktop Edition Works
Riva is a combination of three key components that work together:
1. Riva Desktop Edition: Riva Desktop Edition is a synchronization application that runs on users'
desktops. Each client synchronises a single GroupWise account and CRM account. The application
includes connection wizards and synchronization settings to permit manual or scheduled
synchronization of data. Multiple instances of Riva Desktop Edition can run on the same machine to
service multiple accounts.
2. Connection Wizards
Wizards
Riva Desktop Edition includes a connection wizard for GroupWise system and the CRM system.
3. Synchronization Settings
Riva Desktop Edition allows you to set your synchronization policy, schedule and other options.
There are five steps to install and configure Riva CRM Desktop Edition:
•
Step 1 – Install Riva CRM Desktop Edition and check for updates
•
Step 2 – Connect Riva to the GroupWise System and the CRM systen
•
Step 3 – Configure desired synchronization settings
•
Step 4 – Perform initial data synchronization
•
Step 5 – Verify the initial synchronization was successful
Install and Configure Riva CRM Desktop Edition
Step 1 – Install Riva CRM Desktop Edition and Check for Updates:
Confirm that the user's computer meets the system requirements:
•
Windows 2000 or XP workstation with latest service packs
•
Microsoft .NET 2.0 Framework must be installed:
http://www.microsoft.com/downloads/details.aspx?familyid=0856EACB-4362-4B0D-8EDDAAB15C5E04F5&displaylang=en
•
256 MB of RAM
•
50 MB of available disk space for the application
•
GroupWise client 7.0.2 or higher
Download and install Riva Desktop Edition:
1. Download the "riva
rivariva-desktopdesktop-latest.zip"
latest.zip file onto the desired Windows computer system.
2. Extract the "ri
riva
rivava-desktopdesktop-latest.zip"
latest.zip file to c:\
c:\Program Files\
Files\Omni\
Omni\RivaRiva-CRMCRM-Desktop.
Desktop
3. Place a shortcut for the “Riva.exe” file on the Windows desktop and label it “Riva Desktop”.
4. Double-click Riva Desktop to start the application.
5. From the main menu, select Help > Check for Updates to update Riva CRM Desktop Edition to the
latest available release version. Follow the steps in “How to Update Riva CRM Desktop Edition”.
Edition”
Revised: October 31, 2008
© 2002-2008 Omni Technology Solutions Inc.
Page 3 of 28
Riva CRM Integration Desktop Edition User Guide
www.omni-ts.com
Step 2 – Configure the Connections:
GroupWise Connections - To configure the GroupWise connections:
1. Select the Setup tab and click the “GroupWise Connection” configure connection link to run the
“Welcome to Riva’s GroupWise Wizard”.
2. Click Next >.
>
3. Add the GroupWise username, password, DNS name or IP address for the GroupWise 7.0.2 (or
higher) SOAP enabled Post Office that the user’s GroupWise client normally uses (leave the Port: as
7191 unless a different SOAP post value is assigned to that Post Office)..
4. Click Next> and Finish.
Finish
CRM System Connections - To configure the CRM system connections:
1. Select the Setup tab and click the “Target Connection” configure connection link to run the “CRM
Connector Wizard”.
2. Select the desired CRM system and click OK
Revised: October 31, 2008
© 2002-2008 Omni Technology Solutions Inc.
Page 4 of 28
Riva CRM Integration Desktop Edition User Guide
www.omni-ts.com
.
3. Follow the respective CRM connection wizard. Provide the CRM user name, password, and URL of
the CRM authentication web page:
Different CRMs require different configuration information:
•
SugarCRM and info@hand CRM use a normal CRM URL, e.g.
http://crm.mycompany.com
•
Microsoft Dynamics CRM uses a specific authentication URL, e.g.
http://mscrm.mycompany.com
Revised: October 31, 2008
© 2002-2008 Omni Technology Solutions Inc.
Page 5 of 28
Riva CRM Integration Desktop Edition User Guide
www.omni-ts.com
For Salesforce.com. the URLs are embedded into connection wizard so you need to pick one of the
connection types:
•
Production (Encrypted – https) – used in most environments
•
Production (Not encrypted – http) – used for trouble shooting
•
Sandbox (Encrypted – https) – used for development testing
4. Click Next> and Finish.
Finish
Step 3 – Configure the Synchroniz
Synchronization Settings:
Select the Setup tab and click the Settings button to configure the synchronization settings:.
1. Under the Sync Start Time tab, specify the synchronization start time (licensed mode only). Riva
CRM Desktop Edition will synchronize all items from the CRM that have been modified or created
since the Synchronization Start Time. This setting is disabled in “Demo” mode. You must apply
either a trial or purchase license file to enable this setting (see “How to License Riva CRM Desktop
Edition” below for details).
.
Revised: October 31, 2008
© 2002-2008 Omni Technology Solutions Inc.
Page 6 of 28
Riva CRM Integration Desktop Edition User Guide
www.omni-ts.com
2. For the initial synchronization, do not select the checkbox to "Use a Synchronization Schedule". You
can configure this after you have confirmed the synchronization is working as desired. Under the
Scheduling tab:
•
Do not select “Run Omni Riva CRM when Windows starts, and
•
Do not select “Use a Synchronization Schedule”.
3. Under the Address Books
Book tab, specify the name of the CRM address books that will be created in the
GroupWise account and indicate which type of address book objects to synchronize between
GroupWise and the CRM system. Riva will create two new contact books: <Address Book name> |
Contacts and <Address Book
Book name> | Leads.
Leads. We recommend setting the “Address Book name” field
to identify the CRM solution. In this example Riva will create a SugarCRM | Contacts and a
SugarCRM | Leads in the GroupWise client.
Revised: October 31, 2008
© 2002-2008 Omni Technology Solutions Inc.
Page 7 of 28
Riva CRM Integration Desktop Edition User Guide
www.omni-ts.com
4. Under the Calendar tab, specify the name of the CRM calendar that will be created in the GroupWise
account and indicate the type of calendar items to sync between GroupWise and the CRM system.
5. Under the Other tab, specify the name of the CRM content folder that will be created in the
GroupWise account under the “Cabinet” and indicate the type of calendar items to synchronize
between the CRM system and the GroupWise client. Supported modules will depend on the CRM.
Information for these modules is synchronized from the CRM to GroupWise. It can not be modified in
GroupWise.
Note: If your CRM system does not use a “Quotes” or other modules, do not check them.
Revised: October 31, 2008
© 2002-2008 Omni Technology Solutions Inc.
Page 8 of 28
Riva CRM Integration Desktop Edition User Guide
www.omni-ts.com
TM
6. Under the SmartConvertTM tab, specify the name of the Smart Convert child folder that will be created
TM
inside the CRM Content folder. SmartConvert allows you to convert GroupWise emails into CRM
archived emails, new opportunities, quotes and cases. Ensure that you check Enable SmartConvert.
SmartConvert
For the Contact Creation Filter enter the semi-colon delimited list of email domain name that will be
filtered out when you drag ‘n drop emails in the SmartConvert folders in the GroupWise client. If you
enter an email domain (e.g. omni-ts.com) no contacts will be created for emails that match the
creation filter, otherwise SmartConvert will work (e.g. archive email, create an opportunity, etc) if the
account and contact that matches the email already exists. This is commonly used to filter your own
email domain names to prevent creating accounts and contacts based on your domain name. If * is
used in the filter, SmartConvert will not create any new accounts or contacts. See “Using
SmartConvert” on page 16 for more details on using SmartConvert.
7. Click OK to save the synchronization settings.
Step 4 – Run the Initial Synchronization:
Select the Setup tab and click the Sync button to start the initial synchronization. The amount of time to
complete the initial synchronization will depend on the number of records to be synchronized.
Revised: October 31, 2008
© 2002-2008 Omni Technology Solutions Inc.
Page 9 of 28
Riva CRM Integration Desktop Edition User Guide
www.omni-ts.com
Step 5 - Verify Initial Synchronization Was Successful
Successful:
Users can verify a successful initial synchronization by checking for the following:
The “Address
Address Books”
Books configuration creates both a <CRM name> | Leads and a <CRM name> | Contact”
Contact in the
user’s GroupWise address book in the GroupWise client:
•
“Leads” from the CRM will be in <CRM name> | Leads.
Leads
o
o
o
•
If the user makes a change to a lead in the CRM, that change will be synchronized to this address
book.
Changes made in this address book in the GroupWise client will be synchronized back to the
“Leads” in the target CRM system. If the user creates a new GroupWise contact in <CRM name>
| Leads it will be created in the target CRM system.
If the user converts the lead to a contact in the CRM system, that entry will be removed from the
<CRM name> | Leads and a new contact and account will be created in <CRM name> | Contacts
during the next synchronization cycle.
“Contacts” and “Accounts” from the target CRM system will appear as contacts and organizations in
<CRM name> | Contacts as GroupWise “Contacts“ and “Accounts“.
Revised: October 31, 2008
© 2002-2008 Omni Technology Solutions Inc.
Page 10 of 28
Riva CRM Integration Desktop Edition User Guide
www.omni-ts.com
The “Calender
Calender”
Calender configuration creates a sub calendar which should be checked in the GroupWise client:
•
Leaving the “CRM Calendar” checked will display CRM calendar items in the user’s primary calendar.
•
Un-check the “CRM Calendar” to not display CRM calendar items in the user’s primary calendar. The
user would have to select the “CRM Calendar” sub-calendar to view those calendar items.
•
Appointments and phone calls from the CRM system will appear as appointments in the CRM
Calendar. Changes made in the GroupWise CRM calendar will be synchronized back to the target
CRM system. Changes made in the CRM system will be synchronized to the GroupWise CRM
calendar.
•
Tasks from the CRM system will appear as tasks in the GroupWise CRM Calendar. Once a task is
marked as completed in the GroupWise CRM calendar, it will be synchronized as completed to the
CRM. Only unfinished tasks are synchronized from the CRM to GroupWise.
Revised: October 31, 2008
© 2002-2008 Omni Technology Solutions Inc.
Page 11 of 28
Riva CRM Integration Desktop Edition User Guide
www.omni-ts.com
The “Other
Other”
Other configuration creates a “CRM Content” folder immediately below the root of the “Cabinet” folder.
Individual child folders will be created below “CRM Content” for Quotes, Opportunities, and Cases.
TM
The “SmartConvert
SmartConvertTM” configuration creates a “Smart Convert To . . .”
folder immediately below the “Opportunities” folder in the “CRM Content”
folder structure at the root of the “Cabinet” folder. Individual child folders
will be created below “CRM Content” for Email, Quote, Opportunity, and
Case.
Revised: October 31, 2008
© 2002-2008 Omni Technology Solutions Inc.
Page 12 of 28
Riva CRM Integration Desktop Edition User Guide
www.omni-ts.com
How to License Riva CRM Desktop Edition
Running in Demo Mode
Riva CRM Desktop Edition will work in DEMO mode when installed. In DEMO mode, the Riva CRM desktop
Edition application:
•
•
Initial synchronization is locked into starting seven days prior to the initial settings configuration date
will limit the number of items that will display in the GroupWise client to 50 of each type (contact,
account, calendar item, quote, case, and opportunity.)
How to Request a License
Riva CRM Desktop Edition is licensed to the individual user. Both the GroupWise connection and CRM
connection settings must be properly configured and synchronization should be tested. To request a license:
1. Select Help and Submit License Request.
Request
2. Complete the “License Request Form”. Ensure that you provide an accurate email address,
otherwise your license request will not be processed.
Choose between “Trial License” or “Purchase License”
License” and click the OK button.
Revised: October 31, 2008
© 2002-2008 Omni Technology Solutions Inc.
Page 13 of 28
Riva CRM Integration Desktop Edition User Guide
www.omni-ts.com
3. In the “Save License Request” window, provide a suitable name for the LicenseRequest.xml file. By
default, your request file will be saved to the \LicenseRequests folder in your Riva CRM Desktop
installation folder. Click the Save button.
4. Read the instructions provided in the License Request Result window and click OK.
OK
5. Email the license file that was created by the wizard to "[email protected]", as per the directions
in the result box.
How to Apply a License File
You will receive an email with your trial or purchase license file attached. To apply the license file:
1. Exit Riva CRM Desktop Edition.
2. Create a child \Licenses folder in the Riva CRM Desktop Edition installation directory (if a “\Licenses”
folder does not already exist).
3. Copy the .license file you received into the \Licenses folder.
4. Restart Riva CRM Desktop Edition.
5. (Optional) From the main menu, we recommend that you select the "Options" > "Re"Re-initialize with
New Settings" to reset your synchronization start time options. Select a new start date that better
reflects the date range you want to have applied to your settings.
Solution
ution
Synchronizing Data Between GroupWise and Your CRM Sol
Current Synchronization Options
Riva CRM Desktop Edition is a synchronization application that runs directly on a workstation. It does not
need to run on the workstation of the user being synchronized. Each instance of Riva Desktop Edition
synchronizes a single account. You can run multiple instances of Riva Desktop Edition on a single desktop to
synchronize multiple accounts. It is the best option for companies with fewer than 10 accounts.
BiBi-directional Synchronization. The following bi-directional synchronization options are currently available:
•
•
•
Address Book contacts (users in CRM) and organizations (accounts in CRM). Riva creates a
“Contacts” and a “Leads” address book in the GroupWise client
Appointments
Tasks - only uncompleted tasks will be synchronized. Completed tasks will be removed from the
GroupWise client calendar views during the next Riva synchronization cycle.
With bi-directional synchronization, the user can make a change in either the GroupWise client or in the CRM
interface and the data will synchronize in both directions during the next Riva synchronization cycle.
Revised: October 31, 2008
© 2002-2008 Omni Technology Solutions Inc.
Page 14 of 28
Riva CRM Integration Desktop Edition User Guide
www.omni-ts.com
UniUni-directional Synchronization.
Synchronization The following uni-directional (from CRM to GroupWise only) updates are
currently available:
•
•
•
•
CRM phone calls (appear as appointments in GroupWise)
CRM Quotes (read-only & HTML ConnectBar view)
CRM Opportunities (read-only & HTML ConnectBar view)
CRM Cases (read-only & HTML ConnectBar view)
Using the Omni ConnectBartm
When users view quotes, opportunities, and cases in the "CRM Content" folder in HTML view, they will be
tm
able to read, edit or delete those items using the Omni ConnectBar . When the user chooses one of the
ConnectBar options, it will open the CRM web applicable form in their default web browser.
Changes made by launching an item with the Omni ConnectBar are saved directly in the CRM databases and
synchronized back to GroupWise during the next synchronization cycle.
Revised: October 31, 2008
© 2002-2008 Omni Technology Solutions Inc.
Page 15 of 28
Riva CRM Integration Desktop Edition User Guide
www.omni-ts.com
Using SmartConvert tm
SmartConvert allows you to drag an email and automatically convert it into an CRM archived email, quote,
opportunity or case. SmartConvert will create the contact and company if they do not exist in the CRM. Smart
Convert supports all GroupWise clients, including mobile clients.
When enabled in Riva synchronization settings, Smart Convert creates a folder structure specific to the types
supported by the target CRM.
When you select an email and drag and drop it or right-click and drag it and "Link to" one of the Smart Convert
To folders, the following process occurs:
•
Riva's Smart Convert process extracts the email address and account information from the To:,
From:, CC: and BCC: fields.
•
It checks the CRM to see whether the email addresses exist in the CRM.
•
If the email addresses exist, Smart Convert will automatically create the email, quote, opportunity or
case and assign it to the correct email addresses and companies.
•
If the email addresses don't exist in the CRM, Smart Convert checks whether the companies exist
using the email domain name as the comparison field.
•
If the companies don't exist, Smart Convert creates the companies (using the domain name as the
company name), creates the contacts (using the first and last names and email address) and
associates the contacts with the appropriate companies.
Revised: October 31, 2008
© 2002-2008 Omni Technology Solutions Inc.
Page 16 of 28
Riva CRM Integration Desktop Edition User Guide
www.omni-ts.com
•
Smart Convert then creates the archived email, quote, opportunity or case and assigns it to the newly
created contacts and/or companies.
•
Because Smart Convert uses the domain name in the Company web site to determine whether a
company exists, to prevent duplicates, it is critical to have the company web site information entered
for all Company accounts.
Microsoft SharePoint to GroupWise Synchronization
SharePoint calendar, contact and task lists are synchronized to GroupWise.
Synchronization
Synchronization between Microsoft SharePoint and GroupWise is different than standard CRM systems as
follows:
•
Riva will create Address Books in GroupWise that match the Contact Lists in SharePoint. Riva will
create Calendars in GroupWise that match the Calendars in SharePoint. Riva will create folders in
the SharePoint content (below the Cabinet in GroupWise) to match the folders that exist in
SharePoint.
•
Traditionally, the SharePoint account is linked to an Active Directory account. SharePoint and/or
Active Directory native permissions control user access to SharePoint® calendars, tasks, projects,
lists, etc.
•
Because SharePoint calendars are “shared calendars”, synchronisation is uni-directional from
SharePoint® to GroupWise. Changes made in GroupWise to SharePoint® appointments are not
synchronised to SharePoint®
Revised: October 31, 2008
© 2002-2008 Omni Technology Solutions Inc.
Page 17 of 28
Riva CRM Integration Desktop Edition User Guide
www.omni-ts.com
Additional Configuration Tasks Explained
How to Update Riva Desktop Edition
Riva CRM Desktop Edition includes a Check for Updates function which permits you to upgrade the
application from our online upgrade server. Steps for performing the update to an existing Riva CRM Desktop
Edition installation are:
1. Launch Riva CRM Desktop Edition.
2. From the main menu, select Help and Check for Updates.
Updates
3. In the "Internet Connection" window, click Yes.
Yes
4. If an "Update Available" window opens, click Yes.
Yes
Revised: October 31, 2008
© 2002-2008 Omni Technology Solutions Inc.
Page 18 of 28
Riva CRM Integration Desktop Edition User Guide
www.omni-ts.com
5. In the "Download Successful" window, click OK.
OK
6. Close and re-launch Riva Desktop Edition.
7. From the main menu, select Help and About Omni Riva and confirm that the Version number matches
the release that you just downloaded. Click OK.
OK
Revised: October 31, 2008
© 2002-2008 Omni Technology Solutions Inc.
Page 19 of 28
Riva CRM Integration Desktop Edition User Guide
www.omni-ts.com
Start--up
How to Force Riva CRM Desktop Edition to Load at Windows Start
Riva CRM Desktop Edition can be configured to start each time Windows starts.
1. Select the Setup tab and click the Settings button to configure the synchronization settings.
2. Under the Scheduling tab, check “Run
Run Omni Riva CRM when Windows starts”.
starts
3. Click OK to save the settings.
How to Schedule Synchronization Cycles
Riva CRM Desktop Edition can be configured to automatically perform synchronization updates between
GroupWise and the CRM system using the built-in synchronization scheduler.
1. Select the Setup tab and click the Settings button to configure the synchronization settings.
2. Under the Scheduling tab,
a. Check “Use
Use a Synchronization Schedule”
Schedule
b. Set the desired synchronization frequency for peak times and off-peak times
c.
Click the Edit Peak Times and the Edit Blackout Times links to set the day and times for “peak”
and “blackout” times. Blackout times are configured so Riva does not try to synchronize with
GroupWise when it is performing system maintenance or backup functions. Confirm with your
GroupWise administrator what these days and times should be set to.
Revised: October 31, 2008
© 2002-2008 Omni Technology Solutions Inc.
Page 20 of 28
Riva CRM Integration Desktop Edition User Guide
www.omni-ts.com
3. Click OK to save the settings.
How to Change Connection Passwords
If you change your GroupWise or CRM passwords, these changes will need to be made to the Riva
connection configuration. To modify connection passwords:
1. From the Setup tab, click the edit link beside the GroupWise connection or the CRM connection.
2. In the applicable authentication window, type in the new password and click OK.
OK
Revised: October 31, 2008
© 2002-2008 Omni Technology Solutions Inc.
Page 21 of 28
Riva CRM Integration Desktop Edition User Guide
www.omni-ts.com
3. (Optional) Click the Sync button to force a manual sync of data.
Riva CRM Desktop Edition will synchronize data into the “CRM Address Book”, “CRM Calendar” and “CRM
Content” that were created in the user’s GroupWise account.
How to Rebuild a Connection and
and Retain Previous Synchronized Names
It is possible to replace a GroupWise or CRM connection to use a different user name, post office or CRM
system, and retain the names that are configured for the “CRM Address Book”, “CRM Calendar” and “CRM
Content”. To rebuild a connection using the existing configured names:
1. From the Setup tab, click the remove link beside the GroupWise connection or the CRM connection.
2. In the “Delete connection?” window, select Yes to remove the connection.
Note:
Note The previously configured account will no longer be synchronized
3. Click the configure connection link for the connection that needs to be created and follow the wizard.
Revised: October 31, 2008
© 2002-2008 Omni Technology Solutions Inc.
Page 22 of 28
Riva CRM Integration Desktop Edition User Guide
www.omni-ts.com
How to Remove Existing Data and ReRe-Sync New Data
It is possible to remove the existing data in the current “CRM Address Book”, “CRM Calendar” and “CRM
Content” and replace it with a clean set of data without changing connection settings. To remove and reinitialize data:
1. From the main menu, select ReRe-Initialize
Initialize > and select the desired re-synchronization option:
2. Option – With Same Settings will use the existing synchronization settings.
Click Yes and Riva CRM Desktop Edition will immediately remove existing content, recreate the
“CRM Address Book”, “CRM Calendar” and “CRM Content” folders and re-synchronize a fresh copy of
the data, using the current synchronization settings.
3. Option – With New Settings will remove the existing synchronization settings, permit the user to
change any of the synchronization settings including changing the names of address books,
calendars and folders and remove existing data before performing a synchronization of the data using
the new synchronization settings. Note: If the names of the folders, address books and calendar are
change, the previously synchronized folders, address books and calendars will need to be removed
manually from the GroupWise account.
How to Remove Existing Data and ReRe-initialize with New Connections
The recommended best practice is to re-initialize data using new connections:
1. Remove and build new connections.
2. Perform a Re-Initialize using the desired option.
Revised: October 31, 2008
© 2002-2008 Omni Technology Solutions Inc.
Page 23 of 28
Riva CRM Integration Desktop Edition User Guide
www.omni-ts.com
How to Remove Synchronized Data in the GroupWise Client
The recommended best practice to empty (remove) existing synchronized data and just leave the empty CRM
address book, calendar and content folder is to perform a Re-Sync: with no selected content in the
Synchronization settings:
1. From the main menu, select ReRe-initiailize With New Settings.
Settings
2. In the “Continue with Re-initialization ?” window, select Yes.
Yes
3. Making the following changes:
a. Under the “Scheduling” tab, remove the check for Use a Synchronization Schedule;
Schedule
b. Under the “Address Book” tab, remove the check for all the Synchronize items (Note
Note:
Note Do not
remove or change the Address Book name);
name
c.
Under the “Calendaring” tab, remove the check for all the Synchronize items (Note
Note:
Note Do not
remove or change the Calendar name);
name and
d. Under the “Other” remove the check for all the Synchronize items (Note
Note:
Note Do not remove or
change the Folder name)
name
4. Click OK to start the Synchronization. This will remove all CRM synchronized data from the
GroupWise client.
Revised: October 31, 2008
© 2002-2008 Omni Technology Solutions Inc.
Page 24 of 28
Riva CRM Integration Desktop Edition User Guide
www.omni-ts.com
How to Uninstall Riva CRM Desktop Edition
Because we allow multiple instances of Riva CRM Desktop Edition to run on a single machine, we do not use
that standard Windows Control Panel – Add & Remove Programs to uninstall and remove Riva.
WARNING - Riva CRM Desktop Edition will not automatically reverse the "automatic startup
when Windows starts" setting when it is deleted. Users must reverse existing settings
settings
BEFORE uninstalling Riva CRM Desktop Edition.
GroupWise address books, folders and calendars created in the user's GroupWise account by Riva CRM
Desktop Edition will not be removed by uninstalling the application. Users must manually remove GroupWise
address books, folders and calendars created by Riva CRM Desktop Edition.
STEPS
Recommended steps to uninstall Riva CRM Desktop Edition are:
1. Modify the application startup and synchronization settings and select OK to apply these changes.
2. Manually delete the directory that contains Riva Desktop Edition.
3. (Optional) Manually remove GroupWise Address Books and Calendars created by Riva Desktop
Edition.
Modify Riva CRM Desktop Edition Settings
1. Launch Riva Desktop Edition.
2. From the Setup tab, click the Settings button.
3. From the Scheduling tab, uncheck "Run
Run Omni Riva CRM when Windows starts"
Use a
starts and uncheck "Use
Synchronization Schedule".
Schedule
4. Click OK.
OK
5. Close Riva Desktop Edition.
Revised: October 31, 2008
© 2002-2008 Omni Technology Solutions Inc.
Page 25 of 28
Riva CRM Integration Desktop Edition User Guide
www.omni-ts.com
Manually Remove Riva CRM Desktop Edition
1. Open Windows Explorer and navigate to the Riva Desktop installation directory, usually C:\Program
Files\Omni\Riva-CRM-Desktop
2. Rename or Remove the Riva-CRM-Desktop folder.
3. Remove any " Riva Desktop Edition" shortcuts from the user's Windows desktop or menus.
OPTIONAL - Remove CRM Address Books
Books and Calendars in the GroupWise Client
Once Riva CRM Desktop Edition settings have been modified to no longer use a Synchronization Schedule,
the address book and calendar items created by Riva Desktop Edition will no longer synchronize with the
CRM system. The user can choose to retain that information, or to manually remove it.
Manually Remove the "CRM Contacts" Address Book
1. Open the user's GroupWise client and click on Address Book.
2. Find the "CRM Contacts" address book. Right click and choose to Delete
Delete Book ...
3. In the "Delete Address Book" window, select the "CRM Contacts" address book and click OK.
4. In the "Address Book - Question" window, select Yes to permanently delete the CRM Contacts address
book.
5. Close the Address Book window.
Manually Remove the "CRM Calendar"
1. Open the user's GroupWise client and expand the GroupWise Calendar in the tree view.
2. Right-click "CRM Calendar" and choose Delete.
Delete
3. In the "Delete Folder(s)" window, select Folder(s) and items and click OK.
OK
Revised: October 31, 2008
© 2002-2008 Omni Technology Solutions Inc.
Page 26 of 28
Riva CRM Integration Desktop Edition User Guide
www.omni-ts.com
Support for Riva
Reporting a Technical Issue
Riva CRM Desktop Edition includes a “Submit Issue Report” feature in the program. If you experience a
problem with the application, select Help > Submit Issue Report and complete the form. Please ensure that
you include the correct contact information. Once the OK button is clicked, Riva CRM Desktop Edition will
send this issue and a copy of the application logs to our technical support team.
:
.
Upgrade and Maintenance Support Agreements
Customers who have current upgrade and support contracts are eligible to receive full email and telephone
support Monday to Friday between 9:00 a.m. and 5:00 p.m. Mountain Time (UTC -7). Limited email support
may be available during extended hours. Email and telephone support is also available to customers who are
evaluating Riva.
Free Support
Support
Free support is limited to information available from our support forum, our web site and information contained
in the user manual. Telephone and email support for customers who do not have a current support contract
can be provided on a fee per incident or fee per hour basis, whichever is greater.
Revised: October 31, 2008
© 2002-2008 Omni Technology Solutions Inc.
Page 27 of 28
Riva CRM Integration Desktop Edition User Guide
www.omni-ts.com
Contacting Support
You can contact support using the following methods. Please include as many details as possible when
requesting support:
Use the “Contact Us” link in the top right corner of any page of our website and complete the online form
or go to www.omni-ts.com/contact-us.html.
Call or fax us:
Phone:
Fax:
1-780780-423423-4200
1-780-423-4711
Online Resources
Resources
Online resources for Riva include:
•
Product Webpage: Go to http://www.omni-ts.com/crm-integration for the latest product information.
•
Product Documentation: Go to www.omni-ts.com select Support,
Support, follow the link for Documentation
and select Messaging Documentation
•
Riva Flash Tutorials: will be added to www.omni-ts.com/quicktours
•
Support Forum: Go to www.omni-ts.com/Forum and:
•
o
Select the Riva CRM Integration for GroupWise ~ Desktop Edition forum
o
“Riva
Riva RM Desktop Edition Tips”
Tips available at http://www.omni-ts.com/forum/post--2140--page1.html is a collection of forum articles to provide troubleshooting and advanced management
steps
Product FAQ: Go to http://www.omni-ts.com/crm-integration and select Frequently Asked Questions
Revised: October 31, 2008
© 2002-2008 Omni Technology Solutions Inc.
Page 28 of 28