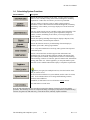
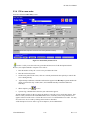
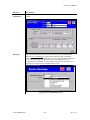
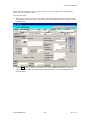
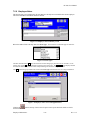
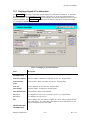
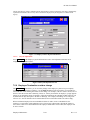
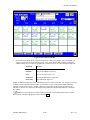
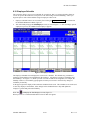
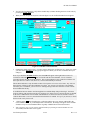
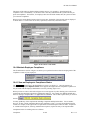
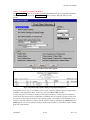
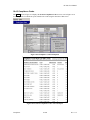
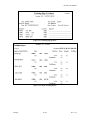
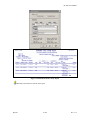
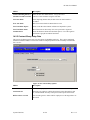
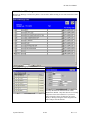
1
User Manual
Client
Employee
Scheduling and Compliance
Software
26 Harbor Park Dr.
Port Washington, NY 11050
516-484-4400
www.sandata.com
HC Plus User Manual
The contents of this manual and related documentation are proprietary to Sandata Technologies,
Inc. and cannot be copied or otherwise reproduced or disclosed to any third party. It is solely for use in
connection with Sandata Technologies, Inc. ® HC Plus and must be returned upon request or termination
of services.
Windows is a trademark of the Microsoft Corporation.
Copyright 2005 Sandata Technologies, Inc. All rights reserved.
HC Plus User 11.5 Manual revised: June 28, 2005
The Scheduling and Compliance system
1-1
Rev 11.5
HC Plus User Manual
TABLE OF CONTENTS
CHAPTER 1
1.1
1.2
1.3
1.4
1.5
THE SCHEDULING AND COMPLIANCE SYSTEM ........................................... 1-15
START & LOGIN TO HC PLUS ..................................................................................................... 1-15
LOG IN FEATURES ...................................................................................................................... 1-16
THE SCHEDULING SYSTEM MAIN MENU .................................................................................... 1-17
SCHEDULING SYSTEM FUNCTIONS ............................................................................................. 1-18
HELP .......................................................................................................................................... 1-19
CHAPTER 2
CLIENT MAINTENANCE ........................................................................................ 2-21
2.1
ACCESS THE CLIENT MAINTENANCE SCREEN ............................................................................. 2-21
2.2
LOCATE A CLIENT’S RECORD ...................................................................................................... 2-21
2.3
PROCESS A NEW CLIENT.............................................................................................................. 2-23
2.3.1
Add a new client ................................................................................................................ 2-23
2.3.2
Complete the Client Screen ............................................................................................... 2-23
2.3.3
Create a service for a new client ....................................................................................... 2-28
2.3.4
Fill in a new order ............................................................................................................. 2-29
2.3.5
View the new schedule ....................................................................................................... 2-30
CHAPTER 3
CLIENT MAINTENANCE FUNCTIONS ................................................................ 3-31
3.1
VIEW A CLIENT’S ORDER INFORMATION ..................................................................................... 3-31
3.1.1
Order entry summary list—field description ..................................................................... 3-32
3.2
SCHEDULE A CLIENT ................................................................................................................... 3-33
3.3
PLACE A CLIENT ON HOLD—OR RESUME SERVICES .................................................................... 3-34
3.4
DISCHARGE A CLIENT ................................................................................................................. 3-35
3.4.1
Correct a discharge ........................................................................................................... 3-35
3.4.2
Re-admit a client................................................................................................................ 3-36
3.4.3
Re-admit a service ............................................................................................................. 3-37
3.5
VIEW CLIENT HISTORY ............................................................................................................... 3-38
3.6
ENTER NOTES ............................................................................................................................. 3-39
3.6.1
Edit Notes .......................................................................................................................... 3-41
3.7
ENTER CLIENT REQUIREMENTS .................................................................................................. 3-42
3.8
EXCLUDE AN EMPLOYEE FROM WORKING WITH A CLIENT .......................................................... 3-43
3.9
NURSES VISITS ........................................................................................................................... 3-44
3.10 ENTER THE CLIENT DIAGNOSIS .................................................................................................. 3-45
3.11 CLIENT MEDICATIONS ................................................................................................................ 3-46
3.12 PLAN OF TREATMENT—THE HCFA 485 FORM .......................................................................... 3-47
3.12.1 Form HCFA-485—page 1 ................................................................................................. 3-48
3.12.2 Form HCFA-485—page 2 ................................................................................................. 3-51
3.12.3 Form HCFA-485—page 3 ................................................................................................. 3-53
3.13 ENTER EMERGENCY CONTACTS ................................................................................................. 3-56
3.14 CLIENT MAILING ADDRESS ........................................................................................................ 3-57
CHAPTER 4
4.1
CLIENT REPORTS .................................................................................................... 4-58
CLIENT LABELS .......................................................................................................................... 4-63
CHAPTER 5
ENTER/VIEW CLIENT ORDERS ........................................................................... 5-64
5.1
ENTER ORDER DATA ................................................................................................................... 5-64
5.1.1
Order Entry Detail Screen................................................................................................. 5-65
5.2
ORDER ENTRY BUTTONS/FEATURES .......................................................................................... 5-66
5.2.1
Authorized Hours History Screen ...................................................................................... 5-67
5.2.2
Changing Authorized Hours .............................................................................................. 5-68
5.3
CHANGE AN ORDER .................................................................................................................... 5-69
The Scheduling and Compliance system
1-2
Rev 11.5
HC Plus User Manual
5.4
5.5
SPLIT ORDER ENTRY .................................................................................................................. 5-69
LOCATE OPEN ORDERS .............................................................................................................. 5-70
CHAPTER 6
SERVICE MAINTENANCE ...................................................................................... 6-71
6.1
SERVICE SCREEN FIELD DESCRIPTIONS ...................................................................................... 6-71
6.2
SERVICE SCREEN FUNCTIONS ..................................................................................................... 6-75
6.2.1
Billing and Insurance ........................................................................................................ 6-77
6.3
HANDLE MUTUAL CLIENT CASES ................................................................................................ 6-78
6.3.1
To create a mutual situation .............................................................................................. 6-78
6.4
ORDER ENTRY CHANGES FOR MUTUAL CASES .......................................................................... 6-80
6.5
TO HANDLE CLUSTER SITUATIONS .............................................................................................. 6-80
6.5.1
To link cluster cases .......................................................................................................... 6-81
6.6
TO HANDLE TASK BASED ASSIGNMENTS (TBA) ........................................................................ 6-81
6.7
VIEW A CLIENT’S LINK HISTORY ................................................................................................. 6-83
6.8
SETTING UP MISCELLANEOUS CLIENTS ....................................................................................... 6-84
6.8.1
Special Codes on Service Screens ..................................................................................... 6-85
CHAPTER 7
EMPLOYEE MAINTENANCE................................................................................. 7-86
7.1
FIND AN EMPLOYEE .................................................................................................................... 7-86
7.2
EDIT EMPLOYEE DATA ................................................................................................................ 7-86
7.3
ADD A NEW EMPLOYEE ............................................................................................................... 7-86
7.3.1
Enter Contract Assignments .............................................................................................. 7-88
7.3.2
Enter New Employee Payroll information......................................................................... 7-89
7.4
RETURNING EMPLOYEES ............................................................................................................ 7-89
7.5
FUNCTIONS OF THE EMPLOYEE MAINTENANCE SCREEN ............................................................ 7-90
7.5.1
Availability ........................................................................................................................ 7-90
7.5.2
Employee Schedule ............................................................................................................ 7-91
7.5.3
Employee Skills.................................................................................................................. 7-92
7.5.4
Employee/Client Exclusions .............................................................................................. 7-93
7.5.5
Employee Sharp History & Employee History .................................................................. 7-94
7.5.5.1
7.5.5.2
7.5.6
7.5.7
7.5.7.1
7.5.7.2
7.5.7.3
7.5.7.4
Sharp History ................................................................................................................................ 7-95
Employee History ......................................................................................................................... 7-95
Employee Notes ................................................................................................................. 7-96
Employee Payroll & Tax Information ............................................................................... 7-97
Contract Payroll information......................................................................................................... 7-99
Deductions .................................................................................................................................. 7-100
Direct deposit information .......................................................................................................... 7-100
Payroll Adjustments .................................................................................................................... 7-101
7.5.8
Employee Termination or status change.......................................................................... 7-101
7.5.9
Assign Contracts to an Employee .................................................................................... 7-103
7.5.10 Employee Compliance Record......................................................................................... 7-104
7.5.11 Employee in Service/Training Records............................................................................ 7-104
7.5.12 Supervisory visits/Administrative Evaluation .................................................................. 7-105
7.5.13 Employee Mailing Address .............................................................................................. 7-106
7.6
EMPLOYEE REPORTS ................................................................................................................ 7-106
7.6.1
Employee Labels.............................................................................................................. 7-108
CHAPTER 8
SCHEDULE MAINTENANCE................................................................................ 8-109
8.1
SCHEDULE MAINTENANCE FUNCTIONS .................................................................................... 8-109
8.2
VIEW A CLIENT’S SCHEDULE ................................................................................................... 8-109
8.2.1
Schedule screen properties .............................................................................................. 8-110
8.2.1.1
Scheduled vacation/sick days...................................................................................................... 8-112
8.3
TO ADD SPECIAL CODES ............................................................................................................ 8-114
8.4
ASSIGN AN EMPLOYEE TO A VISIT ............................................................................................. 8-114
8.4.1
Santrax data on Schedule Screen..................................................................................... 8-118
8.4.2
Copy a schedule to other days of the week ...................................................................... 8-120
8.4.3
Copy a schedule a week forward ..................................................................................... 8-120
8.4.4
Add a ‘sudden’ visit to a schedule ................................................................................... 8-121
The Scheduling and Compliance system
1-3
Rev 11.5
HC Plus User Manual
8.5
FIND OPEN ORDERS.................................................................................................................. 8-122
8.6
COPY ALL SCHEDULES ............................................................................................................. 8-123
8.7
FIND SCHEDULES PENDING NOTIFICATION............................................................................... 8-124
8.8
VIEW A PERMANENT SCHEDULE............................................................................................... 8-125
8.8.1
Delete a permanent schedule........................................................................................... 8-127
8.9
VIEW/CHANGE A CALENDAR VISIT .......................................................................................... 8-127
8.9.1
Change Notification options ............................................................................................ 8-128
8.10 VERIFY A VISIT ......................................................................................................................... 8-128
8.11 CANCEL A VISIT ........................................................................................................................ 8-129
8.11.1 Track Cancellations......................................................................................................... 8-130
8.12 REACTIVATE A CANCELLED VISIT ............................................................................................. 8-131
8.13 CREATE A REPORT DOCUMENTING CHANGES ............................................................................ 8-132
8.14 SCHEDULE A TBA CLIENT ........................................................................................................ 8-133
8.15 SCHEDULE A CLUSTER CLIENT .................................................................................................. 8-133
8.16 SCHEDULE A MUTUAL CLIENT .................................................................................................. 8-133
8.17 MODIFY A 24-HOUR VISIT......................................................................................................... 8-134
8.18 EMPLOYEE SCHEDULE .............................................................................................................. 8-136
8.18.1 Set Employee Availability ................................................................................................ 8-137
8.18.2 Employee Schedule Screen Buttons ................................................................................. 8-138
8.18.3 Enter Hours for Special Codes ........................................................................................ 8-140
8.18.4 Enter special codes for a visit day ................................................................................... 8-140
8.18.5 Record tasks performed by an employee for a client ....................................................... 8-142
8.18.5.1
To enter new tasks .................................................................................................................. 8-142
8.18.6 Overtime and Absence tracking....................................................................................... 8-145
8.19 SCHEDULE REPORTS ................................................................................................................. 8-146
CHAPTER 9
VERIFICATION PROCEDURES........................................................................... 9-147
9.1
VERIFICATION OVERVIEW ........................................................................................................ 9-147
9.2
AUTOMATIC BATCHING............................................................................................................ 9-147
9.3
VERIFY SCHEDULES VIA THE VERIFICATION MENU ................................................................. 9-147
9.3.1
Verification for special codes—sick and holiday............................................................. 9-151
9.3.2
Verification Screen Features ........................................................................................... 9-151
9.4
VERIFYING VISITS VIA THE CLIENT SCHEDULE SCREEN ........................................................... 9-152
9.5
VERIFYING VISITS VIA THE EMPLOYEE SCHEDULE SCREEN ..................................................... 9-153
9.6
CHANGE SCHEDULED HOURS AFTER VERIFICATION .................................................................. 9-154
9.7
SANTRAX VISIT VERIFICATION ................................................................................................ 9-155
9.8
APPLYING UNKNOWN CALLS TO A VISIT AND VERIFYING .......................................................... 9-156
9.9
VIEW THE PHONE NUMBER OF A SANTRAX CALL ...................................................................... 9-157
9.10 THE VERIFICATION REPORT ..................................................................................................... 9-157
9.11 VERIFIED DISCREPANCIES REPORT .......................................................................................... 9-160
9.11.1 Verification Overlapping Visits Report ........................................................................... 9-161
9.11.2 Verified and Unbatched Transactions Report ................................................................. 9-162
9.11.3 Santrax Call Exception Maintenance .............................................................................. 9-163
9.11.4 Apply missing calls via Santrax ....................................................................................... 9-164
9.11.5 Manual Batch Listing for Time Sheet Transfers to Payroll ............................................. 9-165
9.11.5.1
9.11.5.2
9.11.5.3
9.11.5.4
9.11.5.5
9.11.6
9.11.7
9.11.8
9.11.8.1
Transfer all Batches ................................................................................................................ 9-168
Batching Daily Special Code Records .................................................................................... 9-168
View a Time Sheet’s Details................................................................................................... 9-169
Add a Time Sheet to a Batch .................................................................................................. 9-169
Delete a Time Sheet................................................................................................................ 9-172
Current week batching..................................................................................................... 9-172
Create a new batch .......................................................................................................... 9-173
Mark a batch for transfer ................................................................................................ 9-173
Notes on Transfer process....................................................................................................... 9-174
9.11.9 View Unbatched Timeslips .............................................................................................. 9-174
9.11.10
On-Demand Timesheets............................................................................................... 9-176
9.11.11
Batch Export Report .................................................................................................... 9-178
9.11.12
CIN Exception Report.................................................................................................. 9-179
The Scheduling and Compliance system
1-4
Rev 11.5
HC Plus User Manual
CHAPTER 10
COMPLIANCE ................................................................................................... 10-181
10.1 COMPLIANCE OVERVIEW ....................................................................................................... 10-181
10.2 ACCESS THE COMPLIANCE SYSTEM ........................................................................................ 10-181
10.3 DEFAULT COMPLIANCE CODE MAINTENANCE ....................................................................... 10-182
10.3.1 Levels of Compliance..................................................................................................... 10-182
10.3.2 Code Categories ............................................................................................................ 10-182
10.3.3 Company........................................................................................................................ 10-182
10.3.4 States.............................................................................................................................. 10-182
10.3.5 District Codes ................................................................................................................ 10-183
10.3.6 Location Codes .............................................................................................................. 10-183
10.3.7 Access a Profile Sheet.................................................................................................... 10-183
10.3.7.1
10.3.7.2
Set up a compliance profile sheet for a company’s employees ............................................. 10-184
View Compliance Generic Codes ......................................................................................... 10-184
10.4 MAINTAIN EMPLOYEE COMPLIANCE ...................................................................................... 10-185
10.4.1 View an Employee’s Compliance Status........................................................................ 10-185
10.4.1.1
10.4.2
Individual Employee Compliance Status Reports................................................................. 10-189
Update compliance records of all employees ................................................................ 10-191
10.4.2.1
10.4.2.2
10.4.2.3
10.4.2.4
10.4.2.5
10.4.2.6
10.4.3
10.4.4
Forecasting employees’ compliance ..................................................................................... 10-192
View/Print a Compliance Worksheet.................................................................................... 10-193
Daily and End of Month Compliance Update ....................................................................... 10-194
Employees’ Current Compliance Status ............................................................................... 10-196
Compliance Status Reports for all Employees...................................................................... 10-197
In-Service worksheet generation........................................................................................... 10-198
Compliance Codes......................................................................................................... 10-200
Compliance Test Results................................................................................................ 10-201
10.4.4.1
Edit Generic Codes ............................................................................................................... 10-201
CHAPTER 11
DAILY FUNCTIONS.......................................................................................... 11-202
11.1 SANTRAX INTERFACE ............................................................................................................. 11-202
11.1.1 Import and Process Visit Maintenance data.................................................................. 11-203
11.1.2 View/accept non-reconciled visits ................................................................................. 11-203
11.1.3 Reprocess non-reconciled visits..................................................................................... 11-204
11.1.4 Visit Maintenance Reports............................................................................................. 11-204
11.1.4.1
11.1.4.2
11.1.4.3
Reconciled Visit Posting Report ........................................................................................... 11-205
Non-Reconciled Visit Report................................................................................................ 11-205
Invalid Non-Reconciled Visit Report.................................................................................... 11-206
11.2 PRINT SANTRAX REPORTS ...................................................................................................... 11-207
11.2.1 Access Santrax Reports.................................................................................................. 11-207
11.3 CALL TRACKING .................................................................................................................... 11-211
11.4 FIND OPEN ORDERS................................................................................................................ 11-212
11.5 VIEW CLIENT’S PLAN OF TREATMENT.................................................................................... 11-212
11.6 FIND UNAPPROVED SPECIAL CODES....................................................................................... 11-213
11.7 TRACK DOCTOR’S ORDERS .................................................................................................... 11-214
11.7.1 Create a new doctor’s order.......................................................................................... 11-215
11.7.2 View Existing Doctor’s orders....................................................................................... 11-215
11.7.3 Print Missing Orders ..................................................................................................... 11-215
11.7.4 Print Orders Returned ................................................................................................... 11-216
11.8 REFERRAL TRACKING ............................................................................................................ 11-216
11.9 CLIENT /SERVICE INTERFACE ................................................................................................. 11-217
11.9.1 Doctor Interface Report................................................................................................. 11-218
11.9.2 Guarantor Interface Report........................................................................................... 11-218
11.9.3 Employee Interface Report ............................................................................................ 11-219
11.9.4 Service Interface Log..................................................................................................... 11-219
11.9.5 Client Interface Log....................................................................................................... 11-219
11.10
CLINICAL EXPORT .............................................................................................................. 11-220
11.11
PLAN OF TREATMENT TABLE MAINTENANCE..................................................................... 11-221
11.11.1
485 Worksheet ........................................................................................................... 11-221
11.11.2
Diagnoses Code Maintenance ................................................................................... 11-223
The Scheduling and Compliance system
1-5
Rev 11.5
HC Plus User Manual
11.11.2.1
11.11.3
11.11.3.1
11.11.4
11.11.5
11.11.6
11.11.7
11.11.8
11.11.9
11.11.10
11.11.11
11.11.13
11.11.14
11.11.15
11.11.16
11.11.17
CHAPTER 12
12.1
12.2
12.3
12.4
12.5
Medications Maintenance features........................................................................................ 11-225
DME & Supplies:....................................................................................................... 11-227
Safety Measures:........................................................................................................ 11-227
Nutritional Requirements: ......................................................................................... 11-227
Allergies: ................................................................................................................... 11-227
Treatment Goals:....................................................................................................... 11-228
Rehabilitation: ........................................................................................................... 11-228
Potential discharge Plans: ........................................................................................ 11-228
Type of Facilities: ...................................................................................................... 11-228
Homebound Reasons: ................................................................................................ 11-229
Unusual Environments: ............................................................................................. 11-229
Leave Home Reasons................................................................................................. 11-229
Print Blank 485.......................................................................................................... 11-230
Plan of Treatment Control File ................................................................................. 11-230
TRAINING........................................................................................................... 12-231
TRAINING TOPICS ................................................................................................................... 12-231
CLASS MASTER ...................................................................................................................... 12-232
CLASS ROSTER ....................................................................................................................... 12-233
PRINT CERTIFICATES .............................................................................................................. 12-235
TRAINING REPORT.................................................................................................................. 12-236
CHAPTER 13
13.1
13.2
13.3
13.4
13.5
13.6
13.7
13.8
13.9
13.10
13.11
13.12
13.13
13.14
13.15
13.16
13.17
13.18
13.19
13.20
13.21
13.22
13.23
13.24
13.25
13.26
13.27
13.28
13.29
13.30
13.31
Add a diagnosis code to your database ................................................................................. 11-224
Medications ............................................................................................................... 11-225
REPORTS ............................................................................................................ 13-238
SERVICE DISTRIBUTION LIST .................................................................................................. 13-238
NOTES LIST ............................................................................................................................ 13-239
EXPIRING CARE PLANS ........................................................................................................... 13-239
CLIENT/EMPLOYEE SCHEDULE HISTORY ................................................................................ 13-239
VNS TRANSACTION REPORT.................................................................................................. 13-240
CHANGE LOG ......................................................................................................................... 13-241
TRAINING REPORT.................................................................................................................. 13-241
REFERRAL REPORT ................................................................................................................. 13-241
PENDING LIST MENU .............................................................................................................. 13-241
CLIENT STARTING TIME REPORT ........................................................................................ 13-242
NON-WORKING EMPLOYEES ............................................................................................... 13-243
EMPLOYEE OVERTIME REPORT .......................................................................................... 13-243
ACTIVITY REPORT .............................................................................................................. 13-244
ADDITIONAL REPORTS MENU............................................................................................. 13-246
EXPIRING ORDERS REPORT ................................................................................................ 13-247
ADMITS BY DOCTORS REPORT ........................................................................................... 13-247
SERVICE ADMIT/DISCHARGE REPORT ................................................................................ 13-247
SERVICE CENSUS REPORT .................................................................................................. 13-248
DOCTOR CASE COUNT ........................................................................................................ 13-248
VERIFIED VISIT COUNT ...................................................................................................... 13-249
HOLD/RESUME LISTS ......................................................................................................... 13-249
CLIENT HOLD REPORT ....................................................................................................... 13-250
UNDER ASSIGNED SERVICED CLIENTS REPORT .................................................................. 13-251
COMPETED VISITS REPORT................................................................................................. 13-252
SPECIAL CODES REPORT .................................................................................................... 13-253
WEEKLY CARFARE LOG ..................................................................................................... 13-254
NURSES VISIT/HISTORY REPORT ........................................................................................ 13-256
EXPIRING CERTIFICATIONS REPORT ................................................................................... 13-257
EMPLOYEE HOURS WORKED REPORT ................................................................................ 13-258
EMPLOYEE UNAVAILABILITY REPORT................................................................................ 13-259
PLAN OF TREATMENT REPORTS .......................................................................................... 13-260
The Scheduling and Compliance system
1-6
Rev 11.5
HC Plus User Manual
CHAPTER 14
SYSTEM FUNCTIONS ...................................................................................... 14-262
14.1 SCHEDULING SYSTEM DEFAULTS ........................................................................................... 14-262
14.1.1 Scheduling Tab .............................................................................................................. 14-262
14.1.2 Compliance Defaults Tab .............................................................................................. 14-265
14.1.3 HC Plus interface Tab ................................................................................................... 14-266
14.1.4 Global Tab..................................................................................................................... 14-267
14.1.5 Sharp Tab ...................................................................................................................... 14-269
14.2 CONTRACT MAINTENANCE .................................................................................................... 14-271
14.2.1 Contract—general information...................................................................................... 14-271
14.2.2 Contract Holiday data ................................................................................................... 14-272
14.2.3 Pro-Health Contract Maintenance ................................................................................ 14-273
14.2.4 Contract—Santrax setup information............................................................................ 14-275
14.2.5 Contract-Sharp Setup Data ........................................................................................... 14-276
14.3 LOCATION MAINTENANCE ..................................................................................................... 14-277
14.4 PROVIDER MAINTENANCE ...................................................................................................... 14-278
14.5 CHANGE COORDINATOR ID.................................................................................................... 14-278
14.6 AUTO BATCH STATUS REPORT ............................................................................................... 14-279
14.7 CODES MAINTENANCE ........................................................................................................... 14-279
14.7.1 Classification Codes ...................................................................................................... 14-280
14.7.2 Reason Codes ................................................................................................................ 14-280
14.7.3 Category Codes ............................................................................................................. 14-280
14.7.4 Referral/Discharge ........................................................................................................ 14-281
14.7.5 Doctor Codes................................................................................................................. 14-281
14.7.6 Work Codes ................................................................................................................... 14-282
14.7.7 Contract Site/Area Codes .............................................................................................. 14-282
14.7.8 County codes ................................................................................................................. 14-282
14.7.9 Coordinator Team Codes .............................................................................................. 14-282
14.7.10
Alien Identification Codes ......................................................................................... 14-282
14.7.11
Diagnosis Codes ........................................................................................................ 14-283
14.7.12
District Codes ............................................................................................................ 14-283
14.7.13
Skill Codes ................................................................................................................. 14-283
14.7.14
Topic Codes ............................................................................................................... 14-283
14.7.15
Pay Source Codes...................................................................................................... 14-284
14.7.16
Procedure Codes ....................................................................................................... 14-284
14.7.17
Company Segment ..................................................................................................... 14-284
14.7.18
Department Numbers................................................................................................. 14-284
14.7.19
Program Types .......................................................................................................... 14-284
14.7.20
Level Care ................................................................................................................. 14-284
14.8 ADDITIONAL CODES MENU .................................................................................................... 14-285
14.8.1 Referral/Discharge Types.............................................................................................. 14-285
14.8.2 User Fields .................................................................................................................... 14-285
14.8.3 Must Cover Codes ......................................................................................................... 14-285
14.8.4 Supervisory Visit Results ............................................................................................... 14-285
14.8.5 Nurses ............................................................................................................................ 14-286
14.8.6 Note Types ..................................................................................................................... 14-286
14.8.7 Coordinator Maintenance ............................................................................................. 14-286
14.8.8 Cluster Groups .............................................................................................................. 14-286
14.8.9 Race Codes .................................................................................................................... 14-287
14.8.10
Tax codes ................................................................................................................... 14-287
CHAPTER 15
SECURITY FEATURES .................................................................................... 15-288
15.1 TO ACCESS HC PLUS SECURITY FEATURES ............................................................................. 15-288
15.2 TO VIEW A LIST OF CURRENT USERS ....................................................................................... 15-288
15.2.1 To view the security profile of an individual user.......................................................... 15-289
15.3 TO ADD A NEW USER............................................................................................................... 15-289
15.4 SECURITY GROUP MAINTENANCE .......................................................................................... 15-290
15.4.1 To view a list of Security Groups................................................................................... 15-290
The Scheduling and Compliance system
1-7
Rev 11.5
HC Plus User Manual
15.4.1.1
15.4.2
15.4.3
15.4.4
15.4.5
To view a Group’s security profile ....................................................................................... 15-290
List of Security Categories and Objects......................................................................... 15-292
To Create a New Security Group................................................................................... 15-295
To Set a Group’s Security Permissions ......................................................................... 15-296
To Remove a Security Group......................................................................................... 15-299
CHAPTER 16
16.1
16.2
16.3
16.4
16.5
16.6
16.7
16.8
16.9
16.10
16.11
16.12
16.13
FREQUENTLY ASKED QUESTIONS (FAQ’S) ............................................. 16-300
HOW TO HANDLE A CLIENT CANCELLATION ........................................................................... 16-300
CLIENT CANCELS FOR MORE THAN ONE DAY .......................................................................... 16-300
HOW TO HANDLE AN EMPLOYEE CANCELLATION ................................................................... 16-300
EMPLOYEE CANCELS FOR MORE THAN ONE DAY ..................................................................... 16-300
ENTER A TEMPORARY REPLACEMENT ..................................................................................... 16-300
ENTER A REPLACEMENT FOR MORE THAN ONE DAY ................................................................ 16-301
CLIENT REFUSES HOME ATTENDANT/EMPLOYEE..................................................................... 16-301
PERMANENTLY REMOVE AN EMPLOYEE FROM A SCHEDULE ................................................... 16-302
EXCLUDE AN EMPLOYEE FROM WORKING WITH A CLIENT ...................................................... 16-302
HOW TO HANDLE UNSCHEDULED VISITS ............................................................................. 16-302
HOW TO HANDLE TWENTY-FOUR HOURS CASES .................................................................. 16-303
PAYING FOR SICK TIME ....................................................................................................... 16-303
PAYROLL STEPS AFTER THE AUTO BATCH IS RUN ............................................................... 16-303
The Scheduling and Compliance system
1-8
Rev 11.5
HC Plus User Manual
Table of Figures
Figure 1-1 Scheduling System Main Menu ............................................................................................... 1-17
Figure 1-2 Telephone Directories.............................................................................................................. 1-19
Figure 2-1: Find Clients screen ................................................................................................................. 2-21
Figure 2-2: Client Roster ........................................................................................................................... 2-22
Figure 2-3: Blank Client Screen ................................................................................................................ 2-23
Figure 2-4: Client Screen filled in ............................................................................................................. 2-26
Figure 2-5: Completed Service Maintenance screen. ................................................................................ 2-28
Figure 2-6: Order Entry Detail Screen....................................................................................................... 2-29
Figure 2-7: Client Schedule Screen prior to employee assignment ........................................................... 2-30
Figure 2-8: Client Screen with services..................................................................................................... 2-30
Figure 3-1: Order Summary List. .............................................................................................................. 3-31
Figure 3-2: Changing the Order Entry Detail Screen ................................................................................ 3-33
Figure 3-3: Client Hold screen. ................................................................................................................. 3-34
Figure 3-4: Client Discharge screen .......................................................................................................... 3-35
Figure 3-5: Client Correct Discharge Screen............................................................................................. 3-35
Figure 3-6: Client Re-Admit Screen.......................................................................................................... 3-36
Figure 3-7: Re-Admit a service ................................................................................................................. 3-37
Figure 3-8: Sharp Client History ............................................................................................................... 3-38
Figure 3-9: Client History screen .............................................................................................................. 3-38
Figure 3-10: Client Notes Screen .............................................................................................................. 3-39
Figure 3-11: Enter a new note. .................................................................................................................. 3-40
Figure 3-12: Multiple notes displayed....................................................................................................... 3-41
Figure 3-13: Client Requirements Screen.................................................................................................. 3-42
Figure 3-14: Blank Employee Exclusions screen ...................................................................................... 3-43
Figure 3-15: Nurses Visit screen. .............................................................................................................. 3-45
Figure 3-16: Client Diagnosis screen. ....................................................................................................... 3-45
Figure 3-17: Plan of Treatment History screen ......................................................................................... 3-47
Figure 3-18: Physician Telephone/Verbal Order....................................................................................... 3-48
Figure 3-19: Form 485, 1st page. ............................................................................................................... 3-48
Figure 3-20: Client Medications screen..................................................................................................... 3-49
Figure 3-21: The Client Diagnosis screen. ................................................................................................ 3-49
Figure 3-22: Select Medical Equipment and Supplies............................................................................... 3-50
Figure 3-23: The Select Safety Measures dialog box. ............................................................................... 3-51
Figure 3-24: The Nutritional Requirements dialog box............................................................................. 3-51
Figure 3-25: The “Select Allergies” dialog box. ....................................................................................... 3-51
Figure 3-26: Form 485, 2nd page................................................................................................................ 3-52
Figure 3-27: Orders for Discipline dialog box and text field..................................................................... 3-52
Figure 3-28: Recording doctor’s orders..................................................................................................... 3-53
Figure 3-29: Form 485, 3rd page............................................................................................................... 3-53
Figure 3-30: Goals/Rehabilitation/Potential Discharge Plans ................................................................... 3-54
Figure 3-31: Doctor List............................................................................................................................ 3-54
Figure 3-32: The Doctor Maintenance screen. .......................................................................................... 3-55
Figure 3-33: The Emergency Contacts screen........................................................................................... 3-56
Figure 4-1: Client Reports Menu............................................................................................................... 4-58
Figure 4-2 Client List Report..................................................................................................................... 4-60
Figure 4-3 Client Activity Report.............................................................................................................. 4-61
Figure 4-4 Client Profile Report................................................................................................................ 4-62
Figure 4-5 Client Schedule Report ............................................................................................................ 4-63
Figure 4-6 Client Labels............................................................................................................................ 4-63
Figure 5-1 Order Entry Summary Screen.................................................................................................. 5-64
Figure 5-2 Order Entry Detail Screen........................................................................................................ 5-65
Figure 5-3 Authorized Hours History Screen ............................................................................................ 5-67
Figure 5-4 Authorized Hours Update Screen ............................................................................................ 5-68
Figure 6-1: Incomplete Service Maintenance Screen ............................................................................... 6-71
The Scheduling and Compliance system
1-9
Rev 11.5
HC Plus User Manual
Figure 6-2: Completed Service Maintenance screen. ................................................................................ 6-74
Figure 6-3: Service Discharge screen. ....................................................................................................... 6-76
Figure 6-4: Guarantor screen..................................................................................................................... 6-77
Figure 6-5: Client Link Window ............................................................................................................... 6-79
Figure 6-6: Link screen w/reason for ‘no’ link.......................................................................................... 6-80
Figure 6-7: Cluster Maintenance/History screen ....................................................................................... 6-81
Figure 6-8: Client Link History screen...................................................................................................... 6-83
Figure 6-9: Sample Miscellaneous Client Screen...................................................................................... 6-84
Figure 6-10: Special Codes on Service Screen.......................................................................................... 6-85
Figure 7-1: The Find Employees screen.................................................................................................... 7-86
Figure 7-2: Employee Maintenance screen. .............................................................................................. 7-87
Figure 7-3: Contract Assignment screen ................................................................................................... 7-89
Figure 7-4: Initial Employee Availability screen. ..................................................................................... 7-90
Figure 7-5: Defining availability for each day........................................................................................... 7-91
Figure 7-6: Employee Availability screen with times filled in.................................................................. 7-91
Figure 7-7: The Employee Skills screen.................................................................................................... 7-92
Figure 7-8 Employee/Client Exclusions.................................................................................................... 7-94
Figure 7-9 Employee Sharp Status History ............................................................................................... 7-95
Figure 7-10 Employee History .................................................................................................................. 7-95
Figure 7-11 Employee Notes Summary screen ......................................................................................... 7-96
Figure 7-12 Note Types............................................................................................................................. 7-96
Figure 7-13 Employee Notes screen with append feature ......................................................................... 7-96
Figure 7-14 Employee Payroll Information............................................................................................... 7-97
Figure 7-15 Contract Specific Payroll Information ................................................................................... 7-99
Figure 7-16 Deductions Information ....................................................................................................... 7-100
Figure 7-17 Employee Direct Deposit Information................................................................................. 7-101
Figure 7-18 Payroll Adjustment screen ................................................................................................... 7-101
Figure 7-19 Employee Status Change ..................................................................................................... 7-102
Figure 7-20 Employee Contract Assignment Screen............................................................................... 7-103
Figure 7-21 Employee Non-Compliance records .................................................................................... 7-104
Figure 7-22: Employee Training & In-service information..................................................................... 7-104
Figure 7-23: Employee Certification information ................................................................................... 7-105
Figure 7-24 Supervisor Visits/Administrative Evaluations ..................................................................... 7-105
Figure 7-25 Employee Mailing Address.................................................................................................. 7-106
Figure 7-26 Employee Reports Menu ..................................................................................................... 7-106
Figure 7-27 Employee List Report .......................................................................................................... 7-107
Figure 7-28 Employee Profile Report (Payroll information selected)..................................................... 7-107
Figure 7-29 Employee Work Schedule Report........................................................................................ 7-108
Figure 7-30 Employee Labels.................................................................................................................. 7-108
Figure 8-1 Schedule Maintenance Menu................................................................................................. 8-109
Figure 8-2 Client Schedule before Assigning Employees ....................................................................... 8-110
Figure 8-3 Weekly Special Codes record ................................................................................................ 8-113
Figure 8-4 Weekly Special Codes Entry ................................................................................................. 8-113
Figure 8-5 Weekly Special Codes History .............................................................................................. 8-113
Figure 8-6 Schedule Detail...................................................................................................................... 8-114
Figure 8-7 Find/Assign Employee Screen............................................................................................... 8-115
Figure 8-8 List of Employees available for a client................................................................................. 8-116
Figure 8-9 Change/Notification screens .................................................................................................. 8-118
Figure 8-10 Client Weekly Schedule with Santrax data.......................................................................... 8-119
Figure 8-11 Client Daily Detail screen showing Santrax corrected hours............................................... 8-119
Figure 8-12 Copying a Schedule ............................................................................................................. 8-120
Figure 8-13 Add a Visit Screen ............................................................................................................... 8-121
Figure 8-14 Find Open Orders................................................................................................................. 8-122
Figure 8-15 Open Orders List.................................................................................................................. 8-123
Figure 8-16 Copy Schedules form........................................................................................................... 8-123
Figure 8-17 Pending Notification ............................................................................................................ 8-124
Figure 8-18 Schedules pending notification ............................................................................................ 8-125
The Scheduling and Compliance system
1-10
Rev 11.5
HC Plus User Manual
Figure 8-19 Permanent Schedule............................................................................................................. 8-126
Figure 8-20 View/Modify Day’s Schedule Data ..................................................................................... 8-127
Figure 8-21 Change Notification screen.................................................................................................. 8-128
Figure 8-22 Reactivate Visit Screen ........................................................................................................ 8-131
Figure 8-23 Change Log Report.............................................................................................................. 8-132
Figure 8-24 Adjust 24 Hours Case Schedules ......................................................................................... 8-134
Figure 8-25 Employee Schedule.............................................................................................................. 8-136
Figure 8-26 Set an Employee’s Availability ........................................................................................... 8-137
Figure 8-27 Special Code Entry Screen................................................................................................... 8-141
Figure 8-28 Add Tasks Screen ................................................................................................................ 8-143
Figure 8-29 Employee Schedule Report.................................................................................................. 8-146
Figure 9-1 Verification Menu.................................................................................................................. 9-148
Figure 9-2 Employee Schedule Verification ........................................................................................... 9-148
Figure 9-3 Schedule Verification Detail.................................................................................................. 9-149
Figure 9-4 Schedule Verification Detail Screen with history.................................................................. 9-150
Figure 9-5 Vacation/sick days on schedule screen .................................................................................. 9-151
Figure 9-6 Verification Screen functions ................................................................................................ 9-152
Figure 9-7 Verified visits......................................................................................................................... 9-152
Figure 9-8 Schedule Detail screen........................................................................................................... 9-153
Figure 9-9 Verified Client Schedule Screen ............................................................................................ 9-153
Figure 9-10 Santrax Unapplied calls ....................................................................................................... 9-156
Figure 9-11 Viewing the Telephone number Associated with a Santrax call.......................................... 9-157
Figure 9-12 Verification Report options.................................................................................................. 9-158
Figure 9-13 Schedule Verification Report............................................................................................... 9-159
Figure 9-14 Unverified Report ................................................................................................................ 9-159
Figure 9-15 Discrepancy Report options................................................................................................. 9-160
Figure 9-16 Verified Hours Discrepancy Report..................................................................................... 9-160
Figure 9-17 Verification Overlapping Visits Report ............................................................................... 9-161
Figure 9-18 Verified and Unbatched Transactions Report ...................................................................... 9-162
Figure 9-19 Santrax Unapplied Calls Report........................................................................................... 9-163
Figure 9-20 Batch Listing/Time Sheet Transfer Screen .......................................................................... 9-166
Figure 9-21 Batch Detail Screen ............................................................................................................. 9-167
Figure 9-22 Time Sheet Detail Screen..................................................................................................... 9-169
Figure 9-23 Add a Time Sheet ................................................................................................................ 9-170
Figure 9-24 Available Time Sheet Detail Screen .................................................................................... 9-171
Figure 9-25 Create New Batch Screen .................................................................................................... 9-173
Figure 9-26 Unbatched Timeslips ........................................................................................................... 9-175
Figure 9-27 On Demand Timesheets menu ............................................................................................. 9-176
Figure 9-28 Build a Timesheets printing list ........................................................................................... 9-177
Figure 9-29 Sample Timesheet 1............................................................................................................. 9-177
Figure 9-30 Sample Timesheet 2............................................................................................................. 9-178
Figure 9-31 Batch Export Report Menu .................................................................................................. 9-178
Figure 9-32 Visits To Be Exported Report.............................................................................................. 9-179
Figure 9-33 Visits Not To Be Exported Report....................................................................................... 9-179
Figure 9-34 CIN Exception Report Menu ............................................................................................... 9-179
Figure 9-35 Visits to be Exported—CIN Exception Report.................................................................... 9-180
Figure 9-36 Verified Visit for WOS Report—CIN Exception Report .................................................... 9-180
Figure 10-1 Compliance System Main Menu........................................................................................ 10-181
Figure 10-2 Company Maintenance ...................................................................................................... 10-182
Figure 10-3 Compliance Category Codes.............................................................................................. 10-182
Figure 10-4 Company Maintenance ...................................................................................................... 10-182
Figure 10-5 State Codes ........................................................................................................................ 10-182
Figure 10-6 District Codes .................................................................................................................... 10-183
Figure 10-7 Location Codes .................................................................................................................. 10-183
Figure 10-8 Profile Sheet Defaults ........................................................................................................ 10-183
Figure 10-9 Profile Sheet defaults ......................................................................................................... 10-184
Figure 10-10 Generic compliance codes ............................................................................................... 10-184
The Scheduling and Compliance system
1-11
Rev 11.5
HC Plus User Manual
Figure 10-11 Generic Code details ........................................................................................................ 10-185
Figure 10-12 Individual Employee Compliance Status ......................................................................... 10-186
Figure 10-13 Employee’s In-service Training History.......................................................................... 10-187
Figure 10-14 In-service Training Report.............................................................................................. 10-187
Figure 10-15 Printing a Non-compliance Letter.................................................................................... 10-188
Figure 10-16 Non-compliance Letter Formatting.................................................................................. 10-188
Figure 10-17 Individual Employee Profile Sheet .................................................................................. 10-190
Figure 10-18 Individual Employee Compliance Code List ................................................................... 10-191
Figure 10-19 Update/Worksheet Menu ................................................................................................. 10-191
Figure 10-20 Compliance Work Sheet .................................................................................................. 10-192
Figure 10-21 Work Sheet Print Options ................................................................................................ 10-193
Figure 10-22 Printed Work Sheet listing Non-Compliant Employees .................................................. 10-193
Figure 10-23 Work Sheet of Completed Codes..................................................................................... 10-194
Figure 10-24 Daily Update and EOM Compliance Processing ............................................................. 10-194
Figure 10-25 Compliance Letter and Label Selection ........................................................................... 10-195
Figure 10-26 Build an employee list ..................................................................................................... 10-195
Figure 10-27 Employees Current Status Sheet ...................................................................................... 10-196
Figure 10-28 Employees In-service Status Report ................................................................................ 10-197
Figure 10-29 Compliance Status of all Employees Report.................................................................... 10-197
Figure 10-30 Non-Compliant Employees Report.................................................................................. 10-198
Figure 10-31 Compliant Employees with Warnings Report.................................................................. 10-198
Figure 10-32 In-service Work sheet Selection ...................................................................................... 10-199
Figure 10-33 In-service Work sheet Report .......................................................................................... 10-199
Figure 10-34 Compliance Code Print Options ...................................................................................... 10-200
Figure 10-35 Generic Compliance Codes w/Levels Report .................................................................. 10-200
Figure 10-36 Compliance Results Options............................................................................................ 10-201
Figure 10-37 Edit Generic Codes .......................................................................................................... 10-201
Figure 11-1 Daily Functions Menu ....................................................................................................... 11-202
Figure 11-2 Santrax—Non Reconciled Transactions ............................................................................ 11-203
Figure 11-3 Reconciled Visit Report..................................................................................................... 11-205
Figure 11-4 Non-Reconciled Visit Report............................................................................................. 11-205
Figure 11-5 Invalid Non-Reconciled Visit Report ................................................................................ 11-206
Figure 11-6 Print Saved Reports screen ................................................................................................ 11-208
Figure 11-7 Santrax Daily Call Exception Reports (DE) ...................................................................... 11-208
Figure 11-8 Santrax Daily Management Report (DM).......................................................................... 11-209
Figure 11-9 Santrax Daily Call Summary (DS)..................................................................................... 11-209
Figure 11-10 Santrax Daily Summary Exception (SE).......................................................................... 11-209
Figure 11-11 Auto Batch Exception Report (AE) ................................................................................. 11-210
Figure 11-12 Auto Batch Summary (AS).............................................................................................. 11-210
Figure 11-13 Santrax Visit Maintenance Import—Applied Visits Report ............................................ 11-210
Figure 11-14 VNS Daily Status Report ................................................................................................. 11-211
Figure 11-15 Call Tracking /Call Schedule Screen ............................................................................... 11-211
Figure 11-16 Call Schedule Screen ....................................................................................................... 11-212
Figure 11-17 Unapproved Special Codes Menu.................................................................................... 11-213
Figure 11-18 Locating Special Codes.................................................................................................... 11-214
Figure 11-19 Doctor's Orders Menu...................................................................................................... 11-214
Figure 11-20 Doctor's Order.................................................................................................................. 11-215
Figure 11-21 List of Doctor’s Orders .................................................................................................... 11-215
Figure 11-22 Received Orders Report................................................................................................... 11-216
Figure 11-23 Referral Tracking............................................................................................................. 11-216
Figure 11-24 Referral Tracking Detail .................................................................................................. 11-217
Figure 11-25 Interface Client/Service/Employees................................................................................. 11-218
Figure 11-26 Plan of Treatment Table Maintenance ............................................................................. 11-221
Figure 11-27 Worksheet Categories ...................................................................................................... 11-221
Figure 11-28 Worksheet Sub Categories............................................................................................... 11-222
Figure 11-29 Blank 485 worksheet ....................................................................................................... 11-222
Figure 11-30 Diagnosis Code Maintenance Table ................................................................................ 11-223
The Scheduling and Compliance system
1-12
Rev 11.5
HC Plus User Manual
Figure 11-31 ICD9 Diagnosis Code Master .......................................................................................... 11-223
Figure 11-32 ICD9 Diagnosis Code–Search by Code ........................................................................... 11-224
Figure 11-33 ICD Diagnosis Code–Search by Text .............................................................................. 11-224
Figure 11-34 Medications Screen.......................................................................................................... 11-225
Figure 11-35 Forms of Medication........................................................................................................ 11-226
Figure 11-36 Medication Routes ........................................................................................................... 11-226
Figure 11-37 Medication Frequency ..................................................................................................... 11-226
Figure 11-38 Medication Units.............................................................................................................. 11-226
Figure 11-39 DME & Supplies Maintenance ........................................................................................ 11-227
Figure 11-40 Safety Measures Maintenance ......................................................................................... 11-227
Figure 11-41 Nutritional Requirements................................................................................................. 11-227
Figure 11-42 Allergy Maintenance........................................................................................................ 11-227
Figure 11-43 Goals Maintenance .......................................................................................................... 11-228
Figure 11-44 Rehabilitation Table Maintenance ................................................................................... 11-228
Figure 11-45 Potential Discharge Plans ................................................................................................ 11-228
Figure 11-46 Facility Types Maintenance............................................................................................. 11-228
Figure 11-47 Functional Limitations ............................................................. Error! Bookmark not defined.
Figure 11-48 Homebound Reasons ....................................................................................................... 11-229
Figure 11-49 Unusual Environments..................................................................................................... 11-229
Figure 11-50 Patient Leaves Home Reasons ......................................................................................... 11-229
Figure 11-51 Plan of Treatment Control File ........................................................................................ 11-230
Figure 12-1 Training Menu ................................................................................................................... 12-231
Figure 12-2 Training Topics.................................................................................................................. 12-231
Figure 12-3 Training Class Master ........................................................................................................ 12-232
Figure 12-4 Training Class Maintenance .............................................................................................. 12-232
Figure 12-5 Training Class Roster......................................................................................................... 12-233
Figure 12-6 Employee’s Training History............................................................................................. 12-234
Figure 12-7 Training Certificate Print Menu......................................................................................... 12-235
Figure 12-8 Printed Certificate .............................................................................................................. 12-235
Figure 12-9 Training Report options ..................................................................................................... 12-236
Figure 12-10 Employee Training Report............................................................................................... 12-236
Figure 12-11 Training Sign up sheet ..................................................................................................... 12-237
Figure 12-12 Topic Training Report ..................................................................................................... 12-237
Figure 13-1 Reports Menu..................................................................................................................... 13-238
Figure 13-2 Service Distribution Report ............................................................................................... 13-238
Figure 13-3 Pending Notification Report .............................................................................................. 13-242
Figure 13-4 Non-working Employees Report ....................................................................................... 13-243
Figure 13-5 Employees Overtime Report.............................................................................................. 13-244
Figure 13-6 Individual Client Activity Report ...................................................................................... 13-245
Figure 13-7 Consolidated Activity Report ............................................................................................ 13-246
Figure 13-8 Additional Reports Menu................................................................................................... 13-246
Figure 13-9 Clients Held Detail Report................................................................................................. 13-249
Figure 13-10 Clients Resumed Detail Report........................................................................................ 13-250
Figure 13-11 Client Hold Report........................................................................................................... 13-250
Figure 13-12 Under Assigned Client Report ......................................................................................... 13-251
Figure 13-13 Completed Visits Summary Report ................................................................................. 13-252
Figure 13-14 Special Codes Report....................................................................................................... 13-253
Figure 13-15 Weekly Carfare Log Menu .............................................................................................. 13-254
Figure 13-16 Weekly Carfare Report .................................................................................................... 13-254
Figure 13-17 Weekly Carfare Report (including clusters) .................................................................... 13-255
Figure 13-18 Nurse Visit Report menu ................................................................................................. 13-256
Figure 13-19 Nurse Visit Report ........................................................................................................... 13-256
Figure 13-20 Nurse Visit History Report .............................................................................................. 13-257
Figure 13-21 Expiring Certifications Report......................................................................................... 13-257
Figure 13-22 Employee Hours Worked Report..................................................................................... 13-258
Figure 13-23 Employee Unavailability Report...................................................................................... 13-259
Figure 13-24 Expiring Plans of Treatment Report ................................................................................ 13-260
The Scheduling and Compliance system
1-13
Rev 11.5
HC Plus User Manual
Figure 13-25 Unsigned Plans of Treatment Report ............................................................................... 13-261
Figure 13-26 Unsigned Verbal Orders Report....................................................................................... 13-261
Figure 14-1 System Functions menu ..................................................................................................... 14-262
Figure 14-2 Scheduling Defaults menu ................................................................................................. 14-262
Figure 14-3 Compliance Defaults menu................................................................................................ 14-265
Figure 14-4 HC Plus directory assignments .......................................................................................... 14-266
Figure 14-5 System Global Defaults ..................................................................................................... 14-267
Figure 14-6 Sharp default options ......................................................................................................... 14-269
Figure 14-7 List of Contracts................................................................................................................. 14-271
Figure 14-8 General Contract Information ............................................................................................ 14-271
Figure 14-9 Contract Holiday Information............................................................................................ 14-273
Figure 14-10 Pro-Health Contract Data................................................................................................. 14-273
Figure 14-11 Contract/Santrax options.................................................................................................. 14-275
Figure 14-12 Contract/Sharp options..................................................................................................... 14-276
Figure 14-13 Location Maintenance inputs........................................................................................... 14-277
Figure 14-14 Auto Batch Status Report................................................................................................. 14-279
Figure 14-15 Codes Maintenance Menu................................................................................................ 14-279
Figure 14-16 Additional Codes Maintenance Menu.............................................................................. 14-285
Figure 15-1 System Function Menu ...................................................................................................... 15-288
Figure 15-2 List of Users....................................................................................................................... 15-288
Figure 15-3 New User Entry Screen...................................................................................................... 15-289
Figure 15-4 Assign a New User to a Security group ............................................................................. 15-290
Figure 15-5 List of Security Groups...................................................................................................... 15-290
Figure 15-6 A Group’s Security Profile ................................................................................................ 15-291
Figure 15-7 Security Group—General Information .............................................................................. 15-295
Figure 15-8 Security Group—User Membership .................................................................................. 15-295
Figure 15-9 Creating Security Permissions ........................................................................................... 15-297
Figure 15-10 Group Permissions Report ............................................................................................... 15-298
Figure 15-11 Deleting a Group.............................................................................................................. 15-299
The Scheduling and Compliance system
1-14
Rev 11.5
HC Plus User Manual
Chapter 1 The Scheduling and Compliance system
The HC Plus System comprises both scheduling and compliance functions. Scheduling enables you to
maintain client and employee information, enter orders, schedule care by matching clients to employees,
produce reports, and verify employee’s schedules for payroll purposes. The Compliance Reporting System
maintains all aspects of employee compliance in regard to training, certification, evaluations, and
adherence to contract requirements. This manual will explain how you can perform the various tasks the
Scheduling and Compliance System provides.
1.1
Start HC Plus
1.
If you have an HC Plus Shortcut on your desktop,
type http://access.hcplus.com in the address bar.
click on it. Or open a browser window and
2.
The HC Plus Login screen appears.
a)
Enter your username and password in lower case letters, then press Log In
b) The Applications screen will now be displayed
The Scheduling and Compliance system
1-15
Rev 11.5
HC Plus User Manual
c) Click on the Icon
d) The Scheduling and Compliance login screen appears.
c)
1.2
Fill in the Log In Name and Password and click Continue
Log In Features
When the Scheduling and Compliance login screen appears. You will need to enter your Login Name, first.
A blinking cursor will be in the password text box waiting for entry of the password that matches your
login name. Your system administrator (or your HC Plus technical support) will supply you with your
password.
If you need to log in as a different user, press the up arrow on your keyboard or click in the Log-In-Name
text box with the mouse.
If you have keyed your login id, press the Tab key on the keyboard to position the cursor in the Password
text box. (In general, use the Tab key for moving around from field to field on a screen.)
If your scheduling system is made up of more than one location, select the correct location.
Press the Enter key, click on the Continue button, or press Alt + C to continue to the Main Menu.
The Scheduling and Compliance system
1-16
Rev 11.5
HC Plus User Manual
1.3
The Scheduling System Main Menu
The Scheduling System main menu contains eight buttons used to access scheduling or compliance
functions. Each is described in detail in this manual. You may select any function button by clicking the
mouse or by pressing the Alt key plus the underscored character (e.g., Exit).
You must enter and exit the system through this menu. When you finish processing a particular form
always exit your current screen through the Exit Door (
--save and exit icon) or the Exit button—until
you backtrack to the main menu. Upon completion of your HC Plus work, select the Exit Scheduling
button to exit the system.
Figure 1-1 Scheduling System Main Menu
The Scheduling and Compliance system
1-17
Rev 11.5
HC Plus User Manual
1.4
Scheduling System Functions
Function/Button
Description
Includes the functions related to client orders. You may enter new client
orders or view or modify existing client orders including their scheduling
requirements. Orders must exist before you can set up a schedule.
Enter new employees into the system or modify existing employee
information. Some of this information includes defining skills, availability,
and training. It also enables you to assign employees to clients and create
schedules.
Enter new clients into the system or modify existing client information. The
client information includes care plans, special requirements, diagnosis,
contacts, contracts, and billing. It also allows you to assign employees to
Clients schedule.
Includes all reporting including Client Reports, Employee Reports, Notes,
Expiring Care Plans, Contract Reports and more.
Includes the functions necessary for maintaining client and employee
schedules, open orders, and copying schedules.
Use to verify that schedules have been kept, and to generate time slips and
verification reports.
Includes various functions needed to support other maintenance and
scheduling tasks. Some of the daily functions include: call tracking; find
open orders; plan of treatment; transportation list; doctor’s orders tracking;
referral tracking; client/service interface; plan of treatment table; maintenance
training; and cluster care. Where applicable, you can print Santrax reports.
Functions used to establish and maintain employee compliance requirements.
When your agency has multiple locations, select the location whose
data you want to access.
Accesses functions needed to set system defaults, and fix values for various
codes. It also includes utilities for creating and maintaining contracts,
locations, and coordinators.
In addition, use this button to access all HC Plus security features.
Press this button to exit HC Plus.
Note: HC Plus automatically times out after 45 consecutive minutes of inactivity for all non-Admin
personnel. The following screens are exempt from timing out: Employee Payroll Info (in add mode only),
Contract Assignment (in add mode only), Create Work Sheet, and Daily Update and EOM.
The Scheduling and Compliance system
1-18
Rev 11.5
HC Plus User Manual
1.5
Help
When you click on the Help button located on the screen toolbar, several options, listed below, appear.
Hitting Tools opens a submenu: giving you access to a calculator and a calendar.
Click on the Print Screen option to print an image of the contents of a current screen in Landscape mode.
The Phone Book option displays a searchable list of client or employees providing their current telephone
numbers.
Figure 1-2 Telephone Directories
The Scheduling and Compliance system
1-19
Rev 11.5
HC Plus User Manual
When you click on the Open Folder
The Scheduling and Compliance system
button, the detail of the client or employee appears.
1-20
Rev 11.5
HC Plus User Manual
Chapter 2 Client Maintenance
This chapter will show you how to:
2.1
1.
Access a client record.
2.
Create a new client record.
3.
Maintain current records.
Access the Client Maintenance Screen
From the Main menu (Figure 1-1), select the
2.2
button. The Find Clients Screen appears.
Locate a client’s record
1.
Enter client data in any of the fields shown below and press Find to retrieve his/her record.
2.
To access the list of all your clients, press Find leaving all fields blank.
Note: If you need to include terminated
clients in your list, check the “Show Term”
box. If you just want to see Active or Current
Clients leave the box UN-checked.
Figure 2-1: Find Clients screen
Search Fields
Description
Location
Use the dropdown to select the agency’s location.
Ignore Location
Access clients without regard to location.
Client Name
Enter the name or part of a name.
Show Term?
Include terminated clients in your list. (see note)
Client No
Retrieve a client using the client number.
Social Security
Find a client record using the social security number
Client Maintenance
2-21
Rev 11.5
HC Plus User Manual
MRN
Find clients using their Medical Record number
VNS Entry/Case
Find clients using their VNS entry or case number.
Contract
Limit clients to a specific contract
City
Enter the city
Coordinator
Use the dropdown to select a specific coordinator
County
Enter the county or borough.
Figure 2-2: Client Roster
NOTE:
Left click on the scroll handle
record count of the clients
search.
to display a
found in the
Right click on the scroll bar to carry out any of the
operations listed below.
The roster shows the code of the coordinator
(Coord) assigned to each client; the MC column
shows the ‘Must Cover’ rating for the client.
Client Maintenance
2-22
Rev 11.5
HC Plus User Manual
2.3
Process a new client
Processing a new client into HC PLUS involves carrying out the steps outlined below.
Add a new
client
Create a
Service
Fill out an
order
See the new
schedule
2.3.1 Add a new client
Click on Client Maintenance button
Press the Add Client button on the Find Clients screen and a blank Add New Client screen appears.
Most text boxes are empty with the exception of fields that contain default values, notably Client No,
Location, Status and Start Date. All Mandatory Fields are outlined in black. (i.e. Last name, first name,
etc.)
Figure 2-3: Blank Client Screen
2.3.2 Complete the Client Screen
1.
Proceed to fill in the client’s name.
2.
The program assigns the Client an ID number. (If you prefer to enter the Client No manually, please
contact Client Services to make this option available.)
3.
The Location code may be chosen from the dropdown box, if you have multiple locations.
4.
Enter the Social Security number.
5.
The default for the Status drop-down is “Active.” The “Hold” and “Terminated” options come into
play when editing the record of an existing client. (In that case, the Discharge Reason will also be
operative.)
Client Maintenance
2-23
Rev 11.5
HC Plus User Manual
6.
Use the Tab key to navigate from field to field within the Personal and Demographic Info section.
Enter the pertinent address, including the state, city and zip.
7.
The County field is next. Use the drop-down selections that were established when your system was
set up
8.
Use the drop-down menu to fill in the District. A district is any type or size of geographic area that
your agency wishes to define. (Districts are established in the District Code Maintenance function via
the Codes Maintenance menu.) Your system administrator has probably created appropriate choices
that are available in the drop-down menu. .
9.
For the client’s Birth Date, enter both the month and date in 2-digit format, and the year with four
digits (for example: 01/15/1953).
10. For Sex, enter “M,” “F” or “N” for Not Applicable. “NA” is used in situations where the Client is a
group, such as a nursing home unit or some other Cluster Care site.
11. For Race categories, use the dropdown.
12. For Marital status, use the dropdown.
13. Use the Telephone Numbers fields to enter the client’s phone numbers. The system creates the
appropriate parentheses and dashes to format the number properly with an area code. Enter an
Extension if appropriate. The Type drop-down contains options describing the phone’s use.
The client phone number is mandatory if the client has a Santrax
effective date. (See Service Maintenance)
14. Enter a Nationality, if applicable.
Enter data into the Health Care Information section
1.
The Start Date defaults to the current date when you are establishing a new Client. If you wish to
modify this date, be sure to input two digits each for month, date, and year (for example: 06/05/04).
2.
End Date cannot be edited in this screen; the date for terminating service is defined by other functions
in the HC Plus system such as using the discharge button (See section 3.4).
3.
The Must Cover drop-down is used to quantify the necessity of making a scheduled visit in the event
of staffing problems or inclement weather. Higher ratings in this field indicate that the client may be
able to miss a visit without adverse effects. Lower ratings point out that the agency must take
whatever measures are necessary to supply an employee at the scheduled time. Once a Must Cover is
specified, that client’s schedule must be filled by the coordinator.
Client Maintenance
2-24
Rev 11.5
HC Plus User Manual
4.
The Coordinator drop-down shows the codes and names of
Coordinators currently in the system.
**A coordinator code contains the contract ID in the first three
digits and the coordinator’s ID in the last two.
5.
Select or establish a Team. A team is any grouping of employees within your agency selected for
particular skills or needs. Add new teams by accessing System Functions Î Codes Maintenance Î
Coordinator Team Codes.
6.
Click the Equipment Supervision checkbox when the agency is required to handle
oversight/maintenance of special equipment (such as oxygen) in the client’s home. If equipment
supervision is designated for a client, enter the start date in the field next to the checkbox.
7.
Enter the Last Call Date, the most recent date the client had been contacted by the agency.
8.
The call Frequency field can be used for your agency to indicate how often they should contact the
client.
9.
Where appropriate, enter the Client’s Medicare ID. Together with the ID, enter the date this Medicare
ID number was Verified.
10. The Medical Record (MRN) is for use with your agency’s internal system of managing client medical
records, if applicable.
11. Record the Client’s health insurance claim number, if applicable, in the Health Insurance Claim #
field.
12. The Doctor Field uses a drop-down menu for physicians who are already entered in the HC Plus
system.
13. Nurse is a drop-down field where you may select a nurse to be assigned to the client.
14. Visit Frequency of the nurse allows the entry of values 1-12. (A default value can be set on an agency
level using the Systems Functions Î Scheduling defaults Î Global module.)
15. Use the Directions field to provide directions for an employee regarding the client, e.g., how to get to
the client’s home.
NOTE: FOR AGENCIES THAT HAVE AUTO CLIENT NUMBERING TURNED ON…
If you are entering a new client into the system and the client’s name already exists a prompt will be
displayed (as below) to help reduced duplicate entries. You can then pull up the existing Client record.
Client Maintenance
2-25
Rev 11.5
HC Plus User Manual
Figure 2-4: Client Screen filled in
16. When you press Save/Exit, HC PLUS checks your inputs and directs you to correct them, if necessary,
as shown in the example below.
Client Maintenance
2-26
Rev 11.5
HC Plus User Manual
NOTE:
Before you save, you can abort the new client
record by hitting Cancel. This brings up the
dialog shown on the right.
On some HC Plus screens: to save your entries, click on the Exit door
wish to exit the screen without updating, select the
button; but if you
icon instead.
ADDITIONAL NOTE: If your Agency is set-up for Auto ID numbering, and you decide to cancel an
entry, you may cancel BUT that number will not be used again.
Client Maintenance
2-27
Rev 11.5
HC Plus User Manual
2.3.3 Create a service for a new client
Once a new Client is saved, automatically a blank service entry screen appears with certain fields such as
name, location, status, and start date filled in. A service ID number is also assigned.
As you select in the contract name from the dropdown list, the bottom part of the screen (Additional
Service Information) is displayed.
Instructions related to filling out the fields of the Service Maintenance screen are provided in
Chapter 6 Service Maintenance .
Figure 2-5: Completed Service Maintenance screen.
Once you complete the Service Maintenance screen, press Save/Exit . Immediately, a blank Order
Entry screen appears.
Client Maintenance
2-28
Rev 11.5
HC Plus User Manual
2.3.4 Fill in a new order
Proceed to fill in the Order Entry screen.
Figure 2-6: Order Entry Detail Screen.
Section 5.1 fully covers the order entry procedure and the screen’s field descriptions in detail.
However, the simplest method to complete a new order is:
1.
Enter the number of days for a service to be provided to the client.
2.
Enter the total weekly hours.
3.
On the lower portion of the screen, click on a weekday and enter the time period you want for the
service during that day.
4.
Adjust the days and hours so that the total hours that appear in the Hr:/Days segment matches the
values you entered in steps 1 and 2; that is, the scheduled hours/days match the authorized
hours/days.
5.
When complete, press
6.
Upon saving, a schedule that is based on your order entries appears.
to save.
All this schedule requires is that you assign an employee to provide services on the days shown. Note
that now when you return to the client Maintenance screen, a summary of the newly entered service
appears at the foot of the screen. Click on the service row to view the detailed service order. You may
also enter a new service order by clicking on the blank row beneath it.
A full description of service orders is given in Chapter 6, Service Maintenance .
Client Maintenance
2-29
Rev 11.5
HC Plus User Manual
2.3.5 View the new schedule
When you fill out an Order Entry, and save it, the schedule screen appears ready for you to assign
employee(s) to work with the client during the authorized/scheduled days.
Figure 2-7: Client Schedule Screen prior to employee assignment
Figure 2-8: Client Screen with services
Client Maintenance
2-30
Rev 11.5
HC Plus User Manual
Chapter 3 Client Maintenance Functions
After displaying a client’s record, you can change many fields using the Edit button. However, only users
with appropriate security clearance may change a Client’s Name and Social Security number. This is for
open orders, only.
Other changes may be made using the buttons on the right side of the Client
Maintenance screen. Each button allows you to perform specific tasks related to
the client’s welfare. In the following sections, each function/task is described in
the order they appear under the Switch To heading.
3.1
View a client’s order information
The Order Info button opens the Order Entry summary screen. This screen lists
all orders currently attached to a client. No modifications are permitted on this
screen. A red asterisk to the right of the End Date indicates the order had been
terminated. If the client is HRA authorized, the HRA hour information is
displayed at the bottom of this screen.
You can use the dropdown box on the left side of the Order Entry screen to filter
out orders by contract—or select ALL to see every service for the client regardless
of the contract to which the service belongs.
The Client Info button returns you to the Client Maintenance screen.
Figure 3-1: Order Summary List.
NOTE: Press the New button to set up a new order. See Chapter 5 for a full description of the
procedure used to create a new order record.
Client Maintenance Functions
3-31
Rev 11.5
HC Plus User Manual
3.1.1 Order entry summary list—field description
Heading
Description
Order ID/Date
The ID number of the individual order and the date the order was originally placed.
Effective Date
Effective date of start of services. This field cannot be changed when scheduled visits
exist prior to the date you want to enter.
Note: When editing a change to the effective date of an order, cancelled visits are not
included. This allows you to handle the case where the effective date needs to be
changed to a later date but schedules exist prior to the new effective date. You may
cancel the unwanted visits—and you will then be able to modify the order’s effective
date.
End Date
The End Date field may remain empty, indicating that no end of service has yet been
projected. If you do put in an end date, ADMIN users will only be allowed to remove it
when there are no active orders for the client; this validation avoids the occurrence of
two open orders for the client.
Clasf
The assigned employee’s classification: HHA indicates Home Health Aide; HM
(Homemaker); PCA (Personal Care Assistant). TRN indicates the employee is in
training and will be accompanied on visits by another employee.
Qty
The number of employees assigned to the client by this order, if applicable.
Days
Number of days until contract expiration. If the order has been closed the number is for
the days the order WAS open. The order can be left OPEN and will be listed as OPEN..
Frequency
Frequency of the employee’s visits, e.g., weekly, and daily.
WC
Work Code. Further defines the employee’s duties. Categories include: HH (Home
Health maintenance); HIV (care for client with AIDS symptoms); House Keeping
assistance for partially or totally disabled clients; Live-in care, comprising multiple
duties; long-term care; MH (multiple patients at the site); short-term care.
SC
The Shift Code refers to the work shift during which the client will be serviced. For
Example, a 1 may refer to the early morning shift.
Proc
Procedure Code. Attaches information about ordered procedures.
Start Times
Times for start of each scheduled visit.
Total Hours
Total of weekly hours.
Visits
Number of visits scheduled for this client per week.
DAYS (SAT,
SUN etc.)
For each day, the number of hours (stipulated by the contract for service to be delivered
to the client) is displayed.
Cat
Category code. Displays an abbreviation for the agency that contracts the employee for
the client. Agencies and programs can be added, modified or deleted in Main Menu Î
Special Functions Î Codes Maintenance Î Category Codes. (See section 14.7.3.)
Contract
Used to distinguish among multiple programs offered by the agency indicated by the
Category code. For instance, Visiting Nurse Service offers Adult Care as well as AIDS
care training and Cluster Care. Contracts can be added, modified or deleted in Main
Menu Î System Functions Î Contract Maintenance. (See section 14.2.)
Authorization
Displays the social services specialist or insurance company professional who has
authorized the ordered visits and procedures, guaranteeing payment to the agency.
Scheduled
Thru
This field displays the last date of the current schedule of visits. This date serves as a
reference for your renewing the existing schedule or for setting up a new one. Note the
difference between Scheduled Thru date and End Date. The End Date specifies the
projected end of all service for this client.
Client Maintenance Functions
3-32
Rev 11.5
HC Plus User Manual
When you press on the *** button to the left of an existing listed order, the Change Order screen appears,
as shown below.
A full description of the order entry detail screen appears in Chapter 5 Enter/View Client Orders.
1.
You may change the information on this screen by pressing Change Auth. Note: upon
modification, the end date is validated to check if schedules exist that are past your desired end
date. Once your changes are accepted, the revised Schedule Screen based upon your changes is
displayed.
Figure 3-2: Changing the Order Entry Detail Screen
2.
3.2
You may end an order either by discharging the client or by clicking on New Auth and entering a
new authorization.
Schedule a client
Use the Schedule button to view, modify or set up a new schedule for the client. For complete scheduling
details, see Chapter 8, Schedule Maintenance.
Client Maintenance Functions
3-33
Rev 11.5
HC Plus User Manual
3.3
Place a client on hold—or resume services
Pressing the Hold button on the Client Maintenance screen (below) places the services to be administered
to the client on a hold status. When putting a client/service on hold, HC Plus will remove holiday hours,
only if the hold date is on or before the actual holiday.
Hold Button
Figure 3-3: Client Hold screen.
1.
Use the drop-down menu to select a reason for the hold in your company’s service to the Client, and
enter the date when service has been put on hold status. You cannot enter a date more than 30 days in
the future when placing a client on Hold.
2.
Click Exit to save the data and leave this screen. Once a client is on hold, the button on the right of
the Client Maintenance screen toggles to Resume and the service is shown with a red H and an end
date. Use the Resume button to reactivate the client when necessary. When selecting Resume for a
client in a Hold status, you are prevented from entering a ‘Resume Date’ of more than 30 days into the
future.
3.
Reports are available listing all clients who are on hold and those that have resumed service.
Client Maintenance Functions
3-34
Rev 11.5
HC Plus User Manual
3.4
Discharge a client
The Discharge button (Figure 2-4, Client Screen) allows you to record the date and reason of a client’s
leaving your agency’s service. Use the drop-down menu to enter the code for an established discharge
reason. Once a client is discharged, he/she will not appear on the active client roster. Note that you cannot
enter a date more than 30 days in the future when discharging a client. When discharging, HC-Open will
remove holiday hours, only if the discharge date is on or before the actual holiday.
Before a client or service discharge, you will have to unlink any linked clients.
Figure 3-4: Client Discharge screen
3.4.1 Correct a discharge
After the discharge/termination of a client, a Re-Admit button appears in the Switch to list of his/her
record. So, if you mistakenly discharged a client, do the following:
1.
After pressing the Re-Admit button, the following screen appears.
Figure 3-5: Client Correct Discharge Screen
Client Maintenance Functions
3-35
Rev 11.5
HC Plus User Manual
2.
A discharge can only be corrected for the last discharged service. When you correct a discharge,
do not enter a re-admit date or select a service
3.
Press Correct Discharge on this screen. A popup appears giving the reactivation information—
and requests you confirm you want to restore all orders as of the original discharge date.
4.
Press OK. The following screen appears.
5.
Enter a reason for correcting the discharge and Press Correct Discharge to complete the process.
3.4.2 Re-admit a client
1.
On the Find Clients screen, enter either the ID # or the last name. Click on the
checkbox to the right of client ID #.
2.
Display the client’s record. Click the Re-Admit button. The following screen appears.
Figure 3-6: Client Re-Admit Screen
3.
Enter the Re-admit Date as shown above and click on Re-Admit Client.
4.
Proceed to set up a new order and a schedule for this client.
Client Maintenance Functions
3-36
Rev 11.5
HC Plus User Manual
Note: Agencies are able to re-admit and schedule a VNS client by creating a new order, which will generate
the Scheduled Through Date for the current Friday. You will then be able to enter the schedule for the
current week.
We strongly recommend you allow the VNS process to handle the Re-Admits automatically. The Visit
Entry # is not used to determine a re-admit. You can manually discharge and readmit the VNS client: the
end date on the service will be removed; the service status will be changed to active; the visit entry number
cleared: the readmit written to history; and an order or authorization created as needed.
Readmitting Terminated VNS Clients: You may re-admit terminated VNS clients and assign them to a Non
VNS contract. From the Client Maintenance screen Î Re-admit Î Select ‘Re-admit Client’. You will be
transferred to the Service Maintenance screen and will be able to select a new non-VNS contract for the
client.
3.4.3 Re-admit a service
When a client who had been previously discharged is processed for readmission, you may elect—in the
case where he/she used multiple services, to reinstate some or all of those services. When you press ReAdmit for this discharged client, the following screen appears:
Figure 3-7: Re-Admit a service
1.
Select those services you want operative upon readmission of the client.
2.
Press the Re-Admit Service button.
Client Maintenance Functions
3-37
Rev 11.5
HC Plus User Manual
3.5
View client history
The History button opens a screen that displays the Sharp status of the client, such as, discharged,
readmitted etc., and you may, with the proper security level, update this termination history.
Figure 3-8: Sharp Client History
The HC Plus History button on the bottom of the Sharp screen opens another screen that displays major
changes to a client’s status. No editing takes place on this screen. This history lists the most recent
changes at the top of the screen. Use the lateral scroll bar to view fields at the extreme right. Changes
made through the SHARP history will not affect the client’s HC Plus history.
Figure 3-9: Client History screen
Client Maintenance Functions
3-38
Rev 11.5
HC Plus User Manual
Field
Description
Date Time Stamp
This date is permanently attached to the change displayed on that line, to
provide reliable tracking of modifications in these records.
UserChanged
If the entry in the field is different from the previous entry, this indicates that a
new user at the agency or in your company has been authorized to edit the
client’s account information.
Type
Indicates a change in the client’s care status, such as discharge from the
agency’s care, a hold in service or a readmission.
Start Date
Start date of service to this client.
End Date
Entering an end date in one of the other maintenance screens will produce an
entry in this field.
# Days
Number of days is automatically computed and entered here when start date and
end dates have been entered in the screens of a given order.
Discharge
If the status change shown is a discharge, this field displays the distinctive
discharge code. These codes provide the ‘reason’ for the discharge such as
transfer to another agency, a nursing facility, or hospitalization. See section 3.4.
HI Claim #, Medical
Record #, Medicare ID
and Medicaid ID
Use the horizontal scroll bar to view the following: Health Insurance Claim #,
Medical Record #, Medicare ID and Medicaid ID. The fields reflect any
changes to those numbers.
3.6
Enter Notes
The Notes button on Figure 2-4 opens the Client Notes screen (below), and is used for entering comments
of various types, including billing and financial information.
Figure 3-10: Client Notes Screen
1.
Press the New button. This screen below appears:
Client Maintenance Functions
3-39
Rev 11.5
HC Plus User Manual
Figure 3-11: Enter a new note.
2.
Use the drop-down menu to select a note type or category, and then enter text into the window. The
Note field is limited to 4,000 characters. If you exceed limit, a message appears warning that the
highlighted section of text will be deleted.
3.
When you’re done, click the
Client Maintenance Functions
button.
3-40
Rev 11.5
HC Plus User Manual
3.6.1 Edit Notes
1.
When you launch the Notes function for a client, all the notes currently on record are displayed.
Figure 3-12: Multiple notes displayed.
2.
To restrict the display of existing notes to one category, select that category from the drop-down menu.
3.
To edit an existing note, press the ** button and change the text as needed. A password is needed to
change existing notes but you can append (using the + button) additional comments to an existing
note.
Client Maintenance Functions
3-41
Rev 11.5
HC Plus User Manual
Print the notes using the
screen.
3.7
button. The notes print as sorted and displayed on the Client Notes
Enter Client Requirements
Requirement criteria, selected from a drop-down list, are used to match a client’s needs (requirements) with
an employee’s skills. These may include such specialties as languages spoken by the employee, his/her
ability to work around various types of pets and the ability to perform tasks that involve lifting. Pressing
the Requirements button on the Client Maintenance Screen (Figure 2-4) displays the Client Requirements
screen below.
Note: The selections in the drop-down boxes must be defined in the Skill Codes table. See section 14.7.13.
Figure 3-13: Client Requirements Screen.
FIELD
Description
Description
This column lists other client requirements that have already been defined.
Rating
Assigns a level of importance to the requirement. A low numerical rating indicates a low
level of importance. This rating will be matched with employee skills. The checkbox
indicates that the client should be matched with an employee who has the skills to fulfill
the requirement.
Client Maintenance Functions
3-42
Rev 11.5
HC Plus User Manual
3.8
Exclude an employee from working with a client
Using Exclusions helps you document information regarding specific employees with whom the client
refuses to work.
The Client Exclusion screen displays two tabs: ‘Excluded from Client’ which lists all employees excluded
from working for the client and ‘Excluded from Contract ‘which will list all employees excluded from
working for the active contract. From the Exclusion screen, you are able to add, delete, and modify client
exclusions. When New is selected, you will be presented with a look-up screen which will accept alpha or
numeric entries. You also may document exclusion levels and exclusion reasons.
The available exclusion levels are Warn and Prevent with new entries defaulting to Prevent. If the
exclusion level is set to Warn, you will be warned before assignments can be made with the option of
allowing the assignment left open. The ‘Excluded from Contract’ tab is informational only and cannot be
modified.
Figure 3-14: Blank Employee Exclusions screen
1.
Press New to bring up an employee selection window. Enter the first few digits of the employee
number or the first characters of a name and press the Exit button. A list of employees matching
your criteria appears.
Client Maintenance Functions
3-43
Rev 11.5
HC Plus User Manual
2.
Select the employee you want to exclude.
3.
The screen below appears with his/her name on the left side.
4.
On the right side of the screen, enter the exclusion level (warning or prevention) and note the
reason for the refusal. Press the
5.
3.9
button to save the information.
By using the Excluded from Contract tab, you can globally exclude an employee from working
with any client who is covered by a specific service contract.
Nurses Visits
This screen keeps track of nurses’ visits to clients in accordance with order requirements. ‘A’ for
Assessment; ‘I’ for initial; and ‘S’ for Supervisory indicate the Type of visit. The Visit date field does not
allow the entry of a future date.
The interface of nurse visits from PC Sharp to HC Plus uses the following rules.
a)
HC Plus will only store one nurse visit per date.
b) If a duplicate date is detected, HC Plus will update the existing visit’s type based on the hierarchy: ‘A’,
‘I’, ‘S’. This means that an ‘A’ssessment or ‘I’nitial assessment code will always replace an
‘S’upervisory type, and an ‘S’ type will never replace an existing type. If the duplicate date is detected
and the existing record is ‘A’ or ‘I’ then the replacement will only be performed if the PC Sharp visit
contains either an ‘A’ or ‘I’.
Client Maintenance Functions
3-44
Rev 11.5
HC Plus User Manual
Figure 3-15: Nurses Visit screen.
3.10 Enter the Client Diagnosis
1.
To record diagnostic information for a new client or to edit diagnostic information for an existing
client press the Diagnosis button on the Add Client screen (Figure 2-4). The Diagnosis screen
appears. Proceed to fill in the fields using the drop down boxes. Exit by pressing
.
Figure 3-16: Client Diagnosis screen.
FIELD
Description
Dx Type
Diagnosis type. Principle Dx, Surgical Procedure, Other Active Dx, Inactive Dx, and
Unknown are the available diagnosis types. This drop down list cannot be changed.
Dx Code
Diagnosis code number associated with the Diagnosis Description taken from the ICD-9
(International Classification of Diseases, Ninth Revision). You can enter a code here, if
you know the number, or have it automatically filled in when you select the Diagnosis
Description.
Description
This is the diagnosis description for the diagnosis code number. See 14.7.11 for more
information on maintaining your company’s database of diagnostic codes.
Type
Specifies if this diagnosis is an Onset or Exacerbation of the condition.
Date
Enter the date of onset of the condition.
Eductd
Educated. Use this checkbox if the client has been informed about the diagnosis by a
doctor or nurse, or at a health care institution.
Dschg Dx
Discharge Diagnosis. Check to indicate that this is the final diagnosis at the End Date of
your agency’s services.
Comments
Enter any comments pertaining to the diagnosis.
Client Maintenance Functions
3-45
Rev 11.5
HC Plus User Manual
3.11 Client Medications
When you press this button, the client medication screen appears. See Figure 3-20 for a full description of
the medications procedure.
Client Maintenance Functions
3-46
Rev 11.5
HC Plus User Manual
3.12 Plan of Treatment—the HCFA 485 form
The system allows you to complete an electronic version of the federal government’s Health Care
Financing Administration Form HCFA-485. Many of the 485’s numbered fields are automatically filled
when the document opens. You will probably begin with field #10 or 11, entering diagnosis code(s) and
any medications that have been ordered.
Also see section 11.11, Plan of Treatment Table Maintenance.
1.
Press the 485/486 button on the Client Maintenance screen (Figure 2-4), and you are prompted to
“Please Select a Service.” Use the drop-down menu to select one of the client’s services. Following
selection, the first page of the form appears.
Figure 3-17: Plan of Treatment History screen
•
NOTE: Using the above screen, you can enter orders from a doctor in attendance of the patient.
Clicking on Verbal Orders brings up the following screen. The order may be viewed and printed.
Client Maintenance Functions
3-47
Rev 11.5
HC Plus User Manual
Figure 3-18: Physician Telephone/Verbal Order
3.12.1 Form HCFA-485—page 1
The client’s data plus information data that you filled in previously related to diagnosis and medications
appears on this first page.
Figure 3-19: Form 485, 1st page.
Item 10 Medications: Click this button and the Client Medications screen opens.
Client Maintenance Functions
3-48
Rev 11.5
HC Plus User Manual
Figure 3-20: Client Medications screen.
•
For the type of medication, use the drop-down to select a medication from the list of all medications in
your company’s database.
•
You may press the Medication Tables button at the bottom of the screen to add or modify the current
medications.
•
Items 11, 12, 13 Diagnoses. Click this button and the Client Diagnosis screen appears:
Figure 3-21: The Client Diagnosis screen.
•
Use the Dx Type pull down to specify Principle Diagnosis, Surgical Procedure, Other Active
Diagnosis (secondary health issues confronting the Client), Inactive Diagnosis (past illnesses or
injuries) or a diagnosis as yet undetermined (Unknown).
•
DX Code and Description fields. Use the drop-down to select from the list of diagnoses and their
codes that are stored in your company’s database.
Client Maintenance Functions
3-49
Rev 11.5
HC Plus User Manual
You may add a new diagnosis by doing the following:
Enter new text and press Return. The system asks for confirmation that you wish to add a new diagnosis
entry to your company’s table of diagnostic codes.
It is recommended that you search the ICD-9 for an established diagnostic code that fits the situation,
before inputting a new diagnosis.
Item 14. DME and Supplies: Click if any durable medical equipment or supplies are needed. This dialog
box appears:
Figure 3-22: Select Medical Equipment and Supplies
Multiple items may be selected; be sure that an ‘x’ appears in the left-hand column. When you have
selected all of the necessary items, press OK. Do not be concerned if all of the selections fail to fit into the
limited text field at #14 on the form. When the form 485 is printed, any text that doesn’t fit in the original
field will appear in an addendum to the printed form. Note: this field also accommodates free text.
However, if you wish to enter selections from the dialog box and free text, enter selections from the dialog
box first! If you enter free text into the field and then use the dialog box, the selection(s) will replace your
free text.
Item 15. Safety Measures: Click this button to record any special precautions that must be observed by
the Employee. This item operates in the same manner as #14.
Client Maintenance Functions
3-50
Rev 11.5
HC Plus User Manual
Figure 3-23: The Select Safety Measures dialog box.
Item 16. Nutritional Requirements: Click this button to record details regarding the Client’s dietary
needs. Be careful here, because some of the selections may contradict each other. Otherwise, this item
works in the same way as seen in #14 and #15.
Figure 3-24: The Nutritional Requirements dialog box.
Item 17. Allergies: Multiple entries are permissible, so be careful not to select NKA (“No Known
Allergies”) along with other entries from the list.
Figure 3-25: The “Select Allergies” dialog box.
3.12.2 Form HCFA-485—page 2
When you click on Next the second HCFA page appears.
Client Maintenance Functions
3-51
Rev 11.5
HC Plus User Manual
Figure 3-26: Form 485, 2nd page.
Item 18A. Functional Limitations. Click the checkboxes for any limits to the Client’s movements or
bodily functions that apply. Use the free-text field to add comments.
Item 18B. Activities Permitted. Click the checkboxes to record types of movement that are permissible
for the Client. Complete or partial restriction to bed, exercise and the use of wheelchairs or walkers are
included.
Item 19. Mental Status. Use any of the checkboxes and the free-text field to record details of the Client’s
mental and emotional state. Be careful not to enter contradictory information.
Item 20. Prognosis. Use the checkboxes to record the Client’s prognosis.
Item 21. Orders for Discipline and Treatments. The text field at #21 is filled by selections from
separate scroll lists for each of these categories. Clicking each category’s button opens a dialog box
containing a scroll list of entries. Multiple entries may be selected (make sure an ‘x’ appears next to the
selection). Click OK and your selections are entered into the text field.
Figure 3-27: Orders for Discipline dialog box and text field.
•
Orders. Record any verbal orders that have been issued by the client’s physician.
Client Maintenance Functions
3-52
Rev 11.5
HC Plus User Manual
Figure 3-28: Recording doctor’s orders.
3.12.3 Form HCFA-485—page 3
Figure 3-29: Form 485, 3rd page.
Item 22. Goals/Rehabilitation/Potential Discharge Plans. The text field is filled by selections from
separate scroll lists for each of these three categories. Clicking each category’s button opens a dialog box
containing a scroll list of entries. Multiple entries may be selected (make sure an ‘x’ appears next to the
selection). Click OK and your selections are entered into the text field.
Client Maintenance Functions
3-53
Rev 11.5
HC Plus User Manual
Figure 3-30: Goals/Rehabilitation/Potential Discharge Plans
•
Goals. Use the drop-down scroll list to identify the desired end result of agency health-care, as
established by the physician.
•
Rehabilitation. Use the scroll list to record the Client’s prospects for full recovery.
•
Potential Discharge Plans. Use the scroll list to specify follow-up plans for discharge. Types of plan
include monitoring by the Client’s family, physician, or both.
Item 23. Nurse’s Signature and Date of Verbal SOC where applicable: Use the drop-down menu to
select one of the nurses who have been entered into your company’s database. Click the checkbox if the
nurse’s written signature is on file in your records.
Item 24. Physician’s Name, Address, Phone Number and License. Fill these fields in one of two ways.
•
Click the ‘down’ arrow to open a drop-down list of the physicians who are entered in your company’s
database.
•
Select one of the physicians on the list and his or her information from the database is entered into the
appropriate fields at #24 on the form.
•
If you wish to fill in item #24 with a doctor who is new to the system, click on the button itself, as seen
below:
This action opens the Doctor Maintenance screens.
Figure 3-31: Doctor List
•
If you wish to edit a physician’s information, click the ** button next to his or her entry. Click the
New button at the bottom of the screen to add information for a physician new to your company’s
database. Either action opens this screen:
Client Maintenance Functions
3-54
Rev 11.5
HC Plus User Manual
Figure 3-32: The Doctor Maintenance screen.
•
Edit or enter the appropriate information and press Save & Exit. Enter the newly added physician into
item #24 on Form 485 as shown above.
Item 25. Date HHA Received Signed POT. Enter the date that the home health-care agency received the
Plan of Treatment, signed by the Client’s physician.
Items #26 and #28 appear only on the printed version of the form. Item #27 provides a field on the printed
form where the attending physician signs in agreement with these statements.
•
Item #26 states: “I certify/re-certify that this patient is confined to his/her home and needs intermittent
skilled nursing care, physical therapy and/or speech therapy or continues to need occupational
therapy. The patient is under my care, and I have authorized the services on this plan of care and will
periodically review the plan.”
•
Item #28 states: “Anyone who misrepresents, falsifies, or conceals essential information required for
payment of Federal funds may be subject to fine, imprisonment, or civil penalty under applicable
Federal laws.”
Item 27. Attending Physician’s Signature and Date Signed. Click the checkbox to indicate that the
physician has signed a printout of this form, and enter the date. When printed, a space is provided for the
physician’s signature.
Comments Text entered in this field will be recorded on the electronic version of this form in your
company’s database, but will not appear on a paper printout.
Client Maintenance Functions
3-55
Rev 11.5
HC Plus User Manual
3.13 Enter Emergency Contacts
The Emgcy button is located on the right of the screen as seen in Figure 2-4. When you press this button,
the Emergency Contacts screen appears. Two contact persons may be entered. The top of the form
displays the Location, Client # and Client Name as recorded in the client’s general information. These
fields cannot be edited. The bottom half of the screen records information related to a client’s emergency
status including his/her agreement to a ‘Do not resuscitate order.’
Figure 3-33: The Emergency Contacts screen.
FIELD
Description
Ignore Call Schedule
Check this box when you want the call schedule ignored.
Lives With Patient Button
Enters the client’s telephone number in the phone # field for the contact
person.
However, If you intend entering a separate home telephone number for the
next of kin or neighbor, you may manually input a different number.
Name, Address, Phone,
Type
Enter the name, address, telephone, and type of telephone of the person to
be contacted.
Rel
Relationship. Use the drop down list to show the relationship of the person
to the client.
Client Maintenance Functions
3-56
Rev 11.5
HC Plus User Manual
Personal Emergency
Response/Date
Indicate in the checkbox whether and on what date personal emergency
response requirements had been set for this client. You must enter a PERS
date. A red P.E.R.S label appears on the following screens: Client
Maintenance, Client Schedule, Schedule Detail, Schedule Detail Verify,
Order Entry, and Detail Order Entry.
Do not resuscitate order
Click this checkbox to indicate that a Do Not Resuscitate order is on file.
Date Ordered DNR
Enter the date that the DNR order was filed.
3.14 Client Mailing Address
When the client uses a mailing address that differs from his residence, use the Mailing Address button to
record that information.
Client Maintenance Functions
3-57
Rev 11.5
HC Plus User Manual
Chapter 4 Client Reports
1.
Press the Reports button on the Main menu, Figure 1-1. The Reports Menu appears. Press the Client
Reports button. The screen below appears. Using the template, you can create various client reports
including those relating to client profiles, schedules and activities. You may also use this screen to
print client mailing labels.
Use button to
toggle between
sort options.
Figure 4-1: Client Reports Menu.
2.
Select one of four checkboxes for the type of report you want. The clicking on Report Type option
(Activity Report, Client List, Client Schedule, and Client Information Profile) defines further choices
you have for producing your report. For example, the graphic below shows different INCLUDE
options available when the Schedule Report is checked. In this case, the option appears allowing you
to display the client’s emergency contacts.
Client Reports
4-58
Rev 11.5
HC Plus User Manual
3.
In the REPORT ON section, you may set the report scope to include all or just one client, coordinator,
cluster group etc.
4.
The INCLUDE section allows for the inclusion/exclusion of specific client data by clicking or
blanking any of the active checkboxes. Note that if you check the Header Page box, the first page of
the report will display the options you chose. For some agencies, a “Directions” option is also
available for being displayed on the Client Schedule Detail and Summary Reports.
5.
When you choose Client Information Profile, the selection of “Start Date and Discharge Dates” is
optional. If the Schedules or Activity Report options are checked, the dates on the left side of the
screen are enabled and you can then enter a date range of schedules you want to have printed for your
clients.
6.
The Hammer icon allows you to save the options you prefer for the next report you want to generate.
Client Reports
4-59
Rev 11.5
HC Plus User Manual
Figure 4-2 Client List Report
•
NOTE: You may sort the report by District Code (available to all Agencies) and by Client Type
(available only to DFTA, Housekeeping and Homemaking Agencies). These sort options are
available in the Include section of the report screen by selecting the sort by toggle button.
When you check the client activity report option, the client reports menu allows you to sort by contract
when you choose Admission/Discharge as shown below.
Client Reports
4-60
Rev 11.5
HC Plus User Manual
Figure 4-3 Client Activity Report
Client Reports
4-61
Rev 11.5
HC Plus User Manual
Figure 4-4 Client Profile Report
Client Reports
4-62
Rev 11.5
HC Plus User Manual
Figure 4-5 Client Schedule Report
An option to include TASKS has been added to the Client Schedule Report (Summary Only) for
agencies using the Tasks Management Module.
4.1
Client Labels
Use the Client Reports screen to print Client Labels that may be used for the purposes of mailing or chart
updating.
*For Pro-Health clients the client ID does not appear on the printed label.
Figure 4-6 Client Labels
NOTE: Label size is: 1” x 2 5/8”
Client Reports
4-63
Rev 11.5
HC Plus User Manual
Chapter 5 Enter/View Client Orders
5.1
Enter order data
Before you can schedule an employee to work with the client, orders authorizing the work assignment must
exist. You may enter new, or view/modify existing client orders by selecting
Scheduling Main Menu. .The Find Clients Screen appears as shown in Figure 2-1.
from the
Alternatively, if you are already on a client screen, you may view his/her order information by clicking on
the Order info button located in the Switch To area of the screen.
1.
Locate a client by entering his/her last name (or a partial name), then press the Find Clients button. If
you press the find button and the name box is left blank, the entire client roster appears.
2.
Press the button to the left of the name you want.
3.
The Order Entry screen appears. (The field descriptions for this screen are found below Figure 3-1.)
Figure 5-1 Order Entry Summary Screen
You may toggle between orders for linked clients by filtering the linked service and by clicking on the
linked client ID.
Enter/View Client Orders
5-64
Rev 11.5
HC Plus User Manual
4.
To view an existing order, click on the three-asterisk button
to the right of an order.
Hitting the buttons at the bottom of the screen can access other client information including schedule
and care plan data.
5.
To enter new orders: click the New button on the top of the screen. This action will access the Order
Entry (Add) screen. Some client information including the client name and current date is filled in, as
well as the order date and effective date. Likewise, the Order Id is filled in by the system; this
number is used to track the order in various screens.
6.
Fill in the rest of the fields as described below. Most importantly, enter the number of days (# Days)
and the total hours for the week (Tot Hrs).
7.
The actual days are filled in (according to those values) on the bottom section of the screen. Be
careful: if you don’t fill out the bottom portion (Days) section, a schedule will not be created.
8.
To set the actual assignment days: a) click or unclick a day; b) change the start time if required; c)
enter the number of authorized hours—and the day’s end time will be calculated accordingly. At the
right, under Hrs/Days, you will see the total hours authorized for the number of selected days.
9.
Once complete, press Schedule to see your input. Note: To see the schedule, you must access the
week that contains the effective date of your order.
Figure 5-2 Order Entry Detail Screen
5.1.1 Order Entry Detail Screen
FIELD
Description
Order Date
The date the order was entered. It defaults to the date the screen was opened.
Total Days
Total number of days the order will extend. An order is OPEN when it has no end
date.
Enter/View Client Orders
5-65
Rev 11.5
HC Plus User Manual
FIELD
Description
Cat/Svc
Select a Service or Contract from the drop down list. This field is required.
Effective Date &
Ends
Show the span of days/weeks the order will remain effective. If applicable, enter a
date in the Ends field when you know the end date when the order will become
inactive.
Classf
Choose a classification from this drop down list. These include HHA, HM, PCA,
and TRN. This is a required field.
Live In
Check if the order requires a live-in worker to help the client.
Start Time
Enter the daily start time for the coverage. The default is 9 AM.
# Days
Enter the number of days in the week the client will be taken care of.
Tot Hours
Enter the total number of authorized hours for the week.
Plan
The name of the service plan.
Unit
The unit that will expedite the order.
Proc Code
Select a Procedure Code Information from the drop down list. To have a procedure
code show up in the list you need to set up a provider, assign the procedure codes to the
provider and then associate the service with the provider.
Work Cd
Enter Work Code Information from the drop down list. These include HH (Home
Health maintenance), HIV (care for clients with AIDS symptoms), and HK (House
Keeping assistance for partially or totally disabled clients).
Shift
Enter a Shift code if needed.
Authorization
Enter the name of the person who authorized the order.
Days and times of
order
The Start and End times and the total Hours for that particular day will be filled in
automatically from information added previously in the # days and Tot Hours
fields. You may override this information. Any or all (day of the week) boxes may
be checked, depending on what is needed for the order.
Hrs/Days
For example, 27/3 indicates that 27 hours are scheduled over three days.
Instruction
Type in instructions related to the order. Pre-formatted Orders for Discipline are
also displayed here if the Instruction button is selected.
5.2
Order Entry Buttons/Features
BUTTON
Description
Instructions
Click this button to select pre-formatted instructions from the Orders for Discipline
screen. When you highlight an instruction, an ‘x’ appears to its left. That
instruction, when you press OK, will appear at the bottom of the Order screen.
Perm Schedule
This button brings up the Permanent Schedule screen. See Figure 8-19.
Enter/View Client Orders
5-66
Rev 11.5
HC Plus User Manual
BUTTON
Description
Schedule
See Client Schedule Figure 8-2.
Requirements
See Client Requirements Figure 3-13.
Change Auth
This button brings up the order screen allowing you to update some of its data, such
as the number of hours or days that are authorized. Change the weekday data on the
bottom of the screen to conform to your day/hour changes.
Note: when you select a client who already has an HRA Order/Authorization, you
cannot change the Effective Date to a date earlier than the Service Start date. For
more information see section 5.2.1.
New Auth
Allows you to terminate an old order and create a new one by modifying the
effective date of the order. The system supports having multiple authorization
effective dates within the same week and the schedules are adjusted to match the
latest authorization.
Authorization
History
Once orders are set up, this window (see Figure 5-3) displays the hours authorized
for this client. For each service the client uses, the number of visit hours are shown
(for each day) along with the Hrs/days for the week. For example, 20/5 means that
the order authorizes 20 hours of service for this client—extending over five days
during the week.
5.2.1 Authorized Hours History Screen
Once orders are set up, this window (see below) displays the hours authorized for this client. You may also
access the Authorization History screen from the Order, Service Maintenance or Client Schedule screens.
The Authorized Hours History screen contains a New button from which you can create a new
authorization. You can add a new authorization as long as its effective date is not greater than the current
authorization that is part of an ongoing order.
Figure 5-3 Authorized Hours History Screen
Enter/View Client Orders
5-67
Rev 11.5
HC Plus User Manual
5.2.2 Changing Authorized Hours
Sometimes the Authorized Hours History Screen contains authorizations not related to an order. A redstarred row signifies such an authorization. When you click on a red-starred row, the Authorized Update
Hours screen appears. Enter your changes and press the Exit button to save.
Figure 5-4 Authorized Hours Update Screen
The screen above contains a trash can icon which allows you to delete the authorization.
A non-starred row on the Authorized Hours History screen, however, is an authorization related to an order
and may only be changed by using the Change Authorization feature on the Order Entry screen.
Enter/View Client Orders
5-68
Rev 11.5
HC Plus User Manual
5.3
Change an order
For a client with more than one HRA Order/Authorization, you have the ability to modify the Effective
Date of an Order using the Change Auth function on the order screen. If the new Effective Date overlaps
with another order for the same HRA service, then any schedules are accordingly shifted.
a)
If the Effective Date is changed to the Effective Date of a prior order, the prior order is deleted and its
schedules are moved to the changed order.
b) If the Effective Date is made earlier causing an overlap, the End Date of the earlier order is changed to
the new Effective Date of the changed order. Schedules for dates equal to or after the new End Date
are moved to the changed order.
c)
If the Effective Date is made later and there are schedules prior to the new Effective Date, those
schedules are moved to the prior order and the End Date of the earlier order is changed to the new
Effective Date of the changed order. If there is no prior order, this change cannot be made and an error
message is displayed.
d) A warning message is displayed, with a confirmation required when a different order is effected (i.e.,
the End Date changed and schedules moved).
NOTE: For a client with Weekly Authorizations who has banked hours: because of the banked hours,
you may allow total hours to exceed the total weekly authorization.
5.4
Split Order Entry
You may take an order and split it into two periods. For example, if you currently have an order with an
effective date of 7/14/04 and an end date of 9/1/05, you can enter another order with an effective date of
7/15/05. The new order will be assigned an end date of 9/1/05. This, in turn, will change the original
order’s end date to 7/15/05.
1.
Click on New on the Order Entry screen.
2.
Note: If no end date appears on the order, you will get a prompt “Do you want to terminate existing
order?” Click on “NO.” Enter all information needed for the new order, then press
3.
.
If there is a specific end date (a red dot is displayed to the right of the End Date) then a new order will
be will adjusted accordingly as shown in the message below.
Enter/View Client Orders
5-69
Rev 11.5
HC Plus User Manual
5.5
Locate Open Orders
For scheduling purposes, you often have to locate those orders that are unfilled, that is, no employee was
assigned to the client for a day mandated by the order. To do so, press the Find Open Orders button on
the Schedule Maintenance Menu and follow the instructions detailed in section 8.5.
Enter/View Client Orders
5-70
Rev 11.5
HC Plus User Manual
Chapter 6 Service Maintenance
On the bottom of the Client Maintenance screen is a scrollable list of services provided to the client. You
may add a new service by clicking on the last blank row. If you click on a current service, you will see all
the details of that service.
To view the contract data for that service, press the contract button to the left of the contract name and
Figure 14-8 General Contract Information appears.
After entering a new service, you will be taken to the order entry screen; upon filling it out, the client
schedule screen will appear.
Figure 6-1: Incomplete Service Maintenance Screen
6.1
Service Screen Field Descriptions
SERVICE
FIELDS
DESCRIPTION
Contract
Use the dropdown to assign a contract. Hitting the Contract button to the left of the
dropdown will bring up a screen where you can view the contract’s details.
Fiscal ID
Corresponds to the client number of the client being billed if the client has more than
one service; otherwise, it corresponds to the service number.
Category
These are shorthand codes identifying the different institutions that provide services.
See the category table, section 14.7.3 which is accessed by pressing Special functions
Î Codes Maintenance Î Category. (Note: If the category is DFTA, different fields
Service Maintenance
6-71
Rev 11.5
HC Plus User Manual
such as Case Management and Client Type (Home Maker or Housekeeper) appear on
the Service Maintenance screen.)
Live in?
Check if the service requires the attendant live together with the client.
ADDITIONAL
SERVICE
INFORMATION
Duty Free
/Effective Date
If a client is set to duty free, then the lunch or dinner hour is not included in the
assigned hours; that is, if the attendant is scheduled to start at 9 am and work 8 hours,
then he/she must work from 9 am to 6 pm. However, if the client were not set to duty
free, the attendant would work 9 to 5pm.
HC Plus automatically removes 1 hour for scheduled visits when the duty free is
checked. When changing a client’s duty free status, you will be asked if the system
should reduce the schedules by 1 hour.
TBA/ Effective
Date/Linked
Client name
Check this box to indicate the client is Task Based Assignment. If checked, you must
enter the TBA effective date. The TBA client may be linked to another TBA client.
See section 6.6 for details.
Cluster/ Effective
Date/Linked
Client name
Check this box to indicate the client is part of a cluster situation. If checked, you
must enter the effective date. The cluster client may be linked to another client.
Mutual/ Effective
Date/Linked
Client name
Check this box to indicate the client is a mutually linked client. If checked, you must
enter the effective date. The mutual client may be linked to another client.
Advanced
Directive/Date
Sharp defined field indicating that certain forms (e.g. living will) and instructions
have been given to the client to sign off on. If you check this field, you must also
enter the directive date.
Cert Effective
Date
Date of certification of services.
Cert Expiration
Date
Date certification of services expires.
Use Santrax/
Effective Date
Fill in the date the Santrax time-tracking service goes into effect.
Last Care Plan
Date
Enter the date of final service to be provided for the client.
Bldg Access
NOTE: This is a user-defined field. Enter a code designating the nature of access to
the building where the patient is located.
Special Care
Check if special care is being provided, if applicable.
Supp Timesheet
Print
Check to suppress printing of the Timesheet.
Approval type
Select the approval for service from the dropdown.
Authorization
type
Enter daily, hourly, weekly etc.
Service Maintenance
This indicates to HC Plus that the client will be tracked via Santrax.
6-72
Rev 11.5
HC Plus User Manual
Special Code
Default
Use the dropdown to assign the codes for holidays, sick, training, etc.
Deflt Classf
Default Classification. Enter (via dropdown) the type of service, e.g. Home health
aide, Housekeeper etc.
Referral
Select the source of the client’s referral to your agency.
HRA
Authorization #
Enter the HRA authorization number for this service
Electrical
Emergency
When it is imperative that the client’s electricity supply should not be cut off (for
example, a generator must be provided) enter an appropriate emergency level.
Pay source
Enter a code denoting payment sources.
Case worker
Name
Enter name of HRA worker.
Case worker
Phone
Enter worker’s telephone number.
Work Code
Drop down values indicating the scope of the work.
Shift code
Enter the work shift number 1, 2, 3 etc.
For VNS services: Enter the Entry number, the Health Area, VNS team # and coverage code.
VNS FIELDS
DESCRIPTION
MRN #
The medical record number appears here as entered on the client maintenance screen.
Entry #
Enter his/her health insurance claim number. This is the Reference # that appears on
the verification screen.
Ref File #
Enter the reference file number for the service.
Team #
Enter the number of the team assigned for this service.
Health Area
Enter a 4-digit code that relates, for example, to nursing, grooming, and speech
therapy.
Service Maintenance
6-73
Rev 11.5
HC Plus User Manual
Coverage Code
H-Hourly, R-regular or B-both.
Figure 6-2: Completed Service Maintenance screen.
Sometimes, you have to create more that one service order for a client as, for example, where the
client requires both a health attendant (HA) and a registered nurse (RN) to take care of his health needs or
where different contracts are involved in providing for his/her treatment. To create a new service order
click on the blank service summary row on the bottom of the Client Maintenance screen; and a blank
service order will appear.
Service Maintenance
6-74
Rev 11.5
HC Plus User Manual
6.2
Service Screen Functions
The button list (Switch to) to the right of the Service Maintenance screen enables
you to perform functions that are related to services provided to clients. For
instance, you may register guarantors, remove the service and view both the
authorized hours and the client’s cluster history.
BUTTON
FUNCTION
Authorization
History
Displays the authorized hours as per the order requirements.
When the hours are not part of a current order (red-starred rows) you can modify
the hours by clicking on the row, then updating the hours. However, when the
hours are associated with an order, you must use the Order Entry screen to change
the hours.
Service Maintenance
6-75
Rev 11.5
HC Plus User Manual
BUTTON
FUNCTION
Cluster
Maintenance
Use this button to create and maintain a cluster situation. See section 6.5 for
details.
Discharge
Press this button to remove this service for the client. Enter a reason and date.
When a service is discharged—it does not mean that the client is terminated.
However, it indicates that the order for this service is ended, and all the schedules—
on or following the day you entered into the service discharge form—(red
signifying open) are blanked out. The End Date will appear in red in the service
summary row located on the Client Maintenance screen.
Figure 6-3: Service Discharge screen.
Service Maintenance
6-76
Rev 11.5
HC Plus User Manual
BUTTON
FUNCTION
Guarantor
Use this button to enter the name of the guarantor for this service.
Figure 6-4: Guarantor screen.
6.2.1 Billing and Insurance
Use the form below to enter financial information related to the services provided to this client.
Provider ID
Enter the ID of the
provider.
Program Type
may be any of the
codes in the
dropdown—that
were entered in the
in the Codes
Maintenance
section such as
Initial Surplus
funds: Amount of
money available
for servicing the
client.
Billing Type may
be:
Insurance information: includes the Medicare and/or Medicaid ID as well as the
dates the ID’s were verified. The Health Insurance claim number is displayed along
with its date of expiration.
User Fields 1/2/3/4: You may create your own fields using the Contract-general
information screen. These labels will be copied to the Misc section of the Billing
and Insurance screen.
Service Maintenance
6-77
Rev 11.5
HC Plus User Manual
BUTTON
FUNCTION
Link
When you press
this link button, the
Find Client screen
appears. Select the
client you want to
link for the
service—and the
link window to the
right appears.
Now, use this
window to link the
two clients in
either a Mutual,
TBA or cluster
situation.
See the following sections for more details on how to implement link procedures.
Link History
Provides a
snapshot of the
link/unlink history
of a client.
6.3
Handle mutual client cases
A mutual case is the situation where two clients live in the same household and the attendant is servicing
both clients at the same time. One of the clients will be designated as the primary client and all schedules
are opened up under the client number of this primary client. The other client is designated as the
secondary client.
Note: When linking mutual clients, if the secondary client has surplus funds on their record prior to the
link, the surplus amount will be set to zero and grayed out.
6.3.1 To create a mutual situation
1.
First, set up the ‘Primary client’ with a service order and a schedule.
2.
Then set up the secondary client with only a service order. Do not create a schedule for the
secondary mutual, that is, do not enter data in the Order Entry screen—use the STOP icon to exit
leaving it blank.
3.
Note: When linking two existing non-mutual clients, you have the option to automatically end the
open orders of the secondary client.
4.
Click on the Link button at the right of the Service screen. The Find Clients screen appears.
5.
Select a client. The Client Link window appears. Select the appropriate radio button. You may
enter an effective date when linking clients as Mutual. Otherwise, the effective date defaults to the
date the clients are linked
Service Maintenance
6-78
Rev 11.5
HC Plus User Manual
Figure 6-5: Client Link Window
In the example above, ZAPATA is linked to
HARRY as being the secondary mutual client. This
information now appears on the HARRY client
record, designating HARRY as the mutual primary
client.
The linking data also appears on the Additional Service info section of each client’s Service Maintenance
record.
Duty Free status must be in sync for mutual clients. You may update any changes made to the primary
client’s duty free status. These updates include removal and editing of DF at the service level. Updates can
only be made on the primary’s record and will be reflected on the secondary client’s service screen.
However, the secondary client’s DF option on the Service Maintenance form will be disabled in edit mode.
The linking of Mutual Clients will be prevented if any of the following conditions exists: a) The Duty Free
Status of the clients differ. b) If only one client has a DF effective date that is later than the Link Date. c)
Even if both Clients have DF effective date that is later than the link date, however, the effective dates are
not the same.
Once two clients are linked, when you proceed to the Schedule of the secondary client you will see that the
schedule of the primary mutual was copied to it starting from the date following—the day after—the date
the link was made. The code MB appears in each cell of the primary and secondary schedules. Note that
unscheduled visits also appear on the Mutual Secondary schedule if they appear on the primary’s schedule.
Service Maintenance
6-79
Rev 11.5
HC Plus User Manual
Be aware that when you unlink mutual clients, the primary client will retain his/her schedule while that of
the secondary is broken and erased.
And keep in mind, you may not link clients unless they both are HRA approved (see Approval Type field
on the Service Maintenance Screen). The HRA authorized schedule should also be completed.
Furthermore, a client may not be set to mutual if the client is currently a Cluster or a TBA client. In
addition, a client may only be designated as the secondary client if there is no surplus fund amount or
schedules for the client.
Certain conditions must be met before linking can be accomplished. If the link cannot be made, (e.g., the
secondary client was a TBA, or has a current schedule) the reason for the rejection of the link is shown on
the screen—as shown below. In such a case, press the stop icon, correct the problem, and proceed to link.
Date
Figure 6-6: Link screen w/reason for ‘no’ link
After linking, the Link button on the Service Screen toggles to Unlink, allowing you to break the mutual
connection between the clients. The Link History button on the Service screen brings up a screen
documenting all the changes made in a client’s mutual situation.
NOTES:
1) If the primary client is put on Hold or Discharged, the schedule automatically changes to MS. MS
signifies Mutual Secondary—and an order is automatically created for the secondary client.
2) If the primary client is returned from discharge, the schedule reverts back to MB for Mutual Both and
the schedule is reinstated and a new order is created. (The same process occurs if a secondary client is
discharged and returned from discharge.
3) When the Primary Client is discharged or put on hold, the Weekly special code record
(Vac/Sick/Hol/Per) is moved to the Secondary client.
4) Also note that a change in mutual status is a criterion for a new timeslip. The Manual Batch process will
place schedules with changes in mutual status in separate timeslips.
6.4
a)
Order Entry Changes for Mutual Cases
For Mutual cases, you may allow the effective date of a changed order to be the effective date of the
previous order. This allows you to overlay one order with another, in effect deleting the original order.
b) When the Primary Client is put on Hold or Discharged, the Secondary client’s effective date will
become the original order’s effective date.
6.5
To handle cluster situations
After creating a service for a client, if necessary, you can specify that service as being part of cluster
situation. Cluster Care clients can be Duty Free—and both Cluster and Duty free indicators are displayed.
Santrax calls for Cluster cases with 2 shifts for the same attendant/client pair—are applied to both shifts
with one call in and one call out; however, the shifts must be consecutive.
Service Maintenance
6-80
Rev 11.5
HC Plus User Manual
Schedules for cluster clients who reflect the Duty Free status function the same way as a regular client who
is duty free. a) The schedule’s duty free indicator will be set to yes for all cluster clients who are duty free.
b) The schedules for all cluster clients who are duty free are inspected and if the scheduled hours are
between 5 and 11 hours, an hour is added to the scheduled hours and the end time is adjusted.
Note: A change has been made to the HC Plus Santrax call processing to allow calls for split shift cluster
cases to use the non-cluster update logic if the employee is not working for any other client on that day
1.
The Service Maintenance screen, Figure 6-2, contains a button labeled Cluster Maint. Click it to
display a screen where you create, view, or change a cluster situation.
2.
To create the cluster, click on the Cluster Case radio-button, then enter the cluster group number and
the effective date for participation in the group. When a cluster group number is changed without a
change in cluster status, the correct cluster group number is displayed on the client maintenance screen
and on the client schedule report. The cluster group history is shown at the bottom of the screen and
may be changed using the Modify History button.
Figure 6-7: Cluster Maintenance/History screen
3.
After clicking the Exit button, you will be returned to the Service Maintenance screen. Exiting from
there to the Client Maintenance screen, you will notice a red Cluster in the service row—indicating
this client service is part of a cluster situation.
6.5.1 To link cluster cases
Once you’ve established clients as cluster cases, you may group these clients, that is, link them by pressing
Link on the bottom of the Client Maintenance screen. The Figure 6-6: Link screen appears. Click on the
Cluster radio button to establish a link between two cluster cases.
6.6
To handle Task Based Assignments (TBA)
A TBA (task based assignment) case is the situation where attendants are assigned to clients based on the
types of tasks required by the clients. A task-based client can be linked to one other task-based client in the
SHARP system. The attendant who, on a given day, services two task-based clients who are linked will be
paid at a higher hourly rate for the day. If the attendant services task based clients who do not have any
Service Maintenance
6-81
Rev 11.5
HC Plus User Manual
link to other task based clients, the rate of pay will be the same as for a regular client. Note that TBA
clients cannot be assigned to a cluster.
To enter a TBA client:
1.
When you enter a new service for a client, check off the TBA checkbox on the Service screen (Figure
6-1) and enter a TBA effective date. A client may not be set to TBA if the client is currently a Cluster
or Mutual client.
2.
Use the Link button to select the client who is to be serviced together with this client. This newly
linked client must be TBA and cannot already be linked to another client. Discharged clients also
cannot be linked.
Service Maintenance
6-82
Rev 11.5
HC Plus User Manual
3.
When linked, the Service screen will display the current TBA effective date and TBA linked client.
4.
If a client who is linked to another client in discharged, there is a vendor option in SHARP to
determine if the TBA link should be removed. If the vendor option for breaking TBA linkage is set to
yes, then the two linked clients will be unlinked from each other (but still remain TBA clients).
6.7
View a client’s link history
Press the Link history button at the bottom of the Service screen to see the links (Mutual, TBA, or Cluster)
that had been established or broken for this client. The following screen appears:
Figure 6-8: Client Link History screen
Service Maintenance
6-83
Rev 11.5
HC Plus User Manual
6.8
Setting up miscellaneous clients
For the purpose of assigning special codes to handle
vacation, sick, or training days for employees, ‘dummy’
client records may be set up.
When an employee is on vacation, jury duty or sick leave,
he/she is assigned for that day to one of these ‘dummy’
clients; and then, his/her pay for that day is properly taken
care of by HC PLUS.
The services shown at the bottom of the Misc client screen
describes the ‘services’ (e.g. vacation) that are assigned to
the dummy client.
Figure 6-9: Sample Miscellaneous Client Screen
Service Maintenance
6-84
Rev 11.5
HC Plus User Manual
6.8.1 Special Codes on Service Screens
When you access the Service Maintenance screen (click on a service row on the Client Maintenance
screen) you can, by using the dropdown box on the Special Code Default field, select a default code for
the service. When paying an employee by special code, (see 8.18.4) the ‘reason code’ on the special codes
screen will default to the selected code after you choose a contract/service for miscellaneous clients. If a
default code had not been assigned for the service, the reason code will be blank.
Figure 6-10: Special Codes on Service Screen
Service Maintenance
6-85
Rev 11.5
HC Plus User Manual
Chapter 7 Employee Maintenance
The Employee Maintenance screen allows you to enter new employees or modify the records of existing
employees. It includes defining employee skills, availability, and training. It also enables you to assign
employees to clients and to set up work schedules.
7.1
1.
Find an employee
Click on the Employee Maintenance button in the Main Menu (Figure 1-1). The Find Employees
screen opens. Enter your search parameters and click Find Employees to retrieve the names of the
employee(s). When you check Show All? then the list will also include employees whose status is
other than active, namely T (terminated), N (not active), or some other status such as X (not to be
rehired).
Figure 7-1: The Find Employees screen.
7.2
Edit employee data
When you click on the button to the left of an employee name, an existing record appears (see Figure 7-2).
Users who do not have appropriate permissions cannot change the employee’s SSN, Last Name, First
Name, and Middle Initial; however, if you do have an appropriate security level, you may change employee
data by first clicking on the Edit button on the Employee Maintenance screen and them modifying the
fields.
7.3
Add a new employee
1.
Click the New Employee button on Figure 7-1. A blank screen similar to that below appears. Proceed
to fill in the employee information, including a six-digit employee number. Instead of manually
entering the number, HC PLUS can automatically assign Employee IDs. If you would like to have this
option activated, please contact Client Services.
2.
Complete the Employee form below.
Employee Maintenance
7-86
Rev 11.5
HC Plus User Manual
Figure 7-2: Employee Maintenance screen.
Field
Description
EMPLOYEE
BASIC
INFORMATION
Name and Title
Enter the employee’s name and title.
Emp #
If your agency uses employee numbers for ID purposes, enter one for the new
employee. The field accommodates up to six characters.
Emp SSN#
Social Security number
Status
This field records the employee’s standing with your agency. The employee may be
active; eligible for re-hiring; temporarily unavailable due to classes; or may have
been terminated. Use the Status Change button to terminate, enter a Leave of
Absence, or to alter in any way an employee’s status. See section 7.5.8, page 7-101
Location
Choose the location code that identifies your agency’s area of coverage.
PERSONAL AND
DEMOGRAPHIC
Name, address,
borough, city,
state
Enter the employee’s address.
Phone Numbers
Enter contact telephone numbers for the employee.
Emergency Info
Enter the person to contact in case of an emergency along with the appropriate
telephone number,
Birth Date
Enter the employee’s date of birth. Enter a 4-digit year.
Sex
Enter the employee’s gender
Use the checkbox, if appropriate, to indicate the employee is a supervisor.
Employee Maintenance
7-87
Rev 11.5
HC Plus User Manual
Field
Description
Race
For Race categories, use the dropdown.
Maiden Name
Enter the employee’s maiden name if appropriate.
WORK
RELATED
INFORMATION
Hire Date
Enter the date the employee is to be hired cannot be more than 30 days. (HC Plus
does not create an ‘active’ entry in the Sharp History when an employee or client is
added.)
Term Date
Date employee was terminated. This is a protected field. See section 7.5.8.
ReHire Date
If the employee has been inactive or terminated and re-hired, the ReHire date
appears in this protected field.
First day worked
This date is automatically populated with the first verified workday in the
employee’s first payroll. This indicator will remain until manually removed.
Last raise date
Enter the date when the employee was last given an increase in salary.
Classf
Classification is a drop-down used to categorize your employees. Employee types
include HHA (Home Health Aide), HM (Home Maker), and PCA (Personal Care
Assistant).
Supervisor?
Check this field when the employee is a supervisor.
Coordinator
The drop-down box shows the names of Coordinators who are in your system.
Team
Select or establish a Team in the same manner as Districts, Counties and
Coordinators. A Team is any grouping of Employees within your agency. The table
itself is accessed by System Functions Î Codes Maintenance Î Coordinator Team
Codes.
Transpt
Transportation. Use the drop-down to record the employee’s means for traveling to
scheduled visits.
District
Code of District in which the employee will be working.
Pickup
This field indicates whether the employee personally picks up his check. If so,
Sharp is informed. This indicator will remain until it is manually removed.
3.
Once the employee form is completed, click on the Exit button to save its contents.
4.
The Contracts Assignment immediately screen appears. Fill in the appropirate contract(s) and press
Exit . Follwing your saving of the contract data, the Employee Payroll Information screen (Figure
7-14) appears. Fill in pay information and then press Exit.
7.3.1 Enter Contract Assignments
After saving a new employee record, the contract assignment screen appears (for Multi-Contact agencies)
and you are requested to select the contract under which the employee will be working. When you exit and
save, the completed Employee screen displays the selected contract(s). Check a default contract when
more than one contract exists. See section 7.5.9 for details. Note that the Contract Assignment screen does
not appear when adding a new employee for a single contract agency.
Employee Maintenance
7-88
Rev 11.5
HC Plus User Manual
Figure 7-3: Contract Assignment screen
7.3.2 Enter New Employee Payroll information
After recording the contract for the employee, the payroll screen is displayed. See section 7.5.7 for details.
You must enter the State and Federal marital status and City Tax 1 before exiting.
Note: After entering your payroll data, you will be requested to enter availability information for the
employee.
7.4
Returning Employees
HC Plus allows you to return an employee from History, if applicable. That is to say, you may use his/her
past record of employment in your agency.
1.
When an employee is added into HC Plus, the social security number, and HC Plus ID is
compared to the history table for a possible match. If a record is found, the employees on history
who matched, is displayed. You then have an option to select an employee from the list and return
him/her from history.
2.
If the employee # entered in HC Plus is different than the one that was used in the past, the HC
Plus employee # will be replaced by the ‘old’ employee #.
Returning an employee from history updates the HC Plus history table's status for that employee. The
Employee Contract assignment screen displays entries for vendors where the employee has a history and
has the option of returning employee from history. The employee export to Sharp will send additional
information to Sharp (date returned & status code) to trigger the return from history. Note that this ‘return’
feature must be activated on an individual Agency basis.
Employee Maintenance
7-89
Rev 11.5
HC Plus User Manual
7.5
Functions of the Employee Maintenance Screen
The employee screen allows registering of special information about an
employee through the use of the function buttons that are displayed on the right
side of the screen.
7.5.1 Availability
For a new employee, this button opens the window below; allowing you to
define the hours and days an employee is available for assignments. Enter the
effective date of employment and any comment that you wish.
When you exit this window, the layout below appears.
Figure 7-4: Initial Employee Availability screen.
1.
Double-click in any of the cells (for example, Saturday) to define the employee’s available hours for
that day.
Employee Maintenance
7-90
Rev 11.5
HC Plus User Manual
Figure 7-5: Defining availability for each day.
•
Remember to enter a 2-digit hour value for Start Time and End Time.
•
Enter AM or PM.
•
The total “Hours” field will be calculated by the system.
•
Check “Preferred,” “Available” or “Unavailable” as appropriate. If an employee is
unavailable, that status will appear in the time/cells of the employee’s schedule
calendar.
•
Enter any Notes in the free-text field.
Note the checkboxes for other days in the week. These comprise a work-saving
feature of the system. If the specifics of the employee’s availability on a given day
are the same for other days, clicking the checkboxes for those days will copy this
information to the availability screen.
2.
When availability data is saved, the grid reappears with the appropriate cells populated. If you wish to
copy this availability to a second week, click on the red arrow to the right of ‘Week 1’ and you will be
prompted to copy the availability one week forward.
Figure 7-6: Employee Availability screen with times filled in.
When you use the
door to leave the above
screen, the window to the right appears
prompting whether you wish to copy the new
employee’s current availability status to future
weeks.
7.5.2 Employee Schedule
The Schedule button on the Employee screen opens a display of the employee’s assigned clients and
hours—as shown in Figure 8-25. Employee schedules (covered in Chapter 8) may be established and
forecasted for an indefinite period into the future.
Employee Maintenance
7-91
Rev 11.5
HC Plus User Manual
7.5.3 Employee Skills
The Skills button opens the Employee Skills screen that allows definition of an employee’s training and
experience. This field can also include physical restrictions on an employee’s duties, as well as work
environment preferences. Skills, restrictions, and preferences include additional languages spoken by the
caregiver; allergies, including intolerance to smoke; Pet restrictions; Lifting restrictions, or notation of capacity
for heavy lifting.
Skills can be added, modified or deleted via Main Menu Î Special Functions Î Codes Maintenance Î Skill
Codes
Figure 7-7: The Employee Skills screen.
1.
Use the Skills drop-down menu to add a skill to the employee’s record. Note that some agencies also
use the skills feature to specify restrictions on environments in which the employee can work.
2.
To remove a skill, place your cursor on the skill row and press Delete on your keyboard.
Employee Maintenance
7-92
Rev 11.5
HC Plus User Manual
7.5.4 Employee/Client Exclusions
The Exclusions button will display a screen where you can register clients (and contracts) with whom this
employee cannot work. The screen displays two tabs: ‘Excluded Clients’ which lists clients the employee
will not work with and ‘Excluded Contracts’ which list contracts the employee will not work for.
1.
Press New, and key in a client’s name in the following screen.
2.
Press the button to the right of the client’s name; that client will henceforth be excluded from being
visited by this employee. You may also type in a reason for the exclusion.
Employee Maintenance
7-93
Rev 11.5
HC Plus User Manual
Figure 7-8 Employee/Client Exclusions
7.5.5 Employee Sharp History & Employee History
On the ‘SHARP History’ screen you may update the termination history of an employee to correct errors.
The screen reflects the data SHARP uses for the employee’s status history. (The ability to view and modify
information on the ‘SHARP History’ screen is controlled by the security item ‘Sharp Employee Status
History’ which is located in the ‘Employee’ category under security maintenance.)
The ‘Employee History’ function, however, provides an audit trail of the employee’s work history; and
changes made via the SHARP History will not alter information on this screen.
Employee Maintenance
7-94
Rev 11.5
HC Plus User Manual
7.5.5.1
Sharp History
When you click the History button, the SHARP Status History screen appears listing the dates changes
have been made to the employee’s status. If you change the rehire date, you are asked to confirm the
change. The updated rehire date is now displayed on the Employee Maintenance screen.
Figure 7-9 Employee Sharp Status History
7.5.5.2
Employee History
When you click the HC Plus History button on the bottom of the Sharp Status History window, another
window appears listing all the changes that have been made to the employee’s status (audit trail) with the
reasons for the change.
Note: You are notified when attempting to make a change causing an inconsistency between a current HC
Plus client/employee status and his/her Sharp History status. A discrepancy error message displays
advising you to examine the data and correct if necessary.
Figure 7-10 Employee History
Employee Maintenance
7-95
Rev 11.5
HC Plus User Manual
7.5.6 Employee Notes
This button opens a screen displaying all notes that have already been recorded for the current employee.
The name and address information cannot be altered.
Figure 7-11 Employee Notes Summary screen
Below the address field is the drop down box Note Type. You can use it to select the type of note to be
Figure 7-12 Note Types
The three-asterisk button *** to the left of the list of entries brings up a particular note to view/edit. For an
existing note: use the + button to append a message to the current note. The Continue button displays the old
note with the addition and includes a date stamp indicating who made the change to the note.
The New button brings up a blank note screen whose Note Type field and text areas are ready to be filled in.
Figure 7-13 Employee Notes screen with append feature
Clicking the
button at the top of the screen will print a notes report that looks similar to what is
shown on the screen.
Employee Maintenance
7-96
Rev 11.5
HC Plus User Manual
7.5.7 Employee Payroll & Tax Information
The Payroll Info button opens a screen that contains employee payroll and tax information. A drop down
box (Current Contract) on the Employee Payroll Info form allows you to enter payroll information for
different Contracts. The Contract Specific screen then displays the employee ID number specific to each
contract assignment. The Direct Deposit information screen also has a drop down contract selection box
for viewing direct deposit information.
Figure 7-14 Employee Payroll Information
Field
Description
GENERAL
INFORMATION
Federal Exemptions
Enter the number of federal tax exemptions (0-30 or 99). Required field.
Federal Marital
status
Enter married or single for Federal tax purposes. Required field.
State Tax
Use the dropdown to select the state. Required field.
State Exempt
Enter the number of exemptions. Required field.
State Marital status
Enter married or single. Required field.
City Tax 1
Use dropdown for city tax entry. (NOTE: City Tax 1 is a required field.)
City Tax 2
Use dropdown for city tax entry
EIC
Click to indicate Yes if the worker is eligible for and can claim the Earned Income
Tax Credit (EITC). The credit reduces the amount of tax an individual owes, and
may be returned in the form of a refund.
SHARP-SPECIFIC
INFORMATION
Employee Maintenance
7-97
Rev 11.5
HC Plus User Manual
Field
Description
Union Init Balance
Enter amount of union initiation fee.
Ins Cov
Use the drop-down for the type of insurance coverage—Family or individual.
Temporary Rate
code
I f applicable, a dropdown for a 0-9-rate code can be assigned for tax w ithheld
where zero is the default value.
In Group Maintenance, a security option Temp Rate Change is present in the
Available Objects for Selected Category within the ‘Employee’ Available
Categories option in order to allow access to updating this field
This option works in conjunction with the ‘Payroll Information’ security
permissions:
If a Security Group allows Access and Update rights assigned in ‘Payroll
Information’, then the Temp Rate Change security option will have Allow Access
and Update rights automatically enabled. However, if the Security Group has only
Allow Access enabled in ‘Payroll Information’, then the Temp Rate Change will
only have the Allow Access right enabled.
In that case, the Allow Update (in the Employee Available category) will have to
be set manually to allow updating the temp rate field on the payroll screen.
Ins Marr
Use dropdown to record whether employee is single, married, divorced, legally
separated, or widowed.
Override Ins. Elg?
Check when you want to override an employee’s eligibility for insurance
coverage.
Weekend pay
Check if employee is paid at a different weekend rate. Defaults to yes.
FICA
Check if FICA is to be deducted.
Pay Adjust
If applicable, should you need to add additional dollars to the gross payroll or
subtract dollars from the gross payroll you can you this function.
Employee Maintenance
7-98
Rev 11.5
HC Plus User Manual
7.5.7.1
Contract Payroll information
Click the Contract Specific button to display the payroll data related to a contract. The contract Payroll
information screen displays employee contract accumulated totals for Paid Hours, Insurance Hours and
Accrued Vacation and Sick Hours. Employee totals are displayed on this screen when an employee is
assigned to multiple contracts.
Figure 7-15 Contract Specific Payroll Information
Employee Maintenance
7-99
Rev 11.5
HC Plus User Manual
7.5.7.2
Deductions
The deductions screen lists all the items for which an amount will be garnished from the employee’s pay.
Figure 7-16 Deductions Information
Fields
Description
Deductions 1 Garnish
Enter amount of a first deduction.
Deductions 2
Enter amount for a second deduction.
Union dues
Enter the Union dues amount.
Note: The system (on a contract level) can disable the copying of union dues from
one contract to another. Contact Customer Relations for further help.
Tax Deferred Annuity
Enter the tax deferred annuity value.
TDA/2
This deduction is agency defined. Some agencies refer to this deduction as TDA2,
while other agencies refer to it as Deduction # 5.
Credit Union
Credit Union fee amount or percentage.
Pol Act Monthly
This deduction is agency defined
Deduction 8
This deduction is agency defined.
Garnish Amount
Total amount to be garnished from employee’s salary.
Garnish Balance
Balance remaining after salary has been garnished.
7.5.7.3
Direct deposit information
The payroll screen above allows you to enter an employee’s direct deposit data. Click on the Direct Deposit
button and the screen below appears. Fill in the necessary bank account information.
Employee Maintenance
7-100
Rev 11.5
HC Plus User Manual
The Pre-Note Waiver option is enabled when the ABA number is entered; and the Pre-Note date is automatically
copied from the default Contract to any other Contracts the employee may be assigned to in a Multi Vendor
Agency.
Figure 7-17 Employee Direct Deposit Information
7.5.7.4
Payroll Adjustments
Press Pay Adjust on the Employee payroll information screen to enter adjustment amounts for an
employee working under contract.
Figure 7-18 Payroll Adjustment screen
7.5.8 Employee Termination or status change
The Status Chng button allows you to record any change in the employee’s position in your company
including his/her termination or quitting. Use the Status dropdown in the screen below to record the new
status and enter a note detailing the reasons for the change. For example, if the new status is LOA (leave of
absence) enter the reason such as maternity, illness etc. When you terminate an employee, a popup appears
asking you to confirm this action for the date. Following termination, the schedules for that employee will
be deleted for all days subsequent to the date of discharge. For example, terminating on 3/8 will go into
effect on 3/9—the 3/8 calendar cell will contain data but from 3/9 and forward the cells will be empty.
When a terminated employee has an unscheduled visit that is used to create a scheduled visit, the
employee’s overall status will be updated to active. This prevents a discrepancy showing the employee
active at the contract level but terminated on the employee maintenance screen: rather, the employee will
be active on both.
Employee Maintenance
7-101
Rev 11.5
HC Plus User Manual
An option is available for multi-vendor agencies so that, prior to the automatic termination of an employee,
HC PLUS will check whether the employee is inactive in all contracts.
Figure 7-19 Employee Status Change
The employee’s most recent status change history appears at the bottom of the screen whenever an
employee status change is selected and the HC Plus employee interface to SHARP will pass only the latest
status code and date when more than one status change occurs on the same date. The termination of an
employee is not allowed if vacation/sick/holiday/misc transactions exist after the termination date.
You have the ability to remove the Rehire Date when the employee was incorrectly terminated.
Functionality will work as follows:
1.
Select an active employee who was previously terminated incorrectly and has a date in the Rehire
Date field.
2.
Select Status Change and change the employee’s status to the SAME active status they are
currently in.
3.
Once selected, a system-generated message appears: Warning! Previous Status: Active. Do you
wish to clear out the Rehire Date? If yes is selected, the rehire date is removed from the Employee
Maintenance form. If you select no, then rehire date will remain on the Employee Maintenance
form. Note that a record is kept in HC PLUS history of any attempt to remove the rehire date.
NOTE: You may enter a special code for terminated employees without having to do a
re-hire transaction. You may also inactivate an employee using a termination date before the date of a
special code. However, the termination-date cannot be earlier then the date of a verified visit. Also,
when using Copy Visit, Employees with a rehire status will be assigned to the permanent schedule.
NOTE: Additionally, if an employee’s status is non-rehire-able as a safety factor, you
must first terminate that employee and then re-hire them.
Employee Maintenance
7-102
Rev 11.5
HC Plus User Manual
7.5.9 Assign Contracts to an Employee
To record the contracts the employee will be filling, press the Contracts button on the Employee Maintenance
screen; the screen below appears. NOTE: If employee is Non-re-hirable, you must terminate before you re-hire.
Figure 7-20 Employee Contract Assignment Screen
1.
Use the Contracts dropdown to select the contracts pertaining to this employee. The first contract the
employee is assigned to is the one the system will automatically default to. When adding additional
contracts make sure your designation is correct. And make sure to designate one of the contracts as Default,
i.e., the prime contract he/she will be servicing.
2.
When necessary, use the
Change Status button to
update the employee’s status
for individual vendors.
Employee Maintenance
7-103
Rev 11.5
HC Plus User Manual
7.5.10 Employee Compliance Record
The Compliance button displays a list of the non-compliant issues for the employee. See section 10.4.1.
Bring up to date, as necessary, any compliance row by changing its completion, expiration and result fields.
Figure 7-21 Employee Non-Compliance records
7.5.11 Employee in Service/Training Records
This Training button on the Employee Maintenance screen opens a screen that displays any classes
attended and certificates earned by the employee. See Chapter 12 for more information on maintaining
your agency’s employee training database.
Figure 7-22: Employee Training & In-service information
When you click on the Certification tab, you may add any certificates the employee holds, if this option is
set-up in System Functions. To delete a certification, remove the Class Date and the record is deleted.
You may click on the Attended/Cert Issued checkbox to indicate that the employee completed the required
In-Service program. Note: The HRA Certificate compliance dates are updated whenever you make
changes to the Training/In Service records.
Employee Maintenance
7-104
Rev 11.5
HC Plus User Manual
Figure 7-23: Employee Certification information
You may enter the HRA
Certificate information from the
Compliance module. If your
agency chooses to do that, then
the Employee Training screen
appears without showing a
certification tab.
This option is accessed from
System Functions Î
Scheduling Defaults Î
Compliance Tab Î “Enter Cert
through Compliance.”
If checked, certification is entered directly through Employee
Compliance by entering a complete date for the in-service course. If it
is not set, than the Certification Tab appears on the Training screen.
7.5.12 Supervisory visits/Administrative Evaluation
The Supervisory button brings up a screen to record visits of this employee that have been supervised.
Figure 7-24 Supervisor Visits/Administrative Evaluations
1.
Enter the Date and Time of the supervised visit. The date may not refer to a future date. The Type
may be E for evaluation and S for supervisory. The Result field may only be A = administrative; P =
professional; C = competence; or blank. Click on the Compl check box if the visit was completed.
Employee Maintenance
7-105
Rev 11.5
HC Plus User Manual
7.5.13 Employee Mailing Address
By clicking on the Mailing Addr button, you can display a screen in which you can enter an employee’s
mailing address when different that the address on his main record. This is the address to which all nonpayroll related material will be mailed. The address that appears on the Employee Maintenance screen is
the address to which all payroll related material will be mailed. (e.g. payroll checks, direct deposit stubs,
tax information, etc.)
Figure 7-25 Employee Mailing Address
7.6
Employee Reports
A variety of employee reports may be created using the template below, including Employee Information
(Profile); Employee List; and Employee Schedule.
1.
Press the Reports button on the Main menu, Figure 1-1. The Reports Menu appears. Press the
Employee Reports button.
Figure 7-26 Employee Reports Menu
Employee Maintenance
7-106
Rev 11.5
HC Plus User Manual
2.
Select one of three checkboxes for the type of report you want. As seen above, clicking on an option
(e.g., Employee list) defines the options you have for producing the report.
3.
In the REPORT ON section, you may limit the report scope to one or all employees, coordinators etc.
4.
The INCLUDE section allows for the inclusion/exclusion of specific data by clicking or blanking any
of the active checkboxes. Note that if you check the Header Page box, the first page of the report will
display the options you chose for that report. The toggle button to the left of Empl Addr/Phone
allows you to include both address and phone information or only one of them.
Note that the Hammer icon allows you to save the options you prefer for the next report you may want
to generate.
5.
After choosing your options, press the printer icon or the magnifying glass buttons to print or preview
the desired report.
Figure 7-27 Employee List Report
* For those employees who have a Rehire status: an ‘R’ indicator displays to the left of the rehire date and
the original hire date appears above it.
Figure 7-28 Employee Profile Report (Payroll information selected)
The Payroll Information section of the report for Sharp and Pro-Health will always display the common
fields Federal and State Marital Status and Exemptions, State and City Tax Codes and EIC data. If the
Employee Maintenance
7-107
Rev 11.5
HC Plus User Manual
Scheduling Defaults Integration Type is Pro-Health or Combined then Pay, OT Rates and W4 Status will
also be displayed. If the Scheduling Defaults Integration Type is set to Sharp then W/E Pay will display.
The Employee Information Profile report includes excluded contract/s as well as excluded client/s.
Figure 7-29 Employee Work Schedule Report
Note: Do not select Page Break Per Employee if printing more than one employee schedule. Page Break
option will only print ONE Employee schedule per page.
7.6.1 Employee Labels
You may also generate labels for employees based on criteria selected on the Employee Reports Menu
screen. All employee payroll checks, stubs and tax info will be mailed to the address stored in the
Employee Maintenance Page. All non-payroll matering will be mailed to the Mailing Address.
Note that the printing of employee labels is allowed only if security access is given to Employee Labels and
Employee Compliance.
Figure 7-30 Employee Labels
There are additional employee reports that can be accessed via the Reports menu. They are the
Employee Overtime hours report, the Employee Hours Worked report and the Employee Unavailability
report. See sections 13.12, 13.29 and 13.30.
Employee Maintenance
7-108
Rev 11.5
HC Plus User Manual
Chapter 8 Schedule Maintenance
After entering work orders for a client, you can fill your open orders by scheduling an employee to service
the client.
8.1
Schedule Maintenance functions
When the Schedule Maintenance button is clicked in the HC Plus Main Menu (Figure 1-1) the screen
below is displayed.
Figure 8-1 Schedule Maintenance Menu
8.2
View a Client’s Schedule
Clicking
first brings up the find client screen. After selecting a specific client to
view, his/her schedule screen appears.
NOTE: If a calendar cell is blank, you may have to create a new work order for that time period.
Schedule Maintenance
8-109
Rev 11.5
HC Plus User Manual
The above schedule represents a case where there are several service orders for the client. The ALL in the
dropdown box displays the schedules of all of these orders; however, if you select a specific service from
the dropdown, only the schedule for that service is displayed. In the example below, the schedule (in red)
signifies that an employee has not yet been assigned to fill the order.
Figure 8-2 Client Schedule before Assigning Employees
Once, an employee is assigned, the entry appears in green with the employee’s name filled-in.
8.2.1 Schedule screen properties
The Scroll Forward/Backward icon
moves the calendar display by one-week
increments or decrements. To increment the WOS (week of service), click on the arrow to the right of the
box, to decrement, click on the arrow to the left. To jump to a desired WOS, without scrolling, key in the
desired date and press Enter on the keyboard.
The upper portion of the Calendar screen displays client information. The second portion displays both the
authorized hours (even for clients who were discharged or placed on hold), scheduled hours, and the
Santrax hours for the client. When applicable, it also displays the Prior Approval Expiration date (PA
Exp).
Schedule Maintenance
8-110
Rev 11.5
HC Plus User Manual
The rest of the screen is a calendar-like arrangement of days and times. The WOS follows a normal sevenday pattern, each day column possibly having several Day/Time cells. Each cell reflects a visit scheduled
for that day. The cells show: start and end times for visits; the P/T (Permanent or temporary) status; the
classification of the to-be assigned employee; and the contract ID.
Once an employee is assigned, each cell will display his/her name and phone number. See section 8.4:
Assign an employee to a visit.
The Color of the text information indicates the status of the visit. Filled visits (an employee has been
assigned) are displayed in GREEN. Open (employee not yet assigned) visits are displayed in RED and
Canceled visits are displayed in BLUE. Verified visits are displayed in BLACK and visits Pending
notification are in PINK. A # sign appearing in a cell signifies that the data had been changed. When you
click on a ‘colored’ cell, the detail screen appropriate for that cell appears. For example, clicking on a
black-verified cell will display the Verification detail screen. Note: You may click on the binoculars icon
to access the client search screen.
BUTTON
Feature
Requirements
See client requirements, Figure 3-13.
Exclusions
View those employees who may not work for this client. See Figure 3-14.
History
Click to see the client’s Sharp Status History.
Notes
See client notes, Figure 3-11.
Show Codes
This button toggles between displaying the work/service and procedure codes—and
the default of Show Emps displaying the name of the assigned employee.
Client Info
See client information, Figure 2-4.
Order Info
See the order information, Figure 3-1.
New Order
Enter a new order, Figure 3-1.
Hours
Display the scheduled hours as compared to the hours specified by the client order.
Perm
Displays the permanent schedule for this client. An OPEN visit appears in RED, a
SCHEDULED in GREEN, and a CANCELLED in BLUE. (See section 8.8)
Schedule Maintenance
8-111
Rev 11.5
HC Plus User Manual
Authorization
History
8.2.1.1
Displays the authorized hours for the client.
Scheduled vacation/sick days.
Scheduled vacation, sick or holidays are specified in the appropriate calendar cell. In the example below,
the employee assigned was on vacation Tuesday, 8/3. When you click on cell containing a special code,
the Special Code Maintenance screen appears showing the transaction details for that day.
Schedule Maintenance
8-112
Rev 11.5
HC Plus User Manual
On the Schedule
Maintenance
Screen:
When you click
the
Vacation/Sick/
Holiday/Personal
button (the button
is red when codes
exist) the window
to the right
appears,
displaying the
hours or amounts
relegated to each
code for the week
of service.
Figure 8-3 Weekly Special Codes record
A history record is created whenever changes are made to daily and weekly special
codes. To view the weekly special code history, click on a specific record; the
Special Code Entry screen appears as shown below. It has a History button: select
this button to view all changes to the special codes.
Figure 8-4 Weekly Special Codes Entry
Figure 8-5 Weekly Special Codes History
In the example above, the allocated training hours were changed to ten from zero.
Schedule Maintenance
8-113
Rev 11.5
HC Plus User Manual
8.3
To add
special
codes
Special holiday, vacation and sick codes—including carfare units—may be
allocated to each employee. Training visits and personal days may also be entered
using the special code entry procedure.
To add special codes:
8.4
1.
Press Vacation/Sick/ Holiday/Personal on the Schedule screen. The
Weekly Special Code record appears.
2.
Press New on that screen and the form below appears.
3.
Select an employee and a contract/service and then fill in the values for
each code that is needed.
Assign an employee to a visit
To assign an employee to a visit (or to change the current employee), do the following:
1.
Click within a non-blank calendar day/time cell to view current visit information.
Figure 8-6 Schedule Detail
Schedule Maintenance
8-114
Rev 11.5
HC Plus User Manual
2.
You may change times or assign another employee using this screen. Be careful to indicate by P
(permanent) or T (temporary) the nature of your modification.
3.
Use the binoculars to the left of the employee name to access the Find Employees screen.
Figure 8-7 Find/Assign Employee Screen
4.
To view the client’s requirements, click on the Requirements button. You may want to use this
information to find the appropriate employee who can meet those requirements.
5.
Use the dropdown boxes to specify the sought for employee’s Clsf (classification), Loc (location),
District, and Zip.
6.
Check off the desired Search Options:
7.
UnScheduled Only
Restrict search to employees who have not been
scheduled for that period.
Prev Worked Case
Restrict search to employees that have already
worked the case.
Use Requirements
Include the client’s requirement parameters to
narrow the search for an employee.
Use Availability
Narrow the search by taking the employee’s
availability into consideration. Once an attendant
is terminated, he/she is removed from this list.
Preferred Only
As part of availability, select employees who
‘prefer’ to work on those day(s).
Use Contract
Assignment
Choose only from employees assigned to the client
contract.
Click on the binoculars on the top right to bring up the list of employees matching your search criteria.
Schedule Maintenance
8-115
Rev 11.5
HC Plus User Manual
Figure 8-8 List of Employees available for a client
8.
The first employee in the list will be automatically selected; and his/her data appears at the bottom of
the screen. (If you click on the name of another employee, e.g. VERGEL, that name will appear on the
bottom.) Employees are not active will not appear in the list, as they are ineligible for assignment.
9.
If the employee you selected had not been assigned to the specified contract, you will see the following
popup:
10. After selecting an employee, several features on the bottom of the Find Employees screen allow you
to obtain additional information about the person you want to assign to this client.
Schedule Maintenance
8-116
Rev 11.5
HC Plus User Manual
BUTTON
Description
Decline
Creates a note specifying the date and time and the fact the employee declined the
assignment.
Emp Sched
View the chosen employee’s current schedule. See section 8.18.
Compliance
Transfers you to the employee’s compliance data. See Figure 7-21
Emp Maint
Check or MODIFY the employee’s personal information, Figure 7-2.
11. Click to the left of a name on the list on Figure 8-8 to assign the chosen employee to the client.
12. Once you have selected the employee, click the
button on Figure 8-8; you will be returned to the
Figure 8-6 Schedule Detail screen where the name is now inserted into the employee text box.
button of Figure 8-6. This will bring up the change notification screen where you
13. Click on the
may record whether the employee and/or the client have been notified about the assignment.
Schedule Maintenance
8-117
Rev 11.5
HC Plus User Manual
Figure 8-9 Change/Notification screens
Note: The Reason drop down boxes for Client, Employee, Agency, and Service Change/Notifications differ
in content as each is checked.
14. Click on the
button on the notification screen. You will be returned to the calendar screen
(Figure 8-2) with the assigned employee’s name appearing in the cell for the specific day.
Note: You can always view those clients who are pending notification by following the procedures in
section 8.7 below, Find Schedules Pending Notification.
8.4.1 Santrax data on Schedule Screen
The total Santrax hours for each day appear in a row above the calendar cells. Each
cell contains the start and end times of the recorded Santrax call along with the total
hours displayed, whether matching or differing from the hours that were scheduled.
A raised total-hour indicates that either an in-call or an outcall was missing, yet the
visit was verified. An underlined call time indicates that a call had been applied to
the day’s visit using the Santrax Apply Call procedure.
Schedule Maintenance
8-118
Rev 11.5
HC Plus User Manual
Figure 8-10 Client Weekly Schedule with Santrax data
Figure 8-11 Client Daily Detail screen showing Santrax corrected hours
Note 1: Unscheduled visits via Santrax, having a valid client and employee, are displayed on the client
schedule screen. The literal Unsched (in red) identifies these visits. You can click on an unscheduled visit
cell and create and verify the visit from this entry. In assigning an employee for an unscheduled Santrax
call, the system validates the active status of the employee in the contract for which the assignment is being
made.
Note 2: Holiday hours (date is in red alongside an H) are updated automatically when permanently
removing and/or assigning an employee to a visit that occurs on a holiday. You will be prompted to
confirm any update of holiday hours.
Note 3: If there are several visit schedules on any day, you may have to use the scroll bar at the right to
view those visits.
Note 4: Schedule screens display corrected hours entered via Santrax Visit Maintenance. Corrected hours,
if present, appear on the Schedule Detail screen next to Santrax actual hours and display with a yellow
background. The weekly and daily verification screens use corrected hours as the default when a visit is
manually verified.
Schedule Maintenance
8-119
Rev 11.5
HC Plus User Manual
8.4.2 Copy a schedule to other days of the week
The following procedure allows you to copy a day’s schedule for other days of the week. This is often
useful when a schedule needs to be moved forward a day or so.
1.
On the client calendar screen, click on an individual cell. The Figure 8-20 View/Modify Day’s
Schedule Data appears. Click the Copy button at the bottom of that screen. A copy parameter area
appears (outlined in the next figure by a dashed-line rectangle).
Figure 8-12 Copying a Schedule
2.
If, as in the above example, you want to copy Monday’s schedule to Tuesday, Wednesday and
Thursday, click on the appropriate checkboxes.
3.
Check also the Times and/or Employee checkboxes if you want that data to copied.
4.
Click on the Copy button. The schedule is now replicated for the new day(s).
8.4.3 Copy a schedule a week forward
You may duplicate a week’s schedule for the following week.
1.
On the calendar screen, click on the right arrow of the date. A blank calendar screen is displayed.
2.
Click on the copy
appears.
Schedule Maintenance
button that is to the left of the binoculars. The previous week’s schedule
8-120
Rev 11.5
HC Plus User Manual
8.4.4 Add a ‘sudden’ visit to a schedule
Due to a medical emergency, you may have to add more visits to an already scheduled patient. To do so:
1. Right-click your
mouse after
positioning it over the
date of the day for the
added visit. Click on
the Add A Visit
button.
2. The Add a Visit
screen then appears.
Note that for Cluster
Clients, the Duty Free
Indicator is selected.
Figure 8-13 Add a Visit Screen
3.
door. The next screen
Enter an employee name and the time/duration of the visit. Click the
appears where you will enter the reasons for the added visit and whether the client and/or employee
have been notified of the change.
Schedule Maintenance
8-121
Rev 11.5
HC Plus User Manual
4.
. The new visit will appear in a cell as part of the
Once you complete the above screen, click on
day’s schedule. Accordingly, the scheduled hours for that day will be updated to reflect the added
‘emergency’ visit.
8.5
Find Open Orders
For the purposes of scheduling, you often have to locate those orders that are still unfilled, that is, no
employee is assigned to the client for a day mandated by the order. To correct this problem, do the
following:
1.
Press the Find Open Orders button on the Schedule Maintenance Menu. See Figure 8-1.
2.
Enter search criteria in the fields below to narrow the results of the open orders returned.
Figure 8-14 Find Open Orders
FIELD
Description
Start Date
and Time
Enter the beginning date and the time the system will use to start finding open orders.
The default date for this field is the actual date when the screen first appears. The default
time is 12:00 AM. Enter a different date and time if you do not want the current defaults.
End Date and
Time
Enter the ending date and the time the system will use to stop searching for open orders.
The default date for this field is the actual date. The default time is 11:59 PM. Enter a
different date and time if you prefer other limits.
Client
To limit the open order search, use the drop down menu to select a specific Client.
Leave the field blank when you want to search for all clients having open orders.
Contract
Use the drop down menu to select the name of a Contract. Leave blank to search for all
contracts.
District
Use the drop down menu to select the name of a District or branch within the agency.
Leave blank to search all districts.
Coordinator
Use the drop down menu to select the name of a Coordinator responsible for the specific
clients with open orders. Leave blank to search all coordinators.
Team
Use the drop down menu to select the name of a Team responsible for specific clients
with open orders. Leave blank to search across all teams.
Sort Options
Set the sequence for listing the open orders: check the Client Name, Service Date or the
Coordinator/contract box
Schedule Maintenance
8-122
Rev 11.5
HC Plus User Manual
Coordinator/contract box.
3.
After the search criteria have been filled in, click on the magnifying glass button
of open orders. The following screen appears.
to generate a list
Figure 8-15 Open Orders List
4.
8.6
To see the detail for an open order, click on the asterisk button next to the client’s name. The
View/Modify Schedule screen appears so that you can assign an employee to cover the open order.
See Figure 8-20.
Copy All Schedules
This function allows you to copy all schedules for all clients as far into the future as needed. The copying
of schedules forward has been automated to work as a batch process as well as online. Be careful: once
you start this process, the system will take time to do the copying. We recommend you do your entire
schedule copying on an overnight basis.
There is no need to copy schedules on an individual client level. The Copy All Schedules function does
this copying (at one time) for all clients that have an active order and a related schedule. This holds true
whether the client has a permanent employee assigned to them or not. If there is no permanent employee,
the system copies the schedule as an open order.
If for some reason, an individual client’s schedule had already been copied forward to a week when all
clients’ schedules are now being copied, the system insures that no duplication occurs with the more recent
copy.
1.
To duplicate schedules, click on the Copy Schedules button on the Schedule Maintenance Menu
(Figure 8-1)
Figure 8-16 Copy Schedules form
2.
Use the Copy Thru WOS field to specify the Week of Service end date—the date through which you
want all schedules copied.
Schedule Maintenance
8-123
Rev 11.5
HC Plus User Manual
3.
The Coordinator drop down menu can be used to copy only those schedules for which a particular
coordinator is responsible.
4.
Use the Contract drop down menu to copy only those schedules related to a specific contract
5.
After all the information has been entered, click on the Copy Schedule button. The system may take
some time to copy the schedules, depending on the number of weeks forward that you set. Messages at
the bottom of the screen alert you to the progress of the copy.
6.
When the copying is complete, a confirm-popup displays the date through which the schedule was
copied.
8.7
Find Schedules Pending Notification
Schedules may have been set up but the client or the employee has not yet been notified of the assignment.
The following feature allows you to locate all such pending notification orders.
1.
Click on the Pending Notification button on the Schedule Maintenance Menu (Figure 8-1)
Figure 8-17 Pending Notification
FIELD
Description
Start Date and
Time
The beginning date and time the system will use to find schedules pending notification.
The default date for this field is the current date. The default time is 12:00 AM. Enter a
different date and time if you do not want the current defaults.
End Date and
Time
The ending-date and time to stop finding schedules pending notification. The default
date is today and the default time is 11:59 PM.
Client
Use the drop down menu to limit the search to one client.
Contract
Use the drop down menu to limit the search to a specific contract. Leave blank to
search for all contracts.
District
Use the drop down menu to limit the search to a district or a branch within the agency.
Leave blank to search all districts.
Coordinator
Use the drop down menu to select a coordinator responsible for certain clients. Leave
blank to search all coordinators.
Schedule Maintenance
8-124
Rev 11.5
HC Plus User Manual
2.
to get a list of
After search criteria have been filled in, click on the magnifying glass button
schedules pending notification. Click on the ** button to see the schedule’s details.
Figure 8-18 Schedules pending notification
By double-clicking on PENDING, you can change the status to SCHEDULED once the employee
and/or client is notified of the assignment.
Also keep in mind: The Figure 13-3 Pending Notification Report can also be generated for the purpose of
tracking clients who have not been notified of employee assignments.
8.8
View a Permanent Schedule
The Perm button on the Figure 8-6 Schedule Detail screen (or on the Client Schedule screen) allows you to
see the schedules which are permanent for this client, that is, the pattern that usually works for this client.
Take note:
•
Permanent Schedules cannot exceed the Authorized Hours for the client.
•
An OPEN visit appears in RED, a SCHEDULED in GREEN, and a CANCELLED in BLUE.
•
The permanent schedule does not display open orders or only temporary assignments. However,
an actual schedule reflects even temporary (T) changes made to a client’s schedule.
Schedule Maintenance
8-125
Rev 11.5
HC Plus User Manual
Figure 8-19 Permanent Schedule
1.
If you click on the Week arrow, going forward to week 2, the system prompts you as to whether you
want to copy this pattern for the following week. Click Yes to affirm. When creating a permanent
schedule pattern for a second week, permanently cancelled visits are not copied into the second week.
BUTTON
Feature
Requirements
See Client Requirements, Figure 3-13.
Schedule
See Client Schedule, Figure 8-2.
Notes
See Client Notes, Figure 3-11.
Client Info
See Client Maintenance, Figure 2-4.
Order Info
See Order Entry Figure 3-1.
Adding an additional week takes effect immediately based on current system date. For example, if week #2
is added to pattern, then the current schedule week becomes week #1 of the pattern and the following
schedule week becomes week #2. Adding or deleting a week on the permanent pattern will cause the
scheduler to scan all visits affected by the change and to update their Perm/Temp indicators to match the
new pattern.
NOTE: You cannot directly access the permanent schedule of a secondary mutual client. Instead,
proceed to the schedule of the primary client and click Perm.
Schedule Maintenance
8-126
Rev 11.5
HC Plus User Manual
8.8.1 Delete a permanent schedule
You can delete a week from the pattern; but you must delete the weeks in descending week order
Click on the trash can to delete and then press
Yes on the confirm window.
8.9
1.
View/Change a Calendar Visit
Click within a non-blank calendar day/time cell to view and change current visit information. The
screen below appears, showing the day’s schedule data. Use the red date arrows to view the schedule
of an earlier of a later day.
Figure 8-20 View/Modify Day’s Schedule Data
The visit Start Time and visit End Time may be altered in this screen. The P/T (Permanent or
Temporary) status of the scheduled visit may also be updated for either the client or the employee. You
may reduce scheduled hours when they exceed weekly authorizations including banked hours. When you
click the
door, the change notification screens appear. (See the next section).
After filling out the above screen, a verification popup appears requesting you to confirm the change.
The Santrax end time is missing in the example above. But by pressing the Unapplied button, you
may begin a process to verify the visit and have it batched. See section 9.8.
Schedule Maintenance
8-127
Rev 11.5
HC Plus User Manual
8.9.1 Change Notification options
Upon changing a visit’s details, the screen below appears offering several options related to the notification
of the client and/or employee as to the schedule’s change. All changes that you make to a schedule will
appear in the Change Log Report—as shown in Figure 8-23. However, checking the Exclude checkbox
will cause this notification change not to appear on that report.
Figure 8-21 Change Notification screen
When you return to the calendar schedule and click on a day cell for this date, the screen below appears.
Click on its History button to view the changes that you previously made to this day’s schedule. You may
also change the text in the Reason/Notes section.
8.10 Verify a visit
After clicking on a day’s cell and displaying the schedule information as shown in Figure 8-20, you can
verify that the visit was completed by hitting the Verify Visit button on the bottom of the screen. For
further details on the verification procedure, see Chapter 9, Verification procedures.
Schedule Maintenance
8-128
Rev 11.5
HC Plus User Manual
8.11 Cancel a visit
Several buttons are available on Figure 8-20 providing different options for canceling a visit and notifying
the involved parties. Always enter a reason for cancellation and add a note, if necessary. Be aware that
you may cancel an employee’s visit and set his/her pay hours to zero.
BUTTON
Description
Client Cancel
The visit is to be cancelled because of the client. This button displays the client
cancellation-notification screen that is similar to the one shown for the cancelled
employee below.
Employee Cancel
The cancel options (checkboxes) in the above screen allow you to cancel a whole
day’s visits or to simply cancel this visit. You may also limit the cancellation for this
client only and/or leave the employee available for other visits. When you check the
box indicating cancellation for only this client, another checkbox appears prompting
you to indicate whether you want to add this employee to the exclusion list for this
client.
When you cancel an employee, the client’s schedule cell is not marked
CANCELLED but is treated as an open visit requiring the assignment of another
employee.
Schedule Maintenance
8-129
Rev 11.5
HC Plus User Manual
Canceling a visit for sick or vacation—and choosing the pay zero hours option—does
not validate whether the total cancelled hours exceeds accrued vacation or sick time.
Agency Cancel
Cancel an agency when necessary.
Service Cancel
Allows you to cancel a service when necessary.
8.11.1 Track Cancellations
When you access the cancelled visit on the Employee Schedule screen as shown below, click on the
CANCELLED box and the availability form for that day is then displayed. From there, you can proceed
to the Client Schedule screen where the visit appears as an open (red) visit.
Schedule Maintenance
8-130
Rev 11.5
HC Plus User Manual
A visit cancelled by an
employee appears on the
client’s schedule as an open
visit. Click on the cell to
assign a replacement.
8.12 Reactivate a cancelled visit
When reviewing a CANCELLED day cell (blue font), the screen buttons on Figure 8-20 switch to a
‘REACTIVATE format. Appropriate ‘Reactivate’ screens are then displayed to enable you to reinstate the
cancelled visit.
Figure 8-22 Reactivate Visit Screen
Schedule Maintenance
8-131
Rev 11.5
HC Plus User Manual
8.13 Create a report documenting changes
Use the following procedure to create a list
of all changes made during a defined time
period.
1.
Press the Reports button on the
Schedule Maintenance Menu.
2.
Choose the Change Log report.
The Form to the right appears.
3.
Check the Cancellations Only
checkbox if you only want to see
a list of cancelled visits.
4.
Press the
your report.
icon to generate
The Change Log contains an additional
Report Type ‘Tasks’ for those agencies
who have the ability to enter tasks
Figure 8-23 Change Log Report
Schedule Maintenance
8-132
Rev 11.5
HC Plus User Manual
8.14 Schedule a TBA client
Each of the TBA linked clients will have their own separate schedules that are set up in the usual manner.
However, the schedule maintenance screen for each client displays the corresponding TBA Link Client
number and Name.
The checking of assigned hours versus authorized hours is done on a weekly basis instead of daily. As long
as the assigned hours for the week do not exceed the amount authorized for the week plus accumulated
banked hours, the assigned hours for the day will be accepted.
Banked hours are based on the number of unbilled but authorized hours accumulated for the client prior to
the date of the schedule.
The Client Schedule report displays the TBA client’s prior approval information and accumulated banked
hours at the bottom of the report following the display of the client’s schedule for the week.
If the client is TBA effective, the Santrax Daily Summary Exception Report will display B next to the
client’s name. TBA unlinked clients are displayed on the report in the same section as the regular clients
while TBA linked clients are displayed on the report in a separate section between the regular client section
and the cluster client section of the report.
8.15 Schedule a cluster client
The scheduling and assignment of an employee to a patient in a cluster situation is done in the same way as
a regular client.
8.16 Schedule a mutual client
When a primary mutual is linked to a secondary mutual, the schedule of the secondary is copied from the
primary. See Handle mutual client cases, section 6.3.
Schedule Maintenance
8-133
Rev 11.5
HC Plus User Manual
8.17 Modify a 24-hour visit.
You may modify the details of a 24-hour visit by clicking on the Mod 24 hr Visit button on the
View/Modify Schedule Detail Screen. A screen appears listing all the 24-hour visits for that client. Double
clicking on the first column of any row will display the appropriate Schedule Detail screen for that visit.
Figure 8-24 Adjust 24 Hours Case Schedules
Schedule Maintenance
8-134
Rev 11.5
HC Plus User Manual
To modify the 24-hour details:
1.
Select a row by clicking on
a checkbox.
2.
Use the Modify Times
button on the bottom of the
screen to change the date
and times of the visit.
3.
Once you enter your
changes, Save is activated.
4.
Pressing Save will display
a Change Notes window
asking you to enter the
reason for your time
change.
5.
You may also select a row and shift the selected time of a visit by
pressing Shift Selected Visits.
6.
The window on the right is displayed.
7.
Enter your shift parameters and click OK.
Note: In HC Plus Santrax call processing, the ‘T’ indicator on a 24-hour case indicates the call is for the
visit on the prior day. Instead of creating an unscheduled visit, these calls will be used to close out the prior
day’s visit.
Schedule Maintenance
8-135
Rev 11.5
HC Plus User Manual
8.18 Employee Schedule
The system also allows you to set up a schedule for an employee, that is, to assign to him/her clients for
service on specific dates and times. This process is the mirror image of client scheduling—where you
begin the process with a client and then assign an employee to him or her.
1.
Employee schedule features are accessed by first clicking the Employee Schedule button located on
the Schedule Maintenance Menu, Figure 8-1.
2.
This will initially bring up the Find Employee screen, as seen in Figure 7-1. After selecting a specific
employee to process, the schedule for that employee appears:
Figure 8-25 Employee Schedule
The Employee Schedule Screen displays the current week’s schedule. This includes any permanent or
temporary clients that have been scheduled for the employee. Also shown is employee availability (and
unavailability). See Figure 7-4. (When you click on a time cell that has no assignment, for example, the
Saturday cell above, an availability popup appears in which you can enter a reason for any change of
availability for that day.
At the upper right is the display of the total hours scheduled for the week. This calendar screen can be used
to enter any employee cancellations, effect changes in the scheduled hours or days and update the
employee’s general and preferred availability.
Note: The
will display the Find Employee screen, Figure 7-1.
When you click on a cell the Schedule detail screen for that visit appears.
Schedule Maintenance
8-136
Rev 11.5
HC Plus User Manual
8.18.1 Set Employee Availability
When you click on a blank time cell, the window below appears in which you may set the availability for
that day and for other days. You may also override the current availability or use the general availability
pattern. In the example below, the employee ‘prefers’ working thirteen hours on Saturday and Wednesday
during the week of 8/5 to 8/11.
Figure 8-26 Set an Employee’s Availability
You may also initiate availability setting by right-clicking on the date above a calendar column on the
schedule screen and then pressing Enter Availability.
Schedule Maintenance
8-137
Rev 11.5
HC Plus User Manual
8.18.2 Employee Schedule Screen Buttons
The buttons at the bottom of the Employee Schedule screen, Figure 8-25, are to be used to review or alter
employee-scheduling information.
BUTTON
Feature
Skills
Displays the Employee Skills screen as seen in Figure 7-7.
Exclusions
Displays Figure 7-8. This is a list of all clients that this particular health care
worker cannot work for.
Notes
Displays the employee notes screen.
Show Codes
The Show Codes button displays the calendar with the procedure codes, that is,
services to be delivered to the client. The button toggles to Show Cli/Srv
(client/services) which allows you to view the client’s name.
Employee Maint
View the employee’s record, Figure 7-2.
General Availability
Press this button to set and view the employee’s general (overall) pattern of
availability. By pressing right arrow near the Week 1 button, you can copy
‘availability’ to future weeks.
Schedule Maintenance
8-138
Rev 11.5
HC Plus User Manual
Pref Avail/Available
This toggle button allows you to view the current availability and preferred
availability on the calendar. In the example below, the employee could not work
on 9/25 during two afternoon hours.
Hiatus
This button displays a popup that allows you to cancel employee workdays.
Compliance
View employee’s non-compliance status. See Figure 10-12.
Verification
Brings up the verification screen where you can verify that visits were carried out
as scheduled. See Figure 9-2.
Vac/Sick
Holiday/Carfare/
Personal
When the button is red, it indicates that accrued sick and vacation days exists for
the employee. Click on the data line—and a popup appears allowing you to
change the information.
Schedule Maintenance
8-139
Rev 11.5
HC Plus User Manual
Select Location
Use this button to
access a list from
which to choose the
site at which the
employee works and is
subject to its billing
and clerical
procedures. See
Location Maintenance
(section 14.2.5) for
more information.
8.18.3 Enter Hours for Special Codes
You may enter hours for special codes (including carfare units) from either the Client or Employee
Schedule screens. Press on the Vac/Sick/Hol/Pers button to access the Weekly Special Codes screen.
Select New. The following screen appears.
1.
Use the dropdown to select a Contract/Service.
2.
Enter the hours for special codes and the amount of carfare units.
3.
You may generate a Special Codes report detailing all employees on sick, holiday, vacation, etc.,
during a week of service. This report is accessed by Main Menu Î Reports Î Additional reports
Î Special Codes reports
8.18.4 Enter special codes for a visit day
A second method to enter special codes is:
1.
Right-click on the date heading. Click on Enter Special Codes. The Special Codes screen appears.
Schedule Maintenance
8-140
Rev 11.5
HC Plus User Manual
Figure 8-27 Special Code Entry Screen
2.
Choose a contract/service from the dropdown box. The reason will automatically be filled in, if you
had entered a default reason in the service record of the ‘Vacation’ or ‘Sick’ miscellaneous client. See
section 6.8.
3.
After completing the above screen and pressing the Exit door, the calendar screen will appear with the
special codes inserted in the day’s cell.
Often you may want to enter a ‘zero’ total hour for an employee’s availability on a certain day—
giving the reason for that anomaly. These special code situations will not be sent to auto-batch or billing
until the payroll department changes the hours for those employees. The feature Find Unapproved
Special Codes (see section 11.6) can be accessed from the Daily Functions menu to locate all employees
in this unapproved category—and then, if necessary, you can proceed to input the correct hours.
Schedule Maintenance
8-141
Rev 11.5
HC Plus User Manual
8.18.5 Record tasks performed by an employee for a client
Often, during a visit, an employee may perform chores or tasks for the client. These may range from
helping the client shower to taking his/her oral temperature. During and after a visit, you may want to
record the work done. Tasks entered during the Santrax call will be interfaced to HC PLUS during call
processing. Visits, under this system, cannot be verified unless tasks are entered.
Task entry and editing can be accomplished using HC PLUS. After appropriate settings for individual
Agencies, a Task button displays on both the Client and Employee Visit Detail screens and the
Client/Employee Verification Detail screens. You then have the ability to add, modify and delete task
assignment/s from these screens. The process is as following:
1.
To access the Detail screens, display the employee (or the client) schedule.
Notice the number of tasks marked in each cell when the employee is assigned a client.
2.
8.18.5.1
When you click on a cell, the Detail screen appears, with a Task button located at the bottom.
Press it to view current tasks for that visit or to enter new ones.
To enter new tasks
You may enter tasks for a scheduled visit or even for a visit that was verified, as long as the visit had not
been posted and batched.
1.
Click on the New button on the Employee Tasks screen. The following screen appears.
Schedule Maintenance
8-142
Rev 11.5
HC Plus User Manual
2.
Highlight an item for the list of available tasks and press Add>>. The item will added to list of
tasks preformed for the client.
3.
Certain tasks such as temperature readings or weight require you enter the reading as shown
below.
Figure 8-28 Add Tasks Screen
4.
Press Accept to record the reading you entered.
5.
When you press
Schedule Maintenance
the list will appear.
8-143
Rev 11.5
HC Plus User Manual
6.
You can modify certain tasks by double-clicking on them and changing the reading
7.
You may also delete a task by highlighting then pressing the
Schedule Maintenance
8-144
icon.
Rev 11.5
HC Plus User Manual
8.18.6 Overtime and Absence tracking
Some agencies can track the hours that an employee worked overtime or was absent during a visit. When
scheduled hours are changed, if the exceed the hours authorized the amount appears on the Visit Detail
screen and if they are less than the authorized hours, the employee is deemed absent for that time. A reason
must be entered for each overtime or absence occurrence.
1.
Access the Schedule Detail screen of a calendar cell.
2.
Change the hours as necessary. You will be required to fill in the OT/ABS field and the reason
code.
3.
The schedule calendar will display the characters OA in the day’s cell, marking it as an
overtime/absence situation.
All overtime/absence changes made on an employee’s schedule detail screen are also displayed on his/her
assigned client’s schedule and detail screens.
In an absence situation (where you reduce the number of hours for a visit) the system will prompt you
whether you want to create a split visit. In the case below the original visit was reduced to one hour
because of an emergency. However, since the rest of the visit could be carried out later in the day, the visit
was split into two parts.
Schedule Maintenance
8-145
Rev 11.5
HC Plus User Manual
Clicking Yes to the above prompt, the original 7 hour visit is split into two visits of one and six each (on
client calendar schedule). You can change the times of the second visit and assign another employee to
complete the work, if necessary.
ÎÎÎ
8.19 Schedule Reports
To generate a series of reports detailing your current schedules: Press the Reports button on the Main
Menu, Figure 1-1. The Reports Menu appears. Choose the Clients Reports button to display an array of
options from which you can generate various schedule reports from the client’s point of view. See Figure
4-1. Alternatively, press the Employee Reports button for a menu to produce schedule reports from the
employee’s perspective.
Figure 8-29 Employee Schedule Report
Schedule Maintenance
8-146
Rev 11.5
HC Plus User Manual
Chapter 9 Verification procedures
9.1
Verification Overview
The system provides two methods with which to verify that an employee filled the clients’ schedule as
required by a work order. The first method is to follow the procedures using the formal Verification menu
via the Employee’s schedule. You may also, as described in sections 9.4 and 9.5, verify visits ‘on the fly’
directly from a schedule calendar screen.
Note: When a visit is manually verified from the Client Schedule, the appropriate Employee schedule is
updated as well.
HC Plus uses verified hours, if present, instead of scheduled hours when checking to see if employee
exceeded authorized hours. This allows adjustments of pay hours to exceed scheduled hours as long as
authorized hours plus banked hours (if applicable) are not exceeded. However, the validation to prevent
verified hours from exceeding scheduled hours is available—and is controlled by the option ‘Allow
Verified Hours Greater Than Scheduled’ on the Scheduling Defaults Sharp screen (see section 14.1.5) Call
Client Relations to enable.
9.2
Automatic Batching
When the Batch Verified Visits field is checked in the Sharp section of the Scheduling System Defaults,
manually verified records are automatically batched. The criteria for inclusion in a batch are location,
contract, week of service, and user.
•
Employee verified schedules will be added to an existing batch if a match is found for location,
contract, week of service, and user.
•
Employee verified schedules will be placed in a new batch if a match is not found for location,
contract, week of service, and user.
•
Within the same batch, records that are verified together for the same client will get the same timeslip
number, i.e., they will be included in the same Batch Detail summary record by employee and client.
Note: records that are verified at different times will not get the same timeslip number.
•
Within the same batch, records for the different clients will not get the same timeslip number, i.e., they
will be placed in separate Batch Detail summary record by employee and client.
•
When a manually verified batch visit is unverified, the visit is removed from the batch.
9.3
1.
Verify Schedules via the Verification Menu
Use the Verify Schedules button on the Scheduling Main Menu (Figure 1-1) to bring up the
Verification Menu below.
Verification procedures
9-147
Rev 11.5
HC Plus User Manual
Figure 9-1 Verification Menu
2.
Clicking Verify Schedules brings up the Find Employee screen (Figure 7-1). Select the employee
whose schedule you want to verify. After the employee is selected, the Employee Schedule
Verification screen appears.
Figure 9-2 Employee Schedule Verification
3.
Visits that have already been verified will be in black. Unverified visits are displayed in green.
4.
To verify a particular day(s) click in the checkbox in a cell, then press the red Verify button at the
bottom. The total number of verified hours is displayed in the cell. An ellipsis (…) indicates the visit
was verified but not batched, whereas, when it is batched, the batch number appears in the cell.
Verification procedures
9-148
Rev 11.5
HC Plus User Manual
5.
You may also simultaneously verify all the schedule days (without checking the boxes in the cells) by
pressing the Verify All button.
6.
When you click on a specific day/time cell in the figure 9-2, the Verification Detail screen appears.
Figure 9-3 Schedule Verification Detail
7.
Examine the details of this screen. (You may want to change the verified times etc. In this case, when
you click on the Exit-door, another popup will appear in which you can enter comments about your
changes.)
Note: If you check the Per Diem checkbox, the letters PD will appear in the right bottom corner of a
verified visit when the Show Codes button is selected from the Client Schedule. Live-in visits that
exceeded 12 hours show the per diem indicator. The per diem indicator is also visible for a 24-hour visit
that is split into two 12-hour visits; however, it will not automatically be checked.
The Per Diem indicator is only selectable on those visits equal to or in excess of 12 hours. Any visit less
than 12 hours will have its Per Diem indicator grayed out. Any 12-hour visit will have to be manually
selected by user. In addition, you will receive a warning message when more than one 12-hour visit has
been scheduled for the day.
A modification has been made to the HCO application to add the Sharp Aids per diem logic. Per Diem
works as follows with regards to Special Care (Aids) services. If the Service’s Special Care flag is checked
on the Service Maintenance Screen and the scheduled hours are between 0 and 4.99, and the Contract’s
‘Aids Per Diem Rate’ is not zero, then the Per Diem checkbox is enabled. It is up to you, the user, to check
the box on the Verify Visit screen.
8.
Clicking on the Exit-door formalizes the verification and the entry now appears in BLACK in the
Client schedule screen. If you had adjusted the verified hours, the change will appear on the schedule
framed in a tiny box in bold underneath the originally scheduled hours enclosed in brackets.
9.
After verifying a visit, you can view the verification history by clicking on a black schedule cell. The
View/Modify Schedule Detail screen appears.
Verification procedures
9-149
Rev 11.5
HC Plus User Manual
10. When you click on the Verification button on the bottom of the screen, the Schedule Verification Detail
screen appears with the history displayed at the bottom.
Figure 9-4 Schedule Verification Detail Screen with history
Note: The screen above displays non-transferred batches in red and transferred batches in black.
BUTTON
Feature
Client/Agency/
Employee/Service
Cancel
These four buttons function in the same manner, as do the cancel buttons on Figure
8-20.
Un-Verify
This button sets the individual visit back to an unverified status. The color of the
text in the calendar for that day will revert from BLACK to GREEN.
Client Schedule
View the Client Schedule screen, Figure 8-2.
Add History
This button allows you to add additional information to the verification history
without having to modify the visit.
Sched History
Displays a screen showing all the scheduling changes.
Perm
This button brings up the Permanent Schedule screen. See Figure 8-19.
Unapplied
Allows you to apply Santrax calls to the visit and then proceed to verify that visit.
Verification procedures
9-150
Rev 11.5
HC Plus User Manual
Note: The verification screen keeps the same week ending date when selecting a second or third
employee’s schedules to verify. That is, if you use the binoculars to search/verify another employee’s
visits, the WOS retrieved will be the same as that of the first employee. This feature works only when the
‘Default Schedules to current WOS’ option is not selected on the Scheduling Defaults screen.
9.3.1 Verification for special codes—sick and holiday
Vacation and sick days appear on the verification screens either through cancellation or by entering special
codes as described in section 8.18.4.
Figure 9-5 Vacation/sick days on schedule screen
When you click on a vacation/sick cell, the detail screen below appears along with the batch number to
which the visit’s timeslip was assigned.
9.3.2 Verification Screen Features
The verification screen has several buttons that add the following functionality.
Verification procedures
9-151
Rev 11.5
HC Plus User Manual
Figure 9-6 Verification Screen functions
BUTTON
Feature
Verify All
This red button will verify all the scheduled visits of a selected employee. Three
red dots in a cell signify that the cell had been verified via the ‘Verify all’ method.
(Verify)
If you check a checkbox in a green scheduled cell, this button toggles to “Verify
Selected” allowing you to verify only those schedule(s) as necessary.
Select All
(DeSelect All)
Employee Schedule/
Maintenance/ Notes/
Show Codes/
Compliance/
Vacation, Sick,
Holiday/Pers, Select
Location
This button will place a check mark in all the small check boxes that appear in the
bottom right corner of the calendar day visits. Once set, the Select All button
toggles to read DeSelect All as seen in the above figure. Clicking Deselect will
remove all the checks in the small check boxes.
These buttons bring up screens similar to those described in the Employee
Schedule section 8.18.
Figure 9-7 Verified visits
Once the visit hours are manually verified, the batch number (e.g. 064) appears in the cell.
9.4
Verifying Visits via the Client Schedule Screen
To verify visits using the client schedule screen, do the following:
1.
Click in a green cell (a scheduled visit) or in a pink cell (pending notification). Note that cancelled
(blue) or open (red) visits cannot be verified. The schedule detail screen appears
Verification procedures
9-152
Rev 11.5
HC Plus User Manual
Figure 9-8 Schedule Detail screen
2.
Click on the Verify Visit button on the lower right of the screen.
3.
The schedule verification detail screen is displayed (Figure 9-3). Make changes to the hours as needed
and press the
button. The verified Client Schedule screen is displayed.
Figure 9-9 Verified Client Schedule Screen
9.5
Verifying Visits via the Employee Schedule Screen
On the Employee Schedule screen, do the following:
1.
Click in a cell. The schedule detail screen appears for the client for that day.
2.
Click on the Verify Visit button on the lower right of the screen.
Verification procedures
9-153
Rev 11.5
HC Plus User Manual
3.
9.6
The Schedule Verification detail screen is displayed (Figure 9-3). Make changes to the hours as
needed and press the Exit button. The verified Employee Schedule screen is displayed as shown on
the right.
Change scheduled hours after verification
The system allows you to modify scheduled times even for visits that had already been verified. Note that
the system does not check authorizations when scheduled hours are changed for a verified visit. But once
the timesheet is batched and transferred to billing (posted), the scheduled times cannot be increased; you
may, however, decrease the scheduled hours on a visit that has already been posted. Decreasing the
scheduled hours is allowed when the verified and posted hours are less than the original scheduled hours.
1.
Click on a verified cell. The verification screen appears.
2.
Change the schedule’s hours (Start and End times) as shown below.
Verification procedures
9-154
Rev 11.5
HC Plus User Manual
9.7
Santrax Visit Verification
When you access a verified Employee’s schedule, the Santrax times are displayed. If the employee had
worked with two clients, the verified call-in and call-out times are shown for each client.
Verified Santrax employee visit-time data also appears in the cells of the client schedule screen. The callin and call-out times appear together with the total hours that had been verified.
When you click on a cell the verification details are shown including the Santrax information.
Verification procedures
9-155
Rev 11.5
HC Plus User Manual
9.8
Applying unknown calls to a visit and verifying
On Figure 9-8 Schedule Detail screen the Unapplied button allows you to apply Santrax calls to the visit
and then proceed to verify that visit. In the example below, the Santrax end time is missing. We will
proceed to apply a call to it.
1.
When you press Unapplied, a list of Santrax Unapplied Calls screen appears. For agencies using the
task option, the screen will also show the number of tasks.
2.
Check the Select checkbox to the left of the call you want applied to the visit.
Figure 9-10 Santrax Unapplied calls
3.
Click the Apply Selected button. You are now in a ‘verify’ mode and a series of windows appears
stepping you through the verify process. The end result appears as shown below.
If you manually apply calls, the
calendar screen will show the
Santrax call time as an
underlined entry.
The Santrax total hours, when
displayed in bold, indicate
verification when the verified
hours differ from the scheduled.
To indicate that a visit was verified due to call assumption processing: on the client/employee schedule
screens, the verified hours will appear in red; and on the Daily Call Summary report (Santrax Reports),
verified hours will appear raised.
Verification procedures
9-156
Rev 11.5
HC Plus User Manual
When you manually apply calls, HC PLUS calculates the banked late minutes. The calculation for
banked hours is performed for a visit that meets the following criteria:
•
Not a TBA or a Cluster client. Not a 24-hour visit. The visit has never been verified.
•
The visit does not initially have both Santrax Calls.
•
Has just had a manually applied start or an end call via the Santrax Unapplied Calls Screen.
•
Has just had a manually applied start or end call from Client or Employee schedules screen via the
Santrax Call Exception Maintenance screen.
9.9
View the phone number of a Santrax call
The Visit Detail screen allows you to view the telephone number associated with certain Santrax calls. If
the client ID was manually entered during the call, then the call is displayed within a gray box.
1.
Place your mouse over a shaded call time Schedule detail screen.
2.
A tool tip appears showing the phone number.
Figure 9-11 Viewing the Telephone number Associated with a Santrax call
9.10 The Verification Report
Click the Verification Report button on the Verification Menu (Figure 9-1) to create the report. Several
Include options are available, namely: Verified, Unverified, Include Posted, Posted Only, and a report that
Verification procedures
9-157
Rev 11.5
HC Plus User Manual
shows classification totals. The Sort option selected and the "Filter By" criteria appear at the top of each
report page.
NOTE: At the time of the transfer of a batch, execute the Verification Report by Employee for the
week of service selecting Posted Only and Show Clsf Totals; this data should match the confirm report
automatically generated at the time of transfer.
Figure 9-12 Verification Report options
1.
Click the check box for the appropriate sort. Enter the week of service: the week defaults to the latest
full week from the current date but can be altered by clicking on the arrows or by keying in dates.
2.
You may toggle
verification date.
3.
After clicking the Verified checkbox, include other options, such as, Include Posted, Posted Only,
and Show Clsf (classification) Totals. If you click Un-Verified, all these other options are grayed out
and unavailable.
4.
Click the Magnifying glass button to preview/view the report.
Verification procedures
to
—and produce a report on the data by
9-158
Rev 11.5
HC Plus User Manual
Figure 9-13 Schedule Verification Report
Figure 9-14 Unverified Report
Verification procedures
9-159
Rev 11.5
HC Plus User Manual
9.11 Verified Discrepancies Report
Press the Discrepancy Report button on the Verification Menu to generate a listing of employee visits
where there is a difference between the total hours, as verified by a supervisor, and the Santrax Call hours.
You may choose to produce the report according to the date of verification or the date of service.
Figure 9-15 Discrepancy Report options
Figure 9-16 Verified Hours Discrepancy Report
Verification procedures
9-160
Rev 11.5
HC Plus User Manual
9.11.1 Verification Overlapping Visits Report
To produce a report detailing those visits with overlapping time between clients (excluding cluster cases);
click the Overlapping Visit Report button on the Verification Menu. The following option window
appears. Enter the dates and the name of a specific employee. Note: Leaving the employee field blank will
generate a report for the time period that will include all employees.
Figure 9-17 Verification Overlapping Visits Report
Verification procedures
9-161
Rev 11.5
HC Plus User Manual
9.11.2 Verified and Unbatched Transactions Report
To produce a report detailing those visits that have been verified but not yet batched, click on the
Unbatched Report button on the Verification Menu (Figure 9-1). The window shown below appears.
The report will display or print data for week of service based on date entered. The location must always
be entered. You may request specific contracts or coordinators from the drop-down textboxes. If you
select the Sort by Coordinator option, all coordinators will appear on the report. If this option is not
selected the report will sort by contract; client name and employee name and the coordinator’s name will
not appear. Press the report view or print icon to generate the report.
Figure 9-18 Verified and Unbatched Transactions Report
Verification procedures
9-162
Rev 11.5
HC Plus User Manual
9.11.3 Santrax Call Exception Maintenance
HC Plus is linked to your Santrax call system. By clicking the Santrax button on the Verification menu,
you can view your call exceptions. A window appears listing the calls; and by using the drop down boxes
on the bottom, you may filter the visits according to several categories, e.g., employee name.
Call exception categories include Invalid Employee ID; Invalid Client Id; Invalid Coordinator;
Unscheduled Visits; Unknown Client; Unknown Employee; Overnight Visit without Start call; and Only
One Call found for Visit.
Note: Clients on Hold are sent to Santrax; and calls from Santrax for clients on Hold create unscheduled
visits. Also note that hours for unscheduled visits, whether computed or corrected, are captured on
Schedule and Auto Batch Exception reports as unscheduled visits.
1.
To produce a Santrax exception report, click on the Santrax Call Exception Maintenance button on
the Figure 9-1 Verification Menu.
2.
You may filter this listing according to employee name, ID, Client, Visit Date, Contract, Coordinator
or reason code—by entering a value in any of the dropdown boxed at the bottom of the screen. Use
the Reset All button to clear those boxes, when required.
Figure 9-19 Santrax Unapplied Calls Report
Verification procedures
9-163
Rev 11.5
HC Plus User Manual
9.11.4 Apply missing calls via Santrax
The Santrax call process allows you to apply missing calls to schedules. There are, however, several points
to observe: a) You won’t be able to change the employee once the Santrax call has been applied to the
visit. b) If a visit is cancelled or re-activated, only the original employee can be re-assigned to the visit if
more than one call is present. c) You will not be able to move a visit to a different day once the call has
been applied.
1.
When you right-click on a row of the Figure 9-19 Santrax Unapplied Calls Report, a popup appears
allowing you to access either the Employee or Client schedule screens or to create a schedule if one is
missing. In the example below, the Employee schedule was chosen. On its screen, you will see the
notation on top indicating an unapplied call for the date. Also the affected date is highlighted in red.
2.
Click on the cell (in the example above, the red-lettered Sat 5/5) and the Schedule Verification screen
appears.
Verification procedures
9-164
Rev 11.5
HC Plus User Manual
3.
Click on its
4.
Returning to the Santrax Unapplied calls screen, you will notice that this visit has been removed from
the list of unapplied calls.
door and you will be prompted to apply a call to this visit.
When applying an unknown call to a linked Client (TBA or Cluster) the Santrax call is replicated to the
other client. You will also be able to click on the linked client information on the client schedule screen to
toggle between the linked clients.
9.11.5 Manual Batch Listing for Time Sheet Transfers to Payroll
Timesheets (often also called timeslips) are usually generated automatically for all verified visits. Multiple
timesheets are generated for multiple visits for the same client, same attendant, same day; and the hours are
not combined into a single timesheet.
When a visit is verified or visit maintenance files are applied—a timesheet is created—and the visit is
assigned to a batch number. Batches can either be by contract or by vendor.
When batches are selected for transfer to payroll, the User, Week end date, employee and client selections
are used as criteria for transfer selection.
However, verified records may also be batched manually before being transferred to payroll. You create a
batch, adding to it the timesheets you want to be part of the batch.
Note: Daily Special code records are also placed in a batch if regular visits for the same Contract,
Client/Service, Employee and WOS exist. If a batched Daily special code record has its hours changed to
zero, it will be removed from the batch and you will receive a message specifying the batch it was removed
from. You will be notified when Daily Special code visit is added to a batch.
To see the listing of existing batches according to specific dates, client, or agency, do the following:
1.
Press the Batch Listing button of the Verification menu. You may use the drop down boxes (User,
Vendor, and Week Ending date) and the Employee/Client buttons at the bottom of the screen to filter
the list of displayed batches. You must first select a vendor on the batch-listing screen before the
batches will be displayed. If your agency has only a single vendor, then no selection is required.
2.
Pressing the All Batches button redisplays all the time sheet transfer batches. Press the Exclude
Completed button to view batches that have not been transferred to payroll.
Verification procedures
9-165
Rev 11.5
HC Plus User Manual
3.
Pressing the Contract or the Category button filters those batches belonging to a specific contract or
defined category.
Figure 9-20 Batch Listing/Time Sheet Transfer Screen
4.
Right-click on a row (e.g., 24) to transfer a batch to payroll. The following screen appears asking you
to confirm the transfer.
The row is now marked as transferred.
Verification procedures
9-166
Rev 11.5
HC Plus User Manual
A red asterisk in the Out of
Balance cell indicates that the
header of the batch must be
corrected. When activated,
press the Transfer All
button—and all batches not yet
transferred are in included in
the transfer process, regardless
of location. Current week
batches, however, are not
transferred.
The toggle button
Exclude/Include Completed
allows inclusion or exclusion
of completed batches as shown
in the figure to the right.
Completed batches are those batches that have been transferred to Sharp and have returned the payroll
batch number to HC Plus. Batches that have been transferred to Sharp but have not been updated with a
Payroll batch number are given the status of ‘Transferred’. (Changing the ‘Batch Listing Dflt Display All’
on the Scheduling System Defaults (Scheduling tab) screen controls this default setting.)
•
5.
Empty Timesheet batches are deleted for the Batch listing after 14 days.
When you left-click on a batch row and the Batch Detail screen appears showing the time sheet data
for the batch.
Figure 9-21 Batch Detail Screen
Verification procedures
9-167
Rev 11.5
HC Plus User Manual
Button
Function
Select By Employee
Pressing this button brings up the Find Employees screen. Select an employee
and the Batch listing will display the selected employee’s timesheets.
Client
Click Client—and the Find Clients screen appears. Select a client and his/her
records are displayed if they are in the batch.
All
Click All and all records are redisplayed.
Add Time Sheet
See section 9.11.5.4.
Modify Batch Header
For the Batch to be sent to payroll the Batch: total line data (# of Time Sheets
and the amount Billed) must be the same as Actual: total line data.
However, the Batch total line may or may not agree with the Actual: total line as
shown in the example below.
This may happen—after batching—because a manually verified employee
record(s) was automatically added to the batch, and this activity is not reflected
on the Batch total line. Alternatively, an employee’s record(s) was
subsequently unverified—removed from the batch—and its removal is reflected
on the Actual total line but not the Batch total line.
Click Modify Batch Header to equalize the totals. After correcting, click
Save Batch Header to complete. Following your correction, you may rightclick the row and transfer the batch to payroll.
New Batch
9.11.5.1
See section 9.11.7. This option is disabled for some contracts.
Transfer all Batches
You may transfer all batches by pressing the Transfer All button on the bottom of the Batch Listing
screen.
A list appears of all the successfully transferred batches.
9.11.5.2
Batching Daily Special Code Records
Daily Special code records are automatically placed in a batch if regular visits for the same Contract,
Client/Service, Employee and WOS exist.
For an Auto-Batch vendor, the batches from the Auto-Batch process are looked at before the User’s
batches. If a batched Daily Special code record had its hours changed to zero, it will be removed from the
Verification procedures
9-168
Rev 11.5
HC Plus User Manual
batch and you will receive a message specifying the batch it was removed from. You will also be notified
when a Daily Special code visit is added to a batch.
9.11.5.3
View a Time Sheet’s Details
1.
Left-click anywhere on a row in Figure 9-21 and the Time Sheet details appear—along with the names
of both the employee and the client.
2.
Alternatively, you can search for the time sheet of a specific employee by pressing the Employee
button in Figure 9-21 Batch Detail Screen. The Find Employees screen, Figure 7-1, allows you to
choose the employee you want. When you press the Exit button, the Time Sheet detail screen is
displayed.
Figure 9-22 Time Sheet Detail Screen
9.11.5.4
Add a Time Sheet to a Batch
With the requisite security, you may add (or delete) time sheets during the batch transfer process.
1.
Click on the Add Time Sheet button the batch list shown below.
Verification procedures
9-169
Rev 11.5
HC Plus User Manual
2.
The screen below appears and displays, in a summarized format, any verified un-batched timesheets
that are for the same location, contract, and week of service.
Figure 9-23 Add a Time Sheet
6.
Click the checkboxes on the far left of the screen next to each employee/client row you wish to add.
Note that the all the underlying time sheets for the checked employee are added to the batch listing
using this method.
7.
Press the Add Selected button on the bottom of the screen. The selected time sheets are added to the
batch.
8.
A second method—by clicking on a row to display the Available Time Sheet Detail screen—allows
individual days to be added. To do so, follow the procedures described in the bordered sections right
below.
Verification procedures
9-170
Rev 11.5
HC Plus User Manual
To see the time sheets of individual days, click on a row on the Add a Time Sheet screen. This will
display the Available Time Sheet Detail screen.
Figure 9-24 Available Time Sheet Detail Screen
Note: If you click on a checkbox to the left of a day, the Add Selected button is activated. Pressing that
button will add only those days of the available time sheets that you checked. For example, when you
check Sun and hit Add Selected, the Batch listing will only show the Sun but not the Sat time sheet.
Note: Once a timesheet is added to a batch, the verification detail screen will display the batch number for
that timesheet. See section 9.3.
Verification procedures
9-171
Rev 11.5
HC Plus User Manual
A visit cell on the
Employee
Verification Schedule
screen displays a
batch number in
BLACK if it has been
transferred and RED
if it has not. If the
batch has been
transferred, you may
click on the verified
visit to see when the
visit was posted as
well as verified.
9.11.5.5
Delete a Time Sheet
1.
Click Delete Timesheet on the Figure 9-22 Time Sheet Detail Screen. A confirmation screen appears.
2.
Click Yes. The row is removed on the Batch Detail screen.
9.11.6 Current week batching
Some agencies have the ability to verify current week visits (minus the current day) and automatically
batch those visits, by either placing them in an existing batch for Current WOS or automatically creating a
new batch for the Current WOS. A toggle button entitled Current Week/Prior Weeks appears on the
Batch Listing form when verified visits exist for the current WOS.
.
Verification procedures
9-172
Rev 11.5
HC Plus User Manual
Hitting Current Week shows the batch for timeslips generated for the week minus the current and future
days.
9.11.7 Create a new batch
The New Batch button Figure 9-21 allows the creation of a new batch for a selected Contract and weekend
date.
1.
Click New Batch, and the following screen appears.
Figure 9-25 Create New Batch Screen
2.
Select a Contract from the drop down list.
3.
Enter the Week Ending date. The date you enter is automatically converted to a Friday date when you
leave the field. You cannot enter a current or future week of service date.
4.
Note: Check Multi Week to place visits more than two weeks prior to the current week of service into
a Multi week batch.
5.
Click Create New Batch. A new Batch Detail row (see Figure 9-21) appears with summarized
information about the batch created for the specified Contract and Week Ending Date.
9.11.8 Mark a batch for transfer
Batches can be marked for transfer to payroll if the batch header information agrees with the actual records
in the batch. Once a batch is marked for transfer, it becomes read only.
1.
Right mouse click on a batch (Figure 9-21) where the above condition is true. A confirmation screen
appears.
2.
Click Yes and the Transfer Date is set to the current date and the Status column reads * Completed.*
The payroll batch # to which the timesheets were transferred is displayed. No modifications can now
be made to the batch.
Verification procedures
9-173
Rev 11.5
HC Plus User Manual
9.11.8.1
Notes on Transfer process
You will get an error message if you try to transfer a batch that had already been transferred (Completed
status). If you try to transfer a batch with no records, you will also get an error message. When
transferring a batch to payroll (right mouse click on the Batch listing screen): if the display had been
filtered by the Employee or Client, you will get an error message that reads, “Batch listing has been
selected by Employee or Client. To transfer the batch, please click the All Batches button, and then try the
transfer again.”
After a batch is completed, you can execute the Verification Report by Employee for the W/E date,
selecting Posted Only and Show Clsf Totals.
9.11.9 View Unbatched Timeslips
1.
Press View Unbatched Timeslips on the Figure 9-1 Verification Menu screen to display the form
shown below. Enter the week-ending date or check Multi week if the batch pertains to timeslips more
than two weeks to the current week of service. You may select according to coordinator and also have
the option to select a multi-week batch.
Verification procedures
9-174
Rev 11.5
HC Plus User Manual
2.
Click on the View Unbatched button. The unbatched timeslips appear. You can filter the results
according to employee or client.
Figure 9-26 Unbatched Timeslips
You may toggle between Non-Santrax clients and Santrax clients by pressing the Show button on the
bottom right. When you click on a record line, the available timesheet detail screen appears.
Verification procedures
9-175
Rev 11.5
HC Plus User Manual
9.11.10
On-Demand Timesheets
To print timesheets click on the Print Timesheets button on the Daily Functions Menu (Figure 11-1). The
screen below appears giving four different options for timesheet printing: a) All active services by format;
b) Active services limited by either client employee coordinator or cluster group; c) Timesheets for a list of
clients or employees; and d) blank timesheets according to format.
An option is available to include verified schedules within the WOS timesheet print.
Another option allows you to suppress the printing of social security numbers.
No timesheets will be printed for Housekeeping and Homemaking attendants whose HRA Certifications
have expired.
Figure 9-27 On Demand Timesheets menu
On demand timesheets for Mutual Clients display both clients’ names and ID numbers. The literal
“Mutual” appears on the timesheet next to the ID and name of the Secondary Mutual Client.
Blank Timesheets may be printed using the fourth option with the selection
you make appropriate to a specific format. Specify the number of copies you
want of each type.
Verification procedures
9-176
Rev 11.5
HC Plus User Manual
When you build a list for on demand timesheets (third option from the left), the dropdown will include
clients placed on HOLD during the week of service selected.
Figure 9-28 Build a Timesheets printing list
Figure 9-29 Sample Timesheet 1
Verification procedures
9-177
Rev 11.5
HC Plus User Manual
Figure 9-30 Sample Timesheet 2
If there are multiple visits on the same date for the same client/employee pair, the detail of each visit will
be printed—up to a maximum of two visits. If there are more then two visits, all visits on that date are
combined and the literal ‘Multiple Visits’ is displayed.
9.11.11
Batch Export Report
The Batch Export button allows for the creation of two reports:
1) The Visits to be Exported report provides the details on all visits that have been batched and will
now be exported to payroll and billing.
2) The Visits not to be Exported report displays visits that are problematic and need to reviewed.
Figure 9-31 Batch Export Report Menu
Verification procedures
9-178
Rev 11.5
HC Plus User Manual
Figure 9-32 Visits To Be Exported Report
Figure 9-33 Visits Not To Be Exported Report
9.11.12
CIN Exception Report
For some agencies, after the batching process is complete, a CIN file is set up and sent to Billing. The CIN
Exception Report menu allows you to create two reports based of the CIN file to review, and correct if
necessary, any visit data
Figure 9-34 CIN Exception Report Menu
Verification procedures
9-179
Rev 11.5
HC Plus User Manual
Figure 9-35 Visits to be Exported—CIN Exception Report
Figure 9-36 Verified Visit for WOS Report—CIN Exception Report
For agencies using the CIN file: The batch routine will only allow batching of visits that have computed
hours that are the same as scheduled hours; will only allow visits that have tasks; but you may un-verify
schedules which have already been batched and transferred.
Verification procedures
9-180
Rev 11.5
HC Plus User Manual
Chapter 10
Compliance
10.1 Compliance Overview
Compliance codes are the criteria that must be met for an employee to be in adherence to certain standards.
They include the licenses and certificates, medical procedures, evaluations, training and in-service
requirements that an employee must meet in order to be assigned to clients.
Compliance issues are established by company policy and/or state or local agencies. Each of these entities
can be described as a level of compliance to be met. The same compliance issues can exist for all these
levels—but may differ in the parameters established for them, such as, expiration dates, frequency, or recertification.
Within the scope of compliance, there are three basic codes that exist: Generic Codes; Regular Codes; and
Result Option Codes. Generic Codes are all the established codes available to be assigned to any employee
classification or level. In HC Plus, these codes are assigned to at least one level but, if required, can be
assigned to several or all levels.
HC Plus tracks and maintains all aspects of employee compliance. It has the capability to forecast an
employee’s compliance status and determine whether an employee may be assigned to clients.
Compliance codes are first set up on a Generic Codes Level. From the Generic level, it is then determined
as to what level these codes should be assigned to employees. Once the codes have been established and
assigned to levels, HC Plus will then assign them to the employees through an automated process called an
Update: the compliance system has a one-time start up process that is easily maintained as the updates are
performed.
The only other maintenance required is to modify existing compliance codes or create new compliance
codes as circumstances may dictate, or to assign them to new or additional levels.
The compliance system was designed with the emphasis on your being able to create and customize the
required codes and related levels. To utilize all the flexibility, integrity and effectiveness that the system
affords, it is important that a start up strategy is utilized before the first update is performed. For a
suggested start up strategy, refer to your system administrator.
10.2 Access the Compliance system
The Compliance button on the Scheduling Main Menu, Figure 1-1, brings up the following. You can also
access all compliance functions by using the pull down menu on the menu bar.
Figure 10-1 Compliance System Main Menu
Compliance
10-181
Rev 11.5
HC Plus User Manual
10.3 Default Compliance Code Maintenance
The following section identifies those lists that must be set up before you can administer your compliance
system. Each example illustrates what sort of entries should be made to each list. Pressing the
corresponding button on the Compliance Menu accesses each list—to which you may add new entities.
10.3.1 Levels of Compliance
10.3.2 Code Categories
This table keeps track of all the entities, governmental and
others, who require you to keep track of your employees’
compliance with health regulations and requirements.
Figure 10-3 Compliance Category
Codes
Figure 10-2 Company Maintenance
10.3.3 Company
10.3.4 States
Figure 10-4 Company Maintenance
You may type additional company information into the empty
text box. (As with other text boxes like this, the arrow will
turn to an asterisk.) The Default value is No but clicking in the
default text box can change this. A message appears
requesting that you verify this change.
HC Plus
Figure 10-5 State Codes
Compliance
10-182
Rev 11.5
HC Plus User Manual
10.3.5 District Codes
10.3.6 Location Codes
Figure 10-7 Location Codes
Figure 10-6 District Codes
10.3.7 Access a Profile Sheet
This Profile sheet button allows you to set up and view the profiles of each company or contract in your
system. When you select a name from the drop-down box, the profile sheet for that company appears. See
Figure 10-9.
Figure 10-8 Profile Sheet Defaults
Compliance
10-183
Rev 11.5
HC Plus User Manual
10.3.7.1
Set up a compliance profile sheet for a company’s employees
Use the drop-down boxes to establish the criteria that the company’s employee will have to meet. For
example, if a Home Health Worker must be certified for HHA, use the drop-down to enter the required
level of certification (such as HRA certification) that the worker needs to have in order to comply.
Figure 10-9 Profile Sheet defaults
10.3.7.2
View Compliance Generic Codes
The Codes button on the bottom of the above figure (or the Codes button on the Compliance main menu)
will, when pressed, display the generic codes currently assigned to the company. Using the Code
Description data box, your system administrator (with proper security clearance) may update the
company’s compliance codes; and using the Add New button, create new codes when necessary.
Figure 10-10 Generic compliance codes
Compliance
10-184
Rev 11.5
HC Plus User Manual
The names of the codes are displayed along with the category. For example, a Y would signify the
compliance issue was mandatory. An Alert box with a Yes entry indicates that the system will alert you
upon non-compliance. For instance, if an employee does not take his/hr tetanus shot, the system will alert
you to the non-compliance.
When you press on the display button to the left on an entry, the details of the selected code are displayed
as shown below. Use this screen to set alerts, expirations, result codes, and effective dates.
Figure 10-11 Generic Code details
10.4 Maintain Employee Compliance
The file maintenance section of Figure 10-1allows you to perform functions related to keeping track of the
compliance records of your employees.
10.4.1 View an Employee’s Compliance Status
The Employees button brings in the Find Employee Screen. See Figure 7-1. Once the employee is
selected, the Employee Compliance Status screen appears showing his/her non-compliance. Updates can
only be made from the Employee Maintenance screen by selecting “Supervisor.”
When you click on a NO or YES cell on Figure 10-12 a note appears in yellow alerting you to omissions or
requirements that should be looked into regarding this employee. For example, the APPLICATION entry
below is missing a completed date—no application was submitted. This is made explicit when you click on
.
the NO.
You may update any of the requirements including Completion and Expiration dates. You are unable,
however, to enter a future completion date into the compliance system. You may also update the Results
column: for example, to the right of the I-9 requirement is a Results drop down box for either ‘Completed’
or ‘Authorization required’; selecting ‘Authorization required’, requires the entry of an expiration date.
Compliance In-Service training rules are as follows:
Compliance
10-185
Rev 11.5
HC Plus User Manual
a)
The In-Service completion date is the date of last class attended. If no class has ever been attended,
then the date is set to employee’s hired date. The In-service expiration date will be either 3 or 6
months after completion date, depending on whether a quarterly or a semi-annually compliance code is
used. Also, the In-service expiration date is calculated based on the employee’s training class date. If
no training classes had been assigned, then the expiration is based on the hire date.
b) The In-Service expiration date is modifiable as long as it is within the current in-service period. For
semi-annual codes, the in-service periods are January 1 thru July 31 and July 1 thru February 28; for
quarterly codes, the period is January 1 thru December 31.
c)
There is a minimum of 60 days required between in-service classes.
The HRA Certificate compliance dates are updated whenever you make changes to Training/Certification
records from the Employee Maintenance screen.
Note: You cannot update Administrative Evaluation dates from the employee compliance screen. Updates
can only be made from the employee Supervisory Visits screen. Also keep in mind that Supervisory Visits
and Administrative Evaluation statuses will be blank when you delete the last Supervisory Visit or the
Administrative Evaluation record.
Figure 10-12 Individual Employee Compliance Status
Button
Functions of Compliance Status Screen
After advancing to a desired date, press the Forecast button to
determine the employee’s compliance status at that future time.
Compliance
10-186
Rev 11.5
HC Plus User Manual
Button
Functions of Compliance Status Screen
Press this button to bring up a screen showing the employee’s inservice training record.
Figure 10-13 Employee’s In-service Training History
When you press the Training button on
the above screen, the following menu
appears with functions related to training.
You may then generate an in-service
training report that will summarize your
employees’ in-service histories.
Figure 10-14 In-service Training Report
Compliance
10-187
Rev 11.5
HC Plus User Manual
Button
Functions of Compliance Status Screen
When you press on this button a miniature menu appears.
Click Set up to edit the address and heading formats for
the letter. When you Print, a letter addressed to the employee
detailing his/her non-compliance issues is printed. An example
follows:
Figure 10-15 Printing a Non-compliance Letter
Letter Set up
Clicking the radio button ‘set up’ allows you to create the format and
content of your own letter.
Figure 10-16 Non-compliance Letter Formatting
The Comp? text box on the top of the screen allows you to select
compliance issues—after making a selection, you will get a list
indicating YES or NO compliance. However, hitting the Noncompliant button will list only those issues that are still in noncompliance.
Compliance
10-188
Rev 11.5
HC Plus User Manual
Button
Functions of Compliance Status Screen
Press this button to see all the required compliance issues that need to
be met for this client along with the current status.
This button lists all the contracts for this employee indicating if he/she
is in compliance with the requirements of the contract. The details of
the compliance of each contract may be displayed by hitting the button
to the right of the contract name.
The button displays the Figure 10-10 Generic compliance codes.
This button brings you back to the Figure 10-1 Compliance System
Main Menu.
When you click on a compliance row and then press Audit, an audit
trail similar to the example below is displayed.
10.4.1.1
Individual Employee Compliance Status Reports
The menu bar on Figure 10-12 Individual Employee Compliance Status allows you to print two reports for
each employee.
When you press a menu option, you are prompted to select the company or contract for whom the
employee works. The company name appears on the profile sheet heading.
Compliance
10-189
Rev 11.5
HC Plus User Manual
Figure 10-17 Individual Employee Profile Sheet
Compliance
10-190
Rev 11.5
HC Plus User Manual
Figure 10-18 Individual Employee Compliance Code List
10.4.2 Update compliance records of all employees
You may create and update a worksheet of employees’ compliance statuses. The Update button of Figure
10-1displays the following menu.
Note: The Compliance system includes non-active employees (LOA, Disability, Workers’ Comp, and
Family Leave etc.) along with Active employees by default. Everyone’s status is re-calculated when
compliance information is updated. Terminated employees, however, are excluded from the worksheet.
Figure 10-19 Update/Worksheet Menu
Compliance
10-191
Rev 11.5
HC Plus User Manual
You may also access all the worksheet update functions using the menu.
10.4.2.1
1.
Forecasting employees’ compliance
When you press the Forecast button on the above screen, a window appears providing options for
choosing a forecast date. Choose one option, than press Create Work Sheet.
Forecast options
Figure 10-20 Compliance Work Sheet
2.
A list of non-compliant employees is displayed. You may find employee(s) using the area on top of
the screen where you may limit the search by category, status, etc.
3.
Click on the S to the left of an entry to view (see Figure 10-12) the non-compliant issues for an
individual employee.
4.
Toggle the All Employee button to see a list of all employees including those that are fully compliant.
Compliance
10-192
Rev 11.5
HC Plus User Manual
10.4.2.2
View/Print a Compliance Worksheet
The View Worksheet button on the Update Worksheet Menu displays the current Compliance Worksheet
(Figure 10-20). When you press the Print Worksheet button, a menu is displayed offering several
options.
Figure 10-21 Work Sheet Print Options
Figure 10-22 Printed Work Sheet listing Non-Compliant Employees
Using the above form, you can, for instance, create a report of all non-compliant employees along with the
compliance codes applicable to them. In this case, click on the Show Codes checkbox.
You may also print a work sheet for employees with completed codes by selecting a specific compliance
code from the drop down menu, for example PPD. In addition, there is an option to generate a report with
only specific results requested (for those codes requiring results). For example, for the PPD code you can
selectively filter only the positive results or only the negative results by choosing from a Result drop down.
NOTE: Reports can now be pulled by employee Social Security Number. If you need this feature enabled,
please call Client relations.
Compliance
10-193
Rev 11.5
HC Plus User Manual
Figure 10-23 Work Sheet of Completed Codes
10.4.2.3
Daily and End of Month Compliance Update
When you click the Update and EOM button, the following screen appears allowing you to: Update
Employee Compliance files; Generate a work sheet; Generate Employee Letters and Labels; or Capture
End of Month History.
1.
Click on the appropriate checkboxes for DAILY and/or END OF MONTH, and then press Proceed.
Figure 10-24 Daily Update and EOM Compliance Processing
Compliance
10-194
Rev 11.5
HC Plus User Manual
When you click on
the Employee
Letters checkbox, a
Letters button
appears. Press on it
to select options for
generating and
sorting the letters.
You can also select
specific employees
by pressing the
Select Employees
button. A list
appears from which
you can choose the
employees to whom
you want letters
sent.
The Set Up button
allows you to design
the letter content.
Figure 10-25 Compliance Letter and Label Selection
Figure 10-26 Build an employee list
Print Employee
Labels
Compliance
When you check this box and press Proceed, you are prompted to complete the
procedures shown above, that is, select your criteria and build an employee list.
When you press Continue, the system begins to generate the labels.
10-195
Rev 11.5
HC Plus User Manual
For those who use Mail Merge for the processing of Compliance letters, labels will
print directly to their printer and not to a text file.
10.4.2.4
Employees’ Current Compliance Status
The Employee status button displays a list of employees giving their current compliance statuses. You
may toggle the buttons at the bottom to view only non-compliant or only compliant employees.
Figure 10-27 Employees Current Status Sheet
1.
Click the S button on the left of each entry to view an individual employee’s compliance issues. See
Figure 10-12.
2.
Click on the C button on the right of a row to recalculate the employee’s last date of compliance.
Compliance
10-196
Rev 11.5
HC Plus User Manual
10.4.2.5
Compliance Status Reports for all Employees
The menu bar that is active when viewing the Employee
Current Status Sheet allows you to generate several reports.
These reports identify those employees in your company who
are either not compliant, are undergoing in-service training, or
are perhaps compliant but with warnings. After selecting a
report name from the dropdown menu, a selection window
may appear listing the various options available for limiting the
scope of the report.
Figure 10-28 Employees In-service Status Report
Figure 10-29 Compliance Status of all Employees Report
Compliance
10-197
Rev 11.5
HC Plus User Manual
Figure 10-30 Non-Compliant Employees Report
Figure 10-31 Compliant Employees with Warnings Report
10.4.2.6
In-Service worksheet generation
Press the Inservice WorkSheet button Figure 10-19 Update/Worksheet Menu to print a worksheet for a
specific month and year, coordinator, classification and status. You also have several sort options.
Compliance
10-198
Rev 11.5
HC Plus User Manual
Figure 10-32 In-service Work sheet Selection
Figure 10-33 In-service Work sheet Report
Compliance
10-199
Rev 11.5
HC Plus User Manual
10.4.3 Compliance Codes
The Codes button of Figure 10-1displays the Generic Compliance Code screen as seen in Figure 10-10.
You may generate four different reports related to the codes using the menu bar of that screen.
Figure 10-34 Compliance Code Print Options
Figure 10-35 Generic Compliance Codes w/Levels Report
Compliance
10-200
Rev 11.5
HC Plus User Manual
10.4.4 Compliance Test Results
The Results button of Figure 10-1 displays the results of tests related to compliance issues. For instance, if
an employee completed an HEPATITISB-1 test, the table below specifies that he/she will then have to
proceed to take the HEPATITISB-2 test—which will appear as a new compliance issue on the employee’s
record.
Figure 10-36 Compliance Results Options
10.4.4.1
Edit Generic Codes
To change the criteria of a specific code, click the
button to the left of a row in the screen above.
Figure 10-37 Edit Generic Codes
Compliance
10-201
Rev 11.5
HC Plus User Manual
Chapter 11
Daily Functions
Click on the Daily Functions button on the HC Plus main screen to access the menu below—where you
can carry out several clerical chores. The menu options vary according to different agency requirements.
The functionality of each button is explained in the sections below.
Figure 11-1 Daily Functions Menu
11.1 Santrax Interface
The Santrax interface is designed to match Santrax employee-calls by to the client-employee visits that had
been scheduled via HC Plus. Any Santrax visit that does not match a corresponding HC Plus visit is
marked as non-reconciled. You may correct the details of a non-reconciled visit and, once corrected,
attempt to reprocess it. A visit that cannot be reconciled (for example you cannot reconcile a client ID) is
deemed invalid, is marked as such and purged from the system.
The Santrax Interface button (for some agencies) is the portal used for importing and reconciling Santrax
visits. Pressing it allows access to the Visit Maintenance Import button which, in turn, displays the VM
Import Menu.
ÎÎÎ
Daily Functions
11-202
Rev 11.5
HC Plus User Manual
11.1.1 Import and Process Visit Maintenance data
To import the visit call data use the following procedure: Press the Import and Process button; you are
asked to locate the import text file.
Once the Santrax text file is located, press Open to import it into HC Plus. The data will now be matched
up against the visit data in the HC Plus schedule.
11.1.2 View/accept non-reconciled visits
Non-reconciled visits appear on the screen below, a reason outlining the problem with the particular visit.
You may view/correct a visit’s details—and enter a comment in the text box below—then click on the Inv
(invalid) checkbox to remove the check and validate the visit.
Figure 11-2 Santrax—Non Reconciled Transactions
Daily Functions
11-203
Rev 11.5
HC Plus User Manual
11.1.3 Reprocess non-reconciled visits
After correcting visits and marking them as valid you may process them accordingly. A Reconciled Visit
Posting Report is generated. See the VM reports section below. Following the reconciliation, you are
prompted to post the newly reconciled visits.
11.1.4 Visit Maintenance Reports
Several reports related to the reconciliation of the
call visits may be generated using the menu on the
right—displayed after pressing Santrax
InterfaceÎVisit Maintenance Reports.
The figures below display the option menus for generating the reports. .
Generate by either hours
or by actual call times
Daily Functions
11-204
Rev 11.5
HC Plus User Manual
11.1.4.1
Reconciled Visit Posting Report
Figure 11-3 Reconciled Visit Report
11.1.4.2
Non-Reconciled Visit Report
Figure 11-4 Non-Reconciled Visit Report
Daily Functions
11-205
Rev 11.5
HC Plus User Manual
11.1.4.3
Invalid Non-Reconciled Visit Report
Figure 11-5 Invalid Non-Reconciled Visit Report
Daily Functions
11-206
Rev 11.5
HC Plus User Manual
11.2 Print Santrax Reports
Several reports relating to Santrax operations are available for viewing and printing in HC Plus. They are:
1.
Daily Call Summary--abbreviated to DS which includes the Unscheduled/Unvisited Report.
2.
Daily Call Exception—abbreviated to DE. Note: The Unknown Client list displays for all existing
coordinators and contracts on the Daily Call Exception and Daily Management reports.
3.
Daily Summary Exception—abbreviated to SE
4.
Daily Management—abbreviated to DM
5.
Auto Batch Summary—abbreviated to AS
6.
Auto Batch Exceptions—abbreviated to AE. Note that the Auto batch exception report excludes
“Day not assigned” calls for visits that have been entered through the schedule screen without
manually applying the calls. The calls will remain on the Santrax Unapplied calls screen as error
code 9 (Visit Created after Call Matching).
7.
Auto Batch Changed Calculated Hours—abbreviated to AC
8.
Overcall Summary—abbreviated to OC
9.
Lateness Summary—abbreviated to LS
10. Lateness Detail—abbreviated to LD
11. Docking Summary
12. HRA Time & Leave Summary
13. Completed Visits Summary
14. Weekly Billing Report
15. Employee Work Time Overlap Report
16. Santrax Visit Maintenance Import - Applied Visits
17. Santrax Visit Maintenance Import - Unapplied Visits
11.2.1 Access Santrax Reports
The Santrax reports listed above are grouped in the following manner: Daily reports; Auto Batch reports;
Attendant Lateness reports; Overcall reports, Visit Maintenance Reports, VNS Daily Status reports and
Batch Export Reports. To access a report:
1.
Click on the Print Santrax Reports Button on Figure 11-1 Daily Functions Menu. The following
screen is displayed.
Daily Functions
11-207
Rev 11.5
HC Plus User Manual
Figure 11-6 Print Saved Reports screen
2.
Press on a tab (for example, Daily Reports). Highlight a date and all the daily reports produced for that
date are shown on the right side of the screen.
3.
Highlight a report name and click on either the
or the
icon.
Note: you may hold down your mouse button and simultaneously select multiple reports.
When you view multiple reports, you can move from report to report using the arrows at the bottom of the
screen.
Figure 11-7 Santrax Daily Call Exception Reports (DE)
The above report includes Unknown Employees; Employees terminated; Extraneous calls; Unscheduled
visits; only one call found to employee; and unmatched client phone numbers (unknown clients). Scroll
through the pages to see each exception type.
Daily Functions
11-208
Rev 11.5
HC Plus User Manual
Figure 11-8 Santrax Daily Management Report (DM)
Figure 11-9 Santrax Daily Call Summary (DS)
Note: the last page of this report contains the Unscheduled/unvisited report.
Figure 11-10 Santrax Daily Summary Exception (SE)
Daily Functions
11-209
Rev 11.5
HC Plus User Manual
Figure 11-11 Auto Batch Exception Report (AE)
Figure 11-12 Auto Batch Summary (AS)
Note: Among other features, the Autobatch Exception reports also display corrected hours that were
entered in Santrax Visit Maintenance.
Two reports are accessed via the Visit Maint Report tab: Import –Applied Visits and Unapplied Visits.
Note that these reports distinguish between blank and zero hours reported. The blank is interpreted as ‘no
correct hours’ while zero is accepted as true corrected hours of zero.
Figure 11-13 Santrax Visit Maintenance Import—Applied Visits Report
Daily Functions
11-210
Rev 11.5
HC Plus User Manual
Another report is available in HC Plus called the VNS Daily Status Report. This report displays any
exceptions that occur for schedules imported by the VNS Daily process in HC Plus. In addition, this report
will include a section listing all new and re-admitted clients.
Figure 11-14 VNS Daily Status Report
11.3 Call Tracking
For agencies not using Santrax, this HC Plus function gives you a way of tracking whether an employee
had shown up for a scheduled shift and to gather information about calls made during a particular time
period for a client or a range of clients. The frequency of these calls from the client’s site is set in the
General Information screen in Contract Maintenance (section 14.2.1).
1.
Click on the Call Tracking button to bring up the screen below.
Figure 11-15 Call Tracking /Call Schedule Screen
2.
You may specify the Client Range (e.g., only clients whose last name begins in B to D). You may
also use the drop-down boxes to restrict the search to a specific client, contract, district, coordinator, or
team.
3.
Click the Show Only Open checkbox if you are only interested in viewing open orders which are
nevertheless being serviced.
4.
Click on the magnifying glass button to initiate your search, the results of which appear in the
following screen.
Daily Functions
11-211
Rev 11.5
HC Plus User Manual
Figure 11-16 Call Schedule Screen
The buttons at the bottom of the Call Schedule screen are standard buttons used to access client and
employee records for a selected row.
11.4 Find Open Orders
This button the Daily Functions menu allows you to find open orders. See section 8.5 above for a full
description.
11.5 View Client’s Plan of Treatment
This button on the Daily Functions screen accesses the 485 plan of treatment for the client. If the 485 does
not exist for this client, you may create one at this juncture. Filling out the 485 is covered in detail in
section 3.12; maintaining 485 codes and tables can be found in section 11.11, Plan of Treatment Table
Maintenance; and Plan of Treatment reports are discussed in section 13.31.
Daily Functions
11-212
Rev 11.5
HC Plus User Manual
When you click on the
button, the client’s Home Health Certification (485) form appears.
11.6 Find Unapproved Special Codes
This function allows you to view a list of employees having unapproved special codes. This is usually
related to a zero value having been put into the Hours field of the Employee Availability screen. When you
click on the Find Unapproved Special Codes button, the following window appears.
Figure 11-17 Unapproved Special Codes Menu
1.
After filling in the search criteria, click on the magnifying glass button to generate a list of employees
with currently unapproved codes. The screen below appears. Click on the asterisk button next to the
name. A full description of the special code appears. When authorized to do so, you can change the
‘hours’ on the screen—removing the day from special code status for that employee.
Daily Functions
11-213
Rev 11.5
HC Plus User Manual
Figure 11-18 Locating Special Codes
11.7 Track Doctor’s Orders
In the Medicare system, you often need a signed doctor’s order authorizing treatment at your agency for a
particular client. The usual procedure is: after a Nurse’s assessment, an order is created which is then
forwarded to the doctor to sign. A signed order—returned from the doctor’s office to the agency—is
documentation for the eligibility of treatment.
Click on the Doctor’s orders tracking button to display the following screen.
Figure 11-19 Doctor's Orders Menu
The User and Location displayed on this screen are the values that had been keyed in on the login screen.
Daily Functions
11-214
Rev 11.5
HC Plus User Manual
11.7.1 Create a new doctor’s order
Clicking the Enter New Order button will display the Doctor’s order screen.
Figure 11-20 Doctor's Order
When the Orders Received check box is clicked, it means the doctor had already signed the order, thus the
current date is automatically entered into Date Received. You may change this if it is not correct. The
Due Date is then calculated two weeks from the current date.
11.7.2 View Existing Doctor’s orders
The View Existing Orders button allows you to see a list of current orders that have not as yet been
received from the doctor. Click the checkbox Show All orders when you want to view even those orders
that had already been received.
Figure 11-21 List of Doctor’s Orders
11.7.3 Print Missing Orders
Use the Print Missing Orders button to print out a list of Doctor’s orders that are outstanding, that is,
were not returned by the doctor—and containing his/her signature.
Daily Functions
11-215
Rev 11.5
HC Plus User Manual
11.7.4 Print Orders Returned
You may create a report of orders that have been marked as signed and received.
Figure 11-22 Received Orders Report
When this screen first appears, the previous day is the default date in the Start Date and End Date. Adjust
these dates, if necessary, before pressing the magnifying glass or printer button.
The
displays the following report.
11.8 Referral Tracking
You may use the system to track clients referred to you by outside agencies (Referral Src) but are pending
acceptance by your service. The Referral Tracking button brings up the following screen:
Figure 11-23 Referral Tracking
Daily Functions
11-216
Rev 11.5
HC Plus User Manual
1.
Select the week of service by clicking on the right or left arrow buttons
detail, click on the small button
. To view the
to the left of the entry.
2.
The
button will display the following screen. All fields may be edited. The Description field
holds the name of the referred client. (The client’s name is required if Accepted is checked. If you do
not include a name, the system will display an error message.)
3.
The drop down boxes for Contract, Classification, District, Coordinator, Diagnosis, Referral Src
(source of the referral), Sex, and Transport are similar to those seen in previous sections.
Figure 11-24 Referral Tracking Detail
4.
The Status check boxes are Accepted, Rejected and Pending. When you click Accepted, a window
appears asking you to confirm that you want to add the referred client to the client file. When you
press Yes, the client maintenance screen is displayed. Enter the client’s data and being his/her
registration process.
5.
The binoculars
at the bottom of the Referral Tracking Screen will bring up the Find Employee
Screen, Figure 8-7 should you desire to locate an employee who can meet the referral’s service
requirements.
11.9 Client /Service Interface
The
on the Daily Function Menu brings up the following screen whose purpose is to
produce several reports related to client services.
Daily Functions
11-217
Rev 11.5
HC Plus User Manual
Figure 11-25 Interface Client/Service/Employees
1.
Change the default Modified Date (default is the current date) and Thru date if necessary before
clicking on either the magnifying glass or printer buttons.
2.
The
will display a group of reports, and the
will send the reports to the printer. The
display of the reports will overlap. Use Alt-Key-X to display each underlying report. To exit, click on
the Options (Print) Menu option at the top left of the screen—and press the Exit option.
11.9.1 Doctor Interface Report
This report is a roster of doctors currently on file.
11.9.2 Guarantor Interface Report
This report lists the guarantors on file.
Daily Functions
11-218
Rev 11.5
HC Plus User Manual
11.9.3 Employee Interface Report
This report is a roster of all current employees.
11.9.4 Service Interface Log
This report is essentially a roster of current clients. The Service Name, most often, matches that of the
client name. In some cases, however, there is a discrepancy indicating that service delivery to that client is
under a different name, as may happen in a cluster situation.
11.9.5 Client Interface Log
This report tracks all the dates relevant to service of a client, such as, start and end dates and dates of client
record modification.
Daily Functions
11-219
Rev 11.5
HC Plus User Manual
11.10 Clinical Export
The nursing staffs of some agencies make use of the 485 Health Maintenance data, including start of care
information and diagnosis data. This data can be exported to a text file that is stored in the directory
indicated on the Global tab screen of the Scheduling System Defaults module.
When you press
relevant clinical data.
Daily Functions
on the Daily Functions menu you are prompted to export the
11-220
Rev 11.5
HC Plus User Manual
11.11 Plan of Treatment Table Maintenance
The
button on Figure 11-1 Daily Functions Menu brings up the following screen.
Click on any of its buttons to display a screen appropriate to maintaining the table related to the button’s
name.
Figure 11-26 Plan of Treatment Table Maintenance
11.11.1
485 Worksheet
Clicking this button displays the worksheet categories and allows you to print a blank 485 worksheet form.
Figure 11-27 Worksheet Categories
Click on the open folder button
Daily Functions
to display the Sub Categories.
11-221
Rev 11.5
HC Plus User Manual
Figure 11-28 Worksheet Sub Categories
Note: The Specifics box above toggles from Yes to No.
You may click the magnifying glass on the Worksheet Categories screen to view a 485 Work Sheet
showing the categories and sub-categories. Use the Print option on the menu to print a blank form.
Figure 11-29 Blank 485 worksheet
Daily Functions
11-222
Rev 11.5
HC Plus User Manual
11.11.2
Diagnoses Code Maintenance
HC Plus allows you to view your current diagnosis codes and to update them, when necessary, in
conjunction with ICD9 standards—by clicking on Diagnoses in Figure 11-26.
Figure 11-30 Diagnosis Code Maintenance Table
1.
Clicking the Add button brings up a screen in which you may enter a new code and description. The
Sort button will sort the information above in ICD9 code order
2.
Clicking the Search ICD9 button displays the ICD9 Diagnostic Code Master shown below. In the
example, the “E” button was pressed to display all codes whose Text starts with the character “E.”
Figure 11-31 ICD9 Diagnosis Code Master
To Search by Code, enter the code number, e.g., 482, in the code box and click on the Question mark ?
key. The following screen appears:
Daily Functions
11-223
Rev 11.5
HC Plus User Manual
Figure 11-32 ICD9 Diagnosis Code–Search by Code
To Search by Text, enter text that appears in the diagnosis description in the text box and click on the
Question mark key. The following screen appears:
Figure 11-33 ICD Diagnosis Code–Search by Text
11.11.2.1 Add a diagnosis code to your database
Hit the + button to enter an ICD9 code to your database. The following message appears. Click Yes to
transfer.
Daily Functions
11-224
Rev 11.5
HC Plus User Manual
11.11.3
Medications
The Medications button in Figure 11-26 will bring up a screen with which you may add new medications
to your list, or enter other pertinent medication data.
Figure 11-34 Medications Screen
1.
Click
to brings up an empty slot in which you may add a new medication
11.11.3.1 Medications Maintenance features
The buttons at the bottom of the screen display additional screens useful for prescribing a medication. You
can edit any row on these forms; and the Add button appearing on the forms serves to display a blank last
row where you can insert text
Daily Functions
11-225
Rev 11.5
HC Plus User Manual
The Forms button brings up the following:
The Routes Button brings up the following:
Figure 11-36 Medication Routes
Figure 11-35 Forms of Medication
The Frequency Button:
Figure 11-37 Medication Frequency
Daily Functions
The Units Button:
Figure 11-38 Medication Units
11-226
Rev 11.5
HC Plus User Manual
The following pages show each of the screens that are displayed after the corresponding button on Figure
11-26 Plan of Treatment Table Maintenance is pressed. Their content is self-explanatory.
11.11.4
DME & Supplies:
11.11.5
Safety Measures:
Figure 11-40 Safety Measures Maintenance
Figure 11-39 DME & Supplies Maintenance
11.11.6
Nutritional
Requirements:
11.11.7
Allergies:
Figure 11-42 Allergy Maintenance
Figure 11-41 Nutritional Requirements
Daily Functions
11-227
Rev 11.5
HC Plus User Manual
11.11.8
Treatment Goals:
11.11.9
Rehabilitation:
Figure 11-44 Rehabilitation Table Maintenance
Figure 11-43 Goals Maintenance
11.11.10
Potential discharge
Plans:
11.11.11
Type of Facilities:
Figure 11-45 Potential Discharge Plans
Figure 11-46 Facility Types Maintenance
Daily Functions
11-228
Rev 11.5
HC Plus User Manual
11.11.12
Homebound Reasons:
Figure 11-47 Homebound Reasons
11.11.13
Unusual Environments:
11.11.14
Leave Home Reasons
Figure 11-49 Patient Leaves Home Reasons
Figure 11-48 Unusual Environments
Daily Functions
11-229
Rev 11.5
HC Plus User Manual
11.11.15
Print Blank 485
Pressing this button will send a blank 485 form to the default printer.
11.11.16
Plan of Treatment Control File
This window allows you to enter the default settings for 485/486 plan of treatment forms.
Figure 11-50 Plan of Treatment Control File
Daily Functions
11-230
Rev 11.5
HC Plus User Manual
Chapter 12
Training
Clicking the Training button on the Figure 11-1 Daily Functions Menu brings up the following screen,
with which you may set up and monitor the ongoing instruction of your employees. First set up the topics
to be covered, create, and schedule classes for these topics and, finally, determine who will attend each
class.
Figure 12-1 Training Menu
12.1 Training Topics
Click on Topic Maint and use the screen below to set up the topics to be taught to your employees.
Figure 12-2 Training Topics
Training
12-231
Rev 11.5
HC Plus User Manual
Hit the New button to add a new topic.
12.2 Class Master
The Class list below shows the current classes that are scheduled. To add a new class, press New and enter
the class data into Figure 12-4.
Figure 12-3 Training Class Master
The Location defaults to the Agency name.
Figure 12-4 Training Class Maintenance
Training
12-232
Rev 11.5
HC Plus User Manual
12.3 Class Roster
For users with adequate permission, use this screen to register employees who will be attending a particular
course defined in the class master. Add employees to the class by pressing Register Employee. Then
select each attendee from the drop-down box.
Figure 12-5 Training Class Roster
Note: You may register employees for classes regardless of their current work status.
1.
To add more employees to the class roster, press the Register Employees button.
2.
A ‘Show all’ check box displays when you select Register Employee—and the cursor will now be on
the drop-down box next to the Binocular button.
3.
You now have the option of checking and selecting Show All employees. If this option is selected,
click on the drop-down box and all employees, active and non-active will, display for selection. If this
option is not selected, the drop-down box will, by default, display only active employees.
4.
You may also enter the employee number or SS number.
5.
When you try to register an employee who has recently attended a class, the following message
appears.
6.
When the employee has attended a class, check the attendance box. In-service and training classes will
not be interfaced to Sharp unless the employee has attended the class.
Training
12-233
Rev 11.5
HC Plus User Manual
7.
Press on the Training button on the right of each row to view the training history of an employee.
Figure 12-6 Employee’s Training History
8.
You may enter the date that a certificate was issued and the issuing agency.
Training
12-234
Rev 11.5
HC Plus User Manual
12.4 Print Certificates
Following graduation, you may print certificates
attesting to an employee’s successful completion
of a course.
You may also reprint a Certificate.
Figure 12-7 Training Certificate Print Menu
Figure 12-8 Printed Certificate
Training
12-235
Rev 11.5
HC Plus User Manual
12.5 Training Report
You may create training reports by employees, classes, or topics. Several options are available for the type
of report, including documentation on those who attended and those employees who failed to show up.
Besides the Training report, a Training sign-up sheet may also be printed to facilitate marking course
attendance.
Figure 12-9 Training Report options
Figure 12-10 Employee Training Report
Training
12-236
Rev 11.5
HC Plus User Manual
Figure 12-11 Training Sign up sheet
Figure 12-12 Topic Training Report
Training
12-237
Rev 11.5
HC Plus User Manual
Chapter 13
Reports
The system allows for great flexibility in generating reports by allowing you to fill in a report layout form.
When you click on the Reports button on the Scheduling System main menu, the Reports menu appears.
The Client Reports and the Employee Reports are described in chapters 2 and 3. The sections below are for
reference purposes, showing the entry screen used to produce specific reports.
13.1 Service Distribution List
Figure 13-1 Reports Menu
Figure 13-2 Service Distribution Report
Reports
13-238
Rev 11.5
HC Plus User Manual
13.2 Notes List
13.3 Expiring Care plans
The report produced according to the criteria you
enter below will list all the notes you entered in HC
Plus for either employees or clients.
This report lists those client care plans due to expire
by a certain cutoff date. The Category (contract) is
shown together with the certification dates.
13.4 Client/Employee Schedule History
This report lists the schedule history of clients together with assigned employees during a period of time.
Reports
13-239
Rev 11.5
HC Plus User Manual
13.5 VNS Transaction Report
As seen below, the menu allows options for importing and for generating a discrepancy report for schedules
during a time period.
Note: Another report is available in HC Plus called the VNS Daily Status Report. You may access this
report from the Main Menu Æ Daily FunctionsÆ Print Santrax Reports Æ Tab VNS Daily Reports. This
report displays any exceptions that occur for schedules imported by the VNS Daily process in HC Plus. In
addition, this report will include a section listing all new and re-admitted clients.
Reports
13-240
Rev 11.5
HC Plus User Manual
13.6 Change Log
13.7 Training Report
Documents all the changes you made to records in
the system during a specific period.
You may also access this report via the Training
functions in Chapter 12. An example of this report
appears in Figure 12-10.
13.8 Referral Report
13.9 Pending List Menu
Provides a list of contracts—and the clients referred
by them to your company as had been entered in the
daily functions/referral-tracking screen.
Lists all clients who must be notified as to the
assignment of employees filling an order.
Reports
13-241
Rev 11.5
HC Plus User Manual
Figure 13-3 Pending Notification Report
13.10 Client Starting Time Report
This report documents the starting time for clients as per contracts and/or coordinators.
Reports
13-242
Rev 11.5
HC Plus User Manual
13.11 Non-working Employees
This report lists employees who are not currently assigned and working.
Figure 13-4 Non-working Employees Report
If the Mail Merge option is selected, a text file will be created in the directory specified in Merge Directory.
You will then be able to export the text file accordingly.
The Mail Merge button will only display if the Mail Merge option in System FunctionsÆ Scheduling
Defaults Æ Compliance Tab is enabled.
13.12 Employee Overtime Report
This report documents all workers whose visit time exceeds forty hours per week.
Reports
13-243
Rev 11.5
HC Plus User Manual
The Employee Overtime report is currently being used in Pro-Health but can be accessed for all users with
proper security access. To enable the report, access: Main Menu Î System Functions Î Group
Maintenance Î Security Group Î Select a Group Security Group Maintenance Î Group Permissions Tab
“Available Category” = Employee, “Available Objects” = Employee Overtime Report, then click the
checkbox to enable permission. For Pro-Health users, the report displays both the Employee ID and the
SSN.
Figure 13-5 Employees Overtime Report
13.13 Activity Report
This report is available for agencies tracking tasks that are carried for certain clients. The individual report
lists the dates and hours those tasks were performed whereas the consolidated report shows the tasks
provided by an employee (or contract) to all clients assigned to them.
Reports
13-244
Rev 11.5
HC Plus User Manual
Figure 13-6 Individual Client Activity Report
Manually entered tasks are starred on the report.
Reports
13-245
Rev 11.5
HC Plus User Manual
Figure 13-7 Consolidated Activity Report
13.14 Additional Reports Menu
You may generate more reports by hitting the Additional Reports button on the bottom of the Reports
Menu. The following submenu appears:
Figure 13-8 Additional Reports Menu
Reports
13-246
Rev 11.5
HC Plus User Manual
13.15 Expiring
Orders Report
Lists orders that have
expired as of a certain date.
13.16 Admits by
Doctors
Report
13.17 Service Admit/Discharge Report
Fill out the menu below to tailor your report to your needs. The report summarizes by contract and client
all the admissions and discharges during a specified time.
Reports
13-247
Rev 11.5
HC Plus User Manual
13.18 Service Census
Report
13.19 Doctor Case Count
Provides statistics on the doctors employed by your
company. See the example on the right.
Reports
13-248
Rev 11.5
HC Plus User Manual
13.20 Verified Visit Count
Provides visit statistics according to contract.
13.21 Hold/Resume Lists
This menu creates two reports. 1) HOLD DETAIL—lists clients ON HOLD for a specific end date; 2) The
RESUME DETAIL report shows the details of clients who have resumed receiving service.
Figure 13-9 Clients Held Detail Report
Reports
13-249
Rev 11.5
HC Plus User Manual
Figure 13-10 Clients Resumed Detail Report
13.22 Client Hold Report
Use the Client Hold report button to create a report listing all clients in ‘Hold’ status for a specific reason.
Figure 13-11 Client Hold Report
Reports
13-250
Rev 11.5
HC Plus User Manual
13.23 Under Assigned Serviced Clients Report
This report details those clients who are not being assigned employees and are therefore not being serviced
according to the contract. Note that clients who have zero unauthorized hours do not appear on this report.
When you click the Under Assigned/Service button, you can limit the report to several parameters as
shown below.
Figure 13-12 Under Assigned Client Report
Reports
13-251
Rev 11.5
HC Plus User Manual
13.24 Competed Visits Report
This report provides a breakdown of your agency’s completed visits during a specific time period.
Figure 13-13 Completed Visits Summary Report
Reports
13-252
Rev 11.5
HC Plus User Manual
13.25 Special Codes Report
This report provides a list of all employees who were assigned a special code, that is, were on vacation or
sick or worked more than forty hours during a particular week.
Click on the type of special code as shown on the right, select a contract and a coordinator then press the
Print or View button.
Figure 13-14 Special Codes Report
For Holiday special codes reporting: employees with more than 12 Holiday hours in a week will be
highlighted by three asterisks next to their account number. For employees who are scheduled for the same
client in different contracts where the total holiday hours exceed 12 (but not for an individual contract) the
asterisks display on both contracts.
Reports
13-253
Rev 11.5
HC Plus User Manual
13.26 Weekly Carfare Log
This report provides a list and approval/signoff
sheet for carfare expenses made by employees
during a week of service. Employees who have no
coordinator assignment will appear at the beginning
of the report or may be selected from the
coordinator drop down by selecting ‘Not Assigned’
Data on the report is grouped by Employee
Coordinator. Start and End hours use verified hours
and not scheduled hours. The client coordinator ID
(PS) appears between the city and contract. For
each employee, blank spaces are available for
entering the eligible amount for each day and the
total eligible amount for the week. An ‘Approved
signature’ line appears at the end of an Employee
Coordinator section.
If ‘Include all clusters’ is not checked, the standard
report summarizes all cluster visits (at the same
location) on the same day, for the same cluster, and
regards it as only one visit. Since at least two
distinct visits must be present on the same day for a
Figure 13-15 Weekly Carfare Log Menu
cluster to be included on the carfare report, a cluster
at the same location would not appear on this
report. Note that for Non-Santrax clients the
scheduled hours appear on the Weekly Carfare Log
Figure 13-16 Weekly Carfare Report
Reports
13-254
Rev 11.5
HC Plus User Manual
When ‘Include all clusters’ is checked, the report looks at each cluster visit as a single visit and does not
summarize by day. In this case, the report, as shown below, includes even clusters (located at the same
address) which would not appear on the standard report.
Figure 13-17 Weekly Carfare Report (including clusters)
Note: For each day the employee is eligible for carfare, the system scans the coordinators for the clients. If
at least one of the coordinators is the same as the employee’s default coordinator (as shown on the
employee screen)—the system lists the visits for the day under that coordinator. If not, the system selects
the coordinator from the last client for the day and lists the visits under that coordinator.
Reports
13-255
Rev 11.5
HC Plus User Manual
13.27 Nurses Visit/History Report
These two reports provide information about the visits by nurses.
Figure 13-18 Nurse Visit Report menu
Figure 13-19 Nurse Visit Report
* Based on an Agency option setting, you can have the ability to select ‘Clients Due for: ‘ALL’,
‘Assessment’ and ‘Supervisory’ visits. The ALL selection will display all visit types due; Assessment will
Reports
13-256
Rev 11.5
HC Plus User Manual
display never visited clients and clients with the last visit type S; and Supervisory will display never
visited clients and clients with the last visit type of A and I.
Figure 13-20 Nurse Visit History Report
The Nurse Visit History report has an Export option which will create a comma delimited file.
13.28 Expiring Certifications Report
Figure 13-21 Expiring Certifications Report
Reports
13-257
Rev 11.5
HC Plus User Manual
13.29 Employee Hours Worked Report
This report requires security access to be enabled. Please contact customer service.
Figure 13-22 Employee Hours Worked Report
Reports
13-258
Rev 11.5
HC Plus User Manual
13.30 Employee Unavailability Report
This report documents employees who are unavailable during a range of dates and times.
Figure 13-23 Employee Unavailability Report
Reports
13-259
Rev 11.5
HC Plus User Manual
13.31 Plan of Treatment Reports
To access three reports related to HCFA do the following:
1.
Click Daily Functions on the Main Menu.
2.
On the next screen, click Plan of Treatment.
3.
Use the report item on the menu bar to generate any of the reports listed.
Enter the month and year for the Expiring Plans of Treatment Report.
Figure 13-24 Expiring Plans of Treatment Report
Reports
13-260
Rev 11.5
HC Plus User Manual
Figure 13-25 Unsigned Plans of Treatment Report
Figure 13-26 Unsigned Verbal Orders Report
Reports
13-261
Rev 11.5
HC Plus User Manual
Chapter 14
System Functions
This chapter presents an overview of functions available for setting up defaults of various kinds, and in
maintaining codes necessary for efficient use of HC Plus.
Figure 14-1 System Functions menu
14.1 Scheduling System Defaults
Click on Scheduling Defaults to set defaults for Scheduling, Compliance, HC Plus Interface, Global, and
Sharp needs.
14.1.1 Scheduling Tab
Figure 14-2 Scheduling Defaults menu
This screen allows you to set the formal parameters for your system such as the dates through which you
may copy schedules etc.
System Functions
14-262
Rev 11.5
HC Plus User Manual
Field
Description
Copy thru date
For copying schedules forward in the global mode, enter the
latest date through which to implement the generation of
employee and client schedules.
P/R weekend
The end of the Payroll Week usually set to Friday.
Minimum Gross Margin %
Usually about 30% in reference to the difference between
service reimbursement rates and employee salary rates.
Allow O/T assignment?
Permits overtime assignments (exceeding forty hours) for
employees. Set to either Yes, No or Warn.
Use Confirmation
For future use.
Lock Notes
Notes will be read-only after their initial creation. If this box
is checked you may not modify an old note—only reference it
in a later note with the appropriate corrections cited.
Must enter discharge note
Upon discharge, a note must be entered detailing the reason
for the discharge.
Avail Copy thru
Enter the last date the availability of an employee may be
copied forward.
Scheduled weekend
Enter day (usually Friday) for start of weekend
Base WOS
Starting Week of Service.
Ignore Loc for Clt Search?
Check when you want the search for clients to disregard any
specific location but to search across all locations.
Integration type
Indicate whether integration of your system is:
The integration type affects issues such as batching.
Force entry of reason codes?
Make the entering of reason codes for various entries to be
mandatory.
Default Sched to Curr WOS?
Enabling this option will cause scheduler to always go to
current week of service when selecting a different client or
employee. Not enabling it causes the schedule to display the
same week as viewed on the schedule of the preceding client
or employee.
For the Employee Verification screen: For the Employee
Verification Screen, if the checkbox is checked, Week of
Service will default to the prior week. If it is not checked, the
Week of Service will default to the week currently being
worked on.
Batch Listing Dflt Display All?
The Batch Listing screen defaults to showing ALL of the
batches.
Warn TBA/Cluster Overlap
Warn TBA/Cluster Traditional
Overlap
Users with access to Allow Update for Scheduling Default
Settings will be able to modify these settings; if checkboxes
are clicked, the system will display a warning whenever a
TBA or Cluster schedule overlaps, with the option to accept
or decline the update.
Warn TBA/Cluster Unavailable
Warns if the employee is unavailable for a TBA/cluster.
System Functions
14-263
Rev 11.5
HC Plus User Manual
Field
Description
Show Clsf Tot on Verify Posting
Report
If checked, the Verify Posting Report will tally the number of
HA’s, RN’s , etc. Does not appear when the Integration type
= Sharp
Copy forward conflict
Enter a reason for a conflict in copying forward a schedule.
This will appear in the history.
Cursor at Emp number /SS number
Enter preference for cursor positioning on the Verification
screen either at the Employee # or the Social Security #.
Use Availability checking
For scheduling purposes, make employee availability a
prerequisite for assignments.
Prompt for interface date (Activity
report)
Future use.
Display employee number
Employee number appears on screen.
Verification started date
Enter date for starting of the verification process.
Emp Classf overrides order
For timesheet billing, this option allows the employee
classification status to take precedence over the classification
that appears on the order. That is, even if the order calls for
an HA, a LPN can do the job as well—and will be paid at the
LPN rate.
Use Employee number
Use a local employee number or use an automatically
incremented HC Plus number.
Next Emp no
The next employee number that will be assigned is displayed
in this text box.
Allow Emp Class Differ from Order
In assigning employees to the schedule, allow the employee
classification to differ from that specified in the order.
Deflt Clsf On Search
If checked, the search for employee will default the order’s
classification.
Maximum Hours for Trainers
When you attempt to assign an employee with a classification
of Trainer, a warning is displayed. Enter hours (between 0
and 24, in quarter increments) into this field.
Auto Assign Client ID
HC-Open has the capability of automatically assigning client
ID numbers.
Next Client No:
Displays the next automatically generated client number.
Is Client SSN required?
Check if you want the SS# to be mandatory on the client
screen.
Employee/User Fields
Customize Certain fields by entering a label for them. For
example, you may want to add a Race/Ethnic field to your
employee screen.
System Functions
14-264
Rev 11.5
HC Plus User Manual
Field
Description
Force entry of coordinator?
If this option is selected, you will be forced to enter a Client
Coordinator on either the Client Maintenance or Service
Maintenance screen. However, the default setting is to not
require entering data in the coordinator field.
Force Entry of Department Number
Make the department number mandatory
Activ All Contracts on Empl Rehire
Check this to reactivate all contract/s when a terminated
employee status is changed to Active or Rehire.
Carfare Code
Enter the code that signifies carfare—to be used on the
Service screens and employee payroll.
Generate Carfare
If checked, the carfare field is displayed on the verification
screen
14.1.2 Compliance Defaults Tab
Click on the Compliance tab to set the basis on which compliance is handled.
Figure 14-3 Compliance Defaults menu
Field
Description
Show hepatitis consent
Option to display hepatitis consent on the Profile sheet
Log User off
Check, if after nightly update, you want the user to be logged off.
Include all employees
Check if the nightly update will include all employees.
Use Alien ID number
Use an immigration number, if necessary, for an employee who has
no Social Security number.
Allow override in-service
Disregard for compliance purposes an employee’s non-completion
of a past in-service training course. To do this you must enter a
requisite security password.
Training visits required
Enter the number of training visits required for employees
System Functions
14-265
Rev 11.5
HC Plus User Manual
Mail Merge
Enable this checkbox if you want the Mail Merge button to display,
for example, on the Non-working Employees report menu.
Merge Directory
Specify the directory where you want the text file exported.
Password
Enter Password required for compliance processing
Supervisory Visit
Compliance Code
Select the compliance code from the dropdown that reflects the
updates of supervisory visits.
Min Days Between InService
Minimum number of days required between in-service training
sessions.
Enter CERT through
compliance
If checked, certification is made directly through Employee
Compliance by entering the completion date for the in-service
course. A Certificate can then be printed out. If this checkbox is
not set, than certification is done through the Certification Tab that
appears on the Training screen accessed via Employee
Maintenance.
14.1.3 HC Plus interface Tab
Use the Misc tab to set the directory addresses where the automated batch process sends its files. The
Timeslip Interface File path designates the folder (HABATCH) where timeslips are filed for batching.
Figure 14-4 HC Plus directory assignments
System Functions
14-266
Rev 11.5
HC Plus User Manual
14.1.4 Global Tab
Click on this tab to set global defaults for the HC Plus system.
Figure 14-5 System Global Defaults
Employee sex and total number of employees by sex may be added to the Employee Report List. To
enable this feature click the Display Employee Sex on List Report checkbox.
•
Also note that the Client ID length can be numeric, alphabetic and up to nine characters in length.
•
Holiday hours can be limited to an amount determined by the Agency by entering the amount into
the Max Holiday Hrs field. By default, the system sets the maximum holiday hours to 12.
•
By entering a value in the Visit Frequency Default field you can define the default value for
Nurses visits on the Client Maintenance Screen.
Field
Description
Use International Format?
For use outside of the United States
Care Centric Integration?
No longer used.
Use Service ID table?
Future use.
Allow Alpha Emp No?
Allow an alphabetic employee ID.
Use Document Tracking?
No longer used.
Find Employees by Hired Date?
When searching for employees, use the hire date.
Find Employees by Compl Status?
When searching for employees, take the compliance status
into account.
System Functions
14-267
Rev 11.5
HC Plus User Manual
Field
Description
Employee Availability Required?
If checked, when entering a new employee, you will be forced
to enter his/her availability at the time of the record’s creation.
Edit Medical Record Number (MRN)?
For some agencies the MRN is required and limited to 9
numeric positions. Checking this box, allows changing the
number, when necessary.
Display Employee sex on List report?
Document the employee’s gender on the Employee list report.
Batch by Vendor instead of by
Contract
Batching of timeslips will be done at the vendor level; if a
batch doesn’t already exist for a specific vendor then one is
created. Although batches are created based upon client
location, the Batch Listing does not display location.
Leaving this blank allows batching by contract.
Use Training Visit Tracking?
No longer used.
Santrax format
Select the Santrax format from the dropdown.
Export as Contract
Export data to Santrax with ‘N’- the contract ID; or ‘D’-the
contract description; or ‘C’ –the contract category.
Max Holiday hours
Enter the maximum holiday hours allowed by an employee
Client ID type (A or N)
Some agencies use a numeric number of length 7, while others
use an alpha of length 6.
Client ID length
Set the length of the client ID.
Maximum age of order (days)
Usually set to 60 days, it disallows the creation of an order
going forward or backward sixty days.
Visit frequency Default
Nurse visit limit, usually set to 3—that is once every three
months.
Clinical Export Path
Directory for the export of Clinical Data.
System Functions
14-268
Rev 11.5
HC Plus User Manual
14.1.5 Sharp Tab
Set Sharp system defaults for calculated hours and discharge options.
Figure 14-6 Sharp default options
Field
Description
Display Calculated Hours in Decimal Format?
Check to have the visit hours displayed in decimal
format.
Allow Verified Hours Greater the Scheduled
Checking this field allows temporary assignment
and verified hours to exceed Daily or Weekly
authorizations
Santrax Exception Maintenance. Use Search
Button
No longer used.
Schedule Cancellation – Default No Entry Hours
For Sharp Integration types: Use this to control the
number of payroll hours given to employee when
canceling a visit for ‘No Entry’. This value can be
set to any value from 0 to 12.
Schedule Cancellation – Set Vac P/R Hours to
Zero.
For Sharp Integration types: Use this to control the
number of payroll hours given to employee when
canceling a visit for Vacation.
Schedule Cancellation – Set Sick P/R Hours to
Zero.
For Sharp Integration types: Use this to control the
number of payroll hours given to employee when
canceling a visit for Sick—and create a transaction
with zero hours.
System Functions
14-269
Rev 11.5
HC Plus User Manual
Field
Description
Schedule Cancellation – Set Misc P/R Hours to
Zero.
Use this to control the number of payroll hours
given to employee when canceling a visit for
Holiday or Delegate etc. Enabling this option
creates a transaction with zero hours.
Saved Reports Path
Define the directory for storing Santrax reports
Batch Verified Visits
When this field is checked, only verified records are
batched. The criteria for inclusion in a batch are
location, contract, week of service, and user.
Allow PDS Interface
No longer used.
PDS File Directory
No longer used.
Display Employee Prior Status
Select the option to display employee prior status,
information; deselect the option to hide the prior
status. (See the Employee Status Change screen.)
Use ICD9 codes
If the ‘Use ICD9 Codes’ is ‘Unchecked’, the
Search ICD9 Code button will not display on the
Code Maintenance screens. When searching for a
Diagnosis Code, the system will use the DX Code.
If no DX code exists, a message will display
"Invalid Diagnosis Code." ‘Unchecked’ is the
default setting.
If the "Use ICD9 Codes" box is "Checked," the
Search ICD9 Code button will display on the Code
Maintenance screens. When searching for a
Diagnosis Code, the system will first choose the DX
Code. If no DX Code exists, it will then select a
matching ICD9 Code. If neither exists, a message
will display "Invalid Diagnosis Code.”
This option is available at the Agency level. If you
would like the "Use ICD9 Codes" setting for your
Agency, please contact Client Services at 516-4844400 ext 552.
System Functions
14-270
Rev 11.5
HC Plus User Manual
14.2 Contract Maintenance
To view data about your contracts, press the Contract Maint button. A list of contracts appears. This
information is used throughout the system in enrolling and servicing clients. You may create new contracts
as needed by pressing the New button at the bottom left of the screen.
Figure 14-7 List of Contracts
14.2.1 Contract—general information
Click on the ** button to the left of each entry to see details of each contract. Provider information is
entered on this screen—and corresponds to the provider displayed in Service Maintenance.
Figure 14-8 General Contract Information
System Functions
14-271
Rev 11.5
HC Plus User Manual
Field
Description
Contract #
Displays the Contract Id.
Description, Address
Name and location of agency handling contract.
Call Frequency
This feature is used in call tracking. Santrax users
usually check Never.
Contact Information
Enter the contact person’s information.
User Field Description
.Create fields for use on the Service-Billing and
Insurance Screen.
Vendor #
Enter the vendor number for this contract.
Approval Type
Options are:
Authorization Type
Depending on the Approval type, this field may be
weekly for Approval type = contract and daily for
Medicaid.
Category
Use the dropdown to select the contract category.
Allow PDS Interface
No longer used.
PDS File Directory
No longer used.
Provider
Choose the name of the service provider
Payroll/Billing
V = VNS; P-Prohealth
Comments
Enter comments relevant to this contract ‘s
management
14.2.2 Contract Holiday data
The Holidays tab on Figure 14-8 allows you to set up your work-year calendar, recording those days that
are holidays or non-working days for this contract. You may modify the Dates and Pay types, if you have
the proper security clearance.
System Functions
14-272
Rev 11.5
HC Plus User Manual
Figure 14-9 Contract Holiday Information
14.2.3 Pro-Health Contract Maintenance
Use this to keep track of the Pro-Health contracts.
Figure 14-10 Pro-Health Contract Data
Field
Description
Cluster
Check when the contract includes cluster situations
where one employee covers many clients.
Carepak ID
Payroll/Billing system ID.
System Functions
14-273
Rev 11.5
HC Plus User Manual
Field
Description
Orders outside 485 certification
Yes signifies that the system does not have to match
485 Certification periods. Other options are ‘No’
and ‘Warn.’
Site/Area codes
Use dropdown to select a site code, if available.
Company/Segment
Use dropdown to select a company division or
segment, if available.
Show rates
When checked, the employee’s rates will display on
the verification screen, e.g.,
Export Clinical Data
Click to allow the export of 485 Health
Maintenance data for use by agency personnel. The
Scheduling Defaults/Global tab displays the
directory for storing the export.
Hold Split Shift Billing
When there is a split shift in a day’s visit and one of
the shifts is verified—this checkbox will flag a
billing error; billing will be delayed until the second
shift is also verified
System Functions
14-274
Rev 11.5
HC Plus User Manual
14.2.4 Contract—Santrax setup information
Press the Santrax tab on Figure 14-8 to set up your options for using Santrax, such as having the program
verify that the visit hours match the scheduled hours.
Figure 14-11 Contract/Santrax options
FIELD
Description
Use Santrax?
Check to indicate that Santrax will be used for this contract.
Santrax Acct #
Enter your Santrax account number
VNS Vendor #
Include the VNS vendor #, if any.
Start time Dev
Enter the allowed deviation (e.g. lateness) for an employee’s start time.
End Time Dev
Enter the allowed deviation (e.g. leaving early) for the end time.
Tot Time Dev
Enter the total time deviation allowed for an attendant.
Ignore Time?
Ignore the number of scheduled hours when trying to reconcile visits.
Match Visit By Hours?
Flag visits whose hours do not match the number scheduled.
Orig Sched Times
All visits not adhering to the original scheduled start/end times will be
non-reconciled.
Use Corrected Hrs?
Allow the user to enter and correct hours on the Santrax visit
maintenance screen.
Contract Import
Check to import contract data into Visit Maintenance.
System Functions
14-275
Rev 11.5
HC Plus User Manual
FIELD
Description
Timetrax Banking Effective
Enter the date that ‘Banked Hours’ will go into effect.
Schedule Created from VNS
Check to create schedules using the VNS data.
Last Auto Batch
After importing Santrax data, the date of the last batch transfer is
recorded.
Next Auto batch
Date for next auto-batch of Santrax data to occur.
Last Visit Main. Import
Most recent date when Santrax call data was imported to system.
Last Visit Main. Status
Brief status note on how many visits were processed or bypassed.
Autobatch now
Press this button to initiate the auto-batch process. For some agencies
this button is grayed-out and not functional.
14.2.5 Contract-Sharp Setup Data
This screen (for Sharp agencies only) sets the options for handling employees. They can be terminated
(and their schedules ended) or can be inactivated on a temporary basis but can be instantly reinstated into
active service.
Figure 14-12 Contract/Sharp options
FIELD
Description
Auto Terminate
Terminate any employee who has been inactive more than 90 days.
Auto Inactivate
Inactivate any employee who has been inactive more than 90 days, that
is, exclude him/her from any search process but keep his name on file.
DFTA 12 hour override
For relevant agencies: Allow a DFTA employee to work longer than a 12
hour shift.
System Functions
14-276
Rev 11.5
HC Plus User Manual
14.3 Location Maintenance
Accessed by pressing the Location Maintenance button on the System Functions Menu, this screen
contains basic data about the site from which service is provided. It also used to set certain parameters for
Santrax as are relevant for that location.
Figure 14-13 Location Maintenance inputs
Use the
button on the
Main Menu to set the location you want to use for
your system. A list appears showing (for a mutisite organization) the different locations. Choose
the one you require.
System Functions
14-277
Rev 11.5
HC Plus User Manual
14.4 Provider Maintenance
You can set up and maintain a list of care providers using this screen. This information appears in the
Figure 6-2: Completed Service Maintenance screen. After adding a provider, assign procedure codes to this
provider using the window shown in section 14.7.16. Once a provider is designated on a service contract, you
can apply corresponding procedure codes to the client’s order.
14.5 Change Coordinator ID
You may change Coordinator ID’s using the button by that name on the system functions menu. Once a
new Coordinator ID has been updated, all clients/employees associated with the previous ID will be
converted. If you wish to assign an existing ID to another Coordinator, you will be issued a warning and
prompted to merge coordinators. If you respond YES, the system will merge all clients/employees
associated with the existing ID to the new coordinator. If you respond NO, nothing will be done and a new
ID will have to be selected.
System Functions
14-278
Rev 11.5
HC Plus User Manual
14.6 Auto Batch Status Report
Press the Autobatch Status Report button to generate a list displaying the contracts and the date of the
next autobatch is scheduled for a WOS.
Figure 14-14 Auto Batch Status Report
14.7 Codes Maintenance
Use this menu to add both codes into the system. Your entries will be listed in the corresponding dropdown selections available for fields appearing on the client, employee, and various other screens.
Figure 14-15 Codes Maintenance Menu
System Functions
14-279
Rev 11.5
HC Plus User Manual
14.7.1 Classification Codes
14.7.2 Reason Codes
These codes describe the type of care provided to
the client, i.e. HA Home Attendant.
List of reason codes determined by Agency.
14.7.3 Category Codes
List of agencies used.
System Functions
14-280
Rev 11.5
HC Plus User Manual
14.7.4 Referral/Discharge
Reasons for discharge or referral of a patient. You are able to define existing or new codes entered as a Hold
reason code.
14.7.5 Doctor Codes
You may delete doctors from the Doctor Codes
Maintenance Module. Only those doctors not currently
assigned to clients will be deleted. If you select a
doctor assigned to clients for deletion, the system
displays a message listing the clients assigned to the
doctor and prevents the deletion.
System Functions
14-281
Rev 11.5
HC Plus User Manual
14.7.6 Work Codes
14.7.7 Contract Site/Area Codes
List of the codes for occupations and services
afforded by employees to clients.
Different sites handled by your agency as per contract
requirements.
14.7.8 County codes
14.7.9 Coordinator Team Codes
14.7.10
List of coordinator/teams in your agency.
Different documents required for identification of
individuals within your agency.
System Functions
14-282
Alien Identification Codes
Rev 11.5
HC Plus User Manual
14.7.11
Diagnosis Codes
14.7.12
District Codes
Standard diagnosis codes for describing a client’s
health status.
List of different districts covered by your agency.
14.7.13
14.7.14
Skill Codes
List requisite skills of your employees as needed for
the servicing of clients.
System Functions
Topic Codes
List of various issues and topics to be covered in
training sessions of employees.
14-283
Rev 11.5
HC Plus User Manual
14.7.15
Pay Source Codes
14.7.16
Procedure Codes
Create a list of pay source codes as needed.
Create a list of medical procedures to be used by your
employees.
14.7.17
14.7.18
Company Segment
Department Numbers
List the different units within your agency.
Create department codes and descriptions.
14.7.19
14.7.20
Program Types
Assorted kinds of health programs available to your
clients.
System Functions
Level Care
A list showing the various levels of care within your
organization.
14-284
Rev 11.5
HC Plus User Manual
14.8 Additional Codes Menu
This menu allows access to more codes and fields that are used by the system.
Figure 14-16 Additional Codes Maintenance Menu
14.8.1 Referral/Discharge Types
14.8.2 User Fields
Create reasons for discharge of client from service.
You may create your own fields here for use on the
Contract and Service Maintenance screens.
14.8.3 Must Cover Codes
14.8.4 Supervisory Visit Results
Used in the client screen to determine whether the
coordinator must fill the client’s visit assignments.
System Functions
14-285
Rev 11.5
HC Plus User Manual
14.8.5 Nurses
14.8.6 Note Types
Create a list of nurses in your employ. Used in the
nurse visit screen.
Use this screen to create different types of notes.
The checkbox option “Print Notes on Client
Schedule” is checked by default but you can edit it
by removing the check. This allows you to exclude
certain notes types from appearing on the Client
Schedule report when Notes is checked in the
INCLUDE section of the report menu form.
14.8.7 Coordinator Maintenance
14.8.8 Cluster Groups
Use this screen to view/set up codes for your cluster
groups. Enter these codes into the Group # field on
the Cluster Maintenance screen.
System Functions
14-286
Rev 11.5
HC Plus User Manual
14.8.9 Race Codes
14.8.10
Race Codes displays four column headings: Race
Code, SH Code (Sharp), PH Code (Pro-Health) and
Description. All existing entries may be edited with
the PH Code and Description being the only fields
that the user can change. Any new records require
all fields to be filled.
System Functions
Tax codes
Tax Codes which displays three column headings:
Tax Code, Tax #, and Description. You can edit an
existing code directly on the Tax Codes form. Any
new records require all fields to be entered. The
Tax Code field accepts only two values: “S” for
State and “C” for City.
14-287
Rev 11.5
HC Plus User Manual
Chapter 15
Security Features
The HC Plus security system allows you to create security groups whose members have permission to fully
access and modify certain modules—but may have no or fewer rights to other modules. Each HC Plus user
is assigned to a security group, inheriting that group’s defined permissions. If your security level precludes
you from certain functions, the relevant access buttons will be grayed out.
15.1 To access HC Plus security features
Figure 15-1 System Function Menu
You can access all of the security features by clicking on one of the following buttons on the Systems
Functions menu:
15.2 To view a list of current users
Press the User Maint button on the System Functions menu to see a roster of users—and, depending on
the permissions of the group to which you belong—you may set/change a user’s password, security levels,
etc. A check in the Logged in field signified a user is currently online.
Figure 15-2 List of Users
Security Features
15-288
Rev 11.5
HC Plus User Manual
15.2.1 To view the security profile of an individual user
1.
Click on the ** button to the left of a user’s name. The screen (on the left) appears giving general
information about the user, such as his/her name, password. You may change the information in any
of the data boxes.
2.
When you click on the Groups tab, the screen on the right appears showing the group of which the
user is a member. For example, DAN is a member of the SECURITY ADMIN group and is allowed
access/permission to all HC Plus features other members of that group are entitled.
3.
You may use the Add >> and the << Remove buttons to assign this user to any of the available
group(s) shown. (Use the >> and << arrows to simultaneously enroll the user as a member of all
groups or to remove him/her from all groups.)
15.3 To add a new user
Click on the NEW button on the bottom of the Figure 15-2 to enter new users into the security system. A
blank screen appears. ADMIN users have the ability to create hidden users.
Figure 15-3 New User Entry Screen
1.
Fill in all the user information, that is, Name, Password, Initials, Area code, and Location.
2.
After filling in the data, press the Groups tab. A screen appears allowing you to assign this new user
to one or several groups.
Security Features
15-289
Rev 11.5
HC Plus User Manual
Figure 15-4 Assign a New User to a Security group
3.
Use the Add >> button to move an available group to the Member of window, thereby assigning this
user to that group. As a member of a group, this user is entitled to all the security permissions allowed
to other members of the group.
15.4 Security Group Maintenance
The definitions of a group’s security levels are set up using the procedures detailed in this section.
15.4.1 To view a list of Security Groups
1.
Press the Group Maint button on the System Functions (Figure 15-1) menu to view a list of the
current security groups.
Figure 15-5 List of Security Groups
15.4.1.1
To view a Group’s security profile
1.
Click on the ** to the left of a group’s name. The group’s general information screen appears (see
below).
2.
Click on the Users tab to view all the Current Members of this group. You may use the Add >> and
the << Remove button to assign or remove any Available User.
Security Features
15-290
Rev 11.5
HC Plus User Manual
3.
Click on the Group Permissions tab to view (and modify if you are authorized to do so) the security
profile of this group.
Figure 15-6 A Group’s Security Profile
A list of ‘Objects’ (screens, reports etc.) is displayed for each Available Category. The checkboxes on
the far right allow you to see the checked-off level, that is, the ‘rights’ every member of this group has to
the highlighted object. In the example above, every member of the SECURITY ADMIN group may
access, add, and delete Codes as part of his/her Administrative activities.
Note: As you go down the list of categories, highlighting each one, a corresponding list of available objects
for that category is displayed in the center of the screen.
Once you highlight a particular object, then the checkboxes on the right display the levels of permission for
that object.
You may create a report showing all the permissions granted to the group by pressing the Preview/Print
Permissions buttons. See the Figure 15-10 Group Permissions Report.
A full list of all the objects related to each available category appears in the next section
Security Features
15-291
Rev 11.5
HC Plus User Manual
15.4.2 List of Security Categories and Objects
The following table lists all the objects that belong to each security category.
Categories
Available Objects
Administrative
Compliance
Santrax
Security Features
15-292
Rev 11.5
HC Plus User Manual
Client
NOTE
For authorized users who Suppress Duty Free for a client, the system will
generate a warning message and the user will be forced to enter a note. This
note will be recorded in the Client Notes. If Duty Free is suppressed on an
individual visit and the user does not enter a note, the system will
automatically generate a ‘Duty Free Suppression’ note in the schedule
History module. If the user does enter a note, it will be appended to the
system-generated note. The Change Log report will also display the systemgenerated as well as the user notes associated with the duty-free suppression.
Employee
Security Features
15-293
Rev 11.5
HC Plus User Manual
Note: The security option ‘Temp Rate Change’ will work in conjunction with the ‘Payroll
Information’ security permissions. If a Security Group has Allow Access and Update rights
assigned in ‘Payroll Information’, then the new ‘Temp Rate Change’ security option will have
Allow Access and Update rights automatically enabled. However, if the Security Group has only
Allow Access enabled in ‘Payroll Information’, then the ‘Temp Rate Change’ security option will
only have the Allow Access right enabled. The Allow Update will have to be set manually to
allow the Security Group access rights to update the temp rate field on the employee payroll
screen.
Scheduling
Verification
Miscellaneous
Print Screen
Security Features
15-294
Rev 11.5
HC Plus User Manual
15.4.3 To Create a New Security Group
New Security groups may be created and ADMIN users have the ability to create hidden groups
1.
Click on the NEW button on the bottom of the Figure 15-5 to define new groups for the security
system. A blank General Information screen appears. Enter text in the Group Name data box.
Figure 15-7 Security Group—General Information
2.
Click on the Users tab to assign users to this new group. In the example below, two users MJOSEPHE
and ATHOMAS were added to the ‘EXAMPLE’ group.
Figure 15-8 Security Group—User Membership
Security Features
15-295
Rev 11.5
HC Plus User Manual
15.4.4 To Set a Group’s Security Permissions
After creating a new security group, you may set up rules authorizing users of that group to view, perhaps
change, specific HC Plus features and functions.
1.
Click on the Group Permissions tab of the Security Group Maintenance screen. The response
window below appears.
2.
Press No to define a new permission table for this group as shown in Figure 15-9—and proceed to
instruction 3. (However, click the Yes button if you want to select a previously defined group and to
adopt its permission arrangements for your new group; a selection window appears (below) allowing
you to choose the ‘parent’ group.)
3.
Select a Category, for example, Administrative. The ‘objects’ for which you will grant permission
appear in the center panel of the screen.
Security Features
15-296
Rev 11.5
HC Plus User Manual
Figure 15-9 Creating Security Permissions
4.
Highlight an object from the center panel.
5.
Click on the ‘permissions’ you wish to give to this group for the object. In the example below, every
member of the group will be allowed to add (but not delete) codes within the Codes Maintenance
module.
6.
Repeat steps 4 and 5 until all the permissions are assigned to this group.
Security Features
15-297
Rev 11.5
HC Plus User Manual
Shortcut Note: If, after highlighting an Available Category, you press the button Grant Full Rights, you
can simultaneously award full rights to every object in that category. A confirm window appears as shown
below; click Yes to proceed.
7.
Press the Print Permissions button to print a report’ showing all the ‘rights’ given to this group.
Figure 15-10 Group Permissions Report
Security Features
15-298
Rev 11.5
HC Plus User Manual
15.4.5 To Remove a Security Group
1.
View the list of Security Groups (Figure 15-5). Click on the ** to the left of the group you want to
delete. Its General information screen appears (see below).
2.
Press the trash icon. A confirm window appears. Click Yes to remove the group.
Figure 15-11 Deleting a Group
Security Features
15-299
Rev 11.5
HC Plus User Manual
Chapter 16
Frequently Asked Questions (FAQ’s)
16.1 How to handle a client cancellation
1.
Click in the day cell to cancel
2.
Click “Client Cancel.”
3.
Enter Reason Code, i.e., Client Refuses Service, Family Takes Responsibility, etc.
NOTE: If “No Entry” is selected, the system will automatically cancel service and pay the employee 2
hours for no entry
4.
Press the Exit door
16.2 Client cancels for more than one day
1.
Click in the first day to cancel. Click “Client Cancel.”
2.
Enter a Reason Code.
3.
Check the Days of the Week you want to cancel.
4.
Press the Exit door
NOTE: Service is cancelled for the day(s); and the employee is released from the schedule.
16.3 How to handle an employee cancellation
1.
Click in the schedule’s day cell.
2.
Click Employee Cancel.
3.
Enter Reason Code, i.e., Employee Sick, Vacation, etc
4.
Click Set Payroll Hours to Zero only if you do not want to pay for sick, vacation, etc.
5.
Press the Exit door.
16.4 Employee cancels for more than one day
1.
Click in first day to cancel
2.
Click “Employee Cancel”
3.
Enter Reason Code, i.e., Employee Sick, Vacation, etc
4.
Click “Set Payroll Hours To Zero” ONLY if you do NOT want to pay for sick, vacation, etc
5.
Note the “Thru Date” is the ‘week ending’ you are presently in. (Change if necessary.)
6.
Check the “Days of the Week” to cancel.
7.
Press the Exit door
NOTE: To pay vacation/sick in bulk time, click the Vacation/Sick/Holiday button located at the
bottom right of the screen and fill out the window.
16.5 Enter a temporary replacement
1.
Click in the day of the open schedule (red box)
Frequently Asked Questions (FAQ’s)
16-300
Rev 11.5
HC Plus User Manual
2.
Enter an employee name in the employee field.
3.
Make sure “T” appears for temporary, next to employee’s name
4.
Press the Exit door
5.
Enter a Reason Code on the next screen.
6.
Close its Exit door
16.6 Enter a replacement for more than one day
1.
Click in first day for temporary replacement (red box)
2.
Enter employee name in the employee field
3.
Make sure “T” appears for temporary, next to employee’s name
4.
Click “Copy”
5.
Enter Reason Code
6.
Close the door
7.
Note the “Thru Date” is the ‘week ending’ you are presently in (change if necessary).
8.
Check the “Days of the Week” for replacement
9.
Field: “Copy What”, click “Employee”
10. Click “Copy”
16.7 Client refuses home attendant/employee
1.
Go to the Client Schedule
2.
Click on the first day you want to remove the h/a.
3.
Click on Client Cancel.
4.
Reason Code is: ‘Client Refuses home attendant.’
5.
Check the days to remove h/a
6.
Check the Only Employee checkbox. (The attendant’s name is printed alongside.)
7.
Check Permanent cancellation.
8.
Check Add to Exclusion List.
9.
Check Leave as open shift.
10. Press the Exit door
11. The order is now displayed in RED / open to be filled.
Frequently Asked Questions (FAQ’s)
16-301
Rev 11.5
HC Plus User Manual
16.8 Permanently remove an employee from a schedule
1.
Go to the Client Schedule.
2.
Click on the first day you want to put in a permanent replacement.
3.
Highlight the employee’s name you need to remove.
4.
Type in the new employee’s name.
5.
Tab and change the “T” to a “P” for Permanent.
6.
Click on Copy.
7.
For the Reason Code, enter ‘Schedule Change.’
8.
Click on the Days to change
9.
Click on the Employee.
10. Click on Copy.
16.9 Exclude an employee from working with a client
1.
Go to the Client Maintenance Screen
2.
Click on Exclusions
3.
Type in employee’s last name, first name
4.
Tab to text field.
5.
Type in reason for the exclusion
Note: You can also go to the Employee Maintenance Screen and do the exclusion from the employee
maintenance screen and exclude the Client.
16.10 How to handle unscheduled visits
If a home attendant calls in that he/she will not be in because of illness:
1.
Go to the Client Schedule screen.
2.
Locate the day employee will be out.
3.
Click inside the day.
4.
Click on Employee Cancel.
5.
Select the correct reason (remember Payroll hrs is set to zero).
6.
The order is now open and RED.
7.
Click in the red schedule.
8.
Fill the order with a temporary replacement.
If you have an UNSCHEDULED VISIT and this appears as RED/GREEN, you have two options.
Frequently Asked Questions (FAQ’s)
16-302
Rev 11.5
HC Plus User Manual
Option one:
1.
If there is an order in green below the Unscheduled Visit, you must first cancel the employee for
the green visit.
2.
You now have a RED open order.
3.
You can fill this red open schedule with the name of the employee from the Unscheduled Visit.
PAYROLL will verify these hours and the Unscheduled Visit will disappear from the schedule.
Option two:
1.
If there is an order in green below the Unscheduled Visit, you must first cancel the employee for
the green visit.
2.
You now have a RED open order.
3.
You can do an agency cancel on the red open order.
4.
You must now enter the scheduled hours in the Unscheduled Visit.
5.
Payroll will verify this call.
16.11 How to handle twenty-four hours cases
If your agency is doing tasks and the home attendant does not call out with the task codes at the end of a
24-hour visit, an Unscheduled Visit will appear. There is nothing you can do to remove this visit. This is
an alert to the Field Department that the home attendant made an error.
16.12 Paying for sick time
In HC Plus the default payroll hours for sick and vacation time has been set to zero.
When an employee calls in sick and you cancel the employee from the schedule, they will automatically
have no hours for sick time.
If you wish to pay them sick time:
1.
If the employee is going to be out for only one or two days, you can remove the check mark on Set
PAYROLL hours to Zero and this will automatically pay sick time.
2.
If the employee is going to be out for more than two (2) days, leave the checkbox marked.
If you then want to pay them for more than two days sick, do the following:
1.
Click in the black box in the scheduled day and type over the ZERO and type the amount of hours
to pay.
When you receive the doctor’ note for the employee that was out sick:
2.
Go to the Client Schedule.
3.
Click in the black box (sick). Type (over the zero) the correct amount of hours for the days out.
Remember to give the Fiscal department the timesheet with the doctors’ note.
16.13 Payroll Steps after the Auto batch is run
I.
Click on Verify Schedules on the Main Menu:
Frequently Asked Questions (FAQ’s)
16-303
Rev 11.5
HC Plus User Manual
1.
On the Verification Menu, click on Verification Report. The report will show you verified
and unbatched time sheets.
2.
Enter the W/E Date.
3.
Enter the Contract Name from the drop down menu.
4.
Click on View.
5.
Examine the Verification Report.
6.
Check if W/E date is correct and change if necessary
7.
Check on Un-Verified transactions.
8.
Print—and determine if time sheets need to be verified and added to a batch.
9.
Repeat with different week ending dates to insure there is nothing outstanding.
10. Exit to the Verification Menu.
II.
Click on Batch Listing on the Verification menu
1.
Select New Batch.
2.
Select a contract—Contract is your agency name.
3.
Enter the Week Ending date
4.
Click Create New Batch.
5.
Click Add Time Sheet.
6.
A list of Santrax Client Time Sheets appears.
7.
Click on each time sheet to be added.
8.
Click on add Selected.
9.
Answer Yes.
10. Click on Next Page and repeat the above instructions until all time sheets have been added.
11. Click on Show Non Santrax Clients, if necessary add these time sheets to the batch
12. Repeat steps 1, 2 & 4 and check off Multi Week to create a mixed batch.
13. Repeat steps 5 though 11.
III.
Out of balance
1.
Any batched that are out of balance will have a red star to the left of the batch
2.
Click on Modify Header
3.
Click on the out of balance batch
4.
Correct Header
5.
Click on Save Header.
Frequently Asked Questions (FAQ’s)
16-304
Rev 11.5
HC Plus User Manual
6.
Click on View Unbatched Time Slips, enter the correct week ending dates and contract name. This
report helps to insure no verified time slips are outstanding and need to be added to a batch.
IV.
Once you are sure all is correct:
1.
Click on Batch Listing
2.
Click on Transfer All.
3.
Wait about 10 minutes.
4.
Logon on to Sandsport.
5.
At the Command line: QS
6.
Continue as you normally would for the edit
7.
Don’t forget to enter your 200’s.
Frequently Asked Questions (FAQ’s)
16-305
Rev 11.5
HC Plus User Manual
Thank you for using HC PLUS
If you have any questions or comments please call
Client Relations at 516/484-4400 ext. 552.
Frequently Asked Questions (FAQ’s)
16-306
Rev 11.5