Download Terminal User Guide
Transcript
hicaps terminal user guide contact phone numbers for HICAPS/EFTPOS table of contents HICAPS Help Desk 1300 650 852 1HICAPS/EFTPOS 4 Merchant No. 1.1 1.2 1.3 4 4 6 Manual Merchant No. 2 HICAPS your merchant details For Authorisations: • Credit Card (Credit) Account This is an Australia-wide number 13 25 15 • Debit Card (Cheque) or (Savings) Account This is an Australia-wide number 1300 650 852 lost or stolen cards Please call the above authorisation line appropriate for the card type used (credit or debit). Call 13 25 15 and select extension 500 when calling about lost or stolen credit cards. terminal number Attach your first log on receipt here! HICAPS help desk glossary diagram of HICAPS terminal 7 2.1 2.1.1 2.1.2 2.2 2.2.1 2.2.2 2.3 2.3.1 2.3.2 2.4 2.5 2.6 2.7 2.8 terminal provider setup 7 adding a new provider 7 changing and deleting providers11 processing a HICAPS claim12 processing a HICAPS claim transaction (HICAPS terminal)12 processing a HICAPS claim transaction (practice management system)15 cancelling a HICAPS claim16 cancelling a HICAPS claim (HICAPS terminal)16 cancelling a HICAPS claim (practice management system)18 manual daily transaction summary (HICAPS totals)18 settlement transaction report (HICAPS forced settlement)19 ordering terminal rolls 20 performing terminal sign on/logon 21 customising a HICAPS receipt (optional) 22 3 EFTPOS 23 3.1 3.1.1 3.1.2 3.1.3 3.2 3.2.1 3.2.2 3.3 3.3.1 3.3.2 3.3.3 3.3.4 processing an EFTPOS transaction processing an EFTPOS transaction following a successful claim transaction processing an EFTPOS transaction processing an EFTPOS transaction (practice management system) refunding an EFTPOS transaction refunding an EFTPOS transaction refund an EFTPOS transaction (practice management system) EFTPOS settlement manual EFTPOS settlement automatic terminal settlement merchant password host forced settlement 23 23 25 28 28 28 31 32 32 34 36 36 4 terminal functions 4.1 the screensaver (idle screens) 4.2 main menu 4.2.1 logon 4.2.2 batch 4.2.3 terminal 4.2.4 setup 4.2.5 tests 4.2.6 reprint 4.3 transaction menu 4.3.1 balance / quote 4.3.2 refund / cancel 4.3.3 pre-auth 4.3.4 completion 4.3.5 cash out 4.3.6 sale 4.4 terminal function keys 4.4.1 report [1] key (print EFTPOS and HICAPS reports) 4.4.2 setup [2] key (refer help desk) 4.4.3 reset [3] key 4.4.4 lock [4] key 4.4.5 sign on [5] key 4.4.6 quote [6] key 4.4.7 order [7] key 4.4.8 reprint [8] key (reprint EFTPOS and HICAPS transactions) 4.4.9 load [9] key 4.4.10 initialise [0] key 4.4.11 paper feed [*] key 4.4.12 alpha [#] key 4.5 changing the terminal security password 4.6 fallback procedure 37 5 terminal connections 47 37 38 38 38 38 39 39 39 40 40 40 40 40 41 41 42 42 43 43 43 43 44 44 44 44 44 44 44 45 46 6 thermal printer 49 7 HICAPS response codes 51 7.1 7.2 transaction level HICAPS response codes item level HICAPS response codes 51 53 8 EFTPOS error messages and corrective actions 55 9 manual backup procedure 57 10 merchant requirements to ensure EFTPOS transactions are valid 58 11 terminal functions T4200 series 59 12 60 Medicare Australia Easyclaim 1. HICAPS/EFTPOS HICAPS Health Industry Claims And Payments Service. The company responsible for the switching of transactions to health funds from the terminal. issue date The date the membership card was issued. Those cards with issue dates have them printed on the bottom right-hand corner of the card. item cost The amount charged for the given item of service. item number Numeric code identifying the type of service performed. Refer to the HICAPS Quick Reference Guide or the relevant schedule for a full list of item numbers. 1.1 HICAPS help desk HICAPS Help Desk phone number is 1300 650 852. For HICAPS Help Desk hours of operation, please refer to www.hicaps.com.au Provider information section. HICAPS fax number is 1300 725 726. 1.2 glossary benefit Value of rebate authorised by a Health Fund. member A customer of a Health Fund. cancel Reverses a transaction processed through the terminal. MMF The Multi-Merchant Facility. This is a feature of the HICAPS terminal which optionally allows you to settle the EFTPOS funds separately for each provider. patient ID A member listed on the card which identifies a given patient within a Health Fund membership. Practice Management System The PC-based system which allows a transaction to be sent directly to the HICAPS terminal. provider Practitioners who provide Health Services to patients. provider number Is eight characters that uniquely identify each individual provider for a specific location. Provider numbers that HICAPS use are issued by Medicare Australia or Medibank Private. Provider numbers are location specific, so you must have a provider number for each location you wish to practice at. refund Refunds a previous EFTPOS or credit approved transaction. reversal Reverses an approved transaction on the same day the transaction was processed. RRN Receipt reference number (unique 12 digit field). card claim claim declined After treatment is provided, details are sent electronically via the terminal to the Health Fund. When a Health Fund declines to pay the request a brief response message will print with each declined item and/or claim. claim receipt Either the terminal or the associated Practice Management System prints a receipt, which must be signed by the patient to acknowledge services and approve the transfer of payment to the provider. claim to sale The terminal facility allowing you to start an EFTPOS transaction using the Gap amount returned from the HICAPS Claim. clinical code A membership card issued by the Health Fund or an EFTPOS or credit card, issued by a bank. Two digit numeric identifying the body part/primary condition/ diagnostic intervention on which the service was performed. date (of service) The date the specific item of service was performed – format ddmm. swipe member card Pass the membership card through the card reader on the right-hand side of the HICAPS terminal. fallback The terminal was unable to contact the bank to process an EFTPOS transaction, but the transaction has been approved/ declined and will be sent to the bank with the next transaction. tooth number Two digit FDI numeric identifying the tooth on which the service was performed. gap payment The amount remaining after the Health Fund has approved a benefit for the specified services. 1.3 2.HICAPS diagram of HICAPS terminal 2.1 high speed thermal printer account select and option keys terminal provider setup Note: To add providers you will need to contact HICAPS in writing. A ‘Change of Practice Details’ form will need to be completed and sent to HICAPS. This form is available from the HICAPS website www.hicaps.com.au or from the HICAPS Help Desk on 1300 650 852. You will receive notification from HICAPS in writing once the providers have been registered. Merchant Function 54 is used for Provider Setup. 2.1.1 adding a new provider backlit graphics screen step 1 Press the [FUNCTION] key. step 2 Enter [5] [4] and press [ENTER]. magnetic stripe card reader alphanumeric keypad smart card reader SELECT PROVIDER 1. Dr Smith 2. NOT ASSIGNED 3. NOT ASSIGNED 4. NOT ASSIGNED 5. NOT ASSIGNED 6. NOT ASSIGNED step 3 Select a Not Assigned provider field by entering the number and pressing [ENTER] or by scrolling up or down to highlight the Not Assigned provider field and pressing [ENTER]. step 4 Enter the provider’s name by pressing ‘sel’ and using the [1] to [9] keys. To select an alpha character entry either press the ‘sel’ button on the left-hand side of the screen or press the Alpha [#] key on the keyboard. A PROVIDER NAME Dr J___ sel 1 4 7 2 5 8 0 3 6 9 CLEAR Pressing the Alpha [#] key again will change from upper case to lower case and symbols. E.g. PROVIDER NAME PROVIDER NAME Dr J___ _QZ 1 sel GHI 7 PRS 4 ABC 5 JKL 8 TUV 0 \+? 2 DEF 6 MNO 9 WXY PROVIDER SETUP CLAIM TO SALE ENABLED Dr Jones___ _qz 3 CLEAR step 7 This option will enable the terminal to prompt to automatically start an EFTPOS transaction for the gap amount. Select the appropriate option for this provider. 1 sel ghi 7 prs 4 abc 5 jkl 8 tuv 0 .,” 2 def mno 9 wxy 3 6 CURRENT ENABLE PROVIDER SETUP CLEAR After entering the provider’s name press the [ENTER] key. step 5 Key the provider number for this location then press [ENTER]. This is the 8-character number supplied by Medicare or Medibank Private. If your provider number is shorter than 8 characters you will need to include leading 0’s to make up 8 characters. Alpha character entry is entered the same as for entering the provider’s name. step 6 Select the Merchant name for processing EFTPOS payments for this provider from the list presented then press [ENTER]. The list can contain up to 25 merchant details so please ensure you select the correct merchant from the list. PROVIDER NUMBER Dr J___ 123456AJ sel 1 4 7 2 5 8 0 3 6 9 CLEAR step 8 Note: If a Claim to Sale is disabled the Claim Deposit is not displayed. This option will enable the terminal to prompt for deposits (optical only). step 9 Select Item Memory enabled or disabled for this provider. Item Memory enables the terminal to recall the last amount entered for this item number. ENABLE step 10 Clear Item Memory will clear all amounts stored for item numbers. step 11 Confirmation that the item memory will be cleared if Yes was selected at Clear Item Memory. DISABLE PROVIDER SETUP ITEM MEMORY DISABLED ENABLE SELECT MERCHANT 1. A – Smith St Practice 2. B – Dr Smith 3. C – Dr Jones 4. D – Dr Brown 5. E – Dr White 6. F – Dr A. Smith CLAIM TO DEPOSIT DISABLED DISABLE PROVIDER SETUP CLEAR ITEM MEMORY? NO YES PROVIDER SETUP ITEM MEMORY WILL BE CLEARED! NO DISABLE YES 
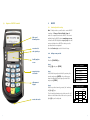
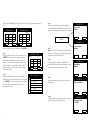
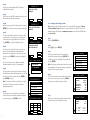
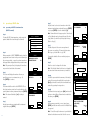
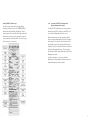
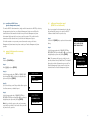
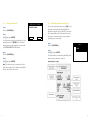
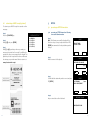
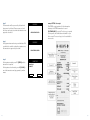
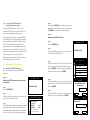
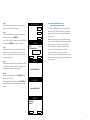
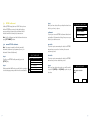
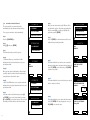
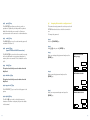
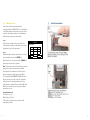
step 12 Select if you want automatic HICAPS settlement enabled for this provider. PROVIDER SETUP HICAPS AUTO SETTLE DISABLED step 13 Select if you want a HICAPS transaction listing to print when automatic settlement takes place. step 14 Key the security password for this provider then press [ENTER]. It is used to protect access to the provider table. ENABLE HICAPS SETTLE TXT LISTING DISABLED ENABLE DISABLE PROVIDER PASSWORD CLEAR SELECT PROMPT OPTION 1. CLINICAL CODE 3. NO PROMPT ENTER PROVIDER TYPE Note: This option should be used when the servicing provider is not the payee provider for Medicare Easyclaim transactions. 1. General Practice 2. optometrical 3. spec/ah/dent 4. diagnostic 5. Pathology 6. Not Applicable PAYEE PROVIDER NUMBER ___ sel 1 4 7 2 5 8 0 step 1 Press the [FUNCTION] key. step 3 Select the provider that you want to change by entering the number and pressing [ENTER] or by scrolling up or down to highlight the provider and pressing [ENTER]. Note: The password that was keyed when the provider was originally entered into the terminal is required to amend any of the provider details. 2. TOOTH NUMBER step 17 This option when completed pre-populates the Payee Provider Number when completing a claim. Use the 0-9 keys to enter provider number and press [ENTER] or press [ENTER] to bypass. Note: To alter provider details you will need to contact HICAPS in writing. A ‘Change of Practice Details’ form will need to be completed and sent to HICAPS. This form is available from the HICAPS website www.hicaps.com.au or from the HICAPS Help Desk on 1300 650 852. step 2 Enter [5] [4] and press [ENTER]. PROVIDER PASSWORD <NO PASSWORD SET> If you do not want to process Medicare Australia Easyclaim transaction section 5. Not applicable. step 18 The provider has now been added, a confirmation receipt will be printed and the terminal will display a provider summary, press [ENTER] to finish. 2.1.2 changing and deleting providers PROVIDER SETUP step 15 This option will tell the terminal to prompt for either a clinical code or tooth number, or no prompt at all. Select whichever is appropriate for this provider, or press [ENTER] to accept the highlighted option. step 16 This option lets you select the type of provider you are for processing Medicare Australia Easyclaim transactions. Select whichever is appropriate for this provider, or press [ENTER] to accept the highlighted option. DISABLE 3 6 9 step 4 The Provider summary screen will be shown, use the down arrow to go to page 2 and press [CLEAR] to enable you to modify the provider’s details. step 5 Once you have entered the modify provider function follow the steps used for adding a provider. SELECT PROVIDER 1. Dr Smith 2. NOT ASSIGNED 3. NOT ASSIGNED 4. NOT ASSIGNED 5. NOT ASSIGNED 6. NOT ASSIGNED A PROVIDER SUMMARY PROV PROV NUM MID CLAIM TO SALE CLAIM DEPOSIT ITEM MEMORY AUTO SETTLE Dr Smith 123456AJ Dr Smith ENA DIS DIS ENA PROVIDER SUMMARY SETTLE TXT LIST PASSWORD PROMPT Press Press Press REPORTS CLEAR ENTER DIS DIS None to Print to Modify To Finish CLEAR 2.2 processing a HICAPS claim step 6 Key the clinical code or tooth number on which the treatment supplied was performed then press [ENTER] or just press [ENTER] to use the default of [00]. 2.2.1processing a HICAPS claim transaction (HICAPS terminal) step 1 To start a HICAPS Claim transaction, simply swipe the patient’s Health Fund card through the terminal. step 2 When prompted to SELECT PROVIDER simply select the appropriate screen button for the provider claiming for the services provided, or press the relevant number on the keypad that is displayed beside the provider’s name. 1. A – Smith St Practice 2. B – Dr Smith 3. C – Dr Jones 4. D – Dr Brown 5. E – Dr White 6. F – Dr A. Smith step 3 The screen will display the number of items you are able to process in one transaction, e.g. 16. Press [ENTER] to continue. step 4 The terminal will then ask for the PATIENT ID. This is the 2-digit number printed on the card relating to the specific patient receiving treatment then press [ENTER]. Note: This value will default to [01] if nothing is entered. step 5 Key the item number associated with the treatment supplied then press [ENTER]. step 7 The date this part of the service was performed. dd, mmm = current date. To change the date enter DD = day, e.g. 26 and MM = 12, e.g. DEC. CLAIM Note: This prompt will only be displayed if more than one provider is loaded into the terminal. TOOTH NUMBER Note: Terminal Provider Setup prompt for Clinical code or Tooth Number may be changed through Provider Setup (Refer 2.1) and will only be displayed if setup (Refer to Step 15). SELECT PROVIDER MAXIMUM ALLOWED ITEM ENTRIES ARE CLAIM 01 CLEAR CLAIM DATE SERVICE dd, mmm DDMM To accept the default of the current date just press [ENTER]. XX CLEAR CLAIM step 8 Enter the cost to be charged for this item. ITEM COST Note: This field will default to the last cost charged for the same item if item amount memory is enabled. ENTER CLAIM PATIENT ID 01 step 9a You will be presented with a summary of the item(s) entered. By pressing the middle left screen button [Mod] you are able to modify the item that has been entered by repeating the steps above. CLEAR step 9b To add another item, simply press [Add] and enter the options as above. Once all items have been added to the claim, press [ENTER]. CLAIM ITEM NUMBER CLEAR step 10 If the summary presented is correct, simply press [ENTER] and the claim will be sent to the Health Fund for approval. Note: To scroll through the items use top and bottom buttons beside the arrows at the left of the screen. $0.00 ENTER CLAIM – PATIENT ID 01 <01/01> ITEM # 0001 DATE SERVICE ITEM COST Press REPORTS 26.MAR $52.52 to Print ADD CLAIM SEND TO HEALTH FUND? 01 RECORD(S) TOTAL $52.52 Dr Smith 01 NO YES example HICAPS claim receipt The claim receipt contains all of the information relating to the claim. A second [CUSTOMER COPY] is printed without the statutory declaration. The first copy is required to be signed by the Fund member and retained for your office records and may be required to be produced by the Health Fund. The second copy is for the customer’s own records. 2.2.2processing a HICAPS claim transaction (practice management system) To start a HICAPS Claim Transaction, simply send the transaction to HICAPS by clicking on the HICAPS icon on your Practice Management System screen. When the terminal receives the transaction details from your Practice Management System, the terminal will prompt for the customer card to be swiped. The terminal will recognise the card type that should be swiped by the type of transaction that is received from the Practice Management System. The results from the transaction will be returned directly to the Practice Management System. For further assistance on processing a Practice Management System transaction please contact your Practice Management System provider. 2.3 cancelling a HICAPS claim step 1 Press the [REFUNDS] key. REFUND / CANCEL 2.3.1 cancelling a HICAPS claim (HICAPS terminal) There are two options for cancelling HICAPS claim transactions, but for each option a transaction can only be cancelled on the same day that it was originally processed. OPTION 1 Transaction was processed by the same terminal. step 1 Press the [REFUNDS] key. step 2 The terminal will then prompt you to swipe/insert the card. Swipe the patient’s Health Fund card. step 3 The terminal will then display the transaction(s) processed for your patient for the current day. If there is more than one transaction for that patient all transactions can be reviewed by using the up/down arrow buttons. step 4 Select the transaction you want to cancel and press the [ENTER] key. step 5 You will then be asked to confirm the cancel by pressing either the NO [CLEAR] or YES [ENTER] key. Alternatively you can use the option selection button beside the [NO] and [YES] prompts on the screen. Note: The terminal will produce two copies of the cancellation receipt. The first copy must be signed by the Fund member and retained for your records, the second copy is for the member’s own records. OPTION 2 Transaction was processed by a different terminal. Note: The transaction must still have been processed in the same day. REFUND / CANCEL SWIPE/INSERT CARD S $25.88 $47.50 Press ENTER to CANCEL TXN SEND CANCEL ? BENEFIT PROVIDER # RRN # NO step 3 The terminal will prompt for you to select a provider by entering the provider number or scrolling down and highlighting the provider and pressing [ENTER]. step 4 The terminal will then prompt you for the 12-digit Receipt Reference Number of the original claim. Key the RRN and press [ENTER]. CANCEL TXN? RRN:123456 NAB Dr Smith 26/03/085 14:15 903600-802 BENEFIT CLAIM step 2 The terminal will then prompt you to swipe/insert the card. Swipe the patient’s Health Fund card. $25.88 1234567A 000000123456 YES step 5 The terminal will then prompt you for the Benefit amount approved by the Health Fund on the original claim. Key the amount and press [ENTER]. step 6 You will then be asked to confirm the cancel by pressing either the NO [CLEAR] or YES [ENTER] key. Alternatively you can select your response using the corresponding keys on the side of the display next to the [NO] or [YES] prompts on the screen. SWIPE/INSERT CARD SELECT PROVIDER 1. A – Smith St Practice 2. B – Dr Smith 3. C – Dr Jones 4. D – Dr Brown 5. E – Dr White 6. F – Dr A. Smith RRN NUMBER 000000123456 CLEAR CANCEL TXN ? ENTER BENEFIT AMOUNT $25.88 Note: The terminal will produce two copies of the cancellation receipt. The first copy must be signed by the Fund member and retained for your records, the second copy is for the member’s own records. CLEAR SEND CANCEL ? BENEFIT PROVIDER # RRN # NO $25.88 1234567A 000000123456 YES 2.3.2cancelling a HICAPS claim (practice management system) 2.5settlement transaction report (HICAPS forced settlement) To cancel a HICAPS claim transaction, simply send the transaction to HICAPS by selecting the appropriate option from your Practice Management System screen. When the terminal receives the transaction details from your Practice Management System the terminal will prompt for the customer card to be swiped. The results from the transaction will be returned directly to the Practice Management System. Prior to processing the first transaction of each day, the terminal will prompt you to print the HICAPS Settlement details from the previous day. For further assistance on processing a cancel transaction using your Practice Management System transaction please contact your Practice Management System provider. 2.4manual daily transaction summary (HICAPS totals) step 1 Press the [FUNCTION] key. step 2 Select the appropriate day, SUMMARY LISTING or DETAILED LISTING by entering [1] or [2] or scrolling to highlighting the option and pressing [ENTER]. Note: The summary will report on totals for each provider, broken down by Health Fund. The detailed listing also includes all transactions processed. For Practice Management System users the totals are obtained from the Practice Management System. step 2 Enter [5] [1] and press [ENTER]. step 3a Select the appropriate day, TODAY or PREVIOUS DAY by entering [1] or [2] or scrolling to highlighting the option and pressing [ENTER]. step 1 Select the YES [ENTER] key to produce the transaction listing. PRINT TXN LISTING HOST FORCED SETTLED PRINT TRANSACTIONS? NO YES PRINT TXN LISTING 1. SUMMARY LISTING 2. DETAILED LISTING HICAPS TOTALS 1. TOTAL 2. PREVIOUS DAY step 3b If you select today you will be provided with an option for either summary or detailed report. step 4 Select the appropriate day, SUMMARY LISTING or DETAILED LISTING by entering [1] or [2] or scrolling to highlighting the option and pressing [ENTER]. Note: If you select the previous day, only a summary report will be provided. In both cases the reports will be printed out by provider. HICAPS TOTALS 1. SUMMARY LISTING 2. DETAILED LISTING 2.6 ordering terminal rolls step 1 Press the [FUNCTION] key. step 2 Enter [7] and press [ENTER]. To confirm that you wish to order stationery for your terminal press the YES [ENTER] key. The terminal will now print a receipt confirming your order with a STATIONERY ORDER PLACED message. step 3 Press the [FUNCTION] Key. step 4 Enter [5] and press [ENTER]. MERCHANT FUNCTION STATIONERY ORDER? NO YES 2.7 performing terminal sign on/logon If you receive a transaction response code [LR] (Logon Required) or when advised by the Help Desk, the terminal is required to logon to HICAPS. In most cases this is automatically done by the terminal, however, there may be some times when you are required to manually sign on to the switch. step 1 Press the [FUNCTION] key. step 2 Enter [5] and press [ENTER]. HOSTS 1. NAB The terminal will now communicate with HICAPS and print a receipt confirming your sign on. example sign on receipt Note: This will send a sign on message to the host and it must be approved. The stationery will take five business days for the rolls to arrive. 2.8 customising a HICAPS receipt (optional) To customise your HICAPS receipt for seasonal or other messages. step 1 Press the [FUNCTION] key. step 2 Enter [2] [6] and press [ENTER]. step 3 Enter [0] to [4] depending on where you want your message to be printed on the receipt. You will then be prompted to enter your message using the keypad. The alpha entry for the receipt text is the same as that used for entering your provider names. Refer to section 2.1.1. ENTER RECEIPT TEXT 0HEADER 1 FOOTER 2 FOOTER 3 FOOTER 4 FOOTER 4 1 2 3 4 3. EFTPOS 3.1 processing an EFTPOS transaction 3.1.1processing an EFTPOS transaction following a successful claim transaction step 1 Note: The following screen will be displayed if the Provider is set up to accept a deposit and also if YES [ENTER] was answered to the deposit taken question at Step 1. CLAIM DEPOSIT TAKEN FOR THIS CLAIM? NO step 2 Enter the amount of the deposit. YES CLAIM ENTER DEPOSIT AMOUNT example customised receipt. $10.50 ENTER step 3 Confirm that the outstanding value is correct and press YES [ENTER]. CLAIM OUTSTANDING $42.02 PAY BY CREDIT/DEBIT? NO step 4 Swipe or insert the credit or debit card. YES REFUND / CANCEL SWIPE/INSERT CARD step 5 The cardholder is to select their account using the buttons beside each account option. SELECT ACCOUNT CHEQUE SAVINGS CREDIT step 6 The terminal will then prompt for the cardholder to enter their PIN and press [ENTER]. For a Credit or Charge card transaction the cardholder can just press [ENTER] if they don’t have a PIN. PINPAD TOTAL KEY PIN AND ENTER $42.02 3.1.2 processing an EFTPOS transaction step 1 To start an EFTPOS Sale transaction, simply swipe the patient’s EFTPOS card through the terminal. This could be Credit: Visa, MasterCard, Charge: Amex, Diners or JCB, or Debit: Cheque or Savings as per your EFTPOS agreement. step 2 If the terminal has MMF active, you will then be prompted to select the appropriate provider from the merchant list. CLEAR step 7 The transaction will be processed by the bank and be approved or declined. Please ensure you check the screen and receipt to confirm the transaction was approved or declined. step 3 Enter the amount of the sale. RESPONSE SELECT MERCHANT 1. A – Smith St Practice 2. B – Dr Smith 3. C – Dr Jones 4. D – Dr Brown 5. E – Dr White 6. F – Dr A. Smith VISA PURCHASE SALE AMOUNT $25.50 <RESPONSE MESSAGE> ENTER step 8 If the payment was made using a card without a PIN you will also be asked to confirm the signature once the transaction is approved by the bank. step 4 The cardholder is to select their account using the buttons beside each account option. RESPONSE SELECT ACCOUNT CHEQUE SIGNATURE REQUIRED SAVINGS CREDIT step 9 If the signature matches press YES [ENTER] and the transaction is complete. If the signature doesn’t match, press NO [CLEAR] to cancel the transaction and get payment by another means. SIGNATURE CORRECT? NO step 5 The terminal will then prompt for the cardholder to enter their PIN and press [ENTER]. SIGNATURE For a Credit or Charge card transaction the cardholder can just press [ENTER] if they don’t have a PIN. YES PINPAD TOTAL KEY PIN AND ENTER $25.50 CLEAR step 6 The transaction will be processed by the bank and be approved or declined. Please ensure you check the screen and receipt to confirm the transaction was approved or declined. example EFTPOS sale receipt RESPONSE <RESPONSE MESSAGE> step 7 If the payment was made using a card without a PIN you will also be asked to confirm the signature once the transaction is approved by the bank. The EFTPOS receipt contains all of the information relating to the EFTPOS transaction. A second [CUSTOMER COPY] is printed. The first copy is required to be signed by the cardholder and retained for your office records. The second copy is for the cardholder’s own records. RESPONSE SIGNATURE REQUIRED step 8 If the signature matches press YES [ENTER] and the transaction is complete. If the signature doesn’t match, press NO [CLEAR] to cancel the transaction and get payment by another means. SIGNATURE SIGNATURE CORRECT? NO YES step 4 Pressing the NO [CLEAR] to enter a different value for the Refund for this cardholder (refer to option 2 below or the YES [ENTER] key to Refund the selected transaction. 3.1.3processing an EFTPOS transaction (practice management system) To start an EFTPOS transaction, simply send the transaction to HICAPS by clicking on the HICAPS icon on your Practice Management System screen. option 2 Refunding any EFTPOS Transaction The terminal will prompt for the customer’s EFTPOS (Credit or Debit) card to be swiped. It will then prompt for the remaining input: Provider (for MMF), Account, PIN, etc. The results from the transaction will be returned directly to the Practice Management System and a receipt for your records will be produced for the customer to sign, together with a copy for the customer. step 1 Press the [REFUNDS] key. step 2 The terminal will then prompt you to swipe/insert the card. Swipe the Cardholder’s card. For further assistance on processing a Practice Management System transaction please contact your Practice Management System provider. step 3 The terminal will prompt for you to select a Merchant by entering the number beside the Merchant’s name and press [ENTER] or scrolling down and highlighting the Merchant name and pressing [ENTER]. 3.2 refunding an EFTPOS transaction 3.2.1 refunding an EFTPOS transaction There are two options for refunding an EFTPOS transaction. option 1 Refunding an EFTPOS transaction processed by the same terminal step 1 Press the [REFUNDS] key. step 2 The terminal will then prompt you to swipe/insert the card. Swipe the cardholder’s card. step 3 The terminal will then display the transaction(s) processed by this cardholder for the current day. If there is more than one transaction for that cardholder all transactions can be reviewed by using the up/down arrow buttons. REFUND / CANCEL SWIPE/INSERT CARD CANCEL TXN? RRN:123456 Merchant Name 531539-870 CASHOUT PURCHASE S $25.88 $47.50 Press CLEAR to REFUND Press ENTER to CANCEL TXN step 4 The terminal will then prompt you to enter the refund password for the selected merchant. Key the Password and press [ENTER]. REFUND / CANCEL SWIPE/INSERT CARD SELECT MERCHANT 1. A – Smith St Practice 2. B – Dr Smith 3. C – Dr Jones 4. D – Dr Brown 5. E – Dr White 6. F – Dr A. Smith REFUND ENTER MERCHANT PSWD “Merchant Name” step 5 The terminal will then prompt you for the amount for the Refund. Key the amount and press [ENTER]. CLEAR “Card Type” REFUND SALE AMOUNT $0.00 CLEAR step 6 The cardholder is to select their account using the buttons beside each account option. SELECT ACCOUNT CHEQUE step 7 The terminal will then prompt for the cardholder to enter their PIN and press [ENTER]. SAVINGS CREDIT For a Credit or Charge card transaction the cardholder can just press [ENTER] if they don’t have a PIN. step 8 The transaction will be processed by the bank and be approved or declined. Please ensure you check the screen and receipt to confirm the transaction was approved or declined. step 9 If the payment was made using a card without a PIN you will also be asked to confirm the signature once the transaction is approved by the bank. PINPAD TOTAL KEY PIN AND ENTER CLEAR RESPONSE To refund an EFTPOS transaction, simply send the transaction to the HICAPS terminal by selecting the appropriate option from your Practice Management System screen. When the terminal receives the transaction details from your Practice Management System the terminal will prompt for the customer card to be swiped. The results from the transaction will be returned directly to the Practice Management System. For further assistance on processing a cancel transaction using your Practice Management System transaction please contact your Practice Management System provider. <RESPONSE MESSAGE> step 10 If the signature matches press YES [ENTER] and the transaction is complete. If the signature doesn’t match, press NO [CLEAR] to cancel the transaction and get payment by another means. $25.50 3.2.2 refund an EFTPOS transaction (practice management system) RESPONSE SIGNATURE REQUIRED SIGNATURE SIGNATURE CORRECT? NO YES 3.3 EFTPOS settlement step 3 Once you have selected the provider/merchant from the list, you have 3 options. Settling EFTPOS simply advises HICAPS that you have finished EFTPOS processing for that day. Anything processed after performing the settlement will be included with the following day’s transactions. 3.3.1 manual EFTPOS settlement 2. PRE-SETTLEMENT 3. LAST SETTLEMENT pre-settle To print a report summarising the totals for EFTPOS transactions processed so far during the current settlement period. Note: You cannot manually settle the terminal if Automatic Settlement is programmed (as in 3.2.2 Automatic Terminal Settlement). step 2 If the terminal has MMF active, you will then be prompted to select the appropriate provider from the merchant list. 1. SETTLEMENT settlement To print your current EFTPOS settlement details and optionally a full transaction listing, then process your totals to your bank account. Note: For Pre Settlement and Last Settlement functions press [SETTLEMENT] button. step 1 To settle your EFTPOS facility manually, press the [SETTLE] key. SETTLEMENT TXN LISTING SELECT MERCHANT 1. A – Smith St Practice 2. B – Dr Smith 3. C – Dr Jones 4. D – Dr Brown 5. E – Dr White 6. F – Dr A. Smith last settle To print a report summarising the totals for EFTPOS transactions previous settlement period. step 4 Once you have selected an option you will be asked to press YES [ENTER] or NO [CLEAR] to print out your selection. MERCHANT NAME Do <option selected> NAB? NO YES 3.3.2 automatic terminal settlement EFTPOS SETUP This option enables your terminal to settle automatically at a pre-determined time each day. 1. SETTLEMENT To set up your terminal to settle automatically: 2. AUTO SETTLE NAB step 1 Press the [FUNCTION] key. step 2 Enter [5] [6] and press [ENTER]. step 3 The terminal provides you with 3 options: step 3a 1. Settlement allows you to enable or disable settlement for all providers/merchants or by each provider/merchant. step 3a.i Once you have selected settlement for all merchants you will be asked to enable or disable settlement by using the buttons beside each option. step 3b 2. Auto Settle NAB allows you to set up the automatic settlement time by all providers/merchants or by each provider/merchant. step 4 Select auto settle for all merchants by pressing [1] and [ENTER] or for a selected merchant by pressing [2] and [ENTER]. If you selected option 2 for a selected merchant you will be asked to select the merchant. step 5 Once you have selected auto settle NAB you will be provided with 3 options. Select the appropriate Auto settle by entering [1] or scrolling to highlight the option and pressing [ENTER]. 3. MERCHANT PASSWORD SETTLEMENT NAB AUTO SETTLE NAB 1. AUTO SETTLE 2. AUTO LAST SETTLE 3. CLEAR AUTO SETTINGS step 6 Press YES [ENTER] to confirm that auto settle is to be enabled for all providers/merchants. AUTO SETTLE NAB ENABLED 1. ALL MERCHANT 2. SELECT MERCHANT ENABLE step 7 The terminal will ask if you wish to print a complete transaction listing when each auto-settle is performed. Select YES [ENTER] to print the listing, or NO [CLEAR] to produce only totals. SETTLEMENT NAB ENABLED ENABLE DISABLE EFTPOS SETUP 1. SETTLEMENT AUTO SETTLE PRINT TXN IN SETTLE? DISABLED ENABLE step 8 The terminal will ask you to enter the time you wish to settle in 24 hour clock time. DISABLE AUTO SETTLE ENTER SETTLEMENT TIME <HHMM> 0000 2. AUTO SETTLE NAB 2055 3. MERCHANT PASSWORD CLEAR AUTO SETTLE NAB 1. ALL MERCHANT 2. SELECT MERCHANT step 9 The terminal will ask you to confirm the time entered. Select YES [ENTER] if the time displayed is correct, or NO [CLEAR] to re-enter the time. AUTO SETTLE START AUTO SETTLEMENT AT 08.55PM? NO DISABLE YES step 10 You will be asked to confirm the number of times the terminal will retry to perform the settlement. To accept the default of 0 attempts, simply press [ENTER]. You may increase the number of retries to 2 or 3. Simply key [2] or [3] and press [ENTER]. AUTO SETTLE AUTO SETTLE RETRY 0 <MAXIMUM RETRY IS 3> 2 CLEAR 3.3.3 merchant password 4. terminal functions 4.1 the screensaver (idle screens) The HICAPS T4200 has a built in screensaver function. While the terminal is not in use it will display the following screens. The screensaver will scroll between these screens until you start to use the terminal, either: > from your integrated Practice Management System, EFTPOS SETUP The terminal is able to have a known password, a password that is set up when your terminal is installed or a scrolling password. 1. SETTLEMENT If you know your password you can change your password using this option. 3. MERCHANT PASSWORD > by swiping a card, > by using any key including the clear key. 2. AUTO SETTLE NAB If you don’t know your password you will need to contact the HICAPS Helpdesk on 1300 650 852 and they will tell you how to change your password. 3.3.4 host forced settlement The terminal automatically settles at 21:30EST each day. The automatic settlement time can optionally be moved. See Automatic Terminal Settlement 3.2.2. If the terminal is not settled then it will be automatically settled by the HICAPS switch at the relevant time. Note: If the HICAPS switch settles then no receipt is printed. To obtain Totals please use Last Settle Enquiry, refer to 4.2.3. Note: All times are Melbourne/Sydney times. 4.2 main menu The Main Menu is accessed by pressing the bottom right hand button beside the screen. 4.2.1 logon The Logon option is used to logon to the NAB/HICAPS host, log on by terminal, by merchant or by provider. MAIN MENU 1. LOGIN 2. BATCH 3. TERMINAL 4. SETUP 5. TESTS 6. REPRINT LOGON 1. LOGON HOST 2. PARAM TID 3. PARAM MERCHANT 4. PARAM PROVIDER 4.2.4 setup HICAPS use only. 4.2.5 tests Perform tests on the terminals: HOST: HICAPS transactions host, EFTPOS transactions, and Loads & Initialisations host. Only to be used on advice from the HICAPS Help Desk. DISPLAY: to test the terminal’s display. 4.2.2 batch The Batch option is used to perform settlement, review and reprint transactions in the current batch. For Settlement see the Settlement section. Review – used to review transactions and reprint a receipt. BATCH 1. SETTLEMENT 2. REVIEW 3. TOTAL 4. FIND View – is used to view the terminal and PIN pad software versions. TESTS 1. HOST 2. DISPLAY 3. KEYBOARD 4. PRINTER 5. CARD READ 6. PINPAD Printer: to test the printer. Card reader: to test the terminal’s card reader or any card. PINPAD: to confirm the PIN pad is functioning. 4.2.6 reprint The Reprint option is used to either reprint the receipt for the last transaction or reprint any transaction by entering the invoice number, which is the last 6 digits of the RRN. Find – used to find a previous transaction using the RRN and enables you to reprint a receipt. Terminal options: 1. TERMINAL 2. PRINTER 3. COMMS 4. PASSWORD 5. TIPS Keyboard: to test the keypad. Total – used to display EFTPOS totals. 4.2.3 terminal SETUP REPRINT 1. LAST 2. INVOICE TERMINAL 1. VIEW 2. LOAD TABLES 3. TRAINING Load Tables – is used to load configuration information from the NAB/HICAPS host. Training – is used to put the terminal into training for host transactions. 4.3 transaction menu The following menu lists the available transactions for the HICAPS T4200. 4.3.1 balance/quote The Balance Inquiry option can be used to request an account balance, but only for NAB debit cardholders. The Quote option allows a provider to provide a quotation to a patient by checking with the patient’s Health Fund what they are covered for. Entering a quote transaction is the same as for a claim transaction. TRANSACTION 1. BALANCE / QUOTE 2. REFUND / CANCEL 3. PRE-AUTH 4. COMPLETION 5. CASHOUT 6. SALE 4.3.5 cash out The Cash Out option allows you to provide cash to your customers. The terminal will also prompt for cash out or tips if you have these options configured in the terminal. If you wish to ignore the cash out or tip option, press ENTER to bypass those steps. Cash out is available on cheque and savings accounts only. 4.3.6 sale The Sale option is explained in section 3.1 Note: Refer to HICAPS website www.hicaps.com.au for Health Funds participating in the quotations function. 4.3.2 refund/cancel The Refund/Cancel option is used to either reverse an EFTPOS transaction or cancel a HICAPS Claim transaction (refer to section 2.3.1). 4.3.3 pre-auth The Pre-auth option is available for credit cards only. A pre-authorisation is a non-value transaction. In order to process the value portion of a pre-authorisation, refer to the completion option below. 4.3.4 completion The Completion option is used to process the value transaction relating to a pre-authorisation already obtained. A completion must be performed within four business days of obtaining a pre-authorisation, and is only available for CREDIT cards. 4.4 terminal function keys To access functions on the keypad, simply press the [FUNCTION] key followed by the function you want to use, e.g. REPORT [1]. 4.4.1report [1] key (print EFTPOS and HICAPS reports) The REPORT [1] key allows you to print a number of different standard reports from the terminal. audit Produces an audit trail of transactions processed through the terminal. The details for each transaction include: Transaction Type: Claim, Cancel, Sale etc. Transaction Date and Time (format dd/mm/yy hh:mm). Transaction amount: in the case of a claim, the total amount requested. shift As well as allowing the running shift total to be reset, you can produce a summary report of EFTPOS transactions processed since the last shift total reset was performed. reprint This is used to reprint the receipt for an EFTPOS or HICAPS transaction processed in the current batch. By using [LAST] for the previous transaction or [INVOICE] for any other receipt in the batch using the invoice number (last six digits of the RRN). provider This is used to print a summary of the provider’s set up. 4.4.2 setup [2] key (refer help desk) This option should only be used on advice from the Help Desk. Card Type: HICAPS, VISA etc. 4.4.3 reset [3] key Authorisation Number. The RESET [3] key is used to re-start the terminal. Invoice Number: used to reprint an EFTPOS transaction receipt. 4.4.4 lock [4] key Card Number: the full card number used for the transaction. Transaction Code: S/K – the card was Swiped or Keyed NO – the transaction was either Approved or processed offline x – the transaction has been sent to the acquiring bank, if the [X] is absent the transaction has been processed in [fallback] and will be passed to the host with the next transaction. The LOCK [4] key is used to lock and unlock your HICAPS terminal to provide added security. When active the Lock option prevents all use of the terminal until the security password is keyed in. Once the terminal is locked it will be unusable until your 4-digit terminal security password is keyed followed by [ENTER]. Note: MMF – The provider password is also your refund password. 4.4.5 sign on [5] key The SIGN ON [5] key is used to logon to the NAB/ HICAPS host. 4.4.6 quote [6] key 4.5 The QUOTE [6] key allows a provider to provide a quotation to a patient by checking with the patients Health Fund what they are covered for. Entering a quote transaction is the same as for a claim transaction. The terminal security password is used to process both EFTPOS Refunds and to also unlock the terminal for use. 4.4.7 order [7] key The ORDER [7] key is used to order terminal paper rolls as detailed in section 2.6. 4.4.8reprint [8] key (reprint EFTPOS and HICAPS transactions) The REPRINT [8] key is used to either reprint the receipt for the last transaction or reprint any transaction by entering the invoice number. This is detailed in section 4.2.6. changing the terminal security password To change the password: step 1 Press the [FUNCTION] key. step 2 Enter [9] [0] and press the [ENTER] key. step 3 Enter your existing 4-digit password and press the [ENTER] key. ENTER OLD PASSWORD MID: 33123433 4.4.9 load [9] key This option should only be used on advice from the Help Desk. 4.4.10 initialise [0] key CLEAR step 4 Enter a new 4-digit password and press the [ENTER] key. ENTER NEW PASSWORD This option should only be used on advice from the Help Desk. 4.4.11 paper feed [*] key The PAPER FEED [*] key is used to feed the paper in the printer. 4.4.12 alpha [#] key The ALPHA [#] key is used to select alpha numeric characters used when configuring the provider details in the terminal. CLEAR step 5 Enter your new password again and press the [ENTER] key. NEW PASSWORD AGAIN CLEAR 4.6 5. fallback procedure terminal connections In the event of the terminal being unable to communicate with the NAB/HICAPS host, it will default to a fallback situation. Amounts above your floor limit require an authorisation number to be obtained and entered when requested into the terminal. step 1 If a transaction is unable to be processed due to a communication problem, the following screen may be displayed at the end of the transaction. . step 2 Enter authorisation number* (refer below for contact phone numbers) and press the [ENTER] key. FALLBACK ___ ENTER AUTH CODE sel 1 4 7 2 5 8 0 3 6 9 CLEAR If authorisation is not received, press the [CANCEL] key and request another form of payment. Note: The transaction will be stored within the terminal and passed on when communication is available. If the amount of the transaction is below your floor limit, the transaction will be approved on fallback. The receipt will detail APPROVED 08 (fallback). Please ask the customer to sign the receipt. The transaction will be stored in the terminal and passed on when communication is available. Please call the HICAPS Help Desk if your terminal processes more than 2 fallback transactions in a row. For authorisation call: Credit Cards 13 25 15 Debit Cards 1300 650 852 *Call the above contact number to obtain a valid authorisation number. 6. thermal printer The HICAPS T4200 terminal has a high speed, whisper quiet thermal printer. It must only be loaded with special thermal paper available from HICAPS, ordered either through the terminal, refer: 2.6 Ordering Terminal Rolls or by contacting the HICAPS Help Desk on 1300 650 852. Loading the T4200 Thermal Printer 7.HICAPS response codes 7.1 transaction level HICAPS response codes Code Receipt Print Out Description 00 Approved (8) Approved or completed successfully 01 Prov Not Approv (15) Provider not approved by fund 02 Mship Under Invest (19) Membership under investigation 03 Invalid Prov Nbr (16) Invalid Provider number 04 Retain Card (11) Retain card 12 Declined (8) Declined 14 Invalid Card Nbr Invalid card number (no such number) 19 No Items Entered No items entered 21 Call Help Desk – note 1 No action taken 40 Mship Not Covered Membership not covered 42 Mship Ended at DOS Membership ceased/suspended at date of service 51 Mship Unfinancial (17) HICAPS Membership unfinancial 54 Expired card (12) Expired card 56 Invalid Mship Nbr (18) Invalid Membership numbers 57 No Ancillary Cover (19) No Ancillary cover 58 Txn Not Permitted (17) Transaction not permitted to terminal 60 Provider Not Recogd (16) Provider not recognised with fund 61 Benefit Limit Excee (19) Benefit limit exceeded 69 No Benefit Payable No Benefit payable 76 Approved (8) Approved (terminal will request new key) 91 System Inoperative (17) Health Fund system currently unavailable 94 Duplicate Tax (13) Duplicate transmission 96 System Malfunction (18) System Malfunction or Invalid Message 97 Reconc Totals Reset (19) Reconciliation totals have been reset 98 MAC ERROR (19) MAC Error P0-PZ Refer Health Fund (17) – note 2 Refer to Health Fund LP Locked Provider H1 Time Out waiting for ACK from terminal IL Number of items exceeded limit H2 Maximum number of ACK Time Outs reached TP The transaction password is protected H3 Timed Out waiting for response message from terminal II Invalid max item setup H4 LRC Error in response message FL H5 Unable to send, terminal not connected n [empty] Claim initiated from Practice Management A System. (i.e. only provider in the EA field) H6 Terminal busy FC HX ActiveX Internal Error BZ Communication Error CE Communication Error ED Destination Error ield content error – (a) Non numeric field such as F patient ID, Body part number, service date and amount contain non-numeric data (i.e. anything other than accept ‘0’ to ‘9’) (b) Alpha numeric field such as item number contains symbols. (i.e. anything other than ‘A’ to ‘Z’. ‘a’ to ‘z’, ‘0’ to ‘9’ and space) EN Network Request Error Note 1: Response code for the unmatched reversal, void, cancellation) transactions. HM Hardware Error HW Hardware Error LC Unexpected loss of carrier Note 2: Response code in the range P0 – P9 and PA – PZ indicate that a transaction has been declined by the Health Fund for a specific reason. These transactions must be followed up directly with the fund. NA Transaction Type not available ND Reversal Time Out Code Receipt Print Out Description NM No sync with Modem network Failure Contact Help Desk 00 Approved (8) Transaction Approved NS Declined – Settlement required TO Time Out Error TC Cancelled by user or input time out VN Void not allowed LR Terminal Logon Required JF Journal Full IM Invalid MAC DI Duplicate Invoice TA Transaction Not Allowed NP Provider number not found 7.2 item level HICAPS response codes 01 Item No Benefit (15) Nil benefit payable on this item 02 Restricted Item (15) Nil benefit – restricted item 03 Restricted Item (15) Reduced benefit – restricted item 04 Previously Paid (15) Nil benefit – benefit previously paid 05 Limit Reached Nil benefit – limit reached 06 Limit Reached Reduced benefit – limit reached 07 Waiting Period Nil benefit – qualifying period applies 08 PreReq Ser Reqd Nil benefit – pre-requisite service required 09 Pre Existing Nil benefit – pre existing ailment 10 Item Nbr Invalid Item number invalid 11 Item Nbr Ceased Item number ceased 12 Item Not Valid Item not valid for provider 41 Refer to Health Fund Refer to fund 13 Item Not Apprvd Item not approved – not payable by HICAPS 42 System Problem System Problem 14 Max Nbr Ser Exc Service exceeds number of times permitted 50 Prov Not Appro Provider not approved by Fund (at date of service) 15 Cost Missing Cost must be entered 51 Prov Not Appro Provider not approved by Fund for this service at DOS 16 DOS Not Valid Date of service must be before today P0-PZ Refer to Fund Refer Health Fund – note 1 17 DOS too Old Date of service too old 18 Body Part Reqd Body part required 19 Pat Not Covered Patient not covered 20 Depd Status End Dependent status ceased 21 Invald Pat Code Invalid patient code 22 Mship Not Cover Membership not covered 23 Mship Ended DOS 24 Note 1: Item codes in the range P0 – P9 and PA – PZ indicate that an item has been declined by the Health Fund for a specific reason. These items must be followed up directly with the Fund. 8. EFTPOS error messages and corrective actions Code Short Description Details Membership ceased/suspended at date of service 00 Approved Transaction approved or completed successfully Mship Unfin DOS Membership unfinancial at date of service 04 Pick up card 25 No Ancill Cover No ancillary cover eclined. The Card Issuer has requested the card be D retained by the merchant and returned to the acquirer with the merchant vouchers 26 Item Not Coverd Not covered for this service 05 Declined The transaction has been declined 27 Duplicate Serv Duplicate service already processed 07 Pick up card 28 Excess on Serv Nil benefit – excess on service applied 29 Excess on Serv Reduced benefit – excess on service applied ick up card– The Card Issuer has requested the card be P retained by the merchant and returned to the acquirer with the merchant vouchers – special condition 30 Quote Required Nil benefit – quote required prior to service 13 Invalid Amount he amount of the transaction is invalid for the type of T transaction or merchant 14 Invalid Card ither the Card Issuer does not recognise the card or E the card number is not allowed to be processed by the terminal 15 No such issuer The card issuer is not known by the terminal or switch 21 No action taken he card issuer did not process the requested T transaction 31 Issuer Not Supported he acquirer does not have an acquiring arrangement T with the issuer of this card 32 Partially Completed he transaction was not fully completed and has been T reversed 33 Expired Card he terminal has advised that the card used for the T transaction is expired or has been replaced 31 Quote Required Reduced benefit – quote required prior to service 32 Exceeds Quote Nil benefit – claim exceeds quote 33 Exceeds Quote Reduced benefit – claim exceeds quote 34 Age Restriction Nil benefit – Age restriction applies 35 Age Restriction Reduced benefit – Age restriction applies 36 Gender Restrict Nil benefit – Gender restriction applies 37 Gender Restrict Reduced benefit – Gender restriction applies 38 Invalid Charge Nil benefit – Amount charged is invalid 39 Notional Charge Notional Charge 40 Converted Item Converted item 38 PIN Retried Exceeded he allowable number of pin retries has been exceeded T for the card 39 No Credit Account he Credit account was selected for the transaction, but T one is not attached to the card 43 Pick up card ick up card – The Card Issuer has requested the card be P retained by the merchant and returned to the acquirer with the merchant vouchers – stolen card 52 No Cheque Account he Cheque account was selected for the transaction, T but one is not attached to the card 53 No Savings Account he Savings account was selected for the transaction, T but one is not attached to the card 54 Expired Card he Card Issuer has advised that the card used for the T transaction is expired or has been replaced 55 Incorrect PIN he PIN entered by the cardholder is not valid for the T card used 58 Not Permitted his type of transaction is not permitted to be T performed at this terminal 61 Exceeds Limit he transaction amount exceeds the daily or weekly T withdrawal limit 65 Exceeds Frequency he number of transactions exceeds the number T allowed by the Card Issuer 75 PIN Retried Exceeded he allowable number of pin retries has been exceeded T for the card 76 Approved he transaction was approved but the terminal will T perform an automatic sign on for security reasons 91 System Inoperative The Switch or Card Issuer is currently not available 96 System Malfunction he Switch has experienced a serious malfunction or T the message is unable to be processed due to invalid details in one or more fields 97 Totals Reset S ettlement has been processed and the terminal totals have been reset 98 MAC Error he Switch has identified a possible security error or the T message is unable to be processed due to invalid details in one or more fields N1 Upgrade Available ransaction approved – a new version of terminal T software is available and the terminal will automatically attempt to upgrade overnight N2 PIN PAD Error ransaction declined – the PINPAD connected to the T terminal is invalid and cannot be used on the terminal N3 Upgrade Required ransaction declined – the current version of terminal T software is no longer supported, the terminal will need to be upgraded before proceeding Note: If the screen display is blank, power reset the terminal and check connections. If problem persists, call the Help Desk. If any other error messages are displayed, please call the Help Desk. 9. manual backup procedure Manual Backup Procedure involves the use of the manual imprinter and vouchers. This procedure should only be used when you are advised in the terminal error message section. Do not use manual backup procedure for any of these situations: • Declined • Faulty and damaged cards • Invalid card • Expired card • Card number error • Retain card If you have any doubt on whether you should use the manual backup procedure, please call the Help Desk. However, for many of these messages, the Help Desk cannot assist any further as the details of specific customer account details cannot be revealed. For example, if a transaction is declined due to lack of funds, this will not be advised to you. 10.merchant requirements to ensure EFTPOS transactions are valid 11. terminal functions T4200 series # Description 1 Reports: 1 Audit (print txn listings: 1 all txns. 2 eftpos only. 3 hicaps only). 2 Shift Totals (reset). 3 Reprint (last or invoice). 4 Provider (print provider table). (c) Ensure the card is not recorded on any warning bulletin. 2 Merchant Programming – HICAPS USE 3 Terminal Reset – reset & restart terminal s/w, power reset. (d) Ensure that the card imprint is legible and complete. 4 Physical Terminal Lock – (password configuration thru F90). 5 Signon 6 Balance/Quote – (balance for NAB debit accounts only). 2. For any signature based transaction verify the cardholder’s signature matches the signature on their card. If the signature does not match, or you are suspicious of the sale, contact the appropriate centre listed on the next page. 7 Stationery Order 8 Reprint: 1 Last. 2 Invoice – enter last 6 digits of RRN. 9 Program Load 3. Ensure the accuracy of any card information keyed into the PIN pad. 10 Date/Time – (Terminal Password). 4. Retain your electronic transaction receipts and manual transaction vouchers for a period of not less than 12 months. 11 Config Print 13 Journal Status – No. of Transactions 0000. Room Left 0142. 14 Pre-Auth/Completion of Pre-Auth. 15 Paper Feed 21 Review/Reprint Receipt – enter last 6 digits of RRN. 22 Batch review – Scroll thru txns and reprint any in current batch. 26 Receipt Text – Enter customer text on the receipt (Christmas greeting, Happy Easter, etc) 50 Terminal Config – HICAPS USE 51 HICAPS Totals: 1 Today. 2 Previous Day. (Hicaps midnight settlement enable/disable F54) 53 Refund/Cancel transaction. 1. For all manual transactions: (a) Always try the transactions through the PIN pad first. (b) Check the card is being used after its ‘valid from’ date and before its ‘valid to’ date. (e) Obtain authorisation for above floor limit transactions. If any of these conditions are not met, it is possible that the transaction may be invalid and the merchant account debited for the value of the disputed transaction. 54 Provider Table (including: item amount memory & hicaps settlement enable/disable) 55 Provider Lock / Unlock (password configuration thru F54; also accepts rolling p/w to unlock) 56 Eftpos Setup: 1 Settlement enable/disable. 2 Auto Settle NAB. 3 Merchant Password (known or rolling password) 59 Default Sponsor Initalise 60 Initialise 72 Reprint Last Receipt 73 Reprint Receipt – reprint any txn receipt (in current batch) using last 6 digits of RRN 76 Cashout 79 Reports: 1 Audit (print txn listings: 1 all txns. 2 eftpos only. 3 hicaps only). 2 Shift Totals (reset). 3 Reprint (1 last. 2 invoice.). 4 Provider (print provider table). 82 Printer Test: 1 Receipt. 2 Char map. 83 Display Test 84 Keyboard Test 89 Card Reader Test 90 Terminal Password Change 91 Identification – Terminal Software Version. Terminal ID. 94 Pinpad Test 99 Maintenance Options – HICAPS USE 12. Medicare Australia Easyclaim HICAPS have developed Medicare Australia’s Easyclaim solution for the HICAPS T4200 terminal. The user guide for the Easyclaim solution is a separate user guide that is available from HICAPS by contacting the HICAPS Helpdesk on 1300 650 852. HICAPS Pty Ltd ABN 11 080 688 866 67197A1008