1
+
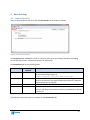
EQUELLA® Bulk Importer
User Manual
Version 4.71
June 2015 edition.
Information in this document may change without notice. EQUELLA® and its accompanying
documentation are furnished under a non-disclosure, evaluation agreement or licence agreement.
Copying, storing, transmitting, or otherwise reproducing the software or this document in any form
without written permission from Pearson Inc is strictly forbidden.
All products, other than EQUELLA®, named in this document are the property of their respective owners.
Property of:
Pearson Inc
1330 Avenue of the Americas
NY 10019 USA
2
Contents at a Glance
1
INTRODUCTION ............................................................................................................................................. 7
2
INSTALLATION AND START UP ....................................................................................................................... 9
3
QUICK START GUIDE .................................................................................................................................... 11
4
BASIC SETTINGS ........................................................................................................................................... 14
5
CSV FILE FORMAT ........................................................................................................................................ 17
6
RUNNING THE IMPORT ................................................................................................................................ 52
7
APPENDICES ................................................................................................................................................ 71
3
Table of Contents
1
INTRODUCTION ............................................................................................................................................. 7
1.1
1.2
1.3
2
KNOWLEDGE REQUIRED TO USE THE EBI ...............................................................................................................7
HOW THE EBI WORKS .......................................................................................................................................7
TECHNICAL STUFF..............................................................................................................................................8
INSTALLATION AND START UP ....................................................................................................................... 9
2.1
2.2
2.3
2.4
2.5
2.6
SYSTEM REQUIREMENTS .....................................................................................................................................9
WINDOWS® INSTALLATION AND START UP ............................................................................................................9
MACINTOSH™ INSTALLATION AND START UP........................................................................................................10
LINUX INSTALLATION AND START UP ...................................................................................................................10
COMPATIBILITY WITH PREVIOUS EQUELLA BULK IMPORTER VERSIONS.....................................................................10
UPGRADING TO THE LATEST VERSION ..................................................................................................................10
3
QUICK START GUIDE .................................................................................................................................... 11
4
BASIC SETTINGS ........................................................................................................................................... 14
4.1
4.2
4.3
4.4
4.5
5
CONNECTIONS TAB ..........................................................................................................................................14
CSV TAB .......................................................................................................................................................15
OPTIONS TAB .................................................................................................................................................16
LOG TAB .......................................................................................................................................................16
TOOLBAR .......................................................................................................................................................16
CSV FILE FORMAT ........................................................................................................................................ 17
5.1
METADATA ....................................................................................................................................................17
5.1.1 Specifying Metadata to Import ..............................................................................................................17
5.1.2 Handling Commas in Metadata .............................................................................................................19
5.1.3 Importing Metadata Attributes .............................................................................................................20
5.1.4 Specifying Multi-Value Metadata Fields ................................................................................................20
5.1.5 Special Characters and File Encoding .....................................................................................................22
5.2
ATTACHMENTS AND HYPERLINKS ........................................................................................................................23
5.2.1 Specifying Attachments to Import .........................................................................................................23
5.2.2 Specifying URLs to Import ......................................................................................................................25
5.2.3 Specifying Link Names for Attachments and URLs .................................................................................26
5.2.4 Specifying Multiple Attachments and Hyperlinks per Item ....................................................................27
5.3
ADVANCED CONTENT .......................................................................................................................................30
5.3.1 Appending XML Fragments to Metadata ..............................................................................................30
5.3.2 Repeating Sub-trees and XPath Support ................................................................................................32
5.3.3 Using Command Options .......................................................................................................................35
5.3.4 Setting Owners and Collaborators for Items ..........................................................................................40
5.3.5 Managing Attachment Thumbnails (EQUELLA 6.3 QA1 and higher only) .............................................41
5.3.6 Uploading to Multiple Collections ..........................................................................................................44
5.3.7 Attaching EQUELLA Resources ...............................................................................................................44
5.3.8 Custom Attachments .............................................................................................................................46
5.3.9 Uploading CAL Content (Australia) ........................................................................................................48
4
5.3.10
6
Attaching Files Without Metadata ....................................................................................................49
RUNNING THE IMPORT ................................................................................................................................ 52
6.1
OUTPUT ........................................................................................................................................................52
6.2
STOPPING OR PAUSING THE IMPORT ...................................................................................................................53
6.3
ERRORS .........................................................................................................................................................53
6.4
CONNECTING WITH A PROXY .............................................................................................................................54
6.5
REQUIRED EQUELLA PERMISSIONS ...................................................................................................................54
6.6
EQUELLA SCRIPTS, WORKFLOW AND DIGITAL RIGHTS MANAGEMENT .....................................................................54
6.6.1 EQUELLA Scripts .....................................................................................................................................55
6.6.2 EQUELLA Workflow ................................................................................................................................55
6.6.3 EQUELLA Digital Rights Management ...................................................................................................55
6.7
TESTING YOUR IMPORT ....................................................................................................................................55
6.8
IMPORTING SELECT ROWS FROM YOUR CSV ........................................................................................................57
6.9
UPDATING EXISTING ITEMS IN EQUELLA ............................................................................................................58
6.9.1 Updating Existing Items using Source Identifiers ...................................................................................58
6.9.2 Updating Existing Items using Target Identifiers ...................................................................................60
6.9.3 Targeting Particular Item Versions ........................................................................................................61
6.9.4 Creating New Versions ...........................................................................................................................61
6.9.5 Updating Existing Metadata without Uploading Attachments .............................................................61
6.9.6 Replacing and Appending to Metadata in Existing Items ......................................................................62
6.9.7 Appending Attachments to Existing Items .............................................................................................62
6.10
SAVING ITEMS IN DRAFT STATUS ........................................................................................................................63
6.11
SAVING YOUR SETTINGS ...................................................................................................................................63
6.12
SETTING PREFERENCES .....................................................................................................................................63
6.13
SAVING ITEM IDS OF IMPORTED ITEMS ................................................................................................................64
6.14
EXPORTING ITEMS ...........................................................................................................................................65
6.14.1
Exporting a Subset of Items ...............................................................................................................65
6.14.2
Using Identifiers to Export Individual Items .......................................................................................66
6.14.3
Conflicting Filenames.........................................................................................................................67
6.14.4
Limitations in the Export Function .....................................................................................................67
6.15
EXPERT SCRIPTING...........................................................................................................................................68
6.16
COMMAND LINE OPERATIONS ...........................................................................................................................69
6.16.1
Windows ............................................................................................................................................69
6.16.2
Macintosh ..........................................................................................................................................69
6.16.3
Linux ..................................................................................................................................................70
6.16.4
Examples............................................................................................................................................70
7
APPENDICES ................................................................................................................................................ 71
7.1
APPENDIX A: TIPS AND TROUBLESHOOTING..........................................................................................................71
7.1.1 General Tips ...........................................................................................................................................71
7.1.2 Troubleshooting .....................................................................................................................................72
7.2
APPENDIX B: EQUELLA WHERE CLAUSE SYNTAX................................................................................................78
7.2.1 Simple WHERE Clause ............................................................................................................................78
7.2.2 Check if a Schema Field Exists ................................................................................................................79
7.2.3 Combining Multiple Statements ............................................................................................................79
5
7.2.4 Full Syntax Reference .............................................................................................................................79
7.3
APPENDIX C: EXPERT SCRIPTING OBJECT MODEL...................................................................................................81
7.3.1 xml Object Reference ............................................................................................................................83
7.4
APPENDIX D: EXPERT SCRIPT EXAMPLES ..............................................................................................................85
7.4.1 Example: Mapping Ordinary CSV Headings to XPaths ...........................................................................85
7.4.2 Example: Transforming CSV Data Values ..............................................................................................86
7.4.3 Example: Including a Column of Absolute Item URLs in an Export ........................................................88
7.4.4 Example: Including a Column of Attachment UUIDs in a Receipts file ...................................................88
7.4.5 Example: Dynamically Controlling Where Attachments are Exported to ..............................................88
7.5
APPENDIX D: XPATH 1.0 SUPPORT (LIMITED) ......................................................................................................90
7.5.1 Examples of Supported XPaths ..............................................................................................................90
7.6
APPENDIX E: GLOBAL SETTINGS .........................................................................................................................92
6
1 Introduction
The EQUELLA Bulk Importer (EBI) is a program that allows you to upload content into the award winning
Pearson EQUELLA® content management system. It allows non-technical users to quickly and easily
import large amounts of content into EQUELLA. The simple steps to use it are as follows:
1. Collect your data into a spreadsheet-like text file called a comma separated view (CSV)
2. Specify in your CSV where in EQUELLA data should go and any files you wish to attach
3. Point the EBI at your CSV and your EQUELLA server
From here the EBI does all the work. Phew!
1.1 Knowledge Required to Use the EBI
The EBI is easy to use and does not require any programming or scripting skills. You should, however,
have a basic understanding of EQUELLA including familiarity with the EQUELLA Admin Console, EQUELLA
schemas and EQUELLA collections. Familiarity with Microsoft® Excel is also handy but not essential.
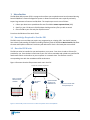
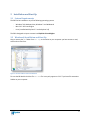
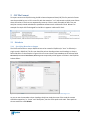
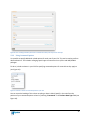
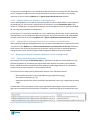
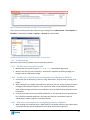
1.2 How the EBI Works
The EBI can either be installed on your workstation or on a server. From there it reads a CSV text file
provided by you. From the data in each row of your CSV it forms metadata and uploads any specified file
attachments which can be either on your computer or a network share. The EBI then creates a
corresponding item with the metadata and file attachments.
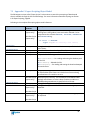
Figure 1 illustrates how the EBI processes each row in the CSV.
EQUELLA Bulk Importer
Fetch a row from
CSV and collect Step
metadata
1
Step
2
Get files to
attach
Step
3
Upload metadata
and files to an
EQUELLA item
Step
4
Fetch next row from CSV
and repeat steps 1-4
CSV file
Files
EQUELLA®
Figure 1. How the EBI processes each row of a CSV and uploads content into EQUELLA
7
For each row in the CSV the EBI creates (or updates) an item in EQUELLA. It can upload content to an
EQUELLA installation on the same computer, an installation on the local network or an EQUELLA server
accessed over the Internet.
1.3 Technical Stuff
The EBI is a Python application written in Python 2.7. It is packaged as a standalone application for
Windows and Macintosh using py2exe and py2app respectively. It can be run on platforms other than
Windows or Macintosh by installing Python 2.7.4 or higher (but not Python 3) and wxPython 2.8 and
running the source Python scripts included in the Windows package.
The EBI communicates with EQUELLA using the EQUELLA SOAP APIs over the HTTP or HTTPS internetworking protocols. The application can optionally communicate with EQUELLA via a proxy and
supports Basic and Digest proxy authentication. All network communications are achieved with the
standard Python library urllib2. Files are “POSTed” to EQUELLA in Base64-encoded “chunks”.
The EBI largely uses the EQUELLA 5.1 API which is back-supported in later versions of EQUELLA. Some
EBI functionality may leverage features that are only available in later versions of EQUELLA. Any such
features are emphasized in this document as to what versions of EQUELLA they are supported in.
The EBI is not supported as part of the core EQUELLA product and is provided “as-is”. If you wish to have
any extensions made to the program or issues resolved please contact the Pearson EQUELLA team to
engage the services of an EQUELLA consultant (www.equella.com).
8
2 Installation and Start Up
2.1 System Requirements
The EBI can be installed on any of the following operating systems.
-
Windows® XP, Windows Vista, Windows 7 and Windows 8
Mac OS™ 10.6.x and higher
Linux (installed with Python 2.7 and wxPython 2.8)
The EBI is designed to import content into EQUELLA 5.1 and higher.
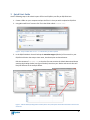
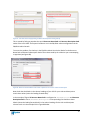
2.2 Windows® Installation and Start Up
Copy or extract the ebi folder from ebi.zip to a location on your computer you have access to read,
write and run files from.
Figure 2. The EBI installed in Microsoft Windows
To start the EBI double-click the file ebi.exe file. It may only appear as “ebi” if you have file extensions
hidden on your computer.
9
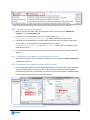
2.3 Macintosh™ Installation and Start Up
Double-click (mount) the disk image ebi.dmg. Drag the ebi package to your Applications folder (see
Figure 3).
Drag
Figure 3. Installing the EBI on Mac OS X
Start the EBI by launching it from your Applications folder.
2.4 Linux Installation and Start Up
To use the EBI on Linux Python 2.7 and wxPython 2.8 must be installed.
1. Install Python 2.7 (http://www.python.org).
2. Install wxPython 2.8 for Python 2.7 (http://wxpython.org)
3. Copy or extract the ebi folder from ebi.zip to a location where you have access to read and
write files from.
To start the EBI launch the ebi.py python file with Python.
2.5 Compatibility with Previous EQUELLA Bulk Importer Versions
EBI version 4 is backwards compatible with CSV files used with older versions of the EBI. Settings files
(*.ebi) used with versions 2 and 3 can be used with version 4.
Version 1 “state” files (e.g. state.txt) are only compatible with EBI version 1.
2.6 Upgrading to the Latest Version
After installing the EBI you can regularly check what version you are using and if there are any new
versions available on the download site. Click the About button
on the toolbar. The About screen
will tell you what version you are using, what the latest available version is and where you can download
it from. Upgrading the EBI is a simple matter of replacing the ebi folder or package with the newer
version.
10
3 Quick Start Guide
Use the following steps to do a basic import of files into EQUELLA, one file per EQUELLA item.
1. Create a folder on your computer and put the files in it that you wish to upload to EQUELLA.
2. Using Microsoft Excel® create a CSV file in that folder called content.csv.
Figure 4. Set up a folder with content.csv and the files you wish to upload
3. In the EQUELLA Admin Console lookup the metadata targets (XPaths) of the controls in your
EQUELLA collection that map to item name, item description and attachments.
Edit the contents of content.csv so that the first row contains the XPaths determined above
omitting the leading slashes (see Figure 5 below). Note that your XPaths and control titles will
likely be different to the example below.
Figure 5. Add the XPaths (leading slashes omitted) of the name, description and attachments fields to the first row
of the CSV
11
4. Add a row for each file you wish to upload and put the item title, description and filename on
each row:
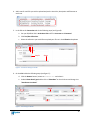
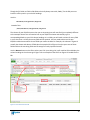
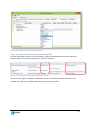
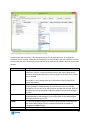
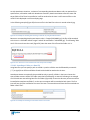
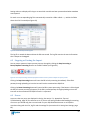
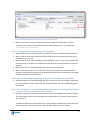
5. In the EBI on the Connection tab do the following steps (see Figure 6):
a. Put your EQUELLA URL in Institution URL and fill in Username and Password
b. Click Test/Get Collections
c. Select the collection you would like to upload your files to in the Collection drop-down
Step a
Step b
Step c
Figure 6. Connection settings in the EBI
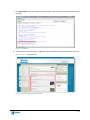
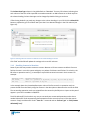
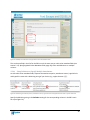
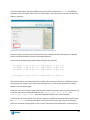
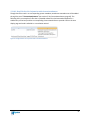
6. On the CSV tab do the following steps (see Figure 7):
d. Click the Browse button, browse to content.csv and select it
e. Under Column Data Type double-click on “Metadata” on the third row and change it to
“Attachment Locations”
Step d
Step 7
Step e
Figure 7. CSV settings in the EBI
12
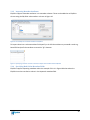
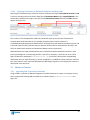
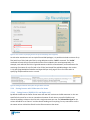
7. Click Start Import. Once processing is complete check in the log that you received successes (see
Figure 8).
Figure 8. Resulting log
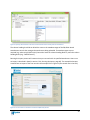
8. Check that the items are created in EQUELLA. There should be one brand new item for each row
in content.csv (see Figure 9).
Figure 9. Files successfully uploaded to EQUELLA
13
4 Basic Settings
4.1 Connections Tab
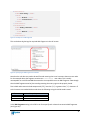
Upon starting the EBI the main form with the Connections tab will appear as follows:
Figure 10. The EBI’s Connection tab
The Connections tab and CSV tab collect the necessary settings for connecting to EQUELLA and loading
the CSV file that provides metadata and location of attachments.
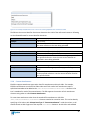
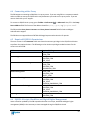
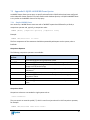
The Connections tab has the following fields:
Field
Institution URL
Required/
Optional
Required
Username
Required
Password
Collection
Required
Required
Description
The URL of the EQUELLA institution in this field. This will be the URL
of your EQUELLA login page (e.g.
http://equella.institute.edu/training).
A username of an EQUELLA user account that has privileges to create
items in the collection you specified above (see section 6.5, Required
EQUELLA Permissions, page 54).
The password of the account specified above.
An EQUELLA institution can support multiple “collections”. In this
field you will need to select which collection you would like to upload
content into.
The following command buttons are available on the Connections tab:
14
Command Button
Function
This button connects to EQUELLA and populates the Collection drop down list
with a list of collections the specified EQUELLA user can contribute to.
Test / Get Collections
Test Import
This button starts a test run of the import process (see section 6.7, Testing Your
Import, page 55). This button appears on every tab.
Start Import
This button starts the import process (see section 6, Running the Import, page
40). This button appears on every tab.
After filling in the necessary fields on the Connections tab the next steps are to prepare a CSV file with
metadata and attachment information and load it using the CSV tab (see section 4.2, CSV Tab, page 15).
4.2 CSV Tab
The CSV tab allows you to load a CSV into the EBI and specify how it should be parsed.
Figure 11. The EBI’s CSV tab
The CSV tab has the following fields:
Field
CSV
Required/
Optional
Required
Encoding
Required
Row Filter
Optional
Description
The file path to a CSV of metadata and attachment locations. See
section 5, CSV File Format, page 17) for further information about the
CSV.
This field allows you to restrict which rows in your CSV are processed.
See section 5.1.5, Special Characters and File Encoding, page 22) for
further information.
This field allows you to restrict which rows in your CSV are processed.
See section 6.8 Importing Select Rows from Your CSV,, page 57) for
further information.
The following command buttons are available on the CSV tab:
15
Command Button
Browse…
Function
This button allows you to browse your computer and select the CSV file that
provides the metadata for the source content.
Reload CSV
This button reloads the specified CSV into the EBI. It is useful if you are making
changes to the CSV whilst using the EBI.
Test Import
This button starts a test run of the import process (see section 6.7, Testing Your
Import, page 55). This button appears on every tab.
Start Import
This button starts the import process (see section 6, Running the Import, page
40). This button appears on every tab.
The requirements for the CSV file are provided in section 5, CSV File Format, page 17). Instructions on
how to run the EBI is provided in section 6, Running the Import, page 52).
4.3 Options Tab
Further settings for advanced configuration are available on the Options tab. These settings are
referenced in this document as they apply.
4.4 Log Tab
The Log tab has a rolling log of messages that display progress and status when you use the EBI to
import (or export) content. This tab has a Clear button which clear’s the log and Test Import and Start
Import buttons as with the other tabs.
For information about the log see section 6, Running the Import, page 40.
4.5 Toolbar
The following toolbar buttons are available:
Toolbar
Button
Description
Function
Open
Loads settings from a settings file (see section 6.11 Saving Your Settings, page
63).
Save
Saves current settings (see section 6.11 Saving Your Settings, page 63).
Stop
Stop processing part way through an upload run (see section 6.2 Stopping or
Pausing the Import, page 53).
Pauses and unpauses processing part way through an upload run (see section
Pause/Unpause 6.2 Stopping or Pausing the Import, page 53).
Preferences
About
Opens the Preferences dialog (see section 6.12, Setting Preferences, page 63).
Opens the About dialog to see the current version number, what the latest
version available is, where to get the latest version and license information.
16
5 CSV File Format
To import content into EQUELLA using the EBI a Comma Separated View (CSV) file of a particular format
must be provided by you. A CSV is a text file with the extension “.csv” and contains multiple rows of data
where the values in each row are separated by commas. CSVs are much like tables of data. They can
easily be created, viewed and edited in spreadsheet software such as Microsoft® Excel. Below is an
example of a simple CSV file designed for the EBI as it appears in Microsoft® Excel:
Figure 12. An example CSV file for use with the EBI (viewed in Microsoft® Excel)
5.1 Metadata
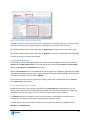
5.1.1 Specifying Metadata to Import
The CSV should contain a row per EQUELLA item to be created in EQUELLA (an “item” is effectively a
single record in EQUELLA). The first row should be column headings where each heading is a schema
field in EQUELLA. In the example in Figure 12 the first two columns map metadata to the schema fields
metadata/title and metadata/description respectively which appear as follows in the EQUELLA
Schema Editor:
Figure 13. EQUELLA Schema fields that correspond to the first two columns of the example CSV in Figure 12.
As you can see the metadata column headings should not simply be name of the node the content
should be mapped to (i.e. “name” and “description”) but the entire path to the node. These paths to
schema nodes are called XPaths.
17
Though the full XPath to fields in EQUELLA technically always start with /xml/, for the EBI you must
leave this off the path in your column headings:
Use this:
metadata/lom/general/keyword
instead of this:
/xml/metadata/lom/general/keyword
The schema of your EQUELLA server that you are importing into will most likely be completely different
to the example above. You will need to look at your EQUELLA schema and carefully type in
corresponding XPaths as your CSV column headings. It is unlikely you will need a column for every field
in your schema as it is likely that many fields will be optional. You may need to discuss with your
EQUELLA administrator which schema fields you need to include. For example, the schema in Figure 13
actually has dozens and dozens of fields but the example CSV of Figure 12 only maps to two of these
fields and thus the remaining fields are left empty for newly imported records.
Use the Browse button on the EBI to select your CSV. Upon doing this it will read the CSV and display the
column headings in the columns grid. Figure 14 is an example of the CSV from Figure 12 loaded into the
EBI.
Figure 14. CSV loaded into the EBI
18
The Column Data Type column in the grid defaults to “Metadata” for every CSV column indicating that
each column of the CSV will be imported as metadata created in an XML element at an XPath equal to
the column heading. Column data types can be changed by double clicking on each one.
If after having loaded it you make any changes to the column headings in your CSV click the Reload CSV
button to update the grid. The EBI will warn you that it has detected changes in the CSV columns (see
Figure 15).
Figure 15. Warning when CSV columns are different to the column headings in the EBI.
Click “Yes” and the EBI will update the settings to the new CSV columns.
5.1.2 Handling Commas in Metadata
Some of your data may contain commas as content. Because a CSV uses commas to delimit from one
field to the next in a row this causes ambiguity as to where a field starts and finishes. To solve this, the
EBI relies on quotation marks (") to encompass any fields that contain commas in their content. For
example:
metadata/title,
Our House,
Our Car,
metadata/description
"This is a picture of my house, my lawn, my cat and my dog"
This is a picture of my car
In the example above the /metadata/description value of the first record is in quotation marks to
prevent the EBI from mistakenly using the commas in the description to determine the end of the field.
The surrounding quotation marks are stripped from the content by the EBI prior to import so they won’t
appear in your item’s metadata in EQUELLA.
Tools like Microsoft® Excel make it very easy to surround your content with quotation marks where
needed. Microsoft® Excel automatically places quotation marks around any text in CSVs that contain
commas. Simply use Microsoft® Excel’s “Save As…” command and set “Save as Type” to “CSV (Comma
delimited)(*.csv)”.
19
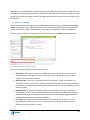
5.1.3 Importing Metadata Attributes
EQUELLA supports metadata attributes in its metadata schemas. These can be added to an EQUELLA
schema using the EQUELLA schema editor as shown in Figure 16.
Figure 16. An example of a metadata attribute in EQUELLA
To import values into a schema attribute field specify in the CSV the attribute as you would a usual tagbased field and prefix the attribute name with a “@” character.
Figure 17. Specifying a column of values in the CSV to import into attribute field in EQUELLA
5.1.4 Specifying Multi-Value Metadata Fields
EQUELLA supports repeating metadata values. An example of this is in Figure 18 below where the
EQUELLA item has two distinct values in the Keywords metadata field.
20
Figure 18. Repeating metadata fields in EQUELLA
It is possible with the EBI to import multiple values per CSV field as repeating fields in EQUELLA. This can
be achieved with either delimited values in the one cell or spreading the values across multiple columns
of the same XPath column heading (or a combination of both).
5.1.4.1 Using Delimiters to Specify Multi-Value Metadata Fields
You can delimit (i.e. separate) the values in the one field with a special character or string of your choice.
In the example in Figure 19 below a pipe character (“|”) is used to separate the values in the
metadata/keywords/keyword column.
Figure 19. An example of delimiting multi-value fields with special characters
In the Delimiter setting in the EBI’s main form specify what delimiters, if any, apply to each column.
Figure below shows how our example would be configured for the metadata/keywords/keyword
field (see Figure 20).
21
Figure 20. Specifying the delimiting strings for columns that are multi-value
Note that XML does not allow metadata attributes to be repeated. If a multi-value column of attributes
is specified in the CSV only the first value will be imported.
NOTE: When viewing multi-value metadata in an EQUELLA wizard bear in mind that only wizard controls
that support multiple values (e.g. a shuffle list control) can display all the values. Edit box controls will
only display the first value of a repeating metadata field. Also note that multi-value wizard controls that
utilize control lists (e.g. check box group, radio button group) will only display values that match values
included in the control’s control list.
5.1.4.2 Using Multiple Columns to Specify Multi-Value Metadata Fields
Instead of (or as well as) using delimiters, you can put values of the one metadata element into separate
columns by using the same XPath column heading across multiple columns (see Figure 31). The EBI will
collect the value from each column and add them all as repeating values in the item’s metadata.
Figure 21. An example of using multiple columns for a multi-value field
Notice that all columns have the same XPath column headings. You can combine delimiting multiple
values within the cells (as described in section 5.2.4.1, Using Delimiters to Specify Multiple Attachments,
page 28) as well as specifying multiple columns of the same XPath column heading.
5.1.5 Special Characters and File Encoding
The EBI supports metadata with special characters such as ©, “, ”, ¥ and è. CSVs that contain such
special characters are saved by your computer in a special standard format, or “encoding”, called
22
unicode. There is more than one form of unicode and unfortunately there is no guaranteed way to
automatically detect what form of unicode a file may be. The EBI supports two types of unicode
encoding, UTF-8 and Latin-1, and it requires you to specify which one applies to your CSV file. The
encoding can be specified in the Encoding field on the CSV tab:
Figure 22. Indicating to the EBI the encoding of your CSV file
The EBI defaults to UTF-8 which is the most common format for text files. However, Microsoft Excel®
often uses Latin-1 encoding when creating text files that contain special characters. Upon an import if
you receive an error such as 'utf8' codec can't decode byte or special characters appear
incorrectly in EQUELLA then try changing the encoding selection and re-run the import.
5.2 Attachments and Hyperlinks
5.2.1 Specifying Attachments to Import
In the example CSV in Figure 12 the fourth column specifies the location of an attachment for each
record. These are file paths and can either be relative to the folder that the CSV is in (e.g.
“attachments/FordEscape.jpg”) or absolute (e.g. “c:/My Documents/My Pictures/FordEscape.jpg”). This
column can be placed in any position in your CSV. If you are running the EBI on Linux, Unix or Macintosh
you should always use forward slashes (“/”) in your file paths. On Windows you can use either forward
or backward slashes.
The EBI needs to be instructed which column contains attachments locations. This is done by setting the
Column Data Type for the corresponding Column Heading to “Attachment Locations” (see Figure 23).
23
Figure 23. Specify which column in the CSV contains the file names and file paths of attachments
The column heading should be an XPath the same as the metadata target of the EQUELLA wizard
Attachments control that manages the attachments being uploaded. If metadata targets are not
required (e.g. when using EQUELLA 4.1) then either leave the column heading blank or prefix the column
heading with # (e.g. “#attachments”).
Running the import process will create an item per row each with its specified attachment. How to run
an import is described in detail in section 5.3.4, Running the Import, page 40). The example below was
created from an import of the first record in the example CSV in Figure 12 (the second row in the CSV):
Figure 24. An item with an attachment created in EQUELLA by the EBI
24
5.2.1.1 Changing the Base Path of Attachment Locations
Relative paths in Attachment Locations are by default relative to the folder the CSV file is in. You can,
however, specify a different “base path” for Attachment Locations to be relative to by changing the field
Use following base path for attachments on the Options tab.
Figure 25. Specifying a base path for Attachment Locations
For example, you might specify in this field an attachments base path of /Users/jimk/Documents
and then in a row in your CSV an Attachment Location of attachments/myimage.jpg. When run, the
EBI would attach the file found at /Users/jimk/Documents/attachments/myimage.jpg.
5.2.2 Specifying URLs to Import
The previous example showed how to attach a file such as an image or a document. You can also upload
references to other web pages. In the example in Figure 3 the fifth column is exactly that. The URLs must
include the “http://” or “https://” text on the front of them (e.g. “http://www.python.org” not
“www.python.org”).
As with file attachments, the column heading for this column should be the metadata target of the
EQUELLA wizard Attachments control that manages the URLs. If metadata targets are not required (e.g.
when using EQUELLA 4.1 or earlier) then either leave the column heading blank or prefix the column
heading with # (e.g. “#urls”).
To allow the EBI to identify which column has URLs in it specify a Column Data Type of “URLs” for the
corresponding column in the columns grid (see Figure 26).
25
Figure 26. Specify which column in the CSV contains URLs
5.2.3 Specifying Link Names for Attachments and URLs
The fifth and seventh columns in the CSV example in Figure 27 below demonstrate how to optionally
provide names for links to the attachments or names for the URLs.
Figure 27. Specifying link names for attachments and URLs in the CSV
The last record in Figure 27 appears in EQUELLA as shown in the example below (note that this is an
example of a single item in EQUELLA with both an attachment and a URL):
26
Figure 28. Link names for attachments and URLs displayed in EQUELLA
As with URLs and attachments paths, these columns can be positioned anywhere in the CSV. They must
be identified in the EBI’s main form as “Attachment Names” and “Hyperlink Names” for their Column
Data Types. You can provide and column heading you like or leave it blank as the EBI does not use the
column headings of Attachment Names and Hyperlink Names. Providing values in these columns is
optional for each row. If you leave some cells blank in the columns then the EBI will use the filename or
url as the link name.
Note: the maximum length allowable in EQUELLA for an attachment or hyperlink description is 1,024
characters.
5.2.4 Specifying Multiple Attachments and Hyperlinks per Item
EQUELLA supports multiple attachments and hyperlinks per item as shown in Figure 29 below.
27
Figure 29. Multiple attachments and hyperlinks in the one EQUELLA item
This can be specified in the CSV for the EBI in much the same way as multi-value metadata fields (see
section 5.1.4, Specifying Multi-Value Metadata Fields, page 20), either with delimiters or multiple
columns.
5.2.4.1 Using Delimiters to Specify Multiple Attachments
As with multi-value metadata fields, separate the attachment paths, attachment names, hyperlink urls
and hyperlink names with a delimiting string of your choice (e.g. a pipe character (“|”).
Figure 30. Delimiting attachment paths, attachment names, hyperlink urls and hyperlink names with a special character
Specify the delimiting string in the Delimiter setting for the corresponding columns in the EBI’s main
form (see Figure 31).
28
Figure 31. Specifying the delimiting strings for attachment paths, attachment names, hyperlink urls and hyperlink names
5.2.4.2 Using Multiple Columns to Specify Multiple Attachments
As with multi-value metadata fields, you can specify multiple columns each with a Column Data Type of
Attachment Location (see Figure 32) to attach multiple attachments to a single item.
Figure 32. Specifying the multiple Attachment Location column
Note that the first two columns in the example above use the same XPath column heading and the third
column has a different XPath column heading. In EQUELLA 5.0 and higher this would result in the
attachments from the first two column able to be managed with the one Attachments Control (that uses
a metadata target of /metadata/primaryattachments/attachment) and attachments from the third
column could be managed by another Attachments control (that uses a metadata target of
/metadata/secondaryattachments/attachment).
Also note that the first column includes a value with a pipe delimiter. As you can see it is possible to use
combination of delimiters and multiple columns when specifying multiple attachments.
29
5.2.4.3 Specifying Link Names for Multiple Attachments and Hyperlinks
Specifying Link and Attachment names for columns of Column Data Type of Attachment Location or URL
is done by including columns of Column Data Type of Attachment Name and/or Hyperlink Name in the
same order (read from left to right in the CSV) as the Attachment Location columns and URLs columns
appear (see Figure 33).
Figure 33. Specifying attachment names for columns of Attachment Locations and URLs
The red lines in the example above show how the EBI will match up the columns of Attachment
Locations with Attachment Names. For example, the Attachment Locations column at L
(“metadata/secondaryattachments/attachment”) will be paired up with Attachment Names column at N
(“secondary attach names”) because they are both the third occurrence (counted from the left) in the
CSV of an Attachment Locations and Attachment Names columns respectively.
Where delimiters are used, the EBI matches pairs of attachment path and attachment name in each
item by matching their corresponding position in the cell. For example, in the first item in the CSV in
Figure 33 above the attachment attachments/010.jpg (in column I) will have the corresponding
attachment name of “Squirrel Eating” (in column J) applied to it in EQUELLA as both values are second in
their list of values in their respective delimited lists. Matching of hyperlink urls and hyperlink names are
determined in the same way.
5.3 Advanced Content
5.3.1 Appending XML Fragments to Metadata
Using the EBI it is possible to append a fragment of an XML document to a node. For example, we may
wish to append the following XML metadata to an element called metadata/contributors as in
Figure 34.
30
<contributor>
<name>Sue Daley</name>
<roles>
<role>Author</role>
<role>Illustrator</role>
</roles>
</contributor>
<contributor>
<name>Bobby Andrews</name>
<roles>
<role>Editor</role>
</roles>
</contributor>
Figure 34. Example of an XML fragment
This can be done by placing the required XML fragment in the cell as text:
Figure 35. Specifying an XML fragment as metadata
Note that the xml does not need to be well-formed meaning that it can have more than one root node.
For the example above the fragment contains two contributor root nodes. This is usually
unacceptable as a well-formed XML document but is acceptable here as an XML fragment. Note though
that the XML fragment must be free-standing meaning that every tag must be properly closed.
Text in XML nodes cannot include ampersands (“&”), less-than (“<”) or greater-than (“>”) characters. If
such characters are needed inside a node then the following strings should be used instead:
Character
&
<
>
Escape Sequence
&
<
>
In the XML Fragment setting in the EBI’s main form specify each column that contains XML fragments
(see Figure 36).
31
Figure 36. Specify which columns contain XML fragments
Note that the EBI builds the metadata for the item by reading the CSV from left to right. For this reason,
an XML fragment that encompasses other metadata fields specified in the same row should be
positioned before the other encompassed metadata fields in the column order of the CSV. Otherwise
they will be overwritten by the encompassing XML fragment.
5.3.2 Repeating Sub-trees and XPath Support
The EBI supports a subset of XPath 1.0 and 2.0. The full reference is provided in section 7.5 Appendix D:
XPath 1.0 Support (Limited), page 90.
At times you may wish to form repeating sub-trees in your XML. This is the type of metadata that is
commonly created in EQUELLA wizards with a Repeater control. You may also wish to associate
attachments or additional metadata (such as attributes) to these sub-trees.
Sub-trees can be achieved with XML Fragments (see section 5.3.1 Appending XML Fragments to
Metadata, page 30) and attachments can be associated with sub-trees by using Custom Attachments
(see section 5.3.8 Custom Attachments, page 46). These features are designed to produce very complex
or inter-related XML. However, producing the CSV data that these features rely on can be challenging.
If your need is only to form simple sub-trees or relate individual elements or attachments with simple
sub-trees then an alternative, and often simpler, approach is to use XPath indexes. An example of an
XPath with an index is as follows:
metadata/contributors/contributor[2]/name
This example is referencing the name child element of the second instance of a repeating sub-tree called
contributor.
32
Among other things, you can create simple repeating sub-trees from columns of data by referencing the
repeating elements by their index. Following are some practical examples of using XPath indexes with
the EBI.
5.3.2.1 Example 1: Forming Simple Sub-trees from CSV Columns
Suppose you wish to construct the following repeating sub-tree in your item XML.
<contributors>
<contributor>
<name>Sam Doe</name>
<role>Author</role>
</contributor>
<contributor>
<name>Lee Phillips</name>
<role>Editor</role>
</contributor>
</contributors>
Rather than using XML Fragments let’s say you would prefer to specify the names and roles in separate
columns in your CSV for simplicity. Using XPath indexes the sub-trees can be formed by using the
following CSV setup.
Figure 37. Using XPath indexes to construct simple repeating sub-trees
In the above CSV, when the EBI encounters columns H and I it will first create the contributors
element (if it doesn’t already exist). It will then create the contributor, name and role elements for
the first contributor sub-tree as the XPath contributor element index in columns H and I is [1].
Subsequently, when the EBI encounters columns J and K it will create the contributor, name and
role elements for the second contributor as the XPath contributor element index in those columns
is [2].
For shallow, simple sub-trees using XPath indexes rather than XML Fragments is often the easiest
approach. However, if your sub-trees are deeper, more complex and varying then it can be unwieldy to
use XPath indexes in which case XML Fragments may be the better option.
5.3.2.2 Example 2: Associating Language Attributes to Textual Elements
EQUELLA supports a multi-language edit box control that allows a contributor to complete a field in
multiple languages. The metadata produced by this control requires an attribute for each value
indicating what language each element represents. For example:
<metadata>
<title>
<string language="en">Hello!</string>
<string language="fr">Bonjour!</string>
<string language="de">Guten tag!</string>
33
</title>
</metadata>
The above metadata could be produced using XML Fragments. However, a simpler alternative is to use
XPath indexes as in Figure 38. This allows the titles to be placed as simple text in separate columns, one
for each language.
Figure 38. Using XPath indexes to associate metadata with repeating metadata
Columns J, K and L create repeating values for metadata/title/string. They are created in the
order they appear in the CSV from left to right. Columns M, N and O add a “language” attribute to
each value. The indexes [1], [2] and [3] instruct the EBI which metadata/title/string element
to append each attribute to. The element containing “Bonjour” has an index of 2 because it is the
second metadata/title/string element created by the EBI.
Note that the repeating metadata/title/string elements could have just as easily been created
using delimiters or XML fragments. However you create the repeating elements, remember to put the
columns that create them before (i.e. to the left of) the columns that attach child metadata to them (i.e.
before columns M, N and O in this example).
5.3.2.3 Example 3: Associating Attachments to Sub-trees
Using XPath indexes it is also possible to associate attachments to repeating metadata. The following
example shows how attachments (in this case résumés) are associated with repeating metadata (in this
case a sub-tree called a “contributor”).
Figure 39. Using XPath indexes to associate attachments with repeating metadata
Columns G and H in the above example should be both set as Attachment Location columns in the EBI.
Their XPath column headings have indexes to instruct the EBI which contributor element to add each
resume child element to. Each resume child element contains a reference to the corresponding
attachment. Figure 40 shoes how the resulting metadata and attachments might appear in a
contribution wizard. Note how each “résumé” attachment is associated with a “contributor”.
34
Figure 40. The resulting metadata (viewed in a contribution wizard) from the previous example
5.3.3 Using Command Options
It is possible to specify additional upload options for each row of your CSV. This can be used to perform
advanced actions. This includes managing special types of content such as zip files and IMS/SCORM
packages.
To do so, include a column in your CSV for specifying command options for records that they apply to
(see Figure 41).
Figure 41. Include a column of command options in your CSV
You can name the heading of this column anything or leave it blank. Specify in the main form the
position of your command options column by selecting “Commands” in the Column Data Type field (see
Figure 42).
35
Figure 42. Specify the CSV column for command options in the EBI
Include the desired commands in the commands column for the applicable rows. The supported
command options and their effects are provided below. Command options are case insensitive. You can
include more than one command per row by separating the multiple commands in the one column with
commas.
Command Option
UNZIP
IMS
AUTO
SCORM
VERSION
Command Option Effect
Attempts to unzip all attachments of the record after uploading them to
EQUELLA. If any files are not valid zip files an error will occur and the entire
record will be rejected. Note that no links will appear in the item unless a list of
links is specified.
See section 5.3.3.1 Creating Item Links to Files within a Zip File, page 37 for
further information.
Uploads the last specified attachment in the record to EQUELLA as an IMS
content package or SCORM package. If any attachments are not valid IMS
package files an error will occur and the entire record will be rejected. Only the
last attachment will be uploaded as EQUELLA supports only one IMS package
per item.
Inspects each attachment and automatically upload IMS content packages or
SCORM packages as IMS packages, unzip zip files (that are not IMS packages)
and simply attach all non-zip files
In some cases SCORM packages are unable to be recognized as anything other
than simple IMS packages. Use this command to force EBI to upload the
package as a SCORM package.
If updating existing items using source identifiers or target identifiers (see
36
section 6.9 Updating Existing Items in EQUELLA, page 58) a new version of the
item will be created rather than the existing item version being updated.
DRAFT
REPLACEMETA
APPENDMETA
APPENDATTACH
DELETE
CAL_PORTION
This can also be achieved using the Options tab. See section 6.9.4 Creating New
Versions, page 61) for further information.
If creating new items or new versions they will be created in DRAFT status. This
command is ignored when updating existing items without the VERSION
command option (see section 6.9 Updating Existing Items in EQUELLA, page 58).
This can also be achieved using the Options tab. See section 6.10 Saving Items in
Draft Status, page 63 for further information.
When updating an existing item metadata from the CSV replaces only that
metadata and leaves all other existing metadata untouched.
This can also be achieved using the Options tab. See section 6.9.6 Replacing and
Appending to Metadata in Existing Items, page 62 for further information.
When updating an existing item metadata from the CSV is appended to the
existing item metadata.
This can also be achieved using the Options tab. See section 6.9.6 Replacing and
Appending to Metadata in Existing Items, page 62 for further information.
When updating an existing item attachments specified in the CSV are appended
to the existing item attachments.
This can also be achieved using the Options tab. See section 6.9.7 Appending
Attachments to Existing Items, page 62 for further information.
If updating existing items using source identifiers or target identifiers (see
section 6.9 Updating Existing Items in EQUELLA, page 58) the item will be
deleted. If using target identifiers an item can be purged by deleting an already
deleted item.
When uploading “portion” items for CAL compliance. See section 5.3.9
Uploading CAL Content (Australia), page 48 for further information.
5.3.3.1 Creating Item Links to Files within a Zip File
If unzipping an attachment using either the “UNZIP” command or the “AUTO” command you can specify
item links to particular files within the zip file. This is done by specifying a list of links to unzipped files in
as the attachment name of the zip file. An example of such as list is shown in Figure 43.
Figure 43. Specifying a list of item attachment links to files within the zip
37
The CSV example above instructs the EBI to unzip all the files in attachment adfa.zip and adds two
hyperlinks in the item called “Start Here” and “Online Help”. The result of the list of links in EQUELLA is
shown in Figure 44.
Figure 44. The extracted zip attachments from the third row of the CSV in Figure 43
The item in Figure 44 actually has attachments of all the unzipped files from adfa.zip but only displays
links to the two specified files start.htm and images/help.htm.
The list of links should be formatted as follows (without the linefeeds):
(
("<filepath
("<filepath
("<filepath
.
.
("<filepath
in zip of file 1>", "<description of file 1>"),
in zip of file 2>", "<description of file 2>"),
in zip of file 3>", "<description of file 3>"),
in zip of file n>", "<description of file n>")
)
The format of the list can be described as a list of pairs where each pair consists of a filepath to a file in
the zip (relative to the root of the zip file) and a description (i.e. name for the hyperlink) as it should
appear in the item display page.
Note that even a zip file with a single hyperlinked file should be enclosed in two sets of parentheses e.g.
if start.htm was the only hyperlinked file then use (("start.htm", "Start Here")) not
("start.htm", "Start Here"). Note the nested parentheses in the correct example.
A shortcut to instruct that all files in the zip have hyperlinks created can be specified by using the name
pair (("*", "*")). This instructs the EBI to create a hyperlink for every file in the zip file using the
name of the filename as the hyperlink name. If used in conjunction with named pairs it will name only
38
files that do not have explicitly named pairs. For example, the following list of links will create two
named hyperlinks and automatically create filename-based links for the remaining files:
(("start.htm","Start Here"),("images/help.htm","Online Help"),("*","*"))
The outcome of the above list of links is shown in Figure 45.
These links are created by the pairs
("start.htm","Start Here") and
("images/help.htm","Online Help")
These links are created
by the pair ("*","*")
Figure 45. The extracted zip attachments from a mix of explicit and wildcard name pairs in a list of links
Specifying a name pair to the zip file itself creates a link to download the zip file. For example:
Figure 46. Providing users with a link to the zip file itself
In the example above, along with the unzipped files, a link called “Download zip” will be added to the
item that allows users to download the entire zip file (see Figure 47).
39
Figure 47. The outcome of specifying a link to the zip file itself (along with a single file)
As with other attachments such as simple files and IMS packages, it is possible to include a mixture of zip
files (with lists of links) and other files by using delimiters and the “AUTO” command. The “AUTO”
command will unzip the zip file and treat the other files included in the record appropriately. For
example, each record of the CSV in Figure 48 contains a valid list of attachments, each attachments list
consisting of a mixture of a zip file (with a list of links) and simple files and IMS packages. See section
5.2.4, Specifying Multiple Attachments and Hyperlinks per Item, page 27 for more information on
specifying multiple attachments in a record.
Figure 48. Mixing attachments with zip files using the AUTO command
5.3.4
Setting Owners and Collaborators for Items
5.3.4.1 Setting Owners (EQUELLA 5.1 and higher only)
By default the EBI sets the owner of new items and new item versions to the EBI username i.e. the user
specified in the main form. You can instead set the owner of each item to a specific EQUELLA user
account by adding a column to the CSV with a single username per row. The Column Data Type for the
column should be set to “Owner” and the column heading can be anything. For any rows where a cell in
the owner column is blank the EBI will set the EBI username as the owner.
40
If a username is specified that is not in EQUELLA the EBI will raise an error and skip the row. Optionally,
you can configure the EBI to fall back to using the EBI username when it encounters a non-existent
username. Do this by checking Options tab -> Ignore owners that do not exist checkbox.
5.3.4.2 Setting Collaborators (EQUELLA 5.1 and higher only)
You can add collaborators to an item in much the same was as you can specify owners. Add a column of
any heading to your CSV and put in a delimited list of usernames. Set the Column Data Type of the
column to “Collaborators” and specify what delimiter you are using for the column. Leave the cell blank
for any items that should have no collaborators.
As with owners, if a username is specified that is not in EQUELLA the EBI will raise an error and skip the
row. Optionally, you can configure the EBI to simply ignore non-existent usernames and create/update
the item anyway. Do this by checking Options tab -> Ignore collaborators that do not exist checkbox.
5.3.4.3 Setting LDAP or Replicated Datastore Users as Owners and Collaborators
When specifying LDAP and replicated datastore users as owners and collaborators instead of usernames
use user IDs and set Options tab -> Save usernames that are not internal users as user IDs checkbox. In
some cases the user ID may be the same as the username. Check your LDAP or replicated datastore
settings to make certain. See the EQUELLA LDAP Configuration Guide for further information.
5.3.5
Managing Attachment Thumbnails (EQUELLA 6.3 QA1 and higher only)
5.3.5.1 Suppressing and Specifying Thumbnails
By including a column with a Column Data Type of “Thumbnails” the EBI will instruct EQUELLA to only
generate thumbnails for file attachments whose attachment locations are listed in the Thumbnails
column. EQUELLA will be instructed by the EBI to suppress thumbnail generation for any attachment
location entries that do not appear in the Thumbnails column.
Three formats can be used to specify Attachment locations in the Thumbnails column:
-
Exact attachment location (e.g. Circular Motion 1.jpg, images\Dining 1.jpg)
File extension wildcard (e.g. *.tif)
Attachment location with custom thumbnail separated with a colon (e.g. images\squirrel:Dining
1.jpg)
A combination of any of the above formats can be specified by separating the values with a delimiter.
Figure 49 is an example CSV that utilizes the “Thumbnails” column data type in all three different ways.
Figure 49. Suppressing and specifying thumbnail generation
41
In the example above Column C has been given a column data type of “Attachment Locations” and
column D has been given a column data type of “Thumbnails”. Both columns are using “|” as the
delimiter. Each of the three data rows have four files specified in the Attachment Locations column.
Note that the Thumbnails column’s column heading may be anything as the EBI will ignore it.
In the first data row two attachment locations have been specified in the “Thumbnails” column,
files\pictures\squirrel.jpg and Circular Motion 1.jpg. The EBI will instruct EQUELLA to
generate thumbnails only for those two attachment locations and suppress thumbnail generation for
the rest (images\Dining 1.jpg and images\Faren-Celc Conv.tif). Note that the Attachment
Location values are case-sensitive.
In the second data row an extension wildcard *.tif is used in the “Thumbnails” column. This causes
EBI to instruct EQUELLA to generate thumbnails of all attachment locations that have that file extension.
This is a case insensitive match but the extension must be spelt the same e.g. *.jpg will not match *.jpeg.
The third data row demonstrates how to specify a custom thumbnail. In this case the EBI will still
instruct EQUELLA to suppress thumbnail generation of the attachment location and will specify another
file attachment to use as a thumbnail. In the example, the “Thumbnails” column value
files\pictures\squirrel.jpg:Dining 1.jpg instructs the EBI that the attachment location
files\pictures\squirrel.jpg should use the file Dining 1.jpg as its thumbnail (which should
be a file attached to the same item) and thumbnail generation for files\pictures\squirrel.jpg
will be suppressed. Note that the thumbnail should be specified as a relative path from the item’s
filestore.
5.3.5.2 Selecting the Item’s Thumbnail
In an EQUELLA contribution wizard it is possible to select a thumbnail for the item to control how it is
displayed in search results (see Figure 50).
Figure 50. Selecting an item’s thumbnail in an EQUELLA contribution wizard
This thumbnail selection can be achieved in an EBI import by including a column with a Column Data
Type of “Selected Thumbnail” (the column can have any column heading).
The allowed values are:
42
-
“DEFAULT” or empty (equivalent)
“NONE”
An attachment location
An extension wildcard
The following example (Figure 51) demonstrates all four ways of specifying a selected thumbnail.
Figure 51. Specifying an item’s selected thumbnail with the EBI
The selected thumbnail format used in the first two data rows (DEFAULT and empty) both have the
same effect which is the same as selecting “Default” for the selected thumbnail in an item’s contribution
wizard.
The format used in the third data row (NONE) is an example of the equivalent of selecting “None” for the
selected thumbnail in an item’s contribution wizard.
The format used in the fourth data row (attachments\Circular Motion 1.jpg) is an attachment
location of an attachment without thumbnail suppression. This is the equivalent of checking “Select
Thumbnail” and selecting a thumbnail in an item’s contribution wizard.
The format used in the fifth data row (*.jpg) is an example of specifying a selected thumbnail with an
extension wildcard. The EBI will select the first attachment location that matches the wildcard and
doesn’t have thumbnails suppressed.
5.3.5.3 Thumbnails and Custom Attachments
Thumbnail suppression, custom thumbnails and thumbnail selection can be achieved in Custom
Attachments (see Section 5.3.8 Custom Attachments, page 46) by including each of the following
elements respectively in the <attachment> element:
Thumbnails suppression:
<thumbnail>suppress</thumbnail>
Custom thumbnail:
<thumbnail>[relative path to an attached file]</thumbnail>
Thumbnail selection:
<selected_thumbnail>true</selected_thumbnail>
The following example (Figure 52) demonstrates all three techniques employed in custom attachments:
43
Figure 52. Examples of suppressing, specifying and selecting thumbnails in Custom Attachments
5.3.6 Uploading to Multiple Collections
By default, when creating new items they are created in the collection specified in the Collection dropdown on the main form. It is also possible to specify different collections per row in your CSV. Note that
this feature cannot be used when updating existing items or creating new versions from existing items.
To specify a Collection per row add a column to your CSV with a single collection name per row. The
Column Data Type for the column should be set to “Collection” and the column heading can be
anything. If a cell in the column is left blank then the collection specified in the Collection drop-down on
the main form will be used. If a collection is specified that is not in EQUELLA, or the EBI username does
not have permission to create items in, an error is raised and the row skipped.
5.3.7 Attaching EQUELLA Resources
Other EQUELLA resources — items and item attachments — can be attached to an EQUELLA item in the
same institution. This can be accomplished with the EBI by using the “EQUELLA Resources” Column Data
Type.
As with “Attachment Locations” and “URLs” columns, the column heading should be the metadata
target of the EQUELLA resource attachments (as used in the corresponding collection’s EQUELLA wizard
configuration if applicable). A column of “EQUELLA Resource Names” Column Data Type allows the
names of the link descriptions to the EQUELLA Resources to be specified if the default should be
overridden. As with “Attachment Locations” and “URLs” columns, multiple EQUELLA resources can be
attached to the one item by using delimiters or multiple “EQUELLA Resources” columns.
There are two formats that can be used for the specifying EQUELLA Resources in your CSV: by item UUID
and by source identifier.
5.3.7.1 Specifying EQUELLA Resources by UUID
If the UUIDs of the EQUELLA resources to attach are known then an EQUELLA resource can be specified
by UUID:
44
Figure 53. An example “EQUELLA Resources” column for attaching EQUELLA items of known UUIDs
The supported formats for EQUELLA resources are as follows:
EQUELLA Resource Format 1 item uuid
Example
“b515cc8d-d6b0-4a50-bb09-6c87920804b8”
Behavior
The latest live version of the specified item itself will be attached as an
EQUELLA resource
Default Attachment Name
The item name
EQUELLA Resource Format 2 item uuid/item version
Example
“b515cc8d-d6b0-4a50-bb09-6c87920804b8/3”
Behavior
The specified version of the specified item itself will be attached as an
EQUELLA resource
Default Attachment Name
The item name
EQUELLA Resource Format 3 item uuid/item version/relative attachment path
Example
“b515cc8d-d6b0-4a50-bb09-6c87920804b8/3/docs/intro.pdf”
Behavior
The attachment of the specified item version will be attached as an
EQUELLA resource. Use item version 0 for the latest live version.
Default Attachment Name
The attachment description
EQUELLA Resource Format 4 item uuid/item version/<package>
Example
“521b2225-54e0-4d7b-a4d6-45243fcd7889/1/<package>”
Behavior
The IMS or SCORM package attached to the specified item version will be
attached as an EQUELLA resource
Default Attachment Name
The package name
5.3.7.2 Specifying EQUELLA Resources by Source Identifier Directives
If the UUIDs of the EQUELLA resources to attach are not known then resources can be specified by
source identifiers (for details about source identifiers see section 6.9.1 Updating Existing Items using
Source Identifiers, page 58). This feature is particularly useful if uploading the EQUELLA resources with
the EBI either in the same run, or a preceding run, as the items themselves.
Specifying EQUELLA resources by source identifiers is done using any of the same formats as resources
specified by UUID except that in place of a UUID a source identifier directive is included. For example:
45
Figure 54. An example “EQUELLA Resources” column for attaching EQUELLA items of unknown UUIDs
The EBI uses the source identifier directive to determine the UUID of the referenced resource. Following
are the allowed formats for source identifier directives:
Source Identifier Directive Format 1
Example
Behavior
{source identifier}
“{R-32-544}”
Resolves to the UUID of the item of a matching source identifier in
the same collection as the item being uploaded
Source Identifier Directive Format 2
Example
Behavior
[collection name]{source identifier}
“[Resources Collection]{R-32-544}”
Resolves to the UUID of the item of a matching source identifier in
the specified collection. Uses the same source identifier as
specified in items being uploaded.
Source Identifier Directive Format 3
Example
[collection name][absolute XPath]{source identifier}
“[Resources Collection][/xml/metadata/@resourceid]{R-32544}”
Resolves to the UUID of the item of a matching source identifier
in the specified collection. Uses the source identifier found at
the specified XPath.
Behavior
5.3.8 Custom Attachments
EQUELLA supports attachment types other than file attachments and simple URLs. For example,
EQUELLA attachments can also be YouTube videos and Flickr media. Such attachments require
specialized metadata to be added to the /xml/item/attachments/attachment element in the
item’s metadata for each of these attachments. The EBI supports the creation of such attachment
elements using what are called Custom Attachments.
To create item attachments other than the standard file attachments or URL links
/xml/item/attachments/attachment elements need to be created in items. This can be done by
specifying a CSV column with Column Data Type of “Custom Attachments”. Inside the column, a cell
should contain an XML fragment of the required attachment elements. As with URLs and standard
46
attachments, the column heading should be the metadata target of the corresponding Attachments
control in the wizard.
For example, to create an item with two attachments, a YouTube video and a Kaltura-hosted video, you
would use a Custom Attachments value such as this (Figure 55):
<attachment type="custom">
<type>youtube</type>
<file />
<description>Equella tour</description>
<attributes>
<entry>
<string>playUrl</string>
<string>http://www.youtube.com/v/uELyRAlRs&fs=1&source=uds&autoplay=1</string>
</entry>
<entry>
<string>thumbUrl</string>
<string>http://3.gvt0.com/vi/uELyRAlRs/default.jpg</string>
</entry>
<entry>
<string>videoId</string>
<string>uELyRAlRs </string>
</entry>
</attributes>
</attachment>
<attachment type="custom">
<type>kaltura</type>
<uuid>de077d83-4b99-439b-9e5e-ef566d454226</uuid>
<file />
<description>Nature Video</description>
<attributes>
<entry>
<string>title</string>
<string>Nature Video</string>
</entry>
<entry>
<string>kalturaServer</string>
<string>846328ab-522a-450b-9764-e52e15e1b6bd</string>
</entry>
<entry>
<string>thumbUrl</string>
<string>
https://cdnsecakmi.kaltura.com/p/691542/sp/69129200/thumbnail/entry_id/0_crf3ox66/vers
ion/100000</string>
</entry>
<entry>
<string>entryId</string>
<string>0_crf3ox66</string>
</entry>
</attributes>
</attachment>
Figure 55. Attachment elements as specified in a Custom Attachment field
The above Custom Attachments value would result in two attachments in the EQUELLA item, the first to
a YouTube video and the second to a Kaltura-hosted video.
Notice that an attachment UUID was supplied for the second custom attachment (but not for the first).
This demonstrates that when using custom attachments you can, if you wish, provide an attachment
47
UUID rather than leaving it to EQUELLA or the EBI to automatically generate a UUID (as is done for URLs
and standard attachments).
Note that though the data in a Custom Attachments CSV cell is technically an XML fragment the column
does not need to be set for XML Fragments (see section 5.3.1 Appending XML Fragments to Metadata,
page 30, to learn more about XML Fragments).
There are several formats for the various types of attachments supported in EQUELLA. Higher versions
of EQUELLA support a greater number of attachment types as content support typically increases with
each version of EQUELLA. One of the easiest ways of determining the format of attachment elements in
EQUELLA is to simply create an attachment using an EQUELLA wizard control and inspect the resulting
metadata.
Thumbnails for local file attachments can be controlled in custom attachments by including the
elements attachment/thumbnail or attachment/selected_thumbnail. See Section 5.3.5.3
Thumbnails and Custom Attachments (page 43) for further information about thumbnail control in
custom attachments.
5.3.9 Uploading CAL Content (Australia)
The EBI can be used for uploading copyright-identified content that utilizes EQUELLA’s Copyright Agency
Limited (CAL) compliance features.
“Holding” items (e.g. items that register books and journals) can be uploaded without any special EBI
settings other than meeting the minimum metadata requirements for saving items to the holding
collection.
“Portion” items (e.g. eReserves) should also be uploaded so that they meet minimum metadata
requirements for saving items to the portions collection. Additionally, a column of “EQUELLA Resources”
should be included so that each portion is linked to a holding item. The link should be to the holding
item itself, not any of its attachments. If more than one EQUELLA Resource is specified for the portion
item then the EQUELLA Resource column for holding items should be specified first (i.e. furthest left) in
the CSV.
Each portion row in the CSV should also have a command option “CAL_PORTION”. See section 5.3.3
Using Command Options (page 35) to learn more about command options.
Figure 56 is an excerpt from an example portions CSV showing the columns set in EBI to a column data
type of “EQUELLA Resources” (column O) and a column data type of “Commands” (column P).
48
Figure 56. An example of some of the key columns when uploading CAL portions.
The column heading of the EQUELLA Resources column should be the same as the metadata target of
the Attachments control configured in the portion collection wizard for linking portions to holdings
(minus the leading slash). In the above example the metadata target is
/item/temp_resourceHandler. See section 5.3.7 Attaching EQUELLA Resources (page 44) to learn
about how to interlink items using the “EQUELLA Resources” column data type.
There are many ways to interlink items using an “EQUELLA Resources” data type in EBI. In the above
example the first three rows are linked to the same holding item (in a collection called “Books”) by its
ISBN. The next three rows are linked to a holding item by the holding item’s UUID. See section 5.3.7
Attaching EQUELLA Resources (page 44) to learn other ways to interlink items.
5.3.10 Attaching Files Without Metadata
You can upload files and attach them to items without the associated attachment metadata by using the
“Raw Files” column data type. This is unlike when using an “Attachment Location” column data type for
which the EBI will automatically generate system attachment metadata for each file uploaded i.e.
/xml/item/attachments/attachment.
A CSV column of “Raw Files” can have any column heading (it will be ignored by the EBI). The data cells
can have either file paths (as you would use in an “Attachment Locations” column) or a path to a folder.
When a folder is specified the EBI will recurse through the folder uploading all files and folders within.
5.3.10.1 Attaching Individual Raw Files
As with Attachment Locations, with Raw Files you can specify a path to a single file. The file will be
attached to the item but no corresponding attachment metadata will be generated.
In the following example (Figure 57) a file called “volcano1.jpg” will be attached to the item and no
corresponding system attachment metadata. As a result the file will not appear as an attachment link on
the item display page and it will not be editable via an Attachments control in a contribution wizard.
Figure 57. An example of attaching a file with no associated attachment metadata by using the Raw Files column data type.
49
As with Attachment Locations, a column of corresponding Attachment Names cells can optionally be
specified but, unlike when used with Attachment Locations, Attachment Names allow the name and
target folder of the file to be specified as it will be attached to the item. It will have no effect on the
resource links displayed on the item display page.
In the following example (Figure 58) the source file in the Raw Files column is named volcano2.jpg.
Figure 58. An example of renaming and relocating a “Raw File” by using Attachment Names.
Because a corresponding Attachment Names value is “images/VOLCANO2.jpg” the file will be attached
to the item in a sub folder called “images” and will be renamed to “VOLCANO2.jpg”. The following “tilde
view” of the item shows the result (Figure 59). Note the name of the file and the folder it is in:
Figure 59. The “tilde view” of the resultant item from the previous example.
5.3.10.2 Attaching a Folder as a Raw File
Using Raw Files you can specify a path to a folder. A path to a folder must be followed by an asterisk
(“*”) to signify that all files and folders found inside should be attached to the item.
Attachment Names can optionally be provided but only to specify a folder in the item to locate the
source folder structure inside. This folder must also be followed by an asterisk. Following is an example
of a CSV with two rows utilizing Raw Files for folders (Figure 60). That entire directory structure and files
located below attachments/folder/* on the source computer will be attached to both items. The first
item will have the files attached to the root of the item. The second item will have the files attached to a
folder called “files”.
Figure 60. An example of attaching an entire folder structure to an item.
50
5.3.10.3 Raw Files Used in Conjunction with Custom Attachments
Though Raw Files result in no corresponding system metadata, attachment metadata can still be added
through the use of “Custom Attachments” (see section 5.3.8 Custom Attachments, page 46). The
following CSV is an example of a file that is uploaded as Raw Files (and renamed and placed in a
subdirectory of the item) and has a corresponding Custom Attachment to provide a link on the item
display page and make it editable in a contribution wizard.
Figure 61. Using Raw Files in conjunction with Custom Attachments.
51
6 Running the Import
The import process is started by clicking the Start Import button. The process provides a visual cue to
progress by outputting information to the Log tab. Figure 62 below shows the output of an import
process that ran without error.
Figure 62. An example of the output of an error-free import process
Note the second last line of the log, “Processing complete (success 3)”. This line will
summarize how many items were processed and indicate if there were any errors.
6.1 Output
The example in Figure 62 indicates that 3 rows were found in the CSV and all three were successfully
imported into EQUELLA. The EBI automatically outputs attachment paths, URLs and command options.
You can specify additional CSV data to be included in the output by marking columns for Display (see
Figure 63).
Figure 63. Specifying a column of data to be included in the output display
52
Setting columns to Display will help you to see which records have been processed and what metadata
was imported.
For each run a corresponding log file is automatically created in a folder called logs within the folder
where the CSV is located (see Figure 64).
Figure 64. Automatically created log files
The log file is named the date and time the EBI was started. The log file contains the same information
that is output to the Log tab.
6.2 Stopping or Pausing the Import
You can stop or pause an import process part way through by clicking the Stop Processing or
Pause/Unpause Processing buttons on the EBI’s toolbar (see Figure 65).
Figure 65. The Stop Processing and Pause/Unpause buttons to halt or pause an import or export process
Clicking the Stop Processing button will cause the EBI to halt processing immediately. If the EBI is
partway through uploading an item the item will not be committed into EQUELLA.
Clicking the Pause Processing button will cause the EBI to pause processing. If the button is clicked again
the EBI will resume processing (unpause). If the EBI is paused partway through uploading an item the
item will not be committed into EQUELLA until it is unpaused.
6.3 Errors
Any errors that may occur are displayed in the log. See section 7.1, Appendix A: Tips and
Troubleshooting, page 70) for common errors. If you are still having trouble understanding the meaning
of an error you should copy the error and send it to your EQUELLA administrator or an EQUELLA
consultant along with the CSV, log file and the settings file (see section 6.11 Saving Your Settings, page
63).
53
6.4 Connecting with a Proxy
The EBI supports connecting to EQUELLA via a proxy server. If you are using EBI on a corporate network
and are unable to connect to EQUELLA this may be because you need to use a proxy server. If you are
unsure check with your IT support.
To connect to EQUELLA via a proxy got to Toolbar-> Preferences ( ) -> Advanced. Here, fill in the Proxy
Server Address field. The format of the address should be [host]:[port] e.g. “proxy001:8080”.
The EBI provides Proxy Server Username and Proxy Server Password fields for Basic and Digest
Authentication support.
The EBI does not support Microsoft NTLM challenge/response authentication for proxies.
6.5 Required EQUELLA Permissions
The user account in the Username fields must have the necessary privileges in the EQUELLA collection
to perform the required actions. The following are the minimum privileges needed on items for the
various uses of the EBI.
Field
Create new items
Edit Existing items
Create new version of existing items
Delete existing items
Set owner of existing items
Set collaborators of existing items
Exporting items
Required Privileges
CREATE_ITEM
VIEW_ITEM
VIEW_ITEM
DISCOVER_ITEM
EDIT_ITEM
CREATE_ITEM
VIEW_ITEM
DISCOVER_ITEM
NEWVERSION_ITEM
VIEW_ITEM
DISCOVER_ITEM
DELETE_ITEM
VIEW_ITEM
DISCOVER_ITEM
EDIT_ITEM
REASSIGN_OWNERSHIP_ITEM
VIEW_ITEM
DISCOVER_ITEM
EDIT_ITEM
REASSIGN_OWNERSHIP_ITEM
VIEW_ITEM
DISCOVER_ITEM
6.6 EQUELLA Scripts, Workflow and Digital Rights Management
Items created or updated by the EBI respond and conform to scripts, workflow and digital rights
management (DRM) in the same way as items managed through an EQUELLA wizard.
54
6.6.1 EQUELLA Scripts
If the EQUELLA collection that you are importing content into has an Expert Save Script configured the
script will be run upon import of new items or updated items (see section 6.9 Updating Existing Items in
EQUELLA, page 58). Expert New Version Scripts, however, are only run if the VERSION command option
is used. Scripts are not run during test runs.
Scripts on wizard controls or wizard pages are not run.
6.6.2 EQUELLA Workflow
If a workflow template is associated with the collection you are importing into then new items and new
item versions will progress through workflow as if they were created with an EQUELLA wizard. Workflow
is not applied when updating existing items (unless creating new versions).
If you wish to avoid new items going into workflow then remove the workflow template from the
collection. However, note that when a workflow template is removed from a collection any items
currently in moderation will immediately go live.
6.6.3 EQUELLA Digital Rights Management
EQUELLA’s Digital Rights Management (DRM) can be applied to items by reproducing the metadata in
the /xml/item/rights element as the DRM pages in a contribution wizard would produce. This can
be done with standard metadata, XML fragments (see section 5.3.1 Appending XML Fragments to
Metadata, page 30) or a combination of both.
6.7 Testing Your Import
Before running the import you will likely want to perform a test run. This can be done by clicking the
Test Import button. Clicking this button performs the same actions as a real import but without
submitting items or attachments to EQUELLA. For this reason it runs faster than a real import, especially
one with large attachments. The Test Import button is a useful way of verifying your settings and CSV
file prior to commencing an import.
55
Figure 66. Performing a test run
You can create sample XML files in a test run by checking the check box Options tab -> Save test XML
(see Figure 67).
Figure 67. Configuring the EBI to save item XML files on test runs
When this check box is checked the EBI will create sample files in a folder called test_output under
the folder containing the CSV. Within this folder the EBI will create one sub folder for each run and one
56
xml file for each item (see Figure 68). This is a convenient way to verify the final item XML without
creating items in EQUELLA.
Figure 68. Test item XML produced by the EBI
Note that the item IDs in the test XML files are assigned by EQUELLA and will change with each test run.
They will also be different to the actual item IDs assigned to the records by EQUELLA in a real import
run.
Some system metadata will not be available in these documents (e.g. owner details, item history) as
much of the system metadata is only calculated by EQUELLA when an item is saved for real.
6.8 Importing Select Rows from Your CSV
It is possible to specify a subset of rows to process (either test or real) and a specific order they should
be processed in. This is done by specifying a row filter. A row filter instructs the EBI to only import rows
with row positions that fall within lists and/or ranges of numbers. The row filter is specified in the Row
Filter field (see Figure 69).
57
Figure 69. Specifying a subset of rows to import or test import
Some examples of row filters are as follows:
Row Filter
1, 3, 9
15-23
101, 3, 12-18, 216-11, 3, 2, 1
2, 1-3, 2, 2, 2-3
Outcome
Process rows 1, 3 and 9 in the CSV
Process rows 15 to 23 inclusive
Process all rows from 10 onwards
Process rows 1, 3 then rows 12 to 18, then all rows 21 onwards
Process rows 6 through 11 then row 3, row 2 and finally row 1
Process row 2 then row 1 then row 3
The last example highlights a row filter with duplicate rows. In this event the EBI only imports each
distinct row once and in the order each distinct row first appears in the row filter.
Note that a row position of a CSV row means its position discounting the headings row. Technically, the
first row in the CSV file is actually the headings row. However, the second row in the CSV is the first data
row and therefore is considered to have a row position of 1 for the purposes of row filters.
If Row Filter is left blank the EBI will process all rows in the CSV.
6.9 Updating Existing Items in EQUELLA
Using the EBI not only can you create new items in EQUELLA but you can also update existing ones.
6.9.1 Updating Existing Items using Source Identifiers
One way of updating existing items is by specifying a source identifier field that can match the records in
the CSV with items in EQUELLA. This can be useful if your CSV already contains IDs from another system
or generated in the CSV itself.
58
Create a field in the EQUELLA schema that a source identifier can be stored in. The field can be named
anything and may either be an element or an attribute. Check the Index for Advanced Searches check
box. See the example in Figure 70 of a source identifier attribute named “identifier”.
Figure 70. Specify a “source identifier” in EQUELLA
Now in the CSV a column of source identifiers is required. These can be of any format, numerical or
alphanumerical, as long as they are unique to each row of the CSV. For example, “1”, “DFWTE”, “2323423”, “S342343-B” are all valid source identifiers. In the column heading specify the XPath that
matches the EQUELLA schema field where the source identifier will be stored. An example of this is
shown in Figure 71.
Figure 71. Specifying a column of unique source identifiers in the CSV
Note that source identifiers cannot contain apostrophes.
In the EBI’s main form specify the column of the source identifiers in the Source Identifier field (see
Figure 72).
59
Figure 72. Specify the CSV column for unique source identifiers in the EBI
Now when an import is run (test or real) for each row in the CSV the EBI will search EQUELLA for an item
that matches the row’s source identifier. If it finds a matching item rather than creating a new item in
EQUELLA it will update the matching item (or create a new version if used in conjunction with the
VERSION command option).
By default, only items with a status of “live” will be updated with source identifiers.
6.9.2 Updating Existing Items using Target Identifiers
If you know the EQUELLA item IDs that you are updating another way of updating existing items is by
specifying what are called target identifiers. Target identifiers are the UUID EQUELLA item IDs of the
existing items in EQUELLA. To do this, in your CSV include a column of item IDs (see Figure 73).
Figure 73. Specifying a column of Target Identifiers
You can name the column heading of this column anything or leave it blank. In the EBI select “Target
Identifiers” for the Column Data Type for the corresponding column.
60
When run, the EBI will attempt to match the target identifier of each row against an existing item in
EQUELLA and update that item. For any rows with blank target identifiers new items are created. If a
target identifier is provided that does not exist in EQUELLA an error will be returned and the EBI will
move on to the next row.
By default, using target identifiers will see live items updated (or new versions created if used in
conjunction with the VERSION command option). However, unlike when using source identifiers, if no
live items are available then the first non-live item will be updated (e.g. draft, moderating, archived etc)
6.9.3 Targeting Particular Item Versions
By specifying a column of item versions and setting the column data type as “Target Versions” you can
update a particular version of an item regardless of its status. Target versions can be used in conjunction
with either source identifiers or target identifiers.
Figure 74. Specifying a column of Target Versions
When using target versions each row can specify an explicit item version (e.g. 1, 2, 3 etc) or an implicit
item version with a value of either 0 or -1. Using an item version of 0 will see the latest live version of an
item updated. Using an item version of -1 will see the latest version of the item regardless of its status.
6.9.4 Creating New Versions
By default, when updating existing items with the EBI the latest version is edited. Optionally, you may
instruct the EBI to create new versions. This can be done by checking Options tab -> Create new
versions checkbox.
You can also specify individual rows to generate new versions by using the “VERSION” Command Option
(see section 5.3.3 Using Command Options, page 35).
6.9.5 Updating Existing Metadata without Uploading Attachments
It is possible to update the metadata of existing items without uploading and overwriting existing
attachments. This can be done by configuring the EBI such that no columns have a Column Data Type of
“Attachment Locations” or “URLs”. This technique will work regardless of whether the matching of
existing items is done with source identifiers or target identifiers
An existing configuration can be easily reconfigured to update only metadata by setting the Column
Data Type of attachment location columns and URL columns to “Ignore” (see Figure 75).
61
Figure 75. Modifying a configuration to update metadata of existing items but not attachments
6.9.6 Replacing and Appending to Metadata in Existing Items
By default, when updating existing items with the EBI existing item metadata is cleared and replaced by
the metadata specified in the CSV. Optionally, you may instruct the EBI to replace only the metadata
specified in the CSV or to append the metadata in the CSV to the item’s existing metadata. This can be
done by checking Options tab -> Existing Metadata drop-down.
Setting the Existing Metadata drop-down to “Replace only specified metadata” will have EBI ignore any
existing custom metadata nodes in the item metadata not specified in the CSV thus leaving them
untouched. Nodes that are specified in the CSV will be cleared.
Setting the Existing Metadata drop-down to “Append to Existing metadata” will have EBI leave any
existing custom metadata nodes that are in the item and specified in the CSV untouched. Nodes that are
specified in the CSV will also be left untouched but added to with the metadata specified in the CSV.
You can also specify individual rows to replace and append specified metadata by using the
“REPLACEMETA” and “APPENDMETA” Command Options respectively (see section 5.3.3 Using
Command Options, page 35).
Note that if you are using source identifiers, even when specifying to append metadata, the node
identified as the source identifier will not be appended to but rather replaced. This is to prevent
duplicate source identifiers appearing in an item.
6.9.7 Appending Attachments to Existing Items
By default, when updating existing items with the EBI existing attachments are replaced by any
attachments specified in the CSV. Optionally, you may instruct the EBI to append the attachments
specified in the CSV to the item’s existing attachments. This can be done by checking Options tab ->
Append attachments checkbox.
You can also specify individual rows to append attachments by using the “APPENDATTACH” Command
Option (see section 5.3.3 Using Command Options, page 35).
62
6.10 Saving Items in Draft Status
By default, when items or new versions of items are created in EQUELLA with the EBI they are made
immediately live (or in moderation if workflow applies). Optionally, you may instruct the EBI to create
items or item version in “draft” status. This can be done by checking Options tab -> Create new items
and item versions in draft status checkbox.
You can also specify individual rows to create new items or item versions in draft status by using the
“DRAFT” Command Option (see section 5.3.3 Using Command Options, page 35).
6.11 Saving Your Settings
You can save your settings to a settings file and load previously used settings by using the EBI’s toolbar
(see Figure 76).
Save settings
Open settings file
Figure 76. Tool bar buttons for opening and saving settings files
Settings files have the extension “.ebi”. If necessary, it is possible to copy an existing settings file and
edit it with a text editor. Note, however, that the password setting in a settings file is encrypted and can
only be modified with the EBI. Control-S or Command-S is a shortcut for saving your settings.
6.12 Setting Preferences
The EBI’s preferences settings allow you to configure the behavior of the EBI itself. The Preferences
dialog is accessed by using the preferences toolbar button (see Figure 77).
Figure 77. Setting application preferences
The following settings are available in the Preferences dialog:
63
Basic Tab
Field
Load last settings file
when starting EBI
Action
If this setting is checked, when next launched the EBI will automatically
load the last opened or saved settings file (*.ebi).
Clear log each run
When checked the EBI will clear the log prior to starting each test or real
run.
Save password in settings
file
When checked, upon save the EBI will encrypt and save the password in
the connection tab to settings files.
Log buffer size (lines)
This controls the maximum amount of text displayed in the EBI’s Log tab.
Will revert to default (1,000 lines) if cleared.
Advanced Tab
Field
Proxy Server Address
Action
The address of your network’s proxy server if one is required to connect
to EQUELLA (see section 6.4 Connecting with a Proxy, page 54).
Proxy Server Username
The username for basic or digest authentication with your network’s
proxy server.
Proxy Server Password
The password for basic or digest authentication with your network’s
proxy server.
Debug mode
When checked the EBI will output to the display and log files additional
diagnostic information particularly when errors occur.
Network logging
When checked network diagnostic information is displayed and recorded
in the log for each HTTP request made to EQUELLA. WARNING: log files
grow rapidly when this setting is in effect, potentially more than 50Kb per
item. To avoid excessively large log files only use this setting with a small
set of records per run.
Attachment chunk size
(bytes)
Controls the size of each “chunk” that attachments are broken up into
during upload. Each chunk is transmitted as a single HTTP or HTTPS
request. Will revert to default (2 MB) if cleared.
These settings and others are stored in an automatically created “global” settings file. See section 7.6
Appendix E: Global Settings, page 92, for more information.
6.13 Saving Item IDs of Imported Items
It is possible to produce a list of item IDs assigned to the items that you imported. Do this by including
an empty column in your CSV and setting its Column Data Type to “Item ID” (you can give it any column
heading you wish). In doing this the EBI will create a copy of your CSV file in a sub folder called
receipts found within the folder containing the CSV (see Figure 78).
64
Figure 78. Producing a list of item IDs of imported items
This copy of the CSV is created once the import is completed or halted. Amongst other uses, this can be
used for producing a CSV of target identifiers for updating the imported items in the future.
By including a column with a column data type of “Item Version” the item version can also be saved.
By including a column with a column data type of “Row Error” any errors encountered when attempting
to import a row will be saved to the CSV copy.
6.14 Exporting Items
The EBI can be used for exporting metadata and attachments from EQUELLA. This is done by checking
Options tab -> Export Items as CSV. In this mode the EBI will re-label the Test Import and Start Import
buttons as Text Export and Start Export respectively.
When the Start Export button is clicked EBI will iterate through items in EQUELLA, populating the loaded
CSV and downloading attachment files as it goes. Attachment files will be downloaded to the CSV folder
or the folder specified in the base path in Options.
You can export item IDs and item versions by including columns with a column data type of “Item ID”
and “Item Version” respectively.
6.14.1 Exporting a Subset of Items
By default all live items in the collection specified on the Connection tab will be exported. Any preexisting rows in the CSV will be erased (except the header row). Row filters (see section 6.8 Importing
Select Rows from Your CSV, page 57) can be used to limit the number of items exported.
If a Collection column is provided in the CSV then all collections in the EQUELLA institution will be
exported and the collection column will be populated with collection names.
A subset of items from the specified collection(s) can be exported by specifying a WHERE clause in
Options tab -> WHERE clause.
65
Figure 79. Using a WHERE clause to export a defined set of items
A full description of EQUELLA’s WHERE clause syntax is provided in section 7.2 Appendix B: EQUELLA
WHERE Clause Syntax, page 78.
By default only live items are exported. By checking Options tab -> Include non-live items items of any
status will be exported.
6.14.2 Using Identifiers to Export Individual Items
Source Identifiers (see section 6.9.1 Updating Existing Items using Source Identifiers, page 58) and
Target Identifiers (see section 6.9.2 Updating Existing Items using Target Identifiers, page 60) can be
used for selecting individual items for export based on IDs (item IDs or custom IDs) specified in the CSV
(see figures below).
Figure 80. An example of a CSV for exporting items from EQUELLA based on Source Identifiers
66
Figure 81. An example of a CSV for exporting items from EQUELLA based on Target Identifiers
If using Source Identifiers with a “Collection” column it is possible to export items from more than one
collection in the one run (the Collection drop-down will be ignored). If using Target Identifiers, items can
be exported from any collection in the one run regardless of the presence of a “Collection” column.
By default, when using Source Identifiers or Target Identifiers only live items will be exported. However,
by using Target Versions items of any status can be exported. For more information about Target
Versions see section 6.9.3 Targeting Particular Item Versions, page 61. Alternatively, checking Options
tab -> Include non-live items the highest version of the matching item will be exported regardless of its
status.
6.14.3 Conflicting Filenames
When exporting attachments, files from different items may have the same names and since EBI exports
all files into the same folder there may be filename conflicts. Options tab -> Filename Conflicts allows
you to decide what EBI should do in such cases. The options are the following:
Option
"Do not overwrite any files"
"Overwrite files in target folder"
"Overwrite files with same names"
Effect
EBI will create subfolders if it encounters any same-named
named files in the target folder (DEFAULT BEHAVIOR)
EBI will overwrite any same-named files in the target folder
existing prior to export and create subfolders for same-named
files it has downloaded in the current export run
EBI will overwrite all files of the same names regardless if they
existed in the target folder prior to export or from previous items
in the same export run
6.14.4 Limitations in the Export Function
For simple content the export capability will produce a CSV that can be used, without any modifications,
for re-importing content back into EQUELLA. However, EBI’s CSV export function does not support some
of the more advanced EBI features. Features not supported (i.e. not exportable) are the following:
-
EQUELLA Resources (EQUELLA resource attachments are not supported)
Custom Attachments (only simple files, SCORM, IMS and zip files are exportable)
67
XML fragments and XPath indexes should be used with care. Whilst the export function supports both of
these features complex metadata that uses “intertwined” XML fragments and XPaths may require some
testing and fine-tuning to support smooth, repeatable two-way import/export of content between a CSV
and EQUELLA.
6.15 Expert Scripting
For those comfortable with programming, the EBI supports powerful scripting capabilities called Expert
Scripts. Amongst other uses, Expert Scripts allow you to precisely control how CSVs are interpreted for
import into EQUELLA and how EQUELLA items are parsed and formatted for export out of EQUELLA.
Expert Scripts are configured by clicking the Expert Script buttons in the Options tab (see Figure 82).
Figure 82. Configuring Expert Scripts in Options
There are four types of Expert Script that can be written:
Start Script – This script is executed by the EBI before processing any rows or items. It is only
executed once for each test or real run. It could be used, for example, performing a custom
validation of the CSV prior to import.
Row Pre-Script – This script is executed on every row imported or every item exported. It is
executed as soon as a row or item is read from EQUELLA and before any processing by the EBI. It
could be used, for example, pre-processing the row data of the CSV prior to the EBI converts the
data to item XML.
Row Post-Script – This script is executed on every row imported or every item exported. It is
executed after a row or item is read from EQUELLA and processed by the EBI but prior to being
added to EQUELLA (or a CSV during export). It could be used, for example, adjusting the XML
produced by the EBI prior to uploading to EQUELLA.
End Script – This script is executed by the EBI after processing all rows or items. It is only
executed once for each test or real run. It could be used, for example, producing a custom
outcome report of the import or export.
68
Figure 83 below shows at which point in a process run (import or export) that each script is executed by
the EBI.
Yes
Finished
processing
all Rows or
Items?
Submit Item to
EQUELLA
Or
Export row to
CSV
No
Fetch next CSV
row to import
Or
Fetch next item
to export
Start Import
or Export
Start
Script
Row
PreScript
Import
Or
Export
Loop
Row
PostScript
End
Script
Processing
Complete
Convert CSV row
to item XML
Or
Convert item
XML to CSV row
Figure 83. The context of each type of Expert Script during an EBI import or export run
EBI Expert Scripts are written in the Python programming language (http://www.python.org). As well as
the standard Python libraries, Expert Scripts have a number of objects available to them for reading and
writing data as well as controlling and viewing the process flow of the EBI. A complete reference for the
EBI’s Expert Scripting object model is provided in Appendix C: Expert Scripting Object Model, page 81).
Examples Expert Scripts are provided in Appendix D: Expert Script Examples, page 85.
6.16 Command Line Operations
The EBI can be started non-visually from a command prompt based on the settings in a settings file (see
section 6.11 Saving Your Settings, page 63). In non-visual mode the EBI suppresses the main form and
runs using the settings from a settings file. This can be useful for running the EBI as a scheduled task
(e.g. a cron job or a Windows Scheduler task).
6.16.1 Windows
The settings filename can be expressed as a relative path from your current directory.
Command
ebi.exe –start <settings filename>
Behavior
Run an import non-visually
ebi.exe –test <settings filename>
Run a test import non-visually
ebi.exe <settings filename>
Open the EBI visually
6.16.2 Macintosh
The settings filename must be expressed as a full absolute path. Treat the ebi package as a directory
with filename ebi.app.
69
Command
ebi.app/Contents/MacOS/ebi –start <settings filename>
Behavior
Run an import non-visually
ebi.app/Contents/MacOS/ebi –test <settings filename>
Run a test import non-visually
ebi.app/Contents/MacOS/ebi <settings filename>
Open the EBI visually
6.16.3 Linux
Make certain that Python is installed and in your path environment variable. The settings filename can
be expressed as a relative path from your current directory.
Command
python ebi.py –start <settings filename>
Behavior
Run an import non-visually
python ebi.py –test <settings filename>
Run a test import non-visually
python ebi.py <settings filename>
Open the EBI visually
Note: Even in command line mode the EBI requires a graphical user interface (GUI) or desktop
environment be present in Linux.
6.16.4 Examples
Starting an import run non-visually on Macintosh:
ebi.app/Contents/MacOS/ebi -start /Users/jimk/Documents/training_load.ebi
Starting a test import run non-visually on Windows:
ebi.exe -test "c:/my documents/test run.ebi"
Launching the EBI visually with a settings file loaded on Linux:
python ebi.py work_in_progress.ebi
70
7 Appendices
7.1 Appendix A: Tips and Troubleshooting
7.1.1
General Tips
7.1.1.1 Getting Started
The EBI works well when configured correctly but if you are using it for the first time it can take some
time and effort to get the CSV and settings exactly right.
The best approach is to start with a simple upload of a handful of files or hyperlinks with say nothing
more than a couple of metadata fields (e.g. title and description). This can be done by following the
quick start guide in section 3 Quick Start Guide, page 11.
Once you have a simple upload working gradually add additional and more complex metadata and
content. Before using advanced features carefully read the relevant sections of this manual.
7.1.1.2 Microsoft Excel®
An excellent tool for producing CSV files is Microsoft Excel®. Use Microsoft® Excel’s “Save As…”
command and set “Save as type” to “CSV (Comma delimited)(*.csv)”.
Figure 84. Using Microsoft Excel® to produce a CSV file
Among other benefits, CSV files produced by Excel automatically have the necessary formatting for
handling commas.
In some errors the EBI identifies columns by their position number. For convenience, you can configure
Excel to display numerical column headings rather than alphabetic.
71
Figure 85. Microsoft® Excel configured to display numeric column headings
This is done by checking the “R1C1 reference style” setting found in Office Button -> Excel Options ->
Formulas in Excel 2007 and Tools -> Options -> General tab in Excel 2003.
Figure 86. Setting Microsoft® Excel to display numberic column headings
7.1.2 Troubleshooting
Below are some common problems and corresponding solutions.
7.1.2.1 The EBI’s main screen fails to launch
1. Make certain you are not using the –start or –test command line arguments
2. Make certain that you have installed (i.e. extracted or copied the ebi folder/package) to a
location that has read/write privilege
7.1.2.2 The EBI says it successfully imported items but I can’t find them in EQUELLA
1. Ensure that you are performing a real run using “Start Import” and not a test run using “Test
Import”
2. When looking for your freshly imported items check that your user account has the necessary
privileges to the EQUELLA collection. Your account will need at least DISCOVER_ITEM and
VIEW_ITEM privileges to find the items in EQUELLA. See the EQUELLA Security Guide for more
information.
3. Verify that the items are not in workflow moderation. If the collection that you imported into
has a workflow template applied to it then items will likely be created with a status of
“Moderating” and won’t appear in standard searches.
7.1.2.3 Item titles and descriptions are not displaying properly in EQUELLA
1. When viewing your imported items in EQUELLA they may appear without a title or description
and instead the titles may be displayed as the UUID of the item (See Figure 87):
72
Figure 87. Item titles incorrectly appearing as UUIDs and descriptions missing entirely
This is caused by failing to populate the special Resource Name Path and Resource Description Path
nodes of the item’s XML. These special nodes are set in the EQUELLA schema configuration via the
EQUELLA Admin Console.
To correct the problem, first look up in the EQUELLA Admin Console the XPaths for the Resource
Name Path and Resource Description Path of the schema used by the collection you are attempting
to populate (see Figure 88).
Figure 88. Where to find the XPaths of the nodes to update to set an item’s name and description
Now check that the XPaths in the column headings of your CSV for your titles and descriptions
match these values (minus the leading forward slash).
In the example of Figure 88 Resource Name Path is configured as /metadata/title and Resource
Description Path is set to /metadata/description. A corresponding CSV should use these
XPaths (minus the leading forward slash) in the column headings for the title and description
columns such as in the example CSV in Figure 89 below.
73
Figure 89. An example CSV with column headings correctly specified to populate the schema of Figure 88
7.1.2.4 The EBI can’t find my attachments
1. Make certain that the column with the attachment paths is correctly set as “Attachment
Locations” for its Column Data Type.
2. If the paths to the attachments in the csv are absolute paths (e.g. c:\my
documents\attachments\FordEscape.jpg) double-check that they are correct.
3. If the paths to the attachments are relative paths make certain they are relative to the folder
your CSV file is in. For example, if an attachment path is specified as
attachments\FordEscape.jpg then the attachments folder must be a subfolder of the
folder the CSV file is in.
4. If you have multiple attachments per item and CSV row make certain that you have specified a
delimiter
7.1.2.5 Attachments aren’t appearing in my items (yet no errors)
1. Ensure that the column in your CSV where you specify the file names has a Column Data Type of
“Attachment Locations”.
7.1.2.6 Attachments are not appearing in the EQUELLA wizard
1. If the attachments appear in the item display page but not in the wizard then custom metadata
referencing the attachments is missing. Ensure that the column heading of the Attachment
Locations where the files are specified in the CSV uses an XPath that matches a metadata target
of an Attachments Control in the wizard (see Figure 90).
Figure 90. The XPath of an Attachments Locations column or a URLs column should match the metadata target of the
Attachments control in the corresponding collection wizard
74
7.1.2.7 I’m receiving the error “CSV headings do not match the settings”
1. This error occurs when the column headings in the CSV file differ to the column headings in the
EBI’s main form. This usually occurs because the CSV columns have been modified or rearranged
since it was last loaded into the EBI. This can be rectified by either
a. clicking the Reload CSV button and selecting “Yes”. This allows the EBI to update the
column settings to match the CSV, or
b. modifying the CSV so that it matches the columns in the EBI’s main form
7.1.2.8 I’m receiving the error “'utf8' codec can't decode byte”
1. This error occurs when the wrong encoding is being used to read the CSV file. Try changing the
encoding to “latin1” and re-running the import (see section 5.1.5 Special Characters and File
Encoding, page 22)
7.1.2.9 Special characters are imported incorrectly into EQUELLA
1. This can occur when the wrong encoding is being used to read the CSV file. Try changing the
encoding and re-running the import (see section 5.1.5 Special Characters and File Encoding,
page 22)
7.1.2.10 The EBI errors trying to upload file attachments
1. If you receive the following error: “ERROR parsing Full resolution: [Errno 2] No such file or
directory” and you are running the EBI on Linux, Unix or Macintosh ensure that you are using
forward slashes in your file paths (“/”).
7.1.2.11 A column of metadata won’t import into my item yet there is no error
1. Make certain that the column’s Column Data Type has been specified as “Metadata” in the
EBI’s main form.
7.1.2.12 My multi-value field is not being split into separate fields in EQUELLA
1. Double check that this problem is actually occurring. Multi-value fields are only fully displayed in
an EQUELLA wizard if a multi-value control (e.g. a shuffle list control) is mapped to the metadata
field. A non-multi-value control such as an edit box will only display the first value.
The best way to verify if your multi-value metadata is imported correctly is to either use a
custom display template or directly view the item’s underlying metadata.
2. Check that you have specified the correct delimiting character or string for the column in the
EBI:
75
Figure 91. Check that the multi-value columns have been correctly specified
3. Make certain that you are not attempting to split an attribute field. XML does not allow
attributes to be repeated. An attribute field’s last node will start with an “@” symbol (e.g.
item/itembody/@identifier).
7.1.2.13 Existing items won’t update using source identifiers
1. Make certain the source identifier field in the EQUELLA schema is indexed for power searches
2. Make certain that the Source Identifier field in the EBI is set for the column where the source
identifiers exist in your CSV
3. Make certain that the column heading of source identifiers column in your CSV is an XPath that
matches the tag or attribute in the EQUELLA schema where the source identifiers are stored in
EQUELLA.
4. Make certain that you are uploading the items into the correct collection
5. Make certain that the items are live. Only live items can be updated with source identifiers.
Remove any workflow templates from the collection before doing an initial import or use target
identifiers instead of source identifiers.
7.1.2.14 Only one IMS package is appearing on the item even though more are specified
1. EQUELLA supports only one IMS package per item. If more than one IMS package is specified in
the row (and IMS or AUTO is specified in the command options) only the last IMS package will
be imported.
7.1.2.15 I’m receiving the error: “org.xml.sax.SAXParseException: The content of elements must
consist of well-formed character data or markup.”
1. EQUELLA is rejecting the XML document formed from the CSV metadata and column headings.
This often happens when column headings have invalid XPaths (e.g. element names that start
with numbers).
To determine where the exact problem lies try saving sample test XML files (to learn how to do
this see section 6.7 Testing Your Import, page 55) and viewing the file in a browser.
76
7.1.2.16 I’m receiving an error containing the text: “EQUELLA returned the following script
error:”
1. EQUELLA is unable to create or update the item sent from the EBI due to an EQUELLA expert
script error in the EQUELLA collection configuration. The text following the error should indicate
what the actual script error is. For example:
15:49:02: ERROR uploading file: EQUELLA returned the following script
error: Can't find method com.tle.web.scripting.impl.ItemScriptWrapper
.getItem(java.lang.String).
Examine and debug the expert script in the EQUELLA Admin Console. This is easier if you are
able to reproduce the error in an EQUELLA contribution wizard.
77
7.2 Appendix B: EQUELLA WHERE Clause Syntax
An WHERE clause allows you to query on specific schema fields in EQUELLA that have been configured
to be indexed for Power Searches. For those familiar with database queries, an EQUELLA WHERE clause
is very similar to the WHERE clause of an SQL query.
7.2.1 Simple WHERE Clause
At a minimum, a WHERE Clause must start with a “WHERE” keyword and followed by an XPath, a
comparison operator and, typically, a comparison value:
WHERE [XPath] [comparison operator] [comparison value]
Example:
WHERE /xml/meta/color is 'blue'
The four components of the statement should be separated by whitespace such as spaces, tabs or
linefeeds.
Comparison Operator
The following comparison operators are available:
Comparison
operator
is
is not
like
not like
in
not in
>
<
Purpose
For matching against string comparison values
For returning all results that do not match against a string comparison value
For matching against strings. Can utilize the ‘*’ wildcard operator within
strings or on the end of strings
For returning all results that do not match against the specified LIKE
comparison
For matching against any members of a group of comparison values
For returning all results that do not match any of members in a group of
comparison values
For returning results where a date field is later than a comparison date value
For returning results where a date field is earlier than a comparison date
value
Comparison Value
Comparison values are surrounded in single quotes such as:
'blue houseboat'
They can contain an asterisk symbol (‘*’) which is used in conjunction with a LIKE comparison operator,
for example:
WHERE /xml/meta/name LIKE 'blue house*'
78
A group of comparison operators can be formed with parenthesis and commas and compared to with an
IN operator. For example:
WHERE /xml/meta/status IN ('published', 'under review', 'in development')
7.2.2 Check if a Schema Field Exists
You can return items where a field exists with an EXISTS keyword, e.g.:
WHERE /xml/meta/is_complete EXISTS
The converse statement is as follows:
WHERE NOT /xml/meta/is_complete EXISTS
7.2.3 Combining Multiple Statements
By using the keywords AND and OR and by using parenthesis multiple statements can be combined to
either narrow down searches or broaden searches
Example 1:
WHERE /xml/meta/name LIKE 'blue house*' OR
/xml/meta/color is 'blue'
Example 2:
WHERE /xml/meta/name LIKE 'blue house*' AND
/xml/meta/status IS 'published'
Example 3:
WHERE (/xml/meta/name LIKE 'blue house*' OR
/xml/meta/color is 'blue')
AND /xml/meta/status IS 'published'
7.2.4 Full Syntax Reference
Following is a reference for the full syntax of WHERE Clauses in EQUELLA described in Wirth syntax
notation (WSN):
79
WHERE STATEMENT
BOOLEAN_EXPR
OR_BOOLEAN_EXPR
AND_BOOLEAN_EXPR
CLAUSE
BRACKETS
COMPARISON
EXISTS_CLAUSE
XPATH
COMPARISON_OP
::=
::=
::=
::=
::=
::=
::=
::=
::=
::=
COMPARISON_RHS
STRING_VALUE
NUMBER_VALUE
GROUP_VALUE
STRING
ALPHA
NUMBER
::=
::=
::=
::=
::=
::=
::=
"where"? BOOLEAN_EXPR
OR_BOOLEAN_EXPR
AND_BOOLEAN_EXPR ("or" AND_BOOLEAN_EXPR)*
CLAUSE ("and" CLAUSE)*
"not" CLAUSE | BRACKETS | COMPARISON | EXISTS_CLAUSE
"(" BOOLEAN_EXPR ")"
XPATH COMPARISON_OP COMPARISON_RHS
XPATH "exists"
"/" (ALPHA | NUMBER | [/._:@])+
"=" | "is" | "<>" | "is not" | "<" | "<=" | ">" | ">=" |
"like" | "not like" | "in" | "not in"
"null" | NUMBER_VALUE | STRING_VALUE | GROUP_VALUE
"'" STRING "'"
NUMBER+
"(" STRING_VALUE ("," STRING_VALUE)* ")"
(ALPHA | [0-9] | ...)*
[a-zA-Z]
[0-9]
80
7.3 Appendix C: Expert Scripting Object Model
The EBI supports scripts called “Expert Scripts” to be written to control the processing of data beyond
what is available through the CSV and EBI settings. For more information about EBI scripting see section
6.15 Expert Scripting, page 68.
Following is the complete EBI scripting object model reference.
Object
action
Allowed
Contexts
Row Pre-Script
(import only)
Row Post-Script
(import only)
Description
Integer (read-only). Indicates if a new item being created or an
existing item is being edited, new-versioned or deleted. Can be
compared to the constants NEWITEM, EDITITEM, NEWVERSION
and DELETEITEM e.g.
if action == NEWITEM:
logger.log("We’re creating a new item!")
collection
All scripts
columnHeadings
csvData
ebi
All scripts
All scripts
All scripts
String (read-only). Returns the collection name specified in the EBI
main screen.
List. A list of the column headings of the CSV.
List. A complete representation of the CSV file as a list of lists.
Object. Has the following members:
ebi.csvFilePath() – For reading and setting the absolute path
of the CSV.
ebi.loadCsv() – Reloads the CSV.
ebi.basepath() – For reading and setting the absolute basepath
for attachments.
errorCount
All scripts
imsmanifest
Row Post-Script
(import only)
institutionUrl
itemId
All scripts
Row Pre-Script
(export only)
Integer (read-only). The number of items attempted to be imported
or exported but failed. Does not include the current one being
processed even if it results in an error.
XmlScriptType (read-only). The imsmanifest of SCORM and IMS
package attachments. Its value is None if neither an IMS nor a
SCORM package attachment is specified in the CSV row.
String (read-only). Returns the EQUELLA institution URL.
String (read-only). Item UUID of the current item being imported or
exported.
Row Post-Script
Row Pre-Script
(export only)
String (read-only). Item version of the current item being imported
or exported.
itemVersion
Row Post-Script
81
logger
All scripts
Object (read-only). For outputting to the console and the log files. It
has only one method, log(text, display=True, log=True).
The parameters display and log decide if the output should be to
the console and/or log files. E.g. the following example would log
only to the log files:
logger.log("Hello world!", False)
mode
All scripts
Integer (read-only). Indicates if the process run is an export or an
import. Can be compared to the constants EXPORT and IMPORT
e.g.
if mode == IMPORT:
logger.log("Excuse me, we’re importing here!")
process
All scripts
Object (read-only). For controlling the flow of the import or export
run. Has the following members:
process.halt() – Halts the entire run as soon as the script is
complete.
process.skip() – Skips the current row (import) or item
(export).
process.halted – Boolean (read-only). Indicates if the process is
rowCounter
rowData
Row Pre-Script
Row Post-Script
End Script
Row Pre-Script
(import only)
Row Post-Script
sourceIdentifierIndex
All scripts
successCount
All scripts
targetIdentifierIndex
All scripts
targetVersionIndex
All scripts
testOnly
username
All scripts
All scripts
vars
All scripts
scheduled to be halted.
Integer (read-only). The position of the row in the CSV that is
currently being processed.
List. An array of a single row as read from the CSV during export or
as produced by the EBI during import and prior to writing to CSV.
Modify the contents to adjust the calculated row data in an export
or receipts file or for pre-processing row data prior to conversion to
XML during an import.
Integer (read-only). Index of the source identifier column. -1 if none
specified.
Integer (read-only). The number of items successfully imported or
exported not including the current one being processed.
Integer (read-only). Index of the target identifier column. -1 if none
specified.
Integer (read-only). Index of the target version column. -1 if none
specified.
Boolean (read-only). Indicates if the process run is a test run only.
String (read-only). Returns the username that the EQUELLA
connection was established with.
Dictionary. A general purpose dictionary cleared at the
commencement of each run and persisted through each run. Made
available to scripts for passing parameters between scripts and
rows/items.
82
xml
Row Pre-Script
Row Post-Script
xmldom
Row Pre-Script
Row Post-Script
XmlScriptType. A wrapper to xmldom (see below). Same data as
xmldom but with many helper functions. See xml Object Reference
below for a complete reference.
xml.dom. The standard Python xml parser loaded with item XML.
XML as produced by the EBI during import (prior to submitting to
EQUELLA) or item XML of the current item in EQUELLA being
exported (prior to conversion to row data).
See http://docs.python.org/2/library/xml.dom.html for the
complete object reference.
A handy function for debugging is xmldom.toprettyxml() which
returns a formatted, indented string representation of the XML
document.
7.3.1 xml Object Reference
The xml object is a variable of type XmlScriptType. It is similar in functionality to the xml object
available in EQUELLA scripting but with slightly different method names.
Technically XmlScriptType is a wrapper to the fully-featured Python library xml.dom with additional
helper functions to simplify common tasks.
Below are the methods of xml and other XmlScriptType objects.
Member
createNode(xpath, value)
document
getNodes(xpath, string=True)
getNode(xpath)
getSubtree(xpath)
getSubtrees(xpath)
Description
Creates an element or attribute at the specified XPath with the
text value supplied. Creates the path as required.
The xml.dom.Document that is wrapped by the XmlScriptType
If string=True:
List of Strings. A list comprising of each text value found at
every matching element or attribute.
If string=False:
List of xml.dom.node. A list comprising of each matching
xml.dom.node (element or attribute).
String. Returns the text value of the element or attribute.
XmlScriptType. Returns an XmlScriptType (same type as xml) if
an element is found at the given XPath (otherwise returns
None).
List. Returns a list of XmlScriptTypes (same type as xml)
matching the given XPath. Can be used as follows:
for dog in xml.getSubtrees("meta/dogs/dog"):
logger.log(dog.getNode("name"))
logger.log(dog.getNode("breed"))
Note: this method replaces the deprecated function
iterate()
83
newSubtree(xpath)
removeNode(xpath)
root
nodeCount(xpath)
nodeExists(xpath)
setNode(xpath, value)
XmlScriptType. Creates and returns an XmlScriptType (same
type as xml) at the given XPath.
Removes all matching elements and attributes.
The root element xml.dom.Node of the underlying document
xml.dom.Document
Integer. Returns the number of attributes or elements found
matching the given XPath.
Boolean. Indicates if an element or attribute exists at the given
XPath.
Sets an element or attribute at the specified XPath with the
text value supplied. Creates the path as required.
The context of the XPaths in the methods are at the root element of the documents (/xml in the case of
EQUELLA item XML). The xpath parameter used in the methods support only some of the W3C XPath
1.0 specification. XPath support is detailed in 7.5 Appendix D: XPath 1.0 Support (Limited), page 90. Note
that elements are indexed starting at 1 not 0.
The methods createNode() and setNode() will create the necessary elements for the entire XPath if
they are not present. The methods do this by creating the necessary subtree starting from the last
existing node in the XPath. For example if /xml/item already exists in the metadata then an XPath of
/xml/item/role/author would see the nodes <role> and <author> created under the existing
<item> node.
84
7.4 Appendix D: Expert Script Examples
Following are some simple EBI Expert scripts examples. See section 6.15 Expert Scripting, page 68 for
more information about Expert Scripts.
7.4.1 Example: Mapping Ordinary CSV Headings to XPaths
Suppose that the CSV for import into EQUELLA is regularly exported from another system and has the
following column headings:
Figure 92. Example of CSV with arbitrary column headings (i.e. not XPaths)
Now suppose that the columns are to be mapped to the following schema fields in your EQUELLA
institution:
ID
Title
Description
Keywords
URL
Figure 93. Example of a “map” of arbitrary column headings in a CSV to a schema’s nodes
You could of course manually update the columns in your CSV to match the XPaths of the schema.
However, if the same CSV is regularly exported from the source system for import into EQUELLA this can
be a tiresome and error-prone task.
An alternative is to use a Start Script to automatically map the column to XPaths prior to each import.
1. Add the following script in the Start Script:
85
# map of CSV columns to schema XPaths
columnMap = {
"ID":"metadata/@sourceidentifier",
"Title":"metadata/name",
"Description":"metadata/description",
"Keywords":"metadata/keywords/keyword",
"URL":"metadata/urls/url",
}
for pos, heading in enumerate(columnHeadings):
if heading in columnMap:
columnHeadings[pos] = columnMap[heading]
2. Update the columnMap dictionary as appropriate for your CSV and schema:
3. Run the import
The above script will work for EBI exports as well.
7.4.2 Example: Transforming CSV Data Values
Even when the column headings map correctly to EQUELLA metadata, sometimes the actual data
provided in CSV cells require transformation and Expert scripts can be used. For example, suppose an
EQUELLA collection and schema expects the field /xml/metadata/subject populated by one of the
following values:
Figure 94. Values expected by EQUELLA
However, suppose that the CSV provided (perhaps a report/export from another system) instead uses
the values “MATH”, “SCI”, “LANG” ENG” and “SS”:
Figure 95. Values provided in the CSV and requiring transformation
The following examples show how the data itself can be transformed during the import process using
one of two approaches: either with a Row Pre-Script or with a Row Post-Script.
86
Approach A: Using a Row Pre-Script
The following script meets the requirement by converting the raw values in the “metadata/subject” cell
to the values configured in the EQUELLA collection each time a row is read from the CSV. This occurs
prior to the EBI converting the row data to XML and uploading to EQUELLA.
1. Add the following script in the Row Pre-Script:
value = rowData[columnHeadings.index("metadata/subject")]
if value == "MATH":
value = "Mathematics"
elif value == "SCI":
value = "Sciences"
elif value == "LANG":
value = "Languages"
elif value == "ENG":
value = "English Language Arts"
elif value == "SS":
value = "Social Sciences"
rowData[columnHeadings.index("metadata/subject")] = value
2. Run the Import
Approach B: Using a Row Post-Script
Using the following Row Post-script, each time a row is read from the CSV, as per usual EBI will first
convert the row data to XML. The script will then convert the values in the XML at
“/xml/metadata/subject” to the values configured in the EQUELLA collection prior to the EBI uploading it
into EQUELLA.
1. Add the following script in the Row Post-Script:
value = xml.getNode("metadata/subject")
if value == "MATH":
value = "Mathematics"
elif value == "SCI":
value = "Sciences"
elif value == "LANG":
value = "Languages"
elif value == "ENG":
value = "English Language Arts"
elif value == "SS":
value = "Social Sciences"
xml.setNode("metadata/subject", value)
2. Run the Import
87
7.4.3 Example: Including a Column of Absolute Item URLs in an Export
Supposing you wish to include the absolute URL of each item in an export. The URL of an item is not
included in an item’s metadata but is producible with EBI Expert scripts.
In the following script each time an item is read from EQUELLA, as per usual EBI will first convert the
XML to row data. The script will then populate the cell with the column heading of “Item URL” with the
item URL (calculated in the first line of the script) prior to the EBI outputting the row data to the CSV file.
1. Add a column to your CSV headed “Item URL”
2. Set it’s datatype to “Ignore”
3. Add the following script in the Row Post-Script:
itemUrl = "%s/items/%s/%s" % (institutionUrl, itemId, itemVersion)
rowData[columnHeadings.index("Item URL")] = itemUrl
4. Run the export
7.4.4 Example: Including a Column of Attachment UUIDs in a Receipts file
With Expert scripts it is possible to write data to a Receipts file (for more about Receipts files see section
6.13 Saving Item IDs of Imported Items, page 64). In this example, a Row Post-script is used to populate
an empty column in a Receipts file with resulting attachment UUIDs.
1. Add an empty column with the heading "Attachment UUIDs" to the CSV and set its column
datatype to "Ignore"
2. Make certain another column empty is set as a Receipts column
3. Add the following script in the Row Post-Script:
attachmentUUIDs = []
for attachment in xml.iterate("item/attachments/attachment"):
attachmentUUIDs.append(attachment.getNode("uuid"))
rowData[columnHeadings.index("Attachment UUIDs")] = "|".join(attachmentUUIDs)
4. Run the import
7.4.5 Example: Dynamically Controlling Where Attachments are Exported to
When exporting all local attachments are downloaded to the attachments basepath (specified on the
Options tab, CSV folder by default). You can, however, specify the basepath in an expert script by setting
ebi.basepath.
In the following scripts each time an item is read from EQUELLA, the Row Pre-Script will calculate the
preferred location of the local attachment, in this case a subfolder of the attachments basepath based
on subject metadata. After EQUELLA has exported the item’s file the Row Post-Script will modify the
filepath exported to the CSV to each local attachment to reflect the subfolder it is located in.
88
1. Add the following script in the Row Pre-Script:
import os
# determine name of sub folder in basepath to export attachments to
subject = xml.getNode("metadata/subject")
if subject == "Geological":
vars["folder"] = "geology"
elif subject == "Plants":
vars["folder"] = "plants"
elif subject == "Animals":
vars["folder"] = "animals"
else:
vars["folder"] = "other"
# save original basepath
vars["unmodifiedBasepath"] = ebi.basepath
# modify basepath to include sub folder
ebi.basepath = os.path.join(ebi.basepath, vars["folder"])
2. Modify the code to calculate vars["folder"] as needed
3. Add the following script in the Row Post-Script:
import os
# modify attachment location to include subfolder in path
rowData[columnHeadings.index("metadata/files/file")] =
os.path.join(vars["folder"],
rowData[columnHeadings.index("metadata/files/file")])
# restore basepath to original basepath
ebi.basepath = vars["unmodifiedBasepath"]
4. Adjust the XPath to reflect where attachment locations are specified in the CSV tab
5. Run the export
89
7.5 Appendix D: XPath 1.0 Support (Limited)
The EBI supports a limited subset of XPath 1.0 and XPath 2.0 functions. The supported XPath features
are listed below. Note that elements are indexed starting at 1 not 0.
Operators
/
//
.
..
[
]
*
@*
node()
text()
=
!=
<
>
<=
>=
+
(
)
Functions
string(object)
true()
false()
not(boolean)
position()
last()
upper-case(string)
lower-case(string)
substring(string, start)
substring(string, start, length)
starts-with(string, string)
ends-with(string, string)
contains(string, string)
concat(string, string, ...)
(NOTE: two or more parameters required)
name()
name(node)
(NOTE: must be surrounded by spaces)
7.5.1 Examples of Supported XPaths
Comparisons
people/person[name[@type='first'] > 'M']/name
people/person[name[@type='first'] < name[@type='last']]/name
people/person[@id<2 and @year='2015']/name
people/person[name[@type='last']='Smith' or name[@type='first']='Sue']/name
vehicles/vehicle[make]/model
Functions
vehicles/vehicle[not(year='2010')]/model
people/person[@id='1']/name[text() > 'M']
people/person[position()=2]/name
vehicles/vehicle[upper-case(make)='HONDA']/@id
vehicles/vehicle[substring(make,2)='onda']/model
vehicles/vehicle[substring(make, 2, 3)='ond']/model
vehicles/vehicle/model[string-length()=5]
vehicles/vehicle[starts-with(lower-case(make), 'hon')]/model
vehicles/vehicle[contains(model, 'ond')]/@id
vehicles/vehicle[concat(@id,make,model)='7372HondaCivic']/@id
90
Arithmetic
people/person[7 - (last() - 3) = position()]/name
people/person[substring(name[2], string-length(name[2]) - 2, 3)='vis']/name
NOTE: minus (-) symbol must be surrounded by spaces
Context and Wildcards
people/person[1]/*[last()]
//@id
people/person/name[text()='Bob']
/doc/people/person[1]//@*[contains(., 'i')]
/doc//node()[contains(lower-case(.), 'f')]
people/person[1]/person/../../person[2]/@id
91
7.6 Appendix E: Global Settings
The EBI has global settings that control the overall behavior of the application. Some global settings can
be changed in the Preferences dialog inside the application (see section 6.12 Setting Preferences, page
63).
Global settings are stored in the ebi.properties file located in the EBI’s application folder on
Windows and Linux and in ebi.app/Content/Resources/lib on Macintosh. If this file is not present
when the EBI is first launched the EBI will automatically create it. Each global setting is of the form
<settingname> = <value> and must be specified under a section of the form [sectionname]. For
example:
[State]
settingsfile = C:\Users\jim\Documents\Upload_test.ebi
[Configuration]
loadlastsettingsfile = True
attachmentmetadatatargets = True
If a global setting is not present in ebi.properties a built-in default value is used. The EBI loads the
global settings into memory upon launch. Thus, though changes to the global settings file can be made
whilst the EBI is running the changes will only take effect when the EBI application is re-launched (i.e.
shut down and restarted). Changes made to global settings via the Preferences dialog do not require a
restart.
The following settings are available:
Section
Default Value
loadlastsettingsfile
Global Setting
[Configuration]
False
Debug
[Configuration]
False
attachmentchunksize
[Configuration]
2097152
networklogging
[Configuration]
False
Purpose
If this setting is set to True, when
launched visually the EBI will
automatically load the settings file
(*.ebi) specified in settingsfile.
When set to True the EBI will output to
the display and log files additional
diagnostic information particularly when
errors occur.
Controls the size (in bytes) of each
“chunk” that attachments are broken up
into during upload. Each chunk is
POSTed as a single HTTP request.
When set to True network diagnostic
information is displayed and recorded in
the log for each HTTP request made to
EQUELLA.
WARNING: log files grow rapidly when
92
attachmentmetadatatargets
[Configuration]
True
scormformatsupport
[Configuration]
True
clearlogeachrun
[Configuration]
False
logbuffersize
[Configuration]
1000
proxyaddress
[Configuration]
(empty)
proxyusername
[Configuration]
(empty)
proxypassword
[Configuration]
(empty)
settingsfile
[State]
(last opened or
saved settings
file)
mainframesize
[State]
(last height and
width of the
main form)
scriptdialogsize
[State]
(last height and
width of the
script dialog)
this setting is in effect, potentially more
than 50Kb per item. To avoid excessively
large log files only use this setting with a
small set of records per run.
When set to False the EBI does not
attempt to create Attachment Metadata
Targets. This can be useful when using
the EBI with EQUELLA 4.1 which does
not support Attachment Metadata
Targets for most attachment-related
wizard controls.
If set to False, when using the “IMS”
and “AUTO” command options the EBI
uploads SCORM packages as simple IMS
packages rather than the SCORM format
utilized in EQUELLA 5.2 and higher.
When checked the EBI will clear the log
prior to starting each test or real run.
This controls the maximum amount of
text displayed in the EBI’s Log tab.
The address of your network’s proxy
server if one is required to connect to
EQUELLA.
The username for basic or digest
authentication with your network’s
proxy server.
The password for basic or digest
authentication with your network’s
proxy server.
This is automatically updated by EBI and
used to determine a default folder for
the Open EBI Settings dialog. There is
typically no need to modify this setting.
This is automatically updated by EBI and
used to determine the default
dimensions of the main form. There is
typically no need to modify this setting.
This is automatically updated by EBI and
used to determine the default
dimensions of the script dialog. There is
typically no need to modify this setting.
93