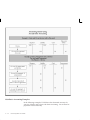
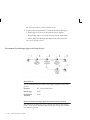
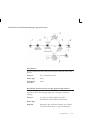
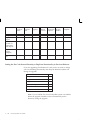
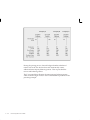
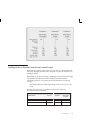
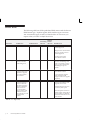
1
Oracle Payables
User Guide
RELEASE 11i
VOLUME 1
April 2000
Oracler Payables User Guide Release 11i
The part number for this book is A81016–02 . To reorder this book, use set part number A81180–02
Copyright E 1988, 2000, Oracle Corporation. All rights reserved.
Primary Author: Christina Ravaglia
Major Contributors: Robert Anderson, Victoria Anderson, Amy Andrews, Janet Coshow, Craig
Jeung, Bervina Lane, Lauren Scott, Lynn Taslitz
Contributors: Christopher Andrews, D. Yitzik Brenman, Frank Colligan, Subir Hira, William Hogan,
Christine Monk, Joseph Murphy, Noela Nakos, Sushma Rathnam, Manish Srivastava
The Programs (which include both the software and documentation) contain proprietary information
of Oracle Corporation; they are provided under a license agreement containing restrictions on use and
disclosure and are also protected by copyright, patent and other intellectual property law. Reverse
engineering of the Programs is prohibited. .
Program Documentation is licensed for use solely to support the deployment of the Programs and not
for any other purpose.
The information contained in this document is subject to change without notice. If you find any
problems in the documentation, please report them to us in writing. Oracle Corporation does not
warrant that this document is error free. Except as may be expressly permitted in your license
agreement for these Programs, no part of these Programs may be reproduced or transmitted in any
form or by any means, electronic or mechanical, for any purpose, without the express written
permission of Oracle Corporation.
If the Programs are delivered to the US Government or anyone licensing or using the Programs on
behalf of the US Government, the following notice is applicable:
RESTRICTED RIGHTS LEGEND
Programs delivered subject to the DOD FAR Supplement are ’commercial computer software’ and use,
duplication and disclosure of the Programs including documentation, shall be subject to the licensing
restrictions set forth in the applicable Oracle license agreement. Otherwise, Programs delivered subject
to the Federal Acquisition Regulations are ’restricted computer software’ and use, duplication and
disclosure of the Programs shall be subject to the restrictions in FAR 52.227–14, Rights in Data ––
General, including Alternate III (June, 1987). Oracle Corporation, 500 Oracle Parkway, Redwood City,
CA 94065.”
The Programs are not intended for use in any nuclear, aviation, mass transit, medical, or other
inherently dangerous applications. It shall be licensee’s responsibility to take all appropriate fail–safe,
back up, redundancy and other measures to ensure the safe use of such applications if the Programs
are used for such purposes, and Oracle disclaims liability for any damages caused by such use of the
Programs.
Oracle is a registered trademark and ConText, Enabling the Information Age, Oracle7, Oracle8,
Oracle8i, Oracle Access, Oracle Application Object Library, Oracle Financials, Oracle Discoverer, Oracle
Web Customers, Oracle Web Employees, Oracle Workflow, Oracle Work in Process, PL/SQL, Pro*C,
SmartClient, SQL*, SQL*Forms, SQL*Loader, SQL*Menu, SQL*Net, SQL*Plus, and SQL*Report are
trademarks or registered trademarks of Oracle Corporation. Other names may be trademarks of their
respective owners.
Contents
VOLUME 1Volume 1 . . . . . . . . . . . . . . . . . . . . . . . . . .
i
Preface . . . . . . . . . . . . . . . . . . . . . . . . . . . . . . . . . . . . . . . . . . . . . . . . . xix
Chapter 1
Payables Overview . . . . . . . . . . . . . . . . . . . . . . . . . . . . . . . . . . . . . .
Payables Overview . . . . . . . . . . . . . . . . . . . . . . . . . . . . . . . . . . . . . . .
Payables Workbenches . . . . . . . . . . . . . . . . . . . . . . . . . . . . . . . .
The Invoice Workbench . . . . . . . . . . . . . . . . . . . . . . . . . . . . . . .
The Payment Workbench . . . . . . . . . . . . . . . . . . . . . . . . . . . . . .
1–1
1–2
1–2
1–5
1–8
Chapter 2
Payables Setup . . . . . . . . . . . . . . . . . . . . . . . . . . . . . . . . . . . . . . . . . .
Setting Up Oracle Payables . . . . . . . . . . . . . . . . . . . . . . . . . . . . . . . .
Payables Setup Steps Summary . . . . . . . . . . . . . . . . . . . . . . . .
Lookups . . . . . . . . . . . . . . . . . . . . . . . . . . . . . . . . . . . . . . . . . . . . . . . .
Distribution Sets . . . . . . . . . . . . . . . . . . . . . . . . . . . . . . . . . . . . . . . . .
Automatic Payment Programs . . . . . . . . . . . . . . . . . . . . . . . . . . . . .
Automatic Payment Programs Window Reference . . . . . . . .
Voucher Numbers and Document Sequences . . . . . . . . . . . . . . . .
Choosing a Set Of Books . . . . . . . . . . . . . . . . . . . . . . . . . . . . . . . . . .
Financials Options . . . . . . . . . . . . . . . . . . . . . . . . . . . . . . . . . . . . . . .
Defining Financials Options . . . . . . . . . . . . . . . . . . . . . . . . . . .
Financials Options Window Reference . . . . . . . . . . . . . . . . . .
2–1
2–2
2–4
2 – 13
2 – 17
2 – 20
2 – 22
2 – 24
2 – 34
2 – 36
2 – 37
2 – 39
Contents
i
Accounting Methods . . . . . . . . . . . . . . . . . . . . . . . . . . . . . . . . . . . . .
Setting up Your Accounting Method . . . . . . . . . . . . . . . . . . . .
Payables Options . . . . . . . . . . . . . . . . . . . . . . . . . . . . . . . . . . . . . . . .
Payables Options Window Reference . . . . . . . . . . . . . . . . . . .
Special Calendar . . . . . . . . . . . . . . . . . . . . . . . . . . . . . . . . . . . . . . . . .
Payment Terms . . . . . . . . . . . . . . . . . . . . . . . . . . . . . . . . . . . . . . . . . .
Payment Terms Window Reference . . . . . . . . . . . . . . . . . . . . .
Signing Limits . . . . . . . . . . . . . . . . . . . . . . . . . . . . . . . . . . . . . . . . . . .
Invoice Tolerances . . . . . . . . . . . . . . . . . . . . . . . . . . . . . . . . . . . . . . .
Invoice Approvals . . . . . . . . . . . . . . . . . . . . . . . . . . . . . . . . . . . . . . .
Invoice Approvals Window Reference . . . . . . . . . . . . . . . . . . .
Interest Rates . . . . . . . . . . . . . . . . . . . . . . . . . . . . . . . . . . . . . . . . . . . .
Expense Report Templates . . . . . . . . . . . . . . . . . . . . . . . . . . . . . . . .
Expense Report Templates Window Reference . . . . . . . . . . .
Tax Recovery Rules . . . . . . . . . . . . . . . . . . . . . . . . . . . . . . . . . . . . . .
Tax Recovery Rules Window Reference . . . . . . . . . . . . . . . . . .
Countries and Territories . . . . . . . . . . . . . . . . . . . . . . . . . . . . . . . . . .
Banks . . . . . . . . . . . . . . . . . . . . . . . . . . . . . . . . . . . . . . . . . . . . . . . . . .
Defining Banks . . . . . . . . . . . . . . . . . . . . . . . . . . . . . . . . . . . . . . .
Defining Bank Accounts . . . . . . . . . . . . . . . . . . . . . . . . . . . . . . .
Defining and Maintaining Payables Payment Documents . .
Banks Window Reference . . . . . . . . . . . . . . . . . . . . . . . . . . . . . .
Bank Accounts Window Reference . . . . . . . . . . . . . . . . . . . . . .
Payment Documents Window Reference . . . . . . . . . . . . . . . .
Bank Validation . . . . . . . . . . . . . . . . . . . . . . . . . . . . . . . . . . . . . . . . . .
Tax Codes . . . . . . . . . . . . . . . . . . . . . . . . . . . . . . . . . . . . . . . . . . . . . . .
Defining Tax Codes . . . . . . . . . . . . . . . . . . . . . . . . . . . . . . . . . . .
Tax Codes Window Reference . . . . . . . . . . . . . . . . . . . . . . . . . .
Withholding Tax Details Window Reference . . . . . . . . . . . . .
Withholding Tax Groups . . . . . . . . . . . . . . . . . . . . . . . . . . . . . . . . . .
Bank Charges . . . . . . . . . . . . . . . . . . . . . . . . . . . . . . . . . . . . . . . . . . .
Withholding Tax Certificates and Exceptions . . . . . . . . . . . . . . . .
Withholding Tax Certificates and Exceptions Window
Reference . . . . . . . . . . . . . . . . . . . . . . . . . . . . . . . . . . . . . . . . . . .
Reporting Entities . . . . . . . . . . . . . . . . . . . . . . . . . . . . . . . . . . . . . . . .
Reporting Entity Window Reference . . . . . . . . . . . . . . . . . . . .
Income Tax Regions . . . . . . . . . . . . . . . . . . . . . . . . . . . . . . . . . . . . . .
Income Tax Regions Window Reference . . . . . . . . . . . . . . . . .
Bank Transaction Codes . . . . . . . . . . . . . . . . . . . . . . . . . . . . . . . . . .
Payment Formats . . . . . . . . . . . . . . . . . . . . . . . . . . . . . . . . . . . . . . . .
Payment Formats Window Reference . . . . . . . . . . . . . . . . . . .
ii Oracle Payables User Guide
2 – 50
2 – 55
2 – 57
2 – 58
2 – 87
2 – 89
2 – 92
2 – 95
2 – 96
2 – 99
2 – 101
2 – 104
2 – 106
2 – 110
2 – 114
2 – 116
2 – 119
2 – 121
2 – 122
2 – 124
2 – 129
2 – 132
2 – 135
2 – 140
2 – 145
2 – 146
2 – 147
2 – 151
2 – 154
2 – 158
2 – 160
2 – 161
2 – 163
2 – 165
2 – 166
2 – 168
2 – 170
2 – 172
2 – 173
2 – 174
Chapter 3
Controlling the Status of Payables Periods . . . . . . . . . . . . . . . . . . .
Closing an Accounting Period . . . . . . . . . . . . . . . . . . . . . . . . . .
Aging Periods . . . . . . . . . . . . . . . . . . . . . . . . . . . . . . . . . . . . . . . . . . .
Setting Up Credit Card Programs . . . . . . . . . . . . . . . . . . . . . . . . . .
Credit Card Code Sets . . . . . . . . . . . . . . . . . . . . . . . . . . . . . . . .
Credit Card Code Sets Window Reference . . . . . . . . . . . . . . .
Credit Card Programs . . . . . . . . . . . . . . . . . . . . . . . . . . . . . . . . .
Credit Card Programs Window Reference . . . . . . . . . . . . . . .
Credit Card GL Account Sets . . . . . . . . . . . . . . . . . . . . . . . . . .
Credit Card Profiles . . . . . . . . . . . . . . . . . . . . . . . . . . . . . . . . . .
Credit Card Profiles Window Reference . . . . . . . . . . . . . . . . .
Credit Cards . . . . . . . . . . . . . . . . . . . . . . . . . . . . . . . . . . . . . . . . .
Credit Cards Window Reference . . . . . . . . . . . . . . . . . . . . . . . .
Credit Card Transaction Employee Workflow . . . . . . . . . . . .
Credit Card Transaction Manager Workflow . . . . . . . . . . . . .
Setting Up Credit Cards Using Web Application Dictionary . . .
Payables Implementation Information . . . . . . . . . . . . . . . . . . . . . .
Customizing Your Supplier Letters . . . . . . . . . . . . . . . . . . . . .
Implementing the Invoice Payments Descriptive Flexfield .
Setting Up Custom Payment Programs . . . . . . . . . . . . . . . . . .
Setting Up Custom Payment Formats . . . . . . . . . . . . . . . . . . .
Using the External Laser Format Payments Program . . . . . .
Customizing Automatic Withholding Tax . . . . . . . . . . . . . . . .
Using the Multiple Organization Support Feature . . . . . . . .
Setting Up Print Styles and Drivers for the Supplier
Mailing Labels Report . . . . . . . . . . . . . . . . . . . . . . . . . . . . . . . .
2 – 178
2 – 179
2 – 182
2 – 184
2 – 187
2 – 188
2 – 189
2 – 191
2 – 192
2 – 193
2 – 194
2 – 197
2 – 197
2 – 198
2 – 206
2 – 215
2 – 217
2 – 217
2 – 220
2 – 221
2 – 225
2 – 227
2 – 230
2 – 231
Suppliers . . . . . . . . . . . . . . . . . . . . . . . . . . . . . . . . . . . . . . . . . . . . . . .
Suppliers . . . . . . . . . . . . . . . . . . . . . . . . . . . . . . . . . . . . . . . . . . . . . . .
Entering Suppliers . . . . . . . . . . . . . . . . . . . . . . . . . . . . . . . . . . . .
Suppliers and Supplier Sites Window Reference . . . . . . . . . . . . . .
Reviewing and Adjusting Suppliers . . . . . . . . . . . . . . . . . . . . . . . .
Finding Suppliers . . . . . . . . . . . . . . . . . . . . . . . . . . . . . . . . . . . .
Reviewing Suppliers . . . . . . . . . . . . . . . . . . . . . . . . . . . . . . . . . .
Adjusting Suppliers . . . . . . . . . . . . . . . . . . . . . . . . . . . . . . . . . .
Identifying Duplicate Suppliers . . . . . . . . . . . . . . . . . . . . . . . . . . . .
Supplier Merge Program . . . . . . . . . . . . . . . . . . . . . . . . . . . . . . . . . .
Supplier Merge Report . . . . . . . . . . . . . . . . . . . . . . . . . . . . . . . . . . .
Purchase Order Header Updates Report . . . . . . . . . . . . . . . . . . . .
Supplier Audit Report . . . . . . . . . . . . . . . . . . . . . . . . . . . . . . . . . . . .
3–1
3–2
3 – 10
3 – 14
3 – 37
3 – 37
3 – 38
3 – 38
3 – 42
3 – 43
3 – 46
3 – 47
3 – 48
2 – 232
Contents
iii
Taxpayer ID Validation . . . . . . . . . . . . . . . . . . . . . . . . . . . . . . . . . . . 3 – 49
Tax Registration Number Validation . . . . . . . . . . . . . . . . . . . . . . . . 3 – 51
Chapter 4
Invoices . . . . . . . . . . . . . . . . . . . . . . . . . . . . . . . . . . . . . . . . . . . . . . . .
Entering Invoices Overview . . . . . . . . . . . . . . . . . . . . . . . . . . . . . . .
Differences Between Entering Invoices in the Invoice
Gateway Window and the Invoice Workbench . . . . . . . . . . .
Invoice Gateway . . . . . . . . . . . . . . . . . . . . . . . . . . . . . . . . . . . . . . . . .
Invoice Gateway Overview . . . . . . . . . . . . . . . . . . . . . . . . . . . .
Entering Invoice Records in the Invoice Gateway Window .
Entering a Basic Invoice Record in the Invoice Gateway . . .
Entering Purchase Order Matched Invoice Records in the
Invoice Gateway . . . . . . . . . . . . . . . . . . . . . . . . . . . . . . . . . . . . .
Entering Price Corrections in the Invoice Gateway . . . . . . . .
Finding Invoice Records in the Invoice Gateway Window . .
Modifying Invoice Records in the Invoice Gateway
Window . . . . . . . . . . . . . . . . . . . . . . . . . . . . . . . . . . . . . . . . . . . . .
Adding Invoice Records to an Existing Invoice Gateway
Batch . . . . . . . . . . . . . . . . . . . . . . . . . . . . . . . . . . . . . . . . . . . . . . .
Creating Invoices From Invoice Gateway Invoice
Records (Import) . . . . . . . . . . . . . . . . . . . . . . . . . . . . . . . . . . . . .
Invoice Gateway Identification Window Reference . . . . . . . . . . .
Invoice Gateway Window Reference . . . . . . . . . . . . . . . . . . . . . . . .
Entering Invoices in the Invoice Workbench . . . . . . . . . . . . . . . . .
Entering Basic Invoices in the Invoice Workbench . . . . . . . . .
Entering Invoice Distributions in the Invoice Workbench . .
Creating Distributions by Allocation in the Invoice
Workbench . . . . . . . . . . . . . . . . . . . . . . . . . . . . . . . . . . . . . . . . . .
Entering Invoice Batches in the Invoice Workbench . . . . . . . . . . .
Allocation . . . . . . . . . . . . . . . . . . . . . . . . . . . . . . . . . . . . . . . . . . . . . . .
Allocation Overview . . . . . . . . . . . . . . . . . . . . . . . . . . . . . . . . . .
Allocate Window . . . . . . . . . . . . . . . . . . . . . . . . . . . . . . . . . . . . .
Charge Allocations Window . . . . . . . . . . . . . . . . . . . . . . . . . . .
Charge Allocations Window Reference . . . . . . . . . . . . . . . . . .
Matching Charges to Material Receipts . . . . . . . . . . . . . . . . . .
Recording Allocations for Periodic Costing . . . . . . . . . . . . . .
Allocation Restrictions . . . . . . . . . . . . . . . . . . . . . . . . . . . . . . . .
Reviewing Allocation of Other Charges . . . . . . . . . . . . . . . . .
Entering Purchase Order Matched Invoices . . . . . . . . . . . . . . . . . .
Matching to Purchase Order Shipments and Distributions
From the Invoice Workbench . . . . . . . . . . . . . . . . . . . . . . . . . . .
Recording Price Corrections in the Invoice Workbench . . . .
iv Oracle Payables User Guide
4–1
4–2
4–5
4–7
4–8
4 – 11
4 – 11
4 – 12
4 – 16
4 – 18
4 – 20
4 – 21
4 – 22
4 – 24
4 – 26
4 – 44
4 – 44
4 – 47
4 – 49
4 – 55
4 – 57
4 – 58
4 – 59
4 – 61
4 – 62
4 – 64
4 – 67
4 – 68
4 – 69
4 – 70
4 – 73
4 – 76
Matching to Receipts From the Invoice Workbench . . . . . . . 4 – 78
Matching Restrictions . . . . . . . . . . . . . . . . . . . . . . . . . . . . . . . . . 4 – 81
Viewing Purchase Order Information . . . . . . . . . . . . . . . . . . . 4 – 82
Final Matching Purchase Orders . . . . . . . . . . . . . . . . . . . . . . . . 4 – 82
Credit and Debit Memos . . . . . . . . . . . . . . . . . . . . . . . . . . . . . . . . . . 4 – 84
Entering Credit/Debit Memos . . . . . . . . . . . . . . . . . . . . . . . . . 4 – 84
Matching Credit/Debit Memos to Purchase Orders and
Invoices . . . . . . . . . . . . . . . . . . . . . . . . . . . . . . . . . . . . . . . . . . . . . 4 – 85
Matching Credit and Debit Memos to Invoices . . . . . . . . . . . 4 – 88
Matching Credit and Debit Memos to Purchase Orders and
Receipts . . . . . . . . . . . . . . . . . . . . . . . . . . . . . . . . . . . . . . . . . . . . . 4 – 89
Clearing a Credit . . . . . . . . . . . . . . . . . . . . . . . . . . . . . . . . . . . . . 4 – 91
Entering Foreign Currency Invoices . . . . . . . . . . . . . . . . . . . . . . . . 4 – 92
Manual Exchange Rate Entry . . . . . . . . . . . . . . . . . . . . . . . . . . 4 – 92
GL Daily Rates Table Default Exchange Rate Entry . . . . . . . . 4 – 93
AutoRate Exchange Rate Entry . . . . . . . . . . . . . . . . . . . . . . . . . 4 – 94
Mixed Invoices . . . . . . . . . . . . . . . . . . . . . . . . . . . . . . . . . . . . . . . . . . 4 – 96
Entering Taxes on Invoices . . . . . . . . . . . . . . . . . . . . . . . . . . . . . . . . 4 – 97
Tax Types . . . . . . . . . . . . . . . . . . . . . . . . . . . . . . . . . . . . . . . . . . . 4 – 98
Tax Codes . . . . . . . . . . . . . . . . . . . . . . . . . . . . . . . . . . . . . . . . . . . 4 – 99
Setting Up Tax Control Payables and Financials Options . . . 4 – 99
Tax Allocation During Approval . . . . . . . . . . . . . . . . . . . . . . . 4 – 100
Tax Amount Verification During Approval . . . . . . . . . . . . . . . 4 – 101
Tax Control Methods . . . . . . . . . . . . . . . . . . . . . . . . . . . . . . . . . 4 – 102
Deriving Tax From a Natural Account (Account Method) . . 4 – 104
Defaulting Tax in Payables . . . . . . . . . . . . . . . . . . . . . . . . . . . . . 4 – 105
Entering Taxes When You Do Not Use the Automatic Tax
Calculation Feature . . . . . . . . . . . . . . . . . . . . . . . . . . . . . . . . . . . 4 – 108
Using the Automatic Tax Calculation Feature to Enter Tax
in the Invoice Workbench . . . . . . . . . . . . . . . . . . . . . . . . . . . . . . 4 – 111
Using the Automatic Tax Calculation Feature to Prorate Tax
in the Invoice Workbench . . . . . . . . . . . . . . . . . . . . . . . . . . . . . . 4 – 114
Using the Automatic Tax Calculation Feature to Enter Tax
in the Invoice Gateway . . . . . . . . . . . . . . . . . . . . . . . . . . . . . . . . 4 – 116
Offset Taxes . . . . . . . . . . . . . . . . . . . . . . . . . . . . . . . . . . . . . . . . . 4 – 117
Entering Use Taxes . . . . . . . . . . . . . . . . . . . . . . . . . . . . . . . . . . . 4 – 121
Entering Taxes on Expense Reports . . . . . . . . . . . . . . . . . . . . . 4 – 122
Recoverable Tax . . . . . . . . . . . . . . . . . . . . . . . . . . . . . . . . . . . . . . 4 – 124
Tax Summary Window . . . . . . . . . . . . . . . . . . . . . . . . . . . . . . . . 4 – 127
Entering Freight on Invoices . . . . . . . . . . . . . . . . . . . . . . . . . . . . . . . 4 – 129
Entering Invoices for Suppliers Subject to Income Tax Reporting
Requirements . . . . . . . . . . . . . . . . . . . . . . . . . . . . . . . . . . . . . . . . . . . 4 – 131
Updating 1099 Information . . . . . . . . . . . . . . . . . . . . . . . . . . . . 4 – 133
Contents
v
Holds . . . . . . . . . . . . . . . . . . . . . . . . . . . . . . . . . . . . . . . . . . . . . . . . . .
Applying Holds . . . . . . . . . . . . . . . . . . . . . . . . . . . . . . . . . . . . . .
Releasing Holds . . . . . . . . . . . . . . . . . . . . . . . . . . . . . . . . . . . . . .
Approval . . . . . . . . . . . . . . . . . . . . . . . . . . . . . . . . . . . . . . . . . . . . . . .
Submitting Online Approval for Invoices . . . . . . . . . . . . . . . .
Submitting Online Approval for Invoice Batches . . . . . . . . .
Payables Approval Program . . . . . . . . . . . . . . . . . . . . . . . . . . .
Scheduling Invoice Payments . . . . . . . . . . . . . . . . . . . . . . . . . . . . . .
Scheduled Payments Window Reference . . . . . . . . . . . . . . . .
Discounts . . . . . . . . . . . . . . . . . . . . . . . . . . . . . . . . . . . . . . . . . . . . . . .
Assets Integration . . . . . . . . . . . . . . . . . . . . . . . . . . . . . . . . . . . . . . . .
Oracle Projects Integration . . . . . . . . . . . . . . . . . . . . . . . . . . . . . . . .
Entering Project–Related Invoices and Expense Reports . . .
Adding or Modifying Project Information on Invoices . . . . .
Purchasing Integration . . . . . . . . . . . . . . . . . . . . . . . . . . . . . . . . . . .
Setting Up Your System for Matching . . . . . . . . . . . . . . . . . . .
Integrated Supplier and Purchasing Information . . . . . . . . .
Purchase Order and Receipt Matching . . . . . . . . . . . . . . . . . .
Purchase Order Shipment and Distribution Matching . . . . .
Two–, Three–, and Four–way Approval . . . . . . . . . . . . . . . . .
PO Default and QuickMatch Invoices . . . . . . . . . . . . . . . . . . .
Payment on Receipt . . . . . . . . . . . . . . . . . . . . . . . . . . . . . . . . . .
Invoice Variances . . . . . . . . . . . . . . . . . . . . . . . . . . . . . . . . . . . . .
Variance Accounts . . . . . . . . . . . . . . . . . . . . . . . . . . . . . . . . . . . .
Defining Accrual and Variance Accounts . . . . . . . . . . . . . . . .
Closing Purchase Orders . . . . . . . . . . . . . . . . . . . . . . . . . . . . . .
Receipt Accrual . . . . . . . . . . . . . . . . . . . . . . . . . . . . . . . . . . . . . .
Purging Payables and Purchasing Information . . . . . . . . . . .
Oracle Property Manager Integration . . . . . . . . . . . . . . . . . . . . . . .
Oracle Grants Management Integration . . . . . . . . . . . . . . . . . . . . .
Procurement Card Integration . . . . . . . . . . . . . . . . . . . . . . . . . . . . .
Payables Credit Card Program Overview . . . . . . . . . . . . . . . .
Credit Card Transactions . . . . . . . . . . . . . . . . . . . . . . . . . . . . . .
Credit Card Transactions Window Reference . . . . . . . . . . . . .
Oracle Inventory Integration . . . . . . . . . . . . . . . . . . . . . . . . . . . . . .
Entering Recurring Invoices . . . . . . . . . . . . . . . . . . . . . . . . . . . . . . .
Defining a Recurring Invoice Template . . . . . . . . . . . . . . . . . .
Creating Recurring Invoices . . . . . . . . . . . . . . . . . . . . . . . . . . .
Recurring Invoices Window Reference . . . . . . . . . . . . . . . . . .
vi Oracle Payables User Guide
4 – 136
4 – 136
4 – 140
4 – 145
4 – 147
4 – 147
4 – 148
4 – 150
4 – 152
4 – 155
4 – 157
4 – 159
4 – 159
4 – 163
4 – 165
4 – 166
4 – 167
4 – 168
4 – 169
4 – 170
4 – 171
4 – 171
4 – 172
4 – 173
4 – 174
4 – 175
4 – 176
4 – 177
4 – 178
4 – 179
4 – 180
4 – 180
4 – 181
4 – 182
4 – 184
4 – 185
4 – 186
4 – 188
4 – 191
Prepayments . . . . . . . . . . . . . . . . . . . . . . . . . . . . . . . . . . . . . . . . . . . .
Foreign Currency Prepayments . . . . . . . . . . . . . . . . . . . . . . . .
Matching Prepayments to Purchase Orders . . . . . . . . . . . . . .
Entering Prepayments . . . . . . . . . . . . . . . . . . . . . . . . . . . . . . . .
Applying and Releasing Holds on Prepayments . . . . . . . . . .
Paying Prepayments . . . . . . . . . . . . . . . . . . . . . . . . . . . . . . . . . .
Applying Prepayments to Invoices . . . . . . . . . . . . . . . . . . . . .
Applying Prepayments to Expense Reports . . . . . . . . . . . . . .
Automatic Tax Calculation When Applying Prepayments . .
Withholding Tax When Applying Prepayments . . . . . . . . . .
Unapplying Prepayments . . . . . . . . . . . . . . . . . . . . . . . . . . . . .
Cancelling Prepayments . . . . . . . . . . . . . . . . . . . . . . . . . . . . . . .
Find Prepayments to Apply Window . . . . . . . . . . . . . . . . . . .
Find Invoices to Apply Window . . . . . . . . . . . . . . . . . . . . . . . .
Recording a Refund of a Prepayment or Advance . . . . . . . . .
Apply/Unapply Prepayments Window Reference . . . . . . . .
Self–Service Expenses Integration . . . . . . . . . . . . . . . . . . . . . . . . . .
Expense Reports . . . . . . . . . . . . . . . . . . . . . . . . . . . . . . . . . . . . . . . . .
Entering Expense Reports . . . . . . . . . . . . . . . . . . . . . . . . . . . . .
Entering Foreign Currency Expense Reports in the Expense
Reports Window . . . . . . . . . . . . . . . . . . . . . . . . . . . . . . . . . . . . .
Applying Holds to Expense Reports . . . . . . . . . . . . . . . . . . . .
Applying Advances Against Expense Reports . . . . . . . . . . . .
Modifying and Reviewing Existing Expense Reports . . . . . .
Paying Expense Reports . . . . . . . . . . . . . . . . . . . . . . . . . . . . . . .
Expense Reports Window Reference . . . . . . . . . . . . . . . . . . . .
Payables Invoice Import Program . . . . . . . . . . . . . . . . . . . . . . . . . .
Payables Invoice Import Parameters . . . . . . . . . . . . . . . . . . . .
Purging Expense Reports or Invoices You Have Imported .
Invoice Import Report . . . . . . . . . . . . . . . . . . . . . . . . . . . . . . . .
Invoice Import Exceptions Report . . . . . . . . . . . . . . . . . . . . . .
Invoice Import Prepayments Applied Report . . . . . . . . . . . . .
Payables Open Interface Import . . . . . . . . . . . . . . . . . . . . . . . . . . . .
Submitting the Payables Open Interface Import Program . .
Payables Open Interface Import Parameters . . . . . . . . . . . . . .
Payables Open Interface Import Troubleshooting . . . . . . . . .
Open Interface Invoices Window . . . . . . . . . . . . . . . . . . . . . . .
Payables Open Interface Purge Program . . . . . . . . . . . . . . . . .
Payables Open Interface Outbound Advice . . . . . . . . . . . . . .
Payables Open Interface Workflow . . . . . . . . . . . . . . . . . . . . .
Payables Open Interface Report . . . . . . . . . . . . . . . . . . . . . . . .
4 – 195
4 – 197
4 – 197
4 – 198
4 – 199
4 – 200
4 – 200
4 – 204
4 – 205
4 – 205
4 – 205
4 – 207
4 – 208
4 – 209
4 – 209
4 – 210
4 – 215
4 – 216
4 – 219
4 – 222
4 – 223
4 – 223
4 – 225
4 – 230
4 – 231
4 – 239
4 – 248
4 – 251
4 – 253
4 – 254
4 – 259
4 – 261
4 – 262
4 – 267
4 – 269
4 – 270
4 – 270
4 – 271
4 – 272
4 – 275
Contents
vii
Reviewing and Adjusting Invoices . . . . . . . . . . . . . . . . . . . . . . . . .
Invoice Overview . . . . . . . . . . . . . . . . . . . . . . . . . . . . . . . . . . . .
Finding Invoice Batches . . . . . . . . . . . . . . . . . . . . . . . . . . . . . . .
Finding Invoices . . . . . . . . . . . . . . . . . . . . . . . . . . . . . . . . . . . . .
Reviewing Invoice Distributions . . . . . . . . . . . . . . . . . . . . . . . .
Reviewing Payment Information in the Invoice Workbench
Payments Window (of the Invoice Workbench) Reference . .
Reviewing Invoice Batches . . . . . . . . . . . . . . . . . . . . . . . . . . . .
Reviewing Invoices . . . . . . . . . . . . . . . . . . . . . . . . . . . . . . . . . . .
Calculating a Supplier or Supplier Site Balance . . . . . . . . . . .
Calculate Balance Owed Window Reference . . . . . . . . . . . . .
Adjusting Invoice Batches . . . . . . . . . . . . . . . . . . . . . . . . . . . . .
Adjusting Invoices . . . . . . . . . . . . . . . . . . . . . . . . . . . . . . . . . . .
Adjusting Prepayments . . . . . . . . . . . . . . . . . . . . . . . . . . . . . . .
Adjusting Invoice Distributions . . . . . . . . . . . . . . . . . . . . . . . .
Invoice and Invoice Batch Adjustment Restrictions: . . . . . . .
Adjusting Scheduled Payments . . . . . . . . . . . . . . . . . . . . . . . .
Cancelling Invoices . . . . . . . . . . . . . . . . . . . . . . . . . . . . . . . . . . .
Identifying Duplicate Invoices . . . . . . . . . . . . . . . . . . . . . . . . .
Resolving Duplicate Invoices . . . . . . . . . . . . . . . . . . . . . . . . . .
Adjustment Charts . . . . . . . . . . . . . . . . . . . . . . . . . . . . . . . . . . . . . . .
Invoice Adjustment Chart . . . . . . . . . . . . . . . . . . . . . . . . . . . . .
Invoice Distribution Adjustment Chart . . . . . . . . . . . . . . . . . .
Invoice Notices . . . . . . . . . . . . . . . . . . . . . . . . . . . . . . . . . . . . . . . . . .
Printing Invoice Notices from the Invoice Workbench . . . . .
Invoice Holds Window Reference . . . . . . . . . . . . . . . . . . . . . . . . . .
Match to Purchase Orders Window Reference . . . . . . . . . . . . . . .
Invoice Batches Window Reference . . . . . . . . . . . . . . . . . . . . . . . . .
Invoices Window Reference . . . . . . . . . . . . . . . . . . . . . . . . . . . . . . .
Distributions Window Reference . . . . . . . . . . . . . . . . . . . . . . . . . . .
VOLUME 2Volume 2 . . . . . . . . . . . . . . . . . . . . . . . . . .
Chapter 5
Payments . . . . . . . . . . . . . . . . . . . . . . . . . . . . . . . . . . . . . . . . . . . . . . .
Creating Single Payments . . . . . . . . . . . . . . . . . . . . . . . . . . . . . . . . .
Recording Manual Payments and Wire Transfers . . . . . . . . .
Paying Invoices with Quick Payments . . . . . . . . . . . . . . . . . . .
Paying Invoices with Clearing Payments . . . . . . . . . . . . . . . .
viii Oracle Payables User Guide
4 – 287
4 – 288
4 – 289
4 – 290
4 – 292
4 – 293
4 – 293
4 – 294
4 – 295
4 – 296
4 – 297
4 – 298
4 – 299
4 – 304
4 – 304
4 – 308
4 – 310
4 – 311
4 – 313
4 – 314
4 – 315
4 – 315
4 – 326
4 – 332
4 – 333
4 – 334
4 – 336
4 – 339
4 – 342
4 – 352
i
5–1
5–2
5–2
5–4
5–7
Refunds . . . . . . . . . . . . . . . . . . . . . . . . . . . . . . . . . . . . . . . . . . . . . . . .
Entering Refunds . . . . . . . . . . . . . . . . . . . . . . . . . . . . . . . . . . . . .
Voiding Refunds . . . . . . . . . . . . . . . . . . . . . . . . . . . . . . . . . . . . .
Paying Invoices From the Invoice Workbench . . . . . . . . . . . . . . . .
Paying Invoices in Payment Batches . . . . . . . . . . . . . . . . . . . . . . . .
The Payment Batch Process . . . . . . . . . . . . . . . . . . . . . . . . . . . .
Payment Batch Sets . . . . . . . . . . . . . . . . . . . . . . . . . . . . . . . . . . .
Initiating Payment Batches . . . . . . . . . . . . . . . . . . . . . . . . . . . .
Building Payments . . . . . . . . . . . . . . . . . . . . . . . . . . . . . . . . . . .
Modifying Payment Batches . . . . . . . . . . . . . . . . . . . . . . . . . . .
Formatting Payments . . . . . . . . . . . . . . . . . . . . . . . . . . . . . . . . .
Printing Payment Batch Checks . . . . . . . . . . . . . . . . . . . . . . . .
Confirming Payment Batches . . . . . . . . . . . . . . . . . . . . . . . . . .
Finding Payment Batches . . . . . . . . . . . . . . . . . . . . . . . . . . . . . .
Reviewing Payment Batches . . . . . . . . . . . . . . . . . . . . . . . . . . .
Troubleshooting a Payment Batch . . . . . . . . . . . . . . . . . . . . . .
Cancelling Payment Batches . . . . . . . . . . . . . . . . . . . . . . . . . . .
Printing a Preliminary Payment Register . . . . . . . . . . . . . . . .
Printing a Final Payment Register . . . . . . . . . . . . . . . . . . . . . .
Printing Separate Remittance Advice . . . . . . . . . . . . . . . . . . . .
Payment Batch Restrictions . . . . . . . . . . . . . . . . . . . . . . . . . . . .
Creating Foreign Currency Payments . . . . . . . . . . . . . . . . . . . . . . .
Stopping or Voiding Foreign Currency Payments . . . . . . . . .
Creating Zero–Amount Payments . . . . . . . . . . . . . . . . . . . . . . . . . .
Electronic Payments . . . . . . . . . . . . . . . . . . . . . . . . . . . . . . . . . . . . . .
Creating Electronic Funds Transfer Payments Without the
Oracle e–Commerce Gateway . . . . . . . . . . . . . . . . . . . . . . . . . .
Creating Electronic Payments with the Oracle e–Commerce
Gateway . . . . . . . . . . . . . . . . . . . . . . . . . . . . . . . . . . . . . . . . . . . .
Future Dated Payments . . . . . . . . . . . . . . . . . . . . . . . . . . . . . . . . . . .
Setting Up Your System for Future Dated Payments . . . . . . .
Creating Future Dated Payments . . . . . . . . . . . . . . . . . . . . . . .
Voiding or Stopping Future Dated Payments . . . . . . . . . . . . .
Future Dated Payment Restrictions . . . . . . . . . . . . . . . . . . . . .
Troubleshooting Future Dated Payments . . . . . . . . . . . . . . . .
Accounting for Future Dated Payments . . . . . . . . . . . . . . . . .
Update Matured Future Payment Status Program . . . . . . . .
Update Matured Future Payment Status Report . . . . . . . . . .
Future Payment Maturity Date Report . . . . . . . . . . . . . . . . . .
5 – 10
5 – 11
5 – 13
5 – 14
5 – 17
5 – 17
5 – 20
5 – 22
5 – 26
5 – 27
5 – 30
5 – 31
5 – 32
5 – 36
5 – 37
5 – 38
5 – 43
5 – 44
5 – 44
5 – 45
5 – 46
5 – 48
5 – 51
5 – 52
5 – 54
5 – 54
5 – 57
5 – 60
5 – 60
5 – 62
5 – 67
5 – 67
5 – 67
5 – 68
5 – 69
5 – 69
5 – 71
Contents
ix
Reviewing and Adjusting Payments . . . . . . . . . . . . . . . . . . . . . . . .
Payment Overview . . . . . . . . . . . . . . . . . . . . . . . . . . . . . . . . . . .
Finding Payments . . . . . . . . . . . . . . . . . . . . . . . . . . . . . . . . . . . .
Reviewing Payments . . . . . . . . . . . . . . . . . . . . . . . . . . . . . . . . .
Updating Payments . . . . . . . . . . . . . . . . . . . . . . . . . . . . . . . . . .
Stopping Payments . . . . . . . . . . . . . . . . . . . . . . . . . . . . . . . . . . .
Voiding Payments . . . . . . . . . . . . . . . . . . . . . . . . . . . . . . . . . . . .
Escheating Checks . . . . . . . . . . . . . . . . . . . . . . . . . . . . . . . . . . . .
Reconciling Payments with Oracle Cash Management . . . . . . . .
Clearing Restrictions . . . . . . . . . . . . . . . . . . . . . . . . . . . . . . . . . .
Payment Batches and Payment Batch Sets Window Reference . .
Payments Window Reference . . . . . . . . . . . . . . . . . . . . . . . . . . . . . .
5 – 73
5 – 74
5 – 76
5 – 78
5 – 78
5 – 81
5 – 82
5 – 85
5 – 86
5 – 87
5 – 88
5 – 96
Chapter 6
Foreign Currency . . . . . . . . . . . . . . . . . . . . . . . . . . . . . . . . . . . . . . . .
Foreign Currency Transactions . . . . . . . . . . . . . . . . . . . . . . . . . . . . .
System Setup for Multiple Currency . . . . . . . . . . . . . . . . . . . .
Entering Invoice Currency . . . . . . . . . . . . . . . . . . . . . . . . . . . . .
Making Foreign Currency Payments . . . . . . . . . . . . . . . . . . . .
Gain/Loss Calculation . . . . . . . . . . . . . . . . . . . . . . . . . . . . . . . .
Types of Exchange Rate Entry . . . . . . . . . . . . . . . . . . . . . . . . . .
Types of Exchange Rates . . . . . . . . . . . . . . . . . . . . . . . . . . . . . .
Reporting on Foreign Currency Transactions . . . . . . . . . . . . .
Integration with Other Oracle Applications . . . . . . . . . . . . . .
Cross Currency Payments for Fixed–Rate Currencies . . . . . .
Entering Invoice Exchange Rates for EMU Currencies . . . . .
Accounting for Fixed–Rate Payments . . . . . . . . . . . . . . . . . . .
AutoRate Program . . . . . . . . . . . . . . . . . . . . . . . . . . . . . . . . . . .
6–1
6–2
6–3
6–4
6–5
6–5
6–8
6–8
6–9
6–9
6 – 10
6 – 10
6 – 13
6 – 15
Chapter 7
Accounting . . . . . . . . . . . . . . . . . . . . . . . . . . . . . . . . . . . . . . . . . . . . .
Accounting in Payables . . . . . . . . . . . . . . . . . . . . . . . . . . . . . . . . . . .
Accounting Events . . . . . . . . . . . . . . . . . . . . . . . . . . . . . . . . . . .
How Feature Setup Affects What Details Are Recorded for
Accounting Events . . . . . . . . . . . . . . . . . . . . . . . . . . . . . . . . . . .
How System Setup Controls How Payables Creates
Accounting Entries . . . . . . . . . . . . . . . . . . . . . . . . . . . . . . . . . . .
Creating Accounting Entries in Payables . . . . . . . . . . . . . . . . . . . .
Payables Accounting Process . . . . . . . . . . . . . . . . . . . . . . . . . .
Payables Accounting Process Report . . . . . . . . . . . . . . . . . . . .
Payables Accounting Entries Report . . . . . . . . . . . . . . . . . . . .
Creating Accounting Entries From Transaction Windows . .
7–1
7–2
7–3
x Oracle Payables User Guide
7–9
7–9
7 – 12
7 – 13
7 – 14
7 – 17
7 – 21
Chapter 8
Adjusting Accounting Entries . . . . . . . . . . . . . . . . . . . . . . . . . . . . .
Find Accounting Entries Window Reference . . . . . . . . . . . . .
Update Accounting Entries Window Reference . . . . . . . . . . .
Viewing Accounting Entries . . . . . . . . . . . . . . . . . . . . . . . . . . . . . . .
Viewing Accounting Lines Directly . . . . . . . . . . . . . . . . . . . . .
Viewing Accounting Entries For Queried Transactions . . . .
View Accounting Windows . . . . . . . . . . . . . . . . . . . . . . . . . . . .
Transferring Accounting Entries to Your General Ledger . . . . . .
Payables Transfer to General Ledger Program . . . . . . . . . . . .
Payables Transfer to General Ledger Report . . . . . . . . . . . . . .
Posting in Oracle General Ledger . . . . . . . . . . . . . . . . . . . . . . . . . .
Intercompany Accounting When You Use Oracle General
Ledger . . . . . . . . . . . . . . . . . . . . . . . . . . . . . . . . . . . . . . . . . . . . . .
Drilling Down to Payables from Oracle General Ledger . . .
Reconciling Payables Activity . . . . . . . . . . . . . . . . . . . . . . . . . . . . .
Reconciling Payables Activity to General Ledger . . . . . . . . .
7 – 22
7 – 23
7 – 23
7 – 26
7 – 27
7 – 28
7 – 29
7 – 33
7 – 34
7 – 37
7 – 39
Reports, Programs, and Listings . . . . . . . . . . . . . . . . . . . . . . . . . . .
Submitting Standard Reports, Programs, and Listings . . . . . . . .
Request Sets . . . . . . . . . . . . . . . . . . . . . . . . . . . . . . . . . . . . . . . . .
Automatic Reports . . . . . . . . . . . . . . . . . . . . . . . . . . . . . . . . . . .
Submitting Requests . . . . . . . . . . . . . . . . . . . . . . . . . . . . . . . . . .
Cancelling Requests . . . . . . . . . . . . . . . . . . . . . . . . . . . . . . . . . .
Monitoring Requests . . . . . . . . . . . . . . . . . . . . . . . . . . . . . . . . . .
Common Report Parameters . . . . . . . . . . . . . . . . . . . . . . . . . . .
Common Report Headings . . . . . . . . . . . . . . . . . . . . . . . . . . . .
Programs . . . . . . . . . . . . . . . . . . . . . . . . . . . . . . . . . . . . . . . . . . . . . . .
Credit Card Transaction Validation and Exception Report . .
Credit Card Invoice Interface Summary Program . . . . . . . . .
Mass Additions Create Program . . . . . . . . . . . . . . . . . . . . . . . .
Unaccounted Transactions Sweep Program . . . . . . . . . . . . . .
Update Income Tax Details Utility and Report . . . . . . . . . . . .
Workflow . . . . . . . . . . . . . . . . . . . . . . . . . . . . . . . . . . . . . . . . . . . . . . .
Distribute Employee Card Transaction Verifications . . . . . . .
Distribute Manager Card Transactions Approvals . . . . . . . .
Supplier Reports . . . . . . . . . . . . . . . . . . . . . . . . . . . . . . . . . . . . . . . . .
New Supplier/New Supplier Site Listing . . . . . . . . . . . . . . . .
Supplier Balance Revaluation Report . . . . . . . . . . . . . . . . . . . .
Supplier Mailing Labels . . . . . . . . . . . . . . . . . . . . . . . . . . . . . . .
Supplier Paid Invoice History Report . . . . . . . . . . . . . . . . . . .
Supplier Payment History Report . . . . . . . . . . . . . . . . . . . . . .
8–1
8–2
8–2
8–3
8–4
8–4
8–5
8–5
8–8
8 – 10
8 – 10
8 – 13
8 – 15
8 – 16
8 – 18
8 – 22
8 – 22
8 – 23
8 – 24
8 – 24
8 – 25
8 – 27
8 – 30
8 – 31
7 – 39
7 – 41
7 – 45
7 – 46
Contents
xi
Suppliers Report . . . . . . . . . . . . . . . . . . . . . . . . . . . . . . . . . . . . .
Income Tax Forms and Reports . . . . . . . . . . . . . . . . . . . . . . . . . . . .
1099 Reporting Overview . . . . . . . . . . . . . . . . . . . . . . . . . . . . .
1096 Form . . . . . . . . . . . . . . . . . . . . . . . . . . . . . . . . . . . . . . . . . . .
1099 Forms . . . . . . . . . . . . . . . . . . . . . . . . . . . . . . . . . . . . . . . . . .
1099 Invoice Exceptions Report . . . . . . . . . . . . . . . . . . . . . . . .
1099 Payments Report . . . . . . . . . . . . . . . . . . . . . . . . . . . . . . . .
1099 Electronic Media . . . . . . . . . . . . . . . . . . . . . . . . . . . . . . . . .
1099 Supplier Exceptions Report . . . . . . . . . . . . . . . . . . . . . . .
Tax Information Verification Letter . . . . . . . . . . . . . . . . . . . . . .
Withholding Tax By Invoice Report . . . . . . . . . . . . . . . . . . . . .
Withholding Tax By Payment Report . . . . . . . . . . . . . . . . . . . .
Withholding Tax By Supplier Report . . . . . . . . . . . . . . . . . . . .
Withholding Tax By Tax Authority Report . . . . . . . . . . . . . . .
Withholding Tax Certificate Listing . . . . . . . . . . . . . . . . . . . . .
Withholding Tax Letter . . . . . . . . . . . . . . . . . . . . . . . . . . . . . . . .
Withholding Tax Report . . . . . . . . . . . . . . . . . . . . . . . . . . . . . . .
Invoice Reports . . . . . . . . . . . . . . . . . . . . . . . . . . . . . . . . . . . . . . . . . .
Batch Control Reports . . . . . . . . . . . . . . . . . . . . . . . . . . . . . . . . .
Credit Memo Matching Report . . . . . . . . . . . . . . . . . . . . . . . . .
Invoice Aging Report . . . . . . . . . . . . . . . . . . . . . . . . . . . . . . . . .
Invoice Audit Listing by Voucher Number . . . . . . . . . . . . . . .
Invoice Audit Listing . . . . . . . . . . . . . . . . . . . . . . . . . . . . . . . . .
Invoice Audit Report . . . . . . . . . . . . . . . . . . . . . . . . . . . . . . . . .
Invoice History Report . . . . . . . . . . . . . . . . . . . . . . . . . . . . . . . .
Invoice on Hold Report . . . . . . . . . . . . . . . . . . . . . . . . . . . . . . .
Invoice Register . . . . . . . . . . . . . . . . . . . . . . . . . . . . . . . . . . . . . .
Matched and Modified Receipts . . . . . . . . . . . . . . . . . . . . . . . .
Matching Detail Report . . . . . . . . . . . . . . . . . . . . . . . . . . . . . . .
Matching Hold Detail Report . . . . . . . . . . . . . . . . . . . . . . . . . .
Open Items Revaluation Report . . . . . . . . . . . . . . . . . . . . . . . .
Payables Approval Report . . . . . . . . . . . . . . . . . . . . . . . . . . . . .
Prepayments Status Report . . . . . . . . . . . . . . . . . . . . . . . . . . . .
Recurring Invoices Report . . . . . . . . . . . . . . . . . . . . . . . . . . . . .
Unrealized Gain/Loss Report . . . . . . . . . . . . . . . . . . . . . . . . . .
Invoice Tax Reports . . . . . . . . . . . . . . . . . . . . . . . . . . . . . . . . . . . . . .
Intra–EU VAT Audit Trail Report . . . . . . . . . . . . . . . . . . . . . . .
Tax Audit Trail Report . . . . . . . . . . . . . . . . . . . . . . . . . . . . . . . .
Use Tax Liability Report . . . . . . . . . . . . . . . . . . . . . . . . . . . . . . .
xii Oracle Payables User Guide
8 – 32
8 – 35
8 – 35
8 – 38
8 – 40
8 – 43
8 – 44
8 – 46
8 – 49
8 – 51
8 – 53
8 – 55
8 – 57
8 – 59
8 – 60
8 – 61
8 – 62
8 – 65
8 – 66
8 – 67
8 – 68
8 – 71
8 – 72
8 – 73
8 – 75
8 – 76
8 – 78
8 – 80
8 – 80
8 – 82
8 – 86
8 – 88
8 – 91
8 – 95
8 – 96
8 – 99
8 – 99
8 – 102
8 – 106
Payment Reports . . . . . . . . . . . . . . . . . . . . . . . . . . . . . . . . . . . . . . . .
Cash Requirement Report . . . . . . . . . . . . . . . . . . . . . . . . . . . . .
Discounts Available Report . . . . . . . . . . . . . . . . . . . . . . . . . . . .
Discounts Taken and Lost Report . . . . . . . . . . . . . . . . . . . . . . .
Final Payment Register . . . . . . . . . . . . . . . . . . . . . . . . . . . . . . . .
Missing Document Numbers Report . . . . . . . . . . . . . . . . . . . .
Payment Audit by Voucher Number Report . . . . . . . . . . . . . .
Payment Batch Control Report . . . . . . . . . . . . . . . . . . . . . . . . .
Payment Exceptions Report . . . . . . . . . . . . . . . . . . . . . . . . . . . .
Payment Gain & Loss Report . . . . . . . . . . . . . . . . . . . . . . . . . .
Payment Register . . . . . . . . . . . . . . . . . . . . . . . . . . . . . . . . . . . . .
Preliminary Payment Register . . . . . . . . . . . . . . . . . . . . . . . . . .
Stopped Payments Report . . . . . . . . . . . . . . . . . . . . . . . . . . . . .
Void Payment Register . . . . . . . . . . . . . . . . . . . . . . . . . . . . . . . .
Accounting and Reconciliation Reports . . . . . . . . . . . . . . . . . . . . .
Accounts Payable Trial Balance Report . . . . . . . . . . . . . . . . . .
Payables Account Analysis Report . . . . . . . . . . . . . . . . . . . . . .
Posted Invoice Register . . . . . . . . . . . . . . . . . . . . . . . . . . . . . . .
Posted Payment Register . . . . . . . . . . . . . . . . . . . . . . . . . . . . . .
Unaccounted Transactions Report . . . . . . . . . . . . . . . . . . . . . .
Key Indicators Report . . . . . . . . . . . . . . . . . . . . . . . . . . . . . . . . . . . .
Key Indicators Current Activity Report . . . . . . . . . . . . . . . . . .
Key Indicators State–of–the–System Report . . . . . . . . . . . . . .
Notices . . . . . . . . . . . . . . . . . . . . . . . . . . . . . . . . . . . . . . . . . . . . . . . . .
Invalid PO Supplier Notice . . . . . . . . . . . . . . . . . . . . . . . . . . . .
Matching Hold Agent Notice . . . . . . . . . . . . . . . . . . . . . . . . . .
Prepayment Remittance Notice . . . . . . . . . . . . . . . . . . . . . . . . .
Print Invoice Notice . . . . . . . . . . . . . . . . . . . . . . . . . . . . . . . . . .
Receiving Hold Requestor Notice . . . . . . . . . . . . . . . . . . . . . . .
Supplier Open Balance Letter . . . . . . . . . . . . . . . . . . . . . . . . . .
Listings . . . . . . . . . . . . . . . . . . . . . . . . . . . . . . . . . . . . . . . . . . . . . . . . .
Bank Account Listing . . . . . . . . . . . . . . . . . . . . . . . . . . . . . . . . .
Distribution Set Listing . . . . . . . . . . . . . . . . . . . . . . . . . . . . . . . .
Employee Listing . . . . . . . . . . . . . . . . . . . . . . . . . . . . . . . . . . . . .
Expense Report Template Listing . . . . . . . . . . . . . . . . . . . . . . .
Payment Terms Listing . . . . . . . . . . . . . . . . . . . . . . . . . . . . . . . .
Payables Lookups Listing . . . . . . . . . . . . . . . . . . . . . . . . . . . . .
Tax Codes Listing . . . . . . . . . . . . . . . . . . . . . . . . . . . . . . . . . . . .
Tax Recovery Rules Listing . . . . . . . . . . . . . . . . . . . . . . . . . . . .
8 – 110
8 – 110
8 – 114
8 – 115
8 – 116
8 – 118
8 – 119
8 – 120
8 – 122
8 – 124
8 – 125
8 – 127
8 – 131
8 – 132
8 – 134
8 – 134
8 – 137
8 – 139
8 – 142
8 – 144
8 – 148
8 – 148
8 – 153
8 – 155
8 – 155
8 – 156
8 – 157
8 – 159
8 – 160
8 – 161
8 – 163
8 – 163
8 – 165
8 – 166
8 – 168
8 – 169
8 – 170
8 – 171
8 – 173
Contents
xiii
Country–Specific Reports . . . . . . . . . . . . . . . . . . . . . . . . . . . . . . . . .
Bank Charges Reports . . . . . . . . . . . . . . . . . . . . . . . . . . . . . . . .
Japan Actual Payment Report . . . . . . . . . . . . . . . . . . . . . . . . . .
Japan Invoice Transaction Check Report . . . . . . . . . . . . . . . . .
Japan Payment Schedule Report . . . . . . . . . . . . . . . . . . . . . . . .
8 – 175
8 – 175
8 – 175
8 – 175
8 – 176
Chapter 9
Resource Management . . . . . . . . . . . . . . . . . . . . . . . . . . . . . . . . . . .
Purging Records . . . . . . . . . . . . . . . . . . . . . . . . . . . . . . . . . . . . . . . . .
Criteria for Purging Records . . . . . . . . . . . . . . . . . . . . . . . . . . .
Submitting Purges . . . . . . . . . . . . . . . . . . . . . . . . . . . . . . . . . . . .
Viewing the Status of a Purge . . . . . . . . . . . . . . . . . . . . . . . . . .
Aborting a Purge . . . . . . . . . . . . . . . . . . . . . . . . . . . . . . . . . . . . .
Restarting a Purge . . . . . . . . . . . . . . . . . . . . . . . . . . . . . . . . . . . .
Recreating Database Objects From Which You Purge . . . . . .
Purge Reports . . . . . . . . . . . . . . . . . . . . . . . . . . . . . . . . . . . . . . . . . . .
Preliminary Purged Listings . . . . . . . . . . . . . . . . . . . . . . . . . . .
Final Purged Listings . . . . . . . . . . . . . . . . . . . . . . . . . . . . . . . . .
Rejected Purged Listings . . . . . . . . . . . . . . . . . . . . . . . . . . . . . .
Final Purge Statistics Report . . . . . . . . . . . . . . . . . . . . . . . . . . .
Tables Purged by the Payables Purge Process . . . . . . . . . . . .
9–1
9–2
9–2
9–7
9–9
9 – 10
9 – 10
9 – 11
9 – 13
9 – 13
9 – 15
9 – 16
9 – 16
9 – 18
Chapter 10
Other Topics . . . . . . . . . . . . . . . . . . . . . . . . . . . . . . . . . . . . . . . . . . . .
AuditTrail . . . . . . . . . . . . . . . . . . . . . . . . . . . . . . . . . . . . . . . . . . . . . . .
Positive Pay Integration . . . . . . . . . . . . . . . . . . . . . . . . . . . . . . . . . . .
Positive Pay Report . . . . . . . . . . . . . . . . . . . . . . . . . . . . . . . . . . .
Automatic Interest . . . . . . . . . . . . . . . . . . . . . . . . . . . . . . . . . . . . . . .
Payment Batches and Quick Payments . . . . . . . . . . . . . . . . . .
Manual Payments . . . . . . . . . . . . . . . . . . . . . . . . . . . . . . . . . . . .
Void Payments and Stop Payments . . . . . . . . . . . . . . . . . . . . .
Automatic Offsets . . . . . . . . . . . . . . . . . . . . . . . . . . . . . . . . . . . . . . . .
Automatic Offsets and Invoice Processing . . . . . . . . . . . . . . .
Automatic Offsets and Payment Processing . . . . . . . . . . . . . .
Posting with Automatic Offsets . . . . . . . . . . . . . . . . . . . . . . . .
Enabling Automatic Offsets . . . . . . . . . . . . . . . . . . . . . . . . . . . .
Automatic Withholding Tax Overview . . . . . . . . . . . . . . . . . . . . . .
Setting Up Withholding Tax . . . . . . . . . . . . . . . . . . . . . . . . . . .
Withholding Taxes . . . . . . . . . . . . . . . . . . . . . . . . . . . . . . . . . . . .
Creating Withholding Tax Invoices . . . . . . . . . . . . . . . . . . . . .
Paying a Tax Authority . . . . . . . . . . . . . . . . . . . . . . . . . . . . . . . .
Reviewing Withheld Amounts Online . . . . . . . . . . . . . . . . . . .
10 – 1
10 – 2
10 – 3
10 – 4
10 – 7
10 – 9
10 – 10
10 – 11
10 – 12
10 – 14
10 – 17
10 – 21
10 – 22
10 – 24
10 – 25
10 – 26
10 – 28
10 – 29
10 – 29
xiv Oracle Payables User Guide
Withholding Tax Reports . . . . . . . . . . . . . . . . . . . . . . . . . . . . . .
Projected Withholding Tax . . . . . . . . . . . . . . . . . . . . . . . . . . . . .
Projected Withholding Tax Window Reference . . . . . . . . . . .
View Period–To–Date Withheld Amounts . . . . . . . . . . . . . . .
View Period–To–Date Withheld Amounts Window
Reference . . . . . . . . . . . . . . . . . . . . . . . . . . . . . . . . . . . . . . . . . . .
Automatic Tax Calculation Overview . . . . . . . . . . . . . . . . . . . . . . .
Automatic Tax Calculation Levels . . . . . . . . . . . . . . . . . . . . . .
Calculation of Tax Distributions For Line or Tax Code
Automatic Tax Calculation . . . . . . . . . . . . . . . . . . . . . . . . . . . . .
Setting Up Automatic Tax Calculation . . . . . . . . . . . . . . . . . . .
Disabling Automatic Tax Calculation . . . . . . . . . . . . . . . . . . .
Budgetary Control in Payables . . . . . . . . . . . . . . . . . . . . . . . . . . . . .
Setting Up Payables for Budgetary Control . . . . . . . . . . . . . .
Checking Funds for Invoices . . . . . . . . . . . . . . . . . . . . . . . . . . .
Approval When You Use Budgetary Control . . . . . . . . . . . . .
Encumbrances in Payables . . . . . . . . . . . . . . . . . . . . . . . . . . . . . . . .
Reviewing Encumbrances . . . . . . . . . . . . . . . . . . . . . . . . . . . . .
Intercompany Accounting . . . . . . . . . . . . . . . . . . . . . . . . . . . . . . . . .
Setting Up Intercompany Accounting . . . . . . . . . . . . . . . . . . .
Petty Cash Funds . . . . . . . . . . . . . . . . . . . . . . . . . . . . . . . . . . . . . . . .
10 – 29
10 – 30
10 – 31
10 – 32
10 – 33
10 – 34
10 – 34
10 – 38
10 – 39
10 – 40
10 – 42
10 – 43
10 – 43
10 – 45
10 – 46
10 – 48
10 – 50
10 – 50
10 – 51
Appendix A
Navigation . . . . . . . . . . . . . . . . . . . . . . . . . . . . . . . . . . . . . . . . . . . . . A – 1
Payables Navigator Paths . . . . . . . . . . . . . . . . . . . . . . . . . . . . . . . . . A – 2
Oracle Payables Character Mode Forms and Corresponding GUI
Windows . . . . . . . . . . . . . . . . . . . . . . . . . . . . . . . . . . . . . . . . . . . . . . . A – 9
Appendix B
Profile Options . . . . . . . . . . . . . . . . . . . . . . . . . . . . . . . . . . . . . . . . . . B – 1
Appendix C
Function Security . . . . . . . . . . . . . . . . . . . . . . . . . . . . . . . . . . . . . . . . C – 1
Appendix D
Attachments . . . . . . . . . . . . . . . . . . . . . . . . . . . . . . . . . . . . . . . . . . . . D – 1
Appendix E
Invoice, Payment, and Account Default Charts . . . . . . . . . . . . . E – 1
Appendix F
Oracle Payables Alerts . . . . . . . . . . . . . . . . . . . . . . . . . . . . . . . . . . . F – 1
Contents
xv
Appendix G
Payables Open Interface Tables . . . . . . . . . . . . . . . . . . . . . . . . . . .
Payables Open Interface Tables . . . . . . . . . . . . . . . . . . . . . . . . . . . .
Understanding the Payables Open Interface Tables . . . . . . .
Payables Open Interface Table Descriptions . . . . . . . . . . . . . .
Sequential Numbering During Import . . . . . . . . . . . . . . . . . .
Account Overlay in Payables Open Interface Import . . . . . .
Using SQL*Loader to Populate the Payables Open
Interface Tables . . . . . . . . . . . . . . . . . . . . . . . . . . . . . . . . . . . . . .
How the Invoice Gateway Window Populates the Open
Interface Tables . . . . . . . . . . . . . . . . . . . . . . . . . . . . . . . . . . . . . .
G–1
G–2
G–2
G–4
G – 49
G – 49
G – 51
G – 54
Appendix H
Purchase Order Matching Database Tables . . . . . . . . . . . . . . . . . H – 1
Appendix I
Payables Credit Card Transaction Interface Table . . . . . . . . . . . I – 1
Appendix J
Oracle Payables Holds . . . . . . . . . . . . . . . . . . . . . . . . . . . . . . . . . . .
Account Holds . . . . . . . . . . . . . . . . . . . . . . . . . . . . . . . . . . . . . . .
Funds Holds . . . . . . . . . . . . . . . . . . . . . . . . . . . . . . . . . . . . . . . . .
Invoice Holds . . . . . . . . . . . . . . . . . . . . . . . . . . . . . . . . . . . . . . . .
Matching Holds . . . . . . . . . . . . . . . . . . . . . . . . . . . . . . . . . . . . . .
Variance Holds . . . . . . . . . . . . . . . . . . . . . . . . . . . . . . . . . . . . . . .
Miscellaneous Holds . . . . . . . . . . . . . . . . . . . . . . . . . . . . . . . . . .
Glossary
xvi Oracle Payables User Guide
J–1
J–2
J–3
J–4
J–5
J–8
J–9
Window References
Apply/Unapply Prepayments Window Reference . . . . . . . . . . . .
Automatic Payment Programs Window Reference . . . . . . . . . . . .
Bank Accounts Window Reference . . . . . . . . . . . . . . . . . . . . . . . . .
Banks Window Reference . . . . . . . . . . . . . . . . . . . . . . . . . . . . . . . . .
Calculate Balance Owed Window Reference . . . . . . . . . . . . . . . . .
Charge Allocations Window Reference . . . . . . . . . . . . . . . . . . . . . .
Credit Card Code Sets Window Reference . . . . . . . . . . . . . . . . . . .
Credit Card Profiles Window Reference . . . . . . . . . . . . . . . . . . . . .
Credit Card Programs Window Reference . . . . . . . . . . . . . . . . . . .
Credit Card Transactions Window Reference . . . . . . . . . . . . . . . .
Credit Cards Window Reference . . . . . . . . . . . . . . . . . . . . . . . . . . .
Distributions Window Reference . . . . . . . . . . . . . . . . . . . . . . . . . . .
Expense Report Templates Window Reference . . . . . . . . . . . . . . .
Expense Reports Window Reference . . . . . . . . . . . . . . . . . . . . . . . .
Financials Options Window Reference . . . . . . . . . . . . . . . . . . . . . .
Find Accounting Entries Window Reference . . . . . . . . . . . . . . . . .
Income Tax Regions Window Reference . . . . . . . . . . . . . . . . . . . . .
Invoice Approvals Window Reference . . . . . . . . . . . . . . . . . . . . . .
Invoice Batches Window Reference . . . . . . . . . . . . . . . . . . . . . . . . .
Invoice Gateway Window Reference . . . . . . . . . . . . . . . . . . . . . . . .
Invoice Holds Window Reference . . . . . . . . . . . . . . . . . . . . . . . . . .
Invoices Window Reference . . . . . . . . . . . . . . . . . . . . . . . . . . . . . . .
Match to Purchase Orders Window Reference . . . . . . . . . . . . . . .
Payables Options Window Reference . . . . . . . . . . . . . . . . . . . . . . .
Payment Batches and Payment Batch Sets Window Reference . .
Payment Documents Window Reference . . . . . . . . . . . . . . . . . . . .
Payment Formats Window Reference . . . . . . . . . . . . . . . . . . . . . . .
Payment Terms Window Reference . . . . . . . . . . . . . . . . . . . . . . . . .
Payments Window (of the Invoice Workbench) Reference . . . . .
Payments Window Reference . . . . . . . . . . . . . . . . . . . . . . . . . . . . . .
Projected Withholding Tax Window Reference . . . . . . . . . . . . . . .
Recurring Invoices Window Reference . . . . . . . . . . . . . . . . . . . . . .
Reporting Entity Window Reference . . . . . . . . . . . . . . . . . . . . . . . .
Scheduled Payments Window Reference . . . . . . . . . . . . . . . . . . . .
Suppliers and Supplier Sites Window Reference . . . . . . . . . . . . . .
Tax Codes Window Reference . . . . . . . . . . . . . . . . . . . . . . . . . . . . .
Tax Recovery Rules Window Reference . . . . . . . . . . . . . . . . . . . . .
4 – 210
2 – 22
2 – 135
2 – 132
4 – 297
4 – 62
2 – 188
2 – 194
2 – 191
4 – 182
2 – 197
4 – 352
2 – 110
4 – 231
2 – 39
7 – 23
2 – 170
2 – 101
4 – 339
4 – 26
4 – 334
4 – 342
4 – 336
2 – 58
5 – 88
2 – 140
2 – 174
2 – 92
4 – 293
5 – 96
10 – 31
4 – 191
2 – 166
4 – 152
3 – 14
2 – 151
2 – 116
Contents
xvii
Tax Summary Window . . . . . . . . . . . . . . . . . . . . . . . . . . . . . . . . . . .
Update Accounting Entries Window Reference . . . . . . . . . . . . . .
View Period–To–Date Withheld Amounts Window
Reference . . . . . . . . . . . . . . . . . . . . . . . . . . . . . . . . . . . . . . . . . . . . . . .
Withholding Tax Certificates and Exceptions Window
Reference . . . . . . . . . . . . . . . . . . . . . . . . . . . . . . . . . . . . . . . . . . . . . . .
Withholding Tax Details Window Reference . . . . . . . . . . . . . . . . .
xviii Oracle Payables User Guide
4 – 127
7 – 23
10 – 33
2 – 163
2 – 154
Preface
Welcome to Release 11i of the Oracle Payables User Guide.
This user guide includes the information you need to work with
Payables effectively. It contains detailed information about the
following:
• Overview and reference information
• Payables implementation suggestions
• Specific tasks you can accomplish using Payables
• How to use Payables windows
• Payables programs, reports, and listings
• Payables functions and features
• Payables system setup
This preface explains how this user guide is organized and introduces
other sources of information that can help you.
Preface
xix
Audience for This Guide
Welcome to Release 11i of the Oracle Payables User Guide.
This guide assumes you have a working knowledge of the following:
• The principles and customary practices of your business area.
• Oracle Payables
If you have never used Payables, we suggest you attend one or
more of the Payables training classes available through Oracle
University.
• The Oracle Applications graphical user interface.
To learn more about the Oracle Applications graphical user
interface, read the Oracle Applications User Guide.
See: Other Information Sources for more information about Oracle
Applications product information.
How To Use This Guide
This guide contains the information you need to understand and use
Payables.
This preface explains how this user guide is organized and introduces
other sources of information that can help you. This guide contains the
following chapters:
• Chapter 1 provides a brief introduction to the graphical user
interface (GUI) available with this release of Payables. It also
explains the Invoice and Payment workbenches and how you use
them to enter invoices and create payments.
• Chapter 2 contains a checklist for setting up your Payables
system, and includes a complete description of each Payables
setup window.
Note: There is no separate implementation manual for this product.
All implementation information is included in this user guide.
• Chapter 3 tells you how to enter, review, and adjust your
suppliers.
• Chapter 4 describes how to enter, adjust, approve, and review all
types of invoices and invoice batches. It tells you how to enter
invoices in both the Invoices window and the Invoice Gateway
window. It also explains holds and expense reports. It includes
xx
Oracle Payables User Guide
information on importing EDI invoices, invoices from other
systems, and credit card transaction data by using Payables
Open Interface Import. It also describes how to use Payables
Invoice Import to import expense reports. In addition, it
describes Payables integration with other Oracle products.
• Chapter 5 provides detailed information about creating,
modifying, reviewing, and reconciling payments and payment
batches.
• Chapter 6 describes how to enter foreign currency information
and complete foreign currency transactions. It explains how to
make payments in associated fixed–rate currencies. It also
describes how to use the AutoRate program to automatically
provide invoices with exchange rates.
• Chapter 7 tells you how account for your transactions, and then
view and update the accounting entries. It also describes how to
use the Payables Transfer to General Ledger Program to transfer
accounting entries to the General Ledger Interface. From this
table you can then create journal entries and post them to your
general ledger. This chapter also explains how to reconcile
Payables activity with your general ledger.
• Chapter 8 explains how to submit a request or request set, and
briefly describes each Payables report and listing.
• Chapter 9 tells you how to use the Purge feature to delete
records that you no longer need to access online.
• Chapter 10 includes documentation about the following
specialized features: AuditTrail, Positive Pay Integration, Interest
Invoices, Automatic Offsets, Automatic Withholding Tax,
Automatic Tax Calculation, Budgetary Control and
Encumbrance, and Intercompany Accounting.
• Finally, appendices A – J include information about menu paths,
profile options, function security, attachments, hierarchical field
defaults, alerts, open interface tables, credit card transaction
interface tables, purchase order matching database tables, and
predefined holds.
Preface
xxi
Finding Out What’s New
From the expandable menu in the Payables HTML help window,
choose the section that describes new features or what’s new. This
section describes:
• New features in 11i. This information is updated for each new
release of Payables.
• Information about any features that were not yet available when
this user guide was printed. For example, if your system
administrator has installed software from a mini pack as an
upgrade, this document describes the new features.
Other Information Sources
You can choose from many sources of information, including online
documentation, training, and support services, to increase your
knowledge and understanding of Payables.
If this guide refers you to other Oracle Applications documentation,
use only the Release 11i versions of those guides unless we specify
otherwise.
Online Documentation
All Oracle Applications documentation is available online (HTML and
PDF). The technical reference guides are available in paper format
only. Note that the HTML documentation is translated into over
twenty languages.
Your HTML help may contain information that was not available when
this guide was printed.
The HTML version of this guide is optimized for onscreen reading, and
you can use it to follow hypertext links for easy access to other HTML
guides in the library. When you have an HTML window open, you can
use the features on the left side of the window to navigate freely
throughout all Oracle Applications documentation.
• You can use the Search feature to search by words or phrases.
• You can use the expandable menu to search for topics in the
menu structure we provide. The Library option on the menu
expands to show all Oracle Applications HTML documentation.
xxii
Oracle Payables User Guide
You can view HTML help in the following ways:
• From an application window, use the help icon or the help menu
to open a new Web browser and display help about that window.
• Use the documentation CD.
• Use a URL provided by your system administrator.
Related User Guides
Payables shares business and setup information with other Oracle
Applications products. Therefore, you may want to refer to other user
guides when you set up and use Payables.
You can read the guides online by choosing Library from the
expandable menu on your HTML help window, by reading from the
Oracle Applications Document Library CD included in your media
pack, or by using a Web browser with a URL that your system
administrator provides.
If you require printed guides, you can purchase them from the Oracle
store at http://oraclestore.oracle.com.
User Guides Related to All Products
Oracle Applications User Guide
This guide explains how to navigate the system, enter data, and query
information, and introduces other basic features of the GUI available
with this release of Payables (and any other Oracle Applications
product).
You can also access this user guide online by choosing “Getting Started
and Using Oracle Applications” from the Oracle Applications help
system.
Oracle Alert User Guide
Use this guide to define periodic and event alerts that monitor the
status of your Oracle Applications data.
Preface
xxiii
Oracle Applications Implementation Wizard User Guide
If you are implementing more than one Oracle product, you can use the
Oracle Applications Implementation Wizard to coordinate your setup
activities. This guide describes how to use the wizard.
Oracle Applications Developer’s Guide
This guide contains the coding standards followed by the Oracle
Applications development staff. It describes the Oracle Application
Object Library components needed to implement the Oracle
Applications user interface described in the Oracle Applications User
Interface Standards. It also provides information to help you build your
custom Oracle Developer forms so that they integrate with Oracle
Applications.
Oracle Applications Flexfields Guide
This guide provides flexfields planning, setup, and reference
information for the Payables implementation team, as well as for users
responsible for the ongoing maintenance of Oracle Applications
product data. This guide also provides information on creating custom
reports on flexfields data.
Oracle Applications User Interface Standards
This guide contains the user interface (UI) standards followed by the
Oracle Applications development staff. It describes the UI for the
Oracle Applications products and how to apply this UI to the design of
an application built by using Oracle Forms.
User Guides Related to This Product
Payables shares business and setup information with other Oracle
Applications products. Even if you have not installed them as separate
products, your Payables application includes some forms and
functionality from other Oracle Applications. Therefore, you may want
to refer to other user guides when you set up and use Payables.
Oracle General Ledger User Guide
Use this manual when you plan and define your chart of accounts,
accounting period types and accounting calendar, functional currency,
and set of books. It also describes how to define journal entry sources
and categories so you can create journal entries for your general ledger.
xxiv
Oracle Payables User Guide
If you use multiple currencies, use this manual when you define
additional rate types, and enter daily rates. This manual also includes
complete information on implementing Budgetary Control.
Oracle Cash Management User Guide
This manual explains how you can reconcile your payments with your
bank statements.
Oracle Purchasing User Guide
If you install Oracle Purchasing, refer to this user guide to read about
entering and managing the purchase orders to which you match
invoices.
Oracle Receivables User Guide
Use this manual to learn how to implement flexible address formats for
different countries. You can use flexible address formats in the
Suppliers, Banks, Invoices, and Payments windows.
Oracle Receivables Tax Manual
This manual provides everything you need to know about calculating
tax within Oracle Receivables, Oracle Order Management, Oracle sales,
and Oracle Web Customers. It includes information about
implementation procedures, setup forms and windows, the Oracle
Receivables Tax calculation process, tax reports and listings, and open
interfaces.
Oracle Projects User Guide
If you install Oracle Projects, use this user guide to learn how to enter
expense reports in Projects that you import into Payables to create
invoices. You can also use this manual to see how to create Project
information in Projects which you can then record for an invoice or
invoice distribution.
Oracle Assets User Guide
If you install Oracle Assets, you can use this manual to add assets and
cost adjustments directly into Oracle Assets from invoice information
in Payables.
Preface
xxv
Country–Specific Manuals
Use these manuals to meet statutory requirements and common
business practices in your country or region. They also describe
additional features added to Payables to meet those requirements.
Look for a user guide appropriate to your country; for example, see the
Oracle Financials for the Czech Republic User Guide for more information
about using this software in the Czech Republic.
Multiple Reporting Currencies in Oracle Applications
If you use the Multiple Reporting Currencies feature to report and
maintain accounting records in more than one currency, use this
manual before implementing Payables. The manual details additional
steps and setup considerations for implementing Payables with this
feature.
Multiple Organizations in Oracle Applications
If you use the Oracle Applications Multiple Organization Support
feature to use multiple sets of books for one Payables installation, use
this guide to learn about setting up and using Payables with this
feature.
Web Applications Dictionary, Project Configurator, and Object
Navigator User Guide
Use this guide when you set up Oracle Self–Service Expenses or the
procurement card feature.
Oracle Self–Service Web Applications Implementation Manual
If you use Oracle Self–Service Web Applications, read this guide to
learn how to implement Oracle Applications for the Web.
Oracle Property Manager User Guide
This guide describes how Oracle Property Manager enables companies
to manage their leased and owned properties. Tenants can set up
scheduled payments for rent and other expenses, export payment items
to Oracle Payables, and pay their suppliers. Landlords can set up
scheduled billings, export billing items to Oracle Receivables, and track
their customers’ accounts. Facilities managers can keep track of office
space allocation and cost, using employee information from Oracle
Human Resources. Lease administrators can abstract leases and track
xxvi
Oracle Payables User Guide
lease history. Tenants and landlords can abstract leases and manage
payments and invoices
Oracle Self–Service Expenses Implementation Manual
This book explains in detail how to configure Oracle Self–Service
Expenses and describes its integration with Oracle Payables and Oracle
Projects.
Oracle Treasury User Guide
This guide describes how to use Oracle Treasury to manage your
financial market transactions and exposures. It also describes how to
perform in–house banking.
Oracle Business Intelligence System Implementation Guide
This guide provides information about implementing Oracle Business
Intelligence (BIS) in your environment.
BIS 11i User Guide Online Help
This guide is provided as online help only from the BIS application and
includes information about intelligence reports, Discoverer workbooks,
and the Performance Management Framework.
Using Oracle Time Management
This guide provides information about capturing work patterns such as
shift hours so that this information can be used by other applications
such as General Ledger.
Installation and System Administration Guides
Oracle Applications Concepts
This guide provides an introduction to the concepts, features,
technology stack, architecture, and terminology for Oracle Applications
Release 11i. It provides a useful first book to read before an installation
of Oracle Applications. This guide also introduces the concepts behind,
and major issues, for Applications–wide features such as Business
Intelligence (BIS), languages and character sets, and self–service
applications.
Preface
xxvii
Installing Oracle Applications
This guide provides instructions for managing the installation of Oracle
Applications products. In Release 11i, much of the installation process
is handled using Oracle One–Hour Install, which minimizes the time it
takes to install Oracle Applications and the Oracle 8i Server technology
stack by automating many of the required steps. This guide contains
instructions for using Oracle One–Hour Install and lists the tasks you
need to perform to finish your installation. You should use this guide
in conjunction with individual product user guides and
implementation guides.
Upgrading Oracle Applications
Refer to this guide if you are upgrading your Oracle Applications
Release 10.7 or Release 11.0 products to Release 11i. This guide
describes the upgrade process in general and lists database upgrade
and product–specific upgrade tasks. You must be at either Release 10.7
(NCA, SmartClient, or character mode) or Release 11.0 to upgrade to
Release 11i. You cannot upgrade to Release 11i directly from releases
prior to 10.7.
Using the AD Utilities
Use this guide to help you run the various AD utilities, such as
AutoInstall, AutoPatch, AD Administration, AD Controller, Relink,
and others. It contains how–to steps, screenshots, and other
information that you need to run the AD utilities.
Oracle Applications Product Update Notes
Use this guide as a reference if you are responsible for upgrading an
installation of Oracle Applications. It provides a history of the changes
to individual Oracle Applications products between Release 11.0 and
Release 11i. It includes new features and enhancements and changes
made to database objects, profile options, and seed data for this
interval.
Oracle Applications System Administrator’s Guide
This guide provides planning and reference information for the Oracle
Applications System Administrator. It contains information on how to
define security, customize menus and online help, and manage
processing.
xxviii
Oracle Payables User Guide
Oracle Payables Applications Technical Reference Manual
This reference guide contains database diagrams and a detailed
description of database tables, forms, reports, and programs for Oracle
Payables, including Payables and related applications. This
information helps you convert data from your existing applications,
integrate Payables with non–Oracle applications, and write custom
reports for Payables.
You can order a technical reference manual for any product you have
licensed. Technical reference guides are available in paper format only.
Oracle Workflow Guide
This guide explains how to define new workflow business processes as
well as customize existing Oracle Applications–embedded workflow
processes. You also use this guide to complete the setup steps
necessary for any Oracle Applications product that includes
workflow–enabled processes.
Training and Support
Training
We offer a complete set of training courses to help you and your staff
master Oracle Applications. We can help you develop a training plan
that provides thorough training for both your project team and your
end users. We will work with you to organize courses appropriate to
your job or area of responsibility.
Training professionals can show you how to plan your training
throughout the implementation process so that the right amount of
information is delivered to key people when they need it the most. You
can attend courses at any one of our many Educational Centers, or you
can arrange for our trainers to teach at your facility. We also offer Net
classes, where training is delivered over the Internet, and many
multimedia–based courses on CD. In addition, we can tailor standard
courses or develop custom courses to meet your needs.
Support
From on–site support to central support, our team of experienced
professionals provides the help and information you need to keep
Payables working for you. This team includes your Technical
Representative, Account Manager, and Oracle’s large staff of
consultants and support specialists with expertise in your business
Preface
xxix
area, managing an Oracle server, and your hardware and software
environment.
Do Not Use Database Tools to Modify Oracle Applications Data
We STRONGLY RECOMMEND that you never use SQL*Plus, Oracle
Data Browser, database triggers, or any other tool to modify Oracle
Applications tables, unless we tell you to do so in our guides.
Oracle provides powerful tools you can use to create, store, change,
retrieve, and maintain information in an Oracle database. But if you
use Oracle tools such as SQL*Plus to modify Oracle Applications data,
you risk destroying the integrity of your data and you lose the ability to
audit changes to your data.
Because Oracle Applications tables are interrelated, any change you
make using an Oracle Applications form can update many tables at
once. But when you modify Oracle Applications data using anything
other than Oracle Applications forms, you might change a row in one
table without making corresponding changes in related tables. If your
tables get out of synchronization with each other, you risk retrieving
erroneous information and you risk unpredictable results throughout
Oracle Applications.
When you use Oracle Applications forms to modify your data, Oracle
Applications automatically checks that your changes are valid. Oracle
Applications also keeps track of who changes information. But, if you
enter information into database tables using database tools, you may
store invalid information. You also lose the ability to track who has
changed your information because SQL*Plus and other database tools
do not keep a record of changes.
About Oracle
Oracle Corporation develops and markets an integrated line of
software products for database management, applications
development, decision support and office automation, as well as Oracle
Applications. Oracle Applications provides the E–business Suite, a
fully integrated suite of more than 70 software modules for financial
management, Internet procurement, business intelligence, supply chain
management, manufacturing, project systems, human resources, and
sales and service management.
xxx
Oracle Payables User Guide
Oracle products are available for mainframes, minicomputers, personal
computers, network computers, and personal digital assistants,
enabling organizations to integrate different computers, different
operating systems, different networks, and even different database
management systems, into a single, unified computing and information
resource.
Oracle is the world’s leading supplier of software for information
management, and the world’s second largest software company.
Oracle offers its database, tools, and application products, along with
related consulting, education and support services, in over 145
countries around the world.
Preface
xxxi
Your Feedback
Thank you for using Payables and this user guide.
We value your comments and feedback. This guide contains a
Reader ’s Comment Form you can use to explain what you like or
dislike about Payables or this user guide. Mail your comments to the
following address or call us directly at (650) 506–7000.
Oracle Applications Documentation Manager
Oracle Corporation
500 Oracle Parkway
Redwood Shores, CA 94065
U.S.A.
Or, send electronic mail to [email protected] .
xxxii
Oracle Payables User Guide
CHAPTER
1
Payables Overview
T
his chapter gives an overview of Payables and describes the two
Payables workbenches.
Payables Overview
1–1
Payables Overview
Oracle Payables has a highly responsive, multi–window graphical user
interface (GUI) with full point–and–click capability. You can use your
mouse or keyboard to operate graphical controls such as pull–down
menus, buttons, poplists, check boxes, or tabbed regions.
You can read more about the basic characteristics of this GUI user
interface in the Oracle Applications User Guide.
This discussion includes the following topics:
• Payables Workbenches: page 1 – 2
• The Invoice Workbench: page 1 – 5
• The Payment Workbench: page 1 – 8
Payables Workbenches
Payables includes two fully integrated workbenches, the Invoice
Workbench and the Payment Workbench. You can perform most of
your transactions in Payables using the Invoice Workbench or the
Payment Workbench. You enter, adjust, and review invoices and invoice
batches in the Invoice Workbench. You create, adjust, and review
payments and payment batches in the Payments Workbench.
You may be restricted in the windows, buttons, and actions you can
access based on the Function Security implemented by your System
Administrator. See: Function Security in Payables: page C – 2.
Use the Invoice Overview and the Payment Overview windows to
review information from their respective workbenches. These windows
also act as bridges between the two workbenches. For example, from
the Invoices Overview, you can choose the Payments button to navigate
to the Payments window.
Some Payables windows have a customizable folder that allows you to
move, resize, and hide fields in the window. See: Customizing the
Presentation of Data in a Folder (Oracle Applications User Guide).
Payables workbenches let you find critical information in a flexible way.
For example, in the Invoice Workbench, you can find an invoice based
on supplier, purchase order number, status, or other criteria. Then, for
that invoice, you can review distributions, scheduled payments,
payments, holds, and other detailed invoice information. You can also
perform matching, submit approval, apply and release holds, or initiate
payment. All the windows you need are accessible from just one form;
1–2
Oracle Payables User Guide
you can query an invoice then perform several transactions without
having to find the invoice again. You can also keep multiple windows
open at one time.
In Payables, the Invoices window, Payments window, and Payment
Batches window each has an associated Actions window you can use to
perform available actions on one or more records. For example, see the
Invoice Actions window below:
Payables also provides Find windows that you can use to query records
by field, record status, or by a range of values. You can access most Find
windows from a window’s View menu. For example, from the Invoices
Payables Overview
1–3
window you can use the Find Invoices window to query all approved
invoices with a range of invoice dates.
Payables opens other Find windows automatically when you are
navigating to a window, so it can display in the window records that
match criteria you specify. For example, when you select a credit memo
in the Invoices window and choose the Match button, Payables
automatically opens the Find Invoices for Matching window. You enter
criteria in the window, and choose the Find button. Payables then opens
the Match to Invoices window and displays invoices that match your
criteria.
To see how to navigate to or open a window in Payables, see: Payables
Navigator Paths: page A – 2.
1–4
Oracle Payables User Guide
The Invoice Workbench
Payables Overview
1–5
The Invoice Workbench is a group of windows that you use to enter,
adjust, and review your invoices and invoice batches. The following is
the window hierarchy in the Invoice Workbench:
H
Invoice Batches
• Find Invoice Batches
H
Invoices
• Find Invoices
– Calculate Balance Owed
• Distributions
– Find Invoice Distributions
• Scheduled Payments
• Invoice Holds
– Release
• Invoice Actions
– Apply/Unapply Prepayments
• Payments
H
Invoice Overview
The following diagram shows how you can navigate between the
windows in the Invoice Workbench. You navigate into the Invoices
window or Invoice Batches window through the Navigator, and
navigate to most windows by choosing buttons. You can access the Find
windows from the View menu, and the Apply/Unapply Prepayment
window by selecting the appropriate check box in the Invoice Actions
window. You access the matching windows from the Invoices window
by selecting Invoice, Purchase Order, or Receipt from the match poplist
and then choosing the Match button.
1–6
Oracle Payables User Guide
Payables Overview
1–7
The Payment Workbench
The Payment Workbench is a group of windows that you use to create,
adjust, and review payments and payment batches. The following is the
window hierarchy in the Payment Workbench:
1–8
Oracle Payables User Guide
H
Payment Batches
• Find Payment Batches
• Copy To
• Payment Batch Actions
– Modify Payment Batch
– Confirm Payment Batch
H
Payments
• Find Payments
• Select Invoices
• View Invoices
• Payment Actions
H
Payment Batch Sets
• Find Payment Batch Sets
• Submit Batch Set
H
Payment Overview
The following diagram shows how you can navigate between windows
in the Payment Workbench. You navigate into the Payments, Payment
Batches, and Payment Overview windows through the Navigator, and
navigate to most of the other windows by choosing buttons. You can
access the Find windows from the View menu, and the Modify Payment
Batch and Confirm Payment Batch windows by selecting the
appropriate check box in the Payment Batch Actions window.
Payables Overview
1–9
See Also
Payables Navigator Paths: page A – 2
1 – 10
Oracle Payables User Guide
CHAPTER
2
Payables Setup
T
his chapter tells you how to set up Payables after you have
installed it. It includes an overview with list of steps to follow to set up
Payables, and includes detailed instructions on completing setup tasks
in each Payables setup window.
Note: Refer to the first section, Setting Up Oracle Payables, to see if a
setup step is documented outside of the Payables User Guide. We
suggest that you use this document in online help during setup. You
can then quickly access any non–Payables specific setup documentation
by using hypertext links.
Payables Setup
2–1
Setting Up Oracle Payables
Follow the steps in the following chart to set up your Payables system.
The chart shows you where to read in detail about the setup step. The
Window Names(s) column shows you in which window(s) you perform
the step, and if the window is available only if you use a specific
responsibility or product. The Required column shows you if the step is
required, optional, required with defaults, or conditionally required.
If you use this chart in online help, then you can easily access any
documentation in other books by using hypertext links
☞
Attention: If you use the Oracle Applications Multiple
Organization Support feature to use multiple sets of books for
one Payables installation, read the Multiple Organizations in
Oracle Applications manual before proceeding.
☞
Attention: If you use the Multiple Reporting Currencies
feature to record transactions in more than one currency, read
the Multiple Reporting Currencies in Oracle Applications manual
before proceeding. The manual details additional setup steps
and setup considerations for implementing Payables with this
feature.
Oracle Applications Implementation Wizard
If you are implementing more than one Oracle Applications product,
you may want to use the Oracle Applications Implementation Wizard to
coordinate your setup activities. The Implementation Wizard guides
you through the setup steps for the applications you have installed,
suggesting a logical sequence that satisfies cross–product
implementation dependencies and reduces redundant setup steps. The
Wizard also identifies steps that can be completed independently––by
several teams working in parallel––to help you manage your
implementation process most efficiently.
You can use the Implementation Wizard as a resource center to read
online help for a setup activity and open the appropriate setup window,
and to see a graphical overview of setup steps. You can also document
your implementation by using the Wizard to record comments for each
step, for future reference and review.
For more information, see: Oracle Applications Implementation Wizard User
Guide.
2–2
Oracle Payables User Guide
Setting Up Underlying Oracle Applications Technology
The setup steps in this chapter tell you how to implement the parts of
Oracle Applications specific to Oracle Payables.
The Implementation Wizard guides you through the entire Oracle
Applications setup, including system administration. However, if you
do not use the Wizard, you need to complete several other setup steps,
including:
• performing systemwide setup tasks such as configuring
concurrent managers and printers
• managing data security, which includes setting up responsibilities
to allow access to a specific set of business data and complete a
specific set of transactions, and assigning individual users to one
or more of these responsibilities
For more information, see: Oracle Applications System Administrator’s
Guide.
Also, if your product uses Oracle Workflow, for example, to approve
invoice records in the Payables Open Interface, you need to set up
Oracle Workflow.
For more information, see: Oracle Workflow User Guide.
Payables Upgrade Steps
If you have upgraded from a previous release of Payables you need to
perform only the following steps:
• Perform any setup for new or changed features. See the Oracle
Applications Product Update Notes for information about new
features. Then see the documentation about the new feature for
details on any special setup.
• Set Profile Options (required if you are upgrading from character
mode to GUI).
Payables Setup
2–3
Payables Setup Steps Summary
Applications Setup Steps:
Step
Number
❑ Step 1
Required?
Required
Applications Setup Step Description
Create application user sign–ons and
passwords.
See: Users Window (Oracle Applications
System Administrator’s Guide).
❑ Step 2
Required
Define your chart of accounts.
See: Defining Your Chart of Accounts (Oracle
General Ledger User Guide), and Defining Your
Account Structure (Oracle General Ledger User
Guide)
❑ Step 3
Optional
Define descriptive flexfields.
The structure of the Descriptive Flexfields
(datatypes, value sets) should be consistent
among windows that share flexfield
information. For example, flexfields in the
Invoice Gateway, Distributions Sets, Invoices,
and Distributions windows must all have the
same structure to work properly.
Window
Name(s)
AIW
Reference
System
Administrator
responsibility:
Users
Common
Applications
General Ledger:
multiple
windows
Common
Applications
System
Administrator
responsibility:
multiple
windows
Common
Applications
Currencies
Common
Applications
See: Defining Descriptive Flexfields (Oracle
Applications Flexfields Guide).
❑ Step 4
Optional
Enable currencies that you plan to use.
See: Currencies Window (Oracle General
Ledger User Guide).
❑ Step 5
Optional
If you want to enter foreign currency
transactions, define additional rate types,
and enter your daily rates.
See: Defining Conversion Rate Types (Oracle
General Ledger User Guide), Entering Daily
Rates (Oracle General Ledger User Guide), and
Foreign Currency Transactions: page 6 – 2.
Applications Setup Steps (Page 1 of 2)
2–4
Oracle Payables User Guide
General Ledger:
1) Conversion
Rate Types and
2) Daily Rates
Common
Applications
Step
Number
❑ Step 6
Required?
Required
Applications Setup Step Description
Define your accounting period types and
accounting calendar periods.
See: Defining Period Types (Oracle General
Ledger User Guide), and Defining Calendars
(Oracle General Ledger User Guide).
❑ Step 7
Required
Define a set of books. Specify a set of
books name and assign it a calendar,
functional currency, and a chart of accounts
structure.
Window
Name(s)
1) Period Types
and
AIW
Reference
Common
Applications
2) Accounting
Calendar
(Define) Set of
Books
Common
Applications
Application
Developer
responsibility:
Profiles
Common
Applications
System
Administrator
responsibility:
System Profile
Values
Common
Applications
See: Defining Sets of Books (Oracle General
Ledger User Guide).
❑ Step 8
Required
After choosing your set of books, use the
Application Developer responsibility to set
the GL Set of Books ID profile option to
Updateable.
See: Overview of User Profiles (Oracle
Applications System Administrator’s Guide), and
Setting User Profile Options (Oracle
Applications System Administrator’s Guide).
❑ Step 9
Required
After choosing your set of books, use the
System Administrator responsibility to set
the GL Set of Books Name profile option. If
you are not using multiple organizations
feature, set the option for the Oracle
Payables application. If you are using
multiple organizations feature, set the
option for each unique combination of
organization and responsibility.
See: Overview of User Profiles (Oracle
Applications System Administrator’s Guide), and
Setting User Profile Options (Oracle
Applications System Administrator’s Guide).
Applications Setup Steps (Page 2 of 2)
Payables Setup
2–5
Financials Setup Steps:
Step
Number
❑ Step 10
Required?
Required
with Defaults
Financials Setup Step Description
Define Payables Lookups.
Window
Name(s)
AIW
Reference
Oracle Payables
Lookups
Financial
Common
Oracle
Purchasing
Lookups
Financial
Common
Distribution Sets
Financial
Common
Oracle Human
Resources
Lookups
Financial
Common
Location
Financial
Common
See: Lookups: page 2 – 13.
❑ Step 11
Required
with Defaults
Define Purchasing Lookups.
See: Defining Lookup Codes (Oracle
Purchasing User Guide).
❑ Step 12
Optional
Define distribution sets. You can use a
distribution set to automatically enter
distributions for an invoice. If you use
Multiple Organization Support, perform this
step for each organization
See: Distribution Sets: page 2 – 17.
❑ Step 13
Optional
If you use Payables to enter employees in
your organization, enter employee lookups.
See: Adding Lookup Types and Values
(Oracle Human Resources User Guide).
❑ Step 14
Required
Enter locations.
See: Site Locations (Oracle Human Resources
User Guide).
❑ Step 15
Conditionally
Required
Enter employees. If you have Oracle Human
Resources installed, use the People window.
See: Entering a New Person (Managing People
Using Oracle HRMS). If you do not have
Oracle Human Resources installed, use the
Enter Person window. See: Enter Person:
(online help).
Enter Person
Financial
Common
❑ Step 16
Conditionally
Required
If Oracle Inventory or Oracle Purchasing is
installed, you must define at least one
Inventory Organization before defining
Financials Options.
Inventory:
Organization
Financial
Common
See: Creating an Organization (Oracle Human
Resources User Guide).
Financials Setup Steps (Page 1 of 2)
2–6
Oracle Payables User Guide
Step
Number
❑ Step 17
Required?
Required
with Defaults
Financials Setup Step Description
Define payment programs.
See: Automatic Payment Programs: page
2 – 20.
❑ Step 18
Optional
Update country and territory information,
and assign flexible address formats.
Window
Name(s)
AIW
Reference
Automatic
Payment
Programs
Financial
Common
Countries and
Territories
Financial
Common
System
Administrator
responsibility:
multiple
windows
Financial
Common
General Ledger:
multiple
windows
Financial
Common
See: Countries and Territories: page 2 – 119,
and Flexible Addresses (Oracle Receivables
User Guide or consult online help).
❑ Step 19
Optional
Implement sequential voucher numbering.
See: Implementing Sequential Voucher
Numbering: page 2 – 31.
❑ Step 20
Optional
Implement Budgetary Control in General
Ledger.
See: Setting Up Budgetary Control (Oracle
General Ledger User Guide).
Financials Setup Steps (Page 2 of 2)
Payables Setup Steps
Step
Number
Required?
❑ Step 1
Required
Payables Setup Step Description
Window
Name(s)
AIW
Reference
Product
Install or upgrade Payables.
See: Oracle Applications Installation Manual for
Windows or Oracle Applications Installation
Manual, Oracle Applications Upgrade Preparation Manual, Oracle Applications Installation
Update Notes.
❑ Step 2
Required
Select your primary set of books. If you use
Multiple Organization Support, perform this
step for each organization.
Choose Set of
Books
Product
See: Choosing a Set of Books: page 2 – 34.
Payables Setup
2–7
Step
Number
❑ Step 3
Required?
Payables Setup Step Description
Required
Use the System Administrator
responsibility to assign your set of books to
a responsibility.
Window
Name(s)
AIW
Reference
System
Administrator
responsibility:
Responsibilities
Financial
Common
System
Administrator
responsibility:
System Profile
Values
Product
Financials
Options
Product
Payables Options
Product
Special Calendars
Financial
Common
Payment Terms
Financial
Common
Suppliers
Financial
Common
See: Function Security in Payables: page
C – 2.
❑ Step 4
Optional
Set profile options.
See: Profile Options in Payables: page B – 2.
❑ Step 5
Required
Define Financials options. If you use
Multiple Organization Support, perform this
step for each organization.
See: Financials Options: page 2 – 36.
❑ Step 6
Required
Define Payables options. If you use
Multiple Organization Support, perform this
step for each organization.
See: Payables Options: page 2 – 57.
❑ Step 7
Optional
Define special calendars for key indicators,
recurring invoices, payment terms and
withholding tax.
See: Special Calendar: page 2 – 87.
❑ Step 8
Required
Define your payment terms.
See: Payment Terms: page 2 – 89.
❑ Step 9
Conditionally
Required
If you plan to use automatic withholding
tax, define Tax Authority type suppliers.
You must do this before defining tax codes
and tax groups. If you use Multiple
Organization Support, set up Supplier Sites
for Tax Authority type suppliers for each
organization.
See: Entering Suppliers: page 3 – 10.
Payables Setup Steps (Page 2 of 5)
2–8
Oracle Payables User Guide
Step
Number
Required?
❑ Step 10
Required
Payables Setup Step Description
Define bank accounts. If you use Multiple
Organization Support, perform this step for
each organization.
Window
Name(s)
AIW
Reference
Banks
Financial
Common
Suppliers
Financial
Common
Request Set
Product
Assign Reporting
Set of Books
Product
Invoice
Tolerances
Product
Invoice
Approvals
Product
Payment Interest
Rates
Product
See: Defining Banks: page 2 – 122.
❑ Step 11
Conditionally
Required
Define Suppliers. If you use Multiple
Organization Support, set up Supplier Sites
for each organization.
See: Entering Suppliers: page 3 – 10.
❑ Step 12
Optional
Define request sets.
See: Defining Request Sets (Oracle Applications
User Guide).
❑ Step 13
Conditionally
Required
Assign Reporting Set of Books. If you use
Multiple Organization Support, perform this
step for each organization.
If you use Multiple Reporting Currencies
assign a primary set of books. See: Multiple
Reporting Currencies manual.
❑ Step 14
Optional
Define your purchase order matching and
tax tolerances. If you use Multiple
Organization Support, perform this step for
each organization.
See: Invoice Tolerances: page 2 – 96.
❑ Step 15
Required
with Defaults
Define invoice approval codes. You use
these codes to apply and release holds from
invoices.
See: Invoice Approvals: page 2 – 99.
❑ Step 16
Optional
If you want to use Automatic Interest
Calculation, define payment interest rates.
See: Interest Rates: page 2 – 104.
Payables Setup Steps (Page 3 of 5)
Payables Setup
2–9
Step
Number
Required?
❑ Step 17
Optional
Payables Setup Step Description
If you want to use Payables to enter
employee expense reports, create templates
for entering expense reports. If you use
Multiple Organization Support, perform this
step for each organization.
Window
Name(s)
AIW
Reference
Expense Report
Templates
Product
Tax Recovery
Rules
Product
See: Expense Report Templates: page 2 – 106.
❑ Step 18
Optional
If you use recoverable tax, then define tax
recovery rules. If you use Multiple
Organization Support, perform this step for
each organization.
See: Tax Recovery Rules: page 2 – 114.
❑ Step 19
Optional
Define tax codes, and if you use automatic
withholding tax, define withholding tax
groups. If you use Multiple Organization
Support, perform this step for each
organization.
1) Tax Codes and
2) Withholding
Tax Groups
Product
Withholding Tax
Certificates and
Exceptions
Product
Reporting Entity
Product
Income Tax
Regions
Product
See: Tax Codes: page 2 – 146, Withholding
Tax Groups: page 2 – 158, and Setting Up
Withholding Tax: page 10 – 25.
❑ Step 20
Optional
Define withholding tax certificates and
exceptions. If you use Multiple Organization
Support, perform this step for each
organization.
Withholding Tax Certificates and Exceptions:
page 2 – 161.
❑ Step 21
Conditionally
Required
Define one or more reporting entities for
your organization for income tax reporting.
If you use Multiple Organization Support,
perform this step for each organization.
See: Reporting Entities: page 2 – 165.
❑ Step 22
Conditionally
Required
with Defaults
Define additional United States 1099
income tax regions.
See: Income Tax Regions: page 2 – 168.
Payables Setup Steps (Page 4 of 5)
2 – 10
Oracle Payables User Guide
Step
Number
Required?
❑ Step 23
Optional
Payables Setup Step Description
Define any additional payment formats.
Window
Name(s)
AIW
Reference
Payment Formats
Product
Control Payables
Periods
Product
Aging Periods
Product
System
Administrator
Responsibility:
multiple
windows
Product
multiple
Product
See: Payment Formats: page 2 – 173.
Note: If you plan to define foreign currency
or multiple currency payment formats, you
must first enable the Allow Multiple
Currencies Payables option in the Payables
Options window. See: Currency Payables
Options: page 2 – 60.
❑ Step 24
Required
Open your Payables accounting period.
See: Controlling the Status of Payables
Periods: page 2 – 178.
❑ Step 25
Optional
Define the format for the Invoice Aging
Report.
See: Aging Periods: page 2 – 182.
❑ Step 26
Required
Set up Print Styles and Drivers for the
Supplier Mailing Labels Report.
See: Setting Up Print Styles and Drivers for
the Supplier Mailing Labels Report: page
2 – 232.
❑ Step 27
Optional
If you use credit cards, then set up credit
card programs.
See: Setting Up Credit Card Programs: page
2 – 184
Payables Setup Steps (Page 5 of 5)
See Also
Enabling Automatic Offsets: page 10 – 22
Payables Implementation Information: page 2 – 217
Payables Setup
2 – 11
Payables Navigator Paths: page A – 2
Setting Up Intercompany Accounting: page 10 – 50
Setting Up Payables for Automatic Interest: page 10 – 9
Setting Up Payables for Budgetary Control: page 10 – 43
Electronic Payments: page 5 – 54
Setting Up Withholding Tax: page 10 – 25
Implementing Oracle Payables for Projects Integration (Oracle Projects
User Guide)
Setting Up Your Accounting Method: page 2 – 55
Setting Up Your System for Positive Pay: page 10 – 3
Setting Up Your System for Matching: page 4 – 166
Setting Up Your System for Future Dated Payments: page 5 – 60
Setting Up Payables for Recoverable Taxes: page 4 – 126
2 – 12
Oracle Payables User Guide
Lookups
A lookup is any predefined value that was not defined in a setup
window. Use the Oracle Paybles Lookups window to review and
maintain sets of values, or lookups, that you use in Payables.
In some fields, you must select a value from a predefined lists of values.
Sometimes the values on the list are items you have defined in a setup
window, such as supplier names, payment terms, or tax codes. Other
predefined sets of values are lookups, which you can view, and in some
cases, update, in the Oracle Payables Lookups window.
A lookup category is called a lookup type, and the allowable values for
the lookup type are called lookup names. For example, names of invoice
types, such as Standard, Prepayment, Debit Memo, and so on, are
lookup names for the lookup type of Invoice Type.
You can add lookup names to some lookup types. For lookup types that
you can modify, you can define up to 250 lookup names. For example,
you can define additional values for Source, which you specify when
you import invoices. You cannot change lookup name values after you
save them. To remove an obsolete lookup you can disable the code,
enter an end date, or change the meaning and description to match a
replacement code.
You can view all Payables lookups in the Oracle Payables Lookups
window. However, you can’t modify most lookups. For example, the
Payables application uses lookups that you do not use for data entry,
such as lookups that list exceptions on the Invoice Import Exceptions
report.
If you use Multiple Language Support (MLS), you can define lookups in
each of your installed languages. Select Translations from the toolbar or
menu to enter the lookup name and description in other languages.
When a user selects lookups from a list of values, the lookups on the list
will appear in the user’s language. For more information, see: the Oracle
Applications User Guide.
For detailed information on defining and updating lookups, see:
Lookups, Oracle Applications Developer’s Guide, or see online help.
Payables Setup
2 – 13
Purchasing Lookups
Note that in the Oracle Purchasing Lookups window you can add
values for the following lookups that Payables uses:
• FOB. Supplier default for all new purchase orders. See: Entering
Suppliers: page 3 – 10.
• Freight Terms. Supplier default for all new purchase orders. See:
Entering Suppliers: page 3 – 10.
• Minority Group. Supplier classification for reporting purposes.
See: Entering Suppliers: page 3 – 10.
• Pay Group. Groups invoices in payment batches. See: Paying
Invoices in Payment Batches: page 5 – 17.
• Supplier Type. Supplier classification for reporting purposes.
Enter this value in the Type field of the Classification region of the
Suppliers window. See: Classification Region of the Suppliers
window: page 3 – 18. Also defines tax recovery rules. See: Tax
Recovery Rules: page 2 – 114.
Payables Lookups
You can add values for the following lookup types in this window:
• AWT Certificate Types. Define withholding tax certificates.
Payables predefines the Standard lookup name. See: Withholding
Tax Certificates and Exceptions: page 2 – 161.
• AWT Rate Types. Define Withholding Tax type tax codes.
Payables predefines the following: Certificate, Exception, Penalty,
and Standard lookup names. See: Tax Codes: page 2 – 146.
☞
Attention: Oracle Payables uses only the Standard AWT Rate
Type. If you want to use an AWT Rate Type other than
Standard, you may want to customize Automatic Withholding
Tax to perform special behavior based on the AWT Rate Type.
See: Customizing Automatic Withholding Tax: page 2 – 230.
• Bank Branch Type. Payables predefines the following Bank
Branch values that you enter in the Banks window: ABA, CHIPS,
OTHER, SWIFT.
• Card Brand. Used in the Credit Card Programs window.
Payables includes four card brands: American Express, Diner’s
Club, MasterCard, and Visa. See: Credit Card Programs: page
2 – 189.
• Date Mask. Obsolete.
2 – 14
Oracle Payables User Guide
• Disbursement Type. Used when you define your payment
documents in the Payment Documents window of the Banks
window. See Defining and Maintaining Payables Payment
Documents: page 2 – 129.
Payables predefines three disbursement type values: Combined,
Computer Generated, and Recorded.
• Dont Pay Reason. Used in the Modify Payment Batch window
when you remove all invoices for a supplier site from a payment
batch. See: Modifying Payment Batches: page 5 – 27.
• EDI Payment Format. Payables predefines the following lookup
names: CCD, CCP, CTP, CTX, PPD, PPP.
• EDI Payment Method. Payables predefines the following lookup
names: ACH, BACS, BOP, FEW, FWT, SWT, ZZZ.
• EDI Remittance Method. Payables predefines the following
lookup names: Do not route, EDI to Third party, EDI to payee,
EDI to payee’s bank, EDI to payer’s bank.
• EDI Transaction Handling. Payables predefines the following
lookup names: C, D, I, U, Z.
• Source. Used when you enter the source of invoices you want to
import. See: Payables Invoice Import Program: page 4 – 239, or
Payables Open Interface Program: page 4 – 261.
• Tax Type. Used to define tax codes. See: Tax Codes: page 2 – 146.
Payables uses four predefined tax type values: Sales, Use, Offset,
and Withholding Tax. In addition, it predefines the following tax
codes for installations in Italy and Brazil. For details on these tax
types, please refer to your country–specific documentation:
– Italy: Custom Bill, Exempt Vat, Non Taxable, Self Invoice
– Brazil: ICMS, IPI
Payables Setup
2 – 15
Country–specific lookups
The following lookups are used only in certain localized versions of
Payables. For more information refer to your country–specific
documentation.
• JE_Custom_Bill_Tax Type. Used to define a Custom Tax type tax
code. When a distribution has a Custom Tax type, the amount
entered is a statistical amount and is reported in the Purchase
VAT register.
• JE_EEC_VAT_Doc. Not implemented.
• JE_Exempt_Tax_Type. Not implemented.
• JE_Nontaxable_Tax. Used to define a Non Taxable type tax code.
• JE_Self_Invoice_Doc. Not implemented.
• JE_Self_Inv_Tax_Type. Used to define a Self Invoice type tax
code. When a distribution has a Self Invoice tax type, the amount
entered is a statistical amount and is reported in the Self Invoice
Purchase and Sales VAT registers.
2 – 16
Oracle Payables User Guide
Distribution Sets
You can use a Distribution Set to automatically enter distributions for
an invoice when you are not matching it to a purchase order. For
example, you can create for an advertising supplier a Distribution Set
that allocates advertising expense on an invoice to four advertising
departments.
You can assign a default Distribution Set to a supplier site so Payables
will use it for every invoice you enter for that supplier site. If you do
not assign a default Distribution Set to a supplier site, you can always
assign a Distribution Set to an invoice when you enter it.
Use Full Distribution Sets to create distributions with set percentage
amounts, or use Skeleton Distribution Sets to create distributions with
no set distribution amounts. For example, a Full Distribution Set for a
rent invoice assigns 70% of the invoice amount to the Sales facility
expense account and 30% to the Administration facility expense
account. A Skeleton Distribution Set for the same invoice would create
one distribution for the Sales facility expense account and one
distribution for the Administration facility expense account, leaving the
amounts zero. You could then enter amounts during invoice entry
depending on variables such as that month’s headcount for each group.
If you enable and use a descriptive flexfield with your distribution set
lines, the data in the flexfield will be copied to the invoice distributions
created by the Distribution Set.
Note: Taxable distributions created by distribution sets are
always inclusive of tax when you use Automatic Tax
Calculation even if you have not checked the Includes Tax
check box at the supplier site.
Creating Distribution Sets
"
To create a Full Distribution Set:
1.
In the Distribution Sets window, enter the Name and Description of
the Distribution Set you are creating.
2.
Enter the Account and Description for each distribution and enter
the Percentage of the invoice amount that you want to distribute to
the Account. You can enter positive and negative percentages.
Create as many distributions as you need. The sum of the
distribution percentages must equal 100 or 0.
Payables Setup
2 – 17
If you are creating a Distribution Set for a federally reportable
supplier, optionally enter an Income Tax Type.
Optionally enter an Invoice Tax Code. The Tax Code will default
based on the Tax Code Defaults hierarchy you defined in the
Payables Options window. See: Defaulting Tax in Payables: page
4 – 105. If the source Payables uses is Template, then Payables uses
the value from the Distribution Set, even if the value is null.
3.
"
Save your work. Payables automatically assigns type Full to your
Distribution Set.
To create a Skeleton Distribution Set:
1.
☞
2.
In the Distribution Sets window enter the Name and Description of
the Distribution Set you are creating.
Attention: If you create a skeleton Distribution Set, include
skeleton in the name to remind you to enter the line amounts.
Enter the Account and Description for each distribution and leave
the Percentage at zero. Create as many distributions as you need.
If you are creating a Distribution Set for a federally reportable
supplier, optionally enter an Income Tax Type.
3.
Save your work. Payables automatically assigns type Skeleton to
your Distribution Set.
Creating a Project Related Distribution Set
If you have Oracle Projects installed, you can associate a distribution
with a project by entering project information on invoice distributions.
The system uses the project information to build the distribution
accounts. If you use a project related distribution set, Payables
automatically enters the project information on the distribution for you.
You can override the project fields on the distribution. The system will
then create accounts based on the new information.
Prerequisite
❑ Oracle Projects is installed.
"
To create a project related Distribution Set:
1.
2 – 18
Oracle Payables User Guide
Enter either a Skeleton or Full Distribution Set in the Distribution
Sets window.
2.
If a distribution is project related, check Project Related.
Enter the Project, Task, Expenditure Type, and Organization.
If you use Oracle Grants Management, you can enter a value for
Award Number, to record the award associated with the project.
3.
Save your work.
See Also
Entering Invoices for Suppliers Subject to Income Tax Reporting
Requirements: page 4 – 131
Entering Project Related Invoices and Distributions: page 4 – 160
Defaulting Tax in Payables: page 4 – 105
Implementing Oracle Payables for Projects Integration (Oracle Projects
User Guide)
Oracle Grants Management Integration: page 4 – 179
Payables Setup
2 – 19
Automatic Payment Programs
If you use Oracle Payables, use the Automatic Payment Programs
window to define payment programs. If you use Oracle Receivables,
use this window to define additional receipt and remittance format
programs.
Payables users:
Use the Automatic Payment Programs window to define payment
programs that you use to format payment documents and separate
remittance advice. You specify whether each program is for building
payments, formatting payments, or creating a payment remittance
advice.
Payables predefines one program for building payments and many
standard programs for formatting payments. Payables also predefines a
program for creating a separate remittance advice for payments. You
can select these predefined programs when you define a payment
format, or you can use these programs as templates for creating your
own custom payment programs.
Receivables users:
Use the Automatic Payment Programs window to define additional
receipt format programs you use to create receipt documents such as
checks or bills of exchange. You can define as many receipt programs as
you want. Payables already provides sample receipt programs that you
can use to create and format receipt and remittance documents. If you
need a different automatic receipt program, then you should copy the
sample program and modify it. You specify whether each program is
for the creation, printing, or transmission of automatic receipts or
remittances.
See Also
Payment Formats: page 2 – 173
Setting Up Custom Payment Programs: page 2 – 221
Setting Up Custom Payment Formats: page 2 – 225
2 – 20
Oracle Payables User Guide
Defining Payment Programs for Payables and Defining Receipt and Remittance
Programs for Receivables
Payables Prerequisites
❑ If you are not using Payables predefined payment programs, define
a payment program using Oracle Reports. See: Setting Up Custom
Payment Programs: page 2 – 221.
❑ Register your program in the System Administrator’s Concurrent
Programs window. Optionally assign a default printer to the
program. If you do not assign a default printer then when you use
the payment program, Payables will use the printer you defined as
your default as the Printer profile option.
Receivables Prerequisites
❑ Create a receipt program using Oracle Reports. See: Setting Up
Custom Payment Programs: page 2 – 221.
❑ Register your program in the System Administrator’s Concurrent
Programs window.
"
To define payment, receipt, or remittance programs:
1.
In the Automatic Payment Programs window, enter a unique Name
for the program you are defining. This name will appear on a list of
values whenever you need to enter the program name.
Enter a program Type.
Enter the Registered Name. The concurrent manager uses the
Registered Name to refer to the payment program.
2.
Save your work.
☞
Attention: If you have installed European localizations, the
Automatic Payment Programs window displays any
country–specific payment programs for your country in
addition to the standard Oracle Payables programs. Also, if you
have installed Oracle Receivables with European localizations,
the Automatic Receipt Programs window displays any
country–specific receipt or remittance format programs for your
country in addition to the standard Oracle Receivables
programs. For more information about the country–specific
programs, please consult the Oracle Financials user guide for
your country.
Payables Setup
2 – 21
Automatic Payment Programs Window Reference
Name. The name of the program you are defining. This name will
appear on a list of values when you need to enter the name of the
program.
Suggestion: If you use Receivables, since you use both a
format receipts and a transmit receipts program with a single
receipt format, you should give both the same name. You can
use the same name if the program type is different.
Type. Type of program you are defining.
Payables Types:
• Build Payments. A program Payables uses to build payments for
the invoices in a payment batch. Payables submits this program
during payment batch selection to calculate the payment totals for
your payments and determine on which payment documents the
payment appears.
Payables provides a predefined Build Payments program called
the Standard Build Payments Program. Payables uses this
standard build program to group the selected invoices for each
payment, order the payments using the order option you specify
in the Payment Batches window, create any necessary overflow
documents, and determine the total number and amount of
payments for a payment batch.
☞
Attention: You do not need to define any additional Build
Payment programs. Use the Standard Build Payments Program
that Payables provides.
• Format Payments. A program Payables uses to format your
payment documents. During the Format Payments program,
Payables uses your payment format to create the layout of your
checks or electronic payments.
• Remittance Advice. A program Payables uses to format a
separate remittance advice document. For example, you can use a
remittance program to create separate remittance advice
documents for your electronic funds transfers.
Receivables Types:
• Print Created Receipts. A program you use to create a batch of
automatic receipts.
2 – 22
Oracle Payables User Guide
• Transmit Created Receipts. A program you use to format the
output of automatic receipts that you have created on to a
magnetic medium.
• Print Bank Remittance. A program you use to print a batch of
your remittances.
• Transmit Bank Remittance. A program you use to format the
output of bank remittance batches that you have created on to a
magnetic medium.
Registered Name. Enter the concurrent program short name of your
payment program. Your System Administrator defined this short name
when registering your payment program.
Payables Setup
2 – 23
Voucher Numbers and Document Sequences
You can assign a unique voucher number to each invoice and payment
document in your Payables system so you have a unique identifier for
each document. For example, you may get two invoices with identical
invoice numbers from two different suppliers. If you assign a voucher
number to each, you can locate each invoice based on its unique
voucher number.
☞
Attention: Plan your setup carefully. Before you set up your
system for voucher numbers, read this section and the related
documentation on Document Sequences in the Oracle
Applications System Administrator Guide.
Assigning unique voucher numbers to documents is called document
sequencing. You can set up document sequencing for all of the
documents you use in all of your Oracle Applications.
Voucher numbers provide proof of completeness. If you use sequential
voucher numbers, you can confirm that no document has been lost.
Even if invoices or payments are deleted, each voucher number retains
audit records. You can also maintain an audit trail because you can
trace a journal entry back to the original document in Payables.
When setting up document sequencing, you select a set of numbers,
called a sequence, that you will assign to a type of document. The type
of document is called a document category. For example, you may
decide to assign the sequence of numbers to a document category of
Credit Memo Invoices. Then, each Credit Memo you create will have a
unique voucher number. Specifying the sequence that will be assigned
to a category is called assignment.
When you create and save a sequence, you cannot change it. When you
save it, a concurrent process starts that automatically generates the
sequence. Wait until this process completes successfully before
continuing with assigning the sequences to a category.
☞
2 – 24
Oracle Payables User Guide
Attention: Do not use voucher numbers that exceed nine
digits. If your a voucher number exceeds nine digits in
Payables, then Payables cannot process the document.
Document Sequences
You can define any number of document sequences. When you define
sequences, you define automatic sequences and (optionally) manual
sequences.
• Manual Sequences. Enter voucher numbers manually by
entering a number in the Voucher Number field when you create
a document. Since numbers are entered manually, you can add
coding to the number, for example, the transaction date. The
system confirms only that the number is unique and that it is in
the correct sequence for the document category. The system
does not ensure that you have entered the next available
document number in the sequence. Do not assign manual
sequences to documents that Payables creates automatically (for
example, electronic payments) because you cannot manually
enter a voucher number for those documents.
• Automatic Sequences. Payables assigns numbers automatically
when the document is created. Payables can assign numbers
automatically for any document, whether it is created manually
by users or automatically by Payables. If Payables creates a
document automatically (for example, recurring invoices), then
assign only an automatic sequence to it. When Payables
automatically assigns sequence numbers it always assigns the
next available number in the sequence. However, you may still
have gaps in the sequence, for example, if there is a system
problem while you are saving a document.
• Gapless Sequences (Type of Automatic Sequence valid only in
the context of certain localizations): Payables assigns numbers
automatically, it confirms that the document has been
successfully created before it assigns the next available number
in the sequence. This ensures that you have no gaps of
unassigned numbers in the sequence.
For the following documents that users enter manually, you can assign
either manual or automatic sequences:
• Manually entered invoices in the Invoice Gateway
• Manually entered invoices in the Invoice Workbench
• Manual payments
• Quick payments
• Invoices you import through the Open Interface Tables (Manual
voucher numbers are possible but not recommended, since you
Payables Setup
2 – 25
would have to enter correct voucher information for each invoice
in the Open Interface Invoices window.)
For the following documents that Payables automatically creates,
assign an automatic sequences.
• Invoices created during Payables Invoice Import (including
expense reports)
• Invoices created from recurring invoice templates
• Payments created in a payment batch
• Interest invoices
☞
Attention: Once you save your changes in the Document
Sequences window, the only fields you can update are the
Description fields and the Message check box.
For detailed information, see: What is a Document Sequence? and
Sequence Assignments Window in the Oracle Applications System
Administrator’s Guide.
Document Categories
A document category is a set of documents (invoices or payments) that
share similar characteristics. You can assign a single document
sequence to one or more document categories. For example, you could
assign one sequence to all invoice categories. Payables predefines the
following categories for Payables documents:
H
Predefined invoice categories: Standard Invoices, Credit Memo
Invoices, Debit Memo Invoices, Expense Report, Interest Invoices,
Mixed Invoices, Prepayment Invoices, Recurring Standard Invoices
H
Predefined payment categories: Check Payments, Clearing
Payments, Electronic Payments, Supplier Refund Payments, Wire
Payments
When a document is created, Payables automatically assigns the
default document category to the document.
• Invoices: Payables assigns a default invoice document category
in the Document Category Name field in the Invoices window
based on the value you select in the Invoice Type field in the
Invoices window
2 – 26
Oracle Payables User Guide
• Payments: In the Payment Documents window, Payables
defaults the payment document category based on the payment
method you assign to the payment document.
When you create a payment, the document category defaults
from the payment document.
You can use the document categories that Payables provides and you
can define additional categories. If you enable Document Category
Override in the Invoices and Payments regions of the Payables Options
window, you can override the default document category that Payables
automatically assigns to invoices or payments. If you enable this
Payables option for payments you can also override the document
category in the Payment Documents window.
For detailed information, see: Define Document Categories (Oracle
Applications System Administrator’s Guide).
Additional Information About the Document Categories Window
The following is additional information for some of the fields in the
Document Categories window. Use these hints as a reference while
you are using the following documentation: Document Categories
Window (Oracle Applications System Administrator’s Guide).
☞
Attention: Once you save a Document Category you cannot
change it.
Application. The application that owns the tables where the voucher
number will be stored: Oracle Payables.
Code. This is the code for the category that is stored in the application
tables. When you select a document category for a document, the
system stores this value in the DOC_CATEGORY_CODE column for
the document record.
Name. Document category name that the user sees in the Document
Category field in Payables windows. This is also the name you enter in
the Category field of the Sequence Assignments window.
Table Name. The Payables table that stores the document (and the
document’s voucher number).
• AP_INVOICES_ALL stores all invoices.
• AP_EXPENSE_REPORT_HEADERS_ALL stores all expense
report information before it is imported. This includes expense
reports entered in Payables, Self–Service Expenses, and Projects.
• AP_CHECKS_ALL stores all payment information.
Payables Setup
2 – 27
Sequence Assignments
In the Sequence Assignments window, you assign sequences to one or
more document categories. You further specify a unique combination
of Oracle Application, set of books, and document entry method
(Manual or Automatic). The document entry method indicates
whether Payables automatically creates the document or a user
manually enters the document.
You can assign the same document sequence to more than one category
if the application specified in the sequence is the same as the
application specified for the category. For example, you can assign an
automatic numbering sequence to documents you enter manually (such
as category Standard Invoices) and documents created automatically
(such as category Expense Reports), if both categories are in the same
application (Payables). Remember that if Payables creates a document
automatically, for example during Payables Invoice Import, then you
need to assign an automatic sequence to the document category.
Sequential Numbering Profile Option
The Sequential Numbering profile option controls whether you can
assign voucher numbers to documents, and whether you are required
to assign voucher numbers to documents. This option can be enabled
at the Responsibility, Application, Site, or User level. You can choose
one of the following options:
• Not used. The system does not enforce sequential numbering.
However, it does ensure that any numbers entered are unique.
• Partially Used. The system enforces sequential numbering for
all of the sequences that are assigned to a document category. If
you create a document and no active sequence has been assigned
to its document category, then Payables displays a warning
message that a sequence does not exist. You can proceed
without a sequence, or you can define and assign the sequence
before you proceed.
• Always Used. The system enforces sequential numbering for all
document categories. If you attempt to create a document and
no active sequence has been assigned to its document category,
then you cannot proceed until you define and assign a sequence.
☞
2 – 28
Oracle Payables User Guide
Attention: We recommend that you do not change this value
once you have set it. When you select Not Used, if you enter a
number it is stored in the VOUCHER_NUM column. If you
select Partially Used or Always Used, the system populates the
DOC_SEQUENCE_VALUE column. Consequently, if you
update the value after you have been using voucher numbers,
existing voucher number data, while not lost, is no longer
displayed because the system is using a different column.
Payables Setup
2 – 29
2 – 30
Oracle Payables User Guide
Document Sequencing Setup Examples
Example 1
You specify Always Used for the Sequential Numbering profile option.
You create a document sequence named Auto Expense that uses
automatic numbering. You assign the sequence to the document
category Expense Report, used for invoices Payables Invoice Import
creates from expense reports. When Invoice Import creates an invoice,
it automatically enters Expense Report in the Document Category
name field. When you commit the record, Payables enters the next
available number from the Auto Expense sequence into the Voucher
Number field. Payables ensures that the number assigned is unique for
the Auto Expense sequence.
Example 2
You also create a document sequence named Man Inv Standard that
uses manual numbering. You assign the sequence to a document
category you create called Standard Manual Invoice. You enable the
Document Category Override Payables option for invoices. When you
manually enter a Standard invoice, you can override the default
category, Standard Invoice, and enter Standard Manual Invoice in the
Document Category field. Because you set Sequential Numbering to
Always Used, you must enter in the Voucher Number field an available
number from the Man Inv Standard sequence. Payables ensures that
the number you assign is in the sequence and that it is unique within
that sequence. When you enter voucher numbers in this manner,
Payables does not require you to use the next available voucher
number.
Implementing Sequential Voucher Numbering
The steps below are a summary of the steps to implement document
sequencing. Refer to the Oracle Applications System Administrator Guide
for details on each step.
☞
Attention: Plan your document sequencing carefully. You
cannot make changes to the important data in the Document
Sequences and Document Categories windows after you save
your work.
Prerequisite
❑ Plan every document category you will use (across all Oracle
Applications), plan a sequence to assign to each document
category, and decide if the sequence will be automatic or manual.
Payables Setup
2 – 31
Remember not to assign manual sequences to documents that the
system creates automatically.
❑ Log in as the System Administrator to perform the first four steps.
"
To implement sequential voucher numbering:
1.
Enable the Sequential Numbering Option in the System Profile
Values window. Set the value to either Partially Used or Always
Used.
2.
Optionally define Additional Document Categories in the
Document Categories window. See: Document Categories Window
(Oracle Applications System Administrator’s Guide).
3.
Define Document Sequences in the Document Sequences window.
See: Defining a Document Sequence (Oracle Applications System
Administrator’s Guide).
☞
Attention: Do not use voucher numbers that exceed nine
digits. If your voucher numbers exceed nine digits in Payables,
then Payables cannot process your documents.
4.
Assign Document Sequences to document categories in the
Sequence Assignments window. See: Assigning a Document
Sequence (Oracle Applications System Administrator’s Guide).
5.
If you want to use custom document sequences, then in the
Payables Options window, enable Document Category Override
options in the Invoice region and the Payment region. You must
enable this option for payments if you want to assign custom
document categories to payment documents you define. See:
Payables Options: page 2 – 57. You can change these options after
you have set them.
6.
Assign Default Document Category to Bank Account Payment
Documents. See: Defining Banks: page 2 – 122.
See Also
Voucher Numbers: page 2 – 24
2 – 32
Oracle Payables User Guide
Making a Sequence or Assignment Inactive
In the Sequence Assignments window, you can disable an assignment
by entering a To date. The To date is the last date that the assignment
is active. Once you have disabled the assignment, you can then disable
the sequence in the Document Sequences window. Once disabled, a
sequence cannot be reactivated.
☞
Attention: Always disable the assignment before you disable
a sequence or you will have a category with an inactive
sequence assigned to it.
Payables Setup
2 – 33
Choosing a Set Of Books
Your set of books defines the account structure, accounting calendar,
and functional currency your organization uses to record transactions
in Payables. If you are not using the Multiple Organization support
feature, you can choose one primary set of books for each installation of
Payables. You can choose one primary set of books for each installation
of Payables. You can choose a secondary set of books in the Accounting
Methods region of the Payables Options window if you are keeping
both an accrual and cash set of books.
Your system administrator associates sets of books with one or more
responsibilities. Your responsibility determines with which set of
books you are working. You have the option of setting up multiple
organizations within one installation of Payables. Your system
administrator associates a responsibility with a particular organization
and set of books. The name of your set of books appears on all reports
you generate in Payables.
If you use the Multiple Reporting Currencies feature, read the Multiple
Reporting Currencies in Oracle Applications manual for information on
your sets of books.
☞
Attention: You cannot change your Set of Books selection in
this window after you save it.
Prerequisites
❑ Define your Set of Books. See: Defining Sets of Books (Oracle
General Ledger User Guide).
"
2 – 34
To choose your primary set of books:
1.
Navigate to the Choose Set of Books window.
2.
Enter the name of the Set of Books you want to use.
3.
Save your work.
Oracle Payables User Guide
See Also
Setting Up Oracle Payables: page 2 – 2
Accounting Methods: page 2 – 50
Payables Options: page 2 – 57
Creating Dummy Accounting Reference Data, Oracle Training
Administration User Guide
Multiple Organizations in Oracle Applications
Payables Setup
2 – 35
Financials Options
Use the Financials Options window to define the options and defaults
that you use for your Oracle Financial Application(s). Values you enter
in this window are shared by Oracle Payables, Oracle Purchasing, and
Oracle Assets. You can define defaults in this window to simplify
supplier entry, requisition entry, purchase order entry, invoice entry,
and automatic payments. Depending on your application, you may not
be required to enter all fields.
Although you only need to define these options and defaults once, you
can update them at any time. If you change an option and it is used as
a default value elsewhere in the system, it will only be used as a default
for subsequent transactions. For example, if you change the Payment
Terms from Immediate to Net 30, Net 30 will be used as a default for
any new suppliers you enter, but the change will not affect the Payment
Terms of existing suppliers.
Attention Oracle Payables Users:
You are required to enter defaults for the Accounting Financials
Options in the Accounting region. You define your tax defaults in the
tax region. If you do not use encumbrance accounting or budgetary
control, you do not need to enter defaults in the Encumbrance region.
If you do not also have Oracle Purchasing installed, you do not need to
enter defaults in the Supplier – Purchasing region. If you do not have
Oracle Human Resources installed, you are not required to enter
defaults in the Human Resources region. If your organization does not
need to record a VAT registration number, and if you don’t use
recoverable tax, you don’t need to enter defaults in the Tax Registration
region. Payables uses most of the Supplier–Payables Financials
Options as defaults in the Suppliers window. To see the default
hierarchy for Payables review the Account Default Hierarchy Chart:
page E – 11.
Attention Oracle Purchasing Users:
If Purchasing is the only Oracle application installed at your site, you
are only required to enter information in the following regions:
Accounting and Supplier Purchasing You define your tax defaults in
the tax region.
2 – 36
Oracle Payables User Guide
Attention Oracle Assets Users:
If Oracle Assets is the only product you use, you are only required to
enter information in the following regions: Supplier, Human
Resources, and Accounting.
Attention Encumbrance Accounting Users:
If you use encumbrance accounting, and you have Oracle Payables,
Oracle Purchasing, and Oracle General Ledger installed, define your
encumbrance options in the Encumbrance Financials Options region.
See: Defining Encumbrance Types (Oracle General Ledger User Guide).
Defining Financials Options
Prerequisites
❑ Define your set of books. See: Defining Sets of Books (Oracle
General Ledger User Guide)
❑ Define your payment terms. See: Payment Terms: page 2 – 89.
(Payables and Purchasing)
❑ Define your invoice and payment currencies in the Currencies
window. See: Currencies Window (Oracle Applications System
Administrator’s Guide). (Payables and Purchasing)
❑ Define at least one Inventory Organization if Oracle Inventory or
Oracle Purchasing is installed.
"
To define financials options:
1.
In the Financials Options window, select each tabbed region that
contains the options you want to define. Refer to the window
references below for detailed information on any field.
Accounting: page 2 – 39
Encumbrance: page 2 – 40
Human Resources: page 2 – 42
Supplier – Purchasing: page 2 – 44
Supplier Entry: page 2 – 45
Tax: page 2 – 47
Payables Setup
2 – 37
2.
Enter or change values.
3.
Save your work.
See Also
Creating Dummy Accounting Reference Data, Oracle Training
Administration User Guide
2 – 38
Oracle Payables User Guide
Financials Options Window Reference
Accounting Financials Options
In this region you specify the maximum number of Payables
Accounting Periods you allow.
Future Periods. The first time you enter this field Payables displays
the number of future periods you use in your set of books as a default.
You can change this number to the maximum number of future periods
you want to allow in Payables. Payables uses this value to limit the
number of future periods you can maintain in the Control Payables
Periods window. You can enter invoices in future periods, but
Approval applies holds that prevent you from paying them or creating
accounting entries for them.
GL Accounts
Liability. Payables assigns this account as the default Liability Account
for all new suppliers you enter. You can override this value during
supplier entry. If you use Accrual Basis accounting, then the Liability
Account for an invoice determines the liability account(s) charged
when you create accounting entries for invoices.
Prepayment. The Prepayment account and description for a supplier
site’s invoices. The Financials option value defaults to new suppliers,
and the supplier value defaults to new supplier sites.
When you enter a Prepayment type invoice, Payables will use this as
the default GL account for each Item line you create.
Future Dated Payment. If you use future dated payments, then enter a
value for Future Dated Payment account. This value defaults to all
new suppliers and new bank accounts. The supplier value defaults to
all new supplier sites. The bank account value defaults to new
payment documents.
When Payables accounts for future dated payments, it uses the Future
Dated Payment Account from either the supplier site or the payment
document, depending on the option you select in the Payment
Accounting region of the Payables Options window.
If you relieve liability payment time, this should be an asset account. If
you relieve liability at future dated payment maturity, then this should
be a liability account.
Payables Setup
2 – 39
Discount Taken. If you choose to distribute your discounts to the
system Discount Taken Account, Payables uses this account to record
the discounts you take on payments. Use the Payables Options
window to select your method for distributing discounts for your
invoices.
PO Rate Variance Gain/Loss. Payables uses these accounts to record
the exchange rate variance gains/losses for your inventory items. The
variance is calculated between the invoice and either the purchase
order or the receipt, depending on how you matched the invoice.
These accounts are not used to record variances for your expense items.
Any exchange rate variance for your expense items is recorded to the
charge account of the purchase order. Payables calculates these
amounts during Approval.
Expenses Clearing. Payables uses this as a temporary account to
record information about credit card transactions imported from
Self–Service Expenses using the Invoice Import program. When you
import a credit card transaction, Payables creates a debit in this
account. When payment for the expense is remitted, Payables reverses
the original entry by creating a credit for the same amount.
Encumbrance Financials Options
To use encumbrance accounting or budgetary control, you must install
Payables, Purchasing, and General Ledger. Use this region to enable
encumbrance accounting and to specify the default encumbrance types
Payables assigns to your invoices, and Purchasing assigns to your
requisitions and purchase orders.
If you enable encumbrance accounting or budgetary control,
Purchasing creates encumbrances when you reserve funds for a
requisition or purchase order. If you use the perpetual accrual method
in Purchasing, Purchasing reverses purchase order encumbrances when
you inspect, accept, and deliver the units. If you are using the periodic
accrual method in Purchasing, Payables reverses the purchase order
encumbrances when you create accounting entries for invoices.
Payables creates encumbrances when you approve an unmatched
invoice, when there is a variance between a matched invoice and the
purchase order to which it is matched, and when the invoice
encumbrance type is different from the Purchasing encumbrance type.
See also: Encumbrance Entries in Payables: page 10 – 46.
Oracle Financials provides two predefined encumbrance types that you
can use to identify requisition, purchase order, and invoice
2 – 40
Oracle Payables User Guide
encumbrances: Commitment and Obligation. You can define
additional encumbrance types in Oracle General Ledger in the
Encumbrance Types window. See also: Encumbrance Entries in
Payables: page 10 – 46.
Use Requisition Encumbrance. Enable this option to encumber funds
for requisitions. If you enable this option, Purchasing creates journal
entries and transfers them to General Ledger to encumber funds for
purchase requisitions.
Encumbrance Type. If you enable Use Requisition Encumbrance, you
must select an encumbrance type by which you can identify your
requisition encumbrance journal entries. Purchasing assigns this
encumbrance type to the encumbrance journal entries it creates for
purchase requisitions.
Reserve at Completion. If you enable Use Requisition Encumbrance,
indicate whether you want requisition preparers to have the option to
reserve funds. If you do not enable this option, only requisition
approvers will have the option to reserve funds.
Use PO Encumbrance. Enable this option to encumber funds for
purchase orders, purchase order and receipt matched invoices, and
basic invoices (not matched). If you enable this option, Purchasing
encumbers funds for purchase orders and Payables encumbers funds
for variances during Approval for purchase order and receipt matched
invoices. If you enable this option and enter a non–purchase order
matched invoice, Payables will encumber funds for it during Approval.
All Payables encumbrances are reversed when you create accounting
entries. If you enable Use Requisition Encumbrance, you must also
enable this option.
PO Encumbrance Type. If you enable Use Purchase Order
Encumbrance, select a purchase order encumbrance type by which you
can identify your purchase order encumbrance journal entries.
Purchasing assigns this encumbrance type to the encumbrance journal
entries it creates for purchase requisitions and purchase orders.
Invoice Encumbrance Type. If you use purchase order encumbrance,
select an invoice encumbrance type by which you can identify your
invoice encumbrance journal entries. Payables assigns this
encumbrance type to the encumbrance journal entries that it creates
when Approval approves an unmatched invoice or an invoice matched
to a purchase order or receipt for which there is a variance. We
recommend that you use an encumbrance type different from the
Payables Setup
2 – 41
Purchasing encumbrance type so you can identify invoice
encumbrances.
See Also
Invoice Variances: page 4 – 172
Budgetary Control In Payables: page 10 – 42
Encumbrance Entries in Payables: page 10 – 46
Defining Sets of Books (Oracle General Ledger User Guide)
Overview of Encumbrance Accounting (Oracle General Ledger User
Guide)
Defining Encumbrance Types (Oracle General Ledger User Guide)
Entering Encumbrances (Oracle General Ledger User Guide)
Human Resources Financials Options
Use this region to enter the options and defaults for entering employee
information in the Enter Person window.
Business Group. Enter the name of the business group that you want
to associate with Purchasing. If you use Purchasing jointly with Oracle
Human Resources, you must reference the business group that you
define in Oracle Human Resources. If you use Purchasing without
Human Resources, you can use the default value. The default for this
field is the Human Resources default of Setup Business Group.
The business group determines which employees you can use in
Purchasing. In Purchasing, you can see only the employees in this
business group.
Expense Reimbursement Address. Select the default address you
want to use on payments for employee expense reports: Home or
Office. The system uses this default for each new employee you enter.
You can override this default during employee entry or expense report
entry.
2 – 42
Oracle Payables User Guide
Use Approval Hierarchies. Enable this option to use positions and
position hierarchies to determine approval paths for your documents
within Purchasing. Disable this option of you want approval paths
based on the supervisor structure.
Employee Numbering Method. You can enter your employee
numbers manually or let the system generate sequential employee
numbers. The system prevents you from entering a value in this field if
you install Oracle Human Resources or Oracle Payroll. You can change
the numbering method at any time.
• Automatic. The system automatically assigns a unique
sequential number to each employee when you enter a new
employee.
• Manual. You enter the employee number when you enter an
employee.
• Use National Identifier Number. The system automatically
enters the employee’s National Identifier Number as the
employee number. For example, a Social Security number for a
United States employee.
☞
Attention: Be careful if you switch from manual to automatic
entry. The employee number must be unique. When you use
manual entry, you can assign any number and in any order. If
you switch to automatic after having entered employee
numbers manually, the system may try to assign a number that
you already assigned. If you switch from manual to automatic
entry, make sure the next available number for automatic entry
is larger than the largest number you have already recorded.
Next Automatic Number. If you select the Automatic Employee
Numbering method, enter the starting value you want the system to
use for generating unique sequential employee numbers. After you
enter a number and save your changes, the system displays the number
that it will assign to the next new employee you enter.
Supplier – Payables Financials Options
The options you define in the region, except for Receipt Acceptance
Days, are used as default values for the Payment region of the
Suppliers window. The supplier values default to new supplier sites
for the supplier, which default to new invoices for the supplier site.
You can override these values during entry of the supplier, supplier
site, and invoice.
Payables Setup
2 – 43
Payment Terms. Payables uses payment terms to automatically
calculate due dates, discount dates, and discount amounts for each
invoice you enter. If the terms you want to use are not on the list of
values, you can define additional terms in the Payment Terms window.
See: Scheduling Invoice Payments: page 4 – 150.
Payment Method. The invoice payment method you use most
frequently. See: Defining and Maintaining Payables Payment
Documents: page 2 – 129.
• Check. You can pay with a manual payment, a Quick payment,
or in a payment batch.
• Clearing. Used for recording invoice payments to internal
suppliers.
• Electronic. You generate an electronic payment file that you
deliver to your bank to create payments.
• Wire. Used to manually record a wire transfer of funds between
your bank and your supplier’s bank.
Receipt Acceptance Days. If you create interest invoices for late
payment, enter the number of days in your receipt acceptance period.
If you enable the Recalculate Scheduled Payment Payables option,
Approval recalculates your invoice due date based on this value. See:
Interest Rates: page 2 – 104.
Always Take Discount. Enable this option to have Payables always
take an available discount for a supplier, regardless of when you pay
the invoice. See: Discounts: page 4 – 155.
Pay Alone. If an invoice has the Pay Alone option enabled, Payables
creates a separate payment for each invoice. If the Pay Alone option is
not enabled for an invoice, the invoice will be paid with other invoices
for the same supplier site on a single payment.
Supplier – Purchasing Financials Options
The options you define in this region, except for Inventory
Organization, are used as default values for the Purchasing region of
the Suppliers window. The supplier values default to new supplier
sites for the supplier, which default to new purchasing documents for
the supplier site.
Note: If you use the Multiple Organizations Support feature,
values you enter in this window will default to both the
Supplier and Supplier Site.
2 – 44
Oracle Payables User Guide
You can override defaulted values during entry of the supplier,
supplier site, and purchasing documents.
Ship–To /Bill–To Location. The name of the ship–to/bill–to location
for the system default value. If the name you want does not appear in
the list of values, use the Location window to enter a new location. See
also: Site Locations (Oracle Human Resources User Guide).
Inventory Organization. You need to choose an inventory
organization if you use Purchasing. You can associate each of your
Purchasing operating units with one inventory item master
organization. When you associate your Purchasing operating unit with
an inventory organization, items you define in this organization
become available in Purchasing. You can only choose an inventory
organization that uses the same set of books as your Purchasing
operating unit. Do not change the Inventory Organization after you
have already assigned one to Purchasing.
Ship Via. Freight carrier you use with suppliers. If the type of freight
carrier you want does not appear in the list of values, use the Freight
Carriers window to define a new shipping method. The value you
enter here is the value in the Description field of the Freight Carriers
window in Purchasing.
FOB. If the type of FOB you want is not in the list of values, use the
Oracle Purchasing Lookups window to define a new FOB.
Freight Terms. The freight terms for a supplier identify whether you or
your supplier pays for freight charges on goods you receive. You can
define new freight terms in the Oracle Purchasing Lookups window.
Supplier Entry Financials Options
The options you define in this region are used to control supplier entry
and purchase order matching.
RFQ Only Site. Default value for all new suppliers. You cannot create
purchase orders in Purchasing for a supplier site which is an RFQ Only
Site.
Hold Unmatched Invoices. If you enable this option for a supplier
site, Payables applies a Matching Required hold to an invoice if it has
Item type distributions that are not matched to either a purchase order
or receipt. Payables applies the hold during Approval. You cannot pay
the invoice until you release the hold. You can release this hold by
matching the invoice to either a purchase order or receipt, and
resubmitting Approval, or you can manually release the hold in the
Payables Setup
2 – 45
Holds window of the Invoice Workbench. Payables will not apply a
hold if the sum of the invoice distributions by accounting code
combination is zero.
Match Approval Level. Indicate how you want to match most
invoices. Defaulting is in the following order but can be overridden at
any level: Financials options > supplier > supplier site > purchase
order shipment. The value at the purchase order shipment controls to
which purchasing document type you can match an invoice.
• Purchase Order. Match invoices to purchase orders.
• Receipts. Match invoices to purchase order receipts.
Supplier Number Entry. You can enter your supplier numbers
manually or let Payables automatically generate sequential supplier
numbers for you. You can change the number entry method at any
time.
• Automatic. The system automatically assigns a unique
sequential number to each supplier when you enter a new
supplier.
• Manual. You enter the supplier number when you enter a
supplier.
☞
Attention: Be careful if you switch from manual to automatic
entry. Each supplier number must be unique. When you use
manual entry, you can assign any number and in any order. If
you switch to automatic after entering supplier numbers
manually, the system may try to assign a number that you
already assigned. If you switch from manual to automatic
entry, make sure the next available number for automatic entry
is larger than the largest number you have already recorded.
See also: Entering Suppliers: page 3 – 10, and Payables Options: page
2 – 57.
Supplier Number Type. Type of supplier number you want Payables
to use for supplier number entry.
• Alphanumeric. Numbers, characters, or a combination.
• Numeric. Numbers only.
After you begin entering suppliers, you can change your Number Type
from numeric to alphanumeric at any time; however, you can change
your Number Type from alphanumeric to numeric only if all your
current supplier numbers are numeric.
Next Automatic Number. If you select the Automatic Supplier
Number Entry method, enter the starting value you want the system to
2 – 46
Oracle Payables User Guide
use for generating unique sequential supplier numbers. After you
enter a number and save your changes, the system displays the number
that it will assign to the next new supplier you enter.
Tax Financials Options
Rounding Rule. Select the method you want the system to use to
round the tax amount when it calculates tax in Payables and
Purchasing. For example, the calculated tax is 5.988 and your precision
is 2 decimal places. If your rounding rule is Up and the currency is
USD, then the system will enter 5.99 for the tax amount.
Payables uses the rounding rule you select to calculate tax on invoices,
recurring invoices, expense reports, and purchase orders. The value
you enter here defaults to new suppliers. You can override this value
at any level. If you update it in the Financials Options window, it will
not affect existing suppliers and will default only to new suppliers.
Payables rounds to the Minimum Accountable Unit if you entered a
value for that field. Otherwise, it rounds to the precision you enter.
The examples below assume you are using a Minimum Accountable
Unit of .01 and the currency is USD.
• Up. Round up. For example, round $5.988 to $5.99
• Down. Round down. For example, round $5.988 to $5.98
• Nearest. Round to the nearest number, and if the difference
between Up and Down is equal, round Up. For example, round
$5.988 to $5.99
Payables also uses the rounding rule you select to calculate the splitting
of tax between recoverable and nonrecoverable tax lines. See:
Calculation of Tax Distributions: page 10 – 38.
Precision. Enter a one–digit whole number to indicate to which
decimal place you want to round automatically–calculated tax amounts
in Payables and Purchasing. For example, the calculated tax amount is
$121.011 and you round Nearest. If the precision is 2, the system will
enter $121.01. If the precision is 0, the system will enter $121.00.
The system will use the lower of the precision entered here and the
default precision for the currency. For example, if your functional
currency is USD, and you enter a precision of 3, the system will use a
precision of 2.
The system uses the value you enter for this option for all new tax
amounts that are calculated automatically. This is the precision value
Payables Setup
2 – 47
for tax calculation throughout the system and you cannot override it
anywhere else.
The system will disregard any value you enter for Precision if you enter
a value in the Min Accountable Unit field.
Min Accountable Unit. Indicate the smallest monetary unit to which
you want to round the tax amount. For example, the currency is USD,
the calculated tax is 5.541, and your Rounding Rule is Nearest. If your
Mimimum Accountable Unit is .01, the system will enter 5.54. If your
Minimum Accountable Unit is.05, the system will enter 5.55.
☞
Attention: Do not enter a minimum accountable unit that has
more decimal places than your functional currency or your
invoice distribution amounts may not match your invoice
amount after rounding. This may cause a distribution hold on
your invoice.
The system uses the value you enter for this option for all new tax
amounts Payables calculates automatically. The precision used in tax
calculations will be the same number of decimal places as your
Minimum Accountable Unit. This is the precision value for tax
calculation throughout the system and you cannot override it anywhere
else.
Default Tax Code. Tax code default for the Invoice Tax Code option in
the Suppliers window. In addition, you can include this tax code in
your Tax Code Defaults hierarchy that you define in the Payables
Options window. This hierarchy is used throughout Payables to
default tax codes to documents. See: Defaulting Tax In Payables: page
4 – 105.
If you choose a tax code for which you have defined different tax rates
for different effective date ranges, Payables will automatically use the
appropriate rate during invoice entry based on the invoice date.
Member State. The location of your company or organization.
Payables uses this country name to determine if your company or
organization is located in a member state of the European Union (EU).
VAT Registration Number. The Value–Added Tax (VAT) registration
number for your organization. Your organization is assigned a VAT
Registration Number if you register to pay VAT. The first two
characters of a VAT registration number are the country code for the
country or state where the registered company or organization is
located. Payables prints this number on the header of the Intra–EU
VAT Audit Trail Report.
2 – 48
Oracle Payables User Guide
Enable Recoverable Tax. Enable this option if you want Payables to do
any of the following:
• flag tax type distributions as recoverable for reporting purposes
• split taxes into separate recoverable and nonrecoverable lines.
For more details, see: Partially Recoverable Tax: page 4 – 124.
• automatically calculate tax and prorate it back to the GL account
of the taxable distribution. See: Using the Automatic Tax
Calculation Feature to Prorate Tax in the Invoice Workbench:
page 4 – 114.
Default Recovery Rate. If you want to specify a rate that will default
to tax recovery rules and tax codes you define, then enter the rate.
Cash Basis Encumbrance. If you are using cash basis accounting for
your secondary set of books, enable this option if you want to
encumber nonrecoverable tax and recoverable tax against the expense
account.
See Also
EU VAT Taxes: page 4 – 118
Payables Setup
2 – 49
Accounting Methods
When you set up Payables you choose a primary accounting method.
In the Payables Options window you can also choose a secondary
accounting method. The accounting method determines the types of
accounting entries Payables creates. For each accounting method, cash
or accrual, you choose a set of books in which you will account for
transactions. You cannot change your primary accounting method
after you create accounting entries.
Set up Payables to create accounting entries in compliance with one of
the following accounting methods:
• Cash Basis Accounting. You account only for payments, and do
not record liability information for invoices. The payment
accounting entries typically debit your expense or asset account
and credit your cash or cash clearing account. When you create
accounting entries, Payables might also create entries for
discount taken and foreign currency exchange gain or loss.
Payables uses the payment date as the accounting date for your
expense and cash journal entries.
• Accrual Basis Accounting. You create accounting entries for
invoices and payments. The invoice accounting entries generally
debit your expense or asset account and credit your liability
account. For prepayments, Payables creates accounting entries
that debit your prepayment account and credit your liability
account. For prepayment applications, Payables creates
accounting entries that debit your liability account and credit
your prepayment account.
Payment accounting entries typically debit the liability account
and credit the cash or cash clearing account. Payables might also
create accounting entries for discount taken and foreign currency
exchange gain or loss.
When you reconcile payments using Oracle Cash Management,
Payables might also create accounting entries for cash clearing,
bank charges, bank errors, and foreign currency exchange gain or
loss between payment and reconciliation time.
• Combined Basis Accounting. You maintain one set of books for
cash accounting and one set of books for accrual accounting.
You choose which will be your primary and your secondary set
of books. Invoice accounting entries are recorded for your
accrual set of books, and payment accounting entries are
recorded in both your cash set of books and accrual set of books.
2 – 50
Oracle Payables User Guide
Combined basis accounting allows you to produce financial
reports for either your cash or accrual set of books. For example,
you may want to manage your company on an accrual basis, but
require cash basis accounting information for certain regulatory
reporting on a periodic basis.
Accrual Basis Accounting Examples
In the following examples, US Dollars is the functional currency for
your set of books and you use accrual basis accounting. You account
for payments at issue time only.
Example 1
You enter and approve an invoice for $100 with payment terms that
allow you to take a 10% discount on the invoice if paid within 10 days.
When Payables creates accounting entries for the invoice, it debits the
expense account and credits the liability account.
You pay the invoice five days later, taking the 10% discount. When
Payables creates accounting entries, it records the liability and cash
transactions along with the appropriate discount transaction.
Example 2
You enter and approve a $25 prepayment for a supplier site. You then
enter and approve a $100 invoice for the same supplier site. When you
account for the prepayment and invoice, Payables records the expense
and liability transactions for the invoices.
You then pay the prepayment and apply the prepayment to the invoice,
reducing the amount due on the invoice. You pay the remaining
amount of the invoice and create accounting entries for the prepayment
application and the invoice. The prepayment application accounting
entry debits the liability account for the amount of the prepayment and
credits your prepayment account. The invoice payment accounting
entry debits your liability account for the reduced invoice amount and
credits your cash account.
Payables Setup
2 – 51
Cash Basis Accounting Examples
In the following examples, US dollars is the functional currency for
your set of books and you use cash basis accounting. You account for
payments at issue time only.
2 – 52
Oracle Payables User Guide
Example 1
You enter and approve an invoice for $100 with payment terms that
allow you to take a 10% discount on the invoice if paid within 10 days.
Payables creates no accounting entries for the invoice.
You pay the invoice five days later, taking the 10% discount. When
Payables creates accounting entries, it records the expense and cash
transactions along with the appropriate discount transaction.
Example 2
You enter and approve a $25 prepayment for a supplier site. You then
enter and approve a $100 invoice for the same supplier site. Payables
records no accounting entries for the prepayment and invoice.
You then pay the prepayment and apply the prepayment to the invoice,
reducing the amount due on the invoice. You pay the remaining
amount of the invoice and create payment accounting entries. The
accounting entry prepayment application debits the expense account
and credits the prepayment account for the amount of the prepayment.
The payment accounting entry debits your expense account and credits
your cash account for the reduced invoice amount.
Payables Setup
2 – 53
2 – 54
Oracle Payables User Guide
See Also
Defining Your Chart of Accounts (Oracle General Ledger User Guide)
Budgetary Control In Payables: page 10 – 42
Automatic Offsets: page 10 – 12
Foreign Currency Transactions: page 6 – 2
Intercompany Accounting: page 10 – 50
Oracle Cash Management User Guide
Encumbrance with Combined Basis Accounting: page 10 – 47
Encumbrance with Cash Basis Accounting: page 10 – 47
Setting up Your Accounting Method
Set up Payables to create accounting entries for your transactions in
accordance with cash basis, accrual basis, or both (combined basis),
accounting methods.
If you implement Multiple Reporting Currencies, open and close
Payables periods in your primary set of books. Payables automatically
opens and closes Payables periods in all of the associated reporting sets
of books. You cannot close a Payables period if outstanding
transactions exist in your primary or associated reporting set of books.
See: Multiple Reporting Currencies in Oracle Applications manual.
☞
Attention: After you create accounting entries, we strongly
discourage you from changing your accountig method because
this will probably cause your accounts to be out of balnace.
Prerequisite:
❑ Define Sets of Books in the Set of Books window. See: Defining
Sets of Books (Oracle General Ledger User Guide).
Payables Setup
2 – 55
"
To set up your accounting method:
H
In the Accounting Method tabbed region of the Payables Options
window, select Cash or Accrual as your primary accounting
method.
If you want to use combined basis accounting, select Accrual as
your primary accounting method, and Cash as your secondary
accounting method. If you do not want to use a secondary
accounting method, select None as the secondary accounting
method.
See Also
Budgetary Control In Oracle Payables: page 10 – 42
Foreign Currency Transactions: page 6 – 2
Intercompany Accounting: page 10 – 50
Automatic Offsets: page 10 – 12
2 – 56
Oracle Payables User Guide
Payables Options
Use this window to set control options and defaults used throughout
Payables. You can set defaults in this window that will simplify
supplier entry, invoice entry, and automatic payment processing.
Although you need to define these options and defaults only once, you
can update most of them at any time to change controls and defaults
for future transactions.
☞
Attention: If you use the Multiple Reporting Currencies
feature to record transactions in more than one currency, read
the Multiple Reporting Currencies in Oracle Applications manual
before proceeding. The manual details all setup considerations
for implementing Payables with this feature.
Defining Payables Options
Prerequisites
❑ Define your chart of accounts. See: Defining Your Chart of
Accounts (Oracle General Ledger User Guide).
❑ Define your Financials options. See: Financials Options: page
2 – 36.
❑ Define your payment terms. See: Payment Terms: page 2 – 89.
❑ Define your currencies. See: Currencies Window (Oracle
Applications System Administrator’s Guide).
"
To define Payables options:
1.
In the Payables Options window, select each region that contains
the options you want to define. Refer to the window references
below for detailed information on any field:
• Accounting Methods: page 2 – 58
• Currency: page 2 – 60
• Expense Report: page 2 – 62
• Interest: page 2 – 63
• Invoice: page 2 – 64
• Invoice Tax: page 2 – 67
• Matching: page 2 – 70
Payables Setup
2 – 57
• Payment: page 2 – 71
• Payment Accounting: page 2 – 74
• Reports: page 2 – 78
• Supplier: page 2 – 80
• Tax Defaults and Rules: page 2 – 82
• Transfer to GL: page 2 – 85
• Withholding Tax: page 2 – 86
2.
Enter or change option values.
3.
Save your work.
See Also
Account Default Hierarchy Chart: page E – 11
Invoice and Invoice Batch Default Chart: page E – 2
Payment and Payment Batch Default Chart: page E – 7
Payables Options Window Reference
• Payment Accounting: page 2 – 74
• Transfer to GL: page 2 – 85
Accounting Methods Payables Options
Use this region to control accounting information for your Payables
system.
Accounting Methods. Method(s) used to create accounting entries for
your transactions in accordance with cash basis, accrual basis, or both
(combined basis) accounting methods.
• Primary Accounting Method. Accounting method you use for
your primary set of books. Although Primary Accounting
Method is not a required field, you cannot create accounting
entries until you have entered a primary accounting method.
Payables creates accounting entries according to the accounting
2 – 58
Oracle Payables User Guide
method you choose. You cannot change your primary
accounting method after you create any accounting entries.
– Accrual
– Cash
• Secondary Accounting Method. If you want to use combined
basis accounting, choose Accrual or Cash for the accounting
method you use for your secondary set of books. If you do not
want to use combined basis accounting, choose None.
– Accrual
– Cash
– None
• Set of Books (Primary/Secondary). Payables displays the
primary set of books you selected in the Choose Set of Books
window. If you use a secondary set of books, select its name
from the list of values. Your secondary set of books must have
the same currency, chart of accounts, and calendar as your
primary set of books.
Automatic Offset Method. Enable Automatic Offsets by selecting
Balancing or Account as your Offset Method if you want Payables to
automatically create balancing accounting entries for your invoice and
payment transactions. For details, see: Automatic Offsets: page 10 – 12.
• None. Do not use Automatic Offsets. For your invoice
transactions, Payables creates one liability accounting entry, and
for your payment transactions, Payables creates one cash type
accounting entry.
• Balancing. Payables uses the supplier site’s default liability
account and overwrites the balancing segment (usually the cost
center code) with the balancing segment from the expense
distribution GL Account.
• Account. When creating the offsetting liability account, Payables
uses the expense GL Account from the invoice distribution and
overwrites the account segment with the default liability account
from the supplier site.
See Also
Accounting Methods: page 2 – 50
Payables Setup
2 – 59
Defining Sets of Books (Oracle General Ledger User Guide)
Automatic Offsets: page 10 – 12
Currency Payables Options
Use Multiple Currencies. Enable this option if you want to enter and
pay invoices in a currency different from your functional currency.
Payables also allows you to define a multiple currency payment format
and bank account if you enable this option.
If you update this Payables option from enabled to disabled, Payables
checks and warns you if you have any multiple currency bank accounts
that are using multiple currency payment formats. You must inactivate
the payment documents that use multiple currency payment formats
and change the Multiple Currency field value on multiple currency
bank accounts to disabled before you can change this Payables option
from enabled to disabled.
Require Exchange Rate Entry. Enable to require entry of an exchange
rate whenever you enter an invoice or a payment in a currency other
than your functional currency. If you maintain daily rates in the Daily
Rates window, Payables defaults the rate automatically, based on the
date and the Rate type you enter. Payables always requires you to
enter an exchange rate when you use the User exchange rate type, even
if you do not enable this option.
You cannot create accounting entries for or pay foreign currency
invoices without exchange rates. After you have entered invoices or
created payments, you can enter exchange rates, either manually, or by
using the AutoRate program.
When you create future dated payments, you will not be required to
enter an exchange rate for the maturity date. However, you should
add an exchange rate for the maturity date after payment creation.
Otherwise you will be unable to create accounting entries associated
with the maturity date.
Exchange Rate Type. Payables uses this default rate type when you
enter invoices or create payments.
• User. Used to manually enter an exchange rate during invoice
entry or at payment time.
• Spot. A daily exchange rate which is a quoted market rate.
When you specify a Spot rate type, Payables automatically enters
the invoice Exchange Rate from the GL Daily Rates table.
2 – 60
Oracle Payables User Guide
• Corporate. A standard market rate determined by senior
management for use throughout your organization. When you
specify a Corporate rate type, Payables automatically enters the
invoice Exchange Rate from the GL Daily Rates table.
• User–defined. An exchange rate type you define in the Define
Daily Conversion Rate Types window. You can define as many
exchange rate types as you need. When you specify a
User–defined rate type, Payables automatically enters the invoice
exchange rate for you from the GL Daily Rates table.
Realized Gain/Loss. Payables uses these accounts as the default
realized gain and loss accounts for payments from each of your bank
accounts. If the exchange rate changes between invoice entry and
payment, Payables automatically calculates the realized gain or loss
and records it in this account. Payables records gains and losses only if
you use accrual basis accounting. The Account for Gain/Loss Payables
option controls when Payables accounts for gains and losses.
Rounding. Payables uses this account for currency rounding at the
following times:
• You use multiple currencies and the payment currency does not
round within the payment currency precision. For example, if a
payment rounds to 100.001 GBP, the payment will be for 100.00
GBP, and the rounding error of .001 will be recorded in this
account.
• The functional currency amounts of payments do not equal the
amount recorded as the liability. The system charges the
remaining amount to the rounding account to fully relieve
liability. This happens when you make the final payment of an
invoice that is already partially paid.
• You have enabled automatic offsets and the cash account is
pooled, and you have rounding errors. The system charges the
remaining amount to the rounding account to fully relieve the
cash clearing account. This happens when you make the final
payment of an invoice that is already partially paid.
See Also
AutoRate Program: page 6 – 15
Entering Daily Rates (Oracle General Ledger User Guide)
Payables Setup
2 – 61
Expense Report Payables Options
Default Template. The default expense report template that you want
to use in the Payables Expense Reports window. You can override this
value in the Expense Reports window. A default expense report
template appears in the Expense Reports window only if the expense
report template is active.
Payment Terms. Payment terms you want to assign to any suppliers
that you create from employees during Invoice Import.
Suggestion: Define and assign immediate payment terms for
your employee suppliers.
Pay Group. Pay Group you want to assign to any suppliers that you
create from employees during Invoice Import. You can define
additional values for Pay Group in the Purchasing Lookups window.
Payment Priority. Payment priority you want to assign to any
suppliers that you create from employees during Invoice Import. A
number, between 1 (high) and 99 (low), which represents the priority of
payment for a supplier.
Apply Advances. Default value for the Apply Advances option in the
Expense Reports window in Payables. If you enable this option,
Payables applies advances to employee expense reports if the employee
has any outstanding, available advances. You can override this default
during expense report entry.
If you use Self–Service Expenses and you enable this option, then
Payables Invoice Import applies all outstanding, available advances,
starting with the oldest, up to the amount of the Self–Service expense
report.
Automatically Create Employee as Supplier. If you enable this option,
when you import Payables expense reports, Payables automatically
creates a supplier for any expense report where an employee does not
already exist as a supplier. If the supplier site you are paying (HOME
or OFFICE) does not yet exist, Payables adds the supplier site to an
existing supplier. Payables creates a HOME or OFFICE supplier site
with the appropriate address, depending on where you are paying the
expense report. The Home address is from the PER_ADDRESSES
table, and the Office address is from the HR_LOCATIONS table.
Payables creates suppliers based on the defaults you select in this
region and employee information from the Enter Person window. You
can review suppliers and adjust any defaults in the Suppliers window.
If you do not enable this option, enter an employee as a supplier in the
Suppliers window and link the Employee Name/Number to the
2 – 62
Oracle Payables User Guide
supplier before you use Payables Invoice Import. Payables cannot
import expense reports without corresponding suppliers, and lists
them on the Invoice Import Exceptions Report with No Supplier holds.
Hold Unmatched Expense Reports. This option defaults to the Hold
Unmatched Invoices option for the supplier and supplier site for any
suppliers Payables creates during Invoice Import.
When Hold Unmatched Invoices for a supplier site is enabled,
Payables requires that you match each invoice for the supplier site to
either a purchase order or receipt. If you enable this option for a site,
then Payables applies a Matching Required hold to an invoice if it has
Item type distributions that are not matched to a purchase order or
receipt. Payables applies the hold to the invoice during Approval. You
cannot pay the invoice until you release the hold. You can release this
hold by matching the invoice to a purchase order or receipt and
resubmitting Approval, or you can manually release the hold in the
Holds window of the Invoice Workbench. Payables will not apply a
hold if the sum of the invoice distributions by accounting code
combination is zero.
See Also
Payables Invoice Import Program: page 4 – 239
Entering Suppliers: page 3 – 10
Expense Reports: page 4 – 216
Interest Payables Options
Use this region to enable Automatic Interest Calculation and then enter
defaults, such as expense and liability accounts, for the interest invoices
Payables creates automatically when you pay overdue invoices.
Allow Interest Invoices. Enable this option if you want to allow
Payables to calculate interest for overdue invoices and create interest
invoices for selected suppliers. Payables automatically creates interest
invoices when you pay overdue invoices in a payment batch or with a
Quick payment. If you pay an overdue invoice using a manual
payment, Payables warns you that interest is due on the invoice and
you should pay the invoice in a payment batch or with a Quick
payment.
Payables Setup
2 – 63
When you enable the Allow Interest Invoices Payables option, Payables
enables the Allow Interest Invoices option in the Payment Region of the
Suppliers window for all new suppliers you enter. You can override
this default value at any time. If you do not enable the Allow Interest
Invoices Payables option, you cannot enable the Allow Interest Invoices
option in the Suppliers window.
Minimum Interest Amount. If you enable the Allow Interest Invoices
option, you must enter a value in this field that represents the
minimum interest amount Payables will pay. If the calculated interest
amount is less than this amount, Payables does not create an interest
invoice.
Suggestion: Because interest payments compound every
thirty days, we suggest you pay interest when it is due, rather
than allowing it to compound. Set the minimum interest
amount low enough so that your interest does not compound,
but not so low that you pay very exceedingly small amounts of
interest on past due invoices.
Expense Interest Invoice Account. If you enable the Allow Interest
Invoices option, you must enter an interest expense account. When
Payables creates accounting entries for interest invoices, it uses this
account as the expense account.
Liability Interest Invoice Account. If you enable the Allow Interest
Invoices option, you must enter an interest liability account. Payables
uses this account as the liability account when it creates accounting
entries for interest invoices. This interest liability account is always
used when interest invoices are automatically created during the
payment process. Payables does not overwrite the interest liability
account if you use Automatic Offsets. See: How Payables Builds the
Offsetting Liability Accounts: page 10 – 15.
See Also
Automatic Interest: page 10 – 7
Invoice Payables Options
Use Batch Controls. Enable this option to enable use of the Invoice
Batches window, which you can use to specify batch defaults that help
speed and control invoice entry in the Invoice Workbench.
2 – 64
Oracle Payables User Guide
Enabling this option also allows you to specify an invoice batch name
to a group of invoice records when you submit Payables Open Interface
Import.
Confirm Date as Invoice Number. If you enable this option, then
during invoice entry when you accept the invoice date as the default
for invoice number, Payables displays a pop–up window that reads,
”Use the Invoice Date as the Invoice Number?”.
Allow Online Approval. Enable this option if you want to allow users
to submit Payables Approval in the Invoices window and the Invoice
Batches window. See: Submitting Online Approval for Invoices: page
4 – 147, and Submitting Online Approval for Invoice Batches: page
4 – 147.
Allow Adjustments to Paid Invoices. Enable this option if you want
to allow users to update the distributions of a paid invoice. If you
enable this option you can also reverse a match to a purchase order
document and then match to another purchase order document that is
not final matched. This means you could create a distribution variance
on a paid invoice if you do not ensure the distributions total equals the
invoice amount when you do your invoice adjustments. You would
discover this possible error when you submitted Approval because
Approval would place a Distribution Variance hold on the invoice and
prevent you from creating accounting entries for the invoice.
Recalculate Scheduled Payment. Payables calculates scheduled
payments using a start date and payment terms. For example, if the
start date is 01–JAN–97 and the payment terms are Net 30, the invoice
will be payable in full on 30–JAN–97. During invoice entry, Payables
automatically calculates scheduled payments for invoices using the
invoice Payment Terms, and the invoice Terms Date as the start date.
If you enable the Recalculate Scheduled Payment Payables option,
Payables automatically recalculates scheduled payments of invoices
during Approval. During recalculation, Payables uses the most recent
of the available start date options and the most favorable of the
available payment terms options so you can optimize your cash flow.
Payables determines which Payment Terms are more favorable by
comparing the rank you assigned to the terms in the Payment Terms
window. The following chart shows which options Payables uses
during the recalculation. The available options are different depending
on whether the invoice is purchase order matched.
Payables Setup
2 – 65
Start Date and Payment Terms Used During Scheduled Payment Recalculation
Recalculation occurs only if you enable the Recalculate Scheduled Payment Payables Option
Is Invoice
Start Date
PO Matched?
Payment Terms
No
Most recent of the following:
1. Invoice Date
2. Terms Date
3. Date Goods Received + Receipt
Acceptance Days
Invoice Payment Terms
Yes
Most recent of the following:
1. Invoice Date
2. Terms Date
3. Date Goods Received + Receipt
Acceptance Days
More favorable of the following:
1. Invoice Payment Terms
2. Purchase Order Payment Terms
Allow Document Category Override. Enable this option if you want
to allow users to override the default Document Category assigned to
an invoice by Payables. Payables automatically assigns a document
category to an invoice if your Sequential Numbering profile option is
Partially Used or Always Used. Payables predefines a document
category for each invoice type. Your system administrator can define
additional document categories for an invoice type.
If your Sequential Numbering profile option is Not Used, Payables
does not assign a document category to an invoice and you cannot
enable this option, or enter a document category for an invoice.
Automatically Create Freight Distribution. If you enable this option,
Payables checks the Create Freight Distribution check box in the
Invoices window and automatically creates a single freight distribution
using the Freight Amount and Freight Account you enter for an
invoice. If you usually allocate freight to invoice distributions, or enter
freight distributions manually, then do not enable this option.
Freight Account. If you enable the Automatically Create Freight
Distribution Payables option, you must enter a freight account.
Payables uses this account as the default freight account for an invoice.
You can override this account during invoice entry. See also: Entering
Freight on Invoices: page 4 – 129.
GL Date Basis. The date you want Payables to use as the default
accounting date for invoices during invoice entry.
• Invoice Date. Invoice date you enter during invoice entry.
2 – 66
Oracle Payables User Guide
• System Date. Current date for your Payables system. The date
you enter the invoice.
• Goods Received/Invoice Date. Date that you enter in the Date
Goods Received field. If no value is entered, then the invoice
date is used.
• Goods Received/System Date. Date that you enter in the Date
Goods Received field. If no value is entered, then the system
date is used.
Prepayment Settlement Days. Number of days you want Payables to
add to the system date to calculate a default settlement date for a
prepayment. Payables prevents you from applying the prepayment to
an invoice until on or after the settlement date.
Prepayment Payment Terms. Payment terms that you want to use for
all prepayments. For example, you may want to have immediate
payment terms for all prepayment type invoices. Note that this value
does not exist at the supplier or supplier site level; the value you enter
here defaults to all prepayment invoices.
If you do not enter a value here, then Payables will default the supplier
site value for invoice payment terms to prepayments you enter.
Invoice Tax Payables Options
Require Tax Entry at Header. If you enable this option, Payables
requires you to enter a Tax Code and Tax Amount in the Invoices
window when you enter an invoice. Note that this option does not
apply to any imported invoices. If you use Automatic Tax Calculation
at the header level, Payables automatically will calculate a Tax Amount
for you, so you are required to enter a tax code only if one has not
defaulted from the supplier site.
If you have enabled this option and the invoice has no tax, in the
Invoices window you enter a Tax Code with a zero–percent tax rate
assigned to it.
If you enter a Tax Code and Tax Amount for an invoice, Payables
automatically creates a tax distribution. You can adjust the tax
distribution in the Distributions window.
You cannot enable this option if you select Line or Tax Code as your
Calculation Level Payables option. If you allow override of the tax
calculation level and you enter an invoice using Line or Tax Code level
calculation, Payables will not require you to enter a Tax Code or Tax
Payables Setup
2 – 67
Amount in the Invoices window even if you have enabled the Require
Tax Entry at Header option.
Do not enable this option if you want to enter Use type tax codes on
invoices. If you enable this option, Payables prevents you from
entering Use tax codes on invoices. In addition, when you enable this
option and enter a Use type tax code as the default tax code for a
supplier site, Payables does not assign the default to the invoices you
enter for the supplier site.
You may not want to enable this option if you want to allocate tax
across selected invoice distributions.
If the Require Tax Entry at Header Payables option is disabled when
you enter an invoice, then the Tax Code and Tax Amount fields are
optional.
Note that if you enable this option and if you process expense reports
in Payables the import program will reject any expense reports that do
not have at least one tax line. If an expense report has no tax, you can
enter a zero amount line with a zero rate tax.
Use Automatic Tax Calculation. Select this option if you want to
enable Payables to automatically calculate and enter tax on invoices. If
this option is not enabled, Payables will disable Automatic Tax
Calculation options throughout the system. If you disable this option
after you have enabled it, Payables will not automatically calculate
sales tax for any invoice.
If you want to use Automatic Tax Calculation for some invoices, and
you also want to create tax distributions for other invoices by manually
entering tax distributions, by allocating tax across selected invoice
distributions, or by matching to purchase orders, then enable this
option. You can selectively disable Automatic Tax Calculation for a
particular supplier, supplier site, or invoice. See: Disabling Automatic
Tax Calculation: page 10 – 40.
If you do not enable this option, Payables does no tax calculation but
will automatically create a tax distribution if you enter values for Tax
Code and Tax Amount in the Invoices window. Payables copies the
invoice tax code and tax amount values to the new tax distribution but
does no tax calculation.
Calculation Level. If you enable the Use Automatic Tax Calculation
option, select the level at which you want Payables to automatically
calculate sales tax. This value defaults to new suppliers you enter. See
also: Automatic Tax Calculation Level: page 10 – 34.
2 – 68
Oracle Payables User Guide
• Header. Automatically create tax distributions based on the
Invoice Amount and Tax Code in the Invoices window:
• Tax Code. Automatically create tax distributions based on the
distribution Amount, Tax Code, and Includes Tax check box in
the Distributions window.
When calculating tax amounts, group lines with the same tax
code and Includes Tax check box setting together, calculate tax,
and then round the tax amount.
• Line. Automatically create tax distributions based on the
distribution Amount, Tax Code, and Includes Tax check box in
the Distributions window.
When calculating tax amounts, calculate tax for each
distribution, round the tax amount, then add the tax amounts.
Allow Calculation Level Override. Enable this option if you want to
allow users to adjust the default value of the Calculation Level option
for new and existing suppliers.
The Calculation Level defaults in the following order: Payables
Options –> Suppliers –> Supplier Site –> Invoices. You can adjust the
default calculation level in the Supplier, Supplier Sites, and Invoices
windows only if the Allow Override option is currently enabled in the
previous window. You can enable the Allow Calculation Level
override check box in the Suppliers window for new and existing
suppliers only if the Allow Calculation Level Override check box in the
Payables Options window is currently enabled. See also: Overriding
Tax Calculation Level: page 10 – 37.
Distribution Amounts Include Tax. Enable this option if you use
Automatic Tax Calculation at the Line level or Tax Code level, and you
want the Distribution Amounts Includes Tax check box to be enabled
by default for all new suppliers you enter.
When the Distribution Amount Includes Tax check box is enabled at
the supplier site, Payables subtracts the calculated tax from non–Tax
(Item, Misc, Freight, Prepayment type) distributions when Payables
automatically creates tax distributions. When you select this option at
the supplier site, Payables always checks the Includes Tax check box for
invoice distributions and recurring invoice templates. Note that this
option does not apply to distributions created by Distribution Sets.
You cannot enable this option unless you enable Automatic Tax
Calculation and you select Line or Tax Code as your Calculation Level.
Payables Setup
2 – 69
This value defaults to the Distribution Amounts Include Tax option in
the Suppliers window, and you can change it in the Suppliers window
if you enable the following option, Allow Override.
Allow Override. If you enable the Allow Override option, you can
override the Distribution Amounts Include Tax check box default value
for all suppliers.
If you enable this option you can also adjust the Includes Tax check
boxes in the Expense Report Templates window.
Note that if you enable Header as the Calculation Level Payables
option, then you cannot enable this option. Therefore you can never
enable the Includes Tax check box in any of the following windows:
Distributions, Invoice Gateway, Expense Report Templates.
See Also
Automatic Tax Calculation Overview: page 10 – 34
Tax Codes: page 2 – 146
Matching Payables Options
Allow Final Matching. Enable this option to allow final matching of
purchase order matched invoices. You can indicate a final match when
you match an invoice to a purchase order during invoice entry or when
you adjust a matched invoice distribution. You cannot final match
when you match invoices to receipts.
☞
Attention: If you final match to a purchase order, any
subsequent invoices matched to the purchase order will be
placed on hold, and you cannot manually release the hold. See
also: Final Matching Purchase Orders: page 4 – 82.
Allow Distribution Level Matching. Enable this option if you want
to allow matching to purchase order distributions. If you enable this
option, you can match an invoice to one or more purchase order
distributions. If you do not enable this option, Payables only allows
you to match an invoice to a purchase order shipment.
Allow Matching Account Override. Enable this option if you want to
allow override of the account for an invoice distribution created from
matching to a purchase order. You can override the account for a
matched invoice distribution in the Distributions window of the
2 – 70
Oracle Payables User Guide
Invoice Workbench, or on any imported invoices. You cannot override
the account for a matched invoice distribution if you use encumbrance
accounting, or perpetual receipt accrual. In addition, you cannot
override the account if the purchase order is projects related and the
item destination for the purchase order distribution is Inventory.
Transfer PO Descriptive Flexfield Information. Enable this option if
you want Payables to automatically transfer the descriptive flexfield
information from the purchase order distribution to the invoice
distribution when you match an invoice to a purchase order. If you
enable this option, make sure that the flexfield structure is the same for
purchase order distributions and invoice distributions.
See Also
Automatic Interest: page 10 – 7
Payment Terms: page 2 – 89
Scheduling Invoice Payments: page 4 – 150
Payment Payables Options
Bank Account. The internal bank account you use to disburse funds.
Payables uses this value as a default in the Payment Batches window,
and the Payments window.
Payment Batch Limit. The default maximum outlay amount Payables
will pay for each payment batch. If a payment batch exceeds the
maximum outlay, Payables displays a warning message that you are
exceeding your maximum outlay, but allows you to proceed with the
payment batch.
EFT User Number. The number which identifies you as a user of
electronic funds transfer services to your bank or clearing organization.
Payables includes this information in some EFT payment formats.
Additional Pay Through Days. Number of days between your regular
payment batches. Payables uses the additional pay through days to
determine the default Pay Through Date when you initiate a payment
batch. For example, if you define 5 as the value in this field, Payables
Payables Setup
2 – 71
adds 5 days to the system date to calculate the default Pay through
Date when you initiate a payment batch.
Allow Document Category Override. Enable this option if you want
to allow users to override the default document category assigned to a
payment document by Payables. If your Sequential Numbering profile
option is Partially Used or Always Used, Payables automatically
assigns a document category to a payment document when you define
a payment format for the payment document. Payables predefines a
document category for each payment method. Your system
administrator can define additional document categories for a payment
method. You can then use these additional document categories to
override the default document category for a payment document, only
if you enable this Payables option.
If your Sequential Numbering profile option is set to Not Used,
Payables does not assign a document category to a payment document
and you cannot enter a value in this field. Payables also does not allow
you to enter a document category for a payment. See also: Voucher
Numbers: page 2 – 24.
Exclude Tax From Discount Calculation. If you enable this option,
when you enter an invoice, and if you use Header level tax calculation,
Payables subtracts the tax amount from the invoice amount when it
enters the invoice amount applicable to discount in the Invoices
window. If you enable this option, you cannot select Prorate Tax for
your Discount Distribution Method Payables option. Note that even if
you enable this option, taxes with corresponding offset taxes, such as
VAT taxes, will not be excluded from discount calculation.
If you do not enable this option, Payables uses the gross amount
(including the tax amount) of an invoice as the invoice amount
applicable to discount. When you enter an invoice you can always
override the default invoice amount applicable to discount.
Method. The method you want Payables to use for distributing the
discounts you take when making payments.
If you leave this field blank, Payables uses the System Account method
for distributing your discounts.
• Prorate Expense. Payables automatically prorates any discounts
across all the invoice distributions. Payables assigns the
discount to the charge account unless the invoice is matched to a
purchase order with Accrue on Receipt enabled, in which case it
is assigned to the price variance account.
2 – 72
Oracle Payables User Guide
If your Exclude Tax From Discount Payables option is enabled in
this window and you enable this option, then the discount is
prorated only to the expense lines and not the tax lines.
• Prorate Tax. Payables automatically prorates a percentage of the
discount amount across the tax distributions. Payables only
prorates the percentage of discount amount equal to the
percentage of your tax distributions. Payables credits the
remaining discount amount to the Discount Taken account you
enter in the Financials Options window.
For example, if your tax distributions are 10 percent of the total
invoice amount, Payables prorates 10 percent of the discount
amount across the tax distributions. Payables credits the
remaining 90 percent of the discount amount to the Discount
Taken account.
You cannot select Prorate Tax if your Exclude Tax From Discount
Payables option is enabled in this window.
• System Account. Payables credits all discounts to the system
Discount Taken account you define in the Financials Options
window.
If you enable Automatic Offsets, and you want to have Payables
distribute Discount Taken amounts across balancing segments,
choose this method. See also: Automatic Offsets: page 10 – 12.
If you enable the Use Bank Charges option in the payment
region, the Discount Distribution Method defaults to System
Account and you cannot update it.
Allow Print. If you enable this option, you can create Quick payments.
Suggestion: If you are going to print Quick payments, you
may want to have a fast, dedicated concurrent manager queue
and a dedicated printer with checks ready to print.
Allow Pre–Date. If you enable this option, Payables allows you to
create payments with a payment date before the system date for any
payment except a manual payment.
Allow Void and Reissue. If you enable this option, you can reissue a
Quick payment. You may need to reissue a check for a Quick payment
if it is spoiled during printing. When you reissue a check, Payables
voids the old check and creates a replacement check. The checks are
identical except that the new check has a new check number, payment
date, and payment exchange rate if you are using multiple currencies.
You cannot select the Void and Reissue option for future dated
payments.
Payables Setup
2 – 73
Allow Address Change. Enable this option if you want to allow users
to address a payment to an address other than the invoice’s supplier
site’s address.
Allow Remit–to Account Override. Check this check box if you want
to allow users to change the default primary supplier site bank account
during Quick payment and payment batch creation. If you enable this
option, you can override the Payables default of the Remit–to field of
the Payments window and the Modify Payment Batch window. You
can then select an alternate Remit–to account from a list of the supplier
site’s active bank accounts that use the same payment currency. If you
do not enable this option, you can override the Remit–to Bank Account
only in the Scheduled Payments window.
Use Bank Charges. If you want to use the Bank charge feature, enable
this option. See also: Bank Charges: page 2 – 160.
If you enable this option, you must enter a value for the Bank Charge
bearer field in the Supplier region of the Payables Options window.
Also, if you enable this feature, Payables will enter System Account as
the value for the discount distribution method field in the Payment
region of the Payables Options window, and you cannot override this
value.
If you enable this option, you cannot take discounts on invoices.
Payment Accounting Payables Options
☞
Attention: You should not change any accounting options
after you have saved your selection because that could result in
the creation of inconsistent accounting entries in your system.
Account For Payment: Choose when you want to create payment
accounting entries. You can select one or both options.
Payables creates the following accounting entries, depending on how
the Account for Payment option is set. This accounting assumes you
use accrual basis accounting. You specify the GL accounts when you
define the payment document. Any accounting entries for gain and
loss are controlled by the Account for Gain/Loss Payables option, so
they are not included here.
• Both (When Payment is Issued, and When Payment Clears):
Payables accounts for each payment you issue twice—once as an
unreconciled payment and once again as a cleared payment. If
you select both options you have the same functionality as the
Allow Reconciliation Accounting option provided in previous
releases.
2 – 74
Oracle Payables User Guide
Payables creates the following accounting entries after payment
issue:
– unreconciled payment: debit the AP Liability account and
credit the Cash Clearing account
For future dated payments, debit the AP Liability account
and credit the Future Dated Payment Account. Then, at
payment maturity, debit the Future Dated payment Account
and credit the Cash Clearing account.
Payables then creates the following accounting entries after
payment reconciliation or clearing in Cash Management:
– reconciled payment: debit the Cash Clearing account and
credit the Cash account
– bank charges: debit the Bank Charges account and credit
the Cash account
– bank errors: account in Cash account and Bank Errors
account. Debits and credits depend whether the bank error
was a positive or negative amount
• When Payment is Issued: Payables accounts for each payment
once, after payment issue. After you issue the payment,
Payables creates the following accounting entries.
– unreconciled payment: debit the AP Liability account and
credit the Cash account.
For future dated payments, debit the AP Liability account
and credit the Future Dated Payment Account. Then, at
payment maturity, debit the Future Dated payment Account
and credit the Cash account.
Although you can reconcile the payment in Cash Management,
Payables does not create accounting entries for payment
reconciliation, bank charges, or bank errors, or gain and loss at
reconciliation.
• When Payment Clears. If you select only this option, Payables
accounts for each payment once, after clearing. After you clear
the payment in Oracle Cash Management, Payables creates the
following accounting entries.
– reconciled payment: debit the AP Liability account and
credit the Cash (asset) account.
– bank charges: debit the Bank Charges account and credit
the Cash account.
Payables Setup
2 – 75
– bank errors: account in Cash account and Bank Errors
account. Debits and credits depend whether the bank error
was a positive or negative amount.
See also: Accounting Methods: page 2 – 50.
Account For Gain/Loss: Select the time at which you will record
currency gains or losses for foreign currency payments. If you selected
Account For Payment When Payment Clears above, then the system
enables the When Payment Clears option here and you cannot update
it. See also: Gain/Loss Calculation: page 6 – 5.
The combination of Payables options you select and your accounting
method control which gain and loss accounting entries Payables
creates. The following tables show between which transactions
Payables will calculate gains and losses, depending on your system
setup:
Gain/Loss Accounting for Accrual Basis Accounting
Account for Gain/Loss:
Payment Issue Only
Account for Payment:
Payment Issue Only
Account for Payment:
Payment Clearing Only
Account for Payment:
Payment Issue and
Payment Clearing
2 – 76
Account for Gain/Loss:
Payment Clearing Only
Account for Gain/Loss:
Payment Issue and
Payment Clearing
ÉÉÉÉÉÉÉÉÉ
ÉÉÉÉÉÉÉÉ
ÉÉÉÉÉÉÉÉÉ
ÉÉÉÉÉÉÉÉ
ÉÉÉÉÉÉÉÉ
ÉÉÉÉÉÉÉÉÉ
ÉÉÉÉÉÉÉÉ
ÉÉÉÉÉÉÉÉ
ÉÉÉÉÉÉÉÉ
ÉÉÉÉÉÉÉÉ
ÉÉÉÉÉÉÉÉ
ÉÉÉÉÉÉÉÉ
ÉÉÉÉÉÉÉÉ
ÉÉÉÉÉÉÉÉ
ÉÉÉÉÉÉÉÉ
ÉÉÉÉÉÉÉÉ
ÉÉÉÉÉÉÉÉ
ÉÉÉÉÉÉÉÉ
ÉÉÉÉÉÉÉÉ
ÉÉÉÉÉÉÉÉ
Invoice –> Payment Issue
(not available)
(not available)
(not available)
Invoice –>Payment
Clearing
(not available)
(not available)
Invoice –> Payment
Clearing
1) Invoice –> Payment
Issue
2) Payment –> Payment
Clearing
For future dated
payments:
1) Invoice –> Payment
2) Payment –>Payment
Maturity, and
3) Payment Maturity –>
Payment Clearing
Oracle Payables User Guide
When accounting for the
Payment, Payables uses
the invoice exchange rate
so there’s no gain/loss at
payment time)
Gain/Loss Accounting for Cash Basis Accounting
Account for Gain/Loss:
Payment Issue Only
Account for Payment:
Payment Issue Only
Account for Payment:
Payment Clearing Only
Account for Payment:
Payment Issue and
Payment Clearing
Account for Gain/Loss:
Payment Clearing Only
Account for Gain/Loss:
Payment Issue and
Payment Clearing
ÉÉÉÉÉÉÉÉ
ÉÉÉÉÉÉÉÉ
ÉÉÉÉÉÉÉÉ
ÉÉÉÉÉÉÉÉ
ÉÉÉÉÉÉÉÉ
ÉÉÉÉÉÉÉÉ
ÉÉÉÉÉÉÉÉ
ÉÉÉÉÉÉÉÉ
ÉÉÉÉÉÉÉÉ
ÉÉÉÉÉÉÉÉ
ÉÉÉÉÉÉÉÉ
ÉÉÉÉÉÉÉÉ
ÉÉÉÉÉÉÉÉ
ÉÉÉÉÉÉÉÉ
ÉÉÉÉÉÉÉÉ
ÉÉÉÉÉÉÉÉ
ÉÉÉÉÉÉÉÉ
ÉÉÉÉÉÉÉÉ
ÉÉÉÉÉÉÉÉ
ÉÉÉÉÉÉÉÉ
ÉÉÉÉÉÉÉÉ
ÉÉÉÉÉÉÉÉ
ÉÉÉÉÉÉÉÉ
ÉÉÉÉÉÉÉÉ
ÉÉÉÉÉÉÉÉ
(not available)
(not available)
(not available)
(not available)
(not available)
(not available)
(not available)
Payment –> Payment
Clearing
Payment –> Payment
Clearing
For future dated
payments:
1) Payment Issue –>
Payment Maturity, and
2) Payment Maturity –>
Payment Clearing
You can select one or both options.
• Both. (When Payment is Issued and When Payment Clears).
– Cash Basis: Record currency gains and losses between
payment time and payment clearing time.
For future dated payments, records gains and losses
between payment and payment maturity and then between
payment maturity and payment clearing.
– Accrual Basis: Record currency gains and losses between
invoice time and payment issue time. For future dated
payments, record gains and losses between invoice time and
payment issue, and then between payment issue and
maturity time of the payment.
Then record currency gains and losses between payment
time (payment maturity time for future dated payments)
and payment clearing time
Payables Setup
2 – 77
• When Payment is Issued. (Available only if you use accrual
basis accounting). Record currency gains and losses between
invoice time and payment issue.
• When Payment Clears. If this is the only enabled option, then
Payables will record currency gains and losses between payment
time and payment clearing time
– Cash Basis: Records gains and losses between Payment
Issue and Payment Clearing.
– Accrual Basis: Record gains and losses between invoice and
payment clearing.
Calculate Gain/Loss. Select the transaction level at which you want to
calculate foreign currency gains and losses.
• For Each Invoice. Calculate the gain or loss for each invoice on
the payment.
• For Total Payment. Calculate the gain or loss for the entire
payment.
Use Future Dated Payment Account. You can define a future dated
payment account at both the supplier site and the payment document
level. This option controls which account Payables will use to create
accounting entries for future dated payments.
• From Payment Document
• From Supplier Site
Reports Payables Options
Relieve Future Dated Payment Liability. This option controls whether
the Accounts Payable Trial Balance report includes as liabilities invoices
that you have paid with future dated payments.
☞
Attention: Updating this option after you set it will not affect
any accounting entries. However, updating the option may
make trial balance reports that you have already submitted
invalid. If you update this option, then you can resubmit
recent trial balance reports for an accurate report of your
liabilities.
If you use accrual basis accounting, then select the date that you relieve
the liability for an invoice that you pay with a future dated payment.
The option you select here should reflect the future dated payment
account type that you use. For example, if the future dated payment
account you use is a liability account, then you don’t relieve liability
2 – 78
Oracle Payables User Guide
until the payment matures. Therefore you should select When
Payment Matures as the option here.
☞
Attention: The options you can select here are controlled by
the setting of the Account For Payment option in the Payment
Accounting tabbed region. If the Account for Payment When
Payment is Issued option is not enabled, then the Relieve
Future Dated Payment Liability option is set to When Payment
Clears, and you cannot update it.
• When Payment is Issued. The Accounts Payable Trial Balance
report will not include as liabilities any invoices paid with future
dated payments.
Choose this option if you relieve liability on the date that the
payment document is created. If you select this option, then the
future dated payment account you use should be an asset
account.
• When Payment Matures. The Accounts Payable Trial Balance
report will include as liabilities all invoices paid with future
dated payments, and they will remain on the report until
payment maturity.
Choose this option if you relieve liability on the date that the
payment status has been recorded as matured, which is usually
the maturity date on the future dated payment document. On or
after the maturity date, you can record a future dated payment
as matured by updating its status from Issued to Negotiable.
The maturity date is the date the bank disburses funds to the
supplier.
If you select this option, then the future dated payment account
you use should be a liability account.
• When Payment Clears. The Accounts Payable Trial Balance
report will include as liabilities all invoices paid with future
dated payments, and they will remain on the report until
payment reconciliation.
If you do not account for payments at issue time, then the system
will set this option for you. You cannot update this option unless
you enable the Account for Payment at Issue Time Payables
option.
Payables Setup
2 – 79
Supplier Payables Options
Use this region to enter defaults for the Suppliers window. These
values then default to the Supplier Site, and then to the invoice. You
can override these defaults at any time.
Pay Group. The Pay Group you want to assign to any new suppliers
you enter. You can choose any Pay Group you have defined in the
Oracle Purchasing Lookups window.
Invoice Currency. The currency that you use as a default for each new
supplier you enter.
Terms Date Basis. The date that Payables uses as the payment terms
start date when Payables calculates the due and discount date for
invoice scheduled payments.
• System. Current date of your Payables system.
• Goods Received. The date you receive goods for invoices you
match to purchase orders.
• Invoice. Invoice date.
• Invoice Received. Date you receive an invoice.
Pay Date Basis. The Pay Date Basis default for each new supplier you
enter. The Pay Date Basis for a supplier defaults to the new supplier
sites you enter for the supplier. You can override the default for each
supplier and supplier site.
• Discount. Payables selects invoices for payment based on the
scheduled payment discount date.
• Due. Payables selects invoices for payment based on the
scheduled payment due date, regardless of any available
discounts.
Bank Charge Bearer. If you use the Bank Charges feature, indicate
whether you or your supplier will pay for any bank charges associated
with payments to your suppliers. If your suppliers pay, indicate
whether your suppliers use the standard or negotiated rate. This value
will default to all new suppliers you enter. You can override this value
at the supplier and supplier site. See also: Bank Charges: page 2 – 160.
• Internal. You will pay bank charges.
• Supplier/Negotiated. Your supplier will bear any bank charges
at a negotiated rate.
• Supplier/Standard. Your supplier will bear any bank charges at
a standard rate.
2 – 80
Oracle Payables User Guide
Combined Filing Program. Enable this option if you are using 1099
Combined Filing Program reporting. When you submit the 1099
Electronic Media report, Payables will produce K–records for all tax
regions participating in the Combined Filing Program that have
qualifying payments.
☞
Attention: If you use electronic filing or magnetic media to
file your tax information with the Internal Revenue Service and
you are not participating in the Combined Filing Program, do
not enable this option. The Internal Revenue Service may
return your 1099 magnetic tape if the tape contains K records.
Use Pay Site Tax Region. You can enable this option only if you enable
the Combined Filing Program Payables option.
Enable this option if you want to use a 1099 supplier’s tax region as the
default tax region. If you enable this option, Payables uses the 1099
supplier site’s region as the default tax region for the invoice
distributions. You can override this default region for each invoice
distribution in Distributions window.
Do not enable this option if you do not want to use a supplier site’s tax
region as the default tax region. You must then enter the default tax
region you want to use for all invoices in the next field, the Income Tax
Region Name field.
The default you choose here determines how many K records Payables
will produce on your 1099 Electronic Media. Payables produces one K
record for each tax region. If you are participating in the Combined
Filing Program, Payables forwards your 1099 qualifying payment
information to all the tax regions that participate in the Combined
Filing Program. If you enable this option, you may have as many K
records as you have different supplier tax regions.
If you choose a default Income Tax region in the next field, you may
have only one K record. This would be a K record for that one default
tax region. Of course, you can always override the default tax region
for each invoice distribution. In this case, Payables will then produce
additional K records on your 1099 Electronic Media, one K record for
each tax region. Payables only produces K records for tax regions that
participate in the Combined Filing Program and that you have entered
(either as a default or manually) on a paid distribution for a 1099
supplier. You can also choose to have your 1099 payment information
forwarded to only one tax region regardless of which region your 1099
suppliers do business from. You do this by entering a value in the
following Income Tax Region name field.
Payables Setup
2 – 81
Income Tax Region. You can enter this field only if you enable the
Combined Filing Program Payables option and did not enable the Use
Pay Site Tax Region option. Enter the tax region you wish to use as the
default for the invoice distributions of your 1099 suppliers. You can
override this default region for each invoice distribution.
See Also
Suppliers: page 3 – 2
Tax Defaults and Rules Payables Options
Use this region to set a hierarchy for Payables to use when it provides
default tax codes. Payables will search the sources you enable, in the
order you designate until it finds a tax code. When it finds a tax code,
it will stop searching and default the tax code to the document you are
creating. For detailed information on this feature, see: Defaulting Tax
in Payables: page 4 – 105. See also: Tax Defaulting Restrictions and
Considerations: page 4 – 107.
Enable each source you want to use by checking its check box. For each
source, enter a rank (1 is searched first), and give each source a unique,
consecutive number starting with 1.
Note that two Payables options supersede the hierarchy you define. If
you enable the Enforce Tax from Purchase Order option, Payables
always searches first at the Purchase Order Level for purchase order
matched documents. If you enable the Enforce Tax From Account
option, Payables always searches next at the Natural Account. If the
invoice is not purchase order matched or if you have not enabled the
Enforce Tax from Purchase Order option, Payables checks the Natural
Account first.
Enforce Tax From Account. Enable this option if you want to enforce
the relationship between the tax code and the expense or asset account
for distributions. If the following conditions are true then Approval
will check that for every account to which you have assigned a tax
code, that the tax code matches:
• You have enabled the Enforce Tax From Account option.
• You have assigned tax codes to accounts in the Tax Options
window in General Ledger.
2 – 82
Oracle Payables User Guide
• You have disabled the Allow Tax Code Override option in the
Tax Options window in General Ledger.
If the tax code does not match the account then Approval will place the
invoice on Natural Account Tax hold.
If you enable the Enforce Tax From Account option, then during
Payables Invoice Import and Payables Open Interface Import the
system checks the tax codes of all accounts that have tax codes
assigned to them. If the tax code is incorrect, Payables will not import
the invoice or expense report and will list it as an exception.
If you enable this option we recommend that you rank Account at or
near the top of your source hierarchy to minimize holds.
See also: Deriving Tax From a Natural Account – Account Method:
page 4 – 104
☞
Attention: Do not enable this option if you enable the Enforce
Tax from Purchase Order or if you use Automatic Tax
Calculation at the Header level. Since you can’t enforce the
correct natural account at the purchase order or at the invoice
header level, this may cause frequent holds during Approval.
Enforce Tax from Purchase Order. Enable this option if you want
Payables to verify that the tax code assigned to an invoice matches the
tax code on the purchase order document to which you matched. If
you enable this option, the primary tax code default will be from the
purchase order, if the purchase order has a tax code. This is regardless
of the rank you assign to the PO for Matched Invoices source in your
Tax Code Defaults hierarchy. See: Defaulting Tax Codes: page 4 – 105.
If the purchase order shipment to which you matched is defined in
Purchasing as taxable, and the tax codes on the invoice and the
purchase order are not the same, Approval automatically applies a Tax
Difference hold to the invoice. Approval also applies a Tax Difference
hold to an invoice if the invoice and purchase order tax code are the
same and the purchase order shipment to which you matched is
non–taxable. Payables releases the hold when you submit Approval
after correcting the tax code on the invoice or on the purchase order to
which you matched. You can also manually release a Tax Difference
hold in the Holds window and the Invoice Actions window.
Note: If you enable this option we recommend that you do not
also enable the Enforce Tax From Account Payables option in
the Tax Defaults and Rules tabbed region.
Payables Setup
2 – 83
Tax Code Defaults.
• PO for Matched Invoices. For purchase order matched invoices,
if the purchase order is taxable, Payables defaults the tax code
from the purchase order shipment. If the purchase order
shipment has no tax code assigned to it, Payables continues its
search for a tax code at the next ranked source.
You must enable this option if you want to enable the Enforce
Tax from Purchase Order option in the Payables Options
window. If you have enabled the Enforce Tax from Purchase
Order option, then when defaulting a tax code to a purchase
order matched document, Payables will always search at this
source first, no matter what rank you have assigned to it.
• Supplier Site. Invoice Tax Code value you entered in the
Invoice Tax region of the Supplier Sites window.
• Supplier. Invoice Tax Code value you entered in the Invoice Tax
region of the Suppliers window.
Note: If you use the Multiple Organization Support feature,
you cannot enter a value for Invoice Tax Code in the Suppliers
window, and you cannot select the Supplier option for your
Tax Code Defaults in the Payables Options window.
• Account. Tax Code value you assigned to the expense or asset
account in the Tax Options window in General Ledger. For more
information see: Deriving Tax From a Natural Account: page
4 – 104.
You must enable this option if you enable the Enforce Tax From
Account option. Note that if you enable the Enforce Tax From
Account option, Payables will always search for a tax code from
the Account source either first or second, regardless of the rank
you assign here. It will search at the purchase order level first
only if you have also enabled the Enforce Tax from Purchase
Order option and the invoice is purchase order matched.
• Financials Options. Value you entered for Tax Code in the
Financials Options window.
• Invoice Header. Value you enter for Tax Code in the Invoices
window. This source is used only for providing a default for
invoice distributions.
• Template. Template you use to create an invoice or invoice
distributions: Distribution Set, or expense report template.
☞
2 – 84
Oracle Payables User Guide
Attention: If you use zero–rated taxes in Distribution Sets or
expense report templates to indicate that lines are non–taxable,
then rank Template high in your hierarchy to ensure that that
the zero–rated taxes are not overwritten by other sources.
Note: When Payables creates invoices from recurring invoice
templates, the tax code defaults from either the purchase order
or the Distribution Set.
Transfer to GL Payables Options
Use this region to set defaults for submission of the Payables Transfer
to General Ledger Process. If you use Oracle General Ledger you can
also set defaults for submitting Invoice Import, which transfers
accounting lines to Oracle General Ledger.
Transfer to GL Interface. Select the level at which you want to
summarize accounting entries when you submit the Payables Transfer
to General Ledger program. If Payables creates summarized journal
entries, Payables combines all the invoice or payment transactions for a
particular account or date into a single journal entry line. If you do not
create summarized journal entries, then Payables creates a journal entry
line for each accounting entry. The original accounting entries remain
in Payables until you purge them.
• In Detail. Do not summarize the entries.
• Summarize by Accounting Date. Summarize the accounting
lines by account and date.
• Summarize by Accounting Period. Summarize the accounting
lines by account and accounting period.
Submit Journal Import. Enable this option if you want to submit
journal import when you submit Payables Transfer to General Ledger.
Journal Import imports accounting entries from the GL Interface into
Oracle General Ledger.
Allow Override At Program Submission. If this option is enabled,
then when users submit the Payables Transfer to General Ledger
Process, they can change the defaults that you set in this region.
Payables Setup
2 – 85
Withholding Tax Payables Options
Use Withholding Tax. Select this option to enable Automatic
Withholding Tax. If you enable this option, you have the option to
allow your suppliers and supplier sites to be subject to withholding tax.
Allow Manual Withholding. Enable this option to allow manual
creation and adjustments of Withholding Tax type distributions for
your invoices.
Tax Group. The name of the withholding tax group that you would
like to use as the default withholding tax group for the new suppliers
you enter.
Apply Withholding Tax. Select the time at which you would like
Payables to apply withholding taxes to your supplier’s invoices:
• Never.
• At Invoice Approval time.
• At Payment Time. When you create payments in a payment
batch or with a Quick payment.
Withholding Amount Basis.
• Include Discount Amount. Payables includes the invoice
discount amount when it calculates withholding tax amounts for
the invoice.
• Include Tax Amount. Payables includes the invoice tax amount
when it calculates withholding tax amounts for the invoice.
Create Withholding Invoice. Select the time at which you would like
Payables to automatically create withholding tax invoices to remit
withheld taxes to tax authorities:
• Never.
• At Invoice Approval Time.
• At Payment Time.
See Also
Automatic Withholding Tax Overview: page 10 – 24
2 – 86
Oracle Payables User Guide
Special Calendar
Use the Special Calendar window to define periods that Payables uses
for automatic withholding tax, recurring invoices, payment terms, and
for the Key Indicators Report. For example, if you monitor staff
productivity weekly, use this window to define weekly periods for the
Key Indicators calendar type.
The Report Run display–only check box indicates that a Key Indicators
Report has been run for this period. The check box is not applicable to
Payment Terms, Withholding Tax, or Recurring Invoices calendar types.
Note: The periods you define in the Special Calendar window
are completely separate from the periods you define in the
Accounting Calendar window for your AP Accounting Periods.
See: Defining Calendars (Oracle General Ledger User Guide).
"
To set up a special calendar:
1.
In the Special Calendar window, select the Type of calendar you
want to define:
• Recurring Invoice
• Withholding Tax
• Payment Terms
• Key Indicator
2.
Enter a calendar name and description. You will select this name
from a list of values when you assign a special calendar to a key
indicator report, a recurring invoice template, a withholding tax
type tax code, or payment terms.
Enter the number of periods per year. For example, if you use a 12
month period calendar, enter 12.
3.
Enter a period name. For example, Jan, Feb, Mar, etc., or Q1, Q2,
Q3, Q4.
Enter in the Year field the calendar year in which a period occurs.
Enter numbers in the Sequence fields to indicate the order in which
the periods occur. The sequence numbers of a period should
represent the sequence of the period in a regular calendar.
Therefore, May–December 2002 should be sequenced 5–12, and
January 2003 should be sequenced 1.
Enter the From Dates and the To Dates for the period. Periods
within a year cannot overlap.
Payables Setup
2 – 87
Payables displays the System Name for the period by combining the
accounting period name you entered with the last two digits of the
From Date. Payables lists System Names whenever you select a
period name from a list of values. This way you can use the same
period names every year, such as Jan, Feb, but they will be unique to
the period, because they will be Jan–03, Feb–03.
4.
If you are defining a payment terms calendar, enter a due date for
each period. For invoices with terms dates that fall anywhere
within the period, a due date defines the date on which these
invoices become due. Be sure to define periods with due dates for
any terms date for which a user will enter an invoice or expense
report.
5.
Save your work.
See Also
Key Indicators Report: page 8 – 148
Automatic Withholding Tax Overview: page 10 – 24
Entering Recurring Invoices: page 4 – 185
Payment Terms: page 2 – 89
2 – 88
Oracle Payables User Guide
Payment Terms
In the Payment Terms window, you define payment terms that you can
assign to an invoice to automatically create scheduled payments when
you submit Approval for the invoice. You can define payment terms to
create multiple scheduled payment lines and multiple levels of
discounts. You can create an unlimited number of payment terms.
Payment terms have one or more payment terms lines, each of which
creates one scheduled payment. Each payment terms line and each
corresponding scheduled payment has a due date or a discount date
based on one of the following:
• a specific day of a month, such as the 15th of the month
• a specific date, for example, March 15, 2002.
• a number of days added to your terms date, such as 14 days after
the terms date
• a special calendar that specifies a due date for the period that
includes the invoice terms date. Only due dates can be based on a
Payables Setup
2 – 89
special calendar. Discount dates cannot be based on a special
calendar.
Each payment terms line also defines the due or discount amount on a
scheduled payment. When you define payment terms you specify
payment amounts either by percentages or by fixed amounts.
After you define your payment terms, in the Payables Options window
you can select default payment terms that Payables automatically
assigns to the suppliers and supplier sites you enter. The payment
terms for a supplier site default to the invoices you enter for the site.
☞
Attention: If you update the payment terms on an invoice,
Payables immediately recalculates the scheduled payment for
the invoice. Thus, you must re–enter any manual adjustments
you made to the previous scheduled payment. For example, if
you update the payment priority on a particular scheduled
payment and then change the payment terms, Payables will
immediately recalculate the scheduled payment using the same
payment priority defaults as before and you will need to update
the payment priority again.
If you use Multiple Language Support (MLS), you can define payment
terms in each of your installed languages. Select Translations from the
toolbar or menu to enter the payment term name and description in
other languages. When a user selects payment terms from a list of
values, the payment terms on the list will appear in the user’s language.
For more information, see: the Oracle Applications User Guide.
Prerequisite:
❑ If you are defining calendar–based payment terms, define one or
more payment terms type special calendars. See: Special Calendar:
page 2 – 87.
"
To define payment terms:
1.
In the Payment Terms window, enter a unique payment term name
and a description. These will appear on a list of values whenever
you select payment terms.
For detailed information on any field, see: Payment Terms Window
Reference: page 2 – 92.
2 – 90
2.
If you are entering Day of Month terms, enter a Cutoff Day.
3.
If you enable Automatic Interest, enter a unique value in the Rank
field.
Oracle Payables User Guide
4.
If you want to make this payment term invalid on and after a certain
date, enter that date in the [Effective Dates]To field.
5.
Enter each payment terms line.
Enter one of the following to determine the portion of an invoice
due on the scheduled payment:
• % Due
• Amount
In the Due tabbed region, enter one of the following to determine
the due date on the scheduled payment line:
• Calendar
• Fixed Date
• Days
• Day of Month, and Months Ahead
6.
If you are using discount terms, define payment terms lines in the
First, Second, and Third Discount tabbed regions. Define your
discounts so that the first discount has an earlier discount date than
the second and so on. You can realize only one discount on a
payment terms line.
Note: You cannot use a special calendar to define discount terms.
Enter one of the following to determine the portion of the invoice to
discount on the scheduled payment:
• % Discount
• Amount
In the Discount region, enter the discount percent.
Enter one of the following to determine the due date on the
scheduled payment line:
• Due Days
• Day of Month, and Months Ahead
7.
Save your work.
See Also
Payment Terms Restrictions: page 2 – 94
Payables Setup
2 – 91
Payment Terms Window Reference
Name. Payment term name. Use names that make it easy to identify
the usage of payment terms. For example, use 1/10 Net 30 to refer to a
payment term which indicates you get a 1% discount if you pay within
10 days and the invoice is due in 30 days. This name will appear on a
list of values with the description whenever you select a payment term.
Description. Description of payment term.
Cutoff Day. For Day of Month type terms only, the day of month after
which the due and discount dates of the scheduled payment will be in a
future month. The exact month depends on the value you enter for
Months Ahead. Payables compares the invoice terms date to the Cutoff
Day. If you leave this field blank, Payables always uses the current
accounting month to determine the due and discount dates. For
example, your Cutoff Day is 11, your Months ahead is zero, and your
Day Of Month due date is 15. If you enter an invoice with a terms date
of January 12, Payables will set the due date for February 15.
If you use Due Days or Fixed Date type terms, do not enter a cutoff day.
Rank. If you enable Recalculate Scheduled Payment, enter a unique
value to rank your invoice terms. 1 is the highest rank. Payables uses
ranks to choose the most favorable payment terms from the invoice and
purchase order. During Approval, Payables recalculates the scheduled
payment using the most favorable terms only if the Recalculate
Scheduled Payment Payables option is enabled.
% Due. The portion of an invoice due. The total of your scheduled
payment lines must equal 100%. You cannot combine percentages due
and amounts due for one set of payment terms. See also: Payment
Terms Restrictions: page 2 – 94.
Amount. For amount due terms only, enter the amount due. Typically
amount due terms have more than one payment terms line since you
must specify zero as the amount on your last payment terms line.
Payables uses the zero amount payment line to determine the remaining
amount due on the last scheduled payment. See also: Payment Terms
Restrictions: page 2 – 94.
Calendar. If you enter a value in the Calendar field, Payables
determines due dates for scheduled payments by using a special
calendar. A special calendar is divided into periods, and each period
has a due date assigned to it. When you assign due dates to the periods
of a payment terms calendar, you can avoid weekends, holidays, and so
on. You can define special calendars for payment terms in the Special
Calendar window.
2 – 92
Oracle Payables User Guide
Note: If you use calendar–based terms, be sure to use calendars
with periods defined for any invoice terms date that you will
use. You cannot assign calendar–based terms in the Invoices
window if there is not a period defined for the terms date. If
you do so in the Invoice Gateway, then the system will use the
terms date as the due date. If you do so for an expense report,
you cannot import it.
Fixed Date. Specific month, day, and year on which payment terms are
due.
% Discount. Payables uses the percentage you enter here to calculate
the discount amount available for a scheduled payment. Payables
multiplies this percentage with the amount due on the scheduled
payment line to determine the discount amount available on the
scheduled payment line. In the Second and Third Discount regions, you
can enter second and third discount percentages for discounts available
if you miss the first discount date. Do not enter a value in this field if
there is no discount available.
Days. Payables adds this number of days to the invoice terms date to
determine the due or discount date on your scheduled payment line.
You cannot enter values in the Day of Month and Months Ahead fields
for a payment terms line if you enter a value in this field.
Day of Month/Months Ahead.
Day of Month. Payables uses the value you enter here to calculate
a due or discount date for a scheduled payment. For example,
enter 15 to have Payables schedule payment for the 15th day of
the month. Enter 31 if you want to have Payables schedule
payment for the final day of the month, including months with
less than 31 days.
Months Ahead. For Day of Month type terms only. Payables
uses the value you enter here in conjunction with the Cutoff Day
you enter to calculate the due or discount date of a scheduled
payment line. If you enter zero in this field and the terms date of
an invoice is the same as or later than the Cutoff Day, then
Payables uses the day in the Day of Month field for the next
month as the due date of an invoice payment line. If you enter 1
in this field, Payables uses one month beyond the next month as
the due date.
You cannot enter a value in this field if you enter a value in the
Due Days field.
Payables Setup
2 – 93
See Also
Automatic Interest: page 10 – 7
Financials Options: page 2 – 36
Payment Schedule Recalculation: page 2 – 65
Scheduling Invoice Payments: page 4 – 150
Discounts: page 4 – 155
PAYMENT TERMS RESTRICTIONS:
% DUE/AMOUNT DUE. You cannot combine the percentage due and
amounts due for one payment term.
CALENDAR. You cannot use a special calendar to define discount
terms.
2 – 94
Oracle Payables User Guide
Signing Limits
Managers can approve an expense report only if the total amount of the
expense report does not exceed their signing limit. The Manager
(Spending) Approval Process in the Expense Reporting workflow uses
the signing limits you define to determine which manager has
authority to approve expense reports. You assign signing limits in your
primary functional currency.
When you assign signing limits to a manager, you also specify a cost
center to which this signing limit applies. You can give managers
signing limits for multiple cost centers.
Multiple Reimbursement Currencies and Signing Limits
If you have set up Self–Service Expenses to allow multiple
reimbursement currencies, users can specify a reimbursement currency
different from your primary functional currency. If a user specifies a
reimbursement currency different from your primary functional
currency, the signing limits you assign to managers do not apply.
"
To assign signing limits:
1.
Navigate to the Employee Signing Limits window.
2.
Select AP Expense Report as the document type.
3.
Enter the name of the manager to whom you want to assign a
signing limit.
4.
Enter the cost center for which you want this manager to approve
expense reports.
5.
Enter a signing limit for this manager.
6.
Save your work.
See Also
Setting Up Employees (Oracle Self–Service Expenses Implementation
Guide)
Payables Setup
2 – 95
Invoice Tolerances
Use the Invoice Tolerances window to define the matching and tax
tolerances you want to allow for variances between invoice, purchase
order, receipt, and tax information. You can define both
percentage–based and amount–based tolerances.
Tolerances determine whether Payables places matching or tax holds on
an invoice. When you submit Approval for an invoice you have
matched to a purchase order or receipt, Payables checks that the invoice
matches the purchase order or receipt within the purchase order
matching tolerances you define. When you submit Approval for an
invoice with a tax amount, Payables checks that the actual invoice tax
amount equals the calculated tax amount within the tolerances you
define.
If you use a percentage based tolerance, Payables calculates the
tolerance based on the invoice amount, including tax. For example, you
enter a $108 invoice and the tax rate is 8%. You have a 10% tax
tolerance. You can enter a tax distribution amount anywhere from $8 to
$8.80 without getting a Tax Variance hold on the invoice.
If you enter a zero for a percentage tolerance and enable the check box
for that tolerance, Payables will not allow any variance at all. If you
want a low tolerance, you can enter a very small percentage. If you
enter no value, then Payables will allow infinite variance.
Payables displays next to the tolerance field the name of the Hold that
Payables will apply to your invoice during Approval if the variance
exceeds the tolerance you define.
"
To set tolerance levels for your invoices:
In the Invoice Tolerances window, select the check box for each tolerance
you want to enforce, and enter tolerance levels for your purchase order
matching transactions and your invoice taxes. If you do not have a
purchasing system installed, enter tolerances only in the tax region.
Enter all amounts in your functional currency.
• PO Matching. Purchase order matching tolerances apply to any
purchase order matched invoice, including invoices matched to
receipts.
• Maximum/Quantity Ordered. Enter either the percent or
quantity difference above purchase order shipment line quantity
ordered that you allow suppliers to invoice. Approval checks the
quantity billed against the quantity ordered without taking price
into consideration. Enter a Maximum Quantity Ordered
2 – 96
Oracle Payables User Guide
tolerance only if most of your purchase orders are for the same
relative value.
• Maximum/Quantity Received. Enter either the percent or
quantity difference above purchase order shipment line quantity
received that you allow suppliers to invoice. Approval checks the
quantity billed against the quantity received without taking price
into consideration. Enter a Maximum Quantity Received
quantity tolerance only if most of your purchase orders are for the
same relative value.
• Price. The percentage difference above purchase order shipment
line unit price that you allow suppliers to invoice.
• Exchange Rate Amount. The amount of variance you allow
between an invoice amount and the amount of the purchase order
shipment to which it is matched. Payables compares the
functional currency of each, based on the invoice and purchase
order exchange rates, respectively. Enter a value in this field only
if you enter foreign currency invoices in Payables.
• Shipment Amount. The amount of variance you allow between
all invoice amounts (in transaction currency) matched to a
shipment and the amount of the purchase order shipment.
Approval applies the Maximum Shipment Amount hold if the
match exceeds the tolerance.
• Total Amount. The total amount of variance you allow for both
the Exchange Rate Amount variance and the Shipment Amount
combined. If you do not use foreign currency, do not enter a
value in this field.
Suggestion: For the greatest control over your foreign currency
invoices, you may choose to enter a Total Amount tolerance that
is less than the total of your Shipment Amount and Exchange
Rate Amount tolerances. For example, if your foreign currency
invoice match is within the individual Exchange Rate Amount
and Shipment Amount tolerances, you still may want Payables
to prevent payment of the invoice because the exchange rate
variance combined with the shipment amount variance, while
within their individual tolerances, exceed your desired Total
Amount tolerance.
H
Tax
• Tax %. For Sales, Offset, and user–defined tax types, Approval
validates the tax amount of tax distributions against the sum of
the distributions the tax is allocated to. If the implied rate of the
tax distributions you enter is different from the rate you enter for
Payables Setup
2 – 97
a particular tax code, including the tax tolerance you define,
Approval applies Tax Variance hold to the invoice.
• Tax Amount Range. The amount of variance you allow between
the actual invoice tax amount and the invoice calculated tax
amount.
"
To make a tolerance inactive:
H
2 – 98
Oracle Payables User Guide
Deselect the check box for the tolerance.
Invoice Approvals
Use the Invoice Approvals window to define the codes that you use to
manually hold or release invoices. You can define hold codes that you
assign to an invoice during entry to place the invoice on hold. For
example, ”Needs CFO Approval”. You can also define release codes
that you use in the Invoice Holds or Invoice Actions window to remove
the holds you apply to invoices. For example, ”CFO Approved”. You
cannot pay an invoice that has a hold applied to it. You can define as
many invoice approval codes as you need.
You can also determine whether to allow accounting entry creation for
the hold codes you define. If you assign to an invoice a hold code that
does not allow accounting, then you cannot create accounting entries for
the invoice until you remove the hold.
Payables predefined invoice hold codes
Payables predefines hold codes and release holds that it uses to apply
and release invoice holds during Approval.
In the Invoice Approvals window, you can query the predefined hold
and release approval codes that Payables provides, but you cannot
modify them.
INVOICE APPROVAL TYPES (Holds and Releases)
Approval Hold Types
Approval Release Types
User Definable
Manual Release
Allowed
Acct Hold Reason
No
Funds Hold Reason
Mixed
Insufficient Information
No
✔
Invoice Hold Reason
Mixed
Matching Hold Reason
Mixed
Variance Hold Reason
Mixed
Acct Release Reason
N/A
Funds Release Reason
N/A
Sufficient Information
N/A
Table 2 – 1 (Page 1 of 2)
Payables Setup
2 – 99
Approval Hold Types
Approval Release Types
User Definable
Manual Release
Allowed
Invoice Release Reason
✔
N/A
Matching Release Reason
✔
N/A
Variance Release Reason
✔
N/A
Hold Quick Release Reason
✔
N/A
Inv Quick Release Reason
✔
N/A
Table 2 – 1 (Page 2 of 2)
Defining Supplier Controls
You can automatically apply holds to invoices for a supplier site by
enabling invoice controls for the site. Payables provides four types of
controls that you can enable in the Control Information region of the
Supplier Sites window. You can also define default values for these
controls in the Control region at the supplier level. Payables
automatically assigns defaults you define for a supplier to any new sites
you enter for the supplier. See: Control Region of the Suppliers and
Supplier Sites window: page 3 – 19.
Defining Invoice Hold and Release Codes
"
2 – 100
To define invoice hold or release code:
1.
In the Invoice Approvals window enter a unique Name and Reason
to identify the approval code. The name and reason will appear on
a list of values whenever you need to enter the approval code.
2.
Enter the type of approval code you are defining. You can define
either hold or release codes. For detailed information on any field,
see: Invoice Approvals Window Reference: page 2 – 101
3.
If you are defining a hold code, enable the Accounting Allowed
option if you want to allow Payables to create accounting entries for
invoices that have this hold code.
4.
If you want to make the approval code inactive on and after a
certain date enter a value in the Inactive On field.
Oracle Payables User Guide
5.
Save your work.
See Also
Summary of Approval Hold Codes: page J – 2
Applying Holds: page 4 – 136
Releasing Holds: page 4 – 140
Approval: page 4 – 145
Invoice Approvals Window Reference
Use the Invoice Approvals window to define approval codes that you
use to manually apply and release holds.
Name. A unique approval code name. The name and description will
appear on a list of values when you need to enter the hold or release
code.
Description. Description of the hold or release code. Use this
description to elaborate on your hold or release code to eliminate any
confusion over similar names.
Type. The type of an approval code determines if a hold is applied or
released. You can enter a Hold type or a Release type.
Hold Types:
Hold type approval codes are used by Approval when it applies
holds to invoices. You can define and manually apply approval
codes of the Invoice Hold Reason type.
For a summary of predefined approval codes listed by type, see:
Summary of Approval Hold Codes: page J – 2.
Release Types:
Release type approval codes are used by Approval when it releases
holds. You can manually release holds using approval codes with
release types Invoice Release Reason, Matching Release Reason,
Variance Release Reason, Hold Quick Release Reason, and Invoice
Payables Setup
2 – 101
Quick Release Reason. Release hold codes appear on a list of values
for the Release field of the Invoice Actions and Invoice Holds
windows of the Invoices form. You can define release codes for the
following release types:
• Invoice Release Reason. You can use approval names with this
release type to release one manually releasable hold for one
invoice in the Invoice Holds window.
• Invoice Quick Release Reason. You can use approval names
with this release type to release all manually releasable holds for
one invoice in the Invoice Holds window.
• Hold Quick Release Reason. In the Invoice Actions window,
you can use the approval name with this release type to release all
holds from invoices that you query in the Invoice Workbench. In
the Invoice Actions window, you can use only approval codes
with this release type. Payables releases only the type of hold you
entered as part of your search criteria.
• Matching Release Reason. You can use approval names with
this release type to release a Matching hold that Payables
automatically applies to an invoice during Approval.
• Variance Release Reason. You can use this type of approval code
to release Variance Holds that Approval automatically applies to
invoices that have a tax variance.
The following release types are predefined by Payables:
• Acct Release Reason. For an invoice, Payables releases an
account hold when you correct the invalid account and submit
Approval.
• Funds Release Reason. Payables uses these releases for funds
checking if you use budgetary control. Payables releases a Funds
hold on an invoice during Approval if sufficient funds exist for an
invoice or if Payables can perform funds checking.
• Sufficient Information. Payables predefines one release code
with the Sufficient Information type. Payables places a Sufficient
Information release code on an invoice after you enter an
exchange rate for a foreign currency invoice.
• Variance Release Reason. Payables predefines two release codes
with the Variance Release Reason type.
Payables places the Variance Corrected release code on an invoice
if you correct an invoice variance. Payables places this release
code when you submit Approval for an invoice with a
2 – 102
Oracle Payables User Guide
distribution or tax variance hold for which you have corrected the
variance.
You cannot enter a variance release reason for an invoice with a
Distribution Variance hold. You must adjust the invoice so that
the total of the invoice distributions equals the invoice amount.
You can enter Variance Override for an invoice if you want to
release an invoice from a tax variance hold using the Holds
window. You can also define other Variance Release Reasons to
use for releasing invoices from tax variance hold.
Accounting Allowed. If this option is enabled, Payables creates
accounting entries for invoices with this hold code. You can control this
option only for holds of the type Invoice Hold Reason.
Manual Release Allowed. If you can release this hold manually,
Payables enables this check box.
Inactive On. Date on and after which you want to prevent use of a hold
or release code. On or after this date, Paybles will not include this code
on a list of values, and you will not be allowed to enter it. You can
adjust an inactive date at any time.
Payables Setup
2 – 103
Interest Rates
In the Payment Interest Rates window, you define interest rates Payables
uses to calculate and pay interest on overdue invoices. Payables
calculates interest on overdue invoices only if you enable both the Allow
Interest Invoices Payables option, and the Allow Interest Invoices option
for the supplier site of an invoice.
Payables calculates interest based on the rate you enter in this window
in accordance with the United States Promt Payment Act. The formula
used compounds monthly, up to a maximum of 356 days interest. You
can review the formula in the following discussion: Automatic Interest:
page 10 – 7.
For each rate you define, specify during which dates the rate is effective.
Effective dates of rates cannot overlap. For example, the current interest
rate is 7% for all unpaid balances. The interest rate on overdue invoices
will rise to 7.5% on December 1, 2002. This new rate will be valid for
four months. You enter two date ranges and interest rates, the first from
today’s date to November 30, 2002 (interest rate 7%) and the next from
December 1, 2002 to March 31, 2003 (interest rate 7.5%).
You can add or change a rate at any time. Payables uses the interest rate
that is valid on your payment date to calculate and pay interest on
overdue invoices.
Defining Payment Interest Rates
Prerequisite
❑ Enable the Allow Interest Invoices Payables option. See: Interest
Payables Options: page 2 – 63
"
To define payment interest rates:
1.
2 – 104
Oracle Payables User Guide
In the Payment Interest Rates window, enter an interest rate, and
enter a start date and an end date between which the interest rate is
effective.
2.
Save your work.
See Also
Interest Payables Options: page 2 – 63
Automatic Interest: page 10 – 7
Payables Setup
2 – 105
Expense Report Templates
Use this window to define templates based on the expense report forms
you regularly use in your company. You can define default values for
expense items, and you can then choose those items from a list of
values when you enter expense reports. During Payables Invoice
Import, Payables uses the expense item information to create invoice
distributions.
You define expense report templates for types of expense reports you
use in your company. For example, define a Salesperson template to
use when you enter expense reports for your salespeople. On that
template, define expense items that are reimbursable, such as meals,
airfare, and hotel. However, you do not need to define a mileage
expense item because your salespeople have car allowances.
2 – 106
Oracle Payables User Guide
Expense Report Templates for Self–Service Expenses
If Oracle Self–Service Expenses is installed, employees can enter
expense reports using a standard Web browser. Only templates that
have the Enable for Self–Service Users option checked are available for
use with Self–Service Expenses.
The self–service attributes in the Expense Report Templates window
control some of the functionality of Self–Service Expenses. For
example, you can use a self–service attribute to require employees to
provide justifications for certain expense types. For complete
descriptions of all the self–service attributes, see: Self–Service
Attributes: page 2 – 112.
Project–Related Expense Report Templates
Employees can enter project–related expense reports via Self–Service
Expenses. To create a project–related expense report in Self–Service
Expenses, an employee must choose project–related expense items from
the list of values on the Enter Receipts window. To create
project–related expense items, you associate expense items with Oracle
Projects expenditure types in the Expense Report Templates window.
Employees can then associate a project number and a task number with
the project–related expense items when they enter expense reports in
Self–Service Expenses.
Each Oracle Projects expenditure type is assigned a unit of measure,
such as, a currency, hours, miles. When defining a template you can
only use expenditure types that have currency as a unit of measure in
the Expense Report Templates window. Expenditure types with cost
rates are not displayed in the Expense Report Templates window. The
list of values for the Projects Expenditure Type field contains only
expenditure types that have currency as a unit of measure.
Only the names defined in the Expense Item fields of a self–service
enabled template appear on the list of values in the Enter Receipts page
of Self–Service Expenses. To have the Oracle Projects expenditure
types appear in this list of values, establish a separate template where
the expense item names are identical to the expenditure type names.
Instruct users who enter project–related expense reports to use this
template.
☞
Attention: Note that users cannot enter or view
project–related information in the Payables Expense Reports
window.
Payables Setup
2 – 107
Defining Expense Report Templates
Prerequisites:
❑ Define your chart of accounts. See: Defining Your Chart of
Accounts (Oracle General Ledger User Guide).
❑ Define your tax codes if you associate tax codes with your expense
report items. See: Tax Codes: page 2 – 146.
❑ If you use multi–organization support, log in with a responsibility
assigned to the same organization as the users who will use the
template. Note that if you use multi–organization support, users
can select and use templates only if they have been defined by a
user in the same organization.
"
To define an expense report template:
1.
In the Expense Report Templates window, enter a Template Name
and Description. To specify a day on which the template can no
longer be used, enter an inactive date.
2.
To make an expense report template available for use in
Self–Service Expenses, check the Enable for Self–Service Users
option.
3.
Enter a list of expense items (for example, airfare, meals, hotel, and
so on).
4.
Choose a Type for each expense item.
5.
For each expense item, you can set a default value for the following
fields. These will be the defaults for the item when a user enters an
expense report:
• Includes Tax check box
• Tax Code
• GL Account. You can enter one or more segments.
6.
2 – 108
Oracle Payables User Guide
Save your work.
Defining Self–Service Expense Report Templates
Prerequisites:
❑ If you want to use the Calculate Amount button, then customize
the user extension. See: Calculate Amount Button (Oracle
Self–Service Expenses Implementation Guide).
❑ Define an expense report template and check the Enable for
Self–Service Users option.
"
To define the values of the Self–Service attributes:
For each expense item on a self–service enabled template, you can
optionally define one or more of the Self–Service Attributes. For
complete descriptions of all the Self–Service Attributes see: Self–Service
Attributes: page 2 – 112.
"
1.
To have an expense item appear as an expense type on every
self–service enabled template, check the Viewable From All
Templates option.
2.
To require employees to provide a justification when reporting a
certain expense item, enable the Justification Required check box
for that expense item.
3.
To require that employees submit a receipt for an expense type
when the reported amount exceeds a certain limit, enter a number
in the Require Receipt Above field.
4.
To have a name appear on the status bar of a browser when a
mouse is over an icon, enter a name in the Prompt field. Note that
the name you enter in the Prompt field appears in the list of values
on the Enter Receipts page. If you enter a name different from the
expense item name in the Prompt field, then the expense item name
(as displayed on the template) does not appear in the list of values.
5.
If you want the Calculate Amount button to appear when a user
chooses an expense item, enable the Calculate Amount check box.
Note that you cannot select this option unless this user extension
has been customized.
To define a project–related expense report template:
1.
Query a self–service enabled expense report template, or define a
new self–service enabled template.
Payables Setup
2 – 109
2.
Associate Oracle Projects expenditure types with the expense items
on the template.
See Also
Expense Reports: page 4 – 216
Expense Report Template Listing: page 8 – 168
Expense Report Templates Window Reference
Template Name/Description. Name and description of the template.
Inactive On. Date on which you can no longer use this template to
enter expense reports.
Expense Item. The name of an expense item as it appears on an
expense report, for example, Airfare or Meal. You can set up a
Miscellaneous expense item with no account so you can enter the
account during expense report entry.
Suggestion: Use different first letters for each item so during
expense report entry you only need to enter the first letters of
items.
Type. Type of invoice distribution associated with an expense item.
When you submit Payables Invoice Import, Payables enters this value
in the Type field for the invoice distribution. For certain types of tax
reporting, such as Value Added Tax, Payables uses the Type to relate
tax distributions to the invoice item lines that were taxed. You can
enter the following types:
• Freight.
• Item. Goods or services.
• Miscellaneous.
• Tax. Select Tax to define a tax expense.
Includes Tax. The Includes Tax check boxes on the Expense Report
Templates window control the default behavior of the Includes Tax
check boxes on the Expense Reports window and the Enter Receipts
window of Self–Service Expenses. If checked on the Expense Report
Templates window for an expense item, then by default the Includes
2 – 110
Oracle Payables User Guide
Tax check box is checked when a user chooses that expense item while
building an expense report. The user can override this default if she
wishes.
Note: You can enable the Includes Tax check box only if Auto
Tax Calculation is enabled at the line level.
For more information, see the Includes Tax option in the Expense
Reports Window Reference: page 4 – 231. See also: Automatic Tax
Calculation Overview: page 10 – 34.
Tax Code. Tax code associated with the expense item, for example,
Sales Tax. Payables provides a default value during expense report
entry based on the Tax Code Defaults hierarchy you defined in the
Payables Options window. See: Defaulting Tax in Payables: page
4 – 105. During expense report entry, if the hierarchy source Payables
uses is Template, then Payables will default the value from the expense
report template, even if the value is null. If Template is not the highest
ranked source, Payables may use a different tax code default source
when you enter expense reports. You can always override this tax code
on an expense report or the invoice distribution.
Payables requires a tax code for each Tax type expense item.
Note: If an expense item is associated to an inactive tax code,
then that expense item is unavailable for use when building an
expense report.
GL Account. Account associated with an expense item. You can enter
as many segments of an account as you want, leaving the other
segments blank. When you enter expense items on expense reports,
Payables uses the segments you define here to overwrite the
corresponding segments of an employee’s default expense account.
When you create an invoice from an expense report, Payables creates
invoice distributions with this account for each expense item.
Note: An expense item is project–related when a user associates
a project number and a task number to an expense item in
Self–Service Expenses. The Project Expense Report Account
Generator defined in Oracle Projects assigns an account to each
project–related expense item. The value in the GL Account is
ignored for project–related expense types. For a description of
the Project Expense Report Account Generator see: Default
Account Generator for Expense Reports (Oracle Projects User
Guide).
Projects Expenditure Type. Oracle Projects expenditure type
associated with an expense item. You define expenditure types in the
Expenditure Types window of Oracle Projects.
Payables Setup
2 – 111
Self–Service Attributes
If you have installed Self–Service Expenses, use the Self–Service
Attributes region to define additional attributes for expense types that
employees can use to enter expense reports in Self–Service Expenses.
Payables does not use the fields in this region unless you install
Self–Service Expenses. For more information, see: Self–Service
Expenses Integration: page 4 – 215.
Prompt. This name is displayed in the Expense Type poplist in the
Enter Receipts page.
Viewable From All Templates. Enable this option if you want this
expense item to be viewable in Self–Service Expenses regardless of the
template the employee selects.
Require Receipt Above. If you want to require employees to submit
receipts for this expense type, then enter the amount above which a
receipt is required. For example, if you want employees to submit
receipts for an expense type if the expense is more than $20, then enter
20. If you leave this field null, a receipt is never required. If you enter
zero, a receipt is always required for all expenses.
Note: If you enter a value greater than zero, this control
applies only if the reimbursement currency is in your
functional currency. If you enter a value in this field and the
employee enters an expense report with a reimbursement
currency different from your functional currency, a receipt is
always required.
The View Receipts page indicates for each expense type whether
employees are required to submit a receipt. If an employee does not
submit an original receipt for an expense item that is required, the
expense item is subject to shortpay. You can configure Oracle
Workflow to prevent payment for expense items for which your
accounting department has not received receipts.
Calculate Amount. If you define Descriptive Flexfield values for this
expense type, check the Calculate Amount check box if you want to
display a Calculate Amount button with any Descriptive Flexfield
segments that are displayed for this expense type on the Enter Receipts
page. You can write programmatic extensions in PL/SQL to calculate
the expense amount when the user chooses the Calculate Amount
button. For more information see: Descriptive Flexfields (Oracle
Self–Service Expenses Implementation Guide).
Justification Required. Enter Yes for this field if you want to require
employees to enter the Justification field in the Enter Receipts page for
this expense type. For example, you can require employees to enter the
2 – 112
Oracle Payables User Guide
Justification field for Meal expense types. Employees cannot submit
expense reports that are missing required justifications.
See Also
Expense Reports: page 4 – 216
Expense Report Template Listing: page 8 – 168
Payables Setup
2 – 113
Tax Recovery Rules
If you record partially recoverable and nonrecoverable taxes in
Payables or Purchasing, when you use a tax code for an invoice or
purchase order distribution, the system calculates the recovery rate for
the tax. In the Tax Codes window you specify the recovery rate by
entering either a fixed percentage rate or a tax recovery rule. Use a tax
recovery rule if the recovery rate varies, depending on the following
distribution attributes:
• Distribution account
• Invoice date
• Condition (for example, supplier type)
In the Tax Recovery Rules window you can define tax recovery rules.
Each tax recovery rule can have multiple rates. Each active rate must
have a unique combination of account range, effective dates, and
condition. For example, you set up a recovery rule with different
recovery rates for January and February. When the system calculates
the recovery rate for a January invoice distribution, it uses the January
rate and for a February distribution it uses the February rate.
2 – 114
Oracle Payables User Guide
The degree of tax recovery can be influenced by factors such as:
• the nature of the business or the organization
• the nature of the goods or services purchased
• the intended usage for the items purchased
The account for a purchased item provides information about its
recovery rate. For example, the account records information that might
influence the recovery rate such as the division or cost center
purchasing the item, and the natural account of the item. You can set
up recovery rules to assign recovery rates based on the rate you assign
to an account range.
When you define a recovery rule, you can specify the recovery rate
with either a percentage rate or a PL*SQL function name. Specify a
PL*SQL function name when you need to use a complex tax rule.
See Also
Tax Codes: page 2 – 146
Tax Codes Listing: page 8 – 171
Recoverable Tax: page 4 – 124
Setting Up Payables for Recoverable Tax: page 4 – 126
Tax Recovery Rules Listing: page 8 – 171
Tax Reporting Ledger (Oracle Receivables Tax Manual or online help)
Financial Tax Register (Oracle Receivables Tax Manual or online help)
Payables Setup
2 – 115
Tax Recovery Rules Window Reference
Use this window to define rules that determine tax recovery rates. You
can assign these rules to tax codes.
Tax Recovery Rules
Name. Name of the tax recovery rule.
Description. Description of the tax recovery rule.
Tax Recovery Rates
Account From/To. Account range that the recovery rate applies to.
When Payables checks whether an account is within an account range,
it checks segment by segment, and ensures that each account segment
is within the segment range. For example, you set up the following
two ranges:
Account From
Account To
(Segment Ranges)
1
00–10–00
99–10–99
00–99, 10–10, 00–99
2
00–11–00
98–12–99
00–98, 11–12, 00–99
You enter 97–11–00 as the account on a distribution, Payables uses the
rate for the second range because 97 is within the range 00–98, 11 is
within the range 11–12, and 00 is within the range 00–99.
Rates
Enter one of the following:
Rate %. The percentage of the tax that is recoverable. 100 means 100%
recoverable, and 0 or blank in this field means 0% recoverable. This
value defaults from the Financials Options window.
Function. If you have defined a PL*SQL function to calculate the rate,
enter it here.
2 – 116
Oracle Payables User Guide
Effective Dates
From/To Date. Invoice or purchase order date range when the tax
recovery rule is effective.
Enabled. Enable this option to enable the rate.
Conditions
Use this region to specify additional conditions for your recovery rate.
Rates can vary depending on whether the distribution satisfies a
particular condition. For example, you can define a recovery rule in
which the recovery rate is 100% for manufacturing suppliers and 50%
for wholesale suppliers.
Condition. In this release, the only condition you can use is supplier
type. Select Supplier Classification as the condition if you want to
assign a recovery rate based on the supplier’s type. You assign a type
to a supplier in the Type field in the Classification region of the
Suppliers window. See: Classification Region of the Suppliers window:
page 3 – 18.
Value. Classification for the Condition you select. For example, if you
enter Supplier Classification as the Condition, then also enter a supplier
classification, such as Wholesale or Manufacturing. You can define
additional values for supplier type in the Oracle Purchasing Lookups
window.
Descriptions
Description. Description of the tax recovery rate.
See Also
Tax Codes: page 2 – 146
Tax Recovery Rules: page 2 – 114
Tax Recovery Rules Listing: page 8 – 171
Setting Up Payables for Recoverable Tax: page 4 – 126
Recoverable Tax: page 4 – 124
Payables Setup
2 – 117
Tax Codes Listing: page 8 – 171
2 – 118
Oracle Payables User Guide
Countries and Territories
Use this window to maintain country and territory information in
Oracle Financials. You cannot enter a new country or territory in this
window, but you can update the name, description, VAT member state
code, or address style for any of the more than 200 predefined countries
or territories.
Adjusting Country or Territory Information
"
To adjust country or territory information:
1.
Adjust any of the following four fields:
• Country/Territory. Country or territory name.
• Description. Country or territory description.
• VAT Member State Code. Member State Code for a country
belonging to the European Union (EU). There are special
Value–Added Tax (VAT) rules that apply to member states of the
EU. If a country does not belong to the European Union, you
should not enter a member state code. The following Oracle
Applications use member state codes:
– Oracle Payables and Oracle Purchasing use member state
codes to determine which suppliers to include in the
Intra–EU VAT Audit Trail Report.
– Oracle Receivables uses member state codes to determine
which customers to include in the European Sales Listing.
• Address Style. Address style data entry default for a country or
territory. If you leave this field blank, the Oracle Financials
default address style will be used. Oracle Financials provides the
following address styles:
– Japan
– Northern Europe
– South America
– Southern Europe
– UK/Africa/Australasia
You can also create your own address styles. See: Setting Up
Flexible Addresses (Oracle Receivables User Guide).
Payables Setup
2 – 119
2.
Save your work.
See Also
EU VAT Taxes: page 4 – 118
Intra–EU VAT Audit Trail Report: page 8 – 99
2 – 120
Oracle Payables User Guide
Banks
Use the Banks window to enter bank information for bank branches
with which you do business. Some Oracle Financial Applications,
including Oracle Receivables and Oracle Payables, share bank
definitions, although not every application uses all available bank
information. Each bank branch can have multiple bank accounts, and
each bank account you define can be associated with Payables payment
documents and/or Receivables payment methods.
If you use Receivables, use the Banks window to define your internal
banks, which you use for receipts, and external banks, which are your
customers’ banks with which you do business. If you use Receivables
only, you do not need to define Payables payment documents.
If you use Payables, use the Banks window to define your internal bank
accounts from which you disburse payments. For each internal bank
account, you can define payment documents for checks, electronic
payments (EFT and EDI), wire transfers, and other payment methods.
Payables Setup
2 – 121
You can also enter supplier bank information for your suppliers to
which you send electronic payments. If you use Payables only, you do
not need to define clearing houses.
If you are using Oracle Cash Management, you need to define a Bank
Errors Account, a Bank Charges Account, and a Cash Clearing Account
for each bank account you plan on reconciling by using Cash
Management. If you use Payables, you can override these accounts for
each payment document you define.
See Also
Defining Bank Accounts: page 2 – 124
Defining Multiple Currency Bank Accounts: page 2 – 128
Defining A Foreign Currency Bank Account: page 2 – 129
Defining and Maintaining Payables Payment Documents: page 2 – 129
Banks Window Reference: page 2 – 132
Bank Accounts Window Reference: page 2 – 135
Payment Documents Window Reference: page 2 – 140
Bank Charges: page 2 – 160
Entering Suppliers: page 3 – 10
Defining Banks
You can define a bank or a clearing house. Define Banks to record
internal banks, where you are the account holder of a receipt and/or
disbursement account. If you use Payables, you can define external
banks where your suppliers are the account holders. If you use Oracle
Receivables, define banks to record external banks where your
customers are the account holders of disbursement accounts.
Define Clearing Houses to record banks that process electronic versions
of your receipt information which you send to them. These clearing
2 – 122
Oracle Payables User Guide
institutions then create copies of your customer receipt information
which they forward to each of your remittance banks.
"
To enter a basic bank:
1.
In the Banks window, enter all basic bank information: bank name,
branch name, bank number, branch number, and address. Use a
bank account name that indicates its usage, for example, ”Main
Disbursement – USD.”
2.
Select Bank as the Institution.
3.
Optionally enter the EFT (electronic funds transfer) Number.
4.
Optionally enter names and information for your bank contacts in
the Contact region.
5.
Save your work.
Proceed with Defining Bank Accounts: page 2 – 124.
"
To enter a clearing house:
1.
In the Banks window, enter all basic bank information: bank name,
branch name, bank number, branch number, and address. Use a
bank account name that indicates its usage, for example, ”Main
Clearing – USD.”
2.
Select Clearing House as the Institution.
3.
Optionally enter the EFT (electronic funds transfer) Number.
4.
Optionally enter names and information for your bank contacts in
the Contact region.
5.
Choose the Related Banks button. Enter the bank name and
number, and branch name and number for all banks related to the
clearing house.
6.
Save your work.
Proceed with Defining Bank Accounts: page 2 – 124.
See Also
Flexible Addresses (Oracle Receivables User Guide or online help)
Payables Setup
2 – 123
Defining Bank Accounts
This section includes the following topics:
Defining Internal Bank Accounts: page 2 – 124
Defining Customer Bank Accounts: page 2 – 126
Defining Supplier Bank Accounts: page 2 – 127
Defining Multiple Currency Bank Accounts: page 2 – 128
Defining Foreign Currency Bank Accounts: page 2 – 129
Defining Internal Bank Accounts
You define internal bank accounts to define bank accounts for which
you are the account holder. Oracle Receivables uses internal bank
accounts to receive payments from customers. Oracle Payables uses
internal bank accounts to disburse funds to suppliers.
2 – 124
Oracle Payables User Guide
Prerequisite
❑ You have installed Oracle Receivables.
❑ Define custom payment formats for Payables payment documents
if you are defining a disbursement bank account. (Optional). See:
Payment Formats: page 2 – 173.
"
To define a basic bank account for receipts:
1.
In the Banks window query an existing Bank.
2.
Choose the Bank Accounts button. Enter the Bank Account Name
and Bank Account Number (account numbers must be unique
within a bank branch). Optionally enter an Account Type and
Description.
3.
If you want to use Bank Account validation, enter Check Digits.
4.
Select Internal Account Use.
5.
In the GL Accounts region, enter a Cash Account.
6.
In the Receivables Options region, enter GL Account information
for Remitted Receipts, Factored Receipts, and Short Term Debt.
7.
In the More Receivables Options region, optionally enter Receipt
and Discount GL Account information. See also: Defining
Accounting Flexfield Combinations (Oracle General Ledger User
Guide).
Optionally enter the Receivables Activity to use for earned and
unearned discounts, or select from the list of values. Receivables
Activities provide default general ledger accounts for discounts
created in Oracle Receivables. See: Receivables Activities in the
Oracle Receivables User Guide.
8.
Optionally enter contact information in the Account Contact
region.
9.
Save your work.
Prerequisite
❑ You have installed Payables
"
To define a basic bank account for disbursements:
1.
In the Banks window query an existing Bank.
Payables Setup
2 – 125
2.
Choose Bank Accounts. Enter the Bank Account Name and Bank
Account Number. If you will use this bank for payments you make
with the e–Commerce Gateway, enter an Account Type. Optionally
enter a Description. The currency defaults from your functional
currency.
If you want to use Bank Account validation, enter Check Digits.
3.
Select Internal Account Use.
4.
In the GL Accounts region, enter the following accounts: Cash,
Cash Clearing, Bank Charges, Bank Errors.
5.
In the Payables Options region, enter default information for your
payment batches. Record whether you allow zero–amount
payments.
If you use Automatic Offsets indicate if this is a pooled account.
6.
Optionally enter contact information in the Account Contact
region.
7.
Proceed with Defining and Maintaining Payables Payment
Documents: page 2 – 129.
Defining Customer Bank Accounts
If you use Oracle Receivables, you can enter bank account information
for your customers. Receivables uses this information when you
receive electronic payments from your customers.
"
To define a customer bank account:
1.
In the Banks window query an existing Bank.
2.
Choose the Bank Accounts button. Enter the Bank Account Name
and Bank Account Number. Optionally enter an Account Type and
Description.
If you want to use Bank Account validation, enter Check Digits.
2 – 126
3.
Select Customer Account Use.
4.
Optionally enter contact information in the Account Contact
region.
Oracle Payables User Guide
5.
Save your work.
See Also
Bank Accounts Window Reference: page 2 – 135
Automatic Receipts (Oracle Receivables User Guide)
Automatic Offsets: page 10 – 12
Defining Supplier Bank Accounts
You can enter information for bank accounts for which your supplier is
the account holder. You then assign these accounts to the supplier and
its sites. Payables uses this bank information when you create
electronic payments for your suppliers.
Prerequisite
❑ Define the suppliers and supplier sites that use the bank account to
receive electronic payments. See: Entering Suppliers: page 3 – 10.
"
To define a supplier bank account:
1.
In the Banks window query an existing Bank.
2.
Choose the Bank Accounts button. Enter the Bank Account Name
and Bank Account Number. Enter the EDI ID number only if you
have installed Oracle Energy. Optionally enter an Account Type
and Description. Optionally change the account currency, which
defaults from your functional currency.
If you want to use Bank Account validation, enter Check Digits.
3.
Select Supplier as the Account Use.
4.
In the Supplier Assignments region list the supplier, and optionally
list supplier sites, that use the account to receive electronic
payments.
5.
Optionally enter account holder information in the Account Holder
region.
Optionally enter contact information in the Account Contact
region.
Payables Setup
2 – 127
6.
Save your work.
7.
In the Bank Accounts region of the Suppliers and Supplier Sites
windows, verify for each supplier and site that all appropriate bank
accounts are listed. For suppliers and supplier sites with multiple
bank accounts, designate as the primary bank account one bank
account per period and per currency. See: Bank Accounts Region
of the Supplier and Supplier Sites windows: page 3 – 16
Defining Multiple Currency Bank Accounts
A multiple currency bank account is an account that accepts payments
in more than one currency.
If you define a multiple currency bank account for payments, the
currency of the bank account must be the same as your functional
currency.
For information on reconciling multiple currencies see: Multi–Currency
Handling and Multi–Currency Clearing (Oracle Cash Management User
Guide or online help).
Prerequisites
❑ Enable the Use Multiple Currencies Payables option. (Oracle
Payables)
❑ Enable the currencies you need in the Currencies window. See:
Currencies Window (Oracle General Ledger User Guide).
"
To define a multiple currency bank account:
1.
Define a basic bank account for receipts or disbursements. See:
Defining Bank Accounts: page 2 – 124.
• If you are defining a bank account for receipts, in the Receivables
Options region, enable the Multiple Currency Receipts option.
• If you are defining a bank account for disbursements, in the
Payables Options region, enable the Multiple Currency Payments
option and enter Realized Gain and Realized Loss accounts.
Proceed with Defining and Maintaining Payables Payment
Documents: page 2 – 129. You can define payment documents
that use a payment format with any currency.
2.
2 – 128
Oracle Payables User Guide
Save your work.
Defining Foreign Currency Bank Accounts
Prerequisites
❑ Enable the Use Multiple Currencies Payables option.
❑ Enable the currencies you need in the Currencies window. See:
Currencies Window (Oracle General Ledger User Guide or online help).
"
To define a foreign currency bank account:
1.
Define a basic bank account for receipts or disbursements. See:
Defining Bank Accounts: page 2 – 124.
• If you are defining a bank account for disbursements, in the
Payables Options tabbed region, enter Realized Gain and
Realized Loss Accounts.
Proceed with Defining and Maintaining Payables Payment
Documents: page 2 – 129. Choose a payment document that uses
a payment format with the same foreign currency as the bank
account.
2.
Save your work.
See Also
Bank Accounts Window Reference: page 2 – 135
Foreign Currency Transactions: page 6 – 2
Creating Foreign Currency Payments: page 5 – 48
Entering Flexible Addresses (Oracle Receivables User Guide or online help)
Defining and Maintaining Payables Payment Documents
Use the Payment Documents window to define payment documents
for an internal bank account. Examples of payment documents are
checks or electronic payments. You must create at least one payment
document before you can use a bank account to create invoice
Payables Setup
2 – 129
payments. You can create an unlimited number of payment documents
for an internal bank account.
When you define payment documents, you can only select payment
formats that use the same currency as the bank account currency. If the
bank account is a multiple currency bank account, you can choose
foreign currency payment formats or multiple currency payment
formats.
Defining Payment Documents
Prerequisites
❑ Define payment formats. See: Payment Formats: page 2 – 173.
❑ If you use sequential numbering, and you want to assign a custom
document sequence to the payment document, then 1) define and
assign the custom sequence to the document category you want to
use, and 2) enable the Allow Document Category Override option
in the Payment region of the Payables Options window. See also:
Voucher Numbers and Document Sequences: page 2 – 24.
"
To define a payment document:
1.
In the Bank Accounts window, query a disbursement bank account.
Choose the Payables Documents button to navigate to the Payment
Documents window.
2.
Enter a name for the payment document that is unique for the bank
account. Select a Disbursement Type and Payment Format. Enter
in the Last Document Number field the last payment document
number you used on a payment document. In the Last Available
Document Number field, enter the last payment document number
available for a payment document.
3.
In the Additional Information region, enter the number of Setup
Checks you want Payables to print at the beginning of each
automatic payment batch or Quick payment.
If you are using the sequential numbering feature, optionally assign
a Document Category.
If you have enabled Oracle Cash Management integration for
reconciliation, optionally override the GL Accounts in the GL
Accounts region.
2 – 130
Oracle Payables User Guide
If you want to use the payment document for future dated
payments, then in the Future Dated payments tabbed region, set
the Future Date Use option to either Allowed or Mandatory. If you
use the future dated payment account from the payment document
rather than the supplier site, then enter the account.
4.
Save your work.
See Also
Payment Documents Window Reference: page 2 – 140
Voucher Numbers: page 2 – 24
Future Dated Payments: page 5 – 60
Making Payment Documents Inactive
"
"
To make a payment document inactive:
1.
Query the Bank. Choose Bank Accounts and query the bank
account in the Bank Accounts window.
2.
Choose Payables Documents to navigate to the Payment
Documents window.
3.
For the payment document you want inactive, in the Inactive On
field, enter the date on which this payment document will no
longer be available for use. When you create a payment on or after
this date you will no longer see this payment document in a list of
values.
4.
Save your work.
To void a range of payment documents:
1.
Query the Bank. Choose Bank Accounts and query the bank
account in the Bank Accounts window.
2.
Choose Payables Documents to navigate to the Payment
Documents window. In the Document Information region, choose
Void Unused Payment Documents.
3.
Enter the range of documents you want to void, and enter a Void
Date. These documents will no longer be available for use.
Payables Setup
2 – 131
4.
Save your work.
See Also
Payment Documents Window Reference: page 2 – 140
Bank Accounts Window Reference: page 2 – 135
Payment Document Restrictions:
DOCUMENT NUMBERS: You cannot define a document number
more than once for the same bank account. For example, if a payment
document uses document numbers 0 – 1000, then other payment
document numbers you define for the same bank account cannot use
any numbers in that range.
Banks Window Reference
Bank region
Name. The name of the bank.
Alternate Name. You can enter an alternate name for your bank if you
enable the AP: Enter Alternate Fields profile option. If you do not
enable this option, the Alternate Name field will not appear.
Number. Identification number of the bank. The system uses this
information to identify the bank in payment formats that use electronic
payment methods. The combination of Bank Number and Branch
Number must be unique.
Bank Branch Region
Name. The name of the bank branch.
Alternate Name. You can enter an alternate name for your bank
branch if you enable the AP: Enter Alternate Fields profile option. If
you do not enable this option, the Alternate Name field will not appear.
2 – 132
Oracle Payables User Guide
Number. The number of the bank branch. Payables uses this
information to identify the bank branch in payment formats using
electronic payment methods, in creating positive pay files, and when
laser printing the MICR line on checks. If you are using positive pay to
notify this bank of payments, you must accurately enter the American
Bank Association 9 digit transit routing code in this field if this is a U.S.
based bank. The combination of Branch Number and Bank Account
Number must be unique within a bank.
Type. The banking organization to which this branch belongs. You
must enter a value in this field if you will use this bank for payments
with Oracle e–Commerce Gateway.
Remaining Bank Branch Information
Institution. Enter either Bank or Clearing House to indicate what type
of bank branch you are defining.
• Bank. Bank in which you have a disbursement and/or receipt
account. Or bank in which your customer has a disbursement
account, or your supplier has a receipt account.
• Clearing House. Bank that processes a magnetic tape of your
receipt information which you send to it. The clearing institution
then creates tapes of your customer receipt information which it
forwards to each of your remittance banks.
Description. A description (up to 240 characters) of the bank or bank
branch.
Inactive On. If you enter an Inactive On date, during transaction entry,
after this date the bank’s accounts will no longer appear on any lists of
values in Payables, and you will not be able to enter the bank accounts
when you enter transactions.
EDI ID Number. This field is used only by Oracle Energy, if you have
installed it. If you have not installed Oracle Energy, leave this field
blank.
EDI Location. The Electronic Data Interchange (EDI) location code for
this bank. For more information, see: Oracle e–Commerce Gateway User
Guide.
EFT Number. Your company’s EFT (electronic funds transfer) user
number. This number is used to identify your company on any EFT
transmissions with the bank.
Payables Setup
2 – 133
[ ] Use the global descriptive flexfield if your installation uses
country–specific functionality. Refer to your country–specific
documentation for information on any information you enter here.
Address Region of Banks Window
Enter address information for your bank account in this region.
Alternate Address. You can enter an alternate address for your bank
branch if you enable the AP: Enter Alternate Fields profile option. If
you do not enable this option, the Alternate Address field will not
appear.
Contact Region of Banks Window
Enter information for person you use as a contact at the bank branch.
You can enter additional contacts in the Account Contact region of the
Bank Accounts window.
Prefix. The prefix (Mr., Ms., etc.) of the contact.
Clearing House Region of the Banks Window
Clearing House. The name of the clearing house institution that you
want to assign to this remittance bank branch. Clearing houses process
an electronic version of your receipt information which you send to
them. These clearing institutions then create a file of your customer
receipt information which they forward to each related remittance
bank.
Branch. Enter the branch of the clearing house institution that you
want to assign to this remittance bank branch. Oracle Receivables
requires that you define your bank branches that have an Institution
Type of Clearing House before you define your bank branches with an
Institution Type of Bank. You can assign clearing houses to your bank
branches.
Clearing House Programs Region of the Banks Window
This region is only available if you are entering or reviewing
information for a Clearing House.
2 – 134
Oracle Payables User Guide
Print Program. The printing program to assign to this remittance bank
branch. Oracle Receivables uses this program to format the listing of
remitted receipts for this bank branch. Receivables provides one
standard remittance printing program. If you need a different
remittance printing format, you need to copy then modify the standard
program that Receivables provides.
Transmission Program. The name of the transmission program to
assign to this bank branch. Receivables uses the transmission programs
that you define to format your automatic remittances for this
remittance bank branch.
Bank Accounts Window Reference
Name. The name you use to refer to the bank account. You may want
to use a name that indicates the usage of the bank account.
Alternate Name. You can enter an alternate name for your bank
account if you enable the AP: Enter Alternate Fields profile option. If
you do not enable this option, the Alternate Name field will not appear.
Number. The bank account identification number. The combination of
Bank Account Number and Bank Branch Number must be unique
within each bank.
Account Type. Type of your bank account. For example, Electronic.
Account Use. Indicate the account holder of this account.
• Internal. Your company or organization is the account holder of
this account.
• Customer. Your customer is the account holder of this account.
You record Customer Accounts to facilitate funds transfer
between the Customer Bank Account and your internal bank
account.
• Supplier. (Oracle Payables) Your supplier is the account holder
of this account. You record Supplier Accounts so you can pay
your suppliers electronically.
Check Digits. The value used to validate the authenticity of your bank
account number according to country specific bank account validation
requirements. This value is provided by your financial institution.
Currency. Currency for a bank account. The default value is your
functional currency.
Payables Setup
2 – 135
If you do not enable the Use Multiple Currencies Payables option,
Payables does not allow you to change this value. If you select your
functional currency as your bank currency, you can enable the Use
Multiple Currencies Payables option and use this bank account to pay
foreign currency invoices.
If you select a different currency than your functional currency in this
field, when you define Payables Payment Documents, you will only be
able to select payment formats that you define in that currency. Also,
you will only be able to pay invoices that you enter in this foreign
currency.
Inactive On. On and after this date, during transaction entry, the
bank’s account will no longer appear on any lists of values in Payables,
and you will not be able to enter the bank account.
Description. Description of the Bank Account. For your reference
only.
[ ] Use the global descriptive flexfield if your installation uses
country–specific functionality. Refer to your country–specific
documentation for information on any information you enter here.
Account Holder Region of the Bank Accounts Window
Account Holder. Name of the person or organization within your
organization who is responsible for this account (optional).
Alternate Account Holder. You can enter an alternate name for your
bank account holder if you enable the AP: Enter Alternate Fields profile
option. If you do not enable this option, this field will not appear.
EFT Requester ID. Numeric designation of the organization or person
that is responsible for generating this account’s electronic payments
(optional). This number is assigned by the bank.
Supplier Assignments Region of the Bank Accounts Window (Oracle Payables)
If you choose Supplier as the Bank Account type, you can use this
region to assign supplier bank accounts to a supplier and the supplier’s
sites. Entering information in this region will update the Bank
Accounts region of the Suppliers and Supplier Sites windows. See:
Bank Accounts Region of the Suppliers and Supplier Sites windows:
page 3 – 16.
2 – 136
Oracle Payables User Guide
Name. Name of supplier that uses this bank branch to receive
electronic payments. If you enter a supplier without specifying a site,
Payables defaults the bank account to any new sites you enter for the
supplier, but not to existing sites.
Number. Supplier number of the supplier that uses this bank branch to
receive electronic payments.
Site. Supplier site of a supplier that uses this bank branch.
Effective Dates From/To. Enter dates if you want to limit the time
during which this supplier site uses this bank account as the primary
bank account for receiving electronic payments in the bank account
currency.
Primary. Enable this check box to make this the default bank account
for a supplier or site for receiving electronic payments in the bank
account currency. For each supplier and supplier site that has bank
account assignments, you must designate exactly one bank account per
currency as the primary bank account.
GL Accounts Region of the Bank Accounts Window
You cannot enter GL Account information for Supplier bank accounts.
Cash. Enter the cash account you are associating with a bank account.
This account must be an asset account.
When you create a payment, Payables creates accounting entries to
credit this cash account. For future dated payments, on the payment’s
maturity date, Payables credits the cash account and debits either the
future dated payment account or the clearing account (depending on
how you account for payments).
If you set up Payables to account for payments at clearing time, then
Payables creates accounting entries for your unreconciled invoice
payments to credit your cash clearing account, instead of your cash
account, using the cash clearing account defined in the next field. After
you reconcile your payments using Oracle Cash Management, when
you create accounting entries for the reconciled invoice payments, you
debit your cash clearing account and credit the cash account you enter
here.
If you enable the Automatic Offsets Payables option and enable the
Pooled Account option in the Payables Options region of the Bank
Accounts window, then when you create a payment, Payables creates a
corresponding cash accounting entry for each liability distribution that
Payables Setup
2 – 137
you pay using this bank account. Payables uses the cash account you
define here together with the Automatic Offset Method you choose in
the Payables Options window to create the cash accounting entry.
Cash Clearing. If you set up Payables to account for payments at
clearing time, enter the cash clearing account you are associating with a
bank account. When you create accounting entries for your
unreconciled invoice payments, you credit your cash clearing account
using this account. After you reconcile your invoice payments using
Oracle Cash Management, when you create accounting entries for the
cleared payments, you debit this cash clearing account and credit this
bank account’s cash account. The account you enter here defaults to
the Cash Clearing Account field in the GL Accounts region of the
Payment Documents window.
For future dated payments, when the payment is recorded as mature,
Payables debits the future dated payment account and credits the cash
clearing account. After you reconcile your invoice payments using
Oracle Cash Management, when you create accounting entries you
debit the cash clearing account and credit the cash account.
Bank Charges. If you are using Oracle Cash Management to reconcile
your payments, enter the bank charges account you are associating
with a bank account. After you reconcile your invoice payments, using
Oracle Cash Management, Payables accounting entries to record your
bank charges using this account. The account you enter here defaults
to the Bank Charges account field in the GL Accounts region of the
Payment Documents window.
Bank Errors. If you have enabled the Account for Payment When
Payment Clears Payables option and if you are using Oracle Cash
Management to reconcile your payments, then enter the bank errors
account you are associating with a bank account. When you reconcile
your invoice payment using Oracle Cash Management, Payables
creates accounting entries to record any bank errors using this account.
The account you enter here defaults to the Bank Errors account field in
the GL Accounts region of the Payment Documents window.
Confirmed Receipts. If you use Automatic Receipts in Receivables and
are required to send receipt information to your customer before
applying the receipt, the receivable is maintained in the Accounts
Receivable account until it is confirmed by the customer. Upon
confirmation, it is reversed from the Accounts Receivable account and
placed into the Confirmed Receipts account. If you are not required to
send receipt information to your customer, the receivable is
automatically reversed from Accounts Receivable and placed into
Confirmed Receipts.
2 – 138
Oracle Payables User Guide
Future Dated Payment. If you will use this bank account to disburse
future dated payments, enter the default value for the future dated
payment account. This value will default to payment documents you
enter for this bank account. When Payables accounts for future dated
payments, it uses the future dated payment account from either the
payment document or supplier site, depending on how the Use Future
Dated Payment Account Payables option is set.
Payables Options Region of the Bank Accounts Window (Oracle Payables)
You cannot enter Payables Options information for Supplier bank
accounts.
Maximum Outlay. The largest currency outlay that you allow for a
payment batch for this bank account. If the total outlay of a payment
batch exceeds the maximum outlay for the payment batch, Payables
displays a warning, but allows you to continue processing the payment
batch. The Maximum Outlay for a bank account defaults from the
Payables Options window. When you initiate a payment batch using
the bank account, Payables uses the bank account’s Maximum Outlay
as a default. You can override this default.
Maximum Payment. The largest payment amount that you allow in a
payment batch. When you initiate a payment batch using the bank
account, Payables uses the bank account’s Maximum Payment as a
default. You can override this default.
Minimum Payment. The lowest payment amount that you allow in a
payment batch. When you initiate a payment batch using the bank
account, Payables uses the bank account’s Minimum Payment as a
default. You can override this default.
Realized Gain. If the bank account is a foreign currency or multiple
currency account, enter the account you want Payables to use when
creating accounting entries for realized exchange rate gains on foreign
currency payments. If you use Payables, the default for this field is the
Realized Gain Account you define in the Payables Options window. If
you are not using multiple currencies, you can leave this field blank.
Realized Loss. If the bank account is a foreign currency or multiple
currency account, enter the account you want Payables to use when
creating accounting entries for realized exchange rate losses on foreign
currency payments. If you use Payables, the default account is the
Realized Loss Account from the Payables Options window. If you are
not using multiple currencies, you can leave this field blank.
Payables Setup
2 – 139
Multiple Currency Payments. If you have enabled the Use Multiple
Currencies Payables option and you want to use this bank account to
pay invoices entered in multiple currencies, enable this option.
Allow Zero Payments. If you will allow zero–amount payments from
this bank account, enable this option.
Pooled Account. If you use Automatic Offsets and you want to
associate multiple companies with this bank account, then enable this
option. When you enable the Automatic Offsets Payables option,
Payables creates one offsetting liability distribution for each invoice
distribution. If you then pay the invoice from a pooled bank account,
then which Payables accounts for the invoice payment, Payables creates
one corresponding cash accounting entry for each liability distribution.
In addition, Payables builds the cash account based on the Cash
Account defined for the bank account, and on the account segments of
the liability lines. See: How Payables Builds the Offsetting Cash
Accounts: page 10 – 18 for details.
If you do not use a pooled account, then when Payables accounts for
the payment, it creates a single accounting entry for the Cash account,
and uses the Cash Account that is defined for the bank account without
modifying any account segments.
Account Contact Region of the Bank Accounts Window
Prefix. The prefix (Mr., Ms., etc.) of the contact.
Buttons
Payables Documents. Navigates to the Payment Documents window.
This button is disabled if the bank account Use is Supplier.
Bank Codes. Navigates to the Bank Transaction Codes window. See:
Bank Transaction Codes, Oracle Cash Management User Guide.
Payment Documents Window Reference
Use this window to define payment documents for your Internal bank
accounts in Oracle Payables. Note that you do not need to define
2 – 140
Oracle Payables User Guide
payment documents for refunds because refunds do not use payment
documents.
Document Information Region of the Payment Documents Window
Document Name. Name of the payment document.
Disbursement Type. The type of payment document. You can define
additional disbursement types in the Oracle Payables Lookups
window. They will then appear in this field’s list of values.
• Computer Generated. A payment document that you use for
payment batches or Quick payments.
• Recorded. A payment document that you use only for manual
payments. You use this type for payments that you generate
outside Payables and need to record in Payables.
• Combined. A payment document that you use for both manual
and computer generated payments.
Payment Format. The format you want Payables to use to format
payments for a payment document.
If you enable the Use Multiple Currencies Payables option, select your
functional currency as your bank currency, and define your bank
account as multiple currency, you can select any of the payment
formats you defined, whether they are multiple currency or not. If you
do not define your bank account as multiple currency, you can only
select formats that are defined in the same currency as your bank
account.
Payment Method. Payables displays the payment method for the
payment format you selected in the previous field.
Inactive On. Enter the date to make a payment document invalid for
any disbursements. Payables does not display these payment
documents in the list of values on or after this date.
Additional Information Region of the Payment Documents Window
Last Used. The last payment number you used to create a payment. If
you are defining a new payment document, enter the number of the
first document less 1. Payables automatically updates this number
Payables Setup
2 – 141
when you create payments. You cannot update the Last Used field if
the document is in use by a payment batch.
Last Available. The last payment number available for a payment
document. Payables uses Last Document Number and Last Available
Document Number to determine if enough payment documents exist
to print an automatic payment batch. Payables warns you when you
initiate a payment batch if you are likely to run out of documents. You
cannot update the Last Available field if the document is in use by a
payment batch.
Setup Checks. The number of checks you want Payables to print at the
beginning of each payment batch or Quick payment. Use setup checks
to aid in aligning your printer.
Document Category. If you enable your Sequential Numbering
System Profile option, Payables predefines a document category for
each payment method for a payment document. Payables uses the
document category to assign a unique voucher number to a payment, if
your system administrator assigns an automatic sequential numbering
sequence to the document category
If you do not enable your Sequential Numbering System Profile option,
you cannot enable the Allow Document Category Override Payables
option or enter a value in this field. If you do not enable the Allow
Document Category Override Payables option, you cannot update the
document category for a payment document, and you therefore cannot
select a custom document category.
GL Accounts Region of the Payment Documents Window
Cash Clearing. If you have enabled the Account for Payment When
Payment Clears Payables option, enter the cash clearing account you
are associating with a payment document. When you create a
payment, Payables creates accounting entries for your unreconciled
invoice payments to credit this cash clearing account using this
account. After you reconcile your invoice payments using Oracle Cash
Management, Payables creates accounting entries to debit this cash
clearing account and credit this bank account’s cash account. The
account you enter here overrides the Cash Clearing Account you
entered in the GL Accounts region of the Bank Accounts window.
For future dated payments, when the payment is recorded as mature,
Payables debits the future dated payment account and credits the cash
clearing account. When you reconcile the payment, Payables debits the
cash clearing account and credits the cash account.
2 – 142
Oracle Payables User Guide
Bank Charges. If you have enabled the Account for Payment When
Payment Clears Payables option and you are using Oracle Cash
Management to reconcile your payments, enter the bank charges
account you are associating with a payment document. After you
reconcile your invoice payments using Oracle Cash Management,
Payables creates accounting entries to record your bank charges using
this account. The account you enter here overrides the Bank Charges
account you entered in the GL Accounts region of the Bank Accounts
window.
Bank Errors. If you have enabled the Account for Payment When
Payment Clears Payables option and you are using Oracle Cash
Management to reconcile your payments, enter the bank errors account
you are associating with a payment document. After your invoice
payments using Oracle Cash Management, Payables creates accounting
entries to record any bank errors using this account. The account you
enter here overrides the Bank Errors account you entered in the GL
Accounts region of the Bank Accounts window.
Future Dated Payments Region of the Payment Documents Window
Future Date Use. Select either Allowed or Mandatory if you want to
allow this payment document to be used for future dated payments.
• Mandatory. Every time you use this payment document it will
create future dated payments. The Future Dated Payment check
box in the Payment workbench will be enabled and you cannot
disable it.
• Allowed. You can use this document as a future dated payment
document. When you use this payment document, the Future
Dated payment check box in the Payment workbench will
default to enabled. However, you can disable the Future Dated
Payment check box for the payment if you want to use this
payment document for a non–future dated payment.
• Not Allowed. You cannot use this payment document to create
future dated payments. If you use a payment document with the
not allowed option selected, you cannot enable the payment’s
Future Dated Payment check box.
Account. If you have enabled the payment document for future dated
payments, you can enter a future dated payment account in this field.
The value in this field defaults from the bank account. When Payables
creates accounting entries for a payment, it uses the future dated
payment account from either the supplier site or the payment
Payables Setup
2 – 143
document, depending on which option you selected in the Payment
Accounting region of the Payables Options window.
If you relieve liability for future dated payments when the payment is
issued, then use an asset account. If you relieve liability at clearing
time, then use a liability account.
Payment Document Restrictions:
SETUP CHECKS: You can enter the number of setup checks only if
your payment format corresponds to a check payment method.
Payables prints these setup checks with XXXs and automatically
records them as void when you confirm a payment batch or format a
Quick payment.
2 – 144
Oracle Payables User Guide
Bank Validation
During entry, the system validates bank numbers and bank account
numbers for certain countries. This helps you detect data entry errors.
Refer to your country–specific documentation for details.
Payables Setup
2 – 145
Tax Codes
In the Tax Codes window, you define the tax names, or tax codes, you use
on invoices to record invoice taxes you pay to suppliers and tax
authorities. Each tax code has a tax type, a tax rate, and an account to
which you charge tax amounts.
You can define tax codes that have different tax rates during an effective
date range you specify. For example, you can define a tax code that has
a 10% rate one year, and a 10.5% rate the next year. Payables
automatically uses the correct rate depending on the invoice date.
You define the Tax Code Defaults hierarchy in the Payables Options
window to determine the order in which Payables searches for tax codes
when a Payables document requires a default tax code. See: Defaulting
Tax in Payables: page 4 – 105.
You can assign tax codes to expense or asset accounts so that Payables
will automatically enter the appropriate tax code when you enter an
account. For more information see: Deriving Tax From an Account:
page 4 – 104.
If you use automatic tax calculation, Payables calculates the invoice sales
tax and automatically creates tax distributions. You do not need to
define special tax codes for distributions that include tax. Simply select
the Includes Tax check box when you enter the distribution, and
Payables adjusts the calculation. See: Automatic Tax Calculation
Overview: page 10 – 34.
During the Approval process, Payables uses the tax code to validate that
you have entered tax distributions correctly. See: Tax Amount
Verification During Approval: page 4 – 101.
Offset Tax Codes
Offset taxes are negative–rate taxes. In the Tax Codes window you can
associate Offset taxes with Sales or User–defined taxes. When you use
the Sales or User–defined tax on an invoice, you record the tax, but the
associated Offset tax reduces or eliminates your tax liability.
To associate an Offset tax with a Sales or User–defined tax, first define
the Offset tax. Then when you define the Sales or User–defined tax,
enter the Offset tax code in the Offset Tax field. For details, see: Offset
Taxes: page 4 – 117.
2 – 146
Oracle Payables User Guide
Withholding Tax Codes
Withholding Tax type tax codes can have multiple rates, effective date
ranges, tax amount limits, and taxable amount limits. You can also link
a tax authority supplier to a Withholding Tax type tax code so you can
create invoices to pay taxes you withheld from your suppliers.
Defining Tax Codes
Prerequisites
❑ Define tax types. See: Lookups: page 2 – 13.
❑ Define accounts. See: Defining Accounts (Oracle General Ledger User
Guide).
❑ (Optional) For recoverable taxes, to assign a tax recovery rule to a
tax code, define tax recovery rules. See: Tax Recovery Rules: page
2 – 114.
"
To define tax codes for Sales, Use, Offset, and User–defined invoice
taxes:
1.
In the Tax Codes window, enter a tax code. The tax code must be
unique for the effective dates you use. For detailed information on
any field, see Tax Codes Window Reference: page 2 – 151.
2.
You can enter more than one rate for the tax code as long as the
active effective dates are unique. For each tax rate, enter the
following:
• Tax code and tax type.
• Tax rate percentage. For example, enter 5 if this is a 5% tax. If
you are defining an Offset tax code, then enter a negative number.
• In the From and To fields, enter the effective dates during which
the rate is effective.
• If the Enable Recoverable Tax Financials option is enabled, then in
the Recovery Rules tabbed region enter either a recovery rule
name or any recovery rate. For Sales or User–defined tax types,
the recovery rate will default from the Financials option Default
Recovery Rate but can be updated to be any percentage from 0 to
100. For Offset tax types, the recovery rate will default to zero
and cannot be updated. If the Enable Recoverable Tax Financials
Payables Setup
2 – 147
option is not enabled, this value will default to zero and cannot be
updated.
• The Enabled check box will be selected by default.
• Account to which you will charge this tax if the Enable
Recoverable Tax Financials option is not enabled. If it is enabled,
then only recoverable tax amounts will be charged to this account.
• If you are defining a Sales or User–defined tax code and you want
to associate an Offset tax with it, enter the Offset tax.
• Description of the tax code. We recommend that you use the
same description for all tax codes that have the same tax code
name (and different effective date ranges).
3.
Save your work.
Defining Tax Codes for Withholding Taxes
Payables provides flexibility in defining withholding tax rates with
specific controls. When you define a withholding tax code, you indicate
first whether you will have any amount or rate controls by selecting one
of the following rate structures:
• Period Limit. After you pay a certain amount for withholding
tax in a period, Payables stops withholding taxes. For example,
for each special calendar period, Payables will withhold no more
than $10,000.
• Flat Rate. The withholding tax has no amount or period limits.
• Amount Ranges. The tax rate depends on how much you have
already paid during a time period. Base the paid amount on the
gross amount of total paid invoice amounts, or on the total
amount of tax withheld. The time period can be either per
withholding tax calendar period or per invoice. For example,
define a tax that for each year will withhold at a rate of 10% until
you pay $100,000 in invoices, and then it withholds at a rate of
15% after you pay $100,000.
In addition to these controls, the same withholding tax code can have
different rates depending on the effective date. For example, a
withholding tax has a rate of 10% one year and 11% the following year.
2 – 148
Oracle Payables User Guide
Prerequisites
❑ (Optional) Define AWT Rate Types. See: Lookups: page 2 – 13.
☞
Attention: Payables uses only the Standard AWT Rate Type. If
you want to use an AWT rate type other than Standard, you
may want to customize Automatic Withholding Tax to perform
special behavior based on the AWT rate type. See: Customizing
Automatic Withholding Tax: page 2 – 230.
❑ Define accounts. See: Defining Accounts (Oracle General Ledger User
Guide).
❑ Define your tax authorities as Tax Authority type suppliers. See:
Classification Region of the Suppliers window: page 3 – 18.
❑ Define Withholding Tax Periods if you want to be able to review
online period–to–date amounts for a Withholding Tax code. See:
Special Calendar: page 2 – 87.
"
To define tax codes for withholding taxes:
1.
In the Tax Codes window, enter a tax code. For detailed information
on any field, see Tax Codes Window Reference: page 2 – 151.
Enter Withholding Tax as the tax type, and enter a description of the
tax code.
Do not enter effective dates or a rate in this window. Enter them
later in the Withholding Tax Details window.
2.
Enter the account to which you will charge this tax.
3.
Choose the Withholding Tax Details button. The Withholding Tax
Details window opens. For detailed information on any field, see:
Withholding Tax Details Window Reference: page 2 – 157.
4.
In the Withholding Tax Details window, specify the tax authority by
entering either its supplier name or supplier number. Enter the tax
authority supplier site.
5.
Select one of the following values for Rate Type, then complete the
associated fields:
• Period Limit: To limit the amount of tax withheld during a
withholding tax calendar period select Period Limit. Then enter
values for Calendar and Period Limit.
• Flat Rate: If you do not want to control the tax based on amounts
paid, then select this option.
Payables Setup
2 – 149
• Amount Ranges. To base the rate on the amount of the total
invoices paid to date or the amount withheld to date, choose
Amount Ranges. Then enter values for Amount Basis (Gross or
Withheld Amount) and Period Basis (Invoice or Period). If you
choose Period for Period Basis, also enter a value for Calendar. If
you choose the Amount Basis option, you can enter values in the
Amount Range fields below.
6.
To review online period–to–date withheld amounts for this tax code,
then enter a special calendar name, if you haven’t already.
7.
To automatically create a tax withholding group for this tax code,
select the Create Tax Group check box.
8.
In the Tax Rates region, enter rate details. Enter the rate type.
☞
Attention: You can define your own AWT rate types in the
Oracle Payables Lookups window. Payables uses only the
Standard AWT rate type. To use an AWT rate type other than
Standard, you may want to customize Automatic Withholding
Tax to perform special behavior based on the AWT Rate Type.
See: Customizing Automatic Withholding Tax: page 2 – 230.
To set effective dates for the rate, enter values for one or both fields.
The dates must not overlap.
Enter the rate percentage for the tax code you are defining. For
example, enter 5 if this is a 5% tax.
Enter any comments for your future reference.
9.
If you selected Amount Basis for the rate type, enter one or both
Amount Range fields to set upper and/or lower amount limits for
taxable amounts or tax amount.
10. Save your work.
See Also
Withholding Tax Groups: page 2 – 158
Entering Taxes on Invoices: page 4 – 97
2 – 150
Oracle Payables User Guide
Tax Codes Window Reference
For each tax code defined, the following fields are constant on every
tabbed region of this window. Define them once for each code:
GL Account. Account to which you want to charge tax amounts for
your tax code. You cannot enter an account that you have defined as a
summary account.
If the tax is recoverable or partially recoverable, you might want to use
an asset account.
If you define a Sales, Withholding, or User–defined type tax, you should
enter a tax expense account. Payables automatically creates one or more
separate tax type distributions using the tax code account under the
following conditions:
• Enable Recoverable Tax is not enabled and tax is automatically
calculated at any calculation level
• Enable Recoverable Tax is enabled and there is a recoverable
portion calculated at the Line or Tax Code level
• Enable Recoverable tax is enabled and the tax is 100%
recoverable, and calculated at the Header level
When you define a Use tax, Payables does not use the account you
define here because Payables does not create a tax distribution for a Use
type tax.
Note that under the following circumstances the system ignores any
value you enter for GL Account in this window, and assigns the tax
distribution the same account as the taxable distribution:
• You use automatic tax calculation and the calculated tax
distribution is nonrecoverable
• You create the tax distribution through allocation
You can choose to prorate your tax expense across selected invoice
distributions when you use the Allocations window of the Invoice
Workbench. You can also achieve proration automatically by setting up
Recoverable Tax with recovery rates of zero.
Account Description. Payables displays the description of the GL
Account.
VAT Transaction Type. This field is used only for Belgian VAT tax
reporting. For more information, see: Oracle Financials for Belgium User
Guide.
Payables Setup
2 – 151
Rates Tabbed Region
Tax Code. A unique name for your tax. For example, CA Sales, 15%
VAT, or Federal Withholding. Tax Codes appear with their tax types and
descriptions in a list of values whenever you need to enter a tax code.
Tax Type. Type of tax you are defining: Sales, Use, Offset, Withholding,
or User–defined. For more information on Tax Types, see Tax Types:
page 4 – 98.
Rate. The rate for the tax code you are defining. For example, if you are
defining a 6.5% sales tax, enter 6.5.
For Withholding Tax type tax codes, do not enter a tax rate in this field.
Enter tax rates for Withholding Tax type tax codes in the Tax Rates
region of the Withholding Tax Details window.
For Sales, Offset, and User–defined tax types, Approval validates the tax
amount you enter on invoice distributions for a particular tax code
against the sum of the distributions to which the tax is allocated. If the
implied rate of the tax distributions you enter is different from the rate
you enter here for a particular tax code, including the tax tolerance you
define, Approval applies a Tax Variance hold to the invoice.
For Use type tax codes, Payables uses the rate you enter here to
determine the amount of your tax liability when you submit the Use Tax
Liability report, but does not create an invoice distribution.
For tax codes with Sales, Withholding, User–defined, or Use tax types,
you can enter only a rate greater than or equal to zero.
For tax codes with Offset tax types, you can enter only a rate less than
zero. When you define an Offset tax code, enter the same rate (but with
a negative value) as the tax code it is offsetting. For example, if you
have a VAT tax of 4% and are defining an offsetting tax for this tax, enter
–4 in this field.
(Effective) From/To. Dates that define when a tax rate is used for a tax
code. You can use effective dates to define tax codes with tax rates that
change over time. For example, you can use effective date ranges to
define a tax called California Sales that has an 8% rate from January
through May, and a 8.25% rate from June forward. You can leave the To
field null if you want a tax rate to be used indefinitely.
Effective dates cannot overlap for any active lines of the same tax code.
You make effective dates active by checking the Enabled check box.
You cannot enter effective dates here if the tax type is Withholding. For
Withholding type taxes, enter effective dates in the Withholding Tax
Details window. Be sure to define effective dates for any transaction
2 – 152
Oracle Payables User Guide
that requires a tax code. For example, a user cannot enter a tax code in
the Invoices window if no tax rate is defined for the tax code on the
invoice date.
☞
Attention: Be sure to provide an active tax rate for any date
that a user may enter the tax code. For example, you can enter
and save expense reports with tax codes that have no active tax
rate assigned for the receipt date. However, these expense
reports will be rejected during import.
Enabled. Select this option to activate the rate you entered for the Tax
Code. The Enabled check box controls whether a tax code appears in a
list of values. If this check box is enabled, the tax code appears in the tax
code list of values in the following windows regardless of effective date
range: Financials Options, Distribution Sets, Expense Reports, Expense
Report templates, Suppliers, and Supplier Sites. The effective dates
control only which rate is used for a tax code.
However, in the Invoices window, Distributions window, and Invoice
Gateway window, an enabled tax code appears on the list of values only
if the invoice date is within the tax code’s effective date range.
You cannot disable a withholding tax here. Use the Effective Dates To
field to disable a Withholding Tax type tax code.
Recovery Rules Tabbed Region
Use this region to indicate the tax recovery rate for this tax code. These
values default to new purchase orders and invoice distributions. Users
can override these options only if the Tax: Allow Override of Tax
Recovery Rate profile option is enabled by the system administrator.
Enter one of the following:
Rate. Fixed rate at which the tax is recoverable. If the Enable
Recoverable Tax Financials option is not enabled, this value will default
to zero and cannot be updated. If the Enable Recoverable Tax Financials
option is enabled, then the rate will default from the Financials options
Default Recovery Rate but can be updated to any value from 0 to 100. If
you do not plan to reclaim taxes but are setting up the system to use
Automatic Tax Calculation for proration, then enter zero.
Rule Name. Tax recovery rule name that determines the tax recovery
rate when you use the tax code on a purchase order or invoice
distribution. The rule determines the rate based on the distribution
account, date, and condition. An example of a condition is supplier
type. You define tax recovery rules in the Tax Recovery Rules window.
See: Tax Recovery Rules: page 2 – 114. You can enter a value for Rule
Name only if the Enable Recoverable Tax Financials option is enabled.
Payables Setup
2 – 153
Other Tabbed Region
Description. Description of the tax code. The system displays the tax
description in a list of values whenever you need to select a tax code.
We recommend that you use the same description for each instance of
the same tax code if you enter multiple effective date ranges. Doing so
avoids confusing users who choose tax codes in setup forms.
Enable for Self–Service Users. If you have installed Oracle Self–Service
Expenses, and you want this tax code to appear on the tax poplist in the
Enter Receipts page of Self–Service Expenses, then enable this option.
See: Entering Taxes on Expense Reports: page 4 – 122.
Offset Tax. If you are defining a Sales or User–defined tax code, you
can associate an Offset tax with it by entering the name of the Offset tax
code here. If you enter the Sales or User–defined tax code on an invoice
distribution, Payables creates an Offset tax distribution based on the
Offset tax you enter here when you choose the Calculate Tax button or
during Approval. Payables will create the Offset tax only if you have
enabled the Use Offset Taxes option at the supplier site level. For
details, see: Offset Taxes: page 4 – 117.
Withholding Tax Details Window Reference
Rate Structure. Indicate whether will have any amount controls on this
rate type.
• Period Limit. After you pay a certain amount for a withholding
tax in a period, Payables does withhold further taxes. For
example, for each special calendar period, Payables withholds no
more than $10,000.
If you select this value you must enter values for the Period Limit,
and Calendar fields. You cannot enter values for the Amount
Basis and Period Basis fields.
• Flat Rate. The withholding tax has no amount or period limits.
If you select this value you cannot enter a value in the Amount
Basis, Period Basis, and Period Limit fields.
• Amount Ranges. The tax rate depends on how much you have
already paid during a time period. Base the paid amount on
either the gross amount of total paid invoice amounts, or on the
total amount of tax withheld. The time period can be per
withholding tax calendar period or per invoice. For example,
2 – 154
Oracle Payables User Guide
define a tax that for each invoice that withholds at a rate of 10%
until you have paid $1000 in tax, after which it withholds at 15%.
If you select this value you must enter values for the Amount
Basis and Period Basis fields. If you select Period as your Period
Basis, you must also select a Calendar. You cannot enter a value
for Period Limit.
Tax Authority Name. Supplier name of the tax authority to which you
want to link a Withholding Tax type tax code for payment of withheld
tax. A tax authority must be a supplier with a supplier type of Tax
Authority.
Number. Supplier number of the tax authority.
Site. Tax authority supplier site to which you will remit withholding tax
payments.
Amount Basis. To enter amount ranges in the Tax Rates region, select
Amount Ranges as the Rate Type and specify an Amount Basis and a
Period Basis.
To define a tax rate with a taxable amount range, choose Gross as the
Amount Basis. For example, to specify that you want a tax rate of 10%
for the first $10,000 subject to withholding tax, choose Gross as the
Amount Basis, enter 0 as the From amount, and enter $10,000 as the To
amount.
To define a tax rate with a tax amount range, select Withheld Amount as
the Amount Basis. For example, to specify that you want a tax rate of
10% for the first $10,000 of tax, select Withheld Amount as the Amount
Basis, enter 0 as the From amount, and enter $10,000 as the To amount.
You can also use amount ranges as limits for a taxable amount or tax
amount by specifying zero as a tax rate beyond a certain amount range.
For example, to stop withholding after the system has withheld $1,000,
set Amount Basis to Withheld Amount, and select your calendar. Then,
in the Tax Rates Region, create one record with an amount range from 0
to 1000 with the appropriate rate, then enter a second record with an
amount range from 1000 to null with a rate of 0. Because this is an
alternate way of setting a period limit, you cannot enter a value for
Period Limit if you enter a value for Amount Basis.
• Gross Amount. Amount range is based on invoice amount. For
example, the range is 0 to 10,000. If the Period Basis is Period, the
rate is effective for the sum of all invoices between 0 and $10,000
entered during each period. Or, if you use Invoice Period basis,
and the rate is effective for each invoice that has an amount
between $0 and $10,000.
Payables Setup
2 – 155
• Withheld Amount. Amount range is based on the tax amount.
For example, the range is 0 to 1,000. If the Period Basis is Period,
then the rate is effective until Payables has withheld a total of
$1,000 during each period. Or, if you use Invoice Period Basis,
then the rate is effective for each invoice until you have withheld
$1,000.
Period Basis. To enter amount ranges in the Tax Rates region, select
Amount Ranges as the Rate Type, and specify an Amount Basis and a
Period Basis.
• Invoice. Select Invoice if you want to apply an amount range to
each invoice.
• Period. Select Period to apply an amount range to a Withholding
Tax period. If you enter a value here, then specify the name of the
special calendar that uses the periods you want to use.
Calendar. The name of the special calendar you want to associate with a
Withholding Tax type tax code. Regardless of which Rate Type you
select, if you enter a value here, you can review online period–to–date
withheld amounts in the View Period–To–Date Withheld Amounts
window. You define withholding tax special calendars in the Special
Calendars window. See: Special Calendar: page 2 – 87.
Currency. The system displays the functional currency assigned to your
set of books. Any period limit you define applies to only those invoices
entered in your functional currency.
Period Limit. The maximum amount of tax to withhold for a
Withholding Tax type tax code on an invoice or within a period.
Payables will not withhold taxes for this tax code during a period once
this limit is reached. Before you enter a value here, first enter the
calendar for the periods you want to use. Any period limit you define
applies only to those invoices entered in your functional currency.
The other way to set period limit is to select Amount Ranges for the Rate
Type, select an Amount Basis, select a Period Basis of Period, and select
a Calendar. Then in the Tax Rates region define an amount range (over
your period limit) that has a rate of 0. To prevent conflicting period
limits, you cannot enter a value for Period Limit if your Rate Type is
Amount Ranges.
Create Tax Group. Enable this check box to automatically create a tax
withholding group from a single Withholding Tax type tax code. To use
a Withholding Tax type tax, you must assign it to a withholding tax
group. You can define a Withholding Tax Group with multiple
Withholding Tax type tax codes in the Withholding Tax Groups window.
2 – 156
Oracle Payables User Guide
Tax Rates region
If you define a tax code as a Withholding Tax type, define tax rates in the
Tax Rates region. You can also define effective date ranges for a tax rate
and tax amount limits or taxable amount limits for a tax rate.
Type. Rate type for the Withholding Tax type tax code.
Effective Dates: From/To. The effective dates for a rate. Complete one
or both fields.
Enter effective dates for a tax rate with or without amount ranges. You
can enter multiple rates for a Withholding Tax type tax code with
overlapping effective date ranges only if you enter unique contiguous
amount ranges for the same effective date range. For example, if you
want to use the effective date range 01–JAN–2001 to 31–DEC–2001 for
two different amount ranges, one being 0 to 1000, the second being 1000
to 10000, then the starting amount for the second range must be exactly
the same amount as the ending amount of the first range.
Amount Range: From/To. The amount range for a tax rate. You can
enter values here only if you selected Amount Ranges as the rate type.
Complete one or both fields. Amount ranges with overlapping effective
date ranges must be contiguous.
If you are entering a tax rate with an amount range, you must first
specify in the Withholding Tax Details region the Amount Basis and the
Period Basis. You can apply an amount range to either a single invoice,
or to an amount–to–date within a period.
Rate. The rate for the Withholding Tax type tax code you are defining.
Comments. Enter any comments for your reference.
See Also
Automatic Withholding Tax Overview: page 10 – 24
Special Calendar: page 2 – 87
Payables Setup
2 – 157
Withholding Tax Groups
Use this window to define withholding tax groups that include multiple
Withholding Tax type tax codes. You can assign the same tax code to
more than one group. When you assign a withholding tax group to an
invoice or distribution, Payables calculates invoice withholding tax
based on every tax code in the withholding tax group. For example, you
assign a withholding tax group to an invoice or distribution if you need
to withhold taxes at both the local and country level, each withheld at
different rates and remitted to different tax authorities. You define and
assign to the invoice or distribution a Withholding Tax Group that
includes both taxes.
You rank all of the tax codes in a withholding tax group when you
define the group. When you enter an invoice and enter a withholding
tax group, Payables calculates the taxes in order of rank. Lower ranked
taxes are applied to the amount of the invoice or distribution amount
less the previous withholding tax amounts. For example, you define a
withholding tax group with two tax codes, and you give tax A (rate =
10%) a rank of 1 and tax B (rate = 5%) a rank of 2. When you assign this
group to an invoice, Payables calculates the withholding tax for a $100
invoice as follows: tax A = $10, tax B = $4.50 (.05(100 – (100 * .10))).
If you want to define a withholding tax group with only one
Withholding Tax type tax code, you can enable the Create Record Group
option in the Withholding Tax Details region of the Tax Codes window
to automatically create a withholding tax group with the one
Withholding Tax type tax code.
You can assign a default withholding tax group in the Payables Options
window. Payables automatically assigns the Payables default
withholding tax group to all new suppliers. The suppliers value
defaults to any new supplier sites for the supplier. Supplier sites assign
the default to any new invoices you enter for the supplier site. You can
override any withholding tax group default at any time.
Creating Withholding Tax Groups
Prerequisites
❑ Define Withholding Tax type tax codes. See: Tax Codes: page
2 – 146.
2 – 158
Oracle Payables User Guide
"
To create withholding tax groups:
1.
In the Withholding Tax Groups window, enter a unique name for
your withholding tax group, and enter a description of the group.
The name and description will appear on a list of values whenever
you need to select a withholding tax group.
2.
If you want to inactivate this withholding tax group on a certain
date, enter an Inactive Date.
3.
Assign a rank to each tax code in the tax group. 1 is the highest
rank. You can assign the same rank to more than one tax code. For
example, if you want to use the gross invoice amount to calculate
withheld amounts for each tax code, assign each tax code a rank of
1.
Enter each Withholding Tax type tax code that you want to assign to
this group.
Payables automatically displays the Description, Tax Authority
Name, and Tax Authority Site that are associated with each tax code.
4.
Save your work.
See Also
1099 Reporting Overview: page 8 – 35
Automatic Withholding Tax Overview: page 10 – 24
Payables Setup
2 – 159
Bank Charges
Use the Bank Charges window to specify charges associated with
transferring money between banks. If you use Payables you specify
charges between your remittance banks and your suppliers’ banks. If
you use Receivables you specify charges between your customers’
banks and your banks. You can define charges:
• from a single bank to a single bank
• from a single bank to all banks (i.e., to all banks including the
transferring bank)
• from a single bank to all other banks (i.e., to all banks except the
transferring bank)
• from all banks to a single bank
• from all banks to all banks
Any time you specify a single bank, you have the choice of selecting a
particular branch of that bank or all branches.
Payables and Receivables users use this window. If you use both of
these products, bank charges information you enter is shared between
the products.
Different countries have different guidelines for using Bank Charges. If
you use this feature, refer to your country–specific documentation to
see how you should use this feature:
• Japan: Bank Charges (Oracle Financials for Japan User Guide)
2 – 160
Oracle Payables User Guide
Withholding Tax Certificates and Exceptions
Use the Withholding Tax Certificates and Exceptions window to define
Withholding Tax type tax code rate exceptions for a supplier site. You
can define a certificate to specify a rate exception for a Withholding Tax
type tax code for all invoices of a supplier site. You can also define a
rate exception for a Withholding Tax type tax code for a single invoice.
Defining Withholding Tax Certificates and Exceptions
Prerequisites:
❑ Enable the Use Withholding Tax Payables option. See: Payables
Options: page 2 – 57.
❑ Define Withholding Tax type tax codes. See: Tax Codes: page
2 – 146.
❑ Enter withholding tax details for suppliers: See: Withholding Tax
Region of the Suppliers and Suppliers Sites windows: page 3 – 36.
❑ Payables predefines the Standard certificate type. Define additional
certificate types in the Oracle Payables Lookups window. See:
Lookups: page 2 – 13.
"
To define a withholding tax certificate:
1.
In the Withholding Tax Certificates and Exceptions window, enter a
supplier name or supplier number, and supplier site for which you
want to define a certificate or an exception.
2.
In the Certificate region, enter the Withholding Tax type tax code for
which you want to define a withholding tax certificate.
3.
Enter the certificate number. This number can be user–defined or it
can be a number assigned to a certificate issued to the supplier by
the tax authority.
4.
Enter the certificate type.
5.
Enter the certificate priority. If you have one or more certificates for
the same Withholding Tax type tax code with an overlapping
effective date range, Payables applies the certificate with the highest
priority (1 = highest priority). Only one certificate can be enforced
at a time.
Payables Setup
2 – 161
"
2 – 162
6.
Enter the certificate tax rate for the Withholding Tax type tax code.
If the certificate specifies that the supplier site is exempt from this
tax code, then enter 0 as the rate.
7.
Enter the effective date range for the certificate tax rate. If you want
to limit the dates during which the certificate is effective, you can
enter just a From date, just a To date, or both a From date and a To
date. If you specify a unique priority for each certificate, then you
can enter overlapping effective date ranges on different certificates
for the same Withholding Tax type tax code for the same supplier
site if you specify a unique priority for each certificate.
8.
Enter any comments that apply to the current tax certificate.
9.
Save your work.
To define a withholding tax exception:
1.
In the Withholding Tax Certificates and Exceptions window, enter
the supplier name, supplier number, and supplier site for which you
want to define an exception.
2.
In the Exception region, enter the Withholding Tax type tax code for
which you want to define an exception.
3.
Enter the invoice number to which the current exception applies. If
you enter the invoice before entering the exception, select from a list
of values the invoice number to link the exception to the invoice. If
you enter the exception before entering the invoice, enter the
unvalidated invoice number and Payables will automatically link
the exception to the invoice number when you enter the invoice.
4.
Enter the exception rate for the invoice.
5.
Enter the effective date range for the exception. If you want to limit
the dates during which the exception is effective, you can enter just
a From date, just a To date, or both a From date and a To date. If
you enter an incorrect invoice number for an exception, enter an
effective date range in the past to make an exception rate for an
invoice invalid.
6.
Enter any comments that apply to the current tax exception.
Oracle Payables User Guide
7.
Save your work.
See Also
Automatic Withholding Tax Overview: page 10 – 24
Withholding Tax Certificates and Exceptions Window Reference
Supplier region
Supplier Name. The supplier name for which you will define a tax
certificate or exception.
Supplier Number. The supplier number for which you will define a tax
certificate or exception.
Supplier Site. The supplier site for which you will define a tax
certificate or exception.
Certificate region
Tax Code. The Withholding Tax type tax code for which you will define
a tax certificate.
Certificate Number. The certificate number for a withholding tax
certificate.
Certificate Type. The certificate type for the withholding tax certificate.
Payables predefines the Standard type. You can define additional
certificate types in the Oracle Payables Lookups window.
Certificate Priority. The certificate priority. If you have one or more
certificates for the same Withholding Tax type tax code with an
overlapping effective date range, Payables applies the certificate with
the highest priority. Only one certificate can be applied at a time.
Rate. The certificate rate for the Withholding Tax type tax code. Enter 0
if the certificate specifies that the supplier site is exempt from this tax
code.
Date From/To. The effective date range for the certificate tax rate. You
must enter both a From date and a To date. You can enter overlapping
effective date ranges on different certificates for the same Withholding
Payables Setup
2 – 163
Tax type tax code for the same supplier site if you specify a unique
priority for each certificate.
Comments. Any comments that apply to the current tax certificate.
Exception region
Tax Code. The Withholding Tax type tax code for which you will define
a tax exception.
Invoice Number. The invoice number to which the current exception
applies. If you enter the invoice before entering the exception, select
from a list of values the invoice number to link the exception to the
invoice. If you enter the exception before entering the invoice, enter the
unvalidated invoice number and Payables will automatically link the
exception to the invoice number when you enter the invoice.
Rate. The exception rate for the invoice.
Date From/To. The effective date range for the exception. You can enter
just a From date or you can enter both a From date and a To date. If you
enter an incorrect invoice number for an exception, enter an effective
date range in the past to deactivate an exception rate for an invoice.
Comments. Any comments that apply to the current tax exception.
2 – 164
Oracle Payables User Guide
Reporting Entities
Use the Reporting Entity window to define reporting entities for your
1099 tax reporting. A reporting entity is any person or organization that
has a unique Tax Identification Number (TIN).
You can submit the following 1099 reports for a specific reporting entity:
• 1096 Form
• 1099 Forms
• 1099 Invoice Exceptions Report
• 1099 Supplier Exceptions Report
• 1099 Payments Report
• 1099 Electronic Media
For each reporting entity, you assign one or more balancing segment
values. For example, you define a reporting entity called Headquarters
which is comprised of Company 1, Company 2, and Company 3 (three
balancing segment values). When you submit a 1099 report, you specify
Headquarters as the reporting entity for which you want to submit the
report. Payables prints on the 1099 report the accumulated payments
for Companies 1, 2, and 3. Payables sums up the paid invoice
distributions that have these company balancing segment values in their
accounts.
Balancing segment values must be unique across reporting entities.
Therefore, the list of values for the Balancing Segment field of the
Reporting Entity window displays only balancing segments not already
assigned to other reporting entities.
Defining Tax Entities
Prerequisites
❑ Define the locations of each reporting entity. See: Site Locations
(Oracle Human Resources User Guide).
❑ Use the Key Flexfield Segments window to define Balancing
Segment values. See: Defining Key Flexfields (Oracle Applications
Flexfields Guide).
❑ Define Payables Options. See: Payables Options: page 2 – 57.
Payables Setup
2 – 165
"
To define tax entities:
1.
In the Reporting Entity window enter the Name, Location, and Tax
ID Number of the reporting entity you are defining. If you submit
the 1099 Electronic Media for this tax entity, the Tax ID Number
value should be nine digits or the program will fail.
Enter one or more balancing segment values that comprise the
reporting entity.
2.
Save your work.
See Also
1099 Reporting Overview: page 8 – 35
Reporting Entity Window Reference
Use this window to define reporting entities. A reporting entity is any
person or organization that has a unique Tax Identification Number
(TIN).
Name. Reporting entity name you are defining.
Location. Location of the tax reporting entity. If you have defined only
one location, Payables enters that location automatically.
Description. Payables automatically enters the location description
when you enter the location.
Tax ID Number. Unique tax identification number. For example, an
individual’s social security number, or a corporation or partnership’s
federal identification number/federal tax ID. If you submit the 1099
Electronic Media for this tax entity, the value should be nine digits or
the 1099 Electronic Media program will fail.
Payables provides country specific validation of the taxpayer
identification number. The validation rules are based on your home
country, as defined in the Member State field of the VAT Registration
region of the Financials Options window. If your home country is the
same as your Default Country Profile option, then validation will be
performed in accordance with the rules of your home country. If your
home country is different from your default country, then no validation
will be performed.
2 – 166
Oracle Payables User Guide
Balancing Segment Values
Value. A balancing segment value that is included in tax reporting
entity. For example, you define a reporting entity called Headquarters
which is composed of Company 1, Company 2, and Company 3 (three
balancing segment values). A reporting entity can have as many
balancing segment values as you require. You cannot use the same
balancing segment for more than one entity.
Description. Payables automatically enters the description of the
balancing segment value.
Payables Setup
2 – 167
Income Tax Regions
Use the Income Tax Regions window to define your tax regions if you
are using 1099 Electronic Media Combined Filing Program reporting in
the United States. If you enable the Combined Filing Payables option,
when you submit the 1099 Electronic Media Payables produces K
records for all tax regions (or states) participating in the Combined
Filing Program that have qualifying payments. Payables also produces
B records for suppliers with 1099 payment amounts that equal or exceed
the tax region’s reporting limit in qualifying states.
Payables has predefined the region abbreviations and the descriptions
for all U.S. States, the District of Columbia, and some U.S. Territories.
Payables has also predefined the region codes for those tax regions that
are participating in the Internal Revenue Service’s current Combined
Filing Program. You must enter a region code for all tax regions that
you wish to use for the Combined Filing Program reporting and that
Payables has not already defined. You cannot update the predefined
region abbreviations, descriptions, or region codes.
You can use this window to define your income tax regions for those
states that are participating in the Combined Filing Program. You can
select one of these tax regions for each of your 1099 supplier sites in the
Supplier Sites window. Depending on how you define your Payables
options, Payables uses either the supplier site’s tax region or the system
default tax region as the default region for each of the invoice
distributions for your 1099 supplier. When you submit your 1099
reports, Payables uses the tax region from the invoice distributions to
determine to which tax authority Payables should report the payments.
In the United States, you usually define the various states as your
income tax regions. If you are participating in the Combined Filing
Program, the Internal Revenue Service then automatically forwards each
state’s 1099 B records to each state on the 1099 Electronic Media.
In this window, define your income tax regions so that they conform to
the Internal Revenue Service codes. You can use the 1099 Supplier
Exceptions Report to identify any 1099 suppliers with state
abbreviations that do not conform to the income tax regions you define
here.
2 – 168
Oracle Payables User Guide
Defining Income Tax Regions
Prerequisites
❑ If you are doing business within the United States, refer to federal or
state tax publications to obtain information regarding the 1099
reporting requirements for each participating tax region. For
example, you need to identify the reporting limits for each of your
income tax regions. You also need to define region codes for all
states that have recently started participating in the Combined
Filing Program.
❑ Enable your Combined Filing Program Payables option. See:
Payables Options: page 2 – 57.
"
To define income tax regions:
1.
In the Income Tax Regions window, enter the region Abbreviation
you are defining or locate the region Abbreviation you are updating.
Enter the region’s Internal Revenue Service Code.
Enter a Description for the region if it is not predefined.
2.
Enter for the Reporting Limit Amount the minimum amount
Payables uses to determine whether to report on a supplier’s
payments. If you do not enter an amount, Payables assumes the
limit is zero.
Select the Method that Payables uses to compare actual payments to
the Reporting Limit Amount:
• Compare Individually. Compare to the Reporting Limit Amount
the sum of payments for each 1099 MISC Income Tax type.
• Compare Sum. Compare to the Reporting Limit Amount the sum
of payments for all 1099 MISC Income tax types.
• Same as Federal. Ignore the region Reporting Limit Amount, and
instead use the Federal reporting limit, which Payables has
predefined as $600.
3.
Save your work.
See Also
1099 Reporting Overview: page 8 – 35
Payables Setup
2 – 169
Income Tax Regions Window Reference
Abbreviation. The abbreviation for an income tax region. Payables
uses the abbreviation to identify a unique tax reporting authority. The
abbreviation must be unique. After you save a tax region, you cannot
update or delete it, but you can specify effective dates if you want to
make it inactive.
You can specify a single region when you submit the Update Income Tax
Distributions Report. You can specify a single region or all regions
when submitting the 1099 Payments Report.
Code. The unique numeric region code determined by the Internal
Revenue Service. The code cannot exceed two digits. You need to
ensure that the code you define for a tax region exactly matches the code
defined by the Internal Revenue Service to ensure correct Combined
Filing reporting information. Payables produces B and K records in its
1099 Electronic Media Program only for region codes that you define in
this window or that are predefined.
Description. The description of your income tax region.
Reporting Limit
Amount. The reporting limit amount for a region. Contact your tax
authorities to obtain information regarding their 1099 tax reporting
requirements. If the total 1099 MISC payments equal or exceed the
Reporting Limit Amount, Payables includes these payments in the 1099
reports for that tax region. Payables uses this Reporting Limit Amount
with the next field, Reporting Limit Method, to determine if the 1099
MISC payments are required to be reported. If you do not enter an
amount, Payables assumes the limit to be zero.
Method. The comparison method that you want Payables to use when
determining which 1099 MISC payments will be reported to the tax
authorities you define here. Contact your tax authorities to obtain
information regarding their 1099 tax reporting requirements. Payables
uses this Reporting Limit Method with the previous field, Reporting
Limit Amount, to determine what payments are required to be reported.
If the total 1099 payments equal or exceed the Reporting Limit Amount
based on the Reporting Limit Method you select here, Payables includes
these payments in the 1099 reports for that tax region. You can select
one of the following reporting methods for each tax region:
• Compare Individually. Payables compares to the region’s
Reporting Limit Amount, payments made to a supplier by each
individual 1099 MISC Type. For example, region X’s reporting
2 – 170
Oracle Payables User Guide
limit is $600. If you make a total of two $400 payments to a
supplier in region X and classify each payment as a different 1099
MISC Type, Payables will not report this supplier to region X
because neither individual payment type exceeded region X’s
reporting limit. In this case, Payables only reports the supplier to
the Federal tax authorities.
• Compare Sum. Payables compares to the region’s Reporting
Limit Amount, the sum of all 1099 MISC Type payments made to
a supplier in a specific region. For example, region X’s reporting
limit is $600. If you make a total of two $400 payments to a
supplier and classify each payment as a different 1099 MISC Type,
Payables will report this supplier to the region X tax authority
because the sum of the payments exceeds region X’s reporting
limit. In this case, Payables reports the supplier to both federal
and state tax authorities.
• Same as Federal. Payables compares payments made to a 1099
supplier to the Federal reporting limit. Payables does not use the
region’s reporting limit.
Effective Dates
The effective dates for the region. You can enter one date, both dates, or
neither. If you define effective dates, if the current date falls outside of
the effective dates, Payables will not include the region on a list of
values, and will not allow you to enter the region when you assign an
income tax region to an invoice distribution.
Payables Setup
2 – 171
Bank Transaction Codes
If you want to load electronic bank statements or use Cash
Management’s AutoReconciliation feature, you must define, for each
account and bank, the transaction codes that your bank uses to identify
different types of transactions on its statements. You should define a
bank transaction code for each code that you expect to receive from
your bank.
For detailed information on this window see: Bank Transaction Codes
(Oracle Cash Management User Guide).
About Bank Statements (Oracle Cash Management User Guide)
Reconciling Bank Statements Automatically (Oracle Cash Management
User Guide)
2 – 172
Oracle Payables User Guide
Payment Formats
Use the Payment Formats window to define the payment formats you
need to define payment documents in the Banks window. You define
payment formats for the four payment methods that Payables uses. You
can define as many payment formats as you require for each payment
method; however, each payment format must be unique for that
payment method.
You choose a Build Payments program, and a Format Payments
program for each payment format. You can choose any payment
program that you have defined in the Payment Programs window or
any standard program Payables provides. You do not have to define a
Separate Remittance Advice program for a payment format, because
you can include the separate remittance advice program in your Format
Payments program. Each Format Payments program provided by
Payables includes a remittance advice program. You can, however,
control how many invoices to include on your remittance advice.
You can define a separate payment format for each of your payment
currencies. If you assign a currency to a payment format, you can use
that format only with a bank account whose bank account currency is
the same as the format currency. If you use a payment format to pay
multiple currency invoices and do not assign a currency to the payment
format, you can only use that format with a bank account for which you
also allow payment of multiple currency invoices. When you define a
bank account, you can only allow payment of multiple currency invoices
if the bank account currency is your functional currency.
You can also specify the number of invoices allowed per payment, the
invoice grouping, the position of the check stub (for payment formats
using payment programs that produce a stub), and whether the
payment format can be used for multiple currencies and zero–amount
payments only.
Defining Payment Formats
Prerequisites
❑ Define payment programs. See: Automatic Payment Programs:
page 2 – 20.
❑ If you want to define either a foreign currency or multiple currency
payment format, enable the Allow Multiple Currencies Payables
option. See: Payables Options: page 2 – 57.
Payables Setup
2 – 173
"
To define payment formats for payment documents:
1.
In the Payment Formats window, enter the name of the payment
format you are defining. This name will appear in a list of values in
the Payment Documents window.
2.
Select the type of payment method that this payment format will
use.
If you want the payment format to pay only zero amount payments,
enable that option.
If you want this format to group payments by due date, enable the
Group by Due Date option.
3.
Either enable the format for multiple currency payments, or select a
single currency.
4.
Specify if you want the payment format to print a remittance advice
on a payment stub, and if so, if you want it printed before or after
the payment document.
Enter the number of invoices you want to appear on your remittance
advice for this payment format.
5.
Choose a Build Payments Program, a Format Payments Program,
and if you selected None for Remittance Advice, choose a separate
remittance program.
Payment Formats Window Reference
Payment Format. Unique name for the payment format.
Payment Method.
• Check. Payment in a payment batch, Quick payment, or manual
payment.
• Electronic. You pay electronic payments either through the
e–Commerce Gateway, or by delivering a payment batch file to
your bank. For both methods, Payables creates a file during
payment batch creation. For e–Commerce Gateway payments,
the file is processed through the e–Commerce Gateway and
delivered to your bank to create payments. For electronic funds
transfers, the file is formatted and delivered to your ap.out
directory for you to deliver to your bank.
• Wire. A payment method where you pay invoices outside of
Payables by notifying your bank that you want to debit your
2 – 174
Oracle Payables User Guide
account and credit your supplier’s account with appropriate
funds. You provide your bank with your supplier’s bank
information, and your bank sends you confirmation of your
transaction. Your supplier’s bank sends your supplier
confirmation of the payment. You then record the transaction
manually.
• Clearing. Payment method you use to account for intercompany
expenses when you do not actually disburse funds through
banks. Generally, you do not generate a payment document with
the Clearing payment method.
When you enter the invoice, you enter Clearing for the payment
method. You can record a clearing payment using a Manual type
payment only.
Zero Amount Payments Only. Enable this option if you want this
payment format to be used only to create zero amount payments.
Disable this option if you want this payment format to be used to create
nonzero amount payments. You cannot update this value for a payment
format used in a payment batch in progress.
Group by Due Date. Enable this option if you want this format to
group payments by due date. If you enable this option, Payables groups
payments for invoices with the same due date on the same payment
document. Invoices with different due dates are paid using a separate
payment document for each due date.
If you enable this options for future dated payments, the format groups
all payments by maturity date. See: Maturity Date Calculation for
Payment Batch Payments: page 5 – 62.
If you disable this option, Payables groups payments on payment
documents according to the order in which the invoices were selected
when you initiate a payment batch.
Currency
If you enable the Use Multiple Currencies Payables option, you can
change this option from Single to Multiple at any time; however, you
can change the currency from Multiple to Single only if you have not
already assigned the payment format to a payment document.
• Multiple. Select Multiple if you want to use a payment format to
pay invoices of different currencies. You can select Multiple only
if you enable the Use Multiple Currencies Payables option. You
can only use a multiple currency format with a bank account
Payables Setup
2 – 175
whose bank account currency is the same as your functional
currency.
• Single. Select Single if you want to use a payment format to pay
invoices of only one currency. You must select the currency you
want to pay with this format in the next field. You can then use
this format only with a bank account whose currency is the same
as the currency you define for this payment format.
Currency. Enter a currency code for a Single currency payment format.
If you do not enable the Use Multiple Currencies Payables option,
Payables enters your functional currency in this field and you cannot
change it.
Remittance
Choose where you want to print remittance advice for the payments you
create using this payment format.
Before Document. Payables prints a remittance advice on the payment
document stub, before it prints the payment.
After Document. Payables prints a remittance advice on the payment
document stub, after it prints the payment.
None. Payables prints a separate remittance advice, based on the
remittance advice program you select for the payment format.
Number of Invoices. The number of invoices you want to appear on
your remittance advice for this payment format. This value only applies
to a remittance advice included in your Format Payments programs (not
a Separate Remittance Advice program). Do not change this value for
the payment formats that Payables predefines. Note that for any of the
Evergreen type payment formats the maximum value that defaults in
this field is 37, and if you enter a value greater than 37 your payment
format will not work.
Programs
Build Payments. The Build Payments program this payment format
uses during payment building to group the selected invoices for each
payment, to order the payments using the order option you specify, to
create any necessary overflow payments, and to determine the total
number and amount of payments for a payment batch.
☞
2 – 176
Oracle Payables User Guide
Attention: For this field, select the Standard Build Payments
program that Payables provides. You do not need to define any
additional Build Payment programs.
Format Payments. The Format Payments program this payment format
uses. You must select None for the Remittance Advice option to select
the BACS or the U.S. Treasury Format Payments program since these
formats do not have remittance stubs. During payment formatting,
Payables uses your payment format to create the layout of your checks
or electronic funds transfer file. If you plan on using a laser printer to
print checks, select the External Laser Format Payments Program.
Separate Remittance. The Remittance Advice program this payment
format uses to create a separate remittance advice for each payment.
Choose the Tax Authority Remittance advice if you use automatic
withholding tax and are creating a payment format you will use when
paying a tax authority.
See Also
Automatic Payment Programs: page 2 – 20
Payables Setup
2 – 177
Controlling the Status of Payables Periods
You enter and account for transactions in open accounting periods.
The period statuses available in Payables are Never Opened, Future,
Open, Closed, and Permanently Closed. When you first define a
period, Payables assigns a status of Never Opened to the period.
Payables does not allow transaction processing in a period that has
never been opened. After you change the status to Future or Open you
cannot change it back to Never Opened.
Your accounts payable periods are separate from your general ledger
periods. For example, you can close your Q1 period in Payables before
you close your Q1 period in General Ledger. For details on setting up
general ledger periods, see: Defining Calendars (Oracle General Ledger
User Guide).
If you use the Multiple Reporting Currencies feature, read the Multiple
Reporting Currencies in Oracle Applications manual for information on
changing a period status when you use Multiple Reporting Currencies.
"
To change the status of an accounting period:
1.
In the Control Payables Periods window update the Period Status
to one of the following:
• Future. Payables allows invoice entry and accounting in a
Future period. However, you cannot transfer accounting entries
to general ledger if the accounting date is in a future period.
Payables does not allow payment entry or payment voiding in a
Future period.
Payables allows you to limit the number of Future periods based
on the number you enter in the Future Periods field in the
Financials Options window. After you change the status of a
Future period to Open, you cannot change it back to Future.
• Open. You can record transactions and account for them in an
Open period. You cannot open a period if it is an adjusting
period. You define adjusting periods using the Define Calendar
window. Adjusting periods can have overlapping dates.
• Closed. Payables does not allow transaction processing in a
Closed period. You can reopen a Closed period if the
corresponding general ledger and purchasing periods are also
Open. You cannot close a period in which any of the following
conditions exist:
– Accounted transactions that have not been transferred to
general ledger.
2 – 178
Oracle Payables User Guide
– Future dated payments for which the Maturity Date is on or
before the current date but that still have a status of Issued.
– Unaccounted transactions.
– Unconfirmed payment batches.
For details on Closing an Accounting Period, see: Closing an
Accounting Period: page 2 – 179.
• Permanently Closed. Payables does not allow transaction
processing in a Permanently Closed period. You cannot reopen a
Permanently Closed period.
2.
Save your work.
See Also
Defining Calendars (Oracle General Ledger User Guide)
Closing an Accounting Period
You close a Payables period after you have completed accounting for
transactions for the period and you have transferred the accounting
entries to general ledger.
You cannot close a period in Payables if any of the following conditions
exist:
• Accounted transactions that have not been transferred to
general ledger. Submit the Payables Transfer to General Ledger
process to transfer accounting entries. See: Payables Transfer to
General Ledger Process: page 7 – 34.
• Future dated payments for which the Maturity Date is on or
before the current date but that still have a status of Issued.
Submit the Update Matured Future Dated Payment Status
Program: page 5 – 69.
• Unaccounted transactions. Submit the Payables Accounting
process to account for transactions, or submit the Unaccounted
Transaction Sweep to move any remaining unaccounted
transactions from one period to another. See: Payables
Accounting Process: page 7 – 13, and Unaccounted Transactions
Sweep: page 8 – 16.
Payables Setup
2 – 179
• Unconfirmed payment batches. Confirm all payment batches.
See: Confirming Payment Batches: page 5 – 32.
Close a period when no one is entering any invoices or payments to
prevent the following situation: Another user enters (but does not
save) a transaction in an open period, you close the period, and the
user then saves the transaction. If this does happen, and if your
accounting practices permit it, you can just submit the Unaccounted
Transactions Sweep program.
"
To complete the close process in Payables:
1.
Approve all invoices and confirm all payment batches.
• See: Approval: page 4 – 145.
• See: Confirming Payment Batches: page 5 – 32.
2.
If you use future dated payments, submit the Update Matured
Future Dated Payment Status Program. This will update the
status of matured future dated payments to Negotiable so you can
account for them.
• See: Update Matured Future Dated Payment Status Program:
page 5 – 69.
3.
Submit the Payables Accounting Process to account for all
unaccounted transactions.
• See: Payables Accounting Process: page 7 – 13.
4.
Review the Unaccounted Transactions Report. Review any
unaccounted transactions and correct data as necessary. Then
resubmit the Payables Accounting Process to account for
transactions you corrected.
• See: Unaccounted Transactions Report: page 8 – 144.
• See: Payables Accounting Process: page 7 – 13.
5.
Transfer invoices and payments to the General Ledger and
resolve any problems you see on the output report:
• Payables Transfer to General Ledger Program: page 8 – 144.
6.
Move any unresolved accounting transaction exceptions to the
next period (optional).
• Submit the Unaccounted Transactions Sweep Program: page
8 – 16.
7.
2 – 180
Oracle Payables User Guide
In the Control Payables Periods window, close the period in
Payables.
• See: Controlling the Status of Payables Periods: page 2 – 178.
8.
Reconcile Payables activity for the period. See: Reconciling
Payables Activity: page 7 – 45. You will need the following reports:
• Accounts Payable Trial Balance Report: page 8 – 134 (this period
and last period).
• Posted Invoice Register: page 8 – 139.
• Posted Payment Register: page 8 – 142.
9.
If you use Oracle Purchasing, accrue uninvoiced receipts. See:
Purchasing Integration: page 4 – 165.
10. Post journal entries to the general ledger and reconcile the trial
balance to the General Ledger. See: Reconciling Payables Activity
to General Ledger: page 7 – 46.
CLOSE RESTRICTIONS:
COMBINED BASIS ACCOUNTING: If you use the combined basis
accounting method, you must transfer invoices and payments to your
accrual set of books and payments to your cash set of books before you
can close an accounting period.
Payables Setup
2 – 181
Aging Periods
Use the Aging Periods window to define time periods for the Invoice
Aging Report. The Invoice Aging Report provides information about
invoice payments due during four periods you specify. Payables
displays the invoice information in four columns. Each column
corresponds to one period.
When you submit the Invoice Aging Report, you select the type of aging
periods to use for the report.
For example, you define one type of aging period called Weeks Past
Due, and define the following periods for Weeks Past Due: 1 Week, 2
Weeks, 3 Weeks, and Over 3 Weeks. You also define a type of aging
period called Current, and define the following periods for Current: Due
in More than 3 Weeks, Due in 3 Weeks, Due in 2 Weeks, and Due in 1
Week. When you submit the report, if you select Weeks Past Due for the
Type parameter, Payables reports on the four periods with that type.
You can use the Aging Periods window to modify or reorder the periods
within an aging period type at any time.
Defining Aging Periods
"
To define an aging period:
1.
In the Aging Periods window, enter the Name and Description of
the type of aging periods you are defining. When you submit the
Invoice Aging Report, this value will appear in Type parameter list
of values if it is active. To activate the aging period, choose Active.
2.
Enter each aging period:
Enter the range of days for the period. For example, to define a
period that reports invoice payments due during the next 7 days,
enter From –7 days To 0 days.
Enter the First and Second lines of the Column Heading as you want
them to appear on your report. For example, Due in 1 Week.
Enter the column order. The period with Column Order 1 will be
the first column on the report, and so on. The Invoice Aging Report
uses only the four lowest numbered periods. You can reorder
periods at any time.
2 – 182
Oracle Payables User Guide
3.
Save your work.
See Also
Invoice Aging Report: page 8 – 68
Payables Setup
2 – 183
Setting Up Credit Card Programs
Prerequisites
❑ You have the requisite agreements in place with your card issuer.
❑ Enter your card issuer as a supplier. Include all information
including payment terms and supplier site. If you pay with
Electronic payments, enter supplier bank information. See:
Entering Suppliers: page 3 – 10.
❑ Set up your employees who will be card holders. Enter complete
employee information, including employee name, home and/or
office address, supervisor, default expense account, and cost center.
See: Enter Person (Managing People Using Oracle HRMS).
"
2 – 184
Setting up credit card programs:
1.
In the Credit Card Code Sets window, create credit card code sets.
Enter card codes, such as Standard Industry Classification (SIC)
codes, or Merchant Category Codes (MCC). Assign a default GL
account to a card code. See: Credit Card Code Sets: page 2 – 187.
2.
In the Credit Card Programs window, define your credit card
program, including the card issuer, card type, and credit card code
set. In this window you can also specify transaction statuses for
which you will not create invoices. For example, statuses of
Unapproved, Disputed, or Hold. See: Credit Card Programs: page
2 – 189.
3.
In the Credit Card GL Sets window, define GL account sets. A GL
account set is a list of values that card holders can use to change
accounts during transaction verification. See: Credit Card GL Sets:
page 2 – 192.
4.
In the Credit Card Profiles window, define credit card profiles that
you assign to credit cards. Attributes of a credit card profile
include credit card program, GL account set, default GL account,
exception clearing account, employee verification options, and
manager approval options. In addition you can record restrictions
for credit card codes. See: Credit Card Profiles: page 2 – 193.
5.
In the Credit Cards window, assign a card to a card holder and
assign a credit card profile to the card. See: Credit Cards: page
2 – 197.
6.
Set up the Credit Card Transaction Employee Workflow. See:
Credit Card Transaction Employee Workflow: page 2 – 198.
Oracle Payables User Guide
7.
Set up the Credit Card Transaction Manager Workflow. See: Credit
Card Transaction Manager Workflow: page 2 – 206.
8.
Configure Self–Service Web Applications credit card functions
using Web Applications Dictionary. See: Setting Up Credit Cards
Using Web Application Dictionary: page 2 – 215.
9.
Provide detailed cardholder information and card profile
information to your card issuer. You can write a custom program
to send this information to your card issuer electronically. The card
issuer sends cards for your employees. Your card issuer can
provide an acknowledgement of the card numbers for all new
credit cards. Distribute cards to your employees. Your employees
can use the cards to purchase goods.
10. If you use Self–Service Web Applications, customize the online
HTML help. Your employees will see this help when they use the
help icon in Self–Service Web Applications. The APWHLCC1.html
file is located in the following directory:
/OA_HTML/<language> virtual path
Suggestion: Make a copy of all custom HTML files and store
the copies in a directory protected from upgrades.
11. In the Users window, assign a Credit Cards responsibility and the
Workflow responsibility to employees.
There are four levels of the Credit Cards responsibility that you can
define for employees:
• Credit Cards – Assign this responsibility for employees that
should have access to records for one or more employees.
The securing attribute for the seeded Credit Cards responsibility
is ICX_HR_PERSON_ID. To allow a Web user the ability to verify
open credit card transactions and to review a credit card
transaction history for more than one employee, define an
additional securing attribute value (ICX_HR_PERSON_ID) for
each employee to which you will allow access to credit card
transactions for this employee.
Enter the Web user in the Person field.
• Credit Cards (Card Profile Administrator) – Assign this
responsibility for the employee that is the Administrator in the
Credit Card Profiles window. This responsibility has access to all
records for a Credit Card Profile. See: Credit Card Profiles: page
2 – 193.
Payables Setup
2 – 185
☞
Attention: To assign this responsibility, you must first define
the employee name for Administrator in the Credit Card
Profiles window.
☞
Attention: To assign this responsibility, you must also define
the Securing Attribute in the Users window to
AP_CARD_PROFILE_ADMIN_ID. You then assign the
EMPLOYEE_ID for the profile administrator as the Securing
Attribute Value.
• Credit Cards (Program Administrator) – Assign this
responsibility for the employee that is the Administrator in the
Credit Card Programs window. This responsibility has access to
all records for a Credit Card Program. See: Credit Card
Programs: page 2 – 189.
☞
Attention: To assign this responsibility, you must first define
the employee name for Administrator in the Credit Card
Programs window.
☞
Attention: To assign this responsibility, you must also define
the Securing Attribute in the Users window to
AP_CARD_PROGRAM_ADMIN_ID. You then assign the
EMPLOYEE_ID for the program administrator as the Securing
Attribute Value.
• Credit Cards (Full Access) – Assign this responsibility to
employees that should have access to all records for all card
programs, all card profiles, and all employees.
Employees can use any of the Credit Cards responsibilities to verify
open transactions, and to view a transaction history using
Self–Service Web Applications. Each of these responsibilities
includes the following functions:
• Verify Open Transaction. Use to update the status, cost center,
account, and description of a transaction. You can also split a
transaction.
• View Transaction History. Use to review a transaction history.
The seeded Workflow responsibility includes the following
functions:
• View Notifications: View notifications sent by Workflow.
• View Progress: View the progress of the workflow process for a
selected document.
2 – 186
Oracle Payables User Guide
The securing attribute for the seeded Workflow responsibility is
ICX_HR_PERSON_ID.
See: Users Window (Oracle Applications System Administrator’s
Guide).
Credit Card Code Sets
Use this window to define sets of credit card codes that can be used to
create default accounting distributions for transactions that you import
from your credit card issuer. Your card issuer maintains card codes, for
example, Standard Industry Classification (SIC) codes or Merchant
Category Codes (MCC), to identify suppliers and supplier types for the
transactions that your employees incur when using a procurement
card.
You can assign a default account to a card code so that when you
import a transaction for that card code, you can create a default
accounting distribution for the transaction based on the card code for
the transaction.
You define sets of credit card codes in this window. You assign credit
card code sets to credit card profiles. You then assign credit card
profiles to credit cards.
Note: The Credit Card Code Sets window uses the
AP_CARD_CODE_SETS and the AP_CARD_CODES table to store
information on credit card code sets and the credit card codes
that are assigned to them. If your credit card issuer provides
you with its card codes you can load this information directly
into the table to save you data entry time. For detailed
information on the table, see: Oracle Payables Applications
Technical Reference Manual. You can then use the Credit Card
Code Sets window to edit and update credit card code sets.
In a future version of Payables, you will be able to use credit card codes
to define restrictions on credit cards you distribute to employees.
Payables Setup
2 – 187
Defining Credit Card Code Sets
Prerequisites
❑ Your credit card provider sends you the list of card codes it uses.
For example, Standard Industry Codes (SIC) or Merchant Category
Codes.
❑ Define your chart of accounts. See: Defining Your Chart of
Accounts (Oracle General Ledger User Guide).
"
To define a credit card code set:
1.
In the Credit Card Code Sets window, enter the Code Set Name
and Description.
2.
In the Card Codes region, enter the card code value, for example,
the SIC. Enter a description for the card code.
If the card code value is a group card code, enable the Blocking
Group check box and leave the account field empty.
If you want to assign a default account to the card code value, enter
the account. If you enable the Build Account From Code option for
a Credit Card Profile, this value will overlay the employee’s default
expense account and the default account template for the profile
when Payables builds the account for transactions that use the card
code.
3.
Enter an Inactive On date if you want to limit the time during
which the card code will appear on a list of values.
4.
Save your work.
Credit Card Code Sets Window Reference
Code Set Name. Name of the credit card code set. You assign card
code sets to credit card programs. Card code sets contain card codes.
Description. Credit card code set description. This will appear on a
list of values when you select a credit card code set.
Blocking Group. Enable this check box if the card code value is a
blocking group value. This field will be used by future version of
Payables.
2 – 188
Oracle Payables User Guide
Value. Card code value. For example, Standard Industry Code or
Merchant Category Code. This code is defined and used by your credit
card issuer to identify suppliers and groups of suppliers. This code is
also used to indicate the supplier type for an imported credit card
transaction.
Description. Card code description. This value will appear on a list of
values when you select a card code.
Account. If you want to associate an account with a card code, enter
the account here. When Payables creates the default GL account for the
transaction, it will use the account for a credit card code to overlay any
values from the default employee expense GL account or default
account template for the profile.
☞
Attention: To use the account associated with a credit card
code to build a default accounting distribution for an imported
transaction, you must enable the Build Acct From Code option
in the Credit Card Profiles window. See: Credit Card Profiles:
page 2 – 193.
Inactive on. If you want to limit the amount of time a card code value
is listed on a list of values for the credit card set, enter the date it will
become inactive.
Credit Card Programs
This window allows you to define your credit card programs for each
card issuer. You define the supplier and supplier site for your card
program. You also specify which transaction statuses to exclude when
you automatically create an invoice for your card issuer.
Defining Credit Card Programs
Prerequisites
❑ Define credit card code sets in the Credit Card Code Sets window.
See: Credit Card Code Sets: page 2 – 187.
❑ Enter your card issuer as a supplier. Include all information
including payment terms and supplier site. If you make EFT
payments, enter supplier bank information.
❑ If necessary, define additional Card Brands in the Lookups
window.
Payables Setup
2 – 189
"
2 – 190
To define a credit card program:
1.
In the Credit Card Programs window, enter a Card Program Name
and complete the definition of the card program. For detailed
information on any field, see: Credit Card Programs Window
Reference: page 2 – 191.
2.
Save your work.
Oracle Payables User Guide
Credit Card Programs Window Reference
Card Program Name. Name of the credit card program.
Inactive On Date on which you can no longer create a credit card
profile with this credit card program. On this date, this credit card
program will no longer appear on a list of values for credit card
programs.
Card Brand. The card brand (for example, American Express, Visa, or
MasterCard) of the credit card. You can define additional Card Brand
values in the Lookups window.
Card Type. Enter the card type for your reference.
• Procurement
• Travel and Entertainment.
Supplier. Supplier name of card issuer.
Supplier Site. Card issuer’s payment supplier site.
Card Code Set. Enter a card code set that includes card codes your
card issuer uses to record restrictions on cards. You define credit card
code sets in the Credit Card Code Sets window. See: Credit Card Code
Sets: page 2 – 187.
Administrator. Employee name of the administrator for the credit card
program.
Card Program Currency. Currency in which the card issuer invoice is
created. This value defaults from the supplier site.
Description. Description of the Credit Card program.
Exposure Limit. This field will be used by a future version of Payables.
You can use this field for your reference to record the program’s credit
limit.
Exception Clearing Account. Account to which Payables will charge
exceptions if the Credit Card Transaction Validation and Exception
Report tries to create a transaction distribution for an invalid GL
account.
Do not Pay If Status Is. If you want the Credit Card Invoice Interface
Summary to exclude any transaction accounting distributions with the
following statuses, check each check box status you want to exclude
from invoice creation. For example, if you do not want to import
transactions with a status of Unverified or Hold, check those check
boxes. If you check the Unapproved check box, the Credit Card
Invoice Interface Summary will not select those transactions for which
Payables Setup
2 – 191
manager approval is required and manager approval has not yet been
obtained, or for those transactions that managers have rejected.
• Unverified
• Unapproved
• Account Exception
• Personal
• Disputed
• Hold
Credit Card GL Account Sets
Use the Credit Card GL Account Sets window to create a list of values
of GL accounts that your employees can use to correct account
information for their credit card transactions, if you allow your credit
card holders to update transaction accounts. Each card holder’s credit
card is assigned a credit card profile. Each credit card profile can be
assigned one credit card GL set.
Defining Credit Card GL Sets
Prerequisite
❑ Define your chart of accounts. See: Defining Your Chart of
Accounts (Oracle General Ledger User Guide).
"
To define a credit card code:
1.
In the Credit Card GL Account Sets window, enter a GL Account
Set Name and Description.
List the GL accounts that are included in the set. In the Description
field, enter the account name that credit card holders will see when
they use Self–Service Web Applications to change the account for a
transaction, for example, Office Supplies.
2.
2 – 192
Oracle Payables User Guide
Save your work.
Credit Card Profiles
Use this window to define profiles for the various types and levels of
spending you allow for credit card holders. You assign a credit card
profile to each card that you assign to a card holder. You specify the
level of employee verification and manager approval required for
employee credit cards to which a profile is assigned. Additionally, you
can define the GL accounts that are displayed when a card holder uses
Self–Service Web Applications to update the status or GL account of a
transaction. You can also define a template GL account for a profile
that helps build the default accounting distributions for imported
credit card transactions.
Defining Credit Card Profiles
Prerequisite
❑ Define credit card programs in the Credit Card Programs window.
See: Credit Card Programs: page 2 – 189.
"
To define a credit card profile:
1.
In the Credit Card Profiles window, enter a Profile Name and
complete the fields to create a profile. For detailed information on
each field, see: Credit Card Profiles Window Reference: page
2 – 194.
2.
If you want to record restrictions to the credit card based on card
codes, enter values in the Card Code region. Values in this region
will be used in a future release of Payables. You can record this
information for your reference.
The card codes you enter must be in the card code set assigned to
the card program you choose. These card code restrictions should
be based on card code restrictions that your card issuer supports.
Examples include:
• If you want to exclude the card holder from transactions that use
a card code or a particular range of codes, then check the
Exclusion check box and enter a card code or range of card
codes.
• If you want to restrict the total amount an employee can spend
during a time unit, then enter the time unit (Transaction, Daily,
Monthly, or Period), and the amount.
Payables Setup
2 – 193
• For a range of codes, if you want to restrict the total number of
transactions an employee can execute during a time unit, then
enter the number of allowed transactions, and select the time
unit (Transaction, Daily, Monthly, or Period).
3.
Save your work.
Credit Card Profiles Window Reference
Profile Name. The name of the credit card profile.
Inactive On. Date on which you can no longer use this profile and it
will no longer appear on a list of values.
Description. Description of the credit card profile. This value will
appear on a list of values when you select a profile in the Credit Cards
window.
Card Program Name. Credit card program that you want to associate
with this profile. See: Credit Card Programs: page 2 – 189.
Program Currency. Payables displays the currency of the credit card
program.
Administrator. Employee name of the administrator for the credit card
profile.
Acct Set Name. GL account set you are assigning to the credit card
profile.
Default Acct Template. If you want to default account segments to the
transactions you import for this card program, enter the account
segments. If you want to skip an account segment, then leave it blank.
To create default accounting distributions for an imported transaction,
Payables overlays the employee’s default expense account with any
segment values contained in the default account template.
If you also enable the Build Account From Code option in this window,
and you have associated accounts with card codes in the Card Code
Sets window, then the account value for a card code overlays the
employee expense account and default account template values. Then,
if you allow employee verification using Self–Service Web Applications,
the employee can override the default GL account.
For example, a card holder’s default employee expense account is
01–450–5800. The default account template is ––5900. This creates a
default transaction account of 01–450–5900. If you have enabled the
Build Account From Code option, and the account assigned to the card
2 – 194
Oracle Payables User Guide
code is 6000, then during the Credit Card Transaction Validation report,
Payables assigns 01–450–6000 as the transaction account. During
validation, the employee can overwrite any account segment based on
the list of values that you define in the Credit Card GL Accounts
window.
Exception Clearing Account. Account to which you will charge
exceptions that occur when the Payables Credit Card Transaction
Validation Exception Report executes. See: Credit Card Transaction
Validation and Exception Report: page 8 – 10. An example of an
exception is a transaction with an invalid cost center ID. This value
defaults from the credit card program. See: Credit Card Programs:
page 2 – 189.
Allow Status ”Personal”. Enable this option if you want to allow
employees to change the status of their transactions to Personal during
verification. If you do not enable this option, then Personal will not
appear as a status option.
Allow Direct Account Entry. Enable this option if you want to allow
Self–Service Web Applications users to enter account numbers directly
in the Account field during transaction verification. This allows users
to enter numeric accounts in Self–Service Web Applications rather than
selecting the GL account description you defined in the Credit Card GL
Account Sets window.
Build Acct From Code. If you enable this option, then when Payables
builds the account for the transaction it will use the account associated
with the card code to overlay the account values from the default
employee expense GL account and the profile Default Account
Template. You associate accounts with card codes in the Credit Card
Code Sets window.
Manager Notifications. Select the level of notification or approval for
that you want Workflow to enforce for transactions to which this
profile has been assigned when Workflow processes a transaction for a
manager’s direct reports.
• No Notifications. Workflow will not notify the card holder’s
manager.
• Notifications Only. Workflow will notify the card holder’s
manager, but it will not require approval.
• Approval Required. Workflow will require approval from the
card holder’s manager.
Employee Notifications. Select the level of card holder notification or
verification that you want Workflow to enforce for transactions to
Payables Setup
2 – 195
which this profile has been assigned when Workflow processes a
transaction for the card holder.
• No Notifications. Workflow will not notify the card holder
• Notifications Only. Workflow will notify the card holder but it
will not require verification from the card holder.
• Verification Required. Workflow will require verification from
the card holder.
Card Codes Region
Use this region to set limits and restrictions on card codes that are used
by the credit card. This region is currently not used by Payables. You
can enter values for your own reference to record restrictions that your
card issuer supports.
Exclusion. Enable this option for a card code or card code range to
indicate that transactions with the card code or card code range would
be rejected by the card issuer.
Card Code From/To. Enter the range of card codes for which you are
recording a restriction. To record a restriction for a single card code,
enter the card code value in both fields.
Time Unit. To record transaction number or amount restrictions
indicate the time unit to which the restriction applies. For transaction
number restrictions, you cannot select the Transaction time unit.
• Transaction
• Day
• Month
• Period. Period between statements from the card issuer.
Maximum Transactions. Number of allowed transactions for a code
range during a time unit. If you want to restrict the number of credit
card transactions during a time unit, then enter the card codes you are
restricting, and enter the time unit and the transaction number.
Maximum Amount. Total amount allowed to be charged for a card
code range during a time unit. If you want to restrict the amount a
card holder can charge for a card code range during a time unit, enter
the card code range, the time unit, and the allowed amount.
2 – 196
Oracle Payables User Guide
Credit Cards
This window allows you to define the credit cards distributed to your
employees. Enter an employee name and credit card number, and
assign a card profile.
Defining Credit Cards
Prerequisite
❑ Enter Credit Card Profiles.
"
To define a credit card:
1.
In the Credit Cards window complete the information for each
credit card holder. The following fields are required:
• Card Program
• Card Member Name
• Card Number
• Employee Name
• Profile Name
2.
The remaining fields are for your reference only. For detailed
information on any field, see: Credit Cards Window Reference:
page 2 – 197.
3.
Save your work.
Credit Cards Window Reference
In this release, Payables uses only the following fields: Card program,
Card Member Name, Card Number, Employee Name, and Profile
Name. The remaining fields are for your reference.
Card Program. The credit card program you are assigning to the credit
card.
Card Member Name. The card holder’s name, as it appears on the
credit card.
Card Number. The number on the credit card.
Payables Setup
2 – 197
Employee Name. Card holder’s name as it appears in the Enter Person
window.
Expiration Date. Expiration date of the credit card.
Department Name. Name of employee’s department or organization
as it appears on the card.
Date of Birth. Payables displays the employee’s date of birth. This
value defaults from the Enter Person window.
Mother’s Maiden Name. Maiden name of cardholder ’s mother. For
identification purposes.
National Identifier. Tax Identification Number (TIN) for an employee.
Card Description. Description of the credit card.
Inactive On. Date on which this card profile will no longer appear on a
list of values.
Maximum Amount Per Transaction. If you want to override the card
holder’s authorized amount per transaction, enter the maximum
authorized amount. In a future release, this value will override any
amount per transaction restrictions you may have set in the Credit
Card Profile window.
Maximum Amount Per Period. If you want to override the card
holder’s authorized credit limit per billing period, enter the authorized
maximum amount. In a future release, this value will override any
amount per period restrictions you may have set in the Credit Card
Profile window.
Physical Card Issued. Check this option if a physical card has been
issued to the employee.
Paper Statement Wanted. Check this option if the card holder wants
to receive a paper statement from the card issuer.
Credit Card Transaction Employee Workflow
The Credit Card Transaction Employee Workflow is a predefined
workflow that you can initiate to notify employees of transactions that
have been posted to their credit card accounts. The Credit Card
Transaction Employee Workflow determines if workflow will notify an
employee of transactions created by the employee’s credit card, and it
determines if the employee is required to verify the transaction
information.
2 – 198
Oracle Payables User Guide
This section describes the Credit Card Transaction Employee Workflow
in detail to give you an understanding of what each activity in this
workflow does. You cannot replace this workflow with a new
workflow process. You can customize this process as necessary to meet
your business requirements.
You initiate the Credit Card Transaction Employee Workflow from the
Submit Request window by submitting the Distribute Manager Card
Transactions Approvals program. See: Distribute Employee Card
Transaction Verifications: page 8 – 22
The status of a transaction after the successful completion of the Credit
Card Transaction Employee Workflow is contingent upon the Employee
Notification Method (ENM) and Manager Notification Method (MNM)
settings in the Credit Card Profiles window. If ENM is set to None or if
both notification settings are set to None, then the transaction will not
be selected because it was already set to Approved or Verified by the
successful completion of the Credit Card Transaction Validation and
Exception Report. If Employee Verification is required, then the status
must be set by the employee to one of the following: Hold, Personal,
Disputed, Verified. If ENM is set to Notification Only and MNM is set
to Approval or Notification, then the transaction status is set (once the
Credit Card Transaction Employee Workflow completes successfully)
to Verified.
ENM = Verification
ENM = Notification
MNM = None
Set by employee
Approved
MNM = Approval or Notification
Set by employee
Verified
Setting Up Credit Card Transaction Employee Workflow
A predefined sample Credit Card Transaction Employee Workflow is
included with Oracle Applications.
Prerequisites
❑ Select your employee notification method in the Credit Card
Profiles window. See: Credit Card Profiles: page 2 – 193.
❑ Install Oracle Workflow. See Oracle Workflow Installation Notes.
Payables Setup
2 – 199
"
To set up the Credit Card Transaction Employee Workflow:
1.
Install and set up Self–Service Web Applications to allow
verification of transactions via Self–Service Web Applications. See:
Oracle Self–Service Web Applications Implementation Manual.
2.
Install the Oracle Workflow Builder client component program.
See: Oracle Workflow Installation Guide.
3.
The Credit Card Transaction Employee Workflow definition (.wft)
file is automatically loaded into the database under the APPS
account when you install Self–Service Web Applications. Using the
Oracle Workflow Builder program, you can open the Credit Card
Transaction Employee Workflow definition file by providing the
APPS username, password, and database. Show the AP
Procurement Card Employee Verification Workflow item type and
choose OK.
4.
Define the Timeout value for the following activity:
• Request Emp To Review Incurred PCard Transactions
See: Process Window (Oracle Workflow Guide).
5.
Use the Workflow Builder program to Customize the following
Procurement Card Transaction Employee Verification Workflow
messages:
• Notify Employee of Incurred Procurement Card Transactions
• Request Emp To Review Incurred PCard Transactions
See: Oracle Workflow Guide.
Procurement Card Employee Verification Main Process Activities
The Procurement Card Transactions Employee Verification process
consists of four unique process–type activities.
The following is a description of each activity listed by the activity’s
display name. You can create all the components for an activity in the
graphical Oracle Workflow Builder except for the functions associated
with function activities. All function activities execute PL/SQL stored
procedures, which are created and stored in Oracle8i by your workflow
designer/developer. The naming convention for the PL/SQL stored
procedures used in the Credit Card Transaction Employee process is:
AP_WEB_PCARD_WORKFLOW_PKG.<PROCEDURE>
2 – 200
Oracle Payables User Guide
AP_WEB_PCARD_WORKFLOW_PKG is the name of the package that
groups all of the procedures used by the Credit Card Transaction
Employee Process. <PROCEDURE> represents the name of the
procedure. You can view the script that creates the
AP_WEB_PCARD_WORKFLOW_PKG package and other Oracle
Payables–specific stored procedure packages used by the Credit Card
Transaction Employee Process in the admin/sql subdirectory of the
Self–Service Applications for the Web directory structure on your
server.
Procurement Card Employee Verification Parent Process
Start (Node 1)
This is a Standard function activity that simply marks the start of the
process.
Function
WF_STANDARD.NOOP
Result Type
None
Prerequisite
Activities
None
Pre PCard Transaction Employee Verification Custom Process (Node
2)
Payables Setup
2 – 201
You can customize this activity to meet your business needs. If you do
not customize this activity, the activity will not affect the Workflow
process.
Required
No
Prerequisite
Activities
None
Procurement Card Transactions Employee Verification (Node 3)
This process selects employee transactions from the
AP_EXPENSE_FEED_DISTS table, if the status of the transaction is
Validated and the EMPLOYEE_VERIFICATION_ID column is NULL.
The process then checks the Employee Notification method
(Notification Only, None, or Verification Required) that you selected in
the Credit Card Profiles window. The process groups transactions on
the notification by employee and credit card profile. See: Credit Card
Profiles: page 2 – 193.
Note: This process does not select records in
AP_EXPENSE_FEED_DISTS that have a status of Hold,
Disputed, or Personal. You can modify the Pre or Post
Procurement Card Transaction Employee Verification Process if
you want to select these statuses for employee notification.
The activities in this process are described below. See: Procurement
Card Transaction Employee Verification: page 2 – 203.
Result Type
Transactions are categorized.
Required
If you do not use this process you must manually
change the transaction status from validated to
verified. Use either the Verify Open Transactions
function of Self–Service Web Applications, or the
Credit Card Transactions Window in Payables to
change the status of transactions from validated to
verified.
Prerequisite
Activities
None
Post Card Transaction Emp Verification Custom Process (Node 4)
2 – 202
Oracle Payables User Guide
You can customize this activity to meet your business needs. If you do
not customize this activity, the activity will not affect the Workflow
process.
Required
No
Prerequisite
Activities
None
End (Node 5)
This function activity marks the end of the process.
Function
WF_STANDARD.NOOP
Result Type
None
Prerequisite
Activities
Start
Procurement Card Transaction Employee Verification
Start (Node 1)
This is a Standard function activity that simply marks the start of the
process.
Function
WF_STANDARD.NOOP
Result Type
None
Prerequisite
Activities
None
Payables Setup
2 – 203
Build PCard Transaction Info For Emp Verification Msg (Node 2)
This function activity selects and builds transaction notification
information for the employee. This information is sent to the employee
if the verification method you selected in the Credit Card Profiles
window was Notification Only or Verification Required.
Function
AP_WEB_PCARD_WORKFLOW_PKG.
BUILDEMPVERIFICATIONMESSAGE
Result Type
Required
This is required if the verification method you
selected in the Credit Card Profiles window was
Notifications Only or Verification Required.
Prerequisite
Activities
Start
Check Employee Notification Method (Node 3)
This function activity checks which verification method you selected in
the Credit Card Profiles window. The options are: Notification Only,
None, and Verification Required.
Function
AP_WEB_PCARD_WORKFLOW_PKG.
CHECKEMPNOTIFICATIONMETHOD
Result Type
Returns the Employee Notification Method
Required
Yes
Prerequisite
Activities
None
Notify Employee of Incurred PCard Transactions (Node 4)
This notification activity sends a message to the employee that incurred
the credit card charges. The message itemizes the credit card
transactions.
2 – 204
Required
This is required if the verification method you
selected in the Credit Card Profiles window was
Notifications Only.
Prerequisite
Activities
Build PCard Transaction Info For Employee
Verification Message, and Check Employee
Notification Method
Oracle Payables User Guide
Request Emp To Review Incurred PCard Transactions (Node 5)
This notification activity sends a message to the employee requesting
verification of the credit card transactions. The employee can either
update the transaction status by responding to the message, or the
employee can assign a status to each transaction using the Verify Open
Transactions function in Self–Service Web Applications.
Required
Yes (if Employee Notification method is
Verification Required)
Prerequisite
Activities
Build PCard Transaction Info For Employee
Verification Message, and Check Employee
Notification Method
Check That All Transactions Employee Categorized (Node 6)
At the end of the Timeout period, this function activity checks the
status of each employee transaction. If all transactions have been
categorized, this activity function initiates the Update Transactions
From Status Validated to Verified activity function. If any transactions
remain uncategorized by the employee at the end of the Timeout, this
activity function initiates the Request Emp To Review Incurred PCard
Transactions function activity.
Function
AP_WEB_PCARD_WORKFLOW_PKG.
CHECKEMPVERIFICATIONCOMPLETE
Result Type
Yes/No
Required
Yes
Prerequisite
Activities
None
Update Transactions From Status Validated to Verified (Node 7)
This function activity updates the status of uncategorized employee
transactions from Validated to Verified. If an employee responds to a
request to verify incurred procurement card transactions by choosing
the Automatically Verify Remaining and Continue button in the
message, this process updates all uncategorized transaction
distribution status from Validated to Verified.
Function
AP_WEB_PCARD_WORKFLOW_PKG.
MARKREMAININGTRANSVERIFIED
Result Type
Transaction status updated from Validated to
Verified.
Required
Yes
Payables Setup
2 – 205
Prerequisite
Activities
None
Auto Approve Verified Transactions Not Req Mgr Approval (Node 8)
This function activity is used only if you selected Notifications Only or
None as the manager verification method in the Credit Card Profiles
window. See: Credit Card Profiles: page 2 – 193. For any verified
transactions not requiring manager approval, the system changes the
status from Verified to Approved.
Function
AP_WEB_PCARD_WORKFLOW_PKG.
AUTOAPPROVERTRANSNOTREQAPRVL
Result Type
Transaction status updated from Verified to
Approved.
Required
No
Prerequisite
Activities
Transaction status must be Verified.
End (Node 9)
This function activity marks the end of the process.
Function
WF_STANDARD.NOOP
Result Type
None
Prerequisite
Activities
Start
Credit Card Transaction Manager Workflow
The Credit Card Transaction Manager Workflow is a predefined
workflow that you can initiate to notify managers of transactions
incurred by their direct reports. The Credit Card Transaction Manager
Workflow determines if workflow will notify a manager of transactions
created by the manager’s employee’s credit card, and it determines if
the manager must approve the transactions.
You initiate submit the Credit Card Transaction Manager Workflow
from the Submit Request window by submitting Distribute Manager
Card Transactions Approvals program. See: Distribute Manager Card
Transactions Approvals: page 8 – 23
The status of a transaction after the successful completion of the Credit
Card Transaction Manager Workflow is contingent upon the Employee
Notification Method (ENM) and Manager Notification Method (MNM)
settings in the Credit Card Profiles window. If MNM is set to None or
2 – 206
Oracle Payables User Guide
Notification Only, then the status of a Verified transaction is
automatically set to Approved. If Manager Approval is required, then
the manager sets the transaction status to either Approved or Rejected.
ENM = None
ENM = Verification or Notification
Approved
Approved
Set by the manager
Set by the manager
MNM = None or Notification
MNM = Approval
Setting up the Credit Card Transaction Manager Workflow
Prerequisites
❑ Select the manager notification method in the Credit Card Profiles
window. See: Credit Card Profiles: page 2 – 193.
❑ Install and configure Oracle Workflow. See: Oracle Workflow
Installation Notes.
❑ Employees verify credit card transactions. If at the Credit Card
Profile level, the Employee Notification Method is Notification
Only or Verification Required, Verification can occur during the
Credit Card Transaction Employee Workflow. If at the Credit Card
Profile level the Employee Notification Method is None, the Credit
Card Transaction Validation and Exception Report automatically
sets the status to Verified.
"
To set up the Credit Card Transaction Manager Workflow
1.
Install the Oracle Workflow Builder client component program.
2.
The Credit Card Transaction Manager Workflow definition (.wft)
file is automatically loaded into the database under the APPS
account when you install Self–Service Web Applications. Using the
Oracle Workflow Builder program, you can open the Credit Card
Transaction Manager Workflow definition file by providing the
APPS username, password, and database. Show the AP
Procurement Card Manager Approval Workflow item type and
choose OK.
3.
Set Workflow Timeout Activities:
• Request Mgr Approval of Emp Incurred PCard Transactions
Payables Setup
2 – 207
See: Process Window (Oracle Workflow Guide).
4.
(Optional but recommended) Customize Workflow Messages:
• Notify Mgr of PCard Trxns Incurred By Direct Reports
• Request Mgr Approval Of Emp Incurred PCard Transactions
• Inform Emp That Manager Has Rejected PCard Transaction
See: Oracle Workflow Guide.
Procurement Card Manager Approval Parent Process
Start (Node 1)
This is a Standard function activity that simply marks the start of the
process.
Function
WF_STANDARD.NOOP
Result Type
None
Prerequisite
Activities
None
Pre PCard Transaction Mgr Approval Custom Process (Node 2)
This activity is provided for you to customize to meet your business
needs. If you do not customize this activity, the activity will not affect
the Workflow process.
2 – 208
Oracle Payables User Guide
Function
Result Type
None if not customized.
Required
No
Prerequisite
Activities
None
Procurement Card Transaction Manager Approval Process (Node 3)
This process selects and builds manager transaction information in
accordance with the verification method you selected: Notification
Only, None, or Approval Required.
This process selects transactions for a direct manager’s employees from
AP_EXPENSE_FEED_DISTS where the status is Verified and the
MANAGER_APPROVAL_ID column in NULL. The process then
checks the Manager Notification Method you selected in the Credit
Card Profiles Window (None, Notification Only, Approval Required).
See: Credit Card Profiles: page 2 – 193. If the Notification Method is
Notification Only, transactions are grouped in notifications based on
the direct reports of a manager and the credit card profile. If the
Notification Method is Approval Required, transactions are grouped in
notifications based on a single direct report for a manager and the
credit card profile. See: Manager Rejection of Procurement Card
Transaction Process: page 2 – 213.
Note: This process does not select records in
AP_EXPENSE_FEED_DISTS that have a status of Hold,
Disputed, or Personal. You can modify the Pre or Post
Procurement Card Transaction Manager Approval Process if
you want to select these statuses for manager notification.
The activities in this process are described below. See: Procurement
Card Transaction Manager Approval Process: page 2 – 211.
Required
Yes
Prerequisite
Activities
None
Payables Setup
2 – 209
Post PCard Transaction Mgr Approval Custom Process (Node 4)
This activity is provided for you to customize to meet your business
needs. If you do not customize this activity, the activity will not affect
the Workflow process.
Function
Result Type
None if not customized.
Required
No
Prerequisite
Activities
Procurement Card Transaction Manager Approval
Process
Manager Rejection of PCard Transactions Process (Node 5)
This process sets transaction statuses to Rejected and notifies the
employee card holder that their manager has rejected their
transactions. See: Manager Rejection of Procurement Card Transaction
Process: page 2 – 213.
Required
No
Prerequisite
Activities
None
End (Nodes 6 and 7)
This function activity marks the end of the process.
2 – 210
Function
WF_STANDARD.NOOP
Result Type
None
Prerequisite
Activities
Start
Oracle Payables User Guide
Procurement Card Transaction Manager Approval Process
Start (Node 1)
This is a Standard function activity that simply marks the start of the
process.
Function
WF_STANDARD.NOOP
Result Type
None
Prerequisite
Activities
None
Build PCard Transactions Info For Mgr Approval Msg (Node 2)
This activity prepares credit card transactions that have a status of
Verified for use in the manager approval or manager notification
message.
Function
AP_WEB_PCARD_WORKFLOW_PKG.
BUILDMANAGERAPPROVALMESSAGE
Result Type
Required
Required if the verification method you selected
was Notifications Only or Approval Required.
Payables Setup
2 – 211
Prerequisite
Activities
None
Check Manager Approval Method (Node 3)
This activity checks the manager verification method you selected in
the Credit Card Profiles window. See: Credit Card Profiles: page
2 – 193. The verification method you selected determines whether to
notify the manager, or if approval is required.
Function
AP_WEB_PCARD_WORKFLOW_PKG.
CHECKMANAGER APPROVALMETHOD
Result Type
Returns Manager Notification method
Required
Yes
Prerequisite
Activities
None
Notify Mgr of PCard Trxns Incurred By Direct Reports (Node 4)
For transactions for which the Manager Notification Method is
Notification Only, this activity sends a message to managers informing
them of credit card transactions for which their direct reports are
responsible. The managers do not respond to this message.
Required
Yes (if Manager Notification method is Notification
Only
Prerequisite
Activities
Build PCard Transaction Info For Manager
Approval Message, and Check Manager Approval
Method
Mark All Transactions As Approved (Node 5)
If a manager responds to a request for transactions approval by
indicating that transactions are approved, this activity changes the
status of transactions on the notification to Approved.
2 – 212
Function
AP_WEB_PCARD_WORKFLOW_PKG.
MARKTRANSACTIONSASAPPROVED
Result Type
Changes transaction status from Verified to
Approved.
Required
If you do not perform this activity, you must
change the status of transactions to Approved, or
Oracle Payables User Guide
another acceptable status before they can be
transferred to the Payables Open Interface tables.
Prerequisite
Activities
None
Request Mgr Approval Of Emp Incurred PCard Transactions (Node
6)
For transactions for which the Manager Notification Method is
Approval Required, this activity sends a message to managers
informing them of credit card transactions for which their direct
reports are responsible, and it requests approval for the transactions.
Managers can approve or reject transactions.
Required
Yes (if Manager Notification method is Approval
Required)
Prerequisite
Activities
Build PCard Transaction Info For Mgr Approval
Msg, and Check Manager Approval Method
End (Nodes 7 and 8)
This function activity marks the end of the process.
Function
WF_STANDARD.NOOP
Result Type
None
Prerequisite
Activities
Start
Manager Rejection of Procurement Card Transaction Process
Payables Setup
2 – 213
Start (Node 1)
This is a Standard function activity that simply marks the start of the
process.
Function
WF_STANDARD.NOOP
Result Type
None
Prerequisite
Activities
None
Mark All Transactions As Rejected (Node 2)
If a manager responds to a request for transaction approval by
indicating that transactions are rejected, this activity marks all
transactions from the notification as Rejected.
Function
AP_WEB_PCARD_WORKFLOW_PKG.
MARKTRANSACTIONSASREJECTED
Result Type
Changes transaction status from Verified to
Rejected.
Required
If you do not perform this activity, you must
change the status of transactions to Rejected.
Prerequisite
Activities
None
Inform Emp That Mgr Has Rejected PCard Transaction (Node 3)
This notification activity sends a message to an employee card holder
that the card holder’s manager has rejected the card holder’s
transactions.
Required
No
Prerequisite
Activities
None
End (Node 4)
This function activity marks the end of the process.
2 – 214
Function
WF_STANDARD.NOOP
Result Type
None
Prerequisite
Activities
Start
Oracle Payables User Guide
Setting Up Credit Cards Using Web Application Dictionary
If your employees are using the Credit Cards responsibility of
Self–Service Web Applications to verify open credit card transactions,
and to view a credit card transaction history, the content of the Web
pages for these Credit Cards functions can be configured using the Web
Applications Dictionary tool. Web Applications Dictionary is a module
of Oracle Applications.
Prerequisites
❑ Install Oracle Self–Service Applications for the Web
❑ Install Web Applications Dictionary
Web Page Prompts
The following table describes Regions in Web Application Dictionary
that you can use to modify the field prompt names for Web pages that
are displayed using functions of the Credit Cards responsibility. To
modify prompt names, modify the region item Long Label in the
Region Items window.
Web Application Dictionary
Region ID
Description
AP_WEB_CARD_EMP_VERIFY
The Employee Credit Card
Transaction Verification page of
the Verify Open Credit Card
Transactions function.
Table 2 – 2 (Page 1 of 1)
View Transaction History
The following table describes Regions in Web Application Dictionary
that you can update to customize how search results are displayed for
the View Transaction History function of the Credit Cards
responsibility. Update the region items for the region to control what
columns to display, what column labels to display, the order in which
columns are displayed, and whether a column should be a search
attribute.
Payables Setup
2 – 215
Web Application Dictionary
Region ID
Description
AP_EXP_FEED_DISTS_OPEN
Results page 1 of the Verify Open
Transactions function.
AP_EXP_FEED_DISTS_HIST
Results page 1 of the View Credit
Card Transaction History
function.
Table 2 – 3 (Page 1 of 1)
See Also
Procurement Card Integration: page 4 – 180
Web Applications Dictionary, Oracle Configurator, and Object Navigator
User Guide
2 – 216
Oracle Payables User Guide
Payables Implementation Information
This section provides you with reference material you may need for
implementing Payables or Oracle Public Sector Payables. It includes
specific information on the following topics:
• Customizing Your Supplier Letters: page 2 – 217
• Implementing the Invoice Payments Descriptive Flexfield: page
2 – 220
• Setting Up Custom Payment Programs: page 2 – 221
• Setting Up Custom Payment Formats: page 2 – 225
• Using the External Laser Format Payments Program: page
2 – 227
• Customizing Automatic Withholding Tax: page 2 – 230
• Using the Multiple Organization Support Feature: page 2 – 231
• Setting Up Print Styles and Drivers for the Supplier Mailing
Labels Report: page 2 – 232
Customizing Your Supplier Letters
You use supplier letters to notify your suppliers, purchasing agents,
and purchase requestors of actions you have taken for their invoices or
to request additional information from them. Payables provides the
following reports that produce supplier letters:
• Matching Hold Agent Notice. This report produces a letter
notifying your purchasing agents that you cannot pay an invoice
because of a price or quantity variance.
• Receiving Hold Requestor Notice. This report produces a letter
notifying your purchase requestors that you cannot pay an
invoice until they acknowledge that they received the product
they ordered.
• Print Invoice Notice. This report produces a letter notifying a
supplier that you have entered one or more invoices for the
supplier in Payables.
• Prepayment Remittance Notice. This report produces a letter
notifying a supplier that you have applied a prepayment to an
invoice. Payables automatically prints the supplier name,
Payables Setup
2 – 217
address information, and any related information, such as
invoice number, on each of the letters it prints.
• Invalid PO Supplier Notice. This notice informs a supplier that
you placed an invoice on hold because the supplier did not
provide a valid purchase order number.
• Tax Information Verification Letter. This letter requests a
supplier to confirm or provide tax information.
Many of the reports include report parameters that you can use to
specify custom information, such as sender name, title, and return
address, each time you submit a report. In addition, each of the reports
includes boilerplate text that you can customize to reflect your
organization’s operations.
If your installation uses multiple languages, you can customize the
following notices in multiple languages. When Payables prints the
notice, it prints it in the language assigned to the supplier site.
• Print Invoice Notice.
• Prepayment Remittance Notice.
• Invalid PO Supplier Notice.
Using Report Parameters
The Tax Information Verification Letter and the three purchase order
notices provide report parameters that you use to specify the name,
title, and return address of the letter sender when you submit the
reports. You can define defaults for all of these report parameters to
avoid having to re–enter the parameters each time you submit the
reports. See: Define Concurrent Program (Oracle Applications System
Administrator Guide).
☞
2 – 218
Oracle Payables User Guide
Attention: Two of the reports, Print Invoice Notice and
Prepayment Remittance Notice, do not use report parameters.
For these reports, Payables includes a fictitious name and title
for the sender of the letter. You should modify this boilerplate
text to reflect the name(s) and title(s) of the persons in your
organization responsible for sending out supplier letters.
Modifying Boilerplate Text
You can use Oracle Reports to customize any of the boilerplate text
defined in a supplier letter report.
Prerequisite
❑ You should be familiar with your Oracle Reports and Oracle
Reports Designer. See: Oracle Reports User’s Manual.
"
To make a copy of the Original Report File (Recommended):
1.
In your operating system, change directories to the srw directory in
the AP top level directory.
2.
Make a copy of the original file for each report you want to modify
and save each copy using a different name. You may also want to
store the original file in a different directory or give it a new name,
because Payables references the original report name when you
submit a report.
The following are the file names for each supplier letter report.
"
Matching Hold
Agent Notice
APXMHLET.rdf
Receiving Hold
Requestor Notice
APXVDRAL.rdf
Tax Information
Verification
Letter
Invalid PO
Supplier Notice
APXVDTIN.rdf
Print Invoice
Notice
APXINPRT.rdf
Prepayment
Remittance
Notice
APXPPREM.rdf
APXVDLET.rdf
To load your copy into Oracle Reports Designer:
1.
Start Oracle Reports Designer and use the Open File menu option
to select the file you want to modify.
Payables Setup
2 – 219
2.
Open the report and bring up the layout window. Oracle Reports
displays the report and allows you to select and manipulate objects
in the layout body of the report.
Modifying Your Report
You can select any boilerplate object and use the Oracle Reports
Designer text editing tool to modify the text in the object.
Suggestion: You can identify boilerplate objects by selecting
objects and bringing up the property sheets. Oracle Reports
displays the name and type of an object in the property sheet
for the object.
You can also change the characteristics of a boilerplate object, including
the length and height, to accommodate the text that you wish to add or
modify. Also, you can reposition boilerplate objects within a report
frame to change the format of the report.
☞
Attention: You should exercise caution when changing the
format of a report. You can cause your report to fail if you
move an object outside the boundaries of the object’s defined
frame.
When you have finished making your changes, save the changes and
exit Oracle Reports. The next time you submit the report, the
modifications you made will appear in the body of the report.
☞
Attention: You should not change any of the SQL statements
in the report. Payables defines each statement to select
necessary information for each report. Also, you should not
change any of the functions, report settings, or names of objects
that Payables defines.
Implementing the Invoice Payments Descriptive Flexfield
Payables uses the same Descriptive Flexfield definition for scheduled
payments and invoice payments. Payables automatically transfers
Descriptive Flexfield information from the scheduled payment to the
invoice payment when payments are created.
With Oracle Application Object Library, once you define the Invoice
Payments Descriptive Flexfield, you can access this Descriptive
Flexfield in every window where it appears. Depending on your
security level, you can enter, update, or view information in this
Descriptive Flexfield in the Scheduled Payments window of the Invoice
2 – 220
Oracle Payables User Guide
Workbench, the Modify Payment Batch Window, and the Invoices
window of the Payments Workbench. See also: Planning Your
Descriptive Flexfields (Oracle Applications Flexfields Guide).
Setting Up Custom Payment Programs
You use payment programs to create payment documents in Payables.
Payment programs determine how Payables builds and formats your
payment documents. You assign payment programs to a payment
format, then assign the payment format to a payment document for a
bank account. When you pay an invoice, using either a single payment
or a payment batch, select a payment document from the bank account
you use to pay the invoice.
In addition to the predefined Build program, Payables provides several
predefined payment programs designed to provide basic layouts for
your payment documents.
• APXPBFOR Oracle Standard Format Payments Program
• APXPBFOF Oracle Form Feed Format Payments Program
• APXPBFEG External Standard Format Payments Program
• APXPBFEF External Form Feed Format Payments Program
• APXPBFEL External Laser Format Payments Program
• APXPBFUS Format Payments (U.S. Treasury)
• APXPBFBC Format Payments (BACS 1/2 Inch Tape)
• APXPBSRA Separate Remittance Advice
• APXPBBLD Build Payments Program
• APXPBFTR Format Payments (Bank Transfer Request)
• APXPBFZG Generate Zengin File
• APECEPYO EDI Outbound Program
You can also define additional payment programs to meet your
organization’s unique needs. See also: Payment Formats: page 2 – 173,
Defining Banks: page 2 – 122, and Automatic Payment Programs: page
2 – 20, and Custom Payment Programs: page 2 – 221
Payables Setup
2 – 221
Multiple Payment Formats
Payables allows you to pay your supplier using the payment method
(check, wire, or electronic) that you want. For example, if you want to
pay by electronic funds transfer, you can set up a program to create
your payments in an EFT format and assign that EFT program to a
payment format that uses the Electronic payment method.
Custom Payment Programs
Payables supports three payment program types: Build Payments,
Format Payments, and Remittance Advice. Each payment format
requires a Build Payments and a Format Payments program. You can
also optionally assign a Remittance Advice program to a payment
format. Payables predefines a standard Build Payments program and
Remittance Advice program, along with several Format Payment and
Remittance programs.
If you use the payment programs provided by Payables, you do not
need to perform any set up steps. If you choose to use a custom
payment program, you must create your custom program using Oracle
Reports, register the program, and define the program in Payables.
You can create a payment program that generates both a payment
document and a remittance advice or you can choose to create a
separate remittance advice program. If you use checks as a payment
document, you generally include a remittance advice (i.e. check stub)
with each check. If you use electronic funds transfer, you generally
generate a separate remittance advice document.
For specific instructions on setting up your Electronic Funds Transfers,
see: Creating Electronic Payments without the Oracle e–Commerce
Gateway: page 5 – 54.
Setting Up Custom Payment Programs
Prerequisite
❑ You should be familiar with your Oracle Reports and Oracle
Reports Designer. See: Oracle Reports User’s Manual.
"
To create/modify a payment program:
1.
2 – 222
Oracle Payables User Guide
In your operating system, change directories to the srw directory in
the in the AP top level directory.
2.
Make a copy of the original file for each report you want to modify
and save each copy using a different name. Use one of the
predefined payment programs as a template. We suggest that you
copy and modify program APXPBFEG.rdf. See also: Define
Concurrent Program (Oracle Applications System Administrator’s
Guide). You may also want to store the original file in a different
directory or give it a new name, because Payables references the
original report name when you submit a report.
3.
Register Your Payment Program with your System Administrator.
Suggestion: We recommend that you use the Standard Build
Payments Program provided by Payables instead of creating a
custom Build Payments program. The Standard Build
Payments Program builds and validates payments for the
invoices you select for payment, according to invoice and
payment controls defined in Payables. If you create your own
Build Payments program, you risk violating these validation
controls. If you must create a custom build program we
recommend that you copy and modify program
APXPBBLD.rdf. You can, however, create as many custom
Format Payments and Remittance Advice programs as you
need and assign them, along with the Standard Build Payments
Program, to payment formats you create.
After you create a custom payment program, you must have your
System Administrator register the program. You must register a
program before you can use it in Payables. When you enter a value in
the Registered Name field, Payables automatically validates the name
against all registered programs. See also: Managing Concurrent
Programs and Reports (Oracle Applications System Administrator’s
Guide), and Define Concurrent Program (Oracle Applications System
Administrator’s Guide).
Defining Your Payment Program
You must define a payment program before you can assign it to a
payment format and create payment documents. Define your payment
programs using the Define Automatic Payment Programs window.
See: Automatic Payment Programs: page 2 – 20.
After you register your payment program, you must define the
program in Payables. You must define a payment program before you
can assign it to a payment format and create payment documents.
Define your payment programs using the Define Automatic Payment
Programs window. See: Automatic Payment Programs: page 2 – 20.
Payables Setup
2 – 223
"
To define a payment program:
1.
In the Automatic Payment Programs window enter a descriptive
name for your payment program in the Name field.
2.
In the Type field you can choose between the three program types:
Build Payments, Format Payments, and Remittance Advice.
3.
In the Registered Name field, you should select the program name
that your System Administrator used to register your payment
program.
After you define a payment program, you can select the program when
you define your custom payment formats. Payables displays the name
for each program type for all your payment programs. You cannot
change a program type or registered name after you define a payment
program.
4.
In the Type field you can choose between the three program types:
Build Payments, Format Payments, and Remittance Advice.
5.
In the Registered Name field, you should select the program name
that your System Administrator used to register your payment
program. When you enter a value in the Registered Name field,
Payables automatically validates the name against all registered
programs.
After you define a payment program, you can select the program when
you define your custom payment formats. Payables displays the name
for each program type for all your payment programs. You cannot
change a program type or registered name after you define a payment
program.
After Setting Up Custom Payment Programs
Once you create, register, and define a custom payment program, you
can use it in any payment format. Specify the number of invoices you
want to include on the remittance advice in the Payment Formats
window. See: Payment Formats: page 2 – 173.
☞
Attention: You cannot have more than thirty–seven invoices
on a remittance advice.
After you select a payment program for use with a payment format, the
final step is to assign your payment format to a payment document for
a bank account. See: Defining Bank Accounts: page 2 – 124.
2 – 224
Oracle Payables User Guide
Setting Up Custom Payment Formats
Payables predefines several payment formats you can use. For these
check payment formats, Payables prints invoice information on the
remittance advice (stub), and prints the payment amount on the
payment portion of the check.
If you have more invoices for a payment than there are lines on the
remittance advice, Payables prints each payment document with
remittance advice to cover the number of invoices and voids the
payment portion of all the payment documents except the last
document. See: Paying Invoices in Payment Batches: page 5 – 17.
Payables provides several predefined payment formats, including the
following. Payables also provides several country–specific payment
formats. Contact your local Oracle representative for more
information.
• Standard Check Format
• Long Check Format
• Long Laser Format
• Short Check Format
• US Treasury Check
• BACS 1/2 Inch Tape (EFT)
• EDI Outbound Program
Before you install Payables, you should decide which payment formats
you want to use. Contact your Oracle support representative to obtain
a copy of these payment formats. And, make sure you order the
payment document that each format requires.
If you want to use any of Payables’s standard or alternative non–laser
payment formats, you do not need to take any further action. You can
enter and pay invoices after you successfully complete your installation
and Payables set up steps. If you want to use the Long Laser Format,
you may want to activate a MICR line, implement a special font, or
define signature amount limits. See also: Using the External Laser
Format Payments Program: page 2 – 227.
Clearing Payment Format
In addition to the formats above, Payables also provides a dummy
payment format called Clearing Payment for use with the Clearing
payment method. You use this payment format only if you use the
Payables Setup
2 – 225
Clearing payment method to reconcile intercompany/interfund
liabilities. See also: Payment Formats: page 2 – 173.
Customizing Your Payment Format
You may want to modify one of Payables payment formats to provide
different information on your payment document or remittance advice.
For example, you may want to list only invoice number, description,
and invoice payment amount on your remittance stub. If you need
assistance with making changes to the check printing program, please
contact Oracle Consulting Services at your local Oracle office. See also:
SettingUp Custom Payment Programs: page 2 – 221.
When you make changes to a payment formatting program, you should
test your results by doing a test payment batch. You can print the
output on blank paper, using a transparency of your check to verify
spacing. You should make sure your printer is set to the correct setting
(number of lines per inch). See also: Paying Invoices in Payment
Batches: page 5 – 17.
Setting Your Payment Format to Ignore a Country Code
You can set your payment program to ignore one country’s country
code when printing addresses on checks. For example, a United States
company can set this execution option so it prints the country code
only on non–United States checks. You update and define country
codes in the Countries and Territories window. See: Countries and
Territories: page 2 – 119.
"
2 – 226
To set your payment format to ignore a country code:
1.
In the Concurrent Programs window, query the program short
name. For example, if you are updating the External Laser Format
Payments Program, query APXPBFEL.
2.
Enter the following in the Execution Options field substituting the
country code for XX: p_country_to_ignore=”XX”.
Oracle Payables User Guide
3.
Save your work. The program will not print the country code in
the check address.
See Also
Concurrent Programs Window (Oracle Applications System
Administrator’s Guide)
Using the External Laser Format Payments Program
Payables provides the External Laser Format Payments program and
corresponding Long Laser Format to support your check laser printing
needs. This format supports the following features:
• Scanned signatures with amount and specific supplier controls
• MICR encoding
• Variable fonts for portions of the check image
• Custom objects printed on the check image
Before you use the Long Laser Format, you need to customize the
automatic payment program used by the Long Laser Format. By
customizing the program, you can enable MICR encoding, enforce
signature controls that you define, and have full control over what
Payables prints on the check. After you customize the program,
associate the payment format with a payment document for a bank
account and you’re ready to laser print your checks.
If you want to enable the MICR line, verify that you have correctly
entered the bank routing number and bank account number for your
disbursement bank account in the Banks window. The bank routing
number is stored in the Branch Number field. See also: Payment
Formats: page 2 – 173, and Defining Banks: page 2 – 122.
"
To customize the Automatic Payment Program
1.
Query the program short name, APXPBFEL, in the Define
Concurrent Program window. See: Concurrent Programs Window
(Oracle Applications System Administrator’s Guide).
2.
Navigate to the Execution Options field and do a field edit. The
execution options include:
Payables Setup
2 – 227
p_printer_code_
mask
Controls which objects associated with these
printer codes are enabled. Payables defaults 101
and 102 to activate printing of the check number on
the remittance and check, 111 to activate the MICR
line, 121 and 122 to activate the first and second
signatures and 141 to activate a special font for the
address portion of the check. You can add printer
codes you require or remove printer codes you
don’t need by editing this option.
Suggestion: The escape sequences corresponding to these
printer codes are defined in the printer driver file located in
$FND_TOP/$APPLREP/APLASP.prt. The printer driver
definition that Payables provides works with Oracles Payables
HP LaserJet 4 printer cartridge. If you want to use a different
printer cartridge, you simply modify the escape sequences
contained in the printer driver file. If you want to define a new
printer driver file for use with a different printer, see: Setting
Up Additional Printer Driver Files: page 2 – 229.
The printer codes provided in APLASP.prt include:
2 – 228
code ”100”
activation string
code ”101”
1st check number
code ”102”
2nd check number
code ”103”
3rd check number,
code ”104”
deactivate check number mode
code ”111”
MICR activation
code ”112”
MICR deactivation
code ”121”
1st signature
code ”122”
2nd signature
code ”123”
3rd signature
code ”131”
custom printer code #1
code ”132”
custom printer code #2
code ”133”
custom printer code #3
code ”141”
address font activation
code ”199”
default state
p_sig2_amount
Check amount threshold to get 2nd signature
p_sig3_amount
Check amount threshold to get 3rd signature
Oracle Payables User Guide
p_sig1_vendnum
The supplier number associated with the supplier
record for the person with signature #1. This
feature prevents the check signer from signing their
own check.
p_sig2_vendnum
The supplier number associated with the supplier
record for the person with signature #2. This
feature prevents the check signer from signing their
own check.
p_sig3_vendnum
The supplier number associated with the supplier
record for the person with signature #3. This
feature prevents the check signer from signing their
own check.
p_continuous_
stationery = ”N”
Do not change this option: it imbeds a new page
escape sequence after each check which is
necessary for laser printing to function properly.
Setting Up Additional Printer Driver Files
If you have multiple bank accounts, you may need to define additional
printer driver files to support different check images. Linking a new
printer driver file to the External Laser Format Payments Program
requires you to perform the following steps.
"
To set up additional printer driver files:
1.
Copy and modify the APLASP printer driver file to support new
check image. The printer driver file is located in
$FND_TOP/$APPLREP/APLASP.prt.
2.
Copy and modify the PORTRAITLASERCHECK Print Style and
link your printer driver file to it. See: Print Styles Window (Oracle
Applications System Administrator’s Guide)
3.
Copy and modify the PORTRAITHPLJ4LASCHECK printer driver
definition and link your printer driver file to it. See: Printer
Drivers Window (Oracle Applications System Administrator’s Guide).
4.
Define a new printer driver assignment for the type of printer you
are using and link your print style and printer driver definition to
it. See: Printer Types Window (Oracle Applications System
Administrator’s Guide).
5.
Copy and modify the APXPBFEL concurrent program, changing its
name and program short name, and link it to a printer and the
print style you defined in step 2. See: Copying and Renaming a
Payables Setup
2 – 229
Concurrent Program (Oracle Applications System Administrator’s
Guide).
6.
Define a Payment Program for the concurrent program you created
in step 5. See: Automatic Payment Programs: page 2 – 20.
7.
Define a payment format and payment document and when you
create payments using that payment document, Payables will print
your checks according to the new driver file specifications. See:
Payment Formats: page 2 – 173, and Defining Banks: page 2 – 122.
Customizing Automatic Withholding Tax
If you are using Payables to automatically withhold tax, you may want
to customize the AP_CUSTOM_WITHHOLDING_PKG to perform
special behavior. This PL/SQL package contains two procedures that
are called when you automatically withhold tax. Both procedures are
empty (perform nothing), but can be modified.
AP_SPECIAL_RATE is called any time you automatically withhold tax.
Modify this procedure if you want to use Penalty type AWT rates, or
any other user–defined AWT Rate Type. For example, you may want
to use a Penalty type rate for a specific supplier. The
AP_SPECIAL_RATE procedure is located in the following directory
and is called:
$AP_TOP/admin/plsql/apcmawtb.pls
After you modify this file, execute the following command:
$ sqlplus <APPS username>/<APPS password> @apcmawtb.pls
AP_SPECIAL_ROUNDING is called only when you automatically
withhold tax during payment batch processing. Modify this procedure
if you want to perform rounding of tax amounts during withholding.
For example, you may want to round all withholding tax amounts up
to the nearest dollar. The AP_SPECIAL_ROUNDING procedure is
located in the following directory and is called:
$AP_TOP/admin/plsql/apcmawtb.pls
2 – 230
Oracle Payables User Guide
After you modify this file, execute the following command:
$ sqlplus <APPS username>/<APPS password> @apcmawtb.pls
See Also
Automatic Withholding Tax Overview: page 10 – 24
Using the Multiple Organization Support Feature
You can use the Oracle Applications Multiple Organization Support
feature to use multiple sets of books for one Payables installation. You
can then assign a unique set of books (with its unique calendar, chart of
accounts, and functional currency) to each organization you define.
When you assign responsibilities using function security you can limit a
user to one organization’s set of books. In addition to its original title,
the oganization name is displayed in the header of reports also.
With the Multiple Organization Support feature you can segregate
transactions by operating unit but you can still choose to share certain
information, such as supplier information, between organizations so
the information needs to be entered only once. For more information
read the Multiple Organizations in Oracle Applications manual before
proceeding.
If you use the Oracle Applications Multiple Organization Support
feature, you must implement Cash Management for your payment
reconciliation needs. See: Reconciling Payments with Oracle Cash
Management: page 5 – 86.
When you use Oracle Applications Multiple Organization Support,
Payables displays the user’s organization name in each window title. if
you use Multiple Reporting Currencies, payables also displays the
currency.
Payables Setup
2 – 231
Setting Up Print Styles and Drivers for the Supplier Mailing Labels Report
When you submit the Supplier Mailing Labels report, you choose an
output style parameter of either Formatted or Unformatted. If you
choose Formatted, Payables prints the supplier label information on
Avery brand laser labels. If you choose Unformatted, Payables creates
a flat file with the supplier label information. You can then use a
custom program to format the flat file and print your custom labels.
For more information, see: Supplier Mailing Labels Report: page
8 – 27.
Before you can run the Supplier Mailing Label report, you must set up
a print style and printer driver and assign them to the report. You set
up the print style based on whether you want to run the report in the
Formatted or Unformatted output style, and if you use a printer in
PostScript mode or not.
If you want to use the Formatted output style, and you use a printer in
non–PostScript mode, and an SRW driver is not defined for this printer,
you must first define a new Portrait type (66 height x 80 width) SRW
driver for your printer and it must be in your $FND_TOP/$APPLREP
directory. See: Creating Custom SRW Drivers (Oracle Applications
System Administrator’s Guide).
Suggestion: If you want to be able to choose both Formatted
and Unformatted output styles when you submit the report,
assign in the Print Style window an SRW driver that can print
in the Unformatted output style, and assign in the Printer
Drivers window an SRW driver that can print in the Formatted
output style. The system uses the SRW driver in the Print
Styles window when, in the Submit Request window, you enter
zero in the Copies field. The system uses the SRW driver in the
Printer Drivers window if, in the Submit Request window, you
enter a value greater than zero in the Copies field, and you
enter a printer value in the Printers field. If the Print Style SRW
driver is different from the Print Drivers SRW driver, each time
you submit the Supplier Mailing Labels program, you must
remember to properly set the Copies and Printer fields in the
Submit Request window.
"
2 – 232
To define the ’Portrait – Mailing Labels’ Print Style:
1.
Log in to Oracle Applications and choose the System
Administrator responsibility.
2.
Navigate to the Print Styles window.
Oracle Payables User Guide
3.
Define the Portrait – Mailing Labels print style by entering and
saving the following values and options. For more information,
see: Print Styles Window (Oracle Applications System Administrator’s
Guide).
Style Name
PORTRAITMAILLABELS
Sequence
(blank)
User Style
Portrait – Mailing Labels
SRW Driver
Select a driver depending on whether
an SRW driver for your printer is
predefined in Oracle Applications,
whether you use your printer in
PostScript mode, and whether you use
the Formatted (Avery labels) or
Unformatted (custom labels) Output
Style parameter for the Supplier
Mailing Labels Report:
– APFMLB (predefined PostScript SRW
driver, Formatted output style, with
page breaks)
– APUMLB (predefined non–PostScript
SRW driver, Unformatted output style,
without page breaks)
– existing Portrait type (66 height x 80
width) SRW driver, e.g. P (predefined
non–PostScript SRW driver for
Formatted/Unformatted output styles
with page breaks)
– user–defined
4.
Description
Style for Supplier Mailing Labels
Columns
80
Rows
66
Suppress
Header
Disabled
Orientation
Portrait
Save your work
Payables Setup
2 – 233
"
To define the printer driver:
1.
Log in to Oracle Applications and choose the System
Administrator responsibility.
2.
Navigate to the Printer Drivers window.
3.
Define a printer driver by entering the following values. For more
information, see: Printer Drivers Window (Oracle Applications
System Administrator’s Guide).
If you are using a printer in non–PostScript mode, you may want to
remove the PostScript references in the values you enter for the
Driver Name, User Driver, and Description.
Driver Name
PORTRAITPSMAILLABELS
User Driver
PostScript Portrait for Mailing Labels
Description
PostScript Portrait 80x66 (8.5”x11”), 0
margins
SRW Driver
Select a driver depending on whether
an SRW driver for your printer is
predefined in Oracle Applications,
whether you use your printer in
PostScript mode, and whether you use
the Formatted (Avery labels) or
Unformatted (custom labels) Output
Style parameter for the Supplier
Mailing Labels Report:
– APFMLB (predefined PostScript SRW
driver, Formatted output style, with
page breaks)
– APUMLB (predefined non–PostScript
SRW driver, Unformatted output style,
without page breaks)
– existing Portrait type (66 height x 80
width) SRW driver, e.g. P (predefined
non–PostScript SRW Driver for
Formatted or Unformatted output
styles with page breaks)
– user–defined
Platform
2 – 234
Oracle Payables User Guide
(blank)
Driver Method
Command
You can use other Driver Methods.
Using an alternate Driver Method may
require you to change the values for
Spool File, Standard Input, Program
Name, and Arguments.
Spool File
Enabled
Standard Input
Disabled
Program Name
(blank)
Arguments
lp –c –d$PROFILES$.PRINTER
–n$PROFILES$.CONC_COPIES
$PROFILES$.FILENAME
Note that for some operating systems
you will need to alter the Arguments.
Using alternate Arguments may require
you to change the values for Spool File
and Standard Input.
Initialization
If you use a printer in PostScript mode,
leave the Initialization field blank. If
you use a printer in non–postscript
mode and want to use the Formatted
output style, enter a string with the
following escape sequences:
– printer coordinate origin in top left
corner of physical page
– all page margins (top, bottom, left,
right) are 0
– page dimensions are 80 characters
wide and 66 characters high
Reset
4.
"
If you entered an Initialization string,
enter a string that will reset the printer’s instructions for the next print job.
Save your work.
To assign the printer style and printer driver to your printer:
1.
Log in to Oracle Applications and choose the System
Administrator responsibility.
Payables Setup
2 – 235
"
2 – 236
2.
Navigate to the Printer Types window. For more information, see:
Printer Types Window (Oracle Applications System Administrator’s
Guide).
3.
Query the printer you want to use to print the mailing labels.
4.
Select PORTRAITMAILLABELS as the printer style and select the
printer driver name you defined, e.g. PORTRAITPSMAILLABELS.
5.
Save your work.
To assign the printer style to the Supplier Mailing Labels Report:
1.
Log in to Oracle Applications and choose the System
Administrator responsibility.
2.
Navigate to the Concurrent Programs window. For more
information, see: Concurrent Programs Window (Oracle
Applications System Administrator’s Guide).
3.
Query the Supplier Mailing Labels Program (short name
APXVDLBL).
4.
In the Output region, overwrite the Style default value of ’Portrait’
with ’Portrait – Mailing Labels’.
5.
If you do not want to allow users to select other print styles when
they submit the report, check the Style Required check box.
6.
Save your work.
Oracle Payables User Guide
"
To issue a Restart concurrent manager command:
H
See: Controlling Concurrent Managers (Oracle Applications System
Administrator’s Guide).
Payables Setup
2 – 237
2 – 238
Oracle Payables User Guide
CHAPTER
3
Suppliers
This chapter describes how to enter, adjust, and maintain suppliers. It
also describes how to identify duplicate suppliers and merge them.
To review information on reports not included in this chapter, refer to
the Reports chapter. See: Supplier Reports: page 8 – 24.
Suppliers
3–1
Suppliers
Set up suppliers in the Suppliers window to record information about
individuals and companies from whom you purchase goods and
services. You can also enter employees whom you reimburse for
expense reports. When you enter a supplier that does business from
multiple locations, you store supplier information only once, and enter
supplier sites for each location. You can designate supplier sites as pay
sites, purchasing sites, RFQ only sites, or procurement card sites. For
example, for a single supplier, you can buy from several different sites
and send payments to several different sites. Most supplier
information automatically defaults to all supplier sites to facilitate
supplier site entry. However, you can override these defaults and have
unique information for each site.
The system uses information you enter for suppliers and supplier sites
to enter default values when you later enter transactions for a supplier
site. Most information you enter in the Suppliers window is used only
to enter defaults in the Supplier Sites window. When the system enters
that information in a later transaction, it only uses supplier site
information as a default, even if the supplier site value is null and the
supplier has a value. If you update information at the supplier level,
existing supplier sites are not updated.
When you enter a supplier, you can also record information for your
own reference, such as names of contacts or the customer number your
supplier has assigned to you.
This chapter includes the following topics:
• How Your Oracle Product Uses Supplier Information: page
3–3
• Multiple Organization Support: page 3 – 5
• Controlling Supplier Information Entry: page 3 – 5
• Setting Up Supplier Tax Information: page 3 – 6
• Suppliers Subject to Income Tax Requirements: page 3 – 7
• Taxpayer ID and Tax Registration ID Validation: page 3 – 8
• Setting Up Supplier Hierarchies: page 3 – 8
• Entering Employees as Suppliers: page 3 – 9
• Factoring Arrangements: page 3 – 9
• Entering Suppliers: page 3 – 10
• Suppliers and Supplier Sites Window Reference: page 3 – 14
3–2
Oracle Payables User Guide
• Supplier Restrictions: page 3 – 36
• Finding Suppliers: page 3 – 37
• Reviewing Suppliers: page 3 – 38
• Adjusting Suppliers: page 3 – 38
• Adding a New Supplier Site: page 3 – 40
• Updating a Supplier’s Tax Status: page 3 – 41
• Identifying Duplicate Suppliers: page 3 – 42
• Supplier Merge Program: page 3 – 43
• Supplier Audit Report: page 3 – 48
• Supplier Merge Report: page 3 – 46
• Purchase Order Header Update Report: page 3 – 47
How Your Oracle Product Uses Supplier Information
Four Oracle financial applications use the Suppliers window: Payables,
Purchasing, Assets, and Property Manager. If you use more than one of
these products, supplier information is shared with the other
product(s). In addition to the supplier name and address, Payables and
Purchasing require you to enter additional information about the
supplier. Assets and Property Manager require no additional
information. However, for any product, you can record a variety of
other supplier information in the many optional fields.
Oracle Payables
Before entering invoices for a supplier, you must enter at least one pay
site for the supplier.
The following examples show how entering additional supplier
information in the Suppliers and Supplier Sites windows can help you
manage your Payables system:
• Record bank account information that Payables uses to generate
an electronic payment for the supplier.
• Assign a default Pay Group or Payment Priority to a supplier or
supplier site so that Payables defaults that Pay Group or
Payment Priority to all invoices you enter for that supplier site.
You can initiate a payment batch for a specific Pay Group or a
range of Payment Priorities.
Suppliers
3–3
• Select the Hold Unmatched Invoices option for a supplier or
supplier site to have Payables automatically apply a hold to any
invoice you enter that is not matched to a purchase order or
receipt.
• Create a supplier and link it to an employee so you can pay the
employee’s expense reports.
Oracle Purchasing
Before entering purchase orders for a supplier, you must enter at least
one purchasing site for the supplier.
The following are examples of how entering additional supplier
information can help you manage your Purchasing system:
• Purchasing uses supplier and supplier site information to enter
default values, such as Freight Terms and Shipment Method for
all of the supplier’s purchase orders. See: Entering Purchase
Order Headers (Oracle Purchasing User Guide).
• Define receiving control options to ensure that products you
receive are within the tolerances you specify and the guidelines
you choose. For example, you can specify a Quantity Received
Tolerance, and a range of days in which you will allow receipt of
shipments. See: Define Receiving Options (Oracle Purchasing
User Guide).
Oracle Assets
Oracle Assets uses only the Supplier Name, Supplier Number, and
Inactive On date.
Record additional supplier information for your own reference.
Oracle Property Manager
Payables imports lease invoices from Oracle Property Manager. You
must enter at least one pay site for a supplier before importing invoices
from Oracle Property Manager.
See Also
Supplier Restrictions: page 3 – 36
3–4
Oracle Payables User Guide
Multiple Organization Support
If you use the Multiple Organization Support feature, you cannot enter
the following fields at the Supplier level: Liability account, Prepayment
account, Distribution Set, Invoice Tax Code, and Future Dated Payment
account. You can enter these fields only at the supplier site level. See:
Multiple Organizations in Oracle Applications.
Controlling Supplier Information Entry
Supplier numbering
You can assign your own supplier numbers when you enter suppliers,
or, if you enable the Automatic Supplier Numbering Financials option,
the system automatically assigns supplier numbers for you. See:
Supplier Entry Financials Options: page 2 – 45.
Controlling duplicate supplier entry
You cannot enter a new supplier with exactly the same name as an
existing supplier. However, if you do get duplicate suppliers in your
system, you can merge them. For example, you may inadvertently
enter both Oracle Corporation and Oracle Corp., which the system
accepts as two separate suppliers. You can merge both into a single
supplier record. When you submit Supplier Merge, you can choose to
update the associated purchase orders and invoices to refer to the
merged supplier. See also: Supplier Merge Program: page 3 – 43.
Suggestion: Use a naming convention that minimizes risk of
separate entries of the same supplier under different names.
For example, if you consistently spell the full name of a
company, do not enter both Oracle Corp. and Oracle
Corporation.
Financials and Payables options – defaults to suppliers
You can define Financials and Payables options to speed both supplier
and invoice entry. The system defaults the values you enter for certain
Financials and Payables options to each supplier you enter. That is, the
values for these Financials and Payables options become the defaults
for the corresponding options in the Suppliers window. From the
supplier, the system defaults values to corresponding fields for each
new supplier site you enter. Payables defaults the values you enter at
the supplier site to each invoice you enter for the supplier site.
Payables enters defaults for your convenience and you can override
Suppliers
3–5
most defaults during supplier entry and during invoice entry. See also
Invoice and Invoice Batch Default Chart: page E – 2.
Note: Updating default information at the supplier level does
not update existing supplier sites. To update existing supplier
site values, do so at the supplier site level.
Financials and Purchasing options – defaults to suppliers
You can define Financials and Purchasing options to speed both
supplier and purchase order entry. The system defaults the values you
enter for certain Financials and Purchasing options to each supplier you
enter. That is, the values for these Financials and Purchasing options
become the defaults for the corresponding options in the Suppliers
window. From the supplier, the system defaults values to
corresponding fields for each new supplier site you enter. Payables
defaults the values you enter at the supplier site to each purchase order
you enter for the supplier site. Payables enters defaults for your
convenience and you can override most defaults during supplier entry
and during invoice entry. See also: Purchase Order Defaulting Rules
(Oracle Purchasing User Guide).
See Also
Supplier Restrictions: page 3 – 36
Setting Up Supplier Tax Information
Paying VAT and Sales tax for suppliers
You select default sales type taxes for suppliers in the Invoice Tax Code
Field in the Invoice Tax region of the Supplier Sites window. These
values will be used as tax defaults if you include Supplier or Supplier
Site in your Tax Code Defaults hierarchy. See: Defaulting Tax in
Payables: page 4 – 105.
Entering intra–EU suppliers and recording VAT for reporting
purposes
If you enter a supplier that is in the European Union (EU), you must
first specify its country as an EU member state. See: Countries and
Territories: page 2 – 119. When you enter an EU supplier that is
3–6
Oracle Payables User Guide
registered to pay Value–Added Tax (VAT) charges, enter the VAT
registration number as the Tax Registration Number for the supplier.
When you are doing business in the EU with an EU supplier, you
record VAT taxes for reporting purposes; however, you do not pay
them to the supplier if you use offset taxes. To use offset taxes, you
must enable the Use Offset Taxes option in the Supplier Site window.
When you use Offset taxes, Payables eliminates your VAT tax liability
while maintaining a record of all VAT taxes you need to report. For
more information see: EU VAT Taxes: page 4 – 118.
Suppliers subject to income tax reporting requirements
Define a supplier as federally reportable by enabling the Federal option
and recording a default Income Tax Type (1099 MISC Type) in the
Suppliers window. Payables assigns the income tax type to each
invoice you enter for that supplier. See also: Entering Invoices for
Suppliers Subject to Income Tax Reporting Requirements: page 4 – 131.
If you participate in the United States Internal Revenue Service (IRS)
Combined Filing Program, you can also define a supplier as State
reportable. When you do this, you must select a site to be the Income
Tax Reporting Site. Payables uses the State Reportable status of a
supplier for reporting purposes only. You can create custom reports to
satisfy a tax authority’s reporting requirements.
If the tax reporting name is different from the supplier name, enter it in
the Reporting Name field in the Tax Reporting Region. Payables uses
the Reporting Name to produce documents for the IRS. If you report
electronically, select an Organization Type in the Tax Reporting region.
For more information, see Tax Reporting Region of the Suppliers
Window: page 3 – 33.
If you enter nine zeros, 000000000, as the value for the Tax
Identification Number (TIN) for a supplier, then the TIN will appear as
null on the following reports: 1099 Electronic Media Report, 1099
Forms, or the Tax Information Verification Letter. You can enter this
value (000000000) for suppliers that are waiting for their TINs and for
whom you need to record 1099 payments.
You can enter up to three address lines when you enter a supplier, but
the 1099 Form only provides space for one address line. Payables uses
the first supplier address line from the Suppliers window and adds as
much as possible of the second and third address lines if there is
available space in the 1099 Form. Payables prints a maximum of thirty
characters in the address field of the 1099 Form. Similarly, Payables
prints up to 33 characters for the combination of the City, State, and
postal Code. Because of the space constraints, you may want to
Suppliers
3–7
implement a standard for entering addresses to ensure that the 1099
has a complete mailing address when it is printed.
You can use the Tax Information Verification Letter to request that your
suppliers provide or verify their tax information. See: Tax Information
Verification Letter: page 8 – 51.
Withholding Taxes for Suppliers
Enter withholding tax information for a supplier in the Withholding
Tax region of the Suppliers and the Supplier Sites windows. Select
Allow Withholding Tax if you want to enable withholding for a
supplier or supplier site, and select a default Withholding Tax Group
that Payables will default to all invoices you enter for the supplier site.
For more information, see: Automatic Withholding Tax Overview: page
10 – 24.
Taxpayer ID and Tax Registration Number Validation
Payables provides country–specific validation of the Taxpayer ID, also
known as the NIF, to alert you to data entry errors for Italy and Spain.
Payables also validates the Tax Registration Number, also known as the
VAT registration number, for Austria, Italy, The Netherlands, and
Spain. See: Taxpayer ID Validation: page 3 – 49 and Tax Registration
Number Validation: page 3 – 51.
See Also
Updating a Supplier’s Tax Status: page 3 – 41
Setting Up Supplier Hierarchies
You can record the relationship between a franchise or subsidiary and
its parent company by recording a value for the Parent Supplier field in
the General region of the Suppliers window. Information will not
automatically default from parent to subsidiary suppliers unless the
subsidiary is a supplier site of the parent.
3–8
Oracle Payables User Guide
Entering Employees as Suppliers
You must enter an employee as a supplier before you can pay the
employee’s expense reports. Either enable the Automatically Create
Employee as Supplier Payables option to have Payables do this
automatically during Payables Invoice Import, or manually enter the
employee as a supplier in the Suppliers window.
• To have Payables automatically create supplier information for
employees during Invoice Import, enable the Automatically
Create Employee as Supplier Payables option in the Expense
Report region of the Payables Options window. If this option is
enabled, then when you import employee expense reports,
Payables uses information from the Enter Person window to
create supplier and supplier site information for the employees.
For example, if you import an expense report with HOME as the
pay site and if the employee is not entered as a supplier, then
Payables automatically enters a supplier record for the employee
with a payment supplier site called HOME. The Supplier Type
will be Employee, and the Employee Name and Number fields
are automatically populated. See: Enter Person (Managing People
Using Oracle HRMS manual or online help).
• To enter an employee as a supplier manually, in the Classification
region of the Suppliers window, select Employee as the supplier
Type, and enter the Employee Name or Number.
Note that when you update employee information in the Enter Person
window, it automatically updates the supplier record, and vice versa.
Factoring Arrangements
If a supplier sells its receivables to a factor, you can enter invoices for
the supplier and make payments to the factor by creating a pay site
defined for the factor. On the first address line enter the name of the
factor preceded by the word ”and” or ”or.” On the remaining two
address lines, enter the address of the factor. Payables then addresses
the payment to the supplier and/or the factor, since Payables prints the
supplier name and the three address lines on each payment.
Example 1
Supplier ABC has sold their receivables to Factor B, and you want to
send payments directly to Factor B. You want your payment document
to be made out to ”ABC Or Factor B.” Define a pay site for supplier
ABC called ”Factor B.” On the first address line enter ”OR Factor B.”
On the remaining two address lines enter Factor B’s address.
Suppliers
3–9
If you select the Factor B supplier site when you enter and pay an
invoice for ABC, the first two lines of the payment will read ”Payable
to: ABC OR Factor B” and the factor can endorse and cash the
payment.
Example 2
Supplier ABC has sold their receivables to Factor B, and you want to
send payments directly to Factor B. You want your payment document
to be made out to ”ABC AND Factor B.” Define a pay site for supplier
ABC called ”Factor B.” On the first address line enter ”AND Factor B.”
On the remaining two address lines enter Factor B’s address.
If you select the Factor B supplier site when you enter and pay an
invoice for ABC, the first two lines of the payment will read ”Payable
to: ABC AND Factor B.” Both the supplier and the factor will have to
endorse the payment before it can be cashed by the factor.
See Also
Supplier Restrictions: page 3 – 36
Entering Expense Reports: page 4 – 219
Entering Suppliers
Prerequisites
❑ Verify that the supplier has not already been entered in the system.
Use the Suppliers Report: page 8 – 32, and Supplier Audit Report:
page 3 – 48.
❑ Define the following lookups in the Oracle Purchasing Lookups
window: Pay Group, Supplier Type, Minority Group. See: Defining
Lookup Codes (Oracle Purchasing User Guide).
❑ Define Supplier Types in the Oracle Payables Lookups window.
See: Lookups: page 2 – 13.
❑ If you have installed Purchasing, complete Purchasing setup. See:
Setting Up Purchasing.
❑ Define Financials Options. See: Financials Options: page 2 – 36.
3 – 10
Oracle Payables User Guide
❑ Define payment terms. See: Payment Terms: page 2 – 89.
(optional)
❑ Define Distribution Sets. See: Distribution Sets: page 2 – 17.
(optional)
Purchasing Prerequisites
❑ If you use Oracle Purchasing, define Supplier Types in the Oracle
Payables Lookups window. See: Lookups: page 2 – 13.
❑ If you use Oracle Purchasing, define FOB codes, Minority Groups
and Freight Terms codes in the Oracle Purchasing Lookups
window. See: .
❑ If you use Oracle Purchasing, define Ship Via codes in the Defining
Freight Carriers window. See: Defining Freight Carriers (Oracle
Inventory User Guide).
"
To enter basic supplier information:
1.
In the Suppliers window, enter a unique Supplier Name.
Suggestion: Use a naming convention that minimizes risk of
separate entries for the same supplier under different names.
For example, if you consistently spell the full name of a
supplier, do not enter both Oracle Corp. and Oracle
Corporation.
2.
If you enable the Supplier Number Entry option in the Financials
Options window, Payables automatically enters a Supplier Number
for you. If you did not enable this option, enter a unique Supplier
Number.
3.
Optionally enter the supplier’s tax identification number in the
Taxpayer ID field; for example, an individual’s social security
number, or a corporation or partnership’s federal identification
number/federal tax ID.
4.
Optionally enter the value–added tax (VAT) registration number in
the Tax Registration Number field if you are entering a VAT
supplier.
If you want to prevent invoice or purchase order entry for this
supplier after a certain date, then enter the date in the Inactive On
field.
5.
Enter supplier information in the appropriate regions of the
Suppliers window. If the information also appears in the Supplier
Suppliers
3 – 11
Sites window, the supplier information will default to the supplier
site. See the following field references for detailed information for
any region.
• Accounting: page 3 – 15
• Bank Accounts: page 3 – 16
• Classification: page 3 – 18
• Control: page 3 – 19
• EDI (Electronic Data Interchange): page 3 – 21
• General: page 3 – 22
• Invoice Tax: page 3 – 22
• Payment: page 3 – 26
• Purchasing: page 3 – 29
• Receiving: page 3 – 31
• Withholding Tax: page 3 – 36
6.
In the Suppliers window, choose the Sites button to navigate to the
Supplier Sites window. Enter at least one supplier site.
Enter the supplier site name and address. The site name will not
appear on documents you send to the supplier. It is for your
reference when you select a supplier site from a list of values
during transaction entry. Enter any additional supplier site
information you want to record in the appropriate region. If
supplier information automatically defaults to new supplier sites
you enter for the supplier, you can override these defaults. See the
following field references for detailed information for any region.
• Accounting: page 3 – 15
• Bank Accounts: page 3 – 16
• Contacts: page 3 – 19
• Control: page 3 – 19
• EDI (Electronic Data Interchange): page 3 – 21
• Invoice Tax: page 3 – 22
• Payment: page 3 – 26
• Purchasing: page 3 – 29
• General: page 3 – 21
• Tax Reporting: page 3 – 36
3 – 12
Oracle Payables User Guide
• Withholding Tax: page 3 – 36
7.
Save your work.
8.
You can enter another site by choosing the Down arrow key, or by
choosing New from the File menu.
See Also
Supplier Restrictions: page 3 – 36
Entering Flexible Addresses (Oracle Receivables User Guide)
Suppliers
3 – 13
Suppliers and Supplier Sites Window Reference
Enter and review supplier and supplier site region information in the
following sections. Because many regions of the same name share
many of the same fields, we have combined the region references when
possible.
See Also
Supplier Restrictions: page 3 – 36
Suppliers and Supplier Sites Header Field Reference
Inactive On. Date on which a supplier or supplier site will no longer
appear on a supplier list of values.
Language. Language spoken at the site. This value controls the
language in which Payables prints the following for this supplier:
Invalid PO Supplier Notice, Prepayment Remittance Notice, Print
Invoice Notice.
Site Name. Unique supplier site name that distinguishes the site from
a supplier’s other sites. For example, city name or branch name. This
name is for your reference when selecting sites from a list of values
during purchase order or invoice entry, and will not appear on any
correspondence with the supplier. For employees, site names are
typically Home or Office.
Supplier Number. Supplier Number. If you enable the Automatic
Supplier Numbering option in the Financials Options window,
Payables automatically enters a Supplier Number for you. If you did
not enable this option, enter a unique Supplier Number.
Supplier Name. Unique supplier name.
Alternate Name. You can enter an alternate name for your supplier or
supplier site if you enable the AP: Enter Alternate Fields profile option.
If you do not enable this option, the Alternate Name field will not
appear.
Tax Registration Number. Tax registration number, for example, a
supplier’s value–added tax (VAT) registration number. You enter a tax
3 – 14
Oracle Payables User Guide
registration number for a supplier if it is required to pay or report on
Value–Added Taxes (VAT).
Taxpayer ID. Supplier’s Tax Identification Number (TIN). If a supplier
is an individual, the TIN is the supplier’s social security number. If a
supplier is a corporation or a partnership, the TIN is also known as a
Federal Identification Number. In many countries a fiscal code is the
principal means of identifying and querying suppliers. The fiscal code
is unique across all entities and appears on all official documentation.
You can enter a fiscal code in the Taxpayer ID field of the Suppliers
window and in the Define Reporting Entities window. The Taxpayer
ID you enter here will be displayed in all supplier lists of values to help
identify your suppliers. See also: Taxpayer ID and Tax Registration
Number Validation: page 3 – 8.
If you enter nine zeros, 000000000, as the TIN value, the TIN appears as
null on the following reports: 1099 Electronic Media Report, 1099
Forms, and the Tax Information Verification Letter. You can enter this
value (000000000) for suppliers that are waiting for their TINs, and for
whom you need to record 1099 payments.
Accounting Region of the Suppliers and Supplier Sites Windows
Supplier accounting values default to all new supplier sites you enter
for the supplier. Supplier site accounting values default to all new
invoices for the supplier site. You can override any accounting defaults
during supplier site entry and invoice entry.
Distribution Set. Default Distribution Set for all invoices entered for
the supplier site. Define additional Distribution Sets for the list of
values in the Distribution Set window.
If you use the Multiple Organization Support feature, you can enter a
value in this field only at the supplier site level.
Liability. The Liability Account and description for a supplier site’s
invoices. The supplier default is the Financials option for the Liability
Account. When you create the default Liability Account, Payables
defaults this Liability Account to each supplier you enter. You can
override this default. When you enter an invoice, Payables
automatically defaults the supplier site’s Liability Account to the
invoice. You can also override this default.
If you use the Multiple Organization Support feature, you can enter a
value in this field only at the supplier site level.
Suppliers
3 – 15
Prepayment. Payables uses this as the default GL account and account
description for Item lines that Payables automatically creates for
prepayments. The supplier default is the Financials option for the
Prepayment Account.
If you use the Multiple Organization Support feature, you can enter a
value in this field only at the supplier site level.
Future Dated Payment. If you use future dated payments, enter the
future dated payment account you want to use. The Financials option
value defaults to new suppliers, and the supplier value defaults to new
supplier sites. You can override these defaults.
When Payables creates a future dated payment, it uses the future dated
payment account from either the supplier site or the payment
document, depending on which option you select in the Payment
Accounting region of the Payables Options window.
If you relieve liability for future dated payments when the payment is
issued, then use an asset account. If you relieve liability at clearing
time, then use a liability account.
If you use the Multiple Organization Support feature, you can enter a
value in this field only at the supplier site level.
See Also
Supplier Restrictions: page 3 – 36
Bank Accounts Region of the Suppliers and Supplier Sites Windows
Use this region to record the supplier bank accounts that your suppliers
and supplier sites use for electronic payment transactions. You define
supplier bank accounts in the Bank Accounts window. See: Defining
Supplier Bank Accounts: page 2 – 127.
Bank accounts you have already assigned to the supplier or supplier
site in the Bank Accounts window will appear here. Information you
enter in this region of the Supplier and Supplier Sites windows will
appear in the Supplier Assignments region of the Bank Accounts
window. See: Supplier Assignments Region of the Bank Accounts
window: page 2 – 136.
3 – 16
Oracle Payables User Guide
The Bank Accounts region appears for new supplier sites after you save
the supplier site. When you enter bank accounts for a supplier site,
Payables defaults all of the supplier’s active bank accounts. You can
add or delete bank accounts for a supplier or supplier site at any time.
Updating bank accounts for a supplier will not affect bank accounts for
existing supplier sites.
If you want to view detailed information or update a bank account
listed in this window, you can double click on the current record
indicator to navigate to the Banks window.
Name. Name of the bank account that this supplier or supplier site
uses. The list of values includes only active supplier bank accounts.
Number. Bank account number of the bank account that this supplier
or supplier site uses.
Primary. Enable this check box to have Payables use this bank account
as a default when you pay this supplier electronically. For each
supplier and supplier site that has bank account assignments, you must
designate as the primary bank account exactly one bank account per
currency. For all periods during which a supplier or site has active
bank accounts, you must specify a primary bank account. When you
enter an invoice, the supplier site primary bank account for the invoice
currency defaults to each scheduled payment. If no primary bank
account is selected for the supplier site, then the system uses the
supplier’s primary bank account. The Remit–to bank Account for the
scheduled payment then defaults to the payment.
If you enable the Allow Remit–to Account Override Payables option,
you can override the Remit–to bank account value in the Scheduled
Payments window, the Payments window, and the Modify Payment
Batch window with any other remit–to bank with the same currency
and for the same supplier.
Curr. Payables displays the currency you defined for the bank account.
Effective Dates From/To. Enter dates if you want to limit the time
during which a supplier site uses this bank account as the primary
bank account for receiving electronic payments in the bank account
currency.
Suppliers
3 – 17
Classification Region of the Suppliers Window
Employee Name. Select the name of an active employee to link an
employee to the supplier. You cannot select an employee name unless
you enter Employee as the supplier Type in this region.
Type. Type of supplier. Use Type to group suppliers for reporting
purposes. Several supplier reports use Type as a report parameter.
You can also define tax recovery rules based on supplier type. You
define supplier types in the Oracle Payables Lookups window. See:
Lookups: page 2 – 13. If you are entering an employee as a supplier,
you must select Employee in this field. Select Tax Authority for
suppliers to whom you remit withholding taxes.
Minority Owned. The minority group if the supplier is a
minority–owned business. You enter minority group codes for this list
of values in the Oracle Purchasing Lookups window. See: Lookups:
page 2 – 13.
Number. Employee number of the employee you have associated with
the supplier record.
One Time. Enable to designate a supplier with whom you do not
expect to do repeat business. You can find all one–time suppliers by
using the Suppliers Find window.
SIC. Standard Industry Code.
Small Business. You can use this designation for tracking business
with small companies.
Suggestion: Assign a variety of codes to distinguish among
suppliers. For example, assign codes to distinguish between
more reliable suppliers and less reliable suppliers. You can also
assign codes to distinguish types of suppliers, such as original
equipment manufacturers and suppliers of office products.
Woman Owned. You can use this designation for tracking business
with companies owned by women.
See Also
Supplier Restrictions: page 3 – 36
3 – 18
Oracle Payables User Guide
Contacts Region of the Supplier Sites Window
Contact information is for your reference only and is not used by the
system.
Prefix. Enter the appropriate prefix for your contact (Mr., Ms., Dr.,
etc.).
Inactive On. Date on which this contact will no longer appear on the
contact list for this supplier site.
Alternate Contact Name. You can enter an alternate name for your
supplier site contact if you have enabled the AP: Enter Alternate Fields
profile option. If you do not enable this option, the Alternate Name
field will not appear.
Control Region of the Suppliers and Supplier Sites Windows
Prevent payment of multiple supplier invoices by applying a hold to
the supplier site rather than to each individual invoice. You can enable
several types of supplier related holds for a supplier site. Payables also
provides these options at the supplier level, but only uses these values
to provide defaults for new supplier sites that you enter. The options
you enable at the supplier site level control Payables processing.
Hold All Payments. The most restrictive supplier site hold. By
selecting Hold All Payments for a supplier site, you prevent any
invoices for the supplier site from being selected for payment during a
payment batch or for a Quick payment. You cannot pay invoices for
the supplier site until you deselect the Hold All Payments option at the
supplier site.
☞
Attention: If the Hold All Payments option is enabled at the
supplier site, the Hold field in the Invoices window does not
reflect this, because it is a supplier hold, not an invoice hold.
Hold Unmatched Invoices. If you enable this option for a site, then
Payables applies a Matching Required hold to an invoice if it has Item
type distributions that are not matched to either a purchase order or
receipt. Payables applies the hold to the invoice during Approval. You
cannot pay the invoice until you release the hold. You can release this
hold by matching the invoice to a purchase order or receipt and
resubmitting Approval, or you can manually release the hold in the
Holds window of the Invoice Workbench. Payables will not apply a
hold if the sum of the invoice distributions by accounting code
combination is zero.
Suppliers
3 – 19
The default is the Hold Unmatched Invoices option you chose in the
Financials Options window. However, if this is a supplier that the
system automatically created during import, the default is the Hold
Unmatched Expense Reports option you defined in the Expense Report
region of the Payables Options window.
Hold Unapproved Invoices. If enabled, Payables automatically applies
a Supplier hold to all unapproved invoices entered for that site,
including any invoices you import. Payables applies this hold when
you submit Approval. You can still pay invoices that were entered for
the supplier site. You can manually release the Supplier hold in the
Holds window of the Invoice Workbench. Deselect this supplier site
option when you no longer want to hold unapproved invoices for a
supplier site.
Payment Hold Reason. The reason you are applying an invoice hold to
an invoice.
Invoice Amount Limit. If you enter an invoice for a supplier site that
exceeds the invoice amount limit you specify, Payables applies an
Amount hold to the invoice during Approval. You cannot pay the
invoice until you release the hold. You can release the hold by
adjusting the invoice amount, changing the Invoice Amount Limit for
the supplier site, or you can manually release the hold in the Holds
window of the Invoice Workbench.
Invoice Match Option. For purchase order shipments, indicate
whether you want to match invoices to purchase orders or to purchase
order receipts. This option defaults in the following order and can be
overridden at any level: Financials Options
Supplier
Supplier Site
Purchase Order Shipment. If the supplier was created automatically
during Invoice Import, the default value is Purchase Order, and you
can change it to Receipts as appropriate.
• Purchase Order. Match invoices to purchase order shipments
and/or distributions.
• Receipts. Match invoices to purchase order receipts.
See Also
Applying Holds: page 4 – 136
3 – 20
Oracle Payables User Guide
EDI (Electronic Data Interchange) Region of the Supplier and Supplier Sites
Windows
If you pay this supplier with electronic payments, enter the following
information for your supplier. For more information on Electronic
Data Interchange (EDI), see: Creating Payments with the Oracle
e–Commerce Gateway: page 5 – 57.
EDI Location. Electronic Data Interchange (EDI) location code for this
supplier site. This field appears only at the supplier site. For more
information, see: Oracle e–Commerce Gateway User Guide.
EDI ID Number. This field is used only by Oracle Energy, if you have
installed it, and it appears only at the supplier site.
Payment Method. How the electronic payment will be made.
Payment Format. Indicates type of information being transmitted with
the funds if the Payment Method is ACH.
Remittance Method. Party responsible for sending the remittance
advice to the payee.
Remittance Instruction. Text of specific wire or other electronic
payment instructions for an intermediary or recipient financial
institution (optional).
Transaction Handling. Standard EDI transaction code (ANSI ASC
X12) designating the action to be taken by all parties.
• C. Payment Accompanies Remittance Advice.
• D. Make Payment Only.
• I. Remittance Information Only.
• U. Split Payment and Remittance.
• Z. Other Handling.
General Region of the Supplier Sites Window
Customer Number. The number your supplier uses to identify your
company or organization. This number appears on the Oracle
Purchasing standard purchase order. This value is used for your
reference only.
Shipping Network Location. Physical location of the supplier site.
The location that you enter in this field appears on the list of values for
the Ship To Location field in Oracle Purchasing’s Purchase Order
Suppliers
3 – 21
window. Purchasing uses this information when it receives outside
processing items. In Work in Process, when you have two consecutive
outside processing operations on a routing, you can use the Ship To
Location to specify that the supplier for the first outside processing
operation is to ship the completed assemblies directly to the supplier
for the next outside processing operation.
Site Uses
Pay. Supplier site to which you send payment of an invoice. You
cannot enter an invoice for a supplier site that is not defined as a pay
site.
RFQ Only. Enable if you do not allow entering purchase orders for a
supplier site. An RFQ Only site is a site from which you receive
quotations.
Purchasing. Supplier site from which you order goods or services.
You must enter at least one purchasing site before Oracle Purchasing
allows you to enter a purchase order.
Procurement Card. Supplier site that accepts the credit card brands of
your procurement cards.
General Region of the Suppliers Window
Customer Number. The number your supplier uses to identify your
company or organization. This number appears on the Oracle
Purchasing standard purchase order.
Number. Parent supplier number.
Parent Supplier Name. Name of supplier’s parent organization if
supplier is a franchise or subsidiary. The parent organization must also
be defined as a supplier in the system.
Invoice Tax Region of the Suppliers and Supplier Sites Windows
Invoice Tax Code. Tax code that represents the tax charges you
generally receive on invoices from a supplier. Usually determined by
the shipping location to which your supplier sends goods to you. The
supplier value defaults from the Financials Options window, and the
3 – 22
Oracle Payables User Guide
supplier site value defaults from the supplier. You cannot enter an
Offset tax in this field.
When Payables defaults a tax code value to a document such as an
invoice, it uses the Tax Code Defaults hierarchy you define in the Tax
Defaults and Rules region of the Payables Options window. You can
include Supplier and Supplier Site tax values in this hierarchy. See:
Defaulting Tax in Payables: page 4 – 105.
If the Tax Calculation Level option for the supplier site is Header, the
Tax Code value defaults to the Invoices window. If the Calculation
Level option is Tax Code or Line, the Tax Code value defaults to the
Distributions window. You can override this default during supplier
site entry and invoice entry.
The list of values for this field lists all active tax codes, regardless of
effective dates. If a tax code has different tax rates based on effective
dates, then the tax rate for the tax code is determined by either the
invoice date or, for expense reports, by the receipt date.
If you use the Multiple Organization Support feature, you can enter a
value in this field only at the supplier site level.
Use Offset Tax. You can use offset taxes to record taxes on invoices
while offsetting the tax liability. You can associate offset taxes with
sales or user–defined taxes in the Tax Codes window.
When you enter an invoice, if a tax code you use has an associated
offset tax and if you enable the Use Offset Tax check box for the
supplier site, Payables creates a default offsetting tax distribution for
each tax distribution on an invoice. You can use offset taxes to record
the value added tax (VAT) name and amount without paying VAT to
the supplier (the tax distribution and the offset tax distribution net to
zero). For example, in the Tax Codes window, you can define an offset
tax code named Offset 10 that has a negative 10% rate. You can then
define a user–defined tax called VAT 10 that has a 10% rate. You can
assign the Offset 10 tax to the VAT 10 tax. You can always override the
default offset tax distribution on an invoice or manually enter
additional offsetting tax distributions.
If you delete the Invoice Tax Code for a supplier, the system deletes the
offset tax code from the supplier and supplier site and does not
automatically assign any default tax to any new supplier sites you
enter.
If you use the Multiple Organization Support feature, you can enable
this option only at the supplier site level.
Suppliers
3 – 23
Calculation Level. Select the level at which you want Payables to
automatically calculate tax for this supplier or supplier site. This value
defaults from the Payables Options window to the supplier, and from
the supplier to the supplier site, and from the supplier site to the
invoice. You can override the Calculation Level value if you enable the
Allow Calculation Override option in the previous window. For
detailed information, see: Automatic Tax Calculation Levels: page
10 – 34.
• Header. Automatically calculate the tax amount and create tax
distributions based on the Invoice Amount and Tax Code in the
Invoices window.
• Line. Automatically create tax distributions based on the
Distribution Amount, Tax Code, and Includes Tax check box in
the Distributions window. Calculate amounts at the line level.
• Tax Code. Automatically create tax distributions based on the
Distribution Amount, Tax Code, and Includes Tax check box in
the Distributions window. Calculate amounts at the tax code
level.
• None. Disable automatic tax calculation for this supplier or
supplier site.
Allow Calculation Level Override. This field applies to the
Calculation Level for tax. The Allow Calculation Level Override value
defaults to the corresponding fields in the following windows in the
order shown: Payables Options –> Suppliers (available only if you do
not use Multiple Organization Support) –> Supplier Site –> Invoices.
That is, you can adjust the default Calculation Level in the Supplier,
Supplier Sites, and Invoices windows only if the Allow Calculation
Level Override option is enabled in the previous window.
You cannot adjust the default Calculation Level in the Suppliers
window if the Allow Calculation Level Override option is not currently
enabled in the Payables Options window. You cannot enable this
option in the Supplier Sites window if the Allow Calculation Level
Override option is not currently enabled in the Suppliers window.
If you enable Allow Calculation Level Override for a supplier site,
during invoice entry after you enter a Tax Code in the Invoices
window, Payables opens a window in which you can change the
calculation level. You can choose Header, Tax Code, or Line, or you
can choose None, which disables tax calculation for the invoice. See
also: Overriding Tax Calculation Level: page 10 – 37.
Rounding Rule. If you use automatic tax calculation, select the
method for the system to use to round the automatically–calculated tax
3 – 24
Oracle Payables User Guide
amount. For example, the calculated tax is $5.988 and your Precision is
2 decimal places. If your Rounding Rule is Up, Payables enters 5.99 for
the tax amount.
Payables uses the rounding rule to calculate tax on invoices, recurring
invoices, and expense reports. This value defaults from the Payables
Options window to new suppliers, and from a supplier to the
supplier’s new supplier sites.
You can override this value at any level. If you update it in the
Payables Options window, it does not affect existing suppliers and
defaults only to new suppliers. If you update this value in the
Suppliers window, it does not affect existing supplier sites and defaults
only to new supplier sites. If you update it in the Supplier Sites
window, it does not affect existing invoices and will be used to
calculate tax on new invoices.
Payables rounds to the Minimum Accountable Unit if you entered a
value for that field in the Payables Options window. Otherwise, it
rounds to the Precision you enter. The examples below assume you are
using a Minimum Accountable Unit of .01.
• Up. Round up. For example, round $5.988 to $5.99
• Down. Round down. For example, round $5.988 to $5.98
• Nearest. Round to the nearest number, and if the difference
between Up and Down is equal, round Up. For example, round
$5.985 to $5.99.
Distribution Amounts Include Tax. Enable this option if you use
automatic tax calculation at the Tax Code or Line level, and you want
Payables to subtract the calculated tax from distributions when
Payables automatically creates tax distributions. For example, you
enter a distribution for $110 and enter a Tax Code with a 10% tax rate.
When Payables calculates the tax, it decreases the amount of the
distribution you entered to $100, and creates a $10 tax distribution.
You cannot enable this option if you select Header or None as the
Calculation Level.
This value defaults from the Payables Options window to new
suppliers, and from a supplier to any new supplier sites for the
supplier. You can update the Distribution Amounts Include Tax check
box for new and existing suppliers and supplier sites only if you enable
the Allow Override (of Distribution Amounts Include Tax) Payables
option.
Note that the Distribution Amounts Include Tax option does not apply
to distributions created by Distribution Sets.
Suppliers
3 – 25
Payment Region of the Suppliers and Supplier Sites Windows
All supplier payment values default to new supplier sites you enter.
Supplier site values default to invoices. You can override any payment
defaults during supplier site entry, except Allow Interest Invoices,
which does not display in the Supplier Sites window.
The defaults in the Supplier Payment region come from the defaults
you enter in the Financials Options window, except the default for Pay
Group and Allow Interest Invoices, which come from the Payables
Options window, and the default for Exclude Freight From Discount,
which is always No.
Allow Interest Invoices. If this option is enabled, Payables calculates
interest for the supplier’s overdue invoices and creates corresponding
interest invoices when you pay the overdue invoices. Payables
calculates interest only for invoices that are overdue 365 days or less. If
you enable this option, it is automatically enforced for all of a
supplier’s sites.
Payables automatically enables this option in this window if you
enabled this option in the Payables Options window. If this option is
not enabled in the Payables Options window, you cannot enable it here.
See: Automatic Interest: page 10 – 7 and.
Always Take Discount. Enable this option to have Payables always
take an available discount for a supplier, regardless of when you pay
the invoice.
Attention AR. Enable to have ”Attention Accounts Receivable”
printed on your checks immediately below the supplier site name and
before the address if your payment formatting program allows it.
Payables also prints this legend on your supplier mailing labels.
Exclude Freight From Discount. If this option is enabled for an
invoice, Payables automatically subtracts the freight amount from the
invoice amount when calculating the invoice amount subject to
discount. Payables uses the Discountable Amount on an invoice to
calculate the discount amounts when creating a scheduled payment for
an invoice.
Invoice Currency. The supplier invoice currency is used as a default
for new supplier sites you enter. The supplier site invoice currency is
used as a default for the Purchasing documents and Payables
transactions you enter for a supplier. Tax authority type suppliers must
use your functional currency as the default currency.
Pay Alone. If this option is enabled for an invoice, Payables creates a
separate payment for each invoice. If the option is not enabled for an
3 – 26
Oracle Payables User Guide
invoice, the invoice is paid with other invoices for the same supplier
site on a single payment.
Pay Group. Pay Group assigned to a supplier. The default for this
field is the Payables option you define for Pay Group. You can
override this default during supplier site entry or invoice entry.
Suggestion: When you create a payment batch, you can
choose a Pay Group to pay a category of suppliers or invoices
in the same payment batch. You define Pay Groups for
suppliers and supplier sites in the Oracle Purchasing Lookups
window. Examples of Pay Groups you can define are
employees, merchandise, non–merchandise, government,
domestic, and international.
Pay Date Basis. The Pay Date Basis for a supplier determines the pay
date for a supplier’s invoices.
• Due
• Discount
Payment Currency. The default for Payment Currency in the Suppliers
window is the value you enter for supplier Invoice Currency. You can
change the Payment Currency value only if the Invoice Currency has
associated fixed–rate currencies (for example, euro). If the Invoice
Currency is a fixed–rate currency, you can change the Payment
Currency value to an associated fixed–rate currency. The supplier
Payment Currency is used as a default for all new supplier sites you
enter.
The supplier site Payment Currency is the default for the Payment
Currency field in the Invoices window. It is also the default currency
for invoices you create for this supplier site by using Payment on
Receipt, Open Interface Import, and Recurring Invoices.
Payment Method. The method you use most frequently to pay this
supplier’s invoices:
• Check. You can pay with a manual payment, a Quick payment,
or in a payment batch.
• Electronic. Pay electronic payments either through the
e–Commerce Gateway, or by delivering a payment batch file to
your bank. For both methods, Payables creates a file during
payment batch creation. E–Commerce Gateway payment files
are processed through the e–Commerce Gateway and delivered
to your bank to create payments. Files for electronic funds
transfers are formatted and delivered to your ap.out directory
for you to deliver to your bank.
Suppliers
3 – 27
You must enter supplier bank account information to use
electronic payments. See: Bank Accounts Region of the Suppliers
and Supplier Sites window: page 3 – 16. If you enable the Use
Multiple Supplier Banks Payables option, you can also enter
supplier banks in the Banks window and assign them to your
suppliers.
• Wire. Manually record an external wire transfer of funds
between your bank and your supplier’s bank.
• Clearing. Record invoice payments to internal suppliers.
Payment Priority. A number, between 1 (high) and 99 (low), which
represents the priority of payment. The system uses the Supplier Site
value to automatically assign a Payment Priority to an invoice’s
scheduled payment(s) during invoice entry.
Terms. Payment terms used to schedule payments for an invoice. The
system uses payment terms to automatically calculate due dates,
discount dates, and discount amounts for each invoice you enter. If the
terms you want to use are not on the list of values, you can define
additional terms in the Payment Terms window. See also: Scheduling
Invoice Payments: page 4 – 150.
Terms Date Basis. Date from which Payables calculates a scheduled
payment for a supplier. The default is one of the following Payables
option you defined for Terms Date Basis.
• System. When you enter invoices, Payables defaults the system
date as the terms date.
• Goods Received. When you enter invoices, Payables prompts
you to enter the date you received the goods that are included on
the invoice as the terms date.
• Invoice. When you enter invoices, Payables defaults the invoice
date as the terms date.
• Invoice Received. When you enter invoices, Payables prompts
you to enter the date you received an invoice as the terms date.
Bank Charge Bearer. Indicate whether you or your supplier pays bank
charges for electronic payments. If your supplier pays, indicate
whether your supplier uses the standard or negotiated rate. This
information is used in the Define Bank Charges window. See: Bank
Charges: page 2 – 160. This field is not visible if you do not enable the
Use Bank Charges Payables option.
• Internal. You pay bank charges.
3 – 28
Oracle Payables User Guide
• Supplier/Negotiated. Your supplier pays bank charges at a
negotiated rate.
• Supplier/Standard. Your supplier pays bank charges at a
standard rate.
See Also
Automatic Interest: page 10 – 7
Purchasing Region of the Suppliers and Supplier Sites Windows
All supplier purchasing values default to new supplier sites you enter.
Note: If you use the Multiple Organizations Support feature,
values you enter in the Financials Options window will default
to both the supplier and supplier site.
Supplier site values default to purchase orders and purchase
requisitions. You can override any purchasing defaults during supplier
site entry and purchasing document entry.
Create Debit Memo From RTS Transaction. Enable this option if you
want the system to automatically create a Debit Memo in Payables
when you enter a Return To Supplier (RTS) in Purchasing. The value
for supplier defaults from the Purchasing Options window.
Note: This feature is not available in the base release of
Payables release 11i. If your installation of Payables does not
include this functionality, then you can call Oracle Customer
Support to request it in a patch.
Bill–To Location. Location to which a supplier sends the invoice for
goods or services. The default for this field is the Financials option
you define for Bill–To Location, and the supplier site default is the
supplier option you enter.
Country of Origin. Country in which a product was manufactured.
This value defaults to purchase orders and releases.
FOB. Free–on–Board (FOB) code for a supplier. The default is the
Financials option you define for FOB, and the supplier site default is
the supplier option you enter.
Suppliers
3 – 29
Freight Terms. You negotiate freight terms with a supplier to
determine whether you or the supplier pays for freight charges on
goods you order from a supplier. The supplier default is the Financials
option you define for Freight Terms, and the supplier site default is the
supplier option you enter.
Purchasing Hold Reason. Reason you are preventing approval of
purchase orders for a supplier. You enter a value in this field only if
you enable the Purchase Order Hold field. The system does not use
this information; it is for your reference only.
Purchase Order Hold. If you enable this option for a supplier, and you
also enable the Enforce Supplier Hold option in the Control region of
the Purchasing Options window, then you can create a purchase order
for the supplier, but you cannot approve the purchase order. To release
this hold, deselect Purchase Order Hold here.
Ship–To Location. Location where a supplier sends shipments for
goods/services. The default for this field is the Financials option you
define for Ship–To Location, and the supplier site default is the supplier
option you enter.
Ship Via. Freight carrier you use with a supplier. The default is the
Financials option you define for Ship Via, and the supplier site default
is the supplier option you define. The value you enter is the value in
the Description field of the Freight Carriers window in Purchasing.
If the supplier was created automatically during Invoice Import, the
default value is Purchase Order and you can update it.
Payment on Receipt Region
Enter information in the following fields if you have installed
Purchasing and use the Payment on Receipt feature to create invoices
from receipts and purchase orders. These receipts include Advance
Shipment Notices (ASNs) and Advance Shipment and Billing Notices
(ASBNs) that you receive electronically in Purchasing. See: Advance
Shipment Notice (ASN/ASBN) (Oracle Purchasing User Guide).
Pay on. You can enter a value for the Pay On field only if the supplier
site is a pay site. For more information, see: Payment on Receipt
(Oracle Purchasing User Guide).
• Receipt. If you want to use the Pay on Receipt AutoInvoice
Program to automatically create invoices based on receipts and
purchase orders you enter for this supplier site, enter Receipt.
3 – 30
Oracle Payables User Guide
• blank. If you do not want to use the Pay on Receipt AutoInvoice
Program, leave this field blank.
Alternate Pay Site. Pay site to be used as the supplier site when the
system creates invoices from this supplier site’s receipts. This list of
values is limited to active pay sites for the supplier.
• If this supplier site record is a pay site: If you want Payables to
create invoices for a different pay site, then enter the site name
(Optional). If you want to use this supplier site as the pay site,
then leave the field blank.
• If this supplier site record is not a pay site: Enter the supplier site
to use for payment of invoices for this supplier site’s receipts
(Required).
Invoice Summary Level. If you left the Alternate Pay Site field blank,
enter the level at which you want to consolidate invoices for this
supplier site when you submit the Pay on Receipt AutoInvoice
Program:
• Pay Site. Create one invoice for this supplier pay site.
• Packing Slip. Create one invoice per packing slip for this
supplier pay site.
• Receipt. Create one invoice per receipt for this supplier pay site.
Receiving Region of the Suppliers Window
All supplier receiving values default to new purchase orders you enter
for a supplier. You can override any receiving defaults during
purchase order entry.
Allow Substitute Receipts. Receivers can receive substitute items in
place of ordered items. You must have previously defined acceptable
substitute items for the ordered item in the Purchasing Item
Relationships window. See: Defining Item Relationships (Oracle
Inventory User Guide).
Allow Unordered Receipts. Receivers can receive unordered items.
You can override this option for specific items. If you enable this
option you can later match the unordered receipts to a purchase order.
Days Early/Late Receipt Allowed. Maximum acceptable number of
days early/late for receipts.
Enforce Ship–to Location. The value you enter in this field determines
whether the receiving location must be the same as the ship–to location:
Suppliers
3 – 31
• None. The receiving location may differ from the ship–to
location.
• Reject. Purchasing does not permit receipts when receiving
location differs from the ship–to location.
• Warning. Purchasing displays a warning message but permits
receipt when receiving location differs from the ship–to location.
Match Approval Level. If you use Oracle Payables with Oracle
Purchasing or another integrated purchasing product, you can perform
online matching of invoices and original purchase orders or purchase
order receipts. Matching ensures that you only pay for the goods and
services you ordered and that your suppliers do not over–bill you. If
you are billed for an item over the amount and quantity tolerances you
define, the Payables Approval Program applies holds to the invoice and
prevents payment until you release the holds.
• 2–Way. When you match to a purchase order or receipt,
Payables Approval performs these control checks:
1. Quantity billed <= Quantity ordered
2. Invoice price <= Purchase order price
• 3–Way. Control checks 1 and 2, plus:
3. Quantity billed <= Quantity received
• 4–Way. Control checks 1, 2, and 3, plus:
4. Quantity billed <= Quantity accepted
Note that when you query suppliers in this window you cannot use
Match Approval Level as query criteria.
Quantity Received Tolerance. Maximum acceptable over–receipt
tolerance percentage.
Quantity Received Exception. How Purchasing handles receipts that
exceed the Quantity Received Tolerance:
• None. Receipts may exceed the selected tolerance.
• Reject. Purchasing does not permit receipts in excess of the
selected tolerance.
• Warning. Purchasing displays a warning message but permits
receipts in excess of the selected tolerance.
Receipt Date Exception. How Purchasing handles receipts that are
earlier or later than the allowed number of days selected
• None. Receipts may exceed the allowed days early or late.
3 – 32
Oracle Payables User Guide
• Reject. Purchasing does not permit receipts outside the selected
number of days early or late.
• Warning. Purchasing displays a warning message but permits
receipts outside the selected number of days early or late.
Receipt Routing. Default receipt routing that you assign goods:
Direct Delivery, Inspection Required, or Standard Receipt.
See Also
Defining Purchasing Options (Oracle Purchasing User Guide)
Defining Default Options (Oracle Purchasing User Guide)
Defining Accrual Options (Oracle Purchasing User Guide)
Defining Control Options (Oracle Purchasing User Guide)
Defining Internal Requisition Options (Oracle Purchasing User Guide)
Defining Numbering Options (Oracle Purchasing User Guide)
Tax Reporting Region of the Suppliers Window
You record supplier tax information to enable three defaults during
invoice entry, and to provide tax reporting information. For more
information, see: Entering Taxes on Invoices: page 4 – 97.
Federal. Reportable to the United States Internal Revenue Service for
1099 purposes. In the United States, you must report to the Internal
Revenue Service certain types of payments you make to 1099 reportable
suppliers.
Refer to federal tax publications for more information regarding 1099
reporting requirements.
Income Tax Type. Income tax type for a United States 1099 reportable
supplier. Choose from a list of 1099 Miscellaneous Tax types. This
value defaults from supplier to invoice distributions. You can override
this default during invoice entry. Purchasing also retains the Income
Tax Type at the purchase order line level for a supplier’s purchase
orders.
Suppliers
3 – 33
Reporting Name. Tax reporting name for a supplier subject to United
States Internal Revenue Service (IRS) income tax reporting
requirements. Required only if the tax reporting name for the supplier
is different from the supplier name. In accordance with IRS
requirements, Payables prints this name, instead of the supplier name,
on all 1099 reports for the supplier.
For example, you define a supplier for a consulting firm owned and
operated by a single individual. You enter the name of the company as
the supplier name; however, the tax reporting name for the company is
the name of the individual. The IRS levies penalties against a business
that submits 1099 information with any name other than the tax
reporting name for the supplier. By entering the individual’s name as
the tax reporting name, you produce 1099 information for the supplier
that complies with the IRS requirements.
Reporting Site. This reporting supplier site’s address is printed on the
1099 form. Payables displays the income tax reporting site for the
supplier if you have already defined a supplier site as the tax reporting
site in the Tax Reporting region in the Supplier Sites window.
You can choose only one supplier site as the income tax reporting site
for a supplier. Payables requires a tax reporting site for each 1099
supplier for income tax reporting purposes. Payables warns you if you
do not select a tax reporting site for this 1099 supplier.
State. Enable this field if you participate in the United States Internal
Revenue Service Combined Filing Program and the supplier is
reportable to a state taxing authority. Payables uses this status for
reporting purposes only. By marking a supplier as State Reportable,
you can create custom reports that satisfy a tax authority’s reporting
requirements. Refer to state tax publications to obtain information
regarding 1099 reporting requirements.
Verification Date. Date you received tax verification from the supplier.
In Payables you can submit Tax Information Verification Letters for
your suppliers. Payables prevents the generation of any further letters
to a supplier after the Verification Date.
Name Control. The first four characters of the last name of your 1099
supplier. Payables displays the four character Name Control you enter
here when you create your 1099 Electronic Media Report for federally
reportable suppliers. If you do not enter any values in the Name
Control field, Payables does not print in the four positions designated
for the Name Control information in this supplier’s B record when you
create your 1099 Electronic Media Report.
3 – 34
Oracle Payables User Guide
Organization Type. Type of organization for this supplier. The United
States Internal Revenue Service (IRS) requires this information if you
use magnetic media to file your 1099 tax information.
• Corporation
• Government Agency
• Individual
• Partnership
• Foreign Corporation
• Foreign Government Agency
• Foreign Individual
• Foreign Partnership
If you participate in the United States IRS Combined Filing Program
and you make payments to a foreign supplier, you need to ensure that
you select one of the foreign Organization Types to indicate that the
supplier is a foreign entity. If you made 1099 payments to a foreign
supplier, Payables flags the B records in your 1099 tape for those
suppliers who meet the Internal Revenue Service’s reporting limit.
Payables then includes the country of these foreign suppliers in its 1099
reports.
See Also
Entering Taxes on Invoices: page 4 – 97
Tax Codes: page 2 – 146
1099 Reporting Overview: page 8 – 35
Entering Invoices for Suppliers Subject to Income Tax Reporting
Requirements: page 4 – 131
Supplier Restrictions: page 3 – 36
Suppliers
3 – 35
Tax Reporting Region of the Supplier Sites window
Income Tax Reporting Site. Enable check box to select a site as the
reporting site for a supplier. This reporting supplier site’s address is
printed on the 1099 form Payables requires exactly one tax reporting
site for each 1099 supplier for income tax reporting purposes.
Tax Registration Number. Tax registration number, for example, a
supplier’s value–added tax (VAT) registration number.
Withholding Tax Region of the Suppliers and Supplier Sites windows
Use this region to enter withholding tax information for a supplier and
supplier site. If your Use Withholding Tax Payables option is not
enabled, you will not be able to navigate to this region. The options
you select for a supplier default to the new supplier sites you enter,
then default to invoices you enter for that site.
Allow Withholding Tax. Enable to allow withholding taxes for the
supplier and supplier site. If you do not allow withholding tax for a
supplier, you cannot allow withholding tax for any of the supplier’s
sites. If you disable at the supplier site, you will not be able to allow
withholding taxes for any invoices entered for this supplier site.
Withholding Tax Group. A default withholding tax group to assign to
all invoices for the supplier site.
See Also
Automatic Withholding Tax Overview: page 10 – 24
Supplier Restrictions:
ACCOUNTS: All accounts you enter must consist of valid
combinations of segment values.
3 – 36
Oracle Payables User Guide
Reviewing and Adjusting Suppliers
This discussion includes the following topics:
• Finding Suppliers: page 3 – 37
• Reviewing Suppliers: page 3 – 38
• Adjusting Suppliers: page 3 – 38
See Also
Identifying Duplicate Suppliers: page 3 – 42
Finding Suppliers
You can find suppliers by using the Find Suppliers window or by
entering a query directly into the Suppliers window. In the Find
Suppliers window you can enter a wide variety of search criteria,
including tax status, parent supplier, and payment priority range. You
then choose the Find button to navigate to the Suppliers window,
where Payables displays all suppliers that match the Find criteria.
From the Suppliers window, you can review all information about a
supplier.
"
To find a supplier using the Find Suppliers window:
1.
Open the Find Suppliers window from the Suppliers window,
either by choosing the Find icon from the toolbar or by selecting
Find from the View menu.
Enter search criteria directly into the fields. You can enter complex
criteria by entering information in several fields.
2.
Choose Find to navigate to the Suppliers window, where Payables
displays all suppliers that match your search criteria.
Suppliers
3 – 37
Reviewing Suppliers
You can review suppliers in the Suppliers and Supplier Sites windows
in inquiry mode or entry mode, depending on the path you choose
from the Navigator.
"
To review suppliers:
1.
Find the Supplier using the Find Suppliers window. See: Finding
Suppliers: page 3 – 37.
2.
Review supplier information in the Suppliers window.
3.
Choose the Sites button to open the Supplier Sites window
4.
Sites appear in alphabetical order.
5.
To see other sites do one of the following:
• Choose the Up Arrow or Down Arrow key
• Choose the Page Up or Page Down key
• Choose Record from the View menu, and then choose either First
or Last
See Also
Calculating a Supplier or Supplier Site Balance: page 4 – 296
Adjusting Suppliers
Updating Supplier and Supplier Site Defaults
Remember that when you make changes to values that default to
Payables and Purchasing documents, the changed value defaults only
to new documents you subsequently enter or create. For example, if
you change the Pay Group for a supplier site, the new Pay Group will
default to new invoices you enter, but the change will not affect existing
invoices. Also, if you change a supplier value that defaults to supplier
sites, the change will only affect new supplier sites you create, but the
change will not affect existing supplier sites. Therefore, the change will
not affect documents you subsequently create for existing supplier
3 – 38
Oracle Payables User Guide
sites. If you want a change to affect documents you enter or create for
an existing supplier site, be sure to make the changes at the supplier
site level.
"
To update supplier and supplier site defaults:
1.
Find the Supplier in entry mode. See: Finding Suppliers: page
3 – 37.
2.
In the Suppliers window, make any changes in the appropriate
fields. For detailed information on any field, see the Suppliers and
Supplier Sites Window Reference: page 3 – 14.
3.
Choose the Sites button to open the Supplier Sites window. Update
information for any supplier sites.
4.
Save your work.
Updating Supplier Invoice Holds
Holds are controlled at the supplier site. For example, if you have
enabled the Hold All Payments option for a supplier and supplier site,
and you disable the option for the supplier, but not the supplier site, all
unapproved invoices for the supplier site will remain held for payment.
"
To update supplier holds:
H
In the Supplier Sites window, update the hold status.
See Also
Applying Holds: page 4 – 136
Releasing Holds: page 4 – 140
Suppliers
3 – 39
Adding a New Supplier Site
"
To add a new supplier site:
1.
Find the Supplier. See: Finding Suppliers: page 3 – 37.
2.
In the Suppliers window, choose the Sites button to navigate to the
Supplier Sites window.
3.
Navigate to a new supplier record in one of the following ways:
• choose New from the File menu
• use the [Down Arrow] key
• choose the New icon on the tool bar
4.
Enter the Supplier Site Name and address information. The Site
Name will not appear on documents you send to the supplier; it is
for your reference when you select a supplier site from a list of
values during transaction entry. Enter in the appropriate region
any additional Supplier Site information you want to record. If
supplier information automatically defaults to the new supplier
sites you enter, you can override these defaults. See the following
field references for detailed information on a region.
• Accounting: page 3 – 15
• Bank Accounts: page 3 – 16
• Contacts: page 3 – 19
• Control: page 3 – 19
• EDI (Electronic Data Interchange): page 3 – 21
• General: page 3 – 21
• Invoice Tax: page 3 – 22
• Payment: page 3 – 26
• Purchasing: page 3 – 29
• Tax Reporting: page 3 – 36
• Withholding Tax
5.
3 – 40
Oracle Payables User Guide
Save your work.
Updating a Supplier’s Tax Status
"
To update a supplier’s tax status:
1.
Find the Supplier. See: Finding Suppliers: page 3 – 37.
2.
In the header region of the Suppliers window, make any changes to
the Taxpayer ID or Tax Registration Number.
In the tax reporting region, update any additional information. For
detailed information on any field, see: Tax Reporting Region of the
Suppliers window: page 3 – 33.
3.
In the Suppliers window, choose the Sites button to navigate to the
Supplier Sites window. If you need to change a supplier site’s tax
information, then in the Tax Reporting Region of the Supplier Sites
window, change the Tax Registration Number, or Income Tax
Reporting Site status. See: Tax Reporting Region of the Supplier
Sites window: page 3 – 36.
☞
4.
Attention: If you are updating an existing supplier to 1099
reportable status after you have entered invoices and made
payments to the supplier, then you may want to use the Update
Income Tax Details Utility to make mass updates to existing
invoices.
Save your work.
See Also
Update Income Tax Details Utility and Report: page 8 – 18
Entering Invoices for Suppliers Subject to Income Tax Reporting
Requirements: page 4 – 131
1099 Reporting Overview: page 8 – 35
Suppliers subject to income tax reporting requirements: page 3 – 7
Suppliers
3 – 41
Identifying Duplicate Suppliers
Although the system will not allow you to enter duplicate supplier
names, you may inadvertently define the same supplier using two
different names. For example, you might enter Oracle Corporation and
Oracle Corp, or you might enter a contracter under his name and his
company name. You might also create duplicate suppliers if you
import suppliers from another accounts payable system.
If you want to know if a supplier exists, you can query the Supplier in
the Suppliers window or submit the Supplier Listing by Supplier
Name. When you enter an invoice, check the list of values for the
Supplier field to see if your supplier exists before you enter a new
supplier.
Suggestion: To avoid entering duplicate suppliers in
Payables, consider developing and using standard naming
conventions for suppliers, and restricting who can enter new
suppliers.
Submit the following reports periodically to review your suppliers and
identify duplicates:
• Suppliers Report. Lists detail supplier information. Report
provides multiple selection criteria and lists suppliers in
alphabetical order. See: Suppliers Report: page 8 – 32.
• Supplier Audit Report. Lists active suppliers whose names are
the same up to a number of characters which you specify, and
ignores case, spaces, special characters, etc. The report lists all
sites of each possible duplicate supplier. See: Supplier Audit
Report: page 3 – 48.
3 – 42
Oracle Payables User Guide
Supplier Merge Program
The Supplier Merge Program is a utility you can use to maintain your
supplier records. You can use it to merge duplicate suppliers into a
single, consolidated supplier. You can use it to merge transactions
within the same supplier from one supplier site to a different supplier
site. You can choose to merge all transactions for a supplier into a new
supplier, or you can just choose to merge unpaid invoices. This option
is useful in the case of an acquisition. In that case, you might want to
leave all of the transaction history with the original supplier and only
merge unpaid invoices to the new supplier who now wants to receive
the payments.
☞
Attention: Merging suppliers is an irreversible action. You
cannot reverse the merge once it has completed. Before you
initiate the merge program, you should be sure that the action
you want to take is final.
When you merge supplier information you have different options. You
can choose to merge both invoices and purchase orders. If you choose
to merge invoices, then you can merge all invoices or just unpaid
invoices. When you choose to merge all invoices, any associated
payments are merged as well. The unpaid option will not transfer
partially paid invoices or partially applied prepayments. If you have
invoices with these conditions, then you must choose the option to
merge all invoices. Alternatively you can complete payment of the
invoices or application of the prepayments.
The Supplier Merge Program updates all information related to the
transaction you choose to merge, depending on the other Oracle
products you are using. If you choose to merge invoices, other
information that is updated with the new supplier information is
recurring invoice templates, accounting entries, project cost lines, fixed
asset invoices, and inventory movement statistics. If you choose to
merge purchase orders, then all related purchase order information is
updated with the new supplier information. This includes information
like receipt transactions, requests for quotations, supplier schedules,
sourcing information, approved supplier lists, and MRP information.
Payables will not transfer invoices if the merge would create a
duplicate invoice for the new supplier. We recommend that you review
the invoices for both the old supplier and the new supplier before a
merge so you can identify and resolve any duplicate invoices.
You can run the Invoice History Report for each supplier to get a listing
of all invoices. If you find a duplicate invoice situation you need to
decide what you want to do with the duplicate record. You can leave it
Suppliers
3 – 43
under the old supplier. If you want to merge it to the new supplier,
then you need to alter the invoice number so the merge does not
recognize it as a duplicate. If the invoice is unpaid, partially paid and
not fully accounted, then you can adjust the invoice number, merge,
and then proceed to cancel the invoice or take whatever action is
needed. If the invoice is paid or fully accounted, then you must adjust
it to be partially paid and accounted before you can change the invoice
number. To do this you can enter a zero amount distribution line, and
then you can increase the invoice amount. You can then alter the
invoice number. Then you simply reduce the invoice amount back to
the original amount and, if you choose, you can delete the distribution
line you added. Note that you must have enabled the Allow
Adjustments to Paid Invoices Payables option in order to change the
invoice number.
As part of the merge program, Payables makes inactive any supplier
sites from which you choose to merge all transactions. If you choose to
merge all transactions for all sites, Payables automatically makes
inactive the supplier as well.
After the Supplier Merge Program completes, it automatically produces
the Supplier Merge Report as an audit trail of your supplier merge
activity. The report lists all invoices and purchase orders updated by
the merge. It also lists duplicate invoices that it did not merge. This
information is not available online. If you need to retain this audit trail
you should keep this report.
Prerequisites
❑ Identify duplicate suppliers. See: Identifying Duplicate Suppliers:
page 3 – 42.
❑ If you merge invoices, the consolidated supplier site must be a pay
site. See: General Region of the Supplier Sites window: page
3 – 21.
❑ If you merge purchase orders, the consolidated supplier site must
be a purchasing site. See: General Region of the Supplier Sites
window: page 3 – 21.
❑ Submit Payables Open Interface Import for any invoice records that
are in the Open Interface tables for the duplicate supplier. The
merge does not update any information in these interface tables
since it has not yet been validated and created as invoices. Also,
after a complete supplier merge, the supplier will be inactive, and
you cannot import invoice records for inactive suppliers.
3 – 44
Oracle Payables User Guide
"
To initiate a supplier merge:
1.
In the Supplier Merge window, select which invoices to transfer to
the new supplier and site: All, Unpaid, or None.
2.
If you want to transfer all purchase order information to the new
supplier, select PO.
3.
Enter the supplier name and site from which you want to merge
information. Enter the supplier name and site to which you want
to merge information. If the supplier you want to transfer from has
multiple sites that you want to merge, you must enter a row for
each supplier and site combination.
• If you are merging supplier sites for the same supplier, then enter
the same supplier for both the From and To Supplier Names.
• If you want the merge to automatically create an existing site
belonging to the old supplier for the new supplier, along with
merging information in that site, select Copy Site. When you do
this you will not be able to enter a site in the To Supplier Site
field.
4.
Choose the Merge button. Payables submits a concurrent request
to run the Supplier Merge Program.
5.
Review the Supplier Merge Report after the request completes.
See Also
Purchase Order Header Updates Report: page 3 – 47
Supplier Merge Report: page 3 – 46
Suppliers
3 – 45
Supplier Merge Report
The Supplier Merge Program is a utility you can use to maintain your
supplier records. You can use it to merge duplicate suppliers into a
single, consolidated supplier. You can use it to merge transactions
within the same supplier from one supplier site to a different suppler
site. You can choose to merge all transactions for a suppler into a new
supplier, or you can just choose to merge unpaid invoices. This option
is useful in the case of an acquisition. In that case you may want to
leave all of the transaction history with the original supplier and only
merge unpaid invoices to the new supplier who now wants to receive
the payments.
The report lists the new (correct) suppliers and the old (duplicate)
suppliers. The report also lists invoice information for invoices
updated for each set of new and old suppliers. Payables prints the
total number and total amount of invoices that have been updated for
each set of merged suppliers.
Payables also prints the total number of duplicate invoices. You can
use this report to identify any duplicate invoices, update the invoice
number on one of the invoices, and then resubmit Supplier Merge.
Report Submission
Payables automatically prints this report when you initiate a Supplier
Merge. See: Supplier Merge Program: page 3 – 43.
3 – 46
Oracle Payables User Guide
Purchase Order Header Updates Report
Use the Purchase Order Header Updates Report to review purchase
orders updated by the Supplier Merge program.
This report prints the new (correct) and the old (duplicate) suppliers. It
then lists for each updated purchase order the purchase order number
and name of the purchasing agent.
Report Submission
Payables automatically prints this report when you initiate a Supplier
Merge and choose to update purchase orders for the suppliers you
merge. See: Supplier Merge Program: page 3 – 43.
Suppliers
3 – 47
Supplier Audit Report
Use the Supplier Audit Report to help identify potential duplicate
suppliers. For example, you enter a supplier named Oracle
Corporation, and another supplier named Oracle Corp. This report
lists active suppliers whose names are the same up to a specified
number of characters. The report ignores case, spaces, special
characters, etc.
You may want to run the report with different parameters to fine tune
your search. Specify a length short enough to identify duplicates, such
as Comco and Comco, Inc., but long enough to avoid obviously
different supplier names, such as General Instruments and General
Electric.
The report lists all site names and addresses of each potential duplicate
supplier. Payables inserts a blank line between groups of possible
duplicate suppliers. Review the report to determine which suppliers
are duplicates. After you have identified duplicate suppliers, you can
combine them using Supplier Merge. If you merge purchase order
information, then any references to the supplier in blanket purchase
orders, quotations, and autosource rules are updated to the new
supplier.
Report Submission
You submit this report from the Submit Request window. See:
Submitting Standard Reports, Programs, and Listings: page 8 – 2.
Selected Report Parameters
Matching Supplier Name Length. Number of characters in the
supplier name that you want Payables to compare to identify potential
duplicate suppliers.
See Also
Supplier Merge Program: page 3 – 43
Common Report Parameters: page 8 – 5
Common Report Headings: page 8 – 8
3 – 48
Oracle Payables User Guide
Taxpayer ID Validation
Payables provides for Italy and Spain the following country–specific
validation of the Taxpayer Identification Number, also known as the
NIF. If you have defined either Italy or Spain as your ”Home Country”
in the Member State field of the Financials Options window, and your
home country is the same as your Default Country profile option, then
Payables validates the Taxpayer Identification Number you enter based
on the rules of your home country. If the Member State value in the
Financials Options window and Default Country profile option are
different, Payables performs no validation.
Italy (IT)
• Taxpayer ID is unique
• Length = 16 or 11
• Check Digit is correct (last number)
Spain (ES)
• Taxpayer ID Number is unique
• Starts with valid character
• Format of rest of number depending on the first character: If the
first character is:
– T then no further validation
– A, B, C, D, E, F, G then rest must be numeric
– X, P, Q, S, or a number then check Check Digit (last number)
Portugal (PT)
• Taxpayer ID Number is unique
• Length = 9
• Taxpayer ID must be numeric
• Check Digit is correct (last number)
Suppliers
3 – 49
• Complies with check digit validation
See Also
Setting User Profile Options (Oracle Applications System Administrator’s
Guide)
3 – 50
Oracle Payables User Guide
Tax Registration Number Validation
Payables provides for Greece, Italy, Spain, Netherlands, and Austria the
following country–specific validation of the Taxpayer Registration
Number, also known as the VAT number. If you have defined one of
these countries as your ”Home Country” in the Member State field of
the Financials Options window, and your home country is the same as
your Default Country profile option, then Payables validates the
Taxpayer Identification Number you enter based on the rules of your
home country. If the Member State value in the Financials Options
window and Default Country profile option are different, Payables
performs no validation.
Greece
• Tax Registration Number is unique
• All characters are numeric
• Length = 9 (can be prefixed with ”EL”)
• Check Digit (the 9th digit) is correct
Italy (IT)
• Tax Registration Number is unique
• All characters are numeric
• Length = 11
• Check Digit is correct
Spain (ES)
• Tax Registration Number is unique
• Prefixed with ”ES”
• Format of rest of number depending on the next character: If the
next character is:
– T then no further validation
– A, B, C, D, E, F, G then rest must be numeric
– X, P, Q, S, or a number then check Check Digit (last number)
Suppliers
3 – 51
Netherlands (NL)
• Tax Registration Number is unique
• Length = 14
• First two characters are ”NL”
• Last two characters are in the range 01–99
• 12th character = B
• Characters 3–10 are numeric
• Characters 3–10 match check digit held in char 11
Austria (AT)
• Tax Registration Number is unique
• Length = 11
• First three characters are ”ATU”
• Characters 4–10 match check digit held in character 11
Belgium (BE)
• Tax Registration Number is unique
• Length = 11
• First two characters are ”BE”
• Characters 3–11 are numeric
• Last two characters are check digits
See Also
Setting User Profile Options (Oracle Applications System Administrator’s
Guide)
3 – 52
Oracle Payables User Guide
CHAPTER
4
Invoices
This chapter tells you how to enter, adjust, approve, and review
invoices and invoice batches. It explains how you can use the Invoice
Gateway and the Invoice Workbench to enter invoices. It discusses all
kinds of invoices: Basic, Credit/Debit Memo, Mixed, Purchase Order
Matched, Recurring, Prepayments, and Expense Reports. It tells you
how to enter invoice information that is used by other products
including Oracle Purchasing, Oracle Projects, and Oracle Assets.
This chapter describes holds and tells you how to apply or release an
invoice hold.
It describes how to use Payables Open Interface Import to import
invoices from the Invoice Gateway, e–Commerce Gateway, Property
Manager. procurement card companies, and external systems. It also
explains how to use Payables Invoice Import to import expense reports
from Self–Service Expenses and Projects.
For information on invoice reports, see the Reports chapter.
Invoices
4–1
Entering Invoices Overview
You can enter and import invoices into Payables in many ways:
Manual Invoice Entry
You usually enter supplier invoices in either the Invoice Workbench or
the Invoice Gateway. You can match to purchase orders when entering
these invoices. For information on the differences between these
windows, see the following section, Differences Between Entering
Invoices in the Invoice Gateway Window and the Invoice Workbench:
page 4 – 5.
• Invoice Workbench: (Invoice Batches window, Invoices window,
Distributions window, and the associated windows). Used to
enter any invoice directly into the Payables system. Use this
instead of the Invoice Gateway when entering complex invoices
or invoices that require online validation and defaulting. Also
used when entering an invoice that needs immediate action, such
as payment. See: Entering Basic Invoices in the Invoice
Workbench: page 4 – 44, and Entering Invoice Batches: page
4 – 55.
• Invoice Gateway window: Used for quick, high–volume invoice
entry for invoices that do not require extensive validation and
defaults. After entry, you import these into the Payables system.
Validation and defaulting occur during import. See: Entering
Invoice Records in the Invoice Gateway: page 4 – 11.
Automatic Invoice Creation
You can set up your system to automatically create periodic invoices,
for example, rent invoices:
• Recurring Invoices. See: Entering Recurring Invoices: page
4 – 185.
Imported Invoices
You can import invoices or invoice information to create invoices in
Payables. See: Payables Invoice Import Program: page 4 – 239, and
Payables Open Interface Import Program: page 4 – 261.
• Self–Service expense reports: Expense reports your employees
enter using a Web browser. See: Self–Service Expenses
Integration: page 4 – 215.
4–2
Oracle Payables User Guide
• Payables expense reports: Expense reports entered in the
Payables Expense reports window by the Payables department.
See: Expense Reports: page 4 – 216.
• Credit Card invoices: Invoices for employee credit card
expenses. The credit card company sends you these invoices as a
flat file. See: Procurement Card Integration: page 4 – 180.
• Oracle Projects and Personal Time and Expense reports. If you
use Oracle Projects, project–related expense reports. See:
Entering Project Related Invoices and Distributions: page 4 – 160
• EDI invoices. Electronic invoices transferred from Oracle
e–Commerce Gateway. See: Running the EDI Invoice
InboundProgram (Oracle e–Commerce Gateway User’s Guide).
• Invoices from external systems. Invoices, such as invoices from
legacy systems, loaded using SQL*Loader. See: Using
SQL*Loader to Populate the Payables Open Interface Tables:
page G – 1.
• Oracle Property Manager invoices: Lease invoices transferred
from Oracle Property Manager. See: Oracle Property Manager
Integration: page 4 – 178.
See Also
Entering Foreign Currency Invoices: page 4 – 92
Mixed Invoices: page 4 – 96
Prorating Freight and Miscellaneous Charges: page 4 – 50
Entering Freight on Invoices: page 4 – 129
Entering Taxes on Invoices: page 4 – 97
Entering Invoices for Suppliers Subject to Income Tax Reporting
Requirements: page 4 – 131
Approval: page 4 – 145
Applying Holds: page 4 – 136
Releasing Holds: page 4 – 140
Invoices
4–3
Scheduling Invoice Payments: page 4 – 150
Entering Prepayments: page 4 – 198
Finding Invoice Batches: page 4 – 289
Finding Invoices: page 4 – 290
Adjusting Invoices: page 4 – 299
Cancelling Invoices: page 4 – 311
Checking Funds for Invoices: page 10 – 43
Entering Prepayments: page 4 – 198
Invoice Overview: page 4 – 288:
Foreign Currency Transactions: page 6 – 2
Prepayments: page 4 – 195
Mixed Invoices: page 4 – 96
Invoice Overview: page 4 – 288
Invoice Notices: page 4 – 332
Discounts: page 4 – 155
Assets Integration: page 4 – 157
Oracle Inventory Integration: page 4 – 184
4–4
Oracle Payables User Guide
Differences Between Entering Invoices in the Invoice Gateway Window and the
Invoice Workbench
You can enter invoices in either the Invoice Gateway window or the
Invoice Workbench. The following discussion outlines the differences
between entry in the two windows to help you decide when to use a
particular window for invoice entry.
When You Should Use Invoice Gateway For Invoice Entry
Use the Invoice Gateway window for your everyday entry of invoice
records. Use this window for rapid, high–volume entry of Standard
and Credit Memo invoices that are not complex and do not require
extensive online validation or defaulting of values during entry. You
can use this window for purchase order matching and for applying
prepayments to the invoice you are entering. See below for a list of
invoice entry tasks that cannot be performed in the Invoice Gateway
window, and that you should perform in the Invoice Workbench
instead.
Use the Invoice Gateway window if you want to use the Open Interface
Workflow. You can customize the Open Interface Workflow to process
your invoice records before you import them. For example, you can
perform custom validation of cost center information before you
submit import.
When You Should Use the Invoice Workbench For Invoice Entry
Use the Invoice Workbench for entering and maintaining more complex
invoices for which you require extensive online validation and online
defaulting. You may also want to use the Invoice Workbench if you
need to perform an action on the invoice immediately after entering it.
For example, if you need to enter an invoice and create a payment for
it, then enter the invoice in the Invoice Workbench so the record is
immediately accessible for approval and payment.
Functionality available only by invoice entry in the Invoice
Workbench
Use the Invoice Workbench to:
• Enter PO Default type invoices (which default supplier
information from purchase orders)
• Enter Prepayment type invoices
Invoices
4–5
• Enter Debit Memo type invoices
• Match Credit Memos to invoices
• Perform Header–level automatic tax calculation
Online results seen only in the Invoice Workbench
Although the following occurs during import, in the Invoice
Workbench you can see online results of the following:
• Automatic tax calculation
• Tax account defaulting
• Allocation
• Automatic sequential voucher numbering
Tasks performed during invoice entry only in the Invoice Workbench
Although you can perform the following tasks in the Invoice
Workbench after you have imported Invoice Gateway invoices, use the
Invoice Workbench if you want to perform any of these tasks during
invoice entry:
• Use invoice attachments
• Apply holds to single invoices
• Apply holds to scheduled payments
• Override default payment priority from supplier
• Override the Terms Date
• Create payments
Interface Differences
When you use the Invoice Gateway, you enter invoice header and line
information in the same window, and can view only one record at a
time. In the Invoice Workbench, you enter invoice header information
in the Invoices window, and the related invoice distributions in the
Distributions window. You can view multiple invoices at the same
time in the Invoices window.
4–6
Oracle Payables User Guide
Invoice Gateway
You can enter invoices in either the Invoice Gateway window or the
Invoice Workbench. The Invoice Gateway window is the quickest way
to enter most invoices. Use this window to enter a large volume of
invoices that do not require extensive online validation or extensive
online defaulting of values.
Note: Speed up invoice record entry by customizing Invoice
Gateway folders. You can resize, rename, move, and hide
fields to match your business process. See: Customizing the
Presentation of Data in a Folder (Oracle Applications User’s
Guide).
Invoices
4–7
This section includes the following topics:
• Invoice Gateway Overview: page 4 – 8
• Entering Invoice Records in the Invoice Gateway Window: page
4 – 11
• Entering Purchase Order Matched Invoices in the Invoice
Gateway: page 4 – 12
• Entering Price Corrections in the Invoice Gateway: page 4 – 16
• Finding Invoice Records in the Invoice Gateway Window: page
4 – 18
• Modifying Invoice Records in the Invoice Gateway Window:
page 4 – 20
• Adding Invoice Records to An Existing Invoice Gateway Batch:
page 4 – 21
• Creating Invoices From Invoice Gateway Invoice Records
Import: page 4 – 22
See Also
Invoice Gateway Window Reference: page 4 – 26
Invoice Gateway Identification Window Reference: page 4 – 24
Invoice Gateway Overview
Payables uses information you enter in the Invoice Gateway window to
create invoices in Payables. You enter invoice header and line
information in this window. This information is stored in the Payables
Open Interface tables. Because the system performs limited validation
and defaulting of invoice values while you are entering invoices, you
can enter invoices more quickly in the Invoice Gateway than you can in
the Invoice Workbench (the Invoice Workbench is the Invoices window
and its associated windows).
4–8
Oracle Payables User Guide
After you enter invoice records in the Invoice Gateway, you can submit
a customized workflow program to automate your business processes
for managing invoices. For example, you can customize the workflow
program to validate the cost center on all invoices before you import
them.
Invoices
4–9
You then submit the Payables Open Interface Import Program to
validate the values you entered, provide any default values, and then
create invoices with distributions and scheduled payments in the
regular Payables tables.
After import, Payables provides a report that lists invoice records that
were successfully imported and any that could not be imported
because they had invalid or missing information. You can query the
rejected invoice records in the Invoice Gateway window, correct them,
and then resubmit them for import.
When you import invoice records successfully, Payables creates regular
invoices that you can view, modify, and approve in the Invoice
Workbench. After approval, the invoices are ready for payment.
After you successfully create invoices based on data in the invoice
records, you can purge the invoice records from the Open Interface
tables.
See Also
Submitting the Payables Open Interface Import Program: page 4 – 262
Payables Open Interface Troubleshooting: page 4 – 269
Payables Open Interface Purge Program: page 4 – 270
Payables Open Interface Workflow: page 4 – 272
Payables Open Interface Report: page 4 – 275
Payables Open Interface Tables: page G – 2
4 – 10
Oracle Payables User Guide
Entering Invoice Records in the Invoice Gateway Window
When you enter invoice records in the Invoice Gateway window, you
group the invoice records by assigning the same Gateway Batch name
to each invoice. When you enter a value for Gateway Batch in the
Invoice Gateway Identification window, the system assigns that
Gateway Batch name to each invoice record you enter. You can use the
Gateway Batch name to query the group of invoice records in the
Invoice Gateway window, and to identify a group of invoice records
that you want to import together.
Note that if you have enabled the Use Batch Control Payables option
and you want to maintain the grouping of invoices after import, then
when you submit import for the Invoice Gateway batch, you can assign
an Invoice Batch name to the group of invoices that Payables creates.
You can then use the Invoice Batch name to query the same group of
invoices in the Invoice Workbench.
Entering a Basic Invoice Record in the Invoice Gateway
Prerequisites
❑ Define suppliers with at least one pay site. See: Entering Suppliers:
page 3 – 10.
❑ If you don’t want to use Invoice Gateway as the source for all
Invoice Gateway batches, define additional values for the import
Source in the Oracle Payables Lookups window (optional). See:
Lookups: page 2 – 13.
❑ Customize your Invoice Gateway folder forms to hide fields you
don’t use. For example, if you don’t use Automatic Tax
Calculation, hide the Includes Tax check box to prevent users from
entering values in these fields and causing rejection of the invoice
record during import. See: Customizing the Presentation of Data in
a Folder (Oracle Applications User’s Guide).
"
To enter a basic invoice record in the Invoice Gateway window:
1.
Navigate to the Invoice Gateway. The Invoice Gateway
Identification window opens. Enter a unique value for the
Gateway Batch. For the Source, enter Invoice Gateway, or a source
you defined in the Oracle Payables Lookups window. The
Gateway Batch and Source values in the Invoice Gateway
Identification window will default to all invoice records you enter.
Invoices
4 – 11
2.
In the Invoice Gateway window, enter the invoice header
information. The following header fields are required:
• Supplier or Supplier Num
• Site
• Invoice Amount
Enter at least one invoice line. The following fields are required for
each invoice line:
• Line Type
• Amount
For descriptions of the other fields, see: Invoice Gateway Window
Reference: page 4 – 26.
3.
To add a new record in the Invoice Gateway batch, use the [down
arrow] key or select the New Record icon from the toolbar.
Perform step 2 for each invoice record.
4.
If you want to import your invoice records now, choose the Create
Invoices button and see: Creating Invoices From Invoice Gateway
Invoice Records (Invoice): page 4 – 22. Or, you can import the
batch later. See: Submitting the Payables Open Interface Import
Program: page 4 – 262.
5.
Save your work.
Entering Purchase Order Matched Invoice Records in the Invoice Gateway
When you enter a purchase order matched invoice record, the import
process automatically creates invoice distributions for you based on
your match. You can match to a purchase order receipt, and you can
match to a purchase order at different levels: purchase order header,
purchase order line, purchase order shipment, purchase order
distribution.
Suggestion: When you are matching to a purchase order, also
open the View PO window to have easy access to purchase
order information.
Note: During import, the system does not check quantity or
unit price tolerances. If the invoice exceeds the tolerances you
have set in the Invoice Tolerances window, Payables applies a
system hold on the invoice at Approval time.
4 – 12
Oracle Payables User Guide
Matching to a Purchase Order at the Invoice Gateway Header Level
Prerequisites
❑ Your purchasing information must be generated in Oracle
Purchasing or transferred to Oracle Purchasing tables from an
external purchasing system.
❑ A purchase order for the same supplier, supplier site, and currency
as the invoice record you are entering must be approved and open.
❑ The purchase order is Standard, has only one line, and only one
shipment. Also, the Match option for the shipment is set to
Purchase Order.
"
To enter a purchase order matched invoice record at the header level:
1.
In the Invoice Gateway window, enter an invoice record.
Enter a value in the invoice header for PO Number. If you want
the purchase order terms to default to the invoice record then leave
the Terms field empty.
2.
Enter line information. The only required fields are Line Number,
Type, and Amount.
3.
Optionally enter a value for either Quantity Invoiced or PO Unit
Price. During import the system provides the other value
(Quantity Invoiced x PO Unit Price = Amount).
4.
Save your work. The invoice record is ready for import. After you
create invoices from the invoice records, you can view the
distributions created by the match in the Distributions window of
the Invoice Workbench.
Matching to a Purchase Order Shipment or Distribution in the Invoice Gateway
Prerequisite
❑ A purchase order for the same supplier, supplier site, and currency
as the invoice record you are entering must be approved and open.
"
To enter a purchase order matched invoice record at the shipment or
distribution level:
1.
In the Invoice Gateway window, enter an invoice record.
Invoices
4 – 13
If you want the payment terms to default from the purchase order
enter a PO Number and do not provide a value for Terms. The
payment terms will default from the purchase order you identify
here in the invoice record header.
2.
In the Invoice Lines region, enter at least one line. Enter the Line
Number, enter Item as the line type, and enter the Amount.
☞
3.
Attention: For purchase order matched lines, do not provide
distribution information by entering a Distribution Set or
Projects information, or the invoice will not import
successfully. Also, do not enable the Prorate Across check box
on purchase order matched lines.
For each line you want to match, enter the PO Number.
If you are matching to a blanket purchase order, you must also
provide values for both Release Number and PO Shipment
Number.
4.
Enter values in the relevant fields to match the invoice line to
whatever level of detail you want: purchase order line, shipment,
or distribution:
• PO Shipment. To match to a shipment, enter the PO Line
Number and PO Shipment Number. If you are matching to a
purchase order line with multiple shipments, you must enter a
value here. If you don’t know the shipment number, and if the
shipment has a unique Ship–To location for the purchase order,
then you can match to the shipment by entering the Ship–To
location exactly as it appears on the shipment.
Note: If you match to a purchase order with only one line and
only one shipment, then only the purchase order number is
required. Also, if you enter a PO Line information, and that
PO Line has only one shipment, then you are not required to
enter shipment information.
• PO Distribution. To match to a purchase order distribution,
enter the PO Line Number, PO Shipment Number, and PO
Distribution Number. If you want the GL Account populated
with an Overlay GL Account, then you must specify the
purchase order distribution.
5.
4 – 14
Oracle Payables User Guide
Optionally enter a value for either Quantity Invoiced or PO Unit
Price. During import the system provides the other value
(Quantity Invoiced x Unit Price = Amount).
6.
Save your work. The invoice record is ready for import After you
create invoices from the invoice records, you can view and modify
the distributions created by the match in the Distributions window
of the Invoice Workbench.
Matching to Receipts in the Invoice Gateway
You can match to a receipt associated with a purchase order shipment.
Specify the purchase order number and the receipt to which you want
to match.
Prerequisite
❑ The Match option on the purchase order shipment is set to Receipt.
"
To enter a receipt matched invoice record:
1.
In the Invoice Gateway window, enter an invoice record.
If you want the payment terms to default from a purchase order,
enter a PO Number in the header and do not provide a value for
Terms. The payment terms will default from the purchase order
you identify here in the invoice record header.
2.
In the Invoice Lines region, enter at least one line. Enter the Line
Number, enter Item as the line Type, and enter the Amount.
☞
3.
Attention: For receipt matched lines, do not provide
distribution information by entering a Distribution Set or
Projects information, or the invoice will not import
successfully. Also, do not enable the Allocate Across check box
on purchase order matched lines.
For each line you want to match, enter the PO Number, Line
Number, and Shipment Number.
If you enter a PO number of a blanket purchase order, then you
must provide values for both Release Number and PO Shipment
Number.
4.
If you want the line to have the same account as the purchase order
distributions for the receipt, then do not enter a value for Account.
If you want to assign a particular account to the new invoice
distributions, then enter that account.
5.
Enter a Receipt Number and a Receipt Line Number. You can use
the list of values to find out additional information associated with
the receipt number, including packing slip and receipt date.
Invoices
4 – 15
6.
If you want to match further to the associated purchase order
distributions, then enter the PO Line Number and PO Shipment
Number. If you don’t know the shipment number, and if the
shipment has a unique Ship–To location for the purchase order,
then you can match to the shipment by entering the Ship–To
Location exactly as it appears on the shipment. Then enter the PO
Distribution Number.
7.
Optionally enter a value for either Quantity Invoiced or PO Unit
Price. During import the system provides the other value
(Quantity Invoiced x Unit Price = Amount).
8.
Save your work. After you create invoices from the invoice
records, you can view and modify the distributions created by the
match in the Distributions window of the Invoice Workbench.
See Also
Invoice Gateway Window Reference: page 4 – 26
Entering Price Corrections in the Invoice Gateway
You use a price correction when a supplier sends you an invoice for a
change in Unit Price. You can record a price correction when you
match a Credit or Standard invoice record to a previously matched
purchase order and adjust the invoiced unit price.
Prerequisite
❑ A purchase order for the same supplier, supplier site, and currency
as the invoice record you are entering must be approved and open.
"
4 – 16
To record a price correction in the Invoice Gateway window for a
purchase order shipment or distribution:
1.
In the Invoice Gateway window, enter the invoice record. If you
are recording a price increase, enter a Standard type invoice record.
If you are recording a price decrease, enter a Credit type invoice
record.
2.
In the Lines region, enter the line information. Enter Item as the
line type.
Oracle Payables User Guide
☞
Attention: For purchase order matched lines, do not provide
distribution information by entering a Distribution Set or
Projects information, or the invoice will not import
successfully. Also, do not enable the Allocate Across check
box on purchase order matched lines.
3.
For each line you want to match, enter the PO Number. If you are
matching to a blanket purchase order, then you must provide
values for both Release Number and PO Shipment Number.
4.
Enter values in the relevant fields to match the invoice line to
whatever level of detail you want: purchase order line, shipment,
or distribution:
• PO Line. If you want to match to a purchase order line, enter
the PO Line Number. If you don’t know the line number and if
the line has a unique inventory item or unique item description
for the purchase order, then you can match to the line by
entering either the Inventory Item ID or the PO Item Description
exactly as it appears on the purchase order line.
• PO Shipment. If you want to match to a shipment, then enter
the PO Lines and PO Shipment Number. If you don’t know the
shipment number, and if the shipment has a unique Ship–To
location for the purchase order, then you can match to the
shipment by entering the Ship–To Location exactly as it appears
on the shipment.
• PO Distribution. If you want to match to a purchase order
distribution, enter values for PO Line, PO Shipment, and PO
Distribution Number.
5.
Check the Price Correction check box.
6.
Enter the Unit Price for the incremental amount of the price
correction. During import the system provides the value for
Quantity Invoiced (Quantity Invoiced x PO Unit Price = Amount).
7.
Save your work. After you create invoices from the invoice
records, you can view and modify the distributions created by the
match in the Distributions window of the Invoice Workbench.
See Also
Invoice Gateway Window Reference: page 4 – 26
Invoices
4 – 17
Finding Invoice Records in the Invoice Gateway Window
You can query any invoice record in the Invoice Gateway window if
you entered it in the Invoice Gateway window and you have not yet
purged the invoice record from the Payables Open Interface tables. If
you have successfully imported the invoice record, we recommend that
you view it in the Invoice Workbench, where you can see the new
distributions, scheduled payments, and defaults that were assigned
during import.
To find invoice records that are in the same Invoice Gateway batch, you
can use the Invoice Gateway Identification window. Or, to find invoice
records regardless of Invoice Gateway batch, you can perform a query
directly in the Invoice Gateway window. For example, to see all
invoice records that have been rejected in all batches, you can query all
invoices with the Status of Rejected.
If you entered invoices in the Payables Open Interface from other
sources such as e–Commerce Gateway or your credit card company
and you want to view or modify them, do not use the Invoice Gateway
Window; use the Open Interface Invoices Window instead.
Prerequisites
❑ You entered the invoice record using the Invoice Gateway window.
❑ The invoice record has not been purged from the Open Interface
tables.
"
4 – 18
To find invoice records using the Invoice Gateway Identification
window:
1.
The Invoice Gateway Identification window and the Invoice
Gateway window appear.
2.
In the Invoice Gateway Identification window, identify the invoice
records you want to find by entering values for Gateway Batch and
Source. You can additionally search for invoice records by Status.
If you leave Status null, then the query will retrieve records
regardless of status (unprocessed, rejected, and processed).
3.
Choose the Find button. The Invoice Gateway window displays all
invoice records that match your search criteria.
4.
Use the [down arrow] key, or choose Next Record from the Go
menu until the Invoice Gateway window displays the invoice
record you want to see.
Oracle Payables User Guide
"
To find invoice records by performing a query in the Invoice
Gateway window:
1.
Navigate to the Invoice Gateway. The Invoice Gateway
Identification window and the Invoice Gateway window appear.
2.
Go directly to the Invoice Gateway window. Do not use the
Invoice Gateway Identification window.
Note: If you use the Invoice Gateway Identification window,
the Source and Gateway Batch values for each invoice record
will default from the Invoice Gateway Identification window
and will limit your query to that invoice batch and source.
3.
From the Query menu, choose Enter.
4.
Enter the identifying information in one or more fields. Or, to
query all unpurged invoice records, enter no information.
5.
From the Query menu, choose Run. The Invoice Gateway window
displays all invoice records that match your search criteria.
6.
Use the [down arrow] key, or choose Next Record from Go menu
until the Invoice Gateway window displays the invoice record you
want to see.
Invoices
4 – 19
Modifying Invoice Records in the Invoice Gateway Window
In the Invoice Gateway window, you can modify any invoice record
you entered in the Invoice Gateway window but have not successfully
imported. If you have successfully imported an invoice record and
want to modify it, you must use the Invoice Workbench.
When correcting problems with invoice records rejected during import,
you can find the rejection reason by looking at the Payables Open
Interface Import Report, or, you can query the record in the Invoice
Gateway window and choose the Rejections button to see the rejection
reason in the Rejections window. For a more detailed explanation of
the rejection, see: Payables Open Interface Report: page 4 – 275.
Prerequisites
❑ You have not successfully imported the invoice record. (Imported
invoice records have a status of ”Processed”).
❑ You have not purged the invoice record.
❑ Payables Open Interface Import is not currently processing the
invoice record.
"
To modify an invoice record in the Invoice Gateway window:
1.
Find the invoice record. See: Finding Invoice Records in the
Invoice Gateway Window: page 4 – 18.
2.
Change the invoice record.
3.
Save your work.
If you are ready to submit Payables Open Interface Import, choose
the Create Invoices button and see: Creating Invoices From Invoice
Gateway Invoice Records (Import): page 4 – 22.
4 – 20
Oracle Payables User Guide
Adding Invoice Records to an Existing Invoice Gateway Batch
You can add invoice records to a Gateway Batch at any time. Either
query an existing batch and add invoice records to it, or add invoice
records to an existing batch by using the same Source and Batch Name
when you enter new invoice records.
Prerequisite
❑ At least one invoice in the existing batch has not been purged.
"
To add an invoice records to an Invoice Gateway batch:
1.
In the Invoice Gateway Identification window specify the Gateway
Batch and Source of the existing Invoice Gateway batch.
2.
View the existing batch, or add invoice records without viewing the
batch first:
• To see the batch first, choose the Find button. The Invoice
Gateway window displays the invoice records in the Invoice
Gateway batch. To create a new record, either choose New
Record from the menu, or use the [down arrow] key until the
Invoice Gateway window opens a new record.
• To add an invoice record to the batch without seeing the existing
invoice records in the batch, choose the Enter button in the
Invoice Gateway Identification window.
3.
Enter the invoice record in the Invoice Gateway window.
4.
Save your work.
See Also
Invoice Gateway Identification Window Reference: page 4 – 24
Invoices
4 – 21
Creating Invoices From Invoice Gateway Invoice Records (Import)
The Payables Open Interface Import Program creates invoices using the
invoice records you entered in the Invoice Gateway window. Once
import creates invoices in Payables, you can view and modify them in
the Invoice Workbench. You can also pay the invoices after you
approve them.
There are two ways you can submit Payables Open Interface Import for
invoice records you have entered in the Invoice Gateway window: Use
the Create Invoices window, or submit the Payables Open Interface
Import Program from the Submit Request window. If you submit
import from the Submit Request window, you can optionally specify
only the Source, and not the Invoice Gateway Batch Name (Group
parameter). To submit the request from the Submit Request window,
see: Submitting the Payables Open Interface Import Program: page
4 – 262.
Prerequisite
❑ If you use Open Interface Workflow, submit it before importing
invoices. If you use workflow but have not yet submitted
workflow for your invoice records, the invoice records can still be
imported. See: Payables Open Interface Workflow: page 4 – 272.
"
To create Payables invoices by using the Create Invoices window:
1.
In the Invoice Gateway window, choose the Create Invoices button.
2.
The Create Invoices window opens. Payables defaults values for
the Source and Batch based on the last selected invoice record. You
can override these values.
3.
If you want to apply a hold to all invoices you are importing, enter
a Hold Name.
If you have enabled the Use Batch Controls Payables option, enter a
value for Invoice Batch. Payables defaults the Invoice Gateway
Batch name. You can override this value.
If you want to assign a GL Date to any invoice record in the Invoice
Gateway batch that does not already have a GL Date at the line or
header level, enter a value for the GL Date parameter.
If you want to purge invoice records from the interface tables after
you successfully create new invoices from them, enable the Purge
option. Purging does not affect invoice records that are rejected
4 – 22
Oracle Payables User Guide
during import. Alternatively, you can purge the invoice records
later.
If you want to summarize the Audit section of the Payables Open
Interface Report, select the Summarize Report option. If you do
not select this option and you are importing a large number of
invoice records, this report could be very lengthy.
4.
Choose the Create Invoices button Payables submits the Payables
Open Interface Import Program for the invoice records that match
the Source and Batch parameters you specified in the Create
Invoices window.
After you choose the Create Invoices button, Payables displays the
following message: Payables Open Interface Import is processing
your invoices. You can query the status in the Requests window by
using the following request ID: [concurrent request ID number].
When your request has completed, you can view the invoices in the
Invoice Workbench. They are ready for approval and payment.
See Also
Payables Open Interface Import Troubleshooting: page 4 – 269
Invoices
4 – 23
Invoice Gateway Identification Window Reference
When you navigate to the Invoice Gateway window, the Invoice
Gateway Identification window opens. Use this window to assign
Source and Gateway Batch names to the invoice records you will enter
in the Gateway Batch window. You can then use these values to
identify invoice records for queries, and for import.
When you enter invoice records, the Source and Gateway Batch name
values default from the values currently in the Invoice Gateway
Identification window.
Source. Enter either Invoice Gateway, or enter a value that you defined
in the Oracle Payables Lookups windows. If you enter a user–defined
source, then use it only for one particular source type. For example, if
you define a Source name that you use for Invoice Gateway invoice
records, do not use it for any other method of entering data in the Open
Interface tables. At import time, the Source differentiates between
invoice records you enter in the Invoice Gateway window; credit card
records from your credit card issuer; lease invoices from Property
Manager; and invoice records you load using e–Commerce Gateway or
SQL*Loader.
Gateway Batch. A Gateway Batch is used to group invoice records
that you enter in the Invoice Gateway window. You can add invoice
records to a batch at any time. You can use the Gateway Batch name to
specify a group of invoice records you want to query, import, or purge
together. You can import data in concurrent processes for the same
Source by specifying a unique group (Gateway Batch) for each request.
This reduces the processing time of your import. For example, if you
have enter 200 invoice records, instead of submitting import for a
single batch of 200 invoices, you can submit two batches at the same
time for faster processing.
Note that if you use batch control for your invoice batches (the Use
Batch Control Payables option is enabled) and you want to maintain
the grouping of invoices after import, then when you submit import for
the Invoice Gateway batch, you can assign an Invoice Batch name to
the group of imported invoices. You can then query the invoice group
in the Invoice Workbench by using the Invoice Batch name.
Status. Use this field to query invoice records with a particular status.
You can query Rejected or Processed invoice records by specifying
those statuses. If you provide no value for Status when you perform a
query, the system retrieves invoice records regardless of status.
• Rejected. The import process has rejected the invoice. Read the
Payables Open Interface Report to find the reason for the
4 – 24
Oracle Payables User Guide
rejection. Correct the invoice in the Invoice Gateway window
and resubmit the import program.
• Processed. The invoice record has been successfully imported
into Payables. You can query and modify the invoice in the
Invoice Workbench. The invoice is ready for approval and
payment.
• Null. The invoice record has not been processed by import.
See Also
Invoice Gateway: page 4 – 7
Invoice Gateway Window Reference: page 4 – 26
Invoices
4 – 25
Invoice Gateway Window Reference
Enter invoice header and line information in this window. When you
submit Payables Open Interface Import, Payables creates invoices with
distributions and scheduled payments based on the invoice records
you enter in this window. After an invoice record is imported
successfully, you can view, modify, and approve it in the Invoice
Workbench.
You can modify invoice records in the Invoice Gateway window if they
have not been imported or purged. After you purge an invoice record
from the Payables Open Interface tables, you can no longer query or
modify the invoice record in the Invoice Gateway window.
Fields that are validated online have the following designation in this
document: (LOV). This indicates that you can select from a list of
valid, active values. Also, if you enter an invalid or inactive value in
one of these fields, then the list of values will appear automatically. For
information on the validation that Payables performs during the import
process, see the Payables Open Interface Report: page 4 – 275, and see
the validation information in the column descriptions of the Payables
Open Interface Table Descriptions: page G – 4.
Suggestion: Customize your Invoice Gateway folder forms to
prevent yourself from entering values that could cause
rejection of the invoice during import. For example, if you
don’t use Automatic Tax Calculation, then hide the Includes
Tax check box. Also, when you customize your folder, make
sure that either the Supplier or Supplier Num field remains in
front of the Invoice Num field. That way, when you enter the
invoice number, the system can check for duplicate invoice
numbers for that particular supplier. If you enter a duplicate
invoice number, Payables immediately gives you an error
message. Otherwise, you won’t receive the message until you
save your record.
Invoice Gateway Header Region
Enter the invoice header information in this region. The following
information is required: Supplier Site, Invoice Amount, and either
Supplier Number or Supplier Name.
Date Invoice Received. The date you receive an invoice.
4 – 26
Oracle Payables User Guide
If your Terms Date Basis Payables option is set to Invoice Received, and
you provide a value, Payables will use this value as the Terms Date. If
you don’t provide a value here, then the invoice will be rejected.
Description. Description of goods and services listed on the invoice.
During import, this value is the default for invoice header description.
The description appears on the payment document remittance, and you
can include it when you transfer journal entries to your general ledger.
Discountable Amount. Invoice amount applicable to discount. If you
don’t enter a value, during import Payables defaults the Invoice
Amount as the Discountable Amount value.
Document Category. (LOV) Payables uses the document category to
assign a unique voucher number to an invoice. Enter a document
category only if all of the following conditions are true. If one or more
of the following conditions are not true, then the invoice record will be
rejected during import.
• You use automatic sequential voucher numbering (your
Sequential Numbering profile option is set to either ”Partial” or
”Always”).
• Your Document Category Override Payables option is enabled.
• The document category you enter has a valid sequence assigned
to it.
If you enter a value for Document Category, then Payables will ignore
any value you enter for Voucher Number in this window.
Payables predefines a document category for each invoice type. The
predefined document category will default to the invoice during
import if you use automatic sequential voucher numbering and you do
not enter a value in this Document Category field. If you do not use
voucher numbering (your Sequential Numbering profile option is set to
”Not Used”), then do not enter a value, or import will reject the
invoice.
Exchange Date/ Exchange Rate. Foreign currency rate information that
Payables uses to convert a foreign currency invoice amount to your
functional currency. If a rate is available based on the Exchange Rate
Type and Exchange Date that you enter, then the Invoice Gateway
window will display it. Do not overwrite any value that the system
provides in this window or the invoice record will be rejected during
import. If you have enabled the Require Exchange Rate Entry option in
the Financials Options window and the exchange rate type is User then
you must enter a value for Exchange Rate or the invoice record will be
Invoices
4 – 27
rejected. See: Foreign Currency Transactions: page 6 – 2 and Entering
Foreign Currency Invoices: page 4 – 92.
Exchange Rate Type. (LOV) Type of exchange rate between the
invoice and your functional currency. If you have entered a foreign
currency invoice record and do not enter a value for Exchange Rate
Type, then during import Payables defaults the exchange rate type
from the Exchange Rate Type field in the Payables Options window.
• User. An exchange rate entered by you manually during invoice
entry or payment time. If you have enabled the Require
Exchange Rate Entry option in the Financials Options window
and the exchange rate type is User, then you must enter a value
for Exchange Rate or the invoice record will be rejected.
• Spot. A daily exchange rate that is a quoted market rate. When
you specify a Spot rate type, Payables automatically enters the
invoice Exchange Rate from the GL Daily Rates table.
• Corporate. A standard market rate determined by senior
management for use throughout your organization. When you
specify a Corporate rate type, Payables automatically enters the
invoice Exchange Rate from the GL Daily Rates table.
• User–defined. An exchange rate type you define in the Define
Daily Conversion Rate Types window. You can define as many
exchange rate types as you need. When you specify a
user–defined rate type, Payables automatically enters the invoice
exchange rate for you from the GL Daily Rates table.
GL Date. The default GL Date for the distributions for this invoice.
Must be in an open or future period. During import, Payables looks for
a GL Date value to assign to the invoice distribution. Payables assigns
a value from the first source it finds, and it searches the following
sources in the following order: 1) GL Date field in invoice record line,
2) GL Date field in invoice record header, 3) GL Date parameter from
import submission, 4) GL Date Basis Payables option. If the system
searches at the GL Date Basis level, the following occurs: If the GL
Date Basis option is set to Goods Received/Invoice Date, then Payables
uses the Goods Received Date, if it is populated. If not, then Payables
uses the Invoice Date. If the GL Date Basis option is set to Goods
Received/System Date, then Payables uses the Goods Received Date, if
it is populated. If it is not, then Payables uses the system date at time
of import.
If the Use PO Encumbrance option is enabled in the Financials Options
window, then the date must be in the current encumbrance year.
Date Goods Received. The date you receive goods for invoice records.
4 – 28
Oracle Payables User Guide
If your Terms Date Basis Payables option is set to Goods Received, then
if you provide a value, Payables will use this value as the Terms Date,
and if you don’t provide a value here, Payables will reject the invoice.
Invoice Amount. Total amount of the invoice. If you enter a Credit
invoice, the amount must be a negative number. If you enter a
Standard invoice, the amount must be zero or greater.
Invoice Curr. (LOV) The currency of the invoice. The Invoice
Gateway window defaults the supplier site currency. You can override
this value. After you import your invoice, you cannot change the
currency. You can use the Invoice Actions window to cancel the
invoice, then re–enter the invoice with the correct currency.
If you enter a currency other than your functional currency, then you
must provide exchange rate information.
Invoice Date. Date on the invoice. If you do not enter a value, then
import uses the system date at the time of import as the default.
Payables may use the Invoice Date as the Terms Date and GL Date for
an invoice, depending on your system setup. If your GL Date Basis is
Invoice Date, then the Invoice Date must be in an open or future
period.
Invoice Num. The invoice number provided by the supplier on the
invoice. This value must be unique for the supplier. If you do not
enter a value, then during import, Payables uses the system date at the
time of import as a default. If you enter more than one invoice for a
supplier, you must enter a unique value for the invoice number.
Invoice Type. (LOV) The type of invoice. Standard and Credit are the
only invoice types you can enter in this window. If you do not enter a
value for this field then a value will be assigned during import based
on the amount of the invoice.
• Standard. A trade invoice you receive from a supplier. The
amount of a Standard invoice must be zero or greater.
• Credit. Credit Memo. A negative amount invoice you receive
from a supplier representing a credit for goods or services
purchased. Note that in the Invoice Gateway you can match a
credit memo to a purchase order to perform a price correction,
but you cannot match a credit memo to an invoice. If you want
to match to an invoice, then use the Invoice Workbench.
Liability Account. (LOV) Account for the invoice liability. Payables
uses this account when you create accounting entries for your invoices
if you use accrual basis accounting. Payables credits an amount equal
to the sum of your invoice distributions. You cannot enter more than
Invoices
4 – 29
one Liability account for an invoice. The Invoice Gateway window
provides the supplier site Liability account as a default. You can
override this value. Payables defaults this value to invoice
distributions during import.
Pay Alone. A Pay Alone invoice is paid with its own payment
document without including other invoices for the supplier. The
Invoice Gateway window defaults to each record the Pay Alone value
for the supplier site. You can override this value.
Payment Curr. (LOV) If the Invoice Currency is not a fixed–rate
currency, then the Payment Currency will be the same as the Invoice
Currency and you cannot enter a value in this field.
If the payment currency is a fixed–rate currency, such as euro or
another EMU currency, you can change it to an associated currency.
For fixed–rate currencies, the payment currency value defaults from the
supplier site. If the supplier site has no default payment currency, the
value defaults from the Invoice Currency. If you change the Invoice
Currency then the value for Payment Currency will change to the value
for Invoice Currency.
Pay Group. (LOV) Use Pay Group to group in a payment batch
invoices from multiple suppliers. The Invoice Gateway window
defaults the supplier site’s Pay Group. You can override this value.
Payment Method. (LOV) The payment method you use to pay the
supplier site. The Invoice Gateway window defaults the supplier site’s
Payment Method to this field. You can override this value. During
import Payables defaults this Payment Method to all scheduled
payments of the invoice.
Payment Rate. If you are making a payment in a different currency
than the invoice, and both currencies are associated fixed–rate
currencies, Payables displays the fixed cross rate. You cannot update
this value in this window.
Payment Rate Date. The date the Payment Rate is effective. If the
payment currency and invoice currency are associated fixed–rate
currencies, then when you enter the Invoice Date, Payables enters the
invoice date value as the payment rate date.
Payment Rate Type. If the Payment Currency is different from the
Invoice Currency and both are fixed–rate currencies, Payables displays
EMU Fixed.
PO Number. (LOV) If you are matching the entire invoice record to a
purchase order, then enter the number of a valid, open purchase order
that has not been final matched. The purchase order must be for the
4 – 30
Oracle Payables User Guide
supplier site you entered. The list of values displays all available
purchase orders for the supplier site you specified. If you match to a
purchase order, then during import Payables uses purchase order
information to create invoice distributions. If you want to override the
account default that the purchase order provides, then see Account
Overlay in Payables Open Interface Import: page G – 49.
If you do not enter a value for PO Number at the header, then you can
still enter a PO Number for any line. However, if you want the invoice
to use terms from a purchase order, you must enter the purchase order
here. Payables uses terms from the purchase order you identify in this
field if you match to a purchase order and do not enter a value for
Prepay Apply Amt. If you are applying prepayments, the maximum
currency amount of the prepayments you want to apply to an expense
report. If you leave this column and the PREPAY_NUMBER column
blank, then Payables applies available prepayments up to the amount
of the invoice. If you specify a prepayment number, then Payables
enters the unapplied prepayment amount up to the amount of the
invoice. You can decrease the amount Payables enters. Payables
ensures that the prepayment amount does not exceed the invoice
amount.
Note: The prepayment is not actually applied until the import
process. Therefore, to prevent overapplication of an
prepayment, you cannot select a prepayment number that has
been applied to another expense report that has not yet been
imported.
Prepayment Distribution. (LOV) Distribution number of a specific
Item distribution on the specified prepayment that you want to apply.
Leave this field blank to apply all available prepayment Item
distributions, starting with the lowest distribution number first, up to
the amount of the invoice. This field is enabled after you enter a valid
value for the Prepayment Number field.
Prepayment GL Date. Accounting date for the application of the
prepayment. This will be the GL date on the new Prepayment type
distribution on the imported invoice.
Prepayment Number. (LOV) Invoice number of a specific prepayment
you want to apply. Leave this field blank to apply all available
advances in chronological order, starting with the oldest prepayment
first, up to the amount of the invoice.
Site. (LOV) The supplier site address to which you want to remit
payment. This site must be a pay site. If you print checks, Payables
Invoices
4 – 31
prints this address on the check. The Invoice Gateway window
defaults this value if you enter a supplier with only one active pay site.
Supplier. (LOV) Supplier Name. You must specify a valid supplier in
either the Supplier field or the Supplier Number field.
Supplier Num. (LOV) Supplier number. You must specify a valid
supplier in either the Supplier field or the Supplier Number field.
Terms. (LOV) Payment terms. This value defaults from the supplier
site. You can overwrite that value. The system searches in the
following order to find a value for payment terms and uses the first
value it finds: 1) Invoice header terms (this field), 2) Purchase order
terms if the invoice is purchase order matched. Payables uses the
purchase order terms from the purchase order identified in the invoice
header, even if the lines are matched to different purchase orders. 3)
Supplier site.
The import process uses the invoice amount, payment terms, and terms
date to create one or more scheduled payments for each invoice record.
You define terms in the Payment terms window. See also: Payment
Terms: page 2 – 89.
Transaction Code. USSGL Transaction Code. If you use Oracle Public
Sector General Ledger, you may be required to maintain Standard
General Ledger information for your invoice transactions. The import
program imports any USSGL information that you enter in this field.
Voucher Num. Manual voucher number assigned to the invoice for
internal tracking purposes. If you use automatic sequential numbering
(your Sequential Numbering profile option is set to ”Partial” or
”Always”), then during import, Payables ignores any value you enter
here. Do not enter a value with more than 9 digits or Payables will
have problems processing the invoice.
Withholding Tax Group. (LOV) Enter a value if you want to apply
multiple withholding taxes to this invoice. This value defaults from the
supplier site.
You can also enter a value for Withholding Tax Group at the invoice
line level. Any value you enter in the Withholding Tax Group field for
an invoice line will override any value you enter here in the header.
Workflow Status. If you use Oracle Open Interface Workflow, this
field shows you the workflow status of the invoice record.
• Processing. Workflow is currently processing invoice record.
• Processed. Workflow has processed the invoice record and it is
ready for import.
4 – 32
Oracle Payables User Guide
• Not Applicable. All Gateway invoices are saved with this
status. You can customize workflow to select invoice records
with this status. Invoice records with this status can be imported
before workflow processing.
[] (Descriptive Flexfield). You use descriptive flexfields to record
custom data. The flexfield you use in this window will provide values
to the invoice descriptive flexfield in Payables. Therefore, the structure
of the information you enter in these columns (datatypes, value sets)
must match the structure of the descriptive flexfield segments you have
defined in the Invoices window or you will experience validation
problems when you try to access this information in the Invoice
Workbench.
[ ] (Localization Descriptive Flexfield). If you are using a localization,
you must enter appropriate values in this flexfield or the invoice will be
rejected. For more information see your localization guide.
Display Only Region
Invoice Total. Payables displays the value you entered for Invoice
Amount so you can compare it to the line total.
Lines Total. Payables displays the sum of the amounts in the Lines
region for this invoice record. The sum of the invoice lines does not
need to equal the Invoice Total when you submit import. For example,
you may have a $10 tax line with a VAT tax that has an offsetting tax.
The tax amount will be zero after the invoice record is imported and
approved, but the lines will not equal the invoice total when you save
the record in the Invoice Gateway.
Source. Source identifier used by Payables Open Interface Import.
The value should be either Invoice Gateway, or a source name you
defined in the Oracle Payables Lookups window.
Gateway Batch. Name of the Gateway Batch that you assigned in the
Invoice Gateway Identification window.
Request ID. If you have submitted Payables Open Interface Import for
this record, then the system displays the concurrent request ID. In the
Requests window, you can use the request ID to query the status and
results of the import process.
Invoices
4 – 33
Status. The status of the invoice record.
• Null. The invoice record has not been processed by import.
• Processed. The invoice record has been successfully imported
into Payables. You can query and modify the invoice in the
Invoice Workbench. The invoice is ready for approval and
payment.
• Rejected. The import process has rejected the invoice. Read the
Payables Open Interface Report or choose the Rejections button
to see the reason for the rejection. Correct the invoice in the
Invoice Gateway window and resubmit import.
Invoice Gateway Lines Region
Use this region to enter line information for an invoice. Enter at least
one invoice line per invoice. The following fields are required in this
region: Line Type and Amount.
When Payables imports the invoice record it creates one or more
distributions for the invoice based on the information you enter in this
region. Payables uses distributions to create accounting entries for
invoices. An invoice can have an unlimited number of distributions.
Payables transfers accounting information to your general ledger
during the Payables Transfer to General Ledger Program.
You can create distributions by entering lines, or you can create them
automatically by using Distribution Sets, proration of charges, or
purchase order matching.
Suggestion: Customize your Invoice Gateway folder window
to hide fields for features you don’t use. For example, if you
don’t use Automatic Tax Calculation, then hide the Includes
Tax check box. This will prevent you from entering values that
could cause rejection of the invoice during import.
1099 Type. Income tax type, for 1099 reporting purposes. If you do not
use a Distribution Set to create invoice distributions, Payables uses the
supplier site’s income tax type as the default value. If you use a
Distribution Set to create invoice distributions, Payables uses the
default income tax type from the Distribution Set as the default value.
You can enter or adjust this field regardless of whether the supplier is
defined as a 1099 supplier. Payables uses this information when you
submit the 1099 Payments Report and the 1099 Form Reports. See also:
1099 Reporting Overview: page 8 – 35
4 – 34
Oracle Payables User Guide
You can update this field of the imported invoice in the Distributions
window even after you have posted a distribution. You can use the
Update Income Tax Details Utility to make adjustments to many
distributions at once. See: Update Income Tax Details Utility and
Report: page 8 – 18.
Account. (LOV) This value is the complete account (including
balancing segment, cost center, and account) to charge when you create
accounting entries for this distribution. Usually an expense or asset
account. Do not enter a value for account if you provide account
information by using any of the following: Distribution Set, proration,
matching to a purchase order, or providing Projects information.
If you have defined a Distribution Set at the supplier site level and you
do not enter account information here, then the Distribution Set
account information from the supplier site will default to the invoice
during import.
If you have Oracle Projects installed and you enter Projects
information, do not enter a value here. The Invoice Gateway window
will build the account for you after you save the invoice record.
Note that if you enter values for any of the following, during import
they will override one or more segments of this account field: Overlay
GL Account, Account Segment, Cost Center Segment, Balancing
Segment. For more information, see: Account Overlay in Payables
Open Interface Import: page G – 49.
Account Segment. If you want import to override the account
segment of the account for this line, then enter the overriding value.
For more information, see: Account Overlay in Payables Open Interface
Import: page G – 49.
Import will reject the invoice record if you use a Skeleton Distribution
Set and use the Prorate feature for the same line.
Amount. Amount to charge to the general ledger account. If this is a
foreign currency invoice, enter the amount in foreign currency and
enter exchange rate information. Since this window does not format
your amounts according to currency, be sure not to exceed the precision
of your currency. For example, if you are entering US dollars, do not
enter more than 2 numbers after the decimal.
Balancing Segment. If you want to override the balancing segment of
the account for this line during import, then enter the overriding value.
For more information, see: Account Overlay in Payables Open Interface
Import: page G – 49.
Invoices
4 – 35
Cost Center Segment. If you want to override the cost center of the
accounting segment of the account for this line during import, then
enter the value. For more information, see: Account Overlay in
Payables Open Interface Import: page G – 49.
Description. Description of the distribution. For tax distributions, the
tax code defaults as the description during import. If you do not enter
a value and you match to a purchase order, then during import,
Payables assigns to the invoice the description from the purchase order
line.
Distribution Set. (LOV) Used to create invoice distributions
automatically when invoice is not matched to a purchase order or when
you do not want to enter invoice distribution information manually. If
you want to use a Distribution Set, you must enter one before you
import the invoice record.
You can provide account information from only one of the following
sources or the invoice will be rejected during import: Distribution Set,
purchase order, Account field, allocation of a non–Item type line,
Projects information.
Import will reject the invoice record if you use a Skeleton Distribution
Set and use the Allocate feature for the same line.
If you want to override the account default that the Distribution Set,
then see Account Overlay in Payables Open Interface Import: page
G – 49.
Final Match. You can enable this option only if the line is matched to a
purchase order, and the Allow Final Matching Payables option is
enabled. For detailed information, see: Final Matching Purchase
Orders.
☞
Attention: Enable only if you are certain this is a final match to
the purchase order. Once you approve a final matched invoice
distribution, you cannot update the Final Match check box in the
Distributions window.
GL Date. Payables uses the GL Date as the accounting date for the
invoice. The date must be in an open or future period.
During import, Payables looks for a GL Date value to assign to the
invoice distribution. Payables assigns a value from the first source it
finds, and it searches the following sources in the following order: 1)
GL Date on invoice record line, 2) GL Date on invoice record header, 3)
GL Date parameter from import submission, 4) GL Date Basis Payables
option. The following occurs if the system searches at the GL Date
Basis level: If the GL Date Basis option is set to Goods
4 – 36
Oracle Payables User Guide
Received/Invoice Date, then Payables uses the Goods Received Date, if
it is populated. If not, then Payables uses the Invoice Date. If the GL
Date Basis option is set to Goods Received/System Date, then Payables
uses the Goods Received Date, if it is populated. If it is not, then
Payables uses the system date at time of import.
If the Use PO Encumbrance Financials option is enabled, then the date
must be in the current encumbrance year.
Includes Tax. If the supplier site uses Line or Tax Code level automatic
tax calculation, and you are not matching to a purchase order, then you
can check this check box to indicate if a distribution amount includes a
non–Use type tax (Sales, user–defined, etc.) If you check this check
box, then during Approval of the imported invoice, Payables will use
the line amount and Tax Code to create a tax distribution with the same
Tax Code and the appropriate tax amount. Payables then subtracts the
calculated tax from the distribution amount. For detailed information
on automatic tax calculation, see: Automatic Tax Calculation Overview:
page 10 – 34.
Income Tax Region. (LOV) Income tax region for the distribution. Do
not enter a value here unless you also enter a value for 1099 Type, or
import will reject the record. Payables orders distributions by income
tax region on the 1099 Form reports. If you enable the Combined Filing
Program Payables option, when you submit the 1099 Electronic Media
Report, Payables will produce K records for all tax regions participating
in the Combined Filing Program that have qualifying payments.
If you enable the Use Pay Site Tax Region option in the Payables
Options window, the default for this field during import is the supplier
site’s state. If you choose instead to enter a tax region in the Income
Tax Region field in the Payables Options window, the default for this
field during import is the tax region you entered. See also: 1099
Reporting Overview: page 8 – 35.
Line Number. Unique line number for the invoice. If you value is
entered, then import will assign numbers during import.
Match Option. This option indicates whether you are matching to a
purchase order or a receipt. Note that the match option on the
purchase order shipment controls whether you can match to receipts or
purchase order.
Oracle Projects Project (LOV) /Task (LOV) /Expenditure Information
(LOV)/ Expenditure Type (LOV). Oracle Projects is installed, enter
values in these fields to associate an invoice with a project to charge the
expenditures on an invoice to a specific project, task, or organization.
The system uses the project information you enter to create an account
Invoices
4 – 37
that defaults to the invoice distribution. You can override this project
information in the Distributions window after you import the invoice.
Note: If you enter project information, you must enter a value
for Task unless you have matched to a purchase order with
project information with a null task ID. A purchase order can
have a null task ID only if its destination is Inventory or Shop
Floor. If the destination is Inventory or Shop Floor, the project
information is used by Project Manufacturing.
Overlay GL Account. Enter a value if you want to replace any or all
segments of the complete account (for example, balancing segment,
cost center, and account) for this line. If you enter a value here, it will
replace any account created from a Distribution Set, purchase order
matching, prorating non–Item type lines, or entering Projects
information. You must use the account flexfield structure of your
organization. For more information, see: Account Overlay in Payables
Open Interface Import: page G – 49.
If you match to a purchase order distribution (or a purchase order
shipment with one distinct account), then after you save the record, the
Invoice Gateway will display the purchase order distribution account
in this field. You can overwrite that value and perform the match with
the new value you enter.
If you are matching, the Payables option Allow Matching Acount
Override must be enabled.
PO Item Description. (LOV) To match to a purchase order line with a
unique item description, enter the item description exactly as it appears
on the purchase order. If the purchase order has more than one line
with the same item description, then the invoice record will be rejected.
PO Distribution Number. (LOV) If you want to match an Item type
invoice line to a purchase order distribution, then enter the purchase
order distribution number.
PO Line Number. (LOV) If you want to match an Item type invoice
line to a purchase order line, then enter the purchase order line number.
PO Number. (LOV) To match an Item type invoice line to a purchase
order for the same supplier site, enter the purchase order number. You
must specify the PO Number if you want to match in greater detail to a
purchase order shipment, line, or distribution. If you are matching to a
receipt, you can enter a value here to limit the list of values for the
receipt. If you enter both PO Number and Receipt Number, then the
match will be to the receipt only. Note that the match option on the
purchase order shipment controls whether you can match to receipts or
purchase order.
4 – 38
Oracle Payables User Guide
PO Shipment Num. (LOV) If you want to match an Item type invoice
line to a purchase order shipment, then enter the purchase order
shipment number.
PO Unit of Measure. (LOV) If you are matching an Item type invoice
line to a purchase order item, you can specify the item by entering a
unit of measure. For example, each, square feet, or months. This
value is not required, but may be helpful during purchase order
matching.
PO Unit Price. If you are matching an Item type invoice line to a
purchase order distribution, then enter a value for either PO Unit Price
or Quantity Invoiced. If you are performing a price correction, enter
the incremental amount of the price correction in this field. During
import, Payables calculates the value you do not enter (Quantity
Invoiced x Unit Price = Match Amount).
Price Correction. You use a price correction when a supplier sends you
an invoice for a change in unit price. You can record a price correction
when you match a Credit or Standard invoice to a purchase order.
Adjust the invoiced unit price of a previously matched purchase order
shipment by matching a price correction to it.
To record a price increase, match a Standard invoice record to a
purchase order shipment or distribution. To record a price decrease,
match a Credit invoice record to a purchase order shipment or
distribution. Check the price correction check box, and enter the Unit
Price for the incremental amount of the price correction. Enter either
Quantity Invoiced or Match Amount. Payables will calculate the
remaining field (Quantity Invoiced x Unit Price = Match Amount).
Projects Quantity. Enter a value if you have installed Oracle Projects
and you want to record a project quantity for the distributions that
import creates from this line.
Prorate Across. Enable this check box to prorate tax, freight, or
miscellaneous charges across lines with the same Prorate Group. Or, if
you do not assign a Prorate Group, then Payables will prorate the cost
to all lines during import. Payables prorates only Tax, Freight, or
Miscellaneous lines. Do not enable this check box if the line is purchase
order matched or if you are automatically calculating tax.
For other line in the prorate group, import creates a charge distribution
and records the allocation. The new charge distribution has the same
GL account as the line to which you allocate it. After Payables creates
the distribution you can update the account any time before the invoice
is accounted.
Invoices
4 – 39
Prorate Group. If you want to prorate a charge to a group of lines,
enter the same value to identify the Item lines in the group and the
non–Item line you are allocating. For example, if you want to allocate
tax to two Item lines, then enter the same line group number for the
two Item lines and the Tax line. If you do not assign Prorate Groups,
and you use the Prorate Across check box for a non–Item line, then
Payables will allocate the cost to all lines during import.
Quantity Invoiced. Quantity Billed value you enter during a purchase
order match. If you are matching an Item type line to a purchase order
distribution, then enter a value for either Quantity Invoiced or Unit
Price. During import, Payables calculates the value you do not enter
(Quantity Invoiced x PO Unit Price = Amount). If the distribution is
not matched to a purchase order distribution, Payables leaves the field
blank. If this is a price correction, this value will be zero.
Receipt Num. (LOV) If you want to match the line to a receipt, then
enter the receipt number. The list of values for this field can be limited
by values you enter in other fields such as PO Number. The list of
values for this field gives additional information, such as the packing
slip number to help you select the correct line. Note that the Quantity
in the list of values is the original quantity on the receipt, not the
adjusted quantity.
Receipt Line Number. If you want to match the line to a receipt, then
enter a Receipt Number and receipt line number. To ensure that you
are matching to the correct receipt, you should also enter: PO Number,
PO Line Number, and PO Shipment Number.
Recoverable. This check box indicates the amount of a tax line is
recoverable.
Recovery Rate. If you record recoverable tax, this is the rate at which
tax is recoverable for this line.
Ship–To Location. If you want to match an Item type invoice line to a
purchase order shipment, enter a value if exactly one shipment on the
purchase order has the Ship–To location you specify. Or you can match
to a purchase order shipment by entering a value for PO Shipment
Num.
Statistical Quantity. Statistical quantity based on the unit of measure.
For example, if your unit of measure is barrels, you can enter the
number of barrels here.
Tax Code. (LOV) Tax Code associated with the distribution line. For a
non–Tax type distribution, enter the name of the tax that is applicable
to this distribution. For Tax type distributions, enter the same Tax
4 – 40
Oracle Payables User Guide
Code that the Tax distribution is paying. For detailed information, see:
Entering Taxes on Invoices: page 4 – 97.
Payables enters the a default tax code in the Invoices window based on
the Tax Code Defaults hierarchy you defined in the Payables Options
window. See: Defaulting Tax in Payables: page 4 – 105. If you enter a
tax code in the Invoice Gateway and Invoice Header is the highest
ranking applicable tax source, then during distribution creation,
Payables assigns the tax code to each invoice distribution. If Payables
defaults the distribution tax code from the Invoice Header, it will
override any tax codes on the distributions created by Distribution
Sets, purchase order matching, or the Account tax code default source.
If the distribution type is Item, you cannot enter an Offset tax code in
this field. You can, however, enter a tax code with an associated Offset
tax if Payables is set up for Offset taxes.
Track as Asset. If you enable this check box, Payables transfers this
distribution to Oracle Assets when you submit the Create Mass
Additions for Oracle Assets Program. The distribution must be
charged to a GL asset–type account, and assigned to an asset category.
You can then create assets in Oracle Assets from the imported
distribution information. If the distribution has an asset account,
Payables enables this option during import and you cannot adjust it in
the Distributions window. If the account is an expense account,
Payables does not enable the check box during import, but you can
enable it in the Distributions window if the distribution is unposted.
For more information see: Assets Integration: page 4 – 157.
Transaction Code. USSGL Transaction Code. If you use Oracle Public
Sector General Ledger, you may be required to maintain US Standard
General Ledger information for your invoice transactions. Open
Interface Import imports any USSGL information that you load into the
interface tables and assigns the information to the invoices it creates.
Type. (LOV) Line Type is a required field. Valid line type values in
this window are: Item, Tax, Freight, or Miscellaneous. Payables uses
Type to differentiate between item, tax, freight, and miscellaneous
charges. You can include purchase order information for a line only if
the type is Item.
During import, Payables may create more than one distribution for
each line and the distribution types may not match the line type you
enter here. For example, if you enter a tax inclusive item line, during
import, Payables will create an Item and a Tax distribution.
• Item. Standard item such as goods or services.
Invoices
4 – 41
• Freight. Freight amount. For detailed information see: Entering
Freight on Invoices: page 4 – 129.
• Tax. Tax amount. For detailed information on entering tax Type
distributions, see: Entering Taxes on Invoices: page 4 – 97.
• Miscellaneous.
Withholding Tax Group. (LOV) Withholding Tax Group for the line.
Enter a value if you want to apply multiple withholding taxes to this
invoice line. If you do not enter a value, then during import, Payables
will default the invoice header withholding tax group, if you entered
one. For more information, see: Withholding Tax Groups: page 2 – 158.
[ ] (Descriptive Flexfield). You use descriptive flexfields to record
custom data. The flexfield you use in this window will provide values
to the invoice descriptive flexfield in Payables. Therefore, the structure
of the information you enter in these columns (datatypes, value sets)
must match the structure of the Descriptive Flexfield segments you
have defined in the Invoices window or you will experience validation
problems when you try to access this information in the Invoice
Workbench.
[ ] (Localization Descriptive Flexfield). If you are using a localization,
you must enter appropriate values in this flexfield or the invoice will be
rejected. For more information see your localization guide.
Display Only Region
Buttons
Rejections. Choose this button to navigate to the Invoice Gateway
Rejections window. This window displays for the current record the
reason that the record was rejected during its last submission to
Payables Open Interface Import. This is the same rejection that appears
on the Payables Open Interface Report. For more information on the
rejection, see: Payables Open Interface Report: page 4 – 275.
Create Invoices. Choose this button to open the Create Invoices
window. You can use this window to submit import which will
validate your invoice records and create invoices from them. For more
4 – 42
Oracle Payables User Guide
information see: Creating Invoices from Invoice Gateway Invoice
Records: page 4 – 22.
See Also
Invoice Gateway: page 4 – 7
Invoice Gateway Identification Window Reference: page 4 – 24
Distribution Sets: page 2 – 17
Entering Foreign Currency Invoices: page 4 – 92
Entering Invoices for Suppliers Subject to Income Tax Reporting
Requirements: page 4 – 131
Entering Project Related Invoices and Distributions: page 4 – 160
Entering Taxes on Invoices: page 4 – 97
Invoices
4 – 43
Entering Invoices in the Invoice Workbench
Entering Basic Invoices in the Invoice Workbench
Use this procedure to enter a trade invoice you get from a supplier if
the invoice is basic (will not be matched to a purchase order or receipt).
Prerequisite
❑ Enter the supplier and at least one pay site in the Suppliers
window. See: Entering Suppliers: page 3 – 10.
4 – 44
Oracle Payables User Guide
"
To enter a basic invoice:
1.
In the Invoices window choose Standard or Mixed for the invoice
Type.
2.
Enter the Supplier or Supplier Number.
3.
Enter the Supplier Site to which you will send payment of the
invoice. Payables will print the address for this site on the
payment.
4.
Enter the Invoice Date or accept the Payables default (today’s date)
by choosing [TAB].
Payables may use the invoice date you enter as the Terms Date and
GL Date default for an invoice, depending on how your Payables
Options and Defaults are set up.
If your GL Date Basis Payable Option is set to Invoice (Date), you
must enter an invoice date that is in an open or future period.
5.
Enter the Invoice Number from the invoice your supplier sent you
or accept the Payables default (today’s date) by choosing [TAB].
Payables will not allow you to enter duplicate invoice numbers for
the same supplier.
Suggestion: You may want to use an invoice numbering
convention that minimizes the risk of separate entries of the
same invoice under different invoice numbers. For example, if
you consistently enter alphanumeric invoice numbers in upper
case you would enter an invoice number only as ABC123, and
not also as abc123.
Enter the full Invoice Amount including tax, freight and
miscellaneous charges.
6.
Enter the Description of your invoice. This will appear on your
payment document and may appear in your general ledger.
7.
Enter distributions automatically by entering a Distribution Set, or
choose the Distributions button and enter the distributions
manually.
8.
Payables automatically schedules payment of the invoice using the
Invoice Amount, Payment Terms, and Terms Date. Enter or review
the defaults for these fields.
Invoices
4 – 45
9.
Save your work.
See Also
Adjusting Invoices: page 4 – 299
Applying Holds: page 4 – 136
Applying Prepayments to Invoices: page 4 – 200
Approval: page 4 – 145
Attachments in Payables: page D – 2
Budgetary Control In Payables: page 10 – 42
Creating Single Payments: page 5 – 2
Entering Credit/Debit Memos: page 4 – 84
Entering Foreign Currency Invoices: page 4 – 92
Entering Freight on Invoices: page 4 – 129
Entering Project Related Invoices and Distributions: page 4 – 160
Entering Suppliers: page 3 – 10
Entering Taxes on Invoices: page 4 – 97
Financials Options: page 2 – 36
Payables Options: page 2 – 57
Payables Transfer to General Ledger Program: page 7 – 34
Paying Invoices in Payment Batches: page 5 – 17
Scheduling Invoice Payments: page 4 – 150
4 – 46
Oracle Payables User Guide
Entering Invoice Distributions in the Invoice Workbench
The distributions you enter for an invoice allocate the total invoice
amount to various expense or asset accounts. For example, you can
distribute expenses from one office supply invoice to expense accounts
for several departments. Payables uses distributions to create
accounting entries for invoices.
You can enter distributions in the following ways:
• Enter manually in the distributions window. See: Entering
Invoice Distributions Manually: page 4 – 48
• Use a Distribution Set. See: Distribution Sets: page 2 – 17
• Match an invoice to a purchase order or receipt. See: Entering
Purchase Order Matched Invoices: page 4 – 70
• Create through Allocation. Creating Freight and Miscellaneous
Charges by Allocating to Distributions: page 4 – 50
Invoices
4 – 47
• Create Tax distributions through Automatic Tax Calculation. See
Using the Automatic Tax Calculation Feature to Enter Tax: page
4 – 111
• Create Freight Distributions by using the Create Freight
Disitribution check box in the Invoices window.
Entering Invoice Distributions Manually in the Distributions window
"
To enter distributions manually in the Distributions window:
1.
Select your invoice in the Invoices window and choose the
Distributions button to navigate to the Distributions window.
2.
Choose a distribution Type. Choose Item for goods or services you
ordered. Choose Miscellaneous for other expenses on an invoice
that are not freight or tax. Choose Freight or Tax for those types of
charges.
Warning: If you use Periodic Costing, if you enter a Tax,
Freight, or Miscellaneous distribution, you need to Allocate the
charges to one or more distributions. See: Creating
Distributions By Allocating in the Invoice Workbench: page
4 – 49.
Enter the distribution Amount and the GL Account.
If you enter an asset type Account, Payables automatically enables
the Track as Asset check box and you cannot change it. If you enter
an expense account and want to import this distribution to Oracle
Assets, enable the Track as Asset check box. See: Assets
Integration: page 4 – 157.
3.
The distribution GL Date defaults from the invoice GL Date you
entered. You can override the default and change the distribution
GL Date to any date in an open or future period. Payables uses the
GL Date as the accounting date for a distribution.
4.
Enter any additional distributions in the same manner.
If the sum of the distributions does not equal the Invoice Total,
Payables will put the invoice on Distribution Variance hold during
invoice Approval.
4 – 48
Oracle Payables User Guide
5.
Save your work.
See Also
Distributions Window Reference: page 4 – 352
Adjusting Invoices: page 4 – 299
Distribution Sets: page 2 – 17
Entering Freight on Invoices: page 4 – 129
Entering Taxes on Invoices: page 4 – 97
Invoice and Invoice Batch Default Chart: page E – 2
Payables Transfer to General Ledger Program: page 7 – 34
Creating Distributions by Allocation in the Invoice Workbench
You can use the Charge Allocations window to automatically create
tax, freight, or miscellaneous distributions, just as the Prorate window
did in previous releases.
The charge distributions you create are allocated Tax, Freight, or
Miscellaneous distributions. Allocation associates a charge with the
cost of an item on a receipt. This allocation information is used to
record the full cost of a receipt item if you use one of the Periodic
Costing options available in Oracle Cost Management. For details on
Allocation, see: Allocation: page 4 – 57.
In the Charge Allocations window, you specify the following:
• the charge amount and type (freight, tax, or miscellaneous)
• the distributions to which the charge will be allocated
• The charge amount associated with each distribution. You can
either specify an exact amount to allocate to each distribution, or
you can prorate the charge amount across all selected
distributions.
For each selected distribution, Payables creates a charge distribution
and records the allocation. The new distribution has the same GL
Invoices
4 – 49
account as the distribution to which you allocate it. After Payables
creates the distribution you can update the account any time before the
invoice is accounted.
For example, on a $110 invoice, you want to allocate $10 of a
miscellaneous charge to two Item distributions. Enter the $110 invoice
and enter two Item distributions, one for $75 and one for $25. Prorate
the Miscellaneous charge of $10 to the two Item distributions. Payables
creates two Miscellaneous distributions, one for $7.50 and one for
$2.50. The Miscellaneous distributions have the same account as the
Item distributions.
Note: If you are matching to a purchase order shipment or
receipt, then you have the option of allocating directly in the
match window, without navigating to the Distributions
window. If you are matching to a purchase order distribution,
then allocate freight and miscellaneous charges in the Allocate
window. See: Allocate Window: page 4 – 59.
See Also
Allocation Restrictions: page 4 – 68
Creating Freight and Miscellaneous Distributions by Allocating to an Item Distribution
"
To create freight or miscellaneous distributions by allocating to
distributions:
1.
In the Invoices window, enter all basic invoice information. See:
Entering Basic Invoices: page 4 – 44. If you are allocating freight,
do not check the Create Freight Distribution check box.
2.
Enter invoice distributions using the method of your choice. Select
any Item or new distribution.
Warning: The selected record must be an Item or a new
distribution if you want to use the Charge Allocations window
to create new distributions.
Choose the Allocate button. Payables opens the Charge
Allocations window.
3.
4 – 50
Oracle Payables User Guide
In the Charge Allocations window enter the information for the
charge you are allocating:
Type: Enter either Freight or Miscellaneous.
Tax Code: Enter a tax code if the Freight or Miscellaneous charge is
taxable. If you enter a tax code, then Payables includes this tax
code on the Freight or Miscellaneous distribution it creates.
Amount: Amount of the charge. The system will create new
charge distributions totalling this amount.
4.
In the Allocations region, Payables displays all distributions. You
can allocate freight and miscellaneous charges only to Item
distributions.
Select the distributions to which you want to allocate the charge by
checking the check box to the left of the Item distribution. If a
distribution is not eligible for allocation, for example, it is a tax
distribution, you cannot select the check box.
Suggestion: You can use the Select/Unselect All button if you
want to select or deselect all eligible distributions.
5.
Specify the charge amounts allocated to each selected distribution.
You can either prorate the charge amount to all selected Item
distributions by using Prorate check box, or you can enter specific
charge amounts for each selected Item distribution:
• If you want to prorate the charge amount to all selected Item
distributions in the window, then enable the Prorate check box.
Payables will create distributions that have amounts
proportional to the Item amounts on the selected distributions.
For example, if you are allocating a $10 freight charge to two
selected distributions, one for $75, and one for $25, and if you
select Prorate, then Payables will create two freight distributions,
one for $7.50, and one for $2.50.
• If you want to specify the charge amounts, then enter a charge
amount in the Allocated Amount field for each selected Item
distribution. The sum of the charge amounts, which is displayed
in the Allocated Total field, must equal the charge amount you
entered in the Amount field.
6.
If you want to use this window to create more allocated charge
distributions (Tax, Freight, or Miscellaneous), then choose the New
button. Payables saves your allocations and clears the Charge
Allocations window so you can allocate new charges. For details
on allocating Tax, see: Creating Tax Distributions by Allocating to
Invoice Distributions: page 4 – 52.
7.
Choose the OK button to allocate the Charge Amount to the
selected the distributions and close the window. Payables
Invoices
4 – 51
automatically creates the Freight or Miscellaneous distributions.
You can review them in the Distributions window.
Creating Tax Distributions by Allocating to Invoice Distributions
You can use the Charge Allocations window to allocate tax to invoice
distributions. Payables automatically creates tax distributions that total
the tax amount you specify. The new Tax distributions have the same
GL account as the non–tax distributions to which they are allocated.
You can update the account after Payables creates the new Tax
distributions. Note that you can also achieve this functionality
automatically under certain conditions. See: Using the Automatic Tax
Calculation Feature to Prorate Tax in the Invoice Workbench: page
4 – 114.
During Approval, Payables uses the tax rates of the tax codes to check
that the tax amount is correct within the tolerances you defined. So, as
always, you should make sure that the non–tax lines also have the
appropriate tax codes.
Prerequisites
❑ If you use Automatic Tax Calculation, then disable it for this
invoice. See: Disabling Automatic Tax Calculation: page 10 – 40.
❑ If you use any other features that automatically create tax
distributions, then remove all automatically calculated tax
distributions in the Distributions window.
"
To create tax distributions by allocating a tax charge:
1.
In the Invoices window enter all basic invoice information. See:
Entering Basic Invoices: page 4 – 44. Do not enter a Tax Code or
Tax Amount.
2.
Enter invoice distributions using the method of your choice: receipt
match, purchase order match, Distribution Set, or manual entry.
Do not enter tax codes for the distributions and do not enter Tax
type distributions. If you are matching to a purchase order
shipment or receipt, then you have the option during the match of
allocating in the Allocate window.
In the Distributions window, select any Item or Prepayment
distribution or any new record.
4 – 52
Oracle Payables User Guide
Warning: The selected record must be either an Item,
Prepayment, or a new distribution if you want to use the
Charge Allocations window to create distributions.
Choose the Allocate button. Payables opens Charge Allocations
window and displays all distributions.
3.
In the Charge Allocations window enter the information for the tax
you are allocating:
Type: Select Tax.
Tax Code: Enter a tax code.
Amount: Amount of the tax charge. The system will create new
Tax distributions totalling this amount.
4.
In the Allocations region, Payables displays all distributions. You
cannot allocate Tax to a Tax distribution. Select the distributions to
which you want to allocate tax charges by checking the check box
to the left of the distribution. You cannot select the check box for
distributions that are not eligible for allocation, for example, tax
distributions.
Suggestion: You can use the Select/Unselect All button if you
want to select or deselect all eligible distributions.
5.
Specify the charge amount for each selected distribution. You can
either prorate the tax charge across all selected distributions, or you
can enter specific charge amounts for each selected distribution:
• If you want to prorate the tax amount across all selected
distributions, then enable the Prorate check box. During
allocation, Payables will create tax distributions that have
amounts proportional to the amounts of the selected
distributions.
• If you want to specify the allocation amounts, then enter a
Charge Amount for each selected distribution. The sum of the
charge amounts must equal the tax amount you entered in the
Amount field.
6.
If you want to create more allocated charge distributions, then
choose the New button. Payables saves your allocations and clears
the Charge Allocations window so you can allocate new charges.
7.
Choose the OK button to allocate the Tax amount to the selected
distributions and close the Charge Allocations window. Payables
automatically creates tax distributions for you.
8.
You can review the new Tax distributions in the Distributions
window. If necessary, enter tax codes on the non–tax lines to
Invoices
4 – 53
ensure that Approval checks the tax amount against the correct
non–tax lines.
See Also
Charge Allocations Window Reference: page 4 – 61
Allocations Overview: page 4 – 58
Allocation Restrictions: page 4 – 68
4 – 54
Oracle Payables User Guide
Entering Invoice Batches in the Invoice Workbench
You can use invoices batches to:
H
Enter invoice defaults at the batch level that override system or
supplier site defaults for all invoices in the batch.
H
Maximize accuracy by tracking variances between the control
invoice count and total and the actual invoice count and total
resulting from your invoice entry.
H
Easily locate a batch online and review the name of the person who
created the batch and the date it was created.
Prerequisites
❑ Enable the Use Batch Controls Payables option. See: Payables
Options: page 2 – 57.
❑ Group unentered invoices into batches.
❑ Establish a systematic naming convention to help you locate
batches. For example, you may want to include in your invoice
batch name the date or the initials of the person who entered the
batch.
Suggestion: If you file physical documents by invoice batch
name, a systematic naming convention will facilitate retrieval.
Invoices
4 – 55
"
To enter an invoice batch:
1.
In the Invoice Batches window enter a unique value in the Invoice
Batch Name field. This name will appear on your reports and will
help you locate the batch online.
2.
Enter the number of invoices in the batch in the Control Count
field.
Enter the sum of invoice amounts in the batch in the Control Total
field.
Payables tracks variances between the Control Count and Total and
the Actual Count and Total as you enter invoices.
Warning: If there is a discrepancy between the invoice amount
and batch amount, Payables warns you when you exit a batch
but it does not prevent Approval and payment of the
individual invoices within a batch. You can make a correction
immediately, or you can adjust the invoice batch later.
3.
Enter any Invoice Defaults you want for the invoices. Defaults
include: Currency, Type, Document Category, Hold Name, Liability
Account, Payment Terms, Pay Group, GL Date, and Hold Reason.
These defaults override system and supplier site defaults. Of
course, you can override these defaults as you enter individual
invoices.
4.
Choose the Invoices button and enter the invoices.
5.
Save your work.
See Also
Invoice Batches Window Reference: page 4 – 339
Approval: page 4 – 145
Adjusting Invoice Batches: page 4 – 298
4 – 56
Oracle Payables User Guide
Allocation
If you use one of the Periodic Costing options available in Oracle Cost
Management to record costs of goods that you order, then when you
manually enter distributions for other charges (tax, freight, or
miscellaneous), you need to record the distributions to which they are
allocated. Allocation enables you to record accurately all costs
associated with a receipt.
If you Do Not Use Periodic Costing
If you have not installed Oracle Cost Management or do not use
Periodic Costing, you do not need to record these allocations.
However, you may find the Charge Allocation and Allocate windows
useful for automatically creating charge distributions. If you do not
use Periodic Costing, we suggest you read only the following allocation
discussions:
• Creating Distributions by Allocation: page 4 – 49
• Charge Allocations Window Reference: page 4 – 61
• Allocate Window: page 4 – 59
• Allocation Restrictions: page 4 – 68
If You Use Periodic Costing
If you use Periodic Costing, then you may find all of the allocation
discussions helpful:
• Allocations Overview: page 4 – 58
• Charge Allocations Window Reference: page 4 – 61
• Creating Distributions by Allocation: page 4 – 49
• Matching Charges to Material Receipts: page 4 – 64
• Recording Allocations for Periodic Costing: page 4 – 67
• Reviewing Allocation of Other Charges: page 4 – 69
• Allocation Restrictions: page 4 – 68
Invoices
4 – 57
Allocation Overview
You can allocate charges other than the cost of goods to invoice
distributions. Allocation records the amount of the tax, freight, or
miscellaneous charge that is associated with an invoice distribution. If
you allocate a tax, freight, or miscellaneous charge to a distribution that
has been matched to a receipt, then the tax, freight, or miscellaneous
charge is included in the cost of the item on the receipt. This enables
you to accurately record all costs associated with a receipt item. For
example, you have an invoice for $1813:
Distribution Type
Description
Amount
Allocated Amount
(visible in the Charge
Allocations window)
Item
Service
500
Item
Computer
1000
10
Item
Printer
300
3
Freight
Freight
13
You allocate the freight cost to the computer and printer, but not to the
distribution for service. You can specify the freight amounts allocated
to each invoice distribution, or you can have the system prorate the
allocated amounts based on the Item distribution amounts.
The following table shows the charge distribution types that you can
allocate, and to which distribution types you can allocate them. You
cannot allocate Item, Prepayment, or Withholding Tax distributions to
other distributions.
Charge Type
Eligible Distributions for Allocation
Freight
Item
Miscellaneous
Item
Tax
Item, Freight, Miscellaneous, or Prepayment
Automatic Allocation by Payables
Payables automatically records the charge allocation for tax, freight, or
miscellaneous charge distributions when the Tax, Freight, or
Miscellaneous charge distributions are created by any of the following
methods:
4 – 58
Oracle Payables User Guide
• You prorate tax, freight, or miscellaneous charges during a match
of a material invoice to a purchase order or receipt.
• Payables performs automatic Line or Tax Code level tax
calculation.
• You create Freight, Miscellaneous, or Tax distributions by
allocating to other distributions.
Payables does not automatically record tax, freight, or miscellaneous
charge allocations when it creates distributions in any other way,
including:
• Payables creates tax distributions created by Header level
automatic tax calculation.
• Payables creates freight distributions because you use the Create
Freight Distribution check box in the Invoices window.
During Approval, if the amount of a Freight, Miscellaneous, or Tax
distribution is not fully allocated (either not allocated, or a
corresponding distribution was reversed or deleted) and is not
associated with a receipt, then Payables prorates the allocation to all
eligible distributions on the invoice. For details on the allocation of
taxes during Approval, see: Tax Allocation During Approval.
See Also
Allocation Restrictions: page 4 – 68
Allocate Window
Use the Allocate window to automatically create allocated tax, freight,
or miscellaneous distributions when you are matching to a purchase
order or receipt. Payables does not create the distributions until you
choose the Match button in the matching window (Match to Receipts
window, Match to Purchase Orders window, or Match to Purchase
Order Distribution).
Notice that in the matching window Payables displays an Allocations
region. If you want to change the allocated amounts, deselect the
Allocate check box to clear the amounts. You can then re–enter the
allocated charge by selecting the Allocate check box and re–entering the
allocation information.
Invoices
4 – 59
Each tax distribution you create using the Allocate window will have
the same GL Account as the distribution to which it is allocated.
Note: The Allocate window replaces the Prorate window,
which was in releases before 11i.
Prerequisite
❑ If you are creating tax distributions and if you use Automatic Tax
Calculation, disable it for this invoice.
❑ If you are creating tax distributions and you use any other features
that automatically create tax distributions, remove all automatically
calculated tax distributions from the invoice before you allocate.
Creating Charge Allocations During Matching
"
To create tax, freight, or miscellaneous distributions by using the
Allocate window:
1.
In the Invoices window, enter all basic invoice information. If you
are allocating freight, do not check the Create Freight Distribution
check box.
2.
From the Match poplist, choose the document you want to match
to (Purchase Order or Receipt), and choose the Match button.
3.
Use the find window to navigate to the matching window.
4.
In the window in which you are matching, select the record to
which you want to match and allocate.
5.
Select the Allocate check box. The Allocate window opens.
6.
For each charge you want to allocate, do the following:
• Select the check box next to the charge: Tax, Freight, or
Miscellaneous.
• Enter the charge amount.
• In the Tax Code field, if you are allocating a tax charge or if the
charge you are entering is subject to tax, enter the tax code.
• Payables enters this value in the Tax Code field of the
distributions it creates, and in the Tax Code field of the allocated
distribution.
• (Optional) Enter a Description Prefix
4 – 60
Oracle Payables User Guide
• Payables constructs the descriptions of the new distributions by
appending the Description Prefix you enter to the description of
each distribution you prorate to.
7.
Choose the OK button to save your work. You can review the
allocation amounts in the Allocations region of the matching
window.
Payables creates allocated charge distributions for you when you
save the match.
See Also
Allocation Restrictions: page 4 – 68
Charge Allocations Window
You can use the Charge Allocations window the following ways:
• Create and allocate tax, freight, or miscellaneous charge
distributions. See: Creating Distributions by Allocation: page
4 – 49.
• Allocate an existing tax, freight, or miscellaneous charge
distribution to one or more distributions to record costs for
Periodic Costing. See: Recording Allocations for Periodic
Costing: page 4 – 67.
• Review and update existing allocations for a charge. See:
Reviewing Allocation of Other Charges: page 4 – 69.
The mode the Charge Allocations window uses depends on where your
cursor is in the Distributions window when you choose the Allocate
button. For example, if the cursor is in an Item, Prepayment, or blank
distribution in the Distributions window, and you choose the Allocate
button, then the Charge Allocations window opens and is empty, and
you can use the Charge Allocations window to create distributions
based on the information you enter. If the cursor is on an existing tax,
freight, or miscellaneous distribution, then the window opens and
shows you any distributions that the tax, freight, or miscellaneous
charge distribution is allocated to, and any distributions available for
allocation.
Invoices
4 – 61
For Matching to Other Invoice Distributions Only
Use the Charge Allocations window to allocate charges to distributions
on the same invoice, not to match to receipts. If you match to receipts
and you are entering a tax, freight, or miscellaneous charge invoice
such as a freight invoice from a freight supplier, and you want to match
that freight charge to a receipt, see: Matching Charges to Material
Receipts: page 4 – 64. If a tax, freight, or miscellaneous charge
distribution is already matched to a receipt, then you cannot allocate it
to another invoice distribution.
See Also
Allocation Restrictions: page 4 – 68
Charge Allocations Window Reference
The top part of this window describes the charge that is allocated. The
Allocations region of this window shows the distributions to which you
can allocate the charge, and the amount that is allocated.
Type. The type of charge: Tax, Freight, or Miscellaneous.
Tax Code.
• For a Tax charge: Tax code associated with the tax charge.
• For a Freight or Miscellaneous charge: Tax code applicable to the
freight or miscellaneous distribution. This tax code will be
added to the freight or miscellaneous distribution if you are
creating it by using this window.
Amount. Amount of the tax, freight, or miscellaneous charge.
Allocated Total. Sum of the amounts you are allocating (values in the
Allocated Amount fields). To save the allocation, this amount must
equal the value you entered in the Amount field.
Prorate. Use this check box to prorate the charge amount across all
eligible distributions.
4 – 62
Oracle Payables User Guide
Allocations Region
(Check box) Indicates that a distribution is selected for allocation.
Num. Distribution number of the eligible distribution.
Type. Type of the eligible distribution. You can allocate Freight and
Miscellaneous charges to Item distributions only. You can allocate Tax
charges to Freight, Miscellaneous, Item, or Prepayment distributions.
Description. Description of the eligible distribution.
Amount. Amount of the eligible distribution.
Allocated Amount. Amount allocated to the distribution. If you are
currently allocating by proration, leave these fields empty. After you
choose the OK button to allocate, Payables calculates the prorated
amounts and populates these fields for you.
Buttons
Select/Unselect All. Selects or deselects all eligible distributions.
New. Allocates the charge amounts to selected distributions and clears
the Charge Allocations window so you can allocate new charges.
Cancel. Discards any changes and closes the window.
OK. Allocates the charge amounts to selected distributions and closes
the window.
See Also
Allocation Restrictions: page 4 – 68
Invoices
4 – 63
Matching Charges to Material Receipts
Complete the following steps to match an invoice for freight, tax, or
miscellaneous charges to a material receipt. Note that this step is
required for accurate costing data if you use Periodic Costing. When
you match a freight, tax, or miscellaneous invoice to a receipt, the total
cost of the goods on the receipt includes the freight, tax, or
miscellaneous charges that are matched to the receipt. This kind of
matching associates costs related to acquiring the goods that are on the
receipt, but it does not affect the quantity and amounts billed on the
purchase order shipment. If you have installed Oracle Costing, this
information is then used by that product.
For example, you buy a $1000 computer from Company A. You hire
Company B to ship it to you for $50. You receive the computer. When
you get the freight invoice from Company B, you can match that freight
invoice to the receipt for the computer from Company A. This
associates the $50 freight charge with the cost of the $1000 computer,
making the total cost of the computer $1050.
4 – 64
Oracle Payables User Guide
Prerequisites
❑ A purchase order for the same currency as the invoice you are
entering must be approved and open. At least one receipt
transaction exists for the purchase order.
❑ The Invoice Match option for the purchase order shipment you are
matching to is set to Receipt.
"
To match a freight, tax, or miscellaneous invoice to a receipt:
1.
In the Invoices window, enter a Standard invoice for the freight,
tax, or miscellaneous charge. Enter the supplier and supplier site.
The supplier and site can be different from the supplier and site on
the receipt.
• If the supplier and site charging the freight, tax, or miscellaneous
charge is the same as the supplier and site on the purchase order
receipt, you can enter a PO Default invoice. Payables prompts
you to enter the PO Number, then automatically defaults the
Supplier, Supplier Number, Site, and Currency from the
purchase order to the Invoices window.
Enter all basic invoice information (see: Entering Basic Invoices:
page 4 – 44), but do not manually enter the distributions.
2.
In the Invoices window, select Receipt from the Match button
poplist. Choose the Match button. The Find Receipts for Matching
window opens. Select either Freight, Tax, or Miscellaneous as the
type. Payables creates invoice distributions with this type.
Enter search criteria for one or more receipts to which you want to
match the invoice. The search criteria can include purchase order
information to help you identify each receipt. Note that values you
enter in certain fields will affect lists of values for other fields. For
example, if you enter a purchase order number, then the list of
values for Receipt Number lists only receipt numbers for the
purchase order you entered.
The supplier and site on each receipt you are matching to can be
different from the supplier and site on the invoice. Choose the Find
button.
3.
The Match Other Charges to Receipts window opens and displays
the receipt lines that match your search criteria.
You can choose the View Receipt button to see detailed information
about any receipt. If the receipt you are looking for is not
displayed, you can either return to the Find Receipts for Matching
Invoices
4 – 65
window or enter a query directly in the Match Other Charges to
Receipts window.
4.
In the Match Other Charges to Receipts window, enter information
for the distributions you want to create:
• Type. This value defaults from the Find Receipts for Matching
window.
• Amount. Total tax, freight, or miscellaneous charge that you
want to match.
• Tax Code. If the charge type is Tax, enter the tax code. If the
charge type is Freight or Miscellaneous, leave this field blank.
(To allocate tax to freight or miscellaneous distributions, use the
Charge Allocations window after you create the freight or
miscellaneous distributions.)
• Account. To assign an account to the new distributions enter a
value here. If you have a default Payables option for Freight
Account, it will default if you select Freight as the Type.
5.
Indicate which receipt lines you want to match to by selecting the
check box to the left of the receipt line.
6.
Select the match amount for each selected receipt line by using one
of the following methods. You can either prorate the match to all
selected receipt lines, or enter specific charge amounts for each
selected receipt line:
• If you want to prorate the match amount to all selected receipt
lines in this window, enable the Prorate check box. During the
match, Payables creates distributions with amounts proportional
to the amounts on the receipt lines you selected.
• If you want to specify the match amounts, then enter a Charge
Amount for each selected receipt line. The sum of the Charge
Amounts must equal the tax, freight, or miscellaneous charge
amount you entered in the Amount field.
7.
Choose the Match button to complete the match, close the Match to
Receipt window and the Find window, and return to the current
invoice record.
Review the new invoice distributions in the Distributions window.
If you want to allocate tax to the new freight or miscellaneous
distributions, choose the Allocate button in the Distributions
window and complete the allocation in the Charge Allocations
4 – 66
Oracle Payables User Guide
window. Oracle Cost Management can then include the tax
amount in the actual cost of the item on the receipt.
See Also
Allocation Restrictions: page 4 – 68
Recording Allocations for Periodic Costing
If you use one of the Periodic Costing options available in Oracle Cost
Management to record costs of goods that you order, you need to
allocate other charges (Tax, Freight, and Miscellaneous) to other invoice
distributions that are matched to receipts. When a distribution is
matched to a receipt, the distribution and any tax, freight, or
miscellaneous distributions that are allocated to it are included in the
cost of the receipt.
Allocating Tax, Freight, and Miscellaneous for Periodic Costing
Prerequisite
❑ The invoice is not yet accounted.
"
To allocate an existing tax, freight, or miscellaneous charge to another
distribution:
1.
In the Invoices window, enter all basic invoice information. See:
Entering Basic Invoices: page 4 – 44.
2.
Enter the tax, freight, or miscellaneous charge distributions that
you want to allocate to the matched distributions by using a
Distribution Set, or manual entry. Enter invoice distributions by
matching to a receipt.
3.
In the Distributions window select the Tax, Freight, or
Miscellaneous distribution that you want to allocate to a
receipt–matched distribution.
Warning: The selected distribution record must be a Freight,
Miscellaneous, or Tax distribution that has not been matched to
a receipt, or you cannot perform this step properly.
Invoices
4 – 67
Choose the Allocate button. Payables opens the Charge Allocations
window and displays all distributions to which you can allocate the
charge.
4.
In the Charge Allocations window, Payables displays in the top
region the distribution Type and Charge Amount.
5.
Select the distributions to which you want to allocate the charge by
checking the check box to the left of the receipt line.
Suggestion: You can use the Select/Unselect All button as a
toggle to select or deselect all eligible distributions.
6.
Indicate the amounts of the allocation by using one of the following
methods. You can either prorate the allocation amount to all
selected distributions, or enter a specific charge amount for each
selected distribution:
• To prorate the charge amount to all selected distributions in this
window, enable the Prorate check box.
• To specify the allocation amounts, enter a Charge Amount for
each selected distribution. The sum of the Charge Amounts
must equal the tax, freight, or miscellaneous charge amount you
entered in the Amount field.
7.
Choose OK to have Payables allocate the Charge Amount to the
selected the distributions and close the window.
Allocation Restrictions
CANCELLED INVOICES. You cannot modify allocations if the
invoice is cancelled.
PAID INVOICES. If the invoice is partially or fully paid and the
Allow Adjustments to paid Invoices Payables option is not enabled,
you cannot create new charges in the Allocations window.
APPLIED PREPAYMENTS. If a prepayment invoice has been partially
or fully applied, you cannot create new charges in the Allocations
window.
ITEMS MATCHED TO MULTIPLE PO DISTRIBUTIONS. You
cannot allocate a single nonrecoverable tax distribution to more than
one Item distribution if the distributions are matched to different
purchase order distributions.
ENCUMBERED TAX DISTRIBUTIONS: You cannot allocate a new
Tax distribution to an Item distribution if encumbered Tax distributions
4 – 68
Oracle Payables User Guide
already exist for the item distribution. Also, you cannot change
allocations for a nonrecoverable Tax distribution if it has been
encumbered and if it is already been allocated to purchase order
matched Item distributions.
ACCOUNTED ALLOCATIONS. You cannot adjust an allocation after
you have accounted for the charge.
Reviewing Allocation of Other Charges
You can review or modify existing allocations of a Tax, Freight, or
Miscellaneous distribution by selecting the distribution in the
Distributions window and choosing the Allocate button. You can make
any changes in the Charge Allocations window.
You cannot modify charge allocations after accounting for the invoice.
See Also
Selecting Multiple Records (Oracle Applications User’s Guide)
Prorating Tax: page 4 – 52
Adjusting Invoice Distributions: page 4 – 304
Invoices
4 – 69
Entering Purchase Order Matched Invoices
You can match Payables invoices to purchase orders to ensure that you
pay only for the goods that you have ordered, or you can match to
purchase order receipts to ensure that you pay only for goods that you
have received. Purchase order matched invoices are invoices that you
match to any of the following:
• Purchase order shipments
• Purchase order receipts
• Purchase order receipt lines
• Purchase order distributions
You can set up controls in your system to require you to purchase order
match each invoice. You can also set an option on a purchase order
shipment that controls whether invoices should match to that shipment
directly or to a receipt. You set tolerances to specify the range of
variance you will allow if the amounts or quantities on the invoice are
greater than the amounts or quantities on the purchase order or receipt.
When you enter an invoice and match it, Payables automatically creates
distributions for you and checks that the match is within the tolerance
you define. See: Invoice Tolerances: page 2 – 96.
After you save the match, Payables updates the quantity billed for each
matched shipment and its corresponding distribution(s) based on the
amount you enter in the Quantity Invoiced field. Payables also updates
the amount billed on the purchase order distribution(s).
Note: You can match to purchase orders that have a status of
Closed for Invoice.
Receipt and purchase order matching setup and functionality is
described in detail in Purchasing Integration: page 4 – 165. The
following section describes how to enter and match invoices.
You can match an invoice to a purchase order in different ways:
H
Receipt match. Matching to receipts allows you to pay only for
goods you receive, and to pay for partial shipments without getting
invoice holds. In addition, any exchange rate variance is likely to
be smaller because the time between the receipt and invoice is less
than the time between the purchase order and invoice.
If you use one of the Periodic Costing options available in Oracle
Cost Management to record costs of goods that you order, it is
critical that you always match to receipts to ensure accurate cost
accounting. When you match an invoice for goods to a receipt, you
4 – 70
Oracle Payables User Guide
can also link other charges, such as freight, tax, and miscellaneous
to that receipt, so that costing can include those charges in the cost
of the goods. If you match to a purchase order instead of a receipt,
you will not have accurate costing data. See: Matching to Receipts
from the Invoice Workbench: page 4 – 78.
H
Purchase order shipment match. Based on the Quantity Invoiced,
Payables prorates the Match Amount across all non–fully billed
purchase order distributions associated with the purchase order
shipments you match to. Payables automatically creates invoice
distributions based on the purchase order distributions.
You can match to individual purchase order shipments or you can
enter a QuickMatch invoice and Payables will automatically
complete the match to all purchase order shipments. Payables
automatically creates invoice distributions based on the purchase
order distributions. See: Matching to Purchase Order Shipments
and Distributions From the Invoice Workbench: page 4 – 73 and
Entering Purchase Order Matched Invoices in the Invoice Gateway:
page 4 – 12
H
Purchase order distribution match. You can allocate the match
amount to specific purchase order distributions. Payables
automatically creates invoice distributions based on the purchase
order distributions you match to. See: Matching to Purchase Order
Shipments and Distributions From the Invoice Workbench: page
4 – 73.
H
Price correction. Use a price correction to adjust the invoiced unit
price of previously matched purchase order shipments,
distributions, or receipts without adjusting the quantity billed. You
can enter an invoice to record a price increase, or you can enter a
credit memo or debit memo to record a price decrease. You can use
a price correction when a supplier sends an invoice for a change in
unit price for an invoice you have already matched to a purchase
order. See: Recording Price Corrections in the Invoice Workbench:
page 4 – 76 and Entering Price Corrections in the Invoice Gateway:
page 4 – 16.
When you match an invoice to the receipt before you return the
goods to the supplier, you can match a credit memo or debit memo
to a receipt to record the Payables part of a Return to Supplier
transaction.
Invoices
4 – 71
Purchase Order Matching Restrictions
CAN’T MATCH TO PROCUREMENT CARD POs: If a purchase
order will be fulfilled in the procurement card process, you can’t match
an invoice to it.
See Also
Purchasing Integration: page 4 – 165
Purchase Order Matching Database Tables: page H – 2
Invoice Matching Detail Report: page 8 – 80
Match to Purchase Orders Window Reference: page 4 – 336
4 – 72
Oracle Payables User Guide
Matching to Purchase Order Shipments and Distributions From the Invoice
Workbench
Prerequisites
❑ Your purchasing information must be generated in Oracle
Purchasing or transferred to Oracle Purchasing tables from an
external purchasing system.
❑ A purchase order for the same supplier and currency as the invoice
you are entering must be approved and open.
"
To match to specific purchase order shipments or distributions:
1.
Enter a Standard, PO Default, or Mixed type invoice in the Invoices
window. If you enter PO Default type, Payables prompts you to
enter a PO Number, then Payables automatically defaults the
Supplier, Supplier Number, Site (if it is a pay site), and Currency
from that purchase order to the invoice.
Invoices
4 – 73
Enter all basic invoice information (see: Entering Basic Invoices:
page 4 – 44), but do not manually enter distributions you want to
match to purchase orders.
2.
Select Purchase Order from the Match button poplist, then choose
the Match button.
3.
In the Find Purchase Orders for Matching window enter search
criteria for the purchase order(s) to which you want to match the
invoice.
4.
Choose the Find button to navigate to the Match to Purchase
Orders window.
5.
The Match to Purchase Orders window opens. For detailed
information on any field, see: Match to Purchase Orders Window
Reference: page 4 – 336.
Review the purchase order Payment Terms and optionally change
the invoice payment terms in the Invoices window. Payables uses
the invoice payment terms to schedule invoice payment unless the
Recalculate Scheduled Payment option is enabled in the Payables
Options window. If that option is enabled, Payables uses the more
favorable payment terms between the purchase order and the
invoice.
6.
Create invoice distributions by matching to a purchase order. For
each shipment you want to match, select the shipment in the Match
to Purchase Orders window by checking the Match check box, and
enter two of the following: Quantity Invoiced, Unit Price, Match
Amount. Payables automatically calculates and enters the
remaining field (Quantity Invoiced x Unit Price = Match Amount).
The Unit Price defaults from the purchase order shipment unit
price.
7.
If you want to allocate tax, freight, or miscellaneous charges to the
distributions that this match will create, then check the Allocate
check box.
8.
If you want to match in further detail, you can match to purchase
order distributions. The Shipment Quantity block displays the
number of distributions for the current PO shipment:
Enter a value for Quantity Invoiced, then choose the Distributions
button. The Match to Purchase Order Distributions window opens.
For each purchase order distribution you want to match to, select
the purchase order distribution and enter the Quantity Invoiced.
9.
4 – 74
Oracle Payables User Guide
Choose the Match button to save your match.
To review the new invoice distributions, choose the Distributions
button in the Invoices window.
"
To match to all purchase order shipments (QuickMatch):
1.
In the Invoices window enter QuickMatch as the invoice Type.
Enter the purchase order number.
Enter all basic invoice information (see: Entering Basic Invoices:
page 4 – 44), but do not manually enter the distributions that will
not be part of the price correction.
2.
Select Purchase Order from the Match button poplist, then choose
the Match button. Payables navigates to the Match to Purchase
Orders window. Payables automatically selects all purchase order
shipments for the purchase order you entered that have the Match
Option set to Purchase Order and that have an unbilled quantity.
Payables fully matches the invoice to the distributions of the
matched shipments and automatically creates invoice distributions.
You can adjust any of the selected shipments by overriding the
defaults, including deselecting a shipment. For detailed
information on any field, see: Match to Purchase Orders Window
Reference: page 4 – 336.
3.
Review the purchase order Payment Terms and optionally change
the invoice payment terms in the Invoices window. Payables uses
the invoice payment terms to schedule invoice payment unless the
Recalculate Scheduled Payment option is enabled in the Payables
Options window. If that option is enabled, Payables uses the more
favorable payment terms between the purchase order and the
invoice.
4.
Choose the Match button in the Match to Purchase Orders window
to save your match.
To review the invoice distributions Payables created, choose the
Distributions button in the Invoices window.
See Also
Match to Purchase Orders Window Reference: page 4 – 336
Invoices
4 – 75
Recording Price Corrections in the Invoice Workbench
Use a price correction when a supplier sends an invoice for a change in
unit price for an invoice you have matched to a purchase order or
receipt.
Payables records and updates the invoiced unit price of previously
matched purchase order shipments or distributions without adjusting
the quantity billed so you can track price variances. Payables also
updates the amount billed on the originally matched purchase order
distributions.
"
To record a price correction for a purchase order shipment or
purchase order distribution:
1.
Enter the invoice.
• If you are recording a price increase, enter a Standard, PO
Default, or Mixed invoice. If you select PO Default, Payables
prompts you to enter the PO Number, then automatically
defaults the Supplier, Supplier Number, Site (if it is a pay site),
and Invoice Currency.
• If you are recording a price decrease, enter a Credit Memo or
Debit Memo type invoice. See: Entering Credit/Debit Memos:
page 4 – 84.
Enter all basic invoice information (see: Entering Basic Invoices:
page 4 – 44) but do not manually enter the distributions that will
not be part of the price correction.
4 – 76
2.
Select Purchase Order or Receipt from the Match button poplist,
then choose the Match button.
3.
In the Find Purchase Orders for Matching or Find Receipts for
Matching window, check Price Correction and enter the invoice
number for which you are recording the price correction. Enter
search criteria for the purchase order(s) or receipts to which you
want to match the invoice.
4.
Choose the Find button to navigate to the Match to Purchase
Orders window or Match to Receipts window.
5.
Payables opens the Match to Purchase Orders window or Match to
Receipts window. For detailed information on any field, see: Match
to Purchase Orders Window Reference: page 4 – 336. Review the
purchase order Payment Terms and optionally change the invoice
Payment Terms in the Invoices window. Payables uses the invoice
payment terms to schedule invoice payment unless the Recalculate
Oracle Payables User Guide
Scheduled Payment option is enabled in the Payables Options
window. If that option is enabled, Payables uses the more
favorable payment terms.
6.
Adjust the invoiced unit price of a previously matched purchase
order shipment by matching a price correction to it. To record a
price increase for a purchase order shipment, enter the Unit Price
for the incremental amount of the price correction, and enter either
Quantity Invoiced or Match Amount for each shipment you want
to match to. Payables automatically calculates and enters the
remaining field (Quantity Invoiced x Unit Price = Match Amount).
7.
If you want to match in further detail, you can match to specific
purchase order distributions:
To match to purchase order distributions, choose the Distribute
button. Select the purchase order distribution you want to match
to and enter the Quantity Invoiced. Payables automatically
calculates and enters the remaining field (Quantity Invoiced x Unit
Price = Match Amount). The Unit Price defaults from the Match to
Purchase Orders window and you cannot change it.
8.
Choose Match to save your match.
To review the new invoice distributions, choose the Distributions
button in the Invoices window.
See Also
Invoice Overview: page 4 – 288
Purchasing Integration: page 4 – 165
Entering Taxes on Invoices: page 4 – 97
Entering Freight on Invoices: page 4 – 129
Invoices
4 – 77
Matching to Receipts From the Invoice Workbench
You can match invoices to purchase order receipts. You can match in
different ways, depending on the invoice type.
• Invoice For Goods Received (Items): You create distributions
that correspond to the receipt or purchase order distributions to
which you match. This updates the quantity billed on the
purchase order shipment, purchase order distributions, and the
receipt transaction. See: Matching to Receipts: page 4 – 79.
• Freight/Tax/Miscellaneous: If you enter an invoice that is only
for freight, tax, or miscellaneous charges, you can allocate these
freight, tax, and miscellaneous distributions to the receipt, but
the invoice distribution type remains Freight, Tax, or
Miscellaneous. You can match a tax, freight, or miscellaneous
invoice to a receipt even if the receipt has a different supplier or
site from the invoice. This type of match does not update the
4 – 78
Oracle Payables User Guide
quantity billed in Purchasing. See: Matching Other Charges to
Material Receipts: page 4 – 64.
Matching to Receipts
Prerequisites
❑ The Invoice Match option for the purchase order shipment you are
matching to is set to Receipt. When you enter the invoice, if the
Invoice Match option for the supplier site is set to receipt then the
match button will default to Receipt.
❑ A purchase order for the same supplier and currency as the invoice
you are entering must be approved and open, and it must have at
least one receipt entered against it.
"
To match an invoice to a receipt:
1.
Enter a Standard, PO Default, QuickMatch, or Mixed invoice in the
Invoices window. Enter all basic invoice information (see: Entering
Basic Invoices: page 4 – 44), but do not manually enter distributions
that will not be matched.
• If you enter a PO Default invoice, Payables prompts you to enter
the PO Number, then automatically defaults the Supplier,
Supplier Number, Site (if it is a pay site), and Currency from the
purchase order to the Invoices window.
• If you enter a QuickMatch invoice, Payables prompts you to
enter the PO Number. Payables automatically defaults the
supplier, supplier number, site (if it is a pay site) and currency
from the purchase order to the Invoices window. Select Receipt
from the Match button poplist. Choose the Match button.
Payables opens the Match to Receipts window and selects all
receipts for the purchase order shipments that have the Match
Option set to Receipt. Skip the next steps and go to step 5.
2.
In the Invoices window select Receipt from the Match button
poplist then choose the Match button. Payables opens the Find
Receipts for Matching window.
3.
In the Find Receipts for Matching window, select Item in the Type
field to indicate that you are matching a material invoice. Payables
will create distribution types that match the type entered here.
Enter search criteria for the receipts to which you want to match
the invoice. This can include the purchase order that the receipt
Invoices
4 – 79
was created against, the packing slip, and so on. Choose the Find
button to navigate to the Match to Receipts window.
If no records are found that match your search criteria, try
broadening your search, and confirm that any criteria you enter is
correct.
4.
The Match to Receipts window displays the receipts that match
your search criteria. The displayed receipts include receipts for
purchase orders that have the Invoice Match option set to Purchase
Order. However, you can match to a receipt line only if the Invoice
Match option on the associated purchase order shipment is set to
Receipt.
Choose the View Receipt button to see detailed information about
any receipt.
5.
Create invoice distributions by matching to a receipt. In the Match
to Receipts window, select each receipt line you want to match to
by selecting the Match check box. Then for each receipt line enter
two of the following: Quantity Invoiced, Unit Price, Match
Amount. Payables automatically calculates and enters the
remaining field (Quantity Invoiced x Unit Price = Match Amount).
The Quantity Invoiced defaults from the unbilled quantity for this
receipt. The Unit Price defaults from the purchase order shipment
unit price if the unit of measure on the receipt is the same as that on
the purchase order.
6.
If you want to match in further detail, you can match to purchase
order distributions. The Purchase Order block displays the number
of distributions for the current PO shipment being matched::
To match to purchase order distributions for the receipt, choose the
Distribute button. Select the purchase order distribution you want
to match to, and enter the Quantity Invoiced. Payables
automatically calculates and enters the Match Amount (Quantity
Invoiced x Unit Price = Match Amount). The Unit Price defaults
from the match you made in the Match to Receipts window and
cannot be updated here.
7.
4 – 80
Oracle Payables User Guide
In the Match to Receipts window review the purchase order
Payment Terms. You can change the invoice payment terms in the
Invoices window. Payables uses the invoice payment terms to
schedule invoice payment unless the Recalculate Scheduled
Payment option is enabled in the Payables Options window. If that
option is enabled, Payables uses the more favorable payment terms
between the purchase order and the invoice.
8.
If you want to allocate tax, freight, or miscellaneous charges to the
distributions that this match will create, then check the Allocate
check box.
9.
Complete the match and save your work by choosing the match
button. This completes the match, closes the Match to Receipts
window and the Find Receipts for Matching window, and returns
you to the current invoice record.
10. You can review the new distributions in the Distributions window.
Enter any additional distributions.
Matching Restrictions
QUANTITY INVOICED: In the Match to Purchase Orders and Match
to Purchase Order Distributions windows, the Quantity Invoiced must
be in the same unit of measure as the purchase order shipment. In the
Match to Receipts and Match to Receipt Distributions window, the
Quantity Invoiced must be in the same unit of measure as the receipt.
QUANTITY INVOICED: You must enter a negative Quantity
Invoiced if the invoice amount is negative, and a positive Quantity
Invoiced if the invoice amount is positive. You cannot enter a negative
amount that reduces the quantity invoiced to less than zero.
UNIT PRICE: You cannot adjust the Unit Price if you are matching to
an amount–based purchase order with a monetary unit price of 1. For
example, 1 USD or 1 GBP.
CONTROL/ACTUAL QUANTITY AND TOTAL: In the Match to
Purchase Order Distributions window, the Control Quantity and Total
must equal the Actual Quantity and Total.
AMOUNTS: Credit memos and debit memos must be entered with
negative amounts. All match amounts must be negative as well.
Invoices
4 – 81
Viewing Purchase Order Information
"
To view purchase order information:
H
Choose the View PO button in the Match to Purchase Orders
window to navigate to the Purchase Order Shipments window.
H
Choose the View PO button in the Match to Distributions window
to navigate to the Purchase Order Distributions window.
See Also
Payment Overview: page 5 – 74
Purchasing Integration: page 4 – 165
Final Matching Purchase Orders
When you match an invoice to a purchase order, you have the option of
indicating whether the invoice is the final match to a purchase order.
If you then match another invoice to this purchase order, Approval
places a Final Matching hold on the new invoice. You cannot manually
release this hold. You must reverse the match in the Distributions
window of the Invoice Workbench and resubmit Approval to release
this hold. You can then match the invoice to a different purchase order
or enter distributions manually.
If you final match an invoice to a purchase order and the invoice has an
approval exception that causes Approval to place a hold on the invoice,
Payables also places a Can’t Try PO Close hold on the invoice. To
release this hold, you must release the other holds on the invoice and
resubmit Approval.
If you use automated receipt accrual in Purchasing and you final match
an invoice to a purchase order shipment that is not fully delivered
(quantity delivered is not equal to quantity received), Payables places a
Can’t Close PO hold on the invoice. If you manually release the hold,
Payables disables the Final Match check box.
If you are using encumbrance accounting and you mark an invoice
distribution as a final match to a purchase order, Payables creates
4 – 82
Oracle Payables User Guide
reversing journal entries for all outstanding encumbrances on that
purchase order.
Note: You cannot final match to a purchase order when you
are matching to receipts.
Prerequisite
❑ Enable the Allow Final Matching Payables option. See: Matching
Payables Options: page 2 – 70.
"
To final match a purchase order:
H
When you are matching an invoice or a credit/debit memo to a
purchase order, check the Final Match option in either the Match to
Purchase Orders window or the Match to Invoice Distributions
window.
☞
Attention: Check Final Match only if you are certain this is a final
match against the related purchase order. Once you approve a final
matched invoice distribution, you cannot update the Final Match
check box for the distribution.
See Also
Closing Purchase Orders: page 4 – 175
Entering Basic Invoices: page 4 – 44
Scheduling Invoice Payments: page 4 – 150
Entering Purchase Order Matched Invoices: page 4 – 70
Invoice Tolerances: page 2 – 96
Purchasing Integration: page 4 – 165
Final Match (with Budgetary Control) (Oracle General Ledger User’s
Guide)
Invoices
4 – 83
Credit and Debit Memos
Enter a credit or debit memo to record a credit for goods or services
purchased. Credit/debit memos are netted with basic invoices at
payment time.
• Credit Memo. Negative amount invoice created by a supplier
and sent to you to notify you of a credit.
• Debit Memo. Negative amount invoice created by you and sent
to a supplier to notify the supplier of a credit you are recording.
Usually sent with a note explaining the debit memo. See: Invoice
Notices: page 4 – 332.
This discussion includes the following topics:
• Entering Credit/Debit Memos: page 4 – 84
• Matching Credit/Debit Memos to Purchase Orders and Invoices:
page 4 – 85
• Clearing a Credit: page 4 – 91
Entering Credit/Debit Memos
"
To enter a credit/debit memo:
1.
In the Invoices window enter either the Credit Memo or Debit
Memo Invoice Type. Enter a negative invoice amount and all basic
invoice information. See: Entering Basic Invoices: page 4 – 44.
Enter Immediate Payment Terms, if appropriate.
2.
Enter distributions. You can enter them manually (see: Entering
Invoice Distributions: page 4 – 47) or enter them automatically in
one of the following ways:
• Enter a skeleton Distribution Set. See: Distribution Sets: page
2 – 17
• Match to the original invoice you entered. See: Matching
Credit/Debit Memos to Purchase Orders and Invoices: page
4 – 85.
• Match to a purchase order or receipt. See: Matching
Credit/Debit Memos to Purchase Orders and Invoices: page
4 – 85.
4 – 84
Oracle Payables User Guide
3.
Save your work.
See Also
Recording a Refund from a One Time 1099 Supplier: page 4 – 135
Matching Credit/Debit Memos to Purchase Orders and Invoices
When you enter a credit/debit memo, you can match it to existing
invoice(s), purchase orders, or receipts to have Payables automatically
copy the accounting information and create invoice distributions for
the credit/debit memo.
For example, if you receive a credit for items you returned to a
supplier, you can enter a credit memo and match it to the original
invoice you entered to ensure that the credit memo distributes the
Invoices
4 – 85
credit to the same accounts originally charged. Payables calculates
discounts on credit and debit memos if you match them to invoices you
paid using a discount.
You can match to an invoice even if it is paid and posted. You can
match the credit memo to multiple invoices, and at different levels of
detail. Your available choices depend on whether the originating
invoice was purchase order matched or not.
If the original invoice is not purchase order matched (basic invoice),
you can:
H
Match to an invoice. Payables prorates your credit amount based
on the invoice distribution amounts of the original invoice.
Payables automatically creates invoice distributions for the
credit/debit memo based on the distributions of the original
invoice.
H
Match to specific invoice distributions. You can allocate the
credit amount to specific invoice distributions of the original
invoice. Payables automatically creates invoice distributions for
the credit/debit memo based on the original invoice distribution
that you select. For example, you order three chairs for three
different departments and return one. You can match a
credit/debit invoice to the original distribution for that department
to ensure that the credit matches the charge.
If the original invoice is purchase order matched, you can:
H
Match to an invoice. Payables prorates your credit amount based
on the invoice distribution amounts of the original invoice.
Payables automatically creates invoice distributions for the
credit/debit memo based on the distributions of the original
invoice.
Payables updates the quantity billed for each of the originally
matched purchase order shipments and their corresponding
distributions by the credit quantity you enter. Payables also
updates the amount billed on the purchase order distributions.
H
4 – 86
Oracle Payables User Guide
Match to specific invoice distributions. You can allocate the
credit amount to specific invoice distributions of the original
invoice. Payables automatically creates invoice distributions for
the credit/debit memo based on the original invoice distributions
that you select. For example, you may order three chairs for three
different departments and return one. You can match a
credit/debit invoice to the original distribution for that department
to ensure that the credit matches the charge.
Payables updates the quantity billed for each of the originally
matched purchase order shipments and their corresponding
distributions by the credit quantity you enter. Payables also
updates the amount billed on the purchase order distributions.
H
Match to purchase order shipments. Payables prorates, based on
the quantity billed, your credit amount across all purchase order
distributions associated with the purchase order shipment to which
you match the credit/debit memo. Payables automatically creates
invoice distributions for the credit/debit memo based on the
purchase order distributions associated with the purchase order
shipment you match to.
Payables updates the quantity billed for each purchase order
shipment and its corresponding distributions by the amount of the
credit/debit memo. Payables also updates the amount billed on
the originally matched purchase order distributions.
H
Match to purchase order distributions. Payables automatically
creates invoice distributions for the credit/debit memo based on
the purchase order distributions.
Payables updates the quantity billed for each purchase order
shipment and its corresponding distributions by the amount of the
credit/debit memo. Payables also updates the amount billed on
the originally matched purchase order distributions.
H
Match to a Receipt. Match credit and debit memos to receipts
when you return goods to a supplier after you enter an invoice for
the goods.
H
Automatic Debit Memos. If you enable the supplier site option,
Create Debit Memo for RTS Transaction, then when you enter an
RTS (Return to Supplier) transaction in Purchasing, the system
automatically creates an unapproved Debit Memo in Payables that
is matched to the receipt.
Note: This feature is not available in the base release of
Payables release 11i. If your installation of Payables does not
include this functionality, then you can call Oracle Customer
Support to request it in a patch.
H
Record a Price Correction. Use a price correction when a supplier
sends an invoice for a change in unit price for an invoice you have
already matched to a purchase order or receipt. You can record a
price correction by selecting Price Correction in the Find window
when you match a credit/debit memo to a purchase order
shipment, purchase order matched invoice distribution, or receipt.
When you record a price correction for a credit/debit memo, you
Invoices
4 – 87
are recording a price decrease from the original invoice. You must
specify the number of the original invoice in the Find window.
Payables updates the invoiced unit price of previously matched
purchase order shipment or distributions without adjusting the
quantity billed so you can track price variances; Payables also
updates the amount billed on the originally matched purchase
order distributions.
See: Recording Price Corrections in the Invoice Workbench: page
4 – 76
Matching Credit and Debit Memos to Invoices
You can match credit and debit memos to invoices only in the Invoice
Workbench, not in the Invoice Gateway.
"
To match a credit /debit memo to an invoice or invoice distribution:
1.
In the Invoices window, enter a Credit Memo or Debit Memo type
invoice. See: Entering Credit/Debit Memos: page 4 – 84.
Enter a negative invoice amount and all basic invoice information
but do not manually enter the distributions. See: Entering Basic
Invoices: page 4 – 44.
2.
In the Invoices window, select Invoice from the poplist for the
Match button. Choose the Match button.
3.
In the Find Invoices to Match window, enter search criteria for the
invoice. If you want to apply the credit/debit memo to a purchase
order matched invoice, you can enter that purchase order number
to see all invoices matched to that purchase order.
4.
Choose the Find button. Payables navigates to the Match to
Invoice window.
To see more information about an invoice, select it and choose the
Invoice Overview button.
5.
Create invoice distributions by matching to one or more invoices.
Select the invoice by selecting the left check box, and enter a Credit
Amount.
To match in further detail, continue the match at the invoice
distribution: Choose the Distribute button. Select each invoice
distribution you want to match to and enter a Credit Amount.
6.
4 – 88
Oracle Payables User Guide
Choose the Match button to create invoice distributions for the
credit/debit memo based on the matches you made.
To review the new invoice distributions, choose the Distributions
button from the Invoices window.
Matching Credit and Debit Memos to Purchase Orders and Receipts
Each purchase order shipment indicates whether you should match to
either a purchase order or receipt. You can match only to the document
type (purchase order or receipt) specified by the purchase order
shipment.
"
To match a credit /debit memo to a purchase order shipment or
receipt in the Invoice Workbench:
1.
Enter a Credit Memo or Debit Memo type invoice. See: Entering
Credit/Debit Memos: page 4 – 84.
Enter a negative invoice amount and all basic invoice information
but do not manually enter the distributions. See: Entering Basic
Invoices: page 4 – 44.
2.
In the Invoices window, select either Purchase Order or Receipt
from the Match button poplist. Choose the Match button.
Payables opens the Find Purchase Orders for matching window or
the Find Receipts for Matching window.
3.
If this is a price correction, then check the price correction check
box and enter a value for Invoice Number.
If you want to associate an invoice with the credit memo, then
enter the invoice number as search criteria. This link allows you to
approve the invoice as a ”related invoice”. See: Approving Related
Invoices: page 4 – 90.
Enter search criteria for the document you want to match to and
choose the Find button. Payables navigates to either the Match to
Receipts or Match to Purchase Orders window.
4.
Create invoice distributions by matching to one or more purchase
order shipments or receipt lines.
• To match to purchase order shipments, select the shipment and
enter either a Quantity Invoiced or Match Amount. Payables
automatically calculates the remaining field (Quantity Invoiced x
Unit Price = Match Amount). You can optionally change the
Unit Price, which defaults from the purchase order.
• To match to a receipt lines select the receipt line and enter either
a Quantity Invoiced or Match Amount. Payables automatically
calculates the remaining field (Quantity Invoiced x Unit Price =
Invoices
4 – 89
Match Amount). You can optionally change the Unit Price,
which defaults from the purchase order.
Note: The Quantity Invoiced cannot reduce the Quantity
Billed below zero.
5.
If you want to match in further detail, choose the Distribution
button and continue the match at the purchase order distribution
level. If you are matching to a receipt, the Match to Purchase Order
Distributions window displays items that were delivered.
6.
If you want to automatically create allocated tax, freight, or
miscellaneous distributions, enable the Allocate check box. See:
Allocate window: page 4 – 59.
7.
Choose the Match button to create invoice distributions for the
credit/debit memo based on the matches you made.
To review the new invoice distributions, choose the Distributions
button in the Invoices window.
Creating Tax Distributions Automatically
To create credit memo tax distributions automatically, do only one of
the following:
• Enter the Tax Amount in the Invoices window when you enter
the credit/debit memo.
• Match to invoice distributions, either individually or through
allocation.
If you do both, each method will create tax distributions and you will
have duplicate tax distributions. If you are required to enter a Tax
Amount but you want to create distributions by matching, you can
enter a 0% tax in the Invoices window and then match as usual.
Approving Related Invoices
"
To approve related invoices when entering credit/debit memos:
H
4 – 90
Oracle Payables User Guide
In the Invoices window choose the Actions button. Check Approve
Related Invoices, and choose OK to have Payables automatically
initiate Approval for any invoices associated with a credit/debit
memo.
Clearing a Credit
You can clear a credit or debit memo you have entered and have been
unable to include in a payment. For example, a supplier sends you
cash in lieu of a credit invoice, and you have already entered a debit
memo. You can pay the debit memo with a refund. See: Refunds: page
5 – 10.
Alternatively, you can perform the following task to enter a positive
amount invoice to balance out the impact of the credit/debit memo.
"
To clear a credit that will not be used:
1.
Enter a Standard type invoice for the positive amount of the
credit/debit memo. For example, if you entered a credit for –$10,
enter a new invoice for $10.
Other than the invoice amount and invoice number, enter all of the
same basic invoice information you entered on the credit/debit
memo.
You may want to enter a write off account on the distribution if you
do not want the accounts on the credit or debit memo to bear the
impact of the unrecovered credit.
2.
If you matched the credit/debit memo to a purchase order, match
the new invoice to the purchase order to correct the purchase order
information. See: Entering Purchase Order Matched Invoices: page
4 – 70.
3.
Create a zero amount payment at payment time to net the new
invoice with the credit/debit and clear both from your Invoice
Aging.
Invoices
4 – 91
Entering Foreign Currency Invoices
When you enter an invoice in a currency other than your functional
currency, Payables uses an exchange rate to convert the invoice and
invoice distributions into your functional currency for creating journal
entries. You define your functional currency during setup for your set
of books. See: Foreign Currency Transactions: page 6 – 2.
To assign an exchange rate to an invoice, you can manually enter the
rate when you enter an invoice. Alternatively, you can have Payables
enter an exchange rate from the GL Daily Rates table either by entering
a rate type and rate date during invoice entry or entering them later
and then using the AutoRate program.
If you match an invoice to a purchase order, Payables uses the invoice
exchange rate to create invoice distributions. Payables does not use the
purchase order exchange rate. If there is a difference between the rates,
Payables records the exchange rate variance.
Manual Exchange Rate Entry
Prerequisites
❑ Enable the Use Multiple Currencies Payables option.
❑ Enable the currencies you need in the Currencies window. See:
Currencies Window (Oracle Applications System Administrator’s
Guide).
"
To enter a foreign currency invoice with a manually entered exchange
rate:
1.
In the Invoices window, enter all basic invoice information (see:
Entering Basic Invoices: page 4 – 44), including the Invoice
Currency, and the Invoice Amount expressed in the foreign
currency. Before entering distributions or matching the invoice,
proceed with the next step:
2.
In the Rate Type field, enter User, and enter the Exchange Rate you
want to use to convert the invoice into your functional currency.
Optionally change the Exchange Date which defaults from the
invoice GL Date.
3.
4 – 92
Oracle Payables User Guide
Enter the invoice distributions.
4.
Complete processing the invoice and save your work.
GL Daily Rates Table Default Exchange Rate Entry
Prerequisites
❑ Define rates in the GL Daily Rates Table. See: Entering Daily Rates
(Oracle General Ledger User’s Guide).
❑ Enable the Use Multiple Currencies Payables option. See: Payables
Options: page 2 – 57.
❑ Enable the currencies you need in the Currencies window. See:
Currencies Window (Oracle Applications System Administrator’s
Guide).
"
To enter a foreign currency invoice with a GL Daily Rates Table
default exchange rate:
1.
In the Invoices window, enter all basic invoice information (see:
Entering Basic Invoices: page 4 – 44), including the Invoice
Currency, and the Invoice Amount expressed in the foreign
currency. Before entering distributions or matching the invoice,
proceed with the next step.
2.
In the Rate Type field enter the type of exchange rate you want to
default from the GL Daily Rates table, such as Spot or Corporate.
Optionally change the Exchange Date, which defaults from the
invoice GL Date.
Payables automatically enters the Exchange Rate from the GL Daily
Rates table. If the Exchange Rate field is null, then a rate for the
Currency and Rate Type and Exchange Date you entered is not
defined in the GL Daily Rates table. If the Require Exchange Rate
Entry Payables Option is disabled, you can continue entering the
invoice, and later either enter the Exchange Rate manually or
update the GL Daily Rates table and submit AutoRate.
3.
Complete processing the invoice and save your work.
Invoices
4 – 93
AutoRate Exchange Rate Entry
Prerequisites
❑ Define rates in the GL Daily Rates Table. See: Entering Daily Rates
(Oracle General Ledger User’s Guide).
❑ Disable the Require Exchange Rate Entry Payables option. See:
Payables Options: page 2 – 57.
❑ Enable the Use Multiple Currencies Payables option. See: Payables
Options: page 2 – 57.
❑ Enable the currencies you need in the Currencies window. See:
Currencies Window (Oracle Applications System Administrator’s
Guide).
"
To enter a foreign currency invoice exchange rate with AutoRate:
1.
In the Invoices window, enter all basic invoice information (see
Entering Basic Invoices: page 4 – 44), including the Invoice
Currency, and the Invoice Amount expressed in the foreign
currency. Before entering distributions or matching the invoice,
proceed with the next step:
2.
In the Exchange Rate region, select the Type of exchange rate you
want to default, such as Spot or Corporate.
Optionally change the Rate Date, which defaults from the invoice
GL Date.
Leave the Rate field empty.
3.
Complete processing the invoice and save your work.
4.
Before you approve invoices, submit AutoRate from the Submit
Request window to have Payables automatically default exchange
rates to foreign currency invoices without exchange rates. If you
do not run AutoRate before Approval, Payables will apply No Rate
holds to all foreign currency invoices without exchange rates. No
Rate holds prevent you from paying and creating journal entries for
those invoices.
FOREIGN CURRENCY INVOICE RESTRICTIONS:
CHANGING CURRENCY TYPES: Once you save your invoice, you
cannot change the currency. You can use the Cancel Invoice action then
re–enter the invoice with the correct currency.
4 – 94
Oracle Payables User Guide
NO RATE HOLD: Payables will not allow you to create accounting
entries an invoice in a currency other than your functional currency.
Approval will put a No Rate hold on a foreign currency invoice with no
rate defined.
PURCHASE ORDER MATCHING: Payables will not allow you to
match an invoice to a purchase order that has a different currency.
WITHHOLDING TAX: Payables will not create a payment for a
foreign currency invoice if the following conditions are true: the invoice
has a withholding tax group assigned that is set up with either a period
limit or more than one amount range.
See Also
Foreign Currency Transactions: page 6 – 2
Entering Purchase Order Matched Invoices: page 4 – 70
Entering Credit/Debit Memos: page 4 – 84
Approval: page 4 – 145
Invoice Variances: page 4 – 172
AutoRate Program: page 6 – 15
Payables Options: page 2 – 57
Invoices
4 – 95
Mixed Invoices
Mixed Invoices are invoices or credit/debit memos for which you can
perform both positive and negative matching to purchase orders and to
other invoices.
For example, you can enter an invoice for –$100 with Invoice Type
Mixed. You can match to an invoice for $–200, and match to a purchase
order for $100.
"
To enter a Mixed invoice:
1.
Enter the invoice or credit/debit memo in the Invoices window,
and enter Mixed as the invoice Type.
You can enter either a positive or negative invoice amount.
2.
4 – 96
Oracle Payables User Guide
Match to purchase orders, and/or invoices. See: Entering Purchase
Order Matched Invoices: page 4 – 70, and Matching Credit/Debit
Memos to Purchase Orders and Invoices: page 4 – 85.
Entering Taxes on Invoices
You can record taxes by manually entering tax distributions, or by
having Payables automatically create tax distributions based on a tax
code you enter.
Your available entry options depend on the Payables options you have
enabled and whether you have tax defaults set. These options and
defaults determine what kind of taxes you can record and whether
Payables is enabled to automatically enter certain kinds of taxes for
you.
This discussion includes the following tax topics:
• Tax Types: page 4 – 98
• Tax Codes: page 4 – 99
• Setting Up Tax Control Payables and Financials Options: page
4 – 99
• Tax Allocation During Approval: page 4 – 100
• Tax Amount Verification During Approval: page 4 – 101
• Tax Control Methods: page 4 – 102
• Deriving Tax From a Natural Account: page 4 – 104
• Defaulting Tax in Payables: page 4 – 105
• Entering Taxes When You Do Not Use the Automatic Tax
Calculation Feature: page 4 – 108
• Using the Automatic Tax Calculation Feature to Enter Tax in the
Invoice Workbench: page 4 – 111
• Using Automatic Tax Calculation in the Invoice Gateway: page
4 – 116
• Offset Taxes: page 4 – 117
• EU VAT Taxes: page 4 – 118
• Entering Use Taxes: page 4 – 121
• Entering Taxes on Expense Reports: page 4 – 122
• Invoice Tax Restrictions: page 4 – 122
• Recoverable Tax: page 4 – 124
Invoices
4 – 97
• Tax Summary: page 4 – 127
See Also
Creating Tax Distributions by Allocating Tax to Distributions: page
4 – 52
Automatic Tax Calculation Overview: page 10 – 34
Tax Reporting Ledger (Oracle Receivables Tax Manual or online help)
Financial Tax Register (Oracle Receivables Tax Manual or online help)
Tax Types
Payables uses five types of taxes:
4 – 98
H
Sales. Used to record sales tax charges.
H
Use. A tax you pay directly to a tax authority instead of to a
supplier. Suppliers do not include use taxes on invoices. By
assigning use taxes to invoices, you can create a record of the taxes
you owe to tax authorities. Review your use tax liabilities by
running the Use Tax Liability Report. See: Entering Use Taxes:
page 4 – 121
H
Offset. A negative–rate tax you use to offset a positive tax to allow
you to record and report on zero–rated taxes. For example, an
office in an EU state paying an intra–EU invoice can assign a VAT
tax and a corresponding Offset tax to an invoice, so it can record
and report VAT taxes without actually paying any to the supplier.
See: Offset Taxes: page 4 – 117
H
User–defined (VAT, GST). You can define in the Oracle Payables
Lookups window as many tax types as you require for your tax
authorities and tax rates. Payables treats user–defined taxes as
Sales taxes. See: Lookups: page 2 – 13.
H
Automatic Withholding Tax. A tax you use to withhold taxes from
Payables expense reports and supplier invoices. See: Automatic
Withholding tax Overview: page 10 – 24.
Oracle Payables User Guide
Tax Codes
You can create an unlimited number of tax codes for each tax type. In
the Tax Codes window, you create tax codes and assign to each a Tax
Type, Account, and Tax Rate. You can assign positive tax rates,
zero–percent tax rates for tax–exempt distributions, and negative tax
rates for Offset taxes. You can associate an Offset tax with a Sales or
User–defined tax code. During supplier and supplier site entry, you
can assign one withholding tax code, and one Sales, Use, or
user–defined tax code. Payables assigns tax codes as defaults based on
your Tax Code Defaults hierarchy. For information on defining tax
codes, see: Tax Codes: page 2 – 146. For information on defaulting tax
codes, see: Defaulting Tax in Payables: page 4 – 105.
You can assign tax codes to expense or asset accounts. For more
information see: Deriving Tax From an Account: page 4 – 104.
You can define tax codes with different rates during effective dates you
specify. For example, you can define a tax code that has a rate of 5%
during one year, and 6% the following year. The invoice date
determines the tax rate that Payables applies to the invoice.
If you record recoverable or partially recoverable taxes, you can also
assign tax recovery rates or tax recovery rate rules to tax codes. See:
Recoverable Tax: page 4 – 124.
Setting Up Tax Control Payables and Financials Options
In the Payables Options window, you can enable Automatic Tax
Calculation and set tax options and defaults. The following options
determine how Payables defaults tax codes and calculates tax,
including whether Payables calculates tax based on invoice header
information or invoice distribution information. You can also use these
options to have Payables calculate tax for distributions when the
distribution amount includes tax. For detailed information, see:
Defaulting Tax in Payables: page 4 – 105, Automatic Tax Calculation
Overview: page 10 – 34, and Invoice Tax Payables Options: page 2 – 67,
Tax Financials Options: page 2 – 47.
Financials Options:
• Default Tax Code
• Rounding Rule
• Precision
Invoices
4 – 99
• Min Accountable Unit
• Enable Recoverable Tax
• Default Recovery Rate
• Cash Basis Encumbrance
Payables Options:
• Exclude Tax from Discount Calculation
• Require Tax Entry at Header
• Use Automatic Tax Calculation
• Calculation Level
• Allow Calculation Level Override
• Distribution Amounts Include Tax
• Allow Override
• Enforce Tax From Purchase Order
• Tax Code Defaults
• Enforce Tax From Account
Tax Allocation During Approval
You can allocate taxes to taxable distributions in the Charge Allocations
window. Allocation records the association between tax distributions
and taxable distributions. This information is used if you use Oracle
Costing to do periodic costing and in tax reporting. Allocation is
automatic when you use line level or tax code automatic tax calculation
or allocation can be done manually when you use the Other Charge
Allocations window. If a tax distribution is not allocated or not fully
allocated, then Approval reallocates tax distributions by prorating the
tax amount across all taxable distributions. You can view allocations in
the Allocations window. You can also use the Charge Allocations or
the Allocate windows to automatically create allocated tax
distributions. See: Creating Tax Distributions by Allocating Tax to
Distributions: page 4 – 52, and Reviewing Allocation of Other Charges
to Distributions: page 4 – 69.
4 – 100
Oracle Payables User Guide
Tax Amount Verification During Approval
During Approval, Payables automatically verifies all tax information
on an invoice and places one or more holds on an invoice if tax
exceptions exist.
Approval first checks to see if the tax distribution is fully allocated. If
it’s not, then Approval automatically allocates the full tax amount by
prorating it across taxable invoice distributions. The following
distribution types can be taxable: Item, Freight, Miscellaneous,
Prepayment.
Payables checks for tax variances and, if you match an invoice to a
purchase order, it checks for invoice and purchase order tax code
variances. If you enable the Enforce Tax From Account option in the
Payables Options window, Approval also verifies that for all natural
accounts that have tax codes associated with them that the tax code is
correct.
During Approval, Payables verifies that you have entered your tax
distribution(s) correctly. For example, you entered a $108.00 invoice for
a $100.00 telephone which was taxed with an 8% state Sales tax. The
invoice should have one tax distribution for $8, and one item
distribution for $100. Both distributions should have the same tax
code, and the tax code should have an 8% tax rate. During Approval,
Payables verifies that each tax distribution amount equals the sum of
the non–tax distributions with the same tax code multiplied by the tax
rate assigned to the tax code.
Type
Amount
Tax Code
Distribution
Description
Item
100
An 8% Sales tax
Telephone
Tax
8
An 8% Sales tax
Tax on the telephone
If a taxable distribution does not have a tax code, then Approval
assumes that all tax codes that are not specified on any other non–tax
distributions are applicable to it. For example, if you want two tax
codes to apply to one Item line, then enter the tax distributions as
usual, in the appropriate amounts, and leave the Tax Code field for the
Item distribution blank.
Invoices
4 – 101
Type
Amount
Tax Code
Distribution
Description
Item
100
Tax
8
An 8% Sales tax
Tax on the telephone
Tax
5
A 5% Sales tax
Second tax on the
telephone
Telephone
If the tax amounts are not within the tolerances you define, Approval
applies a hold to the invoice. In the Invoice Tolerances window you
can define percentage or amount tolerances to determine the amount of
tax variance you allow on your invoices. If you have defined a
percentage tolerance, and the variance exceeds this percentage,
Approval applies a Tax Variance hold. If you have defined an amount
tolerance, and the variance exceeds this amount, Approval applies a
Tax Amount Range hold. Payables releases the Tax Variance or Tax
Amount Range hold if you enter a tax distribution with an appropriate
name and amount and resubmit Approval.
Approval then verifies that each tax distribution amount is within the
tolerances you define. The tax amount should equal the sum of the
distributions to which the tax was allocated multiplied by the tax rate
of the tax code. Continuing with the previous example, Approval
checks that the tax amount is $8 because the distribution to which it
was allocated is $100 and the tax rate of the tax code is 8%.
If the tax amounts are not within the tolerances you define, Approval
applies a hold to the invoice. In the Invoice Tolerances window you
can define percentage or amount tolerances to determine the amount of
tax variance you allow on your invoices. If you have defined a
percentage tolerance, and the variance exceeds this percentage,
Approval applies a Tax Variance hold. If you have defined an amount
tolerance, and the variance exceeds this amount, Approval applies a
Tax Amount Range hold. Payables releases the Tax Variance or Tax
Amount Range hold if you enter a tax distribution with an appropriate
tax code and amount and resubmit Approval.
Tax Control Methods
You can control tax code defaulting in Oracle Purchasing and Oracle
Payables using the Item Method or the Account Method.
Note: Although you can set up Payables to automatically
default tax codes to invoices, in many tax regimes the supplier
invoice is a legal document that governs the tax that is due,
4 – 102
Oracle Payables User Guide
and any defaulted tax code should be updated in accordance
with the tax code shown on the supplier invoice.
Controlling Tax From Item and Destination: Item Method
Using the Item method, the tax code for a transaction defaults based on
the inventory item and source (point of supply). You can select from
and rank the following sources to define your tax defaulting hierarchy:
PO for Matched Invoices, Supplier Site, Supplier, Account, Financials
Options, Invoice Header, Template.
Typically, with the Item Method, the system searches for a tax code at
all levels except the Account level. The Item Method is most suitable
for implementations that are closely integrated with Oracle Purchasing,
where tax codes may be associated with inventory items on a purchase
order and copied to the invoice during purchase order matching. See:
Tax Defaults in Purchasing (Oracle Purchasing User’s Guide).
See: Defaulting Tax in Payables: page 4 – 105
Controlling Tax from Natural Account: Account Method
Use the Account Method if your chart of accounts is constructed
around tax compliance. When you use the Account Method, the
system assigns a tax code based on the expense or asset account, and
ignores any tax codes from the supplier, supplier site, or Financials
option. When you use this method, you assign to a tax code one or
more expense or asset accounts. When you record a transaction,
Payables checks if the expense or asset account has a tax code assigned
to it, and if it does, Payables records the tax on that transaction in the
tax account.
By validating the tax code for your invoice distributions against the tax
code assigned to your account, you can ensure that the tax amounts on
your tax returns reconcile to the tax control accounts and that the
taxable amounts on your tax returns reconcile to the Profit and Loss
accounts. The Account Method is most suitable for implementations
where the chart of accounts is set up for strict tax compliance and
integration with Oracle Purchasing is not required.
See: Deriving Tax From a Natural Account (Account Method): page
4 – 104
Invoices
4 – 103
Deriving Tax From a Natural Account (Account Method)
In some countries and implementations, your chart of accounts may be
constructed around tax compliance. If you set up your system with the
Account Method, the system will automatically enter a tax code for a
distribution based on the Account segment of the expense or asset
account you enter for the distribution. With the Account Method, the
system ignores any tax codes at the supplier, supplier site, or Financials
options level. You may want to set up your system to do this for VAT
reconciliation. For example, you may be taxed at a different rate based
on the type of automobile you purchase. You can associate tax codes
with your automobile accounts to automatically enter one tax rate for
your standard car account, and another tax rate for your luxury car
account.
You can set up your tax defaulting hierarchy to enter the tax code
based on the Account, and if a tax code is not associated with the
account, the system will then look for a tax code value at the next level
in your hierarchy.
Assigning a Tax Code to a Natural Account
Prerequisites
❑ In the Tax Codes window in Payables, define the tax codes you
want to use. See: Tax Codes: page 2 – 146.
❑ In the Tax Code Defaults region of the Payables Options window in
Payables, include the Account source in your tax defaulting
hierarchy. Optionally enable the Enforce Tax From Account option.
See: Tax Code Defaults Payables Options: page 2 – 82.
❑ You do not use Automatic Tax Calculation at the Header level. See:
Using the Automatic Tax Calculation Feature to Enter Tax in the
Invoice Workbench: page 4 – 111.
"
To assign a tax code to the Account segment of your expense or asset
account:
H
In the Tax Options window, assign a tax code to each account for
which you want the system to automatically enter the tax code.
If you want Approval to validate that the tax code matches the
account, then do not enable the Allow Tax Code Override check
box in the Tax Options window, and enable the Enforce Tax From
Account option in the Payables Options window.
4 – 104
Oracle Payables User Guide
Defaulting Tax in Payables
You can set up your Payables system to default tax codes based on
your business needs. You set the Tax Code Defaults hierarchy in the
Tax Code Defaults region of the Payables Options window to
determine 1) which sources you use for tax codes, and 2) the order in
which Payables will search the sources to find a valid tax code value.
Payables uses the Tax Code Defaults option to provide a default tax
code for documents throughout the system. Note that certain
documents cannot use some sources, and Payables will skip these
sources when it searches through the hierarchy for a tax code. There is
no online tax code defaulting in the Invoice Gateway window. If you
do not provide a value for tax code, then it will default during import
based on the Tax Code Defaults hierarchy.
The following table shows the sources that documents throughout the
system can use. A document can use a source from the hierarchy
unless indicated by: N/A (not applicable).
Tax Code Defaults to Payables Documents
Purchase
Order
Invoice
matched to
PO
Unmatched
invoice (all
types)
Supplier
Site
Supplier
Natural
Account
Financials Invoice
Options
Header
Template
N/A
N/A
Price increase
or decrease to
PO
N/A
Credit/debit
memo
matched to
PO
N/A
Unmatched
credit/debit
memo
N/A
Invoices
4 – 105
Purchase
Order
Supplier
Site
Supplier
N/A
N/A
N/A
Natural
Account
Financials Invoice
Options
Header
Template
Prepayment
Expense
report
N/A
Invoice imported via
Open Interface Import
N/A
Expense
report
template
N/A
N/A
N/A
N/A
N/A
Distribution
set
N/A
N/A
N/A
N/A
N/A
Setting the Tax Code Source Hierarchy to Duplicate Functionality in Previous Releases
If you are upgrading from Release 10.7 and you do not want to change
your tax defaulting functionality, then keep the defaults Payables sets
during the upgrade:
Invoice Header
1
Template
2
Supplier Site
3
Supplier
4
Financials Option
5
Natural Account
null
PO for Matched Invoices
null
Note: If your Validate Tax from PO Payables option was enabled
before the upgrade, Payables will not automatically set the
hierarchy during the upgrade.
4 – 106
Oracle Payables User Guide
Tax Defaulting Restrictions and Considerations
☞
Attention: Although the Tax Code Defaults Payables option
allows you flexibility, there are many issues you need to
consider when you set up your tax hierarchy to avoid problems
in your system:
• If you use Automatic Tax Calculation at the Header level, we
strongly recommend that you do not include the Natural
Account source in your ranking. Otherwise, you risk having
incorrect tax codes on your distributions. For example, if you
use Automatic Tax Calculation at the Header level, the system
will automatically create a tax distribution for you based on the
tax code in the Invoices window. (The Invoice Header has no
account for which the system can assign a tax code). When you
enter the distributions, Payables will automatically assign the
natural account tax code to each distribution that has an account
with a tax code associated with it. The tax distribution based on
the invoice header may no longer correspond to the tax codes
assigned to the non–tax distributions. If this is true, then
Approval will place a Natural Account Tax Hold on the invoice.
• If you enable the Enforce PO Tax Code option in Payables, you
must enable the PO for Matched Invoices source when you set
up your hierarchy.
• The system will ignore the purchase order source unless the
document is matched to a purchase order.
• The Enforce Tax From Account option in the Payables Options
window is not enforced until Approval.
• After an invoice or distribution has been created using a default
from one of the seven sources, if you change the tax code value
of the source, the system will not provide the changed default.
• In the Invoice Gateway, you can use only Line level or Tax Code
level automatic tax calculation. Payables will create tax
distributions based on the tax code and line amount. However,
you can adjust the distributions in the Invoice Workbench after
import.
• If Payables uses the Template source, it defaults the tax code
value even if the value in the Distribution Set or expense report
template is null.
Invoices
4 – 107
Entering Taxes When You Do Not Use the Automatic Tax Calculation Feature
If Automatic Tax Calculation is not enabled for an invoice, you can
enter tax distributions for the invoice manually, or automatically by
using a Distribution Set, matching to a purchase order, or allocating.
Note: If you want Payables to create tax distributions for you
automatically by prorating across multiple distributions, see
instead: Creating Tax Distributions by Allocating to Invoice
Distributions: page 4 – 52.
Using the automatic tax entry methods helps ensure that allocation is
complete and correct and therefore that the invoice will not be put on
hold during Approval. However, you can also enter taxes for invoices
manually in the Distributions window.
Payables assigns tax codes as defaults based on your Tax Code Defaults
hierarchy. See: Defaulting Tax in Payables: page 4 – 105. You can
override these defaults.
During Approval, Payables verifies that you have entered the tax
distributions accurately based on the tax rates assigned to the tax codes
you use. In addition, if you have not allocated the taxes in the
Allocations window, then Approval completes allocations for you. See:
Tax Amount Verification During Approval: page 4 – 101.
Entering Tax Distributions Manually in the Invoice Workbench
Prerequisite
❑ You do not use Automatic Tax Calculation, or Automatic Tax
Calculation is disabled for the supplier site. See: Disabling
Automatic Tax Calculation: page 10 – 40.
"
4 – 108
To manually enter Sales or user–defined type tax distributions for an
invoice:
1.
In the Invoices window enter all basic invoice information (see
Entering Basic Invoices: page 4 – 44), but do not enter the
distributions yet.
2.
If you want Payables to automatically create a single tax
distribution, enter a tax code and tax amount in the Invoices
window. Payables will copy these values to the tax distribution it
creates. If you want to create multiple tax distributions, do not
enter a tax code and tax amount; you must enter multiple tax
distributions manually.
Oracle Payables User Guide
3.
Enter distributions automatically by entering a Distribution Set or
by matching to a purchase order, or choose the Distributions button
and enter distributions manually. See: Distribution Sets: page
2 – 17, Matching to Purchase Orders: page 4 – 73, or Entering
Invoice Distributions: page 4 – 47.
4.
Navigate to the Distributions window.
5.
If you entered a tax code and tax amount in the Invoices window,
and Invoice Header is the source your Tax Code Defaults hierarchy
uses, then Payables automatically enters a Tax type distribution
with the same tax code and tax amount you entered; it does no tax
amount calculation.
6.
Indicate which non–tax (Item, Miscellaneous, or Freight type)
distributions are subject to the tax amount on the tax distributions.
Approval will complete the allocations for you.
For each non–tax (Item, Miscellaneous, or Freight type)
distribution, enter a tax code, or accept or change the default if
there is one. For tax–exempt distributions, enter a zero–percent
Sales or a zero–percent user–defined tax code. Approval does not
require you to create a corresponding zero amount tax distribution.
However, you might need to create one to comply with your local
reporting requirements.
For each non–zero–percent tax code you use for non–tax
distributions, you must have a corresponding Tax type distribution
with the same tax code. The amount of the tax distribution must
equal the sum of the non–tax distributions with the same tax code
multiplied by the tax rate associated with the tax code. For
example, you enter two item type distributions, each for $50, and
each with the same tax code that has a 8% tax rate. You must enter
one $8 tax distribution with the same tax code.
If more than one tax is applicable to a non–tax distribution, leave
the distribution’s Tax Code field empty. During Approval,
Payables applies to that distribution all tax codes that are assigned
to tax distributions and that you have not assigned to any other
non–tax distribution. For example, an invoice has one item
distribution that is subject to two taxes. Leave the tax code blank
on the item distribution and enter the two tax distributions.
During Approval, Payables will apply both tax rates to the item
distribution to verify that the tax distribution amounts are correct.
7.
Complete invoice entry and save your work.
After Approval, in the Allocations window you can view the
completed tax allocations.
Invoices
4 – 109
Entering Tax Lines Manually in the Invoice Gateway
In the Invoice Gateway, if a line is taxable, you must enter the tax code
for it. If you do not use automatic tax calculation, then you must enter
at least one tax line for each tax code that you use on the non–tax lines.
In the Invoice Gateway, you cannot enter a line that is taxable by two
different tax codes (unless one of the codes is an Offset tax code that is
associated with the tax code you enter). If a tax code has an Offset tax
assigned to it, then Payables will create the corresponding Offset tax
line during Approval.
Prerequisite
❑ You do not use Automatic Tax Calculation, or Automatic Tax
Calculation is disabled for the supplier site. See: Disabling
Automatic Tax Calculation: page 10 – 40.
"
To manually enter Sales or user–defined type tax lines for an invoice:
1.
In the Invoice Gateway window enter all basic invoice information.
2.
Enter lines automatically by entering a Distribution Set or by
matching to a purchase order, or enter lines manually.
3.
Indicate which non–tax (Item, Miscellaneous, or Freight type) lines
are subject to the tax amount on the tax distributions.
For each taxable non–tax (Item, Miscellaneous, or Freight type) line,
enter a tax code. For tax–exempt lines, enter a zero–percent Sales
or a zero–percent user–defined tax code. If you are not using
proration, also create a corresponding zero–amount tax line.
For each non–zero–percent tax code you use for non–tax lines, you
must enter a corresponding Tax type line with the same tax code.
The amount of the tax line must equal the sum of the non–tax lines
with the same tax code multiplied by the tax rate associated with
the tax code. For example, you enter two item type lines, each for
$50, and each with the same tax code that has a 8% tax rate. You
must enter one $8 tax line with the same tax code.
4 – 110
4.
If you do not enter a tax code for an Invoice Gateway line, then
during import, Payables will create a tax distribution for it with the
tax code from the Tax Code Defaults hierarchy. So if you don’t
want a line to be taxable, remember to enter a zero–rate tax code
for it.
5.
Complete entry of the invoice record, and save your work. After
import, approve the invoices.
Oracle Payables User Guide
Approval will complete the allocations for you. In the Allocations
window you can view the completed tax allocations.
Using the Automatic Tax Calculation Feature to Enter Tax in the Invoice
Workbench
Payables automatically creates tax distributions for you differently
depending on what Calculation Level you use:
• Header. Payables creates unallocated tax distributions based on
the following information in the Invoices window: invoice
amount and tax code. See: Invoice Header Level Automatic Tax
Calculation: page 4 – 111.
• Line/Tax Code. Payables creates allocated tax distributions
based on the following information in the Distributions window:
distribution amount, tax code, and Includes Tax check box. See:
Distribution Level (Line and Tax Code) Automatic Tax
Calculation in the Invoice Workbench: page 4 – 113 and
Calculation of Tax Distributions For Line or Tax Code Automatic
Tax Calculation: page 10 – 38.
Invoice Header Level Automatic Tax Calculation
If the Automatic Tax Calculation feature is enabled and the Calculation
Level on the invoice is Header, Payables automatically calculates the
tax amount for you based on the tax code you enter for an invoice.
Payables then creates a tax distribution based on the values in the Tax
Code and Tax Amount fields of the Invoices window.
You can use Invoice Header automatic tax calculation only in the
Invoices window, not the Invoice Gateway.
Prerequisites
❑ Set up Automatic Tax Calculation. See: Setting Up Automatic Tax
Calculation: page 10 – 39.
❑ At the supplier site, either select Header as the Calculation Level
option, or enable the Allow Override option. See: Invoice Tax
Region of the Supplier and Supplier Sites windows: page 3 – 22.
Invoices
4 – 111
"
Automatically entering taxes at the Header Calculation Level:
1.
In the Invoices window enter all basic invoice information (see
Entering Basic Invoices: page 4 – 44), but do not enter the
distributions yet.
Accept the default tax code, if there is one, or enter a Sales or
user–defined tax code. If the Enable Recoverable tax Financials
option is enabled, then only tax codes that have a recovery rate of
100 can be selected. Payables automatically calculates and enters
the Tax Amount field based on the invoice amount and the tax rate
assigned to the tax code.
If you have enabled the Allow Override option at the supplier site,
then you can choose the calculation level in the Tax Calculation
field. Select Header.
4 – 112
2.
Enter non–tax type (Item, Freight, or Miscellaneous) distributions
automatically by entering a Distribution Set or by matching to a
purchase order, or choose the Distributions button and enter
distributions manually. See: Distribution Sets: page 2 – 17,
Matching to Purchase Orders: page 4 – 73, or Entering Invoice
Distributions: page 4 – 47.
3.
Choose the Distributions button to navigate to the Distributions
window. Payables automatically creates one tax type distribution
based on the tax code and tax amount in the Invoices window.
Payables uses the GL account from the tax code.
4.
You can adjust the tax distribution and add new tax distributions.
The amount of each tax distribution must equal the sum of the
non–tax distributions with the same tax code multiplied by the tax
rate associated with the tax code, or Approval will apply a hold to
the invoice.
5.
Save your work. After invoice approval, you can view the
completed tax allocations in the Allocations window.
Oracle Payables User Guide
Distribution Level (Line and Tax Code Level) Automatic Tax Calculation in the Invoice
Workbench
When you enable the Automatic Tax Calculation feature, and Payables
calculates at the Line or Tax Code level, Payables automatically creates
Tax type distributions for you based on non–tax (Item, Freight, or
Miscellaneous type) distributions you enter. You use the Includes Tax
check box to indicate whether each non–tax distribution amount is
inclusive or exclusive of tax. If the non–tax distribution amount
includes tax, then when Payables creates the tax distribution it will also
subtract the calculated tax amount from the non–tax distribution, and
uncheck the Includes Tax check box for the distribution.
Payables automatically creates tax distributions for you when you
choose the Calculate Tax button, or, if you do not press the button,
Payables creates tax distributions during Approval. If you use
Recoverable Tax, you can also use the Tax Summary window to view
and calculate tax for you. See: Tax Summary: page 4 – 127. When you
use the Calculate Tax button, use the Tax Summary window, or submit
Approval, Payables calculates tax only for distributions for which it has
not already calculated tax.
For details on how Payables calculates the tax amounts, see:
Calculation of Tax Distributions For Line or Tax Code Automatic Tax
Calculation: page 10 – 38
When Payables completes line level automatic tax calculation, it also
completes the tax allocation. You can view the completed allocation in
the Allocations window.
Prerequisites
❑ Set up Automatic Tax Calculation. See: Setting Up Automatic Tax
Calculation: page 10 – 39.
❑ At the supplier site, either select either Line or Tax Code as the
Calculation Level option, or enable the Allow Override option.
See: Invoice Tax Region of the Supplier and Supplier Sites
windows: page 3 – 22.
"
Automatically entering taxes at the Line or Tax Code Calculation
Level:
1.
In the Invoices window enter all basic invoice information (see:
Entering Basic Invoices: page 4 – 44). If you have Invoice Header
as your highest ranking applicable Tax Code Default Source and
you want Payables to default a tax code to all distributions you
Invoices
4 – 113
enter, enter a tax code. Since you are using Line or Tax Code level
calculation, you cannot enter a Tax Amount.
If you have enabled the Allow Override option at the supplier site,
when you navigate to the Tax Code field, Payables opens a window
that asks you at what level you want to calculate tax. Select Line or
Tax Code.
2.
If you want to enter any distributions automatically, enter a
Distribution Set or match to a purchase order. See: Distribution
Sets: page 2 – 17, or Matching to Purchase Orders: page 4 – 73.
3.
If you are still in the Invoices window, choose the Distributions
button to navigate to the Distributions window.
☞
Attention: Do not enter any Tax type distributions manually if
you use Line or Tax Code level calculation.
4.
Manually enter any remaining non–tax (Item, Freight or
Miscellaneous type) distributions. See: Entering Invoice
Distributions: page 4 – 47.
5.
For every non–tax distribution enter a tax code, or accept or change
the default if there is one. If you have a tax–exempt distribution,
enter a zero–percent Sales tax code or a zero–percent user–defined
tax code.
6.
Check the Includes Tax check box for each non–tax distribution
with an amount that includes tax. You can adjust this option only
if the Allow Override (for Distribution Amounts Include Tax)
Payables option is enabled.
7.
If you want Payables to create your tax distributions and
allocations now, choose the Calculate Tax button. If you do not use
the Calculate Tax button, Payables will automatically create tax
distributions and allocations during Approval. If you use
Recoverable Tax, you can choose Tax Summary from the Tools
menu to use the Tax Summary window to view and calculate tax.
See: Tax Summary: page 4 – 127.
8.
Save your work.
Using the Automatic Tax Calculation Feature to Prorate Tax in the Invoice Workbench
If the Automatic Tax Calculation feature is enabled and the Calculation
Level on the invoice is Line or Tax Code, then Payables automatically
calculates the tax amount for you based on the tax code you enter for
an invoice. If the Recoverable Tax feature is also enabled in the
Financials Options window, and you have set up your tax codes with a
4 – 114
Oracle Payables User Guide
recovery rate of zero in the Tax Codes window, then all tax
automatically created by the system will be charged to the GL account
of the taxable distributions. Thus, proration can be achieved with no
manual intervention during invoice entry.
Payables automatically creates tax distributions for you when you
choose the Calculate Tax button, or, if you do not use the button,
Payables creates tax distributions during Approval. You can also use
the Tax Summary window to view and calculate tax for you. See: Tax
Summary Window: page 4 – 127.
When you use the Calculate Tax button, use the Tax Summary window,
or submit Approval, Payables calculates tax only for distributions for
which it has not already calculated tax.
For details on how Payables calculates the tax amounts, see:
Calculation of Tax Distributions For Line or Tax Code Automatic Tax
Calculation: page 10 – 38.
When Payables completes Line level automatic tax calculation, it also
completes the tax allocation. You can view the completed allocation in
the Allocations window.
Prerequisites
❑ Set up Automatic Tax Calculation. See: Setting Up Automatic Tax
Calculation: page 10 – 39.
❑ At the supplier site, either select either Line or Tax Code as the
Calculation Level option, or enable the Allow Override option. See:
Invoice Tax Region of the Supplier and Supplier Sites windows:
page 3 – 22
"
Automatically entering taxes at the Line or Tax Code Calculation
Level:
1.
In the Invoices window enter all basic invoice information (see:
Entering Basic Invoices: page 4 – 44). If you have Invoice Header
as your highest ranking applicable Tax Code Default source and
you want Payables to default a tax code to all distributions you
enter, then enter a tax code. Because you are using Line or Tax
Code level calculation, you cannot enter a Tax Amount.
If you have enabled the Allow Override option at the supplier site,
then you can choose the calculation level in the Tax Calculation
field.
Invoices
4 – 115
2.
If you want to enter any distributions automatically, enter a
Distribution Set or match to a purchase order. See: Distribution
Sets: page 2 – 17, or Matching to Purchase Orders: page 4 – 73.
3.
If you are still in the Invoices window, choose the Distributions
button to navigate to the Distributions window.
☞
Attention: Do not enter any Tax type distributions manually if
you use Line or Tax Code level calculation.
4.
Manually enter any remaining non–tax (Item, Freight or
Miscellaneous type) distributions. See: Entering Invoice
Distributions: page 4 – 47.
5.
For every non–tax distribution enter a tax code, or accept or change
the default if there is one. If you have a tax–exempt distribution,
enter a zero–percent Sales tax code or a zero–percent user–defined
tax code.
6.
Check the Includes Tax check box for each non–tax distribution
with an amount that includes tax. You can adjust this option only if
the Allow Override (for Distribution Amounts Include Tax)
Payables option is enabled.
7.
If you want Payables to create your tax distributions and
allocations now, choose the Calculate Tax button. If you do not use
the Calculate Tax button, Payables will automatically create tax
distributions and allocations during Approval. You can also choose
View and Update Tax Summary from the Tools menu to use the Tax
Summary window to view and calculate tax. See: Tax Summary:
page 4 – 127.
8.
Save your work.
Using the Automatic Tax Calculation Feature to Enter Tax in the Invoice Gateway
In the Invoice Gateway, the only types of automatic tax calculation you
can use are Line level and Tax Code level.
Inclusive Line Level Automatic Tax Calculation in the Invoice Gateway
Prerequisite
❑ At the supplier site, select Line or Tax Code as the Calculation
Level option. See: Invoice Tax Region of the Supplier and Supplier
Sites windows: page 3 – 22.
4 – 116
Oracle Payables User Guide
"
To enter invoice lines in the Invoice Gateway by using tax inclusive
automatic line level calculation.
H
When you enter invoice lines in the Invoice Gateway, use the
Includes Tax check box to indicate if an invoice line includes tax.
When Payables Open Interface Import creates distributions from
the invoice record, it creates a tax distribution in the appropriate
amount, and reduces the amount of the item distribution by the tax
amount.
See Also
Automatic Tax Calculation Overview: page 10 – 34
Offset Taxes
Use Offset tax codes to record taxes on invoices, while reducing or
completely offsetting tax liability. Offset taxes have negative–amount
rates, so when you use them, you enter negative–amount invoice tax
distributions. For example, you can use Offset taxes to record the
Value Added Tax (VAT) name and amount without paying VAT tax to
the supplier (the tax distribution and the Offset tax distribution net to
zero).
For example, you enter an invoice with a $5 VAT tax distribution you
want to offset. You also enter a –$5 Offset tax distribution. You will
pay no VAT tax, but you will record the $5 VAT tax so you can report it
later. If you are a member of the European Union (EU), you can report
on these zero–rated taxes using the Intra–EU VAT Audit Trail report.
To make Offset tax entry easier, in the Tax Codes window you can
associate Offset taxes with Sales or User–defined taxes. You enable the
use of associated tax codes at the supplier site. If you have enabled the
Use Offset Taxes check box at the supplier site, when you enter a tax
code with an associated Offset tax, then Payables will create a new
Offset tax distribution. Payables creates the new distribution at one of
the following times:
• When you use the Calculate Tax button in the Distributions
window
• During Approval
Invoices
4 – 117
• When you choose the OK button in the Tax Summary window
For example, you can define an Offset tax code named Offset 10 that
has a negative 10% rate. You can then define a user–defined tax called
VAT 10 that has a 10% rate. You can assign the Offset 10 tax to the VAT
10 tax. You can always override the default Offset tax distribution on
an invoice or manually enter additional offsetting tax distributions.
You enable the Use Offset Taxes check box at the supplier site and enter
an invoice for $100 with a tax code of VAT 10. Payables creates both a
$10 tax distribution and a –$10 offsetting tax distribution automatically
either when you use the Calculate Tax button or during Approval.
You cannot enter an Offset tax in the Tax Code field in the Invoice
Gateway, or the invoice record will be rejected during import.
However, you can enter taxes that have associated Offset taxes.
Payables creates a tax distribution for both the tax code you entered
and for the Offset tax.
If you use have enabled the Recoverable Tax feature, note that Offset
taxes are 100% recoverable.
EU VAT Taxes
When you enter a supplier that is registered to pay Value–Added Tax
(VAT) charges, you should enter the VAT registration number and
related information during supplier entry. See: Entering Suppliers:
page 3 – 10. Specify a country as an European Union (EU) member
state. See: Countries and Territories: page 2 – 119.
If your organization is VAT–registered, and you receive an invoice from
a VAT–registered supplier site in the same EU member state, you are
required to pay VAT charges to the supplier.
However, if your organization is located in an EU member state and
the VAT–registered supplier site is located in a different EU member
state, you are not required to pay VAT charges on invoices from the
supplier, but you are required to report the charges to your tax
authorities. You can use Offset tax distributions to eliminate your VAT
liability while maintaining a record of the charges.
You can use the Intra–EU VAT Audit Trail Report to review the original
VAT charges for your intra–EU invoices. Payables includes in this
report any charges from supplier sites located in other EU member
states.
If you assign to a VAT–registered supplier in an EU member state
different from yours a default VAT tax code with an associated
offsetting tax code, then Payables can automatically create VAT and
4 – 118
Oracle Payables User Guide
offsetting tax distributions for you when you enter invoices for that
supplier.
Setting Up Payables for Offset Taxes
"
To set up Payables for Offset taxes:
1.
In the tax codes window, define an Offset tax. When you define it,
enter Offset as the tax type, and enter a negative rate.
1.
In the Tax Codes window, if you want to associate an Offset tax
with a Sales or User–defined tax, then when you define the Sales or
User–defined tax, enter the Offset tax code name in the Offset tax
field.
2.
In the Supplier Sites window, enable the Use Offset Taxes check box
for any supplier sites for which you want to automatically create
Offset tax distributions. If you do not enable this option and you
enter a tax distribution for the supplier site, Payables will ignore
any associated Offset taxes.
You can also assign to the supplier site a default Tax Code that has
an associated Offset tax.
Entering Offset Taxes
You cannot manually enter Offset taxes in the Invoice gateway.
However, you can enter Sales or User–defined taxes that have an
associated Offset tax if you have completed setup for Offset taxes.
Prerequisites
❑ Set up Payables for Offset taxes. See: Setting Up Payables for
Offset Taxes: page 4 – 119.
❑ The invoice date is within the effective date range of the Offset tax
code. (The Offset tax code is active).
❑ Ensure that Approval will not enter a duplicate Offset tax
distribution: Either make sure that the Use Offset Taxes option is
not enabled for the supplier site, or make sure that when you enter
the Sales or User–defined tax that it does not have an associated
User–defined tax.
Invoices
4 – 119
"
To enter Offset taxes manually:
1.
Enter an invoice in the Invoices window. For the invoice amount,
include the negative amount that will offset the tax. For example, if
you are entering a $100 invoice and the VAT tax is $8, and the
offsetting tax is –$8, then enter $100 as the invoice amount.
2.
When you enter the distributions, for each distribution that is
taxable, enter the Sales or User–defined tax in the tax code field.
Or if the distribution is subject to another tax, then leave the tax
Code field blank to indicate to Approval that both taxes apply to
the taxable distribution. Note that Approval does not check if tax
amounts are appropriate for Offset taxes.
3.
Enter the tax distribution for the tax you want to offset, either
manually or automatically. In the tax code field, enter the Sales or
User–defined tax code.
4.
Enter the offsetting tax distribution. In the Tax Code field, enter
the Offset tax code. Enter a negative amount.
5.
Save and approve the invoice.
Prerequisites
❑ Set up Payables for Offset taxes. See: Setting Up Payables for
Offset Taxes: page 4 – 119.
❑ The Use Offset Taxes option is enabled for the supplier site.
"
4 – 120
To enter Offset taxes automatically:
1.
Enter an invoice. For the invoice amount, include the negative
amount that will offset the tax. For example, if you are entering a
$100 invoice and the VAT tax is $8, and the offsetting tax is –$8,
then enter $100 as the invoice amount.
2.
When you enter the distributions, for each distribution that is
taxable, enter the Sales or User–defined tax in the Tax Code field
Or, if the distribution is subject to another tax, then leave the tax
Code field blank to indicate to Approval that both taxes apply to
the taxable distribution. Note that Approval does not check if tax
amounts are appropriate for Offset taxes.
3.
Enter the tax distribution for the tax you want to offset, either
manually or automatically. In the Tax Code field, enter the Sales or
User–defined tax code.
Oracle Payables User Guide
4.
If you use Line or Tax Code level automatic tax calculation, then
you can choose the Calculate Tax button to automatically create the
Offset tax distribution.
5.
If you do not choose the Calculate tax button, then save the invoice.
Note that the sum of the distribution amounts will not equal the
invoice amount until after Approval.
6.
Save and approve the invoice. During Approval, Payables first
creates the Offset tax distribution, if you have not yet created one.
Approval then checks that the positive tax amounts are appropriate
for the taxable invoice distributions.
Entering Use Taxes
To record a Use tax you pay to a tax authority instead of a supplier,
assign a Use type tax code to the invoice distributions that are taxable
by the Use tax. Payables records the tax you owe the tax authority
based on the Use tax code’s tax rate and account. You do not create a
tax distribution for the Use tax, because tax distributions record
supplier liabilities.
"
To enter Use taxes for an invoice in the Invoice Workbench:
1.
In the Invoices window, enter all basic invoice information. See:
Entering Basic Invoices: page 4 – 44.
In the Tax Code field, enter a Use type tax code or accept the
supplier site default, if applicable.
2.
Enter invoice distributions using the method of your choice:
purchase order match, Distribution Set, or manual entry.
3.
Choose the Distributions button to navigate to the Distributions
window. For each distribution you enter with an Item, Freight, or
Miscellaneous type, Payables defaults the tax code based on your
tax defaults hierarchy. The tax code indicates that the distribution
is taxable. If you have a tax–exempt distribution, clear the Tax
Code field.
Do not create a tax distribution for the Use tax.
4.
Complete invoice entry and save your work.
5.
To review your Use tax liability, run the Use Tax Liability Report.
Invoices
4 – 121
"
To enter Use taxes for an invoice in the Invoice Gateway:
1.
In the Invoice Gateway, enter the invoice record.
2.
For each Item, Freight, or Miscellaneous line that includes Use tax,
enter a Use type tax in the Tax Code field. Do not enable the
Includes Tax check box.
3.
Complete invoice entry and import the invoice record.
4.
To review your Use tax liability, run the Use Tax Liability Report.
INVOICE TAX RESTRICTIONS:
REQUIRE TAX ENTRY AT HEADER OPTION: If this option is
enabled, you cannot enter Use tax codes for some invoices, either
manually or through a supplier site default. In addition, you should
not enable this option if you want to use Allocate window to prorate
tax because if you enter a default tax and amount and then prorate, you
may overstate your taxes.
Entering Taxes on Expense Reports
Payables and Self–Service Expenses use the following Payables tax
features during expense report entry:
• Tax Code Defaults hierarchy
• Tax From Natural Account
• Require Tax Entry at Header
• Automatic Tax Calculation (inclusive Line or Tax Code level
only)
This section describes how you use these features to record taxes on
expense reports.
Tax Code Defaulting
Tax Code Defaulting for Expense Report Templates
When you create a template for an expense report, after you enter an
account for an item, Payables defaults a value for the Tax Code field
based on your Tax Code Defaults hierarchy. Note that for expense
report templates, the only sources Payables uses are Financials Options
4 – 122
Oracle Payables User Guide
and Account. You define your Tax Code Defaults hierarchy in the Tax
Code Defaults region of the Payables Options window. See: Tax
Control Methods: page 4 – 102.
Tax Code Defaulting During Expense Report Entry
When you enter expense report items, in either the Expense Reports
window in Payables or the Enter Receipts page in Self–Service
Expenses, the value for the Tax Code field defaults based on your Tax
Code Defaults hierarchy. Note that for expense reports, the only
sources Payables uses are Financials Options, Account, and Template.
Payables defaults the tax code from the expense report template only if
Template is the source the hierarchy uses. If Template is the source
Payables uses, it provides the value from the expense report template
even if the value is null.
Includes Tax Check Box
If you use Automatic Tax Calculation, Payables can perform tax
inclusive line tax calculation for expense items that you enter in the
Payables Expense Reports window or Self–Service Expenses users enter
in the Enter Receipts page. If you use Line or Tax Code level
Automatic Tax Calculation, you can use the Includes Tax check box to
create appropriate Item and Tax invoice distributions during Payables
Invoice Import.
Note: For expense reports entered in the Payables Expense
Reports window or the Enter Receipts page of Self–Service
Expenses, Payables does not perform Header level automatic
tax calculation, and it does not perform tax exclusive Line level
or Tax Code level automatic tax calculation. The only
automatic tax calculation Payables performs for these expense
reports is tax inclusive Line level or Tax Code level automatic
tax calculation.
Enabling the Includes Tax check box for an expense item indicates that
an expense amount includes tax. If a user enables this check box for an
expense item, then during Payables Invoice Import, when Payables
creates a corresponding expense invoice distribution, the system
decreases the distribution amount by the calculated Sales tax. Payables
will also create a Tax type distribution for the appropriate Sales tax
amount.
If a supplier site exists for an employee, then Payables and Self–Service
Expenses use the automatic tax calculation options at the supplier site
to determine how automatic tax calculation is used for the employee’s
Invoices
4 – 123
expense reports. If a supplier site does not exist for the employee,
Payables and Self–Service Expenses use the automatic tax calculation
options in the Payables Options window to determine how automatic
tax calculation is used for the employee’s expense reports.
For more information, see: Automatic Tax Calculation Overview: page
10 – 34. In addition, to use the Includes Tax check box in Self–Service
Expenses, you must set the SS Expenses: Enable Tax profile option to
Yes.
If you do not use Line level automatic tax calculation or you do not
enable override of the check box, you cannot enable the check box in
the Expense Reports window in Payables, and the check box will not
appear in the Enter Receipts page of Self–Service Expenses.
See Also
Automatic Withholding Tax Overview: page 10 – 24
Setting Up Supplier Tax Information: page 3 – 6
Tax Codes: page 2 – 146
Lookups: page 2 – 13
Tax Audit Trail Report (By Tax Code or Invoice): page 8 – 102
Use Tax Liability Report: page 8 – 106
Tax Codes Listing: page 8 – 171
Intra–EU VAT Audit Trail Report: page 8 – 99
Recoverable Tax
You can automatically account for recoverable, partially recoverable,
and nonrecoverable taxes. In most cases of goods and services taxes,
the business registered for tax purposes is required to collect the tax on
the goods and services it provides (output tax), and can then reclaim
the tax that is paid to produce those goods and services (input tax). In
some cases, however, the tax paid is either not recoverable or is only
partially recoverable.
4 – 124
Oracle Payables User Guide
In Oracle Payables, you can reclaim or recover tax based on a variable
recovery rate, record the taxes for which you are liable, and ensure that
you are recovering all allowable taxes.
Because nonrecoverable tax becomes part of the acquisition cost of the
item, funds checking and budgetary control include nonrecoverable tax
as part of the cost to fully recognize the commitment. Similarly, receipt
accruals are also recorded inclusive of nonrecoverable tax to ensure
that you are fully recognizing your liability. Nonrecoverable tax is also
transferred to Oracle Projects as part of the project cost.
You can assign a recovery rate to a tax code to indicate the percentage
of the of the tax that is recoverable. If the Enable Recoverable Tax
Financials option is not enabled, then the system will enter 0 for the
recovery rate, and it cannot be updated. If the option is enabled you
can enter any rate from 0 (nonrecoverable) to 100 (recoverable). When
you use a tax code with a recovery rate, Payables will create separate
distributions for the recoverable and nonrecoverable portions of the
tax, as necessary, and ensure that the Tax distributions have
appropriate accounts.
Even if you do not intend to recover any tax, you can use this option to
prorate taxes automatically. You can do this if you enable the
Recoverable Tax feature, set the recovery rate of all your taxes to 0, and
use automatic withholding tax. See: Using the Automatic Tax
Calculation Feature to Prorate Tax in the Invoice Workbench: page
4 – 114.
When you use a tax code, Payables calculates the amount of the tax that
is recoverable. The recovery rate is based on how the tax code is set
up. A tax code can have either a recovery rate or a recovery rule
assigned to it. The recovery rate will be based on one of the following
options:
1.
Fixed rate assigned to the tax code
2.
Tax recovery rule assigned to the tax code. A rule is based on one
of the following:
– fixed rate
– PL*SQL function
Also, the rate for a recovery rule can vary, based on a unique
combination of the following:
– effective date range
– account range
– a condition, such as supplier type
Invoices
4 – 125
Setting up Payables for Recoverable Tax,
or for Using Automatic Tax Calculation for Proration
Step
Number
Window Name
Option or Field Name
Description
❑ Step 1
Financials Options
Enable Recoverable Tax
You must enable this option.
❑ Step 2
Financials Options
Default Recovery Rate
This value defaults to the Recovery Rate field in the Tax
Codes window and to the Rate % field in the Tax Recovery
Rules window. You might want to set this to 100 if you
routinely deal with recoverable taxes. Otherwise, we
recommend that you set it to 0. For example, set it to 0 if
you use Automatic Tax Calculation for Proration.
❑ Step 3
Financials Options
Cash Basis Encumbrance
If you are using cash basis accounting for your secondary
set of books, enable this option if you want to encumber
nonrecoverable tax and recoverable tax against the expense
account.
❑ Step 4
Oracle Purchasing
Lookups
All
If you use tax recovery rules that use supplier type, define
any additional values for Supplier Type in the Oracle
Purchasing Lookups window.
❑ Step 5
Suppliers
Type
If you use tax recovery rules that use supplier type, assign
values for Supplier Type in the Suppliers.
❑ Step 6
Tax Recovery Rules
All
Define any tax recovery rules you want to use.
❑ Step 7
Tax Codes (Recovery
Rules tabbed region)
Either Rule Name or Rate
Assign either a fixed tax rate or a tax recovery rule. If you
are using Automatic Tax Calculation for Proration, assign
0% rates to all tax codes.
❑ Step 8
System Profile Values
(System Administrator
Responsibility)
Tax: Allow Override of Tax
Code
Select a value for this option.
❑ Step 9
System Profile Values
(System Administrator
Responsibility)
Tax: Allow Override of Tax
Recovery Rate
Select a value for this option. If you are setting up your
system to use Automatic Tax Calculation for Proration, but
do not intend to report on recoverable taxes, then do not
enable this option.
See Also
Tax Recovery Rules: page 2 – 114
Tax Recovery Rules Listing: page 8 – 171
Tax Codes: page 2 – 146
4 – 126
Oracle Payables User Guide
Tax Codes Listing: page 8 – 171
Setting Up Payables for Recoverable Tax: page 4 – 126
Tax Reporting Ledger (Oracle Receivables Tax Manual or online help)
Financial Tax Register (Oracle Receivables Tax Manual or online help)
Tax Summary Window
You can use the Tax Summary window to preview the calculated tax
for an invoice. This window calculates tax based on the following:
• Your tax setup in Payables including:
– Whether you use Automatic Tax Calculation, and at what
level you use it (Line or Tax Code).
– How you round tax (Up, Down, Nearest), and to what
precision or minimum accountable unit you round.
• The details of each distribution including:
– Tax codes.
– The recovery rate.
– The setting of the Includes Tax check box.
For example, if an Item line is Tax Inclusive, you can preview the
details of the Tax distribution that Payables would create before you
use the Create Tax button. When you open the Tax Summary window,
Invoices
4 – 127
it displays amounts summarized by tax code for all taxable
distributions on the invoice.
In the Tax Summary window you can override projected tax amounts.
For example, you might want to do this if Payables rounds tax amounts
up and your supplier rounded tax amounts down. Or, if you override
a tax amount for a tax code with an associated Offset tax, you might
want to override the Offset tax amount also,
Prerequisites
❑ The Enable Recoverable Tax Financials option is enabled.
❑ Automatic Tax Calculation is enabled for this supplier site.
"
To review calculated or projected tax in the Tax Summary window
1.
Enter the invoice and the taxable distributions.
2.
In the Distributions window, select View and Update Tax Summary
from the Tools menu. The Tax Summary window opens and shows
the projected tax for the invoice.
The Tax Summary window shows only distributions for which tax
has never been calculated.
3.
If you want to change the total amount of the tax, and have
Payables automatically create the tax distributions for you, then
change the value of Tax Amount and choose the OK button.
4.
Choose OK or Cancel to close the Tax Summary window.
• If you choose OK, Payables automatically creates all applicable
tax distributions.
• If you choose Cancel, Payables creates no distributions and
closes the Tax Summary window.
4 – 128
Oracle Payables User Guide
Entering Freight on Invoices
You can record freight charges by manually entering freight
distributions, by allocating freight to invoice distributions or by having
Payables automatically create a freight distribution based on a freight
amount you enter.
If you usually want to have Payables automatically create a freight
distribution, you can enable the Automatically Create Freight
Distribution Payables option and enter a default Freight Account in the
Payables Options window.
Entering a Single Freight Distribution
"
To enter a single freight distribution for an invoice:
1.
In the Invoices window enter all basic invoice information (see
Entering Basic Invoices: page 4 – 44), but do not enter the
distributions yet.
2.
Enter the Freight Amount.
If you have enabled the Automatically Create Freight Distribution
Payables option and have entered a default Freight Account,
Payables checks the Create Freight Distribution check box and
displays the freight account in the Freight window. In this window,
you can optionally override the freight account, assign a tax code to
the freight distribution and add a description for the freight
distribution. Based on this information, Payables automatically
creates a freight distribution for the invoice.
If you have not enabled the Automatically Create Freight
Distribution Payables option you can check the Create Freight
Distribution check box and enter the freight account in the Freight
window Payables displays after you check the check box. Based on
this information, Payables automatically creates a freight
distribution for the invoice. Alternatively, you can manually enter
a freight distribution directly in the Distributions window.
Invoices
4 – 129
3.
Complete invoice entry and save your work.
See Also
Creating Freight and Miscellaneous Distributions by Allocating to
Invoice Distributions: page 4 – 50
Payables Options: page 2 – 57
4 – 130
Oracle Payables User Guide
Entering Invoices for Suppliers Subject to Income Tax Reporting
Requirements
If you set up a supplier as federally reportable and assign a default
income tax type, Payables defaults the Income Tax Type (1099 MISC
Type) to each invoice distribution you enter for that supplier. You can
override the default Income Tax Type for an invoice distribution in the
Distributions window of the Invoice Workbench. You can also use the
Update Income Tax Details utility to make income tax type updates at
any time before running your reports.
In the United States, you must report to the Internal Revenue Service
certain types of payments you make to 1099 reportable suppliers.
Within Payables, you can designate suppliers as federally reportable,
classify their invoice distributions by 1099 MISC Type, then at the end
of the year when you submit your 1099 reports, Payables lists payments
of reportable distributions made to 1099 suppliers.
For example, you enter an invoice for a 1099 reportable supplier. The
supplier’s hourly fees are reportable for U.S. 1099 reporting purposes,
but reimbursable business expenses, such as travel, are not. In the
Distributions window for the fee distribution you assign an Income Tax
Type; however for the travel distribution, you clear the Income Tax
Type field.
Prerequisite
❑ Designate the supplier as federally reportable and record 1099
reporting information. See: Suppliers subject to income tax
reporting requirements: page 3 – 7.
"
To record income tax information for an invoice:
1.
In the Invoices window enter all basic invoice information. See:
Entering Basic Invoices: page 4 – 44.
2.
Enter distributions automatically by entering a Distribution Set or
by matching to a purchase order, or choose Distributions and enter
distributions manually. See: Distribution Sets: page 2 – 17, Entering
Purchase Order Matched Invoices: page 4 – 70, or Entering Invoice
Distributions: page 4 – 47.
If you are entering distributions by using a Distribution Set that
does not include an Income Tax Type for any distribution, Payables
automatically enters the supplier’s default Income Tax Type. If the
Invoices
4 – 131
Distribution Set has an Income Tax Type other than the supplier’s
default, the Distribution Set overrides the supplier default.
3.
In the Distribution Summary optionally adjust or review the
Income Tax Type and Region for each distribution.
Clear the Income Tax Type field of any distribution that is not
federally reportable.
Enter a Region to identify a distribution as applicable to United
States state 1099 reporting requirements. If you enabled the Use
Pay Site Tax Region Payables Option, the default for Region is the
state in the address for the supplier site for the invoice.
Alternatively, you can also enter a default Income Tax Region in the
supplier region of the Payables Options window.
Payables uses this information to group distributions by type and
region on the 1099 reports. If you enable the Combined Filing
Program Payables option, when you run your 1099 reports,
Payables groups all reportable distributions by state.
4.
Save your work.
See Also
1099 Reporting Overview: page 8 – 35
Entering Suppliers: page 3 – 10
Suppliers subject to income tax reporting requirements: page 3 – 7
Automatic Withholding Tax Overview: page 10 – 24
4 – 132
Oracle Payables User Guide
Updating 1099 Information
You can update 1099 information for your suppliers. If you paid a
supplier before you set up the supplier as a 1099 supplier, run the
Update Income Tax Details Utility. Or, if you need to update only a
few invoices, you can update the 1099 types in the Distributions
window.
Adjusting 1099 Amounts
The following are suggestions for adjusting transactions for 1099
suppliers. If you need to add an amount to a 1099 supplier, for
example if you paid the supplier through another system, you can
adjust an invoice paid during the year in the Distributions window of
the Invoice workbench. Add a distribution for the amount you want to
add for 1099 purposes, including the Income Tax Type. Also add an
offsetting distribution with a null Income Tax Type. If you did not pay
the supplier during the year using Oracle Payables, then complete the
following steps:
Prerequisites
❑ The supplier is recorded as a 1099 supplier. See: Suppliers Subject
to Income Tax Reporting Requirements: page 3 – 7.
❑ Enable the Allow Pre–Date Payables option. See: Payment
Payables options: page 2 – 71.
❑ Enable the Use Batch Controls Payables option. See: Invoice
Payables Options: page 2 – 64.
❑ If you are already in the next year, open the last period in the prior
year in both General Ledger and Payables, for example, December
1998. Controlling the Status of Payables Periods: page 2 – 178.
❑ You do not use Automatic Offsets.
❑ The Allow Adjustments to Paid Invoices Payables option is
enabled.
❑ Set up a unique pay group, such as ”1099”. See: Lookups: page
2 – 13.
"
To record 1099 payments made outside of Payables:
1.
Enter invoices in invoice batches, and use the following defaults.
See: Entering Invoice Batches: page 4 – 55.
Invoices
4 – 133
• Terms = Immediate
• GL Date = Date in opened period of the tax reporting year.
• Pay Group = unique Pay Group such as ”1099”
2.
For each invoice, enter 1099 information:
• Invoice Date = Date in opened period.
• Invoice Number = 1099 Adjustment
• Invoice Amount = 0 (zero)
Enter Distributions:
• Enter one line with the amount you want to record, and use an
account such as your suspense account. Enter the correct income
tax type for this distribution.
• Copy the distribution. Make this an offsetting distribution by
changing the amount so the two distributions net to zero. Delete
the Income Tax Type field for the second distribution.
4 – 134
3.
Submit the Invoice Register to confirm that all invoice amounts are
zero. See: Invoice Register: page 8 – 78.
4.
Submit Payables Approval for the invoice batch. See: Approval:
page 4 – 148.
5.
Submit a payment batch to pay the zero–amount invoices. Use the
Pay Group you assigned to the invoices. Use a date in the opened
period as the payment date. See: Creating Zero–Amount
Payments: page 5 – 52.
6.
Account for the invoice and payment transactions, and transfer
them to your General Ledger. See: Payables Transfer to General
Ledger Program: page 7 – 34.
7.
Post the journal entry in your General Ledger.
8.
If you had changed any Payables options to complete this process,
set them back.
9.
Close the GL and AP periods that you opened to complete this
process.
Oracle Payables User Guide
Recording a Refund From a One–Time 1099 Supplier
If you get a refund from a one–time 1099 supplier, you need to record
the refund in Payables so that the 1099 reports are accurate. Enter a
credit memo that you match to the original invoice, and then pay it
with a refund. See: Refunds: page 5 – 10.
See Also
1099 Reporting Overview: page 8 – 35
Invoices
4 – 135
Holds
Holds that you apply manually or that Payables applies, prevent
payment and, in some cases, creation of accounting entries for an
invoice. You can remove holds that you apply, and you can manually
release certain holds that Payables applies during Approval.
Payables provides some generic invoice holds for you to use, and you
can define your own, based on your invoice approval needs. You can
also prevent payment of supplier invoices by placing a hold on the
supplier rather than on each individual invoice.
This discussion on holds includes the following topics:
• Applying Holds: page 4 – 136
• Releasing Holds: page 4 – 140
See Also
Invoice Approvals: page 2 – 99
Summary of Approval Hold Codes: page J – 2
Invoice Holds Window Reference: page 4 – 334
Applying Holds
There are three types of holds you can use to prevent payment of an
invoice:
4 – 136
H
Invoice Hold. You can manually apply one or more Invoice Hold
Reason Approvals (”holds”) to an invoice using the Invoice Holds
window of the Invoice Workbench.
H
Scheduled Payment Hold. You can hold payment on part of an
invoice by placing one or more of the scheduled payments on hold
in the Scheduled Payments window of the Invoice Workbench.
H
Supplier Hold. In the Supplier Sites window, you can enable the
Hold All Payments, Hold Unapproved Invoices, or Hold
Unmatched Invoices options. You also have the option of
specifying an Invoice Amount Limit for a supplier site.
Oracle Payables User Guide
☞
Attention: The Holds field of the Invoices window displays
only invoice holds and does not reflect holds you apply in the
Scheduled Payments window or in the Supplier Sites window.
For example, if the Hold All Payments option is enabled in the
Supplier Sites window and there are no invoice holds on an
invoice, the Invoice Summary Holds field will display zero.
Payables automatically applies certain holds to exception invoices
during Approval. You cannot manually apply these system holds.
For example, if the sum of an invoice’s distribution amounts does not
equal the Invoice Amount, Payables will apply a Distribution Variance
hold to the invoice during Approval.
Applying a Hold to an Invoice
Prerequisite
❑ Define your hold codes in the Invoice Approvals window. See:
Invoice Approvals: page 2 – 99.
❑ Enter the invoice. See: Entering Invoices: page 4 – 44.
"
To apply a hold to an invoice:
1.
Find the invoice in the Invoices window. See: Finding Invoices:
page 4 – 290.
2.
Select the invoice and choose the Holds button to navigate to the
Invoice Holds window. Apply a hold by selecting a Hold Name
from the list of values. You can select from all Invoice Approvals
defined with the type Invoice Hold Reason. You can apply as
many holds to an invoice as you require.
Payables displays a full audit trail of all current and released
invoice holds in this window.
3.
Save your work.
Invoices
4 – 137
Applying a Hold to a Scheduled Payment
Prerequisite
❑ Enter the invoice. See: Entering Invoices: page 4 – 44.
"
To apply a hold to a scheduled payment:
1.
Find the invoice in the Invoices window. See: Finding Invoices:
page 4 – 290.
2.
Select the invoice and choose the Scheduled Payments button to
navigate to the Scheduled Payments window. To hold a scheduled
payment, check Hold. By checking the Hold check box, you will
not be able to pay the scheduled payment until you remove the
hold by checking the check box again.
If you want to partially pay an invoice that has only one scheduled
payment, you can choose Split to break the scheduled payment in
two. This way you can place one of the lines on hold, while leaving
the other free for payment. You can create as many scheduled
payments as you require as long as the sum of the Gross Amounts
for all equals the Invoice Amount.
For example, the supplier sends you an invoice for two desks and
delivers only one. You can partially pay the invoice by splitting the
scheduled payment in two and applying a hold to one scheduled
payment. You can release the hold after delivery, making the
scheduled payment available for payment.
3.
Save your work.
Applying Supplier Site Holds
Prerequisite
❑ Define your hold codes in the Invoice Approvals window. See:
Invoice Approvals: page 2 – 99.
"
To apply supplier site holds:
Prevent payment of multiple supplier invoices by applying a hold to
the supplier site rather than on each individual invoice. There are
several types of supplier related holds (also known as vendor holds)
that you enable for a supplier site. Payables also provides these
options at the Supplier level, but Payables only uses these values to
4 – 138
Oracle Payables User Guide
provide defaults for new supplier sites that you enter. The options you
enable at the Supplier Site control Payables processing:
H
Hold All Payments. This is the most restrictive supplier site hold.
By checking Hold All Payments in the Control region of the
Supplier Site window, you prevent the supplier site from being
selected for payment during a payment batch or for a Quick
payment. You cannot pay invoices for the supplier site until you
uncheck the Hold All Payments option at the supplier site.
H
Invoice Amount Limit. If you enter an invoice for a supplier site
that exceeds the invoice amount limit you specify, Payables applies
an Amount hold to the invoice during Approval. You cannot pay
the invoice until you release the hold. You can release the hold by
adjusting the invoice amount or you can manually release the hold
in the Invoice Holds window.
H
Hold Unmatched Invoices. By checking this for a site, if you do
not match an invoice to a purchase order or purchase order receipt
(and instead enter distributions manually or with a distribution
set), Payables places a Matching Required hold on the invoice
during Approval. You cannot pay the invoice until you release the
hold. You can release this hold by matching the invoice to a
purchase order or purchase order receipt or you can manually
release the hold in the Invoice Holds window.
H
Hold Unapproved Invoices. By checking this option for a site,
Payables automatically applies a Supplier hold to all new invoices
entered for that site. Payables applies this hold during Approval.
You will still be able to pay invoices that have previously been
entered and approved for the supplier site. You can manually
release the hold in the Invoice Holds window. Uncheck this option
when you no longer want to hold unapproved invoices for a
supplier site.
APPLYING HOLDS RESTRICTIONS:
PAYMENT BATCH SELECTED INVOICES: You cannot apply holds
to an invoice you have selected for payment in a payment batch.
Invoices
4 – 139
See Also
Approval: page 4 – 145
Payables Transfer to General Ledger Program: page 7 – 34
Selecting Multiple Records (Oracle Applications User’s Guide)
Checking Funds for Invoices: page 10 – 43
Releasing Holds
Release holds from invoices to allow payment and accounting entry
creation for the invoices. You can view the holds on an invoice in either
the Invoice Overview window or the Invoice Holds window. You can
see the number of invoice holds on an invoice in the Holds display only
region of the Invoices window. Identify invoices on hold with the
Invoices On Hold report and the Matching Hold Detail report. These
reports aid you in releasing holds from invoices.
After you release all holds from an invoice it is not necessary for you to
resubmit Approval before you can pay or create accounting entries for
it. Approval will not place an invoice on the same type of hold that
you manually released.
You must manually release all holds that you apply manually. Payables
does not automatically release holds that you apply to invoices.
During Approval, Payables automatically releases system holds
(anything other than the user defined holds you define) from invoices
with corrected exception conditions. For example, you fix a
distribution variance on an invoice, resubmit Approval and Payables
automatically releases the Distribution Variance hold.
If you release a manually releasable hold that Payables applied during
Approval, the next time you submit Approval, Payables will not
reapply the same hold.
Payables applies some holds that you cannot release. You can use the
Invoice Holds window to view invoices with these holds, but you
cannot manually release these holds. You must correct the exception
that caused Approval to place the hold on the invoice, then resubmit
Approval to release the holds. You can correct exceptions by updating
the invoice or the purchase order or by changing your Invoice
Tolerances.
4 – 140
Oracle Payables User Guide
There are three types of holds you can manually release:
H
Invoice Hold. You can release one or more Invoice Hold Reason
Approvals (”holds”) from an invoice using the Invoice Holds
window. You can release multiple invoice holds from many
invoices at once using the Invoice Actions window. See: Releasing
Holds From an Invoice: page 4 – 141, and Releasing Holds from
Multiple Invoices: page 4 – 142.
H
Scheduled Payment Hold. You can release a scheduled payment
hold in the Scheduled Payments window. See: Releasing
Scheduled Payment Holds: page 4 – 143.
H
Supplier Site Hold. Release the Hold All Payments option for a
supplier site by unchecking the Hold All Payments option at the
supplier site in the Suppliers window. Holds resulting from the
following supplier options must be released from the invoices in
the Invoice Holds window: the Hold Unapproved Invoices option
(Supplier hold), Hold Unmatched Invoices option (Matching
Required hold), and the Invoice Amount Limit (Amount hold). See
below: Releasing Holds From an Invoice.
See Also
Hold Release Restrictions: page 4 – 144
Summary of Approval Hold Codes: page J – 2
Invoice Holds Window Reference: page 4 – 334
Releasing Holds From an Invoice
Prerequisite
❑ Define your release codes in the Invoice Approvals window. See
Invoice Approvals: page 2 – 99.
"
To release holds from an invoice:
1.
In the Invoices window find the invoice from which you want to
release holds. See: Finding Invoices: page 4 – 290.
Invoices
4 – 141
2.
Choose the Holds button to navigate to the Invoice Holds window.
Release a hold by selecting a Release Name. You can select from all
Invoice Approvals defined with the type Invoice Release Reason.
To release multiple holds at once, choose Release and select a
Release Name. You can select from all Invoice Approvals defined
with the type Invoice Quick Release Reason. When you save your
work, Payables automatically assigns the release name to all
releasable holds. Choose OK.
3.
Save your work.
Releasing Holds from Multiple Invoices
Prerequisite
❑ Define your release codes in the Invoice Approvals window. See
Invoice Approvals: page 2 – 99.
"
To release holds from multiple invoices:
1.
In the Invoices window, use the Find window to query the invoices
for a particular supplier from which you want to release holds.
See: Finding Invoices: page 4 – 290. It is not necessary to enter a
particular Hold Name in the Holds region of the Find Invoices
window. In the Invoices window, select each invoice for which you
want to release holds (use the CTRL key and at the same time right
click with your mouse on each invoice to select it).
2.
Choose Actions to navigate to the Invoice Actions window. Select
Release Holds. In the Hold Name field, either select the name of
the one hold type you want to release, or accept the default of All
to release all releasable holds for each selected invoice
Select a Release Name. You can select from all Invoice Approvals
defined with the type Hold Quick Release Reason. Optionally
override the release reason associated with the Release Name.
4 – 142
3.
Choose OK. Payables automatically releases all releasable holds
and assigns the release name to all releasable holds across the
multiple invoices you selected.
4.
Save your work.
Oracle Payables User Guide
Releasing Scheduled Payment Holds
Prerequisite
❑ Define your release codes in the Invoice Approvals window. See
Invoice Approvals: page 2 – 99.
"
To release scheduled payment holds:
1.
In the Invoices window or the Invoice Holds window, choose the
Scheduled Payments button to navigate to the Scheduled Payments
window.
2.
Uncheck the Hold check box to release the hold from a scheduled
payment.
3.
Save your work.
Releasing Supplier Holds
"
To release supplier holds:
H
To release Supplier, Matching Required, and Amount holds from
an invoice, see above: To release holds from an invoice. To release
a Hold All Payments option for a supplier site, simply uncheck the
option in the Supplier Sites window.
See Also
Adjusting Invoices: page 4 – 299
Invoice Tolerances: page 2 – 96
Selecting Multiple Records (Oracle Applications User’s Guide)
Invoices
4 – 143
HOLD RELEASE RESTRICTIONS:
FIND WINDOW. When you use the Find window to locate invoices
from which you want to release holds, Payables releases only the holds
that match your invoice find criteria.
SYSTEM HOLDS. Payables applies some holds that you cannot
manually release. You can use the Invoice Holds window of the
Invoice Workbench to view invoices with these holds, but you cannot
release these holds. You must fix the problem that caused Approval to
place the hold on the invoice then resubmit Approval to release the
holds. You cannot release the following holds:
• Dist Variance. Invoice amount does not equal the sum of the
invoice distribution amounts.
• No Rate. Foreign currency invoice does not have an exchange
rate assigned to it.
• Can’t Funds Check. Budget does not exist for the invoice
accounting period, or the invoice distribution account does not
equal the purchase order distribution account. This hold is used
by Payables only if you use encumbrance accounting and the
absolute or advisory method of budgetary control.
• Final Matching. Invoice has one or more distributions final
matched to a purchase order.
• Can’t Try PO Close. Invoice is final matched to purchase order,
but Approval placed one or more holds on invoice during
approval.
• Dist Acct Invalid. Invoice distribution has an invalid account.
An invalid account prevents you from creating accounting
entries for an invoice or payment.
• ERV Acct Invalid. Approval created an invalid Exchange Rate
Variance account for an invoice distribution. Payables only
applies this hold if you enable Automatic Offsets.
• No AWT Period. Approval did not find the period in the
withholding tax special calendar. Create the period in the special
calendar and resubmit Approval.
4 – 144
Oracle Payables User Guide
Approval
Before you can pay or create accounting entries for an invoice,
including prepayments, you must submit Approval for the invoice in
one of three ways:
• Online by using the Invoice Actions window. See: Submitting
Online Approval for Invoices: page 4 – 147.
• Online by using the Approve button in the Invoice Batches
window. See: Submitting Online Approval for Invoice Batches:
page 4 – 147.
• Batch by submitting the Payables Approval program from the
Submit Request window. See: Payables Approval Program: page
4 – 148.
Approval validates the matching, tax, period status, exchange rate, and
distribution information for invoices you enter and automatically
applies holds to exception invoices. If an invoice has a hold, you can
release the hold by correcting the exception that caused Approval to
apply the hold and then resubmitting Approval. Correct exceptions by
updating the invoice or the purchase order, or change your Invoice
Tolerances. Payables automatically releases the hold when the
exception is no longer an issue. You can manually release certain
invoice holds even if you have not resolved the matching error
condition. You can do this in the Invoice Holds window.
Authorized users can always correct an invoice, even if you have
approved, paid or created accounting entries for the invoice. See also:
Adjusting Invoices: page 4 – 299.
You can identify all invoices that Payables has not yet reviewed with
Approval by submitting the Invoice Register for Unapproved Invoices
Only. You can check the Approval status of an invoice online in the
Invoice Overview window or the Invoices window.
Payables and Oracle Alert are fully integrated to allow you to alert
approvers and purchasing agents when you or Payables places an
invoice on a specific hold. Alert also provides you with an integrated
system of alerts, messages, and message distribution to focus attention
on time–sensitive or critical information and streamline the approval
process. Exception reporting in Alert is accomplished using either
electronic mail or paper reports.
Invoices
4 – 145
Approval Example
For example, you have three invoices on matching hold. The first
invoice is on matching hold because the quantity billed exceeds the
quantity received. The second invoice is on matching hold because the
invoice price exceeds the purchase order shipment price. The third
invoice is on matching hold because the quantity billed exceeds the
quantity ordered.
Invoice 1. Your receiving department receives the goods and records
the receipt information. Your invoice now matches the receipt and
Payables releases the hold when you submit Approval.
Invoice 2. A supplier sends a credit to correct the amount due on a
previous invoice. After you enter the credit and match it to the same
purchase order, your invoice now matches the purchase order and
Payables releases the hold when you submit Approval. Use Approve
Related Invoices in the Invoice Actions window to submit Approval for
both the credit and the original invoice.
Invoice 3. You increase your tolerance levels using the Tolerances
window. Your invoice now matches your receipt and purchase order
within your newly–defined tolerance levels and Payables releases the
hold when you submit Approval.
See Also
Releasing Holds: page 4 – 140
Payables Options: page 2 – 57
Purchasing Integration: page 4 – 165
Summary of Approval Hold Codes: page J – 2
Encumbrance Entries in Payables: page 10 – 46
Using Oracle Alert for Exception Reporting: page F – 2
4 – 146
Oracle Payables User Guide
Submitting Online Approval for Invoices
Prerequisites:
❑ Enable the Allow Online Approval Payables option.
"
To submit online Approval for invoices:
1.
In the Invoices window, find the invoice(s) for which you want to
submit Approval. If you want to submit Approval for multiple
invoices, select them in the Invoices window.
2.
Choose Actions. Select Approve.
If you are approving a credit or debit memo, select Approve
Related Invoices to submit online Approval for invoices associated
with the credit or debit memo.
3.
Choose OK.
Payables displays messages about the number of holds applied and
released during this cycle of Approval.
Submitting Online Approval for Invoice Batches
Prerequisite
❑ Enable the Allow Online Approval Payables option.
"
To submit online Approval for invoice batches:
1.
In the Invoice Batches window, find the invoice batch(es) that
contain invoices for which you want to submit Approval. If you
would like to submit Approval for multiple batches, select them in
the Invoice Batches window.
2.
Choose Approve. Payables submits Approval to review each
invoice contained in each batch you select.
Invoices
4 – 147
In the Invoice Holds window, you can review any invoice holds
and releases that Payables applies.
See Also
Selecting Multiple Records (Oracle Applications User’s Guide)
Payables Approval Program
You can automate your approval cycle through automatic approval
resubmission. Define your submission options for the Payables
Approval program in the Submit Request window. You can specify the
intervals in which you want to submit Approval, and Payables will
submit Approval using the parameters you specify up until the End
Resubmission date you specify. See also: Submitting Standard Reports,
Programs, and Listings: page 8 – 2.
"
To submit batch Approval:
1.
In the Submit Request window, select Payables Approval as the
request Name, and enter the parameters of your choice. Choose
OK.
2.
Choose the Submit button to submit your request.
Payables Approval Program Parameters
Option. The option that Payables uses to select unapproved invoices
for Approval.
• All. Submit Approval for all invoices. Payables reviews all
invoice distributions that Approval has not yet approved or that
you have not manually released from matching hold using the
Invoice Holds window.
• New. Process only invoice distributions that you entered after
the last Approval. Approval only reviews invoice distributions
that Approval has not yet tested. When you submit a request for
New invoices, Approval does not release invoice distributions
already on hold.
4 – 148
Oracle Payables User Guide
Suggestion: Enter All to ensure you release any existing holds
on invoices as well as place new holds. Submit Approval right
before you make automatic payments to update the
authorization status on all invoices.
Invoice Batch Name. Payables reviews invoices that are in the invoice
batch you select. Payables lets you enter this field only if you have
enabled the Use Batch Control Payables option. See Payables Options:
page 2 – 57
Start / End Invoice Date. A beginning / end date for the range of
invoices you want to approve. Approval reviews invoices that have an
invoice date in the range you specify.
Supplier Name. Payables only reviews invoices for the supplier you
select.
Pay Group. Payables only reviews invoices in the Pay Group you
select.
Invoice Number. Payables only reviews the invoice you select.
Entered By. The userid of the person who entered invoices. Payables
reviews all invoices entered by this person.
See Also
Adjusting Invoices: page 4 – 299
Applying Holds: page 4 – 136
Releasing Holds: page 4 – 140
Budgetary Control in Payables: page 10 – 42
Using Oracle Alert for Exception Reporting: page F – 2
Invoice Variances: page 4 – 172
Budgetary Control In Payables: page 10 – 42
Automatic Offsets: page 10 – 12
Summary of Approval Hold Codes: page J – 2
Invoices
4 – 149
Scheduling Invoice Payments
During invoice entry, Payables automatically schedules payment for
each invoice based on the Payment Terms and Terms Date you enter for
the invoice. Payables uses the Payment Terms definition to calculate the
due date, discount date, and discount amount for each scheduled
payment. For example, if an invoice has Payment Terms of Net 30,
Payables calculates the due date as 30 days after the Terms Date. You
can assign default Payment Terms to a supplier.
If you enable the Recalculate Scheduled Payment Payables option,
Payables will also recalculate your scheduled payments during
Approval. This recalculation is based on your most favorable available
payment terms and start dates. For more information on the Recalculate
Scheduled Payment Payables option, see: Recalculate Scheduled
Payment: page 2 – 65.
The invoice Terms Date defaults from the supplier site Terms Date Basis
option you select:
4 – 150
Oracle Payables User Guide
• System. System date on day of invoice entry.
• Goods Received. The date you receive goods for invoices you
match to purchase orders.
• Invoice. Invoice date.
• Invoice Received. Date you receive an invoice.
Use the Scheduled Payments window to review or adjust dates and
amounts of all payments, including discount schedules, for an invoice.
You can also schedule partial payments and place all or part of the
scheduled payment on hold.
☞
Attention: Payables recalculates and overwrites scheduled
payments if you adjust the invoice Payment Terms, or if the
Scheduled Payment Recalculation Payables option is enabled
and you submit Approval for the invoice. If you manually
adjust scheduled payments and Payables subsequently
recalculates the scheduled payments, you will need to re–enter
your changes.
See Also
Adjusting Scheduled Payments: page 4 – 310
Applying a Hold to a Scheduled Payment: page 4 – 138
Discounts: page 4 – 155
Financials Options: page 2 – 36
Payables Options: page 2 – 57
Payment Terms: page 2 – 89
Reviewing Payments: page 5 – 78
Invoices
4 – 151
Scheduled Payments Window Reference
All amounts in the Scheduled Payments window are displayed in the
payment currency, except for the Gross Amount, which is displayed in
the invoice currency.
Amount Paid. Invoice amount minus the gross amounts of the
remaining payments. The Amount Paid does not include discounts you
realize on payments. For example, if you pay $90 and realize a $10
discount on a $100 invoice, Payables displays $100 in this field.
Amount Remaining. Payables displays the unpaid amount of a
selected scheduled payment line.
Discount Amount Remaining. Payables displays the first discount
amount available on the unpaid amount of a scheduled payment line.
Payables displays the discount amount you would realize if you paid
the scheduled payment today.
Due Date. Payables calculates the date the invoice is due based on the
invoice Terms Date and invoice Payment Terms. For example, if the
terms date is January 1, 2002, and the invoice payment terms are Net 30,
the Due Date is January 30, 2002.
If you enable the Recalculate Scheduled Payment Payables option,
during Approval Payables recalculates the due date based on your most
favorable available payment terms and start dates. For more
information on the Recalculate Scheduled Payment Payables option, see:
Recalculate Scheduled Payment: page 2 – 65.
Payables does not default Due Dates for scheduled payments you add
manually.
Gross Amount Total. Sum of the scheduled payment Gross Amounts.
This must equal the Invoice Amount.
Gross Amount. Gross amount due for the scheduled payment,
displayed in the invoice currency. Payables subtracts the discount
amount, automatic withholding amount, and prepayment amount from
the gross amount to calculate the payment amount.
Hold. Enable this check box if you want to apply a payment hold on the
scheduled payment line. If a scheduled payment has a payment hold,
Payables will not create a payment for that scheduled payment until you
disable the check box. See: Applying a Hold to a Scheduled Payment:
page 4 – 138.
☞
4 – 152
Oracle Payables User Guide
Attention: Scheduled payment holds do not appear in the
Holds field of the Invoices window.
You cannot enable this hold if the scheduled payment line has already
been paid.
Invoice Amount. Amount of the invoice, displayed in the payment
currency. If this is a prepayment, Payables displays the amount of the
prepayment that remains unapplied.
Payment Method. Payables defaults the payment method from the
invoice (Check, Electronic, Wire, or Clearing).
Payment Priority. A number, between 1 (high) and 99 (low), that
represents the priority of payment. The value for this field defaults from
the invoice batch if you specified one in the Invoice Batches window.
Otherwise it defaults from the supplier site. You can enter a payment
priority range as a criteria for selecting invoices for a payment batch.
Discount/ Second Discount/Third Discount
Date/Amount. Payables displays the discount amount you are eligible
to subtract from the gross amount if you pay the invoice before the
corresponding discount date. For example, you enter a $100 invoice
with a payment terms date of January 1, 2002, and your payment terms
allow you to take either a 10% discount if you pay within 10 days, or a
5% discount if you pay within 20 days. When you select Discount, the
date is January 10, 2002, and the amount is $10.00. You select Second
Discount, and the date is January 10, 2002, and the amount is $5.00. If
you make the payment on or before eligible discount dates, you choose
between paying the gross amount of the invoice or taking the most
favorable discount option.
Remit–to Bank
Name. Payables defaults the primary Remit–to bank account for the
supplier site for the invoice currency. If there is no primary bank
account for the supplier site, Payables defaults the primary bank
account for the supplier. If you want to change the default, you can
select any bank account name from the list of values. The list of values
lists all valid bank accounts with the same payment currency for the
supplier.
Number. Payables displays the bank account number associated with
the Bank Account Name.
Invoices
4 – 153
Buttons
Holds. Opens the Invoice Holds window. Payables automatically
displays any invoice holds the invoice may have.
Payments. Opens the Payments window of the Invoice Workbench.
The Payments window displays summary payment information for the
invoice.
Split Schedule. If you want to automatically create an additional
scheduled payment, select a scheduled payment and update the
amount. Choose Split Schedule to have Payables create an additional
scheduled payment with the net amount due. For example, select a $100
scheduled payment and change the gross amount to $40. Choose Split
Schedule to have Payables create a new $60 scheduled payment.
Pay... Opens the Payments window so you can pay selected scheduled
payments. See: Paying Invoices From the Invoice Workbench: page
5 – 14.
See Also
Adjusting Scheduled Payments: page 4 – 310
Applying a Hold to a Scheduled Payment: page 4 – 138
Discounts: page 4 – 155
Payables Options: page 2 – 71
Payment Terms: page 2 – 89
Reviewing Payments: page 5 – 78
4 – 154
Oracle Payables User Guide
Discounts
Payables uses payment terms you assign to an invoice to pay invoices at
a discounted rate. You define discount payment terms in the Payment
Terms window. You can define discount payment terms that have
Payables vary the discount amount depending on how old the invoice
is. You also define the payment terms to pay the full invoice amount if
you have missed the discount date. For example, you can define
payment terms to take a 10 percent discount if the invoice is paid within
5 days of the Terms Date, or a 5 percent discount if the invoice is paid
within 10 days. If the invoice is over 10 days old, Payables pays the full
invoice amount on the due date you specify.
When you submit Approval for an invoice with discount terms,
Payables automatically creates a scheduled payment, which includes a
discount date and discount amount. If you enter an invoice that does
not have discount terms, you can modify the scheduled payment to
include a discount.
You use Pay Date Basis and Always Take Discount to control whether
you take a discount and when you pay an invoice. There are two key
ways to take discounts with Payables:
• Enable the Always Take Discount Supplier option. Payables takes
a discount regardless of when you pay the invoice.
• Select Discount for the Pay Date Basis for the supplier, and
disable the Pay Only When Due check box for your payment
batch. Payables takes a discount and pays the invoice within the
discount period.
If you take a discount, Payables uses the Discount Distribution Method
you specify in the Payables Options window to credit the appropriate
accounts. The Exclude Tax From Discount option you specify in the
Payables Options window controls whether Payables subtracts the tax
amount from the invoice amount when it enters the invoice amount
applicable to discount.
Invoices
4 – 155
DISCOUNT RESTRICTIONS
BANK CHARGES: You cannot use the Discount feature if you enable
the Use Bank Charges Payables option.
See Also
Payment Terms: page 2 – 89
Scheduling Invoice Payments: page 4 – 150
Scheduled Payments Window Reference: page 4 – 152
Payment Payables Options: page 2 – 71
4 – 156
Oracle Payables User Guide
Assets Integration
You can enter invoices for asset items in Oracle Payables and then
import specified distributions into an interface table in Oracle Assets.
You can then create assets from the distributions in Oracle Assets. For
detailed information see: Create Mass Additions from Invoice
Distributions in Oracle Payables (Oracle Assets User’s Guide).
Prerequisites
❑ Install Oracle Assets.
❑ Assign to Payables the same set of books you use for the Oracle
Assets corporate book.
❑ If you use Oracle Inventory and Oracle Purchasing, set up your
items with asset categories.
"
To record an invoice distribution as an asset:
1.
Enter the invoice in either the Invoices window or the Invoice
Gateway.
Enter the distribution description. This description will be
imported into Assets.
Enable the Track as Asset check box for the item line, and
optionally, for the nonrecoverable tax line. The account must be set
up for an existing asset category, and must be either an asset
clearing account or a construction–in–process (CIP) clearing
account. If you enter the invoice in the Invoice Workbench,
Payables automatically enables the check box if you have entered
an Asset type account.
2.
Approve the invoice. See: Approval: page 4 – 145.
3.
Account for the invoice. See: Payables Accounting Process: page
7 – 13.
4.
Transfer the invoice accounting entries to General Ledger. See:
Transferring Accounting Entries to Your General Ledger: page
7 – 33.
5.
Submit the Mass Additions Create Program: page 8 – 15. Create
Mass Additions for Assets process sends valid invoice distribution
information from Payables to an interface table in Assets.
6.
Prepare Mass Additions in Assets.
Invoices
4 – 157
7.
Review Mass Additions in the Oracle Assets Mass Additions
window.
See Also
Entering Invoice Distributions: page 4 – 47
Create Mass Additions from Invoice Line Distributions in Oracle
Payables (Oracle Assets User’s Guide)
Oracle Assets User’s Guide
4 – 158
Oracle Payables User Guide
Oracle Projects Integration
If you have installed Oracle Projects, you can record project
information on supplier invoices, expense reports entered in the
Invoices window, and on Self–Service Expenses employee expense
reports which Payables converts into invoices. For each transaction,
Payables records the project name, task, and expenditure information.
The Account Generator creates an expense account for each invoice
distribution that has projects information. Project–related transactions
are interfaced back to Projects where the transactions are recorded and
associated with particular projects.
This document includes the following topics:
• Entering Project–Related Invoices and Expense Reports: page
4 – 159
• Adding or Modifying Projects Information on Invoices: page
4 – 163
Entering Project–Related Invoices and Expense Reports
This discussion gives a brief overview of the ways in which you can
add Projects information to expense reports and invoices. For detailed
information on Payables Integration with Projects, see the Payables and
Expense Report sections of the ”Integration with Other Oracle
Applications” chapter in the Oracle Projects User’s Guide.
You can enter projects information on supplier invoices. These
transactions are interfaced to Oracle Projects as supplier invoices. You
can enter projects information on supplier invoices in the following
ways:
• Use the Invoices window and the Distributions window to enter
an invoice, and include projects information. You can specify
projects information either by using a project–related
Distribution Set or by entering the project information manually.
• Match an invoice to a project–related purchase order.
• Assign a project–related Distribution Set to a recurring invoice
template.
• In the Distributions window, add Projects information to any
existing supplier invoice you have entered or imported.
You can enter projects information on expense reports. These
transactions are interfaced to Oracle Projects as expense reports. You
Invoices
4 – 159
can enter projects information on expense reports in the following
ways:
• Employees enter projects information on an expense report in the
Enter Receipts window in Self–Service Expenses.
• Import expense reports from Projects.
• In the Distributions window, add projects information to any
invoice you have entered or imported. This includes expense
reports you entered in the Invoices window (invoice type of
Expense Report), and expense reports you have entered in either
the Payables Expense Reports window or Self–Service Expenses
and that you have imported.
Note: Only Self–Service Expenses expense reports are
processed by the Expense Reporting Workflow, and any
changes you make to an expense report after import will not be
included in Workflow.
Entering Project–Related Invoices and Distributions
When you enter a project–related invoice, enter the projects
information, either manually in the projects fields, or by entering a
project–related Distribution Set for the invoice. These project values
default to the Distributions window where you can override them, and
where you can additionally add a value for Quantity.
If you match to a purchase order, then Payables automatically copies
any projects information from the purchase order to the invoice
distribution.
You can also import through the Payables Open Interface tables
projects–related invoices from the Invoice gateway and other systems.
Note: Project fields will not appear in the Invoices window or
Distributions window if you have not installed Oracle Projects.
Creating Project–Related Recurring Invoices
When you set up a recurring invoice template, assign a project–related
distribution set to the template. All invoices created by the template
will have the project information. You can override these values in the
Distributions window after Payables creates the recurring invoice.
4 – 160
Oracle Payables User Guide
Entering Project–Related Self–Service Expense Reports
This section gives you an overview of the Self–Service Expenses
project–related expense report process. Each step refers you to
documentation where you can find more information on the step.
1.
Set up Payables, Self–Service Expenses, and Oracle Projects to
process project–related Self–Service expense reports.
See: Setting Up Oracle Projects with Self–Service Expenses (Oracle
Self–Service Expenses Implementation Guide)
2.
In Self–Service Expenses, an employee enters an expense report
with project–related receipts, either online (the Create New
Expense Report function) or disconnected (the Upload Expense
Spreadsheet function). For each project–related receipt, the
employee enters a project number and a task number.
When the employee submits the expense report in Self–Service
Expenses, the system validates the project–related information, and
then saves the expense report information in the Payables Invoice
Import tables. If an expense line fails validation, Self–Service
Expenses displays an error message on the View Receipts window.
An employee must correct all errors before saving or submitting an
expense report.
3.
Once the expense report is submitted, the system starts the
Expense Reporting Workflow process. Workflow uses the Project
Expense Report Account Generator to assign an expense account to
each project–related item on the expense report.
4.
The Accounts Payable department (AP) reviews, audits, adjusts,
and approves expense reports entered via Self–Service Expenses
using the Expense Reports window in Payables. Note that project
fields are not available in this window.
After AP approves the expense report, it is ready for import. Any
unverified receipts are subject to short payment during the
workflow process.
See: Workflow (Oracle Self–Service Expenses Implementation Manual)
5.
You submit Payables Invoice Import to convert the expense report
into an invoice. Select Self Service as the Source parameter to
create invoices from expense reports entered in Self–Service
Expenses. An expense report entered in Self–Service Expenses is
not eligible for import until the Manager (Spending) Approval
Process and the AP Approval Process complete successfully.
See: Workflow (Oracle Self–Service Expenses Implementation Manual)
Invoices
4 – 161
See: Payables Invoice Import Program: page 4 – 239.
If expense reports could not be imported, Payables prints the
Invoice Import Rejections Report. If the expense report is rejected,
correct the problems and resubmit Payables Invoice Import.
See: Invoice Import Report: page 4 – 253.
6.
In the Payables Invoice Workbench, you can adjust project
information in the Distributions window.
See: Adding or Modifying Projects Information on Invoices: page
4 – 163.
7.
In Payables, approve and pay the invoice.
See Also
Oracle Self–Service Expenses Implementation Manual
Implementing Oracle Payables for Projects Integration (Oracle Projects
User’s Guide)
Creating a Project Related Distribution Set: page 2 – 18
Importing Expense Reports from Oracle Projects
When you enter expense reports in Oracle Projects or Oracle Personal
Time and Expense (PTE), you can load them into Payables. You then
submit the Payables Invoice Import process to creates invoices from the
expense report information. You can then approve and pay the
invoices. For detailed information on importing Projects expense
reports, see: Integrating Expense Reports with Oracle Payables (Oracle
Projects User’s Guide).
Entering Project–Related Expense Reports in Payables
There are no project fields in the Expense Reports window. You can
enter expense reports in the Invoice Workbench. Enter an invoice with
the invoice type of Expense Report, enter an employee’s name as the
supplier, and enter projects information, either by using a
project–related Distribution Set, or by manually entering projects
information. The system automatically builds the expense account for
the distribution based on the projects information on the distribution.
4 – 162
Oracle Payables User Guide
Adding or Modifying Project Information on Invoices
In the Distributions window, you can update or add project
information on invoices, or expense reports that you have entered in
Payables. After you post the invoice in Payables, you can interface
them to Projects.
Adjusting Project–Related Invoices
If the project–related invoice is not accounted, then in Payables you can
make any adjustments that you can to any other unposted invoice. See:
Adjusting Invoices.
If the invoice has already interfaced to Oracle Projects, you can no
longer adjust the total amount of the invoice. After interfacing the
invoice to Projects, to make a change to an invoice distribution, you
should add a reversing distribution with the incorrect information, and
then add a new distribution with the correct information.
For example, if you entered a distribution for $500, with cost center 444
in the expense account, and you want to change the cost center to 445.
Press the Reverse button to create a new distribution with the same
information as the distribution you want to replace, including cost
center 444, but an amount of –$500. Then add a new distribution for
$500 with cost center 445. For more information see: Adjusting
Expense Reports, and Adjustments, Supplier Invoice Adjustments in
Payables (Oracle Projects User’s Guide).
If you have interfaced the invoice from Payables to Projects, then from
Oracle Projects, you can make net–zero adjustments to Payables
invoices based on regular Payables invoice update restrictions. These
changes are recorded in both Payables and Projects, so they do not get
interfaced back to Projects.
In Payables you can cancel an invoice after interfacing it to Oracle
Projects. However, if you have made net zero adjustments in Oracle
Projects, you must interface them to Payables before you can cancel the
invoice.
Adjusting expense account information
The Account Generator creates an expense account for each invoice
distribution that has projects information. If you change the project
information on the invoice distribution, the system rebuilds the
distribution accounts based on the new project information. You can
override the account that Account Generator builds only if you enable
the profile option: PA:Allow Override of PA Distributions in AP/PO.
Invoices
4 – 163
You can make these changes in either Payables or in Projects if the
invoice has already been interfaced to Projects. For detailed
information, see: Accounting Transactions Created by the Account
Generator, and Implementing the Account Generator for
Project–Related Payable Invoices in Oracle Projects (Oracle Projects
User’s Guide)
4 – 164
Oracle Payables User Guide
Purchasing Integration
Payables fully integrates with Purchasing and other purchasing
systems. This allows you to access your purchasing information online
and match invoices to purchase orders or purchase order receipts.
You can use many options in Payables to control purchase order and
receipt matching. You can define invoice tolerances which Payables
uses when approving your purchase order or receipt matched invoices.
If you use a purchasing system other than Oracle Purchasing and you
want to match invoices, you must provide that purchasing information
in several Purchasing tables in order to perform the matches. See:
Purchase Order Matching Database Tables: page H – 2. If you want
assistance from Oracle to integrate your purchasing system with
Payables, contact Oracle Consulting Services at your local Oracle office.
This discussion includes the following topics:
• Setting Up Your System for Matching: page 4 – 166
• Integrated Supplier and Purchasing Information: page 4 – 167
• Purchase Order Matching: page 4 – 168
• Two–, Three–, and Four–way Approval: page 4 – 170
• Purchase Order Shipment and Distribution Matching: page
4 – 169
• PO Default and QuickMatch Invoices: page 4 – 171
• Payment on Receipt: page 4 – 171
• Invoice Variances: page 4 – 172
• Variance Accounts: page 4 – 173
• Defining Accrual and Variance Accounts: page 4 – 174
• Closing Purchase Orders: page 4 – 175
• Receipt Accrual: page 4 – 176
• Purging Payables and Purchasing Information: page 4 – 177
Invoices
4 – 165
Setting Up Your System for Matching
You can set options and tolerances in Payables and Purchasing to
control matching in your system.
In the Invoice Tolerance window you can set tolerances for the variance
you will allow between invoices and purchase orders or receipts.
The following options and windows control matching in your system.
The windows or document in which you can set the option are listed in
the same order as the defaulting hierarchy. If a value defaults to
another window or document, you can always override the default
value.
• Hold Unmatched Invoices (enabled, disabled)
– Financials Options window (Supplier Entry) and Payables
Options window (Expense Reports)
– Suppliers window
– Supplier Sites window
• Match Approval Level (2–way, 3–way, 4–way)
– Purchasing Options window
– Suppliers window
– Supplier Sites window
– purchase order shipment
• Invoice Match Option (Receipt, Purchase Order)
– Financials Options window
– Suppliers window
– Supplier Sites window
– purchase order shipment
• Automatic Creation of Debit Memo (enabled, disabled)
– Suppliers window
– Supplier Sites window
– return to supplier transaction
4 – 166
Oracle Payables User Guide
Integrated Supplier and Purchasing Information
Integrated information in Payables and Purchasing ensures consistency
of information between applications and avoids the necessity of having
to enter the information more than once.
Payables shares suppliers with Purchasing. You can enter a supplier in
either application and use that supplier to create requisitions and
purchase orders in Purchasing. Then, within Payables, you can create
invoices for the same supplier and match the invoices to one or more
purchase order shipments, purchase order distributions, or purchase
order receipts.
In addition, Payables and Purchasing share the lookup values that you
use during supplier entry. You can create values for the following
lookup types in the Oracle Payables Lookups window:
• Supplier Type
• Minority Group
You can create values for the following lookup types in the Oracle
Purchasing Lookups window:
• FOB
• Pay Group
• Supplier Type
• Minority Group
• Freight Terms
See Also
Purchase Order Matching Database Tables: page H – 2
Entering Suppliers: page 3 – 10
Financials Options: page 2 – 36
Invoice Tolerances: page 2 – 96
Payables Options: page 2 – 57
Lookups: page 2 – 13
Invoices
4 – 167
Purchase Order and Receipt Matching
Payables shares purchase order information from your purchasing
system to enable online matching with invoices. Match your billed
(invoice) items to the original purchase orders or receipts to ensure that
you pay only for the goods or services you ordered. If you are billed
for an item in excess of the amount and quantity tolerances you define
in the Invoice Tolerances window, Approval applies a hold to the
invoice, which prevents payment.
You can match a single invoice to multiple purchase order shipments
and distributions, or you can match multiple invoices to a single
purchase order shipment or distribution. Payables ensures that when
you match an invoice to a purchase order that the invoice and purchase
order have the same supplier and currency.
When you match an invoice to a purchase order or receipt, Payables
creates invoice distributions using the purchase order distribution
accounting information. You cannot delete invoice distributions
created through matching. If you incorrectly match an invoice to a
purchase order, you may either cancel the invoice, or reverse the
individual distributions which are incorrectly matched.
See Also
Approval: page 4 – 145
Releasing Holds: page 4 – 140
Entering Purchase Order Matched Invoices: page 4 – 70
Adjusting Invoices: page 4 – 299
Matching to Receipts from the Invoice Workbench: page 4 – 78
4 – 168
Oracle Payables User Guide
Purchase Order Shipment and Distribution Matching
You can match to purchase order shipments, purchase order
distributions, and purchase order shipments for receipt transactions. A
purchase order shipment may have multiple distributions. If you are
billed for only a portion of a shipment, you may want to match at the
distribution level to ensure you charge the correct account If you
choose not to match to the distributions, Payables prorates the match
amount across the available distributions for that shipment.
You may want to record a price correction for a purchase order
shipment if you receive an invoice from the supplier that is an
adjustment to the unit price of an invoice you previously matched to
that purchase order shipment. You can record price corrections
without adjusting the quantity billed on the purchase order.
You can reverse purchase order matches in the Distributions window of
the Invoice Workbench. You can cancel invoices matched to purchase
orders in the Invoice Actions window of the Invoice Workbench. If you
cancel an invoice matched to a purchase order, in addition to creating
reversing distributions, Payables reverses the match to the purchase
order by cancelling the invoiced quantity and amount of the original
invoice distributions. Payables reduces the billed quantity and billed
amount on the matched purchase order distributions by the amount of
the cancelled or reversed invoice distributions. You can then match
these purchase order shipments and distributions to other invoices.
See Also
Matching to Receipts from the Invoice Workbench: page 4 – 78
Entering Purchase Order Matched Invoices: page 4 – 70
Adjusting Invoices: page 4 – 299
Cancelling Invoices: page 4 – 311
Recording Price Corrections: page 4 – 76
Invoices
4 – 169
Two–, Three–, and Four–way Approval
Two–way approval verifies that purchase order and invoice
information match within your tolerances as follows:
• Quantity billed on the purchase order shipment is less than or
equal to Quantity ordered on the purchase order shipment.
• Invoice price on the purchase order shipment is less than or
equal to Purchase order price on the purchase order shipment.
Three–way approval adds a third criterion to verify that receipt and
invoice information match with the quantity tolerances you define:
• Quantity billed on the purchase order shipment is less than or
equal to Quantity received on the purchase order shipment.
Four–way approval adds a fourth criterion to verify that acceptance
documents and invoice information match within the quantity
tolerances you define:
• Quantity billed on the purchase order shipment is less than or
equal to Quantity accepted on the purchase order shipment.
When you match to a purchase order, Payables automatically performs
two–way approval. In the Purchasing Options window you can choose
to additionally use three–way or four–way approval. You can change
the Match Approval Level option at the supplier, supplier site and
purchase order shipment levels.
If the invoice and purchase order do not match within the tolerances
you define for quantity and price, Approval places a matching hold on
the invoice. You must release the hold before you can pay the invoice.
See Also
Releasing Hold: page 4 – 140
4 – 170
Oracle Payables User Guide
PO Default and QuickMatch Invoices
If you know the number and amount of the purchase order to which
you want to match, Payables provides you with two invoice types, PO
Default and QuickMatch, to help speed up invoice matching.
Enter PO Default as the invoice type if you know the purchase order
you want to match to, but you do not know to which purchase order
shipments or distributions you want to match. When you enter a PO
Default invoice in the Invoice Workbench, Payables prompts you to
enter the purchase order number and automatically copies the supplier
name, supplier number, supplier site, and currency from that Purchase
order to the invoice. When you choose the Match button, Payables will
retrieve all purchase order shipments or receipt lines associated with
the specified purchase order. You can then match to any shipment,
distribution, or receipt line.
Enter QuickMatch as the invoice type if you want to match an invoice
to all shipments or receipt lines on a purchase order. When you enter a
QuickMatch invoice in the Invoice Workbench, Payables prompts you
to enter the purchase order number and automatically enters the
supplier name, supplier number, supplier site, and the purchase order
currency for the invoice currency. When you choose the Match button,
Payables automatically navigates to the match window, and selects all
shipments that have an unbilled quantity. You can choose to complete
the match or override the matching information.
See Also
Entering Purchase Order Matched Invoices: page 4 – 70
Mixed Invoices: page 4 – 96
Entering Receipt Matched Invoices: page 4 – 79
Payment on Receipt
If you have installed Oracle Purchasing, you can increase the efficiency
of your procurement cycle by generating payments to suppliers based
on receipt transactions. These receipts include Advance Shipment
Notices (ASNs) and Advance Shipment and Billing Notices (ASBNs)
Invoices
4 – 171
that you receive electronically in Purchasing. See: Advance Shipment
Notice (ASN/ASBN) (Oracle Purchasing User’s Guide).
You can set up your suppliers to be paid either on receipt or delivery,
and you can choose the level of invoice consolidation: packing slip,
receipt, or supplier pay site. After receipt or delivery transactions are
created, you can submit the Pay on Receipt AutoInvoice Program to
automatically import invoices that are matched to corresponding
purchase orders. After the Payables Open Interface Import process
completes, you can then approve and pay these purchase order
matched invoices using standard Payables payment processing
functionality. See: Payment on Receipt (Oracle Purchasing User’s Guide).
Invoice Variances
If you use accrual basis accounting, and have Oracle Purchasing
installed, then Payables records variances when you approve and
create accounting entries for an invoice distribution matched to either a
purchase order or receipt. Variances are the differences between the
purchase order and invoice in price, quantity, and, for foreign currency
transactions, exchange rate. Invoice variances include nonrecoverable
tax. Variance is calculated based on the invoice amount, not including
any prepayment distributions.
The following formulas show how Payables calculates the invoice
amount, purchase order amount, and the variance amounts.
Invoice Variances
Purchase Order Amount
PO Qty x PO Price x PO/Receipt Rate
Invoice Distribution Amount
Invoice Qty x Invoice Price x Invoice Rate
Expense or Accrual Amount
All in functional currency if this is a
foreign currency transaction.
Invoice Distribution Amount –
(Invoice Price Variance + Exchange Rate Variance)
Invoice Price Variance (IPV)
Invoice Qty x (Invoice Price – PO Price) x Invoice Rate
Quantity Variance
(Invoice Qty – PO Qty) x PO Price x PO Rate
Exchange Rate Variance (ERV)
Invoice Qty x PO Price x
(Invoice Rate – PO/Receipt Rate)
Table 4 – 1 (Page 1 of 1)
4 – 172
Oracle Payables User Guide
Note: The balancing entry to encumbrances is the reserve for
encumbrances. The associated encumbrances use the same
formulas; for example, the encumbrance for a purchase order is
calculated according to the formula PO Qty x PO Price x PO
Rate.
During Approval, Payables applies holds to purchase order matched
invoices that exceed tolerances you defined for price, quantity, and
exchange rate differences in the Invoice Tolerances window.
See Also
Invoice Tolerances: page 2 – 96
Approval: page 4 – 145
Encumbrance Entries in Payables: page 10 – 46
Accounting Methods: page 2 – 50
Variance Accounts
The accounts to which Payables records invoice distributions and any
related variance distributions depend on your accrual method (receipt
or period end), and the item type (expense or inventory).
If you use the receipt accrual method, (also known as perpetual
accrual), the system automatically records an accrual when you record
an item as received in Oracle Purchasing. When you create accounting
entries for the invoice, Payables reverses this accrual and records the
AP liability. If you use period end accruals, you run the Accrual
Process for Period End Accruals and enter a reversing manual journal
entry for the AP accrual. When you create accounting entries for the
invoice, Payables records the expense and the AP liability. For
inventory items you must use the receipt accrual method. For expense
items you select your Accrue Expense Items Purchasing option, either
On Receipt or Period End.
Payables creates all variance distributions at invoice approval time.
Invoices
4 – 173
EXPENSE ITEM
Accrual
Method
Purchase
Order Expense
Quantity
Variance
Invoice Price
Variance
Exchange Rate
Variance
On Receipt
Expense AP
Accrual Account
Expense AP
Accrual Account
Charge Account
Charge Account
Period End
Charge Account
Charge Account
Charge Account
Charge Account
INVENTORY ITEM
Accrual
Method
On Receipt
Purchase
Order Expense
Inventory AP
Accrual Account
Quantity
Variance
Invoice Price
Variance
Inventory AP
Accrual Account
Invoice Price
Variance Account
Exchange Rate
Variance
Exchange PO
Rate Variance
Gain or Loss
Account
Defining Accrual and Variance Accounts
You define accounts in different windows of different products. To see
which windows inherit accounts you define, see: Account Default
Hierarchy Chart: page E – 11.
Exchange PO Rate Variance Gain/Loss Account. Accounting Region
of the Financials Options window in Payables or Purchasing. See:
Defining Financials Options: page 2 – 37.
Expense Accounts Payable Accrual Account. Defining Accrual
Options Region of the Purchasing Options window in Purchasing. See:
Defining Accrual Options (Oracle Purchasing User’s Guide).
Inventory Accounts Payable Accrual Account. Organization
Parameters window in Oracle Inventory. See: Organization Parameters
Window, Defining Other Account Parameters (Oracle Inventory User’s
Guide).
4 – 174
Oracle Payables User Guide
Invoice Price Variance Account. Organization Parameters window in
Inventory. See: Organization Parameters Window, Defining Other
Account Parameters (Oracle Inventory User’s Guide).
See Also
Invoice Tolerances: page 2 – 96
Overview of Receipt Accounting (Oracle Purchasing User’s Guide)
Defining Purchasing Options (Oracle Purchasing User’s Guide)
Reconciling A/P Accrual Accounts Balance (Oracle Purchasing User’s
Guide)
Accrual Write–Offs (Oracle Purchasing User’s Guide)
Receipt Accruals – Period End Process (Oracle Purchasing User’s Guide)
Closing Purchase Orders
Payables closes a purchase order when the quantity billed and the
quantity received (if you require receipt on the purchase order
shipment) against the purchase order are both greater than or equal to
the quantity ordered less the quantity cancelled on the purchase order.
Payables displays a warning message if you try to match to a closed
purchase order, but you can still complete the match. When you
submit Approval, Payables applies the appropriate matching hold(s).
You can reopen a closed purchase order in Purchasing by adding a new
shipment, over–receiving within your tolerance, or changing the
quantity for a shipment.
Payables closes a purchase order shipment when the quantity billed
and the quantity received (if you require receipt on the purchase order
shipment line) against the purchase order shipment are both greater
Invoices
4 – 175
than or equal to the quantity ordered less the quantity cancelled on the
purchase order shipment.
See Also
Final Matching Purchase Orders: page 4 – 82
Receipt Accrual
Purchasing provides you with a number of windows and reports to
support receipt accrual for purchase orders you match to. You can
report on the balance of the receipt accrual accounts and manually
write off any accrual transactions. You can then report on the
transactions you chose to write off.
If goods receipt accruals are enabled, either using the perpetual or
Period–end method, and the Enable Recoverable Tax option is enabled,
then the receipt accruals will be accounted inclusive of nonrecoverable
tax to reflect the liability on the receipt of goods. See: Recoverable Tax:
page 4 – 124.
See Also
Variance Accounts: page 4 – 173
Accrual Reconciliation Report (Oracle Purchasing User’s Guide)
Accrual Write–Off Report (Oracle Purchasing User’s Guide)
Overview of Receipt Accounting (Oracle Purchasing User’s Guide)
4 – 176
Oracle Payables User Guide
Purging Payables and Purchasing Information
Payables maintains all invoice, purchase order, and related records you
enter in Payables and Purchasing. You may want to delete these
records periodically to limit the amount of space required for your
Payables and Purchasing tables. You can use the Purge feature to
delete all invoices and payments in Payables, and all requisitions,
purchase orders, and receipts in Purchasing. You can also delete
inactive suppliers.
When you purge payables and purchasing information, Payables
maintains summary records of all purged information for reference and
audit purposes.
See Also
Purging Records: page 9 – 2
Invoices
4 – 177
Oracle Property Manager Integration
You can use Payables to make payments for leases that you record in
Oracle Property Manager. In Property Manager, you abstract a lease,
authorize payment, and then export the lease payment information to
Payables by using the Export Payments to Payables window in
Property Manager. This loads the invoice information into the Oracle
Payables Open Interface. To import this information into Payables and
create Payables invoices, use the Source of Oracle Property Manager
when you submit the Open Interface Invoice Program. You can then
query, approve, and pay the lease invoices in Payables.
See Also
Oracle Property Manager User’s Guide
4 – 178
Oracle Payables User Guide
Oracle Grants Management Integration
If you install Oracle Grants Management, you can record an award ID
in the following windows:
• Invoices
• Distribution Sets
• Distributions
If you enter an award ID in the Invoices window, it defaults to invoice
distributions. You can also add award ID information to Distribution
Sets to default the award ID to distributions. In the Distributions
window you can add a value for award ID to any imported invoice
distributions.
Invoices
4 – 179
Procurement Card Integration
You can streamline your procure–to–pay process by implementing a
procurement card program in which your employees purchase items
directly from suppliers using a credit card. The credit card issuer then
sends transaction files directly to you (the employer). You can import
credit card transaction files from your card issuer directly into
Payables. Then, you can automatically generate transaction accounting
distributions and create invoices to pay the card issuer.
This will help you reduce transaction costs and eliminate low–amount
invoices. For additional flexibility, your employees can use Self–Service
Web Applications to verify transactions and to override default
transaction accounting.
Payables Credit Card Program Overview
This section gives you an overview of the Payables credit card program
process. Each step refers you to the sections in the documentation
where you can find more information on the step.
4 – 180
1.
Set up Payables and Self–Service Web Applications credit card
program. See: Setting Up Credit Card Programs: page 2 – 184.
2.
Import credit card transactions. The card issuer sends you a file
with the card transactions and charges. You load this data into the
AP_EXPENSE_FEED_LINES table. See: The Payables Credit Card
Transaction Open Interface Tables: page I – 2.
3.
Validate imported credit card transactions. Submit the Credit
Card Transaction Validation and Exception Report. This report
identifies transaction exceptions such as credit card numbers that
are undefined. This program also builds the default GL Accounts
for the transactions. See: Credit Card Transaction Validation and
Exception Report: page 8 – 10.
4.
Employee verification. From the Submit Request window, submit
the Distribute Employee Credit Card Transaction Verifications
program. This initiates the Credit Card Transaction Employee
Workflow, and it executes as you have defined it. If verification is
required, an employee can verify transactions directly from a
workflow notification. The employee can also use Self–Service Web
Applications to verify transactions. If verification is not required,
an employee will receive a notification indicating that transactions
posted to the employee’s credit card account. See: Credit Card
Transaction Employee Workflow: page 2 – 198.
Oracle Payables User Guide
5.
Manager approval or notification. From the Submit Request
window, submit the Distribute Manager Card Transaction
Approvals program. This initiates the Credit Card Transaction
Manager Workflow, and it executes as you have defined it. If
approval is required from the manager, a manager can approve an
employee’s credit card transactions directly from a workflow
notification. If approval is not required, a manager will receive a
notification that lists all credit card transactions incurred by the
manager’s direct reports. See: Credit Card Transaction Manager
Workflow: page 2 – 206.
6.
Adjust transaction distributions. If card program administrators
need to adjust or create transaction distributions, use the Credit
Card Transactions window. See: Credit Card Transactions: page
4 – 181.
7.
Create invoices. You submit the Credit Card Invoice Interface
Summary to move the transaction data from the
AP_EXPENSE_FEED_DISTS table to the AP_INVOICE_HEADERS
and AP_INVOICE_DISTRIBUTIONS tables. You can summarize
transactions by GL Account. See: Credit Card Invoice Interface
Summary: page 8 – 13.
You submit the Payables Open Interface Import Program to create
invoices in Payables from the invoice data in the Payables Open
Interface tables.
8.
The invoices are ready for accounts payable approval and
payment. See: Approval: page 4 – 145.
Credit Card Transactions
Use the Credit Card Transactions window to review and update credit
card transaction distributions.
During Payables Open Interface Import, Payables converts transaction
distributions into invoices with distributions. When you load
transactions from the card issuer, each transaction has one distribution.
You can use this window to split a transaction distribution into
multiple distributions which you can then process separately. For
example, an employee receives a bill for a hotel room. Instead of
charging the $100 corporate rate, the hotel charged $130. You can
create two distributions for the transaction, one for $100, and one for
$30. You can assign a status of Disputed for the $30 transaction and
process the $100 distribution as usual.
Invoices
4 – 181
☞
Attention: To prevent payment of a transaction distribution
with a status of Disputed, you also need to check the Disputed
check box in the Don’t Pay If Status region of the Credit Card
Programs window. See: Credit Card Programs: page 2 – 189.
Card holders can create multiple distributions per transaction in the
Open Credit Card Transactions page of Self–Service Web Applications.
You can also use the Distributions region of the Credit Card
Transactions window in Payables to split distributions. The total
amount of the transaction distributions must equal the transaction
amount.
Credit Card Transactions Window Reference
Card Number. Credit card number of the credit card that incurred the
transaction.
Transaction Date. Date that the transaction posted to the credit card
account.
Reference Number. The reference number that the card issuer
assigned to the transaction.
Currency. Currency of the credit card statement.
Amount. Amount of the transaction in the credit card statement
currency.
Card Program. Card program assigned to the credit card used for the
transaction.
Card Code. Credit card code (supplier or supplier type) of the
transaction.
Employee Name. Card holder’s name.
Merchant Name. Merchant that processed the transaction.
Transaction Distributions
Status. Current status of the transaction. Either in the Open Credit
Card Transactions page or by responding to a workflow notification,
card holders can update their own transactions, and managers can
approve the transactions of their direct reports. In addition, you can
update the status of transactions in the Credit Card Transactions
window. The statuses you select for the Do Not Pay If Status Is option
4 – 182
Oracle Payables User Guide
in the Credit Card Programs window determine whether Payables will
allow you to pay a transaction with a particular status.
• Approved. All approvals are complete and the transaction is
ready for import.
• Disputed. A card holder or manager assigns this status to a
distribution to indicate that there is a dispute over the
transaction.
• Hold. A card holder assigns this status to a distribution to
indicate that there is a problem with the transaction.
• Personal. A card holder uses this status to indicate that a
transaction was personal.
• Rejected. Workflow assigns this status to a transaction if the
manager denies approval for the transaction.
• Validated. The Credit Card Transaction Validation and
Exception Report assigns this status to a transaction if it was
successfully validated.
• Verified. Either in the Credit Card Transaction Verification page
or by using workflow, the card holder has verified the
transaction.
Amount. Amount of the transaction distribution.
Account. Account to which the transaction distribution will be
charged. The Credit Card Transaction Validation and Exception Report
builds accounts depending on how you set up your card profile. Card
holders can change the default account by using the Credit Card
Transaction Verification page. In addition, you can override the
account in this window.
Description. Description of the transaction distribution. This will be
the invoice distribution description (unless you summarize by GL
Account when you submit the Credit Card Invoice Interface Summary).
Account Description. Payables displays the description of the account.
Invoices
4 – 183
Oracle Inventory Integration
Tracking Inventory Movement Statistics in Payables
To comply with the European Union’s Intrastat requirements, you may
need to record information associated with the movement of goods
between statistics–gathering countries. If you install Oracle Inventory,
and want to comply with Intrastat reporting requirements, you can
record statistics for invoices. You can do this in the Movement
Statistics window in Inventory, or you can access the Movement
Statistics window directly from the Payables Invoices window.
Prerequisite
❑ Install and set up Inventory to record movement statistics.
"
To track inventory movement statistics in Payables:
1.
In the Invoices window, query the invoice for which you want to
record movement statistics.
2.
From the Tools menu choose Movement Statistics.
Enter statistics information into the Movement Statistics window.
The statistical values you record for the invoice can be different
from the invoice amount. For more information see: Entering
Movement Statistics (Oracle Inventory User’s Guide).
3.
Save your work.
See Also
Collecting and Reporting Movement Statistics (Oracle Inventory User’s
Guide)
4 – 184
Oracle Payables User Guide
Entering Recurring Invoices
You can enter invoices for periodic business expenses for which you
may not receive invoices, such as rent. To enter recurring invoices, first
define a recurring invoice template, then create invoices based on the
template. With a recurring invoice template, you can do the following:
H
Specify the intervals in which invoices based on the recurring
invoice template will be created.
H
Create up to two special one–time invoice amounts of a
non–standard amount, such as a deposit or balloon payment.
H
Define recurring invoices to increase or decrease by a fixed
percentage from period to period.
Invoices
4 – 185
This discussion includes the following topics:
• Defining a Recurring Invoice Template: page 4 – 186
• Creating Recurring Invoices: page 4 – 188
• Withholding Taxes from Recurring Invoices: page 4 – 190
When Payables creates recurring invoices, the invoice date is the first
date of the period in which the recurring invoice is created. The Terms
Date depends on the Terms Date Basis setting at the supplier site, but is
calculated differently than for regular invoices:
• If the Terms Date Basis is set to System Date, then the Terms
Date is the same date that the recurring invoice was created.
• If the Terms Date Basis is set to anything else, then the Terms
Date is the invoice date, which is the first day of the period in
which the recurring invoice is created.
See Also
Recurring Invoices Window Reference: page 4 – 191
Recurring Invoice Restrictions: page 4 – 190
Defining a Recurring Invoice Template
Prerequisite
❑ Define periods in the Special Calendar window. See: Special
Calendar: page 2 – 87.
❑ If you want to use a Distribution Set for the recurring invoices,
define a Full Distribution Set. See: Distribution Sets: page 2 – 17.
"
To define a recurring invoice template:
1.
In the Recurring Invoices window, enter the Supplier information.
2.
Enter the Period information. Select a Period Type that determines
the frequency of the recurring invoice. For example, Month or
Quarter.
In the Number of Periods field, enter the total number of invoices
you want to create over the life of the template.
4 – 186
Oracle Payables User Guide
In the First field, enter the first period for which you want to create
an invoice. The period must be open or future.
3.
In the Template Definition region, enter the template Number,
which must be unique for the supplier. When you create invoices
based on the template, Payables creates the invoice number for
each invoice by appending the name of the recurring invoice period
to the template Number.
Select the Payment Method with which you will pay the invoices
you create with this template.
Enter the payment Terms you want to use to schedule payment for
each invoice you create with the template.
Enter additional information, if applicable:
• Optionally change the invoice currency, which is your functional
currency unless you have a supplier site default. If you enter a
foreign currency, enter exchange rate information when you
create invoices based on the template.
• Optionally enter a Hold name to prevent the creation of invoices
using this template until you release this hold by clearing this
field.
• Optionally enter the template description. Payables uses the
template description as invoice distribution descriptions if
purchase order or Distribution Set descriptions are unavailable.
• Optionally override the Liability Account which will be assigned
to each invoice created from this template.
• Optionally enter the Expiration Date, the date after which
invoices cannot be created using this template. Invoices you
create before the Expiration Date can have invoice dates after the
Expiration Date.
• Optionally enter the GL Date, which will default to each invoice
you create with this template. Leave this field blank to have
Payables use the beginning date of the recurring invoice’s period.
• Optionally check Pay Alone if each invoice should be paid on a
separate payment document.
4.
☞
Select the Distribution Origin you want to use. You create
distributions for the recurring invoices either by using a
Distribution Set or by matching to a purchase order shipment.
Attention: If you use Distribution Sets for recurring invoices, you
can use only Full Distribution Sets.
Invoices
4 – 187
5.
Enter the recurring invoice amounts in one of the following two
ways:
• If you know the total sum of the recurring invoices you will
create, enter the Control Amount and Payables will calculate and
enter the First Amount.
• If you know what the periodic recurring invoice amount will be,
enter the amount of your first invoice in the First Amount field.
Payables will calculate and enter the Control Amount field.
If applicable, enter the Change and Special Invoice Amount fields:
• If you want the invoices to increase or decrease by a set
percentage from period to period, enter the percentage in the
Change field, and Payables will recalculate the Control Amount.
• If you want to create a special invoice amount to record a deposit
or balloon payment, enter one or two Special Invoice Amounts
and the Periods in which you want to create invoices for them,
and the system will recalculate the Control Amount. When
Payables creates the invoice for that period, the invoice amount
equals the special amount.
Payables displays the Next Amount, which is the amount of the next
invoice that Payables will create from this template.
6.
If you are paying the supplier electronically, in the Supplier Bank
region, enter or confirm the supplier remit–to bank.
7.
Save your work.
Creating Recurring Invoices
Prerequisite
❑ Define a recurring invoice template. See: Defining a Recurring
Invoice Template: page 4 – 186.
"
4 – 188
To create recurring invoices:
1.
In the Recurring Invoices window, query the recurring invoice
template from which you want to create invoices. Enter in the
Number of Invoices field the number of invoices you want to
create. Choose Create Invoices.
2.
Payables navigates to the Create Invoices window and displays
invoices in the next available periods. For example, your template
is for monthly invoices starting in January and you have already
Oracle Payables User Guide
created two invoices. If you entered 2 for Number of Invoices,
Payables will display the March and April invoices.
3.
If you want to include the invoices in an invoice batch, enter a
Batch Name. This name will appear on your reports and will help
you locate the batch online. You can enter the name of an existing
batch or a new batch name. You can only enter a Batch Name if
your Use Batch Control Payables option is enabled.
4.
If you are using Foreign Currency, enter Exchange Rate
information. See: Foreign Currency Transactions: page 6 – 2.
5.
Choose Create to create the invoices. The new invoices are now
regular invoices and must be approved before you can pay them or
create journal entries for them.
6.
Save your work.
If you have enabled the Invoice Amount Limit or Hold
Unapproved Invoices supplier site holds, Payables places those
holds on exception invoices as it creates them.
You can review and adjust the distributions or scheduled payment
of a recurring invoice by querying the invoice in the Invoices
window.
Creating Recurring Credit/Debit Memos
"
To create recurring credit memos or debit memos:
H
Define a recurring invoice template as usual, but enter negative
invoice amounts. See: Defining a Recurring Invoice Template: page
4 – 186.
Invoices
4 – 189
Withholding Taxes from Recurring Invoices
"
To withhold taxes from a recurring invoice:
H
When you define a recurring invoice template, enter the
Withholding Tax Group. This group will be applied to all invoices
you create for that template.
See Also
Automatic Withholding Tax Overview: page 10 – 24
Withholding Tax Groups: page 2 – 158
RECURRING INVOICE RESTRICTIONS:
SEQUENTIAL NUMBERING. You must use automatic sequential
numbering for recurring invoice voucher numbers.
NO REMAINING PERIODS: If the template has no remaining
periods, you cannot create any invoices.
CHANGING TEMPLATE FIELDS AFTER PAYMENT: You cannot
update the following fields in the recurring invoice template after you
have created a payment for a recurring invoice created by the template:
Supplier Name, Supplier Number, Supplier Site, Type, First Period
Number, Currency, and GL Date.
See Also
Entering Taxes on Invoices: page 4 – 97
Foreign Currency Transactions: page 6 – 2
Adjusting Invoices: page 4 – 299
Scheduling Invoice Payments: page 4 – 150
4 – 190
Oracle Payables User Guide
Recurring Invoices Window Reference
Number of Invoices. Enter in this field the number of invoices you
want to create, then choose the Create Invoices button to create the
invoices.
Supplier Region
Site. The supplier pay site for which a template is defined. This field is
entered automatically if only one pay site exists for a supplier.
Pay Group. Pay Group name associated with a template. Default Pay
Group name for all invoices created with a template.
Calendar Region
Name. Calendar name representing frequency of invoice creation (e.g.
Monthly). To enter a calendar name, you must first define the calendar
as a Recurring Invoice type calendar in the Special Calendar window.
Number of Periods. Total number of invoices to be made over the life
of a template.
First. The first period for which a recurring invoice will be created. The
period must be in an open or future period.
Next. Payables displays the next recurring invoice period for which an
invoice can be created with a template. The First period is used as the
default for the Next Period until the first invoice is created.
Periods Remaining. Payables displays the number of periods
remaining for which you have not yet created invoices.
Template Definition Region
Number. Template Number, which must be unique for a supplier.
When you create invoices based on a template, Payables creates the
invoice number for each invoice by appending the name of the recurring
invoice period to the template Number.
Description. Template description used as the distribution descriptions
if no purchase order or Distribution Set description is available.
Currency. Currency for invoices created from a template. Default is the
functional currency unless the supplier site has a different default.
Liability Account. Account where invoice liability will be recorded.
This will be defaulted to all invoices created from a template.
Invoices
4 – 191
Hold. Hold name to automatically prevent the creation of invoices
using a template. Release the hold by clearing this field.
Payment Method. Payment method for invoices created from a
template.
GL Date. Date to recognize the invoice liability. The GL Date is used as
a default accounting date for each invoice. If you do not enter a GL
Date, the beginning date of each invoice’s period will be each invoice’s
default GL Date.
Expiration Date. Last day you can create invoices using a template.
Before this date you can create invoices with invoice dates after the
Expiration Date.
Withholding Tax Group. The withholding tax group that will be used
as a basis for withholding from invoices created from a template. This
defaults from the supplier site.
Terms. Terms you want to use to create a scheduled payment for each
invoice you create from a template.
Pay Alone. Pay alone invoices are paid on separate payment
documents.
Distribution Origin Region
Select either Set or PO to choose whether invoice distributions are
created by a Distribution Set or a purchase order. Then enter the specific
source:
Name. If you choose Set, enter the name of a Full Distribution Set.
Num. Purchase order number.
Line. Purchase order line.
Shipment. Purchase order shipment. If you select a purchase order
shipment, during invoice creation Payables automatically matches the
invoices created to the purchase order shipment. It prorates across all
purchase order distributions to create the invoice distributions. For
example, you have a blanket purchase order for car leases. You enter the
purchase order number, line, and shipment on a template to create lease
invoices, and Payables will match each invoice created by the template
to the purchase order shipment.
4 – 192
Oracle Payables User Guide
Amounts Region
First Amount. Amount of first invoice created by a template, excluding
any special payment such as a deposit. Used with the Change
percentage to calculate incremental invoice amounts. Used with the
Number of Regular Invoices to calculate the Control Total.
Next Amount. Amount of the next scheduled recurring invoice.
Change. Percent change to increase or decrease the amount per period.
For example, if you pay rent once per month and your rent increases 1%
per month, enter 1 here.
Number of Regular Invoices. Total number of periods defined for a
template.
Special Invoice Amount1 / Amount2. One time special payment such
as a deposit or balloon payment including the regular periodic payment.
It is the only amount paid in that period.
Period. Period in which you want to pay the Special Invoice.
Control Total. Total amount available for creation of invoices. Payables
enters this number for you if you enter the First Amount and the
Number of Regular Invoices.
Released Total. Sum of the invoice amounts that have been created
using the template.
Amount Remaining. Funds available for invoice creation using a
template. Payables displays the Control Total minus the Released Total.
Remit–To Bank Account Region
Bank Account Name/Number. If you are paying the supplier
electronically, enter the supplier bank account name and number to
which you will remit payment. Payables defaults the supplier site’s
primary account, if there is one for the payment currency. If none exists
at the site level, Payables defaults the primary bank account from the
supplier level, if one exists. You can change the account by choosing
from the list of values another account with the same currency.
Bank/Branch Name/Number. Payables displays the Bank and Branch
associated with the supplier bank account you select.
Invoices
4 – 193
Buttons
Create Invoices. After you have created a template and entered in the
Number of Invoices field the number of invoices you want to create, if
you choose this button Payables will create the invoices.
RECURRING INVOICES WINDOW RESTRICTIONS:
CREATE INVOICES BUTTON: The button is enabled only if Number
of Periods Remaining is greater than zero, the system date is earlier than
the expiration date, and there is no hold on the recurring invoice
template.
UPDATES: In the Recurring Invoices window, all the fields except for
Liability Account cannot be updated after the first invoice has been
created.
NO REMAINING PERIODS: You cannot create an invoice if a
template has no remaining open or future periods.
See Also
Entering Recurring Invoices: page 4 – 185
Defining a Recurring Invoice Template: page 4 – 186
Creating Recurring Invoices: page 4 – 188
Withholding Taxes from Recurring Invoices: page 4 – 190
Special Calendar: page 2 – 87
4 – 194
Oracle Payables User Guide
Prepayments
A prepayment is a type of invoice you enter to make an advance
payment to a supplier or employee. For example, you need to pay a
deposit on a lease, or pay an employee an advance for travel expenses.
You can later apply the prepayment to one or more invoices or expense
reports you receive from the supplier or employee to offset the amount
paid to them.
You can enter two types of prepayments: Temporary and Permanent.
Temporary prepayments can be applied to invoices or expense reports
you receive. For example, you use a Temporary prepayment to pay a
hotel a catering deposit. When the hotel’s invoice arrives, apply the
prepayment to the invoice to reduce the invoice amount you pay.
Permanent prepayments cannot be applied to invoices. For example,
you use a Permanent prepayment to pay a lease deposit for which you
do not expect to be invoiced.
In the Invoice Workbench you can enter and apply prepayments. In the
Invoice Gateway you cannot enter prepayments, but you can apply
existing prepayments to invoices you enter.
You enter a prepayment as you enter any other invoice. However, you
additionally specify 1) the prepayment type, Temporary or Permanent,
and 2) the settlement date, the date after which the prepayment can be
applied to an invoice. You can also apply a hold to a prepayment if you
want to control payment of it.
On a prepayment, you can enter any number of distributions, either
manually, or automatically by purchase order matching, distribution
sets, or allocating. You can enter all types of distributions, including
Tax distributions created by automatic tax calculation and automatic
withholding tax. You can also take discounts on prepayments.
You can apply paid Temporary prepayments on and after the
prepayment settlement date. You can apply only Item distributions
from the prepayment. The prepayment remains available until you
apply the full amount of the prepayment Item distributions to one or
more invoices. You can review the Prepayment Status Report to check
the status of all prepayments in Payables. See: Prepayments Status
Report: page 8 – 91.
When you enter a Standard invoice in the Invoice Workbench, or enter
an expense report in the Expense Reports window, Payables notifies
you if you have available prepayments for the same supplier.
You apply prepayments to invoices and expense reports differently,
depending on where you enter them: Invoice Workbench, Invoice
Invoices
4 – 195
Gateway, Expense Reports window, or Self–Service Expenses. See the
window–specific documentation for details.
When you apply a prepayment, Payables creates a negative amount
Prepayment type distribution on the invoice, and reduces the
prepayment’s available applicable amount. For example, if you apply a
$100 Prepayment distribution to an invoice, Payables creates a negative
$100 Prepayment distribution, and reduces the Amount Available on
the prepayment Item distribution by $100. The account of the
Prepayment distribution on the invoice defaults from the Item
distribution on the prepayment.
When you apply a prepayment, in addition to updating fields in the
Apply/Unapply Prepayments window, Payables updates the following
fields. For Invoice Gateway invoices and expense reports, these values
appear after import:
• For the invoice:
– Invoices window: Prepaid Amount; Status is updated to
reflect that the invoice has been paid or partially paid
– Distributions window: Prepayment Number; Prepayment
Distribution
• For the prepayment:
– Invoices window: If you have applied all Item distributions,
the invoice Status will change from Available to Fully
Applied
– Distributions window: Prepay Amt Remaining
This discussion includes the following topics:
• Foreign Currency Prepayments: page 4 – 197
• Matching Prepayments to Purchase Orders: page 4 – 197
• Entering Prepayments: page 4 – 198
• Applying and Releasing Holds on Prepayments: page 4 – 199
• Paying Prepayments: page 4 – 200
• Applying Prepayments to Invoices: page 4 – 200
• Applying Prepayments to Expense Reports: page 4 – 204
• Automatic Tax Calculation When Applying Prepayments: page
4 – 205
• Withholding Tax When Applying Prepayments: page 4 – 205
4 – 196
Oracle Payables User Guide
• Unapplying Prepayments: page 4 – 205
• Cancelling Prepayments: page 4 – 207
• Find Prepayments to Apply Window: page 4 – 208
• Find Invoices to Apply Window: page 4 – 209
• Recording a Refund of a Prepayment: page 4 – 209
• Apply/Unapply Prepayments Window Reference: page 4 – 210
Foreign Currency Prepayments
If you use accrual basis accounting, Payables uses the prepayment’s
original exchange rate when it accounts for the Prepayment
distribution on an invoice. This credits the prepaid asset account for
the correct amount. Because the prepayment application pays the
invoice, Payables then records any gain or loss between the functional
currency amount of the payment (original prepayment) and the
functional currency amount of the invoice (invoice amount that the
prepayment relieved). If the exchange rate accounting causes unequal
debits and credits for the transaction, Payables accounts for that
difference in a rounding entry to balance the transaction.
Matching Prepayments to Purchase Orders
You can match a prepayment to a purchase order. The accounting
entries for the prepayment matched to the purchase order debit the
default prepayment account (unless you choose to override your
invoice distributions). Payables creates an encumbrance for the
prepaid amount against the default prepayment account.
The match is treated like a reservation of the quantity billed. Payables
does not calculate the invoice price variance or exchange rate variance
at this point. Furthermore, you cannot change the unit price during the
prepayment match to purchase order. A final match to the purchase
order is not allowed either. When the matched prepayment is applied
to an invoice, Payables reverses the matched quantity on the
prepayment to reflect the balance of the total quantity matched.
The following example illustrates a prepayment application to a
purchase order: You contract to attend a $5,000 trade show and the
show requires a prepaid deposit of $1,000. Enter a purchase order for:
quantity 5,000, unit price one, unit of measure each, currency USD.
Invoices
4 – 197
Match a prepayment deposit of $1,000 to the purchase order. You get
an invoice for $5,000 and enter the invoice amount as $5,000. Match
the invoice to the purchase order, and then apply the prepayment.
After you have completed invoice entry and the prepayment
application, in the Invoices window you will see that the invoice
amount is $5,000 and the prepaid amount is $1,000.
Applying the invoice to the prepayment reverses the prepayment from
the purchase order, resulting in a net match of $5,000. The prepayment
application ensures that you don’t overpay the trade show fee.
Entering Prepayments
You can enter a Prepayment type invoice only in the Invoices window.
You cannot enter a Prepayment type invoice in the Invoice Gateway.
Prerequisites
❑ (Optional) Enter a prepayment account at the supplier site. This
value will default to any distributions you enter manually.
❑ (Optional) Set a default value for the prepayment payment terms in
the Payables Options window. If you do not enter a default value,
payment terms default from the supplier site.
"
To enter a prepayment:
1.
In the Invoices window select Prepayment as the invoice type and
enter all basic invoice information. See: Entering Basic Invoices:
page 4 – 44. Before entering distributions, proceed with the next
three steps.
2.
Select a Prepayment Type:
• Temporary. You can apply this prepayment to invoices after you
approve and pay it, and after the settlement date.
• Permanent. You cannot apply this prepayment to invoices.
3.
4 – 198
Oracle Payables User Guide
The Settlement Date that defaults here is calculated based on your
Prepayment Settlement Days Payables option. You can update this
value. You cannot apply a Temporary prepayment to invoices or
expense reports before the settlement date.
4.
If you want to restrict the prepayment’s application to invoices
matched to a particular purchase order, enter a value for
Prepayment PO Number.
5.
Enter the distributions. You can enter distributions manually or
automatically with Distribution Sets, purchase order matching,
allocation, and automatic tax calculation. See: Entering Invoice
Distributions: page 4 – 47.
If you do not enter distributions automatically, then when you
navigate to the Distributions window and enter Item distributions,
Payables defaults the prepayment account from the supplier site.
6.
Review or modify the scheduled payments.
7.
Approve the prepayment as you would any other invoice. See
Approval: page 4 – 145.
8.
Save your work. The prepayment is ready for payment. You must
fully pay prepayments. After you fully pay a Temporary
prepayment, it is available to be applied.
See Also
Implementing Sequential Voucher Numbering: page 2 – 31
Applying and Releasing Holds on Prepayments
To prevent payment of a prepayment, you can apply one or more holds
to the prepayment or you can hold the scheduled payment. Apply
these holds as you would for any other invoice. See: Applying Holds:
page 4 – 136.
You release holds from a prepayment just as you would for any other
invoice. See: Releasing Holds: page 4 – 140.
Invoices
4 – 199
Paying Prepayments
Pay a prepayment just as you would any other invoice. However, you
cannot partially pay a prepayment; you must fully pay it. See: Creating
Single Payments: page 5 – 2, or Paying Invoices in Payment Batches:
page 5 – 17. You must fully pay a prepayment before you can apply the
prepayment to an invoice.
Applying Prepayments to Invoices
You can apply the available amount of Item type distributions from a
Temporary type prepayment to one or more approved invoices to offset
the amount you pay on the invoice(s). If you entered the prepayment
as a Permanent type and want to apply it, you can query the
prepayment in the Invoices window and change the Prepayment Type
to Temporary.
Prerequisites
❑ The invoice type is Standard, Mixed, or Expense Report.
❑ Today’s date is on or after the Settlement Date of the prepayment.
❑ The invoice date is on or after the date of the prepayment.
❑ The prepayment is type Temporary, fully paid, approved, not
cancelled, has no active holds, and has not already been fully
applied.
❑ The prepayment has the same supplier, invoice currency and
payment currency as the invoice.
❑ If the prepayment has a value in the Prepayment PO Number field,
then the invoice must be matched to the same purchase order.
Applying Prepayments in the Invoice Workbench
Payables creates Tax distributions automatically either when you
choose the Calculate Tax button in the Distributions window, or when
you submit Approval for the invoice. For invoices you enter in the
Invoice Workbench, you can apply a prepayment either after you
approve an invoice, or while you are entering it. If you use Line level
or Tax Code level automatic tax calculation, you might want to time the
entry of the prepayment application either before or after tax
4 – 200
Oracle Payables User Guide
calculation, depending on whether you want to create separate Tax
distributions for your Item and Prepayment distributions. If you apply
the prepayment before the invoice is approved, Payables creates one
Tax distribution. If you approve the invoice first, Payables creates one
Tax distribution for the prepayment and one Tax distribution for the
item.
When you apply a prepayment to an invoice, you can see all available
prepayment Item distributions for the same supplier in the
Apply/Unapply Prepayments window. You can partially apply a
Prepayment distribution by applying only a portion of its available
amount.
To apply a prepayment, you can either create or query the prepayment
and then select the invoice to which the prepayment will be applied, or
you can create or query the invoice and then select the Prepayment
distributions you want to apply. If you want to apply specific
Prepayment Item distributions to the invoice, then you must query the
invoice and apply the prepayment to the invoice. Otherwise, Payables
will apply the amount of the application across the available
Prepayment Item distributions, starting with the first Prepayment Item
distribution, up to the application amount.
When you apply a prepayment, you can print a Prepayment
Remittance Notice, which you can send to the supplier. This notice
states that a prepayment has been applied to an invoice and this may
result in a decreased payment or nonpayment of the invoice.
"
To apply a prepayment to an invoice in the Invoice Workbench:
1.
In the Invoices window, query either the prepayment or the invoice
to which you want to apply it.
2.
Choose the Actions button and select the Apply/Unapply
Prepayment check box. Choose OK. The Apply/Unapply
Prepayments window opens. This window shows different
information depending on what you queried, an invoice or a
prepayment. For details on any field, see: Apply/Unapply
Prepayments Window Reference: page 4 – 210.
• If you initially queried a prepayment, Payables displays all
invoices that are not fully paid and to which the prepayment can
be applied. If you want to limit available choices, enter a query
or use the Find Invoices to Apply window by choosing Find
from the View menu.
Check the Apply check box for each Prepayment distribution
you want to apply to the invoice. Enter the amount to apply for
Invoices
4 – 201
each prepayment. Optionally change the GL Date, which is the
accounting date for the new Prepayment distributions that
Payables creates when you apply a prepayment. If you want to
see more information on an invoice, select it and choose the
Invoice Overview button.
• If you initially queried an invoice, Payables displays all
approved and paid Prepayment distributions that you can apply
to the invoice. If you want to limit available choices, enter a
query or use the Find Prepayments to Apply window by
choosing Find from the View menu.
Check the Apply check box for each Prepayment distribution
you want to apply to the invoice. Enter the amount to apply for
each prepayment. Optionally change the GL Date, which is the
accounting date for the new Prepayment distributions that
Payables creates when you apply a prepayment. If you want to
see more information on a prepayment select it and choose
Invoice Overview.
3.
If you want to print a Prepayment Remittance Notice for the
supplier, select the Print check box.
4.
Choose the Apply/Unapply button to apply the prepayment
amounts you specified and to save your work.
5.
Review the new Prepayment distributions for the invoice in the
Distributions window. On the Prepayment distributions you can
adjust the values in the description fields. Make any necessary
adjustments to account for tax on the invoice. See: Adjusting Tax
When Applying Prepayments: page 4 – 200.
6.
Save any changes and approve the invoice. Any unpaid amount
remaining on the invoice is ready for payment.
Applying Prepayments in the Invoice Gateway
For Invoice Gateway invoices, you specify the prepayment information
when you enter the invoice record. During import Payables applies the
prepayment. You can also apply prepayments to invoices in the Invoice
Workbench after you import them.
Note that for Invoice Gateway invoice records Payables applies the
prepayment during import, so the available prepayment amount is
available to apply to other invoices until import. If you apply the
available prepayment amount to more than one invoice, Payables will
apply the prepayment in order of oldest invoice to newest, not to
exceed the prepayment amount.
4 – 202
Oracle Payables User Guide
When you enter an invoice record in the Invoice Gateway, Payables
does not notify you if you have available prepayments for the same
supplier. You can submit the Prepayments Status Report to get the
prepayment details you need to successfully apply the prepayment.
You can apply one or all prepayment Item distributions. If you do not
specify a value for Prepayment Distribution, Payables will apply the
Prepayment Amount across all available Prepayment Item distributions
in chronological order, starting with the first Prepayment Item
distribution, up to the prepayment amount. You cannot apply more
than the total amount of available prepayment Item distributions, and
you cannot apply more than the total amount of the Standard invoice
you are entering. Payables will not let you enter a number for
Prepayment Amount that exceeds the unpaid invoice amount. If you
enter a number for Prepayment Amount that exceeds the amount
available for prepayment, Payables rejects the invoice record during
import. If you enter only a Prepayment Amount and do not identify a
specific prepayment, Payables applies available prepayments, starting
with the oldest, up to the amount of the invoice.
Additional Prerequisite for the Invoice Gateway
❑ Get up–to–date prepayment information from the Prepayments
Status Report. See: Prepayments Status Report: page 8 – 91.
"
To apply a prepayment to an invoice in the Invoice Gateway:
1.
In the Invoice Gateway window, enter a Standard type invoice
record.
2.
Enter the following fields to apply a prepayment to the invoice
during import.
• Prepayment Number: Invoice number of the prepayment.
• Prepayment Distribution: Distribution number of the
prepayment Item distribution you want to apply. Leave blank to
prorate the amount across all available prepayment Item
distributions.
• Prepay Apply Amt: Amount of the prepayment you want to
apply.
• Prepayment GL Date: Accounting date for the prepayment
application. This will be the GL Date on the Prepayment
distribution that import creates for the invoice.
Invoices
4 – 203
3.
Submit Payables Open Interface Import to import the invoice
record. Payables applies the prepayment amount to the invoice
during import.
4.
View the new distributions for the Standard invoice in the
Distributions window. On the Prepayment distributions you can
adjust the value in the Description field. Make any necessary
adjustments to account for tax on the invoice. See: Adjusting Tax
When Applying Prepayments.
5.
Save any changes and approve the invoice. If there is any
remaining unpaid amount on the invoice, it is ready for payment.
Prepayment Application Restrictions
ENCUMBRANCE: If you use encumbrance accounting, you must
enter a GL date in a period that is within the latest encumbrance year.
Applying Prepayments to Expense Reports
In the Expense Reports window, you apply prepayments, also known
as advances, to expense reports during expense report entry. You can
specify whether you want Payables to apply to an expense report all
outstanding and available advances, one specific advance, one specific
advance Item distribution, or a certain maximum amount of advances.
Unless you specify a specific advance to apply, Payables applies all
outstanding, available advances, starting with the oldest, up to the
amount of the expense report. If you do not specify an advance Item
distribution to apply, then Payables applies available advance Item
distributions, starting with the one with the lowest distribution
number. See: Applying Advances Against Expense Reports: page
4 – 223.
For expense reports entered in Self–Service expenses, advances are
applied during Invoice Import if the Apply Advances Payables option
is enabled. Payables applies all outstanding, available advances,
starting with the oldest, up to the amount of the expense report.
4 – 204
Oracle Payables User Guide
Automatic Tax Calculation When Applying Prepayments
If you use automatic tax calculation, Payables will create the correct Tax
distribution for you based on the taxable invoice amount. If you use
line level or tax code level tax calculation and your Prepayment
distribution has a tax code assigned, Payables calculates the tax amount
net of the Prepayment distribution amount. If you use header level tax
calculation, you might need to manually adjust the invoice amount and
tax amount if the Prepayment distribution has a tax code assigned.
Withholding Tax When Applying Prepayments
If you use automatic withholding tax, Payables creates the correct
withholding tax distributions. If you have your Withholding Tax
Payables option set to Apply Withholding Tax at Invoice Approval
Time, then you may want to time the entry of the prepayment
application before the invoice is approved. If you apply the
prepayment before the invoice is approved, Payables creates a
Withholding Tax distribution net of the prepayment amount. If you
approve the invoice first, Payables creates a Withholding Tax
distribution based on the taxable invoice amount. When the
prepayment is applied then you will have to manually adjust the
withholding tax amount and the withholding invoice if you have your
Withholding Tax Payables option set to create withholding invoice at
invoice approval time or at payment time.
Unapplying Prepayments
If you mistakenly apply a prepayment to an invoice, you can unapply
it. It is then available to apply to another invoice. When you unapply a
prepayment, you must unapply the full prepaid amount. Payables
increases the amount available for the prepayment by the unapplied
amount. Payables creates a positive amount Prepayment distribution
on the invoice, with the same attributes as the existing Prepayment
distribution it is reversing. Payables then updates the status of the
invoice to unpaid or partially paid.
You can review in the Distributions window the Prepayment
distributions applied to an invoice.
Invoices
4 – 205
You unapply prepayments in the Invoice Workbench. However, if the
prepayment was applied before your Payables system was upgraded to
Release 11i, you unapply the prepayment by submitting the Unapply
Preupgrade Prepayment program from the Submit Request window.
"
To unapply a prepayment in the Invoice Workbench:
1.
In the Invoices window query the invoice or the prepayment.
2.
Choose Actions and select the Apply/Unapply Prepayment check
box. Choose OK.
Payables displays all existing prepayment applications. Select each
Prepayment distribution you want to unapply by checking the
Unapply check box. You cannot modify the prepayment amount
because you must unapply the complete amount that you
previously applied.
If you want to limit available prepayment choices, enter a query or
use the Find Prepayments to Apply window by choosing Find from
the View window. If you want to see more information on a
prepayment or an invoice, select it and choose Invoice Overview.
If you want to print a Prepayment Remittance Notice for the
supplier, select the Print check box.
3.
Choose the Apply/Unapply button to unapply the prepayment
amount(s) and save your work.
4.
If you had manually adjusted any amounts on the invoice to
account for tax, then undo those adjustments.
Unapplying Prepayments Applied Before Upgrading to 11i
If you applied a prepayment to an invoice before upgrading to 11i, you
cannot unapply the prepayment in the Invoice Workbench. To unapply
this prepayment, you must submit the Unapply Preupgrade
Prepayment program from the Submit Request window. You cannot
unapply more than one prepayment application at a time.
Note that accounting for this is different from the procedure described
for prepayment unapplication event. Because prepayments were
different before Release 11i, accounting for this unapplication will be a
payment adjustment on the invoice and an invoice adjustment for the
prepayment.
4 – 206
Oracle Payables User Guide
Prerequisite
❑ The prepayment was applied before Payables was upgraded to
Release 11i.
"
To unapply a prepayment by submitting the Unapply Preupgrade
Prepayment program:
1.
In the Name field of the Submit Request window, choose Unapply
Preupgrade Prepayment. The Parameters window opens.
2.
Enter the report parameters to specify the prepayment you want to
unapply:
• Invoice Number. The list of values includes only invoices that
had prepayment applications that were applied before the
upgrade.
• Prepayment Number. The list of values shows only
prepayments that were applied to the invoice number you
entered in the Invoice Number parameter.
• GL Date. The accounting date on which the unapplication is
recorded. This should be in an open or future period.
3.
In the Submit Request window, choose the Submit button to
unapply the prepayment.
See Also
Approval: page 4 – 145
Cancelling Prepayments
You can cancel prepayments if they have not been paid or applied to
invoices. To cancel an applied prepayment, you must first unapply the
prepayment and void the payment document that paid the
prepayment.
"
To cancel an unapplied prepayment:
1.
In the Invoices window query and select the prepayment.
2.
Choose the Actions button and select Cancel Invoices.
Invoices
4 – 207
3.
Choose OK to save your work.
Payables automatically creates reversing distributions for the
prepayment and reduces the prepayment amount to zero.
"
To cancel an applied prepayment:
1.
Fully unapply the prepayment. See: Unapplying Prepayments:
page 4 – 205.
2.
Void the payment document used to pay the prepayment. See:
Voiding Payments: page 5 – 82.
3.
Cancel the prepayment (see above, To cancel an unapplied
prepayment).
Find Prepayments to Apply Window
When you are in the Apply/Unapply Prepayments window you can
narrow your search for prepayments to apply by using the Find
Prepayments to Apply window.
"
To use the Find Prepayments to Apply window:
1.
In the Apply/Unapply Prepayments window, choose Find from the
View menu. Payables opens the Find Prepayments to Apply
window.
2.
Enter any search criteria to narrow your search:
• Prepayment Number. Invoice Number of the prepayment.
• Supplier Site.
• Prepayment Dates. Range of invoice dates for the
prepayment(s).
• Earliest Settlement Dates. Range of settlement dates.
• Prepayment Amounts Available. Range of original invoice
amounts for the prepayment(s).
3.
4 – 208
Oracle Payables User Guide
Choose Find to have Payables list in the Apply/Unapply
Prepayments window all prepayments that match your search
criteria.
Find Invoices to Apply Window
When you are in the Apply/Unapply Prepayments window you can
narrow your search for invoices to apply by using the Find Invoices to
Apply window.
"
To use the Find Invoices to Apply window:
1.
In the Apply/Unapply Prepayments window, choose Find from the
View menu. Payables opens the Find Invoices to Apply window.
2.
Enter any search criteria to narrow your search:
• Invoice Number
• Supplier Site
• range of Invoice Dates
• range of Invoice Amounts
3.
Choose Find to have Payables list in the Apply/Unapply
Prepayments window all invoices that match your search criteria.
Recording a Refund of a Prepayment or Advance
Note: We recommend that to record a refund, you enter a
standard invoice and apply the prepayment to it. Then enter a
debit memo and pay it with a Refund payment in the Payments
window. See: Refunds for Prepayments: page 5 – 10.
Alternatively, record the refund by using the following method.
Recording Refunds by Paying a Standard Invoice
You can record a refund from a supplier that pays back an unused
prepayment or part of a prepayment. When you do this, Payables
reverses the prepayment so that it is no longer outstanding and so that
you can no longer apply the prepayment to an invoice. The net effect is
a debit to your cash (asset) account in the amount of the refund and a
credit to the prepayment account in the amount of the refund.
You can use exactly the same method to record a refund from an
employee for an advance.
Invoices
4 – 209
Prerequisites
❑ You have entered and paid a prepayment or advance.
❑ The supplier or employee has refunded the unused portion of the
prepayment.
❑ If the supplier or employee has not refunded the entire
prepayment, apply the appropriate amount of the prepayment to
an invoice or expense report.
"
To record a refund of a prepayment:
1.
In the Invoices window, enter an invoice in the amount of the
refund from the supplier. Enter Standard for the type. Enter a
description on the invoice to indicate that you are retiring a
prepayment. Create an Invoice distribution for the amount of the
refund to debit your cash account.
2.
Approve the invoice.
3.
Choose the Actions button to navigate to the Invoice Actions
window. Select the Apply/Unapply Prepayment check box and
choose OK.
4.
Select the prepayment you want to apply. Enter the refund amount
in the Amount To Apply field. Optionally change the GL Date.
5.
Choose the Apply/Unapply button to apply the prepayment
amount to the invoice you entered for the refund and to save your
work.
This fully retires the prepayment. This credit balances the debit
you entered on the invoice (Step 1) to the Cash account.
Apply/Unapply Prepayments Window Reference
Payables provides two ways to apply prepayments to an invoice. You
can do either of the following:
• Create or query an invoice and apply one or more prepayments
to the invoice.
• Create or query the prepayment and apply it to one or more
invoices.
4 – 210
Oracle Payables User Guide
Selecting an Invoice and Applying it to a Prepayment
When you select an invoice and choose the Apply/Unapply
Prepayment option in the Invoice Actions window, the Apply/Unapply
Prepayments window opens. It automatically displays all prepayments
that have been applied to the invoice, and all available Prepayment
distributions that you can apply to the invoice. Payables displays
prepayment item type distributions that meet the following criteria:
same supplier, and invoice currency as the invoice. The prepayment’s
Settlement Date is on or before today’s date. The prepayment’s date is
on or before the date of the invoice. The prepayment is type
Temporary with a status of Available.
Invoice Amount. Amount of the invoice. All amounts displayed in
this window are in the invoice currency.
Invoice Amount Unpaid. Amount of the invoice that is unpaid by
payments and prepayments. You can apply remaining prepayments up
to this amount.
Apply. Use the Apply check box to select prepayments to apply to the
invoice.
Amount To Apply. Enter the amount of the prepayment Item
distribution you want to apply. This amount cannot exceed the amount
of the Prepayment distribution that is unapplied. The total amount of
prepayments you apply cannot exceed the unpaid amount of the
invoice.
GL Date. Accounting date of the prepayment application. This value
will be the GL Date on the Prepayment distribution that Payables
creates.
Number. Invoice number of the prepayment.
Dist. Distribution number of the prepayment Item distribution.
Tax Code. Tax code on the prepayment Item distribution. This value
defaults to the tax code on the Prepayment distribution that Payables
creates. You cannot update this value in the Distributions window.
Amount Available. Amount of the prepayment that you can apply.
This is the original distribution amount minus any existing amounts
applied to invoices.
Site. Payables displays the supplier site to which the prepayment was
paid.
Print. To print a Prepayment Remittance Notice for the supplier when
you apply a prepayment, choose this option. The Prepayment
Remittance Notice is a letter notifying the supplier that you have
Invoices
4 – 211
applied a prepayment to an outstanding invoice. Payables prompts
you to enter the following information for the letter signature block:
Name of Sender, Title of Sender, Phone of Sender. See: Prepayments
Remittance Report: page 8 – 157.
Description. Payables displays the description of the selected
distribution. This value defaults to the new Prepayment distribution,
and you can modify the description in the Distributions window.
Account. Account to which the prepayment was charged. This
account defaults to the new Prepayment distribution, and you cannot
modify the account in the Distributions window.
PO Num/Receipt Num. If the Prepayment distribution was purchase
order matched, Payables displays the transaction to which it was
matched.
Buttons
Invoice Overview. If you select a Prepayment record and then choose
this button, Payables opens the Invoice Overview window and displays
information on the prepayment.
Apply/Unapply. Choose this button to apply or unapply selected
prepayment amounts. You can review the updated distributions for
the invoice in the Distributions window.
Existing Prepayment Applications
This region of the window shows all prepayment amounts you have
already applied to the invoice. It shows the amount applied, the GL
date and tax code on the invoice Prepayment distribution, the
prepayment invoice number and distribution number, and the
prepayment’s supplier site. It also shows the description and account
description of the prepayment Item distribution, as well as the
purchase order number or receipt number if the Item distribution was
matched.
If you unapply a Prepayment distribution, you must unapply the full
amount that you previously applied. You select the Unapply check box
to identify a distribution you want to unapply.
Selecting a Prepayment and Applying it to an Invoice
If you select a prepayment and choose the Apply/Unapply Prepayment
option in the Invoice Actions window, Payables displays invoices that
4 – 212
Oracle Payables User Guide
meet the following criteria: same supplier and invoice currency as the
prepayment. The invoice date is on or after the date of the
prepayment.
Prepayment Amount. Amount of the prepayment in the invoice
currency.
Prepayment Amount Remaining. Amount of the prepayment that is
unapplied to invoices and available for application.
Apply. Use the Apply check box to select invoices to which you will
apply the prepayment.
Amount To Apply. Enter the prepayment amount you want to apply.
This amount cannot exceed the Invoice Amount Unpaid. The total
amount of invoices you apply cannot exceed the Prepayment Amount
Remaining.
GL Date. Accounting date of the prepayment application. This value
will be the GL Date on the Prepayment distribution that Payables
creates.
Invoice Number. Invoice to which you are applying the prepayment.
Amount Unpaid. Amount of the prepayment that you can apply. This
is the original invoice amount minus withholding tax and any existing
prepayments or payments.
Site. Invoice supplier site.
Print. To print a Prepayment Remittance Notice for the supplier when
you apply a prepayment, choose this option. The Prepayment
Remittance Notice is a letter notifying the supplier that you have
applied a prepayment to an outstanding invoice. Payables prompts
you to enter the following information for the letter signature block:
Name of Sender, Title of Sender, Phone of Sender. See: Prepayments
Remittance Report: page 8 – 157.
Description. Payables displays the description of the selected invoice.
Existing Prepayment Applications
This region of the window shows all invoices to which the prepayment
has been applied. It shows the amount applied, the GL date and tax
code on the invoice Prepayment distribution, the invoice number that
the prepayment has been applied to, and the invoice supplier site. It
also shows the Prepayment distribution number, description and
account description of the prepayment Item distribution, as well as the
Invoices
4 – 213
purchase order number or receipt number if the Item distribution was
matched.
If you unapply a Prepayment distribution, you must unapply the full
amount that you previously applied. You select the Unapply check box
to identify a distribution you want to unapply.
Buttons
Invoice Overview. If you select an invoice record and then choose this
button, Payables opens the Invoice Overview window and displays
information on the invoice.
Apply/Unapply. Choose this button to apply or unapply selected
prepayment amounts. You can review the updated distributions for
the invoice in the Distributions window.
See Also
Prepayments: page 4 – 195
Applying Prepayments to Invoices: page 4 – 200
Unapplying Prepayments: page 4 – 205
4 – 214
Oracle Payables User Guide
Self–Service Expenses Integration
If you install Oracle Self–Service Expenses, your employees can enter
expense reports using a Web browser. These expense reports are stored
in the Payables Interface tables. Workflow processes these expense
reports for you and gets the necessary approvals. You can then import
the expense reports using Payable Invoice Import. Import creates
invoices from the expense reports. The invoices are ready for Approval
and payment. For detailed information see: Oracle Self–Service Expenses
Implemenation Manual (available on your documentation CD).
See Also
Payables Invoice Import Program: page 4 – 239
Invoices
4 – 215
Expense Reports
Use the Expense Reports window in Payables to enter Payables
expense reports for your employees. You can also use this window to
review and modify any of the following expense reports:
• expense reports entered in the Payables Expense Reports
window
• expense reports submitted by your organization’s employees
using Oracle Self–Service Expenses
• expense reports entered in Oracle Projects and then transferred
from Projects to Payables
• expense reports entered in Oracle Personal Time and Expense
and then transferred to Projects, and transferred from Projects to
Payables
If you have paid advances to an employee you can use this window to
apply advances to expense reports to reduce the amount you pay. You
can also apply a hold to an expense report to prevent payment. You
can apply advances and holds to expense reports that are from any
source.
Before you can pay expense reports you must submit the Payables
Invoice Import program to have Payables automatically create invoices
from the expense reports. You can then use Payables to pay and
account for the invoices. You cannot view expense reports in this
window if they have been purged during Payables Invoice Import. If
you do not purge expense reports during Payables Invoice Import, you
can still view successfully imported expense reports in this window,
but you cannot modify them.
4 – 216
Oracle Payables User Guide
The following are the steps you follow to process an expense report:
1.
Enter employees and their locations, expense addresses,
Supervisors, and default expense accounts in the Enter Person
window. See: Enter Person (Managing People Using Oracle HRMS
manual or online help).
2.
Enter Human Resources Financials options and Expense Report
Payables options. See: Human Resources Financials Options: page
2 – 42, and Expense Report Payables Options: page 2 – 62.
3.
Define the employee as a supplier using either of the following
methods:
Invoices
4 – 217
• Enable the Create Employee As Supplier Payables option to
automatically create suppliers from employees when you submit
Payables Invoice Import. See: Expense Report Payables
Options: page 2 – 62.
• Enter the employee as a supplier in the Suppliers window before
submitting Payables Invoice Import for expense reports. See:
Entering Employees as Suppliers: page 3 – 9.
4.
For Payables and Self–Service expense reports, define expense
report templates that model the different expense report formats
your employees use. See: Expense Report Templates: page 2 – 106.
5.
Enter expense reports in any of the following products.
• Payables. See: Entering Expense Reports in Payables: page
4 – 219.
• Oracle Self–Service Expenses. See: Self–Service Expenses
Integration: page 4 – 215.
• Oracle Projects.
• Oracle Personal Time and Expense.
If you enter invoices in Projects or Personal Time and Expense
you must also transfer them from Projects to Payables.
6.
In the Payables Expense Reports window optionally apply holds
and/or apply advances to the expense reports. See: Applying
Holds to Expense Reports: page 4 – 223, and Applying Advances to
Expense Reports: page 4 – 223.
Optionally modify or review Payables or Projects expense reports.
Review, audit and approve Self–Service Expense Reports. See the
following:
• Modifying and Reviewing Payables Expense Reports: page
4 – 226
• Modifying and Reviewing Oracle Projects Expense Reports: page
4 – 226
• Reviewing, Auditing, and Approving Self–Service Expenses
Expense Reports: page 4 – 227
7.
4 – 218
Oracle Payables User Guide
Submit Payables Invoice Import to create invoices and invoice
distributions for the expense reports. See: Payables Invoice Import
Program: page 4 – 239. Review the Invoice Import reports. If there
are exceptions, correct any expense reports that caused exceptions
and resubmit Payables Invoice Import.
8.
Pay the invoices as you would any other invoices. See: Creating
Single Payments: page 5 – 2, or Paying Invoices in Payment
Batches: page 5 – 17.
Entering Expense Reports
You can enter expense reports in the following products.
• Oracle Payables (see below).
• Oracle Self–Service Expenses.
• Oracle Projects.
• Oracle Personal Time and Expense.
Entering Basic Expense Reports in the Payables Expense Reports Window
Invoices
4 – 219
Prerequisites
❑ Enter employees, their locations, their supervisors, and their
expense addresses in the Enter Person window. See: Enter Person
(Managing People Using Oracle HRMS manual or online help).
❑ Enter Human Resources Financials options and Expense Report
Payables options. See: Human Resources Financials Options: page
2 – 42, and Expense Report Payables Options: page 2 – 62
❑ Define expense report templates. See: Expense Report Templates:
page 2 – 106.
❑ If you want to be able to check the Includes Tax check box, you
must use Line level automatic tax calculation (at the site level if one
exists, at the supplier level if there is no supplier site, or the
Payables Options level if no supplier exists) and you must enable at
least one of the following two options: Distribution Amount
Includes Tax check box on the Expense Report Template, or Allow
Override (for Distribution Amount Includes Tax) Payables option.
For more information, see: Automatic Tax Calculation Overview:
page 10 – 34.
"
4 – 220
To enter a basic expense report:
1.
In the Expense Reports window, either enter the employee name in
the Employee field, or enter the employee number in the Number
field.
2.
Optionally change the GL Account, which defaults for the
employee from the Enter Person window.
3.
In the Send to field, optionally change the location to which you
want to send payment for the expense report. You control the
default expense address in the Financials Options window.
4.
In the Date field, enter the period ending date for the expense
report. Payables uses this date as the GL Date for invoice
distributions created from the expense report. When you submit
Payables Invoice Import you have the option to override this date.
5.
Either enter an Invoice Number, or Payables will enter the invoice
date as the Invoice Number. Enter a Description of the expense
report. This will become the invoice description, and it will appear
on reports.
6.
Enter the total Amount of the expense report. Payables will
confirm that the sum of the item amounts matches this amount.
Oracle Payables User Guide
7.
Enter the expense report Template you want to use. The template
determines which Items you can select. The template also may
provide defaults for Type, Includes Tax, Tax Code, and GL
Account. During Payables Invoice Import, Payables creates invoice
distributions from the item lines.
For each item line on the expense report, select the Item and enter
the item Amount. Optionally change the Tax Code associated with
the item. The value for the Includes Tax check box defaults from
the Expense Report Template for that item. If you use inclusive
automatic tax calculation at the line level and you have the Allow
Override (Distribution Amount Includes Tax) Payables option
enabled and the item amount includes tax, you can adjust the
Includes Tax check box.
Optionally update the GL Account. The default GL Account for
each item line is the GL Account for the employee overlaid with
any segments defined at the template for each expense item.
8.
Save your work.
Expense Report Restrictions:
UNIQUE INVOICE NUMBER. The same invoice number cannot be
used twice for the same employee.
DATE. If the period ending Date is in a Never Opened accounting
period, then Payables does not import the expense report, and Payables
lists the expense report on the Invoice Import Exceptions report. If the
period ending Date is in a Closed period, Invoice Import uses the first
day of the next Open or Future accounting period as the GL date.
See Also
Automatic Withholding Tax Overview: page 10 – 24
Expense Report Templates: page 2 – 106
Expense Reports Window Reference: page 4 – 231
Payables Invoice Import Program: page 4 – 239
Purging Expense Reports or Invoices You Have Imported: page 4 – 251
Invoices
4 – 221
Recording VAT Details on an Expense Report
You can record VAT details on an expense report in the Expense
Reports window. You can also enter or update VAT information in the
Distributions window after the Payables Invoice Import program has
created invoices from expense reports. See: Merchant Information
Tabbed Region: page 4 – 237, and Receipt Information Tabbed Region:
page 4 – 237.
Entering Foreign Currency Expense Reports in the Expense Reports Window
Foreign currency expense reports are subject to the same system
requirements as foreign currency invoices. For more information on
foreign currency and the Exchange Rate fields in the Expense Reports
window, see: Foreign Currency Transactions: page 6 – 2, and Entering
Foreign Currency Invoices: page 4 – 92.
You can only apply advances (prepayments) that have the same
currency as the expense report.
Prerequisites
❑ Enable the Use Multiple Currencies Payables option. See: Payables
Options: page 2 – 57.
❑ Enable the currencies you need in the Currencies window. See:
Currencies Window (Oracle Applications System Administrator’s
Guide).
"
4 – 222
To enter an expense report in foreign currency:
1.
In the Expense Reports window, enter a basic expense report. See:
Entering Expense Reports: page 4 – 219.
2.
Select the expense report Currency. This is the currency in which
Payables will pay the invoice.
3.
Enter the Exchange Rate information.
4.
Save your work.
Oracle Payables User Guide
Applying Holds to Expense Reports
At any time before you submit Payables Invoice Import for an expense
report, you can apply a single User–defined hold to an expense report.
This will prevent payment of the invoice Payables creates from the
expense report. Payables also prevents creation of accounting entries
for the invoice if you select a hold that prevents accounting.
Prerequisite
❑ Define User–defined holds in the Invoice Approvals window. See:
Invoice Approvals: page 2 – 99.
"
To apply a hold to an expense report:
1.
In the Expense Reports window, enter or query an expense report.
2.
In the Hold field, enter a user–defined hold.
3.
Save your work.
During Payables Invoice Import, Payables applies the hold to the
invoice it creates for the expense report. You can release the
invoice hold by using the Invoice Actions window or the Invoice
Holds window. See: Releasing Holds: page 4 – 140.
Expense Report Holds Restrictions:
USER–DEFINED HOLDS. You can apply only one User–defined hold
to an expense report.
See Also
Invoice Approvals: page 2 – 99
Applying Advances Against Expense Reports
You can pay an employee an advance (prepayment) and later apply the
advance against an expense report to reduce the amount you pay for an
expense report. For example, you pay an employee a $500 travel
advance. When the employee returns from a trip, her expense report
totals $1500. You fully apply the advance against the actual expenses
Invoices
4 – 223
when you enter the expense report. When you import the expense
report, the system creates a $1500 invoice, and records a prepayment
application of $500, resulting in a $1000 unpaid balance on the invoice.
You can apply advances to any expense report you can query in the
Expense Reports window. You can apply an advance at any time
before submitting Payables Invoice Import for an expense report.
Note: The advance is not actually applied until the import
process. Therefore, to prevent overapplication of an advance,
you cannot select a prepayment number that has been applied
to another expense report that has not yet been imported.
Of course, you can also apply advances to an expense report after you
import it, just as you would for any other invoice. Query the invoice in
the Invoices window and use the Apply Prepayments check box in the
Invoice Actions window.
Applying Advances Against Expense Reports Before Import
Prerequisites
❑ Enable the Apply Advances Payables option. See: Expense Report
Payables Options: page 2 – 62
☞
Attention: Note that this automatically enables the Apply
Advances check box. If you do not want to apply advances to
an expense report you must disable the Apply Advances check
box in the Expense Reports window. If the check box is
enabled, Payables will apply all available advances to the
invoice.
❑ The advance has a settlement date on or before the system date, is
fully paid, is type Temporary, has the same invoice and payment
currency as the expense report, and has not been fully applied.
"
To apply an advance against an expense report:
1.
In the Expense Reports window, enter or query an expense report.
Payables notifies you if the employee has outstanding advances.
2.
Check the Apply Advances check box. Enter information to apply
one or more advances:
• To apply a single advance, enter the invoice Number of the
advance (prepayment). Payables displays in the Amount field
the remaining amount of the advance up to the expense report
4 – 224
Oracle Payables User Guide
total. If you do not want to apply the full available advance to
this expense report, change this to a lesser value.
• To apply multiple advances, leave the Number field empty.
Payables applies all outstanding advances in chronological order,
starting with the oldest advance first, up to the amount of the
expense report, unless you specify a maximum amount in the
Amount field. If you want to apply a specific advance first,
enter the number of the advance (prepayment) in the Number
field, then override the advance’s available Amount and enter a
greater number. The system will then apply the specified
advance first, then apply remaining advances (oldest first) up to
the Amount you specify.
3.
Complete expense report entry and save your work.
Payables applies the advances during Payables Invoice Import.
Applying Advances Against Expense Reports Restrictions
OVERAPPLYING ADVANCES TO EXPENSE REPORTS: You cannot
apply advances to an expense report for more than the amount of the
expense report.
See Also
Prepayments: page 4 – 195
Modifying and Reviewing Existing Expense Reports
You can review and modify expense reports in the Expense Reports
window. If you have successfully imported an expense report using
Payables Invoice Import but have not yet purged it, you can view it but
you cannot modify it.
You can quickly open an expense report you have saved as an icon on
your Navigator. When you have the expense report open, select Place
on Navigator from the Actions menu. Later, if you choose the icon in
the Documents region of your Navigator, then Payables will
automatically open the Expense Reports window and query the
expense report. See also: Using the Navigator’s Documents Region
(Oracle Applications User’s Guide).
Invoices
4 – 225
This section includes the following topics:
• Modifying and Reviewing Payables Expense Reports: page
4 – 226
• Modifying and Reviewing Oracle Projects Expense Reports: page
4 – 226
• Reviewing, Auditing, and Approving Oracle Self–Service
Expense Reports: page 4 – 227
Modifying and Reviewing Payables Expense Reports
Prerequisite
❑ If you want to modify the expense report you have not submitted
Payables Invoice Import for the expense report.
❑ If you want to view the expense report you have not purged the
expense report during Payables Invoice Import.
"
To review or modify a Payables expense report:
1.
In the Expense Reports window, query the expense report you
want to review or modify.
2.
Make any modifications you want to the expense report, including
applying a hold and applying advances.
3.
Save your work.
Modifying and Reviewing Oracle Projects Expense Reports
In the Payables Expense Reports window, you can query and review
Projects and Personal Time and Expense reports you have transferred
from Projects to the Payables interface tables. You cannot view an
expense report in this window that you have imported into Payables
and tied back to the original expense report in Projects.
☞
4 – 226
Oracle Payables User Guide
Attention: You must make all changes to Projects expense
reports in the Projects Expense Reports window. If you were
to make changes in the Payables Expense Reports window,
Projects would have no record of the modification, and the GL
accounts for the invoice distributions would be null. However,
you can apply advances and holds to these expense reports in
the Payables Expense Reports window before you submit
Payables Invoice Import.
Prerequisites
❑ Enter expense reports in Oracle Projects, or enter expense reports in
Oracle Personal Time and Expense and transfer them into Projects.
❑ Submit the Oracle Projects Distribute Expense Report Costs Process
to calculate the amount and generate accounts.
❑ Submit the Oracle Projects Interface Expense Reports to Payables
process to transfer expense reports to the Payables Invoice Interface
Tables.
"
To review or modify an Oracle Projects expense report:
1.
In the Expense Reports window, query the expense report you
want to review or modify.
2.
Apply a hold and/or apply advances to the expense report.
3.
Save your work.
Reviewing, Auditing, and Approving Oracle Self–Service Expense Reports
If your employees submit their expense reports using Self–Service
Expenses, you can use Payables to review, audit, and approve the
expense reports submitted by your employees. You can view
Self–Service expense reports in this window only after the Server Side
Validation process in Oracle Workflow has completed. Use Oracle
Workflow to manage the approval process for Self–Service expense
reports. For more information, see: Oracle Self–Service Implementation
Manual.
☞
Attention: Oracle Workflow, in its standard configuration,
requires accounting review for expense reports entered in
Self–Service Expenses that include expense items that require
receipt or justification. If accounting review is not performed,
the Oracle Workflow process cannot complete. If the Oracle
Workflow process does not complete for an expense report
entered in Self–Service Expenses, it cannot be imported using
Payables Invoice Import.
☞
Attention: For an expense report entered in Self–Service
Expenses that includes only expense items that do not require
receipts, and do not require justification, accounting review is
not required; the Payables Reviewed check box will be checked
automatically. Once Management approves an expense report
that includes only expense items that do not require receipts
and do not require justification, the Oracle Workflow process
Invoices
4 – 227
completes automatically without accounting review. After the
Oracle Workflow process completes, the expense report can be
imported using Payables Invoice Import.
Prerequisite
❑ Your employee has sent any receipts you require to your Accounts
Payable department.
"
To review, audit, and approve expense reports entered using
Self–Service Expenses:
1.
In the Expense Reports window, query the expense report you
want to review, audit, or approve.
2.
Optionally apply advances to the expense report. If you have
enabled the Apply Advances Payables option, the Apply Advances
check box will be enabled if there are any outstanding and available
advances for the employee. If you do not want to apply advances
to the expense report, you must disable the Apply Advances check
box. See: Applying Advances to Expense Reports: page 4 – 223.
3.
Optionally apply holds to the expense report. See: Applying
Holds to Expense Reports: page 4 – 223.
4.
For each expense item, use the Receipt Verified check box to
indicate if your accounts payable department has received from the
employee a valid receipt and all required information for the item.
If the expense item requires a receipt and the receipt is not verified,
the item is subject to shortpay.
☞
Attention: If an expense item does not require receipt and the
Receipt Required check box is not checked, it is not necessary
to check the Receipt Verified check box.
We recommend that you do not adjust the Receipt Missing check
box since this value is entered by the employee to indicate that an
original receipt was not available for submission.
5.
4 – 228
Oracle Payables User Guide
If an expense item is not reimbursable under your current policy
guidelines, or you want to adjust the amount for another reason,
adjust the amount of the expense item, include an Adjustment
Reason, and if appropriate, use the Receipt Verified check box to
indicate if your accounts payable department has received a valid
receipt for this item from the employee. If the expense item
requires a receipt and the receipt is not verified, the item is subject
to shortpay. If you adjust an expense item, you must also adjust
the expense report total. Oracle Workflow, in its standard
configuration, will automatically notify the employee of an
adjustment to the expense report when you save your changes.
☞
Attention: If you want to adjust an expense item, do not
delete it. Instead, reduce the expense item or change the
amount to zero.
6.
If an employee does not provide sufficient information for an
expense item, you can shortpay the expense item. To shortpay an
expense item due to insufficient information, include an
Adjustment Reason indicating what information the employee
needs to provide. Check the Policy Violation Shortpay check box.
If appropriate, check the Receipt Verified check box for the expense
item. Oracle Workflow, in its standard configuration, will
automatically notify the employee of the item for which she needs
to provide more information. The employee can then provide the
missing information to the accounts payable department.
7.
Once you have completed your review and audit of an expense
report, including receipt verification and adjustment, check the
Payables Reviewed check box.
8.
Save your work.
☞
Attention: Once accounting review has been performed, you
must run the Workflow Background Process to restart the
Workflow process from deferred status. If the Workflow
Background Process determines that accounting review has
been performed, the Workflow process can continue towards
completion. If the Workflow process for an expense report
does not complete, the expense report cannot be imported using
Payables Invoice Import.
See Also
Expense Report Templates: page 2 – 106
Self–Service Expenses Integration: page 4 – 215
Invoices
4 – 229
Paying Expense Reports
Payables will pay invoices only. Submit Payables Invoice Import to
have Payables create invoices from expense reports. You can then
create payments for the invoices.
Prerequisite
❑ Submit Payables Invoice Import to create invoices from expense
reports. See: Payables Invoice Import Program: page 4 – 239
"
To pay invoices created from expense reports:
H
Create payments for the invoices as you would for any other
invoices. See: Creating Single Payments: page 5 – 2, or Paying
Invoices in Payment Batches: page 5 – 17.
See Also
Voucher Numbers: page 2 – 24
Entering Employees as Suppliers: page 3 – 9
4 – 230
Oracle Payables User Guide
Expense Reports Window Reference
You can enter employee expense reports in the Expense Reports
window. Use this window to view expense reports you have entered in
Payables or Self–Service Expenses, or view expense reports you have
transferred from Projects. In addition, you can apply advances or
prepayments to expense reports in this window.
You submit the Payables Invoice Import program to convert the
expense reports into invoices that you can pay. If you do not purge
invoices during Payables Invoice Import you can still view them in the
Expense Reports window, but you cannot modify them.
Employee/Number. Name and number of the employee. This
employee will become the supplier on the invoice Payables Invoice
Import creates. Before submitting Payables Invoice Import for expense
reports you should either enable the Create Employee As Supplier
Payables option, or enter the employee as a supplier in the Suppliers
window.
GL Account. GL Account for the employee. This value defaults from
the Enter Person window. You cannot enter an account you have
defined as a summary account.
Payables overlays the employee’s GL Account with the segment values
defined for an Item’s GL Account.
For example, an employee’s default GL Account is 01–450–5800. The
expense report template you use has two expense item lines:
Meals:
XX–XXX–5900 (Meals Expense)
Airfare:
XX–XXX–5920 (Airfare Expense)
During Payables Invoice Import for the expense report, Payables
creates invoice distributions for the expense items in the following
manner:
Meals:
01–450–5900 (Meals Expense)
Airfare:
01–450–5920 (Airfare Expense)
Send To. Location to which the payment will be sent. Defaults from
the Enter Person window.
Date. Period ending date for the expense report. Payables uses this
date as the invoice date and the GL Date for the invoice created from
the expense report. When you submit Payables Invoice Import you
have the option to override this date.
Invoices
4 – 231
If the date you enter is in a future closed accounting period, Payables
will not import the expense report and will list it on the Invoice Import
Exceptions report. If the date you enter is a date in a closed accounting
period in the past, when Payables imports the expense report, it will
use the first day of the current accounting period as the GL Date.
Invoice Num. Number Payables uses as the invoice number when it
creates the invoice. The number must be unique for the employee. If
you do not enter a value, the invoice number will be the Date you
enter.
Amount. Total amount of the expense report.
Inv Description. Description of the expense report. This will become
the invoice description and it will appear on reports.
Currency. Currency that will be the invoice currency and the currency
in which the invoice will be paid.
Lines Total. Payables displays the cumulative sum of the expense
report item line Amounts. You cannot save the expense report unless
the Lines Total equals the Amount you enter in the previous field.
Hold. If you enter a user–defined hold name in this field, Payables
automatically applies this hold to the invoice that Payables Invoice
Import creates from the expense report. You cannot pay or account for
the invoice until you release the hold by using the Invoice Holds
window.
Withholding Tax Group. If you want to default a withholding tax
group to each item you enter, enter a withholding tax group for the
expense report. Alternatively, you can leave this field empty and enter
a withholding tax group for individual items.
Functional Region
This region displays functional currency information.
Currency. Expense report currency. Payables displays your functional
currency and you cannot update it. This will be the invoice currency.
Type. Type of exchange rate between the expense report currency and
your functional currency (Spot, Corporate, User, or User–defined). If
the expense report currency and your functional currency are different
currencies and have a predefined fixed rate, you can also select EMU
Fixed as the Type.
4 – 232
Oracle Payables User Guide
Date. The date used to determine functional rate. You can override
the Payables default of the system date.
Rate. If you selected the User rate type, enter the Rate. Otherwise, the
Rate will default from the GL Daily Rates Table if you have defined a
rate for the Type and Date you selected. If a rate is not defined in the
GL Daily Rates Table, you can define it later and then submit the
AutoRate program. If the Invoice Currency is different from your
functional currency, and both currencies are associated fixed–rate
currencies, Payables will enter the fixed rate.
Payment Region
Currency. The currency in which the expense report will be paid. The
default is from the Send To supplier site, if a supplier site exists for the
employee. Otherwise the default is the expense report currency, which
is your functional currency. If the expense report invoice currency is a
fixed–rate currency such as euro or another EMU currency, you can
change the payment currency value to an associated fixed–rate
currency.
Type. If the Payment Currency is different from the Invoice Currency
and both are fixed–rate currencies, Payables displays EMU Fixed. If
the invoice and payment currencies are the same, you cannot enter a
value in this field.
Date. If the Payment Currency is different from the Invoice Currency
and both are fixed–rate currencies, enter the date the Payment Cross
Rate is effective. Payables displays the value you entered for Date as
the default. If the Date is null, Payables displays the first date of the
first period. If the invoice and payment currencies are the same, you
cannot enter a value in this field.
Rate. If you are making a payment in a different currency than the
expense report, and both currencies are associated fixed–rate
currencies, Payables displays the fixed cross rate. You cannot update
this value in this window. If the invoice and payment currencies are
the same, you cannot enter a value in this field.
Invoices
4 – 233
Apply Advances Region
Apply Advances. Enable this check box if you want to apply employee
advances (prepayments) to an expense report. Payables performs the
applications during Payables Invoice Import. After you enter the
employee name in this window, Payables notifies you if there are
prepayments available to apply. You can apply an advance only if it
has a settlement date on or before today’s date, is type Temporary, has
been fully paid, is not fully applied, and has the same currency and
supplier/employee as the expense report.
Payables automatically enables this check box if you enable the Apply
Advances Payables option and there are available advances.
☞
Attention: If you do not want to apply advances to an
expense report you must disable the Apply Advances check
box. If the check box is enabled, Payables will apply all
available advances to the invoice even if the Number and
Amount fields are empty.
Payables prevents you from enabling this check box if there are no
outstanding advances to apply. Payables applies the advances you
specify when you submit Payables Invoice Import for an expense
report. See also: Applying Advances Against Expense Reports: page
4 – 223.
Number. Invoice number of a specific prepayment you want to apply.
Leave this field blank to apply all available advances in chronological
order, starting with the oldest prepayment first, up to the amount of
the expense report.
Distribution. Distribution number of a specific Item distribution on
the specified prepayment that you want to apply. Leave this field blank
to apply all available prepayment Item distributions, starting with the
lowest distribution number first, up to the amount of the expense
report.
Amount. If you are applying prepayments, the maximum currency
amount of the prepayments you want to apply to an expense report. If
you leave this field and the Number field blank, Payables applies
available prepayments up to the amount of the expense report. If you
specify a prepayment number in the Number field, Payables enters the
unapplied prepayment amount up to the amount of the expense report.
You can decrease the amount Payables enters. Payables ensures that
the prepayment amount does not exceed the expense report amount.
GL Date. Accounting date for the application of the advance. This will
be the GL date on the new Prepayment type distribution on the
expense report invoice.
4 – 234
Oracle Payables User Guide
Reviewed Region
The Reviewed region is used by Payables only if you install
Self–Service Expenses.
Payables. Enable this check box if the Accounts Payable department
has completed a review of an expense report entered in Self–Service
Expenses, including a verification of receipts.
Management. Oracle Workflow checks this check box after all
appropriate managers have approved this expense report.
Template
Template. Expense report template you are using to enter the expense
report. Expense report templates determine the expense report items
you can select. You define expense report templates in the Expense
Report Templates window. The list of values includes all active
templates. If you use multiple–organization support, the list of values
is limited to templates defined for your organization. If a default
expense report template was selected in the Payables Options window,
then that template is the default in this field if it is still active.
Expense Reports Window Tabbed Regions
The following two fields appear in each of the tabbed regions of the
Expense Reports window.
Item. Name of an expense item. The items you can enter depend on
the template you enter for the expense report. You define expense
items for an expense report template in the Expense Report Templates
window.
Note: You can associate tax codes with expense items in the
Expense Report Templates window. If an expense item is
associated with a tax code that is now inactive, then you cannot
select the item in the Expense Reports window.
Amount. The amount of an expense item. If the sum of the expense
item amounts does not equal the amount you entered for the expense
report, you cannot save the expense report.
Invoices
4 – 235
☞
Attention: Do not delete expense items entered in Self–Service
Expenses. Instead, adjust the expense item amount to zero.
Accounting Tabbed Region
GL Account. Payables displays the default account for the expense
item you enter. When you define a default account for an expense
item, you do not have to enter a value for every segment of the account
because it gets combined with the employee’s GL Account during
invoice entry. You cannot enter an account that you have defined as a
summary account.
Tax Code. Tax code for this expense item line. Payables does not allow
you to enter a tax code with an Offset tax type in this field. If the tax
code does not have a valid rate on the receipt date then Invoice Import
will reject it. The default for this field is from your Tax Code Defaults
Hierarchy. See: Defaulting Tax in Payables: page 4 – 105.
If you enter an expense line with a tax code, then enter a Tax type
expense item line with the same tax code and in the appropriate
amount. During Approval, Payables verifies that you have entered
your tax distribution(s) correctly. For example, you entered a $108.00
invoice for a $100.00 telephone which was taxed with an 8% state sales
tax. The invoice should have one tax distribution for $8, and one item
distribution for $100. Both distributions should have the same tax
code, and the tax code should have an 8% tax rate. During Approval,
Payables verifies that each tax distribution amount equals the sum of
the non–tax distributions with the same tax code multiplied by the tax
rate assigned to the tax code.
Payables will perform inclusive automatic tax calculation if you use
Line or Tax Code level automatic tax calculation, you enter a Tax Code,
and you enable the Includes Tax check box. Payables performs
inclusive automatic tax calculations during Payables Invoice Import.
For more information see: Entering Taxes on Expense Reports: page
4 – 122.
☞
Attention: Invoice Import will reject expense reports that
have a tax code without a valid tax rate on the tax date. On
expense reports, the tax date is the receipt date. If there is no
receipt date, then import uses the expense report date as the
tax date.
Includes Tax. If you use Automatic Tax Calculation at the Line
calculation level and the expense item amount includes tax, enable this
check box and enter a Tax Code. During Invoice Import, when
Payables creates a corresponding expense distribution, it decreases the
4 – 236
Oracle Payables User Guide
distribution amount by the calculated sales tax. Payables will also
create a Tax type distribution for the appropriate sales tax amount. For
more information, see: Entering Taxes on Expense Reports: page
4 – 122.
Withholding Tax Group. The withholding tax group for the current
expense report item. The default for this field is the withholding tax
group you entered for the expense report.
Merchant Information Tabbed Region
Name. Used to record VAT on expense reports. Name of merchant
that issued the receipt with the VAT charge. For example, name of
hotel that issued a bill that included a VAT charge. This value is not
validated against suppliers defined in Payables.
Document Number. Used to record VAT on expense reports. Number
of the receipt or invoice that included the VAT charge. For example,
receipt number of hotel bill that included a VAT charge.
Tax Reg Number. Used to record VAT on expense reports. Tax
registration number for the merchant that issued the VAT–inclusive
receipt. This number is used for reporting and reclaiming VAT.
Taxpayer ID. Used to record VAT on expense reports. Taxpayer ID
number of the merchant that issued the VAT–inclusive receipt. Also
known as the NIF in Europe or the NIT in Latin America.
Receipt Information Tabbed Region
Receipt Date. Used to record VAT on expense reports. Date of the
receipt or invoice that included the VAT charge. For example, receipt
date of hotel bill that included a VAT charge. This date is used as the
tax effective date. If you do not provide a value here, then Payables
will use the invoice date as the tax effective date.
Country of Supply. Used to record VAT on expense reports.
Two–letter ISO designation for the country of origin of the goods or
services.
Reference. Used to record VAT on expense reports. This entry is not
validated and can be used for any notes for internal use.
Invoices
4 – 237
Expense Audit Tabbed Region
The Expense Audit region is used by Payables only if you install
Self–Service Expenses.
Justification. The justification for the expense item. Entered by an
employee in Self–Service Expenses.
Receipt
• Verified. Check this box if the employee has sent a receipt to
Accounts Payable for this item.
• Required. This check box is enabled if you indicated in the
Expense Report Templates window that a receipt is required for
this expense item.
• Missing. This box is checked by the employee if the original
receipt is not available for an expense item. After the employee
submits the expense report with a receipt missing check box
enabled, Oracle Workflow, in its standard configuration, will
indicate to management in the approval notification whether an
original receipt is missing for an expense item.
Adjustments Tabbed Region
Adjustment or Short Payment Reason. The adjustment reason is used
by Payables only if you install Self–Service Expenses. If you adjust or
shortpay the expense report item that the employee entered, enter an
adjustment reason.
Policy Violation Short Payment. Check this check box to perform a
policy violation shortpay for an expense item for which the employee
has not provided sufficient information.
See Also
Importing Expense Reports from Payables: page 4 – 241
4 – 238
Oracle Payables User Guide
Payables Invoice Import Program
Use Payables Invoice Import to create Payables invoices from expense
reports you enter in Payables, Self–Service Expenses, or Oracle Projects.
You can also use Payables Invoice Import to import invoices from other
accounting systems. You can then use Payables to pay these invoices
and create accounting entries for them. Figure 4 – 1 below illustrates
the Payables Invoice Import Process.
When you import invoices, Payables records the source of the imported
invoices and the imported invoice details. Payables Invoice Import
verifies all your expense report and invoice information to ensure it
creates valid, fully–distributed invoices, ready for approval and
payment. If the expense report or invoice information fails validation,
Payables Invoice Import does not create an invoice from the
information and reports the exception on the Payables Invoice Import
Exceptions Report. Payables will not import an invoice or expense
report more than once.
☞
Attention: If you are importing invoices from an external
system, note that beginning with Payables Release 11 you are
able to import external invoices only through the Payables
Open Interface Import process. See: Payables Open Interface
Program: page 4 – 261.
You should plan to move existing processes from the Payables
Invoice Import Interface Tables to the Payables Open Interface
Tables. In a future release we will no longer support import of
external invoices through Payables Invoice Import. We
recommend that if you are implementing any new Payables
Invoice Import processes that you use only the Payables Open
Interface Tables and the Payables Open Interface Import
process. If you need detailed documentation on the Invoice
Interface tables, please refer to the Appendix in the Oracle
Payables User’s Guide, Release 11 or earlier. You can get an
online version of the Oracle Payables User’s Guide on the
MetaLink Web site.
Invoices
4 – 239
Figure 4 – 1
4 – 240
The Payables Invoice Import Process
Oracle Payables User Guide
This discussion covers the following topics:
• Importing Expense Reports from Payables or Oracle Self–Service
Expenses: page 4 – 241
• Importing Expense Reports from Oracle Projects: page 4 – 243
• Importing Invoices from Other Accounting Systems: page 4 – 246
• Purging Expense Reports or Invoices You Have Imported: page
4 – 251
• Payables Invoice Import Parameters: page 4 – 248
• Resolving Payables Invoice Import Exceptions: page 4 – 252
Creating Invoices from Payables and Self–Service Expense Reports
When you enter expense reports using the Expense Reports window in
Payables, or in Self–Service Expenses, Payables automatically saves the
expense information in the Payables Invoice Import Interface Tables.
When you submit Payables Invoice Import, Payables creates invoices
from the expense reports. Payables processes all expense reports
entered since the last time you submitted Payables Invoice Import.
If you enable the Automatically Create Employee As Supplier Payables
option, Payables automatically creates suppliers and supplier sites for
employees who are not already suppliers. If you do not enable this
option, you must manually enter the employee as a supplier before
submitting Payables Invoice Import.
Prerequisites
❑ Enter expense reports in Payables or Self–Service Expenses. See:
Entering Expense Reports: page 4 – 219, or see the Self–Service
Expenses online help.
❑ If the Create Employee As Supplier Payables option is not enabled,
manually enter the employee as a supplier in the Suppliers
window. See: Entering Suppliers: page 3 – 10.
"
To submit Payables Invoice Import for expense reports entered in
Payables or Self–Service Expenses:
1.
In the Submit Request window, choose Payables Invoice Import as
the Name.
Invoices
4 – 241
2.
Enter the report parameters. For more information on report
parameters, see: Payables Invoice Import Parameters: page 4 – 248.
If you use batch control, enter a Batch Name.
• Select Payables Expense Reports for the Source to create invoices
from expense reports entered in Payables.
• Select Self Service for the Source to create invoices from expense
reports entered in Self–Service Expenses.
Optionally enter or modify the GL Date to override all expense
report GL Dates.
If you want to purge expense reports from the Payables Invoice
Import Interface Tables, enter the date criteria you want Payables
to use. Payables will delete all records for expense reports that
were entered before this date and have already been imported.
3.
Choose OK to save the parameters. In the Submit Request
window, choose Submit to submit Payables Invoice Import for all
Payables expense reports or all of Self Service expense reports in
the system that have not yet been imported. Payables creates
invoices with the following attributes:
• Type is Expense Report.
• Invoice Number is from the Expense Report Invoice Number.
• Invoice distributions are based on the expense Items.
• Scheduled payments are based on payment terms defined in the
Payables Options window.
• Payment Method is defined in the Financials Options window.
When the program is complete, you can query the new invoices in
the Invoice workbench. The new invoices are ready for the normal
process of approval and payment.
Payables automatically produces the following reports so you can
review the invoices that Payables Invoice Import successfully
created, and the invoices that Payables Invoice Import was unable
to import:
• Payables Invoice Import Report: page 4 – 253
• Payables Invoice Import Exceptions Report: page 4 – 254
4 – 242
Oracle Payables User Guide
• Payables Invoice Import Prepayments Applied Report: page
4 – 259
See Also
Entering Expense Reports: page 4 – 219
Financials Options: page 2 – 36
Entering Employees as Suppliers: page 3 – 9
Payables Options: page 2 – 57
Importing Expense Reports from Oracle Projects
Payables integrates with Oracle Projects so that you can create Payables
invoices based on expense reports entered in Oracle Projects and Oracle
Personal Time and Expense. We recommend that you submit a
streamlined process from the Submit Processes window in Oracle
Projects to combine the following processes in one step: 1) transfer
expense reports to Oracle Payables, 2) submit Payables Invoice Import,
and 3) Tieback Invoices from Oracle Payables. However, you can
submit these processes individually.
Oracle Projects generates the GL account for each expense report
expense item using the accounting rules you have defined. After you
transfer the expense report to the Payables Invoice Import Interface
Tables, you can submit Payables Invoice Import to create an invoice
from the expense report.
If you enable the Automatically Create Employee As Supplier Payables
option, Payables automatically creates suppliers and supplier sites for
employees who are not already suppliers. If you do not enable this
option, you must manually enter the employees as a suppliers before
submitting Payables Invoice Import.
Invoices
4 – 243
Prerequisites
❑ Enter expense reports in Oracle Projects.
❑ Run Oracle Projects Distribute Expense Report Costs Process to
calculate the amount and generate accounts.
❑ Submit Oracle Projects Interface Expense Reports to Payables
process to transfer expense reports to the Payables Invoice Interface
Tables.
❑ If the Create Employee As Supplier Payables option is not enabled,
manually enter the employee as a supplier in the Suppliers
window. See: Entering Suppliers: page 3 – 10.
"
To submit Payables Invoice Import for expense reports entered in
Oracle Projects:
1.
In the Submit Request window, choose the Request as the Type,
and select Payables Invoice Import as the Name.
2.
Enter the report parameters. For more information on report
parameters, see Payables Invoice Import Parameters: page 4 – 248.
Do not enter a batch name. Select Oracle Projects for the Source.
Leave the GL Date field empty.
If you want to purge expense reports from the Payables Invoice
Import Interface Tables, enter the date criteria you want Payables
to use. Payables will delete all Oracle Projects expense reports that
were entered before this date and have already been imported and
tied back to the original expense report in Oracle Projects.
3.
Choose OK to submit Payables Invoice Import for all Oracle
Projects expense reports in the system that have not yet been
imported. Payables creates invoices with the following attributes:
• Type is Expense Report.
• Supplier name is Employee Name.
• Invoice Date is Week Ending Date.
• Invoice Number is the expenditure batch name from Oracle
Projects appended to a unique identifier for the expense report.
• Invoice distributions are based on cost distribution of expense
report items. Also, each invoice distribution in Payables
includes, expenditure item information, such as project
information, amount, and account coding.
4 – 244
Oracle Payables User Guide
• Invoice Liability account is based on accounting rules in Oracle
Projects.
• Scheduled payments are based on payment terms defined in the
Payables Options window.
• Payment Method is from the Financials Options window.
• If the supplier is a US federally reportable 1099 supplier,
Payables enters the Income Tax type for each invoice
distribution.
When the program is complete, you can query the new invoices in
the Invoice workbench. The new invoices are ready for the normal
process of approval and payment.
Payables automatically produces the following reports so you can
review the invoices that Payables Invoice Import successfully
created, and the invoices that Payables Invoice Import was unable
to import:
• Payables Invoice Import Report: page 4 – 253
• Payables Invoice Import Exceptions Report: page 4 – 254
• Payables Invoice Import Prepayments Applied Report: page
4 – 259
4.
You then submit the Oracle Projects Tieback Expense Reports from
Payables process to tieback expense report costs to ensure that your
Oracle Projects data loaded successfully.
Importing Expense Reports From Oracle Projects Restrictions:
PURGING: You cannot purge an Oracle Projects expense report in
Payables until you submit the Oracle Projects Tieback Expense Reports
process to link the invoice created for the expense report to the original
expense report, and automatically update the purge flag on the expense
report record in Payables to Yes.
See Also
Payables Options: page 2 – 57
Defining Financials Options: page 2 – 37
Invoices
4 – 245
Integrating Expense Reports with Oracle Payables (Oracle Projects
User’s Guide)
Distribute Expense Report Costs (Oracle Projects User’s Guide)
Interface Expense Reports (Oracle Projects User’s Guide)
Tieback Expense Reports from Payables (Oracle Projects User’s Guide)
Importing Invoices from Other Accounting Systems
Use Payables Invoice Import to import invoices from any accounting
system. Before you can create invoices from invoice information from
other accounting systems, you must define a lookup value in the Oracle
Payables Lookups window for the source of the invoice information.
Load the invoice information you want to import into the Payables
Invoice Import Interface Tables, including valid supplier name,
supplier site, a value for the Source lookup, and invoice distributions.
You do not, however, enter an employee name/number. When you
submit Payables Invoice Import, Payables validates the information
you loaded into the tables and creates invoices for the invoice
information you loaded.
☞
Attention: If you are importing invoices from an external
system, note that after Release 11i you will be able to import
external invoices only through the Payables Open Interface
Import process. During Release 11 you should plan to move
existing processes from the Payables Invoice Import Interface
Tables to the Payables Open Interface Tables. We recommend
that if you are implementing any new Payables Invoice Import
processes that you use only the Payables Open Interface Tables
and the Payables Open Interface Import process. See: Payables
Open Interface Program: page 4 – 261.
Prerequisites
❑ Create or modify the invoice flat file that contains the information
you want to import. See: Setting Up Payables to Import
Non–Oracle Invoices: in your pre–Release 11i Payables user’s
guide.
❑ Run SQL*Loader. Indicate your control file as the SQL*Loader
control file, your invoice flat file as the SQL*Loader input file, and
your Payables SQL*Plus username and password as the database
sign on. For more information see: Setting Up Payables to Import
4 – 246
Oracle Payables User Guide
Non–Oracle Invoices in your pre–Release 11i Payables user’s guide,
and see Oracle8i Server Utilities.
❑ Define a new Source lookup value to identify the source of the
invoices. See: Setting Up Payables to Import Non–Oracle Invoices
in your pre–Release 11i Payables user’s guide, and Lookups: page
2 – 13.
❑ Enter Suppliers and Supplier sites in the Payables Suppliers
window. See: Entering Suppliers: page 3 – 10.
❑ Enter code combinations for expense and liability accounts in the
Define Accounting Flexfield Combination window.
❑ If you want to purge your interim records from the Payables
Invoice Import Interface Tables, set the purgeable flag in
AP_EXPENSE_REPORT_HEADERS to Yes.
"
To submit Payables Invoice Import for invoices entered in external
accounting systems.
1.
In the Submit Request window, choose Request as the Type, and
select Payables Invoice Import as the Name.
2.
Enter the report parameters. For more information on report
parameters, see Payables Invoice Import Parameters: page 4 – 248.
If you use batch control, enter a Batch Name. In the Source field,
select the source name you defined in the Oracle Payables Lookups
window. Leave the GL Date field empty.
If you want to purge all records from the Payables Invoice Import
Interface Tables, and you have set the purgeable flags in the Tables
to Yes, enter the Purge Date you want Payables to use. Payables
will delete all records for invoices and expense reports that were
entered before this date and have already been imported.
3.
Choose OK to submit Payables Invoice Import for all invoices in
the system that have not yet been imported. Payables creates
invoices with the following attributes:
• Type is Standard.
• Invoice Number is the same as the one you specified in the flat
file.
• Scheduled payments are based on payment terms defined in the
Payables Options window
• Payment Method is from the Financials Options window
Invoices
4 – 247
• If the supplier is a US federally reportable 1099 supplier,
Payables enters the Income Tax type for each invoice distribution
When the program is complete, you can query the new invoices in
the Invoice workbench. The new invoices are ready for the normal
process of approval and payment.
Payables automatically produces the following reports so you can
review the invoices Payables Invoice Import successfully created,
and the invoices Payables Invoice Import was unable to import:
• Payables Invoice Import Report: page 4 – 253
• Payables Invoice Import Exceptions Report: page 4 – 254
Use SQL*Plus to correct any exceptions before resubmitting
Payables Invoice Import.
Importing Invoices From Other Accounting Systems Restrictions:
SOURCE LOOKUP. When you load an invoice record into the
Payables Invoice Import Interface Tables, make certain that the lookup
Source value you specify is identical to the code in the Oracle Payables
Lookups window.
See Also
Payables Options: page 2 – 57
Defining Financials Options: page 2 – 37
Payables Invoice Import Parameters
Batch Name. Payables groups the invoices created from the expense
reports you import and creates an invoice batch with the batch name
you enter. You can enter a batch name only if you have enabled the
Use Batch Control Payables option. Payables verifies that the batch
name you enter is unique.
Suggestion: A systematic naming convention for batches
helps you to file your physical documents and quickly retrieve
them later.
4 – 248
Oracle Payables User Guide
Summarize Report. Payables automatically prints two reports when
you submit Payables Invoice Import: the Payables Invoice Import
Report, and the Payables Invoice Import Exceptions Report. This
option controls the level of detail on the Payables Invoice Import
Report.
• Yes. Submit the Payables Invoice Import Report in summary. A
summary report shows the total number and dollar amount of
invoices created from expense reports, and the total number and
dollar amount of advances applied to expense reports.
• No. Submit the Payables Invoice Import Report in detail. A
detail report shows information about each of the expense
reports from which Payables Invoice Import created invoices, as
well as the total number and dollar amount of invoices. The
detail report also shows all the advances you applied to each
expense report.
Both versions of the Payables Invoice Import Report also list any
exceptions Payables finds during an import.
Source. Enter the name of the source of the expense reports, or the
user–defined name of the external invoices. Payables automatically
creates invoices from the source you enter.
• Payables Expense Reports. Expense reports entered in Oracle
Payables. This corresponds to a value of XpenseXpress in the
Source column in the Payables Invoice Import interface tables.
• Oracle Projects. Expense reports transferred from Oracle
Projects to the Payables Invoice Import Interface tables. These
may include expense reports originally entered in Oracle
Personal Time and Expense.
• Self Service. Expense reports entered in Self–Service Expenses.
• User–defined. External invoices transferred to the Payables
Invoice Import Interface tables.
GL Date: You can enter a GL Date only if the source you select is
Payables Expense Report or Self Service. The date you enter must be in
an Open or Future period or Payables will not create invoices from the
expense reports. If you import invoices from Oracle Projects, Payables
uses the GL Date you entered in Projects.
If you leave the GL Date parameter blank, then Payables uses the GL
Date Payables option defined in the Payables Options window to
determine the default GL date for invoice distribution lines. If the GL
Date Payables option is Invoice or Invoice Received Date, Payables
enters the Period Ending Date of the expense report as the default GL
Invoices
4 – 249
Date for all imported expense reports. If the GL Date Basis Payables
option is System or one of the Goods Received Date options, Payables
enters the system date as the default GL Date for all imported expense
reports. If you enter a GL date when submitting Invoice Import,
Payables enters that date on the invoice distribution lines created by
the Invoice Import process.
☞
Attention: If you are using encumbrance accounting, you
must enter a GL Date in a period that is within the latest open
encumbrance year. (See also: Budgetary Control In Payables:
page 10 – 42).
Transfer Descriptive Flexfield. Enter Yes if you want to import
Descriptive Flexfield details for the source you select. If you enter Yes,
Payables transfers any Descriptive Flexfield information you have
defined for the expense report you are importing, and creates invoices
and invoice distributions with the same Descriptive Flexfield details.
☞
Attention: If you choose to transfer Descriptive Flexfield
details for expense reports or invoices, you should enable the
corresponding invoice and invoice distribution Descriptive
Flexfield segments. If you do not enable the segments, you will
not be able to view your Descriptive Flexfield details in the
Invoice workbench.
You should also ensure that the value sets you define for your
invoice and invoice distribution Descriptive Flexfield segments
match the value sets for your expense report header and lines
Descriptive Flexfield segments. If they do not match, when
you navigate to the Descriptive Flexfield fields in the Invoice
Workbench, Payables will prompt you to enter valid values.
Purge Date. Enter the date you want Payables to use to purge expense
reports or invoices from the Payables Invoice Import Interface Tables.
Payables does not delete any expense reports or invoices for which it
has not yet created invoices.
If the source is Payables Expense Report, Payables deletes all records
for expense reports that were entered before this date and have already
been imported.
If the source is Oracle Projects, Payables deletes all records for Oracle
Projects expense reports that were entered before this date, have
already been imported and tied back to the original expense report in
Oracle Projects, and have the purgeable flag in the Payables Invoice
Import Interface Tables set to Yes.
4 – 250
Oracle Payables User Guide
If the source is user–defined, Payables deletes all invoice records that
have already been imported and have a purgeable flag in the Payables
Invoice Import Interface Tables set to Yes.
See Also
Tieback Expense Reports from Payables (Oracle Projects User’s Guide)
Purging Expense Reports or Invoices You Have Imported
When you submit Payables Invoice Import for any source, enter a
Purge Date to have Payables delete information from the Payables
Invoice Import Tables. All transactions entered before the Purge Date
will be deleted if they meet specific criteria that varies by source:
• Payables Expense Reports: To purge Payables expense reports
from the Payables Invoice Import Interface Tables, enter the
purge date you want Payables to use. Payables will delete all
records for Payables expense reports that were entered before
this date and have already been imported.
• Oracle Projects: To purge Oracle Projects expense reports from
the Payables Invoice Import Interface Tables, enter the purge
date you want Payables to use. Payables will delete all Oracle
Projects expense reports that were entered before this date and
have already been imported and tied back to the original
expense report in Oracle Projects.
• User–defined: To purge all records from the Payables Invoice
Import Interface Tables, set the purgeable flags in the Tables to
Yes, and enter the purge date you want Payables to use.
Payables will delete all records for expense reports and invoices
that were entered before this date and have been imported.
• Self Service: To purge Self–Service expense reports from the
Payables Invoice Import Interface Tables, enter the purge date
you want Payables to use. Payables will delete all records for
Self–Service expense reports that were entered before this date
and have already been imported.
Invoices
4 – 251
Resolving Payables Invoice Import Exceptions
Information may not import properly for a variety of reasons, including
duplicate invoice numbers or invalid suppliers. When you submit
Payables Invoice Import, Payables automatically prints the Payables
Invoice Import Exceptions Report. This report lists employee and
expense report information for each expense report for which Payables
did not create an invoice. If you import invoices, the report lists
supplier and invoice information for each invoice that Payables did not
import. For detailed information on all exceptions, see Payables
Invoice Import Exceptions Report: page 4 – 254.
1.
Review the Payables Invoice Import Exceptions Report to identify
the reason(s) your information did not import properly. Determine
the exact nature of the problem by consulting the Payables Invoice
Import Exceptions Report: page 4 – 254.
2.
If the import process fails for records with a source of Oracle
Projects or a User–defined source, you may need to correct the
problem outside of Payables.
• Oracle Projects: The tieback process updates all expense reports
as rejected in Oracle Projects. Correct rejected expense reports in
Oracle Projects.
• User–defined: Fix invoice problems in the flat file and reload
with SQL*Loader, or use SQL*Plus to correct problems directly
in the Payables Invoice Import Interface Tables.
3.
Resubmit Payables Invoice Import.
Review the Payables Invoice Import Exceptions Report to confirm
that you resolved the problems that had prevented import.
4 – 252
Oracle Payables User Guide
Invoice Import Report
Use this report to review detailed information for each invoice Payables
imports during Payables Invoice Import. You can also review the total
number and amount of invoices that Payables successfully imported.
Payables creates invoices from Payables expense reports, Self–Service
expense reports, and Oracle Projects expense reports, or from invoices
from other accounting systems.
You can submit the Invoice Import report in summary or in detail by
using the Summarize Report parameter when you submit Payables
Invoice Import. The summary report displays only the total number
and amount of imported invoices.
Payables also provides an Invoice Import Exceptions report with the
Invoice Import report. This exceptions report lists employees or
suppliers with expense reports or invoices that Payables was not able
to import. See also: Invoice Import Exceptions Report: page 4 – 254.
Report Submission
Payables automatically prints this report when you submit the Payables
Invoice Import process. See: Payables Invoice Import Program: page
4 – 239.
Selected Report Headings
Source. Source of the imported invoices.
• Payables Expense Reports. Expense reports entered in the
Payables Expense Reports window.
• Self Service. Expense reports entered via Self–Service Expenses.
• Oracle Projects. Expense reports entered in Oracle Projects or
Oracle Personal Time and Expense.
• User–defined. Externally created invoices transferred to
Payables Invoice Import Interface Tables.
Total. Total amount of an imported invoice.
Description. Partial description of an imported invoice.
Period End Date. Date of an expense report.
Hold. The hold name if you entered a hold on an expense report.
Payables applies this hold to the invoice created from the expense
report.
Invoices
4 – 253
Apply Advance. Payables prints Yes if an advance was applied to the
imported invoice. You can review additional details regarding any
prepayment applications at the bottom of this report. If for some
reason Payables was unable to apply a prepayment, Payables displays
the reason.
See Also
Lookups: page 2 – 13
Automatic Offsets: page 10 – 12
Invoice Import Exceptions Report
Use this report to review the exceptions that occurred during the
Payables Invoice Import process. You can use Invoice Import to import
expense reports from Payables or Oracle Projects or to import invoices
from another accounting system. If you import expense reports,
Payables lists employee and expense report information for each
expense report for which Payables did not create an invoice. If you
import invoices, Payables lists supplier and invoice information for
each invoice that Payables did not import.
Payables also displays the reason why Payables did not create an
invoice from an expense report or why Payables did not import an
invoice from another accounting system.
Report Submission
Payables prints this report automatically when you submit the Payables
Invoice Import process. See: Payables Invoice Import Program: page
4 – 239. Payables prints this report only if it identifies exceptions
during import.
Selected Report Headings
Name. Name of supplier or employee for whom Payables did not
create an invoice.
Total. Total amount of an expense report or invoice.
4 – 254
Oracle Payables User Guide
Period End Date. Date entered for an expense report.
Invoice Number. Payables displays the invoice number for an expense
report or invoice. If this is an expense report you entered in Payables,
the invoice number may be the same as the Date. In the Payables
Expense Reports window, the default for invoice number is the Date.
Exception Reason:
• Addr Line [1–3] Too Large. Invoice Import attempted to create a
supplier from an employee and Address Line 1–3 for the
employee home address exceeds 35 characters.
• City/State/Country] Too Large. Invoice Import attempted to
create a supplier from an employee and the City/State/Country
for the employee home address exceeds 25 characters.
• Create As Supplier. You are using manual supplier number
entry and you did not enter the employee as a supplier before
submitting Invoice Import.
• Create Duplicate Supplier. You are trying to create an invoice
from an expense report for an employee name that is not already
a supplier and a supplier name already exists for the same
employee name.
• Create EFT Site. The Financials option for payment method is
Electronic. The employee exists as a supplier in Payables, but is
missing a supplier site complete with bank information.
• Create EFT Supplier. The Financials option for payment
method is Electronic and the employee does not already exist in
Payables as a supplier complete with supplier sites and bank
information.
• Duplicate Report. The invoice number already exists for an
employee or supplier.
• Future Date. The expense report date, the accounting date
which determines the period in which your general ledger
recognizes an invoice expense and liability, is in a closed period
and is after the date you entered an expense report.
If the expense report date is in a closed period but before the
date you entered an expense report, Payables creates an invoice
from this expense report so it does not appear on the Exceptions
Report.
• No Exchange Rate. The Payables option Require Exchange Rate
Entry is Yes and the expense report is in a foreign currency and
has no exchange rate information.
Invoices
4 – 255
• No Home Address. The expense report is being sent to the
employee’s home address, but there is no home address defined
for the employee.
• No Location. You entered an employee as a supplier without
entering a location.
• No Office Address. The expense report is being sent to the
employee’s office address, but there is no office address defined
for the employee.
• No Withholding on Site. Supplier site does not have the Allow
Withholding Tax option enabled and you tried to import an
invoice that a) has an invoice distribution with an automatic
withholding tax group assigned to it, b) has an invoice
distribution with a line type of Withholding Tax, or c) has a
withholding tax group assigned to it.
• Not A Supplier. The Payables option Automatically Create
Employee as Supplier is not enabled, and the employee does not
already exist in Payables as a supplier.
• Zip Code Too Large. Invoice Import attempted to create a
supplier from an employee on an expense report and the Zip
Code for the employee home address exceeds 20 characters.
Oracle Projects Exceptions
In addition to the standard exception codes above, Payables also
displays the following exception codes for expense reports you try to
import from Oracle Projects:
• Beyond Encumbrance Year. You are using encumbrance
accounting, and the expense report has a GL Date in a period
that is beyond the latest encumbrance year.
• Combination Missing. The expense report has no Liability
Account. Unlike an expense report you enter in Payables, Oracle
Projects must specify a liability account when entering an
expense report.
• Expense Account Missing. The expense report is missing some
or all of the expense account information.
• Invalid Combination. The expense report’s Liability Account is
invalid or inactive.
• Invalid Currency. The expense report currency is invalid in
Payables.
4 – 256
Oracle Payables User Guide
• Invalid Employee. You are trying to create an invoice for an
expense report for an employee who is invalid or inactive.
• Invalid Expense Account. The expense report has an expense
account that is inactive or invalid.
• Invalid Hold Code. The expense report has a hold code that is
invalid or inactive in Payables.
• Invalid Line Type. The expense report has an invalid line type
in Payables. Valid invoice distribution line types in Payables are
Item, Tax, Miscellaneous, and Freight.
• Invalid Rate Type. The foreign currency expense report has a
rate type that does not exist in Payables.
• Invalid Set of Books. The expense report has a Set of Books that
is different from the Set of Books you defined for your Payables
organization.
• Invalid Set of Books – Line. The expense report has an expense
line with a Set of Books that is different from the Set of Books
you defined for your Payables organization.
• Invalid Statistical Quantities. The expense report has invalid
statistical quantities. Payables lets you enter only positive
statistical quantities for positive distributions and negative
statistical quantities for negative distributions.
• Invalid Tax Code. The expense report has a tax code that does
not exist or is inactive in Payables.
• No Unit of Measure. The expense report has an invoice
distribution with a statistical quantity, but there is no unit of
measure. You must use Oracle General Ledger to define a unit of
measure and to be able to enter statistical quantities.
• Null Invoice Number. You are trying to create an invoice for an
expense report that does not have an invoice number.
Other Accounting System Exceptions
In addition to the standard exceptions and the Oracle Projects
exceptions listed above, Payables also prints the following exceptions
for invoices you import from another accounting system:
• Doc Category Unneeded. Sequential Numbering is not enabled
and you have entered a document category for an invoice that
you are importing from another accounting system.
Invoices
4 – 257
• Inactive Seq Assignment. The sequence for the document
category of the invoice you are importing is inactive.
• Invalid Doc Category. The document category you have entered
for this invoice is not valid or is inconsistent with the type of
invoice you are importing.
• Invalid Supplier Site. The invoice has a supplier site that is
invalid or does not exist in Payables.
• No Doc Category Override. The Allow Document Category
Override Payables option for invoices is not enabled and you
have entered a document category for an invoice you are
importing. Payables allows you to enter a document category
for an imported invoice only if you allow overriding of the
default category for the type of invoice you are importing.
• No Sequence Assignment. Sequential Numbering is enabled,
but no sequence is assigned to the document category for the
type of invoice you are importing.
• Manual Sequence Assigned. Sequential Numbering is enabled,
but the document category for the type of invoice you are
importing has a manual sequence assigned. Payables does not
support manually–entered sequential numbers for invoices
imported from another accounting system.
• Missing Supplier. You are trying to create an invoice based on
an invoice from another accounting system which has a supplier
that does not exist in Payables.
• Tax Line Required. You are trying to import an invoice from
another accounting system that has no tax distribution. You
must enter at least one tax distribution on an invoice if you have
the Require Tax Entry Payables option enabled.
See Also
Entering Employees as Suppliers: page 3 – 9
Financials Options: page 2 – 36
Payables Options: page 2 – 57
4 – 258
Oracle Payables User Guide
Approval: page 4 – 145
Foreign Currency Transactions: page 6 – 2
Voucher Numbers: page 2 – 24
Budgetary Control In Payables: page 10 – 42
Defining Sets of Books (Oracle General Ledger User’s Guide)
Enter Person (Managing People Using Oracle HRMS manual or online
help)
Site Locations (Oracle Human Resources User’s Guide)
Invoice Import Prepayments Applied Report
Use this report to review the advances (prepayments) applied to
expense reports you import into Payables. Payables prints a listing of
all prepayments that were applied during Invoice Import.
Report Submission
Payables prints this report automatically when you submit the Payables
Invoice Import process and choose to apply advances. Payables prints
this report only if it applies prepayments to the expense reports you
import. See: Payables Invoice Import Program: page 4 – 239.
Selected Report Headings
Amount Applied. The amount of the prepayment applied to this
imported invoice.
Invoice Amount Remaining. The invoice amount remaining after the
prepayment is applied.
Invoices
4 – 259
Prepayment Amount Unapplied. The amount of the prepayment
remaining after the prepayment is applied.
See Also
Prepayments: page 4 – 195
Applying Advances Against Expense Reports: page 4 – 223
4 – 260
Oracle Payables User Guide
Payables Open Interface Import
You can use the Payables Open Interface Import program to create
Payables invoices from invoice data in the Payables Open Interface
tables. You can populate the Payables Open Interface tables with
invoice data from the following sources:
• Invoice Gateway. You can enter Standard and Credit invoices in
the Invoice Gateway window.
• Supplier invoices (ASC X12 810/EDIFACT INVOIC) transferred
through Oracle e–Commerce Gateway.
• Invoices you load from other accounting systems with a custom
SQL*Loader program. See: Using SQL*Loader to Populate the
Payables Open Interface Tables: page G – 1.
• Credit card transactions you have transferred using the Credit
Card Invoice Interface Summary. See: Credit Card Invoice
Interface Summary: page 8 – 13.
• Lease invoices you have transferred from Oracle Property
Manager. See: Property Manager Integration: page 4 – 178.
Note: Use Payables Invoice Import to import expense report
data from the Payables Invoice Interface tables. See: Payables
Invoice Import Program: page 4 – 239.
This section includes the following topics:
• Submitting the Payables Open Interface Import Program: page
4 – 262
• Payables Open Interface Troubleshooting: page 4 – 269
• Open Interface Invoices Window: page 4 – 270
• Payables Open Interface Purge Program: page 4 – 270
• Payables Open Interface Outbound Advice: page 4 – 271
• Payables Open Interface Workflow: page 4 – 272
• Payables Open Interface Report: page 4 – 275
See Also
Payables Open Interface Tables: page G – 2
Invoices
4 – 261
Submitting the Payables Open Interface Import Program
Use Payables Open Interface Import to create invoices from invoice
records in the Payables Open Interface tables. During Import, Payables
validates invoice records and rejects invoice records that have
insufficient or invalid data. Successfully imported invoices have
distributions and scheduled payments, and can be queried, modified
and approved in the Invoice Workbench. After invoices are approved
they are ready for payment.
Suggestion: Set up your system to submit Payables Open
Interface Import after each business day so you don’t use
system resources while users are online.
4 – 262
Oracle Payables User Guide
Importing e–Commerce Gateway Invoice Records
If you are importing invoices through the Oracle e–Commerce
Gateway, you can submit the e–Commerce Invoice Inbound set. This
program set submits both the e–Commerce Gateway Program, which
populates the Payables Open Interface Tables with the electronic
invoice records your supplier provides, and the Payables Open
Interface Import Program, which transfers the invoice data from the
Invoices
4 – 263
interface tables into the invoice tables in Payables. To submit the
e–Commerce Invoice Inbound transaction, see: Running the
e–Commerce Invoice Inbound Program (Oracle e–Commerce Gateway
User’s Guide). The discussion below describes how you can submit the
Payables Open Interface Program separately. You may need to submit
Payables Open Interface Import separately if you have had rejections
that you have fixed and want to import corrected e–Commerce invoice
records.
Payables supports the outbound application advice (824/APERAK) for
e–Commerce invoices. When you submit the Payables Open Interface
Outbound Advice, Payables creates a notification for invoices that were
successfully imported and those that failed import, and you can send
this notification to your e–Commerce trading partners via the
e–Commerce Gateway.
Importing Invoice Gateway Records
When you enter invoice records in the Invoice Gateway window, you
can choose the Create Invoices button to submit the Payables Open
Interface Import program from the Create Invoices window.
Alternatively, you can submit the import program from the Submit
Request window, as described below.
Prerequisites
❑ Enter suppliers and at least one supplier pay site in the Payables
Suppliers window. See: Entering Suppliers: page 3 – 10.
❑ If you use Workflow, Workflow has completed processing records.
Note: If you want Payables to import Invoice Gateway invoice
records, import will select these records for import even if
workflow has not yet processed them.
Additional Prerequisites for e–Commerce (810/INVOIC) Invoices
❑ In e–Commerce Gateway, define the trading partner. See: Defining
Trading Partner Data (Oracle e–Commerce Gateway User’s Guide).
❑ In Oracle e–Commerce Gateway, enable the Inbound Invoice
Transaction for each supplier you define as a trading partner. See:
Enabling Electronic Transactions (Oracle e–Commerce Gateway User’s
Guide).
❑ In Oracle e–Commerce Gateway, define any code conversions for
the transaction. See: Overview of Code Conversion, Defining
4 – 264
Oracle Payables User Guide
Code Conversion Categories, Assigning Code Conversion Cross
Reference Categories, and Defining Code Conversion Cross
Reference Values (Oracle e–Commerce Gateway User’s Guide).
❑ Use Oracle e–Commerce Gateway to submit the e–Commerce
Gateway Invoice Inbound Program from the Run e–Commerce
Inbound Datafile Import Process window. See: Running the
e–Commerce Invoice InboundProgram (Oracle e–Commerce Gateway
User’s Guide).
Additional Prerequisites for Invoices You Transfer Using
SQL*Loader
❑ Use the Oracle Payables Lookups window to define a Source type
lookup. In the Type field of the Oracle Payables Lookups window,
select Source. Enter any name in the Name field, except
e–Commerce Gateway, Credit Card, Oracle Property Manager, ERS,
or another existing source. See: Lookups: page 2 – 13.
❑ Transfer invoices into the Payables Open Interface tables. See:
Using SQL*Loader to Populate the Payables Open Interface tables:
page G – 1.
Additional Prerequisites for Invoices You Transfer Using the Credit
Card Invoice Interface Summary
❑ Transfer invoices into the Payables Open Interface tables. See:
Credit Card Invoice Interface Summary: page 8 – 13.
Additional Prerequisites for Invoices You Transfer from Property
Manager
❑ Transfer lease invoices into the Payables Open Interface tables
using the Export Payments to Payables window in Property
Manager.
"
To submit Payables Open Interface Import:
1.
In the Submit Request window, choose Request in the Type field.
In the Name field, enter Payables Open Interface Import.
2.
Enter the report parameters as appropriate. For more information
on report parameters, see Payables Open Interface Import
Parameters: page 4 – 267. In the Source field, select the source
name from the list of values.
Invoices
4 – 265
If your records have a Group and you want to import invoices for a
single group, enter the Group. This allows you to import smaller
sets of records concurrently for the same source, which improves
your performance. If you are importing invoice records that you
entered in the Invoice Gateway window, enter the Invoice Gateway
Batch Name as the Group.
To use invoice batch control, enter an Invoice Batch Name.
To apply a hold to each invoice this process creates, enter a Hold
Name.
To summarize the Audit section of the Payables Open Interface
report, select the Summarize Report option. If you do not select
this option and you are importing many invoices, this report could
be very long.
3.
Choose OK to save the parameters. Choose Submit to submit
Payables Open Interface Import.
When the program is complete, you can query the new invoices in
the Invoice Workbench. The new invoices are ready for the normal
process of approval and payment.
Payables automatically produces a report so that you can review
the invoices Payables Open Interface Import successfully created,
and those that could not be imported. See:
Payables Open Interface Report: page 4 – 275
Fix problems that are identified in the report, and then resubmit
Payables Open Interface Import.
• If you entered invoice records in the Invoice Gateway window,
update the records in the Invoice Gateway window.
• To update all other types of invoice records, either use the Open
Interface Invoices window to make changes in the Payables
Open Interface tables, or purge the rejected records and load a
new flat file into the interface table.
See Also
Payables Options: page 2 – 57
Defining Financials Options: page 2 – 37
4 – 266
Oracle Payables User Guide
Payables Open Interface Import Troubleshooting: page 4 – 269
Account Overlay in Payables Open Interface Import: page G – 49
Payables Open Interface Import Parameters
Source. Choose the source of the invoices from the list of values.
• Invoice Gateway. Invoice records you entered in the Invoice
Gateway window. If you did not specify a source when you
entered the invoice records then Invoice Gateway was
automatically entered as the Source for all invoice records during
entry.
• e–Commerce Gateway. Supplier invoices (ASC X12
810/EDIFACT INVOIC) transferred through Oracle
e–Commerce Gateway.
• Credit Card. Credit cards transactions from the credit card
issuer.
• Oracle Property Manager. Lease invoices from Oracle Property
Manager.
• User–defined. Invoices you load from other accounting systems
using a custom SQL*Loader program. You define Source type
lookups in the Oracle Payables Lookups window.
Group. To limit the import to invoices with a particular Group ID,
enter the Group ID. The Group must exactly match the GROUP_ID in
the Payables Open Interface tables. You can import data in concurrent
processes for the same source by specifying a unique Group for each
request. This reduces the processing time of your import. Payables
Open Interface Import imports data with the source and group
combination you specify.
If you are importing invoice records from the Invoice Gateway
window, enter the Invoice Gateway Batch name. If you did not enter a
value for Invoice Gateway Batch name during entry, then no value was
assigned to Gateway Batch Name (GROUP_ID). If you do not specify a
Group during import, Payables imports invoice records for all Invoice
Gateway batches that match the Source name you specify.
Invoices
4 – 267
Invoice Batch Name. You can enter a batch name only if you have
enabled the Use Batch Control Payables option. If you have enabled
this option, you must enter an invoice batch name. Payables groups
the invoices created from the invoice records you import and creates an
invoice batch with the batch name you enter.
If you use a batch name and some invoices are rejected during the
import process, you can import the corrected invoices into the same
batch if you enter the exact Invoice Batch Name during the subsequent
import.
If you are importing invoice records that you entered in the Invoice
Gateway, you may want to enter the Invoice Gateway Batch name for
consistency.
Hold Name. If you want to apply a hold to all invoices that the invoice
process creates, enter an invoice hold name. You can define your own
holds in the Invoice Approvals window.
Hold Reason. Payables displays the invoice hold reason description.
GL Date: To assign a GL Date to any invoice in the batch that does not
already have a GL Date at the line or header level, enter a value for the
GL Date parameter. If you do not enter a value here, or at the line or
header level, then during import the system assigns a GL Date based
on the GL Date Basis Payables option.
☞
Attention: If you are using encumbrance accounting, you
must enter a GL Date in a period that is within the latest open
encumbrance year. See also: Budgetary Control In Payables.
Purge. Enter Yes if you want Payables to delete from the Payables
Open Interface tables all successfully imported invoice records that
match the Source and Group ID of this import. Payables does not
delete any invoice data for which it has not yet created invoices. If you
want to purge later, you can use the Payables Open Interface Purge
Program.
Summarize Report. If you want to summarize the audit portion of the
Payables Open Interface Report, enter Yes. If you do not select this
option and you are importing a large number of invoice records, this
report could be very long.
4 – 268
Oracle Payables User Guide
Payables Open Interface Import Troubleshooting
You may experience two types of errors while trying to import
invoices: incorrect data or program failure.
Incorrect Data
The Payables Open Interface Report lists invoices that were not
imported correctly. If a problem exists at the invoice level, the invoice
is rejected without further validation. Examples of these fatal errors
are:
• No supplier or supplier site
• Duplicate invoice number
If the invoice level information is correct, Payables validates all values
at the line level, and the rejections report lists all line level problems. If
a distribution is rejected, the whole invoice is rejected.
Correct the data in one of the following ways:
• If you entered invoice records in the Invoice Gateway window,
update the records in the Invoice Gateway window.
• Use the Open Interface Invoices window to correct problems
directly in the Payables Open Interface tables for invoice records
entered in any way other than Invoice Gateway.
• Submit Purge Payables Open Interface to purge the rejected
records from the Payables Open Interface tables, then import
corrected data for the rejected records into the tables.
Program Errors
If a failure occurs in the e–Commerce Gateway Program or the
Payables Open Interface Program, you can query the program in the
Requests window. Read about errors in the log file.
Payables Open Interface Import commits in cycles of 1000. For
example, if an error stops the import program when it is validating the
350th invoice record, the system will have already committed the first
300 invoices.
Invoices
4 – 269
Open Interface Invoices Window
Use this window to update records in the Payables Open Interface
tables. Note that this window performs no validation. The field names
in this window correspond to the table columns. For detailed
descriptions of the columns in the interface, see: Payables Open
Interface Tables: page G – 2.
☞
Attention: We recommend that you use the Invoice Gateway
window to update any invoice records you entered in the
Invoice Gateway window.
Payables Open Interface Purge Program
Use the Payables Open Interface Purge Program after you submit the
Payables Open Interface Import program. This program purges
records from the Payables Open Interface tables
(AP_INVOICES_INTERFACE and
AP_INVOICE_LINES_INTERFACE). Purge only invoices that you
successfully imported, or enter Yes for Purge All to purge all records in
the table that match the Source and Group program parameters you
enter.
Report Submission
You submit this program from the Submit Request window. See:
Submitting Standard Reports, Programs, and Listings: page 8 – 2.
Selected Report Parameters
Source. Choose the source of the invoices you want to purge from the
list of values. Use e–Commerce Gateway, Credit Cards, Invoice
Gateway, Oracle Property Manager, or a Source type lookup you
defined in the Oracle Payables Lookups window. The source must
exactly match the Source in the Payables Open Interface tables. This
parameter is required.
Group. (Optional) To limit the purge to invoices with a particular
group, enter the GROUP_ID. If you entered the invoices in the Invoice
Gateway window, enter the Invoice Gateway Batch name. The Group
must exactly match the value in the GROUP_ID column in the Payables
Open Interface tables. You can purge data in concurrent processes for
the same source by specifying a unique Group for each request. This
4 – 270
Oracle Payables User Guide
reduces purge process time. The Payables Open Interface Purge
Program purges data with the Source and Group combination you
specify.
Purge All. Enter Yes to purge all records in the Payables Open
Interface tables that match the Source and Group you enter above.
These records include successfully imported records, records rejected
during import, and records that you have not tried to import yet. Enter
No to purge only records that have been successfully imported.
Payables Open Interface Outbound Advice
This program creates notification data about e–Commerce invoices
processed during Payables Open Interface Import. You can send this
notification to your supplier via the e–Commerce Gateway. See:
Outbound Application Advice (824/APERAK) (Oracle e–Commerce
Gateway User’s Guide).
Program Submission
You submit this program from the Submit Request window. See:
Submitting Standard Reports, Programs, and Listings: page 8 – 2.
Selected Program Parameters
Source. Choose e–Commerce Gateway because you are creating a
notification about e–Commerce Gateway transactions.
Group. (Optional) Choose the Group of the invoices for which you
want to submit this report.
Status.
• Accepted. Limit the program to successfully imported invoices.
• Rejected. Limit the program to invoices that failed import.
• All. Submit the program for both Accepted and Rejected
invoices.
Invoices
4 – 271
Payables Open Interface Workflow
The Payables Open Interface Workflow is a workflow template that
must be customized before it processes any data. If the workflow is
submitted before customization it will run but no validation or actions
are performed. You cannot replace this workflow with a new process.
You can customize the Payables Open Interface Workflow to help
automate verification and validation of data in the Payables Open
Interface tables before you submit Payables Open Interface Import. For
example, you can modify this workflow to validate all accounting code
combinations in the Payables Open Interface tables. Your workflow
can send notifications of any invalid code combinations to a specified
user for correction. You can also customize the workflow to override
any invalid code combinations with a designated default value. Using
Oracle Workflow, you can add workflow rules that meet the specific
requirements of your business. If you implement this workflow, then
once an invoice record has successfully completed workflow, it is ready
to be imported into the Oracle Payables application tables.
When the workflow is submitted it looks at all data in the
AP_INVOICES_INTERFACE table that meets the parameters specified
and has a value of ’Y’ in the WORKFLOW_FLAG column.
Additionally, you can customize workflow to select records with a null
value. You need to do this if you want to select Invoice Gateway
records. All Invoice Gateway records are saved with no value for
WORKFLOW_FLAG.
Workflow sets a temporary value of ’S’ for ’Selected’ when it processes
the invoice. Once an invoice has successfully completed workflow the
value is set to ’D’ for ’Done’. Invoices that have the value of ’D’ or null
4 – 272
Oracle Payables User Guide
in this column are ready to be imported into the application tables
using the Payables Open Interface Import.
When an invoice fails workflow, a notification is sent via e–mail to the
individual set up in workflow as the performer. The responsible
individual can act based on the e–mail. Alternatively, the individual
can periodically use the Oracle Applications Notification window to
query and review data that has failed the workflow. If you choose the
References button in that window, the system navigates to the Open
Interface Invoices window. You can use this window to correct data in
the interface tables for any invoices that are not from the Invoice
Gateway. If you need to correct invoice records that were entered in
the Invoice Gateway window, then use the Invoice Gateway window.
Once you correct the data, return to the Oracle Applications
Notification window, and choose the Respond button. Enter Problem
Fixed. Oracle Payables automatically resubmits the invoice to
workflow.
Suggestion: To schedule the automatic import of data and
initiation of workflow as a recurring process, use the Submit
Request Set window. For example, if you integrate with Oracle
e–Commerce Gateway for inbound invoices, you may want to
create a request set containing the three programs,
e–Commerce Invoice Inbound, Payables Open Interface
Workflow, and Payables Open Interface Import. You can
schedule this request set to run regularly, for example, every
six hours.
Submitting the Payables Open Interface Workflow
The program can be added to a request set along with the Payables
Open Interface Import routine to handle a complete loading of data
into the application tables. This task describes how to submit the
process individually.
Prerequisites
❑ Customize the workflow validation. Edit the procedure
Do_Custom_Validation. This procedure is stored in
$AP_TOP/admin/sql/apiiwkfb.pls. Edit the file and compile it
against the server. The name of the workflow is AP Open Interface
Import Workflow. If you want to process invoice records from the
Invoice Gateway, customize the workflow to select invoice records
with a null WORKFLOW_FLAG.
Invoices
4 – 273
❑ Assign Performer: Set up the individual who should receive
notification of the workflow event.
❑ Populate the WORKFLOW_FLAG column in the
AP_INVOICES_INTERFACE table with a value of ’Y’ in order for
Workflow to perform action on an invoice. If you have customized
Workflow to additionally select records with the
WORKFLOW_FLAG set to null, then if you do not want a record
selected for import, set the flag to D.
Workflow Submission
You submit this program from the Submit Request window. It will
process all records that have not yet been processed. See: Submitting
Standard Reports, Programs, and Listings: page 8 – 2.
Selected Workflow Parameters
Source. If you want to limit Workflow to records with a particular
source, enter the source exactly as it appears in the Oracle Payables
Lookups window. Leave blank if you want Workflow to process
records regardless of source.
Group. If you want to limit Workflow to records with a particular
group, enter the group. If you entered the invoices in the Invoice
Gateway window, then enter the Invoice Gateway Batch name. Leave
blank if you want Workflow to process records regardless of group.
See Also
Oracle Workflow Guide
4 – 274
Oracle Payables User Guide
Payables Open Interface Report
Use this report to review detailed information for each invoice
Payables imports during Payables Open Interface Import. The report
has two sections, the Payables Open Interface Audit Report and the
Payables Open Interface Rejections report.
The Audit section lists the invoices that Payables has successfully
imported. If you choose to summarize the report when you import,
then the Audit section will list only the number of invoices selected for
import, and the number of successfully imported invoices.
The Rejections section lists invoices that Payables was not able to
import and lists the rejection reasons.
If the import program finds a reason to reject the invoice record at the
invoice header level, it will record that reason on the report and will
not process the invoice record further. Therefore, even if the invoice
record has more than one error, the report may list only the first error
the import program finds.
If you entered the invoice records in the Invoice Gateway, then you
may find the following table helpful: How the Invoice Gateway
Populates the Open Interface Tables: page G – 54. This table shows you
the column that the Invoice Gateway field populates.
Report Submission
Payables automatically generates this report when you submit the
Payables Open Interface Import process. See: Payables Open Interface
Import Program: page 4 – 239.
Report Headings
Source Name. The source of the invoices you entered as a parameter
when you submitted the report.
• e–Commerce Gateway. Flat file sent electronically from your
supplier and processed through Oracle e–Commerce Gateway.
• Invoice Gateway. Invoice record you entered in the Invoice
Gateway window.
• User–defined source. Lookup value with Source type you
define for invoices loaded into the open interface tables using
SQL*Loader or the Invoice Gateway window.
Invoices
4 – 275
• Credit Card. A credit card transaction you transferred to the
Payables Open Interface tables using the Credit Card Invoice
Interface Summary.
• Property Manager. Lease invoices you transferred from Oracle
Property Manager.
• ERS. Evaluated Receipt Settlement. Payables uses this source
name to automatically create invoices from receipts.
• RTS. Return to Supplier. Credit memos automatically created
by the system from Purchasing returns.
Group/Batch Name/GL Date/Purge. Payables prints the values you
entered for these parameters when you submitted Payables Open
Interface Import.
Hold Name. If you entered a Hold Name parameter when you
submitted Open Interface Import, Payables prints the Hold that was
applied to the invoices.
Hold Reason. If you entered a Hold Name parameter when you
submitted Open Interface Import, Payables prints the Hold Reason for
the Hold.
Payables Open Interface Audit Report –– Selected Report Headings
Invoice Number/Date/Amount. Number, date, and amount of the
invoice Payables created during Payables Open Interface Import.
Dist Number. Number assigned to the invoice distribution.
Dist Amount. Amount of the invoice distribution.
Accounting Date. GL Date for the invoice.
Payables Open Interface Rejections Report –– Selected Report Headings
Invoice Number. Payables prints the number of the invoice that could
not be imported.
Invoice Level/Line Number. The report prints Invoice if the problem
is at the invoice level. If the problem is with a line of the invoice, the
report prints the line number.
Rejection Code/Reason. The report lists the reason the invoice could
not be imported and prints a brief explanation of the problem.
• Account Required. Accounting information is missing for this
line.
4 – 276
Oracle Payables User Guide
• Acct Date Beyond Enc Year. Accounting date
(ACCOUNTING_DATE) is beyond the encumbrance year and
the Use PO Encumbrance Financials option is enabled.
• Acct Date Not In Open Pd. Accounting date
(ACCOUNTING_DATE) is not in an open period.
• Applying More Than Avail. You are applying a prepayment to
the invoice and the amount you are applying is greater than the
prepayment amount available for application. You can see a
prepayment’s available amount in the Amount Remaining field
of the invoices window, or on the Prepayments Status Report.
See: Prepayments Status Report: page 8 – 91.
• AutoTax Calc Off. The Payables Option Use Automatic Tax
Calculation is not enabled and you have provided a value for
Amount Includes Tax.
• Can Match To Only 1 Line. You tried to match to a purchase
order line by providing a value for ITEM_DESCRIPTION or
INVENTORY_ITEM_ID, and the purchase order has more than
one line that matches the item. Enter a value for either
PO_LINE_NUMBER or PO_LINE_ID instead.
• Cannot Incl Tax. You have matched this invoice line to a
purchase order, and you have provided a value for Amount
Includes Tax. Purchase order lines do not include tax so you
cannot perform inclusive automatic tax calculation on them.
• Doc Cat not Req. The Sequential Numbering profile option is
set to ”Not Used”, and you have entered a value for
DOC_CATEGORY_CODE.
• Dupl Inv Num In Import. Duplicate invoice number for this
supplier already exists in this import.
• Duplicate Invoice Number. Invoice number for this supplier
already exists in Payables.
• Duplicate Line Number. Duplicate values for an invoice line
number (LINE_NUMBER) exist for this invoice.
• Duplicate Voucher. You attempted to assign a voucher number
to an invoice and another invoice already exists with the same
voucher number.
• GLOBAL_ATTR_Value_Found. You have installed a localized
version of Payables and you provided an invalid value in the
GLOBAL_ATTRIBUTE_CATEGORY column.
Invoices
4 – 277
• Inactive AWT Group. Inactive automatic withholding tax group
(AWT_GROUP_ID or AWT_GROUP_NAME).
• Inactive Currency Code. Inactive currency code
(INVOICE_CURRENCY_CODE).
• Inactive Distribution Set. Inactive distribution set
(DISTRIBUTION_SET_ID or DISTRIBUTION_SET_NAME).
• Inactive Pay Curr Code. Inactive payment currency code
(PAYMENT_CURRENCY_CODE).
• Inactive PO Num. Inactive purchase order number
(PO_NUMBER).
• Inactive Tax Code. Inactive tax code (TAX_CODE).
• Inactive Terms. Inactive payment terms (TERMS_ID or
TERMS_NAME).
• Incl Tax Calc Off. Supplier Site is not enabled for inclusive tax
calculation. The Supplier Site must be set to Line Level tax
calculation. In addition, the Amount Includes Tax check box
must be checked, or the override for this value must be enabled.
• Inconsistent Allocation Information. You cannot allocate
”other charge” lines on an invoice to both receipts and to items
on that invoice.
• Inconsistent AWT Group. Values exist for Automatic Tax
Withholding group in the following columns, and the groups do
not match: (AWT_GROUP_ID) and (AWT_GROUP_NAME).
• Inconsistent Curr. You tried to match an invoice record to a
purchase order that has a different currency. Invoice and
purchase order currency must be the same.
• Inconsistent Dist Acct. Values exist for distribution account in
the following columns and the accounts do not match:
(DIST_CODE_CONCATENATED) and
(DIST_CODE_COMBINATION_ID).
• Inconsistent Dist Info. You can provide account information by
using only one of the following sources: account, Distribution
Set, proration, projects information, purchase order matching.
• Inconsistent Dist Set. Values exist for distribution set in the
following columns and the distribution sets do not match:
(DISTRIBUTION_SET_ID) and (DISTRIBUTION_SET_NAME).
4 – 278
Oracle Payables User Guide
• Inconsistent Info Entered. Your Use Multiple Currencies
Payables option is not enabled and you have entered a currency
that is not your Functional currency.
• Inconsistent Inv Type/Amt. Invoice type lookup code and
invoice amount are inconsistent. For example, you enter a Credit
invoice with a positive value for the invoice amount.
• Inconsistent PO Dist Info. Values exist for purchase order
distribution information in the following columns, and the
information does not match: (PO_DISTRIBUTION_ID) and
(PO_DISTRIBUTION_NUM).
• Inconsistent PO Info. Values exist for purchase order
information in the following columns, and the information does
not match: (PO_HEADER_ID) and (PO_NUMBER).
• Inconsistent PO Line Info. Values exist for purchase order line
information in the following columns, and the information does
not match: (PO_LINE_ID) and (PO_LINE_NUMBER) do not
match.
• Inconsistent PO Shipment. Values exist for purchase order
shipment information in the following columns, and the
information does not match: (PO_LINE_LOCATION_ID) and
(PO_SHIPMENT_NUM).
• Inconsistent PO Supplier. The value you provided for supplier
does not match the supplier on the purchase order.
• Inconsistent Rate. Exchange rate type and exchange rate date
do not match the exchange rate.
• Inconsistent Receipt Information. The
RCV_TRANSCATION_ID you provided is not a valid value for
the RECEIPT_NUMBER you provided.
• Inconsistent Release Info. You have provided values for both
PO_RELEASE_ID and RELEASE_NUM and they do not match.
• Inconsistent Suppl Site. Values exist for supplier site in the
following columns and the sites do not match:
(VENDOR_SITE_ID) and (VENDOR_SITE_CODE).
• Inconsistent Supplier. Values exist for supplier in the following
columns, and the suppliers do not match: VENDOR_ID,
VENDOR_NUM, VENDOR_NAME.
• Inconsistent Terms Info. Values exist for terms information in
the following columns and the information does not match:
(TERMS_ID) and (TERMS_NAME).
Invoices
4 – 279
• Insufficient PA Info. You must provide values for all of the
following Projects columns: PROJECT_ID, TASK_ID,
EXPENDITURE TYPE, EXPENDITURE_ITEM_DATE, AND
EXPENDITURE_ORGANIZATION_ID.
• Insufficient Receipt Information. Payables is unable to
complete the match because the receipt information provided in
columns RECEIPT_NUMBER and RCV_TRANSACTION_ID is
not sufficient to identify a unique receipt transaction.
• Insufficient Prepay Info. You did not provide enough
information to successfully apply a prepayment to the invoice.
You must provide at least a prepayment amount or prepayment
number.
• Inv Type Cannot Be AWT. Open Interface Import will not
import invoices with an invoice type
(INVOICE_TYPE_LOOKUP_CODE) of AWT (automatic
withholding tax).
• Invalid Acct Overlay. The account created using the overlay
feature with the following values Overlay GL Account,
BALANCING_SEGMENT, COST_CENTER_SEGMENT, or
ACCOUNT_SEGMENT is invalid.
• Invalid Assignment. You have entered a valid value for
DOC_CATEGORY_CODE, but the document category does not
have an active, automatic sequence assigned to it.
• Invalid AWT Group. Withholding tax group must be a valid
value in AP_AWT_GROUPS.NAME.
• Invalid Currency Code. This must be a valid value for currency
code in FND_CURRENCIES.CURRENCY_CODE.
• Invalid Dist Set With PO. If the invoice is matched to a
purchase order, the line cannot contain a distribution set
(DISTRIBUTION_SET_ID or DISTRIBUTION_SET_NAME).
• Invalid Distribution Acct. This must be a valid value for
account in the GL_CODE_COMBINATIONS table.
• Invalid Distribution Set. The distribution set must be a valid
value in AP_DISTRIBUTION_SETS.
• Invalid Doc Category. Payables uses the Invalid Category
rejection for one of the following three reasons: 1) The
Document Category Payables option is enabled and you have
entered one of the following values for
DOC_CATEGORY_CODE: ’INT INV’, ’MIX INV’, ’DBM INV’,
’CHECK PAY’, ’CLEAR PAY’, ’EFT PAY’, ’FUTURE PAY’, ’MAN
4 – 280
Oracle Payables User Guide
FUTURE PAY’, ’PREPAY INV’, ’REC INV’, ’WIRE PAY’, ’EXP
REP INV’, 2) You entered ”Standard Invoices” as the
DOC_CATEGORY_CODE and the invoice amount is less than
zero, or you entered ”Credit Memo Invoices” and the invoice
amount is greater than zero. Or, 3) The document category
specified is not valid in FND_DOC_SEQUENCE_CATEGORIES
for AP_INVOICES or AP_INVOICES_ALL.
• Invalid Exch Rate Type. You used a non–User type exchange
rate type, and you entered an exchange rate. Change the rate
type to USER or delete the exchange rate.
• Invalid Final Match Flag. You entered Yes as the value for
FINAL_MATCH_FLAG and the Payables option of Allow Final
Matching is not enabled or the Match Option on the purchase
order shipment is to Match to Receipts.
• Invalid Inv Type Lookup. Invalid invoice type lookup code.
Type must be either Standard or Credit.
• Invalid Invoice Amount. You did not provide a value for
Invoice Amount.
• Invalid Invoice Quantity. You are attempting to match the
invoice to a purchase order shipment, and the Quantity to be
matched exceeds the available Quantity of the shipment by more
then the tolerance you defined in the Invoice Tolerances window.
• Invalid Item. Invalid item (ITEM_DESCRIPTION
INVENTORY_ITEM_ID). This value must match the purchase
order PO_LINES.INVENTORY_ITEM_DESCRIPTION or
PO_LINES.INVENTORY_ITEM_ID.
• Invalid Liability Acct. The liability account must be valid in the
GL_CODE_COMBINATIONS table.
• Invalid Line Amount. Line amount not equal to Quantity x Unit
Price.
• Invalid Line Type Lookup. Invalid value for
LINE_TYPE_LOOKUP_CODE. You can use Item, Freight, Tax or
Miscellaneous.
• Invalid Location Code. The value you entered for the
SHIP_TO_LOCATION_CODE column is invalid.
• Invalid PA Acct. The account for this line could not be built by
Account Generator.
Invoices
4 – 281
• Invalid Pay Curr Code. Invalid payment currency code. This
must be a valid value in
FND_CURRENCIES.CURRENCY_CODE.
• Invalid Pay Group. The value you entered for Pay Group is
invalid. The value must be a valid lookup value for Pay Group.
• Invalid Pay Method. This value must be one of the following:
CHECK, CLEARING, EFT, WIRE. (To enter EFT in the Invoice
Gateway window, enter Electronic).
• Invalid PO Dist Num. Invalid purchase order distribution
number. This must be a valid value in
PO_DISTRIBUTIONS.DISTRIBUTION_NUM.
• Invalid PO Info. You provided values for more than one of the
following, and the information does not match: PO receipt, PO
header, PO line, PO release, and PO shipment.
• Invalid PO Line UOM. Invalid purchase order line Unit of
Measure. This must be a valid value in
PO_LINES.UNIT_MEAS_LOOKUP_CODE.
• Invalid PO Num. You can obtain a list of active, valid values for
purchase order number from PO_HEADERS.SEGMENT1 or
PO_HEADERS.PO_HEADER_ID.
• Invalid PO Release Info. You are matching to a blanket
purchase order, and one of the values you provided for release
number, shipment number, or line number is invalid.
• Invalid PO Release Num. You have provided an invalid value
for either RELEASE_NUM or PO_RELEASE_ID.
• Invalid PO Shipment Num. Invalid purchase order shipment
number.
• Invalid Prepayment Information. You are tying to apply a
prepayment to an invoice and you have provided invalid
prepayment information. For example, you may have specified
an incorrect invoice number for the prepayment, or you may
have specified a prepayment that is not available. Submit the
Prepayments Status Report to get up–to–date information on
available prepayments. See: Prepayments Status Report: page
8 – 91.
• Invalid Price/Quantity. The values for Unit Price, Quantity
Invoiced, and Line amount are inconsistent. (Quantity Invoiced
x Unit Price = Amount)
4 – 282
Oracle Payables User Guide
• Invalid Quantity. The value for Quantity
(QUANTITY_INVOICED) must be greater than zero for
Standard type invoices.
• Invalid Receipt Information. You provided an invalid value in
at least one of the following columns: RECEIPT_NUMBER and
RCV_TRANSACTION_ID.
• Invalid Sequence. The document category you entered has a
valid, automatic sequence assigned to it. However, Payables
was unable to retrieve the next value from the sequence.
• Invalid Shipment Type. Shipment Type should be Blanket,
Scheduled, or Standard, and the purchase order should be
approved.
• Invalid Supplier. You can obtain a list of valid values for
supplier from the PO_VENDORS table.
• Invalid Supplier Site. You can obtain a list of valid values for
supplier site from the PO_VENDOR_SITES table.
• Invalid Tax Code. You can obtain a list of active, valid values
for tax code in AP_TAX_CODES.
• Invalid Tax Region. You provided an invalid value for Tax
Region (INCOME_TAX_REGION). You can obtain a list of
active, valid values for tax code in
AP_INCOME_TAX_REGIONS.
• Invalid Tax Type. Invalid tax type. You cannot use the OFFSET
tax type, but you can use any other valid tax types from
AP_TAX_CODES.
• Invalid Terms. Invalid terms. Terms must be valid terms in
AP_TERMS.TERMS_ID or AP_TERMS.TERMS_NAME.
• Invalid Type 1099. The value for TYPE_1099 is not a valid
value.
• Invalid Unit Price. The value for Unit Price (UNIT_PRICE)
must be greater than zero.
• Invalid Who Information. Invalid information in one of the
following columns: LAST_UPDATED_DATE,
LAST_UPDATED_BY, LAST_UPDATE_LOGIN,
CREATION_DATE, CREATED_BY.
• INVALID_GLOBAL_ATTR1–20. You have installed a localized
version of Payables and you provided an invalid value in the
GLOBAL_ATTRIBUTE_CATEGORY column.
Invoices
4 – 283
• INVALID_GLOBAL_CONTEXT. You have installed a
localization and the value you provided for the
GLOBAL_ATTRIBUTE_CATEGORY column is not a valid value
for the localization.
• Invoice Amount Incorrect. Invoice amount
(AP_INVOICES_INTERFACE.INVOICE_AMOUNT) does not
equal the sum of the line amounts
(AP_INVOICE_LINES_INTERFACE.AMOUNT) for rows with
the same INVOICE_ID.
• Line Has Price Break. You are matching to a blanket purchase
order release at the line level which has been set to allow price
override. You have provided only line level data. Payables
cannot identify the shipment to which it should match because
shipments can have different prices. If you identify the
shipment, then Payables can complete the match.
• Line Tax Calc Off. The Supplier Site Automatic Tax Calculation
level is not set to Line, and you have provided a value for
Amount Includes Tax.
• Line Type Cannot Be AWT. Open Interface Import will not
import an invoice if the LINE_TYPE_LOOKUP_CODE is AWT
(automatic withholding tax).
• No Exchange Rate. The invoice currency is different from your
functional currency, you have entered USER as the exchange rate
type, and you have not entered a value for
DEFAULT_EXCHANGE_RATE.
• No Invoice Lines. You must enter at least one invoice line to
create an invoice. The line must have an INVOICE_ID that
matches the INVOICE_ID of an invoice header.
• No PO Line Num. You matched the invoice to a multi–line
purchase order, and you did not enter purchase order line
number (PO_LINE_ID or PO_LINE_NUMBER).
• No Supplier. You did not identify the supplier in any of the
following columns: VENDOR_ID, VENDOR_NUM, or
PO_NUMBER.
• No Supplier Site. You did not identify the supplier site in any of
the following columns: VENDOR_SITE_ID, VENDOR_SITE
CODE, or PO_NUMBER.
• No Tax Code. You did not enter a tax code, and a valid tax code
could not be found based on the Tax Code Default hierarchy you
defined in the Payables Options window.
4 – 284
Oracle Payables User Guide
• No Tax Rate on Date. You are applying a prepayment to an
invoice. The tax code on the Prepayment distribution does not
have a rate defined for the Prepay GL Date. Either change the
Prepay GL Date or, in the Tax Codes window, define a rate for
the tax code that is effective on the Prepay GL Date.
• No Terms Info. You did not specify payment terms in the
import tables, the invoice is not matched to a purchase order,
and you have not specified default payment terms for the
supplier site.
• Non–Unique Location Code. You have provided a Ship–To
location as the matching criterion and it is not unique. For
example, you provided a Ship–To location of Boston, and Boston
is the Ship–To location on three different shipments on the
purchase order.
• Not Pay Site. The supplier site is not enabled as a pay site in the
Supplier Sites window in Payables.
• Override Disallowed. The Sequential Numbering profile option
is set to Partial or Always, you have entered a value for
DOC_CATEGORY_CODE, and the Allow Document Category
Override Payables option is disabled. You cannot enter a value
in this column unless you enable the Allow Document Category
Override Payables option.
• PA Flexbuild Failed. Account Generator did not build an
account for the invoice.
• Pay X Rate Not Fixed. Invoice currency and payment currency
are not associated fixed–rate currencies.
• Pay Rate Overwritten. You are paying the invoice in a related
fixed–rate currency. You provided a value for payment cross
rate which was incorrect. During import the value you entered
was overwritten by the value stored in General Ledger.
• Skeleton Distribution. This line does not have a type of Item,
and you tried to use a Skeleton distribution set.
• Release Missing. You have matched to a blanket purchase order
and you have not provided a value for Release Number.
• Unit Prc Not Equal to PO. Unit price does not equal the Unit
Price on the Purchase Order within the tolerance you defined in
the Invoice Tolerances window.
• UOM Does Not Match PO. Unit Of Measure does not match
the Unit of Measure on the purchase order.
Invoices
4 – 285
• UOM Does Not Match Receipt. Unit of Measure does not
match the Unit of Measure on the receipt.
See Also
Lookups: page 2 – 13
Common Report Headings: page 8 – 8
Financials Options: page 2 – 36
Payables Options: page 2 – 57
Approval: page 4 – 145
Foreign Currency Transactions: page 6 – 2
Voucher Numbers: page 2 – 24
Budgetary Control In Payables: page 10 – 42
Defining Sets of Books (Oracle General Ledger User’s Guide)
Site Locations (Oracle Human Resources User’s Guide)
4 – 286
Oracle Payables User Guide
Reviewing and Adjusting Invoices
This section includes the following topics:
• Invoice Overview: page 4 – 288
• Finding Invoice Batches: page 4 – 289
• Finding Invoices: page 4 – 290
• Reviewing Invoice Distributions: page 4 – 292
• Reviewing Payment Information: page 4 – 293
• Payments Window Reference: page 4 – 293
• Reviewing Invoice Batches: page 4 – 294
• Reviewing Invoices: page 4 – 295
• Calculating a Supplier or Supplier Site Balance: page 4 – 296
• Adjusting Invoice Batches: page 4 – 298
• Adjusting Invoices: page 4 – 299
• Adjusting Invoice Amounts: page 4 – 301
• Adjusting Invoice Exchange Rates: page 4 – 303
• Adjusting GL Dates: page 4 – 303
• Adjusting Invoice Distributions: page 4 – 304
• Adding New Invoice Distributions: page 4 – 307
• Reversing Invoice Distributions: page 4 – 308
• Adjusting Scheduled Payments: page 4 – 310
• Cancelling Invoices: page 4 – 311
• Identifying Duplicate Invoices: page 4 – 313
• Invoice Adjustment Chart: page 4 – 315
• Invoice Distribution Adjustment Chart: page 4 – 326
Invoices
4 – 287
Invoice Overview
In the Invoice Overview window, you can review the status of an
invoice and some high–level information. This window is particularly
helpful for reviewing information quickly when a supplier calls you to
inquire about the status of an invoice. This window also serves as a
bridge between the Payment and Invoice Workbenches.
This window displays summary information for the invoice:
• Supplier Information
• Invoice Information
• Invoice Status
• Scheduled Payments
• Actual Payments
• Active Holds
• Purchase Order Information
Warning: The Active Hold region does not include scheduled
payment holds or supplier site holds. For example, if the
supplier site has the Hold All Payments option enabled you
will not see a hold in the Active Hold region of the Invoice
Overview.
This is a display–only window. If you are in entry mode, then choose
the Invoices button to navigate to the Invoices window to adjust the
invoice.
For more detailed information regarding the invoice or related
attributes, choose the Invoices, Supplier, View PO, or Payment
Overview button.
If your query retrieves more than one invoice, Payables orders and
displays queried invoices by the latest invoice date. To see the next
queried invoice, press [Next Screen].
Note: You can view the detail accounting lines for the
transaction in the form of a balanced accounting entry (i.e.,
debits equal credits). You can also choose to view the detail
accounting as t–accounts.
See: Viewing Accounting Lines: page 7 – 26
4 – 288
Oracle Payables User Guide
Finding Invoice Batches
You can find invoice batches in the Invoice Workbench either by using
the Find Invoice Batches window, or by entering query criteria directly
into the Invoice Batches window. If you want to find invoices
contained in a particular invoice batch, query the invoice batch in the
Invoice Batches window, then choose the Invoices button.
In the Find Invoice Batches window, you can search for a batch by
entering ranges for invoice batch names and dates. You then choose
Find to navigate to the Invoice Batches window, where Payables
displays all invoice batches that match your Find criteria.
"
To find invoice batches using the Find Invoice Batches window:
1.
Open the Find Invoice Batches window from the Invoice Batches
window, either by choosing the Find icon from the Toolbar or by
selecting Query Find from the menu. Enter criteria directly into the
fields.
2.
Choose the Find button to navigate to the Invoice Batches window
where Payables displays all invoice batches that match your
criteria.
You can also open custom folders that display information in a
custom format, if you or your organization has defined any.
See Also
Customizing the Presentation of Data in a Folder (Oracle Applications
User’s Guide)
Batch Control Reports: page 8 – 66
Invoice Batches Window Reference: page 4 – 339
Invoices
4 – 289
Finding Invoices
You can find invoices to respond to supplier inquiries, including
questions regarding invoice payment status, invoice payment date,
reasons an invoice has not been paid, and total balance due for a
supplier or supplier site. You can also find invoices to make
adjustments to them or to perform actions on them, such as approval
or cancellation.
You can find invoices in the Invoice Workbench either by using the Find
Invoices window or by entering query criteria directly into the Invoices
window. In the Find Invoices window, you can enter a greater variety
of criteria, including invoice status and ranges for invoice amounts,
invoice dates, and voucher numbers. You then choose Find to navigate
to the Invoices window, where Payables displays all invoices that
match your Find criteria. From the Invoices window, you can review
or adjust information about an invoice, and you can navigate to other
windows to review or adjust scheduled payments, distribution holds,
related payments, and more.
If you want to find invoices contained in a particular invoice batch, you
can also find the invoice batch, then choose the Invoices button in the
Invoice Batches window. See: Finding Invoice Batches: page 4 – 289.
If you want to review in one window a wide variety of high level
information about a single invoice, use the Invoice Overview window.
See: Invoice Overview: page 4 – 288.
You can quickly open an invoice you have saved as an icon on your
Navigator. When you have the invoice open, select Place on Navigator
from the Actions menu. Later, if you choose the icon in the Documents
region of your Navigator, then Payables will automatically open the
Invoice workbench and query the invoice. See also: Using the
Navigator ’s Documents Region (Oracle Applications User’s Guide).
4 – 290
Oracle Payables User Guide
"
To find an invoice using the Find Invoices window:
1.
Open the Find Invoices window from the Invoices window either
by choosing the Find icon from the Toolbar or by selecting Find
from the View menu. Enter criteria directly into the fields. You can
enter complex criteria by entering information in several fields.
Some fields will not become enabled unless you first identify the
supplier.
2.
Choose the Find button to navigate to the Invoices window where
Payables displays all invoices that match your criteria.
Payables displays invoices in the following order:
Supplier Name (ascending)
Supplier Site (ascending)
Invoice Date (descending)
Invoice Number (ascending)
Invoices
4 – 291
Invoice Amount (descending)
You can also open custom folders that display information in a
custom format, if you or your organization has defined any.
☞
Attention: The Holds field in the Invoices window shows
only invoice holds, not supplier holds. For example, if the
supplier site has the Hold All Payments option enabled and
there are no invoice holds on an invoice, the Hold field will
display zero.
See Also
Customizing the Presentation of Data in a Folder (Oracle Applications
User’s Guide)
Invoice Overview: page 4 – 288
Adjusting Invoices: page 4 – 299
Reviewing Invoice Distributions
In the Distributions window, you can use the Find Invoice Distributions
window to search for distributions for one invoice that match criteria
you select. Search by accounted status, GL date range, amount range,
and account range.
"
4 – 292
To find invoice distributions in the Invoice Workbench:
1.
In the Invoices window, select an invoice and choose Distributions.
2.
Open the Find Invoice Distributions window from the
Distributions window, either by choosing the Find icon from the
Toolbar or by selecting Find from the View menu.
3.
Enter criteria directly into the fields. You can enter complex
criteria by entering information in several fields.
4.
Choose Find to navigate to the Distributions window where
Payables displays all invoice distributions of the invoice you
selected that match your criteria.
Oracle Payables User Guide
You can also open custom folders that display information in a
custom format, if you or your organization has defined any.
See Also
Reviewing Invoices: page 4 – 295
Customizing the Presentation of Data in a Folder (Oracle Applications
User’s Guide)
Reviewing Payment Information in the Invoice Workbench
Use the Payments window of the Invoice Workbench to get quick
payment information for a selected invoice. To use the window, select
an invoice in the Invoices window and choose the Payments button.
The Payments window displays payment documents that you have
used to pay the selected invoice. For further information, you can then
choose the Payment Overview button or the Scheduled Payments
button.
Note: This window is separate from the Payments window in
the Payments Workbench, which you use to create single
payments.
Payments Window (of the Invoice Workbench) Reference
Discount Taken. If you realized a discount when you created the
payment, Payables displays the amount of the discount.
Document Number. Payment document number, for example, check
number.
GL Date. Payment GL Date.
Payment Amount. Amount of the payment.
Payment Date. The GL Date for the payment lines and the date on the
payment document. The date must be in an open accounting period.
Invoices
4 – 293
Payment Method.
• Check. A manual check, a Quick payment, or a check in a
payment batch.
• Electronic. An electronic funds transfer file you generate and
deliver to your bank to create payments.
• Wire. Wire transfer of funds between your bank and your
supplier’s bank.
• Clearing. Used for recording invoice payments to internal
suppliers within your organization.
Void. Payables enables this check box if you have voided the payment.
[] (Descriptive Flexfield). Payables displays any values from the
Payment’s descriptive flexfield. If you use a local version of Payables,
consult your county–specific documentation for more information on
this flexfield.
Buttons
Scheduled Payment. Navigates to the Scheduled Payments window.
Payment Overview. Navigates to the Payment Overview window
which displays additional payment information. From this window
you can navigate to the Payments Workbench, the Banks window, or
the Suppliers window.
Reviewing Invoice Batches
Prerequisite
❑ Enable the Batch Control Payables option. See: Payables Options:
page 2 – 57.
"
4 – 294
To review invoice batches:
1.
Find the invoice batch. See: Finding Invoice Batches: page 4 – 289.
2.
To see detailed information on any invoice in the batch, in the
Invoice Batches window choose the Invoices button.
Oracle Payables User Guide
Reviewing Invoices
You can review invoices in either the Invoice Workbench or the Invoice
Overview window. If you want to be able to enter complex query
criteria, review multiple invoices, or review all details about invoices,
use the Invoice Workbench. If you just want to review high level
invoice information for a single invoice, such as invoice status, active
holds, scheduled payments, and actual payments, use the Invoice
Overview window. See: Invoice Overview: page 4 – 288.
Note: You can view the detail accounting lines for the
transaction in the form of a balanced accounting entry (i.e.,
debits equal credits). You can also choose to view the detail
accounting as t–accounts.
See: Viewing Accounting Lines: page 7 – 26
"
To review invoices in the Invoice Workbench:
1.
Find the invoice using the Find Invoices window. See: Finding
Invoices: page 4 – 290.
2.
If you want to review invoice distributions, scheduled payments,
holds, or payments, choose the appropriate button in the Invoices
window.
Invoices
4 – 295
Calculating a Supplier or Supplier Site Balance
The Calculate Balance Owed window shows how much you owe a
supplier and how many unpaid invoices you have in the system for the
supplier.
"
To calculate a supplier or supplier site balance:
1.
4 – 296
Oracle Payables User Guide
Open the Find Invoices window from the Invoices window, either
by choosing the Find icon from the Toolbar or by selecting Find
from the View menu. Enter the supplier name, site name, or other
unique supplier or supplier site information. Optionally restrict the
balance to invoices of a particular status or hold. Payables
calculates the balance based on the combination of criteria you
enter. If you do not enter a currency, all invoices are included
regardless of currency and the balance is shown in the functional
currency.
2.
"
Choose Calculate Balance Owed to have Payables navigate to the
Calculate Balance Owed window. Optionally check Take Discount
to have Payables reduce the balance by available discounts.
Choose Calculate to have Payables display the total due amount
and the total number of unpaid invoices that match the criteria you
entered. Payables also displays and includes in its calculation any
unpaid and available prepayments.
To calculate a supplier or supplier site balance in a foreign currency:
1.
Open the Find Invoices window from the Invoices window, either
by choosing the Find icon from the Toolbar or by selecting Find
from the View menu. Enter the supplier name, site name, or other
unique supplier or supplier site information. Enter the currency for
which you would like to calculate the balance. Optionally restrict
the balance to invoices of a particular status or hold. Payables
calculates the balance based on the combination of criteria you
enter.
2.
Choose Calculate Balance Owed to have Payables navigate to the
Calculate Balance Owed window. Payables displays the amounts
in both the entered currency and your functional currency.
Enter a default exchange rate for Payables to use to convert into
your functional currency your foreign currency invoices that do not
have an exchange rates. Choose Calculate to have Payables display
for the invoices that match your criteria the Balance Owed in both
the foreign and functional currency, and the total number of unpaid
invoices. Payables also displays and includes in its calculation any
unpaid and available prepayments.
Calculate Balance Owed Window Reference
This window shows a supplier balance for the invoices that match the
criteria you enter in the Find Invoices window.
Default Exchange Rate: If you have foreign currency invoices that do
not yet have exchange rates, you can calculate the balance with an
exchange rate you enter in the window. The exchange rate you enter
will not update the invoices; you are still required to submit AutoRate
or enter an exchange rate in the Invoices window.
Balance Owed: Unpaid invoice amount minus available prepayments.
If you have enabled the Include Outstanding Future Dated Payments
Invoices
4 – 297
check box, then Payables also subtracts the sum of any outstanding
(issued but not matured) future dated payments
Number of Invoices: Number of unpaid invoices, not including
unpaid prepayments.
Number of Prepayments: Number of available prepayments.
See Also
Supplier Customer Netting Report (Oracle Receivable User’s Guide)
Adjusting Invoice Batches
"
To adjust an invoice batch:
1.
Find the invoice batch. See: Finding Invoice Batches: page 4 – 289.
In the Invoice Batches window you can do the following:
• Modify batch invoice defaults. Invoice batch defaults you enter
in the Invoice Batches window apply to invoices you enter after
entering or changing an invoice batch default. For example, if
half of the invoices you are entering are standard and half are
credit memos, after you have entered all standard invoices, you
can change the Type default to Credit Memo so you will not
need to enter Type for each credit memo.
To change a field for an invoice you have already entered, you
must make the change directly to the invoice in the Invoices
window. See: Adjusting Invoices: page 4 – 299.
• Modify Control Count and Control Total. If you find a
duplicate invoice when entering a batch, you may want to throw
it away and adjust the control count on your batch. Payables
allows you to change the control count or control total at any
time before creating journal entries.
• Add invoices to a batch. You can add invoices to a batch at any
time.
• Delete invoices from a batch. You can delete an invoice from a
batch at any time before the invoice has been approved.
2.
4 – 298
Oracle Payables User Guide
Save your work.
"
To delete an invoice batch:
H
You cannot delete an invoice batch that contains invoices. If you
want to delete an invoice batch, you must delete the invoices in the
batch.
See Also
Invoice and Invoice Batch Adjustment Restrictions: page 4 – 308
Adjusting Invoices
Authorized users can make adjustments to invoice details,
distributions, and scheduled payments, even if the invoice has been
accounted or paid. After you make an adjustment to an invoice, you
may need to submit Approval before you can pay it. If you adjust
payment terms or any scheduled payment information on an approved
invoice, you do not need to resubmit Approval.
See: Invoice and Invoice Batch Adjustment Restrictions: page 4 – 308
for more information on adjusting different types of invoices and
invoice distributions.
Remem