1
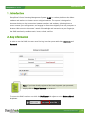
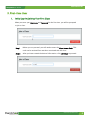
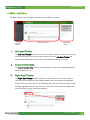
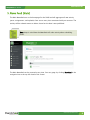
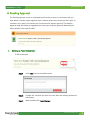
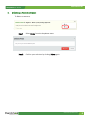
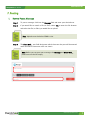
SLMS Student Guide
SharpSchool User Manual
SHARPSCHOOL
USER MANUAL
SLMS
STUDENT GUIDE
For more information, please visit:
www.customernet.sharpschool.com
www.sharpschool.com
0
SharpSchool User Manual
SLMS Student Guide
TABLE OF
CONTENTS
1. INTRODUCTION ............................................................................................................ 1
2. KEY INFORMATION ....................................................................................................... 1
3. FIRST-TIME USER ......................................................................................................... 2
I.
INITIAL LOG-IN/JOINING YOUR FIRST CLASS ...................................................... 2
4. MAIN-INTERFACE ......................................................................................................... 3
I.
II.
III.
LEFT-HAND TOOLBAR .................................................................................. 3
CENTER CONTENT AREA ............................................................................... 3
RIGHT-HAND TOOLBAR ................................................................................ 3
5. NEWS FEED (MAIN) ...................................................................................................... 4
6. PENDING APPROVAL .................................................................................................... 5
I.
II.
EDITING A POST/COMMENT ........................................................................... 5
DELETING A POST/COMMENT ......................................................................... 6
7. POSTING ...................................................................................................................... 7
I.
II.
III.
HOW TO POST A MESSAGE ............................................................................ 7
COMMENTS .............................................................................................. 8
LIKING ................................................................................................... 8
8. ASSIGNMENTS .............................................................................................................. 9
I.
II.
HOW TO SUBMIT AN ASSIGNMENT ................................................................... 9
VIEWING SUBMISSIONS ............................................................................. 11
www.sharpschool.com
SLMS Student Guide
SharpSchool User Manual
1. Introduction
SharpSchool’s Social Learning Management System (SLMS) is a robust platform that allows
students and teachers to interact across a digital medium. The system is designed to
innovate the day-to-day interactions between teachers and students, allowing them to
access content, post assignments, and engage in discussions digitally from any computer or
browser. With an entire classroom’s worth of knowledge and interaction at your fingertips,
the SLMS seamlessly combines work, home, school, and fun.
2. Key Information
In order to use the SLMS, the user must first log into the system with their Username and
Password.
Note: If you have already registered but have forgotten your password,
simply click on Forgot Password to retrieve it.
To access the SLMS, teachers can click the My Classes link adjacent to the Select a School
dropdown.
www.sharpschool.com
1
SLMS Student Guide
SharpSchool User Manual
3. First-time User
I.
Initial Log-in/Joining Your First Class
When you enter your Username and Password for the first time, you will be prompted
to join a class.
Step 1
Before you can proceed, you will need to enter the Class Access Code. This
code can be attained from teachers associated with the class.
Step 2
After you have entered the desired information, click Join Class to proceed.
www.sharpschool.com
2
SLMS Student Guide
SharpSchool User Manual
4. Main-Interface
The Main-Interface for the SLMS is broken into three distinct sections:
Left-hand
Toolbar
I.
Center Content Area
Right-hand
Toolbar
Left-hand Toolbar
The Left-hand Toolbar gives the user access to global feeds for every class that they
are associated with. Any of the options chosen under the Left-hand Toolbar will
display pages populated by every class associated with the user’s account.
II.
Center Content Area
The Center Content Area displays the body content of the selected page (Newsfeed,
Pending Approval, etc…)
III.
Right-hand Toolbar
The Right-hand Toolbar displays activity and tasks specific to the current level or
class the user has selected. At the global viewing level, the toolbar will aggregate
activity from every class the user is associated with, and at the class level the toolbar
will only aggregate activity from that class. The tool bar also produces badges that
list the number of tasks under each heading.
www.sharpschool.com
3
SLMS Student Guide
SharpSchool User Manual
5. News Feed (Main)
The Main Newsfeed acts as the homepage for the SLMS and will aggregate all new activity
(posts, assignments, and uploads) from across every class associated with your account. The
activity will be ordered newest to oldest, based on the date it was published.
Note: Keep in mind how the Newsfeed will order activity when scheduling
posts.
The Main Newsfeed can be accessed at any time, from any page, by clicking Newsfeed in the
navigation bar at the top left-hand of the screen.
www.sharpschool.com
4
SLMS Student Guide
SharpSchool User Manual
6. Pending Approval
The Pending Approval screen is populated by the number of posts or comments that you
have, which currently require approval from a teacher before they can go live. Every post, or
comment, you create in the classes you are connected to require approval. The Pending
Approval page will display an aggregation of every post requiring approval (depending on
either global or class specific view).
I.
Editing a Post/Comment
To Edit a comment,
Step 1
Select Edit from the dropdown menu
Step 2
Change the comment by select the text field and editing the desired
information
Step 3
When finished click, Save Changes.
www.sharpschool.com
5
SLMS Student Guide
SharpSchool User Manual
II.
Deleting a Post/Comment
To Delete a comment,
`
Step 1
Select Delete from the dropdown menu
Step 2
Confirm your selection by clicking Delete again.
www.sharpschool.com
6
SLMS Student Guide
SharpSchool User Manual
7. Posting
I.
How to Post a Message
Step 1
To post a message, click into the Message field and enter your desired text.
Step 2
If you would like to attach a file (or files), select File to enter the file browser
and select the file (or files) you would like to upload.
Note: Uploads must be below 25MB in size.
Step 3
The Share With… text field designates which classroom the post will be entered
under and which classroom users can view it.
Note: Before you can post your message, the Message and Share With…
fields must not be left empty.
www.sharpschool.com
7
SLMS Student Guide
SharpSchool User Manual
II.
Comments
Commenting allows Teachers and students to engage each other over assignments,
posts, and other content. Comments work differently for Teachers and students inregards to permissions and when they are displayed for shared viewing. Teacher
comments are automatically approved, while student comments require administrative
approval before they are made public.
Student Commenting (Approval)
Student comments require teacher approval before they can go public. To submit a
comment for approval, simply enter the desire text into the Write a comment field… and
press Enter on your keyboard.
III.
Liking
SharpSchool’s SLMS allows students and teachers to partake in a “Like” feature to show
support for a post, or acknowledge that they viewed a comment. Students and teachers
can simply click the Like icon (
) to like a post or comment.
www.sharpschool.com
8
SLMS Student Guide
SharpSchool User Manual
8. Assignments
SharpSchool’s SLMS allows students to submit assignments for their classes and have them
graded through the system.
I.
How to Submit an Assignment
Step 1
To submit an assignment, navigate to either the Global Assignments section
by clicking the Assignments link on the left toolbar, or enter a specific class
and select the Assignments link on the right toolbar.
Step 2
Navigate to an assignment and click Submit Assignment
www.sharpschool.com
9
SLMS Student Guide
SharpSchool User Manual
Step 3
When submitting an assignment, students are required to attach a file by
selecting File under the Attach section. Students are required to enter a
message to their teacher attached to the submission.
Step 4
Once the file has been selected and uploaded, click Submit Assignment to
finish the process.
www.sharpschool.com
10
SLMS Student Guide
SharpSchool User Manual
II.
Viewing Submissions
Step 1
To view submitted assignments, navigate to the assignment post in a
desired classroom.
Step 2
Click the View Submission button within the desired assignment post.
Step 3
Once you have selected an assignment, you will be taken to the Your
Submissions page.
Step 4
Click through the different submissions you have made to the assignment
to view the file. Click the attachment to view the submission.
www.sharpschool.com
11
SLMS Student Guide
SharpSchool User Manual
III.
Resubmitting Assignments
Step 1
To resubmit and assignment, navigate to the desired assignment and click
Resubmit Assignment.
Step 2
The previous submission will be catalogued and dated in order to keep
simple track of which submission is most recent and relevant.
Step 3
When you have finished making your submission corrections, click
Resubmit Assignment in the bottom right corner of the input field.
www.sharpschool.com
12
SLMS Student Guide
SharpSchool User Manual
IV.
Viewing Feedback for Assignments
Step 1
To view feedback on a given assignment, navigate to the desired
assignment posting and click View Feedback.
Step 2
From this screen, students are able to view the due date of assignments,
the number of submissions made, the grading of the assignment, and any
comments left by their teachers.
www.sharpschool.com
13