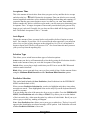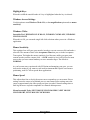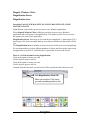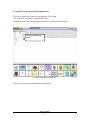
1
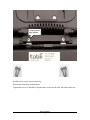
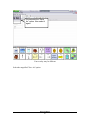
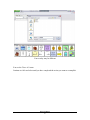
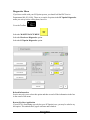
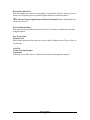
Getting Started with ECOpoint ™ For ECO2 and ECO-14 A Supplement to the ECO™ Manual PRC HEADQUARTERS 1022 Heyl Rd • Wooster, OH 44691 Telephone: (330 262-1984 • (800) 262-1984 Fax: (330) 263-4829 E-mail Address: [email protected] Web Site Address: www.prentrom.com ECOpoint Manual 14829v2.0 PRC INTERNATIONAL Liberator Ltd Minerva Business Park Lynch, Peterborough, Cambridgeshire PE2 6FT UK Fax: +44 845 2661155 E-mail Address: [email protected] Web Site Address: www.liberator.co.uk ECO, ECOpoint and WordCore are trademarks of Prentke Romich Company. Minspeak and Unity are registered trademarks of Semantic Compaction Systems, Inc. in the United States and other countries. Pixon is a trademark of Semantic Compaction Systems, Inc. Semantic Compaction is a trademark of Semantic Compaction Systems, Inc. PCS Symbols are a product of Mayer-Johnson. Fonix-DECtalk Text-to-Speech software is a copyright of Fonix Corporation; all rights reserved. RealSpeak Text-to-Speech is a trademark of Nuance Communications, Inc. AT&T Natural Voices is a trademark of AT&T Corporation. Acapela speech technologies licensed from the Acapella Group. Non-English text-to-speech supplied by the Acapela Group and RealSpeak Text-to-Speech, a trademarked product of Nuance Communications, Inc. Windows, WindowsXP, Windows Explorer, Windows Media Player, Microsoft Outlook, Microsoft Word, Windows WordPad and Microsoft PowerPoint are registered trademarks of Microsoft, Inc. IBM is a registered trademark of International Business Machines. Tracker is a trademark of Madentec, Inc. Headpointing technology by Madentec IntelliTools is a registered trademark of IntelliTools, Inc. HeadMouse is a trademark of Origin Instruments, Inc. ECOpoint is a product developed by PRC in collaboration with Tobii Technology(AB) Bluetooth Wireless Technology is a registered trademark. The Bluetooth word mark and logos are owned by the Bluetooth SIG, Inc. and any use of such marks by PRC is under license. Other trademarks and trade names are those of their respective owners. WordQ is a trademark of Bloorview MacMillan Children's Centre Paint Shop Pro software is copyrighted by JASC Software, Inc. Image Viewer/32 is shareware from SB Software. Digital photos of the devices courtesy of Doug Miller ELECTRONIC INTERFERENCE INFORMATION This device complies with Part 15 of the FCC Rules. Operation is subject to two conditions: (1) this device may not cause harmful interference, and (2) this device must accept any interference received, including interference that may cause undesired operation. Warning! Changes or modifications to this product which are not authorized by Prentke Romich Company could exceed FCC limits and negate your authority to use this product. This equipment has been tested and found to comply with the limits for a Class B digital device, pursuant to Part 15 of the FCC Rules. These limits are designed to provide reasonable protection against harmful interference in a residential installation. This equipment generates, uses and can radiate radio frequency energy and, if not installed and used in accordance with the instructions, may cause harmful interference to radio communications. However, there is no guarantee that interference will not occur in a particular installation. You can determine whether this product is causing interference in your radio or television by turning this product off. If the interference stops, it was probably caused by this product or one of its accessories. You can attempt to correct the interference by using one or more of the following measures: • Turn the television or radio antenna until the interference stops. • Move this product to one side or the other of the television or radio. • Move this product farther away form the television or radio. • Plug this product into an outlet that is on a different circuit from the television or radio; that is, this product should be controlled by different circuit breakers/fuses from the television or radio. • If necessary, contact a Prentke Romich Company service technician for assistance. This device complies with Part 15 of the FCC Rules. Operation is subject to the following two conditions: (1) this device may not cause harmful interference, and (2) this device must accept any interference received, including interference that may cause undesired operation. This device contains FCC-ID POOWML-C40. Bluetooth QD ID B013848 This Class B digital apparatus meets all requirements of the Canadian Interference-Causing Equipment Regulations. Cet appareil numérique de la classe B respect toutes les exigences du Règlement sur le matériel brouiller du Canada. Tobii/ATI has tested the eye-tracker system to comply with IEC/EN 60825-1/A1-A2 class 1 LED products intended to be used for long time exposure. (COGAIN 2007, Intertek ETL Semko 2005) CLASS 1 LED PRODUCT –The Tracker Headpointing option falls within the limits of a Class 1 LED product as specified by CENELEC EN 60825-1, Amendments 1 and 2. CE ENVIRONMENTAL INFORMATION: Use: 0o - 45o C; Storage: (-20o) - 50o C; 95% maximum relative humidity @ ambient temperatures less than 40o C. Attention! Consult accompanying documents. This device not intended to be an emergency call device or sole communication device. Warnings! When operating this device in a medical environment, do not use with any product that is not medically approved. Follow the medical environment's rules for infrared, computer and cell phone use. Any mounts used should be fitted by a qualified person. Failure to install the mounting system according to the manufacturer's instructions may result in an injury to the user. ©Prentke Romich Company 2009-2010. All rights reserved. Under copyright laws this manual may not be copied, in whole or in part, without the written consent of the Prentke Romich Company. ECOpoint Manual ii Table of Contents Table of Contents............................................................................................................ iii Extremely Important—Before You Begin ...................................................................... 5 Mounting the ECOpoint System on your ECO ............................................................... 7 Positioning the ECOpoint.............................................................................................. 14 Calibrate the ECOpoint ................................................................................................. 27 Calibrate Now....................................................................................................................................... 27 Eye Track Settings................................................................................................................................ 27 Calibration Settings .............................................................................................................................. 28 Other ECOpoint Access Method Menu Options ........................................................... 29 Eye Track Status................................................................................................................................... 29 Pause/Resume....................................................................................................................................... 31 Pointer Color ........................................................................................................................................ 31 Pointer Size........................................................................................................................................... 31 Pointer Type ......................................................................................................................................... 31 Acceptance Time .................................................................................................................................. 32 Auto Repeat.......................................................................................................................................... 32 Selection Type ...................................................................................................................................... 32 Predictive Selection .............................................................................................................................. 32 Highlight Keys...................................................................................................................................... 33 Windows Access Settings..................................................................................................................... 33 Windows Clicks.................................................................................................................................... 33 Mouse Sensitivity ................................................................................................................................. 33 Mouse Speed ........................................................................................................................................ 33 Magnify Windows Clicks..................................................................................................................... 34 Magnification Factor ............................................................................................................................ 34 Magnification Area............................................................................................................................... 34 Diagnostics Menu................................................................................................................................. 38 Practice .......................................................................................................................... 40 ECOpoint Manual iii iv Extremely Important—Before You Begin Skip this section if ECOpoint is already mounted on your ECO. Go to page 14 to learn about positioning your system; page 27 to learn about calibrating the ECOpoint; and page 29 for more system and setting options. If the ECOpoint is NOT MOUNTED on your ECO you MUST follow the directions below! On your ECO, go to the Toolbox and open the MAINTENANCE MENU. In the System Information Box, look for the OS version number. OS Version = 6.01 (or higher) means you do not have to complete a software update. ECOpoint Manual 5 If the OS version is listed: If the OS version number is 6.01 or above, you do not have to update software. Go to the instructions for attaching ECOpoint beginning on page 7. If the OS version is lower than 6.01 or is not listed at all: If you do not see the OS version listed, or it is lower than 6.01, you MUST update your software before you mount the ECOpoint system on your ECO. To Update Software: 1. Back up the vocabulary in your ECO by performing a Memory Transfer. See the TRANSFER MEMORY MENU chapter in the ECO User Manual on the support CD or use this link for instructions about memory transfers. http://support.prentrom.com/article.php?id=478 2. When the vocabulary is backed up, find the ECO RESTORE DISK and the instructions for using for it that came with your ECOpoint unit. If you already have a Restore Disk for your ECO, you will need to use the disk that has the latest version number on it. For instance, if the version number for one of your disks is 1.05 and the version number on the other disk is 1.07, use the Restore Disk with the highest version number. 3. FOLLOW THE RESTORE DISK INSTRUCTIONS EXACTLY AS THEY ARE WRITTEN. When the Restore Disk process is completed, you can mount the ECOpoint system on your device. See the next page. ECOpoint Manual 6 Mounting the ECOpoint System on your ECO Remove screw Remove screw Remove screw Remove screw Remove these 4 screws Before you start: Make sure the ECO is OFF. Turn the ECO OFF. Carefully place the ECO face down on a flat surface. Remove the four screws (shown above) from the back of the case You will not need these screws unless you remove the ECOpoint system from your device. We suggest you put the screws in a small bag and label the bag in case you need the screws at a later date. ECOpoint Manual 7 Remove the bracket and the four black screws from the ECOpoint parts bag. There are two long screws and two shorter screws. Long screws here Long screws here Short screws here Short screws here Do not put the screws in yet. The longer screws will go on top of the bracket The shorter screws will go on the bottom of the bracket. Do not attach screws yet. Longer screws go in top of bracket Shorter screws go in bottom of bracket ECOpoint Manual 8 Longer post goes here. Shorter post goes here. Fit the small round posts on the top of the bracket into their holes on the ECO case. Long screws in top holes Short screws in bottom holes. When the posts are secure in the holes the bracket looks like the picture above. Place the long screws in the top holes and the short screws in the bottom holes. Tighten the screws until the bracket is secured to the ECO case. ECOpoint Manual 9 Line up tabs on ECOpoint with slots on bracket Pick up the ECOpoint unit. Make sure the label is visible to you. (See picture above) Slide the tabs on the ECOpoint unit into the slots available for them in the ECO case. ECOpoint tab in slot, lined up with hole ECOpoint Manual 10 Insert screws and tighten Find the silver screws in your parts bag. Place them in the holes in the bracket. Tighten the screws so that the ECOpoint unit is secured to the tabs, the bracket and case. ECOpoint Manual 11 ECO-2 Connection Your cable may be slightly different from the one pictured here but it will connect to the ECO2 in the exact same way as described below. Plug the power cable into the hole on the right side of the case (as you are now looking at the device.) Plug the USB end of the cable into the USB port on the back of the case to complete the assembly. ECOpoint Manual 12 ECO-14 Connection Plug the power cable into the hole on the right side of the case (as you are now looking at the device). USB ports USB end of cable Plug the USB end of the cable into one of the USB ports on your ECO to complete assembly. ECOpoint Manual 13 Positioning the ECOpoint The positioning of the ECOpoint system in relation to the user is extremely important. The goal of positioning is to achieve a stable eye image for the ECOpoint to track. Because of this you will probably have to try out different positions. Once you begin setting options you may have to refine the positioning again. When the image of your pupils is stable you are ready to use the system. ECOpoint System Parameters The ECOpoint "eyebox" is measured at 10" x 15" x 8". As long as your eyes are within this area you are in the view range of the ECOpoint. At this time you must be positioned 20 to 24 inches from the ECO screen. If you move in and out of the view area, the system will "remember" you. This means that once you set up the system you should not have to recalibrate it because of body movement. Imaginary Eyebox (or Gazing Area) The ECOpoint eyebox is 10" x 15" x 8". As long as your eyes are within this area you are in the view range of the ECOpoint. At this time, you must be positioned 20-24 inches from the ECO screen. If you move in and out of the view area, the system will "remember" you. This means that once you set up and calibrate the system, you should not have to recalibrate because of body movement. The positioning mount should be both sturdy and adjustable. ECOpoint Manual 14 Meeting the following positioning requirements will help you achieve success with the ECOpoint system: 1. You must have one eye (preferably two) within the eyebox. 2. You should be between 20 and 24 inches from the ECO screen. 3. Your nose must be aimed at, or slightly above, the midpoint (or upper 2/3ds of the ECO screen. 4. Your face must be straight-on to the ECO screen. If you are tilted due to positioning or posture, the ECO/ECOpoint must be tilted at a similar angle so that your face is directly in front and within 20-24 inches of the ECO. 6. There can be no obstructions between your face and the ECO/ECOpoint. Mount the ECO with the ECOpoint attached securely to the mount you are going to use. Once you have the whole unit mounted securely, turn your ECO ON. Go to the Toolbox and select the ACCESS METHOD MENU . Select the ECOpoint option. Select the Eye Track Status option. You will use the Eye Track Status window to help find the best positioning for your ECOpoint and yourself. Eye Track Status window. Eye Track Status option. ECOpoint Manual 15 ECOpoint is designed to track where your eyes are looking. It is most accurate when your eyes are centered inside an imaginary box that is 15 inches wide, 10 inches high and 8 inches deep. The center of this box is located approximately 22 inches from the screen of the ECO The Eye Track Status Window allows you to see if your eyes are within the ECOpoint's field of view. When the track status window is open, you should see to two white circles on a black background. If you physically have only one eye, you will see a single circle. The circles may move as your eyes move but they should not be "flickering". If "flicker" is present, it is most likely that you will have to adjust the position of the user or the device. Positioning Adjust the angle of the device until the front of your face and the display are parallel. ECOpoint Manual 16 Device not adjusted to user's gaze. Device not adjusted to user's gaze. INCORRECT POSITIONING Both of the above positions are incorrect. The device has not been adjusted for the user's position. Notice the Eye Track Status window. There are either no white circles (your eyes) visible or there is only one circle. (These pictures assume you have both eyes; if you physically have only one eye, you will see only one circle.) ECOpoint Manual 17 In both illustrations, device is adjusted to user's gaze CORRECT POSITONING In these graphics, the ECO has been adjusted for the user's position. Notice that the white circles in the Eye Track Status window are now aligned. ECOpoint Manual 18 Your eyes should be between 20 and 24 inches from the screen. When the yellow triangle is in the center your distance position is correct. The yellow triangle shows your distance position inside the imaginary box. Adjust your distance from the ECO until the yellow triangle is at the widest (center) part of the green diamond. Notice yellow triangle is not in center of green diamond. Too Far ECOpoint Manual 19 Notice yellow triangle is not in center of green diamond. Too Close Your nose should be pointed at the vertical middle of the screen and your eyes should be looking at the top 1/3rd of the screen. The yellow triangle is centered in the green diamond and the white circles are a little above the center of the window. ECOpoint Manual 20 Notice the circles are too high in the window. Notice the circles are too low in the window. Too High Too Low The white dots show the relative position of your eyes inside the imaginary box. Adjust the vertical position of your ECO until the dots are vertically centered in the black box. ECOpoint Manual 21 Your nose and eyes should be pointed at the horizontal center of the screen Graphic is looking down on user and device. The eyes and nose are pointing toward the center of the device. ECOpoint Manual 22 Too Far Left Too Far Right Look at the Eye Track Status window. The white dots show the relative position of your eyes inside the imaginary box. Adjust the horizontal position of your ECO until the dots are horizontally centered in the black box. ECOpoint Manual 23 The vertical and horizontal axes of the ECO should be aligned with the vertical and horizontal axes of your head. In this graphic the head is horizontally and vertically aligned with the ECOpoint system. Notice the white circles are aligned in the Eye Track Status window and the yellow arrow is in the center of the green diamond. ECOpoint Manual 24 If your head is tilted to the left or right, tilt the ECO to match the angle of your head. Incorrect Notice the white circles in the Eye Track Status windows. They show the relative tilt of your eyes inside the imaginary box. The ECO has not been adjusted for this tilt. ECOpoint Manual 25 The Postions in both Graphics are Correct In these graphics, the left-right tilt of the ECO has been adjusted to match the user's position. The white circles are now horizontally level in the Eye Track Status window. You are now ready to calibrate the system. ECOpoint Manual 26 Calibrate the ECOpoint Before you calibrate your ECOpoint, make sure you have used the Eye Track Status window to help correctly position the user and the ECOpoint. See pages 14-27. "Insertable Tool" under an option below indicates the option can be assigned to a key on your overlay or stored under a sequence using the Insertable Tool function. These options are specifically helpful for ECOpoint. See the Store/Assign Tools…chapter in your manual for information about assigning Tools to keys. If you are not already in the ECOpoint menu, do the following: Open the ACCESS METHOD MENU. If the menu does not open to the ECOpoint page, select ECOpoint. Select the Calibrate Now option. Calibrate Now Insertable Tool: CALIBRATE ECOPOINT Let your eyes follow the target around the screen. The 5-point calibration process allows ECOpoint to track and learn your eye-gaze. Default calibration settings will be used unless you change the settings in the Calibrate Settings option. When the calibration is finished, select OK. You can begin tracking with ECOpoint once the pointer appears. If you have problems using the system after calibration, try making adjustments in any of the following options. Eye Track Settings Adjust these settings if you wear glasses. Using Glasses If you wear glasses while you use the ECOpoint system, answer YES. If not, reply NO and OK to close the menu. Right and Left Diopter: This is your glasses prescription. If you answered YES to Wearing Glasses, fill in the diopter number for your right and left eyes. You can ask your eye doctor for these figures. They can be positive or negative. If you are not wearing glasses, do not fill in these two options. ECOpoint Manual 27 . Calibration Settings The options in this menu help personalize the ECOpoint system for your eyes. As you experiment with some of these options you may also have to re-work the positioning of the system. Choose the settings you want and select OK. Then select the Calibrate Now option to perform a calibration. Stimulus Type: Point, Image If you select Image or Video you must have an Image or Video file stored in your device or a USB flash drive to be displayed. Image files are recommended when a user has difficulty looking specifically at the Point or is better motivated by a personal image. If you select Point you can also select a Pointer Color. Stimulus Size: Small to Large This increases or decreases the size of the point, image or video that is being displayed during calibration. For the most accurate calibration it is best to use a smaller point or image. Stimulus Speed: Normal, Fast, Very Fast, Slow, Very Slow Adjust this option if there are motor issues with the eye's ability to perform smooth pursuits. If an individual has visual tracking problems, we suggest you decrease the speed of the stimulus. Active Eye: Both, Left, Right or Single Eye. Both means that ECOpoint will track both your eyes as you look at the screen; Left or Right means that ECOpoint will see both your eyes but will track only the eye that you have selected in this option; select Single Eye if you have only one eye (e.g., you wear a patch over one of your eyes or have lost an eye). Stimulus Sound: YES (on), NO (off) If the sound is on, you will hear a beep at the end of a gaze point calibration. Keyboard Step-through: YES (on), NO (off) Allows the user to step through each calibration point manually. A USB keyboard must be plugged into the ECO in order to use this option. You must use the "s" key on the keyboard to step through the calibration. ECOpoint Manual 28 Calibration Area: Large, Medium or Small. Select the area of the screen that you want to use for calibration. The size you select is only for eye-tracking calibrations; you will be able to use the whole screen when you are actually using the ECO with the ECOpoint system. You may want to select a calibration area, do the calibrations and then practice on the ECO screen. You may have to try out the all the calibration areas before you find and are satisfied with the one that will work best for you. Eyegaze Calibration: Per User Area or Global. This determines if the eyegaze is calibrated once for the entire device (Global) or if each User Area has its own calibration (Per User Area). Select Background Color: You can select a color for the calibration area. This is useful if you have visual problems that are helped when you are looking at certain colors. Select Pointer Color: If you select Point for your Stimulus Type, you can select a Pointer color. Select Image: You can select an icon to use as the image you look at when you are calibrating your ECOpoint. If you do not want to use an icon you can select an image you already have stored on a USB drive or a folder on your ECO. This is useful if your eyes track an image better than a dot or point. Other ECOpoint Access Method Menu Options Eye Track Status Insertable Tool: ECOPOINT EYE TRACK STATUS See pages See pages 14-27. for more information about this option. This option allows you to open (and close) the Eye Track Status window to see if your eyes are within the ECOpoint's field of view. When the track status window is open, you should see to two white circles on a black background. If you have only one eye, you will see a single circle. The circles may move as your eyes move but they should not be "flickering". If "flicker" is present, it is most likely that you will have to adjust the position of the user or the device. ECOpoint Manual 29 You will see something similar to the picture above when you select Eye Track Status. At the top of the Eye Track Status box is a yellow arrow on a green background. If the user is in the view area, the arrow will be located in the center between to two red boxes. To Close the Status Window Select the Eye Track Status option in the menu; Click the small red box with an "x" in it in the top right corner of the status window; Assign the ECOPOINT TRACK STATUS tool to a key on your overlay to toggle the window open and closed. ECOpoint Manual 30 Pause/Resume Insertable Tool: DISABLE POINTER Use this option to stop and restart the ECOpoint system while you make adjustments to ECOpoint settings and options. Only Direct Selection will work when ECOpoint is paused. To Pause ECOpoint: Method 1 Go to the Toolbox and open the ACCESS METHOD MENU Press or gaze at the Pause/Resume option to set (or release) Pause. Method 2 and Gaze directly at the infrared window between the the front of the ECO case until PAUSE or RESUME is selected. keys on Method 3 Assign the insertable Tool DISABLE POINTER to a key on your overlay. Press the key to set PAUSE. Press again to set RESUME. See the Store/Assign Tools…chapter in your manual for information about assigning Tools to keys. Pointer Color A pointer color should help you find the pointer easily and to maintain you gaze on it. Pointer Size This option allows you to adjust the pointer size from 5 to 45 pixels in diameter. The default size is 20. A larger pointer size may impact an individual's ability to maintain eye contact with the target key. Pointer Type This option allows you to select the type of pointer you want to use. The options are Shrinking Dot, Clock and Invisible. You can use this in conjunction with Highlight Keys option. We suggest you experiment with this option to see which pointer works best for you. ECOpoint Manual 31 Acceptance Time This is the amount of time it takes from when you gaze at a key until the device accepts and selects the key. With ECOpoint, the Acceptance Time can often be set to a much shorter length than with other access methods (including head tracking and scanning). If you notice that the gaze cursor begins to move over the key you want, then suddenly shifts to another key before a selection can be made, you may want to try shortening your Acceptance Time. A longer Acceptance Time means you must hold your gaze on a key longer to get it selected. Generally, the eye does not like to hold still for long periods of time. The default Acceptance Time is .7 seconds. Auto Repeat Choose the amount of time you must look at a selected key before it begins to repeat itself. For example, if you select 1/0 of a second for the auto repeat time, you must first select a key on your overlay, then gaze at the selected key for 1/10 of a second until it begins to repeat itself. The key will repeat at 1/10th of a second intervals until you move your eyes away from the repeating key. Selection Type This allows you to switch between three types of selection options: Auto means your device will automatically select the key using dwell selection which is based on the amount of time you set in the Acceptance Time option. Switch allows you to plug a single switch into your ECO or to use the PRC Bluetooth switch to make selections. Blink allows you to open and close your eyes for a period of time. Set the amount of time using the Minimum Blink Duration and the Maximum Blink Duration options. Predictive Selection This works hand-in-hand with Icon Prediction. (Icon Prediction is in the FEEDBACK MENU and the default is ON.) When you turn Predictive Selection On, your device highlights only those icons where messages are stored. These highlighted icons are the only keys on the keyboard that will produce a response. You can change the color of the non-active keys to grey or white. Go to the FEEDBACK MENU, Icon Prediction and select Grey or White. Grey allows you to see the shadow of the icon on the key; white turns the entire key white so it looks blank. But if you try to select a grey or white key, nothing will happen. Note: Icon Prediction alone allows you to press grey or white keys. The key's icon will appear in the Icon display area but no message will be spoken. Icon Prediction will work whether Predictive Selection is On or not. ECOpoint Manual 32 Highlight Keys When this is ON the outside border of a key is highlighted when the key is selected. Windows Access Settings Use this option to turn Windows Clicks ON, set the magnification option and set mouse sensitivity. Windows Clicks Insertable Tool: WINDOWS CLICKS ON, WINDOW CLICKS OFF, WINDOWS CLICKS ON/OFF When this is ON, you can make single left-click selections when you are in a Windows application. Mouse Sensitivity This regulates how still your gaze must be in order to execute a mouse click and make a selection. The amount of time is the Acceptance Time that you set in the Acceptance Time option. The higher the mouse sensitivity level the more stable your gaze must remain in order to make a mouse click. A LOW sensitivity level will be best for most users as the eye has a natural tendency to move around a target. The default is NORMAL. As you become more experienced with ECOpoint and managing your gaze, you can increase the setting if you want to work in an environment that requires exact mouse positioning, such as CAD or spread sheet applications. Mouse Speed This adjusts how fast or slowly the mouse cursor responds to eye movement. Slower settings cause the cursor to lag behind your eye movement. Faster settings move the curser at approximately the same speed your gaze is tracked. Normal settings show a little lag but move at speeds comparable to a normal desktop mouse. Mouse Insertable Tools: NEXT MOUSE CLICK DOUBLE, NEXT MOUSE CLICK RIGHT, NEXT MOUSE CLICK HOLD. ECOpoint Manual 33 Magnify Windows Clicks Magnification Factor Magnification Area Insertable Tools: CLICK MAGNIFY ON, CLICK MAGNIFY OFF, CLICK MAGNIFY ON/OFF Magnification works when your mouse cursor is in a Windows application. When Magnify Window Clicks is ON you can select an area in your Windows application and it will appear in a magnified box. This makes it easier for you to select the options you want in your application. Magnification Factor: how large do you want the area magnified—2 times larger (2X) 4 times larger (4X). Select an option then try it out till you find the size that works well for you. The Magnification Area (in number of pixels) is the size of the area you are magnifying. We recommend that you select different numbers for Factor and Area and try them out in an application on your ECO. You'll then have a good idea of what works for you. There is a 2-click rhythm for using Magnification: Click on the option or menu you want. Click it again to open or select it. Click on the option or menu you want. Click it again to open or select it. Continue with this idea until you and your ECO have performed the action you want. With Magnification Click ON: When you click the "File" menu you see something similar to this. Your overlay may be different ECOpoint Manual 34 To open the File menu in the Word application: Click on (or select with your access method) the "File" menu. The word "File" will show up magnified in a box. Click on the word "file" in the magnification box to see the whole File menu. Click the option you want. Your overlay may be different Now you can click on an individual File menu option. ECOpoint Manual 35 We selected the "Save As" option. Now select it again. Your overlay may be different Select the magnified "Save As" option. ECOpoint Manual 36 . Your overlay may be different You see the "Save As" menu. Continue to click and select until you have completed the action you want to accomplish. ECOpoint Manual 37 Diagnostics Menu If you have trouble with your ECOpoint system, you should call the PRC Service Department (800-262-1990). There are a couple of options in the ECOpoint Diagnostics menu you can try before calling them, however. Go to the Toolbox Select the MAINTENANCE MENU Select the Hardware Diagnostics option. Select the ECOpoint Diagnostics option. Refresh Information Service may ask you to select this option and then to read off the information in the box in the center of the menu. Restart EyeGaze Application If your ECO is functioning correctly but your ECOpoint is not, you may be asked to try this option. This unloads the Eyegaze software and reloads it. ECOpoint Manual 38 Restart ECOpoint Unit This takes the previous option one step further. It unloads the EyeGaze software, powers down your ECOpoint, powers up the ECOpoint and then re-loads the software. The Restart Eyegaze Application and Restart ECOpoint Unit are both options you can try on your own. Erase Calibration Data This erases the stored calibration data for all Areas. You must recalibrate your unit after using this option. Eye Track Status Calibrate Now Both of these options are the same ones you use in the ECOpoint menu. They are here for convenience. Grid Size Gather Tracking Samples Log Results If necessary, your PRC Service Technician will walk you through these options. ECOpoint Manual 39 Practice As with most things, the best way to become adept at using the tracking system is to practice with it. The device needs to get used to your eyes and your eyes need to get used to the ECOpoint. If you don't expect perfection right from the start, the mistakes that come with the learning process will not be so frustrating. You may find that you have to fine tune the positioning of the ECOpoint. If so, remember to use the Eye Track Status window and then recalibrate. If you feel yourself getting frustrated or tired, move away from the ECOpoint (out of tracking range). When you look at anything for long periods of time without moving much, it is always good to take periodic breaks. ECOpoint Manual 40