1
Contents
I
Table of Contents
Foreword
0
Part I Using Help
10
Part II Program Installation
11
1 System Requirements
................................................................................................................................... 13
2 From a CD ................................................................................................................................... 13
3 From our Website
................................................................................................................................... 17
4 Local Area Network
...................................................................................................................................
Issues
18
5 Installing Upgrades
................................................................................................................................... 19
6 Moving the Program
................................................................................................................................... 20
7 Display Configuration
................................................................................................................................... 20
Part III Program Overview
21
Part IV The Main Screen
22
Part V The Alternate Interface
34
Part VI Getting Started
42
Part VII Six Steps to Painless Legal Billing
43
Part VIII Printing in the Program
55
Part IX Creating PDF Files
57
Part X Printing your own Letterhead
58
Part XI Creating Code Lists
58
1 Staff Categories
................................................................................................................................... 59
2 Staff Members
...................................................................................................................................
and Billing Rates
59
3 Task Codes ................................................................................................................................... 64
4 Activity Codes
................................................................................................................................... 66
5 Cost Codes ................................................................................................................................... 68
6 Productivity ...................................................................................................................................
Codes
71
7 Batch Codes................................................................................................................................... 74
Part XII Clients and Matters
75
1 New Clients ................................................................................................................................... 75
2011 Tussman Programs, Inc.
II
Tussman Program Release 10
2 Client Lookup
................................................................................................................................... 78
3 Browse Clients
................................................................................................................................... 80
4 Editing Clients
................................................................................................................................... 81
5 Client Lists ................................................................................................................................... 84
6 Client Labels................................................................................................................................... 86
7 New Matters ................................................................................................................................... 90
8 Select Clients
...................................................................................................................................
and Matters function
93
9 Tagging Clients
...................................................................................................................................
or Matters
95
10 Editing Matters
................................................................................................................................... 95
11 Client and Matter
...................................................................................................................................
Notes
99
12 Matter Lookup
...................................................................................................................................
and Browse
101
13 Transferring...................................................................................................................................
and Merging Matters
103
14 Matter Lists................................................................................................................................... 104
15 Matter Labels
................................................................................................................................... 105
16 File Status Options
................................................................................................................................... 109
17 Related Names
................................................................................................................................... 110
18 Conflict Check
................................................................................................................................... 112
19 Client Emails
................................................................................................................................... 113
20 Exporting Clients
...................................................................................................................................
and Matters
114
Part XIII Charges
116
1 Fee Charges
................................................................................................................................... 117
Types of Fee..........................................................................................................................................................
Charges
117
Hourly Charges
......................................................................................................................................................... 118
Nonbillable
.........................................................................................................................................................
Time
118
Flat Fee.........................................................................................................................................................
Charges
120
Overriding
.........................................................................................................................................................
Flat Fee Charges
120
Minimum.........................................................................................................................................................
Retainer Fee Charges
121
Entering Fee..........................................................................................................................................................
Charges
123
Location Codes
.......................................................................................................................................................... 130
Audit Trails and
..........................................................................................................................................................
Memos
130
Locating a Fee
..........................................................................................................................................................
Charge
130
Editing Fee Charges
.......................................................................................................................................................... 131
Writing Down
..........................................................................................................................................................
Fee Charges
133
2 Cost Charges
................................................................................................................................... 137
Types of Cost
..........................................................................................................................................................
Charges
137
Entering Cost
..........................................................................................................................................................
Charges
138
Editing Costs
.......................................................................................................................................................... 140
3 Browsing Charges
................................................................................................................................... 140
4 Combined Cost
...................................................................................................................................
and Fee Charge
142
5 Split Billing................................................................................................................................... 142
6 Duplicating...................................................................................................................................
Charges
146
7 Transferring...................................................................................................................................
Charges
147
2011 Tussman Programs, Inc.
Contents
III
8 Copying Charges
................................................................................................................................... 147
9 Flat and Contingent
...................................................................................................................................
Fee Billing
147
10 Other Transaction
...................................................................................................................................
Types
148
11 Time at a Glance
................................................................................................................................... 149
12 Batch WIP Entry
................................................................................................................................... 152
Importing Charges
.......................................................................................................................................................... 160
Remote .........................................................................................................................................................
Entry Data
160
Amicus ......................................................................................................................................................... 161
TimeMatters
......................................................................................................................................................... 162
Copitrak......................................................................................................................................................... 164
Equitrak......................................................................................................................................................... 166
CSV File.........................................................................................................................................................
Import
171
Generic .........................................................................................................................................................
Import Format
172
Tussman.........................................................................................................................................................
Import
173
Tussman.........................................................................................................................................................
Merge Import
174
13 Listing Charges
................................................................................................................................... 174
14 Editing Billed
...................................................................................................................................
Charges
178
15 Spell Checking
................................................................................................................................... 178
Part XIV Making Bulk Changes to WIP
180
Part XV AR Transactions
181
1 Types of AR...................................................................................................................................
Transactions
182
2 Beginning Balances
................................................................................................................................... 184
3 Entering AR...................................................................................................................................
Transactions
185
4 Audit Trails...................................................................................................................................
and Memos
193
5 Payment Application
...................................................................................................................................
Rules
193
6 Advances and
...................................................................................................................................
Credit Balances
196
7 Client Level...................................................................................................................................
Payments
198
8 Browsing AR
...................................................................................................................................
Transactions
200
9 Locating an...................................................................................................................................
AR Transaction
202
10 Editing AR Transactions
................................................................................................................................... 203
11 Reversing Payments
................................................................................................................................... 204
12 Client Refunds
................................................................................................................................... 206
13 Retainer and
...................................................................................................................................
Trust Accounts
206
14 Client Level...................................................................................................................................
Retainers
209
15 Posting to GL
................................................................................................................................... 209
16 AR Journal ...................................................................................................................................
Reports
216
17 Month at a Glance
................................................................................................................................... 219
Part XVI Account Balances
220
1 Account Inquiry
................................................................................................................................... 221
2011 Tussman Programs, Inc.
IV
Tussman Program Release 10
2 Master Ledger
................................................................................................................................... 226
3 Adjusting a...................................................................................................................................
Balance
227
4 Transferring...................................................................................................................................
Balances
227
5 Eliminating ...................................................................................................................................
Account History
228
Part XVII Billing
1 Prebills
228
................................................................................................................................... 229
Prebill Format
..........................................................................................................................................................
Options
231
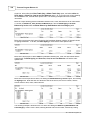
Prebill Summary
..........................................................................................................................................................
Report
233
2 Generating ...................................................................................................................................
Bills
233
Selecting Who
..........................................................................................................................................................
to Bill
238
Billing a List..........................................................................................................................................................
of Files
239
Files with no..........................................................................................................................................................
New Charges
244
Invoice Numbers
.......................................................................................................................................................... 245
Billing Dates.......................................................................................................................................................... 247
Printing the ..........................................................................................................................................................
Bills
249
Printing Second
..........................................................................................................................................................
Copies
250
Printing your..........................................................................................................................................................
own letterhead
250
3 Bill Formats................................................................................................................................... 251
General Formatting
..........................................................................................................................................................
Options
254
Bill Heading..........................................................................................................................................................
Options
256
Balance Forward
..........................................................................................................................................................
Section
261
Fee Section .......................................................................................................................................................... 263
Cost Section.......................................................................................................................................................... 272
Current Charges
..........................................................................................................................................................
Subtotal
274
Payments and
..........................................................................................................................................................
Credits Section
275
Interest Section
.......................................................................................................................................................... 277
Statement Recap
.......................................................................................................................................................... 279
Retainer Account
..........................................................................................................................................................
Section
285
Trust Account
..........................................................................................................................................................
Section
286
Summary Pages
.......................................................................................................................................................... 287
Split Bill Options
.......................................................................................................................................................... 293
Consolidated
..........................................................................................................................................................
Billing
294
Current Charges
..........................................................................................................................................................
vs. Balance Forward
296
4 Bill Messages
................................................................................................................................... 296
5 Listing New...................................................................................................................................
Bills
298
6 Editing Bills................................................................................................................................... 301
Edit Bill Screen
.......................................................................................................................................................... 301
Legacy Bill Editing
.......................................................................................................................................................... 302
7 Billing Summary
...................................................................................................................................
Reports
303
8 Retainer Application
...................................................................................................................................
Reports
303
9 Finalizing Bills
................................................................................................................................... 303
10 Unfinalizing...................................................................................................................................
Bills
306
11 Refinalizing...................................................................................................................................
Bills
310
12 Reprinting Bills
................................................................................................................................... 310
13 Reminder Statements
................................................................................................................................... 312
14 Historical Bills
................................................................................................................................... 316
2011 Tussman Programs, Inc.
Contents
V
15 Client Statements
................................................................................................................................... 317
16 Emailing Bills
................................................................................................................................... 318
17 Electronic Billing
................................................................................................................................... 326
LEDES
.......................................................................................................................................................... 327
Tymetrix
.......................................................................................................................................................... 330
Litigation Advisor
.......................................................................................................................................................... 333
Legalgard .......................................................................................................................................................... 337
PALS-FM .......................................................................................................................................................... 340
CCIC
.......................................................................................................................................................... 343
Part XVIII Reports
344
1 WIP Summary
................................................................................................................................... 345
2 Accounts Receivable
................................................................................................................................... 347
3 Receivable ...................................................................................................................................
Analysis
351
4 Trust, Retainer
...................................................................................................................................
and Credit Balances
353
5 File History...................................................................................................................................
and Status
355
6 Productivity...................................................................................................................................
Reports
356
7 Billing Analysis
................................................................................................................................... 363
8 Income Analysis
................................................................................................................................... 364
9 Staff Earnings
...................................................................................................................................
Analysis
366
10 Realization ...................................................................................................................................
Analysis
369
11 Budget Analysis
................................................................................................................................... 371
12 Custom Reports
................................................................................................................................... 372
13 Files with No
...................................................................................................................................
WIP
374
14 Periodic Activity
...................................................................................................................................
Summary
374
15 Fee Ledger ................................................................................................................................... 377
16 Cost Ledger................................................................................................................................... 378
17 Billing Ledger
................................................................................................................................... 379
18 Daily Cash Receipts
................................................................................................................................... 380
Part XIX Tools
382
1 Reindexing ...................................................................................................................................
Data Files
383
2 Backup/Restore
...................................................................................................................................
Data
384
3 Automatic Backups
................................................................................................................................... 386
4 Archiving Billing
...................................................................................................................................
Data
387
5 Purging Data
...................................................................................................................................
Files
388
6 Bulk Close/Delete
................................................................................................................................... 390
7 Security
................................................................................................................................... 390
8 Users
................................................................................................................................... 391
9 List Users Currently
...................................................................................................................................
Logged on
395
10 Activity Log................................................................................................................................... 395
2011 Tussman Programs, Inc.
VI
Tussman Program Release 10
11 Change Trial
...................................................................................................................................
Status or Staff Level
396
12 Change Demo
...................................................................................................................................
Status
396
13 Change Network
...................................................................................................................................
Status
397
14 Change Data
...................................................................................................................................
Folder
397
15 Tussman PDF
...................................................................................................................................
Writer
398
16 Remote Entry
...................................................................................................................................
Functions
398
17 Export Time................................................................................................................................... 399
18 Convert to Long
...................................................................................................................................
File ID's
400
19 Convert to Unlimited
...................................................................................................................................
Rate Schedules
401
20 Convert to 3...................................................................................................................................
decimal places for cost rates
401
21 Reconstruct...................................................................................................................................
Account Balances
401
22 Convert Retainer
...................................................................................................................................
to Trust
401
23 Expand all Activity
...................................................................................................................................
Codes
402
24 Reassign Sort
...................................................................................................................................
Codes to WIP
402
25 Match Posting
...................................................................................................................................
Dates with Cutoff Dates
402
26 Reassign Billing
...................................................................................................................................
and Payment Applications
402
27 Clear all Tags
................................................................................................................................... 403
28 Match Alternate
...................................................................................................................................
IDs
403
29 Enable Special
...................................................................................................................................
Actions
403
Part XX Setup
403
1 Firm Name ................................................................................................................................... 404
2 Appearance...................................................................................................................................
and Interface Options
404
Use Expanded
..........................................................................................................................................................
Control Panel Interface
404
Startup Screen
.......................................................................................................................................................... 405
Font Selection
.......................................................................................................................................................... 406
Allow Switching
..........................................................................................................................................................
Between Modules
407
Set Line Width
.......................................................................................................................................................... 407
Always Display
..........................................................................................................................................................
Client and Matter ID in Browses
407
3 Cllient and ...................................................................................................................................
Matter Options
407
Client and Matter
..........................................................................................................................................................
Field Titles
407
Client and Matter
..........................................................................................................................................................
Defaults
408
Default Fee Agreement
.......................................................................................................................................................... 410
Fee Arrangement
......................................................................................................................................................... 410
Billing Rate
......................................................................................................................................................... 412
Cost Rate
......................................................................................................................................................... 412
Bill Format
......................................................................................................................................................... 412
Billing Interval
......................................................................................................................................................... 412
Global Changes
......................................................................................................................................................... 413
Default Billing
..........................................................................................................................................................
Options
413
Billing Holds
......................................................................................................................................................... 415
Billing Threshold
......................................................................................................................................................... 416
Tax or Markup
......................................................................................................................................................... 416
Interest ......................................................................................................................................................... 417
Retainer.........................................................................................................................................................
Account
419
2011 Tussman Programs, Inc.
Contents
VII
Installment
.........................................................................................................................................................
Payment Options
421
Ceiling on
.........................................................................................................................................................
Fees
421
Discount.........................................................................................................................................................
on Fees
422
Prompt Payment
.........................................................................................................................................................
Discount
422
Global Changes
......................................................................................................................................................... 422
Sort Order for
..........................................................................................................................................................
Client Lookups
423
Client Lookup
..........................................................................................................................................................
Option
423
Auto Search..........................................................................................................................................................
Option
423
Include Inactive
..........................................................................................................................................................
Files in Lookups
423
File ID Delimiter
.......................................................................................................................................................... 423
File ID Format
..........................................................................................................................................................
for Reports
424
Include Contact
..........................................................................................................................................................
Person with Address
424
Allow Duplicate
..........................................................................................................................................................
Codes
425
Require Originating
..........................................................................................................................................................
Attorney
425
Require Responsible
..........................................................................................................................................................
Attorney
425
4 Data Entry Options
................................................................................................................................... 425
5 Default Batch
...................................................................................................................................
Codes
428
6 Payment Application
...................................................................................................................................
Order
429
7 Auto Reconstruct
...................................................................................................................................
Option
429
8 Print to File...................................................................................................................................
Option
429
9 Miscellaneous
...................................................................................................................................
Options
429
Part XXI Troubleshooting and Support
429
Part XXII General Ledger
432
1 Overview ................................................................................................................................... 432
2 Installation ................................................................................................................................... 433
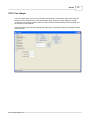
3 GL Configuration
................................................................................................................................... 434
4 The GL Main
...................................................................................................................................
Screen
436
5 Company Setup
................................................................................................................................... 443
6 Departments
...................................................................................................................................
and Locations
446
7 Chart of Accounts
................................................................................................................................... 447
8 Accounting...................................................................................................................................
Periods
452
9 Beginning Balances
................................................................................................................................... 452
10 Journal Entries
................................................................................................................................... 454
11 Browse/Edit...................................................................................................................................
Journal Entries
456
12 Year End Closing
................................................................................................................................... 458
13 Tracing Activity
................................................................................................................................... 459
14 Journals and
...................................................................................................................................
Reports
460
Journal Detail
.......................................................................................................................................................... 460
Account Detail
.......................................................................................................................................................... 461
Earnings Statement
.......................................................................................................................................................... 462
Balance Sheet
.......................................................................................................................................................... 463
Trial Balance.......................................................................................................................................................... 464
Budget Projections
.......................................................................................................................................................... 464
2011 Tussman Programs, Inc.
VIII
Tussman Program Release 10
Part XXIII Accounts Payable
465
1 Vendors
................................................................................................................................... 465
2 Payables
................................................................................................................................... 468
3 Recurring Payables
................................................................................................................................... 475
4 Credit Memos
................................................................................................................................... 476
5 Checks
................................................................................................................................... 478
Check Formatting
.......................................................................................................................................................... 478
Printing Multiple
..........................................................................................................................................................
Checks
481
Printing Individual
..........................................................................................................................................................
Checks
484
Recording Manual
..........................................................................................................................................................
Checks
487
Other Bank Transactions
.......................................................................................................................................................... 487
Special Transactions
.......................................................................................................................................................... 489
Check Register
.......................................................................................................................................................... 490
Reversing, Deleting,
..........................................................................................................................................................
Voiding Checks
494
Reconciling ..........................................................................................................................................................
Accounts
496
6 AP Reports................................................................................................................................... 498
Vendor Status
..........................................................................................................................................................
& History
498
Aged Payables
.......................................................................................................................................................... 500
Cash Requirements
.......................................................................................................................................................... 501
1099 Forms .......................................................................................................................................................... 503
Part XXIV GL and Billing Interface
505
Part XXV GL Setup and Tools
509
1 GL Startup ...................................................................................................................................
Screen
509
2 Default Bank
...................................................................................................................................
Account
509
3 Reindex GL...................................................................................................................................
Data Files
510
4 Backing Up...................................................................................................................................
the GL
510
5 Archive GL ...................................................................................................................................
Data
510
Part XXVI Calendar
510
1 Overview ................................................................................................................................... 510
2 Installation ................................................................................................................................... 511
3 The Calendar
...................................................................................................................................
Screen
511
4 Calendar Set
...................................................................................................................................
up
516
Staff Codes .......................................................................................................................................................... 516
Event Codes.......................................................................................................................................................... 517
Location Codes
.......................................................................................................................................................... 519
Holiday List .......................................................................................................................................................... 520
Work Groups
.......................................................................................................................................................... 520
Calendar Security
.......................................................................................................................................................... 521
5 Calendar Entries
................................................................................................................................... 521
Adding Entries
.......................................................................................................................................................... 522
Viewing Calendar
..........................................................................................................................................................
Entries
526
Editing Calendar
..........................................................................................................................................................
Entries
526
Calendar Browse
.......................................................................................................................................................... 528
2011 Tussman Programs, Inc.
Contents
IX
Week at a Glance
.......................................................................................................................................................... 531
Month at a Glance
.......................................................................................................................................................... 532
To Do List .......................................................................................................................................................... 532
Recurring Events
.......................................................................................................................................................... 534
6 Calendar Reports
................................................................................................................................... 536
Traditional Reports
.......................................................................................................................................................... 536
Week at a Glance
.......................................................................................................................................................... 539
Month at a Glance
.......................................................................................................................................................... 541
7 Exporting to...................................................................................................................................
Outlook
543
8 Purging Calendar
...................................................................................................................................
Entries
543
9 Backing Up...................................................................................................................................
the Calendar
544
10 Reindexing ...................................................................................................................................
the Calendar
544
Index
2011 Tussman Programs, Inc.
0
10
1
Tussman Program Release 10
Using Help
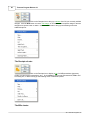
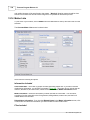
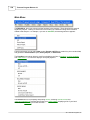
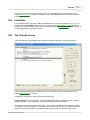
The Tussman Program help system is a comprehensive reference guide to the entire program. To
access it, from within the Tussman Program, select User Manual from the Help menu The Table of
Contents is displayed in the left hand side of the help screen. If the Table of Contents does not
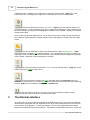
appear, click the Show button at the top. Topics that are displayed with a book icon to the left have a
variety of subtopics listed under them. Double click on the main topic to view the list of subtopics.
Then click on the topic you want to read the text. To expand the Table of Contents to display all
subtopics, right click anywhere on the Table of Contents area and click Open All. To collapse and
show only the main topics, click Close All.
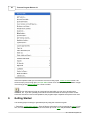
You can also access the help system by pressing the F1 function key from anywhere in the program.
When you do that, the specific help topic related to that screen will be displayed.
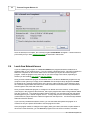
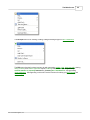
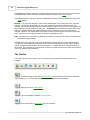
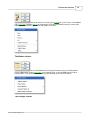
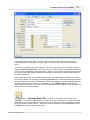
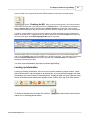
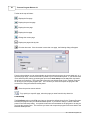
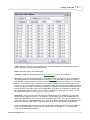
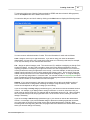
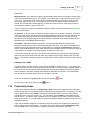
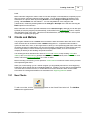
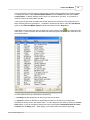
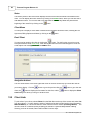
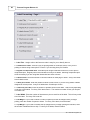
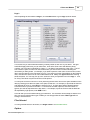
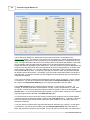
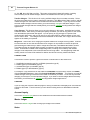
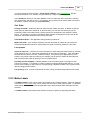
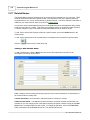
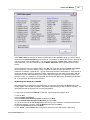
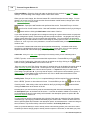
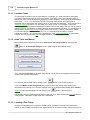
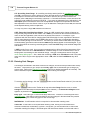
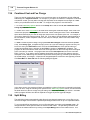
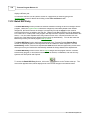
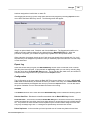
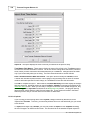
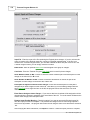
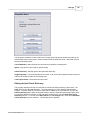
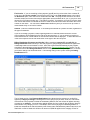
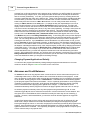
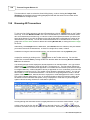
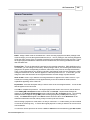
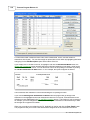
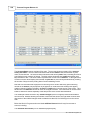
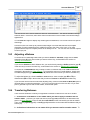
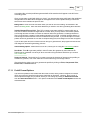
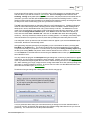
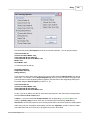
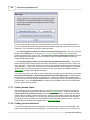
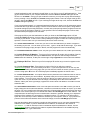
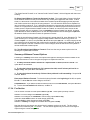
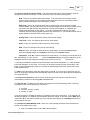
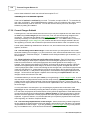
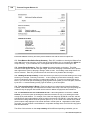
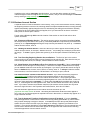
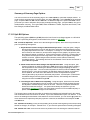
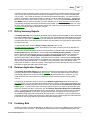
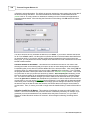
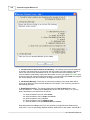
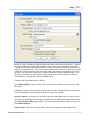
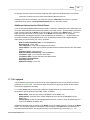
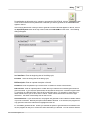
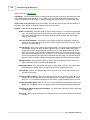
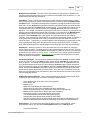
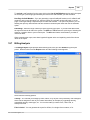
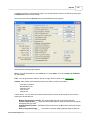
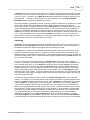
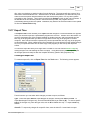
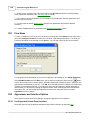
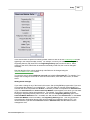
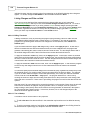
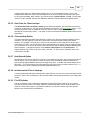
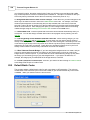
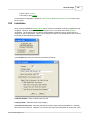
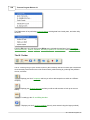
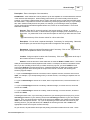
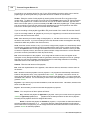
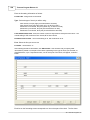
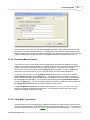
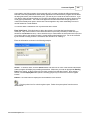
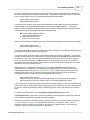
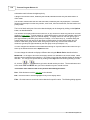
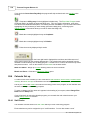
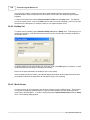
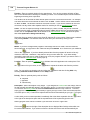
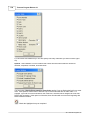
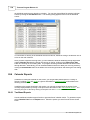
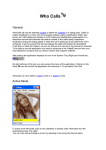
You can search the User Manual for keywords by clicking the Search tab above the Table of
Contents, typing in a word or phrase, and pressing Enter or clicking List Topics. A list of topics
containing that word or phrase will then appear, which you can select from to view the text.. For
example, if you are interested in reading about split billing, enter "split billing" in the search space, click
List Topics, and the screen will display the following list, as shown below. You can then click on any
of those topics to read the text.
2011 Tussman Programs, Inc.
Using Help
2
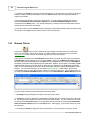
11
Program Installation
The Tussman Program is a Windows application designed to work with any version of Windows up
through and including Windows 10.
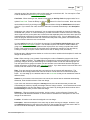
To install the program, follow the instructions depending on whether you are installing from a CD or
from our website.
New Installation
2011 Tussman Programs, Inc.
12
Tussman Program Release 10
If you are creating a new installation, the program should be installed in a separate folder on your
computer. The Setup Wizard asks you for the Destination Location during the installation
procedure. The default folder is c:\tp9, but you can change it if necessary. If you are installing the
program on a network, you only need to install it once on the server, or, if you do not have a server, on
one of the computers on the network, and then create a shortcut to the program on each of the
workstations that will be accessing the program. Do not install the program itself on each workstation
as that will simply create completely separate copies of the program.
Note that when creating a shortcut for the program you must fill in both the Target and Start In spaces
in the main Shortcut properties screen. To check this, right click on the Tussman Program shortcut on
your desktop, then left click on Properties. What appears in the Start In space should be exactly the
same as appears in the Target space, but leaving off the part that reads /tp7.exe. For example, if
Target reads C:\tp9\tp7.exe, then Start In should read C:\tp9.
Installing as an Upgrade
If you are installing the program as an upgrade, either to an older version of Release 11, or to
Releases 6 through 10 of the program, the upgrade must be installed into the same folder where your
existing copy of the program is located. You can install Release 11 as an upgrade for versions 6
through 10 without having to perform a data conversion. Release 4 and prior versions of the program
will require a data conversion before the upgrade to Release 11 can be performed. When performing
an upgrade from Release 6 or higher, it is not necessary to install intermediate upgrades; i.e, each
upgrade is cumulative, so you only need to install the most recent upgrade in order to fully update the
program. As long as you follow the appropriate instructions, installing the program into the same folder
as an existing copy of the program will not erase or overwrite any of your existing data, but will only
update the appropriate program files. Since we update the program frequently, you should periodically
check our website to see if a newer version is available for download.
Note that the name of the Tussman Program executable file is TP7.EXE (even though the version
number is Release 11). This was done so that existing customers can upgrade from prior versions
without having to modify any of their existing program shortcuts.
After installing the program, read the program overview section, the section that describes the
user interface and the getting started section. You will then be ready to begin entering clients and
matters, recording time, and generating bills.
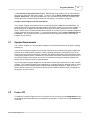
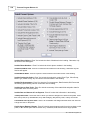
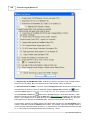
Program Display Problems and Options
Following are the most common problems you might encounter with the program's display:
1. Icons on the Toolbar and Control Panel are not appearing - This means you left the Start In
space blank in the Tussman shortcut on your desktop. See above for further information.
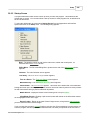
2. Column Headings on Browses do not appear - This means you are using the Windows Classic
Theme. To fix this switch to the Windows XP theme (or another theme of your choosing), by clicking
on the Start button on your Windows desktop, Control Panel, Display, and selecting the Theme you
want to use.
3. Screens in the Tussman Program do not fit within the confines of the monitor. Release 11
requires that the screen resolution on your monitor is set to at least 1024 by 768. Some older monitors
may still be set to 800 by 600, or you may have selected that setting so that text will appear larger and
more readable on the screen. Since Release 10 and higher you can select a larger font size for use by
Tussman (see 4 below) using a lower screen resolution should no longer be necessary. To change the
screen resolution setting on your monitor, click on the Windows Start button and select the Control
Panel. Then click on Display, Settings. With Windows 7, go to the Control Panel and under the
Appearance and Personalization section select Adjust screen resolution. Then slide the Screen
Resolution tab to the appropriate setting.
2011 Tussman Programs, Inc.
Program Installation
13
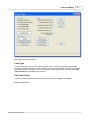
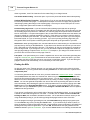
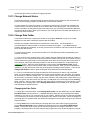
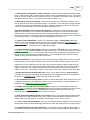
4. The font size is too small for me to read. With Release 10 and higher you can select different
fonts and font sizes from within the program. To do this, click on Setup, Appearance and Interface
Options, Select Font. From the drop down menu you can select the font you want (Verdana is the
default) and in the Font Size section pick the font size setting (1 is smallest, 5 is largest).
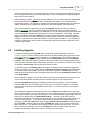
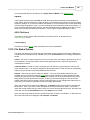
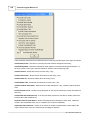
Problems Accessing the Tussman User Manual
The Tussman Program User Manual can be accessed by clicking on Help from the Main Menu. Or,
press the F1 key to bring up the Help topic related to the specific screen you are on in the program. If
the help topics do not appear, this is probably because you are running the program on a network
server. Newer version of Windows and Internet Explorer do not allow you to run a help file installed on
another computer for security reasons. To overcome this problem, click on Help, Install Help File on
Local Drive. This function will have to be performed on each computer that will be accessing the
program on your network.
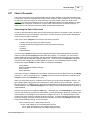
2.1
System Requirements
The Tussman Program is a 32-bit program designed to work with all Windows XP or higher, including
Windows 10.
If you will be running the program on a local area network, we do not advise running the program with
Windows 98 or Windows 2000, especially if those operating systems are running the server, as we
have encountered occasional problems, especially with Windows 2000 which often has difficulty when
printing large numbers of bills. Windows NT, XP and other more recent versions have proved to be a
very reliable network environments, but we do not recommend running the Tussman Program with
Novell, as it too has been known to cause problems.
Any recently made computer designed to run Windows will have ample resources to run the Tussman
program. The Tussman Program is not designed to run on Apple computers, although it will run using
the Windows emulation software which is available with most Apple computers. While we have no
direct experience with Linux, we have been told by several customers that they have successfully run
the program on Linux servers.
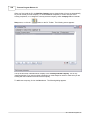
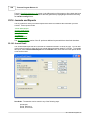
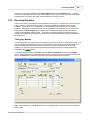
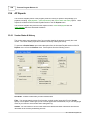
2.2
From a CD
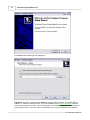
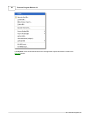
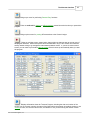
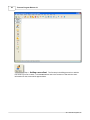
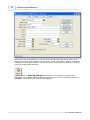
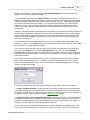
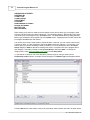
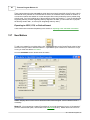
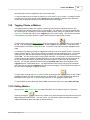
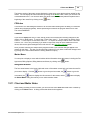
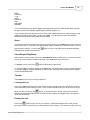
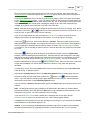
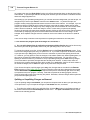
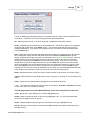
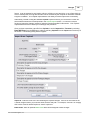
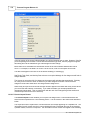
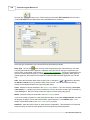
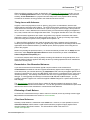
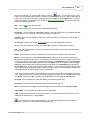
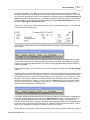
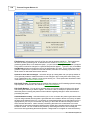
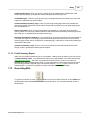
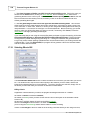
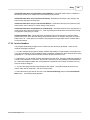
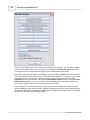
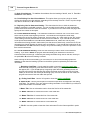
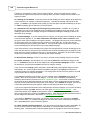
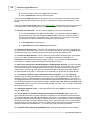
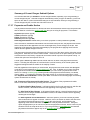
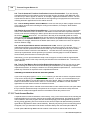
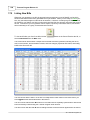
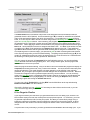
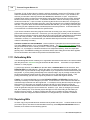
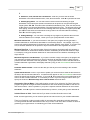
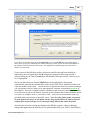
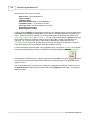
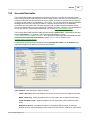
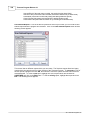
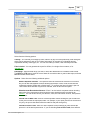
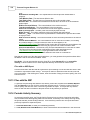
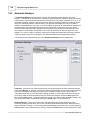
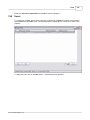
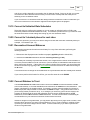
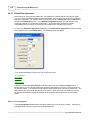
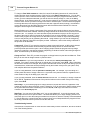
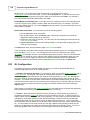
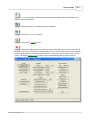
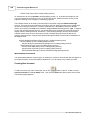
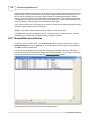
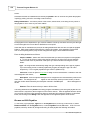
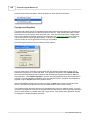
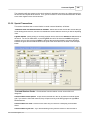
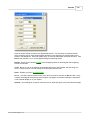
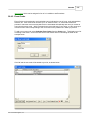
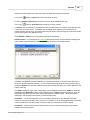
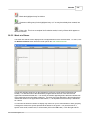
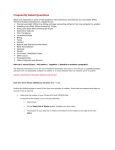
To install the Tussman Program from a CD, insert the CD into your drive and the Setup Wizard screen
shown below should automatically come up within a few seconds. If it does not, run the Install.exe file
on the CD.
2011 Tussman Programs, Inc.
14
Tussman Program Release 10
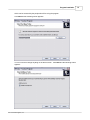
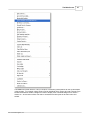
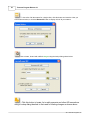
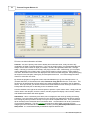
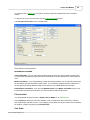
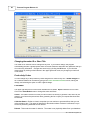
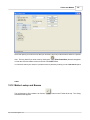
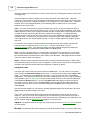
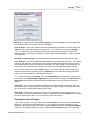
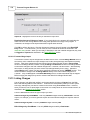
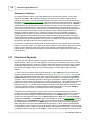
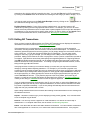
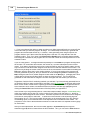
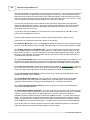
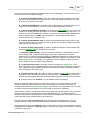
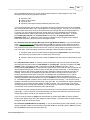
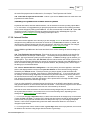
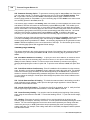
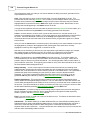
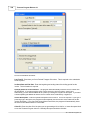
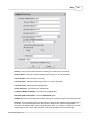
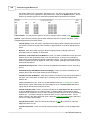
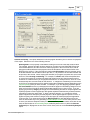
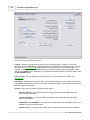
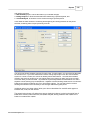
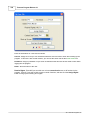
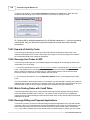
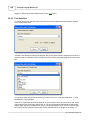
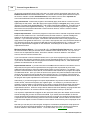
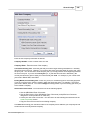
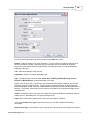
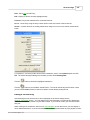
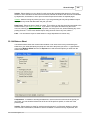
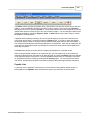
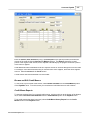
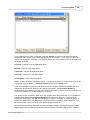
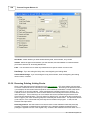
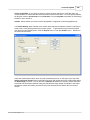
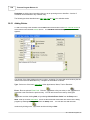
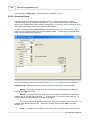
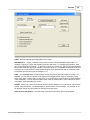
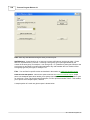
Click Next and the following screen will appear:
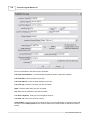
Important! The above screen specifies where the program will be installed. The default folder is
C:\TP9. To install it in a different folder, or if you are installing it on a local area network, enter the
drive and directory that you want. If you are installing it on a local area network, the folder should be
on the network server. If you do not have a dedicated server, it can be installed on any computer
2011 Tussman Programs, Inc.
Program Installation
which can be accessed by the people who will be using the program.
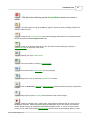
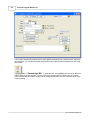
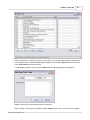
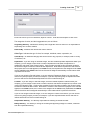
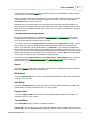
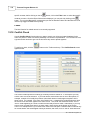
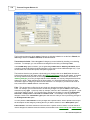
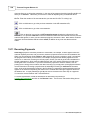
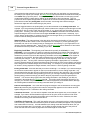
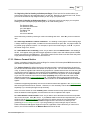
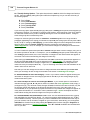
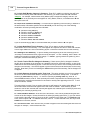
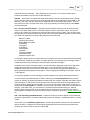
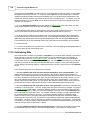
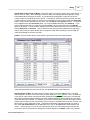
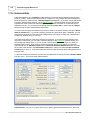
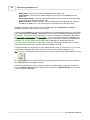
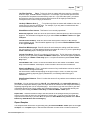
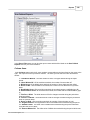
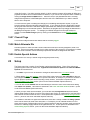
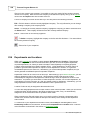
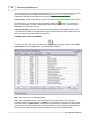
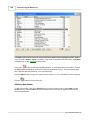
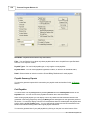
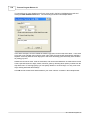
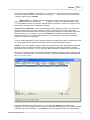
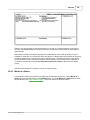
Click Next and the following screen appears:
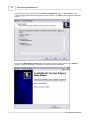
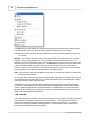
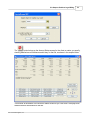
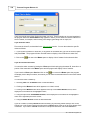
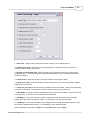
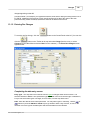
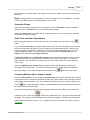
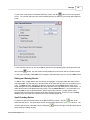
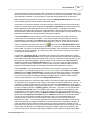
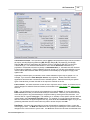
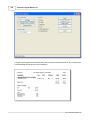
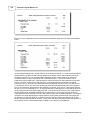
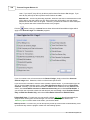
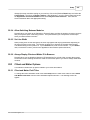
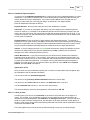
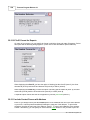
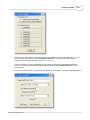
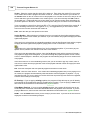
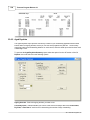
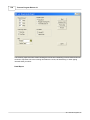
You do not need to change anything on the above screen. Click Next and the following screen
appears:
2011 Tussman Programs, Inc.
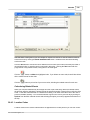
15
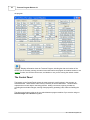
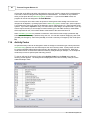
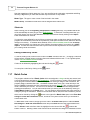
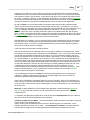
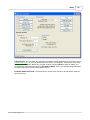
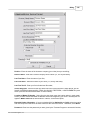
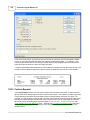
16
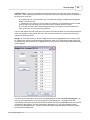
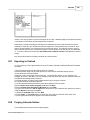
Tussman Program Release 10
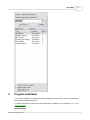
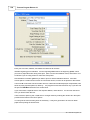
In the above screen you should check the Create a desktop icon option so that a shortcut to the
Tussman Program will automatically appear on your desktop. Click Next and the following screen will
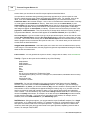
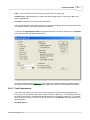
appear:
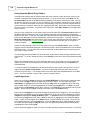
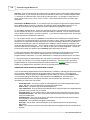
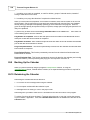
Verify that the Destination location shown in the screen above is correct and then click Install to
continue. When the installation is complete, the following screen will appear:
2011 Tussman Programs, Inc.
Program Installation
17
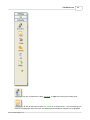
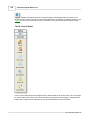
The Launch Tussman Program option is normally checked. This means that when you click Finish
the Tussman Program will automatically start up, taking you to the program's main screen. You are
now ready to begin using the program.
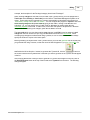
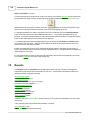
After completing the installation, an icon like this should appear on your desktop.
Use this icon whenever you want to access the program.
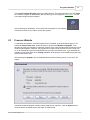
2.3
From our Website
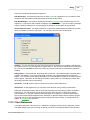
To download and install the Tussman Program from our website, go to the Download page on our
website at www.tussman.com. Select the option to download the Release 10 Upgrade. Even
though it says this is an upgrade, it contains a complete copy of the program which can also be used to
create a new installation. However, the program will not open unless you have received a code from
us, so do not attempt to perform the download until you have received the code. If you download the
upgrade into the same folder as an existing installation of the program, it will disable the program until
you enter the correct code.
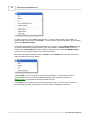
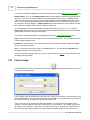
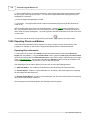
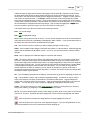
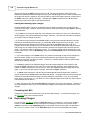
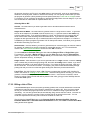
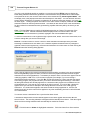
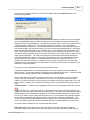
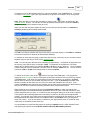
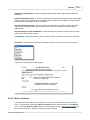
After selecting the Upgrade, click the Download button and the following screen, or one like it, will
appear.
Rest assured that the upgrade contains nothing suspicious or malicious. Click the Open button to
continue and the download process will begin, as shown below:
2011 Tussman Programs, Inc.
18
Tussman Program Release 10
Once the download is complete, the Tussman Program Install Wizard will appear. Continue from this
point exactly as if you were installing from a CD as described in that section.
2.4
Local Area Network Issues
If you are installing the program on a local area network, the program should be installed into a
separate folder on your network server. If you do not have a dedicated servier, it should be installed on
one of the computers on the network which can be accessed by everyone who will be using the
program. Install the program in the same way as you would a single user version, depending on
whether you are installing from a CD or from our website.
Once you have installed the program as described above, to be able to access the program from any
computer on the network you simply create a shortcut on that computer which targets the TP7.EXE
file located in the Tussman program folder on the server or other computer. For the shortcut to work,
the Tussman Program folder must have been made accessible to that workstation on a shared basis
with full rights to read, write and create files.
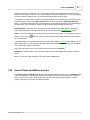
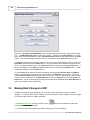
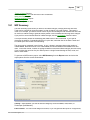
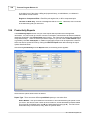
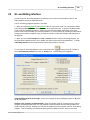
Once you have installed the program, to configure it for shared use on the network, so that multiple
users can be in the program at the same time, start up the program and select Change Network Status
from the Tools menu. To activate the network sharing functions, you must then enter the code which
should appear on your Tussman Program invoice. To verify that you have successfully activated the
network features, select About the Tussman Program from the Help menu. The line that says Network
Status should read "Shared".
If you have not purchased the network version, you can still install and operate the program on a
network, but only one person will be able to use the program at a time.
Since the program makes no changes to the registry when you install it, and does not place hidden or
other files in other directories, you can move the program from one servier to another, to another
2011 Tussman Programs, Inc.
Program Installation
19
location on the same server, or to another computer, simply by copying the entire program folder and
then changing the shortcuts to point to the new location. It is not necessary to re-install the program
when moving it in this manner.
When installling a program update on a network installation, you only need to install the update once
into the folder where the program is located. Do not install the update on each computer which
accesses the program. No changes are required on the individual workstations when you perform an
update, because all of the program files and data files are stored together in the same folder.
Some users may prefer to install the program files separately from the data files by creating a
separate data folder. We do not normally support this feature, although if you require this type of
installation we do offer this capability for an additional fee. We do not encourage this option as it tends
to make support and maintenance of the program much more complicated. For example, using this
option it is possible to install the program files on each individual workstation, while having just the
data files on the server. However, this type of installation makes it much more difficult to update the
program, as you then have to install each update on each individual workstation. In our experience, it
is also not uncommon for users to become confused about exactly which folder contains the correct
Tussman Program data.
2.5
Installing Upgrades
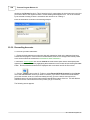
To install a Tussman Program upgrade, after reviewing the general instructions in the main
Program Installation section, follow the same instructions as when installing the program itself, either
from a CD or from our website, with one exception: You must specify the correct folder where your
existing copy of the program is already installed when the Setup Wizard asks for the Destination
Location. Often the Setup Wizard will be able to detect the location of the existing program and will
insert that as the destination folder automatically. Otherwise, you must enter it yourself or you will wind
up installing a second copy of the program that contains no data.
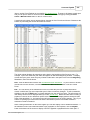
To determine where your existing copy of the program is installed, before installing the upgrade go
into the your existing copy of Tussman and select About the Tussman Program from the Help menu
(in versions 6 and 7, click on Info) The name of the folder will appear on the Directory line. Copy
down the drive and directory exactly as it appears there and type it in the Destination Location screen
of the Setup Wizard.
Before installing an upgrade, you must also make sure that no one else has the program open, if you
are on a local area network, and that you have closed the program on your computer also.
After the Setup Wizard completes the installation and launches the program, you will be asked to
enter the code which you must obtain from us before you can complete the upgrade. If you do not
have the code, the program will be disabled until you enter it. You will not lose any of your program
data, however.
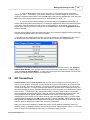
After installing the upgrade and entering the code, click on Clients from the File menu to make sure
that your data is present. If it is not, that means you have installed the program in the wrong folder and
have created a second empty copy of the program. You must then install the upgrade again, this time
making sure to specify the correct Destination Location. This time it will be more difficult to
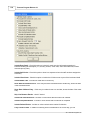
determine the location, as the Tussman Program shortcut on your desktop will probably now take you
to the new empty program. You may have to determine the location of the existing program by
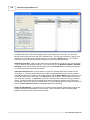
clicking on your Windows Start button, then clicking on Search, Files and Folders, and searching for
the file TP7.EXE. Windows will then list all the TP7.EXE files found on your computer, showing the
folder each one is in. You will then have to determine which of these is the correct one. You can do
this, if necessary, by clicking on each of the TP7.EXE files in the list to start up that copy of the
program and checking the File menu to see if it contains your current data.
2011 Tussman Programs, Inc.
20
Tussman Program Release 10
When you install an upgrade on a network, it only needs to be installed once, into the folder where the
program is located on the server or on the computer which holds the program. No changes need to be
made to the individual workstations.
Installing an upgrade following these instructions will not erase or overwrite any of your existing data,
but will only update the appropriate program files.
You should check our website (www.tussman.com) periodically to see if there is a new upgrade
available for download, as we post new upgrades frequently. The date of the latest upgrade available
is shown in the Upgrade screen on the website. You can check the date of your copy of the program
by selecting About the Tussman Program from the Help menu. The date appears on the Version
line. If the date shown on the Upgrade screen is more recent, you should then download the upgrade
after getting the upgrade code from us. Note that the code changes periodically, so you should always
get the latest code before attempting an upgrade.
2.6
Moving the Program
To move the program from one computer to another, the easiest method is simply to copy the entire
Tussman Program folder from the old computer to the new one. All the Tussman Program files reside
in that one folder (with the exception of any separate Batch WIP Entry folders you may have created).
If you do not know which folder Tussman is installed in, check the program information screen by
clicking the
Directory line.
button on the Toolbar. The name of the Tussman folder will appear on the
After copying the Tussman folder to your new computer, create a shortcut on your desktop which runs
the tp7.exe file located in the Tussman folder. You can do this using My Computer to locate the
tp7.exe file in the Tussman folder. Right click on the file and select the option to Create Shortcut.
Then drag the shortcut from the end of the list of files and drop it onto your desktop.
If you are moving the program to a network server, create a similar shortcut on the desktop of each
person who will be using the program. Do not install the program on each of their computers as that
will simply create a blank copy of the program on their computer.
If it is not practical for you to copy the entire Tussman folder to the new computer, you can also move it
from one computer to another by installing the program on the new computer and then restoring a
backup of the data from the old computer (made using the Tussman backup/restore function) into the
new copy of the program. If you are doing this, make sure that both copies of the program are the
same version. For example, do not restore data from version 7, 8 or 9 into version 10, as this will
cause some problems. If you are installing a newer version of Tussman on the new computer, first
install that same version on the old computer before making the backup so that any updates to the
data files are made before the backup is created. If that is not possible, then you can install the
program on the new computer, restore the data from the backup, and then install the program again
into the same folder. This will trigger the program to update the data files the first time you start up the
program.
2.7
Display Configuration
Release 10 requires that the screen resolution on your monitor is set to at least 1024 by 768. Some
older monitors may still be set to 800 by 600, or you may have selected that setting so that text will
appear larger and more readable on the screen. Since with Release 10 you can now select a larger
font size for use by Tussman (see below) using a lower screen resolution should no longer be
necessary. To change the screen resolution setting on your monitor, click on the Windows Start
2011 Tussman Programs, Inc.
Program Installation
21
button and select the Control Panel. Then click on Display, Settings. With Windows 7, go to the
Control Panel and under the Appearance and Personalization section select Adjust screen
resolution. Then slide the Screen Resolution tab to the appropriate setting.
If the font size in the Tussman Program is too small for you to read comfortably, you can now select
different fonts and font sizes from within the program. To do this, click on Setup, Appearance and
Interface Options, Select Font. From the drop down menu you can select the font you want (Verdana
is the default) and in the Font Size section pick the font size setting (1 is smallest, 5 is largest).
3
Program Overview
The Tussman Program contains all the functions you need to maintain a list of your clients and
matters, keep track of time and costs expended on their behalf, generate bills, and keep track of your
receivables, client payments, and client trust funds. The program also generates a wide variety of
management reports which provide useful information for your firm.
Each client that you enter into the program can have an unlimited number of matters associated with
it. The section on Clients and Matters contains complete instructions on setting up and maintaining
your client and matter files. For each client or matter you must enter certain fee arrangement and
billing instructions which determine how that client or matter will be billed. Part of the initial program
setup is to also enter a list of your staff members and their billing rates. Other lists of codes, such as
activity and cost codes, can also be created to help speed up data entry and to assist in generating
reports.
Time and costs which you want to bill to a client can be recorded as described in the section on
Charges. They can be added directly to the main list of unbilled charges (the normal method) or you
can use the Batch WIP entry function which maintains separate time sheets that are periodically
exported to the main list of charges. You can also record nonbillable and administrative time, as well
as a variety of flat fee charges.
The section on Billing describes in detail the procedures for generating bills. A draft form of your bills,
called prebills, can be printed first, if desired. After bills are in final form and have been printed and
sent out, a separate finalizing procedure must be performed before you can generate bills for your next
billing cycle. It is always possible to go back and unfinalize one or more bills if changes are required,
and you can also reprint copies of previous bills or print special reminder statements or cumulative
historical statements.
You can design up to ten different bill formats which can show different levels of detail. The many
different options which control the level of detail, layout, and wording of your bills are described in detail
in the Bill Formats section.
Client payments and other types of transactions that affect a client's account balance are referred to
as AR Transactions. These can be used to also record beginning balances when you are entering
your initial client and matter information, to keep track of retainer and trust account receipts and
disbursements, or to record a client credit or refund. The section on AR Transactions explains in
detail the way in which client payments are applied against a client's balance due, how credit balances
are maintained and applied, and how payments can be easily distributed among multiple matters for a
client.
The program can maintain for each matter both a retainer and a trust account, in which separate funds
are maintained on behalf of the client. Retainer funds can be applied automatically against a client's
bill, if desired. You can also configure the program to charge interest on past due amounts, add a
tax or markup to fees, give percentage or prompt payment discounts, set up an installment payment
plan, and implement various types of billing holds and thresholds which prevent bills from being
generated unless certain criteria are met. The program can also handle split billing where charges are
2011 Tussman Programs, Inc.
22
Tussman Program Release 10
apportioned among two or more clients.
The program has many functions which enable you to look up information. In addition to browse and
lookup functions for your clients, matters, charges, and AR transactions, the Time-at-a-Glance screen
shows a monthly calendar summarizing the time worked by each staff member or by the entire firm.
The Account Status screen for each client or matter gives a snapshot history and summary of their
account status. From this screen you can drill down to access all the supporting detail. The
Master Ledger feature displays all the activity to date, both billed and unbilled, for a client or matter,
including both fee and cost charges, bills, payments and credits, and trust and retainer activity.
A wide variety of reports, described in the Reports section, provide information that is useful in the
management of your firm.
To begin using the program, review the section that describes the user interface, the getting started
section, and the Six Steps to Painless Legal Billing section.. You will then be ready to begin
entering clients and matters, recording time, and generating bills.
4
The Main Screen
The program's main screen consists of the Main Menu (the list of menu options displayed across the
top), the Toolbar (the icons on the bar just below the Main Menu), and the Control Panel (the menu
and icons displayed down the left side). All of the functions in the program can be accessed from the
Main Menu, but many of them can also be accessed using either the Toolbar or the Control Panel or
both. For example, to add a new client, you can click on Clients from the Main Menu and select New
from the submenu. Or, you can click the
menu. Or, simply click the
button on the Toolbar and pick Client from the
icon on the Control Panel at the left
2011 Tussman Programs, Inc.
The Main Screen
23
In addition to the menu and toolbars shown above, you can select from a variety of start up screens so
that when you open the program it auotmatically loads the screen that you use most often, The Browse
Clients screen is especially helpful because it displays a list of your clients enabling you to quickly find
the client you want either to look up the client information or perform any of the program functions for
that client.
The Main Menu, Toolbar, and Control Panel are described in detail below. The Control Panel is
especially useful because using its six buttons you can perform virtually all the commonly used
functions in the program.
Main Menu
The Main Menu gives you access to all the functions in the program. These functions are grouped
together by subject. Clicking on each menu item will bring up a submenu listing all the functions
related to that subject.
For example, clicking on Clients will bring up the following menu of tasks related to maintaining your
list of clients..
2011 Tussman Programs, Inc.
24
Tussman Program Release 10
To add a new client, click on New on the submenu. To find an existing client, click on Find. To
browse through a list of clients, click Browse. To view or print a client list click List, or to print mailing
labels click Labels and Export.
Some other functions related to Clients and Matters are also listed. Click on Related Names to bring
up names and addresses of people related to your client matters, or Conflict Check to perform a
conflict check, Client Emails to send bulk emails to selected clients, or Print Client/Matter Notes to
print out the notes you have saved for your clients and matters.
Each client can have an unlimited number of matters, and the Matters menu shown below lets you
add, find, browse and list your matters.
The Accounts menu is for looking up client account information. From the submenu select
Account Status screen to bring up a detailed summary of the client's account status, or
Master Ledger to view a detail of all activity to date on the file.
The Charges menu shown below lets you add new fee and cost charges to bill to your clients, or
locate edit and list existing charges Other functions related to Charges are also listed.
2011 Tussman Programs, Inc.
The Main Screen
25
The Receipts menu is for entering, locating, editing and listing all types of AR Transactions.
The Bills menu lists the functions having to do with generating prebills, bills, listing new bills, printing
billing summary and retainer application reports, finalizing bills, unfinalizing bills, generating
reminder statements, reprinting finalized bills, generating historical statements, and generating
client statements. Also appearing on this menu are the functions for editing your Bill Formats and
Bill Messages.
2011 Tussman Programs, Inc.
26
Tussman Program Release 10
The Reports menu shown below lists all the management reports described in detail in the
Reports section.
2011 Tussman Programs, Inc.
The Main Screen
27
The View menu shown below is a list of a number of commonly used functions to look up information
in the program. For example, select Client to find an individual client, Charge to locate a charge if you
know the transaction number, Charges for Client to display a list of unbilled charges for a client or
matter, etc. All of these functions can also be accessed from other parts of the main menu and
toolbar.
2011 Tussman Programs, Inc.
28
Tussman Program Release 10
The Setup menu contains options for configuring the program and for entering lists of staff members,
activity/shorthand codes, cost codes, and more, described in detail in the Setup section.
.
The Tools menu lists a variety of utility and maintenance functions which are described in detail in the
Tools section.
Window - This menu item brings up a list of all the windows that are currently open in the Tussman
Program. When using the program, you can have multiple screens open at the same time. For
example, you can be entering a new client, leave that screen open and go to enter a new charge, leave
that screen open and go generate a report, etc. The Windows menu will list each screen that is open
and let you switch between them without having to close or minimize any of the currently active
windows. However, it is good practice not to leave too many screens open at one time, as eventually
your computer may not be able to handle the number of files that are open.
Help - Use this menu to open the User Manual, the Tutorial, or to access our website for Product New
or the latest support updates.
As previously stated, most of the functions on the Main Menu, especially the commonly used ones, can
be accessed directly using the buttons on the Toolbar and Control Panel, as described below, making
it rarely necessary to use the pull down menus.
The File menu can be used to switch between the Billing, General Ledger, and Calendar programs.
You can also use the File menu to bring up browse screens displaying your clients, matters, related
names, unbilled and billed charges, and AR transactions. The File menu is not referred to further in
this manual, but is included as a convenience for those who might have become used to it as a main
feature of the user interface from Release 8.
The Toolbar
The Toolbar shown below contains a set of icons which give you quick access to a variety of commonly
used functions in the program. It is divided into 3 main sections. The first section at the left is for
entering new information using either the Batch WIP Entry function or New button. The second
section is for looking up and editing existing information. The third section consists of shortcuts to
some of the lesser used functions in the program.
2011 Tussman Programs, Inc.
The Main Screen
29
This button brings up the main Batch WIP Entry screen which can be used as an alternate
way of entering charges and is also used for importing charges from other systems.
Brings the "New" menu which lets you create new clients, matters, charges, AR
transactions, bills calendar entries, and GL transactions as shown below:
- Click this button to locate a client or matter using the dialog shown below, as described in
detail here.
Displays the Client Browse screen so that you can view a list of all your clients.
2011 Tussman Programs, Inc.
30
Tussman Program Release 10
To view a list of all the matters for a single client, click this button and enter the client you
want as shown below, or click the Browse All button to display a list of all your matters.
Use to locate, list and edit unbilled charges using the lookup dialog shown below:
- Click this button to locate, list or edit payments and other AR transactions
using a lookup dialog identical to that used for locating charges as shown above.
2011 Tussman Programs, Inc.
The Main Screen
31
- Click this button the bring up the Account Status screen for a client or
matter.
- Click this button to bring up the Master Ledger for a client or matter, showing a detail of all
activity to date on the file.
- Brings up the Time At a Glance screen which displays daily totals of hours worked and also
lets you browse and edit the charges for each day.
- Brings up a calendar similar to the Time at a Glance screen showing a summary of
cash receipt totals for each day of the month.
Displays your list of related names.
Click on this button to perform a Conflict Check
Click on this button to spell check your list of charges.
Brings up a menu for performing Remote Entry functions.
.
Prints an audit trail of charges or AR transactions entered since the last time you opened the
program.
Brings up the screen for posting AR transactions to the General Ledger.
- Brings up a dialog screen, shown below, that provides an alternate way to access most of
the program functions. Some users prefer this to the Main Menu as you can access most functions
directly without having to go through the intermediate pulldown menus. If you like to use this menu
screen you can make it your default start-up screen so that it comes up automatically when you start
2011 Tussman Programs, Inc.
32
Tussman Program Release 10
the program.
Displays information about the Tussman Program, including the date and number of the
version you are currently running, the name of the folder where the program is installed, whether or not
security is active, the id of the current user, and whether or not you are running the network version.
The Control Panel
The buttons on the Control Panel access the most commonly used functions in the program, as
described below. These buttons make it rarely necessary to use the Main Menu. The six buttons
represent the six basic steps in the billing process: adding a new client, opening a matter file,
recording time and other charges, entering client payments, generating a bill, and then finalizing the
bill.
The three menu buttons at the top let you switch between program modules if you are also using our
General Ledger and Calendar Programs.
2011 Tussman Programs, Inc.
The Main Screen
33
Left click on this button to add a new client, or right click to look up an existing client.
Left click on this button to add a new matter for an existing client. If you are browsing your
client list or displaying a client record, the new matter will automatically be assigned to the highlighted
2011 Tussman Programs, Inc.
34
Tussman Program Release 10
or displayed client. Otherwise, you will first have to select the client you want. Right click on this
button to look up an existing matter. Right click on this button to look up an existing matter.
Left click on this button to enter a new charge. Right click on this button to display a list
of unbilled charges. If you are browsing your client or matter list or displaying a client or matter record,
the list will include only charges for the highlighted or displayed client or matter. Otherwise, all unbilled
charges will be listed.
Once you bring up the new charge screen, you can also find and edit an existing charge, browse your
list of charges, or generate lists of charges using the buttons that appear at the top of the new charge
screen.
Left click on this button to enter a new client payment or other AR transaction. Right
click on this button to display a list of AR transactions. If you are browsing your client or matter list or
displaying a client or matter record, the list will include only transactions for the highlighted or displayed
client or matter. Otherwise, all AR transactions will be listed.
Left Click on this button to generate a new bill for all or selected clients. Right click on this
button to generate a prebill instead of a bill.
Click on this button to display your list of bills which have been generated but not yet
finalized. From this screen you can then finalize all or selected bills, which is the last step in the billing
process. Right click on this button to display a list of finalized bills.
Click on this button to bring up a note pad. If you have activated the program security
functions, then each user will have their own personal note pad.
5
The Alternate Interface
As an alternative to the user interface described in the Main Screen section, you can select a different
interface which emphasizes using an expanded version of the Control Panel at the left to access most
of the functions of the program. To select this interface, click on Setup, Appearance and Interface
Options, Use Expanded Control Panel Interface. That interface is described in this section, but the rest
2011 Tussman Programs, Inc.
The Alternate Interface
35
of the User Manual assumes you are using the normal interface described in the Main Screen section.
The alternate interface main screen consists of the Main Menu (the list of menu options displayed
across the top), the Toolbar (the icons on the bar just below the Main Menu), and the Control Panel
(the buttons and icons displayed down the left side).
The Main Menu, Toolbar, and Control Panel are described in detail below. The Control Panel, a new
feature of Release 10, is especially useful because using it you can perform virtually all the commonly
used functions in the program.
Main Menu
The Main Menu gives you access to the basic setup and tools functions in the program, most of which
are not used that often.
2011 Tussman Programs, Inc.
36
Tussman Program Release 10
The Setup menu contains options for configuring the program and for entering lists of staff members,
activity/shorthand codes, cost codes, and more, described in detail in the Setup section.
.
The Tools menu lists a variety of utility and maintenance functions which are described in detail in the
Tools section.
Window - This menu item brings up a list of all the windows that are currently open in the Tussman
Program. When using the program, you can have multiple screens open at the same time. For
example, you can be entering a new client, leave that screen open and go to enter a new charge, leave
that screen open and go generate a report, etc. The Windows menu will list each screen that is open
and let you switch between them without having to close or minimize any of the currently active
windows. However, it is good practice not to leave too many screens open at one time, as eventually
your computer may not be able to handle the number of files that are open.
Help - Use this menu to open the User Manual, the Tutorial, or to access our website for Product New
or the latest support updates.
The File menu can be used to switch between the Billing, General Ledger, and Calendar programs.
You can also use the File menu to bring up browse screens displaying your clients, matters, related
names, unbilled and billed charges, and AR transactions. The File menu is not referred to further in
this manual, but is included as a convenience for those who might have become used to it as a feature
of the user interface from Release 8.
The Toolbar
The Toolbar shown below contains a set of icons which are shortcuts to several functions in the
program:
This button brings up the main Batch WIP Entry screen which can be used as an alternate
way of entering charges and is also used for importing charges from other systems.
Displays your list of related names.
Click on this button to perform a Conflict Check
Click on this button to spell check your list of charges.
2011 Tussman Programs, Inc.
The Alternate Interface
37
Brings up a menu for performing Remote Entry functions.
.
Prints an audit trail of charges or AR transactions entered since the last time you opened the
program.
Brings up the screen for posting AR transactions to the General Ledger.
- Brings up a dialog screen, shown below, that provides an alternate way to access most of
the program functions. Some users prefer this to the Main Menu as you can access most functions
directly without having to go through the intermediate pulldown menus. If you like to use this menu
screen you can make it your default start-up screen so that it comes up automatically when you start
the program.
Displays information about the Tussman Program, including the date and number of the
version you are currently running, the name of the folder where the program is installed, whether or not
security is active, the id of the current user, and whether or not you are running the network version.
2011 Tussman Programs, Inc.
38
Tussman Program Release 10
The Control Panel
The Control Panel is the primary tool for using the program. It groups together into a set of clusters all
of the commonly performed functions. For example, the Clients cluster includes an icon which you can
click on to bring up a list of all your clients. To the right of the icon are a set of buttons. Click New to
add a new client, Find to find an existing client, and More to bring up a menu with additional options
related to clients and matters. The Control Panel is described in detail below.
The three buttons at the top let you switch between program modules if you are also using our
General Ledger and Calendar Programs. Click General Ledger to bring up the General Ledger
interface, Calendar to bring up the Calendar screen, and Billing to return to the main billing screen.
The Clients cluster:
2011 Tussman Programs, Inc.
The Alternate Interface
39
Click on the clients icon to bring up a browse list of your clients, or click New to
add a new client or Find to look up an existing client. Click the More button to bring up a menu with
additional options related to your clients and matters, as follows:
The Matters cluster:
Click on the Matters icon to bring up a browse list of your existing matters.
Click the New button to add a new matter for an existing client, or click the Find button to find an
existing matter. Click the More button to bring up the following menu with more options:
The Charges cluster:
2011 Tussman Programs, Inc.
40
Tussman Program Release 10
Click on the Charges icon to bring up a browse list of all your currently unbilled
charges. Click the New button to enter a new charge, or click Find to find a specific charge or browse
charges for a specific client or matter. Click the menu button to bring up the following menu with
additional options:
The Receipts cluster:
Click on the Receipts icon to display a list of all AR transactions (payments,
credits, trust and retainer transactions, etc). Or click New to enter a new AR transaction, Find to find
an existing one, or More to bring up the following menu of additional options:
The Bills cluster:
2011 Tussman Programs, Inc.
The Alternate Interface
41
Click on the Bills icon to bring up a list of the bills you have generated but not
yet finalized. Or, click Prebill to generate a new prebill, Bill to generate a new Bill, or More to bring up
the following menu of additional options:
The Reports cluster:
Click the Reports button to bring up a menu listing the various reports
generated by the program, as follows:
2011 Tussman Programs, Inc.
42
Tussman Program Release 10
Also in the Reports cluster you can click the TAG icon to bring up the Time at a Glance screen, the
Account Inquiry icon to bring up the Account Status screen for a client or matter, or the Master Ledger
icon to bring up the Master Ledger for a client or matter
Click on this button to bring up a personal note pad which you can use to records notes,
reminders, etc. If you are operating on a network and have activated the security functions so that
each user must enter a user ID and password, the program keeps a separate note pad for each user.
6
Getting Started
The following steps will help you get started quickly using the Tussman Program:
1. Review the configuration options. Some of this are quite simple, such as entering the name of your
firm, and others are more complicated, such as settin up a list of users and passwords if you want to
2011 Tussman Programs, Inc.
Getting Started
43
restrict access to the program. It is a good idea to review these options first, as some of them may
make it easier to enter information into the program. However, you can always go back later when you
have more time to review or change these options.
3. Review the section on creating code lists, which describes the different categories of codes which
you can create. These codes are used to make data entry easier (for example, the activity codes and
cost codes), and others are designed more for reporting puposes (for example, the productivity
codes). You do not have to set up all these lists first, as they can always be added or edited later.
2. Enter a list of the attorneys and other staff members in your firm who will be entering time in the
program, along with their billing rates. It is a good idea to do this before you start entering your clients
and matters, especially if clients are being billed using different rates. That way when setting up your
files you can specify their billing rates at the same time.
3. Decide if you need to create different bill formats for different clients. You may want to review the
section on bill formats so you understand the many options for formatting your bills, although this can
always be done later.
3. Begin entering your clients and matters, as described in the section on Clients and Matters.
4. Enter beginning balances for your clients and matters that have outstanding balances that you want
to carry over from your old system. The beginning balances do not have to be entered first, as long as
they are put in before you generate your first bills.
5. You are now ready to begin recording charges for your clients, generating bills, entering payments.
and printing management reports. All the instructions for performing those and other functions are
described in detail in the rest of this manual. It is especially important to understand the concept of
finalizing bills, so before generating bills you should review that section. You should also review the
section on Account Balances, as this will help you understand how a client's account balance is
maintained and how you can look up a client's account information.
7
Six Steps to Painless Legal Billing
Using the Tussman Program, billing your clients is almost as easy as 1-2-3. The program's main
screen, show belown, features a Control Panel at the left with buttons that take you step by step
through the billing process, which includes setting up a new client and matter file, recording charges
and cash receipts, and generating and finalizing a bill..
2011 Tussman Programs, Inc.
44
Tussman Program Release 10
Step 1 - Adding a new client. The first step in the billing process is to add the
new client to your list of clients. Click the New button next to the Clients icon and enter the client
information into the screen which appears below.
2011 Tussman Programs, Inc.
Six Steps to Painless Legal Billing
45
The Client ID can be either alpha, numeric, or mixed. Unless you are used to using a numeric
numbering system for your clients, it is easiest just to use the client's name as their ID., as shown
above.
Client ID's are by default limited to 8 characters. You can increase this to 16 if desired by clicking on
Tools, Convert to Long File ID's. This can be done at any time and when performed this function will
convert all your existing data to the longer format. However, once you have selected the longer format
you cannot revert to the original 8 character limit (except by restoring from a backup made before the
conversion was done).
When setting up the client, you can also specify the type of fee arrangement, the billing rate, and the
bill format you want to use by clicking on the Fee Agreement button. Other optional billing instructions,
such as charging interest on past due amounts, automatically applying retainer funds against each bill,
installment payment options, and the like, are listed by clicking Billing Options. While there are
many options to select from, you set up defaults for each one so that In most cases you can skip these
screens and use the default settings.
Step 2 - Opening a Matter File. The client record contains just the basic client
information. You must then open at least one matter file for each client before you can generate a bill.
Some clients may have hundreds of matters (such as an insurance company) while others (such as a
family law client) may have only one. After saving the client information, click the New button next to
the Matter icon to open a matter for that client.
2011 Tussman Programs, Inc.
46
Tussman Program Release 10
Each matter must be assigned an ID, as shown above; the maximum length will be either 8 or 16
characters, the same as you selected for the Client ID. The ID can be alpha or numeric; in the above
example we used 01 as the matter ID. You can also enter up to 5 lines for the matter title, which can
print in the heading of the client's bill.
Step 3 - Entering Charges. Now that you have entered the client and matter
information, you can begin recording time and costs for that client. Click the New button next to the
Charges icon and the entry screen shown below appears:
2011 Tussman Programs, Inc.
Six Steps to Painless Legal Billing
47
We have filled it in to show that attorney Perry Mason has spent 1 hour reviewing the facts of the case.
In the above example we have selected Entry Type H, for billable time. You can also enter nonbillable
time, flat fee charges, billable and nonbillable costs, and a variety of other transaction types.
The program automatically knows what rate to use depending on which rate schedule you specified for
the client matter you are working with. If you have not yet entered a list of staff members and billing
rates, you can do this by selecting Staff Members from the Setup menu (click Setup from the Main
Menu at the top of the screen). Or, you can leave the Staff Member blank, in which case you will have
to manually enter the rate you want to use.
You can enter unlimited text for the description, and you can create your own list of shorthand
abbreviations to speed up data entry.
Step 4 - Entering Cash Receipts. Click the New button next to the Receipts icon to
record client payments and other similar transactions, such as trust or retainer account transactions,
client credits and writeoffs, etc. The screen below shows that we have recorded an initial payment of
$1000.00 from our new client, Paul Drake.
2011 Tussman Programs, Inc.
48
Tussman Program Release 10
The program automatically applies cash receipts against outstanding bills or against future charges as
they are billed. You can also post cash receipt totals to the Tussman General Ledger if you are using
that module.
Step 5 - Generating a Bill. To generate a bill, click the Bill button next to the Bills icon
and the following screen appears. Since we have been working with Paul Drake's file, the program
assumes this is who we want to bill, but you can change this to select any other individual file or group
of files for billing.
2011 Tussman Programs, Inc.
Six Steps to Painless Legal Billing
49
Click Preview, and the program will display a copy of the bill, as shown below. You can format your
bills by selecting from literally hundreds of options which control the level of detail, layout, and wording
of the bill, and you can create up to ten different format for clients with different requirements.
2011 Tussman Programs, Inc.
50
Tussman Program Release 10
If the bill looks OK, you can print it from the Preview screen by clicking on the printer icon at the top.
The bill shown above has been generated in the default format, but there are literally hundreds of
formatting options that let you control the level of detail and layout of the bill.
Once you have generated a bill, it can be edited and generated again as often as necessary until it is in
final form. If you click on the Find button next to the Charges icon on the Control Panel and select the
client you want a list of the charges for that client will appear, and you can then edit or delete any of
those charges.
Similarly, if you click on the Find button next to the Receipts icon on the Control Panel and select the
2011 Tussman Programs, Inc.
Six Steps to Painless Legal Billing
51
client you want a list of payments and other AR transactions for the same client will appear.
Step 6 - Finalizing the Bill. After you have printed the bill in final form and sent it
to the client, the final step in the billing process is to finalize that bill. This procedure is necessary so
that the balance due from this bill becomes the balance forward on the next bill, and so that the
charges which appeared on this bill are marked as billed and do not appear again on the following bill.
To finalize, click the Bills icon and a list of any bills that you have generated but not yet finalized will
appear, as shown below. Highlight the bill you want to finalize and click the Finalize button at the top,
then select the option to Finalize Highlighted Bill and you are done!
After you finalize a bill, you can reprint a copy of it or unfinalize it if you need to make changes and
redo it. Click the More button next to the Bills icon to list these functions. From this menu you can also
produce reminder statements for clients who are past due or historical bills (a cumulative bill
showing all billed activity to date).
You have now completed the six steps to painless legal billing!
Looking up Information
Looking up existing information, such as to find a client's address or phone number, check
their account status, make changes to an existing file, or to view and edit charges and other
transactions you have entered, is extremely easy. Virtually all data is at your fingertips using
the set of buttons shown below which appear on the Toolbar at the top of the main screen:
To locate an existing client or matter file click the
matter ID's in the dialog shown below.
2011 Tussman Programs, Inc.
button and enter the client and/or
52
Tussman Program Release 10
If you don't know the client ID, you can also type in the alternate client ID or even a portion
of their name or address and the program will locate it, as described in the main manual
Or, to browse a list of your existing clients and matters, click the
clients or the
button for a list of
button for a list of matters.
To view and edit your currently unbilled charges or AR transactions, click the
button
for a list of charges (which includes both fees and costs) or the
button for a list of AR
Transactions (which includes client payments, retainer and trust transactions). If you click
either of these buttons the dialog shown below appears, which enables you to view a list of
all transactions, transactions for a specific client or matter, or a single transaction if you
know the record number of the one you want (record numbers appear on the prebills and
transaction detail lists).
2011 Tussman Programs, Inc.
Six Steps to Painless Legal Billing
53
The
button brings up the Account Status screen for the client or matter you specify,
showing detailed account balances and history for that file, as shown in the sample below:
The buttons at the bottom of the Account Status screen let you "drill down" to display more
detailed account information for that file.
2011 Tussman Programs, Inc.
54
Tussman Program Release 10
The
button brings up the Master Ledger for a client or matter which displays a
complete list of all activity to date for a client or matter, including both billed and unbilled
charges and a list of all bills, payments and other AR transactions. You can click on any of
the transactions on the list to view or, if appropriate, edit them, and you can print the list in
the form of a detailed report.
Finally, the
and
buttons bring up the Time at a Glance and Daily Cash
Receipts Summary screens in the format of a monthly calendar showing the total hours and
charges, or the total cash receipts, entered for each day. You can then click on any date on
the calendar to display and edit the charges or receipts for that day.
The program also generates a wide variety of management reports which you can view by
selecting Reports from the Main Menu. Some of the reports include:
Accounts receivable
WIP Summary
Trust, Retainer and Credit Balances
File History and Status
Productivity
Billing Analysis
Income Analysis
Staff Earnings Analysis
Realization Analysis
Budget Analysis
Periodic Activity Summary
Daily Cash Receipts
Fee Ledger
Cost Ledger
Billing Ledger
All of these reports are extremely flexible and can be configured to be sorted, filtered and
subtotalled in a variety of ways, and to cover any range of dates desired. In addition to
these reports, you can generate client and matter lists and labels and detailed lists of
charges, cash receipts and other transactions.
2011 Tussman Programs, Inc.
Printing in the Program
8
55
Printing in the Program
When printing bills or reports in the program, you almost always have four options, as shown in the
following sample dialog that comes up when generating some reports:
Print - Click this button to send the report directly to your printer. Your standard Windows printer
dialog will come up. Simply click the Print button on that dialog, unless you first need to select a
different printer. The option to select a page range on that dialog will not work with the Tussman
Program. If you want to print selected pages of a bill or report, use the Preview function described
below.
Compress Print - Works the same as the Print option, except the report will be generated in
compressed print.
Print to File - Sends the bill or report to a text file which can then be viewed and edited using Microsoft
Word or another word processing program, or it can be sent as an attachment to an email. After
selecting this option, a standard Windows dialog comes up from which you can specify a file name and
location. Click the Save button on that dialog after entering the file name and location. When
completed, you can then retrieve that file into a word processing program, or attach it to an email.
We no longer recommend using the Print to File option as the file which is produced is a simple plain
text file and when using proportional fonts it may not look acceptable. Instead, you should install and
use the Tussman PDF writer, or another PDF writer of your choice.
When using Tussman with some older versions of windows, the Print to File option may not work; i.e.,
the Windows dialog from which you specify the file name and location will not come up. To get around
this problem, select Print to File Option from the Setup menu and click Yes when asked if you want
to switch to the old print to file function. Using this method, when you want to generate a bill or report
to a file a simple dialog will come up into which you can type the name of the file you want to create.
You can also specify a drive and directory. For example, to create a file named Report.txt on a floppy
disk in drive A, enter A:\report.txt. The name of the folder and the name of the file should not be
longer than eight characters, and the file may have an extension of up to three characters. The Print
to File Option on the Setup menu will also let you switch back to using the new method if you are
currently using the old method.
CSV File - With many of the reports you also have the option of generating them to a CSV file. After
selecting that option a dialog will come up where you can specify the file name and the folder where
you want to save it. Be sure to give the file a .csv extension.
Preview - Generates the entire bill or report to the screen where it can be viewed one page at a time.
The bill or report will look exactly like it will appear when actually printed. Use the buttons on the
2011 Tussman Programs, Inc.
56
Tussman Program Release 10
Toolbar at the top as follows:
- Display the first page
- Display the previous page
- Display the next page
- Display the last page
- Enlarge the current page
- Display two pages side by side
- Print the document. If the document is more than one page, the following dialog will appear:
From the above dialog you can select whether to print the entire document, the current page only, or a
specified page range. The document will be printed to your current default printer. If you need to send
it to a different printer, before generating the report select Print Setup from the File menu and select
the printer you want there. This printer will become the new default printer for the Tussman Program
for as long as you keep the program open. The next time you close and reopen the program it will
revert back to using the Windows default printer.
- Close the preview screen and exit.
- To go quickly to a specific page, select the page you want from this drop down list.
Print Setup
The Print Setup option on the File menu lets you change the default printer for the Tussman Program.
Normally the program uses your Windows default printer. If you want to change it, select a different
printer in the Print Setup dialog. This printer will become the new default in the program for as long as
you keep the program open. The next time you close and re-open the program it will revert back to the
Windows default printer.
2011 Tussman Programs, Inc.
Creating PDF Files
9
57
Creating PDF Files
Any bill or report generated in the program can be saved in a standard PDF file format. To do this, you
must first install the Tussman PDF writer.
The installation files should already be in your Tussman Program folder. To run the installation, click
on Tools from the main menu and select the option to Install Tussman PDF Writer. A WinZip Self
Extractor dialog will appear. Do not change the Unzip To folder. Click on Unzip and wait for the
procedure to finish, then click Close.
After installing the PDF Writer as described above, to save a bill or report to a pdf file all you have
to do is select the Print option when generating the bill or report, then select Tussman PDF
from the list of printers which appears in the printer dialog. Give the output file a name and
folder destination, and you are done. You can then open or attach that file to an email just like
any other pdf file.
If for some reason the Tussman PDF does not appear on your list of printers, and you are
running the program over a local area network, try installing it on your local drive instead by
selecting the Install PDF Writer on Local Drive option from the Tools menu.
If it still does not appear, then probably you have previously installed an older version of the
PDF writer which is not compatible with Windows 7. To fix this you must first uninstall the
older version by clicking on Tools and selecting the option to Uninstall the PDF writer. Then
try installing it again and it should work.
If it still does not install correctly, it may be necessary to start up the Tussman Program using
the option to Run as Administrator. To do this, right click on the Tussman Program shortcut
on your desktop and select that option from the menu.
When using the PDF writer, you can have all PDF files sent automatically to a specified folder
by selecting Configure Tussman PDF Writer from the Tools menu, checking the Use
Default Folder Location box and, entering the name of the folder in the Location box, and
then checking the Use Print Job Name to Save PDF File box. Each PDF file that you
generate will then be saved automatically in that folder and it will be given the same as the
print job (for example, if generating an Accounts Receivable Report that will be its name).
When generating bills, you can also configure the program to create a separate PDF file for
each client. To do that, configure the PDF Writer options as described in the previous
paragraph so that the files are saved automatically in the specified folder, then click on the
File Option button that appears on the Generate New Bills screen and check the box that
says Save Each Bill to a Separate File. Each bill will be saved with a name that consists of
the client ID followed by the posting date of the bill.
To configure Tussman to automatically open the pdf file after it has been generated, select
Configure Tussman PDF Writer from the Tools menu and check the View PDF After
Saving box. Do not check this option if you are generating separate PDF files for each client
when generating bills, as described in the previous paragraph, or if you will be emailing the
2011 Tussman Programs, Inc.
58
Tussman Program Release 10
bills.
10
Printing your own Letterhead
You can save money and time by having the program automatically print your firm's letterhead when
generating bills. To do this, you must first obtain a copy of your letterhead or the artwork for the
letterhead in the form of a jpg file. The easiest way to do this is to scan a copy of your letterhead to a
jpg file. Most current printers will also perform scans, but you must be sure to save it to a jpg file. Once
you have the file, simply save it in a folder somewhere on your computer. Alternatively, you can
probably obtain a jpg file containing a copy of your letterhead from your graphics designer or printer. In
that case, the file will probably just contain the artwork for the letterhead itself, and will not be a
complete scan of the letterhead. In either case, once you have saved the file in a location that is
accessible to the program, click on Bills, Edit Bill Formats, click on the format you use and go to
format option 11. Set the Include return address option to N, then set the Print Logo option to Y,
then click on the Details button. Enter the location and name of the jpg file in the first space. For
example, if the file is named letterhead.jpg and is located in the tp9 folder on your C drive, enter
C:\tp9\letterhead.jpg. If the jpg file contains a scan of your complete letterhead, leave the Row and
Column settings at 0, and ether 8.5 for the Width. If the jpg file just contains the artwork, you may
have to play with the settings. First try entering 1.00 for the Row and Column settings (this creates a
one inch margin at the top and left side), leaving the Width at 0.00. If you need larger margins at the
top or left, increase the Row and Column settings respectively.
If you have separate artwork, or a separate letterhead page that you want to use for subsequent pages
(for bills that are longer than one page), enter the name of that file in the second space, along with the
coordinate settings as previously described. In either case, when printing bills the program will use the
first file to print the first page of each bill. If you specified a file for subsequent pages it will use that;
otherwise no logo will be printed on subsequent pages.
If the program fails to print the letterhead even after you have set the Print Logo option to Y and
entered the Detail information, check to make sure you entered the information in the same format you
are using to print the bill. If that is correct, then probably the program is unable to locate the jpg file you
specified. Check to make sure you entered the path and file name correctly.
Note that you must enter the logo instructions for each bill format that you are using.
11
Creating Code Lists
The Program maintains several lists of different types of codes which can be used for various
purposes.
For example, you will definitely want to create a list of all the attorneys and other staff members in your
firm who will be recording time for billing purposes. Each staff member can be assigned up to 60
different billing rates. Staff Members can be grouped into different Categories, if necessary.
You can also create a list of Activity Codes and Cost Codes which assist in speeding up data entry in a
variety of ways. For example, Activity Codes can be used as shorthand abbreviations when entering
the description of work performed. Along with Task Codes , Activity Codes and Cost Codes must also
be assigned to each time entry if you are required to submit bills in electronic formats such as LEDES
2011 Tussman Programs, Inc.
Creating Code Lists
59
or Tymetrix.
Productivity Codes are generally optional but consist of ten different categories of user-definable codes
which can be assigned to each client or matter so that they can be grouped by responsible attorney,
area of law, etc.
To maintain your code lists, select Setup from the Main Menu. The various types of codes are listed in
the first section of the submenu.
11.1
Staff Categories
Staff Category codes are used to classify your staff members to indicate whether they are Partners,
Associates, Paralegals, etc. You can create any list of categories you want, although if you are
required to submit bills electronically you may have to use a list specified by your client. After creating
your list of Category Codes, when you create or add to your list of Staff Members the appropriate
Category Code should be inserted in the Category space.
To display your Category list,click on Staff Categories from the Setup menu.
To add a new category, click the New button and the following screen will appear:
Assign a Code of one or two characters to identify the category; for example, "P" for Partner, "A" for
Associate, etc. Then enter the title of that category; for example, "Partner", "Associate", etc.. If you are
submitting bills electronically, the title may have to be entered exactly as specified in the instructions
you received from the company that you submit the electronic bills to..
The Itemize Timeslips on Bill option is used if you are grouping charges on the bill by Staff Category
and want charges for some categories to be itemized and others not. For example, you may want to
show the detail of work done by attorneys but only the total of work done by paralegals. To do this, first
set Bill Format option 66 to C, which causes the charges on the bill to be grouped by Staff Category.
Then set option 64 to Y so that by default charges for each category will be itemized. Then enter N in
the Itemize Timeslips on Bill box for those categories where you do not want the charges itemized.
11.2
Staff Members and Billing Rates
A list of all members of your firm who will be recording time in the program must be entered in the Staff
Member file along with the hourly billing rates they will be charging. Each staff member can be
assigned up to 90 different rates. If you need to increase that, there is an option to allow unlimited
2011 Tussman Programs, Inc.
60
Tussman Program Release 10
billing rates. You may find that this function also makes it easier to identify your rates as you can
assign your own code to each rate schedule and it is easier to view, edit and select them. To activate
this option, click on Tools from the main menu and select the option to Convert to Unlimited Rate
Schedules.
To view or edit your list of staff members and rates select Staff Members and Rates from the Setup
menu. Rates are entered in columns similar to a spreadsheet and each column makes up what is
referred to in the program as a Rate Schedule. Thus, Rate Schedule 1 consists of the rates entered in
column 1 for each staff member. When you open a new Matter in the program you specify in the
fee arrangement screen which of the rate schedules you want to use for that matter. Then, whenever
a staff member records time for that matter the program will use the rate from that Schedule to
calculate the amount of the charge. This allows each staff member to bill time at different rates on the
same matter. For example, if a matter is assigned to rate schedule 1, regardless of which staff
member enters time on that matter the program will use that staff member's Rate 1 in calculating the
amount of the charge.
.
Note that a default Staff Member with a code consisting of asterisks will appear as the first one listed.
This is used by the program in case you record time without specifying the staff member. However, it
is better practice to always specify the staff member when entering time, even if you are only a one
person firm. You can specify a default staff code which will automatically be assigned to each charge
using the Data Entry Options function.
To add a staff member to the list, do not attempt to edit or use the default staff member, but always
create a new one.
Click on the New button to add a Staff Member and enter the information as follows:
2011 Tussman Programs, Inc.
Creating Code Lists
61
Code - Assign a code of up to four characters. It is recommended that you simply use the person's
initials, although a numeric code is also permitted.
Name - Enter the name of the Staff Member.
Category - Assign an optional code from the Staff Categories list if you are using them
Sort Code - If used, determines the order in which Staff Members are listed on the bill (if charges are
itemized separately for each Staff Member by setting Bill Format option 66 to Y), and in the optional
Staff Member summary at the end of the fee section on the bill (generated by setting Bill Format option
83 to A). For example, assign A as the Sort Code to the Staff Member you want listed first, B to the
second one, etc. You can also configure the program to assign the sort code as the Order code when
making time entries so that if several staff members perform work on the same day the entries for that
day will be listed on the bill in order of the Staff Members' sort codes; i.e. all entries on a specific day
for a staff member with sort code A would be listed on the bill before those with sort code B. To use
this option, check option 13 in the Data Entry Options screen.
Alias Code - Use if you want work performed by this Staff Member to be attributed to another Staff
Member when it appears on the bill. For example, if you want work done by this Staff Member to be
attributed to Staff Member XYZ on the bill, enter XYZ as the Alias Code. The code you assign as the
Alias Code must be a valid Staff Member code. Thus, in the above example XYZ must appear as one
of your Staff Member codes before it can be assigned as an Alias Code to another Staff Member.
If you have assigned Alias Codes to your staff members but do NOT want the alias code to appear on
the bill, in bill format option 7 set the option for including the Staff Member to C. Then the actual
Code, not the Alias Code, will appear.
2011 Tussman Programs, Inc.
62
Tussman Program Release 10
Active - Defaults to Y but can later be changed to N if this Staff Member leaves the firm or you do not
want them to be listed as one of the selections in your pop up list of Staff Members. If a once-active
Staff Member leaves the firm, it is better to make them inactive rather than deleting them so that their
name will remain on file for purposes of your management reports.
Rates - Enter up to 90 rates for each Staff Member, remembering how each rate is part of a Rate
Schedule as described at the beginning of this section. If the rates for this Staff Member will be the
same or similar to those used by an existing Staff Member, you can import that set of rates by clicking
on the Import button and entering the Staff Member code of the one you want to copy.
If you have selected the option to use unlimited billing rates, as described at the beginning of this
section, the screen for adding a new staff member will instead look like this:
Below the basic staff member information is a scrolling list of all your rate schedules. Click on each
one to enter this staff member's rate for that schedule.
Editing and Changing Rates
To change the rates for a single Staff Member, double click on the Staff Member, or highlight that Staff
2011 Tussman Programs, Inc.
Creating Code Lists
63
Member and click Edit. A dialog similar to the Add New Staff Member screen shown above will
appear, in which you can make your changes.
To change all the rates in an existing Rate Schedule, or to create a new Rate Schedule, click on
Rates and select the Rate Schedule you want to change from the list. After making your selection the
a screen will appear listing each staff member's rate for that rate schedule. Make whatever changes
you need and click OK to save the changes. If you have selected the option to use unlimited rate
schedules, you can create a new rate schedule by clicking the Create New Rate Schedule at the
bottom of the dialog. Assign a code and title to the new rate schedule and enter the rates for each
staff member.
Creating a new Rate Schedule is necessary when, for example, you are setting up a new client who will
be billed using a combination of rates that is not contained in a Rate Schedule that you have already
created. When creating a new Rate Schedule, you can import the rates from another existing Rate
Schedule by clicking on Import. This saves time if most of the rates in the new schedule will be the
same as in an existing one.
To help remember what each Rate Schedule is used for, you can assign a descriptive Title to each
schedule. To do this, click on Rates, then click on each schedule that you are using and fill in the Title
space at the top, as shown in the screen above.
If you need to create a new rate schedule but are not sure which rate schedules are not being used,
you can click the Rates button on the main Staff Members screen, then click the Find Unused
Schedule button at the button and it will bring up the first rate schedule that has not been assigned to
any currently active clients or matters. This feature only is available if you are not using the unlimited
rate schedule feature.
You can also change rates by simply clicking on the cell containing the rate that you want to change
when viewing the Staff Members list. For example, to change Perry Mason's rate 1 in the sample
screen at the beginning of this section, click on that cell and the following dialog will pop up: Simply
make the change and click OK.
If you are changing rates because you are increasing your existing rates, you have two options:
1. Create a new Rate Schedule or Schedules with the new rates, and then edit your existing clients
and matters to assign the new Rate Schedule(s). Instead of editing each matter individually to make
the change, it is possible to do a global replace; for example, to have all matters currently using rate 12
to change to rate 52. This can be done using the Global Changes function.
2. Change the rates in your existing Rate Schedules to match the new rates. This method has the
advantage of not requiring you to edit your existing clients and matters to assign the new schedules.
However, this will be impractical if you are increasing the rates for some clients but not for others. In
that case you must create new Rate Schedules for the new rates.
In either case, when you edit your Rate Schedules the changes take effect immediately; there is not
way to specify that the changes are to take effect on a date in the future. Thus, if you are changing
2011 Tussman Programs, Inc.
64
Tussman Program Release 10
your rates as of a specified date, you must make the changes on that date. Changes only affect
charges that are entered after the changes are made, unless you perform the revaluation procedure
described below.
Revaluing Existing Charges After Making Rate Changes
When you make a change in your existing rates as described above, the change will only affect
charges that are entered after the changes have been made. If you want the changes applied
retroactively, to charges that have already been entered using the old rates, click on the Revalue
button on the Staff Members screen and the following screen will appear:
If you click OK, the program will then recalculate the dollar amount of all unbilled charges using the
current rates shown in the Staff Members screen. You can restrict the revaluation procedure to apply
only to matters billed using a specified Rate Schedule, to charges for a specified Staff Member, or to
charges for a specified client or matter by filling in any or all of those fields in the screen shown above.
If you enter a Beginning Date, only charges dated on or after that date will be revalued. If you leave
the date blank, all unbilled charges will be revalued. Regardless of your selections, only unbilled
charges will be affected. If you want to change the billing rate for charges that have already been
billed, you must unfinalize the bill(s) on which those charges appeared, perform the revaluation
procedure, and then generate and finalize those bills again.
11.3
Task Codes
A Task Code is an optional code which can be assigned to each fee or cost charge which you enter.
Task Codes are usually used only if you are required to submit bills in LEDES or other electronic
formats. There is a standard list of Task Codes created as part of the Uniform Task-Based
Management System which is required by most electronic billing systems. One of these Task Codes
must be assigned to each fee or cost charge which is billed. The Task Code gives a general
description of the type of work involved, which is then further specified by the additional use of an
Activity Code or Cost Code.
To view or edit your list of Task Codes, click on Task Codes from the Setup menu. The following
screen will appear, which displays a partial list of the Uniform Task Code set.
2011 Tussman Programs, Inc.
Creating Code Lists
65
While it is possible to create your own list of Task Codes, you can also simply import the standard set
created by the Uniform Task-Based Management System by clicking the Import button at the bottom
of the Task Codes screen shown above.
To add additional codes to the list, click the New button and the following screen will appear.
Assign a code of up to eight characters plus a description.
When creating a Task Code it is possible to assign a Rate to each code. If you do this, the program
2011 Tussman Programs, Inc.
66
Tussman Program Release 10
will use that as the billing rate when calculating the amount of each fee charge which is assigned that
Task Code, instead of using the rate assigned to the Staff Member. This feature is only activated
when you set option 6 in the Data Entry Options screen to T. If you leave the Rate at 0.00, the
program will use the rate assigned to the Staff Member.
Since not everyone uses Task Codes, the space for entering them when adding new fee and cost
charges can be disabled. by setting option 6 in the Data Entry Options screen to N. Set this option to
Y to activates the Task Code space in the data entry screen, although entry of a Task Code will still be
optional. If you want to require the entry of a Task Code for each charge, set option 6 to R. If you only
want to require the entry of Task Codes for certain matters, go to the matter screen for each Matter
which requires their use, click on the Z button at the bottom of the screen and enter Y.
When formatting your bills it is possible to include the Task Code for each charge (format item 70).
Placement of the Task Code is determined by item 73. You can also combine charges by Task Code
(item 65), sort charges by Task Code (item 66), or include a summary of charges by Task Code (item
90).
11.4
Activity Codes
An optional Activity Code can be assigned to each fee charge to indicate the type of work performed.
Electronic billing systems such as LEDES require the use of Activity Codes. Activity Codes can also
be used as shorthand abbreviations when typing in the description of work performed. Most firms
create their own list of codes which stand for commonly used phrases (for example, TC for telephone
conference) in order to speed up the data entry process.
To view or edit your list of Activity Codes, select Activity Codes from the Setup menu and the
following screen appears. The example below displays the of the Unform activity codes plus some
additional sample codes.
2011 Tussman Programs, Inc.
Creating Code Lists
67
To import the Uniform set of Activity Codes required by LEDES and other electronic billing systems,
click on the Import button at the bottom of the screen.
You can also add your own list of codes by clicking on the New button to display the following screen.
You can create an unlimited number of codes. Fill in the information for each code as follows:
Code - Assign a code of up to eight characters. If you will be using your codes as shorthand
abbreviations, it is best not to use a code which is the same as a commonly used word; for example,
TO or AS, so that they are not confused with actual text.
Cat - Assign an optional category code. This can be used if, in addition to assigning an Activity Code
to each fee charge, you also need to be able to keep track of two different categories of time for
reporting purposes. For example, you might need to track court time as opposed to out of court time,
or work performed in-county as opposed to out-of-county. In the first example, an Activity Code that
related to work performed in court could be assigned the Category code 1, and an Activity Code that
related to work performed out of court could be assigned the Category code 2. If using the Category
Code, you can only assign either 1 or 2 as the code. You can then create a Productivity Report which
gives a breakdown of total hours worked by category by selecting items 64 and 65 from the list of items
which can be included on a User Defined or One Time report.
Amount - If you enter an amount in this space, the program will use this as the default number of
hours or dollar amount to charge when recording fee charges using this Activity Code. How the
amount is used depends on the type of charge you are entering.
If you are recording an hourly charge (transaction type H), the amount is used as the default number
of hours. For example, if you always want to charge a minimum of 1 hour for each office visit, you
could create an Activity Code (OV, for example) with an associated amount of 1.00. When recording
time using that Activity Code, the program will insert 1.00 as the hour amount, which you can then
change if necessary.
If you are recording a flat fee charge (transaction type F), the amount is used as the default dollar
amount. For example, if you have a standard charge of $500.00 for drafting a particular document,
you could create an Activity Code for that service with an associated amount of 500.00. When
recording a flat fee charge using that code, the program will insert 500.00 as the default dollar amount,
which you can then change if necessary.
2011 Tussman Programs, Inc.
68
Tussman Program Release 10
Related to Task Code - This feature gives you the ability to assign groups of Activity Codes to
specific Task Codes. Then, when entering time after specifying the Task Code you can click the
Activity Code lookup and it will only list those Activity Codes which have been assigned to that Task
Code. To use this feature, enter the Task Code that you want to assign this Activity Code to. You will
also have to check option 15 in the Data Entry Options screen to activate this feature.
Description - Enter the description or text assigned to this Activity Code. The text can be virtually
unlimited (up to approximately 6 single spaced pages). When you insert this Code in the Activity Code
space when recording a fee transaction, the description assigned to that Code will automatically be
inserted into the description space for that charge. You could thus create a list of Activity Codes, each
with a whole paragraph or more of text to be used for commonly performed services. This feature can
be disabled, so that the text is not automatically inserted into the description space, by going to the
Data Entry Options screen and changing option 10 to Y.
There are thus two ways in which the text associated with an Activity Code can be inserted into the
description area when recording a charge. First, if the Activity Code is typed into the Activity Code
space in the entry screen, the associated text will be automatically inserted as described above.
Alternatively, you can type one or more Activity Codes directly into the description when entering a
charge, interspersed with regular text if necessary, and the codes will automatically be expanded to the
full text as you type. If you do not want the codes automatically expanded when you type, check the
Disable Auto Expansion box in the Data Entry Options Screen on the Setup menu. Then the codes will
only be expanded if you type a plus sign (+) in front of each code, and they will be expanded only when
you save the description, instead of as you type them.
If you want to require the entry of an Activity Code for each charge, enter Y in the appropriate space
under item 6 in the Data Entry Options screen on the Setup Menu. If you only want to require the
Activity Code for certain matters, go to those matters, click on the Z button, and enter a Y in the second
space in that field. For example, if you are also requiring entry of Task Codes, enter YY. If you only
want to require an Activity Code, enter NY.
When formatting your bills it is possible to include the Activity Code for each charge (item 70).
Placement of the Activity Code is determined by item 74. You can also combine charges by Activity
Code (item 65), sort charges by Activity Code (item 66), or include a summary of charges by Activity
Code (item 90).
Editing Activity Codes
To edit an exiting activity code, locate it on the list and click Edit, or double click on it. If you change
the Code itself, when you save the changes the program will ask if you want to perform a global
replace. If you click Yes all charges previously entered with this code will be updated so that the
changed code is assigned. Otherwise, existing transactions will retain the old code. It is recommended
that you perform the global replace if you must change a code.
Codes can be deleted by highlighting the code and clicking the
You can print a code list by clicking on the
11.5
button.
button..
Cost Codes
A Cost Code can be assigned to each cost charge that is billed to a client to indicate the category or
type of cost. For example, you might want to create separate cost codes to identify photocopy
charges, telephone charges, court reporter fees, court filing fees, etc. For each cost code you can
assign a default unit charge, so that you can have the program automatically calculate the dollar
2011 Tussman Programs, Inc.
Creating Code Lists
69
amount for costs such as photocopy and fax charges. Up to six different unit charge rates can be
entered so that you can bill different rates to different clients, if necessary. You can also have a
markup percentage automatically added to certain costs Bills can be formatted so all charges with
the same cost code are combined into a single line item, if desired. While not always required, cost
codes are necessary if:you want the program to be able to distinguish between hard and soft costs for
reporting purposes. A hard cost is a cost that is actually paid out of pocket, such as a court filing fee.
A soft cost is an internal cost that is incurred by the firm, such as photocopies made in-house, long
distance phone charges, and the like. You can assign a specific General Ledger account to each
cost code so that cash receipts from clients can be posted to specific GL accounts depending on the
type of cost they are reimbursing. Cost Codes are also required if you are submitting bills in electronic
formats such as LEDES and Tymetrix.
To display or edit your list of Cost Codes, select Cost Codes from the Setup menu to display the
following screen. The example below displays a partial list of the Uniform code set.
You can create your own list of cost codes, or you may import the Uniform Task-Based Management
System list that is used by most electronic billing systems such as LEDES. To import the Uniform list,
click on the Import button at the bottom of the screen. The Uniform set will then be added to your
existing list; i.e, you can have both your own set of codes and the Uniform set in the same list.
To add a new code of your own, click on the New button. The following screen appears:
2011 Tussman Programs, Inc.
70
Tussman Program Release 10
Enter the cost code information as follows:
Code - Assign a code of up to four characters, alpha or numeric. While you are allowed to assign a
code of up to eight characters, it is recommended for reporting purposes that you use codes of four
characters or less.
Hard or Soft - Enter C if this is a hard cost, D if it is a soft cost. A hard cost is one that is paid out of
pocket, such as a court filing fee. A soft cost is an internal cost such as in-house photocopying or long
distance telephone charges. When recording costs, if you do not assign a cost code the program
assumes it to be a hard cost.
Combine Charges on Bill - When printing cost charges on a client's bill, you have the option of
itemizing each cost or of combining costs with the same cost code into a single line item. To
combine costs, set bill format option 113 to S. If there are some costs that you want combined and
others that you want itemized, also set format option 113 to S. Then, for each cost category that you
want itemized, enter N in this space. This will override the default setting of format option 113. If
format option 113 is set to Y, so that costs are itemized, then this setting will have no effect and all
costs will be itemized on the bill.
Rates - If you enter an amount in the default rate space, then whenever you record a cost charge
using this Cost Code the program will prompt you to enter the number of Units to be billed. It will then
automatically calculate the dollar amount of the charge by multiplying the unit charge times the number
of units you specified. For example, if this cost code is for photocopy charges and you charge 30 cents
for every photocopy made, enter .30 in this space. You can always override the calculated amount if
necessary when recording an individual cost charge.
To establish additional rates if you must charge different rates to different clients, enter the additional
rates in the additional rate spaces. You can specify which rate you want to use for each client or
matter by specifying in the Fee Agreement screen for that file which cost rate schedule you want to
use.
Normally the rates only allow for two decimal spaces. If you need to use rates that carry to three
decimal spaces (for example, the IRS mileage rate for 2015 is .575 cents per mile), you may configure
the program to do this by selecting the Convert to 3 decimal spaces for cost rate option from the
2011 Tussman Programs, Inc.
Creating Code Lists
71
Tools menu.
Markup Percent - If you want the program to automatically add a markup percentage to certain costs,
enter the percentage amount here. For example, if you want to add a 10 percent markup to this cost,
enter 10.00. The amount of the markup will be automatically added by the program each time you
save a cost using this cost code. For example, if you enter a cost using this code in an amount of
$10.00, and you specified a markup percent of 10.00, then when the cost is saved the program will
automatically increase the amount to $11.00.
If you do not want the markup to be added for specific matters, enter the letter N as the Matter Group
code for those matters.
GL Account - If you are using the Tussman General Ledger, you can assign a default GL account to
each Cost Code. When cash receipts are recorded and posted to the GL, the program will then post
cost reimbursements to the specific GL account assigned to that Cost Code. If no GL account is
specified here, the program will post the reimbursement to the default Cost Reimbursement account
specified in the GL and Billing Interface screen.
Description - Enter the description of this cost. This text will automatically be inserted in the
description space when you enter a cost charge using this cost code. If you want the description that
appears on the bill to include the number of units billed (if you assigned a unit amount as described
above), enter the # symbol as a macro within the body of the description where you want the number of
units inserted; for example, "Photocopy charges: # copies at .30 per copy".
If you want to require the entry of a Cost Code for each charge that is recorded, go to the Data Entry
Options screen on the Setup menu and under item 6 where it says "Require Activity Code" enter the
letter C. This will then cause the program to require both an Activity Code for fees and a Cost Code for
costs.
Editing Cost Codes
To edit an exiting cost code, locate it on the list and click Edit, or double click on it. If you change the
Code itself, when you save the changes the program will ask if you want to perform a global replace. If
you click Yes all cost charges previously entered with this code will be updated so that the changed
code is assigned. Otherwise, existing cost transactions will retain the old code. It is recommended
that you perform the global replace if you must change a cost code.
Codes can be deleted by highlighting the code and clicking the
You can print a code list by clicking on the
11.6
button.
button..
Productivity Codes
There are ten separate categories of Productivity Codes which can be assigned to your clients and
matters so that they can be grouped together for billing and reporting purposes. For example, you may
want to assign codes to your clients to indicate who referred the client to your firm, which attorney
brought the client in, the type of client, etc. You may want to group matters by responsible attorney,
area of law, etc. This would make it possible to see, for example, how your firm's revenue is broken
down by area of law. Or, it would enable you to generate separate batches of prebills and bills for each
responsible attorney.
There are ten different categories of Productivity Codes, all of which are completely user-defined; no
built-in codes come with the program. To view the list of each category, select Productivity Codes
from the Setup menu. The ten different categories are listed on the submenu as follows:
2011 Tussman Programs, Inc.
72
Tussman Program Release 10
ORIGINATING ATTORNEY
REFERRED BY
CLIENT TYPE
CLIENT GROUP
DEPARTMENT
LOCATION
RESPONSIBLE ATTORNEY
BILLING ATTORNEY
MATTER TYPE
MATTER GROUP
When adding a new client or matter, there are spaces in each screen where you can assign to each
record a code from each of the above categories. The Originating Attorney, Referred By, Client Type,
and Client Group codes appear only in the client screen. The Responsible Attorney, Billing Attorney,
Matter Type and Matter Group appear only in the matter screen. Department and Location Codes can
be assigned to both clients and matters.
The normal use of each of these codes is explained below. However, you can use the codes for any
purpose you want. It is also possible to change the title of each code category. For example, if you
want to group your clients according to state of residence, you could change the title of the Client
Group category to State so that when entering new clients, or anywhere else in the program where
that category is referred to, instead of reading Client Group it would say State. To change the
category titles, select Client and Matter Field Titles.from the Setup menu.
To view the list of codes for one of the categories, select the type of code you want from the
Productivity Codes submenu. A sample screen showing a list of Matter Type codes appears below:
Click the New button at the bottom of any list of productivity codes to add a new code, as shown below:
2011 Tussman Programs, Inc.
Creating Code Lists
73
Each code can be up to four characters, alpha or numeric. Enter also a description of each code.
The categories of codes, and their suggested uses, are as follows:
Originating Attorney - Identifies the attorney who brought the client into the firm or is responsible for
supervising all of a client's matters.
Referred By - Identifies who referred the client to the firm.
Client Type - Indicates the type of client; for example, individual, estate, corporation, etc.
Client Group - An additional category that can be used for any purpose; for example, state or county
of residence, etc.
Department - If you are using our General Ledger, are have created separate departments within your
company, you can assign to each client or matter a department code which corresponds to a
department code used in the General Ledger. Cash receipts recorded for this client when posted to
the General Ledger will then be credited to that department. Note that the Department Code used for
this purpose is the one that appears in the matter screen; the Department Code assigned to the client
merely establishes the default code for that client and is assigned automatically to each matter which
is opened for that client.
If you are not using the General Ledger, or are not using the Department feature, you can use this
code for any other purpose you want; for example, if you have separate groups or departments within
your firm and want to indicate which department a client or matter belongs to.
Location - If you are using our General Ledger, and have created separate Locations within your
company, you can assign to each client or matter a location code which corresponds to a location code
used in the General Ledger. Cash receipts recorded for this client when posted to the General Ledger
will then be credited to that Location. Note that the Location Code used for this purpose is the one that
appears in the matter screen; the Location Code assigned to the client merely establishes the default
code for that client and is assigned automatically to each matter which is opened for that client.
If you are not using the General Ledger, or are not using the Location Code feature, you can use this
code for any other purpose you want; for example, if you have separate branch offices and want to
indicate which office a client or matter belongs to.
Responsible Attorney - The Attorney responsible for handling an individual matter.
Billing Attorney - The Attorney in charge of reviewing and approving billings for a matter, if different
from the responsible attorney.
2011 Tussman Programs, Inc.
74
Tussman Program Release 10
Note that regardless of which attorneys, if any, are specified as the originating, responsible and billing
attorneys, any attorney or other staff member may record work on any matter..
Matter Type - The type or case or area of law involved in the matter.
Matter Group - An additional code which can be assigned at the matter level.
Shortcuts
When creating your list of Originating, Responsible and Billing Attorneys, it is probable that the list
will be substantially the same as your list of Staff Members. To save time in creating these lists, you
can simply import your list of Staff Members into each of these three lists by clicking on the Import
button at the bottom of each list.
You can also create defaults for each of the ten productivity codes so that when opening new files the
program will automatically insert into each productivity code space the default code, which can then be
changed if necessary. To establish these defaults, select Client and Matter Defaults from the Setup
menu. Note that when you change one of the defaults, the program asks if you want to do a global
replace. This will then insert the new code in place of the old one anywhere the old code appears in
your existing clients and matters.
Editing Productivity Codes
To edit an existing code, locate it on the list and click Edit, or double click on it. Changing a code here
will not perform a global replace to existing clients and matters with that code. To do a global replace,
use the Client and Matter Defaults function.
Codes can be deleted by highlighting the code and clicking the
You can print a code list by clicking on the
11.7
button.
button..
Batch Codes
The program maintains a list of Batch Codes which are assigned to charges as they are entered, and
a second list which are assigned to AR Transactions. You do not have to create a list of batch codes,
as the program maintains these lists automatically. When entering a charge or AR Transaction, the
program assigns a default batch code. The default consists either of the year, month and day in the
format YYMMDD, followed by the first 2 characters of the current User ID, if any, or just the year and
month, followed by the User ID. The User ID is not added to the default batch code assigned when
entering AR transactions. You can select which format you want to use as the default by clicking on
Default Batch Codes from the Setup menu. You can assign a different batch code when entering or
editing any charge or transaction. Whenever a new batch code is used, that code is added to your list,
which can be viewed by clicking the
button to the right of the Batch Code space in the Enter New
Charges or Enter AR Transactions screen, as well as in any other screen where you are asked to
enter a batch code.
To add a batch code to the list, simply type in the code in the Batch Code space in either the Enter
New Charges or Enter AR Transactions screen and press Enter and the code will be added to the
list. To delete a batch code from either list, highlight it on the list and click the
button at the
bottom of the list. Deleting a batch code from the list will not delete the charges or transactions in that
2011 Tussman Programs, Inc.
Creating Code Lists
75
batch.
Batch codes are assigned to make it easier to view lists charges or AR transactions, especially if more
than one person is entering charges into the program. You can browse a list of the charges or AR
transactions in a specific batch by selecting Browse from the Charges or Receipts menu and then
picking ...for one Batch from the submenu. You can also print a list of the charges or AR
Transactions in a batch by selecting List from the Charges or Receipts menu and then selecting the
Batch option from the submenu.
Batch codes are also used to post AR transactions to the General Ledger, although you can also post
by Month or have the program post automatically, as described in the Posting to GL section, in which
case the Batch Code is not used.. Other than as described above, the use of batches is not required
or essential to operating the program.
12
Clients and Matters
The program maintains a list of Clients which contains the basic information about each client. Each
client can then have an unlimited number of Matters assigned to it. A separate matter should be
opened for each case, claim, or other legal matter in which you are representing that client. Each client
must have at least one matter before you can record charges or generate a bill. Many clients may only
have a single matter, but some clients may have many separate matters, such as an insurance
company for which you are handling many different claims.
The following sections describe how to add new clients and matters, lookup existing clients and
matters, edit clients and matters, generate client and matter lists and labels, add related names for a
matter, and lookup account information for a client or matter.
Before recording a new client, you can perform a Conflict Check to make see if there are any conflicts
with representing that client.
When you are first setting up The Tussman Program you will probably also want to record beginning
balances for those clients who have outstanding balances. Similarly, you may need to record balances
in a clients trust or retainer account, or credit balances for those clients who have unused credits.
Procedures for entering these balances are described in the beginning balances section.
12.1
New Clients
To add a new client, click the
Client screen appears below:
2011 Tussman Programs, Inc.
button on the Control Panel at the left. The Add New
76
Tussman Program Release 10
Fill in the new client information as follows:
Client ID - This is the primary code used to identify and locate each client. It may consist of any
combination of alpha or number characters. If you use an actual number, it is recommended that you
always use the same number of digits (for example, use 0001 through 9999, rather than 1 through
9999). That way your clients will be sorted in the proper numeric order. Alternatively, you can simply
use an abbreviation of the client's name. Each client ID must be unique, however. When adding a
new client, the bottom of the screen will display the last client ID that was assigned. Always start typing
the client ID in the first space, leaving any unused spaces at the end. You cannot assign the same
client ID to more than one client.
By default the program is configured to allow Client and Matter ID's of up to 8 characters each. To
increase that limit to 16 characters each select Convert to Long File ID's from the Tools menu. This
function can be performed at any time and all your existing data will be converted to the 16 character
format. Once you do this, you cannot convert back to the 8 character format unless you restore from a
backup that was made prior to switching to the 16 character format.
Click the C button to the right of the Client ID space to perform a quick conflict check. Simply enter the
client's name in the ID space, click the C button, and the program will display a list of clients, matters,
and related names where that name appears.
Alternate ID - This is a secondary code which can be assigned to each client for sorting and lookup
purposes. If you are using a numeric system for your client IDs, the alternate ID can then be used for
as a sorting key when you want to look up or list your clients in alphabetical order. Thus, the alternate
ID will normally be the clients last name or business name. The alternate ID can be any combination
of up to twelve characters. You can configure the program to either allow or prevent you from
assigning the same alternate ID to more than one client by selecting Allow Duplicate Codes from the
Setup menu. It is recommended that you not allow duplicate alternate IDs.
2011 Tussman Programs, Inc.
Clients and Matters
77
Name and Address - Enter the client's name and address exactly as you want it to appear on their
bills. If you type an asterisk (*) in the first space of a line, that line will be omitted when printing their
address on bills or address labels. If you type a period (.) in the first space of a line, a blank line will be
printed on the bill. Otherwise, lines that are left blank will be ignored when printing the address on the
bill.
If the client's name does not fit on the first line, type as much as you can on the first line followed
immediately by a plus sign (+). Then type the rest of the name on the second line. The two lines will
then be joined together when printing the bill.
Note that you can print a different address, or an additional second address, on a client's bill by
entering it in the Billing Address screen for each matter, as described in the New Matter section. You
can also enter additional names and addresses to appear on the bill using the Related Names feature.
Contact Person - An additional line for typing the name of a contact person. This line can be added to
the name and address printed on the bill by typing a plus sign (+) in the first space, in which case it will
be added immediately following the preceding lines. If you want to skip a line between the Name and
Address and the Contact Person, type the at symbol (@) in the first space instead of the plus sign.
Alternatively, if you always want to print the Contact Person as the sixth line of the Name and Address
for all clients, select Include Contact Person with Address from the Setup menu and enter either Y,
to print it immediately following the Name and Address, Z to print it after skipping a line, or F to print as
the first line of the address. If you use this method it is not necessary to enter the plus sign or at sign
in the first space.. If you type an asterisk (*) in the first space, it will not print this line regardless.
Note that if you want to use the Contact Person line for another purpose, you can change the title of
that line by selecting Client and matter Field Titles from the Setup menu. You can also use this line
for entering the client's email address, as described in the section on emailing bills.
Productivity Codes - Assign the desired productivity codes, if any, to this client.
Phone Numbers - Enter the client's residence, business, mobile, and fax numbers. Note that you can
program in a default area code, so that it doesn't have to be entered each time, by selecting
Client and Matter Defaults from the Options screen.
E-Mail - Enter the client's email address if desired. If you want to use this space for another purpose,
you can change the title of that line by selecting Client and Matter Field Titles from the Setup menu.
You can alternatively enter the email address in the Contact line, as described above. If you are
going to be emailing your bills, the program will look first in this space for the client's email address,
then in the Contact space. If you want to enter an email address but don't want the program to email
bills to this client, type an asterisk in the first space before typing the email address. If this client will
have more than one matter and you want to send the emails for each bill to different addresses, then
enter the email address for each matter in line 5 of the matter title, preceeded by a pound sign (#), and
then make sure in the email setup screen that you select the Separate Email for each Matter option.
Date Opened - Enter the date the file was opened; it defaults to the current date.
Fee Agreement - Click on the Fee Agreement button to enter the default fee agreement for this client-for example, which billing rate schedule and bill format to use. These settings determine only the
default instructions for this client, and are inserted automatically when you open matters for this client,
as the fee agreement for each matter might be different. A Fee Agreement button also appears on
each matter screen and that is where the program looks to obtain the actual fee agreement
instructions.
You can establish a system-wide default fee agreement by selecting Default Fee Agreement from the
Setup menu. When you open a new client, the program automatically inserts the default fee
agreement, which can then be changed if necessary.
2011 Tussman Programs, Inc.
78
Tussman Program Release 10
You will find a complete explanation of the Fee Agreement options in the Default Fee Agreement topic.
Billing Options - Click on the Billing Options button to enter additional default billing instructions for
this client. These have to do with options such as placing billing holds on the file, charging interest,
retainer account options, and the like. These settings determine only the default instructions for this
client, and are inserted automatically when you open matters for this client, as the billing instructions
for each matter might be different. A Billing Options button also appears on each matter screen and
that is where the program looks to obtain the actual instructions.
You can establish system wide default billing options by selecting Default Billing Options from the
Setup menu. When you open a new client, the program automatically inserts the set of default billing
options which can then be changed if necessary.
You will find a complete explanation of the Billing Options in the Default Billing Options topic.
Notes - Click on the Notes button to type free-form notes about this client. You can also enter Notes
in each individual matter screen.
Print Memo - Check this box if you want the program to print a New Client Memo, which will happen
after you save the information.
Save - To save the new client you must click the Save button. If you checked the Print Memo box,
the program will print a New Client Memo.
Remember that after adding a new client, you must open at least one matter for that client before you
can begin entering charges.
12.2
Client Lookup
The quickest way to find an existing client is to click the
brings up the following dialog:
button on the Toolbar at the top This
If you know the client ID, alternate ID, or any part of the client's name, address, or phone number, type
it in the Client space, leave the Matter space blank and click OK. The program will take you directly to
the client you selected, or display a list of matches to select from.
There is an option in the program that determines whether or not the program will display a list of
matches if you have typed in a client ID for which there is an exact match. For example, if you type in
the client ID 100, and there is a client with the number 100 but also a client with the number 1001, you
can either have the program display a list of both clients as matches which you can select from, or
2011 Tussman Programs, Inc.
Clients and Matters
79
have it go directly to the client with the exact matching number without displaying the similar matches.
To change this option, select Client and Matter Options from the Setup menu, then select Client
Lookup Option. To display matches even if there is an exact match, click Yes, To omit the list of
matches if there is an exact match, click No.
There is also an option that will disable the full text search that is performed if the program does not
find a matching client ID or alternate ID. To disable or enable the full search, select the Auto Search
option on the Client and Matter Options submenu accessed from the Setup Menu.
Alternatively, you can select the client you want from a list by clicking on the
icon to the right of the
client space. A screen similar to the one shown below will pop up from which you can select the client
you want as follows:
You can locate the client you want from the list either by:
1 Scrolling manually through the list until you find the one you want;
2. Typing the client ID or alternate ID, depending on how the list is sorted As you type each
character, the list will scroll to the closest match. You can change the sort order by clicking on the Sort
Order button, or you can change the default sort order by selecting the Default Sort Order for Client
Lookups from the Setup menu. When typing, if you need to start over press the space bar.
2011 Tussman Programs, Inc.
80
Tussman Program Release 10
3. Performing a search by typing the client ID, alternate ID, or any text (such as a portion of the name,
address or phone number) in the space next to the Search button and then pressing the button to
display any matches.
The list will be sorted either by client ID or alternate ID. You can change the default sort order by
selecting Default Sort Order for Client Lookups from the Client and Matter Options submenu
accessed from the Setup menu. You can also change it by clicking on the Sort Order button but that
change will not become the new default.
f you do not want to include closed files when searching or performing lookups, check the Show Active
Files Only box that appears in the bottom portion of the lookup dialog.
12.3
Browse Clients
Click on the
button on the Toolbar at the top to display a scrolling list of your clients from
which you can locate a specific client record. It is often helpful to use this screen as your default
start up screen so that it comes up automatically when you enter the program.
There are two variations of the Client Browse screen which you might also find helpful. Normally the
Client Browse screen displays only a list of your clients. Clcking on the Matters for Client button at
the top of the list will then display a list of matters for the highlighted client, or clicking on All Matters
will switch to a browse screen displaying a list of all clients' matters. A third option is to display a split
screen browse showing your client list at the left and a list of matters for the highlighted client at the
right. As you scroll through the client list, the list at the right changes to display the highlighted client's
matters. You can select this option as your default start up screen, in which case it will come up
automatically when you enter the program or when you click the Clients icon. You can also bring it up
by clicking the Clients and Matters button at the top of the Client Browse or Matter Browse screens.
You can locate a client from the Client Browse screen by either
1 Scrolling manually through the list until you find the one you want;
2. Typing the client ID or alternate ID, depending on whether the list is sorted by client ID or alternate
ID. As you type each character, the list will scroll to the closest match. You can change the sort order
by clicking on the Sort Order button, or by setting the default sort order by selecting the Default Sort
Order for Client Lookups option from the Setup menu. When typing, if you need to start over press
the space bar.
3. Performing a search by typing the client ID, alternate ID, or any text (such as a portion of their
2011 Tussman Programs, Inc.
Clients and Matters
81
name, address or phone number) in the space next to the Search button at the top and then pressing
the button to display any matches.
Once you have highlighted the client you want, click on that record, click the Edit button, or right click
on the Client button on the Control Panel to display that client's record. Once you have highlighted
the client you want, clicking on many of the buttons on the Toolbar or Control Panel will default to using
that client ID.
You can also filter the list to display one or more matching clients by clicking the Filter button which
brings up the Select Clients and Matters dialog, where you can enter the search criteria you want.
If you want the list to include closed and/or deleted clients, check the Closed Files or Deleted Files
boxes. Otherwise, only active files will be listed. This setting also controls whether closed files are
included in other client searches and lookups in the program (except for certain lookups where closed
files are never included; for example, when entering new charges.)
To add a new client, click the New button, which is the same as left clicking the Client button on the
Control Panel or selecting New from the Clients menu.
12.4
Editing Clients
After you have added a new client, the client information can be edited at any time. Just locate the
client using any of the methods described in previous sections, which then brings up the main client
screen. From this screen, you can edit the client information and access additional information about
the client as described below.
2011 Tussman Programs, Inc.
82
Tussman Program Release 10
Changing the client ID or alternate ID
The client ID or alternate ID can be changed at any time. If you make a change, the program
automatically performs a global replace where all records related to that client are updated so that you
do not lose any information. Changes are saved only by clicking the OK button. If you close the client
screen by clicking on the X button in the upper right hand corner, any changes you made will not be
saved.
Productivity Codes
You can change any of the productivity codes assigned to a client at any time. Global changes for all
or selected clients can be made by going to the Client and Matter Defaults screen, making the change,
and selecting the option to make a global change.
File Status
The upper right hand corner of the screen indicates the file status: Open indicates the file is active.
Click on the Close/Delete button to change the status as follows:
Closed - The client remains on file but you cannot enter new activity or generate a bill, and it will not
appear in your lists and reports unless when generating the list or report you request that closed files
be included;
Collection Status - Similar to closed, except that you can continue to generate bills so that you can
collect a balance due. This status is designed for the situation where a client still owes an outstanding
balance, but you will not be performing additional work for them.
Deleted - This marks the client for deletion. The client is not physically deleted from your database
2011 Tussman Programs, Inc.
Clients and Matters
83
until you perform the separate purge function which rebuilds your entire database, thereby removing
any records you have marked for deletion.
When you change the file status at the client level, all matters for that client will also be assigned the
same status. Thus, if you close a client, all matters for that client will also be closed. If you have a
client with several matters, and you want to close one of them but keep the others open, then leave the
client open and use the Close/Delete button in the matter screen instead.
Deleting a file is not recommended if any recent billing activity has been performed for that file, as
when you perform the purge function all records related to that file will also be deleted, and this could
affect some of your management report totals. In many cases, it may thus be preferable to close a
client file rather than delete it.
Fee Agreement and Billing Options
By clicking on these buttons you can change the default Fee Agreement or Billing Options for the
client. If you make changes in either screen, after clicking OK the program will ask if you want the
changes applied to the existing matters for that client. If you click No, then the settings in the matters
will not be changed, and the changes will only apply to future matters that are opened for that client. It
is important to remember that the program actually uses the Fee Agreement and Billing Option
instructions that are entered at the matter level, and that the settings in the client screen are only the
defaults for that client. Thus, if you want to make change in existing matters for a client you must
either make the changes in the matter screen or click Yes when asked if you want the changes
applied to existing matters.
If you make a change in the Fee Agreement screen that affects the billing rate for a client, you will
also be asked if you want the change applied to charges that have already been entered for that client.
If you click Yes, you will next be asked for a Cutoff Date. If you leave the cutoff date blank, then the
amount of all unbilled charges for that client will be recalculated using the new rates. If you put in a
cutoff date, then only charges dated after that date will be recalculated. In either case, charges that
have already appeared on finalized bills will not be affected. If you click No, then the rate change will
only apply to charges that are entered after the change is made.
It is possible to make global changes to the Fee Agreement and Billing Options for all or selected
clients by going to the Default Fee Agreement and Default Billing Options screen, making the changes
there, and selecting the option to perform a global replace.
Account Inquiry
If you click on the Account Inquiry button from the client screen, the figures shown will be the
cumulative totals of all matters for that client.
Master Ledger
Click on the Master Ledger button to bring up the ledger for this client.
Calendar
If you are using the Tussman Calendar program, clicking on this button will display a list of all calendar
entries for this client. From this screen you can edit or add additional calendar entries.
Matters
This button displays a list of this client's matters, from which you can select a specific matter to view or
edit.
2011 Tussman Programs, Inc.
84
Tussman Program Release 10
Notes
The bottom portion of the client screen displays the most recent notes that have been added for this
client. You can display the entire notes file by clicking on the Notes button, where you can then edit or
add additional notes. You can also add a note which will be automatically dated and placed at the
beginning of the notes file by clicking on the
button.
Client Memo
You can print or display a memo which includes all the information about this client, including the Fee
Agreement, Billing Options and Notes, by clicking on the
button.
Email Client
You can send an email to this client by clicking the
button. For this function to work you must
have performed the initial email setup. After clicking the button the screen below appears. Enter the
email subject and message, then click the SEND button.
Navigation buttons
The four arrow buttons in the lower right hand corner of the client screen help you locate the next file
you want to display.: Click the
button to go to the previous client, the
client, the
button to display the first matter for this client, and the
Client dialog from which you can go to another client.
12.5
button to go to the next
button to display the Select
Client Lists
To print a list of your clients, select Clients from the Main Menu at the top of the screen and select List
from the submenu. You then have the option of selecting a list that includes just the client information (
Without Matters), or a list that includes for each client a list of their matters (Including Matters). The
list can include all or selected clients (including just clients for a specified Responsible or Billing
Attorney), and can be sorted, filtered and formatted in various ways.
2011 Tussman Programs, Inc.
Clients and Matters
85
You can also print a matter list if you need to be able to generate a detailed list of all or selected
matters.
To export a list of your clients to Excel, use the Labels and Export function.
The Generate Client Lists screen is shown below:
Select from the following options:
Information Included
Client Information - Click on this button and then check the items you want included for each client.
You can select everything from the client name and address to the fee arrangement, client notes and
more.
Matter Information - If you are generating a client list including matters, click on this button and select
the information you want included for each matter. You can select everything from the matter title to
the fee agreement, billing address, matter notes, and the list of related names for that matter.
Related Name Information - If you checked Related Names in the Matter Information screen, click
on this button and check the information you want included for each related name.
Files Included
You can generate the list for all files, a Single Client or Matter or for Selected Files
In the Include box below you can select whether or not to include open files, closed files, collection
files, deleted files, and files on hold. If, for example, you just want a list of your clients who are marked
for deletion, uncheck everything except Deleted Files.
Sort Order
2011 Tussman Programs, Inc.
86
Tussman Program Release 10
Primary Sort Order - Determines the main order in which clients are listed. In addition to listing in
either client ID or alternate ID order, you can also sort them by any of the productivity codes, by date
opened, zip code, fee arrangement, rate schedule, and bill format. For example, if you want a list
showing which clients are assigned to each of the 60 rate schedules, select Rate Schedule as the
primary sort order. It is also possible to sort by the numeric value of the client ID This is useful if you
assign numeric client IDs but the numbers are not all the same number of digits. For example, when
sorting by client ID all clients whose number begins with 1 will be listed before any client whose
number begins with 2. Thus, client 1001 will appear before client 2, even though the numeric value of
1001 is greater than 2. If, on the other hand, you want clients sorted by the numeric value of the client
ID, select that as the primary sort order.
Client Subsort Order - This is relevant only if the primary sort order you selected is something other
than the client ID or alternate ID. In that case, the subsort order determines in what order (by client ID
or alternate ID) clients that have the same primary sort key are listed
Matter Sort Order - If you are including matters, this determines whether the matters for each client
are listed by matter ID or short title.
List Options
All Info on One Line - If checked, all of the information for each client, matter and related name will be
printed on one line, rather than separate lines for each item of information. If the information selected
does not all fit on one line, it will be truncated. This option may be appropriate if you are printing a very
simple client list containing, for example, just the client ID, alternate ID, and name, and you want to
save paper by printing in a more compact format.
Print Landscape (if info on 1 line) - If you have selected the option to print all info on one line you
should check this option so that more information will fit on each line.
New Page for each Category - Indicates whether of not you want to begin a new page for each
primary sort category. For example, if printing a client list sorted by Originating Attorney, you may want
to use this option so that in effect you are generating a separate list which can be given to each
attorney listing just their clients.
Line spacing - Enter 1, 2 or 3 to indicate the number of lines you want to skip between each client and
matter.
List Clients for Responsible or Billing Attorney - You can enter here a Responsible or Billing
Attorney code and the list will include just clients for that attorney. Since a client can have multiple
matters, and each matter can be assigned to a different responsible and/or billing attorney, when
generating the list the program will check all the matters for each client to see if any of those matters
have been assigned to the responsible or billing attorney you have specified. If so, that client will be
included on the list.
12.6
Client Labels
The Client Labels function can be used to print mailing or other types of labels for all or selected
clients. To generate client labels, select Clients from the Main Menu at the top of the screen and
select Labels and Export from the submenu.
For printing address labels, we recommend using Avery 5161 labels, which contain 20 labels in two
columns on each sheet. If you are using a different size of label, you may have to adjust the format
settings described below in order to get them to print correctly.
The Client Labels screen is shown below:
2011 Tussman Programs, Inc.
Clients and Matters
87
Select from the following options:
Label Type
You can design and save up to five separate label formats. The first two formats are pre-defined,
although they can be modified if desired, and the next three are user-defined. Select the type of label
you want to generate from the list. If you want to view or edit the label format, then click on the Edit
Label Format button immediately below the list.
Edit Label Format
The label formatting function consists of two screens, referred to as Page 1 and Page 2.
Page 1 appears below:
2011 Tussman Programs, Inc.
88
Tussman Program Release 10
1. Label Title - .Assign a title to this format to make it easy for you to identify later on.
2. Continuous or Laser - Enter C if you are printing labels on continuous forms, or L if you are
printing on sheets using a laser printer. Enter L if you are using Avery 5161 labels.
3. Regular or Compressed Print - Enter R to print using the standard courier font, or C to print in
compressed print. Regular print is recommended for Avery 5161 labels. Selecting compressed print
will be necessary if you are using label sheets that have three columns.
4. Labels Across - Enter the number of columns of labels on each page or sheet. Avery 5161 labels
have 2 labels across.
5. Labels per Column - Enter the number of labels in each column, if you are using sheets of labels
designed for a laser printer. Avery 5161 labels have 10 labels per column.
6. Total Lines per Label - Enter the number of printable lines on each label. That will vary depending
on the size of the labels. For Avery 5161 labels enter 6. The maximum number of lines you can print
on a label is 26.
7. Label Width - Enter the number of characters to print on each line of the label. This will vary on the
size of the label. For Avery 5161 enter 38.
8. Left Margin - If you need to indent a number of spaces from the left margin before you begin
printing, enter the number of spaces to indent. For Avery 5161 labels, leave this blank.
9. Top Margin - If you need to increase the top margin before you begin printing the first label, enter
the number of additional lines to skip. For Avery 5161 labels, leave this blank.
2011 Tussman Programs, Inc.
Clients and Matters
89
Page 2
After completing the information in Page 1, click the Next button to go to Page 2, shown below:
This screen lets you select what information you want printed on each line of your labels. The right
hand side displays the items you can select from, such as the client name and address, phone
numbers, etc. Each item is identified by a letter; i.e., the letter C represents the client name. The left
side contains a space for each line on the label where you enter a letter or letters indicating the
information you want printed. For example, if you want to print the client name on the first line of each
label, enter the letter C in the first space of line 1. If you want to print the client address on the following
lines, enter D in line 2, E in line 3, F in line 4 and G in line 5. Always use upper case when entering
these selections. You can only use up to the number of lines you specified in item 6 in Page 1. Thus,
for Avery 5161 labels only the first six lines will be printed.
You can print more than one item on a line (assuming the two items will fit in the space available on the
label) by entering more than one letter in the space for that line. For example, to print both the client ID
and alternate ID on line 1, enter AB in the space for line 1. .A single space will be skipped between
each item when it is printed on the label. To increase the number of spaces, enter the number of
spaces you want to skip between the two letters. For example, to print the client ID and the alternate
ID separated by eight spaces, enter A8B in line 1.
Click OK after you have finished making your selections. The selections will be saved so that the next
time you want to print the same type of labels you can simply select the same Label Type without
having to edit the format.
Files Selected
You can generate labels for all clients, for a Single Client or for Selected Clients..
Options
2011 Tussman Programs, Inc.
90
Tussman Program Release 10
These options determine the sort order in which labels are printed (enter N for client ID order or A for
alternate ID order); whether or not clients that are closed, on collection status, marked for deletion, or
on hold are included; and whether or not the descriptive title of each productivity code is printed along
with the code, if you are including any of the productivity codes on the label (i.e., if you are including the
Originating Attorney, and the originating attorney happens to be ABC, you can either have it just print
the attorney initials "ABC", or have it print "Originating Attorney: ABC").
Exporting to ASCII, CSV, or Outlook format
These functions are described separately in the section on Exporting Client and Matter Information.
12.7
New Matters
To add a new matter for an existing client, click
button on the Control Panel at the left and
select the client you want to add the matter for. If you want to open a matter for a client that is not yet
on file, you must first add the new client.
Fill in the New Matter screen shown below as follows:
Client - Displays the ID of the client to which the matter will be assigned. Select a different client if
necessary.
Matter ID - You must assign a matter ID consisting of up to eight characters (or up to 16 characters if
you have selected that option, as described in the New Client section). Matter IDs do not have to be
2011 Tussman Programs, Inc.
Clients and Matters
91
unique; i.e., you can use 01 as the ID for each client's first matter, 02 for the second, etc. The matter
ID does not have to be numeric; it could be a descriptive title, such as the name of the opposing party.
Alternatively, you can create a system of unique matter IDs, where no ID is duplicated. The advantage
of using unique IDs is that you can then locate the matter using just the matter ID, instead of having to
first specify the client ID. However, maintaining such a system may be more complicated than using
the simpler system of numbering each client's matters consecutively, or using a descriptive name.
You can enter a default First Matter ID in the Client and Matter Defaults screen. Thus, if you always
use 01 as the ID of each client's first matter, this saves you the trouble of having to type it in manually.
When opening a new matter the bottom of the screen will display the ID assigned to the last matter
opened for that client.
Short Title - This is an additional key of up to twelve characters which can be assigned to each matter.
It provides an alternative way of looking up a matter. For example, if you are using a numeric system
for your matter IDs, it is a good idea to assign a short description, such as the name of the opposing
party or type of case, as the Short Title. You can always locate a matter using either the matter ID or
the Short Title.
Matter Title - These five lines are for entering identifying information about the matter, such as a claim
number, date of loss, adverse party name, etc. You can change the wording which identifies each line
by going to the Client and Matter Field Titles screen. For example, if you always want Line 2 of the
matter title to contain a claim number, you can change the heading of Line 2 to read Claim Number..
If you need additional lines for the matter title, you can add additional lines by typing a plus sign (+) in
the first space of the Matter Notes screen, followed immediately by one or more lines of text.
If the first line of the matter title is longer than the 40 characters which is allowed, type as much as you
can on the first line followed immediately by a plus sign (+) and then continue the text on the following
line. When printing the matter title on the bill the two lines will be joined together.
You can format your bills to print the entire matter title, the first line only, or to omit it completely.
Statement format options 29-32 control the appearance of the Matter Title on the bill. Note that if you
type an asterisk (*) in the first space of a line, that line will not be printed on the bill regardless of the
format selections.
If you will be emailing bills to this client and want the bill for this matter to go to a specific address,
iinstead of the address entered in the client screen, type the email address in the last line of the matter
title preceeded by a pound sign (#). Then make sure in the email setup screen you select the
Separate Email for each Matter option.
Productivity Codes - Assign the desired productivity codes, if any, to this matter.
Date Opened - Enter the date the file was opened; it defaults to the current date.
Budgeted Amount - You can use this feature to enter a dollar amount that you want to budget for the
fees for this matter. This then allows you to generate a Report that shows how the actual fees entered
and billed for each case compare to the amount budgeted. You can also have the program alert you in
the data entry screen if the amount of a charge you are entering causes the total fees entered to date
to exceed or approach the budgeted amount. To activate this feature, go to the Data Entry Options
screen and check item 16. You can also enter an optional threshhold amount there so that if the total
fees is within $xxx of the budget amount the alert will activate. If you leave the amount in the Data
Entry Options screen at 0.00 the alert will activate only when the actual budget amount is reached.
Fee Agreement - Click on the Fee Agreement button to enter the fee agreement for this matter--for
example, which billing rate schedule and bill format to use. When you open a new matter the program
will automatically insert the default billing instructions for the client, which are entered by clicking on the
2011 Tussman Programs, Inc.
92
Tussman Program Release 10
Fee Agreement button in the client screen. You can change the settings for each individual matter, if
necessary.
You can establish a system wide default fee agreement by selecting Default Fee Agreement screen.
See that topic for a full explanation of the Fee Agreement options. When you open a new client, the
program automatically inserts the default fee agreement, which can then be changed if necessary.
Billing Options - Click on the Billing Options button to enter additional billing instructions for this
matter, such as placing billing holds on the file, charging interest, retainer account options, and the like.
When you open a new matter the program automatically inserts the default billing options for the client
which are entered by clicking on the Billing Options button in the client screen. They can then be
customized for each individual matter, if necessary.
You can establish system wide default billing options by selecting Default Billing Options from the
Setup menu. The topic for that section describes in full each billing options. When you open a new
client, the program automatically inserts the set of default billing options which can then be changed if
necessary.
Bill Address - Normally when you print a bill, the program uses the address which is entered in the
client screen. In some cases you may want to use a different address for an individual matter. If so, it
can be entered by clicking on the Bill Address button. Type in the full address, and the program will
then use that address in place of the address in the client screen.
If you want to print two addresses on a bill, type a plus sign (+) in the first space of the first line in the
Bill Address screen, followed immediately by the second address. The program will then print that
address in addition to the address shown in the client screen.
If you want to use a billing address for this matter that has already been entered for another matter for
this same client, instead of entering the full address type a number sign (#) in the first space of the first
line, followed immediately by the matter ID of the matter where that billing address appears. For
example, to use the billing address from matter 01, enter #01 on the first line in the Billing Address
screen for this matter.
You can also use the Bill Address to enter a contact person or other information that will print as the
first line of the address on the bill, followed by the address in the client screen. To do that, type in the
name preceeded by an equals sign (=).
To add additional names and addresses to a bill, you can also use the Related Names feature which
allows you to add an unlimited number of additional parties to the bill.
You can also use the Billing Address feature to print a second copy of each bill for this matter by
checking the Use this address to print second copy of bill option at the bottom of the Billling
Address screen. If you check this option, the program will print a first bill for this matter using the
regular address that appears in the client screen, and then a second copy using the address you enter
in the Billing Address screen. If you check this option but leave the billing address blank, the second
copy will also print using the client address. The second copy can be printed using a different bill
format by entering the number of the format you want to use in the space provided. Otherwise, the bill
will be in the same format as the first bill.
You can delete all the billing addresses you have entered for a client's matters by going to the
Account Status screen for that client, clicking on the button with the letter A, and entering the code
2010.
Payment Split - This function affects how client payments are allocated for purposes of your
Staff Earnings Analysis reports. In some cases you may want to specify that a certain percentage of
each payment is allocated first to the Originating, Responsible or Billing Attorney for that matter. If you
want to do this for all matters, you can simply specify this, and enter the percentages, when you
2011 Tussman Programs, Inc.
Clients and Matters
93
generate the report, in which case it is not necessary to enter the percentages in the Payment Split
screen for each matter. However, if you will be doing this for certain matters only, or if the percentages
will vary for different matters, then you must enter the percentages in each matter.
For example, if for this matter you want the Originating Attorney to be credited with 10 percent of each
payment received, click on the Payment Split button and enter 10.00 in the Originating Attorney
space. The balance of the payments received will then be allocated for purposes of the Staff Earnings
Analysis report in the normal way, based on how much each attorney billed on that matter.
Related Names - This button is for entering names and addresses of parties related to this matter,
such as opposing parties, attorneys, witnesses, etc, as described in the Related Names section.
Notes - Click on the Notes button to type free-form notes about this matter. You can type the notes in
directly, or click on the
top of the notes file.
button to enter a note which will be automatically dated and inserted at the
The Matter Notes can be printed at the end of a client's bill by setting bill format option 198 to Y. Or, by
typing a plus sign (+) in the first space, the Matter Notes will be added as additional lines to the Matter
Title, as described earlier in this section.
When entering matter notes, you can begin a new line by pressing Ctrl-Enter.
Print Memo - Check this box if you want the program to print a New Matter Memo after the matter is
saved.
Save - To save the matter information you must click the Save button.
12.8
Select Clients and Matters function
The Select Clients and Matters dialog shown below appears whenever you click on a Selected Files
button in the program. This function enables you to select a group of clients and matters, based on
filter criteria which you enter, either when performing a function such as generating bills, or when
printing a report if you only want certain files included.
2011 Tussman Programs, Inc.
94
Tussman Program Release 10
The left side of the dialog is for filtering the list using client information, as described in the
Client Lookup section. For example, if you want to only list matters for a specific Originating Attorney,
enter the Originating Attorney code in that space (as the Originating Attorney is assigned at the client
level). The right hand side of the screen is for filtering based on information that appears in the matter
file; for example, listing all matters that are assigned to a specific Responsible Attorney (as the
Responsible Attorney is assigned at the matter level). If you are performing a function that applies only
to clients, such as printing client labels, the right side of the screen will be grayed out, as shown in the
above example. Otherwise, you can make selections from both sides. Enter the search criteria you
want and click OK when done. If you specify more than one search criteria, only files that match all
the selected criteria will be listed. For example, if you enter both a Responsible Attorney Code and a
Rate Schedule, you will have selected only files assigned to that Responsible Attorney and which are
using that rate schedule.
If you want to list clients or matters that do not match a specific criteria, change the = sign to a # sign.
For example, if you want to list clients that are not assigned to Responsible Attorney ABC, change
the = sign on the Responsible Attorney line to a # sign and type ABC in the next space.
For the Date Opened spaces, it defaults to the greater than (>) and less than (<) symbol. For
example, to list matters that were opened between January 1, 2005, and December 31, 2005, enter
the January 1 date in the first Date Opened space and the December 31 date in the seond Date
Opened space. If you want to list files that were opened on a specific date, change one of the symbols
to an equal sign and enter the date in that Date Opened space.
You can also filter the list to include only clients or matters where a specific word or phrase appears
anywhere in the file by entering that word or phrase in the Text Search space. If entered on the client
side, it will search for that word or phrase in the client name or address. On the matter side it will
search the matter title.
To list only clients or matters where a specific field has been left blank, type a period (.) in that space.
For example, if you want to find all matters where the Responsible Attorney space has been left
blank, type a period in that space and click OK. This tool is useful in order to make sure that required
2011 Tussman Programs, Inc.
Clients and Matters
95
information has not been omitted from any of your matter files.
To select a random group of clients or matters, you can use the tagging function. First tag the clients
or matters you want, then enter Y in the Tagged space which appears in both the client and matter
column and the program will select just those files that have been tagged.
12.9
Tagging Clients or Matters
The tagging function enables you to select a random group of clients or matters so that you can
perform a function affecting just the files you have tagged. For example, if you want to generate bills
for a random group of clients you can first tag the clients you want, then go to generate bills, click the
Selected Files button and enter Y in the Tagged space in the client column. You can also tag clients
if, for example, you want to generate a report that includes just a specific list of clients.
To tag a client, bring up the Browse Clients screen by clicking on the
button on the Toolbar at
the top. Find and highlight the client you want, and then right click on that client. A red check mark
will then appear in the Status column at the left. To remove a tag, right click on the highlighted client
again.
You can also tag clients by clicking the Tag button at the top of the client browse screen. A menu of
options will then appear. The first option will tag or untag the currently highlighted client. The second
option will let you tag selected clients by entering the criteria you want in the selection screen and
clicking OK. You can use this option to tag multiple selections. For example, if you want to include in
a report clients for two separate originating attorneys, you can use this function to first tag the clients
for the first originating attorney, then perform the function again to tag the clients for the second
attorney. You can then generate the bills clicking the Selected Files option and entering Y for the
Tagged selection, as described above. This works because each time you tag a group of selected
files, those files are tagged in addition to any files previously tagged. The third and fourth options on
the menu are for tagging or untagging all clients.
To tag a matter, bring up the Browse Matters screen by clicking on the
button on the Toolbar.
Highlight the matter you want, and then right click on that matter. An check mark will then appear in
the Status column at the left. To remove a tag, right click on the highlighted matter again.
To remove all client and matter tags, select Tools from the main menu, then select Clear All Tags.
12.10 Editing Matters
After you have added a new matter, the matter information can be edited at any time. Locate the
matter by clicking the
button on the Toolbar, then enter both the client and matter ID and click
OK to display the matter record. From this screen, you can edit the matter information and access
additional information about the matter as described below.
2011 Tussman Programs, Inc.
96
Tussman Program Release 10
Changing the matter ID or Short Title
The matter ID or short title can be changed at any time. If you make a change, the program
automatically performs a global replace where all records related to that matter are updated so that you
do not lose any information. Changes are saved only by clicking the OK button. If you close the
matter screen by clicking on the X button in the upper right hand corner, any changes you made will
not be saved.
Productivity Codes
You can change any of the productivity codes assigned to a matter at any time. Global changes for
all or selected matters can be made by going to the Client and Matter Defaults screen, making the
change, and selecting the option to make a global change.
File Status
The upper right hand corner of the screen indicates the file status: Open indicates the file is active.
Click on the Close/Delete button to change the status as follows:
Closed - The matter remains on file but you cannot enter new activity or generate a bill, and it will not
appear in your lists and reports unless when generating the list or report you request that closed files
be included;
Collection Status - Similar to closed, except that you can continue to generate bills so that you can
collect a balance due. This status is designed for the situation where a balance is still owed, but you
will not be performing additional work on this file.
Deleted - This marks the matter for deletion. The matter is not physically deleted from your database
2011 Tussman Programs, Inc.
Clients and Matters
97
until you perform the separate purge function which rebuilds your entire database, thereby removing
any records you have marked for deletion.
When you change the file status at the matter level, only that matter is closed and the client record will
remain unaffected. If you want to change the status of the client file as well, you should use the
Close/Delete function in the client screen.
Deleting a file is not recommended if any recent billing activity has been performed for that file, as
when you perform the purge function all records related to that file will also be deleted, and this could
affect some of your management report totals. In many cases, it may thus be preferable to close a file
rather than delete it.
Fee Agreement and Billing Options
By clicking on these buttons you can change the Fee Agreement or Billing Options for the matter.
Changes made here only affect this particular matter. If you want the change to apply at the client
level, you should make the changes in the client screen.
If you make a change in the Fee Agreement screen that affects the billing rate for a matter, you will
also be asked if you want the change applied to charges that have already been entered for that
matter. If you click Yes, you will next be asked for a Cutoff Date. If you leave the cutoff date blank,
then the amount of all unbilled charges for that matter will be recalculated using the new rates. If you
put in a cutoff date, then only charges dated after that date will be recalculated. In either case, charges
that have already appeared on finalized bills will not be affected. If you click No, then the rate change
will only apply to charges that are entered after the change is made.
It is possible to make global changes to the Fee Agreement and Billing Options for all or selected
matters by going to the Default Fee Agreement and Default Billing Options screen, making the
changes there, and selecting the option to perform a global replace.
Names
Click on the Names button to view, edit or add to a list of names and addresses of persons related to
this matter, such as adverse parties, witnesses, etc.
Bill Address
Click on the Bill Address button to enter or edit a special billing address for this matter, as described
in the New Matters section.
Split Billing
Click on the Split Billing button to enter instructions for splitting charges entered on this matter with
another matter or matters, as described in the Split Billing section.
Payment Split
Click on the Payment Split button to enter or edit the payment split information for this matter, as
described in the New Matters section.
Transfer/Merge
The Transfer/Merge dialog contains four separate functions:
Transfer File - This function allows you to transfer this matter to a different client.. After clicking the
Transfer File button the Select Client dialog appears. Select the client you want to transfer the matter
2011 Tussman Programs, Inc.
98
Tussman Program Release 10
to, click OK, then click Yes to confirm. This matter, along with all related information, including
account history and all unbilled charges, will then be transferred to the client you selected.
Transfer Charges - This function is for moving unbilled charges from one matter to another. Select
the client and matter that you want to transfer the charges to, click OK and then Yes to confirm, and all
unbilled charges from this matter will be transferred to the selected matter. If you only want to transfer
selected unbilled charges from this matter, you must do that by editing the individual charges. If you
want to transfer charges that were already billed, you must first unfinalize the bill(s) that those charges
appeared on.
Copy Charges - This function allows you to copy the charges on this matter , both billed and unbilled,
to another matter. After clicking on this option specify the matter you want to copy them to, then select
from the addtional options that willl appear. You can specify to copy charges for a specific staff
member and/or date range, and you can specify to copy either billed or unbilled charges or both, and
fees or costs or both. The charges will remain unaffected on this matter, but a copy of them will then
appear on the matter you specified.
Merge File - This function is for merging two separate matters into a single surviving matter. It should
be done with care as once the two files have been merged it is not possible to reverse the process.
After selecting the matter that you want to merge this matter with, click OK and then Yes to confirm.
This matter will then be merged with the matter you selected, which then becomes the surviving
matter. All information related to the disappearing matter, including account history and unbilled
charges, will be transferred to and combined with the surviving matter. The disappearing matter will
actually remain on file but will be marked for deletion and will not have any related information.
Convert Time
This function is used to perform a global conversion of unbilled time for this matter from
1.
2.
3.
4.
Nonbillable (transaction type N) or to Billable (transaction type H).
Billable (type H) to Nonbillable (type N)
Administrative (type A) to Billable (type H)
Billable (type H) to Administrative (type A).
For example, if you entered time on this matter as nonbillable, but now want to convert it to billable,
click the Convert Time button, then click Convert Nonbillable to Billable. . This function converts all
unbilled charges of the type selected for this matter to the status you select. To convert only selected
charges, you will have to edit the individual charges. If you want to convert charges that have already
been billed, you will first have to unfinalize the bill(s) those charges appeared on
Calendar
If you are using the Tussman Calendar program, clicking on this button will display a list of all calendar
entries for this matter. From this screen you can edit the existing entries or add additional calendar
entries.
Account Inquiry
Click on the Account Inquiry button to view detailed account information about this matter.
Master Ledger
Click on the Master Ledger button to bring up the ledger for this matter.
Notes
2011 Tussman Programs, Inc.
Clients and Matters
99
The bottom portion of the matter screen displays the most recent notes that have been added for this
matter. You can display the entire notes file by clicking on the Notes button, where you can then edit
or add additional notes. You can also add a note which will be automatically dated and placed at the
beginning of the notes file by clicking on the
button.
FE Button
This function is for eliminating the balance of an unused credit resulting from the billing or a minimum
retainer fee (transaction type FE). Before performing this function the program will ask for a code.
The code is NOBBYFE.
Z Button
If you want to require the entry of Task, Activity and/or Cost Codes when recording charges for this
matter, click on the Z button. To require just a Task Code, enter Y. To also require an Activity Code,
enter YY. To also require a Cost Code, enter YYY. To require an Activity Code but not a Task Code
enter NY, etc. This is only necessary if you want to require the codes for some matters but not for
others, as there are global settingsfor this under item 6 in the Data Entry Options screen
Once you have entered your selections the program will ask if you want the changes applied to all
matters for this client. This way if a client has many matters you only have to make the changes once
by picking one of their matters and then clicking Yes to this inquiry.
Matter Memo
You can print or display a memo which includes all the information about this matter, including the Fee
Agreement, Billing Options, Billing Address and Notes, by clicking on the
button.
Navigation buttons
The four arrow buttons in the lower right hand corner of the matter screen help you locate the next file
you want to display.: Click the
button to go to the previous matter, the
next matter, the
button to display the client screen for this matter, and the
the Select Matter dialog from which you can select another matter.
button to go to the
button to display
12.11 Client and Matter Notes
When adding or editing a client or matter, you can enter free form notes about that client or matter by
clicking on the Notes button. A dialog such as that shown below appears:
2011 Tussman Programs, Inc.
100
Tussman Program Release 10
You can add additional notes by simply typing them in, or you can add a note which will be
automatically dated by the program and added at the begining by clicking on the
button. The first
few lines of your client or matter notes are displayed in the bottom portion of each client or matter
screen. You can then view, edit or add notes by clicking on the Notes button on that screen. There
are options to include the notes when printing client lists or matter lists. When performing a
conflict check, you can also search the notes by selecting the option to do a complete search. Matter
notes can also be printed at the end of a client's bill by setting bill format option 198 to Y, or you can
use the matter notes space to add additional lines to the matter title which is printed in the heading of
the bill simply by typing a plus sign in the first space of the Notes area followed by the text you want.
You can print a report showing all or selected notes by clicking on Clients from the main menu and
selecting Print Client/Matter Notes. The following sceen appears:
2011 Tussman Programs, Inc.
Clients and Matters
101
Select the options you want and note that you can have it print only notes that were dated on a specific
date. This only works if you enter notes by clicking the
(Enter Dated Note) button that appears
on both the client and matter screens to the left of the Notes button.
You can also search your notes for a particular word or phrase by entering it in the Text Search space.
sdfds
12.12 Matter Lookup and Browse
The quickest way to find a matter is to click the
described below appears.
2011 Tussman Programs, Inc.
button on the Toolbar at the top. The dialog
102
Tussman Program Release 10
There are several ways of then finding the matter you want. These methods can be used anywhere in
the program where the Select Matter dialog appears or where you are asked to enter the matter ID or
select a matter; for example, when entering new charges, generating a bill or report, etc:
If you know the client
First enter the client ID, as described in the Client Lookup section. You can then select the specific
matter as follows:
1. If you know the matter ID or short title, or any portion of the matter title, type it in the client ID space
and press Enter. The program will then find that matter or display a list of matches to select from;
2 Click on the
icon next to the Matter space to display a list of matters for the selected client.
If you do not know the client
You can also select a matter by leaving the Client space blank and typing the matter ID, short title or a
portion of the matter title in the Matter space and the program will display a list of matches.
If you leave the Client space blank and click on the
icon next to the Matter space the program
will display a list of all your matters, from which you can select as described above in the Quick Search
section..
You can also locate a matter by:
1. Selecting Find from the Matters menu on the Main Menu;
2. Clicking on the Matters button which appears on a client's record;
3. Clicking on the Matters button which appears at the top of the Client Browse screen, which
displays a list of matters for the highlighted client;
4. Using the split screen Client/Matter Browse, which displays a list of matters for the highlighted
client on the right hand part of the screen;
5. Using the Matter Browse screen as described below.
If you do not want to include closed files when searching or performing matter lookups, click on the
Clients icon on the Control Panel and make sure the Closed option at the top of the client browse list is
unchecked. If you want to include closed files in lookups and searches, check the Closed box.
2011 Tussman Programs, Inc.
Clients and Matters
103
Matter Browse Screen
The Matter Browse is a screen similar to the Client Browse which displays a scrolling list of your
matters which you can bring up by clicking the Matters icon on the Control Panel. You can make this
your default start up screen, in which case it will come up automatically when you enter the program.
You can also bring up the Matter Browse screen by clicking on the Matters or All Matters button at the
top of the Client Browse screen. If you click on Matters, only matters for the highlighted client will
appear; otherwise, all matters will appear.
You can locate a matter from the Matter Browse screen by either
1 Scrolling manually through the list until you find the one you want;
2. Typing the client ID, matter ID, or short matter title, depending on the sort order of the list. As you
type each character, the list will scroll to the closest match. You can change the sort order by clicking
on the Sort Order button. When typing, if you need to start over press the space bar.
3. Performing a search by typing the matter ID, short title, or any text from the matter title in the space
next to the Search button and then pressing the button to display any matches.
Once you have highlighted the matter you want, click on that record, click the Edit button, or right click
on the Matter button on the Control Panel to display that matter record. Once you have highlighted
the matter you want, clicking on many of the buttons on the Toolbar or Control Panel will default to
using that matter ID.
You can also filter the list to display one or more matching matters by clicking the Filter button which
brings up the Select Clients and Matters dialog, where you can enter the search criteria you want.
If you want the list to include closed files, check the Include Closed Files box. Otherwise, only active
files will be listed.
To add a new matter, click the New button, which is the same as left clicking the Matter button on the
Control Panel or selecting New from the Matters section on the Clients menu.
The Filter button at the bottom of your main matter list brings up the Select Clients and Matters dialog
which can be used to filter the list to include only those matters which match certain criteria which you
select.
To print a list of selected matters, use the Matter List function and click on the Selected Files button
when generating the list.
.
12.13 Transferring and Merging Matters
Matters can be transferred from one client to another, or two matters can be merged together into
one. To do this, locate the matter that you want to transfer or merge and click on the Transfer/Merge
button. If you want to transfer the matter to another client, click Transfer File and enter the ID of the
client that you want to transfer the matter to. To merge this matter with another matter, click the
Merge File button and enter the client and matter ID of the file that you want to merge this matter with.
The matter that you merge this matter with will become the surviving matter, and all account history
2011 Tussman Programs, Inc.
104
Tussman Program Release 10
and unbilled charges will be transferred to that matter. Warning! Merging matters should be done
with care as once the two files have been merged it is not possible to reverse the process.
12.14 Matter Lists
To print a list of your matters, click on Matters from the Main Menu at the top and select List from the
submenu.
The Generate Matter Lists screen is shown below:
:
Select from the following list options:
Information Included
Client Information - This button is grayed out when generating matter lists. If you want a list with
detailed client information, you will have to generate a Client List. The matter list can include just the
client ID, alternate ID, and client name, which can be selected in the Matter Information screen.
Matter Information - Select the information you want included for each matter. You can select
everything from the matter title to the fee agreement, billing address, matter notes, and the list of
related names for that matter.
Related Name Information - If you checked Related Names in the Matter Information screen, click
on this button and check the information you want included for each related name.
Files Included
2011 Tussman Programs, Inc.
Clients and Matters
105
You can generate the list for all files, a Single Client or Matter, or for Selected Files. Use the
Selected Files option to, for example, only list matters for a single responsible attorney.
In the Include box below you can select whether or not to include open files, closed files, collection
files, deleted files, and files on hold. If, for example, you just want a list of matters which are marked
for deletion, uncheck everything except Deleted Files.
Sort Order
Primary Sort Order - Determines the main order in which matters are listed. In addition to listing in
either client ID, alternate ID, matter ID, or short title order, you can also sort them by any of the
productivity codes in the matter screen, by date opened, fee arrangement, rate schedule, and bill
format. For example, if you want a list showing which matters are assigned to each of the 90 rate
schedules, select Rate Schedule as the primary sort order.
Client Subsort Order - Not applicable when generating a matter list.
Matter Sort Order - If you selected a primary sort order other than by matter ID or short title, this
determines whether the matters for each primary sort group are listed by matter ID or short title.
List Options
All Info on One Line - If checked, all of the information for each matter and related name (if included)
will be printed on one line, rather than separate lines for each item of information. If the information
selected does not all fit on one line, it will be truncated. This option may be appropriate if you are
printing a very simple client list containing, for example, just the client ID, matter ID and matter title,
and you want to save paper by printing in a more compact format.
New Page for each Category - Indicates whether of not you want to begin a new page for each
primary sort category. For example, if printing a matter list sorted by Responsible Attorney, you may
want to use this option so that in effect you are generating a separate list which can be given to each
attorney listing just their matters.
Line spacing - Enter 1, 2 or 3 to indicate the number of lines you want to skip between each matter.
12.15 Matter Labels
The Matter Labels function can be used to print labels for all or selected matters. While not designed
to be used as mailing labels, they can be used to print file folder or other types of labels.. To generate
matter labels, click on Matters from the Main Menu at the top and select Label and Export from the
submenu.
The Matter Labels screen shown below contains a variety of options for generating the labels.
2011 Tussman Programs, Inc.
106
Tussman Program Release 10
Label Type
You can design and save up to five separate label formats. The first two formats are pre-defined,
although they can be modified if desired, and the next three are user-defined. Select the type of label
you want to generate from the list. If you want to view or edit the label format, then click on the Edit
Label Format button immediately below the list.
Edit Label Format
The label formatting function consists of two screens, referred to as Page 1 and Page 2.
Page 1 is displayed below, showing the appropriate settings for printing Avery 5161 Labels.
2011 Tussman Programs, Inc.
Clients and Matters
107
1. Label Title - .Assign a title to this format to make it easy for you to identify later on.
2. Continuous or Laser - Enter C if you are printing labels on continuous forms, or L if you are
printing on sheets using a laser printer.
3. Regular or Compressed Print - Enter R to print using the standard courier font, or C to print in
compressed print. Selecting compressed print will be necessary if you are using label sheets that
have three columns.
4. Labels Across - Enter the number of columns of labels on each page or sheet.
5. Labels per Column - Enter the number of labels in each column, if you are using sheets of labels
designed for a laser printer.
6. Total Lines per Label - Enter the number of printable lines on each label. That will vary depending
on the size of the labels. The maximum number of lines you can print on a label is 26.
7. Label Width - Enter the number of characters to print on each line of the label. This will vary on the
size of the label. A maximum of 40 characters is recommended.
8. Left Margin - If you need to indent a number of spaces from the left margin before you begin
printing, enter the number of spaces to indent. For most labels you can leave this blank.
9. Top Margin - If you need to increase the top margin before you begin printing the first label, enter
the number of additional lines to skip. For most labels, you can leave this blank.
After completing the information in Page 1, click the Next button to go to Page 2.
2011 Tussman Programs, Inc.
108
Tussman Program Release 10
Page 2 is displayed below, with the correct settings for printing address labels for each matter
This screen lets you select what information you want printed on each line of your labels. The right
hand side displays the items you can select from, such as the matter ID and title, billing address, etc.
Each item is identified by a letter; i.e., the letter c represents the matter title. Note that these letters are
all lower case. The left side contains a space for each line on the label where you enter a letter or
letters indicating the information you want printed. For example, if you want to print the matter title on
the first line of each label, enter the letter c in the first space of line 1. If you want to print the additional
lines of the matter title on the following lines, enter d in line 2, e in line 3, f in line 4 and g in line 5.
Always use lower case when entering these selections. You can only use up to the number of lines
you specified in item 6 in Page 1.
You can also include information from the client screen on the label by entering an upper case letter
that corresponds to the information which can be printed on a client label. For example, if you want to
include the client name on one of the lines, enter an upper case letter C.
You can print more than one item on a line (assuming the two items will fit in the space available on the
label) by entering more than one letter in the space for that line. For example, to print both the matter
ID and short title on line 1, enter ab in the space for line 1. .A single space will be skipped between
each item when it is printed on the label. To increase the number of spaces, enter the number of
spaces you want to skip between the two letters. For example, to print the matter ID and the short title
separated by eight spaces, enter a8b in line 1. To print the client ID followed by the matter ID, enter
Aa.
Click OK after you have finished making your selections. The selections will be saved so that the next
time you want to print the same type of labels you can simply select the same Label Type without
having to edit the format.
Files Selected
2011 Tussman Programs, Inc.
Clients and Matters
109
You can generate labels for all matters, for a Single Client or Matter or for Selected Files.
Options
These options determine the sort order in which labels are printed (enter N for client ID/matter ID
order or A for alternate ID/matter ID order); whether or not matters that are closed, on collection status,
marked for deletion, or on hold are included; and whether or not the descriptive title of each productivity
code is printed along with the code, if you are including any of the productivity codes on the label (i.e., if
you are including the Responsible Attorney, and the responsible attorney happens to be ABC, you can
either have it just print the attorney initials "ABC", or have it print "Responsible Attorney: ABC").
ASCII File Export
This button is used to export matter information to an ASCII text file, as described in the
ASCII file export section.
CSV File Export
This button is used to export matter information to an Excel spreadsheet.
12.16 File Status Options
The upper right hand corner of both the client and matter screen indicates the file status: Open is the
normal status and indicates the file is active. Click on the Close/Delete button to change the status as
follows:
Closed - The client or matter remains on file but you cannot enter new activity or generate a bill, and it
will not appear in your lists and reports unless when generating the list or report you request that
closed files be included;
Collection Status - Similar to closed, except that you can continue to generate bills so that you can
collect a balance due. This status is designed for the situation where a client still owes an outstanding
balance, but you will not be performing additional work for them.
Deleted - This marks the client or matter for deletion. The file is not physically deleted from your
database until you perform the separate purge function which rebuilds your entire database, thereby
removing any records you have marked for deletion. Deleting a file is not recommended if any recent
billing activity has been performed for that file, as when you perform the purge function all records
related to that file will also be deleted, and this could affect some of your management report totals. In
many cases, it may thus be preferable to close a file rather than delete it.
When you change the file status at the client level, all matters for that client will also be assigned the
same status. Thus, if you close a client, all matters for that client will also be closed. If you have a
client with several matters, and you want to close one of them but keep the others open, then leave the
client open and use the Close/Delete button in the matter screen instead.
Once a file has been closed or deleted, use the same button to reopen or undelete it. In that case, the
title on the button will have changed to either Reopen or Undelete.
2011 Tussman Programs, Inc.
110
Tussman Program Release 10
12.17 Related Names
The Related Names function maintains a list of contact persons, separate from your client list. These
contacts can be associated with a specific matter, such as parties to the case, opposing attorneys,
corporate officers, etc, or they can be entered as general contacts. This list of contacts is searched, in
addition to your main client list, when you perform a Conflict Check.
You can also use the Related Names function to enter additional names and addresses that you want
to appear on the bills for a matter. This allows you to address a bill to an unlimited number of parties.
To do this, assign the Type Code ADDR for each Related Name that you want on the bill.
To add, view or edit names of people related to a specific matter, click on the Names button in the
matter screen.
To add, view or edit the entire list of related names, including those not related to a specific matter,
click the
.button on the Toolbar at the top.
Adding a New Related Name
To add a related name, click the New button at the top of the related name list and fill in the
information in the screen shown below:
Code - Assign a code for sorting and lookup purposes of up to twelve characters. An abbreviation of
the contact's name is usually best.
Contact Information - Enter the name, address and phone numbers for contact.
Additional Information - The additional contact information is optional, and the field titles are user
definable so you can configure each of the spaces following the phone numbers (except for the Date
Open field) to correspond with your own needs. To change the field titles, click on the Field Titles
button at the bottom of the Related Names list. The default field titles are:
2011 Tussman Programs, Inc.
Clients and Matters
111
EMAIL
CONTACT
TYPE
AREA
SOURCE
AGE
BIRTHDAY
AMOUNT
ii is recommended that you use the Type field to assign a short code to each contact which indicates
the type of contact; for example, opposing party, witness, supplier, etc.
If you want the name and address for one or more of the Related Names for a matter to appear in the
heading of the bills for that matter, use the code ADDR. It will then print this name and address
following the client and/or billing address for this matter.
Notes
You can enter free-form text notes about each contact by clicking on the Notes button at the bottom of
each contact record. This button only appears when editing a record after it has been saved. You can
type the notes in directly, or click on the
and inserted at the top of the notes file.
button to enter a note which will be automatically dated
Close/Reopen/Flag/Delete
When editing a contact record, click on the Close/Reopen button to either close or reopen the contact
record. The current status is shown to the right of the Code at the top of the screen.
To delete a record, click on the
button at the bottom of the screen.
You can also flag a record by clicking on the Flag button. The status space next to the Code indicates
if a record is flagged. Flagging individual records is a way of printing a list containing just the flagged
records as described below.
Transfer
The transfer function is not currently supported.
Filtering the List
Click on the Filter button at the top of the browse screen to configure the list to include only contacts
which match the search criteria you enter. Once you have filtered the list, you can print the list of just
those records by clicking on the
button. If you want to pick a random list to print, first flag the
individual records as described above, then filter the list to display only flagged names, then print the
list as described below.
Printing the List
Click on the
button to print a list of your contacts. A dialog then appears from which you can
select which items of information you want included for each contact. If you want the list to include only
2011 Tussman Programs, Inc.
112
Tussman Program Release 10
specific contacts, before clicking on the he
button, click on the Filter button to select the specific
contacts you want. Once the filtered list has been displayed, you can print it by clicking on the
button. You can also flag specific contacts that you want as described above and then filter the list to
include only flagged contacts before printing.
Labels
The label function for related names is not currently supported.
12.18 Conflict Check
Use the Conflict Check function when you want to search your client and matter database for the
name of a person in order to avoid the possibility of a conflict in representation. You can also use it as
a general search function to get a list of files where any word or phrase appears.
To perform a check, click the
appears below.
button on the Toolbar at the top. The Conflict Search screen
The screen includes spaces for entering up to twenty names to search for. In each space you may
enter a name or word to search for. If you enter both a first and last name in one of the spaces, for
example, a match will normally be produced when both names or words appear anywhere in the
same record. For example, if you enter John Smith in line 1 a match will be produced whenever both
the names John and Smith appear in the same record. Thus, both John Smith and Smith, John or
John A. Smith appearing in a client or matter record would produce a match. Alternatively, if you only
want to return a match when there is an exact match, check the box at the bottom of the screen.
Then in our example above if you entered John Smith in the first space a match would be returned only
for records where John Smith appear exactly as entered, and Smith, John or John A. Smith would not
2011 Tussman Programs, Inc.
Clients and Matters
113
return a match.
If you want to search for more than one name, enter each name on a separate line. You can also use
separate lines if you are not sure of the spelling of the name, in which case enter the alternate
spellings on each line.
You can narrow a search if necessary. For example, if you have lots of clients named Smith but want
to see if there are any Smiths living in Chicago, enter Smith Chicago on line1, making sure that the
checkbox at the bottom is unchecked. The program will then produce a match only if both the words
Smith and Chicago appear in the same record. If, on the other hand, you entered Smith in line1 and
Chicago in line 2, the program would produce a list of matches where either word appeared.
When searching, the program checks all of your clients, matters and related names for matches. The
Search Scope option determines whether or not the program also searches the client and matter
notes, and the separate billing addresses entered in the matter files. The more detailed search may
require a bit more time to perform. Select the Limited Search for the more abbreviated and quicker
search.
After entering the name or names you want to search for, click on Perform Search. When completed,
the program will indicate the number of matches found on the Search Result line at the bottom of the
dialog. To view the matches, click either Print Results or Results to Screen. The list will show the
matches for each name you searched for, indicating whether the match is found in a client, matter, or
related name record, and showing the context in with the name or word appeared.
Note that you can also perform a conflict check when entering a new client using the C button to the
right of the Client ID space.
12.19 Client Emails
This function enables you to send an email to all or selected clients. Select this option from the
Clients menu and continue as follows:
1. Select whether you want to send to All Clients or Selected Clients;
2011 Tussman Programs, Inc.
114
Tussman Program Release 10
2. Click on Attachments if you want to attach a file, then click the folder button at the bottom to select
the file, or type in the path and file name. You can send multiple attachments making sure they are
separated by a semicolon.
3. Enter the Subject and Message you want.
4. Click Send. The program will send an email to each selected client as long as the client has an
email on file.
Before Sending make sure you set up the email function. Click the Setup button if necessary to do
this. For purposes of this function it is not necessary to have configured the Tussman PDF driver as
that is used only when emailing bills. Click the Log button after the emails have been sent to see a list
of each email.
You can also send an email to a single client by clicking the
button on the client screen.
12.20 Exporting Clients and Matters
Client and matter information can be exported in a variety of ways so that it can be used by other
programs; for example, so that it can be imported into Microsoft Excel or Microsoft Outlook.
Exporting Client Information
To export your list of clients, click Clients from the Main Menu at the top and select Labels and
Export from the submenu. From the Client Labels screen, ignore the Label Type and Label Format
functions, but choose from the Files Selected options if you want to export only information for a single
client or selected clients, You can also select from the Options list the sort order and whether or not
closed files, collection files, deleted files, or files on hold are included.
After selecting any of the above options you want, click on one of the following buttons:
1) ASCII File Export - This creates a tab-delimited text file containing your client information.
2) CSV File Export - Creates a comma-delimited "csv" file which is the format required for importing
the information into Microsoft Excel;
3) Outlook Format Export - Creates a comma-delimited "csv" file in the format required for importing
into your Microsoft Outlook contact list.
After selecting one of the above options, the following screen will appear:
2011 Tussman Programs, Inc.
Clients and Matters
115
In the Enter Letters space type the letters corresponding to the information which you want to export,
as shown in the Client Selections portion of the list. For example, to include the client ID, alternate ID
and client name, enter the letters ABC. You must enter the letters in upper case. When exporting
client information, you cannot include any of the Matter Selections on the right hand portion of the
screen.
After selecting the items you want to export, click OK. You must then specify the name and location
for the export file. If you are creating a CSV or Outlook file make sure you give the file a .csv
extension; for example, "tpclients.csv". The file created will contain the information for each client on a
single line (in either client ID or alternate ID order, depending on the sort order you selected), with the
information for each client appearing in the order in which you typed the corresponding letters in the
selection screen. For example, if you typed AB, the client ID will appear first, followed by the alternate
ID. If you typed BA, the order will be reversed.
Importing into Excel or Outlook
After generating the export file as described above, to import the information into Excel start up the
Excel program. Click on File, then Open, and find the export file that you just created in Tussman. The
information will then be imported into an Excel spreadsheet.
To import into your Microsoft Outlook Contact List, open the Outlook program, then
1) Click on File
2) Select Import and Export,
3) Select Import from another program or file and click Next,
4) Select Comma Separated Values (Windows) and click Next,
5) Type in the name of the File to Import (this will be the file you created in Tussman as described in
the previous section) or locate it using the Browse button and click Next,
6) Select the Contacts folder and click Next,
7) Click Finish. (If the Finish button is grayed out, check the box to the left of the action line)
2011 Tussman Programs, Inc.
116
Tussman Program Release 10
8) Your list of Tussman clients will then appear in your Outlook contact list.
Exporting Matter Information
To export matter information, click on Matters from the Main Menu at the top and select Labels and
Export from the submenu. From the Matter Labels screen, ignore the Label Type and Label Format
functions, but choose from the Files Selected options if you want to export only information for a single
client or matter or for selected matters. You can also select from the Options list the sort order and
whether or not closed files, collection files, deleted files, or files on hold are included.
After selecting the above options, click either the ASCII File Export or CSV File Export button (you
cannot export matter information to Outlook) and the screen shown above in the Client Export section
will appear. In the Enter Letters space type the letters corresponding to the information which you
want to export. You can select items from both the Client Selections and Matter Selections portion
of the list. For example, to include the client ID, client name, matter ID and matter title enter the letters
ACac. Selections from the Client portion must be entered in upper case. Selections from the Matter
portion must be entered in lower case.
After selecting the items you want to export, click OK. You must then specify the name and location for
the file you want to create. If you are creating a CSV file make sure you give the file a .csv extension;
for example, "tpcases.csv". The file created will contain the information for each matter on a single line
in the sort order you selected, with the information for each matter appearing in the order in which you
typed the corresponding letters in the selection screen.
To import the matter information into an Excel spreadsheet, follow the same instructions in the
Importing Into Excel section above.
13
Charges
There are two main types of charges that can be entered in the program: fees and costs. Fees
consist of both hourly charges and flat fee charges that you want to bill to a client for work done on a
matter. Costs are entered to bill a client for out of pocket expenses such as court filing fees, as well
as incidental costs such as photocopy expense and telephone charges. Both fee and cost charges are
entered in the same screen in the program. To enter a new charge, click on the
the Control Panel at the left.
button on
When charges are entered as described above, they are added immediately to the unbilled charges file
and are ready to be billed to the client. No separate posting or other updating procedure is required
before a bill can be generated. However, it is also possible to enter charges using the
Batch WIP Entry function, in which case they are initially stored in a separate file and are not added to
the unbilled charges file until an export procedure is performed. Each program user can create their
own Batch WIP Entry folder, and the Batch Entry function also has a more flexible timer function than
the regular entry screen. The differences between the two entry functions are described in the
Batch WIP Entry section. To access the Batch WIP entry function click on the
Toolbar at the top.
button on the
Charges can be entered at any time; i.e., you can enter charges for the next billing cycle even if you
have not yet closed out your current billing cycle, as any charges that are entered after you generate a
2011 Tussman Programs, Inc.
Charges
117
bill, or which are dated after the ending cutoff date you are using on that bill, will simply be saved for
the following bill.
The following sections explain in detail the procedures for entering fees and costs, including:
The different Types of Fee Charges
An explanation of the screen for Entering Fee Charges
How to locate and browse lists of fee charges
The procedures for editing and writing down fee charges
The different Types of Cost Charges
An explanation of the screen for Entering Cost Charges
Procedures for editing cost charges
Entering a combined fee and cost charge
How to split or duplicate charges
Ways to handle flat and contingent fee billing
Other types of charges that can be entered
Using the Time at a Glance screen to view charges
The Batch WIP Entry function
Generating Lists of Charges
Editing billed charges
Performing a Spell Check of charges
13.1
Fee Charges
There are two basic types of fee charges: hourly charges and flat fee charges.
An hourly charge is entered when you want to record an amount of time you have spent working on a
matter. Hourly charges can be both billable and nonbillable. If billable, they will be charged to the
client based on the hourly rate for the staff member who performed the work. Nonbillable time can be
entered to keep track of work done on a matter which you will not be charging the client for, either
because you a billing on a flat fee or contingent fee basis, you are representing the client on a pro bono
basis, or you are doing work on an hourly rate case which you will not be charging for. Similar to
nonbillable time, administrative time can also be entered to record work done for the firm which is not
related to a client's matter.
A flat fee charge is entered when you want to bill the client a fixed dollar amount for performing a
specific task. There are also several specialized types of flat fee charges, including an overriding flat
fee charge and a minimum retainer fee charge, described in the next section.
Fee charges appear in a separate section on the client's bill. There are many different ways to format
that section. Charges can be itemized separately or summarized in a variety of ways, listed
chronologically or grouped by staff member, task or activity code, and displayed with varying degrees
of detail.
Once fee charges have been billed, they are stored in the Billed Charges file for future reference.
While it is possible to purge or archive charges that have been billed, it is not necessary or
recommended, as their presence should not affect performance of the program and most firms prefer
to retain such detail so that they can reprint copies of old bills or historical bills which detail past work
done on a client's matter.
13.1.1 Types of Fee Charges
The following sections describe the different types of fee charges that can be entered. The various
types are identified by the transaction type code which is assigned to each charge. The codes are
listed on a drop down menu which you can select from when entering new charges.
2011 Tussman Programs, Inc.
118
Tussman Program Release 10
The types of fee charges fall into the following categories:
Hourly Charges
Nonbillable and Administrative Time
Flat Fee Charges
Overriding Flat Fee Charges
Minimum Retainer Fee Charges.
13.1.1.1 Hourly Charges
H - Billable Time. The most common type of charge, used to record time that is spent working on a
client's matter that you intend to bill to the client at the applicable hourly rate.
N - Nonbillable Time. Nonbillable time can be recorded on any matter where you want to keep a
record of time worked which cannot be billed to the client, either because you are billing on a flat or
contingent fee basis, you are representing the client on a pro bono basis, or the specific task is one
that you have decided not to charge for. Nonbillable time is tracked separately by the program for
reporting purposes and can always be converted to billable time if you subsequently decide to charge
for it.
A - Administrative Time - Administrative time can be recorded to keep track of work performed on
behalf of the firm but which cannot be charged to a client; for example, time spent on continuing
education, personnel matters, office administration and the like. If you want the program to keep track
of such time, it is a good idea to open a client file for the firm, with separate matters under that client
for the various categories of administrative tasks that you want to track separately. When setting up
those matters, set the fee arrangement to A. Then, whenever time is entered on those matter,
regardless of the transaction type used, the program will automatically convert the transaction type to
A. Administrative time can also be recorded on regular matters, but like nonbillable time it will not be
billed to the client.
FOY - An FOY is an hourly charge that will appear on the bill in lieu of any other hourly charges that
you have entered. The other charges will still be saved in the system for reporting purposes but only
the FOY will appear on the bill and the total amount of fees on the bill will be the amount of the FOY.
13.1.1.2 Nonbillable Time
Nonbillable time (entered as transaction type N) is time that you have spent working on a client's
matter but that you are not going to be charging for. Firms record nonbillable time for a variety of
reasons. Some firms want to show the nonbillable time on a client's bill, and others want to record it
strictly for internal record keeping purposes. This section explains the different options when entering
nonbillable time and for showing it on a client's bill.
Uses for Nonbillable Time
Nonbillable time can be entered on any matter, regardless of the fee arrangement. Thus, it can be
used on a regular hourly rate matter to record time spent working on the case which you are not going
to bill for. Or, it can also be entered on flat fee or contingent fee matters, where you will not be billing
on an hourly basis, so that you can have a record of the actual time spent.
Data Entry Options for Nonbillable Time
Normally when recording nonbillable time the Enter New Charges screen allows you to enter the
number of hours but does not assign a dollar amount. This way, if you show the time on the client's bill
it will not show a dollar amount, only the number of hours. If you prefer to show the dollar value of the
time on the bill, even though the client is not being charged for it, then you should configure the
program so that when entering nonbillable time it assigns a dollar amount. To do this, click the
Options button on the Enter New Charges screen and set option 7, Assign Dollar Amount to
2011 Tussman Programs, Inc.
Charges
119
Nonbillable Time, to Y. For this to work, you must also enter the correct billing rate schedule you
want to use in the fee agreement screen for the matter.
You can also configure the program so that whenever you record time on a flat fee or contingent fee
matter, the time is automatically converted to nonbillable. This way, you do not have to keep track of
which matters are being billed for time and which matters are not. You can simply enter all time as
billable (type H) and if you assign it to a matter which is a flat or contingent fee matter the program will
convert it to nonbillable (type N). To enable this option, click the Options button on the Enter New
Charges screen and set option 5, Convert Time to Nonbillable, to Y. If you want the program to ask
you for confirmation before converting each charge, enter A.
Converting Time from Billable to Nonbillable, or vice versa
In addition to having the program automatically convert time from billable to nonbillable as it is entered,
as described above, you can perform a global conversion of all the unbilled charges for a specific
matter at any time. Thus, if you have entered all of the time on a matter as billable, and then decide
not to bill it, you can convert it all to nonbillable. Or, if you enter time as nonbillable, and then decide to
bill it, you can convert it to billable. This situation can arise if, for example, you are initially handling a
matter on a contingent fee basis but then change the agreement with your client so that they are to be
billed on an hourly basis. If you have already generated and finalized bills showing the nonbillable
time, and want to convert it to billable, you will first have to unfinalize all the bills on which the
nonbillable time appeared, and then perform the conversion.
To convert time from nonbillable to billable, or vice versa, go to the matter screen for that matter and
click on the Convert Time button. Then click either on the Convert Billable to Nonbillable or
Convert Nonbillable to Billable button. Before converting nonbillable to billable, make sure you have
entered the correct billing rate schedule you want to use in the fee agreement screen for that matter.
Showing Nonbillable Time on a Bill
There are many different format options that determine if and how nonbillable time appears on the
client's bill.
Format option 69 determines whether or not nonbillable time is shown on the bill. Set this option to Y if
you want to omit both nonbillable and administrative time, A to omit Administrative time only, or B to
omit nonbillable time only.
Set format option 68 to Y if you want to omit all time charges on flat and contingent fee matters. Using
this option, both nonbillable and billable time will not be itemized on a client's bill if the fee arrangement
is flat or contingent. The dollar value of any billable time will still be included in the total new charges
on the bill, however. This option allows you to omit nonbillable time if the fee agreement is flat or
contingent, but to include it if the fee agreement is hourly.
In format option 79 you can enter a short additional phrase (for example, "NO CHARGE") that will be
added in parentheses following the description for each nonbillable charge that appears on a client's
bill. To omit this text, simply leave this space blank.
Format option 81 determines the format for the dollar amount of nonbillable time as it appears on the
bill. Enter A to show the amount as 0.00, M to show the words "No Charge", N to show the letters
"N/C", or D to show the actual dollar value followed by the letters "NC". For option D to work, you must
have configured the program so that when nonbillable time is entered a dollar value is assigned, as
described above; otherwise, the amount will show as "0.00NC". As an additional option, you can
simply leave the amount space blank by setting format option 78 to Y, so that the amount space is left
blank if the amount is 0.00. This overrides whatever setting you have selected for option 81, unless
you have set 81 to D, in which case there will be an actual dollar amount. Of course, these options
apply only if you are showing the dollar amounts for each charge by having entered Y in the Amount
2011 Tussman Programs, Inc.
120
Tussman Program Release 10
space in format option 70. If you simply want to omit the Amount column completely, leave that space
blank or enter N.
Format option 87 determines whether or not nonbillable time is included in the optional summary by
staff which can be printed at the end of the fee section. To include nonbillable time in that summary,
set 87 to Y. A separate line item will appear in the summary showing the total nonbillable time, if any,
for each staff member.
It is also possible to print a separate line at the end of the fee section showing the total dollar value of
the nonbillable and administrative time shown on the bill. Format option 189 is used for this, as
follows. Type an exclamation mark (!) in the first space of option 189, followed by the text you want,
using the # sign as a macro indicating where you want the program to insert the amount. For example,
enter "!Additional work valued at # has been performed at no charge". This message will appear
following the total of the new charges, but only if nonbillable or administrative time has appeared on the
bill, and only if you have configured the program to assign dollar amounts to nonbillable and admin
time by setting option 7 in the Data Entry Options screen on the Setup menu to Y.
13.1.1.3 Flat Fee Charges
F - Flat Fee. A flat fee charge can be entered anytime you want to bill the client a fixed dollar amount
for performing a task, regardless of the number of hours spent. You can record flat fee charges either
in place of, or in addition to regular hourly charges. If you record both hourly and flat fee charges on
the same matter, the flat fee charges will be billed in addition to the hourly charges, unless you record
a special overriding flat fee charge, as described below. You can record flat fee charges regardless of
the type of fee arrangement you have set up for the matter; There is no limit on the number of flat fee
charges that can be recorded on a matter.
FR - Recurring Flat Fee. - Use to bill a flat fee on a recurring basis, such as when you want to bill the
client a regular monthly fee for representing them on a matter. Once an FR charge is entered, that
charge will appear automatically on each bill that is subsequently generated for that matter. When each
bill is finalized, the program automatically generates a new FR charge in the same amount. The old
one is marked as billed and stored in the Billed Charges file and the new one is dated the date
following the ending cutoff date you used on that bill and stored in the Unbilled Charges file so that it
will automatically appear on the following bill. If you want to discontinue the fee arrangement, simply
locate the FR charge in the Unbilled Charges file and delete it.
FN - Nonbillable Flat Fee. - Use to describe work for which you are not charging where you do not
wish to enter the number of hours.
13.1.1.4 Overriding Flat Fee Charges
FO - Overriding Flat Fee. An overriding flat fee charge is a way of writing down or adjusting the total
of the hourly charges on a client's bill. For example, if the total of the hourly charges on a client's bill
comes out to $1050.00, and you want to round it off to $1,000.00, one way of doing this is to enter an
FO transaction in the amount of $1,000.00. The detail of the hourly charges will still appear on the bill
(unless you enter it as an FOX, as described below), but the total will be adjusted to the amount of the
FO. If you enter a description for the FO transaction in the description space, that text will appear as
an explanation for the adjustment following the subtotal of the hourly charges. In the above example, if
when entering your FO in the amount of $1,000.00, you type in the following explanation "adjustment
per attorney ABC", then on the bill there will appear a total following the itemization of the hourly
charges in the amount of $1,050.00. The next line will show an adjustment in the amount of $50.00
with the explanation "adjustment per attorney ABC", and the following line will show the adjusted total
2011 Tussman Programs, Inc.
Charges
121
of $1,000.00. The text explaining the adjusted total is entered as item 96 in the list of bill format
options. If you leave the description space blank when entering your FO, then the total of the fee
charges will be adjusted directly, with no explanation. You can use an FO both to decrease or
increase the amount of fees on the bill, but you may enter no more than one FO transaction for each
individual bill.
The important thing to remember when entering an FO is that the amount of the FO should be the
total amount of fees that you want to bill the client on that bill, not the amount that you want to add or
subtract from the total.
If when entering the FO you assign a Staff code to that transaction, then any increase or decrease in
the total on the bill will be attributed entirely to that staff member. Otherwise, the increase or decrease
will be divided prorata among all the staff who have charges on the bill.
FOR - Recurring Overriding Flat Fee. Same as an FO, except that the charge will appear on every
bill that you generate for that matter. Use an FOR if you want to bill the client a fixed amount on each
bill regardless of the amount of work done on the matter. For example, if your agreement with the
client calls for charging them $1,000.00 monthly for handing a certain matter, enter an FOR in that
amount. Enter also an appropriate description, such as "monthly retainer for managing ABC rental
property." Each time you finalize a bill for that matter, the program will automatically generate a new
and identical FOR charge that will appear on the following bill. If you want to discontinue the recurring
fee arrangement, locate that FOR charge in the unbilled charges file and delete it.
In most cases it may be simpler to enter an FR charge to accomplish the same result. Use an FOR
only if you will also be recording billable time on the same matter, but do not want to charge the client
for the time. If you use an FR, the amount of the FR will be added to any other fee charges appearing
on the bill, whereas the amount of an FOR overrides the amount of any other fee charges. If you
want to use an FR, but still keep track of the actual time spent on the case without charging for it, you
can always record the time as nonbillable (entry type N).
An FOR is not used when you want to let a client pay an already outstanding balance in installments.
In that case, set up an installment payment plan instead.
FOX - Overriding Suppressing Flat Fee. Same as an FO, except that by entering it as an FOX, the
detail of the individual hourly charges, if any, will be omitted from the bill and the FOX will appear as
the only charge on the bill, with the description that you enter in the description space of the FOX. As
with an FO, the total amount of the fee charges will be adjusted to the amount of the FOX. Unlike with
a regular FO, however, you can enter more than one FOX and the total of the fee charges on the bill
will be the sum of the FOX transactions.
FOY - FOX with Hours. Same as an FOX, except that it is entered like an hourly charge (type H) so
that you can assign a number of hours and rate. Thus, it will appear on the bill as if it were a single
hourly charge, instead of a flat fee charge. Or, you can enter 1 as the number of hours, as if it were a
unit charge, and enter the dollar amount as the rate.
13.1.1.5 Minimum Retainer Fee Charges
FE - Minimum Retainer Fee. Enter an FE charge if you want to charge your client a fixed minimum
fee for handling their matter, with the proviso that if the value of the time worked on the case exceeds
the minimum fee they will be billed for the excess. The client will be billed for the amount of the FE
charge immediately, which will appear on their bill with the description that you enter in the FE charge.
You then keep track of the work performed on the case by recording billable time charges (transaction
type H) in the normal manner. Once its value exceeds the amount of the minimum fee, the program
will resume billing for the time in the normal way. By billing an FE the program in effect gives the client
a credit in that amount which is applied against the fee charges that are subsequently entered until the
2011 Tussman Programs, Inc.
122
Tussman Program Release 10
amount of the credit is used up, at which point the program resumes billing for the additional fee
charges in excess of the amount of the FE.
An FE is considered a minimum fee earned upon receipt and if the value of the time worked never
reaches the amount of the FE, the client is not entitled to a refund. When the client pays the amount of
an FE, the payment is recorded like any other payment and is attributed by the program, for purposes
of the Staff Earnings Analysis Report, to the staff member whose code was entered in the Staff
Member space when the FE charge was entered. This situation is distinguishable from when the client
pays an advance retainer fee which is deposited in your trust account and is used to pay for future
fees and costs as they are incurred. In that situation the money is not considered earned until the
actual time and costs are billed, and if the retainer is not used up the client is normally entitled to a
refund of the balance.
So that the program accurately calculates the value of the billable time that is recorded, a matter which
is being billed in this way should be set up using Fee Arrangement H (Hourly) and the correct Rate
Schedule should be assigned. Billable time that is recorded will appear on the bill, but until the
accumulated value exceeds the amount of the FE there will be no additional charge to the client. The
bill can be formatted so that either the time appears showing its dollar value with an adjustment at the
end (the adjustment appearing with the explanation entered in bill format item 97 and the adjusted total
with the explanation entered in format item 98), or so that it appears with a 0.00 amount until the
program resumes charging. This option is determined by bill format item 82. Alternatively, you can
place a hold on the file so that none of the time appears on the bill until the accumulated value
exceeds the amount of the FE.
Use an FE if, for example, you agree to handle your client's matter for a minimum fee of $5,000.00,
regardless of the amount of time spent, but that if the value of that time exceeds $5,000.00 the client
will be billed for the excess. In this example, you would initially enter an FE for $5,000.00. Suppose
then in the first month you also record billable time with a value of $3,000.00. On the first bill the client
will then be billed a total of $5,000.00, and will have an unused credit of $2,000.00 (the difference
between the amount of the minimum fee and the value of the time worked that month) which will be
carried forward to the following month. If the following month an additional $3,000.00 of billable time is
recorded, on that bill the client will be billed an additional $1,000.00, the difference between the credit
carried forward and the total of the time worked that month.
An FE only affects the fees that are billed, and any costs incurred will still be billed in the normal way.
An FE also only affects charges which are dated after the FE. Thus, any billable time that is recorded
with a date prior to the date of the FE will be billed in the normal manner. Be sure then, when
recording your initial FE, to date it prior to the date of any billable time that is recorded for that matter.
You can enter as many FE transactions as you want, and the amounts will be added together in
determining whether or not to charge for billable time that is entered thereafter.
After billing an FE charge, the Account Status screen for a matter will show the amount of the unused
credit from the minimum fee with the description "credit from billed retainer". The Trust, Retainer and
Credit Balances Report will also show the amount of any Unused Minimum Retainer Fees if you
select the option to include those amounts in the Type of Report box. To eliminate the balance of an
unused minimum retainer fee, go to the matter screen, click on the FE button,, and enter the code
NOBBYFE. This will reduce the credit balance to 0.00 and the program will resume charging for any
unbilled time on that matter.
FER - Recurring Minimum Retainer. Similar to an FE, except that an additional minimum retainer
fee in the same amount is automatically billed each time a new bill is generated. Also, with an FER an
unused credit is not carried forward from one bill to the next, as it is with an FE. For example, if an
FER in the amount of $1,000.00 is billed, and hourly charges of $600.00 are entered, the client will be
billed a total of $1,000.00, but the unused credit of $400.00 will not be carried forward to be applied
against hourly charges that appear on future bills. Instead, a new minimum retainer fee of $1,000.00
will be charged on the following bill, and the credit from that charge will be applied only against hourly
2011 Tussman Programs, Inc.
Charges
123
charges appearing on that bill.
Use this method if, for example, your agreement with the client calls for billing a monthly retainer fee of
$1,000.00, regardless of the amount of work actually performed, but that if the value of the work
performed in any month exceeds $1,000.00 the client will be billed for the excess.
13.1.2 Entering Fee Charges
To record a new fee charge, click the
button on the Control Panel at the left. (You can also
click the
button on the Toolbar at the top and select Charge from the menu, or select
Charges from the Main Menu and select New from the submenu). The Enter New Charges screen
appears below:
Completing the data entry screen
Entry Type - The drop down menu lists the various types of charges which can be entered. The
selection defaults to Billable Time (transaction type H) as that is the most common type of transaction,
but you can select other types of charges, such as costs, from the drop down menu.
Date - Enter the date the service was performed. You may either type it in manually, click the
or
buttons or press the PG DN or PG UP keys to go ahead or back a day at a time, or click on the
calendar icon to the right of the date space and select the date from the calendar.
2011 Tussman Programs, Inc.
124
Tussman Program Release 10
Client and Matter - Select the client and matter as described in the sections on client and matter
lookups. You must assign each charge to both a client and a matter.
When you save each charge, the client and matter ID is carried forward to the next charge. You can
change it of course, but if you do not want the client and matter carried forward, change option 12 in
the Data Entry Options screen to N.
Staff Member - Specify the staff member who performed the service. Press the F3 key or click the
button for a list of staff member codes. New staff members can be added on the fly by clicking on
the
button and then clicking the Add button at the bottom of the list.
If you leave this blank, the program will not assign this charge to a specific staff member for purposes
of your management reports, such as billing and cash receipt summaries. The program also may not
use the correct billing rate if you do not specify the staff member. You can configure the program to
require the entry of a staff member code for each charge by setting option 1 in the Data Entry Options
screen to Y. Even if you are a sole practitioner, it is still recommended that you always enter a staff
member code.
You can define a default staff code which will be entered automatically. The default code can be
specified on a global basis by going to the Data Entry Option screen (item 14) or you can specify a
separate default staff code for each program user by entering it in each user's file.
Task Code - Entry of a Task Code is generally not necessary unless you are submitting bills in
LEDES, Tymetrix, or other electronic format which requires them. Press the F3 key or click the
button for a list of task codes. New task codes can be added on the fly by clicking on the
and then clicking the Add button at the bottom of the list.
button
Since not everyone uses Task Codes, the space for entering them can be disabled by setting option 6
in the Data Entry Options screen to N. Set this option to Y if you want to activate the Task Code
space, although entry of a Task Code will still be optional. To require the entry of a Task Code for
each charge, set option 6 to R. If you only want to require a Task Code for certain matters, go to the
Matter screen for each Matter which requires their use, click on the Z button at the bottom of the
screen and enter Y in the first space.
Activity Code - Entry of an Activity Code is optional although it will be required if you are submitting
bills in LEDES, Tymetrix or other electronic format. Press the F3 key or click the
of activity codes. New activity codes can be added on the fly by clicking on the
clicking the Add button at the bottom of the list.
button for a list
button and then
Normally when you enter an activity code the text describing that code will automatically be inserted in
the description space at the bottom of the screen It can then be edited or added to if necessary. If
you do not want the text for each activity code inserted in the description space, set option 10 in the
Data Entry Options screen to Y.
You can string two activity codes together in the Activity Code space by typing the first code followed
immediately by a plus sign (+) followed immediately by the second code. The text for both codes will
then be joined together and inserted in the description space, as described above. When the charge is
saved, however, only the first activity code will be retained in the Activity Code space.
When you press the F3 key for a list of Activity Codes it will normally present your entire list of codes.
If instead you want to assign groups of Activity Codes to specific Task Codes, so that when you press
2011 Tussman Programs, Inc.
Charges
125
F3 it only lists the Activity Codes assigned to the Task Code you selected, check option 15 in the
Data Entry Options screen and then for each Activity Code specify which Task Code it is assigned to.
If you want to require the entry of an Activity Code for each charge, enter Y in the space under option
6 in the Data Entry Options screen. If you only want to require an Activity Code for certain matters, go
to the Matter screen for each Matter which requires their use, click on the Z button at the bottom of the
screen and enter Y in the second space, following the setting for the Task Code requirement (for
example, to require an Activty Code but not a Task Code, enter NY).
Hours - Enter the amount of time to be charged as decimal parts of an hour; for example, enter .25 for
15 minutes. Click on the
or
buttons to increase or decrease the amount of time shown by .10
hours per click, or type in the number of hours manually.
If you are recording billable time and you entered an Activity Code to which a default amount is
assigned, that amount will automatically be entered here. You can change it if necessary.
Click on the
button if you want to enter the time in minutes. Enter the number of minutes in the
dialog that pops up and click OK. The program will convert the number of minutes to decimal parts of
an hour, following the rounding rules specified by items 2, 3 and 4 in the Data Entry Options screen.
For example, if you are rounding to tenths of an hour, and enter 2 minutes, the program will round that
to .1 hour.
Click on the
button if you want the program to calculate the number of hours of elapsed time
between a specified starting time and ending time. Enter the start time and ending time in the dialog
that pops up and the program calculates the elapsed time and converts it to decimal parts of an hour
based on the rounding rules specified in the Data Entry Options screen. You can record multiple
blocks of elapsed time by clicking on the
button more than once. Each time you enter a new block
of time and click OK the new amount will be added to the amount, if any, which was previously
calculated.
This data entry screen has a simple timer function which can be activated by clicking the Start Timer
button at the top, as described below.
Note that the rounding rules specified in the Data Entry Options screen normally apply when you
record the number of hours using either the timer, the
button or the
button as described
above. If you also want the rounding rules to apply when the number of hours is entered manually,
check the box under item 4 in the Data Entry Options screen.
If you are entering a flat fee charge (transaction type F), the Hours space will be grayed out as it is not
relevant.
Rate - The billing rate which is being charged for the staff member and matter you selected will be
inserted automatically, and to the right of the Rate space will be indicated the Rate Schedule or Case
Rate which is being used. You may override the rate if necessary.
If you entered a Task Code to which a default rate is assigned, and you set option 6 in the
Data Entry Options screen to T, then the rate for the Task Code will appear instead.
The Rate space will be grayed out if you are entering a flat fee charge or if you are entering nonbillable
or administrative time (transaction types N or A).
Amount - If you are recording an hourly charge (transaction type H) the program will automatically
calculate the dollar amount by multiplying the number of hours times the rate. You can manually
2011 Tussman Programs, Inc.
126
Tussman Program Release 10
override that amount if necessary.
If you are recording a flat fee charge, you must enter the amount manually. If you entered an Activity
Code to which a default amount is assigned, that amount will automatically be inserted in the Amount
space here.
If you are recording nonbillable or administrative time, this space will be grayed out. If you have
configured the program to assign a dollar amount to nonbillable time by setting item 7 in the
Data Entry Options screen to Y, then the program will calculate a dollar amount for nonbillable and
administrative time and will display that amount, but you will not be able to edit it, as it is for
informational purposes only and will not be billed to the client. Otherwise, the amount will show as
0.00.
Reference - This field is grayed out unless you are entering a cost charge, in which case you can use
it to record the check number of the check you wrote to pay the cost, the invoice number of the bill you
paid, or other information.
Location - This field has been added for the purpose of being able to distinguish work done in different
counties for local tax purposes; for example, if you are required to pay tax on services rendered within
a county but not on services performed outside that county. In that case, you can create a set of two
character codes to indicate the county where the work was performed (or other category). These
codes should be added to the list of Location Codes accessed from the Productivity Code section on
the Setup Menu; remember that for this purpose the codes must be no more than two characters. If
you have assigned a Location Code to each charge, then you can run various reports to give you a
breakdown of charges billed or income received by Location. For a breakdown of charges billed, use
the Billing Analysis report, selecting the option to Total By Transaction Location. For income received,
use the Income Analysis Report, also selecting the option to Total By Transaction Location. You can
also total or subtotal any of the Productivity Reports by Transaction Location, and you can generate
lists of charges filtered for a specific Location Code.
Description - Enter the description of the work performed in the large rectangular space in the bottom
portion of the screen. This is the text that will appear on the bill explaining the charge. You can enter a
virtually unlimited amount of text. If you assigned an activity code to this charge, the text represented
by that code will automatically appear in the description space unless you have configured the program
not to insert it, as described above. You can edit or add to it as necessary. You can also use activity
codes as shorthand abbreviations within the body of the text. To do this, simply type the code. (It is
no longer necessary to type a plus sign in front of the code as was required in versions prior to 9.0.
However, if you prefer to use the old method where the codes must be preceded by a plus sign, and
are not automatically expanded as you type, but are expanded when you save the text, go to the Data
Entry options screen on the Setup menu and check the option that says Disable Auto Expansion of
Activity Codes). Codes will be replaced with the full text automatically as you type. If you typed a
code which you do not want expanded, immediately after it has been expanded click the
the right of the description space and the expanded text will be replaced by just the code. .
button to
When typing the codes it does not matter if you enter them in lower or upper case.
Click on the
button to the right of the description box to display a list of activity codes which can
be used as abbreviations. If you select one from the list the text for that code will automatically be
inserted in the description box at the end of any text which has already been entered.
Click on the .
button to repeat the same text which was entered in the previous transaction.
Click on the
button to spell check the text which you have entered for this charge.
2011 Tussman Programs, Inc.
Charges
127
To insert a hard carriage return in the body of the text, press the F2 function key.
To underline text, type a single underscore character (_) in the space immediately before the text you
want underlined, followed by a second underscore character in the space immediately following that
text. For example, to underline the case citation in the phrase
review opinion in Smith v. Jones case
enter it as follows:
review opinion in _Smith v. Jones_ case.
The actual underlining will only appear once you actually print the bill.
If you want to underline the entire description a single underscore character at the beginning will
suffice.
You can also print all or part of the description in bold or italic. To bold a portion, enter a ^ character
(uppercase number 6) at the beginning and end of the portion you want bolded. To print a portion in
italic, type a | or pipe character (uppercase backslash, normally located above the Enter key) at the
beginning and end. If you want to bold or italicize the entire description, just type the character at the
beginning.
Note that you cannot use more than one of the above features -- underling, bolding or italicizing -- in
the same line of description on the bill.
To type symbols or characters not found on the keyboard, position the cursor where you want the
symbol inserted and click the
button at the right of the description box. Select the symbol you
want and it will be inserted in the description. In addition to many commonly used symbols, such as the
paragraph and section symbol, you can use this feature to insert letters with accents or tildes.
To hide text so that it appears when viewing the charge in the program but does not print on the
client's bill, type an asterisk (*) followed by the text you want hidden. It is thus important to remember
that nothing typed following an asterisk will appear on the bill.
Press ENTER or TAB when you are finished entering the text. Pressing PG DN, which was used in
versions of Tussman prior to 9.0, no longer works.
Batch - A batch code is not required, but is automatically assigned by the program to each transaction.
This default batch code consists of the date, in the format YYMM, followed by the user ID, if any, of the
person entering the charge. Or, you can configure the program to add the day to the batch code
(YYMMDD) by selection Default Batch Codes from the Setup menu. You can change the batch code
if desired when entering or editing any transaction. Since there is no posting of charges, the use of
batch codes is limited. You can browse and list an individual batch of charges, sometimes making it
easier to review and edit them, especially if several different people are doing inputting. If you do
assign a batch code, it can consist of any combination of up to eight characters. Click on the
button next to the batch space for a list of existing batches. The list displays the batch code and date
each batch was created, in reverse chronological order, showing the most recently created batch at the
top. To create a new batch, simply type the new code in the Batch space.
Combine Code - The combine code is used if you want to combine two or more separate charges
into a single line item on a client's bill. To do this, make up a unique code of up to eight characters and
enter that code in the Combine Code space for each of the charges that you want to combine. On the
client's bill, those charges will appear as a single charge. The description from the combined charges
will be joined together into a single paragraph, and the amount of the charge will be the combined total
of the individual charges. If when combining the charges you only want the text from one of the
2011 Tussman Programs, Inc.
128
Tussman Program Release 10
charges to appear as the description on the bill, add an asterisk (*) following the combine code for that
one charge only.
It is also possible to combine charges on the bill using bill format options 64 and 65. Using that
method you can, for example, have all charges for each staff member on the same date combined into
a single entry for that day. Using that method it is not necessary to use the combine code. Using the
combine code is more appropriate when you occasionally want to combine two or more random
transactions into one line item
Order - The order code consists of a single character and is used if you want to change the order in
which charges with the same date are listed on a bill. Charges are by default assigned an order code
of M (in previous versions of the program the default was Z). Charges with the same date will normally
be listed on the bill in the same order they were entered into the program. To change that order,
reassign the order codes so that the order codes fall in the same alphabetical sequence in which you
want them listed. For example, if you simply want to reverse the order of two charges, change the
order code of the one you want to appear first to A. To make a charge appear last, assign it an order
code of Z.
You can also have charges on the same date automatically sorted by staff member using the Sort
Code which can be assigned to each Staff Member. To do this, check option 13 in the
Data Entry Options screen. If you select this option, then when entering charges the program will
automatically insert each Staff Member's Sort Code in the Order space.
Split - If you are entering a charge on a matter where charges are being split with one or more other
matters using the split billing function, a Y will appear in this space. If for any reason you do not want
this individual charge to be split with the other matters, enter X instead. That charge will then be billed
only to the matter to which it is assigned.
Status - Select the option to Bill (the default) unless you want to Hold this transaction, in which case it
will not be billed until you remove the hold; or Suppress, in which case the amount of the charge will be
included in the client's bill but the detail of the charge will not appear on the bill.
Using the Timer
The upper right corner of the entry screen contains a Timer button. You can use this to run a timer
when you have the Enter New Charges screen open. To start the timer running click the Start Timer
button. The elapsed time will be displayed to the right. To stop or pause the timer, click the Stop
Timer button. The elapsed time will then be converted to decimal parts of an hour, using the rounding
rules specified in the Data Entry Options screen, and the dollar value will be calculated and displayed
in the Hours and Amount spaces. If you click the Start Timer button again, the timer will resume
from where it left off. When you then click Stop Timer, the new total of all the elapsed time will be
converted to decimal parts of an hour and will be displayed in the Hours space, along with the new
dollar Amount.
After the timer has started, you can clear the currently displayed elapsed time and restore it to 0.00 by
right clicking on the Start or Stop Timer button.
If you close or cancel the Enter New Charges screen any elapsed time stored on the timer will be
wiped out. Thus, you can only time a single entry at a time, and once you save the entry you can no
longer add additional time using the timer. If you want to have more flexibility when using the timer you
should consider using the Batch WIP Entry function to record your time.
Options - the Options button at the top of the screen brings up the list of Data Entry Options referred
to in this chapter.
Browse - the Browse button at the top brings up a list of all unbilled charges. If you have filled in the
2011 Tussman Programs, Inc.
Charges
129
Client ID space, the list will include only charges for that client (or matter if you have also entered the
Matter ID).
Batch - the Batch button at the top brings up a list of all charges in the current Batch (i.e., the batch
entered in the Batch space in the upper right of the entry screen).
Saving the Charge
When you have finished entering the above information, click on Save:More if you have additional
charges to enter, or Save:Exit if you have finished entering charges.
IClicking the Cancel button, or the X button in the upper right hand corner of the window, closes the
screen without saving the charge.
Audit Trails and New Charge Memos
Before saving the charge you can print an audit trail or new charge memo by clicking on the
button.
If you select the Audit Trail, the program will generate a list of all the new charges you have entered
since the last audit trail was printed, or since the last time you opened the program. Whenever you
close the program the audit trail is cleared, so if you want to generate audit trails make sure to do it
before closing the program. You can also print the audit trail by selecting Audit Trails from the
Reports menu, then selecting Charges Audit Trail.
The Running Total box on the Enter New Charges screen shows the total number of hours and the
dollar amount of fees and costs that have been saved in the current entry session. This may not
match the total on your audit trail since each time you close the entry screen the running totals are
reset to 0.00.
If you select Memo for this Charge Only the program prints a new charge memo showing the
information for this charge only. You can print a charge memo for a charge that has already been
saved by finding it in the unbilled charges file and clicking on the
button in the edit screen.
Correcting Mistakes after a charge is saved
After clicking Save:More to save a charge, the Previous Entry box displays information about the last
entry that was saved, including the transaction number, date, staff member, client and matter, amount,
and a portion of the description. If you see a mistake and need to go back and edit that charge, click
on the
button. After making your changes, click the OK button to save the changes and return to
the entry screen for the new charge.
If you have closed the entry screen but what to go back and edit the last charge that you saved, the
quickest way is to click on the
button on the toolbar at the top. Then click on the button with
the # sign. The number of the last charge that was entered will appear. Click OK to go to that record.
Other sections describe the ways of locating charges so that you can view and edit them or perform
writedowns.
2011 Tussman Programs, Inc.
130
Tussman Program Release 10
13.1.3 Location Codes
You can assign a Location Code to each charge if, for example, you need to be able to distinguish
work done in different counties for local tax purposes. First create a set of two character codes to
indicate the county where the work was performed (or other category). These codes should be added
to the list of Location Codes accessed from the Productivity Code section on the Setup Menu;
remember that for this purpose the codes must be no more than two characters. Then from the list of
Data Entry Options set option 17 to Y to allow you to enter a code, or R to require a code when
entering charges. Once you have assigned a Location Code to each charge, then you can run various
reports to give you a breakdown of charges billed or income received by Location. For a breakdown of
charges billed, use the Billing Analysis report, selecting the option to Total By Transaction Location.
For income received, use the Income Analysis Report, also selecting the option to Total By
Transaction Location. You can also total or subtotal any of the Productivity Reports by Transaction
Location, and you can generate lists of charges filtered for a specific Location Code.
13.1.4 Audit Trails and Memos
Before saving a new charge you can print an audit trail or new charge memo by clicking on the
button on the Enter New Charges screen which brings up the following dialog:
If you select the Audit Trail, the program will generate a list of all the new charges you have entered
since the last audit trail was printed.
You can also print the audit trail by clicking on the
button on the Toolbar at the top.
If you select Memo for this Charge Only the program prints a new charge memo showing the
information for this charge. You can print a charge memo for a charge that has already been saved by
locating it in the unbilled charges file and clicking on the
button in the edit screen.
The program maintains a separate audit trail for each user, if you have activated the security functions
in the program. Otherwise, a single audit trail is maintained.
13.1.5 Locating a Fee Charge
Charges are assigned both a consecutive record number (sometimes referred to as a transaction
number or entry number) and a batch code, both of which can be used to locate a charge if you want to
2011 Tussman Programs, Inc.
Charges
131
view or edit it. You can also view and edit lists of unbilled charges for a specific date, client, matter,
staff member, or other search criteria. Following are the different ways of locating and displaying
charges:
By Record Number - Each charge is automatically assigned a consecutive record number. It appears
on both the audit trail and charge lists which you generate, as well as on prebills, appearing at the left
hand margin. It does not appear on your actual bills. If you know the number of the charge you want to
look up or edit, click the
button on the Toolbar at the top, enter the number in the space
indicated and click OK. Alternatively, you can use the Go To function on the Browse Charges screen.
When you are viewing an individual charge, you can use the Go To button on that screen to locate the
next charge that you want.
By Batch - To display all the charges in a specific batch, click the Batch button at the top of the
Browse Charges screen, or click Charges from the Main Menu, select Browse from the submenu,
then select for one Batch from the submenu. Using this method, the list will include both billed and
unbilled charges. Billed charges can be distinguished by the letter B appearing in the S (Status)
column.
By Client or Matter - Displaying a list of all the unbilled charges for a specific client or matter is often
the most convenient method, especially if you need to edit several charges appearing on a single bill.
To browse the charges for a single file click the
button on the Toolbar at the top and enter the
client and/or matter ID. If you are already displaying the Browse Charges screen, you can slso click on
the File button at the top of the list. Alternatively, you can go to the Account Status screen for that
client or matter and click Browse WIP, or bring up the Master Ledger for the file, which displays both
billed and unbilled charges.
By Staff Member - To display a list of all unbilled charges for one staff member, click Charges from
the Main Menu, select Browse from the submenu, then select for one Staff Member from the
submenu. Or, If you are already displaying the Browse Charges screen, click on the Staff button at
the top.
You can also find charges for a single staff member using the Time at a Glance function, which
displays a calendar for any month showing the total hours worked on each day for an individual staff
member or the entire firm. You can then click on an individual day for a list of the charges for that day.
By Date - You can locate charges by date by simply scrolling to that portion of the unbilled charges list,
which by default is sorted by the date of the charge, or by filtering the list using the Filter button and
entering a specific date range. Or, you can use the Time at a Glance function which displays a
calendar for any month showing the total hours worked on each day for an individual staff member or
the entire firm. You can then click on an individual day for a list of the charges for that day. This
screen will display both billed and unbilled charges.
By Other Search Criteria - If none of the previous methods work, you can also locate a charge by
filtering the list using specified search criteria. For example, you can even do a text search so that only
charges where a certain word or phrase appears in the body of the description are displayed. Do this
by clicking on the Filter button at the top of the Browse Charges screen.
13.1.6 Editing Fee Charges
A fee charge of any type can be edited at any time before it has appeared on a finalized bill. Once you
have located the charge you want, as described in the previous section, the Editing Charges screen
appears. It is almost exactly the same as the screen for entering new charges. You can change any
2011 Tussman Programs, Inc.
132
Tussman Program Release 10
of the information, including the date, client and matter ID, staff member, description and amount.
Billed charges can also be edited, in a more limited way, as described in the section on
Editing Billed Charges.
If you change the staff member, client or matter, or the number of hours, that will cause the program to
recalculate the amount of the charge. If the billing rate assigned to the new matter or staff member is
different, or if your billing rates have changed since the charge was originally entered, the program will
use the rate that is currently in effect For example, if you enter a charge at a time when your billing
rate is $250.00 per hour, and you change the number of hours after you have increased your rate to
$300.00 per hour, the program will use the new rate when it recalculates the amount. If you want to
keep the old rate, you will have to change the calculated amount manually.
You can change the amount of a charge manually but if you do so the program will not keep a record
of the change for reporting purposes. If you need to keep a record of such changes, use one of the
writedown functions described in the next section. However, you may still want to use the edit function
to change the amount if you are merely correcting a data entry error, rather than writing off or adjusting
the amount of a charge for other reasons.
If you need to transfer a group of charges from one matter to another, instead of editing each
individual charge there is a function in the editing matter screen that allows you to transfer all the
unbilled charges from one matter to another.
After making any changes, click OK to save the changes and exit. Clicking Cancel will not save any
changes. Changes will be saved if you use the Go To or up and down arrow buttons to go to another
charge.
When editing charges the screen contains the following controls which differ from the entering new
charges screen:
Status - The status box defaults to the Bill selection, indicating that this charge is approved for billing
to the client. If you change it to Hold, the charge will be held in the unbilled charges file and will not
appear on the client's bill until the status is changed back to Bill. This provides a way of placing a hold
on individual charges, instead of holding the entire bill. If you change it to Suppress, the charge will be
billed to the client, but it will not appear as a line item on the clients bill. The amount of the charge will
be included in the total of the fee charges on the bill, but with no explanation.
Delete/Recall - Click this button and then click Yes to delete the charge. Once a charge is deleted it
will no longer appear on your bills or in your report totals, and no record of the deletion will be kept for
reporting purposes. However, you can still locate the charge if you know the record number, using one
of the methods described above for locating a charge by record number. You can then click on the
Delete/Recall button again to "undelete" it and restore it to the unbilled charges file If you don't know
the record number, you can generate a list of deleted charges using the Listing Charges function.
If you need to keep a record of deleted charges for reporting purposes, use the writedown feature
described below.
Writedown - Click this button to perform a writedown, as described in the following section.
Go To - To display another charge, enter the number and click this button.
- Click on this button to go to the previous charge in the unbilled charges file;
- Click on this button to go to the next charge in the unbilled charges file;
2011 Tussman Programs, Inc.
Charges
133
- Click on the print icon to print a charge memo showing the information for this transaction, or
to print the audit trail of new charges that have been entered since the previous audit trail was printed,
or since you last closed the program, whichever is later. Note that the audit trail includes a list of
charges that have been edited, in addition to any new charges that have been added.
13.1.7 Writing Down Fee Charges
There are a variety of ways to write up or down the amount of one or more charges after they have
been entered so that the adjustment is reflected on the client's bill and so that a record of the change is
kept for reporting purposes. As described in the preceding section, while you can change the amount
of a charge using the editing function, no record of the change is kept and only the new adjusted
amount shows on the client's bill.
Following is a description of the different methods for performing writedowns (or writeups). Note that
these procedures only apply when you are adjusting the amount of charges on a current bill. If you
want to writeoff an outstanding balance from a previous bill that has already been finalized, you must
do that by applying a credit to the client's account, as described separately.:
The Writedown function
This function automatically decrease or increases the amount of one or more charges by the amount
you specify. A record of the change is kept for purposes of your management reports, but on the
client's bill the charges appear only with the new adjusted amounts; no explanation of the change
appears. If you want to show the client that you are adjusting the amounts, use one of the other
methods described below.
You can use this function to adjust the amounts of a single charge, all the charges for a specific
matter, or all the charges for a specific staff member on a specific matter. To use the writedown
function, either locate the specific charge you want to writedown, or locate any one of the multiple
charges that you want to writedown. Then click the Writedown button on the Editing Charges screen
to display the following dialog:
2011 Tussman Programs, Inc.
134
Tussman Program Release 10
Enter the following information, clicking OK to finish.
Type of Write Down - Select whether you want to write down the currently displayed charge only, or if
you want to write down all the charges for the matter to which this charge is assigned (select
Transactions for All Staff Members), or all the charges for the staff member and matter to which this
charge is assigned (select Transactions for One Staff Member).
Staff Member - If you are writing down just the charges for a specific staff member, enter the staff
member code. Otherwise, ignore this space.
Amount of Writedown - Enter the amount by which you want to reduce the charge or charges. For
example, if you want to reduce the total fee charges on a client's bill from $1500.00 to $1,000.00, enter
500.00 as the amount of the writedown. If you want to increase the amount of the charges, enter the
writedown amount as a negative figure. For example, if you want to increase the amount of fee
charges on the bill from $1,000.00 to $1500.00, enter -500.00 as the writedown amount. If you are
writing down multiple charges, the amount of the adjustment is applied pro rata to the individual
charges.
You can enter the amount either as a dollar amount or as a number of hours. Select which option you
want by clicking the appropriate button at the right of the amount space.
If you want to writeoff a charge or charges completely, reducing the amount(s) to 0.00, enter the total
amount of the charge(s) as the writedown amount. For example, if you want to eliminate a charge of
$100.00, enter 100.00 as the writedown amount. The amount of that charge will then be reduced to
0.00, and the program will automatically change the Status of the charge to Suppress so that the
charge does not appear on the client's bill. If you still want the charge to appear on the bill with the
0.00 amount, change the Status back to Bill after performing the writedown.
or enter Percent to writedown - Instead of entering the amount you want to writeoff, you can specify
a percent. For example, to reduce the amount of the charge(s) by 25 percent, leave the Amount
space blank and enter 25.00 in the percent space.
2011 Tussman Programs, Inc.
Charges
135
Ending Cutoff Date - If you are writing off more than one charge, you must enter an ending cutoff
date. This field defaults to the last ending cutoff date which you used when generating bills. Charges
dated after this date will not be affected by the writedown procedure. Important! If you perform the
writedown and it doesn't appear to do anything, its probably because you didn't enter the correct cutoff
date.
Adjust Hours - If you check this box, in addition to adjusting the dollar amounts of the affected
charges, the program will also adjust the hour amounts accordingly. For example, if you writedown a
charge of $200.00 to $100.00, the program will also reduce the number of hours by one half. If you do
not check this box, the number of hours shown will remain the same. If you choose to adjust the hour
amounts, the program keeps a record of the original amount for reporting purposes and the amount of
the adjustment will appear in the "Hours Written Off" column on your productivity reports. Otherwise,
only the dollar amount will be shown as a writedown on your reports.
Reverse Previous Writedowns - This provides an easy way of "undoing" previous writedowns that
you have performed. Select the above options, exactly as if you were going to perform a writedown to
the charges you want, but instead click the Reverse button and those charges will be restored to their
original amounts.
The Writedown Transaction
A writedown transaction (entry type W) is a separate charge you can enter that adjusts the amount of
fees on a client's bill. Rather than adjusting the amounts of the individual charges, as does the
writedown function described above, the writedown transaction appears as a separate line item in the
fee section of the bill with a negative amount. You must assign the writedown transaction to an
individual staff member, and the amount of the transaction may not exceed the total of that staff
member's charges appearing on the bill. For example, if staff member ABC has fee charges of
$1000.00 appearing on the bill, and you want to reduce them to $800.00, you would enter a writedown
transaction in the amount of $200.00. The maximum amount of the transaction in this example would
be $1,000.00. If you want to writedown charges for more than one staff member, you must enter a
separate writedown transaction for each one. If you want multiple writedown transactions to appear as
a single line item on the bill, you can combine them using the combine code as described in the
Entering Fee Charges section. The advantage of the writedown transaction is that it both shows the
adjustment as a separate line item on the client's bill and keeps a record of the writedown for reporting
purposes.
Enter a writedown transaction as you would any fee charge, selecting W (Writedown) for the Entry
Type. It should be dated not later than the ending cutoff date you will be using on the bill. The date
will determine where in the list of fee charges the transaction will appear, so if you want it at the end
date it the same as the ending cutoff date. Also enter the Client, Matter, and Staff Member.
Remember that the Staff Member is required. Then enter the number of hours and amount that you
are writing off, followed by the description that you want to appear on the bill. After saving the charge
it will appear on the client's bill and can be located and edited just like any other fee charge.
The Overriding Flat Fee Transaction
An overriding flat fee transaction (entry type FO) is a separate charge that can be entered to adjust the
total amount of fees on a client's bill. Unlike the writedown transaction described above, a single FO
transaction can be entered to adjust all of the fee charges on the bill, not just those for a single staff
member. If you do not assign a staff member code to the FO transaction, the adjustment is applied
pro rata to each staff member's charges on that bill for reporting purposes. If you do assign a staff
member code, the writeoff will be applied first against that staff member's charges and any excess will
be applied pro rata against the other staff member's charges. Also unlike the writeoff transaction, an
FO can also be used to writeup (increase) the amount of the fee charges on a bill.
You can enter an FO transaction even if there are no other fee charges on the client's bill, in which
2011 Tussman Programs, Inc.
136
Tussman Program Release 10
case the program will simply bill the amount of the FO. However, in that case it would make more
sense to enter the amount as a regular flat fee charge (entry type F). Only one FO transaction can be
entered for each bill.
Enter an overriding flat fee transaction as you would any fee charge, selecting FO for the Entry Type.
It should be dated not later than the ending cutoff date you will be using on the bill. Enter the client,
matter and staff member (if applicable, as described above). Then enter the amount that you want to
bill. For example, if the total of the hourly charges on a client's bill comes out to $1,050.00, and you
want to round it off to $1,000.00, enter the amount of $1,000.00. The detail of the hourly charges will
still appear on the bill (unless you use Entry Type FOX, which works the same except that the detail of
the fee charges is suppressed), but the total will be adjusted to the amount of the FO. If you enter a
description for the FO transaction in the description space, that text will appear as an explanation for
the adjustment following the subtotal of the hourly charges. In the above example, if when entering
your FO in the amount of $1,000.00, you type in the following explanation "adjustment per attorney
ABC", then on the bill there will appear a total following the itemization of the hourly charges in the
amount of $1,050.00. The next line will show an adjustment in the amount of $50.00 with the
explanation "adjustment per attorney ABC", and the following line will show the adjusted total of
$1,000.00. The text explaining the adjusted total is entered as item 96 in the list of bill format options.
If you leave the description space blank when entering your FO, then the total of the fee charges will be
adjusted directly, with no explanation.
If in the above example you wanted to increase the amount of the fees on the bill from $1050.00 to
$1200.00, you would enter an FO in the amount of $1200.00. The important thing to remember is that
the amount of the FO should be the total amount of fees that you want to bill the client on that bill, not
the amount that you want to add or subtract from the total.
See also the Types of Fee Charges section for more information on overriding flat fee charges and the
two variations (types FOR and FOX)..
The Percentage Discount Option
Another way to write down fees on a bill is to use the billing option that allows you to give an automatic
percentage discount on fees that are billed. The fee charges appear on the bill with their original
amounts and a subtotal, followed by as separately line item showing the amount of the discount. The
discount is recorded as a writeoff for reporting purposes and is applied pro rata to each staff member's
charges.
The Ceiling on Fees Option
You can also writedown the fees on a bill by placing a ceiling on the total amount of fees that can be
billed for a matter. Once that ceiling has been reached, any additional fees charges that are entered
will appear on the bill showing their dollar amount with a subtotal followed by the adjustment as a
separate line item. The adjustment is recorded as a writedown for reporting purposes.
The Account Credit Transaction
Normally an account credit (an AR transaction type Q) is entered to writeoff an outstanding balance
from a previous billing. However, it can also be used to writeoff charges on a current bill. If you want
to use it to writedown fees only, enter it as a transaction type QF. The fee charges will appear on the
bill in their original amounts followed by the total, and the credit will appear separately in the payments
and credits section of the bill. If when entering the QF you check the Record as Writedown box, the
program will record it as a writedown for reporting purposes, but writedowns which are recorded as Q
transactions are treated separately from the other types and appear in a separate column on your
productivity reports.
2011 Tussman Programs, Inc.
Charges
13.2
137
Cost Charges
Cost charges (entry type C) are used to bill the client for expenses incurred on a client's behalf. Costs
fall into two general categories: hard costs, which consist of out-of-pocket expenses such as court
filing fees and expert witness fees, and soft costs, which are billed to reimburse the firm for making
photocopies, phone calls and other in-house expenses. Hard costs and soft cost are tracked
separately by the program, primarily for purposes of posting cash receipts to the General Ledger It
may be of no interest to your firm to distinguish the two different categories. If you want to do this,
however, you must first create a set of cost codes which you then assign to each cost charge that is
entered. For example, you would create separate cost codes to identify photocopy expenses, court
filing fees, telephone charges, etc. Each code is identified as either a hard cost or a soft cost, and this
is how the program keeps the two categories separate.
Cost charges are entered in the same screen as fee charges, as described in the
Entering Cost Charges section. However, there are also two other ways in which cost charges can be
applied to a client's matter:
1. By entering them in the General Ledger, either by recording a payable or issuing a check in
payment of an invoice which is chargeable to a client;
2. Using the Tussman Program import function which merges transactions from a separate metering
device, such as those marketed by Equitrak and Copitrak, which automatically records photocopies,
faxes postage, telephone charges, and other expenses.
Costs that are paid directly from a client's trust account are treated differently and should be entered
as AR transaction types RD or TD, as described separately.
Cost charges appear in a separate section on the client's bill. There are many different ways to format
that section. Charges can be itemized separately or summarized by cost code. and can be displayed
with varying degrees of detail. All of these options are explained in the Bill Format section.
Once cost charges have been billed, they are stored in the Billed Charges file for future reference.
While it is possible to purge or archive charges that have been billed, it is not necessary or
recommended, as their presence should not affect performance of the program and most firms prefer
to retain such detail so that they can generate copies of old bills or historical bills which detail past
charges on a client's matter.
13.2.1 Types of Cost Charges
The types of cost charges that can be entered are as follows. Select the type of charge you want from
the Entry Type drop down menu in the Enter New Charges screen.
C - Billable Cost. Use to record any type of cost which is to be billed to a client's matter.
CR - Recurring Cost. Use to record a cost that will be billed on a recurring basis, such as a monthly
rental or management fee. Once you enter a CR charge, that charge will appear on each bill you
generate for that matter. When each bill is finalized, the old CR charge will be placed in the Billed
Charges file and a new one will be generated in the Unbilled Charges file, dated the day following the
ending cutoff date you used on that bill, and will appear automatically on the next bill. To discontinue
charging the CR, simply locate the charge in the Unbilled Charges file and delete it.
CN - Nonbillable Cost. Use to record a cost which was incurred by the firm but which is not being
billed to the client. Nonbillable costs can appear on the client's bill, depending on the bill format options
that are selected, but they will not be included in the amount being billed.
2011 Tussman Programs, Inc.
138
Tussman Program Release 10
CO - Overriding Cost Charge. An overriding cost charge works just like an overriding fee charge
(type FO), except that it is used to adjust up or down the total amount of costs being billed to the client.
For example, if the total costs on the client's bill comes to $120.00, and you want to reduce it to
$100.00, enter a CO charge in the amount of $100.00. To increase the amount of costs from $120.00
to $150.00, enter a CO in the amount of $150.00. If you enter an explanation for the adjustment in the
description space of the CO, the amount of the adjustment will appear as a separate line item with
that explanation in the cost section of the bill If you do not enter a description for the CO, the cost total
will be adjusted directly, with no explanation.
You may only enter a single CO transaction for each bill.
COR - Recurring Overriding Cost Charge. Same as a CO, except that the charge will appear on
every bill that you generate for that matter. Use a COR if you want to bill the client a fixed amount of
costs on each bill regardless of the amount of the actual costs incurred. For example, if your
agreement with the client calls for charging them $100.00 monthly for costs, regardless of the actual
total of costs charges recorded, enter a COR in that amount. Enter also an appropriate description,
such as "monthly charge for costs incurred." Each time you finalize a bill for that matter, the program
will automatically generate a new and identical COR charge that will appear on the following bill. If you
want to discontinue the recurring cost arrangement, locate that COR charge in the unbilled charges file
and delete it.
A COR is rarely if ever used. A more common arrangement is to bill a client a fixed percentage of the
fees billed each month as an administrative or overhead charge to cover incidental costs, in lieu of
keeping track of and billing for each individual charge. This type of arrangement is done using the
tax or markup billing option. Also, rather than recording a COR, which overrides the total of any other
costs on the bill, it may be more appropriate to enter a CR, which is billed in addition to any other
costs.
13.2.2 Entering Cost Charges
Cost charges are entered in the same screen as fee charges, and most of the procedures are exactly
the same.. Just make sure you use the correct Entry Type code to indicate the type of charge you
want to enter. Refer to the Entering Fee Charges section for a detailed explanation of each step. This
section describes only the differences which apply when entering cost charges:
To record a new fee charge, click the
button on the Control Panel at the left. (You can also
click the
button on the Toolbar at the top and select Charge from the menu, or select
Charges from the Main Menu and select New from the submenu). The Enter New Charges screen
appears, as pictured in the Entering Fee Charges section.
Entry Type - Select the type of cost from the drop down menu. Press C to scroll through the list of
cost entry types. Note that you can enter both fee and cost charges in the same data entry session
simply by selecting the correct entry type for each new charge.
Staff Member - A staff member code is not required or relevant when entering costs.
Task Code - A task code is not required when entering costs, unless you must submit bills in
electronic formats such as LEDES or Tymetrix. In that case, you use the same set of Task Codes
used when entering fee charges. Bill format option 117 determines whether or not the task code is
2011 Tussman Programs, Inc.
Charges
139
included as part of the description when printing each cost on the client's bill. You can require a Task
Code as described in the Entering Fee Charges section.
Cost Code - When entering a cost, instead of requesting an Activity Code the program asks for an
optional Cost Code. Press the F3 key or click the
button for a list of cost codes. New cost codes
can be added on the fly by clicking on the
button and then clicking the Add button at the bottom
of the list. If you enter a cost code, the text for that code is inserted automatically in the description
space.
Assigning a cost code may be necessary if you are required to submit bills in electronic formats such
as LEDES and Tymetrix. It is also necessary if you want to be able to combine costs of the same type
into a single line item on the client's bill, to track hard costs separately from soft costs, and to post cost
reimbursements to different GL accounts depending on the type of cost. If you do not assign a cost
code, the program assumes that the cost is a hard cost and posts to the general cost reimbursement
account in the GL when that cost is reimbursed.
You can require the entry of a Cost Code by entering C for the Require Activity Code option under
item 6 in the Data Entry Options screen. You can also require a Cost Code for certain matters by
going to the Matter screen for each Matter which requires their use, clicking on the Z button at the
bottom of the screen and entering Y in the third space, following the settings for Task and Activity
Codes (for example, to require a Cost Code but not a Task or Activity Code, enter NNY).
Bill format option 118 determines whether or not the cost code is added to the description for each cost
charge on the client's bill.
Units - When entering a cost, instead of requesting the number of hours the program asks for the
number of units to be billed. The units feature is intended to be used when billing for costs such as
photocopy charges, where you will be billing for a multiple number of units at a fixed charge per unit.
The units space will be grayed out unless you have entered a cost code which has been assigned a
default unit amount, as described in the cost codes section. If you have entered a cost code with a unit
amount, enter the number of units that you want to bill for.
Rate - If you are entered a cost code with a unit amount, the unit amount will appear here. The
program will then multiply that amount times the number of units and enter it in the amount space
below. You can assign up to 6 different rates for each cost code so that you can bill different rates for
different clients.
Amount - If you entered a cost code with a unit amount, the amount will be calculated automatically.
Otherwise, enter the dollar amount of the cost charge.
If you use a cost code that is assigned a markup percent, then the amount which you enter will
automatically be marked up by that percentage when the charge is saved. The revised amount will not
be displayed before you save the charge, but you can check it by looking at the amount shown in the
Previous Entry box after you have saved the charge.
Reference - Enter an optional check number, invoice number, or other reference if desired. Bill
format option 116 determines whether or not the reference is added to the description for each cost
charge on the client's bill.
Location - A location code cannot be assigned to a cost charge.
Description - Enter the description in the same way as when entering fee charges. However, if you
are combining charges by cost code on the client's bill, the program will in that case use the text for
the cost code as the description, instead of the text for each individual charge.
2011 Tussman Programs, Inc.
140
Tussman Program Release 10
13.2.3 Editing Costs
Unbilled cost charges are stored in the same file as the unbilled fees and can be located and edited in
the same way. See the section on Editing Fee Charges for a detailed explanation of those procedures.
If you want to view and edit just your list of unbilled costs, without having to also see all the fee
charges, when displaying the list of unbilled charges click on the Filter button and enter C in the
Transaction Type space. This will filter the list to only display the cost charges.
There is no separate procedure for writing down costs. To change the amount of a cost, simply
locate the charge and edit the amount. No record is kept of changes to cost charges for reporting
purposes.
When viewing a cost transaction that was posted from the General Ledger, click the GL button to
display the payable that generated that cost transaction. If you double-click on the payable, you can
then click on the GL Posting button to see the actual check or checks that were issued to pay that
payable (provided it has already been paid).
13.3
Browsing Charges
Charges can be viewed in a scrolling list which can display all or selected charges. From this list you
can select an individual charge to view or edit.
Click the
button on the Toolbar at the top to browse your charges. Then click Browse All
WIP to browse a list of all unbilled charges. Or, enter the client and/or matter ID and click OK to
browse charges for that file only an, or enter the number of the specific transaction you want in the
space at the bottom (if you click the # button to the right of that space it will display the number of the
last transaction you entered). You can also browse charges for an individual client or matter by going
to the Account Status screen for that file and clicking Browse WIP, or viewing the Master Ledger for
the file, which displays both billed and unbilled charges.
Alternatively, you can browse a list of charges (both billed and unbilled) for a single day using the
Time at a Glance function.
Billed charges can be browsed by clicking on Charges from the Main Menu, selecting Browse from
the submenu, and then selecting All Billed Charges. You can also browse billed charges for an
individual client or matter by going to the Account Status screen and clicking Browse Billed Charges,
or viewing the Master Ledger for a file.
You can browse a list of all charges, both billed and unbilled, sorted by transaction number, by clicking
Browse from the Charges menu and selecting the All Charges option.
Below is a screen displaying charges for a single matter:
The first column in the list indicates the status of the charge. The column will normally be blank for
2011 Tussman Programs, Inc.
Charges
141
unbilled charges (charges that have been billed appear with the letter B). Charges on hold.will have
the letter H and charges that are being suppressed from the client's bill will have the letter S. A red
check mark in the first column indicates you have tagged the transaction. Tagging is used to perform
bulk actions as described below. The Number column shows the consecutive transaction number
which has been assigned by the program. These number appear on your prebills and can be used to
quickly locate a specific transaction. Note that when you perform one of the program's purge functions
the numbers will be reassigned and thus may change. This will not hurt anything but simply means
you may not want to perform a purge if you are in the middle of a billing cycle.
The buttons at the top of the screen perform the following functions:
New - Add a new charge;
Edit - Edit the highlighted charge
Sort - Click to charge the sort order of the list. You can list the charges in the order of Record Number
(also referred to as Entry #), Client/Matter, Staff Member, Date or Batch. If you exit and then return to
the list the sort order will revert to the default which is by date.
File - Click to select a client or matter if you want to display charges for that file only;
Batch - Click to display all the charges, both billed and unbilled, in a specific batch. A billed charge will
appear with the letter B in the S (Status) column. Of course, you will only be able to edit the unbilled
charges.
Staff - Click to display all the unbilled charges for a specific staff member.
Filter - Click here to filter the list to display only charges that meet one or more search criteria which
you enter. Using this function gives you the additional flexibility of listing only charges falling within a
specific date range (leave the date range blank for all charges regardless of date) or that are assigned
a specific task or activity code. You can even filter the list to display all charges where a certain word
or phrase appears anywhere within the body of the description. You can enter as many different
search criteria as you want (for example, you can ask for all charges for a specific client within a
specific date range that contain the word "deposition"). However, the list will include only charges that
meet all the search criteria specified.
All - If you are displaying a partial list of charges, click this button to go back to displaying the entire list.
Tag - The tag button is used to tag or untag the highlighted charge. This feature is used in order to
make bulk changes to charges, as described in more detail in that section. Tagged charges will
appear with a red check mark in the first column. Tags are automatically cleared when you close the
program. You can also tag or untag a charge by highlighting it and right clicking the mouse.
Action - This function allows you to make bulk changes to charges, including placing or removing
billing holds, deleting, or assigning to a different staff member or matter.
Go To - If you know the transaction number of the charge you want, enter it in the space to the left and
click the Go To button. By default the space displays the number of the last charge that was added.
- Click on this button to delete the charge which is currently highlighted on the list.
- Click on the print icon to print a list of the displayed charges. If you are using Windows XP, the
list will be generated in the form of a Microsoft Document Imaging file.
2011 Tussman Programs, Inc.
142
13.4
Tussman Program Release 10
Combined Cost and Fee Charge
There is a special method which allows you to record time spent on the telephone as both a fee and
cost charge in a single transaction. For example, if you spend 15 minutes in a telephone conference
on behalf of a client, you may want to charge the client both for the telephone toll charges as a cost
and for your prefessional services as a fee. To configure the program to use this feature:
1. Go to the Data Entry Options screen on the Setup Menu and set item 8, Use Combined Phone
Charge Option, to Y
2. Create one or more cost codes to be used when entering the combined chages. Each code to be
used for this purpose must begin with the letters TC. When creating the code, enter in the Amount
space the dollar amount you want to chage per minute for the cost portion of the call. For example, if
you want to charge 20 cents per minute, enter .20. If you want to charge different rates depending on
the call distance, create a separate code for each rate; for example, TC for local calls, TCX for long
distance, etc.
To enter a combined phone charge, bring up the Enter New Charges screen and select C (Billable
Cost), as the Entry Type. Complete the entry screen as if you were making a regular cost entry, but
be sure to enter your Staff Code as well. Enter as the Cost Code one of the special codes you
created as described above, and enter as the Units the number of minutes the call lasted. The
program will then calculate the dollar amount of the chage based on the unit charge amount assigned
to the cost code you entered. The program will enter as the description the text for the cost code.
Edit it if you like. If you want to assign separate descriptions to the cost and fee charges, enter the
description for the cost charge first, followed by the back slash symbol (\), followed by the description
for the fee charge; for example, "Telephone toll charges\telephone conference with opposing counsel".
Click Save:More or Save:Exit and the following dialog will appear:
In the above screen, the program will have converted the number of minutes you entered into decimal
parts of an hour, using the rounding rules specified in the Data Entry Options screen, and will calculate
the dollar amount of the fee charge using the billing rate for the staff member you entered. Click OK
and the program will then save the two separate cost (type C) and fee (type H) charges.
13.5
Split Billing
The split billing function automatically splits fee and cost charges between two or more files, so you
can enter charges once and have a specified percentage billed to each of up to 21 separate matters.
To set up a split billing arrangement, you must first designate one matter as the master matter. All
charges which are to be split must then be entered on that matter. The split billing instructions are
entered in the master matter file by clicking on the Split Billing button on the matter screen. This
2011 Tussman Programs, Inc.
Charges
143
brings up the Split Billing Arrangement dialog shown below.
Enter the split billing information as follows:
Split Bill - Enter Y to create a split billing arrangement, or N to discontinue an existing split billing
arrangement.
Percent for this Matter - Enter the percent of each charge which is to be billed to the master matter.
For example, if the master matter is to be billed 50 percent of all charges, enter 50.00.
Files to Split With - Enter here a list of up to twenty separate matters that you want to split with, along
with the percentage to be charged to each matter. The matters can be for the same client as the
master matter, or for different clients. Normally the sum of the percentages should equal 100.00, so if
you are billing 50.00 percent to the master file you would assign percentages equaling an additional
50.00 percent to the matters in the list. However, it is not required that the sum of the percents equals
100.00; for example, you can bill 50 percent to the master matter and 60 percent to another. You can
also use the split billing function to create duplicate bills by assigning a percent of 100.00 to both the
master matter and to the other matter(s) you want to split with. In that case, each matter will be billed
the same identical amount of the charges that were entered on the master file.
After setting up a split billing arrangement, you can go back and change the split billing instructions at
any time. If you want those changes to be reflected in charges that have already been entered, you
must then click the Redo Splits button on the Split Billing Arrangement screen as described below.
If you click on the Split Billing button on the matter screen for one of the matters which is in your list of
files to split with, that screen will simply show you the percentage assigned to that matter. You can
only make changes to the split billing arrangement in the master matter.
It is possible to set up a split billing arrangement after charges have already been entered on the
master file by performing the Redo Splits function after the split billing arrangement has been set up.
2011 Tussman Programs, Inc.
144
Tussman Program Release 10
As is always the case, the Redo Splits function only affects charges that have not already been billed
and finalized. To split charges that have already been finalized, you will first have to unfinalize the bills
that those charges appeared on.
After setting up your split billing arrangement, you can then enter the charges that you want to split. All
charges that you want to split must be entered on the master matter. To perform the split, the
program actually creates separate transaction records for each of the matters. For example, if you are
recording a charge of $300.00 which is being split three ways with the master matter and two other
matters, you would enter the charge only once, assigning the client and matter ID of the master matter
and the amount of $300.00. When that charge is saved, or later when you perform the splitting
function, the program will create three separate charges, dividing up the amount of the charge between
each matter by multiplying the percent for that matter times the total amount of the charge. In this
example, three separate charges would be created on each of the matters in the amount of $100.00
each.
There are two ways in which the actual procedure of splitting the transactions can take place.
1. You can have the program split each charge as it is entered, or
2. You can split charges later by performing a separate splitting function that can be done at any
time before your bills are generated, either for all your split billing files, or one at a time.
To choose the method you prefer, click the Options button on the Enter New Charges screen. If you
want to have charges split upon entry, set option 11 to Y. If you want to split them on demand, enter N.
If you split them upon entry, then you do not have to remember to perform the splitting function later
on. However, you may prefer to enter the charges on the master matter first, without splitting them, so
they can be reviewed and edited before the actually splitting is performed. You can also use the
splitting on demand function if you decide to set up a split billing arrangement after entering charges
on a file and want to split those charges that have already been entered. In either case, there are
functions in the program described below which enable you to undo splits, both for the entire matter or
for individual charges, and to redo them again at any time before they are billed.
If you choose the option to split charges upon entry, then charges that are recorded in the Remote
Entry program or in the Batch WIP Entry function (including costs and other charges that are merged
into the Batch WIP Entry screen using the Import function) will be automatically split at the time they
are exported to the main program. Similarly, costs that are posted to the billing program from the
General Ledger will be split at the time they are posted. Otherwise, all these charges will be split when
you perform the splitting function.
Splitting or Unsplitting Charges on Demand
If you are splitting charges on demand, you can perform the splits either for all of your split billing files
in one procedure, or you can split the charges for one matter at a time, as follows:
1. To perform the splits for all of your split billing files, click the More button in the Charges cluster on
the Control Panel and select Perform Splits from the menu. The Split Transactions screen shown
below has the following options:
2011 Tussman Programs, Inc.
Charges
145
Start Date - To perform splits for all unbilled charges, leave the date blank. If you only want to split
charges dated after a specific date, enter the starting date.
Redo All Splits - This function performs the splits for new charges that have not yet been split, and it
redoes the splits that have been previously performed. This is useful if you have made changes in
any of your split billing instructions after having already split some of the charges and want those
charges to reflect the changes; for example, you have changed the percentages or added or deleted
files to split with..
Split New Transactions Only - This function splits only charges that have not already been split.
Undo All Splits - This function reverses all splitting that has previously been performed. The charges
entered on the master file will be the only ones remaining, showing their original full amount, and the
split charges assigned to the other matters will be deleted. It is also possible to undo the splitting of a
single charge; as described later in this topic in the section on Editing and Deleting Split Charges.
All of the above functions only affect unbilled charges. If you want to split or unsplit charges which
have already been billed, you will first have to unfinalize the bills on which those charges appeared
and then perform the splitting or unsplitting (undo) function.
2. To perform the splits for one matter, click on the Split Billing button on the master matter screen.
At the bottom of the Split Billing Arrangement dialog shown earlier in this topic, the Undo Splits and
Redo Splits buttons perform the same functions described above, but only for this one matter, as
follows:
Undo Splits - Click this button to undo the splitting of any unbilled charges for this matter that have
already been split. It is also possible to undo the splitting of a single charge, as described later in this
topic in the section on Editing and Deleting Split Charges.
Redo Splits - Click this button to perform the splits for unbilled charges entered on this matter. You
will be asked if you want to split all unbilled charges for this matter, including redoing splits for charges
that have previously been split, or if you just want to split the new charges. .
Entering Nonshared Charges
If you enter a charge on one of the matters that is not the master file, that charge will be billed only to
that one file, and will not be split with the others. If you want to bill an individual charge only to the
master file, without splitting it with the others, change the Split? instruction in the Enter New Charges
screen from Y to X before saving the charge. If that charge has already been split, then locate that
2011 Tussman Programs, Inc.
146
Tussman Program Release 10
charge and change the Split? instruction from Y to X. The program will then delete all the split
transactions associated with that charge leaving only the charge assigned to the master file restored to
the original full amount. Whenever you redo the splits or perform the splitting function, charges where
the Split? instruction is X will not be split. Charges with a Split? instruction of Y or N will be split
whenever you perform the split or redo splits functions.
Editing and Deleting Split Charges
Charges that have been entered on a split bill file can be edited or deleted in the normal way if they
have not yet been split. However, special care should be used when editing charges after the split has
been performed:
1. If you edit one of the split charges that is not assigned to the master file, but to one of the split files,
those changes will only affect that individual charge. However, if you later redo the splits, the changes
you made to that one charge will be lost.
2. If you want to make changes to the master charge, and have those changes reflected in the split
transactions associated with that charge, you should first undo the split for that one charge. To do
that, locate the charge assigned to the master file and change the Split? instruction to N. The
program will then undo the split for that one transaction only, deleting the associated split transactions
and leaving only the master charge with the amount restored to the original total before the split was
made. You can then make the changes you want. To re-split the charge with the changes, go to the
master matter screen, click on Split Billing, and perform the Redo Splits function as described earlier
in this topic.
3. If you make changes to the master charge only, without first undoing the split, those changes will
affect the master charge only, but if you later redo the splits the split charges may be changed
depending on the type of change you made. Therefore, it is always better to undo the splits for that
charge before making changes.
4. To undo the splitting of an individual charge, locate the charge assigned to the master file and
change the Split? instruction from Y to N. The program will then delete the split transactions and
restore the master transaction to the full amount. If you later redo the splits, that charge will be split
again. If you never want that charge to be split, enter X as the Split? instruction.
4. To delete a split transaction, and have all the related split transactions deleted also, locate the
charge assigned to the master matter and delete that charge. The program will then delete all the split
transactions associated with that charge, after first asking for confirmation. If you do not click Yes
when asked if you are sure, or if you delete one of the charges assigned to the split files, then only that
one transaction will be deleted.
5. When a charge is split, the same description is assigned to each of the split charges. Therefore, if
you later change the text in any one of the individual charges, the change will be reflected in all of the
charges.
Formatting Split Bills
Charges on a split bill can be presented in one of three different ways. To review those options, see
the split billing topic in the bill format section.
13.6
Duplicating Charges
You can use the Split Billing function to duplicate charges. For example, if you have two separate
matters on which you want to bill the exact same set of charges, select one of the matters as the
master file and click on the Split Billing button on the matter screen for that matter, as described in
the Split Billling section. Enter Y in the Split Bill? space and enter as the percent for this matter
2011 Tussman Programs, Inc.
Charges
147
100.00. Then enter the client and matter ID of the other file or files in the spaces below, also entering
as the percent for each 100.00. To enter and bill the charges, follow the instructions in the Split Billing
section as if it were a regular split bill file. Because you entered 100.00 as the percent for each file, the
program will generate duplicate charges for each of those matters, either when you save the charges
upon entry or when you manually split them, as described in the Split Billing section. Since you are not
actually dividing the amount of a single charge among the parties, you will want to set bill format option
280 to 3.
You can also duplicate charges on a one-time basis using the Copy Charges function on the
Transfer/Merge menu found on each Matter screen.
13.7
Transferring Charges
If you need to transfer an unbilled charge from one matter to another, this can be done by editing that
charge and changing the client and/or matter ID. It is also possible to transfer all unbilled charges
from one matter to another. To do this, locate the matter that currently has the charges assigned to it
and click on the Transfer/Merge button. Select the option to Transfer Charges and enter the ID of
the client and matter that you want to transfer the charges to.
13.8
Copying Charges
The Copy Charges function enables you to copy some or all of the charges you have entered on one
file to another file. This can be useful if, for example, you need to generate a copy of a bill for the court
or for other purposes but need to make changes on the bill. To do this, you would open a new matter,
copy the relevant charges to the new matter, and then make any changes you want to the copied
charges and generate the bill on the new matter. This way the original file would be unaffected.
To do this, first open a new matter, either on the same client or under a different client, then go to the
original matter and click the Transfer/Merge button, then click the Copy Charges button. Enter the ID
of the client and matter that you want to transfer the charges to (i.e., the ID of the new matter you just
created). A new dialog will come up where you can specify the staff code and a beginning and ending
date. If you want to copy all charges on that file, just leave those spaces blank; otherwise enter the
staff code and/or date range. Then select whether you want to copy billed charges, unbilled charges,
fees, and costs. Check all four items to copy all the charges on that file. When copying them to the
new file, they will all appear on the new file as unbilled charges, even if they were billed on the original
file. You can then edit the charges (making sure when you edit them that you are editing the charges
on the new matter). To assign a different rate to the charges, go to the new matter, click on Fee
Agreement, and specify the new rate schedule or case rate you want to use, then after clicking OK tell
it to recalculate the charges. Only the charges that you copied to the new matter will be changed; the
original charges will be unaffected. You can then generate a bill on the new matter. When you are
finished, you can close or delete the new matter you created if you no longer need it to be on file.
13.9
Flat and Contingent Fee Billing
Keeping track of time spent on flat and contingent fee cases requires special considerations. The
main consideration is whether or not you will be sending the client periodic bills to update them on the
work done on the case, even though you will not be billing them for the time, or to bill them for costs.
1. If you will be sending them periodic bills, it is advisable to record time spent on the case as
nonbillable, as described in the section on Nonbillable Time. You then have the option of whether or
not you want the nonbillable time to appear on the client's bill, or whether you prefer to just enter it for
your own internal records. If showing it on the bill, there are a variety of options which affect how it
appears, as described in the section on Nonbillable Time. If you will be billing them periodically for
costs only, and do not want to show any time on the bill you can simply put a hold just on fees..
When you actually bill the client for your fee, whether or not you entered nonbillable time, you then
enter the fee as a flat fee charge (type F) and the program will bill them for that amount. Note that
2011 Tussman Programs, Inc.
148
Tussman Program Release 10
simply entering the amount of a flat or contingent fee in the Fee Agreement screen for a matter does
not cause that amount to actually be billed; entering the amount there is for your own information only.
2. If you will not be sending the client periodic bills, you can also enter all the time spent as
nonbillable, and when you are ready to bill them for your fee simply enter that amount as a
flat fee charge (type F) and generate a bill, as described in 1 above. That bill will then show the fee,
plua all the time that you have spent working on the case, unless you configure the bill to omit
nonbillable time, as described in the Nonbillable Time section. Alternatively, you can enter the time as
billable (type H), and when you are ready to bill for your fee enter an overriding flat fee charge (type
FO) which will automatically adjust the fee total on the bill to the amount of the FO, while still showing
the detail of the work done.. In either case, you will probably want to put a hold on the bill so that a bill
is not generated until you are ready to send it, at which time you can remove the hold and then
generate the bill.
Generating a Final Bill for Contingent Fee Cases
When you receive a settlement on a contingent fee case and want to send the client a final settlement
statement, you must first enter the amount of the fee that you will be charging them as described in
either 1 or 2 above, by entering a flat fee (type F) or overriding flat fee (type FO). The preferred
method for handling the settlement funds is to record the receipt of the settlement check as a trust
receipt (AR transaction type TR). Then record the various disbursements from the trust account as
separate type TD transactions; for example, the amounts disbursed to pay any liens or other costs, the
amount paid to the client as their share, and the amount paid to your firm as your fee. The amount
recorded as your fee should be entered as an AR transaction type TDP, or you can enter a separate
TD and P transaction. This records it both as a disbursement from the trust account and as a payment
which will go to pay the fee charge which you entered. You can then generate a bill showing all of the
above activity, which will show an ending balance of 0.00 and an ending balance in the trust account of
0.00, assuming all the receipts and disbursements balance out.
When generating a Staff Earnings Analysis report, note that there is an option to have the program
automatically distribute the amount of fees received on flat and contingent fee cases to the various
staff members who worked on the matter based on how many hours (billable or nonbillable) each
person worked on the case.
13.10 Other Transaction Types
In addition to fee and cost charges, there are several other types of transactions that can be entered in
the New Charges screen, as described below. Select the type of transaction you want from the drop
down menu in the Entry Type space. Once the transaction has been saved, it can be located and
edited in the same way as any other fee charge.
B - Billing Narrative. A billing narrative is a paragraph of text which can appear on the client's bill at
the beginning of the fee section. This is useful if you want the bill to show a narrative description of the
amount they are being charged. It can appear either in place of or in addition to the itemization of the
individual fee charges. No amount is assigned to the billing narrative; it is simply an alternate way of
describing the work done, and the amount billed will still be the sum of the individual charges, whether
or not those charges are itemized on the bill.
To create a billing narrative, after selecting Entry Type B enter a date falling on or before the ending
cutoff date you will be using on the client's bill, specify the client and matter, and enter the paragraph
in the description space.
The paragraph can be composed from scratch, or you can have the program create a draft paragraph
by combining the text from the individual fee charges which are to appear on the bill. You can then edit
the paragraph as necessary. To create the draft paragraph, click on the
2011 Tussman Programs, Inc.
Charges
149
button to the right of the description space and click Yes to confirm. The program then asks for the
ending cutoff date, which should be the same as the ending cutoff date you will be using on the
client's bill. The program will then compose the paragraph by stringing together the text from each
unbilled fee charge dated on or before that date.
If you want the billing narrative to appear in place of the itemization of the individual fee charges on
the bill, set bill format option 64 to N. Since this change will affect all bills generated using the format
you changed, you may want to create a separate bill format to use with clients who are being billed
using a billing narrative. Or, you can simply generate these bills separately, changing the format
before generating the bill and then changing it back after the bill has been printed.
BR - Recurring Billing Narrative. Same as a regular billing narrative, but instead of appearing just on
the client's next bill it will appear on each subsequent bill until you locate the billing narrative
transaction in the unbilled charges file for that matter and delete it.
M - Statement Message. A statement message is a paragraph of text which can be added at the end
of an individual client's bill. Use the Bill Messages feature to add a message at the end of every
client's bill.
To enter a statement message, after selecting M as the Entry Type, enter a date on or before the
ending cutoff date you will be using on the client's bill, specify the client and matter, and enter the text
of the message in the description space.
To print the message in bold on the bill, type a ^ symbol (uppercase number 6) in the first space
followed by the message text. To print in italics type a | character (uppercase backslash) in the first
space.
If you are also printing a global message on each client's bill using the Bill Messages feature, the
individual statement message will appear in addition to that message, unless you enter it as an
exclusive statement message as described below.
MR - Repeating Statement Message. Same as a regular message, but instead of appearing just on
the client's next bill it will appear on each subsequent bill until you locate the statement message
transacdtion in the unbilled charges file for that matter and delete it.
MX - Exclusive Statement Message. An exclusive statement message is entered exactly the same
as a regular statement message (type M), except that if you have also entered a global message using
the Bill Messages feature, the exclusivee statement message will be printed in place of, instead of in
addition to, the global message
RX - Recurring Exclusive Statement Message. The same as an MX, but instead of appearing just
on the client's next bill it will appear on each subsequent bill untill you locate the statement message in
the unbilled charges file for that matter and delete it.
W - Writedown. This transaction is one way of writing down the amount of fees on a bill. It is
described in the Writing Down Fees section.
13.11 Time at a Glance
The Time at a Glance screen is a convenient way to check the total number of hours entered for each
staff member, and the entire firm, on a day by day basis. From this screen, which displays the daily
totals on a calendar for any selected month, you can click on an individual day to see a list of the
charges entered for that day, from which you can then view or edit any of those charges. You can also
print a report from this screen in either a week-at-a-glance or month-at-a-glance format. This is
useful if you want the attorneys to be able to review a daily summary of the work they have recorded.
2011 Tussman Programs, Inc.
150
Tussman Program Release 10
To view the Time at a Glance screen, click on the
following screen appears:
button on the Toolbar at the top. The
When you select Time at a Glance the screen displays a calendar for the current month. A button on
each day displays the total number of hours recorded for that date. To the right of the calendar a box
displays the total number of hours and the dollar value of those charges for the entire month. Below
that is a check box that determines whether or not nonbillable and administrative time is included in the
hour totals. By default the screen displays the totals for the entire firm. To see just the totals for one
staff member, enter the staff member code in the Staff Code space above the Totals box.
Alternatively, you can display the dollar value of the time worked during the month by clicking the Show
Dollars button at the bottom.
To include flat fee charges in the dollar total, check the Include Flat Fees box at the right.
To display totals for a different month, use the arrow keys in the lower right hand portion of the window
to go back or ahead one month or one year at a time. For example, click the
.button to go back
one month, or the
button to go back one year. To go directly to a specific month, click the Go To
button and enter the month and year you want in the format MM/YYYY.
Click on the button in any date box to display a list of all the charges entered for that day. The list will
include both unbilled and billed charges. Billed charges can be identified by the letter B appearing in
the S (Status) column. Double click on a charge, or highlight it and click Edit, to view or edit that
charge. At the end of the list will be a line showing the totals for that day.
2011 Tussman Programs, Inc.
Charges
151
Click on the
button to print a Time at a Glance report. The report can be printed in both a Week
at a Glance or Month at a Glance format. Before selecting which format you want, select from the
options listed on the Print Time at a Glance dialog. You can format the report to show only the total
number of hours for each day, or in addition it can itemize the individual charges for that day. Click the
Detail Work option if you want to include the itemization. The itemization will show each charge on a
single line. Thus, the amount of description that will appear is limited. If there are too many charges to
fit in the space provided for a day, the program will print additional pages with a continuation of the
itemization for each day as required.
If you check the Separate Calendar for Each Staff Member option, the program will print a separate
report for each staff member. Otherwise, the report will be for the entire firm. If you want to generate
the report for a single staff member, before clicking on the
button enter the code of the staff
member you want in the Staff Code space on the main Time at a Glance screen. Also note that the
printed report will either include or omit nonbillable and administrative time depending on the setting
you have chosen on the main screen.
Select the week or month you want for the report by entering any date that falls within that week or
month in the Date space to the right of the Week at a Glance button. Then click either the Week at a
Glance or Month at a Glance button to generate the report.
Year at a Glance
Click the Year at a Glance button at the bottom to display the screen shown below which shows
monthly totals for the year.
Click on a month to display a list of the charges for that month. Click on Show Dollars to display the
dollar value of the time entered rather than the number of hours. Use the arrow buttons at the right to
2011 Tussman Programs, Inc.
152
Tussman Program Release 10
display a different year.
You can also view the Time at a Glance screen for a single client or matter by going to the
Account Status screen for that file and clicking on the Time at a Glance button.
13.12 Batch WIP Entry
The Batch WIP Entry function provides an alternate method of entering fee and cost charges into the
program. Unlike the regular method in which the charges are immediately added to the unbilled
charges file, this function stores the charges in a temporary file and an export function must be
performed before they are added to the main file. Charges in the Batch WIP Entry file will not appear
on a client's bill or in other parts of the program until they have been exported, as described later in this
section. You can create separate batch entry folders for each user, if desired, and each user can
specify one of the folders as their default so that it comes up automatically. You can also make the
Batch Entry screen your default program start up screen.
The Batch WIP Entry function works almost identically to the Tussman Program Remote Entry
module, a separate program for entering time that can be installed on other computers. Like the
Remote Entry module, it has a more sophisticated timer function than the regular entry screen which
allows you to time your work and to automatcally calculate the charge based on the elapsed time.
The Batch WIP Entry function is also used to import charges into the program from the Tussman
Remote Entry program, or from external sources such as Amicus, TimeMatters, and cost recovery
systems such as Equitrak and Copitrak.
To access the Batch WIP Entry function, click on the
button on the Toolbar at the top. The
main screen appears below, which displays a list of the current charges in the selected folder:
2011 Tussman Programs, Inc.
Charges
153
The main menu at the top of the screen lists the following functions which are described later in this
section. Note that the File menu allows you to switch from one folder to another, and the Export
selection is used to merge selected entries with the main file.
From the main screen you can perform the following functions:using the buttons at the left of the
screen.
Adding a New Entry
Click the New button at the bottom to add a new charge. The screen shown below appears:.
2011 Tussman Programs, Inc.
154
Tussman Program Release 10
For the most part, enter the information exactly as you would when entering a fee charge or
cost charge using the normal data entry function. The settings you have created in the
Data Entry Options screen apply to this function as well. The only significant difference is the presence
of the timer in the upper right hand corner. To immediately start the timer running, click the On button.
See the Timer section below for complete information on how to use the timer. Click Save:More or
Save:Exit when you have completed entering the information to save the charge. It will then be added
to the list of entries displayed on the main Batch WIP Entry screen. If you started the timer running,
the timer will continue running after you save the entry, and you can control the timer function directly
from the main screen, as described in the Timer section.
The Batch Entry function will also allow you to save an entry without specifying the client and matter
IDs. They must be added before the entry can be exported to the main program, however.
Cloning an Entry
Click the Clone button to create a new charge for the same client, matter, and staff member as the
entry which is currently highlighted on the main Batch WIP Entry screen. You can then fill in the rest of
the information in the normal way as described above.
Using the Timer
As described above, you can start a timer running on a new entry before it is saved. When saved, the
timer will continue running. Entries that have a timer running will appear on the list with a green clock
in the left hand Status column of the browse screen. You can then access the timer controls by calling
up that entry using the edit function described below, or you can highlight it on the list and click the
Timer button. The following dialog will then appear:
2011 Tussman Programs, Inc.
Charges
155
The above Timer dialog shows that the timer is currently running on Entry 3 with accumulated time of
30 seconds. The buttons on the timer dialog perform the following functions:
On - Starts the timer running. If the timer is paused, it restarts the timer where it left off.
Pause - Suspends the timer and stores the accumulated time. Entries where the timer is suspended
will appear with a white clock in the Status column. You can then restart the timer at any time by
clicking the On button. If you decide not to restart the timer, and want to bill the accumulated time,
click the Done button.
Done - Stops the timer running and calculates the dollar amount of the charge based on the elapsed
time, inserting the number of hours and dollar amount in the Hours and Amount space for that
charge, subject to the rounding rules which are specified in the Data Entry Options screen. If there is
already a number of hours and a dollar amount for that entry, the hours and amount of the timer
session just completed will be added to the amount already existing. Thus, you can run the timer
multiple times on the same charge and each time you click Done the amount of time and its dollar
value will be added to the accumulated amounts from any previous timer sessions. However, rather
than clicking Done each time you want to stop the timer, it is preferable to use the Pause function.
That way, the amount of the charge is calculated only once when you are completely finished with that
entry, resulting in less distortion in the total amount as a result of the rounding rules.
Reset - Resets the amount of time on the timer to 0:00, whether or not the timer is currently running.
Cancel - Resets the timer to 0:00, stops the timer from running if it is currently on, and closes the timer
dialog.
Close - Closes the timer dialog without changing the current status of the timer.
+ and - - These buttons, which work only if the timer is not running, increase or decrease the amount
of time on the timer in one minute increments
The following buttons on the main Batch WIP Entry screen also control the use of the timer:
Timer - Brings up the Timer dialog for the currently highlighted entry.
On/Off - Starts or pauses the timer on the currently highlighted entry. You can also press the F5
function key to toggle the timer on and off.
Pause - Suspends all currently running timers, not just the timer on the highlighted entry.
Pop Up - Brings up one at a time in succession the Timer dialog for all entries on which the timer is
currently running.
2011 Tussman Programs, Inc.
156
Tussman Program Release 10
Running Multiple Timers
The program allows you to run as many timers as you want simultaneously. Alternatively, you can
configure the program to only allow one timer to be running at a time. To select this option, click on
Config on the menu above the Batch WIP Entry screen and check the Prohibit Simultaneous
Timers option. If this option is checked, then when you start a timer on one entry it automatically
suspends any other currently active timer.
Browsing the List of Entries
The main screen displays the list of charges which have not yet been exported to the main unbilled
charges file.
Entries are listed in the order they were added; i.e., in record number order. To change the sort order,
click on the Sort button and select whether you want the entries sorted by Date or by Client and matter
ID.
If instead of displaying the client ID for each entry you would rather see the client alternate ID, press
the F6 function key, or press it again to toggle back to displaying the client IDs.
To filter the list to display only selected entries, click the Filter button. The following screen appears:
From this screen you can select the specific entries that you want to display. Setting a filter makes it
easier to perform certain other functions. For example, if you only want to export entries for a specific
staff member, instead of flagging each entry individually first set a filter for that staff member, and then
click the Flag All button and only the entries for that staff member will be flagged for export. To
remove a filter once it has been set, click the Filter button again and click Cancel.
Printing a List
2011 Tussman Programs, Inc.
Charges
157
To print a list of the entries in the Batch WIP Entry screen, click the
button in the lower left hand
corner. You can then select the sort order and detail options you want from the screen which appears
below:
To print selected entries only, first set a filter as described in the Browsing the List section above and
then click the
button; only the entries currently displayed on the screen will be included in the list.
To view just a summary of the totals of the charges in the Batch WIP Entry file, click the Totals button.
Editing and Deleting Entries
To edit an entry, simply double click on that entry or highlight it on the main Batch WIP Entry screen
and press Enter. You can edit any of the information in the same way as when you are creating a new
entry. To delete an entry, highlight it on the main screen and click the Delete button at the left, or
when editing an entry click the Delete button which appears in the right hand portion of the screen. To
delete all the entries in the Batch WIP Entry screen, click the Delete All button. As a precaution, you
must first filter the list, as described above, before this function will work. Simply choose a filter
selection that will cause all the entries that you want deleted to be listed. There is no way of writing
down an entry until it has been exported to the main unbilled charges file.
Spell Checking Entries
To perform a spell check of the entries in the Batch WIP Entry screen, click the
button in the
lower left hand corner. The spell check function works exactly like the main spell check function. You
can also spell check an individual entry by clicking the
when entering or editing an entry.
2011 Tussman Programs, Inc.
button to the right of the description space
158
Tussman Program Release 10
Using Separate Batch Entry Folders
If multiple staff members will be using the Batch WIP Entry function to enter their time, each one can
maintain a separate folder containing just their entries. To set up a new folder, select New from the
Personal Folders section of the Batch WIP Entry File menu and enter a name for the folder, such as
the person's first name or initials. Do not use spaces or any punctuation, and do not include a path for
the file. The data for each folder will be kept in a subdirectory of the main Tussman Program directory
with the name you assigned. When you are using Batch WIP Entry, the title bar of the window shows
the name of the current folder. To go back to the main folder, select Main Folder from the Batch WIP
Entry File menu.
After you have created one or more folders, each one will be listed in the Personal Folders section of
the Batch WIP Entry File menu, and you can switch to the folder you want simply by selecting that
folder from the menu. Each user can make their folder the default so that when they go into the Batch
Entry function that folder comes up automatically, instead of the main folder. To do this, check the
Make this Default Folder box at the bottom of the screen when displaying the folder they want to use.
For this box to appear the program security function must be active so that a user id is required to
enter the program
Instead of using Personal Folders, it is now preferred that you use Virtual Folders. Each Tussman
Program user is automatically assigned a Virtual folder which is listed on the File menu from the Batch
WIP Entry screen. You can select and use the Virtual folder as the default folder for that user just as
you would a Personal Folder.
You can designate a default staff code for each folder so that when entering charges it defaults to that
staff member. To do this, display the folder, select Config from the menu at the top and enter the staff
code.
When using separate folders, you must remember that none of the charges in any of the folders will
appear on your client bills or anywhere in the main part of the program until they are exported, as
described below.
To delete a folder from the File menu select that folder as the active folder, then go to the File menu
again and select Delete Current Folder. This does not physically delete the folder itself, but only
removes it from the menu. You can add it back to the menu later using the Find function on the File
menu. You can not delete a Virtual Folder, only the Personal Folders.
Exporting Entries
When you are ready to merge the charges in the Batch WIP Entry file with the main unbilled charges
file, you must first flag the specific charges that you want to export. You can either flag entries
individually, by highlighting each one and clicking the Flag button or by right clicking on each entry
that you want to flag. Or, you can flag all entries by clicking the Flag All button. If a filter is in effect,
as described in the Browsing section above, when you click Flag All only the displayed entries will be
flagged. Entries that are flagged will have a red check mark in the Status column.
Entries can be unflagged using the same methods by which they were flagged; i.e., you can unflag a
flagged entry by highlighting it and clicking the Flag button, or all entries can be unflagged by clicking
Flag All and selecting the Unflag All Entries option. To prevent an entry from being flagged when
you perform the Flag All function, place a hold on that entry by highlighting it and clicking the Hold
button. A white hand will appear in the Status column for all entries that are on hold. To remove the
hold, highlight that entry and click Hold again, or click the Flag button and it will be flagged for export.
Of course, after performing the Flag All function you can also unflag selected entries individually by
highlighting them and clicking Flag.
Entries cannot be flagged for export if a timer is currently running or paused on that entry, or if the entry
2011 Tussman Programs, Inc.
Charges
159
has been assigned an invalid client or matter ID.
After flagging the entries you want, merge them with the main program by selecting Export from the
menu above the Batch WIP Entry screen. The following screen will appear:
Assign an optional batch code, if desired, and click the OK button. The flagged entries will then be
added to the main unbilled charges file and deleted from the Batch WIP Entry file. When the
procedure is complete, you will have the opportunity to print a list of the exported entries.
When exporting, the program checks to see if each entry has already been exported and, if so, it will
skip that entry. This safeguard is provided in case you mistakenly import the same set of remote entry
or other data twice.
Export Log
Unlike the Remote Entry Program, the Batch WIP Entry function does not maintain a file of entries
after they have been exported. It does maintain an export log, which you can view by selecting Log
from the menu above the Batch WIP Entry screen. The log lists the date, batch code, and number of
entries that were merged each time you performed the Export function.
Configuration
The Config option on the menu above the Batch WIP Entry screen allows you to enter a default staff
code which will automatically be inserted each time you create a new entry, and a default batch code
which will automatically be assigned each time you perform the Export function. You can also select
the option of whether or not to allow simultaneous timers to be running.
Utilities
The Utilities selection on the menu above the Batch WIP Entry screen contains the following options:
Reindex Data Files - Reindexs the data files associated with the Batch WIP Entry function.
Pack Data Files - This function rebuilds the Batch WIP Entry file to eliminate records which, although
marked as deleted and not visible, have been either deleted or merged with the main unbilled charges
file. The presence of these invisible records explains why the record numbers assigned to each new
entry may not always begin with 1. Packing the file permanently removes these records.
Delete Duplicates - In the event that you have imported a set of remote entry data twice and thus
2011 Tussman Programs, Inc.
160
Tussman Program Release 10
have duplicate entries in the Batch WIP Entry screen, select this function to remove the duplicates.
Consolidate Cost Charges - This function consolidates into a single cost charge multiple charges for
the same client and matter for the same day or month, or you can consolidate all charges for each
client matter into one entry. Only charges listed in the currently displayed Batch WIP Entry screen are
affected. This is useful after importing charges from a cost metering device. There is also a function
that reverses the last consolidation performed, in case you perform the wrong function by mistake.
Disable Duplicate Checking - Select this option if you do not want the program to check for
duplicates when importing remote entry data. If duplicate checking is disabled and you accidently
import the same remote entry data more than once you can use the Delete Duplicates function to
remove the duplicates.
13.12.1 Importing Charges
The Import function on the menu at the top of the Batch WIP Entry screen enables you to import
charges from a variety of sources into Tussman. These sources include charges entered in other
programs, such as Amicus and TimeMatters, charges collected by cost metering devices such as
Copitrak and Equitrak, and charges entered in the Tussman Program Remote Entry Module or using
the Tussman Program Export Time function. After these charges are imported they are added to the
Batch WIP Entry screen and can be viewed, listed, edited or deleted before they are actually merged
with the main unbilled charges file. To merge them with the main unbilled charges file, they must be
flagged and exported as described in the Batch WIP Entry section.
Note that the charges will be imported into the Batch WIP Entry folder that is currently open. If you are
using multiple folders, make sure you have the right folder open before you perform the import.
The procedures for importing charges are described in the following sections:
Remote Entry charges
Amicus
TimeMatters
Copitrak
Equitrak
A generic format text file
A file created by the Tussman Program Export Time function.
13.12.1.1 Remote Entry Data
This function imports Tussman Program Remote Entry data into the Batch WIP Entry screen. This is
the same function that appears on the Remote Entry Functions menu on the main Tools menu or
when clicking the .
button on the main Toolbar. The Remote Entry data must have been
exported from the Remote Entry program to a disk, CD or other media which is listed on the Select
Folder dialog. Select the source of the data and the program will add it to the Batch WIP entry screen.
The program will then ask if you want to delete the source file. Click Yes unless you want to save it for
some reason. Note that data on a CD cannot be deleted, but the old data will be overwritten if you use
that CD to export data again from a Remote Entry module. After Remote Entry data has been
imported into the Batch WIP Entry screen, it must then be exported to the main program after you
have reviewed and flagged it.
2011 Tussman Programs, Inc.
Charges
161
13.12.1.2 Amicus
The Amicus program can be used to create time records which can be exported to a file and then
imported into the Tussman Program. To use this feature, you must purchase a code from us which
allows you to access the Import function in Tussman.
Two steps are required to transfer the information from Amicus to Tussman. It must first be exported
from Amicus, and then imported into Tussman.
You must first configure the Amicus program as follows. This only needs to be done once, and then
you can export the information from Amicus as often as desired as described in steps 13 and 14.
1. Go into the Amicus Adminstrator program;
2. Click on Configure;
3. Select Time Sheets;
4. Click on Accounting System;
5. Select Custom;
6. Click Team Settings;
7. Click on File Type and set the Header option to No and the Special Code option to No;
8. Click on Delimiters and set the Records option to Carriage Return and the Fields option to Fixed
Character Positions;
9. Click on the Fields tab and select the following fields with the Position and Number of Characters
indicated:
a.
b.
c.
d.
e.
f.
g.
h.
Position 1 = Date, format 20000513;
Positoin 2 = Timekeeper, 4 characters;
Position 3 = Client ID, 32 characters (alpha numeric)
Position 4 = Matter ID, 8 characters (alpha numeric);
Position 5 = Activity Code, 8 characters;
Position 6 = Rate, 10 characters;
Position 7 = Time, 10 characters;
Position 8 = Description, 1024 characters.
10. Return to the Accounting System screen (see 4 above) and click on each User, making sure that
the Staff ID's you are using in Amicus are the same as the Staff Codes you are using in Tussman;
11. Close Amicus and restart it for the changes made above to take effect.
12. Go into each person's own copy of Amicus on their computer and click on the Billing tab in the
Setup window. Specify the name of the folder where you want the Amicus time entries to go when
they are posted. You should create a separate folder to be used only for this purpose. The name of
the folder must consist of a drive leter and a directory name, and the name of the directory cannot
exceed eight letters; for example, c:\amicus. You can either create a separate folder on each person's
computer, or you can create a single folder on the network server. The latter method is more
convenient as it makes it easier to import the files into Tussman, as they can then all be imported from
a single location.
13. You are now ready to record time entries in Amicus. Note that when creating a time record there
will be a 32 character space for entering the Client ID. Normally you should enter the exact client ID
2011 Tussman Programs, Inc.
162
Tussman Program Release 10
assigned to that client in Tussman. However, if in Tussman you use a system of unique matter IDs
(i.e., no two matters in the program have the same matter ID), you can enter the matter ID in the
Matter ID space and then either leave the Client ID blank or enter the client name or anything else you
would like.
14. After they have been made, you must post them. which sends them to a file in the folder that you
specified in 12 above.
After time entries have been posted to a file from Amicus, they can be imported into Tussman as
follows:
1. Go into Tussman and select Batch WIP Entry from the File menu;
2. Select Amicus from the Import menu (the Import option appears on the menu at the top of the
screen);
3. Enter the name of the folder where the Amicus export files are located (the same folder you
specified in 12 above), and press Enter. The screen will display a list of all the files in that folder.
Make sure these are actual Amicus export files, as you do not want to import and delete files from
other programs by mistake. Amicus generally creates a separate file containing the time records for
each staff member for each day, and the file extension generally consists of that staff member's ID.
Thus, to display the files for all staff members leave the File Extension space blank. To display just
the files for one staff member enter their ID in the File Extension space.
4. To import the files one at a time, double click on each file that you want to import. To import all the
files in the list, click on Import All Files. To import all the files for one staff member, enter their staff ID
in the File Extension space so that only their files are displayed and then click the Import All Files
button.
5. After files have been imported, the program will ask if you want to delete the file or files. If you click
Yes, the file or files you just imported will be deleted from the folder. If you delete a file by mistake,
Amicus keeps a copy of all exported files in a separate folder on the server, usually called Timepost,
which is a subdirectory of the main Amicus folder. Use care when importing and deleting files from
the list to make sure they are actual Amicus export files. If you enter the wrong folder name in step 3
above, you may wind up displaying a list of files from other programs, which will not contain Amicus
data and should not be imported or deleted.
6. If you do not delete files immediately after they are imported, as described in 5 above, you can
delete them later by highlighting each one on the list and clicking the Delete button. To delete all files
in the list, click Delete All.
7. After importing, close the Amicus Import dialog to return to the Batch WIP Entry screen. That
screen will now display a list of the entries which you have imported. Individual entries can then be
edited or deleted as necessary as described in the Batch WIP Entry section. When you are ready to
merge them with the main unbilled charges file, they must be flagged and exported as described in
the Batch WIP Entry section. The program will only flag and export entries that have valid client and
matter IDs. Those entries will remain in the Batch WIP Entry screen and you can then either correct
them or delete them.
13.12.1.3 TimeMatters
The TimeMatters program can be used to create time and expense records which can be exported to
a file and then imported into the Tussman Program. To use this feature, you must purchase a code
from us which allows you to access the Import function in Tussman.
Two steps are required to transfer the information from TimeMatters to Tussman. It must first be
exported from TimeMatters, and then imported into Tussman
2011 Tussman Programs, Inc.
Charges
163
To export the charges from TimeMatters, use the TimeMatters export function to create an export
file. In the TimeMatters export function you can select which fields from each record you want to
include in the file. You can simply select all the fields, or you can select the following fields, which
contain the relevant information for export to Tussman as indicated:
BIL_TIME/EXP - Indicates the type of charge (T for Time, E for Expense);
BIL_DATE - Contains the date of the charge;
BIL_MATNO - Contains the client and matter ID. When recording charges in TimeMatters, you
must use the same client and matter IDs that are used in Tussman. You can either enter both
the client and matter IDs, separated either by a period or a hyphen, or you can enter just the
matter ID, provided that in Tussman you use a unique system of matter IDs where no two
matters are assigned the same ID.
BIL_STAFF - Contains the Staff Code. You must use the same Staff Codes as are used in
Tussman.
BIL_BILLCODE - Contains the Task Code. This field is optional and must be included only if
you are assigning Task Codes to each charge in TimeMatters; You must use the same Task
Codes as are used in Tussman
BIL_CODE - Contains either the Activity Code or the Cost Code, depending on the type of
charge. This field is optional and should be included only if you are assigning Activity Codes
and Cost Codes to each charge in TimeMatters. You must use the same codes as are used in
Tussman;
BIL_DURATION - Contains the number of hours, if the charge is a time record;
BIL_BILL QTY - Contains the number of units, if the charge is a cost;
BIL_GROSS - Contains the dollar amount of the charge, if the amount is calculated by
TimeMatters. In most cases, you will want Tussman to calculate the dollar amount, so this item
is not required;
BIL_DESC - Contains the transaction description.
BIL_BILL STATUS - Indicates whether billable or nonbillable (default is billable)
BIL_BILL HOLD - Indicates whether the charge is to be billed or is on hold (default is to be
billed)
After creating the export file, go into Tussman, select Batch WIP Entry from the File Menu, and then
select TimeMatters from the Import menu item which appears at the top of the screen. A standard
Windows dialog will appear from which you can locate the export file that you created in TimeMatters.
After selecting the file, the following screen will appear:
2011 Tussman Programs, Inc.
164
Tussman Program Release 10
Input File - This space displays the name of the file you selected in the previous step;
Time Matters Field Names - These spaces display the names of the fields in the TimeMatters export
file where the indicated information is found. You do not need to change these field names, unless for
some reason you have entered the information differently in TimeMatters. Changes should be made
only if you know exactly what you are doing. The field names shown above are the defaults.
Have Tussman Determine Rate and Amount - This option should normally be checked, so that
Tussman will calculate the dollar amount of time charges using the billing rates in effect for the staff
member and matter specified for each charge, as TimeMatters will not have this information.
Click OK to complete the import. When finished, the Batch WIP Entry screen will display the charges
that were imported. Individual entries can then be edited or deleted as necessary as described in the
Batch WIP Entry section. When you are ready to merge them with the main unbilled charges file, they
must be flagged and exported as described in the Batch WIP Entry section. The program will only
flag and export entries that have valid client and matter IDs. Those entries will remain in the Batch
WIP Entry screen and you can then either correct them or delete them.
13.12.1.4 Copitrak
If you are using a cost metering device from Copitrak, charges collected by that device can be
imported into Tussman. To do this, you must first purchase from us a code which will give you access
to this function.
To import the charges into Tussman, you must first create an export file from Copitrak containing
the list of charges in an ASCII text file format. This file should be in the standard Copitrak export file
2011 Tussman Programs, Inc.
Charges
165
format. It can be exported to any location, either to a folder on your hard drive, or on a floppy disk, zip
drive or memory stick, as long as that media can be accessed by the computer on which the Tussman
Program is installed. Your Copitrak representative can assist you with this procedure if necessary.
Alternatively, instead of using the standard Copitrak export file format, you can create a custom file
format which matches the format specified in the Generic Import section. You can then use that
function to import the charges, instead of using the function described in this section. Your Copitrak
representative will have to assist you in setting up this procedure.
Once you have created the output file from Copitrak, it can be imported into Tussman by selecting
Batch WIP Entry from the File menu, and then selecting Copitrak from the Import menu at the top of
the screen. The following dialog will then appear:
Input File - Enter the name of the file containing the Copitrak charges. If the file is not located in the
Tussman Program folder, you must also enter the drive and path. For example, if the file is on a floppy
disk in drive A and is named Copies.txt, enter A:\copies.txt..
Batch Code - Enter an optional Batch Code which will be assigned to these charges
2011 Tussman Programs, Inc.
166
Tussman Program Release 10
Cost Codes - Enter the Tussman Program Cost Codes that should be assigned to copy, fax,
telephone and postage charges imported from Copitrak.
Show Number of Copies or Fax Pages on Bill - Enter Y if you want to include the number of
photocopies or the number of pages faxed as part of the description for each charge.
Show Number Dialed for Phone Charges - Enter Y if you want to inlcude the number dialed as part
of the description for telephone toll charges.
Unit Charge for Copies - You do not have to enter the unit charge as the charge amount is calculated
by Copitrak
Unit Charge for Fax Pages - You do not have to enter the unit charge as the charge amount is
calculated by Copitrak
Description to appear on bill - Enter in these four spaces the descriptive text that you want assigned
to each copy, fax, phone and postage charge.
Use Transaction Date for Each Charge - Enter Y if you want to use the actual transaction date for
each charge. If you want to assign the same date to all the charges, enter N and then enter the date in
the space below.
Date to Assign to Each Charge - If you set the preceding item to N, enter here the date that you want
to assign to each charge in this batch.
Rename Input File After Merging - Check this option if you want to rename the Copitrak export file
after it has been merged, to prevent it from accidentally merged a second time. The new file name will
be the same as the original name, but the extension will be changed to .old.
After verifying the above information, click Import to continue. When the import process is complete,
the records will be displayed on the Batch WIP Entry screen. You can then view, list, edit or delete
them as described in the Batch WIP Entry section. To merge them with the main unbilled charges file,
they must be flagged and exported as described in the Batch WIP Entry section. The program will
not flag or export charges that do not have a valid client or matter ID. Those records will remain in the
Batch WIP Entry screen and you can either edit or delete them.
13.12.1.5 Equitrak
If you are using a photocopy or telephone metering device from Equitrak, charges collected by those
devices can be imported into Tussman. To do this, you must first purchase from us a code which will
give you access to this function.
The Tussman Program also has a function which enables you to create a validation table containing
a list of your clients and matters which can be downloaded to Equitrak. This function is described at
the end of this topic.
To import the charges into Tussman, you must first create an export file from Equitrak containing
the list of charges in an ASCII text file format. This file should be in the standard Equitrak export file
format. It can be exported to any location, either to a folder on your hard drive, or on a floppy disk, zip
drive or memory stick, as long as that media can be accessed by the computer on which the Tussman
Program is installed. Your Equitrak representative can assist you with this procedure if necessary.
The Equitrak export file contains certain information in user defined fields designated in Equitrak as F1
through F8. These fields should contain the following information. The standard Equitrak output file
should already be configured to do this. Especially important is the presence of the file ID in the F2
field.:
2011 Tussman Programs, Inc.
Charges
167
F1 - Not used by Tussman
F2 - Must contain the client and matter ID, separated either by a period or a hyphen.
Alternatively, if you are using unique matter IDs (i.e., no two matters in Tussman have the same
matter ID), then the F2 field may contain only the matter ID.
F3 - For postage charges, this field must contain the Tussman Cost Code which you use for
postage charges. For miscellaneous expenses (Equitrak code D), the F3 field must contain the
charge description;
F4 - For postage charges, must contain the dollar amount;
F5 - For miscellaneous expenses (Equitrak code D) must contain the dollar amount;
F6 - F8 - Not used by Tussman
Alternatively, instead of using the standard Equitrak export file format, you can create a custom file
format which matches the format specified in the Generic Import section. You can then use that
function to import the charges, instead of using the function described in this section. Your Equitrak
representative will have to assist you in setting up this procedure.
Once you have created the output file from Equitrak, it can be imported into Tussman as follows,
depending on whether you are importing photocopy and other cost charges, or telephone charges:
Importing Photocopy and other Cost Charges
To import photocopy and other cost charges, select Batch WIP Entry from the File menu. Then
select Equitrak Copy Charges from the Import menu (the Import option appears on the menu at the
top of the Batch WIP Entry screen). The following screen appears:
2011 Tussman Programs, Inc.
168
Tussman Program Release 10
Input File - Enter the name of the file containing the Equitrak charges. If you do not know the name or
location of the Equitrak export file, consult your Equitrak representative. If the file is not located in the
Tussman Program folder, you must also indicate the drive and path, as shown in the sample screen
above. If the file is in the Tussman Program folder, you can simply enter the file name.
Batch Code - Enter an optional Batch Code to be assigned to this group of charges.
Cost Code for Copy Charges - Enter the Tussman Program Cost Code which is used for copy
charges.
Cost Code for Fax Charges - Enter the Tussman Program Cost Code used for fax charges.
Show Number of Pages or Fax Copies on Bill - Enter Y if you want to include the number of copies
or fax pages in the description for each charge, or N to omit this information.
Unit Charge for Copies - Enter your unit charge for photocopies. For example, if you charge 30 cents
for each photocopy, enter 0.30.
Unit Charge for Fax Pages - Enter your charge for each page faxed. For example, if you charge
2011 Tussman Programs, Inc.
Charges
169
$1.00 per page, enter 1.00.
Charge Separate Rate for Copies for each Matter - If you want to charge different rates for
photocopy charges for different clients, enter Y. You must then enter the specific rate you want to
charge each client in the Client Group space in each client screen. The amount must be preceded by
the letter P. For example, if you want to charge client XYZ 20 cents per photocopy, enter P25 in the
Client Group space for client XYZ. If you have not entered the rate in the Client Group space for a
client, the program will use the default rate entered in the Unit Charge for Copies space described
above.
Description to Appear on Bill for Copy Charges - Enter here the description you want to appear on
the bill for each copy charge. Note that if you are combining charges with the same cost code into a
single line item on the bill, the program will use the text for the cost code instead.
Description to Appear on Bill for Fax Charges - Enter here the description for each fax charge.
Use Transaction Date for Each Charge - Enter Y to use the transaction date found in the Equitrak
export file for each charge that is imported. Enter N if you would rather assign a different date, and
then enter that date in the space below.
If N, Enter Date to Assign to Each Charge - If you entered N for the previous selection, enter here
the date you want to assign to all the cost charges that are imported. Otherwise leave the date blank.
Rename Import file after Merging - Check this option if you want to rename the Equitrak export file
after the import procedure is complete. This prevents the charges in the file from being imported a
second time by mistake. The program will rename the file using the same name but with the extension
.old.
After verifying the above information, click Import to continue. When the import process is complete,
the records will be displayed on the Batch WIP Entry screen. You can then view, list, edit or delete
them as described in the Batch WIP Entry section. To merge them with the main unbilled charges file,
they must be flagged and exported as described in the Batch WIP Entry section. The program will
not flag or export charges that do not have a valid client or matter ID. Those records will remain in the
Batch WIP Entry screen and you can either edit or delete them.
Importing Phone Charges
To import telephone charges, select Batch WIP Entry from the File menu. Then select Equitrak
Phone Charges from the Import menu (the Import option appears on the menu at the top of the
Batch WIP Entry screen). The following screen appears:
2011 Tussman Programs, Inc.
170
Tussman Program Release 10
INput
Input File - Enter the name of the file containing the Equitrak phone charges. If you do not know the
name or location of the Equitrak export file, consult your Equitrak representative. If the file is not
located in the Tussman Program folder, you must also indicate the drive and path. If the file is in the
Tussman Program folder, you can simply enter the file name.
Batch Code - Enter an optional Batch Code to be assigned to this group of charges.
Cost Code - Enter the Tussman Program Cost Code which is used for phone charges.
Show Number Called on Bill - Enter Y to show the number called as part of the description for each
charge on the client's bill, or N to omit.
Show Number of Minutes on Bill - Enter Y to show the call duration in minutes as part of the
description for each charge on the client's bill, or N to omit.
Description to Appear on Bill for Phone Charges - Enter here the description for each phone
charge that you want to appear on the client's bill. Note that if you are combining charges with the
same cost code into a single line item on the bill, the program will use the text for the cost code
instead.
Enter Date to Assign to these Charges - If you enter a date here, that date will be assigned to all the
charges which are imported, regardless of the actual date of the call. To use the actual call date as the
date for each charge, leave this space blank.
Rename Input file after Merging - Check this option if you want to rename the Equitrak export file
after the import procedure is complete. This prevents the charges in the file from being imported a
second time by mistake. The program will rename the file using the same name but with the extension
.old.
After verifying the above information, click Import to continue. When the import process is complete,
2011 Tussman Programs, Inc.
Charges
171
the records will be displayed on the Batch WIP Entry screen. You can then view, list, edit or delete
them as described in the Batch WIP Entry section. To merge them with the main unbilled charges file,
they must be flagged and exported as described in the Batch WIP Entry section. The program will
not flag or export charges that do not have a valid client or matter ID. Those records will remain in the
Batch WIP Entry screen and you can either edit or delete them.
Creating a Validation Table for Equitrak
Tussman can create validation tables containing your staff codes and client and matter IDs for loading
into your Equitrak system. To do this, select Batch WIP Entry from the File menu. Then select
Equitrak Download from the Import menu (the Import option appears on the menu at the top of the
Batch WIP Entry screen). Enter the destination for the validation files. If you leave this space
blank, the files will be created in the Tussman folder. To send them to a different folder, enter the drive
and folder name; for example, c:\equitrak. The folder you specify must already exist. Then specify the
delimiter you want to use to separate the client and matter IDs. You can use either a period or a
hyphen. Click OK and the files will be generated. Four files will be created:
CCUVLDTB.EQT - Contains a list of the client and matter IDs separated by the delimiter you
specified
CLNTSIMP.EQT - Contains the client IDs and client names separated by an equals sign
MTTRSIMP.EQT - Contains the client and matter IDs, separated by the delimiter you specified,
followed by the matter title separated by an equals sign.
USERSIMP.EQT - Contains the staff codes and staff member names separated by an equals
sign
13.12.1.6 CSV File Import
The CSV File Import function allows you to import both fee and cost charges into the program from a
CSV (comma delimited) file. The file does not have to be in any particular format; you simply tell the
program which column each data item (date, client ID, staff code, etc) is located in and the program
does the rest.
To access this function open the Batch WIP Entry screen by clicking the
button on the
Toolbar at the top. Click on the Import item on the menu at the very top of the screen and select CSV
File Import.
First you will be asked to select the file that you want to import from. After selecting the file the
following screen will appear:
2011 Tussman Programs, Inc.
172
Tussman Program Release 10
In the top portion of the screen indicate whether you will be importing fees or costs. However, if the file
you are importing from contains a column with the transaction type code, then the program will ignore
this setting and use the transaction type code assigned to each charge.
Below that next to each data item indicate the number of the column where that data item can be
found. For example, if the Date is in column 2 of the csv file, enter 2 in the space next to Date.
The date must appear in the CSV file in the format mm/dd/yy or mm/dd/yyyy.
Staff Code, Task Code, and Activity/Cost code are not required although for fee charges a staff code is
always desirable.
The Amount is not required for fee charges as the program will calculate that automatically. Similarly
for costs you do not have to enter an Amount if you have assigned a number of Units and have
assigned a Cost Code which has a unit charge amount assigned to it.
When ready to import click OK and the charges will then appear on the Batch WIP Entry screen where
you can review and edit them if necessary. If you made a mistake you can always delete those
charges and import again. Then to merge them with the main list of charges flag all the entries and
click the Export item on the menu at the top.
13.12.1.7 Generic Import Format
The Generic Import function enables you to import cost charges from a comma delimited text file
which has been exported from a cost metering device. The file must be in the exact format described
below.
The export file must be a plain ASCII text file with each cost record appearing on a separate line. The
information for each record must be in comma delimited format. Each data item may be enclosed by
quotation marks, but that is not required. The information for each record must appear in the following
2011 Tussman Programs, Inc.
Charges
173
order and format:
1. Client ID - The Tussman Program client ID. You may leave the client ID blank and enter just
the matter ID, provided that in Tussman you use unique matter IDs; i.e., no two matters are
assigned the same ID.
2. Matter ID - The Tussman Program matter ID
3. Dollar Amount of the Charge
4. Number of Units charged (not required)
5. Date - In format MM/DD/YY
6. Cost Code - Must be a one character code indicating the type of cost. This can be any
letter, but you must enter a list of the cost codes you will be using for this purpose in the
Tussman Program Cost Code file, and it must be entered in the cost code file as follows: The
code must be preceded by the @ symbol, followed by the one character code, followed
immediately by the corresponding Tussman Program cost code for the same type of cost, if it is
different. For example, if your Tussman Program cost code for photocopy charges is PC, and in
the generic import file you will be using just the code C to indicate copies, then you must create
a new cost code in the Tussman Program cost code file with the code @CPC. Enter as the
description for that code the text you want to appear on the bill for each of those charges.
Once you have created the export file from your cost metering device, you can import it into Tussman
as follows:
1. Select Batch WIP Entry from the File menu;
2. Select Generic Import from the Import menu at the top of the screen;
3. A standard Windows dialog will come up that will allow you to select the file that you will be
importing from. It must be located on a disk, memory stick or other media, or in a folder on your hard
drive or the network server.
4. After the charges are imported, they will appear in the Batch WIP Entry screen. From this screen,
you can view, list, edit, or delete the entries as described in the Batch WIP Entry section. When you
are ready to add them to the main unbilled charges file, they must be flagged and exported as
described in the Batch WIP Entry section.
13.12.1.8 Tussman Import
Use this function to import charges from an ASCII text file that was created using the Export Time
function. This enables you to transfer charges from one copy of the program to another, or for other
purposes of an unusual nature.
To use this function, select Batch WIP Entry from the File menu, then select Tussman Import from
the Import menu at the top of the screen. A standard Windows dialog will appear which allows you to
select the file. It must be located on a disk, memory stick or other media, or in a folder on your hard
drive or the network server. The following dialog then appears:
2011 Tussman Programs, Inc.
174
Tussman Program Release 10
Input File - Displays the name of the file you selected to import from.
Recalculate Amount of Charge on Import - If you check this box, the program will recalculate the
dollar amount of each charge based on the billing rates specified in this copy of the program. If
unchecked, the charges will be imported with their original dollar amounts.
Click OK to perform the import. After the charges are imported, they will appear in the Batch WIP
Entry screen. From this screen, you can view, list, edit, or delete the entries as described in the
Batch WIP Entry section. When you are ready to add them to the main unbilled charges file, they must
be flagged and exported as described in the Batch WIP Entry section.
13.12.1.9 Tussman Merge Import
This function is used to import charges from the DOS version of the Tussman Merge Module which is
still used by some customers to import charges from certain older photocopy and telephone metering
devices. After those charges have been imported into the Merge Module using the Convert Data
function in the Merge Module, instead of using the Merge Transactions function in the Merge Module
to send those charges to the main unbilled charges file in Tussman, use this function. After selecting
this function, a dialog will ask you which version of the Merge Module you are using. Select the
regular Merge option, unless you have been specifically instructed to use the YMERGE function. This
function sends the charges from the Merge Module directly to the main unbilled charges file in
Tussman They will not appear in the Batch WIP Entry screen, as that intermediate step is skipped. .
Before merging the charges, they can be reviewed and edited in the Merge Module itself.
13.13 Listing Charges
Lists of charges, both billed and unbilled, can be generated by clicking on Charges from the Main
Menu and selecting List from the submenu. These lists are used primarily when you need to print a
hard copy, although they can also be viewed on the screen using the Preview function. However,
when you want to view or edit charges on the screen it is usually easier to use the browse function, as
described in the Browsing Fee Charges section.
From the List submenu select the type of report you want:::
Unbilled Charges by Client/Matter - Lists only unbilled charges sorted by client/matter. Use this
report if, for example, you want to generate a quick list of the unbilled charges for a specific client or
matter.
Unbilled Charges by Date - Lists only unbilled charges sorted by date
Billed Charges by Client/Matter - Lists only billed charges sorted by client/matter.
2011 Tussman Programs, Inc.
Charges
175
Billed Charges by Date - Lists only billed charges sorted by date
All Charges by Client/Matter - Lists all charges, both billed and unbilled, sorted by client/matter.
Use this report if, for example, you want a complete list of all the charges for a specific client or matter,
regardless of whether or not they have been billed.
All Charges by Date - Lists all charges, both billed and unbilled, sorted by date
All Charges by Record Number - Lists all charges, both billed and unbilled, in record number order
(i.e., the order in which they were entered)
All Charges in a Batch - Lists all the charges in a specific batch, sorted by record number (i.e., the
order in which they were entered). Select the batch you want and click OK to proceed to the next step.
If you prefer to list the charges in a batch sorted by client/matter or by date, or if you just want to list
billed records, select one of the other lists described above and then filter the list for the batch you
want, as described below in the Report Options section. You can limit this list to unbilled charges
only by checking the List WIP only box in the Report options screen described below.
Staff Member Timesheets - Lists all charges, billed and/or unbilled, for a specific staff member.
This report is useful if you want to generate a detailed list of each staff member's time for their review.
Select the staff member you want and click OK to proceed to the next step, or leave the staff member
space blank and the program will generate a separate report for each staff member.
The charges for each staff member can be listed sorted by date or by client/matter. This option is
found in the Options section of the next screen, as described below. The list will normally include both
billed and unbilled charges, but you can filter the list to include unbilled charges only by checking the
List WIP only box in the next screen as described below.
A similar report listing charges for each staff member in a week or month at a glance format can be
generated using the Time at a Glance function.
Report Options Screen
After selecting the type of report you want from the submenu, as described above, a screen appears
which lists a variety of report options you can select, as shown below:
2011 Tussman Programs, Inc.
176
Tussman Program Release 10
The list options determine which types of charges are included, whether or not the list is filtered, the
date range, and the list detail and format, as described below.
Transactions Included - Select the types of charges you want included by checking or unchecking
each item. For example, you can exclude cost charges from the list by unchecking Costs.
The List WIP Only option is useful if you are generating a Batch List or Attorney Timesheet, which
normally includes both billed and unbilled charges, but you want to show unbilled charges only. If you
did not select one of hose two reports, this option is grayed out.
.
The last three items let you generate a list showing only charges that are on hold (either because a
hold has been placed on the matter itself in the Billing Instructions screen for that matter, or because
the charge itself has been placed on hold using the bill status feature, described in the section on
Entering Charges), to list only charges that have been deleted, or to list only charges that have been
written up or down. When selecting one of these options, you should still make sure that you have
checked the types of charges you want from the list above. For example, if you want to list costs on
hold, make sure the Costs selection is checked also.
Filter - This section lets you filter the list to include only charges that match all the filter criteria you
enter. For example, you can filter the list to include only charges in a specific batch or with a specific
transaction (entry) type. To list only costs, for example, enter C in the Transaction Type space. To list
only flat fee charges, enter F. You can also filter to include only charges for a specific staff member,
task code, activity code or cost code and location code. For example, to list only photocopy
charges, enter C in the Transaction Type space and enter the code you use for photocopy charges in
the Activity/Cost Code space.
You can perform a text search to list only charges with a specific name, word or phrase in the body of
the description for that charge by entering the text you want to search for in the Description space.
Files Included - Use these selections to limit the list to a specific client or matter, or to filter the list to
include charges for selected clients and matters, as described in the client lookup and matter lookup
2011 Tussman Programs, Inc.
Charges
177
sections.
Date Range - Leave the date range blank to include all charges regardless of date, or enter the date
range you want. The MTD and YTD buttons are quick ways of entering the correct dates to show
charges for the current month or year to date. The All button can be used to blank out dates that have
previously been entered.
Options - Set the Detail, Summary or Total option to D to generate a detailed list itemizing each
charge. Enter T and the report will show only the total of the charges, with no itemization. Enter S
only if you are generating a list of unbilled, billed or all charges sorted by date or client/matter, and
instead of itemizing each charge you only want the total for each date or client and matter. If using the
S option, you must also set the Include Subtotals option to Y. Note that to generate a summary
report of unbilled charges only it is better to use the WIP Summary report described elsewhere..
Set the Include Subtotals option to Y to include a subtotal of the charges for each date or client and
matter, depending on which sorting option you are using. This selection will have no effect if you are
generating a batch list or a list of all charges by record number. If you are generating an attorney
timesheet, the subtotals will be for each date.
The Subtotal by Client or Matter option determines whether separate subtotals are shown for each
matter, with a grand total for each client, or whether a subtotal is shown for the client only. Enter C to
subtotal by client only, M to subtotal by matter. This option applies only if you selected one of the
lists where charges are sorted by client/matter.
If you set New Page After Subtotals to Y, then after printing each subtotal on the report the program
will skip to a new page (this option only applies if you have set the Include Subtotals option to Y). This
is useful if, for example, you want to print a separate report listing the charges for each date or for each
client. If you are sorting charges by client/matter, then the following option, New Page for each File,
determines whether the program skips to a new page after each matter (enter M) or after each client
(enter C). Do not use this option if you are generating Attorney Timesheets for all staff members, as
each staff member's list will by default begin on a new page.
Enter 1, 2 or 3 in the Line Spacing option to skip that number of lines after each charge.
The Sort by Date (1) or File (2) option appears only if you are generating an Attorney Timesheet.
This determines whether charges for each attorney are listed by date (enter 1) or by client/matter
(enter 2).
The Separate Column for Costs option appears for all reports except the Attorney Timesheets,
which do not include cost charges. Enter Y if you want the report to show the dollar amount of cost
and fee charges in separate columns.
Include - The Include section in the lower right hand corner determines which items of information are
included for each charge on the report. You can include or omit the Entry #, Entry Type, Batch, Task
Code, Activity/Cost Code, Description, and dollar Amount. Certain items such as the Entry
Number, Entry Type, Date, Client and matter IDs (unless they appear in the subtotal headings),
Staff Code, and Hour amount for hourly charges will always appear. You also have the option of
including the complete client name and/or matter title for each charge. If selected, these will appear in
brackets following the description for each charge. If you are sorting the list by client/matter, and
including subtotals, these options are superfluous as the client name and matter title will be shown
automatically as a heading for each new group of charges on the report.
The Legend at End option simply causes an explanation of the various entry type codes to be printed
at the end of the report.
Report Title - You can enter your own title to appear in the heading of the report if desired.
2011 Tussman Programs, Inc.
178
Tussman Program Release 10
Reading the Report
The first column of the report shows the entry number (which can be used to locate the charge for
editing purposes) and the batch code (appearing underneath the entry number, if you selected the
options to include those items).
Two symbols may appear to the right of the entry number An asterisk (*) indicates the charge is on
hold. An exclamation mark (!) indicates the charge has not yet been billed.
If you are including the Task and/or Activity/Cost codes, those items will appear in brackets following
the description, together with the client name and matter title, if those items are being included.
An X appearing next to a dollar amount indicates that the charge is nonbillable.
13.14 Editing Billed Charges
You can locate and view billed charges of all types by clicking Charges from the Main Menu, selecting
Browse from the submenu, then selecting All Billed Charges. You can also browse the billed
charges for a client or matter by clicking on the Browse Billed Charges button on the Account Status
screen for a client or matter, or by finding those charges on the Master Ledger for that client or matter.
When browsing a list of billed charges for a client or matter, the list includes the number of the invoice
that the charge appeared on. Lists of billed charges can also be generated as described in
the Listing Charges section.
Billed charges can be edited, but only the date, description, reference, batch and order code can be
changed. Other changes are not allowed as they might cause the dollar amount to no longer match
the amount on the bill. To change the amount of a billed charge, or to assign it to a different matter,
you must first unfinalize the bill that it appeared on.
13.15 Spell Checking
You can spell check an individual charge either at the time it is entered or later when editing it by
clicking on the
button to the right of the description space. You can also spell check an AR
transaction or a calendar entry in the same way.
You can also spell check all unbilled charges, or all unbilled charges in a specific batch, for a specific
matter or for a specific staff member by clicking the
button on the Toolbar at the top. then
picking the procedure you want from the submenu. This function only spell checks unbilled charges
(fees and costs) and not AR transactions or calendar entries. There is also a spell check function in
the Batch WIP Entry screen which lets you spell check charges entered in that screen.
Performing the Spell Check
When performing the spell check if the program finds a word that is not in the dictionary the
Misspelled Word dialog shown below pops up.
2011 Tussman Programs, Inc.
Charges
179
The top portion shows the record number of the charge (if the charge has already been saved), the
word that was found, and a portion of the text within which the word was found. Below that you can
select the following options:
Correct Manually - Manually enter the correct word to replace the existing word.
Ignore - Skip this word and continue spell checking
Add to Dictionary - Add this word to the spell check dictionary
Suggest Spelling - List some possible correct words. If the correct word appears on the list select it
and it will be inserted in place of the existing word.
Cancel Spell Check.= Discontinue the spell check.
Editing the Spell Check Dictionary
The program maintains two lists of words that are referenced when performing a spell check: the
main dictionary and the user dictionary. The main dictionary is a list of words provided with the
program. The user dictionary consists of words that are added by the user whenever you click the
Add to Dictionary button when the program finds an unknown word when performing a spell check.
You can also add words manually, or edit and delete existing words, using the Edit Spell Check
Dictionary function. To do this, select Spell Check from the Charges menu, then select Edit Spell
Check Dictionary from the submenu. The following screen appears:
2011 Tussman Programs, Inc.
180
Tussman Program Release 10
At the top of the Spell Check Dictionary dialog it indicates which dictionary you are currently working
with. The Main Dictionary always comes up by default. To switch to the User Dictionary, or to then
switch back to the Main Dictionary, click the Switch Dictionary button which appears above the Close
button. If you are searching for a specific word you may have to check both dictionaries to find it.
To search for a word in the dictionary, make sure you are in the correct dictionary, type the word in the
Enter Word space and click the Search button. The program will indicate whether or not the word is
found. If the word is not found, you can add that word to the dictionary by clicking the Save button. If
the word is found, you can delete that word from the dictionary by clicking the Delete button. To edit
it, make the change and click the Save button.
You can scroll through the list of words in a dictionary using the Top, Previous, Next, and Bottom
buttons. Click Top to go to the first word in the dictionary, and Bottom to go to the last. Then click
either Previous or Next to display the previous or next word. To go to a specific point in the list, enter
a letter (a-z) or a known word in the Enter Word space and click Search, then use the Previous and
Next buttons. As you scroll through the list the current word will be displayed in the Enter Word space
and you can delete or edit it if necessary.
14
Making Bulk Changes to WIP
In addition to editing charges individually, you can make certain changes to a group of selected
charges. You can use this function to place or remove billing holds, delete charges, or assign charges
to a different staff member or matter, as follows:
1. Open the Browse WIP screen by clicking on the
clicking the Browse All WIP button.
button on the toolbar at the top, then
2. You can then select the charges you want to change by one of two methods:
2011 Tussman Programs, Inc.
Making Bulk Changes to WIP
181
a. Click the Filter button at the top and select one or more filtering options to select the
charges you want. For example, if you want to reassign all the unbilled charges for a specific staff
member to a different staff member, click the Filter button and enter the Staff Member code, then click
OK so the screen displays just the records for the Staff Member you want. Or,
b. You can tag the individual charges you want to change by highlighting each charge you
want to change and either right clicking on it or clicking the Tag button at the top of the Browse screen.
A red check mark will appear in the first column for each charge you have tagged. After you have
tagged all the charges you want to change click on the Filter button, check the Tagged Entries only
box and click OK.
Note that unlike tagging of client and matter files, this is only a temporary tagging function and the tags
are automatically erased when you close the program.
3. Now that you have displayed the charges you want to change click the Action button at the top of
the Browse screen and select the action you want to make from the menu displayed below:
For example, if you want to reassign all the selected charges to a new staff member, click Assign to
Different Staff Member, enter the staff member code, and continue as instructed. Similarly with the
option to Assign to Different Matter. In either case, the Program will recalculate the amount of each
charge if the change causes a change in the billing rate.
15
AR Transactions
AR transactions include client payments and any other type of transaction that directly affects a
client's account balance. Every time a bill is finalized, the client's account balance is increased by the
amount of the bill. Every time a payment is recorded, the client's account balance is reduced by the
amount of the payment. A client's current account balance is thus the result of adding all of their prior
bills and subtracting all of their payments and adjusting for any direct debits or credits which are posted
to the account. To keep track of this, the program creates a record of each bill when it is finalized,
which is assigned AR transaction type B. Payments, which are entered directly by the program user,
are assigned transaction type P. Other AR transactions are used to record deposits to and
disbursements from a clients trust or retainer account (types T and R respectively), or to enter credits
(type Q),beginning balances (type BB), debits (type D), or refunds (type DA). AR transactions can be
distinguished from charges in that charges are the individual entries that make up a client's bill. Until it
has been billed, a charge has no affect on a client's account balance.
When you enter an AR transaction it updates the client's account balance immediately; there is no
separate posting or updating procedure that must be performed. AR transactions can be posted to the
General Ledger either automatically upon entry, or manually by batch or month.
2011 Tussman Programs, Inc.
182
Tussman Program Release 10
The following sections explain in detail:
The specific types of AR transactions
Howe to record a client's beginning balance
The procedures for entering AR transacdtions
How to locate and browse AR transactions
Procedures for editing editing AR transactions
The way in which payments are applied against a clients account balance;
How to reverse a payment or record a refund to a client;
How the program handles advance payments and credit balances;
How to handle the situation where a client has more than one matter;
The use of retainer and trust accounts;
How to post cash receipts to the General Ledger;
Howe to generate cash receipt journals and other AR journal reports.
15.1
Types of AR Transactions
Following are the different types of AR transactions. Each type is identified by an Entry Type code, as
indicated below. The list of codes is built into the program and cannot be modified. Some of these
transactions are created automatically by the program and others must be entered manually. By far
the most common type of entry you will be recording is a client payment (type P). Refer to the section
on Entering AR Transactions for instructions on how to enter payments and other AR transactions.
B - Billing Record. This type of transaction is created automatically by the program when a bill is
finalized. The amount of the transaction is the total of the new charges (fees, costs, tax and interest)
appearing on that bill. The Reference assigned to the transaction is the invoice number which
appeared on that bill, and the date of the transaction is the same as the posting date used when
generating the bill. A billing record cannot be created manually, but you can manually enter a
beginning balance transaction (type BB) or a debit transaction (type D) to increase the amount of a
client's account balance without having to generate a bill.
BB - Beginning Balance. A beginning balance transaction is used when first setting up the program
to record an unpaid balance due for an existing client that is being carried over from your old billing
system. For example, if you have a matter for a client which has a balance due of $1,000.00 that you
want to carry over from your old system, record a BB transaction in that amount as described in the
beginning balances section..
D - Debit Transaction. A debit transaction is a way of increasing a client's account balance without
having to generate a bill. A debit has the opposite effect of a payment or credit, which decreases an
account balance. It is similar to a BB, except that unlike a BB transaction, which does not appear on
the client's bill except as part of the balance forward amount, a debit transaction can appear on the
client's bill in the payments and credits section (although it can also be applied directly to adjust the
balance forward by unchecking the Show on Next Bill option, in which case it works exactly like a
BB).
A debit can be used if for example, you receive a payment from a client for a one-time service for
which you do not need or want to generate a bill. In that case, first enter a debit transaction in the same
amount as the payment so that the payment can then be applied against an offsetting amount due.
Otherwise, the program would create a credit balance for that client which would remain on your books
indefinitely.
While a debit can be used to increase a client's balance in order to reverse a previous payment, such
as when a client's check has been returned by the bank, there is a separate procedure for
reversing payments which is more appropriate in that case. A debit can be used, however, to transfer
a balance due from one matter to another matter.
2011 Tussman Programs, Inc.
AR Transactions
183
P - Payment. Use to record any kind of cash receipt to your firm, except for receipts that are
deposited in a client's trust or retainer account. Normally a cash receipt is from a client, but
occasionally you may also receive other kinds of receipts, such as rental income, reimbursement for
the use of shared equipment, etc. These types of non-client cash receipts can also be recorded as
payments by entering an asterisk (*) in the client space when entering the transaction. They can then
be posted to the GL along with your other cash receipts, although for non-client cash receipts you must
manually assign the GL account distributions by clicking on the GL Distribution button when entering
the transaction.
While a payment is normally recorded as entry type P, it can also be recorded as PF, PC, PT, or PI if
you want it to be applied only against fees, costs, tax or interest respectively, as described in the
Payment Application Rules section.
Payment transactions are also created automatically by the program when you finalize a bill where
funds were applied automatically against the bill from the client's retainer account. In that case, the
program will create separate payment transactions for the amounts applied against fees, costs, tax,
and interest.
The manner in which the program applies payments against a client's balance is described separately
in the Payment Application Rules section.
You can record a payment even if the client has no outstanding balance to apply it against. In that
case, the payment is recorded as an advance and creates a credit balance, which the program
automatically applies against future charges as described in the Advances and Credit Balances
section.
Client payments normally must be assigned to a specific matter, although you can apply a payment to
multiple matters for the same client as described in the Client Level Payments section.
Q - Credit or Writeoff. Entry type Q is used whenever you want to credit the client's account for any
reason other than the receipt of a payment; for example, you are writing off or discounting all or part of
a balance due, or reducing the balance on one matter because you are transferring it to another. A Q
is normally used only to write off an outstanding balance, and not to reduce the amount of the charges
on a current bill, as described separately in the section on writing off charges, although it can be used
for that as well.
While a credit is normally recorded as entry type Q, it can also be recorded as QF, QC, QT, or QI if you
want it to be applied only against fees, costs, tax or interest respectively, as described in the
Payment Application Rules section.
Credits are applied against a clients account balance in exactly the same manner as payments. As
with payments, you can also record a credit even if the client has no outstanding balance, and it will be
carried forward as a credit balance to be applied against future charges. You can also record a client
level credit in the same way as a client level payment.
DR - Reverse Payment or Credit. A DR transaction is created automatically by the program when
you reverse a payment or credit that was previously entered, as described in the section on
Reversing Payments. It has the effect of increasing the client's account balance in the same amount
that the payment or credit reduced it. A DR is always entered as either a DR1 or a DR2. A DR1 is
created to reverse a payment (type P). A DR2 is created when you reverse a credit (type Q).
DA - Refund or Reduce Credit Balance. This transaction is used to record a refund paid to a client,
or to reduce the amount of a client's outstanding credit balance, as described in the client refunds
section. If the credit balance which you are refunding or reducing is earmarked as a fee, cost, tax or
interest credit, you must enter the DA as a DAF, DAC, DAT or DAI respectively.
RD - Retainer Disbursement. Used to record a disbursement from a client's retainer account, as
2011 Tussman Programs, Inc.
184
Tussman Program Release 10
described in the section on Retainer and Trust Accounts.
RR - Retainer Receipt. Used to record a receipt which is deposited in a client's retainer account, as
described in the section on Retainer and Trust Accounts.
TD - Trust Disbursement. Used to record a disbursement from a client's trust account, as described
in the section on Retainer and Trust Accounts.
TR - Trust Receipt. Used to record a receipt which is deposited in a client's trust account, as
described in the section on Retainer and Trust Accounts.
Combined Transactions
In the following cases you can combine two transaction types into a single transaction, a technique that
speeds up data entry. When the transaction is saved, the program splits them into two separate
entries, as described below:
RDP - Use this type to record a disbursement from a client's retainer account which is being paid to the
firm as reimbursement for fees or costs advanced. The program will save separate RD (retainer
disbursement) and P (payment) transactions.
TDP -. Use this type to record a disbursement from a client's trust account which is being paid to the
firm as reimbursement for fees or costs advanced. The program will save separate TD (retainer
disbursement) and P (payment) transactions.
DP - Use this to record a charge and a payment in a single entry; for example, if you see a client for a
one time consultation and do not need to generate a bill. If you just record the client's payment, the
program will show that they have a credit balance. To avoid this, you can enter a DP. When saved,
the program will create separate debit (type D) and payment (type P) transactions. The two
transactions will offset eachother so that the client will have a 0.00 balance. When entering the
transaction, uncheck the Show on Next Bill box, as you will not be generating a bill. The only
drawback of this shortcut is that using a D to record the charge means that it will not show up as hours
worked on your productivity reports.
You can only use the above combined codes when entering a new AR transaction; you cannot change
the type of an existing transaction to one of the combined codes.
.
15.2
Beginning Balances
When first installing the Tussman Program for use by your firm, it may be necessary to record
beginning balances for those matters that have an outstanding balance due which you want to carry
over from your old system. This is done by recording a Beginning Balance transaction (type BB), as
described in the section on Entering AR Transactions.
Depending on the level of detail that you want to bring over from your old system, you can record the
beginning balance in a variety of ways, all of which involve entering one or more separate BB
transactions.
The simplest method is to record a single BB transaction in the amount of the outstanding balance for
each matter. The beginning balance transaction should be assigned a date corresponding to the date
of the last bill that was generated for that matter.
If the outstanding balance for a matter consists of amounts that were billed on more than one invoice,
2011 Tussman Programs, Inc.
AR Transactions
185
you have the option of entering a separate BB transaction for each outstanding invoice. Each BB
transaction should be assigned a date corresponding to the date of that invoice, and the amount
should be the remaining unpaid balance from that invoice.
Besides entering just the amount of the beginning balance, you can allocate it between fees, costs,
interest and tax, and you can allocate the fee and cost portions to individual staff members and cost
categories. This is done by clicking on the Billing Distribution button when entering the transaction,
as described in the section on Entering AR Transactions.
If a client has a credit balance on an individual matter, that must be recorded by entering a credit (type
Q) transaction instead of a beginning balance. For example, if a client has a credit balance of
$1,000.00, enter a Q transaction in that amount. Date it the date of the last bill and uncheck the Show
on Next Bill option so that the Q transaction appears as a balance forward, and not as a new
transaction on the bill.
If a client has a balance in their retainer or trust account, enter that either as a retainer receipt (RR) or
trust receipt (TR) transaction in the amount of the balance forward, as described in the
Entering AR transactions section. Date the transaction the same as the client's last bill and uncheck
the Show on Next Bill option.
Instead of simply recording a beginning balance for a matter you can alternatively enter the complete
billing and payment history. Do that by entering a separate BB transaction for each invoice that was
generated for that matter, assigning each the date of that invoice and the amount of new charges that
were billed on that invoice. Then record separate payment (type P) and credit (type Q) transactions for
each payment or credit that the client made or received. The program will treat the difference between
the total billings (BB's) and payment and credits (P's and Q's) as the beginning balance for that
matter. When recording these transactions, be sure to always uncheck the Show on Next Bill option.
This method is not recommended as it may prove too complicated and time consuming. You can
always refer to your old billing system if you need to view the prior billing history for a client's matter.
Instead of recording the complete billing and payment history, it is also possible to simply enter
cumulative case-to-date totals for each matter. To do this, record a single BB transaction for the
entire amount of all charges billed to date, and a separate P transaction for the total payments received
to date. You can also enter a Q transaction if the client was given any credits. This is recommended
only if you need to be able to show the cumulative total of amounts billed and paid to date on a clients
bill, and want to carry over the totals to date from your old system. Again, date these transactions the
date of the client's last bill and uncheck the Show on Next Bill option. The program will automatically
record the difference, if any, between the total billed and the total payments and credits as the
beginning balance for that matter.
When recording your beginning balances, it is necessary to record a separate beginning balance for
each matter. It is not possible to simply enter a beginning balance at the client level. The only
exception is if the client has a credit balance and you want to have the program apply that credit
against future billings on any of that client's matters. To do this, enter a credit transaction (type Q) in
the amount of the credit balance and instead of specifying the matter enter an asterisk (*) in the matter
space, as described in the section on Client Level Payments. Date the transaction the date of the
client's last bill and uncheck the Show on Next Bill option.
15.3
Entering AR Transactions
To enter an AR transaction, left click the
2011 Tussman Programs, Inc.
button on the Control Panel at the left, (You can
186
Tussman Program Release 10
also click the
button on the Toolbar at the top and select AR Transaction from the menu,
or select Receipts from the Main Menu and select New from the submenu).
Select the type of transaction you want and fill in the information as follows:
Entry Type - Click on the
button for a list of the accepted entry type codes which you can enter.
The entry type defaults to P for payment. Otherwise, enter the code for the type of transaction you
want to enter, as described in the section on Types of AR Transactions. The types of transactions you
can enter include payments (type P), credits (type Q), beginning balances (type BB), debits (type D),
refunds (type DA), and retainer or trust account receipts and disbursements (types RR, RD, TR and
TD).
Date - Enter the transaction date, either by typing it in or clicking the
or
buttons or pressing
the PG DN or PG UP keys to go ahead or back a day at a time. You can also select the date by
clicking on the calendar button to the right of the Date space.
Client - Select the client as described in the Client Lookup section. If you are recording a non-client
cash receipt (i.e., a payment you have received from a source other than a client), type an asterisk (*)
in the client space. Non-client cash receipts can only be recorded using entry type P.
Matter - Select the matter as described in the Matter Lookup section.
If you are recording a payment or credit (entry type P or Q) for a client with multiple matters, and want
the program to apply it to all of that client's matters, type an asterisk (*) in the Matter space. This
feature is described in detail in the Client Level Payments section.
Reference - Enter the check number or other reference if applicable. This information is not required.
Press the F9 key to insert the same Reference from the previously saved transaction.
2011 Tussman Programs, Inc.
AR Transactions
187
Find Invoice - If you are recording a client payment (type P) and do not know the client or matter ID,
but do know the invoice number of the bill being paid, click on the Find Invoice button to the right of
the Reference space, enter the invoice number and click OK. The program will search for an invoice
with that number and if found will insert the appropriate client and matter ID for you, or give you a list to
choose from if it finds more than one. This feature is useful if, for example, you need to record a check
from a client which does not indicate the client or matter ID, but where the client has written the invoice
number on the check.. You can use the Find Invoice button any time you need to look up a client or
matter based solely on an invoice number.
Amount - Enter the transaction amount. It must always be entered as a positive number, regardless of
the type of transaction.
If you are recording a payment, credit, beginning balance or debit transaction the client's current
account balance will be displayed to the right of the amount space. If you are entering a retainer or
trust transaction their current retainer or trust account balance will be displayed. To insert that amount
in the Amount space click the left arrow button to the right of the Amount space.
Billing Distribution (Payments and Credits) -When entering a payment (P) or credit (Q), the
Billing Distribution button shows you how the program is going to apply that transaction against the
outstanding balance for that matter or client. Since this is performed automatically by the program,
according to the application priority rules described in the Payment Application Rules section, you do
not have to look at the Billing Distribution screen unless you want to verify the application, or unless
you want to change it as described below. The following dialog comes up after clicking the Billing
Distribution button:
The left hand portion of the Payment Application dialog shows how the payment or credit will be
applied by category of charge, indicating how much is going to pay off fees, costs, tax, and interest.
If the amount of the payment exceeds the outstanding balance, then the excess will appear as being
recorded as an advance. Amounts being applied against fees and costs will also be broken down by
staff member or by category of cost. For example, if the client is paying an outstanding balance of
$1000.00, and $600.00 of that was billed by staff member ABC and $400.00 by staff member XYZ, the
distribution on the left hand side will show an amount of $600.00 applied to the category of fees for
2011 Tussman Programs, Inc.
188
Tussman Program Release 10
code ABC and $400.00 in fees for XYZ. The total of these distributions will equal the amount you
entered in the Amount space.
The right hand side of the dialog will display a list of the invoices which are being paid by the payment
or credit, showing the date and reference of each invoice and the amount being applied against that
invoice. If any beginning balance or debit transactions remain outstanding and are being paid, those
also will be listed in addition to the actual bills. If the amount of the payment or credit exceeds the
outstanding balance from all invoices, the excess will be listed as an advance. Again, the total of
these distributions will equal the payment or credit amount.
If you are recording a client level payment, the distributions will reflect the application of the payment or
credit against all that client's outstanding invoices. Otherwise, it will be applied only against the
balance due for the matter you specified.
The bottom of the Payment Application dialog has several buttons which let you perform the following
functions in case you want to change how the payment is being applied:
Inv # - Click this button if you want the entire payment or credit to be applied against a specific invoice.
Enter the number (reference) of the invoice you want to pay and click OK. An Open Invoices dialog
will appear listing any open invoices for this client or matter with that invoice number. If you select one
or more invoices from the list to pay, then the payment or credit will be applied first against that invoice
or invoices, and any remaining amount will be applied to the other invoices, if any, in the normal
fashion. The Open Invoices dialog is described below, as it is the same screen which comes up when
you click Select Invoices to Pay, except that here it only lists the invoice or invoices that have the
invoice number you specify..
Select Invoices to Pay - Clicking this button brings up an Open Invoices dialog that lists all the
outstanding invoices, as well as any unpaid beginning balance or debit transactions, for the matter you
selected. If you are recording a client level payment, the list will include all invoices for that client.
The list shows the matter ID, date, reference, and balance due for each of the invoices. From this list
you can select a specific invoice or invoices for payment by highlighting the one you want to pay and
clicking the Select/unselect Invoice button at the bottom. Once you have selected an invoice a >
symbol will appear in the Status (S) column to the left of the matter ID. Clicking the Select/Unselect
Invoice button again will remove the > symbol and undo the selection. Alternatively, if instead of
selecting an invoice you want to pay every invoice except one or more of those listed, highlight the one
you do not want to pay and click the Mark/Unmark "Do Not Pay" button. An asterisk (*) will appear in
the Status column for those invoices marked "do not pay". To reverse the selection, click the button
again. Once you have made your selections, click the OK button and the Payment Application screen
will be updated to reflect the revised application.
Click the Change Sort Order button if you want to change the order in which the open invoices are
listed.
Note that the Make Partial Payment button at the bottom of the Open Invoices dialog is not
functional.
Record as Advance - Click this button only if you do not want to apply this payment or credit against
any of the client's outstanding invoices. After selecting this option, an asterisk will appear next to the
Record as Advance button. If you record the payment or credit as an advance it will only be applied
to future billings for the matter selected. It is not necessary to click this button if the payment or credit
is already being recorded as an advance because the amount exceeds the client's current outstanding
balance. Only use this feature if you have been specifically instructed that the payment tor credit is not
to be applied to any of the client's currently outstanding invoices, but only against future ones.
Apply to Specific Category - This button enables you to apply the payment or credit only against a
currently outstanding balance attributable to a specific staff member or cost code. For example, if you
receive a partial payment for a matter where the balance due includes amounts that were billed by
2011 Tussman Programs, Inc.
AR Transactions
189
several staff members, and you want the payment to be credited to one of those staff members,
instead of being applied pro rata in the normal way,.click on this button and enter the staff or cost code
that you want credited. If the amount of the payment or credit exceeds the balance due for that staff
member or cost code, any excess will be applied pro rata against the balances for the other staff or
cost codes. You cannot earmark a payment or credit to be applied against future charges for a
specific staff member or cost category, only for currently outstanding balances.
In order to use this feature you must earmark the payment or credit to be applied against either fees or
costs. For example, if you want a payment to be credited to a specific staff member, you must use
entry type PF. If you want it credited to a specific cost code, you must enter it as a PC. Otherwise, the
Apply to Specific Category button will not be functional.
If you want to apply a payment or credit to the outstanding balance of two or more staff or cost
categories in preference over others that are outstanding, you must then enter separate payment
transactions for the amount that you want to credit to each category. Similarly, if you want to earmark
the payment to specific categories but the balance includes both fees and costs, and you will be
applying the payment to both, you must enter separate PF and PC transactions which equal the total
amount of the payment.
While it is normally not necessary or recommended, you can change the way an outstanding balance
is allocated so that you can thereby change the way the payment is applied, as described in the
Forcing Payment Applications paragraph in the Payment Application Rules section.
Billing Distribution (Beginning Balances and Debits) - If you are recording a Beginning Balance
(BB) or Debit (D), click on the Billing Distribution button if you want to specify how the balance is to
be distributed between fees, costs, tax and interest in the dialog shown below. (If you do not specify,
the entire amount will be treated as fees.:)
You can also specify how the fee and cost portion, if any, is being allocated by staff member and cost
code. In other words, if you are recording a beginning balance of $1,000.00, the program must know
how much of that sum is to be recorded as fees, how much as costs, etc.
The Beginning Balance or Debit Distribution dialog has spaces for allocating the amount of the
transaction between Fees, Costs, Interest and Tax. The total that you allocate between these four
categories must equal the Amount of the transaction. By default the program allocates the entire
amount to fees. If this is acceptable, you can simply click OK to close the dialog and continue.
Otherwise, change the allocations if necessary. For example, if you are recording a beginning balance
of $1000.00 and $800.00 of that balance is for fees and $200.00 for costs, enter those amounts in the
Fees and Costs spaces respectively.
Next to the Fees space is a button entitled Allocate Fees by Staff Member. Click on this button if you
2011 Tussman Programs, Inc.
190
Tussman Program Release 10
want to allocate the fee portion to specific staff members. This is not required, but if you know this
information and want those staff members to be credited when the beginning balance or debit balance
is paid, then you can enter it. After clicking on this button a dialog appears showing a list of all your
staff members. To allocate an amount to a specific staff member, double click on that one on the list
and enter the amount that you want to allocate to that staff member. You can also enter the number of
hours of work which that amount represents, but that is not required. The sum of the allocations to the
various staff members must equal the total amount that you have allocated to fees. If you do not enter
the staff allocations, the program will automatically allocate it to the "attorney not specified" category.
Next to the Costs space is a similar button entitled Allocation Costs by Category. Click on this
button if you want to allocate the cost portion to specific categories of costs. You probably will not need
to do this, in which case you can ignore this step. Otherwise, a list of your cost codes will be displayed.
To allocate the cost amount, click on each category that you want to allocate to and enter the amount
for that category. The sum of the individual allocations must equal the total amount which you have
allocated to costs.
GL Distribution - This button is active only if you are recording a payment (P), retainer (RR or RD),
trust (TR or TD) or refund (DA) transaction. Beginning balance (B) and debit (D) transactions are not
posted to the GL as the general ledger works on a cash basis. Thus, transactions are posted from the
billing to the GL only when a cash receipt or disbursement is being recorded. .
The GL Distributions screen is shown below:
It displays a list of which GL accounts will be debited and credited when the transaction you are
recording is posted to the General Ledger. Depending on the type of transaction you are recording,
those accounts will be the ones specified in the GL and Billing Interface screen. See the
Posting to GL section for complete instructions on how to set up the program to post cash receipts to
the General Ledger. The screen will list each account and the amount which will be debited or credited
to that account. The first account listed will always be the cash account. For example, if you are
recording a payment, the first account will be the Default Cash Account which you specified in the GL
and Billing Interface screen. This is the bank account in which you will be depositing the check. The
2011 Tussman Programs, Inc.
AR Transactions
191
remaining accounts will depend on how the payment is being applied; i.e. whether the program is
applying it against fees, costs, tax or interest, or as an advance. The default accounts for those
categories are also set up in the GL and Billing Interface screen. When recording an individual
transaction, you can change the GL distribution if necessary. If you are recording a non-client cash
receipt, you must enter the GL distribution yourself as the program will not know which GL accounts to
credit.
To change the GL distributions, double click on any of the existing distributions on the list or, to add a
distribution, double click on the first blank line. Then enter the GL account, department and location, if
necessary, and the amount which you want to debit or credit to that account. You can enter up to 200
distributions, but in most cases you will have no more than a few. The total debits must equal the total
credits so that your GL remains in balance, Below the list, directly above the OK and Cancel buttons,
the total amounts debited and credited so far are displayed, with the remaining unallocated balance
below that. When entering the GL account number, you can either type in the account number, or type
in a word from the account title, press Enter,, and the program will display a list of matching accounts
to select from. You can also click on the
button to the right of the Account space for a list of all
GL accounts, as you can also do for a list of your Departments and Locations.
Post - If you are recording a transaction such as a payment (type P) that for some reason you do not
want posted to the General Ledger, uncheck this box. Otherwise, leave it checked so that it is posted
to the GL using whatever posting method you have selected.
Show on Next Bill - This item should always be checked if you want the transaction you are recording
to appear on the client's next bill. If you uncheck it, the transaction will be applied directly to the clients
balance forward and the beginning balance on the next bill will already reflect this transaction, with no
explanation appearing on the bill. This is useful if, for example, a client has an outstanding balance
which they are paying, or which you are writing off, but you are closing their case and do not intend to
send them any future bills. It also provides a way of adjusting a client's balance forward to correct a
mistake or for any other reason in cases where you do not want an explanation to appear on their next
bill.
Normally, it is recommended that you leave this item checked, as otherwise the ending balance from
the previous bill will not match the beginning balance on the client's next bill, which could cause some
confusion even though the figures will be correct.
Record as Writedown or Internal Account Transfer - If you are recording a credit (type Q)
transaction, check this box if you want to record the credit as a writedown for reporting purposes.
Writedowns which are recorded in this way are shown in a separate column on your
productivity reports. Do not check this item if you are entering a credit for any other reason; for
example, to correct a mistake in a previous balance, to record a client's credit balance when first
setting up the program, to transfer a balance from one matter to another, etc..
If you are recording a payment (P), or a retainer or trust receipt (RR or TR), check the Internal
Account Transfer box only if you are recording the transaction as a way of transferring funds from one
matter to another. For example, to move retainer funds from one matter to another, you would record
an RD on the matter with the funds and an RR on the matter you want to transfer them to. Since this is
not an actual cash receipt, you can prevent it from appearing on your Daily Cash Receipt report by
checking this box.
Description - Enter the description that you want to appear for this transaction on the client's bill. You
can use activity codes as shorthand abbreviations within the body of the text, the same as when
entering charges. Click on the
button to the right of the description box to display a list of activity
codes which can be used as abbreviations. If you select one from the list the text for that code will
automatically be inserted in the description box at the end of any text which has already been entered.
Click on the .
2011 Tussman Programs, Inc.
button to repeat the same text which was entered in the previous transaction. To
192
Tussman Program Release 10
insert a hard carriage return in the body of the text, press the F2 function key. Click on the
button to spell check the text which you have entered for this transaction. Note that you can only spell
check AR transactions individually; the global spell check function only checks charges. Click the
button to undo the expansion of a shorthand code.
While you can create an activity code which you can use as the standard description for payment
transactions (for example: "Payment received, thank you"), you can also enter a standard description
as item 145 in the bill format options. Whenever you leave the description space for a payment
transaction blank, the program will print that default description on the bill.
Batch - A batch code of up to eight characters can be assigned to each AR transaction. AR batches
are separate from the batches created when entering charges. The batch code is not required, unless
you are using our General Ledger and have selected the option to post to the GL by batch. Using a
batch code can also make it easier to review and edit your AR transactions, since it is very easy to
browse or list transactions by batch.
For purposes of posting to the General Ledger, it is suggested that you assign a separate batch code
to each group of client payments and other checks that make up each bank deposit. That way, when
the batches are posted the resulting GL transactions which appears on your check register will match
the amounts of your bank deposits. For example, you could use a batch code which identifies the date
of the deposit, such as 050212 to indicate the deposit made on February 12, 2005.
By default, the program assigns a batch code which indicates the month and year in the format YYMM.
You can change the default to create a separate batch for each date (YYMMDD) by clicking on Default
Batch Codes from the Setup menu.
Saving the Transaction - To save the transaction, click Save:More if you have additional transactions
to enter, or Save:Exit to close the Enter AR Transactions screen. If you click Cancel or click the X
button in the upper right hand corner, the current entry will not be saved.
After clicking Save:More, the Previous Entry box will display information about the previous entry that
was saved, including the entry number, type, date, client and matter ID and amount. You can go back
and edit this entry by clicking the
button. Below that the Running Total box will display the total
of all transactions entered during your current session (i.e. since you last opened the Enter AR
Transactions screen).
To print an AR Transaction Memo showing the information for the last entry that was saved, click on
the
button and select the AR Transaction Memo option. If you just saved an entry that resulted
in the creation of multiple transactions (such as a client level payment), the memo will only show the
last entry that was created. In that case, select the AR Transaction Audit Trail option after clicking
the
button. The audit trail will list all AR transactions that you have saved since the last audit trail
was printed, or since the last time you closed the program, whichever is most recent.
If you forget to print the audit trail before exiting, you can always generate it later by selecting Audit
Trail from the Receipts menu or by clicking on the
Receipts Audit Trail from the menu.
button on the Toolbar and selecting
2011 Tussman Programs, Inc.
AR Transactions
You can also print a receipt for your client by clicking on the
Client Receipt. The receipt should be printed on your letterhead.
15.4
193
button, then clicking on Print
Audit Trails and Memos
To print an AR Transaction Memo, you must first save the transaction by clicking the Save:More
button to bring up a new blank entry screen. Then click on the
following dialog:
button which brings up the
To print a memo of the transaction that was just saved, select the AR Transaction Memo option. If
you just saved an entry that resulted in the creation of multiple transactions (such as a client level
payment), the memo will only show the last entry that was created. In that case, select the AR
Transaction Audit Trail option. The audit trail will list all AR transactions that you have saved since
the last audit trail was printed.
f you forget to print the audit trail before exiting, you can always generate it later by selecting Audit
Trail from the Receipts menu or by clicking on the
selecting Receipts Audit Trail from the menu.
button on the Toolbar at the top and
To print a receipt to give to a client, click Print Client Receipt when you are entering a new payment
(after you have filled in the basic information, but before you have saved it), or when editing an existing
payment.
15.5
Payment Application Rules
While it may seem a simple matter to say that "client X owes us $1000.00," in reality it is much more
complicated. One client may have several or even hundreds of matters, each of which may have an
outstanding balance. For each matter, money may be owed on account of one or more invoices. On
each invoice there may have been billed any combination of fees, costs, interest and tax charges.
The fee portion may include charges billed by one or more staff members, and the cost balance may
consist of many different cost categories. Each time a payment is recorded, the program knows
exactly what the outstanding balance consists of, and it uses specific rules which determine in what
order outstanding items are paid off.
Normally when a payment or credit is entered you apply it against a specific matter. However, it is also
2011 Tussman Programs, Inc.
194
Tussman Program Release 10
possible to apply a payment or credit against all of a client's matters with outstanding balances, as
described in the section on client level payments. This section describes how a payment is applied
against the balance from a single matter.
There are two basic methods of applying a payment against an outstanding balance:
1. It can be applied by invoice, so that all charges from an older invoice will be paid off before any of
the charges from a more recent invoice;
2. It can be applied by type of charge, so that, for example, all outstanding costs are paid before any
fees are paid, regardless of when they were billed.
To configure the program to choose which method you want to use, select Payment Application
Order from the Setup menu. The dialog shown below appears:
The first option you should select is the Payment Priority option which is listed in the middle. If you
set this option to 1, then by default the program will always apply a payment or credit by invoice; i.e.,
all charges (fees, costs, interest and tax) from an older invoice will be paid before any charges from a
more recent invoice. If you set this option to 2, then the program will apply payments by category of
charge, in the order you specify above in the Payment Application Order box. For example, if you
instruct the program to pay costs first, then when recording a payment or credit all outstanding costs
will be paid, regardless of invoice, before any outstanding fees will be paid.
In the Payment Application Order section at the top specify the order in which you want the four
general categories of charges to be paid off when recording payments or credits. For example, if you
want payments applied first to costs, then to fees, tax and interest in that order, enter C in box 1, F in
box 2, T in box 3, and I in box 4. If you select 1 for the Payment Priority option, so that payments are
applied by invoice, then the program will first apply payments against the oldest invoice, and charges
on that invoice will be paid in the order you specify here. If you select 2 for the Payment Priority option,
then all outstanding charges will be grouped together and paid in the order specified.
2011 Tussman Programs, Inc.
AR Transactions
195
When a partial payment is made, it will be applied pro rata against outstanding charges of the same
category. For example, if a client's balance consists of $1000.00 in fees, made up of charges billed by
three different staff members, and a $500.00 payment is made, the payment will be applied to pay half
of each staff member's balance. If, however, those fees were billed on two different invoices, and you
are using Payment Priority option 1, then of course the fees from the older invoice would be paid first.
Using Payment Priority option 2, then all the outstanding fees would be paid pro rata by staff
member, regardless of when they were billed.
If a payment is made which exceeds a client's current outstanding balance, the excess is recorded as
an advance, thereby creating a credit balance, as described in the section on Advances and Credit
Balances, and that amount will be automatically applied against future charges as they are billed
according to these same priority rules. When applying these advances against future bills, the
program will do this in one of three ways which you can select in the Record Advance Applications
Separately box:
N - If you enter N when the program applies an advance it will find the original payment that gave rise
to the advance and adjust the billing distributions and GL postings for that transaction directly. This is
the simplest method but can create problems because it means that your report totals and GL postings
for prior periods can wind up changing. For example, using this method if a payment received in
January winds up being appied to a bill generated later that year in June, then the January totals will
wind up changing to reflect the application of that payment. To avoid this, use the Y or A settings
described next.
Y - If you enter Y when the program applies advances against a bill it will generate a separate type A
transaction which contains the billing and GL distributions for that application. For example, if a
payment was recorded as an advance in January and is applied against a bill later that year in June,
when finalizing the June bill the program will generate a type A transaction showing that application,
and the original payment in January will remain unchanged. With the Y setting the type A transaction
is created only if the application occurs in a later month.
A - Similar to Y but in this case the program will always create an A transaction when an advance is
applied, even if it is in the same month as the original payment.
Note that the A transaction will actually be either a type A1 (to reflect the application of a payment) or
an A2 (to reflect the application of a credit).
When recording an individual payment or credit, you can override these rules and specify that the
payment is to be applied either against a specific invoice, a specific category of charges (fees, costs,
tax or interest), or even against outstanding charges for a specific staff member or cost category, as
described in the section on Entering AR Transactions. For example, to apply a payment against fees,
costs, interest or tax only, record it using entry type PF, PC, PI or PT respectively. A payment
earmarked in this way will only be applied against charges of that type. For example, if you enter a PC
in an amount which exceeds the client's current cost balance, then the excess will be carried forward
as an earmarked credit balance and will only be applied against future costs. To apply a payment
against a specific invoice or against charges for a specific staff member or cost category, click on the
Billing Distribution button when entering the payment, as described in the section on
Entering AR Transactions.
Forcing Payment Applications by Changing Billing Distributions
When you apply a payment or credit manually by clicking on the Billing Distribution button as
described above, you can only apply it by choosing from the list of invoices, staff members, and cost
categories that have balances outstanding. In other words, you cannot credit a payment to a single
staff member or cost category for more than the portion of the outstanding balance which is attributable
to that category. However, you can change the way that the outstanding balance is allocated so that
you can then apply the payment in the way you want. This is necessary if, for example, you receive a
2011 Tussman Programs, Inc.
196
Tussman Program Release 10
payment from a client and want the entire payment to be credited to one staff member for purposes of
your Staff Earnings Analysis report, even though that staff member did not actually bill the amounts
that are currently outstanding. To do this, you must locate the billing record (or records) which have
amounts outstanding that make up the balance due. These will be the transaction type B records that
are listed when you browse a list of AR for an individual client or matter. Sometimes an outstanding
balance may also be the result of a BB or D transaction. You can easily locate these records by
clicking on AR for Client from the View menu. To change the way the unpaid balance from one of
these records is allocated, click on the Billing Distribution button for that record. The dialog will
display in the left column the amount of fees, costs, tax and interest that were billed on that invoice.
The second column will display the amount, if any, that is still outstanding. If nothing is owed, then the
distribution cannot be changed, as it has already been paid off. This means that the outstanding
balance must be found in another billing record. Once you have located the record with an unpaid
amount, click on the Reallocate Fees or Reallocate Costs buttons that appear next to the Fee and
Cost Balance amounts on the Billing Distribution dialog. A new dialog will come up which displays a
list of all your staff members or cost categories, indicating the amount billed and balance due owed by
each. You can change the allocation by double clicking on each one that you want to change and
entering the new amount. If you increase the amount allocated to one staff member or cost, you will
have to decrease the amount allocated to another, so that the sum of the allocations remains equal to
the total fee or cost balance which is shown in the title bar of the dialog. If you want to change the way
the balance is allocated as between fees, costs, tax and interest, do that first by changing the amounts
in the Billed column. Then click on the Reallocate Fees or Reallocate Costs buttons to adjust those
amounts accordingly. For example, if you reduce the amount allocated to costs and increase the
amount allocated to fees, you must then adjust the individual fee and cost allocations by the same
amount. After making these changes, you can then enter your payment or credit and if you click on the
Billing Distribution button before saving the transaction you will see that it will be allocated according
to the new distributions which you assigned to the billing record(s).
Changing Payment Applications Globally
You can have the program automatically reassign billing and payment allocations from one staff
member to another using the Reallocate function on the Tools menu.
15.6
Advances and Credit Balances
An advance is defined as any payment which is received from a client at a time when they have no
outstanding balance due, or when the balance due is less than the amount of the payment. In that
case, the payment (or that portion which exceeds the current balance due) is recorded by the program
as an advance, thereby giving the client a credit balance. Credit balances are automatically applied
by the program against future bills for that matter. Thus, it is perfectly permissible to record a payment
in advance of generating a client's bill, as the program automatically handles the details of keeping
track of credit balances and applying them against future charges. A credit balance can be
maintained indefinitely and the program will continue to apply it against future bills until it is used up.
An advance payment is entered just like any other payment using transaction type P. A credit
transaction (type Q) can also be entered for an amount in excess of the client's current balance, and
also gives rise to a credit balance which is handled in exactly the same way as one created by a
payment. However, as discussed below, you can also record an advance payment as a type RR
transaction.
It might often happen that you have a client who pays their fee and the work is performed all in the
same month, and you therefore enter all this information (the charges and the payment) together
before generating their first bill. In this case, the payment is technically recorded by the program as an
advance, since the bill has not yet been generated and finalized, but it will be applied automatically
against the bill when it is finalized. This is perfectly acceptable, as the program does not require you to
enter a client's activity in any special order. .
2011 Tussman Programs, Inc.
AR Transactions
197
When recording a payment or credit, as described in the Entering AR Transactions section, you can
click on the Billing Distribution button to see what portion, if any, is being recorded as an advance.
Similarly, the GL Distribution for a payment will show that portion of the payment which is being
recorded as an advance as being posted to the Advances Received account..
Timing Issues with Advances
Suppose a client overpays their account in January, giving rise to a credit balance, which is then
applied against a subsequent bill in March. The original P transaction recorded in January will at least
in part have been recorded as an advance and, if you are using our General Ledger, will be posted to
the GL as such. Later in March those funds will be taken out of the advance category and applied to
fees, costs, interest and/or tax charges that were billed. The program handles this in one of two ways:
1. When the March applications are made it will go back to the original P transaction and edit the
distributions, both for purposes of the billing program and the GL, so that your January report totals,
both in the billing and GL portions of the program will be updated. Or,
2. When the March applications are made the program will create a separate type A transaction
containing the new applications, so that your original January report totals are unchanged and the new
applications will be reflected instead in your March reports, both for purposes of the billing and GL
parts of the program.
Method 2 is probably the preferred method. To choose the method you want click on Setup from the
main menu, select Payment Application Rules and enter the selection you want in the Record
Advance Applications Separately box.
You can also avoid this issue entirely by always recording client advances as RR transactions, since
when the retainer funds are applied it will aways be done by creating separate RD and P transactions
dated in the current period.
Earmarked vs. Non Earmarked Advances
If you enter an advance as a transaction type P or Q, the advance will be recorded as a
nonearmarked credit balance and will be applied automatically against future charges of any type. If,
on the other hand, you want the advance to be earmarked so that it will only be applied against future
charges of a particular type, enter it as a PF, PC, PT or PI so that it is earmarked for fees, costs, tax or
interest respectively. The resulting credit balance will then only be applied against future charges of
that type. A credit (type Q) can similarly be entered as a QF, QC, QT or QI transaction. It is not
possible to earmark a payment or credit to be applied to future charges for a specific staff member or
cost category.
The Account Status screen for each client or matter will indicate separately the presence of both
earmarked and non earmarked credit balances. You can also generate a Credit Balances report which
lists all files that have either earmarked or nonearmarked credit balances.
Eliminating a Credit Balance
If a client has a credit balance that you want to reduce or eliminate, do this by entering a Refund (type
DA) transaction as described in the section on Client Refunds.
Client Level Advances
Normally a credit balance is maintained at the matter level. However, it is also possible to record a
client level advance, which creates a credit balance which the program will apply against future
charges for any of that client's matters. This is described in detail in the section on
Client Level Payments.
2011 Tussman Programs, Inc.
198
Tussman Program Release 10
Advances vs. Retainers
An advance payment made by a client can alternatively be recorded as a retainer or trust receipt
(transaction type RR or TR). Instead of creating a credit balance, this creates a balance in their
retainer or trust account. You can then disburse funds from either of those accounts, as described in
the section on Retainer and Trust Accounts, to pay future charges incurred by that client. Recording a
payment as a retainer or trust receipt is appropriate if the client is advancing the funds as a deposit,
especially where any unused portion is to be returned to the client, and you do not want to record it as
income until it is actually earned. Such funds are usually deposited in a separate bank account and
held in trust until they are earned. Advances can be recorded as regular payments (type P) where the
funds are considered "earned upon receipt" and where the client is simply paying in advance for
charges you definitely expect to incur, or where you simply have not yet entered the charges or
generated the bill. However, some firms follow the practlce of recording all payments as retainer
receipts (type RR) and then disburse the funds as payments when bills are generated. If when you
record an RR the client has an outstanding balance due, the program will ask if you want to apply the
retainer against the outstanding balance and if you click Yes it will record a payment (type P) for up to
the amount of the balance and record the balance as an RR.
You can have a credit balance resulting from an advance payment, and a retainer and/or trust accout
balance on the same matter. If you have configured the program to automatically apply funds from the
retainer account against the client's bill, and the client has both a credit balance and funds in the
retainer account, the program will first apply the credit balance before it applies any of the funds in the
retainer account.
15.7
Client Level Payments
For clients with more than one matter, the program maintains a separate account balance for each
individual matter. When you enter client payments, normally you must specify which matter you want
the payment applied against. However, it is also possible when entering a payment to apply it against
outstanding balances for all of that client's matters. This is convenient if you receive a single check
from a client with multiple matters, and you want the program to simply apply it against all those
matters.
To enter a client level payment, simply type an asterisk (*) in the matter space when recording the
payment (transaction type P), as described in the section on Entering AR Transactions. You can also
enter a credit (type Q) in the same way. When entering the transaction, you can click on the Billing
Distribution button to see how the payment or credit is being applied, or to change the application if
necessary. When you save the transaction, the program will generate a separate payment or credit
transaction for each matter that the payment or credit is being applied to. These individual transactions
behave in the same way as payments that were entered manually and can be edited, reversed or
deleted one at a time. If you have made a mistake in entering a client level payment and need to re-do
or delete it, instead of deleting, reversing or editing the individual records you can simply delete the
entire transaction and re-enter it, as described in the following paragraph:
In addition to the individual payment records, when you save a client level payment or credit the
program also creates a master record for that transaction This master record appears in your list of
AR transactions as either type P or Q and retains the asterisk in the Matter space. To view these
master client level payment records, click on AR for Client from the View menu, enter the client ID
followed by an asterisk (*) in the Matter space, and click OK. Or, go to the Account Status screen for
the client and click on Browse AR; the client level payments for that client will appear at the top of the
list, distinguished by the asterisk in the Matter space. The amount shown on the browse list will be
0.00, unless there is an used credit balance from this transaction, in which case the unused amount
will be displayed. The full original amount of the payment appears in the Amount space when viewing
or editing the transaction, with the unused credit balance, if any, displayed to the right. You cannot edit
or reverse a master record, but you can delete it. When you delete it, the program also deletes all the
2011 Tussman Programs, Inc.
AR Transactions
199
individual payment or credit records that were created when the transaction was originally saved. This
effectively reverses the entire transaction, and you can then re-enter it correctly if desired. This can be
done regardless of whether or not the payment or credit has already appeared on the client's bill.
When viewing a master payment or credit record, click on the Billing Distribution button to see a list
of the individual payment records related to that master record.
If the amount of a client level payment or credit exceeds the current balance due from all that client's
matters, the excess will be carried forward as a client level credit balance, and will be automatically
applied against future bills generated for any of that client's matters. The program does this by
automatically generating a new payment or credit transaction in the amount which is being applied at
the time the bill for each matter is finalized. Application of the credit will appear on the client's bill in the
payments and credits section with the wording "client payment applied".
The Account Status screen for both the client and that client's matters will indicate if there is an
unused client level credit balance available. If you call up a master client level payment record, as
described above, to the right of the Amount space the program will also indicate the amount of any
unused credit balance resulting from that individual payment or credit. If for any reason you want to
reduce or eliminate that unused credit, click on the
button next to the Billing Distribution button.
The amount of the unused credit will appear in the dialog. To eliminate it, change the amount to 0.00
and click OK. Or, reduce it to the desired amount and click OK. If the credit balance is attributable to
more than one client level payment, you will have to perform this procedure with each of the master
records with an unused balance.
For purposes of posting to the GL, note that the entire amount of the master transaction is initially
posted to your Advances Received account, and the individual payment records which are applied to
each matter reverse that posting and credit the fees, costs, tax or interest accounts depending on how
the payment or credit is being applied. Only the master record is debited to the cash account; the
individual records debit the Advances Received account. If you use a client level payment which
results in giving the client a credit balance, make sure that you post the batches which contain the
payment records generated when the bills against which the credit is applied are finalized.
Viewing a history of client level payments and credits may be confusing, especially if a client has
many matters. For a simplified view, go to the Account Status screen for the client, click on More
Detail and select Ledger Card (Summary). On this report each client level payment or credit will be
consolidated into a single line item, no matter how many matters it was applied against. If you then
want to see which matters an individual payment was applied against, locate the master payment
record, as described above, and click on the Billing Distribution button.
When generating bills for a client with multiple matters, normally the program generates separate bills
for each matter, and the payments and credits for each matter are itemized separately on each bill. It
is possible to simplify the bill so that the payments and credits are consolidated into a single section
with each client level payment showing as a single line item. To do this, set bill format option 250 to A
so that the program generates a summary page for each client. Then make sure a Y appears after
the Payments and Credits option in item 267 so that a section showing the current payments and
credits appears on the summary page. You may also want to make sure you have selected other
appropriate items from that list, such as the Balance Forward and New Balance Due. Then configure
the bill so that the Payments and Credits section is omitted from the bill for each individual matter.
This can be done most easily by setting bill format option 3 to Y, so that all that appears on the
individual bills is the detail of the current charges, with no reference to the balance forward or
payments and credits. You can further simply the bill by setting format option 300 to Y or P, so that
instead of generating a completely separate bill for each matter the bill is consolidated. Using the Y
option the charges for each matter are listed consecutively; with the P option the charges for each
matter begin on a new page, but the client name and address appears only on the first page of the first
matter When you generate a consolidated bill the program assigns a single invoice number to the
entire bill for the client. Otherwise it will assign a separate invoice number to the bill for each matter.
2011 Tussman Programs, Inc.
200
Tussman Program Release 10
This also makes it easier to review the client's billing history, as when viewing the Ledger Card
(Summary) as described in the preceding paragraph all bills with the same invoice number will be
consolidated into a single line item.
15.8
Browsing AR Transactions
To view your list of bills, payments, and other AR transactions, click the
button on the Toolbar
at the top. Then click Browse All AR to see a list of all transactions, or enter the client and/or matter
ID to see transactions for that file only, or enter the number of the specific transaction you want in the
space at the bottom (if you click the # button to the right of that space it will display the number of the
last transaction you entered). You can also browse transactions for an individual client or matter by
going to the Account Status screen for that file and clicking Browse AR, or viewing the Master Ledger
for the file.
Alternatively, click Receipts from the Main Menu, select Browse from the submenu, and pick whether
you want to browse all AR transactions, or those for a single client, matter, or batch.
In addition to using the main AR browse function, you can also browse a list of payments (cash
receipts) for each day by clicking on the
button on the Toolbar at the top. You can also
browse lists of finalized bills by clicking on Bills from the Main Menu and selecting Browse Finalized
Bills from the submenu.
The following sample screen displays the AR transactions for an individual matter. The Type column
indicates the type of transaction, such as B for bill, P for payment, etc. The first column indicates its
status. B indicates the transaction has appeared on a bill that has been finalized (a bill itself will aways
be assigned status B). A blank indicates it has not yet appeared on a bill. N indicates you do not want
the transaction to appear on a bill. The number column shows the transaction number. You can use
this number to locate an individual transaction. The amount of a beginning balance, debit, or bill will
appear in the Debit column, while the amount of a payment or credit will appear as a Credit. The Bal
Due column indicates what portion, if any, of a beginning balance, debit or bill remains unpaid, while
the Advance column indicates what portion, if any, of a payment or credit has not yet been applied
against a bill and is being carried as a credit balance (advance).
Scrolling through the AR browse screen is slightly different from most of the other browses. To get
quickly to the top of the list, click the
button to the right of the list. If the
and
buttons
are active, use these to scroll up or down one screen at a time. Otherwise, you can scroll through the
2011 Tussman Programs, Inc.
AR Transactions
201
list in the normal way. To go to the end of the list, click the
button. You can also use the + and buttons on the keyboard number pad to go ahead or back one screen at a time. When viewing the list,
double click on an individual record, or highlight it and press Enter or click the Edit button, to view or
edit that transaction, as described in the section on Editing AR Transactions. The buttons at the top
perform the following functions:
New - Click to add a new AR transaction;
Edit - Click to display and edit the currently highlighted transaction.
Sort Order - Click to change the sort order of the list. Records can be listed by Transaction Number,
Client/matter ID, Date, or Batch. The list always defaults to date order.
View Bill - If the currently highlighted transaction is a bill (type B), click this button to view or print a
copy of the bill;
GL Postings - Display and edit the GL Postings for the currently highlighted transaction
Go To - Enter the transaction number and click the Go To button to display that transaction.
File - Click this button and enter a client ID (and optional matter ID) to view only the AR transactions
for that client or matter.
Batch - Click this button and enter a batch code to view only the AR transactions in that batch.
Search - Click this button to enter search criteria which enable you to filter the list to display only
records which match the filter criteria. For example, you can use this function to search for an invoice
if you know only the invoice number by entering the number in the Reference space and clicking OK.
You can also filter the list to display records in a specific batch, that have a specific transaction type
code, that have a certain word or phrase anywhere in the body of the description, that fall within a
specific date range, or that are for a specific dollar amount. To also filter for a specific client or matter,
click on the Single Client or Matter button. Below that button, enter Y or N depending on whether you
want to filter the list to include specific types of transactions.
If you enter more than one filter criteria, the list will only include records that match all the criteria you
enter. After filtering the list, to remove the filter and display all records, click on the Filter button again,
click Reset, and then click OK, or simply click the ALL button to the right of the Search button.
All Types - Click to display all records after filtering for Payments or Bills only;
Payments - Click this button to display only payment transactions (type P).
Bills - Click this button to display only bills and beginning balance transactions (types B and BB)
Unpaid Bills - Click to display only bills that are still outstanding.
Total - Displays the total Debits and Credits in a batch. The total button is active only when you are
displaying the transactions in a single batch;
- Click to print the currently displayed screen. If you are using Windows XP, the list will be
generated in the form of a Microsoft Document Imaging file.
2011 Tussman Programs, Inc.
202
15.9
Tussman Program Release 10
Locating an AR Transaction
You can locate an AR transaction in a number of ways. The quickest way is to click the
button on the Toolbar at the top which brings up the following dialog:
You can then locate the transaction either by clicking Browse All AR and scrolling through the list, or
you can be more specific as follows:
By Client or Matter - Fill in the client and/or matter IDs and click OK to display a list of all AR
transactions for that file. You can also display AR transactions for a single file by clicking on the
Browse AR button on the Account Status screen for that file, or by viewing the Master Ledger for the
file.
By Record Number - At the time an AR transaction is saved it is assigned a consecutive record
number by the program. The record number for each transaction is included on both the audit trail and
AR Journal reports which you generate, as well as on prebills, appearing at the left hand margin. It
does not appear on your actual bills. If you know the number of the transaction you want to look up or
edit, enter the number in the space indicated and click OK. Or, if you are already browsing your list of
AR Transactions, click on the Go To button at the top and enter the number.
Note that the record numbers assigned to AR transactions are completely different from the record
numbers assigned to charges, as the two categories of transactions are completely different sets of
data.
You can also locate AR transactions as follows:
By Batch - To display all the AR transactions in a specific batch, click Receipts from the Main Menu at
the topr, select Browse from the menu and then select the for one Batch option.
If you are already browsing your list of AR transactions, you can click on the Batch button at the
bottom and select the batch you want.
By Date - You can locate AR transactions by date by simply scrolling to that portion of the AR
2011 Tussman Programs, Inc.
AR Transactions
203
transactions list, which by default is sorted by the date. You can also filter the list of AR transactions
by clicking on the Search button at the bottom and entering the date range you want to display. Or, to
view just the cash receipts go to the Daily Cash Receipts screen by clicking on the
the Toolbar and clicking on the day you want.
button on
By Other Search Criteria - If none of the previous methods work, you can also locate an AR
Transaction by filtering the list using specified search criteria. For example, you can even do a text
search so that only transactions where a certain word or phrase appears in the body of the description
are displayed, or you can search for a specific dollar amount. Do this by clicking on the Search button
at the top of the AR Browse screen, as described in the Browsing AR Transactions section.
15.10 Editing AR Transactions
Once you have located an AR transaction, the Editing AR Transaction screen displays the transaction
information in the same format as the Entering AR Transaction screen.
If the transaction has not yet appeared on a client's bill, you can change most of the transaction
information, including the date, client and matter, amount, batch and description. For example, if you
mistakenly posted the payment to the wrong matter, you can simply change the client and/or matter ID
to the correct one. You can also change the Billing and GL Distribution. You can make certain
changes in the Entry Type (for example, you can change a P to a PF) but some changes are not
permitted. Editing is also limited in the case of a payment or credit, a portion of which was recorded as
an advance, if the advance amount has subsequently been applied against a bill. Beginning Balance
(type BB) and Debit transactions (type D), can be edited unless they have been paid or unless a bill
has been finalized since they were entered. The editing of program-generated transactions, such as
billing records (type B) is also limited.
If the program does not allow you to make the change you want; then you may have to make the
change by entering another adjusting transaction. For example, if you recorded a payment in an
erroneous amount, and the program will not let you change the amount, then you will have to adjust the
client's balance by recording either another payment or credit (type P or Q) to increase the amount of
the original payment), or a debit (type D) if the amount of the original payment was too high and you
need to decrease the amount. If you posted a payment to the wrong matter, and it won't let you
change it, you will have to transfer the balance as described in the section on Transferring Balances,
unless you are willing to unfinalize the bill on which the payment appeared.
If you are posting transactions automatically to the GL and you check or uncheck the Post button, the
program will ask if you want to post or unpost that transaction, in which case the transaction will either
be posted or unposted immediately. If you are not posting automatically then the new instruction will
apply next time you post that batch or month.
When editing transactions the screen contains the following controls which differ from the entering new
AR transactions screen:
Reprint - This button is active only if you are displaying a billing record (type B). If so, click this button
to see a complete copy of this bill.
Reverse - You can only reverse a payment or credit transaction, or a retainer or trust receipt or
disbursement. For complete instructions, see the section on Reversing Payments..
Delete - Click this button and then click Yes to delete the transaction. You cannot delete a transaction
after it has appeared on a client's bill, or in certain other cases as described above. If the program
2011 Tussman Programs, Inc.
204
Tussman Program Release 10
does not allow you to delete the transaction, in the case of payments and credits (types P and Q) it will
allow you to reverse it. Otherwise, you will have to make an adjusting entry as described above.
Go To - Enter the number of the next transaction you want and click Go To to bring it up.
- Click on this button to go to the previous transaction in the AR transactions file;
- Click on this button to go to the next transaction.
- Click on the print icon to print an AR Transaction memo showing the information for this
transaction, or to print the audit trail of new AR transactions that have been entered since the previous
audit trail was printed, or since you last closed the program, whichever is later. Note that the audit trail
includes a list of transactions that have been edited, in addition to any new ones that have been
added.
15.11 Reversing Payments
Reversing a payment is the best procedure to follow when, for example, a client's payment check is
returned unpaid by the bank, and you need to restore the payment amount to the client's balance due.
While you can sometimes simply delete or edit a payment to correct a mistake or undo it, sometimes
the program will not allow you to do that if, for example, the payment has already appeared on the
client's bill. In that case, reversing it is the only option, unless you want to go back and unfinalize the
bill that it appeared on, which requires additional work and is not usually practical as it would mean
sending the client a revised bill. If you have reversed the payment to correct a mistake, such as
posting it to the wrong client or matter, then after reversing it you simply enter a new payment with the
correct information. Reversing a payment has the advantage of leaving an audit trail of what was
done, as the original transaction remains in the file offset by a separate reversing transaction that can
appear on the client's bill explaining the reason for the reversal and restoring the payment amount to
the balance due. A credit (transaction type Q) can also be reversed in the same way as a payment.
You can also reverse Retainer and Trust transactions.
To reverse a transaction, locate the transaction as described in the section on
Locating AR Transactions and click on the Reverse button. The Reverse Transaction dialog shown
below appears:
2011 Tussman Programs, Inc.
AR Transactions
205
Batch - Assign a batch code for the transaction. Since reversing a payment will affect postings to the
General Ledger, you must then post that batch to the GL. The GL postings in the reversing transaction
will be the exact reverse of the GL postings contained in the transaction that is being reversed. Thus, if
the original payment debited the cash account and credited fees, the reversing transaction will credit
cash and debit fees.
Posting Date - This is the date which is assigned to the reversing transaction. While defaulting to the
current date, you can change it if necessary. When posting to the GL, the reversing transaction will be
assigned to the period corresponding to this date, rather than to the period of the original transaction.
Thus, if a check deposited in one month is reversed in the following month, the two transactions, while
netting themselves out to 0.00, will each appear in a different period in the GL. To avoid this, you can
assign the same date and batch as the original transaction and then simply re-post that batch.
Show on Bill - Enter Y if you want the reversing transaction to appear on the client's next bill. If you
enter N, the reversing transaction will be applied directly to the client's balance forward, with no
explanation appearing on the client's bill.
Explanation - Enter the description that you want to enter for the reversing transaction. This is the text
that will appear on the client's bill.
Click OK to complete the procedure. The original payment will remain on the screen, but the title bar
of the Editing AR Transaction window will show that it is reversed. Reversed transactions will
appear on your Browse AR transaction screens with the letter R in the Status column. The reversing
transaction itself will appear as type DR1 (when reversing a payment) or DR2 (when reversing a
credit). The Reference assigned to the DR transaction will be the same as the Reference for the
transaction which was reversed, making it easy to match up the two records.
After reversing a payment or credit, there is no way to "unreverse" it. In other words, you cannot delete
or reverse the reversing entry. To restore the original payment or credit you will have to re-enter it as a
new transaction.
You can also use this procedure to reverse a trust or retainer account transaction (types RR, TR, RD
2011 Tussman Programs, Inc.
206
Tussman Program Release 10
or TD). To accomplish this, you simply locate the transaction you want to reverse, click the Reverse
button and fill in the information as described above. The program will mark the transaction as
reversed and will record a reversing transaction of the opposite type (for example, if reversing an RR it
will create a reversing RD in the same amount).
You cannot reverse a bill, beginning balance, or debit transaction (types B, BB or D). The only way
to reverse a bill is to unfinalize it. If you recorded a beginning balance or debit transaction in error,
and the program will not let you edit or delete it, the only way to reverse it is to record a separate credit
transaction (type Q) in the same amount.
15.12 Client Refunds
AR Transaction type DA is used to record a client refund or to reduce or eliminate a credit balance on
a client's matter.
You can only enter a DA if there is a credit balance on the matter. If there is no credit balance, you
must first create one by recording a separate credit (type Q) transaction in the amount you are
refunding. For example, assume a client has been billed the sum of $1,000.00, all of which has been
paid. You then agree to refund the client the sum of $200.00 as a courtesy discount. To do this, you
first give the client a credit by recording a Q transaction in the sum of $200.00. This creates a credit
balance of $200.00 reflecting the courtesy discount. You then can enter the DA transaction in the
same amount, which reflects the refund check issued to the client. If, on the other hand, the client had
paid an advance of $1,000.00, and was billed only $800.00, to issue the refund you would only need to
enter the DA, as there would already be a credit balance of $200.00 on the matter, representing the
unused portion of their advance payment.
Besides using it to record a refund, you can also enter a DA anytime a client has a credit balance that
you want to reduce or eliminate for any reason.
If the credit balance that you are refunding or reducing is an earmarked credit balance, then you must
also use an earmarked DA. For example, if the client has an unused fee credit balance, you must
enter a DAF to reduce that. Similarly, use a DAC, DAT or DAI to reduce a cost, tax or interest credit.
A plain DA transaction will only have the effect of reducing a non-earmarked credit balance.
Enter a DA transaction exactly like any other AR transaction as described in the section on
Entering AR Transactions.
Once entered, a DA transaction can be edited or deleted (unless it has already appeared on a
finalized bill), but it cannot be reversed.
Note that if you enter a DA with a date after the cutoff date you are using on the current bill, then the
credit balance which normally would show on that bill is really a phantom balance because it has been
eliminated, even though it was done subsequent to that billing period. In that case, the program will not
show the amount of the credit balance on the bill and will not apply it to the charges on the bill, which
may be confusing. Thus, if you are going to record a DA you should always make sure it is posted to
the current billing period and is not dated after the cutoff date you will be using on the current bill.
15.13 Retainer and Trust Accounts
For each matter the program maintains both a retainer and a trust account. You can also maintain a
retainer account at the client level (i.e., a general account not tied to a specific matter).
The retainer account is designed to be used when a client makes an advance payment which is
intended as a deposit to be drawn upon to pay futures fees and costs as they are billed. Although you
2011 Tussman Programs, Inc.
AR Transactions
207
can always record an advance paid by a client just like a regular payment, as described in the section
on Advances and Credit Balances, using the retainer account feature is better when the advance
payment is intended as a deposit against future charges, and where you want to keep track of the
funds separately and not record them as income until actually earned. Retainer account activity
appears in a separate section on the client's bill. You can instruct the program to automatically apply
funds from the retainer account against charges on the clients bill, and even to request additional funds
from the client when the balance in their retainer account falls below a certain amount Note that you
can print a bill using a special "Evergreen" format where the statement recap printed at the end of the
bill is specifically designed for the situation where the client is required to maintain a minimum balance
in their retainer account. To use this format, set bill format option 170 to E.
The trust account is designed to track funds received from or on behalf of the client which are not
intended as a deposit against future charges; such as settlement proceeds from handling a personal
injury case. Trust account activity also appears in a separate section on the client's bill, and while you
can manually disburse funds from the trust account to pay a client's bill, the program does not have the
option to do this automatically.
Recording Retainer and Trust Activity
There is no special procedure that is required to open a retainer or trust account for a matter, as the
program is already set up to keep track of both retainer and trust funds for every matter. Rather, you
simply record funds being received or disbursed by entering retainer or trust receipts and disbursement
transactions.
There are basically two types of transactions which can be recorded in the program which affect a
client's retainer or trust account balance. An RR or TR (retainer or trust receipt) transaction is used to
increase the amount of the clients retainer or trust account balance, while an RD or TD (retainer or
trust disbursement) transaction is used to decrease the balance. These transactions are entered
using the Entering AR Transactions function.
To record the receipt of funds which are deposited in a client's retainer or trust account, enter an AR
transaction type RR (retainer receipt) or TR (trust receipt). You can post it to an individual matter, or to
the client's general "client level" account by typing an asterisk in the Matter space when entering the
transaction.
There are two separate circumstances in which you will disburse funds from a retainer or trust
account. One is when you are withdrawing the funds to pay to your firm to pay for fees or costs
incurred by the client. The second is where you are disbursing the funds to the client or to a third
party.
In the first case, the transaction really involves creating two separate records--a disbursement from
the retainer or trust account (AR transaction type RD or TD respectively) and a payment to your firm
(transaction type P). You can enter these in two steps, creating first the RD or TD and then the P, or
you can record them in one step by using transaction types RDP (retainer disbursement/payment) or
TDP (trust disbursement/payment) respectively. This has the effect of both reducing the balance in the
client's retainer or trust account, and applying a payment towards their account balance in the same
amount. When you save this entry, the program actually creates two separate transactions--the first is
the RD or TD, and the second is the P.
Once you have saved an RD, TD or P transaction, you cannot edit it to create an RDP or a TDP. For
example, if you have entered a retainer disbursement as an RD, when you really intended to enter it as
an RDP, all you need to do is to then enter a separate P transaction in the same amount.
In the second case, where a disbursement from the account is to the client or a third party, enter it
simply as an RD (retainer disbursement) or TD (trust disbursement).
2011 Tussman Programs, Inc.
208
Tussman Program Release 10
It is important when recording retainer or trust activity to be consistent. For example, if you record a
receipt as an RR, when you disburse the funds you must record an RD. If you mistakenly attempt to
disburse funds from a retainer account using a TD, then the clients account status screen and bill will
show the original balance still in the retainer account, but there will now be a trust account balance with
a negative balance in the amount of the TD.
Note that when recording an RR transction, if there is an outstanding balance for that matter the
program will ask if you want to apply the new retainer funds against that balance. If you click Yes in
addition to saving the RR the program will generate an RD and a P transaction in the amount of the
balance or the amount of the RR, whichever is less. Also, when recording a P transaction where the
amount of the P exceeds the balance due for that matter and you have entered a replenishment
amount in the Billing Options screen for that matter the program will ask if you want to record the
excess of that payment as an RR.
Clients with Multiple Matters
You can maintain both a retainer account and a trust account for each matter, and you can also
maintain a retainer account at the client level, as described above. You can have the program
automatically apply funds from a client level retainer account against charges for any of their matters
by entering the correct instruction in the Billing Options screen for that client.
If you have retainer funds in an account which is assigned to a specific matter, you can manually apply
those funds to pay a balance due on another matter as follows: first record a retainer disbursement
transaction (type RD) on the matter which is maintaining the retainer account. Then record a payment
transaction (type P) on the matter which has the balance that you want to pay. In this case you cannot
use a combined RDP transaction, as the RD and P transactions are on different matters.
Reversing Retainer and Trust Transactions
You can reverse a retainer or trust transaction by locating the transaction you want to reverse and
clicking the Reverse button. When reversing a transaction the program creates an opposing
transaction in the same amount; for example, if you are reversing an RR the program creates a
reversing RD transaction in the same amount.
Applying Retainer Funds Automatically
If you want the program to automatically apply funds from a client's retainer account against the
client's bill, or to request replenishment when the balance in the account falls below a certain level,
enter these instructions in the billing options screen for each matter.
Showing Activity on the Client's Bill
Activity occurring in the client's retainer or trust account is reported in a separate section on each
client's bill. There are a variety of formatting options for these sections, as described in the section on
Bill Formats.
Looking up Balances and History
The account status screen for each client or matter will show the current balance, if any, in the retainer
and trust account. To see a detailed history of the activity in that account, click either Retainer
Account Detail or Trust Account Detail You can generate reports showing balances in all retainer
and trust accounts, and detailing activity in those accounts, using the
Trust, Retainer and Credit Balances report function. You can also generate journals detailing retainer
or trust activity as described in the section on AR Journal Reports. The Master Ledger for a file also
shows a history of retainer and trust activity.
2011 Tussman Programs, Inc.
AR Transactions
209
Converting Retainer to Trust
The Convert Retainer to Trust function either converts all retainer account transactions to trust
account transactions, or converts all trust account transactions to retainer account transactions.
This feature is designed for the situtation where, for example, you have entered receipts from clients
as trust receipts, but really intended to record them as retainer receipts. Only perform this function if
you are really certain you want to do so. If, for example, you choose to convert trust to retainer, the
program will read through the entire AR transaction file and convert all TR transactions to RR
transactions, and all TD transactions to RD transactions. This will have the effect of transferring all
current balances in your clients' trust accounts to their retainer accounts.
You can perform this function for a single client or matter by selecting the file you want when the select
client or matter dialog pops up after you select which function you want.
To perform this function, click on Convert Retainer to Trust on the Tools menu. Enter the code
SUSAN and the following menu comes up from which you select the action you want.
15.14 Client Level Retainers
While the program maintains a separate retainer account for each matter, it is also possible to record
retainer receipts at the client level, and to have those funds automatically applied by the program
against charges incurred on any of that client's matters. To do this, when recording the retainer receipt
(transaction type RR), enter an asterisk (*) in the Matter space. If you want the program to
automatically apply these funds against charges incurred on any of that client's matters, make sure you
have entered the correct instruction in the Billing Options screen for that client.
You can manually disburse funds from a client level retainer account by entering an RD transaction,
also entering an asterisk in the Matter space.
The account status screen for both the client and each of that client's matters shows separately the
amount of any unused client level retainer balance. You can have a client level retainer balance and
retainer balances assigned to a specific matter for the same client simultaneously. When applying
funds automatically, the program uses any funds in the retainer account for that matter before drawing
on client level funds.
15.15 Posting to GL
Cash receipts and retainer and trust receipts and disbursements which are entered in the billing
program as AR transactions can be posted to the General Ledger portion of the program to update
your check registers, balance sheet and income and expense statements.
2011 Tussman Programs, Inc.
210
Tussman Program Release 10
There are three methods of posting information from the billing program to the general ledger. You
can post information to the GL manually in batches (the original method used by the program), by
Month, or you can have the program automatically post the information in real time (a new method
incorporated in Release 11 of the program). Select the method you want from
the GL and Billing Interface screen. Each method is described in more detail below.
Posting by Batch
When you record cash receipts and other AR transactions, you can assign them a batch code of your
choice. While you can use any batch code you want, you may want to create a separate batch for
each day's receipts, or you can use the same batch code for an entire month. However, you should
not include transactions from more than one month in the same batch. To make it easier to reconcile
your bank accounts, you may want to assign the same batch code to all the cash receipt transactions
that make up a single bank deposit. That way the total posted to the GL for that batch would match the
total of your actual bank deposit. However, it is also possible to record your bank deposits manually,
as described later, in which case the batch code you assign would not matter.
You can configure the program to assign a default batch code to each AR transaction consisting of the
year and month; for example, 0705 for May 2007, or adding also the day; for example, 070502. To
pick either option click on Default Batch Codes from the Setup Menu.
The follow example illustrates the procedure for posting cash receipts to the GL, starting with the first
step of entering a cash receipt (payment) transaction by clicking on the
Control Panel at the left:
button on the
In the above example, client 1000 has paid us $1729.00 which pays off their balance due which is
2011 Tussman Programs, Inc.
AR Transactions
211
shown to the right of the Amount space. Notice that we are assigning this payment to Batch 070516,
corresponding to today's date.
If we click on the GL Distribution button the program will display which GL accounts are going to be
posted to in order to reflect this payment.
In this case, the entire balance of $1729.00 was for fees, so the program will credit that amount to
GL account 301.00, Fees from legal services and debit the total to 101.01, your office bank account.
Since the program makes this allocation automatically, based on the default accounts we specified in
the GL and Billing Interface screen, it is not necessary to click on the GL Distribution button each
time you record a payment unless you want to verify the distribution or unless you want to manually
allocate it to different accounts.
After saving this transaction, you can add additional ones at any time to the same batch. When you
are ready to post that batch to the GL, click on the
button on the Toolbar at the top, or click
the More button in the Receipts cluster and select Post to GL from the menu. The screen shown
below appears, listing all of the AR batches you have created.
2011 Tussman Programs, Inc.
212
Tussman Program Release 10
For each batch listed it shows the batch code, batch creation date, source, and the number of
transactions in the batch. You can also assign an optional title to each batch by highlighting that batch
and typing it in the Edit Description space at the bottom of the list.
If you double click on a batch on the list, or highlight it and click the Browse/Edit Batch button, the
Browse AR Transactions screen appears listing the individual transactions in the batch, which can be
viewed or edited from this screen. You can also view a list of the GL postings in the batch by clicking
the List GL Distributions in Batch button. In our example, the report will appear as follows:
The list itemizes each transaction in the batch showing the GL postings for each.
If you click the Reassign GL Distributions in Batch button the program will go through each
transaction in the highlighted batch and reallocate the total to the correct GL accounts based on the
defaults you have established in the GL and Billing Interface screen. This function is only necessary if,
for example, you have changed the defaults after entering the transactions in this batch and you want
the changes to be applied to this batch.
When you are ready to post a batch to the GL, highlight it on the list and click the Post Batch button.
The program will ask you to enter a date which will be assigned to the GL transaction that will be
2011 Tussman Programs, Inc.
AR Transactions
213
created by this posting. Click OK to continue and the program will perform the posting procedure. If
the program finds that the GL postings are not in balance it will not allow you to proceed. In that case,
you will want to go back and check the GL distributions in the batch using the List GL Distributions in
Batch function which should enable you to locate any transactions where the postings were omitted or
are not in balance. You can then correct them manually using the Browse/Edit Batch function, or by
clicking the Reassign GL Distributions button.
When done, it will ask if you want to see a summary of the GL postings for the batch. If you click Yes,
it will generate the following report:
After a batch is posted, the list will also indicate the date and number of entries that were posted as
shown below.
If the number of entries posted does not match the number in the batch, it is probably because there
are some AR transactions in the batch that do not generate GL postings. For example, the program
does not post credit (type Q) transactions, nor does it post bills (type B), debits (type D) or beginning
balances (type BB).
After a batch is posted, you can generate a list of the GL postings by clicking on the List GL Postings
button.
Changes made to the AR transactions in a batch after it has been posted may require that the batch be
posted again so that the GL also reflects the changes. In our above example, suppose that the check
received from this client is returned by the bank and we use the program's reverse function to reverse
the check. This creates a separate reversing transaction in the same batch which has GL postings
that reverse the original GL postings. If we now look at the Post to GL screen we see that the batch
contains 2 records, but only 1 has been posted to the GL. There also appears an asterisk (*) in the
column next to the description, as shown below:
The asterisk indicates that the batch has been revised and needs to be posted again to update the GL.
To do this, simply highlight the batch and click the Post Batch button again. This will update the GL
transaction that was generated the last time we posted to reflect the changes. Note that in our
example, since the only thing contained in the batch is the reversed payment, the net posting to the GL
will be 0.00, and the program actually deletes the GL transaction that was previously posted. In other
cases, the GL transaction will simply be modified to reflect the new totals.
Batch totals can be changed by adding new transactions to the same batch after it has been posted, or
2011 Tussman Programs, Inc.
214
Tussman Program Release 10
by editing, reversing or deleting transactions in a batch. If any of these actions are performed you
should re-post that batch. In addition, batch totals can be changed if payments that were intially
recorded in whole or part as an advance are subsequently applied against a client's bill. In that case,
when the bill is finalized the program adjusts the GL postings for that payment to reduce the amount
posted to your advances account and transfer it to the appropriate income or cost reimbursement
account. The batch containing that payment should also be posted again.
If you want to prevent the program from automatically changing the GL postings for a transaction after
it has been entered, there is an option on the GL and Billing Interface screen you can check which will
prevent the program from modifying GL distributions for any transation after it has been saved. This
gives you complete control over how individual transactions are posted.
A batch can be posted to the GL any number of times. Each time you post it the GL transaction that
was previously created is overwritten by a completely new one, so that the amounts previously posted
are never duplicated. When you re-post a batch, the procedure may take longer as the program
needs to search the GL file and undo the entries that were previously posted.
If you have created a batch that you do not want to post to the GL, highlight it on the list and click the
Place Batch on Hold button. To take the batch off hold, simply click the Hold button again.
In addition to batches created when you enter AR transactions, other batches are created by the
program when bills are finalized if the program has automatically applied any funds from a client's
retainer account against their bill. In that case, the program generates two AR transactions for each
transfer: an RD which takes the money from the retainer account and a P which applies it against their
bill. These transactions will be assigned to the batch code which you specify when you ask the
program to finalize bills. If you are using the automatic retainer application feature, you should then
post those batches. Those batches appear on the Post Billing Batches list with source code FIN to
indicate it was created during finalization.
Also on the Post Billing Batches screen are several additional options:
Hide Empty Batches - Changes the display to omit batches that contain no entries
List Unposted Batches Only - Changes the display to only list batches that have not yet been posted.
Rebuild Batch List - This function regenerates your list of AR batches so that only batches that
actually contain AR Transactions are included, and so that transactions that are assigned to batches
which do not appear in the list are added. This should not normally be necessary.
Sort Order - Normally the list appears in reverse chronological order of creation date, but you can also
list them by batch name or posting date.
To find a batch, type in the batch name in the Find Batch space at the bottom of the list.
Create separate GL posting for each transaction - If this option is checked, the program creates a
separate GL posting for each AR transaction. Otherwise, only totals for the batch will be posted.
Creating a separate posting for each transaction will tend to clutter up the GL, especially the cash
account. To avoid this you may want to create a separate asset account to which each transaction is
posted. Then you can create a GL Journal entry for each bank deposit which credits that account and
debits the actual cash in bank account. This suspense account would be listed as the Default Cash
Account in the GL and Billing Interface screen.
Posting by Month
Posting by Month is similar to posting by Batch as described in the previous section. If you have
2011 Tussman Programs, Inc.
AR Transactions
215
selected this option in the GL and Billing Interface screen, then when you click on the
button
to Post to the GL a list of months will appear from which you can select the month you want to post.
Automatic Posting
If you select the automatic posting option from the GL and Billing Interface screen then manual posting
to the GL is not required. Instead, whenever you enter or edit an AR transaction the program will
automatically post that transaction to the GL. The GL will also be updated if necessary whenever the
postings for a GL transaction are affected, such as when you delete or reverse a transaction or when a
bill is finalized or unfinalized (unless you have checked the Do not allow program to change GL
Distributions after payments are saved option).
GL Postings when Finalizing and Unfinalizing
When finalizing a bill, the program may make the following postings to the GL:
1. If the program has applied funds from the client's retainer account against the bill those transactions
will also be posted to the GL. A separate transaction will be posted for each RD and P transaction.
For example, if funds are applied to pay fees, the program will post a transaction disbursing the funds
from the retainer account, and a second transaction recording the funds as fee income. Note that if
the program is applying funds from a client level retainer account (resulting from an RR that was
entered with an asterisk for the matter ID), it will record an RD from the client level retainer and an RR
at the matter level before recording the RD and P at the matter level. This has the effect of transferring
the funds from the client level account to the account for the individual matter. Those additional
transactions are not posted to the GL as they would be a wash transaction.
2. If funds are applied against the bill from a client level credit balance (resulting from a P that was
entered with an asterisk for the matter ID), the program will record a P transaction on the matter to
which it is applied. A GL posting will be created for that P in which the client advance account is
debited and the appropriate income account is debited. The original P that gave rise to the client level
credit balance is not affected as the full amount of that P is posted to the client advance account when
it is saved.
3. If any payments that have previously been recorded are applied against this bill, the program will
post those applications to the GL. For example, a client may have made an overpayment in a previous
month, or may have paid at the time of service and you have recorded both the charges and the
payment at the same time, in which case the payment would originally be saved as an advance and will
be applied against the charges when the bill is finalized. If the payment which is being applied against
the bill is dated in the same month as the date of the bill, then the program will update the original GL
posting created when the payment was saved to reflect the new payment allocation. If the payment
being applied is dated in a prior month, then there are two ways to handle it. You can have the
program update the original GL posting for that payment to reflect the new allocation, as it does when
the payment is dated in the same month. However, this may have the unwanted consequence of
changing your GL figures for prior months. To avoid this, you can instead have the program create a
separate type A transaction whenever a payment is applied against a bill in a later month. Then
reports both in the billing program and in the GL will accurately reflect the month in which the income
was actually realized. For example, if a client makes an advance payment in September and the
payment is later applied against fees billed in October, your September reports would show an
advance being received in September and fee income being realized in October. To use this method,
click on Setup, Payment Application Rules, and check the box that reads "Record Advance
Applications Separately". Otherwise, in the example just cited the billing and GL reports would show
the income being realized in September, when the payment was received, even though the actual bill
was in October.
2011 Tussman Programs, Inc.
216
Tussman Program Release 10
Some users of the program prefer to assign the GL postings to each payment manually upon entry,
and do not want the program to subsequently alter those postings. You can prevent the program from
doing this by going to the GL and Billing Interface screen (click
on the
button on the toolbar at the top of the main General Ledger screen) and check the "Do
not allow program to change GL Distributions after payments are saved" option. In that case, the
program will not make any of the postings described in (3) above, but will still make the postings
described in (1) and (2).
When unfinalizing a bill, the program will delete any GL postings created when the bill was finalized
that involved application of client level credit balances or retainer account funds against the bill, i.e.,
those postings that are described in (1) and (2) above, as the underlying billing transactions are
deleted when the bill is unfinalized. The program will also delete GL postings resulting from the
creation of type A transactions as described in (3) above (as these transactions are also deleted when
a bill is unfinalized). The postings for other payments that have been applied against that bill are
updated to reflect the unfinalizing, which means that the amounts applied against that bill are taken out
of income and restored to the advances account.
15.16 AR Journal Reports
To print or view lists of cash receipts and other types of AR transactions, click Receipts from the Main
Menu and select List from the submenu. Then select one of the following reports from the submenu:
Complete AR Journal - Includes all types of AR transactions, except retainer and trust transactions.
Cash Receipts Journal - Select this if you are only interesting in seeing cash receipts (payments and
credits and related transactions)
Billings Journal - Select this if you are only interesting in seeing a list of finalized bills (type B),
including also beginning balances and debits if desired.
Retainer Account Journal - Includes only retainer account receipts and disbursements.
Trust Account Journal - Includes only trust account receipts and disbursements.
Batch Journal - Lists all the AR transactions in a specified batch.
In addition to these reports, you can print a Daily Cash Receipts report which itemizes your cash
receipts by day.
Report Options
After selecting the type of report you want, the following screen appears from which you can select the
options described below:.
2011 Tussman Programs, Inc.
AR Transactions
217
Transactions Included - This box lists the various types of AR transactions which can be included in
the report, including Beginning Balances (BB), Bills (B), Debits (D), Payments (P), Credits (Q),
Refunds (DA), Advance Applications (A), Retainer Account Transactions (R) and Trust Account
Transactions (T). You can also select whether or not to include Reversed Transactions (i.e.,
payments or credits that have been reversed) or Unfinalized Bills (i.e., bills that have been finalized
but were later unfinalized). If doing a Retainer Account Journal, you can also select whether or not to
include retainer disbursements which were generated automatically by the program to apply funds
against a bill.
Depending on which report you selected, some of these transaction types may be grayed out. For
example, if you selected a Cash Receipts Journal, only Payments, Credits, Refunds, Advance
Applications and Reversed Transactions will be available options. Make sure that only the specific
types of transactions you want included on the report are checked on the list.
Files Included - Use these selections to limit the list to a specific client or matter, or to filter the list to
include charges for selected clients and matters, as described in the client lookup and matter lookup
sections.
Filter - You can filter the list to include only transactions in a specific batch. If you are generating a
Batch Journal, the batch you selected will already be entered here. However, you can also filter any
of the other reports to only list transactions in a specific batch by entering the batch code here. You
can also filter for a specific entry type. This enables you to indicate a more specific selection than the
options listed in the Transactions Included section. For example, if you only want to list payments
that were earmarked to be applied against fees only, enter PF as the Transaction Type. Or, if you are
generating a Retainer Account Journal and only want to list the receipts, enter RR.
Date Range - Leave the date range blank to include all transactions regardless of date, or enter the
date range you want. The MTD and YTD buttons are quick ways of entering the correct dates to show
charges for the current month or year to date. The All button can be used to blank out dates that have
2011 Tussman Programs, Inc.
218
Tussman Program Release 10
previously been entered.
Options - Select from the following options that determine the level of detail and format of the report:
Detail, Summary or Total - Enter D for a detailed report that itemizes each transaction. If you enter T,
the report will show the grand totals for the report only, with no detail. If you enter S, the report will
also omit the detail, but will show instead totals for each date or client and matter, depending on
which sort option you choose. This enables you to generate a report showing summary totals of cash
receipts or billings by date or by client and matter. However, if you want a summary report by client
and matter, it is easier to use the Income Analysis or Billing Analysis Reports.
Sort By Date or Matter - Enter M to sort the transactions on the list by client and matter, or D to sort
by date. If you are generating a list for a single client or matter, this option should be set to M, as
transactions for each matter will always be subsorted by date anyway. In all other cases, sorting by
date will probably result in a quicker list generation time. If you are generating a Batch Journal,
regardless of your selection transactions will be sorted by entry number; i.e, in the order they were
entered.
Include Subtotals - Enter Y to show a subtotal for each date or for each client and matter, depending
on which sort order you chose. Enter N to omit the subtotals.
Show Batch and Entry # - Enter Y to include for each transaction the batch and transaction entry
number, or enter N to omit.
Show Transaction Text - Enter Y to include the description, if any, that was entered for each
transaction. Enter N to omit.
Show Client Name/Matter Title - Enter Y to include for each transaction the full client name and
matter title, or N to omit. This is unnecessary if you are sorting the transactions by client and matter
and are including subtotals, since when including subtotals the list will show each client name and
matter title as a heading at the beginning of the list of transactions for each client and matter.
Orig/Resp Atty - Enter Y to show the originating and responsible attorney assigned to the matter for
each transaction on the list, or N to omit.
Distribution Detail - Enter Y to show for each transaction the detailed billing distribution. For
example, when listing a payment it will show how much was applied against fees, cost, tax and
interest, with a further breakdown of fees by staff member and costs by cost category. Enter N to omit.
If you are generating a Cash Receipts Journal, you may enter W in this space to generate the report
in a special format where the total amount of each payment that was applied to fees, costs, tax,
interest and advance is shown in a separate column. This format omits the breakdown by staff
member and cost code, instead just showing the total that was applied to each category.
GL Distribution - Enter Y to include for each relevant transaction the General Ledger postings which
were assigned, indicating which GL accounts are being debited and which accounts are being credited.
Enter N to omit.
Running Total - Enter Y to include a running total of the transactions in the right hand column. Enter
N to omit.
Line Spacing - Enter 1, 2 or 3 depending on how many lines you want to skip after each transaction
on the list.
Legend at End - Enter Y to include a legend at the end of the report listing all of the transaction types
which appeared on the report and a short explanation of each type. Enter N to omit.
2011 Tussman Programs, Inc.
AR Transactions
219
Reading the Report
Each transaction listed on the report will show beginning in the first column the transaction entry
number, followed by the transaction type, date and reference. Below this information will appear the
Batch Code, client and matter ID, client name and matter title, and the transaction description.
Depending on the report options you selected, some or all of that information may be omitted. If you
are including the Billing Distribution, a distribution column will also appear. For bills, this column will
summarize the charges on the bill by category, as indicated by the letter appearing in the first column
of each distribution. F indicates fees, C or D indicates costs (C for hard cost, D for soft cost), T for tax,
and I for interest. For fees and costs, next will appear the staff member or cost category code,
followed by the distribution amount. For payments and credits, first will appear the invoice number of
the invoice being paid (appearing once only with the first distribution for each invoice), followed by the
letter indicating the category of charge, the staff member or cost category code, and the distribution
amount. Amounts recorded as an advance will be clearly indicated. If you are omitting the
Distributions, the client and matter ID will appear in place of the distribution column, instead of below
on a separate line. For bills, beginning balances and debits, the transaction amount will appear in the
Charge column. For payments and credits, the amount will appear in the Credit column. If you are
including the distributions, at the end of the report will appear a summary of the total charges and
credits by staff member and cost category.
If you are generating a Cash Receipts Journal, and entered W for the Distribution Detail option
described above, instead of showing the distributions for each payment in the form of a table, there will
be separate columns on the report showing how much of the payment was applied to fees, costs, tax,
interest and advance. The report will not include the detailed distribution showing the breakdown by
staff member or cost category.
If you are including Advance Application (type A) transactions on the report, the amount of each
advance application will appear in both the Charge and Credit columns, as it is merely an accounting
entry transferring funds from the advance category to pay fees, costs, tax or interest. The distribution
section will show how that application was applied. Note that Advance Application transaction are no
longer created in Release 9, but some may appear if you used prior versions of Tussman.
If you have recorded client level payments, the master payment record will appear on a cash receipts
journal, but the amount shown will be 0.00, unless there is still an unused client level advance related
to that payment. In that case, the amount will show the unused portion of the credit balance. The
individual payment records created when the master record was saved, or when a client level advance
was later applied to an individual matter, will appear on the list in the normal way.
If you are including the GL Distributions on the report, these will appear below the Billing Distributions
for each transaction. Each GL distribution will show the GL account number and title, department and
location, and the amount debited or credited to that account. At the end of the report will be a
summary of the amounts posted to each GL account.
If you are including reversed transactions or unfinalized bills on the list, those will be identified by an
asterisk (*) to the left of the entry number.
15.17 Month at a Glance
A special month-at-a-glance screen displays daily cash receipt totals for any month, as shown below:
2011 Tussman Programs, Inc.
220
Tussman Program Release 10
To display this screen, click the
button on the Toolbar at the top. The amount shown for each
day is the total of payments (AR transaction type P) that were recorded for that day, excluding
payments that have been reversed or deleted. The total for the month is displayed at the right. Use
the arrow keys to navigate back or ahead one month or year at a time, or click the Go To button and
enter the month you want. Click on any button to browse a list of the payments for that day.
Click the Year at a Glance button to display a summary of cash receipts for each month in the
selected year.
16
Account Balances
The Tussman Program maintains a separate account balance for each matter. You can view the
current status of each matter, or cumulative totals for each client, including case-to-date totals, current
balance due, and totals of unbilled charges, using the Account Inquiry function.
Account balances are maintained using an open item method of accounting. In other words, rather
than maintaining a single total which is periodically updated to reflect changes in the account balance,
the program keeps track of the balance due from each individual invoice which is billed to the client.
The client's current account balance is determined by adding together the balances due from each
invoice. Because the program also maintains a detailed record of each payment or credit and how it is
applied to the client's invoices, it is always possible for the program to determine how the current
balance is broken down by category of charge or by staff member and cost category. This also makes
it possible for the program to roll back the client's account balance when you unfinalize a bill or when
a payment or credit is reversed or deleted. It is also possible for the program to determine what a
client's outstanding balance was at any prior date, simply by considering only the AR transactions
dated through that date when calculating the client's balance (this can be done by specifying the report
2011 Tussman Programs, Inc.
Account Balances
221
date that you want to use when generating an Accounts Receivable report).
A client's account balance, as shown on the Account Status screen or on your Accounts Receivable
reports never includes the amount of any unbilled charges. Unbilled fees and costs are transferred to
accounts receivable only when they are billed to the client and the bill is finalized.
Note also that the Account Status screen and Accounts Receivable reports always show the
current account balance (unless you are generating an AR report as of a prior date). This figure may
differ from the Balance Forward which will appear on the client's next bill, as the Balance Forward
will normally match the Balance Due which appeared on the previous bill, and will not reflect
subsequent AR transactions entered after that bill was generated (unless you entered AR transactions
after the date of the prior bill and unchecked the Show on Next Bill option when entering the
transaction, in which case they are applied directly to the Balance Forward.) The Account Status
screen totals, on the other hand, always reflect all AR transactions that have been entered to date,
whether or not they have yet appeared on the client's bill..
The program also maintains for each matter separate balances for both the retainer and trust account.
The current balances in these accounts are also shown on the Account Status screen for each client
and matter, unless there is no balance in the account.
Because the program uses an open item accounting method, there is no way to directly change an
account balance without either generating a bill (which increases the account balance by the amount of
the bill) or by entering an AR transaction, which either increases or decreases a balance depending on
the type of transaction entered. The act of unfinalizing a bill, or reversing or deleting an AR
transaction, also affects an account balance.
16.1
Account Inquiry
To check the account status for a client or matter, click the
button on the Toolbar at the top.
You can also display the account status screen by clicking on the Account Inquiry button which
appears on each client and matter record. You can display an account status screen for an individual
matter, or you can display it for a client, in which case the screen shows cumulative totals from all that
client's matters. A sample Account Status screen appears below:
2011 Tussman Programs, Inc.
222
Tussman Program Release 10
The Account Status screen consists of four parts. The top part shows a summary of the account
history and status. The first column shows the total amount billed to date, broken down by fees,
costs, tax and interest. The second column shows the total amount paid to date, indicating how much
was applied to each category of charge. The third column shows the total credits (transaction type
Q's) recorded to date. The fourth column represents the current account balance. To the right of that
are three columns which display amounts that are past due 30, 60 or 90 days determined by counting
the number of days since the posting date of each outstanding invoice.
Note that if a client has made a payment or has been given a credit of which any part is still being
carried as an advance, only that portion of the payment or credit which has actually been applied
against a client's bill will be reflected in the Paid or Credit totals in the top portion of the screen. Thus,
the amount in the Balance column will never be a negative amount. If the client has an unused credit
balance, that will be shown separately in the third portion of the screen described below.
The middle part shows the total of any unbilled charges (Work in Progress) broken down between
fees and costs. Besides showing the number of hours and the amount, the right hand columns show
that portion of the unbilled charges which are dated more than 30, 60 or 90 days prior to the current
date.
Below the Work in Progress section are listed additional items which will vary from account to
account, including:
The minimum amount due (if on an installment payment plan);
2011 Tussman Programs, Inc.
Account Balances
223
The date and amount of the last payment;
The total amount paid since the last bill (if there was more than one payment);
The date of the last bill;
The amount of any unused credit balances (showing separately any client level, non-earmarked, or
earmarked credit balances);
The current retainer and trust account balances;
The date of the last reminder statement, if any;
The amount of any unbilled overriding flat fee or cost charges (types FO or CO);
The amount of any unbilled minimum retainer fee charges (type FE);
The amount of an unused credit from any previously billed FE charges;
The presence of any billing holds or a billing threshold;
The billing interval and next bill date, if you are using the Interval Billing option
The buttons at the bottom and right hand side allow you to access additional information, as follows:
Master Ledger - Takes you to the master ledger for this file.
Fee Ledger - Itemizes each fee charge recorded to date and if billed shows when it was billed, the
amount paid, and the unpaid balance for that charge.
Cost Ledger - Itemizes each cost charge recorded to date and if billed shows when it was billed, the
amount paid, and the unpaid balance for that charge.
Bill Ledger - Itemizes each bill for this file and lists each payment applied against that bill, showing the
remaining balance due.
Periodic Summary - Generates a periodic activity summary for any selected date range for this
client or matter.
Time at a Glance - Displays the Time at a Glance screen showing daily or monthy totals of the hours
worked for this client or matter.
Staff Summary - Shows the total number of hours and dollar amount billed, paid, written off, and
currently outstanding for each staff member.
Cost Summary - Shows the total amount billed, paid, written off, and currently outstanding for each
cost category. The report also show what portion of the total is attributable to soft costs, and what
portion to hard costs.
Open Invoices - Lists each invoice which is currently outstanding. For each invoice, the first line
shows the date, invoice number, and total fees, costs, interest and tax that were billed on that invoice.
The second line shows the total fees, costs, interest and tax that remain outstanding.
Daily Cash Receipts - Itemizes all cash receipts for this file by date, including payments, retainer and
trust receipts and only showing actual cash received, not internal transfers such as when retainer funds
previously applied are disbursed as a payment.
Billing Journal - A report listing each bill generated for this client or matter, showing the billing and GL
distributions for each one, in the same format as the Billing Journal which can be generated using the
AR Journal Reports function. This provides a quicker way of generating that same report. Unlike the
Open Invoices or Invoice History report, this report shows only the total amount of each bill, and not
the balance currently outstanding. However, this report shows the complete billing and GL
distributions, and includes totals at the end, which do not appear on the other reports.
Cash Receipts Journal - A report listing each payment and credit for this client or matter, showing the
billing and GL distributions for each one. This report is exactly the same as the Cash Receipts
2011 Tussman Programs, Inc.
224
Tussman Program Release 10
Journal which you can generate using the. AR Journal Reports function.
Retainer Account Detail - A report listing all retainer account activity to date for the client or matter, in
the same format as the Retainer Account Journal which can be generated using the
AR Journal Reports function.
Trust Account Detail - A report listing all trust account activity to date for the client or matter, in the
same format as the Trust Account Journal which can be generated using the AR Journal Reports
function.
Billed Fee Detail - A report listing all fee charges that have been billed to date for the client or matter,
in the same format as the List Billed Charges by Client/Matter report which can be generated using
the Listing Charges function.
WIP Fee Detail - A report listing all unbilled fee charges, in the same format as the List Unbilled
Charges by Client/Matter report which can be generated using the Listing Charges function.
Billed Cost Detail - A report listing all cost charges that have been billed to date for the client or
matter, in the same format as the List Billed Charges by Client/Matter report which can be
generated using the Listing Charges function.
WIP Cost Detail - A report listing all unbilled cost charges, in the same format as the List Unbilled
Charges by Client/Matter report which can be generated using the Listing Charges function.
Ledger Card (Summary) - A report in the format of a ledger card summarizing the account history for
the client or matter. Each bill, payment, credit and other relevant AR transaction is listed, showing the
amount of each with a running balance in the right hand column. This report is similar in format to the
Complete AR Journal report you can generate using the AR Journal Reports function.
If you are running this report from the Account Status screen for a client, the report will consolidate
each bill and payment by invoice and reference number respectively. When a client has multiple
matters, the program will generate separate bills for each matter, each of which will be result in the
creation of a separate billing record (AR transaction type B). However, if the bill format you are using
for this client calls for generating a consolidated bill, then each time you generate bills for that client the
program will assign the same invoice number to all the bills for that client, causing those bills to be
consolidated into a single line item on this report. Similarly, if a client level payment is recorded,
whereby a payment is applied to multiple matters for a client, only the master payment record will be
listed on this report. These two forms of consolidation result in a dramatically simplified report which
makes it much easier to review the history of a client with multiple matters. You can only generate
this consolidated form of the Ledger Card from the Account Status screen for a client.
Ledger Card (Detailed) - Similar to the Ledger Card (Summary), except for each bill, payment or
other transaction listed it shows the complete billing and GL distribution, along with the batch code and
transaction description, which do not appear on the summary report. This report is the same as the
Complete AR Journal report you can generate using the AR Journal Reports function.
Current Prebill - Generates a prebill for the matter (or all prebills for the client). After clicking this
selection the Generate Prebills screen appears, already configured to generate a prebill for the
correct client or matter, with today's dates entered in the Billing Dates fields. All you need to do is
select the print option from the buttons in the upper right hand corner.
Browse AR - Brings up the Browse AR Transactions screen listing the AR transactions for this client
or matter, exactly as if you had selected AR for Client from the View menu, or clicked on the
button on the Toolbar, and entered this client or matter ID. From this screen you can view, add, edit,
reverse or delete individual AR transactions, as described in the section on Editing AR Transactions.
You can also reprint a copy of any of the bills for this client or matter by clicking on the Reprint button
2011 Tussman Programs, Inc.
Account Balances
225
after bringing up the individual billing record (transaction type B).
Browse WIP - Brings up the Browse Unbilled Charges screen listing all unbilled charges for this client
or matter, both fees and costs, exactly as if you had selected Charges for Client from the View menu,
or clicked on the
button on the Toolbar, and entered this client or matter ID. From this screen you
can view, add, edit, write down or delete individual charges, as described in the sections on
Editing Fee Charges and Editing Costs.
Browse Billed Charges - Brings up the Browse Billed Charges screen listing all billed charges for
this client or matter, both fees and costs, as described in the Editing Billed Charges section.
You can also bring up this screen by selecting Charges, Billed from the File menu and clicking on File
to filter the list for the client or matter you want.
Historical Bill - Generates a historical bill for the matter (or a historical bill for each matter for the
client). After clicking this selection the Generate Historical Statements screen appears, already
configured to generate historical bills for the correct client or matter, with today's dates entered in the
Billing Dates fields. All you need to do is select the print option from the buttons in the upper right
hand corner.
Matter Summary
If you are viewing the account status screen for a client, the Matter Summary button will generate a
report showing a breakdown by matter of the total unbilled charges (WIP), current retainer and trust
balances, current account balance, and any unused credit balances. This is useful if you want to
identify which matter is the source of an amount shown on the account status screen for the client.
Other Functions
The following additional functions are found on the Account Status screen:
- Click the print icon to print a report showing the information on the Account Status screen. The
report is generated in the same format as the File History and Status report.
- Click on this button to delete all the billing addresses that you have entered for this client. You
can only access this button from the account status screen for the client. Before continuing you must
enter the code 2010.
- Click on this button to resequence the bills for a matter. Each time the program finalizes a bill
for a matter, it assigns it a sequential number so that it knows which order the bills for a matter were
generated in. If the bills are out of sequence, then when you go to unfinalize the last bill for a matter it
may not select the most recent one. This should rarely if ever happen, but performing this function
ensures that the bills are in proper sequence.
- A shortcut to generating a Productivity Report for this file.
- Click on this button to reconstruct the account history for this client or matter. This should
rarely if ever be required. However, if it appears that the account balance maintained by the program
for a file is in error, or if the addition on a client's bill is incorrect, clicking on this button should correct it.
2011 Tussman Programs, Inc.
226
Tussman Program Release 10
These errors are generally due to the misallocation of payments. There is a function in the program
that automatically detects these errors in the payment allocations and runs the reconstruct feature to
correct them, so these errors should rarely if ever appear. However, you can turn off this "auto
reconstruct" feature by selecting the Auto Reconstruct option on the Setup menu.
- Clicking on this button deletes the entire account history for this client or matter, as described in
the section on Eliminating Account History. Performing this function requires entry of a special code.
Navigation buttons
The four arrow buttons in the lower right hand corner of the Account Status screen help you locate the
next file you want to display.: Click the
previous client or matter or click the
button to go to the Account Status screen for the
button to go to the next client or matter. If you are displaying
the Account Status for a matter, clicking the
button will display the consolidated Account
Status screen for the client. If you are at the Account Status screen for the client, clicking that
button will display the Account Status screen for that client's first matter. Click the
button to
display the Select Client or Matter dialog from which you can go to the Account Status screen for
any other client or matter.
16.2
Master Ledger
The Master Ledger gives you a complete view of the entire history for a specific client or matter. You
can bring up the Master Ledger by clicking the
button on the Toolbar at the top, or clicking the
the Master Ledger button which also appears on each individual client or matter screen and on the
Account Status screen for each file.
The Master Ledger lists all the individual charges (both billed and unbilled) as well as each individual
AR transaction (bills, payments, etc), giving totals for hours worked to date, amounts billed, paid, and
the balance due. You can click on any of the transactions listed to view or edit them. AR transactions
appear in red, charges appear in black, and retainer and trust transactions appear in green.
If you make changes to the transactions most changes will be reflected on the ledger automatically but
some changes (for example, if you add a new entry while the Master Ledger screen for that client is
open, or if you assign an entry to a different client or matter) may not be reflected immediately. In that
case, to refresh the screen or to update the totals at the end of the list, click the
top of the screen.
button at the
2011 Tussman Programs, Inc.
Account Balances
227
The first column on the screen shows the status of each transaction. The letter B indicates a charge
has been billed. In that case, the Inv/Ref column will show the invoice number of the bill that charge
appeared on.
You can filter the ledger to display only certain types of transactions, or to narrow it down to a specific
date range.
Click the Printer icon at the top to print the master ledger in a format which shows the complete
description for each transaction and is suitable for giving to the client, to the court, or for other
purposes which require a complete printout of all activity on a file. You can also use save the report to
an Excel (csv) file.
16.3
Adjusting a Balance
If a client has an outstanding balance that you want to reduce or eliminate, simply enter a credit
transaction (type Q) in the amount that you want to reduce it by, as described in the section on
Entering AR Transactions.
If you want to increase a client's balance due, you can do that by entering a debit transaction (type D)
in the amount you want to increase it by, as described in the section on Entering AR Transactions.
If a client has a credit balance, and you want to reduce or eliminate that, enter a DA transaction as
described in the section on Client Refunds. To increase the amount of a credit balance, simply enter
an additional payment (type P) or credit (type Q) transaction in the amount you want to increase it by.
To adjust the balance in a client's retainer or trust account, enter a receipt (type RR or TR) or
disbursement (RD or TD) in the amount that you want to increase or decrease the balance by.
If you want the client's next bill to show the adjusting entry, make sure the Show on Next Bill option is
checked when you enter the transaction. If you do not need to show it on the next bill, or if you don't
plan to generate any more bills for that matter, uncheck that option.
16.4
Transferring Balances
There are three situations in which you might want to transfer a balance from one file to another:
1. A client has a credit balance on one matter which you want to apply to a balance due on
another matter. To do this, you must first enter a refund (type DA) transaction, as described in the
section on Client Refunds, on the file with the credit balance in the amount that you want to transfer.
Then, record a payment (type P) or credit (type Q) transaction on the matter with the balance that you
want to pay.
2. A client has a balance due on one matter which you want to transfer to another matter. To
2011 Tussman Programs, Inc.
228
Tussman Program Release 10
do this, first record a credit (type Q) on the matter that currently has the balance due. Then record a
debit (type D) transaction on the matter that you want to transfer that amount to.
3. A client has funds in a retainer or trust account for one matter which you want to transfer to
a retainer or trust account on another matter. To do this, first disburse the funds from the retainer
or trust account which has the funds by recording an RD or TD transaction for that matter Then record
a receipt (type RR or TR) on the matter to which you want to transfer the funds.
If you simply want to use funds in a retainer or trust account on one matter to pay a balance due on
another matter, instead of transferring it to the retainer or trust account on the second matter you can
simply record the second transaction as a payment. In this case, disburse the funds from the first
account using an RD or TD, as described above, but then record a payment (type P) transaction on
the second account, instead of recording an RR or TR.
Note that all three of the above procedures can be followed not just to transfer funds between matters
for the same client, but also to transfer funds from a matter for one client to a matter for a different
client.
16.5
Eliminating Account History
Eliminating the account history for a client or matter is a drastic remedy. It completely deletes all AR
transactions and billed charges, thereby zeroing out the account balance and removing all history of
activity for file, including all retainer or trust account balances and history Only unbilled charges
remain on file and are not affected.
To do this, click on the Z button located on the Account Status screen for the client or matter.
Because this is such a drastic remedy, it requires the entry of a code which can be obtained by calling
Tussman Program technical support.
17
Billing
Once you have opened a matter for a client and entered charges or other activity for that matter, no
additional steps are required before you can generate a bill.
Before printing the actual bill, you can generate a prebill, or draft form of the bill, which shows more
detail than the actual bill. Generating prebills is not required, however.
A bill can be generated at any time, either for an individual client or matter, for selected clients or
matters, or for all active clients and matters. A wide variety of bill format options allow you to design
the layout and level of detail of the bill. Once printed, you can make changes to a bill and reprint it as
many times as necessary. As you generate each bill, it is added to a list of new bills which you can
review and use to print billing summary and other reports.
After a bill is in final form, it must be finalized before you generate the bill for the next billing cycle. The
finalizing procedure adds the amount which was billed to the client's account balance, marks the
charges which appeared on the bill as having been billed, and carries forward the ending balance so
that it will appear as the balance forward on the next bill. It is important to remember that the finalizing
procedure is the last step in the billing process and is done after all the bills have been printed in final
form, not before. After a bill has been finalized, you can reprint an exact copy of that bill at any time. If
you must revise a finalized bill, you can unfinalize it, make the necessary changes, generate it again as
if you were doing it for the first time, and then finalize it again. You can also have the program
unfinalize all the bills for a matter so you can make changes, then have the program automatically
regenerate and finalize those bills again.
2011 Tussman Programs, Inc.
Billing
229
A regular bill can show just the charges for the current billing period, or it can also show any unpaid
balance forward and add that to the balance due. Even if there are no current charges for a matter,
you can generate a bill to show the unpaid balance. You can also generate separate reminder
statements for each client which show only their unpaid balances and do not include any new charges.
A historical bill is a special cumulative bill that details all charges and other activity that has been billed
to date in the form of a single statement. It can be generated at any time for any file. You can also
generate a client statement which shows a summary of all billis, payments and adjustments to date
without the actual detail.
17.1
Prebills
A prebill is a draft form of a regular bill used for review and editing purposes before the actual bill is
generated. Generating prebills is not required, but it may make editing easier because the prebill
provides more detail than the regular bill; particularly if your bill format has been designed to show little
detail. For example, it shows for each charge the transaction entry number, which makes it easier to
locate when editing. A prebill can be generated at any time, even if you are not about to generate your
regular bills, as it provides an easy way to see the current status of a matter.
To generate prebills, click on Bills from the Main Menu and select Prebills from the submenu. Or,
right click on the
button on the Control Panel at the left. This brings up the Generate
Prebills screen, which allows you to select who you want to generate prebills for, along with the other
options described below. Alternatively, you can generate individual prebills for a single client or matter
by going to the Account Status screen for a client or matter and clicking on Current Prebill.
The Generate Prebills screen is shown below, followed by an explanation of the options:
2011 Tussman Programs, Inc.
230
Tussman Program Release 10
Files Selected - Indicate here which file or files you want to generate prebills for. These options are
the same as when generating a bill, as described in the section on selecting who to bill. When
generating prebills there is one additional option: you can instruct the program to generate a prebill for
every matter on which fee charges for a specified staff member appear. To do this, click on the Files
Atty Worked on button and enter the code of the staff member you want. This is useful if you want to
generate a separate set of prebills for each staff member, with each set consisting of prebills for only
those matters on which that staff member worked.
Options for Files with no Charges - This button brings up a dialog which lets you specify whether or
not to generate prebills for matters that have no new charges to bill, but may have other activity such
as an unpaid balance due, retainer or trust account activity, etc. These options are described in detail
in the section on Files with no New Charges....
Edit Prebill Format - This button brings up a dialog that contains a set of formatting options that apply
only to prebills, as described in the section on Prebill Format Options.
Edit Prebill Message - You can print a message at the end of each prebill by clicking on this button
and entering the text that you want to appear. This can be used, for example, to print a form which
allows the person reviewing the prebill to make notations regarding changes or other instructions for
processing the prebill.
Activate/Disable Locking - This feature allows you to "lock" a bill after the prebill is generated so that
any new charges added after the prebill is generated will not be added to the bill even if they are within
the date range selected for the bill. It is normally not recommended that you use this feature but if it is
appropriate for your firm you can activate it by clicking on this button and then checking the first box
which activates the feature. When activated, unchecking that same box will deactivate it for future
prebills that are generated, although prebills that have already been generated when locking was active
will still be locked. You can "unlock" those prebills by unchecking the first box, then checking the
second box and regenerating the affected prebills. Charges that do not appear on a bill because they
2011 Tussman Programs, Inc.
Billing
231
were added after a locked prebill was generated will still be saved and will appear on the bill for the
next billing period.
Once you generate a prebill with locking on, then if you generate that same prebill again after additional
charges have been added those charges will not appear on the second prebill unless you check the
second box which releases the previous lock.
Billing Dates - Enter the cutoff and other dates you want to use for this billing, as described in the
section on Billing Dates. Enter the same dates that you intend to use when generating the actual bills.
Include Charges/Files on Hold - Enter Y if you want to generate prebills for matters which are on
hold, and to include individual charges that are on hold, since you may want to review these prebills
even though because a matter is on hold an actual bill will not be generated. Prebills generated for
files on hold will have a notation in the heading indicating it is on hold. Individual charges that are on
hold will appear with an asterisk next to the transaction entry number. If you set this option to N then
prebills will not be generated for a file with a complete billing hold, and charges on hold will not appear.
If you set this option to X, then close this screen and go to generate bills, the program will include files
and charges on hold when generating your bills.
Interval Billing Option - Make sure this is set to 3, unless you are using the interval billing feature.
Sort Order - Enter N to generate prebills in client ID order, A to generate by client alternate ID.
Prebills can be generated in a variety of other sort orders using the feature which lets you create a
List of Files to bill.
Suppress Interest - Check this box if you want to prevent the charging of interest on the prebills you
are about to generate, even if the instruction for the matter file(s) is to charge interest.
After selecting the options you want, generate the prebills by clicking on Print, Compressed Print,
Print to File, or Preview buttons.
17.1.1 Prebill Format Options
The format for prebills is less flexible than the format for bills, as the prebill is designed for internal
office use only and is intended to show more detail than an actual bill. However, there is a set of
format options that apply only to prebills, which you can change by clicking on Edit Prebill Format
from the Generate Prebills screen. The options contained on the Prebill Format Options screen are
described below:
2011 Tussman Programs, Inc.
232
Tussman Program Release 10
Include Client Address - Enter Y to include the client's full address in the heading. Otherwise, only
the client's name will appear.
Include Phone Numbers - Enter Y to include the client's phone numbers in the heading.
Include Full Matter Title - Enter Y to include the full matter title in the heading. Otherwise only the
first line will appear.
Include Matter Notes - Enter Y to print the notes entered in the matter screen in the heading.
Include Productivity Codes - Enter Y to include the productivity codes (Client Type, Client Group,
Matter Type, Matter Group, etc) for both the client and matter in the heading.
Include Fee Arrangement - Enter Y to show the Fee Arrangement, Rate Schedule, Bill Format and
other Billing Options being used for each matter in the heading.
Include Case to Date Totals - Enter Y to include a summary of the totals billed and paid to date for
each matter at the end of the prebill
Include Date and Amount of Last Payment - Enter Y to show this information in the heading.
Timeslip Sort Order - Select the order in which you want fee charges to be listed on the prebill. Enter
N to sort by Date, Y by Staff Member, C by Staff Category, A by Activity Code, or P by Task Code.
Consolidate Costs by Cost Code - Enter Y to consolidate cost charges with the same cost code into
a single line item on the prebill.
Double Space Between Charges - Enter Y to double space between each fee and cost charge on the
prebill, or S to double space the fee section only. Otherwise, both sections will be single spaced.
2011 Tussman Programs, Inc.
Billing
233
Include Ageing Detail - Enter Y to include a section at the end which shown a breakdown of the
balance due by category of charge with columns showing the amounts past due.
Include Messages - Enter Y to print the same set of messages which will be printed at the end of the
regular bill. Otherwise they will be omitted.
Include Statement Summary Page - Enter Y to print the summary pages which are generated for
clients with multiple matters in the same manner they would be printed if you were generating regular
bills, as described in ***
Start on New Page - Enter Y to begin the prebill for each matter on a new page, C to begin each
client's prebills on a new page, with the matters for that client printed continuously without page breaks
after each one, or enter N to print all prebills continuously.
New Page for Statement Summary - If you entered C for the previous selection so that the prebills for
each client are begun on a new page, but printed continuously for that client, enter Y if you want the
summary page for that client to be printed on a separate page, or N to print it continuously following the
last matter for that client.
Include Task/Activity Codes - Enter Y if you want to include the Task and Activity code for each
charge, shown in parentheses following the description.
17.1.2 Prebill Summary Report
When you have finished generating one or more prebills, a dialog comes up asking if you want to print
a prebill summary report. This report lists the prebills you just generated, in the same format as the
Billing Summary Report. The option to print this report does not come up when you select the
Preview option when generating the prebills. If you previewed them, and want to generate the report,
you can then generate a separate copy of the prebills using the Print to File option, so they are not
actually printed. You can then generate the report when they are finished generating.
17.2
Generating Bills
To generate a new bill, click the
button on the Control Panel at the left, or select Bills from
the Main Menu and pick Generate New Bills from the submenu. The Generate New Bills screen is
shown below:
2011 Tussman Programs, Inc.
234
Tussman Program Release 10
The Generate New Bills screen also lets you make changes to the bill format and specify the billing
dates, sort order for the bills, and other options described below.
Files Selected - The Files Selected box lets you select who you want to bill. If you have already
selected a client or matter, a double arrow will point to the Single Client or Matter button. Otherwise,
the screen defaults to the All Files selection. You can also choose to bill Selected Files, a Range of
Files, or you can create a List of Files to bill. These options are described in detail in the
Selecting Who to Bill section. Immediately below the Files Selected box the program states what
option you have selected. If you have selected a specific client or matter, it will show the file ID. If you
picked a specific matter, it also displays the number of the bill format you are using for that matter in
parentheses following the file ID.
While the program will not generate a bill for a file that is on hold, if you request a bill for a specific
matter that is on hold it will ask you if you want to generate it even though it is on hold. To include all
files that are on hold when generating bills, first go to the generate prebills screen and set the Include
Files/Charges on Hold option to X.
Billing Dates - Enter here the posting date, statement date, and cutoff dates you want to use for these
bills, as described in the section on Billing Dates. Using the correct dates is extremely important, so be
sure to check these each time you generate a bill. The program remembers the last set of dates you
used each time you bring up the Generate New Bills screen. Click on the Change all dates to today
button to insert the current date in all the fields (except for the Beginning Cutoff Date, which should
normally be left blank).
Options for Files with no Charges - This button brings up a dialog with a variety of options that
determine whether or not the program prints a bill if there are no new charges to bill, but if there is
other activity such as a balance forward, trust or retainer activity, etc, as described in detail in the
section on Files with no Current Charges.
Edit Bill Formats - Click this button to make changes in your bill format, or to select a specific format
2011 Tussman Programs, Inc.
Billing
235
to use, as described in the Bill Formats section. If you have selected the option to force use of the
default format, the format you will be using is shown in parenthesis on the button.
Edit Bill Messages - Click this button to enter or change the optional message which can be printed at
the end of each bill. You can create a separate message for each bill format, or use a single message
for all your bills, as described in the section on Bill Messages. If you have selected the option to force
use of the default messge, the number of the message you will be using is shown in parenthesis on the
button.
Regenerate Unfinalized Bills - This function reprints all of the bills in your list of new bills. Only bills
that have previously been generated, and appear in your list of new bills, will be printed, using the exact
same billing dates as when they were originally generated. You can use this function if you want to
print a second copy of your bills, or if you have made extensive editing changes to the bills and want to
reprint the exact same set with the changes. You can also reprint your bills using the Print buttons at
the bottom of the list of new bills. That function has more flexibility as it allows you to reprint a single
bill, all the bills for one client, or the entire set.
Generate Summary Pages Only - Click this button to generate just the summary pages for all the bills
that you have generated and are in your list of new bills. You probably will never need to use this
function, as it generates the summary pages for all of your current bills. It is more likely that you will
occasionally need to re-generate the summary page for a single client. This would be necessary if, for
example, you make changes to one of a client's matters and the changes affect the totals on the
summary page. Instead of having to reprint all of that client's bills in order to get the revised summary
page, you can simply print the summary page for that one client. To do this, highlight any one of that
client's bills on the list of new bills and click the SP button at the bottom of the list.
Invoice Numbering - Click this button to see or change the next invoice number which the program
will assign, as described in detail in the section on invoice numbers.
Sort Order - Enter N to generate the bills in client ID order, A to print in order of client alternate ID. If
you have created a list of files to bill, then you have additional sorting options which are described in
that section. If you must print your bills in some other sort order, you can use the list of files function as
follows: Click on the List of Files button, select either list 1 or list 2, click on Generate List
Automatically, click on Select Files for List and then click OK without entering any selections. Then
click OK again and click Yes to generate a new list. You may have to wait a few seconds while the list
is compiled. Then select the sorting option you want, as described in the list of files to bill section, and
click OK. The screen will display all your active matters sorted in the order you specified. Click Bill
Selected List Now. You can then generate the bills, which will be printed in the order they appear in
the list... Note that the program will only print bills for matters that meet the billing criteria stated in the
Selecting Who to Bill section, even though all matters will be included in the list of files.
Interval Billing Option - Unless you are using the interval billing feature be sure to set this option to
3. If you set it to 1, the program will only generate bills for matters where the Next Bill Date falls on or
before the Ending Cutoff Date you are using for this bill. If you set it to 2, in addition to printing the bills
that would be printed if the setting were 1, the program will also generate bills for matters which are not
using the interval billing feature: i.e., where the Billing Interval and Next Bill Date have been left
blank. Using option 3, the program ignores the Next Bill Dates and will generate bills for all matters in
the normal way.
Number of Copies - Defaults to 1, but you can enter 2 if you want to print a second copy of each bill.
Aging Days +/- - If the number of days since the previous bill has not been sufficient to move the
balance forward from that bill from "current" into "over 30", for example, enter a number here sufficient
to cause that to happen. For example, if it has only been 29 days since the previous bill, enter 1 so
that the program will treat the number of days since the previous bill as 30 for purposes of aging.
Suppress Interest - Check this box if you want to prevent the charging of interest on the bills you are
2011 Tussman Programs, Inc.
236
Tussman Program Release 10
about to generate, even if the instruction for the matter file(s) is to charge interest.
Use Double Sided Printing - Check this option if you have a printer that allows double sided printing.
Activate Widow/Orphan Protection - Check this box if you do not want the description for a charge to
be divided up between two pages. If a description would spill over to the next page, the program will
instead begin printing that charge on the following page. Not everyone will like this option as it could
result in large blank spaces at the bottom of some pages.
Print Summary Pages First - If you have selected the formatting option that calls for printing a
summary page for each client to accompany their bills (bill format option 250), check this option so that
the summary pages are printed first. Otherwise, the summary page will be printed after the individual
bills for each matter. This option also applies to the so-called Esmeralda format where the detail of the
charges is printed as a separate attachment to the bill. If this option is not checked, then the detail is
printed first, followed by the actual bill. You will definitely want to check this option if you are using the
Esmeralda format, or if you are emailing your bills. If you are not printing summary pages with your
bills (option 250 is set to N) then unchecking this option will speed up the generation of your bills.
Select Font - When printing prebills, bills, reminder statements or historical bills you can select the font
style and size by clicking on the Font button. A drop down menu lists the various fonts you can select
from. Below that you can specify the font size. The default is 11, but you can change it to as small as
6 and as large as 19. If you change the size, you may also want to adjust the margins and number of
lines per page settings in option 9 of the bill format. For example, if you change to a smaller font then
you will be able to fit more lines on each page of the bill.
File Option - This option allows you to create a separate PDF file for each client when generating bills
using the Tussman PDF Writer as described in the next section below. Check this option if you want
to generate your bills to PDF files so that you can review or email them yourself. If you are having the
program email the bills automatically, it is not necessary to check this option.
Printing the Bills
As with any report in the Tussman program, you can send your bills directly to the printer by clicking
the Print button, or you can generate them to a file, preview them on the screen first, or print them in
compressed print.
You can also generate the bills to a PDF file if you have installed the Tussman PDF Writer. To do this,
click the Print button and select the Tussman PDF Writer from your list of printers. Click Print, then
specify the file name and location where you want to save it. You can also configure the program so
that the file is saved automatically to a specified folder by clicking on Tools, Configure Tussman PDF
Writer. You can also generate a separate PDF file for each client by selecting the option to save the
files automatically, then checking the option to create separate files for each bill by clicking on the File
Option button on the Generate New Bills screen. If you want to create separate PDF files for each
client, make sure you uncheck the options on the Configure Tussman PDF Writer screen to open or
email the file after generation.
If your printer is configured to print on both sides of the page (doublesided printing), you must configure
Tussman so that each bill begins on a new sheet. To do this, click on Tools and select Doubleside
Printing for Bills, then click Yes to activate the function. Do not activate this function unless you are
using doublesided printing or you will wind up printing blank pages between some of the bills.
Once the program has begun generating the bills, the Please Wait dialog displays a progress report.
You can cancel at any time by clicking the Cancel button. If you confirm that you want to cancel, or
when the program is finished generating the bills, a second dialog comes up indicating it is finished and
showing how many bills were generated. If you click OK, the bills which were just generated will be
saved and added to your list of new bills. If you click the Cancel button on this dialog, the bills will not
2011 Tussman Programs, Inc.
Billing
237
be saved and will not appear in your list of new bills, and it will be necessary to generate them again
and save them if you want to be able to finalize them. Note that saving the bills is different from
finalizing. Saving merely adds them to your list of new bills. Only bills that have been saved and are
included in your list of new bills will be finalized when you perform the finalizing function. It is the
finalizing function which carries forward the new balances and marks the activity as having been billed
so that you can close out the billing cycle once your bills are in final form.
The Info button which appears on that same dialog is a useful debugging tool. It displays information
about the last bill that was generated, indicating the file number and status, whether a billing hold or
threshold is in effect, and whether there is any current activity on the file. The Info button is most
useful if you are attempting to generate a single bill and the program refuses to generate it. In that
case, select the Single Client or Matter option, enter both the client and matter ID for the bill you
want, and click either Print or Print to File..Then click on the Info button when the ending dialog
comes up. This may disclose the reason the bill is not being printed. For example, if the status report
does not show there is any activity on the file, then that is probably the reason why there is no bill.
The dialog that comes up when the bills are finished does not appear if you select the Preview option.
In that case, the bills are automatically saved.
After generating and saving the bills by clicking OK, you can view a list of the bills by selecting List
New Bills from the Bills menu. The list will include all bills you have generated but not yet finalized,
not just the ones that you just printed. From this screen you can print a billing summary report listing
the bills, print mailing labels, and perform other functions described in the section on Listing New Bills.
You can delete all or selected bills from the list using the Cancel buttons in case you generated and
saved the bills in error.
If for any reason the program is interrupted while generating bills, such as by a power failure or printer
malfunction, you do not have to generate the entire set again. Instead, you can use the Range of Files
option to print the bills beginning with the next client or matter following the last one that was printed in
full. When selecting your range, simply leave the ending matter blank and it will continue printing to the
last matter. In case this happens, however, be sure to check to make sure that all the bills have been
saved and are included in your list of new bills.
Sometimes when generating bills a dialog that looks like this may pop up:
This is a precaution which alerts you to the fact that there is already a bill for the indicated matter in
your list of new bills, and that bill was generated using different billing dates than the one you are now
generating. This could reflect one of two possible situations:
2011 Tussman Programs, Inc.
238
Tussman Program Release 10
1. You have forgotten to finalize your bills from the previous billing cycle. If this is the case, you
should click the Cancel button, check your list of new bills, and if necessary finalize them before
generating the bills for the current cycle. You should not continue printing the new bills as the new
bills will overwrite the bills already in the list, and then you will not be able to finalize the old ones
without generating them again.
2. You are generating the same set of bills again but with different billing dates. This could be
either because you have made changes and need to reprint them, or because you want a second set
of the same bills. In either case, however, it means you are using different billing dates than when you
last printed them. This could be an oversight, or it could be deliberate. Before continuing, you should
check to make sure which billing dates you want to use and, if necessary, click Cancel, correct the
Billing Dates, and begin generating the bills again.
If you determine that you are using the correct billing dates, and want to ignore the warning, click either
Generate this Bill Anyway or Generate this Bill and no More Warnings Please! Clicking the latter
will suppress any further warning during this billing run. Clicking the first button will generate this bill
but you may receive further warnings if additional bills are found where there is an existing new bill with
a different date. If you click Skip this Bill, the program will not generate a bill for the indicated matter
and will continue with the next bill.
17.2.1 Selecting Who to Bill
The Generate New Statements screen contains the above box from which you select who you want to
bill. The double arrow to the left of the buttons points to the selection you have made, and the text
below the box states what files you have selected.. To make or change your selection, simply click on
the button you want and make your selection as described in detail below.
Billing Criteria
Regardless of which selection you make, the program will not generate a bill for a matter if
the matter is closed or marked for deletion;
the matter is on hold (unless you have set the Include Files on Hold option in the Generate Prebills
screen to X);
the amount of unbilled charges is less than the billing threshold;
there are no charges to bill and there is no other account activity;.
you are using the interval billing feature and the matter is not due for billing
If there are no charges to bill for a matter as of the ending cutoff date which you are using on the bill,
2011 Tussman Programs, Inc.
Billing
239
the program checks to see if there is any other reason to generate a bill, such as an unpaid balance
forward or current payment, retainer or trust account activity. You can specify in what cases you want
the program to generate a bill by selecting from the options listed in the Files with no Charges screen.
For example, you can configure the program to generate bills only if there are new charges, or you can
also include bills for matters with an unpaid balance due, etc.
Selecting Who to Bill
All Files - Click this button if you want to generate a bill for all matters which meet the criteria
described above.
Single Client or Matter - Click this button to generate a bill for a single client or matter. To generate
bills for all the matters for one client, enter the client ID only. To generate a bill for one matter only,
enter the matter ID also. If you select all matters for a client, the program will only generate bills for
those matters which meet the billing criteria described above. If you select a specific matter, the
program will also generate a bill only if it meets those same criteria with one exception: if a matter is
on hold and you ask the program to generate a bill for that specific matter, it will allow you to generate
the bill after first asking if you are sure.
Selected Files - Click this button if you want to generate bills for a selected group of clients or matters;
for example, all matters for a specific originating or responsible attorney, etc. Fill in the selection
criteria in the Select Clients and Matters screen and click OK to continue.
You can combine the Selected Files option with either the Range of Files or Single Client option.
For example, if you select a Range of Files you can also filter that range using the Selected Files
option. If you are billing all matters for a Single Client, you can also filter to only include matters for a
specific responsible attorney, for example.
Range of Files - Click this button if you want to generate bills for a range of clients. Enter the starting
client or matter that you want to begin printing with, then enter the ending client or matter. If you leave
the starting client blank, it will begin with the first client. If you leave the ending one blank, it will go to
the end of the list. This function is useful if, for example, your printer malfunctioned halfway through
printing bills and you need to run the bills again starting from where the printer malfunctioned.
List of Files - Use this function to enter a list of clients or matters that you want to bill, described in
detail in the section on Creating a List of Files to Bill.. Besides entering the list manually, you can also
generate a list automatically based on various selection criteria. Once the list is created, it can be
sorted in a variety of ways and the bills will be printed in that order, giving you more flexibility than the
normal sort order option.
17.2.2 Billing a List of Files
The List of Files option can be used when generating prebills, bills, reminder statements or historical
statements to manually enter a list of clients or matters that you want to bill. Once you have created
the list, you can have the program print them all in one run, instead of having to generate each bill
individually. You can also generate the list automatically using various selection criteria. Once the list
is created, it can be sorted in a variety of ways, and the bills will be printed in that order. You can
create two separate lists and they can be saved or modified for future use.
After clicking the List of Files button on the Generate Prebills, Generate New Bills, Generate
Reminder Statements or Generate Historical Statements screen, the Create a List of Files to Bills
dialog shown below appears.
2011 Tussman Programs, Inc.
240
Tussman Program Release 10
The right hand portion of the screen displays each of the two lists you can create. You can scroll
through each list using the scroll bar on the right hand side. The first step in creating or using a list is
selecting one of the two lists by clicking on the one you want in the Select List box. You can then
perform any of the following functions by clicking on one of the buttons listed below:
Bill Selected List Now - After you have selected and created the list you want to use, click this button
if you are ready to print the bills in that list. You will be returned to the Generate Prebills or Generate
New Bills screen, and the double arrows will point to the List of Bills button indicating your selection.
You can then proceed to generate the prebills.
Add Files to Selected List - Click this button if you want to manually add clients or matters to the
selected list. If you enter just the client ID, the program will generate bills for all that client's matters.
Click OK and that client or matter will be added to the list and the Select Matter dialog will clear for you
to enter the next file you want to add. Click Cancel when you are done. You will have to scroll up to
see all the files on the list. To delete any of the files in the list, double click on the one(s) you want to
delete. The bills for these files will be printed in the order in which they appear in the list, which will
correspond to the order in which you entered them. If you want the bills printed in a specific order, then
click on the Sort Selected List button described below before continuing.
Build List Automatically - This function lets you specify certain selection criteria based on which the
program automatically generates a list of files to bill. Click on this button and the following dialog
appears from which you can create the list you want
2011 Tussman Programs, Inc.
Billing
241
To create your list, click on one or more of the buttons shown above, as described below. If you make
more than one selection, then the list will only include files that meet all of the criteria selected. The
Files Selected box to the right of the buttons shows you what selections you have made. When you
have completed your selections, click OK to generate the list. You will first be asked if you want to
create a new list, or if you want to add to the existing list. Normally you will want to create a new list,
unless you want the files already in the list to remain there.
If you want to create a list that includes files that meet any of two or more selected criteria, then after
making each selection click OK to generate the list, indicating that you want to add to the existing list.
The resulting list will then consist of all the files which match any of the criteria you selected.
Before displaying the list of files, the program will ask you to indicate how you want the list sorted, as
described below under the Sort Selected List function. After the list is displayed, you can delete
individual files from the list by double clicking on the one(s) you want to delete. You can also add
additional files to the list manually by clicking on Add Files to Selected List.
Although the primary purpose of this function is to create a list of files to bill, you can also use it as an
inquiry function if, for example, you simply want to see a list of all the files which have unbilled charges
in excess of a certain amount, or which are past due a certain number of days, etc After generating
the list, instead of using it to print bills you can simply print a copy of the list itself by clicking on the
Print Copy of Selected List button.
Following are the various selection criteria you can use in creating the list:
Select files for list - This button brings up the Select Clients and Matters dialog from which you can
select a group of clients or matter to include in the list. If you leave all the selections blank and click
OK, then the list will include all of your files. This is useful if you want to create a list so that you can
print the bills in a special sort order, as described below.
Files over Threshold - Click here to create a list consisting only of files where the unbilled fees and
2011 Tussman Programs, Inc.
242
Tussman Program Release 10
costs exceed the billing threshold, if any, specified in the billing instructions for that matter. You must
first enter an ending cutoff date for fees and costs for purposes of calculating the totals; use the same
ending cutoff dates you will be using on the bills. If you leave the cutoff dates blank, then the program
will include all unbilled charges through the current date in calculating the total unbilled charges..
Files with WIP over $XXX - Click here to create a list consisting only of files where the total unbilled
charges exceed a specified amount. A dialog will come up where you must enter the dollar amount,
specify if you want to include fees only, costs only, or both when calculating the total unbilled charges,
and enter the ending cutoff dates to be used when totalling the unbilled charges. For example, if you
want to create a list of files where the total unbilled costs exceeds $100.00, enter 100.00 as the
amount, click the Costs Only option, and enter the appropriate ending cutoff date. Leave the cutoff
dates blank if you want to include all unbilled charges through the current date.
Files with WIP Aged over XXX Days - Click here to create a list consisting only of files which have
unbilled charges dated more than a specified number of days from the current date. For example, for
a list of files that have unbilled charges dating back more than 60 days, click here and enter 60 for the
number of days.
Files not Billed for XXX Days - Click here to create a list consisting only of files which have not been
billed for more than a specified number of days. You must enter the number of days, specify whether
to count from the posting date, statement date, or ending cutoff date used on the last bill, and
indicate whether or not to include files that have never been billed.
Files Due for Billing - Click here if you are using the interval billing option and want to create a list of
files that are due for billing on or before the date you specify.
Files with Unpaid Balance > $XXX - Click here to create a list consisting only of files that have an
unpaid balance due from prior billings greater than the amount you specify.
Files with Balance Due XXX Days - Click here to create a list consisting only of files that have an
unpaid balance due from prior billings which has been outstanding more than a specified number of
days. For example, to list files which are past due 90 days or more, click here and enter 90 for the
Number of Days. If you want to list files that are past due 90 days but only if they have a balance due
greater than $1000.00, click here enter 90, and also click on the Files with Unpaid Balance > $XXX
button and enter 1000.00.
Files with Credit Balance - Click here to create a list consisting of any file which has a credit balance.
Files with Retainer Account Balance - Click here to create a list consisting of any file which has a
retainer account balance.
Files with Trust Account Balance - Click here to create a list consisting of any file which has a trust
account balance.
Files with no WIP - Click here to create a list consisting only of files that currently have no unbilled
charges. This option is designed more as an inquiry function in case you want to monitor your files to
see which ones have not generated any new charges since they were last billed..
Files not worked on for XXX Days - This option lets you generate a list of files where no work has
been performed (i.e., no charges have been entered) for the past number of days that you specify.
Delete Selected List - Click this button to delete all the files from the currently selected list. To delete
a single file from the list, double click on that file and click Yes to confirm.
Sort Selected List - Click this button to sort the list after you have added all the files you want to bill.
The bills in the list will be printed in the sort order you select. The List Sorting Options dialog
appears below:
2011 Tussman Programs, Inc.
Billing
243
First select the primary Sort Option from the box on the left hand side. You can print the bills by:
Client and matter ID
client ID and Short Matter Title;
Client alternate ID and matter ID;
Client alternate ID and Short Matter Title;
Matter Title;
Short Matter Title
You can also print the bills by:
Originating Attorney
Responsible Attorney
Billing Attorney
If you select one of the above three options, then you must also select a Subsort Option from the list
at the right. For example, if select Originating Attorney as your primary sort option, the program will
print all the bills for each Originating Attorney together, and the bills for each Originating Attorney will
be printed using the Subsort Option you select; i.e., by::
Client and matter ID:
client ID and Short Matter Title;
Client alternate ID and matter ID;
Client alternate ID and Short Matter Title
Finally, if you do not want to sort the list, but want to keep the files in the order they are already listed,
select the Print in Order Listed option.
Caution! If you have clients with multiple matters and are generating consolidated bills or are
printing a summary page for each client, then you should only sort the bills by client ID or by
alternate ID, as for those features to work correctly all the bills for each client must be printed together.
When sorting the list, the program automatically removes any duplicates, so that if a client or matter
was added more than once to the list, it will appear only once in the final list.
2011 Tussman Programs, Inc.
244
Tussman Program Release 10
Print Copy of Selected List - Click here to print a copy of the currently selected list showing the file
ID, client name and matter title of each file in the list.
OK - If you click OK, the program simply saves the list or lists you have created for future use. If you
want to actually print bills for the files in the selected list, click instead on the Bill Selected List Now
button.
17.2.3 Files with no New Charges
The Options for Files with no Charges button appears on both the Generate Prebills and Generate
New Bills screens. It brings up the list of options shown below which determine whether or not the
program generates prebills or bills for files that have no current charges to bill, but where there is some
other activity that might warrant generating a bill.
Check the options you want as follows:
Include Files with no New Charges (Bill All Files) - If you check this option, the program will
generate a bill for every matter, regardless of whether there is any type of activity or not. This
overrides all the other settings, and should normally be unchecked.
Include Files with a Balance Forward but no new Charges - Generates a bill if there is a balance
forward from the last bill, even if the balance forward has been paid since the last bill was generated
and nothing remains currently due; i.e., if the new bill would show a balance forward from the previous
bill but the ending balance will be 0.00 after the application of the payments or credits.
Include Files with a Balance Due but no New Charges - Generates a bill if there is an outstanding
balance due; i.e., if the bill will show an ending balance due which remains unpaid from prior billings.
Include Files that have only a Credit Balance - Generates a bill if there is a credit balance which
remains unused on the file.
Include Files that have only Retainer Account Activity - Generates a bill if there is any activity in the
retainer account during the current period.
2011 Tussman Programs, Inc.
Billing
245
Include Files that have only a Retainer Account Balance - Generates a bill if there is a balance in
the retainer account, even if there is no current activity in the account.
Include Files that have only Trust Account Activity - Generates a bill if there is any activity in the
trust account during the current period.
Include Files that have only a Trust Account Balance - Generates a bill if there is a balance in the
trust account, even if there is no current activity in the account
Include Files that have only Payment or Credit Activity - Generates a bill if there is any payment or
credit activity during the current period; i.e., if the only activity that would show on the bill is the receipt
of a payment or the giving of a credit.
Include Collection Files - Check this button to generate bills for files that are on collection status,
provided they meet one of the other billing criteria checked above; for example, they have an unpaid
balance due, etc. If this option is not checked, the program will not generate a bill for a matter that is
on collection status.
17.2.4 Invoice Numbers
The program automatically assigns invoice numbers to each bill that is generated. There are two
methods of assigning numbers:
1. You can configure the program to assign numbers sequentially on a global basis, so that each time
a new bill is generated the next available number is assigned, regardless of which client the bill is being
generated for. This way the same number will never be used more than once.
2. Alternatively, you can assign numbers sequentially for each client. Using this method the first bill for
a client will be numbered 1, the next 2, and so forth. Note that if you are generating a consolidated bill
for a client with multiple matters each consolidated bill, regardless of the number of matters, will only
have one number assigned.
3. You can also assign numbers sequentially for each matter. Using this method the first bill for a
client's matter will be numbered 1, the next 2, and so forth.
To select the method you want to use click on the Invoice Numbering button on the Generate New
Bills screen. The following dialog appears:
2011 Tussman Programs, Inc.
246
Tussman Program Release 10
1. If you have selected the option to assign numbers on a global sequential basis you can specify the
next number that you want the program to assign. For each subsequent bill that you generate the
program will increment that number by 1. However, when generating a bill using this option, the
program checks to see if that number has already been used and, if so, skips ahead to the next
available number. Thus, if you enter in the Next Invoice Number space a number that has already
been assigned to another bill, the program will not re-use that number and will skip ahead to the next
available number.
If you are using option 1, to assign numbers sequentially for each matter, the program will begin with
the number 1 for each matter and increase the number by 1 for each subsequent invoice for that
matter. If you want to change the next invoice number that will be used for a specific matter, the only
way to do that is to edit the number assigned to the last invoice that was finalized for that matter. You
can do this by locating the record of the bill in the list of AR Transactions for that matter and editing the
Ref space, which is where the invoice number appears. If you are just setting up the program and
have not generated any bills yet, then you will have to record a Beginning Balance transaction (type
BB) entering the last invoice number assigned to that matter in the Ref space. (Changing the invoice
number after a bill has been finalized does not have any adverse effects). The next bill that is
generated for that matter will be assigned a number one higher than the number you enter there.
Regardless of which of the 2 numbering methods you selected, if you have already generated but not
yet finalized a bill for a matter, and that bill is included in your list of new bills, the program will use the
same invoice number it used when it originally generated that bill; If you want to re-generate that bill
with a different invoice number, first delete that bill from the list of new bills (by highlighting it and
clicking the Cancel One button at the bottom of the list) before you regenerate it.
Also note that if you are generating bills for a client with multiple matters using the consolidated billing
option, the program will use just one invoice number for the entire bill for that client; i.e., the bill for
each matter will be assigned the same number. Otherwise separate invoice numbers will be assigned
to the bills for each matter for that client. To show the invoice number on the summary page set
format option 33 to R. The invoice number will only print on the summary page if you are using the
consolidating option, since otherwise there will be separate invoice numbers for each matter. An
exception is in the case of the Esmeralda format since in that case there is a separate summary page
for each matter.
After you have finalized a bill, the invoice number appears in the Reference space of the AR
transaction (type B) which is created when the bill is finalized. Thus, you can use the Filter button at
2011 Tussman Programs, Inc.
Billing
247
the bottom of your list of AR Transactions to search for an invoice by number. You can also search for
an invoice by number by clicking on the Inv # button in the Enter AR Transactions screen. This is
convenient if you are recording a payment from a client and know the invoice number but do not know
the client or matter ID, but this function will work only if you are using the global option, as otherwise
the same number could be assigned to multiple invoices.
2. You also have the option of assigning new numbers to each invoice that you generate, or to only
assign an invoice number if the bill contains new charges. Some firms prefer not to assign a new
invoice number if, for example, the bill only shows a balance forward from a previous month with no
new charges.
3. The program maintains a list of invoice numbers that have been used which it checks when
generating bills to see if a number is available if you are using the global option. The program
automatically updates this list when bills are generated and finalized or unfinalized, but versions prior to
Release 9.0 did not always maintain the list accurately. The Rebuild Invoice Number List button
enables you to rebuilt the list of invoice numbers so that it includes only numbers that are actually being
used. It should not normally be necessary to do this.
You have the option of whether or not to show the invoice number in the heading of each bill.
Bill format options 33 and 34 control if and where the invoice number appears. To also show the
invoice number on the Summary Page for each client, set option 33 to R.
17.2.5 Billing Dates
When generating prebills or bills it is extremely important to enter the correct dates in the Billing Dates
box shown below:
The program remembers the last set of dates you used when generating bills, but you should always
check them anyway to make sure they are correct. Using incorrect cutoff dates is one of the most
common errors when generating bills, as activity dated after the ending cutoff dates will not appear on
the bill.
Click on the Change all dates to today button if you want to change all the dates to today's date.
Following is an explanation of each date:
Posting Date - The posting date is the date assigned to the bill for internal reporting purposes. When
each bill is finalized, the program creates an AR transaction (type B) which represents that bill. The
2011 Tussman Programs, Inc.
248
Tussman Program Release 10
date assigned to that transaction is the same as the posting date you used when you generated the
bill. Many of your reports (for example, the Billing Analysis report) summarize the total amount that you
have billed during a specific period. These reports compile the billed totals from the billing records
created when finalizing, rather than by adding up the individual fee and cost charges. Thus, for
purposes of these reports charges billed on a particular bill will show as having been billed during the
period which includes the posting date used for that bill, even though the individual charges
themselves might have been dated during a prior period.
It is thus suggested that for the posting date you use the same date as the ending cutoff date. For
example, if you are generating December bills, which include all the charges incurred during the month
of December, with an ending cutoff date of December 31, you should also use December 31 as the
posting date. That way, your reports showing the amounts billed in December will correlate with the
reports showing the amount of fee and cost charges recorded during the month. Otherwise, if you
used a January posting date, for example, the fee and cost charges which you recorded in December
would not show as having been billed until January.
Statement Date - The statement date is the date which is printed in the heading of a bill, much the
same as you would date a letter or other correspondence. For example, if you are generating your
December bills, but are not actually printing or sending them until January 10, you might want to use
January 10 as the statement date. Items 16 and 17 of the bill format options determine if and where
the statement date are printed in the heading of your bills.
Beginning Cutoff Date - The beginning cutoff date should normally be left blank (i.e., enter
00/00/0000). It is not necessary to specify a beginning cutoff date since charges that were billed on
previous bills will not appear on a new bill as long as the previous bill was finalized. If you have not
finalized the previous bill, and use the beginning cutoff date so that charges from the prior month do
not appear on your new bill, then the balance forward on the new bill will be incorrect as it will not
reflect the prior charges. Thus, you should not use the beginning cutoff date as a way to avoid
finalizing your bills. The only case in which a beginning cutoff date is appropriate is if, for example,
you have entered charges for several months and only want to bill the more recent charges, leaving the
older charges in the unbilled charges file for future billing. For example, if you only want to bill charges
for October, leaving September charges unbilled, enter October 1 as the beginning cutoff date.
Ending Cutoff Date - Enter the date that you want to bill through. For example, if you want all charges
for the month of December to appear on this bill, enter December 31 as the ending cutoff date. Any
charges dated after that date will not be affected and will be saved for the next billing. Thus, as long as
you use a correct cutoff date when generating your bills, you can begin entering new charges for the
following billing period even though your bills for the prior period have not yet been generated or
finalized. You can have the program show the ending cutoff date in the heading of your bills, as
described in the explanation for bill format item 23. This ending cutoff date applies primarily to fee
charges; you can enter a separate cutoff date for costs and payments, as described below, although
the following dates all default to this ending cutoff date when you change it.
Date for Auto Payments - This is the date the program assigns to the AR transaction records (types
RD and P) created by the program when funds are automatically applied from the retainer account
against charges on a bill. It defaults to the ending cutoff date.
Cutoff Date for Costs - You can enter a separate cutoff date which applies only to cost charges. For
example, if you want to bill fees dated through the end of the prior month, but want to bill all costs
through the current date, enter the current date as the cutoff date for costs. Otherwise, this date
defaults to the ending cutoff date described above.
Cutoff Date for Payments - This cutoff date applies not only to payments but also to retainer and trust
account activity, and all other AR transactions (such as debits and credits) that appear in the payments
and credits section on the bill. This date defaults to the ending cutoff date described above, but you
can enter a separate date if, for example, you are billing charges through the end of the previous
month but want the bill to reflect all payments received through the current date.
2011 Tussman Programs, Inc.
Billing
249
17.2.6 Printing the Bills
As with any report in the Tussman program, you can send your bills directly to the printer by clicking
the Print button, or you can generate them to a file, preview them on the screen first, or print them in
compressed print.
The program can automatically print your own letterhead for the first page of each bill, as described in
the bill formatting section.
You can also generate the bills to a PDF file if you have installed the Tussman PDF Writer. To do this,
click the Print button and select the Tussman PDF Writer from your list of printers. Click Print, then
specify the file name and location where you want to save it. You can also configure the program so
that the file is saved automatically to a specified folder by clicking on Tools, Configure Tussman PDF
Writer. You can also generate a separate PDF file for each client by selecting the option to save the
files automatically, then checking the option to create separate files for each bill by clicking on the File
Option button on the Generate New Bills screen. If you want to create separate PDF files for each
client, make sure you uncheck the options on the Configure Tussman PDF Writer screen to open or
email the file after generation.
If your printer is configured to print on both sides of the page (doublesided printing), you must configure
Tussman so that each bill begins on a new sheet. To do this, click on Tools and select Doubleside
Printing for Bills, then click Yes to activate the function. Do not activate this function unless you are
using doublesided printing or you will wind up printing blank pages between some of the bills.
Once the program has begun generating the bills, the Please Wait dialog displays a progress report.
As each bill is generated it is added to your list of new bills. A separate finalizing procedure must then
be performed after you have sent them out. It is the finalizing function which carries forward the new
balances and marks the activity as having been billed so that you can close out the billing cycle once
your bills are in final form.
The Info button which appears on that same dialog is a useful debugging tool. It displays information
about the last bill that was generated, indicating the file ID and status, whether a billing hold or
threshold is in effect, and whether there is any current activity on the file. The Info button is most
useful if you are attempting to generate a single bill and the program refuses to generate it. In that
case, select the Single Client or Matter option, enter both the client and matter ID for the bill you
want, and click either Print or Print to File..Then click on the Info button when the ending dialog
comes up. This may disclose the reason the bill is not being printed. For example, if the status report
does not show there is any activity on the file, then that is probably the reason why there is no bill.
The dialog that comes up when the bills are finished does not appear if you select the Preview option.
After generating and saving the bills by clicking OK, you can view a list of the bills by selecting List
New Bills from the Bills menu. The list will include all bills you have generated but not yet finalized,
not just the ones that you just printed. From this screen you can print a billing summary report listing
the bills, print mailing labels, and perform other functions described in the section on Listing New Bills.
You can delete all or selected bills from the list using the Cancel buttons in case you generated and
saved the bills in error.
If for any reason the program is interrupted while generating bills, such as by a power failure or printer
malfunction, you do not have to generate the entire set again. Instead, you can use the Range of Files
option to print the bills beginning with the next client or matter following the last one that was printed in
full. When selecting your range, simply leave the ending matter blank and it will continue printing to the
last matter. In case this happens, however, be sure to check to make sure that all the bills have been
saved and are included in your list of new bills.
Sometimes when generating bills a dialog that looks like this may pop up:
2011 Tussman Programs, Inc.
250
Tussman Program Release 10
This is a precaution which alerts you to the fact that there is already a bill for the indicated matter in
your list of new bills, and that bill was generated using different billing dates than the one you are now
generating. This could reflect one of two possible situations:
1. You have forgotten to finalize your bills from the previous billing cycle. If this is the case, you
should click the Cancel button, check your list of new bills, and if necessary finalize them before
generating the bills for the current cycle. You should not continue printing the new bills as the new
bills will overwrite the bills already in the list, and then you will not be able to finalize the old ones
without generating them again.
2. You are generating the same set of bills again but with different billing dates. This could be
either because you have made changes and need to reprint them, or because you want a second set
of the same bills. In either case, however, it means you are using different billing dates than when you
last printed them. This could be an oversight, or it could be deliberate. Before continuing, you should
check to make sure which billing dates you want to use and, if necessary, click Cancel, correct the
Billing Dates, and begin generating the bills again.
If you determine that you are using the correct billing dates, and want to ignore the warning, click either
Generate this Bill Anyway or Generate this Bill and no More Warnings Please! Clicking the latter
will suppress any further warning during this billing run. Clicking the first button will generate this bill
but you may receive further warnings if additional bills are found where there is an existing new bill with
a different date. If you click Skip this Bill, the program will not generate a bill for the indicated matter
and will continue with the next bill.
17.2.7 Printing Second Copies
When generating a bill for a specific matter, you can have the program automatically print a second
copy using the Billing Address feature described in the New Matter section. Do this by checking the
Use this address to print second copy box on the Billing Address screen. The second copy will be
printed using the address you enter in that screen, unless you leave it blank in which case the second
copy will use the client address. The second copy can also be printed using a different bill format by
specifying the format you want to use in the space provided in the Billing Address screen. It will print
using the format you specify here regardless of the "force use" setting.
17.2.8 Printing your own letterhead
To have the program print your own letterhead, you must first obtain a copy of your letterhead or the
artwork for the letterhead in the form of a jpg file. The easiest way to do this is to scan a copy of your
2011 Tussman Programs, Inc.
Billing
251
letterhead to a jpg file. Most current printers will also perform scans, but you must be sure to save it to
a jpg file. Once you have the file, simply save it in a folder somewhere on your computer. Alternatively,
you can probably obtain a jpg file containing a copy of your letterhead from your graphics designer or
printer. In that case, the file will probably just contain the artwork for the letterhead itself, and will not
be a complete scan of the letterhead.
In either case, once you have saved the file in a location that is accessible to the program, click on
Bills, Edit Bills Formats, select the format you are using and go to format option 11. Set the Print
Logo option to Y, then click on the Details button. Enter the location and name of the jpg file in the
first space. For example, if the file is named letterhead.jpg and is located in the tp9 folder on your C
drive, enter C:\tp9\letterhead.jpg. If the jpg file contains a scan of your complete letterhead, leave the
Row and Column settings at 0, and ether 8.5 for the Width. If the jpg file just contains the artwork,
you may have to play with the settings. First try entering 1.00 for the Row and Column settings (this
creates a one inch margin at the top and left side), leaving the Width at 0.00. If you need larger
margins at the top or left, increase the Row and Column settings respectively.
If you have separate artwork, or a separate letterhead page that you want to use for subsequent pages
(for bills that are longer than one page), enter the name of that file in the second space, along with the
coordinate settings as previously described. In either case, when printing bills the program will use the
first file to print the first page of each bill. If you specified a file for subsequent pages it will use that;
otherwise subsequent pages will be left blank.
If the program fails to print the letterhead even after you have set the Print Logo option to Y and
entered the Detail information, check to make sure you entered the information in the same format you
are using to print the bill. If that is correct, then probably the program is unable to locate the jpg file you
specified. Check to make sure you entered the path and file name correctly.
If you are using more than one bill format, you will have to enter this information for each format you
are using.
17.3
Bill Formats
You can design and save up to ten different bill formats. Each format consists of a set of options which
control the level of detail and layout of the bill, as well as the wording of the headings and other text
appearing on the bill. The different formats are numbered 1 through 0. When you open a client or
matter, you specify which format you want to use in the Fee Agreement screen. . You can designate
one of the formats as the default in the Default Fee Agreement screen, and that format will
automatically be assigned to each new client when the file is opened. Some firms may use the same
format for all of their bills, whereas others may require several different formats. If you do use more
than one format, you can still run all of your bills together, as when printing bills the program checks to
see which format is assigned to each matter and uses that format. You also have the option of
overriding the format assigned to each matter and using one specified format when you run your bills,
as explained below.
To create or edit your bill formats, click Bills from the Main Menu and select Edit Bill Formats from
the submenu, or click on the Edit Bill Formats button on the Generate New Bills screen. The Edit
Bill Formats dialog shown below has ten buttons each representing one of your ten formats.
2011 Tussman Programs, Inc.
252
Tussman Program Release 10
Click on one of the buttons to view or edit the set of options for that format. You can assign a title to
each format, to make it easier for you to identify, by clicking on the Edit Format Titles button. Once
you assign a title to a format that title will appear on the corresponding format button.
Below the set of ten format buttons is a box where you can designate a default bill format in case you
want to override the format selections at the matter level (this is different. For example, if you want to
print all of your bills using format 1, regardless of which format has been specified in the Fee
Agreement screen for each matter, enter 1 as the Default Bill Format and enter Y in the Force Use
of Default Format space. If you do not enter Y in the Force Use space, the default format has no
effect and the program will use the formats specified for each matter.
After clicking on one of the format buttons, the first of forty screens containing the options for that
format is displayed. Each of the screens in addition to displaying some of the format options have the
same set of buttons at the right hand side which assist in navigating the format screens. For example,
the first of the formatting screens appears below:
2011 Tussman Programs, Inc.
Billing
253
The options are organized into groups corresponding to the different parts of the bill. For example, all
of the options having to do with the manner in which fee charges are itemized and displayed on the bill
are grouped into one section. Click on the Menu button at the right to see a list of these sections, and
click on one of the buttons on the menu to take you directly to that set of format options. Following is a
list of the groups of format options, each of which is described in a separate section of this manual:
General Formatting Options
Statement Heading Options
Balance Forward Section
Fee Section
Cost Section
Current Charges Subtotal
Payments and Credits Section
Interest Section
Statement Recap
Retainer Account Section
Trust Account Section
Statement Summary
Split Billing
Consolidated Billing
At the end of each of these sections is a brief summary of the formatting options for that section,
2011 Tussman Programs, Inc.
254
Tussman Program Release 10
together with suggested settings to create a format that will be suitable for the majority of cases.
Click on the Go To button if you know the number of the bill format option you want to change. Enter
the number and click OK and the screen containing that option will be displayed.
If you want to create a new format which is only slightly different from one of your existing formats,
use the Copy From button to clone the existing format so that you can then change just the items that
will be different. For example, if format 1 is your normal format, but one client asks you to make a
slight change in the format of their bills, select one of the formats you are not currently using, clicking
on that button to bring up the formatting options for the new format. Then click on the Copy From
button, enter the number of the format you want to copy (in this example, format 1), and all of the
settings from that format will be copied into the current format. You can then make the needed
modifications and enter that format number in the Fee Agreement screen for that client's matter(s).
After making changes to a screen of format options, when you click OK or one of the other buttons to
go to another screen, the program will ask if you want the changes incorporated into all ten of the bill
formats. If you click Yes, then the change you made will be applied to all of the formats, not just the
current one. This would be appropriate if, for example, you are changing the return address in the
heading of your bills because you moved your office. Click No if you want the change only applied to
the current format; for example, if you are creating a special format for a single client.
To go to the next or previous screen of options click the Next or Previous button. To go to the same
screen for the next or previous format, click the
or
buttons. For example, if you are viewing
screen 1 of format 8 and want to see screen 1 of format 7, click the left arrow button.
The Print button is not currently operational.
17.3.1 General Formatting Options
The first set of format options, items 1-9, are general ones that affect the entire bill, as follows:
1. Print Dividing Line Between each Section on Bill - Enter Y if you want to print a solid line
dividing each section on the bill. This may make the bill easier to read, especially if you showing a lot
of detail. The dividing lines separate the fee, cost, interest, payments and credits, trust account and
retainer account sections on the bill, setting them off from each other so they are easier to read.. You
can adjust the thickness of the line using the Set Line Width feature on the Setup menu. The
normal setting for this option is 6. To increase the thickness, enter a higher number. To decrease the
thickness, enter a lower number.
2. Skip a Line Before and After Dividing Line - If you are printing dividing lines between the sections
on the bill by setting option 1 above to Y, you can also choose whether or not to skip a line before and
after the dividing line. This spaces out the bill and makes it more readable. If you want these extra
lines, enter Y. If you want a more compact bill without the extra lines, enter N.
3. Generate a Current Charges Only Bill - Enter Y if you want to generate a bill which shows only
the current fee and cost charges, omitting any reference to the balance forward, current payments and
credits, retainer or trust activity. To omit the balance foward and payments and credit, but show any
retainer or trust activity set the option to R. For a fuller explanation of the difference between a current
charges only bill and a regular bill, see the Current Charges vs. Balance Forward section.
4. Convert Text to Upper Case - Enter Y if you want all text on the bill to be printed in upper case,
regardless of how it was entered into the program. This includes both the section headings and other
explanatory text as well as the descriptions for the charges. Enter H if you want only the headings and
explanatory text converted to upper case, leaving the descriptions for the charges to appear exactly as
they were typed into the program. Enter N if you want all the text on the bill to appear as it was entered
2011 Tussman Programs, Inc.
Billing
255
into the program.
5. Display of Negative Amounts - This option controls how the program prints negative amounts on
the bill; i.e., amounts that are less than 0.00. This would occur if, for example, instead of owing money
the client has a credit balance. Select from the following options:
N - Print the amount with a minus sign; for example, -100.00
C - Add "CR" following the amount; for example, 100.00CR;
P - Enclose the amount in parentheses; for example, (100.00);
B - Enclose the amount in brackets; for example, [100.00]
6. Printer Tray Options - If you are using a printer with multiple paper trays, you might want to insert
letterhead in one tray and plain paper in another tray, so that when printing bills the first page is printed
on letterhead and subsequent pages are printed on plain paper. To do this, enter in the first space the
number of the tray that you want to draw the paper for page 1 from. In the second space enter the
number of the tray you want to draw paper for subsequent pages. Trays are numbered from 1 to 9 and
the numbers are assigned by your printer, so you must check your printer setup to determine how the
trays are numbered. This feature may not work with all printers. If you are printing summary pages
with your bills, the summary page will be printed using the paper for page 1. If you do not wish to use
this feature, leave both these spaces blank.
7. Underline Subtotals - Enter Y if you want to underline for emphasis all of the subtotals on the bill,
such as the total appearing at the end of the fee, cost, interest, and payments sections. This option is
ignored if you are printing dividing lines between each section (option 1), as the underlines and
dividing line together would look confusing. Format option 178 controls whether or not the ending
balance on the bill is underlined.
8. Double Space between Charges - Enter Y if you want to skip a line between each of the fee and
cost charges on the bill, or S if you want to double space between fee charges only. Enter N to single
space. If you enter Y, the program will also double space the payments and credits, trust, and retainer
account sections on the bill.
9. Margins, lines per page and column spacing - Enter the column position where you want to set
the left and right hand margins in the Left Margin and Right Margin spaces. In most cases, using a
left margin setting of 6 and a right margin of 77 is recommended. If you will be printing the bills in
compressed print, a right margin of 128 will probably work best. If you change the font type or size by
clicking the Font button on the Generate New Bills screen, you may also need to adjust the margins
after printing a sample bill to see how it prints with the current settings. When using a larger font size,
you may need to decrease the right margin setting. When using a smaller font size, you can increase
the right margin. The program automatically adjusts the layout of the bill to fit whatever margin settings
you are using. Thus, when printing a bill using a smaller font and a larger right margin setting the width
of the bill will automatically expand to fill the available space.
The Lines per Page setting determines how many lines the program prints on each page before going
to a new page. The default setting is 55. If you increase it, you may risk having lines spill over onto a
second page without doing a proper form feed. However, if you are printing the bills in compressed
print, or using a smaller font size, you may increase the number of lines accordingly. For example,
using compressed print you should be able to increase the number of lines to 75.
The Spaces Between Columns setting determines how many blank spaces are skipped between
each column on the bill. For example, when itemizing fee charges on the bill the date, staff code,
description, number of hours, rate, and dollar amount will normally all appear in separate columns. If
you set this option to 1, then the program will separate each column by one space. If you set it to 2,
the columns will be separated by 2 spaces, making it easier to read and more pleasing in appearance..
.
The Starting Space for Total and Subtotal Headings determines at what column the program
2011 Tussman Programs, Inc.
256
Tussman Program Release 10
begins printing the text identifying each subtotal and total amount on the bill. 25 is the default setting
for this option.
17.3.2 Bill Heading Options
This group of bill format options (10-41) controls the format and layout of the heading of the bill. The
heading of the bill can include some or all of the following items:
Your firm's return address
The client's name and address
The statement date
Your employer ID number
An introductory line of text
The client and matter ID
The matter title
The invoice number
The name of the responsible attorney
The balance due
You can also have the program print your letterhead or a logo in the form of a bmp or jpg file so that
you don't have to use actual letterhead. You can print one letterhead or logo for the first page of each
bill, and a separate letterhead or logo, if desired, on subsequent pages.
If you do not print your letterhead or logo, your return address can be printed at the top of the bill,
followed by the client's name and address. With most of the other items you have the option of printing
them below the client name and address as part of a Re section, or they can be printed flush right
opposite the client's name and address. You can also customize an introductory line of text printed at
the beginning of the bill either above or below the Re section. So the client can quickly see what they
owe, you can also show their new account balance in the heading, so they don't have to read through
to the end of the bill to find it.
Note that format option 25 lets you select whether or not you want to print the section headings and
total lines on the bill in bold.
The following set of options control which of the above items are included, their location in the heading,
and the text that accompanies each item.
10. Beginning Line for Return Address - This setting determines which line the program begins
printing your return address at the top of the bill. Enter 1 to start on the first printable line, or move it
down by increasing the number.
11. Include Return Address - This option determines whether or not your return address is printed on
the bill. If you are using your own printed letterhead, enter N to omit it. Otherwise, enter C to center
the return address in the middle of the page, or L to print it flush with the left margin. If you are using
window envelopes and want your return address to appear in the window, use the L setting and move
the address up or down using option 10, if necessary. If you want the program to print your letterhead
or logo, enter N for this option and complete the instructions described as follows:
Print Logo - To have the program print your own letterhead, you must first obtain a copy of your
letterhead or the artwork for the letterhead in the form of a jpg file. The easiest way to do this is to
scan a copy of your letterhead to a jpg file. Most current printers will also perform scans, but you must
be sure to save it to a jpg file. Once you have the file, simply save it in a folder somewhere on your
computer. Alternatively, you can probably obtain a jpg file containing a copy of your letterhead from
your graphics designer or printer. In that case, the file will probably just contain the artwork for the
letterhead itself, and will not be a complete scan of the letterhead. In either case, once you have saved
the file in a location that is accessible to the program, set the Print Logo option to Y, then click on the
Details button. Enter the location and name of the jpg file in the first space. For example, if the file is
2011 Tussman Programs, Inc.
Billing
257
named letterhead.jpg and is located in the tp9 folder on your C drive, enter C:\tp9\letterhead.jpg. If the
jpg file contains a scan of your complete letterhead, leave the Row and Column settings at 0, and
ether 8.5 for the Width. If the jpg file just contains the artwork, you may have to play with the settings.
First try entering 1.00 for the Row and Column settings (this creates a one inch margin at the top and
left side), leaving the Width at 0.00. If you need larger margins at the top or left, increase the Row and
Column settings respectively.
If you have separate artwork, or a separate letterhead page that you want to use for subsequent pages
(for bills that are longer than one page), enter the name of that file in the second space, along with the
coordinate settings as previously described. In either case, when printing bills the program will use the
first file to print the first page of each bill. If you specified a file for subsequent pages it will use that;
otherwise subsequent pages will be left blank.
If the program fails to print the letterhead even after you have set the Print Logo option to Y and
entered the Detail information, check to make sure you entered the information in the same format you
are using to print the bill. If that is correct, then probably the program is unable to locate the jpg file you
specified. Check to make sure you entered the path and file name correctly.
12. Text for Return Address - Enter here your firm's name and address as you want it to appear in
the heading of your bills. You can enter up to six lines. Type it in flush with the left margin. If you want
it centered on the page, simply set option 10 to C, and the program will center it automatically.
13. Print Return Address in Bold - Enter Y to print your return address in bold, or N to print normally.
14. Include Employer ID Number - To print your firm's employer ID number in the heading of the bill,
enter A to print it immediately below your return address, L to print it at the left margin below the
client's name and address, or R to print it at the right margin opposite the client's name and address.
15. Employer ID # Text - Enter here your firm's employer ID number as you want it to appear on the
bill.
16. Line for Statement Date - Enter here the number of the line on which you want the
Statement Date printed. It is not necessary to fill this in. If you select option C or L for item 17, and
want to move the date lower on the page, then you can enter the number of the line you want to print it
on here. Using option R for item 17 it will always print immediately opposite the client's name.
17. Include Statement Date - This option determines the placement of the statement date on the bill.
Enter C to print it below your return address. By default it will print on the second line following the
return address. To move it lower, enter the number of the line you want to print it on in the space for
option 16. Enter L to print the date at the left margin, immediately above the client's name and
address, or R to print at the right margin, opposite the client's name and address. Enter N to omit the
statement date.
18. Client Address Placement - Enter in the first space the number of the line on which you want to
begin printing the client's name and address. Decrease or Increase this number to move it up or down
the page. You can normally leave this space blank as it will automatically position itself below the return
address. In the second space you can indicate the width of the left margin for the client address. This
is separate from the left margin for the bill itself which is entered in option 9, allowing you to adjust the
placement of the address so it can appear in a window envelope. For example, if the left margin in
option 9 is set to 6, and you want to indent the address by 5 more spaces, enter 11. If you just want to
print the client's name and address at the normal left margin, leave the Left Margin space blank.
Note that the address that is printed is normally the client address, but you can enter separate billing
address for each matter, or print an additional second address, as described in the section on
New Matters. To add an unlimited number of additional names and addresses to the bill, use the
Related Names feature, creating for the matter a separate Related Name for each additional party,
assigning to each the Type Code ADDR.
2011 Tussman Programs, Inc.
258
Tussman Program Release 10
19. Omit Client Address - To omit the client address from the heading of the bill, enter Y. Enter N to
include the client address.
20. Print Dividing Line after Client Address - This option allows you to print a single or double
dividing line following the client address, separating it from the body of the bill. Enter Y to print a single
line, D for a double line, or N to omit the line.
21. Beginning Line for Statement Heading - This determines the line on which the statement
heading, described in option 22, is printed. You can normally leave this blank as it will automatically
position itself below the client's name and address. If you want to move it further down the page, then
specify the line number in this space.
22. Include Statement Heading - The statement introduction consists of one or more lines of text
which can be printed at the beginning of the bill. The introduction accompanies certain other
information such as the file number, matter title, invoice number, etc., which make up the "Re" section
in the heading of the bill printed below the client's name and address. If you enter A, the introduction
will be printed as the first item in the Re section, above the file ID, matter title, and any other
information that is being printed in that location (note that some of these items, such as the file ID, can
alternatively be placed opposite the client's name and address). If you enter B, the introduction will be
printed below the other Re information, setting it off by itself and making it a bit more prominent. Enter
N to omit the introduction.
23. Text for Statement Heading - Enter here the text that you want to enter for the statement
heading. If you leave it blank, the program will automatically print "Statement of Account for
Professional Services through " followed by the ending cutoff date being used on that bill, unless you
set option 22 to N so that the heading is omitted.
When entering the text for the heading, you can insert one or more of the following symbols as
macros, so that when the heading is printed on the bill the symbol is replaced by the referenced
information:
* - Beginning Cutoff Date. Use the asterisk symbol to insert the beginning cutoff date.
While normally a beginning cutoff date should not be used, if you have specified one that date
will appear here. If you did not specify a beginning cutoff date when generating the bill, the
program will insert the date following the ending cutoff date used on the previous bill for that
matter (in other words, the first day of this billing cycle). If this is the first bill for the matter, the
program will insert the date the matter was opened.
@ - Ending Cutoff Date. Use the "at" symbol to insert the ending cutoff date.
# - Month of Bill. Use the pound symbol to insert the month which corresponds to the ending
cutoff date. For example, if you are using an ending cutoff date of 12/31/2004 for your bills, this
symbol will translate to "December 2004".
! - Matter Title. Use an exclamation mark to insert the first line of the matter title.
~2 - Matter Title Line 2 - Inserts second line of the matter title
~3 - Matter Title Line 3 - Inserts third line of the matter title
~4 - Matter Title Line 4 - Inserts fourth line of the matter title
~5 - Matter Title Line 5 - Inserts fifth line of the matter title
^ - File ID. Use this symbol to insert the client and matter ID in the format specified in option
27.
2011 Tussman Programs, Inc.
Billing
259
An example of a statement heading using some of the above symbols is:
Statement of Account for Legal Services Regarding ! for the Period * through @
When printed on the bill, the program will automatically wrap the line if it is too long for a single line. To
force the program to begin a second line at a specific point, insert a greater than symbol (>) at the
point where you want the new line to begin.
To print the statement heading in bold, type an = sign in the first space.
24. Center Heading or Print at Left Margin. Enter C to center the statement heading (i.e., the text
entered in 23 above), or L to print it at the left margin.
25. Underline Statement Heading. Enter Y to print a dividing line following the Re section on the bill
to separate it from the body of the bill. If you have already set option 1 to Y, the dividing line will appear
anyway.
25a. Printing Heading Line in Bold. Enter Y in this space if you want to print the statement
introduction in bold, A to also print the section headings on the bill in bold, or S to also print the total
lines for each section in bold. This is in addition to the option where you can print individual section
headings in bold by typing an exclamation mark (!) in the first space of the text for that heading or, in
the case of the statement introduction, an equals sign (=).
26. Include Client/matter ID - Enter L to print the client and matter ID at the left margin as part of the
Re section, or R to print it at the right margin opposite the client's name and address. Enter N if you do
not want the client/matter ID to appear.
27. Client/matter ID Format - If you are including the client/matter ID in the heading, this selection
determines its format. Select from one of the following options:
Z - Show the Client ID only;
C - Show both the client ID and matter ID;
M - Show the matter ID only;
T - Show the short matter title only;
D - Show the client ID and the short matter title
A - Show the client alternate ID and matter ID;
B - Show the client alternate ID and short matter title
The delimiter symbol which separates the client and matter ID can be specified by selecting Charge
File ID Delimiter from the Setup menu. You can select any of the following symbols as the delimiter
(the period or hyphen are most commonly used):
. , / ; : _ - + @ # * &
28. Text Preceding Client/matter ID - Enter in this space the text that you want to appear on the bill
identifying the client/matter ID; for example, "Our File Number:" If you want the this text along with the
Client/matter ID to be printed in bold, type an exclamation mark (!) in the first space followed by the
text.
29. Include Matter Title - Enter L to print the first line of the matter title as part of the Re section of
the heading, either above or below the statement introduction depending on the setting for option 22.
To print all five lines of the matter title, enter Y. To print all five lines, including as well the title
associated with each line, enter H. The titles are the text which identify each line of the matter title, as
it appears on the matter screen. These titles can be modified using the Matter File Field Titles
function on the Setup menu. Note that you can add additional lines to the matter title using the Notes
function on the matter screen, as described in the New Matters section, in which case these additional
2011 Tussman Programs, Inc.
260
Tussman Program Release 10
lines will also appear on the bill unless you are showing just the first line. You can prevent an individual
line of the matter title from appearing on the bill by typing an asterisk (*) in the first space of that line.
Note also that you can join the first two lines of the matter title together, if the entire title does not fit on
one line, by typing a plus sign at the end of the first line and continuing the text on the next line. In that
case, the first two lines will be combined together into a single line on the bill.
You can also print all the lines of the matter title at the right margin opposite the client name and
address by entering R for this option. This is not normally recommended since if you use the full 40
characters allocated to both the name and address and matter title fields the entire text for both of
these items may not fit on one line.
To print the first line of the Matter Title on the same line as the Client/matter ID, enter M. For this
option to work item 26 must be set to L.
Enter Z to print the matter title lines at the right and print the Matter Notes in the Re section.
Enter N if you do not want the matter title to appear in the heading.
30. Underline Matter Title - Enter Y to underline all lines of the matter title, or L to underline the first
line only. Enter B to print the first line in bold. Enter N if you do not want the title underlined or bolded.
31. Number of spaces to indent Matter Title - If you are including the matter title at the left margin,
you can indent it from the left margin to make it stand out. Enter here the number of spaces, if any,
that you want to indent it. If you are including other items in the Re section at the left margin, such as
the File ID, Invoice Number, and Responsible Attorney, those items will also be indented so that the
entire Re section forms a block of text.
32. Text Preceding Matter Title - Enter here the text that you want printed before the matter title. It is
suggested you use the default "Re:" as the matter title, and other associated information such as the
file ID, invoice number and responsible attorney, if included, make up the Re section of the heading.
33. Include Invoice Number - Although the program always assigns an invoice number to each bill,
you do not have to show it on the bill. To print it at the left margin as part of the Re section, enter L. To
print it at the right margin opposite the client name and address, enter R. Enter N to omit it.
34. Text Preceding Invoice Number - Enter here the text you want to print identifying the invoice
number; for example, "Invoice Number:".
35. Include Responsible Attorney - Enter Y if you want to include the name of the responsible
attorney assigned to the matter as part of the Re section. Enter R to print it at the right margin
opposite the client address, or S to print it at the end of the bill. Enter N to omit this item.
36. Text Preceding Responsible Attorney - Enter here the text you want to print identifying the
name of the responsible attorney.
37. Reprint Heading Below Perforation - If you are using special pre-printed forms for the first page
of your bills which includes a perforation so the client can tear off the top portion and return it with their
payment, you can configure the bill so that the Re section is printed a second time below the
perforation to that the portion kept by the client shows the Re information. To do this, enter Y for this
option. You may then have to print a test bill and then adjust the placement of the heading so that it
matches the perforation by increasing or decreasing the line number specified in option 21. This will
move the Re sections up or down on the page. This option works only if you also set option 22 to B.
If you set this option to S then the program will print the same heading that appears on subsequent
pages (per format option 39) below the performation on the first page.
2011 Tussman Programs, Inc.
Billing
261
38. Beginning Line for Heading on Subsequent Pages - Enter here the line number where you
want to begin printing for all pages after page 1 on each bill. Normally you should enter 1 or 2, unless
you need to increase the top margin because you are using a pre printed form.
39. Include in Heading on Subsequent Pages - If a bill goes more than one page, you can print a
heading on each subsequent page showing any or all of the following items:
The Statement Date
The Statement Introduction
The Client Name
The Matter Title
The File ID
The Invoice Number
Select the items you want by entering Y in the box following each item. Enter N if you do not want an
item.
40. Show Page Numbers in Letters or Numbers - The heading of each page of a bill following page
1 always shows the page number, in addition to the items selected in option 39. The page number can
be printed using numbers or letters. For example, to print in the format "Page 2", enter N. To print in
the format "Page Two", enter L.
41. Show Balance Due in Heading - Enter Y if you want to show the Balance Due in the heading of
the bill. It will appear at the right hand margin opposite the client's name and address printed in bold
with the text entered in the Text space. This makes it easier for the client to see how much they need
to pay instead of having to search to the end of the bill.
17.3.3 Balance Forward Section
If there is a balance forward from previous billings for a matter, bill format options 50-59 determine how
that balance forward is shown on the bill.
The "balance forward" is defined as the account balance which is carried forward from the previous
bill, and should match the balance due shown on the previous bill. You can show this balance forward,
if any, on each bill, together with a detail of any payments or credits that have been received during the
current billing period, adding the amount which remains unpaid to the balance due on the current bill.
Alternatively, you can omit reference to the balance forward unless any portion of it remains unpaid,
or you can omit reference to the balance forward completely and just show the total of the current
charges by generating a current charges only bill. The following options control how and when the
balance forward is shown on the bill, and also control whether or not credit balances carried forward
appear..
In addition to appearing separately on the bill, the balance forward also appears in the recap summary
that can be printed at the end of each bill. Therefore, it is not necessary to show the balance forward
separately if you are also printing the recap summary.
At the end of this section is a brief summary which restates the three major options that determine
when the balance forward appears, and instructions for how to implement each option.
50. Show Balance Forward on Bill - Enter Y if you want to show the balance forward as a separate
item on the client's bill. Enter N to omit it. If you omit the balance forward as a separate item, you can
still show it in the Statement Recap at the end of the bill, and the amount of any unpaid balance
forward will be included in the Balance Due that appears at the end of the bill, unless you are
generating a current charges only bill. If you are generating a current charges only bill, then the
balance forward will not appear anywhere on the bill, regardless of the instructions you enter in this
section, nor will it be included in the Balance Due at the end of the bill.
2011 Tussman Programs, Inc.
262
Tussman Program Release 10
51. Location of Balance Forward - If you are including the balance forward as a separate item on
the bill, enter B to show it as the first item in the main body of the bill following the heading, or T to
show it after the detail of the current charges, before the payments and credits section. If you enter S
then the balance forward will appear after the detail of the current charges, but with an additional line
showing the subtotal of the balance forward and the current charges. Enter the text you want to
appear with this total in the space provided.
52. Text Preceding Balance Forward - Enter here the text that you want to appear before showing
the amount of the balance forward. You can insert the @ symbol in the text as a macro which will be
replaced by the date of the previous bill from which the balance is carried forward. For example, if the
previous bill is dated 12/31/2004, and you enter as the text for this item "Balance Forward from @",
then when the next bill is printed the balance forward will appear following the text "Balance Forward
from 12/31/2004".
53. Omit Balance Forward if 0.00 - You can configure the bill to always show the balance forward,
even if it is 0.00, or you can omit the balance forward as a separate item if it is 0.00 by entering Y for
this item. If you enter N, then the balance forward item will always appear. For purposes of this option,
the balance forward is defined as the ending balance due shown on the previous bill. Thus, even if
the balance from the prior bill has since been paid, the new bill will still show the balance from the prior
bill as the balance forward, and the payments and credits section will show the payment, thereby
reducing it by the amount paid. The only exception to this is if you have entered a payment or credit
which eliminated the balance forward, and entered N for the Show on Next Bill option when entering
that payment or credit. In that case, the payment or credit is applied directly to the balance forward
and the payment or credit will not appear on the new bill.
54. Omit Credit Balance Forward - If instead of owing money the client has a credit balance carried
forward from the previous bill, you have the option of either showing or suppressing reference to the
credit. If you enter Y for this option, the balance forward will appear as 0.00, and no reference to the
credit will appear. If you enter S, the balance forward will show as 0.00, but immediately following the
balance forward a separate line item will appear showing the amount of the credit balance. If you enter
N, then the balance forward will show the amount of the credit balance in the format specified in option
5, which controls the display of negative numbers
Regardless of which option you select, if there are new charges on the current bill the program will still
apply the credit balance against those charges and will reduce the ending balance accordingly.
This option refers only to unearmarked credit balances--i.e., credit balances that are not earmarked to
be applied only against fees, costs, tax or interest charges. Option 56 determines whether or not
earmarked credit balances carried forward are shown on the bill.
55. Text Preceding Credit Balance Forward - If you set option 54 to S, so that a credit balance
forward is shown as a separate line item from the balance forward, enter the text identifying the credit
balance forward in this space.
56. Show Earmarked Credit Balance(s) Forward - If the client has one or more earmarked credit
balances carried forward from the prior bill, the amounts can be shown as separate line items following
the balance forward amount by setting this option to Y. If the client has more than one earmarked
credit balance (i.e., one amount earmarked to be applied against fees and another earmarked to be
applied to costs), each amount will be shown on a separate line. Earmarked credit balances will be
applied against new charges of that type on the current bill regardless of whether or not you show the
amount as a balance forward. Earmarked credit balances must be shown separately from the main
balance forward as, for example, a client could have a balance forward owed on account of fees
previously billed, but could also have an used cost credit. In a case such as that, it would be incorrect
to offset the cost credit against the fee balance to arrive at the client's balance forward. Enter N if you
want to omit reference to earmarked credits.
57. Text Preceding Earmarked Credit Balances Forward - Enter here the text which you want to
use to identify an earmarked fee or cost credit balance forward. You cannot modify the wording for a
2011 Tussman Programs, Inc.
Billing
263
"Tax Credit Carried Forward" or an "Interest Credit Carried Forward", which will appear with that exact
wording..
58. Show Unpaid Balance Forward as Separate Line Item - The unpaid balance forward is defined
as the balance forward from the previous bill less any current period payments and credits. In other
words, it is the amount of the balance forward which remains unpaid after applying all the payments
and credits received since the prior bill was generated. You can show this amount as a separate line
item on the bill by entering Y. If so, it will appear following the payments and credits section on the bill.
If there are no payments or credits during the current period, so that the payment and credit section is
omitted, then the unpaid balance forward will also be omitted, as it will be the same amount as the
balance forward, with one exception: if you are omitting the balance forward from the bill, by setting
option 50 to N, but have set this option to Y, then the unpaid balance forward will appear in place of
the balance forward, in the same location as specified in item 51
To show the unpaid balance forward only if the amount is greater than 0.00, enter S instead of Y.. This
option enables you to configure the program to only show the balance forward if any portion of it
remains unpaid. To do this, set option 50 to N and set this option (58) to S. To further simplify the bill,
you could also omit the payments and credits section completely (by setting option 140 to X), so that all
that would appear on the bill, in addition to the current charges, would be the amount of any balance
carried forward that remains unpaid.
59. Text Preceding Unpaid Balance Forward - Enter here the text you want to print on the line
showing the unpaid balance forward.
Summary of Balance Forward Options
Following is a summary of the three main options with regard to showing the balance forward on the
bill and instructions for how to configure the program to implement each one:
1. To always show the balance forward as a separate item on the bill, even if it is 0.00: Set
option 50 to Y and 53 to N.
2. To show the balance forward only if it is greater than 0.00, even if its been paid and is no
longer owing: Set option 50 to Y and 53 to Y.
3. To show the balance forward only if it hasn't been paid and is still outstanding: Set option 50
to N and 58 to S.
Placement of Balance Forward - To show the balance forward at the beginning of the bill, set option
51 to B. To show after the current charges, set 51 to T.
Credit Balances - If you want the balance forward to show if its a credit balance, set option 54 to N or
S, To also show earmarked credit balances, set 56 to Y.
17.3.4 Fee Section
The fee section consists of format options 60 through 104. These options primarily concern:
Whether or not fee charges are itemized (option 64);
Whether or not charges are combined in various ways (options 64 and 65);;
If itemized, what detail is shown for each charge (option 70)
The sort order in which charges are listed (option 66);
Whether a summary of charges is included at the end (options 83-90).
Note that fee and cost charges are always listed in separate sections on the bill. The fee section
appears first, followed by the cost section. The fee section appears only if there are fee charges to
report during the current billing period.
2011 Tussman Programs, Inc.
264
Tussman Program Release 10
Following is a description of each of the fee section options. At the end of this section is a brief
summary of the options with instructions for settings which will create a simple format suitable for the
majority of cases.
60. Heading for Fee Section - Enter here the text for the heading you want to appear at the beginning
of the fee section; for example: "Professional Services". Normally the heading is printed at the left
margin. To center it, type a greater than symbol (>) in the first space followed immediately by the text.
To omit the heading, type an asterisk (*) in the first space.
61. Optional two line message to print at beginning of fee section - In addition to or in place of
the heading, you can print an additional two line message at the beginning of the fee section. If the
heading is also included, the message will appear immediately following the heading but before the
itemization of the charges.
62. Column Headings - If you are itemizing the fee charges, you can print column headings to identify
each item which appears; i.e., the date, staff initials, description, hours, rate and amount. Enter
the text for each column heading in the space indicated. The program will only print column headings
for those items which you actually select for inclusion in format option 70. You can also omit the
column headings entirely by setting option 63 to Y. If the fee section goes beyond the first page, the
column headings will be reprinted at the top of each subsequent page.
If you leave blank the column headings for the date, staff, and description, but enter heading(s) for the
hours, rate and amount, then the text you entered for the fee section heading (item 60) will print on the
same line as the column headings for the hours, rate and amount. Otherwise, the fee section heading
will print first, followed by a blank line, followed by the column headings.
63. Omit Column Headings - Enter Y if you want to omit the column headings from the fee section.
64. Itemize Timeslips - Set this option to Y if you want to itemize the individual fee charges on the
bill. To combine the text from all the fee charges into a single narrative paragraph, enter D. To omit
the itemization, and just show the total of the new fee charges, enter N.
If you use one of the sorting options described in option 66 which group together charges for each
staff member, etc., then this option determines whether charges for each group are itemized or
combined together into narrative paragraphs. The sorting option will not work if this option is set to N;
only the total of the fee charges will appear.
If you omit the itemization of the charges, you can manually enter a paragraph of text that will be
printed in place of the itemization of the charges. To do this, enter a transaction type B (Billing
Narrative) as described in the section on Other Transaction Types. This is useful if instead of showing
the detail of the work that was performed you would rather compose a paragraph summarizing what
was done and show that with the total amount of the charges. If you itemize the charges, you can still
enter a Billing Narrative and it will appear in addition to and before the detail of the charges.
If you want to replace the itemization of the charges with a narrative paragraph, you can also do that by
entering a transaction type FOX, which is one of the types of overriding flat fee charges. . This
method also allows you to adjust the total amount of the fee charges simply by entering the amount
that you want to bill as the amount of the FOX transaction. Other ways of adjusting the total amount of
the fee charges are described in the section on Writing Down Fee Charges
f you choose to itemize the fee charges, you can then either list each one individually or combine
them in various ways. For example, all charges for the same date can be combined into a single line
item. Option 65 lists the various combining options
65. Other Timeslip Combining Options - If you are itemizing fee charges (by setting option 64 to Y),
you then have the option of listing each one individually or of combining them in any one of the
following ways. Charges that are combined together appear as a single line item on the bill, with the
2011 Tussman Programs, Inc.
Billing
265
text from the combined charges strung together into a narrative paragraph. The amount for that line
will be the total from the combined charges:
A - Combine by Staff Member/Day - Enter A to combine all charges recorded by each staff
member for the same day into a single line item, so that each staff member has no more than
one line item on the bill for each date.
B - Combine by Staff Member - Enter B to combine all charges for each staff member into a
single line item, so that there is only one line item for each staff member on the bill.
C - Combine by Staff Member Alias/Day - If you are using alias codes for some of your staff
members, then using this option all charges for each date will be combined by alias code. For
example, if staff member ABC does not have an alias code, and staff members XYZ and 123
both are assigned alias code ABC, then the charges for all three staff members will be
combined by date into a single line items.
D - Combine by Staff Member Alias - Enter D to combine all charges by alias code, so that
each alias code will have only a single line item on the bill reflecting all the charges entered for
staff members with that alias code.
E - Combine by Staff Category/Day - Enter E to combine all charges for staff members with
the same category code into a single line item by date.
F - Combine by Staff Category - Enter F to combine all charges for staff members with the
same category code, so that each staff category has only a single line item on the bill.
Alternatively, if you want to itemize the charges for some staff categories but combine them for
others, you can do this using the Itemize Charges instruction assigned to each category in the
Staff Categories file. For example, you might want to itemize charges for attorneys but just
show a single line item reflecting work by paralegals.
G - Combine by Activity Code - Enter G to combine all charges by activity code. If you
choose this option, then all charges assigned the same activity code will appear as a single line
item. Instead of stringing together the text from the individual charges, the description will be
the text assigned to that activity code. .
H - Combine by Task Code - Enter H to combine all charges by task code so that all charges
assigned the same task code will appear as a single line item. Unlike with activity codes, the
program will string together the text from the individual charges and use that for the description.
N - Enter N, or leave item 65 blank, if you do not want to combine charges.
Instead of combining charges using one of the above methods, you can also combine individual
charges together using the combine code which can be assigned to each individual charge, as
described in the section on Entering Fee Charges. That method is more appropriate if you only want
to combine selected charges together, but normally want to itemize them separately.
When combining charges, except when combining by activity code, the description for each combined
charge consists of the text strung together from the individual charges. You have the option of
including in parentheses following the text for each individual charge the date, staff initials, and amount
of that individual charge, as determined by format option 77.
Only charges of the same transaction type will be combined when using this option. Thus, for
example, billable time (type H) transactions will not be combined with nonbillable time (type N).
Note that instead of using the combining option, in many cases it may be more appropriate to use the
sorting option (item 66) which will group charges of the same type together with the option of showing
a subtotal for each group.
2011 Tussman Programs, Inc.
266
Tussman Program Release 10
66. Timeslip Sorting Options - This option determines the order in which fee charges are listed on
the bill. Listing by date by setting this option to N is the simplest way, but you can also select any of
the following options:
N - Sort by Date.
Y - Sort by Staff Member
C - Sort by Staff Category
A - Sort by Activity Code
P - Sort by Task Code
If you select any option other than N (sorting by date) then a heading will be printed at the beginning of
each group of charges. For example, if sorting by staff member, at the beginning of the list of charges
for each staff member will be printed a heading showing the name of that staff member. Charges
within each group will be subsorted by date.
Charges for each sort group will either be itemized or combined together into a single narrative
paragraph, depending on the setting you selected for option 64.(the sorting option will only work if 64 is
set to Y or D). If sorting by staff category, you can itemize charges for some categories and combine
them for others using the Itemize Timeslips instruction assigned to each category in the
Staff Categories file. Thus, for example, you could itemize charges for attorneys but combine them
for paralegals.
You can combine this option with option 65 to combine charges within each sort category using one of
the criteria specified in item 65. For example, if you are combining charges by staff member/day, and
also sorting by staff member, then in the itemization of charges for each staff member will appear no
more than one line item summarizing the charges for each day.
When sorting by staff member, you can determine the order in which each staff member appears on
the bill using the sort code which can be assigned to each staff member. For example, you may
want the senior staff member's charges to appear first, in which case you would assign them the
lowest sort code (for example, AA or 01). If you do not assign sort codes, then staff members will be
listed in order of their staff code.
Note that you can also change the sort order of charges with the same date using the order code
which you can assign to each charge, as described in the section on Entering Fee Charges.
67. Show Subtotals for Each Sort Category - Enter Y if you want a subtotal to appear following the
itemization of charges for each sort category specified in item 66, if you are sorting charges by any
method other than by date.
68. Omit Timeslips for Flat Fee and Contingent Matters - If you set this option to Y the detail of
individual charges (types H, N or A) will be omitted on matters with a fee agreement of flat fee (F) or
contingent fee (C). The amounts of those charges will not be included in the total on the bill; only flat
fee charges (type F) will appear on the bill and be included in the total. Using this option is not
recommended, as on your productivity reports the amounts of any billable time charges will appear as
if they have been written off. It is better to enter a transaction type FOX to accomplish this same
result without causing the amounts to appear as if they were written off...
69. Omit Nonbillable and Administrative Time - Enter Y to omit both administrative time (type A)
and nonbillable time (type N) from the bill. Or, enter A to suppress administrative time only, or B to
omit nonbillable time only. Use this option if you enter nonbillable and/or administrative time only for
your own records, and do not want it to appear on your client's bills. Alternatively, you can suppress
individual time records from the bill by setting the Status option for those charges to Suppress, as
described in the section on Entering Fee Charges. Enter N to include nonbillable and administrative
time on your bills.
2011 Tussman Programs, Inc.
Billing
267
70. Items to Include for Each Timeslip - This option determines which items appear for each fee
charge that is itemized on the bill. You can select from any or all of the following items:
Date - Enter Y to include the date of the charge. To omit the date if it is the same as the
previous charge shown on the bill (thereby listing each date only once, and leaving a blank
space instead of printing the same date again), enter D;
Staff Code - Enter Y to include the staff code for each charge, or F to show the full staff
member name. If showing the name, the column showing just the initials will be omitted and the
full name of the staff member who performed each service will appear on a separate line
following the description of that charge. If you have assigned alias codes to your staff
members, the alias code will appear instead of their actual code. If you want their actual code to
appear instead of the alias code, set this option to C.
Activity Code - Enter Y to show the activity code for each charge.
Task Code - Enter Y to show the task code for each charge.
Hours - Enter Y to show the number of hours for each charge.
Rate - Enter Y to show the hourly rate for each charge
Amount - Enter Y to show the dollar amount of each charge, or enter H to omit the dollar
amount for hourly charges, but include the dollar amount for flat fee charges.
Descripton - Enter N to omit the description for each charge. It is unlikely you would want to do
this. Alternatively, you can omit the
text from individual charges by typing an asterisk (*) in the
description space for that charge at the beginning of the text you do not
want to print.
To the extent possible the program will not allow widow and orphan descriptions--i.e., it will attempt to
print each description on one page. If it will not fit in the space remaining on the current page, it will
begin it on the following page, unless you uncheck the Widow/Orphan protection option on the main
Generate Bills screen.
To omit an item listed above, leave the space blank or enter N. If you omit one of the items, the the
space for printing the description will automatically expand to fill the column space that would otherwise
be used by that item.
The format and placement on the bill of each of the items that you select from the above list is
determined by format items 71 through 82, described below.
71. Date Format - The date for each charge can appear in one of the following formats. Select by
entering the number corresponding to your choice::
1 - 01/17/05
2 - Tuesday, January 17, 2005
3 - January 17, 2005
If you select option 1, the date will appear in a separate column at the left margin. If you select 2 or 3,
the date will appear on a separate line immediately above the charge; in this case, set the Date option
in item 70 to D so each date is printed only once, and each date appears as a heading followed by all
the charges for that date.
72. Placement of Staff Member Code - Enter one of the following selections which determine the
location of the staff member code:
L - Print in a separate column to the left of the description
2011 Tussman Programs, Inc.
268
Tussman Program Release 10
R - Print in a separate column to the right of the description
P - Print in parentheses at the end of the description
If you have set the Staff Code option in item 70 to F, then the staff code will not appear and instead
the full name of the staff member will be printed on a separate line following the description for each
charge.
If you have assigned alias codes to any of your staff members, then the alias code will appear in place
of the staff code for those staff members, unless you enter C for the Staff Code option in item 70.
73. Placement of Task Code - The task code can appear in one of the following places:
L - In a separate column to the left of the description. If you are also including the date in a
separate column, the task code will appear under the date, instead of in a column by itself. If
the date is not appearing in a separate column, either because you are omitting it or because
you set option 71 to 2 or 3, the task code will appear in its own column..
T - At the beginning of the description;
P - In parentheses immediately following the description.
74. Placement of Activity Code - The options for placement of the activity code for each charge are
the same as those for the task code - enter L, T or P as described above. If you include both the task
code and the activity code, the task code will be listed first, followed by the activity code.
75. Placement of Hour Amount - The hour amount for each charge can appear either in a separate
column to the left of the description (enter L), to the right of the description (enter R), or in
parentheses immediately following the description (enter P). If you are also including the rate for
each charge, it will always appear immediately following the hour amount.
76. Move Hour Amount Flush with Right Margin if Omitting Dollar Amounts - If you are including
the hour amounts for each charge, but not showing the dollar amounts, set this option to Y if you want
to move the hour amount to the right margin so that it prints in the space normally occupied by the
dollar amount. This frees up more space for the description and avoids leaving an empty column at
the right hand side of the page. For this option to work correctly you should also set option 75 to R.
77. If combining Timeslips, show in Parentheses after Description - If you are combining
charges, either by setting option 64 to D or using one of the combining options in item 65, so that the
description from the combined charges is strung together into a single paragraph, you can include in
the paragraph following the description for each individual charge enclosed in parentheses any or all of
the following information from each individual charge: the date, staff code, hours, rate, activity code
and task code. Enter Y after each of the items that you want to include, if any.. Enter N or leave blank
those items you do not want.
78. Omit Dollar Amounts if 0.00 - To leave the dollar amount space blank if the dollar amount of a
charge is 0.00, enter Y.
79. Text to Appear in Parentheses following description for Nonbillable Time - Enter in this
space optional text that will be printed following the description for each Nonbillable or Administrative
Time charge (transaction types N or A) which appears on the bill. For example, if you want to highlight
the fact that nonbillable time is not being charged for, enter the text "NO CHARGE" and that will appear
following the description for each nonbillable charge.: This is particularly useful if you are not showing
the dollar amounts for each charge on the bill, as in that case the client would not otherwise be able to
distinguish billable from nonbillable time. To omit this text, simply leave this space blank.
81. Format for Dollar Amount for Nonbillable Time - When printing nonbillable or administrative
2011 Tussman Programs, Inc.
Billing
269
time (types N and A) on the bill, you can show the dollar amount for these charges in any of the
following formats by entering the letter indicated:
A - Show as "0.00"
M - Show as "No Charge"
N - Show as "N/C"
D - Show the actual dollar amount followed by the letters "N/C"
If you select the D option shown above, the program will print the actual dollar value of the nonbillable
time, followed by the notation "N/C" indicating that it is not being charged. This way, you can show the
client the dollar value of the work you have performed, even though they are not being charged for it.
To do this, you must configure the program so that when you enter nonbillable time the program
assigns the transaction a dollar value using the rate schedule assigned to that matter. To do this,
select Data Entry Options from the Setup menu and set option 10, Assign Dollar Value to
Nonbillable Time, to Y. Otherwise, when recording nonbillable time the program will not assign a
dollar value and thus the amount on the bill will appear as 0.00.
82. Format for Fees not Charged Because Covered by Minimum Retainer - If you have billed the
client a minimum retainer fee charge (transaction type FE), the program will not charge the client for
hourly charges until the amount of the hourly charges has exceeded the amount of the minimum fee.
Until such time as the credit from the minimum fee is used up, hourly charges can appear on the bill in
one of two ways. Select the option you want be entering the letter indicated for this option:
Y - Show the dollar amount for each individual charge with an adjustment at the end reducing
the total fees by the amount that is covered by the minimum fee
N - Show the dollar amount for each charge as 0.00 until the minimum fee credit has been used
up.
83. Summarize Fees at End - A summary can be printed at the end of the fee section showing the
total charges broken down either by staff member or by billing rate. Enter A to summarize by staff
member, or R to summarize by rate. Leave blank or enter N to omit the summary. When
summarizing by staff member, if a staff member has billed time at more than one rate, a separate line
item will appear showing the number of hours for that staff member at each rate. If summarizing by
rate, the summary will consist of separate line items showing the total hours billed at each rate; for
example, if time on the bill is charged using two different rates, there will be two line items in the
summary showing the total hours at each rate. If nonbillable time, administrative time, or flat fee
charges also appear on the bill, a total of those charges will also appear as separate line items
(although nonbillable and administrative time can be omitted from the summary by setting option 87 to
Y). Items 84 though 89, control the level of detail and format of the summary. You can also include
separate summaries by task and activity code using option 90. The summaries can appear regardless
of whether or not you have chosen to itemize charges on the bill. Thus, for example, it you are not
itemizing charges (by setting option 64 to N), you could design the fee section so that all that appears
is a summary of the total hours worked by each staff member.
The staff summary will normally show the hours and amounts in columns which are indented from the
right margin. If you would prefer to print the summary in a wider format where the amounts are flush
with the right margin, enter K as your selection for item 83.
If you are sorting charges by category of staff member (by setting option 66 to C), then a separate
summary will appear at the end of the charges for each category. In all other cases a single summary
will appear at the end of the fee section.
84. Format for Staff Member ID in Summary - If you are summarizing fees by staff member, you can
identify each staff member in the summary by their staff code only (enter C), by their name only (enter
N) or by both their staff code and name (enter Y).
2011 Tussman Programs, Inc.
270
Tussman Program Release 10
85. Include Staff Member Category in Summary - Enter Y if in addition to showing the staff code
and/or name to identify each staff member in the summary, you want to show the staff member's
category. For example, if staff member Perry Mason (PM) is assigned a category code of P (for
Partner), then in the summary he would appear as "Perry Mason, Partner", if item 84 is set to N and
this option is set to Y.
86. Items to be included in Summary - For each line item appearing in the summary, in addition to
the staff member information specified in item 84 and 85 you can show any one of the following
combination of items by entering the letter indicated:
R - Show the billing rate only
H - Show the number of hours only
A - Show the dollar amount only
N - Show the hours and amount
B - Show the hours and rate
Y - Show the hours, rate and amount
If you are summarizing by rate, it is recommended that you select either the B or Y option.
87. Include Nonbillable Time in Summary - Enter Y if you want to include nonbillable and
administrative time in the summary. If so, it will appear as a separate line item for each staff member,
or as a single addition line item if summarizing by rate. Enter N to omit this time from the summary.
88. Heading for Fee Summary - To print a heading at the beginning of the fee summary (such as
"summary of Professional Services") type the text in this space. To omit a heading, leave it blank. the
heading will normally be printed at the left margin. To center it, type a greater than symbol (>) in the
first space, followed immediately by the text.
89. Text for Total of Flat Fee Charges in Summary - If there are any flat fee charges included on
the bill, those will appear in the summary as a separate line item for each staff member, or as a single
additional line item if summarizing by rate. Enter here the text you want to use to identify these flat fee
charges in the summary. This text will appear in place of the hours and rate which show for the hourly
charges. Note that if you are not including the dollar total as part of the summary, flat fee charges will
not appear.
90. Include Summary by Activity and/or Task Code - This option enables you to print a summary at
the end of the fee section which totals the charges by task code and/or activity code. To include a
summary by task code only, enter T. To include a summary by activity code only, enter A. To
include both summaries, enter Y. Each summary will include a separate line item showing the code,
code description, total hours and amount for each task or activity code appearing on the bill. To omit
these summaries, enter N.
This option does not work if you are sorting charges by staff category (by setting option 66 to C). In all
other cases these summaries will appear at the end of the fee section. If the summary by staff
member or rate is also included, that summary will appear first, followed by the summary by task code,
followed by the summary by activity code.
91. Omit Total Hour Amount - At the end of the fee section, a line can be printed showing the total
amount of the fee charges. Unless the total line is omitted (by setting option 93 to Y), you can include
on the total line the total number of hours on the bill, in addition to the dollar total. To include the total
hours, set this option to N. To omit the total hours, enter Y. To show the total hours, but only include
billable time in the total, enter H.
92. Text for Fee Total - Enter here the text you want to appear on the line showing the total of the fee
charges; for example, "Total Professional Fees".
2011 Tussman Programs, Inc.
Billing
271
93. Omit Fee Total - Enter Y if you want to omit the line at the end of the fee section showing the total
amount of the fees. Normally these totals appear aligned with the columns for the hours and amounts
of the individual transactions listed on the bill. If you including subtotals by staff member (see item 83)
you can instead have the totals aligned below the totals shown in that section by setting this option to
K.
94. Default Description for Writedowns - This item is not currently in use.
95. Text for Total Fees After Writedowns - This item is not currently in use.
96. Text for Total After Adjusting for Overriding Flat Fee Charge - If you have adjusted the total
amount of the fees on the bill using an overriding flat fee charge (transaction type FO), and you have
entered a description with the FO charge, that description will appear along with the amount of the
adjustment following the line showing the total fees. Below that a separate line will show the adjusted
total of the fees being billed. Enter here the text you want to appear on that line; for example, "Total
Fees After Adjustment". If you did not enter a description for the FO charge, then the fee total is
adjusted directly, and the amount of the adjustment will not show as a separate line item.
97. Explanation for Adjustment to Fees Covered by Minimum Retainer - If the total amount of
fees on the bill is being reduced because the client has a credit from a minimum retainer fee
(transaction type FE), then the amount of the reduction will show as a separate line item following the
fee total. This separate line item will only appear if format option 82 is set to Y. Otherwise, the
individual charges will be adjusted directly, and there will not be a need for an adjustment at the end.
Enter here the text you want to appear on that line; for example, "Reduction for fees covered by
retainer".
98. Text for Total After Deducting Amount Covered by Minimum Retainer - If the fee section
includes a line item showing a reduction due to a credit from a minimum retainer fee (as described in
option 97 above), then a second line will also appear showing the adjusted total of the fee charges
after deducting the credit. Enter here the text you want to appear on that line; for example, "Total
Additional Fees".
99. Explanation for Reduction in Fees Because Maximum Fee Exceeded - If you have set a
ceiling on fees for a matter, and the total amount of the fee charges on the bill causes the ceiling to be
exceeded, then a separate line item will appear at the end of the bill reducing the fee total by the
amount in excess of the ceiling. Enter here the text you want to appear on the line showing the
adjustment; for example, "Adjustment for fees in excess of agreed maximum".
100. Text for Total Fees After Reduction for Exceeding Maximum Fee - If the bill shows a
reduction to the total fees because the ceiling was exceeded, as described in item 99 above, a second
line will appear showing the adjusted total of the fee charges after deducting the amount in excess of
the ceiling. Enter here the text you want to appear on that line; for example, "Total Fees After
Adjustment".
101. Explanation of Percentage Discount - If you are giving the client a percentage discount on
their fee charges, a separate line will appear following the fee total showing the amount of the discount.
Enter here the text you want to appear on that line. You can insert in the text the @ symbol as a
macro, which will be replaced by the percentage amount of the discount, as entered in the billing
instructions for that matter, when the bill is printed; for example, if you are giving a 10 percent
discount, and you enter here "Courtesy Discount of @ percent", on the bill that text will appear as
"Courtesy Discount of 10.00 percent" followed by the dollar amount of the discount.
102. Text for Total Fees After Deducting Percentage Discount - If the bill shows a reduction to the
total fees because of a percentage discount, as described in item 101 above, a second line will appear
showing the adjusted total of the fee charges after deducting the discount. Enter here the text you
want to appear on that line; for example, "Total Fees After Discount".
2011 Tussman Programs, Inc.
272
Tussman Program Release 10
103. Explanation for Sales Tax or Markup - If you are adding sales tax or a percentage markup to
the fee charges, a separate line will appear showing the amount of the tax or markup. Enter here the
text you want to appear on that line. You can insert the @ symbol in the text as a macro which will be
replaced on the bill with the percentage amount of the tax or markup. For example, if you enter "Sales
tax at @ percent", and you are charging tax of 7 percent per the instructions in the matter file, that text
will appear on the bill as "Sales tax at 7.00 percent" followed by the dollar amount of the tax. This line
item can appear either in the fee section or in the cost section of the bill by setting the Add to Fees
option in the Billing Options screen for each matter to Y or C respectively.
104. Text for Total Fees After Adding Tax or Markup - If you are adding tax or a percentage markup
to the fees, and the markup is appearing in the fee section, as described in 103 above, then a separate
line will appear following the amount of the markup showing the total of the fees including the markup.
Enter here the text you want to appear on that line; for example, "Total Fess Including Tax".
Summary of Fee Section Options
Following is a brief review of the main options that affect the format of the fee section, with instructions
for settings that will create a format suitable for the vast majority of cases:
1. To itemize the fee charges on the bill, set option 64 to Y; Then set 65 and 66 to N so that charges
are not combined and so that they are sorted in date order;
2. Item 70 determines the detail which is shown for each charge. To include the date, staff code,
hours and amount enter Y after each of those items in that option; Then set 71 to 1, 72 to L, and 75
to R. This determines the layout of the information for each charge.
3. Set item 83 to A if you want to include a summary of the fee charges by staff member. Then set 84
to Y, 85 to N, and 86 to Y, which determines the detail for the summary. Set 90 to N, 91 to N and 93
to N to omit the summary to task and activity code, and to show a total line which shows both the total
hours and amount being billed.
17.3.5 Cost Section
The cost section consists of format options 110 through 123. It controls the level of detail and
appearance of the section on the bill which lists the cost charges. Fees and costs are always listed in
a separate section on the bill. Fees appear first, followed by the cost section. The cost section
appears only if there are new cost charges during the current billing period.
Following the explanation of each cost section option is a brief summary:with instructions for settings
which will create a simple format suitable for the majority of cases.
110. Begin Costs on New Page. Enter Y if you want the cost section to begin on a separate page.
Otherwise, the cost section will appear immediately following the fee section..
111. Heading for Cost Section. Enter here the text you want to print as a heading for the cost
section. It will print at the left margin. To center it, type a greater than symbol (>) in the first space,
followed by the text; for example, ">Costs and Disbursements". To omit the heading, leave the space
blank or type an asterisk (*) in the first space.
112. Include Column Headings for Costs. Enter Y to print column headings for the cost section.
The headings used will be the same as those entered for item 62 in the fee section. In the cost
section, only the headings for the Date, Description and Amount will appear..
113. Itemize Costs. To itemize each cost charge individually, enter Y. To combine all costs with the
2011 Tussman Programs, Inc.
Billing
273
same cost code into a single line item, enter S. To omit the itemization completely, and just show the
total of all the costs without any detail, enter N.
Only charges that have been assigned a cost code will be combined when using the combining option.
All other charges will be itemized. If there are some cost codes where you want to itemize each
charge and others where you want to combine them, set this option to S. Then, for each cost code
that you want itemized, enter N in the Combine Charges on Bill space for that cost code in the cost
code file. Charges for all other cost codes will be combined.. This method is useful if, for example,
you want to combine all photocopy and postage charges into single line items, but want to itemize court
filing fees and other costs.
When combining costs, the description for the combined charge will be the text that is assigned to
that cost code. If you want the description to include the number of units billed, you must first assign
a unit amount to the cost code in the cost code file, and then insert the # symbol as a macro within
the body of the description for that cost code where you want the number of units inserted; for
example, "Photocopy charges: # copies at .30 per copy". When printed on the bill, the program will
then insert the number of units in place of the # symbol..
114. Omit Dates. To omit the date for each cost charge, enter Y. Enter N to include the dates, or S
to omit the dates only for combined costs when item 113 is set to S.
115. Omit Duplicate Dates. If you are showing dates, enter Y if you only want to show the date the
first time it appears (i.e., if more than one charge appears with the same date, the date will appear only
with the first charge for that date). To always show the date regardless, enter N.
116. Omit Check Number. If you want to include with each cost the check number or other reference
you entered in the Reference space when recording the cost, enter N. It will appear in parentheses
following the description. To omit the reference, enter Y.
117. Include Task Code. To include the task code for each cost in a separate column to the right of
the date, enter Y. To omit the task code, enter N.
118. Include Cost Code. To include the cost code for each charge in a separate column to the right
of the date and task code, enter Y. To omit, enter N.
119. Indent Cost Amounts from Right Margin. Normally the amount of each cost charge is printed
in a column at the right margin. To indent the amount column for the individual amounts, so that only
the total of the costs appears in the right column, enter Y.
120. Omit Nonbillable Costs - Enter Y to omit nonbillable costs (type CN) from the bill. If included on
the bill by setting this option to N, the amounts for nonbillable costs will appear in the same format as
the amounts for nonbillable time as determined by format option 81.
121. Text for Cost Total - Enter here the text you want to print on the line showing the total of the
cost section.
122. Omit Cost Total - Enter Y to omit the total of the costs, showing just the individual amounts.
123. Omit Cost Section - Enter Y to omit the entire cost section from the bill. This selection is
designed for the situation where you are generating a consolidated bill for clients with multiple matters,
and instead of itemizing the costs for each matter separately, you want to show all the costs for that
client in a single section on the summary page for that client. To show the cost detail on the
summary page for each client, enter Y after Cost Detail in format option 258.
124. Sort by Cost Code - Set this option to C if you want costs to be sorted by Cost Code. A heading
showing the description for the cost code will be printed at the beginning of each listing. If you also
2011 Tussman Programs, Inc.
274
Tussman Program Release 10
want to show subtotals for each cost code set format option 67 to Y.
Summary of Cost Section Options
Costs can be itemized or combined by cost code. To itemize, set option 113 to Y. To summarize by
cost code, set 113 to S. Items 114-118 determine whether or not you include the date, check number,
task code and activity code for each cost. You can also sort the costs by cost code, with option
subtotals, by setting item 124 to C.
17.3.6 Current Charges Subtotal
Following the fee, cost and interest sections on the bill you can print a separate line item which shows
the total of the current charges (the sum of the fees, costs, tax and interest being charged on the
current bill). This total can also appear in the recap summary at the end of the bill, so it is not
absolutely necessary to include this, but most firms prefer to have it. You must include it, however, if
you are generating a current charges only bill, in which case the current charges subtotal is the last
item appearing on the bill, and will therefore represent the amount that the client is requested to pay.
Format options 130 through 132 determine whether or not, and in what format, this subtotal section
appears, as follows:
130. Text Preceding Total of New Charges - Enter here the text you want printed on the line that
shows the subtotal of new charges (i.e, to sum of the fees, costs, tax and interest billed on the current
bill); for example, "Total New Charges". To omit the current charges subtotal, type an asterisk (*) in
the first space.
131. Show Application of Payments and Credits to New Charges - Enter Y if following the subtotal
of the new charges you want to print a separate line item showing the application of any credit
balances carried forward or current period payments and credits against the new charges. For
example, if the client has new charges of $1,000.00, and has made an advance payment of $500.00
intended to be applied against those charges, the amount of that payment will appear with the text
"Less Payments and Credits". on the line following the new charges total. If the advance payment was
in the sum of $1500.00 (i.e., greater than the total of the new charges), this line would only show the
amount of $1,000.00; i.e., that portion of the payment or credit which is being applied against the new
charges. On the next line will appear a separate amount showing the unpaid balance of the new
charges, with the text entered in item 132.
It is not advised that you use this option unless you are generating a current charges only bill, in which
case the detail of the payments and credits, and the recap summary appearing at the end of the bill are
omitted, and the current charges subtotal is the last item appearing on the bill. In that case you will
probably want to adjust the total so it reflects the actual unpaid balance due, rather than just the total of
the new charges.
You may also want to use this option if you are printing the payments and credit section at the
beginning of the bill, immediately following the balance forward, by setting format option 140 to B or
C. In that case, the payments and credits section will only reflect the application of credit balances and
current period payments and credits against the balance forward, so it may be necessary to include
this item so that the application of those payments and credits against the current period charges is
explained. In general, however, it is recommended that you not print the payments and credit section
at the beginning, as it tends to complicate the bill.
132. Text Preceding Unpaid Balance of New Charges - Enter here the text you want to appear on
the line showing the unpaid balance of the new charges, as described in item 131 above; for example,
"Unpaid Balance of New Charges". If you are generating a current charges only bill, you may want to
say "Current Balance Due", since this will be the last item appearing on the bill.
2011 Tussman Programs, Inc.
Billing
275
Summary of Current Charges Subtotal Options
It is recommended that you include the current charges subtotal, especially if you are generating a
current charges only bill. This total will appear automatically unless you type an asterisk (*) in the first
space of item 130. It is also recommended that you set item 131 to N, unless you are generating a
current charges only bill, in which case it should be set to Y.
17.3.7 Payments and Credits Section
The payments and credits section on the bill lists all the AR transactions entered since the previous bill
that are dated on or before the ending cutoff date that you are using for payments. This includes:
Payments (transaction type P)
Credits (transaction type Q)
Debits (transaction type D)
Refunds (transaction type DA)
Reversing transactions created when you reverse a payment or credit (transaction type DR)
If the client has an earmarked credit balance carried forward from prior bills, the payments and credits
section will also show the application of those credits against any current charges on the bill. Also
appearing will be payments generated automatically by the program when applying funds from the
retainer account against charges on the bill.
The payments and credits section will appear only if there is any of the above activity during the current
billing period. Otherwise, the section will be omitted. However, there is an option where you can have
each bill show the entire history of payments and credits instead of just the current period activity. To
activate this option set format option 143 to A.
Format options 140 through 149 control the format and level of detail of the payments and credits
section. Following the description of each item below is a brief summary of the format options and
suggested settings that will be suitable in the majority of cases.
Note that regardless of the options you select below, the payments and credit section will not appear
on the bill if you are generating a current charges only bill. Also, in addition to or in place of printing
the payments and credits section on each individual bill, you can include a payments and credits
section on a client's summary page, showing a detail of the payment and credit activity for all that
client's matters. (To include the payments and credits section on a client's summary page, enter Y
after Payment and Credit Detail in format option 258. If included on the summary page, the following
options will determine its format).
140. Placement of Payments and Credits Section - The location of the payments and credits
section on the bill is determined by entering the letter indicated:
B - Before Detail of New Charges. It will appear before the fee and cost sections, and after the
balance forward, if the balance forward is also appearing at the beginning of the bill.
E - After Detail of New Charges. It will appear following the fee, cost and interest sections, and
after the current charges subtotal and balance forward, if the balance forward is also appearing
following the new charges.
X - Omit Payments and Credits Section. Select this option if you do not want the payments
and credits section to appear on the bill. However, even if the section is omitted, the total of the
payments and credits will appear in the recap at the end of the bill, and the balance due
appearing at the end will still reflect the application of the payments and credits. Using this
option is appropriate if you do not want to itemize the payments on the bill, but are content to just
show the total in the recap at the end, or if you are generating a consolidated bill and want the
payments and credits to appear only on the summary page for the client.
2011 Tussman Programs, Inc.
276
Tussman Program Release 10
C - Combine with Balance Forward Section. If you select this option, the balance forward and
payments and credits will be combined into a single section appearing at the beginning of the
bill. The section will show first the balance carried forward, followed by an itemization of the
payments and credits, followed by the remaining unpaid balance forward, if any. For this option
to work, you must also set format option 50 to Y. In most cases, this presents a simplified and
more compact recap of the balance forward and payment and credit activity, but it can be
confusing if your clients frequently make advance payments, or if you are automatically applying
retainer funds against the bill, since the application of advances and retainer funds will only
appear in the payments and credits section if it is printed after the detail of the new charges.
You can show the application of advances or retainer funds in the current charges subtotal
section, by setting option 131 to Y, but this creates a more confusing bill than if all the payment
and credit activity is listed in one place, as it is when it is printed following the current charges,
using option E.
141. Omit Payments and Credits if Unpaid Balance Forward is 0.00 - If you enter Y for this option,
the payments and credits section will be omitted if the client has paid their balance forward in full.
Enter N and the payments and credits section will always appear whenever there is any current
payment or credit activity to report, regardless of whether or not there is an unpaid balance forward.
142. Heading for Payments and Credits Section - Enter here the text you want to print as the
heading for the payments and credits section; for example, "Payments and Credits". Normally the
heading will be printed at the left margin. To center it, type a greater than symbol (>) in the first space,
followed immediately by the text. To omit the heading, type an asterisk in the first space.
143. Itemize Payments and Credits - Enter Y if you want all the current period transactions to be
itemized. To omit the detail and show only the transaction total, enter N. If itemized, the program will
print the date, description and amount for each transaction. If you are itemizing, and amounts are
being automatically applied from the retainer account against the bill, format option 214 determines
whether those applications appear as a single line item in the payments and credits section, or whether
the amounts applied to fees, costs, tax and interest each appear separately.
If you set this option to A, then each bill will show a complete itemized history of all payment and credit
activity. Thus, each bill will show every payment made to date, instead of the normal format where only
the payments and credits for the current billing period appear. If you activate this option, both the
retainer and trust account sections will also show the complete history of activity.
144. Omit Check Number - Enter N if you also want to include the check number, as entered in the
Reference space when you record AR transactions). If included, it will appear in parentheses following
the description for each transaction. Enter Y if you want to omit the check numbers.
145. Default Description for Payments - Enter here the text you want to appear as the default
description for those payments where you have left the description space blank when entering them;
for example, "Payment Received - Thank You"..
146. Format for Payment and Credit Amounts - This option determines how the amount for each
transaction in the payments and credits section is displayed, as follows:
N - Display with a minus sign; for example, -100.00
P - Display without minus sign; for example, 100.00
C - Display with the letters "CR" or "DB" following; for example, 100.00CR for a payment, or
100.00DB for a debit.
147. Indent Payment and Credit Amounts - Normally the amount of each transaction is printed in a
column at the right margin. To indent the column showing the individual amounts, so that only the
grand total appears at the right margin, enter Y.
148. Text for Payment and Credit Total - Enter here the text you want to print on the line showing
2011 Tussman Programs, Inc.
Billing
277
the total of the payments and credits section; for example, "Total Payments and Credits".
149. Omit Total of Payments and Credits - Enter Y if you want to omit the total line at the end of the
payments and credits section.
Summary of Payments and Credits Section Options
Payments and credits, and other AR transactions, can be itemized on the bill by setting option 143 to
Y. In most cases, it is suggested that you place the payments and credits section following the detail
of the current charges by setting option 140 to E. It is also recommended to set 141 to N. Option 149
should be set to N. Remember that the payments and credits section will not appear if you are
generating a current charges only bill by setting format option 3 to Y.
17.3.8 Interest Section
The interest section appears on the bill only if you are charging interest on the matter and interest
charges are being added to the current bill on account of a past due balance forward. If printed, the
interest section appears following the fee and cost sections, and before the subtotal of new charges.
The interest section will be omitted if you are generating a current charges only bill.
Options 160 through 164 control the format and detail of the section showing the interest charges, as
follows:
160. Text Explaining Interest Charges - Enter here the text you want to appear as the heading for
the interest section; for example "Late Charges". The heading will be printed at the left margin. To
center it, type a greater than symbol (>) in the first space. To omit the heading, type an asterisk (*) in
the first space. If you leave items 161-163 blank, then the interest section will consist of just one line
with the text entered here followed by the amount of interest being charged. Items 161-163 allow you to
show more detail including the amount of the past due balance, the percentage rate, and the days in
the billing cycle, as described below.
161. Text for Amount Interest is Charged On - This is the primary line which appears in the interest
section and displays both the amount of the past due balance on which interest is being charged,
followed by the interest amount. Enter here the text you want to appear on that line before both
amounts are printed; for example, "Late Charge on Past Due Balance of". If you enter that text, and,
for example, a client is being charged $15.00 interest on a past due balance of $1,000.00, this line in
the interest section will read "Late Charge on Past Due Balance of $1,000.00
$15.00.". The first
part, showing the amount of the past due balance, will be printed at the left margin and the interest
amount will be printed flush with the right margin.
If you are using method 5 to calculate interest, then this line on the bill will instead show the average
daily past due balance on which interest has been calculated. In this case the program will not use the
text from line 161, but instead will use the text from 160 followed by the amount.
Note that in some cases the amount on which interest is being charged may not match the amount of
the unpaid balance forward. This would be true in one of the following cases, depending on the
settings in the billing instructions for each matter::
1. You are not charging compound interest, in which case interest will be charged only on the amount
of past due fees and costs. If a portion of the client's past due balance consists of interest charged on
previous bills, the program will calculate interest on that portion only if you are charging compound
interest. There is also a separate billing instruction which determines whether or not interest is
charged on past due tax.
2. You have given the client a certain number of grace days within which to pay their bill, and not all of
the balance due has been owing longer than the number of grace days.
2011 Tussman Programs, Inc.
278
Tussman Program Release 10
3. You are using method 5, in which case the amount on which interest is charged is the average daily
past due balance during the billing period.
162. Text for Percentage Rate - If you want a separate line to appear in the interest section showing
the percentage rate at which interest is being calculated, enter the text that you want to appear on that
line here; for example, "Percentage Rate:" The program will automatically insert the percentage rate
following this text on the bill, as determined by the billing instructions for that matter. If you do not
want this line to appear, simply leave this space blank. This line will also be omitted if you are charging
a fixed dollar amount as the late fee (using interest method 4), instead of calculating interest using a
percentage rate.
163. Text for Days in Billing Cycle - If you want a separate line to appear in the interest section
showing the number of days in the billing cycle (i.e., the number of days since the previous bill), enter
the text you want to appear on that line here; for example, "Days in Billing Cycle:". When printed on
the bill, the program will automatically insert the number of days following the text. To omit this line,
leave this space blank. The program will also omit this line if you are charging interest using
interest method 3 or 4, in which case the number of days in the billing cycle is not relevant.
The number of days in the billing cycle is calculated by the program as follows: When using interest
method 1, the program counts the number of days from the statement date used on the previous bill
to the statement date used on the current bill. When using method 2, the program counts the days
from the ending cutoff date on the previous bill to the ending cutoff date on the current bill. When
using method 5, the program will use the ending cutoff date from the previous bill as the start date and
the ending cutoff date on the current bill as the end date. However, note that if using method 5 you can
set a different start date in the Billing Options screen for a specific matter, in which case the program
will use that start date.
If on the current bill the number of days in the billing cycle appears as an unusually large number, it
means one of two things:
1. You have not generated and finalized a bill for that matter for a long time, or
2. You entered the statement date or ending cutoff date incorrectly on the prior bill or on the current
bill.
3. You are using method 5 and have set a beginning date in the Billing Options screen for that matter
which is prior to the date of the previous bill.
To see the statement date and ending cutoff date that were used on the last bill generated for a matter,
go to the account status screen for that matter. The dates will appear on the Last Billed line in the
bottom portion of the screen. The dates you are using on the current bill appear on the
Generate New Bills screen.
164. Interest Disclosure Statement - If you have set up the billing instructions for a matter so that
interest will be charged on past due amounts, then you have the option of printing a message at the
end of the bill disclosing the fact that interest will be charged if the bill is not paid on time. Enter here
the text that you want to appear for that message; for example, "Late Fee will be Charged on Past Due
Amounts at the Rate of # Percent". Use the pound sign (#) as a macro, as indicated in the example,
which will be replaced by either the interest rate (when using interest method 1, 2 or 3) or the dollar
amount of the late fee (when using interest method 4). To omit the message, simply leave this space
blank.
2011 Tussman Programs, Inc.
Billing
279
17.3.9 Statement Recap
At the end of the bill, in addition to showing the Balance Due you can print a section which
summarizes the activity on the bill, showing the balance forward, total current charges, payments and
credits, and the balance due. You can also include ageing detail, case-to-date totals, and messages of
various types. Options 170-200, described below, determine which items are included, the section
detail and layout, and the wording of the various messages.
If you are generating a current charges only bill, the recap summary will be omitted, as will the line
showing the balance due (the ending balance will instead be the unpaid total of the current charges).
The ageing detail will also be omitted, but, if selected, the cumulative totals and the various messages
(except for the past due reminders) will appear..
At the end of this section is a brief summary of the options with suggested settings for a format which
will be suitable in the majority of cases.
170. Include Recap Summary at End of Bill - In addition to showing the balance due at the end of
the bill, which is the result of adding the unpaid new charges to the unpaid balance forward, you can
include a recap summary which can be printed in one of three formats, as follows:
1. Enter D to print a detailed summary which includes the following items (the number in parentheses
following each item indicates which bill format option contains the text which is used to describe that
line item)::
Balance Forward from prior bill (174)
Less Payments and Credits applied against Balance Forward (142)
Unpaid Balance Forward (58)
Current Fees (60)
Current Costs (111)
Current Tax, if any (103)
Current Interest, if any (160)
Total Current Charges (174)
Less Payments and Credits, if any, applied to current charges (142)
Balance Due (177)
2. Enter Y to include a simplified summary which shows only the four following items, with the text
taken from the bill format option indicated in parentheses::
Balance Forward (174)
Plus New Charges (174)
Less Payments and Credits (174)
Balance Due (177)
3. Enter E to print the summary in an "Evergreen" format, designed for when you require the client to
maintain a minimum balance in their retainer account and want the bill to clearly show how the
retainer is applied and how much they need to pay in order to maintain the minimum balance. An
example of this is shown below:
2011 Tussman Programs, Inc.
280
Tussman Program Release 10
Enter N to omit the summary and show just the Balance Due with the text from option 177.
171. Print Balance Due Before Recap Summary - Enter Y if, in addition to showing the Balance Due
at the end of the recap summary, you also want to print the balance due on a separate line before the
recap summary. If you include this line, it will appear with the text entered in format option 177.
172. Center Recap Summary - Enter Y to center the recap summary on the page. The dollar
amounts will still appear flush with the right margin, but the text identifying each amount will be printed
flush right with the center of the page, making it easier to read. The heading of the recap section will
also be centered. Enter Y if you want the text for each item to be printed at the left margin.
173. Heading for Recap Summary - Enter here the text you want to print as the heading for the recap
summary; for example, "Summary of Account".. It will normally be printed at the left margin, unless
you are centering the entire summary, by setting option 172 to Y. If you are not centering the entire
section, you can center just the heading by typing a greater than symbol (>) in the first space, followed
by the text. To omit the heading entirely, type an asterisk (*) in the first space.
174. Text preceding items in Recap - Enter here the text you want printed to identify the Balance
Forward, Total New Charges, and Payments and Credits in the recap. Note that if you are printing the
detailed recap, the program will instead use the text from 142 for the payments and credits line.
175. If Total Balance Due is a Credit Show as 0.00 - If the ending balance on the bill is a credit
balance, you have the option of showing the balance due amount as 0.00, or of showing the actual
amount of the credit balance. For example, if the client has charges of $5,000.00 on the bill, and has
paid $6,000.00, their ending balance will be a credit in the amount of $1,000.00. Using this option, you
can show the ending balance as $0.00 (set this option to Y), or as a credit in the amount of $1,000.00
(set this option to N), displayed in the format selected in format option 5. Regardless of which option
you select, you can still show a credit balance in a separate message at the end of the bill using option
191 described below..
The effect of this selection on the recap summary will be different depending on whether you are
2011 Tussman Programs, Inc.
Billing
281
printing the detailed recap (setting 170 to D) or the simplified recap (setting 170 to Y), as follows:
1. Using the simplified recap, if you set this option to N, the payments and credits total in the recap
will equal the total amount of the current period payments and credits or, in the above example,
$6,000.00, and the ending balance will show the credit. If you set this option to Y, the payments and
credits total will equal only the amount actually applied against the balance forward and current
charges or, in the above example, $5,000.00, and the ending balance will show as 0.00. Thus,
regardless of whether the ending balance shows as 0.00 or as a credit, the math will be consistent.
2. Using the detailed recap, the payment and credit amounts shown in the recap will always total
only the amounts actually applied against the balance forward and the new charges. Thus, in the
above example the total of the payments and credits shown in the recap will always be $5,000.00,
regardless of which setting you select for this option. Thus, if you set this option to N, the ending
balance (which will show the credit) will not match the sum of the unpaid balance forward and unpaid
current charges, which in this example would come out to 0.00. To avoid this confusion it is suggested
that when using the detailed recap you set this option to Y, so that when the ending balance is a credit
it always shows as 0.00 and the math is consistent.
176. Text Preceding Total Balance Due if Balance is a Credit - If the ending balance on the bill is a
credit balance, and you set option 175 to N so that the credit balance is printed as the balance due,
you can enter here a separate description that will be printed on the balance due line only when the
amount shown is a credit; for example "You have a credit in the amount of:". This will appear in place
of the normal text for the balance due which is entered in item 177.
177. Text Preceding Total Balance Due - Enter here the text that you want to print on the line
showing the Balance Due; for example "Balance Due - Please Pay this Amount". If you are including a
recap summary, this will be the last line of the recap. Otherwise, it will appear by itself at the end of the
bill. If you set option 171 to Y, so that the Balance Due also prints before the recap, this text will be
used for that line item as well. However, if you type an asterisk anywhere in the body of the text, only
the portion preceding the asterisk will be used as the text for that line, while the full text (omitting the
asterisk) will appear at the end of the recap. For example, if you enter "Balance Due * - Please Pay
this Amount", then only the text "Balance Due" will appear before the recap, while "Balance Due Please Pay this Amount" will appear at the end of the recap.
178. Underline New Balance - If you want to underline the Balance Due for emphasis, enter S for a
single underline or D for a double underline. The underlines will be omitted if you are printing dividing
lines between each section on the bill (setting option 1 to Y).
179. Print New Balance in Bold - Enter Y if you want to print the entire line showing the Balance Due
in bold for emphasis.
180. Text Preceding Installment Payment Amount - If you have set up an installment payment plan
for a client, following the Balance Due the program will print the installment payment information. This
will include the amount of next installment which is due, accompanied by the text entered in this
space; for example, "Installment Amount". Note that the program will bill a new installment amount
only if the number of days specified in the installment payment setup have passed since the last
installment amount was billed Following this line will appear the amount of any unpaid past
installments (with the text entered in item 181), current period costs (if those are being added to each
installment, as specified in the installment payment setup) with the text from item 111, followed by the
new minimum due amount, with the text entered in item 182, as described below.
181. Text Preceding Amount of Past Due Installments - If the client has not paid any of their
previously billed installment payments, the unpaid balance of those amounts will appear on a separate
line with the description entered here; for example, 'Plus Past Due Amount".
182 Text Preceding Minimum Due Amount - The last line of the installment payment section will
show the new Minimum Due which the client is required to pay; i.e. the sum of their current installment
2011 Tussman Programs, Inc.
282
Tussman Program Release 10
payment, any past due payments, and current period costs, if they are required to pay those as
incurred. The new Minimum Due amount appears with the text entered here; for example, "Minimum
Amount Now Due" This amount will be different than their total new balance. If their total new
balance does not exceed the new minimum due amount, then the installment payment section will be
omitted and they will be required to pay just the new balance due.
183. Include Ageing Information - You can include following the balance due a breakdown of the
balance showing ageing information and also showing what portion is fees, costs, tax and interest.
Enter Y to include a detailed summary which gives separate ageing detail for fees, costs tax and
interest. Enter S to include a simple one line summary which gives the ageing detail for the entire
balance, without the breakdown by category of charge. The ageing information will automatically be
omitted if the client does not have a balance due, or if you set this option to N.
184. Omit Ageing if Nothing is past due - Enter Y if you do not want the aging detail to print if
nothing is past due.
185.
Buckets for Ageing - The ageing breakdown will five columns, showing the current amount
followed by the three ageing "buckets" specified here, followed by the total balance due. Enter here
the three ageing buckets, indicating the number of days past due, that you want to show; for example,
30, 60 and 90. Always enter them in ascending order; for example, 30 must always appear before 60
and 90, etc. As a for the ageing columns, the program will simply add the word "Over" to each of the
numbers entered here; for example, "Over 30", "Over 60", etc.
Sources of Ageing Confusion
If you are puzzled because amounts still appear in the current column which were billed on the
previous bill, the probable reason is that the prior bill was dated less than 30 days prior to the date
used on the current bill, and those amounts have thus not yet tripped over to the next column. In this
case you can force the current amounts over to the next aging bucket using the Aging Days +/- option
on the Generate New Bills screen. For example, if it has only been 29 days since the previous bill,
enter 1 in the the Aging Days +/- space and the program will add 1 day to make it 30 days for purposes
of the aging section.
Another common source of confusion is when clients make partial payments. If, for example, you
have set the program's payment application order option so that all outstanding costs are paid before
any fees are paid, and the client has more than one bill outstanding, a payment may be applied in
such a way that costs from a more recent bill are paid, leaving fees from an older bill outstanding. In
that case the ageing section will show fees past due from an old bill, even though the client may
actually have paid that bill.
Another source of confusion is if a client pays the exact amount of a recent bill, leaving an older bill still
unpaid. In that case, the program may apply the payment against the older bill first. If the older bill
was more than the more recent bill, the ageing detail will show the more recent amount still owing, and
it will be in the exact amount of the payment that was made, leaving the impression that the payment
was not applied, even though it was actually applied against the older bill.
186. Text for Ageing Categories - If you are printing a detailed ageing section, showing a breakdown
of the balance by fees, costs, tax and interest, enter here the text you want to identify each line of the
ageing section; for example, "Fees", "Costs", "Tax", "Interest", and "Total". If you are printing just the
simplified one line ageing, that line will appear with the wording in the Total space.
187. Include Cumulative Totals - Enter Y to include a section showing case-to-date totals. The
section will include a separate line item showing the total to date, including the activity on the current
bill, for each category listed in item 188. This will include the total fees, costs, tax and interest billed to
date, each on a separate line. To combine all four of those items into a single line item, enter T for
this option and enter the text you want to appear for that line item in the Fees space in item 188.. To
omit any of the line items shown in 188, simply leave the text space blank for that item. You can also
2011 Tussman Programs, Inc.
Billing
283
combine the payments and credits into a single line item by typing the word "combine" into the
Credits space and entering the text you want for the combined line item in the Payments space.
188. Text Preceding Cumulative Totals - Enter for each item that you want included in the summary
of case-to-date cumulative totals the text you want to appear identifying that line item; for example, if
you want to show the total hours billed to date, enter "Hours to Date" in the Hours space.. To omit an
item, simply leave the text space blank and that item will not be included. Certain of the items can be
combined into a single line item, as described above in the explanation for item 187.
The hours-to-date amount will include only billable hours (type H).
189. Message Stating Payment Terms - To add a one line message following the above information
stating the payment terms, enter the text here; for example, "Statements are due and payable upon
receipt". This message will appear only on bills where the client has a balance due. The message will
normally print at the left margin. To center it, type a > symbol in the first space.
Alternatively, you can use this line to print a total of the dollar value of nonbillable and/or administrative
time appearing on the bill. To do this, type an exclamation mark (!) in the first space, followed by the
text you want, using the # sign as a macro indicating where you want the program to insert the amount.
For example, enter "!Additional work valued at # has been performed at no charge". This message
will appear following the total of the new charges, but only if nonbillable or administrative time has
appeared on the bill, and only if you have configured the program to assign dollar amounts to
nonbillable and admin time by setting option 7 in the Data Entry Options screen on the Setup menu
to Y.
190. Message if no Payment is Due - To add a one line message which is printed only on bills where
no payment is due, enter the text here; for example, "Your Account is paid in full--no payment
required." The message will normally print at the left margin. To center it, type a > symbol in the first
space.
191. Message if Client has a Credit Balance - To add a one line message which is printed only on
bills where the client has a credit balance, enter the text here. This message only appears if the credit
balance is an unearmarked credit; i.e., is not earmarked to be applied only against fees, costs, tax or
interest. Separate messages can be entered for if the client has an unused fee or cost credit (items
193 and 194). Use the @ symbol in the body of the text at the place where you want the program to
insert the dollar amount of the credit. To translate the dollar amount of the credit into the number of
unused hours, use the & symbol. The program will calculate the number of unused hours using the
billing rate for the responsible attorney assigned to the matter.
For example, to show the amount of the credit in dollars, you could enter "You have a credit in the
amount of $@". To show the amount of the credit in hours, you could enter "You have a credit of &
hours". The message will normally print at the left margin. To center it, type a > symbol in the first
space.
192. Message if client has an Unused Minimum Fee Credit - If the client has an used credit
resulting from the billing of a minimum retainer fee (type FE), you can print a message showing the
amount of the unused credit by entering the text here. As with option 191, you can show the amount of
the credit in either dollars or hours using the @ and & symbols respectively. For example, to show
the amount of the credit in dollars, you could enter "Unused Balance of Minimum Fee: $@". To show
it in hours, you could enter "Unused Balance of Minimum Fee: & hours". The message will normally
print at the left margin. To center it, type a > symbol in the first space.
193. Message if Client has an Unused Fee Credit - If the client has an used earmarked fee credit,
you can print a message showing the amount of the unused credit by entering the text here. As with
option 191, you can show the amount of the credit in either dollars or hours using the @ and &
symbols respectively. For example, to show the amount of the credit in dollars, you could enter
"Unused Fee Credit: $@". To show it in hours, you could enter "Unused Fee Credit: & hours". The
2011 Tussman Programs, Inc.
284
Tussman Program Release 10
message will normally print at the left margin. To center it, type a > symbol in the first space.
194. Message if Client has an Unused Cost Credit - If the client has an used earmarked cost credit,
you can print a message showing the amount of the unused credit by entering the text here. Enter the
@ symbol as a macro at the point where you want the dollar amount of the credit inserted; for example,
"Unused Cost Credit: $@". The message will normally print at the left margin. To center it, type a >
symbol in the first space.
195. Reminder Message if Past Due 30 Days - You can print one of two reminder messages if there
is a past due balance from a prior bill, This first message prints if there is a balance which is past due
30 days but is not yet past due 60 days. For example, enter "Please Note: Your Account is Past Due
30 Days". To omit the message, leave it blank or set option 197 to Y.
196. Reminder Message if Past Due 60 Days - This second reminder message prints if any portion
of the balance due has been outstanding 60 or more days. For example, enter "Please Note: Your
Account is Seriously Past Due". To omit the message, leave it blank or set option 197 to Y.
197. Omit Past Due Reminders - To omit past due reminders from the bill, enter Y. To omit past
due reminders if the client has made a payment in any amount since the previous bill, even if only a
partial payment, enter P. Otherwise, the past due reminders entered in items 195 and 196 will be
printed on the bill if there is a balance owing 30 or 60 days respectively, unless you leave 195 and 196
blank.
198. Include Matter Notes at End of Bill - Enter Y if you want to print the notes from the matter file at
the end of the bill.
199. Prompt Payment Discount Text - If you are giving the client a prompt payment discount, you
can print three additional lines with the text entered here. The first line shows the amount of the
discount. The second line shows the balance due after taking the discount, and the third line shows
the balance due not including the discount. Within the body of the text for each line, you can insert one
of more of the following symbols as macros which will be replaced with the item indicated:
@ - Discount percent
# - Number of days within which payment must be made
^ - Last day to take discount
* - Dollar amount of the discount
! - Net balance due after taking discount
For example, on the first line you could say "Prompt Payment Discount of @ percent if paid by ^". The
program will automatically add the amount of the discount. The second line could say "Balance Due
After Discount" and the third line could say "Balance Due Without Discount".
200. Show Date and Amount of Last Payment - If you want to add a line showing the date and
amount of the client's last payment for this matter, whether or not that payment was made during the
current billing period, enter Y.
Summary of Statement Recap Options
In most cases, it is helpful to include a recap at the end of the bill summarizing the current activity. To
do this, it is recommended you set option 170 to Y. You may also want to print the new balance in
bold by setting option 179 to Y. Options 171, 172 and 175 should normally be set to N. It is usually
unnecessary to include ageing information or cumulative case-to-date totals, so set options 183 and
187 to N. Also set 198 and 200 to N, unless you specifically need those items. You may want to
review the various messages (items 189-197 and 199) that can be printed at the end of the bill to see
if you want to include any of them. All of them will be omitted if left blank.
2011 Tussman Programs, Inc.
Billing
285
In addition to the various messages described above, you can also add a message of virtually
unlimited length to each bill using the Bill Messages function, and you can add messages to individual
bills by entering a billing message transaction (type M).
17.3.10 Retainer Account Section
A separate section on the bill details the current activity, if any, in the client's retainer account, showing
the beginning balance in the account, itemizing retainer receipts and disbursements, including amounts
applied automatically against charges on the bill, and showing the ending account balance. Normally
only activity for the current billing period will appear, but if you want each bill to show a cumulative
history then set format option 143 to A.
Format options 210 through 220 control the location of that section on the bill and various other
options, as follows:
210. Placement of Retainer Section - The retainer account section can appear immediately before
the recap summary and balance due (enter 1), immediately after the recap summary and balance due
(enter 2), or on a separate page following the recap summary and balance due (enter 3). To omit the
retainer account section, enter 4.
211. Heading for Retainer Section - Enter here the text you want to appear as the heading for the
retainer account section; for example, "Retainer Account". The heading will normally be printed at the
left margin. To center it, type a greater than symbol (>) in the first space followed immediately by the
text.
212. Text Preceding Beginning Retainer Account Balance - The first line item in the retainer
account section is the account balance carried forward from the previous bill. Enter here the text you
want to identify that amount; for example, "Retainer Balance Carried Forward".
213. Show Retainer Account Balance Even if no Activity on Current Bill - If there is no activity in
the retainer account during the current period (i.e., there are no receipts or disbursements to report),
you can omit the retainer account section by entering N. If you want to include the section as long as
there is a balance in the account, even if there is no activity, enter Y. To always include the retainer
account section, even if the balance is 0.00 and there is no activity to report, enter A.
214. Detail Automatic Transfers from Retainer Account - If you have instructed the program to
automatically apply funds from the retainer account against charges on the client's bill, those
deductions from the account will show in the retainer account section. The program generates
separate transaction records for the amounts applied against fees, costs, tax and interest. Enter Y to
list each of these applications separately. To simply show the total amount applied as a single line
item (i.e., combining the amounts applied to fees, costs, tax and interest into one line item), enter N.
Note: If you want to itemzine the automatic transfers in the retainer account section but only show
them as a single line item in the Payments and Credits Section, leave item 214 blank.
Note that automatic applications from the retainer account also show up in the
payments and credits section of the bill. This setting also determines whether amounts applied to
fees, costs, tax and interest appear as separate line items in that section, or whether they appear as a
single combined line item.
215. Text for Automatic Transfers from Retainer Account (if itemized) - If you are itemizing
automatic applications of funds from the retainer account (by setting option 214 to Y), enter here the
text you want identifying each type of transfer. In the Fees space enter the text that will describe a
transfer from the retainer account to pay fee charges; for example, "Applied From Retainer to Fee
Charges". Enter similar descriptions in the Costs, Interest and Tax spaces. The text entered here will
also be used to describe the line items which appear in the payments and credits section reflecting
automatic applications from the retainer account.
2011 Tussman Programs, Inc.
286
Tussman Program Release 10
216. Text for Automatic Transfers from Retainer Account if not Itemized - If you are showing
automatic transfers from the retainer account as a single line item (by setting option 214 to N), enter
here the text you want to appear on that line; for example, "Applied from Retainer Account". The text
entered here will also be used to describe the line item appearing in the payments and credit section
reflecting automatic applications from the retainer account.
217. Text for Ending Retainer Account Balance - Enter here the text you want to appear at the end
of the retainer account section showing the ending account balance; for example, "New Retainer
Account Balance"
218. Retainer Account Replenishment Message - If you have instructed the program to request the
client to remit additional funds if the balance in the retainer account falls below a specified minimum
amount, enter here the message you want to print at the end of the retainer account section requesting
the client to replenish the account. You can insert in the body of the text the # symbol as a macro
which will be replaced by the amount which must be remitted, and the @ symbol as a macro which will
be replaced by the minimum balance required in the account, as specified in the billing instructions for
that matter; for example "Please remit an addition $# to restore your retainer account to the required
minimum balance of $@".
219. Include Replenishment Amount in Balance Due on Bill - Enter Y if you want the
replenishment amount to be included in the total balance due shown on the bill, set option 219 to Y. If
you set 219 to N, the replenishment amount will show only in the message at the end of the retainer
account section which is entered in item 218 above. The total due on the summary page will also
include the replenishment amount provided you format the summary page to include the Retainer
Account Detail (check that item in format option 258).
Alternatively, you can print a Statement Recap in the "Evergreen" format so that the replenishment
amount is clearly shown in the recap summary and included in the total balance due. To do this, set
option 170 to E.
220. Text for Total Balance Due Including Replenishment Amount - Enter here the text you want
to print following the retainer account section showing the total balance due, including the required
replenishment amount; for example, "Balance Due Including Retainer Replenishment". This line will be
printed only if the client is required to remit a replenishment amount.
Summary of Retainer Account Section Options
If you will be using the program's retainer account features, you will want to include a separate section
on the client's bill showing the activity in the retainer account. To do this, it is recommended that you
set format option 210 to 2, to print the section at the end of the bill, 213 to Y so that the bill shows the
balance in the retainer account even if there is no current activity, and 214 to Y so that automatic
applications from the retainer account are itemized on the bill.
If you are requiring the client to maintain a minimum balance in their retainer account, set option 170 to
E if you want the Statement Recap to be printed in the "Evergreen" format which clearly shows the
client how the retainer was applied and how much additional funds they need to remit.
17.3.11 Trust Account Section
A separate section on the bill details the current activity, if any, in the client's trust account, showing the
beginning balance in the account, itemizing trust receipts and disbursements, and showing the ending
account balance. Since the program does not automatically apply trust funds against the client's bill,
the only activity appearing in the trust account section will be receipts and disbursements (transaction
types TR and TD) that have been entered manually. Normally only activity for the current billing period
will appear, but if you want each bill to show a cumulative history then set format option 143 to A.
Format options 221 through 225 control the location of that section on the bill and various other
2011 Tussman Programs, Inc.
Billing
287
options, as follows:
221. Placement of Trust Account Section - The trust account section can appear immediately
before the recap summary and balance due (enter 1), immediately after the recap summary and
balance due (enter 2), or on a separate page following the recap summary and balance due (enter 3).
To omit the trust account section, enter 4. If both the retainer account and trust account sections are
being included in the same location, the retainer account section will appear first, followed by the trust
account section.
222. Heading for Trust Account Section - Enter here the text you want to appear as the heading for
the trust account section; for example, "Trust Account". The heading will normally be printed at the left
margin. To center it, type a greater than symbol (>) in the first space followed immediately by the text.
223. Text for Beginning Trust Balance - The first line item in the trust account section is the account
balance carried forward from the previous bill. Enter here the text you want to identify that amount; for
example, "Trust Balance Carried Forward".
224. Show Trust Balance Even if no Activity on Current Bill - If there is no activity in the trust
account during the current period (i.e., there are no receipts or disbursements to report), you can omit
the trust account section by entering N. If you want to include the section as long as there is a balance
in the account, even if there is no activity, enter Y. To always include the trust account section, even if
the balance is 0.00 and there is no activity to report, enter A.
225. Text for Ending Trust Account Balance - Enter here the text you want to appear at the end of
the trust account section showing the ending account balance; for example, "New Trust Account
Balance"
Summary of Trust Account Section Options
If you are recording the receipt and disbursement of trust funds for your clients, you will want to include
a section on the bill showing the trust activity and balance. It is recommended that you set option 221
to 2 to print that section at the end of the bill, and set 224 to Y so that the bill shows the balance in the
trust account even if there is no current activity.
17.3.12 Summary Pages
The summary page is an optional cover sheet that can be printed for each client or matter which is
designed to give the client a quick overview of their account activity. It is especially useful for clients
with more than one matter, as it summarizes the activity from each of their individual matters, giving
them grand totals of their current activity and showing their total balance due. It can also be used as a
remittance advice which the client returns with their payment. If generated for each matter, the
summary page looks exactly like a regular bill, except that the detail of the fee and cost charges is
printed as a separate attachment.
If you are generating a consolidated bill for each client, so that the program does not generate
completely separate bills for each matter, you have the option of printing the summary page at the end
of the consolidated bill, instead of printing it as a cover sheet. This feature is described in the section
on consolidated billing.
Summary pages are normally printed after the individual bills, but you can have them printed first by
checking that option on the Generate New Bills screen.
Format options 250 through 270 control under what conditions these summaries are printed, and their
format and level of detail as follows:
2011 Tussman Programs, Inc.
288
Tussman Program Release 10
250. Statement Summary Option - To generate a summary page for every client, even if they have
only one matter, enter A. To generate a summary page only for clients with multiple matters, enter
M. To generate a summary for each matter, enter C (this summary page is different from the
summary page printed for each client. To print a summary page for each matter in the same format
as is normally printed for the client, enter Z).
The summary page consists of the heading, which can include your return address, the client's name
and address, and other information as determined by options 252 through 257. This enables you to
use the summary page as the top page, or cover sheet, following which you can attach the individual
bills for each matter. The summary page can also include a section listing each matter for which a bill
was generated, giving totals of the activity for each and showing grand totals at the end. The format
and layout of this section is determined by options 259 through 268. In addition to the matter
summary, you can select additional items to add to the summary page from the list in option 258.
The following sections of this topic describe the options for formatting the heading, selecting the items
to include in the body of the summary page, and formatting the matter summary section of the
summary page which is generated for a client.. The summary page which can be generated for each
matter is described separately in the next to last section of this topic. The final section gives a recap
of the summary page options with suggested format settings.
Summary Page Heading
The options described in this section determine the format of the heading of the summary page which
is generated if you set format option 250 to A or M, so that a summary page is generated for each
client.
252. Print Return Address on Summary - To print your firm's return address, as entered in format
option 12, at the top of the summary page, enter C to center it, or L to print it at the left margin. To
omit your return address, enter N. You can move the return address up or down on the page by
changing the beginning line number in option 10. To print the return address in bold, set option 13 to
Y.
253. Omit Client Address from Summary - Enter Y to omit the client's address from the summary
page. Normally, you will want to include the client's address by setting this option to N. The address
used on the summary page will always be the address appearing in the client screen, regardless of
whether or not there are separate billing addresses assigned to the individual matters for that client..
You can change the settings in format option 18 to change the position of the client's address on the
summary page.
254. Include Statement Date in Heading - To include the statement date in the heading, enter C to
center it below the return address, or R to print it at the right margin opposite the client's address.
Enter N to omit the statement date.
255. Include client ID in Heading - To include the client ID in the heading, enter Y. It will print flush
with the right margin opposite the client's address. Enter N to omit the client ID.
256. Center Summary Heading - You can print a two line heading at the beginning of the summary
page, using the text entered in item 257. To center the heading, enter Y. To print it at the left margin,
enter N.
257. Heading - Enter here the text for a heading of up to two lines which can be printed on the
summary page; for example, "Summary of Account". It will be printed immediately following the client's
address. You can insert the @ symbol as a macro which will be replaced by the ending cutoff date
used on this set of bills, or the # symbol which will be replaced by the month corresponding to the
ending cutoff date. For example, if the ending cutoff date is 12/31/2004, the # symbol will be replaced
with "December 2004".
2011 Tussman Programs, Inc.
Billing
289
If you want the invoice number to print on the Summary Page, set format option 33 to R and note the
rules regarding assigning invoice numbers where the client has multiple matters. Specifically, if you
are generating bills for a client with multiple matters using the consolidated billing option, the program
will use just one invoice number for the entire bill for that client; i.e., the bill for each matter will be
assigned the same number. Otherwise separate invoice numbers will be assigned to the bills for each
matter for that client. If you have not selected the option to consolidate, then the invoice number will
not print on the summary page as there will be a different invoice number for each matter. An
exception is if you are using the Esmeralda format summary page, in which case there will be a
separate summary page for each matter and therefore the consolidation option is not relevant.
Items Included on Summary Page
This section describes the items which can be included on the summary page, in addition to the matter
summary, which is described in the following section. Note that the matter summary is designed so
that it can provide a complete recap of all the activity for each client's matters (except for retainer and
trust account activity), so it may not be necessary to include most of the items described below, unless
you want to simplify the individual bills for each matter so that they primarily just show the detail of the
new charges, and the balance forward, payments and credits, and trust and retainer activity is listed
only on the summary page.
258. Items to Include in Summary - Following the heading, you can select any of the following items
to appear on the summary page:
Balance Forward - The combined balance forward from all the client's matters, in the format
determined by the options in the balance forward section'
Payment and Credit Detail - The detail of all payments and credits received from this client. If
an individual payment has been applied against multiple matters, that payment will appear
as a single line item in this section. The format and wording is determined by the format
options in the payments and credits section.
Payment and Credit Total - If instead of itemizing the payments and credits from each client
you want the summary page to show just the total payments and credits received, select
this option and enter N for the Payment and Credit Detail option. If you are showing the
Payment and Credit Detail, you do not also need this option as the total will automatically
appear at the end of the detail section. The text for this line item will be taken from format
option 148.
Unpaid Balance Forward - Adds a line item showing the total unpaid balance forward for the
client; i.e., the balance forward less payment and credits, with the text entered in option 58.
Fee Total - Adds a line item showing the sum of all the fee charges billed on each of that
client's matters using the text entered in item 262.
Cost Total - Adds a line item showing the sum of all the cost charges billed on each of that
client's matters using the text entered in item 263;
Cost Detail - Adds a section detailing all the cost charges from all of that client's matters.
Normally, costs are detailed on the bill for each individual matter. It is thus redundant to
show them again on the summary page. However, if you would prefer to consolidate all
the cost charges from all the client's matters into a single section on the summary page,
select this option and then omit the cost section from the bill for each individual matter by
setting format option 123 to Y. The format of this consolidated cost detail is determined by
the settings in the cost section of the formatting options..For example, you can consolidate
costs with the same cost code into a single line item, or itemize each charge individually, as
determined by option 113. If you are including the cost detail on the summary page, you do
not also need to include the Cost Total, as the total will automatically appear at the end of
the detail section.
Interest Detail - Includes detail showing the total interest charges billed on all that client's
matters, including an explanation in the format determined by the settings in the
interest section. If you are including this section, you do not also need to select the
2011 Tussman Programs, Inc.
290
Tussman Program Release 10
Interest Total option. The only way to omit the interest section from the bills for the
individual matters is by generating a current charges only bill; i.e. by setting format option 3
to Y.
Interest Total - Adds a line item showing the total interest charges billed on all that client's
matters, with the text entered in item 265, but omitting the detailed explanation. You do not
need to select this option if you are showing the Interest Detail;
Tax Total - Adds a line item showing the total tax charges billed on all that client's matters, with
the text entered in item 264;
Total New Charges - Adds a line item showing the total of all the new charges billed on each of
that client's matters, with the text entered in item 266;
Total New Balance - Adds a line item at the end of the summary page showing the total new
balance owed, which is the sum of the balances from the individual matters, with the text
from item 268;
Ageing - Adds a section showing ageing detail for the client's total new balance for the client, in
the format determined by options 183 through 186. You can omit the ageing detail from the
individual bills for each matter by setting format option 183 to N, in which case the ageing
will appear on the summary page in the detailed format, as if you had set option 183 to Y.
Retainer Account Detail - Adds a section detailing all of the retainer account activity from all
the client's matters. The format options in the retainer account section determine the detail
and layout of this section. If showing the detail on the summary page, you will probably want
to omit the detail section from the bills for the individual matters by setting format option 210
to 4 or by generating current charges only bills.. .If including this section, you do not also
need to include the Retainer Account Balance
Retainer Account Balance - Adds a separate line item showing the client's ending retainer
account balance, representing the sum of the balances from the individual matters, with the
text entered in item 217. You do not need to include this item if you are also including the
Retainer Account Detail;
Trust Account Detail - Adds a section detailing all of the trust account activity from all the
client's matters. The format options in the trust account section determine the detail and
layout of this section. If showing the detail on the summary page, you will probably want to
omit the detail section from the bills for the individual matters by setting format option 221 to
4 or by generating current charges only bills.. .If including this section, you do not also need
to include the Trust Account Balance
Trust Account Balance - Adds a separate line item showing the client's ending trust account
balance, representing the sum of the balances from the individual matters, with the text
entered in item 225. You do not need to include this item if you are also including the Trust
Account Detail;
Messages - Adds the messages (transaction type M) entered on any of the client's matters to
the end of the summary page, as well as the global billing message, if any. These
messages will also appear at the end of each of the bills for the individual matters, unless
you are generating a consolidated bill, in which case they will only appear on the summary
page.
Matter Detail Format Options
259. Detail Option - This setting determines the level of detail of the matter summary. Enter 1 to
include a list of the matters for which bills were generated, showing totals from each matter. To omit
the list of matters, but show a line item with the grand totals from all the matters billed, enter 2. To
omit the matter summary section completely, enter 3. The totals shown for each matter, and on the
grand total line, consist of the column items selected from format option 267.
260. Text for Heading of Detail Section - Enter here the text you want to print as the heading for the
matter detail section; for example, "Summary of Activity by Matter".
261. Include for Each Matter Listed in Detail Section - When listing each matter in the matter detail
section, you can identify each matter by printing any or all of the items listed; i.e. the matter ID, short
2011 Tussman Programs, Inc.
Billing
291
matter title, and the matter title. Enter Y after the ones you want. If you want to double space
between each matter in the list, enter Y after that option.
262-266. These items do not affect the matter detail section, but are used both as the text to explain
some of the line items in the body of the summary page which can be selected from item 258; i.e. the
total fees, total costs, total tax, total interest, and grand total of new charges being billed. They are
also used as the text to describe those items if you are generating a summary page for each matter,
as described below.
267. Columns for Detail Section - This option lists the different items that can be shown for each
matter in the matter detail section. Each item selected is listed in a separate column, and you can
select up to a maximum of six items by entering Y after each one that you want. Each of these items
will represent the cumulative total from all of that client's matters being billed: Whichever column items
you select, the grand total line will give the totals for those same items.
Balance Forward
Payments and Credits
Unpaid Balance Forward
Hours Billed
Fees Billed
Costs Billed
Interest Billed
Tax Billed
Total New Charges
New Balance Due
Minimum Payment Due
To the right of each selection is a space where you can type in the text you want printed as the heading
for each column. Below the list of items is a space where you can also type in the heading you want
printed above the column showing the matter ID and/or title at the left margin.
In addition to the column items listed above, you can also add an additional column at the right hand
margin which contains just a blank underlined space. If you are using the summary page as a
remittance advice, the client can write in each space how much they are paying and what portion of
their payment they want applied to each matter. Enter an appropriate heading for that space, such as
"To Be Applied".
You can also specify the column heading you want to appear for the column showing the matter ID.
You can use the matter detail section to show a summary of the account balance activity for each
matter; for example, by showing the balance forward, total new charges, payments and credits, and the
new balance due, in which case it would be superfluous to show those same items separately on the
summary page by selecting them from 258. Or, you can use the matter detail section to show just a
summary of the new charges; for example, the hours billed, fees, billed, costs billed, and the total new
charges. In the latter case, you can show the cumulative account balance activity (i.e. balance
forward, payments and credits, and new balance due) as separate items on the summary page by
selecting them from 258, or you can omit them entirely if you prefer to generate a current charges only
bill.
268. Text Preceding Total New Balance - Enter here the text you want to appear on the grand total
line which is printed at the end of the matter detail section; for example, "Total Balance Due" or "Grand
Totals".
If the client is on an installment payment plan, and their total minimum due amount is less than their
total new balance, a separate line will be printed following the total new balance showing their new
minimum due amount, with the text from option 182.
2011 Tussman Programs, Inc.
292
Tussman Program Release 10
269. Apply Credit Balance from one Matter to Offset Balance Due from others in Calculating
Total New Balance on Summary - If you are showing the New Balance Due as one of the column
items in the matter summary, and one matter has a credit balance while another matter has a balance
due, you have the option of offsetting a credit balance from one matter against a balance due from
another matter, so that the total new balance will be the net amount. To do this, enter Y for this option.
Otherwise, the total balance due will be just the total of all the matters with a balance due, disregarding
those matters that have a credit balance. If you select this option, the program will not actually apply a
credit balance on one matter against balances due from other matters. See the section on
transferring balances for instructions on how to apply a credit from one matter against a balance due
on another.
270. Message Printed at end of Summary - You can enter up to three lines of text as a message
which is printed at the end of each summary page. This message will appear regardless of whether or
not you are including the matter detail section.
Summary Page for Each Matter
If you are generating a summary page for each matter, by setting option 250 to C, the format will differ
from the summary page generated for a client (by setting option 250 to A or M). Also known as the
Esmeralda format (named after the customer who suggested this feature), the matter summary page is
intended as a cover sheet or summary of the account activity with the detail of the fees and costs
attached separately. The options for this summary page are as follows:
1. The heading of the summary page is exactly the same as it would be for a regular bill generated for
that matter, using the bill heading options (items 10 through 41) which you have selected;
2. The body of the summary page includes separate line items showing the total fees and costs
being billed. Enter the text you want to appear on the fee total line in option 262; for example,
"Legal Fees per the attached itemization". Enter the text you want to appear on the cost total line
in option 263; for example, "Disbursements per the attached itemization". The combined total of
the new charges will then appear with the wording entered in item 266. If you only want to show a
single line with the total of both fees and costs, then enter an asterisk (*) in the first space of line
263.
3. The rest of the summary page will look exactly like a regular bill which would be generated for that
matter; i.e. it will include the balance forward, payments and credits, retainer and trust activity,
statement recap, and any of the other features you can include with the detail and layout you have
selected for those items. The only difference will be that the fee and cost detail sections will be
replaced by single line items showing just the total.
4. Printed beginning on a separate page will be a detailed itemization of the fee and cost charges for
that matter, with the level of detail and layout determined by the format selections you have made
for those sections.
The summary page for a matter is designed to present a simplified bill which shows a recap of the
client's account activity, with the detail of the charges printed as a separate attachment which they can
refer to if necessary.
To print the summary page first with the detail of charges following be sure to check the Print
Summary Pages First option on the Generate New Bills screen.
You cannot print both a summary page for each matter and a summary page for the client.
Note that if you have chosen the option to consolidate the activity for all a client's matters into a single
bill, that selection overrides the Esmeralda option and the program will instead generate a summary
page for the client showing all their matters.
2011 Tussman Programs, Inc.
Billing
293
Summary of Summary Page Options
The most common use of the summary page is as a cover sheet for clients with multiple matters. To
create a simple summary page for these clients, set option 250 to M. For the heading of the summary
page, set option 252 to C, 253 to N, and 254 to R. Do not select any of the options from 258, unless
you decide you want to add them after printing a sample summary page. Set option 259 to 1 to print a
detailed matter summary. From option 267, select the Balance Forward, Payments and Credits, Total
New Charges, and New Balance Due.
17.3.13 Split Bill Options
The split billing options (280 through 290) determine how fee and cost charges appear on a bill which
is part of a split billing arrangement, as described in the section on split billing.
280. Format for Split Bills - Select one of the following three options, which affect only bills that are
part of a split billing arrangement.
1 - Adjust Amount of Each Charge to Show that Party's Share. Using this option, charges
that are being split appear on the bill with their hour and dollar amounts adjusted to reflect
only that party's share of the total. For example, if a charge of 1 hour billed at $300.00 has
been entered on the master file, and the share assigned to this matter is 50 percent, then
the charge will appear on this bill as .5 hours with an amount of $150.00. Charges that are
being shared and charges that are being billed to this matter only will appear in separate
sections on the bill. Shared charges will be listed first, with a subtotal, followed by
nonshared charges. The headings and text for the subtotals of each section are entered in
options 281 through 290.
2 - Show Total Amount of Each Charge with Adjustment at End. Using this option, split
charges will appear on each bill showing the total amount of the charge (before splitting),
with a separate line item following the subtotal of shared charges adjusting the total to
reflect the party's share. The text for these separate line items is entered in 289 and 290,
described below. In the above example, the individual charge will appear on the bill as 1
hour at $300.00, but at the end of the shared fee section an adjustment will appear
reducing the total by 50 percent to reflect that party's share. As with option 1, shared and
nonshared charges will each appear in separate sections, with headings and subtotals
using the text from items 281 through 290.
3 - List Charges with no Reference to Splitting. Using this option, shared and non shared
charges are not segregated on the bill, and the amounts of the individual shared charges
are adjusted to reflect that party's share of the total. There are no separate subtotals for
shared and nonshared charges. This option should always be selected if you are
generating a duplicate bill, where you simply want to create a bill for an additional party or
parties showing the same charges as the master bill.
The following items contain the text which is printed as the headings and subtotal lines for the shared
and nonshared fee and cost sections on the bill, if you have selected either option 1 or 2 above. In the
text for the headings and subtotals of the shared fee and cost sections, you can use the @ symbol as a
macro which will be replaced by that party's percent of the total; as indicated in the examples in 289
and 290 below.
281. Shared Fee Heading - Enter here the heading to be printed at the beginning of the section listing
shared fee charges; for example: "Shared Fees". If you leave this space blank no heading will appear.
282. Shared Fee Total - Enter here the text to be printed on the line showing the subtotal of shared
2011 Tussman Programs, Inc.
294
Tussman Program Release 10
fees; for example; "Total of Shared Fees".
283. Non-Shared Fee Heading.- Enter here the text to be printed at the beginning of the section listed
nonshared fees; for example, "Non Shared Fees". If you leave this space blank no heading will
appear.
284. Non-Shared Fee Total - Enter here the text to be printed on the line showing the subtotal of
nonshared fees; for example, "Total of Non Shared Fees". If you leave this space blank, no subtotal
will appear for this section..
285. Shared Cost Heading - Enter here the heading for the section listing shared costs; for example,
"Shared Costs". If you leave this space blank, no heading will appear.
286. Shared Cost Total - Enter here the text to be printed on the line showing the subtotal of shared
costs; for example "Subtotal of Shared Costs".
287. Non-Shared Cost Heading - Enter here the heading for the section listing non-shared costs; for
example, "Non Shared Costs". If you leave this space blank, no heading will appear.
288. Non-Shared Cost Total - Enter here the text to be printed on the line showing the subtotal of
non-shared costs; for example, "Subtotal of Non Shared Costs".
289. Shared Fee Portion - If you set option 280 to 2, so that a separate line item appears at the end
of the shared fee section adjusting the total to reflect that party's percentage share, enter here the text
to appear on that line; for example, "Your Share of Fees (@ percent)".
290. Shared Cost Portion - If you set option 280 to 2, so that a separate line item appears at the end
of the shared cost section adjusting the total to reflect that party's percentage share, enter here the text
to appear on that line; for example "Your Share of Costs (@ percent)".
Summary of Split Billing Options
For most split billing arrangements, it is recommended that you set option 280 to 2, as this presents a
clearer and more detailed explanation of the charges on the bill by separating shared from nonshared
charges and showing both the total amount and that party's share of the total.
17.3.14 Consolidated Billing
Normally, the program generates a completely separate bill for each matter. As shown in the
Summary Page section, you can also print a separate page for each client which summarizes the
activity from all of their matters. However, it is also possible to generate a consolidated bill for each
client. In a consolidated bill, the activity for each matter is still detailed separately, but instead of
printing separate bills the detail for each matter is printed continuously, without duplicating the
complete bill heading for each matter. The summary page can also be printed, either as a separate
page which functions as a cover sheet, or as a summary at the end of the bill. In addition, instead of
showing the balance forward, payments and credits, and retainer and trust activity for each matter, you
can consolidate that information on the summary page so that the section showing the activity for each
matter lists only the new charges for that matter. This produces a simpler and more compact bill for
clients who have more than one matter.
For some clients you may want to produce completely separate bills for each matter, and for others
you may prefer to generate a consolidated bill. For those clients who wish a consolidated bill, you can
create a separate bill format which you then assign to all the matters for that client.
Format options 300 and 301 control the use of a consolidated bill format, as follows:
300. Consolidate Matters for each Client into One Bill - Set this option to N if you want to create
2011 Tussman Programs, Inc.
Billing
295
completely separate bills for each matter. If you want to create a consolidated bill, enter one of the
following selections:
Y - Enter Y to generate a consolidated bill where the detail for all the matters for each client is
printed continuously. The first page of the bill will show the complete bill heading, with
your return address, the client name and address, and any other items you have selected.
Following that the detail of the activity for the first matter will be printed. Immediately
following that will appear the detail for the second matter, followed by any additional matters
for that client. A dividing line will be printed separating each matter.
P - This produces a consolidated bill similar to that described above, except that the detail for
each matter (after the first matter) will begin on a new page. The complete heading will still
appear only on the first page. This makes the bill somewhat easier to read.
301. Print Statement Summary on Separate Page - Enter Y to print the summary page on a
separate page, or N to print it at the end of the consolidated bill. This option only works if you set
option 300 to Y. Otherwise, the summary page will be printed on a separate page. In either case, to
print the summary page you must also set option 250 to A. If you are printing the summary page at
the end of the bill (by setting this option to N), then you will probably want to eliminate the return
address and client address from the heading of the summary page by setting format options 252 to N
and 253 to Y.
.
Additional Consolidated Bill Options
When generating a consolidated bill, you may also want to eliminate the detail showing the balance
forward, payments and credits, and retainer and trust activity for each individual matter. To do this,
simply set format option 3 to Y, to generate a current charges only bill. The section showing the detail
for each individual matter will then be limited to an itemization of the current fee and cost charges for
that matter. You can then show consolidated balance forward, payment and credit, and retainer and
trust activity on the summary page by selecting the appropriate summary page options. The balance
forward, payments and credits, total new charges, and new balance due for each matter can be shown
in the form of a table by setting format option 259 to 1, and then entering Y after each of those items in
the list in 267. Or, if you want to show more detail, such as an itemization of the payments and
credits, you can enter Y after Payment and Credit Detail in the list of items in 258. To show
consolidated retainer and trust account activity, you must select those items in 258, as they cannot be
included in the table. Note that the items listed in 258 print in addition to the items which appear in
the table which are selected from 267.
If you want to generate a current charges only bill, and only show the total of the current charges on
the summary page with no reference to the balance forward or payment and credit activity, then you
can set option 259 to 1 and from the list of items in 267 select only from those items which total the
current charges; i.e., Hours Billed, Fees Billed, Costs Billed, Tax Billed and Total New Charges. Do
not select any of the items in 258.
You can also omit the detail of the cost charges from the section detailing the activity for each matter
by setting format option 123 to Y. You can then show consolidated cost detail on the summary page
by entering Y after Cost Detail in item 258.
When generating a consolidated bill, it is a good idea not to show heading items related to the
individual matters to the right of the client address, because then they would appear only in the
heading for the first matter. Thus, items 26, 29 and 35 (which determine the location of the file ID,
matter title, and responsible attorney) should not be set to R. Also set format option 22 to A, so that
the bill heading line appears only once at the beginning of the bill.
2011 Tussman Programs, Inc.
296
Tussman Program Release 10
If you are generating a consolidated bill, the program will use the same invoice number to identify the
entire bill; i.e., the bill for each matter will be assigned the same invoice number (normally, a separate
invoice number is assigned to the bill for each matter). Thus, if you are showing the invoice number in
the heading, it need only appear once at the beginning of the bill. To do this, set option 33 to R.
Because a single invoice number is used for the entire bill when generating a consolidated bill, this
makes it easier to review the client's account history. To see a consolidated account history for a
client, go to the Account Status screen for the client, click on More Detail, and select Ledger Card
Summary. Each consolidated bill will appear as a single line item on that report, no matter how many
matters were included on the bill. When recording payments for clients with multiple matters, if you
enter them as client level payments, those also will show as single line items on that report, instead of
itemizing the amount applied to each matter separately. This is one of the major advantages of
generating consolidated bills.
Generating a consolidated bill is not recommended if you use separate billing addresses for some of
the matters for a client, as in a consolidated bill you can only have one address. If you still want to
generate consolidated bills, in that case you should create separate client files for each billing address.
17.3.15 Current Charges vs. Balance Forward
When formatting your bills, you have the option of including or omitting certain sections which are
printed in addition to the sections showing the new fee and cost charges. For example, you can
include or omit the balance forward, payments and credits, and retainer and trust activity. For some
clients, you may want to show just the new charges, with no reference to the balance forward and
payment and credit activity. This can be accomplished by generating a "current charges only" bill,
which is done by setting bill format option 3 to Y. This will cause everything besides just the fee and
cost sections to be omitted from the bill, without having to go though and omit each individual item.
The ending balance shown on a current charges only bill will be just the total of the current charges,
even if they have an outstanding balance owing from a prior bill.
To generate a current charges only bill, but including any retainer or trust account activity, set option 3
to R.
17.4
Bill Messages
To add a message of any length to your bills, select Edit Bill Messages from the Bills menu, or click
on the Edit Bill Messages button on the Generate New Bills screen to bring up the following screen:
2011 Tussman Programs, Inc.
Billing
297
You can enter up to ten separate messages, numbered 1 through 0, by clicking on one of the ten
buttons on the Edit Bill Messages screen. Each message is associated with the bill format of the
same number. For example, message 1 is only printed on bills where the format being used is format
1. However, if you want the same message to appear on every bill, enter the number of that message
in the Default Bill Message space at the bottom of the Edit Bill Messages screen and enter Y in the
Force Use of Default Message space. That message will then be printed on all bills, regardless of
which bill format is being used. If you want to use different messages for each bill format, enter N in
the Force Use of Default Message space.
To print the message in bold, type an exclamation mark (!) in the first space, followed by the text of the
message.
In addition to printing these messages, you can also enter a message to be printed on a single bill by
entering a bill message transaction (type M).
If you are generating a consolidated bill, both the global bill message and all individual messages
entered for each client will not appear at the end of each bill. Instead, they will all be printed at the end
of the summary page, but to do this you must enter Y in the Messages space in format option 258.
If you have entered a message but do not want it to appear on your bills, type an asterisk (*) in the first
space of the message and it will not appear. This way you do not have to delete it. When you want to
start using the message again, simply remove the asterisk.
If you have entered a message but it does not appear on your bills, it is possible that you have
inadvertently typed an asterisk at the beginning.
2011 Tussman Programs, Inc.
298
17.5
Tussman Program Release 10
Listing New Bills
Whenever you generate a new bill, the program keeps a temporary record of that bill in a list which
shows all the bills that have been generated but not yet finalized. When you are ready to finalize your
bills, only the bills that appear in this list will be finalized. Therefore, it is always a good idea to review
the list before you finalize your bills to make sure that all the bills were properly generated and stored in
the list. From this list, you can generate various reports, reprint any of the bills in the list, and finalize
them individually or as a group, as described in this section.
To view and finalize your list of new bills click the
select Finalize Bills from the Bills menu.
button on the Control Panel at the left, or
The screen shown below shows a sample list of bills that have been generated, showing the file ID,
date, invoice number, and the balance forward, total new charges, payments and credits, and ending
balance due from each bill.
The first column with the letter T at the left is normally blank but will contain a red check mark if you
have tagged that bill as described later in this section.
The next column with the letter M will have an icon that looks like a partially opened letter if that bill has
been successfully emailed using the Tussman Program email function.
The third column with the letter R as the heading indicates if funds have been applied from the client's
2011 Tussman Programs, Inc.
Billing
299
retainer account against the bill, as indicated by a green dot. You can see the amount of the
application by scrollling the screen to the left using the right arrow button on the keyboard. You can
print a list of the retainer applications by clicking the Retainer Applications button. No further action
is required with regard to the retainer applications. Upon finalizing the program automatically
generates the AR transactions to reflect the transfers.
The status column with the heading of S is normally blank. A green X indicates the bill is on hold, as
described below. A red dot means that the bill cannot be finalized unless you re-generate it. This
could be caused by a number of factors, but the main cause is if you attempted to finalize the bill after
changes were made to the charges appearing on that bill, and you did not re-generate the bill after the
changes were made. For example, suppose you generate a bill in which there are fee charges of
$1000.00, and you then edit one of the charges so that the total amount is increased to $1200.00.
Unless you then re-generate the bill, the record of that bill in the list of new bills will still show the
amount at $1000.00, and if that bill were to be finalized the figures would not match the actual amount
of the charges. In addition, you probably meant to generate an updated bill anyway to send to the
client. To prevent you from forgetting to re-generate a bill after making such changes, the program will
not finalize it until it is re-generated. It is also possible that a red dot will appear in the status column if
the program was interrupted while the bill was being generated, or if, for example, more than one
overriding flat fee charge has been entered on the same matter. When you finalize your bills, at the
end of the procedure the program gives you an exception list showing any bills that could not be
finalized and stating the reason. Those bills will remain in your list of new bills, and you must then regenerate them before they can be finalized.
The buttons at the top of the screen can be used to perform the following functions:
New Bill - This brings up the Generate New Bills screen from which you can generate a new bill for
any of all of your clients.
Find - If your list is very long, you can click Find and enter the client/matter ID to quickly locate a bill in
the list.
Tag - This function enables you to tag one or more bills so that you can then email, finalize, or perform
any of the other actions described in this section on just those bills. You can tag an individual bill by
double clicking on it, or by clicking the Tag button and selecting Tag/Untag Highlighted Bill. Tagged
bills are displayed with a red checkmark in the first column on the list. To tag a group of selected files,
select the option to Tag Selected Files. This enables you, for example, to tag all the bills for a specific
responsible attorney if you want to then reprint, cancel, or finalize just that attorney's bills. To do that,
once you have tagged the bills you want, you then select the function you want (for example, click the
Email or Finalize button) and then select the option to perform that function on tagged files only. You
can remove tags by simply double clicking on a bill that is already tagged, or by using the appropriate
function on the Tag menu.
Reprint - Click this button to re-generate one or more of the bills on the list. A submenu will pop up
from which you can select whether or not you want to generate only the bill which is currently
highlighted on the list, all the bills for the currently highlighted client (meaning the client whose bill is
currently highlighted on the list), all bills that have been tagged (indicated by a checkmark in the first
column of the list), or all the bills on the list. The bills will be generated using the same billing dates
used when the bill appearing in the list was generated.. If any changes have been made to the bill
since it was last generated (for example, charges were added or edited), those changes will be
reflected on the new bill, and the record in the list will be updated to reflect the changes. Of course, you
can also re-generate a bill in the list by going directly to the Generate New Bills screen and generating
it as if you were doing it for the first time. Either way, the record for that bill in the list of new bills will be
updated to reflect the changes, if any.
The final option on the submenu is to reprint only the summary page for the highlighted client. This is
convenient if you have a client with multiple matters and want to reprint the summary page without
having to reprint all of that client's individual bills.
2011 Tussman Programs, Inc.
300
Tussman Program Release 10
After selecting the option you want you can choose whether the bill(s) are printed, generated to a file,
or previewed on the screen.
Hold - Click this button to place a hold on the bill which is currently highlighted on the list. This
prevents that one bill from being finalized. This is useful if you are ready to finalize most of your bills,
but there are a few which require additional changes and you want to wait before they are finalized.
Highlight that bill on the list and click the Hold button again to remove a hold. Bills that are on hold
have a green letter X appearing in the Status column on the list.
This type of hold is different from the hold which is placed in the billing instructions for the matter, as it
only prevents the bill from being finalized, not from being generated in the first place.
Cancel - Click this button to remove some or all of the bills from the list. Use this function if, for
example,you generated a bill by mistake, or if for some reason you have decided not to send the bill to
the client. This does not delete or affect any of the activity which appeared on the bill. It only
removes the bill from the list so that it will not be finalized unless you generate it again so it is added
back to the list.
Once you click the Cancel button a submenu pops up from which you can select whether to cancel just
the highlighted bill, all bills for the highlighted client (meaning the client whose bill is currently
highlighted on the list), all the tagged bills, or all bills on the list.
Note that it is not necessary to cancel a bill if you simply want to generate the bill again (for example,
after making changes to charges on the bill), since when you re-generate a bill the program
automatically updates the record already in the list, rather than adding a second record.
Labels - Click this button to print mailing labels for the bills in the list. To print these labels, it is
recommended that you use Avery 5161 laser labels, which are 20 labels to a page. Labels can be
printed in order of client ID or by client alternate ID. You can also generate a label for each matter, or
just one label for each client. The beginning line number for Avery 5161 labels should be set to 3, and
the lines between labels setting should be 1.
Billing Summary - This is a useful report in the same format as the list itself, but showing some
additional detail, including the client name and matter title, and a breakdown of the current charges
between fees, costs and interest. It can be sorted by client ID or client alternate ID. It is a good idea to
generate this report before finalizing your bills so that you have a record of the bills that were
generated. If you forget to generate the Billing Summary Report before you finalize, it can be
generated after they are finalized by selecting Billing Summary Reports from the Bills menu.
Retainer Applications - This report lists each bill where funds were applied automatically from a
client's retainer account against charges on the bill. This is a useful report as it provides a total of the
amount which was applied from the retainer account, so that you can know how much to disburse from
the account. This report should be run before you finalize your bills, but if you forget it can be run after
the bills were finalized by selecting Billing Summary Reports from the Bills menu.
Special Reports - This button brings up a menu listing custom reports which have been designed for
specific Tussman Program customers, and for generating bills in the special formats required by
LEDES, Tymetrix, and other electronic billing formats.
Email - Use this function to email one or more of the bills in the list. This feature is described in detail
in the section on Emailing Bills.
Attachments - This feature allows you to attach additional files to a clients bill when emailing the bill.
Highlight the bill you want to add additional attachments to, click the Attachments button, and enter a
list of one or more files that you want to attach, being sure to include the full path and file name.
Separate each file with a semicolon. Click the folder button at the bottom of the screen to find the files
and have them automatically added to the list.
2011 Tussman Programs, Inc.
Billing
301
Finalize - Click this button when you are ready to finalize one or more of the bills in the list. You can
then choose whether to finalize just the highlighted bills, all the bills for the client whose bill is currently
highlighted, just the tagged bills, or all the bills in the list. Please refer to the section on finalizing for
details on this function.
17.6
Editing Bills
Release 11 of the program features a new Bill Editing function that allows you to edit all the
transactions on the bill as well as all the formatting features from a single screen. This feature is
described in detail here.
If you are using versions prior to Release 11 you can edit the bill as described here.
17.6.1 Edit Bill Screen
Release 11 of the program features a new Bill Edit function that allows you to edit all the transactions
and formatting features of the bill from a single screen.
To access the Bill Edit function click on Bills from the main menu and select Generate New Bills. Or,
click the Bill button on the Control Panel at the left. Then select the client or matter you want by
clicking the Single File button. You can only use the Edit function to edit a single bill, or all the bills for
one client. Then click the Edit button at the right (below the Preview button). A screen similar to the
following will appear:
Items in red are instructions or links to edit the indicated information. Items in black are actual
2011 Tussman Programs, Inc.
302
Tussman Program Release 10
information that appears on the bill. If you click on an item in black it brings up the screen where you
can edit that information. For example, if you click on any line in the return address portion that begins
"Law Office of Perry Mason" it brings up the screen where you enter your firm name and address as
you want it to appear in the heading of the bill (Note that the exact format item number is displayed in
far right column of each line). If you click on a charge, such as a fee or cost transaction, a payment,
or a trust or retainer transaction, it will bring up that specific transaction for editing.
After making changes to the transactions or formatting information, to update the information on the
screen you must click the Refresh button at the top. It is not necessary to click Refresh for the
changes to be saved, however. If you want to view an actual copy of the bill, click the Preview button
at the top.
Note that in some cases information may appear differently on the actual bill. For example, if you have
selected an option to combine charges on the bill, or sort them other than by date, the charges will
nonetheless be itemized and listed by date on the edit screen to make it easier to edit them. You can
click the Preview Bill button to see how the charges will actually be formatted on the bill. Also, certain
formatting features may not appear on the edit screen, although you will find a link to edit them; for
example, the optional summary of fees by staff or the summary pages that can be printed for each
client.
You can also use the Bill Edit function from the Prebill screen in the same way as described above.
17.6.2 Legacy Bill Editing
After you have generated a bill, you can make any changes you want to that bill, either editing or
deleting the existing charges and AR transactions on the bill, writing down any of the charges, or
adding new charges or AR transactions. You can also make changes in any of the billing options,
such as adding a percentage discount, applying retainer funds automatically against the bill, etc, or you
can make changes in the bill format. After any changes are made, especially if they affect the amount
of the bill, you must generate that bill again, just as if you were generating it for the first time, so that
the final copy reflects the changes you made. Only after making all changes and generating a final
copy should you finalize the bill.
It is very easy to display lists of the charges and AR transactions on a bill so that you can edit them by
clicking the
and
buttons respectively on the Tool Bar at the top.
Or, go to the Master Ledger for that matter by clicking the
and edit both charges and AR transactions together.
button, which enables you to view
After you have finalized a bill, to make changes to a bill you will first have to unfinalize it, make the
changes you want, generate the bill again, and then finalize the revised copy. However, some
changes, such as changes to the text of the charges on the bill, or changes in the bill format, can be
made without unfinalizing the bill. For example, if the original bill did not itemize the individual fee
charges, and you now want to generate an itemized bill, you can simply make the appropriate changes
to the bill format and use the reprint finalized bills function to reprint that bill in the new format without
having to unfinalize it. Or, if you want to change the text for some of the charges on a finalized bill the
easiest way to do that is go to the Master Ledger for that matter, find the charges you want to edit and
make the changes, then reprint the finalized bill.
2011 Tussman Programs, Inc.
Billing
303
If the bill you want to change is not the most recent bill, you have to unfinalize all the subsequent bills
one at a time (by using the Unfinalize Last Bill for One Matter function) until you have unfinalized the
one you want. Then make the changes you want and generate that bill again. You will then have to
generate and finalize each subsequent bill in sequence in order to make things current. Alternatively,
there is a much easier way to make a change to an old bill. You can use the Unfinalize All Bills for
One Matter function, make the changes you want, and then use the Refinalize Bills function, which
automatically generates and finalizes all the bills for that matter up through the most recent one, using
the same dates and invoice numbers as the original bills. Make sure you read the instructions for the
Refinalize Bills function before doing this, however.
17.7
Billing Summary Reports
The Billing Summary report should be generated and reviewed each month after you have generated
your bills but before they are finalized. The report lists each bill that was generated showing the totals
from each bill. It provides a useful record of your billings for each month, and it is important to review it
to make sure that all of your bills are listed, because only bills listed on the report will be finalized when
you finalize your bills. .
To generate the report, click the Billing Summary Reports button on the
New Bills Awaiting Finalization screen, then select the sort order you want (client ID or alternate ID).
You can also generate this same report by clicking on Bills from the Main Menu and selecting Billing
Summary Reports from the submenu, then picking Current Billing Summary Report. From this
screen you can also generate the report if you forgot to generate the report before you finalized your
bills. In that case, pick the Billing Summary Report for Finalized Bills option. You must then
specify the date range in the box below. Since the record of each bill is saved with the posting date
that is used when you generated the bill, to duplicate the Current report you must specify a date range
that will include all the relevant bills. For example, if you just finalized a set of bills that all used a
posting date of March 31, 2005, then specify a date range that includes that date but would not include
bills that were generated using other posting dates.
17.8
Retainer Application Reports
The Retainer Application Report report should be generated and reviewed each month after you
have generated your bills but before they are finalized. The report lists each bill where funds were
automatically applied from a client's retainer account to pay their balance due. Using this, you can
easily determine how much needs to be transferred from your retainer account to your general
account. .
You can also generate this report by clicking on the Retainer Applications button at the top of the
New Bills screen. You can also generate this same report by clicking on Bills from the Main Menu and
selecting Billing Summary Reports from the submenu, then picking the Current Retainer Application
Report option. From this screen you can also generate the report if you forgot to generate the report
before you finalized your bills. In that case, pick the Retainer Application Report for Finalized Bills
option. You must then specify the date range in the box below. Since the record of each bill is saved
with the posting date that is used when you generated the bill, to duplicate the Current report you
must specify a date range that will include all the relevant bills. For example, if you just finalized a set
of bills that all used a posting date of March 31, 2005, then specify a date range that includes that date
but would not include bills that were generated using other posting dates.
17.9
Finalizing Bills
Finalizing your bills is always the last step in the billing cycle. It is done only after you have printed and
sent out your bills in final form. The finalizing procedure marks all the charges that appeared on the
2011 Tussman Programs, Inc.
304
Tussman Program Release 10
bills as having been billed, adds the amount billed to the client's account balance, and carries forward
the new balance due so that it appears as the balance forward on the following bill. It also creates a
record of the bill which appears as part of the client's account history. While you do not have to finalize
your bills immediately after they have been printed, it is important not to forget to finalize them before
you generate your bills for the following billing period. Otherwise, the next set of bills will include
activity from both billing periods, as the activity from the previous bill will not have been marked as
billed. If you attempt to generate bills for a new cycle without having finalized from the previous cycle,
the program will warn you that there are unfinalized bills still on file. Do not ignore this message
without investigating to see if you have forgotten to finalize the previous set of bills. If you go ahead
and generate a new set of bills without having finalized the previous set, you will then have to generate
the previous set of bills again and finalize them, before you can generate a correct set of current bills.
See the end of this section for special instructions on what to do if you mistakenly generate bills for a
new billing cycle without having finalized the bills from the previous period.
When you generate a bill, it is added to a list which the program maintains of all bills that have been
generated but not yet finalized. Before finalizing, it is a good idea to review the list to make sure all the
bills that you generated are listed, because when you finalize only bills that are included in the list are
finalized. In other words, if you forget to generate a bill for an individual matter, and then go ahead and
finalize your bills, no bill for that matter will be finalized and any unbilled charges for that matter will be
saved and will appear on the next bill that you generate. A bill will also not be saved and finalized if you
generated it, but then clicked the Cancel button on the dialog that comes up when bills are finished
printing.
You can reprint bills in the list by clicking the Reprint button and selecting the option you want. You
can print the highlighted bill, all bills for the highlighted client, all tagged bills (tag them either
individually by doubleclicking on each one or by using the Tag button at the top), or all bills in the list.
You can also just print a bill which appears in the list in the normal way using the Generate New Bills
function.
When you are ready to finalize, you can finalize all the bills in the list, all tagged bills, or you can finalize
them one at a time. If there are some bills in your list of new bills that you do not want to finalize,
either because you are still working on them, or because you decided not to send them, you can either
cancel them or put the bill on hold by highlighting that bill on your list of bills and clicking on either the
Hold or Cancel buttons, as described in the List New Bills section. In either case, this does not delete
or affect the activity that appeared on the bill; it simply prevents the bill from being finalized. When you
are ready to finalize it, highlight the bill and click the Hold button again to remove the hold.
To finalize bills, click the
button on the Control Panel at the left, or click Bills from the Main
Menu and select Finalize Bills from the submenu. This brings up the list of bills that have been
generated but not yet finalized. Click the Finalize button at the top and select the option you want.
You can finalize all bills in the list, all bills for the client whose bill is highlighted on the list, all tagged
bills, or just the currently highlighted bill. Refer to the List New Bills section for instructions on how to
use the tagging function.
Before performing the finalization, the following dialog appears:
2011 Tussman Programs, Inc.
Billing
305
The Batch Code refers to the Batch Code which will be assigned to the AR transactions that are
generated when the bill is finalized. An AR transaction (type B) is created for each bill that is finalized,
and it will be assigned the Batch Code which is entered here. It is possible later to reprint all bills by
batch, or to view or print a list of all bills in a batch using either the Browsing AR Transactions function
or the AR Journal Reports function. When finalizing, the program may also generate other additional
AR transactions if the client has a retainer account balance which is being applied against the client's
balance due. When applying a retainer account balance, the program will generate transactions types
RD and P. These transaction will also be assigned this Batch Code. The Batch Code shown here has
no relation to the Batch Code assigned to the charges which appear on the bills. These additional
type RD and P transactions that are generated when finalizing will be assigned GL distributions. If you
are interfacing with our General Ledger, you should thus post the batch containing these transactions
to the General Ledger after you have finished finalizing. The billing records themselves (type B) do not
contain GL distributions and do not need to be posted to the GL, as the GL works on a cash basis and
the finalizing of a bill by itself does not generate GL distributions.
If for any reason the program is interrupted during the finalization process, you must immediately
reindex the data files before doing anything else. Then, simply finalize again, and the program will
resume where it left off in the process.
When the program finishes finalizing, if any of the bills could not be finalized the program will display an
exceptions list showing which bills, if any, could not be finalized. The most common reason why a bill
cannot be finalized is if you made changes to charges appearing on the bill after it was originally
generated, but you forgot to print it again so that the changes were incorporated into the bill. Bills that
are listed as exceptions must be generated again before they can be finalized. You can do this by
going to the New Bills screen, regenerating each bill that is listed as an exception (as indicated by the
letter E in the Status column) by highlighting it on the list and clicking the Reprint button, and then
highlighting it again and clicking the Finalize One button.
You can view a list of finalized bills by clicking Bills from the Main Menu at the top and selecting
Browse Finalized Bills from the submenu.
After a bill is finalized, you can unfinalize it if necessary so that revisions can be made, or you can
reprint an exact copy at any time.
If You Forget to Finalize
If you forget to finalize your bills before you generate the bills for the next billing cycle, then the new
bills will have activity from both the current period and the previous period. To correct this, you must
re-generate and finalize the bills from the prior period. Do not try to correct this by simply using a
beginning cutoff date to eliminate from the new bills the charges from the previous period, as those
charges will then still remain in the unbilled charges file and the client's account balance will not be
correct.
This procedure is only necessary if you have generated the actual bills for the new billing cycle. If you
2011 Tussman Programs, Inc.
306
Tussman Program Release 10
have only generated prebills, you will not have to re-generate the previous set of bills, as they should
still appear in your list of new bills. To verify this, click the Bill icon on the Control Panel. If the bills
listed there all show the date from the previous billing cycle, you can then simply finalize them in the
normal way and then generate your prebills or bills for the current billing cycle. If, however, you have
already generated your current bills, or if the bills from the previous cycle do not appear in the list of
new bills, you will have to::
1. Go to the Generate New Bills screen and change the Billing Dates to the same dates you used
when you generated the bills for the previous billing cycle.
2. Generate those bills, either by printing them or using the preview or print to file function. It is a good
idea to review them to make sure they match exactly the actual bills that were sent out.
3. Go to the list of new bills and verify that the bills you just generated all appear there showing the
correct posting date from the previous billing cycle. If any bills appear with the posting date from the
new billing cycle, delete those from the list by highlighting each one and clicking the Cancel button.
This ensures that you do not mistakenly finalize any of the bills from the new billing cycle by mistake.
4. Finalize the bills.
5. You can now generate your new bills in the normal way, after first changing the billing dates back to
the correct dates for the current billing cycle..
17.10 Unfinalizing Bills
After a bill has been finalized, it is possible to unfinalize it if you need to make changes or corrections.
Some changes to a bill can be made without finalizing, such as editing the text of the charges, as
described in the section on Editing Billed Charges. You can then reprint that bill using the Reprint
Finalized Bills function and it will reflect those changes. You can also make changes in the bill format,
and when you reprint the bill it will print using the new format. However, more major changes which
involve adding or eliminating charges, or editing the amount of the bill, require that you first unfinalize
the bill.
There are three ways you can unfinalize bills, as follows:
1. You can unfinalize the most recent bill that was finalized for all or selected matters. This
method should be used if you need to make changes to the last bill or bills that were finalized; for
example, if you finalized the bills using an incorrect cutoff date and needed to redo them all, or needed
to make a correction on one client's bill. Once you have unfinalized the bill or bills you want, you can
then make changes and generate and finalize the bill(s) again in the normal fashion. If you need to
change a bill from an earlier period, you can perform the unfinalize function multiple times; each time
you perform the function it will unfinalize the most recent finalized bill going backward in time.
2. You can unfinalize any bill, regardless of when it was generated. This feature is available only
in Release 11 of the program. To do this, simply locate the record of the bill, for example: by going to
the Master Ledger for that matter. Remember that bills appear in red on the Master Ledger and are
assigned the Type code B. Make sure you have located the correct bill, then click the Reverse button
at the right hand side of the edit screen. You can then make any changes you want, regenerate that
bill, and then finalize it when you are done. If you make changes resulting in a different ending
balance on the bill, then if you reprint subsequent bills that have already been finalized the balance
forward will show incorrectly, as it will reflect the original balance forward that appeared when that bill
was finalized. However, any new bills that you generate will reflect the correct balance. To avoid this,
if necessary, you can use method 3 described below, or unfinalize each bill backwards in time until you
reach the one you want, as described in 1 above.
3. You can unfinalize all the bills for one selected matter, in which case all the bills for that matter
are unfinalized and all the activity is restored to unbilled status. If you did this in versions of the
2011 Tussman Programs, Inc.
Billing
307
program prior to Release 11, after making your changes you would then have to manually generate
and finalize each bill in succession from the oldest to the newest in order to incorporate your changes
and restore the matter to current status. If there was a long history for that matter this could involve a
bit of work. However, in Release 11 after unfinalizing all the bills you can then perform the Refinalize
function which automatically regenerates and finalizes all the bills for that matter, incorporating any
changes you made but using the same billing dates and invoice numbers as the original bills.
By way of caution, it is recommended that you unfinalize (especially using the Unfinalize All Bills
option) only when absolutely necessary to make changes in prior bills. For example, if you need to
delete a charge that was billed in a prior bill, rather than redoing all the bills you can simply give them a
credit by entering a transaction type Q that will appear on the next bill. Or, lets say you need to
generate a bill for the court of all work performed to date, but at a different rate than was originally
billed. Instead of unfinalizing all the bills, assigning the new rate and refinalizing the bills you could use
the Copy Charges function to copy all the charges to a new matter, assign the new rate to that matter
and recalculate the charges, then generate a bill for that new matter.
Note that when you unfinalize, if you are using the option to post automatically to the GL the program
will reverse all the GL postings that were generated by those bills, unless the postings are for a year
that has been closed. If you are not posting automatically then you will need to repost any batches
where the GL postings may have changed.
These procedures are described in detail as follows:
Bills can be unfinalized for an individual matter, or for groups of matters, as described below. When
you unfinalize, the program always unfinalizes the most recent bill. Thus, if you want to make changes
to a bill that was generated several billing cycles before, you must individually unfinalize each bill in
sequence going back to the bill that you want to change. Alternatively, you can unfinalize all the bills
for a specified matter. If you unfinalize all of the bills, or if you unfinalize back several billing periods,
you will then have to not only re-generate and finalize the bill that you want to change, but you will also
have to re-generate and finalize each subsequent bill individually in order to restore the account to its
current status. Because of the work involved in doing this, and the possibility that the bills may come
out differently from when they were originally generated due to a variety of factors, it is not
recommended that you unfinalize back past the previous bill unless it is absolutely necessary. Note
however that with Release 11 if you unfinalize all the bills for a matter you can use the Refinalize
function to restore the matter to current status.
The unfinalizing process does not delete any of the activity that appeared on the bill which you
unfinalize, but simply restores those charges to the unbilled charges file and removes the AR
transactions generated when the bill was finalized.
When a bill is unfinalized, it does not go back into your list of new bills. After a bill is unfinalized, the
client's account is restored to the same status as before that bill was generated, just as if that bill was
never generated. Before the bill can be finalized again it must be re-generated as if you were doing it
for the first time.
Warning! Do not unfinalize a bill if the charges which appeared on that bill have been purged or
archived. If they have been archived, you can restore them from the archive file first, and then
unfinalize the bill.
To unfinalize, click Bills from the Main Menu at the top and select Unfinalize Bills from the submenu,
then select one of the following options from the submenu:
Unfinalize Last Bill for One Matter - This will unfinalize the most recent bill for one matter. Select the
matter and the dialog shown below will
appear, showing you the matter ID and the date of the bill that is going to be unfinalized. In this
example, the date of that bill is July 25, 2004. The Posting Date and Batch are the date and batch
code that will be assigned to the reversing AR transactions that will be created when the bill is
2011 Tussman Programs, Inc.
308
Tussman Program Release 10
unfinalized, as described above. By default, the program assigns the same posting date as the date of
the bill that is being unfinalized. The batch defaults to the current date, and this batch should be
posted to the GL as it may contain GL distributions resulting from the reversal of the applications of
payments against that bill. After checking the information on this dialog, click OK and the bill will be
unfinalized..
The above function will only unfinalize the last bill for one matter. If you want to unfinalize the last bill
for all of one client's matters, use the option to unfinalize all bills for selected matters described below.
As described earlier, if you need to unfinalize a bill that was generated previous to the most recent
billing cycle, you can perform this function multiple times and each time it will unfinalize the most recent
bill that remains finalized.
Unfinalize All Bills for One Matter - This selection will unfinalize all the bills for one matter. After
selecting the matter and confirming that you want to do this, the same dialog shown above appears,
but indicating that you are about to unfinalize all the bills for the selected matter. After clicking OK and
confirming again, you will be asked if you want to make a backup before continuing. If you click Yes,
the program will create a backup file which will be listed in the automatic backups screen. This is done
as a precaution in case you perform this function by mistake. After completing the unfinalizing, all the
bills for the selected matter will be unfinalized and all charges will be restored to the unbilled charges
file. You can then make whatever changes you need to make, but as described earlier you will then
have to re-generate and finalize each individual bill in succession in order to restore the account to its
current status, or you can use the Refinalize function (Release 11 only) which will do that automatically.
Alternatively, after unfinalizing all the bills you could simply generate a single cumulative bill, using as
the date the date of the last bill which was finalized, and finalize that bill to bring the account back to
current status. Then, of course, you would no longer have the detailed history of each individual bill on
file
Unfinalize Last Bill for All Matters - This selection will unfinalize the most recent bill for all of your
matters.. It is not recommended that you do this unless it is absolutely necessary; for example, if you
generated your bills and finalized them by mistake before they were in final form, or if you made a
mistake on all the bills which needs to be corrected. After making this selecting, the dialog shown
appears:
2011 Tussman Programs, Inc.
Billing
309
.
In the first space, you must enter a date prior to the date of the bills you want to unfinalize, but later
than the date of the previous set of bills. For example, if you want to unfinalize your last set of bills,
and those bills were dated December 31, 2004, you should enter December 30, 2004 as the date.
This way, only bills dated after December 30, 2004, will be unfinalized. If in this example you were to
enter a date of November 29, 2004, for most matters this would not make a difference as this function
will only unfinalize the most recent bill dated after that date, and in most cases that would be the
December 31 bill. However, if you have matters where a November 30, 2004 bill was their most recent
bill, either because the file was closed or because they had no activity in December, then using a date
of November 29 would cause that bill to be unfinalized also.
In the second space, indicate whether the date you entered in the first space refers to the statement
date or the ending cutoff date which was used on your prior bills. In the above example, if December
31, 2004 was the ending cutoff date on the prior bills, enter C. This normally makes no difference
except that if the statement date used on those bills was January 3, 2005, and you entered a date of
January 2, 2005, and entered C in the space below, no bills would be unfinalized since January 2
would be later than the ending cutoff date of December 31.
You can optionally enter a Batch Code in the third space so that regardless of what date you entered
above, only bills that were finalized using the batch code you enter will be unfinalized. It is normally
not necessary to enter the batch code unless you finalized more than one set of bills using the same
date and you only want to unfinalize one set.
The Posting Date and Batch Code for the reversing transactions should be entered as described
earlier in this section.
After clicking OK and confirming that you want to do this, you will be asked if you want to make a
backup first, as described earlier in this section. After that the program will unfinalize the bills,
indicating when it is finished and stating how many were unfinalized.
In some cases, inexperienced program users may have mistakenly generated and finalized the same
set of bills more than once. In that case, in may be necessary to perform this function more than once
in order to unfinalize all the bills for the same billing cycle. For example, if someone generated the
2011 Tussman Programs, Inc.
310
Tussman Program Release 10
December 31 bills, finalized them by mistake, and then generated a second set of December 31 bills,
and then finalized that set of bills, you will have two sets of December 31 bills. If you unfinalize, the
first time you unfinalize it will only unfinalize the second set of December 31 bills. Those bills will
probably show nothing on them except the balance carried forward from the first set of bills, which will
show the actual activity for the month. To unfinalize the first set, it will be necessary to perform this
function a second time. There is no harm in performing this function more than once, as long as you
enter the same date in the first space each time, since the program will only unfinalize bills dated after
that date. If you think there are still finalized bills dated after that date, you can simply unfinalize again
until it tells you that 0 statements were unfinalized at the end of the procedure. That means there are
no more bills left to unfinalize dated after the specified date.
If you need to unfinalize all the bills going back more than one billing cycle, then you will also need to
perform this function more than once. In that case, you can simply put in a date prior to the date of the
bills you want to unfinalize, and then repeat this function until it says that 0 statements were unfinalized
at the end of the procedure. That will tell you that all the bills dated after that date have been
unfinalized. However, it is not advised that you unfinalize back beyond the most recent set of bills
unless it is absolutely necessary.
Unfinalize Last Bill for Selected Matters - Use this function to unfinalize the most recent bills for all
of a single client's matters, or for a selected group of clients. The Select Clients and Matters dialog
lets you select which client or clients you want. To select a single client, enter the client ID in the client
ID space. Or, for example, to unfinalize the bills for one responsible attorney, enter the responsible
attorney code. Click OK after making your selections and the same dialog shown last above appears.
Fill in that information and continue the procedure as described above.
17.11 Refinalizing Bills
The Refinalizing Bills function enables you to regenerate and finalize all the bills for an individual matter
after they have been unfinalized using the Unfinalize All Bills function. This feature is only available in
Release 11 of the program.
To perform this function, select Bills from the Main Menu, Unfinalize Bills from the submenu, then
Refinalize Bills from that submenu. Specify the matter you want and then continue as indicated. You
have the option to print each bill as they are generated, or you complete the function without having the
bills printed. If you are posting automatically to the General Ledger, any GL postings created by each
bill will be automatically posted to the GL unless the bill is for a year that has been closed. If not
posting automatically you will have to repost any batches or months that might be affected.
Caution: It is recommended that you use the Unfinalize All Bills and Refinalize functions only if
absolutely necessary to make changes in prior bills. This is because in some cases the bills that are
refinalized may be different from the original bills. For example, lets say that at some point during the
billing history for this matter you changed the interest rate that you were charging on past due
amounts. If you unfnalize and refinalize all the bills for this matter when the bills are refinalized they
will all be generated using the current interest rate. However, if you have not changed your interest
rate, tax or markup rate, or fee discount percent during the course of the billing for this matter you
should not have a problem. A change in billing rates will not be a problem as these changes are
reflected in the time charges themselves which are not changed when you unfinalize or refinalize.
17.12 Reprinting Bills
An exact copy of any bill that has been finalized can be printed at any time. To select which bill or bills
you want to reprint, click Bills from the Main Menu at the top, select Reprint Finalized Bills from the
submenu, then choose from the following options:
2011 Tussman Programs, Inc.
Billing
311
Reprint Bills for One Client or Matter - Select this option if you want to reprint one or more bills for a
specific client or matter. After selecting the client or matter, the dialog shown below appears, listing
each finalized bill for that client or matter. The list shows the posting date of each bill, the invoice
number, matter ID, and dollar amount of the bill. From this list. select the specific bill or bills you want
to reprint either by double clicking on each one or by highlighting each one and clicking the Select One
button. After you have selected a bill, the word "Yes" will appear in the Reprint? column. To de-select
a bill, highlight it and click Select One again. Or, to reprint all the listed bills, click Select All. If you
want to reprint all the bills for a client for a specific month, enter the month and year in the Month
space at the bottom. The list will then display only the bills for that month, which you can then select by
clicking Select One or Select All. This is a useful tool if a client has many matters and a long billing
history, and you want to reprint all their bills for a specific month without having to scroll through the
entire list searching for the ones you want.
LEDES - Click the LEDES button at the bottom to generate the bill in the LEDES format.
After selecting the bills you want from the list, click the Print button to generate them.
Reprint a Batch of Bills - Use this function to reprint copies of an entire batch of bills. The batch
code assigned to each bill is the batch code you enter when you finalize your bills. This is a useful tool
if you want to reprint copies of all bills that were generated during a specific billing cycle, provided that
all the bills generated during that billing cycle were finalized together or were assigned the same batch
code when they were finalized. For example, if you sent out and finalized your bills, but forgot to make
printed copies of them for your own records, you do not have to unfinalize them to do this. Instead, use
this function to reprint that batch of bills. To determine what batch code was assigned to a group of
bills, select AR Transactions from the File menu, then click on the Bills button at the bottom of the
screen. This will give you a list of all your finalized bills, which you can scroll through to find the bills
you want to reprint. The batch code assigned to each bill appears in the Batch column of the browse
2011 Tussman Programs, Inc.
312
Tussman Program Release 10
screen. Once you know the batch code, go back and select the Reprint a Batch of Bills function and
enter that batch code.
Reprint Unpaid Bills for One File - This option allows you to reprint all the bills for a specific client or
matter that remains unpaid, either in full or in part. After selecting the client or matter, the program
asks for a number of days past due. If you enter 30, for example, the program will only reprint unpaid
bills with a posting date that is 30 days or more prior to the current date. You must enter a number
greater than 0 in order to continue, so if you want to reprint all outstanding bills, regardless of date,
enter 1.
Reprint Unpaid Bills for Selected Files - Select this option and the Select Clients and Matters screen
appears from which you can select a group of files for which you want to reprint unpaid bills. Click OK
after making your selections, then enter the number of days past due that a bill must be in order to
reprint it. You must enter a number greater than 0.
Reprint Unpaid Bills for All Files - This function prints copies of all unpaid bills. Enter the number of
days past due, as described above, and every unpaid bill that has been outstanding at least that
number of days will be reprinted.
Reprinting Bills Individually
You can also reprint an individual bill by locating the billing record (AR transaction type B) either by
browsing your AR transactions or on the Master Ledger for a matter and clicking on the Reprint button
that appears on the Editing AR Transaction screen.
17.13 Reminder Statements
Reminder Statements are a special type of bill that can be sent to clients who have unpaid balances
due. Unlike a regular bill, reminder statements do not bill for any new charges, but only show unpaid
amounts from previous bills. You can generate a single reminder statement for each client showing the
outstanding balances from all that client's matters, or you can generate separate reminder statements
for each matter.
It is not necessary to use reminder statements at all, as your regular bills will normally show the
amount of any unpaid balance forward, and will add that to the total due, even if there are no new
charges to bill. A regular bill will print for a client with an unpaid balance as long as you are not
generating a current charges only bill, and as long as you have set the
options for files with no new charges to generate bills for clients with an unpaid balance due However,
if you prefer to use reminder statements to bill clients for past due balances, click Bills from the Main
Menu and select Reminder Statements from the submenu. The following screen appears:
2011 Tussman Programs, Inc.
Billing
313
Files Selected - You can select who you want to generate reminder statements for in the same way as
selecting who to bill; i.e., you can generate them for all files, for a single file, selected files, for a range
of files, or for a list of files. Note that if you want to select a specific matter or group of matters, you
must select the option described below to Generate by Matter, since if you are generating statements
by client only then you can only select specific clients.
Reminder Statement Format - Click this button to choose from a variety of format options shown on
the screen below:
2011 Tussman Programs, Inc.
314
Tussman Program Release 10
1. Format to Use for Return Address and Heading - The heading of the reminder statement
in printed in the same format as a regular bill, and can include your return address, the date of
the bill, the client's name and address, file ID, etc. Rather than format the heading of the
reminder statement separately, simply enter the number of one of your regular bill formats (1-0)
and the program will use that format for the heading. If you leave this space blank, the program
will use the settings in the bill format which is assigned to each client.
2. Introductory Message - Enter here an introductory message of any length which will be
printed at the beginning of the reminder statement; for example, "Your account is past due for
the following amounts:".
3. Detail Balance Due By - This selection determines the level of detail shown on the
reminder statement. To show just the total balance due for the client, enter C. Or, you can
show a breakdown of the balance due as follows:
A - Show the balance due from each matter;
B - Show the balance due by matter and invoice;
D - Show the balance due by invoice;
E - Show the balance due by statement date
F - Show the balance due by statement date and invoice.
Note that options A and B apply only if you are generating a single Reminder Statement for
each Client. If you are generating separate reminder statements for each matter, select D, E or
2011 Tussman Programs, Inc.
Billing
315
F.
4. Show Fee, Cost, Interest and Tax Balances - Enter Y if you also want to show a
breakdown of the balance between fees, costs, tax and interest. Enter N to just show the total.
5. Show Ageing Detail - You can also include a section at the end showing an aged
breakdown of the balance due similar to that which can be printed on a regular bill using bill
format options 183-186. Enter A to show a detailed breakdown by fees, costs, tax and interest,
or B to show a one line aged breakdown of the total balance due only. The program will use the
three ageing "buckets" and the text for the headings which are specified in regular options 185
and 186 from the same bill format which is being used for the reminder statement heading.
Enter N to omit the ageing section.
6. Ending Message - You can enter a message of any length to be printed at the end of the
reminder statement; for example, "Thank you for your prompt attention to this matter".
Minimum Amount Due - If you enter an amount in this space, the program will only generate a
reminder statement for clients whose total balance is at least this amount. For example, if you only
want to print reminder statements for clients who owe at least $100.00, enter 100.00. If you leave it at
0.00, a reminder statement will be printed for anyone with a balance due regardless of amount.
Minimum Days Due - If you enter a number of days in this space, the program will only generate a
reminder statement for clients whose balance has been outstanding for at least that number of days.
For example, to only print reminder statement for clients who have had a balance outstanding for 30
days, enter 30.
Minimum Days Since Last Reminder - If you enter a number of days in this space, the program will
only generate a reminder statement for a client if it has been at least that number of days since the
previous reminder statement or bill was generated. The program makes a note of the date that each
reminder statement is generated, and displays that date (if any) on the account status screen for each
client.
Reminder Statement Date - Enter here the date you want to print in the heading of the reminder
statement.
Update Client Records - Enter Y if you want to update your client records to show the above date as
the date of the last reminder statement. This date will then appear on the account status screen as the
date of the client's last reminder statement. If you enter N, the program will not record this date as the
date of the last reminder statement. It is necessary to enter Y if you are using the feature where you
specify the number of Minimum Days Since Last Reminder described above.
Generate by Client or Matter - Select which option you want. If you select the "by Client" option the
program will generate a single Reminder Statement for each client showing the balance due from all
that client's matters. Select "by Matter" if you prefer a separate reminder statement for each matter.
Sort Order - Enter N to print the reminder statements by client ID, or A to print by client alternate ID.
Include Clients on Hold - Check this box if you want to include clients who are on hold.
Font - As with regular bills, you can select a specific font and font size for your reminder statements.
There is no finalizing or other procedure which is necessary after generating reminder statements.
You can generate reminder statements as often as you want, or not at all, and it will have no affect on
generating your regular bills or on maintaining your client account balances.
2011 Tussman Programs, Inc.
316
Tussman Program Release 10
17.14 Historical Bills
A historical statement is a cumulative bill that shows all or selected activity that has previously been
billed on a matter. It prints in the same format as a regular bill. Only charges that have already been
billed will appear on a historical bill; unbilled charges do not appear. (If you want a report that shows
everything, both billed and unbilled, use the Master Ledger). The historical bill can also show all the
payment and credit, retainer and trust activity to date (regardless of whether or not that activity has
appeared on a bill). You can specify a beginning and ending cutoff date, in which case the charges
shown will only be those dated between those dates.
You can select what types of transactions you want to show on the historical bill by clicking the Select
Items to Include button. To include everything, pick the All Transactions option. Otherwise, you can
select options to show just Fees and Costs (Charges Only), Fees Only or Costs Only, Payments and
Credits only, Retainer only, or Trust only.
The historical bill will print in the same format as a regular bill. If you want to make changes in the
format for a historical bill, you can either make the changes to the bill format, generate the bill, and
then change the settings back, or you can create a special bill format which is used only when you
generate historical bills. Once you have created the special format, to use it when you generate
historical bills click on Edit Bill Formats from the Generate Historical Statements screen and enter
the number of that format in the Default Bill Format space, making sure the Force Use of Default
Format space is set to Y. Then generate the bill and when finished change those settings back to the
way they were.
To generate a historical statement, click Bills from the Main Menu at the top and select Historical Bills
from the menu. The screen shown below appears:
Files Selected - You can select which file or file you want to generate historical bills for in the same
2011 Tussman Programs, Inc.
Billing
317
way as you would when generating a regular bill.
Edit Bill Format - The historical bill prints in the same format as a regular bill, so if you want to make
changes in the format before printing the historical bill click on this button.
Edit Bill Messages - The historical bill will print the same messages at the end which will print on a
regular bill. If you want to add or delete a message, click on this button. If you do not want a message
to print, instead of deleting it you can simply type an asterisk in the first space of the message.
Select items to Include - This feature allows you to generate a historical bill that includes only certain
items (for example, just fees or just costs). You can select from the menu shown below:
Heading - You can enter here up to two lines of text that will be printed in the heading of the historical
bill, in place of the heading that appears on regular bills (i.e., the one that is entered in bill format option
23. You can use the same set of macros in the body of the text that can be used with the regular bill
heading.
Billing Dates - For historical bills, the posting date is irrelevant. The statement date is the date that is
printed in the heading. If you enter a beginning cutoff date, only charges dated after that date will
appear. You can also use the ending cutoff date if you want changes only dated on or before a specific
date to appear. Otherwise, set the ending cutoff date to today's date, or a date that is no earlier than
the ending cutoff date used on the last bill.
Sort Order - Enter N to print in order of client ID, A in order of client alternate ID.
Select Font - As with regular bills, you can select a font and font size by clicking on this button.
Other than choosing the options above, no special procedures are necessary to prepare or finalize a
historical bill. You can generate one as often as you like and it will have no affect on the client's
account balance. If you print a historical bill and charges do not appear, it is possible that the bill or
bills on which those charges appeared were unfinalized, or that the charges were archived or purged.
Also make sure you have set the beginning and ending cutoff dates correctly. If charges still do not
appear, try reindexing the data files.
17.15 Client Statements
This feature generates a bill ine form of a "statement" showing a summary of bills, payments, credits
and debits posted to the account during the period you select, but omitting the detail of the individual
2011 Tussman Programs, Inc.
318
Tussman Program Release 10
charges from each bill.
To generate a statement click on Bills from the Main Menu and select Client Statements. The following
screen appears:
Files Selected - You can select which file or file you want to generate client statements in the same
way as you would when generating a regular bill.
Heading - Enter here the text you want printed as the heading for the statement, in place of the
heading that appears on regular bills.
Billing Dates - For statements, the posting date is irrelevant. The statement date is the date that is
printed in the heading. If you enter a beginning cutoff date, only activity dated after that date will
appear. You can also use the ending cutoff date if you want activity only dated on or before a specific
date to appear. Otherwise, set the ending cutoff date to today's date.
Sort Order - Enter N to print in order of client ID, A in order of client alternate ID.
Select Font - As with regular bills, you can select a font and font size by clicking on this button.
17.16 Emailing Bills
In order to email your bills, you must first generate the bills in the normal manner (either by printing or
previewing them), then go to the New Bills Awaiting Finalization screen by clicking on the
2011 Tussman Programs, Inc.
Billing
319
button on the Control Panel. You can then email bills on this list either individually or as a
group, as described below. When you email a bill the program actually generates a copy of the bill to a
pdf file, attaches it to an email, and sends it to the address you have specified, provided you have
followed the steps described below.
Step 1. Enter client email addresses.
To enter your email addresses, go to each client screen and type in the address in the Email
space which appears directly above the Date Opened space. Alternatively, you can enter the
email address in the Contact space (the last line of the client address). When sending emails
the program will look first in the Email space, but if it does not find what looks like a valid
email address there it will then look in the Contact space. If you enter an email address in
both spaces, or if you can fit more than one email in the email space, the program will send
the bill to both emails. If you want to enter an email address for a client but don't want to
email their bills, type an asterisk (*) in the first space of the field where you typed the address.
When sending emails the program will normally use the email address entered in the client
screen. If you need to send bills for certain matters to a different email address, enter that
address in the last line of the Matter Title (Line 5) in the matter screen for those matters, but
you must type a pound sign (#) in the first space before entering the email address. In order to
use this feature you must check the Separate Email for each Matter box in the Email Setup
screen as described in Step 3 below.
Step 2. Install and Configure PDF Writer.
To use the email feature, you must install the Tussman PDF writer so that the program has the ability
to generate bills to a PDF file. If you have not already installed it, click on this link and follow the
instructions. If you have previously installed an older version of the PDF writer, it may be necessary to
uninstall the older version by clicking on Tools, Tussman PDF Writer, Uninstall Tussman PDF Writer
before installing the newer version.
After installing the PDF writer you must configure it for emailing bills by selecting Configure
Tussman PDF Writer from the Tussman PDF Writer option on the Tools menu, as follows:
First, you must check the Use default folder location option and enter the name of the folder
where you want to save the PDF files that are created when you generate bills in the Location
space. Make sure that the folder you specify is a folder that you have already created. If you
do not check this option and enter the name of the folder, then after each bill is generated the
program will prompt you for the location where you want to save it, which will be extremely
irritating if you are generating multiple bills.
You must also check the Use Print Job Name to Save PDF File box and uncheck the View
PDF after saving and Email PDF after saving boxes (this may not make sense but this is
because we are not using the PDF writer functions to email the file).
2011 Tussman Programs, Inc.
320
Tussman Program Release 10
Shown below is the Tussman PDF writer preferences screen with the correct settings
described above:
In the example above, the bills will be saved in the c:\tp9\bills folder, but you can specify any
folder you want. However, the same folder must also be specified in the Email Setup screen
as described below.
Step 3. Configure Email Setup Screen.
Next, you must enter the setup information for the emailing function. To do this, click on the
Finalize icon on the Control Panel at the left. Then click the Email button in the upper right
corner and select Email Setup from the menu that comes up. The setup screen shown below
will then appear:
2011 Tussman Programs, Inc.
Billing
321
Before you begin, note that the Tussman email function will not work with all email servers. There are
two types of mail servers, SMTP/POP and IMAP. In most cases you will probably be using SMTP.
Tussman should work with most SMTP servers provided you know the correct SMTP server address
and port, as described below. If you cannot get it to work with your SMTP server, make sure you have
entered the correct port number and that you have rights on the network to access the port you have
specified. You may have to consult your IT person to get the correct server address and port. If you
still can't get it to work, then you can always create a gmail or aol email account and use that, as
described below. Tussman willl not work with IMAP servers.
Complete the Setup information as follows:
Your Email Address - Enter here the address of the email account you want to use to send
the emails.
Password - Enter here the password for your email account. The program will remember the
password although it will not appear in the space for privacy reasons.
Reply to Address - If desired, you can enter a different email address here in case you want
any replies to emails that are sent to go to an address that is different from the address shown
in the Your Email Address space above. If you leave this space blank, replies will go to the
Your Email Address.
Sender Name - Enter here your firm name. This name will appear as the sender to the
2011 Tussman Programs, Inc.
322
Tussman Program Release 10
recipient of your emails.
CC to - If you want a copy of each email that is sent to be sent to a second address, enter that
address here. Normally you would enter your firm email address here so that you can receive
a copy of each email that is sent. The copy will also include the attached PDF file containing
a copy of the bill.
SMTP Server - Enter here the address of your email server. For example, AOL is
smtp.aol.com; GMAIL is smtp.gmail.com. Click the list icon at the right for a list of
supported servers that you can select from, and the program will automatically insert the
proper setting for the server selected. Currently, the list includes only AOL and GMAIL. If
you are using another email server you will have to determine and enter the server name and
port yourself. A list of some email servers with their SMTP server names and port settings
appears below:
http://www.c3sd.com/email_servers_ports.php
Port - Each SMTP server also comes with a Port address. AOL is 587, Gmail is 465, etc.
Authorization Required - Most SMTP servers require authorization, so if in doubt check this
option.
ISSL - Check this box if you are using GMAIL or another email server that uses SSL. AOL
does not use SSL so leave this box unchecked when using an AOL address.
PDF Driver Name - Enter Tussman PDF. It is possible that other PDF drivers may work,
but they would have to be configurable so that file that are generated are saved automatically
using the print job title as the file name. We have not yet identified any other free PDF
drivers that have this ability
PDF File Folder - Enter here the name of the folder where you want the program to save the
PDF files that are generated. It must be the same folder that you entered in the Tussman
PDF Writer Preferences screen as described above. If you leave both spaces blank, the
files will be saved in the same folder where the Tussman Program is installed.
Separate Email for Each Matter - Check this box only if you want to send a separate email
for each matter to clients that have multiple matters. Otherwise, if you leave this unchecked,
each client will get one email with contains a single PDF file containing all the bills for that
client's matters, including the summary page, if applicable.
If some of the bills for certain clients are going to separate email addresses, then you will have
to check this box. You can enter a separate email address for each matter, if necessary, as
described in Step 1 above. If you do check this box, then the program will not generate a
summary page for each client's matters, regardless of the bill format settings for that feature
(unless you are using the Esmeralda format). Checking this box will also override the bill
format option to consolidate bills for multiple matters into a single bill.
2011 Tussman Programs, Inc.
Billing
323
Note that if you are emailing bills with a summary page you should check the option to Print
Summary Pages First which appears on the Generate New Bills screen (click Bill in the
Bills cluster on the Control Panel).
Delete PDF file after mailing - If you check this box, then after each bill is mailed the PDF
file that was created for that bill will be deleted from your hard drive. If you want to save
copies of all the bills that are mailed, then do not check this box.
Step 4. Selecting Bills for Emailing
To email bills, you must first generate the bills you want to email in the normal way. You do not
actually have to print them (they can be Previewed to the screen instead), but it is a good idea to
carefully review them to make sure they are correct before you send them as emails.
After they have been generated, click on the
button on the Control Panel. This screen
will display a list of the bills you have generated but not yet finalized. You can email all or
selected bills that appear on the list by clicking on the Email button at the top of the screen
and selecting one of the following options from the menu that appears:
If you first want to see which clients will be receiving emails, select the Tag Bills for Clients
with Email Addresses option on the Email menu and the program will flag each bill where
the client has an email address on file (unless it has been preceeded by an asterisk). Tagged
bills are indicated by a red check mark in the first column of the list. You can modify the list
by untagging a bill if you don't want an email sent (to untag a tagged bill, simply click on it).
To send an email to a bill that is not tagged, go to the client and make sure they have a valid
email address, then go back to the list and manually tag that bill by clicking on it. Once all the
bills that you want to send are tagged, use the Email Tagged Bills option on the Email menu
described below.
When you are ready to email the bills, select the option you want from the menu as follows:
Email Highlighted Bill - Emails a copy of the bill that is currently highlighted on the list;
Email All Bills for Highlighted Client - Emails all bills which appear on the list for the client
whose bill is currently highlighted. The program will combine all that client's bills into a
single email unless you have checked the option in the Email Setup screen to send a separate
email for each matter.
Email Tagged Bills - Emails only bills that have been tagged. You can tag bills in the list by
clicking on them, or by clicking the Tag button at the top of the list which enables you to tag
all or selected bills (for example, you can use the Tag button to select only bills for a specific
responsible attorney, etc). Or, as described above, use the Tag Bills for Clients with Email
Addresses function to create a list of bills that you want to email.
2011 Tussman Programs, Inc.
324
Tussman Program Release 10
Remember that regardless of which option you select, the program will only attempt to email
bills to clients whose bill or bills appear in the list of New Bills Awaiting Finalization and
who have been assigned what appears to be a valid email address, as described in Step 1.
Step 5. Email Attachments
You can attach documents to a bill by highlighting that bill on the New Bills Awaiting
Finalization screen and clicking the Attachments button at the top. Enter the name of each
document you want to attach, separated by a semicolon. Or, click the Folder button at the
bottom to locate the files you want to include.
Step 6. Emailing the Bills
The image below shows the screen that comes up when you select the option to email the
highlighted bill. The program inserts the client's email address, and you can enter a Subject
and Message for the email in the spaces provided. The program remembers the Subject and
Message so you do not have to reenter it each time. You can change the email address if
necessary. Click the Setup button at the bottom if you need to review any of the setup
options, as described earlier in this section. Then click SEND when you are ready to send the
email.
If you are running the program on a cloud server, it is possible that after you click Send a Print
dialog will pop up. In this case select the Tussman PDF option from the list of printers (do
not choose the one, if any, that has the word "redirected" after it as that is the one installed on
your local computer and it will not work for this purpose).
After you clicked the SEND button, wait until you receive confirmation that the email has
been sent successfully. The New Bills Awaiting Finalization screen will display the email
icon (the open envelope) in the column with the heading M for each bill that has been
successfully emailed, as appears in the screen below for client 0024.
2011 Tussman Programs, Inc.
Billing
325
If you have selected the option to email tagged bills, or to email all bills, the same dialog shown
above will pop up prior to sending, but it will not display or allow you to enter the email address as
the address will be different for each client. The program will automatically locate the correct
address for each client.
If one or more of the bills that you have selected to email has already been emailed (as
indicated by the icon appearing in the M column), the program will first pop up with a
question asking if you want to resend those bills that have already been sent. Answer yes or
no, as appropriate.
Please note that when you click the SEND button as described above the program
automatically generates the selected bill(s) in the form of PDF file(s), attaches each file to an
email and sends it to the client. You do not have to generate the PDF files yourself (although
you can generate a bill to a PDF file for other purposes if desired, as described elsewhere in
this manual). Each file is assigned a name consisting of the client ID, followed by the matter
ID (if the email is just for one matter), followed by the statement date of the bill and the letters
INV.PDF; for example, 0024.01_041910INV.PDF. These files are stored in the folder you
specified in the setup screens as described above. Note that if the folder names you entered
in each of those two spaces do not match exactly, the program will not be able to find and
send the files and you will get an error message stating that the file cannot be found.
Also note that if you have made any changes to the bill (for example, editing or deleting
charges that appeared on the bill) after it was generated but before you email it, the bill that is
2011 Tussman Programs, Inc.
326
Tussman Program Release 10
emailed will reflect the changes.
Email Log
If you are emailing more than one bill (i.e, if you selected any option other than emailing the
highlighted bill), when finished the program will display a list of the emails that have been
sent. You can print this list, if desired, by clicking the printer icon at the bottom. You can
view a comprehensive list of sent emails at any time by selecting the Email Log option from
the menu that appears when you click the Email button on the New Bills Awaiting
Finalization screen. From the Email Log screen you can also resend an individual email at
any time by highlighting the one you want and clicking the Resend button at the bottom, as
long as you have not checked the setup option to delete the PDF files after each email has
been sent. If you doubleclick on any email on the list, a dialog will display the full subject
and text of the email message.
You can view an Email Log for an individual client by going to the client screen, clicking on
the email icon button to the right of the Email space, and then clicking on the Log button at
the bottom of the send dialog that comes up.
Sending an Email to a Client
You can also use the email function to send an email message to a client by bringing up the
client's record and clicking on the email icon button to the right of the Email space. Enter a
subject and message and click the SEND button. These emails will also appear on the email
log. Since you can change the email address when preparing the email, you can actually use
this function to send an email to anyone by just clicking on the email button on any client's
screen.
You can also send bulk emails to all or selected clients.
17.17 Electronic Billing
The Tussman Program can generate bills in a variety of special formats that may be required by some
of your clients. These bills are submitted electronically, either by email or by uploading to a website,
and are read by a computer program that analizes each bill prior to approving it for payment. These
clients usually require you to use the Uniform Task-Based Management System set of task codes,
activity and cost codes, which can be automatically imported into Tussman as described in the
sections on Task Codes, Activity Codes and Cost Codes. Tussman currently supports the following
formats.
LEDES (1998B format)
Tymetrix
LItigation Advisor
2011 Tussman Programs, Inc.
Billing
327
Legalgard
PALS-FM
If you are required to submit the bills in a different format, or are not sure which format to use, please
contact us:
17.17.1 LEDES
The LEDES 1998B format is the most widely used method of submitting bills in electronic format.
Generating bills in this format using The Tussman Program is very easy. To do this, you must first
purchase a code from us that enables you to access this function in the program. Once you have
purchased the code, you can generate bills in LEDES format as follows:
1. You must first make sure you have correctly entered your list of Staff Members. LEDES usually
requires that the name of each staff member be entered with the last name first, followed by a comma,
followed by the first name. Thus, the name of staff member John Smith must be entered in your
Staff Member file as Smith, John. You must also assign a category code to each staff member.
These codes must be one of the accepted LEDES codes: PT for Partner, AS for Associate, LA for
Legal Assistant, or OT for Other Timekeeper. You must assign one of these codes as the Category
Code to each Staff Member, and these Category Codes must be entered, with their description as
shown above, in the Tussman Staff Categories file.
2. When setting up your matters for each LEDES client, you must always enter in the same space in
each matter screen the Client Matter ID which was assigned by your client to that matter. This is not
the same as the matter ID which is used in Tussman, but could be a claim number or other identifying
reference assigned by your client to the matter. You can enter this ID in either the Short Matter Title
space, or any of the five lines of the Matter Title, but if it is entered in any of the lines of the Matter
Title it must always be the same line. In the unsual case where your client does not assign a Client
Matter ID, you can omit this information.
3. When entering fee and cost charges, you must enter for each charge that is being billed to a
LEDES client the correct Task Code and the correct Activity or Cost Code from the UTBMS (Uniform
Task-Based Management System) list of codes. The uniform code sets can be imported automatically
into Tussman as described in the sections on Task Codes, Activity Codes, and Cost Codes. You can
configure the program to require a task code when entering charges for a specific matter by going to
that matter, clicking on the Z button and entering Y. The program will then give you the option of
applying that setting to all matters for that client. Or, you can require entry of a task code for all
matters by setting option 6 in the Data Entry Options screen to R. In either case, for the task code
space to be operative in the data entry screen when entering new charges, option 6 must not be set to
N.
If you want to include nonbillable time in the LEDES bill, you must configure the program to assign a
dollar amount to the nonbillable time (click on Setup, Data Entry Options, and set item 7 to Y). That
way in the LEDES bill those entries will show the billing rate and hour amount, but that amount will also
show as an adjustment to that line item, thereby reducing the billed amount to 0.00. Otherwise the rate
and amount will just show as 0.00 with no adjustment and the invoice will not be accepted.
4. Before generating an electronic bill in the LEDES format, you must first generate it in the normal
way you generate bills using Tussman, so that the record of that bill appears in your list of new bills.
Do not finalize the bill at this point. Instead, click the Bills icon on the Control Panel and verify that the
bill or bills that you want to generate in the LEDES format appear in the list.
5. After verifying that the bill or bills you want to generate in LEDES format appear on the list, click on
the Special Reports button at the top of the list and select LEDES from the menu. The following
dialog will appear:
2011 Tussman Programs, Inc.
328
Tussman Program Release 10
Fill in the information as follows:
Law Firm ID - Enter here you firm's Federal Taxpayer ID number. This is required or the submission
will be rejected.
Inv Start Date and End Date - Enter the beginning and ending dates of the billing period for this
invoice. This information is required.
Optional Prefix for Invoice Number - The program will automatically insert the invoice number into
the LEDES bill. If you want to add a prefix of some sort to the invoice number, enter it here.
Alternatively, you can add the Matter ID as a prefix by entering the # symbol in this space. If you want
a dash separating the Matter ID and the invoice number entre # followed by a hyphen, #-.
Invoice Description - Enter an optional description for this invoice. This is not required. If you type a
pound sign (#) in this space, the program will automatically use the first line of the matter title as the
invoice description. If you check the Liberty Mutual Format box, the program will automatically insert
the text from the Matter Notes for each matter.
Client ID - Enter the client ID of the client you are generating a bill or bills for, or leave this space blank
to use the Tussman Program client ID. Normally this space should be left blank.
2011 Tussman Programs, Inc.
Billing
329
Location of Client Matter ID - The Client Matter ID is the identifying number or reference assigned by
your client to each matter, as described in 2 above. Select the location of this information from the
drop down menu. You can also specify that you want this information left blank, but that would be
unusual as normally this information is required, unless your client did not assign an ID to each matter.
Failure to properly enter the Client Matter ID, and complete this item to indicate where it is
found, is the most common reason for rejection of a LEDES submission.
Password - Enter here the password you received to access this function.
Path for Files - Enter here an optional path to a separate folder where you want the files containing
the LEDES bills to be saved. For example, to create them in a folder called LEDES on drive C, enter
C:\LEDES. The folder name may be no more than eight characters and the folder must already exist.
If you leave this space blank, the files will be created in the Tussman folder. This path is used only
when you select the Generate for all Tagged Bills option, described below.
Generate for all Tagged Bills - If you check this box, the program will generate LEDES bills for all the
matters that you have tagged in your list of new bills (tagged bills will have a check mark in the first
column of the list. You can tag a bill by just clicking on it, or click the Tag button at the top for other
tagging options). A separate file will be created containing each bill. Each file will be assigned a name
consisting of the client ID followed by an underscore character followed by the matter ID. The file
extensions will consist of the month and year that the bill is generated in the format MMY. Thus, a bill
for client ANDERSON and matter 001 generated in December 2004 will be named
ANDERSON_001.124
6. After completing the above information, click OK to continue. Unless you checked the Generate All
Bills option, you will next be asked to enter the client and matter ID of the file that you want to generate
a LEDES bill for. The program will automatically insert the client and matter ID of the bill that is
highlighted on the List New Bills screen, but you can change it if necessary. To generate a bill for a
single matter, enter both the client and matter IDs. To generate a single LEDES bill which includes all
the matters for a single client, enter just the client ID, leaving the matter blank.
7. Unless you selected the Generate All Bills option, a standard Windows dialog will appear where
you can specify the file name and location where you want the LEDES bill saved. The file name will
default to client ID followed by an underscore followed by the matter ID, with an extension consisting of
the month and year that the bill is generated in the format MMY. The folder will default to the Tussman
Program folder. You can change the file name and folder if desired.
8. After generating the LEDES bill, a file containing the LEDES bill will appear in the folder you
specified in 7 above or, if you selected the Generate All Bills option, the files will appear in the folder
specified in the Path for Files space. You can then attach these files to an email for submission to
your LEDES bill processor, or you can upload them to a website per instructions from your client.
Note that if a LEDES submission is rejected, the most common reason is failure to specify where the
Client Matter ID is located. The Client Matter ID is the ID assigned by the carrier and must be entered
by you somewhere in the matter screen, as described in the setup instructions above. Note that when
filling out the matter profile on the website for the LEDES processor, you will also have to enter what
they call the "Law Firm Matter ID". This is the ID you assigned to the matter and consists just of the
matter ID itself, not including the client ID or any other information.
9. After generating the LEDES bill, and receiving confirmation that it has been accepted by your client,
you can then finalize the bill or bills in the normal way.
If for some reason you need to re-generate a LEDES bill after it has been finalized, you can do this
using the Reprint Finalized Bills function. To do this click Bills from the Main Menu, select Reprint
Finalized Bills, then select the option to Reprint Bills for One Client or Matter, enter the Client and
matter IDs and click OK. Highlight the bill you want to regenerate and click the Select One button.
Then click the LEDES button at the bottom and the LEDES screen will appear. Continue as described
2011 Tussman Programs, Inc.
330
Tussman Program Release 10
starting in step 5 above. You can use this procedure if, for example, your LEDES bill is rejected
because you failed to assign codes to each of the charges. Simply locate the billed charges (go to the
account status screen for that client or matter and click on Browse Billed Charges), make the
changes you need, and then regenerate the LEDES bill as described beginning in step 4 above. Note
that if you need to delete or add charges, or change the dollar amounts, you will have to unfinalize the
bill and generate it again as if you were doing it for the first time).
17.17.2 Tymetrix
Tymetrix is a firm that processes billling invoices either in its own format or in LEDES format. If you
are required to submit electronic invoices to Tymetrix, you must determine first if they are to be in the
LEDES format, or in the proprietary Tymetrix format. This section describes the procedures for
preparing bills in the Tymetrix format.
Before preparing bills in the Tymetrix format, certain information about each case must be entered in
the matter screen for each matter as follows:
1. The Plaintiff's name must be entered in the first line of the Matter Title;
2. The Defendant's name must be entered in the second line of the Matter Title;
3. The Claim Number or case number assigned by your client must be entered in the third line of the
Matter Title. This should normally be an eleven character number.
4. The name of the Insured should be entered in the fourth line of the Matter Title;
5. The name of the Plaintiff's Attorney or Firm must be entered in the fifth line of the Matter Title
6. The name of the Contact Person who receives the bill must be entered in the first line of the
Billing Address for each matter (click on the l Address button in the matter screen);
7. The Street Address where the bill is to be sent must be entered on the second line of the Billing
Address;
8. The City, State and Zip Code where the bill is to be sent must be entered on the third line of the
Billing Address;
9. The code for the staff member in your firm who is the Responsible Attorney for the case must be
entered in the Responsible Atty space in the matter screen. You must add each staff member who
will be listed as a responsible attorney to your list of responsible attorney codes, with their full name as
the description, by clicking on Productivity Codes from the Codes menu and selecting Responsible
Attorney Codes;
10. The Date the case was opened at your firm must appear in the Date Opened space in the matter
screen;
11. If the next bill is to be a Final billing, enter the code FIN in the Department code space in the
matter screen. To do this, you must add the code FIN to your list of Department Codes (click on
Productivity Codes from the Codes menu, then click on Department Codes). If the Department
Code space does not contain the code FIN, the program assumes the next bill is to be an Interim
billing;
In addition to the above matter information, you must also assign to each Staff Member a
Category Code, making sure that these Category Codes are added to your list of Category Codes with
the appropriate description for each category. You must create the following separate categories. The
codes can be of your choice, but the description for each category must read as follows:
Partner
Associate
Paralegal
Other Counsel
Other Staff
In your list of Staff Categories, you must also specify which of those categories consist of persons who
are not actual attorneys by adding an asterisk at the end of the description for that category. For
2011 Tussman Programs, Inc.
Billing
331
example, the description for the Paralegal category should read "Paralegal*".
When entering charges for files that are to be billed in the Tymetrix format, you must assign both a
Task Code and an Activity or Cost Code from the Uniform Task-Based Managment System set of
codes. These codes can be imported into Tussman automatically as described in the sections on
Task Codes, Activity Codes, and Cost Codes. You can configure the program to require a task code
when entering charges for a specific matter by going to that matter, clicking on the Z button and
entering Y. Or, you can require entry of a task code for all matters by setting option 6 in the
Data Entry Options screen to R. In either case, for the task code space to be operative in the data
entry screen when entering new charges, option 6 must not be set to N.
The cost code which you use when entering copy charges (code E101) must be assigned a unit
charge that does not exceed $.10 per copy, as described in the section on Cost Codes. When
recording copy charges for matters billed using Tymetrix, be sure to use that cost code and always
specify the number of copies in the Units space.
Before generating an electronic bill in the Tymetrix format, you must first generate it in the normal way
you generate bills using Tussman, so that the record of that bill appears in your list of new bills. Do
not finalize the bill at this point. Instead, to generate the Tymetrix bill, click the
button on
the Control Panel and verify that the bill or bills that you want to generate in the Tymetrix format appear
in the list.
After verifying that the bill or bills you want to generate in Tymetrix format appear on the list, click on
the Special Reports button at the top of the list and select Tymetrix from the menu. The following
dialog will appear:
2011 Tussman Programs, Inc.
332
Tussman Program Release 10
Fill in the information in the above screen as follows:
Law Firm Tax ID Number - You must include the dash as shown in the above example;
Law Firm Name - Enter the name of your firm;
Law Firm Address - Enter the street address of your firm;
Law Firm City - Enter the city where your firm is located;
State - Enter the state where your firm is located;
Zip - Enter the zip code where your firm is located;
Law Firm Telephone - Enter your firm's telephone number;
Law Firm Tax - Enter your firm's fax number;
Client's Name - Enter the name of your client for whom you are submitting the Tymetrix bill (note that
the name of the contact person at your client is entered in the matter screen as described in item 6
above);
2011 Tussman Programs, Inc.
Billing
333
Location of Insured Name - Select from the drop down menu the location in each matter screen
where the name of the insured can be found. This must be consistent in each matter screen for which
you are generating Tymetrix bills. Normally this should be entered in Line 4 of the Matter Title, since
that line is not used for other purposes;
client ID - To generate Tymetrix bills for all of the matters in your list of new bills, leave this space
blank, and also leave the matter ID and Matter Location blank. Otherwise, enter the Tussman
Program client ID to generate bills for that client only, leaving the client ID and Matter Location blank.
The program will then generate bills for all matters for that client which appear in the list of new bills.
matter ID - To generate a Tymetrix bill for a single matter, enter the Tussman Program matter ID in
addition to the client ID as described above, and leave the Matter Location space blank. To generate
the bill, a bill for that matter must appear in the list of new bills.
Matter Location - Instead of entering a client and matter ID as described above, you can generate
Tymetrix bills for several different clients by assigning all matters for those clients the same Location
code (the Location code is one of the Productivity Codes that can be assigned to each matter). To
generate bills for those clients, leave the client ID and matter ID space blank and enter just that
Location Code in the Matter Location space. The program will then generate Tymetrix bills for all
matters appearing in the list of new bills which are assigned that Location Code, regardless of what
client ID is assigned to those matters.
Invoice Start Date - Enter the beginning date of the time period for this billing cycle;
Invoice End Date - Enter the ending date of the time period for this billing cycle;
Directory Where File is to be Created - Enter an optional path to a folder where you want the files
containing the Tymetrix files to be saved. If you leave this space blank, the files will be saved in the
Tussman Program folder. To save them in a different folder, enter the drive and folder name. For
example, to save them in a folder named Tymetrix on your C drive, enter C:\TYMETRIX. The folder
name must be no more than eight characters, and the folder must already exist.
Password - Enter the password you received from Tussman Programs for access to this function;
Click OK to generate the Tymetrix bills. A dialog will then appear displaying the name of the file that
will be created containing the bill. The file name is in a special format required by Tymetrix, so do not
change the name unless you know what you are doing. The name should not be more than eight
characters plus a three character extension. Regardless of how many matters you are generating bills
for, all the information will be included in a single file with that name, which will be found in the
Tussman folder or in the folder which you specified in the Directory space as described above. After
the file has been saved, you can then submit it to Tymetrix by attaching the file to an email or uploading
it to their website following the instructions you received from Tymetrix.
After generating the Tymetrix bill, and receiving confirmation that it has been accepted by your client,
you can then finalize the bill or bills in the normal way. There is no way to generate a Tymetrix bill if
the bill has already been finalized (unless you unfinalize that bill), so do not finalize your Tymetrix bills
until you are sure they have been accepted.
17.17.3 Litigation Advisor
Tussman can generate electronic bills in the format required by the LitigationAdvisor system as
described in this section. To use this function, you must first purchase a code from us. Then proceed
as follows:
1. For each matter that you will be billing using the LitigationAdvisor format, you must enter certain
information in specific spaces in the matter screen, as follows:
2011 Tussman Programs, Inc.
334
Tussman Program Release 10
Matter Name - Enter the case name in the first line of the Matter Title;
Claim Number - Enter the claim number assigned by your client in the second line fo the
Matter Title
Claim Representative - Enter the Claim Representative's name, number or code as specified
by your client in line three of the Matter Title;
Matter ID Number - Enter the Matter ID Number assigned by the LitigationAdvisor system in
line four of the Matter Title. This does not have to be entered for the INITIAL invoice.;
Additional information must be entered if you are submitting bills for Nationwide or Chubb, as
described in separate sections at the end of this topic.
2 When entering charges for files that are to be billed in the LitigationAdvisor format, you must assign
both a Task Code and an Activity or Cost Code from the Uniform Task-Based Managment System
set of codes. These codes can be imported into Tussman automatically as described in the sections
on Task Codes, Activity Codes, and Cost Codes. You can configure the program to require a task
code when entering charges for a specific matter by going to that matter, clicking on the Z button and
entering Y. Or, you can require entry of a task code for all matters by setting option 6 in the
Data Entry Options screen to R. In either case, for the task code space to be operative in the data
entry screen when entering new charges, option 6 must not be set to N.
3. Before generating an electronic bill in the LitigationAdvisor format, you must first generate it in the
normal way you generate bills using Tussman, so that the record of that bill appears in your
list of new bills. Do not finalize the bill at this point. Instead, to generate the LitigationAdvisor bill, click
the
button on the Control Panel and verify that the bill or bills that you want to generate in
the LitigationAdvisor format appear in the list.
After verifying that the bill or bills you want to generate in LitigationAdvisor format appear on the list,
click on the Special Reports button at the top of the list and select LitigationAdvisor from the menu.
The following dialog will appear:
2011 Tussman Programs, Inc.
Billing
335
Division - Enter the name of the insurance company (your client) that you are billing;
Division Office - Enter the insurance company office location (i.e., the city and state);
Law Firm Name - Enter the name of your firm;
Law Firm Office - Enter the location of your office (i.e., the city and state);
Law Firm Tax ID - Enter your firm's federal tax ID number;
Invoice Sequence - Select from the drop down menu the invoice sequence; either INITIAL (for the
first bill), INTERIM (subsequent bills), FINAL (the final bill), FIRST/FINAL, or SUPPLEMENTAL.(used
when a previous bill was marked FINAL or FIRST/FINAL);
Location of Matter ID Number - Select from the drop down menu the location where in each matter
screen you have entered the Matter ID Number which was assigned by your client. Normally this will
appear in Matter Title Line 4, as described in 1 above, so select this option;
Extended Header Information - If you are submitted bills for Nationwide or Chubb, select that option
and note the special instructions for those carriers at the end of this section. Otherwise, select None.
Password - Enter here the password you were given by the Tussman Program to access this function;
2011 Tussman Programs, Inc.
336
Tussman Program Release 10
Directory - Enter an optional path to a folder where you want the files containing the LitigationAdvisor
files to be saved. If you leave this space blank, the files will be saved in the Tussman Program folder.
To save them in a different folder, enter the drive and folder name. For example, to save them in a
folder named Litad on your C drive, enter C:\LITAD. Folder names should not be more than eight
characters..
Generate for All Matters in List - If you check this box, the program will generate a LitigationAdvisor
bill for all the matters in your list of new bills. Normally this option should not be checked. If not
checked, the program will only generate a bill for the matter that is highlighted on the list.
4. Click OK to generate the bill. Unless you selected the option to generate bills for all matters in the
list, the program will ask you to confirm the client and matter you selected. You can select a different
one but that file must appear in your list of new bills. If you leave the matter space blank, the program
will generate bills for all matters for that client.
5. The program will then ask you to name the file that will be saved containing the LitigationAdvisor
bill, unless you are generating bills for more than one matter, in which case the program will generate a
separate file for each matter and will assign each file a name consisting of the first four characters of
the client ID followed by the first four characters of the matter ID, with an extension consisting of the
month and the last digit of the year. Do not assign a name of more than eight characters plus a three
character extension; for example, BILL.TXT, and do not add a drive or path designation. The file will
be saved in the folder you specified in the Directory space described in 3 above.
6. After generating the LitigationAdvior bills, a file or files containing the bills will appear in the folder
you specified in 3 above. You can then attach these files to an email for submission to your
LitigationAdvisor bill processor, or you can upload them to a website per instructions from your client.
7. After generating the LitigationAdvisor bill, and receiving confirmation that it has been accepted by
your client, you can then finalize the bill or bills in the normal way. There is no way to generate a
LitigationAdvisor bill if the bill has already been finalized (unless you unfinalize that bill), so do not
finalize your LitigationAdvisor client bills until you are sure they have been accepted.
Additional Instructions for Nationwide Clients
If you are submitting LitigationAdvisor bills for Nationwide, in addition to following the above instructions
you must enter additional information about each matter in the matter screen. That information,
described below, must be typed into the Notes are of each matter (by clicking on the Notes button).
You must begin typing the information in the first space of the Notes area, and each item of
information described below, including the last item, must be followed by a semicolon (";"). The
information you must enter is as follows:
Claim Rep Name - The name, number or code assigned to your Claim Representative by the
carrier, with last name first followed by first name and middle initial;
Date of Loss - The date of loss in the format MM/DD/YY;
Line of Business - A two character code selected from a chart provided in the LitigationAdvisor
instructions you received from your carrier
Coverage Code - A code selected from a chart provided in the instructions from your carrier;
Policyholder's Name - The name of the primary insured with last name first, followed by first
name and middle initial;
Claimant Name - The name of the person who suffered loss (plaintiff name), with last name
first followed by first name and middle initital
Claimant ID - The Claimant ID assigned by Nationwide;
Suit Type - A three letter code describing the area of law selected from a list provided by
Nationwide.
State - If you are also required to specify the state where the litigation was filed, add that as the
last item.
2011 Tussman Programs, Inc.
Billing
337
An example of how the above information might look when typed into the Notes space is as follows:
Jones,John;12/30/01;C3;COLL;Smith,John;Anderson,Bill;N/A1;CCL;CA;
In addition to the above information, you must also enter the staff code of the person in your firm
responsible for the case in the Responsible Attorney space in the matter screen.
Additional Instructions for Chubb Clients
If you are submitting LitigationAdvisor bills for Chubb, in addition to following the above instructions you
must enter additional information about each matter in the matter screen. That information, described
below, must be typed into the Notes are of each matter (by clicking on the Notes button). You must
begin typing the information in the first space of the Notes area, and each item of information
described below, including the last item, must be followed by a semicolon (";"). The information you
must enter consists of Invoice Header items 15-25, as described in detail in the LitigationAdvisor
instructions you received from your carrier, as follows:
Date of Loss/Claims-Made Date - In format MM/DD/YY;
Occurrence ID - Enter 100%
Line of Business - From a chart supplied by the carrier;
Insured Name The name of your insured with last name first followed by first name and middle
initial;
Claimant's Name - Last name first;
Date Suit Petition Filed/Hearing - Format MM/DD/YY;
Jurisdiction Type - F for Federal or S for State;
Jurisdiction State- The two character state abbreviation;
Jurisdiction County/District
Opposing Law Firm
Shared Percentage - Enter 100
17.17.4 Legalgard
The procedures for generating an electronic bill in the Legalgaad format are very similar to those for
generating a Legalgard bill. You must first obtain a code from us giving you access to this function.
Generate a Legalgard bill as follows:
1. For each matter that you will be billing using the Legalgard format, you must enter certain
information in specific spaces in the matter screen, as follows:
Matter Name - Enter the case name in the first line of the Matter Title;
Claim Number - Enter the claim number assigned by your client in the second line fo the
Matter Title
Claim Adjuster - Enter the Claim Representative's name, number or code as specified by your
client in line three of the Matter Title;
Additional information must be entered in the Notes area of the matter screen by clicking on the Notes
button. You must begin typing the information in the first space of the Notes area, and each item of
information described below, including the last item, must be followed by a semicolon (";"). The
2011 Tussman Programs, Inc.
338
Tussman Program Release 10
information you must enter is as follows:
Date of Loss - In format MM/DD/YY
Insured's Name
Claimant's Name
Date Suite Petition Filed - in format MM/DD/YY
Jurisdiction Code - F for Federal, S for State
Loss Type Code - from list provided by your carrier
Opposing Counsel Name
Opposing Law Firm Name
2 When entering charges for files that are to be billed in the Legalgard format, you must assign both a
Task Code and an Activity or Cost Code from the Uniform Task-Based Managment System set of
codes. These codes can be imported into Tussman automatically as described in the sections on
Task Codes, Activity Codes, and Cost Codes. You can configure the program to require a task code
when entering charges for a specific matter by going to that matter, clicking on the Z button and
entering Y. Or, you can require entry of a task code for all matters by setting option 6 in the
Data Entry Options screen to R. In either case, for the task code space to be operative in the data
entry screen when entering new charges, option 6 must not be set to N.
3. Before generating an electronic bill in the Legalgard format, you must first generate it in the normal
way you generate bills using Tussman, so that the record of that bill appears in your list of new bills.
Do not finalize the bill at this point. Instead, to generate the Legalgard bill, click the
button
on the Control Panel and verify that the bill or bills that you want to generate in the Legalgard format
appear in the list.
After verifying that the bill or bills you want to generate in Legalgard format appear on the list, click on
the Special Reports button at the top of the list and select Legalgard from the menu. The following
dialog will appear:
2011 Tussman Programs, Inc.
Billing
339
Division - Enter the name of the insurance company (your client) that you are billing;
Division Office - Enter the insurance company office location (i.e., the city and state);
Law Firm Name - Enter the name of your firm;
Law Firm Office - Enter the location of your office (i.e., the city and state);
Law Firm Tax ID - Not required for Legalgard bills;
Invoice Sequence - Not required for Legalgard bills;
Location of Matter ID Number - Not required for Legalgard bills;
Extended Header Information - Select the Nationwide option;
Password - Enter here the password you were given by the Tussman Program to access this function;
Directory - Enter an optional path to a folder where you want the files containing the Legalgard files to
be saved. If you leave this space blank, the files will be saved in the Tussman Program folder. To
save them in a different folder, enter the drive and folder name. For example, to save them in a folder
named Legal on your C drive, enter C:\LEGAL Folder names should not be more than eight
2011 Tussman Programs, Inc.
340
Tussman Program Release 10
characters, and that folder must already exist...
Generate for All Matters in List - If you check this box, the program will generate a Legalgard bill for
all the matters in your list of new bills. Normally this option should not be checked. If not checked, the
program will only generate a bill for the matter that is highlighted on the list.
4. Click OK to generate the bill. Unless you selected the option to generate bills for all matters in the
list, the program will ask you to confirm the client and matter you selected. You can select a different
one but that file must appear in your list of new bills. If you leave the matter space blank, the program
will generate bills for all matters for that client.
5. The program will then ask you to name the file that will be saved containing the Legalgard bill,
unless you are generating bills for more than one matter, in which case the program will generate a
separate file for each matter and will assign each file a name consisting of the first four characters of
the client ID followed by the first four characters of the matter ID, with an extension consisting of the
month and the last digit of the year. Do not assign a name of more than eight characters plus a three
character extension; for example, BILL.TXT, and do not add a drive or path designation. The file will
be saved in the folder you specified in the Directory space described in 3 above.
6. After generating the LitigationAdvior bills, a file or files containing the bills will appear in the folder
you specified in 3 above. You can then attach these files to an email for submission to your Legalgard
bill processor, or you can upload them to a website per instructions from your client.
7. After generating the Legalgard bill, and receiving confirmation that it has been accepted by your
client, you can then finalize the bill or bills in the normal way. There is no way to generate a Legalgard
bill if the bill has already been finalized (unless you unfinalize that bill), so do not finalize your Legalgard
client bills until you are sure they have been accepted.
17.17.5 PALS-FM
Tussman can generate electronic bills in the format required by the PALS-FM system as described in
this section. To use this function, you must first purchase a code from us. Then proceed as follows:
1. When entering charges for files that are to be billed in the PALS-FM format, you must assign both a
Task Code and an Activity or Cost Code from the Uniform Task-Based Managment System set of
codes. These codes can be imported into Tussman automatically as described in the sections on
Task Codes, Activity Codes, and Cost Codes. You can configure the program to require a task code
when entering charges for a specific matter by going to that matter, clicking on the Z button and
entering Y. Or, you can require entry of a task code for all matters by setting option 6 in the
Data Entry Options screen to R. In either case, for the task code space to be operative in the data
entry screen when entering new charges, option 6 must not be set to N.
2. You must assign to each staff member in your Staff Member file a category code.. These codes
must be one of the accepted PALS-FM codes: PT for Partner, AS for Associate, OC for Of Counsel,
LA for Legal Assistant, or OT for Other Timekeeper. You must assign one of these codes as the
Category Code to each Staff Member, and these Category Codes must be entered, with their
description as shown above, in the Tussman Staff Categories file.
3. Before generating an electronic bill in the PALS-FM format, you must first generate it in the normal
way you generate bills using Tussman, so that the record of that bill appears in your list of new bills.
2011 Tussman Programs, Inc.
Billing
341
Do not finalize the bill at this point. Instead, to generate the PALS-FM bill, click the
button
on the Control Panel and verify that the bill or bills that you want to generate in the PALS-FM format
appear in the list.
After verifying that the bill or bills you want to generate in PALS-FM format appear on the list, click on
the Special Reports button at the top of the list and select PALS-FM from the menu. The following
dialog will appear:
Inv. Start Date - Enter the beginning date of the billing cycle;
End Date - Enter the ending date of the billing cycle;
Bill Description Enter an optional description of the bill
Password - Enter the password you received from Tussman for access to this function;
Path for Files - Enter an optional path to a folder where you want the files containing the PALS-FM
files to be saved. If you leave this space blank, the files will be saved in the Tussman Program folder.
To save them in a different folder, enter the drive and folder name. For example, to save them in a
folder named Pals on your C drive, enter C:\PALS. Folder names should not be more than eight
characters.. The folder must already exist for this to work.
Generate all files - If you check this box, the program will generate a PALS-FM bill for all the matters
in your list of new bills. Normally this option should not be checked. If not checked, the program will
only generate a bill for the matter that is highlighted on the list.
4. Click OK to generate the bill. Unless you selected the option to generate bills for all matters in the
list, the program will ask you to confirm the client and matter you selected. You can select a different
2011 Tussman Programs, Inc.
342
Tussman Program Release 10
one but that file must appear in your list of new bills. If you leave the matter space blank, the program
will generate bills for all matters for that client.
5. The program will then ask you to name the file that will be saved containing the PALS-FM bill,
unless you are generating bills for more than one matter, in which case the program will generate a
separate file for each matter and will assign each file a name consisting of the first four characters of
the client ID followed by the first four characters of the matter ID, with an extension consisting of the
month and the last digit of the year. Do not assign a name of more than eight characters plus a three
character extension; for example, BILL.TXT, and do not add a drive or path designation. The file will
be saved in the folder you specified in the Directory space described in 3 above.
6. After generating the bills, a file or files containing the bills will appear in the folder you specified in 3
above. You can then attach these files to an email for submission to your PALS-FM bill processor, or
you can upload them to a website per instructions from your client.
7. After generating the PALS-FM bill, and receiving confirmation that it has been accepted by your
client, you can then finalize the bill or bills in the normal way. There is no way to generate a PALS-FM
bill if the bill has already been finalized (unless you unfinalize that bill), so do not finalize your PALS-FM
client bills until you are sure they have been accepted.
Additional Instructions for Nationwide Clients
If you are submitting LitigationAdvisor bills for Nationwide, in addition to following the above instructions
you must enter additional information about each matter in the matter screen. That information,
described below, must be typed into the Notes are of each matter (by clicking on the Notes button).
You must begin typing the information in the first space of the Notes area, and each item of
information described below, including the last item, must be followed by a semicolon (";"). The
information you must enter is as follows:
Claim Rep Name - The name, number or code assigned to your Claim Representative by the
carrier, with last name first followed by first name and middle initial;
Date of Loss - The date of loss in the format MM/DD/YY;
Line of Business - A two character code selected from a chart provided in the LitigationAdvisor
instructions you received from your carrier
Coverage Code - A code selected from a chart provided in the instructions from your carrier;
Policyholder's Name - The name of the primary insured with last name first, followed by first
name and middle initial;
Claimant Name - The name of the person who suffered loss (plaintiff name), with last name
first followed by first name and middle initital
Claimant ID - The Claimant ID assigned by Nationwide;
Suit Type - A three letter code describing the area of law selected from a list provided by
Nationwide.
An example of how the above information might look when typed into the Notes space is as follows:
Jones,John;12/30/01;C3;COLL;Smith,John;Anderson,Bill;N/A1;CCL;
In addition to the above information, you must also enter the staff code of the person in your firm
responsible for the case in the Responsible Attorney space in the matter screen.
Additional Instructions for Chubb Clients
If you are submitting LitigationAdvisor bills for Chubb, in addition to following the above instructions you
must enter additional information about each matter in the matter screen. That information, described
below, must be typed into the Notes are of each matter (by clicking on the Notes button). You must
begin typing the information in the first space of the Notes area, and each item of information
2011 Tussman Programs, Inc.
Billing
343
described below, including the last item, must be followed by a semicolon (";"). The information you
must enter consists of Invoice Header items 15-25, as described in detail in the LitigationAdvisor
instructions you received from your carrier, as follows:
Date of Loss/Claims-Made Date - In format MM/DD/YY;
Occurrence ID - Enter 100%
Line of Business - From a chart supplied by the carrier;
Insured Name The name of your insured with last name first followed by first name and middle
initial;
Claimant's Name - Last name first;
Date Suit Petition Filed/Hearing - Format MM/DD/YY;
Jurisdiction Type - F for Federal or S for State;
Jurisdiction State- The two character state abbreviation;
Jurisdiction County/District
Opposing Law Firm
Shared Percentage - Enter 100
17.17.6 CCIC
In order to generate bills in the CCIC format, you must first make sure you have entered your Tax ID
Number into the program by clicking on Setup, Change Firm Name, and entering it in the space
provided.
1. You must also make sure you have correctly entered your list of Staff Members and you must
assign one of the following category codes to each staff member:
P = Partner
A = Associate
PA = Paralegal (this will be expanded to read PARA in the CCIC submission)
Click on Setup, Staff Members, and click on each staff member to assign the category codes.
2. When setting up your matters for each CCIC, you must always enter in Line 2 of the Matter Title
the claim number as you want it to appear in the CCIC submission.
3. When entering fee charges, make sure you assign the correct staff code and that each staff
member has been assigned a category code as described in 1 above. You do not need to enter a
Task or Activity Code. When entering costs make sure you enter one of the following Cost Codes:
C = Copies
CR = Court Reporter
F = Fax
FF = Filing Fees
MED = Medical Records
OT = Other
You must make sure you have added the codes listed above to your list of Cost Codes. Click on
2011 Tussman Programs, Inc.
344
Tussman Program Release 10
Setup, Cost Codes, to do this.
4. Before generating an electronic bill in the CCIC format, you must first generate it in the normal way
you generate bills using Tussman, so that the record of that bill appears in your list of new bills. Do
not finalize the bill at this point. Instead, cllick the
button on the Control Panel and verify
that the bill or bills that you want to generate in the CCIC format appear in the list.
5. Highlight the bill that you want to generate in the CCIC format and click on the Special Reports
button at the top of the list and select CCIC from the menu. The program will display the file you
selected. If you have multiple matters for that client and want them all included in a single submission,
blank out the matter space so that just the client ID appears.
7. A standard Windows dialog will appear where you can specify the file name and location where
you want the CCIC bill saved. Select the folder where you want the file saved and then make up a
name for the file in the space provided.
8. After generating the CCIC bill, a file containing the bill will appear in the folder you specified in 7
above. You can then attach the file to an email for submission or you can upload them to a website per
instructions from your client.
9. After generating the CCIC bill, and receiving confirmation that it has been accepted by your client,
you can then finalize the bill or bills in the normal way.
18
Reports
The Reports menu (click Reports from the Main Menu at the top) lists a variety of management
reports which can provide useful information for your firm. These reports, described in detail in the
following sections, include the following:
WIP Summary Report
Accounts Receivable Report
Receivable Analysis
Trust, Retainer and Credit Balances Report
File History and Status Report
Periodic Activity Summary
Productivity Reports
Billing Analysis Report
Income Analysis Report
Staff Earnings Analysis Report
Realization Analysis Report
Budget Analysis Report
In addition, there is a Custom Report function where you can select what information you want from a
list of items.
There are many other reports described elsewhere, including:
Client and Matter Lists
Lists of Charges, both billed and unbilled
2011 Tussman Programs, Inc.
Reports
345
Time at a Glance Reports
Cash Receipts Journals and other lists of AR Transactions
Billing Summary Reports
Retainer Application Reports
Audit Trail Reports
Lists of all of your code files
18.1
WIP Summary
The WIP Summary report shows you totals of all unbilled charges, including both fees and costs.
Totals can be compiled by client and matter, by date, by batch, or by staff member. This report is
useful if, for example, you want to review a list of all your files showing the total unbilled fees and costs
for each one, without having to generate actual prebills or more detailed lists itemizing all the charges.
If you prefer to see an itemized detail of unbilled charges, use the List Charges function instead.
This report normally shows the outstanding WIP balances as of the current date. If you want to
determine the balance of outstanding WIP as of a prior date, enter that date in the Show Totals as of
Prior Date space in the lower left of the dialog.
The report can be generated in two formats. In one, it shows in separate columns the number of
unbilled hours, the dollar amount of the unbilled fees, the unbilled costs, and the total of fees and
costs. In the other format, it shows an ageing breakdown of the total unbilled charges (fees and costs).
If you are doing the report as of a prior date it prints in a single format showing the fees, costs, and
total for each matter.
To generate a WIP Summary report, select WIP Summary from the Reports menu and select the
report options from the screen shown below:
Total By - Select whether you want to total the charges by Client and Matter, Date, Batch, or
Timekeeper (Staff Member).
Files Included - You can include charges for all files, or you can generate the report for a single client,
2011 Tussman Programs, Inc.
346
Tussman Program Release 10
matter, or group of selected files
Date Range - Leave the dates blank to include all unbilled charges, or specify a date range to include
only charges dated within that range. For example, if you only want to list unbilled charges for the
month of December, enter December 1 as the beginning date and December 31 as the ending date.
Show Totals as of Prior Date - Enter here a date if you want the report to show the WIP totals as of
that date. Leave it blank to show the balances as of the current date.
Options - Select the following report options:
Detail or Total Only - Enter D to show the total for each category, or T to show the grand total
only. This should always be set to D, unless for some reason you just want to see a quick
total of the unbilled charges on file, without breaking it down by client and matter, date,
batch or staff member..
Fees and Costs Separate - This option is not currently operational. Regardless of what you
enter here, the report will show fee and cost totals in separate columns, unless you select
the option to include ageing.
Include Ageing - Enter Y if you want to show ageing detail. The report will then break down the
total unbilled charges into three separate ageing buckets. Unbilled charges are aged by
counting the number of days between the date the service was rendered and the current
date. For example, if you recorded a charge dated June1 and you run the report on July 1,
that charge would appear in the over 30 column. If you choose to include the ageing detail,
then the totals shown on the report will include both fees and costs; you cannot both show
fees and costs in separate columns and include the ageing information at the same time.
Ageing Columns - Enter here the number of days for the three ageing columns, from left to
right in ascending order; for example, 30, 60 and 90.
Subtotal by Matter - If you are totalling the report by client/matter, enter Y if you want to show
subtotals for each matter, or N if you want to show just the total for each client.
Line Spacing - Enter 1, 2 or 3 depending on how many lines you want to skip between each
line item on the report.
Include Charges on Hold - Enter Y to include charges that are on hold in the totals, N to omit
charges on hold, and X to include only charges on hold. A charge is considered on hold if
there is a hold in the billing instructions for that matter, or if the transaction itself is on hold.
Include Nonbillable/Admin Time - Enter Y to include nonbillable and administrative time in the
Hours total. The Hours column only appears if you are not showing an ageing breakdown.
Show Date of Oldest Charge for Each Matter - For each matter it shows the date of the oldest
unbilled charge.
Staff Code - Enter a single staff code if you want the report to only include charges for that staff
member.
2011 Tussman Programs, Inc.
Reports
18.2
347
Accounts Receivable
The Accounts Receivable report shows the total amount your firm is owed by all or selected clients.
There are many options which determine the level of detail shown in the report, such as whether or not
it shows just the total amount owed for each client or matter, or whether it is broken down by category
of charge, by staff member or cost category, or by invoice. You can also include an ageing breakdown
showing how far past due each client or matter is. Normally the report shows your outstanding
receivables as of the current date, reflecting all payments and credits recorded through the current
date, but it is also possible to run the report as of a specified prior date. However, if you want balances
as of a prior date is is recommended instead that you use the Receivable Analysis Report.
The Accounts Receivable Report will only list files that have a balance due. It will not show files that
have a credit balance. To generate a report showing credit balances, use the
Trust, Retainer and Credit Balances Report. Or, to generate a single report that shows both files with
a balance due and those with credit balances, use the Custom Reports function or the
Periodic Activity Summary Report.
To generate an Accounts Receivable Report, select Accounts Receivable from the Reports menu
and select the options you want from the screen shown below:
Type of Report - Select the type of report as follows:
Client Totals Only - Shows the balance due for each client only, with no breakdown by matter;
Matter Totals Only - Shows the balance due for each matter, with no subtotal for each client;
Client and Matter Totals - Shows the balance due for each matter, with a subtotal for each
client;
Balances by Invoice - Generates the report in a completely different format, showing the
balance due from each outstanding invoice, sorted by invoice number, showing for each invoice
2011 Tussman Programs, Inc.
348
Tussman Program Release 10
the number, date, file ID, client name, and balance due. This is the only information which will
appear for each invoice, regardless of the selections you make in the Options section. Shown
below is an example of part of an Accounts Receivable Report generated in this format:
Files Included - You can print the report for all files, for a single client or matter, or for selected files.
Options - Select from the following options which determine the level of detail of the report. Some
examples appear at the end of this section:
Include Ageing - Enter Y to show in separate columns ageing detail, indicating what portion of
the balance for each file is past due the number of days specified in the three ageing buckets
below.
Buckets - Enter the number of days for the three ageing columns, starting at the left in
ascending order; for example, 30, 60 and 90.
Show Fee, Cost Interest and Tax Balances - Enter Y to show a breakdown for each file of the
balance due for each file between fees, costs, tax and interest. If you are not including the
ageing detail, this breakdown will appear in separate columns. If you are including the ageing
detail, a separate line item will appear for each client or matter showing the their total fee, cost,
interest and tax balance.
Show Balances by Invoice - Enter Y to show a breakdown of the balance due for each file by
invoice.
Show Balance by Staff Member and Cost Category - Enter Y to show a breakdown of the
balance due for each file by staff member and cost category.
Include Files with No Balance - Enter Y if you want to include all of your clients and matters in
the report, even if they have no balance due. Enter N to just list clients and matters with a
balance due.
Include Administrative Files - Enter Y to include matters where the fee arrangement is set to
Administrative. Since Administrative files are usually set up for internal purposes, and not for
regular clients, this should normally be set to N.
Include Collection Files - Enter Y to include files that are on collection status, N to omit them,
or X to list only files that are on collection status.. Collection status indicates that no further
charges can be recorded on a file, but that it remains open because there is still an outstanding
balance due. To check or change the collection status of a file, locate that matter. The file
status is shown in the upper right hand corner, above the Change File Status button, which you
can click to change the file status.
Include Files on Hold - Enter Y to include files that are on hold, N to omit them, or X to list
only files that are on hold.
Include Closed Files - Enter Y to include closed files, N to omit them, or X to list only closed
files.
2011 Tussman Programs, Inc.
Reports
349
List Files Past Due ___ Days - To list only clients or matters which are past due a specified
number of days, enter the number of days here. For example, if you want the report to show
only clients who are past due at least 30 days, enter 30. If you select this option, you should
also select the option to include the ageing detail, and one of the ageing buckets should
correspond to the number of days you enter here.
List Only if Balance Over $____ - To include only clients or matters with a balance due over a
certain amount, enter the amount here. For example, if you only want to include clients who
owe at least $1000.00, enter 1000.00.
Show Minimum Due Amount - This feature is not currently operational.
Show Last Payment - Enter Y to show for each client the date and amount of their most recent
payment. This information will appear only if you select Client and Matter Totals as the Type
of Report.
Include Phone Numbers - Enter Y to show each client's phone numbers,.or A to add the
client's address as well. This information appears only if you select Client and Matter Totals
as the Type of Report.
Show Date Billed through - Enter Y to show for each matter the ending cutoff date used on
the most recent bill. This date appears following the matter ID or title, or, if you are generating a
Client Totals Only report, following the client ID or name.
Include Client Name - Enter Y to include the full client name. The full client name will appear
anyway if you are generating a Client and Matter Totals report, and will not appear regardless
of this setting on a Matter Totals Only report. This option thus affects just the Client Totals
Only report.
Include Matter Title - Enter Y to include the matter title for each matter on the Matter Totals
Only or Client and Matter Totals report, or A to include the full 5 lines of the matter title.
Show Credit Balances - Enter Y to show the amount of any credit balance carried on each file.
This information will appear following
the client name or matter title depending on the type of report. Enter P to show only credit
balances created by payment (type P) transactions, not including credits from type Q
transactions.
Show Retainer Balances - Enter Y to show the amount of any retainer account balance carried
on each file.
Sort Order - You can sort the report by client ID, client alternate ID, or by responsible attorney. If
you select the responsible attorney option, the report will list the matters for each responsible attorney
separately beginning each one on a separate page. This is useful if you want to be able to give each
responsible attorney a list of their matters with outstanding balances. The responsible attorney sort
works only when running the Matter Totals Only or Client and Matter Totals report.
Report Date - This date defaults to today's date and should not be changed unless you specifically
want to run the report to show your receivables as of a prior date. If you do select a prior date, the
report will be accurate only if you enter N for the options to Show Balances by Invoice and to Show
Balance by Staff Member and Cost Category.
Report Samples
The samples shown below were all generating using the Client and Matter Totals option as the Type
of Report. For a simpler report, in which all the information for each client or matter is listed on a
2011 Tussman Programs, Inc.
350
Tussman Program Release 10
single line, select either the Client Totals Only or Matter Totals Only report, and select either the
Show Aging or Show Fee, Cost Int and Tax Balances option. Or, to print just one column showing
the total balance due, set both those options to N. The following examples show more detailed
information.
Below is a report showing just the breakdown between Fees, Costs, Interest and Tax for each matter.
To do this, set Show Fee, Cost, Int and Tax Balances to Y and set Show Aging to N, Show
Balances by Invoice to N, and Show Balance by Staff Member and Cost Category to N.
Below is the same report but instead of showing the breakdown between category of charge it shows
an ageing breakdown. To do this, set Show Ageing to Y and set the other options to N.
Below is the same report in which both the breakdown between fees, costs, tax and interest and the
ageing detail. Set Show Ageing and Show Fee, Cost, Int and Tax Balances to Y and the other
options to N.
Below is the same report shown above, but adding the Show Balance by Invoice option, and omitting
the Ageing detail. Note that each line shows the date of the invoice, the invoice number, and the
amount owed for fees, costs, interest and tax.
The following example is identical to the one above but adding the Balance by Staff Member and
Cost Category: Each invoice is listed, showing the date and invoice number, followed by a listing
2011 Tussman Programs, Inc.
Reports
351
showing either the staff code or cost code and the balance for each. The total column shows the total
for each invoice. The asterisks in the staff/cost code column for the second to last item indicate that a
cost was billed which was not assigned a cost code.
The sample shown below is the most detailed option in which all four detail settings are set to Y. In
addition to showing the ageing, it lists each invoice and for each invoice shows a breakdown by staff
member and cost category, giving a subtotal for each invoice if there are amounts outstanding for more
than one staff member and cost category.
18.3
Receivable Analysis
The Receivable Analysis Report shows for each client and matter a list of each outstanding invoice
showing the original amount billed and the remaining unpaid balance as of the report date. The report
can be run for any date selected. Check whether you want the amounts shown to include Fees, Costs,
Interest and/or Tax, as shown below.
2011 Tussman Programs, Inc.
352
Tussman Program Release 10
A sample report appears below showing that client Paul Drake was billed $1600 on July 14 and that as
of that date $600 of that amount is still outstanding.
2011 Tussman Programs, Inc.
Reports
18.4
353
Trust, Retainer and Credit Balances
The Trust, Retainer and Credit Balances report can be used to list the balances in your client
retainer and trust accounts, as well as any credit balances and balances from unused retainer fees.
The trust and retainer balances reports can also show a detail of the activity in each account for a
specified period. This is probably the best report if you want to review the current balances and recent
activity in each of your retainer and/or trust accounts. Select this report from the Reports menu and
the following screen appears:
Select from the following report options:
Type of Report - There are five different types of report that can be generated:
Trust Account Balances - This report shows just the balance in the trust account for each
client or matter. With this report, you also have the option of including a transaction detail
showing a history of the activity in the account, as described below.
Retainer Account Balances - This report shows just the balance in the retainer account for
each client or matter. With this report, you also have the option of including a transaction detail
showing a history of the activity in the account, as described below. Note that if a client has a
client level retainer account balance or activity, that will be shown listed under the client's first
matter, with the notation of "Client" after each transaction. There is also an option to have the
totals reflect any currently pending automatic transfers on bills that have not yet been finalized.
Credit Balances - This report shows just the amount of any unused credit balances for each
client or matter. The report will show in separate columns the amount of any credit balances
which are earmarked to be applied against fees,costs, tax or interest only, and the amount of
any unearmarked credit balances. Note that if a client has a client level credit balance that will
be shown listed under the client's first matter.
Unused Minimum Retainer Fees - This report shows just the amount of any unused credits
2011 Tussman Programs, Inc.
354
Tussman Program Release 10
from the billing of a minimum retainer fee (transaction type FE).
All of the Above - This report shows all of the above items. However, instead of showing a
breakdown of earmarked and nonearmarked credit balances as appears in the Credit
Balances Report, the total of unused credit balances of all types appears in a single column.
Subtotal Option - The report can show just the total for each client, totals for each matter, or totals for
each matter with subtotals for each client.
Files Included - You can generate the report for all files, a single client or matter, or for selected files.
Options - Select from the following additional options:
Include Files with No Balance - Enter Y to include files that have no balance. This should
normally be set to N as otherwise the report will list every client or matter, whether or not they
have a balance to report.
Include Administrative Files - Enter Y to include files where the fee arrangement is set to A
for Administrative.
Include Collection Files - Enter Y to include files where the file status is Collection, N to omit
them, or X to include only files on collection status.
Include Files on Hold - Enter Y to include files on hold, N to omit them, or X to include only
files on hold.
Include Closed Files - Enter Y to include closed files, N to omit them, or X to include only
closed files.
Show Credits from Payments only - If you enter Y, the reports which show credit balances will
only include credit balances resulting from the entering of payments (transaction type P), and
will not include credit balances resulting from the entering of a credit
transaction (type Q). Enter N to show credit balances resulting from both types of transactions.
Include Pending Auto Transfers - If you enter Y then the balances shown for the retainer
accounts will also reflect any pending automatic transfers which appear on bills that have not yet
been finalized. Those pending transfers will also appear in the detail of activity for the retainer
account if you have chosen that option.
Detail - Enter Y in the Include Transaction Detail space when generating a Trust Account Balances
or Retainer Account Balances report if you want the report to include a detail of the transactions
(types TR and TD or RR and RD) posted to each account. If you leave the date range blank, the detail
will include all transactions. If you enter a date range, only transactions dated within that date range
will appear. For example, if you want to generate a report showing your current trust account
balances, and also including all of the activity in each account for the past month, enter Y in the
Include Transaction Detail space and enter the dates corresponding to the period you want.
Sort Order - Select whether to print the report by client ID, by client alternate ID, or by Responsible
Attorney.
Report Date - The report date defaults to the current date, but if you want to show balances as of a
previous date, enter that date here.
Other Options - Enter Y to show the date each matter was opened.
2011 Tussman Programs, Inc.
Reports
18.5
355
File History and Status
The File History and Status report produces the same information in the same format as appears on
the Account Status screen for each client or matter. Thus, it provides cumulative totals showing the
amount billed, paid and credited to date with the current aged balance, a summary of any unbilled
charges, and additional detail listing any credit balances and the balances in the retainer or trust
account. Select this option from the Reports menu and the following screen appears:
Files Included - You can generate the report for all files, a single client or matter, or for selected files.
Note that you can also print this same report for a single client or matter by going to the Account Status
screen for that client or matter and clicking on the
button at the bottom of the screen.
Options - Select from the following options:
By Client or Matter - Enter M if you want to print separate totals for each matter, or C to print
totals for each client only. If you print totals for each matter, there is no option to print grand
totals for each client, nor does the report print grand totals at the end.
Sort By ID or Alternate ID - Enter N to print in order of client ID, or A by client alternate ID.
Include Additional Detail - Enter Y to include in addition to the cumulative totals, current
account balance, ageing detail, and work in progress summary the list of additional information
which normally appears at the bottom of the account status screen for each client or matter, as
listed in the Account Inquiry section. That information includes credit balances and the current
balances in the retainer and trust account.
Include Files with No Balance or WIP - Enter Y if you want to include files with no current
balance or unbilled charges. Otherwise, only files with current balances or unbilled charges will
2011 Tussman Programs, Inc.
356
Tussman Program Release 10
be included, even if they have a billing and payment history, a credit balance, or a balance in
their retainer or trust account.
Regular or Compressed Print - Enter R to print regular size, or C for compressed print.
List Files on Hold Only - Enter Y to list only files that are on hold. Otherwise, files on hold will
be included along with your other files.
18.6
Productivity Reports
The Productivity Report function lets you create reports which provide useful management
information. You can include up to twelve columns of information, selected from 80 different statistical
categories described in the Column Items section below. The report can be totalled and subtotalled in
many different ways. There are several pre-defined reports, or you can create a User Defined report
or generate just a One Time Report. In addition to printing the report it can be exported to a CSV file
which can then be opened in Excel by clicking the CSV File Export button after selecting the report
options described below.
After selecting Productivity from the Reports menu, the following screen appears:
Select from the options shown above as follows:
Report Type - There are seven different predefined reports you can select from:
Hours Worked - This report shows the total number of hours worked during the period of time
you select. Also shown is the number of hours written off, and the breakdown between billable
hours (type H), nonbillable hours (type N) and administrative hours (type A). The final column
shows how many of those hours, if any, have not yet been billed.
2011 Tussman Programs, Inc.
Reports
357
Billable Hours and Value - This two column report shows the total number of billable hours
(type H) worked during the period of time you select and the billable value of that time; i.e., the
original dollar value less any writedowns..
Fees Billed - This two column report shows the number of hours and dollar amount actually
billed during the period you select. These figures will not necessairly match the Billable Hours
and Value report. The totals on that report are calculated by adding the number of hours and
dollar value of time worked during the period specified, whereas this report shows the number
of hours and dollar amount billed during the same period. For purposes of this report, time is
considered billed when it appears on a bill with a posting date falling within the date range
specified. For example, if an attorney works 3 hours on a matter on January 30, and that time is
billed on a bill generated with a posting date of February 5, for purposes of the Billable Hours
and Value report it will be included in a report generated for the month of January, but for
purposes of the Fees Billed report it will appear on a report generated for the month of
February. Thus, because time worked during one month may not actually appear on a bill with a
posting date falling within that same month, you should not expect the totals on these two
reports to match. Theoretically, if you bill out all of the time worked during each month on bills
using a posting date falling within the same month, then the totals would match. For this to
work, when generating bills you should always use a posting date of the last day of the month.
Writedowns - Shows the number of hours and dollar amount of fees written off during the
period of time you select. The dollar amount of the writeoffs appears in two columns. The first
column shows writeoffs performed prior to finalizing the bill, which can be done in several ways
as described in the section on writing off fees. The second column shows writeoffs performed
after a bill is finalized by entering a credit transaction (type Q) and specifying that you want to
record the credit as a writedown.
Productivity Analysis - This report which shows the billable hours worked, the billable value
of that time, the amount of fees billed, and the amount of fees collected during the period of
time you specify. You should not expect these totals to match since, as explained earlier, the
hours worked represents the number of hours actually worked during the month, the amount
billed represents the number of hours billed on bills with a posting date falling within the same
period, and the fees collected represents the amount of payments received during the same
period that are applied against fees previously billed. Since time can be worked in one month,
billed out in the following month, and paid for in the month after that, the figures in each column
may be completely different.
Detailed Productivity Analysis - This is a more detailed report than the productivity analysis,
consisting of twelve columns of information including the following items:
Hours Worked (total of all hours worked during period)
Hours Written Off
Billable Hours
Other Hours (Nonbillable and Administrative)
Original Amount (dollar value of billable time before writedowns)
Written Off (dollar amount of any writedowns made before finalizing bills)
Billable Amount (dollar value of billable time after writedowns)
Hours Billed (number of hours billed during same period)
Amount Billed (dollar amount billed during same period)
Average Rate (total amount billed divided by hours billed)
Amount Collected (payment recorded during same period which were applied to fees)
Written Off After Billing (fees written off after billing by recording a credit transaction)
Cost Analysis - This report shows the following figures for the period specified: When
generating this report, you must select Activity/Cost Code as your Total By option.
Total Costs Recorded
2011 Tussman Programs, Inc.
358
Tussman Program Release 10
Amount Billed (of the total costs recorded, the portion that has been billed)
Amount in WIP (of the total costs recorded, the amount that has not yet been billed)
Costs Billed (costs billed on bills with posting date falling within this period)
Costs Collected (payments received which are applied against costs)
Costs Written Off (cost balances written off by recording a credit transaction)
User Defined Reports - If one of the above reports does not suit your needs, you can create a User
Defined report which the program will remember. Click on the User Defined Reports button and the
following screen appears:
This screen lists ten different reports which you can create. The first three reports listed are legacy
reports which are carried over from older versions of the Tussman Program. To generate any one of
the ten reports, highlight it and click OK, then select the rest of the options from the main screen as
described below. To create a new report, highlight one of the reports which are identified as
UNDEFINED and click on the Edit button. To edit an existing report, highlight that report and click
Edit. The following screen appears:
2011 Tussman Programs, Inc.
Reports
359
In the Report Title space you can give the report a name which will be listed on the User Defined
Reports menu so you can remember it.
Column Items
In the Columns spaces at the left, enter numbers corresponding to the items listed on the menu at the
right. The report can have up to twelve columns. The items you can select from are described as
follows:
1 - Total Hours Worked. The total number of hours of all types worked during the report
period.
2 - Hours Written Off. Of the total hours worked, the number of hours written off.
3 - Billed Hours. Of the billable hours worked, the number of hours that have been billed
4 - Hours in WIP. Of the billable hours worked, the number of hours that have not yet been
billed.
5 - Nonbillable Hours. Of the total hours worked, the number that were nonbillable (type N)
6 - Administrative Hours. Of the total hours worked, the number that were administrative (type
A)
7 - Flat Fees - Billed. The dollar amount of flat fee charges recorded during the period that
have been billed.
8 - Flat Fees -Unbilled. The dollar amount of flat fee charges recorded during the period that
have not yet been billed.
9 - Hours on Hold. Of the total hours worked, the number of hours that are on hold.
10 - Original Amount. The original dollar value of the billable hours worked during the period.
11 - Standard Value. The dollar value of billable hours worked during the period calculated
using the rates now in effect.
12 - Amount Written Off. The dollar value of billable time worked during the period which was
2011 Tussman Programs, Inc.
360
Tussman Program Release 10
written off before being billed.
13 - Billable Amount. The dollar value of time worked during the period after deducting
amounts written off.
14 - Billed Amount. The portion of the billable amount that has been billed.
15.- Amount in WIP. The portion of the billable amount that has not yet been billed.
16 - Amount on Hold. The portion of the billable amount still in WIP that is on hold.
17 - Hours Billed. The number of hours billed on bills with a posting date falling within the
report period.
18 - Amount Billed. Dollar amount of fees billed on bills with a posting date falling within the
report period.
19 - Amount Collected. That portion of payments recorded during the report period which were
applied to pay fees.
20 - Written Off (Q's). The amount of fees written off by recording credit transactions dated
within the report period.
21 - Average Rate. Item 18 divided by item 17. If including this item, you must also include 17
and 18..
22 - Budgeted Hours. This feature is not currently supported.
23 - Percent of Budget Achieved. This feature is not currently supported.
24 - Realized v. Billed Amount. Item 19 divided by item 18. If including this item, you must
also include items 18 and 19.
25 - Realized v Original Amount. Item 19 divided by item 10. If including this item, you must
also include items 10 and 19.
26 - Realized v. Standard Value. Item 19 divided by item 11. If including this item, you must
also include items 11 and 19.
27 - Billable Hour Total. The totall number of billable hours worked during the report period
(the sum of items 3 and 4)
28 - Other Hours. The total nonbillable and administrative hours worked during the report
period (the sum of 5 and 6)
29 - Contingent Fee Hours. The number of hours worked on contingent fee matters during the
report period.
30 - Flat Fee Hours. The number of hours worked on flat fee matters during the report period.
31 - Soft Costs Recorded. The dollar amount of soft costs recorded during the report period.
32 - Hard Costs Recorded. The dollar amount of hard costs recorded during the report period
33 - Total Costs Recorded. The sum of 31 and 32.
34 - Nonbillable Costs. The dollar amount of nonbillable costs (type CN) recorded during the
report period.
35 - Soft Costs - Billed. That portion of the soft costs recorded (item 31) that has been billed.
36 - Hard Costs - Billed. That portion of the hard costs recorded (item 32) that has been billed.
37.- Total Costs - Billed. That portion of the total costs recorded (item 33) that has been billed.
38 - Soft Costs in WIP. That portion of the soft costs recorded (item 31) that has not yet been
billed.
39 - Hard Costs in WIP. That portion fo the hard costs recorded (item 32) that has not yet
been billed.
40 - Total Costs in WIP. That portion of the total costs recorded (item 33) ttha has not yet
been billed.
41 - Soft Costs Billed. The amount of soft costs billed on bills with a posting date falling within
the report period.
42 - Hard Costs Billed. The amount of hard costs billed on bills with a posting date falling
within the report period.
43 - Total Costs Billed. The sum of 41 and 42.
44 - Soft Costs Collected. That portion of payments received during the report period applied
to pay soft costs.
45 - Hard Costs Collected. That portion of payments received during the report period applied
to pay hard costs.
46 - Total Costs Collected. The sum of 44 and 45.
47 - Soft Costs Written Off. The amount of soft costs written off by recording a credit dated
2011 Tussman Programs, Inc.
Reports
361
within the report period.
48 - Hard Costs Written Off. The amount of hard costs written off by recording a credit dated
within the report period
49 - Total Costs Written Off. The sum of 47 and 48.
50 - Soft Costs on Hold. That portion of the unbilled soft costs (item 38) that is on hold.
51 - Hard Costs on Hold. That portion of the unbilled hard costs (item 39) that is on hold.
52 - Total Costs on Hold. The sum of 50 and 51.
53 - Interest Billed. The amount of interest charged on bills dated within the report period.
54 - Interest Collected. That portion of payments received during the report period appled to
pay interest.
55 - Interest Written Off. The amount of interest written off by recording a credit dated within
the report period.
56 - Tax Billed. The amount of tax or markup charged on bills dated within the report period.
57 - Tax Collected. That portion of payments received during the report period applied to pay
tax or markup.
58 - Tax Written Off. The amount of tax or markup written off by recording a credit dated within
the report period.
59 - Total Billed. The total charges of all types billed on bills with a posting date falling within
the report period.
60 - Total Collected. That portion of payments received during the report period applied to
fees, costs, tax and interest.
61 - Total Written Off. The total of all charges written off by recording a credit dated within the
report period
62 - Total Hours for Responsible Attorney - Hours worked by the responsible attorney on
each matter during the report period..In other words, hours are included in this amount only if
they were hours worked by a staff member who was also the responsible attorney for the matter
on which the work was performed.
63 - Total Hours to Date. The total hours worked to date without regard to the report period.
64 - Category 1 Hours. The total hours worked.which are assigned an activity code from
category 1.
65 - Category 2 Hours. The total hours worked which are assigned an activity code from
category 2.
66 - Pro Bono Hours. The total hours recorded on matters where the Free Arrangment is Pro
Bono.
67 - Value of Nonbillable Time. The dollar value of nonbillable time and nonbillable flat fee
charges that have been recorded
68 - Nonbillable Flat Fees - The dollar value of any Nonbillable Flat Fee transactions (type FN)
that have been entered
69 - Value of Admin Time - The dollar value of any Administrative time (type A) that has been
entered.
70 - Total Current WIP - The dollar value of all fees currently in WIP (unbilled),
71 - Total Current AR - The total dollar value of all outstanding unpaid bills as of today,
72 - Total Current AR 30 - The dollar value of outstanding bills past due 30 days as of today,
73 - Total Current AR 60 - The dollar value of outstanding bills past due 60 days as of today,
74 - Total Current AR 90 - The dollar value of outstanding bills past due 90 days as of today;
75 - Total Flat Fees - The total amount of flat fee charges (transaction type F) recorded (7+8)
76 - Average Total Hours per Day - The average number of total hours worked per day during
the period (not counting weekends),
77 - Average Billable Hours per Day - The average number of billable hours worked per day
during the period,
78 - Average Dollars/Day Worked - The average dollars per day generated (dollar value of
billable time) during the period,
79 - Average Dollars/Day Billed - The average dollars billed per day during the period,
80 - Average Dollars/Day Recd - The average dollars per day collected during the period.
After making your selections, click OK to save the report, then click OK again to return to the main
2011 Tussman Programs, Inc.
362
Tussman Program Release 10
screen where you can select the rest of the report options as described below.
It is important to remember when generating productivity reports that you cannot expect all of the
figures to match because some of them are measured in different ways. For example, some of the
items, such as the Hours Worked (1) and Billable Amount (13), are calculated based on the
transaction date of the individual charges. Thus, if time is recorded with a transaction date of January
30, it will appear as Hours Worked in January. Other items, such as the Hours Billed (17) and
Amount Billed (18) are based on the posting date used on the bill on which those charges appeared.
Thus, if that charge dated January 30 is billed on a bill generated with a posting date of February 3,
that charge will appear as Hours Billed in February. Still other amounts are based on the date of the
payment.or credit transaction. Thus, if that January 30 charge which is billed in February is paid by
a payment dated March 3, that amount will appear as an Amount Collected (item 19) in March.
One Time Report - If you do not want to use one of the pre-defined reports, and do not want to create
another User Defined Report, click the One Time Report button to select the column items you want
to include. This function works exactly like the User Defined Report function described above, except
that the program does not remember the report for future use. The column items you can select from
are the same as those listed above.
Single Item Spreadsheet - Select this option, then select one of the 80 statistical items, specify
a date range of 12 months duration, and the program will generate a spreadsheet showing the monthly
totals for that one statiscal item.
Files Included - You can generate the report for all files, a single client or matter, or for selected files.
Total By - Figures on the report can be totalled by any of the following:
Staff Member
Staff Category
Staff Member Alias
Month
Day
Client
Matter
Any of your ten categories of Productivity Codes
Fee Arrangement (Hourly, Flat Fee, Contingent Fee, Administrative, Nonbillable and Pro Bono)
Task Code
Activity/Cost Code
Transaction Location
Subtotal By - You can omit subtotals on the report, and just total the figures using the Total By
selection, or you can select an additional Subtotal By method. For example, if you are totalling by
Staff Member or by Client, you can then subtotal by Day, so that in addition to showing totals for each
staff member or client, a breakdown will appear showing the totals by day. Or, if you want to see the
total hours worked by each staff member by matter, you can total by staff member and subtotal by
client or matter. You can subtotal by any of the same Total By methods listed above. Note that if you
choose to Total By staff member, for example, do not also choose to Subtotal By that same method,
as that would be redundant. If you just want to see totals by staff member, for example, with no
subtotals, then select Omit Subtotals for your Subtotal By option.
Staff Members - Using these options, you can generate the report for all staff members, for a single
staff member, or for a list of staff members. To generate the report for a single staff member, check
that option and enter the staff code in the space provided. To generate the report for a list of staff
members, check that option and type their initials in the space provided, separating each one with a
comma.; for example: PM,FLB,DAT
2011 Tussman Programs, Inc.
Reports
363
To exclude a staff member from the report click on the List of Staff Members option and in the space
for the list type a pound sign (#) followed by the code for the staff member you want excluded.
New Page for Staff Member - If you are generating a report for all staff members or for a list of staff
members, and you set this option to Y, then the figures for each staff member will begin on a new
page, in effect generating a separate report for each staff member. This option only works if you are
totalling the report by staff member and have selected a subtotal option other than the No Subtotals
option.
Date Range - Enter the range of dates you want covered by the report. If you leave the dates blank,
the report will include all data in the system. The MTD and YTD buttons are quick ways of inserting the
dates for a month to date or year to date report. The All button blanks out the dates if you want to
include all dates.
When generating the report, note that a legend will appear at the end explaining each of the column
items on the report.
18.7
Billing Analysis
The Billing Analysis report provides totals showing how much you have billed during the report
period. Select this item from the Reports menu and the following screen appears:
Select from the following options:
Total By - You can total your billings by client, matter, or by any ten of the productivity code cateogries
which can be assigned to each of your clients and matters; for example, by originating attorney,
responsible attorney, matter type, etc. You can also total by Location Code, Task Code, or
Activity/Cost code.
Files Included - You can generate the report for all files, for a single client or matter, or for
2011 Tussman Programs, Inc.
364
Tussman Program Release 10
selected files.
Date Range - Enter the date range you want, or leave the dates blank for cumulative totals to date.
The MTD and YTD buttons insert the correct dates for a month-to-date or year-to-date report, while the
All button blanks out the dates.
Options - Select from the following additional options:
Show in Separate Columns - The report will show the total amount billed in one column, but
you can also add separate columns showing the amount of fees, costs, tax and interest billed by
entering Y after each of those items. To configure the report so there is just one Total column
which includes only the fees billed, enter an X in the Fees space.
Include Debit Transactions - Enter Y to include the amount of any debit transactions (type D)
entered for the report period.
Include Beginning Balances - Enter Y to include the amount of any beginning balance
transactions (type BB) entered for the report period.
Include Year to Date Total - Enter Y to add a separate column showing the year to date total
for the year in which the report period falls. For example, if your report period is for the month of
July only, the year to date totals will be the totals for that year through July.
Include Percent of Total - Enter Y to add a separate column showing for each amount the
percent it is of the total report amount. If you are including Year to Date Totals, there will also
be a separate column showing percentages for the year to date totals.
Sort By Category or Amount - Enter C to sort the report by category (for example, if you are
totalling by client, the report will be sorted by client ID) or A by dollar amount (for example, if
totalling by client the report will list the client who was billed the most first).
Include Client/Matter subtotals - Enter C or M to show under each category a breakdown by
Client or Matter
This report is calculated by adding the total amount of charges billed on bills that were generated
using a posting date which falls within the report period. Thus, the totals will not necessarily match
the total of charges that were recorded during the same period. For example, if a staff member works
3 hours on a matter on January 30, and that charge appears on a bill with a posting date of February 3,
for purposes of this report that amount will appear in a February report. The total of the fees billed on
this report should match the totals on the Fees Billed report that can be generated using the
Productivity Report function.
This report provides only summary totals of your billings for the period selected. To see an
itemization of the individual bills, generate a Billing Journal report using the AR Journals function or
the Billing Ledger report found on the Reports menu..
18.8
Income Analysis
The Income Analysis report provides totals showing how much you have collected during the report
period. It adds the payments receivbed during the report period, showing how much was applied to
fees, costs, tax, interest, and what portion was recorded as an advance. Select this item from the
Reports menu and the following screen appears:
2011 Tussman Programs, Inc.
Reports
365
Select from the following options:
Total By - You can total your billings by client, matter or by any ten of the productivity code cateogries
which can be assigned to each of your clients and matters; for example, by originating attorney,
responsible attorney, matter type, etc. You can also total by Location, Task or Activity/Cost code.
Files Included - You can generate the report for all files, for a single client or matter, or for
selected files.
Date Range - Enter the date range you want, or leave the dates blank for cumulative totals to date.
The MTD and YTD buttons insert the correct dates for a month-to-date or year-to-date report, while the
All button blanks out the dates.
Options - Select from the following additional options:
Show in Separate Columns - The report will show the total amount collected in one column,
but you can also add separate columns showing the amount of fees, costs, tax and interest
collected by entering Y after each of those items. To configure the report so there is just one
Total column which includes only the fees collected, enter an X in the Fees space.
Show Amounts Recorded as Advance - Enter Y to also include a separate column showing
that portion of any payments received during the report period that were recorded as an
advance. The sum of this column, plus the fees, costs, tax and interest columns, will equal the
total column.
Include Year to Date Total - Enter Y to add a separate column showing the year to date total
for the year in which the report period falls. For example, if your report period is for the month of
July only, the year to date totals will be the totals for that year through July.
Include Percent of Total - Enter Y to add a separate column showing for each amount the
percent it is of the total report amount. If you are including Year to Date Totals, there will also
2011 Tussman Programs, Inc.
366
Tussman Program Release 10
be a separate column showing percentages for the year to date totals.
Sort By Category or Amount - Enter C to sort the report by category (for example, if you are
totalling by client, the report will be sorted by client ID) or A by dollar amount (for example, if
totalling by client the report will list the client from whom you collected the most first).
Include Client/Matter Subtotals - Enter C or M to include under each category a breakdown by
client or matter.
Allocate Full Amount of Earmarked Payments - If you enter Y for this option the program will
allocate the full amount of payments recorded as PF, PC, PI or PT to the appropriate category
(fees, costs, interest or tax), even if the payment has not yet been fully applied to a finalized bill
and is being carried as a credit balance in the program.
This report is calculated by adding the total amount of payments received during the report period.
Thus, the totals will not necessarily match the total of charges that were billed during the same period,
since charges can be billed in one month and the payment might not be received until a later month..
The total of the fees collected on this report should match the totals in the Amount Collected column
on the Productivity Analysis Reports which can be generated using the Productivity Report function,
and it should also match the total on your Staff Earnings Analysis report.
The figures shown in the Advance column on the report can cause some confusion. If, for example, a
payment is received in July, and a portion of that payment was recorded as an advance, that amount
will appear in the Advance column. If later in the same month that amount is applied against fees on
a bill, then that amount will no longer appear in the Advance column but will appear in the Fees
column. However, if the amount of the advance is not applied against a bill until a later month, that
amount will always show in the Advance column on the July report.. If, for example, a bill is
generated in August and that advance is applied against fees on that bill, then on the August report
the Advance column will show that amount as a negative figure, and the Fees column will show that
same amount as a positive figure. The net effect on the report is 0.00, since the funds are only being
transferred from one category (advances) to another (fees). Thus, the total in the Advance column
for any period will be the net amount of payments received which were initially recorded as an
advance during that period, less the amount of advances (regardless of when they were initially
recorded) that were applied during that period.
Note also that if you include only some of the columns (for example, you leave off the column showing
Advances), then the sum of the individual columns may not equal the amount in the Total column,
which will always be the grand total of payments received during the report period..
This report provides only summary totals of your collections for the period selected. To see an
itemization of the individual payments, generate a Cash Receipts Journal report using the
AR Journals function.
18.9
Staff Earnings Analysis
The Staff Earnings Analysis report distributes your fee income by staff member, allocating each
payment received using the formula you choose, as described below. After selecting this report from
the Reports menu, the following screen appears:
2011 Tussman Programs, Inc.
Reports
367
Allocate Income By - This option determines how the program allocates your fee income for purposes
of this report. Select from one of the following choices:
Working Staff - Each payment is allocated according to how much each staff member billed.
For example, assume two staff members worked on a matter and one billed $400.00 and the
second billed $600.00, and the client then makes a payment in the full amount of $1,000.00.
Using this method, $400.00 of that payment would be allocated to the first staff member and
$600.00 to the second. If the client had only made a partial payment, then the payment would
be divided between the two staff members pro rata; i.e., 40 percent to the first staff member and
60 percent to the second. When making this allocation, the program only takes into account the
amount of fees currently outstanding. For example, if another staff member had billed time
on a previous month's bill, and those charges had already been paid, then that staff member
would not be credited with any of the payment described in our example above, since he or she
would already have received credit for that amount. If charges are outstanding from more than
one bill, then a partial payment will be applied against the outstanding charges depending on the
payment priority option you have selected. For example, if you are applyiing payments against
the oldest invoice first, then a partial payment would be applied to outstanding charges from an
older invoice before it would be applied against any charges from a newer invoice. If you are
applying payments by category of charge, then all outstanding fees will be lumped together and
a partial payment would be applied pro rata against unpaid amounts billed by all staff members,
regardless of when they were billed. If, when entering a payment, you override the default
payment application and specify that the payment is to be applied against a specific invoice, or
against a specify staff member's charges, then this report will reflect that payment application.
In other words, if you generate this report by Working Staff, the staff allocations will be the
same as would show if you are generating a Cash Receipts Journal for the same period of time
in which you show the distribution detail for each transaction. The allocations would also be the
same as would show on a Productivity Report totalled by staff member in which the Amount
Collected (item 19) appears as one of the column items, such as on.the Productivity Analysis
report.
2011 Tussman Programs, Inc.
368
Tussman Program Release 10
Matter Formula - Using this option, the allocation will be the same as using the working staff
method, except that a percentage of each payment will be first allocated to the originating,
responsible and billing attorneys for each matter in the percentage amount, if any, specified in
the Payment Split screen for that matter (To enter the payment split instructions, go to the
matter and click on the Payment Split button). The rest of the payment will then be allocated pro
rata to the working staff who actually billed the fees in the same way as described above. Thus,
if on some matters you want the originating attorney to receive credit for 10 percent of all fees
collected, for those matters enter 10.00 in the Originating Attorney space in the Payment
Split screen, and then generate this report using this option.
You do not need to enter payment splits for every matter. If you do not enter payment split
instructions for a matter, then when running the report by Matter Formula the program will use
the Global Formula, if any (see next paragraph) and if none has been entered it will allocate by
Working Staff.
If you want to allocate the same percentages for all your matters it is not necessary to enter the
percentages in each matter, as you can simply generate this report using the Global Formula
option described next.
Global Formula - Using this option, the program will allocate a specified percentage of each
payment to the originating, responsible and billing attorneys for each matter using the
percentages, if any, entered in the spaces below when you generate the report.The rest of each
payment will then be allocated pr rata to the working staff who actually billed the fees in the
same way as described in the Working Staff formula described above. Thus, for example, if
you always want the originating attorney to receive credit for 10 percent of all fees collected,
enter 10.00 in the Originating Atty Percent space after selecting the Global Formula option.
The percentages entered in these spaces are ignored unless you select the Global Formula
option.
If you select either the Matter Formula or Global Formula option, the report will show in
separate columns the amount that each staff member is being credited with in each capacity. In
other words, there will be a separate column showing how much each staff member is being
credited with as the originating attorney, responsible attorney, and billing attorney. The final
column will show how much they are being credited with as the working attorney; i.e. as the
result of having billed actual fee charges.
Files Included - You can generate the report for all files, for a single client or matter, or for
selected files.
Date Range - Enter the date range you want, or leave the dates blank for cumulative totals to date.
The MTD and YTD buttons insert the correct dates for a month-to-date or year-to-date report, while the
All button blanks out the dates.
Options - Select from the following additional options:
Include Year to Date Total - Enter Y to show in a separate column the total for the current year
to date.
Percent of Total - Enter Y to show for each amount the percent it is of the report total.
Sort by Category or Amount - Enter C to sort the report by staff member, or A to sort by
amount, showing the staff member with the highest amount collected first. The option to sort by
amount will only work if you are not including subtotals.
Subtotal by Client or Matter - To show for each staff member a breakdown of their total
amount collected by client, enter C. To show a further breakdown by matter, enter M. To omit
subtotals and just show the total amount collected for each staff member, enter N.
2011 Tussman Programs, Inc.
Reports
369
Flat and Contingent Fee Payments - This option determines how the program allocates payments
recorded on flat and contingent fee matters. On those matters, depending on how you have billed
them, you might not have entered actual billable time for each staff member, but may have only
entered a single flat fee charge. In that case, the entire amount collected will be allocated to the staff
member who was assigned to the flat fee charge. If, however, you have kept track of the time spent by
each staff member working on that matter, and recorded it as either billable (H), nonbillable (N) or
administrative (A) time, then using this option you can have the program allocate the amount collected
pro rata based on how much each staff member worked on that matter. In making this calculation, the
program counts the total of all time recorded on the matter from the inception (but only time that has
been billed; i.e, has appeared on bills that have been finalized.), and allocates the payment or
payments accordingly. If you do not want to use this feature, select the first option, Show As
Allocated by Program. If you do want to use this feature, select one of the two options described
below:
Allocate by Hours Worked - Using this option, the fees collected are allocated pro rata to each
staff member based solely on how many hours each staff member worked on the matter.
Allocate by Value of Hours Worked - Using this option, the fees collected are allocated pro
rata to each staff member based on the dollar value of the hours they worked on the matter.
Thus, if one staff member normally bills at a higher rate than another, the one at the higher rate
will receive a higher allocation even if they both worked the same number of hours. For this
option to work, you must enter the number of the Rate Schedule that you want to use in
determining the value of the time worked in the Fee Agreement screen for each flat or
contingent fee matter.
Use this Method for Hourly cases also - If you have selected one of the two options above,
check this box if you want that method of allocating receipts to be used for Hourly cases in
addition to Flat and Contingent Fee cases.
Note that the totals shown on this report only reflect that portion of payments received which are
applied against fee charges. Thus, if a payment in the amount of $1,000.00 is received, and $200.00
of that payment is applied to costs and $800.00 to fees, only the $800.00 applied to fees will be
reflected in this report. Amounts recorded as an advance will also not be included, although advance
applications will be included. Thus, if that $1,000.00 were received in June and recorded initially as
an advance, it would not appear at all in the June report. If in July that advance is applied against a
bill that is generated and finalized in that month, then that amount will appear in the July report as that
is when the fees are deemed to have been earned.
18.10 Realization Analysis
The Realization Analysis report lists each bill generated during the date range of the report, showing
the amount of the bill, the amount that has been paid or written off, and the remaining unpaid
balance due. It also indicates the percentage of the amount billed that has been paid; i.e. the
percent that has been realized. You can use this report as an alternative to the
Accounts Receivable Report, as it will list for each client and matter their outstanding invoices. After
selecting this report from the Reports menu, the following screen appears:
2011 Tussman Programs, Inc.
370
Tussman Program Release 10
Select from the report options as follows:
Total By - Normally, the report will list the invoices by client and matter. However, you can also
itemize the invoices separately by originating attorney, responsible attorney, billing attorney, or any of
the seven other productivity code categories which can be assigned to each client and matter. For
example, if you want to list the outstanding invoices for each responsible attorney separately, select
that as your Total By option. Otherwise, if you want them all listed together by client and matter, select
the No Subtotals option.
Files Included - You can generate the report for all files, for a selected client or matter, or for
selected files..
Date Range - Enter the date range you want, or leave the dates blank to list all invoices in the system.
The MTD and YTD buttons insert the correct dates for a month-to-date or year-to-date report, while the
All button blanks out the dates.
Options - Select from the following additional report options:
Include Fees Only - The figures shown on the report will only reflect the fees billed, paid,
written off and outstanding.
Include All Charges - The figures shown will reflect the total of all charges including fees,
costs, tax and interest.
Subtotal By Client and Matter - This option has no affect as the report will always itemize and
subtotal invoices by client and matter.
Itemize Invoices - This option has no affect as the report always lists each invoice separately.
2011 Tussman Programs, Inc.
Reports
371
Include Debit Transactions - Enter Y to include debit transactions (type D) in addition to actual
bills.
Include Beginning Balances - Enter Y to include beginning balance transactions (type BB) in
addition to actual bills.
Show Unpaid Amounts Only - If you enter Y, the report will only list invoices where a portion of
the charges billed remains unpaid. Enter N to include all invoices dated during the period
selected, whether or not there is a balance still outstanding.
New Page for each Sort Category - If you selected a Total By option other than No
Subtotals, enter Y here if you want to begin the list of invoices for each Total By category on a
new page. For example, if you are Totalling By responsible attorney, and want to generate
separate lists of the outstanding invoices for each responsible attorney, enter Y here. Otherise,
the report will be printed continuously.
Remember that the invoices listed on the report will only include bills that were generated with a
posting date falling within the date range you select.
18.11 Budget Analysis
The Budget Analysis Report is helpful if you are using the Program's budgeting feature, where you can
assign to each matter file a budget amount.
Select from the options shown below:
2011 Tussman Programs, Inc.
372
Tussman Program Release 10
Under the Include section, you have the option to include all files where you have assigned a budget
amount, or only those files that are either over budget or approaching budget. For example, if you
want to include all files that are over budget or within $500 of their budgeted total, check the second
option and enter the amount of 500 in the space provided.
A sample report appears below showing for each matter the budgeted amount, fees billed to date, fees
in WIP, the total of billed and WIP fees, and the amount by which the total is over or under budget.
18.12 Custom Reports
The Custom Report function lets you create a report which shows for each client or matter selected
figures which show various aspects of their current account status. This makes it possible to generate
a report showing information which otherwise might require generating more than one report. For
example, you can generate a report showing for each client or matter the current account balance, the
total of their unbilled charges, and the total of any current retainer, trust or credit balances .Normally,
this would require generating three separate reports: a WIP Summary, Accounts Recievable, and
Trust, Retainer and Credit Balances report. Although the File History and Status Report would also
show all those figures, this report provides just the selected information you want in a much more
compact format.
2011 Tussman Programs, Inc.
Reports
373
In addition to printing or previewing the report, you can generate the report to a CSV file by clicking the
CSV Export button (not shown below).
Select this report from the Reports menu and the following screen appears:
Select from the following report options:
Show - You can show totals for each client only, for each matter, or for each matter with subtotals
for each client.
Files - You can generate the report for all files, a single client or matter, or for selected files.
Include - Enter Y after each of the items listed if you want to include in the report:
Files With no Balance
Administrative Files
Collection Files
Files on Hold
Closed Files
Column Items - You can select up to twelve column items to include on the report for each client or
matter from the following list:
Balance Forward from Last Bill - The ending balance shown on the last finalized bill.
Current Payments thru ___ - Payments and credits that have been recorded since the last bill
through the date you enter
Unpaid Balance Forward - The Balance Forward from the Last Bill less the amount of Current
Payments
Work in Progress through ___ - The amount of unbilled charges dated through the date you
2011 Tussman Programs, Inc.
374
Tussman Program Release 10
enter.
New Balance Including WIP - The Unpaid Balance Forward plus the unbilled Work in
Progress.
Total Billed to Date - The total amount billed to date.
Total Paid to Date - The total amount of payments and credit recorded to date.
Minimum Due - The minimum due amount from the last bill, if the client is on an installment
payment plan.
Retainer Account Balance - The current balance in the retainer account.
Trust Account Balance - The current balance in the trust account.
Amount of Last Payment - The amount of the most recent payment received.
Date of Last Payment - The date of the most recent payment received.
Billed Through - The ending cutoff date used on the last bill that was finalized.
Past Due __ Days - The amount of the Unpaid Balance Forward which is past due the number
of days you enter.
Date of Last Fee Activity - The most recent date on which work was performed for the client or
matter.
Current Account Balance - The current Balance Due for each client or matter, not including
any unbilled charges. This figure will be the same as would appear on an
Accounts Receivable Report generated for the current date and reflects the current balance due
from all outstanding invoices after deducting all payments and credits recorded to date.
Unused Credit Balance - The amount of any unused credit balances for each client or matter.
This figure will be the same as the credit balances figure which would appear on a
Trust, Retainer and Credit Balances report generated for the current date..
Last Statement Date - The most recent Statement Date used on a finalized bill.
Note that to include any of the date items listed above, you must generate the report that shows either
the Matter Totals or the Client and Matter Totals.
Sort Order - You can generate the report by client ID, by client alternate ID, orr by responsible
attorney, in which case the files for each responsble attorney will be listed in client ID order.
Files with no WIP Report
Click the small button with the letter C to generate a report showing a list of files that have had no WIP
recorded for a specified number of days. This report is useful to determine which files have not had
any recent activity. After clicking the C button, enter the number of days you want to specify, then click
Preview or Print.
18.13 Files with No WIP
To generate a report listing files that have not had any recent WIP recorded select Custom Reports
from the Reports menu, then click the small button with the letter C. Enter the number of days you
want to specify and then click Print or Preview to generate the report. The report will only list files
where no WIP has been recorded for the past number of days which you specified.
18.14 Periodic Activity Summary
An extremely powerful report, the Periodic Activity Summary lets you select a beginning and ending
date, and then shows the beginning balances for that date, a summary of the activity occuring during
the period selected, and the ending balances. It can effectively combine into one report three what
previously required five separate reports:
1. Accounts Receivable, to show your outstanding balances;
2. Trust, Retainer and Credit Balances, to show credit balances and the balances in the client trust
2011 Tussman Programs, Inc.
Reports
375
and retainer accounts;
3. WIP Summary report, to show the totals of your unbilled charges;
4. Billing Analysis, to show the totals that were billed during a specified period; and
5. Income Analysis, to show the income received during a specified period.
It also adds the extra dimension of showing both beginning and ending balances for the period
selected, something that no report previously could do.
The report can show a separate summary for each client, for each matter, or it can show just the totals
for the entire firm. If you have selected the Periodic Activity Report option from the Account Status
screen for a client or matter, the screen will already reflect that selection. The start and end dates
default to the previous month but you can change them to any range you want (not just one month).
Check the items you want included. By default the report always shows the total balance due and a
separate column showing any credit balances. Separate columns showing Retainer and Trust account
balances and activity will appear only if you check those options. You can also include a column
showing WIP balances and a summary of new charges added during that period.
Additional options (not shown above) allow you to show a breakdown for each bill and/or payment
between fees, costs, tax and interest.
The sample below shows a file where there was no beginning balance, but during the period fees of
$2000 were entered, $1600 was billed, and $1000 was paid, leaving a balance due of $600 and a
balance of unbilled WIP of $400.
2011 Tussman Programs, Inc.
376
Tussman Program Release 10
Below is a more complicated version to illustrate some additional features of the report, as described
below:
On the beginning balance line, we see that prior to the beginning date of 7/1/11 the client had made an
initial payment of $1,000 and had incurred charges of $1,100.00, none of which had been billed yet.
During the month of July, we see that addition charges of $1,001 in fees and $101 in costs were
incurred as shown on the "Fees Added" and "Costs Added" lines. Then we see that the sum of
$1800.90 in fees and $201.00 in costs were billed, and those figures are also deducted from the WIP
column. However, on the bill the client was given a percentage discount of ten percent totalling
$201.00 on fees, so the total of the WIP billed does not match the amount of WIP in the WIP column.
To balance this out we see on the line following the billed amounts Writeoff/Adj line which equals the
sum of any writeoffs or adjustments to WIP appearing on the bill, such as from a percentage discount,
the use of FO or FE transactions, etc. On the next line titled "Cr Bal Applied" we see that the previous
month's payment has been applied against the bill. This line shows the amount of any credit balance
carried forward which is applied to bills during the report period. On the next line is the amount of
actual payments made during the month; in this case the client paid an additional $2000. The following
"Advance" line shows that during the report period the client actually paid more than they owed, and
the difference, in this case $998.10, is deducted from the Bal Due column and added to the Cr. Bal
column, thereby balancing out the account. At the end of the report period we see that the client has a
zero balance, has an unused credit balance of $998.10, and there is no unbilled WIP.
2011 Tussman Programs, Inc.
Reports
377
18.15 Fee Ledger
The Fee Ledger report, found in the Transaction Detail section of the Reports menu, lists all the fee
charges for all or selected files for the selected date range, showing for each charge the original
amount and, if the charge has been billed, the date, invoice and amount billed, the amount paid, and
the remaining unpaid amount.
Select the options from the screen below, then either print or preview the report, an example of which
is shown below.
2011 Tussman Programs, Inc.
378
Tussman Program Release 10
18.16 Cost Ledger
The Costs Ledger report, similar to the Fee Ledger, itemizes all cost charges for the file(s) and date
range you select. It is found in the Transaction Detail section of the Reports menu. Select the
options you want from the screen shown below, then generate the report. It shows for each cost the
original amount, the date, invoice number, and amount billed, the amount paid and the remaining
unpaid balance.
2011 Tussman Programs, Inc.
Reports
379
18.17 Billing Ledger
The Billing Ledger report, found in the Transactions section of the Reports menu, lists each bill for the
file(s) and date range you select, showing for each the amount billed broken down between fees,
costs, tax and interest and listing each payment or credit that was applied against that bill, showing the
payment or credit date and amount.
2011 Tussman Programs, Inc.
380
Tussman Program Release 10
An example appears below
18.18 Daily Cash Receipts
The Daily Cash Receipts report is designed to provide a detail of all incoming funds received by the
firm, including both Payments (recorded as transaction type P), retainer receipts (type RR) and trust
receipts (type TR). The objective is to show only actual cash received, and to not include transactions
recorded in the program which are actually just transfers of funds from one category to another. For
example, funds recorded as a Retainer Receipt (type RR) are normally later applied against a client's
bill resulting in the program creating P transactions applying the funds against the client's bill.
However, these P transactions do not actually reflect new funds received. Therefore, for purposes of
this report only the original RR should appear.
The format of the report is to itemize each day's receipts for the period selected, with separate
columns for payments (type P), retainer receipts (RR) and trust receipts (TR) and subtotals for each
day. Select the period and other options from the screen shown below. You can run the report to
include all or selected clients.
2011 Tussman Programs, Inc.
Reports
381
In determining which transactions to include on the report, so that it only shows new cash receipts, the
program must deal with the following situations:
1. Payments that are recorded as client level cash receipts (type P where an asterisk is assigned
as the matter ID, so that the program will automatically apply the payment to multiple matters). In that
case, separate P transactions are recorded for each application of funds to an individual matter.
These matter level P transactions are omitted for purposes of the report, and only the original client
level payment will appear.
2. Client level retainer receipts (type RR where an asterisk is assigned as the matter ID, so that the
program will automatically apply the retainer funds against all the matters for that client). In this case,
the separate RR transactions recorded when an application of these funds is made to an individual
matter are not reflected on the report. Only the original client level RR will appear.
3. Advance Applications - If you have configured the program so that it records separate Advance
Application (type A) transactions when a credit balance is applied against a bill, these A transactions
are not included on the report. Only the original P transaction that gave rise to the credit balance will
appear.
4. Automatic Transfers from Retainer Account - If you have configured the program to
automatically apply funds from a client's retainer account against their bill, the program will create a P
transaction for each application of funds. These P transactions, created when bills are finalized, are
not included on the report; only the original RR giving rise to the retainer balance will appear.
5. Manual Transfers from Retainer Account - This situation arises when you make a manual
application of funds from a client's retainer account to pay their bill, either by recording a type RDP
transaction, or by entering separate RD and P transactions in the same amount. In this case, the
payment transaction (type P) that is recorded will not appear; only the original RR transaction will
appear on the report. However, note that if you enter the RD and P transactions separately, instead of
as a combined RDP transaction, the P transaction will be omitted from the report only if it was entered
as the next transaction after the RD. If it was entered out of sequence and shows on the report, you
can omit it from the report by going to edit the P transaction and checking the "Internal account
transfer" box.
2011 Tussman Programs, Inc.
382
Tussman Program Release 10
6. Refunds - If you check the option to include refunds (transaction type DA) on the report, those will
appear in the Payments column as a negative amount. If you are not including refunds then the full
original payment amount will be reflected on the report, not reduced by the DA.
7. Transfer of Credit Balance from one Matter to Another - A credit balance is normally transferred
from one matter to another by recording a DA on the matter with the credit balance and a P on the
matter you are transferring it to. If the program encounters a DA transaction accompanied by a P
transaction in the same amount on the same date, it will not include the P transaction unless you have
configured the report to include Refund transactions, in which case the P will simply offset the DA. As
with manual transfers from the retainer account, if the P is not entered as the next transaction in
sequence after the DA, to omit it from the report you will have to go to edit the P transaction and check
the "Internal account transfer" box.
8. Reversed and Deleted Payments - Payments that are reversed (by clicking the Reverse button on
the Edit AR Transaction screen) will not be included on the report, nor will payments that have been
deleted.
9. Reversed and Deleted Retainer and Trust Receipts - Retainer or Trust Receipts that have been
reversed (by clicking the Reverse button on the Edit AR Transaction screen) will not be included on the
report, nor will payments that have been deleted. Note that prior to Release 11 it was not possible to
reverse a retainer or trust receipt; instead, it was advised that you enter an offsetting RD or TD
transaction in the same amount. RR and TR transactions that have been reversed in this way will still
appear on the report, as there is no reliable way for the program to identify which ones have been
reversed. To omit them from the report, go to edit the RR or TR transaction and check the "Internal
account transfer" box.
10. Reversed Retainer or Trust Disbursements - Prior to Release 11 the only way to "reverse" a
disbursement from the retainer or trust account (transaction type RD or TD) was to record an offsetting
RR or TR transaction. These RR and TR transactions will be included on the report as there is no
reliable way for the program to determine which RR or TR's were intended as reversing transactions.
However, you can force the program to omit them by locating the transaction and checking the
"Internal account transfer" box. To avoid having to do this, it is now possible to reverse an RD or TD
transaction by locating the transction using the Edit AR Transactions function and clicking the Reverse
button. This will create a reversing RR or TR transaction, but it will be marked as such and will not be
included on the report.
11. Transfer of Retainer or Trust Balance from one Matter to Another - Moving a retainer or trust
balance from one matter to another requires entering an RD or TD on the matter with the balance and
an RR or TR on the matter you want to transfer it to. To prevent these RR and TR transactions from
showing on the report check the "Internal account transfer" box when entering them.
19
Tools
The Tools menu lists a variety of program maintenance functions which are described as follows:
Reindex Data Files
Backup/Restore Data
Automatic Backups
Archive Billing Data
Purging Data Files
Bulk Close/Delete
Activating or Deactivating Program Security
Setting Up your User File
List Users Currently Logged on
Viewing the Activity Log
2011 Tussman Programs, Inc.
Tools
383
Change Trial Status or Staff Level
Change Demo Status
Changing the Network Status
Changing the Data Folder
Configuring the Tussman PDF Writer
Remote Entry Functions
Exporting Time
Converting to Long File IDs
Reconstructing your Account Balances
Converting Retainer to Trust
Expand all Activity Codes
Reassign Sort Codes to WIP
Match Posting Dates with Cutoff Dates
Clear all Tags
Enabling Special Actions
19.1
Reindexing Data Files
The program maintains a set of index files, separate from your actual data files, which enable the
program to quickly sort and access your data. Sometimes due to computer malfunction, power
interruption, or other cause these files may be damaged and as a result you may receive an error
message when using the program or data may appear to be missing or out of order. If this happens,
you can rebuild your indexes by performing this function. While ordinarily this is not necessary, it is a
good practice to reindex once a month, before generating your bills for the month, to make sure that all
of your data is in order. You should also reindex the data files if the program has been interrupted, or
if you have received an error message, in the middle of performing a critical function, such as
finalizing bills or saving a new charge.
The program automatically prompts you to automatically reindex the data files when starting up the
program if it has been more than 30 days since you last reindexed.
After selecting this option from the Tools menu, the following dialog appears:
2011 Tussman Programs, Inc.
384
Tussman Program Release 10
Click on ALL BILLING FILES to reindex all the files used by the billing program. This includes all the
files listed in lower case, which you do not have to reindex separately if you have selected ALL
BILLING FILES.
Click on DICTIONARY FILES to reindex just the files used by the spell check function. These files are
not included when you click on ALL BILLING FILES.
Click on GENERAL LEDGER to reindex just the files used by the General Ledger Program. You must
then enter the company number, which will default to the currently selected company. If you are
using more than one company, you will have to reindex the files for each company separately.
Click on CALENDAR to reindex just the files used by the Calendar Program.
When reindexing, you must wait until you receive a "Reindexing Completed" message to know that it
has completed successfully. If you are running the program on a network, you must be the only
person using the program, including the Remote Entry Program, if it is operating in Local Mode, in
order to reindex. Otherwise, you will receive a "Files In Use" message. If no one else is using the
program and you still receive a "Files In Use" message, close the program and then reopen it and try
again. If you still receive a "Files In Use" message, it probably means that your network server
incorrectly thinks a file in the Tussman Program is still open. To correct this, you will have to either
reboot the server, or go to the server and close any open files in the Tussman Program folder. To do
the latter, go to the server desktop, click My Computer,
Go to Manage and click the manage line, then click on Shared files or Shared Folders. The
open files should be listed there, and you can then right click on each one to close them.
These instructions may be different depending on what operating system you are using on
your server.
19.2
Backup/Restore Data
To perform a backup or restore click on Backup/Restore from the Tools menu.
Backing Up
It is extremely important to back up your Tussman Program data files on a regular basis. Otherwise, if
you suffer a computer crash, or if your computer is stolen or destroyed, you will have no way of
recovering your data.
There are many ways to perform a backup. Most firms which are running the program on a Local Area
Network should have a regular procedure which backs up all the information on your server. If this
function is working correctly, it should backup the data in the Tussman Program as well. However, for
the backup to be successful it may be necessary for all Tussman users to be out of the program.
Thus, it is a good idea to always close the program completely when you leave the office, as very often
these backup procedures are performed at night.
It is also possible to create a backup by simply copying the entire Tussman program folder to an
external hard drive or to a memory stick. All Tussman Program data is stored in the same folder as
the program itself. You can identify the name of the folder where the program is located by selecting
About the Tussman Program from the Help menu. The name of the folder where the program is
installed appears on the Directory line. You can then copy that folder to your external media using the
My Computer function on your Windows desktop.
An alternative method of making a backup is using the Backup/Restore function on the Tools menu.
Before performing this function you must make sure that no one else is using the program, if you are
on a network. Then either backup or restore as follows:
2011 Tussman Programs, Inc.
Tools
385
A backup can be sent to a CD or to any other type of media. To create a backup on a CD, first insert
the CD and wait for your computer to recognize it. If a windows dialog appears showing the contents
of the CD, close it. Then click on the Backup to CD button and follow the directions given by the CD
Writing Wizard. To backup to an external drive or other destination, click the Backup to Other
Destination button and select the destination you want.
No backup method is guaranteed to work all of the time, so after the procedure is complete it is a good
idea to check the directory of your backup media to make sure that the backup file has been
successfully created. The backup file will be named TPBACK.ZIP and it should have the current date
and time indicating that it was just created or updated. It is also a good idea to have more than one
backup. In other words, if backing up to a memory stick you should have two or more sticks and
rotate them, so that you always have at least one additional older backup in addition to the most recent
one. It is also advisable to never rely on just one method of backing.up. Even if you believe your
network server is being backed up nightly, you should still create separate backups using one of the
other methods, in case your server backup is not working.
Restoring
Restoring from a backup should only be done if absolutely necessary. When you restore, all of your
current data will be overwritten and replaced by the data from the backup. Thus, you will lose any
information that has been added to the program since the backup was made.
To restore from a backup. click the Restore from Backup button and then select the location of the
backup from the Select Folder dialog. For example, if you are restoring from a memory stick which
appears as drive F, select that drive from the list After confirming that you are sure, you should see a
list of files scrolling up the screen. I When finished the program will automatically reindex the files. Be
sure to wait for this to finish.
You can use the backup and restore function to transfer data from one copy of the program to
another. For example, if you have the program installed on your computer at home, in addition to the
main computer at the office, you can backup the data at the office and then restore it on the home
computer, perform some work on that computer, backup that data, and then restore it back to the
computer at the office. If you are doing this, however, you must be very careful as you could easily
wind up losing data because of the fact that each time you restore you are overwriting the existing
data in that copy of the program. Thus, after backing up from one computer, you must not add or edit
any information in that copy of the program while you are working on the other computer and until you
have restored the data back.
You can also use the backup and restore function to transfer the program from one computer to
another. For example, if you have purchased a new computer and want to move the program to that
computer, install the program on the new computer, make a backup of the data on the old computer,
and then restore it into the program on the new computer. Alternatively, you can simply copy the
entire Tussman program folder from the old computer to the new computer, either by transferring it
directly or by copying the folder to a CD, zip disk, memory stick, or other media which can be read by
both computers. When copying the program to a new computer, it is not necessary to actual install
the program on the new computer, since all the necessary files are contained in the Tussman folder.
The only additional step you will need to perform after copying the folder is to create a desktop
shortcut to the program using the My Computer function on your Windows desktop. To do this,
locate the TP7.EXE file in the Tussman Program folder, right click on it, and select Create Shortcut.
Then drag the shortcut, which should appear at the end of the list of files in the folder, to your desktop.
2011 Tussman Programs, Inc.
386
19.3
Tussman Program Release 10
Automatic Backups
The Automatic Backup function creates a backup file containing just the data from the entire
program. This backup file is stored in the Tussman Program folder itself, instead of being copied to an
external media This method should thus not be relied upon as your primary method of backing up, as
described separately. However, this does provide an alternate additional method of backing up which
can prove critically important in case the data in your program is damaged and you do not have a
separate external backup to rely upon. You can configure the program to make automatic backups on
a periodic basis, and the program also gives you the opportunity to make them when you perform
certain functions that make major changes to your data files, such as when you unfinalize all of your
bills or purge or archive data This allows you to "undo" the procedure in case you performed it by
mistake, or in case you want to unfinalize, make some changes and regenerate certain bills, and then
restore the system to the way it was before you unfinalized without the changes being retained.
The following screen appears when you select Automatic Backups from the Tools menu.
Frequency - Select here the frequency with which you want the program to make automatic backups.
If you select Weekly, for example, then when a week has passed since the previous automatic backup
was made the program will prompt you each time you enter the program if you want to make an
automatic backup until you click Yes and the backup is made. If you do not ever want to be asked if
you want to make an automatic backup when you start up the program, select the None option and
then click the Close button.. The program will then not ask if you want to make automatic backups, but
you can still make them on demand by clicking the Create button, as described below.
Existing Backups - This portion of the screen lists the existing backup files which were made
previously, showing the file name, the file size, and the date the backup was made. Backup files are
kept for a period of 23 days. The file name indicates the source of the backup file. A name beginning
with TB m