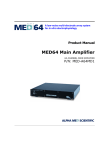
1
Low Frequency Online UPS
Three phase input and three phase output
(80KVA ~120KVA)
User Manual
【Declaration】
This manual is compiled for the 890 series of UPS machine, if the
users select the battery cabinet, distribution boxes and other
peripherals, users need to access the relevant user manual. Before
operation, please read the manual to learn the correct operation way
of the machine. Having read it through, please save for future
reference.
Warning
Input and Output of UPS are dangerous voltage,
must be opearted by professional engineers who
obey the warnings and manuals of UPS
¾ Please read this manual carefully before operate this UPS.
¾ This manual should be read and saved by professional operators.
¾ This manual will not explain the technology in details.
¾
This manual is only for AR890 series 3phase larger power full digital LF UPS
.
During the installation process, make sure the following items:
1.Ensure that the input, output and battery configuration cable specifications
are not less than the minimum required power capacity levels corresponding
wiring specifications.
2. Ensure reliable earth equipment.
3. There are many energy storage devices with high voltage inside the
cabinet, so do not open the box to check without authorization, otherwise you
are responsible for your own life safety.
4. Without permission, it will not be allowed to disconnect any wire or cables
inside the machine.
5. Because this product is large and heavy, please don’t move it randomly and
make strong vibration, and keep a well-ventilated.
6·With electricity, dust clearing inside machine or dirt clearing with wet
towel are strictly prohibited.
7. The battery must be replaced by the professional mechanic, the
replacement of the battery must be sent out to special organization to deal
with recycling. Waste batteries is toxic, please deal with care.
8. After UPS installed, if battery is not used for long, the configured battery
will automatically discharge will automatically consume chemical energy.
According to the surrounding environment and climate around 25 centigrade,
the battery must be charged and discharged at least once every three months.
If the temperature is greater than 30 centigrade, the battery must be
charged and discharged at least once every two months. . When charging
it’s only need to turn on the input mains breaker and run in normal operating
mode for at least 24 hours.
Table of Contents
1·General Information of 890........................................................ 1
1.1 Introduction ................................................................................ 1
1.2 Features ..................................................................................... 1
1.3 Electrical Principle& Running Mode..................................................3
1.3.1·Running Principle ................................................................................ 3
1.3.2·Electrical Structure .............................................................................. 3
1.3.3·Running Mode..................................................................................... 4
1.3.3.1 Normal Mains Mode ............................................................................ 4
1.3.3.2 Battery Mode ..................................................................................... 4
1.3.3.3 Bypass Mode ..................................................................................... 5
1.3.3.4 Manual Bypass Mode........................................................................... 5
1.4 Power Blocks: ............................................................................ 6
1.4.1 Rectifier............................................................................................... 6
1.4.2 Inverter ............................................................................................... 6
1.4.3 Static Switch ........................................................................................ 7
1.4.4 Manual Bypass Switch ........................................................................... 7
1.5. Front Panel& Outside View ...........................................................7
·
2
Technical Specification............................................................. 10
·
3
Installation .............................................................................. 13
3.1 Location and Positioning.............................................................. 13
3.1.1 UPS Room.......................................................................................... 13
3.1.2 Installation Environment ...................................................................... 13
3.1.3 Power source of UPS............................................................................ 13
3.2
3.3
3.4
3.5
3.6
3.7
Package removing...................................................................... 14
UPS hardware Installation ........................................................... 14
Power cables ............................................................................. 16
Terminals ................................................................................. 16
Single UPS Cables Connection...................................................... 17
Hot-Standby UPS ....................................................................... 17
3.7.1 Basic Principle .................................................................................... 17
3.7.2 Flow of Running .................................................................................. 18
3.7.3 Cables Connection............................................................................... 19
3.8 Inspecting after installation ......................................................... 20
3.8.1 UPS Hardware inspecting ..................................................................... 20
3.8.2 Electrical connection inspecting ............................................................. 20
4. Operating Procedures ............................................................... 22
4.1 Checks before startup................................................................. 22
4.2 Startup procedure ...................................................................... 22
4.3 Turn off procedure ..................................................................... 23
5. Operating Control Panel and LCD display .................................. 25
5.1 Menu buttons ............................................................................ 25
5.2 On/Off Operation ....................................................................... 26
5.3 Displayed Items and Retaled Operation ......................................... 26
6. Communication Interface ......................................................... 39
6.1 RS232 ...................................................................................... 39
6.2 RS485 ...................................................................................... 39
6.3 Dry Contacts ............................................................................. 39
7. Options ..................................................................................... 41
7.1 Battery ..................................................................................... 41
7.1.1 Charging and discharging .................................................................... 41
7.1.2 Battery selection ................................................................................ 41
7.1.3 Battery using and Notes ...................................................................... 41
7.2 SNMP ....................................................................................... 42
7.3 UPS Central Monitor ................................................................... 42
8.Daily Management and Maintenance.......................................... 43
8.1
8.2
8.3
8.4
8.5
UPS Room Management .............................................................. 43
Maintenance.............................................................................. 43
Safety Precautions ..................................................................... 43
Precaution and Maintenance termly .............................................. 43
Trouble shootings ...................................................................... 44
9 Package·Delivery·Storage....................................................... 46
9.1 Package.................................................................................... 46
9.2 Delivery.................................................................................... 46
9.3 Storage .................................................................................... 46
Appendix Ⅰ:UPS Stand Base Dimension
Drawing………………………………….47
AR890
(80~120KVA)User Manual
1·General Information of 890
1.1 Introduction
AR890series, 3Phase Digital Low Frequency Large Power UPS, It is the
most advanced UPS in 3Phase low
frequency large power UPS field. It is Online Intelligent Pure Sine-wave
Uninterruptible Power Supply which has the Digital, Information, Networking
features together. This series UPS has the great information sampling system,
signal processing system and perfect protection system. It can be widely used
in various power grid, it has customize design, friendly operating platform, its
advanced digital/analog hybrid technology, can protect Computers, Telecom
devices, Electrical equipments, Medical equipments safely; can solve electrical
problems, like electricity cuts, mains voltage fluctuation/mutation, frequency
variation, electronic noise, thunder strike and so on. This product can be
widely used in fields, as Finance, Telecom, Insurance, Traffic, Taxation, Military,
Security, Energy, Education, Government, Industry, and so on. 890 can supply
strong power guard for you.
1.2 Features
) Ture Online Double Conversion UPS
Isolation Transformer installed at input and output, high efficiency IGBT
used, perfectly solved the electrical problems of thunder strike, voltage
between N an G, fluctuation and interference in the mains power, and so on.
Keep user’s equipment running safely.
) Modularized design of Power blocks
Power blocks included Rectifier part, Inverter part and Static Switch part
are separately installed on each heat sink. This combined with front
maintenance design, are helpful for manufacturing and maintenance on the
spot.
) Functional LCD display
-1-
AR890(80~120KVA)User Manual
Large LCD display, it can show the running status and parameters. Some
parameters can be configured by customers in special need.
) 100% Unbalance load capability in 3phase
3phase full bridge Inverter and Control circuit totally independent
designed, it can be 100% unbalance load in 3phase, there is no circumfluence
among 3 phase, enhancing the reliability of Inverter.
) Optional Monitoring Interfaces
890 UPS can communicate with computer through RS232, also can be
monitored in the network by SNMP, help customer to manage the batteries.
) Manual Maintenance Bypass designed
Manual bypass can ensure no interrupt when repairing it.
) Wide input voltage window
Compatible with different utilities.
) Capability of Battery Cold Start
Start up directly though batteries, it is more convenient to customer.
) Intelligent Battery Management
Full Digital intelligent battery management, control and test battery
charging, discharging strictly, it can improve the reliability and long life of
battery.
) Intelligent Fan controlling
Fan’s running speed is adjustable automatically in different load, decrease
the noise in UPS running, and improve long life of fan.
-2-
AR890
(80~120KVA)User Manual
1.3·Electrical Principle& Running Mode
1.3.1·Running Principle
890 has the advantages of Digital and Analog, Independent processors
DSP and Control board control the running of Rectifier, Inverter, Display of
system, ensure the reliability of UPS.
Fig.1-1 UPS Running Principle
Except the parts in Fig.1-1, UPS has the other parts, including input
inductors, inverter transformer, IGBT, SCR, Circuit breakers.
1.3.2·Electrical Structure
Fig.1-2 UPS Structure
-3-
AR890
(80~120KVA)User Manual
1.3.3·Running Mode
AR890 has 4 running modes: Normal Mains Mode, Battery Mode, Bypass
Mode, Manual Bypass Mode. Details see below:
1.3.3.1 Normal Mains Mode
When the mains power is normal, Rectifier convert AC to DC, then supply
Dc to Inverter, meanwhile charge to the battery. See Fig.1-3:
Fig.1-3 Normal Mains Mode
1.3.3.2 Battery Mode
When mains power is abnormal, Rectifier will stop working, Battery will
supply power to Inverter, and output.
Fig.1-4 Battery Mode
-4-
AR890
(80~120KVA)User Manual
1.3.3.3 Bypass Mode
When Inverter stop working, and mains power is normal, Static Switch will
transfer to bypass output automatically.
Fig.1-5 Bypass Mode
1.3.3.4 Manual Bypass Mode
When UPS needs maintenance, repair or batteries replacement, also there
should be no interrupt at the output, then turn on manual bypass breaker in
correct operation, UPS will transfer to manual bypass output.
Fig.1-6 Manual Bypass Mode
-5-
AR890
(80~120KVA)User Manual
1.4. Power Blocks
1.4.1 Rectifier
¾ Rectifier Circuit Breaker
¾ Arrester
¾ 6 pulse rectifier
¾ Input inductors
¾ Battery temperature compensator
¾ Float Charging
¾ Equalized Charging
Output of Rectifier is limited in rated value, it can float and equalized charge battery,
professional engineers can configure the rectifier’s working.
Fig.1-7 Rectifier
1.4.2 Inverter
¾
¾
¾
¾
¾
¾
¾
¾
Inverter Isolation Transformer
3Phase SPWM Inverter Bridge
Current Sampling
Voltage Sampling
Control of Feedback
Self testing
Hardware Detective
Protection Circuit
Fig.1-8 Inverter
-6-
AR890
(80~120KVA)User Manual
1.4.3 Static Switch
Static Switch use reliable SCR modules, it can transfer between Bypass
and Inverter very shortly, ensure output to load continuously.
1.4.4 Manual Bypass
In order to maintain/repair, 890 UPS install manual bypass breaker inside.
When UPS needs maintenance, repair, also there should be no interrupt at the
output, then turn on manual bypass breaker in correct operation. Normally,
after turning on Manual Bypass Breaker, Inverter will stop running
automatically, and UPS transfer to bypass to supply power to load.
Manual Bypass Breaker should be operated by professional engineers, or,
it will cause damage to UPS and load equipments. So, it needs careful
operation.
1.5. Front Panel& Outside View
PHASE
BYPASS
A
BATT.
LOAD
FAULT
B
C
U
T
S
R
Q
P
O
N
M
L
D
ON
E
F
G
H
K
OFF
I
-7-
J
AR890
(80~120KVA)User Manual
Fig.1-9 AR890 (80KVA -120KVA) front panel indication
A:LCD display: Showing running status(as Voltage, current, load )
B:LED for AC input (Green): Lighting when there are AC input
C:LED for rectifier (Green): Lighting when rectifier working normal
D:Turn to last column:Used for checking LCD display information
E:Turn to last page:Use for checking LCD display information。
F:Turn to next column:Use for checking LCD display information。
G:Switch on button:When switch on ,push the “H” button at the same time。
H:Confirm Button:Switch on working with “G”, Switch off working with “I”
I: Switch off button:When switch off, push the “H” at the same time.
J:Confirm button(ENTER):Used for checking LCD display information.
K:Return button(BACK): Used for checking LCD display information.
L:LED in Chart for battery (Green): Lighting when working in battery mode.
M:LED in Chart for inverter (Green): Lighting when Inverter working normal.
N:LED in Chart for output (Green): Lighting when the there are output Voltage
O:LED in Chart for Bypass (Green): Lighting when working at Bypass mode
P:LED in Chart for maintenance by pass (Green): Light when working at
maintenance bypass mode
Q:LED for Fault alarm (RED): Lighting when there are fault at Rectifier or
Inverter or Bypass
R:LED for overload (RED): Lighting when UPS overload
S:LED for battery low (RED): Lighting when battery low
-8-
AR890
(80~120KVA)User Manual
T:LED for Bypass mode (RED): Lighting when working at Bypass mode
U:LED for phase (RED): Lighting when AC input phase connected mistake
Figure 1-10 AR890 (80KVA-200KVA) outside view
-9-
AR890
(80~120KVA)User Manual
2·Technical Specification
Model
Specification
Rectifier
Structure
Mains power
range(Vac)
Input
frequency
(Hz)
Frequency
tracking(Hz)
Phase
Battery
voltage(VDC)
Charging
current(A)
Phase
Input
Voltage(Vac)
Frequency
(Hz)
Stability
of
Voltage when
take
100%
unbalance
load
Distortion
Transfer
time(ms)
System
Efficiency
Overload
ability
Maintenance
Others
Bypass
Switch
on
function
80KVA
100KVA
120KVA
200KVA
Phase controlled rectifier
380±25%
40~65
50±5%
3φ4W+GND
12V×29=348V
5-40A adjustable
3φ4W
L-N:220 L-L:380
When synchronization:50/60Hz±5%; when
un-synchronization:50/60Hz±0.2%
≤2%,(can working with 100% unbalance load)
Line load THD<3%
0
≥90%
>105% 10min;>125% 1min;>150% 1s
Supply 0ms transfer time maintenance bypass breaker
With cold start ability
Showing three phase input and output voltage,
frequency, load capacity, battery voltage, battery
discharging current and so on.
UPS working status and faulty indication
Input abnormal, battery low, overload, faulty
LCD display
LED display
Alarm ability
Communicati
on
RS232,RS485,dry card
Battery
160KVA
yes
- 10 -
AR890
(80~120KVA)User Manual
testing
function
protection
EMC
Noise (dB)
Cooling way
Ambient
Temperature
(℃)
Humidity
Size(mm)
Weight
(kg)
Short circuit, overload, over temperature, battery low,
output over voltage or low voltage
GB/T 7260.3-2003
<65
Fan cooling
0~40
0~95%
1200W× 900D×1700H
840
950
- 11 -
1100
1400× 1200×1800
1600
1800
AR890
(80~120KVA)User Manual
3·Installation
The main UPS function is to provide safe, clean and stable power supply to
load, and its power supply will not have any change or interruption of sudden
interference. Usually a UPS life is 5-10 yeas (Battery excluded, Because the
battery life affected by the battery type, way of use , environmental
temperature, humidity changes and how to the charger affection. In order to
prolong the battery life, installing location and environment is very important.
3.1 Location and Positioning
3.1.1 UPS Room
UPS room should comply with the following necessary conditions for
equipment normal running.
1) UPS room must be equipped
with
proper effective fire-fighting
equipment;
2) UPS room’s AC input voltage, capacity should can satisfy equipment
normal running
requirement
and,
the mains source of UPS should
equipped with appropriative circuit breaker.
3) Inside UPS room ,it’s prohibited keep storage of flammable, explosive and
other hazardous materials;
4) Before installation, UPS room and ground preparation should be well
prepared and voltage between the neutral line and the grounds should
not exceed 5V;
5) the civil construction of UPS Room of should be completed, the floor had
been hardened. On-site should be clean and dry and no dust.
6) UPS should be installed near the AC mains.
7) The floor board should can stand with the UPS weight and ground pin
connecting plate can be used to fix UPS, and use expanding screws to fix
UPS in the floor to prevent the machine moving during earthquake.
8) UPS room is an important place and should be locked by key. Any
non-related person are not pr ohibited to pass in and out.
- 12 -
AR890
(80~120KVA)User Manual
3.1.2 Installation Environment
1) Temperature :0℃~+40℃
2) Humidity:0%RH~95%RH,(Non-condensing)
3) Altitude: GB/T 7260.3-2003
4) Vertical Degree:No vibration and the vertical gradient less than 5 º.
5) Beside well-ventilated environment, it is recommended to reserve a certain
space before and after, left, right, and top of the UPS, which will help UPS’s
heatsink and routine maintenance. The minimum size requirements of
installation(L×W×H):2500×2500×2000MM
6) Please don’t locate the UPS at where gives off heat, corrosive substances,
and steam; or near machine which gives out iron filings or small objects.
7) Floor board requires to can stand with not less than 2000KG/m2
Notes:
The room should not be stored with flammable, explosive or corrosive
gas or liquid items.
It’s prohibited to install UPS at working environment with metal
conductive dust.
Do not place the UPS in the Fire Department sprinkler nozzle.
3.1.3 Power source of UPS
1)This series UPS require input power source to be 380v,3phase 5wires.
Input power source should 1.2times bigger than UPS max output power.
2) Distribution of the AC and distribution panel of the UPS room shall leave
exclusively circuit breaker for UPS equipment so as to isolate the mains.
Distribution screens or distribution cabinet used
should be produced by a
professional company . Input, output and distribution of circuit breaker
cabinet choice ,please refer to th e requirements of section 3.3.Input
neutral line doesn’t need switch ,and it can be connected to UPS directly.
- 13 -
AR890
(80~120KVA)User Manual
3.2 Package removing
Carefully remove all the UPS packaging, and carefully choose installation
site (see above).
1) Check the following appendix/ accessories complete:
Key(top of the machine, user manual), certificate and warranty card.
2) Carefully check the specification of UPS correct or not:
UPS power capacity;input voltage and frequency, output voltage and
frequency. phases; battery voltage.
3.3 UPS Unpackage Steps
Step 1
Please screw out and take out 8 pcs pads. Then they are parted from UPS.
Figure 3-1:
down 8-M10 clips
Step 2
Choose installation site, Drive 8 pcs M10 swelled bolt into ground according to
following photos, but please remain 50cm over the ground.
- 14 -
AR890
(80~120KVA)User Manual
Steps 3
Please move UPS to ground. When you move, don’t scratch. Then you will
move to site.
Figure 3-3
Screw up 8pcs
8-M10
- 15 -
AR890
(80~120KVA)User Manual
3.4 Power cables
Please choose cables according to UPS capacity. Please follow table to
choose cables for UPS and connection cables for DC breaker and batteries.
1) DC breaker for Input and Output (note: Please use DC breaker
without leakage protection for input):
Minimum DC
Power(KVA)
breaker for Input(A)
80
100
120
160
200
200(3P)
250(3P)
250(3P)
400(3P)
400(3P)
Minimum DC
breaker for
Output(A)
200(3P)
250(3P)
250(3P)
400(3P)
400(3P)
2) Spec. of cable for input
Power(KVA)
80
100
120
160
200
Input
220/380V
3Φ
220/380V
3Φ
220/380V
3Φ
220/380V
3Φ
220/380V
3Φ
L (mm2)
N (mm2)
Battery
(mm2)
PE(mm2)
50
50
70
16
70
70
90
25
90
90
100
25
125
125
140
50
150
150
180
50
L (mm2)
N (mm2)
PE(mm2)
50
50
16
70
70
25
90
90
25
125
125
50
150
150
50
3) Spec. of cable for output:
Power(KVA)
80
100
120
160
200
Output
220/380V
3Φ
220/380V
3Φ
220/380V
3Φ
220/380V
3Φ
220/380V
3Φ
- 16 -
AR890
(80~120KVA)User Manual
3.5 Terminals
AC INPUIT
BATTERY
-
+
A
BATTERY
B
C
PE
AC OUTPUT
N
A
B
C
N
GND
OUTPUT
INPUT
Fig.3-4 Connection of Terminals
3.6 Single UPS Cables Connection
PE
AC INPUIT
BATTERY
-
+
Connect to
Battery Bank
A
B
C
AC OUTPUT
N
A
Connect to
Mains Power
B
C
N
GND
Connect to
Load
Fig.3-5: Single UPS Cables Connection
Note:There are A·B·C to be relative to A phase· B phase· C Phase, Or
R·S·T.
1) Remove breakers board on front panel
2) Please connect Input, output and batteries as Fig.3-4. When you connect
batteries, Don’t be reverse between positive and negative
3) Please connect input mains power in correct phase sequence, or UPS can’t
be turned on, PHASE LED on front panel will alarm.
4) After confirmation of connecting, then start up.
3.7 Hot-Standby UPS
3.7.1 Basic Principle
Make the slave UPS’ output connected to the master UPS’ input bypass,
then it becomes a hot standby system.
- 17 -
AR890
(80~120KVA)User Manual
When the master UPS has fault, the Slave UPS will power the load through the
bypass of master UPS (host), at the moment, if slave UPS also has fault,
system will switch to mains(bypass).
Mains
Power
Li
Output
Bypass
Input
Bypass
Input
Ni
Slave
UPS
Lo
Load
No
Host
UPS
Mains
Input
Fig3-6
Output
Mains
Input
Block Diagram Of Hot-Standby UPS
3.7.2 Flow of Running
When the system is normal, load is powered by master UPS, and the slave
UPS is hot standby, as per fig 3-7, the thick lines stands for the power flow of
full system.
Attention: 1. Two UPSs of the hot-standby System cannot share the
same grow of batteries, two USP should be installed with
batteries separately to ensure the reliability of system;
2. Mains Inputs of master UPS ( A, B, C,N), Slave UPS bypass
inputs( A, B, C, N), Slave UPS mains inputs(A, B, C, N) should
befromthesamesourceofmains(A,B,C,N);andthe
sequence of phases have to be same.
Slave UPS
Bypass Input
of Slave UPS
Mains Input
of Slave UPS
Bypass Input
of Host UPS
Mains Input
of Host UPS
BYPASS
DC
AC
AC
DC
UPS1
BATTERY
BYPASS
DC
AC
DC
UPS2
AC
Load
BATTERY
Host UPS
Fig 3-7 Power flow chart at normal status of hot standby system
- 18 -
AR890
(80~120KVA)User Manual
When master UPS has fault, it switch to bypass, slave UPS start to power
load, as per Fig 3-8, thick lines stand for the power flow when the master UPS
has fault in the hot standby system.
Slave UPS
Bypass Input
of Slave UPS
Mains Input
of Slave UPS
Bypass Input
of Host UPS
Mains Input
of Host UPS
BYPASS
DC
AC
AC
DC
UPS1
BATTERY
BYPASS
DC
AC
DC
UPS2
AC
Load
BATTERY
Host UPS
Fig 3-8
Power flow chart of hot standby system when the master UPS has
fault
3.7.3 Cables Connection
3.7.3.1 Connecting Procedure
1) Take off the front cover of UPS, you can find five Circuit Breakers, from left
to right, they are for battery, mains, bypass and maintenance bypass( only
can be operated by trained engineer), and output.
2) Remove the short connecting cable between bypass circuit breaker and
mains circuit breaker of master UPS; Remove input N line of Master UPS;
Connect the output of slave UPS by correct sequence to the bypass circuit
breaker of master UPS; the output N line of slave UPS should be connected
to the input N line of master UPS.
3) Connect the mains input of master UPS to the mains input of slave UPS
Attention: The phase sequence of mains input cannot be connected wrong,
otherwise, UPS cannot start up normally and the indicator of phase
sequence will light. Please change the phase sequence in this condition.
4) Other connections are same as for single unit, refer to Fig 3-8.
5) Start up only after the confirmation of no mistake in connection.
- 19 -
AR890
(80~120KVA)User Manual
3.7.3.2 Connecting Way
Connection of two UPS hot standby system, as per below Fig 3-9.
Bypass Breaker of Host UPS
Host
UPS
PE
AC INPUIT
BATTERY
-
+
A
B
C
A
N
Connect to Battery
Bank of Host UPS
AC OUTPUT
B
N
C
GND
Connect to Load
Slave
UPS
PE
AC INPUIT
BATTERY
-
+
A
B
C
AC OUTPUT
N
A
B
C
N
GND
Connect to Battery
Bank of Slave UPS
Connect to
mains Power
Fig 3-9 Connection of two UPS hot standby system
Remark: we mark three phases of L wires as A, B and C, they mean Phase A,
phase B, phase C, or Phase R, Phase S, Phase T.
3.8 Inspecting after installation
3.8.1 UPS Hardware inspecting
After installation of UPS hardware, please check below items:
1) Required stable, and neat to look;
2) Vertical angle should be less than 5°;
3) Front panel should be at the same plane, no concave-convex;
4) Check all screws , see if screw down well without missing of flat washer,
spring washer, upside down, etc.
5) Check if there is waste on cabinet, if yes, please clean them;
6) Check if there are any scratch, damage, or painting peel off on the cabinet;
7) Check if the cabinet is clean, should clean up the dirty.
- 20 -
AR890
(80~120KVA)User Manual
3.8.2 Electrical connection inspecting
After finish of electrical connection, please check below items:
1) Input and power distribution inspection: If AC cables are following the
standards? If wirings in the cabinet are loosing?
If the safety labels on the
AC power distribution Unit are complete?
2) Output and battery connection point, code, phase sequence, polarity
inspection: stable of connection points inspection; Re-inspection of battery
polarity and sequence;
3) Check if the wiring is neat or not;
check if the cable routing is following
standards;
4) Check if the installation, wiring is propitious to future rebuild, extension,
and maintenance.
- 21 -
AR890
(80~120KVA)User Manual
4. Operating Procedures
4.1 Checks before startup
Make sure that all power cables are connected properly before
startup, then once again confirm the following steps are correct.
1) Check input voltage is in the range or not;
2) Check input frequency is in the range or not;
3) Check that all the output load switches are cut off
4) Check that all of the circuit breakers and battery breaker are cut off
Normally, follow the procedures described to operate UPS.
4.2 Startup procedure
To startup single UPS, please follow the procedures to operate:
1) Turn on Bypass breaker(Bypass power):
Power board starts work, LCD on, battery low LED on, and buzzer
beeping.
2) Turn on Rectifier breaker(Mains power)
If input power is correct, the Rectifier will be running automatically, the
panel rectifier LED(AC / DC) on, after 20seconds, DC voltage fully grows
up, the battery low red LED will be off, no buzzer alarm.
3) Turn on Battery breaker(Battery):
Rectifier start charging to battery, after battery breaker on.
4) Switch on at front panel to start Inverter
890 series UPS's on / off operation using technology to prevent the wrong
operation of "double buttons operation" switch. When turn on, press the
panel buttons
together for more than a second, DC/AC LED on,
Inverter LED on. After 30secons, turn on Output breaker(no output breaker in
single UPS).
5) Turn on load devices:
After Inverter on, the load devices can be switch on, Follow the steps
below:
First to start high-power load, and then start the low-power load.
- 22 -
AR890
(80~120KVA)User Manual
4.3 Turn off procedure
First, cut off all load, then follow the procedures below:
1) Cut off inverter:
press the panel inverter buttons
to
gether, the output static
switch will automatically transfer the load from the inverter power supply
to the bypass, which could not be causing output voltage interruptions.
2)
Turn off battery breaker(Battery):
If needs turning off UPS power completely, please continue to cut off the
battery breaker, so that rectifiers can only store energy in DC BUS
3) Turn off rectifier input breaker(Mains):
Cut off rectifiers input breaker, the rectifiers will not be able to connect
DC power to DC BUS in AC mains, and DC BUS will slowly release power,
after 2 minutes, DC BUS power release completed.
4) Turn off bypass breaker(Bypass):
Before cut off bypass breaker, make sure the output load does not use,
otherwise once cut off the bypass output breaker, there will not be no
output load so that user equipment will be power
5) When LCD and LED at the front panel off, cut off output breaker,
ups shut down completely.
4.4 Manual maintenance procedures:
The following operations is only to the application of single UPS,
untrained person authorized to do this operation and cause
problems, manufacturer will not take the responsibility.
Press inverter buttons
together, turn off Inverter
1) When BYPASS LED on, cut off rectifier breaker (Mains) and battery
breaker switch(Battery).
- 23 -
AR890
(80~120KVA)User Manual
2) Turn on maintenance bypass breaker (Maintenance bypass), maintenance
bypass LED on, then cut off bypass breaker(bypass) and output circuit
breaker(output), all the LED indicators will be off, after 5minutes, you can
maintain.
3) Maintenance finished, check all the wiring inside and components at
normal state. Turn on bypass circuit breaker(bypass), when the power is
working normally and bypass LED on (Bypass), then turn on output circuit
breaker(output),
cut
off
maintenance
bypass
breaker,
UPS
now
transferred to bypass mode power supply.
4) Then according to Chapter 4 (Operating Procedures) to On/Off
operations.
- 24 -
AR890
(80~120KVA)User Manual
5. Operating Control Panel and LCD display
AR890 series LCD display adopts Chinese and English setting, it can display
UPS working parameter and status, the operating control panel is simple and
brief for user to operate, the user can set partial parameter of UPS and
controlling status.
5.1 Menu buttons
There are 5 buttons for AR890 series, their functions as below:
“Up” and “+”when parameter settings
“Down”and “-” when parameter settings
Transfer between multi choice.
“Enter”
Back to last opearation or page
●Press
together for 10 seconds to Restart LCD
5.2 On/Off Operation
The on/off operation of this
series adopt “ double key operation ”
switch, which has high technical for avoiding mistaken operation, it looks
as belows:
- 25 -
AR890
(80~120KVA)User Manual
Switch ON ---- Press
together for more than 1 second
Switch OFF ---- Press
together for more than 1 second
5.3 Displayed Items and Retaled Operation
1) Turn on Bypass breaker and connected mains, the LCD will display as
below:
WELCOME TO USE UPS
Model : 80KVA
Input : 380V/50Hz
Output : 380V/50Hz
>>>>>>>>>>>>>>>>>>==============
After 10 seconds, goes to information pa ge, or press
entry directly.
2) AR890 UPS takes output parameters as the first information page, means
when UPS running, if no buttons pressing longer than 1 minutes, LCD
will stay showing output parameters.
UPS
Output:
R
S
T
Vl-n:
220V 220V 220V
Load:
0%
0%
0%
UPS Status:
Normal
29-03-2006 Fri 08:00:00
UPS working status:
Power Off
Normal
Rectifier fault
Inv. Protecting
Check battery
Bypass fault
Overloading
Batt. testing
- 26 -
AR890
(80~120KVA)User Manual
Batt. reversal
Par. line fault
Battery low
Load warning
Battery ok
Battery weak
Batt. defective
Press
together, it will entry into setting page, required
password input
Press
or
to move cursor
UPS
Settings
Enter password: 000000
If password wrong, it will show Wrong password!
After correct password input, it shows:
UPS
Settings
►
Choose cursor ►
UPS
Battery
Extra
stayed option, press
to entry:
(1)UPS page
Choose the parameter options:
Settings-UPS
Model select :
Operating mode:
Output voltage:
Output frequency:
Bypass voltage:
Bypass frequency:
◄ 80KVA
Single
220V
50Hz
+15%/-25%
+5%/-5%
- 27 -
AR890
(80~120KVA)User Manual
The menu display as below:
Model select
:
80KVA
Operating mode : Single/Parallel
Output voltage
: 220V/230V/240V
Output frequency: 50Hz/60Hz
Bypass voltage : +15%/-25%·+20%/-25%
Bypass frequency: +5%/-5%·+10%/-10%
Press
to select the value; pr
ess
to move down,press
to move up, when finishing setting, press
to save the operation and
go back to the previous page, press
will go back to the previous
page without saving setting. The same operation as below.
(2)Battery page
When selecting battery, the page displays as below:
Settings -Battery
Elapsed capacity: ◄ 50Ah
Battery capacity: 100Ah
Boost charge adjust: +5V
Float charge adjust: +5V
▼
when entering this page, user can set AH value where the
cursor“- ”stays, press
to leave that page without saving setting; press
to save settings, the cursor turns to “◄ ”and go to the boost charge adjust
option, at
thismoment,usercanpress
to set the boost charge and float charge
voltage value(-5V~+5V),the cursor “▼”can expand the next page, it shows
as below:
- 28 -
AR890
(80~120KVA)User Manual
battery configuration setting: 29PCS/30PCS
battery replacement reminder: ON/OFF
please set year: 3years(1~10years optional)
the “please set year ”row will automatically hide when the set“ battery
configuration setting” is closed.
(3)other pages
Settings-Extra
Clear history log: ◄ On
ECO mode
:
On
Maintenance mode :
On
When the set of “clear history record” is on, go back to the page which
has record, point to one column and simultaneously press
and
,
the record can be deleted; while if that item setting is closed, user can’t
delete the record.
3)
Function menu:
to display all the menu, “ ►”is
When the UPS works normally, press
for selecting menu。
►
UPS
Rectifier data
Bypass data
Output data
Battery data
Operating status
Buzzer control
▼
There are still other options as below:
Battery management
Language
Time & Date
Manufacturer info
Event history log
move
to view the menu and point“
- 29 -
►”to the item.
AR890
(80~120KVA)User Manual
The sign “▲”“▼” on the upright and downright corner of LCD display
means the content can be scrolled upward or downward.
press
press
to enter into the menu where“►”points
to go back to UPS parameter page.
(1)Rectifier data:
It displays UPS rectifier’s thr ee phase input phase voltage, frequency
and rectifier DC output voltage.
UPS
Rectifier data
R
Vl-n:
220V
Frequency :
DC voltage:
It only press
S
220V
T
220V
50.0Hz
395V
to go back to the previous menu that is valid.
(2)Bypass data:
It displays UPS bypass three phase voltage and frequency:
UPS
Bypass data
R
Vl-n: 220V
Frequency:
It only press
S
220V
T
220V
50.0Hz
to go back to the previous menu that is valid.
(3)Output data:
It displays UPS three phase output voltage and load percent
UPS
Output data
R
S
T
Vl-n: 220V 220V 220V
LOAD: 20% 20% 20%
Frequency:
50Hz
- 30 -
AR890
(80~120KVA)User Manual
It only press
to go back to the previous menu that is valid.
(4)Battery data:
It displays UPS battery voltage and charging(discharging) current.
When rectifier works normally, it shows charging current; when UPS is in
inverter modem it shows discharging current. ( when “discharge time for
AH is 0, the “discharge time” and “remaining time”won’t be shown.)
UPS
Battery data
Battery voltage :
348V
Discharge current:
10A
Battery temperature: 30℃
Discharge time
: 1H.30M.
Remaining time
: 2H.30M.
It only press
to go back to the previous menu that is valid.
(5)Operating status:
It displays all operating status of UPS
UPS
Operating status
Operating model : Single
: Normal
Phase
: Normal
Bypass
: Normal
Rectifier
: Normal
Battery
Besides, there are two rows left, user can display by touching the sign at
the downright corner of LCD display.
Inverter :Normal
:
Output
Load
Normal
: Normal
Ambient Temp
:
26 ℃
:
Normal
Inverter Temp.
Parallel line
:
Battery polarity
Fuse
Fan
Normal
: Normal
: Normal
:
Normal
- 31 -
AR890
(80~120KVA)User Manual
press
or
It only press
to scroll and view the menu.
to go back to the previous menu that is valid.
If select operating model as “single”, then the parallel line won’t be
displayed.
(6)Buzzer control:
This series UPS has UPS mute control function, when UPS is in
inverter mode, user can shutdown buzzer alarm function; when UPS is
abnormal, buzzer will automatically startup alarm function without any
screen control.
UPS
Buzzer control
Buzzer:
press
◄
On
to start up or shutdown the buzzer.
It only press
to go back to the previous menu that is valid.
(7)Battery management:
This series UPS has battery test
function, it is based on the principle
that under the long working with mains, reduce the DC output
voltage and let the UPS have a short time discharging to test the
battery validity.
UPS
Battery management
►
Manual test
Auto boost
Submenu displays as below:
Battery
management-Manual test
Test : Closed
- 32 ►
Abort
Standard
Deep
AR890
(80~120KVA)User Manual
Battery management-Auto boost
Auto boost:◄ On
Period: 02Month(s)
Time : 01st, 08 : 00
when entering this screen, press
to start up or shut down auto
boost.
select auto boost closed, press
to stop it and quit from that page.
Select auto boost open, the “period” and “ time” turns out, press
,
when the cursor “◄”change into “-”and points to time setting, then user
can set the period and time and press
to save settings.
(8)Language:
User can set language for Chinese/ English/Spanish
UPS
Language
►中 文
English
Espanol
press
to
select
language between Chinese/ English/
Spanish.
Press
to confirm the option.
- 33 -
AR890
(80~120KVA)User Manual
It only press
to go back to the previous menu that is valid.
(9)Time and Date:
This series UPS comes with cloc k chip to display current time, user can
set the time in this menu.
UPS
Time & Date
Date: 2006 - 03 - 29
Time:
08 : 00 : 00 -
Day :
Press
press
press
Friday
to select year, month, day, hour, minute, second.
to revise( add or reduce) time
to confirm the time and write into the clock chip, when the
cursor “-” turns into“◄”and points to “week” row, press
press
to go ba
to select setting.
ck to the previous menu.
(10)Manufacture Information:
It displays UPS manufacture name, model, version and ID address
number.
The ID address number is the communication data address code
information when UPS adopts RS485 for monitor multi-machine. It can
be set by a series of code switch inside UPS, while it is suggested that
user not revise this parameter at random.
UPS
Manufacture info
UPS Model
:
Hardware
:
Control soft:
UPS Id
:
Press
to setUPSID,itonly
ARX0K-33
Version 1.0
Version 1.0
◄ 01
press
- 34 -
togobacktothepreviousmenu
AR890
(80~120KVA)User Manual
that is valid
4) Event history log:
It displays and records the most important history parameter
and the time for the events, it plays a role as reference to offer data for
the local electricity situation and abnormal situation.
UPS
Event history log
►Status
Parameters
Alarm
The history log includes status information, parameter abnormal and
fault alarm record.
Press
to view all the records and press
record to display in details.
Press
to go ba ck to the previous menu.
(1) Event histoty log-status
Event history log-Status
► Power on/off
AC failure/recovery
Bypass on/off
Battery test
AC failure count
: 2
Overdischarge count: 1
Select each status information as below:
(a) Power On/Off
Power On/Off
01/01
29-03-06
08:00
Power on
(b) AC
failure/recovery
28-03-06 12:00
Power off
AC
failure/recovery
27-03-06
18:00
Power 01/01
on
29-03-06
08:00
AC failure
27-03-06 17:00
Power
off
28-03-06
12:00
AC recovery
27-03-06 16:00
Power
on
- 35 -
to select the
AR890
(80~120KVA)User Manual
(c) Bypass on/off
Bypass on/off
29-03-06 08:00
28-03-06 12:00
01/01
Bypass on
Bypass off
(d) Battery test
Battery test
29-03-06 08:00
29-03-06 08:00
28-03-06 17:10
28-03-06 17:00
01/01
Check battery
Standard test
Last for 10Min
Deep test
It will automatically record the time when the battery finish deep test,
and the abnormal test result will also be recorded, it includes “ check
battery” and “battery capacity decrease”
(2) event history log-Parameters
Event history log-Parameters
► Rectifier
Bypass
Output
Submenu display as below:
(a) Rectifier parameters
Rectifier parameters
01/01
29-03-06 08:00 Voltage R :330V
28-03-06 17:10 Frequency:0Hz
It records rectifier A,B,C three phases abnormal input voltage, high output
voltage and abnormal input frequency.
- 36 -
AR890
(80~120KVA)User Manual
(b) Bypass parameters
Bypass parameters
01/01
29-03-06 08:00 Voltage R:330V
28-03-06 17:10 Frequency:0Hz
It records bypass A,B,C three phases abnormal voltage and frequency.
Output parameter
Output parameters
01/01
29-03-06 08:00 Voltage R:330V
28-03-06 17:10 Load R
:150%
It records output A,B,C three phases abnormal voltage and overload
percent.
(3) Fault record
Fault record
29-03-06 08:00
28-03-06 12:00
27-03-06 18:00
27-03-06 17:00
27-03-06 16:00
27-03-06 15:00
01/01
Battery low
Inv.overtemp.
Phase fault
Par.line fault
Fuse fault
Rect.fault
This record includes the faulty information as below:
Battery low, Phase fault, Inv.overtemp,Rect. overtemp,Fuse fault, Par.line
fault,Fan fault,Rect. fault, Inv.fault,etc.
when the setting “clear history” in the UPS menu is open,user can
simultaneously press
to delete the record.
It will display“ no relevant record” when there is no record in history log.
- 37 -
AR890
(80~120KVA)User Manual
Notice: it is suggested that user should keep the history data record as an
fault analysis for the future maintenance.
- 38 -
AR890
(80~120KVA)User Manual
6. Communication Interface
6.1 RS232
Open the front cover of circuit breakers, there is a RS232 communication
interface on the right side of the front cover to support UPS close
communication(normally less than 10m), and Use SNMP card to make
remote monitoring for UPS input voltage, input frequency, output voltage,
output frequency and load etc., and can operate remote on/off.
6.2 RS485
Open the front cover of circuit breaker, there is a RS485 communication
interface on the right side of the front cover to support remote
communication for UPS input voltage, input frequency, output voltage,
output frequency and load etc., and can operate remote on/off
6.3 Dry Contacts
Open
the
front
cover
of
circuit
breaker,
there
is
dry
contact
communication interface (SIGNAL) on the right side of the front cover. It has
8 ports of dry contact communication signal:
1 )· Fans faults alarming signal : 1P/3P short circuit means fans
faults.(This function is optional)
2)·Maintenance bypass alarming signal:4P/6P short circuit means
entering into maintenance bypass working status.
3)·Inverter faults alarming signal:7P/9P short circuit means inverter
working status abnormal
4)·Low battery alarming signal:10P/12P short circuit means battery low
5)·Mains faults alarming signal:13P/15P short circuit means Mains input
interrupt
6)·Bypass faults alarming signal:16P/18P short circuit means bypass
input fail
- 39 -
AR890
(80~120KVA)User Manual
7)·System faults alarming signal:19P/21P short circuit means UPS
system faults
8)·Output overload alarming signal:22P/24P short circuit means UPS
output overload
Note:Additional communication interface refer to related instructions.
- 40 -
AR890
(80~120KVA)User Manual
7. Options
7.1 Battery
7.1.1 Charging and discharging
Battery group is an important component to make sure UPS supply
uninterruptible power. When Mains working is normal, the power system
make floating charge or equalized charging to the battery group;When
power off, the battery bank supply power to the user equipment.
7.1.2 Battery selection
1) The capacity selection of battery group depends on the current needed by
the
using equipment and the discharge time expected. For example the
battery discharge current is 100A, the user expect the continuous backup
time is 2h during AC power off,then the battery capacity =battery
discharge current× the continuous backup time during AC off =200Ah,the
conclusion comes that the battery capacity add a redundant capacity,that
is the battery capacity actually needed. The battery selection comply with
more better and no less, but the more should not be higher than 20% of
the capacity need by the using equipment.
2) The battery with different capacity could not be connected in series,The
battery with different voltage could not be connected in parallel.
3) The battery group with different capacity could not be connected in
parallel to use.
7.1.3 Battery using and Notes
1) When many groups of battery connected in parallel, the total battery
capacity is the sum of each group of battery capacity.
2) The using temperature of battery group is 0℃~40℃. The battery life is in
inverse proportion against the battery temperature. If the battery
application will make the battery temperature grow up, heat elimination
are required to be fully considered during design, in case the battery
- 41 -
AR890
(80~120KVA)User Manual
temperature rise up(when battery temperature rise, its pole board is
eroded worse by vitriol which short battery life),it is better for the site to
install air condition to prolong battery life.
3) When use the battery in first time or use the battery which not be used for
a long time, Charging battery must be required before using. The battery
will slowly lose capacity due to self discharge for a long time during
storage,if no recharge the battery could not work properly.
4) The user should termly check the battery connection and fixation to
prevent from accident.
7.2 SNMP
SNMP card could be installed in the SNMP slot or outside the slot and play
its function of remote management through internet. The hot swappable
design makes the replacement and maintaining more convenient, and
monitor UPS through Internet browser. Please operate it according to the
user manual of network adapter.
7.3 UPS Central Monitor
The background monitor software central monitor has the function of
background monitor and remote switch off. Please operate it according to the
user manual of central monitor.
- 42 -
AR890
(80~120KVA)User Manual
8. Daily Management and Maintenance
8.1 UPS Room Management
UPS room management includes environment safety management and
facility management.
1) The essence goal of environment safety management is to ensure that the
temperature,
relative
humidity,
lustration,
static,
noise,
electromagnetism interfere all meet the standards. And make sure that
the equipment works stable and be produced safety, provide a stable
power to the electric equipment.
2) The essence goal of equipment management is to keep the equipment’s
physical capability stable and equipment’s electrical capability in a good
condition and meet the standard, keep the facility run well and stable and
record a complete records for the relative technical material and initial
events.
8.2 Maintenance
Correct maintenance (include precaution and remediation) is the key to
make UPS running perfectly. And keep the facility working in long period.
Precautions maintenance includes the normal operation procedures. And
this procedures are used for preventing the system against fault and get its
most efficiency. Remediation maintenance includes finding the fault of the
system, then do the effective maintenance.
8.3 Safety Precautions
In order to do the safe and successful maintenance, you must obey the
safety precautions and use tools and test equipment, and ask the
professional engineers for help. Do obey the following operation process:
1) Be aware that there is a risk voltage in the UPS, even it doesn’t work.
2) Make sure that the UPS operator and maintenance guy is familiar with
UPS and the content of this manual.
3) Mustn’t wear golden or silver jewelry such as finger ring and watch.
4) If problems happen, please ask help from professional people, don’t do it
as it may be or might be.
5) Be aware that there is a risk voltage in the UPS. Before maintenance,
please use a voltmeter to test voltage and confirm that the power is off.
8.4 Precaution and Maintenance termly
The following is the description of precaution and maintenance step. It will
improve the efficiency and stability of the UPS after do the following steps.
- 43 -
AR890
(80~120KVA)User Manual
1) Keep a good environment, avoid dust and chemistry pollution.
2) Check the function of the input and output terminal connect once in a half
year, to confirm that whether it is in good condition or not.
3) Check the working condition of the fans timely, avoid there is something
plug up the air outlet. Please replace with a new one if there is damage.
4) Check the battery voltage and UPS working status timely.
8.5 Trouble shootings
The following is some basic trouble shootings. Please ask for help from
agent or factory’s qualified engineer. Normal guys mustn’t open the panel as
it is very dangerous.
Table 8-1 Trouble Shootings
Phenomenon
Faults
(1) LED indicator:
AC/DC off, FAULT
on
(2) Phase LED on,
buzzer alarm
(3) Inverter has no
output, and buzzer
alarms.
(4) UPS stops, no
output while mains
power failure.
(5) LCD & LEDs off.
(6)
Fans
running
stop
(7) FAULT LED on,
buzzer alarms.
Solution
Rectifier mains input Circuit Breaker is
off, and INPUT LED off ·AC/DC LED
off· FAULT LED on.
Turn on the mains input
circuit breaker
While input voltage is abnormal,
AC/DC LED will be off, and FAULT LED
will be on.
Connect
input
power
which is in the range
AC input phase fault, LCD will display
the wrong information, phase LED will
be on, and buzzer alarm.
Change
the
phase
sequence
of
rectifier
input, it just needs
changing the position
between any two phase
Rectifier hasn’t be started successfully.
Buzzer alarms and battery low LED
on.
Wait until the rectifier
finish its starting, and
buzzer stops alarming.
Output is overload. And OVERLOAD
LED on.
Decrease the load.
Battery Breaker is off.
Turn on battery breaker.
All the breakers haven’t been switched
on.
Turn
on
breaker
Power PCB faults.
Ask engineers to maintain
Output of Phase B abnormal, Fans
faults
Ask engineers to maintain
UPS’ Output has been short circuit
Solve short circuit spot,
Switch
off
Inverter,
Restart Inverter
Heatsink of Inverter temperature too
high
Decrease the load or
make load be balanced.
- 44 -
any
circuit
AR890
(80~120KVA)User Manual
Fuse of Inverter
abnormal
(8) OVERLOAD LED
on
(9) UPS can not
transfer
from
inverter mode to
bypass mode while
switch off.
(10) UPS can not
transfer
from
bypass mode to
inverter
mode
while switch on.
(11)Communication
fault
burnt,
or
IGBT
Replace Fuse or IGBT
No mains, battery low protection.
UPS
will
automatically
mains recover
Overload
Decrease the load.
Bypass voltage, frequency abnormal
Check bypass
Static Switch driver abnormal
Ask engineers to maintain
Inverter fault
Ask engineers to maintain
Static Switch driver abnormal
Ask engineers to maintain
Communication cable plugs wrong.
Connect
communication
well.
Communication software fails
Install software correctly.
Communication Com wrong
Configure correct Com
No problems of above
Ask engineers to maintain
- 45 -
restart
when
the
cable
AR890
(80~120KVA)User Manual
9 Package· Delivery· Storage
9.1 Package
UPS adopts separate reinforced carton packaging with inner foam
cushion. There should be relative information about the UPS, such as model
number, weight, dimension and date be produced.
9.2 Delivery
Please handle it carefully and pay attention to warning signs on the box,
do not handle it rudely. The mark “this side up” should be strictly according to
its correct direction to avoid shake the UPS and damage it. In the middle of
transport, it shouldn’t be placed in the open air storage, and shouldn’t be in
the same container with the flammable, explosive, corrosive goods.
Products are not allowed to withstand rain, snow or liquid substances
leaching and mechanical damage.
9.3 Storage
System should be stored in a dry storehouse to avoid sunshine and rainy.
And the storage should according to the mark on the package. The
surrounding temperature of the UPS mainframe is -25~+55 ℃ ( do not
include the battery). The storage temperature of battery is 0~40℃. The ideal
storage temperature is 15~25℃, relative humidity is 30~90%. There should
be no Harmful gases, no flammable and no explosive goods and corrosive
chemicals, no strong mechanical vibration, shock and strong magnetic field.
Under this condition, the storage could be 6 months. Please discharge and
recharge the battery every three month if plan to store a long time.
- 46 -
AR890
(80~120KVA)User Manual
Appendix Ⅰ:UPS Stand Base Dimension Drawing
Ⅰ: Stand Base Dimension Drawing of AR890 series(80~120KVA)
8-Cables
outlets
8-Holds of UPS
stand points
Holds height of UPS
stand points, 100mm
Fig1 UPS Stand Base Dimension Drawing
47