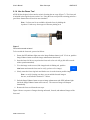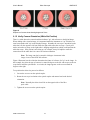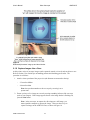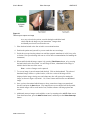
1
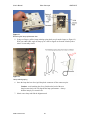
User's Manual
Video Otoscope
AMD-300S (Welch Allyn / AMD)
Document ID: PUB-112
Revision B
User's Manual
Video Otoscope
AMD-300S
The names of any providers and patients used in
illustrations or examples in this document are
fictitious.
Every effort has been made to ensure this manual is
accurate, complete, and useful. Please let us know if
you have any suggestions for improvement using one
of the following means of contact:
AFHCAN
Training Department
4000 Ambassador Drive
Anchorage, AK 99508
Phone: 877 885-5672
Fax: 907 729-2269
Email: [email protected]
Copyright © 2006 Alaska Native Tribal Health Consortium (ANTHC). All rights reserved. No part of this
publication may be reproduced, stored in a retrieval system, or transmitted, in any form, or by any means,
including photocopying, electronic, mechanical, recording or otherwise, without the prior written permission
of Alaska Native Tribal Health Consortium.
PUB-112 Rev B.doc
ii
User's Manual
Video Otoscope
AMD-300S
Table of Contents
Section
Title
Page
Preface ............................................................................................................................................ v
About this Document .................................................................................................................. v
Related Documents ..................................................................................................................... v
For More Information ................................................................................................................. v
Section 1 – Introduction ................................................................................................................ 1
1.1 Introduction to the Video Otoscope ..................................................................................... 1
1.1.1 Functional Description.................................................................................................. 1
1.1.2 Main Components ......................................................................................................... 1
1.1.3 Hardware Features ........................................................................................................ 4
1.1.3.1 Platform Box ......................................................................................................... 4
1.1.3.2 Ear Scope Assembly .............................................................................................. 5
1.1.4 Video Otoscope Features in the AFHCAN Software ................................................... 6
1.2 Particulars of the AFHCAN Installation .............................................................................. 7
1.3 Warnings and Cautions ........................................................................................................ 8
Section 2 – Operation .................................................................................................................... 9
2.1 Basic Operating Procedures ................................................................................................. 9
2.1.1 Start the Software ......................................................................................................... 9
2.1.2 Ensure the Ear Scope Tip Is Clean ............................................................................. 10
2.1.3 Perform Color Reset Adjustment ................................................................................ 10
2.1.4 Use the Focus Tool ..................................................................................................... 11
2.1.5 Verify Camera Orientation (White Dot Position) ....................................................... 12
2.1.6 Capture Images Into a Case ........................................................................................ 13
2.1.7 When Finished with a Patient ..................................................................................... 15
2.2 Special Procedures ............................................................................................................. 15
2.2.1 Using the Insufflation Bulb......................................................................................... 15
Section 3 – Clinical Considerations............................................................................................ 17
3.1 Guidelines for Clinical Success ......................................................................................... 17
3.2 Common Mistakes ............................................................................................................. 17
3.3 Tips and Tricks .................................................................................................................. 17
Section 4 – Routine Maintenance ............................................................................................... 19
4.1 Care and Cleaning .............................................................................................................. 19
4.2 Replacement Items ............................................................................................................. 19
4.2.1 Replacing the Lamp .................................................................................................... 19
4.2.2 Checking and Replacing the Fuses ............................................................................. 22
4.3 Elementary Troubleshooting .............................................................................................. 23
PUB-112 Rev B.doc
iii
User's Manual
Video Otoscope
AMD-300S
List of Illustrations
Figure
1
2
3
4
5
6
7
8
9
10
11
12
13
14
Title
Page
Platform box ........................................................................................................................ 2
Cables and connectors ......................................................................................................... 3
Ear scope assembly ............................................................................................................. 4
Example of the Video Picture screen .................................................................................. 6
Correct way to hang the ear scope assembly on its hook .................................................... 8
Initial screen when using the video otoscope ...................................................................... 9
Focus tool mounted on barrel ............................................................................................ 11
Sequence of screen shots showing degrees of focus ......................................................... 12
Relationship between image up and the white dot ............................................................ 13
Three ways to capture an image ........................................................................................ 14
Removing the lamp replacement door ............................................................................... 20
Lamp retaining spring ....................................................................................................... 20
Lamp correctly seated with alignment tab in notch ........................................................... 21
Removing the fuse drawer ................................................................................................. 22
List of Tables
Table
1
2
Title
Page
Functions of Video Picture screen buttons .......................................................................... 7
Troubleshooting guidelines ............................................................................................... 23
PUB-112 Rev B.doc
iv
User's Manual
Video Otoscope
AMD-300S
Preface
About this Document
This document is part of the set of user manuals provided with the AFHCAN Cart. These user
manuals, covering various topics, are normally assembled into a binder delivered with each Cart.
This modular design has the following advantages:
• the set of manuals provided with your cart includes documents for the specific peripheral
devices installed
• each document is a stand-alone publication, so as new devices or features are added to the
Cart, new manuals can be added to the existing binder
• user information that is common to all items of equipment does not need to be repeated in
each module, but can be covered in separate modules and referenced as needed
Related Documents
This document assumes you have read the introductory hardware and software manuals included
in this binder.
The original manuals provided with the equipment were included in a set of materials delivered
with the AFHCAN Cart. Those manuals can be used to supplement the information provided in
this document. Be aware, however, that items installed on an AFHCAN Cart may have been
modified slightly, so the features as described in the original product manuals may not apply.
For More Information
This document describes the equipment to a level of detail that will meet most user's needs in the
context of clinical use of the AFHCAN Cart. For more information, contact AFHCAN Customer
Support:
AFHCAN Customer Support
Phone: 888 449-4435
Fax: 907 729-2269
email: [email protected]
You can also view additional information at the manufacturer's website:
www.welchallyn.com/medical/
www.amdtelemedicine.com/
PUB-112 Rev B.doc
v
User's Manual
PUB-112 Rev B.doc
Video Otoscope
vi
AMD-300S
Section 1 – Introduction
1.1 Introduction to the Video Otoscope
This manual describes the principal features and operation of the AMD-300S video otoscope, as
installed on an AFHCAN Cart.
1.1.1 Functional Description
The video otoscope combines an otoscope with a digital imaging system to produce high-quality,
video images that can be displayed on a monitor. The video output from the video otoscope is
brought into the computer. The live video feed is displayed on the touchscreen monitor allowing
the healthcare provider to position the instrument to obtain the desired view. Images from the
video input can then be captured and saved in a case as digital photographs.
1.1.2 Main Components
The video otoscope system consists of the following main components (Figures 1 through 3):
• Platform Box (sometimes called a "light box")
The platform box contains the light source, digital imaging electronics, and power supply
• cable assembly
The cable assembly is a pair of cables bundled together in a Teflon sheath:
-
fiber optic bundle
The fiber optic bundle is a cable that conducts light from the light source in the
platform box to the ear scope
-
camera and camera cable
The camera cable includes a CCD camera head, wiring, and a multi-pin connector
that plugs into the platform box
• ear scope assembly
The ear scope assembly is the hand-held unit brought to the patient's ear
PUB-112 Rev B.doc
1
User's Manual
Video Otoscope
Figure 1
Platform box
PUB-112 Rev B.doc
2
AMD-300S
User's Manual
Video Otoscope
Figure 2
Cables and connectors
PUB-112 Rev B.doc
3
AMD-300S
User's Manual
Video Otoscope
AMD-300S
Figure 3
Ear scope assembly
1.1.3 Hardware Features
1.1.3.1 Platform Box
The platform box includes the following items:
• Power Switch
The power switch turns the platform box on (1) or off (0)
Caution: never turn the power switch off then on in quick succession.
Once the unit is turned off, wait at least 15 seconds before turning it
back on. Otherwise the lamp may fail to reignite, and lamp life will be
shortened.
• Color Reset button (white balance) and LED indicator light
Pressing and holding the Color Reset button activates electronics in the platform box that
perform color adjustments based on a pure white image
when the Color Reset button is pushed, the LED indicator beside the button will flicker a
few times indicating that the Color Reset adjustment is in progress; when the flashing
stops, the Color Reset button can be released
PUB-112 Rev B.doc
4
User's Manual
Video Otoscope
AMD-300S
• Image Enhance button and LED indicator light
pressing the Image Enhance button activates image enhancement circuitry in the
platform box and sharpens the image
when lit, the LED indicator light beside the Image Enhance button indicates the image
enhancement circuitry has been turned on
• Light Intensity Control Knob
the Light Intensity Control Knob adjusts the amount of light delivered to the tip of the ear
scope, with clockwise rotation increasing light intensity and stops at maximum and
minimum settings
the knob does not change the intensity of the lamp, but opens or closes an aperture
between the lamp and the fiber-optic bundle
for most viewing situations, maximum intensity is best
• Camera Connector Port
the camera connector port provides the electrical connection for signals coming from the
camera head
when plugged into the camera connector port, the connector on the camera cable must be
oriented with the red dot up (tabs in the connector will physically prevent misalignment)
• Fiber Optic Illumination Port
the fiber optic illumination port provides a connection point for one end of the fiber optic
bundle
• fuse drawer
the fuse drawer, located above the power cord, allows the power supply fuse to be pulled
out, visually checked, and replaced if necessary (2.0 ampere, 250 volt, 5 mm by 20 mm,
Fast Blo, Welch Allyn part number VA303 or equivalent)
• lamp replacement door
the lamp replacement door allows the user to access and replace the lamp which is the
light source for the otoscope (Welch Allyn part number 09500)
1.1.3.2 Ear Scope Assembly
The ear scope assembly consists of the following items:
• ear scope
the ear scope is the component actually inserted into the ear consisting of a tip, a barrel, a
light source connector, and a viewing end
PUB-112 Rev B.doc
5
User's Manual
Video Otoscope
AMD-300S
• optical coupler
the optical coupler consists of a set of lenses, a focusing ring, a threaded connection for
attaching to the camera head, spring-loaded flanges for securing the ear scope, and a set
screw to keep the ear scope from rotating in relation to the camera
• camera head
the camera head is part of the camera cable assembly that contains the digital imaging
chip (CCD imager) and connects to the optical coupler
• light post adapter
the light post adapter comes off of the ear scope barrel at a right angle and includes a
swivel adapter which connects the fiber optic bundle to the instrument as well as a small
port where an insufflation bulb can be attached
1.1.4 Video Otoscope Features in the AFHCAN Software
The features of the AFHCAN software that are unique to the video otoscope are contained on a
single screen, the Video Picture screen (see Figure 4), where otoscope images are captured and
saved. Once the image has been saved to the case, it can be viewed using the image viewing
tools available on the Case screen.
It is possible to select the Video Otoscope button and open the Video Picture screen without
identifying a patient. This may be useful when demonstrating the equipment.
Figure 4
Example of the Video Picture screen
PUB-112 Rev B.doc
6
User's Manual
Video Otoscope
AMD-300S
Table 1 describes the functions of the buttons in the right bar area.
Table 1
Functions of Video Picture screen buttons
Button
Function
Captures the image currently in the central viewing area as a new
image, and creates a thumbnail of that image. The image in the central
viewing area may be a live image, a frozen image, or even one of the
existing images brought up for viewing. After an image has been
captured, the system returns to a live image in the central viewing area.
Switches the image displayed in the central viewing area to the live
video feed from the otoscope. When the image is live, there will be a
steady white border around the central viewing area.
Temporarily freezes the image in the central viewing area so it can be
examined. When the image is frozen, the border around the central
viewing area will flash red and white. A frozen image can then be
captured by pressing the Take Picture button. A live video feed from
the otoscope can be brought up in the central viewing area by pressing
the Live button.
The Rotate button works only when a thumbnail image has been
selected for viewing. Each time the Rotate button is pushed, the image
is rotated 90 degrees clockwise. The rotated version of the image is
what will be saved in the case.
Saves all the images with a green checkmark and a name into the case,
and goes to the Case screen.
Returns to the Add To Case screen. If images have been captured, a
message will appear advising that images will be lost and inviting you to
confirm your decision.
1.2 Particulars of the AFHCAN Installation
The video otoscope is securely attached to the AFHCAN cart. The Platform Box is affixed to the
top shelf by means of Velcro. The Platform Box can be removed for maintenance (for example,
lamp replacement, refer to Section 4). The fiber optic bundle and camera cable are fed through a
Teflon sheath that holds the cables together as an assembly. The cable assembly is clamped to
the cart. The power cable is routed to a power outlet in the lower compartment, and the S-video
cable is routed to a video capture card in the computer. The power and video cables are
incorporated in the Cart's cable management hardware.
The AFHCAN Cart is not intended for use in a sterile environment, so a soaking cap normally
included with the camera cable may have been removed. While the light source and camera head
can theoretically be attached to other types of endoscopes, the sterilization requirements
associated with other endoscopes makes their use on the AFHCAN Cart impractical.
PUB-112 Rev B.doc
7
User's Manual
Video Otoscope
AMD-300S
1.3 Warnings and Cautions
Please observe the following points:
• This manual is intended for clinically trained medical staff using the AFHCAN Cart. All
procedures assume the user understands and determines when the procedures described
here are appropriate and when they are contraindicated. Clinical tips are provided as a
supplement to your training and are provided to help you succeed in using this equipment.
• Never turn the Platform Box off and on in rapid succession. Wait at least 15 seconds after
turning the power off before turning power back on. If power is turned on too soon, the
lamp may not ignite properly, and lamp life will be diminished.
• If the power is left on between patients, turn the Light Intensity Adjustment Knob fully
counter-clockwise (minimum intensity). This simply reduces a potentially annoying or
distracting source of very bright light in the work area.
• Avoid touching the silvery finish on the back of the new lamp or the glass on the front of
the lamp because body oils will degrade the lamp performance. Always handle the lamp by
its ceramic base.
• Do not unscrew the optical coupler from the camera head because this creates an
opportunity for moisture or dirt to get into this area.
• Avoid crimping or crushing the fiber-optic cable and camera cable.
• Do not drop or bang the ear scope assembly because the optical elements are glass.
• Place the ear scope assembly on its hook so it does not put stress on the extension for the
fiber optic bundle (Figure 5).
Figure 5
Correct way to hang the ear scope assembly on its hook
PUB-112 Rev B.doc
8
Section 2 – Operation
2.1 Basic Operating Procedures
Refer to Section 1.1 for descriptions and illustrations of the controls, indicators, and other items
referenced in these procedures.
2.1.1 Start the Software
Log in to the software, if necessary, and proceed as follows:*
1. From the Start screen, press or click on the Create a New Case button.
2. Select real or test case, as appropriate.
3. From the Add To Case screen, press or click on the Video Otoscope button.
A screen similar to the one in Figure 6 will show up.
Figure 6
Initial screen when using the video otoscope
*
Refer to the Software User's Manual for background information on using the software.
PUB-112 Rev B.doc
9
User's Manual
Video Otoscope
AMD-300S
2.1.2 Ensure the Ear Scope Tip Is Clean
The following steps should be performed each time the otoscope is used:
Caution: never turn the otoscope off and on in quick succession.
Whenever you turn the otoscope off, wait at least 15 seconds before
turning it back on again. Otherwise the lamp may fail to illuminate
properly, and the life of the lamp will be shortened.
1. Turn the otoscope light box on and set the intensity adjustment to maximum (turn the Light
Intensity Control Knob fully clockwise). As the lamp warms up, light will be visible
through the vents located below the Light Intensity Control Knob.
2. If a speculum is attached, remove it and discard (presumably it has been used).
3. Use an alcohol prep pad to clean any wax, oil, or other material from the tip.
4. Attach the insufflation bulb, aim the barrel downward, and blow through the tip a number
of times to dry the alcohol (spray may be visible against a dark background).
2.1.3 Perform Color Reset Adjustment
Perform a Color Reset adjustment (also known as white balance) in the following circumstances:
• at least once each week
• after a lamp is replaced
• any time there is a question about good color fidelity of the image
Proceed as follows:
1. Ensure the Light Intensity Control Knob is fully clockwise (maximum intensity).
2. Place a piece of pure white paper on any convenient work surface.
3. Aim the light at the paper holding the ear scope tip between 1/2 inch to 1 inch away from it.
4. Holding the ear scope steady, push and hold the Color Reset button. The LED indicator
light next to the Color Reset button will flash a few times while the electronics are working.
After a moment, the flashing will stop indicating that white balance is complete.
5. Release the Color Reset button.
Note: if the white balance adjustment is correct to begin with, the
LED indicator next to the Color Reset button will not flash at all. To
verify operation of the Color Reset button, you can first perform the
white balance adjustment using a target that is not white, then repeat
with a white target. By using a non-white target first, it forces the
white-balance processing to take place.
PUB-112 Rev B.doc
10
User's Manual
Video Otoscope
AMD-300S
2.1.4 Use the Focus Tool
AFHCAN has designed a focus tool to assist in focusing the ear scope (Figure 7). The focus tool
is included in the supplies drawer on the Cart. Using the focus tool provides a starting point for a
good focus distance that will work in most situations.
Note: if a focus tool is not available, adjust the focus by holding the
tip about 1/2 inch away from a paper with some printing on it.
Figure 7
Focus tool mounted on barrel
To focus with the focus tool, proceed as follows:
1. Ensure the LED indicator light next to the Image Enhance button is off. If it is on, push the
Image Enhance button to turn the image enhancement function off.
2. Insert the barrel of the ear scope into the focus tool as far as it will go (this will not work
with a speculum attached).
3. View the image on the screen (if the image border is flashing red, push the
Live button and rotate the focus tool to verify you have a live image).
4. Slowly rotate the focus ring back and forth to zero in on the clearest possible image.
Note: to verify focusing was done, you can add the focused image to
the case, as described in Section 2.1.5 below.
5. Push the Image Enhance button to turn on image enhancement (the LED indicator light
beside the Image Enhance button will come on). The on-screen image will sharpen
dramatically.
6. Remove the focus tool from the ear scope.
Figure 8 shows a sequence of images showing unfocused, focused, and enhanced images of the
focus tool.
PUB-112 Rev B.doc
11
User's Manual
Video Otoscope
AMD-300S
Figure 8
Sequence of screen shots showing degrees of focus
2.1.5 Verify Camera Orientation (White Dot Position)
There is a white dot on the camera head that indicates "up" with reference to the digital image.
When dealing with a circular image, it is important handle the instrument so "up" inside the ear
canal corresponds with "up" on the displayed image. Normally the ear scope is assembled so the
white dot is on the opposite side from where the light cable enters the ear scope. Gravity will
tend to orient the ear scope so the light cable is hanging straight down, which would position the
white dot on top. If the patient is not sitting up, for example, it may be helpful to rotate the
camera head so the white dot is in a more convenient orientation.
Note: The image can also be rotated in 90-degree increments in the
image viewer of the AFHCAN software.
Figure 9 illustrates how the white dot determines the frame of reference for "up" on the image. In
this example, the white dot (top of camera) is rotated 90 degrees to the left with respect to the ear
scope barrel and fiber optic bundle. As a result, the image appears on the screen rotated 90
degrees to the right.
To reposition the white dot, proceed as follows:
1. Loosen the set screw on the optical coupler.
2. Rotate the ear scope in relation to the optical coupler and camera head to the desired
orientation.
Note: Normally the white dot will be on the opposite side of the fiber
optic cable.
3. Tighten the set screw on the optical coupler.
PUB-112 Rev B.doc
12
User's Manual
Video Otoscope
AMD-300S
Figure 9
Relationship between image up and the white dot
2.1.6 Capture Images Into a Case
At this point a series of otoscope images can be captured, named, reviewed, and saved into a case.
Refer to Section 3 for clinical tips on handling patients and obtaining good results. The
procedure is as follows:
1. Attach a clean speculum of the proper size (the diameter as measured at the tip):
-
2.5 mm for children
-
4.0 mm for adults
Note: the speculum attaches to the ear scope by screwing it on a
quarter turn.
2. Ensure you have a live image on screen by moving something in front of the ear scope
(such as your fingers). If the image appears frozen or the image border is flashing red,
press the Live button.
Note: in the next steps, to capture the video input as a still image, you
must signal the computer to capture the image. There are three ways to
capture an image on the AFHCAN Cart, as shown in Figure 10.
PUB-112 Rev B.doc
13
User's Manual
Video Otoscope
AMD-300S
Figure 10
Three ways to capture an image
As a way to involve the patient, consider letting them hold the hand
switch and take the image on your instructions. Images taken
accidentally need not be saved into the case.
3. Place the hand switch or the foot switch in a convenient location.
4. Position the patient and yourself so you can watch the on-screen image.
5. Guide the ear scope into the patient's ear until the tympanic membrane is in full view (refer
to Section 3 for tips on dealing with wax as well as other recommendations for handling the
instrument).
6. When satisfied with the image, capture it by pressing Take Picture button, or by pressing
the hand switch or the foot switch. As each image is taken, a thumbnail of the image is
added in the left bar area of the screen.
Note: a series of images can be captured.
7. To save an image, it must be named and checked. Click on the thumbnail. The selected
thumbnail image will have a yellow border, a full-size version of the image will be
displayed in the image viewing area, and a data entry box will open up for naming the
image, as shown in Figure 4 (Section 1.1.4). Enter a name and select the next thumbnail
image.
8. Once you have determined which images to keep, ensure those images are named and
checked, and press the Save button. Any images that were not checked will be discarded,
the desired images will be saved into the case, and the software will bring up the Case
screen.
9. Additional otoscope images can be added to a case by returning to the Add To Case screen.
From the Case screen, press the Add To Case button, and then press the Video Otoscope
button.
PUB-112 Rev B.doc
14
User's Manual
Video Otoscope
AMD-300S
2.1.7 When Finished with a Patient
The following steps should be performed at the conclusion of each clinical use:
1. Remove and discard the speculum.
2. Attach the insufflation bulb.
3. Clean the tip with an alcohol pad, aim the barrel downward, and blow the tip dry with the
insufflation bulb.
4. If the otoscope is not likely to be used again within the next 45 minutes, set the power
switch on the Light Box to 0 (off).
Note: if the otoscope will be used for a number of patients, it is okay
to leave the otoscope powered up. When not in actual use, it is a good
practice to turn the Light Intensity Adjustment Knob fully counterclockwise (minimum intensity).
2.2 Special Procedures
2.2.1 Using the Insufflation Bulb
In the AFHCAN installation, the primary use for the insufflation bulb is to assist in cleaning and
drying the tip of the otoscope. However, the insufflation bulb can also be used clinically for
observing the flexibility of the tympanic membrane. Using the insufflation bulb for this purpose
requires the use of a rubberized speculum sized for the patient's ear canal. These items are not
supplied by AFHCAN, and a description of this clinical practice is beyond the scope of this
manual.
If a typmanometer is attached to the cart, then that device would be the preferred way to measure
the flexibility of the tympanic membrane. The typmanometer provides numerical data that is
incorporated into a case as a graph.
PUB-112 Rev B.doc
15
User's Manual
PUB-112 Rev B.doc
Video Otoscope
16
AMD-300S
Section 3 – Clinical Considerations
These pointers are to be used as a supplement to your clinical experience.
3.1 Guidelines for Clinical Success
Characteristics of a good image:
• clear, sharply focused
• tympanic membrane in center, filling most of available image area
• good color fidelity
• up on the image reflects up on patient's ear
Good practices:
• obtain images and data from both ears for the sake of comparison, and include left and right
in image name
• name images with helpful information
• straighten ear canal by pulling pinna up and back for most adults, back for most children
3.2 Common Mistakes
Poor quality images are often the result of the following:
• poor focus
• uncentered image
• scope not parallel with ear canal
• tip not in far enough
• white dot on camera head not up in relation to the patient's ear
3.3 Tips and Tricks
You may find the following pointers helpful:
• do not irrigate painful, bleeding, or draining ears
• do not irrigate an ear with known tubes unless instructed to do so
• if wax is present, try to look around it
• it may be necessary to remove wax
• toddlers and babies need to be restrained, have a parent or other adult assist
• keep the patient interested in the procedure by allowing him or her to watch the on-screen
video and assist in capturing the image
PUB-112 Rev B.doc
17
User's Manual
PUB-112 Rev B.doc
Video Otoscope
18
AMD-300S
Section 4 – Routine Maintenance
4.1 Care and Cleaning
The following are basic cleaning activities:
• Before and after each patient, clean any oils or wax from the tip of the ear scope with an
alcohol prep pad (speculum removed). Aim the ear scope down and blow the tip dry with
the insufflation bulb.
• Use a vacuum to clean any dust from the equipment.
• Wipe down open surfaces with a clean damp (not wet) cloth as needed.
• Disinfect the hand switch with an alcohol prep pad.
4.2 Replacement Items
4.2.1 Replacing the Lamp
Note: before assuming the lamp is bad, run through the
troubleshooting checklist in Section 4.3 below.
The lamp used as a light source is a Welch Allyn product, part number 09500. To replace the
lamp, proceed as follows:
1. On the Platform Box, turn power off and allow the lamp to cool.
2. Unplug all cables from the Platform Box, to include:
-
S-video cable from back (pull straight out)
-
power cable from back (pull straight out)
-
fiber optics cable from front (pull straight out)
-
camera cable from front (hold the knurled part of connector and pull straight out;
pulling on knurled ring releases connector)
3. Carefully but firmly pry the Platform Box loose from the Velcro strips that secure it to the
top shelf and set it upside down on a convenient work surface.
4. Using a small screw driver (or a coin), unscrew the retaining screw of the lamp replacement
door and lift it off the Platform Box (see Figure 11).
Note: removing the old lamp and installing the new one involves a
certain amount of gentle "fiddling" to manipulate the retaining springs
and move the lamp into or out of position.
PUB-112 Rev B.doc
19
User's Manual
Video Otoscope
AMD-300S
Figure 11
Removing the lamp replacement door
5. Using two fingers, pull the lamp retaining spring back away from the lamp (see Figure 12).
With your other hand, angle the lamp up so it can be slipped out from the circular pocket
where it is normally seated.
Figure 12
Lamp retaining spring
6. Once the lamp has been freed, pull the plastic connector off the connector pins.
Caution: avoid touching the silvery finish on the back of the new
lamp because body oils will degrade the lamp performance. Always
hold the lamp by its ceramic base.
7. Obtain a new lamp and find the alignment tab.
PUB-112 Rev B.doc
20
User's Manual
Video Otoscope
AMD-300S
8. Holding it by the ceramic base, and making sure the alignment tab goes into the notch
(Figure 13), pull the retaining springs back and slip the lamp into position in it's circular
pocket.
Note: make sure the lamp is fully seated within the circular area.
When properly seated, the tab will be in its notch, and the connector
pins will be at a slight upward angle.
Figure 13
Lamp correctly seated with alignment tab in notch
9. Push the connector onto the connector pins. The pins are different diameters, so the
connector can only be installed one way.
10. Slide the plain end of the Lamp Replacement Door under the rim of the opening in the
platform box.
11. Using small screw driver, tighten the retaining screw on the Lamp Replacement Door fully.
The Lamp Replacement Door must be fully closed and seated against the supporting parts.
12. Place the Platform Box on the top shelf making sure the Velcro strips reconnect.
13. Plug the cables into the Platform Box as follows:
-
S-video cable: check alignment and plug straight in
-
power cable: orient correctly and plug straight in
-
fiber optic cable: push straight into connector in center of Light Intensity Adjustment
Knob
-
camera cable: make sure red dot on connector is up and push straight into connector
until it clicks
14. Apply power and verify operation.
PUB-112 Rev B.doc
21
User's Manual
Video Otoscope
AMD-300S
4.2.2 Checking and Replacing the Fuses
There are two fuses in the fuse drawer. These fuses are identical. Use Welch Allyn part number
VA303, or a commercially available fuse with the following specs:
2.0 amperes
250 volts
5 millimeter by 20 millimeter
Fast Blo
Once removed, the fuse element is visible inside the glass barrel of the fuse. If the fuse is good,
the element will be visible as a continuous filament. If the fuse is blown, the element will be
melted, and either will be completely gone or will have a distinct gap in the filament.
Replace a fuse as follows:
1. Turn off the video otoscope and disconnect the power cord from the back of the Platform
Box.
2. There are two retaining tabs, one on each side, that hold the fuse drawer in place. Using a
small screw driver, press one retaining tab in and gently pry that side out a small amount
(see Figure 14). Repeat the process on the other side of the fuse drawer. Continue back
and forth in this fashion until the fuse drawer is out far enough to pull with your fingers.
Figure 14
Removing the fuse drawer
3. Hold the fuse drawer up against a suitable background and inspect the fuse elements. If the
fuse element is visible the entire length of the glass, and there are no apparent breaks or
burn spots, the fuse is probably OK.
4. If an element appears to have blown, pull the fuse out and replace it.
5. Making sure the alignment tab is aligned with the slot, push the fuse drawer back into place
until both retaining tabs click into position.
6. Plug the power cord back in and verify operation.
PUB-112 Rev B.doc
22
User's Manual
Video Otoscope
AMD-300S
4.3 Elementary Troubleshooting
Table 2 provides some general guidelines on troubleshooting the video otoscope. The Operating
Manual provided by AMD may also contain some useful troubleshooting information.
Table 2
Troubleshooting guidelines
Problem
blurry image
Possible Solutions
• wax, oil, or something else on tip; clean with alcohol prep pad
• out of focus; use focus tool
• patient moved when image was captured
• Image Enhancement button not pressed (LED indicator
beside button not lit)
• water or fluid in the ear canal
no image
• S-video cable disconnected from Platform Box
• power off
• power cable disconnected
• camera cable loose or disconnected
lamp not lit
• power turned off then on in less than ten seconds; turn power
off, allow lamp to cool for 15 seconds, then turn power on
• fuses blown
• bad lamp
poor color fidelity
• perform Color Reset (white balance) procedure
• problem with monitor or printer
strange bluish color to image
• ensure lamp has warmed up for at least 10 seconds before
capturing image
excessively bright spots in
image
• may be caused by light from tip striking wall of ear canal;
redirect tip to illuminate tympanic membrane
grainy image
• Light Intensity Adjustment Knob may be set too low
(maximum intensity is normally used)
• fiber optics cable connector may not be fully seated or
misaligned (in center of Light Intensity Adjustment Knob)
spots on image
PUB-112 Rev B.doc
• in general, it should not be necessary to pull the ear scope
assembly apart to clean the optics; on occasion, it may be
possible for bits of dirt to get onto the lenses transmitting the
image to the camera head; disconnect the optical coupler
from the ear scope and camera head, and check and clean
the lenses with high quality optical papers or cloths
23
User's Manual
PUB-112 Rev B.doc
Video Otoscope
24
AMD-300S
Index
foot switch, 14
image, 14
freeze button, 7
functional description. See video otoscope:
functional description
fuse
blown, 23
drawer, 22
drawer (image), 2
inspection, 22
replacement, 22
retaining tabs, 22
hand switch, 14
image, 14
hook. See ear scope
image
blurry, 23
capture, 14
characteristics of good images, 17
color, 10, 23
grainy, 23
name, 14
none, 23
rotation, 12
spots, 23
image enhance button, 5, 11
image, 2
insufflation bulb, 6, 10, 15
image, 4
lamp, 4
caution, 7
image, 2
not lit, 23
replacement, 19
replacement(image), 20
retaining spring, 19
retaining spring (image), 20
light box. See platform box
light intensity adjustment knob, 15
light intensity control
knob (image), 2
light intensity control knob, 5, 10
light post adapter, 6
Live button, 13
optic coupler, 5, 6, 8, 12
image, 4
platform box, 1, 4, 7, 21
caution, 8
image, 2
serial number (image), 2
power cable connector
image, 2
add to case screen, 7, 9
AFHCAN
cart, 7
software, 6
back button, 7
barrel release lever
image, 4
bulb. See insufflation bulb
buttons
function of, 7
cable
assembly, 1
camera, 1
fiber optic bundle, 1
images, 3
camera, 1
cable, 1, 8
cable (image), 3
connector port (image), 2
head, 6
orientation, 12
camera connector port. See
cleaning, 19
color reset adjustment
intervals, 10
procedure, 10
color reset button, 4, 10
image, 2
connectors
images, 3
cooling fan
image, 2
create a new case button, 9
ear scope, 8
assembly, 5
assembly, 1
assembly (image), 4
cleaning, 9, 19
hook, 8
hook (image), 8
endoscopes, 7
fiber optic
illumination port (image), 2
fiber optic bundle, 1, 8
image, 3, 4
fiber optic cable, 8
focus
image, 11
ring, 5
ring (image), 3
tool, 11
tool (image), 11
PUB-112 Rev B.doc
25
User's Manual
Video Otoscope
power switch
caution, 4, 8
image, 2
rotate button, 7
save button, 7
set screw, 12
software, 8
speculum, 15
sizes, 13
start screen, 9
S-video connection
image, 2
Take picture button, 7
image, 14
tympanometer, 15
video capture card, 7
video otoscope
button (image), 9
functional description, 1
video picture screen, 6
image, 6
white dot. See camera orientation
PUB-112 Rev B.doc
26
AMD-300S