Download SDSStudentHelp

Transcript
SDSStudentHelp
User Manual
Created: Thursday, June 11, 2009
SDSStudentHelp
The title page normally introduces your product or
service. You might include the author's name, company
name, company logo, copyright information, etc.
Table of Contents
1
Welcome
Ask
2
Web School Office
Introduction
Access System
Login
Forgot or Change Password
Navigate
District Name in System Heading
Basic Icons
Common Search Features and Check Boxes
Look and Browse
Search for a Student
Add Views
Run a Report
Selection and Display Options
Remove Tab for Selected View
Student Selection
Advanced Search
Show Inactive Courses
Hide Inactive Courses
Message Center
Access the Message Center
Screen Elements
Entry Areas
Message Areas
List of Messages
Send/Read/Delete Messages
Data Entry and Changes
Student Information (Vertical View)
Student Information (No Groups/Horizontal View)
Option Menus
Entry Options
Test Score Entry
View Options
Processing Options
Search Options
View Student Options
Add/Change/Update Options
Withdraw Student
Re-enter Student
Add a Student
Change a Student
Delete Students
ID Change for Student
Parent Connect Access Control
Additional Key Entry Options
Activities
1
2
3
4
5
6
7
8
9
10
11
12
13
14
15
16
17
18
19
20
21
22
23
24
25
26
27
28
31
32
35
37
38
39
40
41
42
44
45
46
48
49
51
52
53
55
57
58
Previous School Attended Information
Transcript Detail
Viewing Student Policy Letters
Health Records
Test Score Setup
Master File and Code Entry and Changes (Vertical/Horizontal)
Document Storage and Retrieval
Add a Document to a Student through Web School Office
Add a Document to a Student through Teacher Web
Add Documents to All Students in a School Location
Document Security
Attendance
Attendance Entry
Prerequisites for Daily Attendance
Period Attendance
Daily Attendance
Period Attendance by Class
Withdraw and Re-enroll
How to Withdraw
Withdraw Students that Moved
How to Re-enroll
Correcting Students Withdrawn in Error
Period Attendance Field Trip Option
Teacher Entry Settings
Teacher Entry Code Setup
Bell Schedule
Attendance Analysis Display
School Calendar Setup and Changes
Calendar Change
Student Enrollment Processing
Scheduling
Schedule Changes (Current Year)
Scheduling Icons
Schedule Change Screen Options
Example of Schedule Changes (Current Year)
Master File and Code File Entry and Changes
Course Codes - Current Year
Create/Add/Edit/Delete a Course Code
Course Master - Current Year
Edit/Add/Delete a Course Section
Next Year Registration and Schedule Changes
Course Code/Teacher Code and Course Master Field Descriptions
NY Course Codes Field Descriptions
Teacher Code Field Definitions
Course Master Field Definitions - Basic
Linking Courses
Student Elementary Scheduling
Kindergarten Roundup
Prepare to Open School/Year End Processing
Getting Started - IMPORTANT
End of Year Reports to Run
Steps to Prepare to Open School/Rollover
School Policy Processing
Policy Processing/Policy Definition
Policy Types
60
61
63
64
65
66
67
68
69
70
71
73
74
75
76
79
81
82
83
84
85
86
88
89
90
91
92
93
94
95
96
97
98
99
101
102
103
104
106
107
108
129
130
134
135
136
138
142
143
144
145
147
151
152
153
Policy Processing/Letter Creation
Tuition/Fee Processing
Tuition/Student Fee Codes
Tuition/Student Fees Charge Type Code
Tuition/Student Fees Department Code
Tuition/Student Fees Payment Code
Mass Assignment of Charges and Fees
Fees Adjustments and Payments
Processing Center
Refresh Attendance Analysis
Compute GPA
How GPA Calculation Work
GPA Worksheet
How to Compute GPA
Standards Goals and Objectives
Meal and Miscellaneous Count Planner
Locker Assignment
Setting up the Locker Master
Assigning Lockers to Students in Mass
Locker Utilities
Assigning a Locker to a Single Student
To Change/Move a Student’s Locker Assignment
Locker Reports
Data Exchange State and Federal Reporting
Illinois
Assessment Correction
Assessment Pre-ID
ELL
Exit Student Enrollment
Student Demographics
Student Discipline
Demographics and Early Childhood
Early Childhood
Pre-K Follow-Up
Early Childhood Outcomes
Indiana
DOE-STN (STN lookup)
AT (Attendance)
DOE-FD (Full day Kindergarten)
DOE-GR (Graduate Report)
DOE-LM (Language Minority and Immigrant Students)
DOE-ME (Membership)
DOE-PE (Pupil Enrollment)
DOE-SE (Special Education)
DOE-TB (Textbook Reimbursement OR Supplemental Textbook
INDOE-AD (Additional Student Information)
INDOE-ALT (Alternative Education)
INDOE-DC (Direct Certification or Direct Verification)
INDOE-DM (Dropout and Mobility)
INDOE-HM (Homebound/Hospitalized)
INDOE-SR (Charter School Student Residence Report)
INDOE-TI (Title I)
ISTEPBAR (ISTEP Bar Code Labels)
ISTEPBARC (ISTEP Barcode Corrections)
156
158
159
160
161
162
164
165
167
168
169
170
172
173
176
178
182
183
185
187
188
189
190
191
192
193
194
196
198
200
202
204
206
208
210
212
214
215
216
217
218
219
220
221
222
223
224
225
226
227
228
229
230
231
232
ISTEPBARR (ISTEP Barcode Labels for Retest Takers (Spring Retest))
Michigan
MSDS Request for UIC Group
MSDS Early Childhood Report
Administrative Utilities
Data View Definition
Master Code Field Definition and Maintenance
Control Center
Lock/Unlock Users Out of SDS
Document Control Center
Parent Connect - Office Tasks
Add a Report to a Report Group
Student System Adjustments
Assign Graduation Dates
Transfer Schedule Change
Teacher Web
File Transfer
Other Operations
Useful Information
Toolbox
Mass Data Changes
Add Field Control
Data Mass Load/Swap Table
Import Data from CSV or TXT Files
User Security
Setup New User
User Security Groups
Other Button Options – Save/Change/Sort/Uncheck/Delete/Reset Passwords
User Data Selection/Security Options
Add a New Teacher to WSO and Teacher Web
Web Settings
System Settings
E-Mail Settings
Setup Reports
Reports
Run a Report
Activate Sort Definition Area
Record Selection Options
Save Sort with Name
Delete a Sort from Sort History
Quick Reports (View/Design/Display/Export)
Create Quick Report for Photographer
Create Quick View for SQL Batch File
Goal Based Report Card
Labels
Student Assessment Management (SAM) Reports
Save a Standard SDS Report as a Custom Report - Student
Convert a V7 or V8.5 Custom Report to WSO - Student
Reports where you should run a Program before Printing
District/School Calendar
Parent Connect - Office
Login Details
Create Passwords for Parents
Create Multiple Logins
Uncombined Students for Login
233
234
235
236
240
241
244
246
247
249
251
252
253
255
256
257
260
263
264
265
266
271
273
274
275
276
277
279
280
282
284
285
287
289
290
291
292
294
295
297
298
300
301
302
303
304
305
307
313
315
317
318
319
320
322
Lookup User IDs and Passwords
Edit Parent
Forget/Change Password Link
Reports for Parent Connect
Parent Login and Password Letters
Custom Report for Parent Connect
Remove Unwanted Tabs
Create a Link for Parent Connect Calendar
Setup Next Year Registration for Parent Connect
3
Teacher Web
Introduction
Access System
Login
Forgot or Change Password
Toolbar
Period Attendance or Homeroom/Daily Attendance
Attendance Toolbar
Take Attendance
Create Seating Chart
Take Attendance by Seating Chart
Attendance Document Control
Look and Browse
Gradebook
Access
Gradebook Toolbar
Create/Wizard Gradebook
Delete All Empty Gradebook Pages
Office and Procedures
Office Responsibilities for Teacher Web
Marking Period Grade Reporting Procedures
Column Action (Add/Delete/Edit/Move/Copy/Mass Add)
Adding an Assignment Column to the Gradebook
Quick Add Columns
Add one Assignment Column at a Time
Edit an Assignment Column in the Gradebook
Deleting an Assignment Column in the Gradebook
Move an Assignment Column in the Gradebook
Copy or Mass Add Grades in the Gradebook
Copy Grades from One Column to Another
Mass Add Grades
Post Gradebook Grades to Office or Another Gradebook
Gradebook Document Control
Teacher Defined Grade Charts
Grading Assignments
Extra Credit and Class Participation
Gradebook Options
Special Options
Auto-Post Grades
Copy Current Gradebook Pages
Copy Previous Year Gradebook Pages
Page Link Options
Create Summary Page (also known as an eligibility page)
Creating a Final Gradebook
Transfer/Post grades from Gradebook into Web School Office (office area)
323
324
325
326
327
328
329
330
331
333
334
335
336
337
338
339
340
341
342
343
344
345
347
348
349
350
353
355
356
360
361
362
363
365
366
367
368
369
370
371
372
373
374
375
376
377
379
380
381
382
383
384
385
386
Manual Entry of Grades
Post Gradebook Grades to Grade Area
Discipline Entry
Link Substitute and Teacher for Attendance Entry
4
Tech Instructions
Hardware Requirements (Spec Sheet)
Active X Controls
Pop-up Blocker and Trusted Site
Time Out
How to Update Web School Office
Compress and Backup
Run a Backup
Run a Compress
Build a Shortcut for Compress/Backup Procedures
Setup Nightly Compress and Backup
Web School Office
Remote Desktop
Printing from Remote Desktop
Printing Memory Server Setting
SDS Resources Online
Informational Links
Number of Internet Sessions on Desktop
387
389
390
391
393
394
395
397
398
399
402
403
404
405
406
408
409
410
411
412
413
414
Welcome . 1
Specialized Data Systems, Inc.
Online Help
Web School Office
Teacher Web
Tech Instructions
Welcome
Welcome to SDS Web School Office online help system. Browse
through the help pages by clicking on the links above or selecting
pages in the table of contents. To quickly find specific product
information, enter search criteria in the search box above and click
the search button.
Ask Someone
If you're unable to find what you're looking for in this help
system, contact SDS support click here for support or call
800.323.1605.
Most popular pages
●
Welcome
●
Web School Office
●
Introduction
●
Access System
●
Teacher Web
●
Next Year Registration and Schedule Changes
●
Look and Browse
●
Steps to Prepare to Open School/Rollover
●
Prepare to Open School/Year End Processing
●
Login
SDSStudentHelp
2 . Welcome
Home > Welcome > Ask
Get help from Customer Support or other resources
Customer Support
Contact our customer support department by logining into X-Connect and submitting a support
case by clicking here or call (800) 323-1605.
SDS Website
For product, services and to learn more about SDS visit out website at
www.schooloffice.com .
Billing Questions or System Training Scheduling
For billing or training questions please contact Sherrie Hendrickson at
[email protected] or call (800) 323-1605.
SDSStudentHelp
If you're unable to find
what you're looking for in
this help system, try
these alternative
resources:
●
SDS Website
●
Support
Contact our support
department:
Submit a Case: Click
Here
Phone: (800) 323-1605
Web School Office . 3
Home > Web School Office
Articles in this section
Introduction
Look and Browse
Message Center
Data Entry and
Changes
Attendance
Scheduling
Prepare to Open
School/Year End
Processing
School Policy
Processing
Tuition/Fee Processing
Processing Center
Administrative Utilities
Reports
District/School
Calendar
Parent Connect Office
See also
Introduction
Look and Browse
Message Center
Data Entry and Changes
Attendance
Scheduling
Prepare to Open School/Year End Processing
School Policy Processing
Tuition/Fee Processing
Processing Center
Administrative Utilities
Reports
District/School Calendar
Parent Connect - Office
SDSStudentHelp
4 . Web School Office
Home > Web School Office > Introduction
Introduction
The SDS Student Administrative System (Web School Office) brings to your school/district a comprehensive WEB BASED program with
unmatched reporting capabilities. From Student Demographics, Attendance, Grades, Discipline, through SDS's integrated Gradebook,
Fee Processing and Health Records, you will find a completely integrated system. Since the SDS program is totally WEB BASED, you
only need a browser on your PC or Mac to access the powerful system. Included in the standard package is Parent Connect that
allows parents/students to access their students' records from any location. For private schools, we also have a complete Tuition
Accounting Program. And, the Activity Fund Accounting system is a must for handling your school's activity funds.
See also
Access System
Login
Forgot or Change Password
Navigate
District Name in System Heading
Basic Icons
Common Search Features and Check Boxes
SDSStudentHelp
Web School Office . 5
Home > Web School Office > Introduction > Access System
Access System
1. Locate the URL (link) that your administrator has provided you to access SDS Web Office. For
example: http://yourdistrictwebsite.schooloffice.com/yourdistrictdirectory/sdsweboffice/
2. Locate your browser (i.e. Internet Explorer).
3. Type in the URL into your browser’s address bar. For
example: http://yourdistrictwebsite.schooloffice.com/yourdistrictdirectory/sdsweboffice/
Note: the above links are not hot since they are only examples you need to replace with your district link.
See also
Login
Forgot or Change Password
Navigate
District Name in System Heading
Basic Icons
Common Search Features and Check Boxes
SDSStudentHelp
6 . Web School Office
Home > Web School Office > Introduction > Login
Login
1.
2.
3.
4.
5.
Enter User ID
Enter Password
Click Login
View SDS Web Office
Click on Logout once done in the system.
Build Date
●
This is the date the system was last updated. (i.e. 070927 = yearmonthdate = 09/27/07)
Forgot and Change Password
●
Provides you with the ability to change your password. This will be covered in the next section.
See also
Access System
Forgot or Change Password
Navigate
District Name in System Heading
Basic Icons
Common Search Features and Check Boxes
SDSStudentHelp
Web School Office . 7
Home > Web School Office > Introduction > Forgot or Change Password
Forgot or Change Password
If you have forgotten your password or would like to change your password, follow the below instructions:
1. Enter in User ID
2. Enter Password
3. Click on Forgot or Change Password
4. The following message will display “If you complete the three security questions the forgotten password options will be
activated. Your answers will be used if you forget your password in the future. If you do not complete theses questions the
forgotten password options will NOT be activated for your ID.”
5. Answer the three questions and click Verify. (See Figure 1 below) The curser will then be placed in the New Password box.
6. Enter New Password (Must be at least 4 characters {i.e. new1})
7. Enter Confirm Password (i.e. new1)
8. Click Submit (See Figure 2 below)
9. A message will display stating that “You have successfully changed your password.” Click Ok.
10. Login the system with your new password.
Figure 1
Figure 2
See also
Access System
Login
Navigate
District Name in System Heading
Basic Icons
Common Search Features and Check Boxes
SDSStudentHelp
8 . Web School Office
Home > Web School Office > Introduction > Navigate
Navigate
Folder and Program Access
1. Once you are logged into the system take a look at how the system is setup.
2. On the left is your menu tree:
1. The menu tree is organized by main entry areas.
2. Simply click on the + next to any of the yellow folders to maximize the menu tree.
3. If you would like to then minimize an area of the menu tree click on the - .
4. To access an area of the system click on the menu tree items.
5. On your browser there is a green status bar at the bottom, to let you know where the page you clicked on is in the load
process.
3. On the right side of the system screen:
1. Once you click on an area of the system it will display in the right hand panel.
See also
Access System
Login
Forgot or Change Password
District Name in System Heading
Basic Icons
Common Search Features and Check Boxes
SDSStudentHelp
Web School Office . 9
Home > Web School Office > Introduction > District Name in System Heading
District Name in System Heading
At the top of your screen it will show district/school name if you have it setup. If you do not see it then follow the below instructions.
1.
2.
3.
4.
5.
6.
Login your system.
Enter Data Entry and Changes.
Master File and Code Entry and Changes.
Select the + next to Entry Options.
Select District Information.
Enter in your District Information.
7. Select
to save.
See also
Access System
Login
Forgot or Change Password
Navigate
Basic Icons
Common Search Features and Check Boxes
SDSStudentHelp
10 . Web School Office
Home > Web School Office > Introduction > Basic Icons
Basic Icons
= Video Tutorials and Student Help
= Click to Search
= Document Retrieval
= Help
= Preview
= Print
= Save
= Add
= Delete
See also
Access System
Login
Forgot or Change Password
Navigate
District Name in System Heading
Common Search Features and Check Boxes
SDSStudentHelp
Web School Office . 11
Home > Web School Office > Introduction > Common Search Features and Check Boxes
Common Search Features and Check Boxes
Below is an overview of the search tools in the system and ways to enter data faster.
Search Box and Alpha Radio Buttons
1. The search feature allows you to simply enter in a student name or ID, click on the binoculars and locate the student. You can
also click on the alpha radio buttons to search by starting with letter for the student’s last name. This is a feature that you will
want to take advantage of, so that you do not have to scroll through all the student names.
2. Below is a basic example of one areas of the system where you can do a search:
1. Login
2. Click on Data Entry and Changes
3. Click on Student Information
4. Simply search for a student by typing in the student’s name or ID.
5. Click on the Binoculars.
6. You can also search by clicking on the alpha radio buttons at the top of the screen.
7. Once the student displays that you would like to modify, simply click on the students’ name and to the right the data
entry screen will appear.
Ascending and Descending Radio Buttons
1. Theses radio buttons allow you to sort ascending or descending.
2. Below is a basic example of one areas of the system where you can sort ascending or descending:
1. Login
2. Click on Data Entry and Changes
3. Student Information Changes (Horizontal)
4. Click on the Ascending and Descending Radio Buttons
5. While you are in Student Information Changes (Horizontal)
6. View how the student names go A – Z or Z - A
Retain Values on Add
1. Retain Values on Add check box, if checked before selecting Add “+”, the previously selected values will stay. Then simply
adjust for the new data; for example adding siblings or similar courses.
2. To test out this feature, enter the system |Data Entry and Changes |Master File and Code Entry and Changes |Select Entry
Options |Click in the ‘Retain Values on Add’ box |Click + |Add new data.
See also
Access System
Login
Forgot or Change Password
Navigate
District Name in System Heading
Basic Icons
SDSStudentHelp
12 . Web School Office
Home > Web School Office > Look and Browse
Look and Browse
This area allows you to look and browse at student’s records for the different areas of the system, all in one area. For example:
Attendance (by Class/Daily), Discipline, Documents, GPA, Gradebooks, Marking Period Grades, Policy Notification, Schedules,
Registration, Activities, Tests, and much more. This area is terrific for users you only want to have view rights and not entry rights.
There are also many search and sorting features in this screen to quickly find the record/s you are looking for. You can also run
reports from this screen to make printing a quick report fast and easy!
See also
Search for a Student
Add Views
Run a Report
Selection and Display Options
SDSStudentHelp
Web School Office . 13
Home > Web School Office > Look and Browse > Search for a Student
Search for a Student
1. Login
2. Click on Look and Browse |Student Look and Browse
3. Search by Entering an ID or Name, then click on the binoculars.
4. Also you can search by clicking on the first letter (radio button) of the Students last name.
See also
Add Views
Run a Report
Selection and Display Options
SDSStudentHelp
14 . Web School Office
Home > Web School Office > Look and Browse > Add Views
Add Views
Enter Student Look and Browse, proceed with the following:
1. Click on a Student’s ID or Name
2. Select a View from the Views dropdown (i.e. Marking Period Grades).
❍ Note: If adding the first option Attendance (by class) first, click “OK” to add a tab for the view.
3. To delete, select the tab to delete and select the “X” to delete the tab.
4. Simply click on the tabs to view different data related to the student selected.
See also
Search for a Student
Run a Report
Selection and Display Options
SDSStudentHelp
Web School Office . 15
Home > Web School Office > Look and Browse > Run a Report
Run a Report
Enter Student Look and Browse, proceed with the following:
1. To run a report, simply select a report from the dropdown. (i.e. Schedule (PC))
●
Tech Note: The reports that run from Look and Browse are named par_*.rpt rather than the swb_*.rpt reports. This is
because the par_*.rpt are meant for quick launch (parameters are removed). If you would like to run a custom report from
this area, name it as loc_*_*.rpt or parc*.rpt (i.e. parcschedule.rpt). * = name of particular report.
2. Click to
3. Click
preview.
to exit the report preview.
See also
Search for a Student
Add Views
Selection and Display Options
SDSStudentHelp
16 . Web School Office
Home > Web School Office > Look and Browse > Selection and Display Options
Selection and Display Options
There are several different selection and display options in Student Look and Browse. To take a look at these options Enter Look and
Browse |Student Look and Browse |Click “+” next to “Selection and Display Options”
See also
Search for a Student
Add Views
Run a Report
SDSStudentHelp
Web School Office . 17
Home > Web School Office > Look and Browse > Selection and Display Options > Remove Tab for Selected View
Remove Tab for Selected View
First option you come to is to remove Tab for Selected View. This option will remove the tab you have selected once you click on this
option.
Follow the below instructions as an example:
1. Click on a Tab you would like to remove (i.e. Marking Period Grades)
2. Click Remove Tab for Selected View
❍ See that your tab was removed.
❍
Note: To remove a tab you can also do that by clicking on the tab you would like to remove then on the X next to the
different view options.
Before:
After:
See also
Student Selection
Advanced Search
Show Inactive Courses
Hide Inactive Courses
SDSStudentHelp
18 . Web School Office
Home > Web School Office > Look and Browse > Selection and Display Options > Student Selection
Student Selection
This selection allows you to show all, active or only inactive students. Click on each selection to see how the student list changes
below.
1. 1. All Students
❍ Shows all students (Active and Inactive)
2. Active Students (Default)
❍ This option will only display active students. This option is the screen default.
3. Inactive Students
❍ This option will only display inactive students.
See also
Remove Tab for Selected View
Advanced Search
Show Inactive Courses
Hide Inactive Courses
SDSStudentHelp
Web School Office . 19
Home > Web School Office > Look and Browse > Selection and Display Options > Advanced Search
Advanced Search
This selection provides you with a screen to create an advanced search for Look and Browse.
Follow Steps 1 -6 to complete the search setup:
1. Select a Table = select a table to search in (i.e. Demographics).
2. Field Name = select a field to search in (i.e. Grade_Year).
3. Compare Operation = choose an operation (i.e. Equal to (=)).
4. Compare to Value = from the dropdown select a value (i.e. F).
❍ Click “Add to Formula”
5. For more return to step 1 = to add onto the formula start with 1 and repeat steps.
❍
Note: To clear the formula click on “Clear Formula”
6. Display Students = Click Apply Formula or Cancel.
See also
Remove Tab for Selected View
Student Selection
Show Inactive Courses
Hide Inactive Courses
SDSStudentHelp
20 . Web School Office
Home > Web School Office > Look and Browse > Selection and Display Options > Show Inactive Courses
Show Inactive Courses
This option will show inactive courses.
See also
Remove Tab for Selected View
Student Selection
Advanced Search
Hide Inactive Courses
SDSStudentHelp
Web School Office . 21
Home > Web School Office > Look and Browse > Selection and Display Options > Hide Inactive Courses
Hide Inactive Courses
This option will hide inactive courses.
See also
Remove Tab for Selected View
Student Selection
Advanced Search
Show Inactive Courses
SDSStudentHelp
22 . Web School Office
Home > Web School Office > Message Center
Message Center
The Message Center provides a simple and secure means to communicate with your staff. You are able to send messages with
attached documents to staff members (i.e. Board Reports, Direct Deposits, Resumes, Reviews, Grants, SDS Report etc.). This
program is ALL SDS and does not rely on an email program. The "Alert Message Bar" automatically appears when a message is
ready to be read by the recipient. After the message is handled, the alert is removed automatically. Is there lack of communication
within your district? If so start communicating TODAY with the Message Center!
See also
Access the Message Center
Screen Elements
Entry Areas
Message Areas
List of Messages
Send/Read/Delete Messages
SDSStudentHelp
Web School Office . 23
Home > Web School Office > Message Center > Access the Message Center
Access the Message Center
1. Enter Web School Office select Look and Browse |Message Center.
or
2. Enter Teacher Web on the tool bar locate to load the Message Center.
See also
Screen Elements
Entry Areas
Message Areas
List of Messages
Send/Read/Delete Messages
SDSStudentHelp
24 . Web School Office
Home > Web School Office > Message Center > Screen Elements
Screen Elements
Icons
Help = Displays Instructions
New = Select to clear the message area to allow for the entry of a new message
Reply = Select to respond to the sender of the message you are reading
Reply to All = Select to respond to the sender and all other recipients of the message you are reading
Forward = Select to forward selected message to an individual or group
Send = Select to Deliver/Send your message to the individual(s) you have selected
Multiple Recipients = Select recipient(s) by group or individual(s) in a group
= Displays a screen to help find the Attachment you wish to send
Refresh = Look for new messages
Delete = Permanently remove all messages marked for deletion (del?)
See also
Access the Message Center
Entry Areas
Message Areas
List of Messages
Send/Read/Delete Messages
SDSStudentHelp
Web School Office . 25
Home > Web School Office > Message Center > Entry Areas
Entry Areas
1. From = The current user (your name)
2. To = The recipient of your message (who you are sending to)
❍
Multiple Recipients = Select recipient(s) by group or individual(s) in a group
3. Subject = Basic description for the message
4. Message = Detail message you wish to deliver
5. Attachment = File you wish to send with the message
❍
= Displays a screen to help find the Attachment you wish to send
See also
Access the Message Center
Screen Elements
Message Areas
List of Messages
Send/Read/Delete Messages
SDSStudentHelp
26 . Web School Office
Home > Web School Office > Message Center > Message Areas
Message Areas
1. Finance Office = Users of the SDS financial accounting system.
2. School Office = Users of the SDS student information system.
See also
Access the Message Center
Screen Elements
Entry Areas
List of Messages
Send/Read/Delete Messages
SDSStudentHelp
Web School Office . 27
Home > Web School Office > Message Center > List of Messages
List of Messages
1. To read click the word “Read” on the message line.
2. To delete check the box on the message line and push delete button. (Box will display after you read the message).
See also
Access the Message Center
Screen Elements
Entry Areas
Message Areas
Send/Read/Delete Messages
SDSStudentHelp
28 . Web School Office
Home > Web School Office > Message Center > Send/Read/Delete Messages
Send/Read/Delete Messages
Select a Message Area
1. Click in the radio button of the SDS system you would like to see users for:
2.
3.
4.
5.
6.
●
Finance Office – Users of the SDS financial accounting system.
●
School Office – Users of the SDS student information system.
Click on New
To: Click on the dropdown next to “To:” then select the name of the person you wish to send a message to.
Subject: Enter a subject
Message: Enter your message
Click
to Send
7. Click OK that your message has been sent.
Read a Message
Select the message to “Read”
SDSStudentHelp
Web School Office . 29
Then you can read your message and reply, reply to all, and forward the message. You can view the attachment if there is one by
clicking on
.
When a user receives the message “You have a new message” will display at the bottom of the screen. By selecting the link “You have
a new message” the message center will automatically display.
Delete a Message
After a message has been “Read” a check box will display.
Place a check in the box below “Del?” and click
to delete.
SDSStudentHelp
30 . Web School Office
See also
Access the Message Center
Screen Elements
Entry Areas
Message Areas
List of Messages
SDSStudentHelp
Web School Office . 31
Home > Web School Office > Data Entry and Changes
Data Entry and Changes
This area of the system provides you with quick data entry on the web. Simply select the entry option you would like to enter data for
and start entering! The following are a few View Example: Demographics, Activities, Attendance/Discipline Policy Notification, Health
Records, Discipline, GPA Summary Information, Schedule Change, Schedule Change (Next Year), Test scores, Transcript Detail and
many more. You can also create your own CUSTOM entry options with any fields in your SDS database. There are many search and
sorting options in this area of the system to make finding a student or record simplistic.
See also
Student Information (Vertical View)
Student Information (No Groups/Horizontal View)
Master File and Code Entry and Changes (Vertical/Horizontal)
Document Storage and Retrieval
SDSStudentHelp
32 . Web School Office
Home > Web School Office > Data Entry and Changes > Student Information (Vertical View)
Student Information (Vertical View)
Data Entry using Groups of Data Entry Views and Programs
This option provides controlled yet flexible processing for student data entry.
The main concept of the process is to link data entry screens together into a specific sequence.
When entering information for a new student you needed to display several entry screens. Possibly student demographics, parent
contact information, emergency contact, health, and class schedule.
With this option, after you have completed one screen the system will save your work and automatically display the next data
collection screen you need to complete your work.
These screen groups are under your complete control. You can create a group of entry screens for your use or one that can be
shared by other users in your school or all users in the district. This can also greatly improve the quality of entry. In the past it was
easy to forget to display a screen. These screen groupings act as a reminder to enter required data.
Below is an example of what this looks like.
Your original entry screen simply has an icon
before the locations where you select the view you are working with. Push
the groups you have access to will become available.
and
Note: You have a selection for “Entry Groups” and “Entry Options in Group”. When you select an “Entry Group” from the available list
the “Entry Options in Group” will display the data entry views which are a part of the selected group.
SDSStudentHelp
Web School Office . 33
If you select the predefined sample for a High School student being entered for the next school year the Entry options will change.
When you first select a group the system will position to the first “View” of data in your entry options. After verifying or entry the
needed information push the button to the right of the view. This will automatically save your changes and advance to the next “View”
of data in the selected group. A back button is also provided to move to the previous view. You may also select the view desired from
the drop down provided.
If a view is a special option such as, scheduling, registration, attendance, tuition, or look and browse a secondary screen will display
providing the ability to enter required information. After you have completed those secondary screen save you work as normal. You
can then close the secondary screen or simply switch back to the main screen using the system control Alt/Tab option.
SDSStudentHelp
34 . Web School Office
If you wish to exit the group processing option push the icon to the left of the Entry Group area. This will close the group option and
return you to normal processing.
If you would like to create or change a group simply push the button to the right of the Entry Group selector. This will display the
“Entry Group” design options.
Four areas are displayed.
Available Entry Options is a list of all data views you have access to. These views may have been supplied by SDS or created by
your staff.
Selected Entry Options is a list of views you have access to for the group currently selected in the “Entry Groups” area.
Entry Groups is a list of groups supplied by SDS or created by your staff. Any group starting with “Z_Sample” may be selected but
not changed nor removed. They are intended as examples you can use to create your own groups from.
Group Access Restrictions options allow you to control if the group you are working with is private or can be shared.
Some basic rules have been established.
●
If you do not have security access to a View or Processing option, then it will not show as an option for you to use. For
example if you do not have access to Health records you will not be able to create a group with health.
●
If a group has health records as part of its views you will have access to the group but not to the health records view.
●
If someone other than you created a Group you will be able to use the Group for entry. You will also be able to create your
own Group using it as an example. You will not however be allowed to change or remove it from the system. If you try you will
receive a message with the User ID# who has control of the group. Contact your district administrator for assistance if you feel
the group needs to change or be removed.
●
The Group Access Restrictions is built using your security settings. If you do not have access to student information in a
location then you will not be able to create views for that location. If you do not have access to user security for the entire
district you will not be able to create a Group that the entire district may see.
After you have created or adjusted Groups click the blue diskette to save then you can return to normal processing by again pushing
the design option to the right of the Entry Groups, pushing the icon to the left of the Entry Groups to leave Group process or reselect
Student Information from the menu tree.
See also
Student Information (No Groups/Horizontal View)
Master File and Code Entry and Changes (Vertical/Horizontal)
Document Storage and Retrieval
SDSStudentHelp
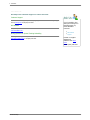
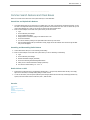
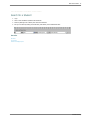
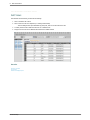
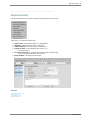
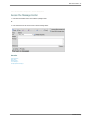
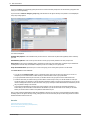
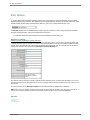
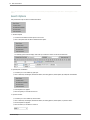
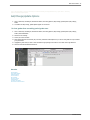
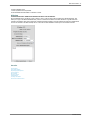
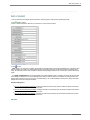
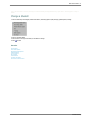
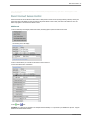
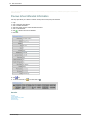
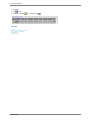
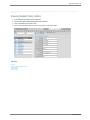
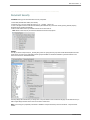
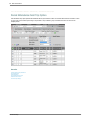
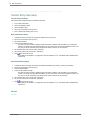
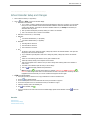
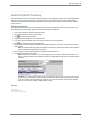
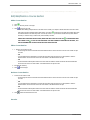
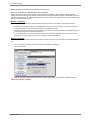
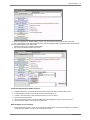
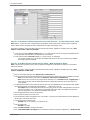
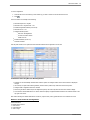
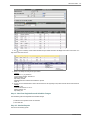
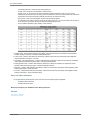
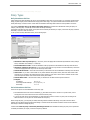
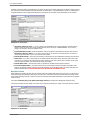
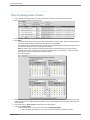
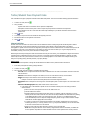
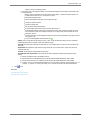
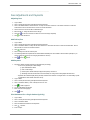
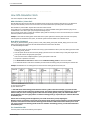
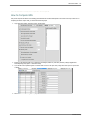
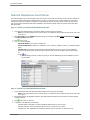
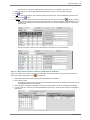
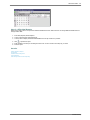
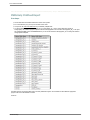
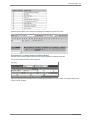
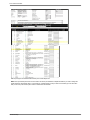
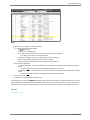
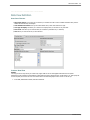
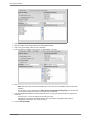
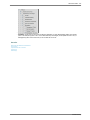
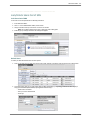
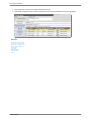
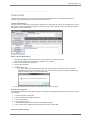
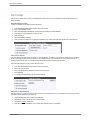
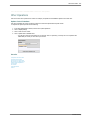
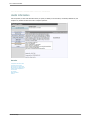
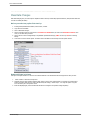
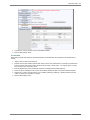
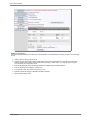
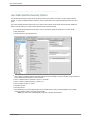
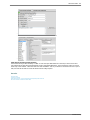
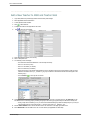
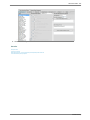
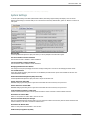
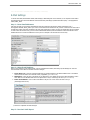
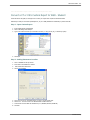
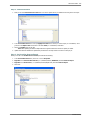
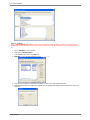
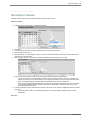
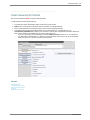
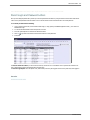
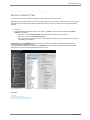
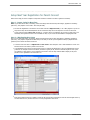
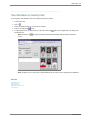
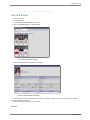
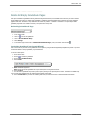
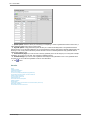
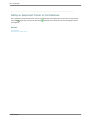
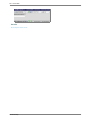
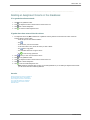
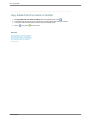
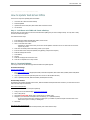
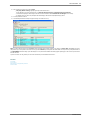
Web School Office . 35
Home > Web School Office > Data Entry and Changes > Student Information (No Groups/Horizontal View)
Student Information (No Groups/Horizontal View)
Student Information provides you with a screen, where you can simply select an entry option, click on a student name and start
entering data or changing student’s information instantly.
There are two different screens to enter data based off your preferences. The Student Information screen which displays data
vertically and the Student Information (Horizontal).
Student Information (No Groups):
Student Information (Horizontal):
SDSStudentHelp
36 . Web School Office
See also
Student Information (Vertical View)
Master File and Code Entry and Changes (Vertical/Horizontal)
Document Storage and Retrieval
SDSStudentHelp
Web School Office . 37
Home > Web School Office > Data Entry and Changes > Student Information (No Groups/Horizontal View) > Option Menus
Option Menus
This menu provides a dropdown for different entry options, test score entry, view options and processing options.
See also
Entry Options
Test Score Entry
View Options
Processing Options
SDSStudentHelp
38 . Web School Office
Home > Web School Office > Data Entry and Changes > Student Information (No Groups/Horizontal View) > Option Menus > Entry Options
Entry Options
1. The Entry Options default to Basic Demographics and then click on the dropdown to view the standard Entry Options: Activities,
Attendance/Discipline Policy Notification, Basic Health Records, Demographics All Fields, Discipline, GPA Summary Information, Health
Records All Fields, Schedule Change, Schedule Change (Next Year), Test scores, Transcript Detail and many more.
2. Tech Note: Administrators can add additional Entry Options (Data View Definitions) to make entering data efficient for example
Emergency Contact Information, Test Scores, Free/Reduced Lunch and more.
●
To add entry options enter Administrative Utilities |Data View Definition and add an Entry View.
Message to Teacher
Message to Teacher and Message to Teacher Grade Entry
In Data Entry and Changes |Student Information |Entry Options = Message to Teacher, you can enter in messages to teachers that
will display in Teacher Web. For Example; if you need to communicate information to your teachers regarding a student’s special ED
program, where the student John Doe needs to have 10% added to each assignment’s score. You can simply enter the Message to
Teacher screen and add in this message into the Message to Teacher Grade Entry box.
Now whenever John Doe appears in a teacher's grade book OR the grade entry screen, the child's name will appear in the color red.
If the teacher hovers over the child's name with the mouse, the message about this student will appear in a pop-up window for a few
brief seconds.
If you enter something into the Message to Teacher box, the student will show up highlighted red in attendance.
Note: Place a date in your message so they know when it was sent and Do NOT use this field for misc. data entry to sort reports - as
then the "stray" students will appear the same as the Spec-ED's. Reserve this field's use for the use described above.
See also
Test Score Entry
View Options
Processing Options
SDSStudentHelp
Web School Office . 39
Home > Web School Office > Data Entry and Changes > Student Information (No Groups/Horizontal View) > Option Menus > Test Score Entry
Test Score Entry
With this entry option you can add, change and delete test scores.
1. Enter WSO and select from the menu |Data Entry and Changes |Student Information Changes (Horizontal Entry) |Entry |Test
Scores Entry.
2. Select your test sort options = School, Grade, Test, Display all Dates or Select/Enter a test date.
3. Click
❍
to add the test entry records needed for the date selected to enter student test scores.
Important Notes:
■
You can have more than one of the same tests for a student as long as each test is set for a different test date.
■
If you create tests that you do not want, simply push
■
and they will be removed.
By clicking
■
To enter a test for only 5 students for example; create tests for all students in the school and grade. Enter the
. It will delete all tests with no scores or 0 for a score in the first 10 test scores.
scores for the 5 students, and then click
to save. Push
and the extra lines will be removed.
4. You must click
once you have entered test scores. If you don’t your work will not be saved.
■
Notice you can change the “First Field to Edit” for ease of entry.
■
Also be aware that you can click on the dropdown arrow under “Sort by” to sort on different fields. Along those
same lines you can select the ascending or descending radio button for further sorting features.
See also
Entry Options
View Options
Processing Options
SDSStudentHelp
40 . Web School Office
Home > Web School Office > Data Entry and Changes > Student Information (No Groups/Horizontal View) > Option Menus > View Options
View Options
These options provide you with the ability to view students’ records in different areas of the system (i.e. Attendance, Demographics,
Discipline, Grade books etc.) By clicking on the View Options drop down you will see many different views. Many of these views
include the same fields as the entry views in Student Information. Selected View Options will display below the Entry Options display.
Keep in mind you can also view records through Look and Browse.
See also
Entry Options
Test Score Entry
Processing Options
SDSStudentHelp
Web School Office . 41
Home > Web School Office > Data Entry and Changes > Student Information (No Groups/Horizontal View) > Option Menus > Processing Options
Processing Options
Processing Options in Student Information provides you with Search Options, View Student Options, Add/Change/Update Options and
Parent Access Control.
See also
Search Options
View Student Options
Add/Change/Update Options
Withdraw Student
Re-enter Student
Add a Student
Change a Student
Delete Students
ID Change for Student
Parent Connect Access Control
SDSStudentHelp
42 . Web School Office
Home > Web School Office > Data Entry and Changes > Student Information (No Groups/Horizontal View) > Option Menus > Processing Options > Search
Options
Search Options
This provides other ways to search in Student Information.
1. All Search Options
●
This shows all the different search options on the screen.
●
Click on this options and view all the individual search options.
The following options will then display. Select what you would like to search on and click the binoculars.
2. By Grade/Year of Graduation
●
This allows you to sort students by grade year.
●
Click on Data Entry and Changes |Student Information |Processing Options |Search Options |By Grade/Year of Graduation.
●
Grade dropdown box appears.
●
Select the grade you would like to search on.
3. By School Location
●
This allows you to sort students by school location.
●
Click on Data Entry and Changes |Student Information |Processing Options |Search Options | By School Location
●
School dropdown box appears.
●
Select the School you would like to search on.
SDSStudentHelp
Web School Office . 43
4. Other Field Options
●
This provides you with a dropdown list of other fields you can sort on and then allows you to select an Other Value as an
additional sort.
Note: To remove a search options simply select it again. You can tell which option is selected because there is a * next to the
searches selected.
See also
View Student Options
Add/Change/Update Options
Withdraw Student
Re-enter Student
Add a Student
Change a Student
Delete Students
ID Change for Student
Parent Connect Access Control
SDSStudentHelp
44 . Web School Office
Home > Web School Office > Data Entry and Changes > Student Information (No Groups/Horizontal View) > Option Menus > Processing Options > View
Student Options
View Student Options
View Student Options provides you with other ways to sort the students on the screen and provides additional entry options.
1. Show Next Year Students
●
Click on Data Entry and Changes |Student Information |Processing Options |View Student Options |Show Next Year Students.
●
Next year students will display.
2. Show Inactive Students
●
Click on Data Entry and Changes |Student Information |Processing Options |View Student Options |Show Inactive Students.
●
Inactive students will be included in the display.
3. Display Student Photo
●
Click on Data Entry and Changes |Student Information |Processing Options |View Student Options |Display Student Photo.
●
The Student Photo will then display.
See also
Search Options
Add/Change/Update Options
Withdraw Student
Re-enter Student
Add a Student
Change a Student
Delete Students
ID Change for Student
Parent Connect Access Control
SDSStudentHelp
Web School Office . 45
Home > Web School Office > Data Entry and Changes > Student Information (No Groups/Horizontal View) > Option Menus > Processing
Options > Add/Change/Update Options
Add/Change/Update Options
1. Click on Data Entry and Changes |Student Information |Processing Options |Add, Change, Update Options |Add, Change,
Delete.
2. This makes the Add, Change, Update Options appear on the tool bar.
To clear grades from a marking period grade area:
1. Click on Data Entry and Changes |Student Information |Processing Options |Add, Change, Update Options |Add, Change,
Delete |Grade Initialization.
2. Click OK on the message.
3. Choose your School Location.
4. Make desired selections in the Grade, HR, Counselor, and Other Field dropdowns if you wish to clear grades for only a selected
group of students.
5. Highlight the grade areas you wish to clear and click the right pointing arrow button to move them to the right hand box.
6. Click the Clear Selected Grade Areas button.
See also
Search Options
View Student Options
Withdraw Student
Re-enter Student
Add a Student
Change a Student
Delete Students
ID Change for Student
Parent Connect Access Control
SDSStudentHelp
46 . Web School Office
Home > Web School Office > Data Entry and Changes > Student Information (No Groups/Horizontal View) > Option Menus > Processing Options > Withdraw
Student
Withdraw Student
Important Notes:
If you are losing a student, withdraw the student as of the last day the student was in class at their location.
If the withdraw is because of an in-district transfer the person who is withdrawing the student should change the school location after
the withdraw information has been entered.
The receiving school, using the web should re-enroll the student and make any changes needed to the students demographic
information, i.e. address, grade year, homeroom, etc. The program will adjust the Student Enrollment records for the student in the
new school.
It is recommended that a user in your district is setup with no school location restriction and can see all students. This user can easily
move students from one location to another prior to the start of the school year.
Withdraw a Student
1. Click on Data Entry and Changes |Student Information |Processing Options |Add, Change, Update Options |Withdraw/Re-enter
Student
2. Click
for the withdraw screen to appear.
3. Select a Student by clicking on the student’s name you would like to withdraw.
4. Verify the Student’s name you select shows next to Name in the withdraw box.
5. Select a Withdraw Date
SDSStudentHelp
Web School Office . 47
6. Select a Withdraw Code
7. Enter any details in the box provided.
8. Click ‘Withdraw Selected Student’ to withdraw or Cancel.
Withdraw
Confused about how to handle those students who move over the summer?
On the withdrawal screen (see above on how to access.), there is a box to enter a date not listed in the calendar dropdown. This
allows you to type in the desired withdrawal date, even if it is before the first date on the school calendar. If no grades have been
entered for the student, there will be a check box to delete the student’s schedule. For those students who have been marked absent
but were not enrolled on the dates marked, there is a check box to delete attendance records prior to the student’s exit date.
See also
Search Options
View Student Options
Add/Change/Update Options
Re-enter Student
Add a Student
Change a Student
Delete Students
ID Change for Student
Parent Connect Access Control
SDSStudentHelp
48 . Web School Office
Home > Web School Office > Data Entry and Changes > Student Information (No Groups/Horizontal View) > Option Menus > Processing Options > Re-enter
Student
Re-enter Student
1. Click on Data Entry and Changes |Student Information |Processing Options |View Student Options |Show Inactive Students
2. Inactive students will display.
3. Click on Processing Options |Add, Change, Update Options |Withdraw/Re-Enter Student.
4. Select a Student by clicking on the students’ name you would like to re-enter.
5. Click
for the re-enter screen to appear, when you hover over
it should say re-enter.
6. Verify the students’ name you select shows next to Name in the re-enroll box.
7. Select a re-enroll Date
8. Select a re-entry Code
9. Enter any details in the box provided.
10. Click ‘Re-enter Selected Student’ to re-enroll or Cancel to cancel the entry.
See also
Search Options
View Student Options
Add/Change/Update Options
Withdraw Student
Add a Student
Change a Student
Delete Students
ID Change for Student
Parent Connect Access Control
SDSStudentHelp
Web School Office . 49
Home > Web School Office > Data Entry and Changes > Student Information (No Groups/Horizontal View) > Option Menus > Processing Options > Add a
Student
Add a Student
1. Click on Data Entry and Changes |Student Information |Processing Options |Add, Change, Update Options |Add
2. Click
to add a student.
3. Enter in Student Information. Make sure you scroll down to enter the School Location.
4. Click
to Save.
Note: Grade_Year, Home_Room, and Misc_Group fields are controlled because of the student enrollment area. If changes to these
fields are made in the regular area, “Master Field Data Entry and Changes (Horizontal)” the Student Enrollment information will be
wrong. We made this control to make it possible for operators making changes before the year is underway to get their data entered
quickly.
It is highly recommended that once the demographics for a district stabilizes, which is normally by the end of the first week that
these settings are changed to an “N” in Web Settings and the student enrollment area is then recreated. The settings should not be
changed again until the summer of the next year. The default setting is “N”. To take advantage of these options, settings in the Web
Settings area will need to be changed and saved.
The three settings are:
●
Allow for Horizontal Grade/Year Changes. If changes are made in horizontal entry after the student enrollment area has been
created you will need to recreate the enrollment area.
●
Allow for Horizontal Home Room Changes. If changes are made in horizontal entry after the student enrollment area has been
created you will need to recreate the enrollment area.
●
Allow for Horizontal Misc Group Changes. If changes are made in horizontal entry after the student enrollment area has been
created you will need to recreate the enrollment area.
See also
SDSStudentHelp
50 . Web School Office
Search Options
View Student Options
Add/Change/Update Options
Withdraw Student
Re-enter Student
Change a Student
Delete Students
ID Change for Student
Parent Connect Access Control
SDSStudentHelp
Web School Office . 51
Home > Web School Office > Data Entry and Changes > Student Information (No Groups/Horizontal View) > Option Menus > Processing Options > Change a
Student
Change a Student
1. Click on Data Entry and Changes |Student Information |Processing Options |Add, Change, Update Options |Change.
2. Click on a Student Name.
3. Click in boxes on the right of the data you would like to change.
4. Click
to Save.
See also
Search Options
View Student Options
Add/Change/Update Options
Withdraw Student
Re-enter Student
Add a Student
Delete Students
ID Change for Student
Parent Connect Access Control
SDSStudentHelp
52 . Web School Office
Home > Web School Office > Data Entry and Changes > Student Information (No Groups/Horizontal View) > Option Menus > Processing Options > Delete
Students
Delete Students
1. Only delete a student if they have no records in attendance or scheduling. If they do have records in either, you must first delete
the records and then will display.
2. Click on Data Entry and Changes |Student Information |Processing Options |Add, Change, Update Options |Delete.
3. Click on the student name you would like to delete.
4. Click
Delete.
●
Delete will not display if the student has any information in attendance or scheduling, these must be removed first.
See also
Search Options
View Student Options
Add/Change/Update Options
Withdraw Student
Re-enter Student
Add a Student
Change a Student
ID Change for Student
Parent Connect Access Control
SDSStudentHelp
Web School Office . 53
Home > Web School Office > Data Entry and Changes > Student Information (No Groups/Horizontal View) > Option Menus > Processing Options > ID Change
for Student
ID Change for Student
1. Click on Data Entry and Changes |Student Information |Processing Options |Add, Change, Update Options |ID Change
2. Click in the box next to ID Number on the student you want to change and enter the new ID Number.
3. Click
to save.
Post Grade books to Marking Period Grades
1. Click on Data Entry and Changes |Student Information |Processing Options |Add, Change, Update Options |Post Grade books to
Marking Period Grades
2. Select an area to Post (i.e. Final Grade ~ 8)
3. Click “Post/Transfer Grades”- Clicking on this button will only Post/Transfer Grades that indicate to post to a specific area.
To indicate where to post in a grade book follow the below instructions:
1. Login
2. Select Teacher Entry Options
3. Click on Grade book
4. Select Change
5. Click on a Course (i.e. Period 1-1 Algebra I (150-01-1)
6. Click on a Grade book (i.e. Algebra I Quarter 1)
7. Select Special Options
8. Select Auto-Post Grades To (i.e. Qtr – (1))
9. Click
to save.
See also
SDSStudentHelp
54 . Web School Office
Search Options
View Student Options
Add/Change/Update Options
Withdraw Student
Re-enter Student
Add a Student
Change a Student
Delete Students
Parent Connect Access Control
SDSStudentHelp
Web School Office . 55
Home > Web School Office > Data Entry and Changes > Student Information (No Groups/Horizontal View) > Option Menus > Processing Options > Parent
Connect Access Control
Parent Connect Access Control
Parent Connect Access Control allows the district office to add a parent to Parent Connect by simply selecting a student, entering the
parent name and e-mail address. It allows the office to edit parents Parent Connect codes, name and e-mail address as well. This
feature only applies to schools that have Parent Connect.
Add Parent
1. Click on Data Entry and Changes |Student Information |Processing Options |Parent Connect Access Control
The following screen will display:
2. Select a Student Name you would like to add a Parent Connect Access to.
3. Enter Parent Name and E-mail address.
4. Click
Add or
Save.
Tech Note: Your passwords are updated in the sdsxplan.mdb automatically. To re-synchronize your databases for parents - Copy the
SDSXPlan.mdb and SDSCPlan.mdb files
SDSStudentHelp
56 . Web School Office
from the Student folder to the ParentConnect/ParentData folder.
Edit Parent
1. Click on Data Entry and Changes |Student Information |Processing Options |Parent Connect Access Control.
2. Click on the Student Name you would like to edit the Parent Connect Access for.
3. Click on Edit next to the Parent Code.
4. Edit the Parent Name/E-mail.
5. Click
to Save.
See also
Search Options
View Student Options
Add/Change/Update Options
Withdraw Student
Re-enter Student
Add a Student
Change a Student
Delete Students
ID Change for Student
SDSStudentHelp
Web School Office . 57
Home > Web School Office > Data Entry and Changes > Student Information (No Groups/Horizontal View) > Additional Key Entry Options
Additional Key Entry Options
Student Information provides you with a screen, where you can simply select an entry option, click on a student name and start
entering data or changing student’s information instantly. In the following section we touch on a few other key Entry Options. You can
also create entry options through Administrative Utilities |Data View Definitions so there are many different entry options.
See also
Activities
Previous School Attended Information
Transcript Detail
Viewing Student Policy Letters
Health Records
Test Score Setup
SDSStudentHelp
58 . Web School Office
Home > Web School Office > Data Entry and Changes > Student Information (No Groups/Horizontal View) > Additional Key Entry Options > Activities
Activities
This area allows you to keep a record of extracurricular activities for each student. Before entering activities here, you will first need
to setup a list of activities.
Setup Activities
1.
2.
3.
4.
Login
Click on ‘Data Entry and Changes’.
Click on ‘Master File and Code Entry’.
Select Entry Options ‘Activity Codes’.
5. Click
to add an Activity.
6. Enter an Activity Date.
7. Enter an Activity Description.
8. Select a School Location.
9. Click
to Save.
Add Activity to Student
This area allows you to keep a record of extracurricular activities for each student.
1.
2.
3.
4.
5.
Login.
Click on ‘Data Entry and Changes’.
Click on ‘Student Information’.
Select Entry Option ‘Activities’.
Click on a Student Name.
6.
7.
8.
9.
Click
to add an Activity.
Select an Activity Type.
Select an Activity Date.
Select an Activity Description.
10. Click
to Save.
Edit a Student Activity Entry
1.
2.
3.
4.
5.
Login.
Click on ‘Data Entry and Changes’.
Click on ‘Student Information’.
Select Entry Option ‘Activities’.
Click on a Student Name.
6. Click
next to the Entry.
7. Modify the Type, Date or Description or click
SDSStudentHelp
to delete.
Web School Office . 59
8. Click
to Save.
See also
Previous School Attended Information
Transcript Detail
Viewing Student Policy Letters
Health Records
Test Score Setup
SDSStudentHelp
60 . Web School Office
Home > Web School Office > Data Entry and Changes > Student Information (No Groups/Horizontal View) > Additional Key Entry Options > Previous School
Attended Information
Previous School Attended Information
This entry option allows you to add to a students’ records previous school/s they have attended.
1.
2.
3.
4.
5.
Login.
Click on ‘Data Entry and Changes’.
Click on ‘Student Information’.
Select Entry Option ‘Previous School Attended Information’.
Click on a Student Name.
6. Click
to add an Previous School Attended.
7. Enter Data.
8. Click
Save.
9. To edit the record click on
See also
Activities
Transcript Detail
Viewing Student Policy Letters
Health Records
Test Score Setup
SDSStudentHelp
or to delete click on
.
Web School Office . 61
Home > Web School Office > Data Entry and Changes > Student Information (No Groups/Horizontal View) > Additional Key Entry Options > Transcript Detail
Transcript Detail
This entry option allows you to enter in students’ transcript details.
●
All schools will need to enter balance information for transfer students.
●
Students that enter prior to the first final grading period (generally the first semester) will also need to have a first semester
schedule created with any midterm grades they received prior to entering your school.
●
Students that enter after the first final grading period can have the first semester information entered through “Detail
Transcript” entry screen. DO NOT give them first semester classes on their schedule. Enter the Balance forward values the
student has at the start of second semester.
Transfer Students Transcript Information
If the Utility “Evaluate Student Credits & Create Balance Forward” has been run you can add transfer transcript information in the
“Detail Transcript” entry area and the system will automatically update the GPA information for the student. If the “Evaluation” has not
been completed then you will need to enter the information in the “GPA Summary” Entry screen.
Balance Credit Earned = Cumulative Graduation credit earned prior to the current student schedule of classes.
Balance Credit Attempted = Cumulative GPA credit for classes taken prior to the current student schedule of classes, passed or
not.
Balance Grade Points A = Cumulative grade points earned toward the A GPA scale prior to the current student schedule of classes.
Balance Grade Points B = Cumulative grade points earned toward the B GPA scale prior to the current student schedule of classes.
Balance Grade Points C = Cumulative grade points earned toward the B GPA scale prior to the current student schedule of classes.
Note: Users should realize that new students will not be ranked with class until semester time when the “Rank with
Class” Process is run.
1.
2.
3.
4.
5.
Login.
Click on ‘Data Entry and Changes’.
Click on ‘Student Information’.
Select Entry Option ‘Transcript Detail’.
Click on a Student Name.
6. Click
to add a Transcript Detail.
SDSStudentHelp
62 . Web School Office
7. Enter Data.
8. Click
to Save.
9. To edit the record click
on or to delete click on
See also
Activities
Previous School Attended Information
Viewing Student Policy Letters
Health Records
Test Score Setup
SDSStudentHelp
.
Web School Office . 63
Home > Web School Office > Data Entry and Changes > Student Information (No Groups/Horizontal View) > Additional Key Entry Options > Viewing Student
Policy Letters
Viewing Student Policy Letters
1. Enter Data Entry and Changes |Student Information
2. Select the Entry Options Attendance/Discipline Policy Notification
3. Click on the Student you would like to view.
4. Click on the yellow folder in front of the letter you would like to view, edit or delete.
See also
Activities
Previous School Attended Information
Transcript Detail
Health Records
Test Score Setup
SDSStudentHelp
64 . Web School Office
Home > Web School Office > Data Entry and Changes > Student Information (No Groups/Horizontal View) > Additional Key Entry Options > Health Records
Health Records
To enter health records there are a couple different steps you need to take.
Step 1 – Setup Activity Codes
1. Login the Web School Office |Data Entry and Changes |Master File and Code File Entry and Changes |Application = Health Activity
Codes.
2. Next Setup the Activity Code Field Code List:
a. Enter an Activity Type.
To enter a new activity click
values).
. In the activity TYPE field, enter S (service), I (injury), C (chronic), or D (other) (use only these
b. Enter an Activity Code.
c. Enter an Activity Description.
d. Select a School Location (it is suggested to use ALL for all school locations).
Step 2 – Health Activity Entry
1. To enter a health activity log entry login Web School Office.
2. Click on Data Entry & Changes.
3. Click on Student Information.
4. In the Entry Options box, choose Health Log.
5. Find and Click on the Student you would like to add a entry to.
6. Click
to Add a Record.
7. Fill in the activity code, date, comment, description, time in, time out, treatment, follow up and destination fields; remaining fields
auto complete.
8. Click
to save the record.
9. To print health activity log for a student:
a. Open the Reports Folder on the WSO menu tree.
b. Click on Student Reports.
c. Click on Health in report groups box.
d. Choose Health Activity Log Report in the 2nd box.
e. Design a Sort to print ONLY this student.
f. Click
to Preview the report.
g. Click
to print the report.
See also
Activities
Previous School Attended Information
Transcript Detail
Viewing Student Policy Letters
Test Score Setup
SDSStudentHelp
Web School Office . 65
Home > Web School Office > Data Entry and Changes > Student Information (No Groups/Horizontal View) > Additional Key Entry Options > Test Score Setup
Test Score Setup
1. To setup your test scores go to Data Entry and Changes |Master File and Code File Entry and Changes.
2. Under application choose ‘All Entry Options’, then in the ‘Entry Options’ choose Test Bank/Test Definition.
3. Click
to enter a test and the test definition.
4. Enter the Test Identifier and all the scores that are needed for the test.
5. Click
to save.
See also
Activities
Previous School Attended Information
Transcript Detail
Viewing Student Policy Letters
Health Records
SDSStudentHelp
66 . Web School Office
Home > Web School Office > Data Entry and Changes > Master File and Code Entry and Changes (Vertical/Horizontal)
Master File and Code Entry and Changes (Vertical/Horizontal)
Master File and Code Entry and Changes have two different entry views on the menu tree. The first is “Master File and Code Entry
and Changes” which allows you to enter data vertically and the second is “Master File Changes (Horizontal).” Select the entry area
that works for you the best. These areas allows you to enter codes and make changes to Activity Codes, Bell Schedule, Course Codes,
Course Master, District Information, Meal and Miscellaneous , School Location, Teachers, Tuitions/Fees and more.
There are many examples in this manual on how to use this area. Basic steps to enter change or add data in this area:
1. Select an Entry Option (i.e. Teachers)
2. Click on a Teacher Code if you would like to modify a teachers’ record or click on
3. Click
to save changes or new entries.
4. To delete a record, click
to open the record and then click
5. Follow the steps above for other entry options.
See also
Student Information (Vertical View)
Student Information (No Groups/Horizontal View)
Document Storage and Retrieval
SDSStudentHelp
to delete.
add another teacher.
Web School Office . 67
Home > Web School Office > Data Entry and Changes > Document Storage and Retrieval
Document Storage and Retrieval
In Document Storage and Retreival the office or teachers can upload files to the system (i.e. Transcript, IEP, Lesson Plan, Workbook
Pages for viewing on Parent Connect, etc.), set descriptions of the file and security all on one screen. Rather than printing all your
reports simply upload them for viewing by other users. This feature allows the office or teachers to attach a document to a student or
classroom of students. The document may be specific to only that student, or the document could be a direction set for an upcoming
project due in a class.
You can create a “Go Green" document storage policy at your school to save paper and Ink. Save the Earth and Cost!
See also
Add a Document to a Student through Web School Office
Add a Document to a Student through Teacher Web
Add Documents to All Students in a School Location
Document Security
SDSStudentHelp
68 . Web School Office
Home > Web School Office > Data Entry and Changes > Document Storage and Retrieval > Add a Document to a Student through Web School Office
Add a Document to a Student through Web School Office
1. To enter Document Storage and Retrieval enter WSO |Data Entry and Changes |Document Storage and Retrieval
2. Select a Student you would like to add a document to.
3. Click on Browse to locate the document you would like to add. (i.e. Goal Based Report Card.pdf)
4. Enter a Description (i.e. Copy of Report Card)
5. Select a Security Group (i.e. Parent Connect)
Documents can be classified in the following security groups:
●
General Documents
●
Homework
●
Office Only
●
Parent connect
●
Quick view export
●
Messaging Export
These classifications are assigned to the document as the document is associated with the student or class.
See also
Add a Document to a Student through Teacher Web
Add Documents to All Students in a School Location
Document Security
SDSStudentHelp
Web School Office . 69
Home > Web School Office > Data Entry and Changes > Document Storage and Retrieval > Add a Document to a Student through Teacher Web
Add a Document to a Student through Teacher Web
The document control allows you to add documents to a course or homeroom.
1. Click on
.
2. Click on
to find the file you would like to add to the classroom (all students).
3. Click Open.
5. Enter a Description.
6. Select a Security Group.
7. Click
to Add.
See also
Add a Document to a Student through Web School Office
Add Documents to All Students in a School Location
Document Security
SDSStudentHelp
70 . Web School Office
Home > Web School Office > Data Entry and Changes > Document Storage and Retrieval > Add Documents to All Students in a School Location
Add Documents to All Students in a School Location
Documents may be added to students and teachers in Master File and Code Entry and Changes by Entry Option as well.
Example:
1. Click on Data entry and changes |Master File Code Entry and Changes |Entry Option = School Location
2. Click on the School Location you wish to add a document to.
3. Click the Document Control
.
4. Click Browse to find the file you would like to add to ALL STUDENTS enrolled in the school location you select from the list.
5. Enter a description. (i.e. High School October 2007 School Event Calendar)
6. Select a security group (i.e. Parent Connect).
7. Click
to Add.
The following will then display where you can click on “Edit/Select” if you would like to edit it or you can click on the yellow folder to
open the file.
If you select another area (i.e. Course Master), then the document will be added to all students enrolled in the course. A document
may be added to a specific teacher using the teachers’ option.
See also
Add a Document to a Student through Web School Office
Add a Document to a Student through Teacher Web
Document Security
SDSStudentHelp
Web School Office . 71
Home > Web School Office > Data Entry and Changes > Document Storage and Retrieval > Document Security
Document Security
Tech Notes: Setting up the documents feature security is important.
1. Enter WSO |Administrative Utilities |User Security.
2. Select the user or group to change the security on (i.e. _Teachers, _Parent, etc.).
3. Then on the right in the menu tree select the following: Document Security | Document. Security (Posting, Retrieval, Import) |
Document Security (Posting and Retrieval).
4. Place a Check mark in the box you DO NOT want the user to have access to.
Note: Parent Connect they only see Homework and Parent Connect security options.
Example:
Let’s say you want to setup security for _General_Office_Users user group (this user group controls what documents/items the users
in this security group can view in Web Office) and this group should NOT see documents classified as “general documents.” Put a
check in the box next to “General Documents.”
The setup change will be saved when you change users or any time another control is clicked on the page. Use the save button if you
make a single change and then use the menu tree to leave to another area.
Note: If no security group is specified, a document is available to everyone that has any access to documents – except for Parent
Connect.
SDSStudentHelp
72 . Web School Office
See also
Add a Document to a Student through Web School Office
Add a Document to a Student through Teacher Web
Add Documents to All Students in a School Location
SDSStudentHelp
Web School Office . 73
Home > Web School Office > Attendance
Attendance
Period by Period Attendance or Daily Attendance can be entered over the WEB by your office staff or from the classroom. When the
attendance information is entered by the office, the record is immediately reflected on each teacher's attendance screen. Late Arrival
and Early Dismissal are handled with ease. For example, those districts tracking minutes of enrollment, all your records are instantly
updated and calculated.
See also
Attendance Entry
Attendance Analysis Display
School Calendar Setup and Changes
Student Enrollment Processing
SDSStudentHelp
74 . Web School Office
Home > Web School Office > Attendance > Attendance Entry
Attendance Entry
Attendance Entry provides the ability to take period attendance, daily attendance, period attendance by class and to set teacher entry
settings. Quick viewing and printing of a student’s attendance history is also available in this area. To enter Attendance, click on
Attendance |Attendance Entry.
See also
Prerequisites for Daily Attendance
Period Attendance
Daily Attendance
Period Attendance by Class
Withdraw and Re-enroll
Period Attendance Field Trip Option
Teacher Entry Settings
SDSStudentHelp
Web School Office . 75
Home > Web School Office > Attendance > Attendance Entry > Prerequisites for Daily Attendance
Prerequisites for Daily Attendance
There are some prerequisites before Daily Attendance may be entered for the first time. This setup is done once before the school
year begins and is seldom edited. These items are all done in Attendance |School Calendar and Changes.
1. Identify School Location
2. Select Calendar Setup
3. Set School Dates to define terms used for grading and attendance analysis (Calendar must be created first)
4. Define Day Codes
5. Save Calendar
6. Once the prerequisites have been set up, attendance may be entered.
7. Listings may be printed for any day that attendance has been entered.
8. An attendance analysis report may be printed for specific months or for any pre-defined terms. This report will analyze
enrollment, absent, tardy and attendance days for each student. A variety of options are available for use. The report may be
printed with student detail or as a summary report.
See also
Period Attendance
Daily Attendance
Period Attendance by Class
Withdraw and Re-enroll
Period Attendance Field Trip Option
Teacher Entry Settings
SDSStudentHelp
76 . Web School Office
Home > Web School Office > Attendance > Attendance Entry > Period Attendance
Period Attendance
This attendance entry option provides the ability to mark students absent for single periods, multiple periods, or all periods of the day.
Period Attendance records absences from classes based on the student schedule. Period absences are converted to Full Day, Half
Day, and Less than Half Day absences based upon your setup information. Period attendance may be entered by teachers or by the
attendance office. The attendance office can enter absences in a student format or a class format. User defined codes allow for the
tracking of absences from school and school related absences from class.
Enter and Record
1. Login
2. Click on Attendance |Attendance Entry
3. Select a School Location
4. Select Period Attendance
❍ Note: The next time you access the attendance entry area the selection of Period Attendance will be remembered.
5. Select the student to be marked absent, either by ID or name
6. Click on a Student
7. Select the appropriate attendance entry option - Absent/Late Arrival/Early Dismissal (Note: defaults to today’s date)
8. Click on the Attendance Codes, Excused/Unexcused, Other Code and Description (i.e. set the attendance codes for the student
case)
9. Select any Special Options
1. Show only Absent Students – Shows only Absent Students
2. Attendance History – Shows the selected student’s attendance history.
3. Show Time In/Out – Shows Time In/Out for “Attendance by Minute” attendance records.
4. Next to #6, click on ‘+’ to add the attendance record,
to save changes or
to delete selected attendance records.
10. Click on the Printer to Print/View “Today’s Period Attendance Report.”
❍ Note: To view the Cumulative Attendance List for a specific student click on “Attendance History” under Special Options,
then click the printer button and it will run a report for just the selected student.
Other Options
On the top right side of the screen is the “Other Options” menu. This area contains the selection options to show “Inactive and
Withdrawn Students”. When an operator first enters the Attendance screen Withdrawn students will not display. If the operator
makes this selection then inactive students will be available for processing. If selected a second time or the user leaves the entry
screen the withdrawn students will not be available for processing.
The “Other Options” area is also where you can select to “Refresh Daily Attendance from Period Attendance”. The program will post
absences from Period attendance to daily attendance as soon as a record is saved. This option is only needed for special
circumstances and is not widely used.
Set Period Attendance Defaults
Period Attendance Defaults are the settings used to determine the codes that will be used by the program whenever a teacher marks
a student in Teacher Web attendance. Each school location has the ability to set their own teacher defaults. That means an
elementary school can set their teacher defaults to Absent/Excused and the high school could select Absent/Unexcused.
1. Login.
2. Click on Attendance |Attendance Entry |Teacher Entry Settings.
3. Select the appropriate School Location.
4. Under Period/Class Attendance Entry Values |Select a Date.
5. Select Defaults (i.e. Code, Ex/Unex, Other Code, Description etc.).
6. Click “Do Not reset Teacher Completion,” Only if you do not want to reset the Attn. Comp (Attendance Completion) for
teachers. This relates to the check box on the Teacher Attendance Entry screen labeled Attn. Comp. When teachers are done
taking attendance for a class the program places a check mark in this column to indicate to the office that they are done taking
attendance.
7. Click
❍
to Save.
Note: This will set the default date and codes for all teachers.
SDSStudentHelp
Web School Office . 77
Period Attendance by Minutes - Multiple Exit/Entry Absences (Late Arrival/Early Dismissal)
This method of attendance can be utilized by school systems that are setup to take attendance by minute by utilizing the Bell Schedule
portion of the program. In Period Attendance there is a Late Arrival and Early Dismissal feature you can use by simply logging in WSO
|Click on Attendance |Attendance Entry |Select Period Attendance |Select Late Arrival or Early Dismissal.
Notes:
●
Early dismissal and Late Arrival is fully automated. Enter the dismissal/arrival time and all classes that meet after dismissal or
before arrival will be checked. The student is marked absent for the time missed in each class.
●
If the student enters or leaves school again on the same day, the Time In and Time Out features should be used.
●
These are explained in the screen prints and examples on the following page.
Example
Below is an example entry. Each case may be slightly different.
A student leaves 2nd hour at 9:03, comes back 5th hour at 11:45 and leaves again at 1:15.
To enter the early dismissal at 9:03:
1. Choose the student and click on Early Dismissal.
2. Enter the time of 9:03
3. Click the paper button to the right of the time.
❍ Note: For early dismissal and late arrival, clicking the paper button beside the drop-downs is optional. The classes will
auto-mark the student absent from that time forward/backward.
SDSStudentHelp
78 . Web School Office
4. The affected classes will checkmark (2nd – 9th period).
5. Choose appropriate codes and description and click the green + sign.
6. The student will be marked absent for the classes that were check marked.
To enter the return at 11:45:
1. Checkmark the 5th hour class.
2. Checkmark Show Time In/Out.
3. Enter the Time In of 11:45
4. Choose the appropriate codes.
5. Click the floppy disk button to save the changes to the 5th hour absence (this will post the correct Duration Total and Time
Entered to the 5th hour absence record).
6. Checkmark 6th, 7th, 8th, & 9th hour.
7. Click the
button to remove the absences for these periods.
To enter the 2nd dismissal at 1:15:
1. Checkmark Show Time In/Out.
2. Checkmark 7th, 8th, & 9th hour.
3. Choose the appropriate codes.
4. Enter the Time Out of 1:15.
5. Click the green
sign.
6. 7th, 8th, & 9th hour will be marked absent.
See also
Prerequisites for Daily Attendance
Daily Attendance
Period Attendance by Class
Withdraw and Re-enroll
Period Attendance Field Trip Option
Teacher Entry Settings
SDSStudentHelp
Web School Office . 79
Home > Web School Office > Attendance > Attendance Entry > Daily Attendance
Daily Attendance
This attendance entry option is typically used by schools that do not mark students absent based on a student schedule. Elementary or
Grade Schools typically use this option.
Daily Attendance Processing consists of recording Full and Half Day Absences and Tardies from school. The Web School Office
Attendance system is an exception based system which requires only the recording of absences. Enrolled students are considered
present unless otherwise noted by an absence entry.
Daily Attendance information is available for inclusion on Grade Reports, generation of monthly attendance analysis reports, student
attendance history reports, and policy analysis which results in the generation of letters.
Enter and Record
1. Login.
2. Click on Attendance |Attendance Entry.
3. Select a School Location.
4. Select Daily Attendance.
5. Search for a Student by Name or ID.
6. Click on a Student.
7. Select an Attendance Date; Note, this method of attendance can be utilized by school systems that are setup to take
attendance by minute by utilizing the Bell Schedule portion of the program.
8. Select Absent/Late Arrival/Early Dismissal.
9. Click on the Attendance Codes, Excused/Unexcused, Other Code and Description.
10. Review Mass Change Options next to Code selections.
11. Select any Special Options.
1. Show only Absent Students – Shows only Absent Students.
2. Show Time In/Out – Shows Time In/Out for attendance records.
3. Enable Quick Mark – Allows quick entry. Select Quick Mark and simply click on a student name, record attendance, then
click on the next student name, record attendance etc...
4. Attendance History – Shows student’s attendance history.
12. Next to #6, click on
selected record.
to add the new attendance record, click
to save changes to a selected record or
to delete a
13. Click on the Printer to Print/View “Today’s Period Attendance Report.”
Enable Quick Mark
When entering and recording daily attendance rather than hitting the Record “Student Name” each time, if you place a check in Enable
Quick Mark you can save time by simply clicking on each student’s name to mark the record.
1. Login.
2. Click on Attendance |Attendance Entry |Daily Attendance.
3. Select an Attendance Date, Attendance Code, Excused/Unexcused Code, Other Code and Description you would like for each
student you are about to select.
4. Place a check in “Enable Quick Mark”.
5. Click the Student Name you would like to mark.
6. You will see the record recorded automatically.
Set Daily Attendance Defaults
1. Login.
2. Click on Attendance |Attendance Entry |Teacher Entry Settings.
3. Under Daily/Homeroom Entry Values |Select a Date.
4. Click on the Attendance Codes, Excused/Unexcused, Other Code and Description.
5. Review Mass Change Options next to Code selections.
6. Click “Do Not reset Teacher Completion,” Only if you do not want to reset the Attn. Comp (Attendance Completion) for
teachers. This relates to the check box on the Teacher Attendance Entry screen labeled Attn. Comp. When teachers are done
SDSStudentHelp
80 . Web School Office
taking attendance for a class they place a check mark in this column to indicate to the office that they are done taking
attendance.
7. Click
❍
to Save.
Note: This will set the default date and codes for all teachers.
See also
Prerequisites for Daily Attendance
Period Attendance
Period Attendance by Class
Withdraw and Re-enroll
Period Attendance Field Trip Option
Teacher Entry Settings
SDSStudentHelp
Web School Office . 81
Home > Web School Office > Attendance > Attendance Entry > Period Attendance by Class
Period Attendance by Class
Period Attn by Class allows you to select a teacher, class and periods for which to record attendance. This attendance entry option
provides the attendance office a quick method to make students absent when they need to refer to a teacher roster.
Enter and Record
1.
2.
3.
4.
5.
6.
Login.
Click on Attendance |Attendance Entry |Period Attn by Class.
Select a Teacher.
Select a Class to Process.
The student roster will display. Then mark students absent, or tardy.
Select /Change the Attendance Code, Excused/Unexcused, Other Code and Description.
7. Click Record All Students or Select Students to Record.
8. Print/View Today’s Period Attendance List.
See also
Prerequisites for Daily Attendance
Period Attendance
Daily Attendance
Withdraw and Re-enroll
Period Attendance Field Trip Option
Teacher Entry Settings
SDSStudentHelp
82 . Web School Office
Home > Web School Office > Attendance > Attendance Entry > Withdraw and Re-enroll
Withdraw and Re-enroll
When a student is withdrawn or reenrolled properly, several tables are affected. The following tables will be affected when the,
withdraw or re-entry button is pressed, Demographics, Demographics History, Daily Attendance, Scheduling, and Student Enrollment.
If students are not withdrawn or re-enrolled properly, attendance analysis will not calculate correctly.
Important Notes:
●
If you are losing a student, withdraw the student as of the last day the student was in class at their location.
●
If the withdrawal is because of an in-district transfer the person who is withdrawing the student should change the school
location after the withdraw information has been entered.
●
The receiving school, using the web should make any changes needed to the students demographic information, i.e. address,
grade year, homeroom, etc. And then re-enroll the student. The program will adjust the Student Enrollment records for the
student in the new school.
●
It is recommended that a user in your district is setup with no school location restriction and can see all students. This user can
easily move students from one location to another prior to the start of the school year.
See also
How to Withdraw
Withdraw Students that Moved
How to Re-enroll
Correcting Students Withdrawn in Error
SDSStudentHelp
Web School Office . 83
Home > Web School Office > Attendance > Attendance Entry > Withdraw and Re-enroll > How to Withdraw
How to Withdraw
1. Enter WSO |Data Entry and Changes| Student Information.
2. Bring up the student.
3. Click on Processing Options |Add, Change, Update Options |Withdraw/Re-enter Student.
4. Click on the student.
5. Click
for the withdraw screen to appear.
6. Select the Withdrawal Date in the Exit Date box. This date will be counted as the last day of attendance. If the student withdrew
over the summer, enter a date prior to the first day of school in the “Date if not in Calendar” box.
7. Select a Withdraw Code.
8. Type a note in the Detailed Description box. This information can be accessed in Daily Attendance in the note field.
9. Click the Withdraw Selected Student button. This will create a Demographics History record, an Attendance W record, post the Exit
Date to the student’s Demographic record and adjust the Student Enrollment records for the student.
THE ATTENDANCE ANALYSIS MUST BE REFRESHED BEFORE AN ACCURATE REPORT WILL PRINT AFTER COMPLETING ANY OF
THE ABOVE PROCESSES.
See also
Withdraw Students that Moved
How to Re-enroll
Correcting Students Withdrawn in Error
SDSStudentHelp
84 . Web School Office
Home > Web School Office > Attendance > Attendance Entry > Withdraw and Re-enroll > Withdraw Students that Moved
Withdraw Students that Moved
Confused about how to handle those students who move over the summer?
On the withdrawal screen (see above on how to access.), there is a box to enter a date not listed in the calendar dropdown. This
allows you to type in the desired withdrawal date, even if it is before the first date on the school calendar. If no grades have been
entered for the student, there will be a check box to delete the student’s schedule. For those students who have been marked absent
but were not enrolled on the dates marked, there is a check box to delete attendance records prior to the student’s exit date.
See also
How to Withdraw
How to Re-enroll
Correcting Students Withdrawn in Error
SDSStudentHelp
Web School Office . 85
Home > Web School Office > Attendance > Attendance Entry > Withdraw and Re-enroll > How to Re-enroll
How to Re-enroll
THE ATTENDANCE ANALYSIS MUST BE REFRESHED BEFORE AN ACCURATE REPORT WILL PRINT AFTER COMPLETING ANY OF
THE BELOW PROCESSES.
1. Click on Data Entry and Changes |Student Information |Processing Options |View Student Options |Show Inactive Students
❍ Inactive students will display.
2. Click on Processing Options |Add, Change, Update Options |Withdraw/Re-Enter Student
3. Click
for the re-enter screen to appear.
4. Select a Student by clicking on the students’ name you would like to re-enter.
5. Verify the students’ name you select shows next to Name in the re-enroll box.
6. Enter the date of re-entry in the Re-Entry date box (this is optional).
7. Choose the re-entry code from the drop down box.
8. Type a note in the Detailed Description box. This information can be accessed in Daily Attendance in the note field.
9. Click the RE-Enter Selected Student button. This will create a Demographics History record, an Attendance R record, update
the Entry and Exit Dates on the Demographic record and adjust the Student Enrollment records for the student’s re-enroll.
See also
How to Withdraw
Withdraw Students that Moved
Correcting Students Withdrawn in Error
SDSStudentHelp
86 . Web School Office
Home > Web School Office > Attendance > Attendance Entry > Withdraw and Re-enroll > Correcting Students Withdrawn in Error
Correcting Students Withdrawn in Error
1. Remove the Exit Date
1. Enter WSO |Open Data Entry and Changes |Student Information.
2. Click on Processing Options |View Student Options |Show Inactive Students – Current.
3. Click the Entry Options dropdown and choose Demographics All Fields.
4. Find the student.
5. Remove the Exit Date.
6. Correct the Exit Code.
7. Click
to Save.
2. Delete the Demographics History Record
1. While in Data Entry and Changes |Student Information |Click the Entry Options dropdown and choose Demographics
History.
2. Find the student.
3. The Demographics History record for the student will display
4. Click
5. Click
on the record to open it.
to delete the demographics history record.
3. Delete the Attendance W Record
1. Enter WSO |Attendance |Attendance Entry.
2. Choose your School Location.
3. Click on Daily Attendance.
4. Find the student.
5. On the right side of the screen, click on Attendance History.
6. The student’s attendance records will display.
7. Find the record with the attendance code of W and checkmark it.
8. Click
to delete the W record.
4. Rebuild the Student’s Enrollment Records.
1. Enter WSO |Attendance |Student Enrollment Processing
2. Click on the
.
3. Choose your school location from the dropdown
4. Enter the first day of school for this student in the Effective Date box.
5. Enter the student's ID number in the "This ID Only" box.
6. Click the Create or Recreate Enrollment Records Icon
■
Read the message.
.
7. Answer "Yes" to the confirmation message.
8. Wait for a message that the enrollment records have been built.
5. Re-activate the Student’s Schedule Records
1. Enter WSO |Scheduling |Schedule Changes (Current Year)
2. Find the student.
3. Click
to checkmark all classes on the student’s schedule (or individually check only the classes you wish to reactivate).
4. Click the
on the left side of the schedule to re-activate the selected classes.
5. ATTENDANCE ANALYSIS MUST BE REFRESHED BEFORE AN ACCURATE REPORT WILL PRINT AFTER COMPLETING
ALL OF THE ABOVE PROCESSES.
6. When a student has been re-enrolled in error, you must:
1. Delete the Demographics History Record
2. While in Data Entry and Changes |Student Information |Click the Entry Options dropdown and choose Demographics
History.
3. Find the student.
■
The demographics history record for the student will display.
4.
Click the file folder button on the record to open it.
5.
Click
SDSStudentHelp
to delete the demographics history record.
Web School Office . 87
■
Delete the Attendance R Record.
6. Enter WSO |Attendance |Attendance Entry.
7. Choose your School Location.
8. Click on Daily Attendance.
9. Find the student.
10. On the right side of the screen, click on Attendance History.
11. The student’s attendance records will display.
12. Find the record with the attendance code of R and checkmark it.
13. Click the
button to delete the R record.
7. Rebuild the Student’s Enrollment Records.
1. Enter WSO |Attendance |Student Enrollment Processing.
2. Click on the
icon.
3. Choose your school location from the dropdown.
4. Enter the first day of school for this student in the Effective Date box.
5. Enter the student's ID number in the "This ID Only" box.
6. Click
■
to Create or Recreate Enrollment Records Icon.
Read the message.
7. Answer "Yes" to the confirmation message.
8. Wait for a message that the enrollment records have been built.
See also
How to Withdraw
Withdraw Students that Moved
How to Re-enroll
SDSStudentHelp
88 . Web School Office
Home > Web School Office > Attendance > Attendance Entry > Period Attendance Field Trip Option
Period Attendance Field Trip Option
This attendance entry option provides the attendance office a quick method to make “ALL” students absent that are enrolled in a class
for “ALL” their courses within a period range. This provides a way to indicate a group of students who will be out of school for
multiple periods.
See also
Prerequisites for Daily Attendance
Period Attendance
Daily Attendance
Period Attendance by Class
Withdraw and Re-enroll
Teacher Entry Settings
SDSStudentHelp
Web School Office . 89
Home > Web School Office > Attendance > Attendance Entry > Teacher Entry Settings
Teacher Entry Settings
The settings available when this option is chosen controls the attendance code default values when teachers are entering attendance
over the web.
See also
Teacher Entry Code Setup
Bell Schedule
SDSStudentHelp
90 . Web School Office
Home > Web School Office > Attendance > Attendance Entry > Teacher Entry Settings > Teacher Entry Code Setup
Teacher Entry Code Setup
Teacher Entry Settings
Follow these steps to change the teachers’ attendance code setup:
1. Login to Web School Office
2. Click on the Attendance Folder
3. Click on Attendance Entry
4. Select your school location at the top (box 1)
5. Click on teacher entry settings (next to red 2)
Daily Attendance Steps
1. Complete the section for teacher entry settings for daily/homeroom entry values.
2. Select your school location at the top (box 1)
3. Select Daily Attendance
4. Choose the Date (defaults to today)
❍ The check box (next to the date) regarding Do NOT reset teacher completion code would allow you to modify these
settings in the middle of the day; CHECK THIS BOX so you don’t lose track of who has taken attendance thus far in the
day; once you set the codes today, these settings should remain in effect for the rest of duration.
5. Set the Absent codes (code, excused, other, description)
6. Set the Tardy codes (code, excused, other, description)
7. Click
❍
next to this section to save.
For EITHER type of attendance, it is suggested to leave the description as it is – this indicates that a TEACHER did the
original entry.
Period Attendance Steps
1. Complete the section for teacher entry settings for period/class attendance entry values in “Teacher Entry Settings.”
2. Select your school location at the top (box 1)
3. Choose Period Attendance
4. Choose the date (defaults to today)
❍ The check box (next to the date) regarding Do NOT reset teacher completion code would allow you to modify these
settings in the middle of the day; CHECK THIS BOX so you don’t lose track of who has taken attendance thus far in the
day; once you set the codes today, these settings should remain in effect for the rest of duration.
5. Set the Absent codes (code, excused, other, description)
6. Set the Tardy codes (code, excused, other, description)
7. Click
❍
next to this section to save.
For EITHER type of attendance, it is suggested to leave the description as it is – this indicates that a TEACHER did the
original entry.
See also
Bell Schedule
SDSStudentHelp
Web School Office . 91
Home > Web School Office > Attendance > Attendance Entry > Teacher Entry Settings > Bell Schedule
Bell Schedule
1. To set a Bell Schedule in Attendance, first enter Data Entry and Changes |Master File Entry and Changes |Entry Options |Bell
Schedule. Some sample bell schedules for a 10 period day have been setup. Simply modify the supplied schedules to meet
your district needs (i.e. edit the periods and times for your school).
❍ You may click the green plus sign to ADD your own classification of bell schedule.
❍
There will be 1 line per period of your day.
❍
Look at existing entries for an example on how to complete each of the fields.
2. Once you have modified the schedule to meet your needs click
to save.
3. Then Enter Attendance |Attendance Entry |Teacher Entry Settings |Set or Change Course Master Selected Bell Schedule.
❍ Note: Illinois clients will no longer need to put start and end times in their course master. The attendance program will
mass change it for you.
See also
Teacher Entry Code Setup
SDSStudentHelp
92 . Web School Office
Home > Web School Office > Attendance > Attendance Analysis Display
Attendance Analysis Display
This area allows you to analyze your attendance statistical information and export.
1. Login.
2. Click on Attendance |Attendance Analysis Display.
3. Select a Start Date to Evaluate.
4. Click in Activate Date Range for the End Date option.
5. Select School |Click arrow to Right.
6. Select Grade/Year |Click Arrow to Right.
7. Select Data Field (i.e. Sex)|Select If Equal to (i.e. F) |Click Arrow to Right.
8. Click Refresh and the Tabs Update.
9. Click on Attendance Summary and View Data.
10. Click on the ‘+’ next to ‘Quick View Export’.
11. Select a Export Option.
12. Save and View.
See also
Attendance Entry
School Calendar Setup and Changes
Student Enrollment Processing
SDSStudentHelp
Web School Office . 93
Home > Web School Office > Attendance > School Calendar Setup and Changes
School Calendar Setup and Changes
1. Select a School Location (i.e. High School)
2. Click on
next to # 2a, a new screen will then display.
1. # 3 Create a new calendar
■
If you need to re-create a calendar and have entered attendance the check box is not active. If you are certain
that you can create a calendar that will still have all dates available for dates with attendance select the link
“Create a new calendar”. The check box will then be activated. Make sure you backup first and check your
attendance after this process.
■
After you make a backup then proceed by clicking on “Create a new calendar”.
■
Click in the check box next to “Create a new calendar”.
2. # 4 Enter a “School Year” (i.e. 2007-2008).
3. # 5 Enter.
■
“First Active Calendar Date” (i.e. 8/13/2007).
■
“Last Active Calendar Date” (i.e. 6/8/2008).
4. # 6 Enter.
■
Enter Beg Date for All Terms.
■
Enter End Date for All Terms.
■
Enter Semester for All Terms.
5. # 7
■
By placing a check next to “Assign Day Codes / Change Day Codes for the selected calendar.” This option will
assign Day Codes to the Active school days.
■
If you would like to proceed place a check next to “Assign Day Codes / Change Day Codes for the selected
calendar.”
■
Select one of the following radio buttons: Mon-Fri, A/B or Rotation D1-DX.
■
Select Day Codes by clicking on the dropdown in each column.
■
■
Then click on the calendar to pick the term you wish to change.
■
Click on
■
3.
Click on the dropdown next to “Pick the Term you wish to change when selecting a date in the calendar” to
select a term.
“Save and Apply Calendar Setup Information”.
Note: By clicking on
, it will close without saving your changes.” Make sure you SAVE first then hit the
close icon. While saving if dates seem to be before another term date or the system sees something odd it will
highlight the field in red and ask you to correct it. Make the change and click save again.
# 2b Copy Calendar Options.
1. This option provides you with the tool to copy a calendar from a school to another school.
2. Click on
Copy Calendar Options.
3. Click on the drop down next to From and select the school you would like to copy from.
4. Click on the drop down next to To and select the school you would like to copy to.
5. Make any necessary edits to the calendar grid.
6. Click
Save Calendar |Click
.
7. Once you are back on the main screen review the calendar display options and the calendar. Last click
calendar.
to save the
See also
Attendance Entry
Attendance Analysis Display
Student Enrollment Processing
SDSStudentHelp
94 . Web School Office
Home > Web School Office > Attendance > School Calendar Setup and Changes > Calendar Change
Calendar Change
Are you one of those lucky schools that didn’t use all of your snow days and will be ending your school year earlier
than originally planned?
If so, remember that you will need to adjust the ending date of your last marking period and inactivate all days in your calendar after
that date.
See also
SDSStudentHelp
Web School Office . 95
Home > Web School Office > Attendance > Student Enrollment Processing
Student Enrollment Processing
The Student Enrollment area is used to maintain enrollment information used for attendance analysis. Three key demographics fields,
Grade Year, Home Room, and Misc Group must be maintained in the this area. Changes made in this area will change the detail
information for a student based on the Effective Change Date selected. By doing this it is possible to evaluate a students’ attendance
correctly over time.
Build Enrollment Data
The enrollment data creation should be run at the beginning of the school year. If situations arise like a snow day or change to the
school calendar simply run the program again and the enrollment information will be adjusted.
1. Login to WSO |Attendance |Student Enrollment Processing.
2. Select a School Location by clicking on the drop down.
3. Click
next to Enrollment Data Creation.
4. Change the Effective Change Date to the first day of school.
5. If you want to build the enrollment for ALL school locations, check the box next to All Locations.
6. Click
next to Create or Re-Create All Enrollment Data.
7. After receiving the message “Warning! All Enrollment records will be changed from xx/xx/xxxx forward” click OK to confirm or
Cancel to cancel.
❍ Note: The enrollment data will be built for all students from the first day of school until the last day of school, based on
the school calendar for the appropriate school location.
8. After receiving the message “Student Enrollment records have been created” click OK.
9. The enrollment records have been created.
❍ Note: This process only needs to be run one at the beginning of the year. However it may become necessary to run it
again for 1 particular student. Enter that student’s ID number in the appropriate box find and run by following the above
instructions.
❍
Tech Note: If you were a previous V8 client and have run enrollment in V8 you should run it now in the web. The web
program uses a new table student_enrollment rather than the enrollment table. Reports will be blank if the enrollment
is not run on the web. This is also something to make note of if you have any old custom reports with the enrollment
table in it. It must look at the student_enrollment table for the web.
See also
Attendance Entry
Attendance Analysis Display
School Calendar Setup and Changes
SDSStudentHelp
96 . Web School Office
Home > Web School Office > Scheduling
Scheduling
Web School Office includes a "tried and true" scheduling option - the magnet board. Position your courses, assign teachers and
rooms. Then simply push the schedule button and your students are scheduled. Change courses and rooms with a few clicks of the
mouse and see the results. You can sort and sequence groups for optimal fast viewing and results. Register students over the WEB
from home (Parent Connect) or in school. Included is an Elementary School scheduler, to create class lists for each teacher's subjects
allowing easy setup of SDS Gradebooks by the elementary teachers. You can work on your schedule at anytime you wish from any
location without having to install a client on your workstation. Simply connect to the Internet and away you go!
See also
Schedule Changes (Current Year)
Next Year Registration and Schedule Changes
Linking Courses
Student Elementary Scheduling
Kindergarten Roundup
SDSStudentHelp
Web School Office . 97
Home > Web School Office > Scheduling > Schedule Changes (Current Year)
Schedule Changes (Current Year)
Schedule Changes (Current Year) is used to make schedule changes to current year schedules and also to individually create student
schedules. In this area, class sections can be manually added to a student schedule. Existing class sections can be deleted,
inactivated, and re-activated. Schedules can also be created by adding the desired course numbers and using the scheduler button
to assign sections.
See also
Scheduling Icons
Schedule Change Screen Options
Example of Schedule Changes (Current Year)
Master File and Code File Entry and Changes
SDSStudentHelp
98 . Web School Office
Home > Web School Office > Scheduling > Schedule Changes (Current Year) > Scheduling Icons
Scheduling Icons
Scheduling Icons
= Click to Print/View Student Schedule
= Check/Uncheck all sections for the displayed student
= Remove Section Assignment
= Find Sections for Unassigned Classes
= Remove selected classes but retain grade information.
= Activate selected courses.
= Permanently delete all selected classes (If grades are inactive, see options Delete for override.)
= Enforce class link settings for selected classes (enter a Y in the link field)
= Ignore class link setting for selected classes (enter a N in the link field)
See also
Schedule Change Screen Options
Example of Schedule Changes (Current Year)
Master File and Code File Entry and Changes
SDSStudentHelp
Web School Office . 99
Home > Web School Office > Scheduling > Schedule Changes (Current Year) > Schedule Change Screen Options
Schedule Change Screen Options
Processing Options
●
In addition to the Search and View Options available in other student information data entry and changes screens, options are
included here specific to schedule changes.
General Options
●
Evaluate Assigned Seats – Click to evaluate the Assigned Seats for each section and adjust if varies from the student count. An
“Evaluation Complete” message will display when finished. This should be run periodically when making schedule changes and
anytime a user notices incorrect Assigned Seat totals in the course master or on class lists.
●
Delete Even if Grades are Found – Click to allow classes to be deleted from students’ schedules even if marking period grades
are found.
●
Delete Even if Gradebook Grades are Found – Click to allow classes to be deleted from students’ schedules even if gradebook
grades are found.
Sort/Display Options
●
Allow for all Schedule Items (No Scrolling) – Click to allow all schedule records to display on the screen at once.
●
Sort Schedule by Period/Semester – Toggles schedule records sorting between sorted by periods or sorted by semester.
View Options (dropdown box)
●
Allows user to display another student information view below the schedule. Example: This would be helpful to display the
student’s transcript detail records to view what classes have already been taken.
Course-Sec-Sem (data entry boxes)
●
●
These boxes allow the user to narrow the focus of records displayed in the Courses and Class Sections dropdowns.
❍ Enter a course number in the Course box and press the Enter key on the keyboard or click the binocular button.
❍
The Course dropdown will move the focus to that course number.
❍
The Class Sections dropdown will be focused to only contain course sections for the entered course number.
Enter a course number in the Course box, a section number in the Sec box and press the Enter key or click the binocular
button.
❍ The Course dropdown will move the focus to that course number.
❍
●
The Class Sections dropdown will be focused to only contain course sections for the entered course and section
number.
Enter a course number in the Course box, a section number in the Sec box, a semester number in the Sem box and press the
Enter key or click the binocular button.
❍ The Course dropdown will move the focus to that course number.
❍
The Class Sections dropdown will be focused to only contain course sections for the entered course, section, and
semester.
Period (dropdown boxes)
●
These boxes allow the user to narrow the focus of records displayed in the Class Section dropdowns to courses in a specific
period or marking period.
❍ Select a specific period from the first dropdown to display Class Sections scheduled in a specific period of the day.
❍
Select a marking period option from the second dropdown to display Class Sections scheduled in specific marking
periods.
Teachers (dropdown box)
●
This box allows the user to narrow the focus of records displayed in the Class Section dropdowns to courses taught by a
specific teacher.
SDSStudentHelp
100 . Web School Office
●
Select a teacher from the dropdown to display Class Sections scheduled to a certain teacher.
Courses (dropdown box)
●
This box contains the course codes setup for the current year.
❍ This is a list of the courses offered for the current year. (Not the specific course master)
❍
Users can select a course code from this list and click the
in front of the list to add the course code to the student’s
schedule. Added course codes can then automatically be scheduled with the Find Sections for Unassigned Classes
button
❍
.
Selecting a course number from this dropdown will narrow the focus of the Class Sections dropdown to include only
class sections for the selected Course Number.
Class Sections (dropdown box)
●
This box contains the course master sections setup for the current year.
●
Users can select a course section from this list and click the
student schedule.
●
The focus in this dropdown can be narrowed by using the other boxes on the screen as outlined above.
in front of the list to add the specific course section to the
Add Message (check box)
●
Check this to display a confirmation message.
Overfilled Warning (check box)
●
Check this to display overfilled class warning.
Class List Option (check box)
●
Check this to display the class list for the selected class section and to display the class list options folder.
●
Class List Options Folder – Click to display the first selected section in the student’s displayed schedule.
See also
Scheduling Icons
Example of Schedule Changes (Current Year)
Master File and Code File Entry and Changes
SDSStudentHelp
Web School Office . 101
Home > Web School Office > Scheduling > Schedule Changes (Current Year) > Example of Schedule Changes (Current Year)
Example of Schedule Changes (Current Year)
1. Enter WSO |Click on Scheduling |Schedule Changes (Current Year).
2. Select a Student.
❍
You can search by student’s name or by clicking on the first letter of the student’s last name.
❍
Once you click on the student’s name that student’s schedule will appear on the right.
3. Add a Course to Student Schedule.
❍ Courses can be added to a student schedule via 2 methods.
1. Add Course Codes and use the
Find Selections for Unassigned Classes button to let the system
find sections to schedule the student into.
■
Find the desired course code in the Courses dropdown and click
■
OR
■
Type the desired course code in the Course box in the upper left corner of the screen. Press the Enter key
on your keyboard and then the
■
to add.
to add.
After adding all desired course codes, click the
Find Selections for Unassigned Classes button to let
the system find sections to schedule the student into
2. Force specific sections of courses onto the student schedule.
■
Find the desired course section in the Class Section dropdown and click
to add. NOTE: The CourseSec-Sem, Periods, & Teachers boxes at the top of the screen may be used to narrow the focus of
selections in the Class Sections dropdown. Use of these options is outlined in the Schedule Changes
(Current Year) section on the previous pages.
■
OR
■
Type the course-sec-sem of the desired section into the Course-Sec-Sem boxes and press the Enter key
on your keyboard and the Space Bar to add.
4. Unlock Courses for Rescheduling.
❍ If you want to “unlock” courses for rescheduling (you want the same courses but want the student run through the
entire scheduling process again)
1. Click the check box beside each of the courses.
2. Click
■
.
This will unlock the courses. Then you can click
the courses.
Find Selections for Unassigned Classes to reschedule
5. Inactivate Course
❍ To inactivate a course (or courses) click in the check box beside the course(s) that you want to inactivate then click
.
6. Reactivate Course
❍ If a course has been inactivated but should be reactivated (i.e. a student withdrew and the system inactivated all their
classes but now the student has returned)
1. Click the check box/es beside the classes to be reactivated.
■
Once all of the classes to be reactivated have checks in the box beside them…
2. Click
above. This will reactivate all classes that are checked.
7. Delete Course
❍ To delete a class from the schedule, put a check in the box beside the course and click
. This will permanently
remove the course from the student’s schedule.
■
Note: If a student has been issued a grade in that class the system will inactive the course instead of deleting
the course. You should never delete a course that has had a grade entered for it so the system will not let you
make the mistake of deleting a course that is already graded.
8. Print Schedule
❍
Click the
button to print a copy of the student’s schedule.
See also
Scheduling Icons
Schedule Change Screen Options
Master File and Code File Entry and Changes
SDSStudentHelp
102 . Web School Office
Home > Web School Office > Scheduling > Schedule Changes (Current Year) > Master File and Code File Entry and Changes
Master File and Code File Entry and Changes
This area is used to access the Course Codes-Current Year and Course Master-Current Year to add, edit, and delete course codes
and course master sections.
See also
Course Codes - Current Year
Course Master - Current Year
SDSStudentHelp
Web School Office . 103
Home > Web School Office > Scheduling > Schedule Changes (Current Year) > Master File and Code File Entry and Changes > Course Codes - Current Year
Course Codes - Current Year
This section will help you create, add, edit, and delete course codes.
See also
Create/Add/Edit/Delete a Course Code
SDSStudentHelp
104 . Web School Office
Home > Web School Office > Scheduling > Schedule Changes (Current Year) > Master File and Code File Entry and Changes > Course Codes - Current
Year > Create/Add/Edit/Delete a Course Code
Create/Add/Edit/Delete a Course Code
Course Codes - Current Year Setup
1. Login.
2. Click on Scheduling.
3. Click on Master File and Code File Entry and Changes.
4. Click the Application dropdown and choose Scheduling (Current Year).
5. Click the Entry Options dropdown and choose Course Codes-Current Year or Course Codes-Current Year (All Fields).
Add a Course Code
1. Click the
.
2. Fill in the data entry boxes on the right .
3. Click
to save the new code.
Edit a Course Code
1. Find the course code to edit.
❍ Scroll through the course code list and find the desired code. Click on the blue course code number to open the code.
❍
OR
❍
Type the desired course code in the white box and either press the Enter key on the keyboard or click the binocular
button. Click on the blue course code number to open the code.
❍
OR
❍
Click the Selection Field dropdown and choose a field. Click the Selection Values and choose the desired field value.
Click on the blue course code number to open the code.
2. Edit fields as necessary.
3. Click
to save changes.
Delete a Course Code
1. Find the course code to edit.
❍ Scroll through the course code list and find the desired code. Click on the blue course code number to open the code.
❍
OR
❍
Type the desired course code in the white box and either press the Enter key on the keyboard or click the binocular
button. Click on the blue course code number to open the code.
SDSStudentHelp
Web School Office . 105
❍
OR
❍
Click the Selection Field dropdown and choose a field. Click the Selection Values and choose the desired field value.
Click on the blue course code number to open the code.
2. Click
to delete the selected course code.
See also
SDSStudentHelp
106 . Web School Office
Home > Web School Office > Scheduling > Schedule Changes (Current Year) > Master File and Code File Entry and Changes > Course Master - Current Year
Course Master - Current Year
1. Login.
2. Click on Scheduling.
3. Click on Master File and Code File Entry and Changes.
4. Click the Application dropdown and choose Scheduling (Current Year).
5. Click the Entry Options dropdown and choose Course Master-Current Year (Basic Fields) or Course Master-Current Year (All
Fields).
See also
Course Codes - Current Year
SDSStudentHelp
Web School Office . 107
Home > Web School Office > Scheduling > Schedule Changes (Current Year) > Master File and Code File Entry and Changes > Course Master - Current
Year > Edit/Add/Delete a Course Section
Edit/Add/Delete a Course Section
Add a Course Section
1. Click
.
2. Fill in the data entry boxes on the right.
3. Click
❍
to save the new code.
Note: When adding multiple sections of the same course number, it is helpful to add the first section and save. Select
that section and check mark the Retain Values button. Then when
is clicked, this will retain all the fields values from
the selected section in the data entry boxes. You will only need to change the section number and any other fields as
desired (i.e. Period From/To, Teacher Code, Room Number) and save.
WHEN USING THE RETAIN VALUES OPTION, MAKE SURE THAT ONCE YOU CLICK THE
, IT DISAPPEARS FROM
THE SCREEN. IF THE
IS STILL ON THE SCREEN AND YOU MAKE CHANGES IN THE BOXES ON THE RIGHT, YOU
WILL BE OVERWRITING THE DATA ON THE SELECTED COURSE SECTION.
Edit a Course Section
1. 1. Find the course section to edit
❍ Scroll through the course sections list and find the desired section. Click on the blue course-sec-sem number to open
the code.
❍
OR
❍
Type the desired course description in the white box and either press the Enter key on the keyboard or click the
binocular button. Click on the blue course-sec-sem number of the desired section to open.
❍
OR
❍
Click the Selection Field dropdown and choose a field. Click the Selection Values and choose the desired field value.
Click on the blue course-sec-sem number of the desired section to open the code.
2. Edit fields as necessary.
3. Click
to save changes.
Delete a Course Section
1. Find the course section to edit
❍ Scroll through the course sections list and find the desired section. Click on the blue course-sec-sem number to open
the code.
❍
OR
❍
Type the desired course description in the white box and either press the Enter key on the keyboard or click the
binocular button. Click on the blue course-sec-sem number of the desired section to open.
❍
OR
❍
Click the Selection Field dropdown and choose a field. Click the Selection Values and choose the desired field value.
Click on the blue course-sec-sem number of the desired section to open the code.
2. Click
to delete the selected course code.
See also
SDSStudentHelp
108 . Web School Office
Home > Web School Office > Scheduling > Next Year Registration and Schedule Changes
Next Year Registration and Schedule Changes
Overview
Below is an overview of the different phases of next year registration and schedule changes.
1. Processing Options.
2. Add Photos to System.
3. Steps for Next Year Scheduling.
Phase 1 - Processing Options
●
Click on the + next to Processing Options.
●
* = The option is active. To make the option inactive select the option again.
●
You will see Search, General and View Student Options. Many of these are similar options to the Data Entry and Changes
|Student Information Processing Options. A few to note in scheduling are:
❍ Evaluate Assigned Seat – This will evaluate the assigned seats for each section and adjust if it varies from the
student count. A message will display when the evaluation is complete. Click OK when message displays.
❍
Delete even if grades are found – If active this will allow you to delete a course even if grades are found. If
inactive, courses will not be deleted if grades are found.
❍
Display Student Photo – If you click on this processing option the students’ photo will display if they are in your
system.
Phase 2 - Add Student Photos to System
Below are basic instructions on the steps for how to upload student photos for Web School Office. More detailed instructions are listed
below them. This is something to have your tech complete. You can have your tech work on this as you proceed to Phase 3.
Basic Instructions for Uploading Photos
1. Copy photos of students in .jpg or .bmp named with their ID number to your photo directory for Web School Office.
2. Upload photos to database through Web School Office.
3. Copy the photo database to Parent Connect.
4. Check to make sure they are installed in Web School Office and Parent Connect.
Detailed Instructions for Uploading Photos
Step 1 – Copy Photos
File Naming
●
Student photos you receive from the photographer are to be saved as .JPG or.BMP format with the student ID number as
the name of the file. Make sure the ID number you give to the photographer is the same as used in Web School Office.
●
If your ID numbers are longer than eight characters, use the LAST eight characters for the photo.
❍ Note: If you have any questions about how the photos are saved on the disk/s or CD ROM that you received from the
photographer, please call them immediately. Their help will be most valuable in allowing your photographs to be
accessible.
SDSStudentHelp
Web School Office . 109
Copy Photos into Web School Office
On the server, using Windows Explorer to copy the picture files from the CD to your SDS Photo folder (i.e. [web root folder]
\sdsweboffice\photo – by default it is c:\netpub\wwwroot\sdsweboffice\photo). You may have to create this folder.
Step 2 – Upload Photos
Photos may be added to your system by…
1. Logging into WSO |Administrative Utilities |Control Center |Student System Adjustments.
2. In Student System Adjustments select the “Import photos for reporting” file format (i.e. JPG or BMP).
3. Click “Load Photos”
❍ Note: This will load the photos into a photo database called sv8photo.mdb for use with SDS reports.
Step 3 – Copy Photo Database to Parent Connect
Now that you have loaded your photos into your photo database (sv8photo.mdb), use Windows Explorer and copy sv8photo.mdb
into your [web root folder]\parentconnect\parentdata .
Step 4 – Check Photos
Check photos to see if your photos are installed in Web School Office and Parent Connect look ok.
1. Either enter into Look and Browse, search for a student’s ID you would like to view. Then under Processing Options |View
Student Options |Display Student Photos.
2. Another option is to enter Reports |Student Reports |Demographics |Student List with Photos to see how they look.
3. Once you have checked out Web School Office, enter Parent Connect as a Parent and view the Student Detail report to verify
the student’s photos have loaded properly.
Phase 3 - Steps for Next Year Registration and Scheduling
A brief outline of all the steps for Next Year Scheduling is listed below. Please review and then proceed with the detailed instructions
in the outline.
1. Prep Work for Next Year Registration & Scheduling.
1. Identify Next Year Students.
2. Course Code & Course Master.
■
For clients who intend to copy the Current Year Course Codes & Course Master to the Next Year Course Codes &
Course Master area.
2. Prepare Next Year Scheduling Area.
3. Adjust Next Year Course Codes and Next Year Course Master (as needed).
4. Prep Work for Activating and Using Next Year Mass Registration.
1. Web Settings.
2. Verify and/or setup Subject Definition
■
For clients who want to use Mass Registration.
5. Prep Work for Parent Connect On-Line Registration.
1. Course Code Setup.
2. Web Registration Setup.
6. Register Students.
1. Next Year Registration and Schedule Changes (Individual Registrations & Scheduling).
2. Next Year Mass Registration.
3. Parent Connect On Line Registration.
7. Enter Course Master (Magnet Board).
1. Create course sections from course codes.
2. Create as many course sections as needed.
8. Schedule Students to Class.
9. Read and correct courses that rejected.
10. Run Reports for Registration & Next Year Scheduling.
1. Registration Reports.
2. Scheduling Reports.
Note 1: The term “Registration” as used in this manual is defined as the student course requests for the next school year. Next Year
Registration can be initiated while still working in the current year. Traditionally, most schools start the Next Year Registration and
Scheduling process after the Winter Break.
Note 2: Course Code, Teacher Code and Course Master Field Definitions may be found in Appendix A of this manual.
SDSStudentHelp
110 . Web School Office
Note 3: Information about Linking of Courses may be found in Appendix B.
Step 1a - Prep Work – Identify Next Year Students
Before working in the Prepare Next Year Schedule Area students must be identified as either students who will be returning or
students who will not be returning. New students, incoming (freshmen) and returning students will need to be identified as “returning
students”. Graduating seniors will need to be identified as “not returning”. There are two methods that may be used to update student
records and the next year school location.
Method 1 – Single Entry
Access WSO |Data Entry and Changes |Student Information Changes (Horizontal) | Entry Options = Demographics All Fields
●
Students, such as graduating seniors, who will not return for the next school year, must have a “1” in the Next Year Active
Field, indicating they will not be returning to the district for the following school year.
●
Students who will be returning, new, or incoming students, must have “0” in the Next Year Active Field, indicating that they will
be returning to the district for the following school year.
●
Enter the school location for all returning students next year in the NY School Location Field. This will give the High School
access to the current 8th grade class for Next Year Scheduling in a district wide database.
Method 2 – Mass Entry
Access WSO |Administrative Utilities |Control Center |Select the Toolbox Tab and type in the word “Mass” in the toolbox password
box.
1. Click on Login and the message “Toolbox Utilities have been enabled” will be displayed.
2. Click on the OK button.
3. Select the “Mass Data Changes” Tab and check the box “I have a working backup of my database.” (Enable Mass Change).
MAKE SURE YOUR HAVE A BACKUP!
SDSStudentHelp
Web School Office . 111
4. Click in the radial button for “Replace All Data in Column”. This will activate table selection and the Mass Change area.
5. Select “Demographics” in the Table Selection drop down. After the Demographics table is selected all students will be displayed.
The “Open Selection Definition Area” button will be
activated and sequencing of students is made available.
6. Click on the “Open Selection Definition Area” button.
The Selection Definition/Query Builder choices are:
1. Field Name drop down (in the example above the choice is the “Grade_Year” field to select this year’s seniors.)
2. Compare Operation drop down (in the example above the choice is “Equal to [=]).
3. Compare to Value drop down (in the example above the value is “12” for all seniors).
4. Click the “Add to Formula” button.
5. Click the “Save Formula” button. The selection definition/query will be displayed in the box. Verify that it is correct.
6. Click the “Finished” button to return to the mass change screen.
When the display screen is refreshed:
1. Verify that the query selection is correct. (In this example only students who are seniors should be displayed. The “Number of
records that will be affected = 34” reflects the correct number of seniors).
SDSStudentHelp
112 . Web School Office
2. In the “Field to Change” drop down, select “Next_Year_ Active”.
3. In the “Change to this” drop down, enter the value of “1”. Selecting the value of “1” will tell the system that students are not
active for next year. Selecting the value of “0” will tell the system that students are active for the next year.
4. Click on the “Make Changes” button. The system will display a warning message that records are going to be changed.
5. Click on the “OK” button. When the system is finished with the changes a message will be displayed indicating that the records
were changed and the number of records changed.
The above Mass Change instructions for the Next_Year_Active field should be followed for returning, new, or incoming students as
well as the Next Year School Location field. For all returning students select the appropriate query and the appropriate field to change.
Remember, the Next_Year_Active field for returning and incoming students should have a value of “0”.
Step 1b - Prep Work - Course Codes/Course Master
Note: If you plan to “copy” the current year course codes and course master to the Next Year Registration and Scheduling area, (as
opposed to re-typing or “starting from scratch”) please verify and make the following corrections before working in the Preparing the
Next Year Schedule Area.
●
Access WSO |Scheduling |Master File Changes (Horizontal) | Application = Scheduling (Current Year) |Entry Options =
Course Codes – Current Year
❍ Verify that all Course Codes have a valid school location. Remove or correct any courses that have a School location of
“ALL”.
●
Access WSO |Scheduling |Master File Changes (Horizontal) |Application = Scheduling (Current Year) | Entry Options =
Course Master – Current Year (All Fields)
❍ Verify all Class sections have a valid school location. Remove or correct any sections that have school location of “ALL”.
Step 2 - Prepare the Next Year Scheduling Area
Note: It is not necessary to perform Step 1 (Delete Course codes in Next Year Area) or Step 2 (Delete Master Schedule) in Next Year
Area to begin the Prepare the Next Year Scheduling Area process. However, we recommend that these two steps are performed to
insure the area is clean.
Access WSO |Scheduling |Prepare the Next Year Scheduling Area |School to Process = Select from Dropdown
Note: The delete and copy operations are administrative tasks that are generally run once a year for each school location.
Remember, Course Codes must remain un-duplicated throughout the district. Also the Course Master Schedule entries must remain
unique by Course, Section, and Semester throughout the district.
1. Delete Course Codes in Next Year Area
❍
Click
■
beside 1
This will delete Course Codes only in the Next Year Area for the School Location selected.
2. Delete Course Master in Next Year Area
❍
Click
SDSStudentHelp
beside 2
Web School Office . 113
This will delete the Course Master only in the Next Year Area for the School Location selected.
■
3. Copy Course Codes from Last Year
❍
Click
■
beside 3
Selecting this option will copy the current year course codes into the next year course code area for the School
Location selected and the School Location of All. When the copy is complete, all course codes in the next year
area may be edited to reflect the course code offerings for the coming year. Any changes made to the Next Year
Course Codes will not affect the course codes within the current year course code area.
4. Copy Course Master from Last Year
❍
Click
■
beside 4
Selecting this option will copy the current year course master into the next year course master area for the
School Location selected and the School Location of All. When the copy is complete, the course master in the
next year area may be edited to reflect the courses and sections for the coming year. Any changes made to the
next year course master will not affect the course master within the current year course master area.
5. Move Grade Year to NY Grade Year.
❍
Click
beside 5
Selecting this option will copy the current grade level from the Grade_Year field into the NY_Grade_Year field.
■
6. Move Home Room to NY Home Room
❍
Click
■
beside 6
Selecting this option will copy the value in current year Home Room field to the NY Home Room field. After the
copy process the NY Home Room field may be edited to reflect the next year home room.
7. Add a Year to Grade Year in the Next Year area.
❍
Click
■
beside 7
Selecting this option will add one year in the Next_Year_Grade field for those students who will attend the school
location selected NEXT YEAR. It will not change the value in the Current Year Grade_Year field. If “year of
graduation” is the value used in the current Grade_Year field instead of actual grade level do not use this option.
If a non-numeric value is found the student will be placed in grade 01. I.e. K will become 01.
Step 3 - Adjust Next Year Course Codes, and Next Year Course Master
Remember; make any necessary adjustments as needed (add , delete or change) to the Next Year Course Code Area before starting
the student registration process. Don’t forget to save any additions or changes.
Access WSO |Scheduling |Master File and Code Entry and Changes |Application = Scheduling (Next Year) | Entry Options =
Course Codes – Next Year
Edit a Course Code
1. Find the course code to edit
❍ Scroll through the course code list and find the desired code. Click on the blue course code number to open the code OR
❍
Type the desired course code in the white box and either press the Enter key on the keyboard or click the binocular
button. Click on the blue course code number to open the code OR
❍
Click the Selection Field dropdown and choose a field. Click the Selection Values and choose the desired field value.
Click on the blue course code number to open the code.
2. Edit fields as necessary
SDSStudentHelp
114 . Web School Office
3. Click
to save changes.
Add a Course Code
1. Click
to add a course code.
2. Fill in the data entry boxes on the right.
3. Click
to save the new code.
Delete a Course Code
1. Find the course code to edit.
❍ Scroll through the course code list and find the desired code. Click on the blue course code number to open the code OR
❍
Type the desired course code in the white box and either press the Enter key on the keyboard or click the button. Click
on the blue course code number to open the code
❍
OR
❍
Click the Selection Field dropdown and choose a field.
❍
Click the Selection Values and choose the desired field value.
❍
Click on the blue course code number to open the code.
2. Click
to delete the selected course code.
Adjust Next Year Course Master
Remember to make any necessary adjustments as needed (add , delete or change) to the Next Year Course Master Area, before
starting the student registration process. Don’t forget to save any additions or changes.
Access WSO |Scheduling |Master File and Code Entry and Changes |Application = Scheduling (Next Year) | Entry Options = Course
Master – Next Year
Edit a Course Section
1. 1. Find the course section to edit
❍ Scroll through the course sections list and find the desired section. Click on the blue course-sec-sem number to open
the code.
❍
OR
❍
Type the desired course description in the white box and either press the Enter key on the keyboard or click
on the blue course-sec-sem number of the desired section to open.
❍
OR
❍
Click the Selection Field dropdown and choose a field.
❍
Click the Selection Values and choose the desired field value.
❍
Click on the blue course-sec-sem number of the desired section to open the code.
. Click
2. Edit fields as necessary.
3. Click
to save changes.
Add a Course Section
1. Click
.
2. Fill in the data entry boxes on the right.
3. Click
❍
to save the new code.
Note: When adding multiple sections of the same course number, it is helpful to add the first section and save. Select
that section and check mark the Retain Values button. Then when
is clicked, this will retain all the fields values from
the selected section in the data entry boxes. You will only need to change the section number and any other fields as
desired (i.e. Period From/To, Teacher Code, Room Number) and save.
❍
WHEN USING THE RETAIN VALUES OPTION, MAKE SURE THAT ONCE YOU CLICK THE
BUTTON, IT DISAPPEARS
FROM THE SCREEN. IF THE BUTTON IS STILL ON THE SCREEN AND YOU MAKE CHANGES IN THE BOXES ON THE
RIGHT, YOU WILL BE OVERWRITING THE DATA ON THE SELECTED COURSE SECTION.
Delete a Course Section
SDSStudentHelp
Web School Office . 115
1. Find the course section to edit.
❍ Scroll through the course sections list and find the desired section. Click on the blue course-sec-sem number to open
the code
❍
OR
❍
Type the desired course description in the white box and either press the Enter key on the keyboard or click
❍
Click on the blue course-sec-sem number of the desired section to open
❍
OR
❍
Click the Selection Field dropdown and choose a field.
❍
Click the Selection Values and choose the desired field value.
❍
Click on the blue course-sec-sem number of the desired section to open the code.
2. Click
.
to delete the selected course code.
Step 4 - Prep Work to Activate NY Mass Registration - Mass Registration Setup
The Next Year Mass Registration area must be activated in order to use.
If you enter the Next Year Mass Registration area before activation you will receive the following message:
1. Access WSO |Administrative Utilities |Web Settings.
2. Select Next Year Mass Registration. The default value is “N”. Change the setting to “Y” to activate Next Year Mass Registration.
Step 4b - Prep Work – Verify and/or Setup Subject Area Definition
Note: When the Subject Area Definition is setup it may be used to track Graduation Requirements. In addition, it must be setup in
order to use the Mass Registration area. In mass registration the subject area is used to group courses by subject area. The same
values for codes that are used in the Subject Area Definition should be entered in the Dept/Curr Field in Next Year Course Codes and
in the Course Type Code Field in the Next Year Course Master.
Access WSO |Scheduling |Master File and Code Entry and Changes | Application = Grade Reporting or All Entry Options |Entry
Options = Subject Area Definition.
●
To add a Course Type Code click
●
Enter the Course Type Code.
❍ Example: E=English, S= Science, M=Math, H=History, L=Electives, F=Fine Arts/Humanities, P=PE/Health
.
●
Enter the Subject Area Description.
❍ English, Science, Math, etc.
●
Enter the total Credits Required for Graduation.
●
Enter the Credit Status Level - Credit Status 1 through Credit Status 8 (Credit Status 5-8 (Optional – if additional areas are
necessary.)
❍ The total credits a student should have by this time. For example, this may be used to define the credits a student
should have by the end of the freshman year. EX: 1 credit for English.
●
Enter the School Location.
●
Click
●
Select the Grade Year from the drop down. (Optional)
●
Select the School Location from the drop down.
to Save.
SDSStudentHelp
116 . Web School Office
Step 5a – Prep Work to Utilize Registration for Parent Connect – On Line Setup Course Codes
Note: Optional – for those who want to register students through Parent Connect. Below are the necessary steps to complete the
setup for Parent Connect. Completing this section enables parents to register their student/s on-line.
Access WSO | Scheduling | Master File Changes and Code File Entry and Changes | Application: Scheduling (Next Year) | Entry
Options = Course Codes – Next Year (All Fields).
●
Course codes must have a Dept/Curr Code assigned (i.e. M = Math). If these codes are not setup, the Student/Parents will
see an empty space when they click on the drop down for course selection.
●
Course codes must have a Scan Code specified (i.e. 1=Fresh 2=Soph., 12=Fresh/Soph,
❍ ({Do not enter in grade year}). This identifies the available grade level/s for each course. Courses may be available
with multiple grade levels identified.
Step 5b - Prep Work Parent Connect On Line Setup – Web Registration Setup
Note: In this area each registration section is setup by department and grade level. This defines the options for course selection
made by the student/s.
Access WSO | Scheduling | Master File Changes and Code File Entry and Changes | Application: Scheduling (Next Year) | Entry
Options = Registration via Web Setup.
●
Make sure each subject description has a Subject Code and Scan Code listed.
●
Entering a Subject Code and Scan Code identifies and ties the course code so that the correct course is available for selection.
❍ Note: Use the same codes that are used for the Dept/Curr Code in Course Codes Next Year.
❍
Note: Users can enter in more than one subject code per description (i.e., E - Electives and LA - Language Arts). If
these codes are not setup, then the Student/Parents will see an empty space when they click on the drop down for
course selection.
●
The Registration Area field is used to specify the order for each course to be displayed on the web registration page. (Replace
the sentence that begins with “Specifiy the order descriptions . . . “with the new one in red.
❍ For example, view the screen display below and notice for grade_year 08, the school would like English to show as the
first option for selection. The “1” was placed in the Registration Area column. Math is to be displayed as the second
option for selection and a “2” is placed in the Registration Area column etc.
●
Select the appropriate Grade Year from the drop down.
●
Select the School Location from the drop down.
●
Enter the placement number for Registration Area. If the number “1” is entered, the selected subject area will be displayed as
the first option in the Parent Connect view.
●
Enter the Scan Code for selected course.
❍ Example: Value of 1 for freshmen, 2 for Sophomore, etc.
●
Enter the Subject Code.
❍ Example: E for English.
●
Enter the Credits required for the specific description.
●
Enter the Maximum Numbers of Requests of course selections a student may request for registration. (I.e. Grade/Year 08
SDSStudentHelp
Web School Office . 117
students need to register for one English course, in the maximum number of requests column enter in a “1”. Grade/Year 08
students need to register for two Electives then enter in “2”. If a numeric value is not entered, then nothing will be
displayed.
●
Enter in the Registration Area Instructions. Any instructions that need to be supplied to the Student/Parents about
selecting the courses should be entered in the Registration Area Instructions.
Below is the screen that will be displayed for parents when registering their student/s for Next Year.
Notice, English shows up first, then Math, Science etc. The screen display reflects the setup that was entered in the
Registration Area column.
●
When your school is finished with registration and no longer wants student/parents to enter registration, change the Parent
Group security. See User Security for further instructions.
Step 6 - Register Students
There are three methods that can be used to complete student registration within Web School Office:
●
Method 1 - Next Year Registration and Schedule Changes
●
Method 2 - Next Year Mass Registration and
SDSStudentHelp
118 . Web School Office
●
Method 3 - Parent Connect On-Line Registration.
You may choose to use only one method or a combination of the three methods listed above.
Method 1 - Next Year Registration and Schedule Changes
Access WSO | Scheduling |Next Year Registration and Schedule Changes.
Scheduling Icons
Below is a brief overview of the icons in Scheduling so you know what they all do before processing.
= Click to Print/View Student Registration Confirmation.
= Click to Print/View Student Schedule.
= Check/Uncheck all sections for the displayed student.
= Remove Section Assignment.
= Find Sections for Unassigned Classes.
= Remove selected classes but retain grade information.
= Activate selected courses.
= Permanently delete all selected classes (If grades are inactive, see options Delete for override.).
= Enforce class link settings for selected classes (enter a Y in the link field).
= Ignore class link setting for selected classes (enter a N in the link field).
TO:
Add Message (Check box)
●
Check this to display a confirmation message that a new course has been added to the student’s request.
Overfill Warning? (Check Box)
●
Check this to receive a warning when a class is overfilled. The “overfill” message indicates that the maximum seating capacity
has been reached.
Class List Option (Check box)
●
Check this to display the class list and class list options folder.
●
Class List Options Folder displays for the first checked section in the students displayed schedule.
Evaluate Assigned Seats (Class Count Evaluation)
●
●
This will adjust class counts in the course master if the numbers do not match on the students schedule for a class.
❍ Select Processing Options located at the top of the screen.
❍
Then Select General Options.
❍
Then Select Evaluate Assigned Seats.
At the end of the process a message will display.
Options
Processing Options
●
In addition to the Search and View Options available in other student information data entry and changes screens, options are
included here specific to schedule changes.
❍ General Options
■
Evaluate Assigned Seats – Click to evaluate the Assigned Seats for each section and adjust if varies from the
student count. An “Evaluation is Complete” message will display when finished. This should be run periodically
when making schedule changes and anytime a user notices incorrect assigned seat totals in the course master or
on class lists.
❍
■
Delete Even if Grades are Found – Click to allow classes to be deleted from students’ schedules even if marking
period grades are found.
■
Delete Even if Gradebook Grades are Found – Click to allow classes to be deleted from students’ schedules even
if gradebook grades are found.
Sort/Display Options
■
Allow for all Schedule Items (No Scrolling) – Click to allow all schedule records to display on the screen at once.
SDSStudentHelp
Web School Office . 119
■
Sort Schedule by Period/Semester – Toggles schedule records sorting between sorted by periods/semester or
sorted by semester/period.
View Options (dropdown box)
●
Allows user to display another student information view below the schedule. Example: This would be helpful to display the
student’s transcript detail records to view what classes have already been taken.
Course-Sec-Sem (data entry boxes)
●
These boxes allow the user to narrow the focus of records displayed in the Courses and Class Sections dropdowns.
❍ Enter a course number in the Course box and press the Enter key on the keyboard or click the binocular button.
■
The Course dropdown will move the focus to that course number.
■
❍
■
❍
The Class Sections dropdown will be focused to only contain course sections for the entered course number.
Enter a course number in the Course box, a section number in the Sec box and press the Enter key or click the binocular
button.
■
The Course dropdown will move the focus to that course number.
The Class Sections dropdown will be focused to only contain course sections for the entered course and section
number.
Enter a course number in the Course box, a section number in the Sec box, a semester number in the Sem box and
press the Enter key or click the binocular button.
■
The Course dropdown will move the focus to that course number.
■
The Class Sections dropdown will be focused to only contain course sections for the entered course, section, and
semester.
Period (dropdown boxes)
●
These boxes allow the user to narrow the focus of records displayed in the Class Section dropdowns to courses in a specific
period or marking period.
❍ Select a specific period from the first dropdown to display Class Sections scheduled in a specific period of the day.
❍
Select a marking period option from the second dropdown to display Class Sections scheduled in specific marking
periods.
Teachers (dropdown box)
●
This box allows the user to narrow the focus of records displayed in the Class Section dropdowns to courses taught by a
specific teacher.
❍ Select a teacher from the dropdown to display Class Sections scheduled to a certain teacher.
Courses (dropdown box)
●
This box contains the course codes setup for the next year.
❍ This is a list of the courses offered for the next year. (Not the specific course master)
❍
Users can select a course code from this list and click the green + in front of the list to add the course code to the
student’s schedule. Added course codes can automatically be scheduled with the Find Sections for Unassigned Classes
button .
❍
Selecting a course number from this dropdown will narrow the focus of the Class Sections dropdown to include only
class sections for the selected Course Number.
Class Sections (dropdown box)
●
This box contains the course master sections setup for the next year.
●
Users can select a course section from this list and click
schedule.
●
The focus in this dropdown can be narrowed by using the other boxes on the screen as outlined above.
in front of the list to add the specific course section to the student
Example of Student Registration Request (Next Year)
1. Access WSO | Scheduling |Schedule Changes (Next Year).
2. Select a Student.
SDSStudentHelp
120 . Web School Office
❍
You can search by student’s name or by clicking on the first letter of the student’s last name or also use the student’s
ID#.
❍
Once you click on the student’s name you can make schedule requests.
3. Add a Course to Student Schedule.
❍ Courses can be added to a student schedule via 2 methods.
■
Add Course Codes and use the
to schedule the student into.
Find Selections for Unassigned Classes button to let the system find sections
■
Find the desired course code in the Courses dropdown and click
■
OR
to add.
■
Type the desired course code in the Course box in the upper left corner of the screen. Press the Enter key
on your keyboard and then the space bar to add
■
After adding all desired course codes, click the
Find Selections for Unassigned Classes button to let
the system find sections to schedule the student into OR the schedules may be run in mass at a later time.
■
Force specific sections of courses onto the student schedule.
■
Find the desired course section in the Class Section dropdown and click
■
Note: The Course-Sec-Sem, Periods, & Teachers boxes at the top of the screen may be used to
narrow the focus of selections in the Class Sections dropdown. Use of these options is outlined in
the section above.
to add.
■
OR
■
Type the course-sec-sem of the desired section into the Course-Sec-Sem boxes and press the
Enter key on your keyboard and the Space Bar to add.
4. Unlock Courses for Rescheduling
If you want to “unlock” courses for rescheduling (you want the same courses but want the student run through the entire
scheduling process again)
❍ Click the check box beside each of the courses or to check all courses, click the link at the top of the box column that
says “check all”.
❍
Click
■
.
This will unlock the courses. Then you can click the green scheduler
to reschedule the courses.
5. Delete Course
❍ To delete a class from the registration request/schedule, put a check in the box beside the course and click
permanently remove the course from the student’s schedule.
. This will
6. Print Registration Confirmation or Schedule
❍
To print the Registration Confirmation Click the first
❍
To print the Student’s Schedule Click the second
button.
button.
Method 2 - Next Year Mass Registration
The Mass Registration tool can be used to register students as a group for a course or courses. One screen allows easy Query
selection for Course, School Location, Grade Level, Home Room, Active and Non Active students for either Current Year or Next Year
Students.
Access WSO |Scheduling |Next Year Mass Registration
To find students who are registered and set the course for registration:
1. Select a subject area from the drop down.
2. Select a course from the list that is displayed.
3. Push the refresh button (2a) to display registered students.
To find students NOT registered:
1. Select a subject area from the drop down.
2. Select a course from the list that is displayed.
3. Select/change the student selection parameters on top right side of the screen.
4. Click on the refresh button (4b) to display registered students.
To register students:
1. Check the box next to the names (s) of the student (s) you wish to register on the right side of the screen.
2. Push the left arrow button.
SDSStudentHelp
Web School Office . 121
To remove registration:
1. Check the box next to the names (s) of the student (s) you wish to remove on the left side of the screen.
2. Push
.
The screen below is an example of the following:
●
Selected subject area = English
●
Selected course = English 9 ACC - 102
●
Refreshed registered students (Count of 58)
●
Selected Course = 103
●
Changed selection options:
❍ Next Year “Not Registered”
❍
Current Year “Never Taken”
❍
Grade Level “11”
●
Refreshed students (Count of 7)
●
Checked 3 students
If at this point the left arrow is pushed the three checked students will be registered for Course 102.
Considerations when using Next Year Mass Registration:
●
Students are not automatically refreshed when selection options are changed. Please use the refresh buttons to display the
changes.
●
User Security is in place when selecting students, School Location, Grade Level, Home Room and Course options.
●
Changes made to registration cannot be reversed.
●
When using the “Never Taken” and/or “Not Registered” options, the screen may take more time than normal to display.
●
The check box “Student Restrictions?” is used to restrict the display of registered students based on the selections made on the
top right of the screen.
Note: When selecting the “Student Restrictions?” check box, only the active, school, grade and home room selections are used.
Method 3 - Parent Connect On Line Registration
Parent Instructions
To Access Parent Connect:
1. Enter User ID.
2. Enter Password.
3. Click on Login.
SDSStudentHelp
122 . Web School Office
4. Click on the “Home Tab”
5. Click on the button next to “It’s time to register for Next Year”
6. Click on the drop downs under each subject area to view and make a selection.
Note: Any Course with a “*” is Pre-selected or Required. Read any notes the school has provided.
7. After you have completed the selections click on “Submit”.
8. After selecting the “Submit” button a new page will be displayed and allows the user to print the selected registration requests.
You can also click the printer button and print a copy of the registration confirmation sheet.
SDSStudentHelp
Web School Office . 123
To view the courses the parent/student registered for:
1. Close the Registration window by clicking on the “x” in the top right hand corner.
2. Click on the student’s first or last name to refresh the Registration and Home Tab.
3. View the selected courses by clicking on the Registration Tab.
Step 7 - Next Year Course Master (Magnet Board)
The magnet board is a tool that can be used to add and delete sections from the course master, assign course sections to teachers
and rooms, and move course sections to different periods, teachers, or rooms. It also includes a potential conflict matrix so the user
can see how many possible conflicts moving a course to a specific period would create.
Basic Instructions
1. Enter Scheduling |Next Year Course Master (Magnet Board).
2. Create Sections from Course Codes.
3. View Number of Students Registered for Course.
4. Create as many Courses as Required.
5. Add Sections to Teachers (on left) and Rooms (on right).
6. Potential Conflicts.
7. Remove Teacher Assignments.
8. Move assignments to different:
❍ Period/s.
❍
Teacher/s by using “Classes without assignments”.
Detailed Instructions
Adding a Course Section
1. Choose your school location (If you have a school location restriction on your user id, the school location will default to the
location on your user id).
2. Choose All Courses or With Registration.
3. From the course list dropdown, choose the course to add an additional section.
❍ ¬ Note that the screen displays how many students are registered for this course, how many sections of this course
currently exist in your next year course master and the section capacity for this course.
4. Click on the Create a Section button to add a section of this course to your next year course master.
❍ ¬ Read the Confirmation message and click OK.
■
Note: If a link course is set up on the course code, a section of the linked course number will also be created.
5. Click the Un-Assigned Courses dropdown to see the new section.
Assign a Course Section to a Teacher
1. Choose your school location (If you have a school location restriction on your user id, the school location will default to the
location on your user id).
2. Choose the Scheduling Settings for your school.
❍ Number of Scheduling Days
❍
Term/Marking Periods
❍
# of Periods
3. Choose a teacher from the Select a Teacher dropdown.
❍ The list of teachers can be displayed in order by Teacher Name, by Course Number, or by Room Number by clicking the
radio buttons above the dropdown.
❍
The selected teacher’s course section assignments will display in the grid.
SDSStudentHelp
124 . Web School Office
4. Select the course section to be assigned from the Un-Assigned Classes dropdown.
5. Select the Term(s) for the new course section.
❍ This can be done either by check marking the boxes below “Select Terms(s):” or
❍
By check marking the Term boxes on the left side of the grid. You can also click in the box where you want to drop the
class.
6. Select the Period for the new course section.
❍ This can be done either by clicking one of the Periods radio buttons or
❍
Clicking on one of the Period headings above the grid. You can also click in the box where you want to drop the class.
7. The selected terms/period will highlight in the grid.
8. Click
to the right of the Un-Assigned Classes dropdown to assign the selected section.
9. You will see the section added in the grid to the selected Terms & Periods for the selected teacher.
Assign a Course Section to a Room
1. Choose your school location (If you have a school location restriction on your user id, the school location will default to the
location on your user id).
2. Choose the Scheduling Settings for your school.
❍ Number of Scheduling Days
❍
Term/Marking Periods
❍
# of Periods
3. Choose the teacher assigned to the course section from the Select a Teacher dropdown.
❍ The list of teachers can be displayed in order by Teacher Name, by Course Number, or by Room Number by clicking the
radio buttons above the dropdown.
❍
The selected teacher’s course section assignments will display in the grid.
4. Select the Term(s) for the course section you wish to assign to a room.
❍ This can be done either by check marking the boxes below “Select Terms(s):” or
❍
By check marking the Term boxes on the left side of the grid.
5. Select the Period for the course section you wish to assign to a room.
❍ This can be done either by clicking one of the Periods radio buttons or Clicking on one of the Period headings above the
grid.
❍
For steps 4 & 5 you can also click in the box of the “un-roomed” class and that is the same as checking the term/period.
6. The course section for the selected terms/period will highlight in the grid.
7. Click the Un-Assigned Rooms dropdown for a list of rooms that are available for the Period/Terms selected.
8. Select Room to Assign.
9. Click
to the right of the Un-Assigned Classes dropdown to assign the selected section.
10. The room number will assign to the selected course section in the grid.
Un-Assign a Course Section from a Teacher
1. Choose your school location (If you have a school location restriction on your user id, the school location will default to the
location on your user id).
2. Choose the Scheduling Settings for your school.
❍ Number of Scheduling Days
❍
Term/Marking Periods
❍
# of Periods
3. Choose the teacher from the Select a Teacher dropdown.
❍ The list of teachers can be displayed in order by Teacher Name, by Course Number, or by Room Number by clicking the
radio buttons above the dropdown.
❍
The selected teacher’s course section assignments will display in the grid.
4. Select the Term(s) for the course section you wish to un-assign
❍ This can be done either by check marking the boxes below “Select Terms(s):”
❍
or
❍
By check marking the Term boxes on the left side of the grid.
5. Select the Period for the course section you wish to un-assign.
❍ This can be done either by clicking one of the Periods radio buttons or
❍
Clicking on one of the Period headings above the grid.
SDSStudentHelp
Web School Office . 125
6. The course section for the selected Term(s) and Period will highlight in the grid.
7. Click the scissors button to the right of the Un-Assigned Classes dropdown to un-assign the selected course section from the
teacher.
❍ Click OK on the confirmation message.
8. The selected course section will be removed from the grid.
Un-Assign a Room for a Course Section
1. Choose your school location (If you have a school location restriction on your user id, the school location will default to the
location on your user id).
2. Choose the Scheduling Settings for your school.
❍ Number of Scheduling Days, Term/Marking Periods, and # of Periods
3. Choose the teacher assigned to the course section from the Select a Teacher dropdown.
❍ The list of teachers can be displayed in order by Teacher Name, by Course Number, or by Room Number by clicking the
radio buttons above the dropdown.
❍
The selected teacher’s course section assignments will display in the grid.
4. Select the Term(s) for the course section you wish to un-assign.
❍ This can be done either by check marking the boxes below “Select Terms(s):”
❍
or
❍
By check marking the Term boxes on the left side of the grid.
5. Select the Period for the course section you wish to un-assign.
❍ This can be done either by clicking one of the Periods radio buttons or
❍
Clicking on one of the Period headings above the grid.
6. The course section for the selected Term(s) and Period will highlight in the grid.
7. Click the scissors button to the right of the Un-Assigned Rooms dropdown to un-assign the selected course section from the
room.
❍ Click OK on the confirmation message.
❍
The room number will be removed from the course section on the grid.
Move a Course Section to a Different Teacher or Period
1. Follow previous instructions to Un-Assign a Course Section from a Teacher.
2. Once the course section is un-assigned, follow previous instructions to Assign a Course Section to a Teacher selecting the
teacher, term and period for the selected course.
Move a Course Section to a Different Room
1. Follow previous instructions to Un-Assign a Room for a Course Section.
2. Once the course section is un-assigned, follow instructions above to Assign a Course Section to a Room to assign the course
section to a different room.
Delete a Course Section from the Course Master
1. Follow instructions above to Un-Assign a Course Section from a Teacher.
2. Once the course section is un-assigned, click the Un-Assigned Course dropdown and select the course section to be deleted.
3. Click the
button to the right of the Un-Assigned Course dropdown to delete the selected course section.
4. Click OK on the confirmation message.
❍ Note: If students have already been scheduled into a course section, the section should be removed from the students’
schedules prior to deleting the course section from the course master.
Potential Conflict Matrix
The Potential Conflict Matrix will display potential conflicts by term/period/day for a selected un-assigned class.
1. Click the Potential Conflicts file folder button in the lower left corner to open the Potential Conflict Matrix display.
2. Choose to display potential conflicts By Day or by Course and Day.
❍ By Day displays the number of potential conflicts for each day in each term/period.
❍
Course and Day will display each course in conflict and the number of potential conflicts for that course for each
day/term/period.
3. Choose the # of sections from the dropdown on the right.
SDSStudentHelp
126 . Web School Office
4. Choose the course section from the Un-Assigned dropdown.
5. Click on the Refresh Display for Courses button to display the potential conflicts for the selected Un-Assigned class.
❍ Note: The Refresh button must be clicked each time a new course section is selected from the Un-Assigned Courses
dropdown.
Step 8 - Schedule Students to Class
Note: During a scheduling run the scheduling operation will take about one (1) to two (2) minutes per 100 students being sent
through the scheduling operation. The schedule run will be making changes to your registration records. Your staff must not work in
Next Year Registration and Scheduling during this process. You may want to notify your guidance department that a schedule run is
being performed.
Access WSO | Scheduling |Schedule Students to Class.
Student Selection Options
Select one of each of the following options to process:
1. School Location (In example below, the High School was selected from the drop down)
2. Grade Year (In the example below, the Next Year Grade/Year selected is “09”
❍ To select more than one grade/year, select and push the right arrow, select another and repeat.
3. Data Element (In the example below, the Data Element selected is Female)
❍ To select more than one data element, select and push the right arrow, select another and repeat.
4. Place a check in “Students that are not fully scheduled” to view only those who are not fully scheduled or remove the check to
include all students.
❍ Note: The web system is different than V8.5 since it looks at the registration, not the student demographics, to make
this determination.
Scheduling Run Options
1. Overload Control - The “Overload Control” option allows for overloading a given value of “Do not overload” or select from 1 to
10 or unlimited number.
2. Activate Test Only Mode – This “Activate Test Only Mode” options will run the students through a scheduling run, but will not
change any schedules nor the course master.
It will simply inform the user as to the number scheduled or rejected. This process will run in 5 to 10 seconds for each 100
students.
3. Ignore Options – The “Ignore Options” are useful when your school gets to the final scheduling runs and is trying to fit in the
last students. There are three (3) to choose from: Ignore Student
4. Requested Section Demands, Ignore Student Requested Semester Demands, and Ignore Student Requested Teacher
Demands.
5. Based on the selection options a list of students will display. Ten will show at a time. Notices there are page numbers and you
have sort options above the various fields.
SDSStudentHelp
Web School Office . 127
6. Click
next to a student, current student schedule and reject matrix information will display at the bottom of the screen. You
may need to scroll down to see it.
7. Below is an example of coding for the reject matrix.
Example:
<MA-10A-01-1 T1_D1_Seats:34>
Course Section Semester: MA-10A-01-1
Marking period(s): T12
Day Code(s): D12345
Assigned Seats when students was scheduled or rejected:
Seats: 34
8. If a link course is associated with a class in the Period area for the originating course/s each link class will be coded as follows:
Example:
LP: 3-3_LT3_LD1
Period the link course is in: LP: 3-3
Marking period(s): LT3
Day Code(s): D1
Step 9 - Next Year Registration and Schedule Changes
Enter Scheduling |Next Year Registration and Schedule Changes.
●
Read and correct rejected courses not scheduled
●
View Class Lists
Step 10 - Student Reports
Sort and run the following reports.
SDSStudentHelp
128 . Web School Office
Enter Reports |Student Reports |Report Groups = Scheduling Next Year.
●
●
Registration Reports
❍ Course Tally
❍
Registration Confirmation
❍
Registration List
❍
Students with No Registration
❍
Student Schedule Edit List
❍
Master List - Courses
Scheduling Reports
❍ Schedules
❍
Class Lists
❍
Student Locator/s
❍
Teacher Locator/s
See also
Course Code/Teacher Code and Course Master Field Descriptions
SDSStudentHelp
Web School Office . 129
Home > Web School Office > Scheduling > Next Year Registration and Schedule Changes > Course Code/Teacher Code and Course Master Field Descriptions
Course Code/Teacher Code and Course Master Field Descriptions
This section covers NY Course Codes, Teacher Code, and Course Master field definitions.
See also
NY Course Codes Field Descriptions
Teacher Code Field Definitions
Course Master Field Definitions - Basic
SDSStudentHelp
130 . Web School Office
Home > Web School Office > Scheduling > Next Year Registration and Schedule Changes > Course Code/Teacher Code and Course Master Field
Descriptions > NY Course Codes Field Descriptions
NY Course Codes Field Descriptions
Basic Fields
Access WSO |Scheduling |Master File and Code Entry and Changes |Application = Scheduling (Next Year) |Entry
Options = Course Codes Next Year.
Field Name
Course_Number
Title
School Location
Description
Up to 10 characters – alpha or numeric.
A unique number for each course offering.
Separate semester courses (different curriculum each semester) must have two separate
and unique course numbers.
Example: 101A -English 1 – First Semester
101B-English 1 – Second Semester
Up to 30 characters.
Enter the course title associated with course code. Remember the course title will print
on schedules, report cards and transcript reports.
Select the appropriate school location from the drop down for the selected Course Code.
All Fields
Access WSO |Scheduling |Master File and Code Entry and Changes |Application = Scheduling (Next Year) |Entry
Options = Course Codes Next Year All Field
Field Name
Course_Number
Title
Section_Capacity (#
needed to make a
section)
SDSStudentHelp
Description
Up to 10 characters – alpha or numeric.
A unique number for each course offering.
Separate semester courses (different curriculum each semester) must have two
separate and unique course numbers.
Example: 101A -English 1 – First Semester
101B-English 1 – Second Semester.
Up to 30 characters.
Enter the course title associated with course code. Remember the course title
will print on schedules, report cards and transcript reports.
The value entered in the Section_Capacity field should reflect the ideal class size
for one section of a course offering. This number is used to determine how
many sections are needed to accommodate the number of students registered
for a specific Course_Number.
Note: Section capacity is not for minimum or maximum number of students
needed to offer a course.
How the system Calculates Sections:
Number of students registered divided by the Section_Capacity = number of
sections needed.
› Be sure to coordinate this number with the ‘Maximum Number of
students’ field.
Generally the ‘Section_Capacity’ number is less than the ‘Maximum Number
of students” that can be accommodated. This is to allow for last minute
enrollees.
› For example, if 90 students register for a class (with a ‘section capacity’
of 30, and ‘Maximum Number of students’ at 30), three (3) sections will be
created and completely filled. If five (5) new students show up the first day
of school, there will be no seats available in this course.
› Be mindful of another negative situation: If the ‘Section_Capacity’ is set
to 50 and the ‘Maximum Number of students’ is set to 30 for these same 90
students. The system will divide the 90 students by 50 and determine that
only 2 sections are needed. When the scheduler goes to assign the
students, it reaches the maximum of 30 per section and is left with 30 kids
with no available seats. As opposed to the “ideal” entered in Section
Capacity, this is reality. The number entered will be the number of students
assigned to the section(s) before it is considered “full.” Once full, no more
students will be assigned and if no other sections are available, the student
will be rejected. Often this will be the same for each section. When the
course section is assigned the maximum number of students, no more
students will be allowed into the section.
› Some schools need to have different maximums for different sections of
the same course, perhaps because of where the class section is held (one
room can hold 34 students, but another room can only hold 25 students).
In this case, select the number needed for most sections. Then after the
course master is built, before starting the assignment phase, change the
maximum seats field on the course master for those sections where the
Web School Office . 131
Sections
Dept Curr Code
Scan Codes
School Location
Semester_Options
(SO)
and
Marking_Periods_Covered
(MPC)
and
Final_Grade_Marking_Period
(FGMP)
maximum is different.
The recommend number of sections to offer for a course. This number is based
on the Ideal Section Capacity and the number of students registered for the
course.
How the system Calculates Sections:
Number of students registered divided by the Section_Capacity = number of
sections needed.
Used for Web Registration through Parent Connect. Course codes must have a Dept/Curr Code
assigned (i.e. M = Math). If these codes are not setup, the Student/Parents will see an empty space
when
they click on the drop down for course selection. Also used in Mass Registration to filter
NY Course Code list by subject area.
Used for Web Registration through Parent Connect. The scan code identifies the available
grade level/s for each course. Courses may be available with multiple grade levels identified.
Enter a value of 1 for Freshmen, 2 for Sophomore, etc.
Select the appropriate school location from the drop down for the selected
Course Code.
These three fields (Semester Options, Marking Periods Covered, and Final Grade
Marking Period) are used in conjunction with each other when building the
course master.
Keep in mind that this explanation is not talking about the number of sections
that will be created for each course, but rather what type of sections will be
created.
Examples:
Schools with 2 Semesters
SO
MPC
1
12
2
34
12
1234
semesters 1 & 2
3
1234
Schools with 3 Semesters
SO
MPC
1
12
2
34
3
56
123
123456
semesters 1, 2 & 3
4
123456
Schools with 4 Semesters
SO
MPC
1
1
2
2
3
3
4
4
1234
1234
1, 2, 3 & 4
5
Descriptive Code
School Year
Schedule Priority
Short Description
Special course
Considerations
Prerequisite Course
Number
1234
FGMP
2
4
24
24
FGMP
2
4
6
246
Result in Course Master
One course for semester 1
One course for semester 2
Two courses, one each for
(same curriculum in each section)
One course for full year
Result in Course Master
One course for semester 1
One course for semester 2
One course for semester 3
Three courses, one each for
246
(same curriculum in each section)
One course for full year
FGMP
1
2
3
4
1234
Result in Course Master
One course for semester 1
One course for semester 2
One course for semester 3
One course for semester 4
Four courses, one each for semesters
1234
(same curriculum in each section)
One course for the full year
Note: the number of terms in the Final_Grade_Marking_Period field must be the
same or greater than the number of terms in the Semester_Option field.
16 Character spaces.
Texas PEIMS only. Refer to state manual.
Enter the appropriate school year for the course offering. (E.g. 2009-2010)
Assign a number from 0 to 9. The lower the number, the higher the scheduling
priority. This is considered on a student by student basis. Entering a schedule
priority number will not give one student priority over another when making
class assignments. The reject matrix will give the best scheduling pass regardless
of the priority set.
Optional.
10 character spaces.
Texas PEIMS only. Refer to state manual.
NOTE: This will not take in to consideration the courses taken in past years. The
“Prerequisite Course Number” field is used for assigning the order of the current
requested classes during the student assignment phase. It is used for semester
classes only and will not apply to courses defined as full year courses.
Enter the course number that must be scheduled in the semester preceding this
course if both numbers are requested. Example: A student requesting both
Photography 1 and Photography 2 must take Photography 1 before Photography
2. If one or both of these courses is offered both semesters, enter the course
SDSStudentHelp
132 . Web School Office
Contact Hrs.
Local Credit YN
Maximum Seats
Day Codes
Teacher Code
Room Number
Graded
Marking Periods covered
Final Grade Marking Period
Credits for Grad
Credits for GPA
GPA Weight Code
GPA Calc
Course Type Code
(4 separate fields)
Course Fee
Book Fee
Duration Total
Study Hall
Include Study Hall Gr_ Yr
Link Course
1 – 15 Fields
number for Photography 1 on the record for Photography 2. The scheduler will
then schedule Photography 1 into the semester before Photography 2 within
the same school year.
Voc Ed courses only.
Texas PEIMS only. Refer to state manual.
This is a Yes/No answer. Enter “Y” if Local Credit is given. Enter “N” if not.
Texas PEIMS only. Refer to state manual.
The maximum number of seats in the classroom.
Use this field to define day patterns. Valid entries are the numbers 1 through 9
only.
If all classes meet every day, there is only one pattern, use 1 on all courses.
Select the teacher from the drop down if only one teacher teaches all sections
of this course.
Enter the Room Number if only one room is used for all sections of this course.
This is a Yes/No answer. Enter “Y” if grades are given in this course. Enter “N” if
not.
Enter the marking periods that grades will be issued. For example, a first
semester course for a school on the quarter/semester system would have “12”
entered in this field for quarter 1 and quarter 2 grades. Note: No spaces, dashes
or commas should be used between the 1 & 2 to designate quarters 1 and 2.
Enter the marking periods that the FINAL grade will be issued. In the above
example, a “2” would be entered because the final grade is issued in the second
marking period.
Enter the credit toward graduation assigned to this class. The system will look at
how many Final Grade Marking periods there are and divide this value between
them.
Enter the credits for GPA assigned to this class. The system will look at how
many Final Grade Marking periods there are and divide this value between them.
Enter the weight number from the grade codes setup for this class. This data
may be transferred to the transcript.
This is a Yes/No answer. Enter “Y” if this is included in GPA calculations. Enter
“N” if not.
Enter the appropriate subject area code. This information is used for the
Graduation Requirement reports. This data may also be transferred to the
student history to print on the transcripts.
Optional. Enter course fee associated with course. Information will print on the
standard student schedule. This fee is not transferred to the Fee Processing
module.
Optional. Enter book fee associated with course. Information will print on the
standard student schedule. This fee is not transferred to the Fee Processing
module.
For schools entering Period Attendance by minutes, enter the Number of
minutes for the duration of the class. NOTES: These schools should also fill in
the Beg_Time and End_Time fields in the Next Year Course Master (All Fields)
screen.
This is a Yes/No answer. Enter “Y” if course number is associated with a study
hall. Enter “N” if not.
If the course number is associated with a specific grade level or levels and not
others, enter the grade level/s to apply for this study hall. If appropriate for
more than one grade level enter the grade levels separated by a comma. (e.g. –
09, 10)
Notes:
1. There are a total of 15 fields that may be used to link courses
together.
2. Courses are linked only one way.
3.
Do not attempt to type the linked course in the field, but rather select
it from the drop down list of course offerings.
4. Students are only registered for the primary course code. Do not
register them for the courses listed in the “Link_Course” fields.
5. If links are entered in this field, the student is registered for the
“primary/lead” course and the linked course will print on the Registration
Confirmation.
6. During the schedule run the system will pick up all linked courses.
Role ID C021
Days of Week C027
Weeks of Month C039
Population Served C030
Instruct Setting C035
SDSStudentHelp
The “link” option is used when students are to remain together from one course
section to another. Select the primary course (for example, 1st semester of
Algebra 1. All students in 1st semester Algebra 1 should be in 2nd semester of
Algebra 1). After selecting the 1st semester course number for Algebra 1 then
select the 2nd semester course number from the drop down list.
Texas PEIMS only. Refer to state manual.
Web School Office . 133
Multi Service C020
Cooperative Voc Ed YN
Sequence Code C135
Grade Book 1
Grade Level Assignment
Code
State Rpt YN
Textbook
Misc
1-9 Fields
Distance Learning
Indicator Code C167
Misc 10
Dual Credit Indicator Code
C088
Course Narrative
Texas PEIMS only. Refer to state manual.
Optional. Enter grade level if this course is to be offered only to a specific grade
level.
Texas PEIMS only. Refer to state manual.
Optional.
Optional.
Texas PEIMS only. Refer to state manual.
Optional
Texas PEIMS only. Refer to state manual.
Used for Web Registration through Parent Connect. Enter a brief description
about the course for parents to review.
See also
Teacher Code Field Definitions
Course Master Field Definitions - Basic
SDSStudentHelp
134 . Web School Office
Home > Web School Office > Scheduling > Next Year Registration and Schedule Changes > Course Code/Teacher Code and Course Master Field
Descriptions > Teacher Code Field Definitions
Teacher Code Field Definitions
Field Name
Teacher Code
Teacher Name
Description
Required. Use up to 10 character spaces.
Keep the code simple and identifiable. Can be up to ten characters - alpha or numeric.
Required. Use up to 30 character spaces.
› Type the name in the form you want to appear on schedules, report cards,
and class lists.
› Some reports sort on this field. It will sort alphabetically.
› If using Mr. or Mrs. the system will sort on Mr. and then Mrs.
›
School Location
Home Room
Notes
If using First Name and then Last Name the system will look at the first name
and alphabetize by first name.
› If using Last Name then First Name the sort will be alphabetically by last name
then first.
Select the appropriate school location for the teacher. Selecting a specific school
location will limit teacher access to only the students in the specific location.
Entering a specific homeroom will connect the teacher to students if the same valuesis
entered in the Home_Room field in the student demographics record. Teachers will see
only student records that match to homeroom,
Memo Field.
Any additional information that is needed.
See also
NY Course Codes Field Descriptions
Course Master Field Definitions - Basic
SDSStudentHelp
Web School Office . 135
Home > Web School Office > Scheduling > Next Year Registration and Schedule Changes > Course Code/Teacher Code and Course Master Field
Descriptions > Course Master Field Definitions - Basic
Course Master Field Definitions - Basic
Course_Sec_Sem
Course Number
Section
Semester
Marking Period
Covered
Final Grade
Marking Period
Day Codes
Teacher Code
Room Number
Period
Period From
Period To
School Location
Graded
Course Type Code
GPA Calc
Credits for GPA
Credits for Grad
Max Seats
Study Hall
State Rept YN
Duration Total
This field is system assigned.
Select the code from the course code list or type in the code number.
User defined.
Recommendation: Start with 01 and work up sequentially.
Do not reuse the same section number within one course code.
User defined. See detailed explanation in Course Codes above under “Semester
Options”.
Recommendation:
For semester courses use “1” for first semester courses and use “2” for second semester
courses.
Schools using full year courses (Middle Schools or Elem Schools) - 3 can represent the full
year courses.
See detailed explanation in Course Codes above under “Semester Options”.
Enter the marking periods that grades will be issued. For example, a first semester
course for a school on the quarter/semester system would have “12” entered in this field
for quarter 1 and quarter 2 grades.
Note: No spaces, dashes or commas should be used between the 1 & 2 to designate
quarters 1 and 2.
See detailed explanation in Course Codes above under “Semester Options”.
Enter the marking periods that the FINAL grade will be issued. In the above example, a
“2” would be entered because the final grade is issued in the second marking period.
Use this field to define day patterns. Valid entries are the numbers 1 through 9 only.
If all classes meet every day, there is only one pattern, use 1 on all courses.
Enter the appropriate teacher code or select the teacher from the drop down.
Enter the appropriate room number where the class will meet. Room number may be
entered after scheduling runs are finished but must be entered before printing the
schedules.
Note: Each room must be defined in Room Information before it can be assigned to a
course.
Period information will print on the student schedule. If this field is left blank the system
will insert the data entered in the fields “Period_From and Period_To”.
Other data may be entered to identify a class section as an Early Bird class (EB) or the
actual times the course meets, such as 7- 7:45. The schedule will be ordered on the
Period_From field so coordinate the two pieces of information to achieve the desired
results on the schedule.
Enter the period of the day that the class begins. DO NOT USE ZERO.
Enter the period of the day that the class ends. DO NOT USE ZERO.
Enter the school location or select from the drop down.
This is a Yes/No answer. Enter “Y” if grades are given in this course. Enter “N” if not.
Enter the appropriate subject area code. This information is used for the Graduation
Requirement reports. This data may also be transferred to the student history to print
on the transcripts.
This is a Yes/No answer. Enter “Y” if this is included in GPA calculations. Enter “N” if not.
Enter the credit toward graduation assigned to this class. The system will look at how
many Final Grade Marking periods there are and divide this value between them.
Enter the credits for GPA assigned to this class. The system will look at how many Final
Grade Marking periods there are and divide this value between them.
The maximum number of seats in the classroom.
This is a Yes/No answer. Enter “Y” if course number is associated with a study hall.
Enter “N” if not.
This is a Yes/No answer. Enter “Y” if this is included in State Reporting. Enter “N” if not.
For schools entering Period Attendance by minutes, enter the Number of minutes for
the duration of the class. NOTES: These schools should also fill in the Beg_Time and
End_Time fields in the Next Year Course Master (All Fields) screen.
See also
NY Course Codes Field Descriptions
Teacher Code Field Definitions
SDSStudentHelp
136 . Web School Office
Home > Web School Office > Scheduling > Linking Courses
Linking Courses
The Purpose of Course Links
Course links ensure that a student will receive a specific sequence of courses based on the assignment of one “primary/lead” course
code during the registration process. The “link” option is used when students are to remain together from one course section to
another. Different schools use linking to accomplish different results. One school may use linking to keep students in learning groups
throughout the day. Other schools may link as a means to schedule courses that rotate on a quarterly basis.
Option 1: Linking teams or learning groups.
Scenario: All of the freshmen are to take Algebra 1 both semester 1 and semester 2. The students are to remain together within
sections. There are three different sections.
Course Codes:
Algebra 1/Semester 1 = 101 A
Algebra 1/Semester 2 = 101 B
Course Master:
101A /01/1 Linked to 101B/01/2
101A/02/1 Linked to 101B/02/2
101A/03/1 Linked to 101B/03/2
The students are registered for 101A only. Depending on other registration requests the system will assign students to section 1, 2 or
3 of the 1st semester Algebra 1 class (101A) and it will also keep them within the same section for 2nd semester (101B).
Option 2: Linking courses that rotate on a quarterly basis.
Scenario: All 7th grade students rotate through exploratory courses each quarter. There are four different rotations. There are 4
different groups.
Group 1 (Red Team) is going to take:
Computers 1st Quarter
Life Skills 2nd Quarter
Art 3rd Quarter
Health 4th Quarter
Group 2 (Blue Team) is going to take:
Life Skill 1st Quarter
Art 2nd Quarter
Health 3rd Quarter
Computers 4th Quarter
Group 3 (Yellow Team) is going to take:
Art 1st Quarter
Health 2nd Quarter
Computers 3rd Quarter
Life Skills 4th Quarter
Group 4 (Green Team) is going to take:
Health 1st Quarter
Computers 2nd Quarter
Life Skills 3rd Quarter
Art 4th Quarter
Course Codes:
Exploratory Course (Computers) 701
Exploratory Course (Life Skills) 702
Exploratory Course (Art) 703
Exploratory Course (Health) 704
Course Master:
Red Team 701/ 01/ 1 Linked to 702/01/1 703/01/2 704/01/ 2
Blue Team 702/ 02/ 1 Linked to 703/02/1 704/02/2 701/02/ 2
Yellow Team 703/ 03/ 1 Linked to 704/03/1 701/03/2 702/03/ 2
Green Team 704/ 04/1 Linked to 701/04/1 702/04/ 2 703/04/ 2
SDSStudentHelp
Web School Office . 137
Notes:
1. There are a total of 15 fields that may be used to link courses together.
2. Courses are linked only one way.
3. Do not attempt to type the linked course in the field, but rather select it from the drop down list of course offerings.
4. Students are only registered for the primary course code. Do not register them for the courses listed in the “Link_Course”
fields.
5. During the schedule run they system will pick up all linked courses.
The “link” option is used when students are to remain together from one course section to another.
See also
Schedule Changes (Current Year)
Next Year Registration and Schedule Changes
Student Elementary Scheduling
Kindergarten Roundup
SDSStudentHelp
138 . Web School Office
Home > Web School Office > Scheduling > Student Elementary Scheduling
Student Elementary Scheduling
There are two methods that may be used to accomplish scheduling the elementary students.
Method 1: The elementary scheduling process may be done before the “Prepare to Open School/Year End Process” in the next year
area.
Method 2: The elementary scheduling process may be completed after the “Prepare to Open School/Year End Process in the current
year area.
Overview
Below lists a brief outline of all the steps for Elementary School Scheduling. Please review and then proceed with the detailed
instructions below the outline.
1. Setup Steps for Student Elementary School Scheduling.
❍ Enter appropriate Grade Year and Home Room Values for each student.
■
Method 1: Before the “Prepare to Open School/Year End Process” in Next Year area. Using “Prepare the Next
Year Scheduling” feature.
■
Method 2: After the “Prepare to Open School/Year End Process” in Current Year area. Manually changing the
Grade Year and Home Room Values.
❍
Enter/update Teacher Information.
❍
Enter/update Course Codes.
2. Create Student Schedules and Teacher Assignments.
3. Run Reports.
Setup Elementary Scheduling
Note: Elementary Schools who schedule in “Current Year” after the Prepare to Open School process is completed may chose not to
utilize the Prepare for Next Year Scheduling options and may “key” the NY_Homeroom directly into the demographic field. However, if
elementary schools choose to utilize the Prepare for Next Year Scheduling option, communication between buildings is critical so that
all schools run the “Prepare for Next Year Scheduling” processes during the same time period. Typically, the district high school will
start the scheduling process before the middle and elementary schools and if not coordinated changes made by a “receiving” school
could be overwritten by a “sending” school.
Method 1 – BEFORE running the “Prepare to Open School/Year End Processing”
Step 1a -Prepare the Next Year Scheduling Area
Note: It is not necessary to perform Step 1 (Delete Course codes in Next Year Area) or Step 2 (Delete Master Schedule) in Next Year
Area to begin the Prepare the Next Year Scheduling Area process. However, we recommend that you do perform these two steps
just to insure the area is clean.
1. Access WSO |Scheduling |Prepare the Next Year Scheduling Area |School to Process = Select from Dropdown.
2. Delete Course Codes in Next Year Area
❍
Click
■
beside 1
This will delete for the School Location selected.
3. Delete Course Master in Next Year Area
❍
Click
■
beside 2
This will delete for the School Location selected.
4. Copy Course Codes from Last Year
❍
Click
■
beside 3
Make Master File Changes and Enter Course Codes
■
Various ways to Code Courses
■
Fields Required
5. Copy Course Master from Last Year
❍
Click
■
SDSStudentHelp
beside 4
Make Master File Changes and Enter Course Codes
■
Magnet Board
■
Required Fields and Linking
Web School Office . 139
6. Move Grade Year to NY Grade Year.
❍
Click
■
beside 5
This will change the Grade Year for All Teachers and Students in the selected location.
7. Move Home Room to NY Home Room
❍
Click
■
beside 6
This will change the HR for all Teachers and Students in the selected location.
8. Add a Year to Grade Year in the Next Year area.
❍
Click
■
beside 7
If a non-numeric value is found the student will be placed in grade 01. I.e. K will become 01.
Step 1b – Enter/Update Teacher Information
1. Access WSO |Scheduling | Master File and Code entry and Changes |Application = All Entry Options |Entry Options =
Teachers
2. › Enter the Next Year School Location, Next Year Grade Level Assignment, and Next Year Homeroom for each teacher.
3. Step 1c – Enter/Update Course Codes
4. Access WSO |Scheduling | Master File and Code entry and Changes |Application = Scheduling (Next Year) |Entry Options =
Course Codes – Next Year (All Fields)
5. › Verify or enter all the elementary classes/subjects to be taught.
6. › Verify the appropriate School Location Code is entered for each course offering.
7. › Verify the appropriate Grade Level Assignment is entered for each course offering.
Method 2 – AFTER running the “Prepare to Open School/Year End Process”
Step 1a –Manually changing Grade Year and Home Room Values for Next Year
1. Access WSO |Data Entry and Changes (Horizontal)|Entry Options = Demographics All Fields.
2. Enter the new school year information in the Grade Year and Homeroom fields for each student.
Step 1b – Enter/Update Teacher Information
1. Access WSO |Scheduling | Master File and Code entry and Changes |Application = All Entry Options |Entry Options =
Teachers.
2. Enter the School Location, Grade Level Assignment, and Homeroom for current year for each teacher.
Step 1c – Enter/Update Course Codes
1. Access WSO |Scheduling | Master File and Code entry and Changes |Application = Scheduling (Current Year) |Entry Options =
Course Codes – Current Year (All Fields)
2. Verify/enter all the elementary classes/subjects to be taught.
3. Verify/enter the appropriate School Location Code is entered for each course offering..
4. Verify/enter the appropriate Grade Level Assignment is entered for each course offering.
Step 2 – Elementary School Scheduling –Create Student Schedules and Teacher Assignments
●
Access WSO |Scheduling |Elementary School Scheduling
●
Select the School Location from the dropdown.
●
Select the year you are working with (current Year Area or Next Year Area) by clicking on the appropriate radial button.
❍ Students are displayed on far left panel, teachers are displayed on middle panel, and Courses are displayed on far right
panel.
●
Check or uncheck to process all Teachers.
SDSStudentHelp
140 . Web School Office
●
Click on the Create Student Schedule and Teacher Assignments button. You will receive the following warning message.
●
Click on the OK button to Create Student Schedules and Teacher Assignments. Click on the Cancel button if you do not want to
create the Student Schedule and Teacher Assignments.
●
When the process is complete you will receive the following message:
Step 3 – Run Reports
●
Access WSO |Reports |Student Reports
❍ Sort and Run the following reports:
■
Schedules
See also
SDSStudentHelp
■
Class Lists
■
Student Locator/s
■
Teacher Locator/s
Web School Office . 141
Schedule Changes (Current Year)
Next Year Registration and Schedule Changes
Linking Courses
Kindergarten Roundup
SDSStudentHelp
142 . Web School Office
Home > Web School Office > Scheduling > Kindergarten Roundup
Kindergarten Roundup
The months of May and June is good to do a "kindergarten roundup". You don’t want to have to wait until August to enter those new
students. Go ahead and enter them now!
Make sure that you enter the Current Year Active as 1 and Next Year Active as 0 so that they won’t be included in this year’s reports,
but will become active when the Prepare to Open School process is completed. You will also need to make sure that the School
Location and Next Year School Location fields are completed. Enter the Grade Year as PK and the Next Year Grade Year as the
appropriate Kindergarten indicator. As always, enter as much information about the student as you possibly can so that you don’t have
missing information when you try to run reports on these students next year.
Since you are using WSO there is no longer a need to wait until the school year is over to put students into their next year homeroom.
As soon as you have your homeroom lists for next year you can enter that information into the NY Home Room field in Student
Information. Once the NY Home Room information is entered you could get a head start on elementary scheduling since Web School
Office allows for Elementary Scheduling in the Next Year area. When the Prepare to Open process is completed the NY Home Room
will move to the Home Room field and the scheduling done in the next year process will move to the current year area.
See also
Schedule Changes (Current Year)
Next Year Registration and Schedule Changes
Linking Courses
Student Elementary Scheduling
SDSStudentHelp
Web School Office . 143
Home > Web School Office > Prepare to Open School/Year End Processing
Prepare to Open School/Year End Processing
This sections covers important steps in getting started for prepare to open, end of the year reports to run and steps
to preapre to open school/rollover.
See also
Getting Started - IMPORTANT
End of Year Reports to Run
Steps to Prepare to Open School/Rollover
SDSStudentHelp
144 . Web School Office
Home > Web School Office > Prepare to Open School/Year End Processing > Getting Started - IMPORTANT
Getting Started - IMPORTANT
●
Perform your Year End Processing in order listed below.
❍ Update Web School Office program.
❍
Verify all current year processing is finished, all next year scheduling is complete, and the End of Year Reports are
printed.
❍
Perform a complete backup of programs and data to archive for the past school year before running the Prepare to
Open School utility.
See also
End of Year Reports to Run
Steps to Prepare to Open School/Rollover
SDSStudentHelp
Web School Office . 145
Home > Web School Office > Prepare to Open School/Year End Processing > End of Year Reports to Run
End of Year Reports to Run
Note: Be sure all attendance and grade changes are accurately reflected in the reports; it is recommended to
calculate GPA and refresh attendance one last time before running these reports.
Recommended reports to print prior to rolling over.
Transcript Records - Past School Year
Note: Middle Schools / Junior Highs not using the transcript area may skip this step.
1. Access WSO |Reports |Student Reports |Grade Reporting - Transcripts.
2. Print Transcripts and/or Permanent Record Labels.
Student Listing - Past School Year
1. Access WSO |Reports |Student Reports |Demographics.
2. Print Student List – By Grade Level or Location.
Attendance Reports - Past School Year
●
Access WSO |Processing Center |Refresh Attendance Analysis.
❍ Refresh Attendance.
❍
Print the following Attendance reports:
■
Yearly Analysis Reports located in WSO |Reports |Student Reports |Attendance – Analysis. Print it for the
year.
■
Cumulative Attendance Reports located in WSO |Reports |Student Reports |Attendance – Daily or Period.
■
Attendance Summary Reports - # of Tardies, etc. located in WSO |Reports |Student Reports |Attendance –
Daily or Period.
■
Withdrawn Students Report located in WSO |Reports |Student Reports |Attendance – Analysis. Print it for
the year.
Grade and G.P.A. Informational Reports - Past School Year
●
Access WSO |Processing Center |Refresh Attendance Analysis.
●
Print the following reports:
❍ Grade Verification Sheets - include all grading periods located in WSO |Reports |Student Reports |Grade – Grade
Reporting.
❍
GPA and Credit Report – run by grade year, located in WSO |Reports |Student Reports |Grade – Grade Reporting.
❍
Report Cards located in WSO |Reports |Student Reports |Grade – Grade Reporting |Grade/Progress Reports.
❍
Rank or Honor Roll Reports located in WSO |Reports |Student Reports |Grade – Grade Reporting.
Course Master Listing - Past School Year
●
Print the Master List - Courses (Landscape) and/or (Portrait) and/or Master List – Courses, located in WSO |Reports
|Student Reports |Scheduling.
Class List – Junior High or Middle Schools that Award High School Credits
●
If your school has courses that allow students to receive high school credit (Examples include Algebra or Geometry), print a
Class List of these students. Retain this list for a step discussed later in this document regarding GPA and transcripts.
❍ You can print a Class List by accessing WSO |Reports |Student Reports |Scheduling.
Gradebook Reports
●
The current year gradebook detail gets removed during the rollover, therefore if teachers wish to retain a copy of the
assignments, gradebook grades, etc they should print the appropriate gradebook reports before leaving for the summer.
●
Office staff can run gradebook reports by going to Reports |Student Reports |Grades-Teacher Gradebook reports.
SDSStudentHelp
146 . Web School Office
Discipline Reports - Past School Year
●
Access WSO |Reports |Student Reports |Discipline.
●
Print the following reports:
❍ Cumulative List - this report prints in student alpha order.
❍
Infraction Analysis - this report prints penalty/infraction by teacher or student.
Health Information - Past School Year
●
Access WSO |Reports |Student Reports |Health and print any necessary or desired health reports for students.
Next Year Scheduling Reports - New School Year
●
Enter WSO |Reports |Student Reports |Scheduling Next Year
●
Print the following reports:
❍ Student Schedule Edit List (by Grade/Year).
❍
Master List – Courses.
See also
Getting Started - IMPORTANT
Steps to Prepare to Open School/Rollover
SDSStudentHelp
Web School Office . 147
Home > Web School Office > Prepare to Open School/Year End Processing > Steps to Prepare to Open School/Rollover
Steps to Prepare to Open School/Rollover
Suggestion: Make sure you plan ahead to open school/rollover.
Prepare
1. Complete a system compress and backup through the Web Control Center/V8.5 |Utilities |Filing (Backup, Compress and
Repair).
❍ No other users should be working in the database, sdsxplan.mdb, during this process. You can lock them out through
WSO |Administrative Utilities |Lock Users out of SDS. (When you are done with prepare to open school/rollover come
back into the same area to unlock the users.)
2. Important Note: A user with a login that can see ALL school locations should do the open school process in districts that have
multiple school buildings in one database. This user will open school for ALL schools at the same time, so communicate well
with the other buildings before proceeding.
3. Make sure that GPA and attendance is refreshed to ensure that the transcript data includes any late grade changes or
attendance edits.
4. If there are any students that are to be deleted (removed completely) from the database change ALL three of the following
fields to 1:
1. Current Year Active
2. Next Year Active
3. Transcript Area Active
■
When to Perform Year End Utilities?
■
When Next Year Processing is complete, including copying/building the course master and scheduling.
■
After all reports for the past school year are finished.
■
Before you enter next year’s school calendar.
■
A week or two before the new school year begins.
Step #1 Prepare to Open School Utility (Compress the database before beginning)
●
Enter WSO |Administrative Utilities |Prepare to Open School (Rollover).
❍ This option is only available if a rollover has not already been performed.
Option 1 - Remove Transcript Information for the class of (##)
If you have a grade level that you want to purge from the transcript detail table, you can select the desired grade_year from the drop
down box. The grade year that it is going to remove are the records of the grade_year value selected from the current school year
(pre-roll over).
For example: If you want to remove the transcripts of students with the grade_year of 08 during the 2007-2008 school year that will
be updating to 09 after roll over for the 2008-2009 school year, you will select grade year of 08 in order to purge their transcript
records.
Option 2 – Remove Students with 1 in Current, Next Year and Transcript Active Field
If there are any students that you want completely removed from the program change their current year active, next year active and
transcript area active fields to 1. Any student that has a 1 in all three of those demographic fields will be removed if this box is
checked during the rollover.
Option 3- Change the value of the grade_year field in Demographics
SDSStudentHelp
148 . Web School Office
Change the value of the grade_year field in demographics to appropriate upcoming year value as indicated to the right.
DO NOT CHECK THIS if grade_year contains year of graduation.
If you want to increase students’ grade levels for next school year, adjust the value in the “Upcoming Grade_Year” column to an
appropriate value. If your school is using values that reflect the year of graduation then leave the box unchecked as you will not want
that value to change.
Option 4 -Remove Discipline Information
If you would like to delete the discipline information put a check in this box. Make sure to print any necessary reports first from WSO
|Reports |Student Reports |Discipline.
Option 5 - Remove Student School Policy Information
If you used the policy letters area and want to clear out the letter history data put a check in this box.
Option 6-Change the Entry Date for students to: MM/DD/YYYY
If you want all students to reflect the same demographic entry date use this option. This option is not generally recommended as
most schools prefer to see each individual entry date.
Option 7- Change Entry Code in Demographics to Same Entry Code
If you would like to give all students the same entry code, then check this option and choose the code from the drop down box. This
code list includes the demographic entry code options.
* Once all of your preferred options 1-7 are checked click on the “Start” button. When it is finished processing, you
will get a pop up box “The Process is Complete”.
Step #2 – Run a Compress (Web Control Center)
Enter the Web Control Center /V8.5 |Click on the + next to the Utilities |Double click on Filing (Backup, Compress, Repair) |Read the
message |Select OK |Uncheck Backup, leave compress checked |Click OK |Read the message |Click OK |Read the message | Click
OK. It should say it is compressing and when finished you will be at your Desktop.
Step #3 – GPA Utilities
When the “Prepare to Open” is run, the program will take the ending cumulative GPA information and place it in the “Balance” fields
as a starting point for the new school year. If you want your students to begin with a zero balance each year (For example:
Elementary, Junior High or Middle Schools) the records can be deleted after “Prepare to Open School” process has completed.
To clear a grade level’s cumulative GPA:
1. Log into the Web Control Center |Utilities |Front Desk |Double click the book “Remove GPA info for a selected grade/year”.
2. Read the message and then click the OK button to run the process.
❍ Note: If your school has all buildings combined into one database, it is recommended to run the utility to zero the
cumulative GPA on the grade levels of students who advanced between buildings. This will allow those students moving
to the next school location to begin with a zero cumulative GPA. Example: New Freshmen with cumulative GPA from
middle school/junior high years should probably have their GPA set to zero. This will then allow them to have a
cumulative gpa that reflects only their high school grades.
3. The 3 options available for this GPA Utility are:
1. Remove GPA balance forward by grade level.
■
Web Office users will not use this option.
2. Remove GPA Balance Forward and Deactivate Transcript Records by Grade level (do not count in
cumulative GPA).
■
If you choose this option, you will choose the grade level whose transcript records are NOT to be included on
transcripts or in cumulative gpa. This option will code the transcript detail field “sequence_code_C135” with an N
for the courses that are in their transcript detail at the time this process is run. Any class with an N in
“sequence_code_C135” will be excluded from transcripts and cumulative gpa.
3. Deactivate transcript records by grade level AND School Year, (do not include in cumulative GPA).
■
This is the same as the prior option except that it will allow you to specify a school year to deactivate (sequence
code C135=N) rather than ALL of the transcript records for a specific grade level.
After the utility is run, if there are freshmen who earned high school credits while in middle/junior high school, you will need to go
into that student’s transcript detail record by entering WSO |Data Entry and Changes |Student Information |Entry Option |Transcript
Detail and remove the N from the “sequence_code_C135” field.
Build Enrollment
SDSStudentHelp
Web School Office . 149
●
Also in step 3 remember to build your enrollment, for instructions on steps to complete this search for “Build Enrollment Data”
in this manual.
What’s Different Now?
1. All students marked as Next Year Active are now Current Year Active in the correct building as NY_School_Location is now the
current School_Location.
2. Students who were marked as inactive in Next Year (graduating students) are now inactive in Current Year or deleted,
depending on your choices during the rollover process.
3. All check marked options have been processed (Options 1-7 in Step 1).
4. All scheduling activity for the new school year will now be processed through the current year area.
5. Attendance detail, gradebook detail, term grades and term GPA detail for the past school year are no longer available.
(transcripts are available which include final grades and cumulative gpa/rank)
6. All school calendars have been deleted.
Verify Next Year’s Data
Things to do to Verify Next Year Data and Prepare for the New Year
1. Setup Calendar and Term Dates.
❍ This must be done prior to the first day of school as it is required for attendance entry. (Refer to Web School Office
Manual for instructions on School Calendar Setup in Web School Office.)
2. Generate Necessary Reports.
❍ Suggestions include the following:
■
Print a new listing of all current students - expected enrollment for new school year by entering WSO |Reports
|Student Reports |Scheduling Current Year.
■
View a few Student Schedules to verify the transfer from next year area to current year. You can view them
by entering WSO |Reports |Student Reports |Scheduling Current Year |Student Schedule.
■
Print a New Course Master by entering WSO |Reports |Student Reports |Scheduling Current Year |Master List
(…).
■
Print a new GPA and Credit Report which shows all students with GPA records, and their new Balance
Forwards for new school year. It is VERY IMPORTANT TO Verify, Verify, and Verify!! You can run this by
entering WSO |Reports |Student Reports |Grades – Grade Reporting |GPA and Credit Report.
■
Print Class Lists if they were not printed from the Next Year area by entering WSO |Reports |Student Reports
|Scheduling Current Year |Class List.
Code Setup Area and Review All Codes
View Code Drop Downs
●
View code drop downs and modify in Administrative Utilities |Master Code Field Definition if necessary.
●
To view fields that have been coded and have a drop down with the values you would like enter WSO |Data Entry and
Changes |Student Information |Select the Entry Options you would like to check the coded fields (i.e. Street Direction {East ~
E, North ~N}). If you need to edit the lists, this is done by going into Administrative Utilities to Master Code Field Definition.
(Refer to Web Office Manual for more info.)
Review All Codes
●
Review all codes indicated below and edit as necessary.
●
Attendance Codes (Daily or Period) - located in WSO |Data Entry and Changes | Master File and Code Entry and Changes
|Select application Attendance Accounting |Choose appropriate entry options.
❍
Daily Attendance (Office and TeacherWeb) – Automatic calculation of Total_Minutes (absent) and assigning the
Absense_Code. For this to work you need to fill out the Attendance_Daily_Defaults table properly (See below). You can
use Grade_Year=XX to setup for the whole location, or specify the Grade_Year. Note that the Enrollment process will
SDSStudentHelp
150 . Web School Office
automatically add A and T records for each location/grade year.
❍
Duration_Total = Minimum # minutes absent to receive this code.
❍
Minutes_In_Day =T otal minutes in day used for calculation for determining Absence_Code. If no Time in/out is
specified, they will receive this value in Total_Minutes in the Attendance record. The program adds up the total minutes
present based on the time in/out and then subtracts this value from the total minutes in day.
❍
Only codes A, H, and X are “auto assigned”. Any other code and nothing happens.
❍
In TeacherWeb, if the teacher enters time in/out and the code changes to an H or X then the teacher will “lose control”
of that entry since the program will think the office has changed the absence code.
❍
If X isn’t defined in Attendance_Daily_Defaults, H will be assumed.
●
Discipline Codes - located in WSO |Data Entry and Changes | Master File and Code Entry and Changes |Select application
Discipline Tracking |Entry Option = Discipline Infraction/Penalty Codes.
●
Teacher Codes - located in WSO |Data Entry and Changes | Master File and Code Entry and Changes |Select application
General Information| Entry Option = Teachers.
●
Grade Codes - have weights changed? - located in WSO |Data Entry and Changes | Master File and Code Entry and Changes
|Select application Grade Reporting |Entry Option = Marking Period GradeCodes.
●
Grading Comment Codes - located in WSO |Data Entry and Changes | Master File and Code Entry and Changes |Select
application Grade Reporting |Entry Option = Marking Period Grade Comments.
●
Grade Area - located in WSO |Data Entry and Changes | Master File and Code Entry and Changes |Select application Grade
Reporting |Entry Option = Grade Area Setup.
●
Honor Roll - located in WSO |Data Entry and Changes | Master File and Code Entry and Changes |Select application Grade
Reporting |Entry Option = Honor Roll Definition Setup.
Policy and Letter Production
●
Enter WSO |Reports |Student Reports |School_Policy and review the following reports if applicable.
❍ Attendance Policies and Letters
❍
Discipline Policies and Letters
Now you are ready for your students to arrive. Have a great year!
See also
Getting Started - IMPORTANT
End of Year Reports to Run
SDSStudentHelp
Web School Office . 151
Home > Web School Office > School Policy Processing
School Policy Processing
Policy processing is used to create written communication to the parents regarding the areas of attendance, discipline, or other
special demographic criteria defined by the user. With daily use, a parent can be quickly notified of their child’s attendance record or a
discipline incident. By using the demographic option, the school can notify specific students of upcoming events (i.e. seniors and the
graduation schedule of events).
See also
Policy Processing/Policy Definition
Policy Types
Policy Processing/Letter Creation
SDSStudentHelp
152 . Web School Office
Home > Web School Office > School Policy Processing > Policy Processing/Policy Definition
Policy Processing/Policy Definition
Policy Processing is used to produce letters for attendance policy, discipline policy or for any other reason you wish to send letters
based on your demographic data. For example, you may want to send a letter to all Seniors about the senior trip or graduation or to
all Juniors with details on the PSAT.
In this section, you must create the letters that will be sent to the students. Each letter will have a code (name), description, selection
criteria, and body of the letter. Once the letters are created, they can be used as often as needed to communicate information about
the student’s attendance, discipline, or demographics to the parents/guardians.
1. To start creating policy letters, enter WSO | School Policy Processing | Policy Definition.
2. Next, click
to create a new letter.
3. Enter a code (name) for the letter. The limit is 10 characters, and the same code cannot be used more than once. It is used to
identify each letter.
4. Enter a short description regarding the topic of the letter. This statement prints in the heading of the letter. The limit is 50
characters.
5. Choose the policy type. The policy can only be based on daily attendance, period attendance, demographics fields, discipline,
or attendance in any period. This tells the computer which tables to analyze in the letter creation process. Details on each
policy type are explained later.
6. Define the selection criteria. The criteria building box will change depending on your choice for the policy type. Details on
selection criteria for each policy type are explained later. Click the “Save Selection Criteria" button to save your work.
7. Type the body of the letter. Do NOT include a salutation as this will be provided in the letter production. Type the letter, letting
the text wrap within the window provided. The letter production process will take care of the margins.
❍ To indent a paragraph, use the space bar.
❍
To begin new paragraphs press the Enter key.
❍
To insert a blank line, press the Enter key again.
❍
You will include the closing portion of the letter (sincerely, regards, etc.) and the person’s signature line and title as
necessary.
❍
Be sure to press the Enter key at least once after the last line of the letter. Period attendance letters will automatically
list the course name(s) that trigger the policy at the end of the letter.
8. Click
to save the new policy.
See also
Policy Types
Policy Processing/Letter Creation
SDSStudentHelp
Web School Office . 153
Home > Web School Office > School Policy Processing > Policy Types
Policy Types
Daily Attendance Policies
Policies designed for daily attendance will work off of the Attendance table. When running the policy, you will specify an Activity Date
Range (top date ranges) and an Evaluation Date range (bottom date ranges). The system will look at all the students absent in the
Activity Date Range. It will then look for records within the Evaluation Date Range that contain the codes specified in the criteria.
If the student meets the policy in the Activity Date Range entered, the student will be identified as meeting the policy. For
example, a five day policy - the fifth day must be within the Activity Date Range.
The student must match the policy exactly. If the system does not identify the students you expect, re-think how the policy is defined.
Remember, “equal to 5” does not mean 5.5.
To set up criteria for Daily Attendance letters, do the following steps:
Explanation on Screen Print:
●
Attendance Codes drop down (box 1) = In this box, choose the appropriate full and half day attendance codes (usually A
and H). Remember that 2 half days = 1 whole day.
●
Selected Attendance Codes = shows the attendance codes you picked from the Attendance Codes drop down list above.
●
Attendance codes drop down (box 2) = If you want to send a letter for only excused or unexcused absences, use this box
to choose the appropriate code. If you are not concerned, leave it blank.
●
Selected Excused Codes = shows the excused codes you selected from the second Attendance Codes drop down list above.
●
Other Codes = If you want to send a letter for only certain absences with specific reasons, then select those reason codes
from this list. For example, if the student has been truant, perhaps you only want to send a letter to students with the "other
code" that represents truant. If the reason doesn't matter, leave it blank.
●
Selected Other Codes = shows the other codes you selected from the Other Codes drop down list above.
●
Examples:
ten half days
two full days and five half days
five full days
10 x 0.5 = 5
(2 x 1)+(6 x 0.5) = 5
5x1=5
Period Attendance Policies
There are two options for Period Attendance under Policy Type.
●
Period Attendance-Will work off of the Attendance_by_Class table and look at the records on a “by class” basis, such as
missing three times in the same class as three records toward the policy.
●
In Any Period- Will work off of the Attendance_by_Class table and look at the records in any class, such as missing three
different classes in one day as three records toward the same policy.
When running the policy, you will specify an Activity Date Range and an Evaluation Date Range. The system will look at all the
students who were absent during the Activity Date Range. It will then look at each student’s cumulative records for the Evaluation
Date Range to determine meeting the policy.
A student that meets the policy in the Activity Date Range entered will be identified as meeting the policy. If the system does
not identify the students you expect, re-think how the policy is defined.
SDSStudentHelp
154 . Web School Office
In addition to the policy based on period absences, your school may also want to identify students that are absent a certain number of
days. This criterion would be defined under Daily Attendance (see section above). The daily attendance records are created based on
the period attendance codes counting toward daily and the period setup. See the chapter on period attendance for more details.
Explanation on Screen Print:
●
Attendance Codes Drop down = I f you only want the period attendance code of A (Period Absence) considered for the
selection criteria, click on the arrow for the pull down list then click on the line for ‘A PERIOD ABSENCE’. The ‘A’ will now
display in the area below. Repeat for additional codes.
●
Selected Attendance Codes = shows the attendance codes you picked from the Attendance Codes drop down list above.
●
Attendance Codes Drop down 2 = If you want to send a letter for only excused or unexcused absences, use this box to
choose the appropriate code. If you are not concerned, leave it blank.
●
Selected Excused Codes = shows the excused codes you selected from the second Attendance Codes drop down list above.
●
Other Codes = If you want to send a letter for only certain absences with specific reasons, then select those reason codes
from this list. For example, if the student has been truant, perhaps you only want to send a letter to students with the “other
code” that represents truant. If the reason doesn’t matter, leave it blank.
●
Selected Other Codes = shows the other codes you selected from the Other Codes drop down list above.
●
Record Count Radio Button = The system will count all the records with the selected codes within the Evaluation Date
Range for the period/s a student is absent in the Activity Date Range. If the fifth absence falls in the Activity Date Range, the
student will be identified. DO NOT USE DURATION TOTAL WITH PERIOD ATTENDANCE LETTERS.
Discipline Policies
Policies designed for discipline will work off of the Infraction code in the Discipline table. When running the policy, you will specify an
Activity Date Range and an Evaluation Date Range. The system will look at the field “infraction date” and check for matching records
for the Activity Date Range entered. It will then look at the records within the Evaluation Date Range for the student with the specified
infraction code/s.
If the student meets the policy in the Activity Date Range entered, the student will be identified as meeting the policy.
The student must match the policy exactly. If the system does not identify the students you expect, re-think how the policy is defined.
Explanation on Screen Print:
SDSStudentHelp
Web School Office . 155
●
Infraction Code = Choose the appropriate infraction code(s) that will select this letter. If the letter needs to be based on the
punishment code instead, see below.*
●
Selected Infraction Code = The system will find all students with the infraction code you specify on the Activity Date and see
of that is the nth occurrence of that infraction within the date range. If yes, the student will be identified for a letter.
* If your discipline policy is based on the punishment (penalty) code, then you must type in the selection yourself AFTER setting the #
of occurrences and clicking the Save Selection Criteria button.
Demographics Policies
Any field in your demographic table may be used in the criteria. For example, letters about the senior trip may be sent to the senior
class by using Grade_Year = 12. To send a letter to the parents of students on bus route 3B and you have a bus_route field, identify
them using bus_route = 3B. This criterion is filled out the same when you use the “Activate Sort Selection” on your report sorts.
Explanation on Screen Print:
●
Field Name = Choose each field that is needed to select only the students who need to receive this letter. After each criterion,
click the “Add to Selection Criteria” button. More than one field may be selected, as shown in the example.
See also
Policy Processing/Policy Definition
Policy Processing/Letter Creation
SDSStudentHelp
156 . Web School Office
Home > Web School Office > School Policy Processing > Policy Processing/Letter Creation
Policy Processing/Letter Creation
1. To start processing attendance letters, enter WSO | School Policy Processing| Policy Processing/Letter Creation.
2. Next, put a check by the letters you want to process.
❍
3. Click the assign policies button. A new screen will then display.
4. Select dates.
❍ The top date boxes (activity date range) are used to check absences during “this period”. Select from and through date.
You can also select “No Beginning Activity Date” although this is not recommended.
❍
The bottom date boxes (evaluation date range) tell the computer to analyze the absences starting from through the last
date selected in the top date boxes and policy types selected below.
❍
Note: the “create a letter for ONLY first class meeting period policy” can be checked when you only want to send 1
letter that will cover all of the classes that met the period policy criteria. If you uncheck this box, 1 letter is created for
EACH class and can result in multiple letters for the same student.
❍
See screen shot below.
❍
5. Click the “Create Letters” button. The computer will analyze the students’ absences (discipline or demographics) and create
a letter if the criteria are met. When finished the computer will show a window that tells how many letters of each policy were
created. Click OK.
6. On the WSO menu tree enter reports by selecting |Reports |Student Reports.
7. In box 1, select School_Policy.
❍ There are several reports you can run, one of them being the Daily Policy Report.
■
This report will list the students who were “hit” by a letter and list the letter received by the student.
SDSStudentHelp
Web School Office . 157
■
❍
This report is convenient to check over the students briefly so as to “head off a letter at the pass” – For example:
a student has been very ill and you decide to NOT send a letter due to the extreme circumstances.
At this point you will want to run the letters, envelopes or labels.
8. To run the letters, complete the following:
❍ Click on Reports |Student Reports
❍
In box 1, select School_Policy.
❍
In box 2, select Policy letters (use for demographic or discipline based letters), Policy Letters (Period attendance – will
optionally include a period attendance report WITH the letter), or Policy Letters (Daily attendance – will optionally
include a daily attendance report WITH the letter).
❍
Click
❍
Answer the parameter questions.
■
School Name = will hide OUR rendition of your letter heading so you can use YOUR letterhead successfully.
.
■
Include the Report for Attendance or Not = all classes are included in the period attendance version. (only
prompted for this if using the daily or period attendance letter reports)
■
Report Date Range = FOR THE DATE RANGE, USE THE VALUES YOU USED IN THE 2ND SET OF DATE BOXES
WHEN YOU CREATED THE LETTERS. (only prompted for this if using the daily or period attendance letter reports)
■
Home Phone Number = Will show or hide the home phone number on the attendance portion. (only prompted
for this if using the daily or period attendance letter reports)
9. To run the envelopes or labels, complete the following:
❍ Enter WSO |Reports |Student Reports
❍
In box 1, select School_Policy.
❍
In box 2, select Policy Envelopes (or labels)
❍
Click the
❍
Answer the following parameter questions:
■
Print the school’s return address (not applicable on the labels)
.
■
Print the student’s name or not
■
When selecting the date range, use the ENDING DATE you selected when you created the letters (the date in the
right hand box)
❍
Print the envelopes or labels
❍
Be sure to match the envelope or label to the proper letter!
10. The last step, once everything has been successfully printed, is to return to the school policy processing option.
❍ Click on policy processing/letter creation. You should either un-assign the letters (basically this erases what you’ve
done) or lock the batch (this creates a history of letters sent to the student’s home during the school year).
See also
Policy Processing/Policy Definition
Policy Types
SDSStudentHelp
158 . Web School Office
Home > Web School Office > Tuition/Fee Processing
Tuition/Fee Processing
This area of Web School Office will help you assess fees such as book fees, lab fees, activity fees, tuition and to record payments of
fees. This module may be interactive with the SDS Finance Accounting System (Web Financial Office) to record charges and
payments directly to the general ledger. Many reports are also available to help users track fees, payments, and outstanding
balances.
See also
Tuition/Student Fee Codes
Mass Assignment of Charges and Fees
Fees Adjustments and Payments
SDSStudentHelp
Web School Office . 159
Home > Web School Office > Tuition/Fee Processing > Tuition/Student Fee Codes
Tuition/Student Fee Codes
To Access:
Login to WSO |Data Entry & Changes | Master File Code Entry & Changes. Choose the application Tuition/Student Fees. This
section provides details on the different tuition related codes and how to enter them.
See also
Mass Assignment of Charges and Fees
Fees Adjustments and Payments
SDSStudentHelp
160 . Web School Office
Home > Web School Office > Tuition/Fee Processing > Tuition/Student Fee Codes > Tuition/Student Fees Charge Type Code
Tuition/Student Fees Charge Type Code
1. This code defines the types or categories of the individual charges. It is used on the actual charges you’ll create in a later
section.
2. To add a new code, click
.
3. Fill in the following fields:
❍ Type code: Enter a 1-character code to represent a type of charge. This is a broad representation, not specific.
❍
Description: Words used here print on various reports to specify what the 1-character code represents.
❍
School location: Enter “ALL” if the code will be shared by all buildings in your district. Otherwise enter the school’s
specific code.
4. Click
to save.
5. To change a code, click on the blue number at the beginning of the line.
6. Edit the information on the right side of the screen.
7. Click
to save.
See also
Tuition/Student Fees Department Code
Tuition/Student Fees Payment Code
SDSStudentHelp
Web School Office . 161
Home > Web School Office > Tuition/Fee Processing > Tuition/Student Fee Codes > Tuition/Student Fees Department Code
Tuition/Student Fees Department Code
This code defines the department who will receive the money from the charges and payments. This code is used on the actual
charges you’ll create in a later section.
1. To add a new code, click the
.
2. Fill in the following fields:
❍ Department code: Enter a 2-character code to represent a department.
❍
Description: Words used here print on various reports to specify what the 2-character code represents.
❍
School location: Enter “ALL” if the code will be shared by all buildings in your district. Otherwise enter the school’s
specific code.
3. Click
to save.
4. To change a code, click on the blue number at the beginning of the line.
5. Edit the information on the right side of the screen.
6. Click
to save.
See also
Tuition/Student Fees Charge Type Code
Tuition/Student Fees Payment Code
SDSStudentHelp
162 . Web School Office
Home > Web School Office > Tuition/Fee Processing > Tuition/Student Fee Codes > Tuition/Student Fees Payment Code
Tuition/Student Fees Payment Code
This code defines the types of payments received from students and parents. This code is used while entering payment information.
1. To add a new code, click the
.
2. Fill in the fields.
❍ Payment code: Enter a 2-character code to represent a department.
❍
Description: Words used here print on various reports to specify what the 2-character code represents.
❍
School location: Enter “ALL” if the code will be shared by all buildings in your district. Otherwise enter the school’s
specific code.
3. Click
to save.
4. To change a code, click on the blue number at the beginning of the line.
5. Edit the information on the right side of the screen.
6. Click
to save.
Charge Definition
All other code areas not listed in the above section must be defined first before creating charges that will be assigned to student
accounts (statements). Those steps are listed above. Most charges must be based on either specific fields in the student
demographics or specific courses. Fees that are assigned by the computer must have a dollar amount. For Indiana schools, there will
be a charge for most every course listed in the course codes. For each course there could be up to 3 types charges (book rent,
consumable, and fee), but not every course will have all 3 charges types.
While charges will mostly be assigned in mass to the student accounts (see next section), even miscellaneous charges that would be
entered by hand or individually need to be set up in this area. For fees that might be assessed individually to students, the dollar
amount may be left at zero, and there does not have to be a tie to demographics or course codes. Some examples of this type of
charge are: a parking permit, yearbook purchase, or property damage.
Add Fee Code
To add a fee code that represents a charge that will be added to a student’s account, follow the below instructions:
1. Enter WSO |Tuition/Fee Processing |Charge Definition
2. To add a new code, click
.
3. Fill in the fields. See below bullets for examples and more details.
❍ Fee code: This is a unique field. Each fee must have a different code. This code is user defined. Think of it as the UPC
code for this item.
❍
Amount: An amount that is charged to the student; set it to zero if the amount will vary on the situation.
❍
Refund: Used only for fees based on courses. Enter the amount available for refund.
■
Example: a book fee of $20.00 that would yield $5.00 if the student dropped the course.
❍
Description: Enter a description for the charge here. The description prints on various reports. This is the name of the
item.
❍
Add course OR Demographics: Only ONE of these areas is used at a time.
■
If the charge were to be attached to specific courses in a student’s schedule, the course code(s) would be
referenced here.
■
Select a course in the drop down box next to the “Add Course” box.
SDSStudentHelp
■
Click the “Add Course” button.
■
Repeat if multiple courses qualify for this same charge. For example, a lab fee could apply not only to
Calculus, but all other math courses as well. Those courses may be added in this same manner by clicking
on the additional math courses in the same drop down area. The word “or” is added between each
course automatically. Be sure to keep the charge description generic enough to avoid confusion. Perhaps
“Math lab fee” would be appropriate in this example.
■
To remove a course from a charge that has multiple course numbers, highlight the text in the formula
containing the course (i.e. “course_number=’####’ or), and press the delete key. Be sure the word “OR”
is not at the end of the last line of the formula.
■
When all course codes have been selected for this fee, move to the next field.
Note: When using fees based on course numbers, dropped classes must be inactivated, not deleted. Be
sure the operator responsible for student schedules is aware of this requirement for the fee process to
Web School Office . 163
operate correctly for refunding purposes.
■
If the charge were to be triggered by field(s) in the student’s demographic file, that field (or those fields) would
be referenced here.
■
When a charge is associated with a field in Student Demographics, a “selection” statement needs to be
created much the same as it is in a query/sort in a report.
■
Click the demographics button.
■
Choose a demographics field name in the first drop down box.
■
Choose the compare operation.
■
Choose the desired value.
■
Click the button “add to demographics.”
■
If another field is involved in the selection process, repeat steps c-f.
■
All demographic selection criteria will be connected by the word “AND”. Therefore a student must meet
ALL of the criteria in order to be charged for this item. If one thing is false, then the student will not be
charged for the item.
■
The white area next to the demographics button will contain a selection statement in the proper syntax for
the system to read.
■
To close the demographics selection builder, click
.
❍
Assign: This is a toggle field with the choices of ‘YES” or “NO”. A ‘YES’ will cause this charge code to be considered
when Assign/Charge Fees is selected. A ‘NO” will prohibit the charge.
❍
Fee Type: The Charge Type Code that was previously set up in an earlier section. A drop down arrow will assist with
data entry.
❍
Department: The Department Type Code that was previously set up in an earlier section. A drop down arrow will
assist with data entry.
❍
Location: Set this equal to the appropriate school location.
❍
Acct AR, Acct Cash, and Acct Inc: These fields should only be completed if the SDS finance package is being
utilized.
■
Enter the receivable account to be debited by this fee.
4. Click
■
Enter the cash account to be debited by this fee. DO NOT USE AN INCOME ACCOUNT IF THIS IS USED.
■
Enter the revenue account to be credited by this fee. DO NOT USE A CASH ACCOUNT IF THIS IS USED.
■
Fee timing: This is a user-defined field that helps the user to keep track of when fees should be charged. (ex. 12
= monthly, 4 = quarterly, 9 = school year monthly, etc.) It is used in conjunction with tuition-based charges.
to save.
See also
Tuition/Student Fees Charge Type Code
Tuition/Student Fees Department Code
SDSStudentHelp
164 . Web School Office
Home > Web School Office > Tuition/Fee Processing > Mass Assignment of Charges and Fees
Mass Assignment of Charges and Fees
Option Descriptions
1. Select All and Deselect = this option is a quick way to check all or uncheck all of the charges to be assigned in this session.
2. Assign/Charge Fees and Unassign Unlocked Fees = these buttons do the actual assigning of fees to the students or removal of
charges from the students if a mistake is found.
3. Lock Batches and Unlock Batches = these buttons post or un-post the charges to the students’ accounts on a more permanent
basis.
Mass Assignment of Charges and Fees Steps
1. Login to WSO and click Tuition/Fee Processing |Mass Assignment of Charges and Fees.
2. Click on “Select All” to check all fees. Two items of note below:
❍ Do NOT check a fee that does NOT have a selection criteria associated with it!!
❍
Blacken the option “Create Statement Charges”.
3. Select a Charge Date – This is the date that will be used to “date” the charges; so it may be July on the calendar, but this
option allows the charges to be dated in August.
4. Select a Date Range to choose the student class assignments during this process.
❍ Note: The first time charges are being assigned for ALL students for ALL charges based on courses, uncheck the
option “Use date range to select student class assignments during the process.” This way the computer knows to charge
the students for all of their classes regardless of the date they signed up to take them. Otherwise no charges may be
assigned to the students.
5. Click Assign Charges – When the process is finished, a message will appear to indicate the process is complete and displays
the total amount charged for all students. Click OK and then click
to return to the previous screen.
❍ Note: Select Un-assign Unlocked Fees if you would like to un-assign any of the fees you just assigned.
6. Verify the accuracy of the charges by running and examining reports. Since all new charge reports contain only unlocked items,
be sure to run all charge reports needed before locking. The locking process will be explained after the section on verification
of the charges. Reports relating to charges include:
❍ Daily Charge List
❍
Charge Summary by Type
❍
Charge Summary by Student
❍
Student Summary by Charge Type
❍
Charge Analysis Report
7. Click “Lock/Unlock Batches” or click
to cancel.
8. Select the batches you would like to lock/unlock.
❍ Note: Changes to locked charges are restricted. Locked Charges may be Unlocked as needed. When financial
accounting is active the finance office has the option to transfer a general ledger transaction for “Locked Batches”. If the
Finance office creates/transfers activity to the accounting system the charges included will become permanent entries.
You will not be able to unlock those entries.
See also
Tuition/Student Fee Codes
Fees Adjustments and Payments
SDSStudentHelp
Web School Office . 165
Home > Web School Office > Tuition/Fee Processing > Fees Adjustments and Payments
Fees Adjustments and Payments
Adjusting Fees
1. Login to WSO.
2. Click on Tuition/Fee Processing |Fee Adjustments and Payments
3. Click on the Student Name to edit the account. You may use the name search box or id number search box to locate the
student faster. Click on the binoculars or hit enter to activate this search.
4. Click on Edit next to the fee to edit an individual charge.
5. Edit the Data (i.e. change the amount of the charge).
6. Click Save
7. Click
to save the corrections or Delete to remove the charge completely.
to Close the Edit box.
Add Tuition/Fee
1. Login to WSO.
2. Click on Tuition/Fee Processing |Fee Adjustments and Payments
3. Click on a Student’s Name. You may use the name search box or id number search box to locate the student faster. Click on
the binoculars or hit enter to activate this search.
4. Click
to add a fee.
5. Select a charge from the fee code drop box.
6. The remaining fields will complete with the related data automatically but can be edited to fit the situation (example: if you
need to change the amount you are charging this student for an item).
7. Click
to save or
cancel .
Add Payment
1. Payment by Family ID (setup steps below) and Student ID (do nothing)
❍ To turn on Pay by Family ID in Web Settings.
■
Open administrative utilities
❍
■
Click on web settings
■
Find the option “Enable Tuition/Fee payments by family” and set to Y
■
All siblings must have the same id# in the field “family id”. Change this in Demographics-All Fields view.
Payments will be divided equally among all family members when entered. This might result in one child ending up with
a credit balance while another child owes money.
2. Login to WSO.
3. Click on Tuition/Fee Processing |Fee Adjustments and Payments
4. Click on a Student’s Name, or enter a Family ID in the “ID:” box.
5. Click
to make a payment.
6. The fee code defaults to payment.
7. Enter the amount and pay type.
8. Click
to save.
Print Statement for a Single Student (quickly)
1. Login to WSO.
2. Click on Tuition/Fee Processing |Fee Adjustments and Payments
3. Click on a Student’s Name
4. Select the Statement format from the dropdown.
5. Click
to preview.
6. Print or Export.
SDSStudentHelp
166 . Web School Office
Reports
Print/Preview Tuition_Fee Reports from WSO |Reports |Student Reports |Tuition Fee Reports.
See also
Tuition/Student Fee Codes
Mass Assignment of Charges and Fees
SDSStudentHelp
Web School Office . 167
Home > Web School Office > Processing Center
Processing Center
Web School Office has many dynamic processing tools. A few to mention, Standard Goals and Objectives, Locker Assignment, Meal
and Miscellaneous Count Planner and many more to make processing streamline for your users.
Standard Goals and Objectives
This area of the system allows you to select from state specific standards and objectives or create your own. Teachers can then add
the standards and objectives to specific assignments in Teacher Web. Once these are entered you have the option to run several
different standard goal and objective progress/report cards, PERFECT for ELEMENTARY schools.
Student Locker Assignment
The assignment system provides a flexible and fast method to assigning student lockers and combinations. The lockers can be
assigned by location and zone (students can have lockers close to their homerooms). The system is geared off a locker master area
that accommodates multiple locker combinations that can be rotated annually.
Meal and Miscellaneous Count Planner
The meal/miscellaneous count is designed to allow users to get a count of items and send those counts to the office. Schools can use
this area to simply get counts of how many students want a hot lunch or customize it to get counts of specific menu items such as
salad bar, milk, pizza, etc. In addition to lunch/menu counts teachers can also use this area to send counts of non food items, as well,
such as school election candidates or even classroom supplies.
See also
Refresh Attendance Analysis
Compute GPA
Standards Goals and Objectives
Meal and Miscellaneous Count Planner
Locker Assignment
Data Exchange State and Federal Reporting
SDSStudentHelp
168 . Web School Office
Home > Web School Office > Processing Center > Refresh Attendance Analysis
Refresh Attendance Analysis
This area updates your attendance records for your reports. Make sure you have built your enrollment records on the web first. For
instructions see “Student Enrollment Processing.” Refresh Attendance Analysis needs to be run before running the attendance analysis
reports, grade reports, and some state reports. This should be run once a month or once a quarter.
1. Login.
2. Click on Processing Center |Refresh Attendance Analysis.
3. Select a School Location.
4. Select a Beginning and Ending Date.
5. Click on Ignore Half Day Absences (Only if you want this to apply.).
6. Choose the fields in the box on the left that you want to use for subtotals and move them to the right box by clicking on the
arrow pointing to the right.
❍ Note: Good fields to use are grade year, homeroom, and sex.
7. Select Refresh Attendance Analysis (This could take some time – watch the Internet Explorer progress bar.)
8. Acknowledge that the refresh has completed.
❍ Open the Reports |Student Reports folders on the menu tree.
❍
In box 1, click on Attendance Analysis.
❍
In box 2, click on Attendance Analysis Statistics (or Attendance Analysis)
❍
Optional steps for the statistics report would be to click the “Activate Sort Definition Area” button, then choose which
school location you require to print. This selection is done against the statistics table which is built from the
student_enrollment table so school_location is not the student’s "current" school location but whatever it was in
student_enrollment for that day. Close the sort definition area and proceed with the steps below.
❍
Click
to view the report.
See also
Compute GPA
Standards Goals and Objectives
Meal and Miscellaneous Count Planner
Locker Assignment
Data Exchange State and Federal Reporting
SDSStudentHelp
Web School Office . 169
Home > Web School Office > Processing Center > Compute GPA
Compute GPA
This section covers how GPA calculation works, a GPA worksheet and how to compute GPA.
See also
Refresh Attendance Analysis
Standards Goals and Objectives
Meal and Miscellaneous Count Planner
Locker Assignment
Data Exchange State and Federal Reporting
SDSStudentHelp
170 . Web School Office
Home > Web School Office > Processing Center > Compute GPA > How GPA Calculation Work
How GPA Calculation Work
This sections explains how GPA calculation works.
GPA Calculation / Honor Roll
GPA calculation and Honor Roll must be dealt with together because the Honor Roll is based on GPA and honor roll is determined
during the GPA calculation process. Be sure all the honor roll criteria is defined before proceeding with a GPA Calculation.
GPA calculation is processed after all grades have been entered and corrected.
Every grade area is re-calculated each time the GPA process is run, both the individual marking periods and those going into the
cumulative totals. This is done to pick up any changes made during the year.
Due to how this process works, be aware that if semester (final) grades are entered prior to the end of the semester, the cumulative
data will be updated to include those grades.
Example: a school that has rotating quarter classes that enters a quarter grade and a semester grade at the end of first quarter,
when the grades are calculated for first quarter, the semester grades will also be added to the cumulative values.
How GPA is Calculated
The Credit_for_GPA field, Marking_Periods_Covered (or Final_Grade_Marking_Period) field, and GPA_Weight_Code on the Course
Master and the grade points defined on the Grade Codes determine how GPA will be calculated.
For individual Marking Period GPA
●
On the course master the system will look at the Credit_for_GPA and divide the value by how many marking periods are listed
in Marking_Periods_Covered.
●
Then the system will take the value of the GPA_Weight_Code field on the course master and go to that grade weight column
on the grade codes for the appropriate grade points.
●
These two values will be multiplied together to get the grade points for that class.
●
This process is repeated for each class.
●
The Grade Points for each class are added and the Credits this marking period for each class are added.
●
The total Grade Points for each class are divided by the total Credits this marking period, the result being the student’s GPA.
Example: GPA calculation for one marking period at a school with four marking periods in the school year.
(A) From the Course Master
(B) From Grade Codes
** This field shows which marking periods the class receives a grade. In the above example, (12) means the class
receives a grade for the first and second marking periods. The Credit for GPA would then be divided by two. German is
listed as a full year course receiving a grade in each of the four marking periods (1234). The Credit for GPA would
then be divided by four. The Typing and P.E. are listed as marking period (1) only therefore; the Credit for GPA would
be divided by one.
Schools with six marking periods throughout the year would use the same process, adjusting the
Marking_Periods_Covered field. A course that covers the first three marking periods would have 123 and would divide
by three. A course that covers the last three marking periods would have 456 and would also divide by three. A full
year course covering all six marking periods would have 123456 in the Marking_Periods_Covered field and therefore
would divide by six.
For Cumulative GPA
The same process is used with the following two exceptions.
SDSStudentHelp
Web School Office . 171
1. The Credit for GPA is divided by how many values are in the Final_Grade_Marking_Period field.
2. The information for this term is then calculated with any balance forward the student may have.
See also
GPA Worksheet
How to Compute GPA
SDSStudentHelp
172 . Web School Office
Home > Web School Office > Processing Center > Compute GPA > GPA Worksheet
GPA Worksheet
GPA Worksheet
The above page gives you an example of how GPA is calculated. Below are blank tables for you to calculate your own GPA. Simply
print off this page and fill in.
(A) From the Course Master
(B) From Grade Codes
(A) From the Course Master
(B) From Grade Codes
See also
How GPA Calculation Work
How to Compute GPA
SDSStudentHelp
Web School Office . 173
Home > Web School Office > Processing Center > Compute GPA > How to Compute GPA
How to Compute GPA
This process computes the GPA for each marking period and adds the comment descriptions to the bottom of the report card. Prior to
computing the GPA for report cards, you should do the following steps:
1. Login Web School Office |Processing Center |Compute GPA.
❍
2. Before you calculate GPA make sure in Data Entry and Changes |Master File, Code Entry and Entry Changes |Application =
Grade Reporting |Entry Option = Grade Area Setup.
3. If you do NOT want a particular grade or comment area to show on the report card, change the column “print on report card”
to FALSE.
❍
4. Save and return to Processing Center |Compute GPA.
SDSStudentHelp
174 . Web School Office
❍
5. Choose the school location (if it is NOT your default school).
6. Choose/Select/Check, Use GPA to rank students, Use grade points to rank students, Run honor roll exclusions after calculation,
User schedule overrides, Rank ties take only one place, Rank only Current Year Students.
7. Click on Compute GPA.
8. To calculate the GPA for only 1 student, enter that student’s ID number in the first box next to the words “Run for this Student
ID Only:”
9. Choose the options as needed:
1. Use GPA to rank students OR Use grade points to rank students: when the ranking portion is run, the rank will
be based on GPA or the grade points, depending on your selection.
2. Run honor roll exclusions after calculations: after the honor roll is run, if this option is checked, students who have
some of the honor roll exclusions will be removed from the honor roll lists.
3. Use schedule overrides: this option is checked only if you have students who should receive credit for a course that
normally would NOT be awarded credit or the credit for a particular student is more than other students in the same
class section.
4. Rank ties take only 1 place: by checking this option, if 2 students tie with their GPA, they will be listed with the same
ranking place (i.e. 4th) and the next student will be 5th. If you uncheck this option, then the tied students will have the
same rank (i.e. 4th) and the next student will be 6th (no 5th place student will be listed).
5. Rank only current year students: by checking this option, only current students will be ranked. If unchecked,
students who graduated in previous school years will be ranked also.
6. GPA rounding – GPA calc: enter the number of decimal places (1-4) to be used in rounding the GPA values.
7. GPA rounding – Rank: enter the number of decimal places (1-4) to be used in rounding the GPA values for rank
purposes.
8. Honor roll minimum: enter the number of credits in which a student must be enrolled in order to be considered for the
honor roll. The purpose of this is to eliminate part time students from your honor roll if desired.
■
Course type code from course master, GPA weight code from course master, leave note column unchanged:
select the appropriate option base on what you do with transcripts.
■
Course type code: use if you utilize the graduation requirements report.
■
GPA weight code: use if you want to notate that a course was on a weighted grade scale or not.
■
Leave unchanged: if neither of the other options are true, use this option
10. Click the Calculate GPA & Honor roll button. The GPA for each marking period will be calculated, even if that marking period
has passed (to catch any grade changes). Also during the calculation process, grades will be posted/re-posted to the
transcript, if appropriate. The comment descriptions will also be inserted for printing on the report cards. If a comment column
was turned “off” in step 6, then the description for that comment will NOT print now.
11. After the GPA calculation is finished, you may process report cards.
12. You can also click the “rank students” button to rank the students based on their new GPAs. Be sure to highlight the grade
levels you want to rank.
SDSStudentHelp
Web School Office . 175
See also
How GPA Calculation Work
GPA Worksheet
SDSStudentHelp
176 . Web School Office
Home > Web School Office > Processing Center > Standards Goals and Objectives
Standards Goals and Objectives
For schools using goal based reporting for report cards, this is the area used to define your standards, goals, and objectives. We first
suggest importing your state standards by following the instructions below. If your state does not have standards to import or you will
be using your own District or School standards that is fine. You can simply add them by following the instructions “Add a New
Standard, Goal, or Objective”. Once completed, teachers may utilize the goal drop boxes in the gradebook assignment creation
screen.
Add State Standards
The Michigan and Illinois standards are available for K-8 and HS Math and English. To add these follow the below instructions:
1. Enter WSO |Administrative Utilities |Control Center |Toolbox
2. Enter in the key MASS
3. Read the message and click OK.
4. Select Data Mass Load/Swap Table.
5. Click on the button to “Lock Users out of SDS” (You only need to do this if you think someone is working in state reporting.)
6. Read the message and click OK.
7. Place a CHECK MARK in “Empty Table before Import” – if you do not do this you will get an error.
8. Read the message and click OK.
9. Select the sdscplan in the first box “Load Tables”.
10. In the next box “Tables Available” select MI_Grade_Book_Objectives or IL_Grade_Book_Objectives depending on your state.
11. Click the right arrow to move that selection to the 3rd box “Tables to Import”. Always click on the MI_Grade_Book_Objectives
or IL_Grade_Book_Objectives in the third box so you can see the fields in the 4th box “Fields to Import”.
12. Click the Import Data button on the right.
❍
13. Once completed click on “Unlock users.” (Only complete this if you locked them out.).
14. Go to Processing Options |Standards Goals and Objectives and click on the first dropdown box to verify they are imported.
Add a New Standard, Goal, or Objective
These instructions will help you add a new standard, goal or objective to the system so your teachers can use it when setting up
gradebook assignments. If your State Standards are not available for import you may enter them here. If you are using your own
District/School Standards they must be entered here. This is necessary if you are using the goal based report card. These must be
setup for teachers to add them to their assignments in gradebook for Goal-based reporting.
1. Enter WSO |Processing Center |Standards, Goals and Objectives
2. If you are starting from scratch you will see a row of 3 boxes. Enter data in box 2 “Enter a short description”. Enter data in box
3 “enter a detailed objective description”. Click on the “Add” button for step 4 “Push to Add/Save”. Once your entry is saved it
will appear on that row in the box 1 dropdown “Select a Standard”.
3. Select a standard in the first row and the next level to the standards will appear in a row below. Follow the steps above (enter
information in boxes 2 & 3 then push the “Add button”). Your saved entry will appear in the first dropdown on this row “Top
Standard Level”.
4. Select a “Top Standard Level” from row 2. A third row for “Sub Level 2” will appear. Add the next level of standard to the
selected “Top Standard Level” following the same steps listed previously. Repeat for each “Top Standard Level”.
5. Repeat the process from step 4 for each level of your Standards until all levels in your hierarchy are completed. Additional
rows/levels will appear as each level is completed.
6. To print a report of the standards you defined, click
SDSStudentHelp
at the top of the screen.
Web School Office . 177
See also
Refresh Attendance Analysis
Compute GPA
Meal and Miscellaneous Count Planner
Locker Assignment
Data Exchange State and Federal Reporting
SDSStudentHelp
178 . Web School Office
Home > Web School Office > Processing Center > Meal and Miscellaneous Count Planner
Meal and Miscellaneous Count Planner
The meal/miscellaneous count area is designed to allow users to get counts of items and send those counts to the office. Schools can
use this area to simply submit counts of students ordering a hot lunch, or customize it to get counts of specific menu items such as
salad bar, milk, pizza, etc. In addition to lunch/menu counts, teachers can also use this area to submit counts of non food items as
well. Non food items could include school election candidates or even classroom supplies. Setup of count items is done from within
Web School Office.
Step 1 – Define Your Meal and Miscellaneous Groups
1. Login Web School Office| Data Entry and Changes |Master File and Code Entry and Changes
❍ Note: If you’re regular teacher code is 1 you will need to use a different ID as the meal/count setup will not react to the
user code of 1.
2. Select Meal Codes from the Application dropdown at the top of the page; select Meal Codes and Miscellaneous Groups
from Entry Options dropdown box.
3. Click
to add a group.
4. In the boxes on the right fill in:
❍ Meal Group Number: you can enter 2 character max
❍
Meal Group Description: examples are; “breakfast”, “lunch”, “elections”, “supplies” (In step 2, you will identify specific
items).
❍
Parental View: if using Parent Connect schools can show the calendar and menu. If you do not want a particular
group to be viewable on parent connect then add an “N” in that field, if it is to be viewable on parent connect make it
“Y”.
❍
Click to
save.
■
Continue adding groups until you have the groups you will need. Additional groups can be added at any time as
the need arises.
Step 2 – Define Your Meal/Miscellaneous Items
1. Login to Web School Office |Data Entry and Changes |Master File and Code Entry and Changes
❍ Note: If you’re regular teacher code is 1 you will need to use a different ID as the meal/count setup will not react to the
user code of 1.
2. Select Meal Codes from the Application dropdown; select Meal Codes and Miscellaneous Count Items from the Entry Options
dropdown selections.
3. Click
to add a menu or count item.
4. In the boxes on the right enter in the following:
❍ Meal Item Number: leave blank as it will be automatically assigned when you save your item.
❍
Meal Item Description: this is the description teachers’ will see in Teacher Web. (i.e. Water)
❍
Meal Item Price: enter if applicable; for example class elections may not have a price or water may be 1.25.
SDSStudentHelp
Web School Office . 179
❍
Meal Item Group: choose from available groups, as entered in step 1. (i.e. Breakfast – Main Course ~ B1)
5. Meal count message: if you need to give additional information about an item, you can put remarks in this area.
6. Click
to save.
7. To edit any item from the main list, click on that item number in the list to the left, make the modification to that item to the
right and then click
to save.
8. To delete any item from the main list, click on that item number in the list to the left, and then click
at the top of the page.
❍ Note: Items you can put in this list could be specific menu items for lunch (taco, spaghetti, chicken sandwich, etc) or be
as general such as adult lunch, child lunch, milk and sack lunch. You can also include survey questions, school supply
needs, or more.
❍
After Item was saved, see below how the item number 64 was assigned to the item automatically.
Step 3 – Setup Lunch Count for Teachers - Add Items to Calendar
Below are the steps on how to create a menu for each calendar date. Teachers will be able to view the current day’s items when
clicking on the Meal and Miscellaneous Counts
in Teacher Web.
1. Login to Web School Office |Processing Center |Meal and Miscellaneous Count Planner
2. Select a School Location
❍ If all locations will have the same menu setup you can manage the menu planner for all locations. Put a check in the box
titled “Add/Change/Delete for All Locations”
3. Choose the date on the calendar by navigating to the correct month and clicking on a date. The selected date will highlight.
4. In the box "Items for", choose from your Meal and Miscellaneous Count Groups. The Menu Items for that group will appear on
the list below.
❍
SDSStudentHelp
180 . Web School Office
5. Select menu items from the list, and then click to add these items to the menu for the selected date.
6. In the box "Items for" choose another Group and Menu Items for which you are taking a count.
7. Click
8.
to add these items to the menu for the selected date.
= Clicking on this icon will clear all selected items for the month.
9. Continue adding menu items until your menu for the date listed to the right is complete.
Step 4 – Copy Menu
Menus may be copied from one day to another or from one school to another in the same database by clicking on
“Activate copy
menu between days and schools”. If you are ordering general items, such as “hot lunch” or “milk”, you can build your menu for one
day and copy this menu to all days. You may also copy an entire menu from one school to another school in your district database.
1. Select the school you will copy the menu FROM at the top of the page.
2. Click on the
“Activate copy menu between days and schools” button.
3. The screen will refresh with a 2nd calendar in the bottom half of the screen. Choose the school location to which you wish to
copy.
4. Choose one of the radio button options to the right of the school copying TO
5. Click
next to the school you are copying to to copy the menu to that school with your selected options.
Step 5 – Teacher Entry Steps – Add Counts
1. Enter Teacher Web.
2. Click
.
3. Today's date will be the default.
4. On the right side of the screen should be the items "to be counted" for the day.
5. Enter the counts for each item ordered.
6. Click
to save the counts.
7. Click
to exit Meal and Miscellaneous Count Entry.
SDSStudentHelp
Web School Office . 181
Step 6 – Office Meal Reports
Below are the steps to take to run reports for Meal and Miscellaneous Counts. Meal counts are run through Web School Office and not
through Teacher Web.
1. Enter WSO |Reports |Student Reports.
2. In box 1, Report Groups, select Meal Counts.
3. In box 2, Select a Report, select Meal and Miscellaneous Count by Location or by Teacher.
4. Click
to preview the report.
5. Enter the date(s) for which you are taking the lunch count. You can run this for the week, day, or month.
6. Print the report.
See also
Refresh Attendance Analysis
Compute GPA
Standards Goals and Objectives
Locker Assignment
Data Exchange State and Federal Reporting
SDSStudentHelp
182 . Web School Office
Home > Web School Office > Processing Center > Locker Assignment
Locker Assignment
This section will first give you an overview of the locker assignment program and some items to think about and then will get into the
details of setting up your lockers and assigning them.
Overview
Lockers and the associated combinations need to be entered in the system. This can be done using the “Data Entry and Changes” in
WSO or the data can be imported. If you have your locker numbers and combinations in a standard format, comma separated value
(CSV) contact SDS support for assistance.
The assignment system provides a flexible method for Locker Assignment.
1. After you select the school you wish to process two additional tabs will display.
2. Select the assignment tab.
See also
Refresh Attendance Analysis
Compute GPA
Standards Goals and Objectives
Meal and Miscellaneous Count Planner
Data Exchange State and Federal Reporting
SDSStudentHelp
Web School Office . 183
Home > Web School Office > Processing Center > Locker Assignment > Setting up the Locker Master
Setting up the Locker Master
The first step is to create a master file of all available lockers and the associated combinations must be entered into the system. This
can be done using the “Data Entry and Changes” in WSO or the data can be imported. If you have your locker numbers and
combinations in a standard format, comma separated value (CSV) contact SDS support for assistance. When the program is run
students will be assigned to lockers by bank, alphabetical, or other area.
1. Enter WSO |Data Entry and Changes |Master File and Code Entry and Changes
2. In the application drop down box, select “All Entry Options”
3. In the entry options drop down box, select “Locker Master - All Fields” or you can select “Locker Master – Basic Fields” to only
see the necessary entry fields.
❍
4. Click
to add a locker’s information.
5. Something to keep in mind when you are setting up the locker assignment system, an Area Location field is available for each
locker. Also an Area Location field is available for each homeroom in the Room master area.
❍ A suggestion is to establish several areas or zones within your school building, possibly 10 to 15 areas.
❍
Then enter the Area Location for each Locker in the Locker Master area.
❍
Also enter the Area Location in the Room master for each Homeroom.
❍
You will then be able to sort the lockers and students by Area Location.
❍
The lockers will then be assigned in close proximity to the student’s homeroom. This will reduce the possibility of a
student with a homeroom and locker on opposite sides of the building.
■
Locker Number: the number assigned to the locker.
■
School Location: the school location in which the locker is located.
■
Location Area: use this to indicate the “freshman hallway”, “sophomore hallway”, etc.
■
Lock Type: indicate the type of lock the locker has.
■
In Service YN: Y=the locker is in working condition; N=the locker is not working.
■
Serial Number: enter a serial number if applicable (optional).
■
Manufacturer: enter a manufacturer if desired (optional).
■
Locker Condition: enter a short description of the locker’s condition (optional).
■
Notes: enter any type of note (optional).
■
ID Number: leave this field blank; the locker assignment process will complete this field.
■
Locker combination: leave this field blank; the locker assignment process will complete this field and move the
information to the appropriate demographics field when the process is run
■
Active combo number 1-9: leave this field blank; the locker assignment utilities will complete this field later.
■
Combo 1 1: enter the 1st number of the 1st combination of this locker (assuming the locker has more than 1 set
of combinations).
■
Combo 2 1: enter the 2nd number of the 1st combination of this locker.
■
Combo 3 1: enter the 3rd number of the 1st combination of this locker.
■
Combo 1 2: enter the 1st number of the 2nd combination of this locker.
■
Combo 2 2: enter the 2nd number of the 2nd combination of this locker.
■
Combo 3 2: enter the 3rd number of the 2nd combination of this locker.
❍
Keep repeating for up to 9 different locker combinations for each locker.
❍
Leave the previous student ID number fields empty – used by the program.
6. Click
to save the information for this locker.
7. Continue until all lockers are added.
SDSStudentHelp
184 . Web School Office
See also
Assigning Lockers to Students in Mass
Locker Utilities
Assigning a Locker to a Single Student
To Change/Move a Student’s Locker Assignment
Locker Reports
SDSStudentHelp
Web School Office . 185
Home > Web School Office > Processing Center > Locker Assignment > Assigning Lockers to Students in Mass
Assigning Lockers to Students in Mass
After you have entered in your locker numbers and combinations in Data Entry and Changes or has SDS import them for you, proceed
with the following:
1. Enter WSO |Processing Center |Locker Assignment
2. Select the School Location you wish to process in the drop down box at the top of the screen.
3. Click on the Locker Assignment tab.
❍ Open lockers display on the left and students without lockers on the right.
4. Check the lockers you wish to have students assigned to and Check the students you want to assign.
❍ Lockers will be assigned in the order the lockers and the students are displayed.
❍
Note: Checking and Un-Checking both have quick check options. The Range options will look for the first checked line
and continue checking until it finds another check. The range is useful when you wish to control a large sorted group of
students to a specific group of lockers.
■
For example all the incoming students to lockers from 1400 to 1699.
■
Sort the students by grade, Sort the Lockers by Locker Number.
■
Check locker 1400, check locker 1699 push the range Link.
■
Check the first student in the freshman class, Check the last student in the freshman class, and push the range
Link.
■
5. The number of lockers available and the number of students to be assigned. Push the Assign Link. Note: This Link is only
available if you have enough lockers available for the students being assigned.
6. It should be noted that the locker assignment program records student information in the Locker Master.
❍ If you have fields in the student demographics area used on schedules or other reports you have two
options.
7. Modify the reports to link to the locker master and print the locker number and combination from that area or use the utility
available under the “Locker Utilities” tab on the above screen to synchronize the student demographics area with the locker
area.
❍
8. A utility/conversion option is available to post locker information from the student demographics area to the locker master. This
utility is useful if you have in the past recorded locker numbers and combinations for your students in the demographics area.
See also
SDSStudentHelp
186 . Web School Office
Setting up the Locker Master
Locker Utilities
Assigning a Locker to a Single Student
To Change/Move a Student’s Locker Assignment
Locker Reports
SDSStudentHelp
Web School Office . 187
Home > Web School Office > Processing Center > Locker Assignment > Locker Utilities
Locker Utilities
Locker Utilities provides you with the options of synchronizing the Locker Master which stores the locker numbers and combinations to
the Demographics and the ability to roll selected combination to the active Locker Combination field.
Synchronize Locker Master to Demographics
1. Enter WSO |Processing Center |Locker Assignment |Locker Utilities
2. Under the “options” area, choose the appropriate demographics locker number and locker combination fields on the right side
of the screen you would like the Locker Master to post to.
3. Click the Synchronize Locker Master to Demographics link under the Utility Description column.
❍ Locker information has now moved to the demographics fields to be printed on schedules or other reports that has
those fields on them.
❍
Note: If you have fields in the student demographics area used on schedules or other reports you have two options.
1. Modify the reports to link to the locker master and print the locker number from that area…
or
2. Continue to use the demographics fields to print the locker information.
Roll selected combination to the active Locker Combination field.
1. Enter WSO |Processing Center |Locker Assignment |Locker Utilities
2. Select the locker combination to be activated, located in the bottom right corner under the options column. This process
tells the computer which combination is active for the school year.
❍ In setting up the locker master, you had the option to enter up to NINE different combinations, so this utility tells the
computer which combination is active for the year.
3. Click on “Roll selected combination to the active Locker Combination field”.
See also
Setting up the Locker Master
Assigning Lockers to Students in Mass
Assigning a Locker to a Single Student
To Change/Move a Student’s Locker Assignment
Locker Reports
SDSStudentHelp
188 . Web School Office
Home > Web School Office > Processing Center > Locker Assignment > Assigning a Locker to a Single Student
Assigning a Locker to a Single Student
1. Enter WSO |Processing Center |Locker Assignment
2. Choose the School Location you wish to process in the drop down box at the top of the screen.
3. Click on the Locker Assignment tab.
4. Check the locker on the left to which you wish to assign to a student.
5. Check the student on the right to whom you wish to assign a locker.
6. Click on Evaluate Selections.
7. After the screen refreshes, click on Assign # student(s).
8. Click on the Locker Utilities tab.
9. Under the “options” area, choose the appropriate demographics locker number and locker combination fields on the right side
of the screen.
10. Click on the link “Synchronize Locker Master to Demographics”.
See also
Setting up the Locker Master
Assigning Lockers to Students in Mass
Locker Utilities
To Change/Move a Student’s Locker Assignment
Locker Reports
SDSStudentHelp
Web School Office . 189
Home > Web School Office > Processing Center > Locker Assignment > To Change/Move a Student’s Locker Assignment
To Change/Move a Student’s Locker Assignment
1. Enter WSO |Processing Center |Locker Assignment
2. On the left, put a check in the student’s original locker assignment on the left.
3. Click on Evaluate Selections.
4. After the screen refreshes, click on Un-assign # student(s).
5. On the left, put a check in the box for the NEW locker for the student.
6. Put a check in the box next to the student’s name on the right.
7. Click on Evaluate Selections.
8. After the screen refreshes, click on Assign # student(s).
9. Click on the Locker Utilities tab.
10. Under the “options” area, choose the appropriate demographics locker number and locker combination fields on the right side
of the screen.
11. Click the option to synchronize the demographics locker fields.
See also
Setting up the Locker Master
Assigning Lockers to Students in Mass
Locker Utilities
Assigning a Locker to a Single Student
Locker Reports
SDSStudentHelp
190 . Web School Office
Home > Web School Office > Processing Center > Locker Assignment > Locker Reports
Locker Reports
Locker reports are located in Reports |Student Reports |Miscellaneous
●
Locker Master List by ID = Swb_loc_Mas_by_ID.rpt
●
Locker Master List = Swb_loc_Master.rpt
●
Locker List = Swb_locker.rpt
●
Locker Check List = Swb_loc_check.rpt (THIS ONE IS NOT LISTED BUT IS IN YOUR STUDENT DIRECTORY. IT MUST BE
CUSTOMIZED TO MATCH YOUR SCHOOLS FIELDS. You can request this though SDS Support).
Note: if you run these reports and you do not see any locker numbers or combinations, verify you have
“Synchronized Locker Master to Demographics.”
See also
Setting up the Locker Master
Assigning Lockers to Students in Mass
Locker Utilities
Assigning a Locker to a Single Student
To Change/Move a Student’s Locker Assignment
SDSStudentHelp
Web School Office . 191
Home > Web School Office > Processing Center > Data Exchange State and Federal Reporting
Data Exchange State and Federal Reporting
State SIS Reporting is done with simple clicks of your mouse. These reports are instantly updated from Web School Office and place
in the proper format for your state. Even changes to your state reporting fields are accomplished with a simply download from SDS.
Then, the new fields are added to your SIS reporting. By being web based and in the central database also helps to make your state
SIS reporting quick and accurate for your total district.
See also
Data Exchange State and Federal Reporting
Illinois
Indiana
Michigan
SDSStudentHelp
192 . Web School Office
Home > Web School Office > Processing Center > Data Exchange State and Federal Reporting > Data Exchange State and Federal Reporting
Data Exchange State and Federal Reporting
Under the processing center, this area is used to gather data for exporting to another program or an output file for upload to your state.
●
First, select your state or company from the drop down box. Your state will display by default.
●
To the right of the state is a drop down box that lists all of the state reports available in SDS.
●
Choose the report to be exported.
After the report has been chosen, the screen refreshes to show several more fields. Complete the following areas:
1. Report export file name: enter the name of the file to be created when ready to export.
2. File export format: choose the output file type from the drop down list.
❍ Note: A quick note on CSV (comma delimited | comma separated values) file format.
SDS uses the method to enclose each data element with double quotes. This is a standard operation to allow for the export of
commas and other special symbols. Programs which import CSV files remove the double quotes before processing.
❍
Two examples:
The wrong way to format a CSV file:
Vendor_Number,Vendor_Name,Address_line1,Address_line2,Address_line3,City,State,Zip_Code,Phone_Number,Fax_Number
00001,AGRESSIVE ELECTRIC, INC,30W414 ROOSEVELT ROAD,WEST CHICAGO ILLINOIS 60190,,,,,,
00010,AIMS EDUCATION FOUNDATION,69 W. WASHINGTON ST,MAIL STOP A23J,CHICAGO, IL 60602,,,,,
00102,AIR FILTER SUPPLY CO.,PO BOX 26346,,,RICHMOND,VA,23286-8224,,
❍
The right way to format a CSV file:
"Vendor_Number","Vendor_Name","Address_line1","Address_line2","Address_line3","City","State",
"Zip_Code","Phone_Number","Fax_Number"
"00001","AGRESSIVE ELECTRIC, INC","30W414 ROOSEVELT ROAD","WEST CHICAGO, ILLINOIS 60190","","","","","",""
"00010","AIMS EDUCATION FOUNDATION","69 W. WASHINGTON ST","MAIL STOP A23J","CHICAGO, IL 60602","","","","",""
"00102","AIR FILTER SUPPLY CO.","PO BOX 26346","","","RICHMOND","VA","23286-8224","",""
❍
Notice the comma in the company name and between Chicago and IL.
❍
In our export, the commas will remain in the fields as intended. The double quote option is the convention that makes comma
delimited data a format that works as a simple and reliable data interchange format.
3. Data selection options: click the A->Z button to design a query statement to export only the necessary students.
4. Create export file: click this icon to actually export the data. It is really your LAST step in the process.
5. Export design options: this button opens a new dialog window to match your SDS fields from various tables to the fields needed by
the state or other program.
❍ Use the yellow triangle icon by the red #1 to CREATE NEW FIELDS in your database if a field does not exist. Check with the
district computer technician or other employee before adding a new field.
❍
Select the appropriate table from the drop box in area #2: Select a table to store data.
❍
Select the appropriate data field from the selected table in area 2 to match to a field in the grid below this area.
❍
Click
❍
The field from SDS will be listed in the column “SDS field name” and the source table will be listed in the column “SDS table
name”.
❍
In the column “default if blank”, enter a value to be exported for ALL students who have blank data in the selected field.
next to the field in the grid of STATE fields to match YOUR field to it.
6. Basic report information: this button opens a new dialog window to complete your district’s information.
❍ Basic reporting information available for this and other reports: this area is used to edit the school district’s name, address, and
other valuable information required by your state.
❍
Complete this information as needed.
❍
To match basic report information to a report field, select *default values from the drop down box in area #2: Select a table to
store data.
❍
Next, select the appropriate basic field from the drop down box in area #3: Fields in Selected Tables.
❍
Click next to the field in the grid of STATE fields to match the default value to it.
❍
Save report changes: click
See also
Illinois
Indiana
Michigan
SDSStudentHelp
to save any changes made to the report setup.
Web School Office . 193
Home > Web School Office > Processing Center > Data Exchange State and Federal Reporting > Illinois
Illinois
This section provides a quick overview of Illinois state reports. You access theses reports enter Web School Office |Processing Center
|Data Exchange, State and Federal Reporting.
See also
Data Exchange State and Federal Reporting
Indiana
Michigan
SDSStudentHelp
194 . Web School Office
Home > Web School Office > Processing Center > Data Exchange State and Federal Reporting > Illinois > Assessment Correction
Assessment Correction
This file format pertains to the data submitted to ISBE SIS to correct student information for the final data files for Adequate Yearly
Progress (AYP) past the “Final File Extract – Data for AYP” deadlines.
This section only applies to those students who were involved in the spring assessment testing (graded 3-8 and 11)
For more information on the state’s requirements on SIS reporting, use this link to access the state’s website:
http://www.isbe.net/sis/
You will need to have fields in your database to enter all the state required values into for this report. Many of these fields already
exist in your database. If you need to add fields to your database to house state reporting data, follow the instructions below. It is
recommended that you check with your district computer technician or database administrator prior to adding fields.
1. Open Processing Center|Data Exchange, State & Federal Reporting
2. Choose Illinois
3. Choose Assessment Correction
4. Assign an SDS Field to each of the state fields listed in the Descriptive Field Name column
1. Click the Export Design Options button
2. Select the appropriate table from the drop box in area #2: Select a Table to Store Data.
3. Select the appropriate data field from the selected table in area 2 to match to a field in the grid below this area.
4. Click the yellow button in the “Assign” column next to the appropriate state field to match the field you selected in step
“c” to it.
5. The field from SDS will then be listed in the column “SDS field name” and the source table will be listed in the column
“SDS table name”.
6. Leave any state fields for which you don’t have fields in your database setup unassigned.
7. Click the yellow triangle button under #1 to create fields in your database for the unassigned fields.
8. You will need to have all users out of the program prior to clicking this button.
9. Database fields will be created in the table selected in #2 and assigned to the state fields.
Once you have all the necessary fields in your database, state required data values need to be entered in the state reporting fields for
students. This is done in the All Demographics Fields data entry screen in Data Entry and Changes |Student Information. To make
data entry easier for this, you might want to use Data View Definition in Administrative Utilities to create a view containing just the
state reporting fields.
If there are fields where the data to be entered is the same for the majority of your students, you have the option of leaving those
fields blank for all students except those who require a value different from the majority. Then on the Data Exchange, State and
Federal Reporting screen, you would fill in the data value for the majority of the students in the Default if Blank Field.
For example, if all but 10 of my students require a value of 01 in IEP Indicator, I would fill in the IEP Indicator field in Student
Information with the required value for those 10 students but leave it blank for the rest of the students. Then when creating the
export file, on the Data Exchange, State and Federal Reporting screen, I would match the state’s IEP Indicator field to the SDS IEP
Indicator field and enter 01 in the Default if Blank box. When the program creates the export file, the 01 will be placed in the IEP
Indicator position for the students where the IEP Indicator field is blank.
To create your report for the state:
1. Open Processing Center|Data Exchange, State & Federal Reporting
2. Choose Illinois
3. Choose Assessment Correction
4. Assign an SDS Field to each of the state fields listed in the Descriptive Field Name column
1. Click the Export Design Options button
2. Select the appropriate table from the drop box in area #2: Select a table to store data.
3. Select the appropriate data field from the selected table in area 2 to match to a field in the grid below this area.
4. Click the yellow button in the “Assign” column next to the appropriate state field to match the field you selected in step
“c” to it.
5. The field from SDS will then be listed in the column “SDS field name” and the source table will be listed in the column
“SDS table name”.
6. In the column “Default if Blank”, enter a value to be exported for ALL students who have blank data in the selected field.
7. Placeholder fields should be left un-assigned.
SDSStudentHelp
Web School Office . 195
5. Complete the Basic Report Information
1. Click the Basic Report Information button to open the basic information area.
■
Complete all the boxes with the appropriate information
■
In Other Values 1, enter your Type and School Code (the last 6 characters of the RCDTS code).
■
When the export file is created, the program will combine the values from the District Number, County
Code, Regional Code, and Other Values 1 boxes to create the RCDTS number in the report header.
6. Click the Save Report Changes button to save changes made to the report setup.
7. Select the students you wish to include in your report.
1. Click the Data Selections Option (A to Z) button at the top of the screen.
2. Set up the appropriate selection for the students you want to include in the report. Example: If you only want to include
students from a specific school location, set up a selection for School Location X. If you want to only send a specific
student, set up a selection for ID_Number X.
To setup a selection:
1. Choose the table that contains the field you wish to select on
2. Choose the field you wish to select on
3. Highlight the field values you wish to include
4. Click the right pointing arrow button to move the values to box #4
5. Choose a Record Selection Option (example: if choosing a specific school location(s), choose “is in list”)
6. Click the Add to Sort Definition button to save your sort.
❍ Setup and save additional selections as desired.
❍
To include only current students, click the blue link “Adjust Selection to Include Only Active Students”
7. Create your export file.
❍ Click the Create Export File button at the top of the screen.
❍
Read the message and write down the name of the file it tells you to rename the exported file to. Also, check that the
correct number of students are being exported.
❍
Click OK on the message.
After creating the file, it will appear at the top of the screen. Click the “Open” file folder button. Choose to save the file. Navigate to
where you want to save the file, example: My Desktop or My Documents. You must save the file with the filename that you wrote
down from the message in step 7 bullet 2 above.
Once the file is saved, if you wish to open it and check it before sending it to the state, use My Computer or Window Explorer to
navigate to the file. Right click on it, choose Open With and choose Notepad. This will open the file in the format required by the state
so that you can check that it contains the correct students and data elements.
See also
Assessment Pre-ID
ELL
Exit Student Enrollment
Student Demographics
Student Discipline
Demographics and Early Childhood
Early Childhood
Pre-K Follow-Up
Early Childhood Outcomes
SDSStudentHelp
196 . Web School Office
Home > Web School Office > Processing Center > Data Exchange State and Federal Reporting > Illinois > Assessment Pre-ID
Assessment Pre-ID
This file format pertains to the data submitted to ISBE SIS when submitting information for Assessment Pre-ID labels. This section
only applies to those students who were involved in the spring assessment testing (graded 3-8 and 11).
For more information on the state’s requirements on SIS reporting, use this link to access the state’s website:
http://www.isbe.net/sis/
You will need to have fields in your database to enter all the state required values into for this report. Many of these fields already
exist in your database. If you need to add fields to your database to house state reporting data, follow the instructions below. It is
recommended that you check with your district computer technician or database administrator prior to adding fields.
1. Open Processing Center|Data Exchange, State & Federal Reporting
2. Choose Illinois
3. Choose Assessment Pre-ID
4. Assign an SDS Field to each of the state fields listed in the Descriptive Field Name column
❍ Click the Export Design Options button
❍
Select the appropriate table from the drop box in area #2: Select a Table to Store Data.
❍
Select the appropriate data field from the selected table in area 2 to match to a field in the grid below this area.
❍
Click the yellow button in the “Assign” column next to the appropriate state field to match the field you selected in step
“c” to it.
❍
The field from SDS will then be listed in the column “SDS field name” and the source table will be listed in the column
“SDS table name”.
❍
Leave any state fields for which you don’t have fields in your database setup unassigned.
5. Click the yellow triangle button under #1 to create fields in your database for the unassigned fields.
1. You will need to have all users out of the program prior to clicking this button.
2. Database fields will be created in the table selected in #2 and assigned to the state fields.
Once you have all the necessary fields in your database, state required data values need to be entered in the state reporting fields for
students. This is done in the All Demographics Fields data entry screen in Data Entry and Changes |Student Information. To make
data entry easier for this, you might want to use Data View Definition in Administrative Utilities to create a view containing just the
state reporting fields.
If there are fields where the data to be entered is the same for the majority of your students, you have the option of leaving those
fields blank for all students except those who require a value different from the majority. Then on the Data Exchange, State and
Federal Reporting screen, you would fill in the data value for the majority of the students in the Default if Blank Field.
For example, if all but 10 of my students require a value of 01 in IEP Indicator, I would fill in the IEP Indicator field in Student
Information with the required value for those 10 students but leave it blank for the rest of the students. Then when creating the
export file, on the Data Exchange, State and Federal Reporting screen, I would match the state’s IEP Indicator field to the SDS IEP
Indicator field and enter 01 in the Default if Blank box. When the program creates the export file, the 01 will be placed in the IEP
Indicator position for the students where the IEP Indicator field is blank.
To create your report for the state:
1. Open Processing Center|Data Exchange, State & Federal Reporting
2. Choose Illinois
3. Choose Assessment Pre-ID
4. Assign an SDS Field to each of the state fields listed in the Descriptive Field Name column
1. Click the Export Design Options button
2. Select the appropriate table from the drop box in area #2: Select a table to store data.
3. Select the appropriate data field from the selected table in area 2 to match to a field in the grid below this area.
4. Click the yellow button in the “Assign” column next to the appropriate state field to match the field you selected in step
“c” to it.
5. The field from SDS will then be listed in the column “SDS field name” and the source table will be listed in the column
“SDS table name”.
6. In the column “Default if Blank”, enter a value to be exported for ALL students who have blank data in the selected field.
7. Placeholder fields should be left un-assigned.
SDSStudentHelp
Web School Office . 197
5. Complete the Basic Report Information
1. Click the Basic Report Information button to open the basic information area.
6. Complete all the boxes with the appropriate information
1. In Other Values 1, enter your Type and School Code (the last 6 characters of the RCDTS code).
2. When the export file is created, the program will combine the values from the District Number, County Code, Regional
Code, and Other Values 1 boxes to create the RCDTS number in the report header.
7. Click the Save Report Changes button to save changes made to the report setup.
8. Select the students you wish to include in your report.
1. Click the Data Selections Option (A to Z) button at the top of the screen.
2. Set up the appropriate selection for the students you want to include in the report. Example: If you only want to include
students from a specific school location, set up a selection for School Location X. If you want to only send a specific
student, set up a selection for ID_Number X.
To setup a selection:
1. Choose the table that contains the field you wish to select on
2. Choose the field you wish to select on
3. Highlight the field values you wish to include
4. Click the right pointing arrow button to move the values to box #4
5. Choose a Record Selection Option (example: if choosing a specific school location(s), choose “is in list”)
6. Click the Add to Sort Definition button to save your sort.
❍ Setup and save additional selections as desired.
❍
To include only current students, click the blue link “Adjust Selection to Include Only Active Students”
7. Create your export file.
❍ Click the Create Export File button at the top of the screen.
❍
Read the message and write down the name of the file it tells you to rename the exported file to. Also, check that the
correct number of students are being exported.
❍
Click OK on the message
After creating the file, it will appear at the top of the screen. Click the “Open” file folder button. Choose to save the file. Navigate to
where you want to save the file, example: My Desktop or My Documents. You must save the file with the filename that you wrote
down from the message in step 7 bullet 2 above.
Once the file is saved, if you wish to open it and check it before sending it to the state, use My Computer or Window Explorer to
navigate to the file. Right click on it, choose Open With and choose Notepad. This will open the file in the format required by the state
so that you can check that it contains the correct students and data elements.
See also
Assessment Correction
ELL
Exit Student Enrollment
Student Demographics
Student Discipline
Demographics and Early Childhood
Early Childhood
Pre-K Follow-Up
Early Childhood Outcomes
SDSStudentHelp
198 . Web School Office
Home > Web School Office > Processing Center > Data Exchange State and Federal Reporting > Illinois > ELL
ELL
This file format pertains to the data submitted to ISBE SIS Early Childhood.
For more information on the state’s requirements on SIS reporting, use this link to access the state’s website:
http://www.isbe.net/sis/
You will need to have fields in your database to enter all the state required values into for this report. Many of these fields already
exist in your database. If you need to add fields to your database to house state reporting data, follow the instructions below. It is
recommended that you check with your district computer technician or database administrator prior to adding fields.
1. Open Processing Center|Data Exchange, State & Federal Reporting
2. Choose Illinois
3. Choose ELL
4. Assign an SDS Field to each of the state fields listed in the Descriptive Field Name column
1. Click the Export Design Options button
2. Select the appropriate table from the drop box in area #2: Select a Table to Store Data.
3. Select the appropriate data field from the selected table in area 2 to match to a field in the grid below this area.
4. Click the yellow button in the “Assign” column next to the appropriate state field to match the field you selected in step
“c” to it.
5. The field from SDS will then be listed in the column “SDS field name” and the source table will be listed in the column
“SDS table name”.
6. Leave any state fields for which you don’t have fields in your database setup unassigned.
5. Click the yellow triangle button under #1 to create fields in your database for the unassigned fields.
1. You will need to have all users out of the program prior to clicking this button.
2. Database fields will be created in the table selected in #2 and assigned to the state fields.
Once you have all the necessary fields in your database, state required data values need to be entered in the state reporting fields for
students. This is done in the All Demographics Fields data entry screen in Data Entry and Changes |Student Information. To make
data entry easier for this, you might want to use Data View Definition in Administrative Utilities to create a view containing just the
state reporting fields.
If there are fields where the data to be entered is the same for the majority of your students, you have the option of leaving those
fields blank for all students except those who require a value different from the majority. Then on the Data Exchange, State and
Federal Reporting screen, you would fill in the data value for the majority of the students in the Default if Blank Field.
For example, if all but 10 of my students require a value of 01 in Title_III_Status, I would fill in the Title_III_Status field in Student
Information with the required value for those 10 students but leave it blank for the rest of the students. Then when creating the
export file, on the Data Exchange, State and Federal Reporting screen, I would match the state’s Title_III_Status field to the SDS
Title_III_status field and enter 01 in the Default if Blank box. When the program creates the export file, the 01 will be placed in the
Title_III_Status position for the students where the Title_III_Status field is blank.
To create your report for the state:
1. Open Processing Center|Data Exchange, State & Federal Reporting
2. Choose Illinois
3. Choose ELL
4. Assign an SDS Field to each of the state fields listed in the Descriptive Field Name column
1. Click the Export Design Options button
2. Select the appropriate table from the drop box in area #2: Select a table to store data.
3. Select the appropriate data field from the selected table in area 2 to match to a field in the grid below this area.
4. Click the yellow button in the “Assign” column next to the appropriate state field to match the field you selected in step
“c” to it.
5. The field from SDS will then be listed in the column “SDS field name” and the source table will be listed in the column
“SDS table name”.
6. In the column “Default if Blank”, enter a value to be exported for ALL students who have blank data in the selected field.
7. Placeholder fields should be left un-assigned.
5. Complete the Basic Report Information
1. Click the Basic Report Information button to open the basic information area.
SDSStudentHelp
Web School Office . 199
■
Complete all the boxes with the appropriate information
■
In Other Values 1, enter your Type and School Code (the last 6 characters of the RCDTS code).
■
When the export file is created, the program will combine the values from the District Number, County
Code, Regional Code, and Other Values 1 boxes to create the RCDTS number in the report header.
6. Click the Save Report Changes button to save changes made to the report setup.
7. Select the students you wish to include in your report.
1. Click the Data Selections Option (A to Z) button at the top of the screen.
2. Set up the appropriate selection for the students you want to include in the report. Example: If you only want to include
students from a specific school location, set up a selection for School Location X. If you want to only send a specific
student, set up a selection for ID_Number X.
To setup a selection:
1. Choose the table that contains the field you wish to select on
2. Choose the field you wish to select on
3. Highlight the field values you wish to include
4. Click the right pointing arrow button to move the values to box #4
5. Choose a Record Selection Option (example: if choosing a specific school location(s), choose “is in list”)
6. Click the Add to Sort Definition button to save your sort.
❍ Setup and save additional selections as desired.
❍
To include only current students, click the blue link “Adjust Selection to Include Only Active Students”
7. Create your export file.
❍ Click the Create Export File button at the top of the screen.
❍
Read the message and write down the name of the file it tells you to rename the exported file to. Also, check that the
correct number of students are being exported.
❍
Click OK on the message
After creating the file, it will appear at the top of the screen. Click the “Open” file folder button. Choose to save the file. Navigate to
where you want to save the file, example: My Desktop or My Documents. You must save the file with the filename that you wrote
down from the message in step 7 bullet 2 above.
Once the file is saved, if you wish to open it and check it before sending it to the state, use My Computer or Window Explorer to
navigate to the file. Right click on it, choose Open With and choose Notepad. This will open the file in the format required by the state
so that you can check that it contains the correct students and data elements.
See also
Assessment Correction
Assessment Pre-ID
Exit Student Enrollment
Student Demographics
Student Discipline
Demographics and Early Childhood
Early Childhood
Pre-K Follow-Up
Early Childhood Outcomes
SDSStudentHelp
200 . Web School Office
Home > Web School Office > Processing Center > Data Exchange State and Federal Reporting > Illinois > Exit Student Enrollment
Exit Student Enrollment
This file format pertains to the data submitted to ISBE SIS to exit an existing student enrollment. Only the Home or Serving School
District may submit data to exit an active enrollment. When a school district requests an “enrollment exit,” ISBE SIS will exit the
student only from that serving school, leaving all other current existing enrollments active.
For more information on the state’s requirements on SIS reporting, use this link to access the state’s website:
http://www.isbe.net/sis/
You will need to have fields in your database to enter all the state required values into for this report. Many of these fields already
exist in your database. If you need to add fields to your database to house state reporting data, follow the instructions below. It is
recommended that you check with your district computer technician or database administrator prior to adding fields.
1. Open Processing Center|Data Exchange, State & Federal Reporting
2. Choose Illinois
3. Choose Exit Student Enrollment
4. Assign an SDS Field to each of the state fields listed in the Descriptive Field Name column
1. Click the Export Design Options button
2. Select the appropriate table from the drop box in area #2: Select a Table to Store Data.
3. Select the appropriate data field from the selected table in area 2 to match to a field in the grid below this area.
4. Click the yellow button in the “Assign” column next to the appropriate state field to match the field you selected in step
“c” to it.
5. The field from SDS will then be listed in the column “SDS field name” and the source table will be listed in the column
“SDS table name”.
6. Leave any state fields for which you don’t have fields in your database setup unassigned.
5. Click the yellow triangle button under #1 to create fields in your database for the unassigned fields.
1. You will need to have all users out of the program prior to clicking this button.
2. Database fields will be created in the table selected in #2 and assigned to the state fields.
Once you have all the necessary fields in your database, state required data values need to be entered in the state reporting fields for
students. This is done in the All Demographics Fields data entry screen in Data Entry and Changes |Student Information. To make
data entry easier for this, you might want to use Data View Definition in Administrative Utilities to create a view containing just the
state reporting fields.
NOTE: For the end of year submission to exit all students from the state’s file, DO NOT enter an Exit Date in Demographics for all of
your students. Follow the instructions below to enter the appropriate exit date in the Default if Blank field when you create your export
file.
If there are fields where the data to be entered is the same for the majority of your students, you have the option of leaving those
fields blank for all students except those who require a value different from the majority. Then on the Data Exchange, State and
Federal Reporting screen, you would fill in the data value for the majority of the students in the Default if Blank Field.
For example, if all but 10 of my students require a value of 01 in IEP Indicator, I would fill in the IEP Indicator field in Student
Information with the required value for those 10 students but leave it blank for the rest of the students. Then when creating the
export file, on the Data Exchange, State and Federal Reporting screen, I would match the state’s IEP Indicator field to the SDS IEP
Indicator field and enter 01 in the Default if Blank box. When the program creates the export file, the 01 will be placed in the IEP
Indicator position for the students where the IEP Indicator field is blank.
To create your report for the state:
1. Open Processing Center|Data Exchange, State & Federal Reporting
2. Choose Illinois
3. Choose Exit Student Enrollment
4. Assign an SDS Field to each of the state fields listed in the Descriptive Field Name column
1. Click the Export Design Options button
2. Select the appropriate table from the drop box in area #2: Select a table to store data.
3. Select the appropriate data field from the selected table in area 2 to match to a field in the grid below this area.
4. Click the yellow button in the “Assign” column next to the appropriate state field to match the field you selected in step
“c” to it.
5. The field from SDS will then be listed in the column “SDS field name” and the source table will be listed in the column
SDSStudentHelp
Web School Office . 201
“SDS table name”.
6. In the column “Default if Blank”, enter a value to be exported for ALL students who have blank data in the selected field.
7. Placeholder fields should be left un-assigned.
5. Complete the Basic Report Information
1. Click the Basic Report Information button to open the basic information area.
Complete all the boxes with the appropriate information:
1. In Other Values 1, enter your Type and School Code (the last 6 characters of the RCDTS code).
2. When the export file is created, the program will combine the values from the District Number, County Code, Regional Code,
and Other Values 1 boxes to create the RCDTS number in the report header.
3. Click the Save Report Changes button to save changes made to the report setup.
4. Select the students you wish to include in your report.
1. Click the Data Selections Option (A to Z) button at the top of the screen.
2. Set up the appropriate selection for the students you want to include in the report. Example: If you only want to include
students from a specific school location, set up a selection for School Location X. If you want to only send a specific
student, set up a selection for ID_Number X.
To setup a selection:
1. Choose the table that contains the field you wish to select on
2. Choose the field you wish to select on
3. Highlight the field values you wish to include
4. Click the right pointing arrow button to move the values to box #4
5. Choose a Record Selection Option (example: if choosing a specific school location(s), choose “is in list”)
6. Click the Add to Sort Definition button to save your sort.
1. Setup and save additional selections as desired.
2. To include only current students, click the blue link “Adjust Selection to Include Only Active Students”
7. Create your export file.
1. Click the Create Export File button at the top of the screen.
2. Read the message and write down the name of the file it tells you to rename the exported file to. Also, check that the
correct number of students are being exported.
3. Click OK on the message
After creating the file, it will appear at the top of the screen. Click the “Open” file folder button. Choose to save the file. Navigate to
where you want to save the file, example: My Desktop or My Documents. You must save the file with the filename that you wrote
down from the message in step 8b above.
Once the file is saved, if you wish to open it and check it before sending it to the state, use My Computer or Window Explorer to
navigate to the file. Right click on it, choose Open With and choose Notepad. This will open the file in the format required by the state
so that you can check that it contains the correct students and data elements.
See also
Assessment Correction
Assessment Pre-ID
ELL
Student Demographics
Student Discipline
Demographics and Early Childhood
Early Childhood
Pre-K Follow-Up
Early Childhood Outcomes
SDSStudentHelp
202 . Web School Office
Home > Web School Office > Processing Center > Data Exchange State and Federal Reporting > Illinois > Student Demographics
Student Demographics
This file format pertains to the data submitted to ISBE SIS when requesting the Student ID, updating student demographic/enrollment
information (SID provided), or creating a new enrollment for an existing student (SID provided).
For more information on the state’s requirements on SIS reporting, use this link to access the state’s website:
http://www.isbe.net/sis/
You will need to have fields in your database to enter all the state required values into for this report. Many of these fields already
exist in your database. If you need to add fields to your database to house state reporting data, follow the instructions below. It is
recommended that you check with your district computer technician or database administrator prior to adding fields.
1. Open Processing Center|Data Exchange, State & Federal Reporting
2. Choose Illinois
3. Choose Student Demographics
4. Assign an SDS Field to each of the state fields listed in the Descriptive Field Name column
1. Click the Export Design Options button
2. Select the appropriate table from the drop box in area #2: Select a Table to Store Data.
3. Select the appropriate data field from the selected table in area 2 to match to a field in the grid below this area.
4. Click the yellow button in the “Assign” column next to the appropriate state field to match the field you selected in step
“c” to it.
5. The field from SDS will then be listed in the column “SDS field name” and the source table will be listed in the column
“SDS table name”.
6. Leave any state fields for which you don’t have fields in your database setup unassigned.
5. Click the yellow triangle button under #1 to create fields in your database for the unassigned fields.
1. You will need to have all users out of the program prior to clicking this button.
2. Database fields will be created in the table selected in #2 and assigned to the state fields.
Once you have all the necessary fields in your database, state required data values need to be entered in the state reporting fields for
students. This is done in the All Demographics Fields data entry screen in Data Entry and Changes |Student Information. To make
data entry easier for this, you might want to use Data View Definition in Administrative Utilities to create a view containing just the
state reporting fields.
If there are fields where the data to be entered is the same for the majority of your students, you have the option of leaving those
fields blank for all students except those who require a value different from the majority. Then on the Data Exchange, State and
Federal Reporting screen, you would fill in the data value for the majority of the students in the Default if Blank Field.
For example, if all but 10 of my students require a value of 01 in IEP Indicator, I would fill in the IEP Indicator field in Student
Information with the required value for those 10 students but leave it blank for the rest of the students. Then when creating the
export file, on the Data Exchange, State and Federal Reporting screen, I would match the state’s IEP Indicator field to the SDS IEP
Indicator field and enter 01 in the Default if Blank box. When the program creates the export file, the 01 will be placed in the IEP
Indicator position for the students where the IEP Indicator field is blank.
To create your report for the state:
1. Open Processing Center|Data Exchange, State & Federal Reporting
2. Choose Illinois
3. Choose Student Demographics
4. Assign an SDS Field to each of the state fields listed in the Descriptive Field Name column
1. Click the Export Design Options button
2. Select the appropriate table from the drop box in area #2: Select a table to store data.
3. Select the appropriate data field from the selected table in area 2 to match to a field in the grid below this area.
4. Click the yellow button in the “Assign” column next to the appropriate state field to match the field you selected in step
“c” to it.
5. The field from SDS will then be listed in the column “SDS field name” and the source table will be listed in the column
“SDS table name”.
6. In the column “Default if Blank”, enter a value to be exported for ALL students who have blank data in the selected field.
7. Placeholder fields should be left un-assigned.
SDSStudentHelp
Web School Office . 203
5. Complete the Basic Report Information
1. Click the Basic Report Information button to open the basic information area.
■
Complete all the boxes with the appropriate information
1. In Other Values 1, enter your Type and School Code (the last 6 characters of the RCDTS code).
2. When the export file is created, the program will combine the values from the District Number, County
Code, Regional Code, and Other Values 1 boxes to create the RCDTS number in the report header.
6. Click the Save Report Changes button to save changes made to the report setup.
7. Select the students you wish to include in your report.
1. Click the Data Selections Option (A to Z) button at the top of the screen.
2. Set up the appropriate selection for the students you want to include in the report. Example: If you only want to include
students from a specific school location, set up a selection for School Location X. If you want to only send a specific
student, set up a selection for ID_Number X.
■
To setup a selection:
■
Choose the table that contains the field you wish to select on
■
Choose the field you wish to select on
■
Highlight the field values you wish to include
■
Click the right pointing arrow button to move the values to box #4
■
Choose a Record Selection Option (example: if choosing a specific school location(s), choose “is in list”)
■
Click the Add to Sort Definition button to save your sort.
■
Setup and save additional selections as desired.
■
To include only current students, click the blue link “Adjust Selection to Include Only Active
Students”
8. Create your export file.
1. Click the Create Export File button at the top of the screen.
2. Read the message and write down the name of the file it tells you to rename the exported file to. Also, check that the
correct number of students are being exported.
3. Click OK on the message
After creating the file, it will appear at the top of the screen. Click the “Open” file folder button. Choose to save the file. Navigate to
where you want to save the file, example: My Desktop or My Documents. You must save the file with the filename that you wrote
down from the message in step 8b above.
Once the file is saved, if you wish to open it and check it before sending it to the state, use My Computer or Window Explorer to
navigate to the file. Right click on it, choose Open With and choose Notepad. This will open the file in the format required by the state
so that you can check that it contains the correct students and data elements.
See also
Assessment Correction
Assessment Pre-ID
ELL
Exit Student Enrollment
Student Discipline
Demographics and Early Childhood
Early Childhood
Pre-K Follow-Up
Early Childhood Outcomes
SDSStudentHelp
204 . Web School Office
Home > Web School Office > Processing Center > Data Exchange State and Federal Reporting > Illinois > Student Discipline
Student Discipline
This file format pertains to the data submitted to ISBE SIS for Student Discipline.
For more information on the state’s requirements on SIS reporting, use this link to access the state’s website:
http://www.isbe.net/sis/
You will need to have fields in your database to enter all the state required values into for this report. Many of these fields already
exist in your database. If you need to add fields to your database to house state reporting data, follow the instructions below. It is
recommended that you check with your district computer technician or database administrator prior to adding fields.
NOTE: SDS has added two new fields to the master database to accommodate the Incident Type Codes and the Disciplinary Action
Codes. The new fields are:
●
State_Incident_Type_Code
●
State_Disciplinary_Action_Code
These fields will be added to the Discipline table in your sdsxplan.mdb database during the full evaluation from the update.
1. Open Processing Center|Data Exchange, State & Federal Reporting
2. Choose Illinois
3. Choose Student Discipline
4. Assign an SDS Field to each of the state fields listed in the Descriptive Field Name column
1. Click the Export Design Options button
2. Select the appropriate table from the drop box in area #2: Select a Table to Store Data.
3. Select the appropriate data field from the selected table in area 2 to match to a field in the grid below this area.
4. Click the yellow button in the “Assign” column next to the appropriate state field to match the field you selected in step
“c” to it.
5. The field from SDS will then be listed in the column “SDS field name” and the source table will be listed in the column
“SDS table name”.
6. Leave any state fields for which you don’t have fields in your database setup unassigned.
5. Click the yellow triangle button under #1 to create fields in your database for the unassigned fields.
1. You will need to have all users out of the program prior to clicking this button.
2. Database fields will be created in the table selected in #2 and assigned to the state fields.
Once you have all the necessary fields in your database, state required data values need to be entered in the state reporting fields for
students. This is done in the Discipline All Fields data entry screen in Data Entry and Changes |Student Information. To make data
entry easier for this, you might want to use Data View Definition in Administrative Utilities to create a view containing just the state
reporting fields.
If you are not using the state required codes in the Infraction and Penalty fields on discipline records, you will need to create a
Discipline data view to include State_Incident_Type_Code and State_Disciplinary_Action_Code and enter the state required codes into
those fields.
If there are fields where the data to be entered is the same for the majority of your students, you have the option of leaving those
fields blank for all students except those who require a value different from the majority. Then on the Data Exchange, State and
Federal Reporting screen, you would fill in the data value for the majority of the students in the Default if Blank Field.
For example, if all but 10 of my students require a value of 01 in Disability Type, I would fill in the Disability Type field in Student
Information with the required value for those 10 students but leave it blank for the rest of the students. Then when creating the
export file, on the Data Exchange, State and Federal Reporting screen, I would match the state’s Disability Type field to the SDS
Disability Type field and enter 01 in the Default if Blank box. When the program creates the export file, the 01 will be placed in the
Disability Type position for the students where the Disability Type field is blank.
To create your report for the state:
1. Open Processing Center|Data Exchange, State & Federal Reporting
2. Choose Illinois
3. Choose Student Discipline
SDSStudentHelp
Web School Office . 205
4. Assign an SDS Field to each of the state fields listed in the Descriptive Field Name column
1. Click the Export Design Options button
2. Select the appropriate table from the drop box in area #2: Select a table to store data.
3. Select the appropriate data field from the selected table in area 2 to match to a field in the grid below this area.
4. Click the yellow button in the “Assign” column next to the appropriate state field to match the field you selected in step
“c” to it.
5. The field from SDS will then be listed in the column “SDS field name” and the source table will be listed in the column
“SDS table name”.
6. In the column “Default if Blank”, enter a value to be exported for ALL students who have blank data in the selected field.
7. Placeholder fields should be left un-assigned.
5. Complete the Basic Report Information
1. Click the Basic Report Information button to open the basic information area.
Complete all the boxes with the appropriate information:
1. In Other Values 1, enter your Type and School Code (the last 6 characters of the RCDTS code).
2. When the export file is created, the program will combine the values from the District Number, County Code, Regional Code,
and Other Values 1 boxes to create the RCDTS number in the report header.
3. Click the Save Report Changes button to save changes made to the report setup.
4. Select the students you wish to include in your report.
❍ Click the Data Selections Option (A to Z) button at the top of the screen.
❍
Set up the appropriate selection for the students you want to include in the report. Example: If you only want to include
students from a specific school location, set up a selection for School Location X. If you want to only send a specific
student, set up a selection for ID_Number X.
To setup a selection:
1. Choose the table that contains the field you wish to select on
2. Choose the field you wish to select on
3. Highlight the field values you wish to include
4. Click the right pointing arrow button to move the values to box #4
5. Choose a Record Selection Option (example: if choosing a specific school location(s), choose “is in list”)
6. Click the Add to Sort Definition button to save your sort.
❍ Setup and save additional selections as desired.
❍
To include only current students, click the blue link “Adjust Selection to Include Only Active Students”
7. Create your export file.
❍ Click the Create Export File button at the top of the screen.
❍
Read the message and write down the name of the file it tells you to rename the exported file to. Also, check that the
correct number of students are being exported.
❍
Click OK on the message
●
After creating the file, it will appear at the top of the screen. Click the “Open” file folder button. Choose to save the file.
Navigate to where you want to save the file, example: My Desktop or My Documents. You must save the file with the filename
that you wrote down from the message in step 7 bullet 2 above.
●
Once the file is saved, if you wish to open it and check it before sending it to the state, use My Computer or Window Explorer
to navigate to the file. Right click on it, choose Open With and choose Notepad. This will open the file in the format required by
the state so that you can check that it contains the correct students and data elements.
See also
Assessment Correction
Assessment Pre-ID
ELL
Exit Student Enrollment
Student Demographics
Demographics and Early Childhood
Early Childhood
Pre-K Follow-Up
Early Childhood Outcomes
SDSStudentHelp
206 . Web School Office
Home > Web School Office > Processing Center > Data Exchange State and Federal Reporting > Illinois > Demographics and Early Childhood
Demographics and Early Childhood
This file format pertains to the Demographics, Enrollment, and Early Childhood data submitted to ISBE SIS. This section only applies
to those students who were enrolled with a pre-k entry/grade level.
For more information on the state’s requirements on SIS reporting, use this link to access the state’s website:
http://www.isbe.net/sis/
You will need to have fields in your database to enter all the state required values into for this report. Many of these fields already
exist in your database. If you need to add fields to your database to house state reporting data, follow the instructions below. It is
recommended that you check with your district computer technician or database administrator prior to adding fields.
1. Open Processing Center|Data Exchange, State & Federal Reporting
2. Choose Illinois
3. Choose Demographics & Early Childhood
4. Assign an SDS Field to each of the state fields listed in the Descriptive Field Name column
1. Click the Export Design Options button
2. Select the appropriate table from the drop box in area #2: Select a Table to Store Data.
3. Select the appropriate data field from the selected table in area 2 to match to a field in the grid below this area.
4. Click the yellow button in the “Assign” column next to the appropriate state field to match the field you selected in step
“c” to it.
5. The field from SDS will then be listed in the column “SDS field name” and the source table will be listed in the column
“SDS table name”.
6. Leave any state fields for which you don’t have fields in your database setup unassigned.
5. Click the yellow triangle button under #1 to create fields in your database for the unassigned fields.
1. You will need to have all users out of the program prior to clicking this button.
2. Database fields will be created in the table selected in #2 and assigned to the state fields.
Once you have all the necessary fields in your database, state required data values need to be entered in the state reporting fields for
students. This is done in the All Demographics Fields data entry screen in Data Entry and Changes |Student Information. To make
data entry easier for this, you might want to use Data View Definition in Administrative Utilities to create a view containing just the
state reporting fields.
If there are fields where the data to be entered is the same for the majority of your students, you have the option of leaving those
fields blank for all students except those who require a value different from the majority. Then on the Data Exchange, State and
Federal Reporting screen, you would fill in the data value for the majority of the students in the Default if Blank Field.
For example, if all but 10 of my students require a value of 01 in IEP Indicator, I would fill in the IEP Indicator field in Student
Information with the required value for those 10 students but leave it blank for the rest of the students. Then when creating the
export file, on the Data Exchange, State and Federal Reporting screen, I would match the state’s IEP Indicator field to the SDS IEP
Indicator field and enter 01 in the Default if Blank box. When the program creates the export file, the 01 will be placed in the IEP
Indicator position for the students where the IEP Indicator field is blank.
To create your report for the state:
1. Open Processing Center|Data Exchange, State & Federal Reporting
2. Choose Illinois
3. Choose Demographics & Early Childhood
4. Assign an SDS Field to each of the state fields listed in the Descriptive Field Name column
1. Click the Export Design Options button
2. Select the appropriate table from the drop box in area #2: Select a table to store data.
3. Select the appropriate data field from the selected table in area 2 to match to a field in the grid below this area.
4. Click the yellow button in the “Assign” column next to the appropriate state field to match the field you selected in step
“c” to it.
5. The field from SDS will then be listed in the column “SDS field name” and the source table will be listed in the column
“SDS table name”.
6. In the column “Default if Blank”, enter a value to be exported for ALL students who have blank data in the selected field.
7. Placeholder fields should be left un-assigned.
5. Complete the Basic Report Information
SDSStudentHelp
Web School Office . 207
❍
Click the Basic Report Information button to open the basic information area.
6. Complete all the boxes with the appropriate information
1. In Other Values 1, enter your Type and School Code (the last 6 characters of the RCDTS code).
2. When the export file is created, the program will combine the values from the District Number, County Code, Regional
Code, and Other Values 1 boxes to create the RCDTS number in the report header.
3. Click the Save Report Changes button to save changes made to the report setup.
4. Select the students you wish to include in your report.
1. a. Click the Data Selections Option (A to Z) button at the top of the screen.
2. b. Set up the appropriate selection for the students you want to include in the report. Example: If you only want
to include students from a specific school location, set up a selection for School Location X. If you want to only
send a specific student, set up a selection for ID_Number X.
To setup a selection:
1. Choose the table that contains the field you wish to select on.
2. Choose the field you wish to select on.
3. Highlight the field values you wish to include.
4. Click the right pointing arrow button to move the values to box #4.
5. Choose a Record Selection Option (example: if choosing a specific school location(s), choose “is in list”).
6. Click the Add to Sort Definition button to save your sort.
1. Setup and save additional selections as desired.
2. To include only current students, click the blue link “Adjust Selection to Include Only Active Students”.
7. Create your export file.
1. Click the Create Export File button at the top of the screen.
2. Read the message and write down the name of the file it tells you to rename the exported file to. Also, check that the
correct number of students are being exported.
3. Click OK on the message.
After creating the file, it will appear at the top of the screen. Click the “Open” file folder button. Choose to save the file. Navigate to
where you want to save the file, example: My Desktop or My Documents. You must save the file with the filename that you wrote
down from the message in step 8b above.
Once the file is saved, if you wish to open it and check it before sending it to the state, use My Computer or Window Explorer to
navigate to the file. Right click on it, choose Open With and choose Notepad. This will open the file in the format required by the state
so that you can check that it contains the correct students and data elements.
See also
Assessment Correction
Assessment Pre-ID
ELL
Exit Student Enrollment
Student Demographics
Student Discipline
Early Childhood
Pre-K Follow-Up
Early Childhood Outcomes
SDSStudentHelp
208 . Web School Office
Home > Web School Office > Processing Center > Data Exchange State and Federal Reporting > Illinois > Early Childhood
Early Childhood
This file format pertains to the Early Childhood data submitted to ISBE SIS. This section only applies to those students who were
enrolled with a pre-k entry/grade level.
For more information on the state’s requirements on SIS reporting, use this link to access the state’s website:
http://www.isbe.net/sis/
You will need to have fields in your database to enter all the state required values into for this report. Many of these fields already
exist in your database. If you need to add fields to your database to house state reporting data, follow the instructions below. It is
recommended that you check with your district computer technician or database administrator prior to adding fields.
1. Open Processing Center|Data Exchange, State & Federal Reporting.
2. Choose Illinois.
3. Choose Early Childhood.
4. Assign an SDS Field to each of the state fields listed in the Descriptive Field Name column.
1. Click the Export Design Options button.
2. Select the appropriate table from the drop box in area #2: Select a Table to Store Data.
3. Select the appropriate data field from the selected table in area 2 to match to a field in the grid below this area.
4. Click the yellow button in the “Assign” column next to the appropriate state field to match the field you selected in step
“c” to it.
5. The field from SDS will then be listed in the column “SDS field name” and the source table will be listed in the column
“SDS table name”.
6. Leave any state fields for which you don’t have fields in your database setup unassigned.
5. Click the yellow triangle button under #1 to create fields in your database for the unassigned fields.
1. You will need to have all users out of the program prior to clicking this button.
2. Database fields will be created in the table selected in #2 and assigned to the state fields.
Once you have all the necessary fields in your database, state required data values need to be entered in the state reporting fields for
students. This is done in the All Demographics Fields data entry screen in Data Entry and Changes |Student Information. To make
data entry easier for this, you might want to use Data View Definition in Administrative Utilities to create a view containing just the
state reporting fields.
If there are fields where the data to be entered is the same for the majority of your students, you have the option of leaving those
fields blank for all students except those who require a value different from the majority. Then on the Data Exchange, State and
Federal Reporting screen, you would fill in the data value for the majority of the students in the Default if Blank Field.
For example, if all but 10 of my students require a value of 01 in IEP Indicator, I would fill in the IEP Indicator field in Student
Information with the required value for those 10 students but leave it blank for the rest of the students. Then when creating the
export file, on the Data Exchange, State and Federal Reporting screen, I would match the state’s IEP Indicator field to the SDS IEP
Indicator field and enter 01 in the Default if Blank box. When the program creates the export file, the 01 will be placed in the IEP
Indicator position for the students where the IEP Indicator field is blank.
To create your report for the state:
1. Open Processing Center|Data Exchange, State & Federal Reporting.
2. Choose Illinois.
3. Choose Early Childhood.
4. Assign an SDS Field to each of the state fields listed in the Descriptive Field Name column.
1. Click the Export Design Options button.
2. Select the appropriate table from the drop box in area #2: Select a table to store data.
3. Select the appropriate data field from the selected table in area 2 to match to a field in the grid below this area.
4. Click the yellow button in the “Assign” column next to the appropriate state field to match the field you selected in step
“c” to it.
5. The field from SDS will then be listed in the column “SDS field name” and the source table will be listed in the column
“SDS table name”.
6. In the column “Default if Blank”, enter a value to be exported for ALL students who have blank data in the selected field.
7. Placeholder fields should be left un-assigned.
5. Complete the Basic Report Information
SDSStudentHelp
Web School Office . 209
1. Click the Basic Report Information button to open the basic information area.
■
Complete all the boxes with the appropriate information .
6. In Other Values 1, enter your Type and School Code (the last 6 characters of the RCDTS code).
7. When the export file is created, the program will combine the values from the District Number, County Code, Regional Code,
and Other Values 1 boxes to create the RCDTS number in the report header.
8. Click the Save Report Changes button to save changes made to the report setup.
9. Select the students you wish to include in your report.
1. Click the Data Selections Option (A to Z) button at the top of the screen.
2. Set up the appropriate selection for the students you want to include in the report. Example: If you only want to include
students from a specific school location, set up a selection for School Location X. If you want to only send a specific
student, set up a selection for ID_Number X.
1. To setup a selection:
■
Choose the table that contains the field you wish to select on.
■
Choose the field you wish to select on.
■
Highlight the field values you wish to include.
■
Click the right pointing arrow button to move the values to box #4.
■
Choose a Record Selection Option (example: if choosing a specific school location(s), choose “is in list”).
■
Click the Add to Sort Definition button to save your sort.
2. Setup and save additional selections as desired.
3. To include only current students, click the blue link “Adjust Selection to Include Only Active Students”
10. Create your export file.
1. Click the Create Export File button at the top of the screen.
2. Read the message and write down the name of the file it tells you to rename the exported file to. Also, check that the
correct number of students are being exported.
3. Click OK on the message.
After creating the file, it will appear at the top of the screen. Click the “Open” file folder button. Choose to save the file. Navigate to
where you want to save the file, example: My Desktop or My Documents. You must save the file with the filename that you wrote
down from the message in step above.
Once the file is saved, if you wish to open it and check it before sending it to the state, use My Computer or Window Explorer to
navigate to the file. Right click on it, choose Open With and choose Notepad. This will open the file in the format required by the state
so that you can check that it contains the correct students and data elements.
See also
Assessment Correction
Assessment Pre-ID
ELL
Exit Student Enrollment
Student Demographics
Student Discipline
Demographics and Early Childhood
Pre-K Follow-Up
Early Childhood Outcomes
SDSStudentHelp
210 . Web School Office
Home > Web School Office > Processing Center > Data Exchange State and Federal Reporting > Illinois > Pre-K Follow-Up
Pre-K Follow-Up
This file format pertains to the data submitted to ISBE SIS when submitting information for Pre-K Follow-Up data collection. The Home
School District is the only entity allowed to add or update Pre-K Follow-Up data in the ISBE SIS.
For more information on the state’s requirements on SIS reporting, use this link to access the state’s website:
http://www.isbe.net/sis/
You will need to have fields in your database to enter all the state required values into for this report. Many of these fields already
exist in your database. If you need to add fields to your database to house state reporting data, follow the instructions below. It is
recommended that you check with your district computer technician or database administrator prior to adding fields.
1.
2.
3.
4.
Open Processing Center |Data Exchange, State & Federal Reporting.
Choose Illinois.
Choose Pre-K Followup.
Assign an SDS Field to each of the state fields listed in the Descriptive Field Name column.
1. Click the Export Design Options button.
2. Select the appropriate table from the drop box in area #2: Select a Table to Store Data.
3. Select the appropriate data field from the selected table in area 2 to match to a field in the grid below this area.
4. Click the yellow button in the “Assign” column next to the appropriate state field to match the field you selected in step
“c” to it.
5. The field from SDS will then be listed in the column “SDS field name” and the source table will be listed in the column
“SDS table name”.
6. Leave any state fields for which you don’t have fields in your database setup unassigned.
5. Click the yellow triangle button under #1 to create fields in your database fot the unassigned fields.
1. You will need to have all users out of the program prior to clicking this button.
2. Database fields will be created in the table selected in #2 and assigned to the state fields.
Once you have all the necessary fields in your database, state required data values need to be entered in the state reporting fields for
students. This is done in the All Demographics Fields data entry screen in Data Entry and Changes |Student Information. To
make data entry easier for this, you might want to use Data View Definition in Administrative Utilities to create a view containing
just the state reporting fields.
If there are fields where the data to be entered is the same for the majority of your students, you have the option of leaving those
fields blank for all students except those who require a value different from the majority. Then on the Data Exchange, State and
Federal Reporting screen, you would fill in the data value for the majority of the students in the Default if Blank Field.
For example, if all but 10 of my students require a value of 01 in IEP Indicator, I would fill in the IEP Indicator field in Student
Information with the required value for those 10 students but leave it blank for the rest of the students. Then when creating the
export file, on the Data Exchange, State and Federal Reporting screen, I would match the state’s IEP Indicator field to the SDS IEP
Indicator field and enter 01 in the Default if Blank box. When the program creates the export file, the 01 will be placed in the IEP
Indicator position for the students where the IEP Indicator field is blank.
To create your report for the state:
1.
2.
3.
4.
Open Processing Center|Data Exchange, State & Federal Reporting.
Choose Illinois.
Choose Pre-K Followup.
Assign an SDS Field to each of the state fields listed in the Descriptive Field Name column.
1. Click the Export Design Options button.
2. Select the appropriate table from the drop box in area #2: Select a table to store data.
3. Select the appropriate data field from the selected table in area 2 to match to a field in the grid below this area.
4. Click the yellow button in the “Assign” column next to the appropriate state field to match the field you selected in step
“c” to it.
5. The field from SDS will then be listed in the column “SDS field name” and the source table will be listed in the column
“SDS table name”.
6. In the column “Default if Blank”, enter a value to be exported for ALL students who have blank data in the selected field.
7. Placeholder fields should be left un-assigned.
5. Complete the Basic Report Information
1. Click the Basic Report Information button to open the basic information area.
■
Complete all the boxes with the appropriate information.
■
SDSStudentHelp
In Other Values 1, enter your Type and School Code (the last 6 characters of the RCDTS
code).
Web School Office . 211
When the export file is created, the program will combine the values from the District Number, County
Code, Regional Code, and Other Values 1 boxes to create the RCDTS number in the report header.
6. Click the Save Report Changes button to save changes made to the report setup.
7. Select the students you wish to include in your report.
1. Click the Data Selections Option (A to Z) button at the top of the screen.
2. Set up the appropriate selection for the students you want to include in the report. Example: If you only want to
include students from a specific school location, set up a selection for School Location X. If you want to only send a
specific student, set up a selection for ID_Number X.
■
To setup a selection:
■
Choose the table that contains the field you wish to select on.
■
Choose the field you wish to select on.
■
■
Highlight the field values you wish to include.
Click the right pointing arrow button to move the values to box #4.
■
Choose a Record Selection Option (example: if choosing a specific school location(s), choose “is in list”).
8. Click the Add to Sort Definition button to save your sort
1. Setup and save additional selections as desired.
2. To include only current students, click the blue link “Adjust Selection to Include Only Active Students”
9. Create your export file.
1. Click the Create Export File button at the top of the screen.
■
2. Read the message and write down the name of the file it tells you to rename the exported file to. Also,
check that the correct number of students are being exported.
3. Click OK on the message
After creating the file, it will appear at the top of the screen. Click the “Open” file folder button. Choose to save the file. Navigate to
where you want to save the file, example: My Desktop or My Documents. You must save the file with the filename that you wrote
down from the message in step 8b above.
Once the file is saved, if you wish to open it and check it before sending it to the state, use My Computer or Window Explorer to
navigate to the file. Right click on it, choose Open With and choose Notepad. This will open the file in the format required by the state
so that you can check that it contains the correct students and data elements.
See also
Assessment Correction
Assessment Pre-ID
ELL
Exit Student Enrollment
Student Demographics
Student Discipline
Demographics and Early Childhood
Early Childhood
Early Childhood Outcomes
SDSStudentHelp
212 . Web School Office
Home > Web School Office > Processing Center > Data Exchange State and Federal Reporting > Illinois > Early Childhood Outcomes
Early Childhood Outcomes
This file format pertains to the data submitted to ISBE SIS when submitting information for Early Childhood Outcomes Ratings. The
Home School District is the only entity allowed to access Early Childhood Outcomes data in the ISBE SIS.
For more information on the state’s requirements on SIS reporting, use this link to access the state’s website:
http://www.isbe.net/sis/
You will need to have fields in your database to enter all the state required values into for this report. Many of these fields already
exist in your database. If you need to add fields to your database to house state reporting data, follow the instructions below. It is
recommended that you check with your district computer technician or database administrator prior to adding fields.
1.
2.
3.
4.
Open Processing Center|Data Exchange, State & Federal Reporting
Choose Illinois
Choose Early Childhood Outcomes
Assign an SDS Field to each of the state fields listed in the Descriptive Field Name column
❍ Click the Export Design Options button
❍ Select the appropriate table from the drop box in area #2: Select a Table to Store Data.
❍ Select the appropriate data field from the selected table in area 2 to match to a field in the grid below this area.
❍ Click the yellow button in the “Assign” column next to the appropriate state field to match the field you selected in step
“c” to it.
❍ The field from SDS will then be listed in the column “SDS field name” and the source table will be listed in the column
“SDS table name”.
❍ Leave any state fields for which you don’t have fields in your database setup unassigned.
5. Click the yellow triangle button under #1 to create fields in your database for the unassigned fields.
❍ You will need to have all users out of the program prior to clicking this button.
❍ Database fields will be created in the table selected in #2 and assigned to the state fields.
Once you have all the necessary fields in your database, state required data values need to be entered in the state reporting fields for
students. This is done in the All Demographics Fields data entry screen in Data Entry and Changes |Student Information. To
make data entry easier for this, you might want to use Data View Definition in Administrative Utilities to create a view containing
just the state reporting fields.
If there are fields where the data to be entered is the same for the majority of your students, you have the option of leaving those
fields blank for all students except those who require a value different from the majority. Then on the Data Exchange, State and
Federal Reporting screen, you would fill in the data value for the majority of the students in the Default if Blank Field.
For example, if all but 10 of my students require a value of 01 in IEP Indicator, I would fill in the IEP Indicator field in Student
Information with the required value for those 10 students but leave it blank for the rest of the students. Then when creating the
export file, on the Data Exchange, State and Federal Reporting screen, I would match the state’s IEP Indicator field to the SDS IEP
Indicator field and enter 01 in the Default if Blank box. When the program creates the export file, the 01 will be placed in the IEP
Indicator position for the students where the IEP Indicator field is blank.
To create your report for the state:
1.
2.
3.
4.
Open Processing Center|Data Exchange, State & Federal Reporting
Choose Illinois
Choose Early Childhood Outcomes
Assign an SDS Field to each of the state fields listed in the Descriptive Field Name column
1. Click the Export Design Options button
2. Select the appropriate table from the drop box in area #2: Select a table to store data.
3. Select the appropriate data field from the selected table in area 2 to match to a field in the grid below this area.
4. Click the yellow button in the “Assign” column next to the appropriate state field to match the field you selected in step
“c” to it.
5. The field from SDS will then be listed in the column “SDS field name” and the source table will be listed in the column
“SDS table name”.
6. In the column “Default if Blank”, enter a value to be exported for ALL students who have blank data in the selected field.
7. Placeholder fields should be left un-assigned.
5. Complete the Basic Report Information
1. Click the Basic Report Information button to open the basic information
■
Complete all the boxes with the appropriate information.
■
In Other Values 1, enter your Type and School Code (the last 6 characters of the RCDTS code).
■
When the export file is created, the program will combine the values from the District Number, County
SDSStudentHelp
Web School Office . 213
Code, Regional Code, and Other Values 1 boxes to create the RCDTS number in the report header.
6. Click the Save Report Changes button to save changes made to the report setup.
7. Select the students you wish to include in your report.
1. Click the Data Selections Option (A to Z) button at the top of the screen.
2. Set up the appropriate selection for the students you want to include in the report. Example: If you only want to
include students from a specific school location, set up a selection for School Location X. If you want to only send a
specific student, set up a selection for ID_Number X.
■
To setup a selection:
1. Choose the table that contains the field you wish to select on
2. Choose the field you wish to select on
3. Highlight the field values you wish to include
4. Click the right pointing arrow button to move the values to box #4
5. Choose a Record Selection Option (example: if choosing a specific school location(s), choose “is in list”)
6. Click the Add to Sort Definition button to save your sort.
■
Setup and save additional selections as desired.
■
To include only current students, click the blue link “Adjust Selection to Include Only Active
Students”
8. Create your export file.
1. Click the Create Export File button at the top of the screen.
2. Read the message and write down the name of the file it tells you to rename the exported file to. Also, check that the
correct number of students are being exported.
3. Click OK on the message.
After creating the file, it will appear at the top of the screen. Click the “Open” file folder button. Choose to save the file. Navigate to
where you want to save the file, example: My Desktop or My Documents. You must save the file with the filename that you wrote
down from the message in step 8b above.
Once the file is saved, if you wish to open it and check it before sending it to the state, use My Computer or Window Explorer to
navigate to the file. Right click on it, choose Open With and choose Notepad. This will open the file in the format required by the state
so that you can check that it contains the correct students and data elements.
See also
Assessment Correction
Assessment Pre-ID
ELL
Exit Student Enrollment
Student Demographics
Student Discipline
Demographics and Early Childhood
Early Childhood
Pre-K Follow-Up
SDSStudentHelp
214 . Web School Office
Home > Web School Office > Processing Center > Data Exchange State and Federal Reporting > Indiana
Indiana
This section provides a quick overview of Indiana state reports. You access theses reports enter Web School Office |Processing
Center |Data Exchange, State and Federal Reporting.
See also
Data Exchange State and Federal Reporting
Illinois
Michigan
SDSStudentHelp
Web School Office . 215
Home > Web School Office > Processing Center > Data Exchange State and Federal Reporting > Indiana > DOE-STN (STN lookup)
DOE-STN (STN lookup)
1. School_number – match to the field that contains your school’s state assigned number OR enter the default value.
2. STN-match to the field that contains your students’ state testing number (STN).
3. Student last name – already matched to the student last name field from demographics table.
4. Student first name – already matched to the student first name field from demographics table.
5. Student middle name – already matched to the student middle name field from demographics table.
6. Student name suffix – match to the field that contains any student’s suffix (i.e. Jr, Sr, IV).
7. Gender – already matched to the sex field from demographics table.
8. Birth date – already matched to the birth date field from demographics table.
9. Ethnicity – already matched to the ethnic code field from demographics table.
See also
AT (Attendance)
DOE-FD (Full day Kindergarten)
DOE-GR (Graduate Report)
DOE-LM (Language Minority and Immigrant Students)
DOE-ME (Membership)
DOE-PE (Pupil Enrollment)
DOE-SE (Special Education)
DOE-TB (Textbook Reimbursement OR Supplemental Textbook Reimbursement)
INDOE-AD (Additional Student Information)
INDOE-ALT (Alternative Education)
INDOE-DC (Direct Certification or Direct Verification)
INDOE-DM (Dropout and Mobility)
INDOE-HM (Homebound/Hospitalized)
INDOE-SR (Charter School Student Residence Report)
INDOE-TI (Title I)
ISTEPBAR (ISTEP Bar Code Labels)
ISTEPBARC (ISTEP Barcode Corrections)
ISTEPBARR (ISTEP Barcode Labels for Retest Takers (Spring Retest))
SDSStudentHelp
216 . Web School Office
Home > Web School Office > Processing Center > Data Exchange State and Federal Reporting > Indiana > AT (Attendance)
AT (Attendance)
1. The following steps should be done PRIOR to running the export for this file:
❍ Run the build enrollment data process as described in an earlier section on Student Enrollment data, build student
enrollment data.
❍
For students who are expelled or suspended OUT of school days of enrollment should be deleted for the days expelled
or OSS
❍
OR
❍
withdraw students on the day the expulsion/OSS begins and re-enroll the student when allowed to return to school.
Remember to activate the student’s schedule again.
❍
Refresh the attendance analysis data per the directions in an earlier section on Refresh Attendance Analysis.
2. School_number – match to the field that contains your school’s state assigned number OR enter the default value.
3. STN-match to the field that contains your students’ state testing number (STN)
4. Start date – already matched to the entry date field from the attendance analysis table.
5. End date – already matched to the exit date field from the attendance analysis table.
6. Days in attendance – already matched to the days in attendance field from the attendance analysis table.
7. Total absences - already matched to the total absences field from the attendance analysis table. (these are the EXCUSED
absences)
8. Total absences unexcused - already matched to the total excused absences field from the attendance analysis table.
9. Grade level – already matched to the grade year field from demographics table.
See also
DOE-STN (STN lookup)
DOE-FD (Full day Kindergarten)
DOE-GR (Graduate Report)
DOE-LM (Language Minority and Immigrant Students)
DOE-ME (Membership)
DOE-PE (Pupil Enrollment)
DOE-SE (Special Education)
DOE-TB (Textbook Reimbursement OR Supplemental Textbook Reimbursement)
INDOE-AD (Additional Student Information)
INDOE-ALT (Alternative Education)
INDOE-DC (Direct Certification or Direct Verification)
INDOE-DM (Dropout and Mobility)
INDOE-HM (Homebound/Hospitalized)
INDOE-SR (Charter School Student Residence Report)
INDOE-TI (Title I)
ISTEPBAR (ISTEP Bar Code Labels)
ISTEPBARC (ISTEP Barcode Corrections)
ISTEPBARR (ISTEP Barcode Labels for Retest Takers (Spring Retest))
SDSStudentHelp
Web School Office . 217
Home > Web School Office > Processing Center > Data Exchange State and Federal Reporting > Indiana > DOE-FD (Full day Kindergarten)
DOE-FD (Full day Kindergarten)
1. School_number – match to the field that contains your school’s state assigned number OR enter the default value.
2. STN-match to the field that contains your students’ state testing number (STN).
3. All remaining fields should be matched to the corresponding data fields in the SDS database.
See also
DOE-STN (STN lookup)
AT (Attendance)
DOE-GR (Graduate Report)
DOE-LM (Language Minority and Immigrant Students)
DOE-ME (Membership)
DOE-PE (Pupil Enrollment)
DOE-SE (Special Education)
DOE-TB (Textbook Reimbursement OR Supplemental Textbook Reimbursement)
INDOE-AD (Additional Student Information)
INDOE-ALT (Alternative Education)
INDOE-DC (Direct Certification or Direct Verification)
INDOE-DM (Dropout and Mobility)
INDOE-HM (Homebound/Hospitalized)
INDOE-SR (Charter School Student Residence Report)
INDOE-TI (Title I)
ISTEPBAR (ISTEP Bar Code Labels)
ISTEPBARC (ISTEP Barcode Corrections)
ISTEPBARR (ISTEP Barcode Labels for Retest Takers (Spring Retest))
SDSStudentHelp
218 . Web School Office
Home > Web School Office > Processing Center > Data Exchange State and Federal Reporting > Indiana > DOE-GR (Graduate Report)
DOE-GR (Graduate Report)
1. School_number – match to the field that contains your school’s state assigned number OR enter the default value.
2. STN-match to the field that contains your students’ state testing number (STN).
3. Grade level – already matched to the grade year field from demographics table.
4. All remaining fields should be matched to the corresponding data fields in the SDS database.
See also
DOE-STN (STN lookup)
AT (Attendance)
DOE-FD (Full day Kindergarten)
DOE-LM (Language Minority and Immigrant Students)
DOE-ME (Membership)
DOE-PE (Pupil Enrollment)
DOE-SE (Special Education)
DOE-TB (Textbook Reimbursement OR Supplemental Textbook Reimbursement)
INDOE-AD (Additional Student Information)
INDOE-ALT (Alternative Education)
INDOE-DC (Direct Certification or Direct Verification)
INDOE-DM (Dropout and Mobility)
INDOE-HM (Homebound/Hospitalized)
INDOE-SR (Charter School Student Residence Report)
INDOE-TI (Title I)
ISTEPBAR (ISTEP Bar Code Labels)
ISTEPBARC (ISTEP Barcode Corrections)
ISTEPBARR (ISTEP Barcode Labels for Retest Takers (Spring Retest))
SDSStudentHelp
Web School Office . 219
Home > Web School Office > Processing Center > Data Exchange State and Federal Reporting > Indiana > DOE-LM (Language Minority and Immigrant
Students)
DOE-LM (Language Minority and Immigrant Students)
1. School_number – match to the field that contains your school’s state assigned number OR enter the default value.
2. STN-match to the field that contains your students’ state testing number (STN).
3. Grade level – already matched to the grade year field from demographics table.
4. All remaining fields should be matched to the corresponding data fields in the SDS database.
See also
DOE-STN (STN lookup)
AT (Attendance)
DOE-FD (Full day Kindergarten)
DOE-GR (Graduate Report)
DOE-ME (Membership)
DOE-PE (Pupil Enrollment)
DOE-SE (Special Education)
DOE-TB (Textbook Reimbursement OR Supplemental Textbook Reimbursement)
INDOE-AD (Additional Student Information)
INDOE-ALT (Alternative Education)
INDOE-DC (Direct Certification or Direct Verification)
INDOE-DM (Dropout and Mobility)
INDOE-HM (Homebound/Hospitalized)
INDOE-SR (Charter School Student Residence Report)
INDOE-TI (Title I)
ISTEPBAR (ISTEP Bar Code Labels)
ISTEPBARC (ISTEP Barcode Corrections)
ISTEPBARR (ISTEP Barcode Labels for Retest Takers (Spring Retest))
SDSStudentHelp
220 . Web School Office
Home > Web School Office > Processing Center > Data Exchange State and Federal Reporting > Indiana > DOE-ME (Membership)
DOE-ME (Membership)
1. School_number – match to the field that contains your school’s state assigned number OR enter the default value.
2. STN-match to the field that contains your students’ state testing number (STN).
3. All remaining fields should be matched to the corresponding data fields in the SDS database.
See also
DOE-STN (STN lookup)
AT (Attendance)
DOE-FD (Full day Kindergarten)
DOE-GR (Graduate Report)
DOE-LM (Language Minority and Immigrant Students)
DOE-PE (Pupil Enrollment)
DOE-SE (Special Education)
DOE-TB (Textbook Reimbursement OR Supplemental Textbook Reimbursement)
INDOE-AD (Additional Student Information)
INDOE-ALT (Alternative Education)
INDOE-DC (Direct Certification or Direct Verification)
INDOE-DM (Dropout and Mobility)
INDOE-HM (Homebound/Hospitalized)
INDOE-SR (Charter School Student Residence Report)
INDOE-TI (Title I)
ISTEPBAR (ISTEP Bar Code Labels)
ISTEPBARC (ISTEP Barcode Corrections)
ISTEPBARR (ISTEP Barcode Labels for Retest Takers (Spring Retest))
SDSStudentHelp
Web School Office . 221
Home > Web School Office > Processing Center > Data Exchange State and Federal Reporting > Indiana > DOE-PE (Pupil Enrollment)
DOE-PE (Pupil Enrollment)
1. School_number – match to the field that contains your school’s state assigned number OR enter the default value.
2. STN-match to the field that contains your students’ state testing number (STN).
3. Grade level – already matched to the grade year field from demographics table.
4. All remaining fields should be matched to the corresponding data fields in the SDS database.
See also
DOE-STN (STN lookup)
AT (Attendance)
DOE-FD (Full day Kindergarten)
DOE-GR (Graduate Report)
DOE-LM (Language Minority and Immigrant Students)
DOE-ME (Membership)
DOE-SE (Special Education)
DOE-TB (Textbook Reimbursement OR Supplemental Textbook Reimbursement)
INDOE-AD (Additional Student Information)
INDOE-ALT (Alternative Education)
INDOE-DC (Direct Certification or Direct Verification)
INDOE-DM (Dropout and Mobility)
INDOE-HM (Homebound/Hospitalized)
INDOE-SR (Charter School Student Residence Report)
INDOE-TI (Title I)
ISTEPBAR (ISTEP Bar Code Labels)
ISTEPBARC (ISTEP Barcode Corrections)
ISTEPBARR (ISTEP Barcode Labels for Retest Takers (Spring Retest))
SDSStudentHelp
222 . Web School Office
Home > Web School Office > Processing Center > Data Exchange State and Federal Reporting > Indiana > DOE-SE (Special Education)
DOE-SE (Special Education)
1. School_number – match to the field that contains your school’s state assigned number OR enter the default value.
2. Corp number of legal settlement – use the default value if all students are the same value; no extra field would be needed in
this case
3. STN-match to the field that contains your students’ state testing number (STN).
4. Grade level – already matched to the grade year field from demographics table.
5. All remaining fields should be matched to the corresponding data fields in the SDS database.
See also
DOE-STN (STN lookup)
AT (Attendance)
DOE-FD (Full day Kindergarten)
DOE-GR (Graduate Report)
DOE-LM (Language Minority and Immigrant Students)
DOE-ME (Membership)
DOE-PE (Pupil Enrollment)
DOE-TB (Textbook Reimbursement OR Supplemental Textbook Reimbursement)
INDOE-AD (Additional Student Information)
INDOE-ALT (Alternative Education)
INDOE-DC (Direct Certification or Direct Verification)
INDOE-DM (Dropout and Mobility)
INDOE-HM (Homebound/Hospitalized)
INDOE-SR (Charter School Student Residence Report)
INDOE-TI (Title I)
ISTEPBAR (ISTEP Bar Code Labels)
ISTEPBARC (ISTEP Barcode Corrections)
ISTEPBARR (ISTEP Barcode Labels for Retest Takers (Spring Retest))
SDSStudentHelp
Web School Office . 223
Home > Web School Office > Processing Center > Data Exchange State and Federal Reporting > Indiana > DOE-TB (Textbook Reimbursement OR
Supplemental Textbook Reimbursement)
DOE-TB (Textbook Reimbursement OR Supplemental Textbook
Reimbursement)
1. STN-match to the field that contains your students’ state testing number (STN).
2. Student last name – already matched to the student last name field from demographics table.
3. Student first name – already matched to the student first name field from demographics table.
4. Grade level – already matched to the grade year field from demographics table.
5. School_number – match to the field that contains your school’s state assigned number OR enter the default value.
6. All remaining fields should be matched to the corresponding data fields in the SDS database.
See also
DOE-STN (STN lookup)
AT (Attendance)
DOE-FD (Full day Kindergarten)
DOE-GR (Graduate Report)
DOE-LM (Language Minority and Immigrant Students)
DOE-ME (Membership)
DOE-PE (Pupil Enrollment)
DOE-SE (Special Education)
INDOE-AD (Additional Student Information)
INDOE-ALT (Alternative Education)
INDOE-DC (Direct Certification or Direct Verification)
INDOE-DM (Dropout and Mobility)
INDOE-HM (Homebound/Hospitalized)
INDOE-SR (Charter School Student Residence Report)
INDOE-TI (Title I)
ISTEPBAR (ISTEP Bar Code Labels)
ISTEPBARC (ISTEP Barcode Corrections)
ISTEPBARR (ISTEP Barcode Labels for Retest Takers (Spring Retest))
SDSStudentHelp
224 . Web School Office
Home > Web School Office > Processing Center > Data Exchange State and Federal Reporting > Indiana > INDOE-AD (Additional Student Information)
INDOE-AD (Additional Student Information)
1. School_number – match to the field that contains your school’s state assigned number OR enter the default value.
2. STN-match to the field that contains your students’ state testing number (STN).
3. Grade level – already matched to the grade year field from demographics table.
4. All remaining fields should be matched to the corresponding data fields in the SDS database.
See also
DOE-STN (STN lookup)
AT (Attendance)
DOE-FD (Full day Kindergarten)
DOE-GR (Graduate Report)
DOE-LM (Language Minority and Immigrant Students)
DOE-ME (Membership)
DOE-PE (Pupil Enrollment)
DOE-SE (Special Education)
DOE-TB (Textbook Reimbursement OR Supplemental Textbook Reimbursement)
INDOE-ALT (Alternative Education)
INDOE-DC (Direct Certification or Direct Verification)
INDOE-DM (Dropout and Mobility)
INDOE-HM (Homebound/Hospitalized)
INDOE-SR (Charter School Student Residence Report)
INDOE-TI (Title I)
ISTEPBAR (ISTEP Bar Code Labels)
ISTEPBARC (ISTEP Barcode Corrections)
ISTEPBARR (ISTEP Barcode Labels for Retest Takers (Spring Retest))
SDSStudentHelp
Web School Office . 225
Home > Web School Office > Processing Center > Data Exchange State and Federal Reporting > Indiana > INDOE-ALT (Alternative Education)
INDOE-ALT (Alternative Education)
1. Corp number – use the default value to mass assign this value to all students included in this export.
2. Student test number (STN) - match to the field that contains your students’ state testing number (STN).
3. Grade year – same as grade level field.
4. All remaining fields should be matched to the corresponding data fields in the SDS database.
See also
DOE-STN (STN lookup)
AT (Attendance)
DOE-FD (Full day Kindergarten)
DOE-GR (Graduate Report)
DOE-LM (Language Minority and Immigrant Students)
DOE-ME (Membership)
DOE-PE (Pupil Enrollment)
DOE-SE (Special Education)
DOE-TB (Textbook Reimbursement OR Supplemental Textbook Reimbursement)
INDOE-AD (Additional Student Information)
INDOE-DC (Direct Certification or Direct Verification)
INDOE-DM (Dropout and Mobility)
INDOE-HM (Homebound/Hospitalized)
INDOE-SR (Charter School Student Residence Report)
INDOE-TI (Title I)
ISTEPBAR (ISTEP Bar Code Labels)
ISTEPBARC (ISTEP Barcode Corrections)
ISTEPBARR (ISTEP Barcode Labels for Retest Takers (Spring Retest))
SDSStudentHelp
226 . Web School Office
Home > Web School Office > Processing Center > Data Exchange State and Federal Reporting > Indiana > INDOE-DC (Direct Certification or Direct
Verification)
INDOE-DC (Direct Certification or Direct Verification)
1. County of legal residence – either match up the appropriate field in your database or use the default value if all students are
the same county.
2. Corp number – use the default value field or match a field if you have one.
3. School_number – match to the field that contains your school’s state assigned number OR enter the default value.
4. Student last name – already matched to the student last name field from demographics table.
5. Student first name – already matched to the student first name field from demographics table.
6. Student middle name – already matched to the student middle name field from demographics table.
7. Birth date – already matched to the birth date field in demographics.
8. All remaining fields should be matched to the corresponding data fields in the SDS database.
See also
DOE-STN (STN lookup)
AT (Attendance)
DOE-FD (Full day Kindergarten)
DOE-GR (Graduate Report)
DOE-LM (Language Minority and Immigrant Students)
DOE-ME (Membership)
DOE-PE (Pupil Enrollment)
DOE-SE (Special Education)
DOE-TB (Textbook Reimbursement OR Supplemental Textbook Reimbursement)
INDOE-AD (Additional Student Information)
INDOE-ALT (Alternative Education)
INDOE-DM (Dropout and Mobility)
INDOE-HM (Homebound/Hospitalized)
INDOE-SR (Charter School Student Residence Report)
INDOE-TI (Title I)
ISTEPBAR (ISTEP Bar Code Labels)
ISTEPBARC (ISTEP Barcode Corrections)
ISTEPBARR (ISTEP Barcode Labels for Retest Takers (Spring Retest))
SDSStudentHelp
Web School Office . 227
Home > Web School Office > Processing Center > Data Exchange State and Federal Reporting > Indiana > INDOE-DM (Dropout and Mobility)
INDOE-DM (Dropout and Mobility)
1. School_number – match to the field that contains your school’s state assigned number OR enter the default value.
2. STN-match to the field that contains your students’ state testing number (STN)
3. Grade level – already matched to the grade year field from demographics table.
4. Dropout or mobility code – the exit code field could be coded to match the state’s values and be an excellent source field
5. Dropout date or mobility date – the exit date field from the demographics table.
6. “Last known” fields – usually use the address related field from the demographics table.
See also
DOE-STN (STN lookup)
AT (Attendance)
DOE-FD (Full day Kindergarten)
DOE-GR (Graduate Report)
DOE-LM (Language Minority and Immigrant Students)
DOE-ME (Membership)
DOE-PE (Pupil Enrollment)
DOE-SE (Special Education)
DOE-TB (Textbook Reimbursement OR Supplemental Textbook Reimbursement)
INDOE-AD (Additional Student Information)
INDOE-ALT (Alternative Education)
INDOE-DC (Direct Certification or Direct Verification)
INDOE-HM (Homebound/Hospitalized)
INDOE-SR (Charter School Student Residence Report)
INDOE-TI (Title I)
ISTEPBAR (ISTEP Bar Code Labels)
ISTEPBARC (ISTEP Barcode Corrections)
ISTEPBARR (ISTEP Barcode Labels for Retest Takers (Spring Retest))
SDSStudentHelp
228 . Web School Office
Home > Web School Office > Processing Center > Data Exchange State and Federal Reporting > Indiana > INDOE-HM (Homebound/Hospitalized)
INDOE-HM (Homebound/Hospitalized)
1. School_number – match to the field that contains your school’s state assigned number OR enter the default value.
2. STN-match to the field that contains your students’ state testing number (STN).
3. Grade level – already matched to the grade year field from demographics table.
4. Homebound begin date and homebound end date – match these fields to the corresponding data fields in the SDS database.
See also
DOE-STN (STN lookup)
AT (Attendance)
DOE-FD (Full day Kindergarten)
DOE-GR (Graduate Report)
DOE-LM (Language Minority and Immigrant Students)
DOE-ME (Membership)
DOE-PE (Pupil Enrollment)
DOE-SE (Special Education)
DOE-TB (Textbook Reimbursement OR Supplemental Textbook Reimbursement)
INDOE-AD (Additional Student Information)
INDOE-ALT (Alternative Education)
INDOE-DC (Direct Certification or Direct Verification)
INDOE-DM (Dropout and Mobility)
INDOE-SR (Charter School Student Residence Report)
INDOE-TI (Title I)
ISTEPBAR (ISTEP Bar Code Labels)
ISTEPBARC (ISTEP Barcode Corrections)
ISTEPBARR (ISTEP Barcode Labels for Retest Takers (Spring Retest))
SDSStudentHelp
Web School Office . 229
Home > Web School Office > Processing Center > Data Exchange State and Federal Reporting > Indiana > INDOE-SR (Charter School Student Residence
Report)
INDOE-SR (Charter School Student Residence Report)
1. School_number – match to the field that contains your school’s state assigned number OR enter the default value.
2. STN-match to the field that contains your students’ state testing number (STN).
3. Street address – use the street name PO Box field from demographics.
4. City of residence – match the city field from demographics.
5. State of residence – match the state field from demographics.
6. Zip code – match the zip code field from demographics.
7. Grade level – already matched to the grade year field from demographics table.
8. All remaining fields should be matched to the corresponding data fields in the SDS database.
See also
DOE-STN (STN lookup)
AT (Attendance)
DOE-FD (Full day Kindergarten)
DOE-GR (Graduate Report)
DOE-LM (Language Minority and Immigrant Students)
DOE-ME (Membership)
DOE-PE (Pupil Enrollment)
DOE-SE (Special Education)
DOE-TB (Textbook Reimbursement OR Supplemental Textbook Reimbursement)
INDOE-AD (Additional Student Information)
INDOE-ALT (Alternative Education)
INDOE-DC (Direct Certification or Direct Verification)
INDOE-DM (Dropout and Mobility)
INDOE-HM (Homebound/Hospitalized)
INDOE-TI (Title I)
ISTEPBAR (ISTEP Bar Code Labels)
ISTEPBARC (ISTEP Barcode Corrections)
ISTEPBARR (ISTEP Barcode Labels for Retest Takers (Spring Retest))
SDSStudentHelp
230 . Web School Office
Home > Web School Office > Processing Center > Data Exchange State and Federal Reporting > Indiana > INDOE-TI (Title I)
INDOE-TI (Title I)
1. School_number – match to the field that contains your school’s state assigned number OR enter the default value.
2. STN-match to the field that contains your students’ state testing number (STN).
3. Grade year – already matched to the grade year field from demographics table.
4. All remaining fields should be matched to the corresponding data fields in the SDS database.
See also
DOE-STN (STN lookup)
AT (Attendance)
DOE-FD (Full day Kindergarten)
DOE-GR (Graduate Report)
DOE-LM (Language Minority and Immigrant Students)
DOE-ME (Membership)
DOE-PE (Pupil Enrollment)
DOE-SE (Special Education)
DOE-TB (Textbook Reimbursement OR Supplemental Textbook Reimbursement)
INDOE-AD (Additional Student Information)
INDOE-ALT (Alternative Education)
INDOE-DC (Direct Certification or Direct Verification)
INDOE-DM (Dropout and Mobility)
INDOE-HM (Homebound/Hospitalized)
INDOE-SR (Charter School Student Residence Report)
ISTEPBAR (ISTEP Bar Code Labels)
ISTEPBARC (ISTEP Barcode Corrections)
ISTEPBARR (ISTEP Barcode Labels for Retest Takers (Spring Retest))
SDSStudentHelp
Web School Office . 231
Home > Web School Office > Processing Center > Data Exchange State and Federal Reporting > Indiana > ISTEPBAR (ISTEP Bar Code Labels)
ISTEPBAR (ISTEP Bar Code Labels)
1. School_number – match to the field that contains your school’s state assigned number OR enter the default value.
2. STN-match to the field that contains your students’ state testing number (STN).
3. Teacher Name – match with the appropriate field from demographics OR use the teacher code field from the curr yr schedules
table.
4. Special Code R, S, & T – these fields are for YOUR use to distinguish other sorting options for your label file.
5. Unassigned – this is a blank field.
6. Lang Arts Accom – match with your language arts accommodation field in demographics.
7. Math Accom - match with your math accommodation field in demographics.
8. Science Accom - match with your science accommodation field in demographics.
9. Grade level – match to the grade year field from demographics.
10. Special ED participant – match with your special ED field in demographics.
11. Primary exceptionality – match with your exceptionality field in demographics.
12. Section 504 – match with your Section 504 field.
13. Corp assigned id – match with your id number field in demographics.
14. Soc Econ Status – match with your social economics status field in demographics.
15. Lang Minority Stat – match with your language minority status field.
See also
DOE-STN (STN lookup)
AT (Attendance)
DOE-FD (Full day Kindergarten)
DOE-GR (Graduate Report)
DOE-LM (Language Minority and Immigrant Students)
DOE-ME (Membership)
DOE-PE (Pupil Enrollment)
DOE-SE (Special Education)
DOE-TB (Textbook Reimbursement OR Supplemental Textbook Reimbursement)
INDOE-AD (Additional Student Information)
INDOE-ALT (Alternative Education)
INDOE-DC (Direct Certification or Direct Verification)
INDOE-DM (Dropout and Mobility)
INDOE-HM (Homebound/Hospitalized)
INDOE-SR (Charter School Student Residence Report)
INDOE-TI (Title I)
ISTEPBARC (ISTEP Barcode Corrections)
ISTEPBARR (ISTEP Barcode Labels for Retest Takers (Spring Retest))
SDSStudentHelp
232 . Web School Office
Home > Web School Office > Processing Center > Data Exchange State and Federal Reporting > Indiana > ISTEPBARC (ISTEP Barcode Corrections)
ISTEPBARC (ISTEP Barcode Corrections)
1. Corp or Dioc Number – enter your corporation number in the default value field.
2. School_number – match to the field that contains your school’s state assigned number OR enter the default value.
3. STN-match to the field that contains your students’ state testing number (STN).
4. Grade level – match to the grade year field from demographics.
5. Teacher Name – match with the appropriate field from demographics OR use the teacher code field from the curr yr schedules
table.
6. Student last name – already matched to the student last name field from demographics table.
7. Student first name – already matched to the student first name field from demographics table.
8. Student middle name – already matched to the student middle name field from demographics table.
9. Corp assigned id – match with your id number field in demographics.
10. Gender – match with the sex field in demographics.
11. Birthdate – match with the birthdate field in demographics.
12. Ethnicity – match with the ethnic code field in demographics.
13. Special Code R, S, & T – these fields are for YOUR use to distinguish other sorting options for your label file.
14. Unassigned – this is a blank field.
15. Special ED participant – match with your special ED field in demographics.
16. Primary exceptionality – match with your exceptionality field in demographics.
17. Section 504 – match with your Section 504 field.
18. LEP – match with your LEP field.
19. Lang Arts Accom – match with your language arts accommodation field in demographics.
20. Math Accom - match with your math accommodation field in demographics.
21. Science Accom - match with your science accommodation field in demographics.
22. Soc Econ Status – match with your social economics status field in demographics.
See also
DOE-STN (STN lookup)
AT (Attendance)
DOE-FD (Full day Kindergarten)
DOE-GR (Graduate Report)
DOE-LM (Language Minority and Immigrant Students)
DOE-ME (Membership)
DOE-PE (Pupil Enrollment)
DOE-SE (Special Education)
DOE-TB (Textbook Reimbursement OR Supplemental Textbook Reimbursement)
INDOE-AD (Additional Student Information)
INDOE-ALT (Alternative Education)
INDOE-DC (Direct Certification or Direct Verification)
INDOE-DM (Dropout and Mobility)
INDOE-HM (Homebound/Hospitalized)
INDOE-SR (Charter School Student Residence Report)
INDOE-TI (Title I)
ISTEPBAR (ISTEP Bar Code Labels)
ISTEPBARR (ISTEP Barcode Labels for Retest Takers (Spring Retest))
SDSStudentHelp
Web School Office . 233
Home > Web School Office > Processing Center > Data Exchange State and Federal Reporting > Indiana > ISTEPBARR (ISTEP Barcode Labels for Retest
Takers (Spring Retest))
ISTEPBARR (ISTEP Barcode Labels for Retest Takers (Spring
Retest))
1. Use the ISTEPBAR report OR this layout (they are the same).
2. FLAG the students in demographics so only students who need to re-take the test are selected and exported for this report.
See also
DOE-STN (STN lookup)
AT (Attendance)
DOE-FD (Full day Kindergarten)
DOE-GR (Graduate Report)
DOE-LM (Language Minority and Immigrant Students)
DOE-ME (Membership)
DOE-PE (Pupil Enrollment)
DOE-SE (Special Education)
DOE-TB (Textbook Reimbursement OR Supplemental Textbook Reimbursement)
INDOE-AD (Additional Student Information)
INDOE-ALT (Alternative Education)
INDOE-DC (Direct Certification or Direct Verification)
INDOE-DM (Dropout and Mobility)
INDOE-HM (Homebound/Hospitalized)
INDOE-SR (Charter School Student Residence Report)
INDOE-TI (Title I)
ISTEPBAR (ISTEP Bar Code Labels)
ISTEPBARC (ISTEP Barcode Corrections)
SDSStudentHelp
234 . Web School Office
Home > Web School Office > Processing Center > Data Exchange State and Federal Reporting > Michigan
Michigan
This section provides a quick overview of Michigan state reports. You access theses reports enter Web School Office |Processing
Center |Data Exchange, State and Federal Reporting.
See also
Data Exchange State and Federal Reporting
Illinois
Indiana
SDSStudentHelp
Web School Office . 235
Home > Web School Office > Processing Center > Data Exchange State and Federal Reporting > Michigan > MSDS Request for UIC Group
MSDS Request for UIC Group
Access WSO |Processing Center | Data Exchange State and Federal Reporting |Select State = Michigan | Select Report = MSDS
Request for UIC Group
Fill in the boxes at the top of the screen:
●
Submitting Entity Type Code should read DISTRICT
●
Submitting Entity Code – 5 digit District Number
●
Other Values 1 (2 digit ISDESA code)
●
Report date
See also
MSDS Early Childhood Report
SDSStudentHelp
236 . Web School Office
Home > Web School Office > Processing Center > Data Exchange State and Federal Reporting > Michigan > MSDS Early Childhood Report
MSDS Early Childhood Report
First Steps:
●
Get the latest Web School Office build and the Control Center update.
●
Run a full evaluation (u22_evct.exe) from the SDS control center.
●
This process will create new MSDS fields in your database, sdsxplan.mdb.
●
The below fields will now be available for data entry in Demographics_SR_1. If any of these fields were already in
Demographics, the evaluation program copied the data from Demographics to the new field in Demographics_SR_1. The report
has matched field SRSD_UIC from DEMOGRAPHICS. If you do not have this field in demographics, you can change the match to
the appropriate field/table.
The fields entered to the Services table relate to the Early Childhood Programs. The evaluation has also added the appropriate
program codes to the SDS database if needed.
These are:
SDSStudentHelp
Web School Office . 237
Students in these programs must be entered into SDS through the Student Services Data Entry screen.
Instructions for Creating the Early Childhood Report
Enter WSO |Select Processing Options |State and Federal reporting |MSDS Early Childhood |XML Format.
The top of the screen should look the below screen shot:
Most of the report fields have been matched for you to SDS fields. Report fields 1, 2, 9 and 10 needs to be matched to default values.
Use this screen as a guideline.
SDSStudentHelp
238 . Web School Office
Make any changes to the matched fields and then press “Create Export File”.
Note: Some report fields (those with ‘M’ in the Field in Use column) are matched to multiple SDS fields. If you need to change the
preset matches for these fields, there is a new check box, “Combine Fields”, in Step 3. When this is checked, you can select each
field, one at a time, and click the yellow marker to match after each selection.
SDSStudentHelp
Web School Office . 239
Notes:
●
Select “XML” in the drop box for “File Export Format.
●
If you want to submit current year students:
❍ Click
and set a sort.
●
❍
Click the icon to Create Export File.
❍
To the right of the second drop box in the very top line, a piece of paper should appear.
■
If it does not, leave this screen and then return to it.
❍
Click the piece of paper icon to show your files previously created for submission.
❍
When the file is displayed, select the output file that was just created.
❍
Right mouse click on the yellow folder of the file created and “Save Target As”.
Name the report appropriately.
❍ For a district submission: The file name should start with “D” followed by the ISD/ESA number, followed by the district
number.
■
SDS does not provide the number; the District/Building should know their numbers.
❍
For a building submission: The file name should start with “B” followed by the ISD/ESA number, followed by the building
number.
■
SDS does not provide the number; the District/Building should know their numbers.
●
Save the file to your desktop.
●
Submit the file to the state through the state web site.
The first six fields of the report are MANDITORY and data must be entered for each student in the matched SDS field. The rest of the
fields are OPTIONAL but all data submitted should follow the Business Rules posted on the CEPI website for this report. Check all date
fields for accuracy and make sure that name fields include only state allowed punctuation (period, comma, apostrophe and hyphen).
See also
MSDS Request for UIC Group
SDSStudentHelp
240 . Web School Office
Home > Web School Office > Administrative Utilities
Administrative Utilities
Note: This area is ONLY for techs that are given the rights by the administration to be the administrator of SDS.
Overview
Utilities for administrators are simplest, to make operating and maintaining the system VERY efficient. SDS also offers Web Hosting
for those who may not have a tech on staff or would like the ease of not thinking about updates, backups etc.
SDS Web Hosting
Have you ever thought about running your SDS system from SDS? With a 45 mbps T3 line, SDS is geared to service your hosting
needs. You can host your full system and database on SDS's Server. This service can minimize networking problems and simplify your
operating procedures. For more information on hosting your system and data call 800.323.1605.
See also
Data View Definition
Master Code Field Definition and Maintenance
Control Center
Import Data from CSV or TXT Files
User Security
Web Settings
SDSStudentHelp
Web School Office . 241
Home > Web School Office > Administrative Utilities > Data View Definition
Data View Definition
Overview of Screen
●
Major View Options: This is where you can select if you would like to create a view for Student Information Entry Views or
Master File and Code Entry and Changes.
●
View Definition Information: Here you can select default views, custom views and the view type.
●
View Type to Display: This allows you to select if it is a display where you can Enter or only View data.
●
Data Areas: This allows you to select the table you would like to pull fields from (i.e. Activities)
●
Title: Where you enter the title for you new data view.
Create a New View
Example:
“Let’s say you want to setup security so no-data entry support staff can see ALL demographics data and search for specific
information such as all children at same address: Superintendent's Secretary, Board Secretary, Social Workers, etc. These people do
not enter any data, but need to see much more than is listed in the basic demographic screen. How do we set this up?”
1. Enter WSO |Administrative Utilities |Data View Definitions.
SDSStudentHelp
242 . Web School Office
❍
2. Under "Major View Options", select “Student Data Entry Views”.
3. Select the “Default Views” drop down and choose "Demographics All Fields".
4. Under “View Type to Display", select the “View” radio button.
5. Enter in the Title for your display in the “Title” box (i.e. Demographics - View Only).
❍
6. Click “Save New View”.
❍ Note: When you go back into Data View Definitions your Custom View will now be available under the Custom View
Dropdown.
❍
Also note that you can put a check mark in “This is my view only (and my security groups).” This will only allow
you or/and the security group that you are in to see the view you have setup.
7. Then Enter Administrative Utilities |User Security |Select the user or user group you would like to NOT have rights to your
custom view.
❍ Then click on the “+” next to the following on the security menu tree:
Web Data Entry and Changes |Student Data Views for Entry and Changes | Demographics |Place a check in
Demographics – View Only (or your custom view setup).
8. Then click Save User Setup.
SDSStudentHelp
Web School Office . 243
❍
❍
Tech Note: To find where to set security for Data View Definitions you enter Administrative Utilities |User Security
|Click on the User/Group |Click on the + next to Web Data Entry and Changes |The Area/Table the view is for (i.e.
Demographics) |Place a check in the view you do not want the user to see.
See also
Master Code Field Definition and Maintenance
Control Center
Import Data from CSV or TXT Files
User Security
Web Settings
SDSStudentHelp
244 . Web School Office
Home > Web School Office > Administrative Utilities > Master Code Field Definition and Maintenance
Master Code Field Definition and Maintenance
This area allows you to code, view, edit and un-code a field. Enter WSO |Administrative Utilities |Master Code Field Definition and
Maintenance.
Code a Field
1. Select the table with the field you want to code (i.e. Demographics)
2. Select the field you would like to code (i.e. School_Location)
❍ Note: If you check Only Coded, the dropdown will only show coded fields.
3. Click the radio button “coded.”
4. If a coded field is chosen, a list of codes and descriptions will display. If the field is not currently coded, a blank Code and
Description screen will display.
5. To
add a code, enter the code in the “Code” box and the description in the “Description:” box. Press the Save/Add Code
Table Entry
to save the entry. Repeat for each code you wish to add.
6. The dropdown on the right contains all values currently used in the selected field. If you wish to add these values to the code
list, click
beside “Save Data Field Values in Code Table” All values from the dropdown list will be added to the code list.
7. Edit codes/descriptions by clicking on the blue code in the list. Edit the values in the Code & Description boxes on the right.
Click Save/Add Code Table Entry
to save the entry
8. To remove codes, check mark the box in front of the code(s) to be deleted and click
Un-code/Edit a Field
1. Select the table with the field you want to uncode (i.e. Demographics)
2. Select the field you would like to uncode (i.e. School_Location)
3. Click the radio button “Uncoded.”
4. Either edit the field or select Uncode.
5. Click
See also
SDSStudentHelp
Save/Add Code Table Entry.
.
Web School Office . 245
Data View Definition
Control Center
Import Data from CSV or TXT Files
User Security
Web Settings
SDSStudentHelp
246 . Web School Office
Home > Web School Office > Administrative Utilities > Control Center
Control Center
The Control Center holds controls such as lock/unlock users, document control, parent connect controls, add a report and more.
See also
Lock/Unlock Users Out of SDS
Document Control Center
Parent Connect - Office Tasks
Add a Report to a Report Group
Student System Adjustments
Teacher Web
File Transfer
Other Operations
Useful Information
Toolbox
SDSStudentHelp
Web School Office . 247
Home > Web School Office > Administrative Utilities > Control Center > Lock/Unlock Users Out of SDS
Lock/Unlock Users Out of SDS
Lock Users Out of SDS
To lock users out of SDS proceed with the following instructions:
1. Enter Web School Office
2. Click on + next to Administrative Utilities |Control Center
3. Click on the button at the top of the screen “Lock users out of SDS”
❍ Note: you can add a message to the users so they know what is taking place.
4. Read the pop up message. Click OK to the message that appears.
Unlock Users
To unlock your Web School Office there are three options:
1. Once you are done with your work return to the control center and click on the button at the top of the screen “Unlock Users.”
❍
2. The second option. Next you your Web School Office link after sdsweboffice type reporting/webcontrolcenter.aspx (i.e.
http://yourschooladdress/sdsweboffice/reporting/webcontrolcenter.aspx ).
❍ Select Finance or Student
❍
Enter your user ID and Password
❍
Click Login
❍
SDSStudentHelp
248 . Web School Office
❍
Then click on Unlock Users.
❍
3. The third option is to go to the web server Web School Office is on, then navigate to the student directory and delete the
stop.txt file.
See also
Document Control Center
Parent Connect - Office Tasks
Add a Report to a Report Group
Student System Adjustments
Teacher Web
File Transfer
Other Operations
Useful Information
Toolbox
SDSStudentHelp
Web School Office . 249
Home > Web School Office > Administrative Utilities > Control Center > Document Control Center
Document Control Center
Documents can be added in many areas of Web School Office by clicking on the Document Control icon throughout the system,
browsing for the document and saving it with the area of the system you apply it to. The document control area in Administrative
Utilities |Control Center |Document Control allows you to click on the document you would like to edit and change the descriptions,
security group save or delete.
Edit a Document Description
1. Enter Web School Office
2. Click on Administrative Utilities |Control Center |Document Control
3. Click on Edit next to the document you would like to edit.
4. The description will then be filled with the description of the document highlighted in yellow. Click in the description box if you
would like to edit it and click on the dropdown box next to security groups if you would like to change the documents security
group.
5. Click Save to save your changes.
Delete Document/s
1. Enter Web School Office.
2. Click on Administrative Utilities |Control Center |Document Control.
3. Place a check mark in the box next to the document /s you would like to delete.
4. Click Delete.
Show Only Missing Documents
To show only missing documents proceed with the following:
1. Enter Web School Office.
2. Click on Administrative Utilities |Control Center |Document Control.
SDSStudentHelp
250 . Web School Office
3. Place a check mark in the box next to “Show Only Missing Documents”.
4. Check marks are placed in the box to delete the missing documents. Hit Delete to delete them so they no longer display.
See also
Lock/Unlock Users Out of SDS
Parent Connect - Office Tasks
Add a Report to a Report Group
Student System Adjustments
Teacher Web
File Transfer
Other Operations
Useful Information
Toolbox
SDSStudentHelp
Web School Office . 251
Home > Web School Office > Administrative Utilities > Control Center > Parent Connect - Office Tasks
Parent Connect - Office Tasks
Create Passwords for New Students
1. Login Web School Office.
2. Click on Administrative Utilities |Control Center |Parent Connect.
3. Select a School Location.
4. Select either Students With No Passwords or Reset Passwords for All Students.
5. Click Create Passwords for New Students.
Report Area Adjustments
1. Login Web School Office.
2. Click on Administrative Utilities |Control Center |Parent Connect.
3. Under Parent Connect Reports select the areas you WOULD like parents to see and click
to save.
See also
Lock/Unlock Users Out of SDS
Document Control Center
Add a Report to a Report Group
Student System Adjustments
Teacher Web
File Transfer
Other Operations
Useful Information
Toolbox
SDSStudentHelp
252 . Web School Office
Home > Web School Office > Administrative Utilities > Control Center > Add a Report to a Report Group
Add a Report to a Report Group
1. Login.
2. Click on Administrative Utilities |Control Center |Add Report to a Report Group.
3. Select a report group.
4. Click on the + or select a report.
5. In box # 3 type in a Description for your report.
6. In box # 4 type in the Crystal Report name.
7. Next to # 5 click
to save.
8. Then enter Reports |Student Reports and the Report Group you added the report to.
See also
Lock/Unlock Users Out of SDS
Document Control Center
Parent Connect - Office Tasks
Student System Adjustments
Teacher Web
File Transfer
Other Operations
Useful Information
Toolbox
SDSStudentHelp
Web School Office . 253
Home > Web School Office > Administrative Utilities > Control Center > Student System Adjustments
Student System Adjustments
1. Login Web School Office.
2. Click on Administrative Utilities |Control Center |Student System Adjustments.
❍ This area is where special adjustments to the system are posted.
❍
For example: Apply tuition Payments and Credits , Correct Grade_Year and Home_Room on registration records,
Remove GPA balance forward for selected grade, Remove GPA balance forward and deactivate transcript for selected
grade, Deactivate transcript detail for selected grade/school year(s).
3. If any of these state to select grade/school, select now if not proceed to 4.
4. Click Apply Now to the right of the adjustment you would like made.
Exclude School Years for Transcript
The SDS transcripts in Web School Office have prompted for school year(s) to be excluded from printing. This kept junior high/middle
school grades from appearing on a high school student’s transcript that is sent on to a college. This question will no longer be asked
prior to running the standard SDS transcripts.
These records can now be flagged to not print on the transcript through a new utility* in WSO. To access this utility, follow these
steps:
●
Login WSO.
●
Open Administrative Utilities |Control Center.
●
Click on the tab for Student System Adjustments.
●
Use the option for “Deactivate transcript detail for selected grade/school year(s).
●
Select the correct school location in the school location dropdown.
●
Select the grade year value of the students who need classes inactivated for a school year, then choose the school year(s) to
deactivate.
●
Click the “Apply Now” button next to the deactivate transcript detail selection line.
These records will now have ‘N’ in field Sequence_Code_C135 in the Transcript Detail records for the selected school location, grade
and school year(s). Any class so noted will not print on the transcript. If a class should be included on a student’s high school
transcript (i.e. HS Algebra class taken in junior high), then you simply remove the “N” from the field Sequence_Code_C135.
* If you do NOT want to run this utility, you may also opt to exclude a school year using the sort/select in web school office prior to
printing transcripts.
IMPORTANT: ALL students in this grade will have ALL classes inactivated for the selected school year. If you have students that are
retained for a school year, make sure to run this utility prior to either:
●
Advancing the grade level, if you use K-12 in the grade_year field.
●
Changing retained students’ graduation year, if you use year of grad (i.e. 09, 10, 11 etc.) in the grade_year field.
PLEASE NOTE: This utility will not inactivate transcript attendance data. If you want to delete attendance data, the 4th option
(Remove transcript attendance for selected grade/school year(s)) can be used. Keep in mind that the transcript will prompt you to
“select a school year” for attendance printing. Only those years from the selected year forward will be included.
SDSStudentHelp
254 . Web School Office
See also
Lock/Unlock Users Out of SDS
Document Control Center
Parent Connect - Office Tasks
Add a Report to a Report Group
Teacher Web
File Transfer
Other Operations
Useful Information
Toolbox
SDSStudentHelp
Web School Office . 255
Home > Web School Office > Administrative Utilities > Control Center > Student System Adjustments > Assign Graduation Dates
Assign Graduation Dates
To assign graduation dates in Web School Office, open Administrative Utilities and click on Control Center and follow the below steps.
1. In the next screen, click on Student System Adjustments. In the Assign Graduation Dates section, choose the grade year for
your seniors from the dropdown box.
2. Choose your School Location. Enter the graduation date in the box to the right of School Location.
3. Click the Assign Now button.
4. A message will display confirming the dates are assigned. Click OK.
If you have any seniors who are not graduating, you can remove the graduation date from their GPA Summary Information.
1. Open Data Entry and Changes |Student Information. Choose GPA Summary Information from the Entry Options dropdown.
2. Search for the student to change. Click the file folder button on their GPA record.
3. Scroll to Grad Date at the bottom of the record. Remove the date and click the floppy disk button to save the change.
To assign graduation dates in School Office v8.5, open Setup |Student Accounting Setup Entry and Changes |Attendance Accounting
|Graduation Dates.
1. Choose the grade year for your seniors from the dropdown.
2. Enter the Graduation Date and your School Location.
3. Click the OK Assign Graduation Dates button.
If you have any seniors who are not graduating you can remove the graduation date for those students in Grades, Transcript &
Graduation Requirement |Grade Reporting |Other Grade Options |Cumulative GPA Changes.
1. Search for the student to change.
2. In the GPA record at the bottom of the screen, remove the Grad Date and press the down arrow on your keyboard to save the
change.
See also
Transfer Schedule Change
SDSStudentHelp
256 . Web School Office
Home > Web School Office > Administrative Utilities > Control Center > Student System Adjustments > Transfer Schedule Change
Transfer Schedule Change
Many schools wish to print report cards in an order determined by a specific class period and teacher code so that report cards can
be quickly sorted. In order to accomplish this we offer a Transfer Schedule Information program.
1. To access this program enter WSO |Administrative Utilities |Control Center.
2. Once the Control Center screen displays click on the Student System Adjustments tab.
3. The bottom option in the Student Systems Adjustment area is Transfer schedule data to sort report cards by
Period/Teacher/Room. Click the “Activate” button to the right of the description line.
Your screen will now display the options for sorting Room or Teacher Code and the Demographic field to transfer this information
into. For your convenience the default values are preset at the most popular selections. If these are not your desired selections, click
your desired selection in each box.
Below those boxes are the areas where you will select the period selection, example:
I want to pass out report cards in 5th period. The Select a Marking Period selection box is next. Remember that the Marking Period
should be the current marking period and not the marking period of the report card print. If you have started 3rd quarter classes but
want to pass out 1st semester report cards, do not select term 2 as your marking period since the students most likely have changed
classes. You want the report card to go to their “current” class – not where they were last semester.
Next, you will see an Advanced Options button. Use this to select your specific school location BEFORE using the transfer process. In
the Field Name dropdown select School Location then in the Compare to Value drop down select YOUR school location. Click the Add
to Selection Criteria button.
Last, once you have made the appropriate selections click the Apply button located just to the right of the Advanced Options button.
When the process is completed, a message box will appear telling you how many student records were changed. Click OK and
proceed to the report card printing area. Set up a sort on the demographic field that your transferred the schedule information to.
See also
Assign Graduation Dates
SDSStudentHelp
Web School Office . 257
Home > Web School Office > Administrative Utilities > Control Center > Teacher Web
Teacher Web
In this area of the control center you have two main options, to add Teacher Web Reports or to setup Gradebook Categories.
To Access: Enter WSO |Administrative Utilties |Control Center |Teacher Web
Teacher Web Reports
This option allows you to add reports to Teacher Web to different areas of Teacher Web. You will also see the default reports in these
areas as well (i.e. swb_dbnm |Student Demographics). This shows the report name swb_dbnm | and the report description (Student
Demographics). See the example below.
Add a Teacher Web Report
1. Enter WSO |Administrative Utilties |Control Center |Teacher Web |Click on Teacher Web Reports
2. Select the area of Teacher Web you would like to add a report to (i.e. Grades)
3. Enter in a report file name (i.e. swbcg6x.rpt)
4. Type in a Report Description.
5. Click
❍
to add the report.
Note: If you receive the following message this means the report name does not exist which means you may have
mistyped the report name or the report is no longer in your student directory. In this case click OK and retype the report
name (Do not forget to type in the .rpt after the file name.).
❍
6. Once you have added your report view it in Teacher Web to verify it meets your needs.
Gradebook Categories
In Administrative Utilities |Control Center |Teacher Web you have the option to add gradebook categories. Below will walk you through
how to add them.
1. 1. Enter Control Center |Teacher Web
2. 2. Click on the radio button “Gradebook Categories”
3. 3. Enter a Category Name
4. 4. Click on the green plus sign
5. ¬ The gradebook categories will automatically fill with “Standard” categories.
6. 5. Once you have all your gradebook categories added verify the setup in Teacher Web.
Restore Gradebook Page
SDSStudentHelp
258 . Web School Office
In Administrative Utilities |Control Center |Teacher Web you have the option to “Restore Gradebook Page”. Below will walk you through
how to add them.
1. Enter Control Center |Teacher Web
2. Click on the radio button “Restore Gradebook Page”
3. Select the Database |Course and Gradebook to restore.
4. To complete the process select the “Restore Selected Gradebook Page” button.
❍ This will add the selected page found in the backup database for the selected course back into your working database.
The title will include an R at the end of the Grade_Book_Title to indicate the restore.
❍
See screen prints below for examples.
SDSStudentHelp
Web School Office . 259
See also
Lock/Unlock Users Out of SDS
Document Control Center
Parent Connect - Office Tasks
Add a Report to a Report Group
Student System Adjustments
File Transfer
Other Operations
Useful Information
Toolbox
SDSStudentHelp
260 . Web School Office
Home > Web School Office > Administrative Utilities > Control Center > File Transfer
File Transfer
This area of the system allows you send your database/file to SDS, save a file to your workstation and send a SQL database to an
Access download.
Send Database to SDS
To send your database to SDS follow the below instructions:
1. Enter WSO |Administrative Utilities |Control Center |File Transfer.
2. Click on Send Database to SDS
3. Select Send .MDB (Microsoft Database) or Send .BAK (Your backup of your SDS database).
4. Write down the assigned filename or create your own
5. Enter a Password
6. Click Send Database to SDS bar
7. Once you have sent it make sure you notify the individual you are working with at SDS what the file name is and password.
Send File to Server
This option allows you to send a file to the server into your SDS directory. For example, if you created a custom report you would like
to have run through SDS and you want to upload it to your Student Directory on your web server you would use this option. If you
wanted to import a file into SDS, you can upload a file to the Student Directory and then import your data.
Follow the below instruction on how to send a file to the server:
1. Enter WSO |Administrative Utilities |Control Center |File Transfer.
2. Click on Send File to Server
3. Click on the Browse button and browse to where your file is located.
4. Click Upload File.
5. You will get a message that your file was sent then click OK.
Send File to Workstation
This option allows you to grab a file from your SDS directory or FPT site and transfer it to your workstation. This is great to use when
customizing reports or transferring an export file.
1. Click in the radio button next to Save File to Workstation.
2. Select where to look for the file ftp site or finance directory.
3. Click the blue Select to choose a file
4. Right click on the link to download: next to the file name and save the file to your desktop.
SDSStudentHelp
Web School Office . 261
SQL to Access Download
The option is intended for use by users who have their data stored in a SQL server. It can however be used by those who use Access
as the database which stores their SDS administrative data.
The reason for the process is to assist with moving data from one SQL server to another, which usually requires some technical
intervention. The portability of an access database is without question much easier than that of SQL server. It requires little or no
technical knowledge to be moved from one machine to another. The downloaded database can be used for report customizations with
Crystal Reports and as a data repository for legacy systems that had been designed to work with an access database on a local
machine.
What does the process do?
●
The program opens the database that houses the SDS administrative data and transfers the data and database structure to a
blank master Access database.
●
To create a blank Master database (ModelPl22.mdb) a new database is being distributed with our updates. During the process
these blank databases are copied to MastPl22.mdb. The data is then place in the respective master database.
●
After the master database is loaded it is copied to a new name SdsxPlanBaK.mdb.
●
A zip file (SDSbak.zip) is created with the new database.
●
Custom reports and the SDS control database (sdscplan.mdb) are added to the new zip file.
❍ The zip file is then copied to the FTP site on the server which contains the clients custom repots and control database.
The process assumed that the FTP site is a directory called FTP and is one level below the directory which contains the
clients control database. This directory could be something like C:\SdsAdmin\student\FTP.
The process will take approximately 10 to 20 minutes and the status bar at the bottom of the web page may not last as long as the
process. Once the button is pushed to start the process the user must leave the web browser open and may not start another
operation. At the end of the process a message will display along with a technical informational screen. At this point the client can
continue with other work including the download the new Zip file.
Note: If there is a recent (30 minutes) time-stamp on mastpl22 the button will be disabled.
To use the database with the SDS system on a local machine the user should do the following:
●
Download the file SDSbak.zip to a temporary directory on their system.
●
Unzip the file.
●
The file SdsXPlanBak.mdb is the student database. If that is then renamed to SdsXPlan.mdb and copied to the directory with
SDSStudentHelp
262 . Web School Office
the SDS system it will be recognized by our programs. It is recommended that they also copy the other files that are in the zip
file to update the SDS system on their local machine.
●
As with any operation backup any file that will be replaced during the process. Custom reports, control database and database
in the SDS system before beginning the process.
See also
Lock/Unlock Users Out of SDS
Document Control Center
Parent Connect - Office Tasks
Add a Report to a Report Group
Student System Adjustments
Teacher Web
Other Operations
Useful Information
Toolbox
SDSStudentHelp
Web School Office . 263
Home > Web School Office > Administrative Utilities > Control Center > Other Operations
Other Operations
This area is where other operations are created. For example, the Update Control Database operation and unlock users.
Update Control Database
This option will adjust the control area which contains menu items and special data entry field controls.
To complete this process proceed with the following:
1. Enter WSO |Administrative Utilities |Control Center |Other Operations
2. Click on Display Settings
3. Click on Lock Out Users in SDS
4. Click on Update Control Database Area.
❍ You will see a green bar at the bottom of your browser when it is processing. I will stop once it is completed. Then
MAKE SURE you unlock your users when you are done.
See also
Lock/Unlock Users Out of SDS
Document Control Center
Parent Connect - Office Tasks
Add a Report to a Report Group
Student System Adjustments
Teacher Web
File Transfer
Useful Information
Toolbox
SDSStudentHelp
264 . Web School Office
Home > Web School Office > Administrative Utilities > Control Center > Useful Information
Useful Information
This area provides you with useful information about your system, IP address, server information, web location, database size, last
compress run, rebuild from master and a link to complete a speed test.
See also
Lock/Unlock Users Out of SDS
Document Control Center
Parent Connect - Office Tasks
Add a Report to a Report Group
Student System Adjustments
Teacher Web
File Transfer
Other Operations
Toolbox
SDSStudentHelp
Web School Office . 265
Home > Web School Office > Administrative Utilities > Control Center > Toolbox
Toolbox
You can enter toolbox though Administrative Utilities |Control Center |Toolbox. Toolbox provides you with three options Mass Data
Changes, Add Field Control, and Data Mass Load / Swap Table. In order to see these options you must first login by using the
password MASS.
See also
Mass Data Changes
Add Field Control
Data Mass Load/Swap Table
SDSStudentHelp
266 . Web School Office
Home > Web School Office > Administrative Utilities > Control Center > Toolbox > Mass Data Changes
Mass Data Changes
Mass Data Changes gives you several options: Replace All Data in Column, Format Data, Replace Characters, Move/Combine Data and
Trim All Text Fields (All Tables).
Before you select any option first start by:
1. Entering WSO |Administrative Utilities |Control Center |Toolbox.
2. Login with the word MASS.
3. Click on Mass Data Changes.
4. Click on the button at the top of the screen to Lock Users out of SDS before you start a task. Remember to Unlock Users
when you are done with your tasks.
5. Click in the box I have a working backup of my database. (Enable Mass Change). ONLY click this if you DO have a working
backup.
6. Then select one of the several options. The below sections will detail out all the steps for those specific sections.
Replace All Data in Column
This option will replace all data in a column for the selected students in the selected field will be changed to the value you enter.
1.
“Select a Table” to edit from the drop down.
2. Optional: Click the “Open Selection Definition Area” button to choose only certain students (i.e. students in a specific school
location or specific grade year only need to be affected by this change.). Follow steps 1 – 6 if using this option. The green
arrow will return you to the previous screen.
3. Below the displayed grid, choose the field with the data to be changed in the (Field to Change dropdown).
SDSStudentHelp
Web School Office . 267
❍
4. In the last box, enter the new data to enter for all displayed students.
5. Click the “Make Changes” button.
Format Data
When selecting “Format Data” all data for the selected students in the selected field, will be formatted to the specified manner
selected.
1. “Select a Table” to edit from the drop down.
2. Optional: Click the “Open Selection Definition Area” button to choose only certain students (i.e. students in a specific school
location or specific grade year only need to be affected by this change.). Follow steps 1 – 6 if using this option. The green
arrow will return you to the previous screen.
3. Below the displayed grid, choose the field with the data to be changed (Field to Change dropdown).
4. Choose the type of formatting to be done to the selected field by selecting an option in the format characters dropdown.
5. Optional: Put in a value in the right most box if you are adding, subtracting, multiplying, or dividing the data by the same
number (i.e. adding 5 to all numbers in a column).
6. Click the “Make changes” button.
SDSStudentHelp
268 . Web School Office
Replace Characters
This option will replace characters for all data for the selected students in the selected field; an example is to find all “W” and change
to “WF”.
1. “Select a Table” to edit from the drop down.
2. Optional: Click the “Open Selection Definition Area” button to choose only certain students (i.e. students in a specific school
location or specific grade year only need to be affected by this change.). Follow steps 1 – 6 if using this option. The green
arrow will return you to the previous screen.
3. Below the displayed grid, choose the field with the data to be changed (Field to Change dropdown).
4. Enter the character(s) to be changed (i.e. find all “W”).
5. In the “Change to this:” box, enter the new value (i.e. “WF”).
6. Optional: Check the box to apply to all fields in the table if necessary.
7. Click the “Make changes” button.
SDSStudentHelp
Web School Office . 269
Move/Combine Column Data
This option will move/combine all column data for the selected students in the selected field with the data in the second selected field.
1. “Select a Table” to edit from the drop down.
2. Optional: Click the “Open Selection Definition Area” button to choose only certain students (i.e. students in a specific school
location or specific grade year only need to be affected by this change.). Follow steps 1 – 6 if using this option. The green
arrow will return you to the previous screen.
3. Below the displayed grid, in the Source field drop box, choose the field with the data that needs to be moved.
4. In the Receiving field drop box, choose the field that will be receiving the data from the source field.
❍
SDSStudentHelp
270 . Web School Office
5. In the third drop box, choose what course of action that should be done with the data once it is moved to the receiving field.
❍ Replace data in receiving field: all data in the receiving field will be overwritten with the data from the source field.
❍
Combine with receiving field: all data in the receiving field will be combined with the data from the source field.
❍
Combine with receiving field w/space: all data in the receiving field will be combined with the data from the source
field with a space put in between the 2 data elements being combined.
❍
Add to receiving amount: all data from the source field will be added to the receiving field data for a new total in the
receiving field.
❍
Subtract from receiving amount: all data from the source field will be subtracted from the receiving field data for a
new total in the receiving field.
6. Optional: Check the box to clear or zero the source data field once the changes are made; leave unchecked to leave the
original data in the source field.
7. Click the “Make Changes” button.
Trim all text fields (all tables)
This feature will trim any excess spaces found in text fields in all of the tables in the database. This option is usual done after a
backup, after a conversion or if you have a problem where users in v7 or v8 entered values in fields and hit the space bar after valid
characters. For example: entered a course number line 101 with a space after the 101. This could cause the system to not find the
course information when needed. Same thing happens in all areas of the system if data is not correctly entered or loaded using the
import program.
1. Only complete this task under the discretion of the SDS support staff recommendation.
2. Click the “Make changes” button.
See also
Add Field Control
Data Mass Load/Swap Table
SDSStudentHelp
Web School Office . 271
Home > Web School Office > Administrative Utilities > Control Center > Toolbox > Add Field Control
Add Field Control
1. Enter WSO |Open Administrative Utilities |Control Center.
2. Click on the button at the top of the screen “Lock users out of SDS”.
3. Click on the “Toolbox” button.
4. Login (Password = MASS or contact support to receive a valid code).
❍
5. Once you have logged in another set of buttons will display. Click on “Add Field Control.”
❍
6.
In the drop box next to “Table”, choose your table (i.e. demographics)
7. Enter the field name.
❍ Note: Field names may NOT have symbols (i.e. @$&^(+?) or spaces in the field name. Any spaces will be
filled with an underscore (i.e. Student_Emerg_Name). Also do not name a field with photo, system, code,
section or any type of SQL statement names. The system does allow the field name to start with a
number.
8. Choose the “Field Type”
❍ Text: General purpose for entering data; use for numbers IF you do not need to perform mathematical functions on
them (add/subtract)
❍
Memo: Use of this field gives you the ability to enter 64,000 characters BUT you cannot search on this field
❍
Number: Use of this type makes a number have a value so you can perform mathematical functions
❍
Double: Used for decimal numbers
❍
Currency: Used for fields that will contain monetary amounts
❍
Datetime: Used for fields that will contain date information
9. Enter a “Default Value” in the box, if you want the field to contain a default value as the field is added (i.e. the word “cell”)
10. Click “Add Field” button
11. Then remember once you are done adding all the fields you would like to unlock the users at the top of the screen.
SDSStudentHelp
272 . Web School Office
See also
Mass Data Changes
Data Mass Load/Swap Table
SDSStudentHelp
Web School Office . 273
Home > Web School Office > Administrative Utilities > Control Center > Toolbox > Data Mass Load/Swap Table
Data Mass Load/Swap Table
Under the direction of support staff or programmers, it is sometimes necessary to mass load or swap data into your database. The
steps below direct how to use this area.
1. Entering WSO |Administrative Utilities |Control Center |Toolbox.
2. Login with the word MASS.
3. If the table in your current database should be emptied first before the new/replacement data is imported, then check the box
for “Empty table before import.” You will receive the below message. Verify you have a working backup then click OK.
❍
4. In the Load Tables box, select the file name of the file or swaptable file with the new source data. Click on the file name.
5. In the Tables Available box, click on the name of the table being imported into your current database.
6. Click the > button to move the table(s) into the Tables to Import box.
7. Click once on the name of the table in the Tables to Import box. The fields in this table are listed in the rightmost box.
8. Highlight the field(s) to be imported. Hold your control key while clicking with the mouse to select multiple fields.
9. Click the Import Data button.
See also
Mass Data Changes
Add Field Control
SDSStudentHelp
274 . Web School Office
Home > Web School Office > Administrative Utilities > Import Data from CSV or TXT Files
Import Data from CSV or TXT Files
To import information into SDS Web Office:
Locate Administrative Utilities on the menu tree and select Import Data from CSV or TXT files. You will receive a warning. Please read
it carefully and select OK.
Follow the red numbers on the screen:
1. #1 Select: Demographics Information
2. #2 Select: Basic Demographics or any Demographics view you have available.
❍ It is recommended that a view containing ONLY the fields you will be importing be set up in Administrative Utilities |Data
View Definition.
3. #3 Browse for the CSV file you wish to import.
❍ Description: Enter your file name (i.e. Demographic Information) and select the Add button. You will see your file below
in the document import area.
4. Click on the blue word Select next to the file to import.
5. A new screen will appear with an important message in red. Read it carefully before continuing.
Follow the red numbers on the screen:
(1 and 2 will remain selected Proceed to step 5)
1. #1 Select: Demographics Information
2. #2 Select: Basic Demographics or any Demographics view you have available.
3. Following #2, select the dot, Match Import Data to Output Format
4. #5 from the left column select ID_Number from the drop down. Also locate the column(s) you wish to import information and
from the drop down, select the name of the field from your CSV file which contains your import information.
5. #6 Select one of the options: if record key is not in file do nothing, one wrong ID and the entire import will be aborted. The
other option is Update if in file else ignore if not in file. If wrong ID numbers are found they will be ignored and the data for
correct ID numbers will import.
6. #7 Select: Import/Paste from XXXX where XXXX is the name of your import file.
7. You will receive a message telling you the import process is complete.
8. A new screen will appear with the following message. Read it carefully.
❍ Note: This process WILL make changes that CANNOT be REVERSED. If you do not have a backup CANCEL
this operation. You must match the key data field and ONLY the data items you wish to change. Your
import data will unconditionally replace data in your database. Match an import field to the wrong
database fields and your data will become incorrect.
See also
Data View Definition
Master Code Field Definition and Maintenance
Control Center
User Security
Web Settings
SDSStudentHelp
Web School Office . 275
Home > Web School Office > Administrative Utilities > User Security
User Security
The Security System Setup in the SDS program enables you to assign and control the program areas that each person/user will have
access to. You can access security through WSO |Administrative Utilities |User Security. In this section we will cover the different
security buttons, users, WSO menu tree and finally the user data selection/security options.
See also
Setup New User
User Security Groups
Other Button Options – Save/Change/Sort/Uncheck/Delete/Reset Passwords
User Data Selection/Security Options
Add a New Teacher to WSO and Teacher Web
SDSStudentHelp
276 . Web School Office
Home > Web School Office > Administrative Utilities > User Security > Setup New User
Setup New User
The steps below will help you setup a new user. To setup a teacher search for “Add a New Teacher to WSO and Teacher Web.”
1. Select Administrative Utilities | User Security.
2. Select Setup New User.
3. Enter the User Code.
4. Note: The SDS client assigns the User Code. The User Code will be entered each time during the program login in the I.D #
Field.
5. Enter the User Name for the new user.
6. Note: The User Name is the actual name of the employee being added into the security area.
7. Enter the Password for the new user.
8. If you would like to copy another users security or user group for this user select it in the below screen (i.e. _Teachers or
_Admin). Then once you click save the user will have the same security as the user/group selected below. For example below
Nielsen will have the same security as everyone in the _Teacher #_TG (Teacher Group). This process will save you TONS of
time so that you do not have to individually setup each user’s security. See User Groups in the below section.
9. Select Save.
●
List of Existing Student System Users are listed on the far left side of the screen. The Users that are listed in the Users column
with a User Code will have access to the Student System. To view the rights of any user, highlight the User Code and Name
and all rights that have been assigned for this user will be displayed in the various areas of the security screen.
●
Note: If your school has the finance system and a user would like to have access to both systems the same user login should
be entered in the finance system and then when the user logs in then they will see the student and finance system on their
menu tree.
See also
User Security Groups
Other Button Options – Save/Change/Sort/Uncheck/Delete/Reset Passwords
User Data Selection/Security Options
Add a New Teacher to WSO and Teacher Web
SDSStudentHelp
Web School Office . 277
Home > Web School Office > Administrative Utilities > User Security > User Security Groups
User Security Groups
A security group allows you to assign users to specific security groups, so each time you setup a user you can simply tie them to the
appropriate group (i.e._AdministrativeUsers, _General Office Users, _Parent, _Substitute Teachers, _Teachers and _View Only
Users,.). See the screen shot below and view how all the groups have a _ so they appear at the top of the list.
To set the security for each group simply click on the group name i.e. _Substitute Teachers so it is highlighted in blue and then
simply check all the options you would NOT like the substitutes to have access to and uncheck the areas you would LIKE them to have
access to. Then save the changes.
Setup another Security Group
If you would like to setup another group, simply setup a new user with the name staring with a _. Then a new group will be added.
For example I added a new group _SDS. I now have a new security group I could setup for SDS for example. (You could even create
a group for coaches. (i.e. _Coaches)
SDSStudentHelp
278 . Web School Office
See also
Setup New User
Other Button Options – Save/Change/Sort/Uncheck/Delete/Reset Passwords
User Data Selection/Security Options
Add a New Teacher to WSO and Teacher Web
SDSStudentHelp
Web School Office . 279
Home > Web School Office > Administrative Utilities > User Security > Other Button Options – Save/Change/Sort/Uncheck/Delete/Reset Passwords
Other Button Options – Save/Change/Sort/Uncheck/Delete/Reset
Passwords
The other button options are basic selections.
●
Save a User Setup = Click here to save your user setup.
●
Change User = Select the User and click on Change User if you would like to modify the user.
●
Sort by User ID = Click here to sort the users by ID.
●
Uncheck All = Click here to uncheck the whole menu tree.
●
Delete = Select the user you would like to delete and click delete.
●
Reset Passwords = Click here to reset user passwords. This will reset by group or those not in a group.
See also
Setup New User
User Security Groups
User Data Selection/Security Options
Add a New Teacher to WSO and Teacher Web
SDSStudentHelp
280 . Web School Office
Home > Web School Office > Administrative Utilities > User Security > User Data Selection/Security Options
User Data Selection/Security Options
The user data selection/security options are the far right area of this screen where you can click on “Custom Teacher Selection
Formula” or “Custom Look/Browse Selection Formula.” These two options allow you to create more defined selections on a user or
group.
The “Custom Teacher Selection Formula” allows you to create a custom selection for the teacher web and “Custom Look/Browse
Selection Formula” allows you to create a custom selection for look and browse in WSO.
●
To use these options simply click on the group or user you would like to change the restrictions on (i.e. Allen, Harold).
●
Select Change User.
●
Now the menu tree is no longer grayed out.
●
Click on Custom Look/Browse Selection formula and the below screen will display. Let’s say Mr. Harold is now the counselor for
Carter’s student and only wants to see Carter’s students.
●
Next to 2. Select the field you would like to sort on (i.e. Counselor).
●
Next to 3. Select a compare operation (i.e. Equal to [=]).
●
Select a Compare to Value (i.e. Carter).
●
Click Add to Formula.
●
Click Save Formula.
●
Click finished once you are done adding all the sorts you would like. Keep in mind you can keep building on top of another
formula by starting at number 1 and going through 6 again.
❍ Note: If you want to clear a formula quickly, simply click on the Clear Formula button.
SDSStudentHelp
Web School Office . 281
❍
❍
You will then see the selection formula added into the look and browse box.
❍
Other ideas for selection formulas would be:
Some schools add a login called “Wrestling” or “Bktbl” or “insert other sport abbreviation here” then setup a custom view to select
only students with the sport field (from demographics) equal to “appropriate abbreviation”. This is wonderful for coaches to look and
browse only on their students – AND it also serves as a check and balance – that way if a student is removed from the team or quits a
team, the coach tells the office to remove that student from the coding sequence.
See also
Setup New User
User Security Groups
Other Button Options – Save/Change/Sort/Uncheck/Delete/Reset Passwords
Add a New Teacher to WSO and Teacher Web
SDSStudentHelp
282 . Web School Office
Home > Web School Office > Administrative Utilities > User Security > Add a New Teacher to WSO and Teacher Web
Add a New Teacher to WSO and Teacher Web
1. Login WSO |Data Entry and Changes |Master File Code Entry and Changes.
2. Select application General Information.
3. In Entry Options select Teachers.
4. Click
to Add a Teacher.
5. Complete the Fields on the Right Side of the screen.
6.
Click
to save the new Teacher.
❍
7. Open Administrative Utilities |User Security.
8. Click on Setup New User.
9. The following screen will display:
❍ The radio button should be indicated for “User Security and Setup”
❍
Enter in a User Code (i.e.J53)
❍
Enter in a User Name (i.e. Nielsen)
❍
Enter in a Password (i.e.Iw2baT!)
❍
Notice the check box “Use Security Settings Below” if this is checked it will use the security setting for what you have
selected in the below screen (i.e. _Teachers #_TG group is selected so this teacher will have the same rights as the
teacher group.)
❍
Then click Save |
to close up the user screen.
❍
10. Check/Un-check the items in the menu tree you would like the user to access or not have access to. To save time you can
also add the user to a security group by choosing the group in the security group options drop box above the security tree.
❍ These groups can be created by you or you could use the SDS standard groups that are already setup for you and you
will see listed at the top of the user list with a _ then the group name (i.e. _teachers #_TG).
11. Add the school location next to school restriction for the user in the box in the upper right hand corner.
12. Add a homeroom to the user ONLY if the user is a new teacher (not applicable for office staff).
SDSStudentHelp
Web School Office . 283
❍
13. Click Save User Setup.
See also
Setup New User
User Security Groups
Other Button Options – Save/Change/Sort/Uncheck/Delete/Reset Passwords
User Data Selection/Security Options
SDSStudentHelp
284 . Web School Office
Home > Web School Office > Administrative Utilities > Web Settings
Web Settings
To access Web Settings enter WSO |Administrative Utilities |Web Settings. Web Settings has three tabs, System Settings, E-Mail
Settings and Setup Reports. Simply click on the tab of the area you would like to access.
See also
System Settings
E-Mail Settings
Setup Reports
SDSStudentHelp
Web School Office . 285
Home > Web School Office > Administrative Utilities > Web Settings > System Settings
System Settings
To access System Settings enter WSO |Administrative Utilities |Web Settings |System Settings will display. There are several
different system settings you have the ability to set in this area that control many different tasks, options etc. Below is an overview of
each option.
Beta Test Key
Contact Specialized Data Systems at (800) 323-1605 if you wish to participate in the Beta Test Program.
First Term available in teacher Gradebook
Enter the first term that is available in Teacher Gradebook.
Last Term available in Teacher Gradebook
Enter the last term that is available in Teacher Gradebook
Messaging Refresh Interval in Minutes
This setting is the frequency Messaging will check for messages. Setting this to zero will turn off Messaging automatic refresh.
Year of Web Roll-Over
If this value matches the School_Year and there is no Hist database, the Web Roll-Over option will be available on the Menu Tree
under Administrative Utilities.
Student Assessment Management (SAM) License Key
Contact Specialized Data Systems at (800) 323-1605 to acquire an activation code.
Session Timeout for Office Web
WARNING! Changing this setting this to a higher value will increase the amount of memory use by the server.
Session Timeout for Teacher Web
WARNING! Changing this setting this to a higher value will increase the amount of memory use by the server.
Track attendance by Minute or Class Count
If Minute is selected then the system will web system will track the number of minutes a student is absent from class.
Show Photos for Teacher Web
Select Y to show photos for Teacher Web or N for do not show.
Allow for Horizontal Grade/Year Changes
Allow for Horizontal Grade/Year Changes (Select Y or N). If changes are made in horizontal entry after the student enrollment area
has been created you will need to recreate the enrollment area.
Show Photos for District Office
Select Y to show photos for District Office or N to not show.
Enable Tuition/Fee payments by Family
SDSStudentHelp
286 . Web School Office
If set to “Y”, the option to apply Tuition/Fee payments for a whole family will be available.
Gradebook Averages May Exceed 100%
This setting changes how grade averages are calculated in Gradebook. Select Y to exceed 100% or N to not exceed 100%.
Screen Size Option Active
Select Y to enable or N to disable changing of grid size in Teacher Web
Allow changing of Gradebook Grade Charts
Set to "N" will prevent Teachers from changing and adding custom Grade Charts for their Gradebooks.
Do Not Transfer Inactive Grades
Setting this to Y will prevent grades for inactive students from being transferred from the Gradebook.
Final Grade Average as a Letter Grade Option
If this value is a Y an option to compute letter or numeric averages for the Final grade will be available. If you select N then the
system will determine if numbers or letters are appropriate based on the marking period entries.
Hide Inactive Student Gradebooks in Parent Connect
In Parent Connect select Y to hide entries in Gradebooks if the student has been marked inactive for that course or N not to.
Make Web Registration Permanent
When Parent Connect Web Registration is submitted, selections are unchangeable. Select, Y for yes or N for No.
Show Alternate Courses
Show alternate course options in Web Registration. Select, Y for yes or N for No.
Disable Combining of students in Parent Connect
Set to "N" allows parents to combine their students into one parent login. Set to "Y" to prevent parents from combining students into
one parent login.
Individual Scheduling Program
Set to SQL to use the New Assignment Program. This is mandatory for SQL Server Clients. Set to Access for Original Program.
Limit Teacher Web Discipline by Date
When set to "Y" teachers can only edit the Teacher Web Discipline records that they have entered on the same day.
Limit Teacher Web Discipline by Teacher Code
When set to "Y" teachers can only see the Teacher Web Discipline records that they have entered.
Allow Version 8 Attendance Entry
Set to "N" if district is using the SDS Web Processing system. "N" is the recommended and default setting.
Allow Version 8 Schedule Changes
Set to "N" if district is using the SDS Web Processing system. "N" is the recommended and default setting.
See also
E-Mail Settings
Setup Reports
SDSStudentHelp
Web School Office . 287
Home > Web School Office > Administrative Utilities > Web Settings > E-Mail Settings
E-Mail Settings
To access enter WSO |Administrative Utilities |Web Settings |E-Mail Settings tab. This area allows you to complete a mass email to
all student/parents who have email addresses entered in Data Entry and Changes |Student Information |Entry = Demographics All
Fields |Master_Email.
Step 1 – Enter Email Addresses
First make sure that you have master email addresses entered in Data Entry and Changes |Student Information |Entry =
Demographics All Fields |Master_Email. If you want to use another field for emails that is ok, (however it must have the word email in
the field name) simply enter them and skip the rest of this step. Please keep in mind if you have not entered these yet and would like
to create a new view for faster entry you can do this in Administrative Utilities |Data View Definitions. Search this manual for more
detailed instructions on “Data View Definitions.” Screen print is an example of the new data view for fast entry.
Step 2 – Setup E-mail Settings
After you have entered in all the master emails, enter into |Administrative Utilities |Web Settings |E-Mail Settings tab. There are
three areas that must be filled out and then click “Save Changes.”
1. Server Name or IP = Enter the external full DNS name or external IP address of the SDS Web Office Server. This address
will be used for the URDL in the e-mail that is sent (if applicable) (i.e. 11.11.11.111).
2. SMTP Server = Enter the name or IP address of your SMTP Server. This address will be used by SDS Web Office to send emails. Make sure the SDS Web Office Server has permissions to relay e-mail through this server (i.e. 11.11.11.111).
3. Return E-mail Address = enter a valid e-mail address to be put in the “From:” field in the sent e-mail (i.e.
[email protected]).
●
After this is completed click “Save Changes”
Step 3 – Run the E-Mail Report
SDSStudentHelp
288 . Web School Office
Now it’s time to run the report.
1. Next on the menu tree click on the Reports |Student Reports.
2. Click on E-Mail in box 1 (report groups), Demographics e-mail list in box 2 (select a report).
3. If you only want to mail a certain group of students, you may use the Activate Sort Definition Area button to design a sort to
select only the appropriate students (i.e. all seniors).
4. Click the blue link to choose ONLY current active students (highly recommended).
❍
5. Below the blue link are the important entry options; in box 7, sender’s email address sill auto fill from Web Settings “Email
Setup” (i.e. the principal’s email address, [email protected]).
6. In box 8, choose the e-mail address field from the demographics table that you want to use to send the e-mail (i.e.
Master_Email). If more than one field is found in demographics that includes the word “email”, it will be listed here.
7. Box 9 allows you to enter a subject about the e-mail contents.
8. Box 10 is where the actual e-mail message should be typed. Be sure to check spelling and punctuation before clicking
send the e-mail out to the recipients. Please note you cannot send an attachment with this option.
to
9. In box 10 if you see the message “You are not correctly setup to use the e-mail option. You must first define / identify your
SMTP server in the School Office setup area. Contact your network support staff.” Then please read the message and do as
instructed.
See also
System Settings
Setup Reports
SDSStudentHelp
Web School Office . 289
Home > Web School Office > Administrative Utilities > Web Settings > Setup Reports
Setup Reports
To access enter WSO |Administrative Utilities |Web Settings |Setup Reports.
In here you can run any of the Setup Reports. These reports contain lists of codes, dates etc. that are helpful when setting up specific
areas of the system.
See also
System Settings
E-Mail Settings
SDSStudentHelp
290 . Web School Office
Home > Web School Office > Reports
Reports
There are 225+ reports in Web School Office. This is even before you active sorts and specific selection formulas to meet your needs.
SDS Reports can be customized to meet your schools needs and your school can even learn how to customize their own reports with
your SDS database. The reporting options are endless! State SIS Reporting is done with simple clicks of your mouse. These reports
are instantly updated from Web School Office and place in the proper format for your state. Even changes to your state reporting
fields are accomplished with a simply download from SDS. Then, the new fields are added to your SIS reporting. By being web based
and in the central database also helps to make your state SIS reporting quick and accurate for your total district.
See also
Run a Report
Activate Sort Definition Area
Record Selection Options
Save Sort with Name
Delete a Sort from Sort History
Quick Reports (View/Design/Display/Export)
Goal Based Report Card
Labels
Student Assessment Management (SAM) Reports
Save a Standard SDS Report as a Custom Report - Student
Convert a V7 or V8.5 Custom Report to WSO - Student
Reports where you should run a Program before Printing
SDSStudentHelp
Web School Office . 291
Home > Web School Office > Reports > Run a Report
Run a Report
1. Login.
2. Select Reports.
3. Click on Student Reports.
4. Click on a Report Group (i.e. Demographics).
5. Select a Report (i.e. Student List).
6. Select or create a sort (this step is optional).
7. Click
to preview the selected report in a separate browser window.
8. Select the Printer button on the preview toolbar to print the report.
9. After previewing and printing the report, click the Close Report buttons at the top of the page to close the preview window.
See also
Activate Sort Definition Area
Record Selection Options
Save Sort with Name
Delete a Sort from Sort History
Quick Reports (View/Design/Display/Export)
Goal Based Report Card
Labels
Student Assessment Management (SAM) Reports
Save a Standard SDS Report as a Custom Report - Student
Convert a V7 or V8.5 Custom Report to WSO - Student
Reports where you should run a Program before Printing
SDSStudentHelp
292 . Web School Office
Home > Web School Office > Reports > Activate Sort Definition Area
Activate Sort Definition Area
Sorting allows you to sort your data and then run a standard SDS report based off your selected sort.
1.
2.
3.
4.
5.
6.
7.
8.
9.
10.
11.
12.
13.
14.
Login
Select Reports
Click on Student Reports
Click on a Report Group (i.e. Demographics) from the box labeled 1 Report Groups.
Select a Report (i.e. Student List) from the box labeled 2 Select a Report.
Click “Activate Sort Definition Area” 3-6.
Select “Adjust student selection to include Only Active Students?” (This will filter current students only.)
❍ Note: If you want to include all current active students for the year, even ones who have withdrawn, then click this link,
then remove the line about the Exit Date field. To remove the line, click Select then click the button “Delete Selected
Sort”.
Select a Table to Sort on (i.e. Demographics) from the box labeled 3 Tables in selected report.
Select a Field (i.e. School_Location) in the box labeled 4 Fields in selected table.
Select the Data you would like to sort on. (i.e. 1, 2) in the box labeled 5 Data in selected field.
Click the arrow to the Right to add the selected values to box 6 Data used for record Selection.
Select a Record Selection Option (default is “If value is in the list (=))
Click Save New Sort
The Sort will then Display near the bottom of the page.
❍ Note: Your sort history will be saved until you remove them. You can name your sort after running the report once with
this sort. (See Save Sort with Name in this section).
15. You can add additional lines to your sort by repeating steps 8-13 above.
16. Then click Close sort/Select, Clear Sort Definition and/or Replace existing selection formula on report.
Close sort/select
This button is used to exit this area. If all selection
and sorting criteria has been defined, click this
button.
Clear Sort Definition
This button is used to erase the criteria defined
and start over OR define a new sort.
Replace existing selection formula
This button is used to overwrite any pre-designed
sort and/or selection criteria that is built into the
report naturally.
❍
17. Click Close Sort/Select if not selected in the previous step.
18. You are now back at the Student Reports page, where you can see the selected report and the selected sort. Click
to
preview.
19. Select the Printer to Print.
20. To Export click on the Disk with the Piece of Paper.
j If value IS in the list. (=)
k
l
m
n
Use this option the same as you would use “is equal
to” or “is one of”; a record will be selected if it
meets one or all of the criteria specified using this
statement; works best for alphanumeric fields
(fields that are numbers and letters but the
numbers are not able to used in computations)
Use this option the same as you would use “is not
equal to” or “is not one of”; a record will be
SDSStudentHelp
Web School Office . 293
n If value is NOT in the list. (<>)
j
k
l
m
selected if it does NOT meet one or all of the
criteria specified using this statement; works best
for alphanumeric fields (fields that are numbers and
letters but the numbers are not able to be used in
computations); sometimes it is easier to NOT
search for criteria than to try to specify all of the
criteria you want.
n If greater or equal to first value (>=)
j
k
l
m
Use this option if you want to specify, for example,
all students with the last name greater than (and
including) “Smith”. This is very helpful if you were
running a large print job and wanted to break it in
half – this is the way to conclude the last portion of
the batch.
j If Greater or Equal first value and less or equal last value.
k
l
m
n
Use this option if you want to specify, for example,
all students with the last name greater than (and
including) “Haynes” and less than (and including)
“Nelson”. This is a way to really “chop” your print
job into smaller batches.
This is the correct option to use if you must
condition that Current Year Active is a zero value.
n If no value (null)
j
k
l
m
Use this option to check a field for an “empty”
value. Perhaps you want all students who are not
marked as, for example, Special Education. This
field would most likely be blank/empty. This is the
correct option to use if you must condition that the
Exit Date is “empty.”
❍
See also
Run a Report
Record Selection Options
Save Sort with Name
Delete a Sort from Sort History
Quick Reports (View/Design/Display/Export)
Goal Based Report Card
Labels
Student Assessment Management (SAM) Reports
Save a Standard SDS Report as a Custom Report - Student
Convert a V7 or V8.5 Custom Report to WSO - Student
Reports where you should run a Program before Printing
SDSStudentHelp
294 . Web School Office
Home > Web School Office > Reports > Record Selection Options
Record Selection Options
1. If value IS in the list. (=) = If this option is selected, then only INCLUDE records with values matching the data in the “Data
used for record selection” data box (i.e. School_Location “1”) on the report.
2. If value is NOT in the list. (<>) = If this option is selected, then EXCLUDE records with values matching the data in the
“Data used for record selection” data box (i.e. School_Location “1”), all school locations other then 1 will display on the report.
3. If greater or equal to first value (>=) = If this option is selected ,then only include data that is greater or equal to the
first value in “Data used for record selection” data box. (i.e. Grade_Year |Selected 07). Any grade year greater or equal to 07
will display.
4. If greater or equal first value and less or equal to last value = If one item is listed this is equivalent to equal too. =
These two options provide an equal to option. Separate they allow for an upper or lower range for selectivity.
5. If no value (null) = When looking for a “Null” record a normal sort will not work. You cannot ask for less than or equal to a
value in a field that has no value (null). This option gives you a way to find records with no entry in a particular field.
6. Select but Do Not Change Sequence
❍ If this options is selected it will not change the grouping on the report.
7. Sequence and Select
❍ If this option is selected it will change the grouping on the report.
❍
In some cases this is a good selection, in others it is not wise to change the way the report is grouped and it may be
better to have a custom report created to meet your school needs.
See also
Run a Report
Activate Sort Definition Area
Save Sort with Name
Delete a Sort from Sort History
Quick Reports (View/Design/Display/Export)
Goal Based Report Card
Labels
Student Assessment Management (SAM) Reports
Save a Standard SDS Report as a Custom Report - Student
Convert a V7 or V8.5 Custom Report to WSO - Student
Reports where you should run a Program before Printing
SDSStudentHelp
Web School Office . 295
Home > Web School Office > Reports > Save Sort with Name
Save Sort with Name
Save Sort with Name
Once you have created a sort, saved it and previewed/printed the report, your sort will automatically be saved under your sort history.
When you return to the Student Reports page the sort will be listed in the Sort History box with the date and time the sort was run
with the report. The sort history is kept as a User setting, meaning this sort is only available to the user who created it. The sort
history is also saved with the report it was designed with, meaning the sort is only available with the report it was designed with. You
may rename a saved sort to make it easily identifiable for future use.
1. Enter Reports |Student Reports |Select Report Group and Report (i.e. Student List)
2. Click on the date and time of the sort to select.
3. A box will appear above the sort list. Enter a name for your new sort. (i.e. School Location 1)
4. Click Save.
SDSStudentHelp
296 . Web School Office
See also
Run a Report
Activate Sort Definition Area
Record Selection Options
Delete a Sort from Sort History
Quick Reports (View/Design/Display/Export)
Goal Based Report Card
Labels
Student Assessment Management (SAM) Reports
Save a Standard SDS Report as a Custom Report - Student
Convert a V7 or V8.5 Custom Report to WSO - Student
Reports where you should run a Program before Printing
SDSStudentHelp
Web School Office . 297
Home > Web School Office > Reports > Delete a Sort from Sort History
Delete a Sort from Sort History
1. Enter Reports |Student Reports |Select Report Group and Report (i.e. Student List)
2. Click on the date and time of the sort to delete.
3.
will appear above
. Click
to delete the selected sort.
See also
Run a Report
Activate Sort Definition Area
Record Selection Options
Save Sort with Name
Quick Reports (View/Design/Display/Export)
Goal Based Report Card
Labels
Student Assessment Management (SAM) Reports
Save a Standard SDS Report as a Custom Report - Student
Convert a V7 or V8.5 Custom Report to WSO - Student
Reports where you should run a Program before Printing
SDSStudentHelp
298 . Web School Office
Home > Web School Office > Reports > Quick Reports (View/Design/Display/Export)
Quick Reports (View/Design/Display/Export)
Quick Reports allows you to select an SDS standard report as a starting point. Then based off the tables that are used in the report,
you can specify the fields you would like printed on the report. If a table is not on the selected report it will not appear as an option to
select from. Quick Reports are a great way to get a quick dump of your data to then export. These reports are not generated through
Crystal Reports.
Creating a Quick Report
1. Login
2. Select Reports
3. Click on Student Reports
4. Click on a Report Group (i.e. Demographics) in the box 1 Report Groups.
5. Select a Report (i.e. Student List) in the box 2 Select a Report.
6. Click
Quick Reports at the top of the page.
7. Select or Deselect the fields you do/do not want to include on your report in box 2 Quick View Fields by clicking on the arrow to
the right or left.
8.
To save the Quick Report place a check mark next to Quick View Fields
9. Click on “Activate Sort Definition Area” to create a sort.
❍ For details on how to create a sort view the Student Reports example above.
10. Click
❍
to preview Quick Report
Only the first 20 records display on the screen for quick viewing. When you export all data will be exported not just the
first 20 records. To view all records before exporting, click on the page numbers at the top of the page.
❍
Also note you can sort the columns by clicking on the Column Headings.
11. Click on the ‘+’ next to Quick View Export
12. Select the export file type (i.e. XML)
13. Click on Show/Hide Your Documents
❍ This will be a list of all your exported documents. You can open and then save to another location.
❍
If you place a check in the checkbox next to the document you can click on the X to delete the export as well.
Saving a Quick View Report
1. Setup your Quick View Report and preview.
2. Close the preview.
3. Click
.
4. Click on the most recent date/time in the History Library box.
5. In the new box that displays with the date/time in the upper right corner, remove the date/time and type a name for the
report.
6. Click
to save.
Running a Saved Quick View Report
1. Click Reports |Student Reports.
2. Click the report group that you used originally to create the report (example: Demographics).
3. Click the default report that you used originally to create the report (example: Student List.
4. Click
.
5. You will see your saved report listed in the History Library.
6. Click on it.
7. Click the little white check box at the top of the screen.
8. Click
SDSStudentHelp
to preview.
Web School Office . 299
See also
Run a Report
Activate Sort Definition Area
Record Selection Options
Save Sort with Name
Delete a Sort from Sort History
Goal Based Report Card
Labels
Student Assessment Management (SAM) Reports
Save a Standard SDS Report as a Custom Report - Student
Convert a V7 or V8.5 Custom Report to WSO - Student
Reports where you should run a Program before Printing
SDSStudentHelp
300 . Web School Office
Home > Web School Office > Reports > Quick Reports (View/Design/Display/Export) > Create Quick Report for Photographer
Create Quick Report for Photographer
This example will show you how to create a quick report to give to your photographer and will provide you with another example on
how to create a quick report.
1. Login.
2. Select Reports.
3. Click on Student Reports.
4. In Report Groups select Demographics.
5. In Select a Report, select Student List.
6. Click on Quick Reports or Quick View, Design, Display, Export.
7. 1 shows all the Available Fields for Quick View.
8. 2 shows all the fields being used on the report you selected (i.e. Student List).
9. In 2 simply select the fields you do not want on your Quick View report and click on the arrow facing left. (i.e. Birth_Date,
School_Location).
10. If you would like to add fields to your report select those in 1 and click on the right arrow. They then display in the Quick View
Fields box.
❍ Note that you can move the fields up and down in the Quick View Fields box.
11. Then click on 3-6 Activate Sort Definition Area button.
12. Click on “Adjust student selection to include Only Active Students?” in the lower right corner.
❍ That will set your system so it will only pull current students.
13. Sort your Quick Report by homeroom then alpha order for an example.
❍ Verify the Demographics table is selected.
❍
Select home_room in Fields in select table. Homerooms will then display in Data in selected field.
❍
Click on the Sequence and Select radio button located under Home_Room.
❍
Click on Save New Sort located in the left corner of the screen.
14. Sort your Quick Report by student last name. Follow the same steps as above instead using Student_Last_Name.
15. Click on Close Sort/Select button.
16. Preview Quick Report by clicking on
.
17. Click on + Quick View Export |Select Export Type (i.e. XML).
18. Click on Show/Hide Your Documents to view files exported.
See also
Create Quick View for SQL Batch File
SDSStudentHelp
Web School Office . 301
Home > Web School Office > Reports > Quick Reports (View/Design/Display/Export) > Create Quick View for SQL Batch File
Create Quick View for SQL Batch File
The Quick View has been enhanced to create a batch file, which can be used to automatically re-run an export.
The created batch file can be executed from the Windows Task Manager (Web Control Center/V8.5). This allows you to export
data at any time you feel is needed.
This new control will do the following:
1. Find the SQL created by the Task Manager in the usr_disp\_Master\Flash directory.
2. It will run the SQL and create a CSV and a XML output/extraction from the system.
3. It will also create a HTM page that can be used for easy viewing of the XML file.
4. The procedure will then copy the three output files (CSV, XML, and HTM) to a directory named FTP under the directory with
the batch file.
5. The FTP can then be accessed by other systems.
What you need to do to make this all work:
1. Make sure your Web Control Center is updated/windows system (v8.5).
2. A current build of Web School Office (i.e. after 3/11/2008).
3. Knowledge of the Microsoft Task Manager.
4. Basic knowledge of batch files and system directory structure.
Note: Using any text editor the batch file created can be adjusted by the district to copy the files to any location they desire.
●
If the word “list” is found in the report name it will be removed. For example export using the report
“Student_List_by_Homeroom” will create a report file name “Student_by_Homeroom”
●
The batch file name will be the report title plus the users ID. The output files will be named with the report file name plus the
appropriate extension of CSV, XML and HTM. The batch file will be created in the directory the School Office v8.5/Web Control
Center resides in. To edit the batch file, right click on it and choose Edit from the popup menu.
●
The path and drive letters in the batch file are based on the directory structure on the server. If the batch file is run from a
workstation adjustments to the batch file may be needed.
●
This is a powerful new tool that is adaptable to create data extractions for other software products you may have needs to
refresh information on a regular basis.
The report “Student_List_by_Homeroom” run by user “xyz” will create the following.
●
Batch file name: Student_ by_Homeroom_by_xyz.bat
●
CSV file name: Student_by_Homeroom_by_xyz.CSV
●
XML file name: Student_by_Homeroom_by_xyz.XML
●
HTM file name: Student_by_Homeroom_by_xyz.HTM
●
SQL control file: Student_by_Homeroom_by_xyz.SQL
For those who like details:
This is a sample of the batch file.
Note: The double quotes are needed in the parameter string for the program u22_xml.exe.
u22_xml.exe "1|Student_by_Homeroom_by_xyz "
copy C:\SDSADMIN\STUDENT\Usr_Disp\_Master\Flash\Student_by_Homeroom_by_xyz.csv C:\SDSADMIN\STUDENT\ftp /y
copy C:\SDSADMIN\STUDENT\Usr_Disp\_Master\Flash\Student_by_Homeroom_by_xyz.xml C:\SDSADMIN\STUDENT\ftp /y
copy C:\SDSADMIN\STUDENT\Usr_Disp\_Master\Flash\Student_by_Homeroom_by_xyz.htm C:\SDSADMIN\STUDENT\ftp /y
See also
Create Quick Report for Photographer
SDSStudentHelp
302 . Web School Office
Home > Web School Office > Reports > Goal Based Report Card
Goal Based Report Card
Note: Most goal based report cards are customized for each client due to the amount of variations school/districts have. To request
a custom goal based report please contact SDS support. Below are instructions on how to setup your system to use our standard
goal base report in the system.
The Goal Based Report is setup to be used for Elementary Report Cards and/or Standard Based Report Cards. The way the report
works, is it first finds the student and ID, second the course/subject the student has been registered for, third it looks at the student’s
gradebooks , forth the assignment date, fifth the object key and six that the assignment has been checked to report on the goal based
report card.
Basic Steps
1. Setup Course/s and Register Students’
2. Setup Standard Goals and Objectives
3. Teacher enters a gradebook (i.e. Reading)
4. Teacher enters assignments/standards (i.e. Expresses Ideas Clearly).
When setting up assignments place a check mark in the “Goal Based Reporting” box. This indicates that the assignment will be
included into the grade calculated for that standard/objective/goal. If this is NOT done then it will not display on the report card and
will not be included into the calculation of the grade on the report card. You also MUST select a Standard Goal and Objective from the
dropdown on the right or the assignment will be ignored on the report!
Detail Steps
1. Setup Course/s and Register Students’ through Web School Office
2. Setup Standard Goals and Objectives in WSO |Processing Center |Standard Goals and Objectives
❍ This MUST be completed.
3. Enter Teacher Web |
Gradebook |Go to Gradebook Page Setup
4. Create your gradebooks by selecting the Create/Wizard.
5. After you have created your gradebooks, enter the class you added the gradebook to and select the gradebook.
6. Setup Columns (also known as assignments)
❍
Click
❍
on to add an assignment or
to add multiple assignments at once.
Fill in the screen for your assignment. Necessary areas that must be filled in for this report are: Standards Goals and
Objectives must be selected, assignment date, and a check in Goal Based Reporting.
❍
Note: You may ask yourself “Why placing a check mark in the “Goal Based Reporting” box is important?” This indicates
that the assignment will then show up on the report card. If this is NOT done then it will NOT display on the goal based
report card.
7. Repeat the above steps for the other gradebooks and assignments.
8. Then run the report from WSO |Reports |Student Reports |Grades – Grade Reporting |Goal Based Report Card.
9. Activate a sort or selection if necessary.
10. Click on
to preview the report.
11. Answer the parameter questions and click ok.
See also
Run a Report
Activate Sort Definition Area
Record Selection Options
Save Sort with Name
Delete a Sort from Sort History
Quick Reports (View/Design/Display/Export)
Labels
Student Assessment Management (SAM) Reports
Save a Standard SDS Report as a Custom Report - Student
Convert a V7 or V8.5 Custom Report to WSO - Student
Reports where you should run a Program before Printing
SDSStudentHelp
Web School Office . 303
Home > Web School Office > Reports > Labels
Labels
There are many different label reports in the system. Below are the labels that match up with some of the reports. Keep in mind your
printer margins; paper etc. can throw off the report a bit. If this is the case contact SDS support and we can create a custom report
to meet your needs.
Mailing Labels (many different ones in the system) use Avery Labels 5160.
Permanent Record Label uses (swb_gln_label.rpt) uses Avery Labels 5163.
Permanent Record Label Long (swb_gln_Long_Label.rpt) uses Avery Label 6462.
See also
Run a Report
Activate Sort Definition Area
Record Selection Options
Save Sort with Name
Delete a Sort from Sort History
Quick Reports (View/Design/Display/Export)
Goal Based Report Card
Student Assessment Management (SAM) Reports
Save a Standard SDS Report as a Custom Report - Student
Convert a V7 or V8.5 Custom Report to WSO - Student
Reports where you should run a Program before Printing
SDSStudentHelp
304 . Web School Office
Home > Web School Office > Reports > Student Assessment Management (SAM) Reports
Student Assessment Management (SAM) Reports
SAM is a program in Web School Office that will track, analyze and chart the progress of your students' test results from year to year.
This is a POWERFUL tool!
With the unique analysis capabilities for S.A.M., you will be able to sort and sequence your analysis by discipline codes, attendance
records, grades or any other data within SDS. This program is the simple analytical connection between your standardized test
scores, curriculum, and school improvement. When new scores arrive, you simply put in the memory card/CD or access the file over
the Internet and select import. The SDS system then automatically imports the new data and analysis away! You can even simply
create QUICK analysis CHARTS or GRAPHS with your data!
See also
Run a Report
Activate Sort Definition Area
Record Selection Options
Save Sort with Name
Delete a Sort from Sort History
Quick Reports (View/Design/Display/Export)
Goal Based Report Card
Labels
Save a Standard SDS Report as a Custom Report - Student
Convert a V7 or V8.5 Custom Report to WSO - Student
Reports where you should run a Program before Printing
SDSStudentHelp
Web School Office . 305
Home > Web School Office > Reports > Save a Standard SDS Report as a Custom Report - Student
Save a Standard SDS Report as a Custom Report - Student
If you are opening your SDS reports in Crystal Reports modifying them, you then must save them as custom reports. If you do not the
next time your system is updated your custom reports will be overwritten.
There are several ways to name your report so you can view your report in SDS.
When you are in your SDS report (i.e. Student List = swb_dbnm.rpt) and made a modification.
First go to “File” and then to “Save As.”
The title of your report will appear in the File name box. You then have three different options on how to save your custom report.
Option 1 - Save as a Standard Custom Report
To save a standard SDS report as a Custom Report simply replace the first _ in the report name with a c (as in custom). Verify that it
is saved in your Student directory where all your SDS programs, reports, etc. are located or the program will not be able to find your
report.
Note: Make sure you have not entered .rpt to many times. Many times people save reports as swbcdbnm.rpt.rpt and the program
cannot find this naming structure since it is incorrect. Crystal Reports will automatically put the .rpt on the end of the report name for
you.
Example:
Standard = swb_dbnm.rpt
Custom = swbcdbnm.rpt
Once the report is saved as a custom report in your student directory the program will automatically make the report available in
Reports |Student Reports under the same report group as the standard report you customized is located. It will display with the same
standard name with (Custom) after the name (i.e. Student List (Custom)).
Option 2 - Location Specific Custom Report
If you have a report you would like to be location specific rather than saving it with a c in the fourth position replacing the _ for a
custom report (i.e. swbcs10.rpt) save it as Loc_123_swb_s10.rpt
Example:
Standard = Swb_s10.rpt
Location specific report where 123 is the school number = Loc_123_Swb_s10.rpt
●
Look and browse will use this for location specific reports based on the student school location.
●
Report production lists the location specific reports based on the user’s security. If a user has access to all school locations
their report list will contain all location specific reports. Just because a report is saved for a specific location does not mean
that the selection formula has been adjusted to only select specific students. That is the responsibility of the person who
designed the report or the operator running the report.
●
Location specific reports do not have their own security element. They are controlled by allowing access to the standard report.
●
The standard report will always be available if the user has access to the Location specific report, except in the case of Look
and Browse and Parent Connect.
●
Also note if you are taking a Grade/Progress Report (i.e. swb_g6x.rpt) and saving it as a location report (i.e.
Loc_123_swb_g6x.rpt) it will not show up in Grade/Progress Report. It will show up in the group that you added it to and then
under the report name you actually named it (i.e. Grade Report for HS).
Option 3 - Save Custom Report with Any Name
In addition to the above ways you can save a SDS custom report you can also save one with any name that does not start with sds,
fin, sv8 or swb as the report name prefix.
Example:
Standard = Swb_s10.rpt
Your own Naming = Student Schedule.rpt
Once you have saved your new report (Student Schedule.rpt) in your student directory you then must add the report to your SDS
system. Follow the below instructions on how to add your report.
1. Login WSO
2. Click on Administrative Utilities |Control Center |Add Report to a Report Group
SDSStudentHelp
306 . Web School Office
3. Select a report group.
4. Click on the + or select a report
5. In box # 3 type in a Description for your report.
6. In box # 4 type in the Crystal Report name.
7. Next
to # 5 Click to save.
8. Then enter Reports |Student Reports and the Report Group you added the report to.
See also
Run a Report
Activate Sort Definition Area
Record Selection Options
Save Sort with Name
Delete a Sort from Sort History
Quick Reports (View/Design/Display/Export)
Goal Based Report Card
Labels
Student Assessment Management (SAM) Reports
Convert a V7 or V8.5 Custom Report to WSO - Student
Reports where you should run a Program before Printing
SDSStudentHelp
Web School Office . 307
Home > Web School Office > Reports > Convert a V7 or V8.5 Custom Report to WSO - Student
Convert a V7 or V8.5 Custom Report to WSO - Student
These instructions will guide you through how to convert your reports from V7/V8.5 to Web School Office.
Please keep in mind you must have Crystal Reports 9, 10, XI or 2008 (Standard or Professional) to perform this task.
Step 1 - Open Custom Report
1. Enter Crystal Reports 9/10/XI/2008.
2. Click on File and go down to Open.
3. Type in the custom File name you would like to convert. (i.e. sds_s10.cus (V7), or sv8cs10.rpt (V8.5).
❍
4. Click Open.
Step 2 - Setting Datasource Location
1. Click on Database on the top tool bar
2. Scroll down to Set Datasource Location
3.
Click Create a New Connection
4. Click on OLE DB (ADO)
❍
5. Click in the box next to “Use Data Link File:” so there is a green check mark.
6. Click on the … box that is next to the ‘Microsoft Data Link File’ white box.
7. Then browse for the student UDL sdsV8S.udl (i.e. c:\sdsadmin\student\ sdsV8S.udl).
8. Click Next
SDSStudentHelp
308 . Web School Office
❍
9. Click on the … box that is next to the Database Name white box.
10. Browse to your student directory and located sdsxplan.mdb (i.e. c:\sdsadmin\student\sdsxplan.mdb).
❍
11. Click on ‘Open’ after you browsed for your database.
❍
12. In the database name box (i.e. c:\sdsadmin\student\sdsxplan.mdb) should appear.
13. Click on Finish
SDSStudentHelp
Web School Office . 309
Step 3 - Table Verification
1. While you are still in Set Datasource Location we now need to update each of your tables that are being used in the report.
❍
2. In the Current Data Source box at the top highlight one table that is used in your custom report (i.e. CourseMaster). Then
go down to the Replace with box and click on the same table (i.e. CourseMaster) used above.
3. Click on the Update button on the right.
❍ Note: When updating the tables if a Map Fields screen appears click OK and continue to update your tables.
4. Update each table until all tables are updated then proceed to the next step. Please do not click on Close just yet.
Step 4 - Set Location Same as Report
While you are still in the Set Data Source Location proceed with the following:
1. In the Current Data Source box, click on the + next to Properties
2. Right click on the Microsoft Data Link File (i.e. c:\sdsadmin\student\ sdsV8S.udl) and select Same as Report.
3. Right click on the Data Source (i.e. c:\sdsadmin\student\sdsxplan.mdb) and select Same as Report.
4. Click Close.
SDSStudentHelp
310 . Web School Office
Step 5 - Linking
This is a VERY IMPORTANT step. If this is not done your report could take minutes to display on the screen. You will only have to
complete this step if you have more than one table used in your report. If you only have one table on your report please proceed to
#7.
1. Click on ‘Database’ on the top tool bar.
2. Scroll down to ‘Database Expert…’
3. In the ‘Database Expert’ click on the ‘Links’ Tab.
4. Right click on one of the links (Looks like an arrow ---------------->).
❍
5. Scroll down to ‘Link Options’ or click on the ‘Link Options…’ button once you have highlighted the link.
6. Make sure that each link has ‘Left Outer Join’ selected. If it is not selected please change the link so that the Join Type is ‘Left
Outer Join.’
❍
SDSStudentHelp
Web School Office . 311
❍
7. If this screen displays take the ‘check mark’ out of the box ‘Return all rows before joining.’
8. Change the ‘Joint Type’ to ‘Left outer Join.’
❍
❍
Note: This screen may look a little different depending on the version of Crystal Reports you are currently using.
9. Click ‘OK’.
❍ Note: You receive the following message, “Your current link configuration contains multiple starting points. Please be
aware that this is generally not supported.” Click ‘OK’
10. Repeat this step with each link. Completing this step for just one link will not change the link option for every link.
11. Once you have checked each link and made the proper changes click ‘OK’ to exit out of the Database Expert.
Step 6 - Replace the report name (V7) or File Path and Name (V8.5) with a Formula
1. In the lower left corner of the report in the ‘Page Footer’ section of the report, click on the text field (i.e. sds_s10.cus) that
contains the V7 report name or the special field File_Path_Name V8.5 Report and hit your delete key.
2. Then open up a standard SDS report for the web (i.e. swb_dbnm.rpt).
3. Copy @rptfootname and place it in the page footer of your custom report.
Step 7 - Save Standard Custom Report
You have just completed all of the converting steps. Now save your custom report to run on the web.
1. Click on File on the top tool bar.
SDSStudentHelp
312 . Web School Office
2. Scroll down to save as.
3. Save this report as (i.e. swbcs10.rpt)
❍ Note: If you save your custom report not with the standard naming structure (i.e. Student Schedule.rpt) then you must
add the report to a report group by entering Web School Office |Administrative Utilities |Control Center |Add Report to
Report Group. Search the manual for more detail instructions on how to add the report to a report group.
See also
Run a Report
Activate Sort Definition Area
Record Selection Options
Save Sort with Name
Delete a Sort from Sort History
Quick Reports (View/Design/Display/Export)
Goal Based Report Card
Labels
Student Assessment Management (SAM) Reports
Save a Standard SDS Report as a Custom Report - Student
Reports where you should run a Program before Printing
SDSStudentHelp
Web School Office . 313
Home > Web School Office > Reports > Reports where you should run a Program before Printing
Reports where you should run a Program before Printing
In this section it lists many reports where programs should be run before printing the report. The programs refresh, calculate or
simply post data to the database to make your reports accurate.
Note: Anything requiring attendance analysis refreshing requires that the student enrollment processing already be done. Student
Enrollment processing is usually run at the beginning of the year and usually only needs to be done during the year for all students if
there are calendar changes.
State Reports
Below is the state reports description, file name, what to needs to be run for each report before printing and the report group the
report is located in under Student Reports.
You can run the below reports from WSO |Reports |Student Reports |Then select the report group listed below for the specific
report/s.
●
Percent Enrollment by Date (A.K.A. Michigan 75 Percent Report) = swb_enroll.rpt |Run Enrollment | Attendance Daily
Report Group.
●
Michigan Count Day Report = swb_db4f.rpt |Run Enrollment |State Report Group.
●
Illinois Full/Half Day Audit Report = swb_c6il.rpt | Run Refresh Attendance Analysis under Processing Options |State
Report Group.
●
Illinois Transportation Reports = swb_trans1, swb_trans2, swb_trans3, swb_trans4.rpt |Run Refresh Attendance Analysis
under Processing |State Report Group.
The below reports can be run from WSO |Processing Center |Data Exchange, State and Federal Reporting |Select the State |Select
the report from the drop downs.
●
Indiana AT Report = Build Enrollment |Run Refresh Attendance Analysis under Processing Options.
●
Pennsylvania Student Calendar Fact = Run Refresh Attendance Analysis under Processing Options.
●
Wyoming WDE-600 = Run Refresh Attendance Analysis under Processing Options.
Attendance Reports
Below is the attendance reports description, file name and the report group the report is located in under Student Reports.
All these attendance reports listed below should have the student enrollment processed at least once and the run the “Refresh
Attendance Analysis” under “Processing Options” before printing.
Note: Anything requiring attendance analysis refreshing requires that the student enrollment processing already be done. Student
Enrollment processing is usually run at the beginning of the year and usually only needs to be done during the year for all students if
there are calendar changes.
●
Attendance Analysis = swb_c06_analysis_web.rpt |Attendance – Analysis.
●
Attendance Statistics Report = swb_stat_enroll.rpt |Attendance – Analysis.
●
Weekly Class Attendance Summary (both from Daily and Period Attendance) = swb_c_class.rpt (Daily) or
swb_pc_class.rpt (Period) |Attendance – Daily or Attendance – Period.
●
Percent Enrollment by Date (A.K.A. Michigan 75 Percent Report) = swb_enroll.rpt |Run Enrollment | Attendance Daily
Report Group.
●
Daily Period List in Period Attendance = swb_pc02.rpt |Attendance |Period Attendance |Must check Attendance History
before clicking on the printer button.
Progress Reports, Report Cards and Class Rank Reports
●
For Progress Reports, Report Cards and Class Rank Reports it is suggested to Post Grades from Gradebook (If
applicable), compute GPA, Run Enrollment and Refresh Attendance Analysis before printing your cards.
●
Your grades could be wrong/blank, GPA’s could be off or your attendance could show up blank or not up to date if you do not
complete these processes.
●
Most of these reports are located in Student Reports |Grades – Grade Reporting or in Parent Connect/Teacher Web. An
example of these reports is located in Student Reports |Grades – Grade Reporting |Grade/Progress Reports (i.e. swb_g6x.rpt).
SDSStudentHelp
314 . Web School Office
Grades - Transcripts
●
All Transcripts /Permanent Record Label need GPA Refreshed, Class Rank run once grades are finalized and in some
cases Refreshing the Attendance Analysis is required (If there is attendance listed on your transcript).
●
Transcripts are located in Student Reports |Grade – Transcript Report Group (i.e. Individual Semester format,
swb_gtn_transcript.rpt).
Miscellaneous
Locker Reports
If you run these reports and you do not see any locker numbers or combinations, verify you have “Synchronized Locker Master to
Demographics.”
Report Messages
To enter in messages that appears on some specific SDS reports, for example Transcripts, Report Cards etc. You can enter these
messages by following the below instructions:
1. Enter WSO |Data Entry and Changes |Master File and Code File Entry and Changes |Application = General Information |Entry
Options = School Location - Messages.
2. In here you can enter in messages for your reports. You can also access these entries from school location view.
See also
Run a Report
Activate Sort Definition Area
Record Selection Options
Save Sort with Name
Delete a Sort from Sort History
Quick Reports (View/Design/Display/Export)
Goal Based Report Card
Labels
Student Assessment Management (SAM) Reports
Save a Standard SDS Report as a Custom Report - Student
Convert a V7 or V8.5 Custom Report to WSO - Student
SDSStudentHelp
Web School Office . 315
Home > Web School Office > District/School Calendar
District/School Calendar
Enter WSO |Click on District / School Calendar located at the bottom of the menu tree.
Add New Event
1. In Selection Options, click on what you would like to search for.
❍
2. Click Search
3. In the boxes at the top select the month, day and year that you want to add the event to.
4. Select the School location (i.e. 1)
5. Select the Calendar (i.e. Sport Calendar). If this is your first ever calendar item leave this at All. As you create events this list
will pull from your existing events.
6. Select the Event Type (i.e. Tennis Practice). As with the Calendar field, this list will pull from your data.
❍
7. Once you have selected the School location, Calendar, and Event Type click the Add New Event button.
❍ You will now see the new event listed below the calendar. Enter a start time, description, event type, coordinator and
calendar. These areas are not code controlled so you can type any information you want to list on the calendar in these
boxes. The Calendar and Event Type will be listed in the dropdown lists for your next calendar entry.
❍
Once you have the appropriate information filled in for this event click the Save Changes button. The event is now listed
on the calendar and can be viewed by clicking on the date box on the calendar or selecting ALL dates from the drop
down box and then clicking search.
8. To Delete a calendar item click on the Delete link on the line of the event. The line will then be highlighted. Then click on Delete
Line # 1111.
❍ You can only modify events if you have administrative rights. If you cannot modify events please contact your SDS
administrator.
See also
SDSStudentHelp
316 . Web School Office
Introduction
Look and Browse
Message Center
Data Entry and Changes
Attendance
Scheduling
Prepare to Open School/Year End Processing
School Policy Processing
Tuition/Fee Processing
Processing Center
Administrative Utilities
Reports
Parent Connect - Office
SDSStudentHelp
Web School Office . 317
Home > Web School Office > Parent Connect - Office
Parent Connect - Office
Note: This section contains instructions for the main office. Below is a brief overview on Parent Connect.
Your Parents will find Parent Connect to be an important communication link. Parent Connect provides schools with the ability to
connect the school and the parents together with a simple, powerful Internet link you can simple add to your schools website. Each
parent will gain increased involvement by being able to view their student’s results and even access homework assignments,
attendance, discipline, grades, GPA, transcripts and much more. E-mail capabilities are built in as well. Since this program is "ALL"
SDS, the amount of information that can be viewed is impressive. Parents can also have access to informative reports at the districts
discretion. Graduation requirements, schedules, registration and more are available for parent preview and/or printing. If there are
families with more than one student at your school, they can combine their students into one view so they can view all their students
at the same time. For Administrators you can also track when parents have accessed the system. It's also VERY simple to notify
parents of your NEW COMMUNICATION TOOL Parent Connect, since we have developed a report that runs with the parents' login
information and a link in the letter that will send them directly to your schools site to login!
See also
Login Details
Reports for Parent Connect
Remove Unwanted Tabs
Create a Link for Parent Connect Calendar
Setup Next Year Registration for Parent Connect
SDSStudentHelp
318 . Web School Office
Home > Web School Office > Parent Connect - Office > Login Details
Login Details
This section gives you login details, for example how to create passwords for parents, send User ID and Password Letters to Parents
and more.
See also
Create Passwords for Parents
Create Multiple Logins
Uncombined Students for Login
Lookup User IDs and Passwords
Edit Parent
Forget/Change Password Link
SDSStudentHelp
Web School Office . 319
Home > Web School Office > Parent Connect - Office > Login Details > Create Passwords for Parents
Create Passwords for Parents
Note: Password assignments MUST be created in Web School Office.
To assign passwords proceed with the following:
1. Login Web School Office |Administrative Utilities |Control Center |Parent Connect
2. Keep the dot in "Students with No Passwords" (that way it will NOT redo existing passwords)
3. Click on "Create Passwords for New Students" button. Now you are done assigning passwords.
4. Then copy the sdsxplan.mdb and the sdscplan.mdb from your student directory (i.e. c:\sdsv8\student) to your
parentconnect\parentdata folder located on your web server in order for those new passwords to be active. UNLESS your
Parent Connect is looking at live database then you DO NOT need to copy it over.
❍ If you do not know where your student directory is located contact your tech or another hit is to run a SDS report
from WSO |Reports |Student Reports (i.e. Student List) and at the bottom of the report you will see the file path and
name of the report. Your reports are located in the same directory.
See also
Create Multiple Logins
Uncombined Students for Login
Lookup User IDs and Passwords
Edit Parent
Forget/Change Password Link
SDSStudentHelp
320 . Web School Office
Home > Web School Office > Parent Connect - Office > Login Details > Create Multiple Logins
Create Multiple Logins
You can create multiple logins for Parent Connect for non-custodial parents, etc. in Parent Connect Access Control. Parent Connect
Access Control allows the district office to add a parent to Parent Connect by simply selecting a student, entering the parent name and
e-mail address. It allows the office to edit parents Parent Connect codes, name and e-mail address as well. This feature only applies
to schools that have Parent Connect. Follow the below instructions to add another parent, guardian etc. to a student:
Add Parent
1. Enter WSO |Data Entry and Changes |Student Information |Processing Options |Parent Connect Access Control
❍
❍
2. Select a Student Name you would like to add a Parent Connect Access to.
3. Enter Parent Name and E-mail address you would like to add.
❍
4. Click Add or Save
Tech Notes:
●
Your passwords are updated in the sdsxplan.mdb located in your Student directory automatically. To re-synchronize your
databases for parents - Copy the SDSXPlan.mdb and SDSCPlan.mdb files from the Student folder to the
ParentConnect/ParentData folder.
SDSStudentHelp
Web School Office . 321
●
The next time that the database is copied to the Parent Connect site, it will be active. If your Parent Connect is looking at your
live database in your Student directory this is not needed.
●
The Parent Login is visible and in order to see the password, hover over the ****** in the Password column.
See also
Create Passwords for Parents
Uncombined Students for Login
Lookup User IDs and Passwords
Edit Parent
Forget/Change Password Link
SDSStudentHelp
322 . Web School Office
Home > Web School Office > Parent Connect - Office > Login Details > Uncombined Students for Login
Uncombined Students for Login
If a parent combined students for the Parent Connect Login, but now they want them separated. You can follow the below instructions
to uncombined their students:
1. Enter the Parent Connect Access control area by going to the Parent Connect login screen; use your regular Web School Office
login.
2. Find the Parent.
3. You will see both of the logins and you can remove the one that was combined by completing the following:
❍ Login Web School Office.
❍
Go into Data Entry and changes to Student information.
❍
Next go to +Processing options and then to Parent Access Control.
❍
Locate one of the combined students. You will see an area that shows two different parent codes. Remove the parent
code that matches the sibling of the selected student. Put a check in the box and click on the delete button. This will
“uncombine” them and they will once again be separate.
❍
In order for this change to be recognized, the database will need to be copied over to the parent connect site.
See also
Create Passwords for Parents
Create Multiple Logins
Lookup User IDs and Passwords
Edit Parent
Forget/Change Password Link
SDSStudentHelp
Web School Office . 323
Home > Web School Office > Parent Connect - Office > Login Details > Lookup User IDs and Passwords
Lookup User IDs and Passwords
To easily lookup user ids and passwords for Parent Connect proceed with the following:
1. Enter Parent Connect login screen; use your regular Web School Office login (You must be setup as a administrator.).
2. You will get an administrative screen that is different than what the parents and students see.
3. Locate the student in question.
4. Click on the Parent Code next to the Student (i.e. 11423).
❍
5. The student will be highlighted in yellow, and then you can answer/ask the security questions if you would like then click “Save”
and then click on “Reset Password” or you can proceed with number 6.
6. When you hover over the ****in the password column, it will tell you the new password.
See also
Create Passwords for Parents
Create Multiple Logins
Uncombined Students for Login
Edit Parent
Forget/Change Password Link
SDSStudentHelp
324 . Web School Office
Home > Web School Office > Parent Connect - Office > Login Details > Edit Parent
Edit Parent
1. Enter WSO |Click on Data Entry and Changes |Student Information |Processing Options |Parent Connect Access Control
❍
2. Click on the Student Name/ID you would like to edit the Parent Connect Access for (i.e. 12025).
❍
3. Click on Edit next to the Parent Code.
4. Edit the Parent Name/E-mail
5. Click Save.
See also
Create Passwords for Parents
Create Multiple Logins
Uncombined Students for Login
Lookup User IDs and Passwords
Forget/Change Password Link
SDSStudentHelp
Web School Office . 325
Home > Web School Office > Parent Connect - Office > Login Details > Forget/Change Password Link
Forget/Change Password Link
To get the “Forget/Change Password?” link that is on the login screen to work proceed with the following:
1. This requires initial setup by the user (Parent/Student). The parent has to put in their username and password and instead of
clicking on Login…click on the Forget/Change password link. This will give them an area where they can change their
password. It also gives you 3 questions to setup just in case the password is forgotten in the future.
2. Once those 3 questions are setup, when they put in their username and click on the Forget/Change password link, it will
present the 3 questions. If all three are answered correctly, it will allow the user to change their password.
See also
Create Passwords for Parents
Create Multiple Logins
Uncombined Students for Login
Lookup User IDs and Passwords
Edit Parent
SDSStudentHelp
326 . Web School Office
Home > Web School Office > Parent Connect - Office > Reports for Parent Connect
Reports for Parent Connect
See also
Login Details
Remove Unwanted Tabs
Create a Link for Parent Connect Calendar
Setup Next Year Registration for Parent Connect
SDSStudentHelp
Web School Office . 327
Home > Web School Office > Parent Connect - Office > Reports for Parent Connect > Parent Login and Password Letters
Parent Login and Password Letters
Once you have assigned passwords to parents you can send parents this information by using the Parent Connect Letters that include
a letter to the parent/students with information on how to access Parent Connect and includes their user id and password.
To run them proceed with the following:
1. Login to Parent Connect with your Web School Office login (i.e. http://enteryourwebaddress/parentconnect/ ). This must be a
Administrator Login.
2. You will see an administrative screen that parents do not see.
3. From the right dropdown box select Parent Password Letters.
4. Click on
to preview all the Parent Connect letters with the current passwords.
5. Print them.
The Parent Password Letters you can access the same way and can be run to send letters home to parents with instructions on
how to access Parent Connect and provides them with their login.
The Parent Login Report shows the parent code, student name, when they last logged in and how many times they have logged in.
See also
Custom Report for Parent Connect
SDSStudentHelp
328 . Web School Office
Home > Web School Office > Parent Connect - Office > Reports for Parent Connect > Custom Report for Parent Connect
Custom Report for Parent Connect
●
To add a custom report to Parent Connect, simply take the standard report (i.e. Parent Password Notification - swb_u2p.rpt)
and rename it to swbcu2p.rpt and save it on the server under ParentConnect/Reporting/District.
●
Then you can run the report from the administrators screen.
●
If you are hosted by SDS you can save this report in your student directory and Parent Connect will locate it for you.
See also
Parent Login and Password Letters
SDSStudentHelp
Web School Office . 329
Home > Web School Office > Parent Connect - Office > Remove Unwanted Tabs
Remove Unwanted Tabs
This area covers how you can remove tabs from Parent connect so parents cannot view all areas.
What parents can see in parent connect is a result of the security that is on the _parent group in User Security. The _parent group is
listed with the other groups and comes above the individual users in the security area. To change these settings proceed with the
following:
1. Login WSO
2. Enter Administrative Utilizes |User Security | Click on group “_parent”. In order to control the various tabs on Parent
Connect you will need to:
❍ Click on the + next to the Parent Connect folder located towards the bottom of the security tree.
❍
Click on the + next to the 2nd Parent Connect folder
❍
Now you will see a list of each area that has a corresponding tab in Parent Connect. Any tab in parent connect that you
want hidden, place a check in it.
For example: If you want gradebooks to show, make sure that "current year schedules" is unchecked and furthermore the
subfolder of gradebooks should be unchecked.
If you want grades for marking periods to show but not gradebooks, leave current year schedules unchecked and also Grades
unchecked...but you can put a check in gradebooks and they won't show.
See also
Login Details
Reports for Parent Connect
Create a Link for Parent Connect Calendar
Setup Next Year Registration for Parent Connect
SDSStudentHelp
330 . Web School Office
Home > Web School Office > Parent Connect - Office > Create a Link for Parent Connect Calendar
Create a Link for Parent Connect Calendar
If you would like to create a link on your site directly to the Parent Connect Calendar without parents having to log into Parent
Connect. Create a hyperlink on your site with the following
http://{YOUR_URL_GOES_HERE]/SDSWebOffice/DistrictOffice/Calendar_Display.aspx
Please remember to replace http://{YOUR_URL_GOES_HERE] with your site information.
See also
Login Details
Reports for Parent Connect
Remove Unwanted Tabs
Setup Next Year Registration for Parent Connect
SDSStudentHelp
Web School Office . 331
Home > Web School Office > Parent Connect - Office > Setup Next Year Registration for Parent Connect
Setup Next Year Registration for Parent Connect
Below are the steps you need to complete to setup Parent Connect for Parents to be able to register their student/s.
Step 1 - Course Codes for Next Year
Note: Log into Web School Office | Scheduling | Master File Changes and Code File Entry and Changes | Application: Scheduling
(Next Year) | Entry Options: Course Codes – Next Year (All Fields)
●
For Next Year Registration on the web the course codes must have a Dept/Curr Code (i.e. M = Math) assigned. If you do not
setup these codes, then the Student/Parents will see a blank when they click on the drop down of courses to select from.
●
Course codes must have a School Year specified (i.e. 1=Fresh 2=Soph., 12=FreshSoph, {Do not enter in grade year}). This
will identify which grade levels each course is available to. Many of your courses will be available to multiple grade levels.
Step 2 – Web Registration Setup
Note: Log into Web School Office | Scheduling | Master File Changes and Code File Entry and Changes | Application: Scheduling
(Next Year) | Entry Options: Registration Via Web Setup. In this area you will set up each registration section, by department and
grade level, that a student will select courses from.
●
In this area make sure there is a Subject Code and Scan Code for each description. This is what identifies the courses. This
links back to the course codes to pull the correct courses.
●
In the Registration Area column you will specify the order you would like the descriptions to show for Student/Parents in each
grade level. For example view the screen below, and notice for grade year 08, this school would like English to show up first
for registration so they placed a 1 in the registration area column. Then next they would like Math to display so they have
placed a 2 in the registration area column and so on.
●
Below shows what this setup for a student in Grade Year 08 would see when registering for Next Year. Notice English shows up
first then Math and so on, because that is how it is setup in Registration Area column.
SDSStudentHelp
332 . Web School Office
●
Also in the Web Registration make sure you have a Year in School (i.e. 1=Fresh 2=Soph., {Do not enter in grade year})
entered.
●
Subject Code must be entered. Use the same codes that were used for the Dept/Curr Code in Course Codes Next Year.
You can also enter in more than one subject code per description (i.e. Electives you could enter in LA {Which would stand for
Language, and Art}) If you do not setup these codes then the Student/Parents will see a blank when they click on the drop
down of courses to select from.
●
Enter the Credits Required for the specific Description.
●
Enter the Maximum Numbers of Requests. Enter the maximum number of courses the student may register for. (I.e.
Grade/Year 08 students need to register for one English course, in the maximum number of requests column enter in a 1.
Grade/Year 08 needs to register for two Electives then enter in 2.) If you do not enter in any numbers then nothing will display.
●
Enter in the Registration Area Instructions any instructions you would like to supply the Student/Parents with when
selecting the courses for the particular description.
●
Once your school is done with registration and would no longer want student/parents to enter registration change the Parent
Group security. See User Security for further instructions.
See also
Login Details
Reports for Parent Connect
Remove Unwanted Tabs
Create a Link for Parent Connect Calendar
SDSStudentHelp
Teacher Web . 333
Home > Teacher Web
Articles in this section
Introduction
Period Attendance or
Homeroom/Daily
Attendance
Gradebook
Discipline Entry
Link Substitute and
Teacher for
Attendance Entry
See also
Introduction
Period Attendance or Homeroom/Daily Attendance
Gradebook
Discipline Entry
Link Substitute and Teacher for Attendance Entry
SDSStudentHelp
334 . Teacher Web
Home > Teacher Web > Introduction
Introduction
With Teacher Web your teachers will be able to enter their Grades, Attendance, Discipline, Meal and Misc. Count, Run/Print Reports,
use the Messaging Center and much more. Teacher Web runs directly over the Internet which your teachers will absolutely enjoy.
They will be able to enter grades from their classroom, home, or from any location where there's access to the Internet. Homework
assignments that are entered in teachers' gradebooks are shown in Parent Connect, which applies to the other areas of Teacher Web
as well. What is great about our gradebook is that it is part of our system. It is NOT a third party gradebook, so it works with Web
School Office and Parent Connect flawlessly.
Gradebook
Your teachers can enter their daily grades from their classroom or from their home. Standards based grading is supported. Browser
based, no additional software needs to be installed on the teachers' computer. A SDS unique link option enables your teachers to
enter information in one gradebook, like homework assignments, and it will automatically populate the linked gradebooks. Your
teachers simply enter their numeric grades and the system automatically calculates the letter grade - no additional calculations
needed.
Attendance and Seating Chart for Teachers
Entry of classroom attendance over the Internet is made simple with Teacher Web in Web School Office. Simply mark a student
absent or tardy (i.e. time entry is your option) and select submit. That's it! The attendance is instantly recorded. There is no need to
install a client program on the teachers' computer; teachers only need access to the Internet. Substitutes can have their own login
created just for subs so they can take attendance as well! PCs or Macs are able to utilize Web School Office. One KEY feature is the
REAL TIME seating chart with PHOTOS which is a perfect aid for SUBSTITUTE teachers. No more switching the name tags to trick the
substitute!
Other Features
There are MANY features in Teacher Web such as Discipline, Meal and Miscellaneous Count, Reports, Messaging Center and much
more! All these features can be turned on or off based off of your district/schools security setup. You choose what you would like
teachers to enter or not enter.
See also
Access System
Login
Forgot or Change Password
Toolbar
SDSStudentHelp
Teacher Web . 335
Home > Teacher Web > Introduction > Access System
Access System
There are 2 ways to access the teacher web area:
1. Go to your Teacher Web link, provided by your system administrator.
❍ An example of the link is: http://yourwebsite.schooloffice.com/yourwebsite/sdsweboffice/teacherweb/.
2. Enter your User ID and Password, provided by your system administrator.
3. Another way to access the Teacher Web area is to go to your SDS Web Office link for example:
http://yourwebsite.schooloffice.com/yourwebsite/sdsweboffice/teacherweb/ and choose the Teacher Entry options from main
menu. This is usually the way that administrators access teacher web.
See also
Login
Forgot or Change Password
Toolbar
SDSStudentHelp
336 . Teacher Web
Home > Teacher Web > Introduction > Login
Login
If you are accessing Teacher Web through a link and not through Web School Office, you will need to login.
For example: http://yourwebsite.schooloffice.com/yourwebsite/sdsweboffice/teacherweb/
1. Enter User ID.
2. Enter Password.
3. Click Login.
It is recommended that you setup your 3 security questions as outlined in the “Forgot or Change Password” section in the event that
you forget your password in the future.
See also
Access System
Forgot or Change Password
Toolbar
SDSStudentHelp
Teacher Web . 337
Home > Teacher Web > Introduction > Forgot or Change Password
Forgot or Change Password
If you are accessing Teacher Web through a link and not through Web School Office, and you want to change your password:
1. Enter in User ID or E-mail.
2. Enter Password.
3. Click on Forgot or Change Password.
❍ If you forgot your password when selecting “Forgot or Change Password?” answer three security questions, click Verify.
Then enter in a New Password and Confirm Password then Verify.
4. Enter New Password.
5. Enter Confirm Password.
6. Click Submit.
See also
Access System
Login
Toolbar
SDSStudentHelp
338 . Teacher Web
Home > Teacher Web > Introduction > Toolbar
Toolbar
= Cancel changes and/or hide Gradebook panel
= Period Attendance or Homeroom/Daily Attendance
= Grade Entry
= Gradebook
= Discipline Entry
= Meal and Miscellaneous Count Entry
= Post Gradebook Grades to Grade Area
= Click drop down to select a report.
= Display Selected Reports
= Click for Help
= Message Center
= Video Tutorials and Student Help
Logout = Logout of Teacher Web
See also
Access System
Login
Forgot or Change Password
SDSStudentHelp
Teacher Web . 339
Home > Teacher Web > Period Attendance or Homeroom/Daily Attendance
Period Attendance or Homeroom/Daily Attendance
Entry of classroom attendance over the Internet is made simple with Teacher Web in Web School Office. Simply mark a student
absent or tardy (i.e. time entry is your option) and select submit. That's it! The attendance is instantly recorded. There is no need to
install a client program on the teachers' computer; teachers only need access to the Internet. Substitutes can have their own login
created just for subs so they can take attendance as well! PCs or Macs are able to utilize Web School Office. One KEY feature is the
REAL TIME seating chart with PHOTOS which is a perfect aid for SUBSTITUTE teachers. No more switching the name tags to trick the
substitute!
See also
Attendance Toolbar
Take Attendance
Create Seating Chart
Take Attendance by Seating Chart
Attendance Document Control
Look and Browse
SDSStudentHelp
340 . Teacher Web
Home > Teacher Web > Period Attendance or Homeroom/Daily Attendance > Attendance Toolbar
Attendance Toolbar
= Saves the attendance entered.
= Click dropdown to view selected report.
= Preview Selected Report
= Document Control – in this area you can add a file to the course or homeroom.
Show Photos = Check to show students photos.
Show Time In/Out Check Box = Check to view option to Record Time
= Click for Help
See also
Take Attendance
Create Seating Chart
Take Attendance by Seating Chart
Attendance Document Control
Look and Browse
SDSStudentHelp
Teacher Web . 341
Home > Teacher Web > Period Attendance or Homeroom/Daily Attendance > Take Attendance
Take Attendance
1. Enter Teacher Web.
2. Click on the Attendance Bell
.
❍ For Period attendance click on desired course.
❍
For homeroom/daily attendance the class list will immediately display.
3. Select “T” or “N” if the student is Tardy/Not Tardy.
4. Select “A” or “N” if the student is Absent/Not Absent.
5. Select an Other Code if further description is necessary.
❍ Typically teachers do not use this code because the office will indicate the reason for the absence.
6. Click on the Student Name to e-mail Parent/Student/Guardian.
7. Click on the Open Envelope for Look and Browse on a Student.
8. Click
❍
❍
to Save.
This will place a check in the “Attn Comp” box on the main period attendance screen, which is an indication to the office
that you are finished taking attendance for that class.
Note: If a student’s name is red that indicates that the office has entered a message for teachers. Hover over the
student’s name and a text box will show with the message. If a student’s name is beige that indicates that the office
pre-entered that student’s attendance and teachers do not have the ability to edit.
See also
Attendance Toolbar
Create Seating Chart
Take Attendance by Seating Chart
Attendance Document Control
Look and Browse
SDSStudentHelp
342 . Teacher Web
Home > Teacher Web > Period Attendance or Homeroom/Daily Attendance > Create Seating Chart
Create Seating Chart
1. Enter Teacher Web.
2. Click on the Attendance Bell
.
3. Click on a Course.
4. Click on the “Attendance - Seating Chart” tab.
5. Define your seating chart by indicating how many rows and seats your seating chart will have and click
now see a visual display of your chart.
to save. You should
6. Choose the method of assigning seats then click on “Auto assign” button.
❍ Alpha by Row, alphabetically from top to bottom.
❍
Alpha by Seat, alphabetically from left to right.
❍
Random.
❍
Manually assign into seats by clicking on a “Student without seat assignment” and then click on the “Add” button of the
seat you would like to put student into. You can manually assign all or some of your students and then choose another
method for the remaining students that will fill in around your manually entered students.
See also
Attendance Toolbar
Take Attendance
Take Attendance by Seating Chart
Attendance Document Control
Look and Browse
SDSStudentHelp
Teacher Web . 343
Home > Teacher Web > Period Attendance or Homeroom/Daily Attendance > Take Attendance by Seating Chart
Take Attendance by Seating Chart
If you would like to take attendance while on the seating chart tab, that is possible.
1. Create seating chart
2. Click on
.
3. Choose the appropriate code “T” for tardy and “A” for absent.
4. Once you are finished click
to save.
5. To make adjustments to your seating chart, you will need to click on the
maintenance area.
again so that it toggles back to the seating chart
❍
Note: By clicking on the
screen.
will toggle back and forth between taking attendance and the seating chart definition
❍
Note: The above screen is a screen print of Period Attendance the same can be done for Daily/Homeroom attendance.
See also
Attendance Toolbar
Take Attendance
Create Seating Chart
Attendance Document Control
Look and Browse
SDSStudentHelp
344 . Teacher Web
Home > Teacher Web > Period Attendance or Homeroom/Daily Attendance > Attendance Document Control
Attendance Document Control
The document control allows you to add documents to a course or homeroom. This is not used to add a document to an individual
student.
1. Enter Teacher Web.
2. Enter Daily/Homeroom or Select a course for Period Attendance.
3. Click on the Document Control
.
4. Click on Browse.
5. Navigate to find the File.
6. Click Open.
7. Enter a Description.
8. Select a Security Group.
9. Click Add. This document will remain until you delete it.
See also
Attendance Toolbar
Take Attendance
Create Seating Chart
Take Attendance by Seating Chart
Look and Browse
SDSStudentHelp
Teacher Web . 345
Home > Teacher Web > Period Attendance or Homeroom/Daily Attendance > Look and Browse
Look and Browse
1. Enter Teacher Web.
2. Enter Attendance.
3. Select Daily/Home Room Attendance or a Course.
4. Click on the Students Name (i.e. Johnella J Pease).
❍
The following screen will then display:
5. Click on the Dropdown for View Option 1 (i.e. Schedule)
❍
Notice the student schedule then displays.
6. Select the next View Option and it will add to the bottom of the screen. Teachers can view up to 4 areas at a time. Available
areas are controlled by user security.
7. When done viewing click on the X on your Browser.
See also
SDSStudentHelp
346 . Teacher Web
Attendance Toolbar
Take Attendance
Create Seating Chart
Take Attendance by Seating Chart
Attendance Document Control
SDSStudentHelp
Teacher Web . 347
Home > Teacher Web > Gradebook
Gradebook
Your teachers can enter their daily grades from their classroom or from their home. Standards based grading is supported. Browser
based, no additional software needs to be installed on the teachers' computer. A SDS unique link option enables your teachers to
enter information in one gradebook, like homework assignments, and it will automatically populate the linked gradebooks. Your
teachers simply enter their numeric grades and the system automatically calculates the letter grade - no additional calculations
needed.
See also
Access
Gradebook Toolbar
Create/Wizard Gradebook
Delete All Empty Gradebook Pages
Office and Procedures
Column Action (Add/Delete/Edit/Move/Copy/Mass Add)
Post Gradebook Grades to Office or Another Gradebook
Gradebook Document Control
Teacher Defined Grade Charts
Grading Assignments
Extra Credit and Class Participation
Gradebook Options
Special Options
Transfer/Post grades from Gradebook into Web School Office (office area)
Manual Entry of Grades
Post Gradebook Grades to Grade Area
SDSStudentHelp
348 . Teacher Web
Home > Teacher Web > Gradebook > Access
Access
1. Enter Teacher Web.
2. Click on to access the gradebook.
❍ The first time that you enter the gradebook a list of your courses will display. Bold lettering means that gradebooks
haven’t been created yet.
❍
Click on “Go to Gradebook Setup Page”. This is where you can setup all of the gradebooks for that class, i.e. term
gradebook, exam gradebook, and final gradebook at one time.
❍
Create your gradebooks
Work on Gradebook from Home
The Gradebook Program may be accessed by most computers with an internet browser (SDS suggests an Internet Explorer browser
or if using Macs, Safari or latest version of the Firefox browser.). Your district may restrict this access using network and/or internet
security. Check with your system administrator if you have a problem accessing Teacher Web from home.
See also
Gradebook Toolbar
Create/Wizard Gradebook
Delete All Empty Gradebook Pages
Office and Procedures
Column Action (Add/Delete/Edit/Move/Copy/Mass Add)
Post Gradebook Grades to Office or Another Gradebook
Gradebook Document Control
Teacher Defined Grade Charts
Grading Assignments
Extra Credit and Class Participation
Gradebook Options
Special Options
Transfer/Post grades from Gradebook into Web School Office (office area)
Manual Entry of Grades
Post Gradebook Grades to Grade Area
SDSStudentHelp
Teacher Web . 349
Home > Teacher Web > Gradebook > Gradebook Toolbar
Gradebook Toolbar
The list below gives you a quick overview of the gradebook icons that are located on the toolbar.
= Select the area you wish to post to.
= Save changes and return to main screen.
= Click for Teacher Web Help
= Select a Report
= Preview Selected Report
= View Dropdown. Select the view that best fits your monitor or needs.
= Quick add columns (Save First!) This allows for quick entry of multiple assignment columns.
= Add a column. Save First! There can only be 99 columns in one Gradebook.
= Edit Column Information and Categories(Change a column)
= Move a column.
= Delete a column.
= Copy grades between columns.
= Send gradebook grades to office grades or another gradebook.
= Gradebook Document Control
Grade Chart: = Click on this link to display the grade chart. (If it is blank then you should select a course.)
= Click on the + to expand the gradebook options. Each option will be explained later in this document.
See also
Access
Create/Wizard Gradebook
Delete All Empty Gradebook Pages
Office and Procedures
Column Action (Add/Delete/Edit/Move/Copy/Mass Add)
Post Gradebook Grades to Office or Another Gradebook
Gradebook Document Control
Teacher Defined Grade Charts
Grading Assignments
Extra Credit and Class Participation
Gradebook Options
Special Options
Transfer/Post grades from Gradebook into Web School Office (office area)
Manual Entry of Grades
Post Gradebook Grades to Grade Area
SDSStudentHelp
350 . Teacher Web
Home > Teacher Web > Gradebook > Create/Wizard Gradebook
Create/Wizard Gradebook
There are two different ways to create a gradebook by using the “Wizard” option or “Create” option. It is recommended that you use
the wizard because it allows you to create all of the gradebooks for a class at one time, a proven time saver. If you are a teacher that
teaches rotation type courses, where the gradebook is the same for each marking period but with a different group of students you
will NOT use the wizard. See the section on “Create New Gradebook (Not through Wizard) to create the first gradebook. Then for
subsequent gradebooks see the section “Copy Current Gradebook Pages”.
Wizard
The wizard will aid in the setup of gradebook pages. To establish a new gradebook or gradebook page for a course, a teacher has to
setup individual gradebook pages for each marking period, which can be done in the “Wizard” as well as the “Create” option. The
Wizard simplifies the process. The Wizard will setup the automatic posting relationship between the new gradebook pages and the
office report card area.
Creating Gradebook Pages
Below are the steps to use when creating gradebook pages by using the Wizard:
1. Enter Teacher Web
2. Click on
to access the gradebook.
3. Click on Go to Gradebook Setup.
4. The following options will display:
❍
Select the Wizard.
❍
When you select the Wizard you may get a message “Warning! No School Location is specified for your user. Gradebook
Wizard may not work properly.” Click OK. If you receive this message, it is suggested that your administrator add school
locations to each teacher in user security. Teachers should have separate login user codes for each location.
5. Then follow the red numbers on the screen 1 - 4.
1. Select a Class from the dropdown.
❍
Note: If you take the check mark out of the box next to “Show only classes with no existing gradebook pages” then you
will see classes with gradebooks and could potentially create duplicate gradebooks for a class so it is recommended that
you leave that check mark in the box.
■
Fill out the following: Page Type, Name of Gradebook Page, Grade Chart, Auto Post Col, Type to Post, % of
Final Grade, Include in Final Page and Show on Parent Connect. This area looks at your school’s grade area
setup to determine what types of gradebooks to create. You only need to create the eligibility gradebooks that
are posting to an eligibility area. If the wizard setups Eligibility gradebooks that post to a progress report area,
you can select “do not create” in the page type column to prevent it from creating that gradebook.
2. Term Page Options, this option is primarily for term gradebook pages.
❍
Select the grade categories and how you would like them weighted. If you enter in a weight they all must add up to
100. If you need categories added to the list contact the office. The office personnel can add additional categories.
❍
Place a check mark in drop lowest score next to the grade category if you would like the lowest score dropped.
Note: If available, the eligibility gradebook will use the same categories.
3. Eligibility (Summary) Page Options:
❍
If your school has an eligibility column defined in the Web School Office, you will see # 3 and will have the option for an
eligibility gradebook page. An eligibility gradebook allows teachers to show a cumulative grade inclusive of more than
one gradebook. An eligibility column holds the grades from eligibility gradebooks. Grades from eligibility gradebooks can
be sent to the office on regular intervals so that the office can generate reports indicating which students are eligible or
ineligible for school activities based on grades.
SDSStudentHelp
Teacher Web . 351
❍
If you don’t have an eligibility area defined then the office can add this to the Web School Office |Master Field and Code
Entry and Changes |Application = Grade Reporting |Entry Option = Grade Area Setup, make it term zero, so it won’t
show on ParentConnect. Have all of the areas (i.e. Grad_Credit, GPA_Credit, etc) marked as False, this is how the
Wizard program determines it is an eligibility page.
❍
Note to system administrators: In the Grade area setup you may have one eligibility area defined or two eligibility
areas defined, one per semester, but only one is active at a time. If your school has two eligibility areas defined, then
first semester only courses should be set to autpost to the 1st semester eligibility area. 2nd semester only courses
should be set to 2nd semester eligibility and full year courses will adjust their autoposting to the appropriate area at
semester.
❍
Zero weights for category box: if your term gradebooks have weighted categories but you would like your eligibility
gradebooks to be strictly un weighted and simply figure the eligibility grade as “points earned out of points possible”
then check the box. If you want the eligibility grade to reflect the weighted categories then leave box unchecked.
❍
Weight column: Typically, schools will leave the weight set at 0 so that they have a running total of all assignments in
that class. If you enter the weight at 50/50 as example, then when you have your first assignment in quarter 2, it will be
worth 50% of the eligibility grade.
4. Create a Gradebook, click here to create a gradebook.
❍
Note: Right below the create button shows the existing gradebook pages. You can access them from this area while in
the wizard.
See also
SDSStudentHelp
352 . Teacher Web
Access
Gradebook Toolbar
Delete All Empty Gradebook Pages
Office and Procedures
Column Action (Add/Delete/Edit/Move/Copy/Mass Add)
Post Gradebook Grades to Office or Another Gradebook
Gradebook Document Control
Teacher Defined Grade Charts
Grading Assignments
Extra Credit and Class Participation
Gradebook Options
Special Options
Transfer/Post grades from Gradebook into Web School Office (office area)
Manual Entry of Grades
Post Gradebook Grades to Grade Area
SDSStudentHelp
Teacher Web . 353
Home > Teacher Web > Gradebook > Delete All Empty Gradebook Pages
Delete All Empty Gradebook Pages
This option will delete all gradebooks without grades and assignments entered; this is available in the wizard. If you want to delete a
single gradebook see section on “Delete single gradebook”. Gradebook Page Wizard delete button will delete ALL empty gradebook
pages for that class. This button is only visible when the “Show only classes…” checkbox is unchecked. It is a quick way to delete
gradebook pages that were created erroneously. This option will be rarely used.
Delete Single Gradebook Page
1. Enter Teacher Web
2. Click on
to access the gradebook.
3. Click on Go to Gradebook Setup.
4. Select Change.
5. At the bottom right of this screen is “Delete Entire Gradebook Page”, enter your teacher code and click
.
Create New Gradebook (not through Wizard)
This is the second way to create a new gradebook. The first option by using the Wizard significantly simplifies the process. If you have
not tried the Wizard to setup a gradebook, try the Wizard first.
To use the Create Option:
1. Enter Teacher Web.
2. Click on
to access the gradebook.
3. Click on Go to Gradebook Setup.
4. Select Create.
5. Enter Gradebook Page Name.
Note: Parents will see the gradebook title if your district/school is using Parent Connect.
6. Select a Course.
7. You can select a gradebook setup from a previous year by clicking on the “Special options” button. This feature is available only
if you used the web gradebook last year otherwise this dropdown will be blank.
8. Select a Grade Chart. If you have not created a grade chart yet review the section on Teacher Defined Grade Charts.
SDSStudentHelp
354 . Teacher Web
9. Special Options: This area is where you would setup your autoposting, or remove a gradebook from Parent Connect view, or
load a gradebook template from current or previous years.
10. Page link options: Linking gradebooks together will allow you to create and edit assignments in one gradebook and those
changes will carry over to the linked gradebooks. This is a great timesaver for teachers that teach the sameclass multiple times a day.
One thing to note: moving columns and deleting columns still need to be done in individual gradebooks. Only gradebooks that are
created will be available to link.
11. Create Summary Page: If you want to create a summary gradebook, that is one that will give you a running total of multiple
gradebooks, you can set it up in this area. This is primarily for eligibility purposes.
12. Create Final Page: If you want to create a gradebook that will figure a final grade based on two or more gradebooks this is
the option for you. See “Create Final gradebook” section for more information.
13. Click
to save.
See also
Access
Gradebook Toolbar
Create/Wizard Gradebook
Office and Procedures
Column Action (Add/Delete/Edit/Move/Copy/Mass Add)
Post Gradebook Grades to Office or Another Gradebook
Gradebook Document Control
Teacher Defined Grade Charts
Grading Assignments
Extra Credit and Class Participation
Gradebook Options
Special Options
Transfer/Post grades from Gradebook into Web School Office (office area)
Manual Entry of Grades
Post Gradebook Grades to Grade Area
SDSStudentHelp
Teacher Web . 355
Home > Teacher Web > Gradebook > Office and Procedures
Office and Procedures
See also
Access
Gradebook Toolbar
Create/Wizard Gradebook
Delete All Empty Gradebook Pages
Column Action (Add/Delete/Edit/Move/Copy/Mass Add)
Post Gradebook Grades to Office or Another Gradebook
Gradebook Document Control
Teacher Defined Grade Charts
Grading Assignments
Extra Credit and Class Participation
Gradebook Options
Special Options
Transfer/Post grades from Gradebook into Web School Office (office area)
Manual Entry of Grades
Post Gradebook Grades to Grade Area
SDSStudentHelp
356 . Teacher Web
Home > Teacher Web > Gradebook > Office and Procedures > Office Responsibilities for Teacher Web
Office Responsibilities for Teacher Web
Post Gradebooks to Marking Period Grades
If your school has determined that the office will transfer gradebook grades instead of having the teachers responsible for this step it
can be accomplished as follows:
1. The user that will post gradebook grades MUST have a school location on their user code.
2. Click on Data Entry and Changes |Student Information |Processing Options |Add, Change, Update Options |Post Gradebooks to
Marking Period Grades.
❍
3. Select an area to Post (i.e. Final Grade ~ 8).
❍
4. Click “Post/Transfer Grades”.
❍ Clicking on this button will only Post/Transfer Grades that indicate to post to a specific area. When the office transfers
gradebook grades, it is posting all gradebooks that are setup to post to that area within their school location.
Add Teacher Web Reports or Add Gradebook Categories
These actions cannot be done from the teacher web area it must be done by someone with access to the Web Office. The teacher
web area has a variety of attendance and grade reports available however, at times users may have additional reporting needs. It is
possible to add additional reports to the report drop down areas within teacher web. Also, if your district would like to add additional
gradebook categories, i.e. homework, class work, projects, labs, etc, the process is outlined below.
1. Enter Web School Office.
2. Click on Administrative Utilities |Control Center |Teacher Web
3. In this area of the Control Center you have three main options, add teacher web reports ,setup gradebook categories, and
restore gradebook page. First we will review Teacher Web Reports and then how to add gradebook categories.
Teacher Web Reports
This option allows you to add reports to Teacher Web to different areas of Teacher Web. You will also see the default reports in
these areas as well (i.e. swb_dbnm |Student Demographics). This shows the report name swb_dbnm | and the report description
(Student Demographics). See the example below.
SDSStudentHelp
Teacher Web . 357
To add a Teacher Web Report
1. Enter Control Center |Teacher Web |Click on Teacher Web Reports
2. Select the area of Teacher Web you would like to add a report to (i.e. Grades)
3. Enter in a report file name (i.e. swbcg6x.rpt)
4. Type in a Report Description.
5. Click
❍
to add the report.
Notes:
1. Teacher Web reports MUST have the Demographics table in all reports in all areas of Teacher Web EXCEPT
Daily Attendance must have Curr_Yr_Schedules table in the report and linked in order for you to be able to add
the report. If the report you are adding does not have this table in it you will receive the below message:
“This report does not contain a required table to run from this area – Curr_Yr_Schedules”
■
■
If this occurs and you do not know how to correct the report you may request a custom report from SDS
Support. Contact SDS for custom report fee information.
2. If you receive the below message “Error! Report was not saved. A report by that name does not exist.” this
means the report name does not exist which means you may have mis-typed the report name or the report is no
longer in your student directory. In this case click OK and retype the report name (Do not forget to type in
the .rpt after the file name.)
■
6. Once you have added your report view it in Teacher Web to verify it meets your needs.
Add Mailing Labels to the Parent of Report
A popular report to add to Teacher Web is Mailing Labels to the Parent of Report (swb_dblp.rpt) to the main page of Teacher Web.
You can do this by following the above instructions and entering in swb_dblp.rpt for the report name.
Gradebook Categories
In Administrative Utilities |Control Center |Teacher Web you have the option to add gradebook categories. Below will walk you
through how to add them.
SDSStudentHelp
358 . Teacher Web
1. Enter Control Center |Teacher Web
2. Click on the radio button “Gradebook Categories”
3. Enter a Category Name
4. Click
❍
.
The gradebook categories will automatically fill with “Standard” categories.
5. Once you have all your gradebook categories added verify the setup in Teacher Web.
❍ Any category currently in use in a gradebook cannot be deleted.
Restore Gradebook Page
The restore feature will restore from a backup file. The restored gradebook page will contain information up through the date of the
backup. This program does NO changes and NO deleting of existing pages therefore if you restore a gradebook page that already
exists then you will have duplicate gradebook page. The solution for that would be to simply delete the less current page.
1. Enter Administrative Utilities |Enter Control Center |Teacher Web
2. Click on the radio button “Restore Gradebook Page”
3. Select the Database |Course and Gradebook to restore.
4. To complete the process select the “Restore Selected Gradebook Page” button.
❍ This will add the selected page found in the backup database for the selected course back into your working database.
The title will include an R at the end of the Grade_Book_Title to indicate the restore.
❍
See screen prints below for examples.
SDSStudentHelp
Teacher Web . 359
See also
Marking Period Grade Reporting Procedures
SDSStudentHelp
360 . Teacher Web
Home > Teacher Web > Gradebook > Office and Procedures > Marking Period Grade Reporting Procedures
Marking Period Grade Reporting Procedures
Here is a brief outline to help guide you through the grade reporting process.
1. Teachers enter grades and comments via one of the methods listed below:
❍ Set their gradebooks up to auto post to the appropriate marking period grade area. Enter comments manually.
❍
Manually enter grades and comments in the Marking Period Grade Entry area
❍
Copy grades from their gradebooks into the marking period grade areas via the
icon. Comments must be manually
entered.
■
Teachers may print grade verification reports for their classes from the Marking period Grade entry reports.
in Teacher Web.
2. Office runs the process to auto post grades.
❍ Enter WSO |Data Entry and Changes |Student Information |Processing Options = Add, Change, Update Options |Post
Gradebooks to Marking Period Grades| Click the dropdown and choose the appropriate grade area to post grades to
|Click the Post/Transfer Grades button.
■
Note: this will overwrite any manually entered grades on classes that are set to auto post.
3. Office runs the Missing Grades by Teacher Report and has teachers resolve any missing grades.
❍ Enter WSO |Reports |Student Reports |Grade Reporting |Missing Grades by Teacher Report.
4. Office Refreshes Attendance.
❍ Enter WSO |Processing Center |Refresh Attendance Analysis – Setup appropriate date range and click the button to
refresh.
5. Office Computes GPA.
❍ Enter WSO |Processing Center |Compute GPA |Make desired selections. Be sure to check the option to run Honor Roll
exclusions if you have Honor Roll Definitions set up with exclusions.
■
Note: GPA must be computed even for Progress Reports in order for the Comment Descriptions to post for
printing on the Grade/Progress Reports
6. Office prints Grade/Progress Reports.
❍ Enter WSO |Reports |Student Reports |Grade/Progress Reports.
❍
Choose the report and setup any necessary selection or sequence and save.
❍
Click
❍
Make appropriate selections on the print selections screen and click to
to preview selection screen.
See also
Office Responsibilities for Teacher Web
SDSStudentHelp
preview/print the report.
Teacher Web . 361
Home > Teacher Web > Gradebook > Column Action (Add/Delete/Edit/Move/Copy/Mass Add)
Column Action (Add/Delete/Edit/Move/Copy/Mass Add)
See also
Access
Gradebook Toolbar
Create/Wizard Gradebook
Delete All Empty Gradebook Pages
Office and Procedures
Post Gradebook Grades to Office or Another Gradebook
Gradebook Document Control
Teacher Defined Grade Charts
Grading Assignments
Extra Credit and Class Participation
Gradebook Options
Special Options
Transfer/Post grades from Gradebook into Web School Office (office area)
Manual Entry of Grades
Post Gradebook Grades to Grade Area
SDSStudentHelp
362 . Teacher Web
Home > Teacher Web > Gradebook > Column Action (Add/Delete/Edit/Move/Copy/Mass Add) > Adding an Assignment Column to the Gradebook
Adding an Assignment Column to the Gradebook
Open a grade book you have already created. There are two different ways to add assignments. The first way is by using the Quick
Column Add
and the other is by using the Add Columns
one assignment.
See also
Quick Add Columns
Add one Assignment Column at a Time
SDSStudentHelp
. The Quick Column Add will save you time when adding more than
Teacher Web . 363
Home > Teacher Web > Gradebook > Column Action (Add/Delete/Edit/Move/Copy/Mass Add) > Adding an Assignment Column to the Gradebook > Quick Add
Columns
Quick Add Columns
1. To use the quick add column enter Teacher Web |Gradebook.
2. Select a course and gradebook.
3. Click on
.
4. Enter in the heading, description, date, due date, points, category, marking period. If you do not want this assignment to show
on Parent Connect uncheck “Show on Parent Connect”
5. Click to
save or
to save and exit the screen (click ok if you use this option). The
WITHOUT saving the entries.
will return to the gradebook
Other Adding Column Options in Quick Add Columns
Show URL’s
●
Click in the check box next to “Show URL Columns” if you would like to see the URL columns where you can enter a link for
your assignment.
State Objectives
●
If your database has state objectives entered you can add state objectives when adding columns by simply clicking in the check
box at the top of the screen “Show State Objectives” and select the Standards, Goals and Objectives you would like for that
assignment.
SDSStudentHelp
364 . Teacher Web
See also
Add one Assignment Column at a Time
SDSStudentHelp
Teacher Web . 365
Home > Teacher Web > Gradebook > Column Action (Add/Delete/Edit/Move/Copy/Mass Add) > Adding an Assignment Column to the Gradebook > Add one
Assignment Column at a Time
Add one Assignment Column at a Time
This area
allows you to add one assignment at a time.
1. Click
.
2. “Gradebook page to copy from:” (if you want to copy an assignment from another gradebook use this option if not skip to step
3) – use this box if your gradebooks are NOT linked, but if you want to copy a particular assignment from another gradebook
into the current gradebook.
❍ Choose the gradebook that has the assignment in the “Gradebook page to copy from” drop down.
❍
Next, use the “Column to copy/edit” box to choose the assignment column you want to copy from the other gradebook.
Note: the “insert before column” option is only available if your gradebook isn’t linked.
❍
Make any necessary changes to the properties of the assignment such as term, category or assignment date and click
. That column is now added to your open gradebook.
3. Choose a category. The drop down box is based upon the categories you chose when you setup your gradebook. This is VERY
important to do.
4. Choose a marking period. This box is filled with the values based on the marking periods included in the class on the course
master (set up by the office). You can print progress reports based on assignments from specific terms so make sure to
choose the correct term for each assignment.
5. Fill in a column heading. This is a short description of the assignment that appears at the top of the assignment column in your
gradebook.
6. Fill in a detailed description. This step lets you add a more detailed description of the assignment. It appears on parent connect
so the parents/students can read, so be a little more specific by including page numbers, problem numbers, etc.
7. Add an assignment date and due date. THIS IS REQUIRED!
8. The item date can be either the date the assignment was given or the date it was due.
9. Define the possible points for the assignment.
10. The objective allows you to further describe the purpose of the assignment if so desired.
11. Information links 1-4 are optional fields where you may list web sites that could be helpful in completing the assignment.
12. Leave the check mark in the box for “parental view on web” if you want this assignment to be viewed by parents in Parent
Connect. Uncheck box if you do not want to show on Parent Connect. By default that box is checked.
13. Leave the “goal based reporting” box unchecked if you are NOT using a goal based report card.
14. Click
to save and add another column. Click
changes.
to save and exit the “add assignment” area. Click
to exit without saving
See also
Quick Add Columns
SDSStudentHelp
366 . Teacher Web
Home > Teacher Web > Gradebook > Column Action (Add/Delete/Edit/Move/Copy/Mass Add) > Edit an Assignment Column in the Gradebook
Edit an Assignment Column in the Gradebook
1. While in the gradebook, click on
.
2. Choose the assignment you want to edit in the “Column to Copy/Edit” drop down box.
3. Adjust the properties of that assignment and click
to save or to
close without saving.
❍ Note: Editing assignments does carry over to linked gradebook assignments.
See also
Adding an Assignment Column to the Gradebook
Deleting an Assignment Column in the Gradebook
Move an Assignment Column in the Gradebook
Copy or Mass Add Grades in the Gradebook
Copy Grades from One Column to Another
Mass Add Grades
SDSStudentHelp
Teacher Web . 367
Home > Teacher Web > Gradebook > Column Action (Add/Delete/Edit/Move/Copy/Mass Add) > Deleting an Assignment Column in the Gradebook
Deleting an Assignment Column in the Gradebook
If no grades have been entered:
1. Click
on the gradebook toolbar.
2. Choose the assignment column to delete from the “Select column” box.
3. Click
next to “Delete Assignment”.
4. Click
to close the “Delete Assignment” area.
If grades have been entered into the column:
1. An assignment column may NOT be deleted from a gradebook until ALL grades are removed from the column. Follow the
directions below to remove grades.
❍ Check the option to “Show Inactive Students”.
❍
Click
❍
In the value box, enter the word “blank”.
.
❍
In the select column to box, choose the column you want to delete.
❍
Click
❍
The word blank should now occupy the column.
❍
Click
next to copy grades.
to close the copy grades area.
2. Click
to save your work. This will clear the column.
3. Click
on the gradebook toolbar.
4. Choose the assignment column to delete from the “Select column” box.
5. Click
6. Click
❍
next to “Delete Assignment”.
to close the “Delete Assignment” area.
Note: Deleting an assignment does not carry over to linked gradebooks. If you are deleting an assignment that is linked
you still have to delete from individual gradebooks.
See also
Adding an Assignment Column to the Gradebook
Edit an Assignment Column in the Gradebook
Move an Assignment Column in the Gradebook
Copy or Mass Add Grades in the Gradebook
Copy Grades from One Column to Another
Mass Add Grades
SDSStudentHelp
368 . Teacher Web
Home > Teacher Web > Gradebook > Column Action (Add/Delete/Edit/Move/Copy/Mass Add) > Move an Assignment Column in the Gradebook
Move an Assignment Column in the Gradebook
1. While in the gradebook, click on
.
2. Choose the assignment you want to move in the “Move Column” drop down box.
3. In the 2nd drop down box titled “To Just Before”, indicate which column you want it to be placed in front of or leave blank and
the assignment will be moved to the end.
4. Click
❍
to move and then
to close.
Note: Moving an assignment column does NOT carry over to linked gradebooks. You will have to move the assignment
in the individual gradebooks. Also, moving an assignment will only work if your assignments are in the default order of
“entry order”. If you have chosen to order assignments by Assignment date, category, or by average this option will not
work for you.
See also
Adding an Assignment Column to the Gradebook
Edit an Assignment Column in the Gradebook
Deleting an Assignment Column in the Gradebook
Copy or Mass Add Grades in the Gradebook
Copy Grades from One Column to Another
Mass Add Grades
SDSStudentHelp
Teacher Web . 369
Home > Teacher Web > Gradebook > Column Action (Add/Delete/Edit/Move/Copy/Mass Add) > Copy or Mass Add Grades in the Gradebook
Copy or Mass Add Grades in the Gradebook
This area
is used to copy grades from one column to another column or it can be used to mass add grades.
See also
Adding an Assignment Column to the Gradebook
Edit an Assignment Column in the Gradebook
Deleting an Assignment Column in the Gradebook
Move an Assignment Column in the Gradebook
Copy Grades from One Column to Another
Mass Add Grades
SDSStudentHelp
370 . Teacher Web
Home > Teacher Web > Gradebook > Column Action (Add/Delete/Edit/Move/Copy/Mass Add) > Copy Grades from One Column to Another
Copy Grades from One Column to Another
1. To copy grades from one column to another: While in the gradebook, click on the
.
2. Choose the column that you want to copy by selecting it in the top dropdown titled “Select from Column”.
3. In the bottom drop down titled “Select to Column”, choose the receiving column.
4. Click on
to copy and the
to close this area.
See also
Adding an Assignment Column to the Gradebook
Edit an Assignment Column in the Gradebook
Deleting an Assignment Column in the Gradebook
Move an Assignment Column in the Gradebook
Copy or Mass Add Grades in the Gradebook
Mass Add Grades
SDSStudentHelp
Teacher Web . 371
Home > Teacher Web > Gradebook > Column Action (Add/Delete/Edit/Move/Copy/Mass Add) > Mass Add Grades
Mass Add Grades
1. To mass add grades: While in the gradebook, click on
.
2. Put the value that you want to mass add in the “Value” box.
3. In the bottom drop down titled “Select to Column”, choose the receiving column.
4. Click
to copy and the
to close this area.
5. The grades will compute the next time that you click on the
(it is recommended that any changes to the mass added
grades be done before you click on the save diskette so that it doesn’t appear as a grade change, in a different color).
See also
Adding an Assignment Column to the Gradebook
Edit an Assignment Column in the Gradebook
Deleting an Assignment Column in the Gradebook
Move an Assignment Column in the Gradebook
Copy or Mass Add Grades in the Gradebook
Copy Grades from One Column to Another
SDSStudentHelp
372 . Teacher Web
Home > Teacher Web > Gradebook > Post Gradebook Grades to Office or Another Gradebook
Post Gradebook Grades to Office or Another Gradebook
Gradebooks can only be setup to auto post to one area therefore, if you need to post your gradebook grades to a 2nd area, such as
for Progress reports, you can use the globe icon
1. While in the gradebook, click on
for that purpose.
.
2. In the top dropdown titled “Select column to post from” choose the column in your gradebook that you want to send to either
another gradebook or the office.
❍ If you want the alphabetical grade, choose gradebook letter grade.
❍
If you want the numeric average, choose the gradebook numeric average.
3. In the middle dropdown choose the office grades, if this is for progress/report cards. If you are copying grades to another
gradebook, choose the appropriate gradebook.
4. In the bottom dropdown titled “Select column to post to”, choose the receiving column.
5. Click on
to copy and the
to close this area. Your grades have been posted.
See also
Access
Gradebook Toolbar
Create/Wizard Gradebook
Delete All Empty Gradebook Pages
Office and Procedures
Column Action (Add/Delete/Edit/Move/Copy/Mass Add)
Gradebook Document Control
Teacher Defined Grade Charts
Grading Assignments
Extra Credit and Class Participation
Gradebook Options
Special Options
Transfer/Post grades from Gradebook into Web School Office (office area)
Manual Entry of Grades
Post Gradebook Grades to Grade Area
SDSStudentHelp
Teacher Web . 373
Home > Teacher Web > Gradebook > Gradebook Document Control
Gradebook Document Control
The document control
allows you to add documents to a course such as a syllabus or homework sheet. This is not used to add a
document to an individual student.
1. Enter a gradebook.
2. Click on the Document Control
.
3. Click on Browse.
4. Navigate to find the File.
5. Click Open.
6. Enter a Description. It is recommended that you leave the date and course name so that students identify it as a document for
your class. Add a description after the date and course info.
7. Select a Security Group. For Parent Connect users make sure security group is Parent Connect.
8. Click Add. This document will remain until you delete it.
See also
Access
Gradebook Toolbar
Create/Wizard Gradebook
Delete All Empty Gradebook Pages
Office and Procedures
Column Action (Add/Delete/Edit/Move/Copy/Mass Add)
Post Gradebook Grades to Office or Another Gradebook
Teacher Defined Grade Charts
Grading Assignments
Extra Credit and Class Participation
Gradebook Options
Special Options
Transfer/Post grades from Gradebook into Web School Office (office area)
Manual Entry of Grades
Post Gradebook Grades to Grade Area
SDSStudentHelp
374 . Teacher Web
Home > Teacher Web > Gradebook > Teacher Defined Grade Charts
Teacher Defined Grade Charts
Teacher defined grade charts are used to figure the students’ grades within the gradebook. This grade chart is separate from the
grade chart used by the office when computing gpa for report cards. Once gradebook grades are sent to the office, those grades are
computed using the office’s grading scale.
To Create a Custom Gradebook Grade Chart
1. In the Wizard click on the Create or Edit a Grade Chart link.
2. In the “create” area click on the “Grade chart” link to the right of the folder icon.
❍ Adjust the “grade” or “lowest value” columns to reflect the values you want for a grade chart. This area allows you to
delete and re-enter new values.
❍
If you would like to make specific grades stand out visually, you can make them bold by checking the “bold” box. You
can make the font of the text or the background color of the cell a different color.
❍
Caution: too many colors will make your gradebook “busy” looking.
❍
When finished give the chart a name and then click
❍
This custom chart will become available as an option only for the person that created it.
❍
To close the grade chart definition area click on the
See also
Access
Gradebook Toolbar
Create/Wizard Gradebook
Delete All Empty Gradebook Pages
Office and Procedures
Column Action (Add/Delete/Edit/Move/Copy/Mass Add)
Post Gradebook Grades to Office or Another Gradebook
Gradebook Document Control
Grading Assignments
Extra Credit and Class Participation
Gradebook Options
Special Options
Transfer/Post grades from Gradebook into Web School Office (office area)
Manual Entry of Grades
Post Gradebook Grades to Grade Area
SDSStudentHelp
to save.
.
Teacher Web . 375
Home > Teacher Web > Gradebook > Grading Assignments
Grading Assignments
●
When entering grades you may enter a number, letter or number/letter combination in any grade area to a maximum of 10
characters.
●
Numbers will automatically be computed; blanks and letters i.e. EX are not calculated, but can be used to show
exemptions, absences, excuses, etc. If you want to give a student a grade of 10, simply enter 10 in the assignment column.
❍ If you want to show that the student is exempt from an assignment, you could enter something like ex or exempt and
since it is alphabetical it will not count for or against this student. Some teachers use A or AB to show absent. You are
limited to 10 characters of text in any column.
●
If you want to give a letter and number combination you can, however it is important to know that putting a letter first
will cause the grade to be ignored in the calculation, such as L-10 or Late-10. If you put the number first, it will
compute such as 10-L or 10-Late. Make sure to use a dash between the number and letter combination. The
letters you use are self defined.
●
Alphabetical entries will display in red text to indicate they are not being used in calculations. Grading characters is limited to
10.
❍ Grades that are not calculated will display as red (alphabetical grades).
●
❍
Grades that have been changed once will display as green.
❍
Grades that have been changed twice will display as orange.
❍
Grades that have been changed three or more times will display as blue.
❍
Grades that received more points earned than possible will display as magenta.
The color key is available by going to Gradebook Page Options and to Display options.
See also
Access
Gradebook Toolbar
Create/Wizard Gradebook
Delete All Empty Gradebook Pages
Office and Procedures
Column Action (Add/Delete/Edit/Move/Copy/Mass Add)
Post Gradebook Grades to Office or Another Gradebook
Gradebook Document Control
Teacher Defined Grade Charts
Extra Credit and Class Participation
Gradebook Options
Special Options
Transfer/Post grades from Gradebook into Web School Office (office area)
Manual Entry of Grades
Post Gradebook Grades to Grade Area
SDSStudentHelp
376 . Teacher Web
Home > Teacher Web > Gradebook > Extra Credit and Class Participation
Extra Credit and Class Participation
The extra credit – (9) category, when adding an assignment is different than any other category. When you add a column into the
gradebook that is an “extra credit – (9)” category, any number that you put into that column is added directly to the average. In
other words, if a student has a 79 average and then a grade of 5 is put into that column, that student’s new average is now 84.
Most commonly teachers will want to add additional points to students “points earned” in order to give a boost to a student’s
average. This can be accomplished by giving extra credit to students by using any other category besides “extra credit-(9)”. If you give
an extra credit assignment, you can either set the points on that assignment at 0*, and then any points you give in that column will go
to “points earned” in the category selected when creating that assignment and nothing will go to points possible of that category.
Another way to give extra credit is to give a student more points than possible. If you have an assignment worth 25 points, and you
want to give a student extra credit, if you give him more than 25 points (28), that will give him 25 points in the points possible and 28
points in the points earned. Whenever you give more points than possible for an assignment it will show in the gradebook as magenta
color so that it stands out from other grades.
*When a gradebook page uses category weighting, an entire category with zero points possible will be ignored in the
final average.
See also
Access
Gradebook Toolbar
Create/Wizard Gradebook
Delete All Empty Gradebook Pages
Office and Procedures
Column Action (Add/Delete/Edit/Move/Copy/Mass Add)
Post Gradebook Grades to Office or Another Gradebook
Gradebook Document Control
Teacher Defined Grade Charts
Grading Assignments
Gradebook Options
Special Options
Transfer/Post grades from Gradebook into Web School Office (office area)
Manual Entry of Grades
Post Gradebook Grades to Grade Area
SDSStudentHelp
Teacher Web . 377
Home > Teacher Web > Gradebook > Gradebook Options
Gradebook Options
On the top of the tool bar when in gradebook, there is an option + Gradebook Options. If you click on the + next to Gradebook
Options the menu will display.
You will then see display options, order assignments by and order students by. Click on the + next to each of the options and the tree
will expand even more. Below outlines the different options in each area of the tree.
Display Options
Enter Gradebook |Click on the + next to Gradebook Page Options | Display Options and Show Inactive Students/Show Color for
Averages/Show Only Averages/Show Averages by Category/Show All by Category/Show All Category Averages and Show Color Key.
Below is a screen shot of what it looks like and below are definitions of the different options.
Show Inactive Students = allow you to view inactive students on your gradebook.
Show Color for Averages = show colors for gradebook averages. These are the colors, if any, that were defined in your custom
grade chart.
Show Only Averages = show only class averages.
Show Averages by Category = show the average of each assignment category.
Show All Category Averages = show average and points earned and possible of each category.
●
On a day to day basis, most teachers prefer to leave it at “Show Only Averages” so that the assignments are instantly visible.
Show Color Key = show the color key for the “Show Color for Averages” option.
Please note, if there is a * next to the option that means it is ACTIVE.
Order Assignments By
Click on the + next to Gradebook Page Options |Order Assignments By and the following options will display:
Assignment Date Ascending, Assignment Date Descending and Category. These are all different sort options that you
have available. Simply click on the option you would like to sort on. Please note, if there is a * next to the option that
means it is ACTIVE.
SDSStudentHelp
378 . Teacher Web
If you order your assignments by date ascending/descending or by category, the “move and assignment” option will
not work for you.
Order Students By
Click on the + next to Gradebook Page Options |Order Students By and the following options will display: ID Number,
Name, Entry Date and Average. These are all different sort options that you have available. Simply click on the
option you would like to sort on. Please note, if there is a * next to the option that means it is ACTIVE.
See also
Access
Gradebook Toolbar
Create/Wizard Gradebook
Delete All Empty Gradebook Pages
Office and Procedures
Column Action (Add/Delete/Edit/Move/Copy/Mass Add)
Post Gradebook Grades to Office or Another Gradebook
Gradebook Document Control
Teacher Defined Grade Charts
Grading Assignments
Extra Credit and Class Participation
Special Options
Transfer/Post grades from Gradebook into Web School Office (office area)
Manual Entry of Grades
Post Gradebook Grades to Grade Area
SDSStudentHelp
Teacher Web . 379
Home > Teacher Web > Gradebook > Special Options
Special Options
This section covers special options.
See also
Auto-Post Grades
Copy Current Gradebook Pages
Copy Previous Year Gradebook Pages
Page Link Options
Create Summary Page (also known as an eligibility page)
Creating a Final Gradebook
SDSStudentHelp
380 . Teacher Web
Home > Teacher Web > Gradebook > Special Options > Auto-Post Grades
Auto-Post Grades
This feature allows teachers to setup their gradebooks so that the office can pull the numeric average or the letter grade down to the
office for report cards or eligibility reports. Teachers setup their gradebooks to auto post into the appropriate column, i.e. term 1
gradebook would be setup to auto post into the term 1 office area.
If you are using the wizard to setup your gradebooks then setting up the autopost relationship between the gradebook and the office
grade area is a part of the gradebook creation screen.
Once gradebooks have been created or if you do not use the wizard to create your gradebooks then you will access the autopost
setup by going into “change”, for existing gradebooks or “create” for new gradebooks.
1. Click the drop down arrow next to Auto-Post Grades To: and select the appropriate grade area for this gradebook.
2. The next line down is for the Grade Type to Post.
❍ If your school uses Letter grades on report cards then you will select the Letter grade option.
❍
If your school uses percentages on report cards then you will select Number.
3. If you would like to show this on Parent Connect place a check in the box next to Show on Parent Connect. If you DO NOT
want it to show simply remove the check mark.
4. If the auto-post is set by the teacher, there is no further need for the teacher to "send grades to office" for reporting purposes.
The office can capture the grades for report cards, progress grades, or eligibility.
See also
Copy Current Gradebook Pages
Copy Previous Year Gradebook Pages
Page Link Options
Create Summary Page (also known as an eligibility page)
Creating a Final Gradebook
SDSStudentHelp
Teacher Web . 381
Home > Teacher Web > Gradebook > Special Options > Copy Current Gradebook Pages
Copy Current Gradebook Pages
This feature is in the “create” area of the gradebook and is active when you are creating a new gradebook. It is not active in the
“change” area of an existing gradebook. It is useful if you want to copy the assignment columns from another gradebook into the
gradebook you are in the process of creating. This is particularly useful to teachers that teach the same course each term, such as
rotation type courses, because it allows them to setup the gradebook once and copy it for subsequent marking periods. For teachers
that accidently created a gradebook on the wrong course number (i.e. you created your first semester gradebook on your 2nd
semester course number) you can copy that gradebook to the proper course number by copying the assignments AND assignment
grades to the proper course.
1. While you are in the gradebook setup CREATE option, click on Special Options. You will see an area that looks like the screen print
below.
2. Select a current gradebook from the dropdown.
3. Make any adjustments to the categories, grade chart, auto-post setup, etc.
4. Click
to save.
5. Now you have a gradebook for the selected course that has the assignment columns already created. If you choose “copy grades”
it will also copy the assignment grades. Edit as necessary.
See also
Auto-Post Grades
Copy Previous Year Gradebook Pages
Page Link Options
Create Summary Page (also known as an eligibility page)
Creating a Final Gradebook
SDSStudentHelp
382 . Teacher Web
Home > Teacher Web > Gradebook > Special Options > Copy Previous Year Gradebook Pages
Copy Previous Year Gradebook Pages
This feature is located in the “create” area of the gradebook setup and is active when you are creating a new gradebook. It is not
active in the “change” area of an existing gradebook. It allows you to choose a gradebook from last year and it will load the
gradebook setup and assignments for you.
1. While you are in the gradebook setup CREATE option, click on Special Options. You will see an area that looks like the screen
print below.
❍
2. Select a “Previous Year”* gradebook from the dropdown.
3. Leave the “Copy Grades for Matching Students” unchecked
4. Make any adjustments to the categories, grade chart, auto-post setup, etc
5. Click
to save.
6. Now you have a gradebook for the selected course that has the assignment columns already created. Assignment/due dates
will reflect the previous school year, so make sure to edit.
*This feature requires that the history file created at rollover be present in the program and data directory.
See also
Auto-Post Grades
Copy Current Gradebook Pages
Page Link Options
Create Summary Page (also known as an eligibility page)
Creating a Final Gradebook
SDSStudentHelp
Teacher Web . 383
Home > Teacher Web > Gradebook > Special Options > Page Link Options
Page Link Options
This is a great option for teachers that teach multiple periods of the same class. This allows teachers to add an assignment into one
gradebook and it will add that assignment to all linked gradebooks.
The Page Link Option is available in the “create” or “change” area. When you click on the “Page Link Options” area you will see a list
of all of your created pages. Put a check in the ones that you want to link to the gradebook that you are currently in. Grayed out
options are already linked to another gradebook.
●
Adding and Editing will carry over to linked gradebooks.
●
Deleting and moving columns will not carry over to linked gradebooks. If you want to delete or move a column you must do it in
the individual gradebooks.
❍ Note: If you want to move an assignment in a linked gradebook, your assignments must be in “entry order”. Entry order
is an option in the Gradebook page options folder in the top right corner of the gradebook
●
The scissors icon “Unlink all linked columns for this page” will unlink existing assignments. It will allow you to link that
gradebook again for future assignments when necessary.
See also
Auto-Post Grades
Copy Current Gradebook Pages
Copy Previous Year Gradebook Pages
Create Summary Page (also known as an eligibility page)
Creating a Final Gradebook
SDSStudentHelp
384 . Teacher Web
Home > Teacher Web > Gradebook > Special Options > Create Summary Page (also known as an eligibility page)
Create Summary Page (also known as an eligibility page)
If you need to keep track of students’ grades for eligibility purposes this is a useful tool. A summary gradebook, also known as an
eligibility gradebook allows you to have an average that contains grades from multiple gradebooks. This gradebook doesn’t contain
any assignments but it keeps an updated average and letter grade that can be posted to the office grades area. The office can then
pull grades from all gradebooks setup to post to the eligibility area and run reports to identify students by the current grade they are
receiving in their classes. Once the Summary gradebook is setup, it requires no maintenance from the teacher as the average will
update automatically based on the grades entered in the summarized gradebooks.
●
Select Create/Change Options from the gradebook setup page then click on the button Create Summary Page. (figure 9)
“Auto-Fill Categories” box. This box, if checked, will automatically fill in the grade categories from the term gradebooks that
are being chosen for the summary gradebook. Summary gradebooks need to have the categories in the same order as the
term gradebooks. The autofill will add them in the proper order.
●
Under “page” select the gradebooks to summarize from the drop down box. Only gradebooks for that section of that class are
available.
●
Enter in the Weight for each gradebook. Typically, schools will leave the weight set at 0 so that they have a running total of all
assignments in that class. If you enter the weight at 50/50, as example, then when you have the first assignment in quarter 2,
that one assignment will be worth 50% of the eligibility grade.
●
Click
to save.
Very important: The grade categories must be the same and in the same order as the summarized gradebooks. When you initially
create a summary gradebook and choose the “Autofill categories” box it will place the categories correctly. If you add categories to
your term/summarized gradebooks after the initial creation, make sure to add the same categories to your summary/eligibility
gradebook.
See also
Auto-Post Grades
Copy Current Gradebook Pages
Copy Previous Year Gradebook Pages
Page Link Options
Creating a Final Gradebook
SDSStudentHelp
Teacher Web . 385
Home > Teacher Web > Gradebook > Special Options > Creating a Final Gradebook
Creating a Final Gradebook
A final gradebook allows teachers to figure a final grade/semester average by incorporating the averages from two or more
gradebooks. Teachers have the flexibility to figure a final grade by weighting term grades and exams to their specific needs such as
Qtr 1 =40%, Qtr 2= 40% and Exam=20% or for teachers that don’t give exams the final grade can be figured with Qtr 1 =50%, Qtr
2= 50%.
●
Go into the Gradebook icon and click on the bottom option on the tree “Go to Gradebook Page Setup”.
●
Put the Dot in “Create”.
●
Choose the course for which you are creating the final gradebook from the “course” drop down box.
●
Give the gradebook a name by filling in the “Gradebook Page Name” box.
●
Choose the Grade Chart you want to use for this Final gradebook.
●
Setup the auto-posting area (in Special Options).
●
Click on the “Create Final Page” button. This will display drop down boxes.
●
Choose the gradebooks that you want to use in the figuring of the final grade. The choices will include all of the gradebooks
you have for that class.
●
Fill in the Weight column (as example, if you want 3rd quarter and 4th quarter to each be worth 50% of the 2nd semester final
grade then put 50 in the weight column next to both. If you want 3rd quarter and 4th quarter to each be worth 40% and an
exam to be 20%. Put those weights next to the appropriate gradebooks.
●
In the “Marking period” column, your choices will be used as the headings of the final gradebook columns.
●
Once you are finished with the setup, click on
●
You now have a final gradebook created. Any time you go into one of the gradebooks that is included in the final gradebook
setup and click on the Save diskette, the current average will be sent to the final gradebook. If at any point, you go into the
“change area” of the final gradebook and make an adjustment, it will clear the averages out of the final gradebook and you will
have to click on the save diskettes again to push the grades back into the final gradebook
to save.
See also
Auto-Post Grades
Copy Current Gradebook Pages
Copy Previous Year Gradebook Pages
Page Link Options
Create Summary Page (also known as an eligibility page)
SDSStudentHelp
386 . Teacher Web
Home > Teacher Web > Gradebook > Transfer/Post grades from Gradebook into Web School Office (office area)
Transfer/Post grades from Gradebook into Web School Office (office
area)
Some schools have the office staff transfer the grades from gradebooks to the office and some schools have the teachers send their
own grades to the office. Please check with your administration to find out which process your school is going to use.
If teachers will be posting their own gradebooks to Office do the following:
1. Make sure gradebooks are setup to auto post.
1. Enter Teacher Web
2. Click
to access the gradebook.
3. Click on Go To Gradebook Setup |Change
4. Choose a Gradebook to change the setup
5. Click the Special Options button
6. In the “auto post grades to” choose the appropriate grade area
7. In the “grade type to post” choose the letter or number grade (check with the office if you are unsure about whether to
post the alpha or numeric grade)
8. Click
under the gradebook title box.
2. Send Grades to the office: (when teachers transfer grades to the office, they are only doing their own grades)
1. Login to SDS Teacher Web
2. Click
“Post Gradebook Grades…” next to the reports drop down box
3. Choose the grading period to which you want to send your grades
3. If the appropriate grade area does NOT show, contact the office so they may ‘turn on’ the proper options.
1. Click “post/transfer grades” button
2. All gradebooks that are setup to auto post into the selected grade area will copy the class grades into that grade area
immediately. If you make any grade changes in a gradebook after transferring grades, you will need to repeat step 2 to
insure that you’re marking period and gradebook grades are the same.
4. Now you may use Grade Entry icon to add the comments and notes to parents that will eventually print on the report
card/progress report.
See also
Access
Gradebook Toolbar
Create/Wizard Gradebook
Delete All Empty Gradebook Pages
Office and Procedures
Column Action (Add/Delete/Edit/Move/Copy/Mass Add)
Post Gradebook Grades to Office or Another Gradebook
Gradebook Document Control
Teacher Defined Grade Charts
Grading Assignments
Extra Credit and Class Participation
Gradebook Options
Special Options
Manual Entry of Grades
Post Gradebook Grades to Grade Area
SDSStudentHelp
Teacher Web . 387
Home > Teacher Web > Gradebook > Manual Entry of Grades
Manual Entry of Grades
If the gradebook area is NOT being utilized, a teacher can simply go into Teacher Web and click on the Marking Period Grade Entry
icon. Manually enter the term grades, comment codes, exam grades directly into the appropriate areas. Once grades are entered
in grade entry, the office has immediate access to them and can print report cards.
Teachers can click on the calculator
, located at the top of the entry screen, to compute a final grade based on the term grades
and exam. The office must set this “calculator” area up prior semester’s end so that the final grades compute properly, according to
the percentage guidelines of the school. If you use the calculator and are using alphabetical grades, it will average the letter grades
NOT the numeric averages.
Setting up the Calculator in Grade Entry
●
Login to WSO |Data Entry and Changes |Master File and Code Entry Changes |Application = Grade Reporting |Entry Options =
Grade Area Setup.
●
Locate your final/semester grade area and make a note of the “Grade area number”
●
Next, determine which grade areas will figure into that final grade and the weight.
●
On the grade areas that will count in the computation of the final grade you will fill in Percent of Final Grade with its weight.
●
For example: If you have 2 quarters and NO semester exam in first semester, then in the quarter 1 and quarter 2 grade
areas, enter 50 in Percent of Final Grade. If you have 2 quarters and a semester exam, then you’ll enter 40/40/20 respectively
or the percentages that your school requires.
●
Enter the Final Grade Area No (Number) as determined in step #2.
●
Click to
●
Next, under Entry Options select Marking Period Grade Codes.
save.
SDSStudentHelp
388 . Teacher Web
●
In the grade weight 0D boxes; enter a numeric value for each grade code.
❍ If you use only letter grades, each letter must have a unique number to represent it. (The computer can only do math
with numbers, so you must use a unique number for each letter grade so the computer can do the math. This provides
relationship between the grades for averaging purposes. The highest grade would get the highest number)
■
A+ = 15
❍
●
■
A = 14
■
A- = 13
■
B+ = 12
■
B = 11
■
B- = 10
■
Etc. Start with a high enough number to include all letter grades.
If you use numeric grades, then the value you will enter in this column is the same number in the grade code column.
■
100=100
The
■
99=99
■
98=98
■
Etc.
has now been successfully setup for use by teachers.
See also
Access
Gradebook Toolbar
Create/Wizard Gradebook
Delete All Empty Gradebook Pages
Office and Procedures
Column Action (Add/Delete/Edit/Move/Copy/Mass Add)
Post Gradebook Grades to Office or Another Gradebook
Gradebook Document Control
Teacher Defined Grade Charts
Grading Assignments
Extra Credit and Class Participation
Gradebook Options
Special Options
Transfer/Post grades from Gradebook into Web School Office (office area)
Post Gradebook Grades to Grade Area
SDSStudentHelp
Teacher Web . 389
Home > Teacher Web > Gradebook > Post Gradebook Grades to Grade Area
Post Gradebook Grades to Grade Area
1. Enter Teacher Web.
2. Click
to access post Gradebook grades to grade area.
3. Select from the drop down box “Grade Areas Available for Gradebook Posting” the grade area you wish to post gradebook
grades for. (i.e. quarter 1).
4. Place a check in the Include Inactive Students if you want to include inactive students’ grades.
❍
5. Click on Post/Transfer Grades. When teachers post grades only their own gradebook grades get transferred.
See also
Access
Gradebook Toolbar
Create/Wizard Gradebook
Delete All Empty Gradebook Pages
Office and Procedures
Column Action (Add/Delete/Edit/Move/Copy/Mass Add)
Post Gradebook Grades to Office or Another Gradebook
Gradebook Document Control
Teacher Defined Grade Charts
Grading Assignments
Extra Credit and Class Participation
Gradebook Options
Special Options
Transfer/Post grades from Gradebook into Web School Office (office area)
Manual Entry of Grades
SDSStudentHelp
390 . Teacher Web
Home > Teacher Web > Discipline Entry
Discipline Entry
The discipline processing area
allows for the entry and changes to discipline infractions. You may adjust discipline records that
you entered. If the office or another instructor entered an infraction you may view the information but are not allowed to change or
delete.
When you attempt to locate a student remember the only students which will display are students registered for one of your classes.
Discipline Entry
1. Click
on Home Toolbar.
2. Select a Student.
3. Click on
.
4. Type in new Data or Modify.
5. Click
to Save.
To search for a student enter their ID or name. When entering a name enter last name followed by a comma then their first name. As
example; if you enter “B, D” then the students whose last name start with a “B” and first name with a “D” will display.
To edit an existing discipline record:
1. Click
on Home Toolbar.
2. Select a Student’s Name.
3. Select Edit on the Infraction to Modify.
4. Edit as necessary.
5. Click
to Save.
Toolbar
Below provides you with the icons that are used in discipline with a brief description of what they do.
= Close discipline processing area
= Search for a student or all
= Select a discipline report to run
= View/print selected report
= Add a discipline infraction for the selected student
= Save new entry or Changes
= Delete displayed infraction (only available in entries you created)
See also
Introduction
Period Attendance or Homeroom/Daily Attendance
Gradebook
Link Substitute and Teacher for Attendance Entry
SDSStudentHelp
Teacher Web . 391
Home > Teacher Web > Link Substitute and Teacher for Attendance Entry
Link Substitute and Teacher for Attendance Entry
This screen allows you to link substitutes and teachers together for attendance entry. What this will do when it is setup, the next time that
administrator logs into the Teacher Web they will see a drop down box with the linked staff members names above the “Logout” link. Pick a
teacher from that drop down box and that administrator will have access to their information. The administrator will have the rights as
setup on their own user security.
Overview of Screen
1. Search for Teacher.
❍ Type in a teacher’s name and click on the binoculars.
2. Linked Only = Shows only teachers that are linked if you place a check in the box.
3. Select/Unselect All = Allows you to select all or unselect all subs.
4. Different workings:
❍ ¬ Teacher Links
■
Click on a teacher name to view if they are linked and if so who they are linked to.
❍
Check boxes
■
Select a Teacher by clicking on the link.
■
Then click in the checkboxes of the teacher’s to link to the teacher selected.
❍
No Teachers Linked or Displays Teachers Linked.
■
The third box to the right will display ‘No Teachers Linked’ if no teacher’s have been linked to the selected teacher.
Once you have created a link/s for the selected teacher then the linked teachers will display in this pain.
❍
Sub has access to:
SDSStudentHelp
392 . Teacher Web
■
■
The far right pane ‘Sub has access to’ shows all the areas the selected teacher/subs have access to.
To change the security for the sub it can be changed under Administrative Utilities |User Security |Web_SC |Teacher
Web |Teacher Web Data Entry.
■
Select the sub on the left (User).
■
Then place a check in the areas you do not want the sub to access.
Link Teacher and Substitute Teacher
1. Login WSO.
2. Click on Attendance |Link Teacher and Substitute Teacher.
3. Select a Teacher by clicking on the Teacher’s Name.
4.
Place a checkmark/s in the box/s next to the substitute’s name you would like to link.
5. Click Save.
❍ Now you will see the teacher has linked teachers displayed in the Linked Teachers section.
6. Change any security settings if necessary.
Setup Yourself as a Substitute Teacher to Access Teachers’ Grade Entry Area
If you are not a teacher and would like to see the Teachers’ Grade Entry area, you can set yourself up as a “substitute teacher” and then
have access to the grade entry area like a teacher would.
1. Login WSO.
2. Click on Attendance |Link Teacher and Substitute Teacher.
3. Choose YOUR SDS login in the 1st Column of Users.
4. Put Checks in front of all YOUR building’s teachers in the middle column.
5. Click
to save.
6. Now YOU can login to Teacher Web using YOUR SDS login.
7. In the upper right corner will be a drop down with all the teachers listed in it.
8. Pick the Teacher of the class you want to enter grades for.
9. Click the open book icon (Grade Entry).
10. Click the Class you want to enter grades for.
11. Enter grades for student(s)
12. Click
to Save.
See also
Introduction
Period Attendance or Homeroom/Daily Attendance
Gradebook
Discipline Entry
SDSStudentHelp
Tech Instructions . 393
Home > Tech Instructions
Tech Instructions
This section provides instructions that are usually directed to techs, for example: hardware requirements, backup, compress, updates,
pop-ups etc.
See also
Hardware Requirements (Spec Sheet)
Active X Controls
Pop-up Blocker and Trusted Site
Time Out
How to Update Web School Office
Compress and Backup
Remote Desktop
SDS Resources Online
Informational Links
Number of Internet Sessions on Desktop
SDSStudentHelp
394 . Tech Instructions
Home > Tech Instructions > Hardware Requirements (Spec Sheet)
Hardware Requirements (Spec Sheet)
Below is a basic list of Hardware Requirements for your school. These requirements may vary depending on the size of your school
and your particular setup. If you have any hardware questions SDS can refer you to a hardware consultant. During the SDS install
process, SDS will require remote access to your server.
Web Server must have the following
●
Windows 2003 Server SP2 running IIS plus any additional Microsoft updates
●
Pentium 4 - 2 GHz or better processor. Dual processors recommended for schools of 100 or more web users. A Dual core
processor is preferred (vs. Quad core) so IIS gets a bigger slice of the CPU.
●
Minimum of 1 GB RAM available. 2 GB RAM available for schools of 100 or more web users.
●
Your database (sdsxplan.mdb or sdsxfin.mdb) must be on the web server.
●
2 GB available on C: drive.
●
SDS Web Control Center or SDS Version 8.5 Installed on Web Server.
●
Your database must be Access 2000.
Desktop
●
Recommended Microsoft Windows 2000 or XP Professional or better using IE6 or IE7 Safari 3 or Firefox 3; Macintosh O/SX or
better using Safari 3 or Firefox 3. If your desktops do not have this setup, please call our office to setup a test for compatibility.
●
Minimum monitor resolution is 1024 x 768 lower setting may cause some information to display off the users desktop, and
require scrolling of browser window.
●
All users need to have Java script and Active X controls enabled on their browser. By default this is enabled.
●
Crystal 11.5 R2 or above for creation of custom reports
Secured Socket Layer (SSL) Option
Optional Secured Socket Layer (SSL) Service-Districts that decide to host their programs with SDS have the option of utilizing our SSL
service. At an approximate cost of $1,000/year, this service will run a SSL Certificate on your SDS Hosted Site. This certificate is the
property of the SDS Hosting Service and is not portable to a client’s web server. Clients that run the SDS system on their own Web
Server are responsible for purchasing the SSL Certificate from a certificate authority.
See also
Active X Controls
Pop-up Blocker and Trusted Site
Time Out
How to Update Web School Office
Compress and Backup
Remote Desktop
SDS Resources Online
Informational Links
Number of Internet Sessions on Desktop
SDSStudentHelp
Tech Instructions . 395
Home > Tech Instructions > Active X Controls
Active X Controls
Enable Active X Controls
Below are important steps so that you can view and print your reports ok through WSO.
If your active X controls are not enabled proceed with the following to enable them:
1. Click on "Tools" menu in the browser.
2. Select "Internet Options" from the pull-down menu."
3. Click on the "Security" tab on the top portion.
4. Select the “Trusted Sites” zone.
5. Set your “Trusted Sites” zone security to low.
6. Click on Sites.
7. Type in the URL of your SDSWebOffice site in “Add this website to the zone”. Note that you will need to uncheck the “Require
server verification (https:)” check box if you are not using https.
8. Click Add, and then close.
9. Click on the "Custom Level" button on the “Trusted Sites” zone option.
10. You will see a scroll-down menu with radio buttons. Select the 'Enable' radio button for the following menu choices:
11. Run ActiveX Controls and Plug-ins
12. Script ActiveX Controls Marked Safe for Scripting
13. Click on the "Ok" button to exit and save.
14. Click on the "Ok" button again to exit out of Internet Options menu.
15. Now, exit your browser and restart! ActiveX should now be enabled. You're all set!
Since Macintosh Safari does not recognize ActiveX controls, to print from Safari the user must have the Adobe Acrobat viewer
installed (See link below). The report will be loaded into Adobe and then they print from there.
http://www.adobe.com/support/downloads/product.jsp?product=10&platform=Macintosh
Make sure you download the most current viewer. Since this is the link that was correct at the time this document was written.
Trouble Viewing or Printing Reports – ActiveX
If you have completed all the steps above to enable your ActiveX control and you are still having problems viewing your reports please
check out the other suggestion below and contact your Tech to assist you. Your Tech can search for solutions for your specific setup
as well.
Note: Microsoft has changed either IE or XP, so no matter what the ActiveX control will not load for a normal user. The minimum level
of security required for the user to load the Crystal Reports ActiveX control is being a member of the local Power Users group.
1. Set your “Trusted Sites” security to low.
❍ In I.E. select |Tools |Internet Options |Security |Trusted Sites |Custom Level or Default |Select Low |Click Ok |Try
running a report.
2. Add the URL to your trusted sites list on every Internet Explorer client.
❍ In I.E. select |Tools |Internet Options |Security |Trusted Sites |Click on Sites |Enter URL if not selected |Click Add.
3. There may be some program blocking ActiveX controls or Pop-Ups. Either a setting in IE or another program, such as
GoogleBar or Symanetc internet Security.
❍ If adding the Web Office URL as trusted sites check other programs that may be blocking it such as Norton.
4. Verify that the various ActiveX options are Enabled or at least set to Prompt.
❍ In I.E. select |Tools |Internet Options |Security |Internet |Custom Level |Active X Control and Plug-ins |Verify Enabled
is selected |Click OK |Try running a report.
5. Complete a manual installation of the print control printcontrol.dll on all workstations. You can create a batch file if necessary.
6. Try to manually install the ActiveX control:
❍ Locate the PrintControl.cab file on your web server server. The PrintControl.cab is on the web server on the C: drive.
Normally it is in C:\Program Files\Business Objects\Common\3.5\crystalreportviewers115\ActiveXControls.
■
or it can be downloaded from the SDS FTP site ftp://ftpguest:[email protected]/ (username = ftpguest
password = sds) in FromSds\CrystalActiveX folder
SDSStudentHelp
396 . Tech Instructions
❍
Copy the PrintControl.cab file to your computer.
❍
Extract the .cab file into a temporary folder.
❍
Right-click the PrintControl.inf file and then and click 'Install'.
❍
Sometimes the PrintControl.dll file doesn’t register properly and it will need to be manually registered. Copy the
PrintControl.dll file to the Windows\System32 folder.
❍
Then type at the CMD Prompt REGSVR32 C:\Windows\System32
7. Internet Explorer ActiveX compatibility patch for Mshtml.dll http://support.microsoft.com/kb/917425/en-us
8. LAST RESORT - Reset the browser to the factory defaults.
❍ In I.E. select |Tools |Internet Options |Security |Trusted Sites |Reset to Default Settings |Click Ok |Add URL as a
Trusted Site and Verify active is enabled. Then try running a report.
See also
Hardware Requirements (Spec Sheet)
Pop-up Blocker and Trusted Site
Time Out
How to Update Web School Office
Compress and Backup
Remote Desktop
SDS Resources Online
Informational Links
Number of Internet Sessions on Desktop
SDSStudentHelp
Tech Instructions . 397
Home > Tech Instructions > Pop-up Blocker and Trusted Site
Pop-up Blocker and Trusted Site
Tech Note: Make sure that your browser allows pop-ups and your Web School Office address is added as a trusted site.
●
To turn off the Pop-up Blocker, go to your Internet browser, for example Internet Explorer. Click on Tools on the top toolbar
|Select Pop-up Blocker |Select Turn off Pop-up Blocker.
●
To add Web School Office as a trusted site, go to Internet Explorer |Select Tools on the top toolbar |Select Internet Options
|Select the Security Tab |Click on Trusted Sites |Click on Sites |Add the Web School Office address
(i.e. http://yourdistrictwebsite.schooloffice.com/yourdistrictdirectory/sdsweboffice/ ) |Click Ok to close.
See also
Hardware Requirements (Spec Sheet)
Active X Controls
Time Out
How to Update Web School Office
Compress and Backup
Remote Desktop
SDS Resources Online
Informational Links
Number of Internet Sessions on Desktop
SDSStudentHelp
398 . Tech Instructions
Home > Tech Instructions > Time Out
Time Out
Tech Note: Keep in mind there is a time out for the SDS Web Systems. The default time out is 20 minutes. At that time you will
then need to refresh your browser and log back into the system.
Time out can be changed in by your administrator in Administrative Utilities |Web Settings. Maximum timeout is 60 minutes. If you
set a number higher than 60 (i.e. 90) it will default back to 60 minutes. This is for security purposes.
See also
Hardware Requirements (Spec Sheet)
Active X Controls
Pop-up Blocker and Trusted Site
How to Update Web School Office
Compress and Backup
Remote Desktop
SDS Resources Online
Informational Links
Number of Internet Sessions on Desktop
SDSStudentHelp
Tech Instructions . 399
Home > Tech Instructions > How to Update Web School Office
How to Update Web School Office
There are four steps when updating Web School Office:
1. Lock Users Out of SDS and Create a Backup
2. Download Updates
3. Update Web Control Center/V8.5, Web School Office and Parent Connect
4. Un-Lock Users
Step 1 - Lock Users out of SDS and Create a Backup
During this step you will be locking out all users from SDS before updating and you will be creating a backup. You may want to notify
all users this will be taking place.
Then follow the below steps:
1. Enter Web School Office |Administrative Utilities |Control Center
2. Enter a Message to Users in the white box.
3. Click on “Lock Users Out of SDS”.
❍ Remember to “Unlock Users” when you are done with the updates. Instructions on how to unlock users are in the last
steps of this process.
4. Once Users are locked proceed with creating a back of your system.
5. Enter the Web Control Center/V8.5 |Utilities |Filing (Backup, Compress and Compare)
6. Read the message and click OK.
7. Check Backup.
8. Click OK.
9. Read the message/s and click OK once read.
10. Once this is completed move to Step 2 below.
Step 2 – Download Updates
This step you will access the download page and download all the update zip/exes.
Access Download Page
Hotlink to Download Page
1. Go to www.schooloffice.com |Support/Downloads |Downloads and Updates |Web School Office (Student/Teacher Web/Parent
Connect)
2. Login (If you do not know the passwords place an X-Connect or call SDS 800-323-1605.)
3. Click on Updates/Downloads |Web School Office (Student/Parent Connect)
Download Zips and Exes
Download the School Office V8.5/Web Control Center, Web School Office Student/Full and Parent Connect if you have Parent Connect.
Follow the below steps for instructions.
Web Control Center/V8.5 Zip
First download the Web Control Center/V8.5 Update Zip:
1. Verify you are on the download page. Hotlink to Download Page
2. Click on S22_EXE.zip
3. Click SAVE (DO NOT RUN). Answer YES to replace the file if it already exists.
4. Navigate to your Web Control Center/V8.5 drive and directory (i.e. c:\sdsadmin\student).
❍ If you do not know where this is located run a SDS report (i.e. Student List) and the file path and name will be on the
bottom of the report or contact your building tech.
5. Click SAVE.
Web School Office Student/Full EXE
Second download the Web School Office Student/Full EXE (This includes Teacher Web):
SDSStudentHelp
400 . Tech Instructions
1. Click on SDSWeboffice_Student.exe from the download page. Hotlink to Download Page
❍ If you have the student and finance system and would like the full update then simply download the
SDSWebOffice_Full.exe rather than SDSWebOffice_Student.exe. Just remember to update your Web Finance Control
Center/V8.5 as well.
2. Click SAVE (DO NOT RUN)
3. Navigate to your Web School Office drive and directory on your web server. (i.e. C:\inetpub\wwwroot\SDSWebOffice or
c:\websites\SDSWebOffice).
❍ System locations may differ from school to school. If you do not know where your web system is located enter WSO |
Administrative Utilities | Control Center | Useful Information to find the directory where your web program resides.
4. Click SAVE. Answer YES if it asks you to replace the file.
Parent Connect EXE
Third download the Parent Connect exe: (Skip this step if you do not have Parent Connect.)
1. Click on ParentConnect.exe from the download page. Hotlink to Download Page
2. Click SAVE (DO NOT RUN)
3. Navigate to your Parent Connect drive and directory on your web server. (i.e. C:\inetpub\wwwroot\ParentConnect or
c:\websites\ParentConnect).
❍ System locations may differ from school to school. Contact the building tech if you have a question in regards to the
location.
4. Click SAVE. Answer YES if it asks you to replace the file.
You have now downloaded all the zips/exes; you can exit the download page. Now apply the updates.
Step 3 – Update Web Control Center/V8.5, Web School Office, Teacher Web and Parent
Connect
In this step we will be applying the updates for the Web Control Center/V8.5, Web School Office (Includes Teacher Web) and Parent
Connect.
Update Web Control Center/V8.5
First, start by updating the Web Control Center/V8.5. You have already downloaded the zip in Step 2 now it is time to apply it.
1. From the Windows Taskbar, select Start |Run (Vista = Start and type in search box), navigate to the SDS Web Control
Center/V8.5 directory and run s22_set.bat (i.e. c:\sdsv8\student\s22_set.bat).
or
❍ From the Web Control Center/V8.5 |Utilities |Backup, Compress, General System Utilities
❍
When the screen displays then from the dropdown menu
❍
Select Misc. Operations | Enhancement (install your last download).
❍
Notes:
■
It is not recommended that Version 8.5 be used as your production processing system until you have your
database converted from Access 2.0 to Access 2000 or above.
■
These updates assume you installed with a CD dated 3/6/2003 or later. If you used an older CD contact SDS for
a new installation CD. DO NOT install these updates if you used an old CD. If you wish you may download the
workstation installation program.
2. UNLOCK USERS “See Step 4 below on how to unlock users.”
3. Enter the Web Control Center/V8.5
4. Select Administrative Tools |Evaluate Control Area from the top tool bar.
5. Read the message and click OK. Control Table Evaluation will begin. If you receive a message box to re-build select YES. Read
the message and select YES to continue.
6. Once the re-build is completed exit the evaluation screen.
Update Web School Office (This includes Teacher Web)
After you have updated and run the evaluation/re-build for the Web Control Center/V8.5 proceed with the below steps to update the
web.
1. You have already downloaded the Web School Office Student/Full exe in Step 2. Now it is time to apply it.
2. LOCK USERS OUT “See Step 1 on how to lock users out of the system.”
3. Run Web_set.bat from you Web School Office directory on your web server (i.e. C:\inetpub\wwwroot\SDSWebOffice). You
cannot run this from a mapped drive.
4. This will do some maintenance and then prompt you for a password. Contact support if you do not have a password.
❍ Note: The password is different for each file. If you download the wrong file, your site may stop working. Running
SDSStudentHelp
Tech Instructions . 401
the .exe file without running Web_Set.bat could break the web site.
5. Open up the main page and verify the build number (i.e. 080812) below the menu tree has changed.
Update Parent Connect
After you have updated the Web Control Center and Web School Office, proceed with the following to update Parent Connect
(Complete this step only if you have Parent Connect.):
1. Run the Par_Set.bat file you downloaded from your ParentConnect directory (i.e. C:\inetpub\wwwroot\ParentConnect) while
logged into the web server. You cannot run this from a mapped drive.
❍ This will do some maintenance and then prompt you for a password. Contact support if you do not have a password.
Running the .exe file without running Par_Set.bat could break the web site.
2. Re-Synchronize your databases - Copy the SDSXPlan.mdb and SDSCPlan.mdb files from the Student folder to the
ParentConnect/ParentData folder.
Step 4 – Unlock Users
There are several ways to unlock users. Below is one way. To see other ways please search on this document for Unlock Users.
1. To unlock users; next you your Web School Office link after sdsweboffice type reporting/webcontrolcenter.aspx (i.e.
http://yourschooladdress/sdsweboffice/reporting/webcontrolcenter.aspx ).
2. Enter your user ID and Password.
3. Click Unlock Users.
See also
Hardware Requirements (Spec Sheet)
Active X Controls
Pop-up Blocker and Trusted Site
Time Out
Compress and Backup
Remote Desktop
SDS Resources Online
Informational Links
Number of Internet Sessions on Desktop
SDSStudentHelp
402 . Tech Instructions
Home > Tech Instructions > Compress and Backup
Compress and Backup
SDS Compress and Backup utility is only available using the Web Control Center/V8.5 currently. There are several ways you can
setup/access the compress and backup utility to make this processes simplistic for yourself.
1. You can setup a nightly compress and backup in Task Manager that can run automatically every day. (We HIGHLY suggest
setting up a nightly compress and backup of your system so the process is automated.)
2. You can simply build an Icon/Shortcut pointing to u22_uday.exe from a workstation. Someone MUST run this program
every day (Unless setup in the Task Manager). Simply verify compress/backup is selected before running.
3. You can login the Web Control Center/V8.5 and run a compress.
See also
Run a Backup
Run a Compress
Build a Shortcut for Compress/Backup Procedures
Setup Nightly Compress and Backup
Web School Office
SDSStudentHelp
Tech Instructions . 403
Home > Tech Instructions > Compress and Backup > Run a Backup
Run a Backup
1. Enter the Web Control Center /V8.5.
2. Click on the + next to the Utilities.
3. Double click on Filing (Backup, Compress, Repair).
4. Read the message.
5. Select OK.
6. Uncheck Compress, leave backup checked (If you want to do both then keep both checked).
7. Click OK |Read the message.
8. Click OK |Read the message |Click OK.
9. It will state it is compressing/black screen will appear and when finished you will be at your Desktop.
See also
Run a Compress
Build a Shortcut for Compress/Backup Procedures
Setup Nightly Compress and Backup
Web School Office
SDSStudentHelp
404 . Tech Instructions
Home > Tech Instructions > Compress and Backup > Run a Compress
Run a Compress
1. Enter the Web Control Center /V8.5.
2. Click on the + next to the Utilities.
3. Double click on Filing (Backup, Compress, Repair).
4. Read the message.
5. Select OK.
6. Uncheck Backup, leave compress checked (If you want to do both then keep both checked).
7. Click OK |Read the message.
8. Click OK |Read the message |Click OK.
9. It will state it is compressing and when finished you will be at your Desktop.
See also
Run a Backup
Build a Shortcut for Compress/Backup Procedures
Setup Nightly Compress and Backup
Web School Office
SDSStudentHelp
Tech Instructions . 405
Home > Tech Instructions > Compress and Backup > Build a Shortcut for Compress/Backup Procedures
Build a Shortcut for Compress/Backup Procedures
1. Right click on the desktop of the workstation you would like to shortcut built.
2. Select New, over to Shortcut.
3. Click on Browse.
4. Select your SDS drive and directory and U22_Uday.exe (i.e. C:\sdsadmin\student\U22_uday.exe).
5. Click OK/Next till you get to name your shortcut. (Steps determine if you are on XP or Vista).
6. Name your Shortcut (i.e. SDS Compress Backup or whatever helps you remember what this is for.).
7. Click OK.
8. Then test it out and run every day.
See also
Run a Backup
Run a Compress
Setup Nightly Compress and Backup
Web School Office
SDSStudentHelp
406 . Tech Instructions
Home > Tech Instructions > Compress and Backup > Setup Nightly Compress and Backup
Setup Nightly Compress and Backup
You may ask yourself “What is the proper procedure of nightly compression of the database for the web? “ We suggest restarting IIS and at the same time compress
and backup your database. You can do this by simply adding a batch file to Task Manager or Windows Server to run every night.
We have created a sample batch file for you to use, that stops and starts IIS, compresses the database.
The database and custom reports will be zipped into a file in the student directory using a different name every time the procedure is run. You can modify this batch
file to meet your needs and change the directory where the batch is looking.
Please NOTE that when running this, it will SHUT EVERYONE DOWN. Keep in mind that this is a supplemental backup to your regular network backup.
1. Download the batch file from ftp://ftp.schooloffice.com (copy and paste in your browser.)
2. Enter user name = ftpguest password = sds
3. Navigate to FromSds\Batch
4. Save Compback.bat to your student or finance directory.
5. Open Compback.bat and modify it to match your directory structure.
❍ With simple changes of the directory, file name from sdsxplan.mdb to sdsxfin.mdb and zip name to FinanceMDB the same process can be used for
finance.
❍
Below is an example of what is in it. Rem are remarks for guidance and the bold lines is what will run. The line StudentMdb%Random% will create a file
named StudentMDB with a random number after it, this way if you run the processes more than once in a day you will not overwrite your previous zip.
❍
Rem
***********************************************************************************************************
Rem ***Rember this is intended as a supplemental backup. You MUST do a regular system backup.***
Rem
***********************************************************************************************************
rem After IISRESET add server name This will force IIS to release the database
IISRESET
rem
Rem
***********************************************************************************************************
Rem Change to mapped drive
F:
rem
Rem
***********************************************************************************************************
rem change to working directory
cd \sdsv8\student
rem
Rem
***********************************************************************************************************
rem run the compress process
u22_uday.exe COMPRESS
rem
Rem
***********************************************************************************************************
rem zip the database to a file named StudentMdb%RANDOM%
rem the %RANDOM% will add a random number to the file name to minimize the possibility of recreating the same file name each day.
rem file will contain student database, control database, and customized reports
rem The file will reside in the student directory or you could add a drive and path before the file name
StudentMdb%RANDOM
❍
rem
pkzipc -add StudentMdb%RANDOM% F:sdsx*.mdb F:sdsc*.mdb F:???c*.rpt
rem
Rem
***********************************************************************************************************
rem In task manager enter the following in the appropriate files to launch this as a batch file named
❍
CompBack.bat
rem Check the Active Column
rem Enter the Hour you wish to start the batch file
rem Enter the Minute you wish to start the batch file
rem Enter the batch file name and its fully qualified path. F:\SDSV8\STUDENT\CompBack.bat
Rem
***********************************************************************************************************
Rem ***Rember this is intended as a supplemental backup. You MUST do a regular system backup.***
Rem
***********************************************************************************************************
6. Once you have modified the batch file then enter the Web Control Center/V8.5.
7. Click on Utilities |Task Manager
❍ See screen shot example below before proceeding to get a visual.
8. Double click on the last record of the Task Processing List and a new line will appear.
9. Enter in the hour (i.e. 03) and minutes (i.e. 00) of when you would like the batch to run. If you are a small school/district we suggest you run this in the
middle of the night or early in the morning when no one is working. If you are a larger district we suggest you run this more than once a day for example at
lunch and then late in the evening or early morning. Keep in mind when you run this everyone will be shut out of SDS. (You can also lock users out in Web
School Office.)
10. Enter in a Description for the task (i.e. Stop IIS, Compress, Zip).
11. Enter in the Task Location and File Name for example F:\sdsv8\student\CompBack.bat .
SDSStudentHelp
Tech Instructions . 407
12. Place a check mark in the box so the task is Active.
❍ Keep U22_TASK.exe running at night/during the day so that the task will run.
❍
If U22_TASK.exe is not running the task will not run. Leave task manager running on a computer that is never turned off.
❍
We recommend adjusting the task manager so that there is another line with a task that Restarts the Task Manager for the next day.
❍
For Example: Hour=03, Minute=30, Description=Start Task Manager, Task File Name F:\sdsv8\student\u22_task.exe
13. Go to File| Save active Task List
14. Click Activate (Add remember to keep this program running or the tasks will not run.)
Note: if you do not want the zip file to use %RANDOM% where it will assign the file a random number you can change it to today’s date. We CAUTION you in doing
this, because if you run this procedure more than once a day you WILL overwrite your backup that was created earlier in the day. To do this, modify the batch file to
use StudentMDB%1 and when setting up the Task Manager in the very final column Activation Information (program options) type in Date. Then the zip will have the
date after the name.
If you do not want to use U22_TASK.exe you can still use the batch file, but have Windows Server launch it.
See also
Run a Backup
Run a Compress
Build a Shortcut for Compress/Backup Procedures
Web School Office
SDSStudentHelp
408 . Tech Instructions
Home > Tech Instructions > Compress and Backup > Web School Office
Web School Office
This section gives instructions on how to run, build a shortcut for compress and backup procedures. A key section to read is how to
setup a nightly compress and backup process.
See also
SDSStudentHelp
Tech Instructions . 409
Home > Tech Instructions > Remote Desktop
Remote Desktop
See also
Printing from Remote Desktop
Printing Memory Server Setting
SDSStudentHelp
410 . Tech Instructions
Home > Tech Instructions > Remote Desktop > Printing from Remote Desktop
Printing from Remote Desktop
Having trouble printing from Remote Desktop?
Remote Desktop may not be able to see your Printer. Remote Desktop will not share TCP/IP printers. The follow is an option to try:
Install the printer onto your network (TCP/IP), then have one computer which does not use the printer install locally and share to your
network. On your computer which is using remote desktop, install the printer from the shared file on the computer, which will not be
using the printer. You'll find that the printer is available from remote desktop.
See also
Printing Memory Server Setting
SDSStudentHelp
Tech Instructions . 411
Home > Tech Instructions > Remote Desktop > Printing Memory Server Setting
Printing Memory Server Setting
If you are receiving an “Error 5 – Load Report failed” the server settings may need to be increased due to printing memory. This should
only occur if you are a large district/school where there are many users printing/viewing MANY reports to the screen.
The PrintJobLimit is can be changed. Since this screen print is from a XP workstation, other registry settings may differ.
If you are having a problem with the number of reports users can print on your web server increase the highlighted settings need below to
increase the number of print jobs that may be processed.
This is located in the registry on the server.
Start|Run
Regedit <Enter>
See also
Printing from Remote Desktop
SDSStudentHelp
412 . Tech Instructions
Home > Tech Instructions > SDS Resources Online
SDS Resources Online
This page is ONLY live IF the server is allowed to access the Internet and Ping 4.2.2.1. Otherwise they will get the page that is
deployed.
See also
Hardware Requirements (Spec Sheet)
Active X Controls
Pop-up Blocker and Trusted Site
Time Out
How to Update Web School Office
Compress and Backup
Remote Desktop
Informational Links
Number of Internet Sessions on Desktop
SDSStudentHelp
Tech Instructions . 413
Home > Tech Instructions > Informational Links
Informational Links
This is the area of the system where SDS provides you with helpful links.
●
Test your Internet Speed http://tech.msn.com/speedtest.aspx
●
Working with Internet Explorer 6 settings http://www.microsoft.com/windows/ie/ie6/using/howto/security/settings.mspx
See also
Hardware Requirements (Spec Sheet)
Active X Controls
Pop-up Blocker and Trusted Site
Time Out
How to Update Web School Office
Compress and Backup
Remote Desktop
SDS Resources Online
Number of Internet Sessions on Desktop
SDSStudentHelp
414 . Tech Instructions
Home > Tech Instructions > Number of Internet Sessions on Desktop
Number of Internet Sessions on Desktop
All browsers are considered one Internet session. No matter how many "Windows" or "Browser Pages" (Tabs in IE7) are open, they
are all part of that one Internet session. When a user logs in we have controls related to all SDS browser page that change from one
page to another. These controls are called Session Variables. Session Variables can be thought of as Page Markers. If two different
web pages are started they will get confused. One will set a Session Variables and the other page will see the setting and wonder
how it got changed. The use of Session Variables in our system is essential in that it allows for the easy movement of a user from
one page to another under strict security. Long story short. One session of SDS on a workstation at a time.
See also
Hardware Requirements (Spec Sheet)
Active X Controls
Pop-up Blocker and Trusted Site
Time Out
How to Update Web School Office
Compress and Backup
Remote Desktop
SDS Resources Online
Informational Links
SDSStudentHelp
Index
PDF Back Cover . 415
SDSStudentHelp
SDSStudentHelp