1
LinkPoint® 9100
REFERENCE MANUAL
LinkPoint 9100
Software Version 1.05
Reference Manual Version 1.4 1103
LinkPoint® 9100 Reference Manual
FDC Omaha Retail Application; LP9100, Software Version 1.05
Reference Manual Version 1.4
LinkPoint International, Inc.
6101 Condor Drive
Moorpark, CA 93021
www.linkpoint.com
Printed in the United States of America.
© Copyright 2003 LinkPoint® International, Inc. All rights reserved.
Under the copyright laws, no part of this publication may be distributed, stored in a retrieval system,
translated into any language, transmitted, in any form or by any means, without the prior written
agreement of LinkPoint International, Inc. LinkPoint International reserves the right to make changes to this
document and the products it describes without prior notice. LinkPoint International shall not be liable for
inadvertent technical errors or omissions made herein, nor for incidental or consequential damages
resulting from the performance or use of this product.
LinkPoint 9100 is a service mark (SM) of LinkPoint International, Inc.
Note: This equipment has been tested and found to comply with the limits for a Class A digital device, pursuant to part 15
of the FCC Rules. These limits are designed to provide a reasonable protection against harmful interference when the
equipment is operated in a commercial environment. This equipment generates, uses, and can radiate radio frequency
energy and, if not installed and used in accordance with the instruction manual, may cause harmful interference to radio
communications. Operation of this equipment in a residential area is likely to cause harmful interference in which case the
user will be required to correct the interference at the user’s expense.
Caution: Danger of explosion if lithium battery is incorrectly replaced. Replace only with the same of equivalent type
recommended by the manufacturer. Dispose of used batteries according to the manufacturer's instructions.
NOTICE
LinkPoint International reserves the right to make changes to specifications at any time
and without notice. The information furnished in this publication is believed to be
accurate and reliable; however, no responsibility is assumed by LinkPoint International
for its use.
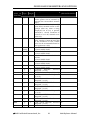
Page
42
323
4
6
13
80
136
138
166
35
137
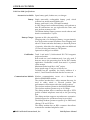
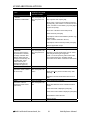
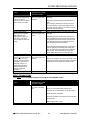
Brief Description Of Change
Added special note
Added two download error messages
Added merchant should call help desk if icon flashes
Removed “and local functions” from 4th bullet point
Added customer copies can be set to 0 through 9
Added ATM/Debit tax amount is optional
Added alphanumeric capability
Added a special loopback cable is needed for test
Added a special loopback cable is needed for test
Changed (Wireless or Dialup) to (Wireless or Phone)
Removed “XXX” from Enter Item Number display
© Copyright 2003 LinkPoint® International, Inc. All rights reserved.
Revision Date
08/14/2002
08/14/2002
09/20/2002
09/20/2002
09/20/2002
09/20/2002
09/20/2002
09/20/2002
09/20/2002
11/03/2003
11/03/2003
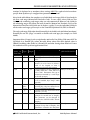
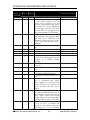
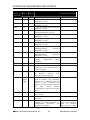
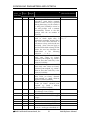
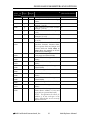
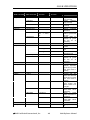
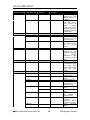
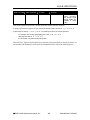
REVISION HISTORY
The following is a revision history of the draft versions (not the “published” version) of
the LP 9100 manual:
Manual Number Draft 1.1, June 14, 2002. The following changes have been made from
the previous draft version (1.0) of this manual:
•
Under “Download Parameters and Options,” the descriptions of many of the fields
in the table were enhanced or clarified. Parameters to be removed and hard-coded in
the next software release were shaded in gray. (NOTE: These changes have been
superseded by the changes in Manual Draft 1.3; please see below for details.)
•
Under “Special Setup Functions,” various details were added on how to perform a
number of these functions.
•
A section entitled “Revision History” was added (but this is for internal LinkPoint
use only; not for inclusion in the published manual).
Manual Number Draft 1.2, June 20, 2002. The following changes have been made from
the previous draft version of this manual:
•
In “Download Parameters and Options,” a note was added stating, “Important Note:
Except for the receipt header and trailer line fields, fields must NOT be left blank in a
Zontalk file, unless the table below shows that their default value is [Blank].
Including other fields in a Zontalk file and then leaving them blank will cause the
terminal to lock up on an Application Error!”
•
Under “Download Parameters and Options,” the default values in the following
fields were changed in the table because of changes in the software:
o
o
o
o
o
1106 from 020 to 030
1125 from N to Y
7002 from N to Y
9004 from PZ01. to PLP1.
9024 from PZ01. to PLP1.
•
Under “Error Transactions,” “Application Error” was added at the end of the error
table.
•
Under “Appendix: Troubleshooting Guidelines,” “Application Error” was added.
•
Under “Appendix: Troubleshooting Guidelines,” “Keymanager 1.2—Keyload Error”
was added.
Manual Number Draft 1.3, August 28, 2002. The following changes have been made
from the previous draft version of this manual:
•
Under “Getting Started / Unpacking,” Point 3, added the following note: “If the
display screen has a plastic protective film on it, this may be removed or left on as
desired (it is used to protect the screen during manufacturing).”
•
Under “LinkPoint 9100 Specifications,” added the following:
o
o
o
o
o
o
o
o
o
o
o
o
Added section entitled “Accessories Available.”
Under “Battery Charger,” added “Optional car charger is available.”
Under “Card Reader,” added “ISO 7811.”
Under “Communications Module,” added “The wireless modem operates at up
to 19.2 Kbps.”
Under “Display,” added “high contrast” and “full graphics capability.”
Added section entitled “Physical.”
Added section entitled “PIN Pad.”
Under “Printer,” added “Thermal” and “with integral paper roll holder” to first
line of this section. Added “Translucent paper door.”
Under “SAMS (Security Access Modules),” added “Up to four ID-000 SAM cards
internally on a removable expansion board.”
Under “Serial Port,” added that the RS-232 is a dual port.
Added section entitled “Standards.”
Added section entitled “Warranty.”
•
Under “Download and Encryption Procedures / Direct Full Download (PC-toTerminal),” added a note after the operator action to plug in the download cable,
stating: “Plug a charger into each terminal.”
•
Under “Download and Encryption Procedures / Direct Full Download (PC-toTerminal),” a warning was added that the terminal must be allowed to reboot and
initialize after the download, and a note was added that the application version
numbers should be verified in AppMan after the download.
•
Under “Download Parameters and Options,” the default values or field lengths of
the following fields were changed in the table because of changes in the software:
o
o
o
o
o
o
o
o
1131 from a field length of 14 to a field length of 14,14
1132 from a field length of 21 to a field length of 21,21
1152 from 00000 to 000
1252 from a field length of 10 to a field length of 10,1
9010 from a field length of 4 to a field length of 4,4
9030 from a field length of 4 to a field length of 4,4
20002 from 30 to 030
20008 from a field length of 19 to a field length of 19,19
o
The FDC card range field numbers were changed from 61700-61710 to 6170061711
•
Under “Download Parameters and Options,” the following fields were removed
from the table (because they were removed from the Terminal Definition File and
hard-coded in the application): Fields 1118, 1119, 1120, 1121, 1122, 1123, 1124, 1125,
1126, 1130, 1353, 1354, 1355, 1356, 1357, 1367, 1368, 1369, 7511, 7512, 7513, 9004, 9024,
20585, 20589, 27815, and 27819.
•
Under “Download Parameters and Options,” the parameter descriptions in the table
were all rewritten so that they exactly matched the field descriptions in the Terminal
Definition File; explanatory comments were placed in parentheses after the
descriptions where necessary.
•
Under “Standard Transactions / Using the Card Reader,” Step 4, a note was added
that “Bad Card Swipe” on all cards may mean the card reader needs cleaning, and
that card reader cleaners can be purchased at office supply stores.
•
Under “Reviews,” added the following note: “Note: After a batch has been
successfully closed, it can still be viewed in the Reviews until a new batch is started.”
•
Under “Reports,” added the following note: “Note: After a batch has been
successfully closed, reports for that batch can still be printed until a new batch is
started.”
•
Under “Special Setup Functions / Application Manager / 4 Version Numbers; Name
and Function of Each Applet,” added the following note: “Note: This list does not
include the terminal’s “boot” program version or the modem firmware version. The
“boot” version number may be viewed for a few seconds when the terminal is
powering up after being turned off. The modem firmware version may be viewed
when the regular application is running, by pressing the blue [F] key for the Admin
menu, then 0 for Diagnostics, then 9 for Wireless Test.”
•
Under “Appendix: Troubleshooting Guidelines,” “Sys Error 0x67B2” was added.
•
Under “Appendix—Troubleshooting Guidelines,” in “Battery frequently runs
down” and in “Battery needs to be charged,” added the following notes: “(for 12volt systems only; not for use in 24-volt truck systems)” and “Charging a discharged
battery for only a few minutes and then removing the charger will cause three bars
to appear in the battery icon, but this does not mean the battery is charged. It only
means the voltage has gone up, but not the battery capacity. The merchant should
be instructed to leave the charger in for several hours, until the battery icon stops
flashing.”
•
Under “Appendix: Troubleshooting Guidelines,” added the following new sections:
o
o
o
o
o
o
o
o
•
“Declined on any transaction”
“Formatting Error”
“Invalid Merch #”
"Mount fail / likely cause unformatted device"
“Sending error”
“Unobtainable / check phone #”
“Unsuccessful / no comms”
“Unsuccessful / not responding.”
Under “Appendix: Troubleshooting Guidelines,” made the following changes to
existing sections:
o
o
o
o
o
o
o
o
o
o
Under the section “Bad card swipe,” changed the note at the end to read, “Note:
Debit sales, debit returns, EBT cash sales, and EBT food returns cannot be
entered manually” (i.e., added debit returns and EBT food returns to the list of
transactions that cannot be entered manually).
Under “Battery frequently runs down,” changed the second sentence in point (b)
to read, “Do this by fully charging it, then using the terminal until the battery is
fully discharged, then fully recharging it” (i.e., instead of leaving the terminal on
until the battery is fully discharged, because the new application automatically
shuts off the terminal after only one hour, so the battery will not discharge in this
way).
Under “Display is blank,” added point (e) about tamper events being a possible
cause of blank display.
Added new information under the section “Keymanager 1.2—Keyload Error.”
Under “Network error 0,” removed the word “report” from the title of this
section (since reports do not dial out).
Added new information to the section “Out of network coverage.”
Under “Paper roll requires replacement,” added the following sentence:
“LinkPoint recommends Appleton 1012 paper. “
Under the section “Printer will not print,” added point (e) “Make sure the paper
is the correct type (high-grade thermal; LinkPoint recommends Appleton 1012)”.
Also renamed the old point (e) as point (f).
Added new information in points (e), (f) and (g) of the section “Terminal is not
getting a signal.”
Under the section “Terminal will not power up,” added the following sentence at
the end of point (a): “But do not hold down the button for more than a second, or
the terminal may power down again.”
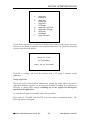
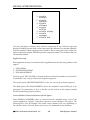
TABLE OF CONTENTS
INTRODUCTION ........................................................................................................................1
Printer .......................................................................................................................................1
Battery.......................................................................................................................................1
PIN Pad ....................................................................................................................................1
GETTING STARTED ..................................................................................................................2
Unpacking................................................................................................................................2
INSTALLATION ..........................................................................................................................3
Setting Up the Terminal .........................................................................................................3
Maintenance.............................................................................................................................4
Returning the Terminal for Service ......................................................................................5
GENERAL FEATURES................................................................................................................6
Application Software Features..............................................................................................6
Hardware Features .................................................................................................................7
LinkPoint 9100 Specifications..............................................................................................14
DOWNLOAD AND ENCRYPTION PROCEDURES..........................................................18
Direct Full Download (PC-to-Terminal) ............................................................................18
Master/Session Key Encryption .........................................................................................19
DUKPT Key Encryption.......................................................................................................20
Configuration (Parameter) Download ...............................................................................20
Application Upgrade............................................................................................................22
DOWNLOAD PARAMETERS AND OPTIONS ..................................................................24
STANDARD TRANSACTIONS .............................................................................................34
Using The Card Reader ........................................................................................................35
Wireless or Dialup Mode .....................................................................................................35
Standard Retail Transactions...............................................................................................36
Transaction Tables ................................................................................................................37
Credit Card Sale – Swiped ...................................................................................................42
Credit Card Sale—Manual Entry........................................................................................45
Credit Card Sale–Receipt .....................................................................................................49
Credit Card Sale–Manual Entry With Direct Marketing/AVS ......................................50
AVS Response Code Definitions.........................................................................................54
Credit Card Sale–Direct Marketing/AVS Receipt ...........................................................55
Purchase Card Sale—Swiped ..............................................................................................56
Purchase Card Sale–Manual Entry .....................................................................................59
Purchase Card Sale—Receipt ..............................................................................................63
Credit Card Return–Swiped ................................................................................................64
Credit Card Return–Manual Entry.....................................................................................64
Credit Card Return—Receipt ..............................................................................................64
Purchase Card Return—Swiped .........................................................................................65
Purchase Card Return—Manual Entry..............................................................................65
Purchase Card Return—Receipt .........................................................................................65
Return--Manual Entry with Direct Marketing/AVS .......................................................65
Ticket Only—Swiped ...........................................................................................................66
Ticket Only—Manual Entry ................................................................................................69
Ticket Only—Receipt............................................................................................................72
2003 LinkPoint® International, Inc.
i
9100 Reference Manual
TABLE OF CONTENTS
Purchase Card Ticket Only—Swiped.................................................................................73
Purchase Card Ticket Only—Manual Entry .....................................................................74
Purchase Card Ticket Only–Receipt...................................................................................74
Ticket Only–Manual Entry with Direct Marketing/AVS................................................74
Ticket Only–Direct Marketing/AVS Receipt ....................................................................78
Authorize Only–Swiped ......................................................................................................78
Authorize Only–Manual Entry ...........................................................................................78
Authorize Only–Receipt.......................................................................................................78
Purchase Card Authorize Only–Swiped or Keyed ..........................................................79
Authorize Only–Manual Entry with Direct Marketing/AVS ........................................79
Void Transaction ...................................................................................................................80
Void Transaction—Receipt ..................................................................................................82
ATM/Debit Sale....................................................................................................................83
ATM/Debit Sale—Receipt...................................................................................................86
ATM/Debit Return...............................................................................................................87
ATM/Debit Return—Receipt..............................................................................................89
EBT Food Sale ........................................................................................................................90
EBT Food Sale—Receipt.......................................................................................................92
EBT Food Return ...................................................................................................................93
EBT Food Return—Receipt..................................................................................................95
EBT Food Stamp Balance Inquiry .......................................................................................96
EBT Food Stamp Balance–Receipt ......................................................................................98
EBT Cash Sale ........................................................................................................................99
EBT Cash Sale—Receipt .....................................................................................................101
EBT Cash Balance................................................................................................................102
EBT Voucher Sale ................................................................................................................102
EBT Voucher Return ...........................................................................................................102
OFFLINE TRANSACTIONS..................................................................................................103
PRE-SALE GRATUITY............................................................................................................108
ERROR TRANSACTIONS .....................................................................................................110
REVIEW......................................................................................................................................113
Review–Item Number ........................................................................................................113
Review–Totals .....................................................................................................................115
Review—Operator ID.........................................................................................................116
REPORTS...................................................................................................................................118
Reports—Item Detail, Card Detail, and Transaction Type Detail................................118
Report–Summary ................................................................................................................124
Report – Operator ID ..........................................................................................................126
REPRINT....................................................................................................................................129
CLOSE AND OTHER BATCH FUNCTIONS.....................................................................131
Batch Close...........................................................................................................................131
Batch Inquiry .......................................................................................................................134
Batch Update .......................................................................................................................135
Offline Batch Upload ..........................................................................................................136
2003 LinkPoint® International, Inc.
ii
9100 Reference Manual
TABLE OF CONTENTS
LOCAL FUNCTIONS ..............................................................................................................140
Table of Local Functions ....................................................................................................140
Response (View Last Responses)......................................................................................146
Batch Functions ...................................................................................................................146
Batch History .......................................................................................................................147
Batch Number......................................................................................................................148
Batch Clear ...........................................................................................................................148
Delete Offline Transactions ...............................................................................................150
Setup Functions ...................................................................................................................152
Printer Setup ........................................................................................................................152
Backlight Timeout Period ..................................................................................................154
LCD Contrast.......................................................................................................................155
Comms Setup.......................................................................................................................156
IP Address............................................................................................................................157
Wireless Terminal ID..........................................................................................................158
Primary Authorization Number .......................................................................................159
Secondary Authorization Number ...................................................................................159
Primary Transaction Close Host Number .......................................................................159
Secondary Transaction Close Host ...................................................................................159
Dialup Terminal ID.............................................................................................................160
Configuration Host Phone Number .................................................................................160
Configuration Terminal ID ................................................................................................161
Configuration (Parameter) Download .............................................................................163
Application Upgrade..........................................................................................................164
Enabling Prompts................................................................................................................164
Enabling Transactions ........................................................................................................166
Key Management ................................................................................................................167
Merchant ID .........................................................................................................................167
Date And Time ....................................................................................................................169
Password ..............................................................................................................................171
Demo Mode .........................................................................................................................172
Diagnostics...........................................................................................................................173
SPECIAL SETUP FUNCTIONS.............................................................................................180
Application Manager..........................................................................................................181
Delete Batch .........................................................................................................................186
Delete Parameters ...............................................................................................................187
Stack/Heap ..........................................................................................................................188
Reset CDS.............................................................................................................................188
Read CDS .............................................................................................................................189
Transaction Generator........................................................................................................189
APPENDIX—TROUBLESHOOTING GUIDELINES .......................................................190
GLOSSARY ...............................................................................................................................199
INDEX.........................................................................................................................................204
2003 LinkPoint® International, Inc.
iii
9100 Reference Manual
INTRODUCTION
INTRODUCTION
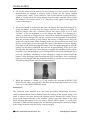
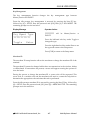
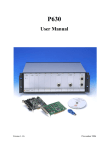
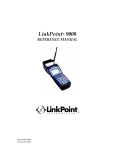
Congratulations on your choice of the LinkPoint® 9100 point-of-sale (POS) terminal. The
LinkPoint 9100 is ideal for the retail needs of you and your merchants. Scientifically
engineered to exceed the quality found in current terminal technology, the LinkPoint
9100 combines flexibility, mobility and user-friendly operation with “soft”
programmable functions. The scrolling menus and an innovative backlit display panel
make terminal operation quick, easy and user-friendly.
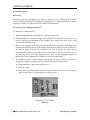
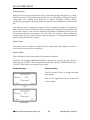
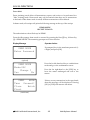
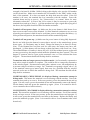
The LinkPoint 9100 is a full-featured, hand-held mobile terminal that can process
transactions either wirelessly or on a dial-up phone line. In areas where there is no
access to either a phone line or a wireless network, offline “store and forward” credit
sales can also be performed. The 9100 can process credit, debit and EBT transactions and
has an optional smart card reader as well. Its integrated “clam shell” printer makes
changing paper quick and easy.
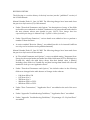
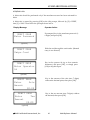
Figure 1
This manual includes step-by-step guides through specific transactions and operations,
and shows how to keep the terminal in peak operating condition. It was designed to
assist FDMS, its help desk, and bank/ISO clients. Words that appear in capital letters
and brackets, [LIKE THIS], stand for keys on the terminal keypad. Words that appear in
capital letters without brackets, LIKE THIS, stand for display messages.
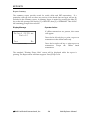
Printer
The LinkPoint 9100 terminal has an integrated thermal printer that uses standard
financial-quality thermal paper. The paper is two and one-fourth inches wide and up to
one and seven-eighths inches in diameter. The printer prints eight lines per second and
has a “clam shell” design for quick, easy replacement of paper.
Battery
A high-capacity rechargeable battery frees the terminal from having to be attached to an
electrical outlet. An innovative cartridge design and a quick-release door on the battery
compartment make battery replacement easy and simple.
PIN Pad
The LinkPoint 9100 terminal has an integrated PIN pad to support debit and EBT
transactions. Both Master/Session and DUKPT encryption are supported.
2003 LinkPoint® International, Inc.
1
9100 Reference Manual
GETTING STARTED
GETTING STARTED
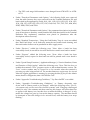
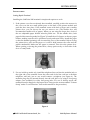
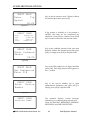
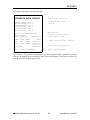
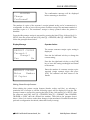
Unpacking
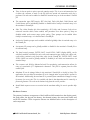
Carefully inspect the shipping carton and its contents for any damage that may have
occurred during shipping. If the terminal is damaged, file a claim immediately with the
shipping company or carrier and notify LinkPoint International.
Do not try to use a damaged terminal!
To unpack the LinkPoint 9100:
1. With the shipping carton right side up, open the carton’s lid.
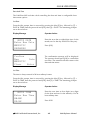
2. Lift the terminal, its charger, charger cable, and line cord up and out of the box. If it
has not already been installed on the terminal, also remove the door of the “clam
shell” printer from the box.
3. Remove the terminal from its protective bubble wrap and place the bubble wrap
back in the shipping carton. If the display screen has a plastic protective film on it,
this may be removed or left on as desired (it is used to protect the screen during
manufacturing). Remove the charger from its protective box and return the box to
the shipping carton. Close the shipping carton and save the shipping materials so
that the unit can be repacked for shipping or moving in the future.
4. The LinkPoint 9100 is a fully mobile terminal that can be used either in wireless or
dialup mode. When using the LinkPoint 9100 terminal, avoid areas with:
♦ Direct sunlight or objects that radiate heat
♦ Excessive dust
♦ Electrical devices that cause excessive voltage variations such as air conditioners,
space heaters, fans, or high-frequency security devices
Shipping Carton Contents
Figure 2
2003 LinkPoint® International, Inc.
2
9100 Reference Manual
INSTALLATION
INSTALLATION
Setting Up the Terminal
Installing the LinkPoint 9100 terminal is simple and requires no tools.
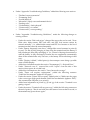
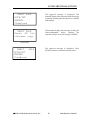
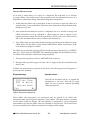
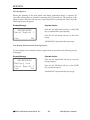
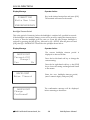
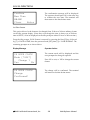
1. If the printer cover has not already been installed, carefully position the recesses in
the cover over the two small plastic posts on the back of the printer module and
push the door into place. If the terminal comes with both a larger and a smaller
printer door, you can choose the one you want to use. (The smaller door will
accommodate smaller rolls of paper.) When you are using the larger door, both of
the two adjustable paper holders must be pulled out. For the smaller door, both
paper holders must be pushed in (Figure 3). Install the roll of paper on the two paper
holders, making sure the roll is positioned evenly and turns freely. Install the paper
so that the thermal (printing) side is toward the front of the terminal. Before closing
the printer door, pull out the paper so it will be held between the roller and the
printer mechanism. Make sure the paper is centered. Then close the printer door.
When opening or closing the printer door, always push evenly on both sides of the
door or it may break.
Figure 3
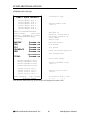
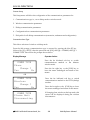
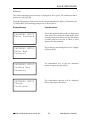
2. For use in dial-up mode only, install the telephone line cord into the modular jack on
the right side of the terminal. Insert the other end of the line cord into a modular
telephone wall jack, just as one would connect a telephone (see Figure 4). The
modular plug may be inserted directly into the wall jack or by using a four-prong
adapter (not included) for older four-prong jacks. For use in dial-up mode, the
terminal must be changed to dial-up mode in setup (see the section entitled “Comms
Setup” under “Local Functions” later in this manual for the procedure).
Figure 4
2003 LinkPoint® International, Inc.
3
9100 Reference Manual
INSTALLATION
3. For wireless mode only, the line cord is not necessary. For use in wireless mode, the
terminal must be changed to wireless mode in Setup (see the section entitled
“Comms Setup” under “Local Functions” later in this manual for the procedure).
When in wireless mode, the whip antenna should be fully extended. (Note: When
the terminal is in wireless mode, a “Y”-shaped icon will appear in the upper left
corner of the display.)
4. Before the terminal is used for the first time, the battery should be fully charged. To
charge the battery, securely plug the charger cable into the charger (see Figure 5).
Plug the charger cable into a standard 110-volt wall outlet. (Note: A car or truck
“inverter” is not recommended, as it can damage the battery. For charging in a
vehicle, an optional car charger may be ordered from LinkPoint International.) Plug
the cord from the charger fully into the round port on the right side of the terminal.
With the terminal turned off, fully charge the battery overnight before using the
terminal for the first time. When charging, make sure all connections are secure and
the bars in the battery icon in the upper left corner of the display screen are flashing
from right to left. When charging the battery, leave the charger plugged in until the
battery icon has three solid black bars and has stopped flashing. If the icon is still
flashing after the battery has been charged overnight, the merchant should call the
help desk. Note that the battery can be recharged before it has fully discharged, but it
is best to “condition” the battery by fully charging it, using the terminal until the
battery is fully discharged, then repeating this cycle several times. Also note that the
battery can be charged while the terminal is turned on, but this is not recommended.
The battery charges better with the terminal turned off.
Figure 5
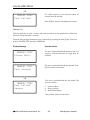
5. When the terminal is turned on, it will display the message WAITING FOR
DOWNLOAD unless an application has been pre-downloaded; in this case it will
“boot up” to the SWIPE CARD idle screen.
Maintenance
The LinkPoint 9100 terminal does not need preventive maintenance. However,
LinkPoint International does recommend periodic cleaning of the keypad, using a soft
brush to remove any dust. Because the terminal can be damaged by liquids, do not
spray liquid cleaners directly on the terminal. Always apply the cleaner to the cloth
before cleaning the terminal. Only use cleaners that are safe for plastic. To avoid costly
downtime, LinkPoint International also recommends protecting the terminal’s charger
with a surge protector while the battery is being charged.
2003 LinkPoint® International, Inc.
4
9100 Reference Manual
INSTALLATION
Returning the Terminal for Service
LinkPoint International has both warranty and non-warranty LinkPoint 9100 services.
Refer to your sales agreement for specific details on coverage. To repair or replace the
LinkPoint 9100 terminal, contact LinkPoint International.
2003 LinkPoint® International, Inc.
5
9100 Reference Manual
GENERAL FEATURES
GENERAL FEATURES
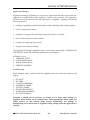
Application Software Features
♦ This application supports retail credit card transactions. It also supports debit and EBT
(electronic benefits transfer) transactions. Supported EBT transaction types are food sale,
food return, food stamp balance inquiry, cash sale, cash balance inquiry, voucher sale, and
voucher return.
♦ Offline (“store and forward”) credit sales can be performed when there is no access to either a
telephone line or a wireless signal. The offline sales can later be uploaded in either wireless or
dial-up mode.
♦ New local functions include: a) view last five host responses ([F], [4], press [OK] to scroll
back through the responses); b) view last five settled batches ([F], [5], [1], press [OK] to scroll
back through the batch close responses).
♦ All transaction types have optional password protection, which is configurable in the
merchant’s Zontalk file.
♦ At the terminal level, debit and EBT transactions will have the item numbers 999, 998, 997,
etc. Credit transactions will have the item numbers 001, 002, 003, etc. Maximum batch size
is 300 transactions (total of any combination of online credit, offline credit, debit, and EBT).
♦ Track 2 data are always transmitted to the host on swiped transactions. If track 2 is damaged,
the transaction will be rejected. The cardholder name is extracted from track 1 for printing on
receipts, but it is not transmitted to the processing host.
♦ There is predial capability to reduce transaction time. This can be enabled or disabled
selectively for each phone number (primary authorization, secondary authorization, primary
close, secondary close, and download phone number) in the individual merchant Zontalk files.
♦ The [CLR] key can be used either as a backspace key to delete a key-in error, or to return to
the previous menu.
♦ The terminal calendar automatically recognizes leap year.
♦ Account range fields are available to customize options for each card type via Zontalk
downloads. The options are AVS, direct marketing (order number), purchasing card
(customer code), tax, and card verification value (Visa’s CVV2, MasterCard’s CVC2, or
AMEX’s CID).
♦ There is an optional retail gratuity feature which can be used by retail businesses like beauty
salons to add tips to retail transactions. This is configurable in the Zontalk file or in terminal
setup.
2003 LinkPoint® International, Inc.
6
9100 Reference Manual
GENERAL FEATURES
♦ There is also an option to print a pre-sale gratuity receipt. This is not a sale transaction, but
it allows the customer to write in the tip before the actual sale transaction with tip is
performed. Pre-sale can be enabled or disabled in terminal setup or in the merchant’s Zontalk
file.
♦ The transaction types EBT Inquiry, EBT Cash Sale, Debit Cash Back, Debit Return, and
Credit Return can be individually enabled or disabled either locally in terminal setup or in
the merchant’s Zontalk file.
♦ Sales Tax, Order Number (for direct marketing), AVS Only, and Customer Code exist as
universal overrides which, when enabled, take precedence over these options if they are
disabled within each account range option setting. These prompts can be enabled either
locally in terminal setup, or in the merchant’s Zontalk file.
♦ An Invoice Number prompt can be enabled or disabled globally either in terminal setup or in
the Zontalk file.
♦ An operator ID prompt can be globally enabled or disabled in the merchant’s Zontalk file or
in terminal setup.
♦ The fraud control prompts, ENTER LAST 4 and ECHO CARD (display MSR), can be
selectively enabled or disabled for each credit card transaction type (online sale, offline sale,
credit return, authorize only, and ticket only) via the Zontalk file. ENTER LAST 4 and
ECHO CARD can each be globally enabled or disabled for all credit card transactions via
terminal Setup.
♦ The customer code field for MasterCard and Visa purchasing card transactions allows for
entry of a maximum of 17 alphanumeric characters. This field is separate from the order
number field.
♦ Merchant ID can be changed either in the merchant’s Zontalk file or locally in Setup. The
application does not allow the merchant ID to be changed when an open batch is present in
the terminal. Additionally, the merchant ID is protected from unauthorized changes in setup
by means of a secret code. This is a variable code that is date-dependent and is created by a
password generator. The code can be obtained only from the service provider.
♦ Invalid batch sequence errors are resolved via the merchant calling his service provider help
desk.
Hardware Features
The primary hardware components of the LinkPoint 9100 terminal are the display panel,
the card reader, the keypad, the battery, the thermal printer, the smart card reader and
an RS-232 interface. Their respective features are detailed below in the description of
each component.
2003 LinkPoint® International, Inc.
7
9100 Reference Manual
GENERAL FEATURES
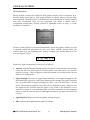
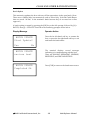
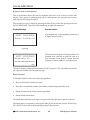
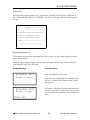
The Display Panel
During normal operation the LinkPoint 9100 graphics display has a 14-character by 4line text display (see Figure 6). Each single character is 9 pixels wide by 16 pixels high.
When required, a font allowing 16 or 20 characters across the display is used for numeric
data only. Non-English fonts are also supported. The screen is backlit with a
configurable timeout time. Display contrast is adjustable locally in setup, or in the
merchant’s Zontalk file.
Figure 6
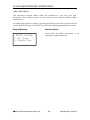
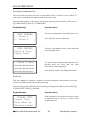
Several context-sensitive icons located immediately above the graphics display are used
to generate additional information for the user. These include, among others, the
wireless mode icon, the “lightning bolt” battery charging icon, and the battery icon as
shown in Figure 7 below.
Figure 7
From left to right, the meaning of each icon is as follows:
•
Antenna: Indicates that the Motient wireless modem is connected and is functioning.
(Note that this icon will display in wireless mode even when there is no wireless
network coverage.) This icon appears when the terminal is in wireless mode, but not
when it is in dialup mode.
•
Signal Strength: Provides an approximate indication of the signal strength for the
Motient modem. The more vertical bars displayed, the stronger the signal. One black
bar = less than RSSI 10 [signal strength]; two bars = 10 to 24; three bars = 25 and
above. The maximum number of bars that can be displayed is three. When no bars
are displayed, this indicates that the signal is very weak or the terminal is out of
network coverage. It is recommended that a wireless transaction not be attempted
unless at least two bars are present (although transactions are often successful with
one bar).
•
Lightning Bolt: Displayed when the battery is being charged.
•
ABC: Indicates that alphanumeric input is available.
2003 LinkPoint® International, Inc.
8
9100 Reference Manual
GENERAL FEATURES
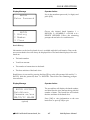
•
Padlock: Indicates that the terminal is locked and must be unlocked before it can be
used. (Note: The “lock” feature is not available in the current application.)
•
Battery: Indicates the approximate reservoir strength of the 9100 battery. The more
bars, the stronger the battery. (The maximum number of bars is three when the
battery is fully charged. When the battery is fully discharged, the icon will display as
an empty rectangle and will begin flashing if a transaction is attempted.) When the
unit is being charged and the lightning bolt appears, the battery bars will pulse in
sequence from right to left.
The idle screen normally displays the date and time at the top, SWIPE CARD in the
middle, and the names of the four yellow “soft” keys at the bottom. After a configurable
period of time, this idle screen times out to the LinkPoint International logo. Zontalk
includes a field to disable this time-out so that the terminal stays on the SWIPE CARD
idle prompt indefinitely when the terminal is not being used. The three areas of the idle
screen are Zontalk-configurable so that they can be replaced by text (such as advertising
messages).
The LinkPoint International logo is contained in one of the application modules. It is not
configurable via the merchant’s Zontalk profile, but this logo can be replaced by writing
a new application module with a new logo, then performing a remote application
upgrade to load it into the terminal.
As described in detail later in this manual, the menu displays allow the user to make
selections from a list of options. There are three basic menus, the main menu for
transactions and the admin menu and special setup menu for local functions such as
reports, review, setup, demo mode, and date and time.
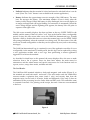
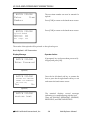
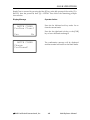
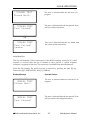
The Card Reader
The LinkPoint 9100 terminal includes a dual track magnetic card reader (Figure 8), so
the terminal can read both track 1 and track 2. The card reader reads the cardholder’s
account number, expiration date, name (track 1 only) and security data from the
magnetic stripe on the back of all major credit and bankcards. Only track 2 data are
transmitted to the processing host for credit, debit and EBT cards. The cardholder name
is extracted from track 1 for printing on the receipt, but track 1 data are not transmitted
to the host.
Figure 8
2003 LinkPoint® International, Inc.
9
9100 Reference Manual
GENERAL FEATURES
Note: When swiping the card (bi-directionally), face the magnetic stripe up and away
from the keypad. The card must be positioned all the way to the back of the card
reader while swiping it.
To begin an on-line credit card sale, the card can be swiped at the “SWIPE CARD” idle
prompt or at the LinkPoint logo. To begin any other transaction type (such as credit
return, debit sale, EBT cash sale, etc.), it is necessary first to choose the transaction type
from the menus as explained later in this manual. The merchant Zontalk files have a
field that allows the default card-swiped transaction type to be changed from on-line
credit sale to debit sale or to EBT food sale, depending on the special requirements of the
merchant.
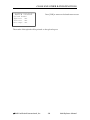
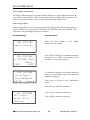
The Keypad and Key Functions
Transactions are performed via the terminal’s keypad (See Figure 9). The keypad allows
the user to select transaction types and information.
Figure 9
As Figure 9 illustrates, the LinkPoint 9100 terminal keypad has 20 keys that can be used
to select numbers or letters, choose functions, or enter data. During transactions, the
number keys and the yellow “soft” keys are used to respond to prompts or to enter
alphanumeric data.
In addition to the 20 keys, the terminal also has an on/off button in the upper right
corner. To turn on the terminal, this button is pressed momentarily. To turn off the
terminal, this button is depressed and held down for about seven seconds until the
display goes blank.
The keypad is used for data input operations in the following ways:
•
To access the transaction and batch main menu from the idle prompt, any one of
several keys can be pressed, including the green [OK] key, the red [C] key, or the
orange [CLR] key.
•
To scroll through menus, the up or down arrow keys must be pressed. When a menu
selection is highlighted, it can be selected by pressing the [OK] key. Menu options
can also be selected by pressing their corresponding numbers on the keypad.
2003 LinkPoint® International, Inc.
10
9100 Reference Manual
GENERAL FEATURES
•
The blue function key, which is labeled [F], is used to access the admin (local
functions) menu. This menu includes such functions as reprint, review, report, setup,
date and time, and so on.
•
When numeric only input is required, the keys marked [1] through [9] and [0] are
used for keying data, with the data appearing from the right hand side of the
display.
•
When alphanumeric input is required, the ABC icon will appear above the display.
On the first press of a number key the appropriate digit will appear. If the same key
is pressed again quickly (in less than two seconds), the first associated alpha
character will appear. Quickly pressing the key again will cause the second
associated alpha character to appear, and so on. Repeated pressing of the key will
eventually result in the numeric digit reappearing on the display. For example, when
the ABC icon is displayed, pressing the [2ABC] key once will generate a “2.” Quickly
pressing the key again will generate the letter A and so on. To make another letter
using the same key, it is necessary to wait two seconds before pressing the key again.
•
Pressing the 0 (zero) key repetitively while in alphanumeric input mode will allow
access, in turn, to each of the characters shown below:
0.,‘-:()!@#$%&*+=/?
•
The green [OK] key, which is labeled OK, acts as the [ENTER] key. When it is
pressed, the next input request is prompted.
•
The orange clear key, which is labeled [CLR], deletes the last character entered when
it is pressed once. If the [CLR] key is held down for more than two seconds, all the
information on the current input line will be cleared. If [CLR] is pressed while no
data are present, the transaction or local function will be terminated and the terminal
will “step back” to the previous menu.
•
The red cancel key, which is labeled [C], exits the current input function and aborts
the current operation. Either the transaction or the local function will be terminated.
In most cases, pressing [C] will return the terminal to the idle prompt (in some cases
it will “step back” to the previous menu).
•
Where appropriate, the four yellow soft keys below the display are used. For
example, when the user is changing the value of a local function in setup, the
terminal will ask for confirmation of the change, prompting the user to press either
YES or NO. The left-most yellow soft key selects YES, while the right-most soft key
selects NO.
•
Pressing and holding the [0] (zero) key from the idle prompt will cause the printer to
feed paper until the [0] key is released.
•
The key “beep” can be enabled or disabled by means of a field in Zontalk.
2003 LinkPoint® International, Inc.
11
9100 Reference Manual
GENERAL FEATURES
The Battery
The main (nickel-metal hydride) battery in the terminal is located above the printer
inside the printer module. The battery can be accessed by opening a quick-release door
on the right side of the terminal. This door is located below the telephone jack and the
charger port. The battery has a “tag” on the end which can be used to pull it out. If the
battery must be replaced, always turn off the terminal before removing the battery!
Removing the battery while the terminal is on can cause a programming error that will
render the terminal inoperable.
The main battery has a unique “cartridge” design consisting of a sealed unit containing
four AA-sized nickel-metal hydride cells. The nominal battery pack voltage is 4.8 volts,
but the actual voltage ranges from about 5.5 volts maximum, down to 4.0 volts when the
battery is completely discharged. The battery pack has a total capacity of 1450 mAh.
The battery pack contains a polyswitch that provides short-circuit and over-current
protection for the battery. Once the short-circuit or over-current condition has ended, the
polyswitch will reconnect (but the battery will lose some of its efficiency if this happens).
A battery icon in the upper right corner indicates the approximate state of charge of the
nickel metal hydride battery. This icon consists of a rectangle with up to three black bars
in it. Three bars indicate maximum charge, while no bars indicates that the battery is
almost or completely discharged. When the icon has no bars in it and begins to flash, the
battery is totally discharged. For instructions on the correct procedure for charging and
conditioning the battery, please see “Installation” above.
Under normal conditions, a fully charged battery that has been properly conditioned can
yield as many as 120 transactions with receipts. During the last ten or twenty
transactions before complete discharge, a LOW BATTERY warning will appear. More
transactions can be done at this point, but the battery should be fully recharged as soon
as practicable.
The terminal also contains a permanent lithium battery which can be accessed only by
removing the printer/battery module. The operator should not attempt to replace this
battery.
To help conserve battery power, the terminal has an activity timer. If there is no activity
on the terminal for the defined interval, it will automatically power down. It can be
powered up again by simply pressing the on/off button. The activity time-out time is
adjustable via a field (#1192) in the merchant’s Zontalk file. (Note: The factory default
setting is 60 minutes. If this value is changed by changing Field 1192 in the merchant’s
Zontalk file, a configuration download must be performed, then the terminal must be
hard-booted by powering it down and up.)
2003 LinkPoint® International, Inc.
12
9100 Reference Manual
GENERAL FEATURES
The Thermal Printer
The thermal printer is contained in a module that is attached to the bottom of the
terminal. The printer uses standard financial-quality thermal paper. The paper is 2 and
one-fourth inches wide and can be up to one and seven-eighths inches in diameter
(when the large printer door is used—please see “Installation” earlier in this manual).
The printer prints eight lines per second, and has a “clam shell” design for quick and
easy paper replacement (see “Installation” for detailed instructions about replacing the
paper).
The rectangular space on the front of the printer module has the LinkPoint International
logo, but this space is slightly recessed so that a sticker with a custom logo can be placed
on top of the LinkPoint logo if desired.
The printer can be disabled or enabled via either Zontalk or local Setup in the terminal.
The number of customer copies of the receipt can also be set in Zontalk or Setup, to as
few as zero or as many as nine copies. Customer copies mask all but the last four digits
of the account number and do not print the expiration date, in accordance with new
regulations in California and several other states. Additionally, only the merchant copy
has a signature line; the customer copy does not.
The Smart Card Reader
The smart card reader is an optional feature. When present, it is located on the right side
of the terminal near the top of the unit. The LinkPoint 9100 supports up to four SAM
smart card modules, as well as a full-sized customer smart card.
The RS-232 Interface
An RS-232 interface on the back of the terminal allows it to be direct-downloaded. It also
allows the terminal to connect to peripherals such as barcode readers, check readers, etc.
2003 LinkPoint® International, Inc.
13
9100 Reference Manual
GENERAL FEATURES
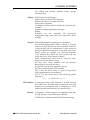
LinkPoint 9100 Specifications
Accessories Available Spare battery pack, leather case, car charger.
Battery Single removable, rechargeable battery pack, which
contains four nickel-metal hydride cells.
Battery pack has 4.8 volts, 1300 mAH nominal.
A fully charged and conditioned battery will perform at
least 80 transactions run one right after the other, and
may perform as many as 120.
The lithium backup battery protects stored software and
data for a minimum of 3 years.
Battery Charger Operates at 110 volts and 60 Hz.
Charging time of a discharged battery is approximately
four hours under normal conditions. Fast charging lasts
about 2.5 hours and takes the battery to about 80 percent
of capacity. After this slow charging takes an additional
1.5 hours to bring the battery to 100 percent.
Optional car charger is available.
Card Reader Track 1 and track 2, bi-directional ISO 7811 magnetic
stripe card reader.
Both tracks are read simultaneously, but only track 2
data are sent to the processing host in the FDC Omaha
application. Cardholder’s name from track 1 is printed
on the receipt.
Minimum reader head life is 1x10⁵ swipes.
Swipe speed range 15 cm/sec to 100 cm/sec.
Terminal has the capability for factory addition of a
track 1, 2 and 3 head reader and decoder at extra cost.
Communications Module Wireless communication occurs via a Research in
Motion (RIM) R802D modem.
The wireless modem has a whip antenna that may be
used in either raised or lowered position (but
performance will be improved in the raised position).
The wireless modem operates in the 800-900 MHz band.
The wireless modem operates at up to 19.2 Kbps.
The dialup modem allows connection through a PSTN
(public switched telephone network) to the processing
host.
The dialup modem supports asynchronous connection.
Limited support for synchronous may be provided.
The dialup modem operates at speeds up to 2400 baud,
offering V.21 and V.22 bis.
The dialup modem has an RJ11 connector that allows
connection to standard telephone cords.
2003 LinkPoint® International, Inc.
14
9100 Reference Manual
GENERAL FEATURES
The dialup and wireless modems cannot operate
simultaneously.
Display LCD (Liquid Crystal Display).
High contrast resolution 128 x 64 pixels.
Default font offers 14 columns by 4 lines.
Full graphics capability.
21 columns by 8 lines and 16 columns by 5 lines are also
available.
Capable of displaying character bit maps.
Backlit.
Readable over the terminal’s full operational
temperature range, unless the LCD is exposed to direct
sunlight.
Keypad 20-key alphanumeric keypad plus on/off button.
Keys include alphanumeric (white on black); C (Cancel)
(white on red); F (Function to select merchant functions)
(white on blue); OK (to confirm entry of data) (white on
green); CLR (Clear to backspace or step back to previous
menu) (white on orange); four software-assignable
“soft” function keys below the LCD (yellow); up and
down arrow key (scroll) (white on black).
Audio feedback tone (short tone for valid key entry,
longer tone for invalid key entry).
All keys have tactile feedback and are software
debounced by at least 20 ms delay.
Keypad life exceeds 1x10⁶ operations per key.
Keys are backlit when the LCD is backlit.
The “1” key also allows entry of a space in any field in
which alphanumerics are permitted.
The “0” key also allows entry of the following special
characters:
0.,‘-:()!@#$%&*+=/?
LED Indicator A red/green/amber LED indicator is located between
the F and C keys. It flashes when certain kinds of invalid
operations are attempted (such as attempting to scroll
farther than the last transaction in a batch review).
Memory 2 megabytes of flash memory for application and data
storage, inclusive of the BIOS and bootloader.
512 kilobytes of battery-backed SRAM for data storage.
2003 LinkPoint® International, Inc.
15
9100 Reference Manual
GENERAL FEATURES
Operating Environment Operating temperature range is between 32 and 104
degrees F (0 to 40 degrees C).
Storage temperature range is between 14 and 158
degrees F (–10 to 70 degrees C).
Relative humidity is up to 85 percent non-condensing at
104 degrees F (40 degrees C).
Physical 3.1 in. (78 mm) H x 2.9 in. (74 mm) W x 8.07 inc. (205
mm) L, 1.31 lb. (595 g).
PIN Pad Secure design capable of secure PIN capture. Dedicated
ID-000 slot for cryptographic coprocessor for ultra-fast
public key processing.
Printer Thermal with “clam shell” design with integral paper
roll holder.
Translucent paper door.
Paper width is 57 mm (approximately 2.25”).
Maximum paper roll diameter (total diameter including
the core) is one and seven-eighths inches.
Resolution is 384 dots/line minimum.
Print speed is at least 15 mm/sec (8 lines per second) for
typical receipt printing.
Printer life exceeds 50 kilometers (31 miles) of paper.
Paper must be rolled with the thermal side outside and
facing the front of the terminal.
SAMs (Security Access The terminal can be upgraded to support manufacturerModules) approved SAMs.
Up to four ID-000 SAM cards
internally on a removable expansion board.
Security Tamper detection to erase sensitive data in memory if
the secure part of the unit is opened.
Warning: An excessive impact such as that caused by
dropping the terminal may open a tamper switch and
render the terminal inoperable.
Tamper evidence to indicate that a unit has been
opened.
Secure key scanning to minimize the possibility of
directly intercepting the keypad signals.
Software implementation of DES encryption algorithms
in the BIOS.
Secure application download to prevent loading of
unauthorized applications.
Serial Port Dual RS-232 serial port allows direct PC-to-terminal
download, barcode readers, check readers, etc.
2003 LinkPoint® International, Inc.
16
9100 Reference Manual
GENERAL FEATURES
The serial port complies with RS 232-E electrical
characteristics.
The communications speeds supported by the serial port
are 1200, 2400, 4800, 9600, 19200 bps, 7 or 8 bits, odd,
even or no parity, 1 or 2 stop bits.
The default setting is 9600 baud, 8 bits, no parity and 1
stop bit.
Smart Cards The terminal can be upgraded to support smart cards.
This requires addition of a smart card board and
manufacturer-approved smart card reader.
Standards FCC Rules and Regulations, Part 15, FCC Rules and
Regulations, Part 2 (SAR and Transmitter), FCC Rules
and Regulations, Part 90 (Transmitter), FCC Rules and
Regulations, Part 68, CSA C.22 No 950/UL 1950. ISO
7816 1-3: EMV’96 V 3.1.1, EN 50082-1:1992, EN 55022:
1994, EN 60950.
Systems Engineering The terminal will respond to user input within one
second.
The system has the capability to support multiple
applications within the application manager (AppMan).
Warranty Standard 12-month warranty.
2003 LinkPoint® International, Inc.
17
9100 Reference Manual
DOWNLOAD AND ENCRYPTION PROCEDURES
DOWNLOAD AND ENCRYPTION PROCEDURES
If the terminal does not have an application already loaded into it, the application can
only be downloaded by means of a direct PC-to-terminal download, as described below.
Once an application has been direct-downloaded and the terminal has been deployed,
the application can be upgraded remotely via a dial-up telephone connection. This
means that application modules (“applets”) can be replaced with newer versions by
means of a remote download. Additionally, a configuration (parameter) download can
be performed remotely.
After a direct full download has been performed, the terminal should be encrypted and
then given a configuration download to load the merchant-specific parameters. If this
last step is not performed, the terminal will still have the “default” test parameters that
are loaded into its memory as part of the direct full download (the terminal will appear
to be functional, but it will not be able to perform live transactions until it has been
downloaded with the merchant’s parameters including merchant ID number).
The procedures below are described in the order they would normally be performed: (1)
direct full download; (2) encryption (Master/Session and DUKPT); (3) configuration
download. Additionally, for software upgrades after the terminal has been deployed,
the application upgrade is described.
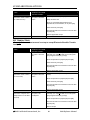
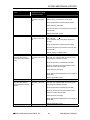
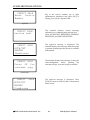
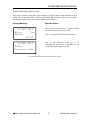
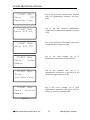
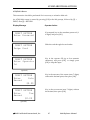
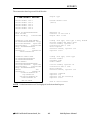
Direct Full Download (PC-to-Terminal)
Caution: This procedure will erase the old application and the encryption keys before it loads the new
application!
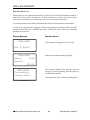
TERMINAL DISPLAY
IDLE PROMPT
BOOT V3.11
K78-204
ENTER SECURITY
CODE:
OPERATOR ACTION
POWER THE TERMINAL DOWN
POWER THE TERMINAL BACK UP WHILE HOLDING DOWN THE 1 KEY
KEY 411412
PRESS [OK] KEY
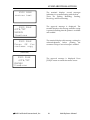
BOOT V3.11
S1 NEXT MENU
1. LOAD CONFIG
2. BOOT LOADER
3. REBOOT
SELECT OPTION:
PRESS 2 KEY
(1) LOAD AT 19200
(2) LOAD AT 38400
LOAD AT 19200 IN ## S
[SECONDS]
PRESS 1 KEY
WAITING ## [SECONDS]
WAITING FOR
DOWNLOAD
PLUG THE DOWNLOAD CABLE INTO THE RS-232 PORT ON THE BACK OF EACH
TERMINAL AND INTO PORT ON THE MULTIPLE DOWNLOAD “BRUMBY BOX”
OR INTO COM PORT ON PC
PLUG A CHARGER INTO EACH TERMINAL
START DOWNLOAD ON PC AS FOLLOWS:
2003 LinkPoint® International, Inc.
18
9100 Reference Manual
DOWNLOAD AND ENCRYPTION PROCEDURES
DLL PC DISPLAY
(PC DISPLAY)
ACTION
GO INTO DOS MODE ON THE DOWNLOAD PC AND CHANGE DIRECTORIES TO THE
9100 APPLICATION TO BE DOWNLOADED.
TYPE NAME OF DLL BATCH FILE ON THE PC AND ENTER
(VARIOUS INFORMATION
DISPLAYED ON DLL PC)
PRESS ANY KEY TO
CONTINUE
PRESS ENTER ON THE PC
WAIT UNTIL DOWNLOAD STARTS—THIS MAY TAKE A COUPLE OF MINUTES
DOWNLOADING
APPMAN.HEX, ETC.
WAIT UNTIL THE PC PROMPTS FOR SERIAL NUMBER
ENTER SERIAL NUMBER
FOR CHANNEL (#):
ON THE PC, TYPE THE SERIAL NUMBER FROM THE LABEL ON THE BACK OF
THE TERMINAL AND PRESS ENTER ON THE PC.
WAIT FOR DLL TO CONTINUE.
(DLL CONTINUES…)
WAIT ABOUT 15 MINUTES FOR DLL TO COMPLETE
PINPADS SUCCESSFULLY
LOADED FOR CHANNELS
(PORT #S DISPLAYED)
PRESS ANY KEY TO
CONTINUE..
PRESS ENTER ON THE PC
IF NECESSARY, REPEAT ABOVE PROCEDURE TO DOWNLOAD MORE TERMINALS
OR
EXIT DOS MODE ON THE PC
TERMINAL DISPLAY
LOADING
ACTION
PRESS ORANGE [CLR] KEY ON THE TERMINAL
REBOOTING…
WAIT FOR TERMINAL TO REBOOT AND INITIALIZE
IDLE PROMPT
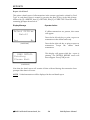
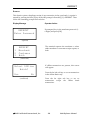
Important: The terminal must be allowed to reboot, initialize, and go to the idle prompt (“Swipe Card” or
“LinkPoint”). If it is powered off before this, the flash memory will be corrupted.
After completing the download, go into AppMan to verify that the correct current version number of each
application “applet” has been downloaded. See procedure for doing this under “Special Setup Functions /
Application Manager” in this manual.
Important: The terminal must now be encrypted and given a configuration download before it can be
deployed!
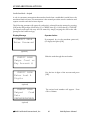
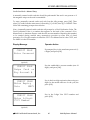
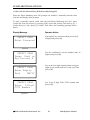
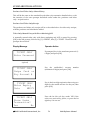
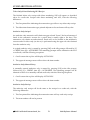
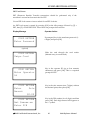
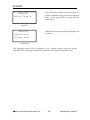
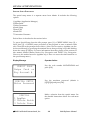
Master/Session Key Encryption
DISPLAY
IDLE PROMPT
ACTION
POWER THE TERMINAL DOWN
POWER THE TERMINAL BACK UP WHILE HOLDING DOWN THE ORANGE [CLR] KEY
IDLE PROMPT
PRESS THE BLUE [F] KEY
APPMAN V2.13C
1 TERMINAL SETUP
2 S/W MAINTENANCE
3 APPLICATION SETUP
4 VERSION NUMBERS
PRESS 3 KEY = APPLICATION SETUP
APPLICATION SETUP
1 FILE SYSTEM
2 SRVTRN78LINKPOINT
3 KEY MANAGEMENT
PRESS 3 KEY = KEY MANAGEMENT
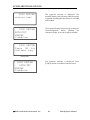
ENCRYPTION
2003 LinkPoint® International, Inc.
19
9100 Reference Manual
DOWNLOAD AND ENCRYPTION PROCEDURES
IS NOT ENABLED
EDIT
OK
[ENCRYPTION]
1 DUKPT
2 MASTER SESS
3 CHECK
MASTER/SESSION
1 MKIXOR
2 MASTER KEY
3 WORKING KEY
PRESS EDIT KEY
PRESS 2 KEY = MASTER SESS
PRESS 1 KEY = MKIXOR AND DOWNLOAD THE KEY VIA SECURE KEYLOADER PC
OR
PRESS 2 KEY = MASTER KEY AND ENTER THE THREE KEY PARTS MANUALLY
VERIFY THE CHECKSUM
PRESS THE [OK] KEY
PRESS 3 KEY = WORKING KEY AND ENTER THE WORKING KEY MANUALLY
VERIFY THE CHECKSUM
PRESS THE OK KEY
IDLE PROMPT
POWER THE TERMINAL DOWN
The terminal must be powered down after this procedure to exit the application manager!
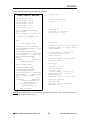
DUKPT Key Encryption
DISPLAY
IDLE PROMPT
ACTION
POWER THE TERMINAL DOWN
POWER THE TERMINAL BACK UP WHILE HOLDING DOWN THE ORANGE [CLR] KEY
IDLE PROMPT
PRESS THE BLUE [F] KEY
APPMAN V2.13C
1 TERMINAL SETUP
2 S/W MAINTENANCE
3 APPLICATION SETUP
4 VERSION NUMBERS
PRESS 3 KEY = APPLICATION SETUP
APPLICATION SETUP
1 FILE SYSTEM
2 SRVTRN78LINKPOINT
3 KEY MANAGEMENT
PRESS 3 KEY = KEY MANAGEMENT
ENCRYPTION
IS NOT ENABLED
EDIT
OK
PRESS EDIT KEY
[ENCRYPTION]
1 DUKPT
2 MASTER SESS
3 CHECK
PRESS 1 KEY = DUKPT AND DOWNLOAD THE KEY VIA SECURE KEYLOADER PC
The terminal must be powered down after this procedure to exit the application manager!
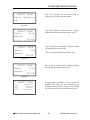
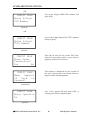
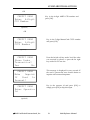
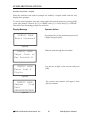
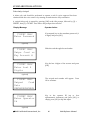
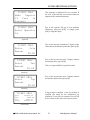
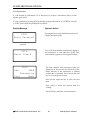
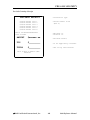
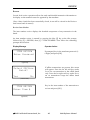
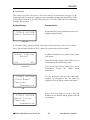
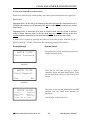
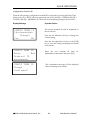
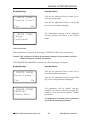
Configuration (Parameter) Download
This loads the merchant parameters such as business name and merchant ID into terminal. This download
requires a PC with Zontalk that has been set up with the files for the LP 9100 FDC Omaha application. For
a remote configuration download, a telephone cord must be plugged into the terminal. For a direct PC-toterminal download, a download cable must be connected from the Com 1 port on the PC to the RS-232 port
on the back of the terminal.
2003 LinkPoint® International, Inc.
20
9100 Reference Manual
DOWNLOAD AND ENCRYPTION PROCEDURES
DISPLAY
IDLE PROMPT
ACTION
PRESS THE BLUE [F] KEY
ADMIN MENU
1 REPRINT
2 REVIEW
3 REPORT
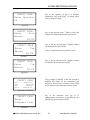
PRESS 6 KEY = SETUP
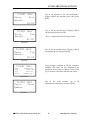
SETUP
ENTER PASSWORD
KEY PASSWORD (1234)
PRESS [OK] KEY
SETUP
1 PRINTER
2 BACKLIGHT
3 CONTRAST
PRESS 4 KEY = COMMS
HOSTS
1 COMMS TYPE
2 WIRELESS
3 DIAL-UP
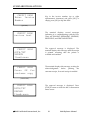
PRESS 1 KEY = COMMS TYPE
COMMS TYPE
[TYPE DISPLAYED]
CHANGE ?
YES
NO
IF WIRELESS, PRESS YES KEY TO CHANGE TYPE TO “PHONE”
OR
IF PHONE ALREADY DISPLAYED, PRESS NO KEY
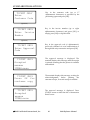
HOSTS
1 COMMS TYPE
2 WIRELESS
3 DIAL-UP
PRESS 4 KEY = CONFIG
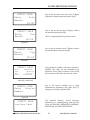
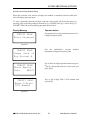
CONFIG HOST
1 HOST PHONE
2 TERMINAL ID
PRESS 1 KEY = HOST PHONE
CONFIG PRIMARY
[PHONE # DISPLAYED]
CHANGE ?
YES
NO
CONFIG HOST
1 HOST PHONE
2 TERMINAL ID
CONFIG TERM ID
ID: [ZONTALK ID #
DISPLAYED]
CHANGE ?
YES
NO
IF NECESSARY, PRESS YES KEY AND ENTER CORRECT ZONTALK PHONE NUMBER
PRESS [OK] KEY
OR
PRESS NO KEY IF # CORRECT
PRESS 2 KEY = TERMINAL ID
IF NECESSARY, PRESS YES KEY AND ENTER CORRECT ZONTALK FILE NUMBER
PRESS [OK] KEY
OR
PRESS NO KEY IF # CORRECT
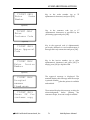
CONFIG HOST
1 HOST PHONE
2 TERMINAL ID
PRESS ORANGE [CLR] KEY TWICE TO RETURN TO SETUP MENU
SETUP
1 PRINTER
2 BACKLIGHT
3 CONTRAST
PRESS 5 KEY = CONFIG LOAD
CONFIG TERM ID
ID: [# DISPLAYED]
2003 LinkPoint® International, Inc.
21
9100 Reference Manual
DOWNLOAD AND ENCRYPTION PROCEDURES
CHANGE ?
YES
NO
CONFIG TERM ID
START LOAD
CONFIRM?
YES
NO
ZONTALK DOWNLOAD
[DOWNLOAD INFO
DISPLAYED]
VERIFY ZONTALK ID
PRESS NO KEY IF ID # IS OK
PRESS YES KEY TO START THE CONFIG LOAD
IF PERFORMING A REMOTE DIAL-UP DOWNLOAD, WAIT FOR CONFIG LOAD TO
START
OR
IF PERFORMING A DIRECT PC-TO-TERMINAL DOWNLOAD, PRESS THE 0 KEY AT
THIS PROMPT; THEN WAIT FOR THE CONFIG LOAD TO START
CONFIG LOAD
CONNECTING
PLEASE WAIT…
CONFIG LOAD
---------PLEASE WAIT
DISCONNECTING
(TEN DASHES WILL DISPLAY; MAKE SURE ALL TEN DASHES ARE REPLACED BY
STARS AS THE DOWNLOAD FINISHES)
(WAIT UNTIL TERMINAL REBOOTS AND INITIALIZES)
IDLE PROMPT
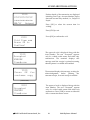
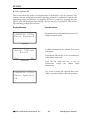
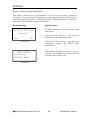
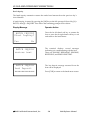
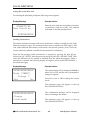
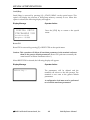
Application Upgrade
This loads the latest versions of the application modules (“applets”) into the terminal. This download
requires a PC with Zontalk that has been set up with the files for the LP 9100 FDC Omaha application. For
a remote application upgrade, a telephone cord must be plugged into the terminal. For a direct PC-toterminal download, a download cable must be connected from the Com 1 port on the PC to the RS-232 port
on the back of the terminal.
Important! Always close an open batch before doing an application upgrade. Always do a configuration
load after the application upgrade!
Important Note: If a new version of the Keymanager applet is loaded into a terminal during an application
upgrade, it will disable debit and EBT in the terminal. If terminals in the field are being
remotely upgraded, the Keymanager applet should not be included in the list in the master
download file (K78_lp_s.dld) when upgrading terminals that currently support debit or EBT!
DISPLAY
IDLE PROMPT
ACTION
PRESS THE BLUE [F] KEY
ADMIN MENU
1 REPRINT
2 REVIEW
3 REPORT
PRESS 6 KEY = SETUP
SETUP
ENTER PASSWORD
SETUP
1 PRINTER
2 BACKLIGHT
3 CONTRAST
HOSTS
1 COMMS TYPE
2 WIRELESS
3 DIAL-UP
COMMS TYPE
KEY PASSWORD (1234)
PRESS OK KEY
PRESS 4 KEY = COMMS
PRESS 1 KEY = COMMS TYPE
2003 LinkPoint® International, Inc.
22
9100 Reference Manual
DOWNLOAD AND ENCRYPTION PROCEDURES
[TYPE DISPLAYED]
CHANGE ?
YES
NO
IF WIRELESS, PRESS YES KEY TO CHANGE TYPE TO “PHONE”
OR
IF PHONE, PRESS NO KEY
HOSTS
1 COMMS TYPE
2 WIRELESS
3 DIAL-UP
PRESS 4 KEY = CONFIG
CONFIG HOST
1 HOST PHONE
2 TERMINAL ID
PRESS 1 KEY = HOST PHONE
CONFIG PRIMARY
[PHONE # DISPLAYED]
CHANGE ?
YES
NO
IF NECESSARY, PRESS YES KEY AND ENTER CORRECT ZONTALK PHONE NUMBER
PRESS [OK] KEY
OR
PRESS NO KEY IF # CORRECT
CONFIG HOST
1 HOST PHONE
2 TERMINAL ID
PRESS ORANGE [CLR] KEY TWICE TO RETURN TO SETUP MENU
SETUP
1 PRINTER
2 BACKLIGHT
3 CONTRAST
PRESS 6 KEY = APP UPGRADE
APP UPGRADE
START UPGRADE
CONFIRM?
YES
NO
PRESS YES KEY TO START
ZONTALK DOWNLOAD
[DOWNLOAD INFO
DISPLAYED]
IF PERFORMING A REMOTE DIAL-UP DOWNLOAD, WAIT FOR DOWNLOAD TO
START
OR
IF PERFORMING A DIRECT PC-TO-TERMINAL DOWNLOAD, PRESS THE 0 KEY AT
THIS PROMPT; THEN WAIT FOR THE DOWNLOAD TO START
SOFTWARE LOAD
CONNECTING
PLEASE WAIT…
SOFTWARE LOAD
RECEIVING
PLEASE WAIT…
(WAIT FOR DOWNLOAD TO COMPLETE)
Notes: After a brief initial download of the master download file, the terminal will dial Zontalk again for each
“applet” that needs to be loaded.
If the terminal already has all the latest versions of “applets,” the terminal will not dial Zontalk again after the
initial download.
Wait until the terminal has finished loading all “applets.” (When it is finished, it will automatically reboot and
return to the idle prompt.)
Perform a configuration load to reload the merchant parameters!
2003 LinkPoint® International, Inc.
23
9100 Reference Manual
DOWNLOAD PARAMETERS AND OPTIONS
DOWNLOAD PARAMETERS AND OPTIONS
Download parameters are used for programming or updating a terminal’s profile. These
parameters may be added or modified through the standard Zontalk Edit procedures.
As mentioned in the previous section, merchant-specific information may be
downloaded remotely into the terminal by means of a configuration download. The
following list contains the available Zontalk parameters (sometimes referred to as
memory locations) for the FDC Omaha Retail application.
The table is organized into five columns:
“Parameter” has the Terminal Definition File (TDF) field number. If a parameter field
number is in bold type in the table below, this means it should probably be included
in the individual merchants’ Zontalk files.
Other fields which normally have the same value regardless of the individual merchant
should probably not be included in the Zontalk files, because they would confuse the
order processing personnel who have to build these files. These fields are shown in
normal text (not bold type) in the tables below. An example of a field that would not
need to be included in the individual files would be 1107, “Swipe Default Enabled on
Idle Screen,” because all merchants normally want to be able to swipe a card at the idle
prompt. If a merchant does have an unusual need that requires changing one of these
fields, it can always be added to the merchant’s Zontalk file.
“Field Type” indicates whether the field is numeric, question, phone, etc., according to
the Field Type Codes shown below:
N = numeric
Q = question, Y or N
P = phone number field (0-9, A-Z, -, *, #, semicolon, comma, and space)
X = alphanumeric
B = binary (0 = no, 1=yes)
S = custom characters (for example, hexadecimal only)
“Field Length” indicates the allowed number of characters. If the number is followed by
a comma plus a second number, the second number indicates the minimum number of
characters allowed in the field. For example, Field 1111, debit working key, has a length
of “16, 16.” This means that 16 characters are allowed, but no fewer than 16 characters.
“Description of Field and Comments” indicates the purpose of the field, with any
comments in parentheses.
“Default Value” indicates the default setting of each field. This is the value that will be
loaded into the terminal during a direct full download. Note that this is not necessarily
what the value “should” be for practical purposes! It is only the value that will be
stored in each field after a full direct download or after deleting the configuration
parameters. Some of these “default” settings are NOT appropriate for use with live
merchants (for example, see the default receipt header lines or the merchant ID). Before a
2003 LinkPoint® International, Inc.
24
9100 Reference Manual
DOWNLOAD PARAMETERS AND OPTIONS
terminal is deployed to a merchant, these settings MUST be replaced with merchantspecific data by means of a configuration (parameter) download!
Note: In the table below the complete set of individual card range fields is listed only for
the first card range (MasterCard Purchase Card). To save space, these fields are not
listed for the remaining card ranges; they are only summarized. However, the fields for
the remaining ranges all follow the same format as MasterCard Purchase Card, so the
MasterCard Purchase Card fields can be used as a guide. To see the individual fields for
all the other card ranges, please refer to the Terminal Definition File (TDF) in Zontalk.
The only card range fields that should normally be included in the individual merchants’
Zontalk files are the “flags” to enable or disable each card type (for example, see Field
61005).
Important Note: Except for the receipt header and trailer line fields, fields must NOT be
left blank in a Zontalk file, unless the table below shows that their default value is
[Blank]. Including other fields in a Zontalk file and then leaving them blank will cause
the terminal to lock up on an Application Error!
Parameter
(Field #s
from TDF)
1102
1106
Field
Type
Field
Length
Description of Field and Comments
Q
N
1
3,3
1107
Q
1
1108
N
4,4
1110
Q
1
1111
16,16
1114
S
[Hex
Chars]
Q
1131
X
14,14
1132
X
21,21
“Backlight Enabled” (Y or N)
“Backlight Timeout Seconds (Max
255)”
“Swipe Default Enabled On Idle
Screen” (Y or N; if set to Y, allows a
card to be swiped to start a
transaction from the idle prompt)
“Swipe Default Txn Tbl” (Credit sale
= 2000; debit sale = 2160; EBT food
sale = 2340. Determines the type of
transaction initiated by a card swipe
at the idle prompt.)
“Key Clicks Enabled (Yes/No)” (Y
or N; if enabled, keys “beep” when
pressed)
“Encrypted Session Key” (debit
working key; only hex characters are
allowed: 0123456789ABCDEF)
“Enable Load New Session Key from
Zontalk” (Y or N)
“Idle Screen: Area B” (custom idle
prompt for second line of display;
this parameter can be changed to
override the “SWIPE CARD” default
display)
“Idle Screen: Area A” (custom idle
prompt for top line of display; this
parameter overrides the date/time
1
2003 LinkPoint® International, Inc.
25
“Default” Value
(SEE NOTE ABOVE!)
Y
030
Y
2000 [for credit sale]
Y
[Blank]
N
SWIPE CARD
[Blank]
9100 Reference Manual
DOWNLOAD PARAMETERS AND OPTIONS
Parameter
(Field #s
from TDF)
Field
Type
Field
Length
1150
Q
1
1152
N
5
1154
Q
1
1156
1158
1160
1162
Q
Q
Q
Q
1
1
1
1
1164
Q
1
1166
Q
1
1168
Q
1
1170
Q
1
1172
Q
1
1174
Q
1
1176
Q
1
Description of Field and Comments
display)
“Enable Customer Code Prompt: Y
or N” (When enabled, this flag
serves as an override for all card
types to the purchasing card option.
It activates the Level 2 Purchasing
Card prompt Customer Code. Note
that the Sales Tax prompt must be
activated separately, in Field 1166.)
“Debit Surcharge Amt (Cents) 0 =
No surcharge” (This applies to debit
sale only OR to debit sale with
cashback. Value is in cents, e.g., 50 =
.50¢ / 1000 = $10.00; max 99999 =
$999.99.)
“EBT Balance Inquiry Enabled” (Y or
N)
“Enable EBT Cash Sale Y or N”
“Debit Return Enabled” (Y or N)
“Credit Return Enabled” (Y or N)
“Military Time Format Enabled” (Y
or N) (if Y, time displayed on idle
prompt is in 24-hour military
format)
“Invoice Number Prompts Enabled”
(Y or N)
“Sales Tax Prompts Enabled” (Y or
N)
“Order Number Prompt Enabled” (Y
or N; direct marketing prompt)
“Cashback on Debit Enabled” (Y or
N)
“PreSale Enabled” (Y or N; this is
not a transaction—this feature
allows printing of a presale receipt
with gratuity line so customer can
add a tip before the actual sale is
done)
“AVS Global Prompt Enabled” (Y or
N. When enabled, this flag serves as
an override for all card types to the
AVS option within the account
ranges options. It activates prompts
for street address and zip code only.)
“Wireless Enabled on Power Up: Y
or N” (if set to Y, terminal will
always go into wireless mode after
powering up; if set to N, terminal
2003 LinkPoint® International, Inc.
26
“Default” Value
(SEE NOTE ABOVE!)
N
000
Y
Y
Y
Y
N
N
N
N
N
Y
N
N
9100 Reference Manual
DOWNLOAD PARAMETERS AND OPTIONS
Parameter
(Field #s
from TDF)
1178
1180
Field
Type
Field
Length
1
1
1182
Q
S
[DM]
Q
1184
Q
1
1186
Q
1
1188
Q
1
1190
N
1192
N
4
1201
P
10
1202
1203
Q
S
[TP]
X
1
1
1252
1
3,3
10,1
Description of Field and Comments
will always go into dialup mode
after powering up)
“PrePrint Receipt Enabled” (Y or N)
“Dukpt or Master/Session Key
Management (D or M)”
“Global
Operator
ID
Prompt
Enabled” (Y or N; max length of
Operator ID is four numeric
characters)
“Print Full Receipt during Offline
Uploads” (Y or N; non-functional in
current software)
“Global Tip Prompt Enabled” (Y or
N)
“Global CVV2 Prompt Enabled” (Y
or N; applies to VISA CVV2,
MasterCard CVC2, and AMEX CID;
if set to Y, will prompt for the Card
Verification
Value
on
every
manually keyed Visa, MC and
AMEX credit sale)
“Idle -> Sleep Screen Timeout (in
mins – 0=never” (from the “SWIPE
CARD” prompt, time in minutes
before terminal returns to the
“LinkPoint” logo; 000 = never times
out to the logo)
“Inactivity PowerDown Timeout in
Seconds, 0 = no auto power-down”
(time before terminal turns itself off
if no keys are pressed—in seconds; 1
to 299 is same as 300 seconds [5
minutes]; max 9999 seconds [167
minutes]; 0 = never powers down
automatically)
(Note: If a config download is
performed to change this setting, the
terminal must be hard-booted—
powered down and up—after the
download in order for the change to
take effect.)
“Dial Prefix” (prefix such as a PABX
access code; blank = no prefix)
“Wait for Dial Tone” (Y or N)
“Tone or Pulse Dialing (T or P)”
“Default Config Terminal ID” (for
Zontalk
parameter
download;
2003 LinkPoint® International, Inc.
27
“Default” Value
(SEE NOTE ABOVE!)
N
M
N
N
N
N
2
3600
[Blank]
Y
T
00000001
[Must be
changed
9100 Reference Manual
DOWNLOAD PARAMETERS AND OPTIONS
Parameter
(Field #s
from TDF)
Field
Type
Field
Length
Description of Field and Comments
“Default” Value
(SEE NOTE ABOVE!)
before doing a config
load]
1
1351
N
1
1352
1358
N
X
1
29
normally this will be the merchant’s
CAN file #)
“Number of Duplicate Receipts”
(number of customer copies of
receipt: 0 minimum to 9 maximum;
if set to 0, merchant copy will still
print, but no customer copy will
print)
“Receipt Start Line Feeds”
“Receipt Header L1: Text”
1359
X
29
“Receipt Header L2: Text”
1360
1361
X
X
29
29
“Receipt Header L3: Text”
“Receipt Header L4: Text”
1362
1366
1370
1371
N
N
N
X
1
1
1
29
1372
X
29
1373
X
29
1374
X
29
1375
1379
N
X
1
29
“Receipt Header: Line Feeds”
“Gratuity: Line Feeds”
“Signature: Line Feeds”
“Receipt Trailer L1” (below
lines)
“Receipt Trailer L2” (below
lines)
“Receipt Trailer L3” (below
lines)
“Receipt Trailer L4” (below
lines)
“Receipt End Line Feeds”
“Receipt Header L5: Text”
1380
X
29
“Receipt Header L6: Text”
1381
X
29
1382
X
29
1383
X
29
1384
X
29
1462
N
8
“Customer Agreement L1” (flex
agreement) (below signature line)
“Customer Agreement L2” (flex
agreement) (below signature line)
“Customer Agreement L3” (flex
agreement) (below signature line)
“Customer Agreement L4” (flex
agreement) (below signature line)
“Menu
Password”
(manager
password)
2003 LinkPoint® International, Inc.
28
flex
2
RETAIL STORE
[This and the other
“default”
receipt
header lines MUST be
changed
in
the
individual merchant
files]
CROSSROADS
MEGA-MALL
123 MAIN ST.
ANYWHERE,
USA
12345
1
1
2
Thanks for shopping
here
Please come again!
flex
[Blank]
flex
[Blank]
flex
7
PHONE: (XXX) XXXXXXX
FAX:
(XXX) XXXXXXX
I agree to pay the
above
according to card
issuer
agreement
(merch. agreement if
return)
1234
9100 Reference Manual
DOWNLOAD PARAMETERS AND OPTIONS
Parameter
(Field #s
from TDF)
1463
Field
Type
Field
Length
Description of Field and Comments
Q
1
1464
N
2
1558
N
3
2015
1
2055
S
[3210]
S
2075
S
1
2095
S
1
2495
S
1
3221
Q
1
3231
3241
Q
Q
1
1
3251
Q
1
3311
Q
1
3321
Q
1
3411
Q
1
3421
Q
1
3611
Q
1
3621
Q
1
3631
Q
1
“Hot Keys Enabled” (if set to Y,
menu options can be accessed by
pressing the corresponding numeric
keys)
“Idle Timeout Period (Seconds)”
(time before terminal returns to idle
prompt when any menu is being
displayed, but no key is pressed;
minimum 1 second, maximum 99
seconds; if set to 00, terminal never
times out)
“Max Transactions in Batch (Max
300)” (number of items in batch; 500
is the maximum for FDC Omaha
host, but the recommended limit for
this application is 300)
“Credit Sale: Fraud Control 0:None
1:Last4 2:MSR 3:Both”
“Ticket Only: Fraud Control 0:None
1:Last4 2:MSR 3:Both”
“Credit Return: Fraud Control
0:None
1:Last4 2:MSR 3:Both”
“Auth Only: Fraud Control 0:None
1:Last4 2:MSR 3:Both”
“Offline Sale: Fraud Control 0:None
1:Last4 2:MSR 3:Both”
“CREDIT
RETURN
Password
Required” (Y or N)
“VOID Password Required” (Y or N)
“AUTH ONLY Password Required”
(Y or N)
“TICKET
ONLY
Password
Required” (Y or N)
“ONLINE CREDIT SALE Password
Required” (Y or N)
“OFFLINE CREDIT SALE Password
Required” (Y or N)
“DEBIT SALE Password Required”
(Y or N)
“DEBIT
RETURN
Password
Required” (Y or N)
“EBT FOOD SALE Password
Required” (Y or N)
“EBT FOOD RETURN Password
Required” (Y or N)
“EBT FOOD BALANCE Password
1
2003 LinkPoint® International, Inc.
29
“Default” Value
(SEE NOTE ABOVE!)
Y
60
300
0
0
0
0
0
Y
Y
N
N
N
N
N
Y
N
N
N
9100 Reference Manual
DOWNLOAD PARAMETERS AND OPTIONS
Parameter
(Field #s
from TDF)
Field
Type
Field
Length
3641
Q
1
3651
Q
1
3661
Q
1
3671
Q
1
3811
Q
1
3821
Q
1
3831
Q
1
3911
Q
1
3921
Q
1
7001
P
20
7002
7003
Q
N
1
1
7004
N
3
7011
S
[12345
67890.
]
15
7012
N
3
7013
N
3
7101
P
20
Description of Field and Comments
Required” (Y or N)
“EBT CASH SALE Password
Required” (Y or N)
“EBT CASH BALANCE Password
Required” (Y or N)
“EBT VOUCHER SALE Password
Required” (Y or N)
“EBT
VOUCHER
RETURN
Password Required” (Y or N)
“BATCH
CLOSE
Password
Required” (Y or N)
“BATCH
INQUIRY
Password
Required” (Y or N)
“BATCH
UPDATE
Password
Required” (Y or N)
“UPLOAD
ALL
OFFLINE
TRANSACTIONS
Password
Required” (Y or N)
“UPLOAD
SINGLE
OFFLINE
TRANSACTION
Password
Required” (Y or N)
“Txn 1: Phone Number” (host
primary
authorization
phone
number)
“Txn 1: PreDial Supported” (Y or N)
“Txn
1:
Re-Dial
Attempts”
(transaction auth primary phone #
re-dial attempts)
“Txn 1: Connection Timeout Period,
in
Seconds”
(primary
auth
connection timeout period)
“Wireless 1: IP ADDRESS” (wireless
auth IP address; only characters
allowed are 0 through nine and
period [.]; this IP address also
applies to wireless batch close and
all
other
on-line
wireless
communication with the processing
host)
“Wireless 1: Connection Timeout”
(in seconds)
“Wireless 1: Inactivity Timeout” (in
seconds)
“Config 1: Phone Number” (phone
number for remote parameter, i.e.,
configuration,
downloads
and
application upgrades)
2003 LinkPoint® International, Inc.
30
“Default” Value
(SEE NOTE ABOVE!)
N
N
N
N
Y
N
N
Y
Y
18002289074
Y
0
30
255.001.150.002
60
30
94100651
[Not a valid number;
must
be
changed
before doing a config
9100 Reference Manual
DOWNLOAD PARAMETERS AND OPTIONS
Parameter
(Field #s
from TDF)
Field
Type
Field
Length
Description of Field and Comments
7102
Q
1
7103
7104
N
N
1
3
7201
P
20
7202
7203
Q
N
1
1
7204
N
3
7501
P
20
7502
Q
1
7503
N
1
7504
N
3
7701
P
20
7702
Q
1
7703
N
1
7704
N
3
9003
N
19
“Config 1: PreDial Supported” (Y or
N)
“Config 1: Re-dial Attempts”
“Config 1: Connection Timeout
Period, in Seconds”
“Txn 2: Phone Number” (host
secondary
authorization
phone
number)
“Txn 2: PreDial Supported” (Y or N)
“Txn
2:
Re-Dial
Attempts”
(transaction auth secondary phone #
re-dial attempts)
“Txn 2: Connection Timeout Period,
in
Seconds”
(secondary
auth
connection timeout period)
“Batch 1: Phone Number” (batch
primary phone number)
“Batch 1: PreDial Supported” (Y or
N)
“Batch 1: Re-Dial Attempts” (batch
primary phone # re-dial attempts)
“Batch 1: Connection Timeout
Period, in Seconds” (primary batch
connection timeout period)
“Batch 2: Phone Number” (batch
secondary phone number)
“Batch 2: PreDial Supported” (Y or
N)
“Batch 2: Re-Dial Attempts” (batch
secondary phone # re-dial attempts)
“Batch 2: Connection Timeout
Period, in Seconds” (secondary
batch connection timeout period)
“Primary Proc: Merchant Number”
(merchant ID number for dial-up
transactions)
9010
X
4,4
9023
N
19
9030
X
4,4
“Primary Proc: Device ID” (device
ID for dial-up transactions)
“Wireless Proc: Merchant Number”
(merchant
ID
for
wireless
transactions)
“Wireless Proc: Device ID” (device
ID for wireless transactions; must be
different from primary proc device
2003 LinkPoint® International, Inc.
31
“Default” Value
(SEE NOTE ABOVE!)
load]
Y
2
30
18002289074
Y
1
30
18002289074
Y
0
60
18002289074
Y
0
60
022009001234566
[This is a test number;
must be changed in
the merchant file]
DAY0
022009001234566
[This is a test number;
must be changed in
the merchant file]
DB01
9100 Reference Manual
DOWNLOAD PARAMETERS AND OPTIONS
Parameter
(Field #s
from TDF)
Field
Type
Field
Length
20002
N
3,3
20008
X
19,19
20586
N
8
20590
N
7
27816
N
5
27820
N
5
60001
N
3,3
61000
61001
N
N
8,8
8,8
61002
61003
61004
61005
N
N
N
Q
2
2
7,7
1
Description of Field and Comments
ID)
“Data Input Idle Timeout Period 0
(Seconds)” (time before terminal
returns to idle if no key is pressed
during data entry: 0 to 60 seconds; 0
= must press [CLEAR] to return to
the idle prompt; 1–60 = terminal
automatically returns to the idle
prompt after the set number of
seconds)
“Zero Key Text Characters” (in any
field in which alpha entry is
permitted, repeatedly pressing the 0
key will access these characters in
succession so they can be keyed into
the field). (Note: Does not apply to
the Dial Prefix field in Setup; in Dial
Prefix, the zero key characters are
hard-coded
to
the
following
selection: , / * # ; ).
“EBT Cash Only Amt: Min EBT Cash
Only Amt Value, (in Cents)”
(decimal point implied, e.g., 99999 =
$999.99; note that Cash Only is the
same as Cash Sale)
“EBT Cash Only Amt: Max EBT
Cash Only Amt Value, (in Cents)”
(decimal point implied, e.g., 99999 =
$999.99; note that Cash Only is the
same as Cash Sale)
“Cash Back Amt: Min CashBack
Amt Value, (in Cents)” (decimal
point implied, e.g., 99999 = $999.99;
applies to Debit CashBack)
“CashBack Amt: Max CashBack Amt
Value, (in Cents)” (decimal point
implied, e.g., 99999 = $999.99;
applies to Debit CashBack)
“Crd Range Cntrl Tbl: Number”
(Card Range Control Table)
“MC Purchase Card LR” (low range)
“MC Purchase Card UR” (upper
range)
“MC Purchase Card Min. Length”
“MC Purchase Card Max. Length”
“MC Purchase Card Type Tbl”
“MC Purchase Card – Disable?” (Y
or N; Y = card type is disabled; N =
2003 LinkPoint® International, Inc.
32
“Default” Value
(SEE NOTE ABOVE!)
030
.,‘-:()!@#$%&*
+=/?
00000
99999
00000
10000
036
54050000
54059999
16
19
0004060
N
9100 Reference Manual
DOWNLOAD PARAMETERS AND OPTIONS
Parameter
(Field #s
from TDF)
Field
Type
Field
Length
61006
N
7
61007
Q
1
61008
Q
1
61009
Q
1
61010
Q
1
61011
Q
1
6102061211
6122061531
6154061551
6156061571
6158061590
6160061610
6162061630
6164061650
6166061690
6170061711
6172061730
Description of Field and Comments
card type is enabled)
“MC Purchase Card Wireless Type
Table”
“MC Purchase Card Customer Code
Prompt” (Y or N)
“MC Purchase Card Order Number
Prompt” (Y or N)
“MC Purchase Card Tax Prompt” (Y
or N)
“MC Purchase Card AVS Only
Prompts” (Y or N)
“MC Purchase Card CVC2 Prompt”
(Y or N)
(Additional MasterCard and MC
purchase, business, business debit,
and corporate fleet card ranges and
related fields--see Fields 60001 to
61011 above for example of all the
fields for one card range).
(Visa and Visa purchase and fleet
card ranges and related fields)
(AMEX “34” card range and related
fields)
(AMEX “37” card range and related
fields)
(Discover (Novus) card range and
related fields)
(JCB card range and related fields)
“Default” Value
(SEE NOTE ABOVE!)
0004560
Y
N
Y
N
Y
(Diners Club card range and related
fields)
(Carte Blanche card range and
related fields)
(JAL card ranges and related fields)
(FDC test card range and related
fields)
(“Unknown” card range and related
fields--allows addition of one card
type such as a private label card)
NOTE: The application also allows for
addition of 16 new card types in the
future, although these are not currently
defined in the TDF.
2003 LinkPoint® International, Inc.
33
9100 Reference Manual
STANDARD TRANSACTIONS
STANDARD TRANSACTIONS
The LinkPoint 9100 uses transaction menus instead of transaction keys. This makes
operating the terminal simple, intuitive, and user-friendly. The main transaction menu
can be accessed from the idle prompt or the LinkPoint logo simply by pressing either
[OK], [C], or [CLR]. The main menu consists of the submenu options 1 Credit, 2 Debit, 3
EBT, and 4 Batch. Each of these submenus can be accessed by pressing the
corresponding number on the keypad. Alternatively, the operator can use the up or
down arrow key to scroll until the desired option is highlighted, then press [OK]. Each
of these submenus can also be accessed from the idle prompt by pressing its
corresponding number on the keypad.
The main menu and submenu options are as follows:
1 CREDIT
1 SALE
2 RETURN
3 VOID
4 AUTHORIZE ONLY
5 TICKET ONLY
6 PRE-SALE
2 DEBIT
1 SALE
2 RETURN
3 EBT
1 FOOD SALE
2 FOOD RETURN
3 FOOD BALANCE
4 CASH SALE
5 CASH BALANCE
6 VOUCHER SALE
7 VOUCHER RETURN
4 BATCH
1 CLOSE
2 INQUIRY
3 UPDATE
4 UPLOAD
Reports, reviews, reprints and other local functions are accessed by pressing the [F] key
to display the admin menu. These will be described later in this manual.
To initiate a card-swiped, online credit sale, simply swipe the card at either the
LinkPoint logo or the SWIPE CARD idle screen. Then follow the remaining prompts on
the display.
2003 LinkPoint® International, Inc.
34
9100 Reference Manual
STANDARD TRANSACTIONS
To initiate other transactions, follow these steps:
1. Check the display for the LinkPoint logo or the SWIPE CARD idle prompt. If it is not
displayed, press the red [C] key to return to the idle prompt.
2. Press [OK], [C], or [CLR] at either the LinkPoint logo or the SWIPE CARD idle
prompt.
3. Choose the desired transaction type from the appropriate menu and submenu as
shown above.
4. Follow the instructions given by the prompts on the display panel to complete the
transaction.
5. Press [C] to return to the idle prompt message when the transaction is completed
(the terminal is programmed to return to idle in one minute if [C] is not pressed).
Using The Card Reader
1. Check the display for the LinkPoint logo or the SWIPE CARD idle prompt. If it is not
displayed, press the red [C] key to return to the idle prompt.
2. For a card-swiped, online credit sale, simply swipe the card at the idle prompt. For
other transactions, initiate the correct transaction type as indicated above.
3. When the terminal prompts Swipe Card or Key Account #, insert the credit or debit
card into the rear of the card reader slot with the magnetic stripe facing up and away
from the keypad (see Figure 8).
4. Slide the card through the slot without stopping. If the terminal displays BAD CARD
SWIPE, press [CLR]. Check the position of the magnetic stripe and slide the card
through the slot again. If the BAD CARD SWIPE message persists, the card may be
damaged. At the prompt SWIPE CARD OR KEY ACCOUNT #, type the account
number directly on the keypad, press [OK], and follow the remaining prompts for a
manually entered transaction. (Note: If all card swipe attempts get the BAD CARD
SWIPE message, the card reader may need cleaning. Card reader cleaners can be
purchased at office supply stores for this purpose.
5. Complete the transaction by following the display messages.
Wireless or Dialup Mode
Before performing transactions, the operator must first choose the mode (wireless or
phone) in which the transactions will be done. Please see the section in this manual
entitled “Local Functions” for detailed information on choosing modes. The basic
procedure for changing modes is as follows: Press the blue [F] key at the idle prompt.
When the ADMIN MENU appears, press 6 = SETUP. Key the password (default = 1234),
then press [OK]. At the SETUP MENU, press 4 = COMMS. At the HOSTS MENU, press
1 = COMMS TYPE. The comms type (Wireless or Phone) will be displayed. Press the
left-most soft key under YES to change modes, or press the right–most soft key under
NO to keep the mode the same.
2003 LinkPoint® International, Inc.
35
9100 Reference Manual
STANDARD TRANSACTIONS
When the terminal is in wireless mode, a “Y”-shaped icon will always be present in the
upper left corner of the display, even if the terminal is out of wireless network coverage.
When in dialup mode, no icon will be present.
Note that transactions performed in wireless mode must be closed in wireless mode and
transactions performed in dialup mode must be closed in dialup mode. It is not
permissible to run transactions in one mode and then close them in a different mode.
Standard Retail Transactions
Standard retail transactions are transactions that all personnel can perform. These
transactions include online credit sale, offline credit sale, credit return, void, ticket only,
authorization only, debit transactions, EBT transactions, and close batch. Standard retail
direct marketing and purchasing card transactions can also be performed if these
features have been enabled.
The LinkPoint 9100 can process up to 300 transactions in a single batch. When the batch
is more than 90 percent full, the warning BATCH NEARLY FULL appears when another
transaction is attempted. The operator can continue the transaction by pressing [OK] at
this prompt.
When the memory is full, the screen displays SETTLEMENT REQUIRED and no further
transactions can be stored until the batch is closed. This is a safety feature that advises
the merchant to close when the batch is full.
The procedures for each transaction type include optional prompts. The options are
designated with the note “(optional)” directly below the displayed message. Depending
on the user’s needs, they may be enabled or disabled.
Retail Gratuity Features
The FDC Omaha application includes functionality for non-restaurant businesses, such
as beauty salons, etc., to accept and process gratuities (tips) with their credit card
transactions. By downloading this application with the Zontalk parameter Field 1186
(Global Tip Prompt) enabled to “Y” (Yes), credit and debit sales will prompt for tip
amount during the transaction. If the Zontalk parameter in Field 1172 (Pre-sale Gratuity)
is set to “Y” (Yes), the operator can print a pre-sale receipt with a tip line that the
customer can fill in. These features can also be enabled locally via terminal setup. When
the actual sale is performed, the tip amount can then be added at the tip amount
prompt. With the retail tip feature enabled, the terminal sends transactions to the FDR
host in a retail format, but the receipts and reports incorporate the tip features.
2003 LinkPoint® International, Inc.
36
9100 Reference Manual
STANDARD TRANSACTIONS
Transaction Tables
The following tables summarize the steps required to perform the various credit, debit
and EBT transactions. (Reviews, reports, reprints, close batch and other functions are
described later in this manual.)
Detailed descriptions of each transaction type are given in the sections immediately
following the tables.
General Instructions
-
To choose a menu option, either press the number of that option, OR scroll with
the up or down arrow key until the option is “highlighted” in reverse text. Then
press the green [OK] key to select it. Make further selections from the sub-menus
using the same method.
-
If a password is requested, the default password is [1][2][3][4]. If the merchant has
changed the password and does not remember the new password, the help desk
should be called for assistance.
-
When in a sub-menu, press the orange [CLR] key to step back to the previous menu.
-
When a field has a YES OR NO question, press the left-most yellow key for YES.
Press the right-most yellow key for NO.
-
When entering data in a field, press the orange [CLR] key to backspace or to empty
a field if necessary.
-
After entering data in a field, press the green [OK] key to save the entry.
-
Press the red [C] key to exit a field or to exit a menu.
-
Use the tables below to find the various transactions and Admin menu options.
CREDIT TRANSACTIONS
CREDIT TRANSACTION
TYPE
CREDIT SALE
- CARD SWIPED
HOW TO START THE
TRANSACTION FROM
THE IDLE PROMPT
Swipe the credit card
STEPS TO COMPLETE THE TRANSACTION
Enter last four digits of the account number from
the card & press [OK]
Enter any requested optional data such as
Operator ID, Invoice Number, etc. & press [OK]
Enter amount & press [OK]
Wait for approval & receipt
2003 LinkPoint® International, Inc.
37
9100 Reference Manual
STANDARD TRANSACTIONS
CREDIT TRANSACTION
TYPE
CREDIT SALE
- ONLINE
- MANUALLY ENTERED
HOW TO START THE
TRANSACTION FROM
THE IDLE PROMPT
Press 1 for Credit
Menu, then press 1 for
Sale, then press 1 for
Online
STEPS TO COMPLETE THE TRANSACTION
Key account # & press [OK]
Key expiration date & press [OK]
Enter CVC2 or CVV2 or CID number if prompted
& press [OK] (This number is on the back of most
cards; if number is not available, just press [OK] to
bypass this prompt)
Press Yes or No at the Phone Sale prompt
Enter amount & press [OK]
If prompted, enter the AVS Address (street # only)
& press [OK]
(AVS = Address Verification Service)
If prompted, enter the AVS zip code & press [OK]
Wait for approval & receipt
CREDIT SALE
- OFFLINE
(Use only where there is
no phone line or wireless
coverage available. Note
that the offline sales are
not approved until they are
uploaded later. Some
offline sales may be
declined when they are
uploaded for approval.)
Press 1 for Credit
Menu, then press 1 for
Sale, then press 2 for
Offline
Swipe card or key account # & exp. date manually
CREDIT RETURN
(Use this to issue a refund
to an account)
Press 1 for Credit
Menu, then press 2 for
Return
Enter password & press [OK]
Remaining prompts will be same as for an online
sale, but you will not get an approval
(Note: You must upload any offline sales at the
end of the business day; see Batch Upload
instructions in the Batch Transactions table below)
Swipe card or key account number & exp. date
manually
Remaining prompts will be similar to those for a
sale
VOID
(Use this to cancel a
transaction in the current
open batch)
Press 1 for Credit
Menu, then press 3 for
Void
Enter password & press [OK]
Enter three-digit Item # from original transaction
receipt
If the correct item is displayed, press [OK]
If the correct card number is displayed, press [OK]
Press [OK] to confirm the void
Wait for receipt
2003 LinkPoint® International, Inc.
38
9100 Reference Manual
STANDARD TRANSACTIONS
CREDIT TRANSACTION
TYPE
AUTHORIZE ONLY
(This will pre-authorize an
amount but will not
capture the sale or charge
the customer’s account)
TICKET ONLY SALE
(Perform this transaction
after getting a voice
approval for a sale, or if
you wish to charge an
account after an Authorize
Only)
HOW TO START THE
TRANSACTION FROM
THE IDLE PROMPT
Press 1 for Credit
Menu, then press 4 for
Authorize
STEPS TO COMPLETE THE TRANSACTION
Swipe card or key account number & exp. date
manually
Remaining prompts will be same as those for a
sale
(If you want to charge the customer’s account,
you must perform a Ticket Only within about 8
days and use the approval you received from the
Authorize Only transaction)
Press 1 for Credit
Menu, then press 5 for
Ticket
Swipe card or key account number & exp. date
manually
Remaining prompts will be same as those for a
sale, except that the terminal will also prompt for
an approval code; at this prompt, enter the code
you received from the voice approval center or
from the Authorize Only transaction
For a manually entered Ticket Only, the terminal
will also prompt for AVS Response Code, AVS
ACI, and AVS TID; key these from the Authorize
Only receipt. If this information is not known,
press [OK] to bypass each of these prompts
PRE-SALE
(This is not a sale; perform
this function only if you
want to give the customer
a receipt so that he can
write a tip amount. A
credit sale must still be
performed after this to
actually charge the
customer.)
Press 1 for Credit
Menu, then press 6 for
Pre-Sale
Enter the base amount of the sale & press [OK]
Wait for the receipt to print; give the receipt to the
customer to write in the tip; then perform a regular
credit sale for the total amount of sale plus tip
DEBIT TRANSACTIONS
(Use only if the merchant account is set up to accept debit cards)
DEBIT TRANSACTION
TYPE
DEBIT SALE
HOW TO START THE
TRANSACTION FROM
THE IDLE PROMPT
Press 2 for Debit Menu,
then press 1 for Debit
Sale
STEPS TO COMPLETE THE TRANSACTION
Swipe the debit card
Enter any requested optional data such as
Operator ID, Invoice Number, etc. & press [OK]
Enter amount & press [OK]
Give the terminal to the customer to enter the PIN
& press [OK]
Wait for approval & receipt
2003 LinkPoint® International, Inc.
39
9100 Reference Manual
STANDARD TRANSACTIONS
DEBIT TRANSACTION
TYPE
DEBIT RETURN
(Use this to issue a refund
to a debit account.)
HOW TO START THE
TRANSACTION FROM
THE IDLE PROMPT
Press 2 for Debit Menu,
then press 2 for Debit
Return
STEPS TO COMPLETE THE TRANSACTION
Enter the password & press [OK]
Swipe the debit card
Enter any requested optional data such as
Operator ID, Invoice Number, etc. & press [OK]
Enter amount & press [OK]
Give the terminal to the customer to enter the PIN
& press [OK]
Wait for approval & receipt
EBT TRANSACTIONS
(Use only if the merchant account is set up to accept Electronic Benefits Transfer
cards)
EBT TRANSACTION
TYPE
EBT FOOD SALE
HOW TO START THE
TRANSACTION FROM
THE IDLE PROMPT
Press 3 for EBT Menu,
then press 1 for Food
Sale
STEPS TO COMPLETE THE TRANSACTION
Swipe the EBT card or key account # & exp. date
manually (if no expiration date on the card, press
[OK] to bypass the Expiry prompt)
Enter the Operator ID (required) & press [OK]
Enter amount & press [OK]
Give the terminal to the customer to enter the PIN
& press [OK]
Wait for approval & receipt
EBT FOOD RETURN
(Use this to issue a refund
on a food sale.)
Press 3 for EBT Menu,
then press 2 for Food
Return
Swipe the EBT card (manual entry not allowed on a
return)
Enter the Operator ID (required) & press [OK]
Enter amount & press [OK]
Give the terminal to the customer to enter the PIN
& press [OK]
Wait for approval & receipt
EBT FOOD BALANCE
(Use this to verify the food
stamp balance on the EBT
account)
Press 3 for EBT Menu,
then press 3 for
FoodStp Bal
Swipe the EBT card or key account # & exp. date
manually (if no expiration date on the card, press
[OK] to bypass the Expiry prompt)
Enter the Operator ID (required) & press [OK]
Give the terminal to the customer to enter the PIN
& press [OK]
Wait for receipt
2003 LinkPoint® International, Inc.
40
9100 Reference Manual
STANDARD TRANSACTIONS
EBT TRANSACTION
TYPE
HOW TO START THE
TRANSACTION FROM
THE IDLE PROMPT
STEPS TO COMPLETE THE TRANSACTION
EBT CASH SALE
Press 3 for EBT Menu,
then press 4 for Cash
Sale
Swipe the EBT card
(Manual entry not allowed for a Cash Sale)
Enter the Operator ID (required) & press [OK]
Enter amount & press [OK]
Give the terminal to the customer to enter the PIN
& press [OK]
Wait for approval & receipt
EBT CASH BALANCE
Press 3 for EBT Menu,
then press 5 for Cash
Bal
Swipe the EBT card or key account number & exp.
date manually
(If no expiration date, press [OK] to bypass this
prompt)
Enter the Operator ID (required) & press [OK]
Give the terminal to the customer to enter the PIN
& press [OK]
Wait for balance to display & print
EBT VOUCHER SALE
(Use this after getting a
voice approval for an EBT
sale)
Press 3 for EBT Menu,
then press 6 for Vouch
Sale
Swipe the EBT card or key account # & exp. date
manually (if no expiration date on the card, press
[OK] to bypass the Expiry prompt)
Enter the Operator ID (required) & press [OK]
Enter the Transaction Voucher Number from the
electronic voucher & press [OK]
Enter amount & press [OK]
Enter approval code (obtained from voice center) &
press [OK]
Wait for approval & receipt
EBT VOUCHER RETURN
(Use this after getting a
voice approval for an EBT
return)
Press 3 for EBT Menu,
then press 7 for Vouch
Rtrn
Swipe the EBT card or key account # & exp. date
manually (if no expiration date on the card, press
[OK] to bypass the Expiry prompt)
Enter the Operator ID (required) & press [OK]
Enter the Transaction Voucher Number from the
electronic voucher & press [OK]
Enter amount & press [OK]
Enter approval code (obtained from voice center) &
press [OK]
Wait for approval & receipt
2003 LinkPoint® International, Inc.
41
9100 Reference Manual
STANDARD TRANSACTIONS
Credit Card Sale – Swiped
A sale is a monetary transaction that transfers funds from a cardholder’s credit line to the
merchant’s bank account. This transaction is the normal procedure used to authorize and
capture a credit card sale for later deposit.
The following prompts will appear if credit sale is selected from the menus by pressing
[OK] at the idle prompt, followed by [1] = CREDIT, then [1] = SALE, then [1] = ONLINE.
(A swiped credit card sale may also be started by simply swiping the card at the idle
prompt or the LinkPoint logo).
Display Message
CREDIT SALE
Enter Password
Operator Action
If prompted, key in the merchant password,
(1-6 digits) and press [OK].
(optional)
CREDIT SALE
Swipe Card or
Key Account #
CREDIT SALE
Enter Last 4
Digits
Slide the card through the card reader.
Key the last 4 digits of the account and press
[OK].
(optional)
CREDIT SALE
Swiped
Card
Data
XXXXXXXXXXXXXX
The swiped card number will appear. Press
OK to continue.
(optional)
2003 LinkPoint® International, Inc.
42
9100 Reference Manual
STANDARD TRANSACTIONS
CREDIT SALE
Enter Operator
Id
Key in the operator ID and press [OK], or
simply press [OK] to skip this input.
(optional)
CREDIT SALE
Enter
Sale
Amount
$0.00
Key in the amount of the sale (max 7 digits)
without the decimal point then press [OK].
CREDIT SALE
Enter
Tax
Amount
$0.00
Key in the tax amount (max 5 digits) without
the decimal, then press [OK].
This is a required field for purchase cards.
(optional)
CREDIT SALE
Enter
Tip
Amount
$0.00
Key in the tip amount (max 5 digits) without
the decimal point then press [OK].
(optional)
CREDIT SALE
Sale
$xxxxx.xx
Tip
Total
$xxx.xx
$xxxxx.xx
Tax
$xxx.xx
If tip prompt is enabled, or if tax amount is
enabled, the totals for the transaction are
displayed. Press [OK] to continue. Press [CLR]
key to return to the enter sale amount screen.
(optional) (conditional)
2003 LinkPoint® International, Inc.
43
9100 Reference Manual
STANDARD TRANSACTIONS
CREDIT SALE
Enter Invoice
Number
Key in the invoice number (up to eight
alphanumeric characters) and press [OK], or
simply press [OK] to skip this field.
(optional)
CREDIT SALE
various text
The terminal displays several messages
indicating it is communicating with the host.
These are DIALING, REDIALING, SENDING,
RECEIVING, and DISCONNECTING.
CREDIT SALE
AUTH/TKT
XXXXXX
Item#:nnnn
The approval message is displayed. The
terminal displays this message until the receipt
is printed assuming that the printer is available
and enabled.
CREDIT SALE
Press OK for
customer copy
The terminal displays this message, waiting for
acknowledgement
before
printing
the
customer receipt, if second receipt is enabled.
(conditional)
CREDIT SALE
AUTH/TKT
XXXXXX
Item#:nnnn
2003 LinkPoint® International, Inc.
The approval message is displayed. Press
[CLR] to return to either the idle or transaction
menu screen.
44
9100 Reference Manual
STANDARD TRANSACTIONS
Credit Card Sale—Manual Entry
A manually entered credit card sale should be performed if the card is not present or if
the magnetic stripe on the card is unreadable.
To start a manually entered credit card sale from the idle prompt, press [OK]. Then
select [1] Credit from the main menu, followed by [1] = SALE, then [1] = ONLINE. Then
follow the remaining prompts shown below.
Note: A manually entered credit card sale will prompt for a Card Verification Value. The
Card Verification Value is a number that appears on the back of the customer’s Visa,
MasterCard, or American Express card after the account number. Requiring this number
to be entered during manual entry transactions provides an extra level of fraud
protection. For Visa this number is called the CVV2. For MasterCard it is the CVC2, and
for AMEX it is the CID number.
Display Message
CREDIT SALE
Enter Password
Operator Action
If prompted, key in the merchant password (16 digits) and press [OK].
(optional)
CREDIT SALE
Swipe Card or
Key Account #
Key the cardholder’s account number (max 19
digits), and press [OK].
CREDIT SALE
Enter Expiry
Date
MMYY
Key in the four-digit expiration date using two
digits for the month and two for the year, the
press [OK].
CREDIT SALE
Enter 3-Digit
CVV2 Number
Key in the 3-digit Visa CVV2 number and
press [OK].
(optional)
2003 LinkPoint® International, Inc.
45
9100 Reference Manual
STANDARD TRANSACTIONS
OR
CREDIT SALE
Enter 4-Digit
CID Number
Key in the 4-digit AMEX CID number and
press [OK].
(optional)
OR
CREDIT SALE
Enter 3-Digit
CVC2 Number
Key in the 3-digit MasterCard CVC2 number
and press [OK].
(optional)
CREDIT SALE
Phone Order
Transaction?
Yes
No
Press the far left soft key under YES if the
order was received by phone, or press the far
right key under NO if it was not.
CREDIT SALE
Make
Imprint
If
Card
Is
Present!
This message is displayed for two seconds. If
the card is present the user should obtain an
imprint with a manual imprinter.
(conditional)
CREDIT SALE
Enter Operator
Id
Key in the operator ID and press [OK], or
simply press [OK] to skip this input.
(optional)
2003 LinkPoint® International, Inc.
46
9100 Reference Manual
STANDARD TRANSACTIONS
CREDIT SALE
Enter
Sale
Amount
$0.00
Key in the amount of the sale (max 7 digits)
without the decimal point then press [OK].
CREDIT SALE
Enter
Tax
Amount
$0.00
Key in the tax amount (max 5 digits) without
the decimal, then press [OK].
This is a required field for purchase cards.
(optional)
CREDIT SALE
Enter
Tip
Amount
$0.00
Key in the tip amount (max 5 digits) without
the decimal point. then press [OK].
(optional)
CREDIT SALE
Sale
$xxxxx.xx
Tip
Total
$xxx.xx
$xxxxx.xx
Tax
$xxx.xx
If tip prompt is enabled, of if the tax prompt is
enabled, the totals for the transaction are
displayed. Press [OK] to continue. Press [CLR]
key to return to the enter sale amount screen.
(optional) (conditional)
CREDIT SALE
Enter Invoice
Number
Key in the invoice number (up to eight
alphanumeric characters) and press [OK], or
simply press [OK] to skip this field.
(optional)
CREDIT SALE
various text
2003 LinkPoint® International, Inc.
The terminal displays several messages
indicating it is communicating with the host.
These are DIALING, REDIALING, SENDING,
RECEIVING, and DISCONNECTING.
47
9100 Reference Manual
STANDARD TRANSACTIONS
CREDIT SALE
AUTH/TKT
XXXXXX
Item#:nnn
CREDIT SALE
Press OK for
customer copy
The approval message is displayed. The
terminal displays this message until the receipt
is printed, assuming that the printer is
available and enabled.
The terminal displays this message, waiting for
acknowledgement
before
printing
the
customer receipt, if second receipt is enabled.
(conditional)
CREDIT SALE
AUTH/TKT
XXXXXX
Item#:nnn
2003 LinkPoint® International, Inc.
The approval message is displayed. Press [CLR]
to return to either the idle or transaction menu
screen.
48
9100 Reference Manual
STANDARD TRANSACTIONS
Credit Card Sale–Receipt
-Transaction type
CREDIT SALE RECEIPT
Custom
Custom
Custom
Custom
Custom
Custom
Header
Header
Header
Header
Header
Header
Line
Line
Line
Line
Line
Line
1
2
3
4
5
6
-Custom header lines
(max 6)
Merch ID:xxxxxxxxxxxxxxxx
Term ID:xxxx
Item #:xxx
VISA SALE:SWIPED
Invoice : xxxxxxxx Op ID:xxxx
Acct:xxxxxxxxxxxxxxxxxx
Exp:mm/yy
AMOUNT
TAX
TIP
TOTAL
-Merchant ID
-Terminal ID and Item #
-Card, tran type, entry method
-Invoice#, operator id
-Card number
-Expiry Date
$xxxxx.xx
$xxxxx.xx
$xxxxx.xx
==========
$xxxxx.xx
-Purchase Amount
-Tax Amount
-Tip Amount
-Total Amount
X____________________________
JOHN DOE
Custom Agreement Line1
Custom Agreement Line2
Custom Agreement Line3
Custom Agreement Line4
Custom
Custom
Custom
Custom
Trailer
Trailer
Trailer
Trailer
Line
Line
Line
Line
-Cardholder Signature
-Cardholder name (if swiped)
-Custom cardholder agreement
lines (max 4)
1
2
3
4
-Custom trailer lines
(max 4)
Date: mm/dd/yy
Time:hh:mmP
Response: AUTH/TKT XXXXXX
2003 LinkPoint® International, Inc.
-Transaction date & time
-Host Response text
49
9100 Reference Manual
STANDARD TRANSACTIONS
Credit Card Sale–Manual Entry With Direct Marketing/AVS
When the Direct Marketing and AVS prompts are enabled, a manually entered credit
card sale will display these prompts.
To start a manually entered credit card sale with Direct Marketing and AVS, select
Credit Sale from the menus by pressing [OK] at the idle prompt, followed by [1] =
Credit, then [1] = Sale, then [1] = Online. Then follow the remaining prompts shown
below.
Display Message
CREDIT SALE
Enter Password
Operator Action
If prompted, key in the merchant password (16 digits) and press [OK].
(optional)
CREDIT SALE
Swipe Card or
Key Account #
CREDIT SALE
Enter Expiry
Date
MM/YY
CREDIT SALE
Enter 3-Digit
CVV2 Number
Key the cardholder’s account number (max 19
digits) and press [OK].
Key in the four-digit expiration date using two
digits for the month and two for the year. then
press [OK].
Key in the 3-digit VISA CVV2 number and
press [OK].
(optional)
2003 LinkPoint® International, Inc.
50
9100 Reference Manual
STANDARD TRANSACTIONS
OR
CREDIT SALE
Enter 4-Digit
CID Number
Key in the 4-digit AMEX CID number and
press [OK].
(optional)
OR
CREDIT SALE
Enter 3-Digit
CVC2 Number
Key in the 3-digit MasterCard CVC2 number
and press [OK].
(optional)
CREDIT SALE
Phone Order
Transaction?
Yes
No
CREDIT SALE
Make
Imprint
If
Card
Is
Present!
CREDIT SALE
Enter Operator
Id
Press the far left soft key under Yes if the order
was received by phone, or press the far right
key under No if it was not.
This message is displayed for two seconds. If
the card is present the user should obtain an
imprint with a manual imprinter.
Key in the operator id and press [OK], or
simply press [OK] to skip this input.
(optional)
2003 LinkPoint® International, Inc.
51
9100 Reference Manual
STANDARD TRANSACTIONS
CREDIT SALE
Enter
Sale
Amount
$0.00
Key in the amount of the sale (max 7 digits)
without the decimal point then press [OK].
CREDIT SALE
Enter
Tax
Amount
$0.00
Key in the tax amount (max 5 digits) without
the decimal, then press [OK].
CREDIT SALE
Enter
Tip
Amount
This is a required field for purchase cards.
Key in the tip amount (max 5 digits) without
the decimal point then press [OK].
(optional)
CREDIT SALE
Sale
Tax
$xxxxx.xx
$xxx.xx
Tip
$xxx.xx
(optional) (conditional)
Total
$xxxxx.xx
CREDIT SALE
Enter AVS
Address
If tip prompt is enabled or if tax prompt is
enabled, the totals for the transaction are
displayed. Press [OK] to continue. Press [CLR]
key to return to the enter sale amount screen.
Key in the customer’s numeric address (up to 5
digits) and press [OK].
(optional)
CREDIT SALE
Enter AVS
ZIP Code
Key in the customer’s 5- or 9-digit zip code
and press [OK].
(optional)
2003 LinkPoint® International, Inc.
52
9100 Reference Manual
STANDARD TRANSACTIONS
CREDIT SALE
Enter
Order
Number
Key in the order number (up to
alphanumeric characters) and press [OK].
25
(optional)
CREDIT SALE
Enter Invoice
Number
Key in the invoice number (up to eight
alphanumeric characters) and press [OK], or
simply press [OK] to skip this field.
(optional)
CREDIT SALE
various text
CREDIT SALE
AUTH/TKT
XXXXXX Y
various text
CREDIT SALE
Press OK for
customer copy
The terminal displays several messages
indicating it is communicating with the host.
These are DIALING, REDIALING, SENDING,
RECEIVING, and DISCONNECTING.
The terminal displays the authorization
response text and the AVS code. The bottom
line will also display the text interpretation of
the AVS code. The terminal displays this
message until the receipt is printed assuming
that the printer is available and enabled.
The terminal displays this message, waiting for
acknowledgement
before
printing
the
customer receipt, if second receipt is enabled.
(conditional)
CREDIT SALE
AUTH/TKT
XXXXXX Y
various text
2003 LinkPoint® International, Inc.
The terminal displays the authorization
response text and the AVS code. The bottom
line will also display the text interpretation of
the AVS code.
Press [CLR] to return to either the idle or
transaction menu screen.
53
9100 Reference Manual
STANDARD TRANSACTIONS
AVS Response Code Definitions
The bottom line of the display (for the credit sale and auth only transactions with direct
marketing/AVS) will be generated by the single character AVS response code as shown
in the following table.
AVS
Code
A
E
N
R
S
U
W
X
Y
Z
Terminal Display
Meaning
Adr Match Only Address Match Only
Not Eligible
No Match
Retry
Not Supported
Adr Not Avail
Zip Code Ok
Exact Match
Exact Match
Zip Code Ok
Not Eligible for AVS
No Match
Retry, System Unavailable
Service Not Supported
Address Information Not Available
9-Digit Zip Code OK
Exact Match
Exact Match
5-Digit Zip Code OK
2003 LinkPoint® International, Inc.
54
9100 Reference Manual
STANDARD TRANSACTIONS
Credit Card Sale–Direct Marketing/AVS Receipt
CREDIT SALE RECEIPT
Custom
Custom
Custom
Custom
Custom
Custom
Header
Header
Header
Header
Header
Header
Line
Line
Line
Line
Line
Line
1
2
3
4
5
6
-Transaction type
-Custom header lines
(max 6)
Merch ID:xxxxxxxxxxxxxxxx
Term ID:xxxx
Item #:xxx
VISA AVS SALE:KEYED
Invoice : xxxxxxxx Op ID:xxxx
Order Number:
xxxxxxxxxxxxxxxxxxxxxxxxxx
AVS Address:xxxxx
AVS Zip Code:xxxxxxxxx
PHONE ORDER
Acct:xxxxxxxxxxxxxxxxxx
Exp:mm/yy
-Merchant ID
-Terminal ID & Item #
-Card, tran type, entry method
-Invoice#, operator id
-Order number
AMOUNT
TAX
TIP
-Purchase Amount
-Tax Amount (optional)
TOTAL
$xxxxx.xx
$xxxxx.xx
$xxxxx.xx
==========
$xxxxx.xx
X____________________________
Custom
Custom
Custom
Custom
Agreement
Agreement
Agreement
Agreement
Custom
Custom
Custom
Custom
Trailer
Trailer
Trailer
Trailer
Line1
Line2
Line3
Line4
Line
Line
Line
Line
1
2
3
4
Date: mm/dd/yy
Time: hh:mmP
Response: AUTH/TKT XXXXXX Y
AVS: Exact Match
TID:xxxxxxxxxxxxxxx ACI: V
2003 LinkPoint® International, Inc.
-AVS numeric address info
-AVS zip code 5–9 digits
-If phone order
-Card number
-Expiry Date
-Tip Amount (optional)
-Total Amount (optional)
-Cardholder Signature
-Custom cardholder
lines (max 4)
agreement
-Custom Trailer Lines
(max 4)
-Transaction date & time
-Host Response text
-AVS response description
-Transaction ID, auth
characteristic indicator
55
9100 Reference Manual
STANDARD TRANSACTIONS
Purchase Card Sale—Swiped
When the customer code and tax prompts are enabled, a swiped credit card sale will
display these prompts.
To start a swiped purchase card sale, select credit sale from the menus by pressing [OK]
at the idle prompt, followed by [1] = CREDIT, then [1] = SALE, then [1] = ONLINE.
Then follow the remaining prompts shown below.
Display Message
CREDIT SALE
Enter Password
Operator Action
If prompted, key in the merchant password (16 digits) and press [OK].
(optional)
CREDIT SALE
Swipe Card or
Key Account #
CREDIT SALE
Enter Last 4
Digits
Slide the card through the card reader.
Key the last 4 digits of the account and press
[OK].
(optional)
CREDIT SALE
Swiped
Card
Data
XXXXXXXXXXXXXX
The swiped card number will appear. Press
[OK] to continue.
(optional)
2003 LinkPoint® International, Inc.
56
9100 Reference Manual
STANDARD TRANSACTIONS
CREDIT SALE
Enter Operator
Id
Key in the operator id (up to 4 numeric
characters) and press [OK], or simply press
[OK] to skip this input.
(optional)
CREDIT SALE
Enter
Sale
Amount
$0.00
CREDIT SALE
Enter
Tax
Amount
$0.00
Key in the amount (max 7 digits) of the sale
without the decimal point, then press [OK].
Key in the tax amount (max 5 digits) without
the decimal, then press [OK].
This is a required field for purchase cards.
(optional)
CREDIT SALE
Enter
Tip
Amount
$0.00
Key in the tip amount (max 5 digits) without
the decimal point, then press [OK].
(optional)
CREDIT SALE
Sale
$xxxxx.xx
Tip
Total
$xxx.xx
$xxxxx.xx
Tax
$xxx.xx
If tip prompt is enabled, or the tax prompt is
enabled, the totals for the transaction are
displayed. Press [OK] to continue. Press [CLR]
key to return to the enter sale amount screen.
(optional) (conditional)
CREDIT SALE
Enter
Customer Code
Key in the customer code (up to 17
alphanumeric characters) as provided by the
purchasing agent and press [OK].
(optional)
2003 LinkPoint® International, Inc.
57
9100 Reference Manual
STANDARD TRANSACTIONS
CREDIT SALE
Enter Invoice
Number
Key in the invoice number (up to eight
alphanumeric characters) and press [OK], or
simply press [OK] to skip this field.
(optional)
CREDIT SALE
various text
The terminal displays several messages
indicating it is communicating with the host.
These are DIALING, REDIALING, SENDING,
RECEIVING, and DISCONNECTING.
CREDIT SALE
AUTH/TKT
XXXXXX
Item#:nnnn
The approval message is displayed. The
terminal displays this message until the receipt
is printed, assuming that the printer is
available and enabled.
CREDIT SALE
Press OK for
customer copy
The terminal displays this message, waiting for
acknowledgement
before
printing
the
customer receipt, if second receipt is enabled.
(conditional)
CREDIT SALE
AUTH/TKT
XXXXXX
Item#:nnnn
2003 LinkPoint® International, Inc.
The approval message is displayed. Press
[CLR] to return to either the idle or transaction
menu screen.
58
9100 Reference Manual
STANDARD TRANSACTIONS
Purchase Card Sale–Manual Entry
When the customer code and tax prompts are enabled, a manually entered credit card
sale will display these prompts.
To start a manually entered purchase card sale, select credit sale from the menus by
pressing [OK] at the idle prompt, followed by [1] = CREDIT, then [1] = SALE, then [1] =
ONLINE. Then follow the remaining prompts shown below.
Display Message
CREDIT SALE
Enter Password
Operator Action
If prompted, key in the merchant password (16 digits) and press [OK].
(optional)
CREDIT SALE
Swipe Card or
Key Account #
Key the cardholder’s account
(maximum 19 digits) and press [OK].
number
CREDIT SALE
Enter Expiry
Date
MM/YY
Key in the four-digit expiration date using two
digits for the month and two for the year and
press [OK].
CREDIT SALE
Enter 3-Digit
CVV2 Number
Key in the 3-digit VISA CVV2 number and
press [OK].
(optional)
2003 LinkPoint® International, Inc.
59
9100 Reference Manual
STANDARD TRANSACTIONS
OR
CREDIT SALE
Enter 4-Digit
CID Number
Key in the 4-digit AMEX CID number and
press [OK].
(optional)
OR
CREDIT SALE
Enter 3-Digit
CVC2 Number
Key in the 3-digit MasterCard CVC2 number
and press [OK].
(optional)
CREDIT SALE
Phone Order
Transaction?
Yes
No
CREDIT SALE
Make
Imprint
If
Card
Is
Present!
CREDIT SALE
Enter Operator
Id
Press the far left soft key under YES if the
order was received by phone, or press the far
right soft key under NO if it was not.
This message is displayed for two seconds. If
the card is present the user should obtain an
imprint with a manual imprinter.
Key in the operator ID (up to four numeric
characters) and press [OK], or simply press
[OK] to skip this input.
(optional)
CREDIT SALE
Enter
Sale
Amount
$0.00
2003 LinkPoint® International, Inc.
Key in the amount (maximum 7 digits) of the
sale without the decimal point, then press
[OK].
60
9100 Reference Manual
STANDARD TRANSACTIONS
CREDIT SALE
Enter
Tax
Amount
$0.00
Key in the tax amount (max 5 digits) without
the decimal, then press [OK].
CREDIT SALE
Enter
Tip
Amount
$0.00
Key in the tip amount (max 5 digits) without
the decimal point then press [OK].
This is a required field for purchase cards.
(optional)
(optional)
CREDIT SALE
Sale
$xxxxx.xx
Tip
Total
$xxx.xx
$xxxxx.xx
Tax
$xxx.xx
If tip prompt is enabled, or the tax prompt is
enabled, the totals for the transaction are
displayed. Press [OK] to continue. Press [CLR]
key to return to the enter sale amount screen.
(optional) (conditional)
CREDIT SALE
Enter
Customer Code
Key in the customer code (up to 17
alphanumeric characters) as provided by the
purchasing agent and press [OK].
CREDIT SALE
Enter Invoice
Number
Key in the invoice number (up to eight
alphanumeric characters) and press [OK], or
simply press [OK] to skip this field.
(optional)
CREDIT SALE
various text
2003 LinkPoint® International, Inc.
The terminal displays several messages
indicating it is communicating with the host.
These are DIALING, REDIALING, SENDING,
RECEIVING, and DISCONNECTING.
61
9100 Reference Manual
STANDARD TRANSACTIONS
CREDIT SALE
AUTH/TKT
XXXXXX
Item#:nnnn
The approval message is displayed. The
terminal displays this message until the receipt
is printed, assuming that the printer is
available and enabled.
CREDIT SALE
Press OK for
customer copy
The terminal displays this message, waiting for
the
acknowledgement
before
printing
customer receipt, if second receipt is enabled.
(conditional)
CREDIT SALE
AUTH/TKT
XXXXXX
Item#:nnnn
2003 LinkPoint® International, Inc.
The approval message is displayed. Press
[CLR] to return to either the idle or transaction
menu screen.
62
9100 Reference Manual
STANDARD TRANSACTIONS
Purchase Card Sale—Receipt
CREDIT SALE RECEIPT
Custom
Custom
Custom
Custom
Custom
Custom
Header
Header
Header
Header
Header
Header
Line
Line
Line
Line
Line
Line
1
2
3
4
5
6
Merch ID:xxxxxxxxxxxxxxxx
Term ID:xxxx
Item #:xxx
VISA P/CARD SALE:KEYED
Invoice : xxxxxxxx Op ID:xxxx
CC:xxxxxxxxxxxxxxxxx
PHONE ORDER
Acct:xxxxxxxxxxxxxxxxxx
Exp:mm/yy
AMOUNT
TAX
TIP
TOTAL
$xxxxx.xx
$xxxxx.xx
$xxxxx.xx
==========
$xxxxx.xx
X____________________________
JOHN DOE
Custom Agreement Line1
Custom Agreement Line2
Custom Agreement Line3
Custom Agreement Line4
Custom
Custom
Custom
Custom
Trailer
Trailer
Trailer
Trailer
Line
Line
Line
Line
1
2
3
4
Date: mm/dd/yy
Time: hh:mmP
Response: AUTH/TKT XXXXXX
2003 LinkPoint® International, Inc.
-Transaction type
-Custom header lines
(maximum 6)
-Merchant ID
-Terminal ID & Item #
-Card, tran type, entry method
-Invoice#, operator ID
-Customer Code
-If Phone Order
-Card number
-Expiry Date
-Purchase Amount (before tax)
-Tax Amount
-Tip Amount
-Total purchase amount with
tax
-Cardholder Signature
-Cardholder name (if swiped)
-Custom cardholder agreement
lines (max 4)
-Custom trailer lines
(max 4)
-Transaction date & time
-Host Response text
63
9100 Reference Manual
STANDARD TRANSACTIONS
Credit Card Return–Swiped
A credit card return should be performed to refund a sale that was performed in a batch
that is now closed. (To reverse a sale in a batch that is still open, a void should be
performed—see “Void Transaction” later in this manual.)
A credit card return is started by pressing [OK] at the idle prompt, followed by [1] =
CREDIT, then [2] = RETURN.
The swiped credit card return transaction will have the same displays as a standard
swiped credit card sale. However, the following changes will occur:
1. The top line of the display will be replaced with the words CREDIT RETURN.
2. Since the transaction is authorized offline the display indicating communications
with the host will not appear.
3. There will be no tip entry screen.
4. The approval message screen will have the following form:
Display Message
CREDIT RETURN
Accepted
Item#:nnnn
Operator Action
The approval message is displayed. Press
[CLR] to return to the transaction menu screen.
Credit Card Return–Manual Entry
A manual credit card return is started by pressing [OK] at the idle prompt, followed by
[1] = CREDIT, then [2] = RETURN.
The remaining prompts will be the same as the standard keyed credit card sale, with the
same changes as described above under credit card return.
Credit Card Return—Receipt
The keyed or swiped credit card return receipt will have the same format as the
standard credit card sale receipt. However, the following modifications will be made:
1. The first line of the printed receipt will say credit return receipt.
2. The abbreviated transaction type printed adjacent to the card name will be RTRN.
3. The response code will be ACCEPTED.
2003 LinkPoint® International, Inc.
64
9100 Reference Manual
STANDARD TRANSACTIONS
Purchase Card Return—Swiped
A swiped purchase card return is started by pressing [OK] at the idle prompt, followed
by [1] = CREDIT, then [2] = RETURN.
The swiped purchase card return transaction will have the same displays as a swiped
purchase card sale. However, the following changes will occur:
1. The top line of the display will be replaced with the words CREDIT RETURN.
2. Since the transaction is authorized offline the display indicating communications
with the host will not appear.
3. The approval message screen will take the following form:
Display Message
CREDIT RETURN
Accepted
Item#:nnnn
Operator Action
The approval message is displayed. Press
[CLR] to return to the transaction menu screen.
Purchase Card Return—Manual Entry
A manually entered purchase card return is started by pressing [OK] at the idle prompt,
followed by [1] = CREDIT, then [2] = RETURN.
The prompts will be the same as those for a keyed purchase card sale, with the changes
described above for credit returns.
Purchase Card Return—Receipt
The keyed or swiped purchase card return receipt will have the same format at the
purchase card sale receipt. However, the following modifications will be made:
1. The first line of the printed receipt will say Credit Return Receipt.
2. The abbreviated transaction type printed adjacent to the card name will be RTRN.
Return--Manual Entry with Direct Marketing/AVS
A manually entered credit card return with direct marketing and AVS is started by
pressing [OK] at the idle prompt, followed by [1] = CREDIT, then [2] = RETURN. The
remaining prompts will be the same as those for a standard keyed credit card return as
described above.
2003 LinkPoint® International, Inc.
65
9100 Reference Manual
STANDARD TRANSACTIONS
Ticket Only—Swiped
A ticket only sale should be performed to capture a sale if a prior approval has been
obtained from the voice center or by running an authorization only transaction.
A swiped ticket only is started by pressing [OK] at the idle prompt, followed by [1] =
CREDIT, then [5] = TICKET. Then follow the prompts shown below.
Display Message
TICKET ONLY
Enter Password
Operator Action
If prompted, key in the merchant password (16 digits) and press [OK].
(optional)
TICKET ONLY
Swipe Card or
Key Account #
Slide the card through the card reader.
TICKET ONLY
Enter Last 4
Digits
Key the last 4 digits of the account and press
[OK].
(optional)
TICKET ONLY
Swiped
Card
Data (optional)
XXXXXXXXXXXXXX
The swiped card number will appear. Press
OK to continue.
TICKET ONLY
Enter Operator
Id
Key in the operator ID (up to four
alphanumeric characters) and press [OK], or
simply press [OK] to skip this input.
(optional)
2003 LinkPoint® International, Inc.
66
9100 Reference Manual
STANDARD TRANSACTIONS
TICKET ONLY
Enter
Sale
Amount
$0.00
Key in the amount of the sale (maximum 7
digits) without the decimal point, then press
[OK].
TICKET ONLY
Enter
Tax
Amount
$0.00
Key in the tax amount (max 5 digits) without
the decimal, then press [OK].
This is a required field for purchase cards.
(optional)
TICKET ONLY
Enter
Tip
Amount
$0.00
Key in the tip amount (max 5 digits) without
the decimal point, then press [OK].
(optional)
TICKET ONLY
Sale
$xxxxx.xx
Tip
Total
$xxx.xx
$xxxxx.xx
Tax
$xxx.xx
If tip prompt is enabled, or the tax prompt is
enabled, the totals for the transaction are
displayed. Press [OK] to continue. Press [CLR]
key to return to the enter sale amount screen.
(conditional)
TICKET
ONLY
(optional)
Enter
Order
Number
Key in the order number (up to
alphanumeric characters) and press [OK].
(optional)
2003 LinkPoint® International, Inc.
67
9100 Reference Manual
25
STANDARD TRANSACTIONS
TICKET ONLY
Enter
Customer Code
Key in the customer code (up to 17
alphanumeric characters) as provided by the
purchasing agent and press [OK].
(optional)
TICKET ONLY
Enter Invoice
Number
Key in the invoice number (up to eight
alphanumeric characters) and press [OK], or
simply press [OK] to skip this field.
(optional)
TICKET ONLY
Enter Approval
Code
Key in the approval code (6 alphanumeric)
previously obtained via voice authorization or
through auth only transaction and press [OK].
TICKET ONLY
Accepted
xxxxxx
ITEM#:nnnn
The approval message is displayed. The
terminal displays this message until the receipt
is printed assuming that the printer is available
and enabled.
TICKET ONLY
Press OK for
customer copy
The terminal displays this message, waiting for
acknowledgement
before
printing
the
customer receipt, if second receipt is enabled.
(conditional)
TICKET ONLY
Accepted
xxxxxx
ITEM#:nnnn
2003 LinkPoint® International, Inc.
The approval message is displayed. Press
[CLR] to return to either the idle or transaction
menu screen.
68
9100 Reference Manual
STANDARD TRANSACTIONS
Ticket Only—Manual Entry
A manually entered ticket only is started by pressing [OK] at the idle prompt, followed
by [1] = CREDIT, then [5] = TICKET. Then follow the prompts shown below.
Display Message
TICKET ONLY
Enter Password
Operator Action
If prompted, key in the merchant password (16 digits) and press [OK].
(optional)
TICKET ONLY
Swipe Card or
Key Account #
Key the cardholder’s account number and
press [OK].
TICKET ONLY
Enter Expiry
Date
MM/YY
Key in the four-digit expiration date using two
digits for the month and two for the year.
TICKET ONLY
Phone Order
Transaction?
Yes
No
Press the far left soft key under YES if the
order was received by phone, or press the far
right soft key under NO if it was not.
TICKET ONLY
Make
Imprint
If
Card
Is
Present!
This message is displayed for two seconds. If
the card is present the user should obtain an
imprint with a manual imprinter.
(conditional)
2003 LinkPoint® International, Inc.
69
9100 Reference Manual
STANDARD TRANSACTIONS
TICKET ONLY
Enter Operator
Id
Key in the operator ID and press [OK] or
simply press [OK] to skip this input.
(optional)
TICKET ONLY
Enter
Sale
Amount
$0.00
Key in the amount of the sale (max 7 digits)
without the decimal point then press [OK].
TICKET ONLY
Enter
Tax
Amount
$0.00
Key in the tax amount (max 5 digits) without
the decimal, then press [OK].
This is a required field for purchase cards.
(optional)
TICKET ONLY
Enter
Tip
Amount
$0.00
Key in the tip amount (max 5 digits) without
the decimal point, then press [OK].
(optional)
TICKET ONLY
Sale
$xxxxx.xx
Tip
Total
$xxx.xx
$xxxxx.xx
Tax
$xxx.xx
If tip prompt is enabled, or the tax prompt is
enabled, the totals for the transaction are
displayed. Press [OK] to continue. Press [CLR]
key to return to the enter sale amount screen.
(conditional)
2003 LinkPoint® International, Inc.
70
9100 Reference Manual
STANDARD TRANSACTIONS
TICKET ONLY
(optional)
Enter
Order
Number
Key in the order number (up to
alphanumeric characters) and press [OK].
25
(optional)
TICKET ONLY
Enter
Customer Code
Key in the customer code (up to 17
alphanumeric characters) as provided by the
purchasing agent and press [OK].
(optional)
TICKET ONLY
Enter Approval
Code
Key in the approval code (6 alphanumeric)
previously obtained via voice authorization or
through auth only transaction and press [OK].
TICKET ONLY
Enter Invoice
Number
Key in the invoice number (up to eight
alphanumeric characters) and press [OK], or
simply press [OK] to skip this field.
(optional)
TICKET ONLY
Accepted
xxxxxx(conditional)
Display Message
Item#:nnnn
TICKET ONLY
Press OK for
customer copy
The approval message is displayed. The
terminal displays this message until the receipt
is printed assuming that the printer is available
and enabled.
Operator Action
The terminal displays this message, waiting for
acknowledgement
before
printing
the
customer receipt, if second receipt is enabled.
(conditional)
2003 LinkPoint® International, Inc.
71
9100 Reference Manual
STANDARD TRANSACTIONS
TICKET ONLY
Accepted
xxxxxx
Item#:nnnn
The approval message is displayed. Press
[CLR] to return to either the idle or transaction
menu screen.
Ticket Only—Receipt
The standard ticket only receipt will be the same as the standard credit sale receipt, with
the following differences:
1. The transaction name printed at the top of the receipt will be ticket only receipt.
2. Immediately below the INVOICE # and ITEM # line the 6 alphanumeric approval
code entered during the transaction will be printed as follows: approval code:
XXXXXX.
3. At the bottom of the receipt the final printed line will be response: accepted.
2003 LinkPoint® International, Inc.
72
9100 Reference Manual
STANDARD TRANSACTIONS
Purchase Card Ticket Only—Swiped
The swiped purchase card ticket only transaction will be similar to the standard swiped
ticket only, as described above. However, the following prompts (which will occur after
the amount input screen) will request additional information.
Display Message
Operator Action
TICKET ONLY
Enter
Tax
Amount
$0.00
Key in the tax amount (max. 5 digits) without
the decimal point, then press [OK].
TICKET ONLY
Enter
Customer Code
Key in the customer code (up to 17
alphanumeric characters) as provided by the
purchasing agent and press [OK].
This is a required field for purchase cards.
Normal transaction flow resumes after this point.
2003 LinkPoint® International, Inc.
73
9100 Reference Manual
STANDARD TRANSACTIONS
Purchase Card Ticket Only—Manual Entry
This will be the same as the standard keyed ticket only transaction detailed above, with
the insertion of the extra prompts described earlier under the purchase card ticket
only—swiped section.
Purchase Card Ticket Only–Receipt
The purchase card ticket only receipt will be as described above for ticket only receipts,
with the purchase card information added.
Ticket Only–Manual Entry with Direct Marketing/AVS
A manually entered ticket only with direct marketing and AVS is started by pressing
[OK] at the idle prompt, followed by [1] = CREDIT, then [5] = TICKET. Then follow the
prompts shown below.
Display Message
TICKET ONLY
Enter Password
Operator Action
If prompted, key in the merchant password (16 digits) and press [OK].
(optional)
TICKET ONLY
Swipe Card or
Key Account #
Key the cardholder’s account
(maximum 19 digits) and press [OK].
TICKET ONLY
Enter Expiry
Date
MM/YY
Key in the four-digit expiration date using two
digits for the month and two for the year, then
press [OK].
TICKET ONLY
Phone Order
Transaction?
Yes
No
2003 LinkPoint® International, Inc.
number
Press the far left soft key under YES if the
order was received by phone, or press the far
right key if it was not.
74
9100 Reference Manual
STANDARD TRANSACTIONS
TICKET ONLY
Make
Imprint
If
Card
Is
Present!
This message is displayed for two seconds. If
the card is present the user should obtain an
imprint with a manual imprinter.
TICKET ONLY
Enter Operator
Id
Key in the operator ID (up to four numeric
characters) and press [OK], or simply press
[OK] to skip this input.
(optional)
TICKET
(optional)ONLY
Enter
Sale
Amount
$0.00
Key in the amount (maximum 7 digits) of the
sale without the decimal point then press [OK].
TICKET ONLY
Enter
Tax
Amount
$0.00
Key in the tax amount (max 5 digits) without
the decimal, then press [OK].
This is a required field for purchase cards.
(optional)
TICKET ONLY
Enter
Tip
Amount
$0.00
Key in the tip amount (max 5 digits) without
the decimal point, then press [OK]
(optional)
TICKET ONLY
Sale
$xxxxx.xx
Tip
Total
$xxx.xx
$xxxxx.xx
Tax
$xxx.xx
If tip prompt is enabled, or the tax prompt is
enabled, the totals for the transaction are
displayed. Press [OK] to continue. Press [CLR]
key to return to the enter sale amount screen.
(conditional)
2003 LinkPoint® International, Inc.
75
9100 Reference Manual
STANDARD TRANSACTIONS
TICKET ONLY
Enter
AVS
Response Code
Key in the previously obtained AVS response
code, one alphanumeric character, and press
[OK].
TICKET ONLY
Enter AVS ACI
Key in the one character alphanumeric
authorization characteristic indicator and press
[OK].
TICKET ONLY
Enter AVS TID
Key in the transaction ID number (maximum
16 alphanumeric) and press [OK].
(optional)
(optional)
TICKET ONLY
Enter
Order
Number
Key in the order number (up to
alphanumeric characters) and press [OK].
TICKET ONLY
Enter
Customer Code
Key in the customer code (up to 17
alphanumeric characters) as provided by the
purchasing agent and press [OK].
TICKET ONLY
Enter Invoice
Number
Key in the invoice number (up to eight
alphanumeric characters) and press [OK], or
simply press [OK] to skip this field.
(optional)
2003 LinkPoint® International, Inc.
76
9100 Reference Manual
25
STANDARD TRANSACTIONS
TICKET ONLY
Enter Approval
Code
Key in the approval code (6 alphanumeric)
previously obtained via voice authorization or
through auth only transaction and press [OK].
TICKET ONLY
Accepted
xxxxxx
Item#:nnnn
The approval message is displayed. The
terminal displays this message until the receipt
is printed assuming that the printer is available
and enabled.
TICKET ONLY
Press OK for
customer copy
The terminal displays this message, waiting for
acknowledgement
before
printing
the
customer receipt, if second receipt is enabled.
(conditional)
TICKET ONLY
Accepted
xxxxxx
Item#:nnnn
2003 LinkPoint® International, Inc.
The approval message is displayed. Press
[CLR] to return to either the idle or transaction
menu screen.
77
9100 Reference Manual
STANDARD TRANSACTIONS
Ticket Only–Direct Marketing/AVS Receipt
The finished ticket only receipt with direct marketing/AVS will appear as described
above for credit sale receipts with direct marketing and AVS, with the following
differences:
1. The first printed line indicating the transaction type will now say ticket only receipt.
2. The abbreviated transaction type printed adjacent to the card name will say: tkto.
Authorize Only–Swiped
An authorize only transaction will obtain an approval and “freeze” the keyed amount of
funds in the customer’s account for a period that is usually eight to ten days. This
transaction only obtains an authorization. Funds will not be credited to the merchant’s
account unless a ticket only (see above) is performed using the approval code obtained
from the authorize only.
A swiped authorize only is started by pressing [OK] at the idle prompt, followed by [1]
= CREDIT, then [4] = AUTHORIZE. The remaining prompts will be identical to those for
a credit sale, with the following exceptions:
1. On all screens the top line will display AUTH ONLY.
2. The approval message screen will not show the item number.
Authorize Only–Manual Entry
A manually entered authorize only is started by pressing [OK] at the idle prompt,
followed by [1] = CREDIT, then [4] = AUTHORIZE. The remaining prompts will be
identical to those for a manually entered credit sale, with the following exceptions:
1. On all screens the top line will display AUTH ONLY.
2. The approval message screen will not show the item number.
Authorize Only–Receipt
The authorize only receipt will be the same as the receipt for a credit sale, with the
following differences:
1. The first printed line indicating the transaction name will say: auth only receipt.
2. The item number will not be present.
2003 LinkPoint® International, Inc.
78
9100 Reference Manual
STANDARD TRANSACTIONS
Purchase Card Authorize Only–Swiped or Keyed
A purchase card authorize only will have the same prompts as a purchase card credit
sale, except for the differences described above.
Authorize Only–Manual Entry with Direct Marketing/AVS
The keyed authorize only transaction with direct marketing/AVS will have the same
prompts as a manual credit sale with direct marketing/AVS, except for the differences
described above.
2003 LinkPoint® International, Inc.
79
9100 Reference Manual
STANDARD TRANSACTIONS
Void Transaction
A void should be performed if it is necessary to reverse a transaction that is in the
current open batch.
A void is started by pressing [OK] at the idle prompt, followed by [1] = CREDIT, then [3]
= VOID. Then follow the prompts shown below.
Display Message
VOID
Enter Password
Operator Action
If prompted, key in the merchant password (16 digits) and press [OK].
(optional)
VOID
Enter Item #
xxx
VOID
SALE
$nnnnnn.nn
Prev
Next
Key in the item number (maximum 3 digits) of
the transaction to void and press [OK]. (The
item number appears on the original receipt.)
The item number and transaction name are
displayed on the second line followed by the
dollar amount. If the transaction is already
voided this is indicated. Press the far left soft
key to view the previous item.
Press the far right soft key to view the next
item.
Press [OK] to select the current item for
voiding.
Press [CLR] to cancel the void transaction.
2003 LinkPoint® International, Inc.
80
9100 Reference Manual
STANDARD TRANSACTIONS
VOID
CCCCCCCCCCCCC
nnnnnnnnnnnnn
MM/YY Swiped
Further details of the transaction are displayed
including Card Type, Account Number, Expiry
date and account entry method, i.e., Swiped or
Keyed.
Press [OK] to select the current item for
voiding.
Press [CLR] to exit.
VOID
Void Item xxx
Press OK to
Confirm!
Press [OK] to confirm the void.
VOID
Accepted
XXXXXX
Item#:nnn
The approval code is displayed along with the
item number. The text “Accepted” appears
only for voided credit return and ticket only
transactions. The terminal displays this
message until the receipt is printed assuming
that the printer is available and enabled.
VOID
Press OK for
customer copy
The terminal displays this message, waiting for
acknowledgement
before
printing
the
customer receipt, if second receipt is enabled.
(conditional)
VOID
Accepted
XXXXXX
Item#:nnn
2003 LinkPoint® International, Inc.
The approval code is displayed along with the
item number. The text “Accepted” appears
only for voided credit return and ticket only
transactions. Press [CLR] to return to either the
idle or transaction menu screen.
81
9100 Reference Manual
STANDARD TRANSACTIONS
Void Transaction—Receipt
The printed void transaction receipt contains identical specific details to the receipt of
the transaction that was voided. This means that the contents of the void transaction
receipt depend on the contents of the receipt of the voided transaction.
An example of the void receipt is shown below:
-Transaction type
VOID RECEIPT
Custom
Custom
Custom
Custom
Custom
Custom
Header
Header
Header
Header
Header
Header
Line
Line
Line
Line
Line
Line
1
2
3
4
5
6
Merch ID:xxxxxxxxxxxxxxxx
Term ID:xxxx
Item #:xxx
VISA AVS VOID SALE:KEYED
Invoice : xxxxxxxx Op ID:xxxx
Order Number:
xxxxxxxxxxxxxxxxxxxxxxxxxx
AVS Address:xxxxx
AVS Zip Code:xxxxxxxxx
PHONE ORDER
Acct:xxxxxxxxxxxxxxxxxx
Exp:mm/yy
AMOUNT
TAX
TIP
TOTAL
$xxxxx.xx
$xxxxx.xx
$xxxxx.xx
==========
$xxxxx.xx
X____________________________
Custom
Custom
Custom
Custom
Agreement
Agreement
Agreement
Agreement
Custom
Custom
Custom
Custom
Trailer
Trailer
Trailer
Trailer
Line1
Line2
Line3
Line4
Line
Line
Line
Line
1
2
3
4
Date: mm/dd/yy
Time: hh:mmP
Response: AUTH/TKT XXXXXX Y
AVS: Exact Match
TID:xxxxxxxxxxxxxxx ACI: V
2003 LinkPoint® International, Inc.
-Custom header lines
(max 6)
-Merchant ID
-Terminal ID & Item #
-Card, tran type, entry method
-Invoice#, operator id
-Purchase order number
-AVS numeric address info
-AVS zip code 5–9 digits
-If phone order
-Card number
-Expiry Date
-Purchase Amount
-Tax Amount (optional)
-Tip Amount (optional)
-Total Amount (optional)
-Cardholder Signature
-Custom cardholder
lines (max 4)
agreement
-Custom Trailer Lines
(max 4)
-Transaction date & time
-Host Response text
-AVS response description
-Transaction
ID,
auth
characteristic indicator
82
9100 Reference Manual
STANDARD TRANSACTIONS
ATM/Debit Sale
A debit sale should be performed only if the merchant account has been activated for
debit.
A debit sale is started by pressing [OK] at the idle prompt, followed by [2] = DEBIT,
then [1] = SALE. Then follow the prompts shown below.
Display Message
DEBIT SALE
Enter Password
Operator Action
If prompted, key in the merchant password (16 digits) and press [OK].
(optional)
DEBIT SALE
Swipe Card
Slide the card through the card reader. (Manual
entry is not allowed.)
DEBIT SALE
Enter Operator
Id
Key in the operator id (up to four numeric
characters) and press [OK], or simply press
[OK] to skip this input.
(optional)
DEBIT SALE
Enter
Sale
Amount
$0.00
Key in the amount of the sale (max 7 digits)
without the decimal point, then press [OK].
DEBIT SALE
Enter
Tax
Amount
$0.00
Key in the tax amount (max 5 digits) without
the decimal, then press [OK].
(optional)
2003 LinkPoint® International, Inc.
83
9100 Reference Manual
STANDARD TRANSACTIONS
DEBIT SALE
Enter
Tip
Amount
$0.00
Key in the tip amount (max 5 digits) without
the decimal point then press [OK].
(optional)
DEBIT SALE
Sale
$xxxxx.xx
Tip
Total
$xxx.xx
$xxxxx.xx
Tax
$xxx.xx
DEBIT SALE
Enter Cashback
Amount
$0.00
If tip prompt is enabled or if tax prompt is
enabled, the totals for the transaction are
displayed. Press [OK] to continue. Press [CLR]
key to return to the enter sale amount screen.
Key in the cashback amount of the sale (max
$999.99) without the decimal point then press
[OK], or simply press [OK] to skip this field.
(optional)
DEBIT SALE
Amt $xxxxxx.xx
Enter PIN
DEBIT SALE
Enter Invoice
Number
Key in the PIN number (4 to 8 digits) and then
press [OK]. Each digit entered will appears as
the ‘*’ symbol.
Key in the invoice number (up to eight
alphanumeric characters) and press [OK], or
simply press [OK] to skip this field.
(optional)
DEBIT SALE
various text
2003 LinkPoint® International, Inc.
The terminal displays several messages
indicating it is communicating with the host.
These are DIALING, REDIALING, SENDING,
RECEIVING, and DISCONNECTING.
84
9100 Reference Manual
STANDARD TRANSACTIONS
DEBIT SALE
AUTH/TKT
XXXXXX
Item#:nnn
The approval message is displayed. The
terminal displays this message until the receipt
is printed assuming that the printer is available
and enabled.
DEBIT SALE
Press OK for
customer copy
The terminal displays this message, waiting for
acknowledgement
before
printing
the
customer receipt, if second receipt is enabled.
(conditional)
DEBIT
SALE
AUTH/TKT
XXXXXX
Item#:nnn
2003 LinkPoint® International, Inc.
The approval message is displayed. Press
[CLR] to return to transaction menu screen.
85
9100 Reference Manual
STANDARD TRANSACTIONS
ATM/Debit Sale—Receipt
DEBIT SALE RECEIPT
Custom
Custom
Custom
Custom
Custom
Custom
Header
Header
Header
Header
Header
Header
Line
Line
Line
Line
Line
Line
1
2
3
4
5
6
Merch ID:xxxxxxxxxxxxxxxx
Term ID:xxxx
Item #:xxx
Invoice : xxxxxxxx Op ID:xxxx
Acct:xxxxxxxxxxxxxxxyyyy
Exp:mm/yy
AMOUNT
TAX
TIP
CASHBACK
FEE
TOTAL
$xxxxx.xx
$xxxxx.xx
$xxxxx.xx
$xxxxx.xx
$xxxxx.xx
==========
$xxxxx.xx
Custom
Custom
Custom
Custom
Agreement
Agreement
Agreement
Agreement
Custom
Custom
Custom
Custom
Trailer
Trailer
Trailer
Trailer
Line1
Line2
Line3
Line4
Line
Line
Line
Line
1
2
3
4
Date: mm/dd/yy
Time: hh:mmP
R
AUTH/TKT XXXXXX
-Transaction type
-Custom header lines
(max 6)
-Merchant ID
-Terminal ID and Item #
-Invoice#, operator id
-Card number
-Expiry Date
-Purchase amount
-Tax amount
-Tip amount
-Cash back amount(optional)
-Txn fee(optional)
-Total Sale amount
-Custom agreement lines
(max 4)
-Custom trailer lines
(max 4)
-Transaction date & time
H t R
t t
Note that the merchant copy of the receipt will display the entire PAN.
2003 LinkPoint® International, Inc.
86
9100 Reference Manual
STANDARD TRANSACTIONS
ATM/Debit Return
This transaction should be performed if it is necessary to refund a debit sale.
An ATM/debit return is started by pressing [OK] at the idle prompt, followed by [2] =
DEBIT, then [2] = RETURN.
Display Message
Operator Action
DEBIT(optional)
RETURN
Enter Password
If prompted, key in the merchant password (16 digits) and press [OK].
DEBIT RETURN
Swipe Card
Slide the card through the card reader.
DEBIT RETURN
Enter Operator
Id
Key in the operator ID (up to four numeric
characters) and press [OK], or simply press
[OK] to skip this input.
(optional)
DEBIT RETURN
Enter
Sale
Amount
$0.00
Key in the amount of the return (max 7 digits)
without the decimal point, then press [OK].
DEBIT RETURN
Enter
Tax
Amount
$0.00
Key in the tax amount (max 5 digits) without
the decimal, then press [OK].
(optional)
2003 LinkPoint® International, Inc.
87
9100 Reference Manual
STANDARD TRANSACTIONS
DEBIT RETURN
Amt $xxxxxx.xx
Enter PIN
Key in the PIN (4 to 8 digits) and then press
[OK]. Each digit entered will appears as the ‘*’
symbol.
DEBIT RETURN
Enter Invoice
Number
Key in the invoice number (up to eight
alphanumeric characters) and press [OK], or
simply press [OK] to skip this field.
(optional)
DEBIT RETURN
AUTH/TKT
XXXXXX
Item#:nnnn
The approval message is displayed. The
terminal displays this message until the receipt
is printed assuming that the printer is available
and enabled.
DEBIT RETURN
Press OK for
customer copy
The terminal displays this message, waiting for
acknowledgement
before
printing
the
customer receipt, if second receipt is enabled.
(conditional)
DEBIT RETURN
AUTH/TKT
XXXXXX
Item#:nnnn
2003 LinkPoint® International, Inc.
The approval message is displayed. Press
[CLR] to return to transaction menu screen.
88
9100 Reference Manual
STANDARD TRANSACTIONS
ATM/Debit Return—Receipt
DEBIT RETURN RECEIPT
Custom
Custom
Custom
Custom
Custom
Custom
Header
Header
Header
Header
Header
Header
Line
Line
Line
Line
Line
Line
1
2
3
4
5
6
Merch ID:xxxxxxxxxxxxxxxx
Term ID:xxxx
Item #:xxx
Invoice : xxxxxxxx Op ID:xxxx
Acct:xxxxxxxxxxxxxxxyyyy
Exp:mm/yy
AMOUNT
TAX
TOTAL
$xxxxx.xx
$xxxxx.xx
=========
$xxxxx.xx
Custom
Custom
Custom
Custom
Agreement
Agreement
Agreement
Agreement
Custom
Custom
Custom
Custom
Trailer
Trailer
Trailer
Trailer
Line1
Line2
Line3
Line4
Line
Line
Line
Line
1
2
3
4
Date: mm/dd/yy
Time: hh:mmP
Response: AUTH/TKT XXXXXX
-Transaction type
-Custom header lines
(max 6)
-Merchant ID
-Terminal ID and Item #
-Invoice#, operator id
-Card number
-Expiry Date
-Return amount
-Tax amount
-Total Amount
-Custom agreement lines
(max 4)
-Custom trailer lines
(max 4)
-Transaction date & time
-Host Response text
Note that the merchant copy of the receipt will display the entire PAN.
2003 LinkPoint® International, Inc.
89
9100 Reference Manual
STANDARD TRANSACTIONS
EBT Food Sale
EBT (Electronic Benefits Transfer) transactions should be performed only if the
merchant’s account has been activated for EBT.
An EBT Food Sale is started by pressing [OK] at the idle prompt, followed by [3] = EBT,
then [1] = FOOD SALE. Then follow the prompts shown below.
Display Message
FOOD SALE
Enter Password
Operator Action
If prompted, key in the merchant password (16 digits) and press [OK].
(optional)
FOOD SALE
Swipe Card or
Key Account #
Slide the card through the card reader, or enter
the number manually. (For manual entry the
expiration date prompt may be bypassed by
pressing [OK] if the card does not have an
expiration date.)
FOOD SALE
Enter Operator
Id
Key in the operator ID (up to four numeric
characters) and press [OK]. This is a required
prompt for EBT.
FOOD SALE
Enter
Sale
Amount
$0.00
Key in the sale amount (max 7 digits) without
the decimal point, then press [OK].
FOOD SALE
Amt $xxxxx.xx
Enter PIN
Key in the PIN number, (4 to 8 digits) and then
press [OK]. Each digit entered will appears as
the ‘*’ symbol.
2003 LinkPoint® International, Inc.
90
9100 Reference Manual
STANDARD TRANSACTIONS
FOOD SALE
various text
The terminal displays several messages
indicating it is communicating with the host.
These are Dialing, Redialing, Sending,
Receiving, and Disconnecting.
FOOD SALE
AUTH/TKT
XXXXXX
Item#:nnn
The approval message is displayed. The
terminal displays this message until the receipt
is printed assuming that the printer is available
and enabled.
FOOD SALE
Press OK for
customer copy
The terminal displays this message, waiting for
acknowledgement
before
printing
the
customer receipt, if second receipt is enabled.
(conditional)
FOOD SALE
AUTH/TKT
XXXXXX
Item#:nnn
2003 LinkPoint® International, Inc.
The approval message is displayed. Press
[CLR] to return to transaction menu screen.
91
9100 Reference Manual
STANDARD TRANSACTIONS
EBT Food Sale—Receipt
-Transaction type
FOOD SALE RECEIPT
Custom
Custom
Custom
Custom
Custom
Custom
Header
Header
Header
Header
Header
Header
Line
Line
Line
Line
Line
Line
1
2
3
4
5
6
-Custom header lines
(max 6)
Merch ID:xxxxxxxxxxxxxxxx
Term ID:xxxx
Item #:xxx
Op ID:xxxx
Acct:xxxxxxxxxxxxxxxyyyy
Exp:mm/yy
BAL
CASH
-Merchant ID
-Terminal ID and Item #,
-Operator id
-Card number
-Expiry Date (if any)
xxx,xxx.xx
-Remaining EBT Balance as
contained in response
-Cash amount
$xxxxxx.xx
Custom
Custom
Custom
Custom
Agreement
Agreement
Agreement
Agreement
Custom
Custom
Custom
Custom
Trailer
Trailer
Trailer
Trailer
-Custom agreement lines
(max 4)
Line1
Line2
Line3
Line4
Line
Line
Line
Line
-Custom trailer lines
(max 4)
1
2
3
4
-Transaction date & time
-Host Response text
Date: mm/dd/yy
Time: hh:mmP
Response: AUTH/TKT XXXXXX
Note that the merchant copy of the receipt will display the entire PAN.
2003 LinkPoint® International, Inc.
92
9100 Reference Manual
STANDARD TRANSACTIONS
EBT Food Return
EBT (Electronic Benefits Transfer) transactions should be performed only if the
merchant’s account has been activated for EBT.
Use an EBT food return to issue a refund for an EBT food sale.
An EBT food return is started by pressing [OK] at the idle prompt, followed by [3] =
EBT, then [2] = FOOD RETURN. Then follow the prompts shown below.
Display Message
FOOD RETURN
Enter Password
Operator Action
If prompted, key in the merchant password (16 digits) and press [OK].
(optional)
FOOD RETURN
Swipe Card
Slide the card through the card reader.
(Manual entry is not allowed.)
FOOD RETURN
Enter Operator
Id
Key in the operator ID (up to four numeric
characters) and press [OK]. This is a required
prompt for EBT.
FOOD RETURN
Enter
Sale
Amount
$0.00
Key in the sale amount (max 7 digits) without
the decimal point, then press [OK].
FOOD RETURN
Amt $xxxxx.xx
Enter PIN
2003 LinkPoint® International, Inc.
Key in the PIN number (4 to 8 digits) and then
press [OK]. Each digit entered will appears as
the ‘*’ symbol.
93
9100 Reference Manual
STANDARD TRANSACTIONS
FOOD RETURN
various text
The approval message is displayed. The
The
terminal
several
messages
terminal
displaysdisplays
this message
until the
receipt
indicating
it
is
communicating
with
the
host.
is printed assuming that the printer is available
These
are Dialing, Redialing, Sending,
and enabled.
Receiving, and Disconnecting.
FOOD RETURN
AUTH/TKT
XXXXXX
Item#:nnn
The terminal displays this message, waiting for
acknowledgement
before
printing
the
customer receipt, if second receipt is enabled.
FOOD RETURN
Press OK for
customer copy
(conditional)
FOOD RETURN
AUTH/TKT
XXXXXX
Item#:nnn
2003 LinkPoint® International, Inc.
The approval message is displayed. Press
[CLR] to return to transaction menu screen.
94
9100 Reference Manual
STANDARD TRANSACTIONS
EBT Food Return—Receipt
-Transaction type
FOOD RETURN RECEIPT
Custom
Custom
Custom
Custom
Custom
Custom
Header
Header
Header
Header
Header
Header
Line
Line
Line
Line
Line
Line
1
2
3
4
5
6
-Custom header lines
(max 6)
Merch ID:xxxxxxxxxxxxxxxx
Term ID:xxxx
Item #:xxx
Op ID:xxxx
Acct:xxxxxxxxxxxxxxxyyyy
Exp:mm/yy
BAL
AMOUNT
-Merchant ID
-Terminal ID and Item #
-Operator id
-Card number
-Expiry Date (if any)
xxx,xxx.xx
-Remaining EBT Balance as
contained in response
-Sale amount
$xxxxxx.xx
Custom
Custom
Custom
Custom
Agreement
Agreement
Agreement
Agreement
Custom
Custom
Custom
Custom
Trailer
Trailer
Trailer
Trailer
-Custom agreement lines
(max 4)
Line1
Line2
Line3
Line4
Line
Line
Line
Line
-Custom trailer lines
(max 4)
1
2
3
4
-Transaction date & time
-Host Response text
Date: mm/dd/yy
Time: hh:mmP
Response: AUTH/TKT XXXXXX
Note that the merchant copy of the receipt will display the entire PAN.
2003 LinkPoint® International, Inc.
95
9100 Reference Manual
STANDARD TRANSACTIONS
EBT Food Stamp Balance Inquiry
EBT (Electronic Benefits Transfer) transactions should be performed only if the
merchant’s account has been activated for EBT.
Use an EBT food stamp balance inquiry to obtain the food balance on the customer’s
account.
An EBT food stamp balance inquiry is started by pressing [OK] at the idle prompt,
followed by [3] = EBT, then [3] = FOODSTP BAL. Then follow the prompts shown
below.
Display Message
FOOD ST BAL
Enter Password
Operator Action
If prompted, key in the merchant password (16 digits), and press [OK].
(optional)
FOOD ST BAL
Swipe Card or
Key Account #
FOOD ST BAL
Enter Operator
Id
FOOD ST BAL
Enter PIN
FOOD ST BAL
various text
2003 LinkPoint® International, Inc.
Slide the card through the card reader, or enter
the number manually. (For manual entry the
expiration date prompt may be bypassed by
pressing [OK] if the card does not have an
expiration date.)
Key in the operator ID (up to four numeric
characters) and press [OK]. This is a required
prompt for EBT.
Key in the PIN number (4 to 8 digits) and then
press [OK]. Each digit entered will appears as
the ‘*’ symbol.
The terminal displays several messages
indicating it is communicating with the host.
These are DIALING, REDIALING, SENDING,
RECEIVING, and DISCONNECTING.
96
9100 Reference Manual
STANDARD TRANSACTIONS
FOOD ST BAL
Please Wait
Printing
The terminal displays this message until the
receipt is printed assuming that the printer is
available and enabled.
(conditional)
FOOD ST BAL
The EBT food balance is displayed. Press
[CLR] to return to transaction menu screen.
BAL nnn,nnn.nn
2003 LinkPoint® International, Inc.
97
9100 Reference Manual
STANDARD TRANSACTIONS
EBT Food Stamp Balance–Receipt
-Transaction type
FOOD ST BAL RECEIPT
Custom
Custom
Custom
Custom
Custom
Custom
Header
Header
Header
Header
Header
Header
Line
Line
Line
Line
Line
Line
1
2
3
4
5
6
-Custom header lines
(max 6)
Merch ID:xxxxxxxxxxxxxxxx
Term ID:xxxx
Op ID:xxxx
Acct:xxxxxxxxxxxxxxxyyyy
Exp:mm/yy
-Merchant ID
-Terminal ID
-Operator id
-Card number
-Expiry Date
BAL xx,xxx.xx
Custom
Custom
Custom
Custom
Trailer
Trailer
Trailer
Trailer
Line
Line
Line
Line
-Remaining EBT Balance as
contained in response
-Custom trailer lines
(max 4)
1
2
3
4
-Transaction date & time
-Host Response text
Date: mm/dd/yy
Time: hh:mmP
Response: XXXXXX
2003 LinkPoint® International, Inc.
98
9100 Reference Manual
STANDARD TRANSACTIONS
EBT Cash Sale
EBT (Electronic Benefits Transfer) transactions should be performed only if the
merchant’s account has been activated for EBT.
An EBT cash sale is started by pressing [OK] at the idle prompt, followed by [3] = EBT,
then [4] = CASH SALE. Then follow the prompts shown below.
Display Message
EBT CASH
Enter Password
Operator Action
If prompted, key in the merchant password (16 digits) and press [OK].
(optional)
EBT CASH
Swipe Card
Slide the card through the card reader.
(Manual entry is not allowed.)
EBT CASH
Enter Operator
Id
Key in the operator ID (up to four numeric
characters) and press [OK]. This is a required
prompt for EBT.
EBT CASH
Enter
Cash
Amount
$0.00
Key in the cash sale amount (max 7 digits)
without the decimal point, then press [OK].
EBT CASH
Amt $xxxxx.xx
Enter PIN
Key in the PIN number (4 to 8 digits) and then
press [OK]. Each digit entered will appears as
the ‘*’ symbol.
2003 LinkPoint® International, Inc.
99
9100 Reference Manual
STANDARD TRANSACTIONS
EBT CASH
various text
The terminal displays several messages
indicating it is communicating with the
host. These are DIALING, REDIALING,
SENDING,
RECEIVING,
and
DISCONNECTING.
EBT CASH
AUTH/TKT
XXXXXX
Item#:nnn
The approval message is displayed. The
terminal displays this message until the
receipt is printed assuming that the printer
is available and enabled.
EBT CASH
Press OK for
customer copy
The terminal displays this message,
waiting for acknowledgement before
printing the customer receipt, if second
receipt is enabled.
(conditional)
EBT CASH
AUTH/TKT
XXXXXX
Item#:nnn
2003 LinkPoint® International, Inc.
The approval message is displayed. Press
[CLR] to return to transaction menu screen.
100
9100 Reference Manual
STANDARD TRANSACTIONS
EBT Cash Sale—Receipt
-Transaction type
EBT CASH RECEIPT
Custom
Custom
Custom
Custom
Custom
Custom
Header
Header
Header
Header
Header
Header
Line
Line
Line
Line
Line
Line
1
2
3
4
5
6
-Custom header lines
(max 6)
Merch ID:xxxxxxxxxxxxxxxx
Term ID:xxxx
Item #:xxx
Op ID:xxxx
Acct:xxxxxxxxxxxxxxxyyyy
Exp:mm/yy
BAL
CASH
-Merchant ID
-Terminal ID and Item #
-Operator id
-Card number
-Expiry Date (if any)
xxx,xxx.xx
-Remaining EBT Balance as
contained in response
-Cash amount
$xxxxxx.xx
Custom
Custom
Custom
Custom
Agreement
Agreement
Agreement
Agreement
Custom
Custom
Custom
Custom
Trailer
Trailer
Trailer
Trailer
-Custom agreement lines
(max 4)
Line1
Line2
Line3
Line4
Line
Line
Line
Line
-Custom trailer lines
(max 4)
1
2
3
4
-Transaction date & time
-Host Response text
Date: mm/dd/yy
Time: hh:mmP
Response: AUTH/TKT XXXXXX
Note that the merchant copy of the receipt will display the entire PAN.
2003 LinkPoint® International, Inc.
101
9100 Reference Manual
STANDARD TRANSACTIONS
EBT Cash Balance
EBT (Electronic Benefits Transfer) transactions should be performed only if the
merchant’s account has been activated for EBT.
Use an EBT cash balance inquiry to obtain the cash balance on the customer’s account.
An EBT cash balance inquiry is started by pressing [OK] at the idle prompt, followed by
[3] = EBT, then [5] = CASH BAL. The remaining prompts will be the same as for a food
stamp balance inquiry (please see procedure on page 96), except that the display and
receipt will display cash bal instead of food st bal.
EBT Voucher Sale
EBT (Electronic Benefits Transfer) transactions should be performed only if the
merchant’s account has been activated for EBT.
Use an EBT voucher sale if a prior approval was obtained from the voice center, and a
voucher was completed with the customer.
An EBT voucher sale is started by pressing [OK] at the idle prompt, followed by 3 =
EBT, then 6 = VOUCH SALE.
The remaining prompts will be the same as those for an EBT food sale (please see
above), except that the display will show VOUCHER SALE. Additionally, the
transaction will prompt for the VOUCHER NUMBER (obtained from the voucher) and
the APPROVAL CODE (obtained from the voice center). It will not prompt for a PIN,
however, because the customer is not required to be present after the paper voucher
form has been completed.
The receipt will be the same as for a food sale, except it will print voucher sale receipt at
the top.
EBT Voucher Return
EBT (Electronic Benefits Transfer) transactions should be performed only if the
merchant’s account has been activated for EBT.
Use an EBT Voucher Return if a prior approval was obtained from the voice center, and
a voucher was completed with the customer.
An EBT Voucher Return is started by pressing [OK] at the idle prompt, followed by [3] =
EBT, then [7] = Vouch Rtrn. The remaining prompts will be the same as for an EBT
Voucher Sale, except that the display will show “Voucher Rtn.”
The receipt will be the same as for a Voucher Sale, except it will print “Voucher Rtn
Receipt” at the top.
2003 LinkPoint® International, Inc.
102
9100 Reference Manual
OFFLINE TRANSACTIONS
OFFLINE TRANSACTIONS
In an area in which there is no access to a telephone line and there is no wireless
coverage, offline “store and forward” sale transactions may be performed. However, it is
important to realize three things when performing these transactions:
1. At the time the offline sale is performed, it does not receive an approval. When it is
uploaded later, it may be declined. Therefore, these transactions are performed at the
merchant’s own risk.
2. Later when the merchant has access to a telephone line or to wireless coverage, the
offline transactions must be uploaded to obtain approvals and to capture in the
regular transaction batch. The batch must then be closed at the end of the business
day or the merchant will not receive credit for the transactions.
3. Any offlines that are repeatedly declined during uploads must be deleted from the
offline batch. See the section in this manual titled Delete Offline Transactions in the
Local Functions chapter for details.
An offline sale is started by pressing [OK] at the idle prompt, followed by [1] = CREDIT,
then [1] = SALE, then [2] = OFFLINE. The remaining prompts will be identical to those
for online credit card sales, with the following exceptions:
1. The transaction displays will show OFFLINE SALE at the top.
2. Receipts will not print an approval code, since no approval has been obtained at the
time of sale.
If offline sale transactions are present in the device, the following screen will appear on
power up of the terminal:
Display Message
Offline Txns
XXX In Batch
Upload Now?
Yes
No
Operator Action
Press the far left hand soft key to upload the
transactions to the host. Press the far right
hand soft key to proceed without uploading
offline transactions.
Offline Transaction Operation
When offline sale transactions are performed, they are placed in an offline sale
transaction batch and assigned a temporary item number. This item number is printed
on the offline credit sale receipt. The item number is reassigned to a host-recognized
item number only after the offline sales are uploaded to the processor. The fraud control
screens are displayed for offline transactions according to their settings.
2003 LinkPoint® International, Inc.
103
9100 Reference Manual
OFFLINE TRANSACTIONS
Offline Sale Transaction Receipt
-Transaction type
OFFLINE SALE RECEIPT
Custom
Custom
Custom
Custom
Custom
Custom
Header
Header
Header
Header
Header
Header
Line
Line
Line
Line
Line
Line
1
2
3
4
5
6
-Custom header lines
(max 6)
Merch ID:xxxxxxxxxxxxxxxx
Term Id:
Item #:xxx
VISA OFFLINE:SWIPED
Invoice : xxxxxxxx Op ID:xxxx
Acct:xxxxxxxxxxxxxxxxxx
Exp:mm/yy
AMOUNT
TAX
TIP
TOTAL
-Merchant ID
-Terminal ID and Item #
-Card, tran type, entry method
-Invoice#, operator id
-Card number
-Expiry Date
$xxxxxx.xx
$xxxxxx.xx
$xxxxxx.xx
==========
$xxxxxx.xx
-Purchase Amount
-Tax Amount (Optional)
-Tip Amount (Optional)
-Total Amount
X____________________________
JOHN DOE
Custom Agreement Line1
Custom Agreement Line2
Custom Agreement Line3
Custom Agreement Line4
Custom
Custom
Custom
Custom
Trailer
Trailer
Trailer
Trailer
Line
Line
Line
Line
-Card Holder Signature
-Cardholder name (if swiped)
-Custom cardholder agreement
lines (max 4)
1
2
3
4
-Custom trailer lines
(max 4)
Date: mm/dd/yy
Time:hh:mmP
Response: OFFLINE
-Transaction date & time
-Host Response text
Uploading Offline Transactions
The merchant is able to upload transactions either one at a time or all at once. Whether
the original offline sales were done in dial-up or wireless mode makes no difference; the
transactions can be uploaded in a different mode. For example, offlines done while the
terminal was in wireless mode can be uploaded in either wireless or dial-up mode. If the
terminal is in dial-up mode when the upload is initiated, offline transactions will be
uploaded to the dial-up host. Once a transaction has been successfully uploaded, the
transaction is deleted from the offline batch. If a transaction is declined, the transaction
will remain in the offline batch until it is either successfully uploaded or manually
deleted. (As noted above, offlines that are repeatedly declined must be deleted from the
offline batch.)
2003 LinkPoint® International, Inc.
104
9100 Reference Manual
OFFLINE TRANSACTIONS
An offline upload is started by pressing [OK] at the idle prompt, followed by [4] =
BATCH, then [4] = UPLOAD. When the display prompts 1 ALL TXNS or 2 SINGLE
TXN, the operator can make the desired selection.
If 1 ALL TXNS is selected, the operator then presses the left-most soft key under YES to
start the upload.
If 2 SINGLE TXN is selected, the display will prompt for the offline item number. When
the correct transaction is displayed, the operator presses [OK]. Additional transaction
information will be displayed (card type, account number, expiration date, and method
of entry (swiped or keyed). If the operator presses [OK] again, the offline transaction
will be sent to the processing network for approval.
When offline sales are uploaded, a report will print out as shown below. If 1 ALL TXNS
was selected, the terminal will re-dial the processing network for an individual approval
for each offline transaction.
2003 LinkPoint® International, Inc.
105
9100 Reference Manual
OFFLINE TRANSACTIONS
Upload Offline Transactions Report
The offline upload transactions report will look like this:
OFFLINE UPLOAD
REPORT
-Report type
Custom
Custom
Custom
Custom
Custom
Custom
-Custom header lines
(max 6)
Header
Header
Header
Header
Header
Header
Line
Line
Line
Line
Line
Line
1
2
3
4
5
6
Merch ID:xxxxxxxxxxxxxxxx
Term ID:xxxx
Date: mm/dd/yy
Time:hh:mmP
-Merchant ID
-Terminal ID and Item #
-Report date & time
Item#:nnn VISA SALE:SWIPED
Ac:xxxxxxxxxxxxxxxxxxx mm/yy
Invoice#:xxxxxxxx
OpID:nnnn
Date:mm/dd/yy
Time:hh:mmP
Resp: xxxxxxxxxxxxxxxx
Amount
Tax
$xxxxxx.xx
$xxxxxx.xx
TOTAL:$xxxxxx.xx
-Item#, card type & entry method
-Account number and expiry date
-Invoice number, operator id
-Transaction date & time
-Host response
Item#:nnn VISA SALE:SWIPED
Ac:xxxxxxxxxxxxxxxxxxx mm/yy
Invoice#:xxxxxxxx
OpID:nnnn
Date:mm/dd/yy
Time:hh:mmP
Resp: xxxxxxxxxxxxxxxx
Amount
Tax
$xxxxxx.xx
$xxxxxx.xx
TOTAL:$xxxxxx.xx
-Item#, card type
-Account number
-Invoice number, operator id
-Transaction date & time
-Host response
END OF REPORT
-Purchase amount, optional tax
-Optional total
-Purchase amount, optional tax amt.
-Optional total
-End of report marker
For more information about uploading offline sales, please see the section in this manual
entitled Offline Batch Upload.
2003 LinkPoint® International, Inc.
106
9100 Reference Manual
OFFLINE TRANSACTIONS
Local Reports, Reprints, and Reviews of Offline Transactions
The merchant will be able to perform all the current reporting, reprinting and reviewing
functions (see later in this manual) for the offline transactions. If offline transactions are
present, the merchant will be asked to select the batch for reporting when any of the
reporting, reprinting or reviewing functions is selected. Offline reports will have the
word OFFLINE printed above the title. Offline reports will not show any response code
as they have been approved offline.
Offline Item Number
The offline item number will start at 1 and increment for each transaction. The number
will be reset to 1 when all transactions are uploaded, i.e., there are no transactions in the
offline batch. There is a maximum of 300 offline transactions allowed in the terminal.
The merchant will have to perform an upload if this maximum is reached.
2003 LinkPoint® International, Inc.
107
9100 Reference Manual
PRE-SALE GRATUITY
PRE-SALE GRATUITY
This function is not a financial transaction. It will not be stored in the terminal’s memory
and will not affect totals. Its purpose it to allow businesses to offer a tip option to their
customers by printing a pre-sale receipt. This is not a restaurant transaction.
A normal purchase must still be performed after the tip amount has been determined.
To start a pre-sale gratuity, select pre-sale from the menus by pressing [OK] at the idle
prompt, followed by [1] = CREDIT, then [6] = PRE-SALE. Then follow the remaining
prompts shown below.
Display Message
PRE-SALE
Operator Action
This message is displayed for 2 seconds.
Not A Sale!
PRE-SALE
Enter
Sale
Amount
$0.00
Enter the sale amount and press [OK].
PRE-SALE
Processing
Please Wait
The terminal displays this message until the
receipt is printed assuming that the printer is
available and enabled.
The transaction menu will then be displayed.
(conditional)
2003 LinkPoint® International, Inc.
108
9100 Reference Manual
PRE-SALE GRATUITY
Pre-Sale Gratuity—Receipt
-Transaction type
PRE-SALE RECEIPT
Custom
Custom
Custom
Custom
Custom
Custom
Header
Header
Header
Header
Header
Header
Line
Line
Line
Line
Line
Line
1
2
3
4
5
6
-Custom header lines
(max 6)
Merch ID:xxxxxxxxxxxxxxxx
Term ID:xxxx
-Merchant ID
-Terminal ID
AMOUNT
$xxxxxx.xx
-Purchase amount
TIP
$_________
-To be supplied by customer
TOTAL
$_________
-Sum of Tip and Purchase
THIS IS NOT A CREDIT CARD
RECEIPT
2003 LinkPoint® International, Inc.
109
9100 Reference Manual
ERROR TRANSACTIONS
ERROR TRANSACTIONS
If authorization of the transaction does not occur due to a communications error then
the reason for this will be displayed. The table below lists some error messages and their
meanings. For more information about some of these error messages, see Appendix—
Troubleshooting Guidelines at the end of this manual.
Display Message
<Txn Name>
Comms Error
<nnnnnnnnnnnnn
nnnnnnnnnnnnn>
2003 LinkPoint® International, Inc.
Operator Action
The comms error will be displayed until the
user presses [CLR], at which point the
transaction menu or the idle screen will be
displayed.
The bottom two lines will contain the specific
communications error message.
110
9100 Reference Manual
ERROR TRANSACTIONS
Error Message
No Dial tone
Connect
Line!
Host Busy
Try Again
No Answer
No Response
From Host
Line Lost
Out Of
Network
Coverage
Modem Has No
Assigned
Hosts
Host Not
Assigned
Host
Inaccessible
Host Is
Undefined
Host Is
Blocked
Invalid
Host Address
Rejected
By Network
Network
Error nnn
Signal
Lost
Modem Error
Please Retry
Hardware
Error
Call Help
Desk
Meaning
Dial tone cannot be detected. Check the phone line connections.
Make sure the phone line has a dial tone.
The host is busy and cannot answer the incoming call. Try the
transaction again.
The host did not pick up the incoming call. Try again.
A connection was established but the remote host did not send
ENQs. Try again.
A connection was established but then an unexpected disconnect
occurred. Check the connections or the wireless signal and try
again.
Wireless modem could not detect network signal. Make sure the
antenna is extended & terminal is vertical. Move to another location
& try again.
Wireless modem has not been configured on the wireless network.
Call the help desk.
Wireless modem is not configured to connect to the wireless
gateway. Call the help desk.
Wireless network could not connect to the wireless gateway. Try
again. If the problem persists, call the help desk.
Wireless modem is not configured to connect to the host. Call the
help desk.
Access to the wireless gateway has been denied by the wireless
network. Call the help desk.
The wireless gateway address is not recognized by the wireless
network. Call the help desk.
The transaction was sent but was discarded by the wireless
network. Try again.
Error code nnn returned by the wireless network. Try again. If the
problem persists, call the help desk.
The wireless network signal was lost before the transaction was
completed. Try again.
The wireless modem was unable to send the transaction. Try again.
There may be an internal connection or other hardware problem.
Try the transaction again. If the problem persists, call the help desk.
2003 LinkPoint® International, Inc.
111
9100 Reference Manual
ERROR TRANSACTIONS
Error Message
Comms. Error
Fault Id:
NNNN
Host Timeout
Application
Error
(followed by
three lines
of variable
text)
Meaning
A general communications fault, identified by a 4-digit number,
occurred. Try again. If the problem persists, call the help desk.
In wireless mode, terminal has not received response from host
within particular time. Try again.
This usually occurs only if erroneous values have been entered in
the merchant’s Zontalk file, or if certain fields in the file have been
left blank. Reboot the terminal. If possible, close any open batches in
the terminal. Then reset the CDS (see how to do this under “Special
Setup Functions” in this manual). Rebuild the Zontalk file with the
correct values (see the table under “Download Parameters and
Options” for guidance). Perform a configuration download to reload the parameters.
2003 LinkPoint® International, Inc.
112
9100 Reference Manual
REVIEW
REVIEW
Several local review operations allow the totals and detailed transaction information to
be display on the terminal screen for appraisal by the merchant.
(Note: After a batch has been successfully closed, it can still be viewed in the Reviews
until a new batch is started.)
Review–Item Number
The item number review displays the detailed components of any transaction in the
batch.
An item number review is started by pressing the blue [F] key at the idle prompt,
followed by [2] = REVIEW, then [1] = ITEM NUMBER. Then follow the remaining
prompts shown below.
Display Message
Operator Action
ITEM REVIEW
Enter Password
If prompted, key in the merchant password (16 digits) and press [OK].
(optional)
Select Offline
Batch?
Yes
No
(conditional)
ITEM REVIEW
Enter Item #
If offline transactions are present, this screen
will appear. Press the far left soft key under
Yes to act on transactions in the offline batch
only. Press the far right soft key under No to
act on transactions except the offline batch
transactions.
Key in the item number of the transaction to
review and press [OK].
(optional)
2003 LinkPoint® International, Inc.
113
9100 Reference Manual
REVIEW
ITEM REVIEW
xxx
SALE
yyyy$nnnnn.nn
Prev
Next
yyyy = VOID for the voided items
The item number and transaction name are
displayed on the second line followed by the
dollar amount.
Press the far left soft key under Prev to view
the previous item.
Press the far right soft key under Next to view
the next item.
Press [OK] to select the transaction for further
detailed reviewing.
Press [CLR] to return to the review menu.
ITEM REVIEW
<transaction
information>
Press the [OK] key to scroll forward through
the available transaction data.
Press the [CLR] key to exit at any time.
The information relating to the transaction will
be displayed on the 3 lines of the display. This
includes card name, account number, expiry
date, entry method.
2003 LinkPoint® International, Inc.
114
9100 Reference Manual
REVIEW
Review–Totals
This review will allow the user to view the totals for an individual card type or the
combined totals for all cards. A totals review is started by pressing the blue [F] key at the
idle prompt, followed by [2] = REVIEW, then [2] = TOTALS. Then follow the remaining
prompts shown below.
Display Message
Operator Action
TOTALS REVIEW
Enter Password
If prompted, key in the merchant password (16 digits) and press [OK].
(optional)
A sub-menu listing all the possible card types will be present for the user to choose
from. This will also include an “ALL” option for a grand total of all card totals.
Select Offline
Batch?
Yes
No
(conditional)
TOTALS REVIEW
<Card Name>
Txns:nnn
$nnnnnn.nn
If offline transactions are present, this screen
will appear.
Press the far left soft key under YES to act on
transactions in the offline batch only.
Press the far right soft key under NO to act on
transactions
except
the
offline
batch
transactions.
For any particular card type the card name,
number of transactions and the total are
displayed. Press [CLR] to return to the menu.
OR
TOTALS REVIEW
Batch Totals
Txns:nnn
$xxxxxx.xx
2003 LinkPoint® International, Inc.
If the ALL card option is chosen, the total
number of txns and the batch grand total will
be displayed.
115
9100 Reference Manual
REVIEW
Review—Operator ID
This review allows the totals to be displayed for an individual or for all operators. This
assumes that the configurable terminal operating parameter is enabled for operator ID
prompting during a transaction. An operator ID review is started by pressing the blue
[F] key at the idle prompt, followed by [2] = Review, then [3] = Operator ID. Then follow
the remaining prompts shown below.
Display Message
Operator Action
OPERATOR TOTAL
Enter Password
If prompted, key in the merchant password (16 digits) and press [OK].
(optional)
Select Offline
Batch?
Yes
(conditional)
No
OPERATOR TOTAL
Enter Operator
Id
2003 LinkPoint® International, Inc.
If offline transactions are present, this screen
will appear.
Press the far left soft key to act on transactions
in the offline batch only.
Press the far right soft key to act on
transactions
except
the
offline
batch
transactions.
Key in the operator ID required then press
[OK] or just press [OK] to select all operators.
116
9100 Reference Manual
REVIEW
OPERATOR TOTAL
Op Id: nnnn
$xxxxxx.xx
Prev
Next
OR
The totals for a particular operator are
displayed.
Press the far left soft key under PREV to view
the previous operators totals. Press the far
right soft key under NEXT to view next
operator’s totals.
Press [CLR] key to return to the menu.
OPERATOR TOTAL
All Operators
The total for all operators is displayed. Press
[CLR] to return to the menu.
$xxxxxx.xx
2003 LinkPoint® International, Inc.
117
9100 Reference Manual
REPORTS
REPORTS
Several reports on the current open batch are available via the 9100 printer. These
include: item detail, card type detail, transaction type detail, summary and operator ID.
(Note: After a batch has been successfully closed, reports for that batch can still be
printed until a new batch is started.)
Reports—Item Detail, Card Detail, and Transaction Type Detail
On all detail reports displaying transaction types, the following abbreviations are used:
Sale Transactions
Ticket Only Transactions
Return Transactions
SALE
TKTO
RTRN
Report – Item Detail
This prints a detail report of all transactions in the current open batch, ordered by Item
Number. An item detail report is started by pressing the blue [F] key at the idle prompt,
followed by [3] = REPORT, then [1] = DETAILS, then [1] = ITEM NUMBER. Then follow
the remaining prompts shown below.
Display Message
Operator Action
Select Offline
Batch?
Yes
No
(conditional)
ITEM DETAIL
Report
Printing
Please Wait
If offline transactions are present, this screen
will appear.
Press the far left soft key to print a report on
transactions in the offline batch only.
Press the far right soft key to print a report on
transactions
except
the
offline
batch
transactions.
This display will appear while the report is
printing. The DETAILS REPORT menu will
then reappear. Press [CLR] to exit.
(conditional)
2003 LinkPoint® International, Inc.
118
9100 Reference Manual
REPORTS
The transaction detail report will look like this:
ITEM DETAIL REPORT
Custom
Custom
Custom
Custom
Custom
Custom
Header
Header
Header
Header
Header
Header
Line
Line
Line
Line
Line
Line
1
2
3
4
5
6
-Report type
-Custom header lines
(max 6)
Merch ID:xxxxxxxxxxxxxxxx
Term ID:xxxx
Date: mm/dd/yy
Time:hh:mmP
-Merchant ID
-Terminal ID and Item #
-Report date & time
Item#:nnn VISA SALE:SWIPED
Ac:xxxxxxxxxxxxxxxxxxx mm/yy
Invoice#:xxxxxxxx
OpID:nnnn
Date:mm/dd/yy
Time:hh:mmP
Resp: xxxxxxxxxxxxxxxx
Amount
Tax
$xxxxxx.xx
$xxxxxx.xx
TOTAL:$xxxxxx.xx
-Item#, card type, tran type & entry method
-Account number and expiry date
-Invoice number, operator id
-Transaction date & time
-Host response
-Purchase amount, optional tax
-Optional total
Item#:nnn DEBIT SALE
Ac:xxxxxxxxxxxxxxxxxxx
CC:xxxxxxxxxxxxxxxxx
Order Number:
xxxxxxxxxxxxxxxxxxxxxxxxx
Invoice#:xxxxxxxx
OpID:nnnn
Date:mm/dd/yy
Time:hh:mmP
Resp: xxxxxxxxxxxxxxxx
Amount
Tax
$xxxxxx.xx
$xxxxx.xx
Cashback:$xxxxxx.xx
Tip:$xxxxx.xx
Surcharge:$xxxxxx.xx
TOTAL:$xxxxxx.xx
-Item#, card type, trans type
-Account number
-Customer Code
-Order number
END OF BATCH
-Invoice number, operator id
-Transaction date & time
-Host response
-Purchase amount, optional tax
-Optional
-Optional
-Optional
-Optional
cashback
tip
txn fee surcharge
total
-End of report marker
NOTE: Voided transactions will be displayed in the item detail report.
2003 LinkPoint® International, Inc.
119
9100 Reference Manual
REPORTS
Report –Card Detail
This prints a detail report of all transactions in the current open batch, ordered by Card
Type. A card detail report is started by pressing the blue [F] key at the idle prompt,
followed by [3] = REPORT, then [1] = DETAILS, then [2] = CARD TYPE. Then follow the
remaining prompts shown below.
Display Message
Operator Action
Select Offline
Batch?
Yes
No
(conditional)
CARD DETAIL
Printing
Please Wait
If offline transactions are present, this screen
will appear.
Press the far left soft key to print a report on
transactions in the offline batch only.
Press the far right soft key to print a report on
transactions
except
the
offline
batch
transactions.
This display will appear while the report is
printing. The DETAILS REPORT menu will
then reappear. Press [CLR] to exit.
(conditional)
Note that the detail report will contain all data collected during the transaction from
prompts if the data is non-zero.
NOTE: Voided transactions will be displayed in the card detail report.
2003 LinkPoint® International, Inc.
120
9100 Reference Manual
REPORTS
The transaction detail report will look like this:
CARD DETAIL REPORT
Custom
Custom
Custom
Custom
Custom
Custom
Header
Header
Header
Header
Header
Header
Line
Line
Line
Line
Line
Line
1
2
3
4
5
6
Merch ID:xxxxxxxxxxxxxxxx
Term ID:xxxx
Date: mm/dd/yy
Time:hh:mmP
-Report type
-Custom header lines
(max 6)
-Merchant ID
-Terminal ID and Item #
-Report date & time
MasterCard TRANSACTIONS
NONE
VISA TRANSACTIONS
Item#:nnn VISA SALE:SWIPED
Ac:xxxxxxxxxxxxxxxxxxx mm/yy
Order Number:
xxxxxxxxxxxxxxxxxxxxxxxx
Invoice#:xxxxxxxx
OpID:nnnn
Date:mm/dd/yy
Time:hh:mmP
Resp: xxxxxxxxxxxxxxxx
Amount
Tax
$xxxxxx.xx
$xxxxxx.xx
TOTAL:$xxxxxx.xx
DEBIT TRANSACTIONS
Item#:nnn DEBIT SALE
Ac:xxxxxxxxxxxxxxxxxxx
CC:xxxxxxxxxxxxxxxxx
Invoice#:xxxxxxxx
OpID:nnnn
Date:mm/dd/yy
Time:hh:mmP
Resp: xxxxxxxxxxxxxxxx
Amount
Tax
$xxxxxx.xx
$xxxxx.xx
Cashback: $xxxxxx.xx
Tip:$xxxxx.xx
Surcharge:$xxxxxx.xx
TOTAL:$xxxxxx.xx
-Card Type
-Item#, card type & entry method
-Account number and expiry date
-Order Number
-Invoice number, operator id
-Transaction date & time
-Host response
-Purchase amount, optional tax
-Optional total
-Card Type
-Item#, card type
-Account number
-Customer Code
-Invoice number, operator ID
-Transaction date & time
-Host response
-Purchase amount, optional tax
-Optional
-Optional
-Optional
-Optional
cashback
tip
txn fee surcharge
total
END OF BATCH
NOTE: If no transactions are present for a particular card type, the card type will not be
displayed in the report.
2003 LinkPoint® International, Inc.
121
9100 Reference Manual
REPORTS
Report – Transaction Type Detail Report
This prints a detail report of all transactions in the current open batch, ordered by
Transaction Type. A transaction detail report is started by pressing the blue [F] key at
the idle prompt, followed by [3] = REPORT, then [1] = DETAILS, then [3] = TXN TYPE.
Then follow the remaining prompts shown below.
Display Message
Operator Action
Select Offline
Batch?
Yes
No
(conditional)
TXN DETAIL
Printing
Please Wait
If offline transactions are present, this screen
will appear.
Press the far left soft key to print report on
transactions in the offline batch only.
Press the far right soft key to print report on
transactions
except
the
offline
batch
transactions.
This display will appear while the report is
printing. The details report menu will then
reappear. Press [CLR] to exit.
(conditional)
2003 LinkPoint® International, Inc.
122
9100 Reference Manual
REPORTS
The transaction detail report will look like this:
TXN DETAIL REPORT
Custom
Custom
Custom
Custom
Custom
Custom
Header
Header
Header
Header
Header
Header
Line
Line
Line
Line
Line
Line
1
2
3
4
5
6
Merch ID:xxxxxxxxxxxxxxxx
Term ID:xxxx
Date: mm/dd/yy
Time:hh:mmP
CREDIT TRANSACTIONS
Item#:nnn VISA SALE:SWIPED
Ac:xxxxxxxxxxxxxxxxxxx mm/yy
Order Number:
xxxxxxxxxxxxxxxxxxxxxxxxx
Invoice#:xxxxxxxx
OpID:nnnn
Date:mm/dd/yy
Time:hh:mmP
Resp: xxxxxxxxxxxxxxxx
Amount
Tax
$xxxxxx.xx
$xxxxxx.xx
TOTAL:$xxxxxx.xx
DEBIT TRANSACTIONS
Item#:nnn DEBIT SALE
Ac:xxxxxxxxxxxxxxxxxxx
CC:xxxxxxxxxxxxxxxxx
Invoice#:xxxxxxxx
OpID:nnnn
Date:mm/dd/yy
Time:hh:mmP
Resp: xxxxxxxxxxxxxxxx
Amount
Tax
$xxxxxx.xx
$xxxxx.xx
Cashback: $xxxxxx.xx
Tip:$xxxxx.xx
Surcharge:$xxxxxx.xx
TOTAL:$xxxxxx.xx
END OF BATCH
-Report type
-Custom header lines
(max 6)
-Merchant ID
-Terminal ID and Item #,
-Report date & time
-Category
-Item#, card type & entry method
-Account number and expiry date
-Order Number
-Invoice number, operator id
-Transaction date & time
-Host response
-Purchase amount, optional tax
-Optional total
-Category
-Item#, card type
-Account number
-Customer Code
-Invoice number, operator id
-Transaction date & time
-Host response
-Purchase amount, optional tax
-Optional
-Optional
-Optional
-Optional
cashback
tip
txn fee surcharge
total
-End of report marker
Note: The report will be ordered by credit, debit and EBT transaction categories and
within these ordered by item number. The detail report will contain all data
collected during the transaction from prompts if the data is non-zero. Voided
transactions will be displayed in the transaction detail report. If no transactions
are present for a transaction type, this type will not be displayed on the report.
2003 LinkPoint® International, Inc.
123
9100 Reference Manual
REPORTS
Report–Summary
The summary report provides totals for credit, debit and EBT transactions. If a
particular card type does not have any activity in the batch, that card type will not be
included in the summary report. A summary report is started by pressing the blue [F]
key at the idle prompt, followed by [3] = REPORT, then [2] = SUMMARY. Then follow
the remaining prompts shown below.
Display Message
Operator Action
Select Offline
Batch?
Yes
No
(conditional)
If offline transactions are present, this screen
will appear.
Press the far left soft key to print a report on
transactions in the offline batch only.
Press the far right soft key to print report on
transactions
except
the
offline
batch
transactions.
The standard “Printing Please Wait” screen will be displayed while the report is
printing. The Report menu will then reappear. Press [CLR] to exit.
2003 LinkPoint® International, Inc.
124
9100 Reference Manual
REPORTS
The summary report will look like this:
BATCH SUMMARY REPORT
-Report Type
Custom
Custom
Custom
Custom
Custom
Custom
-Custom header lines
(max 6)
Header
Header
Header
Header
Header
Header
Line
Line
Line
Line
Line
Line
1
2
3
4
5
6
Merch ID:xxxxxxxxxxxxxxxx
Term ID:xxxx
Batch #: n
Date: mm/dd/yy
Time:hh:mmP
CREDIT TRANSACTIONS
SALE
RETURN
TICKET
VOID
=========
SUB-TOTAL
TXN
nnn
nnn
nnn
nnn
===
nnn
AMOUNT
$xxxxxx.xx
$xxxxxx.xx
$xxxxxx.xx
$xxxxxx.xx
==========
$xxxxxx.xx
DEBIT TRANSACTIONS
SALE
RETURN
========
SUB-TOTAL
TXN
nnn
nnn
===
nnn
AMOUNT
$xxxxxx.xx
$xxxxxx.xx
==========
$xxxxxx.xx
-Merchant ID
-Terminal ID and Item #
-Batch number
-Report date & time
-Category
-No
-No
-No
-No
of
of
of
of
sales and total amount
returns and total amount
tickets and total amount
voids and total amount
-Total for all credit txns
-Category
-No of sales and total amount
-No of returns and total amount
-Total for all debit txns
EBT TRANSACTIONS
SUB-TOTAL
nnn
$xxxxxx.xx
-Total for all EBT txns
ALL TRANSACTIONS
CREDIT
DEBIT
EBT
===========
GRAND TOTAL
nnn
nnn
nnn
===
nnn
$xxxxxx.xx
$xxxxxx.xx
$xxxxxx.xx
==========
$xxxxxx.xx
-Credit sub total
-Debit sub total
-EBT sub total
-Grand total for open batch
End of report marker
2003 LinkPoint® International, Inc.
125
9100 Reference Manual
REPORTS
Report – Operator ID
The operator ID report lists the transactions performed for a single operator or for all
operators. This assumes that the configurable operator id prompt is enabled during
transaction processing. An operator ID report is started by pressing the blue [F] key at
the idle prompt, followed by [3] = REPORT, then [3] = OPERATOR ID. Then follow the
remaining prompts shown below.
Display Message
Operator Action
Select Offline
Batch?
Yes
(conditional)
No
OP ID REPORT
Enter Operator
Id
XXXX
If offline transactions are present, this screen
will appear.
Press the far left soft key to print report on
transactions in the offline batch only.
Press the far right soft key to print report on
transactions
except
the
offline
batch
transactions.
Key in the operator ID required then press
[OK], or just press [OK] to select all operators.
The standard PRINTING PLEASE WAIT screen will be displayed while the report is
printing. The Report menu will then reappear. Press [CLR] to exit.
2003 LinkPoint® International, Inc.
126
9100 Reference Manual
REPORTS
The operator ID report will look like this:
OPERATOR XXXX REPORT
-Report Type and op id
Custom
Custom
Custom
Custom
Custom
Custom
-Custom header lines
(max 6)
Header
Header
Header
Header
Header
Header
Line
Line
Line
Line
Line
Line
1
2
3
4
5
6
Merch ID:xxxxxxxxxxxxxxxx
Term ID:xxxx
Date: mm/dd/yy
Time:hh:mmP
-Merchant ID
-Terminal ID and Item #
-Report date & time
ITEM
001
008
-Item#, card/txn type & amount
CARD
MC
VISA
SUB-TOTAL
TRANS
SALE
RETRN
TOTAL
$xxxxxx.xx
$xxxxxx.xx
==========
$xxxxxx.xx
END OF OPERATORS
-Total value for operator
-End of report marker
If a report for all operators is requested, an ordered report will be generated with the
operator ID printed above the Item/Card/Trans total heading. This section will then be
repeated for each unique operator ID.
2003 LinkPoint® International, Inc.
127
9100 Reference Manual
REPORTS
Aborting Reports
During the printing of the item detail, card detail, transaction detail, or operator ID
report the printing may be aborted by pressing the [C] (Cancel) key. The printout of the
aborted report will end with the text, report aborted. On pressing the cancel key the
following screen will appear:
Display Message
Operator Action
XXXXXXXXXX
Abort Report ?
Yes
No
Press the far right hand soft key or the [CLR]
key to continue the report printing.
Press the far left hand soft key to abort the
report.
XXXXXXXXXX represents the report type
Low Battery Indication When Printing Reports
If a low battery level is detected when a report starts to print, then the following screen
will appear:
Display Message
XXXXXXXXXX
Battery Low
Print Report ?
Yes
No
Operator Action
Press the far right hand soft key to stop the
report printing.
Press the far left hand soft key or the [CLR]
key to print the report.
XXXXXXXXXX represents the report type.
2003 LinkPoint® International, Inc.
128
9100 Reference Manual
REPRINT
REPRINT
This function prints a duplicate receipt of any transaction in the open batch. A reprint is
started by pressing the blue [F] key at the idle prompt, followed by [1] = REPRINT. Then
follow the remaining prompts shown below.
Display Message
Operator Action
REPRINT
Enter Password
If prompted, key in the merchant password (16 digits) and press [OK].
(optional)
1
2
3
The terminal requests the merchant to select
either merchant or customer receipt reprint, or
both.
REPRINT
Merchant
Customer
Both
(conditional)
Select Offline
Batch?
Yes
No
(conditional)
2003 LinkPoint® International, Inc.
If offline transactions are present, this screen
will appear.
Press the far left soft key to act on transactions
in the offline Batch only.
Press the far right soft key to act on
transactions
except
the
offline
batch
transactions.
129
9100 Reference Manual
REPRINT
REPRINT
Enter Item #
Key in the item number of the transaction for
which a duplicate receipt is required and press
[OK], or just press [OK] to reprint the last
transaction.
(optional)
REPRINT
Reprinting
Please Wait
While the receipt is reprinting, this display will
be shown.
(conditional)
The reprinted receipt will be identical to the original receipt except the words
**DUPLICATE** will appear immediately below the six custom receipt header lines.
2003 LinkPoint® International, Inc.
130
9100 Reference Manual
CLOSE AND OTHER BATCH FUNCTIONS
CLOSE AND OTHER BATCH FUNCTIONS
Batch close, batch inquiry, batch update, and offline upload transactions are supported.
Batch Close
Important Note: At the end of each business day the batch must be closed and receive a
CLOSED OK response, or the merchant will not be credited for the transactions in that
day’s batch.
Important Note: A batch that was done in wireless mode must be closed in wireless
mode! A batch that was done in dial-up mode must be closed in dial-up mode! You
cannot perform transactions in one mode and then close them in the other mode.
A batch close is started by pressing the [OK] key at the idle prompt, followed by [4] =
BATCH, then [1] = CLOSE. Then follow the remaining prompts shown below.
Display Message
Operator Action
BATCH CLOSE
Enter Password
If prompted, key in the merchant password (16 digits) and press [OK].
(optional)
BATCH CLOSE
Print Report?
Yes
No
Press the far left hand soft key to print a
summary report and item detail report. Press
the far right hand soft key to print only a close
receipt.
(optional)
BATCH CLOSE
Credit
Debit/EBT
$xxx.xx
$xxx.xx
Total
$xxx.xx
Press OK to Cont.
2003 LinkPoint® International, Inc.
The batch credit amount, batch debit and EBT
amount, and the batch total amount are
displayed.
Press [OK] to confirm the close.
131
9100 Reference Manual
CLOSE AND OTHER BATCH FUNCTIONS
BATCH CLOSE
various text
BATCH CLOSE
Please Wait
Printing
The terminal displays several messages
indicating it is communicating with the host.
These are DIALING, REDIALING, SENDING,
RECEIVING, and DISCONNECTING.
The terminal displays this message until the
batch close receipt is printed assuming that the
printer is available and enabled.
(conditional)
BATCH CLOSE
Closed Ok
After printing the batch close receipt, the
successful close message is displayed. Press
[CLR] to return back to the transaction menu
screen.
If there is a discrepancy between the terminal
and the host during the batch close, then the
error type and amount will be displayed instead
of the CLOSED OK message, for example,
INVLD xxx.xx or FORCE xxx.xx. PLEASE
CALL HELP DESK will also be displayed on
detection of a discrepancy.
Note: The amount displayed in the event of a force or invalid close will include only
credit transactions. It will not include debit or EBT totals.
2003 LinkPoint® International, Inc.
132
9100 Reference Manual
CLOSE AND OTHER BATCH FUNCTIONS
Batch Close–Receipt
BATCH CLOSE RECEIPT
Custom
Custom
Custom
Custom
Custom
Custom
Header
Header
Header
Header
Header
Header
Line
Line
Line
Line
Line
Line
-Merchant header
1
2
3
4
5
6
Merch ID:xxxxxxxxxxxxxxxx
Term ID:xxxx
Batch #: n
#Items:nnn
CREDIT
DEBIT
EBT
TOTAL
Date: mm/dd/yy
-Merchant ID
-Terminal
-Batch number (0 through 9)
-Number of items in batch
-Batch Credit total
$xxxxxx.xx
$xxxxxx.xx
$xxxxxx.xx
=========
$xxxxxx.xx
-Batch
-Batch
EBT total
-Batch
Total
-Transaction date & time
Time: hh:mmP
2003 LinkPoint® International, Inc.
Debit total
133
9100 Reference Manual
CLOSE AND OTHER BATCH FUNCTIONS
Batch Inquiry
The batch inquiry transaction returns the settled total amount from the previous day’s
closed batches.
A batch inquiry is started by pressing the [OK] key at the idle prompt, followed by [4] =
BATCH, then [2] = INQUIRY. Then follow the remaining prompts shown below.
Display Message
Operator Action
BATCH INQUIRY
Start Inquiry?
Yes
Press the far left hand soft key to contact the
host or press the far right hand soft key to exit
and return to the batch menu.
No
BATCH INQUIRY
various text
The terminal displays several messages
indicating it is communicating with the host.
These are DIALING, REDIALING, SENDING,
RECEIVING, and DISCONNECTING.
BATCH INQUIRY
Last Deposit
xxxxxxxxxxxxxx
The last deposit message returned from the
host will be displayed.
2003 LinkPoint® International, Inc.
Press [CLR] to return to the batch menu screen.
134
9100 Reference Manual
CLOSE AND OTHER BATCH FUNCTIONS
Batch Update
This transaction updates the host with any off-line transactions in the open batch. (Note:
These are not Offline Sales, but transactions such as Ticket Only, Void and Credit Return
that are stored “off-line” in the terminal’s batch because they do not need an on-line
approval.)
A batch update is started by pressing the [OK] key at the idle prompt, followed by [4] =
BATCH, then [3] = UPDATE. Then follow the remaining prompts shown below.
Display Message
Operator Action
BATCH UPDATE
Start Update?
Yes
Press the far left hand soft key to contact the
host, or press the far right hand soft key to exit
and return the batch menu.
No
BATCH UPDATE
various text
The terminal displays several messages
indicating it is communicating with the host.
These are DIALING, REDIALING, SENDING,
RECEIVING, and DISCONNECTING.
BATCH UPDATE
Completed Ok
Press [CLR] to return to the batch menu screen.
2003 LinkPoint® International, Inc.
135
9100 Reference Manual
CLOSE AND OTHER BATCH FUNCTIONS
Offline Batch Upload
This transaction uploads offline credit sale transactions to the host. (For more
information about offlines, please see the section in this manual entitled Offline
Transactions.)
An offline batch upload is started by pressing the [OK] key at the idle prompt, followed
by [4] = BATCH, then [4] = UPLOAD. Then follow the remaining prompts shown below.
Display Message
BATCH UPLOAD
1 All Txns
2 Single Txn
2003 LinkPoint® International, Inc.
Operator Action
Select either all offline transactions to be
uploaded or single transaction.
136
9100 Reference Manual
CLOSE AND OTHER BATCH FUNCTIONS
Offline Upload—Single Transaction
Display Message
BATCH UPLOAD
Enter Password
Operator Action
If prompted, key in the merchant password (16 digits) and press [OK].
(optional)
BATCH UPLOAD
Enter
Item
Number
Enter the item number of the
transaction to be uploaded to the host.
offline
(optional)
BATCH UPLOAD
1 OFFLINE SALE
$XX.XX
PREV
NEXT
BATCH UPLOAD
XXXXXXXXXXXXX
CCCCCCCCCCCCCC
Swiped
XX/XX
Press [OK] to display the detailed
transaction information. Press [CLR] key to
cancel the operation.
The detailed transaction information
including card type, card number, expiry
date and entry method is displayed. Press
[OK] to continue. Press [CLR] to cancel the
operation.
(optional)
BATCH UPLOAD
various text
2003 LinkPoint® International, Inc.
The terminal displays several messages
indicating it is communicating with the host.
These
are
DIALING,
REDIALING,
SENDING,
RECEIVING,
and
DISCONNECTING.
137
9100 Reference Manual
CLOSE AND OTHER BATCH FUNCTIONS
BATCH UPLOAD
Enter
Item
Number
The next item number can now be entered for
upload.
BATCH UPLOAD
Press [CLR] to return to the batch menu screen.
Press [CLR] to return to the batch menu screen.
Upload Ended
Approved
xxx
Declined
xxx
Not compl. xxx
The results of the upload will be printed on the upload report.
Batch Upload—All Transactions
Display Message
Operator Action
BATCH UPLOAD
Enter Password
If prompted, key in the merchant password (16 digits) and press [OK].
(optional)
BATCH UPLOAD
UPLOAD ALL OFFLINE
TRANS VIA WIRELESS
(OR DIAL UP)
Yes
Press the far left hand soft key to contact the
host or press the far right hand soft key to exit
and return the batch menu screen.
No
(optional)
BATCH UPLOAD
various text
2003 LinkPoint® International, Inc.
The terminal displays several messages
indicating it is communicating with the host.
These are DIALING, REDIALING, SENDING,
RECEIVING, and DISCONNECTING.
138
9100 Reference Manual
CLOSE AND OTHER BATCH FUNCTIONS
BATCH UPLOAD
Press [CLR] to return to the batch menu screen.
Upload Ended
Approved
xxx
Declined
xxx
Not compl. xxx
The results of the upload will be printed on the upload report.
2003 LinkPoint® International, Inc.
139
9100 Reference Manual
LOCAL FUNCTIONS
LOCAL FUNCTIONS
In addition to Reviews, Reports and Reprints described earlier in this manual, there are
a number of other local functions. All of these are accessed by pressing the blue [F] key,
then scrolling through the admin menu. These functions include response (view last
responses), batch, setup, date and time, password, demo mode and diagnostics. Each of
these functions is summarized in the table below, then explained in detail in the sections
that follow the table.
Table of Local Functions
General Instructions
-
To access the administrative functions, press the blue [F] key.
-
To choose a menu option, either press the number of that option, OR scroll with
the up or down arrow key until the option is “highlighted” in reverse text. Then
press the green [OK] key to select it. Make further selections from the sub-menus
using the same method.
-
If a password is requested, the default password is [1] [2] [3] [4]. If merchant has
changed the password and does not remember new password, see instructions at
end of table below.
-
When in a sub-menu, press the orange [CLR] key to step back to the previous menu.
-
When a field has a yes or no question, press the left-most yellow key for YES. Press
the right-most yellow key for NO.
-
When entering data in a field, press the orange [CLR] key to backspace or to empty
a field if necessary.
-
After entering data in a field, press the green [OK] key to save the entry.
-
Press the red [C] key to exit a field or to exit the admin menu.
-
Use the table below to find the various admin menu and sub-menu options.
2003 LinkPoint® International, Inc.
140
9100 Reference Manual
LOCAL FUNCTIONS
ADMIN MAIN
MENU OPTIONS
FIRST SUBMENU OPTIONS
2ND SUB-MENU
OPTIONS
3RD SUB-MENU
OPTIONS
EXPLANATION
1 Reprint
1 Merchant
--
--
2 Customer
--
--
3 Both
--
--
Reprint
merchant
copy of receipt
Reprint
customer
copy of receipt
Reprint both copies
of receipt
1 Item Number
--
--
2 Totals
--
3 Operator ID
1 MasterCard, 2
Visa, 3 AmEx,
etc.
--
--
1 Details
1 Item Number
--
2 Card Type
--
3 Txn Type
--
2 Summary
3 Operator ID
---
---
4 Response
--
--
--
Displays last five
terminal responses
(press OK to go back
from most recent to
earliest)
5 Batch
1 History
--
--
2 Number
--
--
3 Clear
--
--
4 Del Offline
1 Single Txn
--
2 All Txns
--
Displays last five
batch close amounts
(press OK to go back
from most recent to
earliest)
Displays
current
batch number and
allows number to be
changed
Deletes the current
batch—USE WITH
CAUTION!
Allows
a
single
offline transaction to
be deleted
Deletes all offline
sales—USE WITH
CAUTION!
1 On\Off
--
2 Review
3 Report
6 Setup
1 Printer
2003 LinkPoint® International, Inc.
141
Review
individual
transaction
Review card type
totals & grand total
(0 = All)
Review totals by
operator ID (press
OK key for all
operators)
Print details by item
number
Print details by card
type
Print
details
by
transaction type
Print batch summary
Print
totals
by
operator ID (press
OK key for all
operators)
Turns printer on or
off
9100 Reference Manual
LOCAL FUNCTIONS
ADMIN MAIN
MENU OPTIONS
FIRST SUBMENU OPTIONS
2ND SUB-MENU
OPTIONS
2 Receipt
3RD SUB-MENU
OPTIONS
--
3 Format
1 Header
2 Trailer
3 Flex
2 Backlight
--
--
3 Contrast
4 Comms
-1 Comms Type
---
2 Wireless
1 Auth IP
2 Close Ph.
3 Terminal ID
3 Dial-up
1 Auth 1 Ph.
2 Auth 2 Ph.
3 Close 1 Ph.
4 Close 2 Ph.
5 Terminal ID
4 Config
1 Host Phone
2 Terminal ID
5 Config Load
5 Dial Prefix
--
--
--
2003 LinkPoint® International, Inc.
142
EXPLANATION
Sets
number
of
customer copies
Sets
up
receipt
header lines text
Sets
up
receipt
trailer lines text
Sets up agreement
lines text
Sets
backlight
timeout time
Sets display contrast
Displays
current
comms type (dialup
or wireless) and
allows type to be
changed
(recommend do NOT
change
with
transactions in the
batch)
Sets wireless IP
address
(N/A—dialup close of
wireless batch not
yet available)
Sets
wireless
terminal ID (FDR 4digit device ID—do
NOT set same as
dialup terminal ID)
Sets primary auth
phone number
Sets secondary auth
phone no.
Sets primary close
phone number
Sets
secondary
close phone no.
Sets dialup terminal
ID
(FDR
4-digit
device ID—do NOT
set same as wireless
terminal ID)
Sets Zontalk config
phone no.
Sets Zontalk config
load terminal ID
Sets dial prefix for all
phone numbers (use
Clr key to delete an
existing prefix if no
prefix needed)
Loads
merchant’s
Zontalk parameters
(in dialup mode only)
9100 Reference Manual
LOCAL FUNCTIONS
ADMIN MAIN
MENU OPTIONS
FIRST SUBMENU OPTIONS
6 App Upgrade
2ND SUB-MENU
OPTIONS
--
3RD SUB-MENU
OPTIONS
--
EXPLANATION
Loads new versions
of software (in dialup
mode only)
-
Always
close
batch
before
app
upgrade.
Always do
a
config
load after
app
upgrade.
Enables/disables tax
prompt
Enables/disables
order # prompt
Enables/disables
invoice # prompt
Enables/disables
AVS prompts (street
address and zip
code)
Enables/disables
customer
code
prompt
(for
purchasing cards)
Enables/disables
“Last 4” fraud control
prompt
Enables/disables
“Display MSR” fraud
control prompt
Enables/disables
operator ID prompt
Sets up idle prompt
top line
Sets up idle prompt
main line
Enables/disables
retail tip prompt
Enables/disables
EBT balance inquiry
Enables/disables
EBT cash sale
Enables/disables
debit cashback
Enables/disables
debit return
Enables/disables
credit return
Enables/disables
pre-sale
-
7 Prompts
1 Sales Tax
--
2 Order No.
--
3 Invoice No.
--
4 AVS Only
--
5 Cust Code
--
6 Last 4 No.
--
7 Echo Card
--
8 Operator ID
--
9 Idle Prompt
1 Idle Top
2 Idle Main
8 Enable Txns
0 Tip
--
1 EBT Inquiry
--
2 EBT Cash
--
3 DB Cashback
--
4 DB Return
--
5 CR Return
--
6 Pre-Sale
--
2003 LinkPoint® International, Inc.
143
9100 Reference Manual
LOCAL FUNCTIONS
FIRST SUBMENU OPTIONS
9 Key Mgmt
2ND SUB-MENU
OPTIONS
--
3RD SUB-MENU
OPTIONS
--
0 Merchant ID
--
--
1 Date
2 Time
---
---
3 24hr Format
--
--
8 Password
--
--
--
Sets
merchant
password (if old
password not known
see
special
instructions in note
at the bottom of this
table*)
9 Demo Mode
--
--
--
Changes
between
live and demo mode
(can
NOT
enter
demo mode until live
batch
has
been
closed)
0 Diagnostic
1 Version
--
--
2 Display
--
--
3 Printer
4 Keypad
---
---
5 Card Swipe
1. Track 1
--
2. Track 2
--
6 Dialer
--
--
7 Serial
--
--
8 Memory
--
--
Displays
current
software version
Tests
terminal’s
display
Performs print test
Allows keys to be
tested (press OK key
to exit this test)
Tests card reader’s
track 1
Tests card reader’s
track 2
Tests dialup modem
(not available in
wireless mode)
Tests serial port
connection
(Requires a special
loopback connector)
Tests
terminal’s
RAM
ADMIN MAIN
MENU OPTIONS
7 Date & Time
2003 LinkPoint® International, Inc.
144
EXPLANATION
Selects
key
management
type
(Master Session vs.
DUKPT)
Sets merchant ID
(can NOT change
when transacs in
batch;
requires
secret code from a
password generator
supplied by terminal
manufacturer)
Sets terminal’s date
Sets terminal’s time
(must be set in 24hour military time)
Sets time display on
idle prompt to 12hour
or
24-hour
format
9100 Reference Manual
LOCAL FUNCTIONS
ADMIN MAIN
MENU OPTIONS
FIRST SUBMENU OPTIONS
9 Wireless
2ND SUB-MENU
OPTIONS
--
3RD SUB-MENU
OPTIONS
--
EXPLANATION
Tests
wireless
modem connection
and displays signal
strength (RSSI) (not
available in dialup
mode)
*If the terminal password is unknown, calculate the master override password as follows:
(1) Using only the last two digits of the year, write down terminal’s date in the format: y1 y2 m1 m2 d1 d2.
(2) Rearrange the date as: y1 m1 d1 y2 m2 d2. The resulting number is the override password.
For example, write the date 12/30/2098 in the format: 91 82 11 22 31 02.
Rearrange this date as: 91 11 31 82 22 02.
In this example, the password would be 913820.
Since Review, Reports and Reprint have already been described in detail elsewhere in
this manual, the detailed Local Function information below will start with Response.
2003 LinkPoint® International, Inc.
145
9100 Reference Manual
LOCAL FUNCTIONS
Response (View Last Responses)
This local function allows the last five terminal responses to be reviewed on the 9100
display. They appear in chronological order, with response one being the most recent
and response five being the oldest.
The response review is started by pressing the blue [F] key at the idle prompt, followed
by [4] = RESPONSE. Then follow the remaining prompts shown below.
Display Message
HOST RESPONSE
Enter Password
Operator Action
If prompted, key in the merchant password (16 digits) and press [OK].
(optional)
HOST RESPONSE
Response N:
xxxxxxxxxxxxxx
xx
The most recent response is displayed first. For
example, this could be an approval code or a
close message. Press [OK] to review the next
response, or press [CLR] to exit to the menus.
The above display format will be repeated for all 5 responses. The only difference will be
the response number and response message.
Batch Functions
Local batch functions allow the following operations:
•
Review the last five batch close totals.
•
Reset the current batch number (used when communicating with the host).
•
Delete all transactions in the current open batch.
•
Delete offline transactions.
The batch menu will always prompt for a password when the menu option is selected.
The batch menu is accessed by pressing the blue [F] key at the idle prompt, followed by
[5] = BATCH. Then follow the remaining prompts shown below.
2003 LinkPoint® International, Inc.
146
9100 Reference Manual
LOCAL FUNCTIONS
Display Message
Operator Action
BATCH
Enter Password
Key in the merchant password (1-6 digits) and
press [OK].
BATCH
1 History
2 Number
3 Clear
Choose the desired batch function: 1 =
HISTORY, 2 = NUMBER, 3 = CLEAR, or 4 =
DELETE OFFLINES. Follow the remaining
prompts shown below for each function.
Batch History
Information on the last five batch closes is available with this local function. Data on the
most recent batch close will always be displayed first. The batch data displayed for each
batch are:
•
The batch number
•
Total close amount
•
The number of transactions in the batch
•
The date and time of the batch close
Batch history is accessed by pressing the blue [F] key at the idle prompt, followed by 5 =
BATCH, then the password, then 1 = HISTORY. Then follow the remaining prompts
shown below.
Display Message
BATCH HISTORY
Batch#:nnn
$xxxxxx.xx/nnn
MM/DD/YY HH:MM
(optional)
2003 LinkPoint® International, Inc.
Operator Action
The second line will display the batch number,
and third line the close amount along with the
number of items. The fourth line will include
the date and time of the batch close.
Press [OK] to view information on the next
batch close or press [CLR] to quit.
147
9100 Reference Manual
LOCAL FUNCTIONS
Batch Number
Batch number is accessed by pressing the blue [F] key at the idle prompt, followed by [5]
= BATCH, then the password, then [2] = NUMBER. Then follow the remaining prompts
shown below.
Display Message
BATCH NUMBER
Current:n
Change?
Yes
No
BATCH NUMBER
Enter
New
Batch Number
BATCH NUMBER
Change
Confirmed!
Operator Action
The current batch number is displayed.
Press the far left-hand soft key to change the
current setting.
Press the far right-hand soft key or the [CLR]
key to leave the setting unchanged.
Enter the batch number (one digit), and press
[OK].
The confirmation message will be displayed
before returning to the menus.
Batch Clear
Caution: The Batch Clear operation deletes all transactions from the batch and should
be used only under extreme situations.
Important note: Batch Clear will delete only the batch for the terminal’s current mode.
For example, if transactions have been run in both dialup and wireless modes and the
terminal is currently in wireless mode, only the wireless batch will be deleted. To
delete the dialup transactions, it would be necessary to go into dialup mode.
This procedure will not delete a batch of offline sales. See the section entitled Delete
Offline Transactions later in this manual for the procedure to delete offline sales.
2003 LinkPoint® International, Inc.
148
9100 Reference Manual
LOCAL FUNCTIONS
Batch Clear is accessed by pressing the blue [F] key at the idle prompt, followed by [5] =
BATCH, then the password, then [3] = CLEAR. Then follow the remaining prompts
shown below.
Display Message
Operator Action
BATCH CLEAR
Confirm Clear?
Yes
No
BATCH CLEAR
Change
Confirmed!
2003 LinkPoint® International, Inc.
Press the far left-hand soft key under Yes to
clear the current batch.
Press the far right-hand soft key or the [CLR]
key to leave the batch unchanged.
The confirmation message will be displayed
and the terminal will return to the Batch menu.
149
9100 Reference Manual
LOCAL FUNCTIONS
Delete Offline Transactions
The delete offline transactions operation deletes either all or single transactions from the
open offline batch. If offline sales are repeatedly declined during offline uploads, it will
be necessary to delete them so they do not accumulate in the offline batch.
Delete Single Offline
Delete single offline is accessed by pressing the blue [F] key at the idle prompt, followed
by [5] = BATCH, then the password, then [4] = DEL OFFLINE, then [1] = SINGLE TXN.
Then follow the remaining prompts shown below.
Display Message
Operator Action
DEL OFFLINE
Enter Item #:
Enter the item number
transaction to be deleted.
of
the
offline
DEL OFFLINE
n OFFLINE SALE
$XX.X
PREV
NEXT
Press [OK] to display the detailed transaction
information (n = offline item number). Press
[CLR] key to cancel the operation.
DEL OFFLINE
(Card Type)
(Card Number)
Swiped
XX/XX
The detailed transaction information including
card type, card number, expiry date and entry
method is displayed.
Press [OK] to proceed to the confirmation
screen.
Press [CLR] to cancel the operation.
DEL OFFLINE
Del Item n
Press OK to
Confirm
2003 LinkPoint® International, Inc.
Press [OK] to delete the transaction.
Press [CLR] to cancel the operation.
150
9100 Reference Manual
LOCAL FUNCTIONS
DEL OFFLINE
Deleted!
Item#: n
Press [CLR] or [OK] to return to the del offline
menu. Press [CLR] again to exit.
Delete All Offlines
Delete all offlines is accessed by pressing the blue [F] key at the idle prompt, followed by
[5] = BATCH, then the password, then [4] = DEL OFFLINE, then [2] = ALL TXNS. Then
follow the remaining prompts shown below.
Display Message
Operator Action
DEL OFFLINE
Del All Txns
Press OK to
Confirm
Press [OK] to confirm deletion of all offline
sale transactions in the offline batch. Press
[CLR] key to cancel the operation
DEL OFFLINE
Deleted!
All Txns
Press [OK] or [CLR] key to return to the del
offline menu. Press [CLR] again to exit.
2003 LinkPoint® International, Inc.
151
9100 Reference Manual
LOCAL FUNCTIONS
Setup Functions
Setup is accessed by pressing the blue [F] key at the idle prompt, followed by 6 = setup,
then the password. The desired setup function may be selected by scrolling through the
setup menu. The available setup functions are: printer, backlight, contrast, comms,
config load, app upgrade, prompts, enable transactions, key management, and merchant
ID.
Note that the various settings in setup can also be changed remotely by configuring
them in the merchant’s Zontalk file and then performing a configuration download (see
the sections earlier in this manual entitled Configuration [Parameter] Download and
Download Parameters and Options). In some cases (for example, when configuring
receipt header lines) it is much easier to make the changes via a configuration download
than to change them locally in setup.
Printer Setup
The printer may be enabled or disabled locally. Additionally, the number of copies of
the customers receipt may be configured.
Printer Enable
This local function allows the printer to be enabled or disabled.
From the idle prompt, PRINTER ENABLE is accessed by pressing the blue [F] key,
followed by [6] = SETUP, then the password and [OK], then [1] = PRINTER, then [1] =
ON\OFF. Then follow the prompts shown below:
Display Message
PRINTER
Mode: Off
Change?
Yes
No
Operator Action
Press the far left soft key to change the status
of the printer.
Press the far right-hand soft key to keep the
current setting.
OR
PRINTER
Mode: On
Change?
Yes
No
(conditional)
2003 LinkPoint® International, Inc.
152
9100 Reference Manual
LOCAL FUNCTIONS
PRINTER
Change
Customer Receipt Copies
Confirmed!
The confirmation message will be displayed
before returning to the menus.
The number of copies of the customer’s receipt (printed at the end of a transaction) is
configurable. A value of zero will not print a customer receipt. The maximum number of
customer copies is 9. The merchant’s receipt is always printed unless the printer is
disabled.
From the idle prompt, receipt is accessed by pressing the blue [F] key, followed by [6] =
SETUP, then the password and [OK], then [1] = PRINTER, then [2] = RECEIPT. Then
follow the prompts shown below:
Display Message
RECEIPT COPIES
Current:1
Change?
Yes
No
Operator Action
The current customer receipt copies setting is
displayed.
Press the far left-hand soft key to change the
current setting.
Press the far right-hand soft key or the [CLR]
key to leave the setting unchanged and return
to the menus.
RECEIPT COPIES
Enter
Number
Of Copies
Enter the number of customer receipt copies
required (single numeric digit) and press
[OK]. The terminal will then return to the
menus.
Editing Printer Receipt Formats
When editing the printer receipt formats (header, trailer, and flex), on selecting a
particular line of receipt to edit the following screen will be displayed. From the idle
prompt, format is accessed by pressing the blue [F] key, followed by [6] = SETUP, then
the password and [OK], then [1] = PRINTER, then [3] = FORMAT, then HEADER,
TRAILER or FLEX, then the desired line number. Then follow the prompts shown
below. (Note: It is easier to make these changes in the merchant’s Zontalk file and then
perform a configuration download, rather than locally in setup.)
2003 LinkPoint® International, Inc.
153
9100 Reference Manual
LOCAL FUNCTIONS
Display Message
FORMATTING
Write New Line
Operator Action
Key in the desired receipt line and press [OK].
The terminal will return to the menus.
XXXXXXXXXXXXXX
Backlight Timeout Period
This is the period of inactivity before the backlight is switched off, specified in seconds.
If the backlight is not needed, battery power can be saved by setting the timeout time to
0 (zero) so that the backlight will not come on. From the idle prompt, backlight is
accessed by pressing the blue [F] key, followed by [6] = SETUP, then the password and
[OK], then [2] = BACKLIGHT. Then follow the prompts shown below:
Display Message
BACKLIGHT
Current:030
Change?
Yes
No
BACKLIGHT
Enter Timeout
BACKLIGHT
Change
Confirmed!
2003 LinkPoint® International, Inc.
Operator Action
The current backlight timeout period is
displayed on the second line.
Press the far left hand soft key to change the
current setting.
Press the far right hand soft key or the [CLR]
key to leave the setting unchanged and return
to the menus.
Enter the new backlight timeout period,
(max 3 numeric digits), and press [OK].
The confirmation message will be displayed
before returning to the menus.
154
9100 Reference Manual
LOCAL FUNCTIONS
LCD Contrast
The contrast control allows the terminal’s LCD display to be adjusted.
From the idle prompt, contrast is accessed by pressing the blue [F] key, followed by [6] =
SETUP, then the password and [OK], then [3] = CONTRAST. Then follow the prompts
shown below:
Display Message
CONTRAST
Press “OK” To
Save Setting
Down
Up
Operator Action
Press the far right-hand soft key to adjust the
setting downward.
Press the far left-hand soft key to change the
contrast upward.
Press [CLR] to quit without saving change
Press [OK] to save the setting.
CONTRAST
Change
Confirmed!
2003 LinkPoint® International, Inc.
The confirmation message will be displayed
before returning to the menus.
155
9100 Reference Manual
LOCAL FUNCTIONS
Comms Setup
This Setup menu will allow the configuration of the communications parameters for:
1. Communications type, i.e., set to dialup mode or wireless mode
2. Wireless communication parameters
3. Dialup communication parameters
4. Configuration host communication parameters
5. Dial prefix for all dialup communications (transaction, settlement and configuration)
Communications Type
This allows selection of wireless or dialup mode.
From the idle prompt, communications type is accessed by pressing the blue [F] key,
followed by [6] = SETUP, then the password and [OK], then [4] = COMMS, then [1] =
COMMS TYPE. Then follow the prompts shown below:
Display Message
COMMS TYPE
Phone
Change ?
Yes
No
OR
COMMS TYPE
Wireless
Change ?
Yes
No
COMMS TYPE
Please Wait
Disconnecting
2003 LinkPoint® International, Inc.
Operator Action
Press the far left-hand soft key to switch
communications method to the Motient
wireless mode.
Press the far right key or the [CLR] key to
leave the status unchanged and return to the
menus.
Press the far left-hand soft key to switch
communications method to the PSTN (dialup)
modem.
Press the far right or the [CLR] key to leave
the status unchanged and return to the menus.
If changing from wireless to dial-up mode, this
screen will be displayed during the wireless
disconnection.
156
9100 Reference Manual
LOCAL FUNCTIONS
The confirmation message will be displayed
for two seconds before returning to the menus.
COMMS TYPE
Change
Confirmed!
Wireless Communications Parameters
The configurable wireless communications parameters are:
1. Primary IP Address: this address is used for both authorization and settlement.
2. Terminal ID: the terminal ID used to identify the terminal to FDC Omaha.
3. Close phone number: this is included for future support of dialup settlement of
wireless transactions. This feature is currently not supported by the terminal as it is
not yet supported by FDC Omaha.
IP Address
The IP Address used for wireless communications is configured with this option.
From the idle prompt, Auth IP is accessed by pressing the blue [F] key, followed by [6] =
SETUP, then the password and [OK], then [4] = COMMS, then [2] = WIRELESS, then [1]
= AUTH IP. Then follow the prompts shown below:
Display Message
Operator Action
IP ADDRESS
nnn.nnn.nnn.nnn
Yes
Change?
No
Press the far left-hand soft key to change the
primary authorization IP destination address.
Press the far right-hand soft key or the [CLR]
key to leave the status unchanged and return
to the menus.
IP ADDRESS
Enter New IP
Address
nnn.nnn.nnn.nnn
Enter the new IP address (12 digits) and press
[OK]. (Note: Decimal points will be inserted
automatically.)
IP ADDRESS
Changed
Confirmed!
The confirmation message will be displayed
for two seconds before returning to the menus.
2003 LinkPoint® International, Inc.
157
9100 Reference Manual
LOCAL FUNCTIONS
Wireless Terminal ID
Terminal ID is the same as the four-character FDC Omaha device ID. Important: The
wireless terminal ID must be set to a different value from the dialup TID (see below
under dialup terminal ID).
From the idle prompt, wireless terminal ID is accessed by pressing the blue [F] key,
followed by [6] = SETUP, then the password and [OK], then [4] = COMMS, then [2] =
WIRELESS, then [3] = TERMINAL ID. Then follow the remaining prompts shown
below:
Display Message
TERMINAL ID
Wireless:xxxx
Change ?
Yes
No
TERMINAL ID
Enter New
Terminal ID
XXXX
TERMINAL ID
Changed
Confirmed!
Operator Action
Press the far left-hand soft key to change the
terminal ID.
Press the far right or the [CLR] key to leave the
terminal ID unchanged and return to the
menus.
Enter the new terminal ID and press OK.
The terminal ID field is alphanumeric.
The confirmation message will be displayed
before returning to the menus.
Dial-Up Communications Parameters
The following dial-up communications parameters are configurable and effective when
the terminal is in dial-up mode:
1. Authorization host phone number 1 (primary)
2. Authorization host phone number 2 (secondary)
3. Close host phone number 1 (primary)
4. Close host phone number 2 (secondary)
5. Terminal ID—used to identify the terminal to FDC Omaha
2003 LinkPoint® International, Inc.
158
9100 Reference Manual
LOCAL FUNCTIONS
Primary Authorization Number
The PSTN phone number is configured with this option.
From the idle prompt, Primary Authorization Number is accessed by pressing the blue
[F] key, followed by [6] = SETUP, then the password and [OK], then [4] = COMMS, then
[3] = DIAL-UP, then [1] = AUTH 1 PH. Then follow the prompts shown below:
Display Message
AUTH PRIMARY
xxxxxxxxxxxxxx
Change ?
Yes
No
AUTH PRIMARY
Changed
Confirmed!
Operator Action
Press the far left-hand soft key change the
primary authorization phone number.
Press the far right or the [CLR] key to leave
the status unchanged and return to the menus.
The confirmation message will be displayed
before returning to the menus
Secondary Authorization Number
From the idle prompt, secondary authorization number is accessed by pressing the blue
[F] key, followed by [6] = SETUP, then the password and [OK], then [4] = COMMS, then
[3] = DIAL-UP, then [2] = AUTH 2 PH. The remaining prompts will be the same as for
the primary number, except the top line heading will read auth secondary.
Primary Transaction Close Host Number
From the idle prompt, primary close number is accessed by pressing the blue [F] key,
followed by [6] = SETUP, then the password and [OK], then [4] = COMMS, then [3] =
DIAL-UP, then [3] = CLOSE 1 PH. The remaining prompts will be the same as for the
primary auth number, except the top line heading will read close primary.
Secondary Transaction Close Host
From the idle prompt, secondary close number is accessed by pressing the blue [F] key,
followed by [6] = SETUP, then the password and [OK], then [4] = COMMS, then [3] =
DIAL-UP, then [4] = CLOSE 2 PH. The remaining prompts will be the same as for the
primary auth number, except the top line heading will read close secondary.
2003 LinkPoint® International, Inc.
159
9100 Reference Manual
LOCAL FUNCTIONS
Dialup Terminal ID
Terminal ID is the same as the four-character FDC Omaha device ID. Important: The
dialup terminal ID must be set to a different value from the wireless TID (see above
under Wireless Terminal ID).
From the idle prompt, dialup terminal ID is accessed by pressing the blue [F] key,
followed by [6] = SETUP, then the password and [OK], then [4] = COMMS, then [3] =
DIAL-UP, then [5] = TERMINAL ID. Then follow the remaining prompts shown below:
Display Message
TERMINAL ID
Dial-Up:xxxx
Change ?
Yes
No
TERMINAL ID
Changed
Confirmed!
Operator Action
Press the far left-hand soft key change the
terminal ID.
Press the far right or the [CLR] key to leave the
terminal ID unchanged and return to the
menus.
The confirmation message will be displayed
before returning to the menus
Configuration Host Parameters
The following dialup communications parameters are used for configuring
communications with the configuration host (used for parameter downloads and
application upgrades):
1. Configuration host phone number
2. Terminal ID—used to identify the terminal to the configuration host
Configuration Host Phone Number
From the idle prompt, configuration host phone number is accessed by pressing the blue
[F] key, followed by [6] = SETUP, then the password and [OK], then [4] = COMMS, then
[4] = CONFIG, then [1] = HOST PHONE. The remaining prompts will be the same as for
the Auth and Close Host numbers, except that the top line of the displays will read
config host.
2003 LinkPoint® International, Inc.
160
9100 Reference Manual
LOCAL FUNCTIONS
Configuration Terminal ID
From the idle prompt, configuration terminal ID is accessed by pressing the blue [F] key,
followed by [6] = SETUP, then the password and [OK], then [4] = COMMS, then [4] =
CONFIG, then [2] = TERMINAL ID. Then follow the remaining prompts shown below:
Display Message
CONFIG TERM ID
Id:nnnnnnnnnn
Change?
Yes
No
Operator Action
The current terminal ID will be displayed on
the second line.
Press the far left-hand soft key to change the
current setting.
Press the far right-hand soft key or the [CLR]
key to leave the setting unchanged and return
to the menus.
CONFIG TERM ID
Enter
New
Terminal ID
nnnnnnnnnn
CONFIG TERM ID
Change
Confirmed!
2003 LinkPoint® International, Inc.
Enter the new terminal ID (max
alphanumeric characters) and press [OK].
10
The confirmation message will be displayed
before returning to the menus.
161
9100 Reference Manual
LOCAL FUNCTIONS
Dial Prefix
This option will allow the dial prefix (only used when communicating via the PSTN
phone dialup connection, not wireless Motient) to be configured.
From the idle prompt, dial prefix is accessed by pressing the blue [F] key, followed by
[6] = SETUP, then the password and [OK], then [4] = COMMS, then [5] = DIAL PREFIX.
Then follow the remaining prompts shown below:
Display Message
DIAL PREFIX
nnnnnnnnnnnn
Change?
Yes
No
Operator Action
The current dial prefix will be displayed on the
second line.
Press the far left-hand soft key to change the
current setting.
Press the far right-hand soft key or the [CLR]
key to leave the setting unchanged and return
to the menus.
DIAL PREFIX
Enter New Dial
Prefix
Enter the new dial prefix, (max 10 alpha
numeric characters) and press [OK].
DIAL PREFIX
Change
Confirmed!
The confirmation message will be displayed
before returning to the menus.
2003 LinkPoint® International, Inc.
To remove an existing prefix, press [CLR] until
field is empty and then press [OK}.
162
9100 Reference Manual
LOCAL FUNCTIONS
Configuration (Parameter) Download
This menu option will initiate a configuration data load. The terminal’s internal
operating parameters will be changed.
From the idle prompt, configuration download is accessed by pressing the blue [F] key,
followed by [6] = SETUP, then the password and [OK], then [5] = CONFIG LOAD. Then
follow the remaining prompts shown below.
Note: The batch must be closed before the download can be performed.
Note: The configuration phone number must be set correctly (see above under
Configuration Host Phone Number) before attempting the configuration
download.
Display Message
CONFIG TERM ID
Id:nnnnnnnnnn
Change?
Yes
No
Operator Action
Press the far left-hand soft key to change the
config ID used for the config download.
Press the far right-hand soft key to continue
with the download.
Press the [CLR] key to cancel the operation.
CONFIG TERM ID
Start Load
Confirm?
Yes
No
Press the far left-hand soft key to start the
config download.
(Download
information is
displayed)
Wait until the download completes and the
terminal reboots to the idle prompt.
Press the far right-hand soft key to cancel the
download.
For more information about the configuration download, see the section in this manual
entitled Configuration (Parameter) Download.
2003 LinkPoint® International, Inc.
163
9100 Reference Manual
LOCAL FUNCTIONS
Application Upgrade
This menu option will initiate a software application upgrade. The terminal’s executable
code will be modified.
From the idle prompt, application upgrade is accessed by pressing the blue [F] key,
followed by [6] = SETUP, then the password and [OK], then [6] = APP UPGRADE. Then
follow the remaining prompts shown below.
Note: The batch must be closed before the download can be performed.
Note: The configuration phone number must be set correctly (see above under
Configuration Host Phone Number) before attempting the application upgrade.
Important Note: After the upgrade is completed, a configuration download (see
above) must be performed to re-load the merchant’s parameters!
Display Message
Operator Action
APP UPGRADE
Start Upgrade
Confirm?
Yes
No
Press the far left-hand soft key to initiate an
application upgrade.
(Download
information is
displayed)
Wait until the download completes and the
terminal reboots to the idle prompt. Note that
the terminal may re-dial the download host
several times in the course of the upgrade.
Press the far right-hand soft key or the [CLR]
key to quit and return to the menus.
For more information about the configuration download, see the section in this manual
entitled Application Upgrade.
Enabling Prompts
The prompts function allows the merchant to enable or disable several of the data entry
and information displays that appear during the gathering of data associated with a new
transaction. The prompts that can be controlled are: sales tax, order number, invoice
number, AVS details, customer code, entry of last four PAN digits, echo PAN, operator
ID and tip value. The prompts function also allows the setting of the text that appears on
the top and main lines of the Idle screen. (Note that these prompts can also be selectively
enabled or disabled in the merchant’s Zontalk file.)
2003 LinkPoint® International, Inc.
164
9100 Reference Manual
LOCAL FUNCTIONS
Setting Transaction Prompts
From the idle prompt, prompts is accessed by pressing the blue [F] key, followed by [6]
= SETUP, then the password and [OK], then [7] = PROMPTS. Then select the prompt to
be changed from the menu that appears. When changing any prompt, the following
display will appear (where XXXXXXXXXXXXXX = the prompt name):
Display Message
Operator Action
XXXXXXXXXXXXXX
Mode [*MMM*]
Change ?
Yes
No
The current mode will be displayed (MMM) as
either On or Off, and the user prompted to
change if required.
Press NO to exit, or YES to change the current
mode.
The prompt type will appear on the top line
(XXXXXXXXXXXXX).
XXXXXXXXXXXXXX
Change
Confirmed!
The confirmation message will be displayed
before returning to the menus.
The prompt type will appear on the top line
(XXXXXXXXXXXXX).
Setting Idle Prompt Top Line
On selecting the idle top prompt the following screen appears:
Display Message
Operator Action
FORMATTING
New Top Line
Enter the new top line of the idle screen (max
21 characters) and press [OK]. The terminal
will return to the idle prompts menu.
XXXXXXXXXXX
2003 LinkPoint® International, Inc.
165
9100 Reference Manual
LOCAL FUNCTIONS
Setting Idle screen Main Line
On selecting the Idle Main prompt the following screen appears:
Display Message
Operator Action
FORMATTING
New Greeting
Enter the new main line of the idle screen (max
14 characters) and press [OK]. The terminal
will return to the idle prompts menu.
XXXXXXXXXXX
Enabling Transactions
The enable transactions function allows the merchant to enable or disable several of the
financial transaction types. The transactions that can be controlled are: EBT inquiry, EBT
cash, debit cashback, debit return, credit return, and pre-sale gratuity. (Note: These can
also be selectively enabled or disabled in the merchant’s Zontalk file.)
From the idle prompt, enable transactions is accessed by pressing the blue [F] key,
followed by [6] = SETUP, then the password and [OK], then [8] = ENABLE TXNS. Then
select the transaction to be enabled or disabled from the menu that appears. When a
transaction is selected, the following display will appear (where XXXXXXXXXXXXXX =
the transaction type):
Display Message
Operator Action
XXXXXXXXXXXXXX
Mode [*MMM*]
Change ?
Yes
No
The current mode will be displayed (MMM) as
either ON or OFF, and the user is prompted to
change if required.
Press NO to exit, or YES to change the current
mode.
The transaction type will appear on the top
line (XXXXXXXXXXXXX).
XXXXXXXXXXXXXX
Change
Confirmed!
2003 LinkPoint® International, Inc.
The confirmation message will be displayed
before returning to the menus.
The transaction type will appear on the top
line (XXXXXXXXXXXXX).
166
9100 Reference Manual
LOCAL FUNCTIONS
Key Management
The key management function changes the key management type between
Master/Session and DUKPT.
From the idle prompt, key management is accessed by pressing the blue [F] key,
followed by [6] = SETUP, then the password and [OK], then [9] = KEY MGMT. The
remaining prompt is as shown below:
Display Message
Operator Action
Key Mgmnt Type
TTTTTTTTTTTT
TTTTTTTTT
DUKPT.
Toggle
Enter
will
be
Master/Session
or
Press the left-hand soft key under Toggle to
change the type.
Press the right-hand soft key under Enter to set
the type and return to the Setup menu.
Press [CLR] to return to the Setup menu.
Merchant ID
The merchant ID setup function allows the merchant to change the merchant ID of the
terminal.
The merchant ID cannot be changed while there are transactions in the wireless, dialup
or offline batch. If transactions are present, a screen will appear warning the operator to
close the batch.
During the process to change the merchant ID, a secret code will be requested. This
secret code is a variable code and the merchant will need to contact the help desk to
determine the appropriate code each time this task is performed.
From the idle prompt, merchant ID is accessed by pressing the blue [F] key, followed by
[6] = SETUP, then the password and [OK], then [0] = MERCHANT ID. The remaining
prompts are as shown below:
2003 LinkPoint® International, Inc.
167
9100 Reference Manual
LOCAL FUNCTIONS
Display Message
Operator Action
MERCHANT ID
nnnnnnnnnnnnnnnnnnn
Yes
Change?
No
The current merchant ID will be displayed on
the second line.
Press the far left-hand soft key to change the
current setting.
Press the far right-hand soft key or the [CLR]
key to leave the setting unchanged and return
to the menus.
MERCHANT ID
Enter
Secret
Code
The secret code for changing the merchant ID
should be entered to continue. This is a
variable code and the merchant will need to
contact the help desk to determine the
appropriate code each time this task is
performed.
Press [CLR] key to exit the operation and
return to the menus.
MERCHANT ID
Enter
New
Merchant Id
Enter the new merchant ID (max 19 numeric)
and press [OK].
MERCHANT ID
Change
Confirmed!
The confirmation message will be displayed
before returning to the menus
nnnnnnnnnnnnnnnnnnn
2003 LinkPoint® International, Inc.
168
9100 Reference Manual
LOCAL FUNCTIONS
Date And Time
The LinkPoint 9100 real time clock controlling the date and time is configurable from
these menu options.
Set Date
From the idle prompt, date is accessed by pressing the blue [F] key, followed by [7] =
DATE & TIME, then the password and [OK], then [1] = DATE. The remaining prompts
are as shown below:
Display Message
Operator Action
SETUP DATE
Enter New Date
MMDDYYYY
XXXXXXXX
Enter the new date as eight digits (two for the
month, two for the day and four for the year).
Confirm
New
Date
MMDDYYYY
Clear
Enter
The confirmation message will be displayed.
The operator should press [OK] to confirm the
new date. The terminal will then return to the
date and time menu.
Press [OK].
Set Time
The time is always entered in 24-hour military format.
From the idle prompt, time is accessed by pressing the blue [F] key, followed by [7] =
DATE & TIME, then the password and [OK], then [2] = TIME. The remaining prompts
are as shown below:
Display Message
SETUP TIME
Enter New Time
HH:MM
XX:XX
2003 LinkPoint® International, Inc.
Operator Action
Enter the new time as four digits (two digits
for the hour and two for the minutes). Use 24hour military time.
Press [OK].
169
9100 Reference Manual
LOCAL FUNCTIONS
Confirm
New Time
HH:MM
Clear
Enter
The confirmation message will be displayed.
The operator should press OK or the enter key
to confirm the new time. The terminal will
then return to the date & time menu.
Set Time Format
This option allows for the format to be changed from 12-hour to 24-hour military format
on the idle prompt display. (Note that, even though the time is always set as 24-hour
time in SETUP, it can be displayed on the idle prompt as either 12-hour or 24-hour time.)
From the idle prompt, 24 Hr Format is accessed by pressing the blue [F] key, followed
by [7] = DATE & TIME, then the password and [OK], then [3] = 24 HR FORMAT. The
remaining prompts are as shown below:
Display Message
Operator Action
24 HOUR CLOCK
Mode [*Off*]
Change ?
Yes
No
The current mode will be displayed and the
user prompted to change if required.
24 HOUR CLOCK
Change
Confirmed!
The change will be confirmed. The terminal
will return to the date & time menu.
2003 LinkPoint® International, Inc.
Press NO to exit, or YES to change the current
format.
170
9100 Reference Manual
LOCAL FUNCTIONS
Password
The current merchant password may be changed by this option. The default merchant
password is [1] [2] [3] [4].
From the idle prompt, Password is accessed by pressing the blue [F] key, followed by [8]
= PASSWORD. The remaining prompts are as shown below:
Display Message
Operator Action
PASSWORD SETUP
Enter Password
Key in the merchant password (1-6 digits) and
press [OK]. This prompt will always appear. If the
current password is unknown, key the master
override password (see end of Table of Local
Functions in this manual).
PASSWORD SETUP
Enter New
Password
Key in the new merchant password (1-6 digits)
and press [OK].
PASSWORD SETUP
Confirm New
Password
As confirmation, key in the new merchant
password again and press [OK].
PASSWORD SETUP
Change
Confirmed!
The confirmation message will be displayed
before returning to the menus.
2003 LinkPoint® International, Inc.
171
9100 Reference Manual
LOCAL FUNCTIONS
Demo Mode
Demo (training) mode allows all transactions, reports, and reviews to be performed in a
“fake” training mode. Demo mode may only be entered when there are no transactions
in the batch. When demo mode is exited, all demo transactions will be deleted.
In demo mode, all receipts will print the following message at the top of the receipt:
DEMO MODE
RECEIPT INVALID
The authorization code will always be DEMO.
From the idle prompt, demo mode is accessed by pressing the blue [F] key, followed by
[9] = DEMO MODE. The remaining prompts are as shown below:
Display Message
DEMO MODE
Enter Password
Operator Action
If prompted, key in the merchant password (16 digits) and press [OK].
(optional)
DEMO MODE
Mode:Off
Change ?
Yes
No
DEMO
MODE
Txns Present!
Close
Batch
First
Press the far left-hand soft key to enable demo
mode and go to the confirmation screen.
Press the far right-hand or the [CLR] key to
leave the status unchanged and exit to the
menus.
If there are any transactions in the open batch,
then this message will be displayed. Pressing
[OK] or [CLR] will return to the menu.
(conditional)
2003 LinkPoint® International, Inc.
172
9100 Reference Manual
LOCAL FUNCTIONS
(If terminal is in Demo Mode:)
DEMO MODE
Mode:On
Change ?
Yes
No
Press the far left-hand soft key to exit demo
mode and go to the confirmation screen.
Press the far right-hand or the [CLR] to leave
the status unchanged and exit to the menus.
(conditional)
DEMO MODE
Exiting
Demo Mode
Initializing
The confirmation message will be displayed
before returning to the menus
Diagnostics
The diagnostic functions allow testing of the different hardware components of the 9100
terminal.
Version Name and Number
This option will display the terminal’s application version name and number.
From the idle prompt, version is accessed by pressing the blue [F] key, followed by [0] =
DIAGNOSTIC, then [1] = VERSION.
Display Message
VERSION
LinkPoint
Retail App.
Vn.nn
2003 LinkPoint® International, Inc.
Operator Action
Press the [OK] key to return to the menu.
173
9100 Reference Manual
LOCAL FUNCTIONS
Display Test
This option will test the 9100 screen by generating visible information.
From the idle prompt, display is accessed by pressing the blue [F] key, followed by [0] =
DIAGNOSTIC, then [2] = DISPLAY.
Display Message
ABCDEFGHIJKLMN
OPQRSTUVWXYZ#*
1234567890*[]@
abcdefghijklmn
Operator Action
The ASCII character set will be displayed on
the display. The next display test is
automatically displayed after 2 seconds or on
pressing [OK].
A series of vertical lines (allowing testing of
individual pixels) will occur next. Once again
the [OK] key can be used to display the next
screen.
A series of horizontal lines (allowing testing of
individual pixels) will occur next.
The terminal will return to the diagnostic menu at the end of this test.
2003 LinkPoint® International, Inc.
174
9100 Reference Manual
LOCAL FUNCTIONS
Printer Test
From the idle prompt, printer test is accessed by pressing the blue [F] key, followed by
[0] = DIAGNOSTIC, then [3] = PRINTER. The printer test generates the following test
receipt:
*---------------------------*
*------- PRINTER TEST ------*
*---------------------------*
12345678901234567890123456789
abcdefghijklmonpqrstuvwxyz
ABCDEFGHIJKLMNOPQRSTUVWXYZ
~!@#$%^&*()+|}{:?><`-=\][;,./
*--------------------------*
Keypad (Keyboard) Test
The keypad (keyboard) test prompts the user to press any key, then displays the key
name on the screen.
From the idle prompt, keypad is accessed by pressing the blue [F] key, followed by [0] =
DIAGNOSTIC, then [4] = KEYPAD.
Display Message
Operator Action
KEYBOARD TEST
Press a key:
User is prompted to press a key.
KEYBOARD TEST
Press a key:
Key name is displayed on the screen until the
next key is pressed. The [OK] key will end the
test and return the terminal to the diagnostics
menu.
FOUR KEY
2003 LinkPoint® International, Inc.
Press any key except [OK]. For example, if the
[4] key is pressed, the display shown below
will appear.
175
9100 Reference Manual
LOCAL FUNCTIONS
Card Swipe (Card Reader) Test
The card reader test allows the user to select either track 1 or track 2 to test, waits for a
card swipe, and displays the data from the track on the card.
From the idle prompt, card swipe is accessed by pressing the blue [F] key, followed by
[0] = DIAGNOSTIC, then [5] = CARD SWIPE.
Display Message
Operator Action
CARD READER
1. Track 1
2. Track 2
The user is prompted to select the track to test.
CARD READER
Track x Test
Swipe Card
The user is prompted to swipe a card with data
on the selected track.
Track X Data
<xxxxxxxxxxxxx
xxxxxxxxxxxxxx
xxxxxxxxxxxxx>
If a card swipe is detected and data from the
relevant track are read, then the track
information will be displayed.
Press [CLR] to return to the menu.
Press [OK] to return to the diagnostics menu.
Dialer Test
This test attempts to obtain a connection with the transaction authorization host and
waits for an ENQ character before disconnecting.
From the idle prompt, dialer test is accessed by pressing the blue [F] key, followed by [0]
= DIAGNOSTIC, then [6] = DIALER.
Display Message
DIALER TEST
Cannot Test
Dial when in
Wireless mode
2003 LinkPoint® International, Inc.
Operator Action
If the terminal is in wireless mode, this screen
is displayed. Press any key to return to the
diagnostic menu.
176
9100 Reference Manual
LOCAL FUNCTIONS
DIALER TEST
Please Wait.
DIALER TEST
Test Passed!
The user is informed that the dial test is in
progress.
The user is informed that the test passed. Press
[OK] to return to the menu.
OR
DIALER TEST
Test Failed!
reason
The user is informed that the test failed with
the reason on the bottom line.
Serial Port Test
This test will transmit a series of messages via the RS-232 auxiliary serial port. If a valid
response is received then the test is deemed to have passed. A special loopback
connector is required for this test. This connector is available from the manufacturer.
From the idle prompt, the serial port test is accessed by pressing the blue [F] key,
followed by [0] = DIAGNOSTIC, then [7] = SERIAL.
Display Message
Operator Action
SERIAL TEST
Please Wait.
The user is informed that the serial test is in
progress.
SERIAL TEST
Test Passed!
The user is informed that the test passed. Press
[OK] to return to the diagnostics menu.
2003 LinkPoint® International, Inc.
177
9100 Reference Manual
LOCAL FUNCTIONS
OR
SERIAL TEST
Test Failed!
If a valid response is not received within 10
seconds, the test will fail.
Press [OK] to return to the diagnostics menu.
Memory Test
This test performs a series of write and read operations to the application’s RAM and
checks for heap and stack overflows.
From the idle prompt, the memory test is accessed by pressing the blue [F] key, followed
by [0] = DIAGNOSTIC, then [8] = MEMORY.
Display Message
Operator Action
MEMORY TEST
Please Wait.
The user is informed that the memory test is in
progress. (This should take no longer than 10
seconds)
MEMORY TEST
Test Passed!
The user is informed that the test passed. Press
[OK] to return to the menu.
OR
MEMORY TEST
Test Failed!
reason
The user is informed that the test failed. The
reason could be:
•
•
•
Stack overflow
Heap overflow
Write/Read failure
Press [OK] to return to the menu.
2003 LinkPoint® International, Inc.
178
9100 Reference Manual
LOCAL FUNCTIONS
Wireless Test
The wireless test displays the LLI and the current received signal strength of the wireless
modem. This test cannot be performed in dialup mode.
From the idle prompt, the Wireless Test is accessed by pressing the blue [F] key,
followed by [0] = DIAGNOSTIC, then [9] = WIRELESS.
WIRELESS TEST
LLI:
XXXXXXXX
ESN NNN/NN/NNNNNN
Version NN.NN
RSSI: nn uVdBm
The LLI, RSSI (signal strength), ESN and
version number of the modem are displayed.
Press the [OK] or [CLR] key to return to the
diagnostics menu.
The last line will display mode not enabled if
the test is performed when in dialup mode.
2003 LinkPoint® International, Inc.
179
9100 Reference Manual
SPECIAL SETUP FUNCTIONS
SPECIAL SETUP FUNCTIONS
The special setup menu is a separate menu from Admin. It includes the following
options:
1 AppMan (Application Manager)
2 Delete Batch
3 Delete Parameters
4 Stack/Heap
5 Reset CDS
6 Read CDS
7 Transaction Generator
Each of these is described in the sections below.
To access Special Setup from the idle prompt, press [1] = CREDIT MENU, then [1] =
SALE, then [1] = ONLINE (same procedure as that required to start a manual credit
sale). Then follow the prompts shown below. (Note: The first option, AppMan, can also
be accessed directly by powering the terminal down, then powering it up while holding
down the orange [CLR] key. For more information about this, please see the sections in
this manual entitled Master/Session Key Encryption and DUKPT Key Encryption.
However, this method accesses AppMan only; it does not access the other functions on
the special setup menu.)
Display Message
Operator Action
CREDIT SALE
Swipe Card or
Key Account #
Key the code number 00123455432100 and
press [OK].
SPECIAL SETUP
Enter Password
Key the merchant password
[1][2][3][4]) and press [OK].
SPECIAL
1 AppMan
2 Delete Batch
3 Delete Para
Make a selection from the special menu. See
the detailed instructions below for each menu
option.
2003 LinkPoint® International, Inc.
180
(default
9100 Reference Manual
is
SPECIAL SETUP FUNCTIONS
Application Manager
Application manager (AppMan) is a supervisory application that allows more than one
application or application module (applet) to operate in the terminal. The application
modules work cooperatively under the supervision of AppMan. AppMan provides the
following features:
•
loading or upgrading of individual applets without affecting other resident applets
•
control of application launch
•
integration of applets when sharing of data and resources is needed
•
power-down functions for the terminal
•
a means of configuring the terminal
•
storage of environment settings
The Application Manager (AppMan) menu is accessed by pressing [1] = APPMAN ON
THE SPECIAL menu. The following AppMan menu will appear:
APPMAN Vx.xxx
1. TERMINAL SETUP
2. S/W MAINTENANCE
3. APPLICATION SETUP
4. VERSION NUMBERS
Terminal Setup
When terminal setup is selected from the AppMan menu, the following submenu will
appear:
1.
2.
3.
4.
5.
6.
7.
8.
SET DATE
SET TIME
CHANGE PASSWORD
BACKLIGHT TIMER
ACTIVITY TIMER
DISABLE BACKLIGHT
POWER MANAGEMENT
SET DATE FORMAT
Normally it should not be necessary to change any of these setup settings via
AppMan. Most of them can be changed more easily through the admin menu (see
earlier sections of this manual under Setup). Additionally, the settings in
Admin/Setup will override most of AppMan’s setup settings when the application is
running.
2003 LinkPoint® International, Inc.
181
9100 Reference Manual
SPECIAL SETUP FUNCTIONS
Note: Activity Timer should not be changed via AppMan. It should only be changed
by changing Zontalk Field 1192, performing a configuration download, then
powering the terminal down and up to “hard boot” it.
S/W Maintenance
When S/W maintenance is selected from the AppMan menu, the following prompt will
appear:
ENTER MASTER PASSWORD & PRESS OK
At this prompt, key 29009415 and press [OK]. The following submenu will then appear:
SOFTWARE MAINTENANCE
1. SOFTWARE UPGRADE
2. CHANGE APP STATUS
Software Upgrade
The first option, software upgrade, allows an individual application module (“applet”)
to be loaded into the terminal directly via the serial port.
Note that this is a different procedure from the Application Upgrade described earlier
in this manual. Normally it will not be necessary to perform a software upgrade in
this manner. The following procedure should be performed only under the guidance
of a software engineer.
A direct PC-to-terminal software upgrade is performed as follows:
Press [1] = Software Upgrade. The following submenu will appear:
SELECT LOADER
1. ZONTALK
2. SERIAL LOADER
(Do not choose [1] = Zontalk.)
Press [2] = Serial Loader. The following display will appear:
2003 LinkPoint® International, Inc.
182
9100 Reference Manual
SPECIAL SETUP FUNCTIONS
1.
2.
3.
4.
5.
6.
7.
Upgrade
KfmsAplt
Upgrade
DsApplet
Upgrade
K78COMLP
Upgrade ta78lnk
Upgrade GfxApp
Upgrade
KeyMangr
Upgrade NIM
Use the down arrow key to scroll down to display more software components. Press any
selection to download an upgrade of the software component. The terminal will display
a screen in the following format
About to Load
[Filesystem]
Press OK to Continue
Press OK to confirm, and load the software from a PC using a standard loader
application.
Change App Status
The second option under software maintenance, change app status, allows the various
application modules (“applets”) to be selectively disabled or enabled. It is normally not
necessary to change these settings. Disabling any of the applets will disrupt the
operation of the application.
To verify that all applets are enabled, follow this procedure:
Select option 2, CHANGE APP STATUS, from the software maintenance menu. The
following display will appear:
2003 LinkPoint® International, Inc.
183
9100 Reference Manual
SPECIAL SETUP FUNCTIONS
1. Disable
KfmsAplt
2. Disable
DsApplet
3. Disable
K78COMLP
4. Disable
ta78lnk
5. Disable GfxApp
6. Disable
KeyMangr
7. Disable NIM
You can scroll down to display more software components. If any software component
displays ENABLE plus the name of the component, this indicates it is currently disabled.
Press the number of that component to re-enable it. Before exiting this menu, make sure
all the components display DISABLE plus the component names. This indicates they are
all currently enabled.
Application Setup
When application setup is selected from the AppMan menu, the following submenu will
appear:
1. FILE SYSTEM
2. SRVTRN78LINKPOINT
3. KEY MANAGEMENT
The first option, FILE SYSTEM, re-formats all data and should normally never be used. It
is intended for use only by software development engineers.
The second option, SRVTRN78LINKPOINT, is also for use only by software engineers.
The third option, KEY MANAGEMENT, allows the terminal’s internal PIN pad to be
encrypted. For instructions on how to do this, see the section in this manual entitled
Download and Encryption Procedures.
Version Numbers; Name and Function of Each Applet
When VERSION NUMBERS option is selected from the AppMan menu, a list of the
various application “applets” with their respective version numbers will appear. The
following list is only an example. The actual version numbers will vary depending on
the software release. Press the down arrow key to see additional version numbers.
2003 LinkPoint® International, Inc.
184
9100 Reference Manual
SPECIAL SETUP FUNCTIONS
Example of version numbers list:
Application Versions
S/N: 123456789 (the terminal serial number, entered when the application was downloaded)
BIOS: K78 V3.13
Appman: 2.13c
KfmsAplt: 1.00
DsApplet: 2.08
K78COMLP: 1.03
ta78lnk: 1.00d
GfxApp: 1.01
KeyMangr: 1.02
NIM: 1.51b
Pos_lp: 1.04
APMENGLISH: 2.10
Zontalk: 1.01
(Continue to press the down arrow key until all version numbers have been displayed.)
(Note: This list does not include the terminal’s “boot” program version or the modem
firmware version. The “boot” version number may be viewed for a few seconds when
the terminal is powering up after being turned off. The modem firmware version may be
viewed when the regular application is running, by pressing the blue [F] key for the
ADMIN MENU, then [0] for DIAGNOSTICS, then [9] for WIRELESS TEST.)
The meaning of each “applet” or application module on the above list is as follows:
Appman is responsible for control of loading and maintenance of the other applets. It is
like a simple OS.
KfmsAplt contains the code for the FLASH file system. In the LinkPoint 9100 there are
only three files in this system, corresponding to the three different batches (wireless,
dialup, and offline). The actual storage area is at the end of available FLASH (i.e., it is
not included in the actual applet area).
DsApplet is the configuration database. The terminal’s UI (user interface) is controlled
from here. Default values are set up for every parameter, and those parameters that are
included in the Terminal Definition File (TDF) may be updated via a Zontalk
configuration download.
K78COMLP is the communications applet. All dial-up and wireless communications
protocols are held here.
Ta78lnk is the transaction manager. This is an interface between the application and the
file system, which facilitates file access via individual records. This applet contains the
code for searching through the batches to build reports, retrieve or delete transactions,
etc.
2003 LinkPoint® International, Inc.
185
9100 Reference Manual
SPECIAL SETUP FUNCTIONS
GfxApp is the graphics applet, which contains the code for the different font styles used
on the graphics display (and also runs the menus, although the menu data are held in
DsApplet ).
KeyMangr holds all the DUKPT and Master Session Key loading, handling and
encryption code.
NIM is the applet that holds all the code for building, parsing and processing the specific
host/processor requirements in relation to authorizing financial transactions.
Pos_lp holds the generic routines for the user interface, receipt printing and Admin
functions. The template for transaction flow is held in the DsApplet configuration
database, but the code for the actual actions that take place is held here.
APMENGLISH is a library for Appman display features.
Zontalk contains the high-level code necessary for the Zontalk-specific TMS.
To exit any submenu in AppMan, press the orange [CLR] key. To exit Appman and
reboot the terminal, press [CLR] or [C] at the AppMan main menu.
Delete Batch
Delete batch is accessed by pressing [2] = DELETE BATCH on the special menu. (Delete
batch can also be accessed more easily via the admin menu. Please see the section Batch
Clear under Local Functions earlier in this manual.)
Caution: The Delete Batch operation deletes all transactions in the batch and should
be used only under extreme situations.
Important note: Delete Batch will delete only the batch for the terminal’s current
mode. For example, if transactions have been run in both dialup and
wireless modes and the terminal is currently in wireless mode, only
the wireless batch will be deleted. To delete the dialup transactions,
it would be necessary to go into dialup mode.
This procedure will not delete a batch of offline sales. See the section entitled Delete
Offline Transactions earlier in this manual for the procedure to delete offline sales.
When the DELETE BATCH option is selected, the following display will appear:
2003 LinkPoint® International, Inc.
186
9100 Reference Manual
SPECIAL SETUP FUNCTIONS
Display Message
Operator Action
BATCH CLEAR
Confirm Clear?
Yes
No
BATCH CLEAR
Change
Confirmed!
Press the far left-hand soft key under Yes to
clear the current batch.
Press the far right-hand soft key or the [CLR]
key to leave the batch unchanged.
The confirmation message will be displayed
and the terminal will return to the Special
menu.
Delete Parameters
Delete parameters is accessed by pressing [3] = DELETE PARA on the special menu.
Caution: This operation will delete all merchant parameters in the terminal and reset
them to the generic “default” parameters!
When DELETE PARAMETERS is selected, the following display will appear:
Display Message
Operator Action
DELETE PARAM
Erase Params ?
Yes
No
DELETE PARAM
DELETING
Please Wait
Press the far left-hand soft key under Yes to
erase the merchant parameters.
Press the far right-hand soft key or the [CLR]
key to leave the parameters unchanged.
The parameters will be deleted and the
terminal will reboot to the idle prompt. The
terminal is now reset to the “generic” default
parameters.
A configuration load must now be performed
to re-load the merchant parameters!
2003 LinkPoint® International, Inc.
187
9100 Reference Manual
SPECIAL SETUP FUNCTIONS
Stack/Heap
Stack/Heap is accessed by pressing [4] = STACK/HEAP on the special menu. This
option will display the amount of stack/heap memory currently in use. When this
option is selected, the following display will appear:
Display Message
SPECIAL SETUP
STACK&HEAP USE
Operator Action
Press the [CLR] key to return to the special
menu.
StackUse:####
HeapUse: #####
Reset CDS
Reset CDS is accessed by pressing [5] = RESET CDS on the special menu.
Caution: This operation will delete all merchant parameters in the terminal and reset
them to the generic default parameters! (Reset CDS performs essentially the
same function as Delete Parameters above.)
When RESET CDS is selected, the following display will appear:
Display Message
Rebooting...
Operator Action
The parameters will be deleted and the
terminal will reboot to the idle prompt. The
terminal is now reset to the generic default
parameters.
A configuration load must now be performed
to re-load the merchant parameters!
2003 LinkPoint® International, Inc.
188
9100 Reference Manual
SPECIAL SETUP FUNCTIONS
Read CDS
Read CDS is accessed by pressing [6] = READ CDS on the special menu. This allows the
operator to view the current value in any Zontalk field in the terminal’s memory.
When READ CDS is selected, the following display will appear:
Display Message
READ CDS TABLE
Key Table ID
Operator Action
Key the number of the Zontalk field to be
viewed and press [OK].
For example, key 7001 and [OK] to view the
primary authorization phone number in Field
7001.
READ CDS TABLE
Key Table ID
7001
18002289074
In this example, the primary auth phone
number is displayed.
Press [CLR] to return to the special menu.
Transaction Generator
Transaction Generator is accessed by pressing [7] = TXN GEN on the special menu.
When a special test application is loaded into the terminal, this function will fill the
batch with test transactions so that the operation of the terminal can be tested with a
maximum batch. This allows testing at maximum batch size without first having to enter
300 transactions one by one. However, transaction generator will only work when the
special test version of software is loaded into the terminal. With the regular production
version of software in the terminal, the application will not respond when [7] = TXN
GEN is pressed.
Exit Special Setup
To exit the special setup menu, press [CLR] or [C] while the special main menu is
displayed. The terminal will display SPECIAL SETUP / TRANSACTION CANCELLED.
Press [CLR] or [C] again and the terminal will return to the CREDIT SALE menu.
2003 LinkPoint® International, Inc.
189
9100 Reference Manual
APPENDIX—TROUBLESHOOTING GUIDELINES
APPENDIX—TROUBLESHOOTING GUIDELINES
Normally there will be no problems using the LinkPoint 9100 terminal. However, on the
rare occasions when problems or questions do arise, this guide can be used to find a
quick answer. The questions/problems described below are listed in alphabetical order.
For each one, first try the solution in point (a). If this doesn't work, go to point (b), and
so on.
APPLICATION ERROR appears on the display, followed by three lines of variable
text: This usually occurs only if erroneous values have been entered in the merchant’s
Zontalk file, especially if certain fields in the file have been left blank. Reboot the
terminal. If possible, close any open batches in the terminal. Then reset the CDS (see
how to do this under Special Setup Functions in this manual). Rebuild the Zontalk file
with the correct values (see the table under Download Parameters and Options for
guidance). Perform a configuration download to re-load the parameters.
BAD CARD SWIPE is displayed when a card is swiped: (a) Make sure the magnetic
stripe on the card is fully in the card reader slot and facing toward the top of the
terminal. Slide the card quickly through the card reader (can slide either right to left, or
left to right). Try again several times if necessary. (b) Is this message displayed for every
card, or just a few cards? Some cards have defective magnetic stripes. If it is displayed
for every card, the card reader may be defective and a terminal swap may be required.
If it happens only on some cards, the merchant should explain to these customers that
their cards may be unreadable, and ask for another form of payment. (c) Transactions
can be entered manually if necessary, by pressing the OK key at the idle prompt,
choosing the desired transaction type from the menus, and then keying the account
number. (Note: Debit sales, debit returns, EBT cash sales, and EBT food returns cannot
be entered manually.)
Batch is out of balance on batch close: If the batch is out of balance when it is closed
(i.e., the processing network’s close total response is different from the total on the batch
report), the merchant should call the help desk for assistance. Note: Debit and EBT
transactions are not included in the final batch total from the processing network.
Battery frequently runs down: (a) If the merchant is doing a large volume of
transactions, it is normal for the battery to run down after a few hours. (A fully charged
and conditioned battery will normally support up to about 120 transactions.) The
battery should be fully recharged (for at least five hours) at the end of each day, with the
terminal turned off. (b) The battery may need to be conditioned. Do this by fully
charging it, then using the terminal until the battery is fully discharged, then fully
recharging it. (c) If the merchant is doing a small volume of transactions, but the battery
still only lasts a few hours after a full recharge, the battery may need to be replaced. The
merchant should call the help desk for assistance. Note: The manufacturer recommends
that the battery not be charged on a car or truck inverter, because this can drain or
damage the battery. For charging in a car or truck, contact LinkPoint International to
obtain an approved car charger (for 12-volt systems only; not for use in 24-volt truck
systems). Note: In an emergency, the terminal can be powered up and transactions can
be run while the charger is plugged in, but normally this should not be done. Normally
2003 LinkPoint® International, Inc.
190
9100 Reference Manual
APPENDIX—TROUBLESHOOTING GUIDELINES
the terminal should be powered off during charging. (d) Charging a discharged battery
for only a few minutes and then removing the charger will cause three bars to appear in
the battery icon, but this does not mean the battery is charged. It only means the voltage
has gone up, but not the battery capacity. The merchant should be instructed to leave
the charger in for several hours, until the battery icon stops flashing.
BATTERY LEVEL IS TOO LOW TO CONTINUE—CHARGE NOW is displayed when
a transaction is attempted: battery power is too low to complete the current transaction.
If there is immediate access to an electrical power outlet, the battery should be charged
for five minutes, then transactions can be run with the charger attached. Otherwise, the
battery must be charged later for at least five hours before attempting to use the terminal
again.
Battery needs to be charged: When the LOW BATTERY warning starts to appear, about
10 or 20 more transactions can be run, but the battery should be recharged at the earliest
opportunity. To do this, first turn off the power on the terminal. (You can charge with
the terminal turned on, but this is not the preferred method.) Plug the charger cord into
the port on the right side of the terminal. Make sure all connections are secure. The
battery icon in the upper right corner should flash continuously, indicating the battery is
accepting the charge. Charge it for at least four or five hours. When the battery is fully
charged, the icon will stop flashing and will have three solid dark bars in it. The charger
can then be disconnected. When the charger is not in use, disconnect it from the
electrical wall outlet. Do not leave the charger attached to the terminal continuously
when the battery is fully charged. Note: The manufacturer recommends that the battery
not be charged on a car or truck inverter, because this can drain or damage the battery.
For charging in a car or truck, contact LinkPoint International to obtain an approved car
charger (for 12-volt systems only; not for use in 24-volt truck systems). Note: In an
emergency, the terminal can be powered up and transactions can be run while the
charger is plugged in, but normally this should not be done. Normally the terminal
should be powered off during charging. Note: Charging a discharged battery for only a
few minutes and then removing the charger will cause three bars to appear in the
battery icon, but this does not mean the battery is charged. It only means the voltage has
gone up, but not the battery capacity. The merchant should be instructed to leave the
charger in for several hours, until the battery icon stops flashing.
Battery requires replacement: Use only a battery designed specifically for the LinkPoint
9100 terminal. The merchant should call the terminal help desk for information on
ordering these batteries. To replace the battery in the 9100, open the battery door on the
right side of the unit. Use the tab to pull out the battery. Install the new battery in the
same position as the old one, with the tab on the outer end, toward the battery
compartment door (the battery will only go in one way).
Battery will not accept a charge: (a) Make sure the ambient temperature is between 40
and 104 degrees Fahrenheit (5 and 40 degrees Celsius). If the ambient temperature is
above or below this range, the battery may not accept a charge. (b) The battery may be
too old to accept a charge. Normal lifetime of a battery is about one year. In this case,
the merchant should call the help desk to order a new battery.
2003 LinkPoint® International, Inc.
191
9100 Reference Manual
APPENDIX—TROUBLESHOOTING GUIDELINES
CODE nn (Code plus a two-digit number) appears on the display: The terminal has a
hardware problem. The merchant should call the help desk for assistance.
COMMS. ERROR / FAULT ID: nnnn is displayed during a transaction: A general
communications fault, indicated by a four-digit number (“nnnn”) occurred. Try the
transaction again. If the problem persists, the merchant should call the help desk.
Debit cards do not get approvals: (a) Make sure the debit transactions are being started
correctly, by selecting the transaction menu for debit. If a debit card sale is run as a
credit-card sale, the terminal will display Card Type Not Accepted. (b) If these
transactions are being run correctly but they still do not get approvals, the merchant
should call the terminal help desk for assistance. Also see Declined—invalid PIN below.
Declined—invalid PIN when a debit or EBT transaction is attempted: The customer
entered the wrong PIN. The transaction should be tried again, and the customer should
re-enter the PIN.
DECLINED on any transaction: (a) There may be a problem with the customer’s
account; the merchant should request an alternative form of payment. (b) If all cards are
declined, or all cards of a particular type such as debit or EBT are declined, there may be
a problem with the merchant’s setup on the processing network. In this case the
merchant should call the help desk.
Display is black when terminal is powered up: (a) If the terminal has been left in a hot
place such as the dashboard of a car, the LCD may become dark. Put the terminal in a
cool place and see if the display returns to normal. If the display remains dark, the
terminal may need to be swapped. Note: If the terminal is exposed to extreme heat, it
may be permanently damaged. (b) If the display is dark even under normal
temperature conditions, the merchant should call the help desk for assistance.
Display is blank: (a) Press the power button (to the right of the red [C] key) to make
sure the terminal is turned on. (b) Check for the battery icon in the upper right corner of
the display. If there is no icon, press the red [C] key to find out if the terminal beeps. If
the terminal does not beep, the battery may be dead. Recharge it and test again. (c) If
the terminal beeps but the display is blank, the contrast control may have been lost. The
terminal may need to be swapped. (d) If the terminal has been in a very cold place (near
freezing), the display will be light or blank. Put the terminal in a warmer location and
wait for the display to return to normal. (e) If the back light comes on but the display is
otherwise blank, a tamper event may have occurred (i.e., a secure tamper switch inside
the terminal may have opened as a result of the terminal being dropped). In this case
the terminal must be swapped.
Display is not visible because the ambient light is too dim: Press the red [C] key. The
backlight will come on for 20 seconds and then go out. The backlight will come on
whenever any key is pressed.
EBT cards do not get approvals: (a) Make sure the EBT transactions are being started
correctly, selecting the transaction menu for EBT. If an EBT card sale is run as a credit-
2003 LinkPoint® International, Inc.
192
9100 Reference Manual
APPENDIX—TROUBLESHOOTING GUIDELINES
card sale, the terminal will display Card Type Not Accepted. (b) If these transactions are
being started correctly but they still do not get approvals, the merchant should call the
help desk for assistance. Also see Declined—invalid PIN above.
FORCE is displayed on batch close: The processing network closed the batch for a
different amount than the amount in the terminal’s batch. The merchant should call the
help desk for assistance.
FORMATTING ERROR is displayed instead of the normal idle prompt: The terminal
has lost its application and must be swapped.
HARDWARE ERROR / CALL HELP desk is displayed during a transaction attempt:
There may be a problem with the internal hardware connections, or some other
hardware problem. Try the transaction again. If the problem persists, the merchant
should call the help desk.
HOST BUSY / TRY AGAIN is displayed during a transaction attempt: The processing
network is busy and cannot answer the incoming call. Try the transaction again.
HOST INACCESSIBLE is displayed on wireless transaction attempts: The wireless
network was unable to connect to the wireless gateway. Try the transaction again. If
the problem persists, the merchant should call the help desk.
HOST TIMEOUT is displayed during a wireless transaction attempt: The terminal did
not receive a response from the network within the allowed time. Try the transaction
again.
INVALID is displayed on batch close: There is an invalid transaction in the batch that
was not accepted when the batch closed. The merchant should call the help desk for
assistance.
INVALID / LOAD KEYS is displayed when an EBT or debit sale is attempted: This
means the EBT/debit encryption keys are not correctly loaded in the terminal, or the
terminal is not programmed for EBT or debit. If the merchant has been approved to take
debit or EBT, the help desk should be called for assistance.
INVALID MERCH # is displayed when a transaction is attempted: The merchant’s
account may not be set up correctly on the processing network. The merchant should
call the help desk.
KEYMANAGER 1.2—KEYLOAD ERROR appears on the display after a configuration
download: This indicates that a working key was downloaded into the terminal during
the configuration download, but the terminal was not previously encrypted for debit.
The terminal must be returned for encryption. Before it can be encrypted, the keymangr
applet must be re-enabled by going into AppMan, 2 S/W Maintenance, entering the
password 29009415, then choosing 2 Change App Status, then 6 Enable KeyMangr. For
more information about this procedure, see the section of this manual entitled Special
Setup Functions / Application Manager.
2003 LinkPoint® International, Inc.
193
9100 Reference Manual
APPENDIX—TROUBLESHOOTING GUIDELINES
Keys do not respond: (a) Make sure the terminal is turned on. Make sure the keys are
being pressed hard enough to get a response (keys should beep when pressed). (b) If the
terminal is turned on but the keys do not seem to respond, press the red [C] key to find
out if it beeps. (c) If the [C] key does not beep, the terminal may be "locked up." Power
the terminal down and up to reboot it. If the keys still do not respond, the merchant
should call the terminal help desk.
LINE LOST is displayed during a transaction: A connection was established but then
an unexpected disconnect occurred. If in dialup mode, make sure the phone line is
securely connected to the terminal and to the wall jack. Make sure no other phone
equipment is using the same line. Try the transaction again. If in wireless mode, make
sure the terminal has an adequate signal (at least two bars showing next to the “Y”shaped icon in the upper left corner of the display. Try the transaction again.
LOW BATTERY is displayed during a transaction: When this message starts to
appear, about 10 or 20 more transactions can be done before the battery becomes fully
discharged. If there is no time to recharge the battery, continue to use the terminal until
it starts displaying BATTERY LEVEL IS TOO LOW TO CONTINUE—CHARGE NOW,
or until the terminal automatically shuts down while printing a transaction receipt (it is
preferable to recharge the battery before this happens!). Then recharge the battery.
MODEM ERROR / PLEASE RETRY is displayed during a transaction attempt: The
terminal’s modem probably did not connect with the wireless network. (a) Follow the
directions under “Terminal is not getting a signal” below, to make sure the terminal is
getting an adequate signal. (b) Sometimes this message appears when a transaction is
attempted right after the terminal has been powered up. Wait a minute, then try again.
(c) Make sure the whip antenna is fully extended and is not loose or broken.
MOUNT FAIL / LIKELY CAUSE UNFORMATTED DEVICE is displayed instead of
the normal idle prompt: The terminal has lost its application and must be swapped.
This problem can occur if the terminal is shut down while it is initializing. The user
should be advised not to power off the terminal during initialization.
NETWORK ERROR 0 (or other error number) is displayed when a batch close is
attempted: The wireless network was unable to connect with the wireless gateway. Try
the transaction again. If the error persists, the merchant should call the terminal help
desk.
NO ANSWER is displayed during a transaction attempt: The processing network did
not pick up the incoming call. Try the transaction again. The merchant should call the
help desk if the problem persists.
NO DIALTONE / CONNECT line is displayed when a dialup transaction is
attempted: The terminal cannot detect a dial tone. (a) Make sure the phone cord is
securely plugged into the terminal and the wall jack. (b) If the connections are secure,
check the wall jack with a telephone to make sure it has a dial tone. (c) The phone line
voltage may be too weak for the terminal to sense it. Unplug other phone equipment
2003 LinkPoint® International, Inc.
194
9100 Reference Manual
APPENDIX—TROUBLESHOOTING GUIDELINES
(such as telephones, fax machines, and computer modems) that is on the same line and
try again.
NO RESPONSE FROM HOST is displayed during a transaction attempt: The
transaction response from the processing network did not get back to the terminal.
Follow the directions under “Terminal is not getting a signal” below, to make sure the
terminal is getting an adequate signal. Try the transaction again. If this problem
persists, the merchant should call the help desk. At the end of the day, the merchant
should carefully check the batch close total. Sometimes a transaction that gets NO
RESPONSE FROM HOST does actually capture at the processing host. If the network’s
batch close total is different from the sum of the receipts or the totals on the local
reports, the merchant should call the help desk. (Note that debit and EBT transactions
are not included in the close total from the processing network.)
OUT OF NETWORK COVERAGE is displayed during a transaction attempt: (a) The
terminal’s modem may have temporarily lost its wireless signal. Make sure the terminal
is held almost vertically and not horizontally. Make sure the whip antenna is fully
extended. Try moving the terminal a few feet or turning it in a different direction to get
a better signal. For more information about this, see “Terminal is not getting a signal”
below. (b) If the problem persists, this may mean the terminal is not connecting with the
modem. Power the terminal down and up to reset it. If the error persists, power the
terminal down and up again. If it still occurs, power the terminal down and remove the
battery. Replace the battery and power the terminal up again. (Note: It is normal for
this to occur sometimes after a full download.)
Paper roll requires replacement: The printer uses standard long-life thermal paper that
is 2 ¼” wide by up to 1 7/8” in diameter. This paper can be purchased in any office
supply store. The merchant should be sure to buy the long-life paper that is approved
for financial transactions. LinkPoint recommends Appleton 1012 paper. To install a
new roll, first open the printer by pulling up evenly on both sides of the printer door.
Remove the core of the old roll. Install the new roll so that the thermal (outer side) of
the roll is facing toward the front (keyboard side) of the terminal. Otherwise the receipts
will not print. Make sure the roll turns freely and is not dragging or binding up. Pull
the paper out several inches. Close the printer door. Note: When a red stripe appears
on the paper, this indicates the roll is almost used up and should be replaced.
Printer will not print: (a) Make sure there is paper in the printer. (b) At the idle
prompt, press and hold down the 0 (zero) key to see if the printer will feed paper. If it
will not feed paper, open the printer and make sure the roll is able to turn freely. (c) If
the roll of paper is installed "backward" (wrong side facing up), it will feed but will not
print, because the thermal paper only prints on one side. Open the paper compartment
and make sure the roll is installed with the outer side of the paper toward the front
(keyboard side) of the terminal. (d) If the receipt starts to print but then the terminal
shuts off while printing, the battery may be low. See Battery needs to be charged for
more information. (e) Make sure the paper is the correct type (high-grade thermal;
LinkPoint recommends Appleton 1012). (f) If everything appears to be in order but the
printer still will not print receipts, the merchant should call the help desk for assistance.
2003 LinkPoint® International, Inc.
195
9100 Reference Manual
APPENDIX—TROUBLESHOOTING GUIDELINES
PRINTING ERROR / CHECK PAPER: Load a new roll of paper into the printer,
following the instructions under “Paper roll requires replacement” below. Then do a
reprint to print the receipt. (To reprint a receipt, press the blue “F” key, then press 1 for
Reprint. Choose the desired copy—1 Merchant, 2 Customer, or 3 Both. At the “Enter
Item #” prompt, key the item number or just press OK to reprint the last transaction.)
RECEIVING INACCESSIBLE is displayed during a transaction attempt: The wireless
network was unable to connect with the wireless gateway. Try the transaction again. If
the problem persists, the merchant should call the help desk.
SENDING ERROR is displayed during a transaction attempt: (a) The terminal’s
modem may have temporarily lost its wireless signal. See below under “Signal lost” and
“Terminal is not getting a signal.” (b) If this error persists even when the terminal has a
strong signal, there may be a problem with the Motient network or the wireless
gateway. The merchant should call the help desk.
SIGNAL LOST is displayed during a transaction attempt: The terminal’s modem may
have temporarily lost its wireless signal. Make sure the terminal is held almost
vertically and not horizontally. Make sure the whip antenna is fully extended. Try
moving the terminal a few feet and changing the direction the antenna is pointing, to get
a better signal. For more information about this, see Terminal is not getting a signal
below.
Sys Error 0x67B2 appears during a configuration (parameter) download: This error
message indicates that there is a field in the merchant’s Zontalk file that the terminal’s
application does not support. For example, after Version 1.03 of the software was
deployed, Field 1192 (Inactivity PowerDown Timeout) was created as a new field
supported by Version 1.04. But, if an attempt is made to load this field into a terminal
with 1.03, the configuration download will fail with “Sys Error 0x67B2.” To resolve this
problem, upgrade the terminal to the latest software version. If this is not possible, the
field that is causing the error must be identified and removed from the merchant’s
Zontalk file.
Terminal is not getting a signal, or the signal is weak: If the terminal is not getting a
wireless signal, the “Y”-shaped icon will still display in the upper left corner of the
screen but there will be no black bars next to it. (One black bar = less than RSSI 10
[signal strength]; two bars = 10 to 24; three bars = 25 and above. If possible, perform
transactions only when at least two bars are displayed.) (a) Try moving the terminal
around a couple of feet and changing the direction the antenna is pointing, to get a
better signal. The terminal should normally be held almost vertically to get the best
signal. (b) Make sure the whip antenna is fully extended and is not loose or broken. If it
is loose or broken, the merchant should call the help desk for assistance. (c) If the
terminal is inside a building, try taking it outdoors. If it gets a signal outdoors, the
building was interfering with the signal. (d) Even outdoors, walls can interfere with the
signal. Move away from any nearby walls. (e) If it still does not get a signal outdoors, it
may be in an area where there is no wireless coverage. To further check for coverage,
press the blue F key on the terminal. Then press 0 for Diagnostics followed by 9 for
Wireless. The bottom line of the Wireless Test display should show an RSSI (signal
2003 LinkPoint® International, Inc.
196
9100 Reference Manual
APPENDIX—TROUBLESHOOTING GUIDELINES
strength) of at least 10 uVdBm. While looking at this display, also note the LLI number
on the second line. Make sure it matches the LLI number on the “RIM” sticker on the
back of the terminal. If it does not match, the help desk must be called. If the LLI
number is all zeros, the terminal has lost connection with the modem. Power the
terminal down and up to reset it. See “Unsuccessful / no comms” below for more
information about this. (f) Even if the LLI is correct, it may be necessary to power the
terminal down and up to reset it. (g) If the merchant can’t get a signal after trying all of
the above, the help desk should be called for further assistance.
Terminal will not power down: (a) Make sure the power button is held down for at
least seven seconds to turn off the terminal. (b) If the terminal continues to stay on even
when the power button is held down for some time, remove and replace the battery. (c)
If the problem still persists, the merchant should call the terminal help desk.
Terminal will not power up: (a) Make sure the power button is being fully depressed.
But do not hold down the button for more than a second, or the terminal may power
down again. (b) The battery may be dead. Charge the battery for at least five hours.
Note: If the terminal has not been used for some time, the battery may have selfdischarged. (c) If the battery will not charge, replace the battery with a new one. Note:
The normal lifetime of a battery is about one year. (d) If the terminal powers up but will
not stay powered up, the tamper switch inside the terminal may have opened. This can
happen if someone tried to open up the terminal’s case, or if the terminal has been
dropped. The merchant should call the help desk for assistance.
Transactions take too long to process in wireless mode: (a) Occasionally a transaction
may take a couple of minutes to complete. This could be due to a temporary fluctuation
in the wireless signal. If transactions usually take a minute or two, the terminal may be
in an area with poor wireless coverage. See “Terminal is not getting a signal” above. (b)
If the terminal cannot get a better signal, there may be a problem with the wireless
network in the area in which the terminal is being used. The merchant should call the
help desk for assistance.
UNOBTAINABLE / CHECK PHONE # is displayed during a transaction attempt in
dialup mode: This means the terminal is not connecting with the modem. Power the
terminal down and up to reset it. If the error persists, power the terminal down and up
again. If it still occurs, power the terminal down and momentarily remove the battery.
Put the battery back and power the terminal up again. (Note: It is normal for this to
occur sometimes after a full download.)
UNSUCCESSFUL / NO COMMS is displayed during a transaction attempt in wireless
mode: This means the terminal is not connecting with the modem. Power the terminal
down and up to reset it. If the error persists, power the terminal down and up again. If
it still occurs, power the terminal down and remove the battery. Replace the battery and
power the terminal up again. (Note: It is normal for this to occur sometimes after a full
download.)
2003 LinkPoint® International, Inc.
197
9100 Reference Manual
APPENDIX—TROUBLESHOOTING GUIDELINES
UNSUCCESSFUL / NOT RESPONDING is displayed during a transaction attempt in
dialup mode: This means the terminal is not connecting with the modem. Power the
terminal down and up to reset it. If the error persists, power the terminal down and up
again. If it still occurs, power the terminal down and momentarily remove the battery.
Put the battery back and power the terminal up again. (Note: It is normal for this to
occur sometimes after a full download.)
Water condenses on terminal's display: If the ambient humidity is high, this may be
evidenced by moisture condensation on the terminal's display. In this case, the terminal
must be kept in a cool, dry place.
2003 LinkPoint® International, Inc.
198
9100 Reference Manual
GLOSSARY
GLOSSARY
AC Alternating Current is used as a primary source of
power by AC adapters and power supplies. The
LinkPoint 9100 battery charger receives AC input and
converts it to DC (Direct Current) output.
AC Adapter A device that converts AC electrical current to a
different DC current so that it can be used by a
particular device.
Account Number (1) A unique series or group of digits used to
numerically identify each cardholder. (2) The unique
identification number assigned to the account of a
specific party, within a given institution.
Alphanumeric Capable of using both alphabetic and numeric
characters, as in a display panel, keypad, or a computer
keypad.
Application A software program designed with special codes, stored
in the memory for a specific purpose or customer.
ATM/Debit A monetary function that transfers funds from the
cardholder’s ATM/debit account.
Authorization The process used by card issuers to approve or decline a
transaction request.
Authorize Only A non-monetary function that verifies the availability of
the cardholder’s credit and reserves the authorized
amount for a period of time (usually eight to ten days,
but this varies somewhat depending on the issuer).
Baud Signaling speed equal to the number of signal events
per second.
Card Reader The slot on the terminal that automatically reads the
magnetic stripe or bar code on the back of an encoded
card (bankcard or credit card).
Carrier A frequency signal or tone sent over the telephone or
communication line and modulated by the modem to
transmit or receive data.
Cash Back Maximum Downloaded feature to establish the maximum amount
of cash back allowed by the merchant.
2003 LinkPoint® International, Inc.
199
9100 Reference Manual
GLOSSARY
Cash Back Minimum Downloaded feature to establish the minimum amount
of cash back allowed by the merchant.
Close Batch A monetary transaction used to summarize the day’s
transactions for electronic deposit to the merchant’s
bank account.
Close (Host Response) The batch was sent to the processing (host) computer. If
the close message is “Closed OK,” the close occurred
with no problems. If the close message is “Invalid,” the
batch contained one or more invalid transactions that
were rejected by the host, but the other transactions
closed successfully. In this case the merchant should
call the help desk. (See below under “Invalid.”) If the
close message is “Force,” the batch closed for a different
amount than the amount in the terminal’s memory. The
merchant should call the help desk. (See below under
“Force.”)
CPU Central Processing Unit. The brain of the computer or
terminal that controls either directly or indirectly every
function and device associated with the computer or
terminal.
Customer ID Number A number used by merchants to identify themselves to
the host computer at their bank or financial institution.
Data Information prepared in a particular format for use by
the terminal or host computer for a specific transaction
or operation.
Display The small screen on the terminal that displays messages
to guide users through different operations and to alert
users when errors or problems occur.
EPROM Erasable Programmable Read-Only Memory. A type of
memory chip permanently stored in the terminal.
Contains the standard application, operating system,
and fixed prompts.
File A collection of related data (for example, a batch of
transactions is a file).
2003 LinkPoint® International, Inc.
200
9100 Reference Manual
GLOSSARY
Force (Close Response) This host response indicates that there was a
discrepancy between the transactions sent to the host by
the terminal, and the transactions stored in the host
computer. The terminal forced closure, the batch was
successfully closed, and the transactions were sent to
the host computer. However, the merchant should call
the help desk to find out the reason for the discrepancy.
Fraud Control Measures taken to prevent unauthorized use of a credit
or debit card.
Host Computer A computer used by the processing network to process
credit card, debit card, and EBT transactions.
Invalid (Close Response) One or more credit card numbers sent to the host
computer were invalid. The terminal forced closure, the
batch was successfully closed, and the information was
sent to the host computer. However, the merchant
should call the help desk to find out which transactions
were rejected so that they can be re-entered if necessary.
Keypad The key panel used for entering data and performing
operations.
Manual Transaction Transaction using account information entered from the
keypad rather than by means of an automatic reading
device such as the card reader.
PIN Personal Identification Number. A four- to sixteen-digit
confidential code or electronic signature used by the
card holder to identify himself to the host computer as
the proper user of a credit, debit or EBT card.
Reprint A non-monetary transaction used to print a duplicate
copy of a captured transaction before the batch is
closed.
Return A monetary transaction used to refund a sale
transaction in a closed batch. This transaction credits
the cardholder’s account.
Review A non-monetary function used to review and print
individual items and batch totals as an aid in
reconciling a given day’s transactions.
2003 LinkPoint® International, Inc.
201
9100 Reference Manual
GLOSSARY
Sale A monetary transaction that initiates the transfer of
funds. A sale can be transacted either by card swipe
(magnetic card reader) or by manual entry of the
information.
Scroll To move text across a display screen.
Serial Port A connector used to communicate with host computers,
other terminals, printers, or other peripheral devices
such as check readers or bar code readers.
Swipe The action of sliding a card through a terminal’s card
reader.
Telephone Line Cord A type of cord with modular plugs for connecting a
device to another device or outlet.
Terminal A device used to perform transactions. The transactions
are processed by the terminal itself or by a host
computer. These devices have a display panel, keypad,
card reader and modem, and are used to enter
transaction information.
Ticket Only A monetary transaction used to initiate a deposit in two
situations: (1) following an authorize-only transaction,
and (2) to complete a transaction initiated by voice
authorization. A Ticket Only is also known by a variety
of other names including “force,” “post-authorization,”
“pre-authorized sale,” etc.
Track 1 Data The information stored on Track 1 of a card’s magnetic
stripe includes the cardholder’s name, account number,
expiration date, and security data.
Track 2 Data American Bankers Association information stored on
Track 2 of a card’s magnetic stripe. It includes the
cardholder’s account number, expiration date, and
security data.
Void A monetary transaction used to eliminate a transaction
in the current open batch. If the printer is enabled, a
void receipt will be generated to be included with that
batch’s drafts and tickets.
2003 LinkPoint® International, Inc.
202
9100 Reference Manual
GLOSSARY
Wireless A processing mode in which transaction data are
transmitted via radio frequency signals instead of via a
dialup telephone connection. Wireless transmission
requires that the terminal’s modem be activated on a
wireless network and a wireless gateway. The gateway
routes the transaction via a land line to the processing
host. When the gateway receives a response from the
host, it transmits it back to the terminal via the wireless
network.
2003 LinkPoint® International, Inc.
203
9100 Reference Manual
INDEX
INDEX
A
D
AC...........................................................................199
AC Adapter.............................................................199
Account Number.....................................................199
Alphanumeric .........................................................199
Application .............................................................199
Application Upgrade...............................................164
ATM/Debit
Definition ...........................................................199
Authorization ..........................................................199
Authorization Only
Definition ...........................................................199
AVS ........................................................50, 54, 65, 79
Debit Card Return .................................................... 87
Debit Card Return .................................................... 40
Debit Card Sale .................................................. 39, 83
Delete All Offlines ................................................. 151
Delete Offline Transactions ................................... 150
Delete Single Offline.............................................. 150
Dial-Up Communications Parameters .................... 158
Display Panel ............................................................. 8
Download Parameters .............................................. 24
Download Procedures .............................................. 18
B
EBT Cash Balance ........................................... 41, 102
EBT Cash Sale ................................................... 41, 99
EBT Food Return ............................................... 40, 93
EBT Food Sale ................................................... 40, 90
EBT Food Stamp Balance Inquiry ........................... 96
EBT Voucher Return........................................ 41, 102
EBT Voucher Sale............................................ 41, 102
Backlight Timeout Period .......................................154
Batch Clear .............................................................148
Batch Functions ......................................................146
Batch History ..........................................................147
Batch Inquiry ..........................................................134
Batch Number.........................................................148
Batch Update ..........................................................135
Battery ..................................................1, 12, 190, 191
Baud........................................................................199
Close Batch.............................................................131
Error Transactions ..................................................110
Local Functions ......................................................140
Offline Transactions ...............................................103
Pre-Sale Gratuity ....................................................108
Reports....................................................................118
Reprint ....................................................................129
Review ....................................................................113
Special Setup Functions..........................................180
Standard Transactions...............................................34
C
Card Reader ..................................................9, 35, 199
Card Verification Value (CVV2) ...............................45
Carrier.....................................................................199
Close Batch.............................................................200
Communication Type Setup ...................................156
Credit Card Authorization Only................................39
Manual .................................................................78
Swiped .................................................................78
Credit Card Pre-Sale .................................................39
Credit Card Return....................................................38
Manual .................................................................64
Swiped .................................................................64
Credit Card Sale
Manual ...........................................................38, 45
Swiped ...........................................................37, 42
Credit Card Ticket Only ...........................................39
Credit Card Void.......................................................38
Swiped .................................................................80
2003 LinkPoint® International, Inc.
E
G
Getting Started ........................................................... 2
H
Hardware Features ..................................................... 7
I
Installation.................................................................. 3
K
Keypad ..................................................................... 10
L
LCD Contrast ......................................................... 155
Local Functions.......................................................... 6
M
Maintenance ............................................................... 4
Merchant ID ........................................................... 167
Mode
Phone........................................................... 35, 156
Wireless............................................... 35, 156, 203
O
Offline Batch Upload ............................................. 136
Offline Item Number.............................................. 107
Offline Transaction Operation ............................... 103
204
9100 Reference Manual
INDEX
P
Password .................................................................171
PIN pad .......................................................................1
Printer Enable .........................................................152
Printer Setup ...........................................................152
Printers........................................................................1
Purchase Card Authorization Only
Manual .................................................................79
Swiped .................................................................79
Purchase Card Return
Manual .................................................................65
Swiped .................................................................65
Purchase Card Sale
Manual .................................................................59
Swiped .................................................................56
Purchase Card Ticket Only
Manual .................................................................74
Swiped .................................................................73
R
Receipts
ATM/Debit Card Return ......................................89
ATM/Debit Card Sale ..........................................86
Authorization Only ..............................................78
AVS .....................................................................55
Batch Close ........................................................133
Credit Card Sale...................................................49
EBT Credit Cash Sale ........................................101
EBT Food Return.................................................95
EBT Food Sale.....................................................92
EBT Food Stamp Balance....................................98
Editing Formats..................................................153
Offline Sale ........................................................104
Pre-Sale Gratuity................................................109
Puchase Card Sale................................................63
Purchase Card Return...........................................65
Purchase Card Ticket Only ..................................74
Ticket Only AVS .................................................78
Reports
Aborting .............................................................128
Card Detail.........................................................120
2003 LinkPoint® International, Inc.
Item Detail......................................................... 118
Operator ID ....................................................... 126
Summary ........................................................... 124
Transaction Type Detail .................................... 122
Upload Offline Transaction............................... 106
Reprint.................................................................... 201
Retail Tip Feature..................................................... 36
Return..................................................................... 201
Returning the Terminal for Service............................ 5
Review ................................................................... 201
Item Number ..................................................... 113
Operator ID ....................................................... 116
Totals................................................................. 115
S
Sale
Definition .......................................................... 202
Setting Date and Time............................................ 169
Smart Card Reader ................................................... 13
Specifications ........................................................... 14
Standard Retail Transactions.................................... 36
Swipe...................................................................... 202
T
Terminal ................................................................. 202
Terminal Features....................................................... 6
Terminal ID............................................................ 158
Thermal Printer ........................................................ 13
Ticket Only ............................................................ 202
Manual................................................................. 69
Swiped................................................................. 66
U
Unpacking .................................................................. 2
Uploading Offline Transactions ............................. 104
V
View Last Reponse ................................................ 146
Void........................................................................ 202
205
9100 Reference Manual