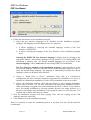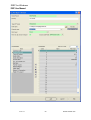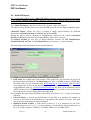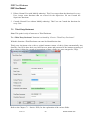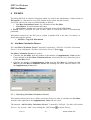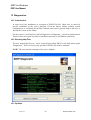
1
IDEP FOR WINDOWS
USER MANUAL
Version 2015 BE
National Accounts Institute
National Bank of Belgium
External statistics
Boulevard de Berlaimont 14
B-1000 Brussels
IDEP for Windows
IDEP User Manual
Table of contents
1
2
3
4
5
6
7
INTRODUCTION. ..................................................................................................................... 1
1.1
Important Remarks on the Software Package. ........................................................................ 1
1.2
How to use the Manual. ......................................................................................................... 1
1.2.1
First Time Users. ........................................................................................................... 1
1.2.2
Experienced Users. ........................................................................................................ 2
1.3
Terminology used. ................................................................................................................ 4
1.3.1
Parties involved in INTRASTAT Data Collection. ......................................................... 4
1.3.2
Main Data involved in INTRASTAT Declarations. ........................................................ 5
INSTALLATION AND UPGRADE........................................................................................... 6
2.1
Installation and Upgrade as a stand alone Application............................................................ 6
2.1.1
Installation and upgrade from the Internet ...................................................................... 9
2.2
Installation and Upgrade in a Local Area Network (LAN). .................................................... 9
2.3
Download of Standalone Installations to a Server. ................................................................. 9
2.4
Un-install the Package. .......................................................................................................... 9
2.5
Log Files. ............................................................................................................................ 10
STARTING THE PACKAGE – LOGON SCREEN. .............................................................. 11
THE GRAPHICAL USER INTERFACE (GUI). .................................................................... 12
4.1
Status Check. ...................................................................................................................... 12
4.2
Screen Layout. .................................................................................................................... 12
4.3
Actions Menu Toolbar......................................................................................................... 13
4.4
Window Menu. ................................................................................................................... 13
4.5
Help Menu. ......................................................................................................................... 14
4.6
Setup Display. ..................................................................................................................... 15
4.7
Function Keys. .................................................................................................................... 16
4.8
Data Entry and Presentation Facilities. ................................................................................ 16
4.8.1
Pick lists. ..................................................................................................................... 16
4.8.2
Field Colours. .............................................................................................................. 17
4.8.3
TAB Order. ................................................................................................................. 17
4.8.4
Sort Order. .................................................................................................................. 18
4.9
Notations used in the next Chapters of this Manual. ............................................................. 18
SYSTEM. .................................................................................................................................. 19
5.1
Exchange Rates. .................................................................................................................. 19
5.1.1
Specifying Exchange Rates. ......................................................................................... 19
5.1.2
Usage of Exchange Rates............................................................................................. 20
5.2
Administrative Parameters................................................................................................... 21
5.3
Select Printer. ...................................................................................................................... 23
5.4
Setup Display. ..................................................................................................................... 23
5.5
Proxy Settings. .................................................................................................................... 23
5.6
Collecting Center. ............................................................................................................... 24
IMPORT. .................................................................................................................................. 24
6.1
Import Format. .................................................................................................................... 25
6.1.1
Specifying the Import Format. ..................................................................................... 25
6.1.2
Usage of the Import Function. ..................................................................................... 29
6.2
Multi-PSI Import. ................................................................................................................ 31
6.3
View Import-Log. ............................................................................................................... 32
PARTIES. ................................................................................................................................. 34
7.1
PSI's.................................................................................................................................... 34
7.1.1
Create / Modify PSI. .................................................................................................... 34
7.1.2
Copy Information from another PSI. ............................................................................ 36
7.2
Users................................................................................................................................... 36
7.2.1
Create / Modify a User. ............................................................................................... 36
7.2.2
Types of Users............................................................................................................. 37
9-Jan-15
-i-
IDNet15manE.doc
IDEP for Windows
IDEP User Manual
7.3
Third Party Declarant. ......................................................................................................... 38
7.4
Change current PSI. ............................................................................................................ 39
8
RETURN. .................................................................................................................................. 40
8.1
The Life Cycle of a Return. ................................................................................................. 40
8.2
Edit Returns. ....................................................................................................................... 41
8.2.1
Introduction to Data Entry of INTRASTAT Information. ............................................. 41
8.2.2
Create the Return Header. ............................................................................................ 42
8.2.3
Adding Return Lines to the Header. ............................................................................. 43
8.2.3.1 Introduction. ............................................................................................................ 43
8.2.3.2 Manual Data Entry of Return Lines. ......................................................................... 44
8.2.3.3 Utilities for Manual Return Line Data Entry............................................................. 46
8.2.3.4 Data Entry through Models. ..................................................................................... 50
8.2.3.5 Copy Lines from another Return. ............................................................................. 51
8.2.3.6 Usage of the Import Function. .................................................................................. 52
8.2.4
Multi-PSI Import ......................................................................................................... 55
8.2.5
Modify, Delete or Consult Return Information. ............................................................ 55
8.2.5.1 The Return Header................................................................................................... 55
8.2.5.2 Return Lines. ........................................................................................................... 56
8.2.5.3 Totals by Reference Overview. ................................................................................ 56
8.2.5.4 Error Overviews. ..................................................................................................... 57
8.2.6
Save Return Line as a Line Model. .............................................................................. 58
8.2.7
Replace Returns........................................................................................................... 58
8.3
Draft Output Returns. .......................................................................................................... 60
8.3.1
Draft Output Format. ................................................................................................... 60
8.3.2
Draft Output / Print...................................................................................................... 61
8.3.3
Draft Output / Disk. ..................................................................................................... 61
8.4
INTRASTAT Output Returns. ............................................................................................. 61
8.4.1
Return Approval / Disapproval. ................................................................................... 61
8.4.2
Aggregated Data. ......................................................................................................... 63
8.4.3
Generate INTRASTAT Output. ................................................................................... 65
8.4.3.1 OneGate. ................................................................................................................. 66
8.4.4
INTRASTAT Output / All PSI's (Third Declarants only). ............................................ 68
8.5
Output Log. ......................................................................................................................... 70
8.6
Overview Declarations. ....................................................................................................... 71
8.7
Reports. .............................................................................................................................. 72
8.8
End. .................................................................................................................................... 73
9
PSI INFO. ................................................................................................................................. 74
9.1
Net Mass Calculation Factors. ............................................................................................. 74
9.1.1
Specifying Net Mass Calculation Factors. .................................................................... 74
9.1.2
Usage of Net Mass Calculation Factors........................................................................ 75
9.2
Line Models. ....................................................................................................................... 77
9.2.1 ........................................................................................................................................... 77
Specifying Line Models. ............................................................................................................. 77
9.2.2
Usage of Line Models.................................................................................................. 79
9.3
PSI Goods Codes. ............................................................................................................... 79
9.3.1
Specifying PSI Goods Codes. ...................................................................................... 80
9.3.2
Usage of PSI Goods Codes. ......................................................................................... 81
9.3.3
Checking validity of Goods Codes. .............................................................................. 83
9.4
Minimum and Maximum Ranges per CN8-code. ................................................................. 83
9.4.1
Specifying Minimum and Maximum Ranges. .............................................................. 83
9.5
Copy PSI Information. ........................................................................................................ 84
10
SYSTEM MAINTENANCE. ................................................................................................ 85
10.1 Declaration Maintenance. .................................................................................................... 85
10.1.1 Archive To Disk. ......................................................................................................... 85
10.1.2 De-archive. .................................................................................................................. 87
9-Jan-15
-ii-
IDNet15manE.doc
IDEP for Windows
IDEP User Manual
10.1.3 Delete Headers. ........................................................................................................... 88
10.2 Backup Idepdata.................................................................................................................. 89
10.3 Restore Backup. .................................................................................................................. 90
10.4 Clean-Up. ........................................................................................................................... 90
10.5 Download. .......................................................................................................................... 91
10.6 Download Log. ................................................................................................................... 93
10.7 Check for upgrades ............................................................................................................. 93
10.8 Install extra features ............................................................................................................ 93
10.9 Remove Language. .............................................................................................................. 94
11
CN8........................................................................................................................................ 95
12
IDEP/CN8 in a multi-user LAN Environment. .................................................................... 96
12.1 Introduction. ....................................................................................................................... 96
12.2 Functions accessible when only one User logged on. ........................................................... 96
12.3 Functions accessible by one User at a time. ......................................................................... 97
12.4 Accessing information with multiple Users.......................................................................... 97
13
Diagnostics. ........................................................................................................................... 99
13.1 Introduction. ....................................................................................................................... 99
13.2 Running IdepTest. ............................................................................................................... 99
13.3 Options. .............................................................................................................................. 99
13.4 Log file. ............................................................................................................................ 100
13.5 Collected Information........................................................................................................ 100
13.6 Repair ............................................................................................................................... 102
13.7 Uninstall ........................................................................................................................... 102
13.8 IDEP Helpdesk ................................................................................................................. 102
Windows is a registered trademark of Microsoft Corporation.
Other brand and product names are trademarks or registered trademarks of the respective holders.
9-Jan-15
-iii-
IDNet15manE.doc
IDEP for Windows
IDEP User Manual
1 INTRODUCTION.
1.1 Important Remarks on the Software Package.
The software package IDEP/CN8 (INTRASTAT Data Entry Package / Combined Nomenclature 8
digits) was developed for the Providers of Statistical Information (PSI's) in order to assist them to
create statistical declarations for their Competent National Administration (CNA).
The main functions of the package are data entry and the validation of that data. An additional
function of the package is the importation, again with validation, of the necessary data from
existing information systems in a company. The package will transform this data to the official
format accepted by the User’s CNA.
The IDEP/CN8 package can also be used by Third Declarants who will create the statistical
declarations for several PSI's (declarants).
Several functions have been included in the package to facilitate the creation of declarations,
including pick lists, standard values and calculations. Extra functionality has been included for the
use of the CN8 Goods Codes.
The official INTRASTAT output generated by the package is an XML file that can be uploaded in
OneGate.
1.2 How to use the Manual.
The manual has basically been set up according to the Menu structure of the package. This implies
that the Chapter Titles within the manual refer to the Menu Options in the package.
This Chapter will give the User the guidelines as to the order in which the different Chapters in the
manual should be read based on the User’s experience and interest in the package.
1.2.1
First Time Users.
The following gives a list of the Chapters that are essential for a basic understanding of the
package.
Chapter 1 - Introduction on the usage of the package and the terminology.
The User should start up the package and then follow the order of the Chapters as described
(Chapters indicated "optional" are not essential for the usage of the package).
Chapter 2 - Installation and Upgrade.
Chapter 3 - Starting the Package – Logon Screen.
9-Jan-15
-1-
IDNet15manE.doc
IDEP for Windows
IDEP User Manual
Chapter 4 – The Graphical User Interface (GUI).
Chapter 5 – System.
5.5 Proxy Settings
Chapter 7 - Parties.
7.1 PSI's.
Attention: You have to create at least 1 PSI to be able to use all functions in Idep.
7.3 Third Party Declarant (optional).
7.4 Change current PSI (optional – only if more than one PSI).
Chapter 8 - Return.
8.1 The Life Cycle of a Return.
8.2 Edit Returns.
8.2.1 Introduction to Data Entry of INTRASTAT Information.
8.2.2 Create the Return Header.
8.2.3 Adding Return Lines to the Header.
8.2.3.1 Introduction.
8.2.3.2 Manual Data Entry of Return Lines.
8.2.3.3 Utilities for Manual Return Line Data Entry.
8.2.5 Modify, Delete or Consult Return Information.
8.3 Draft Output Returns (optional).
8.4 Intrastat Output Returns.
Chapter 11 – CN8.
1.2.2 Experienced Users.
The following gives the list of Chapters and Sections which explain the more advanced features.
Chapter 5 – System.
5.1 Exchange Rates.
5.2 Administrative Parameters.
5.3 Select Printer.
5.4 Setup Display.
Chapter 7 - Parties.
7.2 Users (optional – only if more than one user.).
9-Jan-15
-2-
IDNet15manE.doc
IDEP for Windows
IDEP User Manual
Chapter 8 - Return.
8.2 Edit Returns
8.2.3 Adding Return Lines to the Header.
8.2.3.4 Data Entry through Models.
8.2.3.5 Copy Lines from another Return.
8.2.3.6 Usage of the Import Function.
8.2.4 Multi-PSI Import.
8.2.6 Save Return Line as a Model.
8.2.7 Delete, Change and Replace Returns.
8.5 Output Log
8.6 Overview Declarations (optional)
8.7 Reports.
Chapter 9 - PSI Info.
9.1 Net Mass Calculation Factors.
9.2 Line Models.
9.3 PSI Goods Codes.
9.4 Copy PSI Information.
Chapter 10 - System Maintenance.
Chapter 12 – IDEP/CN8 in a multi-user LAN Environment.
9-Jan-15
-3-
IDNet15manE.doc
IDEP for Windows
IDEP User Manual
1.3 Terminology used.
Before installing the package, this Chapter will explain some basic concepts.
1.3.1 Parties involved in INTRASTAT Data Collection.
CNA:
Stands for "Competent National Administration". This is the statistical
office of the User’s country (in Belgium this is the National Bank of
Belgium). In case of questions or problems with INTRASTAT, or the
use of the IDEP/CN8 software, the CNA should be contacted. New
versions of the software should always be received via the CNA, in
order to ensure the integrity of the data.
OneGate:
The NBB online application in which INTRASTAT returns are
collected (www.onegate.be).
PSI:
Stands for "Provider of Statistical Information". These are Importers /
Exporters who are obliged to make INTRASTAT returns to the CNA.
The PSI is identified by his enterprise number.
Third Party
Declarant or Agent:
A company that makes INTRASTAT statistical declarations to the
CNA on behalf of one or more companies (i.e. PSI's).
User:
A person who is defined in the IDEP/CN8 package and who can
access and use the package. Different Users of the package can have
different authorisations. The authorisations specify whether a user has
access to a given set of functions or all functions.
Three types of Users can be defined.
1. Supervisor (= the default User IDEP). This User can perform all
functions in the package.
2. Editor (= Normal User with Modify authority). This User can
perform the functions for every User, but not the functions that are
reserved for the Supervisor.
3. Consult (= User without Modify authority). This User can consult
the functions for every User.
9-Jan-15
-4-
IDNet15manE.doc
IDEP for Windows
IDEP User Manual
1.3.2 Main Data involved in INTRASTAT Declarations.
All statistical information for a given PSI, in a given Statistical
Period, for the given Flow of goods is contained in a return. A return
is composed of 1 header and one or more lines.
Return:
A return header of a given PSI is basically identified by the
following.
1. The Statistical Period (month).
2. The Flow (arrival or dispatch of goods).
3. The type of information (new information, corrections to a
previous return, ...).
A return line can be seen as 1 transaction (e.g. information on an
invoice). A return line can also contain information aggregated for
several transactions. A return line is identified by a unique number.
NOTE: A PSI can send several returns of the same type (i.e. Arrival of
goods) for the same Statistical Period (i.e. January 2007). That's why
the identification of the returns requires some special attention. The
following two situations should be considered:
1. A User creates several returns, of the same type, for the same
Statistical Period and Flow, on the same PC. In order to uniquely
identify the return, it is identified by a Sequence Number (e.g.
return 1 and 2).
2. The same PSI generates returns from several PC's.
On every PC the return can be identified by for instance, the
sequence number "1". Beside the sequence number, another
qualifier is necessary to uniquely identify the return. This qualifier
is called a "Workstation ID" in the package. If for instance, PSI
“X” generates INTRASTAT returns from three PC's, then he
should identify the PC's by e.g. AA, BB and CC.
The returns will be uniquely identified in the whole EU by the PSI
Enterprise Number + Workstation ID + Return Sequence Number
(e.g. BE0123456789 + AA + 000001).
CN8 Goods Codes:
9-Jan-15
Combined Nomenclature. The 8 digit goods codes that are used within
all the Member States of the EU. The CN8 part of the package
provides user friendly facilities to find the correct CN8 Code for the
goods the User is Importing / Exporting.
It is possible for a PSI to specify a table within the package that
defines a relationship between the goods codes he is familiar with inhouse and the official CN8 Goods Codes.
-5-
IDNet15manE.doc
IDEP for Windows
IDEP User Manual
2 INSTALLATION AND UPGRADE.
2.1 Installation and Upgrade as a stand alone Application.
IDEP/CN8 is distributed via the Internet. Even though the installation / upgrade procedures are
quite similar, they are described in separate Sections hereafter.
Minimum requirements for the installation or upgrade are as follows.
IDEP requires .NET V2.0 or .NET V2.0 SP1 (SP1 is thus optional). This can be installed
on the following systems:
- Windows XP SP1 or higher with Windows Installer V3.0 or higher. To install .NET
V2.0 SP1 you need Windows Installer V3.1 and Windows XP SP2.
- Windows 2000 SP3 or higher
- Windows 2003
- Windows Vista
- Windows 7
- Windows 8
A monitor with a minimum resolution of 800 x 600 (1024 X 768 recommended).
20 MB of free Hard-disk space.
Only upgrade: existing users can upgrade Idep from inside the program via the function
System Maintenance / Check voor Upgrades (see chapter 10.7 in this manual). Other ways of
upgrading are described below.
1. Go to http://www.intrastat.be, choose your language and then "Declarations" and
"IDEP/CN8 for Windows" Click on "Online Installation" and follow the instructions.
(remark: if an online installation should not be possible, the complete installation package
can be downloaded via a zip-file on the same page).
2. When the download procedure is started and (depending on your Windows-version) one of
the following dialogs appear, select "Run this program from it's current location"or "Run".
9-Jan-15
-6-
IDNet15manE.doc
IDEP for Windows
IDEP User Manual
3. Should one of the following Security Warnings appear, select “Yes” or "Run".
9-Jan-15
-7-
IDNet15manE.doc
IDEP for Windows
IDEP User Manual
4. Follow the instructions of the installation program.
Select the user interface languages to be installed and the installation program’s
language. The language selection dialog serves two purposes:
1. It allows installing or removing the available language versions of the User
Interface of IDEP/CN8;
2. It allows selecting the language of the User Interface of the installation program
itself.
Selecting the IDEP/CN8 User Interface language is simply done by clicking on the
appropriate buttons. All available languages are pre-selected. If an existing IDEP/CN8
installation is updated, only the already installed languages are pre-selected. A deselected language will be removed from an existing IDEP/CN8 installation.
The User Interface language of the installation program is automatically set to the
last selected language. Click several times on the various language options in order to
select the desired dialog language. The language is immediately switched (the chosen
language is shown in brackets in the title bar).
Choose a “Stand alone or Server” installation. Note, that in a Client/Server
configuration, the Server must be installed or upgraded first. Installation of a Server is
identical to a Standalone installation. For the Client installation see the next section.
Choose the destination location, either take the default, or select another destination.
Please refer to Section 2.1.4 for more information on appropriate Installation Folders.
When performing an upgrade, the actual installation directory is shown. It is possible to
move an existing installation by selecting another directory (an empty directory or a
directory with another Idep installation) or by typing the name of a new directory. The
required and available disk space are shown.
5. Now the installation program will start copying. Note, that the copying of the CN8
databases may take some time.
6. Click finish to leave the installation program.
Note: It is possible to cancel the installation process at any time. The user will be asked for
confirmation.
9-Jan-15
-8-
IDNet15manE.doc
IDEP for Windows
IDEP User Manual
2.1.1 Installation and upgrade from the Internet
The User will now find the IDEP/CN8 program installed or upgraded in the selected directory
and the subdirectories created by the installation process, in the languages provided by the
NBB. The program is started by either the Windows Start Menu, by double clicking on the
IDEP Shortcut
put on the Desktop by the installation program, or by double clicking on
Idep.exe in the root directory.
2.2 Installation and Upgrade in a Local Area Network (LAN).
IDEP/CN8 can be used in an environment where more persons are working on Intrastat
declarations at the same time on different work stations, but on the same installation of the
program.
This so-called Client/Server environment is created by first installing the program on a Server
system and then installing the Client systems. A Client installation can be seen as a Reference
to the IDEP/CN8 installation on a Server.
The procedure to install or upgrade an IDEP/CN8 Server is completely identical to the
installation or upgrade of IDEP/CN8 Standalone, as described in the previous section.
An IDEP/CN8 Client is installed by following the same procedure, however:
only minimal hard disk space is required;
the “Client” option must be selected;
the “Destination location” to be entered must be the location where the Server is installed;
this procedure will only perform the copying of some Windows system files.
For details and restrictions on the use of the Client/Server concept, see Chapter 12.
2.3 Download of Standalone Installations to a Server.
IDEP provides the possibility to convert Standalone Installations into a Client/Server
configuration. This means that the individual databases of the Standalone Installations are
combined into one database on a Server system (which in fact may be one of the original
Standalone systems).
This function is provided as a Menu option in the System Maintenance Menu and fully described
in Chapter 10.5 - Download.
2.4
Un-install the Package.
The IDEP/CN8 for Windows packages can be un-installed simply through the usual Windows
un-install feature.
1.
2.
3.
4.
Open Add and Remove Programs (Start/Control Panel/Add and Remove Programs).
Choose IDEP/CN8 and click the Add/Remove Programs button.
Confirm the question (‘Do you want to remove...’).
On the question ‘Remove the IDEP-Executables and –Data as well?’ answer ‘Yes’ if you
want to completely remove IDEP/CN8, or ‘No’ if you want to keep the complete
installation but just want to remove the registration, short-cuts etc.
9-Jan-15
-9-
IDNet15manE.doc
IDEP for Windows
IDEP User Manual
Please note, that this cleanup procedure will not delete any files from the installation
directory if:
- It concerns the Root of a drive (e.g. “C:\”);
- It concerns the Root of Windows’ “Program Files” directory;
- A subdirectory called WINDOWS*, WINNT*, SYSTEM*, Program Files (local name)
exists;
- The installation directory is somewhere in the Windows or System directory;
- It concerns an installation directory with more than (~12) sub-folders and/or (~7) files.
A warning message will be displayed.
Due to some limitations of the installation product, not all files are removed. To see which files
(directories) have not been removed, press the Details button on the Add/Remove Programs
dialog. Remaining files can be removed manually using the Windows Explorer. Doing this
may cause a message ‘This change could impact one or more registered programs...’. The User
can confirm this message.
2.5 Log Files.
All IDEP/CN8 for Windows programs log problems in log files. A part of these log files can be
found in the sub-directory named LOG of the Member State directory of the IDEP/CN8
installation. The filename is XXXX_date.log, where XXXX = the application name, see
example below.
C:\Program Files\Eurostat\IDEP_CN8\BE\LOG\IDEP_05111999.log.
If problems are reported to the National Administration, the User is encouraged to supply these
log files as they contain all information required to solve the problem quickly.
In case of problems the program Ideptest collects all relevant log files and sends them to the
Idep helpdesk (zie chapter 13 Diagnostics).
9-Jan-15
-10-
IDNet15manE.doc
IDEP for Windows
IDEP User Manual
3 STARTING THE PACKAGE – LOGON SCREEN.
Idep can be started via the 'Windows Start' button by selecting 'IDEP/CN8' under 'Programs',
by double-clicking the program file Idep.exe in Windows Explorer, or by double-clicking on
the IDEP Shortcut
put on the Desktop by the installation program.
The following so-called “splash-screen” will appear:
This screen allows the User to select the following.
The Member State (if more than one package is installed).
The language (if more than one language is included by the National Administration that
prepared the package).
The Application Name (CN8 or IDEP).
When you have selected the IDEP application, Idep will be started up with the default User Name
"IDEP". This default User cannot be removed from the system. It is possible to create other users
with passwords and with specific authoritisations.
You can also select the CN8 application (List of Commodity Codes).
By clicking on the "OK" button, the User will enter the selected package. By clicking on the
"Canceel" button, the User will leave the Login screen.
If the User has installed Internet facilities, clicking on the link will establish a connection with the
WEB site of the National Bank of Belgium.
9-Jan-15
-11-
IDNet15manE.doc
IDEP for Windows
IDEP User Manual
4 THE GRAPHICAL USER INTERFACE (GUI).
4.1 Status Check.
The PSI Goods Codes defined in the package will be checked; Goods Codes for which the
CN8 code has become invalid for (one of) the years supported by the new package, will be
marked in the PSI Goods Codes list.
When IDEP is upgraded to a new annual version, the maximum / minimum limit values
connected to CN8 Codes are updated with the limit values of the previous year, but only if the
PSI’s limits are higher than those supplied by the CNA and the CNA’s limits are not zero. See
also Section 7.2.3 – Adding Return Lines to the Header.
For the current (default) PSI, the Line Models defined in the package will be checked on codes
(CN8 Codes, Country Codes, (old EMU) Currency Codes, etc.) that are no longer valid. Line
Models that have become invalid for the years supported by the new package will be marked
and a list will be presented. The Line Models for other PSIs, if defined in the package, will be
checked when they are selected as the current PSI during the usage of the package.
Finally, a check is made if this is a first time installation of IDEP/CN8 for Windows. In that
case, the "Add PSI Parameters" screen is automatically presented. (no PSI's exist in the
package yet). See Section 6.1.1 for details of the information to be entered.
4.2 Screen Layout.
Once the application is started, the graphical user interface (GUI) shows the default application
screen containing the following information.
Application name, active PSI identification and PSI name.
9-Jan-15
-12-
IDNet15manE.doc
IDEP for Windows
IDEP User Manual
The Menu bar presenting the main options. Sub-options are shown by clicking on a main
option.
The Toolbar, giving fast access to the major functions via Buttons.
The second Toolbar with context dependent buttons, which appear and disappear when
applicable, corresponds with the "Actions" Menu.
So-called ToolTips provide brief information when the mouse pointer is positioned on a
Button. In the example the mouse pointer is positioned on the Tool bar button “Intrastat
Output” .
The IDEP information area.
The Status bar.
4.3 Actions Menu Toolbar.
The “Actions” Menu option is disabled when the package is started for the first time. It becomes
active when another Menu option is selected and then shows all possible actions in the current
conditions.
The same options become available as those buttons in the context dependent buttons area.
Holding down the right mouse button anywhere on the screen presents the User with the Actions
Menu. The example shows the Actions Menu Toolbar after selection of the “Edit” function.
4.4 Window Menu.
The “Window” Menu option allows manipulation of the open windows. It offers the following
possibilities:
“Cascade” open windows,
“Tile Vertical” of open windows,
“Close All” open windows.
A list of all open windows allows the activation of a selected window.
9-Jan-15
-13-
IDNet15manE.doc
IDEP for Windows
IDEP User Manual
4.5 Help Menu.
The “Help” Menu provides the general Help items.
“Table of Contents” of all available Help.
Information “On this Screen”.
“Support” information.
With the “Diagnostics” option a dedicated diagnostic tool called IdepTest is run. This tool
collects information which can be sent to the NBB Calldesk in case of problems installing or
running IDEP/CN8. The tool can also be run directly from the installation CD-ROM. Please
refer to Section 12 “Diagnostics” of this Manual for more details on IdepTest.
The “About” option provides information relating to IDEP/CN8 itself.
Help on specific Topics is provided through the “Table of Contents” or the Help button
presented on the various IDEP/CN8 screens.
The Help form is a so-called modal form, which allows switching the focus back to the Main
application. The Help window may be maximised and minimised. For subsequent invocations
its last location/size will be restored (e.g. if the User has moved/sized it).
If the Main window is minimised the Help window will be minimised along with it. If the Help
window is minimised, invoking help again will restore the Help window to its most recent
size/location.
All Help texts can be printed individually through the Print Button on each Help screen.
9-Jan-15
-14-
IDNet15manE.doc
IDEP for Windows
IDEP User Manual
4.6
Setup Display.
The “Setup Display” function is selected by “System / Setup Display”.
This option allows the User to change the colour scheme used to identify the status of data entry
fields.
It also defines the layout of the Toolbars and the cursor behaviour of certain fields.
The check box “Automatic TAB” controls the behavior of the cursor during data entry in a
Return Line. For a new IDEP installation, by default this function is switched on. If this
function is switched on, the cursor will automatically move to the next field if the required data
is entered correctly in the current field. This only applies to fields with a fixed data length.
Also see Section 5.8.3, TAB Order.
The check box “Enter as TAB” allows the User to use the Enter key instead of the TAB key in
most screens. See Section 5.8.3, TAB Order, for a full description.
The check box “Save/Restore Workspace” enables the following behaviour: When IDEP/CN8
quits the current screen size and position are stored. Also the maximised state is stored. A list
of active list screens (e.g. Returns list, Exchange Rates etc.) is saved.
When IDEP/CN8 restarts the screen layout and the active list screens are restored (only their
position, not their size).
If the mechanism is switched off IDEP/CN8 will start with the Returns list displayed as usual.
9-Jan-15
-15-
IDNet15manE.doc
IDEP for Windows
IDEP User Manual
4.7 Function Keys.
Users prefering to work with keystrokes instead of Mouse clicks, can use the following function
keys:
F1 : Shows the help text for the currently selected function.
F2 : When pressed on a data entry field, this function key will display a list, from which a
value can be selected.
F3 : Exit from IDEP.
F4 : Add.
F5 : Modify.
F6 : Consult.
F7 : Delete.
F8 : Print.
F12 : Refresh.
ENTER : The functionality of the Enter key is controlled by a User preference, see Section
4.6 – Setup Display.
ESC : This key will return to the previously selected function or to the Menu.
TAB / Shift + TAB : Moves to the next entry, or button in a data entry screen. The behavior
of the TAB key is controlled by a User preference, see Section 4.6 – Setup Display.
Alt + Arrow Down / Alt + Arrow Up : Same as TAB / Shift + TAB.
4.8
Data Entry and Presentation Facilities.
4.8.1 Pick lists.
When positioned on a field where it is obliged to enter a pre-defined code from a list, either the
Arrow Button
at the right hand side of the field can be clicked on or the F2 key can be pressed,
which will present a choice of all possible values. The User can choose a value from this list by
clicking on the desired value. Depending on the size of the list, two different presentations are
used by default:
a so-called Dropdown Box for short lists, clicking on the desired entry puts its value
immediately in the field;
a selection Window for longer lists, an entry is selected by clicking on it and its value is put in
the field by clicking on the OK Button.
In both cases, also the up- and down-arrow keys can be used on the field in which case the
possible values will be shown one by one.
9-Jan-15
-16-
IDNet15manE.doc
IDEP for Windows
IDEP User Manual
4.8.2 Field Colours.
De status of the fields is represented by their colour:
Optional field (can be filled in; not obliged): white;
Field that can only be consulted: gray;
Obliged field: yellow;
Field with errors: red;
Correct field: green.
These are the default settings and can be changed via “System / Setup Display”.
4.8.3 TAB Order.
Users who prefer to work with Keys rather than the Mouse, can use the following options.
If Enter as TAB in “Setup Display” is disabled, then the TAB Key is used to jump from one
field to the next and to the Buttons. The Enter key can be used to activate a Button.
If Enter as TAB in “Setup Display” is enabled, then the Enter key will move the focus to the
next element (field or button) that can get the focus. Pressing Enter on the last element will
move the focus back to the very first element. The original behaviour of the Enter key (Enter is
equivalent to pressing the OK button) is disabled in all windows except lists.
Pressing Enter on a button (e.g. OK or Cancel) will activate the button instead of moving the
focus. Pressing Shift + Enter will move the focus to the previous element (just like Shift + TAB
would do).
The original behaviour with the (Shift +) TAB key is unchanged.
9-Jan-15
-17-
IDNet15manE.doc
IDEP for Windows
IDEP User Manual
4.8.4 Sort Order.
In many lists presented in IDEP, clicking on the Column Header will perform a “Sort”
function. For instance, clicking on the “Correct” Column Header will sort on Correct (“Yes”)
and Incorrect (“No”) entries in the list.
4.9 Notations used in the next Chapters of this Manual.
From the previous Sections of this Chapter, it will be clear that most functions of the package can
be started in more than one way.
For instance:
The function “Line Models” is started by:
selecting the Main Menu option “Info PSI”, Sub-option “Line Models”;
or by a Mouse Click on the Button
“Line Models” on the Main Tool bar.
On the Line Model screen itself, the function “Add Line Models” can be performed by:
selecting the Main Menu option “Actions” (or by calling the Action list via a click on
the right Mouse Button), Sub-option “Add”;
or by a Mouse Click on the Button “Add” on the context dependent Tool bar;
or by pressing the Function Key F4.
In the next Chapters, for each Function the way it is invoked is indicated in a more brief way.
For the above example, the notation is:
The function “Line Models” is started by “Info PSI / Line Models” or by clicking the “Line
Model” Button
.
The function “Add Line Models” is started in “Info PSI / Line Models” via “Actions / Add” or
by clicking the “Add” Button or by the F4 Key.
Other conventions are:
Function names are written in Bold & Italic: “Function”.
Menu options, Button names, etc. to start functions are written in Italic: “Menu”.
Field names are written in Bold: Field.
9-Jan-15
-18-
IDNet15manE.doc
IDEP for Windows
IDEP User Manual
5 SYSTEM.
System functions influence the behaviour of the complete IDEP/CN8 application and thus apply to
all PSI’s defined in the system. Functions on the system level are:
Exchange Rates;
Administrative Parameters;
Select Printer;
Setup Display (this function is described in Chapter 4 - Graphical User Interface);
Proxy Settings (only applicable for sending declarations via Email);
Collecting Centre.
5.1
Exchange Rates.
The “Exchange Rates” function is selected by “System / Exchange Rates” or by clicking the
“Exchange Rates” Button .
The Exchange Rate table allows the User to convert amounts in Foreign Currencies
automatically or manually into amounts in Euro.
The Exchange Rates overview will only show the non-EMU currencies. However, in this case
the Checkbox Show EMU Rates still allows the User to consult these rates, as shown in the
following example.
Without the “old” Local EMU Currencies:
5.1.1 Specifying Exchange Rates.
The function “Add Exchange Rates” is started in “System / Exchange Rates” via “Actions / Add”
or by clicking the “Add” Button or by the F4 Key.
The function “Modify Exchange Rates” is started in “System / Exchange Rates” via “Actions /
Modify” or by clicking the “Modify” Button
or by the F5 Key.
9-Jan-15
-19-
IDNet15manE.doc
IDEP for Windows
IDEP User Manual
To add an Exchange Rate, the User needs to specify:
A unique Currency Code, the User can not enter his local currency.
An optional Description,
Either the Exchange Rate of the new Currency (1 NEW Currency = x Euro) or “1 Euro =”
x NEW Currency..
Exchange Rates can also be imported from outside IDEP. The “Import Exchange Rates”
function is called from the Exchange Rates screen via “Actions / Import” or by clicking the
“Import” Button
or by the F9 key.
Read Section 6 – Import for guidelines on how to define the import format and use the “Import”
function.
A Correct Indicator is shown on the Exchange Rates overview because currencies entered via
the Import function may contain errors.
Note, that imported Exchange Rates will update the correct Rates that already exist.
Exchange Rates can also be exported to a file. The “Export Exchange Rates” function is
called from the Exchange Rates screen via “Actions / Export” or by clicking the “Export”
Button
or by the Control+F9 key.
Possible output formats are MS Access, MS Excel, Text TAB, XML and HTML. The output
format is selected by choosing the appropriate extension in the “Save As” function of the output
file selection.
5.1.2 Usage of Exchange Rates.
The Exchange Rates are used to perform currency conversions.
In the Return line data entry screen.
In the return line Model data entry screen.
The “old” EMU currencies can't be selected as foreign currencie anymore.
Calculations are done automatically after the User has entered the Currency Code and the Invoice
Value in Foreign Currency.
9-Jan-15
-20-
IDNet15manE.doc
IDEP for Windows
IDEP User Manual
See the return line data entry screen as an example:
When a Currency Code is selected from the list, the Invoice Value Euro will be automatically
calculated after entering the Invoice Value in Foreign Currency.
The Invoice Value Euro on the Return line and the PSI Model data entry screen is calculated as
follows.
Invoice Value Euro = Invoice Value in Foreign Currency divided by <Exchange
Rate of the selected Currency Code>.
5.2
Administrative Parameters.
The “Administrative Parameters” function is selected by “System / Administrative
Parameters”.
9-Jan-15
-21-
IDNet15manE.doc
IDEP for Windows
IDEP User Manual
The administrative parameters consist of a set of values that allow the User to specify the
following.
1. INTRASTAT Output.
The ser can select the way(s) in which the output of an INTRASTAT return can be uploaded in
OneGate (manually or automatically).
In case of “Manually to OneGate” users should specify the location where they want the
information to be placed prior to uploading. If this path does not exist on the system, it will be
created automatically during the creation of the output file.
2. The workstation ID.
It is necessary to specify a different value for the Workstation ID for every installation of the
package when INTRASTAT returns for the same PSI are created.
In a LAN environment the workstation ID has to be set for each server installed.
The workstation ID will then be the identifier that will uniquely identify the returns (see also
Chapter 1.3.2).
3. Last Interchange Number.
The number of the Last Interchange (message by email or diskette) sent to the CNA will be
presented here.
4. Enable Archiving (Yes/No)
This option allows you to disable the archive functions. Archive functions can be found under
“System Maintenance / Declaration Maintenance” (see chapter 10.1 Declaration Maintenance).
When archiving is disabled it is possible to delete sent declarations under "Return / Edit" without
prior archiving. Attention, deleted declarations can not be recovered!
9-Jan-15
-22-
IDNet15manE.doc
IDEP for Windows
IDEP User Manual
5.3 Select Printer.
The “Select Printer” function is selected by “System / Select Printer”.
This option allows the User to select a printer that is installed in his system and to modify its
settings. If no printer is selected by the User, then the Windows Default Printer is selected.
Without changing the printer’s original settings, printing in Portrait or Landscape can be selected.
The Printer Setup button allows the User to change the settings for the printer in the same way as
via the Windows Settings / Printers option. Note that changes made here are applied throughout
the entire Windows system.
5.4
Setup Display.
Refer to Chapter 4.6 - The Graphical User Interface / Setup Display.
5.5 Proxy Settings.
In some companies the internet access passes through a proxy. If necessary, in the sheet "Proxy" you
can configurate Idep to allow access to the Internet through a proxy (f.i. to upgrade Idep)
9-Jan-15
-23-
IDNet15manE.doc
IDEP for Windows
IDEP User Manual
5.6
Collecting Center.
The “Collecting Centre” function is selected by “System / Collecting Center”.
This function allows the User to consult the list of Collecting Centers.
6 IMPORT.
IDEP provides Users interfaces to allow import of Complete Returns, Return lines, PSI Goods
Codes and Exchange Rates.
The purpose of the import facility is to avoid double data entry when using other applications that
already contain the necessary information.
The import functionality is supported by two functions.
1. A function to specify the import format.
Multiple physical import formats are supported. The logical file layout (field order, field
length,..) can also be defined by the User.
All defined import formats are available to all PSIs.
2. A function to perform the actual import.
Once the User has defined the import formats for a given PSI, they can be used each time the
import facility is called (on the Return lines, PSI Goods Codes or Exchange Rates or
through the Menu option “System / Multi-PSI Import”).
9-Jan-15
-24-
IDNet15manE.doc
IDEP for Windows
IDEP User Manual
Both functions are explained in the following sections.
6.1
Import Format.
The “Import Format” function is selected by “Import / Format”.
6.1.1 Specifying the Import Format.
Select the Menu option "System / Format”.
The list is pre-set with Default Formats; the Import Format can be modified. They can be used to
perform import and they may serve as examples for User-defined Formats.
Defining a new Import Format will allow the User to specify the Type of Import for which the
format is intended (i.e. Returns, Return Lines, PSI Goods Codes, Exchange Rates) and the
physical format (dBase, Text, Excel,…). Furthermore, the User can specify the default name and
location (if there is one) of the file containing the import data.
The function “Add Import Format” is started in “Import / Format” via “Actions / Add” or by
clicking the “Add” button or by the F4 key.
The function “Modify Import Format” is started in “System / Format” by double clicking on the
Import Format or via “Actions / Modify” or by clicking the “Modify” Button
or by the F5 key.
Note: The specification of the import format is explained for Return lines. Setting the import
format for the other import types (PSI Goods Codes, Exchange Rates) is very similar.
9-Jan-15
-25-
IDNet15manE.doc
IDEP for Windows
IDEP User Manual
The following fields are mandatory:
The Name of the Import format, used for identification when the actual import action is
performed. Note, that for technical reasons a single quote “ ’ ” will be replaced by “ ` ”.
The Type of Import Format, i.e. Return Lines, Lines Multi-PSI, PSI Goods Codes,
Exchange Rates.
The Import Format, i.e. the physical structure such as different Text formats, dBase, Excel,
MS Access.
For Return Lines: the PSI Goods Code Mode, identifying if the CN8 Code or the User
defined PSI Goods Code is used in the import file.
If the value = PSI Goods Code, the system expects the PSI Goods Codes in the import
file. An automatic translation will be done to the CN8 Codes, based on the PSI Goods
Code table. If the PSI Goods Code includes a reference to a Net Mass Calculation
Factor, then the Net Mass is automatically calculated during import.
If the value = CN8, the system expects the CN8 Goods Codes in the import file.
For certain Import Formats (for instance Excel) it must be specified if the Import file
includes Column Headers or not. If it does, the field Rows to Skip appears which defines the
number of irrelevant rows. It is pre-set on ‘1’.
For all Text formats, it must be indicated if the Import file uses the ANSII character set or
not. It is recommended to keep this field on its pre-set value, unless it appears that the import
procedure doesn’t recognise certain special characters in text fields, for instance the Danish
characters å, æ and ø.
9-Jan-15
-26-
IDNet15manE.doc
IDEP for Windows
IDEP User Manual
The following fields are optional:
Description, used for the User’s own identification of the format.
Path Name, the default name and location of the import file for this Import Format
Definition. The Path Name may refer to a WEB location (a WEB-file):
The name of the web file must start with HTTP//domain/ or FTP://domain/ (thus
HTTPS:// is not supported).
As soon as the minimal required part of a web file name (URL) is entered in the
pathname field (e.g. HTTP://domain/somefile.txt) the field will be marked as correct
(IDEP will not check if the file actually exists).
It will not be possible to browse for such a file using the file selection dialog that is
normally used.
External Name, to specify the default name of the table in a database (for instance in
Access) or the name of the Worksheet in a spreadsheet (for instance in Excel). If there is
only one table or Worksheet name found in the given import file, its name is automatically
pre-set.
If the Path Name or External Name are not set here by default, they must be entered when the
actual Import is performed (see Section 7.2.3.6). The default can always be overruled when the
Import is performed.
Now specify the logical file layout (order of fields in the file to be imported, lengths etc.) for the
physical format that has just been selected. The position of the fields can be determined by moving
or dragging the fields to the right (used fields). Used fields can be moved to another position by
moving them up or down, by dragging or by typing another order (enter or use the arrow buttons).
This features can help you to create an import format:
- Preview: after selecting a file, a button "Preview" appears. Pressing it starts reading in the file
and the column "Field Value" shows the content of a complete row of the import file.
- Data row in file: this is a record selector which allows you to browse the import file.
- Try mapping fields: after using the button "Preview", this button appears. By pressing it an
attempt is made to map the fields of the import definition to the columns of the import file. The
result of this attempt needs to be checked and can be adapted by the user.
9-Jan-15
-27-
IDNet15manE.doc
IDEP for Windows
IDEP User Manual
9-Jan-15
-28-
IDNet15manE.doc
IDEP for Windows
IDEP User Manual
Special comments on some of the import fields:
1. Either the CN8 Goods Code or the PSI Goods Code is imported. The PSI Goods Code is
expected in the import file, if the Goods Code Mode = PSI Goods Code. The applicable fields
are taken from the PSI Goods Code list, if import is done in PSI Goods Code Mode.
2. Special remarks on Net Mass and Invoice Value in Foreign Currency and the use of
decimals.
The maximum length of the Net Mass is 10 digits + a maximum of 3 decimals (a total
of maximum 14 characters long, 1 character for the decimal sign included).
The maximum length of the Invoice Value in Foreign Currency is 12 digits + a
maximum of 2 decimals (a total of maximum 15 characters long, 1 character for the
decimal sign included).
The decimals are only used as a facility for the User to be able to enter more accurate
information on the return line level (whether it concerns manual data entry, PSI Models, or
input via the import facility).
3. The field Currency Code can be used to calculate the Invoice Value in Local Currency and
the Invoice Value in Euro via the imported Invoice Value in Foreign Currency and the table of
Exchange Rates.
4. For certain CN8 Goods Codes, the Net Mass is not required and a zero value is accepted
during import.
5. In a Line Multi-PSI Import Format, the following additional fields can be defined: the PSI
Identification, the Flow of the Return and the Statistical Period of the Return (by default
on position 1, 2 and 3). If one or more of these fields are not included in the format, the
User will be prompted for their value(s) at the start of the Import process. This format
contains a “super-set” of the fields used for Arrival and Dispatch Return Lines in all
Threshold Categories.
6.1.2 Usage of the Import Function.
The functionality is similar for Return Lines, PSI Goods Codes and Exchange Rates.
The import function is called by “Actions / Import”, by clicking the “Import” Button
or by the
F9 Key:
for Return lines from the Modify Return Overview list (see Chapter 8.2.3.6) or in the
“Import” menu through "Import in current Declaration" or "Import in new Declaration".
for PSI Goods Codes from the PSI Goods Codes list (see Chapter 9.5).
for Exchange Rates from the Exchange Rates list (see Chapter 5.1).
The “Lines Multi-PSI” import function is called by “System / Multi-PSI Import” (see Section
6.2 – Multi-PSI Import).
A special case is the Import of a WEB-based file. This is described once for all above Import
types in Section 8.2.3.6 – Usage of the Import Function, for Return Lines.
Draft Output is a means for the User to check his declaration before producing the INTRASTAT
output. How to create Draft Output is described in Chapter 8.3. The default “Draft Order”
definition is found as one of the formats provided in the “Import / Format” Menu.
9-Jan-15
-29-
IDNet15manE.doc
IDEP for Windows
IDEP User Manual
The User can add his own Draft Order definition in the same way as described above for the
Import Formats, by selecting Draft Print Order in the field Type of Format.
Which fields appear on the printout or the output on disk can either be defined by the User, or he
can use the available default format.
The User can specify if he wants to include a Correct Indicator in the output for each Return
Line.
When creating Draft Output, the User selects if the output appears on paper or in a file on disk. If
he selects Paper, all defined formats can be applied, only the Draft Print Order is used to define
what is printed and in which order. If he selects Disk, the output will be in the selected Import
Format.
9-Jan-15
-30-
IDNet15manE.doc
IDEP for Windows
IDEP User Manual
6.2 Multi-PSI Import.
For a good understanding of the “Multi-PSI Import” function, please read first the description
of the normal “Return Line Import” function, used to import Return Lines for one single
Declaration, found in Section 8.2.3.6 – Usage of the Import Function.
The “Multi-PSI Import” function is selected by “System / Multi-PSI Import”.
The option is only enabled if there is at least one PSI and if the current User has Modify rights.
“Multi-PSI Import” allows the User to perform a single import function for different
declarations (Statistical Periods and Flows) and different PSIs.
During the import process, Returns are automatically created for the required Statistical
Periods and Flows, for the indicated existing PSI(s), if they don’t exist yet.
The Import Format for this type of import therefore includes the PSI Identification,
Statistical Period and Flow for each Return Line (see Section 6.1 – Import Format).
The following screen is presented to start up this function:
Name is selected from the defined Multi-PSI Import Formats.
Path Name, the default name and location of the import file, this field may be pre-set in
the Import Format Definition. The Path Name may refer to a WEB location (a WEB-file):
the name of the web file must start with HTTP//domain/ or FTP://domain/ (thus HTTPS://
is not supported). As soon as the minimal required part of a web file name (URL) is entered
in the pathname field (e.g. HTTP://domain/somefile.txt) the field will be marked as correct
(IDEP will not check if the file actually exists). It will not be possible to browse for such a
file using the file selection dialog that is normally used.
The procedure for importing a WEB-file is described in Section 8.2.3.6 – Usage of the Import
Function.
External Name, to specify the default name of the table in a database (for instance in
Access) or the name of the Worksheet in a spreadsheet (for instance in Excel). This field
may be pre-set in the Import Format Definition.
Statistical Period Format, a valid period consists of 2 or 4 characters for the Year,
allowed characters are Y, J, A, V, Å, and 2 characters for the Month, allowed characters are
M, T, K. Valid examples: YYMM, YYYYMM, MMAAAA, ÅÅMM, KKJJ.
9-Jan-15
-31-
IDNet15manE.doc
IDEP for Windows
IDEP User Manual
Return Flow Format, the User must enter here the characters used in his import file to
identify Arrival and Dispatch, separated by a /, for instance I/E, 1/2, A/D.
After clicking the OK Button, the import process will start.
Independently of the fact if the Import Log is seen (see next Section 6.3) after the completion
of the Import process, depending on the results, the following screens will be shown:
If no errors have occurred, the Returns overview of the first PSI for which data has been
imported (in case data for more than one PSI was present in the import data).
If errors have occurred, the Returns overview of the first PSI for which the errors have been
reported (there could have been errors for more than one PSI).
If no data has been imported at all (no declarations have been created), the Returns
overview of the current PSI. This also happens if the multi-PSI dialog was dismissed
without importing anything at all.
In any case, the most appropriate Returns overview. As usual, the last declaration will be
pre-selected.
If import lines contain no or incorrect PSI Identification, Statistical Period or Flow, they
can’t be connected to any Declaration. A LOG file is produced, which shows the eventual
errors that occurred during the process. The LOG file can be presented at the end of the
process, see next Section 6.3 – View Import-Log.
A special record where all fields (except PSI Identification, Statistical Period and Flow) are
empty, creates a NILL return.
In fact the PSI Identification can also be left blank if it is defined in the Import definition.
If a return already exists for the given PSI Identification, Period and Flow combination then no
extra NILL return is created.
6.3 View Import-Log.
The “View Import-Log” function is selected by “System / View Import-Log”. It can also be
presented at the end of an import session.
The Import Log is of particular interest for the “Multi-PSI Import” function, as Return Lines
without or with incorrect PSI Identification, Flow or Period can’t be imported in IDEP and
are only listed in this log.
Information stored in the log includes:
Start of Import:
- Start Date and Time of the import;
- Importname;
- Filename and Tablename (if applicable).
Lines with incorrect or missing PSI, Flow or Period (up to a maximum of 100):
- PSI Id;
- Line number in Import Source-File;
- Name of Field containing the error;
- Value of the Field in Error.
9-Jan-15
-32-
IDNet15manE.doc
IDEP for Windows
IDEP User Manual
Lines that are otherwise incorrect (up to a maximum of 100):
- PSI Id;
- Declaration Nr;
- Line number in Import Source-File;
- Line number in Return;
- Name of Field containing the error;
- Value of the Field in Error.
End of import:
- Date and Time;
- List of Declarations for which lines were imported.
- PSI Id;
- Declaration Nr;
- Lines Imported;
- Imported Lines in Error.
9-Jan-15
-33-
IDNet15manE.doc
IDEP for Windows
IDEP User Manual
7 PARTIES.
This Menu deals with the different parties involved in the system.
Providers of Statistical Information, “PSI’s”. IDEP can handle any number of PSI’s, either as
independent entities or under the umbrella of a Third Party Declarant (see Chapter 7.3).
“Users”, who have certain rights to create, change or consult the PSI’s data, to modify system
parameters or to perform system functions.
“Third Party Declarants”, who create INTRASTAT declarations for a number of PSI’s.
Third Party Declarants have an additional function “Approve All” which is also available
from the “Actions” Menu in case the PSI Returns overview is presented. This function is
described in Section 8.4.1 – Return Approval / Disapproval.
The “Change current PSI” option allows to select and work for another PSI defined in the
system.
7.1
PSI's.
The “PSI’s” function is selected by “Parties / PSI’s”.
7.1.1 Create / Modify PSI.
This screen allows the definition or modification of the data of a PSI (Provider of Statistical
Information).
The function “Add PSI’s” is started in “Parties / PSI’s” via “Actions / Add”, by clicking the “Add”
button or by the F4 key.
The function “Modify PSI’s” is started in “Parties / PSI’s” by double clicking on the PSI’s
Identification, via “Actions / Modify”, by clicking the “Modify” Button or by the F5 key.
9-Jan-15
-34-
IDNet15manE.doc
IDEP for Windows
IDEP User Manual
Now the PSI can be defined by filling in all the data that are requested on the screen.
Mandatory fields to be entered are:
BE + Enterprise number (the identification number of the PSI): BE + the 10 digitidentification number of the declarant in the Crossroads Bank for Enterprises.
PSI Name.
Threshold Category Arrival, select the category that is applicable for the PSI.
Threshold Category Dispatch, select the category that is applicable for the PSI.
remark: if you created and sent a standard while it had to be an extended declaration, this can be
corrected as follows. In this screen you have to change the treshold category to extended
declaration. Then you create a new declaration for the same period (see chapter 8.2.2) with type of
return "5, replacement of a previous return". Now it is possible to add the missing data and to
resend the declaration.
Optional fields are as follows.
Name and Address Info, Postal Code, Postal District (City) of the PSI.
Contact Person, Telephone Number, FAX Number of the PSI.
A default value can be selected in National Region on the PSI Parameters screen. This
value is automatically copied to each Return Line created by the PSI or by the import
process.
The OneGate user name and password ought to be filled in if you want to upload the output
automatically into OneGate (see 8.4.3 Intrastat output).
Note that the PSI that is just created or modified has now become the Current PSI.
When several PSI's have been created, the User can change from one to another via “Parties /
Change Current PSI” or by clicking the “Change current PSI” Button
.
9-Jan-15
-35-
IDNet15manE.doc
IDEP for Windows
IDEP User Manual
7.1.2 Copy Information from another PSI.
After clicking on the OK button, a window is displayed that allows the User to copy the PSI
specific tables from another PSI. Note, that this window is not displayed when creating the first
PSI.
Select the PSI from which the tables should be copied, and use the check boxes to indicate
which tables ought to be copied.
7.2
Users.
The “Users” function is selected by “Parties / Users”.
7.2.1 Create / Modify a User.
This screen allows the definition or modification of different Users, with different authorisations.
If there is only one User of the package, he can always work with the default User called "IDEP",
and the rest of this Chapter is of no further interest to him.
The function “Add Users” is started in “Parties / Users” via “Actions / Add” or by clicking the
“Add” button or by the F4 key.
The function “Modify Users” is started in “Parties / Users” by double clicking on the User’s
Identification, via “Actions / Modify”, by clicking the “Modify” Button or by the F5 key.
9-Jan-15
-36-
IDNet15manE.doc
IDEP for Windows
IDEP User Manual
Now the User can be defined by filling in all requested data .
Mandatory fields to be entered are as follows.
User ID, the name used on the Login screen.
The choice of the type of user: Supervisor, Editor or Consult if Yes this User has access to all
functions. If No his access is restricted to those functions required to create declarations, see
Chapter 6.2.2 – Types of Users.
Modify, if Yes, this User is allowed to use Add / Modify on the functions he is allowed to
access. If No, he can only Consult them.
Optional fields are as follows.
Password; if filled in, this password will be requested on the Login screen.
User Name.
Contact Number, Department, Function.
Default PSI ID, if a User often makes declarations for the same PSI, he can fill in the field by
selecting a PSI from the pick list. When the User logs on to IDEP, he will immediately have
this PSI as his current PSI.
7.2.2 Types of Users.
Users can be limited in their access rights to Functions and / or in their rights to Modify data.
There are three Types of Users:
1. Supervisor with Modify authority (= the default User IDEP). This User can perform all
functions in the package.
9-Jan-15
-37-
IDNet15manE.doc
IDEP for Windows
IDEP User Manual
2. Editor (Normal User with Modify authority). This User can perform the functions for every
User, except some functions that are resered for the Supervisor. He can Consult the
Supervisor functions.
3. Consult (Normal User without Modify authority). This User can Consult the functions for
every User.
7.3
Third Party Declarant.
Note: This point is only of interest to a Third Declarant.
The “Third Party Declarant” function is selected by “Parties / Third Party Declarant”.
With this function a Third Declarant can enter his Identification data.
Third party declarants who wish to upload intrastat returns of their clients automatically into
OneGate, can fill in here their own OneGate user name and password if the intrastat reporting of
these clients is linked as a result of procurations of these clients (see www.onegate.be, FAQ).
Refer to the Chapter 7.1 - Parties / PSIs, for the explanation of the various fields.
9-Jan-15
-38-
IDNet15manE.doc
IDEP for Windows
IDEP User Manual
7.4
Change current PSI.
The “Change current PSI” function is selected by “Parties / Change current PSI” or by
clicking the “Change current PSI” Button .
The User always works with data from one PSI at a time (except for producing INTRASTAT
output or archiving returns for all PSI's).
To change from one PSI to another, simply select the PSI that must become the default from the
list of PSI’s by clicking on it and then clicking on the OK button (or by double clicking on this
PSI). All the information related to that PSI is now active (i.e. the returns, all information under
the Menu option "PSI Info").
The identification of the actie PSI appears in the Idep title bar.
9-Jan-15
-39-
IDNet15manE.doc
IDEP for Windows
IDEP User Manual
8 RETURN.
8.1
The Life Cycle of a Return.
All actions related to the INTRASTAT return can be executed by activating the Menu bar option
"RETURN".
The following scheme gives an overview of all main actions that can be performed on a return.
The use of the corresponding Menu options and function keys in the software are described in the
following Chapters.
1. Create a new return => New header
2. Modify existing return => add / modify / delete lines
Approve (F8)
Disapprove (F8)
3. Approved return =>
- Aggregated information.
- return cannot be modified anymore.
Unlock (F9)
Output / INTRASTAT
4. Sent return => return excluded from second INTRASTAT output.
Maintenance / Dearchive
Maintenance / Archive
5. Archived return => return lines deleted in IDEP.
Maintenance / Delete Headers
6. Return completely removed from IDEP.
The various steps in the life cycle of a return are as follows.
STEP 1:
Create a return header which identifies a new return (see Chapter 8.2.2).
STEP 2:
Modify the return by changing the return header, or by adding, deleting or
modifying lines.
Note that lines can be added.
Manually (see Chapter 8.2.3.2).
By means of Line Models (see Chapter 8.2.3.4).
By copying information from other returns (see Chapter 8.2.3.5).
Via the import facility (see Chapter 8.2.3.6).
The complete return can be deleted, in which case no further steps can be taken.
9-Jan-15
-40-
IDNet15manE.doc
IDEP for Windows
IDEP User Manual
STEP 3:
Approve the return before INTRASTAT output can be completed (see Chapter
8.4.1.).
At the moment of approval the return lines are aggregated.
Once the return is approved it can not be modified or deleted anymore. If the User
still wishes to make modifications, the return can be dis-approved.
STEP 4:
An approved return can be processed as official output (“sent to the CNA”, see
Chapter 8.4.3) only once, then it is locked from being processed again. A return can
be unlocked in case the data in the message are corrupted.
STEP 5:
If a return is not needed “on-line” anymore, it can be archived. This means that the
return is put on disk and the return lines are deleted in the database (see Chapter
10.1.1).
The archived return can still be put back in the database via the de-archiving
function (see Chapter 10.1.2).
STEP 6:
After STEP 5, the header of an archived return remains accessible for reference
purposes. If however, this reference is not needed anymore, it can be deleted (see
Chapter 10.1.3).
8.2 Edit Returns.
8.2.1 Introduction to Data Entry of INTRASTAT Information.
Actions related to the creation and updating of INTRASTAT returns are started under the Menu
option "Return / Edit Returns" or by clicking the “Edit Returns” Button
.
A return consists of one return header and several return lines. Therefore the creation of a return
basically consists of two steps.
1. First the Return Header is created, in which the Statistical Period and Flow are specified
(see Chapter 8.2.2).
2. Once the header is created, the Return Lines can be added to this return header (see Chapter
8.2.3).
Return lines can be added in several ways.
-
Manual data entry is the simplest way (see Chapter 8.2.3.2).
By means of Line Models (see Chapter 8.2.3.4).
By copying information from other returns (see Chapter 8.2.3.5).
Via the import facility (see Chapter 8.2.3.6).
Modifying an existing return (see Chapter 8.2.4) can be related to modifying the return header or
adding, deleting or modifying return lines.
9-Jan-15
-41-
IDNet15manE.doc
IDEP for Windows
IDEP User Manual
8.2.2 Create the Return Header.
STEP 1:
Select "Return / Edit Returns" or click on the “Edit Returns” Button
. The PSI
Returns overview is presented.
Note, that after creation of a PSI, the PSI Returns overview is presented by default
after starting up the package.
ST
EP 2: To “Add a Return” to the list of returns of the current PSI, use “Actions /
Add” or click the “Add” button
or press F4. Enter the Header information,
which is common for all the return lines.
After having entered all fields, click on OK to save the information.
NOTE 1: When the User creates or modifies a return header and there is no
declaration with the same Flow created and sent for the previous
month, a message is displayed to warn him that he didn’t produce
and/or send a declaration for the previous month.
This message is not displayed when the first declaration is created.
9-Jan-15
-42-
IDNet15manE.doc
IDEP for Windows
IDEP User Manual
NOTE 2: It is not possible to create a return for a Statistical Period outside the
validity years of the package.
NOTE 3: It is not possible to create a return with a Statistical Period after the
current month.
STEP 3:
Now that the return header is created for a certain flow and period, the return lines
can be added.
8.2.3 Adding Return Lines to the Header.
8.2.3.1 Introduction.
When the return header is created, return lines can be added for all types of returns, except for
returns, which by definition have no lines.
“Modify Return” for a new or existing return is either automatically started after creation of the
header, or it can be manually started by selecting the return (click on it) and clicking the “Modify”
Button , or selecting “Actions / Modify”, or by the F5 key.
The User will now see the “Return overview” of the return lines, which is still empty in this stage.
Summary header information is displayed.
Return lines can now be added in several ways.
Manual data entry is the simplest way, see Chapter 8.2.3.2.
By means of Line Models, see Chapter 8.2.3.4.
By copying information from other returns, see Chapter 8.2.3.5.
Via the import facility, see Chapter 8.2.3.6.
9-Jan-15
-43-
IDNet15manE.doc
IDEP for Windows
IDEP User Manual
8.2.3.2 Manual Data Entry of Return Lines.
STEP 1:
The function “Add Return Lines” is started via “Actions / Add”, by clicking on the
“Add” button , or by the F4 Key, to add a return line manually. This will present
the detailed “Return Line” entry screen.
IDEP provides utilities to make the manual entry of data easier. They are described
in the following Chapter. General remarks for data entry are:
The data can be entered in a random order. Note however, that certain items have
influence on the behaviour of other items.
The TAB key or the Enter key (if enabled by the User in the “System / Setup
Display” function, see Section 4.8.3, TAB Order), or the mouse can be used to
jump from one field to another.
When data is entered manually through the keyboard, IDEP can be instructed to
automatically jump to the next field when the data that has been entered was
correct. In this case, the User doesn’t have to enter the TAB after entering the value.
Of course this mechanism only works for fields in which data with a fixed length
must be entered.
The facility is enabled or disabled by clicking on the check box Automatic TAB in
“System / Setup Display”.
When a field value that was previously entered is selected, by double-clicking or by
using the TAB key, a new value that is entered replaces the previous one. If the User
just wants to add a character to the field, he has to position in the field using the
mouse or arrow keys.
After filling in the last field on the screen the information is saved by clicking the
“Add” button . If some of the required information is still missing or one of the
so-called quality checks on big transactions fails, the program will present a
warning message regarding the missing data. However, the User can also choose to
save an in-complete line, in this case the line will be marked as “Incorrect”.
9-Jan-15
-44-
IDNet15manE.doc
IDEP for Windows
IDEP User Manual
Quality checks are performed automatically in relation with a CN8 Code on
Value / Net Mass, Value / Supplementary Units and Net Mass /
Supplementary Units for all transactions with an Invoice Value higher than
10.000 euro.
The quality check is performed as follows:
When a new Return Line is closed and the line includes a CN8 Code for which
checking is enabled, the values to be checked are calculated:
Invoice Value/Supplementary Unit (if Supplementary Units are
required);
Invoice Value/Net Mass (if Net Mass is required for this CN8
code);
Net Mass/Supplementary Unit (if supplementary units are required
and the optional net mass has been filled in).
The above results are then checked against the maximum / minimum
values connected to the CN8 Code. If any of those are outside the limits,
6 possible different messages are presented, depending on the different
cases:
1.
2.
3.
4.
5.
6.
A value of … € for … units seems too low. Are you sure it is Correct?
A value of … € for … units seems too high. Are you sure it is Correct?
A value of … € for … kilos seems too low. Are you sure it is Correct?
A value of … € for … kilos seems too high. Are you sure it is Correct?
A value of … kilos for … units seems too low. Are you sure it is Correct?
A value of ... kilos for … units seems too high. Are you sure it is Correct?
If the user answers ‘Yes’, the applicable limits for this CN8 Code are
automatically updated for the current PSI.
If the user answers ‘No’, the cursor jumps to the field likely to be
corrected.
The validation is carried out again when the line is closed.
In “PSI Info / Minimum and Maximum Ranges”, the maximum and
minimum values connected to CN8 Codes can be added or modified.
Refer to Section 9.5 for details.
The “Clear” Button
can be used to clear all fields on the screen.
A new screen will be provided automatically for data entry. To stop adding lines,
simply press <ESC> or click on the Cancel Button. The last (still empty) Line will
not be added to the declaration.
9-Jan-15
-45-
IDNet15manE.doc
IDEP for Windows
IDEP User Manual
STEP 2:
After having added lines, the “Return overview” screen is presented; the User now
sees that the new line is added to the list.
The list is presented to the User in modify mode. If he wishes to “Modify”
information for a specific line, he has to select that line and press Enter, double
click on the line, use “Actions / Modify” or click on the “Modify” Button or use
the F5 Key.
The function “Consult Header” is started via “Actions / Header”,by clicking on the
“Header” Button
, or by the F11 Key. Here the User can consult the updated
Header information.
To get back to the PSI Returns overview press <ESC> or close the Return
Overview window, or select the desired window in the Window Menu.
Also from here, the function “Consult Header” can be started via “Actions /
Header” or clicking on the “Header” Button
, or by the F11 Key.
When the User wishes to return to the Main Menu, he has to press <ESC> twice, or
Close all open windows, or select the option “Windows / Close all Windows”.
8.2.3.3 Utilities for Manual Return Line Data Entry.
Note that the following utilities are provided on the “Return Line” data entry screen.
Pick lists.
When positioned on a field where it is obliged to enter a code, the Arrow Button
at the right
hand side of the field can be clicked on, which will present a choice of all possible values. The
User can choose a value from this list by clicking on the desired value.
9-Jan-15
-46-
IDNet15manE.doc
IDEP for Windows
IDEP User Manual
Copy values of a previously created return line.
When adding a second return line in the same session, it is possible to copy the values of a
previously created return line for the same declaration.
This is possible by using the F6 Key, or the “Copy” Button
screen.
, on the “Return Line” detail
The numerical values, such as Supplementary Units, Monetary Values, etc. of the return line
are made zero in the new return line.
PSI Goods Codes.
The in-house PSI Goods Codes can be used within the package instead of the official CN8 Goods
Code list. It is possible to define a relationship between a PSI Goods Code and the corresponding
CN8 Goods Code (see Chapter 9.3 - PSI Info / PSI Goods Codes). Please note the following.
If the User has not (yet) defined any PSI Goods Codes, the field is skipped when
using the TAB key.
It is possible to connect a Net Mass Calculation Factor to a PSI Goods Code (see
Chapter 9.3 - PSI Info / PSI Goods codes). If this is the case, the Net Mass is
automatically calculated when the number of Supplementary Units is entered.
If the User entered a PSI Goods Code, but changes the CN8 Code, the PSI
Goods Code field is cleared.
9-Jan-15
-47-
IDNet15manE.doc
IDEP for Windows
IDEP User Manual
The Net Mass is not automatically calculated when the Supplementary Units are
entered because the Net Mass Calculation Factor is linked to the PSI Goods
Code that has been cleared.
Access to CN8.
If the User does not wish to work with PSI Goods Codes, he can find the correct CN8 Goods
Code by the F2 Key on the field CN8 Goods Codeor by clicking on the
corresponding texts are not installed yet, Idep proposes to do it.
button. If the
The User now has access to all the CN8 search facilities, see the CN8 User manual for details
about using the CN8 program.
The User can return the highlighted CN8 Code to the return line data entry screen in IDEP by
pressing <ALT+S> or the “Return this code to IDEP” Button
or by double-clicking on the
selected code. The system will ask if the User wants to return the selected value to IDEP or not.
Special cases are CN8 Codes 99450000 (repairs), 99500000 (small transactions), 99600000
(discounts and credit notes) and 99700000 (debit notes). After the User has entered the those
CN8 codes, only the applicable fields are presented on the screen.
The value “6” for Nature of Transaction is automatically filled in when CN8 Code 99450000 is
entered, and also CN8 Code 99450000 is automatically filled in when Nature of Transaction “6”
is entered. When the user selects the field Invoice Value (while CN8 Code 99450000 is selected)
a warning will be shown “Specify cost of repairing service only, not the value of the goods”.
More information about these special codes is available in the Intrastat manual.
9-Jan-15
-48-
IDNet15manE.doc
IDEP for Windows
IDEP User Manual
Changed CN8-codes: Idep will check changed CN8-codes. If you use a code that is no longer
valid, Idep will replace it by the new correct code or will propose a selection list with possible
codes. (click on
to display the options).
Net Mass.
The User can add a maximum of 3 decimals to obtain a better precision.
CN8 Codes that have a Supplementary Unit Qualifier require no Net Mass. If the User has
entered one of these codes in the CN8 Code field, the text “Net Mass” on the screen changes into
“Optional Net Mass” and it is no longer required to enter a value in the Net Mass field.
Net Mass Calculation Factors.
The User can define a list of Net Mass Calculation Factors in order to calculate the Net Mass (in
Kg) from the value for the number of Supplementary Units (see Chapter 9.1 - PSI info / Net
Mass Calculation Factors).
The User can call the list of Net Mass Calculation Factors by pressing F2 on the field Net Mass.
If a Net Mass Calculation Factor is attached to a PSI Goods Code that is entered in the line, the
Factor is automatically applied when the number of Supplementary Units is entered.
Supplementary Units.
The field Supplementary Units has a prompt (F2) function and a button. This allows the User
to select a Net Mass Calculation Factor (corresponding to the Supplementary Unit
Qualifier of the CN8 Code). Once the User has entered the Net Mass, the number of
Supplementary Units will be calculated after selection of the Net Mass Calculation Factor:
Net Mass / Net Mass Calculation Factor. The number will be rounded. The calculation is
executed once.
9-Jan-15
-49-
IDNet15manE.doc
IDEP for Windows
IDEP User Manual
Exchange Rates.
The User can define a list of Exchange Rates in order to calculate values in euro from the value in
foreign currency (see Chapter 5.1 - System / Exchange rates). This applies to the Invoice Value.
The User selects the applicable Currency Code in the corresponding field; when hovering the
Mouse pointer over this field, he will see a ToolTip text showing the full description of the
Currency. The Invoice Value in Foreign Currency can be entered with two decimals to
obtain a better precision.
National Region.
If a default value for the National Region has been entered in the PSI Parameters screen (see
Section 7.1.1 – Create / Modify PSI) then the field will be pre-set with that value.
8.2.3.4 Data Entry through Models.
Most of the time a PSI has a number of fixed Trading Partners. The transactions for these
Partners will often be very similar with the exception of values and quantities.
In order to avoid entering the same data over and over again, the User can define a number of
Line Models that already contain the field values which are always the same (e.g. Partner
Country, CN8 Goods Code,...). See Chapter 9.2 - PSI Info / Line models.
The following procedure describes the use of the PSI Models (see also Chapter 9.2.2).
STEP 1:
When adding a return line from the Return Overview list, press the F9 Key, or click
on the “Model” Button . The list of Models defined for the given Flow of the
current PSI is now shown.
9-Jan-15
-50-
IDNet15manE.doc
IDEP for Windows
IDEP User Manual
STEP 2 :
Select the Model to be used for the data entry of the return line and press Enter or
click OK. All values of the Model will be automatically entered in the return line
fields. The cursor will be positioned on the first entry field of the return line screen.
8.2.3.5 Copy Lines from another Return.
This Chapter explains the use of the facility to copy lines from one return to another return.
On the Return Overview screen, the return to copy lines into, is selected. Then the “Copy Lines”
function is started via “Actions / Copy”, by clicking on the “Copy” Button
or by the SHIFT+F6
Keys.
On the Copy screen, a selection of the declarations to copy from can be made using the F2 Key.
For the selected return, the User can specify the range of return lines he wants to copy into the new
return. By default all the lines are copied.
NOTE 1: Return lines can be copied from any return (a Flow other than the current return),
which could mean that too much or too little information is copied, or codes with validity
dates are outside the current range. Therefore a validation process is carried out.
Redundant information is blanked out. Missing or in-correct information marks the return
line as in-correct.
Note that lines can also be copied from one area of the same return to another area.
NOTE 2: Lines for a replace return (see Chapter 8.2.5) are automatically copied from the original
return on creation of the Header. The numeric entry fields are always copied (Invoice
Value, Net Mass,...).
The reason is as follows. The replace return should replace the return from which the
lines are copied. Almost all information should be identical.
9-Jan-15
-51-
IDNet15manE.doc
IDEP for Windows
IDEP User Manual
8.2.3.6 Usage of the Import Function.
The Return Lines can be imported for a given return from a file outside IDEP.
The import format (specifying the physical format and logical file layout) has to be defined before
this function can be used (see Chapter 6 - Import).
All lines in an import file have to be related to the same return (i.e. same Statistical Period and
Flow).
The following procedure describes the use of the import function:
STEP 1:
Call the “Import” function for the selected return via “Actions / Import”, by
clicking on the “Import” Button
or by the F9 Key in the Modify Return
Overview screen or in the ”Import” menu through "Import in current Declaration"
or "Import in new Declaration".
Select the correct Import format in the list of all defined Import Formats for the
import of return lines.
STEP 2:
Select the name of the Import file. The name may refer to a WEB location (a WEBfile): the name of the web file must start with HTTP//domain/ or FTP://domain/ (thus
HTTPS:// is not supported). As soon as the minimal required part of a web file name
(URL) is entered in the pathname field (e.g. HTTP://domain/somefile.txt) the field
will be marked as correct (IDEP will not check if the file actually exists). It will not
be possible to browse for such a file using the file selection dialog that is normally
used, therefore the following “Specify Path” dialog is skipped.
9-Jan-15
-52-
IDNet15manE.doc
IDEP for Windows
IDEP User Manual
In the box “Files of Type”, a selection can be made between the default type for the
selected format, or all files. This can be useful if the file doesn’t have the default
extension.
STEP 3:
For a “normal” file, the following procedure applies (for a WEB-based file, see
below):
When the path and name of the import file have been selected, the import
selection screen re-appears. If the import format type requires an External
Name, i.e. the name of the database table in Access or the Tab name in Excel
format (see Section 6.2.1 – Import Format), an additional field is presented in
which this Name can be entered. The name is pre-set if it was already defined in
the import format or if there is only one table or Tab name found in the given
import file.
9-Jan-15
-53-
IDNet15manE.doc
IDEP for Windows
IDEP User Manual
This STEP is different in case a WEB-based file has been selected. For a WEBbased file, the following procedure applies:
Once the URL has been entered in the file name field, it will not yet be possible
to present a list of tables (or sheet names) as the file must be downloaded first to
be able to present this list.
If, in the import dialog, an URL has been typed as file name to import, the
browse button
will change into the button
.
To download the file, simply press this button. If the file could not be
downloaded the URL will be shown in red and a message will be displayed.
As long as the browse button has not been pressed with success, the OK button
will remain disabled.
If the file is ready to be downloaded (into a temporary file),,the file name field
will be shown in green. Furthermore, if more information is required to start the
import, the appropriate fields will be enabled. See above for the selection of the
external name for a “normal” file.
STEP 4:
The import process starts after clicking the OK Button. When the data from the
import file are imported into IDEP, every field is validated. When the import
process has finished, the import log file can be consulted in “Import / View ImportLog” to see if any error occurred.
NOTE: For the fields Invoice Value and Net Mass, automatic calculation can take
place during import, provided that the data is available in the import file to perform
these calculations. Details are given in Chapter 6.2.1 - Import / Format.
If a default value for the National Region has been entered in the PSI Parameters
screen (see Section 7.1.1 – Create / Modify PSI) and National Region is empty in
the import file, then the field will automatically be filled with that value.
If values in the User's import file are provided with decimals and the decimal
separator symbol in the import file is equal to the Digit grouping symbol defined in
Windows' Regional Settings, the import results will be wrong.
9-Jan-15
-54-
IDNet15manE.doc
IDEP for Windows
IDEP User Manual
For instance: the import file uses the comma ',' as a decimal symbol, and in
Windows the comma ',' has been defined as Digit grouping symbol. A value of
123,45 will result after import in a value that is 100 times higher, i.e. 12345.
The IDEP import process will detect this problem and mark imported lines in this
case as Incorrect. However, when these lines are consulted, they will look correct only some values will be 100 times too high. The import log file needs to be
consulted in "System / View Import-Log" to see exactly which errors occurred.
The Quality Check on maximum and minimum values connected to the CN8
Codes is also carried out during import. If a line contains values outside the
limits, the line is marked incorrect. The reason will be shown if the PSI opens
and closes the erroneous line. See Section 8.2.3.2. for more details on this
check.
When a CN8 Code is imported all spaces are removed from this code. This is
done because in some cases the CN8 Codes used in import files contain spaces
that separate the different CN8 levels.
This behaviour does not apply to the SDF import format.
8.2.4 Multi-PSI Import
In addition to importing the lines for one declaration at a time, IDEP/CN8 offers also the
possibility to import the information of multiple PSI's for multiple Statistical Periods and
both Flows in one session. This Multi-PSI Import facility is described in full in Section 6.2 –
Multi-PSI Import.
8.2.5 Modify, Delete or Consult Return Information.
Modifying, Deleting or Consulting a return can be related to the header data (the PSI Returns list),
or to the list of return lines (the Return Overview). A return can only be modified or deleted if it
has not yet been approved. Consultation of the return is always possible.
Select the “PSI Returns list” under the Menu option "Return / Edit" or by clicking the “Edit
Returns” Button
.
8.2.5.1 The Return Header.
To “Modify Headers”, select the return that has to be modified and use “Actions / Modify
Header”or click the Modify Header button
.
Note, that only the Flow and Statistical Period can be modified. In all other cases, a new Return
Header has to be created; the line data may be copied from the original return using the “Copy”
function (see Chapter 8.2.3.5).
To “Delete Headers” select the return that has to be deleted and use “Actions / Delete”, or click
the “Delete” Button or the F7 Key.
9-Jan-15
-55-
IDNet15manE.doc
IDEP for Windows
IDEP User Manual
It is possible to select a range of returns to be deleted, which could be a mix of ‘delete-able’ and
‘non-delete-able’ (already Approved) returns.
To “Consult Headers” select the return that has to be consulted and use “Actions / Header” or
click the “Header” Button
or the F11 Key.
8.2.5.2 Return Lines.
To “Modify Return Lines”, or “Delete Return Lines”, double click on the return that has to be
modified. Instead of double clicking, “Actions / Modify” or the Button “Modify” or the F5 Key can
be used after selecting a return from the list.
The “Return Overview” is now presented in modify mode for that return.
To “Modify Return Lines”, double click on the return line that has to be modified. The
Detailed Return Line screen is presented in modify mode for that line. Instead of double
clicking, the Button “Modify” , the F5 Key or “Actions / Modify” can be used after
selecting a return line from the list. The Buttons “Next” and “Previous” can be used to
select other lines in modify mode, without having to leave the screen. Clicking on the left
or right part of these Buttons will jump to the top respectively the end of the list.
To “Delete Return Lines”, the Button “Delete”
used after selecting a return line from the list.
, the F7 Key or “Actions / Delete” can be
To “Consult Return Lines, “Actions / Consult”, the Button “Consult”
used after selecting a return from the list.
The “Return Overview” is now presented in consult mode for that return.
or the F6 Key can be
To “Consult Return Lines”, double click on the return line that has to be consulted. The
Detailed Return Line screen is presented in consult mode for that line. Instead of double
clicking, the Button “Consult”
or the F6 Key or “Actions / Consult” can be used after
selecting a return line from the list. The Buttons “Next” and “Previous” can be used to
select other lines in consult mode, without having to leave the screen. Clicking on the left
or right part of these Buttons will jump to the top respectively the end of the list.
8.2.5.3 Totals by Reference Overview.
When a return is selected on the Return Overview (either in Modify or Consult mode), via the
SHIFT+F7 Key, the “Totals by Reference” Button
or “Actions / Totals by Reference”, an
overview is presented of the total values of the selected return, accumulated by Declarant
Reference Number. This overview enables an easy comparison between the INTRASTAT data
entered and the PSI’s financial administrative data.
This function is only available for detailed return lines, not for aggregated lines.
9-Jan-15
-56-
IDNet15manE.doc
IDEP for Windows
IDEP User Manual
A sorted presentation on Reference Number can also be made in the detailed return lines
overview, by clicking on the column header of the Reference Number column.
Please note that the sorting is in alphabetical order rather than numerical order. This means that
purely numerical Reference Numbers may not be correctly sorted (1, 2... 10, 11 will be
ordered 1, 10, 11... 2, 21 ...).
8.2.5.4 Error Overviews.
It is possible that lines containing incorrect values, are imported, or that lines in which data are
missing, are saved. If a return line contains an error, it is marked as incorrect. The User can
recognise the erroneous lines by the flag Correct (Y/N) in the Return Overview (for each line in a
declaration) or the List of Returns (for the whole declaration).
A list of erroneous returns is presented on the “Return / Overview Declarations” screen after
selection of the heck box "Not valid" (see Chapter 8.6 – Overview Declarations).
A list of erroneous lines is presented when an erroneous return is selected in the PSI Returns list,
“Modify” or “Consult” is chosen (see above) and the “Error list” option is selected via “Actions /
Errlist” or the “Erroneous Lines” Button or the F8 Key.
9-Jan-15
-57-
IDNet15manE.doc
IDEP for Windows
IDEP User Manual
Closing this list via the Close Button, Cross Button, Cancel key or “System / Exit”
(CONTROL+F4) will return the list to its “normal” state, i.e. showing all lines.
Correct the lines one by one, in the same way lines without errors would be modified. Once the
line is corrected, it will disappear from the list of erroneous lines. Once all erroneous lines have
been corrected, the return will become correct. The Buttons “Next” and “Previous” can be used to
select other erroneous lines in modify mode, without having to leave the screen. Clicking on the
left or right part of these Buttons will jump to the top respectively the end of the list.
8.2.6 Save Return Line as a Line Model.
The function “Save As Line Model” is started via “Actions / Save As Line Model”, by clicking
the “Save As Line Model” Button
or by the F12 Key. The function is only available in the
Detailed Return Line Screen.
This function will create a model for the Flow of the current Return and save all data entered
so far in the Return Line.
It will prompt for the name of the model, this prompt can be cancelled. If an existing name is
entered or selected from the available picklist, it will update the fields of that line model after
confirmation by the user.
8.2.7 Replace Returns.
After a return has been sent as INTRASTAT output (see Chapter 8.4), some information may
appear to be in-correct or in-complete. Errors can be corrected by sending another return with a
reference to the original one, in which the corrections are included.
A Replace Return is a return with a reference to a previous return which has already been sent to
the CNA and which should be substituted with the new return.
The type of return is entered in the field Type of Return in the return header.
9-Jan-15
-58-
IDNet15manE.doc
IDEP for Windows
IDEP User Manual
A list of possible “candidate returns” is provided for the Reference Number field, in order to
easily select the correct reference return.
The reference to the previous return has to be an existing return for the given PSI, with the status
"Sent = Yes".
When the Reference Number is entered, the Flow and Statistical Period in the current header are
copied from the referenced return. They cannot be modified anymore.
Once the return has been created, it is not possible to modify the Reference Number anymore for
a Replace return, if the number of items is greater than 0.
Returns with a status of Archived cannot be used as reference to the previous return for Replace
Returns, because the line data is not available anymore.
When a Replace Return is created, all the return lines are automatically copied from the original
referenced return.
For a Replace Return, the validation rules on line level are the same as for a new return.
remark: if you created and sent a standard while it had to be an extended declaration, this can be
corrected as follows. In this screen you have to change the treshold category to extended
declaration. Then you create a new declaration for the same period (see chapter 8.2.2) with type of
return "5, replacement of a previous return". Now it is possible to add the missing data and to
resend the declaration.
9-Jan-15
-59-
IDNet15manE.doc
IDEP for Windows
IDEP User Manual
8.3 Draft Output Returns.
The “Draft Output Returns” function is selected by “Return / Draft Output” or by clicking the
“Draft Output” Button .
The draft output functions allow the User to extract a range of returns for a given PSI either on
paper or on disk. Note that this kind of output is only for internal use. It should not be sent to the
CNA ! Draft output includes detailed return lines or aggregated return lines, when the User checks
the appropriate box. Aggregated information is only available for Approved returns.
It is also possible to invoke “Draft Output Returns” directly from within the Header list by the
“Alt + F11” key or “Actions / Draft Output”. In that case, the range of return numbers (From
Number – To Number) is initialised with the return number range of a selection made in the
Header list (or the current return number if there is only one return selected).
8.3.1 Draft Output Format.
This option is fully described in Chapter 6.2.2. It allows the definition by the PSI of the type of
output, for instance Text, Access or Excel, and the fields to be included in the output. Multiple
formats can be defined, which can be selected at the creation of draft output.
9-Jan-15
-60-
IDNet15manE.doc
IDEP for Windows
IDEP User Manual
8.3.2 Draft Output / Print.
This option provides draft output in printed form. The program automatically inserts line breaks if
the fields defined in the format don’t fit on the same line.
All defined Draft Formats can be applied, only the Draft Order is used for the layout.
The User can choose if he wants the information to be printed in portrait or landscape format.
8.3.3 Draft Output / Disk.
This option provides draft output on hard disk.
All defined Draft Formats can be applied.
The User has to specify the filename and path.
Except for Excel and Access Draft Formats, always two files are created, one file for the selected
headers (prefix “H_”) and another file for the return lines corresponding to the selected headers
(prefix “L_”). The prefixes are automatically assigned.
For Excel one spreadsheet is created with TABs Headerlist and Linelist, for Access one database
is created with Tables Headerlist and Linelist.
Note, that if the User selects the Draft Format “HTML”, it is only possible to create draft output
for one declaration.
8.4 INTRASTAT Output Returns.
These functions allows the User to create the official declaration for the CNA.
The medium the User is allowed to use to send the official output (OneGate in Belgium) is
determined by the CNA. The User can restrict the allowed official output to the default type used
by his company in the “System \ Administrative Parameters” screen.
INTRASTAT output can be processed for the current PSI, or in the case of a Third Declarant for
all PSI's at once.
The process of generating INTRASTAT output consists of two steps.
1. Approval of the returns ready for INTRASTAT output.
2. Generation of the INTRASTAT output.
8.4.1 Return Approval / Disapproval.
To create the official output the User must first approve the declaration(s) concerned.
In the list of “PSI Returns”, the declaration to be approved must be selected.
It is possible to select a range of declarations to be approved, which could be a mix of
‘approvable’ and ‘non-approvable’ declarations.
You have the possibility to invoke the “Approve All” function which approves all eligible
declarations for all PSIs.
9-Jan-15
-61-
IDNet15manE.doc
IDEP for Windows
IDEP User Manual
The function “Approve” is executed via “Actions / Approve”, by clicking the “Approve” button
or by the F8 key.
The function “Approve All” is executed via “Actions / Approve All” (available when PSI
Returns overview is selected), via “Parties / Approve All” (always available) or by clicking the
"Approve all" button .
If a range of returns is being approved, a confirmation message will be issued for each return being
processed.
In the list of “PSI returns” the flag “Return Approved” is now set to Yes for the return(s)
concerned.
Note the following points:
A return can only be approved if it does not contain any errors (“Correct” = Yes).
The User can approve more than one return if he wants to include multiple returns in one
intrastat output.
A return can not be modified anymore once it has been approved. If however the User still
wants to modify information for that return, he has to use the function “Disapprove” which is
executed via “Actions / Disapprove, by clicking the “Disapprove” button
or with the key
combination Alt + F8. It is possible to select a range of declarations to be disapproved, which
could be a mix of ‘disapprovable’ and ‘non-disapprovable’ declarations.
9-Jan-15
-62-
IDNet15manE.doc
IDEP for Windows
IDEP User Manual
8.4.2 Aggregated Data.
Return lines will be available in both detailed (as entered by the User) and aggregated form once
the return is approved.
This means that the numeric values of return lines with the same code values, such as CN8 Code,
Partner Country, etc. are accumulated into one aggregated line (e.g. a return of 100 return lines
can be reduced to an aggregated return with 30 return lines).
After Approval and aggregation, the User can choose to either consult the aggregated information
or the detailed information.
To “Consult Return Lines”, choose “Actions / Consult” or click the “Consult” button
or the
F6 Key after haing selected a return from the list. The User will be asked if he wants to consult
Aggregated or Detailed Return Lines.
The “Return Overview” is now presented in consult mode for the aggregated or detailed lines of
that return.
To “Consult Return Lines”, double click on the return line that has to be consulted. The
detailed or aggregated return line screen is presented in consult mode for that line. Instead
of double clicking, the Button “Consult”
or the F6 Key or “Actions / Consult” can be
used after selecting a return line from the list.
In the example, that shows the “Consult Detailed Return” option, it can be seen that 6 return lines
have originally been entered.
9-Jan-15
-63-
IDNet15manE.doc
IDEP for Windows
IDEP User Manual
If the User chooses to view “Consult Aggregated Info”, the following example shows that the 6
detailed return lines have been aggregated into 3 aggregated lines.
When the User consults an aggregated return line, he will see that only the fields which are sent to
the CNA have values (not the fields that are optional).
Press Escape, or click on Close, to return to the list of aggregated lines.
9-Jan-15
-64-
IDNet15manE.doc
IDEP for Windows
IDEP User Manual
Special remarks on aggregation:
When aggregation is carried out, the aggregated Net Mass values are rounded to integers
(scientific rounding: 0.5 becomes 1, 0.4 becomes 0).
If a return is being disapproved, the aggregated information for that return is deleted.
8.4.3 Generate INTRASTAT Output.
The “Generate INTRASTAT Output” function is selected by “Return / INTRASTAT Output”
or by clicking the “INTRASTAT Output” Button
.
It is also possible to invoke “Generate INTRASTAT Output” directly from within the Header
list by the “Alt + F10” key or “Actions / INTRASTAT Output Returns”. In that case, the range
of return numbers (From Number – To Number) is initialised with the return number range of a
selection made in the Header list (or the current return number if there is only one return
selected).
The official output will process all approved returns within the selected range. Processed
declarations will be locked and can not be modified anymore.
The selected output will become the default.
If “Generate INTRASTAT Output” is invoked from within the Header list, two option buttons
on the right hand side of the dialog appear (see picture below). These buttons are “All List
Entries” and “Select Returns”.
Clicking on “Select Returns” will take the current header selection from the Header list to fill
in the range fields “From Number” “To Number”. Clicking “All List Entries” will fill in the
range from the first till the last approved declaration that is not sent.
“From Number” “To Number” allows to manually select a range of Returns. Clicking on the
arrow buttons will present a list of approved declarations (ready to be sent).
9-Jan-15
-65-
IDNet15manE.doc
IDEP for Windows
IDEP User Manual
8.4.3.1 OneGate.
When using the “Intrastat output” option, an XML file will be created that will be put in the
directory the User has defined in “Administrative parameters” (see Chapter 5.2).
The unique filename is composed of the PSI identification or the TPD identification, combined
with the interchange number.
Once the file is created, depending on the User’s choice, it will either be uploaded maually or
automatically:
If you prefer to upload “Manually to OneGate”, a message will be displayed showing the name
and
the
location
of
the
XML
file
to
be
uploaded.
In the following screen, you can click "Connect to OneGate" in order to open the Windows
explorer map in which the output file has been saved and the OneGate login page.
9-Jan-15
-66-
IDNet15manE.doc
IDEP for Windows
IDEP User Manual
You can login to OneGate with a user name and password or with an electronic certifcate.
The “Upload” tab allows you to upload the XML file prepared by Idep.
You can consult the status of the upload under “Exchanges / File exchange log”.
More information is available on www.onegate.be under “Documentation”.
9-Jan-15
-67-
IDNet15manE.doc
IDEP for Windows
IDEP User Manual
The second option is to upload “Automatically to OneGate”. In this case Idep logs in to OneGate
and uploads your return(s) automatically if you have entered the OneGate user name and password
under
“Parties/PSI’s”
(see
also
7.1
PSI’s).
After the upload of the INTRASTAT declaration, an overview of the Returns just Sent is
automatically presented on the screen. To leave this overview, click the Close button or use the
Esc key. With the received ticket number, you can now verify the status of the uploaded
declarations in Onegate under “Exchanges / File exchange log”.
If for some reason (e.g. telecommunication problems) the User has lost the information to be sent
to the CNA, he can use the “Unlock” function via “Actions / Unlock”, the “Unlock” Button
or
the F9 Key to resend the declaration. Then he will have to start the official output process again.
It is possible to select a range of declarations to be “Unlocked”, which could be a mix of
‘Unlockable’ and ‘non-Unlockable’ declarations.
8.4.4 INTRASTAT Output / All PSI's (Third Declarants only).
The “INTRASTAT Output / All PSI’s” function is selected by “Return / INTRASTAT Output”
or by clicking the “INTRASTAT Output” Button
and then selecting the Radio Button All
PSI’s, if the system is set up for a Third Declarant (see Chapter 7.1 - Parties / Third Party
Declarant). The Third Declarant can choose between All PSI’s and Current PSI.
9-Jan-15
-68-
IDNet15manE.doc
IDEP for Windows
IDEP User Manual
However, if the “INTRASTAT output” is invoked directly from the Header list the “Select
Returns” option is the default and the range is pre-set with the selection in the Header list.
The process of generating INTRASTAT Output for All PSI’s is identical to that for One PSI.
However, no range of Returns can be entered, as this range would be different for each PSI.
Third Declarants can approve one or more declarations for one or more PSI's. All approved
declarations for all PSI's will be automatically processed in the official output.
For a Third Declarant, the “Overview Declarations” screen (see Chapter 8.6 – Overview
Declarations) allows the presentation of all declarations for all PSI’s that are “Approved”.
After the transfer of the declaration to OneGate, the overview “Returns just sent” presents all
declarations sent for all PSI’s. With the indicated ticket numbers you can follow the registration
procedure in OneGate.
9-Jan-15
-69-
IDNet15manE.doc
IDEP for Windows
IDEP User Manual
8.5 Output Log.
The “Output Log” function is selected by “Return / Output Log”.
A log of all official output is kept. The User can consult this log under the Menu option “Return /
Output Log”.
The ‘Message text’ column merely shows if you have prepared the declarations in order to
upload them “Manually to OneGate” or if you have uploaded them “Automatically to
OneGate”.
“Manually to OneGate” means that you have to login to OneGate and upload the XML file
yourself.
The success or failure of this particular output is indicated in the ‘Correct’ column.
The ‘Output’ column shows the file name and location
The column ‘Path’ contains the path information.
After having selected an interchange, by “Actions / Consult”, by clicking the Button “Consult”
or the F6 Key or by double Clicking on the interchange, the User will see a list of the messages in
the interchange. One message corresponds to one return, for a given PSI. The most essential data
of the selected return is presented in the lower window. This information corresponds to that
shown in the “Returns Just Sent” overview that is shown immediately after performing the
Official Output.
9-Jan-15
-70-
IDNet15manE.doc
IDEP for Windows
IDEP User Manual
8.6
Overview Declarations.
The “Overview Declarations” function is selected by “Return / Overview Declarations” or by
clicking the “Return Overview” Button
.
The check boxes allow the application of selection criteria for the presentation of the list. By
clicking on combinations of check boxes, the presentation criteria are narrowed.
For Third Declarants, the overview presents the declarations of all PSI’s, if chosen.
9-Jan-15
-71-
IDNet15manE.doc
IDEP for Windows
IDEP User Manual
8.7 Reports.
Four kinds of reports can be obtained via "Return / Report". All of these reports provide
information about the total invoice value for a PSI, over a certain period.
When generating a report, returns that are referenced in a replace return are skipped.
A report can be “previewed” on the screen. If you wish to make a hardcopy on paper, click on the
“Print” Button
.
The four report types are the following.
1. Report by Partner Country.
This option will give you a report for the selected Partner Country per Goods Code of a given
PSI, showing all totals for the specified flow, over the specified time interval.
2. Report by Goods Code.
This option will give you a report for the selected Goods Code per Partner Country of a given PSI,
showing all totals for the specified flow, over the specified time interval.
3. Report by Declarant Ref. Nr
This option will give you a report by Declarant Ref. Nr of a given PSI, showing all totals for the
specified flow, over the specified time interval.
4. Report of Totals for a PSI.
This report presents for the selected PSI, over the specified time interval and Return Flow, the
Total Invoice Value for each Statistical Period within the time interval.
9-Jan-15
-72-
IDNet15manE.doc
IDEP for Windows
IDEP User Manual
8.8 End.
This option closes the program and returns to the Login (splash) screen, where the User can select
another option or program, or choose to leave the package.
9-Jan-15
-73-
IDNet15manE.doc
IDEP for Windows
IDEP User Manual
9 PSI INFO.
The Menu PSI Info is related to functions which are used for the maintenance of data which are
PSI specific (i.e. data that for every PSI, defined in the system, has his own set).
Every PSI can have his own set of functionality as follows.
Net Mass Calculation Factors: for calculation of the Net Mass.
Line Models: for quick manual data entry.
Good Codes: internal codes can be used instead of the official CN8 Codes.
A Search field is provided for each of these tables in which the cursor is automatically
positioned.
Information entered for one PSI can be copied to another PSI at the time of creation, or
afterwards using the option:
PSI Info / Copy PSI Information.
9.1 Net Mass Calculation Factors.
The “Net Mass Calculation Factors” function is selected by “PSI Info / Net Mass Calculation
Factors” or by clicking the “Net Mass Calculation Factors” Button .
Net Mass Calculation Factors are used to:
Calculate the Net Mass from the product of the number of Supplementary Units and the
Factor defined in the Net Mass Calculation Factor selected by the User, when the focus is
on the Net Mass field
Calculate the number of Supplementary Units from the Net Mass by dividing the Net
Mass by the Net Mass Calculation Factor and rounding the result, when the focus is on
the Supplementary Units field.
9.1.1 Specifying Net Mass Calculation Factors.
This function allows the User to define conversion factors in order to calculate the Net Mass
from the value supplied for the Supplementary Units and vice versa.
The function “Add Net Mass Calculation Factors” is started in “PSI Info / Net Mass Calculation
Factors” via “Actions / Add” or by clicking the “Add” button
or by the F4 key.
9-Jan-15
-74-
IDNet15manE.doc
IDEP for Windows
IDEP User Manual
The function “Modify Net Mass Calculation Factors” is started in “PSI Info / Net Mass
Calculation Factors” by double clicking on the specific Net Mass Calculation Factor, via
“Actions / Modify” or by clicking the “Modify” Button or by the F5 key.
The Supplementary Unit Qualifier is selected from the list of qualifiers defined in the
Combined Nomenclature.
Note, that it is possible to enter Net Mass Calculation Factors for the qualifier “-“, which
means: No Supplementary Unit Qualifier. These Factors are applied in a special manner, as
shown in the next section.
9.1.2 Usage of Net Mass Calculation Factors.
The Net Mass Calculation Factors are used to calculate the Net Mass from the
Supplementary Units and vice versa.
The User can call this function by pressing F2 on the field Net Mass after entering the number
of Supplementary Units, for calculation of the Net Mass, or on the field Supplementary
Units after entering the Net Mass, for calculation of the number of Supplementary Units.
This can be done:
On the return line data entry screen.
On the return line Model data entry screen.
9-Jan-15
-75-
IDNet15manE.doc
IDEP for Windows
IDEP User Manual
The list of Net Mass Calculation Factors that is shown, depends on the Supplementary Unit
Qualifier of the CN8 Goods Code that is entered. Only the Factors with the corresponding
Qualifier are shown.
Example of the calculation of the Net Mass in the return line data entry screen.
Pressing F2 on the Net Mass field, presents a Factor selection list containing only the entries
that have “p/st “ as a Supplementary Unit Qualifier.
The Net Mass on the “Return line” and the “Line Model” data entry screen is then calculated
as follows.
Net Mass = Supplementary Units * <Calculation Factor selected from the table>.
9-Jan-15
-76-
IDNet15manE.doc
IDEP for Windows
IDEP User Manual
When no Supplementary Unit Qualifier is attached to the CN8 Code entered, then the
Supplementary Units cannot be entered in the Return line or Line Model. When a Net Mass
Calculation Factor defined for the “-“ Qualifier is applied on the field Net Mass, no
multiplication is done but the Factor is copied into the Net Mass field (as if the number of
Supplementary Units was 1).
Note:
A Net Mass Calculation Factor can be connected to a PSI Goods Code. This allows IDEP to
calculate the Net Mass automatically when the number of Supplementary Units is entered and a
PSI Goods Code is used in a Return Line or a Line Model, that specifies a Net Mass Calculation
Factor. This automatic calculation is also done during Return Line import. See section 9.3 for the
definition of PSI Goods Codes.
To calculate the number of Supplementary Units from the Net Mass, the same procedure as
described above is followed with the focus on the Supplementary Units field. The calculation
done is:
Supplementary Units = Rounded value of (Net Mass / <Calculation Factor selected
from the table>).
9.2 Line Models.
The “Line Models” function is selected by “PSI Info / Line Models” or by clicking the “Line
Models” Button .
Most of the time a PSI has a number of fixed Trading Partners. The transactions for these
Trading Partners will very often be similar except for values and quantities.
In order to avoid entering the same data over and over again, field by field, for every return line,
the User can define a number of Models that already contain the field values which are always the
same (e.g. Partner Country, CN8 Goods Code,...).
9.2.1
Specifying Line Models.
The function “Add Line Models” is started in “PSI Info / Line Models” via “Actions / Add” or by
clicking the “Add” button or the F4 key.
9-Jan-15
-77-
IDNet15manE.doc
IDEP for Windows
IDEP User Manual
The function “Modify Line Models” is started in “PSI Info / Line Models” by double clicking on
the Line Model or via “Actions / Modify” or by clicking the “Modify” Button or the F5 key.
Line Models are created for a specific Flow: Arrival or Dispatch.
When entering data in a Model, the same utilities are available as for return lines (see Chapter
8.2.3.3). There are however, three extra fields on the Model data entry screen.
Model Name, to uniquely identify the Model.
Flow (Arrival or Dispatch)
Model Description.
If the User has a long list of Models, the search facility can be useful if the Model Name he
wishes to access is known. Just type the first letters of the name of the Model and the cursor will
jump automatically to that Model.
Another way to define Line Models is in the Line Details screen through the “Save As Line
Model” function, described in Section 8.2.6 – Save Return as a Line Model.
This function will create a model for the Flow of the current Return and save all data entered
so far in the Return Line.
It will prompt for the name of the model, this prompt can be cancelled. If an existing name is
entered or selected from the available picklist, it will update the fields of that line model after
confirmation by the user.
9-Jan-15
-78-
IDNet15manE.doc
IDEP for Windows
IDEP User Manual
9.2.2 Usage of Line Models.
When adding a return line, the User can select a Model via “Actions / Model” or by clicking the
“Line Model” Button .
The values of the Model will be automatically entered in the return line fields when the User
clicks on OK after selecting the Model he wishes to apply from the list.
The procedure for the usage of line Models when adding a return line is described in
detail in Chapter 8.2.3.4.
9.3 PSI Goods Codes.
The “PSI Goods Codes” function is selected by “PSI Info / PSI Goods Codes” or by clicking
the “PSI Goods Codes” Button
.
The PSI can use his own PSI Goods Code list instead of the official CN8 Goods Code list. The
Goods Codes facility connects this PSI defined Goods Code to the official CN8 Goods Code.
If the User has a long list of PSI Goods Codes, the search facility can be useful if he knows the
PSI Goods Code he wishes to access. Just type the first letters of the PSI Goods Code and the
first PSI Goods Code of which the identification starts with these characters will be selected.
9-Jan-15
-79-
IDNet15manE.doc
IDEP for Windows
IDEP User Manual
9.3.1 Specifying PSI Goods Codes.
The function “Add PSI Goods Codes” is started in “PSI Info / PSI Goods Codes” via “Actions /
Add” or by clicking the “Add” button
or the F4 key.
The function “Modify PSI Goods Codes” is started in “PSI Info / PSI Goods Codes” by double
clicking on the Goods Code or via “Actions / Modify” or by clicking the “Modify” Button or the
F5 key.
The Goods Description is automatically copied from the CN8 Self-Explanatory Texts when the
CN8 Goods Code is entered if the field Return Goods Description on this screen is also set to
Yes.
The PSI Goods Code list can be imported from outside IDEP. The “Import PSI Goods Codes”
function is called from the PSI Goods Codes screen via “Actions / Import” or by clicking the
“Import” Button
or the F9 key.
Read Chapter 6.2.1. for guidelines on how to define the import format.
In the import format, it is possible to define the Net Mass Calculation Factor. If a name is given
in the import file, it must exist in the corresponding Table.
The PSI Goods Code list can also be exported to a file. The “Export PSI Goods Codes”
function is called from the Goods Codes screen via “Actions / Export” or by clicking the
“Export” Button
or the Control+F9 key.
Possible output formats are Access, Excel, Text, XML and HTML.
The whole list is exported, the Field Order is fixed.
9-Jan-15
-80-
IDNet15manE.doc
IDEP for Windows
IDEP User Manual
After entry of the CN8 Code, the Supplementary Unit Qualifier is presented including a field for
the selection of a Net Mass Calculation Factor.
Only the Net Mass Calculation Factors with the same Supplementary Unit Qualifier as the
CN8 Code are displayed on the list. The Factor specified, will automatically be applied to the
Return line or Line Model when the particular PSI Goods Code is selected to calculate the Net
Mass.
Clicking the column header “Correct” sorts on validity, showing all the correct PSI Goods
Codes first and the incorrect ones at the end.
9.3.2 Usage of PSI Goods Codes.
The “PSI Goods Codes” function is used during data entry in the following functions.
On the Return line and Line Model data entry screen, on the field PSI Goods Code using F2.
When importing return lines. A PSI Goods Code which is imported is validated against the list
of PSI Goods Codes. The data (CN8 Code, Goods Description, Net Mass Calculation
Factor) is taken from the first valid PSI Goods Code in the list.
9-Jan-15
-81-
IDNet15manE.doc
IDEP for Windows
IDEP User Manual
For instance, on the return line data entry screen:
The CN8 Code and its associated data will be automatically entered after selecting the PSI Goods
Code from the list.
If there is a Net Mass Calculation Factor connected to the selected PSI Goods Code, the Net
Mass is calculated automatically after the Supplementary Units are entered. This is also done
during import of the return data.
Note the concept of validity dates.
CN8 Goods Codes are only valid between a given start year and a given end year.
The validity dates that are associated with a CN8 Goods Code are assigned to the PSI Goods
Code once the CN8 Goods Code has been entered.
If the User logs on to the package for a year different than his previous logon year, then all the PSI
Goods Codes are checked for their validity dates. PSI Goods Codes that are correct (status
Correct = Y), are checked for their validity dates. If the logon date is outside the range of validity
dates, then the PSI Goods Code is marked with an asterisk (*), which means that the code is not
valid for that logon period.
9-Jan-15
-82-
IDNet15manE.doc
IDEP for Windows
IDEP User Manual
9.3.3 Checking validity of Goods Codes.
Only Valid PSI Goods Codes are presented on the F2 Key and can be selected in the PSI
Goods Codes field in a Return Line. The validity of PSI Goods Codes is checked at start-up of
the package after an upgrade.
In a 2-year package, the validity is set as follows:
CN8 Code doesn’t exist in both years: “Invalid”. The User needs to find another CN8 Code
for this product.
CN8 Code exists in both years: “Valid”.
CN8 Code exists in new year but not in the previous: “Valid”. Note however, that if this
PSI Goods Code is used for a declaration of the previous year, the CN8 Code will be
invalid.
CN8 Code exists in the previous but not in the new year, the User needs to find the correct
CN8 Code for the new year:
In the List of PSI Goods Codes the column “Validate” shows these codes.
In the “Modify PSI Goods Code” screen the indication “Validate” is shown.
Note, that if this PSI Goods Code is used for a declaration of the new year, the CN8 Code
will be invalid.
In a 1-year package only the first two apply.
9.4 Minimum and Maximum Ranges per CN8-code.
The “Minimum and Maximum Ranges” function is selected by “PSI Info / Minimum and
Maximum Ranges”.
The maximum and minimum values connected to CN8 Codes can be added, modified,
consulted, deleted and printed by the User.
They are automatically updated or created when during manual entry of return line data the
user has indicated that certain values are within the accepted limits for his trade operations; see
Section 8.2.3.2 for more details.
9.4.1 Specifying Minimum and Maximum Ranges.
The function “Add Minimum and Maximum Ranges” is started in “PSI Info / Minimum and
Maximum Ranges” via “Actions / Add” or by clicking the “Add” button or the F4 key.
9-Jan-15
-83-
IDNet15manE.doc
IDEP for Windows
IDEP User Manual
The function “Modify Minimum and Maximum Ranges” is started in “PSI Info / Minimum
and Maximum Ranges” by double clicking on the Goods Code or via “Actions / Modify” or by
clicking the “Modify”
Button or the F5 key.
The User can enter here his own figures for the Maximum and Minimum values connected to
the CN8 Code that are used to quality-check each declaration line after it is completed. These
figures overwrite the ones that are provided by the NBB.
9.5 Copy PSI Information.
The “Copy PSI Information” function is selected by “PSI Info / Copy PSI Information”.
This option allows the User to copy the PSI dependent tables from one PSI to the current PSI.
Arrival and dispatch Models table.
PSI Goods Code table.
Net Mass calculation factors table.
When creating a new PSI (see Chapter 7.1.2) the same function is available.
The check box Discard Duplicates allows the User to copy only the information from another
PSI that is not yet available in his own PSI tables. This function is only available when copying
the tables to an existing PSI, as a new PSI still has empty tables and duplicates can not occur.
9-Jan-15
-84-
IDNet15manE.doc
IDEP for Windows
IDEP User Manual
10 SYSTEM MAINTENANCE.
If working in a LAN environment, System Maintenance functions can only be performed when
the databases are exclusively available to one User, or in other words, when there are no other
Users logged on to the system.
The second User who logs on during maintenance by the first User, will receive a message to try
to logon again later.
10.1 Declaration Maintenance.
The “Declaration Maintenance” function is selected by “System Maintenance / Declaration
Maintenance”.
Remark: these functions are not available when archiving is disabled under "System /
Administrative parameters" (see chapter 5.2 Administrative parameters).This Menu option allows
the User to do the maintenance of the return information.
Return maintenance can be done for the current PSI only or in the case of a Third Declarant for all
PSI's at once.
The process of archiving returns is supported through the following features, that are discussed in
the following Chapters.
1. Archive to disk: Move return data to another disk.
2. De-archive: Move archived data back into IDEP.
3. Delete headers: Remove the headers which stay as a reference in IDEP.
10.1.1 Archive To Disk.
The function “Archive to Disk” is started in “System Maintenance / Declaration Maintenance /
Archive to disk”.
When the User wants to make space available on his hard disk, or the returns he has kept in his
system are not required “on-line” anymore, he can Archive the returns which have been sent.
After selecting this function, an overview appears showing the returns that are ready to be
archived.
9-Jan-15
-85-
IDNet15manE.doc
IDEP for Windows
IDEP User Manual
The procedure for archiving returns is as follows:
Select the period or the declarations to be archived. Note that only returns with the status "Sent =
Yes" can be archived. Other returns will be ignored, even if their identification number is within
the selection.
By “Archive to Disk” all declarations as presented are archived or a selection can be made.
Select the drive and path where the archived output should be placed.
IDEP will suggest a new name for the archive (<PSI ID>_DDMMYYYY.MDB). The directory
for archive files must be outside of the Idep_CN8 installation folder. It will be derived from
information stored in the Windows Registry during a previous archival operation - this will
ensure that all archive files will in principle be stored in the same directory. The user is free to
choose another name.
The database name for the Access output database can be entered by the User, the table names for
the three tables involved are assigned by the system. The tables involved are: Detailed Headers,
Detailed Lines, Aggregated Lines. The file layout of these files (field order and length) is the
same as in the IDEP database.
Now IDEP generates the archive database, in the selected path with the specified file name.
If the archive has succeeded the necessary information will be recorded in the ‘Archive’ and
‘Archive Details’ tables (see Section 10.1.2 – De-Archive). If no returns have been archived,
no entry will be made in the Archives table.
It is up to the User to take a backup of the database files.
Note that the header of a return which has been archived, remains in IDEP as a reference. Only
the return lines have been removed from the database. The return now has the status "Archived =
Yes".
9-Jan-15
-86-
IDNet15manE.doc
IDEP for Windows
IDEP User Manual
If more than one PSI has been created, you can archive all sent declarations for all PSI's in
one file.
The features for the archiving process for all PSIs are identical to those of a single PSI. However,
no range of Returns can be entered, as this range would be different for each PSI.
10.1.2 De-archive.
The function “De-archive” is started in “System Maintenance / Declaration Maintenance / Dearchive”.
Returns which have been archived can also be moved back into the IDEP database. This option is
useful in case the User has archived some information and he now wants to restore it in his system.
It is possible to de-archive information from previous releases.
The procedure for de-archiving returns is described in the following steps.
When the function is started, the “Overview of Archives” is presented:
Every Archive that has been made has been recorded in the Archive table, including:
- Date and time of archival;
- Operation (Archive or De-archive);
- Third Declarant ID or current PSI ID;
- User ID;
- Archive file name.
The “Overview of Archives” list offers the following functionality (invoked in the Toolbar, the
“Actions” menu, the “Context” menu or by Function keys):
- Display the “Archive Details” for the currently selected archive entry. This will display
a separate (sortable, read-only) list. The title area of this list will include the file name if
it exists. The “Archive Details” are shown when the User double clicks on an Archive or
has selected an Archive and then clicks the “Consult” button
or via “Actions /
Consult” or by the F6 key.
9-Jan-15
-87-
IDNet15manE.doc
IDEP for Windows
IDEP User Manual
The information presented in this list includes:
- PSI ID
- Selected declaration details:
o Return number & Workstation
o Flow
o Period
o Send date
Restoring the archive will add a new record where the ‘Operation’ field is set to ‘DeArchived’). If no returns have been retrieved, no entry will be made in the Archives table.
The de-archived returns now have the status "Archived = No" again.
De-archiving” for more than one PSI is exactly the same as described in the case of one PSI,
except that he can choose to De-archive All PSI’s or the Current PSI only.
10.1.3 Delete Headers.
The function “Delete Headers” is started in “System Maintenance / Declaration Maintenance /
Delete Headers”.
When the User is sure that the data he has archived will not be needed anymore he can remove the
return headers by using this option. Even after having executed this option, it will still be possible
to restore the return data by “De-archiving”.
After having selected this function, an overview appears showing the returns that are archived.
9-Jan-15
-88-
IDNet15manE.doc
IDEP for Windows
IDEP User Manual
The procedure for deleting headers of archived returns is as follows:
Specify the Statistical Periods of the archived returns, for which the particular header in IDEP
should be removed.
Note that only return headers with the status "Archived = Yes" can be deleted via this function.
Other returns will be ignored even if their identification number is within the range.
You can delete all headers presented in the list or a selection can be made.
10.2 Backup Idepdata.
The function “Backup Idepdata” is started in “System Maintenance / Backup Idepdata”.
It allows the User to create a backup of ALL PSI dependant information for all PSI’s.
In order to do a backup the following must be specified.
Destination drive and path.
File name for the backup .ZIP file.
All the database files concerned are zipped into this file.
All backup, restore and upgrade operations are logged in a file ‘maint.log’. This file is also
included in any backup archive.
Note that the version number of the IDEP package that made the backup is kept with the
Backup information to enable the correct Restore of the information.
At the end of the backup procedure, a message is displayed to indicate whether the backup was
successful or not.
9-Jan-15
-89-
IDNet15manE.doc
IDEP for Windows
IDEP User Manual
10.3 Restore Backup.
The function “Restore Backup” is started in “System Maintenance / Restore Backup”.
This option allows the User to restore a previously made backup. The complete PSI data are
restored, all PSI dependant information present in the system is overwritten!
It is possible to restore a backup from an earlier version.
The Restore facility can be used in two cases:
When the User accidentally has removed PSI dependant information.
In this case, simply Restore the most recent Backup. Information that was entered between
the moment of making the Backup and the Restore operation, is lost. It is therefore
important to make a Backup regularly.
When the IDEP/CN8 package as a whole doesn’t function anymore.
In this case, the User should install a new IDEP/CN8 package from CD-ROM and in this
package run the “Restore Backup” function.
When the restore function is invoked IDEP will present a list of known backups that are
stored in the ‘maint.log’ file. The list will only show backup files that really exist.
The list shows:
Date of backup;
File name of the backup;
Version of IDEP used to backup;
List of PSI databases available in the backup.
At the end of the restore procedure, a message is displayed to indicate whether the restore was
successful or not.
10.4 Clean-Up.
The function “Clean-Up” is started in “System Maintenance / Clean-up”.
This function invokes the so-called “Compact” and “Repair” database functions. It makes lost
space in the database, which is caused by changes the User makes (Add, Delete, Modify
information), available again. Furthermore it is capable to repair in most cases corrupted
databases. Besides freeing-up disk space, a regular “Clean-Up” improves the performance of
the system.
9-Jan-15
-90-
IDNet15manE.doc
IDEP for Windows
IDEP User Manual
10.5 Download.
The function “Download” is started in “System Maintenance / Download (as Upload)”.
IDEP provides the possibility to convert Standalone Installations into a Client/Server
configuration. This means that the individual databases of the Standalone Installations are
combined into one database on a Server system which in fact may be one of the original
Standalone systems or a new, “clean” installation.
“Download” is only possible if both installations, i.e. the Server and the Stand alone installation,
have the same Version of IDEP installed, of the same Member State.
To perform this operation, the function must be started on the intended Server system. In addition
to the general rule that no second User may be logged in when performing a System Maintenance
function (as described in the introduction of this Chapter), to execute this function it is also
required that no User is logged in on the Stand alone system.
The User must indicate the path where the Member State directory of the IDEP for Windows
Stand alone installation is found.
After clicking OK, the following data is downloaded from the Stand alone installation to the
Server:
All data of PSIs that didn’t yet exist on the Server.
Exchange rates that didn’t yet exist on the Server.
If the Stand alone installation contains another language than the Server installation, the new
language is added to the Server.
If Download is completed, a message is presented.
9-Jan-15
-91-
IDNet15manE.doc
IDEP for Windows
IDEP User Manual
Merging the data of a PSI.
For a PSI that occurs in both the source and target installations (i.e. the currently running
IDEP) IDEP will attempt to merge the PSI data.
Declarations from the source PSI will be appended to the list of declarations of the destination
PSI. The Last Return Number will be used to assign a new declaration number to the added
declarations. The new assigned numbers will be reported.
Duplicate declarations that are Archived or Sent will be ignored and reported.
The PSI's Information Data (Models, PSI Goods Codes etc.) will be copied and duplicates will
be silently ignored.
PSIs that to do not exist in the destination installations will be upgraded into the destination.
It is possible to merge any previous installation. There is no restriction on the version number
of IDEP to be downloaded into the current IDEP version.
After the merge of PSI data IDEP will check the validity of line models.
A log file will contain detailed information about the merge operation.
Once the operation has completed the user gets the choice to visualise the log file. The
confirmation message will display a summary of PSIs processed (an asterisk is added to new
PSIs).
The log file can be inspected. It can be shown at any time via the menu option “System
Maintenance / Download Log”.
Important note:
Given that declarations are appended, running the merge operation again will append the
source declarations again!
After a successful Download operation, the Stand alone installation can be removed and a Client
Installation can be performed on the former Standalone PC (see Chapter 2.2).
The procedure can be repeated to combine the data of several Standalone installations into one
server.
9-Jan-15
-92-
IDNet15manE.doc
IDEP for Windows
IDEP User Manual
10.6 Download Log.
The function “Download Log” is started in “System Maintenance / Download Log”.
This function presents the log file resulting from a Download / Merge operation (see Capter
10.5 for details).
Through this log, the User is informed about any re-numbering actions performed during the Download
operation.
10.7 Check for upgrades
The function “Check for Upgrades” is started in “System Maintenance / Check for Upgrades”.
It will check on the Intrastat web-site if any components of the IDEP/CN8 package have been
replaced by later versions. If so, a (partial) re-installation of the package will be done in the
same way as described in Section 2. The package will be re-started afterwards.
If no upgrade is available, the following message appears:
Note: the check box “Proxy with Login” in “System / Display Setup” should be switched on if
“Check for Upgrades” doesn’t work due to security restrictions of a Proxy server.
10.8 Install extra features
The function “Install extra features” is started in “System Maintenance / Install extra
features”.
It allows the User to add GUI languages to his IDEP/CN8 installation, if they are available on
the Intrastat Web-site. It also replaces missing (or possibly defective) components it detects
and thus performs a “repair” function. A (partial) re-installation of the package will be done in
the same way as described in Section 2. The package will be re-started afterwards.
If no extra Features are available, still some components will be replaced.
9-Jan-15
-93-
IDNet15manE.doc
IDEP for Windows
IDEP User Manual
10.9 Remove Language.
The function “Remove Language” is started in “System Maintenance / Remove Language”.
If there is only one single language, this option is not available (it will be hidden or greyed if
the last removable language has been deleted).
A language selection dialog will be shown with the languages that can be deleted:
Only one language can be deleted at a time. The current language can of course not be deleted
(and is not shown in the language selection dialog).
The removal of a language cannot be undone other than via re-installing the language by CDROM or through the above “Install extra Features” function.
9-Jan-15
-94-
IDNet15manE.doc
IDEP for Windows
IDEP User Manual
11 CN8.
More information about the CN8-module is also available in the "Manual CN8 for Windows".
Note that there are four possibilities to access the “CN8” tables.
1. Via the option “CN8” or by clicking the “CN8” Button
.
2. When making a declaration by pressing F2 on the CN8 Code field of the Return line data
entry screen, or of the Line Model data entry screen.
3. When specifying the CN8 Goods Code for which a “Report by Goods Code” should be done.
4. When specifying a PSI Goods Code by pressing F2 on the CN8 Code field of the PSI Goods
Code data entry screen.
In the first case the User can consult the tables of CN8.
In the other cases the User can consult and select a CN8 Goods Code and return it to the
corresponding field in IDEP.
By default all texts of all chapters are installed (unzipped).
Via “CN8 / Add/Remove chapters” this selection can be changed afterwards.
9-Jan-15
-95-
IDNet15manE.doc
IDEP for Windows
IDEP User Manual
12 IDEP/CN8 in a multi-user LAN Environment.
12.1 Introduction.
In a LAN environment where several Users can access the same functionality and the same data at
the same time, it can be necessary to restrict the use of some of the functions and simultaneous
access to data.
From a functional perspective, three cases can be considered. The first is the most restrictive.
1. Functions accessible when only one User logged on.
2. Functions accessible by one User at a time.
3. Accessing information with multiple Users.
The different cases will now be explained in more detail.
12.2 Functions accessible when only one User logged on.
Most system maintenance functions can be only be executed when only one User is logged on to
the system.
Two possible conflict situations can occur.
1. A User tries to log on to the system while another user is executing a function which
requires only one User to be logged on.
The User who tries to log on will see the following message.
“A system maintenance function is being executed. You cannot log on right now. Try
again later.”
The User leaves the system.
2. A User tries to execute a function which requires only one User to be logged on while
already another User is logged on.
The User who tries to execute the function will see the following message.
“This function can only be executed when no other Users are logged on to the
system.”
The User leaves the function.
9-Jan-15
-96-
IDNet15manE.doc
IDEP for Windows
IDEP User Manual
Functions which can only be executed when only one User is logged on to the system are the
following.
“System Maintenance / Backup Idepdata”.
“System Maintenance / Restore Backup”.
“System Maintenance / Clean-up”.
“System Maintenance / Reindex”.
“System Maintenance / Download”.
12.3 Functions accessible by one User at a time.
Some functions can only be executed by one User at a time. Multiple Users can be logged on to
the system.
When a User is accessing a "one-User-at-a-time" function and another User tries to access the
same function, then this second User will see the following message.
“Function already in use. Only one User can have access at a time.”
The second User cannot access the function.
Functions which can only be executed by one User at a time, while multiple Users are logged on
to the system, are as follows:
"Return / Edit / Add"
"System /Administrative parameters"
"Parties / Third Party Declarant"
"Import / Multi-PSI import"
“Return / INTRASTAT Output”.
“System Maintenance / Return Maintenance / Archive to Disk”.
“System Maintenance / Return Maintenance / De-archive”.
“System Maintenance / Return Maintenance / Header Deletion”.
12.4 Accessing information with multiple Users.
The previous two paragraphs dealt with functions which cannot be executed by multiple users due
to the nature of the functionality. In many cases, multiple Users are using the same information in
functions which can be accessed by multiple Users at the same time.
For instance, two Users can be entering Return data for the same PSI at the same time, but only for
different Returns. Should one of these Users try to modify the same Return on which the other
User is working, he will get the following message.
“Function already in use. Only one User can have access at a time.”
The second User cannot modify the data, it is locked by the first User.
9-Jan-15
-97-
IDNet15manE.doc
IDEP for Windows
IDEP User Manual
If for some reason, for instance a power failure, the IDEP package isn’t closed properly, some data
may still be locked when the package is re-started. A special function takes care of the unlocking
of all data in the databases, see Chapter 10.4.
An automatic refresh mechanism makes sure that multiple Users consult the same data, even if
they look at the same window for a longer period. A refresh is done every 15 seconds.
9-Jan-15
-98-
IDNet15manE.doc
IDEP for Windows
IDEP User Manual
13 Diagnostics.
13.1 Introduction.
In some cases, the installation or execution of IDEP/CN8 fails. Often, this is caused by
specific conditions on the User’s platform. Given the almost infinite possible system
configurations, it is difficult for the Idep Calldesk who wants to provide help to this user, to
find out the reason for the failure.
For this reason, a tool IdepTest (AKA Diagnostics or Diagnostix ;-) has been implemented.
This tool does not require any kind of installation and runs on all Windows platforms.
13.2 Running IdepTest.
The tool, named IdepTest.exe, can be invoked from within IDEP via the Help menu option
“Diagnostics”. This is of course only possible if IDEP/CN8 could be installed.
NOTE: The user interface language of the tool is English.
13.3 Options.
9-Jan-15
-99-
IDNet15manE.doc
IDEP for Windows
IDEP User Manual
IdepTest collects a lot of more or less relevant information. This is carried out very quickly.
Once this collection has completed the tool displays the collected information in a scrollable
window and one or more buttons are available:
Button
Show Log
Explore Log
Purpose
Starts the system's default editor on the produced log file.
Starts the Explorer in the exact location where the log file resides. If
possible the log file name is pre-selected. This should help the user
in locating the log file of interest for sending it to the CNA for
instance.
Repair
Repairs the registration of DLLs if this is necessary and possible
DLLs
(this button is not available if this is not possible). This option is
equivalent to executing REGSVR32 on the suitable DLLs.
Uninstall
Uninstalls IDEP if this is possible (this button is not available if
there is nothing to uninstall). The un-installation does not remove
the data and may leave shortcuts in place.
Restart
Restarts the application (e.g. after uninstall or repair).
Send logs to Helps you to send the log files of your Idep installation to the
helpdesk
helpdesk
Cancel
Exits the application or interrupts the collection process.
13.4 Log file.
Each time IdepTest is run a log file is produced in %TEMP%\IdepTest_DDMMYYYY.txt
(note the txt extension in stead of the log extension; this should ensure that the system's
default text editor can be used for viewing the file). The log file can be viewed with any text
editor (Notepad or Word).
The log file is appended to. If the tool is restarted the collected data is appended to the file.
A summary of the collected data is displayed in the GUI.
13.5 Collected Information.
Detailed information about the operating system and installed software is collected.
Interesting information collected is summarised in the GUI.
From the information collected it is possible to infer if an internet connection is available, if
IDEP is correctly installed, if IDEP could use email to send declarations etc.
Summary description of the collected information:
9-Jan-15
-100-
IDNet15manE.doc
IDEP for Windows
IDEP User Manual
Type of information
Miscellaneous
Detailed OS and System
Information
User information
Desktop and local settings
Data Collected
Date, version of IdepTest
Version number, service pack, CPU, memory
User name, company name, administrator status
Fonts, colours, screen resolution, system language,
regional settings
Disk drives and network Drive- and file-system type, available and used
shares
space, maximum filename length
Networking
Domain name, hostname, IP-address, dial-up
networking, internet connections
Windows Installer
MSI location and version, Policy settings (W2K or
higher), service status
Running services
NT or higher
Interesting directories
TEMP, Windows, ...
Common
Environment TEMP, PATH, ...
variables
Startup programs
From start up directory, in Windows registry
IDEP/CN8 Information
Availability of user settings, uninstallation
information, validity and suitability of installation
path, summary directory listing of installation path
Mail Clients
Installed clients, default client, email settings, MAPI
Internet software
Default browser, version, internet settings for
browser, firewall
VB & VBA Settings
To see if any other Visual Basic like applications
have been run
Office components
Office versions and what office components are
installed
Software
development Microsoft development software installed
environments
DLLs
required
by Availability, version, check registration
IDEP/CN8
Log files
Listing of any IDEP, GetRelease, MSI, IdepTest log
files
9-Jan-15
-101-
IDNet15manE.doc
IDEP for Windows
IDEP User Manual
13.6 Repair
The tool for registering DLLs is available on most Windows versions: REGSVR32.
For every DLL that IDEP/CN8 requires IdepTest checks if the required DLL is available and
has the required version. If the DLL is not correctly registered it is possible to correct
(repair) this by using the built-in repair feature of IdepTest. This will execute an operation
similar to REGSVR32.
If the tool did not encounter any repairable problems with the DLLs the repair feature is not
available.
13.7 Uninstall
A complete de-installation of IDEP, including any system files that may have been installed
is normally done by the Windows Installer via the Control Panel/Add and Remove
Programs. If this fails for some reason it is considered extremely dangerous to try
uninstalling with another tool as this could render the system useless if shared system files
are removed (it is very difficult, if not impossible, to detect if a system file is shared on a
system where the Windows Installer based de-installation failed in the first place).
If IdepTest detected IDEP uninstallation information the uninstall feature will be enabled. If
this feature is invoked only the uninstallation information and DLLs installed by IDEP’s
Install program will be removed. Any user data and shortcuts that may be available will not
be deleted.
13.8 IDEP Helpdesk
+32 2 221 44 11 (NL - EN)
+32 2 221 44 33 (FR)
email: [email protected]
9-Jan-15
-102-
IDNet15manE.doc