1
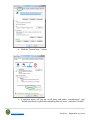
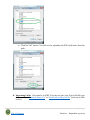
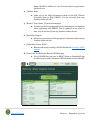
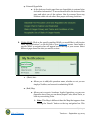
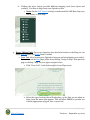
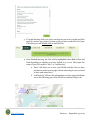
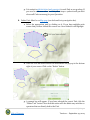
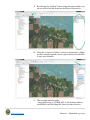
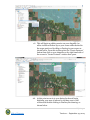
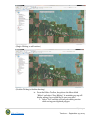
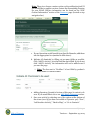
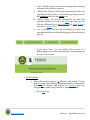
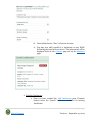
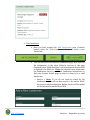
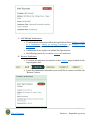
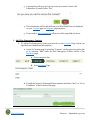
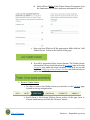
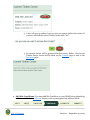
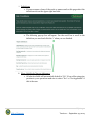
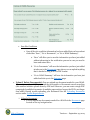
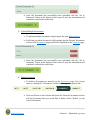
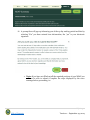
FERNS E-Notification: External User Manual
Oregon Department of Forestry
Table of Contents
Contact Us
Email your request for help here
1. System Requirements
a. Browser
b. Registering
c. Uploading Documents
d. Importing Units
2. Subscriber
3. ODF Layer Legend
4. Notifier/Registered User
a. Register
b. Activate Account
c. Sign In
d. Navigate FERNS Site
i. Dashboard
1. ODF Logo
2. FERNS
3. Search
4. Help
5. “Your Name” (Contact Information)
6. Logout
7. Create NOAP
8. My Notifications/Recent ODF Messages
9. External Hyperlinks
ii. Within NOAP
1. Info
2. Map
1|Page
Table of Contents
Version 1 – September 25, 2014
3. Contacts
4. Conditions
5. Documents
6. Summary
e. Create NOAP
f. Search and Zoom to Operation Area
g. Draw/ Delete Unit
i. Draw Unit
ii. Delete Unit
h. Import/ Delete Unit
i. Import Unit
a. Create a Shapefile in ArcMap 10.1
b. Import a Unit by Downloading ShapeUp
c. Import a Unit by Downloading ArcMap Add-In
ii. Delete Unit
i. Add/Remove Activities
i. Add Non-Chemical Activity
ii. Add Chemical Activity
1. Fertilizer
2. Non-Fertilizer
iii. Add Multiple Activities to one Unit
1. From Previous Activity Page
2. From Map Page
3. From Summary Page
iv. Remove Activity
j. Add/ Remove Operator
i. Add Operator
1. Yourself
2. Existing Operator
3. New Operator
2|Page
Table of Contents
Version 1 – September 25, 2014
ii. Replace Operator
iii. Remove Operator
k. Add/Remove Landowner
i. Add Landowner
1. Yourself
2. Existing Landowner
3. New Landowner
ii. Add Multiple Landowners
iii. Remove Landowner
l. Add Fire Emergency Contact
m. Add/Remove Timber Owner
i. Add Timber Owner
1. Yourself
2. Existing Timber Owner
3. New Timber Owner
ii. Remove Timber Owner
n. Add Site Conditions
i. Definitions
ii. Slope, Stability & Clearcut Adjacency
iii. Waters of the State
iv. Cultural and Wildlife Resources
v. Save Site Conditions
o. Upload/Delete Document
i. Upload a Document
ii. Upload Multiple Documents
iii. Delete Document
p. Submit NOAP
q. Print Full NOAP
r. Copy NOAP
3|Page
Table of Contents
Version 1 – September 25, 2014
1. System Requirements:
a. Browser: FERNS is most compatible with: Internet Explorer 10, Chrome, and Firefox.
If you have an older version of Internet Explorer, FERNS will not look or work properly.
Update your Internet Explorer or use a different browser.
b. Registering: You must have a valid email address to register. If you do not have an email
address you will need to prepare and submit Notifications of Operations and Permits to
Use Power-Driver Machinery via the FERNS kiosk at the ODF office in your area. Search
for nearest office here.
c. Uploading Documents: Documents must be in PDF format. For instructions on how
to convert your document to PDF see the Adobe Website. When uploading documents
you must ensure that you are uploading the document itself and not the document’s path.
To do so (must be done in Internet Explorer):
i. While on the FERNS homepage click the gear icon in the upper right hand corner
of your screen.
ii. Click on Internet Options from the drop down menu that appears.
iii. Click the Security Tab on the menu box that opens.
4|Page
Table of Contents
Version 1 – September 25, 2014
iv. Click the “Custom level…” button
v. A selection menu will pop up. Scroll down and under “miscellaneous”, find
“Include local directory path when uploading files to a server”, and select “Disable”.
5|Page
Table of Contents
Version 1 – September 25, 2014
vi. Click the “OK” button. You will now be uploading the PDF itself rather than the
path.
d. Importing Units: Unit must be in WKT. If you do not have your Unit in this file type
click on either “Download Shape Up” or “Download ArcMap Add In” (both are in blue
circles).
6|Page
Table of Contents
Version 1 – September 25, 2014
2. Subscriber:
a. The Subscriber portion of NOAPs is outside of FERNS.
b. To become a Subscriber follow this link to the Forest Activity Computerized Tracking
System (FACTS) page for full information.
i. For direct access click here for a PDF version of the Subscriber Application or ask
your local ODF office for a Subscriber Application.
c. You will need to (print and) fill out the application. If you provide your email on the
Subscriber Application Form you will receive electronic copies of the NOAPS you
requested and may receive a discount on the Subscriber fees that pertain to your type of
subscription.
d. You must turn in your application (in person or via mail) and subscriber fee to your local
ODF office.
7|Page
Table of Contents
Version 1 – September 25, 2014
3. ODF Layer Legend
Public Ownership:
Hydrography:
High Aquatic Potential Streams
Burea of Indian Affairs
Fish, Large
Fish, Medium
US Burea of Land Management
Fish, Small
Non-fish, Large
National Park Service
Non-Fish, Medium
Non-Fish, Small
Oregon Depatment of Forestry
Unknown, Large
Unknown, Medium
Oregon Department of Fish and
Wildlife
Unknown, Small
Oregon Department of Forestry
Admin
Oregon Department of Forestry
Managed for State Lands
Wetlands NWI
Roads:
Or
Interstate 5
Highways
ODF_CSL_decert
ODF_Consv_Fund
Oregon Department of State Lands
Roads
Other:
County Lines
Oregon Parks and Recreation
State of Oregon Unclassified
US Army Corps of Engineers
US Forest Services
US Fish and Wildlife Services
8|Page
Table of Contents
Version 1 – September 25, 2014
4. Notifier/Registered User:
a. Register: Must begin on FERNS webpage: https://ferns.odf.state.or.us/E-Notification.
i. Click the “Register” button at the bottom of the page.
ii. Input your profile information into the fields provided. Note that the Password has
requirements that must be met. If you hover over the information icon you will
note that those requirements are: contain at least a number, uppercase letter,
lowercase letter, and a symbol. Must be at least 8 characters.
1. Note: Fields that have a red asterisk mean that the field is required to be
filled out.
iii. If you will be submitting a Notification of Operation and/or Application for a
Permit to use Fire or Power-Drive Machinery (NOAP) make sure to fill out the “My
Contact Details” section. You do not have to submit a NOAP to be a FERNS user.
9|Page
Table of Contents
Version 1 – September 25, 2014
iv. If you are a Landowner fill out the Landowner information. Filling out this
information does not mean that you have to be the landowner on each NOAP.
Once registered you will have the option to select yourself as the Landowner, add
someone new, or search for Landowners. See example below.
v. If you are a timber owner fill out the Employer Identification Number or the last
4-digits of your Social Security number. Filling out this information does not mean
that you have to be the Timber Owner on each NOAP. Once registered you will
have the option to select yourself as the Timber Owner, add someone new, or
search for Timber Owners.
10 | P a g e
Table of Contents
Version 1 – September 25, 2014
vi. Once all the appropriate fields have been filled click the “Register” button.
b. Activate Account: Must be done after registering.
i. After you have registered you will receive an email to activate your account. To do
so, open the email “Activate your FERNS Account” and click the link signaled
below. Your account will not work, or be activated, until you click the link.
11 | P a g e
Table of Contents
Version 1 – September 25, 2014
ii. Clicking the link will take you to the FERNS homepage. Here a message will be
displayed on the top of your screen informing you that your account has been
confirmed. Now you can sign into FERNS.
c. Sign in: In order to sign in you must have registered and activated your account. If this
is not the case, follow the registration and activation process laid out above.
i. In order to sign in click the “Sign in” button located in the upper right hand corner
of the FERNS home screen.
ii. Fill in the Email address and Password you selected during the registration process
and click the “Sign In” button (marked in green). If you have forgotten this
information select the “Forgot Password” button (marked in blue).
12 | P a g e
Table of Contents
Version 1 – September 25, 2014
iii. Once successfuly logged in your dashboard will be displayed. Here you will see your
NOAPS (both those submitted and those in draft form) on the left and messages
from ODF on the right.
1. Note: You will not receive email notifications for messages that appear on
your Dashboard.
d. Navigate FERNS Site: When logged into FERNS you will be greeted by your dashboard
from which you can navigate to any other area of the site. Here you will see your NOAPS
(both those submitted and those in draft form) on the left and messages from ODF on the
right. Note: you will not receive email notification for messages that appear on your
dashboard.
i. Dashboard:
1. (Purple) ODF Logo
a. Hyperlink to ODF External Website, can be accessed from any
location within the site.
2. (Black) FERNS
a. Acts as a link to your homepage/dashboard. Can be accessed from
any location within the site.
3. (Gold) Search
a. Takes you to a Map. On this portal you can only search for existing
NOAPS; you cannot simply zoom to any area. Only areas with
existing NOAPS will be pulled up. Can search by: TRS, Operation
13 | P a g e
Table of Contents
Version 1 – September 25, 2014
Name, NOAP ID, address etc. Can be accessed from any location
within the site.
4.
(White) Help
a. Links you to the Help Document located on the ODF Website
(Currently links to Help EMAIL). Can be accessed from any
location within the site.
5. (Brown) “Your Name” (Contact information)
a. Provides you with your personal contact information you inputted
when registering with FERNS. Can be updated at any point in
time. Can be accessed from any location within the site.
6. (Steel Blue) Logout
a. Allows you to securely exit the program. Can be accessed from any
location within the site.
7. (Light Blue) Create NOAP
a. Button used to start creating a NOAP (detailed in Creating a NOAP
section).
8. (Green) My Notifications/Recent ODF Messages
a. List of NOAPS that you have in DRAFT form or Submitted Form
as well as any Formal Comments ODF has made on those NOAPS.
14 | P a g e
Table of Contents
Version 1 – September 25, 2014
9. External Hyperlinks
a. At the bottom of each page there are hyperlinks to external sites
for further information. To access them scroll to the bottom of the
page and select one of the options. Can be accessed from any
location within the site other than pages with map functions.
ii. Within NOAP: Click on the specific pending NOAP you would like to edit/review
from “My Notifications” on the left side of your dashboard screen. Once inside a
specific NOAP a navigation bar will appear across the top of your screen. Select
different pages based on what you need to review.
1. (Black) Info
a. Allows you to add/edit operation name, whether or not you are
simply a Notifier, and reason for submitting NOAP.
2. (Red) Map
a. Allows you to zoom to: locations, Legals, Operations, or your own
Operation Area. Here you can draw/import Units, delete Units, or
look at your existing Units.
i. Note: This Map is different than the Map that appears from
clicking the “Search” button on the top navigation bar. This
15 | P a g e
Table of Contents
Version 1 – September 25, 2014
map allows you to zoom to any area, not just search those that
contain preexisting NOAPS.
3. (Orange) Contacts
a. Allows you to add/edit Land Owner (and Timber Owner if your
NOAP requires one) and add a Fire Emergency Contact.
4. (Blue) Conditions
a. Asks you to provide information of resources present in your
Operation Area to the best of your knowledge including but not
limited to: Slopes, Waters, Stability, and Cultural and Wildlife
Resources.
5. (Green) Documents
a. Allows you to upload any document that is in PDF format. Trouble
uploading a document? See Uploading Documents under System
Requirements for troubleshooting tips.
6. (Purple) Summary
a. The page a NOAP will default to when you reopen it. Additionally,
this is the only page you will have access to after submitting a
NOAP.
i. Provides: summary of information the Notifier provided, legal
requirements, information ODF Personnel has added, and
option to Copy NOAP or Print Full Report.
1. This is another way to access the Units you have and
the activities/operators on each one while the NOAP is
still in draft form.
e. Create a NOAP: Must be on Dashboard page to do so (get there by clicking FERNS
button on top navigation bar).
i. To create a NOAP click on “Create NOAP” in the middle of your dashboard screen.
16 | P a g e
Table of Contents
Version 1 – September 25, 2014
ii. Fill out the Operation name and the Notification type (“I want to”). Additionally
make sure to check the box outlined in blue if you are NOT the Land Owner, Timber
Owner or Operator (i.e. simply the Notifier). Once finished click either: “Save” or
“And go to Map”. Note: Fields that have a red asterisk mean that the field is
required to be filled out.
1. “Save” will allow you to Save your NOAP on the current page without
advancing in case you need to leave and return later.
2. “And go to Map” will save the information you have entered and take you to
the following part of the NOAP to continue filing the notification.
f. Search and Zoom to Operation Area: Once on the Map page (either from clicking
“And go to Map” from previous page or clicking “Map” on upper navigation bar) you can
search and zoom to your Operation Area by using the zoom to function on the left of your
screen.
i. Click on the magnifying glass icon and begin typing the area you would like to zoom
to.
17 | P a g e
Table of Contents
Version 1 – September 25, 2014
Note: zooms/searches that FERNS is compatable with are the following:
ii. As you begin typing, the Zoom to feature will self populate a drop-down menu with
potential areas you are searching for. When your Operation Area appears click on
it from the menu.
iii. Map will zoom to location you just entered. Use +/- buttons on the left to zoom in
or out and find your Operation Area. Additionally, use the layers button, on the
right, to pick different Map options to help you locate your area of operation.
+/- buttons on Left:
Layers on Right:
18 | P a g e
Table of Contents
Version 1 – September 25, 2014
iv. Clicking the layers button provides different mapping tools (base layers and
overlays). Use these to help locate your Operation Area.
1. Note: Use the ODF Legend to help you understand the ODF Base Layer you
can display on your map.
g. Draw/ Delete Unit: Once your Operation Area has been located on the Map you can
begin drawing units and delete them if needed.
i. Draw Unit: After locating your Operation Area you can being drawing your unit(s).
You must be on the Map page (either from clicking “And go to Map” from previous
page or clicking “Map” on your upper navigation bar).
1. Click “Draw Unit” on the bottom right of your Map screen.
2. Select the type of activity that will take place, on the Unit you are about to
draw, from the menu that appears. This will allow FERNS to provide you
with the appropriate polygon, line, or point tool.
19 | P a g e
Table of Contents
Version 1 – September 25, 2014
3. To begin drawing click your cursor on the area you want to begin and click
again to create a new point. Continue until you have reach the end of your
Unit where you will double-click to end the Unit.
4. Once finished drawing, the Unit will be highlighted either Red or Blue and
Pink depending on whether you have clicked on it or not. Next input the
name of your Unit and hit “Save” or “Add Activity”.
a. “Save” will allow you to save your NOAP and the Unit you have
just drawn on the current page without advancing in case you need
to leave and return later.
b. “Add Activity” will save the information you have entered and take
you to the following part of the NOAP to continue filling it out.
20 | P a g e
Table of Contents
Version 1 – September 25, 2014
5. It is easiest to add Activities (and operators) to each Unit as you go along. If
you need to add more than one Unit follow steps 1-4 above until you have
drawn all Units necessary for your Operation.
ii. Delete Unit: Must be on Map page (can be found in top navigation bar)
1. Select the appropriate unit by clicking on it. If you have multiple units
ensure that you have clicked the correct one. Once clicked it will highlight.
2. Once the Unit has been selected its information will pop up in the bottom
right of your screen. Click on the “Delete” button.
3. A prompt box will appear. If you have selected the correct Unit click the
“Delete Unit” button. Note that this action will also delete any activities or
operators that are directly tied to the Unit.
21 | P a g e
Table of Contents
Version 1 – September 25, 2014
4. When the following image appears you have successfully deleted your Unit.
h. Import/ Delete Unit: Once you have reached the Map page you can import Units and
delete them if needed.
i. Import Unit: To import a Unit you must be on the Map page (either from clicking
“And go to Map” from previous page or clicking “Map” on your upper navigation
bar).
1. Click the “Import Unit” button located on the bottom right of your screen.
2. You will be taken to this pop-up screen:
22 | P a g e
Table of Contents
Version 1 – September 25, 2014
3. If you have already created your shapefile, proceed to Step 4. If not, follow
the instructions below to create a shapefile.
a. Create a shapefile in ArcMap 10.1
i. Open the current project or .mxd file you are working in. Add
in any of the significant data you will need in order to digitize
your shapefile such as: Orthoimagery, Ownership, Roads,
Streams, Contours, etc. This example is called
“Importing_to_FERNS.mxd” and includes Ownership, PLSS,
and Orthoimagery.
1. Follow this link to obtain GIS Data in Oregon.
23 | P a g e
Table of Contents
Version 1 – September 25, 2014
ii. By selecting the “Catalog” button along the upper toolbar, you
can see a list of the file structure ArcMap is connected to.
iii. Using the “Connect to Folder” button or navigating to a folder
you have already created, choose a place where you would like
to save your shapefile.
iv. This example uses the folder
“2014_Importing_to_FERNS_KK” as the location where it
would like to save the shapefile. Once you have chosen a
24 | P a g e
Table of Contents
Version 1 – September 25, 2014
location to save your shapefile, right-click on that folder,
select “New” from the pop-up menu, and select “Shapefile…”
v. You will see a “Create New Shapefile” pop-up screen where
you will give the shapefile a name, feature type, and
coordinate system.
vi. The shapefile will automatically be added to the top of your
table of contents on the left hand side of your screen. From
here, right-click on the shapefile, select “Edit Features” from
the pop-up menu, then select “Start Editing”.
25 | P a g e
Table of Contents
Version 1 – September 25, 2014
vii. This will begin an editing session on your shapefile. An
editor toolbar will show up on your screen either docked in
the upper portion of ArcMap or floating in your screen as
shown below. From this toolbar select the “Create Features”
button then click on your shapefile on the right hand side of
the screen in “Create Features” window that opens.
viii. At this point zoom-in to your desired scale and begin
digitizing your area of interest by clicking once to add
vertices and double-clicking to finalize your drawing, as
shown below.
26 | P a g e
Table of Contents
Version 1 – September 25, 2014
(Single-Clicking to add vertices)
(Double-Clicking to finalize drawing)
ix. From the Editor Toolbar, drop-down the Menu titled
“Editor” and select “Stop Editing”. A reminder pop-up will
display asking if you would like to save your edits.
1. Select “Yes” and this will end your editing session
while saving your digitized polygon.
27 | P a g e
Table of Contents
Version 1 – September 25, 2014
2. Select “No” and this will end your editing session and
discard any changes you have made during this edit
session.
4. From Step 3 and the screen below you will need to convert your shapefile
to a WKT file type in order for it to be compatible with FERNS. You can do
this two different ways, downloading an application that will convert your
shapefile into WKT format or, downloading an ArcMap Add-In that will
provide you with the WKT output by selecting a feature in ArcMap.
a. Import a Unit by Downloading Shape Up
i. Click the button “Download Shape Up”
28 | P a g e
Table of Contents
Version 1 – September 25, 2014
ii. A Windows Internet Explorer pop-up will display asking if
you would like to Open, Save, or Save as. For this, select
“Open” and your browser will begin downloading the
application. You can also choose the save or save as button
and direct where you would like the download to be saved.
iii. After opening the download, you will get a window that
opens with the contents of the download, double-click the
file “ShapeUp” with the file type: Application.
29 | P a g e
Table of Contents
Version 1 – September 25, 2014
iv. A window will pop-up asking if you would like to Extract All
Files to a specific location. Select “Extract All” and choose a
location on your local drive, as shown below.
v. A new window will open showing all the extracted files and
an executable application called “Shape Up”. Double-click
the application to open the program and create a shortcut to
the program on your desktop.
30 | P a g e
Table of Contents
Version 1 – September 25, 2014
vi. Once you have opened the program, Shape Up has a help
menu located in the lower left of the screen giving you step
by step instruction on how to use the program. Your outcome
should look something similar to what is shown below.
b. Import a Unit by Downloading ArcMap Add-In
i. From the screen below, select “Download ArcMap Add-In”.
ii. A Windows Internet Explorer pop-up will display asking
what you would like to do with the download, Open, Save, or
Save as. Click “Save As” and navigate to a folder location that
you will know how to get back to easily.
31 | P a g e
Table of Contents
Version 1 – September 25, 2014
iii. Click “Save” and wait for download to complete. Open
ArcMap to a current project that you are working in. Select
the “Customize” menu and then “Add-In Manager” as shown
below.
32 | P a g e
Table of Contents
Version 1 – September 25, 2014
iv. Add the folder where you saved the download then click on
the “Add-Ins” tab at the top of the window, as shown below.
v. The ShapeUp Add-In should now be located in your Shared
Add-Ins list.
vi. In order to utilize this add-in, you must dock the command
button that comes with it into one of your active toolbars. At
the bottom of this window, select “Customize…”
33 | P a g e
Table of Contents
Version 1 – September 25, 2014
vii. Select the “Commands” tab at the top of the window then
navigate down the list until you find “ShapeUp Add-In”.
Click this and you will see the Command “Selected Geometry
to WKT” show up in the list on the right as shown below.
viii. Drag “Selected Geometry to WKT” from this window into the
Tools toolbar or any active toolbar you have up as shown
34 | P a g e
Table of Contents
Version 1 – September 25, 2014
below. Once it is docked, click the icon to open the WKT
Display Window.
ix. Once the WKT Display window has opened, simply select the
shapefile you desire and it will automatically give you the
output you need to copy into the FERNS “Unit WKT” box as
shown below.
35 | P a g e
Table of Contents
Version 1 – September 25, 2014
5. After whichever method of converting your shapefile to WKT you choose
and once you have the WKT format in place in the box, click on “Add
Shape” (see above), give your shape a name and save your changes, as
shown below.
6. Once you have added your Unit you can proceed through the rest of the
NOAP creation process. If you would like to add more units to your NOAP,
simply repeat the process after you have added an Activity and Operator to
your shape.
36 | P a g e
Table of Contents
Version 1 – September 25, 2014
ii. Delete Unit: Must be on Map page (can be found in top navigation bar)
1. Select the appropriate unit by clicking on it. If you have multiple units
ensure that you have clicked the correct one. Once clicked it will highlight.
2. Once the Unit has been selected its information will pop up on the bottom
right of your screen. Click on the “Delete” button.
3. A prompt box will appear. If you have selected the correct Unit click the
“Delete Unit” button. Note that this action will also delete any activities or
operators that are directly tied to the Unit.
37 | P a g e
Table of Contents
Version 1 – September 25, 2014
4. When the following image appears you have successfully deleted your Unit.
i. Add/ Remove Activities: once you have created a Unit you can add Activities to them
(Non-Chemical, Chemical-Fertilizer, or Chemical- Non Fertilizer), and also remove them
if needed.
i. Add Non-Chemical Activity
1. Reach add activities page by: 1. Selecting “Add Activity” button from Map
page after drawing/importing/clicking on appropriate Unit or, 2. by
clicking “Add Activity” on Summary page (top navigation bar) under
Units/Activities/ Operators section.
a. From Map page
b. From Summary Page
2. Fill out all sections with an asterisk on Add Activity and Method sections.
Activity will need to be selected again from the drop-down menu that
populates. Some Activities will require quantities, those that do not FERNS
will autopopulate with N/A. Start date must be 15 days in the future as
there is a 15 day waiting period on each NOAP. Note: Fields that have a red
asterisk mean that the field is required to be filled out.
38 | P a g e
Table of Contents
Version 1 – September 25, 2014
Note: There is no longer a waiver option on the notification itself. If
you would like to request a waiver contact the Stewardship Forester
for your NOAP. His/her information can be found on the “ODF
Contact Information” section of the Summary page (located on top
navigation bar).
3. If your Operation would benefit from Specific Remarks, add those into the
appropriate box (marked in blue above).
4. Adding Operators (located at bottom of this page) is easiest to do now. If
you would like to do so see Add/Remove Operators section.
39 | P a g e
Table of Contents
Version 1 – September 25, 2014
5. Save your activity by selecting one of the options at the bottom of the screen
(even if you have not added an Operator yet): “Save”, “Add Another
Activity”, “Back to Map”, or “Go to Contacts”.
a. “Save” will allow you to save the current page without moving
forward in the notification process.
b. “Add Another Activity” will save the information you have just
provided and take you to a new activity page where you can add
another activity to the same unit.
c. “Back to Map” will save the information you have just provided
and take you back to the Map page. Here you can click on a
different Unit to add activities to (following the steps laid out
above), draw/import a new unit, or delete a Unit.
d. “Go to Contacts” will save the information you have just provided
and take you to the following page of the notification process.
e. If you chose “Save” (i.e. your NOAP will not move to a different
page) you will be presented with a success banner at the top of
your screen.
ii. Add Chemical Activity
1. Fertilizer:
a. Reach the add activities page by: 1. Selecting “Add Activity” button
from Map page after drawing/importing/clicking on appropriate
Unit or, 2. by clicking “Add Activity” on Summary page (top
navigation bar) under Units/Activities/ Operators section.
i. From Map Page
40 | P a g e
Table of Contents
Version 1 – September 25, 2014
ii. From Summary Page
b. Fill out all sections with an asterisk on Add Activity and Method
sections. Activity will need to be selected again from the dropdown menu that populates. Some Activities will require quantities,
those that do not FERNS will autopopulate with N/A. Start date
must be 15 days in the future as there is a 15 day waiting period
on each NOAP. Note: Fields that have a red asterisk mean that
the field is required to be filled out.
41 | P a g e
Table of Contents
Version 1 – September 25, 2014
Note: There is no longer a waiver option on the notification itself. If
you would like to request a waiver contact the Stewardship Forester
for your NOAP. His/her information can be found on the “ODF
Contact Information” section of the Summary page (located on top
navigation bar).
c. If your Operation would benefit from Specific Remarks, add those
into the appropriate box (marked in blue above).
d. Indicate all chemicals by filling out as many fields as possible.
Click “Add To Activity” once that field has been filled. If you do not
click “Add To Activity” the information will not be added even if
you save the page.
i. Note: The box next to “Fertilizer” is best filled by product’s
brand name or common name.
e. Adding Operators (located at bottom of this page) is easiest to do
now. If you would like to do so see Add/Delete Operators section.
f. Save your activity by selecting one of the options at the bottom of
the screen (even if you have not added an Operator yet): “Save”,
“Add Another Activity”, “Back to Map”, or “Go to Contacts”.
42 | P a g e
Table of Contents
Version 1 – September 25, 2014
i. “Save” will allow you to save the current page without moving
forward in the notification process.
ii. “Add Another Activity” will save the information you have just
provided and take you to a new activity page where you can
add another activity to the same unit.
iii. “Back to Map” will save the information you have just
provided and take you back to the Map page. Here you can
click on a different Unit to add activities to it, draw/import a
new unit, or delete a Unit.
iv. “Go to Contacts” will save the information you have just
provided and take you to the following page of the notification
process.
v. If you chose “Save” (i.e. your NOAP will not move to a
different page) you will be presented with a success banner at
the top of your screen.
2. Non-Fertilizer:
a. Reach add activities page by: 1. Selecting “Add Activity” button
from Map page after drawing/importing/clicking on appropriate
Unit or, 2. by clicking “Add Activity” on Summary page (top
navigation bar) under Units/Activities/ Operators section.
i. From Map Page
43 | P a g e
Table of Contents
Version 1 – September 25, 2014
ii. From Summary Page
b. Fill out all sections with an asterisk on Add Activity and Method
sections. Activity will need to be selected again from the dropdown menu that populates. Some Activities will require quantities,
those that do not FERNS will autopopulate with N/A. Start date
must be 15 days in the future as there is a 15 day waiting period
on each NOAP. Note: Fields that have a red asterisk mean that
the field is required to be filled out.
44 | P a g e
Table of Contents
Version 1 – September 25, 2014
Note: There is no longer a waiver option on the notification itself. If
you would like to request a waiver contact the Stewardship Forester
for your NOAP. His/her information can be found on the “ODF
Contact Information” section of the Summary page (located on top
navigation bar).
c. If your Operation would benefit from Specific Remarks, add those
into the appropriate box (marked in blue above).
d. Indicate all Chemicals by filling out as many fields as possible.
Click “Add To Activity” once that field has been filled. If you do not
click “Add To Activity” the information will not be added even if
you save the page.
i. Note: There is an option (in purple) to select either the brand
name or common name. Click on whichever you would prefer.
ii. In blue there is an option to inform ODF if neither the brand
nor common name for your product can be found. If this is the
case, select this button.
e. Adding Operators (located at bottom of this page) is easiest to do
now. If you would like to do so see Add/Delete Operators section.
45 | P a g e
Table of Contents
Version 1 – September 25, 2014
f. Save your activity by selecting one of the options at the bottom of
the screen (even if you have not added an Operator yet): “Save”,
“Add Another Activity”, “Back to Map”, or “Go to Contacts”.
i. “Save” will allow you to save the current page without moving
forward in the notification process.
ii. “Add Another Activity” will save the information you have just
provided and take you to a new activity page where you can
add another activity to the same unit.
iii. “Back to Map” will save the information you have just
provided and take you back to the Map page. Here you can
click on a different Unit to add activities to it, draw/import a
new unit, or delete a Unit.
iv. “Go to Contacts” will save the information you have just
provided and take you to the following page of the notification
process.
i.
If you chose “Save” (i.e. your NOAP will not move to a
different page) you will be presented with a success banner
at the top of your screen.
iii. Add Multiple Activities to Same Unit. After you have an Activity on a Unit you have
the option to add multiple Activities to the same Unit. To do so you have three
options.
1. From Previous Activity Page
a. Once you have input Activity information (and potentially
Operator information too) scroll to the bottom of the page to view
the following options:
46 | P a g e
Table of Contents
Version 1 – September 25, 2014
b. Select “Add Another Activity” button and proceed to provide
Activity information as outlined above.
2. From Map page
a. Locate Map by selecting “Map” button on top navigation bar
within the desired NOAP.
b. Select the Unit you would like to add another Acitivity to. Once
selected the Unit will be highlighted with a pink and blue exterior.
c. Select “Add Activity” button and proceed to provide Activity
information as outlined above.
i. Note: While button does not say “Add Another Activity” it
will still add another Activity to the same Unit (or a first
Activity if you haven’t created any yet).
3. From Summary Page
a. Locate Summary page by selecting Summary button on top
navigation bar within the desired NOAP.
b. Scroll down to Units/Activities/Operators Section. Note: Unit
names are marked in green with the names you originally
provided.
47 | P a g e
Table of Contents
Version 1 – September 25, 2014
c. Find the Unit you would like to add another Activity to and select
“Add Activity” button.
d. Provide Activity information as outlined above.
i. Note: While button does not say “Add Another Activity” it
will still add another Activity to the same Unit (or a first
Activity if you haven’t created any yet).
iv. Remove Activity
1. Locate Summary page by selecting “Summary” button on top navigation bar
within the desired NOAP.
2. Scroll down to Units/Activities/Operators section.
48 | P a g e
Table of Contents
Version 1 – September 25, 2014
3. Locate correct Unit, and Activity (if there are multiple of either) and select
“Remove”.
4. A prompt box will appear. Select “Yes” if you wish to remove the Activity
you have selected.
5. Your Activity has now been removed.
j. Add/ Remove Operator. Once an Activity has been created an Operator can be added
to it following the steps below to: Add yourself as an Operator, Search for existing
Operator, or Add a new Operator. If needed, the Operator can also be removed.
49 | P a g e
Table of Contents
Version 1 – September 25, 2014
i. Add Operator: To add an Operator you must either select “Add Operator” from the
appropriate Activity Section of the Summary page (reached via top navigation bar)
or from the “Add Activity” page itself.
--OR--
Note: You will have to follow one of the examples laid out below for each of the
activities on each of your Units: Add yourself as the Operator, Search for
someone, or Add a new Operator.
1. Yourself
a. Select “I am the Operator” from the options displayed on your
screen.
50 | P a g e
Table of Contents
Version 1 – September 25, 2014
b. If you defined yourself as an Operator when you registered FERNS
will automatically input your information into the NOAP and the
respective Activity. If so, you have completed adding an Operator
to the Activity. This information will be displayed both on the
specific Activity page and on the Summary page under the
appropriate Activity heading.
c. If you did not input your Contact Details information when you
registered you will not be able to be classified as an Operator until
you do so.
i. Select the “Your Name” button in the upper right hand corner
of your screen.
ii. Scroll down to the My Contact Details section and fill out the
information.
iii. Once finished select “Save” at bottom of screen.
51 | P a g e
Table of Contents
Version 1 – September 25, 2014
iv. You may now add yourself as an Operator on any Activity in
any of your NOAPS (following the steps laid out above). This
information will be displayed both on the specific Activity
page and on the Summary page under the appropriate Activity
heading.
2. Existing Operator
a. Select “Search” button from the options displayed on your screen.
b. A search bar and list of Operators in FERNS will be displayed. You
can search through the pages by clicking on the numbers/arrows
on the bottom or by typing in an Operator and selecting “Search”.
52 | P a g e
Table of Contents
Version 1 – September 25, 2014
c. Once you have found the appropriate operator select the “Add to
Activity” button.
d. Once the Operator has been added the information will be
displayed both on the specific Activity page and on the Summary
page under the appropriate Activity heading.
3. New Operator
a. Select “New Operator” button from the options displayed on your
screen.
b. “Add a New Operator” page will appear. Fill out the top Add New
Operator section. Note: Fields that have a red asterisk mean that
the field is required to be filled out.
i. Note: it is important to fill out the Operator’s email if he/she
has one. If this is not filled out they will not have online access
to the NOAP and will not get email updates. Rather, they will
get paper copies in the mail later.
53 | P a g e
Table of Contents
Version 1 – September 25, 2014
c. Fill out the Operator Contact Details section with the appropriate
information.
d. If the Operator happens to also be the Landowner or the Timber
Owner where the operation is occurring provide the following
information.
e. After you have inputted all the correct information select the “Add
Operator” button.
54 | P a g e
Table of Contents
Version 1 – September 25, 2014
f. A success banner will populate the top of the screen once you have
completed adding the Operator.
i. Note: This Operator can now be selected via the “Search”
function for future NOAPS. For this action see “Add Existing
Operator” section.
g. Once the Operator has been added the information will be
displayed both on the specific Activity page and on the Summary
page under the appropriate Activity heading.
ii. Replace Operator: Once an Operator has been added to an Activity you can replace
him/her at any point in time.
1. Locate Summary page by clicking the “Summary” button on the top
navigation bar.
2. Scroll down to Units/Activities/Operators section and find the Activity that
the Operator you would like to replace pertains to.
55 | P a g e
Table of Contents
Version 1 – September 25, 2014
3. Click on the Activity name that you are interested in. This will take you to
the Activity page where the Operator information is located at the bottom.
a. Note: DO NOT Select the “Remove” button from this page. The
action will delete the ACTIVITY not the Operator you are trying to
delete.
56 | P a g e
Table of Contents
Version 1 – September 25, 2014
4. Scroll down to the bottom of the page and select one of the options: “I am
the Operator”, “Search” (for existing Operators), or “New Operator”.
a. Note: you can also select the “Remove” button shown below and
add an Operator from scratch following the “I am the Operator”,
“Search” (for existing Operators), or “New Operator” functions.
5. From here follow the prompts to select your new operator: “I am the
Operator”, “Search” (for existing Operators), or “New Operator”. Once you
have selected an Operator the new Operator will replace the initial
Operator. You will then be displayed with a banner saying the Activity has
been updated.
6. Once the Operator has been replaced the information will be displayed both
on the specific Activity page and on the Summary page under the
appropriate Activity heading.
57 | P a g e
Table of Contents
Version 1 – September 25, 2014
iii. Remove Operator:
1. Locate Summary page by clicking the “Summary” button on the top
navigation bar.
2. Scroll down to Units/Activities/Operators section and find the Activity that
the Operator you would like to remove pertains to.
3. Click on the Activity name that you are interested in. This will take you to
the Activity page where the Operator information is located at the bottom.
a. Note: DO NOT Select the “Remove” button from this page. The
action will delete the ACTIVITY not the Operator you are trying to
delete.
58 | P a g e
Table of Contents
Version 1 – September 25, 2014
4. Scroll to the bottom of the Activity page and find the “Current Operator”
Information. Here, click the “Remove” button.
5. You will not be displayed with a success banner for this action. Rather, the
Operator information will simply disappear from this page and the
Summary page.
59 | P a g e
Table of Contents
Version 1 – September 25, 2014
k. Add/Remove Landowner: Here you will have the option to both add and remove
Landowners.
i. Add Landowner: to add a Landowner you must either select “Add Landowner”
from the Summary page (located on top navigation bar) or click the “Contacts”
button (also on top navigation bar). Here you will have the option to: Add yourself
as the Landowner, Search for existing Landowners, or Add a new Landowner.
1. Yourself
a. Once you have accessed the Add Landowners page select the “I am
the Landowner” button that appears on your screen.
b. If you filled out Landowner information when you registered or
when you completed a different NOAP your page will display you
with a Current Landowners box. This info will be displayed both
on the Contacts page and on the Summary page.
60 | P a g e
Table of Contents
Version 1 – September 25, 2014
c. If you did not input your Landowner information when you
registered you will not be able to be classified as a Landowner until
you do so.
i. Select the “Your Name” button in the upper right hand corner
of your screen.
ii. Scroll down to the “Are you a Landowner” section and fill out
the information.
61 | P a g e
Table of Contents
Version 1 – September 25, 2014
iii. Once finished select “Save” at bottom of screen.
iv. You may now add yourself as a Landowner on any NOAP
(following the steps laid out above). This information will be
displayed both on the Contacts page and on the Summary
page.
2. Existing Landowner:
a. Once you have reached the Add Landowners page (Contacts
button) select the “Search” button to search for an existing
Landowner.
62 | P a g e
Table of Contents
Version 1 – September 25, 2014
b. Here you will be presented with the Landowner Search page. Type
in a name and select “Search” or use the arrows at the bottom of
the page to locate the Landowner you are looking for.
c. Once you have found the appropriate Landowner click the “Add to
NOAP” button.
d. The Landowner will now be displayed both on the Contacts page
and on the Summary page.
63 | P a g e
Table of Contents
Version 1 – September 25, 2014
3. New Landowner
a. Once you have reached the Add Landowners page (Contacts
button) select the “New Landowner” button to create a new
Landowner.
b. This will take you to the Add New Landowner page. Here input all
the information in the three different sections of the page
displayed below. Fields that have a red asterisk mean that the field
is required to be filled out. Note: you can add a new Landowner
but Landowners have to enter their Landowner information on
their own Contact Details page in order for them to be a valid
Landowner.
i. Section 1: Note: If you do not input an email for the
Landowner he/she will not have access to the online NOAP
nor receive emails notifications. Rather, he/she will be mailed
all the information needed from ODF.
64 | P a g e
Table of Contents
Version 1 – September 25, 2014
ii. Section 2:
iii. Section 3: Note: if Landowner is also a Timber owner fill out
the Timber Owner part of this section as well
c. Once you have entered all the information select the “Add
Landowner” button at the bottom of the page.
d. You have successful added a Landowner. His/her information is
now displayed on the Contacts page and on the Summary page.
65 | P a g e
Table of Contents
Version 1 – September 25, 2014
ii. Add Multiple Landowners:
1. To add multiple landowners follow the steps laid out above (Adding yourself
as a Landowner, Adding an existing Landowner, or Creating a new
Landowner) once you have already added a Landowner.
2. Landowners do not replace one anther like Operators do.
3. See following section if you need to remove a Landowner.
iii. Remove Landowner
1. To remove a Landowner you must be on the Contacts page (reached via the
top navigation bar).
2. Locate the Landowner information you would like to remove and click the
“Remove” button.
66 | P a g e
Table of Contents
Version 1 – September 25, 2014
3. A prompt box will pop-up. If you are sure you want to remove the
Landowner (Contact) select “Yes”.
4. This information will be deleted from your NOAP and thus not displayed
on your Contacts page or Summary page anymore.
5. If you need to add a Landowner follow one of the steps laid out above.
l. Add Fire Emergency Contact
i. To add a Fire Emergency Contact you must be on the Contacts Page (where you
inputted your Landowner Information).
1. Arrive at Contacts page by selecting “Contacts” on the upper navigation bar
or by selecting “Edit” under the Fire Emergency Contact section of the
Summary page.
a. From navigation bar:
b. From Summary Page
2. Provide the contact’s Name and Phone number and select “Save” or “Go to
Conditions” at the bottom of the page.
67 | P a g e
Table of Contents
Version 1 – September 25, 2014
i. “Save” will save the information you just provided without
advancing you in the notification process. This allows you to
leave and come back later if needed.
ii. “Go to Contacts” saves the information you just inputted and
takes you to the next page of the notification process.
3. This information will be displayed both on the Contacts page and on the
Summary page.
m. Add/Remove Timber Owner: Here you will have the option to both add and remove
Timber Owners.
i. Add Timber Owner: to add a Timber Owner you must either select “Add Timber
Owner” from the Summary page (a) or click the “Contacts” button (on top
navigation bar) (b). You have the option to: Add yourself as the Timber Owner,
Search for a Timber Owner, or Add a new Timber Owner.
a. Note: The option to add a Timber Owner will only present itself if
you chose to: “Notify the State Forester and Department of Revenue of
the intent to harvest timber (ORS 321.550)” on the Info page of the
specific NOAP.
b. Summary Page
c. Contacts
68 | P a g e
Table of Contents
Version 1 – September 25, 2014
2. Yourself
a. Once you have located the Contacts page click the “I am the
Timber Owner” button.
b. If you inputted your Timber Owner information when you
registered or on a previous NOAP you have successfully added
yourself and your Timber Owner information will be found on the
Contacts page and on the Summary page under the correct
heading.
69 | P a g e
Table of Contents
Version 1 – September 25, 2014
c. If you did not declare yourself as a Timber Owner when you
registered or on a previous NOAP you will not be able to be
classified as a Timber Owner until you have provided the
appropriate information.
d. Click the button with your name on the top most navigation bar.
e. Scroll to the bottom of the page and input your information in the
Timber Owner section as displayed below.
f. Click the “Save” button at the bottom of the screen.
g. You may now add yourself as a Timber Owner following the steps
laid out above. When you are finished the information will be
displayed both on the Contacts page and on the Summary page
under the correct heading.
70 | P a g e
Table of Contents
Version 1 – September 25, 2014
3. Existing Timber Owner
a. Once you have located the Contacts page click the “Search Timber
Owners” button.
b. You will next be presented with the All Timber Owners page.
Search for the appropriate Timber Owner for your NOAP by using
the page numbers at the bottom of the screen or typing in their
name/company in the search field and clicking the “Search”
button.
71 | P a g e
Table of Contents
Version 1 – September 25, 2014
c. Once you have located the appropriate Timber Owner click the
“Add to NOAP” button on the right of your screen.
d. Your Timber Owner will now be displayed on the Contacts page
and on the Summary page under the correct heading.
4. New Timber Owner
a. Once you have located the Contacts page click the “New Timber
Owners” button.
72 | P a g e
Table of Contents
Version 1 – September 25, 2014
b. You will be presented with a page that allows you to add a new
Timber Owner. Fill out the three sections on the page before
clicking save. Note: Fields that have a red asterisk mean that the
field is required to be filled out.
i. Section One: Note: If you do not input an email for the
Timber Owner he/she will not have access to the online NOAP
nor receive emails notifications. Rather, he/she will be mailed
all the information needed from ODF.
ii. Section Two:
73 | P a g e
Table of Contents
Version 1 – September 25, 2014
iii. Section Three: Note: If the Timber Owner also happens to be
the Landowner fill out the Landowner information as well.
c. Once you have filled out all the appropriate fields click the “Add
Timber Owner” button at the bottom of the page.
d. You will be presented with a success banner. The Timber Owner
information will now be displayed on the Contacts page and on the
Summary page under the correct heading. From now on you will
be able to search for existing Timber Owners and find this entry to
add to future NOAPs.
ii. Remove Timber Owner
1. In order to remove the Timber Owner you must be on the Contacts page
located on the top navigation bar.
2. Scroll down to the Current Timber Owner section of the page (next to
Current Landowners) and click the “Remove” button.
74 | P a g e
Table of Contents
Version 1 – September 25, 2014
3. A box will pop-up asking if you are sure you want to delete the contact. If
you have selected the correct Timber Owner click “Yes”.
4. No success banner will be generated for this action. Rather, the Current
Timber Owner section will be blank on the Contacts page as well as the
Summary page.
n. Add Site Conditions: You must add Site Conditions to your NOAP before submitting
it. To do so click the “Conditions” button on the top navigation bar within a NOAP.
75 | P a g e
Table of Contents
Version 1 – September 25, 2014
i. Definitions
1. If you are unsure of any of the words or names used on this page select the
definitions tab on the upper right hand side.
2. The following pop-up box will appear. Use the scroll bar to scroll to the
definition you need and click the “x” when you are finished.
ii. Slope, Stability & Clearcut Adjacency
1. All selection fields will automatically default to “No”. If one of the categories
pertains to your operation make sure to select “Yes” or “Not Applicable” if
this is the case.
76 | P a g e
Table of Contents
Version 1 – September 25, 2014
iii. Waters of the State
1. All selection fields will automatically default to “No”. If one of the categories
pertains to your operation make sure to select “Yes”.
iv. Cultural and Wildlife Resources
1. All selection fields will automatically default to “No”. If one of the categories
pertains to your operation make sure to select “Yes”.
77 | P a g e
Table of Contents
Version 1 – September 25, 2014
v. Save Site Conditions
1. Once all the site condition information has been added that you know about
click either “Save”, “Go to Documents”, or “Go to NOAP Summary”.
a. “Save” will allow you to save the information you have just added
without advancing in the notification process in case you need to
leave and return later.
b. “Go to Documents” will save the information you have just added
at take you to the Documents page where you can upload anything
that is needed so long as it is in PDF format.
c. “Go to NOAP Summary” will save the information you have just
added and take you to the Summary page.
o. Upload/ Delete Document(s): You can upload any document needed to your NOAP.
However, it must be in PDF format and the total number of documents cannot exceed ten
(this number includes uploads done by ODF staff. However, you can create a single PDF
comprised of multiple documents of multiple pages each as long as the PDF is not larger
than 2MB). Having trouble uploading your document? See the Uploading Documents
section under System Requirements.
i. Upload a Document:
1. You can upload any documents needed for a NOAP via the Documents page
located on the top navigation bar.
78 | P a g e
Table of Contents
Version 1 – September 25, 2014
2. Here you will be displayed with the NOAP Documents page. To upload a
document click the Browse button to first locate the document on your own
computer.
3. Locate the file you would like to upload, click on the file and then click the
“Open” button.
4. The file will then populate and be ready to upload. Select the “Upload”
button next.
5. The Document will now appear under the Current Documents section of the
Documents page as well as be displayed on the Summary page.
a. Note: If you are having trouble uploading the document or
someone else on the NOAP cannot read it see the Uploading
Documents section under System Requirements.
79 | P a g e
Table of Contents
Version 1 – September 25, 2014
6. Once the document has successfully been uploaded click the “Go to
Summary” button at the bottom of the screen to save the information and
continue to submit the notification.
ii. Upload Multiple Documents:
1. To upload multiple documents simply repeat the steps laid out above.
2. Each time you add a document it will populate into the Current Documents
section of the Documents page as well as be displayed on the Summary page.
3. Once the document has successfully been uploaded click the “Go to
Summary” button at the bottom of the screen to save the information and
continue to submit the notification.
iii. Delete Document:
1. To delete a document you must be on the Documents page. You can get
there by clicking the “Documents” button on the upper navigation bar.
2. Next scroll down to the bottom and locate the Current Documents section
and the Document that you would like to delete. Select “Delete” on the
correct Document.
80 | P a g e
Table of Contents
Version 1 – September 25, 2014
3. A prompt box will appear. Click “Yes” if you have selected the correct
document and would like to delete it.
4. There will be no success banner displayed for this action. Rather, you will
no longer see the document on the Documents page nor on the Summary
page as it has been removed from your NOAP and from FERNS.
p. Submit NOAP
i. To submit a NOAP all of the appropriate information must have been filled out. If
this is not the case refer to previous steps in this document, the Table of Contents
can help orient you. Otherwise click the Summary button on the top navigation bar
from within the desired NOAP.
ii. Review all information to ensure that it is accurate. You will not be able to edit
the NOAP after it has been submitted. Once you have reviewed the information
click the “Submit” button located on the upper right hand corner of the page.
81 | P a g e
Table of Contents
Version 1 – September 25, 2014
iii. A prompt box will pop-up informing you of the 15-day waiting period and that by
selecting “Yes” you have entered true information; the “yes” is your electronic
signature.
1. Note: If you have not filled out all the required portions of your NOAP you
will not be able to submit. Complete the steps displayed by the error
message before proceeding, i.e.:
82 | P a g e
Table of Contents
Version 1 – September 25, 2014
iv. Once you have successfully submitted your NOAP you will be presented with a
success banner. You will no longer be able to edit your NOAP. You will only be able
to Copy it or Print the Full Report.
v. At this point you and all NOAP parties will receive an email noting that they/you
are part of the notification. This email will also contain the NOAP-ID.
a. NOAPS are not given ID numbers until they have been submitted.
q. Print Full NOAP Report: After you have successfully submitted your NOAP you will
have the option to print the report.
i. To do so click on the NOAP from your Dashboard page.
83 | P a g e
Table of Contents
Version 1 – September 25, 2014
ii. You will be presented with the Summary page. Click “Print Full Report” button
located at top of page.
iii. You will be taken to a new Tab within your browser that will display a PDF of your
NOAP summary. Using the save or print functions you can keep a copy for future
reference.
84 | P a g e
Table of Contents
Version 1 – September 25, 2014
iv. Those who do not have computer access can print a copy of their report while in
the ODF office for their area.
r. Copy NOAP: After you have successfully submitted your NOAP you will have the option
to Copy it. A copied NOAP retains all previous NOAP selections except Site Conditions
and Uploaded Documents. Note: Site Conditions will not be automatically selected as
“no”, but are unselected when copying a NOAP.
i. To do so click on the NOAP from your Dashboard page.
85 | P a g e
Table of Contents
Version 1 – September 25, 2014
ii. You will be presented with the Summary page. Click the “Copy NOAP” button
located at top of page.
iii. A pop-up box will appear. Click “yes” if you would in fact like to copy the NOAP
you have selected.
iv. After a successful copy has been made you will be taken to the Info page of the
NOAP. This NOAP is not tied to the NOAP you copied it from. They will have
different NOAP IDs and the copy will have to go through the waiting period and be
approved again.
1. Copying allows you to keep all the previous information (with the option to
edit it) which can be beneficial if you are doing a similar operation/ an
operation in the same area/ the same operation a few years later etc.
86 | P a g e
Table of Contents
Version 1 – September 25, 2014